

Page 1

SilverCrest DPF-710A
User manual
and service information
Page 2

Page 3
Digital Photo Frame DPF-710A English
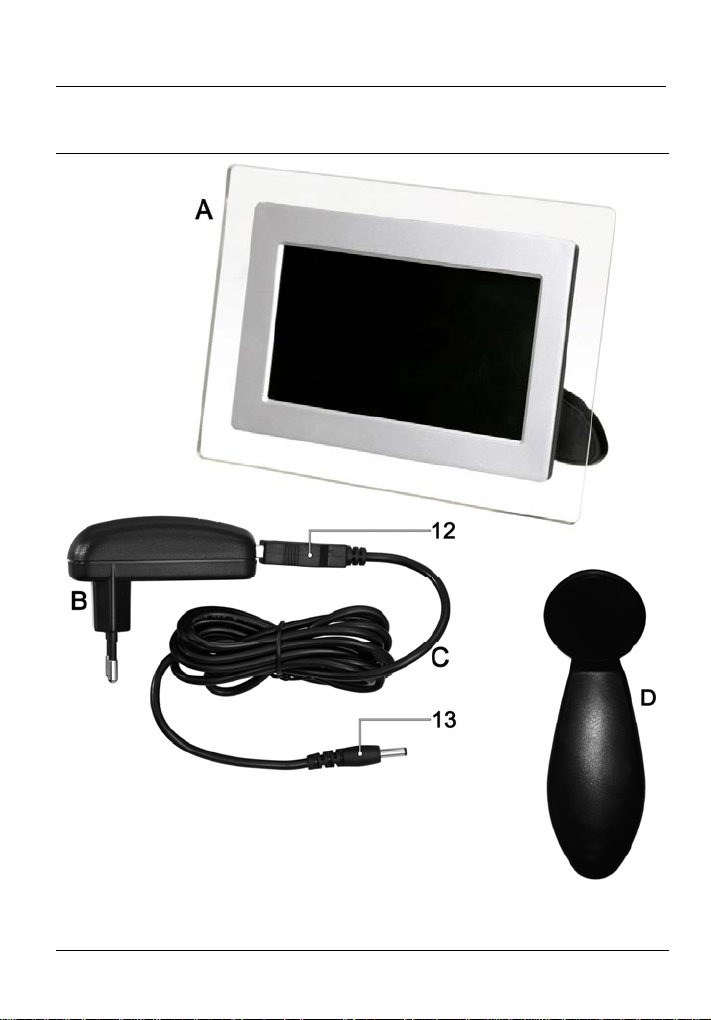
Package contents
Front View
Accessories
A Photo frame
B Power adapter
C DC Power cord
D Pedestal
1
Page 4
English Digital Photo Frame DPF-710A
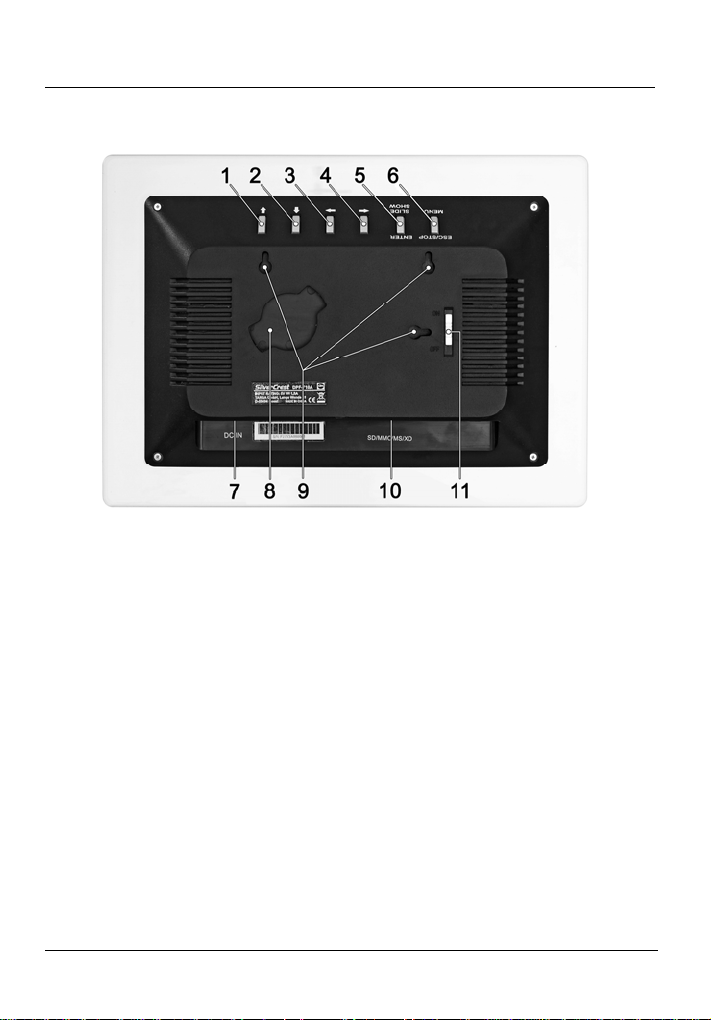
Back view
1 Navigation up
2 Navigation down
3 Navigation right
4 Navigation left
5 Enter - Confirm
6 Menu on/off
7 Power adapter receptacle
8 Pedestal mount
9 Wall mounting holes
10 Card reader
11 On/Off button
12 Flat-shaped plug (figure see page 1)
13 Round-shaped plug (figure see page 1)
2
Page 5

Digital Photo Frame DPF-710A English
Table of Contents
PACKAGE CONTENTS................................................................................1
IMPORTANT SAFETY INSTRUCTIONS......................................................4
Operating Environment.................................................................................4
Power supply................................................................................................5
Cables...........................................................................................................5
Maintenance and Care..................................................................................6
Children ........................................................................................................6
Intended Use ................................................................................................7
Disposal of Old Devices................................................................................7
CE Declaration of Conformity .......................................................................7
GETTING STARTED....................................................................................8
Mounting.......................................................................................................8
Wall-Mounting ...........................................................................................8
Pedestal Mounting.....................................................................................8
Connecting....................................................................................................9
Control Panel................................................................................................9
Inserting the Memory Card .........................................................................10
OPERATION...............................................................................................11
Powering the Device On/Off .......................................................................11
Starting the Picture Playback......................................................................12
Picture Menu...........................................................................................13
Displaying the Clock and Calendar.............................................................14
Setting Date and Time .............................................................................15
Preferences ................................................................................................16
Notes for Picture Editing.............................................................................17
APPENDIX..................................................................................................19
Technical Specifications .............................................................................19
Important Warranty Information..................................................................20
3
Page 6

English Digital Photo Frame DPF-710A
Thank you for choosing a SilverCrest product.
This digital photo frame allows you to play pictures stored on a digital
camera memory card as well as display the integrated calendar. The
package includes a pedestal that can be used option ally and the possibility
for wall-mounting provides maximum flexibility for this photo frame.
Important Safety Instructions
Before you use this device for the first time, please read the foll owing notes
in this manual and heed all warnings, even if you are familiar with handling
electronic devices. Keep this manual in a safe place for future reference. If
you sell or pass this device on to another person, it is imperative that you
also hand over this manual.
Operating Environment
Position the device on a stable, even surface and do not place any objects
on the device. The device is not for use in environments with a high
temperature or humidity (e.g. bathrooms), and must be kept free of dust.
Operating temperature and humidity: 5 °C to 35 °C, max. 85 % RH.
Always make sure that
there is free circulation of air (do not place the device on shelves, on a
thick carpet, on a bed, or anywhere that obstructs the ventilation slots,
and leave at least 10cm clearance on all sides);
no direct heat sources (e.g. heating) can affect the device;
no direct sunlight or bright artificial light reaches the device;
contact with spray and dripping water and abrasive liquids is avoided
and the device is never operated near water, and it must especially
never be immersed (do no place any objects filled with liquids such as
vases or drinks near the device);
the device is never placed in the immediate vicinity of magnetic fields
(e.g. loudspeakers);
no fire sources (e.g. burning candles) are placed on or near the device;
no foreign bodies are introduced into the device;
4
Page 7

Digital Photo Frame DPF-710A English
the device is not subject to any great temperature changes as this may
cause moisture through condensation and short-circuit;
the device is not subject to excessive shocks and vibrations;
Power supply
Use only the supplied power adapter model T arga KSUFB050010 0W 1EU t o
avoid overheating, deformation of housing, fire, electric shock, explosions
and other dangers. Never connect this power adapter to other devices.
Warning! Notice on Mains Separation:
In order to completely disconnect the device from the mains, the power
adapter must be pulled out from the wall outlet. For this reason, the device
should be positioned in a way that assures unobstructed access to the
power outlet so that the power adapter can be immediately pulled out in an
emergency situation. To avoid the danger of fire if the power adapter is not
going to be used for a long while (e.g. during holid ays), it should always be
disconnected from the power socket. Before stormy weather when there is
the danger of lightning, disconnect the device from the power supply.
Cables
Always hold all cables by the plug and never pull on the cable itself. Never
hold the power adapter with wet hands as t his may cause a short circuit or
electric shock. Never place the device, heavy objects or furniture on the
cable and take care that the cord does not become trapped, espec ially at
the plug and sockets. Never make knots in the cable and do not tie it
together with other cords. All cables should be positioned so that nobod y
can trip over them or be obstructed by them. A damaged power a dapter can
cause a fire or an electric shock. Inspect the po wer adapter from time to
time. Never use adapter plugs or extension cables that do not comply with
the current safety regulations in your country, and do not modify any of the
power adapter or cables yourself.
5
Page 8

English Digital Photo Frame DPF-710A
Maintenance and Care
Servicing is required when this device has been d amaged in any way, for
example, when the power adapter or housing is damaged, when liquid or
objects have entered the device, when the product has been exposed to
rain or moisture, when the product does not work normally or if the product
has been dropped. If you notice any smoke, unusual noise or strange
smells, switch off the device immediately and pull the mai ns cable from the
power supply. In this case the device should not be used further an d should
be inspected by authorized service personnel. Please contact qualified
personnel when servicing is needed. Never ope n the housing of the devic e,
or the power adapter. If the housing is opened, your life is in danger due to
electric shock. Only use a clean, dry cloth for cleaning. Never use any
abrasive liquids. Do not attempt to open the housing of the devic e oth er wise
you will void your warranty.
Children
Electrical appliances do not belong in the hands of children! Do not allow
children to play with electrical devices when not u nder supervision. Children
may not be able to comprehend the presence of potential risks. Small parts
can represent choking hazards. Keep the packaging away from children to
avoid the danger of suffocation.
6
Page 9

Digital Photo Frame DPF-710A English
Intended Use
This is an information technology electronics device. It may only be used for
private use, not industrial or commercial purposes. In its default
configuration, this product has not been designed for medical, lifesaving,
rescue or life-maintaining purposes. Furthermore, the device may not be
used outdoors or in tropical climates. Only connection cables and external
devices may be used that comply with safety standards and the
electromagnetic compatibility and shielding quality of this device. This
device fulfils all that relates to CE Conformity, relevant norms and
standards. Any changes to the equipment other than the recommended
changes by the manufacturer may lead to the result that these directives are
not met any more. Only use accessories recommended by the
manufacturer. If you are not using the device within the Republic of
Germany, you must observe the regulations and laws in the country of use.
Disposal of Old Devices
If the product is labelled with a struck-out waste bin, it is subject
to the European Guideline 2002/96/EC. All electric and electronic
devices must be disposed of separately from household waste at
established bodies. Avoid damaging the environment a nd danger
to your personal health by disposing of the device properly. For
further information about proper disposal, contact your local government,
disposal bodies or the shop where you bought the device.
CE Declaration of Conformity
This device has been tested and approved for compl iance with
the basic and other relevant requirements of the EMC Directive
2004/108, as well as the Low-voltage Directive 73/23/EEC.
7
Page 10

English Digital Photo Frame DPF-710A
Getting Started
Mounting
Wall-Mounting
If you wish to mount the digital photo frame onto the wall, use the wall
mounting holes (9) on the back panel of the device to orientate the photo
frame either horizontally or vertically. Use one screw for vertical or two
screws for horizontal mounting with a head diameter of max. 5 mm in order
to support the photo frame weight safely. Please bear in mind that a suitable
wall outlet should be located near the wall mount location.
Pedestal Mounting
In order to place the digital photo frame onto a table you will need to attach
the supplied pedestal (D) onto the back
panel of the device. Insert the pedestal
into the hole (8) and turn it 90 degrees
clockwise until it clicks into place. The
asymmetrical shape of the pedestal
makes it impossible to mount it in inverted
direction. Once the pedestal is attached
you can choose whether to place it
horizontally or vertically on the table.
Please note that the digital photo frame does not detect w hether the
pictures have been recorded in portrait (vertical) or landscape
(horizontal) format. It might be necessary to optimise the picture by
i
using a suitable image-editing programme on a computer.
8
Page 11

Digital Photo Frame DPF-710A English
Connecting
Insert the round-shaped plug (13) of the cable into the connection port ( 7) of
the photo frame and the flat-shaped plug (12) of the cable (C) into the
power out receptacle of the power adapter (B). Plug the power adapter into
a wall outlet.
Control Panel
1 Navigation up
2 Navigation down
3 Navigation right
4 Navigation left
5 Enter - Confirm
6 Menu on/off
9
Page 12

English Digital Photo Frame DPF-710A
Inserting the Memory Card
The built-in card reader can read the following memory cards (alphabetical
order):
Without adapter card With adapter card
MMC Micro SD
MMC Plus Mini SD
MS MMC micro
MS-Pro MMC mobile
SD RS-MMC
SD HC RS-MMC DV
xD
Insert a memory card (see table) into the card reader (10) at the bottom of
the device until it fits in place. The memory card can only be ins erted when
its contacts point towards the photo frame front panel. To remove the
memory card, simply pull it out.
You can insert and remove the memory card while the device is
powered on. If you insert a memory card while the unit i s powered
on, a summary of the pictures contained on the card will be
i
displayed immediately.
10
Page 13

Digital Photo Frame DPF-710A English
Operation
Powering the Device On/Off
Slide the On/Off switch (11) to the “On” position to power on the device or
slide it to the “Off” position to power it off.
After powering the digital photo frame on, after a few seconds the following
image will appear:
Memory card type indicator
(description starting from page 12)
Show Clock or Calendar
(description starting from page 14)
Preferences
(description starting from page 16)
Press the right (3) or left (4) buttons to select the desired icon. The icon will
be highlighted. Press the Enter (5) button to enable the selected function.
11
Page 14

English Digital Photo Frame DPF-710A
Starting the Picture Playback
Open the memory card menu by selecting the left icon ( ) and press the
Enter (5) button. The type of the inserted memory card will be hi ghlighted.
Press the Enter (5) button again to show an overview of the available
pictures.
In this overview, the following features are available:
Enter (5) Shows the current picture continuously. Press
Menu (6) to go back to the overview.
Press and hold Enter
(5) for 2 seconds
Menu (6) Closes the overview menu.
Press and hold Menu
(6) for 2 seconds
right (3), left (4),
down (2), up (1)
Starts the sequential picture playback from the
current picture. Press Menu (6) to stop playback.
Press the menu button (6) again to return to the
overview.
Two menu options will appear: The left icon, a
trash can, lets you delete the current picture from
the memory card. The right icon opens the
Preferences (for more information, read from
page 16 – Preferences).
Press the navigation buttons to select a picture.
The current picture will be highlighted with a
yellow border.
12
Page 15

Digital Photo Frame DPF-710A English
Picture Menu
During picture playback, press and hold the Menu (6) button for 2 seconds
to show the following menu:
Press the buttons right (3), left (4), down (2) and up (1) to select the desired
menu option and enable it by pressing Enter (5). The corresponding action
will be executed immediately and the picture menu will close automatically.
The next time you open it, the last option will still be enabled.
Zooms the picture in (can be zoomed several times).
Press right (3), left (4), down (2), up (1) to select the
desired picture portion.
Zooms the picture out (can be zoomed several times).
This feature is available only when the current picture has
been previously zoomed in. A picture can be zoomed out
only till it reaches the original picture size.
Rotates the picture 90 degrees clockwise.
The rotation will not be saved, therefore the next time you
view the picture it will appear as before rotation.
Rotates the picture 90 degrees counter-clockwise.
The rotation will not be saved, therefore the next time you
view the picture it will appear as before rotation.
13
Page 16

English Digital Photo Frame DPF-710A
A safety prompt will appear. Press Enter (5) to confirm
and to delete the picture.
Warning! This action cannot be undone. If the inserted
memory card is write-protected the deletion cannot be
executed.
Opens the Preferences menu
(see page 16 - Preferences).
Displaying the Clock and Calendar
Open the Clock and Calendar display by selecting the centre icon ( ) – see
figure on page 11 - and press the Enter (5) button. The clock will appear:
Press the Enter (5) button again to enable the calendar.
Press Enter (5) to toggle between the clock and calendar view.
i
14
Page 17

Digital Photo Frame DPF-710A English
Setting Date and Time
To set the date and time, press and hold Menu (6) while the clock or
calendar is displayed until the following menu appears:
To set the clock
To set the date
To set the date and time format
Press the buttons right (3) or left (4) to select the desired icon and ena ble it
by pressing Enter (5) to enable the selected function.
To set the time, press right (3) or left (4) to select the hours, minutes or
seconds and press up (1) and down (2) to set the desired value. Press the
Enter (5) button to apply the changes and to return to the above menu. To
set the date, proceed as for setting the time.
For the date format, press up (1) and down (2) to choose between
month/day/year, day/month/year or year/month/day. For the time format you
can toggle between 12 and 24 hour displa y. Press the Enter button (5) to
confirm your selection.
After you are done with all settings, press the Menu button [6] to exit the
Setup menu.
15
Page 18

English Digital Photo Frame DPF-710A
Preferences
Open the Preferences menu by selecting the right icon ( ) – see figure on
page 11 - and press the Enter (5) button.
Press the buttons up (1) and down (2) to select between the following menu
options and enable them by pressing Enter (5). Press Menu (6) to return.
Language Here you select the between six different display
languages.
Slide Interval Set the picture playback interval between 3 and 60
seconds.
File Description Enable the information display if you want to see
the file names while the pictures are displayed.
During automatic playback the file names are not
displayed, even if this function has been enabled.
Folder Mode If the Folder mode has been enabled, all images
contained in all folder will be displayed. Enable the
Folder mode if the inserted memory card contains
multiple folders and you wish to differentiate
between the folders.
Aspect Ratio Choose between the following options:
Normal: Shows the picture at its original aspect
ratio. Black bars may appear in the left
and right borders.
Smart: Stretches or squeezes the picture to
optimise it for wide screen view on the
photo frame.
Zoom: Fits any picture format to the photo
frame format without distorting it by
cropping it on the borders. Some picture
contents may be lost.
16
Page 19

Digital Photo Frame DPF-710A English
LCD Power
Saving
Display Setting Press the buttons up (1) and down (2) to select
Default Setting Restores all changed settings to the factory-default
System
Information
Notes for Picture Editing
Rotate
If you have taken a picture in portrait format (vertical) with your digital
camera but the photo frame has been installed horizontally, you must rotate
the picture to match the display. Most of the digital cameras already offer
this function. Please read the User’s Manual of your digital camera to find
out if this feature is available. Otherwise use a suitable image-editing
programme on your computer to rotate the pictures.
Enables the screen saver after 15, 30 or 60 minutes
or disables the screen saver (Off). With the screen
saver enabled the screen’s backlight will be turned
off after the preset time. This applies both to the
picture playback as well as to the clock and
calendar display. Press any button to display the
contents again.
between Brightness and Contrast and set the
desired values by pressing right (3) and left (4).
values.
Shows information about the software of the device.
17
Page 20

English Digital Photo Frame DPF-710A
The advantage of editing the picture is a per sistent change of the format. If
you rotate the pictures on your photo frame (see table on page 13 – Picture
Menu) the rotation will only apply to the current vie w, and the picture must
be rotated again the next time you want to show it.
If you have installed the photo frame vertically you must rotate any pictures
captured in landscape format.
Aspect ratio
The aspect ratio of pictures taken on a digital camera (4: 3) does not match
the aspect ratio of your digital photo frame (16:9). When displa ying pictures
without any size adjustment (see page 16 – Preferences, Aspect Ratio)
black bars will appear in the left and right picture margins. If you want to
optimise the picture display on your photo frame it is n ecessary to crop the
picture by using a suitable image-editing programme on your computer.
Normally, this kind of programme is included in the package of most digital
cameras.
To crop the pictures many programmes offer a function “Selection Frame”
or “Crop”. Determine the crop frame for a 16:9 aspect ratio (matching the
photo frame) and select the desired picture portion.
You can freely choose the position and size of the cr op frame and exclude
any undesired or disturbing picture contents.
Once you are done performing all changes, save your picture on the
memory card.
18
Page 21

Digital Photo Frame DPF-710A English
Appendix
Technical Specifications
Photo Frame DPF-710A
Model SilverCrest DPF-710A
Digital photo frame with built-in card reader
for displaying pictures..
Display TFT display with 480 x 234 pixel resolution.
Dimensions (W x H x D) 234 x 170 x 32 mm (without pedestal)
Weight 438 g (without pedestal)
Power supply via supplied power adapter
Targa KSUFB0500100W1EU
Power requirements 5V 1A
Supported memory card
formats
Warranty 36 months
Power adapter KSUFB0500100W1EU
Model Targa KSUFB0500100W1EU
Input voltage 100 – 240 VAC
Frequency 50/60 Hz
Typical current 0.15 A
Output voltage 5 V
Output current 1A
Safety Class II
Safety Level IPX0
MMC, MMC Plus, MS, MS-Pro, SD, SD
HC, xD
(with Adapter: Micro SD, Mini SD, MMC
micro, MMC mobile, RS-MMC, RS-MMC
DV)
19
Page 22

English Digital Photo Frame DPF-710A
Important Warranty Information
Ireland
20
Page 23

Page 24

TARGA GmbH
Lange Wende 41
D-59494 Soest
Germany
www.silvercrest.cc
IE 1365271
 Loading...