

Page 1
DVD Player DP-5300x
User’s Manual and Service Information
Page 2
Front View
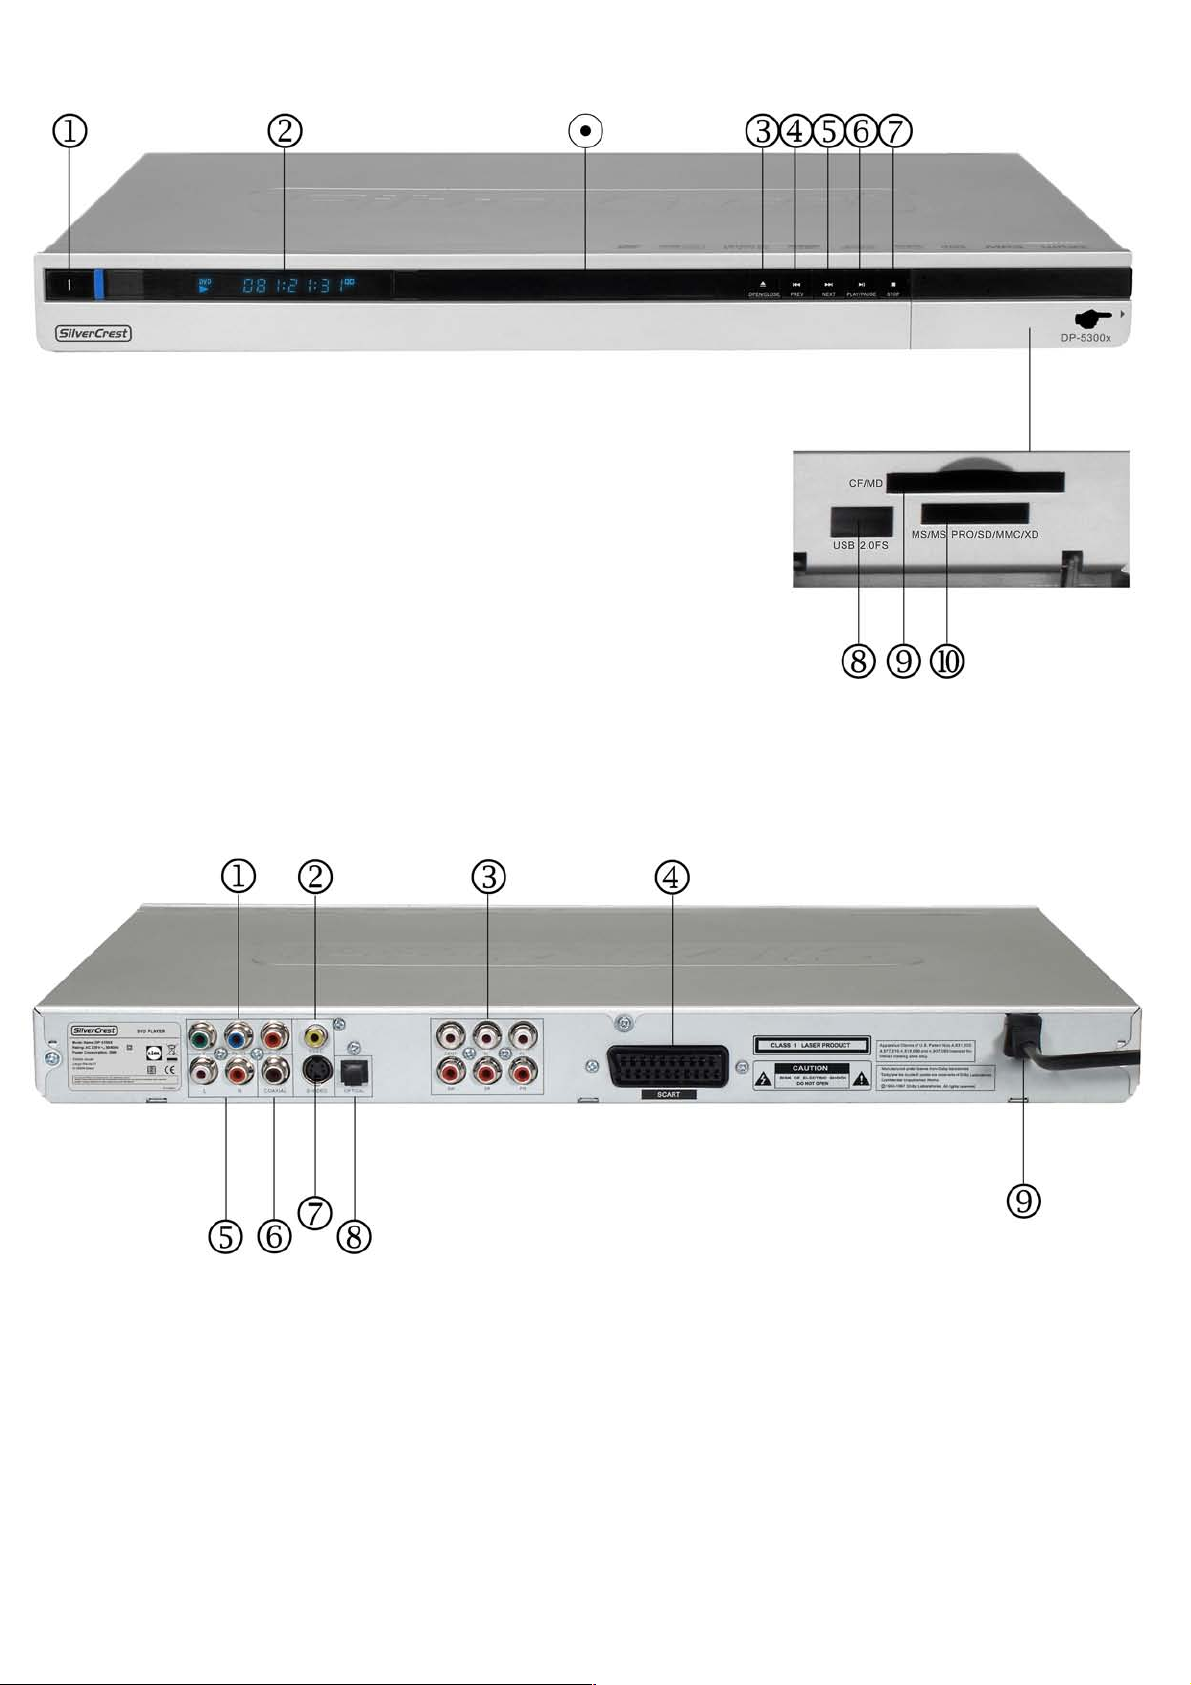
1. Power ON/OFF button
Switches on the DVD player or switches the
unit off.
2. Display
Shows operation information.
Disc tray
Holds discs securely during playback.
3. OPEN/CLOSE button
Opens or closes the disc tray
4. PREV button
Playback skips to the previous title or track.
5. NEXT button
Playback skips to the next title or track.
*CF = CompactFlash, MD = MicroDrive, MS = MemoryStick, MS Pro = MemoryStick Pro, SD = SecureDigital, MMC = MultiMediaCard, XD = xD-PictureCard
6. Play/Pause button
Starts or pauses playback of the inserted media.
7. STOP button
Stops playback.
Protective cover
The USB connector and the card reader are
located behind the front cover. To open it, lightly
pull it forward at the position labelled by a small
arrow.
8. USB -2.0 port
Here you can connect USB devices such as a
USB stick.
9. CF/MD* card reader slot
Insert CF/MD memory cards here.
10. MS/MS Pro/SD/MMC/XD* memory card slot
Insert MS/MS Pro/SD/MMC/XD* memory cards
here.
Back View
1. YPbPr video output (video)
Component output for connecting a Component
video cable.
2. Video output (CVBS) (video)
Analogue video output for connecting a Cinch
video cable.
3. 5.1 Analogue Audio Output
Analogue audio output for connecting a 5.1 Cinch
audio cable.
4. Scart Output (Video and Audio)
Analogue video and audio output for connecting a
Scart cable.
5. L/R Analogue Stereo Output (Audio)
Analogue stereo output for connecting a stereo Cinch cable.
6. Coaxial – Coaxial Digital Audio Output
Digital audio output for connecting a coaxial Cinch cable.
7. S-Video
Analogue video output for connecting a 4-pin S-Video cable.
8. Optical – Optical Digital Audio Output
Digital audio output for connecting a fiber-optics cable.
9. Power cord
Page 3
Remote control
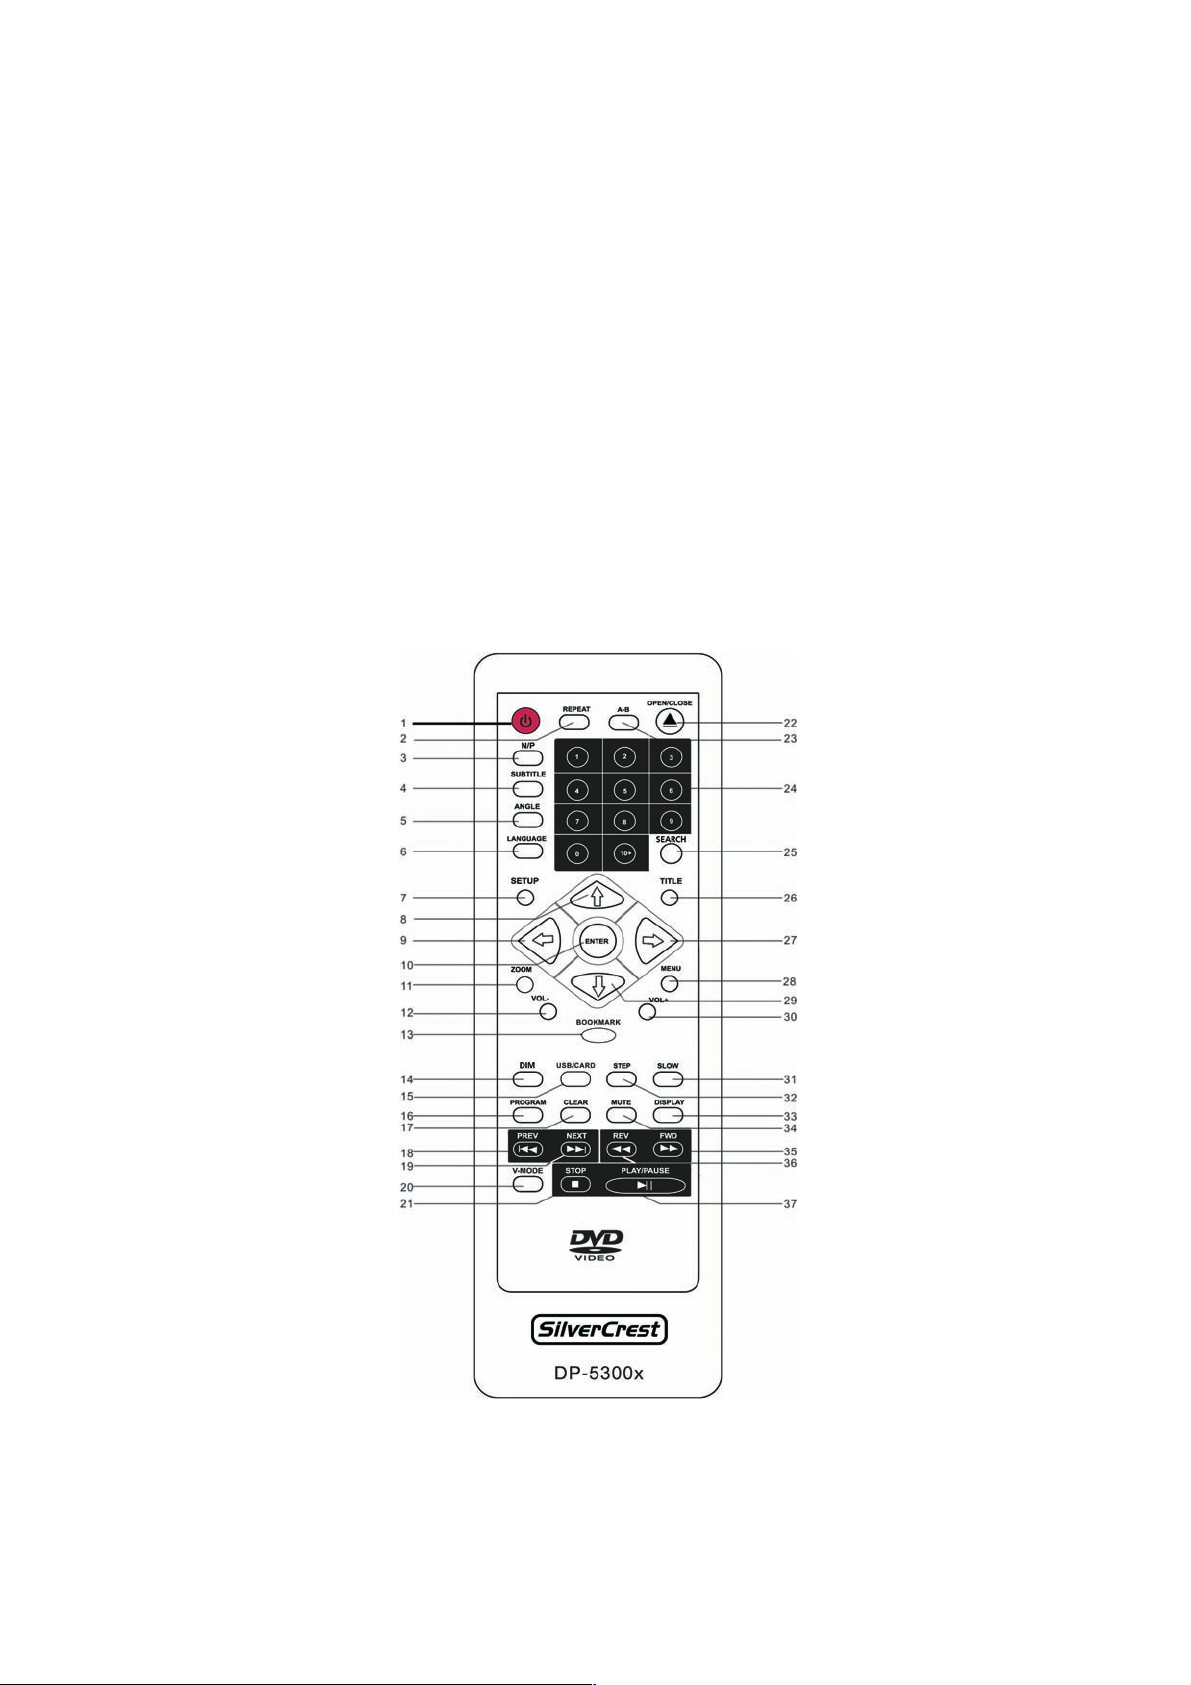
1. POWER button
Switches on the DVD player or switches
the unit to standby mode.
2. Repeat button
Repeats a section, a title or the entire disc.
3. N/P button
Toggles between the TV systems AUTO,
NTSC and PAL.
4. Subtitle button
To turn the subtitles on or off.
5. Angle button
To toggle between the different camera
angles.
6. Language button
Changes the audio language.
7. Setup button
Displays the Setup menu.
8. Up button
Up direction button.
9. Left button
Left direction button.
10. Enter button
Confirms your entry.
11. Zoom button
Enlarges or reduces the picture view.
12. Volume - button
Decreases the audio volume.
13. Bookmark button
Displays the Bookmark menu.
14. DIM button
Dims the display or disables it.
15. USB/CARD button
Displays the USB/card reader menu.
16. Program button
Displays the program menu.
17. Clear button
Erases the last entry.
18. PREV button
Skips to the previous title or track.
20. V-Mode button
Toggles the Video Output between Video,
S-Video, Scart and Component.
21. Stop button
Stops the current playback.
22. Open/Close button
Opens or closes the disc tray.
23. A-B button
Repeats a defined interval.
24. Numeric buttons 0 to 9 / +10
To enter digits 0 to 9 / 10+.
25. Search button
Displays the Search menu.
26. Title button
Displays the disc title menu
27. Right button
Right direction button.
28. Menu button
Displays the disc main menu.
29. Down button
Down direction button.
30. Volume + button
Increases the audio volume.
31. Slow button
Enables the slow-motion playback.
32. Step button
Enables the frame-by-frame playback.
33. Display button
Displays the playback information.
34. Mute button
Mutes the sound.
35. FWD button
Starts a fast forward search.
36. REV button
Starts a fast backward search.
37. Play / Pause button
Starts or pauses playback.
19. Next button
Skips to the next title or track.
Page 4

Important Safety Instructions
Important Safety Instructions
General
Before you use this device for the first time, please
read the following notes in this manual and heed all
warnings, even if you are familiar with handling
electronic devices. Keep this manual in a safe place for
future reference. If you sell or pass this device on to
another person, it is imperative that you also hand over
this manual.
Operating Environment
• Position the device on a stable, even surface and
do not place any heavy objects on the device.
• The device is not for use in environments with a
high temperature or humidity (e.g. bathrooms),
and must be kept free of dust
• Operating temperature and humidity: 5 °C to 35
°C, max. 85 % RH
• Always make sure that
• there is free circulation of air (do not place
the device on shelves, on a thick carpet, on a
bed, or anywhere that obstructs the ventilation
slots, and leave at least 10cm clearance on all
sides;
• no direct heat sources (e.g. heating) can affect
the device;
• do not place any fire sources (e.g. burning
candles) on or near the device;
• do not introduce any foreign bodies into the
device;
• the device must not be subject to any great
temperature changes as this may cause
moisture through condensation and shortcircuit;
• the device should not be subject to excessive
shocks and vibrations;
Power Supply
• The power switch of this device does not fully
disconnect the device from the mains.
• The device consumes electricity in the Standby
mode. In order to completely disconnect the
device from the mains, the power plug must be
pulled out from the wall outlet. For this reason,
the device should be positioned in a way that
assures a direct and unobstructed access to the
wall outlet so that the power plug can be
immediately pulled out in an emergency
situation. To avoid the danger of fire if the
device is not going to be used for a long while
(e.g. during holidays), it should always be
disconnected from the power socket. Before
stormy weather when there is the danger of
lightning, disconnect the device from the power
supply.
• no direct sunlight or bright artificial light
reaches the device;
• contact with spray and dripping water and
abrasive liquids must be avoided and the
device should never be operated near water,
and it must especially never be immersed (do
no place any objects filled with liquids such
as vases or drinks near the device);
• never place the device in the immediate
vicinity of magnetic fields (e.g.
loudspeakers);
• Insert the batteries with the correct polarity and
never try to recharge the batteries and under no
circumstances throw them into fire. Do not mix
batteries (old and new or carbon and alkaline,
etc.). Remove batteries when the device is not to
be used for a long time. Non-intended use may
cause explosion and danger to life.
• Respect the environment! Old batteries do not
belong in with the domestic waste! They must be
handed in to a collection point for old batteries.
1
Page 5

Cables
Maintenance and Care
• Always hold cables by the plug and never pull
on the cable itself.
• Never hold the power cord with wet hands as
this may cause a short circuit or electric shock.
• Never place the device, heavy objects or
furniture on the cable and take care that the cord
does not become trapped, especially at the plug
and sockets. Never make knots in the cable and
do not tie it together with other cords. All cables
should be positioned so that nobody can trip
over them or be obstructed by them.
• A damaged power cord can cause a fire or an
electric shock. Inspect the power cord from time
to time. Never use adapter plugs or extension
cables that don’t comply with the current safety
regulations in your country, and don’t modify
any of the power cords or electrical installations
yourself!
• Servicing is required when this device has been
damaged in any way, for example, when the
power plug, power cord or housing is damaged,
when liquid or objects have entered the device,
when the product has been exposed to rain or
moisture, when the product does not work
normally or if the product has been dropped. If
you notice any smoke, unusual noise or strange
smells, switch off the device immediately and
pull the plug from the wall outlet. In this case
the device should not be used further and should
be inspected by authorized service personnel.
Please contact qualified personnel when
servicing is needed. Never open the housing of
the device, the power adapter or the accessories.
If the housing is opened, your life is in danger
due to electric shock. Only use a clean, dry cloth
for cleaning. Never use any abrasive liquids.
• The DVD/CD drive of this device is classified as
a «Class 1 Laser product» and is denoted with a
corresponding label on the housing. Never open
the device and do not try to repair the device
yourself. Inside the device there are invisible
laser rays. Do not expose yourself to the laser
rays.
• Do not attempt to open the housing of the
device. Otherwise you will lose your warranty.
Disposal of Old Devices
1. If the product is labeled with a
crossed-out waste bin, it is subject to
the European Guideline 2002/96/EC.
2. All electric and electronic devices
must be disposed of separately from
household waste at established
bodies.
3. Avoid damaging the environment and
danger to your personal health by
disposing of the device properly.
4. For further information about proper
disposal, contact your local
government, disposal bodies or the
shop where you bought the device.
2
Page 6

Children
Intended Use
Important Safety Instructions
• Electrical appliances do not belong in the hands
of children! Do not allow children to play with
electrical devices when not under supervision.
Children may not be able to comprehend the
presence of potential risks. Small parts can
represent choking hazards.
• Keep batteries and rechargeable batteries out of
reach of children. If a battery or rechargeable
battery is swallowed, seek medical help
immediately.
• Keep the packaging away from children to
avoid the danger of suffocation
• This device does not belong in the hands of
children! Spring parts may jump out if misused
and cause them harm (e.g. to their eyes).
• This is a consumer electronics device. It may
only be used for private use, not industrial or
commercial purposes.
• Furthermore, the device may not be used
outdoors or in tropical climates. Only connection
cables and external devices may be used that
comply with safety standards and the
electromagnetic compatibility and shielding
quality of this device. This device fulfills all that
relates to CE Conformity, relevant norms and
standards. Any changes to the equipment other
than the recommended changes by the
manufacturer may lead to the result that these
directives are not met any more. Only use
accessories recommended by the manufacturer.
• If you are not using the device within the
Republic of Germany, you must observe the
regulations and laws in the country of use.
• When connecting peripheral devices, make sure
the cables are not too short and that they don’t
force the connectors mechanically!
CE Declaration of
Conformity
This device has been tested and approved for
compliance with the basic and other relevant
requirements of the EMC Directive 89/336/EEC, as
well as the Low-voltage Directive 73/23/EEC.
3
Page 7

4
Page 8

Table of Content
Important Safety Instructions ........................... 1
CE Declaration of Conformity........................... 3
Introduction .......................................... 7
Accessories...................................................... 7
Region Code Information ................................. 7
Compatible Discs ............................................. 7
Device and Disc Maintenance and Care .......... 8
Using the Back Panel ....................................... 9
Front Panel Display ........................................ 10
Remote control............................................... 11
Audio and Video Connectors ............ 12
Video Connections ......................................... 13
Audio Connections ......................................... 19
Setup Menu ......................................... 20
Language Settings ......................................... 20
Picture Settings .............................................. 21
Audio Settings ................................................ 22
Parental Control ............................................. 26
Miscellaneous ................................................ 27
DivX Registration / VoD.................................. 27
Table of Content
Playing Media with Your DVD Player 28
Inserting a DVD/CD ....................................... 28
Pausing Playback .......................................... 28
Stopping Playback ......................................... 29
Resume Function ........................................... 29
Opening the DVD Menu (Menu)..................... 29
PBC (Playback Control) ................................. 29
Skip to a Chapter ........................................... 30
Entering the Title Number via the Numeric
Buttons ........................................................... 30
Bookmark ....................................................... 30
Forward/Backward Search............................. 31
Slow-Motion Playback .................................... 31
Single-Picture Playback (Step)....................... 31
Zoom .............................................................. 32
Changing the Camera Angle .......................... 32
Displaying/Hiding Subtitles............................. 32
Changing the Audio Track Language ............. 32
Changing the Playback Mode ........................ 33
Repeating Intervals (A – B) ............................ 33
REPEAT Function .......................................... 33
Displaying Disc or File Information................. 34
File Browser ................................................... 34
Using Memory Cards/USB Stick With MP3/
WMA/MPEG-4 (XviD)/JPEG Files .................. 35
Special Features for Picture Playback ........... 36
Special Features for MP3 Playback ............... 36
Technical Specifications.................... 37
5
Page 9

6
Page 10

Introduction
Accessories
Please make sure that the following accessories have been included in the DVD player packaging. Check the
package contents carefully, as there may be some accessories under the styrofoam.
Package Contents:
1 x Remote Control
2 x Batteries AAA 1.5 V
1 x User’s Manual
1 x SCART cable
1 x AV cable
1 x Nero Trial
Note: The figures and illustrations may vary from the real model.
Introduction
Region Code Information
This DVD player uses region code information that has been recorded on a Digital Versatile Disc (DVD). If the
region code of the DVD disk does not match the region code of the DVD player, the DVD cannot be played.
The device’s region code is “2”.
You’ll find the region code on the back of the DVD box. In order for a DVD to be playable it must be labelled
“ALL” for “all regions” or “2” for “Region 2”.
Compatible Discs
This DVD player can play the following discs:
DVD-Video
DVD+R
DVD-R
DVD+RW
DVD-RW
DVD+R DL
7
Page 11

DVD-R DL
Audio CD
Video CD
Super Video CD
CD-R with audio/MP3/JPEG/MPEG/WMA contents
CD-RW with audio/MP3/JPEG/MPEG/WMA contents
MPEG-4 discs, VOD videos, XviD, Kodak Picture CD
Compatibility of Discs Created on a PC
When creating a disc on a PC – even when using a compatible format – it may be that this disc is not playable
on this device. This can be due to the burning software settings. In this case, please contact the manufacturer of
your software and check for more detailed information.
Device and Disc Maintenance and Care
Hold the disc on the border only, or put your index finger through the hole in the centre. Avoid touching the
surface containing data. For double-sided discs, this applies to both sides.
Note: Do not attach any adhesive labels nor tape on the disc and avoid scratches or other damage.
Cleaning the Discs
• Fingerprints or stains on the disc surface deteriorate the signal processing. Depending on the amount of
dirt, the light that has been created inside the laser unit will be reflected partially (attenuated) only leading
to inaccurate reading. To clean the disc, use a soft cloth and wipe the disc from the centre to the border.
• When very dirty, wipe the disc with a damp cloth and let the disc dry.
• Do not use any anti-static products or organic solvents or thinners. These can (as is the case with all
volatile substances) damage the disc surface.
Storing the Discs
• To avoid deformation, always store the discs in their box.
• Avoid exposing them to high temperatures and humidity. Do not store the disc in a car parked in the sun.
• For more information, read the instructions included with the discs.
Disc to be Avoided
Use normal, round-shaped discs only. Do not use any deformed, scratched, or damaged discs – they can shatter
with the high rotation speed in the inside of the unit.
Cleaning the DVD Player
The front panel and housing of the DVD player only need to be cleaned with a soft cloth from time to time.
When very dirty, a neutral cleaner can be sprayed onto the cloth first. Do not use any volatile solutions.
8
Page 12
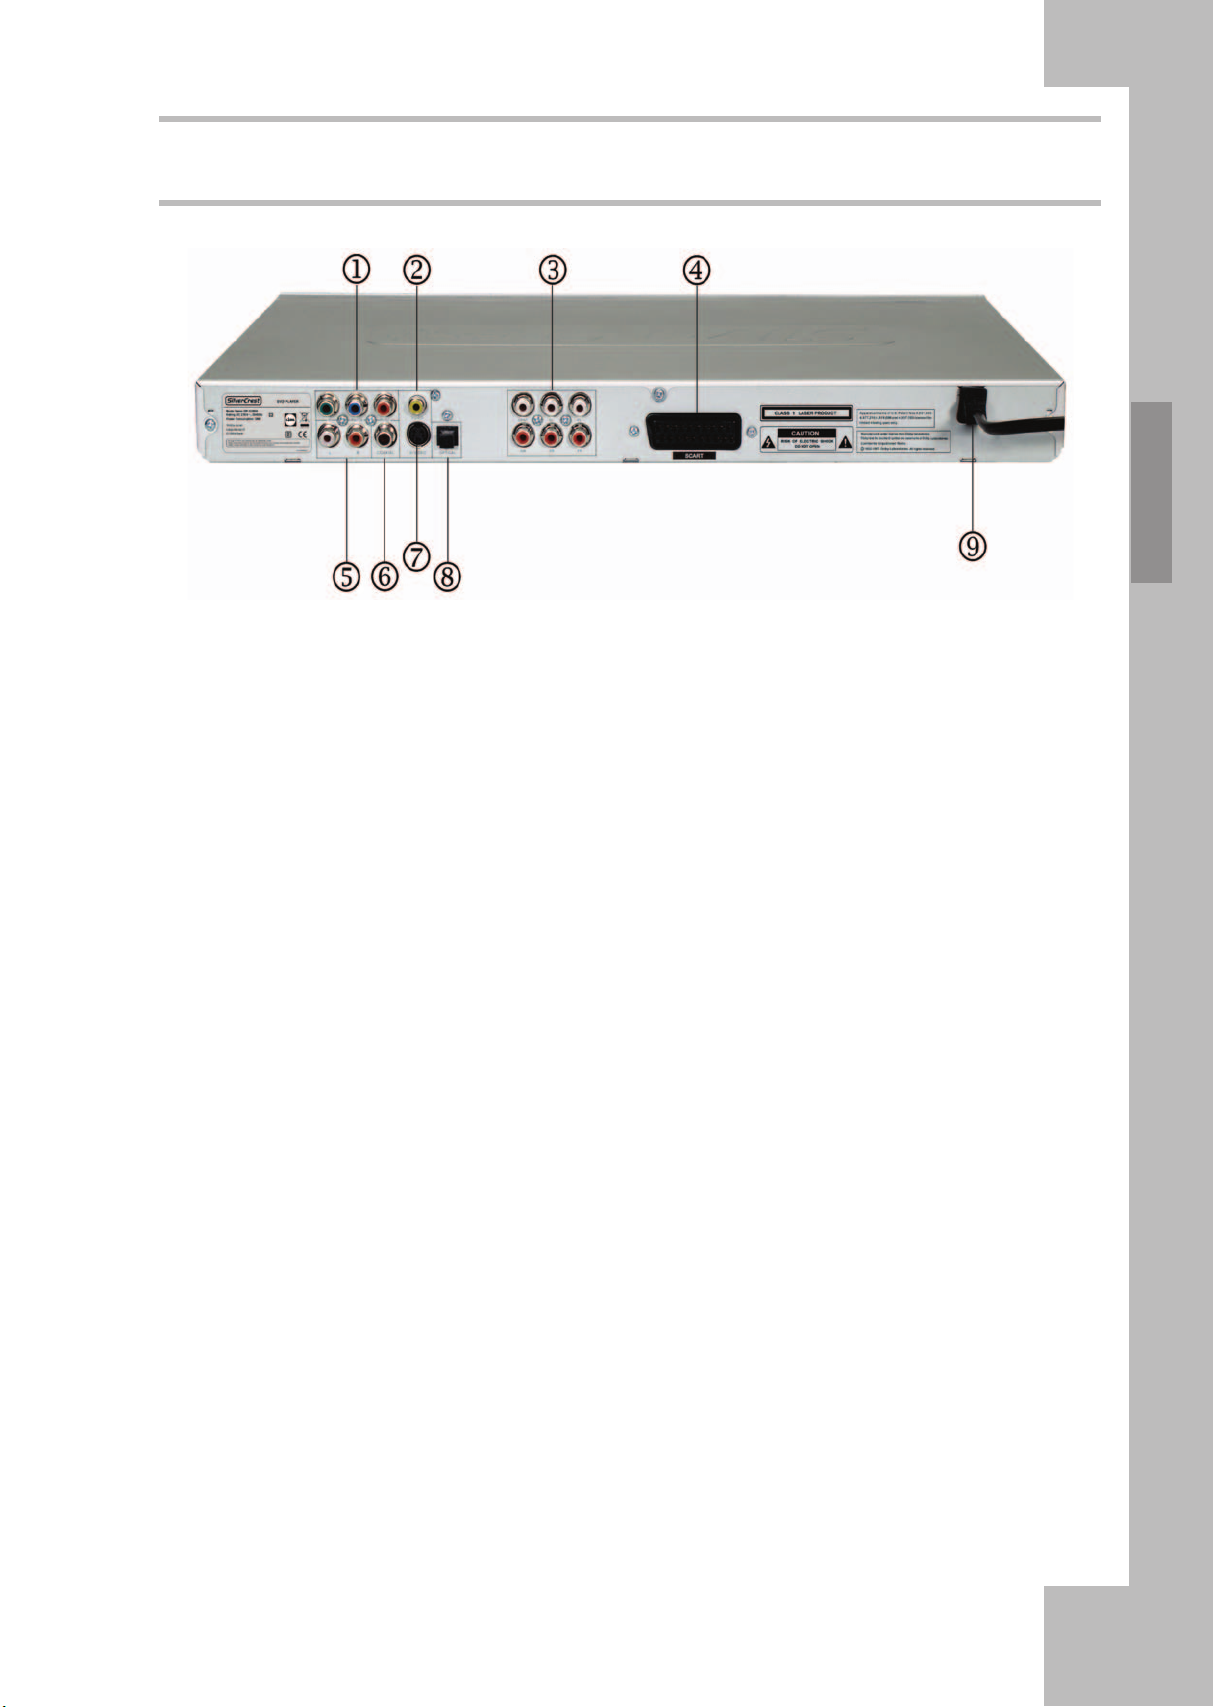
Using the Back Panel
Introduction
1. YCbCr/YPbPr
High-end Video Out port for connecting to the
Component input of a TV, A/V receiver or a
beamer via a YCbCr cable. Please note that
progressive scan output (P-Scan) is only
possible via the Component output connector.
2. VIDEO
Composite Video output (yellow port) to
connect to a TV set or A/V receiver with
FBAS/Composite Video input via an audio/
video cable.
3. 5.1 Analogue Audio Output
Analogue 5.1 channel audio outputs to
connect to the 5.1 input of an A/V receiver or
an active 5.1 multi-channel speaker system.
4. RGB / SCART
To connect to a TV set featuring a 21-pin
SCART input port. This connection allows the
output of both the audio and video signals.
5. Analogue AUDIO L/R
Analogue 2-channel audio output (white/red
ports) to connect a TV set, A/V receiver,
beamer or stereo equipment.
6. Digital Coaxial Audio Output
To connect to a digital audio device such as an
A/V receiver to obtain digital multi-channel
sound. Please note that the amplifier or A/V
receiver must be Dolby Digital, MPEG and/or
PCM-compatible (for more information,
please read the User’s Manual of your A/V
receiver or amplifier).
7. S-VIDEO
S-Video output to connect to a TV set or A/V
receiver with S-Video input via an S-Video
cable. You can use the S-Video output instead
of the video output to achieve better picture
quality.
8. Digital Optical Audio Output
To connect to a digital audio device such as an
A/V receiver to obtain digital multi-channel
sound. Please note that the amplifier or A/V
receiver must be Dolby Digital, MPEG and/or
PCM-compatible (for more information,
please read the User’s Manual of your A/V
receiver or amplifier).
9. Power Cord
To connect to the electrical wall outlet
(230 V).
9
Page 13
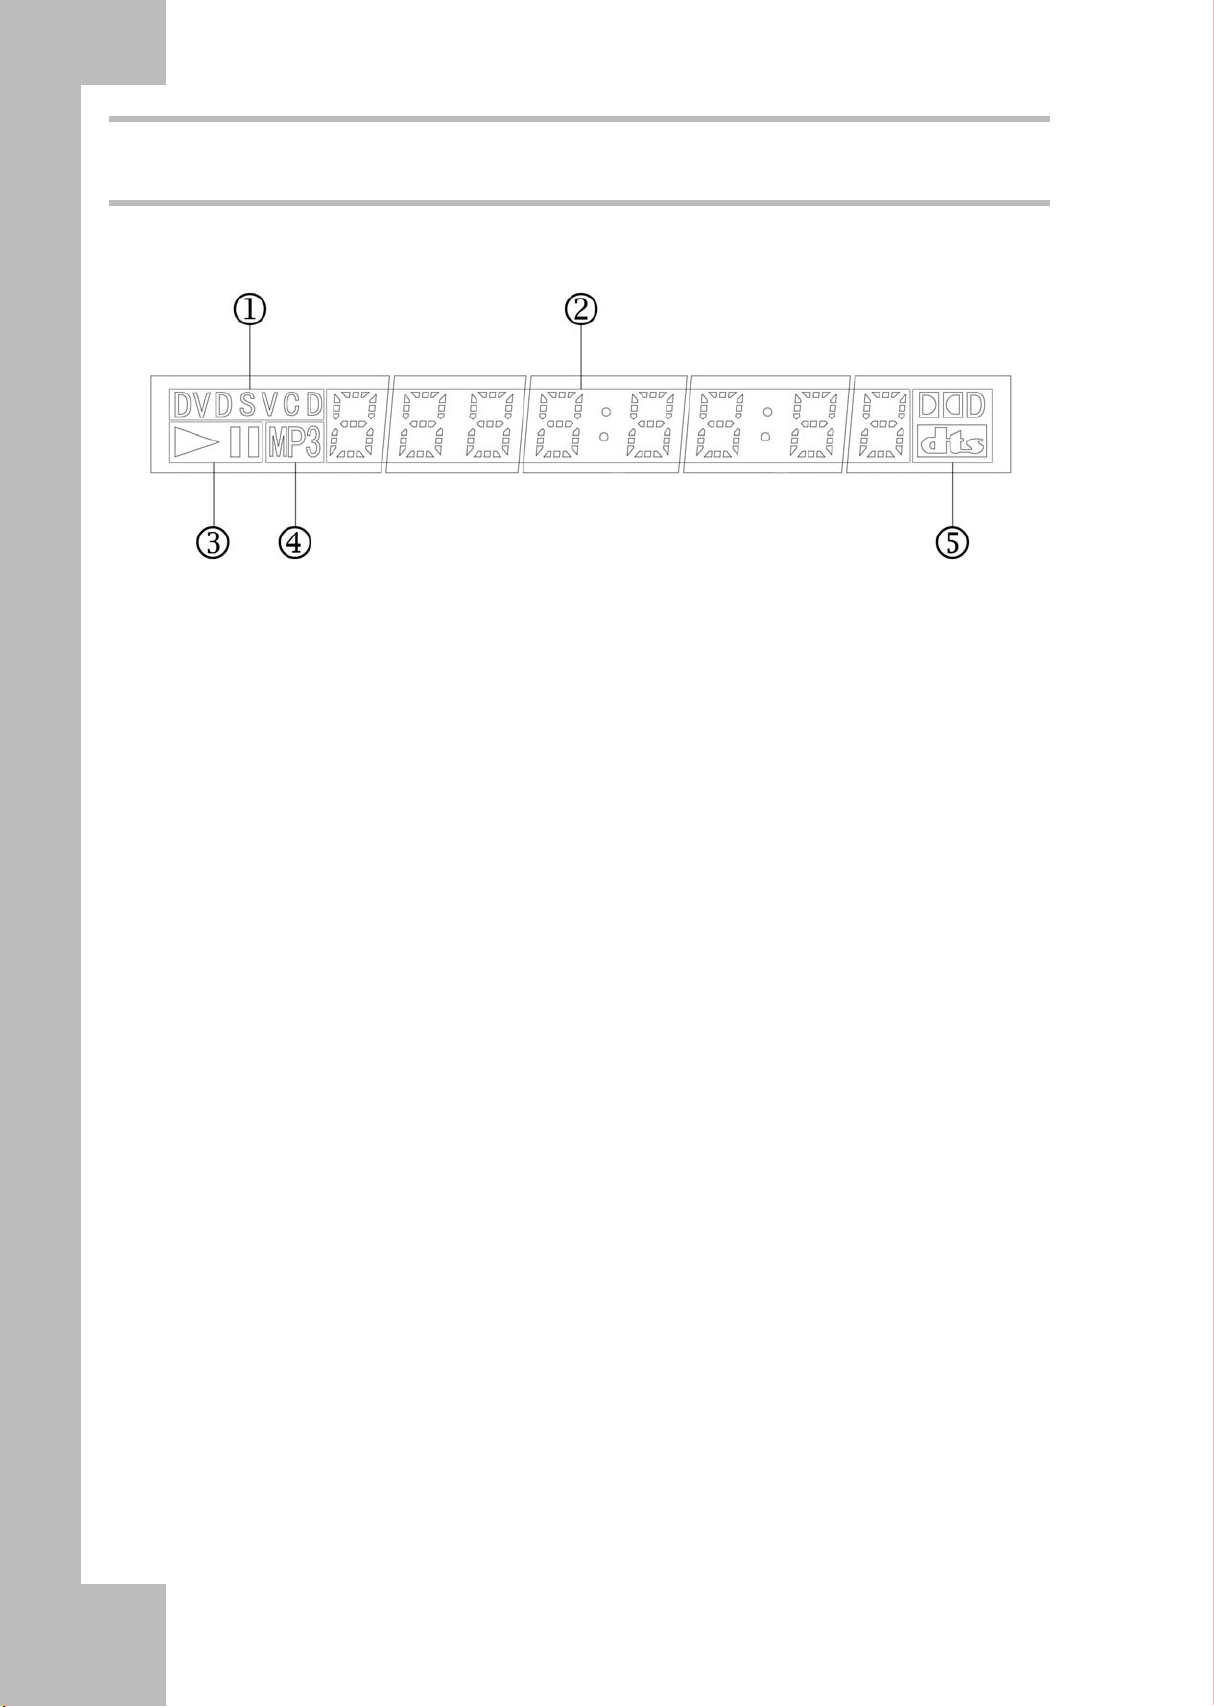
Front Panel Display
1. Disc Type Indicator
Indicates the type of optical disc that has been
inserted – DVD, SVCD, VCD, CD (Audio
CD). If you have inserted a DVD+R/RW or
DVD-R/RW disc, DVD will be displayed.
2. Multi-Function Display / Text Display
Displays information, titles, and the elapsed
and remaining playback times.
3. Playback Status Display
Displays the playback status of a DVD, CD or
another optical disc.
4. MP3 File Display
Indicates that an MP3 file is being played
from DVD, CD, USB stick or memory card.
5. Dolby Digital and dts
Indicates which digital sound mode is
currently active.
10
Page 14

Remote control
The DVD player is supplied with a remote control
unit and the corresponding batteries. For a detailed
description of the button layout, see the fold-out
cover page of this User’s Manual.
Using the Remote Control
Your Silvercrest DVD player can be comfortably
controlled via the supplied remote control unit.
Point the remote control to the sensor at the front
panel of the DVD player. Do not exceed an angle
of 30 degrees for optimum results.
Note:
Any obstacles between the remote control and the
sensor window can deteriorate the remote control
response.
the same signal codes) can interfere with the DVD
player functionality or execute an undesired
function.
Do not store the remote control upside down, and
do not place any objects on it to avoid accidentally
pressing a key and the consequent battery drain.
Also similar remote control units (using
Cautions When Using the Remote
Control
Do not expose the remote control to any shock or
vibrations, and do not splash any liquids over the
remote control. Do not store it in a humid place.
Do not place the remote control under direct
sunlight as its heat may deform the remote control.
Introduction
Inserting the Batteries
If you have just purchased the device or if the
remote control only works at very short distances,
you must insert or replace the batteries. In this
case, insert two new batteries type AAA 1.5 V into
the remote control.
To replace the remote control batteries, you must
remove the battery compartment cover. When
inserting the batteries, make sure that the polarity
matches. On the battery and in the battery
compartment there are the corresponding
markings.
The remote control may not work properly when
the sensor window is exposed to sunlight. In such
a case, put the remote control closer to the sensor
window or change the angle of the light source or
of the unit.
Notes on Batteries
When left unused for a long period of time, it is
recommended that you remove the batteries from the
unit.
Do not use batteries other than those specified.
Inadequate handling of the batteries can lead to
chemical leakage and/or explosion.
If a battery leaks, remove it from the remote control
and avoid any contact with the leaked liquid. Clean
the battery compartment well before inserting new
batteries. We recommend using protective gloves.
11
Page 15

Audio and Video
Connectors
Prior to starting to use your DVD player you must connect it to a display screen. The type of connection
depends on the capabilities of your display screen and of the available cable types.
12
Page 16

Video Connections
You can choose between four different video connection types for your Silvercrest DVD player:
Composite Video
For normal quality – you will need the supplied audio/video cable with Cinch connectors.
S-Video
For a better quality requiring a special S-Video cable and a screen with S-Video input (the S-Video cable is not
included in the package contents).
RGB (via SCART)
Audio and video port offering optimum picture quality. A SCART cable is required (included in the package).
Component Video & Progressive Scan
This video connection offers the highest quality and is supported by modern TV screens and beamers. A
special 3-wire Cinch cable is required.
Note: The audio connection suitable for each video connection will be described in the following section. And
the next chapter will explain all possible audio connections in detail.
Connectors
13
Page 17

Audio/Video Connection to a Screen with Composite Video
and Stereo Audio Inputs
If your TV set features only one single video input – typically a yellow receptacle – please use the Composite
Video output of your DVD player. For the audio connection, use the red and white stereo audio inputs of your
TV.
Have the following cable ready:
1. Audio/video cable – red, white and yellow
connectors (supplied)
2. Power cord (please note that your Silvercrest
DVD player has a fixed-installed power cord)
Warning: Connect the power cord of your DVD
player only after you have finished connecting
all video and audio cables.
1. Power your screen off and connect the DVD
player’s Video Out with the Video In
connector of your screen. Typically, this is a
yellow receptacle equivalent to the Video Out
connector on the back of your DVD player.
2. If you want to output the sound via your TV
set, connect the DVD player’s stereo
connectors to the corresponding inputs of your
TV. Use the red and white connectors of the
audio/video cable.
3. As your Silvercrest DVD player has a fixed
power cord, you only need to plug the other
end into a wall outlet.
4. First turn on your TV then turn on the DVD
player.
5. Select the corresponding Video In connector
on your TV set.
Note: For further information, please check the
instruction manual offered by your TV set. On the
TV screen you’ll see the DVD player’s start
screen.
6. If no picture is displayed, press the V-Mode
button (button 20 on the fold-out cover page)
of the remote control to enable the Video
Output of your Silvercrest DVD player and
press the button as many times as necessary to
display the picture.
14
Page 18

Audio/Video Connection to a Screen with SCART connector
If your screen features a SCART connector you my also connect the DVD player to this SCART connector.
The advantage of this connection type is an optimum picture quality.
Connectors
Have the following cable ready:
1. SCART cable (included in the package)
2. Power cord (please note that your Silvercrest
DVD player has a fixed-installed power cord)
Warning: Connect the power cord of your DVD
player only after you have finished connecting
all video and audio cables.
1. Power your screen off and connect the DVD
player’s SCART connector with the SCART
connector of your screen.
Note: The stereo sound will be transferred directly
over the SCART cable.
2. As your Silvercrest DVD player has a fixed
power cord, you only need to plug the other
end into a wall outlet.
3. First turn on your TV then turn on the DVD
player.
4. Select the corresponding Video In connector
on your TV set.
Note: For further information, please check the
instruction manual offered by your TV set. On the
TV screen you’ll see the DVD player’s start
screen.
5. If your TV set allows you to manually switch
between RGB and FBAS (Video), we
recommend that you use the RGB setting in
order to obtain better picture quality. If you
have connected the DVD player to the TV set
via the SCART cable, the TV set will
automatically switch to DVD mode when
powering the DVD player on (the TV set must
support this function).
6. If no picture is displayed, press the V-Mode
button (button 20 on the fold-out cover page)
of the remote control to enable the SCART
Output of your Silvercrest DVD player and
press the button as many times as necessary to
display the picture.
15
Page 19

Audio/Video Connection to a Screen with S-Video and Stereo
Audio Inputs
If your screen features an S-VIDEO (S-VHS) input, you can use this video connection type as an alternative. The
S-Video connector can be recognized easily by its 4 pins. When using S-Video, the luminance and chrominance
signals are split resulting in higher picture quality than for Composite video. For the audio connection, use the
red and white stereo audio inputs of your TV.
16
Have the following cable ready:
1. S-Video cable (not included in the package)
2. Audio/video cable – red and white connectors
(supplied)
3. Power cord (please note that your Silvercrest
DVD player has a fixed-installed power cord)
Warning: Connect the power cord of your DVD
player only after you have finished connecting all
video and audio cables.
1. Power your screen off and connect the DVD
player’s S-Video Out with the S-Video In
connector of your screen. Use a special S-Video
cable that can be purchased at any retail shop.
2. If you want to output the sound via your screen,
connect the DVD player’s stereo connectors to
the corresponding inputs of your TV. Use the red
and white connectors of an audio/video cable.
3. As your Silvercrest DVD player has a fixed
power cord, you only need to plug the other end
into a wall outlet.
4. First turn on your TV then turn on the DVD
player.
5. Select the S-Video input on your TV.
Page 20

Note: For further information, please check the instruction manual offered by your screen. On the TV screen
you’ll see the DVD player’s start screen.
6. If no picture is displayed, press the V-Mode button (button 20 on the fold-out cover page) of the remote
control to enable the SVHS Output of your Silvercrest DVD player and press the button as many times as
necessary to display the picture.
Video Connection to a TV set/Beamer with Component Video
Inputs (YCbCr/YPbPr)
When using Component Video, the video signal is split into three separate “components”, resulting in a higher
picture quality than for S-Video or Composite video. For the Component video output you need a TV screen or
beamer featuring three Component video inputs.
Furthermore, you will need a special Component video cable (not included in the package) with separate
connectors for the Y, Cb/Pb and Cr/Pr signals. This cable also supports the high-end Progressive Scan mode
when used together with a high-end P-Scan-compatible screen.
To use the Component video output or Progressive Scan mode, the following steps must be performed:
Connectors
17
Page 21

1.Preparation:
• First connect the DVD player to your TV screen
or beamer by using its Composite video or SVideo inputs, see page 14 or 16.
• Connect the Component video cable (not
included) to the corresponding input on your TV
screen or beamer. Normally, the cables and
receptacles are labelled with red, green, and blue
to enable easier connection.
• Power your TV screen or beamer and the DVD
player on and select the corresponding video
signal input on the screen or beamer.
2.Opening the Setup Menu to
Change the Video Settings:
Press the SETUP button (button 7 on the fold-out
cover page) on the remote control to display the
Setup menu. Press the Direction buttons to select the
“Video” menu and press the arrow button Right to
open the menu. Scroll down to the menu option
Video Out and press ENTER (button 10 on the foldout cover page) to open the menu. Press the
Direction buttons to select the option Component
and press ENTER (10) to confirm.
4.Using a Progressive-Scan
Compatible TV Screen:
As you have chosen to use the Component video
output connector you can alternatively set the video
output to be in Progressive Scan mode in order to
obtain high-resolution full-screen pictures. Please
only use this setting when you are sure that your TV
set supports Progressive Scan – please read its
User’s Manual.
As described above, open the Video entry from the
Setup menu and use the Direction buttons to scroll to
the Video Out option.
Press the Direction buttons to select the option PScan and press ENTER (10) to confirm. A warning
message will appear. Follow the on-screen
instructions.
Background Information:
Progressive-Scan generates a picture similar to a
computer display. It will use the entire picture stored
on the DVD without composing it from two half
pictures. The result is a sharper and flicker-free
picture.
18
3.Disconnecting the Composite
Video or S-Video Cable
Next remove the Composite or S-Video cable and
select the video channel associated with the
Component input on your TV set so the
Component video signal is displayed.
Page 22

Audio Connections
Your Silvercrest DVD player features several audio output connectors for connecting an A/V receiver, an active
5.1 speaker system or a TV screen.
There are three connection types:
- Analogue Stereo Output
- Analogue 5.1 Multi-Channel Output
- Coaxial and Optical Digital Output
Connectors
Audio Connection to a TV
Screen or A/V Receiver via
Analogue Stereo Outputs
Have the following cable ready:
1. Audio/video cable – red and white connectors
Connect the stereo outputs of your Silvercrest
DVD player to the corresponding inputs of your
TV screen or A/V receiver. Use the red and white
Cinch connectors of the audio/video cable.
Audio Connection to an A/V
Receiver via Coaxial or
Optical Digital Output
You can use these receptacles to connect the
following devices to your DVD player:
• an A/V receiver or A/V amplifier with digital
muti-channel sound decoder (MPEG-2, Dolby
Digital)
• A/V receiver with 2-channel digital stereo
(PCM)
• 5.1 speaker systems
Have the following cables ready:
1. Coaxial cable (not supplied)
or
2. Optical (fiber-optics) cable (not supplied)
Connect the coaxial or the optical digital output to
the corresponding input socket of the A/V receiver.
These two digital outputs send a coded (“RAW”)
digital signal to the receiver for decoding. Please
note that you can use this connection type only if
your digital receiver supports Dolby Digital, MPEG
and/or PCM – the corresponding option must be set
in the DVD player’s Setup menu. For more
information, see page 25.
As you can see on the fold-out inner cover page, the
back panel of the DVD player has a digital audio
output for coaxial cable labeled number 6 and a
fiber-optics audio output connector labelled
number 8.
What is digital multi-channel
sound?
Digital multi-channel sound will offer you optimum
sound quality. A multi-channel A/V receiver or
amplifier is required, supporting at least one of the
audio formats of your DVD player (MPEG-2 or
Dolby Digital). To find out what formats are
supported by your receiver, please read the
receiver’s User’s Manual.
19
Page 23

Setup Menu
• To open the DVD player’s Setup menu, press
the SETUP button (7).
• Press the arrow buttons 8, 9, 27 and 29 to
navigate the Setup menu. To confirm a
selection or a setting, press ENTER (10).
• To quit the Setup menu, press the SETUP
button (7) again.
Language Settings
OSD Language:
Select the preferred language for the OSD menu of
your DVD player.
DivX Subtitle
Select a character set for your DivX subtitles. The
default setting is «Western European».
Subtitle Position:
Select where you want the MPEG-4 subtitles to be
displayed:
Bottom: The subtitles will be displayed at the
bottom of the screen.
Middle: The subtitles will be displayed a little bit
higher on the screen.
Subtitle:
Select the preferred language for the subtitles of a
DVD (as long as available on the disc). Using the
setting AUTO will use the DVD disc’s default
settings. Off will disable the subtitles.
High: The subtitles will be displayed more
towards the centre of the screen.
Subtitles Background:
Select if you want the subtitles to have a greyish
background, e.g. to have them distinguished better
on a bright background.
20
Page 24

Grey: The subtitles will be displayed on a
background.
None: No background.
Audio
Choose what language will be used for the DVD
audio track. If the selected language has not been
recorded on the disc, the DVD disc’s default
language will be used.
DVD Menu:
Select the preferred language for the DVD menu
(if any).
AUTO1: The pulldown will be read automatically
from the VOB data stream of the PAL DVD. As
DVDs are usually tagged the wrong way, we do
not recommend that you use this setting.
AUTO2: The pulldown will be read automatically
from the VOB data stream of the NTSC DVD. As
DVDs are usually tagged the wrong way, we do
not recommend that you use this setting.
Film: The DVD player will be set to use a
progressive pulldown. The DVD player will join
two related semi-pictures from the DVD. This will
be the proper setting for most purchased or rented
DVDs.
Setup Menu
Picture Settings
In Setup menu, press the arrow button “down” 29 to
go to the Video setting and then press the arrow
button “right” 27 to choose the different menu items.
Picture Mode:
PAL DVDs may contain either Interlaced or
Progressive contents. For interlaced contents, the
DVD player will add a custom-calculated semipicture to each semi-picture. For progressive
contents, it will join two semi-pictures that exist
on the DVD. The procedure the DVD player uses
to do this is defined in the DVD flags.
Unfortunately, often these flags are set the wrong
way, so the DVD player reads an interlaced file as
progressive or vice-versa, causing corresponding
errors during de-interlacing. To avoid this, you can
use a manual preset for the corresponding mode.
VIDEO1: This mode is suitable for PAL
interlaced video contents, e.g. recordings from a
TV show with a DVD recorder or recordings made
with a video camera. In this case, the DVD player
will add a self-calculated semi-picture to all semipictures.
VIDEO2: This mode is suitable for NTSC
interlaced video contents, e.g. recordings from a
TV show with a DVD recorder or recordings made
with a video camera. In this case, the DVD player
will add a self-calculated semi-picture to all semipictures.
Aspect ratio:
Set the aspect ratio of the DVD player to match
that of your TV set.
4:3: Aspect ratio used by older CRT screen TVs.
16:9: Wide-screen format.
21
Page 25

View Mode:
Set the view mode to match that of your TV set.
Fill: The picture will fit the screen, any contents
surpassing the borders will be truncated.
Original: The contents will be played with the
same dimensions they were recorded.
Auto Fit: The DVD player will scale the picture to
fit the screen size.
Pan Scan: 16:9 contents will fill the screen on 4:3
devices. The borders will be truncated.
TV-System:
Your DVD player can play both PAL and NTSC
DVDs. Please note that your display device must
support the corresponding system.
Video Out:
Here you can set the output of your DVD player
where you have connected your TV set.
S-VIDEO: To connect the DVD player via the SVideo connector (7).
Component: To connect the DVD player via the
YPbBr (YUV) connectors (1).
RGB: To connect the DVD player via the SCART
connector to an RGB-compatible TV set.
P-Scan: To connect the DVD player via the YPbBr
(YUV) connector (1) with Progressive Scan. PAL
DVDs may contain either Interlaced or Progressive
contents. For interlaced contents, the DVD player
will add a custom-calculated line to each missing
line. For progressive contents, it will join two semipictures that exist on the DVD. Please also note the
Picture Mode setting.
NTSC: The DVD player will be set to NTSC.
PAL: The DVD player will be set to PAL.
AUTO: The DVD player will detect the TV system
of the DVD automatically.
Audio Settings
In Setup menu, press the arrow button “down” 29
to go to the Audio setting and then press the arrow
button “right” 27 to choose the different menu
items.
22
Page 26

Bass-Management:
If you have connected your DVD player to an AV
receiver or active speakers via the analogue 5.1
outputs (3), you can enable your subwoofer here.
Centre Speakers:
Here you set if there is any centre speaker at the
front in the middle (between the left and right
speakers) and what frequency range is to be used to
feed it.
Off : No subwoofer.
On: The subwoofer will be used.
Front Speakers:
Here you can set whether the front left and right
speaker will receive the full frequency range or if the
bass frequencies will be skipped, for example, when
using a subwoofer.
Large: The front speakers will receive the full
frequency range, there is no subwoofer.
Large: The centre speaker will receive the full
frequency range, there is no subwoofer.
Small: The lower frequencies will be skipped, the
subwoofer will play them back instead.
None: There is no centre speaker installed, the
signals will be sent to the front left and right
speakers.
Surround Speakers:
Here you set if there are any back effect speakers
and what frequency range is to be used to feed them.
Setup Menu
Small: The lower frequencies will be skipped, the
subwoofer will play them back instead.
Large: The surround speakers will receive the full
frequency range, there is no subwoofer.
Small: The lower frequencies will be skipped, the
subwoofer will play them back instead.
None: There are no surround speakers installed, the
signals will be sent to the front left and right
speakers.
23
Page 27

Subwoofer:
Set whether there is a subwoofer installed.
Delay Settings:
If you have connected an active speaker system to
the analogue 5.1 outputs (3) of your DVD player, the
moment at which the sound is emitted should be the
same for all speakers. For this, measure the distance
between your seating position to all the speakers and
enter the distances in Setup menu.
Centre delay:
None: There is no subwoofer installed.
Present: There is a subwoofer installed.
Test Tones:
Test tones are used to verify your speakers’ position.
You can check if all speakers have been connected
properly.
Off : No test tones.
Left: Noise from the left front speaker.
Enter the distance from the centre speaker to your
seating position.
Example : If you are seating 1.7 m away from the
centre speaker, enter 1.7 m.
Surr. Delay:
Enter the distance from the back surround speakers
to your seating position.
Example : If you are seating approx. 2 m away from
the back speakers, enter 2 m.
24
Right: Noise from the right front speaker.
Centre: Noise from the centre speaker.
Left Surr: Noise from the left back speaker.
Right Surr: Noise from the right back speaker.
Subwoofer: Noise from the subwoofer.
Page 28

Digital Output:
You can set the optical (8) and coaxial (6) outputs
(SPDIF) according to the requirements of your
playback device.
Off : The SPDIF connectors are disabled.
PCM: The digital multi-channel tracks of the
DVD will be downmixed by the DVD player.
RAW: The sound will be output as it has been
recorded on the disc. Use this setting when
connecting a Dolby Digital AV receiver.
IMPORTANT: This function works only if the
DVD player has been connected to the playback
device via a digital audio line (optical or
coaxial).
Down Sampling:
Here you can set if you want the DVD player to
downsample Dolby Digital or dts multi-channel
sound to stereo sound.
Off : Function disabled.
Setup Menu
Night Mode:
DVDs usually have a high dynamic range. The
difference between low and high volume of a DVD
is very large. When using a lower volume on your
playback device, the DVD player can compress the
sound in a way that the difference between the lower
and higher volume parts is less accentuated.
Off : No compression.
On: The DVD player reduces the volume
differences between low and high volume of the
DVD by using dynamic compression.
On: Function enabled.
25
Page 29

Parental Control
Retail and rental DVDs include a rating level by age.
This rating can also be recorded by the producer of
the DVD so that a password is required for playback.
The default password for this device is 8888. You
should change it immediately after installing your
DVD player.
WARNING: Only a few DVDs include a recorded
rating. If the DVD producer doesn’t record any
rating onto the DVD, the Parental Control function
of your DVD player will not work automatically.
Parental Control will work only if you enable it
explicitly on the DVD player and if the DVD
inserted includes a corresponding code. If you insert
a DVD that cannot be played back according to
Parental Control, a menu will appear prompting you
to enter your password and to confirm it by pressing
ENTER (10).
To enable the rating, select the item “Parental
Control” from the “Rating” OSD menu and enter
the password (8888). Confirm by pressing ENTER
(10).
Set Password: Here you can change the default
password (8888) and define your own password.
Only digits 0-9 are allowed.
To enter the password, select “Set Password” from
the OSD menu. Enter the correct password.
Confirm by pressing the OK button.
Parental Control:
This item allows you to restrict the age. The
possible settings for German DVDs are.
1. Kid Safe: DVDs suitable for all ages (no
restrictions).
4. PG-13 (Parents Strongly Cautioned): DVDs
suitable for children from 12 years.
8. Adult: DVD can be played without restriction
except for indexed films or hardcore videos.
Again, select “Set Password” and enter your new
password. Confirm by pressing ENTER (10).
Note:
If you have forgotten your password, you can use
the factory-default password (8888).
26
Page 30

Miscellaneous
DivX Registration / VoD
In this menu you can restore the factory-default
settings of your DVD player. This will bring back
the original configuration when you installed the
device for the first time. All your personal settings
will be lost. Please confirm the safety prompt with
Yes and press ENTER (10).
The “Screen saver” option allows you to enable or
disable the screen saver. To enable the screen saver,
press the Direction buttons to navigate to the
“Screen saver” option and press the ENTER button
(10) to confirm. Then select “On” and press ENTER
again to confirm your selection.
To display the DivX VOD (Video On Demand)
registration code of your DVD player, press the
SETUP button (7) and select the Misc menu. Press
the Direction buttons to select the option “DivX
Registration” and press ENTER (10) to confirm.
The Registration code will appear. For more
information, please visit: http://www.divx.com/vod.
Setup Menu
27
Page 31

Playing Media with
Your DVD Player
Inserting a DVD/CD
To play a disc or file with your DVD player:
• Power the DVD player, TV set and any other
external equipment on.
• The DVD player will show the Silvercrest start
screen.
• If no disc has been inserted into the DVD
player’s disc tray the message “No disc” will be
shown.
• Press the OPEN/CLOSE button (22) on the
remote control or the DVD player’s front panel
(3) to open the disc tray. “Open” is displayed on
the screen.
• Load the disc with the label facing up on the disc
tray. For double-sided discs, insert the side to be
played downwards.
• Once you have inserted the disc, press the
OPEN/CLOSE button (22) on the remote control
or the DVD player’s front panel (3) to close the
disc tray.
• The disc contents will be read, this may take a
few seconds. “Loading” is displayed on the
screen.
• Depending on the inserted DISC OR FILE it is
possible that the contents do not play
automatically but a selection menu will be
displayed. In this case, press the Direction
buttons on the remote control to select the menu
item allowing movie playback to start. To start
movie playback, press the ENTER (10) or PLAY
(37) button on the remote control.
Pausing Playback
• To pause playback of the inserted DISC OR
FILE, press the PLAY/PAUSE button (6) of
the DVD player’s front panel or on the remote
control (37) during playback.
• The message “Pause” will be shown on the TV
screen, and on the display (2) on the DVD
player’s front panel you will see the elapsed
playtime.
• The screen will shown the still picture of the
paused scene.
• Press PLAY/PAUSE again: playback starts
automatically from the point where you
stopped.
28
• The playback of DVD Video discs and Audio
CDs starts automatically. For ISO DVDs
containing files the File Browser will open.
• DVDs, VCDs and SVCDs that you want to play
back may include a region code that you’ll find
on the DVD box. The DVD will only play
DVDs/VCDs/SVCDs with the region code 2.
Page 32

Stopping Playback
• To stop movie playback of the inserted disc,
press the STOP button (7) of the DVD
player’s front panel or on the remote control
(21).
Resume Function
• If you have stopped playback by pressing the
STOP button once, the DVD player will store the
current playback position. This feature is called
“Resume Function”. “Stop [Play to Resume]” is
displayed on the screen. As soon as you press the
PLAY button on the DVD player’s front panel or
on the remote control, playback will resume
from the stored position (as long as you don’t
power the DVD player off in the meantime).
• Pressing the STOP button a second time will
delete the stored position. When you press the
PLAY button , playback starts from the
beginning of the disc.
If such a menu exists on the inserted DVD disc, you
can open it during playback by pressing the MENU
button (28) on the remote control. Select the
different menu items by using the Direction button
on the remote control. Press the PLAY/PAUSE
button (6) of the DVD player’s front panel or the
ENTER button on the remote control to confirm the
selected option. To return to playback, press the
MENU button (28) on the remote control again.
PBC (Playback Control)
(Super) Video-CDs can include PBC (Playback
Control). This allows you to select specific
playback functions (menus). The Video CD must
be PBC-compatible (see the CD box).
Enabling PBC
During playback or when playback is stopped,
press the MENU button (28) on the remote
control. PBC is now enabled. To display the PBC
main menu, press the MENU button (28) on the
remote control during playback.
Playing Media with Your DVD Player
Opening the DVD Menu
(Menu)
This function is not available for all DVD discs.
Many DVD discs include a main menu that lets you
playback the movie but also offers different options
such as:
• selecting the language for subtitles and audio
track
• direct chapter selection
• the playback of bonus material on the movie
(background information, making-of, etc.)
29
Page 33

Skip to a Chapter
Press the PREV(18) and NEXT(19) buttons on the
remote control or on the front panel during DVD
playback to
• skip forward to the beginning of the next chapter
• skip backwards to the previous chapter
Enter either the title or chapter number or the time
and press ENTER (10) to confirm.
The selected chapter will be played back
immediately – you don’t need to press the PLAY/
PAUSE button (37). The number of the selected
chapter will appear on the display of the DVD
player’s front panel, to the left of the playback
time.
Entering the Title Number
via the Numeric Buttons
Instead of using the Skip function you can also
select DVD titles directly by entering the title
number via the numeric buttons (24) 0 to 9 on the
remote control.
• During playback, enter the title number via the
numeric buttons on the remote control (24).
Example: Press 3 for the third title or press
10+ and 0 for the tenth title. The entered
numbers will appear for a few moments on the
screen.
• Then press the ENTER button (10) on the
remote control. The title with the entered
number will be played back.
Selecting Media and Files Directly by Entering
the Title, Chapter or Time
The disc or file will be played from the set
position.
Bookmark
1. Select the position you want to bookmark.
2. Press BOOKMARK (13) during playback.
“Bookmark 1 - 3” is displayed on the screen.
3. Press ENTER [10] to set the bookmark. The
playtime will be displayed on the screen.
4. If necessary, you can set up to 2 more
bookmarks.
5. Press BOOKMARK [13] to exit the function.
To go to the bookmark, press the BOOKMARK
button (13), press the Direction buttons to select
the desired bookmark and press ENTER (10) to
confirm.
Delete: to delete a bookmark, press the
BOOKMARK button (13) and press the Direction
buttons to mark the desired bookmark. Press the
CLEAR button (17) to remove the bookmark. All
bookmarks will be deleted when powering off the
device or when replacing the DVD.
30
You can select a specific position within a disc or
a file directly. To do so, press the SEARCH button
(25) on the remote control. The “Search” options
will appear.
Page 34

Forward/Backward Search
Slow-Motion Playback
To select specific sections during playback, you can
also use the fast forward/backward search. To do so,
press the REV (36) or FWD (35) buttons on the
remote control.
For fast forward, press the FWD button (35), for
backward search press the REV button (36).
• Press once for twice the speed. “x2” is displayed
on the screen.
• Press twice for four times the speed. “x4” is
displayed on the screen.
• Press three times for eight times the speed. “x8”
is displayed on the screen.
• Press four times for sixteen times the speed.
“x16” is displayed on the screen.
During fast forward/backward search no sound is
played back.
To resume playback of the movie at the selected
position, press the PLAY/PAUSE button (6) of the
DVD player’s front panel or on the remote control
(37) during the search. “Play” is displayed on the
screen.
You can view the contents of the inserted disc in
slow-motion. To do so, press the SLOW button (31)
on the remote control.
• Press once for 1/2 of the speed. “1/2” is
displayed on the screen.
• Press twice for 1/4 of the speed. “1/4” is
displayed on the screen.
• Press three times for 1/6 of the speed. “1/6” is
displayed on the screen.
• Press four times for 1/8 of the speed. “1/8” is
displayed on the screen.
During slow-motion playback no sound is played
back.
To resume playback of the movie at the selected
position, press the PLAY/PAUSE button (6) of the
DVD player’s front panel or on the remote control
(37) during the slow-motion playback. “Play” is
displayed on the screen.
This function is not available for all discs or media.
Playing Media with Your DVD Player
Single-Picture Playback
(Step)
To view the disc contents or file step by step in
single pictures:
• Press the STEP button (32) during playback, to
pause playback. The screen will shown the still
picture of the paused scene.
• Pressing the STEP (32) button will advance the
movie one frame.
• To resume movie playback, press the PLAY/
PAUSE button of the DVD player’s front panel
(6) or on the remote control (37).
31
Page 35

Zoom
Displaying/Hiding Subtitles
During disc or file playback you can zoom the
picture in three steps. To do so, press the ZOOM
button (11) on the remote control.
• Press once for the first zoom step. “1” is
displayed on the screen.
• Press twice for the second zoom step. “2” is
displayed on the screen.
• Press three times for the third zoom step. “3” is
displayed on the screen.
Press the Direction buttons to move the enlarged
screen area. To return to normal picture size, press
the ZOOM button (11). “Off” is displayed on the
screen.
Changing the Camera Angle
If subtitles exist for the inserted disc or file, you can
display them during playback by pressing the
SUBTITLE button (4) on the remote control. Press
the button SUBTITLE (4) once to view the subtitles
in the first available language. Press the button
SUBTITLE (4) multiple times to view the subtitles
in different languages. The number of the subtitle
language will be shown (e.g. “1/10” for the first of
ten available languages). If the last of all available
languages is displayed (e.g. “10/10” for the tenth of
ten available subtitle languages) you can disable the
subtitle function by pressing the SUBTITLE button
(4) again. “Off” is displayed on the screen.
You can set the position of MPEG-4 file subtitles
(e.g. XviD) and display them on a grey background.
(See the Chapter Setup)
Changing the Audio Track
Language
Some movies on DVD/VCD/SVCDs contain
chapters that have been recorded from different
camera angles. Movies using this features can be
viewed from different angles.
• To do so, press the ANGLE button (5) on the
remote control.
• Each time you press ANGLE (5) it will toggle to
a different camera angle.
Some movies recorded on DISC OR FILE let you
select an audio language during playback. To do so,
press the LANGUAGE button (6) on the remote
control. Press the LANGUAGE button (6) once to
play the first available audio language. Press the
button LANGUAGE (6) multiple times to hear the
audio track in different languages. The selected
language is displayed on the screen.
32
Page 36

Changing the Playback
Mode
You can change the playback mode of an inserted
disc or a file. To do so, press the PROGRAM button
(16) on the remote control during playback. The
available playback options will appear. Press the
Direction buttons to navigate to “Mode” or “Rep
On”. Press the ENTER button (10) on the remote
control to toggle among the different playback
modes.
Mode
• Normal: The disc will be played in the default
order.
• Random: The files contained on the disc will be
played in random order.
Repeat On
Repeating Intervals (A – B)
This function can be used to repeatedly play a
specific interval of a disc or file.
• During playback, press the A–B button (23) on
the remote control as soon as the beginning of
the desired interval has been reached. “Rep A -”
is displayed on the screen.
• Press the A–B (23) button again as soon as the
end of the desired interval has been reached.
Please note that the beginning and end of the
interval must belong to the same chapter.
• The repeated playback of the interval will start
immediately. You do not need to press the PLAY
button (37). The interval will be played back
repeatedly until you press the A–B button again
to disable the function. “Rep AB Off” is
displayed on the screen.
Playing Media with Your DVD Player
• Single: The current file will be played
repeatedly.
• All: All files will be played repeatedly.
• Off : No repeated playback.
Press the PROGRAM button (16) again to hide the
repeat mode selection menu.
This mode does not work for all discs or files. If a
playback mode is not available when pressing the
PROGRAM button (16) the message “Invalid
operation” will appear.
REPEAT Function
During the disc or file playback you can press the
REPEAT button (2) on the remote control to enable
the repeat function. Press the REPEAT button (2)
several times to display the following options in
sequence:
• “Repeat Chapter”: The track or the chapter
will be repeated.
• “Repeat Folder“ (for file playback): The entire
folder will be played back repeatedly.
“Repeat Title” (for DVD playback): The
current title will be played back repeatedly.
• “Off“: The REPEAT function is disabled.
33
Page 37

Displaying Disc or File
Information
During playback, press the DISPLAY button (13) in
the playback mode. Playback information is
displayed on the screen.
• The elapsed playback time of the current DVD
in hours, minutes and seconds
• The remaining playback time to the end of the
movie in hours, minutes and seconds
• The elapsed playback time of the current
chapter in hours, minutes and seconds
• The remaining playback time to the end of the
chapter in hours, minutes and seconds
CD-RW,DVD, DVD-R, DVD+R, DVDRW,DVD+RW discs, USB memory stick as well as
CF I, CF II, SD, MS, MSPro, MMC and SM
memory cards in the left-hand selection window.
Movie files are labelled with a movie roll, picture
with a camera and music files with musical notes.
Furthermore, up to 24 characters of the file name
will appear in the left selection field and 25
characters plus file name extension (e.g. avi or mp3)
will be shown in the address bar on top of the
display window.
Use the Direction buttons on the remote control to
navigate in File Browser. Confirm your selection by
pressing ENTER (10).
• The type of the currently inserted disc (DVD)
• The current title number and the total number of
titles
• The current chapter number and the total
number of chapters
• The currently selected playback language
• The currently selected subtitle setting
• The current camera angle/the total number of
available camera angles
Press DISPLAY (33) again, to hide the
information display.
File Browser
After inserting an ISO DCD, an ISO CD containing
files or an Audio CD into the DVD player, the File
Browser will appear. The File Browser displays the
file formats Audio CD (.cda), MP3 (.mp3), Windows
Media Audio (.wma), Mpeg4 (Xvid)(.avi), Nero
Digital (.mp4) and JPEG (.jpg) contained on CD-R,
In the right selection window you can set filters to
display all files contained on a storage media or only
audio, picture or movie files.
For pictures, a preview will appear in the lower-right
field.
For MP3 files, the ID3 tag will be shown in the
bottom line.
Creating a Playlist in File Browser
Press the Direction buttons on the remote control to
navigate in the Browser. Press the ENTER button
[10] to confirm your selection.
• In the top selection window, select “Edit Mode”
and press ENTER (10). The menu item will be
highlighted.
• Next go to the left-hand selection window and
mark the files that you want to play back in the
desired order by pressing the ENTER button (0).
A checkmark will appear to the left of the
marked files.
• Go back to the top selection window, select the
option “Add to Program” and press ENTER (10)
to confirm. The selected files will be added to
the playlist.
34
Page 38

• You can display the playlist by pressing the
Direction button to go to the “Program View”
option and pressing ENTER (10). Your playlist
will appear in the left selection window.
Using Memory Cards/USB
Stick With MP3/WMA/MPEG-
• Press PLAY/PAUSE (37) to start the selected
programme.
• You can delete the programme by pressing the
Direction button to go to the “Clear Program”
option in the right selection window and
pressing ENTER (10).
• To return to the normal Browser view, select the
“Browser View” option in the upper-right
selection window and press ENTER (10) to
confirm.
Changing the Playback Mode in
File Browser
1. You can change the playback mode of an
inserted disc or a file. Press the Direction
buttons to navigate to “Mode” or “Rep On” in
the upper-right selection window. Press the
ENTER button (10) on the remote control to
toggle among the different playback modes.
Mode
• Normal: The disc will be played in the default
order.
• Random: The files contained on the disc will
be played in random order.
4 (XviD)/JPEG Files
The DVD recorder will always power-on in DVD
mode. To playback from memory card, press the
USB/CARD button (15) on the remote control.
Your DVD player supports the JPEG, MP3, WMA
and MPEG-4 (XviD) file formats and will open
File Browser.
Please only insert one memory card at a time. The
DVD player will start reading the upper slot for
CF I/CF II cards. If you insert a memory card here,
any data contained on card in the lower slot will
not be read.
To insert CFI/CFII, SD, MS/MSPro, MMC and
xD memory card into the DVD player:
• After your TV set, the DVD player and any
other external devices (e.g. audio equipment)
have been powered on and are ready and the
DVD player has been connected properly to
the TV, the Silvercrest start screen will be
shown.
• If no disc has been inserted into the DVD
player’s disc tray the message “No disc” will
be shown.
Playing Media with Your DVD Player
Repeat On
• Single: The current file will be played
repeatedly.
• All: All files will be played repeatedly.
• Off : No repeated playback.
• Open the card reader covers on the front panel
of the DVD player.
• Carefully insert the memory cards into the
slots until they click in place.
The memory cards have to be fully inserted
without applying any brute force!
Supported Memory Cards
The player supports CFI/CFII, SD, MS/MSPro,
MMC and xD memory cards:
35
Page 39

Special Features for Picture
Special Features for MP3
Playback
Your player can display JPEG files. Insert a disc or
insert the corresponding memory media. The File
Browser will appear showing the picture files in the
left-hand selection window. In the lower-right
window you will see a picture preview. As described
in the section “Creating a Playlist in File Browser”,
you can program the picture playback in the form of
a playback list.
Press the TITLE button (26) on the remote control to
generate a thumbnail view containing nine picture
thumbnails. Press the Direction button to browse
through the thumbnails and press the ENTER button
(10) to select a specific picture and view it in full
size.
While displaying a picture, press the Direction
buttons to rotate it:
• Right arrow (27): Rotate by 90°
Playback
Your player can play MP3 music files. Insert a disc
or insert the corresponding memory media. The File
Browser will appear showing the music files in the
left-hand selection window. As described in the
section “Creating a Playlist in File Browser”, you
can program the MP3 playback in the form of a
playback list.
The upper right selection window also contains the
option “Intro”. This will play the first few seconds of
each track.
If the MP3 contains ID3 tag information it will be
displayed at the bottom in File Browser. The ID3 tag
can contain the name of the album, title, artist, the
year, the track and a remark.
• Down arrow (29): Rotate by 180°
• Left arrow (9): Rotate by 270°
• Up arrow (8): Rotate by 180°
The DVD player has to resize the picture to the PAL
resolution of 720 x 576 pixel. The larger the picture
file the more time the DVD player needs for
calculating and displaying the file.
Depending on the picture size and aspect ratio, black
bars may appear in the horizontal or vertical
margins.
36
Page 40

Technical
Specifications
Power supply 230 VAC, 50/60 Hz
Power consumption operation/standby <= 20 W / < 1 W
Weight 2.3 kg (net weight of the player, without any accessories)
Size 430 x 260 x 38 mm (Player)
Colour system PAL/AUTO/NTSC
Laser CD: 780 nm; DVD: 650 nm
Frequency response 20 Hz to 20 KHz (at 1 KHz, 0 dB)
Signal-to-Noise ratio >= 90 dB (at 1 KHz, 0 dB)
Dynamic Range (audio) >= 80 dB
Operating temperature 5 °C - 35°C
Operating humidity max. 85% RH
Supported discs DVD, DVD+/-R, DVD+/-RW, DVD+/-R DL, VCD, SVCD, MVCD,
CD-R, CD-RW, AUDIO-CD, Nero Digital, MPEG4, MP3, DivX
Outputs Scart, Composite Video, S-Video, Component (YUV), Coaxial, Optical
Composite-Video Out Composite: 1.0 ± 0.2 Vp-p
Load impedance: 75 Ω , negative polarity
Video Out (analogue) 2.0 ± 0.1 Vrms
Included accessories RCA audio/video cable (Composite Video and Audio L-R)
Remote control
User’s Manual
Scart (Euro AV) cable
2 batteries, Micro UM-4, AAA 1,5 V
Nero Trial
Technical Specifications
37
Page 41

38
Page 42

39
Page 43

40
TARGA GmbH
Lange Wende 41
59494 Soest
Germany
www.silvercrest.cc
 Loading...