

Page 1

JET GmbH
29.04.2010
FAQs
o
Question?
o
Frage?
o
Answer!
o
Antwort!
o o
o o
Der Kunde muss den Original-Kaufbeleg an folgende Anschrift einsenden:
Rommelsbacher Service c/o Jet GmbH, Am Weimarer Berg 6, DE-99510 Apolda,
GERMANY. Nach Erhalt des Kaufbeleges wird dem Kunden ein Austauschgerät
zugesandt! Den Kunden bitten, sein defektes Gerät zu entsorgen.
Wird beim Telefonat festgestellt, dass das Gerät vermutlich einen Defekt
aufweist, ist folgender Weise vorzugehen:
Auslandservice- Abwicklung:
Customer needs to send the original sales receipt to following service address:
Rommelsbacher Service c/o Jet GmbH, Am Weimarer Berg 6, DE-99510 Apolda,
GERMANY. After receiving the sales receipt customer gets a replacement apparat.
After receiving the new apparat customer can dispose of faulty apparat.
Foreign country service - handling
If you realize (during phone call) that the product probably could have a defect
please fulfill following instructions:
no entry
englisch deutsch
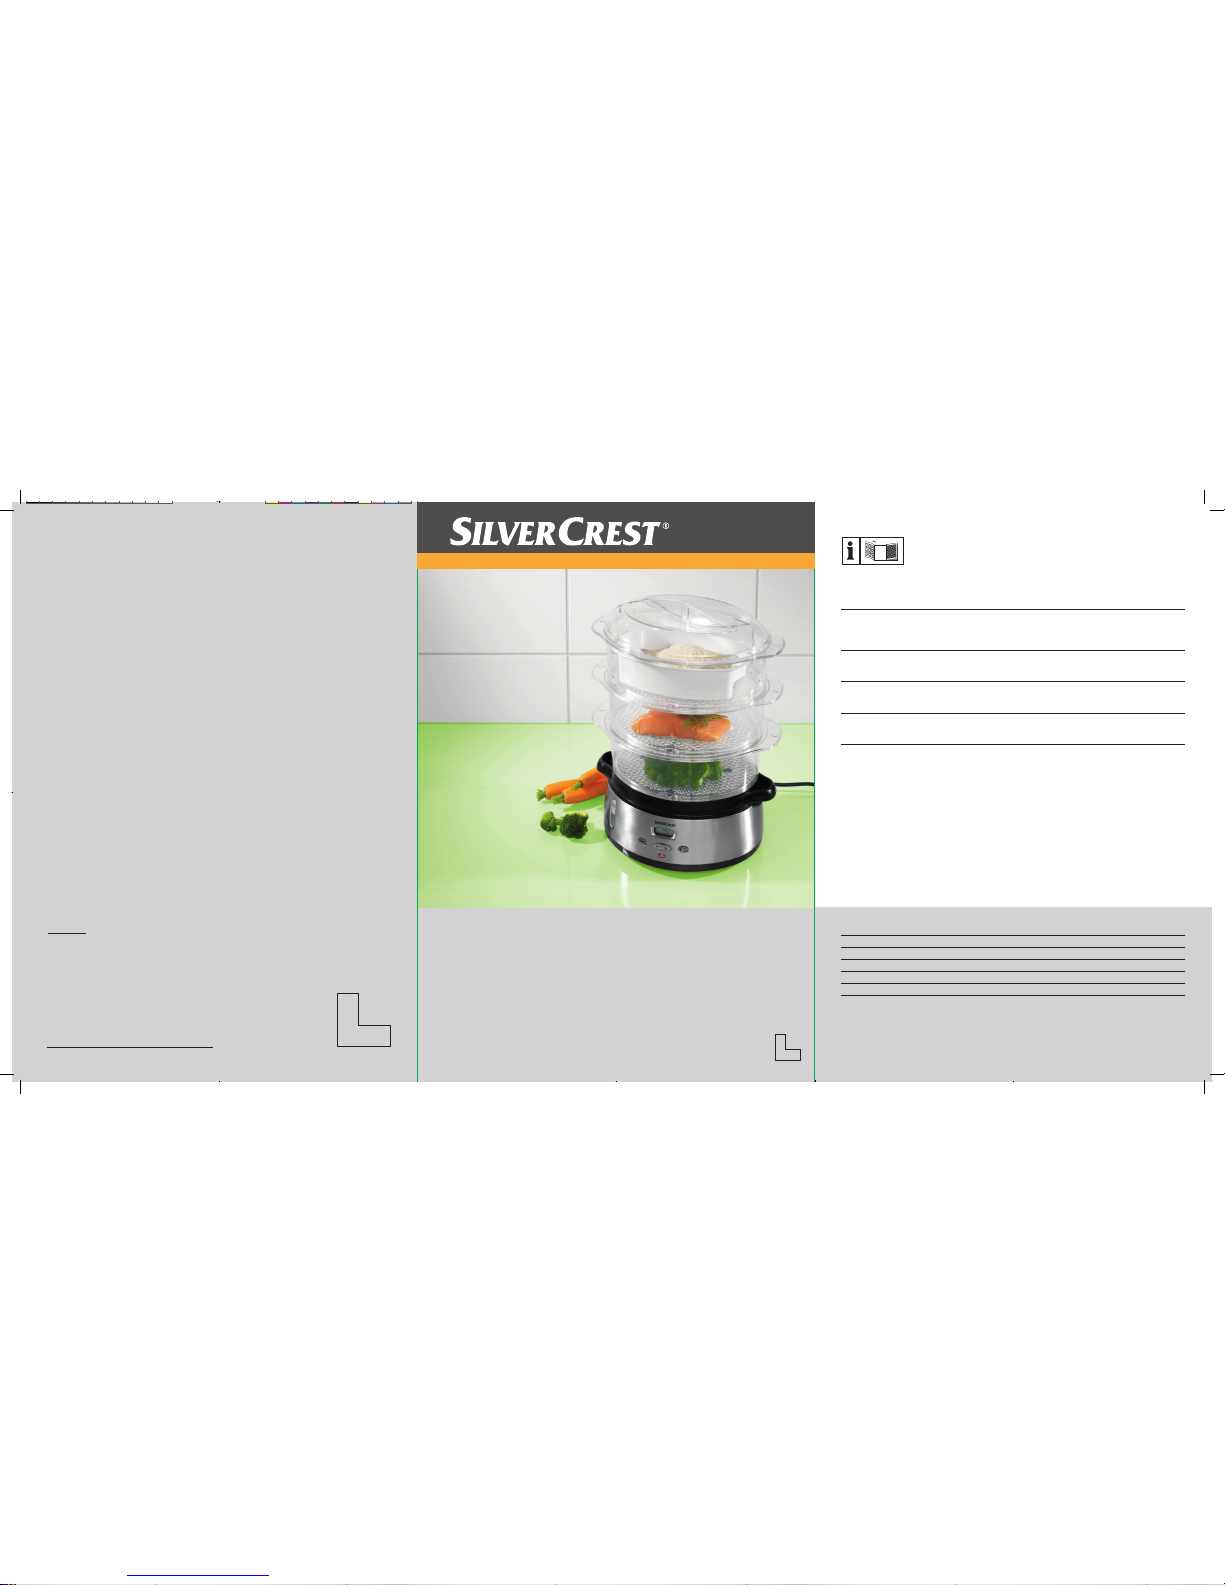
Steamer DGS 800 silvercrest / Dampfgarer DGS 800 silvercrest
kein Eintrag
Kein Eintrag
no entry
FAQs Rommelsbacher.xls
Silvercrest DGS 800
1 von 1
Page 2
Art.-Nr. 16463
ROMMELSBACHER
ElektroHausgeräte GmbH
Rudolf - Schmidt - Str. 18
D - 91550 Dinkelsbühl
Last Information Update · Έκδοση των πληροφοριών: 06 / 2008
Ident.-No.: 16463062008-3
DE / AT Bedienungs- und Sicherheitshinweise Seite 5
NL Bedienings- en veiligheidsinstructies Pagina 19
PT Instruções de utilização e de segurança Página 33
STAINLESS STEEL STEAMER
Operation and Safety Notes
ΑΝΟΞΕΙΔΩΤΟΣ-
ΑΤΜΟΜΑΓΕΙΡΑΣ
Υποδείξεις χειρισμού και ασφαλείας
,* 5$ )& / 50 0- 4
STAINLESS
STEEL STEAMER
GB/IE/CY Operation and Safety Notes Page 5
GR/CY 17
DK Betjenings- og sikkerhedsvejledning Side 31
SE Bruks-och Säkerhetsanvisningar Sida 45
FI Käyttö- ja turvallisuusohjeet Sivu 59
DE/AT/CH Bedienungs- und Sicherheitshinweise Seite 73
Before reading, unfold the page containing the illustrations and familiarise yourself with all functions of the device.
Klap siden med billederne ud til siden, så du kan se på den, medens du læser om alle dampkogerens funktioner.
Vik ut sidan med illustrationerna och gör dig förtrogen med apparatens alla funktioner.
Käännä kuvasivu esiin ja tutustu laitteen kaikkiin toimintoihin ennen sen käyttöönottoa.
Klappen Sie vor dem Lesen die Seite mit den Abbildungen aus und machen Sie sich anschließend mit allen Funktionen des
Gerätes vertraut.
ATDE
GB
SE
FI
GR
DK
IE
CY
CY
STAINLESS STEEL STEAMER
Operation and Safety Notes
GB GR CYCYIE
DAMPKOGER AF RUSTFRIT STÅL
Betjenings- og sikkerhedsvejledning
DK
HÖYRYKEITIN, RUOSTUMATONTA TERÄSTÄ
Käyttö- ja turvallisuusohjeet
FI
ÅNGKOKARE AV ROSTFRITT STÅL
Bruks-och Säkerhetsanvisningar
SE
EDELSTAHL-DAMPFGARER
Bedienungs- und Sicherheitshinweise
ATDE
Last Information Update: 04 / 2009
Ident.-No.: 16463042009-3
ΑΝΟΞΕΙΔΩΤΟΣΑΤΜΟΜΑΓΕΙΡΑΣ
Υποδείξεις χειρισμού και ασφαλείας
Υποδείξεις χειρισμού και ασφαλείας Σελίδα
Πριν ξεκινήσετε την ανάγνωση, ανοίξτε τη σελίδα με τις εικόνες και εξοικειωθείτε με όλες τις λειτουργίες της
συσκευής.
3
3
Page 3
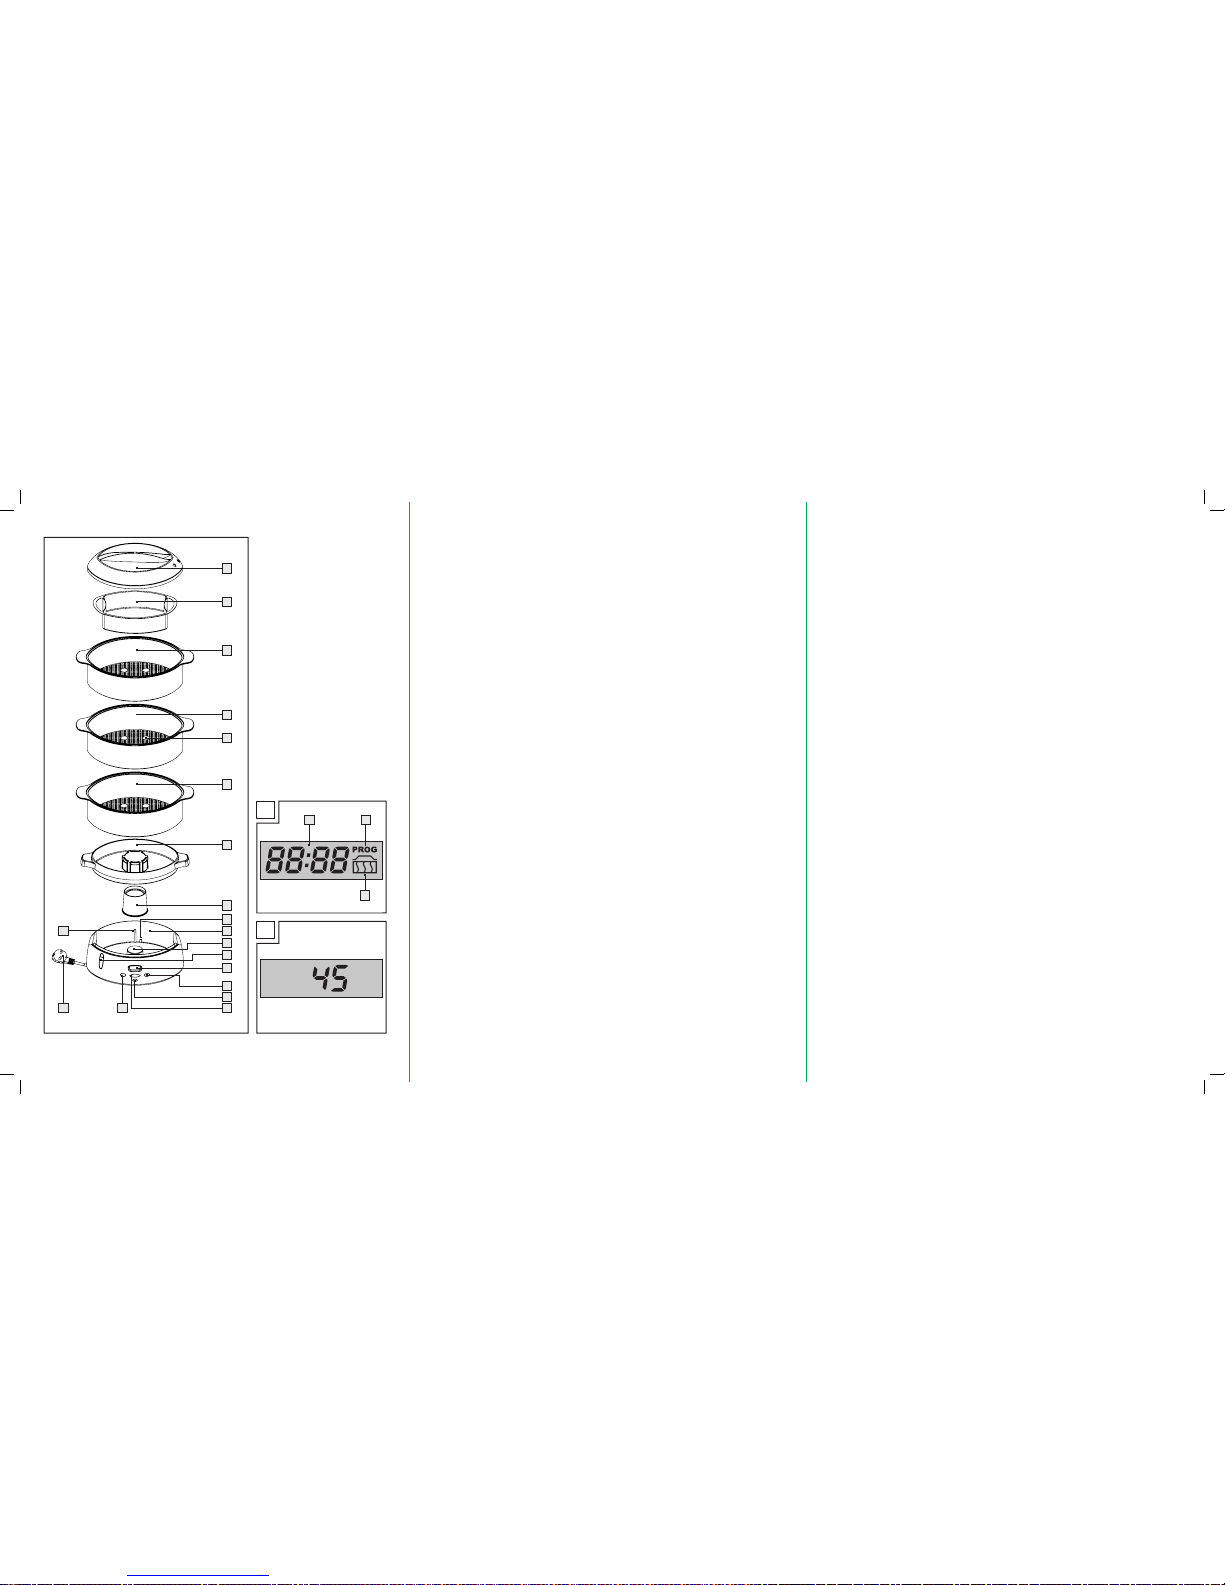
A
1
B
2
3
4
6
5
7
8
10
9
12
13
14
15
161718
20
22
11
21
1
2
3
19
Page 4

GB/IE/CY 5
Table of Content
Introduction
Intended Use ..............................................................................................Page 6
Technical Data ............................................................................................Page 6
Scope of Supply .........................................................................................Page 6
Description of Components ..........................................................................Page 6
Safety ......................................................................................................Page 7
Use Original Accessories .............................................................................Page 8
Prior to Initial Use .............................................................................Page 8
Initial Operation .................................................................................Page 8
Setting the clock .........................................................................................Page 9
Using Immediate-Start Function .....................................................................Page 9
Using Delay-Start Function ...........................................................................Page 10
Keep-Warm Mode ......................................................................................Page 10
Using Several Steam Trays ...........................................................................Page 10
Useful tips ..................................................................................................Page 11
Steaming chart ...........................................................................................Page 11
Storing the Steamer in a Space-Saving Way ..................................................Page 14
Descaling the Base of the Appliance/Water Tank ...........................................Page 15
Cleaning and maintenance ...........................................................Page 15
Disposal ..................................................................................................Page 15
Information ...........................................................................................Page 16
Service ......................................................................................................Page 16
Declaration of Conformity ............................................................................Page 16
Page 5
Introduction
Stainless Steel Steamer
Introduction
We are pleased that you have chosen
this product.
Fold out the page with the pictures and
familiarise yourself with the functions of the appliance before the initial operation. For this, read the
following instruction manual and the safety advices
carefully. Only use the appliance as described and
for the stated ranges of use.
Keep this instruction manual safely. Hand out all
documents to third persons when passing on the
appliance.
Intended Use
The appliance is designed for steaming food. The
steamer may only be used in dry and confined
spaces. Other uses or modifications of the appliance are not intended and harbour considerable
risks. For damage arising from not intended use,
the manufacturer does not assume liability.
The appliance is not designed for commercial use.
Technical Data
Nominal voltage: 220 - 240 V ~ 50 Hz
Nominal power: 800 W
Volume steam trays: 3 l
Volume rice bowl: 1 l
Dimensions:
Weight:
Scope of Supply
Check the scope of supply for completeness as
well as the intactness of the product and all components immediately after unpacking.
1 Base of the appliance
1 Turbo ring
1 Condensate collection basin
3 Steam trays
1 Rice bowl (1 l)
1 Cover
1 Instruction manual
Description of Components
1
Cover
2
Rice bowl
The following icons / symbols are used in this instruction manual:
Read instruction manual! Warning - Hot surfaces!
Observe caution and safety notes!
Keep children away from electrical
devices!
Risk of explosion!
W
Watts (Effective power)
Caution – electric shock!
Danger to life!
V
~
Volt (AC)
Check that the device, mains lead
and plug are in good condition!
Proper procedure and handling.
Risk of fire!
Dispose packaging and appliance in
an environmentally-friendly way!
GB/IE/CY6
31,3 x 23,1 x 39,8 cm
(WxDxH)
2.05 kg
Page 6
Introduction / Safety
3
Upper steam tray (3)
4
Middle steam tray (2)
5
Egg cups (recesses)
6
Lower steam tray (1)
7
Condensate collection basin
8
Turbo ring
9
MIN mark
10
Base of the appliance / water tank
11
Heating element
12
Water level indicator
13
LCD-display
14
ON/OFF button
15
Pilot lamp
16
PLUS/MINUS button
17
PROG button (“programming”)
18
Power cord with mains plug
19
MAX mark
20
Time indicator
21
PROG symbol (“programming”)
22
Keep-warm symbol
Safety
WARNING!
Read all safety advices and
instructions. Non-observance of the safety advices
and instructions may cause electric shock, fire and /
or bad injuries.
KEEP ALL SAFETY ADVICES AND INSTRUCTIONS
FOR THE FUTURE!
Avoid injuries and damage of
the electrical appliance:
DANGER OF LIFE AND ACCI-
DENT FOR BABIES AND CHILDREN! Never leave children unsu-
pervised with the packing material and the
product. There is the hazard of choking by
packing material and the hazard of life by
burns. Children often underrate the risks.
Always keep children away from the product.
Do not operate the appliance in
explosive environments, where
inflammable liquids or gases are
located.
Children and persons, not having the knowl-Children and persons, not having the knowl-
edge or experience in operating the appliance
or having handicaps of physical, sensorial or
mental nature must not operate the appliance
without supervision or instruction by a person,
responsible for their safety. Children must be
supervised in order to ensure that they do not
play with the appliance.
ATTENTION! Never leave the steamer unat-
tended during operation.
ATTENTION! HAZARD OF
BURNS! The appliance will become
very hot during use. Beware of get-
ting in contact with the ascending steam or the
hot food.
Always lift the cover
1
slowly, turning away
from you and let the steam exhaust backwards.
Do not bend over the appliance during steam
generation. Use oven cloths when touching the
cover
1
and the steam trays
3, 4, 6
. Use
a long fork or tongs when checking if the food
is done.
Pull the mains plug after each use. Never let
the cord hang down over the edge of the work
surface so that the appliance can not be pulled
down accidentally.
Let the appliances completely cool down,
before you remove the remaining water from
the base of the appliance / water tank
10
.
ATTENTION! HAZARD OF
FIRE! Do not operate the steamer
in the proximity of or below curtains,
wall cupboards or other inflammable materials.
Place the appliance on a heat resistant surface
(no varnished tables, no table cloths). Do not
operate it in the vicinity of other sources of
heat (oven, gas flame). Otherwise, the appliance and / or pieces of furniture may be damaged.
Place the appliance on an even, stable surface
at a safe distance to walls and cupboards in
order to avoid any damage caused by steam
rising.
Always fill the base of the appliance / water
tank
10
with sufficient water for the period of
steaming. Do not cover the base of the appliance / water tank
10
with aluminium foil or
any other material. If not observed, this can
GB/IE/CY 7
Page 7
8
8
8
8
$
8
8
8
8
$
8
8
8
8
8
8
8
Safety / Prior to Initial Use / Initial Operation
lead to an overheating of the appliance.
Damage of the appliance is the consequence.
Never immerse the appliance in water and
always pull the mains plug before cleaning or
transporting it.
Avoid the hazard of
life by electric shock:
Make sure that the details on the rating label
are in conformity with your mains voltage.
Only connect the unit to alternating current.
Do not at all operate this unit with an external
timer or a separate telecontrol system.
Check the power cord
18
regularly
for damage or deterioration.
Do not operate the appliance when the power
cord
18
or the mains plug is damaged.
ATTENTION! A damaged power cord
18
presents a hazard of life by electric shock.
Have appliances, which do not work faultlessly
or which are damaged, immediately and only
checked and repaired by the after-sales service.
Do not use the power cord
18
for unplugging
the appliance. Keep the power cord away
from hot surfaces, sharp edges and mechanical
forces. Damaged or entangled cords
18
in-
crease the risk of an electric shock.
Do not operate the appliance outside. Never
let the power cord
18
become wet or damp
during operation.
Unplug the power cord
18
when you are not
operating the appliance.
Use Original Accessories
Only use accessories and additional equipment
stated in the instruction manual. The use of other
products or accessories than recommended in the
instruction manual may present a risk of injuries
for you.
Prior to Initial Use
Clean all detachable parts prior to the initial use
with warm soapy water and dry them carefully.
Wipe the interior of the base of the appliance /
water tank
10
with a damp cloth.
Initial Operation
Observe the mains voltage. The mains voltage of
the power source must be in conformity with the
details on the rating label of the appliance. Appliances declared with 230 V can also be operated
with 220 V.
Place the base of the appliance
10
on a sta-
ble, even surface.
Then place the black turbo ring
8
onto the
heating element
11
mounted in the centre.
Make sure that the larger side faces downwards.
Now fill the base of the appliance / water tank
10
with cold water up to the MAX mark 19.
Note: Consider that the base of the appliance /
water tank
10
has to be filled with water at
least up to the MIN mark
9
.
ATTENTION! HAZARD OF BURNS!
Make sure that the water does not exceed the
MAX mark
19
. Otherwise, hot water may spurt
out of the appliance during operation.
ATTENTION! Do not add anything like sea-
sonings etc. to the water. This may affect the
steam flow and / or damage the surface of the
base of the appliance / water tank
10
and the
heating element
11
.
Now place the black condensate collection
basin
7
onto the base of the appliance 10.
Make sure that the semi-circular elevation
points to the front towards the keypad and is
level. Thus, the turbo ring
8
will be kept in
position.
Place the food in the steam trays
3, 4, 6
.
Ensure that all parts are positioned correctly
before switching on the appliance.
ATTENTION! Never use bowls or other
parts, not especially produced for this appliance. Otherwise, there may be the risk of inju-
GB/IE/CY8
Page 8

Initial Operation
ries and / or damage of the appliance.
8 Now place the steam trays
3, 4, 6
in
1 - 2 - 3 succession (please see the markings on
the handles) on top of the condensate collection basin
7
.
8 Place the cover
1
centrically so that the upper
steam tray
3
is completely closed and no
steam can exhaust.
8 Connect the mains plug
18
to a suitable socket.
8 In the LCD-display, the time indicator
20
will
appear (see fig. A).
Now your steamer is ready for use.
$
Setting the clock
Proceed as follows:
8 Simultaneously press the PROG
17
and
ON / OFF
14
buttons for 2 - 3 seconds. A sig-
nal tone will be heard on releasing the buttons.
8 Press the PLUS button
16
to increase the time
indicator by 10 minutes each time. Press the
MINUS button
16
to reduce the time indicator
20
by 1 minute each time.
8 Press the PROG button
17
to confirm your setting.
8 The LCD-display
13
will now show the current
clock time (clock time mode).
$
Using Immediate-Start Function
Note: Consider that the base of the appliance /
water tank
10
has to be filled with water at least
up to the MIN mark
9
. Ensure that the turbo ring 8
in addition to the condensate collection basin
7
has been correctly positioned.
8 Press the ON / OFF button
14
. The LCD dis-
play
13
will show the factory-set steaming time
of 45 minutes (see fig. B).
Note: If you do not press any button within
5 seconds you will hear a signal tone, the pilot
lamp
15
will glow red and the appliance will
start the steaming process automatically.
8 Press the PLUS / MINUS button
16
to increase
or reduce the steaming time in 5 minute steps.
Note: The maximum steaming time is 90 minutes.
Note: Be aware that you might have to replen-
ish water when the steaming time is longer.
Use the openings on the sides of the condensate collection basin
7
for refilling. If the base
of the appliance / water tank
10
is filled up to
the MAX mark
19
, it will be sufficient for approx.
1 hour of steaming.
ATTENTION! HAZARD OF BURNS!
Make sure that the water does not exceed the
MAX mark
19
. Otherwise, hot water may spurt
out of the steamer during operation.
8 5 seconds after the last button has been pressed
a signal tone will be heard. The pilot lamp
15
will glow red and the appliance will start the
steaming process automatically.
8 The LCD-display
13
will indicate the remaining
steaming time.
ATTENTION! HAZARD OF BURNS! The
appliance will become hot during use. Beware
of getting in contact with the ascending steam
or any components.
8 If the set steaming time is elapsed, the appli-If the set steaming time is elapsed, the appli-
ance will automatically switch back to the
keep-warm mode (see “keep-warm mode”).
8 Note: During the steaming process, the steam-
ing time can be increased or reduced in 5
minute steps at any time by pressing the
PLUS / MINUS button
16
. If the steaming time
is manually reduced to ‘0’, the appliance will
switch over to keep-warm mode (see “keepwarm mode”) automatically.
ATTENTION! HAZARD OF BURNS!
Always lift the cover
1
slowly, turning away
from you and let the steam exhaust backwards.
Do not bend over the appliance during steam
generation. Use oven cloths when touching the
cover
1
and the steam trays
3, 4, 6
. Use
a long fork or tongs when checking if the food
is done.
8 Press the ON / OFF button
14
to terminate the
steaming process prematurely or to switch off
the appliance. The indicator on the LCD-display
13
switches back to the time indicator 20
again (see fig. A).
Note: If the supply of water is used up during
use, a signal tone will sound. The steaming
process gets stopped. The indicator on the
LCD-display
13
switches back to the time indi-
GB/IE/CY 9
Page 9

8
8
8
8
8
8
8
8
8
8
8
$
Initial Operation
cator
20
again (see fig. A). Therefore, regularly
check the water level on the water level indicator
12
and replenish sufficient water in good
time!
ATTENTION! HAZARD OF BURNS!
Make sure that the water does not exceed the
MAX mark
19
. Otherwise, hot water may spurt
out of the steamer during operation.
$
Using Delay-Start Function
Note: Consider that the base of the appliance /
water tank
10
has to be filled with water at least
up to the MIN mark
9
. Ensure that the turbo ring
8
as well as the condensate collection basin 7
are positioned correctly.
8 Press the PROG button
17
. In the LCD-display
13
, the time indicator 20 as well as the PROG
symbol
21
(see fig. A) will appear.
8 Press the PLUS / MINUS button
16
to set the
desired delay time in 10 minute steps each
time.
Note: The set delay time refers to the current
clock time. That means if you set a delay time
of 30 minutes at 13:00, the steaming process
will start at 13:30. The maximum delay time is
24 hours.
8 Press the PROG button
17
again.
8 Press the PLUS / MINUS button
16
to increase
or reduce the steaming time in 5 minute steps.
Note: The maximum steaming time is 90 minutes.
Note: Be aware that you might have to replen-
ish water when the steaming time is longer.
Use the openings on the sides of the condensate collection basin
7
for refilling. If the base
of the appliance / water tank
10
is filled up to
the MAX mark
19
, it will be sufficient for approx.
1 hour of steaming.
8 Press the PROG button
17
again. In the LCD-
display
13
the time indicator 20 as well as the
PROG symbol
21
will appear. The delay-start
is now activated.
If the set delay time is elapsed, a signal tone
will sound, the pilot lamp
15
will glow red and
the appliance will start the steaming process
automatically.
ATTENTION! HAZARD OF BURNS!
The appliance will become hot during use.
Beware of getting in contact with the ascending steam or any components.
Note: If the supply of water is used up during
use, a signal tone will sound. The steaming
process gets stopped. Therefore, regularly
check the water level on the water level indicator
12
and replenish sufficient water in good
time!
ATTENTION! HAZARD OF BURNS!
Make sure that the water does not exceed the
MAX mark
19
. Otherwise, hot water may spurt
out of the steamer during operation.
8 Press the PROG button
17
to terminate the
delay start. The PROG symbol
21
in the LCD-
display
13
will go out.
$
Keep-Warm Mode
If the steaming time is elapsed, the appliance will
automatically switch over to keep-warm mode.
- In the LCD-display
13
the time indicator 20 as
well as the keep-warm symbol
22
will appear.
- The pilot lamp
15
will glow green.
- In keep-warm mode, the water is heated for
approx. 2 minutes, followed by a pause of
approx. 8 minutes without heating. In this way,
food is kept warm in the steamer at a temperature of 60 - 70°C.
ATTENTION! HAZARD OF BURNS! The
appliance will become hot during use. Beware
of getting in contact with the ascending steam
or any components.
- The keep-warm mode will remain active until
the supply of water is used up
.
8 Press the ON / OFF button
14
to terminate the
keep-warm mode.
$
Using Several Steam Trays
8 Place the largest food or this with the longest
steaming time (e.g. also rice) in the lower
steam tray
6
.
GB/IE/CY10
Page 10

Initial Operation
8 Please note that the steaming times in the up-Please note that the steaming times in the up-
per
3
and middle steam tray
4
increase by
5 – 10 minutes. Consider this when setting the
steaming time.
8 Taste of foods can spread through condensed
water. Therefore, generally place meat and fish
in the lower steam tray
6
. Let the lower steam
tray
6
empty if you want to prepare food with
longer steaming time first. Place then fish or meat
in the lower steam tray
6
at the desired time.
ATTENTION! HAZARD OF BURNS!
Always lift the cover
1
slowly, turning away
from you and let the steam exhaust backwards.
Do not bend over the appliance during steam
generation. Use oven cloths when touching the
cover
1
and the steam trays
3, 4, 6
. Use
a long fork or tongs when checking if the food
is done.
8 Place the food with the longer steaming time in
the lower steam tray
6
, if you want to prepare
food with different steaming times. Carefully
remove the cover
1
and place the next steam
tray
3, 4
on top of the lower when the steaming time is that of the food to be steamed.
Place the cover
1
carefully on top again.
ATTENTION! HAZARD OF BURNS!
Always lift the cover
1
slowly, turning away
from you and let the steam exhaust backwards.
Do not bend over the appliance during steam
generation. Use oven cloths when touching the
cover
1
and the steam trays
3, 4, 6
. Use
a long fork or tongs when checking if the food
is done.
Useful tips
The steaming times shown in the chart are only
approximate. Times can vary according to the size
of food, quantities in the steaming trays
3, 4, 6
,
the freshness of food and personal tastes. When
you are more familiar with the steamer, you can
adjust the steaming times.
8 Please note that one layer of food will steam
more quickly than several layers. Therefore, the
steaming time increases with the quantity of
food, e.g. 1000 g of cauliflower florets require
longer than 500 g.
8 Make sure that all pieces are of a similar size.
So you achieve an optimal result.
8 If pieces are of different sizes and have to be
layered, place the smaller pieces on top.
8 Do not cram food into the steam trays
3, 4
,
6
. Leave enough room between the pieces to
ensure a good supply of steam circulation.
8 When steaming larger amounts, stir the food
with a long-handled spoon after half of the
steaming time.
8 Never steam frozen meat, poultry or seafood.
Always thaw everything completely first.
8 All of the times shown in the steaming chart
apply to their use with cold water. To slightly
reduce steaming times, use warm (not boiling)
water.
8 The rice bowl
2
is an ideal container for
steaming other food such as fruit, vegetables,
puddings etc.
$
Steaming chart
The steaming times shown in the chart are only approximate. Times can vary according to the size of
food, quantities in the steaming trays
3, 4, 6
,
the freshness of foods and personal tastes.
Therefore, we recommend checking the condition
with a long utensil (fork or skewer) towards the end
of the set steaming time. The steaming times apply
to the quantities shown in the chart. If not specified
otherwise, all steaming times refer to the use of the
lower steam tray
6
. Food in the upper 3 and
middle steam trays
4
requires 5 - 10 minutes longer.
All times shown in the chart apply to their use with
cold water.
GB/IE/CY 11
Page 11

Vegetables Type Quantity Steaming time
Recommen-
dations
Artichokes fresh 2-3, medium size 50 - 55 minutes
Asparagus fresh 400 g 15 - 20 minutes lay flat in steam tray
3, 4, 6
frozen 400 g 15 - 20 minutes criss-cross 2nd
layer to allow
steam flow
Beans, green fresh 400 g 25 - 30 minutes stir halfway through
steaming time
frozen 400 g 35 - 40 minutes
Broccoli fresh 400 g 15 - 20 minutes stir halfway through
steaming time
frozen 400 g 20 - 25 minutes
Brussels sprouts fresh 400 g 20 - 25 minutes stir halfway through
steaming time
Cabbage fresh, chopped 400 g 35 - 40 minutes stir halfway through
steaming time
Carrots fresh, sliced 400 g 20 - 25 minutes stir halfway through
steaming time
Corn on the cob fresh, whole approx.
15 minutes
turn 180° halfway
through steaming
time
Cauliflower fresh, florets 400 g 15 - 20 minutes stir halfway through
steaming time
frozen 400 g 20 - 25 minutes
Green squashes fresh, in slices 400 g 15 - 20 minutes stir halfway through
steaming time
Mushrooms fresh 200 g 15 - 20 minutes stir halfway through
steaming time
Peas frozen 400 g 15 - 20 minutes stir halfway through
steaming time
Potatoes peeled and
chopped
900 g 25 - 30 minutes stir halfway through
steaming time
New potatoes fresh, whole 400 g 30 - 35 minutes
Spinach fresh 250 g 10 - 15 minutes
frozen 400 g 15 - 20 minutes
Tips:
- Cut off thick stems from cauliflower, broccoli
and cabbage.
- Steam leafy, green vegetables for the shortest
possible time as they loose colour easily.
- Salt and season vegetables after steaming for
best results.
- Frozen vegetables need not be thawed before
steaming.
Initial Operation
GB/IE/CY12
Page 12

Initial Operation
Fish and
Seafood
Type Quantity Steaming time
Recommen-
dations
Lobster, tails fresh 2 queues 20 - 25 minutes meat will be opa-
que; cook longer if
necessary
Fish, fillets frozen 250 g 10 - 15 minutes
fresh 250 g 10 - 15 minutes
Fish, thick steaks salmon, cod 250 / 400 g 10 - 15 minutes
tuna 400 g 15 - 20 minutes
Mussels fresh 400 g 10 - 15 minutes steaming is done
when shells are
completely open
Oysters fresh 6 pieces 15 - 20 minutes steaming is done
when shells are
completely open
Prawns fresh 400 g 10 - 15 minutes stir halfway through
steaming time
Tips:
- Fish is done as its colour turns opaque.
- Frozen fish may be steamed without defrosting
if separated before steaming and the cooking
time is extended.
- Add lemon wedges and herbs while steaming
to improve flavour.
Poultry Type Quantity Steaming time
Recommen-
dations
Chicken boneless breast 400 g 15 - 20 minutes remove skin before
cooking
drumsticks 400 g 20 - 30 minutes after steaming,
brown skin under
grill if desired
Meat and
Type sausages
Type Quantity Steaming time
Recommen-
dations
Beef in slices,
fillet steak or
roast beef
250 g 10 - 15 minutes trim all fat;
steamed beef has
a firm texture
Lamb chops with or
without bones
4 chops 15 - 20 minutes trim all fat
GB/IE/CY 13
Page 13

For cooking soft-boiled eggs, set 10 minutes steaming time and take out the eggs timely.
$
Storing the Steamer in a
Space-Saving Way
8 Put the lower steam tray
6
into the middle
steam tray
4
.
8 Put both steam trays
6, 4
into the upper
steam tray
3
.
Meat and
Type sausages
Type Quantity Steaming time
Recommen-
dations
Pork fillet, loin steaks or
loin chops
400 g or 4 chops 10 - 15 minutes trim all fat
Sausages
(pre-cooked)
beef or pork
sausages
(e.g. “frankfurter”)
400 g 10 - 15 minutes pierce skins before
steaming
Tips:
- Steaming has the advantage of allowing all
the fat to drip away during cooking. Due to the
gentle heat only choose tender, lean cuts of
meat and trim all fat. Meat suitable for grilling
is ideal for steaming.
- Serve steamed meat and poultry with fl avour-Serve steamed meat and poultry with flavoursome sauces or marinade before steaming.
- Thoroughly cook all food before serving.
Pierce with a long object (knife or skewer) to
check if done.
- Sausages must be completely cooked before
steaming.
- Use fresh herbs while steaming to add flavour.
Rice Type Quantity
Amount of
water
Steaming
time
Recommen-
dations
Rice white 200 g 300 ml 25 minutes Serves 2
300 g 600 ml 35 minutes Serves 4
brown 300 g 600 ml 40 minutes Serves 4 - 6
Rice pudding pudding rice 100 g rice +
30 g caster
sugar
75 - 80 minutes
Tips:
- Use the rice bowl
2
and add the required
amount of water together with the rice.
- For menu cooking always place the rice bowl
2
in the topmost steam tray as the flavours of the
other foods may spread through the condensed
water.
Initial Operation
Eggs Quantity
Amount of
water
Steaming
time
Recommen-
dations
soft-boiled max. 6 400 ml 8 minutes sit eggs in the egg
cups
5
(recesses
in the steam trays)
hard-boiled 15 minutes
GB/IE/CY14
500 ml
warm milk
Page 14

Put the rice bowl
2
into the lower steam tray 6.
Put the steam trays
3, 4, 6
onto the con-
densate collection basin
7
and put the cover
1
on top.
Now you can store your steamer in a space-
saving way.
Descaling the Base of the
Appliance / Water Tank
ATTENTION! RISK OF INJURY!
Always switch the appliance off and pull the mains
plug prior to all occupations with the electrical
appliance.
ATTENTION! HAZARD OF BURNS!
Let the steamer completely cool down before descaling it.
Descale the base of the appliance / water tank
10
regularly in order to maintain the steam gen-regularly in order to maintain the steam generation and to extend the lifespan of the appliance. The amount of limescale deposit caused
will depend on the water hardness type. Descale the tank
10
after every seventh to tenth use.
Slight and persistent scale:
For slight scale, use a cloth moistened with
vinegar.
Wipe the scaled areas with it.
Use correspondingly more vinegar for persistent
scale.
Then rinse and dry the appliance thoroughly.
Descale the base of the appliance /
water tank:
Place the turbo ring
8
with the upside down
on the heating element
11
(larger side faces
upwards).
Fill the base of the appliance / water tank
10
with cold water up to the MAX mark
19
.
Fill the inside of the turbo ring
8
with usual
decalcifier.
Do not heat the appliance.
Leave the appliance to descale overnight.
Pour the decalcifier out and rinse the appliance
thoroughly.
Then wipe and dry the appliance thoroughly.
Cleaning and maintenance
ATTENTION! HAZARD OF INJURY
Always switch the appliance off and pull the mains
plug prior to all occupations with the appliance.
ATTENTION! HAZARD OF BURNS!
Let the steamer completely cool down before cleaning it.
Clean the steamer regularly, best after every use.
Do not at all immerse the appliance in water.
Wipe out the base of the appliance
10
with a
damp cloth.
Clean all detachable parts in hot soapy water.
Then rinse and dry them thoroughly.
Do not use any abrasive cleaners such as
scouring powder, scouring sponges, steel wool,
washing soda or bleach.
Disposal
The package and the packaging material
are only made of environmentally sound
materials. They can be disposed in the
local containers.
Do not litter electrical appliances
in the domestic waste!
According to the European directive 2002 / 96 / EG
concerning waste electric and electrical appliances
and put into national legalisation, used electrical
appliances have to be collected and conveyed to
an environmentally sound recycling.
Please refer to your local government or city council for the currently valid disposal procedure for disused electrical appliances.
Initial Operation / Cleaning and maintenance / Disposal
GB/IE/CY 15
Page 15

Information
Information
Service
Your appliance does not require any special maintenance. In case of any technical malfunction, please
contact the following service hotline:
0044 – (0) 178 2 284 400
(Standard national call rate*)
* When calling from a mobile network additional
charges may be applied to the national landline
network tariff.
We issue a warranty of 3 years for your appliance
from date of purchase. The appliance has been
produced thoroughly and checked precisely prior
to dispatch. Damage referring to improper use as
well as wear parts do not come under warranty.
WARNING!
Only have your appliances
repaired by qualified specialist and only with original spare parts. This is to ensure to maintain the
safety of the appliance.
WARNING!
Only have the exchange of the
mains plug or the power cord
18
made by the
manufacturer of the appliance or the after-sales
service. This is to ensure to maintain the safety of
the appliance.
Dear valued customer,
approx. 95 % of all complaints can unfortunately
be put down to handling errors and could be
solved without problems if you contacted our
service hotline, arranged for you, by telephone.
Therefore, we ask you to use this hotline before
returning your appliance to your retailer.
Here, you will be assisted quickly without having
to take any ways.
If the mains plug or the power cord
18
is damaged, only have these replaced by the technical after-sales service to ban any risk.
Declaration of Conformity/
We, ROMMELSBACHER ElektroHausgeräte GmbH,
Rudolf-Schmidt-Straße 18, 91550 Dinkelsbühl,
Germany, herewith declare that this product complies
with the following EG-directives:
EG Low Voltage Directive
(2006 / 95 / EG)
Electromagnetic Compatibility
(2004 / 108 / EG)
Name of the product:
Stainless Steel Steamer Art.-Nr. 16463
Subject to technical modifications for the purpose of
further development.
GB/IE/CY16
0044 – (0) 178 2284400
Page 16

DE / AT Bedienungs- und Sicherheitshinweise Seite 5
NL Bedienings- en veiligheidsinstructies Pagina 19
PT Instruções de utilização e de segurança Página 33
Art.-Nr. 16463
ROMMELSBACHER
ElektroHausgeräte GmbH
Rudolf - Schmidt - Str. 18
D - 91550 Dinkelsbühl
Stand der Informationen · Stand van de informatie · Estado das
informações: 06 / 2008 · Ident.-No.: 16463062008-1B
B
EDELSTAHL-DAMPFGARER
Bedienungs- und Sicherheitshinweise
VAPORIZADOR DE ALIMENTOS
EM AÇO INOXIDÁVEL
Instruções de utilização e de segurança
EDELSTAAL STOOMKOKER
Bedienings- en veiligheidsinstructies
B
,* 5$ )& / 50 0- 4
EDELSTAHLDAMPFGARER
EDELSTAAL STOOMKOKER
Bedienings- en veiligheidsinstructies
DE/AT/CH Bedienungs- und Sicherheitshinweise Seite 5
NL Bedienings- en veiligheidsinstructies Pagina 19
Klappen Sie vor dem Lesen die Seite mit den Abbildungen aus und machen Sie sich anschließend mit allen
Funktionen des Gerätes vertraut.
Vouw vóór het lezen de pagina met de afbeeldingen open en maak u vertrouwd met alle functies van het
apparaat.
ATDE
EDELSTAHL-DAMPFGARER
Bedienungs- und Sicherheitshinweise
ATDE
Stand der Informationen · Stand van de informatie: 04 / 2009
Ident.-No.: 16463042009-1B
new
1B
new
1B
Page 17

A
1
B
2
3
4
6
5
7
8
10
9
12
13
14
15
161718
20
22
11
21
1
2
3
19
Page 18

DE/AT/CH 5
Inhaltsverzeichnis
Einleitung
Bestimmungsgemäßer Gebrauch ................................................................................Seite 6
Technische Daten ..........................................................................................................Seite 6
Lieferumfang .................................................................................................................Seite 6
Teilebeschreibung .........................................................................................................Seite 7
Sicherheit ..................................................................................................................Seite 7
Originalzubehör verwenden .......................................................................................Seite 8
Vor der ersten Inbetriebnahme ............................................................Seite 8
Inbetriebnahme ..................................................................................................Seite 8
Uhrzeit einstellen ..........................................................................................................Seite 9
Sofort-Start-Funktion verwenden .................................................................................Seite 9
Startverzögerung verwenden ......................................................................................Seite 10
Warmhalte-Modus .......................................................................................................Seite 11
Mehrere Garbehälter verwenden ...............................................................................Seite 11
Tipps ..............................................................................................................................Seite 11
Dämpfzeit-Tabelle .........................................................................................................Seite 12
Dampfgarer platzsparend aufbewahren ...................................................................Seite 16
Basisgerät / Wassertank entkalken ............................................................................Seite 16
Reinigung und Pflege .....................................................................................Seite 16
Entsorgung...............................................................................................................Seite 16
Informationen
Service ...........................................................................................................................Seite 17
Konformitätserklärung ..................................................................................................Seite 17
Page 19

DE/AT/CH6
Einleitung
Edelstahl-Dampfgarer
Einleitung
Wir freuen uns, dass Sie sich für dieses
Produkt entschieden haben.
Klappen Sie die Seite mit den Abbildungen heraus und machen Sie sich vor der ersten
Inbetriebnahme mit den Funktionen des Gerätes
vertraut. Lesen Sie hierzu aufmerksam die nachfolgende Bedienungsanleitung und die Sicherheitshinweise. Benutzen Sie das Gerät nur wie beschrieben
und für die angegebenen Einsatzbereiche.
Bewahren Sie diese Anleitung gut auf. Händigen
Sie alle Unterlagen bei Weitergabe des Gerätes
an Dritte ebenfalls mit aus.
Bestimmungsgemäßer
Gebrauch
Das Gerät ist zum Dampfgaren von Lebensmitteln
bestimmt. Der Dampfgarer darf nur in trockenen
und geschlossenen Räumen betrieben werden.
Andere Verwendungen oder Veränderungen des
Gerätes gelten als nicht bestimmungsgemäß und
bergen erhebliche Unfallgefahren. Für aus bestimmungswidriger Verwendung entstandene Schäden
übernimmt der Hersteller keine Haftung.
Das Gerät ist nicht für den gewerblichen Einsatz
bestimmt.
Technische Daten
Nennspannung: 220 - 240 V ~ 50 Hz
Nennaufnahme: 800 W
Volumen Garbehälter: 3 l
Volumen Reisschale: 1 l
Lieferumfang
Kontrollieren Sie unmittelbar nach dem Auspacken
den Lieferumfang auf Vollständigkeit sowie den einwandfreien Zustand des Produktes und aller Teile.
1 Basisgerät
1 Turboring
1 Kondensat-Auffangschale
3 Garbehälter
1 Reisschale (1 l)
1 Deckel
1 Bedienungsanleitung
In dieser Bedienungsanleitung werden folgende Piktogramme / Symbole verwendet:
Bedienungsanleitung lesen! Warnung vor heißen Oberflächen!
Warn- und Sicherheitshinweise
beachten!
Kinder vom Elektrogerät fernhalten!
Explosionsgefahr!
W
Watt (Wirkungsleistung)
Vorsicht vor elektrischem Schlag!
Lebensgefahr!
V
~
Volt (Wechselspannung)
Auf Unversehrtheit von Gerät,
Netzkabel und Netzstecker achten!
Tipp! So verhalten Sie sich richtig.
Brandgefahr!
Entsorgen Sie Verpackung und Gerät
umweltgerecht!
Maße: 31,3 x 23,1 x 39,8 cm
(BxTxH)
Gewicht: 2,05 kg
Page 20

DE/AT/CH 7
Einleitung / Sicherheit
Teilebeschreibung
1
Deckel
2
Reisschale
3
Oberer Garbehälter (3)
4
Mittlerer Garbehälter (2)
5
Eierbecher (Vertiefungen)
6
Unterer Garbehälter (1)
7
Kondensat-Auffangschale
8
Turboring
9
Minimal-Markierung
10
Basisgerät / Wassertank
11
Heizelement
12
Wasserstandsanzeige
13
LCD-Display
14
EIN- / AUS-Taste
15
Kontrolllampe
16
PLUS- / MINUS-Taste
17
PROG-Taste („Programmieren“)
18
Netzleitung mit Netzstecker
19
MAX-Markierung
20
Zeitanzeige
21
PROG-Symbol („Programmieren“)
22
Warmhaltesymbol
Sicherheit
WARNUNG!
Lesen Sie alle Sicherheitshinweise und Anweisungen. Versäumnisse bei der Einhaltung der Sicherheitshinweise und Anweisungen
können elektrischen Schlag, Brand und / oder
schwere Verletzungen verursachen.
BEWAHREN SIE ALLE SICHERHEITSHINWEISE
UND ANWEISUNGEN FÜR DIE ZUKUNFT AUF!
Vermeiden Sie Verletzungen
und Beschädigungen des
Elektrogerätes:
LEBENS- UND UNFALLGEFAHR
FÜR KLEINKINDER UND KINDER! Lassen Sie Kinder niemals
unbeaufsichtigt mit Verpackungsmaterial und
Produkt. Es besteht Erstickungsgefahr durch
Verpackungsmaterial und Lebensgefahr durch
Verbrennungen. Kinder unterschätzen häufig
die Gefahren. Halten Sie Kinder stets vom
Produkt fern.
Betreiben Sie das Gerät nicht in
explosionsgefährdeter Umgebung,
in der sich brennbare Flüssigkeiten
oder Gase befinden.
Kinder oder Personen, denen es an Wissen
oder Erfahrung im Umgang mit dem Gerät
mangelt, oder die in ihren körperlichen, sensorischen oder geistigen Fähigkeiten eingeschränkt
sind, dürfen das Gerät nicht ohne Aufsicht
oder Anleitung durch eine für ihre Sicherheit
verantwortliche Person benutzen. Kinder müssen
beaufsichtigt werden, damit sie nicht mit dem
Gerät spielen.
VORSICHT! Lassen Sie den Dampfgarer nie-
mals unbeaufsichtigt, wenn dieser in Betrieb ist.
VORSICHT! VERBRENNUNGS-
GEFAHR! Das Gerät wird während
der Benutzung sehr heiß. Achten Sie
darauf, dass Sie nicht mit dem aufsteigenden
Was serdampf oder den heißen Lebensmitteln
in Berührung kommen.
Heben Sie den Deckel
1
stets langsam, von
sich abgewandt an und lassen Sie so den
Wasserdampf nach hinten entweichen. Beugen
Sie sich nicht über das Gerät, während es
Wasserdampf erzeugt. Verwenden Sie Topflappen, wenn Sie den Deckel
1
und die Garbe-
hälter
3, 4, 6
anfassen. Wenn Sie überprüfen, ob die Lebensmittel fertig gegart sind,
verwenden Sie eine lange Stielgabel oder eine
Zange.
Ziehen Sie nach jedem Gebrauch den Netz-
stecker. Lassen Sie die Netzleitung
18
nicht
über den Rand der Arbeitsfläche herunterhängen, damit das Gerät nicht versehentlich heruntergezogen werden kann.
Lassen Sie das Gerät vollständig abkühlen,
bevor Sie das Restwasser aus dem Basisgerät /
Wassertank
10
entfernen.
VORSICHT! BRANDGEFAHR!
Nehmen Sie den Dampfgarer nicht
in der Nähe oder unterhalb von Vor-
hängen, Hängeschränken oder anderen brenn-
baren Materialien in Betrieb.
Stellen Sie das Gerät auf eine wärmeunempfind-
liche Unterlage (keine lackierten Tische, keine
Page 21

DE/AT/CH8
Sicherheit / Vor der ersten Inbetriebnahme / Inbetriebnahme
Tischdecken). Betreiben Sie es nicht in der Nähe
anderer Wärmequellen (Herd, Gasflamme).
Andernfalls drohen Beschädigungen des
Gerätes und / oder der Möbelstücke.
Stellen Sie das Gerät auf eine ebene, stabile
Unterlage. Achten Sie auf einen ausreichenden
Abstand zu Wänden und Schränken. So vermeiden Sie Schäden durch aufsteigenden
Wasserdampf.
Achten Sie darauf, dass das Basisgerät / der
Wassertank
10
während des Garvorgangs mit
ausreichend Wasser gefüllt ist. Legen Sie das
Basisgerät / den Wassertank
10
nicht mit Alufolie
o.ä. aus. Bei Nichtbeachtung kann es zu einer
Überhitzung des Geräts kommen. Beschädigungen des Geräts sind die Folge.
Tauchen Sie das Gerät niemals in Wasser ein
und ziehen Sie immer den Netzstecker, bevor
Sie es reinigen oder transportieren.
Vermeiden Sie Lebensgefahr
durch elektrischen Schlag:
Achten Sie darauf, dass die Netzspannung
identisch ist mit der Angabe auf dem Typenschild. Schließen Sie das Gerät nur an Wechselstrom an.
Betreiben Sie das Gerät keinesfalls über eine
externe Zeitschaltuhr oder ein separates Fernwirksystem.
Überprüfen Sie die Netzleitung 18
regelmäßig auf Beschädigungen
und Alterungen.
Betreiben Sie das Gerät nicht mit beschädigter
Netzleitung
18
oder beschädigtem Netzstecker.
VORSICHT! Beschädigte Netzleitungen
18
bedeuten Lebensgefahr durch elektrischen
Schlag. Lassen Sie Geräte, die nicht einwandfrei funktionieren oder beschädigt wurden,
sofort und ausschließlich vom Kundendienst
untersuchen und reparieren.
Zweckentfremden Sie die Netzleitung
18
nicht,
um das Gerät aus der Steckdose zu ziehen.
Halten Sie die Netzleitung
18
fern von heißen
Oberflächen, scharfen Kanten und mechanischen Belastungen. Beschädigte oder verwickelte Netzleitungen
18
erhöhen das Risiko
eines elektrischen Schlages.
Betreiben Sie das Gerät nicht im Freien. Achten
Sie darauf, dass die Netzleitung
18
während
des Betriebs niemals nass oder feucht wird.
Ziehen Sie die Netzleitung
18
aus der Steck-
dose, wenn Sie das Gerät nicht verwenden.
Originalzubehör verwenden
Benutzen Sie nur Zubehör und Zusatzgeräte, die
in der Bedienungsanleitung angegeben sind. Der
Gebrauch anderer als in der Bedienungsanleitung
empfohlener Produkte oder anderen Zubehörs
kann eine Verletzungsgefahr für Sie bedeuten.
Vor der ersten Inbetriebnahme
Reinigen Sie alle abnehmbaren Teile vor dem ersten
Gebrauch mit warmem Spülwasser und trocknen
Sie diese sorgfältig ab. Wischen Sie die Innenseite
des Basisgerätes / den Wassertank
10
mit einem
feuchten Tuch aus.
Inbetriebnahme
Beachten Sie die Netzspannung. Die Netzspannung der Stromquelle muss mit den Angaben auf
dem Typenschild des Gerätes übereinstimmen.
Geräte, die mit 230 V bezeichnet sind, können
auch mit 220 V betrieben werden.
Stellen Sie das Basisgerät / den Wassertank
10
auf einen stabilen, ebenen Untergrund.
Stecken Sie dann den schwarzen Turboring
8
auf das mittig angebrachte Heizelement
11
.
Achten Sie darauf, dass die größere Seite
unten liegt.
Befüllen Sie nun das Basisgerät / den Wasser-
tank
10
mit kaltem Wasser bis zur MAX-Mar-
kierung
19
.
Hinweis: Achten Sie darauf, dass das Basisgerät / der Wassertank
10
mindestens bis zur
Minimal-Markierung
9
mit Wasser gefüllt sein
muss.
VORSICHT! VERBRENNUNGSGEFAHR!
Achten Sie darauf, dass das Wasser die MAX-
8
8
8
8
8
8
8
$
8
8
8
8
$
8
8
8
8
Page 22

DE/AT/CH 9
Inbetriebnahme
Markierung
19
nicht überschreitet. Andernfalls
kann während des Garvorgangs heißes Wasser
aus dem Dampfgarer spritzen.
VORSICHT! Geben Sie keinerlei Zusätze wie
Gewürze o.ä. in das Wasser. Diese können die
Dampfzirkulation beinträchtigen und / oder die
Oberflächen des Basisgerätes / Wassertanks
10
und des Heizelements
11
beschädigen.
8 Legen Sie nun die schwarze Kondensat-Auffang-
schale
7
auf das Basisgerät / den Wasser-
tank
10
. Achten Sie darauf, dass die halbkreisförmige Erhöhung nach vorne Richtung
Bedientasten zeigt und plan aufliegt. Dadurch
wird der Turboring
8
in seiner Position gehalten.
8 Geben Sie nun die Lebensmittel in die Garbe-
hälter
3, 4, 6
.
8 Stellen Sie sicher, dass alle Teile richtig plat-
ziert sind, bevor Sie das Gerät in Betrieb nehmen.
VORSICHT! Verwenden Sie niemals Schüsseln
und andere Teile, die nicht speziell für dieses
Gerät produziert wurden. Andernfalls drohen
Verletzungsgefahr und / oder Beschädigungen
des Gerätes.
8 Setzen Sie die Garbehälter
3, 4, 6
in der
Reihenfolge 1 - 2 - 3 (siehe Markierung auf den
Griffleisten) auf die Kondensat-Auffangschale
7
.
8 Setzen Sie den Deckel
1
mittig auf, so dass
der obere Garbehälter
3
komplett geschlos-
sen ist und kein Dampf entweichen kann.
8 Stecken Sie den Netzstecker
18
in eine pas-
sende Steckdose.
8 Im LCD-Display
13
erscheint die Zeitanzeige
20
(siehe Abb. A).
Ihr Dampfgarer ist nun betriebsbereit.
$
Uhrzeit einstellen
Gehen Sie wie folgt vor:
8 Drücken Sie die Tasten PROG
17
und EIN /
AUS
14
gleichzeitig für 2 - 3 Sekunden. Nach-
dem Sie die Tasten loslassen, ertönt ein Signalton.
8 Drücken Sie nun die PLUS-Taste
16
, um die
Zeitanzeige
20
jeweils um 10 Minuten zu
erhöhen. Drücken Sie die MINUS-Taste
16
, um
die Zeitanzeige
20
jeweils um 1 Minute zu
reduzieren.
8 Drücken Sie die PROG-Taste
17
, um Ihre Ein-
gabe zu bestätigen.
8 Das LCD-Display
13
zeigt nun die aktuelle Uhr-
zeit an (Uhrzeit-Modus).
$
Sofort-Start-Funktion verwenden
Hinweis: Achten Sie darauf, dass das Basisgerät /
der Wassertank
10
mindestens bis zur Minimal-
Markierung
9
mit Wasser gefüllt sein muss. Verge-
wissern Sie sich, dass der Turboring
8
und die
Kondensat-Auffangschale
7
korrekt platziert sind.
8 Drücken Sie die EIN- / AUS-Taste
14
. Das LCD-
Display
13
zeigt nun die vorprogrammierte
Dämpfzeit von 45 Minuten an (siehe Abb. B).
Hinweis: Wenn Sie innerhalb der nächsten
5 Sekunden keine Taste betätigen, ertönt ein
Signalton, die Kontrolllampe
15
leuchtet rot
und das Gerät startet automatisch den Dämpfvorgang.
8 Drücken Sie die PLUS- / MINUS-Taste
16
, um
die Dämpfzeit in 5 Minuten-Schritten zu erhöhen
bzw. zu reduzieren.
Hinweis: Die maximale Dämpfzeit beträgt
90 Minuten.
Hinweis: Achten Sie darauf, dass Sie bei
einer längeren Dämpfzeit evt. Wasser nachfüllen müssen. Benutzen Sie zum Nachfüllen die
seitlichen Öffnungen an der Kondensat-Auffangschale
7
. Ein bis zur MAX-Markierung 19
gefülltes Basisgerät / gefüllter Wassertank
10
reicht für ca. 1 Stunde Dämpfzeit.
VORSICHT! VERBRENNUNGSGEFAHR!
Achten Sie darauf, dass das Wasser die MAXMarkierung
19
nicht überschreitet. Andernfalls
kann während des Garvorgangs heißes Wasser
aus dem Dampfgarer spritzen.
8 5 Sekunden nach dem letzten Tastendruck
ertönt ein Signalton. Die Kontrolllampe
15
leuchtet rot und das Gerät startet automatisch
den Dämpfvorgang.
8 Das LCD-Display
13
zeigt die verbleibende
Dämpfzeit an.
VORSICHT! VERBRENNUNGSGEFAHR!
Das Gerät wird während der Benutzung heiß.
Achten Sie darauf, dass Sie nicht mit dem auf-
Page 23

DE/AT/CH10
Inbetriebnahme
steigenden Wasserdampf oder mit Geräteteilen in Berührung kommen.
8 Sobald die eingestellte Dämpfzeit abgelaufen
ist, schaltet das Gerät automatisch in den Warmhalte-Modus (siehe „Warmhalte-Modus“).
Hinweis: Sie können die Dämpfzeit während
des Dämpfvorgangs jederzeit durch Drücken
der PLUS- / MINUS-Taste
16
in 5 MinutenSchritten erhören bzw. reduzieren. Sobald Sie
die Dämpfzeit manuell auf „0“ einstellen,
schaltet das Gerät automatisch in den Warmhalte-Modus (siehe „Warmhalte-Modus“).
VORSICHT! VERBRENNUNGSGEFAHR!
Heben Sie den Deckel
1
stets langsam, von
sich abgewandt an und lassen Sie so den
Wasserdampf nach hinten entweichen. Beugen
Sie sich nicht über das Gerät, während es
Wasserdampf erzeugt. Verwenden Sie Topflappen, wenn Sie den Deckel
1
und die Garbe-
hälter
3, 4, 6
anfassen. Wenn Sie überprüfen, ob die Lebensmittel fertig gegart sind,
verwenden Sie eine lange Stielgabel oder eine
Zange.
8 Drücken Sie die EIN- / AUS-Taste
14
, um den
Dämpfvorgang vorzeitig abzubrechen oder um
das Gerät auszuschalten. Die Anzeige im LCDDisplay
13
wechselt wieder zur Zeitanzeige 20
(siehe Abb. A).
Hinweis: Sobald der Wasservorrat während
des Betriebs aufgebraucht ist, ertönt ein Signalton. Der Dämpfvorgang wird abgebrochen.
Die Anzeige im LCD-Display
13
wechselt wieder
zur Zeitanzeige
20
(siehe Abb. A). Kontrollieren
Sie deshalb regelmäßig den Wasserstand mittels der Wasserstandsanzeige
12
und füllen
Sie rechtzeitig ausreichend Wasser nach.
VORSICHT! VERBRENNUNGSGEFAHR!
Achten Sie darauf, dass das Wasser die MAXMarkierung
19
nicht überschreitet. Andernfalls
kann während des Garvorgangs heißes Wasser
aus dem Dampfgarer spritzen.
$
Startverzögerung verwenden
Hinweis: Achten Sie darauf, dass das Basisgerät /
der Wassertank
10
mindestens bis zur Minimal-
Markierung
9
mit Wasser gefüllt sein muss.
Vergewissern Sie sich, dass der Turboring
8
und
die Kondensat-Auffangschale
7
korrekt platziert
sind.
8 Drücken Sie die PROG-Taste
17
. Im LCD-Dis-
play
13
erscheinen die Zeitanzeige 20 sowie
das PROG-Symbol
21
(siehe Abb. A).
8 Drücken Sie die PLUS- / MINUS-Taste
16
, um
die gewünschte Verzögerungszeit jeweils in
10 Minuten-Schritten einzustellen.
Hinweis: Die eingestellte Verzögerungszeit
bezieht sich auf die aktuelle Uhrzeit. D.h. wenn
Sie um 13:00 Uhr eine Verzögerungszeit von
30 Minuten einstellen, startet der Dämpfvorgang um 13:30 Uhr. Die maximale Verzögerungszeit beträgt 24 Stunden.
8 Drücken Sie erneut die PROG-Taste
17
.
8 Drücken Sie die PLUS- / MINUS-Taste
16
, um
die Dämpfzeit in 5 Minuten-Schritten zu erhöhen bzw. zu reduzieren.
Hinweis: Die maximale Dämpfzeit beträgt
90 Minuten.
Hinweis: Achten Sie darauf, dass Sie bei
einer längeren Dämpfzeit evt. Wasser nachfüllen müssen. Benutzen Sie zum Nachfüllen die
seitlichen Öffnungen an der Kondensat-Auffangschale
7
. Ein bis zur MAX-Markierung 19
gefülltes Basisgerät / gefüllter Wassertank
10
reicht für ca. 1 Stunde Dämpfzeit.
8 Drücken Sie erneut die PROG-Taste
17
. Im
LCD-Display
13
erscheinen nun die Zeitan-
zeige
20
sowie das PROG-Symbol 21.
Die Startverzögerung ist nun aktiv.
8 Sobald die eingestellte Verzögerungszeit ab-
gelaufen ist, ertönt ein Signalton, die Kontrolllampe
15
leuchtet rot und das Gerät startet
automatisch den Dämpfvorgang.
VORSICHT! VERBRENNUNGSGEFAHR!
Das Gerät wird während der Benutzung heiß.
Achten Sie darauf, dass Sie nicht mit dem aufsteigenden Wasserdampf oder mit Geräteteilen
in Berührung kommen.
Hinweis: Sobald der Wasservorrat während
des Betriebs aufgebraucht ist, ertönt ein Signalton. Der Dämpfvorgang wird abgebrochen. Kontrollieren Sie deshalb regelmäßig den Wasserstand mittels der Wasserstandsanzeige
12
und
füllen Sie rechtzeitig ausreichend Wasser nach.
8
$
8
$
8
8
8
8
Page 24

11 DE/AT
Inbetriebnahme
VORSICHT! VERBRENNUNGSGEFAHR!
Achten Sie darauf, dass das Wasser die MAXMarkierung
19
nicht überschreitet. Andernfalls
kann während des Garvorgangs heißes Wasser
aus dem Dampfgarer spritzen.
8 Drücken Sie die PROG-Taste
17
, um die Start-
verzögerung abzubrechen. Das PROG-Symbol
21
im LCD-Display 13 erlischt.
$
Warmhalte-Modus
Nach Ablauf der eingestellten Dämpfzeit wechselt
das Gerät automatisch in den Warmhalte-Modus.
- Im LCD-Display
13
erscheinen die Zeitanzeige 20
sowie das Warmhaltesymbol
22
.
- Die Kontrolllampe
15
leuchtet grün.
- Im Warmhalte-Modus wird das Wasser ca.
2 Minuten lang erhitzt. Danach folgen 8 Minuten Pause, in denen das Wasser nicht erhitzt
wird. Dadurch werden die Lebensmittel im
Dampfgarer bei einer Temperatur von 60 - 70 °C
warm gehalten.
VORSICHT! VERBRENNUNGSGEFAHR!
Das Gerät wird während der Benutzung heiß.
Achten Sie darauf, dass Sie nicht mit dem aufsteigenden Wasserdampf oder mit Geräteteilen
in Berührung kommen.
- Der Warmhalte-Modus bleibt so lange aktiv,
bis der Wasservorrat aufgebraucht ist
.
8 Drücken Sie die EIN- / AUS-Taste
14
, um den
Warmhalte-Modus zu beenden.
$
Mehrere Garbehälter
verwenden
8 Geben Sie die größten Lebensmittel oder die
mit der längsten Dämpfzeit (z.B. auch Reis) in
den unteren Garbehälter
6
.
8 Achten Sie darauf, dass sich die Dämpfzeiten
im oberen
3
und mittleren Garbehälter
4
um 5 – 10 Minuten erhöhen. Beachten Sie dies
bei der Einstellung der Dämpfzeit.
8 Der Geschmack der Lebensmittel kann sich
über das Kondenswasser übertragen. Legen
Sie Fisch und Fleisch daher grundsätzlich in
den unteren Garbehälter
6
. Lassen Sie den
unteren Garbehälter
6
leer, wenn Sie zunächst Lebensmittel mit längeren Dämpfzeiten
zubereiten möchten. Legen Sie Fisch oder
Fleisch dann zum gewünschten Zeitpunkt in
den unteren Garbehälter
6
.
VORSICHT! VERBRENNUNGSGEFAHR!
Heben Sie den Deckel
1
stets langsam, von
sich abgewandt an und lassen Sie so den
Wasserdampf nach hinten entweichen. Beugen
Sie sich nicht über das Gerät, während es
Wasserdampf erzeugt. Verwenden Sie Topflappen, wenn Sie den Deckel
1
und die Garbe-
hälter
3, 4
, 6 anfassen. Wenn Sie überprüfen, ob die Lebensmittel fertig gegart sind,
verwenden Sie eine lange Stielgabel oder eine
Zange.
8 Legen Sie die Lebensmittel mit längerer Dämpf-
zeit in den unteren Garbehälter
6
, wenn Sie
Lebensmittel mit unterschiedlichen Dämpfzeiten
zubereiten wollen. Entfernen Sie vorsichtig den
Deckel
1
und stellen Sie den nächsten Gar-
behälter
3, 4
auf den darunter stehenden,
wenn die verbleibende Dämpfzeit der noch zu
dämpfenden Lebensmittel entspricht. Legen Sie
den Deckel
1
wieder vorsichtig auf.
VORSICHT! VERBRENNUNGSGEFAHR!
Heben Sie den Deckel
1
stets langsam, von
sich abgewandt an und lassen Sie so den Wasserdampf nach hinten entweichen. Beugen Sie
sich nicht über das Gerät, während es Wasserdampf erzeugt. Verwenden Sie Topflappen,
wenn Sie den Deckel
1
und die Gar behälter
3, 4, 6
anfassen. Wenn Sie überprüfen, ob
die Lebensmittel fertig gegart sind, verwenden
Sie eine lange Stielgabel oder eine Zange.
Tipps
Die in der Tabelle angegebenen Dämpfzeiten sind
nur Richtwerte. Die Zeiten können je nach Größe
der Lebensmittel, Füllmenge der Gar behälter
3
,
4, 6
, Frische der Speisen und persönlichen
Vorlieben variieren. Wenn Sie vertrauter mit dem
Dampfgarer sind, können Sie die Dämpfzeiten
anpassen.
DE/AT/CH 11
Page 25

DE/AT/CH12
Inbetriebnahme
8 Achten Sie darauf, dass eine Speisenlage
schneller gegart wird als mehrere Lagen. Deshalb steigt die Garzeit mit der Lebensmittelmenge, z. B. brauchen 1000 g Blumenkohlröschen
länger als 500 g.
8 Achten Sie darauf, dass alle Stücke in etwa
gleich groß sind. So erzielen Sie ein optimales
Ergebnis. Legen Sie die kleineren Stücke nach
oben, wenn die Stücke verschiedene Größen
haben und geschichtet werden müssen.
8 Stopfen Sie die Lebensmittel nicht in die Gar-
behälter
3, 4, 6
. Lassen Sie Platz zwischen
den Stücken. So wird eine optimale Dampfzirkulation gewährleistet.
8 Rühren Sie die Lebensmittel nach der Hälfte
der Dämpfzeit mit einem langen Kochlöffel um,
wenn Sie größere Mengen dämpfen.
8 Dämpfen Sie Fleisch, Geflügel oder Meeres-
früchte niemals in gefrorenem Zustand. Tauen
Sie zuerst alles vollständig auf.
8 Alle in der Dämpfzeit-Tabelle angegebenen
Zeiten beziehen sich auf die Anwendung mit
kaltem Wasser. Verwenden Sie warmes (nicht
kochendes) Wasser, um die Dämpfzeiten leicht
zu verringern.
8 Die Reisschale
2
eignet sich auch ideal zum
Dämpfen von anderen Lebensmitteln wie
Früchten, Gemüse, Pudding, etc.
$
Dämpfzeit-Tabelle
Die in der Tabelle angegebenen Dämpfzeiten sind
nur Richtwerte. Die Zeiten variieren je nach Größe
der Lebensmittel, Füllmenge der Garbehälter
3, 4, 6
, Frische der Speisen und persönlichen
Vorlieben.
Wir empfehlen daher, gegen Ende der eingestellten Dämpfzeit mit einem langen Gegenstand
(Gabel oder Spießchen) den Dämpfgrad zu prüfen.
Die Dämpfzeiten gelten für die in der Tabelle angegebenen Mengen. Wenn nicht anders angegeben,
beziehen sich alle Dämpfzeiten auf den Gebrauch
des unteren Garbehälter
6
. Die Lebensmittel im
oberen und mittleren Garbehälter
3, 4
brauchen
5 - 10 Minuten länger.
Alle in der Tabelle angegebenen Zeiten beziehen
sich auf die Anwendung mit kaltem Wasser.
Gemüse Typ Menge Dämpfzeit Bemerkungen
Artischocken frisch 2 - 3, mittelgroß 50 - 55 Minuten
Spargel frisch 400 g 15 - 20 Minuten flach in den Gar-
behälter
3, 4
,
6
geben
gefroren 400 g 15 - 20 Minuten 2. Lage zur
Dampfzirkulation
über Kreuz
schichten
Bohnen, grün frisch 400 g 25 - 30 Minuten nach der Hälfte
der Garzeit
umrühren
gefroren 400 g 35 - 40 Minuten
Brokkoli frisch 400 g 15 - 20 Minuten nach der Hälfte
der Garzeit
umrühren
gefroren 400 g 20 - 25 Minuten
Rosenkohl frisch 400 g 20 - 25 Minuten nach der Hälfte
der Garzeit
umrühren
Page 26

DE/AT/CH 13
Inbetriebnahme
Gemüse Typ Menge Dämpfzeit Bemerkungen
Kohl frisch,
klein geschnitten
400 g 35 - 40 Minuten nach der Hälfte
der Garzeit
umrühren
Karotten frisch, in Scheiben 400 g 20 -25 Minuten nach der Hälfte
der Garzeit
umrühren
Maiskolben frisch, am Stück ca. 15 Minuten nach der Hälfte
der Garzeit um
180° drehen
Blumenkohl frisch, in Röschen 400 g 15 - 20 Minuten nach der Hälfte
der Garzeit
umrühren
gefroren 400 g 20 - 25 Minuten
Zucchini frisch, in Scheiben 400 g 15 - 20 Minuten nach der Hälfte
der Garzeit
umrühren
Pilze frisch 200 g 15 - 20 Minuten nach der Hälfte
der Garzeit
umrühren
Erbsen gefroren 400 g 15 - 20 Minuten nach der Hälfte
der Garzeit
umrühren
Kartoffeln geschält und klein
geschnitten
900 g 25 - 30 Minuten nach der Hälfte
der Garzeit
umrühren
Neue Kartoffeln frisch, im Ganzen 400 g 30 -35 Minuten
Spinat frisch 250 g 10 -15 Minuten
gefroren 400 g 15 - 20 Minuten
Tipps:
- Entfernen Sie dicke Strünke von Blumenkohl,
Brokkoli und Kohlgemüse.
- Dämpfen Sie grünes Blattgemüse so kurz wie
möglich, da dieses leicht seine Farbe verliert.
- Das beste Kochergebnis erhalten Sie, wenn Sie
das Gemüse nach dem Dämpfen salzen und
würzen.
- Gefrorenes Gemüse muss vor dem Dämpfen
nicht aufgetaut werden.
Fisch und
Meeresfrüchte
Typ Menge Dämpfzeit Bemerkungen
Hummerschwänze frisch 2 Stück 20 - 25 Minuten Fleisch wird
undurchsichtig;
bei Bedarf länger
garen
Page 27

DE/AT/CH14
Inbetriebnahme
Fisch und
Meeresfrüchte
Typ Menge Dämpfzeit Bemerkungen
Fischfilet gefroren 250 g 10 - 15 Minuten
frisch 250 g 10 - 15 Minuten
Fisch, dicke Steaks Lachs, Kabeljau 250 / 400 g 10 - 15 Minuten
Thunfisch 400 g 15 - 20 Minuten
Muscheln frisch 400 g 10 - 15 Minuten Garzeit ist been-
det, wenn sich die
Schalen vollständig geöffnet
haben
Austern frisch 6 Stück 15 - 20 Minuten Garzeit ist been-
det, wenn sich die
Schalen vollständig geöffnet
haben
Garnelen frisch 400 g 10 - 15 Minuten nach der Hälfte
der Garzeit
umrühren
Tipps:
- Fisch ist fertig gegart, wenn er eine undurchsichtige Farbe angenommen hat.
- Gefrorener Fisch kann ohne Auftauen gedämpft werden, wenn die Stücke vor dem
Dämpfvorgang voneinander getrennt wurden
und die Garzeit verlängert wird.
- Geben Sie während des Dämpfens Zitronenspalten und Gewürze an den Fisch, um den
Geschmack zu verfeinern.
Geflügel Typ Menge Dämpfzeit Bemerkungen
Hähnchen Brust,
ohne Knochen
400 g 15 - 20 Minuten Haut vor dem
Garen entfernen
Schlegel 400 g 20 - 30 Minuten nach Garung evtl.
im Ofen (Grillfunktion) bräunen
Fleisch und
Würstchen
Typ Menge Dämpfzeit Bemerkungen
Rindfleisch in Scheiben, Filet-
steak oder Roastbeef
250 g 10 - 15 Minuten Fett vollständig
entfernen,
gedämpftes
Rindfleisch hat
eine feste
Beschaffenheit
Page 28

DE/AT/CH 15
Inbetriebnahme
Fleisch und
Würstchen
Typ Menge Dämpfzeit Bemerkungen
Lamm Kotelett, mit oder
ohne Knochen
4 Koteletts 15 - 20 Minuten Fett vollständig
entfernen
Schweinefleisch Filet, Lendensteak
oder Lendenstücke
400 g oder
4 Stück
10 - 15 Minuten Fett vollständig
entfernen
Würstchen
(vorgekocht)
Frankfurter 400 g 10 - 15 Minuten Haut vor dem
Dämpfen
einstechen
Knacker 400 g ca. 15 Minuten
Tipps:
- Dämpfen hat den Vorteil, dass Fette während
des Garvorgangs vollständig ablaufen.
Wählen Sie auf Grund der sanften Hitze ausschließlich weiches, mageres Fleisch, von dem
Sie das Fett vollständig entfernen. Zum Grillen
geeignetes Fleisch ist für das Dämpfen ideal.
- Servieren Sie gedämpftes Fleisch und Geflügel
mit schmackhaften Saucen oder marinieren Sie
es vor dem Garvorgang.
- Garen Sie das Kochgut sorgfältig vor dem
Servieren. Zur Garprobe stechen Sie mit einem
langen Gegenstand (Messer oder Spießchen)
in das Fleisch.
- Würstchen müssen vor dem Dämpfen vollständig gekocht sein.
- Für ein geschmacklich verfeinertes Ergebnis
geben Sie dem Gargut frische Kräuter bei.
Reis Typ Menge
Wasser-
menge
Dämpfzeit
Bemer-
kungen
Reis weiß 200 g 300 ml 25 Minuten 2 Portionen
300 g 600 ml 35 Minuten 4 Portionen
braun 300 g 600 ml 40 Minuten 4 - 6 Portionen
Reispudding Puddingreis 100 g Reis +
30 g Streu-
zucker
75 - 80
Minuten
Tipps:
- Geben Sie die benötigte Menge Wasser zusammen mit dem Reis in die Reisschale
2
.
- Zum Menügaren platzieren Sie die Reisschale
2
immer in den obersten Garbehälter, da sich
das Aroma der anderen Speisen über das
Kondenswasser übertragen kann.
Eier Menge Wassermenge Dämpfzeit Bemerkungen
weich gekocht max. 6 400 ml 8 Minuten Eier in die Eier-
becher
5
(Vertiefungen in
den Garbehältern)
setzen
hart gekocht 15 Minuten
Für weich gekochte Eier bitte Gerät auf 10 Minuten
einstellen und die Eier rechtzeitig entnehmen.
500 ml
warme Milch
Page 29

DE/AT/CH16
Inbetriebnahme / Reinigung und Pflege / Entsorgung
Dampfgarer platzsparend
aufbewahren
Stellen Sie den unteren Garbehälter
6
in den
mittleren Garbehälter
4
.
Stellen Sie die beiden Garbehälter
6, 4
in
den oberen Garbehälter
3
.
Stellen Sie die Reisschale
2
in den unteren
Garbehälter
6
.
Stellen Sie die Garbehälter
3, 4, 6
auf die
Kondensat-Auffangschale
7
und legen Sie
den Deckel
1
oben auf.
Jetzt können Sie Ihren Dampfgarer Platz sparend
verstauen.
Basisgerät / Wassertank
entkalken
VORSICHT! VERLETZUNGSGEFAHR!
Schalten Sie vor allen Arbeiten am Elektrogerät
das Gerät aus und ziehen Sie den Netzstecker.
VORSICHT! VERBRENNUNGSGEFAHR!
Lassen Sie den Dampfgarer erst vollständig abkühlen,
bevor Sie diesen entkalken.
Entkalken Sie das Basisgerät / den Wasser-
tank
10
regelmäßig. So erhalten Sie die
Wasserdampferzeugung und erhöhen die
Lebensdauer des Gerätes. Die Stärke der
Kalkablagerung hängt von der Wasserhärte
ab. Entkalken Sie das Basisgerät / den Wassertank
10
nach jedem siebten bis zehnten
Gebrauch.
Leichte und hartnäckige Verkalkungen:
Verwendung Sie bei leichter Verkalkung ein mit
Essig befeuchtetes Tuch.
Wischen Sie damit die verkalkten Stellen ab.
Verwenden Sie bei hartnäckigen Verkalkungen
entsprechend mehr Essig.
Spülen Sie anschließend gründlich nach und
trocknen Sie das Gerät sorgfältig ab.
Basisgerät / Wassertank entkalken:
Stellen Sie den Turboring
8
mit der Oberseite
nach unten auf das Heizelement
11
(größere
Seite zeigt nach oben).
Füllen Sie das Basisgerät / den Wassertank
10
mit kaltem Wasser bis zur MAX-Markierung
19
.
Füllen Sie das Innere des Turborings
8
mit
einem handelsüblichen Entkalker.
Erhitzen Sie das Gerät nicht.
Lassen Sie das Gerät über Nacht zum Entkalken
stehen.
Gießen Sie den Entkalker aus und spülen Sie
das Gerät gründlich aus.
Wischen Sie das Gerät anschließend gründlich
aus und trocknen Sie es sorgfältig ab.
Reinigung und Pflege
VORSICHT! VERLETZUNGSGEFAHR!
Schalten Sie vor allen Arbeiten am Elektrogerät
das Gerät aus und ziehen Sie den Netzstecker
18
.
VORSICHT! VERBRENNUNGSGEFAHR!
Lassen Sie den Dampfgarer erst vollständig abkühlen,
bevor Sie diesen reinigen.
Reinigen Sie den Dampfgarer regelmäßig, am
besten nach jedem Gebrauch.
Tauchen Sie das Gerät keinesfalls in Wasser ein.
Wischen Sie das Basisgerät / den Wassertank
10
mit einem feuchten Tuch aus.
Reinigen Sie alle abnehmbaren Teile in heißem
Spülwasser. Spülen Sie diese anschließend
gründlich nach und trocknen sie sorgfältig ab.
Verwenden Sie keine aggressiven Reinigungs-
mittel wie Scheuerpulver, Scheuerschwamm,
Stahlwolle, Waschsoda oder Bleichmittel.
Entsorgung
Die Verpackung und das Verpackungs-
material bestehen ausschließlich aus
umweltfreundlichen Materialien. Sie
können in den örtlichen Behältern
entsorgt werden.
Werfen Sie Elektrogeräte nicht
in den Hausmüll!
Gemäß Europäischer Richtlinie 2002 / 96 / EG
über Elektro- und Elektronik-Altgeräte und Umsetzung
Page 30

DE/AT/CH 17
Entsorgung / Informationen
in nationales Recht müssen verbrauchte Elektrogeräte getrennt gesammelt und einer umweltgerechten
Wiederverwertung zugeführt werden.
Derzeit gültige Entsorgungsmaßnahmen für ausgediente Elektrogeräte erfragen Sie bitte bei Ihrer
Gemeinde- oder Stadtverwaltung.
Informationen
Service
Ihr Gerät verlangt keine besondere Wartung. Wenden Sie sich im Fall einer technischen Störung bitte
an die folgende Service-Hotline:
0049 – (0) 1805 1 188 700
(14 ct / Min.* aus dem deutschen Festnetz)
* Bei Anrufen aus Mobilfunknetzen können Kosten
entstehen, die von den Preisen aus Festnetzen
abweichen.
Sie erhalten auf dieses Gerät 3 Jahre Garantie ab
Kaufdatum. Das Gerät wurde sorgfältig produziert
und vor Auslieferung gewissenhaft geprüft. Schäden, die auf unsachgemäße Behandlung zurückzuführen sind, sowie Verschleißteile fallen nicht unter
die Garantie.
WARNUNG!
Lassen Sie Ihre Geräte nur
von qualifiziertem Fachpersonal und nur mit OriginalErsatzteilen reparieren. Damit wird sichergestellt,
dass die Sicherheit des Gerätes erhalten bleibt.
WARNUNG!
Lassen Sie den Austausch des
Steckers oder der Netzleitung
18
immer vom Hersteller des Gerätes oder seinem Kundendienst ausführen. Damit wird sichergestellt, dass die Sicherheit des Gerätes erhalten bleibt.
Sehr geehrter Kunde,
ca. 95% aller Reklamationen sind leider auf Bedienungsfehler zurück zu führen und könnten ohne
Probleme behoben werden, wenn Sie sich telefonisch mit unserer für Sie eingerichteten ServiceHotline in Verbindung setzen.
Wir bitten Sie daher, bevor Sie Ihr Gerät an Ihren
Händler zurückgeben, diese Hotline zu nutzen.
Hier wird Ihnen, ohne dass Sie Wege auf sich nehmen müssen, schnell geholfen.
Bei Schäden am Netzstecker oder an der
Netzleitung
18
lassen Sie diese ausschließlich
vom technischen Kundendienst ersetzen, um
jedes Risiko auszuschließen.
Konformitätserklärung /
Wir, ROMMELSBACHER ElektroHausgeräte GmbH,
Rudolf-Schmidt-Straße 18, 91550 Dinkelsbühl,
Deutschland, erklären hiermit für dieses Produkt die
Übereinstimmung mit folgenden EG-Richtlinien:
EG Niederspannungsrichtlinie
(2006 / 95 / EG)
Elektromagnetische Verträglichkeit
(2004 / 108 / EG)
Bezeichnung des Produktes:
Edelstahl-Dampfgarer Art.-Nr. 16463
Technische Änderungen im Sinne der Weiterentwicklung
sind vorbehalten.
0049 – (0) 341 2394130
 Loading...