

Page 1

1 Preliminary notes
Thank you for selecting our digital MP3 player SilverCrest DA-16.
This is an electronic entertainment device. It may only be used for private and not
industrial or commercial purposes. By default, the current product is not intended
for use in medical, life-saving or life-sustaining applications. Only those connection
cables and external devices may be used that correspond to the current device in
respect to safety, electromagnetic compatibility and shielding quality. This device
fulfils all relevant standards and guidelines in respect to CE conformity. If the
device is altered in a way that has not been coordinated with the manufacturer, the
compliance with these standards and guidelines is no longer guaranteed. Use only
the accessories specified by the manufacturer. If you don’t use the device within
the Federal Republic of Germany, you have to observe the regional regulations or
laws of the country of use.
In order for you to utilize this device and all its options, we recommend that you
read the corresponding instructions in this manual thoroughly before the initial use
of the device, even if you’re familiar with handling electronic devices. Pay special
attention to chapter “Important safety instructions“ on page 5. Store this manual in
a safe location for future reference. If you sell or transfer this device, please be
sure to pass along these instructions as well.
2 Copyright
The contents of this manual may not be reproduced, copied or otherwise duplicated in electronic, mechanical, magnetic, optical, chemical, manual, or any other
form without the permission of our company, nor may it be stored in a search
engine nor translated into another language.
English
1
Page 2

English
3 Declaration
The descriptions and features in this manual only serve as general guidelines and
do not represent a guarantee. In order to offer you a product of the highest quality,
we reserve the right to make possible improvements or changes without prior
notification.
For all product descriptions and user instructions, the German version is the ultimately valid reference in the event of possible deviations in other languages.
The digital MP3 player SilverCrest DA-16 and the included accessories correspond
to the basic requirements and relevant regulations of the EMC Directive
2004/108/EC and the Low Voltage Directive 2006/95/EC.
The device safely fulfils the requirements of the EN 50332 standard (part 1 and 2)
in respect to a maximum sound pressure of 100 db(A) and an output voltage of a
maximum of 150 mV at the headphones.
4 Manufacturer information
JNC Datum Tech GmbH
Benzstraße 33
71083 Herrenberg
Germany
2
More information can also be found at:
www.mysilvercrest.de
Page 3

5 Table of contents
1 Preliminary notes 1
2 Copyright 1
3 Declaration 2
4 Manufacturer information 2
5 Table of contents 3
6 Important safety instructions 5
7 Scope of delivery 7
8 Control elements 8
9 Display during music playback 9
10 Display during voice playback 10
11 Basic functions 11
11.1 Turning the device on 11
11.2 Turning the device off 11
11.3 Key lock 12
11.4 Navigation 12
11.5 Volume 12
11.6 Replacing the battery 13
12 Play music 15
12.1 Play / Pause 15
12.2 Next title / previous title 15
12.3 Fast forward / rewind 15
12.4 Section repeat function 15
12.5 Play mode 16
12.6 Equalizer 16
13 Voice mode (Recordings) 17
13.1 Starting recordings 17
13.2 Ending recordings 18
14 Folder mode 18
English
3
Page 4

English
15 Equalizer 19
16 Play settings 19
17 Power save (“Auto Off”) 20
18 Backlight 21
19 Language 21
20 Delete 22
21 About 22
22 Back 23
23 Using the device with your computer 23
23.1 System requirements 23
23.2 Connecting to the computer 23
23.3 Microsoft Windows ME, 2000, XP, Vista Installation 25
23.4 Microsoft Windows 98 SE Installation 25
23.5 Copying files 27
23.6 File structure 28
23.7 Disconnecting from the computer 28
23.8 Formatting the memory 30
24 Technical data 31
25 Disposal 31
25.1 Batteries 31
25.2 Device 31
26 Troubleshooting 33
4
Page 5

6 Important safety instructions
Please read and strictly observe the following
instructions!
You are not permitted to disassemble, modify or repair the
MP3 player.
If the MP3 player has been dropped or if the casing has been dam-
aged, turn it off.
Do not give your MP3 player and especially the accessories to
children. Never let your children use electrical devices without supervi-
sion. Children are not always able to recognize potential hazards. Batteries can be fatal if swallowed. Store the batteries out of reach of small
children. If a battery has been swallowed, medical help has to be obtained immediately. Also keep the packaging films away from children.
There is a danger of suffocation.
The MP3 player and the accompanying components may not be
exposed to dripping or sprayed water. Additionally, no objects or con-
tainers containing liquids, such as vases or glasses, may be placed on
top of the device. Pay special attention to the device when it rains,
snows, at the beach, or in the vicinity of water.
Do not use the MP3 player in environments with high humidity,
large amounts of steam, smoke, or dust.
Don’t leave the MP3 player in locations where the temperature can
rise to a large degree (e.g. inside a vehicle). This could damage the
casing and interior parts and cause a fire.
Only place the MP3 player on stable surfaces. Otherwise the MP3
player could drop or topple, cause injuries or sustain damage. Don’t let
the MP3 player drop or bump against anything and take great care when
using it.
English
5
Page 6

English
Make sure that the display is not exposed to any bumps. This could
damage the glass of the display or cause the liquid to leak out. If the liquid gets into the eyes, on the skin or the clothes, it has to be rinsed off
immediately with clear water. If the liquid gets into the eyes, consult your
physician immediately.
Don’t use the MP3 player at an excessive volume.
Longer listening periods at an excessive volume pose a
risk to your hearing.
Only use the MP3 player with the included head-
phones. The use of headphones with other input impedances can lead
to sound pressure that may pose a health risk.
Use particular care in potentially dangerous situations (e.g. while
driving, riding a bicycle, jogging, etc.) or discontinue the use of the
headphones temporarily. Even if your headphones are designed in
such a way that you can continue to perceive external sounds, you
should set the volume only so high that you can still perceive your environment.
We advise against the use of headphones while driving a car or
other vehicle. Please drive carefully and attentively. If you notice that
the device distracts or impedes you while you are driving, switch it off.
There is a danger of explosion if the battery is replaced improperly. Also
read the important information about battery use on page 14.
Dispose of your battery in compliance with the
battery ordinance. “The end consumer is obligated to
return discarded batteries to a distributor or a redemption site intended for this purpose by a public waste
management facility.” (see p. 31)
Dispose of your MP3 player and the batteries in
compliance with the Directive 2002/96/EC (see p.
31). In particular, the device does not belong into
household trash.
6
Page 7
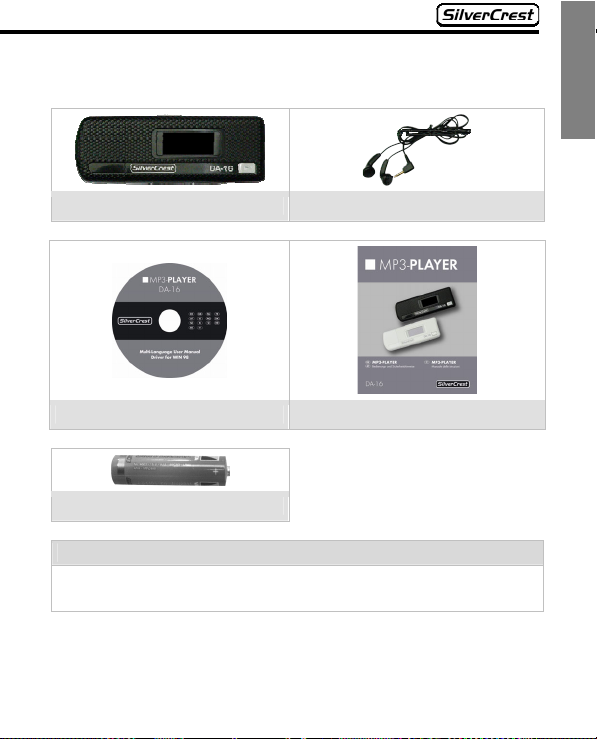
7 Scope of delivery
1. MP3 player SilverCrest DA-16 2. Headphones SilverCrest DA-16
3. Mini CD 4. Operating instructions
5. Battery
Note:
The design and technical data are subject to change without any notification.
English
7
Page 8
English
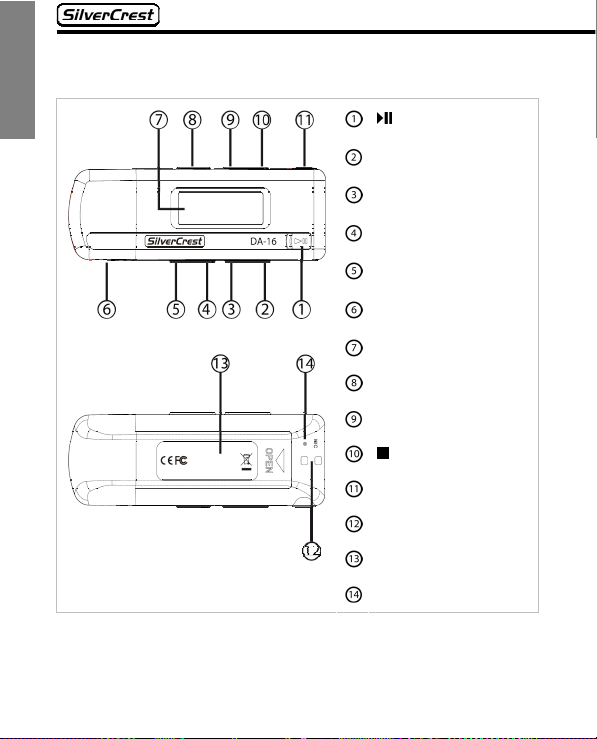
8 Control elements
Button (play/pause)
Fast forward button
Rewind button
VOL+ button
VOL- button
Cap
Display
HOLD (key lock)
M button
Function button
Headphone socket
Loop for carrying strap
Battery compartment
Microphone
8
Page 9
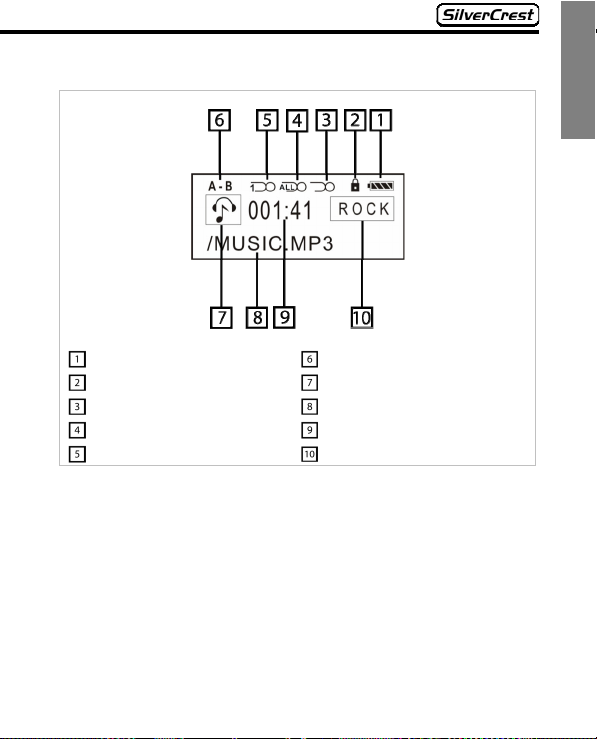
9 Display during music playback
Battery charge level
Key lock symbol
Play setting (here: Shuffle)
Play setting (here: Repeat All)
Play setting (here: Repeat One)
A-B section repeat function
Play music icon
Name of the played file
Time display
Equalizer display
English
9
Page 10

English
10 Display during voice playback
Battery charge level
Key lock symbol
Play setting (here: Repeat All)
Play setting (here: Repeat One)
10
Play voice icon
Name of the played file
Time display
Equalizer display
Page 11
11 Basic functions
With the MP3 player DA-16, you can listen to music and make recordings. How
you use these functions is described starting on p. 15 . But first you will receive an
introduction to basic functions such as turning the device on and off, using the key
lock, navigation, volume control and battery replacement.
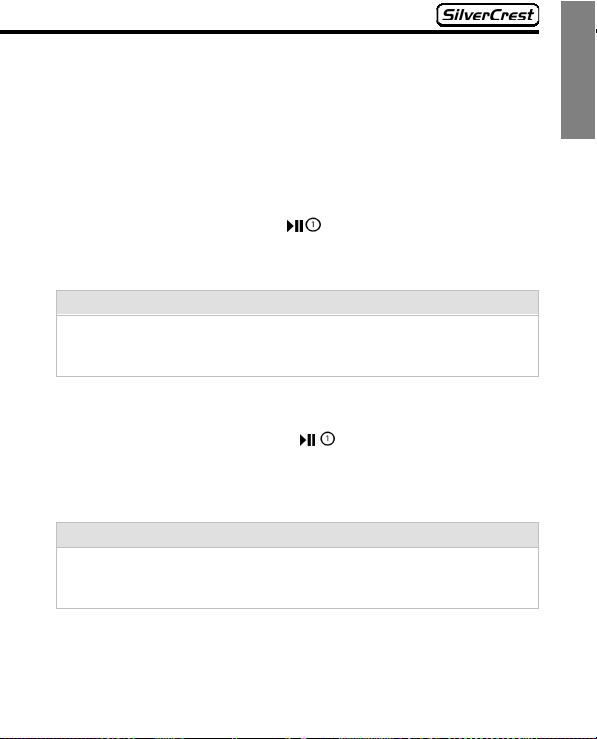
11.1 Turning the device on
To turn the device on, press the button for about three seconds. After a brief
moment, the SilverCrest logo will appear. After a brief loading time, the device is
operational.
Note:
If the MP3 player breaks off the loading process without a message, the bat-
tery is too weak and has to be replaced. For more information about this, read
Replacing the battery on page 13.
11.2 Turning the device off
To turn the device off, please press the button for approx. three seconds.
Then the device switches off and the message “shutting down” appears on the
display. When you turn off the device, it doesn’t matter whether you are playing
music or recording or changing the settings in the menu.
Note:
To turn off your device, the key lock has to be disabled.
Your MP3 player can turn off automatically to save energy. For more infor-
mation about this, read p. 20.
English
11
Page 12

English
11.3 Key lock
The key lock prevents an unintentional operation of your MP3 player - for example
during transport. If the key lock on your MP3 player is activated, all entries are
ignored and the key lock symbol appears.
To activate the key lock, you have to slide the
the arrow and the key lock symbol will appear on the display. To disable the key
lock, you have to slide the
HOLD button in the opposite direction of the arrow.
11.4 Navigation
HOLD button in the direction of
When you have turned on the MP3 player, you can access the menu by briefly
pressing the M button
ing the buttons
one more time:
Music (page 15)
Recordings (page 17)
Folders (page 18)
Equalizer (page 19)
Repeat (page 19)
Auto Off (page 20)
Backlight (page 21)
Language (page 21)
Delete (page 22)
About (page 22)
Back (page 23)
If you don’t press a button for approx. 30 seconds, you will automatically return to
the music or voice playback mode.
. Here you can select the following menu items by press-
and and confirm them by pressing the M button
11.5 Volume
During the playback of music titles or recordings, you can select the volume of the
device with the volume button VOL-/+
from 0 (mute) to the maximum.
12
/ on the side of the device in a range
Page 13

11.6 Replacing the battery
If the battery symbol in the display shows an empty battery, you will need to
change the battery soon. To do this, turn off the MP3 player (p. 11), remove the
cap
, open the battery compartment on the back of the device and remove the
battery. Insert the new battery with the correct polarity (see illustration) and close
the battery compartment again. Only use batteries of the type 1.5 V micro AAA.
Note:
To extend the life of your batteries, you can save energy in the following ways:
Reduce the duration of the backlight (p. 21).
Use the energy saving function (“Auto Off”) (see p. 20).
Please make sure you observe the following information about the batteries as well
as the guidelines about the disposal of batteries on page 31.
English
13
Page 14

English
Important information about the battery:
Make sure that the battery is always inserted in the device with the correct
polarity. Only replace it with the same or an equivalent type. There is a danger
of explosion if the battery is changed improperly.
Don’t attempt to recharge a battery that is not intended for that purpose. There
is a danger of explosion.
Batteries can be fatal if swallowed. Store the batteries out of reach of small
children. If a battery has been swallowed, medical help has to be obtained immediately.
Do not expose batteries to heat and especially not to fire. Never short-circuit
the batteries and don’t try to open them forcefully or recharge them. Otherwise
batteries can explode and cause severe injuries.
Never replace the battery in an environment that poses a risk of explosions.
During the insertion or removal of the battery there might be a spark that could
cause an explosion. Areas that are at risk of explosions are usually labelled as
such, although not always clearly. They include tank areas, such as e.g. below
the decks of boats, fuel overpasses, fuel storage areas, areas in which the air
contains chemicals or particles, such as e.g. grain, dust or metallic powder, as
well as all other areas in which you are normally instructed to turn off your vehicle engine.
Also read the important information about battery disposal on page 31.
14
Page 15

12 Play music
In music mode, you can play back MP3 or WMA music titles.
When you are in the main menu, you can switch into the music mode by pressing
the buttons
button
will now return to the main menu. This does not cause the music playback to stop.
Note:
If you directly select “Music” from the main menu, the title that was last played
will always be played back again. If you would like to play back a different title or
different album, please use the menu item “Folders” to navigate (see 18).
und , selecting the menu item “Music” and pressing the M
. You can exit the music mode by pressing the M button .again. You
12.1 Play / Pause
The playback can be paused with and then resumed. You can exit the
music mode by pressing the M button
again.
12.2 Next title / previous title
During the playback, you can jump to the next saved title by pressing the
button. If you want to hear the current title again from the beginning, press the
button
. You can select the previous title by pressing the button twice.
12.3 Fast forward / rewind
If you keep the buttons or pressed during playback, you can fast
forward or rewind within a title.
12.4 Section repeat function
The section repeat function will allow you to repeat parts of a title as much as you
prefer in the playback mode. This function is especially well-suited to learn foreign
languages, for example.
15
English
Page 16

English
Briefly press the function button once during the playback of a title to mark
the beginning of the section that should be repeated. This is represented by an A
on the display.
When you have reached the end of the section that you would like to repeat during
the playback, briefly press the
marked in this way will now be repeated as often as desired, which is indicated by
A-B
on the display.
If you would like to end the repeat function and continue with the regular playback,
just press the
continued as usual.
Note:
The repetition of music sections (section repeat function) only functions within
one title and not beyond the boundaries of the title.
function button once briefly and the playback of the title will be
12.5 Play mode
Under the item “Repeat” in the menu, you can set a random playback sequence
(shuffle) and activate the repeating of titles. For more information about this, read
p. 19.
12.6 Equalizer
To change the sound characteristics, you have to press the function button
for a long time during the music playback. Now the MP3 player switches between
the individual equalizer modes. Press the
mode is activated. You can also select the desired equalizer setting in the menu
under the item “Equalizer” (page 19).
function button once again. The section
function button until your desired
16
Page 17

13 Voice mode (Recordings)
In the voice mode you can play back and create recordings.
When you are in the main menu, you can select the menu item “Recordings” by
pressing the buttons
the M button
again. You will now return to the menu. This does not cause the playback to stop.
In the voice mode you can generally carry out the same functions (play back /
pause, next title / previous title, fast forward / rewind, section repeat function,
repeat, and equalizer) as in the music playback mode (see section beginning on p.
15).
Note:
In the voice mode, you can play back all titles that are in the “Voice” folder
(see p. 28). Recordings will be stored here automatically.
Once you have started the playback of a recording, you can only create a new
recording again by returning to the menu and restarting the voice mode.
If you directly select “Recordings” from the main menu, the most recently
played voice file will always be played back. If you would like to play back a
different file, please use the menu item “Folders” to navigate (see p. 18).
A playback in random sequence is not possible in voice mode.
and and change to the voice mode by pressing
. You can exit the voice mode by pressing the M button
13.1 Starting recordings
When you have switched into the voice mode, you can start a recording by pressing the
function button . The recording will start directly after pressing the
button. The remaining recording time will briefly be shown on the display, followed
by the length of time you have already been recording, the name under which the
recording is stored, and the microphone symbol, which shows that a recording is
currently in progress.
Note:
Once you have started the playback of a recording, you can only create a new
recording again by returning to the menu and restarting the voice mode.
17
English
Page 18

English
Note:
To achieve the best possible recording result, direct the microphone input
towards the source at a distance of approx. 10 – 15 cm and avoid interfering
sounds.
13.2 Ending recordings
To end the recording, press the function button . This will stop the recording
and the recorded file will automatically be saved in the “Voice” folder. The saved
file automatically receives the name “VXXX.WAV“, where XXX corresponds to a
numerical sequence that begins with 001. For example, if you have already recorded six WAV files, the next recorded file will be stored under “V007.WAV“ in the
“Voice“ folder. If you have deleted other WAV files in the meantime (e.g.
“V003.WAV“), then the file is always stored at the lowest available position, which
in this case means under “V003.WAV“.
You can exit the voice mode by pressing the M button
Note:
The recording can only be carried out in wav format. The mp3 format is not
supported.
The recordings can be deleted under the menu item “Delete“ on page 22 .
.
14 Folder mode
The folder mode offers the possibility to view and navigate through all of the files
stored on the device. Here you can see all of the music files saved on the device
along with the folders you have created. In addition, this mode allows you to directly select the individual files to play them back.
When you are in the main menu, you can select the menu item “Folders” by pressing the buttons
. You can exit the folder mode by repeatedly pressing the VOL- button
button
. You will now return to the main menu.
18
and and switch into the folder mode by pressing the M
Page 19

When you have selected the menu item “Folders”, a list with folders and stored
songs will appear on the display. Press the buttons
between files or folders. To play back the desired file, press the play button
To open a selected folder, press the M button
folder, press the VOL- button
use this button to exit the folder mode and return to the selection menu.
. When you are in the main folder, you can also
and to navigate
.
. To switch into a higher-level
15 Equalizer
With the equalizer you can change the sound characteristics of the playback.
When you are in the main menu, you can select the menu item “Equalizer” by
pressing the buttons
ing the M button
again. You will now return to the main menu.
With the equalizer setting you can change the sound characteristics of your MP3
player. Six settings (“Flat”, “Bass”, “Rock”, “Jazz”, “Classic”, “Pop” and “Custom”)
are available to choose from. You can select the desired setting with the buttons
and . With th e M button you can confirm your selection and return
to the selection menu. If you have selected the setting ”Custom”, you can manually
set the frequency bands 60 Hz, 250 Hz, 1 kHz, 4 kHz and 12 kHz. With the buttons
and you can switch between the individual frequency bands. With the
buttons Volume +
quency band. If you want to store your selection, press the M button
then return to the menu.
and and switch into the equalizer mode by press-
. You can exit the equalizer mode by pressing the M button
and Volume - you can raise or lower the selected fre-
. You will
16 Play settings
With the play settings you can determine whether music titles or recordings will be
played back repeatedly. In addition, this menu item will enable you to set whether
music titles should be played back in a random sequence.
When you are in the main menu, you can select the menu item “Repeat” by press-
ing the buttons
M button
You will now return to the main menu.
and and switch into the play settings by pressing the
. You can exit the play settings by pressing the M button again.
19
English
Page 20

English
When you call up the menu item, the current setting will be displayed. By pressing
the buttons
Disable: At this setting your music titles or recordings will be played back in
regular sequence and not repeated. At this setting, no symbol will appear on
the display.
Repeat one: At this setting the current music title or current recording is re-
peated until you change the title by pressing the button
setting, the symbol
Repeat all: At this setting your music titles or recordings will be played back in
regular sequence. After all music titles or recordings have been played once,
the playback is started again. At this setting, the symbol
display (see page 9 or page 10).
Shuffle: At this setting your music titles will be played back in random se-
quence and not repeated. At this setting, the symbol
display (see page 9).
Repeat shuffle At this setting your music titles will be played back in random
sequence. After all music titles have been played once, the playback is
started again. At this setting, the symbols
(see page 9).
Note:
The random sequence is not available during the playback of recordings. That is
why you aren’t able to select the settings "Shuffle” and “Repeat shuffle" if you
have switched from the voice mode into the play settings.
and you can switch between the following settings:
will appear on the display. (see page 9 or page 10).
will appear on the
will appear on the
and will appear on the display
17 Power save (“Auto Off”)
With this function you can determine whether the MP3 player should automatically
turn off when there is no playback or recording and no buttons are pushed.
When you are in the main menu, you can select the menu item “Auto off” by pressing the buttons
the M button
again. You will now return to the main menu.
20
and and switch into the power save menu by pressing
. You can exit the power save menu by pressing the M button
or . At this
Page 21

The following time lengths are available to you for the device to automatically turn
off: “1 Min“, “2 Min“, “5 Min“ and “10 Min“. If you have selected the setting "Dis-
able”, the MP3 player will not automatically turn off. To store the desired setting,
select it with the buttons
the setting is saved and you automatically return to the menu.
and and then press the M button . Now
Note:
Use this function to save energy and thus achieve a longer battery life.
18 Backlight
With this function you can determine whether the backlight should automatically
turn off when no buttons are pressed. If the backlight is turned off, you can turn it
on again by pressing any button.
When you are in the main menu, you can select the menu item “Backlight” by
pressing the buttons
ing the M button
and and switch into the backlight menu by press-
. You can exit this menu by pressing the M button again.
You will now return to the main menu.
The time lengths between “1 Sec” and “20 Sec” are available to you for the device
to automatically turn off. If you have selected the setting “Always on”, the backlight
of the display will not be turned off. To store the desired setting, select it with the
buttons
and you automatically return to the menu.
and and then press the M button . Now the setting is saved
Note:
Use this function to save energy and thus achieve a longer battery life.
19 Language
With this function you can determine the language of the device menu.
When you are in the main menu, you can select the menu item “Language” by
pressing the buttons
pressing the M button
the M button
again. You will now return to the main menu.
and and switch into the language settings by
. You can exit the language settings menu by pressing
21
English
Page 22

English
The following languages are available: "German”, “Dutch”, “English", “Spanish” and
"French”. With the buttons
languages and confirm them by pressing the M button
saved and you automatically return to the menu.
and you can select between the different
. Then the setting is
20 Delete
With this function you can delete files on your player.
When you are in the main menu, you can select the menu item “Delete” by pressing the buttons
.
button
In the delete menu you have to use the buttons
you would like to delete a music file or a recording. If you select “back”, you will
return to the menu without deleting a title. Confirm your selection with the M but-
. Now you can see the files that are stored on your MP3 player. With the
ton
buttons
cordings and with the buttons Vol +
“Yes” and “No”. If you want to delete a file, select “Yes” and press the M button
. If you have selected “No” and keep the M button pressed, you will return
into the music or voice mode. However, if you press the
return to the previous menu and there you can select again whether you would like
to delete a music file or a recording or return to the main menu.
and and switch into the delete menu by pressing the M
and to select whether
and you can switch between the individual songs and re-
and Vol – you can switch between
button , you will
21 About
If you select this menu item, the firmware version of your MP3 player as well as the
size of the free memory and the total memory are displayed.
When you are in the main menu, you can select the menu item “About” by pressing
the buttons
M button
again. You will now return to the main menu.
22
and and switch into the information menu by pressing the
. You can exit the information menu by pressing the M button
Page 23

22 Back
When you are in the main menu, you can select the menu item “Back” by pressing
the buttons
. You will return to the mode from which you have called up the main menu.
ton
(Music or voice mode).
Note:
If you don’t press a button for approx. 30 seconds, you will automatically return
to the music or voice playback mode .
and and confirm the selection by pressing the M but-
23 Using the device with your computer
23.1 System requirements
Operating system: Windows® 98SE, Me, 2000, XP or Vista
CPU: Pentium III 500 MHz or higher
RAM: 64MB RAM (128 MB recommended)
Hard drive: 50 MB free memory
Interface: USB 2.0 (USB 1.1 compatible)
23.2 Connecting to the computer
You can either connect your MP3 player directly to a free USB connection on your
computer or an extension cable (not included in the scope of delivery). Remove
the cap of the device from the USB plug and proceed as shown in the following
pictures.
English
23
Page 24

English
Note:
If you use a USB hub (a distributor of USB sockets), it may happen that the
MP3 player is not recognized by your computer. In that case connect the MP3
player or the USB extension cord directly to your computer.
Depending on the construction of the USB connections on your computer, it
may be the case that you have to plug in the MP3 player with the display facing down.
If you don’t use the USB plug of your device, always leave the cap on the
device to protect the plug from dust or damage, such as bending or breaking
off.
24
Page 25

23.3 Microsoft Windows ME, 2000, XP, Vista Installation
If you use Microsoft Windows ME, Microsoft Windows 2000, Microsoft Windows
XP or Microsoft Windows Vista as your operating system, no manual driver installation is required after you connect your MP3 player with your PC. The driver
installation happens automatically during the first use and may take some time
depending on the computer. After the successful recognition of the MP3 player, a
new ”removable drive” will appear on “My Computer”. The drive is the internal
memory of the MP3 player. It may be possible that the notification area of your
taskbar will show a new icon, “safely remove hardware”.
Caution:
If you use Microsoft Windows ME, Microsoft Windows 2000, Microsoft Win-
dows XP or Microsoft Windows Vista as your operating system, a manual
driver installation from the provided CD is not required.
The attempt to install the drivers for Windows 98 SE on an operating system
other than Windows 98 SE can damage the system or make it unusable.
23.4 Microsoft Windows 98 SE Installation
If you would like to use your MP3 player on a computer with Microsoft Windows 98
SE as the operating system, you have to install the drivers from the included CDROM.
25
English
Page 26

English
Connect the MP3 player to your PC and then carry out the steps listed below.
1. The above window appears. Now
insert the included driver CD-ROM and
click on [Next >].
3. Now select “CD-ROM drive” and
click on [Next >].
2. Select “Search for the best driver for
the device” and click on [Next >].
4. Click on [Next >]
26
Page 27

English
5. The installation is finished. Click on
[Finish].
Now the MP3 player is recognized and a new removable drive appears on the
6. My computer.
desktop. The designated letter of the drive can be different depending on the
number of hard drives on your system.
23.5 Copying files
Once you have properly connected your MP3 player with your computer, a new
removable drive appears on “My Computer”. The drive is the internal memory of
the MP3 player. Now you can use this removable drive like a regular drive and
copy, delete or rename files as usual. If required, read the user manual of your
operating system.
Caution:
To prevent data loss, you should never disconnect your MP3 player from your
computer during a reading or writing process. To disconnect the player from your
computer, follow the instructions in the section below.
27
Page 28

English
23.6 File structure
You can copy music titles into any desired folder on your MP3 player and also
create any new folders as you prefer. However, you should avoid special characters.
The internal memory of the MP3 player contains a special folder, “Voice”, where all
of the recordings are stored.
23.7 Disconnecting from the computer
Never disconnect your MP3 player from your computer during the data transfer.
You should also use the function “Safely remove hardware” of your operating
system (only Windows XP and Vista). To use this function, exit all programs that
access the drive of your MP3 player (e.g. “My Computer” or Windows Media
Player).
Windows XP:
1. Double-click the symbol “Safely
remove hardware" (you might first
need to unhide the inactive symbols).
28
2. Select the “USB Mass Storage
Device” in the “Safely remove
hardware” window and click on [Stop].
Page 29

3. Also select the “USB Mass Storage
Device" in the “Remove a hardware
component" window and click [OK].
Windows Vista:
4. Next comes a message that you can
now remove the device. Now
disconnect your MP3 player from the
USB socket.
English
1. Double-click the symbol “Safely
remove hardware" (you might first need
to unhide the inactive symbols).
2. Select the “USB Mass Storage
Device” in the “Safely remove
hardware” window and click on [Stop].
29
Page 30

English
3. Select the “USB Mass Storage
Device" in the “Remove hardware"
window and click [OK].
4. Next comes a message that you can
now remove the device. Now
disconnect your MP3 player from the
USB socket.
23.8 Formatting the memory
If you would like to remove the entire contents of your MP3 player or if files on your
MP3 player have been damaged, it may be advisable to format the internal drive.
To format the drive, connect your MP3 player to your computer and open “My
Computer”. Right-click on the drive that you want to format and select “format”.
Select FAT32 for the file system and the standard settings for all additional parameters.
Caution:
If you are uncertain about any of the steps described above, read the help section for your operating system or ask a specialist. An operating error during
formatting can make the computer unusable.
30
Page 31

24 Technical data
Internal memory: 2 GB
Audio formats: mp3, wma
DRM: No
Voice recording: wav format (AD-PCM, 8 kHz, mono)
Installed microphone: Yes
USB 2.0 standard: Full speed / 1.1 compatible
Display: LCD Display
Equalizer: 6 presets and one custom setting
Power supply: 1 x 1.5V AAA battery
Dimensions: 79 x 28 x 19 mm
Weight: 25 g
Headphones SilverCrest DA-16, 3.5 mm stereo jack
25 Disposal
25.1 Batteries
Please consider that you as an end consumer are obligated to return “… discarded
batteries to a distributor or a redemption site intended for this purpose by a public
waste management facility.”
25.2 Device
Please consider that your electronic entertainment device is subject to the European guideline 2002/96/EC for the reduction of electronic waste.
English
31
Page 32

English
You are therefore not permitted to dispose of your
device in your household waste.
You can receive information regarding the disposal of
old devices at the municipal administration, the waste
disposal administration and the store where you purchased this product.
You can drop off your device free of charge at com-
munal collection points.
With the proper disposal of old devices you prevent
environmental damage and don’t damage your health.
32
Page 33

26 Troubleshooting
Problem Possible reason: Suggested solution
The device
has no power.
The headphones don’t
transmit
sound.
The LCD
display doesn’t
show the text
properly.
The battery is empty. Replace the battery (p.13).
The headphone cable is
loose.
The volume is at “0”.
Properly connect the headphones.
Increase the volume with VOL+.
The battery is empty. Replace the battery (p.13).
The headphones are
defective.
The MP3 or WMA file has
errors.
The language isn’t set
correctly.
Clean the headphone plug or replace the headphones.
Reinstall the files.
Set it to the correct language.
Contact the customer hotline (see
The display is defective.
the reverse of the operating instruc-
tions.)
The display turns off
automatically.
Read the chapter “Power save
(Auto Off)” on page 20.
The battery is empty. Replace the battery (p.13).
English
The MP3
player doesn’t
transfer any
MP3 / WMA
files.
The USB cable is not
connected.
The USB cable is defective.
The device is full.
Connect the USB cable.
Use a new USB cable.
Delete files to make room on the
drive.
33
Page 34

English
Problem Possible reason: Suggested solution
The battery is empty. Replace the battery (p.13).
The device
turns off automatically.
The MP3
player isn’t
recognized by
the computer.
The USB cable was
connected.
The energy saving function (“Auto Off”) is turned
on.
Electrostatic interference. Turn on the device again.
A USB hub is interposed.
The USB plug has a
loose connection.
You are using Windows
98 and haven’t installed
the driver.
Disconnect it from the computer.
For more information about this,
read p. 20.
Directly connect your MP3 player to
the computer and remove all USB
hubs from your computer if neces-
sary.
Connect the MP3 player to your
computer and turn the USB plug
slightly.
Proceed as described on page 25.
34
 Loading...