

Page 1

English
1 Preliminary notes
Thank you for selecting our MP3/WMA/OGG car radio SilverCrest CRE-521. In order for you to utilize this device and all its
options, we recommend that you read the corresponding instructions in this manual before the initial use of the device, even if
you’re familiar with handling electronic devices. Please pay particular attention to the chapter “Important safety instructions” on
page 5. Store this manual in a safe location for future reference. If you sell or transfer this device, please be sure to pass along
these instructions as well.
2 Copyright
The contents of this manual may not be reproduced, copied or otherwise duplicated in electronic, mechanical, magnetic, optical,
chemical, manual, or any other form without the permission of our company, nor may they be stored in a search engine nor
translated into another language.
3 Declaration
The descriptions and features in the manual only serve as general information and do not represent a guarantee. In order to
offer you a product of the highest quality, we reserve the right to make possible improvements or changes without prior
notification.
For all product descriptions and user instructions, the German version is the ultimately valid reference in the event of possible
deviations in other languages.
4 Manufacturer information
JNC Datum Tech GmbH
Benzstraße 33
71083 Herrenberg
Germany
More information can also be found at:
www.mysilvercrest.de
1
Page 2

5 Table of contents
1 Preliminary notes .........................................................................................................................1
2 Copyright.......................................................................................................................................1
3 Declaration....................................................................................................................................1
4 Manufacturer information............................................................................................................1
5 Table of contents..........................................................................................................................2
6 Important safety instructions......................................................................................................5
7 Scope of delivery..........................................................................................................................6
8 Installation.....................................................................................................................................8
8.1 Installing the device 8
8.2 Connecting the antenna 10
8.3 Supply voltage 11
8.4 Speakers 11
8.5 Removal 12
9 Operating unit.............................................................................................................................13
10 Display......................................................................................................................................... 15
10.1 General 15
10.2 Radio Mode 16
10.3 CD Mode 16
10.4 MP3/WMA/OGG-CD Mode 16
10.5 SD/MMC Mode 17
10.6 USB Mode 17
2
Page 3

English
11 Activation .................................................................................................................................... 18
11.1 Insertion of the operating unit 18
11.2 Removal of the operating unit (theft protection) 18
12 Basic functions........................................................................................................................... 19
12.1 Turning on/off 19
12.2 Changing the volume 19
12.3 Muting the speakers 20
13 Radio (Tuner) Mode.................................................................................................................... 20
13.1 Selection of the radio station 20
13.2 Select the wavelength range 20
13.3 Find and save radio stations 21
13.4 RDS 22
13.5 Traffic Announcements (“TA“, traffic program ”TP“) 22
13.6 Alternative frequencies (“AF”) 23
13.7 Regional programmes (“REG”) 24
14 CD Mode......................................................................................................................................24
14.1 Selecting a CD as a program source 24
14.2 Inserting / ejecting a CD 25
14.3 Playback / pause 25
14.4 Selecting or repeating tracks 26
14.5 Fast forward and backward play 26
14.6 Repeat track (repeat) 26
14.7 Intro 26
14.8 Playing tracks in random order (random) 26
15 USB/MP3/WMA/OGG and SD/MMC Mode.................................................................................27
15.1 Connecting/removing a USB storage medium 27
15.2 Selecting a USB storage medium as data source 28
15.3 Selecting an iPod® as data source 28
15.4 Insert / remove SD/MMC 28
3
Page 4

15.5 Selecting SD/MMC as a program source 29
15.6 MP3 functions 29
15.7 Searching for track numbers 29
15.8 Alphabetical search 30
15.9 Searching according to compression type 30
15.10 Skipping forward or backward in increments of ten 30
15.11 Pause 31
15.12 Repeat functions (repeat) 31
15.13 Intro 31
15.14 Random playback (random) 31
15.15 Turning the subwoofer on/off 31
16 AUX IN .........................................................................................................................................32
17 Settings .......................................................................................................................................32
17.1 Menu level 1 32
17.2 Menu level 2 34
17.3 Recording and copying function 38
17.4 Deleting tracks 40
17.5 Factory settings (“RESET”) 40
18 Remote control ........................................................................................................................... 41
18.1 Description of the buttons 41
18.2 Changing the battery 43
19 Product information ...................................................................................................................44
19.1 General information 44
19.2 Technical specifications 45
20 Disposal....................................................................................................................................... 46
21 Troubleshooting ......................................................................................................................... 46
4
Page 5
English
6 Important safety instructions
Please read and strictly observe the following instructions!
You are not permitted to disassemble, modify or repair the car radio.
Never open the case of the car radio; it does not contain any serviceable parts! If the case is open, there is a risk of fatality
due to electric shock.
Do not give your car radio and especially the accessories to children. Never let your children use electrical devices without
supervision. Children are not always able to recognize potential hazards. Also keep the packaging films away from children.
There is a danger of suffocation.
The car radio and the accompanying components may not be exposed to dripping or sprayed water. Make sure that no
containers filled with liquid, such as bottles or cups, are placed in the vicinity of the device.
Make sure that the display is not exposed to any bumps. This can damage the display.
Please familiarize yourself with the different functions of your device before you begin driving. Excessively high volumes can
pose a risk for you and other people in traffic. Therefore always select the volume at such a level that environmental noises
(horns, sirens, etc.) can still be perceived.
Multimedia CDs also contain recordings of files other than audio files. If you play such a CD despite the warning information, it
may result in noises at a volume that endangers traffic. Furthermore, the power amplifier and speakers might get damaged.
Don’t use the car radio at an excessive volume. This poses a risk to your hearing.
Please only perform lengthy changes of the device settings while the vehicle is parked. Your concentration might be affected
by the changes.
5
Page 6
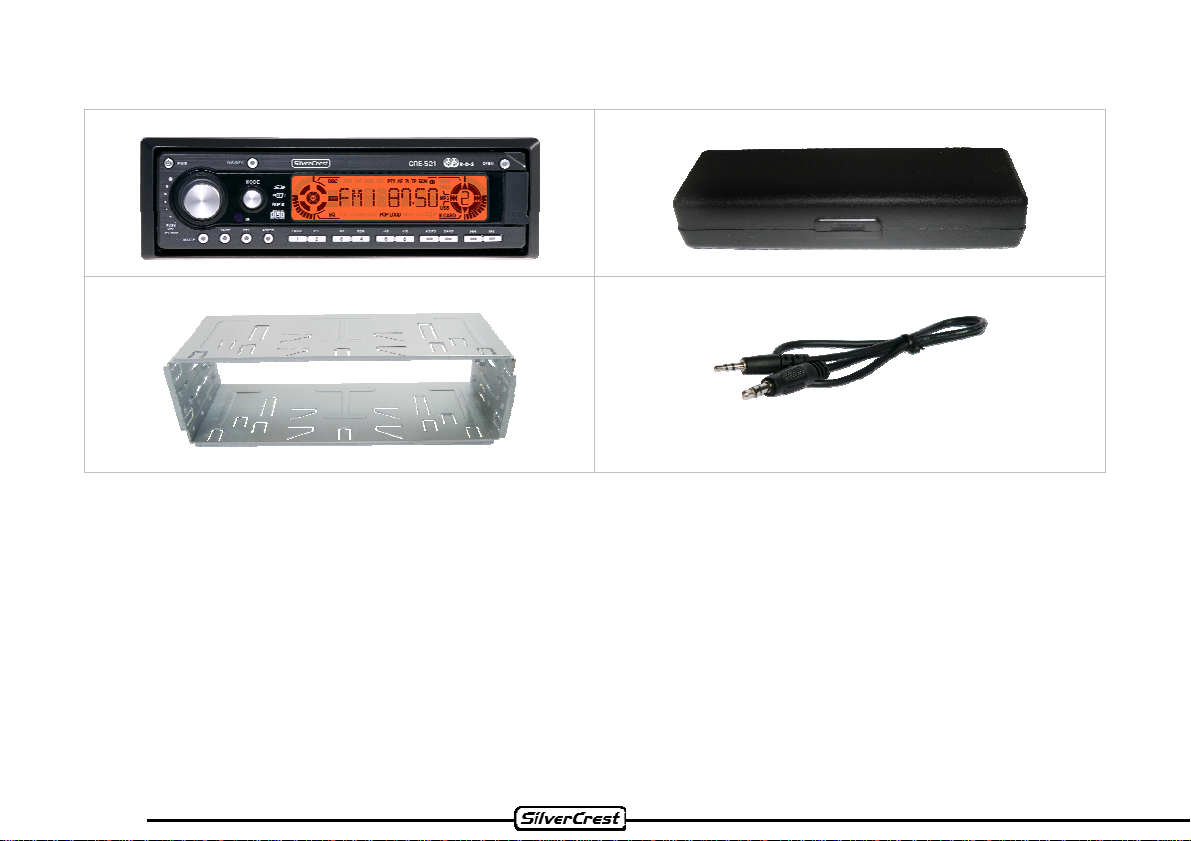
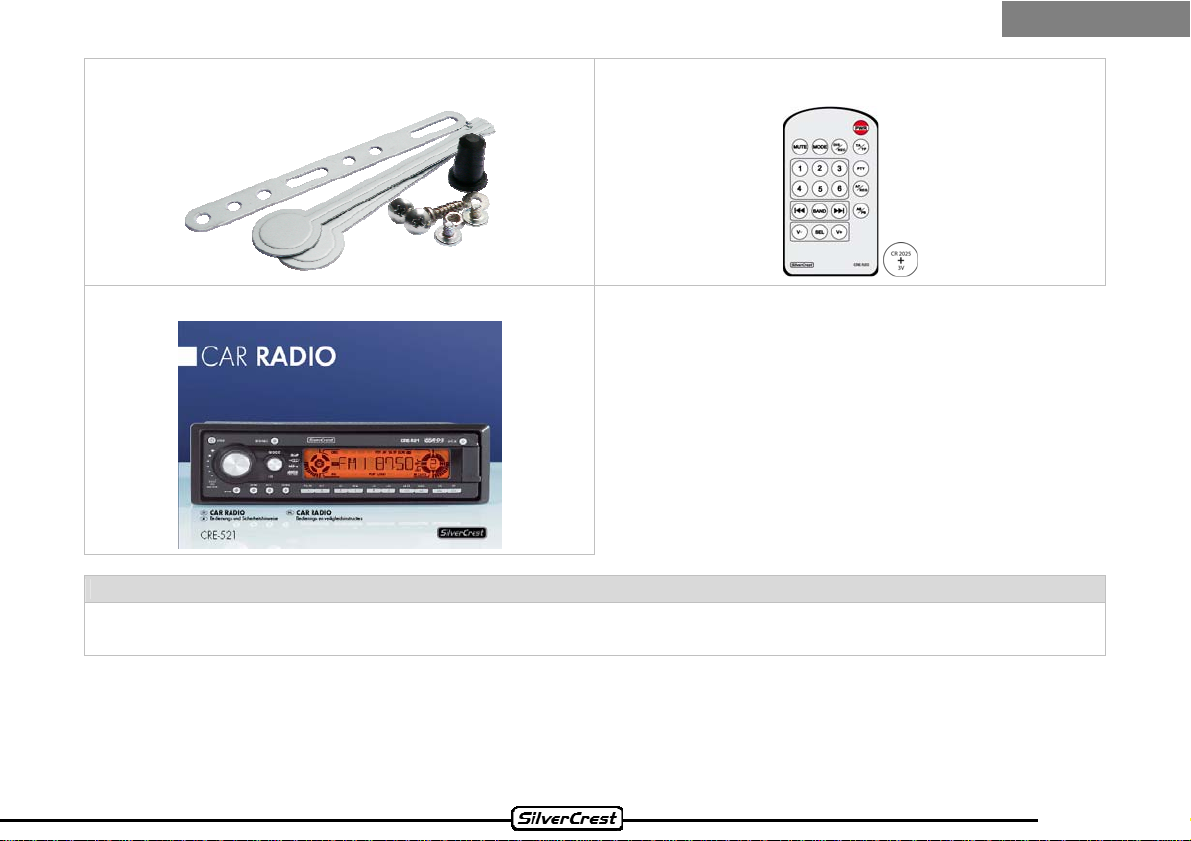
7 Scope of delivery
1. CRE-521 MP3/WMA/OGG car radio
3. Installation frame
2. Case for the operating unit
4. Aux-in connection cable
6
Page 7
English
5. Screws and nuts
7. User manual
Note:
The design and technical data are subject to change without any notification. Illustrations are not true to scale.
6. Remote control
7
Page 8
8 Installation
8.1 Installing the device
Note:
Please observe the following safety instructions for the connection of the device:
Read the entire installation section before connecting the device.
Disconnect the negative pole of the vehicle battery for the duration of the installation.
Observe the safety instructions by the vehicle manufacturer during this task.
If you need to drill holes for the installation, make sure that no parts of the vehicle are damaged.
The cross section of the plus and minus cable may not be less than 2.5 mm².
Do not connect any plugs or cables from the vehicle to the radio without the appropriate expertise!
Only use the supplied cable to connect the device.
Depending on the build of your vehicle, the installation may deviate from this description.
We do not assume any liability for damages caused by faulty installations or connections, nor any subsequent damages.
Illustr. 8.2
Illustr. 8.0
Illustr. 8.1
8
Page 9

Note:
We recommend that you have the device installed by a specialized company. Then you will have created the prerequisites for
a problem-free functioning of the device. If at any point during the installation you are unsure that you can correctly connect
the device by yourself, contact a specialist. A faulty installation may cause damages to the device and the vehicle electronics.
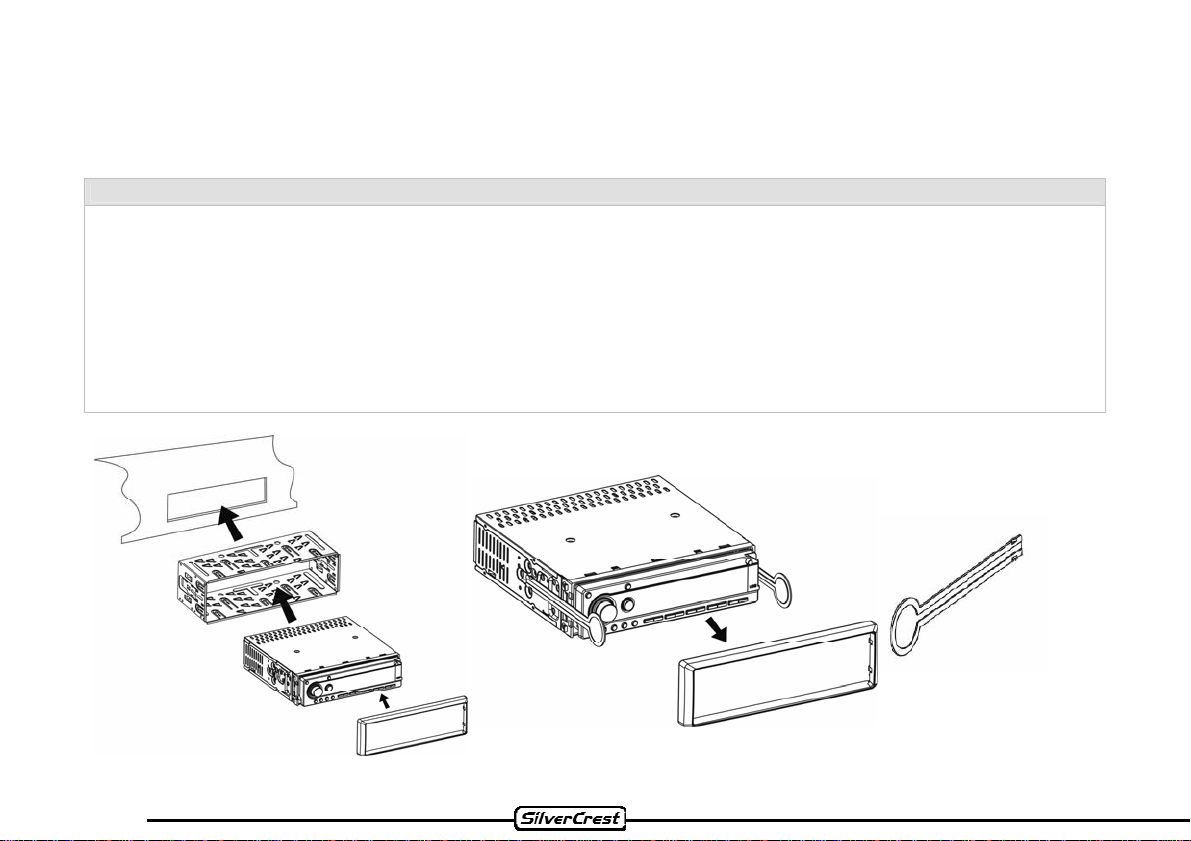
1. For the installation of the device, please remove the transport safety screws on the CD drive first.
2. Then remove the installation frame from the device with the aid of the disassembly key, by sliding the disassembly keys into
the provided openings on the right and left side of the device, as described in Illustr. 8.1. Make sure that the protrusion on
the disassembly key (Illustr. 8.2) points away from the device while it is being inserted. Afterwards, the frame can be slid
down over the device towards the rear.
3. Now slide the installation frame into the installation slot provided for the car radio.
4. Now attach the installation frame by bending the installation brackets towards the outside with a screwdriver. The frame is
properly installed when it can no longer be pulled out, yet also keeps from sliding into the installation slot.
5. Now connect the provided cable set and the antenna corresponding to the Illustr. 8.3 and Illustr. 8.4 as well as the table
below to the vehicle’s electric system. Also observe the specifications in sections 8.2 to 8.4.
Contact
Connector pin assignment ISO connector plug (also see Illustr. 8.3 number 7)
Plug A Plug B
1 Rear right (+) – violet
2 Telephone mute Rear right (-) - violet / black
3 Front right (+) - grey
4 Ignition (ACC+) / red Front right (-) – grey / black
5 Car antenna / blue Front left (+) - white
6 Automatic operating unit dimmer / orange Front left (-) – white / black
7 Battery 12V (+) / yellow Rear left (+) - green
8 Ground / black Rear left (-) – green / black
English
6. Slide the device into the installation frame until the stop. The device will then audibly lock into place.
7. Attach the front frame and then insert the operating unit.
9
Page 10
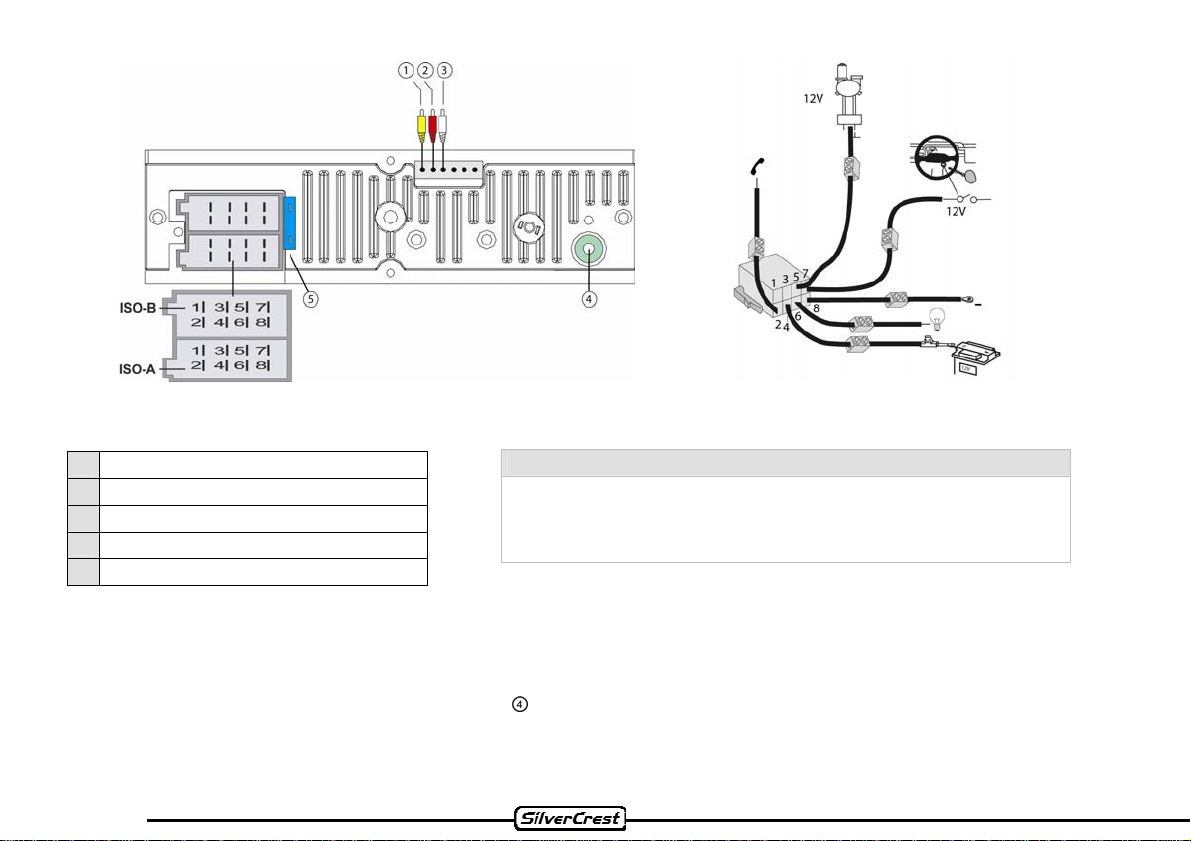
Illustr. 8.3 Illustr. 8.4
(Cable set is not included in the scope of delivery)
1 Subwoofer output (yellow RCA jack)
2 Line out plug right (red)
3 Line out plug left (white)
4 Antenna connection
5 Fuse 15A
Caution:
This device is distinguished by a high output level. This results in a
strong heat generation during the operation. Therefore no cables or
other components may be near the device. If their insulation melts,
there is the danger of a short circuit or fire.
8.2 Connecting the antenna
The device is designed for antennas with an impedance of 75Ω to 150Ω. To connect the antenna, plug the antenna cable into
the antenna socket of the device (black cable, socket
10
on the rear of the device).
Page 11
English
8.3 Supply voltage
ISO plug A:
A4: Attach the connection for +12V operational voltage (diameter at least 2.5 mm² for positive and ground wire) to terminal # 30
(permanent plus) of the vehicle.
A5: +12V switching voltage output (max. 0.5 A). When the device is turned on, the switching voltage adjoins contact A5 and
serves to retract or extract an automatic antenna and as operational voltage for antenna amplifiers.
A6: Connection for operating unit light.
A7: Connection for +12V trigger voltage. Connect to terminal # 15 of the vehicle.
A8: Connect the connection for the ground (diameter at least 2.5 mm² for positive and ground wire) to terminal # 31 (ground) of
the vehicle.
8.4 Speakers
Cable adapter ISO plug B Front speakers
Maximum output for 4-8 Ω speakers 4 x 40W
Music output
Caution:
Don’t attach the speaker connections to each other electrically and don’t connect them to ground! This can lead to the
destruction of the device. Please pay attention to illustr. 8.5 – 8.7.
B3: right + grey B1: right + violet
B4: right - grey/black B2: right - violet/black
B5: left + white B7: left + green
B6: left - white/black B8: left - green/black
Back speakers
11
Page 12

Illustr. 8.5
Illustr. 8.6 Illustr. 8.7
8.5 Removal
Turn off the device. Remove the operating unit and place it into the case. Clamp
off the negative pole of the vehicle battery for the duration of the disassembly.
First remove the front frame of the device. Then insert the two disassembly keys
into the openings on both sides of the front of the device and slide these until the
stop. Make sure that the protrusions on the disassembly keys (Illustr. 8.2) point
away from the device during the insertion. Slowly and carefully pull out the
device. Remove the cable and antenna from the device.
Note:
Make sure that no vehicle cable can cause a short circuit after the device has been unplugged.
12
Page 13
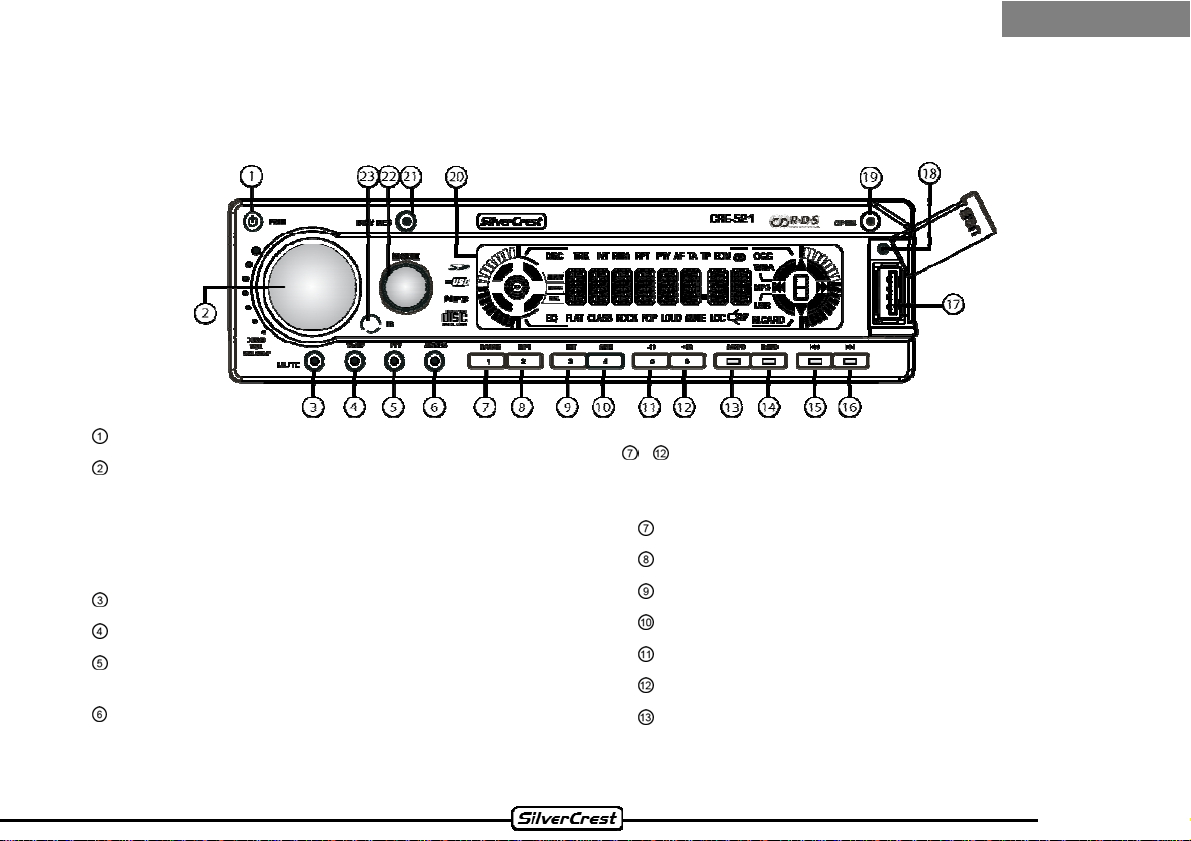
9 Operating unit
Front view (level 1)
Button to turn the device on / off
- Volume control dial (turned)
- Settings dial for menu level 1 - VOL, BAS, TRE, BAL,
FAD (pressed)
- Settings dial for menu level 2 - INVOL - ADJ TAVOL - EON - REC - TELVOL - DSP - LOUD - LOC
– STEREO (if pressed for more than 2 seconds)
Button to mute the device
TA/TP button to turn the traffic alert function on/off
PTY button to select the program style (e.g. jazz, pop,
news, etc.)
AF/REG button: Alternative frequency ON/OFF and
REG ON/OFF (if pressed longer)
English
Radio mode:
Station selection buttons 1-6. Pressing for more than 2
seconds stores the current station under this button.
Music mode:
Pause button
Repeat track
Scan track (approx. 10 seconds)
Random playback of tracks
MP3/WMA/OGG track - 10
MP3/WMA/OGG track + 10
AS/PS button
Radio mode: Automatic station search and automatic
station memory
13
Page 14
Music mode: Start search. Select according to track
number, alphabetical order, code
BAND button
Radio mode: Switch for the frequency band as well as
the button memory FM1 - FM3, MW1 and MW2
Search and record mode. Confirm selection, start
search
Button for station search (lower frequency) and to skip
/ change the audio track during the music playback
(previous track)
Button for station search (higher frequency) and to
skip / change the audio track during the music
playback (next track)
USB connection for external storage media
AUX-IN jack for the connection of external audio
sources
Button to flip down the operating unit
Display
DIS/REC button: Button to record and erase tracks on
SD/MMC/USB storage media.
MODE button for the source selection between radio,
CD (if inserted), memory card (if inserted), USB (if
connected) and AUX-IN
IR sensor (infrared sensor for the remote control)
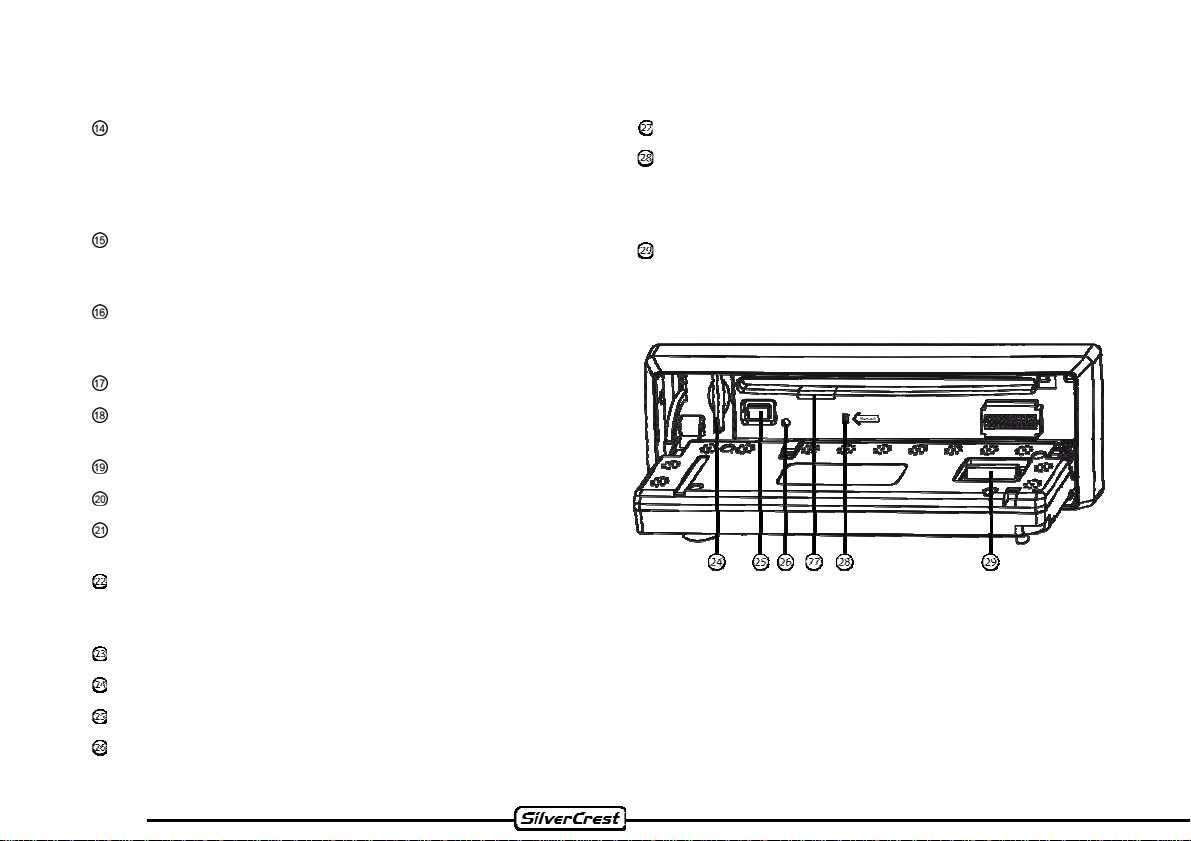
SD/MMC card slot
CD eject button
Status indicator for the device
- lights up continuously when the operating unit is
flipped open.
- blinks when the operating unit has been removed.
CD slot to insert the CD
Reset button to restore factory default settings.
Note: When the factory settings are restored, the clock
and the stored radio stations will also be reset or
erased
Contacts for the operating unit
PLEASE DON’T TOUCH!!
Front view (level 2)
14
Page 15
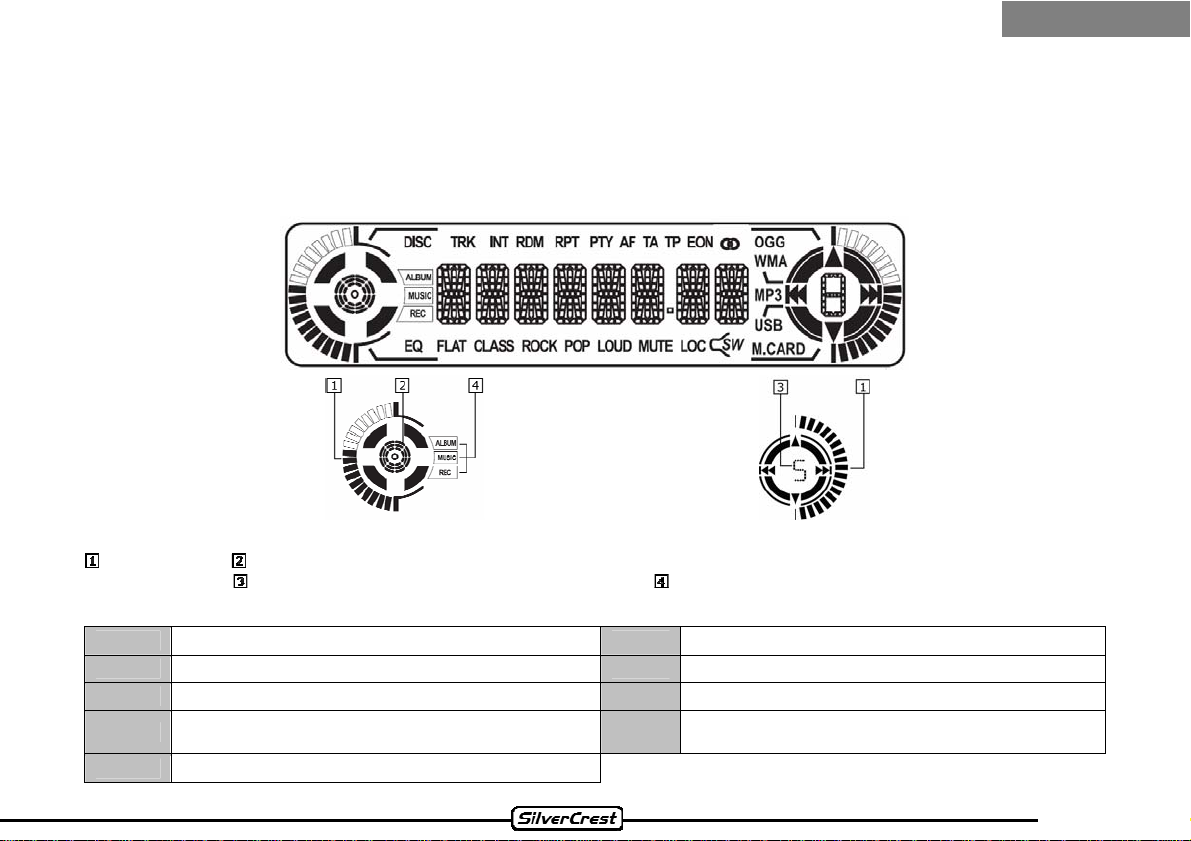
10 Display
10.1 General
Display (entire view)
English
Display (partial view left)
Level indicator CD status indicator (lights up when a CD is inserted, turns when the CD is being read or played, flashes in
pause mode),
The display of the device can show the following messages during the operation:
EQ
CLASS
POP
MUTE
SW
A sound effect setting is active
The sound effect CLASSIC has been selected
The sound effect POP has been selected
The loudspeakers have been muted
The subwoofer output has been activated
Preset button number of the current radio station, REC blinks while recording.
FLAT
ROCK
LOUD
LOC
Display (partial view right)
The sound effect FLAT has been selected
The sound effect ROCK has been selected
The LOUDNESS function has been activated
The selection of local radio stations has been
activated.
15
Page 16

10.2 Radio Mode
The display of the device can show the following messages during the radio operation:
HITRADIO
100.60
CT 16:08
FM 3
MW 2
(Example): RDS program name
Frequency in the FM range
Time
FM range (1-3)
MW range (1-2)
Preset location of the selected station on the
station buttons
AF
TA
TP
PTY
EON
Alternative frequency has been activated
Readiness for traffic alerts has been activated
A broadcast program with traffic information is
being received
A broadcast program with program type
information is being received
An FM stereo program is being received
EON (Enhanced Other Networks) data are
being received
10.3 CD Mode
The display of the device can show the following messag es during the audio CD operation:
DISK
INT
RDM
CD has been inserted
CD tracks are scanned briefly.
CD titles are being shuffled in random sequence
TOC READ
RPT
CD is being read
A CD track is being repeated
CD symbol lights up when a CD has been
inserted or when the pause button has been
pressed Moves during the playback of the CD
10.4 MP3/WMA/OGG-CD Mode
During MP3/WMA/OGG-CD operation, the display can show the following additional messages to the ones for audio
CD operation:
MP3
WMA
An MP3 file is being played
A WMA file is being played
OGG
ALBUM
An OGG file is being played
The name of the current album is being shown
as scrolling text
16
Page 17

English
TITLE
MUSIC
RDM
The name of the current track is being shown as
scrolling text
The compression of the current title is being
shown as scrolling text
CD titles are being shuffled in random order
ARTIST
INT
RPT
The name of the current artist is being shown as
scrolling text
CD tracks are scanned briefly.
A CD track is being repeated
10.5 SD/MMC Mode
The display of the device can show the following messages during the SD/MMC operation:
M.-CARD
MP3
WMA
TITLE
MUSIC
RDM
The memory card has been selected as the
source
An MP3 file is being played
A WMA file is being played
The name of the current track is being shown as
scrolling text
The compression of the current title is being
shown as scrolling text
CD titles are being shuffled in random order
OGG
ALBUM
ARTIST
INT
RPT
An OGG file is being played
The name of the current album is being shown
as scrolling text
The name of the current artist is being shown as
scrolling text
CD tracks are scanned briefly.
A CD track is being repeated
10.6 USB Mode
The display can show the following messages during the operation of a USB source as a music source directory:
USB
MP3
WMA
TITLE
A USB device has been selected as the source
or is connected
An MP3 file is being played
A WMA file is being played
The name of the current track is being shown
ALBUM
OGG
ARTIST
INT
The name of the current album is being shown
as scrolling text
An OGG file is being played
The name of the current artist is being shown
as scrolling text
CD tracks are scanned briefly
17
Page 18

as scrolling text
MUSIC
RDM
The compression of the current title is being
shown as scrolling text
CD titles are being played in random order
RPT
A CD track is being repeated
11 Activation
11.1 Insertion of the operating unit
In order to activate the car radio, you first have to insert the operating unit.
First slide the operating unit tilted slightly from the right onto the left guide pin, as described in the
illustration on the right. Then slide the operating unit onto the right guide pin until it audibly snaps
into place. Now carefully flip the operating unit upwards onto the device until it audibly snaps into
place. Now you can turn on the device.
If the device was turned on when the operating unit was removed, it will automatically turn on again
after the insertion with the last setting (radio, CD, SD/MMC, USB or AUX IN) as soon as the ignition
is turned on.
11.2 Removal of the operating unit (theft protection)
In order to remove the operating unit and thus protect your car radio from theft, turn off the device
with the “PWR/MUTE” button
the operating unit is released from the device on top and opens into the flipped-open position. Now
remove the operating unit, by first sliding the operating unit slightly to the left and then pulling it
towards you (see illustration). The operating unit then releases from the right guide pin and can
subsequently be detached towards the front. Place the operating unit into the provided case and
take it with you when you leave the car.
. Afterwards, press the button to flip down the operating unit. Now
18
Page 19

English
12 Basic functions
12.1 Turning on/off
To turn on the device, briefly press the “PWR” button on the operating unit. To turn the device off, please press the “PWR”
button for more than two seconds. The device will then turn off.
Note:
If the device is activated after the ignition has been started, it will automatically turn on and off with the ignition during
subsequent operation. A prerequisite for this is that the contact A7 is connected to terminal # 15 of the vehicle (see Illustr. 8.3
and Illustr. 8.4).
Caution!
When the radio is turned on, an automatic antenna that may be installed on the vehicle will also be extended. Before driving
into a car wash, you should therefore always turn off the device in order to avoid damages to the antenna as well as the
vehicle.
12.2 Changing the volume
The volume of the device can be changed with the round control dial . The current volume of the device will be indicated on
the display in the process. The volume scale ranges from 0 - 45.
Note:
The volume is not saved when the car radio is turned off. When you switch the car radio back on, the volume level
corresponds to the volume selected in the menu item “INVOL” (see p. 34).
Note:
Don’t use the car radio at an excessive volume. Otherwise there is the risk that you will permanently damage your hearing.
Please consider that while using the device you should still be in the position of perceiving your surroundings (warning
signals, sirens, etc.).
Only make time-consuming or complex changes to your device settings whilst parked. Otherwise your concentration might
be affected by the changes.
19
Page 20

12.3 Muting the speakers
To mute the connected speakers, briefly press the “MUTE” button . “MUTE” will appear in the display. In order to return to the
original volume, briefly press the “MUTE” button again or turn the volume control dial. The message “MUTE” will turn off and
the volume will be at the same level as before it was muted.
Note:
The MUTE setting also affects the LINE outputs. The MUTE function interrupts the playback of the audio tracks until the
function is turned off.
13 Radio (Tuner) Mode
13.1 Selection of the radio station
Turn on the SilverCrest CRE-521 MP3/WMA/OGG car radio with the “PWR” button . If the device was turned off while it was in
RADIO mode, the last selected station will be heard. If the device is set to an operation with one of the different data storage
media, please press the “MODE” button
13.2 Select the wavelength range
FM (UKW) range: To select the FM range, briefly press the “BAND” button repeatedly until the desired range “FM 1“, “FM 2“
or “FM 3“ and the current frequency appear on the display.
MW range: To select the MW range, briefly press the “BAND” button
and the current frequency.
Note:
After selecting a range, the station last selected in this range will be heard.
until you get to the radio function.
repeatedly until the display indicates “MW 1” or “MW 2”
20
Page 21

English
13.3 Find and save radio stations
Search for a station with the station search function
To select the stations, select the desired wave band with the “BAND” button (section 13.2). In order to begin searching in the
desired direction, briefly press one of the buttons “
Manual search for a station
In order to select a station manually, press the buttons “ “ or “ “ for about three seconds. The display will indicate
“MANUAL” Now press the buttons “
change in 50kHz increments in the FM range. If there is no entry for about 7 seconds, the device will switch back to automatic
station search. The display will indicate “AUTO”.
“ or “ “ until the desired frequency appears on the display. The frequency will
Store stations with the station buttons
With the station buttons “1”, “2”, “3”, “4”, “5”, and “6” ( - ) you can preset 6 programming spaces each on each level of the
wave band (e.g. “FM 1“, “FM 2”, or “FM 3”).
To store the station, select the corresponding station with the station search or manually. Press one of the buttons “1”, “2”, “3”,
"4", "5" or "6" until the radio sound is briefly muted in order to store the station. Now the station is stored at the station button
you selected.
Storing a station with the automatic station search
The automatic station search scans for the strongest available stations and stores these under the station selection buttons “1”
– “6” (
In order to start the search, press the “AS/PS” button and keep it pressed for more than two seconds. Now the scanner
allocates all station positions at the current level of the selected wave band as long as enough stations with sufficient reception
quality are available. After the scanning has ended, the stored stations are automatically matched up with their station names
and the station stored at the station position “1” can be heard.
- ).
Accessing stored stations
In order to access the stored stations, select the desired wave range with the “BAND” button , e.g. “FM 1”. Press one of the
six station buttons (
- ) and you will hear the station stored there.
Checking stored stations
For this function, the stations stored under the station buttons of a particular wave length are scanned for about five seconds.
In order to begin checking, briefly press the “AS/PS” button . The station positions “1” – “6” will begin blinking on the display in
sequence and the corresponding stations will be scanned.
“ or “ “ . The scanner will stop at the next available station.
21
Page 22

Information about the current station
In order to show information about the current station, please press the “DIS/REC” button. The desired information will then be
shown to you in the following sequence: current time, PTY, frequency of the current station.
Show current time
In order to show the current time, please press the “DIS/REC” button. Then the current time will be displayed to you.
Note:
If the device receives an RDS station with an RDS time signal, the clock will be automatically updated at particular intervals.
13.4 RDS
RDS is an information system whose signals are additionally broadcast by most FM stations. With RDS programs, the name of
the programme appears as an abbreviation on the display. Further information, such as frequency, time and program type
(PTY) can be faded in. An RDS programme will be broadcast by several stations on different frequencies (alternative
frequencies). If an RDS programme has been selected, the device automatically switches to the alternative frequency that can
be received most clearly, as long as that is available and the AF function (section 13.6) has been turned on.
In order to access the RDS information, repeatedly press the “DIS/REC” button
. The time, program type (PTY) and frequency
will appear in sequence on the display.
13.5 Traffic Announcements (“TA“, traffic program ”TP“)
To activate the traffic announcement program, please press the “TA/TP” button briefly. The message “TA” will appear on the
display and the readiness for announcements is turned on.
To deactivate the traffic announcements, press the “TA/TP” button
for announcements has been switched off.
Note:
If the selected station is not a traffic broadcast station, the device automatically starts to scan for the next traffic broadcast
station.
If “TA” is turned on, the CD, SD-MMC, USB and AUX-IN operation is interrupted for a traffic announcement and will be
continued afterwards. For the duration of the traffic alert, "TRAFFIC” will appear on the display. During AUX-IN operation,
the current track will not stop but continue playing. To stop the device connected via AUX-IN, please consult the manual of
the respective manufacturer of the device.
again. The message “TA” disappears and the readiness
22
Page 23

English
Note:
If you only want to hear traffic announcements, turn on the announcement function with the “TA” button and turn the
volume to “VOL 0” with the volume control dial. The device will automatically regulate a volume increase for traffic
announcements.
The TA volume can be individually adjusted under the volume item “TAVOL“.
13.6 Alternative frequencies (“AF”)
To activate the “AF” function, briefly press the “AF/REG” button . The message “AF” appears and the function is turned on.
To turn off the “AF” function, briefly press the “AF/REG” button . The message “AF” disappears and the function is deactivated.
Note:
The “AF” function is only displayed for broadcast stations that broadcast an “AF” signal. The “AF” message blinks when the
“AF” function is activated but no “AF” signal is available.
If an RDS (radio data system) station is being received that is broadcast by several broadcast stations with different
frequencies, the device automatically switches to the frequency that can be received most clearly. The “AF” function is
activated when the device is delivered.
In an area with bad reception, attempts to change between alternative frequencies can be heard as disruptive pauses. In
such an event, the “AF” function can be turned off.
Note:
Radio reception conditions
In the FM wave band, there can be changes in the reception conditions during the drive. Mountains, buildings or bridges can
diminish reception. This applies especially if the distance to the station is large.
Enhanced Other Networks (EON)
The EON function (see page 35) is an additional RDS service. If the current program doesn’t offer any traffic announcements,
EON automatically switches to the traffic announcements on another program. After the end of the announcement, the device
switches back to the previously heard station. The readiness for traffic announcements has to be activated for this.
23
Page 24

13.7 Regional programmes (“REG”)
Some radio stations divide their programs into regional stations with different content at specific times. If the reception is getting
worse, the “REG” function prevents the car radio from changing to alternative frequencies that have different program contents.
To turn the “REG” function on or off, please keep the “AF/REG” button
display.
pressed until "REG-ON" or "REG-OFF" appears in the
14 CD Mode
The SilverCrest CRE-521 MP3/WMA/OGG car radio supports the formats CD-Audio; CD-R; CD-RW and MP3/WMA/OGG-CD.
The bit rate has to be between 64kbps and 320kbps.
Note:
Conditional on the quality differences of the media as well the characteristics of the recording, it can happen that some
individually recorded CDs are unable to be read. Such events do not constitute a malfunction of the device.
Audio CDs (CD-R and CD-RW) that are recorded individually have to be finalized at the end of the burning process.
Note that the file names of the audio tracks have to correspond to the ISO-9660 standard. During the playback of MP3-
CDs, individual tracks can be skipped or not played back correctly. This can be due to the respective disc configuration,
the decoder software, or the hardware that was used for the recording.
Copy-protected CDs do not correspond to the specifications of audio CDs (CD-DA), don’t carry the respective logo, and
can therefore cause playback errors.
14.1 Selecting a CD as a program source
To play a CD, turn on the device with the “PWR” button . If the device was turned off during CD operation, the playback begins
at the track heard before turning off the device. If the device is set to another program source, press the “MODE” button until
you get to the CD function. The display will indicate the message “TOC READ”.
Note:
The program source “CD” can only be selected through the “MODE” button if there is a CD in the CD slot.
24
Page 25

English
14.2 Inserting / ejecting a CD
To insert a CD, please press the button on the device. Then the
operating unit automatically flips down and uncovers the CD insertion
slot.
Before you insert a CD, press the ” “button to make sure that no
other CD has already been inserted.
To insert the CD, slide it into the CD slot
will automatically be drawn inside.
Flip the front panel back up and let it snap into place.
The message “TOC READ” will be indicated on the display. Then the
message “001" will appear, followed by the time display of the track,
which thus shows that the first track on the CD is now being played
back.
To eject the CD, press the unlocking button
flips down and you can remove the ejected CD after pressing the “
button .
Caution:
Only standard CD formats may be inserted into the CD insertion slot (Ø 12cm).
Make sure that no foreign objects enter the CD slot.
Note:
Never use force when inserting the CD; this could damage the device as well as the CD. Never use force to try to prevent the
device from pulling in a CD. If necessary, eject the CD again.
with the printed side up. It
.again. The front panel
“
14.3 Playback / pause
To pause the playback, briefly press the pause button . “PAUSE” will be indicated on the display. To continue the playback,
press the “1” button again. The device doesn’t have any stop function.
25
Page 26

14.4 Selecting or repeating tracks
By briefly pressing the “ ” button , the playback jumps to the next track. If you press the “ “ button , the playback returns to
the beginning of the current track. If the “
You can briefly press both the ”
“ and ” “ buttons until the number of the desired track appears in the display.
“ button is pressed twice, the playback jumps back to the previous track.
14.5 Fast forward and backward play
For fast forward play, press the ” “ button and keep it pressed until you have reached the desired point. Likewise, press the
”
“ button for fast backward play and keep it pressed until you have reached the desired point. To control the process, the
increasing or decreasing minute and second amount is indicated on the display.
14.6 Repeat track (repeat)
To repeat a track, briefly press the button “2” . The abbreviation “RPT” will briefly appear on the display and the current title
will be repeated continuously.
To end this function, press the button “2”
continue normally.
again. The abbreviation “RPT” will be turned off and the playback of the tracks will
14.7 Intro
To briefly scan the tracks, briefly press the station button “3” during the playback. Then all tracks will be scanned for approx.
ten seconds. The abbreviation “INT” will appear on the display.
To end the INTRO function, briefly press the station button “3”
turned off on the display.
The playback continues at the point where the last intro was broken off.
again. The scan function will end and the “INT” message is
14.8 Playing tracks in random order (random)
For the random playback of CD tracks, briefly press the station button ”4“ . After pressing the button, the abbreviation “RDM”
will appear on the display and the device begins to play back a randomly selected track. If the RDM button is pressed during the
playback of a track, this track will be played again from the beginning. All other tracks will also be played back in random order.
To end the random function, briefly press the station button “4”
be played back in regular sequence.
26
again. The abbreviation “RDM” is turned off and the tracks will
Page 27

Note:
When the last track of a CD has finished, the playback automatically starts again at the beginning of the CD. This happens
regardless of whether the device is in REPEAT mode.
If the first track of a multi-session CD contains audio data, only the audio data are played back, even if other data formats
are recorded.
English
15 USB/MP3/WMA/OGG and SD/MMC Mode
15.1 Connecting/removing a USB storage medium
To connect a USB storage medium, remove the protective rubber cap on the USB connection . Now
plug the storage medium straight from the front into the USB connection of the device. The display
switches to “USB” and the device searches through the storage medium for data that are suitable for
playback.
To remove a USB storage medium, please turn off the radio or change the audio source. Afterwards you
can pull the USB storage medium off the USB connection.
Note:
Please note that the connection of a USB removable storage device can lead to the device being turned off. It’s also possible
that your USB removable storage device is not recognized by the device even if it’s supported. Then the cause is an excessive
power demand by the removable storage device. To protect the device, it shuts off automatically. In such an event you will
need an additional power supply for the removable storage device, which is available in an electronics store.
Note:
Only connect the USB storage medium when the car radio is turned on.
Don’t pull off the USB storage medium while audio data are still being played back from it. This could result in reading
errors on the data storage medium.
To protect the USB connection of the device from damages, please select a sufficiently long USB connection cable.
Make sure that any connected USB storage medium is sufficiently well-protected from sliding inside the vehicle.
Don’t hang any objects across a plugged-in USB storage medium or the plug of a USB connection cable. This could
damage the USB connection.
27
Page 28

15.2 Selecting a USB storage medium as data source
To play back audio tracks from a storage medium (e.g. USB stick, 2.5 “USB hard drive) connected to the USB connection, press
the “MODE” button to select “USB” as the data source.
Then the device will read the audio tracks that can be reproduced from the data storage medium and begins to play back the
first track.
Note:
The “USB” program source can only be selected through the “MODE” button if a USB storage medium has been
connected to the device.
When you pull off the USB storage medium or the plug of the USB connection cable from the device, the device
automatically switches back to the most recently selected program source.
Please note that only those USB storage media are recognized that have been formatted and written according to the
FAT16 or FAT32 standard. Hard drives formatted in NTFS or Linux are not recognized or supported.
15.3 Selecting an iPod® as data source
To select an iPod® as the data source, please connect it with the iPod® connection cable to the USB connection of the device.
The audio data stored on the iPod® can now be played in the same way as on the regular USB storage media.
Note:
Please note that the memory of an iPod® is differentiated into two different memory levels. The CRE-521 can only play back
data from the mass storage level. The iTunes
®
level is not supported.
15.4 Insert / remove SD/MMC
To insert an SD/MMC card, please press the button on the device. Then the operating
unit automatically flips down and uncovers the SD/MMC insertion slot. Now please insert
your SD/MMC card into the card slot
position. SD/MMC cards with a storage capacity of up to 2 GB are supported.
To remove a SD/MMC card, press the unlocking button
Now please press the card that will be removed slightly into the device, until it snaps out.
Afterwards you can remove the card from the slot.
with the contacts to the left until it audibly snaps into
again. The front panel flips down.
28
Page 29

Note:
Never use force when inserting an SD/MMC card; this could damage the device as well as the card. Also prevent direct skin
contact with the contacts on the card to prevent contact problems .
English
15.5 Selecting SD/MMC as a program source
To play back audio tracks from an SD/MMC memory card, press the "MODE” button to select “M-CARD” as the data source.
Then the device will read the music tracks that can be reproduced from the memory card and begins to play back the first track.
Note:
The program source “SD/MMC” can only be selected through the “MODE” button if there is an SD/MMC card in the card
reader. When you remove the SD/MMC card from the device, the device automatically switches back to the most recently
selected program source.
15.6 MP3 functions
Below are descriptions of the functions and displays when an MP3 CD is inserted, an MP3 player / USB storage device is
connected, or when an SD/MMC memory card is inserted.
When the MP3 data is read, the total amount of folders and tracks will briefly appear on the display. This is followed by the
playback. During the playback, the display will alternately show the folder name, track name, and the name of the artist.
15.7 Searching for track numbers
When searching for track numbers, you have the option of quickly getting to the desired track number.
To start searching for track numbers, briefly press the “AS/PS” button. The message “001” will appear on the display, whereby
the last digit is flashing. A maximum of three digits are available for the search. By turning the control dial
last digit of the search entry and confirm it by pressing the control dial
by turning the control dial and confirm by pressing. Proceed with the third digit in the same way. If you press the “BAND”
button at the start of the search, the device selects the desired file and plays it back.
If you don’t need the second and/or third digit for the search, just leave these settings unchanged and begin searching with the
“Band” button
.
. Now the centre digit is flashing. You can also set this
you can select the
29
Page 30

Note:
If a larger number is selected than there are tracks on the data storage medium, the device will start playing the last track on
the data storage medium.
15.8 Alphabetical search
With an alphabetical search, you have the option of searching tracks on the storage medium according to name or parts of the
name (letter entry) and thereby quickly getting the desired track.
To start the alphabetical search, briefly press the “AS/PS” button twice. The message “AXX” will appear on the display, whereby
the “A” is flashing. Now you can select the desired letter by turning the dial
maximum of three letters are available for the search. After you have selected the third letter and have started the search by
pressing the “BAND” button
several search results, they can be viewed by turning the control dial and pressing it to select one.
To start the search without having entered all three letters, press the “BAND” button
name of the first searched title with the searchable letter sequence appears on the display. If there is more than one file, you
can have the different results shown on the display by turning the control dial .
To start the playback, briefly press the control dial
Note:
If the device is unable to find a matching search result, the message “AXX” will be displayed again.
, the search will begin, along with the display of the files that match the desired track. If there are
again.
and confirming your selection by pressing it. A
after entering the last search letter. The
15.9 Searching according to compression type
When searching according to the type of compression, there is the option of having files displayed according to a particular
compression. To start the search for the compression type, briefly press the “AS/PS” button three times. The message “WMA/”,
“MP3/” or “OGG/” will appear on the display. By turning the dial
confirm it by pressing the “BAND” button
The first title of the matching compression type appears on the display. If there is more than one file, you can have the different
results shown on the display by turning the control dial .
To start the playback, briefly press the control dial
to start the search.
again.
, you can now select the desired type of compression and
15.10 Skipping forward or backward in increments of ten
If you briefly press the station button “5” during playback, the device will skip back by ten tracks. If you want to skip ten tracks
ahead, press the station button ”6“
30
.
Page 31

English
15.11 Pause
To suspend the playback of the current title, please press the PAUSE / station button “1” . Then the playback of the current
title is stopped until the PAUSE / station button "1" is pressed again or the device is turned off.
15.12 Repeat functions (repeat)
If you want to continuously repeat the currently played track, briefly press the station button “2” during the playback. The
message “RPT” will be indicated on the display.
To stop the repeat function, press the station button ”2“
played back regularly.
again and the abbreviation RPT is turned off. Then the tracks will be
15.13 Intro
To scan the titles on the storage medium, briefly press the station button “3” . The message “INT” will appear on the display.
Then all tracks will be scanned for approx. ten seconds.
To end the scanning function, press the station button “3”
Note:
When the last track of an MP3 storage medium has finished, the playback automatically starts again at the beginning.
again and the abbreviation “INT” will turn off.
15.14 Random playback (random)
To play back the tracks on the storage medium in random order, briefly press the station button "4" during the playback. The
abbreviation “RDM” will appear on the display.
To end the function, press the station button “4”
again, which will stop the random function. The message “RDM” will turn off.
15.15 Turning the subwoofer on/off
The device has a subwoofer output on its rear side. To activate this connection, press the “BAND” button for more than two
seconds. The sign .will appear on the display.
To deactivate the output again, press the “BAND” button again for more than two seconds.
31
Page 32

16 AUX IN
The AUX IN is a connection with which you can connect external audio devices through their headphone or AUX output with
this device. The audio tracks played back on these devices are then put out through the car speakers. This is how you can e.g.
play back audio files that you have saved on your mobile phone, minidisk, iPod
To connect external audio devices with the MP3/WMA/OGG car radio CRE-521, you will need a cable with a 2.5 mm jack plug
on a 3.5 mm jack plug, which is contained in the scope of the delivery. Connect this cable to the headphone connection or AUX
output of your playback device and begin the playback. Set the volume of the playback device to a medium level and
subsequently regulate the volume with your Silvercrest CRE-521. If the playback source of the Silvercrest CRE-521 has not
been set to AUX yet, please press the “MODE” button
until AUX appears on the display.
®
or tape recorder.
17 Settings
17.1 Menu level 1
By briefly pressing the volume control dial once or several times, the functions of menu level 1, volume control, bass setting,
treble setting, and the speaker balance between the left and right as well as front and rear speaker groups can be selected and
set.
Changing the bass setting (BASS)
Pressing the control dial twice will result in reaching the bass settings. The message “BAS” will appear on the display together
with the current level (e.g. “+2”). To change the bass bandwidth, turn the control dial
bandwidth can be set in a range between “-7” and “+7”. It can be changed in increments of one.
The setting is saved either when the desired value is confirmed by pressing the control dial or through automatic storage
(don’t change anything on the device for approx. five seconds). If you confirm the selection by pressing the control dial , you
will reach the next possible setting. If you use the automatic storage, the device will return to the standard display.
Changing the treble setting (TREBLE)
After pressing the control dial three times, the treble setting (TREBLE) can be reached. The message “TRE” will appear on
the display together with the current level (e.g. “0”). To change the bandwidth of the treble, turn the control dial clockwise or
counter-clockwise. The bandwidth can be set in a range between “-7” and “+7”. It can be changed in increments of one.
The setting is saved either when the desired value is confirmed by pressing the control dial
(don’t change anything on the device for approx. five seconds). If you confirm the selection by pressing the control dial , you
will reach the next possible setting. If you use the automatic storage, the device will return to the standard display.
clockwise or counter-clockwise. The
or through automatic storage
32
Page 33

English
Change in the volume ratio between the right and left speaker group (BALANCE)
After pressing the control dial four times, the settings for the ratio between the speakers connected on the right and left can
be reached (BALANCE).
The message “BAL” appears on the display along with the settings for the volume ratio between the right and left speaker group
(e.g. “BAL 2R“). To change the ratio between the speakers, turn the control dial
clockwise or counter-clockwise. Depending
on the direction in which the control dial is turned, an “R” (right speaker group) or an “L” (left speaker group) will appear on the
display, together with a digit (e.g. “2R“ or “4L“). These provide information about the direction in which the volume ratio is
changed and about the amount of the change. The ratio between the right and left speaker group can be set in a range between
“8R” and “8L”.
The volume ratio between the speakers changes according to the setting and the volume will increase on one side according to
this setting and decrease on the other side.
Note:
If the ratio is set to “0”, the volume on both speaker groups is the same.
If the control dial is set to the maximum position of “8” on one of the two sides, the speaker group in the opposite side will
be mute. To change this, turn the control dial again.
The setting is saved either when the desired value is confirmed by pressing the control dial or through automatic storage
(don’t change anything on the device for approx. five seconds). If you confirm the selection by pressing the control dial
, you
will reach the next possible setting. If you use the automatic storage, the device will return to the standard display.
Changing the volume distribution between the front and rear speaker group (FADER)
After pressing the control dial five times, the settings for the speaker distribution between the front and rear speaker group
(FADER) will be reached.
The message “FAD” will appear on the display along with the set volume ratio between the front and rear speaker group (e.g.
“FAD 2F”). To change the ratio between the speaker groups, turn the control dial
on the direction in which the control dial is turned, an “R” or an “L” will appear on the display, together with a digit (e.g. “2F“ or
“3R“). These provide information about the direction in which the volume ratio is changed and about the amount of the change.
The ratio between the right and left speaker group can be set in a range between “8F” and “8R”.
The volume ratio between the speakers changes according to the setting. The volume of one speaker group increases, the
other decreases.
Note:
If the ratio is set to “0”, the volume on both speaker groups is the same.
If the control dial for one of the two speaker groups is turned to the maximum setting “8”, the other speaker group is muted.
To change this, turn the control dial
again.
clockwise or counter-clockwise. Depending
33
Page 34

The setting is saved either when the desired value is confirmed by pressing the control dial or through automatic storage
(don’t change anything on the device for approx. five seconds). If you confirm the selection by pressing the control dial
will reach the next possible setting. If you use the automatic storage, the device will return to the standard display.
Note:
After pressing the control dial six times, the volume setting is reached again. If no changes are made for 5 seconds, the
device will automatically return to the initial display.
, you
17.2 Menu level 2
Menu level 2 is reached if the control dial is pressed for approx. two seconds. The individual menu items can be reached by
repeatedly pressing the control dial.
On menu level 2, the functions “INVOL” (initial volume), “ADJ” (setting the time), “TAVOL” (standard volume for traffic
announcements), “EON” (automatic station change for traffic announcements), “REC” (recording function settings), “DSP” (tone
settings), “LOUD” (tone setting), “LOC” (distance setting for station search), and “STEREO” (switching between stereo and
mono playback) can be set.
“INVOL”: Initial volume
The “INVOL” function enables an adjustment of the playback volume when the device is turned on according to individual
preferences.
To change the initial volume of the device, press the control dial
appears. There you have the option of setting the initial volume of the device by turning the dial. Turning to the right increases
the initial volume, turning to the left reduces the initial volume. The initial volume can be set between 0-45. Here 0 = no sounds
and 45 = maximum volume of the device.
The setting is saved either when the desired value is confirmed by pressing the control dial
(don’t change anything on the device for approx. five seconds). If you confirm the selection by pressing the control dial
will reach the next possible setting. If you use the automatic storage, the device will return to the standard display.
Note:
During the playback, it’s possible to adjust the volume to the current requirements at any time through the control dial .
until the menu level 2 is reached. The "INVOL" function
or through automatic storage
, you
34
Page 35

English
“ADJ“: Setting the time
To set or change the time settings, press the control dial until you get to menu level 2. The “INVOL” function will appear.
Press the control dial
turning the dial. Turning to the right changes the number of the hours, turning to the left, the minutes.
The setting is saved either when the desired value is confirmed by pressing the control dial
(don’t change anything on the device for approx. five seconds). If you confirm the selection by pressing the control dial , you
will reach the next possible setting. If you use the automatic storage, the device will return to the standard display.
Note:
If the device receives an RDS station with an RDS time signal, the clock will be automatically updated in particular intervals.
until you get to the menu item “ADJ”. There you have the option of setting the time of the device by
or through automatic storage
“TAVOL”: Volume for traffic announcements
The “TAVOL” function enables an adjustment of the playback volume when the device is turned on according to individual
preferences.
To change the device’s volume for traffic announcements, press the control dial
function will appear. Press the control dial
device’s volume for traffic announcements by turning the dial. Turning to the right increases the volume for traffic
announcements, turning to the left reduces the volume for traffic announcements. The volume for traffic announcements can be
set for between 0-45. Here 0 = no sound and 45 = maximum volume of the device.
The setting is saved either when the desired value is confirmed by pressing the control dial
(don’t change anything on the device for approx. five seconds). If you confirm the selection by pressing the control dial
will reach the next possible setting. If you use the automatic storage, the device will return to the standard display.
Note:
During a traffic announcement, it’s possible to adjust the volume to the current requirements at any time through the control
dial
.
until you get to the menu item “TAVOL”. There you have the option of setting the
until menu level 2 is reached. The “INVOL”
or through automatic storage
you
“EON”: Automatic station switching for traffic announcements
The “EON” function is an additional RDS service. If the current program doesn’t offer any traffic announcements, EON
automatically switches to the traffic announcements on another program. After the end of the announcement, the device
switches back to the previously heard station. The readiness for traffic announcements “TA” has to be activated for this.
35
Page 36

To activate the “EON” function, press the control dial until menu level 2 is reached. The “INVOL” function will appear. Press
the control dial
until you get to the menu item “EON”. There you will have the option of activating (ON) or deactivating (OFF)
the function by turning the dial. If the “EON” function is activated, “EON” will appear on the display.
The setting is saved either when the desired value is confirmed by pressing the control dial
or through automatic storage
(don’t change anything on the device for approx. five seconds). If you confirm the selection by pressing the control dial you
will reach the next possible setting. If you use the automatic storage, the device will return to the standard display.
“REC”: Settings for the recording function
This menu item gives you the option of selecting between WMA and MP3 coding while recording. The recording function will be
described in detail below under 17.3.
To reach the menu, press the control dial
until menu level 2 is reached. The “INVOL” function will appear. Now briefly press
the control dial until you reach the menu item “REC”. There you will have the option of selecting between “WMA” and “MP3”
by turning the dial.
The setting is saved either when the desired value is confirmed by pressing the control dial
or through automatic storage
(don’t change anything on the device for approx. five seconds). If you confirm the selection by pressing the control dial , you
will reach the next possible setting. If you use the automatic storage, the device will return to the standard display.
“DSP”: Sound settings – 4-band equalizer
In the “DSP” menu, you have the option of selecting between four different sound settings. The choices are between the sound
settings “CLASSIC“, ”ROCK“, ”POP“ and ”FLAT“. Here you also have the option of deactivating the “DSP” function (“DSP
NONE”).
To select between the different sound settings, press the control dial until menu level 2 is reached. The “INVOL” function will
appear. Press the control dial repeatedly until you get to the menu item “DSP”. There you will have the option of selecting
between the different sound settings by turning the dial.
The setting is saved either when the desired value is confirmed by pressing the control dial
(don’t change anything on the device for approx. five seconds). If you confirm the selection by pressing the control dial
will reach the next possible setting. If you use the automatic storage, the device will return to the standard display.
Note:
After selecting the sound setting, it will appear on the display of the device together with the message “DSP”.
or through automatic storage
, you
36
Page 37

English
“LOUD”: Sound setting – Loudness
The “LOUD” function makes it possible to emphasize low and high frequencies through the push of a button in order to increase
sound perception in an adjustment to the respective volume.
To activate the “LOUD” function, press the control dial until menu level 2 is reached. The “INVOL” function will appear. Press
the control dial repeatedly until you get to the menu item “LOUDNESS”. There you will have the option of activating (“LOUD
ON”) or deactivating (“LOUD OFF”) the function by turning the dial.
The setting is saved either when the desired value is confirmed by pressing the control dial
(don’t change anything on the device for approx. five seconds). If you confirm the selection by pressing the control dial , you
will reach the next possible setting. If you use the automatic storage, the device will return to the standard display.
Note:
When the “LOUDNESS” function (“LOUD ON”) is activated, the message “LOUD” appears on the display. This is turned off
after deactivation.
or through automatic storage
“LOC”: Distance setting for the station search
The “LOCAL” function is relevant for the station search. Here it can be selected whether only local, strong stations (“ON”) or also
weaker, more distant stations (“OFF”) are searched for.
To get to this menu item, press the control dial until menu level 2 is reached. The “INVOL” function will appear. Now briefly
press the control dial until you reach the menu item “LOCAL”. You can choose between “ON” or “OFF” by turning the dial.
The setting is saved either when the desired value is confirmed by pressing the control dial
(don’t change anything on the device for approx. five seconds). If you confirm the selection by pressing the control dial
will reach the next possible setting. If you use the automatic storage, the device will return to the standard display.
Note:
This setting only affects the radio mode and can only be carried out while the radio mode is active.
or through automatic storage
, you
“STEREO”: Switching between stereo and mono playback
This menu item gives you the option of selecting between stereo and mono playback.
To reach the menu, press the control dial until menu level 2 is reached. The “INVOL” function will appear. Now briefly press
the control dial repeatedly until you reach the menu item “STEREO”. There you will have the option of selecting between
“MONO” and “STEREO” by turning the dial.
37
Page 38

The setting is saved either when the desired value is confirmed by pressing the control dial or through automatic storage
(don’t change anything on the device for approx. five seconds). If you confirm the selection by pressing the control dial
, you
will reach the next possible setting. If you use the automatic storage, the device will return to the standard display.
Note:
This setting only affects the radio mode and can only be carried out while the radio mode is active.
17.3 Recording and copying function
With the Silvercrest CRE-521 you will have the option of recording music tracks, radio features, news, etc. onto removable
SD/MMC or USB removable storage devices. The compression types WMA and MP3 are available for this. How you can
change the compression mode is described above in section “REC” under 17.2. Any kind of music track, radio feature and
similar pieces from the radio, a CD or the AUX IN input can be recorded. Before recording, just select the appropriate playback
source by using the “MODE” button
To start a recording, please connect a USB removable storage device or insert an SD/MMC card into the card slot.
Note:
Please keep in mind the legal regulations applicable at your whereabouts pertaining to the production of copies of copyrightprotected materials. If you have any doubts, please consult a specialist near you.
Note:
The files stored by the device on the data storage medium are named as follows:
TRACK**.MP3 or TRACK** .WMA for recordings from an audio CD
Tuner**.MP3 or Tuner** .WMA for recordings from the radio
LINE**.MP3 or LINE** .WMA for recordings from AUX IN
MUSIC**.MP3 or MUSIC** .WMA for copies of an MP3/WMA CD ** = continuing number of titles (01, 02, 03, …)
Recording from a CD
If you want to record from a music CD, please select this through the “MODE” button and then press the “DIS/REC” button
for about three seconds. The recording menu appears and you have the choice between “MMC ALL TRACK RECORD” (saving
all tracks of the CD on an SD/MMC card); “USB ALL TRACK RECORD” (saving all tracks of the CD on a USB removable
storage device), “MMC ONE TRACK RECORD” (saving the current track of the CD on an SD/MMC card) or “USB ONE TRACK
RECORD” (saving the current track of the CD on a USB removable storage device).
.
38
Page 39

If only an SD/MMC card is inserted, only the option to save onto the SD/MMC card is offered. If only a USB removable storage
device is inserted, only the option to save onto the USB removable storage device is offered. If no storage medium is connected
or inserted, the message “NO MEDIA” appears and the recording process is stopped.
To select which storage medium should be used for the recording, please press the control dial
source is indicated and confirm the selection with the “BAND” button
message “REC” will begin flashing on the display. To stop a current recording, press the “DIS/REC” button for more than
three seconds. The recording will stop.
Note:
Please keep in mind the legal regulations applicable at your whereabouts pertaining to the production of copies of copyrightprotected materials. If you have any doubts, please consult a specialist near you.
. Then the recording will start automatically. The
until the desired storage
English
Recording from radio and AUX IN
If you want to record from the radio or through the AUX IN, please select the radio station or the AUX IN through the “MODE”
button
the choice between “REC USB” (the recording will be saved on the USB removable storage device) or “REC MMC” (the
recording will be stored on an SD/MMC card).
If only an SD/MMC card is inserted, only the option to save onto the SD/MMC card is offered. If only a USB removable storage
device is inserted, only the option to save onto the USB removable storage device is offered. If no storage medium is connected
or inserted, the message “NO MEDIA” appears and the recording process is stopped.
To select which storage medium should be used for the recording, please press the control dial
source is indicated and confirm the selection with the “BAND” button . Then the recording will start automatically. The
message “REC” will begin flashing on the display. To stop a current recording, press the “DIS/REC” button
three seconds. The recording will stop.
Note:
Please keep in mind the legal regulations applicable at your whereabouts pertaining to the production of copies of copyrightprotected materials. If you have any doubts, please consult a specialist near you.
and then press the “DIS/REC” button for about three seconds. The recording menu will appear and you now have
until the desired storage
for more than
39
Page 40

Copying from an MP3/WMA CD onto an SD/MMC card or USB removable storage device
If an MP3 and/or WMA CD is inserted into the CD slot and the “DIS/REC” button is pressed for more than three seconds, the
device will start the copy mode for the respective track. If more than one storage medium is available on the device, a selection
menu will appear.
To select the storage medium that should be used for the copy, press the "DIS/REC" button
is indicated. The copying process is started by pressing the “BAND” button
number that indicates the process of the copying. The message “M.CARD” or “USB” will begin flashing on the display. After
the end of the copying process, the device will play the subsequent track.
To stop a current copying process, press the “DIS/REC” button
Note:
Please keep in mind the legal regulations applicable at your whereabouts pertaining to the production of copies of copyrightprotected materials. If you have any doubts, please consult a specialist near you.
for more than three seconds. The copying process is stopped.
. “COPY” will appear on the display along with a
until the desired storage source
17.4 Deleting tracks
During the playback from an SD/MMC memory card and USB removable storage device, it’s possible to delete the current track
from the data storage medium. To do this, press the “DIS/REC” button
respective track. “DELETE” will appear on the display. To delete the track, press the “BAND” button . Then the track is
removed from the data storage medium. Afterwards the device will continue with the playback of the subsequent track.
for more than three seconds during the playback of the
17.5 Factory settings (“RESET”)
By using the reset function, the device can be changed back to the factory default settings.
To use the reset function, please press the button on the device. Then the operating unit automatically flips down. Now press
the button
Note:
When the factory settings are restored, the clock and the stored radio stations will also be reset or erased
on the device with a thin, sharp object. The device will then be reset and turned off if required.
40
Page 41

–
–
18 Remote control
18.1 Description of the buttons
The buttons of the remote control fulfil the same functions as the buttons with the same names on the device.
Button Function Chapter
Turning device on/off 12.1
Traffic announcements 13.5
PTY button to select the program style 13.4
Alternative frequencies 13.6
Automatic station search, track search 13.3
Station search forward, menu navigation, next
track
Selection button, menu button
Switch display, start/stop recording
13.3, 17.1 – 17.2
14.4 – 14.5
13.2 - 13.3, 15.7
15.9, 15.15, 17.1
13.3
14.6 – 14.9
English
Select playback source 13.1, 14.1, 15.2
41
Page 42

Button Function Chapter
p
Muting 12.3
Station button 1, pause
Station button 2, intro
Station button 3, repeat track (repeat)
Station button 4, random playback
Station button 5
MP3 / WMA track - 10
Station button 6
MP3 / WMA track + 10
Select the wavelength range 13.2
13.3
14.3, 15.11
13.3
14.7
13.3
14.6
13.3
14.8
13.3
15.10
13.3
15.10
Station search backwards, menu navigation,
42
revious track
Changing the volume 13.2 – 13.3
13.3, 17.1-17.2,
14.4 -14.5
Page 43

18.2 Changing the battery
To change the battery, please press the lock on the left side of the battery case slightly to
the right. Now the battery compartment can be pulled out towards the front.
Now replace the old battery with a new one of the same type (CR 2025). Please pay
attention to the polarity ("+ pole" to the top) when you insert the battery. Please only touch
the battery on the edge, since there might be contact problems otherwise.
Now slide the battery compartment with the new battery back into the case. Make sure that
the battery compartment snaps back into the case.
English
Note:
Please remove the safety disk on the battery compartment before first using the remote control. Otherwise the remote control
won’t operate properly.
Disposal of the battery
Please consider that you as an end consumer are obligated to return discarded batteries to a distributor or a redemption site
intended for this purpose by a public waste management facility.
43
Page 44

19 Product information
19.1 General information
General information
Radio component
CD component
Operation with memory card
USB operation
CD-MP3/WMA/OGG operation
Power output
Removable flip-down operating unit
Semi dot matrix LCD display
Amber-coloured button illumination
PLL tuner with 18FM/12AM station presets
RDS (PTY, TA, AF, PS, PI)
Playback of CD/CD-R/CD-RW/MP3/WMA/OGG-CD
ESP anti-shock CD/MP3/WMA/OGG
Mechanical anti-shock
SD/MMC cards (up to max. 2GB)
USB connection
Playback of MP3/WMA/OGG
MP3 ID3 tag display: Title, compression, artist and album
Title display with running text
Search (alphabetical, according to track number, according to compression)
4 x 20 W (RMS)
4 band equalizer: Classic, pop, rock, flat
Muting
LINE OUT: 2 x 2 V RCA jack connection
Subwoofer output
AUX IN: Front connection through 2.5 mm jack plug
44
Page 45

19.2 Technical specifications
English
General
Energy supply 12V DC (11V-16V)
Maximum power output 40W x 4 channels
Appropriate speaker impedance 4 – 8Ω
Appropriate speaker output 20W x 4 channels
Fuse 15A
FM stereo radio
Frequency range 87.5-108.0MHz
Sensitivity 10dBμ
Frequency resonance 30Hz – 15kHz
Stereo separation 30dB (1kHz)
Image resonance ratio 50dB
IF resonance ratio 70dB
Audio signal noise ratio 55dB
MW radio
Frequency range 522 – 1620kHz
Sensitivity (S/N=20dB) 30dBμ
CD player
System Disc Digital Audio System
Frequency resonance 20Hz – 20kHz
Audio signal noise ratio >80dB
Distortion factor 10 %
Channel separation >60dB
ESP (Anti-shock function)
Remote control
Type Infrared
Battery CR2025
45
Page 46

20 Disposal
Please consider that your electronic entertainment device is subject to the European Directive 2002/96/EC for the reduction of
electronic waste.
You are therefore not permitted to dispose of your device in your household waste.
You can receive information regarding the disposal of old device at the municipal
administration, the waste disposal administration and the store where you purchased this
product.
You can drop off your device free of charge at communal collection points.
With the proper disposal of old devices you prevent environmental damage and don’t
damage your health.
21 Troubleshooting
If an error occurs, please consider these instructions before you have the device repaired. If you are unable to solve a problem
despite these instructions, please consult the hotline. Don’t try repairing the device yourself under any circumstances. In that
event the device would lose its warranty.
Problem Cause Solution
The frame can’t be
slid off the device
towards the rear
46
The safety screws were not removed Please remove the safety screws and try again.
The disassembly key was not inserted
correctly.
Reinsert the key. Make sure that the protrusion on the
disassembly key points away from the device during the
insertion.
Page 47

Problem Cause Solution
The device does not
play any music
The device can’t be
turned on
The device doesn’t
retain the stored
stations
CD isn’t being drawn
in completely.
The inserted CD
can’t be played.
The connection cables haven’t been
attached correctly.
The “MUTE” or “pause” button is pressed. Press the “MUTE” or “pause” button again.
On / off button was pressed too briefly. Keep the on / off button pressed longer.
The operating unit isn’t inserted correctly. Reinsert the operating unit.
The ignition is turned off. Turn on the ignition
The connection cables haven’t been
attached correctly.
The fuse is blown. Replace the fuse.
The radio hasn’t been connected correctly. Please check if all cables have been attached correctly.
The device temperature is too high. Reduce the volume of the device.
Contacts 4 and 7 haven’t been connected
properly or the vehicle manufacturer has
assigned these in reverse.
The two safety screws were not removed,
or not entirely.
The CD was inserted with the printed side
to the bottom.
The CD has too many scratches.
The CD is dirty.
The device temperature is too high. Reduce the volume of the device.
The CD contains incorrect or faulty data.
Please check if all cables have been attached correctly.
Please check if all cables have been attached correctly.
Remove the transparent plugs on the yellow and red
cable and plug them back together crosswise (yellow to
red and red to yellow).
Please remove the safety screws and try again.
Flip the CD over and try again.
Create another CD from the original or have the CD
repaired.
Clean the CD (without cleaning agents, just a lint-free
cloth).
The CD can’t be used with this device. Please burn your
audio data onto a separate data storage medium and try
again.
English
47
Page 48

Problem Cause Solution
Bad radio reception Reception conditions are bad. Change your location to achieve better reception.
The radio reception
is choppy or
frequently
interrupted.
The radio only
receives few stations
The music is only
played back by one
speaker group
NO FILE
Not all MP3/WMA
tracks are played
back.
The AF function is activated. Deactivate the AF function (see section 17.2).
The REG function is activated. Deactivate the REG function
The balance and/or fader settings are faulty Check the balance or fader settings (see section 17.1).
The CD doesn’t meet the CompactDisc
standard or doesn’t contain any MP3 /
WMA files.
Wrong coding of the files that aren’t being
played back.
Too many files are stored on the CD.
Create a CD that meets the CompactDisc standard.
Recode the files.
A maximum of 1000 tracks can be administered per CD.
Create a CD with less than 1000 tracks.
48
 Loading...