

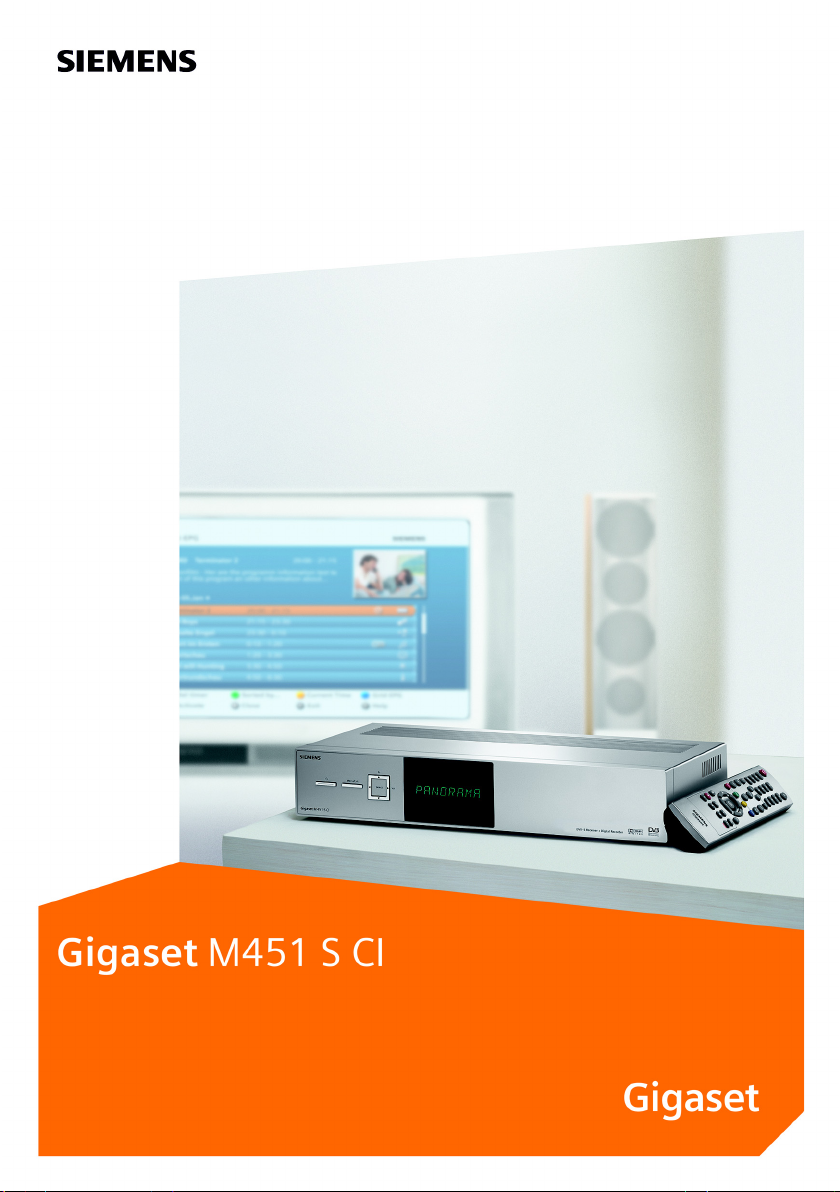
Page 1
Page 2

Page 3

Safety . . . . . . . . . . . . . . . . . . . . . . . . . . . . . . . . . . . . . 5
Safety Precautions . . . . . . . . . . . . . . . . . . . . . . . . . . . . . . . . . . . . . . . . . . . . . . . . . . . . . 5
Information on Installation Location and Operation . . . . . . . . . . . . . . . . . . . . . . . . . . 5
Your Set-Top Box . . . . . . . . . . . . . . . . . . . . . . . . . . . . 6
Using Your Set-Top Box . . . . . . . . . . . . . . . . . . . . . . . . . . . . . . . . . . . . . . . . . . . . . . . . . 6
Display and Device Buttons . . . . . . . . . . . . . . . . . . . . . . . . . . . . . . . . . . . . . . . . . . . . . . 8
Ports . . . . . . . . . . . . . . . . . . . . . . . . . . . . . . . . . . . . . . . . . . . . . . . . . . . . . . . . . . . . . . . . 9
Supplied Items . . . . . . . . . . . . . . . . . . . . . . . . . . . . . . . . . . . . . . . . . . . . . . . . . . . . . . . 10
User Guides . . . . . . . . . . . . . . . . . . . . . . . . . . . . . . . . 11
Quick Reference Card . . . . . . . . . . . . . . . . . . . . . . . . . . . . . . . . . . . . . . . . . . . . . . . . . . 11
Installation Manual . . . . . . . . . . . . . . . . . . . . . . . . . . . . . . . . . . . . . . . . . . . . . . . . . . . 11
Information on the Television Screen . . . . . . . . . . . . . . . . . . . . . . . . . . . . . . . . . . . . . 11
Guides on the Internet . . . . . . . . . . . . . . . . . . . . . . . . . . . . . . . . . . . . . . . . . . . . . . . . . 12
Notation in User Guide . . . . . . . . . . . . . . . . . . . . . . . . . . . . . . . . . . . . . . . . . . . . . . . . 13
Starting Up the Set-Top Box . . . . . . . . . . . . . . . . . . 14
Installation Requirements . . . . . . . . . . . . . . . . . . . . . . . . . . . . . . . . . . . . . . . . . . . . . . 14
Preparing the Remote Control . . . . . . . . . . . . . . . . . . . . . . . . . . . . . . . . . . . . . . . . . . . 15
Connecting up Devices . . . . . . . . . . . . . . . . . . . . . . . . . . . . . . . . . . . . . . . . . . . . . . . . 15
Switching On/Off Devices . . . . . . . . . . . . . . . . . . . . . . . . . . . . . . . . . . . . . . . . . . . . . . 20
Running the Installation Wizard . . . . . . . . . . . . . . . . . . . . . . . . . . . . . . . . . . . . . . . . . 22
Initial Operation . . . . . . . . . . . . . . . . . . . . . . . . . . . . . . . . . . . . . . . . . . . . . . . . . . . . . . 23
Common Interface (Optional) . . . . . . . . . . . . . . . . . . . . . . . . . . . . . . . . . . . . . . . . . . . 23
USB Connection to a PC (optional) . . . . . . . . . . . . . . . . . . . . . . . . . . . . . . . . . . . . . . . 25
Notes on Operation . . . . . . . . . . . . . . . . . . . . . . . . . 26
The Remote Control . . . . . . . . . . . . . . . . . . . . . . . . . . . . . . . . . . . . . . . . . . . . . . . . . . . 26
Menu Structure . . . . . . . . . . . . . . . . . . . . . . . . . . . . . . . . . . . . . . . . . . . . . . . . . . . . . . 28
Overview of the Menu Structure . . . . . . . . . . . . . . . . . . . . . . . . . . . . . . . . . . . . . . . . . 29
Navigation in the Menu . . . . . . . . . . . . . . . . . . . . . . . . . . . . . . . . . . . . . . . . . . . . . . . . 31
Entering Text and Digits . . . . . . . . . . . . . . . . . . . . . . . . . . . . . . . . . . . . . . . . . . . . . . . . 31
Icons in the Menu . . . . . . . . . . . . . . . . . . . . . . . . . . . . . . . . . . . . . . . . . . . . . . . . . . . . 32
Watching Television . . . . . . . . . . . . . . . . . . . . . . . . . 34
Choosing a Channel . . . . . . . . . . . . . . . . . . . . . . . . . . . . . . . . . . . . . . . . . . . . . . . . . . . 34
Setting the Volume . . . . . . . . . . . . . . . . . . . . . . . . . . . . . . . . . . . . . . . . . . . . . . . . . . . 36
Selecting Picture and Sound . . . . . . . . . . . . . . . . . . . . . . . . . . . . . . . . . . . . . . . . . . . . 36
Displaying Information . . . . . . . . . . . . . . . . . . . . . . . . . . . . . . . . . . . . . . . . . . . . . . . . 38
Timeshift – Delayed Viewing . . . . . . . . . . . . . . . . . . . . . . . . . . . . . . . . . . . . . . . . . . . . 43
Setting the Sleep Timer . . . . . . . . . . . . . . . . . . . . . . . . . . . . . . . . . . . . . . . . . . . . . . . . 44
3
Page 4

Listening to the Radio . . . . . . . . . . . . . . . . . . . . . . . 46
Using the Device Buttons . . . . . . . . . . . . . . . . . . . . . . . . . . . . . . . . . . . . . . . . . . . . . . . 46
Recording Radio Programmes . . . . . . . . . . . . . . . . . . . . . . . . . . . . . . . . . . . . . . . . . . . 47
Recording . . . . . . . . . . . . . . . . . . . . . . . . . . . . . . . . . 48
Recording Types . . . . . . . . . . . . . . . . . . . . . . . . . . . . . . . . . . . . . . . . . . . . . . . . . . . . . . 48
Prerequisites for Starting a Recording . . . . . . . . . . . . . . . . . . . . . . . . . . . . . . . . . . . . . 48
Recording Programmes Spontaneously . . . . . . . . . . . . . . . . . . . . . . . . . . . . . . . . . . . 49
Programming a Recording . . . . . . . . . . . . . . . . . . . . . . . . . . . . . . . . . . . . . . . . . . . . . . 49
Changing Recordings . . . . . . . . . . . . . . . . . . . . . . . . . . . . . . . . . . . . . . . . . . . . . . . . . . 50
Administering Recordings . . . . . . . . . . . . . . . . . . . . . . . . . . . . . . . . . . . . . . . . . . . . . . 53
Playing Back a Stored Recording . . . . . . . . . . . . . . . . . . . . . . . . . . . . . . . . . . . . . . . . . 54
Using Trickmode . . . . . . . . . . . . . . . . . . . . . . . . . . . . . . . . . . . . . . . . . . . . . . . . . . . . . 56
Operating a DVD Device and Video Recorder . . . . 61
Viewing a DVD or Video Cassette . . . . . . . . . . . . . . . . . . . . . . . . . . . . . . . . . . . . . . . . 61
Recording to DVD or Video Cassette . . . . . . . . . . . . . . . . . . . . . . . . . . . . . . . . . . . . . . 61
Settings . . . . . . . . . . . . . . . . . . . . . . . . . . . . . . . . . . . 62
Administering the Channel and Favourite Lists . . . . . . . . . . . . . . . . . . . . . . . . . . . . . . 62
General . . . . . . . . . . . . . . . . . . . . . . . . . . . . . . . . . . . . . . . . . . . . . . . . . . . . . . . . . . . . .66
Picture & Sound . . . . . . . . . . . . . . . . . . . . . . . . . . . . . . . . . . . . . . . . . . . . . . . . . . . . . . 72
Channel Search . . . . . . . . . . . . . . . . . . . . . . . . . . . . . . . . . . . . . . . . . . . . . . . . . . . . . . 75
Satellite & Antenna . . . . . . . . . . . . . . . . . . . . . . . . . . . . . . . . . . . . . . . . . . . . . . . . . . . 77
EPG . . . . . . . . . . . . . . . . . . . . . . . . . . . . . . . . . . . . . . . . . . . . . . . . . . . . . . . . . . . . . . . . 83
Parental Lock . . . . . . . . . . . . . . . . . . . . . . . . . . . . . . . . . . . . . . . . . . . . . . . . . . . . . . . . 84
Hard Disk Manager . . . . . . . . . . . . . . . . . . . . . . . . . . . . . . . . . . . . . . . . . . . . . . . . . . . 85
Common Interface (optional) . . . . . . . . . . . . . . . . . . . . . . . . . . . . . . . . . . . . . . . . . . . 86
Glossary . . . . . . . . . . . . . . . . . . . . . . . . . . . . . . . . . . 87
Appendix . . . . . . . . . . . . . . . . . . . . . . . . . . . . . . . . . . 92
Troubleshooting . . . . . . . . . . . . . . . . . . . . . . . . . . . . . . . . . . . . . . . . . . . . . . . . . . . . . . 92
Technical Data . . . . . . . . . . . . . . . . . . . . . . . . . . . . . . . . . . . . . . . . . . . . . . . . . . . . . . . 96
Authorisation . . . . . . . . . . . . . . . . . . . . . . . . . . . . . . . . . . . . . . . . . . . . . . . . . . . . . . . . 96
Trademarks . . . . . . . . . . . . . . . . . . . . . . . . . . . . . . . . . . . . . . . . . . . . . . . . . . . . . . . . . . 97
License Note . . . . . . . . . . . . . . . . . . . . . . . . . . . . . . . . . . . . . . . . . . . . . . . . . . . . . . . . . 97
Service (Customer Care) . . . . . . . . . . . . . . . . . . . . . . . . . . . . . . . . . . . . . . . . . . . . . . . 97
Guarantee Certificate
United Kingdom . . . . . . . . . . . . . . . . . . . . . . . . . . . . . . . . . . . . . . . . . . . . . . . . . . . . . . 98
Index . . . . . . . . . . . . . . . . . . . . . . . . . . . . . . . . . . . . . 99
4
Page 5

Safety
Safety
This set-top box is used exclusively for receiving, recording and replaying DVB signals.
Please read the following information carefully to ensure safe usage.
Safety Precautions
u Only use the cables supplied or authorised accessories, as indicated in this manual,
for connecting the device.
u Do not connect the device during a storm to avoid the risk of electric shock.
u Your SAT system must be installed professionally and protected from lightning.
u Protect the device from moisture, aggressive liquids and vapours in order to avoid
the danger of fire and electric shock. Do not use the device in damp places (e.g.
bathrooms) or in explosive areas.
u The device and remote control may only be repaired by authorised service staff.
Never open the device.
u Keep these instructions in a safe place and make sure the device is accompanied by
these instructions and the supplied accessories when you give it to others to use.
All electrical and electronic products should be disposed of separately from
the municipal waste stream via designated collection facilities appointed by
the government or the local authorities.
This crossed-out wheeled bin symbol on the product means the product is
covered by the European Directive 2002/96/EC.
The correct disposal and separate collection of your old appliance will help
prevent potential negative consequences for the environment and human
health. It is a precondition for reuse and recycling of used electrical and electronic equipment.
For more detailed information about disposal of your old appliance, please
contact your city office, waste disposal service or the shop where you purchased the product.
Information on Installation Location and Operation
u Install the device on a level, non-slip surface. Do not place the device on a heat-sen-
sitive surface. Protect particularly sensitive surfaces.
u Place the device away from heat sources and avoid direct sunlight.
u Do not place objects on the device. Ensure that the air openings for air circulation
are not blocked.
u Disconnect the device from the mains before cleaning it.
Use a soft, dry cloth to clean the device and remote control.
5
Page 6

Your Set-Top Box
Your Set-Top Box
Using Your Set-Top Box
You can use your set-top box to receive radio and television programmes in digital quality, which you can then view directly on a television or other device or also record for
later use.
u Your set-top box supports you in all operations on the basis of a multi-language
menu and an innovative help system: You can read information on operation
directly on the television screen or view introductory demo films (depends on variant).
u With the support of a convenient search function, your set-top box receives and
stores radio and television channels from all satellites at which your SAT system is
directed. With up to four favourite lists, which you can create in line with your
requirements, you have constant access to your preferred channels.
u The Electronic Programme Guide (EPG) offers you detailed information on current
and upcoming programmes. Depending on the broadcast area, you can extend the
functional scope of the EPG by subscribing to an editorially enhanced service.
u Information on the current programme can be displayed simply using the info bar at
the bottom of the screen.
u The integrated hard disk allows you to use the PVR function (Personal Video
Recorder) of your set-top box: You can record programmes in digital without loss of
quality and view your recordings at any time. You can set the recording of individual
programmes or an entire series using the EPG or the timer.
u The Timeshift function (delayed viewing) allows you to choose when you would like
to view a current programme. You can pause the delayed playback a number of
times and then continue again or also forward or rewind.
u Convenient editing functions (Trickmode) allow you to prepare your recordings
directly on the screen, for example by suppressing advertising breaks or integrating
repeats for individual scenes. If a playback is terminated prematurely, the last position viewed will be marked so that you can continue this playback at a later time
directly from this position.
u You can use the teletext offers of the individual channels to read the latest news and
other information.
u Connect the digital audio output of your set-top box to an AV receiver or surround
decoder, for example, in order to enjoy digital sound quality.
u You can connect your DVD device or your video recorder directly to your set-top box
and operate it as usual.
u The device software for your set-top box can be updated via satellite or with the
Gigaset M45x PC Manager software via a connected PC.
u Encrypted channels to which you have subscribed can be activated by inserting your
smart card with the associated CA module into the Common Interface (optional).
u A USB connection (USB 2.0) is available for transferring your preferred recordings to
a PC in order to archive these for later use (optional).
6
Page 7

Your Set-Top Box
You will find all the latest information for your set-top box on the Internet at:
http://www.siemens.com/gigaset
7
Page 8
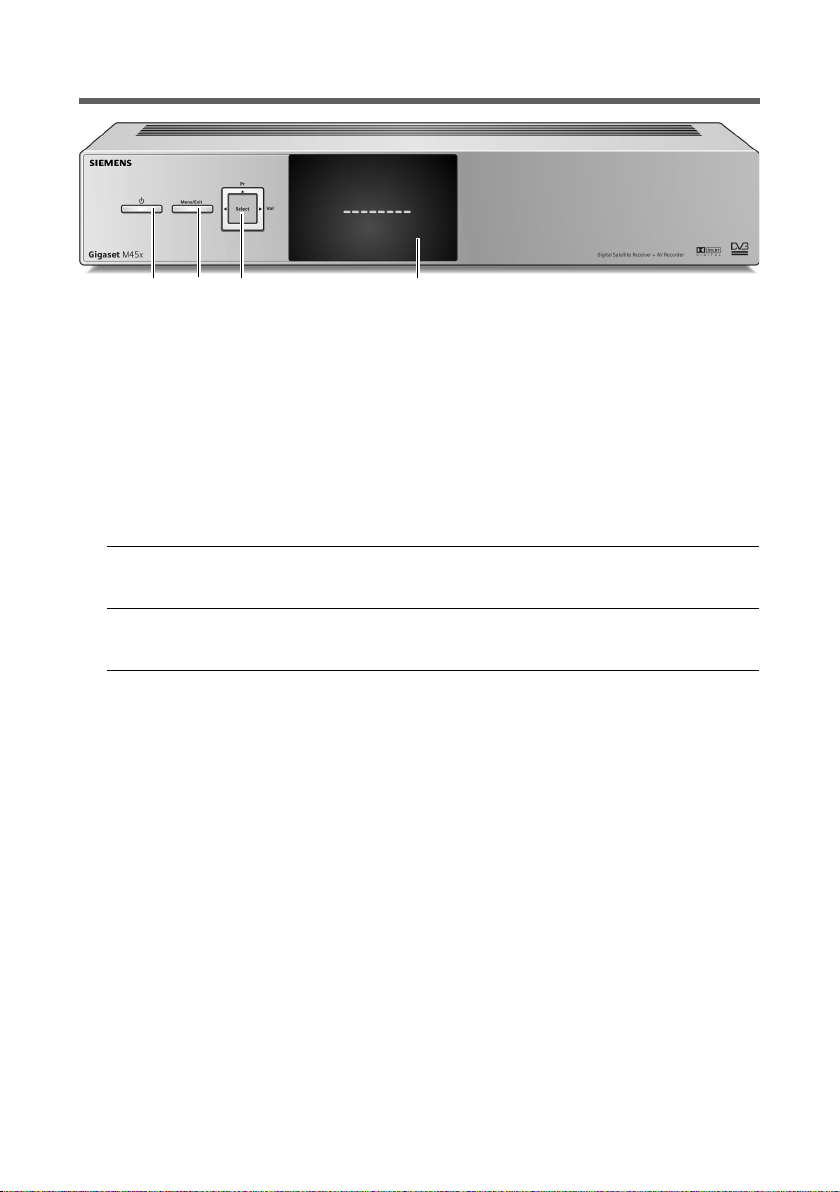
Your Set-Top Box
Display and Device Buttons
1 2 3 4
1 Standby button
Switches the set-top box on or off (standby mode).
2 Menu button
Opens the main menu or closes the menu.
3 Multifunction button
Allows the set-top box to be operated directly from the device. The mapping
of the buttons depends on the current operating state:
In live mode In the menu
Pr Choose channel (back/forward). Navigate.
Scroll through lists line by line.
Vol Change the volume (louder/qui-
eter).
Select Toggle between television and
radio.
Navigate.
Confirm selected option,
e. g. open submenu.
4 Display
Shows the current operating state of the set-top box with the following
elements.
u Segment display (8-position)
– You are shown the name of the current channel in live mode.
– You see the text Menu in the menu.
u Timer LED (red)
– Off: Timers are not programmed or active.
– On: At least one timer is programmed.
– Flashing: Timer is being executed.
u Power LED (green)
– Off: Device is in operation or disconnected from the mains.
– On: Device is in standby mode.
y
z
T
s
q
8
Page 9
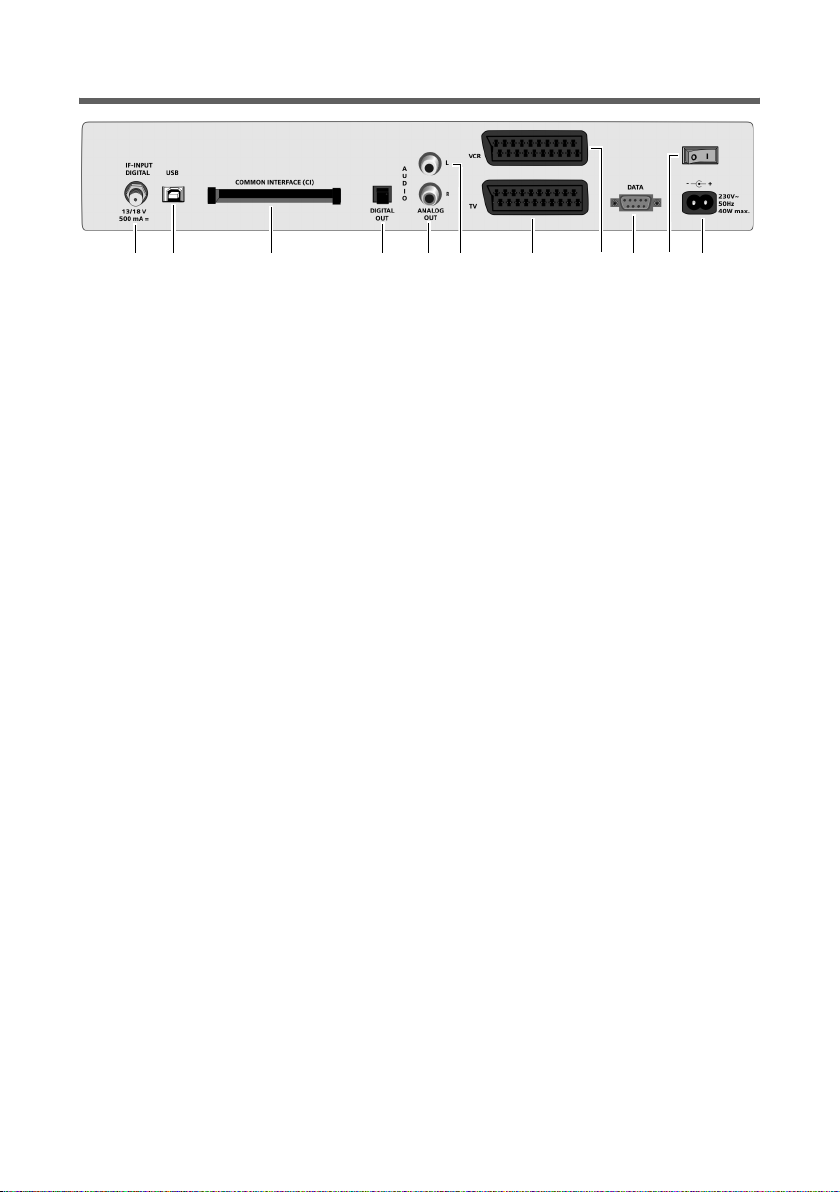
Your Set-Top Box
Ports
11 8 1 2* 3* 4 5 6 7 9 10
1 IF-INPUT DIGITAL: Port for coaxial antenna cable for the connection to the
SAT system (screwed connection with F connector)
2* USB: USB port for the connection to a PC (USB Standard 2.0, Slave) for archiving
recordings on a PC using a USB cable
3* COMMON INTERFACE (CI): CI slot for a CA module with smart card, which is used
for decrypting subscribed Pay-TV channels
4 DIGITAL OUT: Digital audio output (S/P DIF optical, Toslink)
5 AUDIO R: Analogue audio output, right stereo channel (Cinch, red)
6 AUDIO L: Analogue audio output, left stereo channel (Cinch, white)
7 TV: SCART port, optimised for connection of a television
8 VCR: Second SCART port, for example for video recorder or DVD device
9 DATA: RS232 port for the connection to a PC (V.24 extension cable) for updating
the device software from the PC
10 Device switch: On/off switch; disconnects the device from the mains
11 230V~50Hz: Port for supplied mains cable
* Available optionally, depends on device variant
9
Page 10

Your Set-Top Box
Supplied Items
u 1 Gigaset M451 S CI
u 1 remote control
u 2 batteries, AAA, Micro, 1.5 V
u 1 mains cable
u 1 SCART cable
u 1 installation manual
u 1 quick reference card
10
Page 11

User Guides
User Guides
The following help information and guides provide you with information on how to
operate the set-top box:
u Quick reference card
u Installation manual
u Information that you can read directly on the television screen or view as demo films
(depends on variant)
u Guides on the Internet
Quick Reference Card
The quick reference card is included with your packaging. The most important operating
steps for everyday operation of your set-top box are summarised on the quick reference
card.
Installation Manual
The installation manual is included with your packaging. You can use this manual for
starting up your set-top box. In addition to the descriptions of all connection options,
this manual also contains safety notes and technical data.
Information on the Television Screen
This information is stored on the hard disk of your set-top box. You can call up the following information with the remote control (button mapping, see quick reference card)
after the initial startup of your set-top box.
Reading Instructions on Operation
Instructions for operating the set-top box can be read directly on the television screen.
You can either open the help for the current menu directly or you can choose the desired
topic from the list of contents:
Displaying information for the current menu
Information on how to use the menu you are currently in is shown directly without having to search for it.
?
x
Open the first page of the help for the current menu.
Scroll through the help pages.
11
Page 12

User Guides
Selecting information on operation in the list of contents
The list of contents shows all topics that you can read on the television screen with
respect to operating the set-top box. You choose the desired topic from this list and
open the associated help pages:
H Open the Guides & Demos menu.
wo
wo
Choose and confirm the User Guide entry in order to open the list of contents.
Choose the desired topic and confirm your selection.
The first help page for the selected topic is displayed.
x
o
Viewing Demo Films (depends on variant)
You can play introductory demo films that show you the most important functions of
the set-top box clearly and in an easily comprehensible manner:
H
wo
Scroll through the help pages.
You can call up the list of contents again at any time.
Open the Guides & Demos menu.
Choose and confirm the desired demo film.
Guides on the Internet
All guides for your set-top box can be found in print-friendly format at the following
address on the Internet:
http://www.siemens.com/gigaset
You can download the guides free of charge and read them directly on the monitor or
also print them out. The Adobe Reader programme is required to read and print these
guides. This free programme can be found on the Internet at the following address:
http://www.adobe.com
12
Page 13

User Guides
Notation in User Guide
Colour Buttons
The colour buttons on the remote control can be used flexibly: While you are viewing
television, the colour buttons each have the meaning that appears on the button. The
current meaning of the colour buttons can be seen in the menu in the option bar at the
bottom of the screen.
The colour buttons are represented differently in this user guide:
u If the current function of a colour button corresponds to its labelling, you will see
the button in the user guide with the inscription:
Red: Green: Yellow: Blue:
t I K L
u If the colour buttons are used according to the display in the option bar, you will see
the button in the user guide with its assignment within the colour buttons:
Red: Green: Yellow: Blue:
i n g b
Path Representation
A shortened path notation is used for individual command sequences in the user
guides. The path notation describes the key sequence that you have to enter to open the
respective submenu on your remote control. It is assumed that you press the first button
of the respective path notation if your set-top box is in live mode.
Example:
This path notation is the shortened notation for the following operating steps:
M > Settings > General > Menu Language
Your set-top box is in live mode, for example you are currently watching television.
M
wo
wo
wo
Open the main menu.
Choose and open the Settings menu.
Choose and open the General menu.
Open the Menu Language menu.
13
Page 14

Starting Up the Set-Top Box
Starting Up the Set-Top Box
Over the next pages, you will discover how to connect and start up your set-top box.
1. For remote operation, see "Preparing the Remote Control" on page 15.
2. For connecting your SAT system and directing it at the required satellite, see "Connecting a SAT System" on page 15.
3. For connecting the set-top box to your existing devices, see "Connecting up Devices"
on page 15.
4. For starting up the set-top box, see "Switching On/Off Devices" on page 20.
5. For performing the basic settings valid for your region at initial startup, see "Running
the Installation Wizard" on page 22.
6. Optional:
For subsequently installing your CA module for activating Pay-TV channels you have
subscribed to (see "Common Interface (Optional)" on page 23).
Installation Requirements
u You have a SAT system that is suitable for receiving DVB-S (e.g. SAT system with uni-
versal LNB for digital reception).
u Your SAT system is directed precisely at the required satellite or can receive signals
from a number of satellites (e.g. SAT system with a number of LNBs or rotation system).
u Your SAT system is directed, among others, at the Astra satellite (19.2° East) in order
to benefit from regular updates (e.g. EPG data, device software).
u The antenna cable (coaxial cable with screwed connection for F connectors) is as
short as possible and the connectors are attached permanently to the cable.
u You are using a SCART cable for the connection between your set-top box and the
television or between your set-top box and a video recorder or DVD device.
u The colour transmission technology of your television is based on the PAL television
standard.
14
Page 15
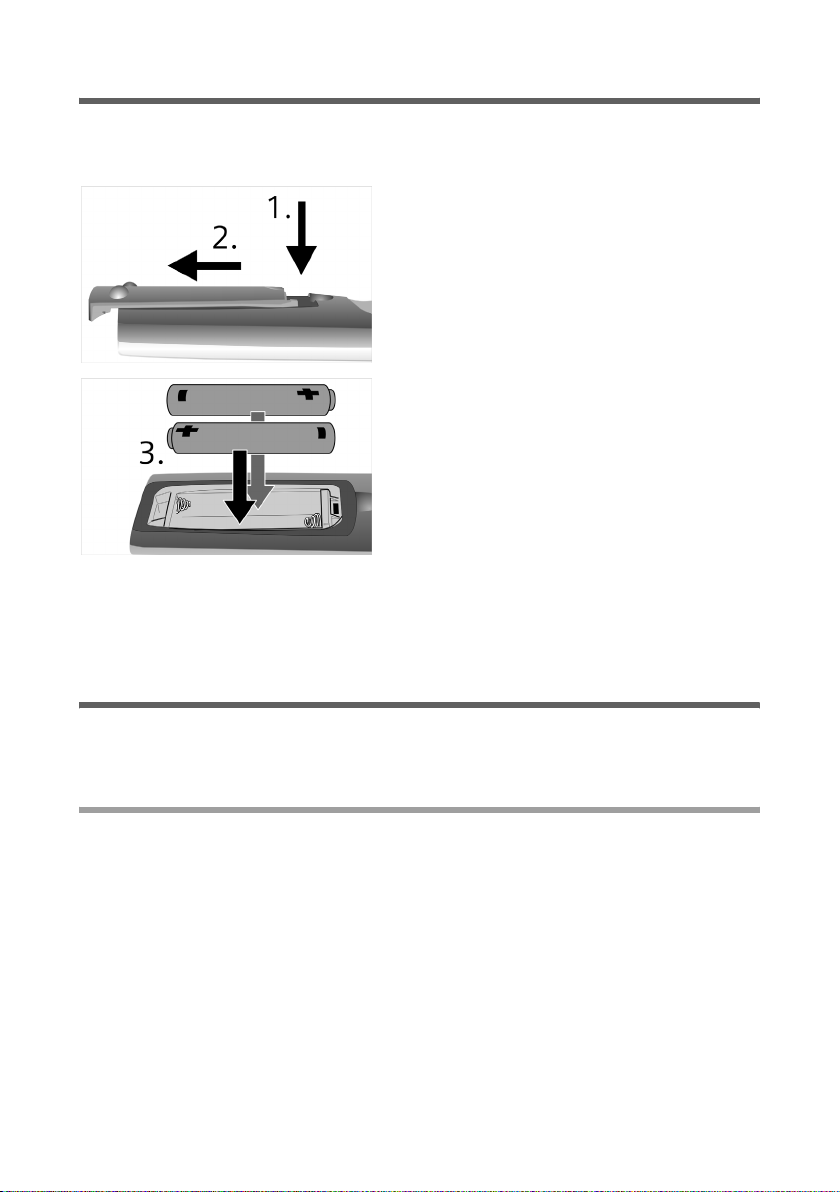
Starting Up the Set-Top Box
Preparing the Remote Control
In order to be able to operate the set-top box after switching it on, you first have to
insert the batteries into the remote control.
1. Press the recess at the top of the battery compartment cover.
2. Push the battery cover downward to open
the battery compartment.
3. Insert the batteries in the remote control as
indicated on the base of the battery compartment.
Push the battery compartment cover over the
battery compartment until it clicks audibly
into place.
Note: If you cannot replace used batteries or discharged accumulators immediately,
use the buttons at the front of the device housing of your set-top box. The most important functions can continue to be used with these buttons, see "Display and Device Buttons" on page 8.
Connecting up Devices
Caution: To eliminate the risk of electric shock, always disconnect all devices from the
mains before connecting the cables.
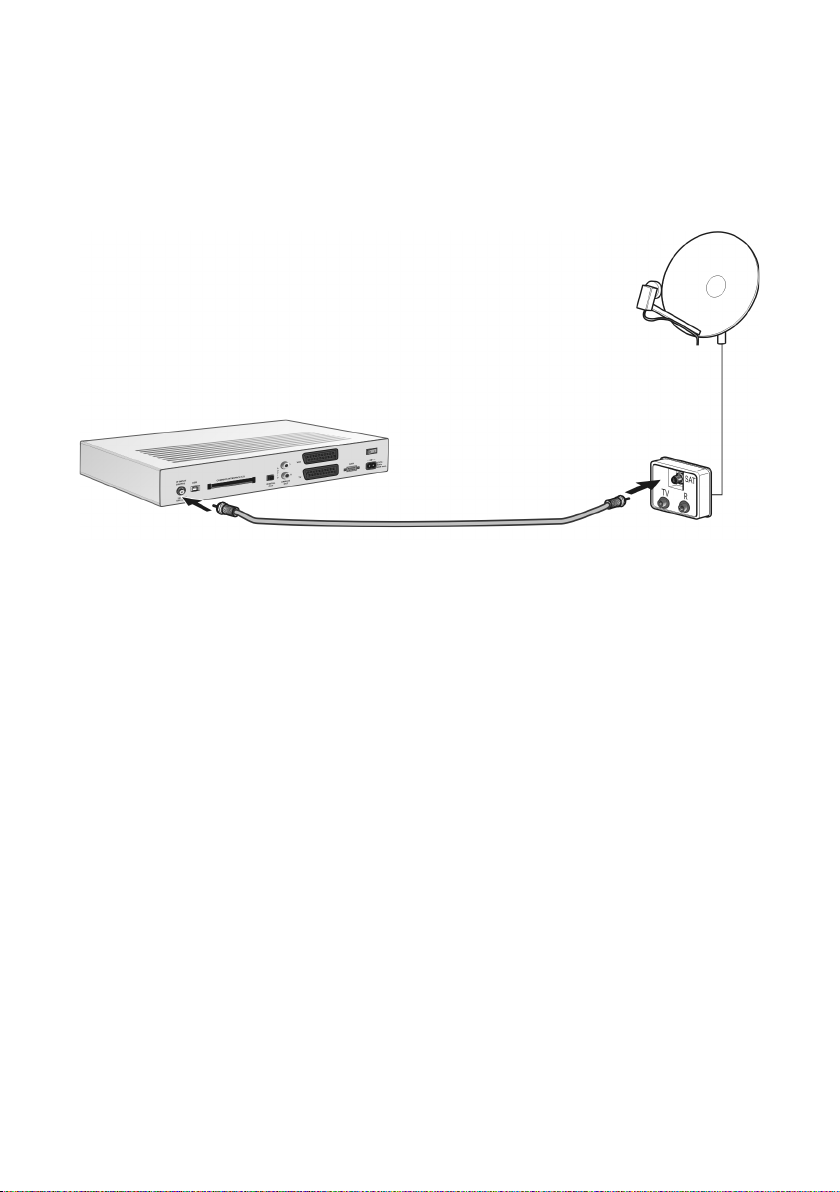
Connecting a SAT System
In order to be able to receive DVB-S signals from a particular satellite, you have to direct
the parabolic reflector on your SAT system precisely at the position of the desired satellite. Your set-top box is designed for parallel operation with a number of satellite positions. Your set-top box uses the DiSEqC 1.0 communications protocol for communication with fixed SAT systems. Rotation systems are controlled by means of the DiSEqC 1.0
communications protocol.
Note: Installation of a fixed SAT system is sufficient for receiving the most common
channels. You will find additional information on selecting and installing the SAT system best suited to your requirements in specialist retail stores for radio and television
technology.
You use a coaxial cable (with screwed connections for F connectors) to connect your settop box to the SAT system.
15
Page 16
Starting Up the Set-Top Box
1. If appropriate, disconnect your SAT system and your set-top box from the mains before connecting the coaxial cable.
2. Insert the connector at one end of the coaxial cable into the antenna port on your
SAT system.
3. Insert the connector at the other end of the coaxial cable into the IF-INPUT DIGITAL
port on the set-top box.
16
Page 17

Starting Up the Set-Top Box
Transmitting Picture and Sound
Your set-top box transmits video signals and analogue audio signals via the SCART ports.
It is therefore perfectly adequate for simple transmission of picture and sound if you
connect the set-top box to the television using the SCART cable supplied. Your set-top
box offers various ports for other connection variants for transmitting analogue and digital sound. The particular connection you choose is solely dependent on your available
terminals and ports for these.
Possible connections
TV TV TV
TV
No. Cable Transmitted signal Set-top box port
1
1x SCART
1x Cinch (with SCART
2
adapter for Cinch)
2x Cinch Audio (analogue) AUDIO R and AUDIO L
3
1 x optical fibre Audio (digital) DIGITAL OUT
4
1x Cinch
5
(device-dependent)
Surround
Decoder
Beamer
AV Receiver
Video and audio (analogue)
Video TV
Video –
Beamer
TV
Stereo System
(analogue)
Stereo System (ana-
17
Page 18

Starting Up the Set-Top Box
Connecting a TV (SCART)
ì Use the SCART cable supplied to connect a SCART port on your television to the TV
port on your set-top box.
If your television does not have a free SCART port, check if you can disconnect
another connected device from your television. You can also connect a video
recorder, for example, to the VCR port on the set-top box, see "Connecting a Video
Recorder / DVD Device (SCART)" on page 19.
Connecting a beamer or television (Cinch)
Beamers and some TVs are equipped with signal inputs in Cinch format. If you want to
use these signal inputs, you need a Cinch adapter (SCART to Cinch) in order to transmit
the video signal using a Cinch cable. When a beamer is connected, you transmit the
sound for example to a stereo system or an AV receiver.
Connecting a stereo system (audio analogue)
If your stereo system does not have any digital audio inputs, you can transmit the audio
signals of your set-top box in analogue in order to make use of the better sound quality
of your stereo system.
ì Use a Cinch cable to set up the following connections:
– Connect the right audio input of your stereo system to the AUDIO R port on your
set-top box (red).
– Connect the left audio input of your stereo system to the AUDIO L port on your
set-top box (white).
Connecting a surround decoder (audio digital)
You can receive digital sound with optimum quality by connecting your set-top box to a
terminal (e.g. surround decoder or AV receiver), which is equipped with a digital audio
input. You require a fibre optic cable for optical transmission of the digital audio signals
from your set-top box.
18
Page 19

Starting Up the Set-Top Box
ì Insert the connector at one end of the fibre optic cable
into an optical audio input on your terminal.
ì Remove the protective cover from the DIGITAL OUT
port on your set-top box and keep it safe for later use.
ì Insert the connector at the other end of the fibre optic
cable into the DIGITAL OUT port on your set-top box.
Connecting a Video Recorder / DVD Device (SCART)
ì Connect your video recorder or DVD device to the VCR port on your set-top box using
a SCART cable.
Depending on the respective operating state of your set-top box, you can play or record
films as usual using the DVD/VCR device:
u Set-top box is switched off (device switch):
No signal on television; playback from DVD/VCR device is not forwarded.
u Set-top box is in standby mode:
Playback from DVD/VCR is forwarded.
If the TV has an AV control, this is switched on and off automatically with the DVD/VCR device (see "Switching On Devices" on
page 20).
u Set-top box is in operation:
– Listening to TV or radio:
As usual, provided the DVD/VCR device is not in playback mode.
You can record the current programme here to DVD or video.
– Playing a DVD or video cassette:
As soon as you start playback on the DVD/VCR device (PLAY),
the set-top box switches over and transmits its signals to the
television.
– Executing a timer recording to DVD or video cassette:
Timer recordings are started automatically if the timer is set to
the storage location External (e.g. DVD recorder). The DVD/
VCR device must be set such that automatic recording can be
started from a connected device.
Note: The video signals from the DVD/VCR device are forwarded to the television from
your set-top box with the signal type FBAS.
With some devices, this can result in only b/w playback in the case of the sample connection shown here. In this case you should connect the DVD/VCR device directly to the
television.
19
Page 20

Starting Up the Set-Top Box
Connecting the Mains Cable
1. Insert the male connector on the mains cable into the 230V~ 50Hz socket.
2. Connect the mains plug on the set-top box to the mains.
3. Connect all other devices to the mains.
Switching On/Off Devices
Switching On Devices
Your set-top box is equipped with an AV control, i.e. the activation signal is also forwarded to the SCART TV port when the set-top box is switched on.
Some televisions support this function: If the television is in standby mode and connected to this SCART port, it will be switched on together with the set-top box and automatically selects the required AV channel.
If your television does not support the AV control function: Switch on the television as
usual and choose the AV channel using the remote control for your television.
1. Make sure that the set-top box, all other connected devices and possibly also the SAT
system are connected to the mains.
2. Switch on your television and any other connected devices (e.g. video recorder, stereo system) as usual.
3. Set the device switch for your set-top box to the position 1. The set-top box is
switched to standby mode.
4. Press the
box starts and also switches on the television if appropriate.
You will see the programme guide for the last channel selected. The name of the current channel is shown on the display.
The set-top box first starts the installation wizard when it is started up initially, see
"Running the Installation Wizard" on page 22.
Alternative operation on the set-top box:
A button on the remote control to switch on the set-top box. The set-top
y Use the standby button to switch on the set-top box.
20
Page 21

Switching Off the Set-Top Box – Standby Mode
Starting Up the Set-Top Box
A
Alternative operation on the set-top box:
Hold down the button for approx. two seconds to switch off the set-top box
after use.
The current programme is terminated and the set-top box switches to
standby mode. Your set-top box remains on standby in standby mode; the
power LED (green) lights up. Picture and sound are no longer forwarded to
the connected devices.
The following applies in standby mode:
u Current recordings continue to be executed.
u Programmed recordings will be started on time.
u EPG updates will be performed occasionally.
y Use the standby button to switch the set-top box to standby mode.
Note: The sleep function allows you to switch the set-top box automatically to standby
mode after a definable period of time.
Disconnecting the Set-Top Box from the Mains
If you want to disconnect your set-top box from the mains using the deviceswitch on
the rear of the housing, you should do so in the sequence below in order to protect the
internal hard disk:
1. If the set-top box is still active, switch it to standby mode (see "Switching Off the SetTop Box – Standby Mode" on page 21).
2. Set the device switch to position 0.
The set-top box is disconnected from the mains. The display is now blank.
Caution: If you switch off the set-top box with the device switch, current recordings will
be aborted and programmed recordings will not be executed. Programmed timers will
be deleted.
21
Page 22

Starting Up the Set-Top Box
Running the Installation Wizard
The installation wizard starts up first of all on initial startup and following the restoration of factory default settings. The wizard guides you automatically through the most
important menus for performing basic settings on your set-top box.
You use the navigation keys to select and confirm your preferred settings in order to call
up the menus described below in succession (see quick reference card). You can change
the settings you make here in the Settings menu following completion of the installa-
tion wizard.
Choosing the Menu Language
You can use the Menu Language option to define the language in which the menu
texts are to be displayed.
w
o
Selecting a Country
Use the Country (of residence) option to indicate the location at which you will install
your set-top box.
w
o
Choosing a Satellite
Use the Choose Satellite option to select a satellite at which your SAT system is to
directed (see also "Connecting a SAT System" on page 15). If your choice is correct, you
will automatically receive the default channels on completion of the installation wizard.
wo
Exiting the Installation Wizard
You can view a short demo film on operating the set-top box (depends on variant) on
conclusion of the initial installation.
If no demo film is offered in the Exit Wizard menu or if you want to view the demo film
at a later time, your set-top box switches automatically to the current television programme (live TV).
Select the desired language.
Confirm your selection to continue working through the installation wizard.
Choose the country in which you want to connect your set-top box.
The time setting and the pre-setting of a list of favourites (depends on variant) are adjusted.
Confirm your selection to continue working through the installation wizard.
Select and confirm the desired satellite.
Other settings are not required for initial installation.
22
Page 23

Starting Up the Set-Top Box
Initial Operation
The initial startup of your set-top box is concluded with the completion of the installation wizard.
Please refer to the information on the quick reference card that you received with your
set-top box before you use the device for the first time. Guides and also (depending on
the variant) demo films for operating your set-top box can be viewed directly on the television, see "Information on the Television Screen" on page 11.
Common Interface (Optional)
Some channels, so-called Pay-TV channels, transmit their programmes partly or exclusively in encrypted form, i.e. the picture and/or sound for such a channel cannot be
transmitted unless decrypted.
You need a CA module (Common Access Module) to decrypt such programmes as well
as a special chip card (e.g. smart card). You can get these by taking out an appropriate
subscription.
Your set-top box is equipped with a CI slot Common Interface (CI) in which you insert
the CA module suitable for your subscribed smart card. Insert the smart card into this
CA module in order to decrypt your subscribed channels.
Information on subscribing to Pay-TV channels as well as on the respective CA modules
and smart cards required is provided for example by specialist retail stores for radio and
television technology or can also be found directly on the Internet pages of the respective channel.
23
Page 24

Starting Up the Set-Top Box
Installing the CA Module and Smart Card
You can install or remove CA modules online.
1. Note the installation instructions that
you received with your smart card or
your CA module.
2. Hold the CR module such that its conne ction s po int to the CI sl ot on your settop box.
3. Push the CA module carefully into the
CI slot of your set-top box until the contacts of the CA module click audibly
into place with a slight push.
4. Push the smart card into the associated
CA module until it reaches a stop. Refer
to the manufacturer's instructions regarding the correct direction for
insertion.
5. Wait until the smart card is recognised and registered by your set-top box.
This process may take a few seconds. The programmes for the channels subscribed
to with this smart card are then decrypted automatically.
Changing the Settings of a CA Module
CA modules generally have their own software as well as adjustable settings for the CRT
display. The name of the installed CA module or the inserted smart card is added to the
Settings > Common Interface menu as a new menu option following installation. You
can adapt the settings displayed in this new sub-menu to your requirements.
M > Settings > Common Interface
wo
24
Choose and confirm the desired CA module and the required smart card.
Then change the desired options, if available. Please also note the information you received with your CA module.
Page 25

Starting Up the Set-Top Box
USB Connection to a PC (optional)
Your set-top box is equipped with a USB por t th at suppor ts the US B St an dar d 2.0 (Slav e).
You can transfer your preferred recordings to a drive on the PC via this USB connection
and archive them there. Then delete the original data from the integrated hard disk in
your set-top box in order to free up memory for new recordings.
To play an archived recording, simply copy the recording back again to the set-top box
and start the playback as usual.
You will need the PC software Gigaset M45x PC-Manager for this data exchange with
your set-top box, which is made available for downloading free of charge on the product
page of your set-top box. The software as well as detailed information on installation
and operation can be found on the Internet at:
http://www.siemens.com/gigaset
25
Page 26

Notes on Operation
Notes on Operation
The Remote Control
Note: The signals from the remote control are received by an infrared sensor, which is
integrated in the display of your set-top box. There should be no obstacles between the
remote control and the display of the set-top box in order to ensure good signal transmission.
1. Point with the remote control toward the set-top box.
2. Then press the desired button.
Button Function
Switch on device.
A
During operation:
Activate sleep function (short press), switch device
to standby mode (long press).
Sound on/off.
m
Numeric keypad: Select channel.
#
Enter text and digits.
In text mode: Delete characters.
D
In live mode:
Open Input Parameters menu.
Toggle between TV and radio (if radio is available).
.
26
Request help for current view.
?
Back to previous channel.
,
Open list of channels.
:
Switch to favourite lists.
J
Toggle between favourite lists.
Page back through lists.
>
Page forward through lists.
<
Open/close teletext.
;
Open Electronic Programme Guide (EPG).
E
Open Guides & Demos menu.
H
Show information for current programme.
G
Page 27

Notes on Operation
Button Function
Colour keys: Functions are menu-specific (see menu
display). As shown in guide:
i (red), n (green), g (yellow), b (blue).
The colour buttons have the following function in live
mode:
(red) Audio Setting: Select sound,
t
e.g. stereo, mono left/right.
(green) Video Channel: Select video channel,
I
e.g. camera position.
(yellow) Subtitle: Select subtitle language or switch
K
subtitles off.
(blue) Language: Select audio language.
L
Select next/previous channel (not in menu).
w
Navigate in menu. Scroll through lists line-by-line.
Adjust volume (not in menu).
x
Navigate in menu.
Open active list of channels/favourites (not in
o
menu). Confirm selected menu option,
e. g. open submenu.
Open main menu.
M
Close menu.
e
Cancel current function.
Start recording current programme immediately.
c
During playback: Fast rewind.
R
In pause mode: Page back screen by screen.
Start playback or exit pause mode.
p
During playback: Fast forward.
F
In pause mode: Page forward screen by screen.
Open the Films / Music menu.
V
Open editing functions (Trickmode),
U
e.g. set bookmarks or edit recordings.
Stop playback, recording or timeshift.
S
Pause playback.
B
In live mode:
Start timeshift (delayed viewing).
27
Page 28

Notes on Operation
Menu Structure
1
Settings
2
3
General
Picture & Sound
Channel Search
Satellite & Antenna
EPG
Parental Lock
Hard Disk
Common Interface
oEnter MMain menu eExit ?Help
Menu Language
Country
Time
Recording Timer
OSD Display
Video Output
Software Update
Default Settings
System Information
1 Title line: Shows the name of the menu currently selected.
In the example: Settings menu.
2 Work area: Shows lists or other submenus in which you can select or change set-
tings. When you select an entry in the work area, the associated settings are generally displayed in an additional window. You make your changes in this window.
In the example: Content of Settings > General menu.
Note: When you select an entry in the work area, the associated settings are generally displayed in an additional window. You make your changes in this window.
3 Option bar: Shows the buttons on the remote control that you can use to access
additional functions. You can also see the current assignment of the colour buttons here, assuming this is available for the menu displayed.
28
Page 29

Overview of the Menu Structure
Notes on Operation
Main menu
TV Live TV
Radio Live Radio
Films All Films
Music All Music
Settings General Menu Language
Submenu 1 Submenu 2 Submenu 3
EPG
Timer
Favourites &
Channel Lists
EPG
Timer
Favourites &
Channel Lists
Country
Time Time Correction
Recording Timer Lead-in Time
Add-on Time
OSD Display OSD Transparency
OSD Display Time
Video Output Signal Type
Aspect Ratio
Software Update
Default Settings
System Information
Picture & Sound Sound Language
Subtitle Subtitle
Video Channel
Channel Search Satellite:
Search Mode
Encrypted:
Frequency:
Polarisation:
Symbol Rate:
Audio Setting
Volume Level
Digital Output
Subtitle Language
29
Page 30

Notes on Operation
Main menu
Settings Satellite &
Guides &
Demos
Submenu 1 Submenu 2 Submenu 3
Antenna
EPG TV Digital (if available)
Parental Lock Lock Device
Hard Disk Delete All Recordings
Common
Interface
(optional)
User Guide Contents
Demos
Antenna Connection LNB
LNB Input
Low Band
High Band
DiSEqC Switch
Toneburst Switch
DiSEqC Mode
Motor Settings
Input Parameters Input Parameters 1 / 3
Input Parameters 2 / 3
Input Parameters 3 / 3
Standard (DVB SI)
Change PIN
Format hard disk
HDD Standby
HDD Information
30
Page 31

Notes on Operation
Navigation in the Menu
You use the buttons on the remote control to operate your set-top box:
M
w
x
o
e
Open the main menu with the "home" button.
You can use the up and down arrow buttons to move the selection marker
on the screen up and down to the entry you want to select.
You can use the left and right arrow buttons to jump to the next higher
or next lower menu level.
Pressing the "OK" button selects the entry that is marked on the screen. If
you have changed a setting, your change is confirmed and stored with
this button.
Use the "X" button to close the menu.
Entering Text and Digits
Use the 0 to 9 buttons on your remote control to enter text. As you enter text, you can
see on screen which characters can be entered with the depressed button.
#
x
Keep pressing the relevant button until the desired character is selected.
After approx. 1 second, the selected character appears in the input box.
Repeat this process until the desired name has been entered fully.
Use these buttons to change the position of the input marker.
D Select this button to delete a character.
31
Page 32

Notes on Operation
Icons in the Menu
The following icons are displayed depending on which options are available for an active
or recorded programme:
Note: Your set-top box can only display the icons that are transmitted by the channel.
The respective channel is responsible for the accuracy and completeness of the icons.
Z
k
[
\
]
(
)
È
*
+
-
W
X
Reception quality: The greater the number of bars that are visible (5 in
total), the better the quality of reception of the current channel (see also
"Checking Input Parameters" on page 45).
Encrypted: The channel transmits its programme in encrypted form.
Subtitle: Subtitles are available for the programme being shown, see "Show-
ing Subtitles" on page 37.
Language: The programme is broadcast via secondary audio programming
in various languages, see "Selecting the Language" on page 38.
Video channel: The programme is broadcast with various camera settings,
see "Selecting the Video Channel" on page 37.
Aspect ratio: The film currently running has an aspect ratio of 16:9, see
"Aspect ratio" on page 68.
Black/white: The film currently running is a black/white.
Stereo: The film currently running is broadcast in stereo.
Dolby Digital: The programme is broadcast in Dolby Digital Sound, see "Dig-
ital output" on page 73.
Tip of the day: The programme is recommended as a tip of the day.
FSK: (FSK = Freiwillige Selbstkontrolle der Filmwirtschaft e. V - censorship
body). The icon is always displayed in conjunction with an age rating, e.g.
FSK 12 for programmes that are not suitable for viewers under the age of
12 years.
Single recording: A single recording is programmed for the relevant
programme.
Multiple recording: A multiple recording is programmed for the relevant
programme.
Y
Some channels transmit additional information, which allows a number of different
programme types to be distinguished. You will see the following genre icons in the EPG
and in the information bar in this case:
32
Copyright: The recording is protected against overwriting / deletion.
Page 33

Notes on Operation
^
_
a
N
Feature film
Series
Show
Sport
%
/
$
&
Information
Children's programme
Music
Other
33
Page 34

Watching Television
Watching Television
The set-top box receives digital television signals and transmits these to your television
set. You choose the desired channel, adjust the volume or call up information offers, for
example, via the set-top box.
Choosing a Channel
The channels are numbered according to how they are sorted in the channel list. To
select a channel, you can switch through the channels one by one or change directly to
a particular channel.
You can limit the number of channels offered to you by creating and selecting a favourite list. Favourite lists only contain the radio and television channels that you have
selected as favourites. When you want to change channel then, you are only offered
those channels contained in the active list (see "Activating a Channel or Favourite List"
on page 34).
Activating a Channel or Favourite List
Your set-top box offers the following lists for selecting channels:
u Channel list: The channel list contains all channels that were found during the
channel search (see "Channel Search" on page 75).
u Favourite lists: You can create up to four favourite lists from the channel list into
which you can copy your preferred channels. For example, you can create a favourite
list with news channels, or one with children's channels, etc. (see "Editing the
Favourite List" on page 64).
In everyday use, you select the channel list or one of the favourite lists as an active list.
When you want to change channel then, only those channels contained in this active
list are available. For further information, please refer to Section "Administering the
Channel and Favourite Lists" on page 62.
Selecting a channel list as an active list
:
Selecting a favourite list as an active list
J
While you are watching television, you open the channel list.
This is then set automatically as the active list for the channel selection.
Press this button again to end the display.
While you are watching television, you open the favourite list.
Press this button a number of times to switch between the four available
favourite lists. The last favourite list selected is set automatically as the
active list for the channel selection.
34
Page 35

Selecting a Channel in the Active List
Watching Television
o
w
>/ <
o
Switching through Channels
w
Alternative operation on the set-top box:
(Available if no menu is open.)
T
Entering the Channel Number
#
Open the active list.
An overview of the channels available in the active list is displayed. You
can see in the title bar whether the channel list or one of your favourite
lists is set as the active list.
Choose the desired channel. Hold down the button in order to skip a
number of entries.
Page back and forward through the list. Hold down the button in order to
skip a number of pages.
Confirm your selection in order to change to the selected channel.
Continue to switch to the next higher or next lower channel number until
the desired channel is shown.
All channels that are contained in the active list are available for selection (see "Activating a Channel or Favourite List" on page 34).
Use the Ch button to change between channels.
The display shows the name of the selected channel.
Enter the number of the desired channel in order to change directly to
this channel. Enter the digits in succession if the channel number contains more than one digit.
All channels or channel numbers that are contained in the active list are
available for selection.
Switching back to the previous Channel
,
Switch back to the channel that was set before the last change. You can
toggle between the last two channels by repeatedly pressing the button.
35
Page 36

Watching Television
Setting the Volume
You can only set the volume on your set-top box if you use analogue audio signals (connection via SCART port or AUDIO L / AUDIO R).
The volume of the digital sound (DIGITAL OUT port) can only be regulated on the connected terminal (e. g. surround decoder).
Adjusting the Volume
(Available if no menu is open.)
You can adjust the volume either from the remote control for your television or using
the remote control for your set-top box. The volume bars, which indicate the current setting, are visible on the screen while you are adjusting the volume.
x
Alternative operation on the set-top box:
s
The volume set on your television is the maximum volume that you can set using the
remote control for the set-top box.
If the maximum volume you can set with your set-top box is too low, you can increase
the base volume on your television set. Use the remote control for the television to do
this.
Set the volume higher or lower.
Use the Vol buttons to adjust the volume.
Switching off the Sound
m
Switch the sound off or on without changing the current volume setting.
Selecting Picture and Sound
Some channels broadcast their programme or individual programme selections with
additional options for picture and sound. Whether or not such options are available for
a current programme or for playing a recording, is indicated in the info bar with a corresponding icon (see "Displaying Information" on page 38). You can use the colour buttons to select the options desired for the current programme.
The availability of options for picture and sound depends on the broadcast area, the
offering of the respective channel and the programme itself.
36
Page 37

Selecting the Audio Setting
Watching Television
t
wo
Selecting the Video Channel
Some channels transmit their programme using a number of video channels, for example you can toggle between various camera perspectives for sports transmissions. Programmes for which a number of video channels are available are displayed in the info
bar with the
Choose the video channel required for the current programme in the Video Channel
menu.
I
wo
Showing Subtitles
Some channels transmit subtitles for their programme, sometimes also in a number of
subtitle languages. Programmes for which a number of subtitles are available are displayed, for example, in the info bar with the
page 32).
In the Subtitle menu, choose whether and in which language subtitles are to be
displayed.
Open the Audio Setting menu.
Select and confirm the desired option.
The audio settings Stereo, Mono left and Mono right are available for
selection. Other options may also be available for some programmes.
icon (see "Icons in the Menu" on page 32).
]
Open the Video Channel menu.
Select and confirm the desired video channel.
icon (see "Icons in the Menu" on
[
K
wo
Open the Subtitle menu.
Select and confirm the desired subtitle language in order to display subtitles for the current programme.
Use the Off option to disable the display of subtitles.
37
Page 38

Watching Television
Selecting the Language
Some channels transmit their programme with a number of sound channels, for example, in various languages or with different levels of sound quality. The \ icon, for
example, identifies the programmes in the info bar for which a number of sound channels are available (see "Icons in the Menu" on page 32).
Choose the sound channel required for the current programme in the Language menu.
L
wo
Note: Analogue sound channels are available via all audio and SCART ports; digital languages are output via the DIGITAL OUT port.
In order to forward digital audio signals via the analogue ports, choose the As ana-
logue output (Scart) setting in the Settings > Picture & Sound > Sound > Digital Output menu (see "Digital output" on page 73).
Open the Language menu in order to display the languages available in
analogue quality.
Press the button again, if necessary, to display the languages available in
digital quality.
Select and confirm the desired sound channel.
Displaying Information
Info Bar
Your set-top box shows you various information on the current programme. The info bar
is shown automatically for a few seconds at the bottom of the screen each time you
change channel; however you can also call it up yourself.
G
Show the info bar for a few seconds.
Press this button again to display detailed information for the current programme (see "Detailed Information" on page 41).
You can adjust the duration of the display and the transparency of the
info bar according to your requirements, see "OSD Display" on page 68.
38
Page 39

Watching Television
The info bar shows the following information, if available (see also "Icons in the Menu"
on page 32):
1 2 3 4 5 6
1 Channel
Title of current programme
Title of next programme
7
8 9
1 Channel number of current channel.
(According to the sorting in the active list of channels or favourites).
2 Name of current channel.
3 Title of current and next programme.
4 Remaining time of current programme:
The remaining time indicates the remaining time period until the end of the current programme in the format hh:mm (Hours: Minutes).
5 Reception quality of current channel.
The quality is optimal when all bars of the icon are filled in.
6 Current time in accordance with the current time setting on your set-top box.
7 Progress bar for current programme:
The times relevant for the current programme are displayed graphically as
progress bars. The frame around the bar symbolises the total length of the current
programme (start and end).
8 This icon is displayed if the selected channel is sending the current programme
encrypted.
9 Each of these icons is only displayed if appropriate options are available for picture
and sound.
ì Press the relevant colour button ( I/ K/ L) to show the respective
selection (see "Selecting Picture and Sound" on page 36).
39
Page 40

Watching Television
Electronic Programme Guide (EPG)
The EPG (Electronic Programme Guide) shows you the current programme for a number
of channels clearly and for a few days in advance on the screen. The contents displayed
are supplied by various providers depending on the broadcast area.
The Settings > EPG menu shows you which EPG contents are provided by your set-top
box (see "EPG" on page 83):
u Standard (DVB SI):
(Available in all broadcast areas.)
Most channels transmit so-called service information (DVB-SI data) in parallel to the
actual programme. This free programme information is provided directly by the
channels and is broadcast for a few days in advance. The offers of individual channels can therefore differ in scope and topicality.
u Extended EPG:
(Only available in some broadcast areas.)
The EPG contents are prepared editorially by a channel-independent information
service for selected channels. The EPG is extended in this way by additional offers,
such as illustrated programme tips or background information. The current data is
stored by your set-top box directly to hard disk in the course of regular EPG updates.
If such a service is offered in your region, this EPG mode is preset for the duration of
a free test phase. A test phase running over a number of months during which you
can use this service begins after the initial startup of your set-top box. Your set-top
box then switches automatically to EPG mode Standard (DVB SI) once this test
phase has concluded. You can then only continue to use the extended EPG by taking
out a chargeable subscription. It is not possible to activate both EPG modes in
parallel.
Notes:
An extended EPG mode can also be provided in the course of a later update of the
device software in some broadcast areas. The free test phase begins in this case with
the installation of this update.
EPG data is made available directly by the channels or in conjunction with a channelindependent information service. Siemens therefore accepts no liability for the content
or availability of the respective service.
Opening the EPG
E
Open the electronic programme guide.
The List EPG menu provides a summary of the upcoming programmes on
the currently selected channel.
n You can toggle the EPG view with this button:
u Choose the EPG - All Channels view to see a summary of the selected
channels and the programmes running on these channels.
u Choose the List EPG view to see a summary of the upcoming pro-
grammes for the currently selected channel.
40
Page 41

Operating the EPG
You have the following options for operating the EPG:
Watching Television
w
>/ <
G
Scroll line-by-line through the programme guide for the current channel
to select the desired programme.
Page back or forward.
Call up detailed information on the selected programme, see "Detailed
Information" on page 41.
n Toggle between the EPG views EPG - All Channels and List EPG.
i Open the Recording pop-up window to plan in the selected programme
for recording (see "Programming an EPG Recording" on page 49). If the
selected programme is already planned in for recording, you can delete
the programming with this button.
EPG view List EPG:
x
Choose the day for which you want to view the programme guide for the
current channel. All upcoming days for which your set-top box has
received EPG data from the respective provider are available for selection.
g Reset the programme summary to the current time.
EPG view EPG - All Channels:
o
Changing channels in the EPG
The EPG views List EPG and EPG - All Channels allow you to switch within the EPG to
the programme summary for a different channel.
You can close the EPG with this button in the EPG view EPG - All
Channels in order to switch to the selected channel.
x
nw
n
Detailed Information
Detailed information for a programme or for playing back a recording is displayed in the
More Information menu.
G
Open the EPG. In the EPG view List EPG you will see the programme overview for the current channel.
Switch to the EPG view EPG - All Channels and select the desired
channel.
Switch back to the EPG view List EPG.
You will now see the programme overview for the selected channel.
You use this button to display detailed information on the currently
selected or displayed programme in the EPG or in the info bar.
Press this button again to close the display of the detailed information.
41
Page 42

Watching Television
Telet ext
Teletext comprises simple individual text pages that are displayed on the television set.
Depending on the respective channel, the teletext contains information on the television programme, news, weather forecasts, etc.
If your television offers teletext, you can also continue to use this. First select the desired
channel with your set-top box. Then call up the teletext offer for this channel as usual
using the remote control for your television.
Calling teletext
You can either display teletext against a black background or in addition to the television
image with a transparent background:
;
Repeat this process following the switchover if you want to change to the teletext offering of a different channel.
Selecting teletext pages
The teletext function of your set-top box offers the following options for navigating
through the teletext offering:
#
w
Press this button a number of times in order to show or hide the teletext
for the current channel.
1x: Show the teletext. The start page of the teletext offer (teletext page
100) is displayed against a black background.
2x: Make the teletext background transparent.
3x: Hide the teletext.
If the selected channel does not broadcast teletext, this button remains
functionless.
Enter a three-digit number in order to call up a teletext page directly. If
available, the associated page is displayed after a short search.
Switch to the next or previous teletext page.
42
Page 43

Watching Television
Timeshift – Delayed Viewing
You determine yourself what you would and would not like to see.
The timeshift function offers the possibility of delayed viewing. You can pause the live
programme as required and continue it sometime later. The current programme is
recorded in the background while you are watching the timeshift recording.
Examples of using timeshift:
u You are interrupted while watching television and can still see the film without any
gaps.
u Because you are late, your partner switches on the news at eight o'clock. You can
watch the news together at ten minutes past eight.
u You watch a good scene again and still do not miss even a second of the programme.
You also have the following possibilities in timeshift mode:
u You see the goal just scored in the football match again in slow motion.
u You skip individual scenes of a programme, for example advertising.
u You identify interesting scenes with bookmarks in order to be able to locate these
scenes again easily.
Activating and Operating Timeshift
Requirements
The timeshift function can only be executed if there is sufficient storage capacity available on the integrated hard disk. You can check the current utilisation of the hard disk
in the Settings > Hard Disk > HDD Information menu (see "HDD information" on
page 86).
Pausing an ongoing programme
B Pause the ongoing live programme.
The set-top box stops the playback of the live programme. You see the
last picture from the ongoing programme in pause mode as a still image;
a pause character is displayed in the upper right corner of the screen.
At the same time, the data for this programme still being received is
stored on the integrated hard disk (timeshift recording).
Note: You cannot switch to another channel during an ongoing timeshift recording.
Continuing an ongoing programme
p Press this button to continue the ongoing programme from the still
image.
Pause mode is ended. The current programme is played back from the
beginning of the timeshift recording. The total length of the timeshift
recording and the current time within the recording are displayed in the
information bar. The live programme received is recorded in the background in parallel to the timeshift playback.
43
Page 44

Watching Television
Controlling the timeshift playback
Use the following buttons to control the timeshift playback, for example to skip
recorded advertising breaks or to repeat individual scenes:
R/ F Start the fast rewind or forward.
Press the button a number of times in order to increase the rewind or
forward speed.
p End the fast rewind or forward.
The timeshift playback is continued at normal speed.
Setting bookmarks
You can identify individual scenes with a bookmark during an ongoing timeshift recording. You can then view these again, for example, before you terminate the timeshift
playback, see "Using Trickmode" on page 56.
U
Open the Trickmode bar.
i Set a bookmark.
U Close Trickmode.
Terminating timeshift playback
S Jump to the current end of the timeshift playback in order to continue the
playback of the current programme without the timeshift.
The timeshift recording continues running in the background.
S Press this button again to end the timeshift recording.
The following options are available for selection in the Stop recording
menu:
u Stop and save
The set-top box stops the timeshift recording and stores the data
recorded to date in the film or radio archive.
u Stop without saving
The set-top box stops the timeshift recording. The data recorded to
date for this recording is deleted.
u Change end time
The timeshift recording is continued as a normal recording up to the
point in time selected here. The recording is then stored in the film or
radio archive.
Setting the Sleep Timer
Use the Sleep Timer option to choose a time period after which your set-top box
switches automatically to standby mode. The Sleep Timer option is not available during
an ongoing recording (also timeshift).
44
Page 45

Activating the Sleep Timer
Watching Television
A
w
o
Changing the Sleep Timer
You can change a programmed sleep timer by selecting a different time period.
A
w
o
Checking Input Parameters
The Input Parameters menu offers you all the relevant technical information for your
set-top box as well as for receiving the selected channel in three selectable submenus.
Short press the button to open the Sleep Timer window.
Choose a time period.
Confirm your selection in order to activate the sleep timer.
Following expiry of the selected time period, your set-top box switches
automatically to standby mode.
Short press the button to open the Sleep Timer window.
Choose a new time period.
Confirm your selection.
The modified setting is stored.
D Open the Input Parameters 1 / 3 menu in live mode. You will see the fre-
quency data for the selected channel as well as the current reception
quality.
The graphical displays in the Input Parameters 1 / 3 menu support you
when positioning your SAT system.
w
o
o
o
You can change to a different channel in all menus in order to call up its
current input parameters.
Use the More … option to switch to the second par t of the (Input Param-
eters 2 / 3) menu in order to display additional channel-specific data.
Use the More … option to switch to the third part of the (Input Parame-
ters 3 / 3) menu in order to display the currently valid version numbers
for various components of your set-top box.
Use the More … option to switch back to the Input Parameters 1 / 3
menu.
e
Use this button to exit the display of input parameters.
45
Page 46

Listening to the Radio
Listening to the Radio
In addition to television channels, you can also receive a number of radio channels with
your set-top box, which broadcast their programme in digital quality via satellite.
. Switch from TV reception to reception of radio channels. Press the button
a number of times to toggle between the two offers.
The same functions, apart from a few exceptions, are available to you in radio mode as
in TV mode. This is especially true also for the topics of recording and playback as well
as timeshift and trickmode.
Operation is also similar. Please note the following exceptions:
u In radio mode you see a blue background.
u Teletext is not broadcast by radio channels.
Using the Device Buttons
You can listen to the radio with your set-top box without leaving the television on: If
your set-top box is connected, for example, to a stereo system and this is switched on,
you can operate radio mode alternately with the remote control or directly with the buttons on the set-top box. The set-top box display supports you when selecting the desired
channel:
y
q
T
s
Note: The functions described here are also valid in TV mode. Your set-top box can still
be operated with the device buttons even if, for example, the batteries on your remote
control are flat (see "Display and Device Buttons" on page 8).
46
Use the standby button to switch the set-top box on or off (standby
mode). When the startup is complete, the display shows the name of the
current channel.
Use the Select button to switch as appropriate from TV mode to radio
mode.
Use the Pr button to select the desired channel.
The name of the selected channel appears on the display.
Use the Vol button to adjust the volume.
Page 47

Listening to the Radio
Recording Radio Programmes
Radio programmes can be recorded using your stereo system, a DVD or cassette
recorder or directly on the hard disk of your set-top box. The way you connect your settop box to the terminal is critical for the quality of your recording.
u Analogue recordings are made when you forward the audio signals of your set-top
box via the VCR or AUDIO L and AUDIO R ports to the desired terminal.
u Digital recordings are made by recording directly to the hard disk. In addition, you
can connect your set-top box via the DIGITAL OUT port to a recorder, which can
transmit digital audio signals to an appropriate storage medium (e.g. DVD recorder
or PC).
47
Page 48

Recording
Recording
Thanks to its integrated hard disk, your set-top box offers you all the advantages of a
PVR device (Personal Video Recorder):
u For delayed viewing (timeshift), see "Timeshift – Delayed Viewing" on page 43
u Digital recording of radio and television programmes
– For spontaneous recordings, see "Recording Programmes Spontaneously" on
page 49
– For EPG recordings, see "Programming an EPG Recording" on page 49
– For timer recordings, see "Programming a Timer Recording" on page 50
u For convenient post-editing of recordings, see "Using Trickmode" on page 56
u Optional:
For archiving recordings, see "USB Connection to a PC (optional)" on page 25
u If you are operating a stereo system, video recorder or comparable device on your
set-top box, you can of course still record the received programmes as usual (see
"Recording to DVD or Video Cassette" on page 61 or "Recording Radio Programmes"
on page 47).
Recording Types
u Spontaneous recording: You decide spontaneously to record the current pro-
gramme. Start the recording with the c button.
u Programmed Recording: You want to have an upcoming programme recorded
automatically and want to programme the time and duration of the required recording. You have the following options:
– EPG recording: Choose a programme you would like to record from the elec-
tronic programme guide. Use the i button to programme a timer for this
programme.
– Timer recording: You would like to record a channel's programme at a specific
time. Even if there is no data available as yet for this date in the EPG, you can still
programme this recording. To do this, enter a new timer in the TV > Timer menu.
Prerequisites for Starting a Recording
You can only start recordings if the following requirements are fulfilled:
u The internal hard disk has sufficient free storage space (see "HDD information" on
page 86). Depending on the quality of the data received, you should assume an
average storage requirement of approx. 2 Gigabytes per hour recording time for television recordings.
u Programmed recordings must not overlap. If programmed recordings (incl. lead-in
time and add-on time) overlap, the second recording can only be started when you
terminate the first recording.
48
Page 49

Recording
Recording Programmes Spontaneously
While a programme is running you decide to record it.
c Start a spontaneous recording.
The recording begins immediately; the recording icon is displayed in the
upper right corner of the screen for a few seconds.
You can call up the Stop recording menu with the S button in order
to stop the recording or change the recording duration (see "Changing an
Ongoing Recording" on page 50).
Programming a Recording
Your set-top box starts programmed recordings automatically, even from standby
mode. Programmed recordings are only executed on time and fully if the time is set correctly. Check the relevant settings for your set-top box before you programme a new
recording (see "Time" on page 66).
Single and multiple recordings can be programmed alternately with the assistance of
the EPG (EPG recording) or by entering the desired transmission time directly as a timer
(timer recording). Adjust the relevant settings as required in the Recording pop-up
window, see "Settings in the Recording Pop-Up Window" on page 51.
All programmed recordings are entered as a timer in the TV > Timer menu
(or Radio > Timer) and can be managed there.
Programming an EPG Recording
E
v
Open the EPG.
Choose the programme you would like to record (see "Operating the EPG"
on page 41).
i Open the Recording pop-up window.
v
o
You can change the settings in the Repeat:, Save: and Protection areas.
Confirm your settings in order to activate this EPG recording.
The relevant EPG entry is flagged appropriately (see "Opening the EPG"
on page 40).
49
Page 50

Recording
Programming a Timer Recording
You can programme up to 25 single and multiple recordings for any transmission times
in the Timer menu.
M > TV or Radio > Timer
wo
Or
g
Make all necessary settings in succession in the Recording pop-up window, see "Set-
tings in the Recording Pop-Up Window" on page 51. The new timer is registered as soon
as you confirm your settings.
Select and confirm the New Timer entry.
Choose the New Timer option.
Changing Recordings
You can change programmed as well as ongoing recordings at any time.
Changing an Ongoing Recording
The recording icon is displayed additionally in the upper right corner of the screen during an ongoing recording when the information bar is called.
Changing the recording end time
S Open the Stop recording menu during an ongoing recording.
wo
wo
Ending an ongoing recording
Select and confirm the Change end time option.
Select and confirm the desired recording duration.
The ongoing recording is then continued with the new settings.
S Open the Stop recording menu during an ongoing recording.
wo
50
Select and confirm one of the following options in order to stop the
recording:
u Stop and save
The set-top box stops the recording and stores the data recorded to
date in the film or radio archive.
u Stop without saving
The set-top box stops the recording. The data recorded to date for this
recording is deleted.
Page 51

Recording
Changing a Programmed Recording
All programmed recordings are entered as a timer in the TV > Timer menu (or Radio >
Timer) and can be administered there. An ongoing recording is identified in the timer
menu with a yellow icon (single or multiple recording).
Changing settings
M > TV > Timer
w
>/ <
o
o
Deleting a programmed recording
Select the timer to be changed.
Page back or forward through the timer list.
Open the Recording pop-up window.
Change the desired settings and confirm your change, see "Settings in
the Recording Pop-Up Window" on page 51.
M > TV > Timer
w
io
Settings in the Recording Pop-Up Window
You can adjust the relevant settings for a recording in the Recording pop-up window.
For example, you can determine here whether the new recording is to be executed once
(single recording) or repeated at regular intervals (multiple recording). You can also
change a pre-programmed recording in this pop-up window.
Changing channels
w
Select the timer to be deleted.
Select the Delete option and confirm your selection with Ye s.
The entry is removed from the timer list.
Choose the channel name displayed in the Recording pop-up window.
#
Or
r
wo
Enter the number of the desired channel. Choose the channel name
displayed.
The active channel or favourite list is displayed.
Open the active channel or favourite list.
Choose and confirm the desired channel for the new programming.
51
Page 52

Recording
Changing the start time of the recording
You can change the date and time for starting a recording.
w
#
w
#
Changing the end time of the recording
You can change the end time of a recording.
w
#
Changing the repeat
You determine whether the recording is to be executed once (single recording) or
repeated at regular intervals (multiple recording).
wx
Choose the date displayed in the Start: area.
Enter the desired date in the format dd:mm:yy
(Day: Month : Year, each two-digit).
Choose the time displayed in the Start: area.
Enter the required time for starting the recording in the format hh:mm
(Hour: Minute, each two-digit).
Choose the time displayed in the End: area.
Enter the required time for ending the recording in the format hh:mm
(Hour: Minute, each two-digit).
The maximum recording time is limited to 24 hours.
Select one of the following options in the Repeat: area:
u Single recording: Choose the Single option if the recording is only to
be executed once.
u Multiple recording: Choose the Daily, Fortnightly, Weekly or
Monthly option in order to execute the programmed recording
repeatedly at regular intervals.
Changing the storage location
Recordings are stored by default on the integrated hard disk. However, you can also programme the recording as a timer for recording with a DVD/VCR device. The DVD/VCR
device must be connected in this case to the VCR SCART port, see "Recording to DVD or
Video Cassette" on page 61.
wx
52
Choose the desired storage location in the Save: area. The To hard disk
(internal) and External (e.g. DVD recorder) options are available for
selection.
 Loading...