

Page 1

EN Dear Customer,
Gigaset Communications GmbH is the legal successor to
Siemens Home and Office Communication Devices GmbH &
Co. KG (SHC), which in turn continued the Gigaset business
of Siemens AG. Any statements made by Siemens AG or
SHC that are found in the user guides should therefore be
understood as statements of Gigaset Communications
.
GmbH
We hope you enjoy your Gigaset.
DE Sehr geehrte Kundin, sehr geehrter Kunde,
FR Chère Cliente, Cher Client,
IT Gentile cliente,
NL Geachte klant,
ES Estimado cliente,
PT SCaros clientes,
die Gigaset Communications GmbH ist Rechtsnachfolgerin
der Siemens Home and Office Communication Devices
GmbH & Co. KG (SHC), die ihrerseits das Gigaset-Geschäft
der Siemens AG fortführte. Etwaige Erklärungen der
Siemens AG oder der SHC in den Bedienungsanleitungen
sind daher als Erklärungen der Gigaset Communications
GmbH zu verstehen.
Wir wünschen Ihnen viel Freude mit Ihrem Gigaset.
la société Gigaset Communications GmbH succède en droit
à Siemens Home and Office Communication Devices GmbH
& Co. KG (SHC) qui poursuivait elle-même les activités Gigaset de Siemens AG. Donc les éventuelles explications de Siemens AG ou de SHC figurant dans les modes d’emploi
doivent être comprises comme des explications de Gigaset
Communications GmbH.
Nous vous souhaitons beaucoup d’agrément avec votre
Gigaset.
la Gigaset Communications GmbH è successore della Siemens Home and Office Communication Devices GmbH &
Co. KG (SHC) che a sua volta ha proseguito l’attività della
Siemens AG. Eventuali dichiarazioni della Siemens AG o
della SHC nei manuali d’istruzione, vanno pertanto intese
come dichiarazioni della Gigaset Communications GmbH.
Le auguriamo tanta soddisfazione con il vostro Gigaset.
Gigaset Communications GmbH is de rechtsopvolger van
Siemens Home and Office Communication Devices GmbH &
Co. KG (SHC), de onderneming die de Gigaset-activiteiten
van Siemens AG heeft overgenomen. Eventuele uitspraken
of mededelingen van Siemens AG of SHC in de gebruiksaanwijzingen dienen daarom als mededelingen van Gigaset
Communications GmbH te worden gezien.
Wij wensen u veel plezier met uw Gigaset
la Gigaset Communications GmbH es derechohabiente de la
Siemens Home and Office Communication Devices GmbH &
Co. KG (SHC) que por su parte continuó el negocio Gigaset
de la Siemens AG. Las posibles declaraciones de la
Siemens AG o de la SHC en las instrucciones de uso se
deben entender por lo tanto como declaraciones de la Gigaset Communications GmbH.
Le deseamos que disfrute con su Gigaset.
Gigaset Communications GmbH é a sucessora legal da Siemens Home and Office Communication Devices GmbH &
Co. KG (SHC), que, por sua vez, deu continuidade ao sector
de negócios Gigaset, da Siemens AG. Quaisquer declarações por parte da Siemens AG ou da SHC encontradas nos
manuais de utilização deverão, portanto, ser consideradas
como declarações da Gigaset Communications GmbH.
Desejamos que tenham bons momentos com o seu Gigaset.
DA Kære Kunde,
FI Arvoisa asiakkaamme,
SV Kära kund,
NO Kjære kunde,
EL Αγ α πητή πελάτισσα, αγαπητέ πελάτη,
HR Poštovani korisnici,
.
SL Spoštovani kupec!
Gigaset Communications GmbH er retlig efterfølger til Siemens Home and Office Communication Devices GmbH &
Co. KG (SHC), som fra deres side videreførte Siemens AGs
Gigaset-forretninger. Siemens AGs eller SHCs eventuelle
forklaringer i betjeningsvejledningerne skal derfor forstås
som Gigaset Communications GmbHs forklaringer.
Vi håber, du får meget glæde af din Gigaset.
Gigaset Communications GmbH on Siemens Home and
Office Communication Devices GmbH & Co. KG (SHC)-yri-
tyksen oikeudenomistaja, joka jatkoi puolestaan Siemens
AG:n Gigaset-liiketoimintaa. Käyttöoppaissa mahdollisesti
esiintyvät Siemens AG:n tai SHC:n selosteet on tämän
vuoksi ymmärrettävä Gigaset Communications GmbH:n
selosteina.
Toivotamme Teille paljon iloa Gigaset-laitteestanne.
Gigaset Communications GmbH övertar rättigheterna från
Siemens Home and Office Communication Devices GmbH &
Co. KG (SHC), som bedrev Gigaset-verksamheten efter Siemens AG. Alla förklaringar från Siemens AG eller SHC i
användarhandboken gäller därför som förklaringar från
Gigaset Communications GmbH.
Vi önskar dig mycket nöje med din Gigaset.
Gigaset Communications GmbH er rettslig etterfølger etter
Siemens Home and Office Communication Devices GmbH &
Co. KG (SHC), som i sin tur videreførte Gigaset-geskjeften i
Siemens AG. Eventuelle meddelelser fra Siemens AG eller
SHC i bruksanvisningene er derfor å forstå som meddelelser
fra Gigaset Communications GmbH.
Vi håper du får stor glede av din Gigaset-enhet.
η Gigaset Communications GmbH είναι η νομική διάδοχος της
Siemens Home and Office Communication Devices GmbH &
Co. KG (SHC), η οποία έχει αναλάβει την εμπορική
δραστηριότητα Gigaset της Siemens AG. Οι δηλώσεις της
Siemens AG ή της SHC στις
επομένως δηλώσεις της Gigaset Communications GmbH.
Σας ευχόμαστε καλή διασκέδαση με τη συσκευή σας Gigaset.
Gigaset Communications GmbH pravni je sljednik tvrtke
Siemens Home and Office Communication Devices GmbH &
Co. KG (SHC), koji je nastavio Gigaset poslovanje tvrtke
Siemens AG. Zato sve izjave tvrtke Siemens AG ili SHC koje
se nalaze u uputama za upotrebu treba tumačiti kao izjave
tvrtke Gigaset Communications GmbH.
Nadamo se da sa zadovoljstvom koristite svoj Gigaset
uređaj.
Podjetje Gigaset Communications GmbH je pravni naslednik
podjetja Siemens Home and Office Communication Devices
GmbH & Co. KG (SHC), ki nadaljuje dejavnost znamke
Gigaset podjetja Siemens AG. Vse izjave podjetja Siemens
AG ali SHC v priročnikih za uporabnike torej veljajo kot izjave
podjetja Gigaset Communications GmbH.
Želimo vam veliko užitkov ob uporabi naprave Gigaset.
οδηγίες χρήσ
ης αποτ
ελούν
Issued by
Gigaset Communications GmbH
Schlavenhorst 66, D-46395 Bocholt
Gigaset Communications GmbH is a trademark
licensee of Siemens AG
© Gigaset Communications GmbH 2008
All rights reserved.
Subject to availability. Rights of modifications
reserved.
www.gigaset.com
Page 2

CS Vážení zákazníci,
společnost Gigaset Communications GmbH je právním
nástupcem společnosti Siemens Home and Office
Communication Devices GmbH & Co. KG (SHC), která dále
přejala segment produktů Gigaset společnosti Siemens AG.
Jakékoli prohlášení společnosti Siemens AG nebo SHC, které
naleznete v uživatelských příručkách, je třeba považovat za
prohlášení společnosti Gigaset Communications GmbH.
Doufáme, že jste s produkty Gigaset spokojeni.
SK Vážený zákazník,
Spoločnosť Gigaset Communications GmbH je právnym
nástupcom spoločnosti Siemens Home and Office
Communication Devices GmbH & Co. KG (SHC), ktorá zasa
pokračovala v činnosti divízie Gigaset spoločnosti Siemens
AG. Z tohto dôvodu je potrebné všetky vyhlásenia
spoločnosti Siemens AG alebo SHC, ktoré sa nachádzajú v
používateľských príručkách, chápať ako vyhlásenia
spoločnosti Gigaset Communications GmbH.
Veríme, že budete so zariadením Gigaset spokojní.
PL Szanowny Kliencie,
Firma Gigaset Communications GmbH jest spadkobiercą
prawnym firmy Siemens Home and Office Communication
Devices GmbH & Co. KG (SHC), która z kolei przejęła
segment produktów Gigaset od firmy Siemens AG. Wszelkie
oświadczenia firm Siemens AG i SHC, które można znaleźć
w instrukcjach obsługi, należy traktować jako oświadczenia
firmy Gigaset Communications GmbH.
Życzymy wiele przyjemności z korzystania z produktów
Gigaset.
TR Sayın Müşterimiz,
Gigaset Communications GmbH, Siemens AG'nin Gigaset
işletmesini yürüten Siemens Home and Office
Communication Devices GmbH & Co. KG (SHC)'nin yasal
halefidir. Kullanma kılavuzlarında bulunan ve Siemens AG
veya SHC tarafından yapılan bildiriler Gigaset
Communications GmbH tarafından yapılmış bildiriler olarak
algılanmalıdır.
Gigaset'ten memnun kalmanızı ümit ediyoruz.
RO Stimate client,
Gigaset Communications GmbH este succesorul legal al
companiei Siemens Home and Office Communication
Devices GmbH & Co. KG (SHC), care, la rândul său, a
continuat activitatea companiei Gigaset a Siemens AG.
Orice afirmaţii efectuate de Siemens AG sau SHC şi incluse
în ghidurile de utilizare vor fi, prin urmare, considerate a
aparţine Gigaset Communications GmbH.
Sperăm ca produsele Gigaset să fie la înălţimea dorinţelor
dvs.
SR Poštovani potrošaču,
Gigaset Communications GmbH je pravni naslednik
kompanije Siemens Home and Office Communication
Devices GmbH & Co. KG (SHC), kroz koju je nastavljeno
poslovanje kompanije Gigaset kao dela Siemens AG. Stoga
sve izjave od strane Siemens AG ili SHC koje se mogu naći u
korisničkim uputstvima treba tuma
Gigaset Communications GmbH.
Nadamo se da ćete uživati u korišćenju svog Gigaset
uređaja.
BG Уважаеми потребители,
Gigaset Communications GmbH е правоприемникът на
Siemens Home and Office Communication Devices GmbH
& Co. KG (SHC), която на свой ред продължи бизнеса на
подразделението Siemens AG. По тази причина
всякакви изложения, направени от Siemens AG или
SHC, които се намират в ръководствата за
потребителя, следва да се разбират като изложения на
Gigaset Communications GmbH.
Надяваме се да ползвате с удоволствие вашия Gigaset.
izjave kompanije
čiti kao
RU Уважаемыи покупатель!
Компания Gigaset Communications GmbH является
правопреемником компании Siemens Home and Office
Communication Devices GmbH & Co. KG (SHC), которая,
ою очередь, приняла подразделение Gigaset в свое
в св
управление от компании Siemens AG. Поэтому любые
заявления, сделанные от имени компании Siemens AG
или SHC и встречающиеся в руководствах
пользователя, должны восприниматься как заявления
компании Gigaset Communications GmbH.
Мы надеемся, что продукты Gigaset удовлетворяют
вашим требованиям.
HU T
isztelt Vásárló!
A Siemens Home and Communication Devices GmbH & Co.
KG (SHC) törvényes jogutódja a Gigaset Communications
GmbH, amely a Siemens AG Gigaset üzletágának utódja.
Ebből következően a Siemens AG vagy az SHC felhasználói
kézikönyveiben található bármely kijelentést a Gigaset
Communications GmbH kijelentésének kell tekinteni.
Reméljük, megelégedéssel használja Gigaset készülékét.
Issued by
Gigaset Communications GmbH
Schlavenhorst 66, D-46395 Bocholt
Gigaset Communications GmbH is a trademark
licensee of Siemens AG
© Gigaset Communications GmbH 2008
All rights reserved.
Subject to availability. Rights of modifications
reserved.
www.gigaset.com
Page 3

s
mobile
Issued by
Information and Communication mobile
Haidenauplatz 1
D-81667 Munich
© Siemens AG 2004
All rights reserved. Subject to availability.
Rights of modification reserved.
Siemens Aktiengesellschaft
www.siemens-mobile.com
Gigaset SL 74
COMMUNICATION FOR LIVING.
Page 4
Handset at a glance
Handset at a glance
16
15
14
13
12
11
10
9
Back panel
1
2
ÐV
INT 1
20.07.04 09:45
§§Camera§§ §§§§§MMS§§§§
8
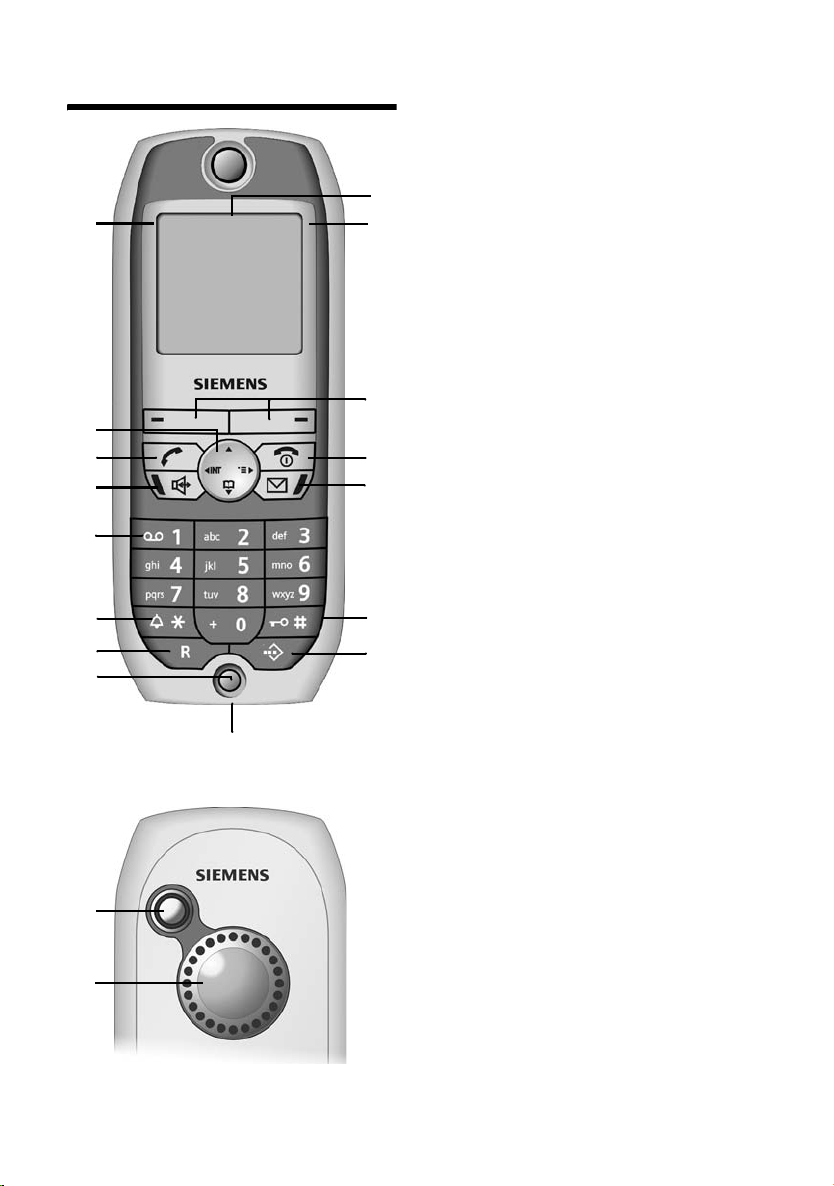
1. Display (screen) in idle status (depending
on the base station)
2. Charge status of the battery
= e V U (flat to full)
= flashes: battery is almost flat/is
charging
1
2
3
4
5
6
7
3. Display keys (see page 7)
4. End call key, On/Off key
End call, cancel function, one menu level
back (short press), back to idle status (long
press), handset on/off (long press in idle
status)
5. Message key
Access to calls and messages lists, flashes:
new message or call
6. Hash key
Keypad lock on/off (hold down)
7. speed dial list key
Open speed dial list
8. Socket for headset and PC interface
9. Microphone
10. Recall key
Initiate enquiry call (short press),
Insert a dial pause (long press)
11. Star key
Ringer on/off (long press),
Toggle between upper/lower case and
digits
12. Key 1
Select answering machine/network
mailbox (the answering machine in your
network)(press and hold in idle status)
13. Handsfree key
Switch from "earpiece" to handsfree mode;
Lights up: handsfree is activated;
Flashes: incoming call, automatic last
number redial
14. Ta lk key
Answer a call, switch from handsfree to
earpiece mode, open last number redial list
(short press, start dialling (long press)
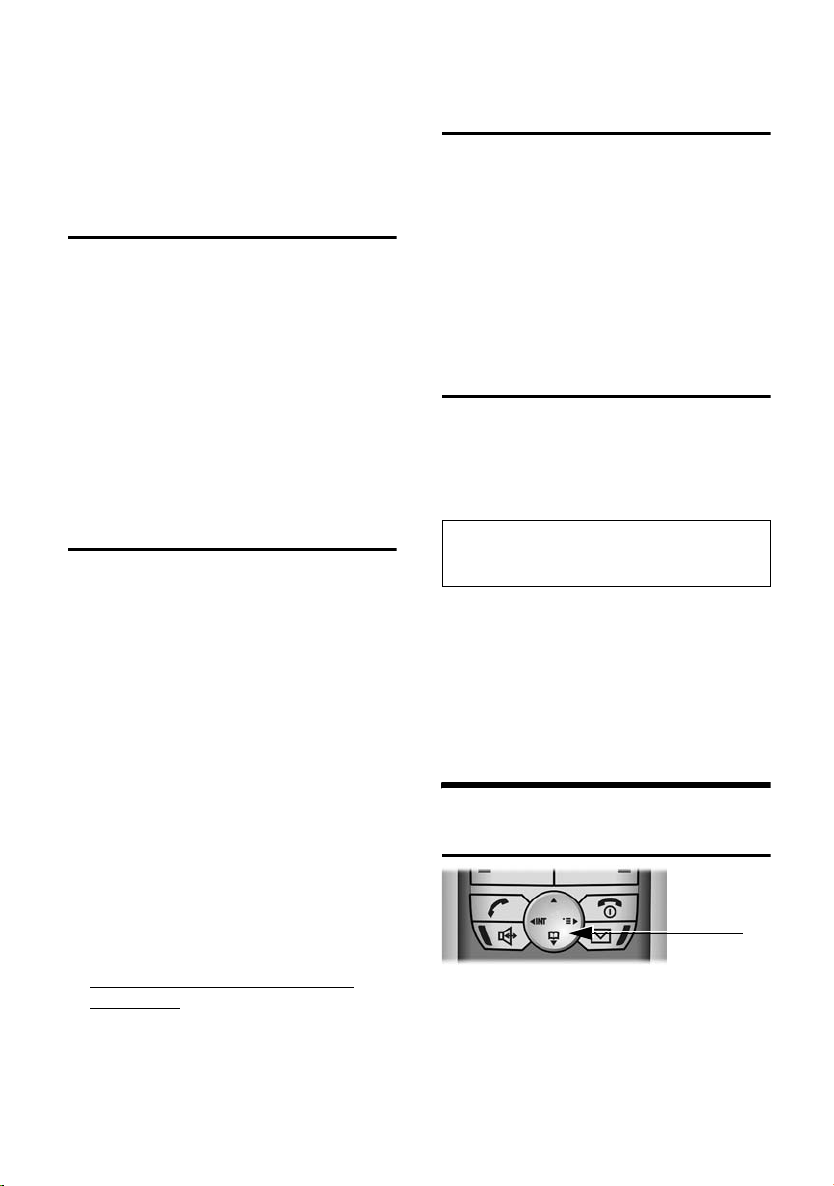
15. Control key (see page 6)
16. Signal strength
Ð i Ñ Ò (high to low)
| flashes: no reception
Back panel:
1. Camera lens
2. Loudspeaker
1
Page 5

Contents
Contents
Handset at a glance . . . . . . . . . . . 1
Safety precautions . . . . . . . . . . . . 3
SL 74 – A handset with
many extras . . . . . . . . . . . . . . . . . 4
Preparing to use the handset . . . 4
Inserting the battery . . . . . . . . . . . . . . 4
Charging the battery . . . . . . . . . . . . . . 5
Registration . . . . . . . . . . . . . . . . . . . . . 5
Changing the display language . . . . . . 6
Changing the base station . . . . . . . . . . 6
Activating/deactivating the handset . . 6
Activating/deactivating keypad
protection . . . . . . . . . . . . . . . . . . . . . . . 6
Operating the telephone . . . . . . . 6
Control key . . . . . . . . . . . . . . . . . . . . . . 6
Display keys . . . . . . . . . . . . . . . . . . . . . 7
Return to idle status . . . . . . . . . . . . . . . 7
Notes on the operating instructions . . 7
Date and time . . . . . . . . . . . . . . . . 8
Setting the date and the time . . . . . . . 8
Setting the alarm clock . . . . . . . . . . . . 8
Setting appointments . . . . . . . . . . . . . 9
Displaying missed appointments, and
anniversaries . . . . . . . . . . . . . . . . . . . . 9
Making calls . . . . . . . . . . . . . . . . 10
Making an external call . . . . . . . . . . . 10
Ending calls . . . . . . . . . . . . . . . . . . . . 10
Making internal calls . . . . . . . . . . . . . 10
Answering a call . . . . . . . . . . . . . . . . . 10
Handsfree . . . . . . . . . . . . . . . . . . . . . . 11
Muting the handset . . . . . . . . . . . . . . 11
Using the directory and lists . . . 11
Directory and speed dial list . . . . . . . . 11
Linking a call-by-call number
with a phone number . . . . . . . . . . . . 14
Email directory . . . . . . . . . . . . . . . . . . 14
Displaying available memory . . . . . . . 15
Last number redial list . . . . . . . . . . . . 15
MMS . . . . . . . . . . . . . . . . . . . . . . . 15
Writing/sending MMS messages . . . . 16
MMS lists . . . . . . . . . . . . . . . . . . . . . . 18
Receiving and viewing
MMS messages . . . . . . . . . . . . . . . . . . 19
Activating/setting up an
MMS centre . . . . . . . . . . . . . . . . . . . . . 20
File Manager . . . . . . . . . . . . . . . . 21
Editing entries . . . . . . . . . . . . . . . . . . . 21
Pictures . . . . . . . . . . . . . . . . . . . . . . . . 22
Sounds . . . . . . . . . . . . . . . . . . . . . . . . 22
Texts . . . . . . . . . . . . . . . . . . . . . . . . . . 23
Memory . . . . . . . . . . . . . . . . . . . . . . . . 23
Using the integrated camera . . . 24
Taking photographs . . . . . . . . . . . . . . 24
Changing settings . . . . . . . . . . . . . . . . 24
Using several handsets . . . . . . . 24
Using a handset as a room monitor . . 25
Setting the Walk and Talk mode . . . . . 26
Handset settings . . . . . . . . . . . . . 27
Setting the display . . . . . . . . . . . . . . . 27
Displaying a logo . . . . . . . . . . . . . . . . 27
Setting night mode . . . . . . . . . . . . . . . 27
Activating/deactivating
Auto Answer . . . . . . . . . . . . . . . . . . . 27
Adjusting the loudspeaker volume . . . 28
Ringer echo . . . . . . . . . . . . . . . . . . . . . 28
Changing the ringer tone . . . . . . . . . . 28
Recording sounds . . . . . . . . . . . . . . . . 29
Activating/deactivating advisory
tones . . . . . . . . . . . . . . . . . . . . . . . . . . 30
Restoring the handset factory
settings . . . . . . . . . . . . . . . . . . . . . . . . 30
Appendix . . . . . . . . . . . . . . . . . . . 30
Care . . . . . . . . . . . . . . . . . . . . . . . . . . . 30
Contact with liquid . . . . . . . . . . . . . . . 30
Customer Care . . . . . . . . . . . . . . . . . . 31
Specifications . . . . . . . . . . . . . . . . . . . 31
Guarantee certificate
(United Kingdom) . . . . . . . . . . . . . . . . 32
Guarantee certificate (Ireland) . . . . . . 32
PC Interface . . . . . . . . . . . . . . . . . . . . . 33
"Balloon Shooter" game . . . . . . . . . . . 34
Writing and editing text . . . . . . . . . . . 34
Predictive text . . . . . . . . . . . . . . . . . . . 34
Index . . . . . . . . . . . . . . . . . . . . . . 36
2
Page 6
Safety precautions
Caution:
Before use, please read the safety precautions and operating instructions.
Explain their contents and the risks involved in using the telephone to your children.
Use only the mains adapter supplied, as indicated on the underside of the
$
‹
Œ
charger.
Use only the rechargeable battery recommended (p. 31)! Never use
conventional batteries (non-rechargeable) or other rechargeable battery types
as this may cause significant damage to health and property.
Insert the rechargeable battery in accordance with the polarity symbols and use
the battery type recommended in these operating instructions.
The operation of medical appliances may be affected. Be aware of the technical
conditions within the particular environment (e.g. doctor's practice).
The handset may cause an intrusive hum in hearing aids.
The handset is not watertight (p. 30).
Safety precautions
Drivers must not use their phones while driving without a handsfree car kit
(Walk and Talk function). Ensure that it cannot be switched on again
accidentally.
Switch off your phone while on board an aircraft (Walk and Talk function).
Make sure it cannot be switched on accidentally.
Do not use the phone in environments subject to explosion hazard
(e.g. auto paint shops).
ƒ
If you give your Gigaset to someone else, make sure you also give them the
operating manual.
Dispose of the batteries and phone in accordance with environmental
regulations.
Note:
Not all of the functions described in these instructions are available in all countries.
3
Page 7
SL 74 – A handset with many extras
SL 74 – A handset with
many extras
With your SL 74 you not only have an
integrated digital camera and the ability to
send and receive MMS messages via the
fixed network (p. 19); your SL 74 can do
much, much more:
u Link photographs and directory entries
– and put a face to the caller (p. 14).
u Record your favourite melody with your
handset and design your own personal
ringer tone (p. 29).
u You can mark the directory entries of
particularly important callers as VIP –
then you can tell by the melody who is
phoning (p. 12).
u Save appointments (p. 9) and bir thdays
(p. 13) in your SL 74 – Your handset
will remind you in good time.
Have fun with your new Gigaset SL74!
Preparing to use the
handset
The pack contains:
u one handset SL 74,
u one data cable,
u one rechargeable battery,
u one battery cover,
u one charger (incl. power supply unit),
u one set of operating instructions.
The display is protected by a plastic film.
Remove the protective plastic film!
Inserting the battery
Caution:
Use only the rechargeable battery
recommended by Siemens on page 31!
Never use conventional batteries (nonrechargeable) or other types of rechargeable
battery as this may cause significant damage
to health and property. For example, the jacket
of the battery could be destroyed or the
battery could explode. The phone could also
malfunction or be damaged.
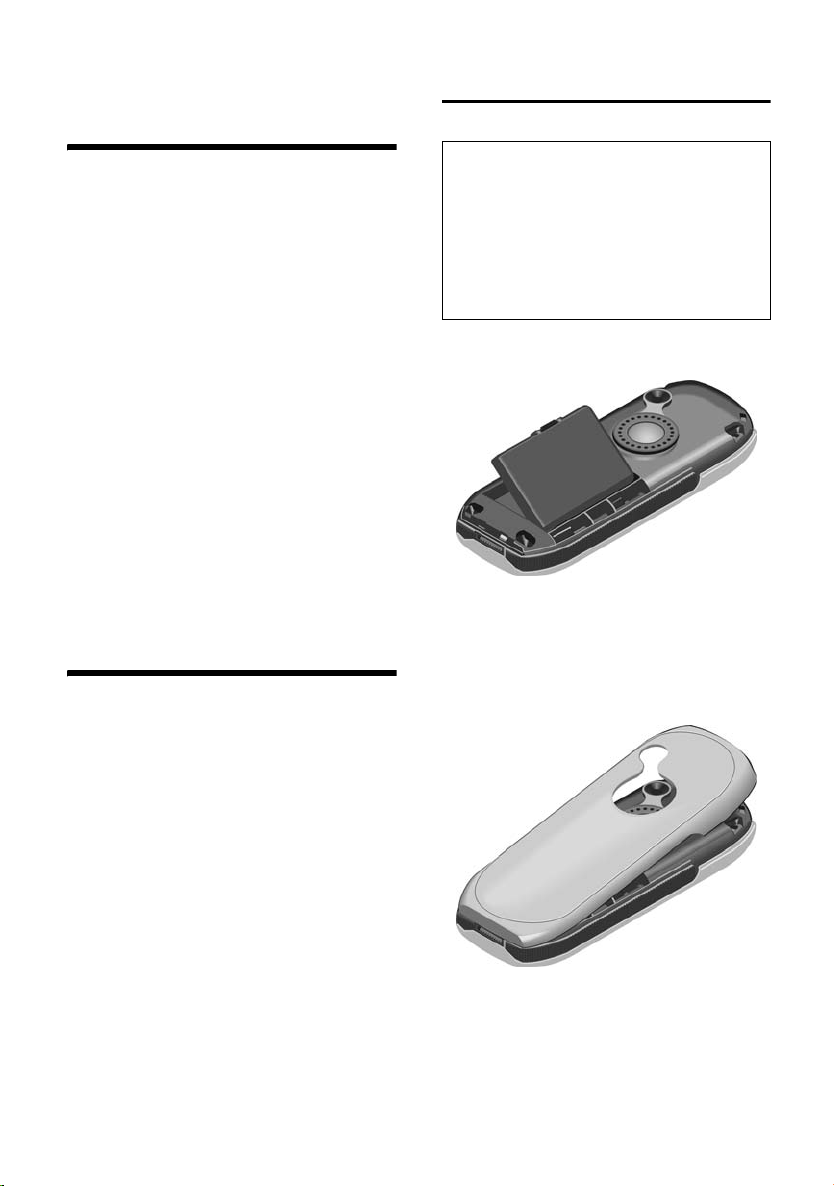
1. Insert the battery the right way round
and make sure it sits properly.
2. Position the battery cover at a slight
angle and slide it with the two lower
lugs into the case. Then push the cover
towards the camera until it closes with
a click.
4
Page 8
Preparing to use the handset
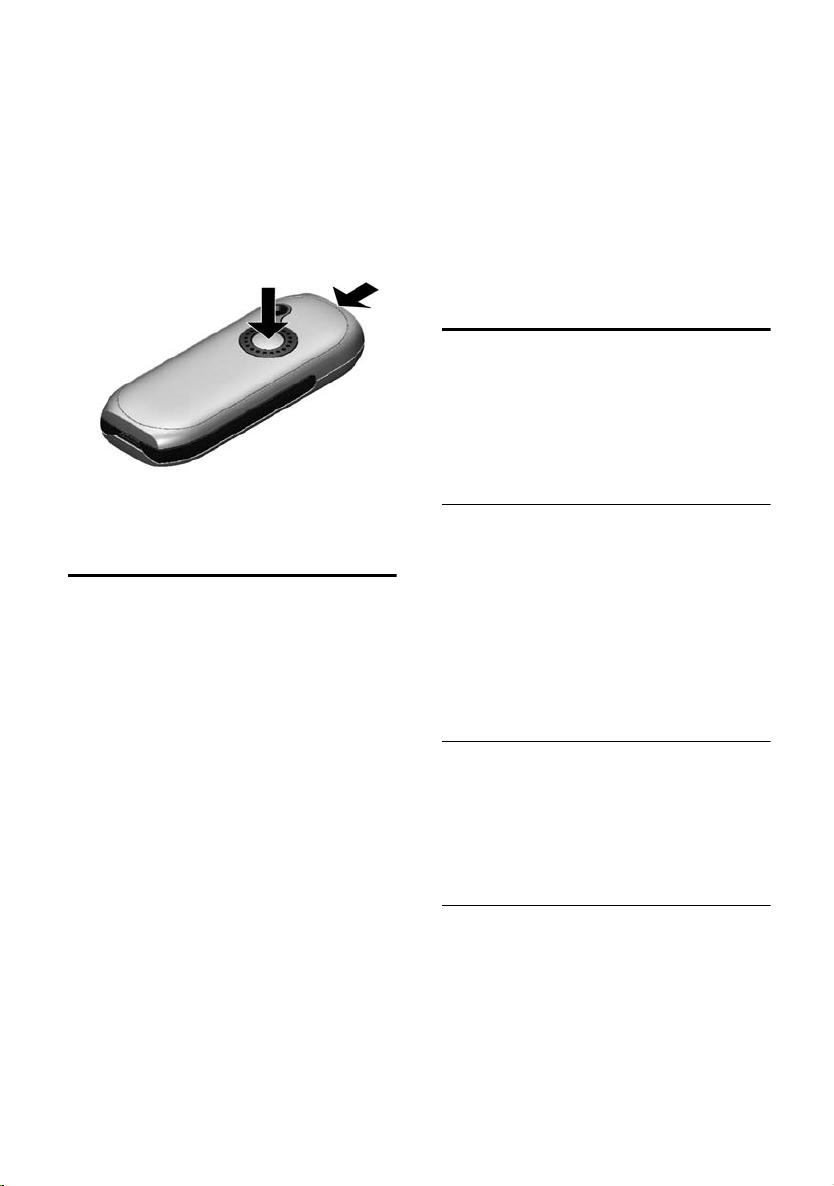
Opening the battery cover.
1. Hold the handset with the keypad
facing down.
2. Place the thumb of the other hand on
the mirror near the loudspeaker (a) and
with the index finger of the same hand
press the grooved area on the
handset (b).
a
3. Lift the cover.
b
Charging the battery
1. Plug the charger's power supply unit
into a mains socket.
2. Place the handset in the charger with
the display up.
Now leave the handset in the charger for
the battery to charge. Battery charging is
indicated in the top right of the display by
changes in the level indicator on the
battery icon = .
First charging and discharging of
the battery:
The battery charging status is correctly
displayed only after uninterrupted
charging and discharging.
For the initial charge we recommend
leaving the handset in the charger
continuously for five hours. Then remove
the handset from the charger and do not
recharge it until the battery is completely
flat.
After initial charging and discharging, you
can replace your handset in the charger
after each call.
Please note:
u You must always repeat this procedure
when you remove the battery from the
handset and replace it again.
u The battery heats up during charging.
This is normal and not dangerous.
u After a while the charge capacity of the
battery will decrease for technical
reasons.
Registration
You have to manually register your SL 74
before you can use it. It can be registered
on up to four base stations.
You must initiate handset registration on
the handset and on the base station.
1. On the handset
v ¢ Ð ¢ Handset ¢ Register H/Set
s Select base station, e.g. Base 1
and press
~ Enter the system PIN of the
base station (the default is
0000) and press
In the display you will see for
example Base 1 flashing.
2. On the base station
Please refer to the operating instructions
for the base station to find out how to
initiate handset registration on the base
station.
SL 74 on data-enabled ISDN base
stations
(CXxxx/SXxxx-series and SLX740isdn base
stations)
Your handset automatically registers on
data-enabled ISDN base stations twice for
faster transmission of MMS messages:
u Once as handset, e. g. Internal 11.
u Once as data module, e. g. INT 41:PC 41.
OK.
OK.
5
Page 9
Operating the telephone
Please remember:
u When you de-register your handset
from a data-enabled ISDN base station,
you have to do so individually as a
handset and then as a data module.
Changing the display language
You can view the display texts in different
languages.
¢ Ð ¢ Handset ¢ Language
v
s Select language. The current
language is marked with ‰.
a Long press (idle status).
You have selected a language you do not
understand:
v Press O 22 and then
choose the right language.
Changing the base station
If your handset is registered to more than
one base station, you can set it to a
particular base station or to the base
station that has the best reception (Best
Base).
¢ Ð ¢ Handset ¢ Select Base
v
s Select one of the registered
base stations or Best Base and
OK.
press
To ensure your Gigaset is always
completely up to date…
You can download firmware updates from
the Internet.
Do the following:
u Use the data cable supplied with the
pack to connect the PC to the handset.
u On the Internet, go to
http://www.siemens-mobile.com/
gigasetsl74 and click on the link
"Service downloads".
u Then load the firmware update to your
handset.
Activating/deactivating the
handset
a Hold down the end call key to
switch the handset on or off.
You will hear the confirmation tone.
The handset activates automatically when
placed in the charger. The display is
illuminated. You can switch off display
illumination, see page 27.
Activating/deactivating keypad
protection
Activating the keypad lock:
# Hold down the hash key.
You will hear the confirmation tone and
the symbol Ø will appear in the display.
Caution:
Wh en t he key pad loc k is act ive yo u cannot call
emergency numbers.
Deactivating the keypad lock:
# Hold down again.
The key lock deactivates automatically if
someone calls you. It re-activates when
the call is finished.
Operating the telephone
Control key
In these operating instructions, the side
(top, bottom, right, left) of the control key
you have to press in each situation is
shown in black (v for right).
The control key has the following
functions:
6
Page 10
Operating the telephone
In handset idle status:
s Open directory.
v Open menu.
u Open list of handsets.
In lists and menus:
t /s Scroll up/down.
v Confirm the selected entry
(same as
u Go back one menu level, or
cancel.
OK).
In an input field:
Use the control key to move the cursor up
t, down s, right v or left u.
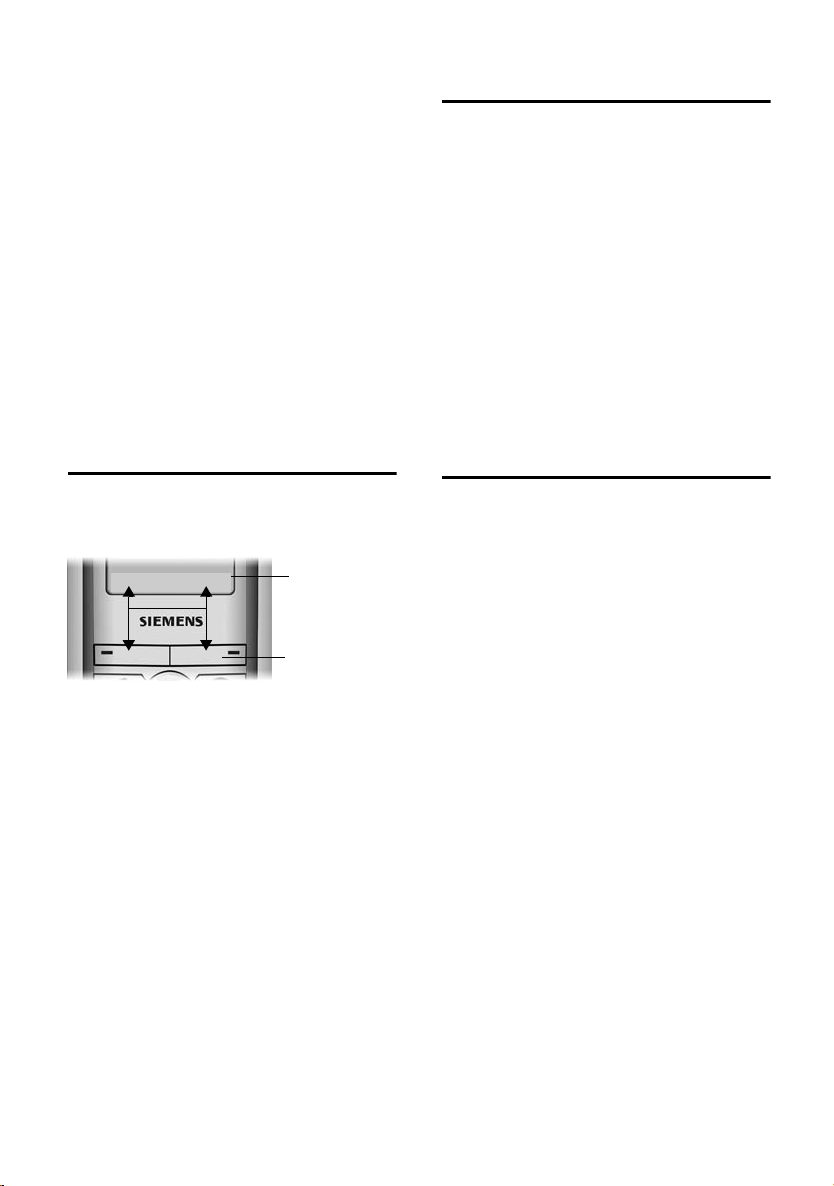
Display keys
The functions of the display keys change
depending on the operating situation.
Example:
§Camera§ §§MMS§
1. Current display key functions are shown in
the bottom display line.
2. Display keys
The most important display icons are:
• Open the last number redial
list.
¨ Open the main menu or a
context-sensitive menu.
W Delete key: Delete input from
right to left.
Î Go back one menu level, or
cancel.
ΠOpen email directory.
Ò Open directory.
Ó Copy a number to the
directory.
1
2
Return to idle status
Reverting to idle status from anywhere in
the menu:
u Press the end call key a and hold
down or
u Press no key: The display
automatically reverts to the idle status
after 2 minutes.
Changes which you have not confirmed/
stored by pressing
Save Entry
The display in idle status is shown on
page 1.
OK will be rejected.
OK, Yes, Save, Send or
Notes on the operating
instructions
The following symbols are used in these
operating instructions:
Copy Entry/Copy List
Choose one of the two menu
functions (the slash / means
"or").
~ Enter numbers or letters.
Save The current functions for the
display keys are shown reverse
highlighted and are offered in
the bottom display line. Press
the display key underneath to
apply the function.
q Press the top or bottom of the
control key (scroll up or
down).
r Press the right or left side of
the control key (e. g. select
setting).
c/Q/ * etc.
Press the handset key shown.
The operating instructions show the steps
you have to take in abbreviated form. This
is shown below using "Handsfree Volume
setting" as an example:
7
Page 11

Date and time
Step 1:
Step 2:
Step 3: Handset Volume
Step 4: r Select volume.
Step 5:
Step 6: a Hold down (idle
1. With the handset in idle status, press on
2. Press the bottom of the control key
3. Press the left (quieter) or right (louder)
4. Press the display key under
5. Press and hold the end call key to return
v
¢ ï
Select and press
Save Press the display key.
status).
the right of the control key to open the
main menu.
Use the control key to move to the ï
icon. This is done by pressing the
appropriate arrow on the control key.
Audio Settings appears on the top line of
the screen. Press the display key
confirm the selection. You will see the
Audio Settings menu.
repeatedly until Handset Volume appears
on the screen and confirm your choice
OK.
with
side of the control key to select the
required volume.
Save to apply
the change.
to the idle status.
OK.
OK to
~ Enter the hours/minutes
(4-digit format), e.g. Q
M 1 5 for 7:15 am.
s Scroll to the Time Mode: line.
r Choose between 12-hour -
and 24-hour mode. In 12-hour
mode you can scroll to the
Time: line and then use the
display key
between am and pm.
Save Press the display key.
am/pm to switch
Setting the alarm clock
Precondition: The date and time have
already been set (p. 8).
Activating /deactivating and setting
the alarm clock
v ¢ ì ¢ Alarm Clock
r In Alarm Clock: select On or Off.
s ~ Scroll to the Time: line and
enter the alarm call (4-digit
format).
Save Press the display key.
a Hold down (idle status). You
will see the ¼ icon.
The alarm will only ring if the handset is in
idle status. A wake-up call with selected
ringer melody (p. 28) is signalled on the
handset. The alarm will ring for
60 seconds if it is not answered.
Date and time
Setting the date and the time
The date and time have to be set if you
want to know exactly when calls were
received.
¢ Ð ¢ Date/Time
v
~ In the Date: line, enter the day/
month/year (6-digit).
s Scroll to the Time: line.
8
Deactivating a wake-up call
Press the display key Silence or any key to
turn off the wake-up call.
Page 12

Date and time
Setting appointments
You can use your handset to remind
yourself of up to 30 appointments (for
volume and melody settings see page 28).
Saving appointments
Precondition: The date and time have
already been set (p. 8).
¢ ì ¢ Set Appoints.
v
New Entry Select and press OK.
r In Appoint.: select On or Off.
s~ Scroll to the Date: line and
enter the day/month in a
4-digit format.
s~ Scroll to the Time: line and
enter the hours/minutes in a
4-digit format.
am/pm If in 12-hour mode (p. 8):
you can switch between am
and pm.
s Scroll to the Notes: line.
Edit Press the display key.
~ Enter text (max. 32
characters) to appear in the
display when the appointment
is due, and press
not enter a text, the display
will then show
"Appointment …" when it is
due.
Save Press the display key.
a Hold down (idle status). You
will see the icon ¼.
The appointment will be displayed in the
appointment list with its date and time.
The handset will only display an
appointment when it is in the idle status.
An appointment is signalled with the
selected ringer melody (p. 28). In the
display you will see for example Appoint. 2.
The appointment call will ring for
30 seconds if it is not answered.
OK. If you do
Managing appointments
v ¢ ì ¢ Set Appoints.
¢ s (Select appointment)
Viewing and changing appointments:
View Press the display key. The
appointment is displayed.
Press a to return to the list.
Edit Press the display key if you
want to change the entry.
Make the changes.
Save Now press the display key to
save the changes.
a Hold down (idle status).
Using other menu functions:
© Open menu.
You can now select the following
functions with s and confirm your
choice with
Edit Entry
Change selected appointment.
Delete Entry
Delete selected appointment.
Delete List
Delete all appointments.
Switching off or answering an
appointment alarm
Press the display key Silence to switch off
the appointment alarm, or select
respond with an MMS.
Displaying missed
appointments, and
anniversaries
Missed appointments/anniversaries
(page 9/page 13) are stored in the Missed
Dates list.
u You do not keep an appointment/
anniversary.
u The handset is switched off at the time
of the appointment/anniversary.
OK:
MMS to
9
Page 13

Making calls
The newest entry is at the beginning of
the list.
¢ ì ¢ Missed Dates
v
s Select appointment/
anniversary.
This will display information
about the appointment/
anniversary. A missed
appointment is marked
with ¼, a missed anniversary
with ‚.
Delete Press the display key to delete
the appointment/anniversary.
Or:
MMS Press the display key to write
an MMS.
a Hold down (idle status).
If there is a new appointment/anniversary
in the list, the display shows
Pressing the display key also opens the
Missed Dates list.
If the list contains 30 entries, the oldest
entry is deleted when the next
appointment call rings.
Appoint.
Making calls
Making an external call
External calls are calls using the public
telephone network.
~c Enter the phone number and
press the talk key
or
c~ Hold down the talk key c
and then enter the phone
number.
You can cancel the dialling operation with
the end call key a.
Ending calls
a Press the end call key.
Making internal calls
Internal calls to other handsets that are
registered to the same base station are
free of charge.
u Initiate the internal call.
Calling a specific handset:
~ Enter the number of the
handset.
Calling all handsets ("group call"):
* Press the star key. All handsets
are called.
Ending the call:
a Press the end call key.
Answering a call
An incoming call is indicated on the
handset by: ringing, a display on the
screen and the flashing handsfree
key d.
You can accept the call by:
u pressing the talk key cor
u pressing the handsfree key d or
u pressing display key Accept (external
call, on analog base stations)
If the Auto Answer function has been
activated (page 27), you can accept a call
by removing the handset from the
charger.
If the rin ger is d ist urbing, press the display
Silence. You can take the call so long as
key
it is displayed on the screen.
10
Page 14

Using the directory and lists
Handsfree
You should inform your caller that you
intend to use the handsfree function
before you activate it.
Activating/deactivating handsfree
Activate while dialling:
~d Enter the number and press
the handsfree key.
Activate during a call:
Press d (the handsfree key).
Deactivate during a call:
c Press talk key. This switches to
"earpiece mode".
If you wish to place the handset in the
charger during a call you must press the
handsfree key d and hold it down as
you do so.
Adjusting the volume while in
handsfree mode during a call
d Press the handsfree key again.
r Select volume.
Save Press the display key.
Muting the handset
You can switch the handset microphone
off. Your caller on the telephone will then
hear a wait melody.
During an external call:
u Mute the handset.
” Reactivate the microphone.
Using the directory and lists
There are:
u Directory,
u Speed dial list,
u Email directory,
u Last number redial list,
u SMS list,
u MMS list.
You can save a total of up to 200 entries in
the directory, speed dial list and email
directory (number depends on the size of
the individual entries).
You create the directory, email directory,
and speed dial list for your individual
handset. You can however send the lists/
entries to other handsets (p. 13).
Note:
– How to enter names is described from
page 34.
–The EATONI predictive text function helps
you to write names and email addresses
(page 34).
Directory and speed dial list
You can use the telephone directory to
store numbers and the corresponding
names. You open the directory in idle
status using the s key.
You can use the speed dial list to manage
your call-by-call numbers of network
providers and other important numbers.
You can assign speed dial digits to entries
in the list (p. 12). You can open the speed
dial list with the C key.
Size of entries:
Number: up to 32 digits
Name: up to 16 characters
11
Page 15

Using the directory and lists
Storing a telephone number in the
directory
s ¢ New Entry
~ Enter number.
s~ Scroll to the Name line and
enter the name.
s Scroll to the Annivers.: line if
you want to enter an
anniversary (see page 13).
s Scroll to the Picture line if you
want to assign a picture
(p. 14).
© Press the display key.
Save Entry Select and press
a Hold down (idle status).
If the cursor is in the Annivers.: line, you
can save the entry with
If your phone is connected to a PABX you
may have to enter the access code
(outside line code) as the first digit of your
directory entry.
OK.
Save.
Storing a telephone number in the
speed dial list
You can assign nine entries on your speed
dial list one of the digits 0, 2-9. If you hold
down one of these digits while the
handset is in the idle status and then press
the talk key c, the assigned number is
dialled immediately.
¢New Entry
C
~ Enter number.
s~ Scroll to the PublicKey: line and
enter the name.
s r Scroll to the Enter key: and
select the speed dial digit.
Save Press the display key.
a Hold down (idle status).
Selecting entries in the directory and
speed dial list
s/C Open directory or speed dial
list.
You have the following options:
u Scroll to the entry, i. e. press the s key
until the name you want is selected
(framed).
u Enter the first character of the name
and then scroll to the name with the
s key.
u Enter the first characters of the name
until it is selected.
Dialling with the directory/speed
dial list
s/C ¢ s (Select entry)
c Press talk key.
Managing entries in the directory and
speed dial list
s/C ¢ s (Select entry)
Viewing and changing entries:
View Press the display key. The
entry is displayed.
Back with
Edit Press the display key if you
want to change the entry.
Make any changes you want
and save them with ©
OK or:
¢ Save Entry.
a Hold down (idle status).
Using other menu functions:
v Open menu.
You can now select the following
functions with s:
Display Number
You can change or add to a saved
number and then dial or use other
functions by pressing ©.
Edit Entry
Change selected entry.
12
Page 16

Using the directory and lists
Delete Entry
Delete selected entry.
VIP Entry (directory only)
Mark directory entry as VIP (Very
Important Person) and assign it a
particular sound (p. 22) as ringer
melody. You can then tell who is calling
you from the ringer melody.
Precondition: Calling Line
Identification.
Copy and Edit (directory only)
So that you do not have to enter a
similar entry twice, you can create a
copy and then edit the copied entry.
Copy Entry
Send an entry to a handset (p. 13).
Delete List
Delete all entries in the directory and
speed dial list.
Copy List
Send a complete list to a handset
(p. 13).
Available Memory
Display the number of free entries in
the directory, speed dial list and email
directory.
Transferring a directory or speed dial
list call to another handset
You can send individual entries or
the entire list to another SL 74-, SL 1-,
S1-, C2 handset or a Comfort handset in
the Gigaset 4000, 3000 or 2000 series.
Preconditions:
u The receiving handset can receive and
send directory entries.
u Both handsets have been registered to
the same base station.
s / C
¢ s (Select entry; page 12)
¢ v (Open menu)
Copy Entry/Copy List
Select and press
~ Enter the internal number of
the receiving handset and
OK.
press
OK.
Yes/No To Copy Entry: Confirm
whether you want to send
another entry.
The successful transfer is confirmed with a
message and with the confirmation tone
at the receiving handset.
Please note:
u Assigned pictures and speed dial digits
are not transferred.
u Entries with identical numbers are not
overwritten.
u The transfer is cancelled if the phone
rings or if the memory of the receiving
handset is full.
Storing an anniversary in the directory
You can store an anniversary for every
number in the telephone directory. You
can enter a time for the reminder call for
that anniversary.
¢ s (Select entry; page 12)
s
View Press the display key.
Edit Press the display key.
s Scroll to the Annivers.: line.
Edit Press the display key.
~ In the Date: line, enter the day/
month (4-digit).
s~ Scroll to the Time: line and
enter the hours/minutes in a
4-di git format for the remin der
call.
sr Scroll to Prompt: and choose
how you want to be reminded
(any sound or visually). For
sounds from the File Manager
you have to enter the time for
the reminder call. For optical
indication, the time entry is
optional.
OK Press the display key.
Save Press the display key.
a Hold down (idle status).
13
Page 17

Using the directory and lists
Deleting anniversaries
Open the directory entry and scroll to the
Annivers.: line. Then press the following
display keys:
Edit, Delete and Save.
Anniversary reminder call
The handset sounds a reminder call with
the ringer melody selected on the
handset.
Stop the reminder call with the
Silence key.
Linking a picture to a directory entry
Precondition: Calling Line Identification.
s ¢ s (Select entry; page 12)
View Press the display key.
Edit Press the display key.
s Scroll to the Picture line.
Insert Press the display key.
MyPictures /Images
Select and press
q Select the picture. When you
View, the picture appears
press
in the display. When you press
OK, the picture is applied.
© Press the display key.
Save Entry Select and press OK.
The picture is displayed on the screen
when that person calls.
Deleting picture assignments
Open the directory entry you want to
change (p. 12). Scroll to the line Picture .
© Open menu.
Clear PictureSelect and press
The picture is not deleted from the File
Manager.
Changing picture assignments
Delete the old picture assignment and
assign a new one.
OK.
OK.
Linking a call-by-call number
with a phone number
This function can be used to put a network
provider's prefix, which is stored in the
speed dial list, in front of the telephone
number.
C Open the network access list.
s Select entry.
© Press the display key.
Display Number
Select and press
~ Enter number.
You can also dial a number
from the directory (page 12).
c Press talk key. The number is
dialled.
OK.
Email directory
You can store email addresses in the email
directory. The entries can be managed just
like directory entries (p. 12).
Storing a new email address
s Open directory.
<E-Mail Directory>
Select and press
New Entry Select and press OK.
~ Enter email address
© Press the display key.
Save Entry Select and press OK.
a Hold down (idle status).
During entry you can open the menu with
© and use the following functions:
Insert '.'/Insert '@'
Select and press
Predictive Text
Select and press OK to activate or
deactivate the predictive text function.
OK.
OK.
14
Page 18

MMS
Displaying available memory
s ¢ s (Select entry; page 12)
¢ v (Open menu)
Select and press
a Hold down (idle status).
Display the number of free entries in the
directory, speed dial list and (p. 11) email
directory (p. 14).
Last number redial list
The last number redial list contains the ten
last dialled numbers. If one of the
numbers is in the directory, then the
caller's name is displayed.
Manual last number redial
Press the talk key c briefly.
sc Select entry and press the
talkkey again. The number is
dialled.
When a name is displayed, you can have
the respective phone number displayed by
using the display key
Managing entries in the last number
redial list
Press the talk key c briefly.
s Select entry.
v Open menu.
You can now select the following
functions with s:
Automatic Redial
The number is dialled automatically
every 20 seconds. The handsfree key
flashes. The loudspeaker is activated. If
the party answers, press the talk key
c. If the call is not answered,
ringing stops after about 30 seconds.
The function is cancelled automatically
after ten failed attempts or if a call is
received.
OK.
View.
Display Number
You can change or add to a stored
number in the last number redial list.
Then you dial it or use other functions
by pressing ©.
Copy to Directory
Add telephone number to the
directory.
Delete Entry
Delete selected entry.
Delete List
Delete all entries.
MMS
The Multimedia Messaging Service
enables you to send and receive texts,
pictures, photographs and sounds in one
message. These elements are put together
as a "slide show" in the MMS message. An
MMS message comprises the content and
an address header. You can send an MMS
message to a telephone with MMS
function, mobile telephone or an email
address.
Preconditions:
u Your network provider supports SMS
within the fixed network.
u Before you can send and receive MMS
messages with your SL 74 handset, it
has to be registered to a base station
that supports the sending and
receiving of linked SMS messages.
Text messages are exchanged between
MMS centres that are operated by service
providers. You can only send and receive
text messages via the MMS centre that is
activated as the active send service centre.
An MMS message is normally sent via
Centre 1 (p. 20). Ask your service provider
if it provides this service. It may require
separate registration.
You can use EATONI predictive text to help
you enter the text (p. 34).
15
Page 19

MMS
With the telephone in idle status, you can
open the MMS function via display key
§§§MMS§§§.
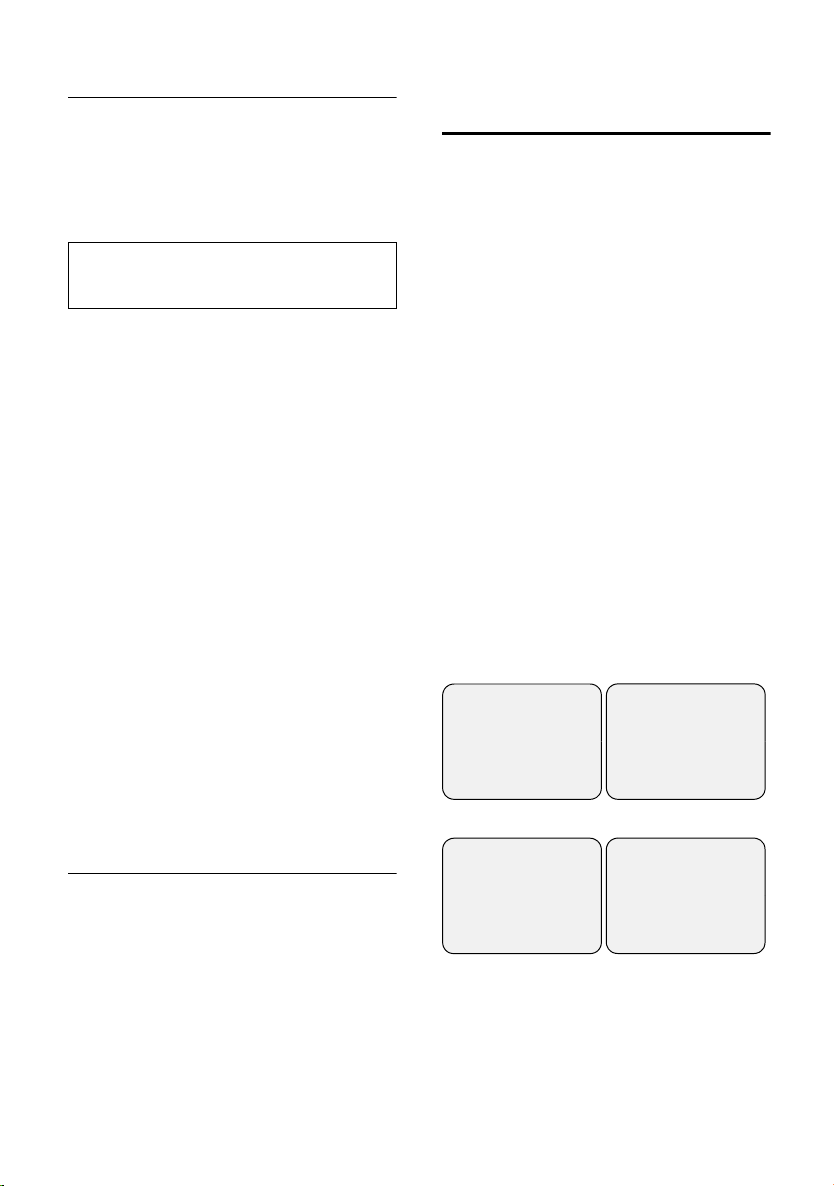
Writing/sending MMS messages
v ¢ î ¢ MMS ¢ New MMS
Putting together MMS content
An MMS message must contain at least
one page of content.
An MMS page can contain text, picture/
photograph/animation and sounds:
______ MMS Page ___1/1
Tex t:
<Empty>
Picture:
<Empty>
Edit V ©
Entering the text
In the Tex t input field:
Edit Press the display key. This
opens the text editor.
~ Enter text.
© Press the display key.
Save Text Select and press
Using other text editor functions:
© Press the display key.
Delete Text
Delete all the text displayed in the
editor.
Insert Text Module
Insert text from the File Manager.
Save Text Module
Save as text in the File Manager.
Predictive Text
Activate or deactivate predictive text
(p. 34).
Select Language
Select entry language.
______ MMS Page ___1/1
Sound:
<Empty>
W ©
Insert
OK.
Inserting a picture:
In the Picture input field:
Insert Press the display key.
<New Picture>/MyPictures /Images/
Animations
Select and press
OK. <New
Picture> starts the integrated
camera (p. 24). MyPictures /
Images/Animations opens the
corresponding list of pictures
in the File Manager. Copy-
protected images cannot be
added.
s Select picture and press
OK.
Inserting sounds:
In the Sound input field:
Insert Press the display key.
<New Sound>/Sounds
Select and press
OK. <New
Sound> starts the sound
recorder (p. 29). Sounds opens
the list of sounds stored in the
File Manager. Copy-protected
sounds cannot be added.
s Select sound and press
OK.
Other functions in the "Putting together
MMS content" submenu:
Pressing the display key © in the
overview display gives you access to the
following functions:
Add Page
Insert a new page after the displayed
page (max. number of pages = 10).
Send
Write MMS header (page 17).
Save
Store MMS message in the MMS-Draft
list.
Preview Page
Open the page displayed in the
overview mode in presentation mode.
16
Page 20

MMS
Preview Message
Play the MMS message currently being
edited in the overview mode in
presentation mode.
Page Duration
Enter the display duration of the
currently displayed page. The page is
displayed for at least as long as the
longest sound/longest animation lasts.
Delete Page
If the MMS message has several pages,
the currently displayed page is
completely deleted.
If the MMS message has only one page,
the content of this page is deleted.
Properties
View properties of the MMS message.
Scrolling between pages:
u Enter number ~ of the page you want
to view.
u Press t in Text to scroll to the previous
page.
u Press s in Sound to scroll to the next
page.
Writing the MMS header
In overview mode select © ¢ Send to
put together the content of the MMS
message.
The MMS header comprises the telephone
number/email address and reference.
___Send MMS 123___
To:
¼
Subject:
Ò V ©
Entering addressee:
In the To input field:
~ Enter telephone number
(press display key Ò) or
email address. If necessary,
use * to change from
"123" input mode to "abc"
input mode.
Note:
You can enter more than one addressee for an
MMS message. Select © ¢ Add Recipient.
Separate addresses with a semicolon.
Entering the reference:
s Select entry field Subject:
~ Enter reference (max.
40 characters). You can use
EATONI predictive text (p. 34)
to help you enter the text.
¢ Predictive Text).
(©
Using other overview mode functions:
Send
Send MMS message (see page 18).
Save
Store MMS message in the MMS-Draft
list.
Default settings
When you write an MMS message, the
default settings will apply to this message
unless you change them.
¢ î ¢ MMS ¢ Settings ¢ Presets
v
Expiry Time
Period during which the MMS centre
tries to deliver the message:
6 hours , 12 hours, 1 day, 1 week, Maximum
(Maximum period permitted by the
service provider).
Priority
Send priority: Low , Normal, High
17
Page 21

MMS
Page Duration
Display duration for an MMS page. Use
this value to define how long an MMS
page is to be displayed to the
addressee. The MMS page is displayed
for at least as long as the longest
sound/longest animation lasts.
Sending MMS messages
Your phone line is busy while an MMS
message is being sent/received.
In overview mode for writing the MMS
header:
© Press the display key.
Send Select and press
now told the size of the MMS
message to be sent.
Yes Confirm the prompt.
The MMS message is sent.
All MMS messages sent are stored in the
MMS outgoing message list.
If a problem occurs while the MMS
message is being sent, this message will
be stored in the MMS "not sent" list
(p. 18).
OK. You are
MMS lists
MMS messages are stored in four lists:
u Inbox (Incoming message list)
Contains received MMS messages and
notifications (p. 19).
u Draft (Draft message list)
Contains drafts of MMS messages,
sorted by date. Press
message,
u Sent (outgoing message list)
Contains sent MMS messages, sorted
by date. Use Delete to delete displayed
MMS message, use
message.
Play to play MMS message.
Send to send MMS
Play to play
u Unsent ("not sent" list)
Contains MMS messages if a problem
arose during sending. Use Send to send
MMS message, the MMS message is
automatically moved to the outgoing
message list. Use
Play to play message.
Opening lists
v ¢ î ¢ MMS ¢ Inbox/Draft/Sent/
Unsent
You can use the message key f to open
the MMS incoming messages list (p. 18) if
there are new MMS messages.
Menu options
Press v for the following list options:
Reply (Incoming message list)
Reply to an MMS message. The
overview mode is opened for putting
together the content of the MMS
message (p. 16). The sender's phone
number is automatically copied to the
input field To: and the reference
together with Re: to the reference line.
Forward (Incoming/outgoing message list)
Forward the MMS message. The
content of MMS messages for
forwarding cannot be changed. The
overview mode is opened for writing
the MMS header (p. 17). Fw: is
automatically added to the reference
line.
Edit (Incoming/outgoing/"not sent" list)
The content of an MMS message is
copied to a new MMS message.
Pictures/photographs, animations,
sounds, texts and reference are copied,
all other content discarded. The new
MMS message is opened in overview
mode for putting together the MMS
content (p. 16).
Edit (Draft message list)
The selected MMS message is opened
in overview mode for putting together
the MMS content (p. 16).
18
Page 22

MMS
Delete Entry (Draft/"not sent"/ outgoing list)
Delete selected MMS message.
Delete all (All lists)
Delete all MMS messages in the list.
Copy to Directory (Incoming message list)
Store telephone number/email
addresses from selected MMS message
in telephone directory/email directory.
Telephone numbers and email
addresses are identified automatically.
Mark as New (Incoming message list)
Mark selected, already read MMS
message as "new".
Attachments (Incoming message list)
List of objects attached to the selected
MMS message is displayed. Press
Play to open the selected object in the
appropriate application. Press
save objects in the File Manager
(p. 21). Install selected photographs/
pictures/animations and sounds with
¢ Install.
v
Properties (All lists)
View properties of the selected MMS
message.
Capacity (All lists)
Display available memory.
View /
Save to
Receiving and viewing
MMS messages
While sending/receiving an MMS
message, your telephone line or, with
ISDN connections, one of the two
telephone lines is busy.
Receiving an MMS
The following settings for receiving MMS
messages depend on the base station your
handset is registered to:
u Immediate : MMS messages are
transmitted direct to your telephone
(CXxxx/SXxxx-series and SLX740isdn
base stations).
u Deferred: MMS messages are saved in
the network.
To CXxxx/SXxxx-series and
SLX740isdn base stations:
A notification about the sender and the
size of the MMS message is added to
the MMS incoming messages list. You
can then download this MMS message
from the network at your convenience.
Other base stations:
A text message is stored in the SMS
incoming message list. When you open
this text message, an MMS notification
about the sender and the size of the
MMS message is added to the MMS
incoming messages list. The display
shows a corresponding message. The
SMS message remains in the SMS
incoming message list until you delete
it. You can download the MMS
message from the network whenever it
suits you.
¢ î ¢ MMS ¢ Settings ¢ Retrieval
v
Behav.
Immediate /Deferred
Select and press
OK (‰ =on).
Select notification (CXxxx/SXxxx-series
and
SLX740isdn base stations only):
Notifications are stored in the incoming
message list (p. 18).
Note:
Bear in mind that you can only download the
MMS message during the period stated under
Expiry in the notification!
f Press to open the incoming
message list.
s Select notification.
Receive Press the display key. The MMS
message is downloaded from
the network. Notification is
deleted.
19
Page 23
MMS
Opening and viewing MMS messages
New MMS messages/notifications are
indicated by the message You have new
messagesÛ, by the f message key
flashing and the confirmation tone.
When you open an MMS message, it is
displayed in presentation mode.
Note:
If an MMS message only contains a sound, an
empty page is displayed and the sound played.
Opening an MMS
f Press to open the incoming
message list.
MMS: MMS: If there are new entries
in several lists: Select and
OK.
press
q Select MMS.
Play Press the display key. The MMS
message is opened.
Presentation mode
The presentation mode plays the MMS
message page by page. Presentation
mode uses the entire screen. No display
keys are available. You have the following
options:
u Enter number ~ of the page you want
to view.
u Press s to scroll to the next page.
u Press t to play the current page again.
u Press t twice to scroll to the previous
page.
Activating/setting up an
MMS centre
Up to 3 MMS centres can be set up. An
MMS message is normally sent and
received via Centre 1. Centre 1 has been
preconfigured for your country.
¢ î ¢ MMS ¢ Settings ¢ Service
v
Centres
The list of MMS centres is displayed. The
currently activated MMS centre is
indicated.
Centre 2 Select entry and press
The settings of the selected MMS centre
are displayed.
Please note:
u If there is a preconfigured setting, only
change it as instructed by your service
provider!
u If yo u w ant to send an MMS via an M MS
centre other than the one you have set,
then you must change the MMS centre
for your handset and the relevant data
module (e.g. Int41:PC 41).
Use q to select the entry fields of the
settings.
______Centre 1____
Active Send:
f
Yes g
Server URL:
http://¼
” V Save
______Centre 1_____
Dial in No. send:
1234567¼
Dial in No. receive:
X U ©
OK.
Opening attachments
You can open/save/install MMS
attachments via the incoming messages
list (page 18).
20
______Centre 1_____
Notification No.:
1234567¼
User Name:
X U ©
______Centre 1_____
Password:
xyz¼
X W Save
Active Send
Is the MMS centre set up as the current
send and receive centre (‰ =on)? If you
want to change this setting, bear in
mind that there always has to be one
MMS centre activated as the current
send centre. Save setting with
Save.
Page 24

File Manager
Server URL
Web address of the MMS server. Save
setting with
Save.
Dial in No. receive (optional)/Dial in No. send
MMS send centre dial-up number for
sending/receiving MMS messages.
Save setting with ©
¢ Save Entry.
If you do not enter a dial-up number for
Dial in No. receive, the dial-up number
entered for Dial in No. send will be used
for sending and receiving messages.
Notification No.
Number of the SMS centre you receive
notifications from. If Notification No. is
not offered, you will have to enter the
number of the SMS centre as additional
SMS reception centre (see base station
operating instructions).
User Name (Optional)
User name at this MMS centre. Save
setting with
Save.
Password (Optional)
If no password has been assigned,
enter a password and save it with
Save.
If a password has already been
assigned, it is shown as (******). To
change the password, delete it
with X. Enter a new password and
save it with
Save.
Text Modules Templates Sent as
Unicode/
Unicode can
be received
A total of approx. 1 MB memory is
available for the File Manager and MMS
together.
For exchanging data with a PC
seepage33.
Editing entries
v ¢ Ï ¢ MyPictures /Images/
Animations/ Sounds/Text Modules
(Select entry)
Renaming entries
v Open menu.
Rename Select and press OK.
~ OK Edit the name (up to
16 characters, do not use
spaces, special characters or
umlauts) and press
entry is stored with the new
name.
You cannot rename sounds
that cannot be deleted (è).
a Hold down (idle status).
¢ q
OK. The
File Manager
Your handset uses the File Manager to
store various data types:
In menu Data type Formats
MyPictures Own
Images Graphics from
Animations Graphic
Sounds Ringer tones,
photographs
any source
sequences
from MMS
melodies
JPEG
JPEG, BMP, GIF,
PNG
Animated GIF
MIDI, MMF,
AMR, iMelody,
Gigaset
melodies
Deleting entries
v Open menu.
Deleting a entry
Delete Entry Select and press OK. The entry
is deleted. Any ringer melody
that is deleted is automatically
replaced with Melody 4. A
deleted logo is not replaced.
If the entry cannot be deleted
(è), you will see an error
message.
a Hold down (idle status).
21
Page 25

File Manager
Deleting all entries in a list
Delete List Select and press OK. All
deletable entries in the list will
be deleted.
a Hold down (idle status).
Sending entry as MMS
v Open menu.
Send as MMS
Select and press
Turn to section "Writing/sending MMS
messages", page 16.
OK.
Viewing properties
v Open menu.
Properties Select and press OK. The name,
format and size of the entry
are displayed.
a Hold down (idle status).
Pictures
Own photographs are stored in MyPictures
, all other pictures in Images. You have the
same options with both types of images.
Animated graphics are stored in
Animations and cannot be used as a logo or
in the directory.
Viewing
v ¢ Ï ¢ MyPictures /Images/Animations
¢ q (Select entry)
View Press the display key. The
photograph/picture/animation
is displayed.
q Switch between entries.
With ” you can return to the
list.
a Hold down (idle status).
Installing pictures
You can use pictures as a logo or assign
th em to a direct or y e ntr y s o that it appe ars
when the person with that number
phones you.
¢ Ï ¢ MyPictures /Images
v
¢ q (Select entry)
v Open menu.
Install Select and press OK.
Using picture as a logo
as Logo Select and press OK.
Yes Press the display key to replace
the current logo.
a Hold down (idle status).
Assigning a picture to a directory entry
as CLIP Picture
Select and press
q Select the name you want to
assign the picture to and
OK.
press
Yes If another picture has already
been assigned, press the
display key to replace the
picture.
a Hold down (idle status).
Sounds
Note:
You can save sounds in the File Manager. How
to record sounds is described in the section
"Recording sounds" (p. 29).
OK.
22
Page 26

File Manager
Playback
v ¢ Ï ¢ Sounds ¢ q (Select entry)
Play Press the display key. Sounds
are played back.
Use the q key to go to the
previous/next entry or to swap
between entries.
End Press the display key. Playback
ends. You will now see the
Sounds sounds list again.
a Hold down (idle status).
While playing back the sounds, you can
use the display key
volume.
Volume to adjust the
Installation
You can assign different sounds for
external calls, internal calls, appointments
and alarm clock, or use the same sound
for all of them.
¢ Ï ¢ Sounds ¢ q (Select entry)
v
v Open menu.
Install Select and press OK.
q Select what the entry is to be
used for and press
entry is assigned to the
category.
a Hold down (idle status).
OK. The
Texts
Viewing
v ¢ Ï ¢ Text Modules
¢ q (Select entry)
View Press the display key. The text
is displayed.
Adding a number to the directory
If the text contains a telephone number
you can copy it to the directory. The
number is marked automatically. If a text
contains several numbers, then only one
is marke d at a ti me. Scro ll dow n the te xt to
have the next number marked.
Ó Press the display key. The
number is added to the
directory.
Editing
You can edit text messages so that they
can be sent as an MMS, for example. They
can be up to 1,000 characters long.
¢ Ï ¢ Text Modules
v
¢ q (Select entry) ¢ View
Edit
Press the display key. The text
is displayed in edit mode. Use
the display key © to save or
delete the text, open
predictive entry and select the
language (section "Entering
the text", page 16).
Memory
You can make the file manager show how
much memory is still available and what
percentage of the individual sections is
taken up.
Please note: If the maximum number of
files used internally for saved MMS
messages is exceeded, a message is
displayed accordingly when an MMS is
sent. In this case, please delete an MMS
you no longer require even if, according to
the file manager, there should still be
memory available.
¢ Ï
v
q Select Capacity and press OK.
Use q to scroll in the list.
a Hold down (idle status).
23
Page 27

Using the integrated camera
Using the integrated camera
You can take photographs and
u send them in an MMS message (p. 16),
u use them as a picture in the directory or
as a logo (p. 22).
Taking photographs
v ¢ ë
Use the screen as the viewer.
Take Press the display key to take a
new photograph. You will see
the photograph on the screen.
Press the display key p to
take a new photograph.
Save/New Press the display key to store
the photograph or to take a
new photograph.
a Hold down (idle status).
You can view, rename and delete
photographs (p. 21). If there is insufficient
memory, the display does not change to
search mode. Delete no longer required
data in the File Manager or MMS lists.
Changing settings
You can set the quality of the picture, its
brightness and white balance:
u Quality Normal: 128 x 105 pixels
u Quality High: 352 x 288 pixels
u Brightness Normal/High: Depending on
brightness
u White Bal. Auto/Indoor/Outdoor
v ¢ ë ¢ © ¢ Camera setup
s Scroll to the Quality line.
r Normal or select High.
s Scroll to the Brightness line.
r Select Normal or High.
s Scroll to the White Bal. line.
r Select Auto, Indoor or Outdoor.
Save Press the display key to save
the settings.
a Hold down (idle status).
Viewing memory
v ¢ ë ¢ © ¢ Info
Used/available memory is
displayed.
a Hold down (idle status).
Using several handsets
Forwarding a call to another handset
u Initiate the internal call.
The external caller hears the
wait melody.
~ /* Enter internal number or start
group call. When the internal
user answers: announce
external call or immediately
a Press the end call key. The
external call is transferred to
the other handset. If the
internal user does not answer
or is busy, the call will come
back to you automatically
(Recall appears in the display).
Internal consultation calls
You can make an internal call while an
external call is in progress.
u Initiate the internal call.
The external caller hears the
wait melody.
~ Enter internal number.
Ending enquiry call:
End Press the display key. You are
reconnected with the external
caller.
24
Page 28

Using several handsets
Accepting/rejecting call waiting during
an internal call
If you get an external call while
conducting an internal call, you will hear
the call waiting tone (short tone).
Ending internal call, accepting external
call:
Accept Press the display key. The
internal call is ended. You are
connected to the external
caller.
Rejecting external call:
Reject Press the display key. The call
waiting tone is turned off. You
remain connected with the
internal caller. The call waiting
tone can still be heard on
other registered handsets.
Using a handset as a room
monitor
With this function, a previously stored
in terna l or exte rnal nu mber is cal led when
a set noise level in the room is reached.
The room monitor remains activated on
the handset even after you hang up.
The handset should be between 1 and
2 metres away from the baby. The
microphone must be directed towards the
baby.
When the room monitor is activated,
incoming calls to the handset which is
near the baby are indicated without a
ring tone, they are just shown on the
display. The display and the key pad are
not illuminated.
When entering an external telephone
number, make sure:
u The handset must not be blocked for
outgoing calls.
u The number to which the room
monitor call is forwarded must not be
blocked by an activated answering
machine.
u Always check the settings of the
room monitor before you leave
home, e. g. sensitivity. Check the
phone line if the room monitor is
redirected to an external number.
u A room monitor stops calling an
external number after around
90 seconds. Room monitor calls to an
internal number (handset) stop after
about 3 minutes.
u The room monitor function severely
curtails the handset's operating time.
Put the handset in the charger. This
ensures that the battery does not go
flat.
u The room monitor function can also be
used in Walk and Talk mode.
Activating the room monitor function
and entering the "call to" number
v ¢ í ¢ Room Monitor
Activate room monitor:
r In Room M.: select On.
Enter the "call to" number:
s Scroll to the Call to: line.
Edit Press the display key. The input
field for the phone number is
opened.
q/~ Enter external number. You
can take the number from the
directory or enter it manually.
© Press the display key.
Save Entry Select and press
is stored.
Only the last 4 digits of the
number are displayed.
You can also enter an internal number:
press the
base station, either select handset s and
press
press
INT key and, depending on the
OK or enter internal number ~ and
Save.
OK. The entry
25
Page 29

Using several handsets
Set the sensitivity:
s Scroll to the Level: line.
r Select sensitivity for the noise
level (Low or High).
Save Press the display key. The
room monitor function is now
activated.
Note:
Once the room monitor is activated, switch
directly to the room monitor setting with v
(open menu).
Deactivating the room monitor
remotely
Take the call from the room monitor and
press the 9 ; keys. The room monitor
function will deactivate around 90
seconds after the call ends. The room
monitor will make no further calls. The
other room monitor functions on the
handset (e.g. no ringer) remain active
until you press the
handset.
To reactivate the room monitor function
with the same telephone number, you
must turn on the activation again and save
Save.
with
Off display key on the
Setting the Walk and Talk mode
In Walk and Talk mode the handsets
cannot be reached by incoming calls. The
handset operating times are greatly
curtailed.
Activating/deactivating the Walk and
Talk mode
v ¢ í ¢ Walk and Talk
Deactivating the Walk and Talk mode:
Off Press the display key.
If, when you are in Walk and Talk mode,
you press the talk key c or the
handsfree key d, the call will go to all
the handsets that are in Walk and Talk
mode. The connection is made with the
first handset to answer the Walk and Talk
call.
u Ring and advisory tones are set in
exactly the same way as if your
handsets were in range of the base
station (page 28).
u "Activate/deactivate ringer" (p. 29) and
"Activate/deactivate keypad lock" (p. 6)
are available in Walk and Talk mode.
u To open the menu, press the display
key ©.
u The Walk and Talk mode is retained
even when you switch your handset off
and back on.
The Walk and Talk function allows
communication between two handsets
(maximum range 300 metres) no matter
how far they are from the base station.
Precondition:
u Both handsets have been registered to
the same base station (recommended
for the room monitor function) or
u Both handsets are registered to
different base stations and both are set
to Best Base (p. 6) or
u One of the handsets is not registered to
any base station and the registered
handset is set to Best Base or
u Neither handset is registered to a base
station.
26
Using a handset in Walk and Talk mode
as a room monitor
© Press the display key.
Room Monitor
Select and press
s Scroll to the Room M.: line.
r Activate the room monitor.
s Scroll to the Level: line.
r Select sensitivity for the noise
level (Low or High).
Save Press the display key. The
room monitor function is now
activated.
OK.
Page 30

Handset settings
Always check the settings of the room
monitor before you leave home, e.g.
sensitivity and phone line.
The room monitor will only call handsets
that are in the Walk and Talk mode.
Press the display key
monitor handset to deactivate the room
monitor. The handset returns to the
normal Walk and Talk mode.
Off on the room
Handset settings
Setting the display
You can choose from 4 colours and several
contrast and brightness levels.
¢ Ð ¢ Handset ¢ Display
v
Colour Scheme
Select and press
s Select colour and press OK.
The current colour is marked
with ‰.
a Short press.
Contrast Select and press
r Select contrast.
Save Press the display key.
Brightness Select and press OK.
r Select brightness.
Save Press the display key.
a Long press (idle status).
OK.
OK.
or
v Scroll to the Picture line.
Insert Press the display key to assign
a picture.
MyPictures /Images
Select and press
s Select picture. When you press
View, the picture appears in the
display. You can move
between the saved pictures by
pressing q. When you press
OK, the picture is applied.
© Press the display key.
Save Entry Select and press OK.
a Long press (idle status).
If you want to change the logo, delete the
picture assignment with © Clear Picture
OK. Then assign a new picture as described
above.
OK.
Setting night mode
The display is dimmed in idle state. When
night mode is activated, the display
illumination is switched off during idle
state if the handset is in the charger.
¢ Ð ¢ Handset ¢ Display
v
Night mode Select and press OK (‰ = on).
a Long press (idle status).
Activating/deactivating
Auto Answer
Displaying a logo
You can have a logo displayed while the
telephone is in idle status.
¢ Ð ¢ Handset ¢ Display
v
Screen Picture
Select and press
current setting is displayed.
r Activate/deactivate logo. Save
Save.
with
OK. The
If you have activated this function, when
you get a call you can simply lift the
handset out of the charger without having
to press the talk key.
¢ Ð ¢ Handset
v
Auto Answer Select and press OK to activate
or deactivate the function
(‰ =on).
a Hold down (idle status).
27
Page 31
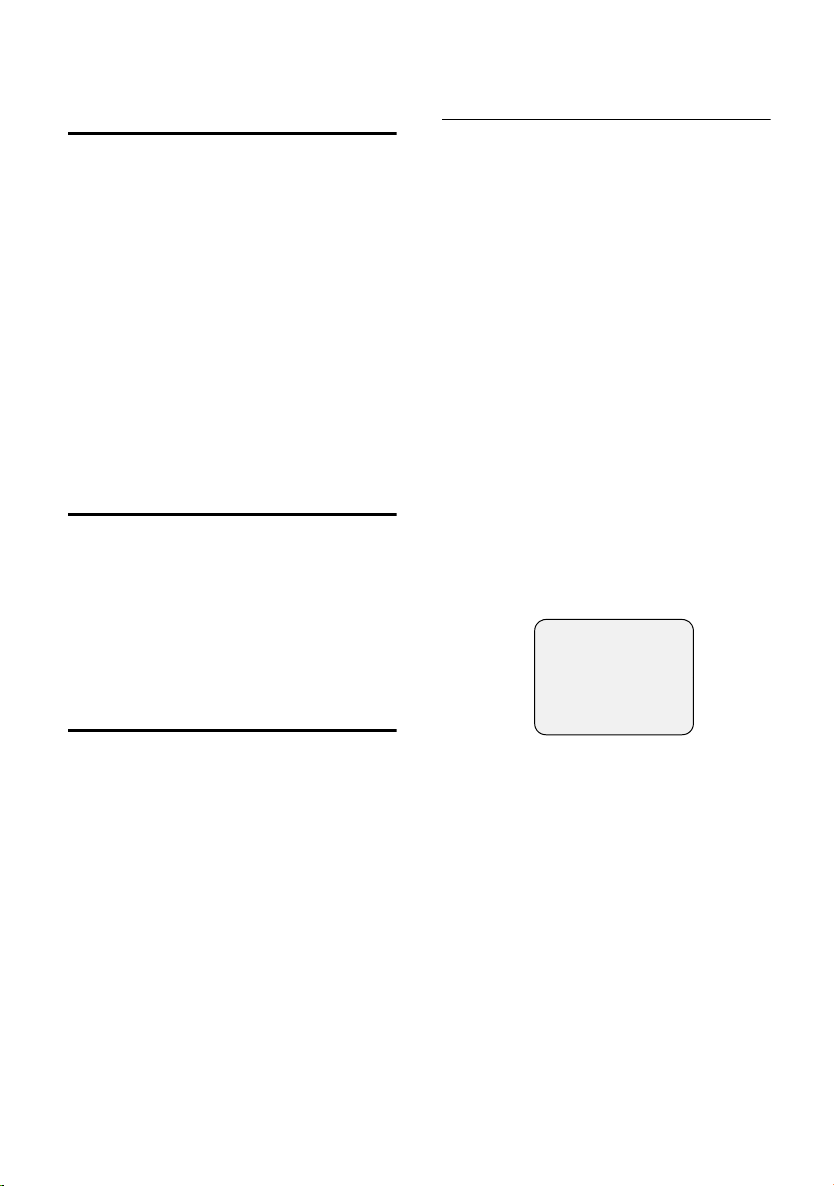
Handset settings
Adjusting the loudspeaker
volume
You can adjust the handsfree volume on
five levels and the earpiece volume on
three levels – you can even do this while
an external call is in progress.
¢ ï
v
Handset Volume
Select and press
r Select the handsfree talking
volume (1–5).
sr Scroll one line lower and set
the earpiece volume (1–3).
Save Press the display key.
a Hold down (idle status).
OK.
Ringer echo
You can select an echo effect for the long
ringer melodies (4–10).
¢ ï
v
Ringer Echo
Select and press
a Hold down (idle status).
OK (‰ = on).
Changing the ringer tone
Settings for external calls and time
control
Setting the volume and melody
v ¢ ï ¢ Ringer Settings
Ext. Calls Select and press OK.
r Select volume.
s Scroll to the next line.
Edit Press the display key.
q Select melody.
Play you can listen to the
Using
marked melody. You can move
between the saved melodies
by pressing q. You can end
the playback by pressing
OK Press the display key.
Save Press the display key to save
the settings.
Setting the time control
v ¢ ï ¢ Ringer Settings ¢ Ext. Calls
Time C. Press the display key for time
control.
Time ctrl:
From: 20:00
Until: 08:00
Ö‡
Î Save
fOng
End.
You can choose any sound from the File
Manager for the ringer tone. You can
adjust the volume in six levels.
28
r In Time ctrl: select On.
s~ Scroll to the From: line and
enter the beginning of the
time period (4-digit format).
s~ Scroll to the Until: line and
enter the end of the time
period (4-digit format).
sr Scroll to the next line and set
the ringer volume for this time
period.
Save Press the display key to save
the time control.
a Hold down (idle status).
Page 32

Handset settings
Settings for internal calls, wake-up
calls and appointments
v ¢ ï ¢ Ringer Settings
q Select setting, e. g. Internal
Calls, and press
r Select volume (1–6).
s Scroll to the next line.
Edit Press the display key.
q Select melody. Using
Play you can listen to the
marked melody.
OK Press the display key.
Save Press the display key.
a Hold down (idle status).
OK.
The same settings for all functions
v ¢ ï ¢ Ringer Settings
All Select and press OK.
Now set volume and ringer
tone (as described in "Settings
for internal calls, wake-up calls
and appointments").
Yes Press the display key to
confirm the prompt.
a Hold down (idle status).
Activating/deactivating the ringer
All handsets ring when there is an
incoming call.
Cancelling the ringer permanently
* Press the star key and hold
until the ringer cannot be
heard any longer. The Ú icon
appears in the display.
To reactivate the ringer, press
the star key and hold.
Deactivating the ringer for the current call
Silence Press the display key
Activating/deactivating the alert tone
In place of the ringer tone you can activate
an alert tone. When you get a call, you will
hear a short tone ("Beep") instead of the
ring tone.
* Press and hold the star key
and within 3 seconds:
Beep on Press the display key. A call is
now signalled by one brief
alert tone. You will now see
º
in the display.
* To reactivate the ringer, press
the star key and hold.
Recording sounds
You can record melodies using the sound
recorder (max. length 30 sec.) or transfer
them by means of the data cable (max.
48 KB) (p. 33).
¢ í ¢ Sound Recorder
v
<New Sound>
Select and press
OK Press the display key to start
recording with the
microphone. You can suspend
recording with
continue with
End Press the display key to end
the recording.
The recording is automatically
repeated for you to check.
Save/New Press the display key to save/
reject the recording and start
again.
X ~ If required, delete the
recommended name and
enter a name for the sound
(max. 16 characters, do not
use spaces, special characters
or umlauts) and press the
display key.
a Hold down (idle status).
Open the File Manager to play, edit or
delete sounds (p. 22).
OK.
Pause and then
record.
OK
29
Page 33

Appendix
Activating/deactivating advisory
tones
Your handset uses "advisory tones" to tell
you about different activities and statuses.
The following advisory tones can be
activated and deactivated individually.
u Key click (every key press is confirmed)
u Acknowledge tones (Confirmation
tone, Error tone, End of menu tone)
u Battery tone
v ¢ ï ¢ Advisory Tones
sr Scroll to the Key Tones: line and
activate/deactivate key click.
sr Scroll to the Confirm.: line and
activate/deactivate
acknowledge tones.
sr Scroll to Battery: and choose
On, Off or during call.
Save Press the display key.
a Hold down (idle status).
Restoring the handset factory
settings
Factory settings of the handset
Function Factory
Battery tone/Key click/
Confirmation tone
Auto Answer on page 27
Room monitor/room
monitor sensitivity
Display language English page 6
Ringer tone:
Melody/time control
Volume: Earpiece/
ringer tone/ handsfree
MMS centre MMS1 country
System PIN 0000 page 5
Appointment name deleted page 9
EATONI predictive text off page 34
Last number redial list empty page 15
Alarm clock/
appointment
settings
on page 30
off//high page 25
Melody 1/off page 28
1/5/3 page 28,
specific
off page 8p
Page
page 28
page 20
age 9
Appendix
You can reset individual settings and
changes you have made. This will not
affect entries in the directory, the calls list,
the email directory or the speed dial list,
the SMS lists, the MMS lists, the handset's
registration to the base station and the
contents of the File Manager.
Press a to cancel the reset.
¢ Ð ¢ Handset ¢ Reset Handset
v
Yes Press the display key.
a Hold down (idle status).
30
Care
Wipe the handset with a damp cloth (use
no solvent) or an antistatic cloth. Never
use a dry cloth. This can cause static.
Contact with liquid
If the handset should come into contact
with liquid, switch it off. On no account
switch the device on. Remove the
battery immediately.
Allow the liquid to drain out of the device.
Then follow the instructions below:
1. Hold the device horizontally with the
open battery case facing down.
!
Page 34

Appendix
2. Hold the handset vertically. Tilt the
device slightly forwards and
backwards, shaking it gently as you do
so.
3. Pat all parts dry and keep the device in
a warm, dry place for at least 72 hours
with the battery compartment open
and with the keypad facing downwards
(do not place in a microwave, oven
etc.).
In many cases, you will then be able to use
it again.
Customer Care
You have access to straightforward
support concerning with technical aspects
of your device and how to operate it
through our Online Support on the
Internet:
www.siemens-mobile.com/
customercare
If you have any trouble with the
equipment, please contact the Siemens
telephone service:
United Kingdom 0 87 05 33 44 11
Ireland 18 50 77 72 77
Replacement or repair services are not
offered in countries where our product is
not sold by authorised dealers.
Authorisation
This product is designed for world-wide
operation, depending on national
approval outside the European Economic
Area (except Switzerland). Country-specific features are allowed for in the design.
The CE sign confirms that the device
meets the fundamental requirements of
the R&TTE Directive.
Excerpt from the original declaration
"We, Siemens AG, declare, that the above mentioned product is manufactured according to
our Full Quality Assurance System certified by
CETECOM ICT Services GmbH with ANNEX V of
the R&TTE-Directive 99/5/EC. The presumption
of conformity with the essential requirements
regarding Council Directive 99/5/EC is ensured."
Senior Approvals Manager
The Declaration of Conformity (DoC) has been
signed. In case of need a copy of the original
DoC can be made available via the company
hotline.
Specifications
Recommended battery
(Valid when these operating instructions were
printed)
Lithium-Ion (Li-Ion), 700 mAh
The device is supplied only with a
recommended battery.
Handset operating times/charging
times
Capacity 700 mAh
Standby time approx. 115 hours (4 days)
Calling time approx. 24 hours
Charging time approx. 2 hours
These operating and charging times apply
only when using the recommended
battery.
31
Page 35

Appendix
Guarantee certificate
(United Kingdom)
Without prejudice to any claim the user
(customer) may have in relation to the
dealer or retailer, the customer shall be
granted a manufacturer's Guarantee
under the conditions set out below:
u In the case of new devices and their
components exhibiting defects
resulting from manufacturing and/or
material faults within 24 months of
purchase, Siemens shall, at its own
option and free of charge, either
replace the device with another device
reflecting the current state of the art,
or repair the said device. In respect of
parts subject to wear and tear
(including but not limited to, batteries,
keypads, casing), this warranty shall
be valid for six months from the date
of purchase.
u This Guarantee shall be invalid if the
device defect is attributable to
improper treatment and/or failure to
comply with information contained in
the user manuals.
u This Guarantee shall not apply to or
extend to services performed by the
authorised dealer or the customer
themselves (e.g. installation,
configuration, software downloads).
User manuals and any software
supplied on a separate data medium
shall be excluded from the Guarantee.
u The purchase receipt, together with
the date of purchase, shall be required
as evidence for invoking the
Guarantee. Claims under the
Guarantee must be submitted within
two months of the Guarantee default
becoming evident.
u Ownership of devices or components
replaced by and returned to Siemens
shall vest in Siemens.
u This Guarantee shall apply to new
devices purchased in the European
Union. The Guarantee is issued by
Siemens plc, Siemens House, Oldbury,
Bracknell, Berkshire, RG12 8FZ.
u Any other claims resulting out of or in
connection with the device shall be
excluded from this Guarantee.
Nothing in this Guarantee shall
attempt to limit or exclude a
Customer's Statutory Rights, nor the
manufacturer's liability for death or
personal injury resulting from its
negligence.
u The duration of the Guarantee shall
not be extended by services rendered
under the terms of the Guarantee.
u Insofar as no Guarantee default exists,
Siemens reserves the right to charge
the customer for replacement or
repair.
u The above provisions does not imply a
change in the burden of proof to the
detriment of the customer.
To invoke this Guarantee, please contact
the Siemens telephone service. The
relevant number is to be found in the
accompanying user guide.
Guarantee certificate (Ireland)
Without prejudice to any claim the user
(customer) may have in relation to the
dealer or retailer, the customer shall be
granted a manufacturer's Guarantee
under the conditions set out below:
u In the case of new devices and their
components exhibiting defects
resulting from manufacturing and/or
material faults within 24 months of
purchase, Siemens shall, at its own
option and free of charge, either
replace the device with another device
reflecting the current state of the art,
or repair the said device. In respect of
parts subject to wear and tear
(including but not limited to, batteries,
keypads, casing), this warranty shall
32
Page 36

Appendix
be valid for six months from the date
of purchase.
u This Guarantee shall be invalid if the
device defect is attributable to
improper care or use and/or failure to
comply with information contained in
the user manuals. In particular claims
under the Guarantee cannot be made
if:
uThe device is opened (this is classed
as third party intervention)
uRepairs or other work done by
persons not authorised by Siemens.
uComponents on the printed circuit
board are manipulated
uThe software is manipulated
uDefects or damage caused by
dropping, breaking, lightning or
ingress of moisture. This also applies
if defects or damage was caused by
mechanical, chemical, radio
interference or thermal factors
(e.g.: microwave, sauna etc.)
uDevices fitted with accessories not
authorised by Siemens
u This Guarantee shall not apply to or
extend to services performed by the
authorised dealer or the customer
themselves (e.g. installation,
configuration, software downloads).
User manuals and any software
supplied on a separate data medium
shall be excluded from the Guarantee.
u The purchase receipt, together with
the date of purchase, shall be required
as evidence for invoking the
Guarantee. Claims under the
Guarantee must be submitted within
two months of the Guarantee default
becoming evident.
u Ownership of devices or components
replaced by and returned to Siemens
shall vest in Siemens.
u This Guarantee shall apply to new
devices purchased in the European
Union. For Products sold in the
Republic of Ireland the Guarantee is
issued by Siemens Ireland Limited,
Ballymoss Road, Sandyford Industrial
Estate, Dublin 18 - The Republic of
Ireland.
u Any other claims resulting out of or in
connection with the device shall be
excluded from this Guarantee.
Nothing in this Guarantee shall
attempt to limit or exclude a
Customers Statutory Rights, nor the
manufacturer's liability for death or
personal injury resulting from its
negligence.
u The duration of the Guarantee shall
not be extended by services rendered
under the terms of the Guarantee.
u Insofar as no Guarantee default exists,
Siemens reserves the right to charge
the customer for replacement or
repair.
u The above provisions does not imply a
change in the burden of proof to the
detriment of the customer.
To invoke this Guarantee, please contact
the Siemens helpdesk on 1850 777 277.
This number is also to be found in the
accompanying user guide.
PC Interface
You can connect the SL 74 handset to your
computer using the data cable supplied.
Your computer can then communicate
with your SL 74 and access parameters
and lists on your handset by means of a
program you can download free of charge
at http://www.siemens-mobile.com/
gigasetsl74. This permits:
u the downloading of polyphonic ringer
tones and logos
u the synchronisation of Outlook
contacts with the directory
u the synchronisation of Outlook
appointments
33
Page 37

Appendix
During data transfer between the handset
and the computer, the screen displays Data
Transfer. During transfer, no entries are
possible via the keypad and incoming calls
are ignored.
"Balloon Shooter" game
Try to hit as many balloons as you can.
Starting the game
v ¢ í ¢ Balloon Shooter
Start Press the display key.
Other options
To open the options menu, press the
display key ©.
To move the sights, press
¢
¢
¢
I
O
¢
¢
¢
or
¢
p
¢
¢
¢
1
2
¢
4L
5
M
N
¢
To shoot the balloon, press 5.
Writing and editing text
When writing a text:
u The cursor is controlled with u v t
s.
u Characters are added to the left of the
cursor.
u Press the star key
switch from the "Abc" mode (upper
case: 1st letter upper case, all others
lower case) to "123", from "123" to
"abc" and from "abc" back to "Abc".
Press the star key * before
entering the letter.
u Press the star key
Shows the selection line of the
characters assigned to the star key.
u The first letter of the name of directory
entries is automatically capitalised,
followed by lower case letters.
*
*
briefly to
and hold:
Editing text
(without predictive text)
When you press a key and hold it, the
characters of that key appear in the
bottom display line and are highlighted
one after the other. When you release the
key the highlighted character is inserted
into the input field.
You can see in the display whether upper
case, lower case or digits are selected: "A"
or "a" appears on the bottom display line
when you make an entry in the directory.
Predictive text
The EATONI predictive text helps you to
write MMS and SMS messages, plus
names, in the directory, speed dial list or
email directory.
Each key between Q and O is
assigned several letters and characters.
These appear in a selection line
immediately under the text panel (over
the display keys) as soon as you press a
key. The letter you are most likely looking
for is reverse highlighted and is at the
beginning of the selection line. It is copied
into the text panel.
470(2)_____Ç_____Abc
Hello Peter, I cannot come
today. Ic
hgi
1. EATONI is activated
2. Text of the message
3. Selection line
If this letter is the one you want, confirm it
by pressing the next key. If the letter
selected by the EATONI is not the one you
want, then press the hash key #
repeatedly until the required letter
appears reverse highlighted in the display
line and is transferred to the text area.
If you press and hold the hash key #,
you will see the selection line of characters
that are assigned to the hash key.
1
2
3
34
Page 38

Appendix
Activating/deactivating predictive text
Predictive text is activated and deactivated
according to specific functions.
Precondition: You are in a text input field
(e.g. MMS, SMS, name in the directory,
speed dial list or email directory).
© Press the display key.
Predictive Text
Select and press
OK (‰ = on).
a Press the end call key briefly
to return to the text area. Now
enter your text.
Order of directory entries
The directory entries are usually sorted in
alphabetical order. Spaces and digits take
first priority. The sort order is as follows:
1. Space (shown here as s)
2. Digits (0–9)
3. Letters (alphabetical)
4. Other characters
If you want to work around the
alphabetical order of the entries, insert a
space or a digit in front of the name. These
entries will then move to the beginning of
the directory.
Names which you have preceded with an
asterisk will move to the end of the
directory.
Entering special characters
Standard characters
1 Q * #
*) **)
1x
Space Space
2x 1 Â ,
3x \ 1 ? * \
4x £
â
!/&
5x $ £ 0 ( §
6x ¥ $ + ) /
7x ¤ ¥ - <
8x ¤ : =
9x ¿ >
10x ¡ %
11x “
12x ‘
13x ;
14x _
*) Directory and other lists.
**) When writing a text message.
Abc-->
.
123
123 -->
abc
#
@
35
Page 39

Index
Index
A
Acknowledge tones. . . . . . . . . . . . . . 30
Advisory tones
Alarm clock
activating/deactivating
assigning sound
setting
Alert tone
Anniversary
not kept
reminder call
storing in the directory
Appointment
activating/setting
deactivating
naming
not kept
setting the ringer
Auto Answer
Automatic redial
B
Balloon Shooter. . . . . . . . . . . . . . . . . 34
Bar
keypad lock
Battery
charging
display
inserting
recommended battery
Battery tone
Belt clip
Best base station
Brief overview
handset
Brightness (display)
C
Call
ending
external
internal
transferring
Call waiting (internal call)
Call-by-Call numbers
linking with phone number
Camera
. . . . . . . . . . . . . . . . . 30
. . . . . . . . . . . 8
. . . . . . . . . . . . . . . 23
. . . . . . . . . . . . . . . . . . . . . . . 8
. . . . . . . . . . . . . . . . . . . . . 29
. . . . . . . . . . . . . . . . . . . . . . 9
. . . . . . . . . . . . . . . . . 14
. . . . . . . . . . 12
. . . . . . . . . . . . . . . 9
. . . . . . . . . . . . . . . . . . . 9
. . . . . . . . . . . . . . . . . . . . . . 9
. . . . . . . . . . . . . . . . . . . . . . 9
. . . . . . . . . . . 23, 29
. . . . . . . . . . . . . . . . . . . 27
. . . . . . . . . . . . . . . . 15
. . . . . . . . . . . . . . . . . . . 6
. . . . . . . . . . . . . . . . . . . . . 5
. . . . . . . . . . . . . . . . . . . . . . . 5
. . . . . . . . . . . . . . . . . . . . . 4
. . . . . . . . . . 31
. . . . . . . . . . . . . . . . . . . 30
. . . . . . . . . . . . . . . . . . . . . . . . 6
. . . . . . . . . . . . . . . . . 6
. . . . . . . . . . . . . . . . . . . . . . 1
. . . . . . . . . . . . . . 27
. . . . . . . . . . . . . . . . . . . . . . 10
. . . . . . . . . . . . . . . . . . . . . 10
. . . . . . . . . . . . . . . . . . . . . 10
. . . . . . . . . . . . . . . . . . 24
. . . . . . . . . 25
. . . . . . . . . . . . . 11
. . . . . . 14
. . . . . . . . . . . . . . . . . . . . . . . 24
changing settings
deleting photos
. . . . . . . . . . . . . . . . . . . . . . . . 1
lens
memory
photographing
renaming photos
viewing photos
Cancel (operation)
Care of the telephone
Changing the base station
Charge status display
Colour (display)
Confirmation tone
Consultation call (internal)
Contents
Contrast (display)
Control key
. . . . . . . . . . . . . . . . . . . . .24
. . . . . . . . . . . . . . . . . . . . . . 4
. . . . . . . . . . . . . . . . . . . . 6
. . . . . . . . . . . . . .24
. . . . . . . . . . . . . . . .21
. . . . . . . . . . . . . . . .24
. . . . . . . . . . . . . . .21
. . . . . . . . . . . . . . . .22
. . . . . . . . . . . . . . . 7
. . . . . . . . . . . . .30
. . . . . . . . . 6
. . . . . . . . . . . . . 5
. . . . . . . . . . . . . . . . .27
. . . . . . . . . . . . . . .30
. . . . . . . . .24
. . . . . . . . . . . . . . . .27
D
Data cable . . . . . . . . . . . . . . . . . . . . .33
Date and time
Deactivating
alarm clock
appointment call
handset
keypad lock
ringer (handset)
wake-up call
Delete
anniversary
appointment
picture from directory
Delete key
Digital camera, see Camera
Directory
adding number from MMS
adding number from
SMS text
assigning a picture
deleting pictures
inserting picture
memory
opening the
order of entries
selecting an entry
sending entry to a handset
storing a number
Display
12/24 hour display
changing language
. . . . . . . . . . . . . . . . . . 7
. . . . . . . . . . . . . . . . . . . 8
. . . . . . . . . . . . . . . 9
. . . . . . . . . . . . . . . . . . . . . 6
. . . . . . . . . . . . . . . . . . . 6
. . . . . . . . . . . . . . .29
. . . . . . . . . . . . . . . . . . 8
. . . . . . . . . . . . . . . . . . .10
. . . . . . . . . . . . . . . . . .10
. . . . . . . . . . .14
. . . . . . . . . . . . . . . . . . . . . 7
. . . . . . . . . . . . . . . . . . . . . .11
. . . . . . . .19
. . . . . . . . . . . . . . . . . .23
. . . . . . . . . .12, 22
. . . . . . . . . . . . . . .14
. . . . . . . . . . . . . . .14
. . . . . . . . . . . . . . . . . . . . .15
. . . . . . . . . . . . . . . . . . 7
. . . . . . . . . . . . . . . .35
. . . . . . . . . . . . . .12
. . . . . . .13
. . . . . . . . . . . . . .12
. . . . . . . . . . . . . 8
. . . . . . . . . . . . . 6
36
Page 40

Index
display keys
memory
missed anniversaries
missed appointments
night mode
setting
. . . . . . . . . . . . . . . . . 1, 7
. . . . . . . . . . . . . . . . . . . . 15
. . . . . . . . . . . . 9
. . . . . . . . . . . . 9
. . . . . . . . . . . . . . . . . . 27
. . . . . . . . . . . . . . . . . . . . . . 27
E
Earpiece mode . . . . . . . . . . . . . . . . . 11
Earpiece volume
EATONI, see Predictive text
Email directory
Emergency number
when keypad lock is active
End call key
Enter dial pause
Entry
finding and dialling (directory)
selecting (menu)
Error/Error tone
Escape key
Exit
. . . . . . . . . . . . . . . . . . . . . . . . 10
call
. . . . . . . . . . . . . . . . 28
. . . . . . . . . . . . . . . . . 14
. . . . . . . . 6
. . . . . . . . . . . . . . . . . . 1, 10
. . . . . . . . . . . . . . . . . 1
. . . . 12
. . . . . . . . . . . . . . . 7
. . . . . . . . . . . . . . . . . 30
. . . . . . . . . . . . . . . . . . . . . 7
F
Factory settings . . . . . . . . . . . . . . . . . 30
handset
system PIN
Fast acces, assigning key 1
File formats
File Manager
animated graphics
any graphics
assigning logo
assigning sounds
deleting an entry
directory entry with picture
editing entries
editing text
entry properties
file formats
installing sounds
melodies
memory
number from SMS text to
own photographs
playing sounds
renaming entries
ringer tones
. . . . . . . . . . . . . . . . . . . . . 30
. . . . . . . . . . . . . . . . . . . . 5
. . . . . . . . . . 1
. . . . . . . . . . . . . . . . . . . . 21
. . . . . . . . . . . . . . . . . . . 21
. . . . . . . . . . 21, 22
. . . . . . . . . . . . . . 21, 22
. . . . . . . . . . . . . . . . 22
. . . . . . . . . . . . . . 23
. . . . . . . . . . . . . . 21
. . . . . . 22
. . . . . . . . . . . . . . . . 21
. . . . . . . . . . . . . . . . . . 23
. . . . . . . . . . . . . . . 22
. . . . . . . . . . . . . . . . . . 21
. . . . . . . . . . . . . . 23
. . . . . . . . . . . . . . . . . . . . 21
. . . . . . . . . . . . . . . . . . . . 23
directory
. . . . . . . . . . . . . . . . . 23
. . . . . . . . . . . . . . 21
. . . . . . . . . . . . . . . . 23
. . . . . . . . . . . . . . 21
. . . . . . . . . . . . . . . . . . 21
sending entry as MMS
templates
viewing pictures
viewing text
Forward
MMS
. . . . . . . . . . . . . . . . . . . .21
. . . . . . . . . . . . . . . . . .23
. . . . . . . . . . . . . . . . . . . . . . . .18
. . . . . . . . . . .22
. . . . . . . . . . . . . . .22
G
Game. . . . . . . . . . . . . . . . . . . . . . . . .34
Group call
. . . . . . . . . . . . . . . . . . . . .10
H
Handset
activating/deactivating
belt clip
brief overview
changing for best reception
changing to another base
idle status
list
muting
night mode
operating and charging times
preparing to use
registering
registering on another
restoring factory settings
setting the display
use as room monitor
using several
Handset charging time
Handsfree
key
setting volume
Hash key
Hearing aids
. . . . . . . . . . . . . . . . . . . . . 6
. . . . . . . . . . . . . . . . . 1
station . . . . . . . . . . . . . . . . . . . 6
. . . . . . . . . . . . . . . . . . . . 7
. . . . . . . . . . . . . . . . . . . . . . . . . 7
. . . . . . . . . . . . . . . . . . . . . .11
. . . . . . . . . . . . . . . . . . .27
. . . . . . . . . . . . . . . . . . . 5
base station
. . . . . . . . . . . . . . . . . .24
. . . . . . . . . . . . . . . . . . . . .11
. . . . . . . . . . . . . . . . . . . . . . . . . 1
. . . . . . . . . . . . .11, 28
. . . . . . . . . . . . . . . . . . . . .1, 6
. . . . . . . . . . . . . . . . . . . . 3
. . . . . . . . . . 6
. . . . . . . 6
. . . . .31
. . . . . . . . . . . . . . . 4
. . . . . . . . . . . . . . . 6
. . . . . . . . .30
. . . . . . . . . . . . . .27
. . . . . . . . . . . .25
. . . . . . . . . . . .31
I
Idle status . . . . . . . . . . . . . . . . . . . . . 7
returning to
Integrated camera
Internal
. . . . . . . . . . . . . . . . . . . . . . . . .10
call
enquiry
. . . . . . . . . . . . . . . . . . 7
. . . . . . . . . . . . . . .24
. . . . . . . . . . . . . . . . . . . . . .24
K
Key 1 (fast access) . . . . . . . . . . . . . . . 1
Key click
Key press (confirmation tone)
. . . . . . . . . . . . . . . . . . . . . . .30
. . . . . . .30
37
Page 41

Index
Keypad lock
activating/deactivating
emergency number
Keys
cancel key
confirmation tone
control key
delete key
display keys
end call key
escape key
fast access
handsfree key
hash key
last number redial
menu key
message key
On/Off key
overview
recall key
speed dial key
speed dial list key
star key
talk key
. . . . . . . . . . . . . . . . . . . . . 6
. . . . . . . . . . . 6
. . . . . . . . . . . . . 6
. . . . . . . . . . . . . . . . . . . . 7
. . . . . . . . . . . . . 30
. . . . . . . . . . . . . . . . . . . . 6
. . . . . . . . . . . . . . . . . . . . 7
. . . . . . . . . . . . . . . . . 1, 7
. . . . . . . . . . . . . . . . 1, 10
. . . . . . . . . . . . . . . . . . . . 7
. . . . . . . . . . . . . . . . . . . . 1
. . . . . . . . . . . . . . . . . 1
. . . . . . . . . . . . . . . . . . . . . 1
. . . . . . . . . . . . . . 7
. . . . . . . . . . . . . . . . . . . . 7
. . . . . . . . . . . . . . . . . . 1
. . . . . . . . . . . . . . . . . . . . 1
. . . . . . . . . . . . . . . . . . . . . 1
. . . . . . . . . . . . . . . . . . . . . 1
. . . . . . . . . . . . . . . . 11
. . . . . . . . . . . . . . . 1
. . . . . . . . . . . . . . . . . . . . . . 1
. . . . . . . . . . . . . . . . . . . . . 10
L
Language, see Display
Last number redial list
. . . . . . . . . . . . . . . . . . . . . . . . . 7
key
managing entries
Last number redial, automatic
. . . . . . . . . . . . . . . . . . . . . . . . . . 1
Lens
List
email directory
handsets
MMS
Logo
picture from File Manager
showing
Loudspeaker
Loudspeaker volume
. . . . . . . . . . . . . . . . . . . . . 7
. . . . . . . . . . . . . . . . . . . . . . . 18
. . . . . . . . . . . . . . . . . . . . . . . . . 27
. . . . . . . . . . . . . . . . . . . . 27
. . . . . . . . . . . . . . . . . . . . 1
. . . . . . . . . . . . 15
. . . . . . . . . . . . . . 15
. . . . . . 15
. . . . . . . . . . . . . . . . 14
. . . . . . . 22
. . . . . . . . . . . . . 28
M
Making calls . . . . . . . . . . . . . . . . . . . 10
accepting call
external
internal
Medical appliances
Memory
directory
. . . . . . . . . . . . . . 10, 11
. . . . . . . . . . . . . . . . . . . . . 10
. . . . . . . . . . . . . . . . . . . . . 10
. . . . . . . . . . . . . . . 3
. . . . . . . . . . . . . . . . . . . . . . 15
. . . . . . . . . . . . . . . . . . . . 15
File Manager
MMS lists
photograph
Menu
back one menu level
end tone
guidance through the menu
. . . . . . . . . . . . . . . . . . . . . . . . . 7
key
opening the
Message key
open list
Microphone
Missed
anniversary
appointment
. . . . . . . . . . . . . . . . . . . . . . . . .15
MMS
"not sent" list
adding number to the directory
attachments
default settings
deleting entry from list
draft message list
editing
entering text
forwarding
incoming message list
inserting picture
inserting sounds
. . . . . . . . . . . . . . . . . . . . . . . .18
lists
memory
MMS centre
MMS properties
opening attachment
opening the
outgoing message list
presentation mode
putting together content
replying to
sending
setting reception
writing
writing header
MMS centre
changing the number of
setting
Muting (handset)
. . . . . . . . . . . . . . . . . .23
. . . . . . . . . . . . . . . . . . . .19
. . . . . . . . . . . . . . . . . . .24
. . . . . . . . . . . . 7
. . . . . . . . . . . . . . . . . . . . .30
. . . . . . . . . . . . . . . . . . 7
. . . . . . . . . . . . . . . . . . . . 1
. . . . . . . . . . . . . . . . . . . . .20
. . . . . . . . . . . . . . . . . . . . 1
. . . . . . . . . . . . . . . . . . . 9
. . . . . . . . . . . . . . . . . . 9
. . . . . . . . . . . . . . . . .18
. . . . . . . . . . . . . . . . . .19
. . . . . . . . . . . . . . . .17
. . . . . . . . . .19
. . . . . . . . . . . . . .18
. . . . . . . . . . . . . . . . . . . . . .18
. . . . . . . . . . . . . . . . . .16
. . . . . . . . . . . . . . . . . . .18
. . . . . . . . . . .18
. . . . . . . . . . . .16, 22
. . . . . . . . . . . . . . .16
. . . . . . . . . . . . . . . . . . . . .19
. . . . . . . . . . . . . . . . . .20
. . . . . . . . . . . . . . .19
. . . . . . . . . . . .20
. . . . . . . . . . . . . . . . . .20
. . . . . . . . . . .18
. . . . . . . . . . . . .20
. . . . . . . . .16
. . . . . . . . . . . . . . . . . . .18
. . . . . . . . . . . . . . . . . .16, 18
. . . . . . . . . . . . . . .19
. . . . . . . . . . . . . . . . . . . . . .16
. . . . . . . . . . . . . . . .17
. . . . . . . . .20
. . . . . . . . . . . . . . . . . . . . . .20
. . . . . . . . . . . . . . . .11
N
Network provider
(Number list)
. . . . . . . . . . . . . . . .11
. . . . . . 6
. . . .19
38
Page 42

Index
Night mode
Noise level in room
Number
adding to the directory
adding to the directory
adding to the directory (MMS)
. . . . . . . . . . . . . . . . . . . . 27
monitor mode
(from text)
. . . . . . . . . . . . . . 26
. . . . . . . . . . . . . . . 23
. . . . . . . . . . 12
. . . . 19
O
On/Off key . . . . . . . . . . . . . . . . . . . . . 1
Open
directory
list of handsets
menu
MMS
Opening an attachment
MMS
Operating time
handset . . . . . . . . . . . . . . . . . . . . . 31
in room monitor mode
in Walk and Talk mode
Order in directory
. . . . . . . . . . . . . . . . . . . . . 7
. . . . . . . . . . . . . . . . . 7
. . . . . . . . . . . . . . . . . . . . . . . 7
. . . . . . . . . . . . . . . . . . . . . . . 20
. . . . . . . . . . . . . . . . . . . . 19, 20
. . . . . . . . . . 25
. . . . . . . . . . 26
. . . . . . . . . . . . . . . 35
P
PC Interface . . . . . . . . . . . . . . . . . . . 33
Photo
white balance
Photograph
memory
picture quality
resolution
saving
sensitivity to light
settings
taking a
viewing
Picture
deleting from directory
editing
inserting in MMS
inserting in the directory
installing
viewing
white balance
Picture quality (photographs)
Power supply unit
Predictive text
Preparing to use (the phone)
Protective plastic film
. . . . . . . . . . . . . . . . 24
. . . . . . . . . . . . . . . . . . . . 24
. . . . . . . . . . . . . . . . 24
. . . . . . . . . . . . . . . . . . . 24
. . . . . . . . . . . . . . . . . . . . . . 24
. . . . . . . . . . . . . . 24
. . . . . . . . . . . . . . . . . . . . . 24
. . . . . . . . . . . . . . . . . . . . . 24
. . . . . . . . . . . . . . . . . . . . . 22
. . . . . . . . . . 14
. . . . . . . . . . . . . . . . . . . . . . 22
. . . . . . . . . . . 16, 22
. . 12, 14, 22
. . . . . . . . . . . . . . . . . . . . 22
. . . . . . . . . . . . . . . . . . . . . 22
. . . . . . . . . . . . . . . . 24
. . . . . . . 24
. . . . . . . . . . . . . . . . 3
. . . . . . . . . . . . . . . . . . 34
. . . . . . . . 4
. . . . . . . . . . . . . . 4
R
Recall key. . . . . . . . . . . . . . . . . . . . . . 1
Register handset
Reminder call
Resolution (photographs)
. . . . . . . . . . . . . . . . . . . . . . . .28
Ringer
assigning from File Manager
time control for volume
Ringer echo
Room monitor
setting the noise level
. . . . . . . . . . . . . . . . . 5
. . . . . . . . . . . . . . . . . . .14
. . . . . . . . . .24
. . . . . .23
. . . . . . . . . .28
. . . . . . . . . . . . . . . . . . . .28
. . . . . . . . . . . . . . . . . .25
. . . . . . . . . . .26
S
Safety precautions . . . . . . . . . . . . . . . 3
Select
menu entry
Send
directory entry to a handset
MMS
Setting
alarm clock
appointment
camera
date
display
display language
earpiece volume
loudspeaker volume
melody
ringer volume
room monitor function
time
volume
Setting the date
Setting the time
Signal strength
Signal tone, see Advisory tones
Sounds
inserting in MMS
installing
playing
recording a
Special characters
entering
Specifications
Speed dial key
Speed dial list
editing a single entry
. . . . . . . . . . . . . . . . . . . . . . . . . 1
key
storing a number
. . . . . . . . . . . . . . . . . . . 7
. . . . . . .13
. . . . . . . . . . . . . . . . . . . . .16, 18
. . . . . . . . . . . . . . . . . . . 8
. . . . . . . . . . . . . . . . . . 9
. . . . . . . . . . . . . . . . . . . . . .24
. . . . . . . . . . . . . . . . . . . . . . . . 8
. . . . . . . . . . . . . . . . . . . . . .27
. . . . . . . . . . . . . . . 6
. . . . . . . . . . . . . . .28
. . . . . . . . . . . .28
. . . . . . . . . . . . . . . . . . . . . .29
. . . . . . . . . . . . . . . . .28
. . . . . . . . . .25
. . . . . . . . . . . . . . . . . . . . . . . . 8
. . . . . . . . . . . . . . . . . . .28, 29
. . . . . . . . . . . . . . . . . 8
. . . . . . . . . . . . . . . . . 8
. . . . . . . . . . . . . . . . . . 1
. . . . . .30
. . . . . . . . . . . . . . .16
. . . . . . . . . . . . . . . . . . . .23
. . . . . . . . . . . . . . . . . . . . . .23
. . . . . . . . . . . . . . . . . . .29
. . . . . . . . . . . . . . . . . . . . .35
. . . . . . . . . . . . . . . . . . .31
. . . . . . . . . . . . . . . . . .11
. . . . . . . . . . . . . . . . . . .11
. . . . . . . . . . . .12
. . . . . . . . . . . . . .12
39
Page 43

Index
Star key
Storing
Switch off, see Deactivate
Switching on
. . . . . . . . . . . . . . . . . . . . . 1, 29
directory entry
number in the directory
speed dial list entry
alarm clock
appointment
handset
keypad lock
room monitor
Walk and Talk
. . . . . . . . . . . . . . . . 12
. . . . . . . . . 12
. . . . . . . . . . . . 12
. . . . . . . . . . . . . . . . . . . 8
. . . . . . . . . . . . . . . . . . 9
. . . . . . . . . . . . . . . . . . . . . . 6
. . . . . . . . . . . . . . . . . . . 6
. . . . . . . . . . . . . . . . 25
. . . . . . . . . . . . . . . . . 26
T
Talk key. . . . . . . . . . . . . . . . . . . . . . . 10
Tex t
. . . . . . . . . . . . . . . . . . . . . . 34
editing
predictive text
special characters
writing
Time control
ringer volume
Ton e
confirmation/error/batt./
end of menu
error tone
. . . . . . . . . . . . . . . . 34
. . . . . . . . . . . . . . 35
. . . . . . . . . . . . . . . . . . . . . 34
. . . . . . . . . . . . . . . . 28
. . . . . . . . . . . . . . 30
. . . . . . . . . . . . . . . . . . . 30
V
VIP (directory entry) . . . . . . . . . . . . . 13
Volume
. . . . . . . . . . . . . . . . . . . . . . . 28
during handsfree use
earpiece
setting
. . . . . . . . . . . . . . . . . . . . 28
. . . . . . . . . . . . . . . . . . . 28, 29
. . . . . . . . 11, 28
W
Wait melody . . . . . . . . . . . . . . . . . . . 11
Wake-up call
deactivating
setting the ringer
Walk and Talk
Warning tone, see Advisory tones
White balance (photos)
. . . . . . . . . . . . . . . . . . . 8
. . . . . . . . . . . . . . 29
. . . . . . . . . . . . . . . . . . 26
. . . 30
. . . . . . . . . . . 24
40
 Loading...