

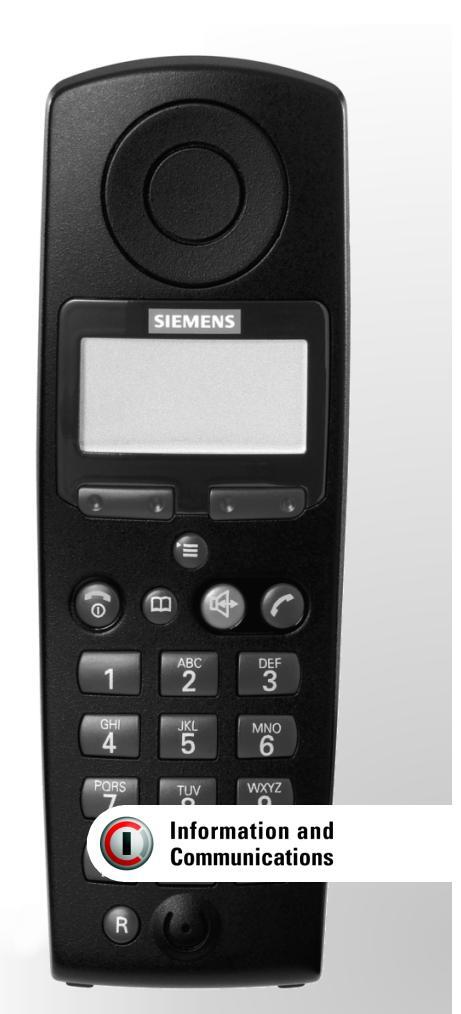
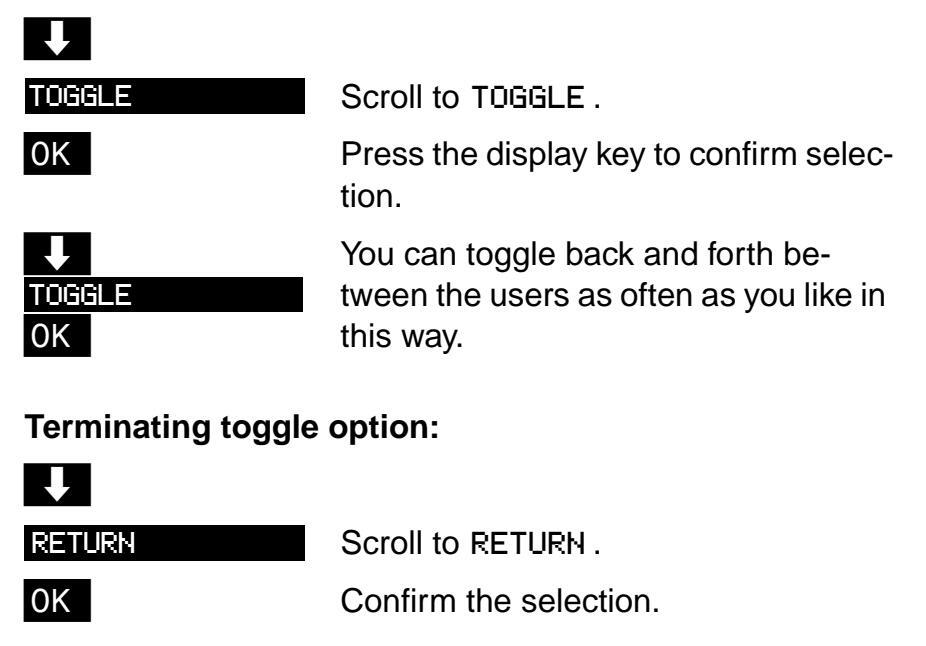
SIEMENS
-Hicom cordless E
Gigaset 3000 Comfort
Operating instructions
Warning
Please read the safety notes on page 2 before putting the equipment into service.
General
Safety notes
Notes on handset use
- Do not use the handset in environments where there is danger of explosion (for example, a paint shop).
- Research has shown that electronic devices such as medical equipment can be affected by the handset. Local safety regulations must therefore be observed.
- The handset is not suitable for people with hearing aids since radio signal interference produces a very unpleasant humming sound if the volume is turned up too high.
- Do not use handsets in damp environments (bathroom). The units are not splashproof.
- If you lend your handset to someone else, please make sure that you include the operating instructions with it.
Notes on battery use
- Only use approved nickel cadmium (NiCd) or nickel metal hydrid batteries (NiMH), see page 12.
- Never use other batteries or normal (non-rechargeable) batteries. These batteries can cause short-circuits and may be subject to damage (dangerous). Note the symbols in the battery compartment:
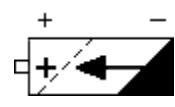
Use rechargeable batteries only and observe polarity.
- Avoid contact with water and fire.
- Do not use non-Siemens charging devices. These could damage the batteries.
- Only use the supplied plug-in power supply unit as designated on the underside of the charging shell.
- Please dispose of defective batteries, the mobile handset and the charging shell in accordance with the environmental specifications.

General

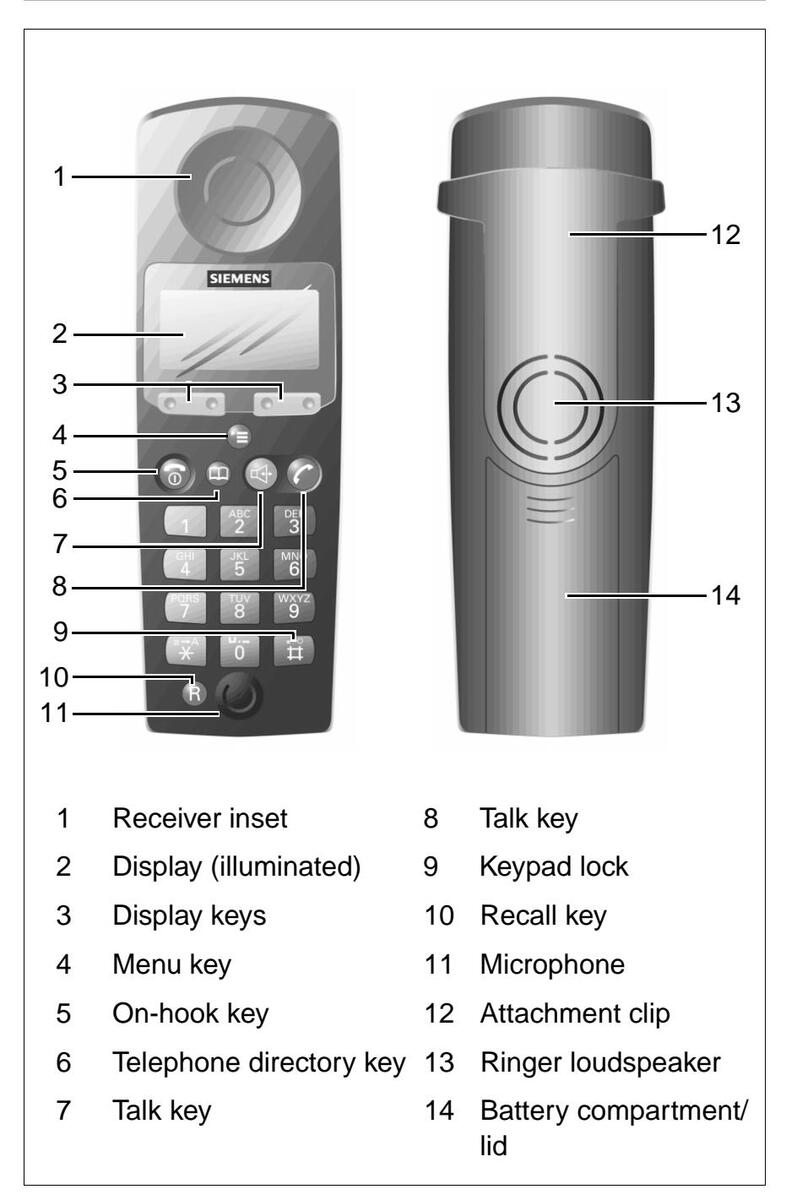
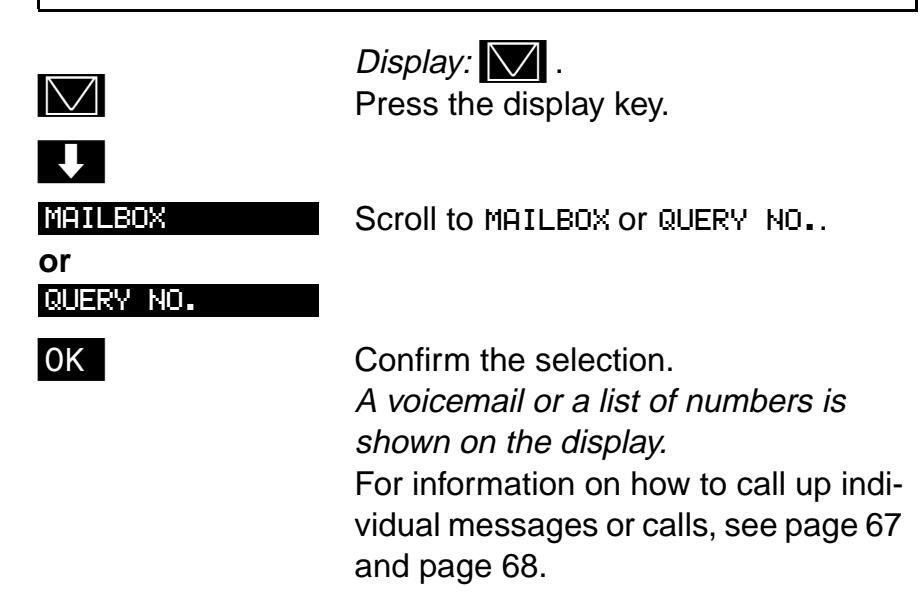
Fig 1 Operating elements, unit parts
| Contents |
| General |
. 2
. 2 |
| Operating elements, unit parts | . 3 |
| Contents | . 4 |
| Introduction | . 7 |
| Notes on these operating instructions. Features Hicom cordless E Environmental conditions General operating instructions Radiorange Leaving the radio network Cleaning the handset |
. 7
. 7 . 8 . 8 . 9 10 10 10 |
| Preparing the handset | 11 |
|
Inserting the batteries into the handset
Charging and using the batteries Fitting the attachment clip Activating/deactivating handsets Activating/deactivating the keypad lock |
11
12 14 15 16 |
| Display | 17 |
| Explanation | 17 |
| Keys | 18 |
| User guidance, selecting functions | 18 |
| Logging handsets onto a telephone system | 21 |
| Opening the logon window |
21
23 23 25 |
| Conducting calls | 26 |
| 26 | |
| 27 | |
|
28
20 |
|
| Speakerphone mode | 30 |
| 31 | |
| Number redial – last five numbers | 31 |
| Manual number redial | 31 |
| Automatic number redial | 31 |
| Copying a number to the telephone directory | 32 |
| Editing an entry | 33 |
|
33
34 |
|
| 0- |
Contents
| Disabling number redial | 34 |
|---|---|
| Entering text | 35 |
| Overview – key layout | 35 |
| Entering letters/characters and digits | 35 |
| Telephone directory | 37 |
| Overview – telephone directory menu. | 37 |
| Storing numbers (directory/network prefix menu) | 38 |
| Other telephone directory functions | 20 |
| 42 | |
| "Linking" the prefix and call number |
4
2
42 |
| Speed dialling from other locations | 42 |
| Main menu – overview | 43 |
| Settings – overview | 44 |
| Audio settings | 45 |
| Audio settings | 45 |
| Activating/deactivating audio settings | 46 |
| Activating/deactivating the ringer | 47 |
| Security | 48 |
| Changing the handset PIN | 48 |
| Activating/deactivating the handset lock | 49 |
| Auto talk | 51 |
| Language | 52 |
| Resetting the handset to the default state | 53 |
| Bases | 54 |
| Selecting the base | 54 |
| Changing the base name | 55 |
| SLC menu — overview | 56 |
| Service | 57 |
| Basic Service | 57 |
| Call forwarding | 60 |
| Mailbox | 67 |
| Query number | 68 |
| Display Test | 69 |
| Message Waiting Indication | 70 |
| Code functions | 71 |
| Switching functions | 72 |
| Automatic callback | 72 |
| Forwarding calls | 73 |
Contents
| Index | 80 |
|---|---|
| Accessories | 79 |
| Technical data | 78 |
| Approval | 78 |
| Troubleshooting | 77 |
| Appendix | 77 |
| Conference | 75 |
| Toggle – Switching between two users | 74 |
| Consultation during a call | 73 |
Notes on these operating instructions
These operating instructions describe the Gigaset 3000 Comfort handset in connection with Hicom cordless E at Hicom 300/300 E/300 H.
All functions that can be performed via your handset are described. You may discover that certain handset functions are not available as required. The reasons for this may be as follows:
- The function is not configured for you and your handset. In this case, please consult your system administrator.
- Your Hicom 300/300 E/300 H does not support this function. Please contact your Siemens sales partner for a system upgrade.
Features
DECT features* handset
- Illuminated graphical display with battery charge display
- Speakerphone mode
- Status-dependent functions
- Number redial for the last 5 numbers
- Telephone directory for 100 entries in the handset
- Enhanced user guidance with displays in different languages according to the setting
- For information on setting the language, see page 52.
- Block dialling with correction option
- Auto talk** on removal from the charging unit
- Protection against inadvertent key activation
- Simplified operation via short cuts
-
Long usage times without recharging with an NiCd battery:
- up to 10 hours talk time.
- up to 100 hours in standby mode.
- Use of an NiMH battery to considerably increase operating times
* DECT = Digital Enhanced Cordless Telecommunications
** Activated by default.
Introduction
Each handset can log onto and be used by up to 4 DECT systems.
Features of the Hicom cordless E
- Internal and external calls in the entire Hicom cordless E radio network
- The user can roam throughout the entire radio network and still receive all internal and external calls at one call number (roaming).
- Automatic call transfer from base station to base station when moving in the radio network (handover).
- Automatic callback for internal calls
- Call forwarding to internal users
- Consultation during a call
- Use of all important Hicom functions
Hicom cordless E
The Hicom cordless E DECT telephone system comprises:
- The radio exchange for the Hicom 300/300 E/300 H,
- Base stations (transmitter/receiver)
- Gigaset handsets (cordless telephones)
- Charging shells
Environmental conditions
- Please read the safety notes, see page 2.
- The handset and charging shell should not be placed near electronic devices, such as other telephones, hi-fi, office or microwave devices, as this may adversely affect the operation of your telephone and/or the electronic equipment.
- Do not expose the handset or charging shell to direct sunlight or other sources of heat.
- Use the handset at temperatures between +5 °C and +45 °C.
- Do not expose the handset or charging shell to damp environments.
- Avoid using the handset and charging shell in rooms where there is a lot of dust.
Introduction
General operating instructions
- The devices offer a high level of privacy. No protection can be guaranteed against illegal bugging using other radio receivers.
-
When operating the handset, a basic distinction is made between:
- telephone/switching functions, e.g. when a call is in progress
- local functions, e.g. the display when the handset is on.
- Local functions can also be performed in the charging shell.
- Local functions can be cancelled with the on-hook key before they are stored or saved.
- The local function is cancelled and the caller reaches you if you receive a call while you are performing local functions.
- Even if you remove the battery, your telephone directory entries, all settings and your PIN are not lost.
- The call charge display at the handset depends on the Hicom 300/300 E/300 H setting.
- Displays from the system do not contain muted vowels or special characters.
- The handset can be implemented as a second executive telephone with limited functions.
- The emergency number function is not supported by Hicom cordless E.
- Any dial pauses entered display P are not recognised by Hicom cordless E and are ineffective.
- The Switch To Tone function cannot be used with Hicom cordless E. The DTMF Suffix Dialling Hicom function can be used as an alternative, (see page 59).
- Operation at a Gigaset base station is possible in accordance with the Gigaset operating instructions.
Radiorange
- Depending on the environment, the range in the open is up to 300 m per base station.
- In buildings, the range extends up to 50 m per base station (depending on the room and building layout and construction).
- If you leave the radio range of the system's base stations during a call, the quality of the voice connection drops, particularly if you move. For a better voice connection, move back into the base station range.
- The radio connection is lost if you exceed the range. This is identified by the flashing of Base 1, for example.
- The field strength is displayed in the first display line by the I>>>> symbol when the phone is idle.
- Please consult your system administrator in the case of range problems.
Leaving the radio network
Integrated power saving function: If you leave the base station radio range when the handset is switched on, the interval between synchronisation attempts gradually increases – this increases the battery life in standby mode.
To ensure that the handset can be used as soon as you return to the radio network, you should immediately register it again :
Press the on-hook key until the display is blank, press the on-hook key again until the handset is on.
• If you intend to leave the radio network and take your handset with you, we recommend that you turn the handset off in order to save the battery.
Cleaning the handset
To clean the handset and the charging shell, simply wipe them with a damp or antistatic cloth. Never use a dry cloth (this produces static charge). Do not use abrasive cleaning agents .
Inserting the batteries into the handset
Note:
- Please read the safety notes first, see page 2.
- Only use supplied or approved batteries . Do not use normal (non-rechargeable) batteries, see page 13.
- Always change the batteries at the same time and only insert batteries of the same type and produced by the same manufacturer.
- Hold the handset with the dialling keypad facing downwards, see Fig 2. A battery compartment for 2 batteries is located in the lower part of the handset.
- To open the battery compartment, press the grooves and slide the lid downwards in the direction of the arrow, see Fig 2. Lift off the lid.
- Insert the 2 batteries supplied into the battery compartment, as shown in Fig 2. Ensure that the batteries are inserted according to correct polarity. This is indicated in the battery compartment.
- Position the lid at a distance of approx. 3 millimetres from the battery compartment, see Fig 2. Slide the lid of the battery compartment upwards until it slots into place.
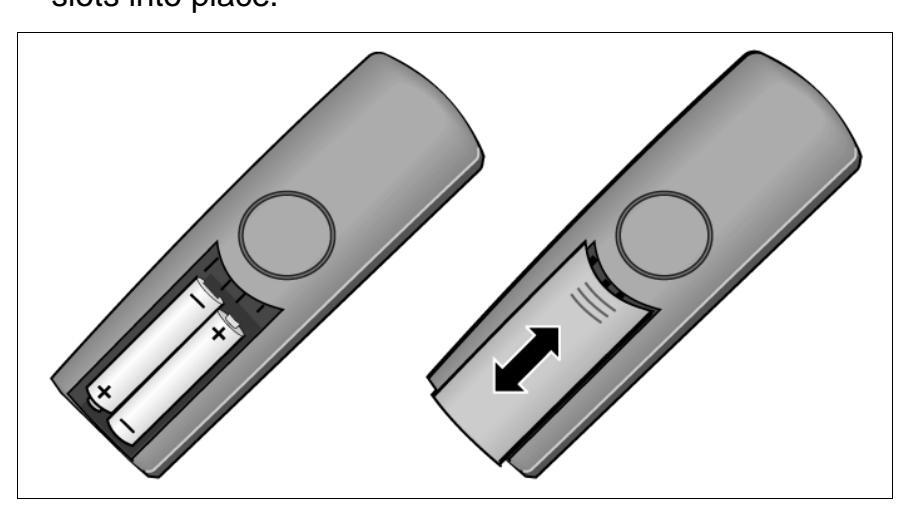
Fig 2 Inserting the batteries
Charging and using the batteries
The batteries supplied (NiCd) are not charged.
To charge the batteries, insert the handset into the Gigaset 3000L charging shell with the display facing upwards.
The battery symbol on the handset display indicates the charging status:
- ODD Batteries empty.
- D Batteries 33% charged.
- D Batteries 66% charged.
- Batteries 100% charged.
Note:
- New batteries should be initially charged for a minimum period of 16 hours without interruption, irrespective of the battery symbol displayed.
- To increase the battery life for as long as possible, the handset should only be placed in the charging shell when the battery is almost empty D .
- The batteries warm up during charging.
- Old, defective batteries must be disposed of in accordance with legal requirements, not in the normal waste disposal system.
Battery charging times:
| Туре | Charging time in the handset (hours) | |
|---|---|---|
| NiCd, 700 mAh | 5 to 6 | |
| NiMH, 1100 mAh | 8 to 9 | |
Battery life:
These times are only achieved after several charging and discharging cycles.
| Туре |
Standby mode
(hours) |
When phone in
use (hours) |
|---|---|---|
| NiCd, 700 mAh | up to 100 | up to 10 |
| NiMH, 1100 mAh | up to 160 | up to 15 |
| NiMH, 1500 mAh | up to 220 | up to 20 |
Approved batteries:
| Nickel cadmium (NiCd) | Nickel metal hydrid (NiMH) |
|---|---|
| Sanyo N-3U (700 mAh) | Sanyo H-3 U (1500 mAh) |
| GP GP60AAKC (600 mAh) |
GP GP130 AA HC
(1300 mAh) |
| Varta 751RS (700 mAh) |
GP GP150 AA HC
(1500 mAh) |
| Varta VH 1101 (1100 mAh) | |
|
Panasonic HHR-110 AA
(1100 mAh) |
|
| Friwo NiMH (1400 mAh) | |
|
Toshiba TH-1200 AARE
(1200 mAh) |
Note on the use of NiMH batteries:
After inserting NiMH batteries into the handset, we recommend that you charge the handset completely and then discharge through use without returning it to the charging shell until the battery low beep is audible. In this way, the handset charge status display is adapted to the longer life of the NiMH battery. You can subsequently place your handset in the charging shell each time it is used. Charging is electronically controlled which ensures that the battery is charged optimally.
Fitting the attachment clip
You can fit the supplied attachment clip to your handset if required.
Place the attachment clip on the back of the handset. There are holes on the sides of the handset approximately level with the display. Press the clip towards the handset until the clip's side tabs click into place in the handset holes.

Fig 3 Fitting the attachment clip
Activating/deactivating handsets
Note:
The language set at the factory is English . For information on changing the language to German or another language, refer to page 52.
- Off status: Display blank calls cannot be received.
- On status e.g. Base 1 is displayed. Prerequisite for all telephone functions: normal operating status.
Activating the handset:

Press the on-hook key and hold it down for one second. You will hear the confirmation beep. * Display when the handset is on or in message status, see page 17.
* Activated by default.
Deactivating the handset:

Press the on-hook key and hold it down until the display is blank. You will hear the confirmation beep.
Note:
The handset can only be fully switched off when it is removed from the charging shell!
The handset is automatically set to on or message status if it is placed in the charging shell, see page 17.
Activating/deactivating the keypad lock
This allows you to protect your handset against inadvertent key activation , e.g. when carrying it in your bag. Calls are signalled even if the keypad is locked and can be answered in the same way as when the telephone is on.
Prerequisite: handset is activated.
Activating the keypad lock:

Press the keypad lock and hold it down for one second .
Keypad locked
Display in keypad lock status.
Deactivating the keypad lock:
Ē
Press Keypad lock and hold it down for one second . Display when the handset is on or in message status, see page 17.
Explanation
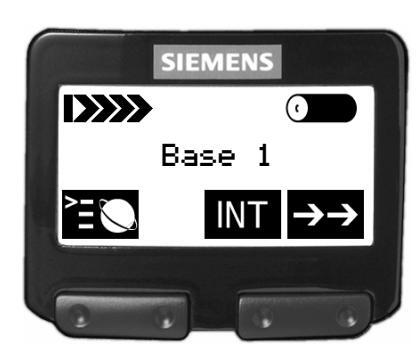
The handset features a 4-line display with 16 characters per line. Depending on the situation, the display shows:
- digits, e.g. dialled numbers
- text, e.g. the current base (system)
- symbols, e.g. ringing or battery symbol
- and in the last line the current functions of the two display keys.
Display when the handset is on or in message status (example)
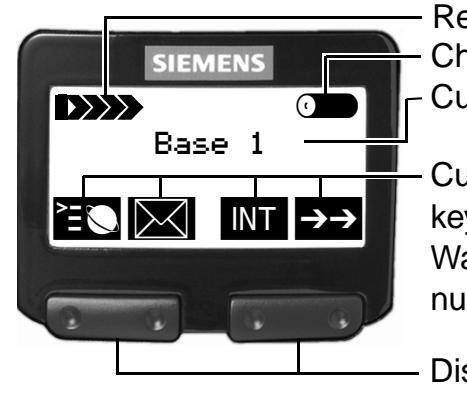
Receive intensity Charge status (100%) Current base display
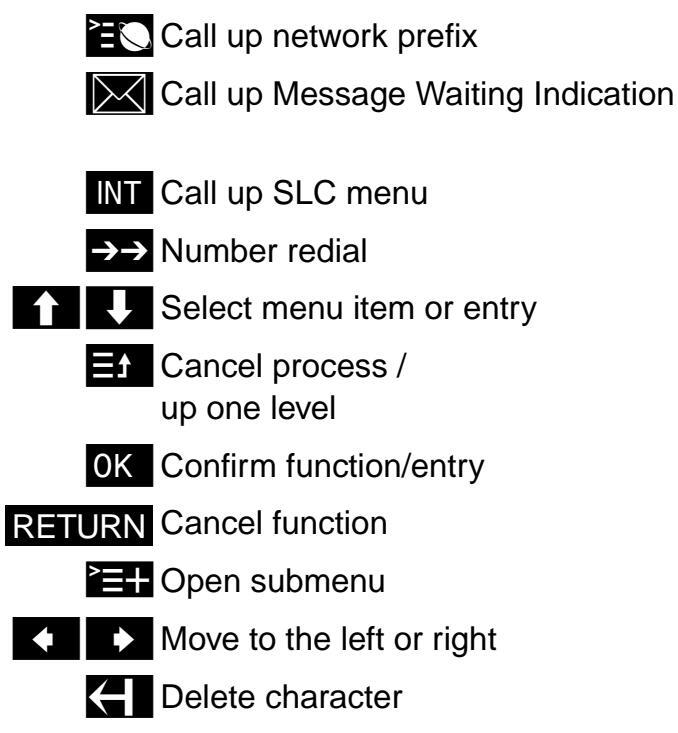
Current functions of the display keys: Network prefix, Message Waiting Indication, SLC menu, number redial
- Display keys:
- varying functions specific to the display
- press left or right side of the key, depending on the function
Display when a call is in progress (example)
Keys
The two display keys are located directly under the display. The current functions of the display keys are status-dependent and are displayed in the lower display line. Each display key can be used to display one or two functions. In the case of two functions, you must press either on the left or the right side of the corresponding display key.
Meaning of the displays keys:
User guidance, selecting functions
The use of all telephone system features is accelerated and simplified by a system of user-friendly prompts based on menus and messages on the display.
For information on setting the language, see page 52.
Depending on the status of the handset, e.g. if the telephone is switched on or in call status, various functions are available and can be selected. With status-dependent functions, only functions that are relevant to the current situation are available.
Function selection using menus (handset functions)
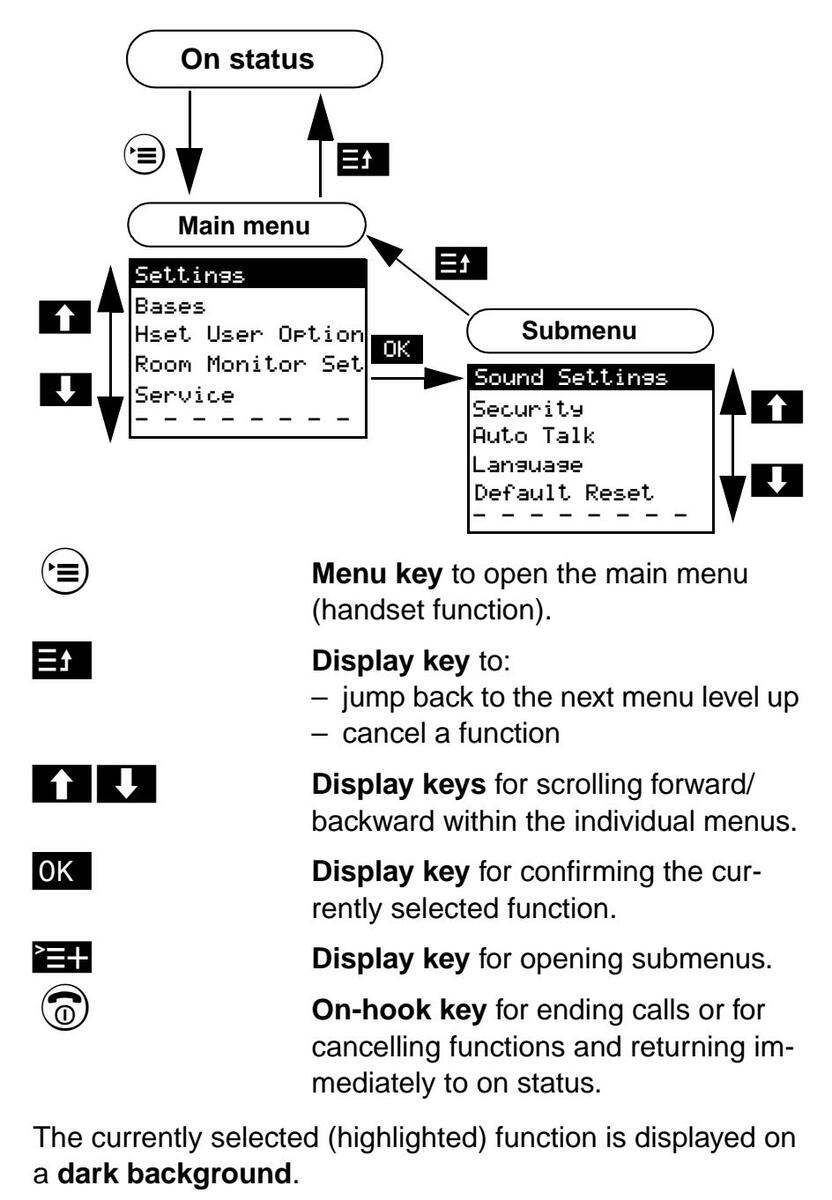
A dotted line indicates the end of the menu. If you scroll further, the first function in the menu is selected again. When the "line" is selected , press the display key RETURN to return to the higher-level menu or to on status.
Function selection using display keys (when a call is in progress, service menu)
When a call is in progress, the display keys and used to call up different functions, e.g.:
| MUTE ON |
|---|
| CONSULT |
| START CONF. |
| START TRANSFER |
For example, you can use the display keys and to scroll to the next function when a call is in progress. If the required function is displayed, simply press the display key OK and follow the instructions.
The other user is unaware that you are scrolling with and . The selected function is only initiated or called up after confirming with OK.
Functions are selected in the same way in the Hicom serv ice menu, see page 57.
You must open a "logon window" in the telephone system and then log on the handset before you can use it to make telephone calls.
This is only required when the handset is put into service for the first time.
Opening the logon window
A second telephone is needed to open the logon window.
Note:
The second telephone can be a logged-on handset or a Hicom telephone with display, e.g. "Optiset E". It must be logged on to the same system and connected at the same network node.
You can enter the name and call number of your system administrator as well as the handset number and code here:
| Your system administrator | |
|---|---|
|
Tel. no. of system
administrator |
|
| Handset number | |
| Code |
-
Ask your system administrator to provide you with the following information:
- code no. (PIN E1) of the handset
- whether this code no. applies network-wide (in the following, this depends on whether or not you have to terminate the entries listed below with "#")
- code (activates the menu for entering the code no. for registering and logging on the handset)
- handset number
- handset system PIN (8 digits)
- whether the second telephone is connected at the same network node
Open the logon window with the second telephone. An "Optiset E" Hicom telephone is used here by way of example to demonstrate the procedure:
| I | I | |
|---|---|---|
| Enter the code for activating the code no. e.g. "*24". | ||
|
Enter
station no. |
An input prompt appears.* | |
| e.g. 4 5 6 |
Enter the assigned handset call
number, e.g. "45678". For network-wide code no.: terminate code no. with "#". |
|
| Enter ID | An input prompt appears. | |
| e.g. 1 3 5 |
Enter the handset code no. (PIN E1),
for example, "13579". Stars (*) are displayed instead of dig- its. For network-wide code no.: terminate code no. with "#". |
|
|
e.g.
ID entered 45678 |
The handset call number is displayed. | |
| e.g. 4 5 6 |
Confirm the displayed handset
number by re-entering it, e.g. "45678". Do not terminate with "#". The ring tone sounds briefly. The log- on window opens for 10 minutes when the ring tone is no longer audible. |
|
|
* The display may differ slightly depending on the telephone used as Optiset de-
vices support 24 characters and bandsets 16 characters |
||
• Take your handset and log it on to the system (see page 23).
Note:
The logon window is automatically closed if the handset is not logged on as described above within 10 minutes. In this case, you must repeat the procedure.
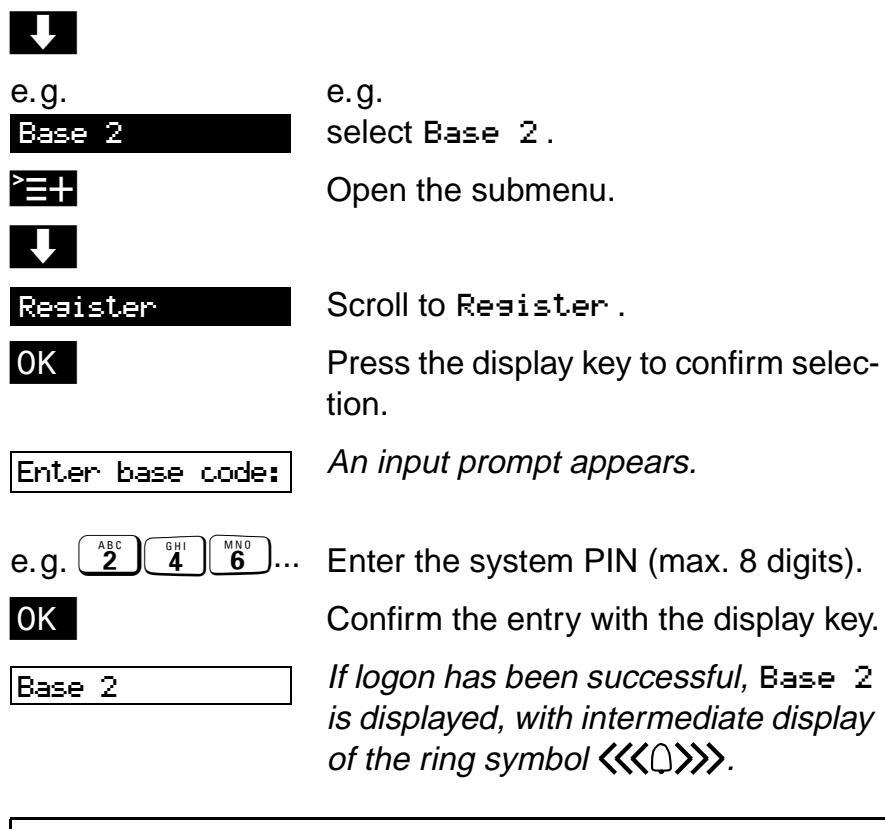
Logging on for the first time
This procedure must be performed if you have not yet used your handset and are logging it on to the system for the first time.
| Note: | ||
|---|---|---|
| The logon window must be opened before you proceed with the logon procedure (see page 21). | ||
| Register? |
Resister? is displayed on the activated handset.
Enter the following in the handset within one minute : |
|
| YES | Press the display key. | |
| Enter base code: | An input prompt appears. | |
| e.g. 2 4 6 | Enter the system PIN (max. 8 digits). | |
| ОК | Confirm the entry with the display key. | |
| Base 1 |
If logon has been successful, Base 1
is displayed, with intermediate display of the ring symbol ((())) . |
|
Logging on at other systems
This procedure must be performed if you want to log your handset on to other systems.
Note:
The logon window must be opened before you proceed with the logon procedure (see page 21).
Enter the following in the activated handset within one minute :
| Press the menu key. | |
|---|---|
| Bases | Scroll to Bases . |
| ОК | Press the display key to confirm selec- |
Note:
- To ensure that the handset/telephone used to "open" the logon window can be used again immediately: press # and enter the code no. digits, e.g. #24.
- Base/system: For Hicom cordless E, the handsets are not logged on at the stations (base stations) but at the telephone system. In this case, Base on the display always refers to the DECT system.*
- The "ISDN Config" function should always be activated as a basic setting.
- DECT = Digital Enhanced Cordless Telecommunications
Setting the ISDN configuration
You can activate the "ISDN Config" function to define one call number that can be accessed internally and externally in the entire radio network (network roaming).
| Press the menu key. | |
|---|---|
| I | |
| Bases | Scroll to Bases . |
| ОК | Confirm the selection. |
|
e.g.
Base 2 |
e.g. Select Base −2 . |
|
}
↓ |
Press the display key. |
| ISDN Confis. | Scroll to ISDN Config. |
| ОК | Confirm the selection - this setting for the base is displayed by the "&" character. |
Proceed in the same way as described above to deactivate the function. The "&" symbol disappears when the ISDN Config function is confirmed using the OK display key.
This display when the telephone is on is a prerequisite and the initial status for all telephone functions, see page 10. Base 2,3,4 or a different name can also be displayed, depending on the current base, see page 54.
Note:
- The on-hook key () can be used to cancel all functions.
- You can end the call by placing the handset in the charging shell.
| Internal dialling | ||
|---|---|---|
| 🕜 or 🖽 | Press the Talk key or speakerphone key. | |
|
Dial the internal number
when Please dial is displayed. |
||
| Call |
Conduct the call.
The name and the number of the user is displayed. You can scroll and execute the listed functions with the display keys and |
|
| Ending a call | ||
| Press the on-hook key or place the handset in the charging shell. | ||
| Note: | ||
|
||
| the CALLERCK display key if the user is busy or does not answer, see page 72. | ||
| • The dialled number is automatically stored for number redial, see page 31. | ||
| External dialling | |||
|---|---|---|---|
| 🕜 or 🔄 | Press the Talk key or speakerphone key. | ||
|
External code
e.g. |
Enter the "external code", e.g. "0", if
Please dial is displayed. |
||
| Dial the external number. | |||
| Call |
Conduct the call.
You can scroll and execute the listed functions with the display keys and . |
||
| Ending a call | |||
| Press the on-hook key or place the handset in the charging shell. Depending on the system setting, the call charges are displayed . | |||
| Note: | |||
|
he dialling process with the splay key. | ||
|
ishts is displayed, then only internal de, forexample. | ||
| • The dialled number is automatically stored for number redial. | |||
|
|||
|
|||
| • If you don't wan | t to save your entries, see page 34. | ||
Block dialling for internal/external dialling
Block dialling means that you enter the number first (up to 32 digits), if necessary correct it and then press the talk key to dial.
Enter the internal number or the "external code", e.g. "0", and the external number.
The entered digits are displayed "in large format".
Correct the entries if necessary using the and display keys.

Press the talk key or the speakerphone key (within 30 seconds). The entered number is dialled.
Ending a call

₽
Press the on-hook key or place the handset in the charging shell.
Note:
- The size of the digits is reduced for longer numbers.
- You can program an automatic callback request with the CHLLEHCK display key if the user is busy or does not answer, see page 72.
- The dialled number is automatically stored for number redial, see page 31.
Answering calls
The handset's ringer tone is audible. The number and the name of the caller are displayed, depending on the user (internal/external), as well as TURN RING OFF .
• The handset is in the charging shell:
Simply remove the handset from the charging shell. (Only if "Auto Talk" is activated, see page 51.)
or
• The handset is not in the charging shell:

Press the talk key.
or
• If required, deactivate the ringer :

Confirm "TURN RING OFF" using the display key.
Ending a call

Press the on-hook key or place the handset in the charging shell.
Speakerphone mode
Speakerphone mode offers you the following advantages:
- other people can listen in and take part in a call.
- You have your hands free. You can set the handset down or place it in the charging shell if you have pressed the speakerphone key.
- When dialling, you hear the ring tone, for example, without having to lift the handset to your ear.
Speakerphone mode during a call

Speakerphone mode when dialling/answering calls

Press the speakerphone key instead of the Talk key .
Number redial – last five numbers
You have dialled a number, but the other party is busy or does not answer: press the on-hook key. The last five numbers dialled (up to 32 digits) are always stored automatically.
If you dialled a number from the telephone directory, then the name is displayed when you use the redial function.
Manual number redial
| →→ |
Press the display key.
The first 3 redial numbers are shown. |
|---|---|
|
↓
↓ |
If necessary, press the display keys to scroll to the required number/name. |
|
Press the talk key.
The selected number/name is dialled. |
Automatic number redial
The handset redials the number.
| →→ | Press the display key. |
|---|---|
|
↓
↓ |
Scroll to the desired number. |
| Open the submenu using the display key. | |
| ↓ | |
| Automatic Redial | Scroll to Automatic Redial. |
| ОК | Confirm the selection. |
| Speakerphone mode is automatically activated when you dial. |
The speakerphone key (🖘) flashes.
| Copying a num | ber to the telephone directory |
|---|---|
| →→ | Press the display key. |
| U | Scroll to the desired number. |
| ≧ ∓ | Open the submenu using the display key. |
| Copy Number | Scroll to Copy Number . |
| ОК | Confirm the selection. |
| Names |
Enter names (max. 16 characters).
(see page 35) |
| ≥ ≡+ | Press the display key. |
| Save Entry | Confirm Save Entry. |
| ОК | |
| Entry saved |
Entry saved is displayed for approx.
2 seconds. |
| Editing an entry | , |
|---|---|
| →→ | Press the display key. |
| Scroll to the desired number. | |
| Open the submenu using the display key. | |
| ↓ | |
| Edit Entry | Scroll to Edit Entry. |
| ОК | Confirm the selection. |
| ♦ | |
|
|
Change the number |
| ≥=+ | Press the display key. |
| Save Entry | |
| ОК | Confirm Save Entry. |
| Entry saved | Entry saved is displayed for approx. 2 seconds. |
| Deleting an entry | |||
|---|---|---|---|
| →→ | Press the display key. | ||
| ↓ | Scroll to the desired number. | ||
| ≥=+ | Press the display key. | ||
| Delete Entry | Scroll to Delete Entry. | ||
| ОК | Confirm the selection. | ||
|
Entry has been
deleted |
Entry has been deleted is dis-
played for approx. 2 seconds. |
||
Displaying an entry
All the digits of a number (up to 32 digits) are displayed.
| →→ | Press the display key. |
|---|---|
| ↓ | Scroll to the desired number/name. |
| ≥ ≡+ | Press the display key. |
| ↓ | |
| Display Entry | Scroll to Display Entry. |
| ОК | Confirm the selection. |
| RETURN | Press the display key to return to the redial function. |
Disabling number redial
You want to prevent other persons from using the number redial function to redial digits (e.g. PIN) that you entered. This disabling function allows you to bar number redial for these digits.
The digits entered (e.g. PIN) can no longer be called up.
Entering text
You can enter names or text for specific functions (local telephone directory, short cuts, messages) via the digit keys.
Overview – key layout
The following table shows the assignment of all letters, digits and characters to the keys:
| Key | Press x 1 | Press x 2 | Press x 3 | Press x 4 | Press x 5 | Press x 6 | Press x 7 | Press x 8 | Press x 9 |
|---|---|---|---|---|---|---|---|---|---|
| 1 | 1 | ||||||||
| ABC 2 | а | b | С | 2 | ä | à | â | ã | Ç |
|
DEF
3 |
d | е | f | 3 | ë | é | è | ê | |
|
GHI
4 |
g | h | Ι | 4 | ï | î | |||
| 5 | j | k | Ι | 5 | |||||
| 6 | m | n | 0 | 6 | ö | ñ | ó | ô | õ |
| Pars 7 | р | q | r | S | 7 | ß | |||
| B | t | u | V | 8 | ü | ú | ù | û | |
|
WXYZ
9 |
W | х | У | Ζ | 9 | ý | æ | Ø | å |
| Ŭ | 」 *) | • | _ | 0 | , | + | : | ? | ! |
|
a→A
¥ |
a →A | * | / | ( | ) | = | & | @ | |
| Ħ | # | £ | $ |
* Blank is inserted
Entering letters/characters and digits
• Entering letters
Press the key the appropriate number of times in quick succession depending on the position of the letter on the key – 1st , 2nd , 3rd or 4th position – or hold the key down.
The first letter of a name is automatically written in upper case letters. This is followed by lower case letters.
Press the key is to switch from lower case to upper case for a particular character.
• Entering digits
Press the appropriate digit key 4 or 5 times in quick succession depending on the number of letters on the digit key.
Entering text
• Entering special characters
Press the key the appropriate number of times (up to 9 times) according to the "Overview - key layout" to enter the special characters, see page 35.
• Entering text with character preview
As soon as you press a key, all letters, digits and special characters assigned to this key are displayed in the lower display line.
Press the key or hold it down until the cursor reaches the required character (letter, digit, special character) in the display line. This character is transferred to the 1st line.
• Correcting/deleting entries
The cursor is moved from character to character with the or display keys and from line to line with the or display keys.
A character is always inserted to the left of the cursor.
The character to the left of the cursor is deleted . The delete function is executed with the C display key.
Your handset has a telephone directory for storing up to 100 numbers.
The stored numbers can be simply dialled, modified or deleted at any time.
Note:
Numbers from the number redial memory can also be transferred to the telephone directory, see page 32.
Overview – telephone directory menu
| Menu | Explanation/notes |
|---|---|
| New Entry | see page 38 |
| Use Number | see page 40 |
| Dial Number | see page 40 |
| Edit Entry | see page 40 |
| Delete Entry | see page 40 |
| Display Entry | see page 41 |
| Copy Entry | not relevant for Hicom cordless E |
| Delete List | see page 41 |
| Copy List | not relevant for Hicom cordless E |
| Available Memory | see page 41 |

The telephone directory ( D ) enables convenient dialling of approximately 100 call numbers.
You can store the prefix numbers of other locations using the network prefix E function.
| 🕮 or 🔁 |
Press the telephone directory key or
the display key for the network prefix menu. (The operation for the tele- phone directory and the network prefix function is identical up to this point.) |
|---|---|
| } = + | Press the display key. |
| New Entry | Scroll to New Entry. |
| ОК | Confirm the selection. |
| Name |
Enter name (only 1st line, max. 16
characters). Enter letters/characters and digits and correct if necessary, see page 35. |
| ↓ I | Jump to the next line. |
| Tel. number |
Enter the associated telephone
number (2nd and 3rd line, max. 32 digits). Enter the "external code", e.g. "0" in front of external numbers. |
| ≻ ≡+ | Press the display key. |
| Save Entry | l |
| ОК | Confirm Save Entry. |
Note:
Telephone directory entries are automatically sorted in alphabetical order. "Names" that begin with "*" or "#" precede entries starting with "A".

Prerequisite: number is stored and handset is on or in message status – no connection is set up.

Press the telephone directory key or the display key for the network prefix menu.
The first names (alphabetical order) in the telephone directory are displayed. The name in the first line is selected (dimmed).

Scroll to the desired name.
or
Enter the first letters, see page 35.
Press the talk key.
The relevant number is displayed and dialled.
Other telephone directory functions
All menus/functions of the telephone directory or network prefix menu are called up in the same way:
Scroll to the desired function.
The remaining functions of the telephone directory are described below.
Use Number:
| Use Number | |
|---|---|
| ОК | Confirm the selection. |
|
e.g.
12345678 |
The dialled number is displayed, e.g.
12345678 . |
| e.g. 9 1 0 | Extend number, for example with 910. |
| ≥ ≡+ | Press the display key. |
| Dial Number | Dial Number is displayed. |
| ОК |
Confirm the selection.
The extended number is dialled. |
Dial Number:
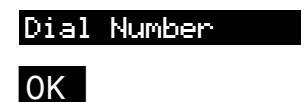
Confirm the selection. The number is dialled.
New Entry:
Enter the new name and new telephone number, see page 38.
| Edit Entry: | |
|---|---|
| Edit Entry | |
| ОК | Confirm the selection. |
|
e.g.
MOORE |
Name flashes. |
| ◆ ◆ ← | e.g. Change Base Name. |
| ↓ | Switch to number and edit |
| ≥ ≡+ | Press the display key. |
| Save Entry | |
| ОК | Confirm Save Entry. |
| Delete Entry: | |
| Delete Entry | |
| ОК | Confirm the selection. |
Display Entry:
Display Entry

Confirm the selection.
| R | ΞT | U | RN |
|---|
To jump to the higher-level menu.
Delete List:
You can also delete the entire telephone directory in one go, e.g. if you are lending the handset to another user. This function is also protected by the handset PIN (max. 8 digits).
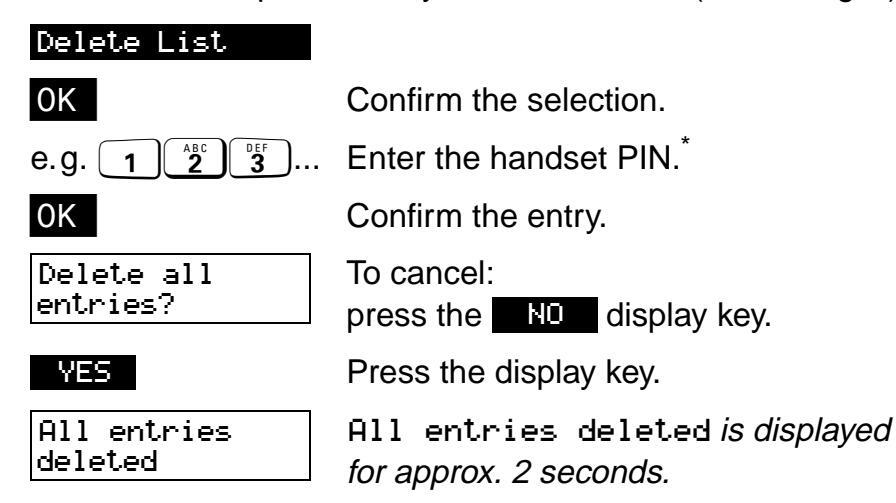
* The default PIN for the handset is "0000".
Available Memory:
The amount of available memory space can be displayed as a percentage.
e.q.
Available Memory

Confirm the selection.

Available Memory: 85% available is displayed for approx.
Network prefix support
"Linking" the prefix and call number
| ØE < | Call up the network prefix menu |
|---|---|
| Confirm the selection. | |
| > =+ | Open the submenu. |
| ОК |
Confirm Use Number .
The prefix number is displayed. |
| e.g. | Enter the telephone number of the user or open the telephone directory and select the number. |
|
Start the dialling procedure.
The prefix number and telephone number are dialled. |
|
Speed dialling from other locations
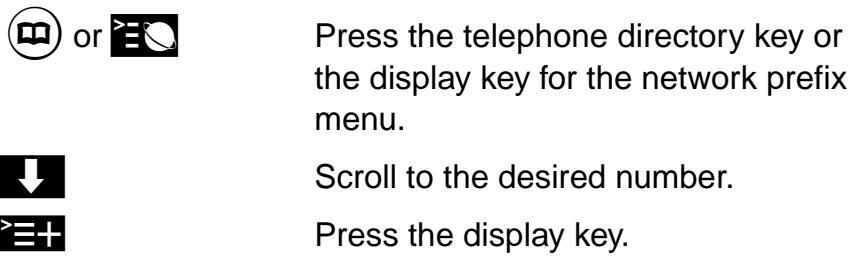
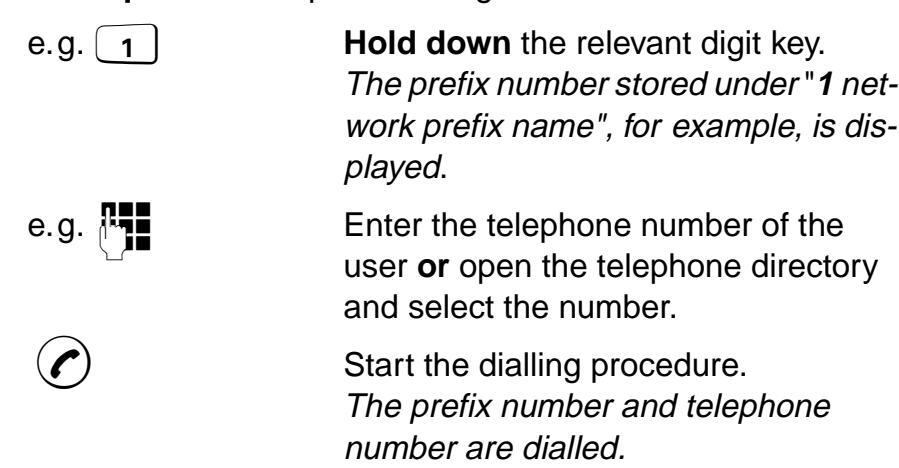
Speed dialling from other locations allows you to rapidly access their prefix numbers:
- You can store 10 speed dialling prefix numbers (0-9) in the network prefix list. Enter a speed dialling number (0-9) in front of the network prefix name, e.g. "1 network prefix name".
- The stored prefix number is displayed by holding down the relevant digit key (0-9).
Prerequisite: the speed dialling number is stored.
Main menu – overview
| Main menu | Explanation/notes |
|---|---|
| Settings | see page 44 |
| Bases | see page 54 |
| Hset User Option | not relevant for Hicom cordless E |
| Room Monitor Set | not relevant for Hicom cordless E |
| Service | see page 57 |
Using the Menu key 🚖 you can call up the main menu. You can scroll this menu using 🚺 or 🚹 and select a menu entry with OK.
Settings – overview
| Setting | Explanation/notes | Lev- |
Default
state |
|---|---|---|---|
| Sound | Pingor volumo | 5 | 5 |
| Settings |
5
40 |
C ⊿ | |
| Counigo | Ringer meioay | 10 | |
| Веер | - | Off | |
| Handset volume | 3 | 1 | |
| Loudspeaker | 5 | 3 | |
| Key beeps, audible each time a key is pressed. | - | On | |
|
Battery low beep, audible ap-
prox. 5 minutes before the bat- tery runs out. |
- | On | |
|
Confirmation beeps indicate
whether functions have been successful (confirmation beep) or unsuccessful (error tone). |
- | On | |
| Security | Changing the handset PIN | - | - |
|
Disable some handset func-
tions |
- | - | |
| Auto Talk |
You can define whether the talk
key must be pressed to accept a call when the handset is re- moved from the charging shell. |
- | On |
| Language |
Different languages can be se-
lected for the display. |
7 | English |
|
Default
Reset |
The resetting of the handset to
the initialization state (defaults) is protected by the handset PIN. Resetting the handset deletes the redial numbers. The regis- tration (logon) and the mobile PIN are retained. |
- | - |
Audio settings
Audio settings
The following audio settings are all set using the same principle:
- ringer volume (for note, see page 46)
- ringer melody (for note, see page 46)
- handset volume
- loudspeaker
The "ringer volume" function is used by way of example here to describe setting procedures:
Audio settings
| * |
Press the display keys to set the re-
quired volume. You can select one of five ringer vol- umes , the crescendo ring (= C) or no ringer tone (= 0). |
|---|---|
| ОК | Confirm the setting. |
| Et | Use the display key to jump to the next menu level up. |
Note:
- The symbol A appears in the first display line if you have deactivated the ringer (level 0).
- A call pickup is signalled by a short ringer tone if the handset is part of a call pickup group. Ringer tones 1-5 are, therefore, recommended in a call pickup group.
Activating/deactivating audio settings
The following audio settings are all activated and deactivated using the same principle:
- Beep (for note, see page 47)
- key beeps
- batt. low beep
- confirmation beep
The "key beeps" function is used by way of example here to describe setting procedures:
| Press the menu key. | |
|---|---|
| Settings |
Settin
|
| ОК | Confirm the selection. |
| ↓ | |
|
Sound Settin
|
Scroll to Sound Settings. |
| ОК | Confirm the selection. |
| ↓ | |
| Кеу Веерз | Scroll to Key Beeps . |
| ОК |
Confirm the selection.
The activated function is indicated by a check mark symbol. |
Audio settings
tΞ
Use the display key to jump to the next menu level up.
To deactivate the function, proceed in the same way as described for activating it.
The check mark disappears again once the "key beeps" function is confirmed with the display key OK .
Note:
- If "Beep" is activated, the symbol AI appears in the first display line in "on" or message status.
- As soon as you activate "Beep", ringer tone deactivation is removed (symbol
Activating/deactivating the ringer
The ringer can be deactivated at the push of a button in "on", message and call status.
Deactivating the ringer:

Activating the ringer:
a→A ¥
Press the key and hold it down until the symbol & disappears.
Note:
- The deactivated ringer is automatically activated as soon as you open the Ringer Volume menu.
- The ringer volume cannot be activated with the * key if it was deactivated via the Ringer Volume menu (level 0, see page 45).
- The ringer volume cannot be deactivated with the key if "Beep" is activated (symbol $\overline$).
Security
Changing the handset PIN
You can use this function to change your handset PIN. The default PIN for the handset is "0000".
This PIN is required for the following functions:
- All functions in the "Security" menu
- Logging on the handset
- Deleting the telephone directory
- Resetting the handset to the default state
Important:
- If you forget your handset PIN, a service engineer will have to access the device. Forgetting a PIN is just as serious as losing a key. If this happens, please consult your system administrator.
- If an incorrect handset PIN is entered, Incorrect. PIN is displayed.
- The functions can be cancelled/terminated with the menu key before settings are saved/deleted.
Security
Activating/deactivating the handset lock
Important:
- Use of the handset lock function is restricted in conjunction with the Hicom cordless E handset.
- Telephone calls (incoming and outgoing) can be made at the locked handset.
- The handset can only be locked against unauthorized dialling by using the "Class of service, change/reset" code function, see page 71.
- The "DSS" or "DSS number" functions cannot be used with the Hicom cordless E.
The following are blocked when the handset is locked:
- Access to the telephone directory
- Block dialling
- Service menu callup
- Function menu callup (except Deactivating the Handset, Lock)
Activating the handset lock
| Press the menu key. | |
|---|---|
| Settings |
Settin
|
| ОК | Confirm the selection. |
| ↓ | |
| Security | Scroll to Security. |
| ОК | Confirm the selection. |
| Enter PIN: | An input prompt appears. |
| e.g. 1 2 3 | Enter the handset PIN * (max. 8 digits). |
| ОК | Confirm the entry. |
| ↓ | |
| Handset Lock | Scroll to Handset Lock . |
| ОК |
Confirm the selection.
The activated function is indicated by a check mark symbol. |
Security

Use the display key to jump to the next menu level up.
Handset locked
The locked display appears. Multiple functions (see above) are locked.
* The default PIN for the handset is "0000".
Deactivating the handset lock
| Press the menu key. | |
|---|---|
| Enter PIN: | An input prompt appears. |
| e.g. 1 ABC 3 |
Enter the handset PIN
*
(max. 8 digits).
Confirm the entry. |
| Handset Lock | Handset. Lock is displayed without the check mark. The handset lock is cancelled. |
| Et | Use the display key to jump to the next menu level up. |
* The default PIN for the handset is "0000".
Auto talk
You only have to remove the handset from the charging shell to accept a call if this function is activated.
| Press the menu key. | |
|---|---|
|
Settin
|
Scroll to Settines. |
| ОК | Confirm the selection. |
| Auto Talk | Scroll to Auto Talk . |
| ОК |
Confirm the selection.
The activated function is indicated by a check mark symbol. |
| tE | Use the display key to jump to the next menu level up. |
Proceed in the same way as described above to deactivate the function.
If the Auto Talk function is confirmed with the OK display key, the check mark disappears.
Language
| raciony setting. un | e deladit language is English. | |
|---|---|---|
| Press the menu key. | ||
| Settings | Settines is displayed . | |
| ОК | Confirm the selection. | |
| ↓ | ||
| Language | Scroll to Language . | |
| ОК | Confirm the selection. | |
| e.g. | Scroll to the required language, | |
| German | forexample, German . | |
| ОК |
Confirm the selection.
The selected language is displayed without a check mark. |
|
| ∃t | Use the display key to jump to the nex menu level up. | |
Factory setting: the default language is English.
The following overview will help you to set the desired language as described above when the unit is delivered or after the language is changed inadvertently:
Possible language settings
| IM 1 | IM 2 |
|---|---|
| German | English |
| English | Czech |
| French | Finnish |
| Italian | Norwegian |
| Spanish | Swedish |
| Portuguese | Danish |
| Dutch | Turkish |
Note:
The language you set only applies to the handset display texts stored in the handset. The language used in the system texts, forexample, when a call is in progress, depends on the telephone system settings.
Resetting the handset to the default state
You can use this function to reset your handset to the defined default state, e.g. if you are handing over your handset to another user.
Note:
- Resetting the handset to the default state deletes the redial numbers.
- The handset PIN and system registration (logon) are, however, not deleted.
| Press the menu key. | |
|---|---|
| Settings | Scroll to Settings. |
| ОК | Confirm the selection. |
| ↓ | |
| Default Reset | Scroll to Default Reset. |
| ОК | Confirm the selection. |
| e.g. 1 | Enter the handset PIN (max. 8 digits).* |
| ОК | Confirm the entry. |
* The default PIN for the handset is "0000".
Settings after the handset has been reset:
| Telephone directory: | Retained |
|---|---|
| Short cuts: | Retained |
| Number redial: | Deleted |
| Handset PIN: | As per last save |
| System registration: | Retained |
| _anguage | English |
| Auto Talk: | On |
| Select Services menu: | Active * |
| Audio settings: | see page 44 |
* In IM 2: inactive
Selecting the base
If your handset is logged onto more than one base (systems*), you can set it to a particular base or "best base" for automatic base changeover during cross-network roaming (in conjunction with "ISDN Config").
| Press the menu key. | |
|---|---|
| J | |
|
Base Settin
|
Scroll to Base Settings. |
| ОК | Confirm the selection. |
| Base 3 | Scroll to the required base, for example, Base 3. |
| ≥ ≡+ | Press the display key. |
| Select | Scroll to Select . |
| ОК |
Confirm the selection.
The activated base is indicated by a check mark. |
| ₽Ŧ | Use the display key to jump to the next menu level up. |
Note:
- If you set Best. Base, the handset is always automatically connected to the base with the best reception.
- If you are located between two systems for example, and the handset switches continuously, you should set it to a particular system.
- The "ISDN Config" function should always be activated as a basic setting, see page 25.
* See also note on page 24
Bases
Changing the base name
You can enter an individual name for the handset, e.g. instead of Base 1* to an individual name, e.g. Internal 3. "3" is the internal number of the handset.
| Press the menu key. | |
|---|---|
| Ų | |
|
Base Settin
|
Scroll to Base Settings. |
| ОК | Confirm the selection. |
| Base 3 | Scroll to the required base, for example, Base 3. |
| ≥=+ | Press the display key. |
| Chnge Base Name | Scroll to Chnee Base Name. |
| ОК | Confirm the selection. |
| Name | Enter the required base names, see page 35. |
| `≡+ | Press the display key. |
| Save Entry | Scroll to Save Entry. |
| ОК | Confirm the selection. |
* Name set by factory
SLC menu — overview
The SLC menu can be called up using the INT display key when the handset is on or in message status . The following functions and submenus are offered:
| SLC menu | Explanation/notes |
|---|---|
| Basic Service | see page 57 |
| Mailbox | see page 67 |
| Query Number | see page 68 |
| Display Test | see page 69 |
Basic Service
When the handset is on or in message status , the basic settings are called up via the SLC menu (see page 56).
When a call is in progress , press the menu kev and scroll to Securice and confirm
The functions shown on page 58 can be activated directly using service codes or via the service menu with and , and by pressing OK .

Prerequisite: the individual functions are enabled on your handset - if necessary, contact your system administrator.
| Function * | Explanation/notes | |
|---|---|---|
| Destinations | ||
|
Variable call for-
warding (11) |
see page 60 | |
|
Fixed call forward-
ing (12) |
see page 62 | |
| Speed dialling (13) | Not relevant for Hicom cordless E. | |
|
Forward
number (14) |
see page 65 | |
| Switches | ||
| Call waiting (21) |
Function only available to limited ex-
tent! |
|
| Do not disturb (22) |
You will not receive any more calls if
you activate do-not-disturb. "Do- not-disturb" is displayed if the call- ing party is an internal caller. |
|
| Call protect (23) | Function not available. | |
| Hunting group (24) |
Ask your system administrator!
The hunt group can be activated and deactivated. |
|
| Forward (25) | see page 62 and 63 | |
|
Forward
number (26) |
see page 65 | |
| Voice info | ||
| Own mailbox (51) |
Prerequisite
: a mailbox has been
set up for your handset. Activated according to voice prompting sys- tem! |
|
| Other mailbox (52) |
Activated according to voice
prompting system! |
|
| PIN/COS | ||
| PIN 1 (61) | Ask your system administrator! | |
| PIN 5 (62) | Ask your system administrator! | |
| Change class of service (67) |
Prerequisite
: PIN 1 is known!
No more external connections can be set up, for example, after a COS is changed. |
|
| Function * | Explanation/notes |
|---|---|
| Timed reminder | |
| New reminder (7) |
For saving daily appointments, e.g.
0930 for 9.30am. The reminder is signalled by the call signal – confirm with the talk key, and if necessary with a second call after five minutes, for example. |
| Other functions | |
| DTMF dialling (81) |
Prerequisite: an external call is in
progress! You can send DTMF sig- nals once this function is activated. Note: speed changeover to tone di- alling with * #. |
| Display (82) |
Your name and number are
not dis-
played on the called party's tele- phone. |
* Codes in brackets: service codes
Follow the instructions in the display after the required function has been selected.
To cancel the operation : press the on-hook key (1).
Note:
While service menu functions are being performed, calls can only be accepted if the service menu is cancelled.
Call forwarding
You can forward all calls to another telephone in the system while you are away from your desk.
In addition, Hicom cordless E offers the following functions:
- variable call forwarding variable destination
- fixed call forwarding destination is permanently stored, e.g. to your mailbox.
- call number forwarding variable call forwarding for "other" call numbers (Hicom users)
| Forwarding to a var |
r
iable destination
Press the display key. |
|---|---|
| BASIC SERVICE | Press the display key. |
| Service: | Display: Service: |
| Enter the service code "11" and jump directly to Please dial. | |
| or | |
| ↓ | |
| DESTINATIONS | Scroll to Destinations . |
| ОК |
Press the display key to confirm selec-
tion. |
| ↓ | |
| VARY FORWARD | Scroll to VARY FORWARD. |
| ОК |
Press the display key to confirm selec-
tion. |
| Please dial | Display: Please dial. |
| Enter the number for variable forwarding. | |
| SAVE | Confirm the entry with the display key. |
| ОК | Variable call forwarding is activated. |
| Ξt | Use the display key to jump to the next menu level up. |
Note:
The system emits an advisory beep when you press the talk key if call forwarding is activated.
Deactivating variable call forwarding
| INT | Press the display key. | |
|---|---|---|
| BASIC SERVICE | Press the display key. | |
| Service: | Display: Service: | |
| ABC JKL 5 |
You can now jump directly to DEACTI-
VATE by entering service code "25": |
|
| or | ||
|
↓
↓ |
||
| SWITCHES | Scroll to SWITCHES. | |
| ОК |
Press the display key to confirm selec-
tion. |
|
| FORWARD | Scroll to FORWARD. | |
| ОК |
Press the display key to confirm selec-
tion. |
|
|
↓
↓ |
||
| DEACTIVATE | Press the display key DEACTIVATE. | |
| ОК |
Press the display key to confirm selec-
tion. Forwarding is deactivated. |
|
| ∃t | Use the display key to jump to the next menu level up. | |
| eternig/meanying a | |
|---|---|
| INT | Press the display key. |
| BASIC SERVICE | Press the display key. |
| Service: | Display: Service: |
|
You can now jump directly to NEW EN-
TRY by entering service code "12". |
|
| or | |
| DESTINATIONS | Scroll to DESTINATIONS. |
| ОК |
Press the display key to confirm selec-
tion. |
| FIXED FORWARD | Scroll to FIXED FORWARD. |
| ОК |
Press the display key to confirm selec-
tion. |
| NEW ENTRY | Scroll to NEW ENTRY. |
| ОК |
Press the display key to confirm selec-
tion. |
| Enter the number for fixed forwarding. | |
| SAVE | Save is displayed. |
| ОК | Confirm the entry with the display key. Fixed call forwarding is activated. |
| t∃ | Use the display key to jump to the next menu level up. |
| Activating/deactivating | fixed forwarding |
|---|
| INT | Press the display key. | |
|---|---|---|
| BASIC SERVICE | Press the display key. | |
| Service: | Display: Service: | |
| ABC JKL 5 |
You can jump directly to DEACTIVATE
or ACTIVATE by entering service code "25". |
|
| or | ||
| SWITCHES | Scroll to SWITCHES. | |
| ОК |
Press the display key to confirm selec-
tion. |
|
| V | ||
| Forward | Scroll to FORWARD. | |
| ОК |
Press the display key to confirm selec-
tion. |
|
| ↓ | ||
|
DEACTIVATE
or |
Scroll to DEACTIVATE or ACTIVATE . | |
| UK |
Fixed forwarding is deactivated or ac-
tivated. |
|
| ŧ∃ | Use the display key to jump to the next menu level up. | |
Deleting the fixed forwarding destination
You can delete the fixed forwarding destination if you are no longer using the handset and are handing it over to an other user.
| INT | Press the display key. | |
|---|---|---|
| BASIC SERVICE | Press the display key. | |
| Service: | Display: Service: | |
|
You can now jump directly to NEW EN-
TRY by entering service code "12". |
||
| or | ||
| ↓ | ||
| DESTINATIONS | Scroll to DESTINATIONS. | |
| ОК |
Press the display key to confirm selec-
tion. |
|
| V | ||
| FIXED FORWARD | Scroll to FIXED FORWARD. | |
| ОК |
Press the display key to confirm selec-
tion. |
|
| ↓ | ||
| DELETE | Scroll to DELETE . | |
| ОК |
Press the display key to confirm selec-
tion. |
|
|
Forwarding
cancelled |
Forwarding cancelled is displayed for approx. 2 seconds. | |
Activating call number forwarding
| INT | Press the display key. |
|---|---|
| BASIC SERVICE | Press the display key. |
| Service: | Display: Service: |
|
You can now jump directly to NEW EN-
TRY by entering service code "14". |
|
| or | |
| ↓ | |
| DESTINATIONS | Scroll to DESTINATIONS . |
| ОК |
Press the display key to confirm selec-
tion. |
| FORWARD NUMBER | Scroll to FORWARD NUMBER. |
| ОК |
Press the display key to confirm selec-
tion. |
| Ţ | |
| VARY FORWARD | Scroll to VARY FORWARD. |
| ОК |
Press the display key to confirm selec-
tion. |
| Enter the number for fixed forwarding. | |
| FINISHED? | FINISHED? is displayed. |
| ОК |
Press the display key to confirm selec-
tion. |
| ENTER PIN: | An input prompt is displayed. |
| e.g. 1 DEF 5 | Enter the handset PIN, e.g. "13579" * . |
| FINISHED? | FINISHED? is displayed. |
| ОК | Confirm query. |
| Enter the destination number. | |
| SAVE | SAVE is displayed. |
| ОК | Confirm the entry with the display key. Variable call forwarding is activated . |
* The default PIN for the handset is "0000".
Deactivating call number forwarding
| INT | Press the display key. |
|---|---|
| BASIC SERVICE | Press the display key. |
| Service: | Display: Service: |
|
You can now jump directly to NEW EN-
TRY by entering service code "26". |
|
| or | |
| SWITCHES | Scroll to SWITCHES. |
| ОК | Press the display key to confirm selection. |
| FORWARD NUMBER | Scroll to FORWARD NUMBER . |
| ОК | Press the display key to confirm selection. |
| VARY FORWARD | Scroll to VARY FORWARD. |
| ОК | Press the display key to confirm selection. |
| Enter the number for fixed forwarding. | |
| FINISHED? | FINISHED? is displayed. |
| ОК | Press the display key to confirm the query. |
| Enter PIN: | An input prompt appears. |
| * | |
| Enter the handset PIN, e.g. "13579" ^ . | |
| FINISHED? | FINISHED? is displayed. |
| ОК | Press the display key to confirm the query. |
| DEACTIVATE | DEACTIVATE is displayed. |
| ОК | Confirm query. Variable call forwarding is deactivated . |
* The default PIN for the handset is "0000".
If you have not been able to take a call, e.g. because the handset was off or you were outside the radio range, you can check spoken messages (voicemail) stored in a mailbox.
Mailbox

| INT | Press the display key. | |
|---|---|---|
| MAILBOX | Scroll to MAILBOX. | |
| ОК | Confirm the selection. | |
| Mailbox Empty | Display: Mailbox Emety. | |
| or | ||
|
e.g.
MOORE WED 16.08 11:55 |
Display:
Name, day, date and time |
|
| Ų | Scroll to one of the 4 functions: | |
|
OUTPUT
DELETE NEXT CANCEL OK |
OUTPUT: Check message
DELETE: Delete entry NEXT: Check next message CANCEL: Close mailbox connection Confirm the selection. One of the 4 functions is executed. |
|
Query number
The call number of the calling party is stored if you are outside of the radio range, the handset is switched off or you do not accept a call (handset is not busy and is on standby). You can guery the stored numbers in the handset and subsequently dial these numbers or delete them.
Prerequisite: only internal calls, or external calls with transforred call numbers are stored
The last five or first five calls are stored. This depends on the Hicom cordless E system settings. The "oldest" call is automatically deleted by subsequent calls if the last five calls are stored. The calls must be deleted individually by the handset user if the first five calls are deleted
Press the display key.
| QUERY NO: | Scroll to QUERY NO. |
|---|---|
| ОК | Press the display key tion. |
|
e.g.
12345 24680 13579 ✔ |
A list of numbers is s
play. The last entry a A check mark behind that a callback has a |
Press the display key to confirm selection
A list of numbers is shown on the display. The last entry appears at the top. A check mark behind an entry means that a callback has already been attempted.
24680
>≡+
ΟK
e.q
INT
Scroll to the desired number, e.g. 24680
Display: name, date and time.
Press the display key to confirm selection.
| e.g. | |
|---|---|
| SMITH | |
| 09.09. | 13:23 |

| DIAL | [ |
|---|---|
| DELETE | I |
| VEXT | ł |
| PREVIOUS | ( |
DIAL: Dial number
DELETE: Delete entry NEXT/PREVIOUS: Display next/previ-
ous entry.
Press the display key to confirm selection
The selected function is executed
Display Test
Using the display test, it is possible to check whether all display items (pixel) are displayed correctly.
If any display items are not dimmed these are faulty. Consult your system administrator or technician.
Message Waiting Indication
With "Message Waiting Indication", you can call up all new messages in the mailbox or access the caller list directly. If you have not taken calls or messages (voicemail), these are signalled in the lower display line with the symbol
Note:
Messages and calls which have already been called up via the functions "MAILBOX" or "QUERY NO" are no longer displayed in "Message Waiting Indication".
Code functions
Like other Hicom telephones, the mobile unit allows you to perform the following functions by entering codes. The codes in your system may deviate from the standard codes specified here. Consult your system administrator if you have any queries about the codes in your system.
| Functions * |
Standard
code |
System-
specific code ** |
|---|---|---|
| Call waiting/override | ★19 | |
| Do not disturb on/off | ★40 / #40 | |
| Call forwarding, variable off | #44 | |
| Call number suppression (no display) | ★5 / #5 | |
|
Class of service
change/reset |
★18 / #18 | |
|
Identification on/off
(before entering the PIN) |
★24 / #24 | |
|
Tone dialling
(connection is set up) |
★ # | |
| Callback request | ★9 | |
|
Hunt group
exclude/include |
★13 / #13 | |
|
Number redial (system)
– save – dial |
★
6
★6 |
|
| Call pickup | ★70 | |
|
Speed dialling
individual/central |
* 28 / * 29 |
* If activated (consult your system administrator if necessary)
** You can enter the codes that are valid for your system in this column.
Prerequisite: the required function is set up.
Note:
Once a call has been set up, the display offers you the option MUTE ON. If you confirm the option with OK , the microphone is deactivated and the MUTE OFF is displayed. No further functions can be activated in this status.
Automatic callback
If a dialled internal user is busy or if your call is not answered, you can program a callback request.
Storing a callback request:
Note:
-
The system calls you back when the user
- becomes free or
- has used his/her telephone or
- has initiated the callback stored in the mailbox.
- The callback is deleted if you do not answer the it within four rings.
- The number of callbacks that can be stored depends on the system setting, for example, 5.
- The stored callbacks can not be deleted . Program the system to perform the callbacks.
Forwarding calls
You answered an external call and would like to forward it to an other user:
Note:
- You can cancel the consultation by pressing TO WAIT. CALL during the dialling process or if the user is busy.
- You can cancel the call forwarding function with the recall key (R) if you reach the info box of a voicemail system .
Consultation during a call
You are conducting an internal or external call and would like to obtain some information from an internal or external user:

Ending a consultation:
Note:
You can cancel the consultation by pressing TO WAIT. CALL during the dialling process or if the user is busy.
You can cancel the call forwarding function with the recall key (R) if you reach the mailbox of a voicemail system .
Toggle – Switching between two users
You can toggle between the two users during a consultation call (see page 73).
Note:
The toggle function cannot be performed with a voice-mail system mailbox .
Conference
This function allows you to set up a telephone conference with up to 8 users.
You are conducting a call and wish to set up a telephone conference with a further user:
You can now perform the following functions:
Adding additional users:
| EXPAND CONF. | Scroll to EXPAND CONF |
|---|---|
| ОК | Press the display key to confirm selection. |
| Please dial | Display: Please dial. |
| Dial the number of the user. | |
| EXPAND CONF. | Scroll to EXPAND CONF |
|
OK
Conf. 1-2-3-4 |
Press the display key to confirm selection.
Conf 1-2-3-4 is displayed. All four users are now linked . |
|---|---|
| Ending a conferenc | e: |
|
Press the on-hook key.
The conference is ended. |
|
| erence: | |
| ▼ EXPAND CONF. | Scroll to EXPAND CONF. |
| ОК |
Press the display key to confirm selec-
tion. |
| Please dial | Display: Please dial. |
| Dial the number of the user. | |
|
↓
CONF. TRANSFER |
Scroll to CONF. TRANSFER. |
| ОК |
Press the display key to confirm selec-
tion. The conference is transferred to the other users . |
| Press the on-hook key or place the handset in the charging shell. | |
|
Note:
You can cancel the reach the mailbox |
function with the recall key (R) if you of a voicemail system during a con- |
ference.
Appendix
Troubleshooting
Before contacting the Service department, you should attempt to correct any errors yourself:
| Error | Possible cause | Remedy |
|---|---|---|
| No display. |
Handset not
switched on. Battery empty. |
Press the on/off
key. Charge battery or replace with spare |
|
Release Conn. is
displayed as soon as you press the talk key. No dial tone; no calls can be made. |
Hicom cordless E is
being used by other users. |
Try again later. |
|
No radio connec-
tion possible to base station, Base 1 flashes. |
The handset is out-
side the radio range of the base stations; radio sig- nal too weak. The handset is not registered. Excessive delay between synchro- nisation attempts. |
Move into radio
range, change location. Log on the hand- set. Switch off handset and switch it back on again. |
|
Base 1 is dis-
played, forexample,but no incoming or outgo- ing calls can be re- ceived or made. Activation/deacti- vation not possible. |
The handset is blocked. |
Open the battery
compartment lid (arrow) and close it again. |
Appendix
Approval
Hicom cordless products satisfy the EU approval specifications in accordance with the EU directive 98/13/EEC.
Technical data
| Standards |
DECT in accordance with ETSI,
CTR 6, CTR 10, GAP |
|---|---|
| Number of channels | 120 duplex channels |
| Frequencies | 1.88 GHz to 1.90 GHz |
| Duplex operation | Time duplex with a 10 ms frame length each |
|
Channel configura-
tion |
1728 kHz |
| Bit rate | 1152 kbit/s |
| Modulation | GFSK |
| Voice encoding | 32 kbit/s (ADPCM) |
| Transmit power |
10 mW medium power;
250 mW peak power |
| Range |
outdoors approx. 300 m,
indoors approx. 50 m |
Convenience handset
Operating times with<br/>fully charged batterysee page 12Permitted environ-<br/>mental conditions<br/>for operation+5 °C to +45 °C<br/>20% to 75% relative humidity<br/>for 75% relative humidityWeight incl. battery<br/>Dimensions<br/>(L x B x H)approx. 165 g
Appendix
Accessories
Gigaset 3000L charging shell
For charging the handset batteries and storing the handset safely.
More information is available on request. Please contact your nearest Siemens Sales office.
Index
Α
| Accessories | 79 |
|---|---|
| Activating/deactivating | |
| the handset | 15 |
| Answering calls | 29 |
| Approval | 78 |
| Attachment clip | 14 |
| Authorization | 27 |
| Auto talk | 51 |
| Automatic | |
| callback | 72 |
| Available Memory | 41 |
В
| Base |
|---|
| changing the name55 |
| display26 |
| select54 |
| Base changeover |
| automatic54 |
| Batteries |
| approved types13 |
| charging times12 |
| inserting into handset11 |
| life13 |
| Use2, 12 |
| Battery |
| low beep44 |
| Battery life78 |
| Battery low beep |
| activating/deactivating46 |
| function44 |
| Beeps |
| setting45 |
| Block dialling28 |
С
| Call | |
|---|---|
| ending | 26 |
| forwarding | 73 |
| Call acceptance, automatic | 51 |
| Call charge display | 9 |
| Call charges | 9 |
| Call forwarding | |
| fixed | 62 |
| variable60, | 71 |
| Call forwarding to a variable | |
| destination | 60 |
| Call number suppression (no | |
| display)59, | 71 |
| CALL PROTECT | 58 |
| CALL WAITING | 58 |
Callback request storing.......72 Callback. automatic .................................... Cancelling functions.................................... Cancelling operations ...... 59 Character function digits .................................... Charging the batteries 12 Charging times.................................... Cleaning charging shell ...... 10 handset.................................... Conducting calls ................................... Conference ......75 Confirmation beep activating/deactivating ..... 46 Confirmation tone function ...... 44 Connection quality .................................... Consultation during a call ......73 Correcting entries .................................... Correction key.................................... COS....................................
D
| Deactivating/activating |
|---|
| the handset15 |
| Default state 44, 53 |
| Deleting |
| entry 40 |
| list 41 |
| Dialling |
| block dial28 |
| cancelling/new |
| external27 |
| internal26 |
| number from directory 39 |
| redialling 31 |
| Display 17 |
| available memory 41 |
| Display keys18 |
| Displaying |
| entry 41 |
| Disposal2 |
| Do not disturb 58, 71 |
Е
| Ending a call | 26 |
|---|---|
| Entering digits | 35 |
| Entering names | 38 |
Index
| Entering text | 35 |
|---|---|
| Entry | |
| deleting | 40 |
| displaying | 41 |
| editing | 40 |
| Environmental conditions | 8 |
| Error correction | 77 |
| External code | 27 |
F
| Features | |
|---|---|
| handset | 3 |
| Hicom cordless E | 8 |
| Fitting the attachment clip. | 14 |
| Fixed call forwarding | 62 |
| Forwarding calls | 60 |
| Function selection | |
| via menus | 19 |
G
| General operating | |
|---|---|
| instructions | 9 |
Н
| Handset | |
|---|---|
| activating/deactivating | 15 |
| cleaning | 10 |
| logging onto the system | 21 |
| preparing | 11 |
| Handset Lock | 49 |
| Handset PIN | |
| changing | 48 |
| Handset volume | 45 |
| Hearing aids | 2 |
| Hicom service menu | 57 |
| Hunt group | 71 |
| HUNTING GROUP | 58 |
I
| ID for code no | 22 |
|---|---|
| Input function | |
| digits | 35 |
| letters/characters | 35 |
| text | 35 |
| Inserting the batteries | 11 |
| ISDN configuration | 25 |
Κ
| Key beeps |
|---|
| activating/deactivating46 |
| function44 |
Keypad
| locking | 16 |
|---|---|
| Keypad lock | 16 |
| Keys | 17 |
L
| Letters/characters | |
|---|---|
| entering | 35 |
| Logging on | |
| handset at a system | 21 |
| Logon window | |
| opening | 21 |
| Loudspeaker | 45 |
Μ
| Mailbox | 58 |
|---|---|
| Main menu | |
| overview | 43 |
| Message status | 17 |
| Message Waiting Indication | 70 |
| Missed calls list | 68 |
Ν
| Network node | 21 |
|---|---|
| Number | |
| deleting | 40 |
| dial | 40 |
| dialling from directory | 39 |
| editing | 40 |
| storing | 38 |
| transfer | 39 |
| Number redial | 31 |
0
| On status26 | |
|---|---|
| Operating elements3 | |
| Operating status 15 | |
| Overview | |
| code functions71 | |
| display keys 18 | |
| main menu 43 | |
| service menu 57 | |
| settings 44 |
Ρ
| Pause display | 9 |
|---|---|
| PIN | |
| handset 48 | 8 |
| service functions58 | 8 |
| system 23 | 3 |
| Power saving function1 | 0 |
Index
| Privacy | 9 |
|---|---|
| Putting the handset into | |
| service | 11 |
| Putting the handset into serv | vice |
| for the first time | 21 |
R
| Radio network |
|---|
| leaving10 |
| power saving function 10 |
| Range10, 78 |
| Replacement batteries13 |
| Ringer |
| activating/deactivating47 |
| melody45 |
| volume45 |
| Room Monitor Set43 |
S
| Scroll | 20 |
|---|---|
| Second executive telephone. | 9 |
| Second telephone | 9 |
| Security | 48 |
| Service | 43 |
| Service menu | 57 |
| Setting the language | 52 |
| Settings | |
| audio | 45 |
| base | 54 |
| language | 52 |
| overview | 44 |
| Short ringer | |
| activating/deactivating | 46 |
| Signalling method59, | 71 |
| SLC menu | |
| Basic Services | 57 |
| Display Test | 69 |
| mailbox | 67 |
| overview | 56 |
| Query number | 68 |
| Speakerphone mode | 30 |
| Special characters | |
| entering | 36 |
| Storing numbers | 37 |
| Structure of the menu | 19 |
| Switching between users | 74 |
| System | |
| administrator | 21 |
| code | 22 |
| PIN | 23 |
т
| Technical data78 |
|---|
| Telephone conference |
| Telephone directory |
| Telephone functions |
| Prerequisite26 |
| Telephone number |
| entering 38 |
| Timed reminder59 |
| Toggle74 |
| Tone dialling |
| Transferring a call73 |
| Transmit power |
| Troubleshooting77 |
U
| Unit parts |
3 |
۷
| handset | 45 |
|---|---|
| loudspeaker | 45 |
| ringer | 45 |
1P A31003-G2323-B841-1-7619
When passing on the device enter the following telephone numbers!
In the event of an error:
For sales queries:
Printed on recycled paper – doing more for the environment!
CE
This device complies with the requirements of the EU guidelines 89/336/EC "Electromagnetic Compatibility",
73/23/EC "Electric Operating Resources for Use within Specific Voltage Parameters".
Therefore displays the CE symbol.
Published by the
Information and Communication Networks Hofmannstraße 51, D-81359 Munich
Siemens Aktiengesellschaft
© Siemens AG 2001 All rights reserved. Subject to availability. Right of modification reserved.
Order No.: A31003-G2323-B841-1-7619 Printed in Germany.


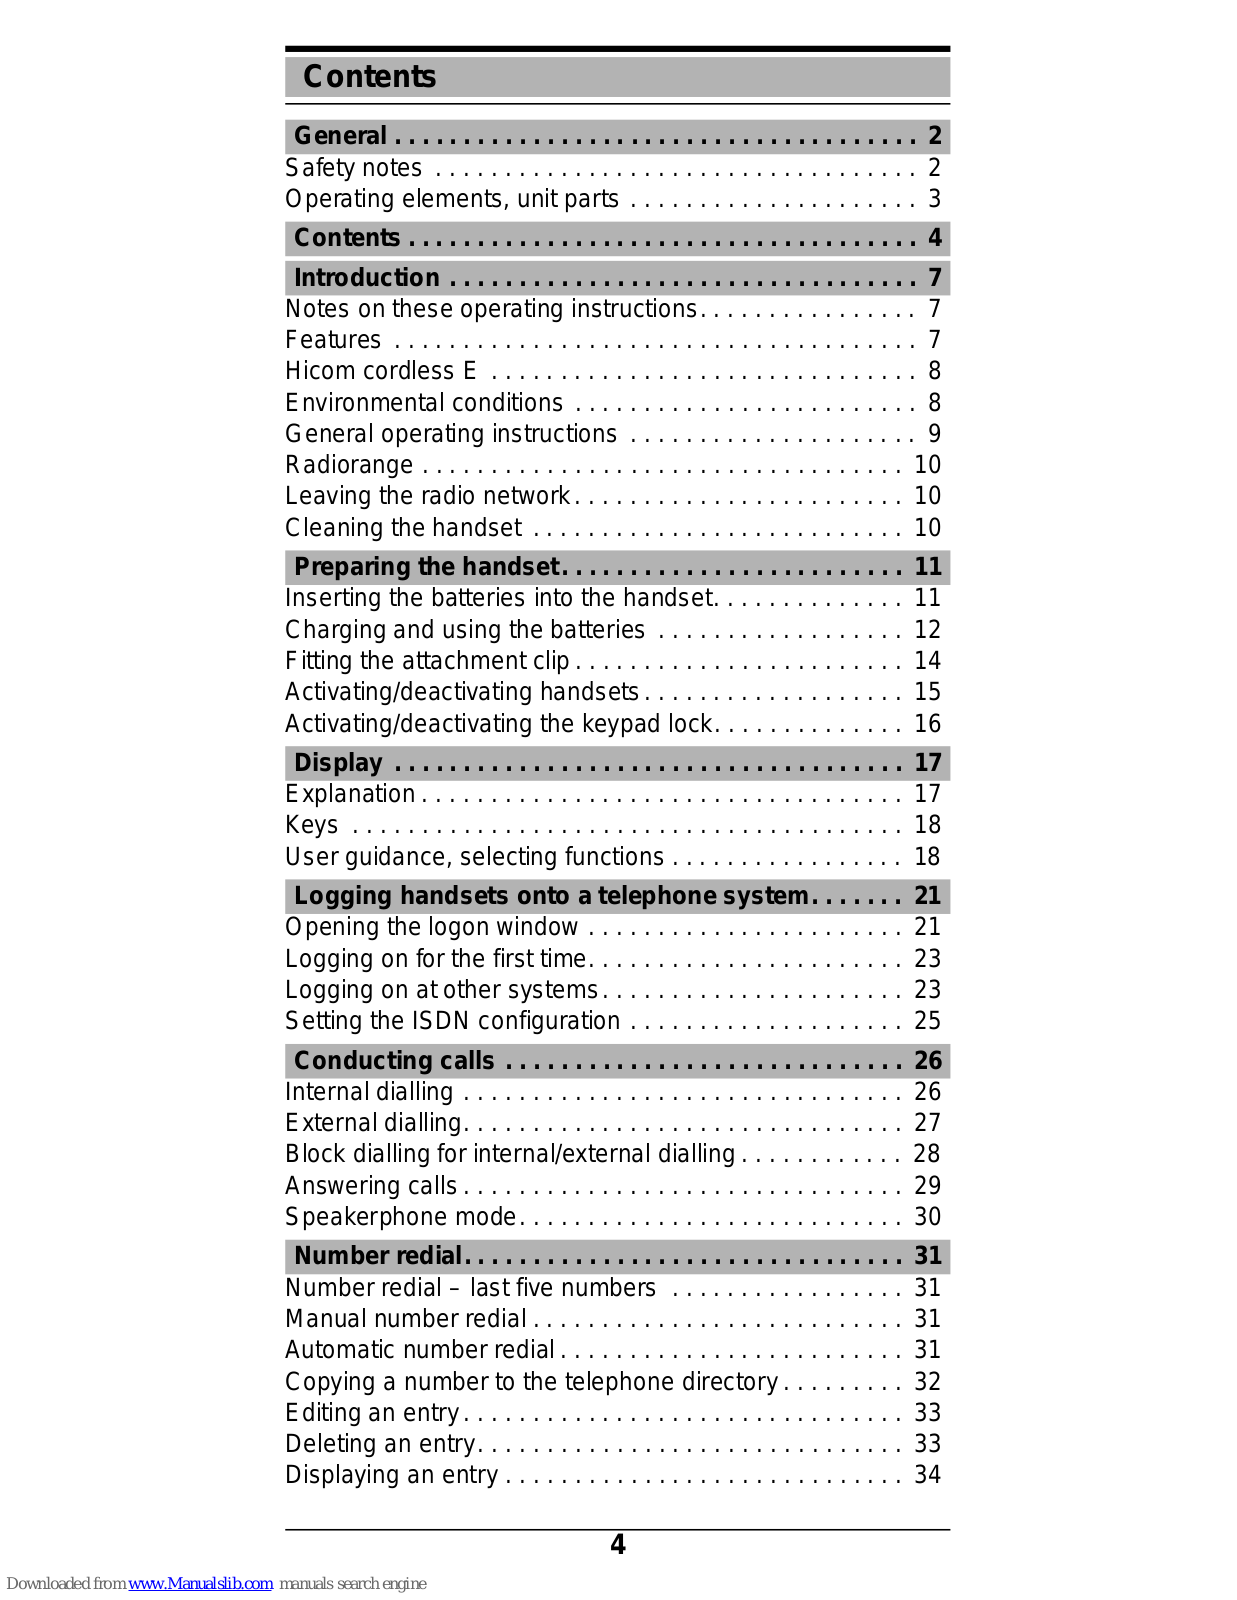


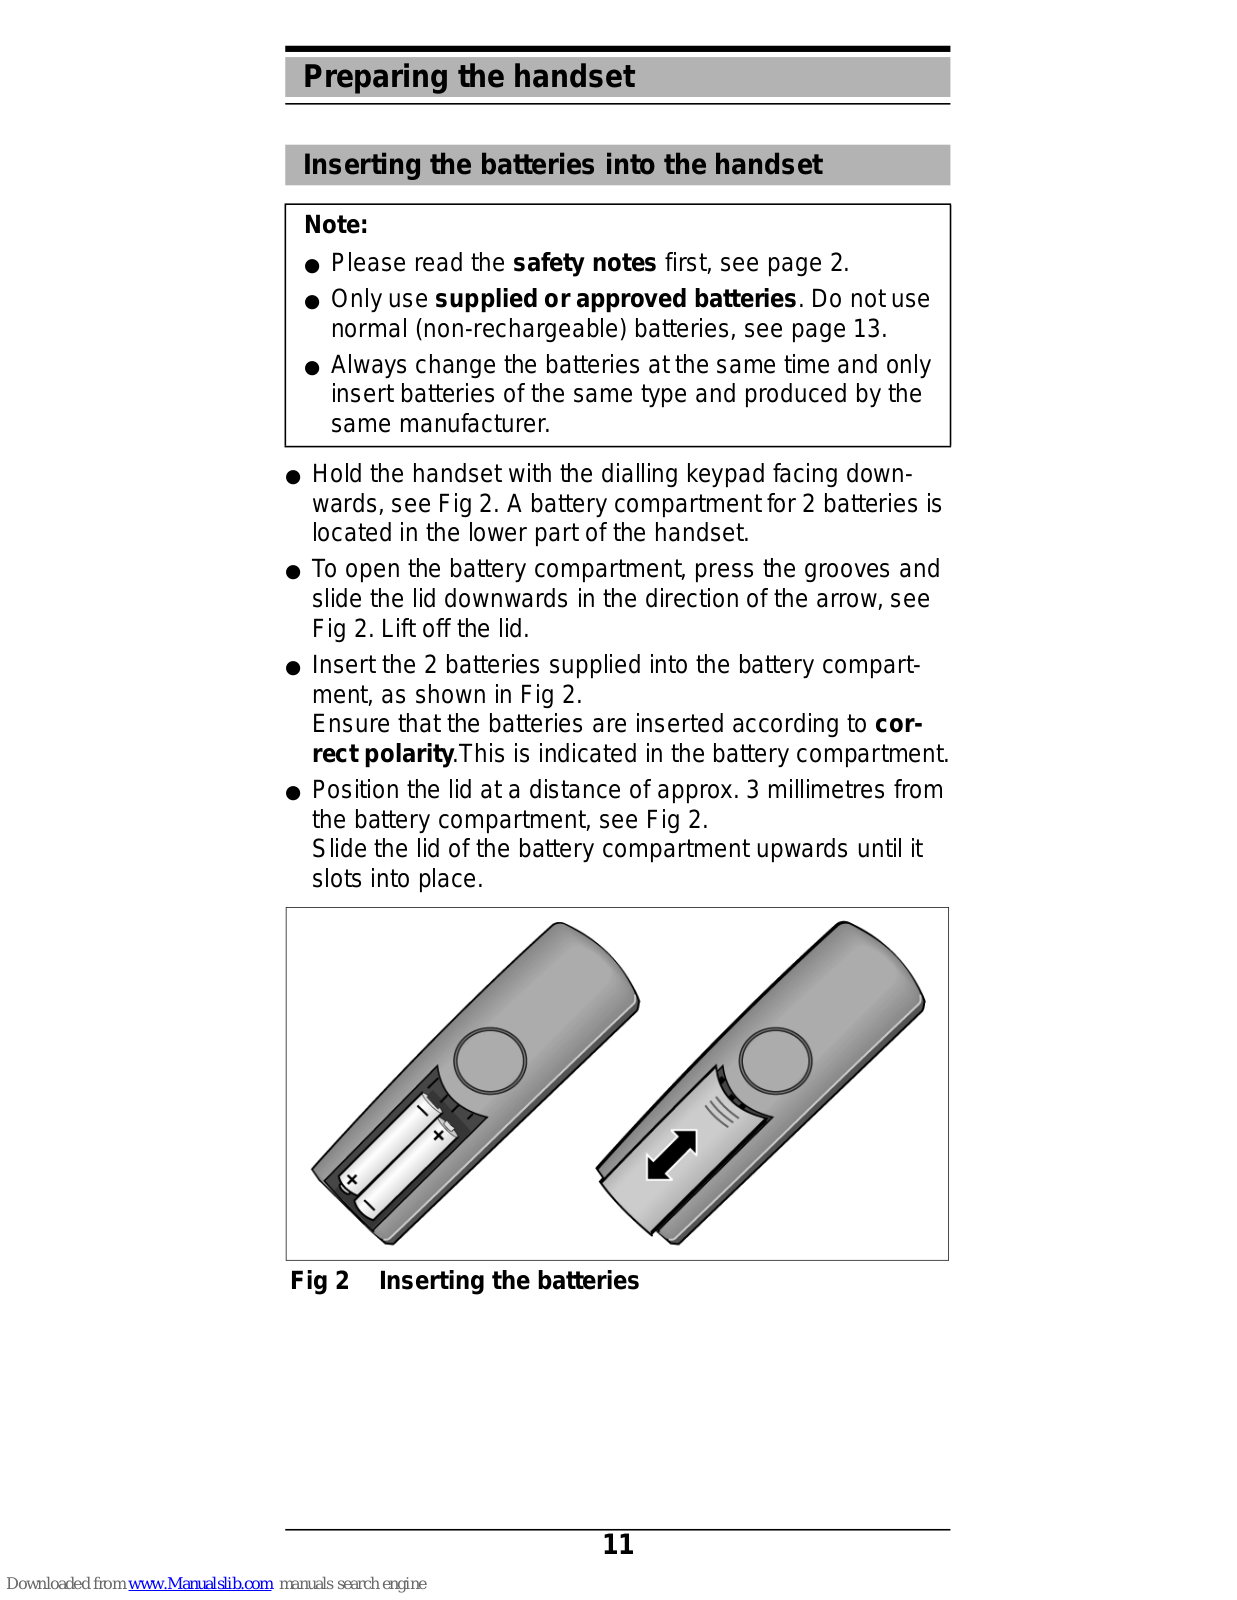
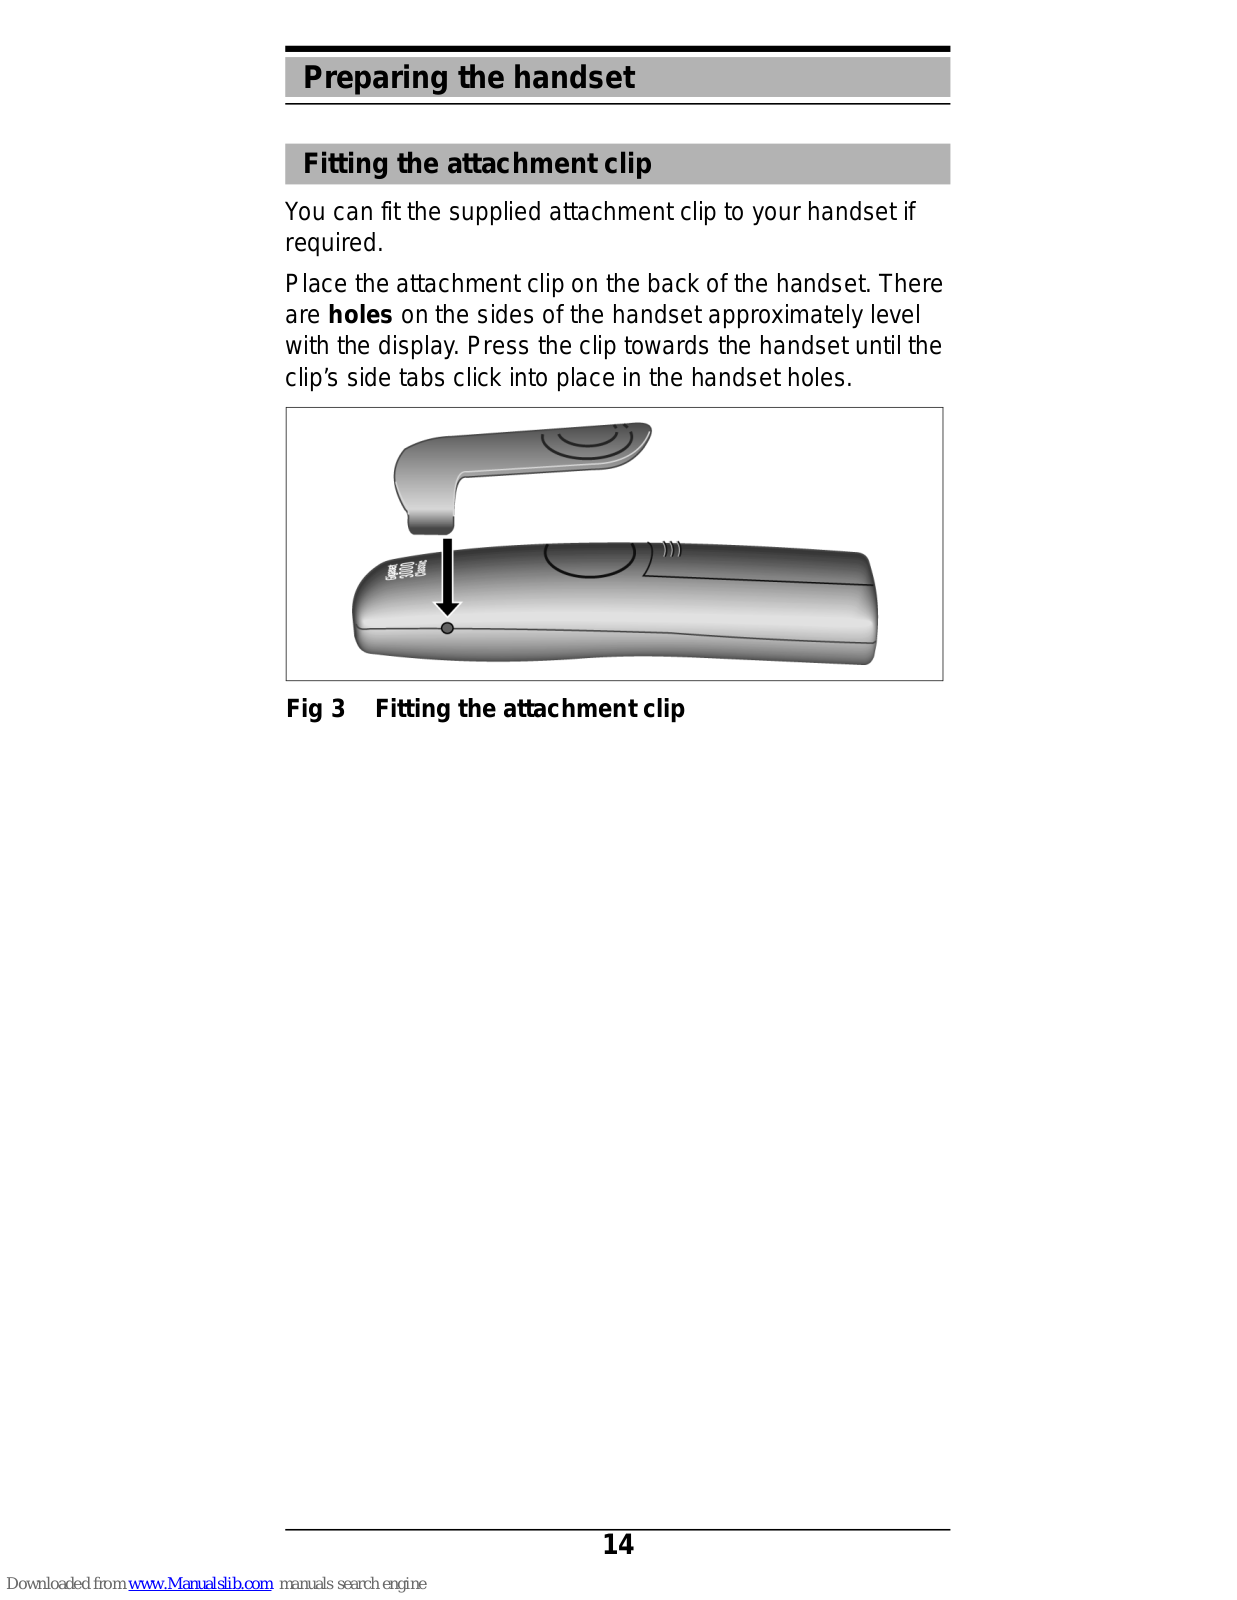
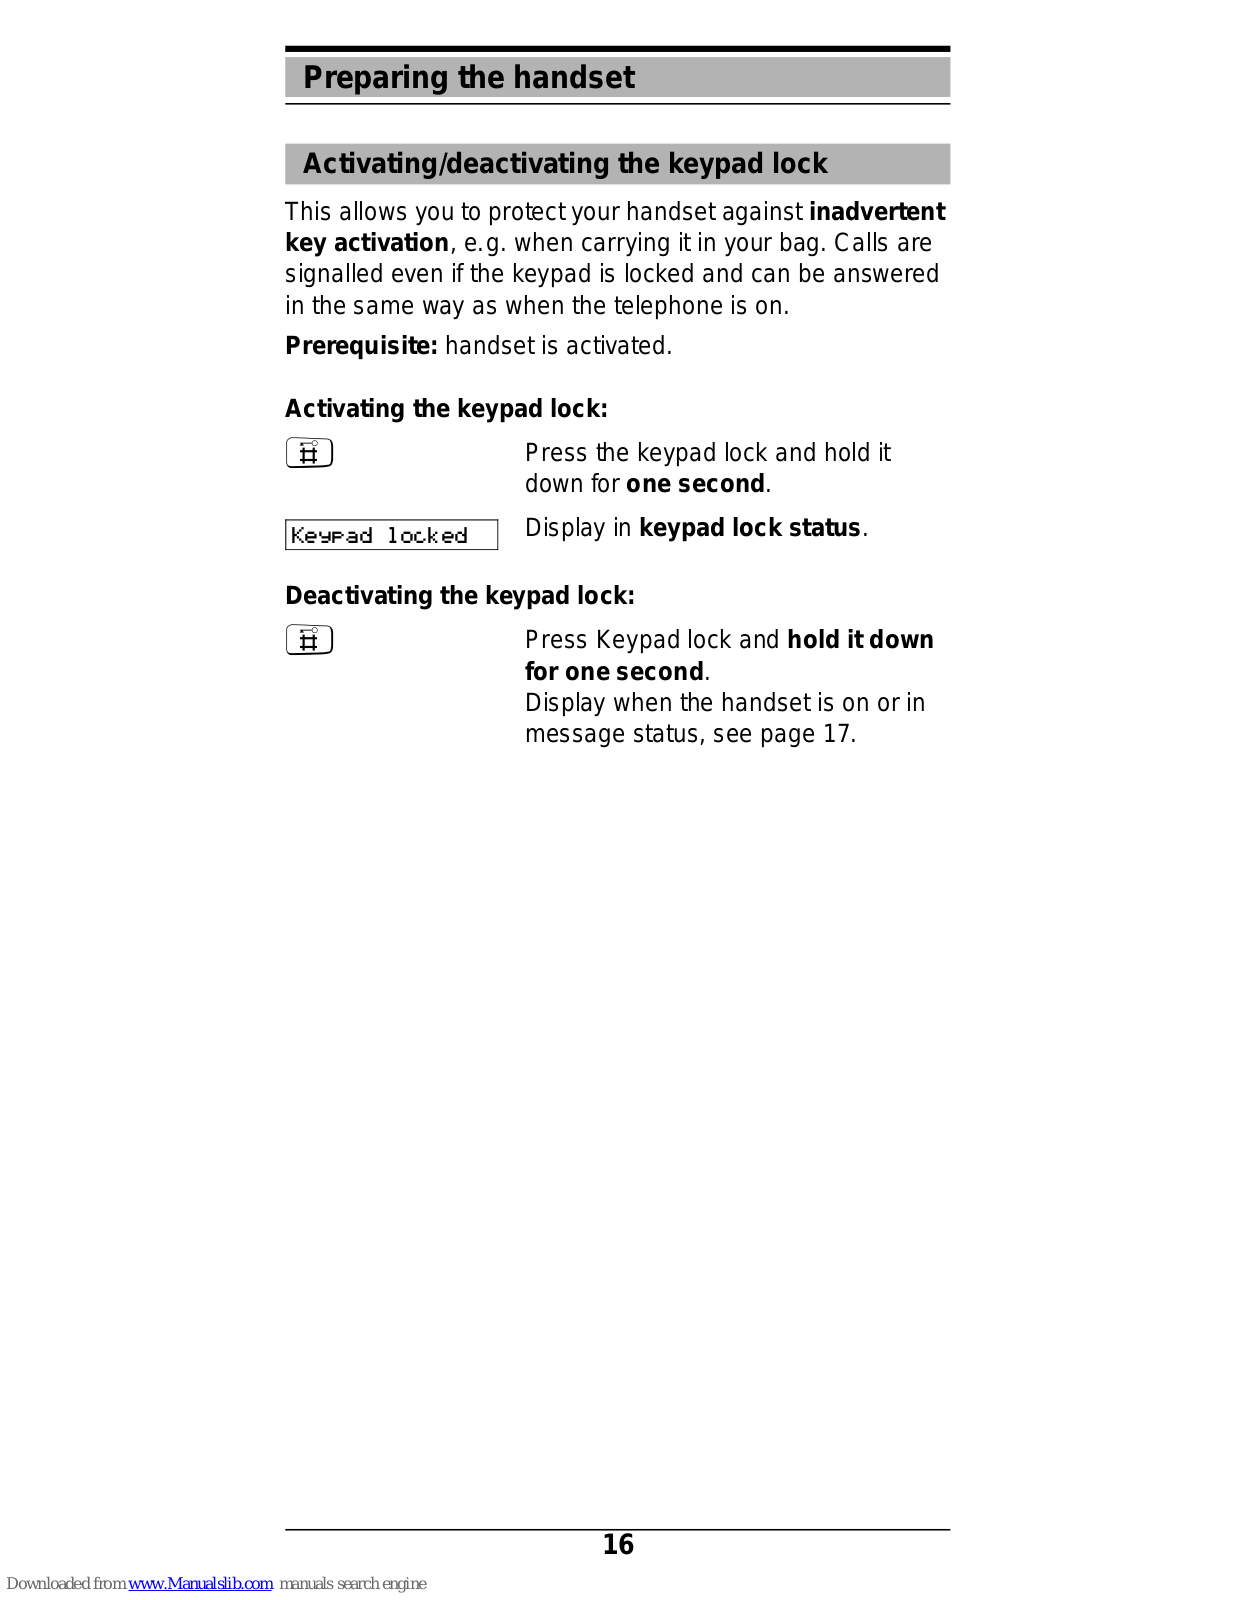
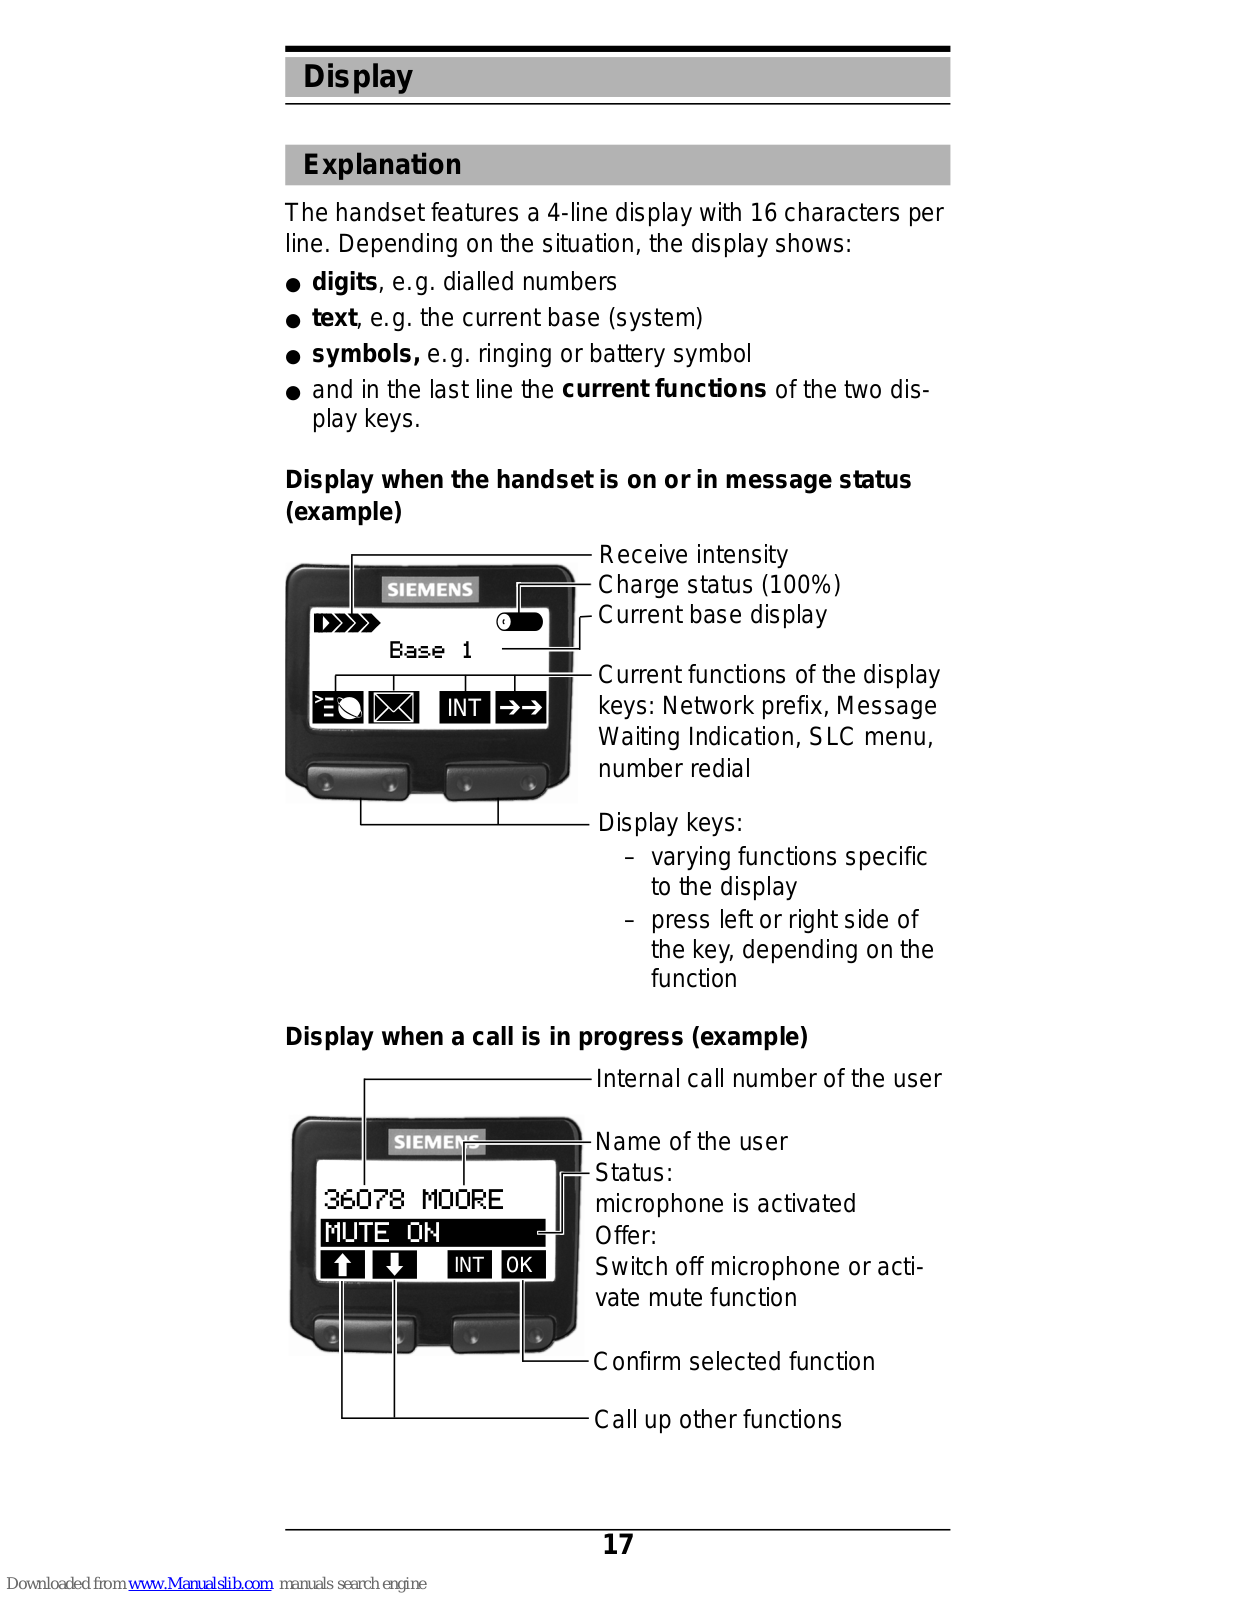

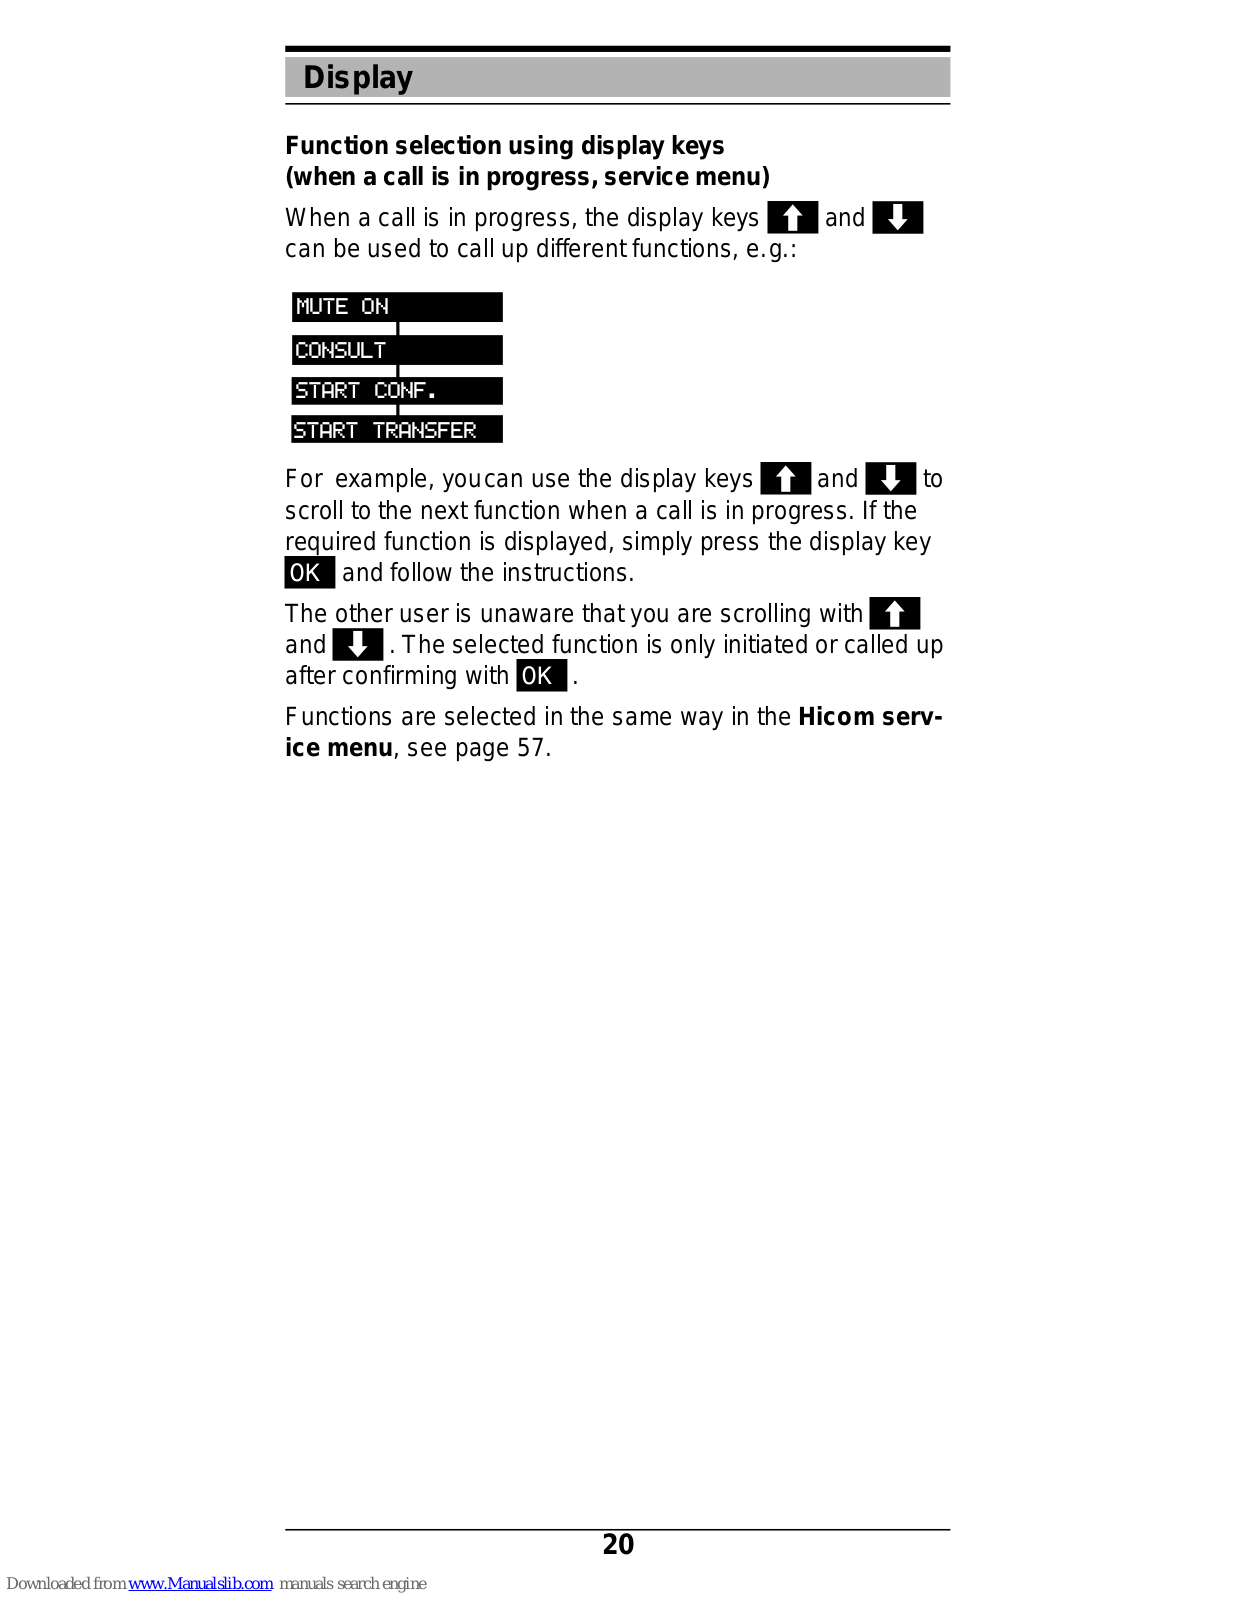

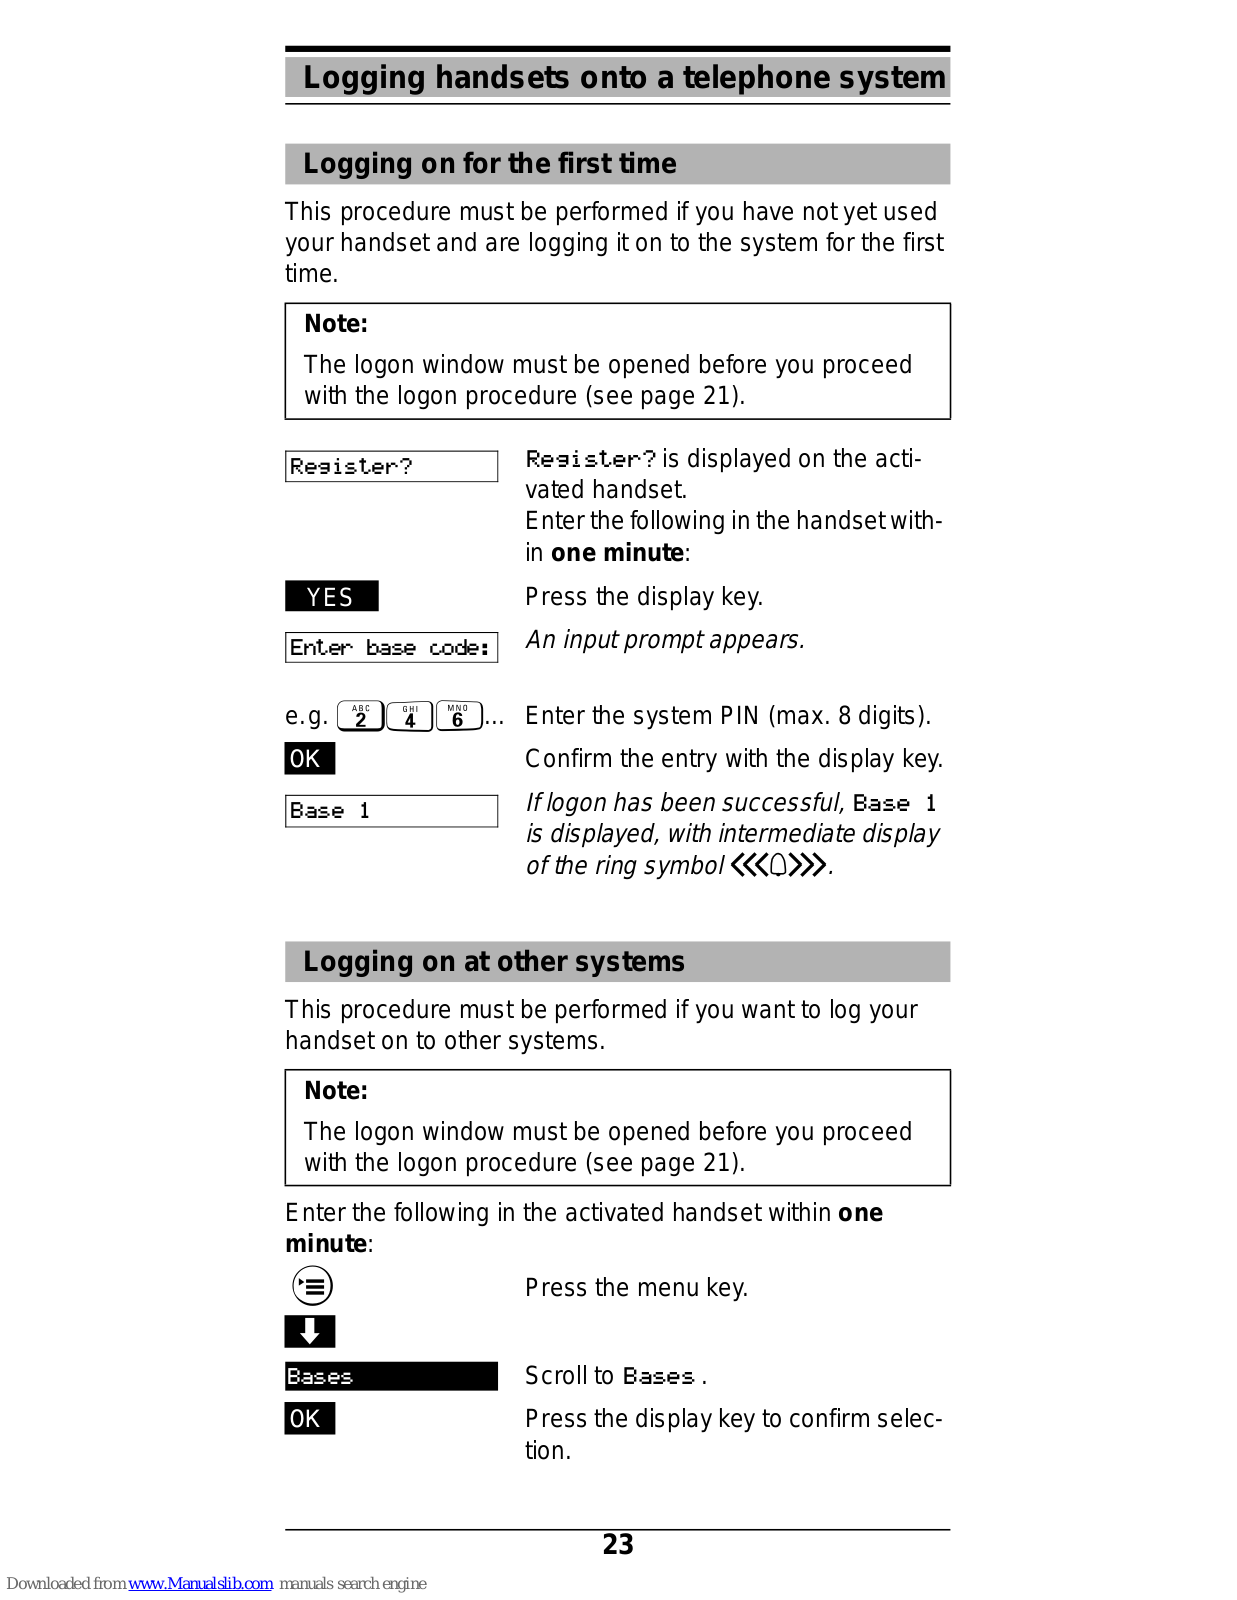
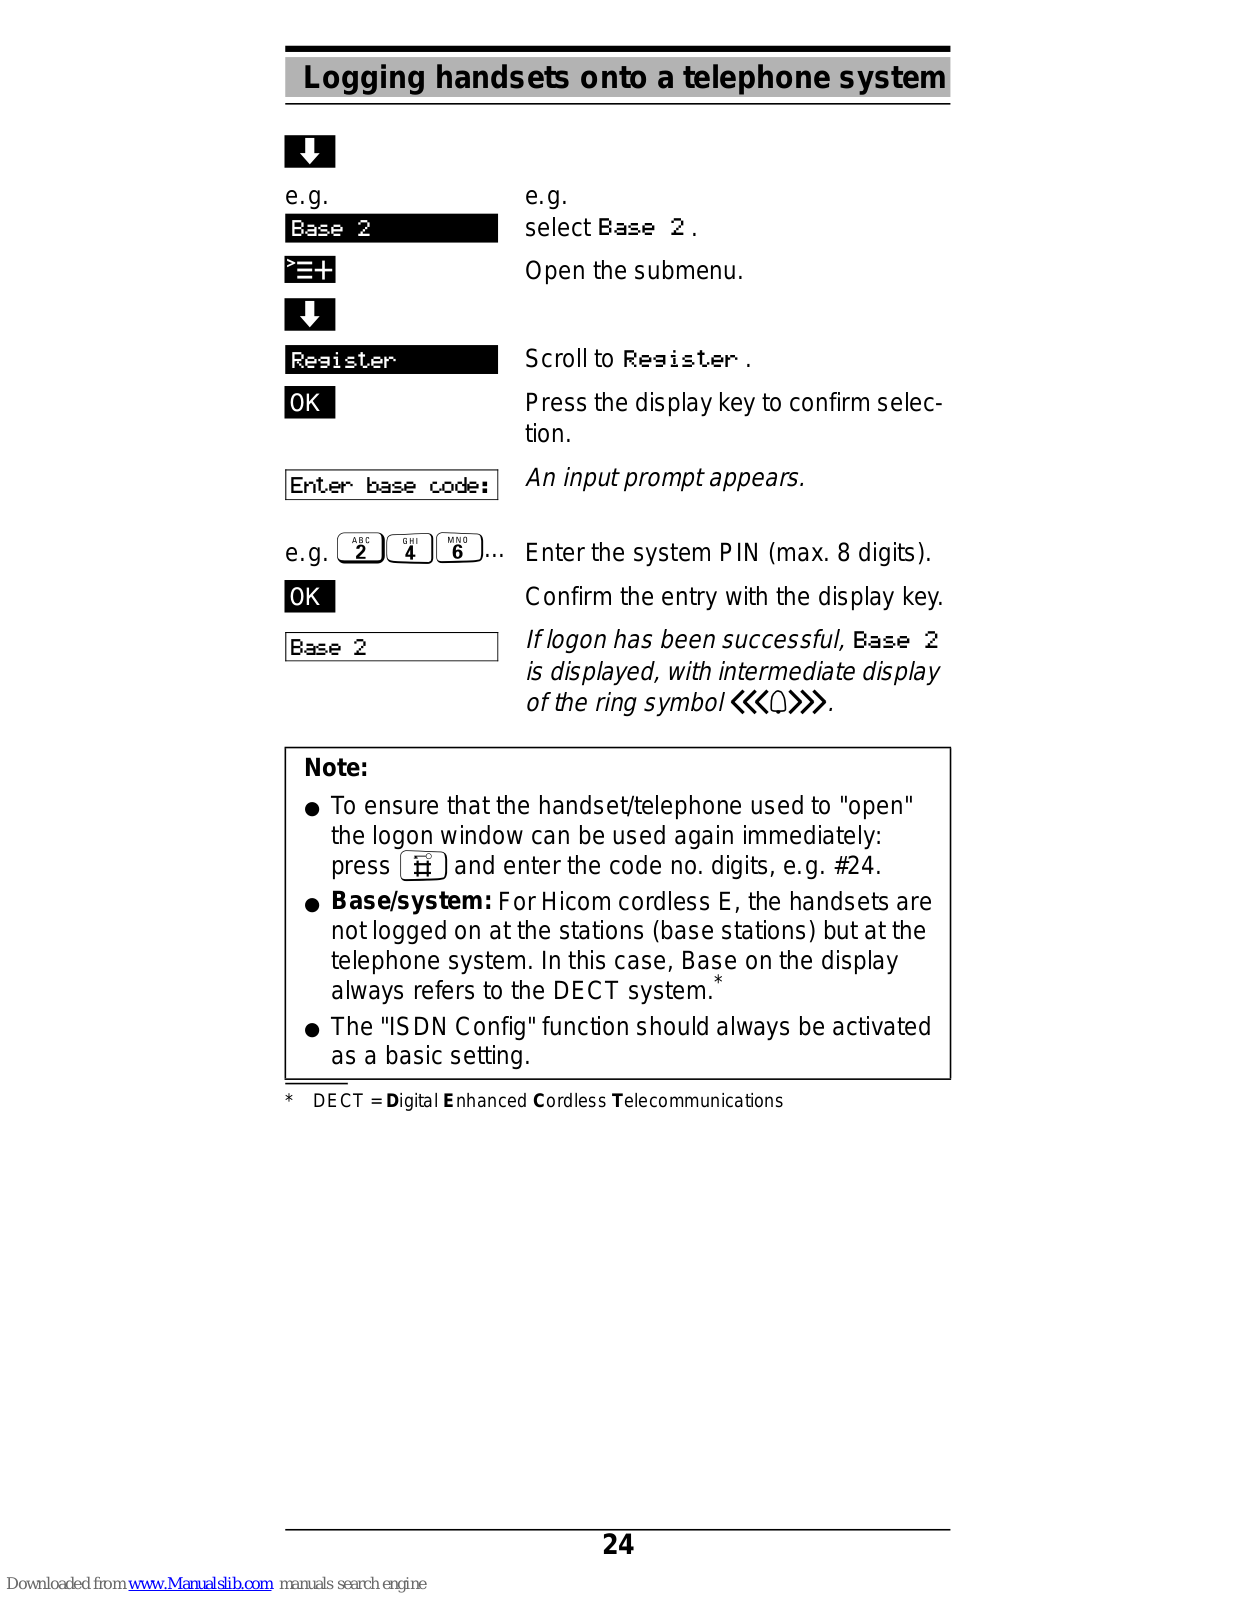
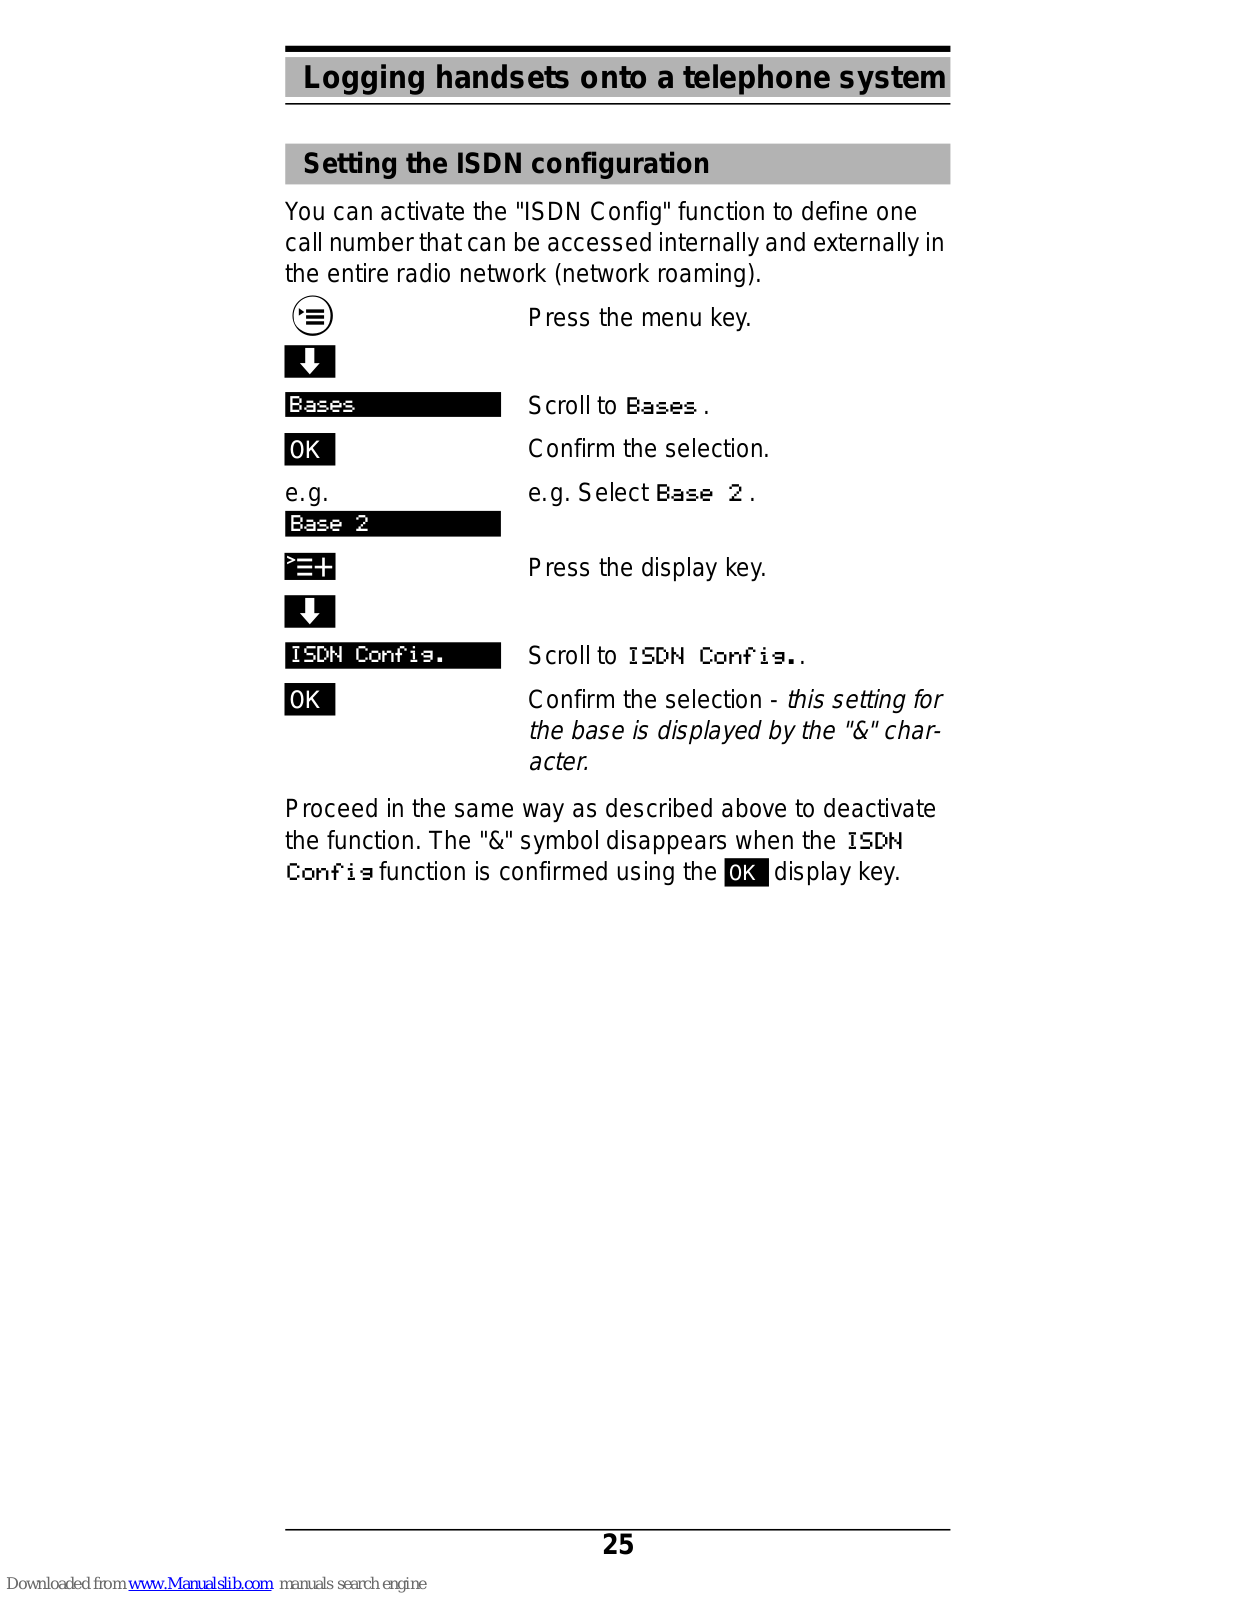


 Loading...