

Page 1

EN Dear Customer,
Gigaset Communications GmbH is the legal successor to
Siemens Home and Office Communication Devices GmbH &
Co. KG (SHC), which in turn continued the Gigaset business
of Siemens AG. Any statements made by Siemens AG or
SHC that are found in the user guides should therefore be
understood as statements of Gigaset Communications
.
GmbH
We hope you enjoy your Gigaset.
DE Sehr geehrte Kundin, sehr geehrter Kunde,
FR Chère Cliente, Cher Client,
IT Gentile cliente,
NL Geachte klant,
ES Estimado cliente,
PT SCaros clientes,
die Gigaset Communications GmbH ist Rechtsnachfolgerin
der Siemens Home and Office Communication Devices
GmbH & Co. KG (SHC), die ihrerseits das Gigaset-Geschäft
der Siemens AG fortführte. Etwaige Erklärungen der
Siemens AG oder der SHC in den Bedienungsanleitungen
sind daher als Erklärungen der Gigaset Communications
GmbH zu verstehen.
Wir wünschen Ihnen viel Freude mit Ihrem Gigaset.
la société Gigaset Communications GmbH succède en droit
à Siemens Home and Office Communication Devices GmbH
& Co. KG (SHC) qui poursuivait elle-même les activités Gigaset de Siemens AG. Donc les éventuelles explications de Siemens AG ou de SHC figurant dans les modes d’emploi
doivent être comprises comme des explications de Gigaset
Communications GmbH.
Nous vous souhaitons beaucoup d’agrément avec votre
Gigaset.
la Gigaset Communications GmbH è successore della Siemens Home and Office Communication Devices GmbH &
Co. KG (SHC) che a sua volta ha proseguito l’attività della
Siemens AG. Eventuali dichiarazioni della Siemens AG o
della SHC nei manuali d’istruzione, vanno pertanto intese
come dichiarazioni della Gigaset Communications GmbH.
Le auguriamo tanta soddisfazione con il vostro Gigaset.
Gigaset Communications GmbH is de rechtsopvolger van
Siemens Home and Office Communication Devices GmbH &
Co. KG (SHC), de onderneming die de Gigaset-activiteiten
van Siemens AG heeft overgenomen. Eventuele uitspraken
of mededelingen van Siemens AG of SHC in de gebruiksaanwijzingen dienen daarom als mededelingen van Gigaset
Communications GmbH te worden gezien.
Wij wensen u veel plezier met uw Gigaset
la Gigaset Communications GmbH es derechohabiente de la
Siemens Home and Office Communication Devices GmbH &
Co. KG (SHC) que por su parte continuó el negocio Gigaset
de la Siemens AG. Las posibles declaraciones de la
Siemens AG o de la SHC en las instrucciones de uso se
deben entender por lo tanto como declaraciones de la Gigaset Communications GmbH.
Le deseamos que disfrute con su Gigaset.
Gigaset Communications GmbH é a sucessora legal da Siemens Home and Office Communication Devices GmbH &
Co. KG (SHC), que, por sua vez, deu continuidade ao sector
de negócios Gigaset, da Siemens AG. Quaisquer declarações por parte da Siemens AG ou da SHC encontradas nos
manuais de utilização deverão, portanto, ser consideradas
como declarações da Gigaset Communications GmbH.
Desejamos que tenham bons momentos com o seu Gigaset.
DA Kære Kunde,
FI Arvoisa asiakkaamme,
SV Kära kund,
NO Kjære kunde,
EL Αγ α πητή πελάτισσα, αγαπητέ πελάτη,
HR Poštovani korisnici,
.
SL Spoštovani kupec!
Gigaset Communications GmbH er retlig efterfølger til Siemens Home and Office Communication Devices GmbH &
Co. KG (SHC), som fra deres side videreførte Siemens AGs
Gigaset-forretninger. Siemens AGs eller SHCs eventuelle
forklaringer i betjeningsvejledningerne skal derfor forstås
som Gigaset Communications GmbHs forklaringer.
Vi håber, du får meget glæde af din Gigaset.
Gigaset Communications GmbH on Siemens Home and
Office Communication Devices GmbH & Co. KG (SHC)-yri-
tyksen oikeudenomistaja, joka jatkoi puolestaan Siemens
AG:n Gigaset-liiketoimintaa. Käyttöoppaissa mahdollisesti
esiintyvät Siemens AG:n tai SHC:n selosteet on tämän
vuoksi ymmärrettävä Gigaset Communications GmbH:n
selosteina.
Toivotamme Teille paljon iloa Gigaset-laitteestanne.
Gigaset Communications GmbH övertar rättigheterna från
Siemens Home and Office Communication Devices GmbH &
Co. KG (SHC), som bedrev Gigaset-verksamheten efter Siemens AG. Alla förklaringar från Siemens AG eller SHC i
användarhandboken gäller därför som förklaringar från
Gigaset Communications GmbH.
Vi önskar dig mycket nöje med din Gigaset.
Gigaset Communications GmbH er rettslig etterfølger etter
Siemens Home and Office Communication Devices GmbH &
Co. KG (SHC), som i sin tur videreførte Gigaset-geskjeften i
Siemens AG. Eventuelle meddelelser fra Siemens AG eller
SHC i bruksanvisningene er derfor å forstå som meddelelser
fra Gigaset Communications GmbH.
Vi håper du får stor glede av din Gigaset-enhet.
η Gigaset Communications GmbH είναι η νομική διάδοχος της
Siemens Home and Office Communication Devices GmbH &
Co. KG (SHC), η οποία έχει αναλάβει την εμπορική
δραστηριότητα Gigaset της Siemens AG. Οι δηλώσεις της
Siemens AG ή της SHC στις
επομένως δηλώσεις της Gigaset Communications GmbH.
Σας ευχόμαστε καλή διασκέδαση με τη συσκευή σας Gigaset.
Gigaset Communications GmbH pravni je sljednik tvrtke
Siemens Home and Office Communication Devices GmbH &
Co. KG (SHC), koji je nastavio Gigaset poslovanje tvrtke
Siemens AG. Zato sve izjave tvrtke Siemens AG ili SHC koje
se nalaze u uputama za upotrebu treba tumačiti kao izjave
tvrtke Gigaset Communications GmbH.
Nadamo se da sa zadovoljstvom koristite svoj Gigaset
uređaj.
Podjetje Gigaset Communications GmbH je pravni naslednik
podjetja Siemens Home and Office Communication Devices
GmbH & Co. KG (SHC), ki nadaljuje dejavnost znamke
Gigaset podjetja Siemens AG. Vse izjave podjetja Siemens
AG ali SHC v priročnikih za uporabnike torej veljajo kot izjave
podjetja Gigaset Communications GmbH.
Želimo vam veliko užitkov ob uporabi naprave Gigaset.
οδηγίες χρήσ
ης αποτ
ελούν
Issued by
Gigaset Communications GmbH
Schlavenhorst 66, D-46395 Bocholt
Gigaset Communications GmbH is a trademark
licensee of Siemens AG
© Gigaset Communications GmbH 2008
All rights reserved.
Subject to availability. Rights of modifications
reserved.
www.gigaset.com
Page 2

CS Vážení zákazníci,
společnost Gigaset Communications GmbH je právním
nástupcem společnosti Siemens Home and Office
Communication Devices GmbH & Co. KG (SHC), která dále
přejala segment produktů Gigaset společnosti Siemens AG.
Jakékoli prohlášení společnosti Siemens AG nebo SHC, které
naleznete v uživatelských příručkách, je třeba považovat za
prohlášení společnosti Gigaset Communications GmbH.
Doufáme, že jste s produkty Gigaset spokojeni.
SK Vážený zákazník,
Spoločnosť Gigaset Communications GmbH je právnym
nástupcom spoločnosti Siemens Home and Office
Communication Devices GmbH & Co. KG (SHC), ktorá zasa
pokračovala v činnosti divízie Gigaset spoločnosti Siemens
AG. Z tohto dôvodu je potrebné všetky vyhlásenia
spoločnosti Siemens AG alebo SHC, ktoré sa nachádzajú v
používateľských príručkách, chápať ako vyhlásenia
spoločnosti Gigaset Communications GmbH.
Veríme, že budete so zariadením Gigaset spokojní.
PL Szanowny Kliencie,
Firma Gigaset Communications GmbH jest spadkobiercą
prawnym firmy Siemens Home and Office Communication
Devices GmbH & Co. KG (SHC), która z kolei przejęła
segment produktów Gigaset od firmy Siemens AG. Wszelkie
oświadczenia firm Siemens AG i SHC, które można znaleźć
w instrukcjach obsługi, należy traktować jako oświadczenia
firmy Gigaset Communications GmbH.
Życzymy wiele przyjemności z korzystania z produktów
Gigaset.
TR Sayın Müşterimiz,
Gigaset Communications GmbH, Siemens AG'nin Gigaset
işletmesini yürüten Siemens Home and Office
Communication Devices GmbH & Co. KG (SHC)'nin yasal
halefidir. Kullanma kılavuzlarında bulunan ve Siemens AG
veya SHC tarafından yapılan bildiriler Gigaset
Communications GmbH tarafından yapılmış bildiriler olarak
algılanmalıdır.
Gigaset'ten memnun kalmanızı ümit ediyoruz.
RO Stimate client,
Gigaset Communications GmbH este succesorul legal al
companiei Siemens Home and Office Communication
Devices GmbH & Co. KG (SHC), care, la rândul său, a
continuat activitatea companiei Gigaset a Siemens AG.
Orice afirmaţii efectuate de Siemens AG sau SHC şi incluse
în ghidurile de utilizare vor fi, prin urmare, considerate a
aparţine Gigaset Communications GmbH.
Sperăm ca produsele Gigaset să fie la înălţimea dorinţelor
dvs.
SR Poštovani potrošaču,
Gigaset Communications GmbH je pravni naslednik
kompanije Siemens Home and Office Communication
Devices GmbH & Co. KG (SHC), kroz koju je nastavljeno
poslovanje kompanije Gigaset kao dela Siemens AG. Stoga
sve izjave od strane Siemens AG ili SHC koje se mogu naći u
korisničkim uputstvima treba tuma
Gigaset Communications GmbH.
Nadamo se da ćete uživati u korišćenju svog Gigaset
uređaja.
BG Уважаеми потребители,
Gigaset Communications GmbH е правоприемникът на
Siemens Home and Office Communication Devices GmbH
& Co. KG (SHC), която на свой ред продължи бизнеса на
подразделението Siemens AG. По тази причина
всякакви изложения, направени от Siemens AG или
SHC, които се намират в ръководствата за
потребителя, следва да се разбират като изложения на
Gigaset Communications GmbH.
Надяваме се да ползвате с удоволствие вашия Gigaset.
izjave kompanije
čiti kao
RU Уважаемыи покупатель!
Компания Gigaset Communications GmbH является
правопреемником компании Siemens Home and Office
Communication Devices GmbH & Co. KG (SHC), которая,
ою очередь, приняла подразделение Gigaset в свое
в св
управление от компании Siemens AG. Поэтому любые
заявления, сделанные от имени компании Siemens AG
или SHC и встречающиеся в руководствах
пользователя, должны восприниматься как заявления
компании Gigaset Communications GmbH.
Мы надеемся, что продукты Gigaset удовлетворяют
вашим требованиям.
HU T
isztelt Vásárló!
A Siemens Home and Communication Devices GmbH & Co.
KG (SHC) törvényes jogutódja a Gigaset Communications
GmbH, amely a Siemens AG Gigaset üzletágának utódja.
Ebből következően a Siemens AG vagy az SHC felhasználói
kézikönyveiben található bármely kijelentést a Gigaset
Communications GmbH kijelentésének kell tekinteni.
Reméljük, megelégedéssel használja Gigaset készülékét.
Issued by
Gigaset Communications GmbH
Schlavenhorst 66, D-46395 Bocholt
Gigaset Communications GmbH is a trademark
licensee of Siemens AG
© Gigaset Communications GmbH 2008
All rights reserved.
Subject to availability. Rights of modifications
reserved.
www.gigaset.com
Page 3
Putting the phone into operation
s
1
–
+
–
+
–
+
–
+
–
+
–
+
2
Be inspired
3
5 h
User guide
and safety information
!
Issued by
Information and Communication mobile
Haidenauplatz 1
D-81667 Munich
© Siemens AG 2002
All rights reserved. Subject to availability.
Right of modification reserved.
Printed in Germany. (09/2002)
Siemens Aktiengesellschaft
http://www.my-siemens.com
Order no.A31008-G200-B101-4-7619
A31008- G200-B101- 4- 7619
Page 4
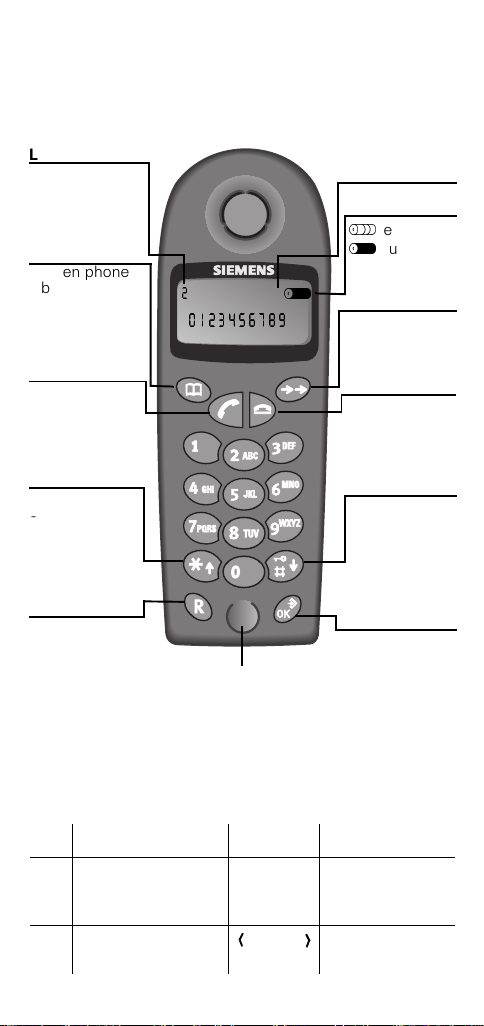
Brief overview of the handset
-
-
List item
Indicates the list
item for an entry
Phone book
key
- Open phone
book
- Call list item "0"
(hold down)
Off-hook key
- Answer call
- Dial call
number
Star key
- Page up
- Call multifrequency
signaling
method
(hold down)
R key
R key function
(flash)
Dialing pause
(hold down)
Microphone
E
Display
Battery status
empty
H
full
E
Redial key
Open redial list
On-hook key
- Terminate
call
- Cancel
function
Hash key
- Page down
-Activate/
deactivate
key lock
(hold down)
Set/OK key
- Open menu
- Confirm
(store) entry
Display symbols and special characters
Star (*)
Hash (#)
Key lock Phone list
2
R
P
NUMBER
R key
Pause
Hold down
R key
empty
Page 5

Congratulations
on purchasing your Siemens Gigaset!
In order to be able to use your phone with ease, read
the following pages to find out how it works.
3
Page 6
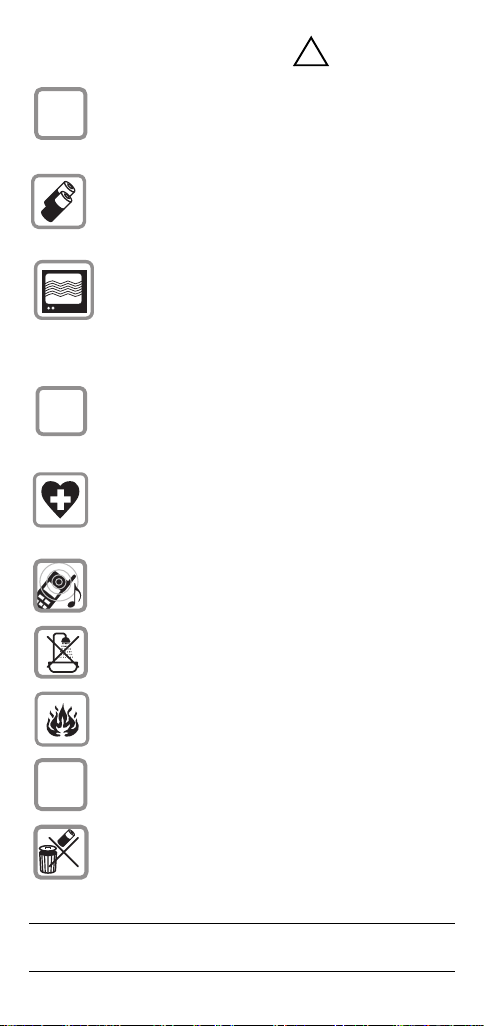
Safety information
!
only the plug-in power supply unit
Use
+
,
provided
device.
Use only
ies of the same type
use conventional (non-rechargeable) batteries, since these can injure you and damage
your health.
Do not position the device
ate vicinity of other devices
hi-fi systems, televisions, microwave ovens
or office equipment. This could cause mutual interference.
Ensure that you insert the rechargeable
batteries with the correct polarity and that
you use the type of battery specified in this
user guide (note the sign in the battery
compartments of the handset).
The operation of medical equipment may be
affected. Bear in mind the technical requirements of the environment (e.g. doctor's
office).
The handset can cause an unpleasant
buzzing sound in hearing aids. Do not hold
the handset too close to your ear.
Do not set up the base unit in bathrooms or
shower rooms. The handset is not splashproof (see also page 21).
, as indicated on the bottom of the
approved, rechargeable batter-
. In other words, never
in the immedi-
such as
)
8
4
Do not use the phone in potentially explosive environments (e.g. paint shops).
Do not pass your Gigaset on to a third party
without the user guide.
Dispose of batteries and your phone in an
environment-friendly manner.
Not all the functions described in this user
guide are available in all countries.
Page 7

Contents
Brief overview of the handset . . . . . . . 2
Safety information . . . . . . . . . . . . . . . . . 4
Putting your phone into operation . . . . 6
Making a phone call. . . . . . . . . . . . . . . 10
Calling . . . . . . . . . . . . . . . . . . . . . . . . . . . . . . . . . 10
Accepting a call. . . . . . . . . . . . . . . . . . . . . . . . . . 10
Redialing . . . . . . . . . . . . . . . . . . . . . . . . . . . . . . . 10
Displaying the caller's number (CLIP) . . . . . . . . . 11
Activating/deactivating the key lock . . . . . . . . . . 11
Phone book. . . . . . . . . . . . . . . . . . . . . . . . . . . . . 12
Registering the handset with the base
unit. . . . . . . . . . . . . . . . . . . . . . . . . . . . . . 13
Settings of the handset . . . . . . . . . . . . 15
Volumes and tunes. . . . . . . . . . . . . . . . . . . . . . . 15
Changing the display language . . . . . . . . . . . . . . 16
Resetting the handset to the factory defaults . . 16
Settings of the base unit . . . . . . . . . . . 18
Signaling method . . . . . . . . . . . . . . . . . . . . . . . . 18
Flash times („R key“) . . . . . . . . . . . . . . . . . . . . . 19
Resetting the base unit to the factory defaults. . 19
Pulse/no-pulse ratio. . . . . . . . . . . . . . . . . . . . . . . 20
Deactivating and reactivating automatic
attenuation equalization . . . . . . . . . . . . . . . . . . . 20
Appendix . . . . . . . . . . . . . . . . . . . . . . . . 21
Caring for your phone . . . . . . . . . . . . . . . . . . . . . 21
Contact with liquid . . . . . . . . . . . . . . . . . . . . . . . 21
Range . . . . . . . . . . . . . . . . . . . . . . . . . . . . . . . . . 21
Questions and answers . . . . . . . . . . . . . . . . . . . 22
Guarantee . . . . . . . . . . . . . . . . . . . . . . . . . . . . . . 23
Customer Care . . . . . . . . . . . . . . . . . . . . . . . . . . 26
Menu overview . . . . . . . . . . . . . . . . . . . 28
Index . . . . . . . . . . . . . . . . . . . . . . . . . . . . 30
Pl ease al s o note t he inde x– page 30!
5
Page 8
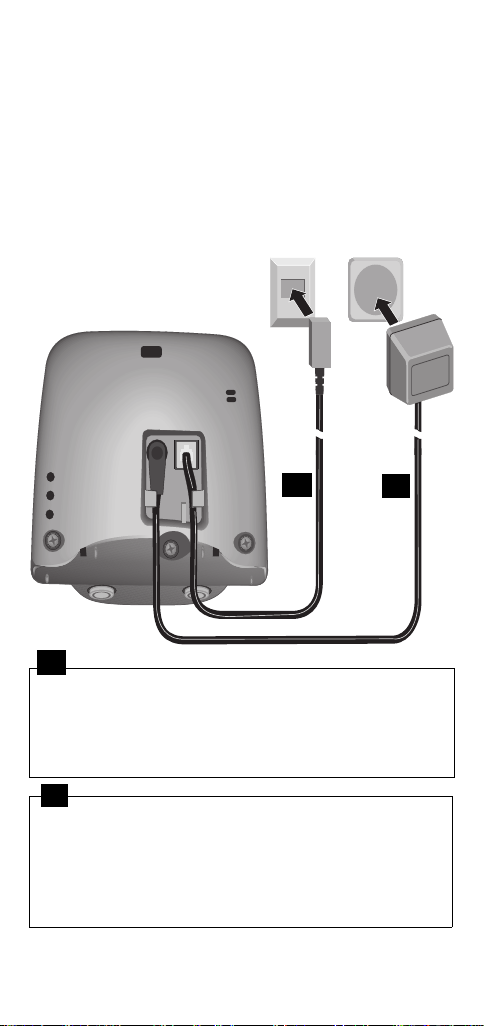
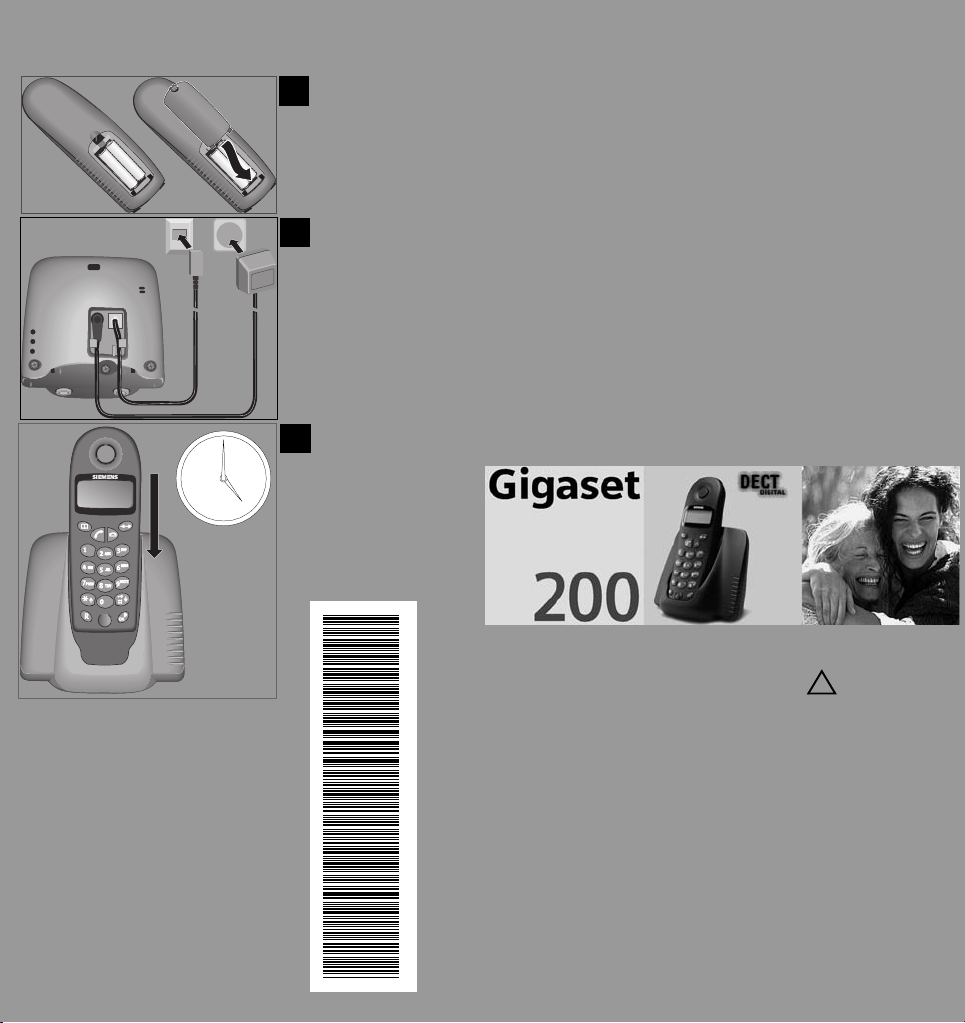
Putting your phone into operation
Step 1: Connect up the base unit
For the analog landline network
Plug-in power supply unit with
power cable (220/230 V)*
Phone connector
with phone cable
1
1
●
Insert the small connector of the
line cord
the socket (engages).
●
Insert the cable in the cable duct.
●
Insert the phone connector in the phone socket.
2
●
Insert the small connector of the
power cable
into the socket.
●
Insert the cable in the cable duct.
●
Plug the 3-pin adaptor into a mains power socket
and switch on.
*Country-specific
6
2
into
Page 9
●
only the plug-in power supply unit
!
Use
provided
, as indicated on the bottom of
the base unit.
●
Important: new phone cable. Use only the
enclosed cable type.
●
If you purchase another cable, ensure that it
has the correct connector pin assignment.
Step 2: Put the handset into operation
The display is protected by a plastic foil.
Please remove the protective foil.
Inserting the batteries
–
+
–
+
–
+
●
Insert the batteries with the
–
+
–
+
–
+
correct polarity
figure.
●
Put the lower end of the battery compartment cover
in position (see arrow), and press against the
_ribbing at the top until it engages.
●
To op e n i t ,
!
lift the cover by the ribbing.
●
Use only
approved, rechargeable batter-
ies of the same type
. Otherwise you risk
damaging your health and the product.
●
Do not use charging units belonging to
other devices because they could damage
the batteries.
– see
7
Page 10
Step 3: Place the handset on
the base unit
In order to make calls, you need to register your handset with the base unit (to make it known to it). The following text appears on the display: "*--*--*". Put the
handset on the base unit with the
following text appears on the display: "REGISTER HS".
It takes around
registered with the base unit. The idle display (battery
symbol) appears instead of the display "REGISTER
HS".
a minute
for the handset to be
display visible
C
. The
Step 4: Charge the batteries
Leave the handset on the base unit for around five
hours in order to charge the batteries. A charging
indicator on the handset shows that the batteries are
being charged:
Batteries empty
H
(symbol flashes)
Batteries
F
Your phone is now ready for operation; you can start
calling.
2
charged
/
3
Batteries
G
charged
Batteries full
E
5 h
1
/
3
Note on the battery
●
8
After the batteries are charged for the first
time, you can put the handset back on the
base unit again after each call. Charging is
controlled electronically. This ensures that
the batteries are charged optimally and
economically.
●
The batteries become warm during charging; this is normal and not dangerous.
●
The charging status of the batteries is only
displayed correctly after an uninterrupted
charging/discharging process. You should
therefore avoid opening the battery
compartment unnecessarily.
8
Page 11

Recommended batteries
Nickel cadmium
(NiCd)
Sanyo N-3U
(700 mAh)
Mobile Power 700
(700 mAh)
Panasonic 600 DT
(600 mAh)
Emmerich 700
(700 mAh)
Nickel-metal hybrid
(NiMH)
Saft RH 6 NiMH 1300
(1300 mAh)
Panasonic HHR-110 AA
(1100 mAh)
Panasonic Pro+ 1500
(1500 mAh)
Sanyo HR-3U
(1600 mAh)
GP GP130 AAHC
(1300 mAh)
Varta Phone Power
(1300 mAh)
Emmerich 1300
(1300 mAh)
Operating times/charging times
Capa-
city
(mAh)
700 Up to 200 (8 days) Over 10 Approx. 5
1200 Up to 320 (13 days) Over 17 Approx. 9
1600 Up to 400 (16 days) Over 23 Approx. 12
Standby time
(hours)
Ta l k t im e
(hours)
Charging
(hours)
time
The first time you charge the batteries, we
8
recommend an uninterrupted charging time as
specified in the table, regardless of the charging
status displayed.
The charging capacity of the batteries decreases as the years go by due to technical reasons.
9
Page 12

Making a phone call
#
Calling
Enter the call number.
or
8
!
C
●
You can also press the off-hook key
first
digit is selected immediately.
●
You can press the on-hook key to cancel
dialing.
●
You can use the key to enter a dialing
pause (hold it down). This is important for
foreign connections, for example.
Press the off-hook key.
Press the on-hook key to terminate the call.
Place the handset on the base
unit.
then
and
enter the call number – each
Accepting a call
Your phone rings (ringing tone).
Press the off-hook key to accept
the call.
Redialing
Your handset automatically saves the last five call
numbers selected.
Press the redial key. The redial list
appears.
34
10
Select the desired call number.
Press the off-hook key – the call
number is dialed.
Page 13

Displaying the caller's number (CLIP)
The prerequisites for this function are as follows:
●
You must have applied for CLIP from your network
provider.
●
The network provider must support call number
display (CLIP).
●
The call number must be transmitted when the
caller calls.
When a call is made,
the call number
appears on the display
(example).
--
8
If the call number consists of more than
twelve digits, an omission mark appears at
the beginning of the line ( ).
If the call number is not displayed, the following
appear:
If you have not applied for CLIP.
If the display of the number is "suppressed" by the caller or if the caller has
not applied for call number transmission.
--
Activating/deactivating the key lock
If you "lock" the keys, any inadvertent touching of the
keys remains without effect. In order to answer an
incoming call, press the off-hook key
3
* Acknowledgment tone = ascending sequence of
tones
Error tone = descending sequence of tones
To activate the lock, hold down
the key – you will here an
acknowledgment tone
symbol appears on the display.
To deactivate the lock, hold down
3
the
The symbol disappears.
key again.
.
*
. The
11
Page 14

Phone book
phone book
The
numbers. A maximum of 22 digits are possible for
each entry.
Storing a new entry
makes it easier to dial ten call
34
#
Open the phone book.
Select and confirm your desired
item from the list.
Enter the call number.
Confirm your entry.
Changing an entry
34
#
Open the phone book.
Select and confirm the desired
call number.
Change the call number.
Confirm your entry.
Using the phone book to dial
34
8
If no number is stored,
Open the phone book.
Page to the desired entry.
Press the off-hook key.
The call number is dialed.
NUMBER
.
Rapid dialing with the key
If you hold down the key, the number stored under
the list item "0"
hook key.
you dial frequently under "0" (e.g. the access number
of a network provider).
12
is selected. To dial it, press the off-
It is therefore advisable to store a number
Page 15

Registering the handset with the base unit
In order to make calls with your handset, you need to
register it with the base unit. This happens automatically the first time you use a handset.
8
Automatic registration:
Gigaset 200 handset to Gigaset 200
base unit
To find out how to register your handset with the base
unit (i.e. make it known to it), refer to
(see page 8).
Manual registration:
Gigaset 200 handset to Gigaset 200
base unit
Manual registration is necessary when:
●
●
Only one handset can be registered at any one
time.
"Step 3"
Automatic registration is not completed
successfully.
The handset provided is replaced.
after
Step 1:
REGISTER HS
3
BASE
Step 2:
Place the handset on the base unit.
After being successfully registered with the base unit,
the handset returns to the idle state.
Open the menu.
Select and confirm.
Confirm.
13
Page 16

Manual registration:
Gigaset 200 handset to other GAP base
units
Step 1:
Put the base unit on standby for registration (see the
user guide for the base unit).
Step 2:
REGISTER HS
3
GAP 1
3
#
After being successfully registered with the base unit,
the handset returns to the idle state.
Open the menu.
Select and confirm.
Select and confirm. "PIN" appears
on the display.
Enter the registration PIN (max. 8
digits) of the GAP base unit that
is on standby for registration
(e.g. "0000").
Confirm your entry.
14
Page 17

Settings of the handset
You can change the settings of your handset to suit
your requirements. The current setting always has a
check mark against it.
Volumes and tunes
Receiver volume
There are three settings for the receiver volume.
HANDSET VOL
SET LEVEL 2
3
Ringing tone volume
There are four settings for the ringing tone volume.
RINGER VOL
3
SET LEVEL 3
3
Open the menu.
Confirm.
The receiver volume and the
associated number are displayed.
Select and confirm the desired
setting (1–3).
Open the menu.
Select and confirm.
The respective volume is emitted, and the associated number
is displayed. Select and confirm
the desired setting (1–4).
Ringing tone tune
There are five different tunes to choose from.
3
3
MELODY
MELODY 4
Open the menu.
Select and confirm.
The respective tune is emitted,
and the associated number is
displayed. Select and confirm the
desired tune (1–5).
15
Page 18

Changing the display language
The menu overview provides orientation here (see
page 28).
LANGUAGE
3
ENGLISH
3
If you inadvertently set the wrong language
8
(i.e. one you don't understand), you can change
the setting by pressing
the handset. You can then select the correct
language by paging through the menu and
confirming it with the
You will find a list of the available languages in
the menu overview on page 28.
Open the menu.
Select and confirm.
Select and confirm the
desired language (e.g. English).
followed by .on
key.
Resetting the handset to the factory defaults
HS RESET
3
RESET YES?
3
or
RESET NO?
After the handset is reset, it must be replaced
8
on the base unit with the
front
, see "
16
Open the menu.
Select and confirm.
Select and confirm.
The handset has the factory
defaults again.
Select and confirm.
Step 3
display visible at the
" (page 8).
Page 19

Factory defaults of the handset:
Function Factory default
Receiver volume 1
Ringing tone volume IRL: 4
UK: 3
Ringing tone tune 1
Display language Country-specific
Redial list Deleted
Phone book Deleted
Key lock Off
Standby for registration On
17
Page 20

Settings of the base unit
8
Normally, no changes are necessary to settings in the base unit.
Settings in the base unit can be easily
changed by using the mobile part if necessary.
Prerequisite:
The handset must be registered with the base
unit.
Signaling method
You use this function to change to the pulse signaling
method.
Factory default: Multifrequency signaling method.
3
or
DIAL MODE
PULSE
TONE
Press the off-hook key.
The following appears on the
display
Open the menu.
Confirm.
Select and confirm your desired
signaling method.
Select and confirm.
Press the on-hook key
""
.
8
18
If you hold down the 4 key, you
cally
have multifrequency signaling for the
subsequent call.
automati-
Page 21

Flash times („R key“)
This function allows you to change the set flash time
(factory default see page 19).
Press the off-hook key.
3
3
TBR
180 MS
Open the menu.
Select and confirm.
Select and confirm the desired
flash time (80, 100, 120, 180,
250, 300 or 600 ms).
Press the on-hook key.
Resetting the base unit to the factory defaults
The handset remains registered when the base unit is
reset.
3
3
or
BASE RESET
RESET YES?
RESET NO?
Press the off-hook key.
Open the menu.
Select and confirm.
Select and confirm.
The base unit has the factory
defaults again.
Select and confirm.
Press the on-hook key.
19
Page 22

Pulse/no-pulse ratio
This function changes the pulse/no-pulse ratio (for
pulse signaling).
Press the off-hook key.
PULSE PAUSE
3
2 - 1
3
Open the menu.
Select and confirm.
Select and confirm the desired
pulse/no-pulse ratio.
Press the on-hook key.
Deactivating and reactivating automatic attenuation equalization
If a device is delivered with automatic attenuation
equalization, automatic attenuation equalization is
always activated on delivery and should (normally)
remain activated.
Automatic attenuation equalization can be deactivated
in the following
unit is connected to a telephone system.
AGC
3
AGC OFF
or
AGC ON
3
exceptional
Press the off-hook key.
Open the menu.
Select and confirm.
Select and confirm.
Select and confirm.
Press the on-hook key.
*
case: when your base
Factory defaults of the base unit:
Function Factory default
Signaling method Multifrequency signaling
Flash time IRL: 120 ms
* Not available in all countries
20
UK: 100 ms
Page 23

Appendix
Caring for your phone
Wipe the base unit and handset with a
antistatic cloth.
of static charge.
Never
use a dry cloth. There is a risk
damp cloth
or
Contact with liquid
If the handset should come into contact with liquid,
on no account switch the device on.
Remove all batteries immediately.
Allow the liquid to drip out of the device, and then dab
all parts of the device dry.
Keep the handset with the batteries removed in a
warm, dry place for at least 72 hours. In many cases,
you will then be able to use it again.
!
Range
The range outdoors when there are no obstructions is
up to 300 m. Indoors, ranges of up to 50 m are possible. If you exceed the range, the following message
appears on the display: "*--*--*".
21
Page 24

Questions and answers
If any questions occur to you while you are using your
device, we are available 24 hours a day at
www.my-siemens.com/customercare
You will find the most frequently asked questions and
answers below.
Question Possible
Nothing appears
on the display.
No response to
keystroke.
No radio link to
the base unit –
the following
message
appears on the
display:
"*--*--*".
The number of
the caller is not
displayed in spite
of CLIP
(see page 11).
cause
The batteries are
empty.
The key lock is
switched on.
The handset is
outside the
range of the
base unit.
The handset is
not registered
with the base
unit.
The base unit is
not switched on.
Number transmission is
disabled.
Possible
solution
Charge or
replace the
batteries.
(see page 8).
Hold down the
3
key.
Reduce the distance between
the handset and
the base unit.
Register the
handset with the
base unit
(see page 13).
Check the power
plug on the base
unit
(see page 6).
The caller must
apply to the
network provider
to have his or her
number transmitted.
22
Page 25

Guarantee
Scope
●
This equipment guarantee applies to end users
(“customers”). This guarantee does not in any way
affect the customer's statutory rights.
●
The guarantee applies to the supplied devices and
all their components but not to their installation or
configuration or to the services provided by the dealer. Manuals and any software supplied on a separate data medium are excluded from the guarantee.
This guarantee does not apply to decorative covers
or any other personalised parts or software not
included in the scope of supply. The guarantee also
does not apply to decorative top or bottom shells
for special editions.
●
The guarantee provides for devices or components
that, despite proper care and use, have demonstrably developed defects due to faulty workmanship and/or faulty materials to be replaced or
repaired at our discretion free of charge. The
guarantee does not cover normal wear and tear.
Alternatively, we reserve the right to replace the defective device with a successor model or reimburse
the original purchase price on return of the defective device. Our decision is final. Any legal claims are
excluded.
●
Claims under the guarantee cannot be made if
– the defect or damage was caused by improper
care or use.
Improper care or use includes the following:
– Opening the device (this is classed as third-party
intervention)
– Manipulating components on the printed circuit
board
– Manipulating the software
– Defects or damage caused by dropping, brea-
king, lightning or ingress of moisture. This also
applies if defects or damage was caused by
mechanical, chemical, radio interference or thermal factors (e.g. microwave, sauna, etc.).
– Repairs or other work done by persons not autho-
rised by us.
– Devices fitted with accessories not authorised by
Siemens.
23
Page 26

●
Any further claims due to damage are excluded,
such as damage arising outside the device, provided this was not due to gross negligence and/or
intent on our part.
●
Claims under the guarantee must be made as soon
as the defect is noticed.
●
A till receipt showing the date of purchase must be
presented as proof. Each claim under the guarantee
is accepted with the express reservation that
subsequent investigations confirm the validity of
the claim.
●
Any devices or components that are replaced
become our property.
●
The costs of materials and labour will be borne by
us, but not the costs of transport, postage or
freight.
●
We are entitled, at our discretion, to make technical
changes (such as firmware updates) beyond repair
or replacement in order to upgrade the device to the
latest state of the art. There is no additional charge
to the customer for this work. Our decision is final.
Any legal claims are excluded.
●
The guarantee is valid in the country of purchase. It
applies only if the device is operated in the relevant
geographical area in accordance with the information on the packaging and in the operating instructions.
●
Any further claims are excluded. Siemens is not
liable in any circumstances for downtime, loss of
profits, loss of data or loss of any other information.
The customer alone is responsible for safeguarding
such data and information.
●
Changes to this guarantee require prior approval by
Siemens in writing.
24
Page 27

Guarantee period
●
The guarantee applies in countries in the EU from 1
January 2002 for a period of 12 months.
●
In all other countries the guarantee period shall be
the relevant minimum statutory guarantee period,
but no longer than 12 months.
●
The guarantee period starts on the day of purchase
by the customer.
●
A successful claim under the guarantee does not
extend the guarantee period.
●
Work under the guarantee is handled by our Customer Care Centers.
The guarantor is Siemens Aktiengesellschaft Deutschland,
Schlavenhorst 88, D-46395 Bocholt.
To redeem the guarantee please contact your
local Customer Care Center (see page 26).
25
Page 28

Customer Care
You can get assistance easily when you have technical
questions or questions about how to use your device
by using our online support service on the Internet at:
www.my-siemens.com/customercare
or by referring to the section entitled
answers
in this manual (page 22).
If the device needs to be repaired, please contact one
of our Customer Care Centers:
Abu Dhabi.......... 0 26 42 38 00
Australia .......... 18 00 62 24 14
Argentina ...... 0 80 08 88 98 78
Austria ............. 05 17 07 50 04
Bahrain ...................... 40 42 34
Bangladesh........ 0 17 52 74 47
Belgium ............. 0 78 15 22 21
Brunei.................. 02 43 08 01
Bulgaria ................ 02 73 94 88
Cambodia ............. 12 80 05 00
Canada ......... 1 88 87 77 02 11
China ............ 0 21 50 31 81 49
Croatia ............... 0 16 10 53 81
Czech Republic 02 33 03 27 27
Denmark............... 35 25 86 00
Dubai ................. 0 43 55 99 88
Egypt ................. 0 13 31 31 44
Estonia ................... 6 30 47 35
Finland............. 09 22 94 37 00
France ............. 01 56 38 42 00
Germany....... 0 18 05 33 32 22
Greece............... 0 16 86 43 89
Hong Kong ........... 22 58 36 36
Hungary........... 06 14 71 24 44
Iceland.................... 5 11 30 00
India................. 01 16 92 39 88
Indonesia ......... 02 14 61 50 81
Ireland ............. 18 50 77 72 77
Italy.................. 02 66 76 44 00
Ivory Coast ........... 80 00 03 33
Jordan ............... 0 79 55 96 63
Kuwait .................... 4 81 87 49
Latvia...................... 7 50 11 14
Lebanon ............... 01 44 30 43
Libya ........... .......... 02 13 35 02 31
Lithuania ..... .................2 39 77 79
Luxembourg ............. 43 84 33 99
Malaysia ..... ..........03 79 52 51 84
Malta .......... 00 35 32 14 94 06 32
Mauritius .... ................. 2 11 62 13
Morocco ..... ............... 22 66 92 32
Netherlands ....... 0 90 03 33 31 02
Norway ....... ............... 22 70 84 00
Oman.......... .................... 79 10 12
Pakistan ...... .......... 02 15 67 35 65
Philippines .. ............... 28 14 98 88
Poland ........ .......... 08 00 22 09 90
Portugal ...... ............ 8 00 85 32 04
Qatar........... ..... 00 97 44 69 67 00
Russia......... .......... 09 57 37 29 51
Saudi Arabia ............ 0 26 51 50 94
Sharjah........ ............ 0 65 33 66 42
Singapore ... ................. 8 45 48 18
Slovak Republic 07 59 68 22 66
Slovenia ...... ............ 0 14 74 63 36
South Africa .......... 08 60 10 11 57
Spain ......... ............ 9 02 11 50 61
Sweden ...... ............ 0 87 50 99 11
Switzerland. ............ 0 12 12 00 90
Taiwan ........ .......... 02 25 18 65 04
Thailand ...... ............0 27 15 51 00
Tunisia ........ ............... 01 86 19 02
Turkey......... ...... (0 216) 579 89 89
United Kingdom . 0 87 05 33 44 11
USA ............ ......... 1 800 777 0211
Vietnam ...... ............... 45 63 22 44
Zimbabwe .. ............... 04 36 94 24
Questions and
26
Page 29

Your Gigaset is intended for operation in your country,
as depicted on the underside of the base unit.
Country-specific features have been taken into
account.
The conformity of the device with the essential
requirements of the R&TTE directive is confirmed by
the CE symbol.
Excerpt from the original declaration:
"We, Siemens AG, declare, that the above mentioned
product is manufactured according to our Full Quality
Assurance System certified by CETECOM ICT Services GmbH with the registration number
"Q810820M" in compliance with ANNEX V of the
R&TTE Directive 99/05/EC. The presumption of conformity with the essential requirements regarding
Council Directive 99/05/EC is ensured.“
Senior Approvals Manager
The Declaration of Conformity (DoC) has been signed. In
case of need, a copy of the original DoC can be made available via the company hotline.
27
Page 30

Menu overview
You can select a menu function more quickly if, rather
than paging through the menu, you simply press the
relevant keys when the device is in the idle state.
Examples:
To set the
display language.
You select the desired language by paging through the
menu and confirming it with the
To set the
signaling method.
You select the desired signaling method by paging
through the menu and confirming it with the
You then press the key.
8
handset
base unit
, press
, press
and then call .=
key.
and then call =
key.
If the language “4_15” is set, the numeric
values (“1_1”) contained in the menu over-
view appear on the display
Settings of the handset:
1 _ HANDSET VOL 1 _ 1 SET LEVEL 1
28
2 _ RINGER VOL 2 _ 1 SET LEVEL 1
-
-
3 _ MELODY 3 _ 1 MELODY 1
4 _ LANGUAGE 4 _ 1 GERMAN 4 _ 9 NORWEGIAN
.
.
1 _ 2 SET LEVEL 2
1 _ 3 SET LEVEL 3
2 _ 2 SET LEVEL 2
2 _ 3 SET LEVEL 3
2 _ 4 SET LEVEL 4
3 _ 2 MELODY 2
3 _ 3 MELODY 3
3 _ 4 MELODY 4
3 _ 5 MELODY 5
4 _ 2 ENGLISH 4 _ 10 SWEDISH
4 _ 3 FRENCH 4 _ 11 FINNISH
4 _ 4 ITALIAN 4 _ 1 2 CZECH
4 _ 5 SPANISH 4 _ 13 TURKISH
4 _ 6 PORTUGUESE 4 _ 14 POLISH
4 _ 7 DUTCH 4 _ 1 5 4 _ 15
4 _ 8 DANISH
Page 31

5 _ HS RESET 5 _ 0 RESET NO?
/
/
6 _ REGISTER HS 6 _ 1 BASE
0
0
5 _ 1 RESET YES?
6 _ 2 GAP 1
6 _ 3 GAP 2
Settings of the base unit:
2 _ TBR 2 _ 80 MS 8 0 MS
-
-
3 _ BASE RESET 3 _ 1 RESE T NO?
4 _ PULSE PAUSE 4 _ 1_5 - 2 1_5 - 1
.
.
5 _ AGC* 5 _ 0 AGC OFF
/
/
1 _ 2 PULSE
2 _ [..] MS [. .] ms
2 _ 600 MS 600 MS
3 _ 2 RESET YES?
4 _ 2 - 1 2 - 1
5 _ 1 AGC ON
1 _ DIAL MODE 1 _ 1 TONE
* Not available in all countries
29
Page 32

Index
A
Acknowledgment tone 11, 20
Activating
automatic attenuation
equalization 20
key lock 11
Answering a call 10
Automatic attenuation
equalization 20
Automatic registration 13
B
Base unit
connecting up 6
resetting to factory
defaults 19
Batteries
charging 8
inserting 7
recommended batteries 9
Brief overview 2
C
Call
answering 10
terminating 10
Call number
changing 12
dialing 10
displaying (CLIP) 11
redialing 10
storing 12
Calling 10
Canceling (a function) 2
Caring for your phone 21
Changing 16
Charging
indicator 8
times and capacity 9
Check mark (on the
display) 15
CLIP (call number display) 11
Connector pin assignment 6
Contact with liquid 21
Customer Care 26
D
Deactivating
automatic attenuation
equalization 19
key lock 11
Dialing 10
Display 2
Display language 16
Display symbols 2
E
Entry (phone book) 12
Error tone 11, 20
F
Factory defaults
of the base unit 19
of the handset 16
Flash times 19
G
GAP base units 14
Guarantee 23
H
Handset
disabling 11
putting into operation 7
resetting to factory
defaults 16
Hearing aids 4
I
Idle display 8
K
Key lock 11
Keys 2
L
Language (display) 16
List item 2, 12
30
Page 33

M
Manual registration 13
Medical equipment 4
Menu overview 28
Multifrequency signaling
method 18
N
Network provider 11
New entry (phone book) 12
Number, see call number 11
O
Operating times 9
Operation, putting your
phone into 6
P
Pause 10
Phone book 12
changing an entry 12
dialing a call number 12
storing a new entry 12
Phone cable 6
Phone connector 6
Phone, putting into
operation 6
Phoning
answering a call 10
calling 10
Plug-in power supply unit 6
Power cable 6
Protective foil 7
Pulse signaling method 18
Pulse/no-pulse ratio 20
Q
Questions and answers 22
R
Range 21
Rapid dialing 12
Receiver volume 15
Redialing 10
Registration (handset)
automatically 13
manually 13
to other GAP base units 14
Ringing tone 15
tune 15
volume 15
S
Safety information 4
Service 26
Settings
display language 16
of the base unit 18, 29
of the handset 15, 28
Signaling method 18
Special characters 2
Symbols 2
T
Tune 15
V
Volume 15
31
 Loading...