

Siemens GIGASET 100 Operating Manual
s
The digital cordless
DECT telephone
*LJDVHW
100
Operating Manual
and Safety Precautions
!
Gigaset 100, GB/IRL, A31008-G100-B100-2-7619
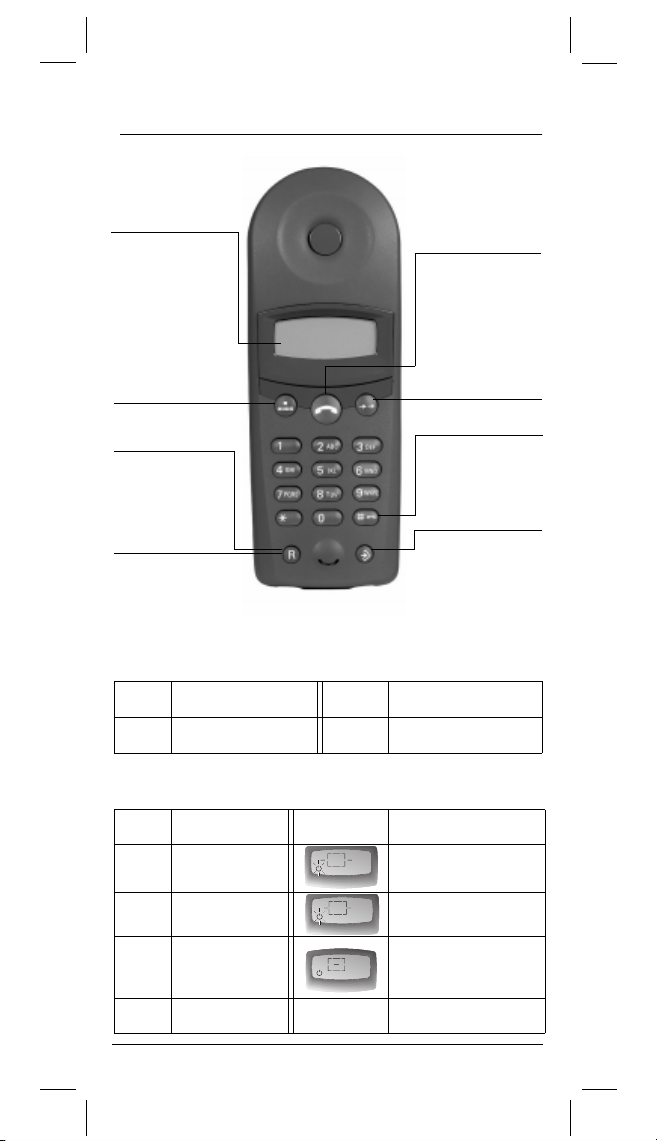
Brief overview
Base station
symbol
Constant:
–
ready for dialling/receiving
calls
Flashing:
–
Connection to
base station
no
Giga100.fm
Handset key
– Accept/end call
– Dial call number
(when have digits
already stored)
02.04.01
Speed dialling
Recall key
–For PABXs and
select carrier
services
Dial pause
–Hold down!
Displays
Base station symbol
Save
4
Special displays
* character
J
# character
@
Recall key
P
Pause
1
_
Memory empty
C
____
ª
ª
«
Redial
Keypad lock
– Lock on/off
hold down to
activate / de-activate!
Memory key
– For saving
– For settings
Lift handset
Keypad lock
Handset ready for
registration
Handset searching
for registered base
Handset found
base that is ready for
registration
2

Gigaset 100, GB/IRL, A31008-G100-B100-2-7619
Giga100.fm
Safety precautions
• Only use the power supply unit supplied as indicated
at the rear side of the base unit.
• Only use the battery supplied or the approved battery type (see page 7).
• Do not install in the immediate vicinity of other devices
e.g. stereo system, television, office equipment or microwave, as they could affect each other.
• Medical equipment can be affected by the handset.
• The handset can cause an unpleasant humming sound in
hearing aids.
• Do not hold the handset to your ear when it is ringing (incoming ring tone).
• Do not install the handset in bathrooms or showers.
• Do not operate the handset in environments where there
is risk of explosion (e.g. paint shops).
• Dispose of batteries and the telephone in an environmentally friendly manner and in accordance with the relevant
legislation.
• Ensure that the operating instructions are included when
passing on your Gigaset 100 to a third party.
• The handset’s battery compartment features the following
diagram:
–
– Ensure correct battery connector polarity (red cable:
Operate battery type in accordance with these
h
operating instructions.
plus pole, black cable: minus pole), otherwise the handset will not work properly. Incorrect polarity can damage
the handset and battery.
02.04.01
3
Gigaset 100, GB/IRL, A31008-G100-B100-2-7619
Giga100.fm
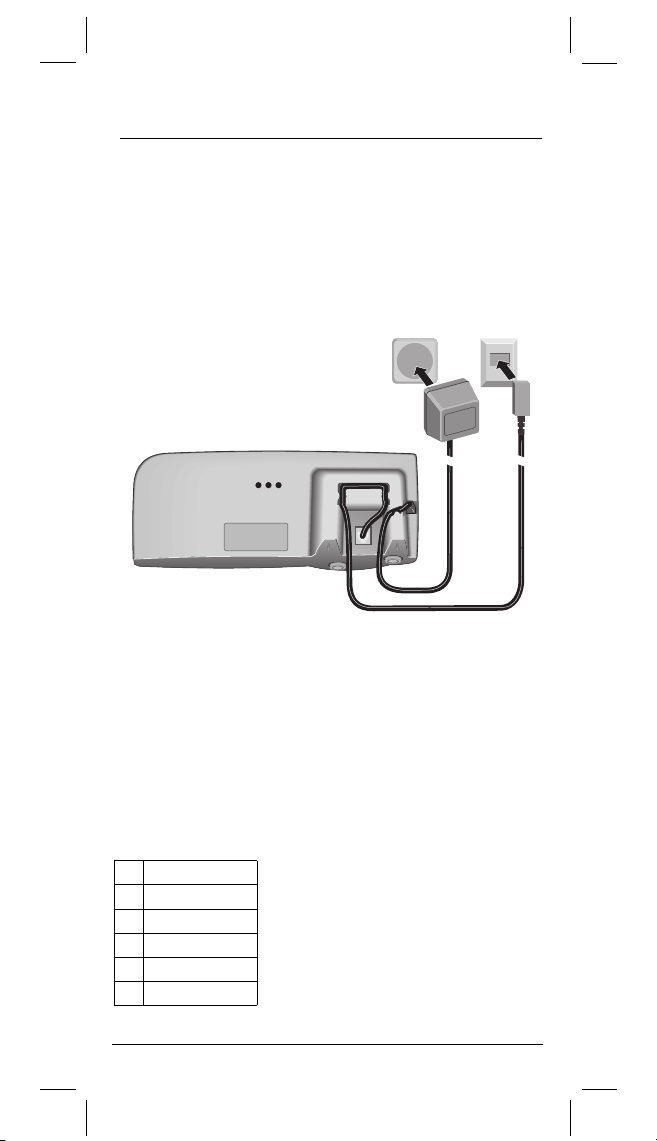
Putting the telephone into service
Step 1: Connecting the base station
First of all, connect your base station to the telephone jack
and the mains supply.
02.04.01
220 V/
• Insert
• Place the cable in the cable duct
• Insert the power supply unit into
If you do not want to use the telephone cable supplied,
ensure that you use either a straightforward extension cable
or a telephone cable with 3/4 connector assignment,
otherwise your Gigaset 100 will not function correctly.
1free
2free
3L a
4L b
5free
6free
small round connector of
the power cable
(for strain relief).
the wall socket.
• Insert
• Place the cable in the cable duct.
• Insert telephone jack into telephone socket.
* Appearance may differ depending on the country!
the rectangular
connector provided on
the telephone cable
into the socket.
into the socket.
230 V
Telephone
jack*
4

Gigaset 100, GB/IRL, A31008-G100-B100-2-7619
11221
2
Giga100.fm
Putting the telephone into service
Step 2: Inserting the battery
• Insert the battery connector in to the socket (see inset); it
must lock securely into place.
• Place the battery in the battery compartment.
• Insert the battery cable in the clip provided.
• Slide the cover into the battery compartment and push
forward until it clicks into place. To open the cover, lift it
up.
• Only use approved batteries.
• Never use non-Siemens charging units as these
can damage the batteries.
02.04.01
The display is protected by a film.
Please remove protective film.
5
 Loading...