

Page 1
5005 / IM2 / A30054-M6522-A801-2-UR19 / overview.fm / 19.12.2005
EN / FR / PL / HU
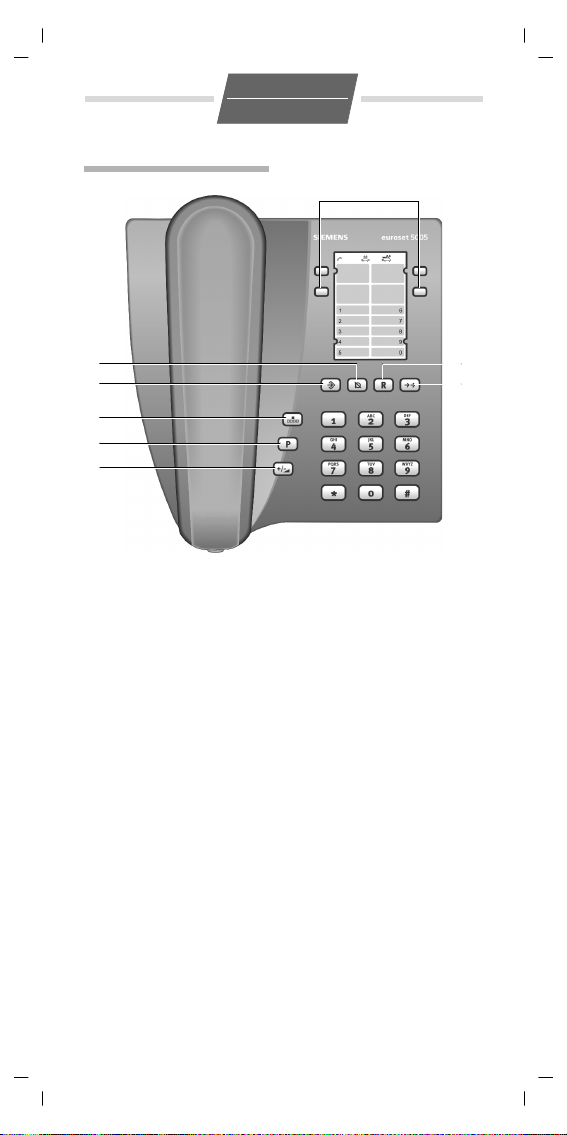
Euroset 5005
1
8
7
6
5
4
1 Repertory keys
2 Recall key
3 Redial key
4 Handset volume control
key
5Pause key
6 Speed dial key
7 Set key
8Mute key
1 Touches d'accès rapide
2 Touche de double appel
3Touche bis
4 Touche de réglage du vo-
lume
5 Touche de pause
6 Touche de numérotation
abrégée
7 Touche Enregistrer
8 Touche de désactivation
du haut-parleur (Mute)
2
3
1 Klawisze prostego
wybierania
2 Klawisz oddzwaniania
3 Klawisz ustawiania
4 Klawisz regu lacji głośności
słuchawki
5 Klawisz pauzy
6 Klawisz szybkiego
wybierania
7 Klawisz ponownego
wybierania
8 Klawisz wyciszania
1Célhívás gomb
2 Megbeszélés gomb
3 Újrahívás gomb
4 Hangos/Halk gomb
5Szünet gomb
6Gyorshívás gomb
7Mentés gomb
8 Némítás gomb (mute)
Page 2
5005 / IM2 / A30054-M6522-A801-2-UR19 / overview.fm / 19.12.2005
EN / FR / PL / HU
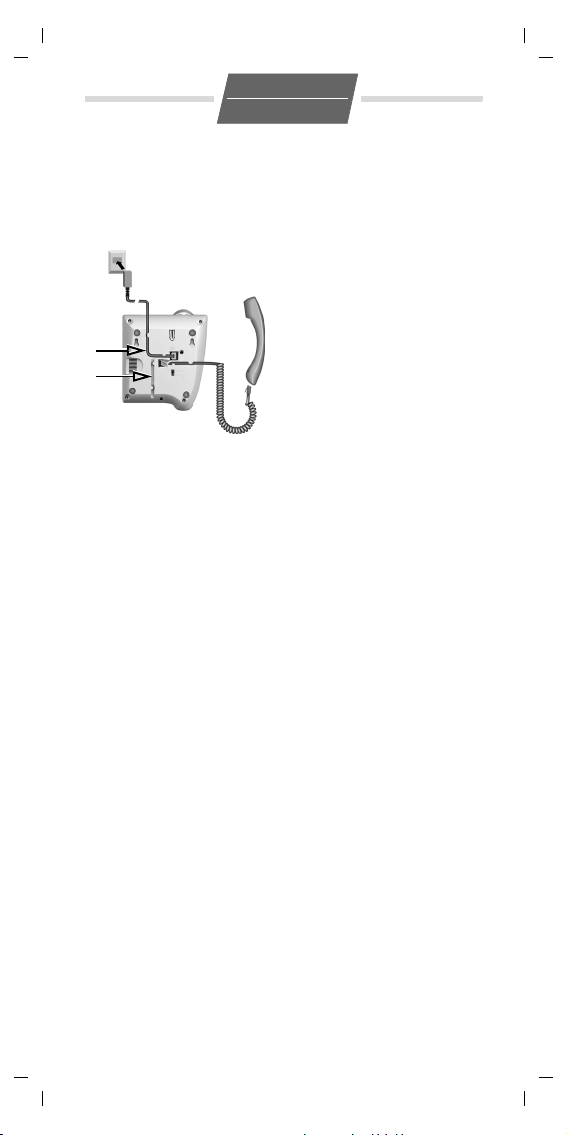
Connections
Raccordement
Połączenia
Csatlakozók
1
2
1 Table top operation
2Wall mounting
1 Pour utilisation sur bureau
2 Pour montage mural
1 W razie ustawienia
na biurku
2Montaż na ścianie
1 asztali üzemeltetés
2 falra szerelés
Page 3
5005 / IM2 en-fr-pl-hu / A30054-M6522-A801-2-UR19 / 5005.fm / 13.12.2005
1
EN
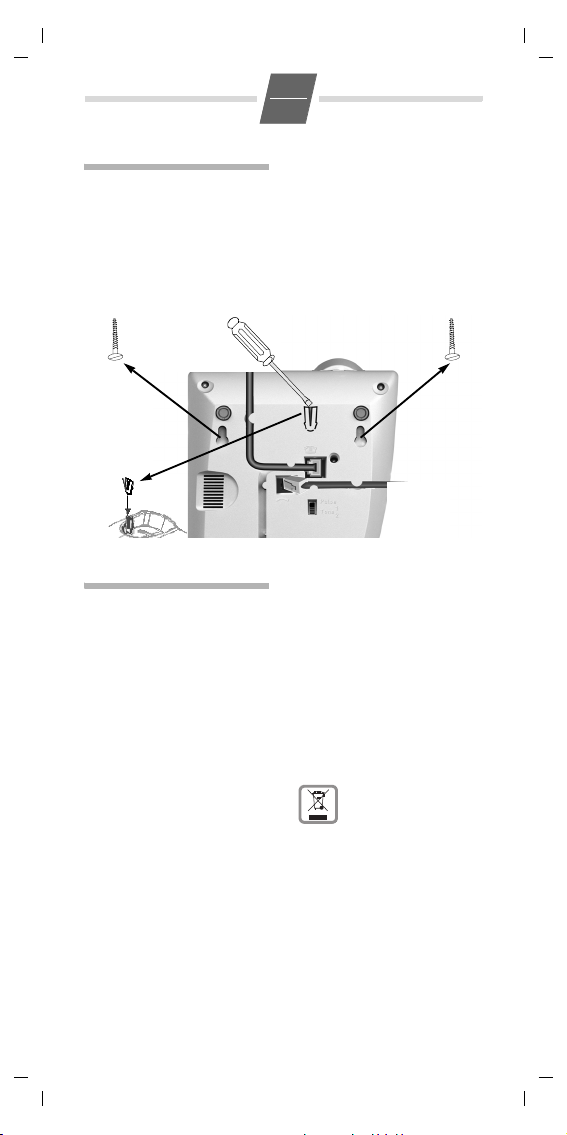
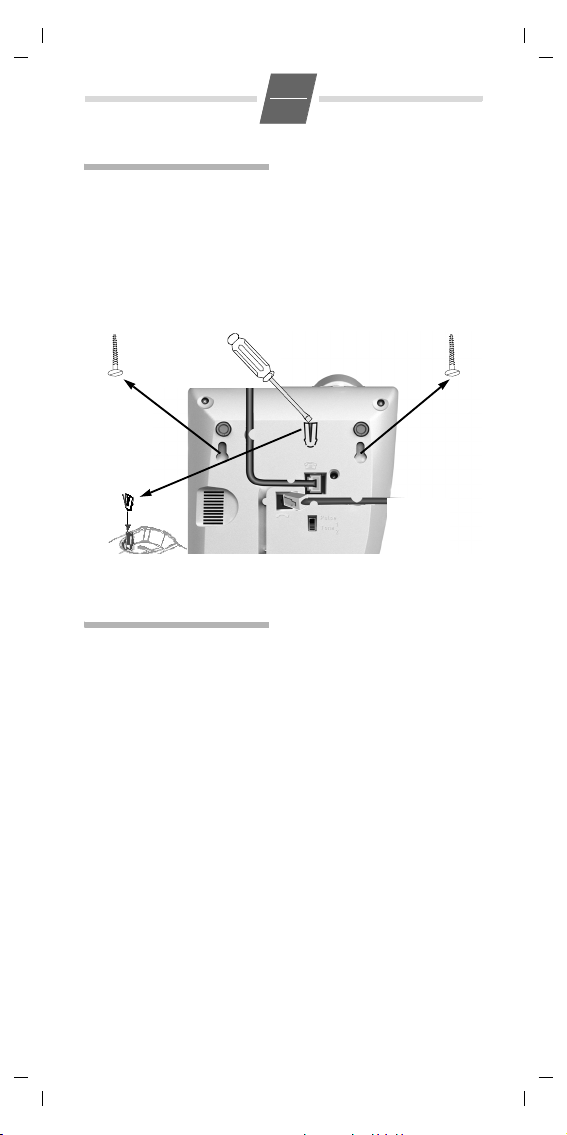
Wall mounting
(see figure)
Once the connecting leads
have been connected, you can
mount the telephone on the
wall:
◆ Drill two dowel holes
(5 mm ∅) 110mm apart,
insert dowels and screw in
Safety precautions
When installing, connecting
and operating the telephone,
always observe the following
precautions:
◆ Only use the jacks and
leads supplied.
◆ Only connect the connect-
ing lead to the intended
socket.
◆ Only connect approved
accessories.
◆ Lay the connecting lead
where it will not cause
accidents.
◆ Position the telephone on
a non-slip surface.
◆ For your safety and protec-
tion, the telephone may
not be used in the bath or
shower rooms (wet locations). The telephone is
not splash proof.
◆ Never expose the tele-
phone to sources of heat,
direct sunlight or other
electrical devices.
countersunk head wood
screws with a slight gap to
the wall.
◆ On underside of tele-
phone: Lift out handset
bracket with screwdriver.
◆ Clip handset bracket into
handset shell mounting.
◆ Hang telephone on pro-
jecting screw heads.
◆ Protect your telephone
from moisture, dust, cor-
rosive liquids and vapours.
◆ Never open up the tele-
phone yourself.
◆ Do not touch the plug con-
tact with pointed or metal-
lic objects.
◆ Do not carry the telephone
by the leads.
◆ If you give your telephone
to someone else, make
sure you also give them
the operating manual.
All electrical and electronic products should
be disposed of sepa-
rately from the municipal waste stream via designated
collection facilities appointed by
the government or the local
authorities.
This crossed-out wheeled bin
symbol on the product means
the product is covered by the
European Directive 2002/96/EC.
The correct disposal and separate collection of your old appliance will help prevent potential
negative consequences for the
environment and human health.
It is a precondition for reuse and
Page 4
5005 / IM2 en-fr-pl-hu / A30054-M6522-A801-2-UR19 / 5005.fm / 13.12.2005
2
EN
recycling of used electrical and
electronic equipment.
For more detailed information
about disposal of your old appliance, please contact your city
office, waste disposal service or
the shop where you purchased
the product.
Setting up the
telephone for use
Recommended
installation of telephone
◆ Do not expose the tele-
phone to direct su nlight or
other sources of heat.
◆ Operate at temperatures
of between +5°C and
+40°C.
◆ Maintain a distance of at
least one metre between
the telephone and radio
equipment, e.g. radio telephones, radio paging
equipment or TV sets.
Otherwise, telephone
communication could be
impaired.
◆ Do not install the tele-
phone in dusty rooms as
this can limit the service
life of the telephone.
◆ Furniture lacquer and
polish can be adversely
affected by contact with
parts of the unit (e.g.
feet).
Dialling and saving
numbers
Dialling a number
co Lift handset, dial
Last number redial
The last number dialled is
automatically saved.
c; Lift handset, pr ess
number.
last number redial
key.
Repertory and speed dial
You can save 4 numbers (max.
21 digits) as repertory numbers on the 4 repertory keys
: and 10 numbers as
speed dial numbers on the
number keys (max. 21 digits).
Saving (or saving with
notebook function)
c? Lift handset, (or
either ... As repertory
: Press repertory
or ... As speed dial
D0...9
o Enter number for
?a Press Set key, (or
with notebook
function: during a
call) press Set key.
key;
Press speed dial
key and speed dial
number (number
key);
reperto ry or spee d
dial.
after the call:)
replace handset.
Dialling a repertory number
c: Lift ha ndset, press
You can also dial any additional digits.
repertory key.
Dialling a speed dial number
cD Lift ha ndset, press
0...9 Press speed dial
speed dial key.
number (number
key).
Notes on saving and
deleting repertory and
speed dial numbers
*
#
and
regardless of the set dialling
mode but are only dialled with
DTMF dialling.
The following steps delete
numbers saved to the repertory or speed dial keys:
◆ The number entered is
longer than 21 digits
◆ Saving a number will
delete the previous content of the memory
are saved
Page 5
5005 / IM2 en-fr-pl-hu / A30054-M6522-A801-2-UR19 / 5005.fm / 13.12.2005
3
EN
Dialling pauses
One or more dialling pauses
(not at 1st digit) can be
entered using
are transferred to the memory
and are necessary for certain
extension systems (e.g.:
< 2368).
0
◆ Dialling a dialling pause
within the first 5 digits:
The entire num ber saved is
dialled, including the
2-second dialling pause.
◆ Dialling a dialling pause
after the first 5 digits:
The port ion of the number
saved after the pause is
only dialled after pressing
the
<. Pauses
< key.
Adjusting the
telephone
Setting the handset
volume
The handset volume can be
set to 2 levels.
E Press Handset vol-
Mute
You can deactivate the telephone's microphone.
During a call:
J Press mute key.
To reactivate microphone:
Press the mute key again.
Setting the ringer
You can set the ringer frequency and volume to 9 levels
Temporary DTMF switching in
"Pulse" position
To use functions that require
DTMF (e.g. remote control of
answering machine), you can
set the telephone to DTMF for
ume control key.
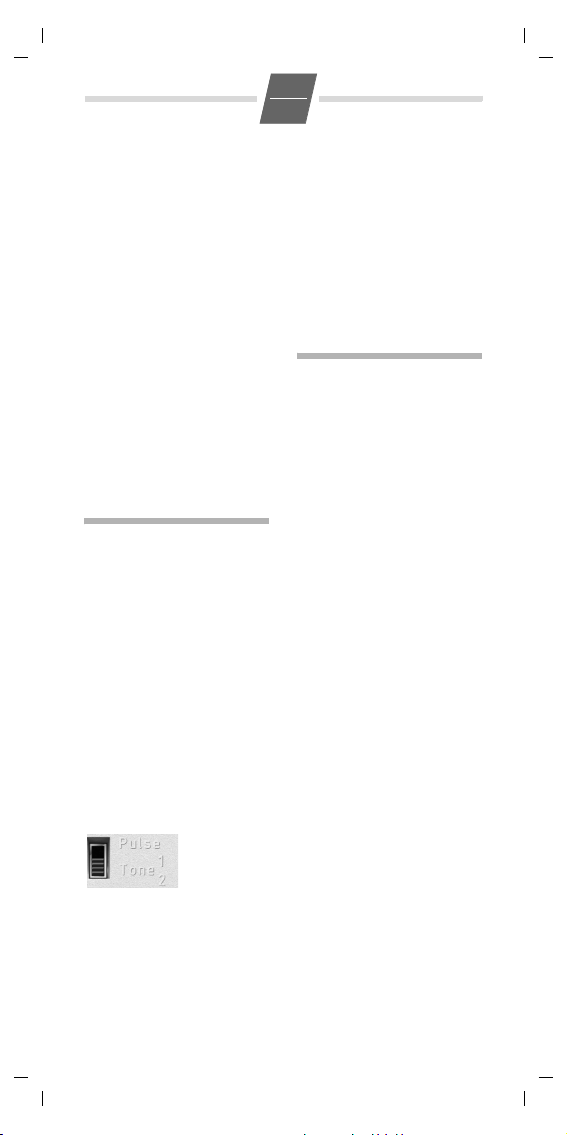
Pulse: Pulse dialling mode (DP)
Tone 1: Tone dialling mode, flash time
100 ms
Tone 2: Tone dialling mode, flash time
280 ms
(factory default: level 6) or
turn it off.
c? Lift the handset,
# Press the hash key.
0...9 Press one of the
? Press Set key.
press the Set key.
number keys. (0:
Ringer off until
handset is next
lifted).
Operation on a PABX
Special functions/Recall
key
During an external call, you
can make an enquiry or forward the call. To do this, press
the recall key
subsequent procedure
depends on your PABX.
By default, the recall key is set
to flash time 1 (pulse/tone
switch in "Tone 1" position).
For connection to a PABX, it
may be necessary to change
the flash time (e.g. pulse/tone
swi tch to "Tone 2 "). To d o this ,
please refer to the operating
instructions for your PABX.
Changing the dialling
mode
By default, your telephone is
set to tone dialling mode
(Tone 1). Depending on the
dialling mode of your PABX,
you may need to set the telephone to pulse dialling (DP).
Slide switch on underside of
unit:
the duration of the call without adjusting the switch.
After the connection is established:
* Press the star key.
After the connection is broken, the setting reverts to DP.
>
. The
Page 6
5005 / IM2 en-fr-pl-hu / A30054-M6522-A801-2-UR19 / 5005.fm / 13.12.2005
4
EN
Operation on public
telephone systems
Public telephone systems - in
some cases by special order/
request – offer you a range of
useful additional services (e.g.
call divert, call back on busy,
three-party conference etc.).
These services can be selected
using specified key
combinations, which your network provider will notify you
of.
You can save the entire key
combination, including the
number of a fixed call divert
destination, to your repertory
or speed dial keys just like a
normal number.
Recall key
In public telephone systems,
the recall key is required to use
certain additional services;
e.g. for "Call back on busy".
By default, your telephone is
set to tone dialling with a flash
time of 100 ms (Tone 1). You
may need to adjust the flash
time using the slide switch on
the underside of the
telephone.
Appendix
Care
To clean, wipe with a moist or
antistatic cloth only, never
with a dry cloth (risk of electrostatic charging and
discharge) or strong cleaning
agent.
If your telephone is not
working perfectly
Lift handset, no dialling
tone: Is the connecting lead
correctly plugged into the telephone and the telephone
socket?
Dialling tone audible but telephone will not dial: The
connection is OK. Is the dialling mode set correctly?
The other party cannot hear
you: Mute activated?
Regular pulse noises can be
heard during a call: The
connection is receiving metering pulses from the exchange,
which the telephone cannot
interpret. Contact your
network operator.
Insert strips
Blank insert strips for the repertory keys can be found on
the Internet at http://www.siemens.com/euroset.
Contacts
If you should encounter any
problems when operating the
telephone connected to a
communication system with
analogue network access,
please contact the network
operator responsible or your
dealer.
Authorisation
The telephone you have purchased is designed for
operation in your country, as
marked on the packaging and
on the unit.
The CE mark attests to the
phone's compliance with the
essential requirements of the
R&TTE directive.
Page 7
5005 / IM2 en-fr-pl-hu / A30054-M6522-A801-2-UR19 / 5005.fm / 13.12.2005
1
FR
Montage mural
(voir schéma)
Une fois les cordons de raccordement enfichés, vous pouvez
fixer le téléphone au mur :
◆ Percer deux trous pour
chevilles (5 mm ∅) espacés de 110 mm, y enfoncer les chevilles et visser
les vis à tête conique sans
Consignes de
sécurité
Au cours de l'installation, du
raccordement et pendant
l'utilisation du téléphone, respectez absolument les consignes suivantes :
◆ Utiliser uniquement les
fiches et cordons livrés
avec l'appareil.
◆ Enficher le cordon de rac-
cordement uniquement
dans la prise/douille prévue à cet effet.
◆ Ne jamais raccorder
d'accessoire non autorisé.
◆ Disposer le cordon de rac-
cordement de façon à éviter tout risque d'accident.
◆ Placer le téléphone à un
endroit où il ne risque pas
de glisser.
◆ Pour des raisons de sécu-
rité, le téléphone ne doit
pas être utilisé dans un
lieu humide (par ex. salle
de bain, etc.). Il n'est pas
les enfoncer complètement.
◆ Sous le téléphone : déta-
cher la fixation combiné à
l'aide d'un tournevis.
◆ Encliqueter la fixation
combiné dans la fente du
logement de combiné prévue à cet effet.
◆ Suspendre le téléphone
aux vis fixées au mur.
étanche aux projections
d'eau.
◆ Ne jamais exposer le télé-
phone à des sources de
chaleur telles que les
rayons directs du soleil ou
le rayonnement d'appareils électriques.
◆ Protéger le téléphone con-
tre l'humidité, la poussière
et les vapeurs et liquides
corrosifs.
◆ Ne jamais ouvrir le télé-
phone sans les conseils
d'un spécialiste.
◆ Ne jamais toucher les con-
tacts à fiche avec des
objets métalliques et pointus.
◆ Ne jamais porter le télé-
phone par les cordons.
◆ Lorsque vo us confiez votre
téléphone à un tiers,
joignez- y toujours le mode
d'emploi.
Page 8

5005 / IM2 en-fr-pl-hu / A30054-M6522-A801-2-UR19 / 5005.fm / 13.12.2005
2
FR
Mise en service du
téléphone
Conseils pour
l'installation du téléphone
◆ Ne jamais exposer le télé-
phone aux rayons directs
du soleil ou à d'autres
sources de chaleur.
◆ Utiliser le téléphone à une
température comprise
entre +5°C et +40°C.
◆ Prévoir une distance mini-
male d'un mètre entre le
téléphone et les appareils
radio, par ex. téléphones
ou dispositifs d'appel de
personnes, ou les postes
de télévision, car des interférences risqueraient de
gêner les communications
téléphoniques.
◆ Ne pas installer le télé-
phone dans un endroit
poussiéreux, au risque de
réduire sa durée de vie.
◆ Les peintures et vernis des
meubles en contact avec
des composants du téléphone (par ex. pieds) risquent de subir des détéri orations.
Composer et
enregistrer un
numéro d'appel
Composer un numéro
co Décrocher le com-
Rappel (Bis)
Le dernier appel composé est
enregistré automatiquement.
c; Décrocher le com-
biné et composer
un numéro.
biné et appuyer
sur la touche bis.
Accès rapide et
numérotation abrégée
Les 4 touches d'accès rapide
: permettent d'enregistrer
4 numéros d'accès rapide
(21 caractères maxi), tandis
que 10 numéros peuvent être
enregistrés sous la forme de
numéros abrégés (via les touches de chiffre).
Enregistrer (ou Enregistrer à
l'aide de la fonction blocnotes)
c? Décrocher le com-
soit ...comme numéro d'accès rapide
: Appuyer sur la
soit ...comme numéro
abrégé
D0...9
o Puis, saisir le
?a Appuyer sur la
Composer un numéro
d'accès rapide
c: Décrocher le com-
biné et appuyer
sur la touch e Enregistrer (ou utiliser
la fonction blocnotes pendant la
communication).
touche d'accès
rapide choisie ;
Appuyer sur la
touche de numérotation abrégée
et composer le
chiffre devant
correspondre au
numéro abrégé
(touche de
chiffre).
numéro d'appel
pour accès rapide
ou numérotation
abrégée.
touche En registrer
et (une fois la
communication
finie) raccrocher le
combiné.
biné et appuyer
sur la touche
d'accès rapide
appropriée.
Page 9

5005 / IM2 en-fr-pl-hu / A30054-M6522-A801-2-UR19 / 5005.fm / 13.12.2005
3
FR
Il est également possible de
saisir des chiffres à la main à la
suite du numéro enregistré.
Composer un numéro abrégé
cD Décrocher le com-
0...9 Composer le chif-
biné et appuyer
sur la touche de
numérotation
abrégée.
fre correspondant
au numéro abrégé
(touche de chiffre).
Remarques pour
l'enregistrement et
l'annulation de numéros
d'accès rapide ou de
numérotation abrégée
Vous pouvez enregistrer les
*
#
et
touches
soit le mode de numérotation
réglé, mais vous pouvez uniquement les composer en
mode fréquence vocal.
Les opérations suivantes permettent d'annuler les numéros enregistrés comme appels
rapides ou abrégés :
◆ Le numéro saisi fait plus
de 21 caractères.
quel que
◆ L'enregistrement d'un
numéro annu le le numéro
précédemment enregistré.
Pauses interchiffres
Il est possible de saisir une ou
plusieurs pauses interchiffres
(sauf à l'emplacement du premier caractère) avec la touche
<. Ces pauses sont mémo-
risées, elles sont nécessaires
pour certaines installations
secondaires
(par ex. : 0
◆ Pause interchiffre dans les
< 2368).
5 premiers chiffres :
numérotation du numéro
entier, pause interchiffre
de 2 secondes incluse.
◆ Paus e interchi ffre après le
e
chiffre :
5
la portion du numéro
enregistrée après la pause
est
composée uniquement
après pression de la touche de pause
<.
Réglages téléphone
Régler le volume de
l’écouteur du combiné
Il existe deux niveaux de
réglage pour le volume de
l'écouteur.
E Appuyer sur la
Désactivation du hautparleur
Pour désactiver le hautparleur du téléphone :
Pendant une communication :
J Appuyer sur la
Pour réactiver le ha ut-parleur :
appuyer une nouvelle fois sur
la touche haut-parleur.
Réglages sonnerie
Il existe 9 niveaux de réglage
de la fréquence de sonnerie
et du volume de la sonnerie
(par défaut à la livraison :
niveau 6), dont l'un permet de
la désactiver.
c? Décrocher le com-
# Appuyer long-
0...9 Appuyer sur l'une
touche de réglage
du volume.
touche de désactivation du hautparleur.
biné et appuyer
sur la touch e Enregistrer.
temps sur la touche dièse.
des touches de
chiffre entre 0 et 9
(0 : sonnerie
désactivée jusqu'à
ce que l'utilisateur
décroche à nouveau).
Page 10

5005 / IM2 en-fr-pl-hu / A30054-M6522-A801-2-UR19 / 5005.fm / 13.12.2005
4
FR
? Appuyer sur la
touche Enregistrer.
Fonctionnement sur
autocommutateurs
privés (IP)
Fonctions spéciales /
Touche de double appel
Au cours d'une communication externe, vous pouvez utiliser la fonction de double
appel ou faire suivre un appel.
Pour cela, appuyez sur la touche de double appel
suite des commandes dépend
de votre autocommutateur
(IP).
A la livraison, la touche de
double appel est réglée sur la
durée de flashing (interruption) 1 (commutateur impul-
Commutation momentanée
en FV lorsque le
commutateur est réglé sur
«Pulse»
Pour utiliser les fonctions qui
nécessitent la FV (par ex. la
commande à distance du
répondeur), vous pouvez
commuter le téléphone en
mode FV pour la durée de la
communication sans faire
coulisser le commutateur.
Après le début de la
communication :
* Appuyer sur la
Le mode ND est automatiquement réactivé à la fin de la
communication.
>
Pulse : mode de numérotation par impulsions
(ND)
Tone 1 : mode fréquence vocale durée du flashing
100 ms
Tone 2 : mode fréquence vocale durée du flashing
280 ms
touche Etoile.
sions/sons en position
« Tone 1 »). Pour le raccordement aux autocommutateurs
privés, il peut être nécessaire
de modifier le flashing (par ex.
commutateur impulsions/son
en position « Tone 2 »). Consultez également le mode
d’emploi de votre autocommutateur privé (IP).
Changer de mode de
numérotation
A la livraison, votre téléphone
est en mode fréquence vocale
(Tone 1). Il peut être nécessaire de mettre le téléphone
en mode de numérotation par
. La
impulsions (impulsions, ND),
selon le mode de numérotation de votre autocommutateur.
Commutateur à coulisse sous
l'appareil :
Fonctionnement sur
systèmes
téléphoniques
publics
Les systèmes téléphoniques
publics vous offrent –
éventuellement avec abonnement / sur demande – des
services supplémentaires très
utiles (par ex. renvoi d'appel,
rappel en cas d'occupation,
conférence à trois, etc.). Pour
sélectionner ces services, il
faut utiliser les combinaisons
de touches qui vous seront
indiquées par l'opérateur.
Il est possible d'enregistrer
une combinaison de touches
avec un numéro de renvoi fi xe
comme un numéro d'appel
normal, sous les touches de
Page 11

5005 / IM2 en-fr-pl-hu / A30054-M6522-A801-2-UR19 / 5005.fm / 13.12.2005
5
FR
numérotation rapide ou
abrégée.
Touche de double appel
Sur les systèmes de téléphone
publics, la touche de double
appel est nécessaire à la disponibilité de services
supplémentaires, par ex. le
« rappel en cas
d'occupation ».
A la livraison, votre téléphone
est en mode fréquence vocale
avec une durée de flashing de
100 ms (Tone 1). Au besoin,
vous pouvez commuter sur
une autre durée de flashing à
l'aide du commutateur à coulisse sous l'appareil.
Annexe
Entretien
Pour nettoyer l'appareil, utiliser uniquement un chiffon
humide ou antistatique ; ne
jamais utiliser de chiffon sec
(risque de charge et de
décharge électrostatiques) ou
de détergent agressif.
Lorsque votre téléphone
ne fonctionne pas
correctement
Pas de tonalité quand vous
décrochez le combiné :
le cordon de raccordement
est-il bien enfiché dans le
téléphone et/ou dans la prise
téléphone ?
La tonalité est audible mais
la numérotation ne fonctionne pas : le raccordement
est correct. Le mode de numérotation réglé est-il le bon ?
Votre interlocuteur ne vous
entend pas : Mode secret
activé ?
Vous entendez régulièrement des bruits d'impulsion
pendant la communication :
le raccordement reçoit des
impulsions de taxation de la
centrale, que le téléphone
n'évalue pas. Contactez votre
opérateur.
Etiquettes mémoire
Des étiquettes mémoire vierges pour les touches d'accès
rapide sont disponibles sur
internet, à l'adresse
http://www.siemens.com/
euroset.
Interlocuteurs
En cas de problème d'utilisation concernant le raccordement au système de communication et la connexion analogique, adressez-vous à l'opérateur compétent ou à votre
détaillant.
Homologation
Le téléphone que vous venez
d'acquérir est conçu pour être
utilisé dans le pays où vous
l'avez acheté, comme vous
pouvez le constater sur
l'emballage.
La conformité de l'appareil
avec les exigences
fondamentales de la directive
européenne R&TTE
(99/05/CE) est confirmée par
le label CE.
Page 12

5005 / IM 2 en-fr-pl-hu / A30054-M6522-A801-2-UR19 / 5005.fm / 13.12.2005
1
PL
Montaż na ścianie
(patrz rysunek)
Po podłączeniu przewodów
można zamontować telefon
na ścianie:
◆ Wywierć dwa otwory na
kołki (5 mm ∅) w ods tępie
110 mm, włóż kołki
iwkręć w nie dwa wkręty
do drewna z łbem
Uwagi dotyczące
bezpieczeństwa
Podczas montażu,
podłączania i obsługi telefonu
należy bezwzględnie
przestrzegać następujących
wskazówek:
◆ Należy używać tylko
dostarczonych gniazd
iprzewodów.
◆
Przewody na leży podłączać
tylko do odpowiednich
gniazd.
◆ Należy używać jedynie
zatwierdzonych
akcesoriów.
◆ Przewody należy ułożyć
w miejscu, w którym nie
mogą spowodować
wypadków.
◆ Telefonu nie należy
umieszczać na śliskich
powierzchniach.
◆ Dla własnego
bezpieczeństwa nie wolno
używać telefonu
w łazienkach ani
prysznicach (wilgotnych
płaskim, zachowując
niewielki odstęp od
powierzchni ściany.
◆ Pod spodem telefonu:
odchyl śrubokrętem
uchwyt słuchawki.
◆
Załóż uchwyt słuchawki na
mocowanie osłony
słuchawki.
◆ Zawieś telefon na wys-
tających łbach wkrętów.
miejscach). Telefon nie
jest odporny na wilgoć.
◆ Telefonu nie wolno
ustawiać w pobliżu źródeł
ciepła ani urządzeń
elektrycznych, ani
wystawiać na działanie
bezpośredniego światła
słonecznego.
◆ Telefon należy chronić
przed wilgocią, pyłem oraz
agresywnymi chemicznie
płynami i oparami.
◆ Nie wolno samodzielnie
otwierać telefonu.
◆ Nie wolno dotykać styków
zaostrzonymi ani
metalowymi
przedmiotami.
◆ Nie wolno przenosić
telefonu, chwytając za
przewody.
◆ Telefon należy
przekazywać innym
osobom wraz z instrukcją
obsługi.
Page 13

5005 / IM 2 en-fr-pl-hu / A30054-M6522-A801-2-UR19 / 5005.fm / 13.12.2005
2
PL
To ur ządzenie jest
oznaczone zgodnie z
Dyrektywą Europejską
2002/96/WE oraz polską
Ustawą o zużytym sprzęcie
elektrycznym i elektronicznym
symbolem przekreślonego
kontenera na odpady.
Takie oznakowanie informuje, że
sprzęt ten, po okresie jego
użytkowania, nie może być
umieszczany łącznie z innymi
odpadami pochodzącymi z
gospodarstwa domowego.
Użytkownik jest zo bowiązany do
oddania go prowadzącym
zbieranie zużytego sprzętu
elektrycznego i elektronicznego.
Prowadzący zbieranie, w tym
lokalne punkty zbiórki, sklepy
oraz gminne jednostki, tworzą
odpowiedni system
umożliwiający oddanie tego
sprzętu.
Właściwe postępowanie ze
zużytym sprzętem elektrycznym
i elektronicznym przyczynia się
do uniknięcia szkodliwych dla
zdrowia ludzi i środowiska
naturalnego konsekwencji,
wynikających z obecności
składników niebezpiecznych
oraz niewłaściwego składowania
i przetwarzania takiego sprzętu.
Przygotowanie
telefonu do
użytkowania
Zalecane miejsce
instalacji telefonu
◆ Telefonu nie wolno
ustawiać w pobliżu źródeł
ciepła ani wystawiać na
działanie bezpośredniego
światła słonecznego.
◆ Dozwolony zakres
temperatury: od + 5°C do
+40°C.
◆ Należy zachować
odległość co najmniej
jednego metra między
telefonem a sprzętem
radiowym, takim jak
radiotelefony, pagery lub
odbiorniki TV.
W przeciwnym razie może
dojść do zakłóceń
komunikacji telefonicznej.
◆ Nie wolno instalować
telefonu w zapylonych
pomieszczeniach — może
to zmniejszyć trwałość
użytkową telefonu.
◆ Lakier i politura na
meblach może ulec
uszkodzeniu wskutek
kontaktu z częściami
urządzenia (na przykład
zjego podstawkami).
Wybieranie
i zapisywanie
numerów
Wybieranie numeru
co Podnieś
Ponowne wybieranie
ostatniego numeru
Ostatnio wybierany numer
jest automatycznie
zapisywany.
c; Podnieś
Klawisze szybkiego
wybierania
4 numery (maks. 21-cyfrowe)
można przypisać do 4 klawiszy
szybkiego wybierania
a 10 numerów szybkiego
wybierania (maks. 21cyfrowych) można przypisać
do klawiszy numerycznych.
słuchawkę,
wybierz numer.
słuchawkę,
naciśnij klawisz
ponownego
wybierania
ostatniego
numeru.
:
,
Page 14

5005 / IM 2 en-fr-pl-hu / A30054-M6522-A801-2-UR19 / 5005.fm / 13.12.2005
3
PL
Zapisywanie numerów (lub
zapisywanie przy użyciu
funkcji notesu)
c? Podnieś
albo ... Jako klawisze
szybkiego wybierania
: Naciśnij klawisz
lub ... Jako klawisz
numeryczny
D0...9
o Wprowadź numer
?a Naciśnij klawisz
słuchawkę, (przy
użyciu funkcji
notesu: podczas
połączenia)
inaciśnij klawisz
ustawiania.
szybkiego
wybierania.
Naciśnij klawisz
szybkiego
wybierania
iklawisz
numeryczny;
przypisywany do
klawisza
szybkiego
wybierania lub
klawisza
numerycznego.
ustawiania, (lub
po zakończeniu
połączenia:) odłóż
słuchawkę.
Wybieranie numeru za
pomocą klawisza szybkiego
wybierania
c: Podnieś
Można również ręcznie
wybrać dodatkowe cyfry
numeru.
słuchawkę
inaciśnij klawisz
szybkiego
wybierania.
Szybkie wybieranie za
pomocą klawiszy
numerycznych
cD Podnieś
0...9 Naciśnij żądany
słuchawkę
inaciśnij klawisz
szybkiego
wybierania.
klawisz
numeryczny.
Uwagi dotyczące
zapisywania i usuwania
numerów szybkiego
wybierania
Klawisze * i
zapisywane bez względu na
ustawiony tryb wybierania,
ale wybierane są tylko
wtrybie DTMF.
Numery telefonów przypisane
do klawiszy szybkiego
wybierania i klawiszy
numerycznych zostają
usunięte w następujących
przypadkach:
#
są
◆ Wprowadzony numer jest
dłuższy niż 21 cyfr.
◆ Zapisanie numeru
powoduje usunięcie
poprzedniej zawartości
pamięci.
Wprowadzanie pauzy
Pauzy wybierania można
wprowadzić (nie w miejscu
pierwszej cyfry) za pomocą
<. Pauzy są
klawisza
przenoszone do pamięci. Są
one konieczne w niektórych
centralach (np. 0
◆ Wprowadzanie pauzy
wybierania w pierwszych
5cyfrach:
Wybrany zostanie cały
zapisany numer, włącznie
z 2-sekundową pauzą.
◆ Wprowadzanie pauzy
wybierania po pierwszych
5cyfrach:
Część numeru zapisana po
pauzie jest wybierana po
naciśnięciu klawisza
< 2368).
<.
Ustawienia telefonu
Ustawianie głośności
słuchawki
Dostępne są 2 poziomy
głośności słuchawki.
E Naciśnij klawisz
regulac ji głośności
słuchawki.
Page 15

5005 / IM 2 en-fr-pl-hu / A30054-M6522-A801-2-UR19 / 5005.fm / 13.12.2005
4
PL
Wyciszanie
Mikrofon telefonu można
wyłączyć.
Podczas rozmowy:
J Naciśnij klawisz
Aby włączyć mikrofon: naciśnij
ponownie klawisz wyciszania.
wyciszania.
Ustawianie dzwonka
Dostępnych jest 9 poziomów
częstotliwości i głośności
dzwonka (ustawienie
domyślne: poziom 6) oraz
wyłączenie dzwonka.
c? Podnieś
# Naciśnij klawisz
0...9 Naciśnij żądany
? Naciśnij klawisz
Tymczasowe włączanie
sygnalizacji DTMF w pozycji
„Pulse”
W celu użycia sygnalizacji
DTMF (na przykład do
zdalnego sterowania
automatyczną sekretarką)
włączyć w telefonie tryb DTMF
na czas trwania połączenia
słuchawkę
inaciśnij klawisz
ustawiania.
krzyżyka.
klawisz
numeryczny.
(0: wyłączenie
dzwonka do chwili
następnego
podniesienia
słuchawki).
ustawiania.
Pulse: tryb wybierania impulsowego (DP).
Tone 1: tryb wybierania tonowego, czas flash
100 ms
Tone 2: tryb wybierania tonowego, czas flash
280 ms
Używanie z centralą
PABX
Funkcje specjalne/klawisz
oddzwaniania
Podczas połączenia
zewnętrznego można
wykonać połączenie
konsultacyjne albo
przekierować połączenie.
W tym celu naciśnij klawisz
oddzwaniania
procedury zależą od centrali
PABX .
Domyślnie ustawiony jest czas
flash 1 (przełącznik
impulsowe/tonowe w pozycji
„Tone 1”). W przypadku
centrali PABX konieczne może
być ustawienie innego czasu
flash (na przykład przełącznik
impulsowe/tonowe w pozycji
„Tone 2”). Szczegółowe
informacje zawiera instrukcja
obsługi centrali PABX.
Zmienianie trybu
wybierania numerów
Domyślnie telefon działa
w trybie wybierania
tonowego (Tone 1).
Wzależności od trybu
wybierania centrali PABX
konieczne może być
ustawienie trybu
impulsowego (DP).
Przesuń przełącznik pod
spodem urządzenia:
bez przestawiania
przełącznika.
Po nawiązaniu połączenia:
* Naciśnij klawisz
Po przerwaniu połączenia
przywrócone zostanie
wybieranie impulsowe.
>
gwiazdki.
. Dalsze
Page 16

5005 / IM 2 en-fr-pl-hu / A30054-M6522-A801-2-UR19 / 5005.fm / 13.12.2005
5
PL
Praca w publicznej
sieci telefonicznej
Publiczne sieci telefoniczne —
w niektórych przypadkach na
specjalne żądanie —
umożliwiają korzystanie
z wielu dodatkowych usług
(takich jak przekierowywanie
połączeń, oddzwanianie przy
zajętości, połączenia
konferencyjne itd.). Usługi te
można uruchomić za pomocą
określonych kombinacji
klawiszy, zgodnie
z informacjami uzyskanymi od
operatora danej sieci.
Całą kombinację klawiszy,
włącznie z numerem
docelowym przekierowania,
można przypisać do klawiszy
szybkiego wybierania
i klawiszy numerycznych tak
jak zwykłe numery.
Klawisz oddzwaniania
W publicznych sieciach
telefonicznych klawisz ten jest
niezbędny do używania
niektórych usług
dodatkowych, takich jak
„oddzwanianie przy zajętości”.
Domyślnie telefon działa
w trybie wybierania
tonowego z czasem flash
równym 100 ms (Tone 1).
Konieczne może być
ustawienie innego czasu flash
za pomocą przełącznika
suwakowego pod spodem
telefonu.
Dodatek
Konserwacja
Do czyszczenia należy używać
tylko wilgotnej lub
antystatycznej ściereczki. Nie
należy używać suchej
ściereczki (ryzyko wyładowań
elektrostatycznych) ani
silnych środków czyszczących.
W razie problemów
z telefonem
Brak sygnału centrali:
sprawdź, czy przewody są
prawidłowo podłączone do
telefonu i gniazdka
telefonicznego.
Słychać sygnał centrali, ale
telefon nie wybiera numeru:
połączenie działa. Sprawdź,
czy ustawiony jest
odpowiedni tryb wybierania.
Rozmówca niczego nie
słyszy: sprawdź, czy włączone
jest wyciszanie.
Podczas połączenia słuchać
miarowe stukanie:
połączenie jest zakłócane
przez impulsy pomiarowe
z centrali, których telefon nie
potrafi zinterpretować.
Skontaktuj się zoperatorem
sieci.
Wkładanie etykietek
Puste etykietki do klawiszy
szybkiego wybierania można
znaleźć w witrynie
internetowej pod adresem
http://www.siemens.com/
euroset.
Zgłaszanie problemów
W razie jakichkolwiek
problemów z telefonem
podłączonym do analogowej
sieci telefonicznej należy
zwrócić się o pomoc do
operatora danej sieci lub
sprzedawcy telefonu.
Autoryzacja
Ten telefon jest przeznaczony
do użytku w kraju nabywcy,
zgodnie z oznaczeniem na
opakowaniu i na urządzeniu.
Zgodność urządzenia
z podstawowymi
wymaganiami dyrektywy
R&TTE jest potwierdzona
znakiem CE.
Page 17

5005 / IM 2 en-fr-pl-hu / A30054-M6522-A801-2-UR19 / 5005.fm / 13.12.2005
1
HU
Falra szerelés
(lásd az alábbi ábrát)
A csatlakozókábelek rögzítése
után a telefont felszerelheti a
falra:
◆ Fúrjon két lyukat a falba
(5 mm ∅) egymástól 110
mm távolságra. Illessze be
a tipliket és csavarja be a
süllyesztett facsavarokat
Biztonsági előírások
A telefon elhelyezésekor,
csatlakoztatásakor és
üzemeltetésekor feltétlenül
tartsa be az alábbi előírásokat:
◆ Kizárólag a mellékelt
csatlakozókat és kábeleket
használja!
◆ A csatlakozókábelt
kizárólag a rendeltetés
szerinti konnektorba/
aljzatba illessze.
◆ Kizárólag a javasolt
tartozékokat
csatlakoztassa.
◆ Gondoskodjon a
csatlakozókábel
balesetmegelőző
elhelyezéséről!
◆ A készüléket
csúszásmentes felületen
helyezze el!
◆ A telefont saját biztonsága
és védelme érdekében ne
használja fürdőszobában
vagy zuhanyzóban
(nedves helyiségekben). A
telefon nem cseppálló.
úgy, hogy azok kissé
kiálljanak a falból.
◆ A telefon alján csavarhúzó
segítségével pattintsa ki a
telefonkagylót rögzítő
csapot.
◆ A rögzítőcsapot illessze be
a kagylóvillán lévő
tartóba.
◆ A telefont a kiálló
csavarfejekre függessze
fel.
◆ Soha ne t egye ki a telefont
közvetlen napsugárzás
hatásának és ne helyezze
el hőforrások vagy más
elektromos készülékek
közelében.
◆ Óvja telefonját
nedvességtől, portól,
maró folyadékoktól és
gőzöktől.
◆ Soha ne szerelje szét a
telefont! A telefon
szerelését bízza
szakemberre.
◆ A csatlakozó- felületeket ne
érintse meg hegyes és
fémtárgyakkal!
◆ Ne húzza a telefont a
kábeleknél fogva!
◆ Telefonját kizárólag a
használati útmutatóval
együtt adja tovább
harmadik személynek.
Minden elektromos/
elektronikus készüléket
az általános háztartási
hulladéktól elkülönítve
kell kez elni és a vo natkozó ál lami
szabályozá st be kell tartan i. Ha a
terméken egy áthúzott szem etes
Page 18

5005 / IM 2 en-fr-pl-hu / A30054-M6522-A801-2-UR19 / 5005.fm / 13.12.2005
2
HU
ikont lát, az azt jelenti, hogy a
termék megfelel az európai
2002/96/EC szabályozásnak.
Az elhasznált készülékek
szakszerű kezelése és
elkülönített gyűjtése a
környezeti és egészségi károsító
hatások megelőzését szolgálják.
Mindez előfeltétele a használt
elektromos és elektronikus
eszközök újrafelhasználhatóságának.
Részletes információt kaphat az
elhasznált készülékek
kezelé séről a helyi hatóságoknál,
a hulladék-kezelő társaságnál,
vagy a szak-kereskedőnél, akitől
a terméket vásárolta.
A telefon üzembe
helyezése
Javaslat a telefon
elhelyezéséhez
◆ A telefont óvja a közvetlen
napsugárzástól vagy más
hőforrások hatásától.
◆ Ajánlott üzemeltetési
hőmérséklet + 5°C és
+40° C között.
◆ A telefon és bármilyen
rádióberendezés, például
mobiltelefon, személyhívó
vagy TV-készülék között
legalább egy méter
távolságot kell tartani.
Ellenkező esetben
telefonbeszélgetések
közben interferencia
léphet fel.
◆ A telefont ne szerelje fel
poros helyiségekben,
mivel ez megrövidíti a
telefon élettartamát.
◆ A készülék alkatrészeivel
(például a gumilábbal)
történő érintkezés a
bútorok felületén nyomot
hagyhat.
Hívószámok
tárcsázása és
elmentése
Hívószám tárcsázása
co Vegye fel a
Újrahívás
Az utoljára tárcsázott
hívószámot a készülék
automatikusan elmenti.
c; Vegye fel a
Célhívás és gyorshívás
Ön elmenthet 4 hívószámot
(max. 21 karakter)
célhívószámként a 4 Célhívás
gombhoz
hívószámot
gyorshívószámként a
számgombokhoz.
Mentés (vagy mentés a
jegyzet funkcióval)
c? Vegye fel a
vagy ...célhíváshoz
: Nyomja meg a
vagy ... gyorshíváshoz
D0...9
o Írja be a
?a Nyomja meg a
kagylót, majd
tárcsázza a
hívószámot.
kagylót, majd
nyomja meg az
Újrahívás gombot.
:, valamint 10
kagylót; (vagy a
jegyzet
funkcióval: hívás
közben) nyomja
meg a Mentés
gombot.
Célhívás gombot;
Nyomja meg a
Gyorshívás
gombot, majd a
gyorshívószámot
(számgombot);
hívószámot cél-,
illetve
gyorshíváshoz.
Mentés gombot,
(illetve
hívásbontás
után:) tegye le a
kagylót.
Page 19

5005 / IM 2 en-fr-pl-hu / A30054-M6522-A801-2-UR19 / 5005.fm / 13.12.2005
3
HU
Célhívás
c: Vegye fel a
Szükség esetén tárcsázáskor
egy-egy számjegyet is
hozzáadhat.
kagylót, majd
nyomja meg a
Célhívás gombot.
Gyorshívás
cD Vagye fel a
0...9 Nyomja meg a
kagylót, majd
nyomja meg a
Gyorshívás
gombot.
gyorshívószámot
(számgombot).
Cél- és gyorshívószámok
elmentése, illetve törlése
#
A * és
tárcsázási módtól függetlenül
tárolódik, azonban csak tone
üzemmód esetén kerül
tárcsázásra.
A Célhívás gombhoz vagy a
Gyorshívás gombhoz
elmentett hívószámok
törlésének esetei:
a beállított
◆ A beírt hívószám 21
számjegynél hosszabb.
◆ Egy hívószám elmentése
törli a korábban elmentett
hívószámot.
Tárcsázási szünetek
Ön egy vagy több tárcsázási
szünetet adhat meg (de nem
az 1. helyen!) a
segítségével. A szünetek a
memóriában tárolódnak és
egyes alközpontok esetén
szükségesek
(például: 0
◆ Az első 5 számjegyen
belüli tárcsázási szünetek
esetén:
A készülék tárcsázza az
elmentett teljes
hívószámot a körülbelül 2
másodperc hosszúságú
tárcsázási szünettel
együtt.
< gomb
< 2368).
◆ Az 5. számjegy utáni
tárcsázási szünetek
esetén:
A hívószám szünet után
elmentett részét a
készülék csak a Szünet
< megnyomása
gomb
után tárcsázza.
A telefon beállítása
Hallgató hangerő
beállítása
A hallgató hangerejét 2
fokozatra állíthatja be.
E Nyomja meg a
Némítás
Ön a telefon mikrofonját
kikapcsolhatja.
Hívás közben:
J Nyomja meg a
A mikrofon bekapcsolása:
nyomja meg újra ezt a
gombot.
Csengőhang beállítása
A csengőhang frekvenciáját és
a csengetés hangerejét 9
fokozatra állíthatja be (gyári
beállítás: 6-os fokozat) vagy
kikapcsolhatja.
c? Vegye fel a
# Nyomja meg a
0...9 Nyomja meg a 0-9
? Nyomja meg a
Hangos/Halk
gombot.
Némítás gombot.
kagylót, majd
nyomja meg a
Mentés gombot.
Kett őskereszt
gombot.
számgombok
egyikét. (0:
csengőhang
kikapcsolva, amíg
a kagylót újra fel
nem veszi).
Mentés gombot.
Page 20

5005 / IM 2 en-fr-pl-hu / A30054-M6522-A801-2-UR19 / 5005.fm / 13.12.2005
4
HU
Üzemeltetés saját
telefonközpontokon
keresztül
Egyéb funkciók/
Megbeszélés gomb
Beszélgetés közben
megbeszélést tarthat vagy
hívást továbbíthat. Ehhez
nyomja meg a Megbeszélés
gombot
kezelés az Ön
telefonközpontjától függ.
Gyári beállításban a
Megbeszélés gomb az 1-es
Flash-időre (impulzus/tone
kapcsoló a „Tone 1“
pozícióban) van beállítva. A
Ideiglenes váltás tone
üzemmódra „Impulzus“
beállítás esetén
A tone üzemmódot igénylő
funkciók (például
üzenetrögzítő távirányítása)
esetén a telefont a kapcsolat
időtartamára tone
üzemmódra állíthatja a
kapcsoló átkapcsolása nélkül.
Kapcsolatfelvétel után:
* Nyomja meg a
A kapcsolat megszakítása
után a készülék újra impulzus
üzemmódra vált.
. A további
>
Impulzus: impulzus tárcsázás
Tone 1: tone tárcsázás, Flash-idő 100 ms
Tone 2: tone tárcsázás, Flash-idő 280 ms
Csillag gombot.
Üzemeltetés
nyilvános
telefonrendszereken
keresztül
A nyilvános telefonrendszerek
lehetőséget nyújtanak – adott
esetben külön kérésre –
hasznos kiegészítő
szolgáltatások (például
hívásátirányítás, visszahívás,
ha foglalt, hármas konferencia
stb.) igénybevételére. Ezeket a
saját telefonközpontokhoz
történő csatlakozás esetén
szükség lehet a Flash-idő
módosítására (impulzus/tone
kapcsoló a „Tone 2“
pozícióban). További
információért lásd a
telefonközpont használati
útmutatóját.
Tárcsázási mód
módosítása
Gyári beállításban telefonja
tone tárcsázásra (Tone 1) van
beállítva. Előfordulhat, hogy a
telefonközpont tárcsázási
módjától függően telefonját
impulzus tárcsázásra
(Impulzus) kell állítania.
A készülék alján lévő kapcsoló:
szolgáltatásokat
meghatározott gombsorok
megnyomásával választhatja
ki. További információért
érdeklődjön hálózati
szolgáltatójánál.
Az összes gomsort a
hívásátirányításhoz
meghatározott hívószámokkal
együtt a többi hívószámhoz
hasonlóan elmentheti a
Célhívás gombhoz vagy a
Gyorshívás gombhoz.
Megbeszélés gomb
A nyilvános telefonrendszerek
esetében a Megbeszélés
gomb meghatározott
kiegészítő szolgáltatások
használatához szükséges,
például „Visszahívás, ha
foglalt“.
Gyári beállításban telefonja
tone üzemmódra (Flash-idő
100 ms) (Tone 1) van
beállítva. Szükség esetén a
Flash-időt átállíthatja a
készülék alján lévő
kapcsolóval.
Page 21

5005 / IM 2 en-fr-pl-hu / A30054-M6522-A801-2-UR19 / 5005.fm / 13.12.2005
5
HU
Függelék
Ápolás
A telefont nedves
törlőkendővel vagy
antisztatikus törlőkendővel
törölje le. Soha ne használjon
száraz törlőkendőt (fennáll az
elektrosztatikus feltöltődés és
kisülés veszélye) vagy éles
tisztítóeszközt!
Ha telefonja nem működik
hibátlanul
A kagyló felvételekor nincs
vonalhang: Ellenőrizze, hogy
a csatlakozókábel a telefonnál
és a telefonaljzatnál
megfelelően illeszkedik.
Vonalhang hallatszik, de a
telefon nem tárcsáz: A
csatlakozás rendben van.
Ellenőrizze a tárcsázási
üzemmód beállítását.
Beszélgetőpartnere nem
hallja Önt: A némítás be van
kapcsolva.
A kapcsolat folyamán
rendszeresen impulzuszajok
hallhatók: A csatlakozás
számláló impulzusokat kap a
központtól, amelyeket a
telefon nem értékel ki. A
problémával forduljon
hálózati szolgáltatójához.
Behelyezhető címkék
Üres behelyezhető címkéket a
Célhívás gombokhoz a http://
www.siemensmobil.hu
internetes címen talál.
Kontakt személy
Amennyiben a
kommunikációs rendszerben
az analóg hálózati
hozzáféréssel kapcsolatos
problémák merülnek fel,
kérjük, forduljon hálózati
szolgáltatójához, illetve a
márkaboltokhoz.
Licensz
A telefon az Ön országában
történő használatra készült,
amint azt a csomagoláson és a
készüléken található jelzés is
mutatja.
A készüléknek az R&TTE
irányelv alapvető
követelményei szerinti
megfelelőségét a CE jelzés
igazolja.
Excerpt from the original
declaration
Hereby, Siemens Home and
Office Communication Devices
GmbH & Co. KG, declares that
this Euroset 5005 is in compliance with the essential requirements and other relevant provisions of Directive 1999/5/EC.
The Declaration of Conformity
(DoC) has been signed. If necessary, a copy of the original DoC
can be made available via the
company hotline.
Issued by
Siemens Home and Office Communication Devices GmbH & Co. KG
Schlavenhorst 66
D-46395 Bocholt
© Siemens Home and Office Communication Devices GmbH & Co.
KG 2005
All rights reserved. Subject to availability.
Rights of modification reserved.
www.siemens.com/gigaset
 Loading...