

Page 1

X2 TECH, X2 Graphic
Printer User Guide
701P36677 February 2001
Page 2

Page 3

Introduction
This Introduction overviews the ColorgrafX X2. Additionally, this
chapter provides information on how to use this guide as well as
the location of information you will need to operate, maintain,
and service the ColorgrafX X2.
Welcome to the ColorgrafX X2
Congratulations on acquiring your new ColorgrafX X2.
Xerox Engineering Systems (XES) looks forward to helping you
increase your organizational productivity through full XES
support with the ColorGrafX hardware, software, supplies, and
service.
Your ColorgrafX X2 is a flexible, high speed six-color (graphics
model) or four-color TECH model) inkjet printer, with piezo head
technology. The printer produces vivid, near photographic quality
prints. Its two media input rolls, automatic cutter, extra large ink
capacity, and heavy-duty design make this production printer
ideal for high volume print production. The compact footprint,
quiet printing, auto-alignment, auto-cleaning and permanent
heads (no more replacing cartridges in the middle of a print
operation) also make this printer ideal for the in-house corporate
graphics environment.
About this guide
This user guide contains information you need to operate and
maintain the ColorgrafX X2 safely and efficiently. Please read
this guide carefully. Always refer to this user guide if a problem
occurs during the use of the ColorgrafX X2.
Introduction i
Page 4
About this guide (con’t)
Conventions
Special conventions are used in this user guide to help you get
the most from the guide.
Typefaces and symbols in the guide identify terms and
conditions. The table below provides you with a description of
the typefaces and symbols used in this user guide.
Typeface Symbol Description
Bold
Italic
Italic
Bold and
Normal
Bold
Normal
None Identifies an action to perform, like press a button or select
an area on the touch screen It also identifies terms, a
feature, an option or message.
Example 1: Select print.
Example 2: The ready to copy message is displayed.
Example 3: The normal R/E screen is displayed.
None Identifies a chapter or section title in this guide. For more
information refer to the chapter or the section title.
Note: The symbol on the left and the word note at the
beginning of a sentence indicates additional information,
explanations, and helpful suggestions.
Caution: The symbol on the left and the word Caution at
the beginning of a sentence alerts the user that certain
operations or procedures may cause damage to the
machine.
WARNING: The symbol on the left and the word
warning at the beginning of a sentence alerts the user to
an operation that could cause injury to them.
This symbol identifies a web site address.
Normal
ii Introduction
This symbol identifies a phone number.
Page 5

About this guide (con’t)
Organization
The ColorgrafX X2 user guide contains seven chapters and two
appendices. Each chapter may contain several sections. This
section provides you with a brief overview of each chapter.
For detailed information, refer to the appropriate chapter and
section.
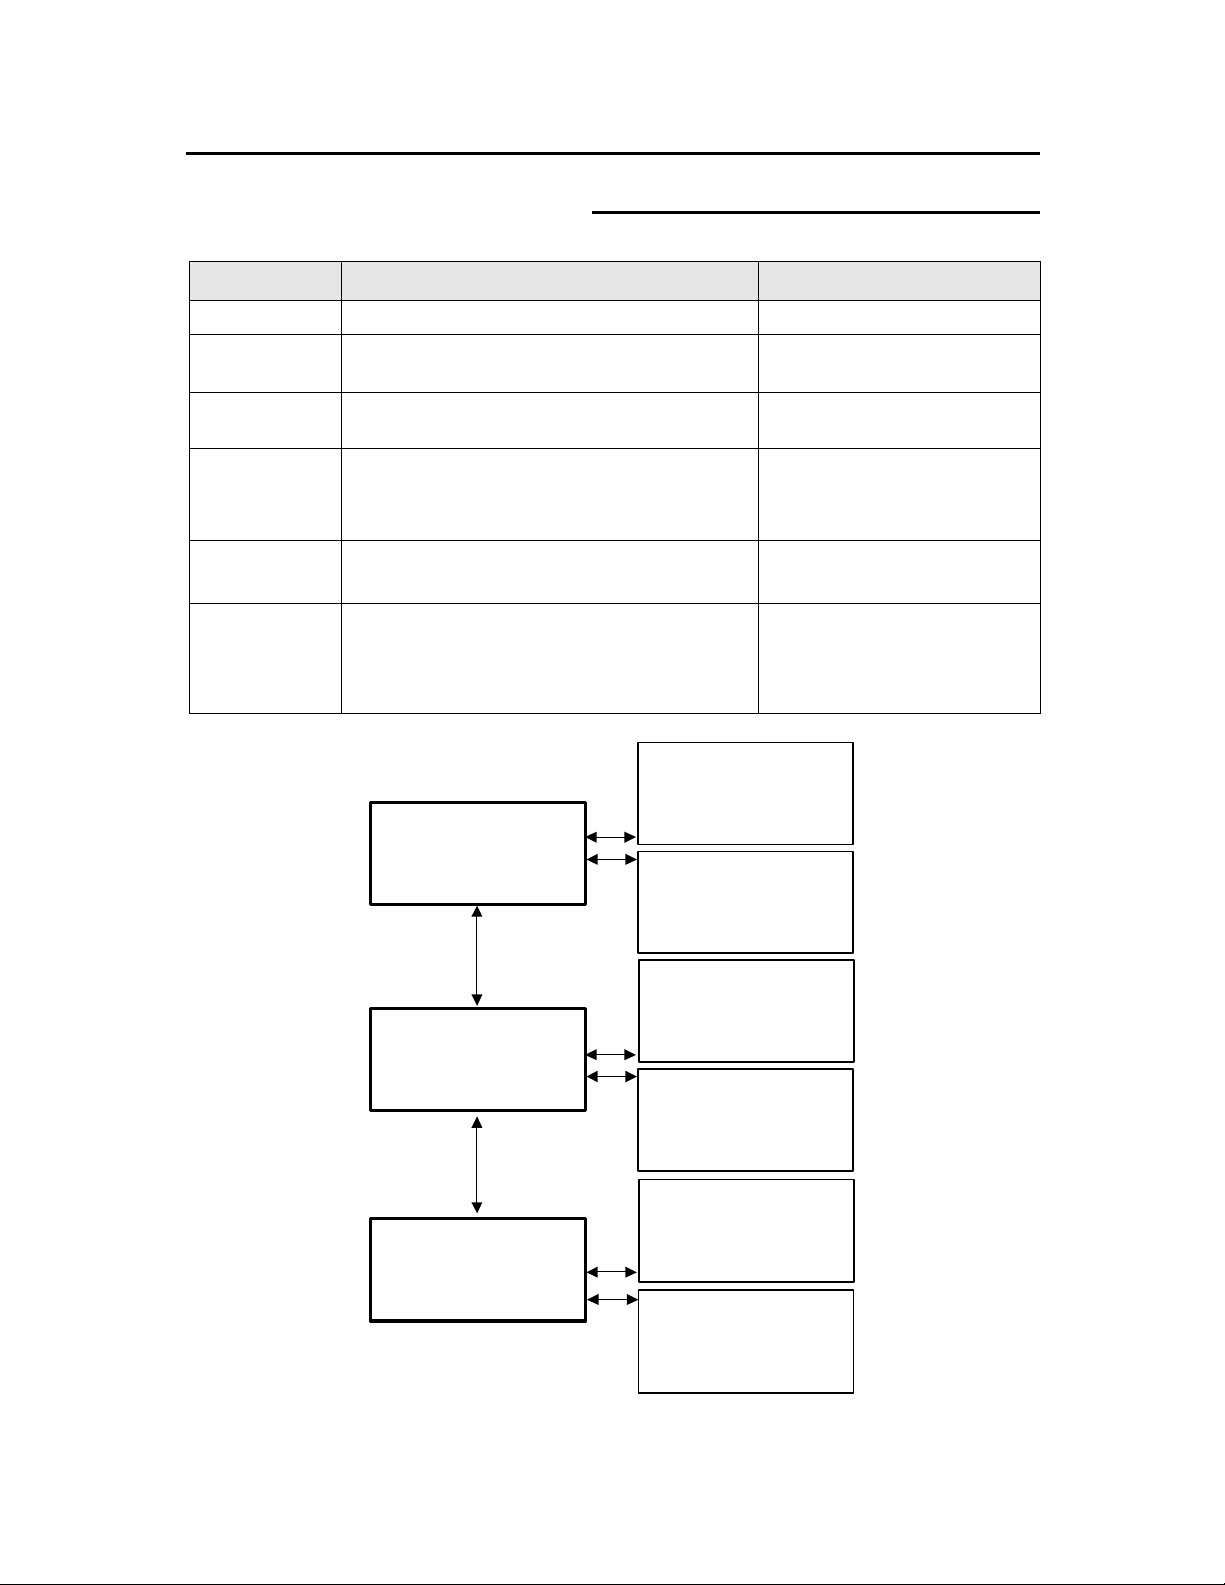
Introduction This chapter provides customer support, compliance, legal
issues, safety information, and the phone numbers for service
and supplies.
Getting to know
the ColorgrafX X2 This chapter introduces you to the ColorgrafX X2’s features and
components.
Operation This chapter describes the procedures to operate the ColorgrafX
X2, including menu options used at the printer’s operation panel.
Supplies This chapter provides the procedures to replace inks and media
as well as the requirements to properly store your supplies to
ensure optimal print quality.
Maintaining
Print quality This chapter provides detailed procedures to adjust the printer
for clear, sharp print output with maximum resolution and sharp
details.
Jam clearance This chapter provides the procedures to clear media jams from
both the media transport and the cutter assembly.
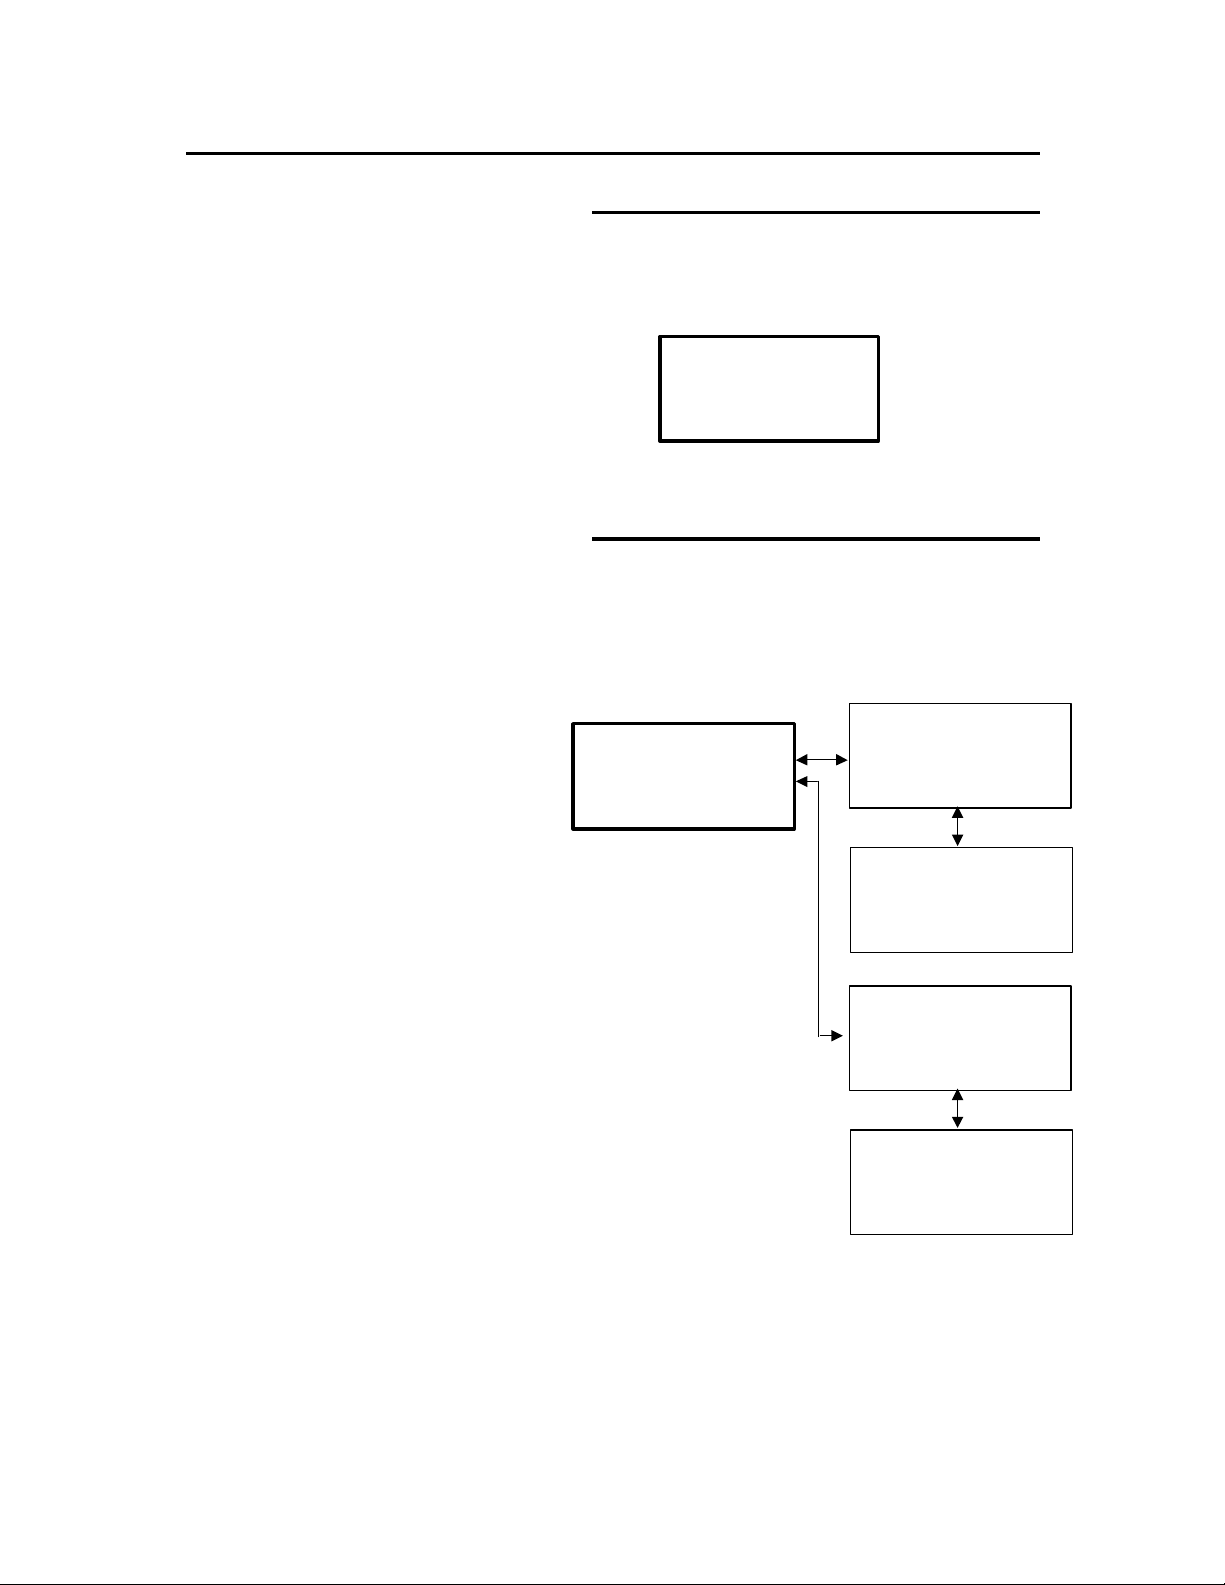
Appendix A
In case of difficulty Appendix A provides problem solving information. When a
machine problem occurs, go to this section first to assist you with
troubleshooting the problem. This chapter also provides the
phone number to call for service.
Appendix B
Menu tree Appendix B provides a complete operations panel menu tree
along with associated descriptions of each option.
Introduction iii
Page 6

Customer support
Service
Should you be unable to resolve a problem, place a call to your
Xerox Engineering Systems service representative.
Your service representative will assist you in keeping your
ColorgrafX X2 operating and if required, arrange for a customer
service engineer to inspect your ColorgrafX X2 and restore its
performance.
When you call service you will need the machine serial number.
You can determine the serial number from the label located on
the rear of the unit.
Fill in each item below. When you call for service, they will
request this information.
Customer account name:
Customer account number:
Machine type:
Machine serial number:
Purchase date:
Please call your Xerox Engineering Systems service representative.
For more information, visit the Xerox Engineering Systems web site
at http://www.xes.com
.
Supplies
To order supplies for the ColorgrafX X2, call your Xerox Engineering
Systems representative.
For more information, visit the Xerox Engineering Systems web site
at http://www.xes.com
.
iv Introduction
Page 7

Compliance information
FCC Compliance in the USA
WARNING: This equipment has been tested and found to
comply with the limits for a Class A computing device pursuant
to Subpart B of Part 15 FCC Rules.
This equipment generates, uses, and can radiate radio
frequency energy and, if it is not installed and used in
accordance with the instruction guide, may cause interference to
radio communications. These limits are designed to provide
reasonable protection against such interference when operated
in a commercial environment. Operation of this equipment in a
residential area is likely to cause interference, in which case the
user, at his own expense, will be required to take whatever
measures may be required to correct the interference.
EME Compliance in Canada
This digital apparatus does not exceed the Class A limits for
radio noise emissions from digital apparatus set out in the radio
interference regulations of the Canadian Department of
Communications.
Conformité EEM
Cet appareil numérique est conforme aux limites d'émission de
bruits radioélectriques pour les appareils de classe A stipulées
dans le Règlement sur le brouillage radioélectrique du Ministère
des Communications du Canada.
Introduction v
Page 8

It’s illegal
In the USA
It is against U.S. law to reproduce copyrighted material without
the permission of the copyright owner unless the copying falls
within the "Fair Use" library reproduction rights of the copyright
law.
Further information on these U.S. provisions may be obtained from
the Copyright Office, Library of Congress, Washington, D.C. 20550,
or telephone the Copyright Office at (202) 707-9100 and ask for
circular 21. Copying other items may be prohibited. If you have any
questions seek legal advice.
In Canada
Parliament, by statute, has forbidden the copying of the following
subjects under certain circumstances. Penalties of fines or
imprisonment may be imposed on those guilty of making such
copies.
Current bank notes or current money.
Obligations or securities of a government or bank.
Exchequer bill paper or revenue paper.
The public seal of Canada or of a province, or the seal of a
public body or authority in Canada, or of a court of law.
Proclamations, orders, regulations or appointments, or notices
thereof (with intent to falsely cause same to purport to have been
printed by the Queen’s Printer for Canada, or the equivalent
printer for a province).
Marks, brands, seals, wrappers, or designs used by or on behalf
of the Government of Canada or of a province, the government
of a state other than Canada, or a department, board,
commission or agency established by the Government of
Canada, or a province or a government of a state other than
Canada.
Impressed or adhesive stamps used for the purpose of revenue
by the Government of Canada or a province or the government
of a state other than Canada.
Documents, registers, or records kept by public officials charged
with the duty of making or issuing certified copies thereof, where
the copy falsely purports to be a certified copy thereof.
Copyright material or trademarks of any manner or kind without
the consent of the copyright or trademark owner.
The above list is provided for your convenience and assistance,
but is not all-inclusive, and no liability is assumed for its
completeness or accuracy. In case of doubt, consult your
solicitor.
vi Introduction
Page 9

Safety notes
Your system has been designed and tested to meet strict safety
requirements. These include safety agency examination and
approval plus compliance with established environmental
standards.
WARNING: Failure to follow the recommendations in this
section may result in personal injury or rescinding of the
machine operation agreement.
Maintenance safety
Follow all warnings and instructions marked on or supplied with
the product.
Unplug the units from the wall outlet before cleaning the exterior.
Always use materials specifically designated for the ColorgrafX
X2. Use of other materials may result in poor performance and
could create a hazardous situation.
Do not use aerosol cleaners. Follow the instructions in this
operator guide for the correct cleaning methods.
Never use supplies or cleaning materials for purposes other than
what they were intended. Keep all supplies and materials out of
the reach of children.
Do not use the units near water, wet locations, or outdoors.
The components of this product are equipped with a three-wire,
grounding-type plug (i.e., a plug having a grounding pin). This
plug will only fit into a grounding-type power outlet. This is a
safety feature. To avoid the risk of electric shock, contact your
electrician to replace the receptacle if you are unable to insert
the plug into the outlet.
Never use a ground adapter plug to connect the system to a
power source that lacks a ground connection terminal.
This system should be operated from the type of power source
indicated on the marking label. If you are not sure of the type of
power available, consult your local power company.
The power supply cord is the disconnect device for this
equipment. Make sure that the installation is near the socket
outlet and is easily accessible.
Do not allow anything to rest on the power cord. Do not locate
the units where someone will step on the cord.
The units should not be placed in a built-in installation unless
correct ventilation is provided.
Introduction vii
Page 10

Safety notes (con’t)
Maintenance safety (con’t)
Never push objects of any kind into the slots of the units as they
may touch dangerous voltage points or short out parts that could
result in a risk of fire or electric shock.
Never spill liquid of any kind on the units.
Never remove any covers or guards that require a tool for
removal. There are no operator serviceable areas within these
covers.
Never attempt any maintenance function that is not specified in
this operator guide.
Never defeat interlock switches. Machines are designed to
prevent operator access to unsafe areas. Covers, guards, and
interlock switches are provided to ensure that the system will not
operate with the covers opened.
If the power plug is used as a disconnect device, instructions
shall comply with UL 1950 Sec. 1.7.2. The power switch does
not break power to the low voltage power supply.
Unplug the reprographic system from the wall outlet and call for
service under the following conditions:
When the power cord is damaged or frayed.
If the gas piston springs in the upper cover of the printer lose
their strength.
If liquid has been spilled into the product.
If the units have been exposed to rain or water.
If the units are producing unusual noises or odors.
If the units or the cabinets have been damaged.
If you need additional safety information concerning the
ColorgrafX X2 or XES supply materials, call:
Please call your Xerox Engineering Systems representative.
viii Introduction
Page 11

Table of contents
Introduction .....................................................................................................................i
Welcome to the ColorgrafX X2....................................................................................i
About this guide ........................................................................................................... i
Conventions ............................................................................................................ ii
Organization........................................................................................................... iii
Customer support ....................................................................................................... iv
Service ................................................................................................................... iv
Supplies.................................................................................................................. iv
Compliance information.............................................................................................. v
FCC Compliance in the USA................................................................................... v
EME Compliance in Canada.................................................................................... v
Conformité EEM..................................................................................................... v
It’s illegal................................................................................................................... vi
In the USA ............................................................................................................. vi
In Canada ............................................................................................................... vi
Safety notes............................................................................................................... vii
Maintenance safety................................................................................................ vii
Getting to know your ColorgrafX X2 .............................................................................. 1
Feature overview.........................................................................................................1
High-speed / high quality printing ...........................................................................1
Quick drying Ink ..................................................................................................... 2
Media widths........................................................................................................... 3
Media types.............................................................................................................3
Minimum down-time...............................................................................................4
Printer components...................................................................................................... 5
Front view ............................................................................................................... 5
Right-side view ....................................................................................................... 5
Rear view ................................................................................................................ 6
Operation panel ....................................................................................................... 9
Operations..................................................................................................................... 12
Operations panel menu.............................................................................................. 12
Entering menu mode.............................................................................................. 12
Menu options......................................................................................................... 13
Set mode ...............................................................................................................14
Starting a print job..................................................................................................... 22
Operating the cutter...................................................................................................23
Replacing cutter blade ........................................................................................... 24
Using the take-up roller ............................................................................................. 26
Setup the take-up assembly.................................................................................... 26
Starting the take-up roller ...................................................................................... 27
Operating the printer from RIP software....................................................................27
Supplies ........................................................................................................................ 28
Replacing ink bottles................................................................................................. 28
Precautions............................................................................................................28
When to replace ink bottle ..................................................................................... 28
Introduction ix
Page 12

Replacement procedures........................................................................................29
Replacement procedures........................................................................................30
Replacing the waste ink bottle ................................................................................... 30
Precautions............................................................................................................30
When to replace the waste ink bottle...................................................................... 31
Replacement procedures........................................................................................31
Loading and removing media .................................................................................... 32
Supported media.................................................................................................... 32
Loading media in the printer..................................................................................32
When to replace media .......................................................................................... 35
Removing media ................................................................................................... 35
Supply storage........................................................................................................... 36
Ink bottle storage...................................................................................................36
Media storage........................................................................................................37
Maintaining print quality...............................................................................................38
Overview .................................................................................................................. 38
Head Maintenance..................................................................................................... 38
Normal maintenance.............................................................................................. 38
Manual maintenance process ................................................................................. 38
Test Print............................................................................................................... 39
Jam clearance................................................................................................................40
Clearing a media jam................................................................................................. 40
Overview............................................................................................................... 40
More tips for clearing media jams.......................................................................... 43
Clearing a cutter jam ................................................................................................. 44
Overview .................................................................................................................. 46
Trouble isolation procedures .....................................................................................46
Quick checks......................................................................................................... 46
Common operating problems..................................................................................... 51
LCD error messages .................................................................................................. 55
User resolvable......................................................................................................55
Menu Tree .................................................................................................................... 57
SET menu – first level only....................................................................................... 58
SET menu – detailed ................................................................................................. 59
HEAD MAINTENANCE menu ................................................................................ 62
REPLACING BLADE menu.....................................................................................63
x Introduction
Page 13

Getting to know your ColorgrafX X2
The printer’s ability to select and print from pre-installed media
widths, coupled with its large ink capacity, makes the printer a flexible
“workgroup” printing resource that is easy-to-use and maintain.
Feature overview
Your ColorgrafX X2 is an easy to use, large format color inkjet
printer. The printer’s features include:
Bi-directional printing for maximum print speed
•
High image quality with resolution up to 720 dpi
•
Six color (graphics model) or four color TECH model) inks.
•
six ink colors for the graphics model are black, cyan, light cyan,
magenta,
TECH model are black, cyan, magenta, and yellow.
UV resistant, water resistant, and dry quickly so prints are ready
to be handled as soon they are printed.
High capacity ink bottles (0.5 or 0.25 liter) for sustained, high-volume
•
printing
The 54” model holds two user-selectable media roll width sizes:
•
54”, 50”, 42”, 36”, 23.4”.
The 36” model holds two user-selectable media roll width sizes:
•
36”, 23.4, and 11”.
light magenta and yellow. The four ink colors for the
The
The inks are
Wide variety of available media
•
Self-cleaning design requires minimum maintenance down-time
•
High-speed / high quality printing
The printer has a wide inkjet printing head for each of the six ink
colors: black, cyan, light cyan, magenta,
Combined with the printer’s accurate, bi-directional print capability,
the ColorgrafX X2 can produce high-quality prints in full color
at speeds up to 622 sq.ft. / 57.8 sq.m. per hour. The speed is
based on print mode used. Available modes are:
One pass, bi and uni-directional 360 dpi mode Fastest
•
One pass, bi and uni-directional 3 black 360 dpi
•
mode---
Two pass, bi and uni-directional 360 dpi mode
•
Four pass, bi and uni-directional 360 dpi mode
•
Eight pass, bi and uni-directional 360 dpi mode
•
Sixteen pass, bi and uni-directional 360 dpi mode
•
Two pass, bi and uni-directional 720 dpi mode
•
Four pass, bi and uni-directional 720 dpi mode
•
Eight pass, bi and uni-directional 720 dpi mode
•
TECH model
light magenta and yellow.
Sixteen pass, bi and uni-directional 720 dpi mode Highest
•
Quality
Getting to Know Your ColorgrafX X2 1
Page 14
Feature overview (con’t)
r
Quick drying Ink
X2 Inks are pigmented, oil-based, and designed
specifically for use with X2 printers and supplies.
These inks are formulated to be smudge resistant
and instant drying. The color gamut is based on the
SWOP (Standard Web Offset Printing) standards fo
press-quality, color graphics, versatility and easy
color calibration. The inks do not require any special
drying time after printing.
6-color printing adds two tonal inks, Light Cyan and
Light Magenta, to the typical suite of 4-color process
printing (Cyan, Magenta, Yellow, and Black). It helps
reduce the gradient perception between dithered
process color shifts, or “smooths out” blended areas
of an image by introducing lighter tones of the colors
that construct the blend. For example, skin tones
appear more true because the color of the dots that
create the image on paper are not as dark from one
percentage to the next.
Because the X2 inks are almost instantly dry when
printed, images can be laminated immediately.
However, X2 prints are NOT waterproof. That is,
they CANNOT be submerged in water or subjected
to running water. Finishing guidelines for outdoor
durability (i.e. prints must be encapsulated) must be
followed when constructing a print for outdoor use.
Refer to your
Applications Guide
requirements.
Caution: ColorgrafX authorized inks, media or
other supplies are designed and quality tested to
assure optimum performance from your X2 printer.
Other materials may not produce the same quality
product and may, in some cases, cause service
problems or damage to your unit.
IMPORTANT NOTE: Such damage will void the
warranty and may require additional service cost.
ColorgrafX X2 Inkjet Graphics
for specific application
2 Getting to Know Your ColorgrafX X2
Page 15
Feature overview (con’t)
Media widths
The printer holds one of each of the following width
media rolls for each roll location:
54 inches (1390 mm) –
•
50 inches (1270 mm) –
•
42 inches (1066 mm) –
•
36 inches (914 mm)
•
23.4 inches (594 mm)
•
11 inches (297 mm) – 36
•
When two media sizes are installed in the printer,
two size graphics can be printed without having to
physically replace and re-install the media rolls.
Media types
The printer can use a variety of media optimized for
different purposes. These include:
Paper, Presentation, 360 dpi
•
Paper, Presentation, 720 dpi
•
Paper, Reinforced, 360 dpi
•
Paper, Line Art, 360 dpi
•
Paper, Photo-base, 360 dpi
•
Film, White Matte, 360 dpi
•
54” only
54” only
54” only
” only
Backlit Film, 360 and 720 dpi
•
Pressure Sensitive Vinyl (PSV), 360
•
Cloth, Polyester, 360 dpi
•
Canvas, Polyester, 360 dpi
•
Refer to your
Applications Guide
type and available widths.
ColorgrafX X2 Inkjet Graphics
for a description of each media
Getting to Know Your ColorgrafX X2 3
Page 16

Feature overview (con’t)
f
X2 supplied products are all direct-write, specially
coated materials that vary in coating structure,
physical properties (such as basis weight and
overall product thickness), and base material type
(such as paper, fabric, film or vinyl). These
variances not only cause the printer setup for each
material to be unique in order to successfully run
each material through the printer, but also cause the
achievable image quality per product to be different.
The coating layer on each media is different
because it must adhere to the individual base
material (i.e., thick or porous, smooth or woven) as
well as image in either 360 or 720 dpi print mode.
Therefore, the image quality will vary per media
type.
For example, Poly Canvas image quality is not equal
to that of Presentation Paper, even though both are
360 dpi. Your RIP should provide curves that are
calibrated specifically for the unique requirements o
each media.
The recommended print media has controlled
curling properties optimized for the printer’s media
transport mechanism. Using the recommended
media will reduce media jams.
Minimum down-time
The ColorgrafX X2 inkjet printer is a self-maintaining
printer and requires no routine maintenance. The
printer performs automatic head cleaning during
routine use
.
4 Getting to Know Your ColorgrafX X2
Page 17
Printer components
The following identifies the locations of the ColorgrafX X2’s
components.
Front view
1
2 3 4
5
6
7
9
8
The picture to the left identifies the location of the
ColorgrafX X2’s main components as viewed with
the front covers open.
1. Top cover
2. Media feeding area
3. Media set guide
4. Feed roller knob
5. Release lever
6. Operation panel
7. Front cover
8. Media exit (take-up roller) –
model, optional on 36” model
standard on 54:
9. Stand
11
22
Right-side view
The components located to the right of the printer
are the:
1. Ink bottle holder
2. Waste ink bottle tray
Getting to Know Your ColorgrafX X2 5
Page 18
Printer Components (con’t)
1
2
3
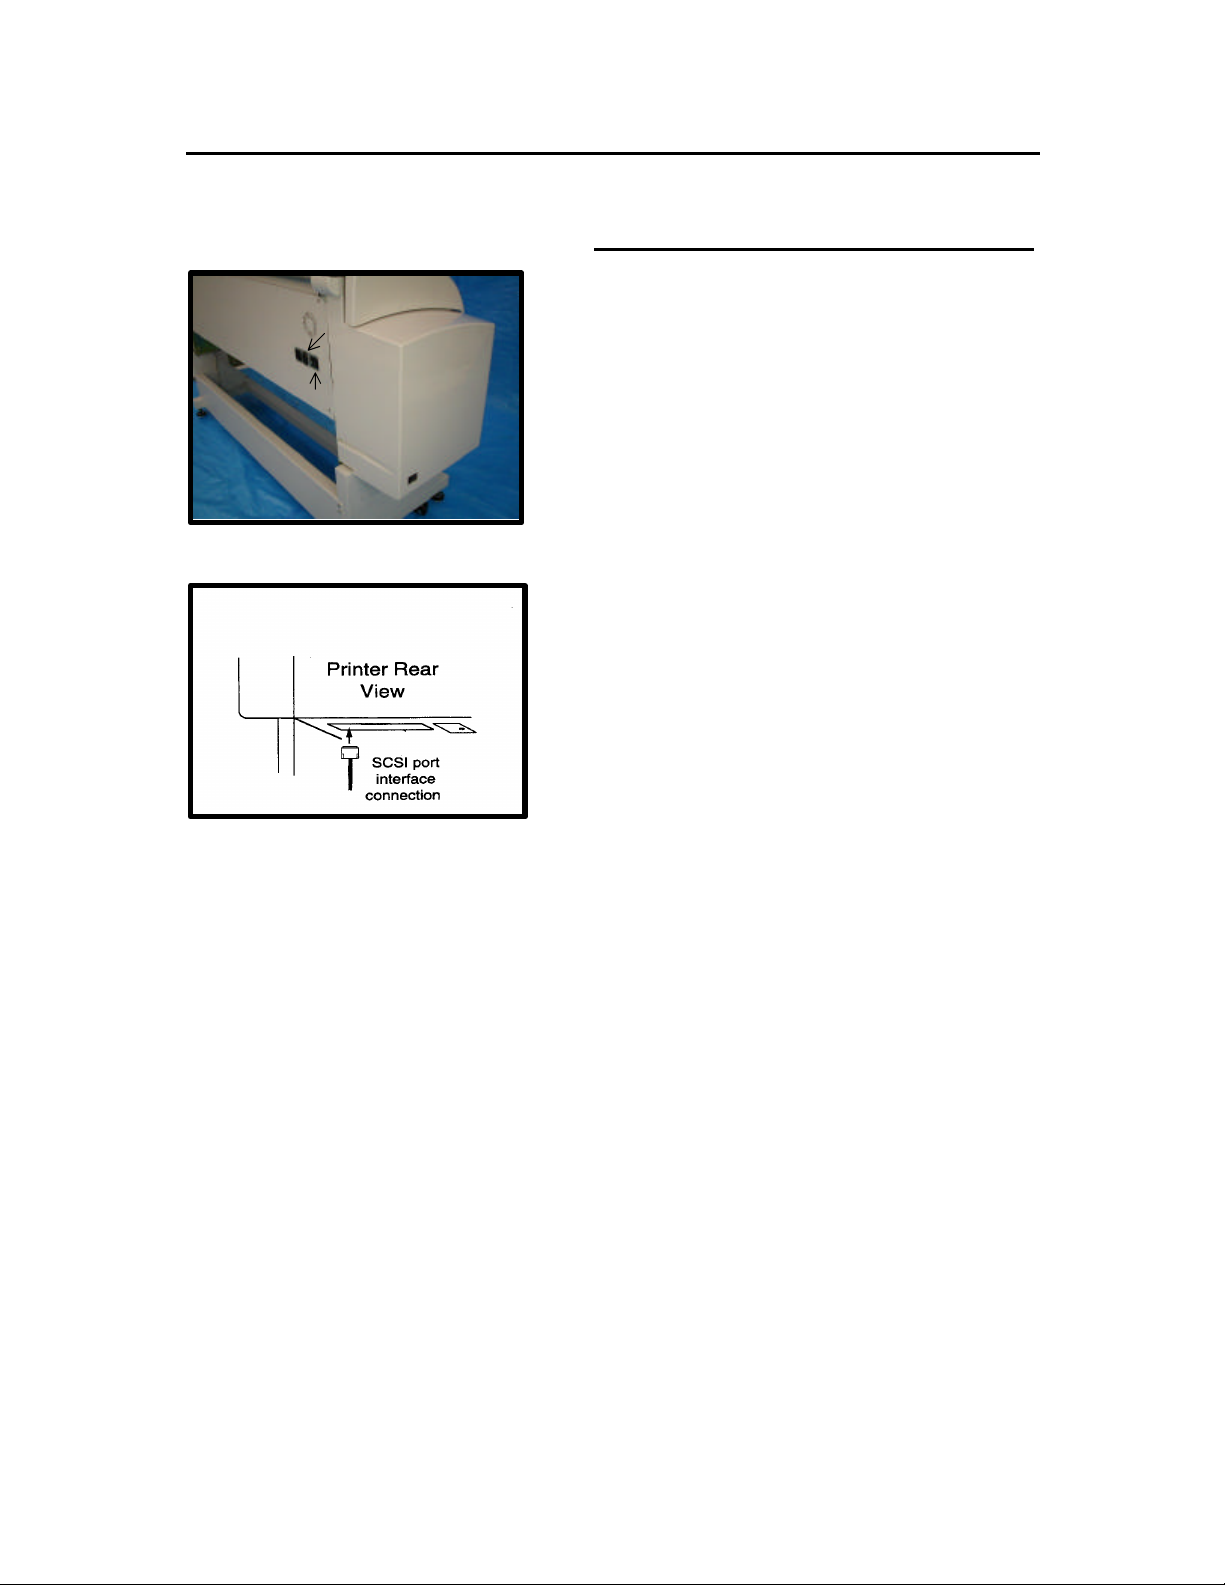
Rear view
The power connection, circuit breaker, and on/off
switch are located at the rear of the printer.
1. Power connector
2. Circuit breaker
3. Power switch
4. SCSI port interface connection
6 Getting to Know Your ColorgrafX X2
Page 19

Printer components (con’t)
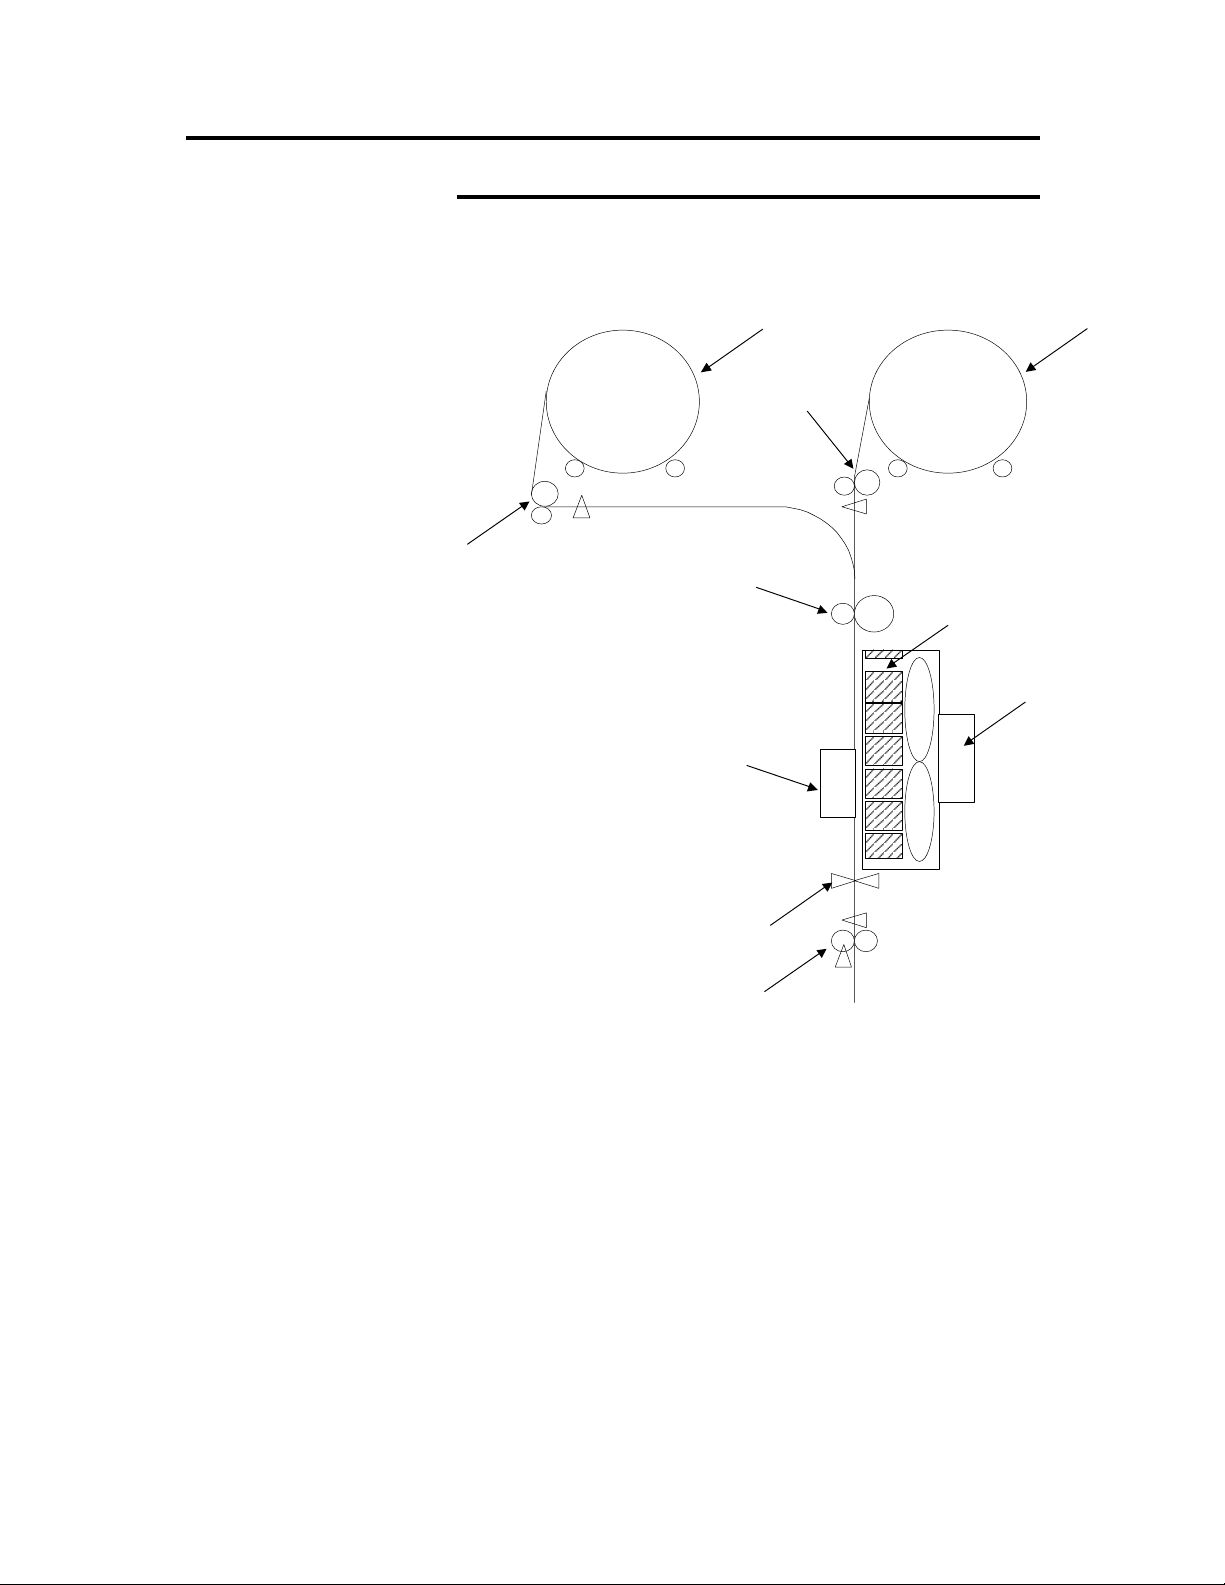
Media transport
To thoroughly know your printer, you need to know how the print
passes through the printer. Refer to the illustration on the next page.
The process is as follows:
1. Media roll - The media roll is mounted in the printer.
2. Media feed roller - The media feed roller pulls the media from the
media roll. It is driven through a clutch which couples to the
timing belt driven by the Pinch roller drive motor. The clutch and
its associated electronics allow the printer to select which media
roll is used to make each print.
3. Media pinch rollers - These rollers are the main media transport
rollers in the printer. The media Pinch roller is driven through a
worm gear connected to a precision stepper motor.
4. Vacuum fans - Six vacuum fans, behind the vacuum platen,
provide the vacuum that holds the media in place on the platen.
5. Vacuum platen - The vacuum platen is a flat surface that holds
the media against its surface using vacuum pressure. Media
held by the vacuum platen presents a flat, unmoving precisionaligned surface to the printer heads while ink is being applied.
6. Print heads - The print heads move across the surface of the
media, depositing ink as required, driven by the carriage motor
and carriage belt.
7. Cutter - After a print is completed, the cutter separates the print
from the media roll completing the print cycle.
8. Media exit roller - The exit roller has a series of star wheels and
exit rollers that gently move the finished print out of the printer.
Getting to Know Your ColorgrafX X2 7
Page 20
Printer components (con’t)
Media transport (con’t)
2
11
2
3
5
4
6
7
8
8 Getting to Know Your ColorgrafX X2
Page 21
Printer components (con’t)
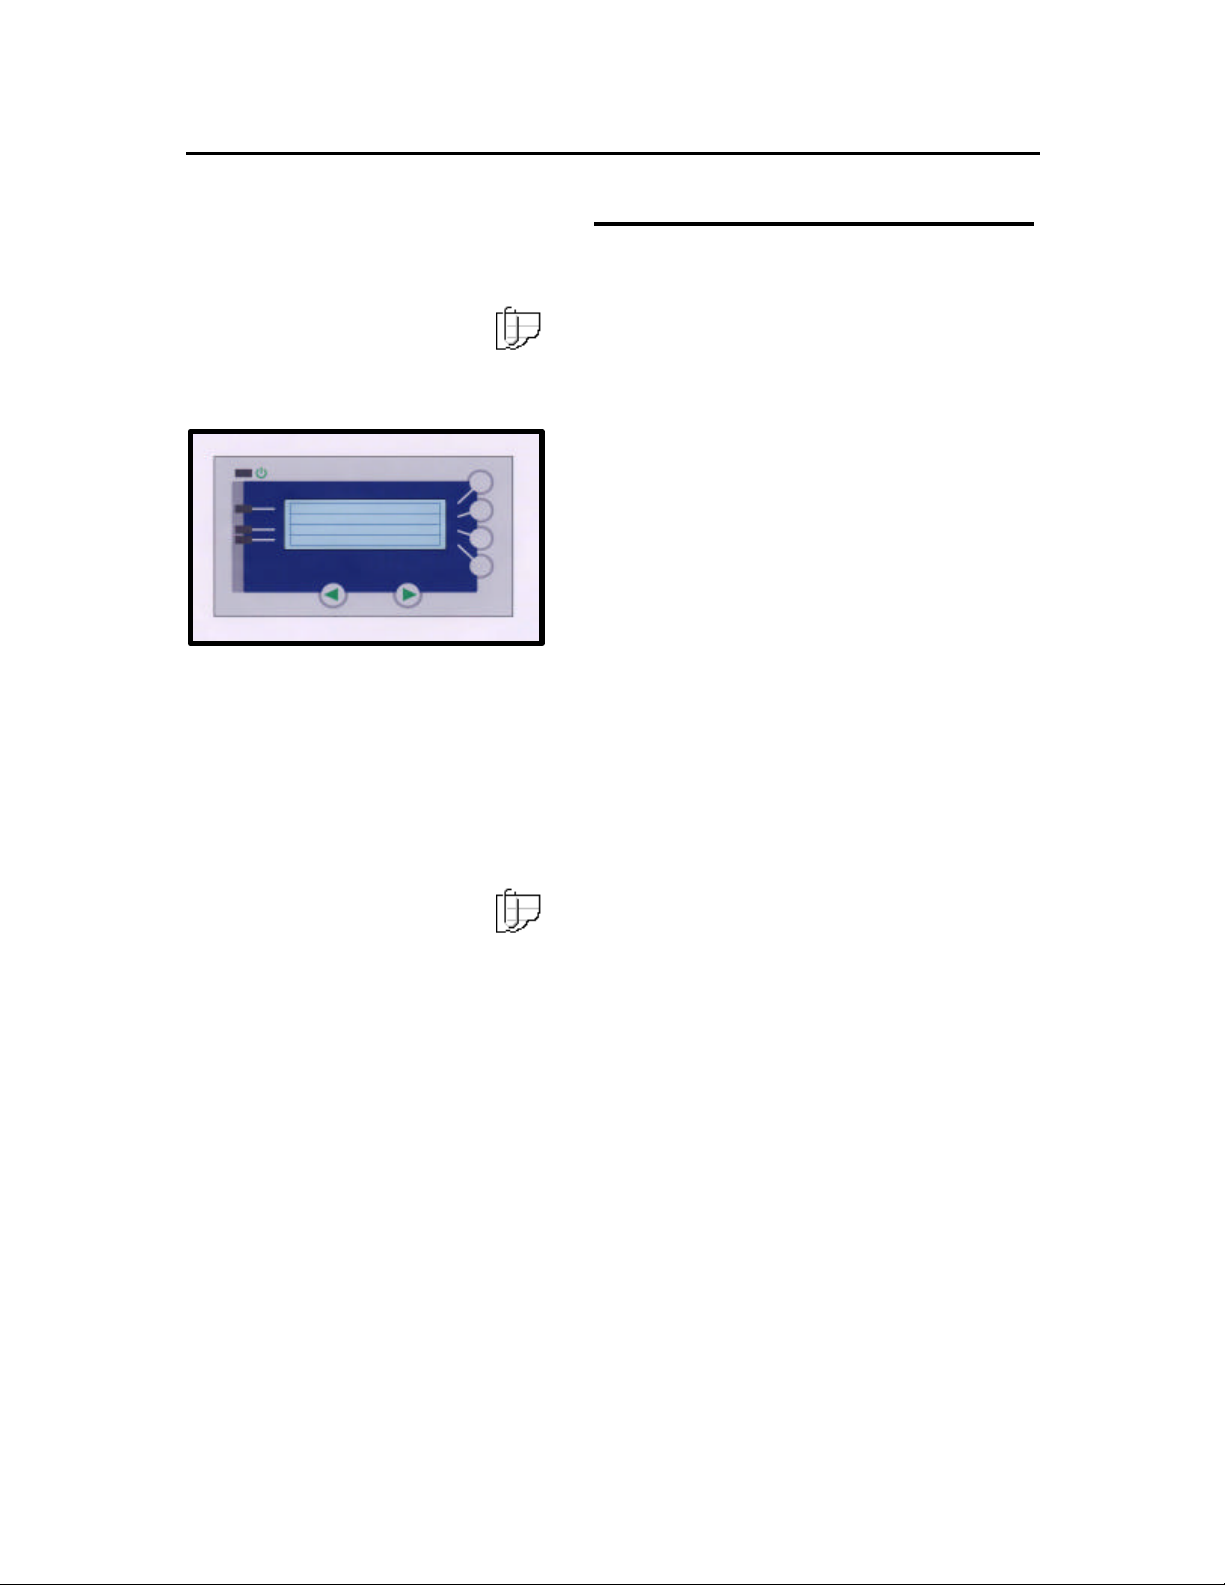
Operation panel
The printer’s operation panel is used to control the
printer.
Note: The operation panel can over-ride a print job
being received from a remote computer. Always
check that there is not a job in progress before
assuming control of the printer using the operation
panel.
The operation panel includes the:
LCD display -- The LCD display shows the
•
current status of the printer. Menu items,
parameters, or error messages are displayed on
the 20 characters x 4 rows LCD (Liquid Crystal
Display).
Power LED, the top LED on the left side of the
•
LCD display. When the printer is turned on, the
green LED is lit and is dark when the printer is
off.
Ready LED, the second LED from the top.
•
When the printer is ready, the green LED is lit
and is dark when the printer is not ready.
Error LED, the third LED from the top. When
•
the printer is in error status, the red LED is lit
and the printer stops.
Warning LED, the bottom LED on the left side
•
of the LCD display. When the printer is in
warning status, the red LED is lit.
Note: LEDs 3 and 4 are also used to indicate a low
media status. If the media roll contains 20% or less
media, the associated LED will flash.
The right and left arrow buttons, located at
•
the bottom of the operation panel. They are
used to select menu options within a menu level.
Getting to Know Your ColorgrafX X2 9
Page 22

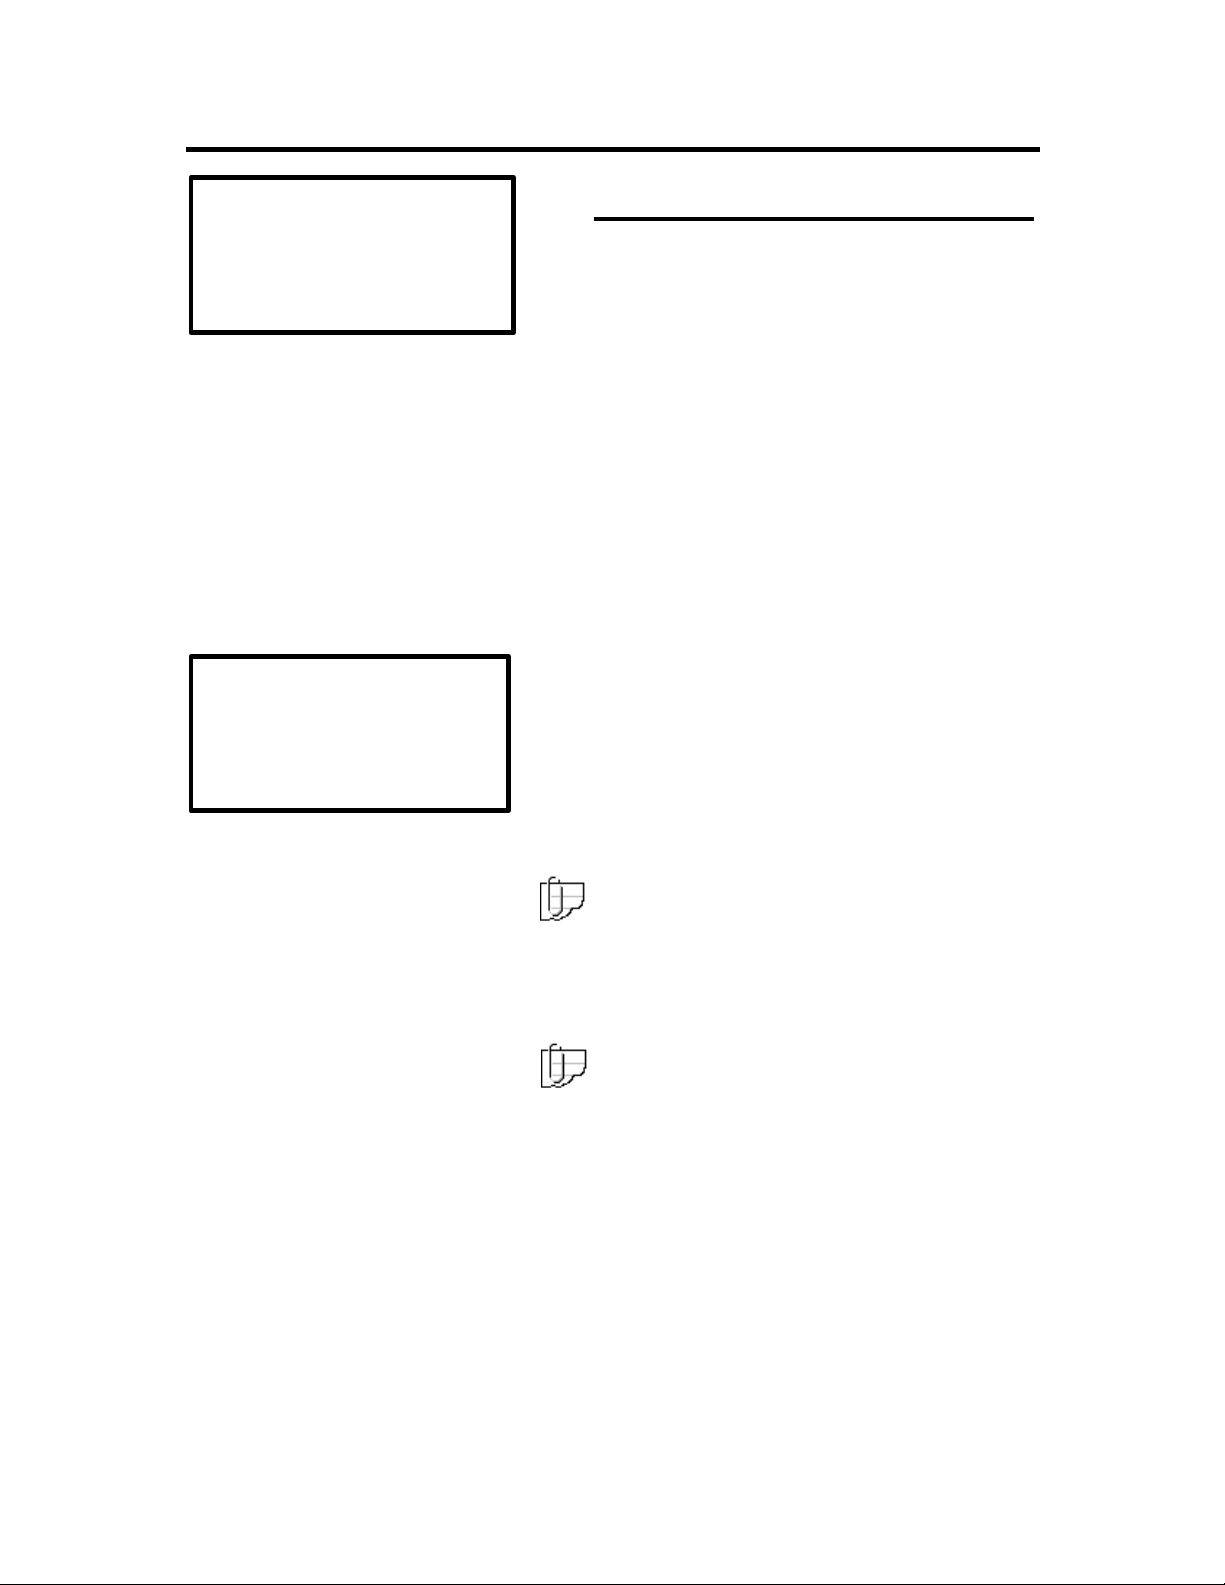
Printer components (con’t)
READY MENU
R: 360 PRES 36
F: 720 PRES 54
ggg Î
ggg
Î
Î
Operations panel (con’t)
The ColorgrafX X2 has three top-level menus, and
four if the Color Direct option is installed. The button
functionality is indicated by the display.
1. The default display, which is initially displayed,
identifies the installed media (type and size) as
well as provides an illustration of approximate
usage.
Note: The media type and size MUST be set at the
operation panel, and the media must be installed
before setting further options
Also, note that the illustration to the right is what
will appear if 360 Presentation Paper is set on the
rear roll and 720 Presentation Paper on the front
roll.
.
This display has the following functionality:
Button 1, the top button on the right side of the
•
LCD. Button 1 provides the Menu button.
Pressing the Menu button shifts the printer to
menu mode, from which you can select printing
options.
Button 2, the 2nd button on the right side of the
•
LCD is not used for this display.
Button 3, the 3
•
LCD. This button is used to change the front
media type.
Button 4, the 4th button on the right side of the
•
LCD. This button is used to change the rear
media type.
2. The second display, accessed using the right
arrow from the default display, has the following
functionality:
rd
button on the right side of the
10 Getting to Know Your ColorgrafX X2
Page 23
Printer components (con’t)
w
READY MENU Î
RWD ALL Î
RWD Î
<MORE> FWD Î
READY MENUÎ
HEAD MAINTENANCE Î
CUT Î
Operations panel (con’t)
Button 1, the top button on the right side of the
•
LCD provides the Menu button. Pressing the
Menu button shifts the printer to menu mode,
from which you can select printing options.
Button 2, the second button is used to
•
completely rewind the media. Current selected
media will be rewound automatically to the start
feed position.
Button 3, the third button rewinds the media as
•
long as the button is pressed. Current selected
media will be rewound.
Button 4, the fourth button moves the media
•
forward. Current selected media will be fed.
3. The third display, accessed using the left arro
from the default display, has the following
functionality:
Button 1, the top button on the right side of the
•
LCD. Button 1 provides the Menu button.
Pressing the Menu button shifts the printer to
menu mode, from which you can select printing
options.
<MORE>
Note: By using the left and right arrow buttons,
Button 2, the second button accesses the
•
maintenance
Note: Head maintenance options can be
accessed from MENU mode as well.
Button 3, the third button is used to
•
media.
Button 4, the fourth button has no functionality
•
directly from this display.
the multiple menus at any level can be cyclically
accessed.
options.
cut
head
the
Getting to Know Your ColorgrafX X2 11
Page 24

Operations
Your ColorgrafX X2 inkjet printer is optimized for easy, automatic
print production requiring minimum attention by an operator. This
chapter describes the procedures to:
1. Use the operation panel
2. Start a print job
3. Operate the cutter
4. Operate the take-up roller
Operations panel menu
IMPORTANT! At the operations panel, you MUST set the media type(s)
installed on the front and rear rollers before starting a print job;
otherwise, the printer will NOT function correctly. Please
familiarize yourself with the menu items before beginning a print
job.
The following describes the operations panel in detail.
The printer’s operation panel menu functions when the printer is in
the offline mode. The menu has two levels:
1. Normal
2. Service
This manual covers only the normal default menu options. The
service options are only used when the printer is being serviced by a
field service engineer. Access to and visibility of service menu
options are password protected and are covered in the optional
ColorgrafX X2 inkjet printer Service Manual.
XES
Procedures
Entering menu mode
The following explains how to enter the menu mode, select, and then
execute a command from the operation panel:
1. Press the button associated with the menu option, button 1 (top
button), to enter Menu mode.
2. Press the LEFT or RIGHT arrow buttons to select a desired top
level menu item.
3. Press the button associated with the menu item to access
options within that item.
4. Press the button associated with the ENTER or EXECUTE option
to accept the option.
12 Operations
Page 25

Operations panel menu (con’t)
Menu options
The top level menu consists of the following options:
Option Description
SET
TEST PRINT
HEAD MAINTENANCE
ADJUSTMENT, AUTO
REPLACING BLADE
LIFE COUNTER
Sets printer options, such as media type, media attributes,
winding direction, language, etc.
Prints the nozzle test pattern for printer diagnostics.
Carries out print head maintenance, such as purging and
wiping print heads.
Sets the adjustment parameters for the printer.
Moves the cutter unit to the center position in order to replace
the cutter blade.
Provides feedback on usage, in feet/meters.
The SET, REPLACING BLADE, and LIFE COUNTER options are
described in this section. HEAD MAINTENANCE is addressed in the
Maintaining Print
AUTO are addressed in Appendix A,
Quality section.
TEST PRINT
In Case of Difficulty
and
ADJUSTMENT,
.
Operations 13
Page 26

Set mode
The SET mode lets you select a media roll, set the media type, set
the media roll’s attributes, set date and time, set SCSI interface ID
and time out, set rewind delay, and set the winding direction for the
Take Up Roller.
<MENU> S
SET Î
<MORE>
SET
From
<SET> S
ROLL SELECT Î
<MORE>
<SET> S
MEDIA TYPE, REAR Î
MEDIA TYPE, FRONT Î
<MORE>
<SET> S
SCSI ID
I/F TIME OUT
<MORE>
<SET> S
UNIT SELECT
WINDING DIRECTION
<MORE>
Î
Î
Î
Î
<SET> S
MEDIA ATTRIBUTE Î
POWER SAVE Î
<MORE>
<SET> S
MAINT. INTERVAL
INIT CUT
<MORE>
<SET> S
DATE SET
TIME SET
<MORE>
Î
Î
Î
Î
<SET> S
AUTO CAP Î
REWIND DELAY
<MORE>
<SET> S
FEED CORRECTION
INTER PAGE GAP
<MORE>
<SET> S
MEDIA FLATTENING
LANGUAGE Î
<MORE>
Î
Î
Î
Î
14 Operations
Page 27

Menu options (con’t)
Set mode (con’t)
Option Description Parameters
Roll Select
Media Type
This command selects which of the two media
rolls, rear or front feeder, on the printer is to be
used for the next print job. Each roll, once
selected, then displays the roll attributes.
Note - Each roll will have separate settings of
various values. This allows loading media with
different characteristics onto the printer and
having the printer settings optimized for each
media type.
Selects either the front or the rear loaded
media type.
<SET> S
ROLL SELECT
Î
<ROLL SELECT> S
* FRONT +
FRONT
BACK
360 PRESENTATION
720 PRESENTATION
WHITE MATTE FILM
BACKLIT FILM 360
BACKLIT FILM 720
POLY CLOTH
POLY CANVAS
PHOTO-BASE PAPER
REINFORCED 360
PSV 360
LINE ART PAPER
-
<MORE>
<SET> S
MEDIA TYPE, REAR Î
MEDIA TYPE, FRONT
<MORE>
Î
<MEDIA TYPE, REAR> S
* 360 PRESENTATION +
<MEDIA TYPE, FRONT> S
* 720 PRESENTATION +
ENTER
ENTER Î
Operations 15
ENTER
Î
-
-
Î
Page 28

Menu options (con’t)
Set mode (con’t)
Option Description Parameters
Media
Attribute
Selects the attributes for each roll of media in
the printer.
Note: the following media do NOT have the
WAIT CUT option as these media must be cut
manually: Poly Cloth, Poly Canvas, Reinforced
360, and PSV 360. Additionally, CUT MODE is
visible for these media, but is automatically
disabled and cannot be changed.
<SET> S
MEDIA ATTRIBUTE Î
POWER SAVE Î
<MORE>
<MEDIA ATTRIBUTE> S
* 360 PRESENTATION Î
* 720 PRESENTATION Î
<MORE>
<MORE> cycles through
all available media
<360 PRESENTATION> S
WAIT CARRIAGE Î
WAIT CUT Î
<MORE>
360 PRESENTATION
720 PRESENTATION
WHITE MATTE FILM
BACKLIT FILM 360
BACKLIT FILM 720
POLY CLOTH
POLY CANVAS
PHOTO-BASE PAPER
REINFORCED 360
PSV 360
LINE ART PAPER
<WAIT CARRIAGE> S
* 0.0 sec +
-
ENTER Î
<WAIT CUT> S
* 0.0 sec +
-
ENTER Î
<MAGNIFICATION> S
* 0.00 % +
-
<360 PRESENTATION> S
MAGNIFICATION Î
CUT MODE Î
<MORE>
<CUT MODE> S
* NORMAL CUT +
ENTER Î
-
ENTER Î
16 Operations
Page 29

Menu options (con’t)
Set mode (con’t)
The following describes the attribute available for
each media:
Option Description Parameters
Wait Carriage
Wait Cut
Magnification
Cut Mode
The Wait Carriage attribute determines the
time delay in seconds that the printer waits
between passes to allow the ink to be
absorbed by the media.
The Wait Cut attribute determines the amount of
time, in seconds, the printer waits after the last
pass before performing the cut operation. This
allows time to let the print image stabilize to
avoid possible smearing before cutting the print
from roll.
The vertical movement of media between
passes of the carriage head is governed by the
number of cycles of the media transport
system's forward motor. This fine-tunes the
amount of media vertical movement that is
associated with each pass of the print heads.
This value is set at the factory and may vary
slightly from media to media.
Note: Changing magnification is only
recommended to fine tune an image. A setting
change can affect other modes for different
images and different media types. True size
proportions can be compromised.
Sets automatic media cutting.
0 – 30 seconds in 0.1 second
intervals.
0 – 30 seconds in .1 second
intervals
-0.50% -- and +0.50% in 0.01
intervals.
NORMAL CUT / NO CUT
Operations 17
Page 30

Menu options (con’t)
Set mode (con’t)
Additional options available through the SET menu.
Option Description Parameters
Power Save
Maintenance
Interval
Init Cut
Date & Time
Set
Sets the idle time before the printer goes into its
power save mode.
Sets the frequency in which the printer runs the
maintenance routine.
Enables/disables a media cut during new media
initialization.
(Enable only when loading new
media and you know the media has a straight
edge.)
Sets the date and time. Use the cursor arrow
buttons <CSR> to move from year>month>date
or hour>minutes>seconds. Use the + or –
buttons to change the time and date numbers.
<SET> S
MEDIA ATTRIBUTE
POWER SAVE Î
<MORE>
<SET> S
MAINT. INTERVAL Î
INIT CUT Î
<MORE>
Î
<POWER SAVE> S
* OFF +
<MAINT. INTERVAL> S
* LONG +
<INIT CUT> S
* YES +
OFF -- 60min
(in 5min interval)
NONE/SHORT/MIDDLE/LONG
YES/NO
YYYY/MM/DD
HH/MM/SS
-
ENTER Î
-
ENTER Î
-
Î
ENTER
<DATE SET> S
* 2000/01/01 +
<SET> S
DATE SETÎ
TIME SETÎ
<MORE>
YYYY/MM/DD -
<CSR> ENTER Î
<TIME SET> S
* 12:34:56 +
HH:MM:SS -
<CSR> ENTER Î
18 Operations
Page 31

Menu options (con’t)
Set mode (con’t)
Option Description Parameters
SCSI ID
I/F Time Out
Unit Select
Normally set during printer installation and
should not require resetting. The host computer
automatically senses the SCSI ID and sets the
software in the host computer to the correct ID
number. The SCSI ID set in the host computer
must agree with the SCSI ID set on the printer.
Determines the amount of time the printer waits
for the next command from the host computer
before aborting the print job.
Sets the measurement unit. Feet/Meters
1 – 6
OFF/10/30/60/120 SEC
Winding
Direction
The winding direction mode is for the take-up
roll. You can select the direction the roll moves.
<SCSI ID> S
* 1 +
<SET> S
SCSI ID
I/F TIME OUT Î
<MORE>
<SET> S
UNIT SELECTÎ
WINDING DIRECTION
<MORE>
Î
Î
<I/F TIME OUT> S
* OFF +
<UNIT SELECT> S
* FEET +
<WINDING DIRECTION> S
* OFF +
OFF/IMAGE OUT/IMAGE IN
In IMAGE OUT selection, the
printer rolls the media as the
printed side becomes the outer
side of the roll.
-
Î
ENTER
-
Î
ENTER
-
Î
ENTER
-
ENTER Î
Operations 19
Page 32
Menu options (con’t)
Set mode (con’t)
Option Description Parameters
Auto Cap
Rewind Delay
Feed
Correction
Inter Page Gap
Media
Flattening
Language
Automatically caps the heads. ON/OFF
Determines the amount of time the printer waits
OFF/1 minute – 60 minutes
for the media rewind.
Compensates for errors in the paper path.
EXECUTE / NON-EXECUTE
Handled by the firmware.
Sets the spacing between images.
UNCONTROLLED
0 – 12 (1 inch interval)
Sets the delay to let the media flatten after
advancing.
Set the language for the operations panel.
NONE/SHORT/MIDDLE/LONG
ENGLISH / GERMAN /
FRENCH / PORTUGUESE /
SPANISH / ITALIAN /
JAPANESE
<AUTO CAP> S
* OFF +
<SET> S
AUTO CAP Î
REWIND DELAY Î
<MORE>
<REWIND DELAY> S
* OFF +
ENTER Î
-
-
ENTER Î
<FEED CORRECTION> S
<SET> S
FEED CORRECTION Î
INTER PAGE GAP Î
<MORE>
<SET> S
MEDIA FLATTENING Î
LANGUAGE Î
<MORE>
* NOT EXECUTE +
<INTER PAGE GAP> S
* 1 INCH +
<MEDIA FLATTENING> S
* NONE +
<LANGUAGE> S
* ENGLISH +
ENTER
ENTER Î
ENTER Î
ENTER
-
Î
-
-
-
Î
20 Operations
Page 33
Menu options (con’t)
REPLACING BLADE
When selected, the REPLACING BLADE option
moves the cutter unit to the center position in order
to replace the cutter blade.
<REPLACING BLADE> S
MOVE TO THE CENTERÎ
LIFE COUNTER 1 and 2
LIFE COUNTER 1 provides media transport usage
information for the life of the printer. LIFE
COUNTER 2 provides media transport usage
information since the last counter reset.
Press CLEAR to reset the counter.
<FRONT ROLL USAGE> S
<LIFE COUNTER>
LIFE COUNTER 1 Î
LIFE COUNTER 2 Î
<MORE>
S
* xxx.x feet
<MORE>
<REAR ROLL USAGE> S
* xxx.x feet
<MORE>
<FRONT ROLL USAGE>
* xxx.x feet
<MORE> ENTER Î
<REAR ROLL USAGE> S
* xxx.x feet
<MORE> ENTER Î
S
CLEAR Î
CLEAR Î
Operations 21
Page 34
Starting a print job
To successfully start a print job, perform the following:
1. Visually check that the printer has adequate media available and
that the ink bottles have enough ink to complete the print.
IMPORTANT!
You must turn the printer on
allows the computer to recognize the printer as a SCSI device.
2. When starting the printer, use the printer’s power switch to turn
the printer ON. The printer will go through an internal self-check
and media initialization to verify that it is ready to print. You will
hear the printer’s motors operate as each printer component is
verified and the media is initialized.
3. Check the printer’s operation panel LCD to verify that it is online
and that there are no error messages displayed.
READY MENUÎ
R: 360 PRES 36 ggg Î
F: 720 PRES 54 ggg Î
<MENU> S
SET Î
<MORE>
4. Verify at the operations panel that the appropriate media
types are set. Refer to the default display. This information
MUST match the installed media. If this is not the case, set
the media type for both the front and rear rollers. The
procedures are as follows:
a. To set the media type for the rear roller, press the MENU
button, the SET button, and then use the arrow button to
scroll to MEDIA TYPE, REAR.
b. Press the button associated with either the + or – until
the media type installed on the rear roller is displayed
and then press the ENTER button. This will return you
<SET> S
MEDIA TYPE, REAR Î
MEDIA TYPE, FRONT Î
<MORE>
to the SET menu.
c. To set the media type for the front roller, use the arrow
button to scroll to MEDIA TYPE, FRONT.
d. Press the button associated with either the + or – until
the media type installed on the front roller is displayed
and then press the ENTER button.
5. Verify that the printer software in the host computer is operating,
and verify that the interface between the host computer and the
printer is working (no error messages on the host computer).
6. Using a print file in a format that your printer software can
process, make any needed modifications to the print. After
verifying that there is a roll of media on the printer of the type and
width you need, send the print to the printer.
Note: Do not open any of the printer’s covers while the printer is
operating. If a cover is opened, the printer immediately stops
printing. The job in progress will be terminated when the cover is
closed again.
before
the digital front end. This
22 Operations
Page 35

Operating the cutter
The cutter can automatically cut the media from the roll to the
selected print size after printing is completed. The cutter then stops
at the left rest position after the cut is completed.
If the cutter stops without completing the cut cycle due to a media
jam, e.g., the printer being turned off or a power failure, turn off the
printer using its power switch. After correcting the source of the
problem, turn on the printer’s power switch. The cutter will return to
the left position.
Note – The cutter has been designed to last the life of the printer.
However, the cutter blade is replaceable. If you have problems with
the cutter, replace the cutter blade. Directions to replace the blade
follow this section.
Caution – Do not pull the media while the cutter is cutting. You may
damage the cutter or the print.
There are two cut modes available:
1. Normal cut mode
2. No cut mode
Normal weight coated media or film can be cut using the normal cut
mode. When heavy media or film cannot be cut with the normal
mode, select the No Cut mode. In the No Cut mode, after printing is
finished and the media is forwarded, the operator then cuts manually
using a knife or scissors. The printer halts and waits for the next
operation.
To avoid injury, the print job will not start if the printer’s cover is open,
even if data is sent to the printer. Use the manual no cut mode
whenever the media cannot be cut in the normal cut mode.
The operator can then manually cut the print using an appropriate
cutting tool.
Operations 23
Page 36
Operating the cutter (con’t)
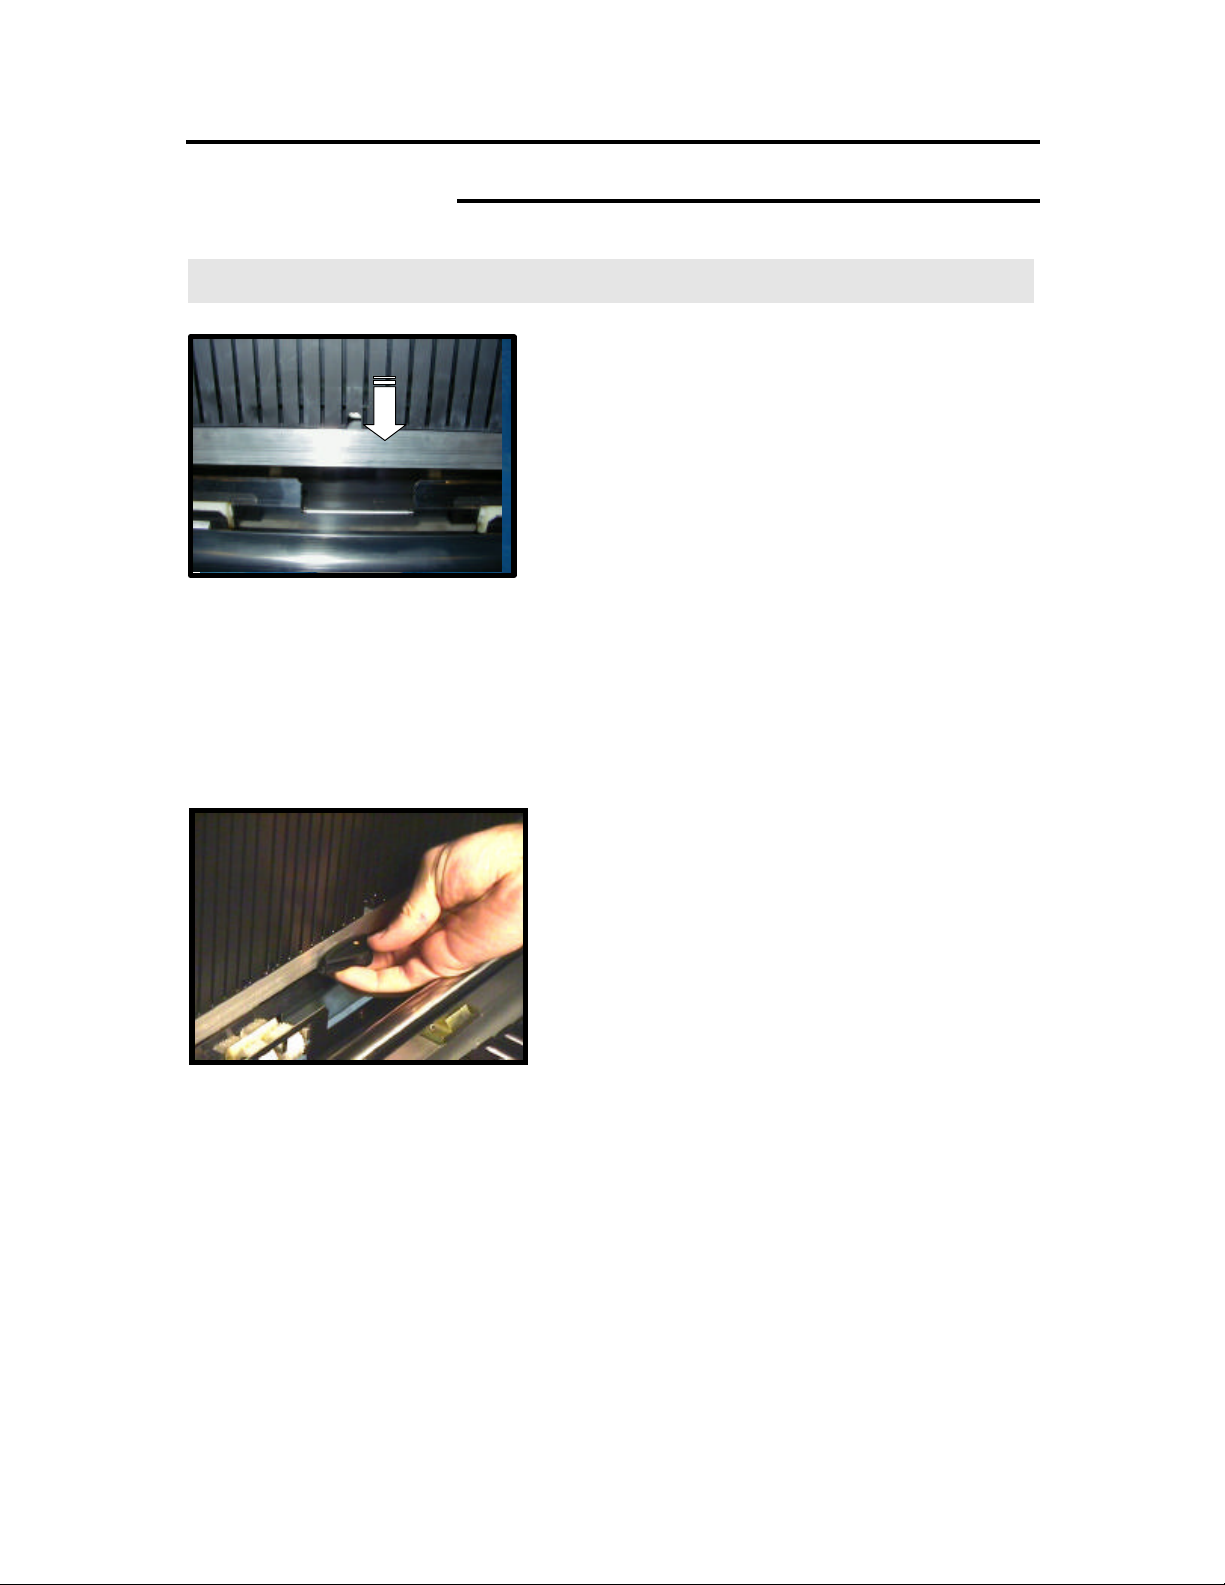
Replacing cutter blade
The procedures to replace the cutter blade are:
Procedures
Platen guide
1
2
3
1. At the printer’s operations panel, press the
Menu button (top button) to enter menu mode.
2. Use the arrow buttons to scroll to Replacing
Blade and press the associated button to
proceed.
3. The operation panel will display: "Move to the
center". Press the associated button to move
the cutter blade to the center.
4. The operation panel will display: "Open
top/front cover". Open the top cover. After
opening the top cover, the panel will again
instruct to open the front cover.
5. Open the top cover and then press the button
associated with NEXT.
6. Manually move the cutter blade to the very
center if not properly centered.
7. The operation panel will display: "Replace
blade and press reset".
8. To remove the cutter, push down the cutter
blade.
24 Operations
Page 37

Operating the cutter (con’t)
Replacing cutter blade (con’t)
9. Tilt and slide the cutter blade from the cutter
holder.
10. Install the new cutter blade to the cutter
holder.
a. Ensure that the cutter unit is still in the
centered position.
b. Push the new cutter blade into the cutter
holder until the blade snaps into position.
11. Press the button associated with RESET.
Note: RESET moves the cutter unit to the
right, even if the cutter blade has NOT been
successfully installed. Should the RESET
button be accidentally pressed before
successful installation, manually move the
cutter holder to the center and properly install
the cutter blade as specified in step 10b.
12. The operation panel displays: "Close the
covers.” Close them.
13. The final message is "Done. Press ½ key.”
This will put the printer in READY status.
Operations 25
Page 38

Using the take-up roller
Procedures
Setup the take-up assembly
The procedures to set-up the take-up roller:
. Adjust the position of TAKE UP ROLLER
HOLDER for the roll size. Perform this action on
both the left and right sides.
2. Loosen the thumbscrew, and slide the TAKE UP
ROLLER HOLDER to the desirable position then
secure the thumb screw.
26 Operations
Page 39

Using the take-up roller (con’t)
r
Setup the take-up assembly (con’t)
3. Set the FLANGE on the plastic roller bearing on
the right side.
4. Set the left FLANGE on the plastic roller bearing.
If you need to adjust the length, do steps 1 and 2
again. (Note that the end caps for the take-up
roller are black versus the green caps for the
media roller. Use these for optimum
performance.)
5. At the operations panel, enable the take-up roll.
a. Press the Menu button (top button) to enter
menu mode.
b. Press the button associated with the Set
menu option.
c. Press the left arrow button 4 times to display
the Winding direction option.
d. Set to the desired direction: Image In or
Image Out.
Starting the take-up roller
Printing surface
1. When the printed media passes completely ove
the platen and emerges out the exit chute, guide
the media over or under the take-up roll and
tape it to the roll.
2. Monitor the media until it has rolled once around
the take-up roll. From this point on, the media
will wind up automatically.
Operating the printer from RIP software
Instructions for operating the printer using the host computer’s digital
front end (DFE) program are covered in associated DFE software
manuals or release notes.
Operations 27
Page 40
Supplies
This section describes the simple procedures for ink and media
replacement. Additionally, how to properly handle and store these
supplies is addressed to ensure maximum print quality.
Replacing ink bottles
Precautions
The following precautions must be strictly enforced when handling
inks.
WARNING: Combustible. Keep ink away from open flames. Do
not drink, drop into eyes, or spill onto your skin. Keep the ink
out of reach of children. The ink can cause difficulty in
breathing and damage your eyes.
1. Use rubber gloves when replacing the ink bottle.
2. Dispose of the empty bottle and gloves in a plastic bag.
3. Dispose of the ink bottles in accordance with local and federal
regulations.
When to replace ink bottle
1. The printer has a separate bottle, each 0.5 or 0.25 liters, for each
color. The ink bottle should be replaced when either:
2. The ink bottle is empty
3. The ink is too old, as indicated on the expiration date, which is
printed on the bottle. Expired ink can cause light image densities.
* INK EMPTY
LOAD INK CARTRIDGE
PRESS TO RESET→
[ER:4631] MENU→
.
a. For cases where an ink bottle is empty, the LCD will display
the
Ink Empty
b. An ink bottle can be changed at any time, that is, during
operation, idle, or off.
Caution: There will be a small amount of ink left in the bottom of the
ink cartridge. This is normal. Do not attempt to pour the residue from
one bottle into a fresh bottle. Doing so will alter the chemical makeup
of the inks themselves, and the excessive residue can cause damage
to interior machine components as well as impact color quality. There
is extra ink in each of the bottles to compensate for this residue.
message.
28 Supplies
Page 41

Replacing ink bottles (con’t)
Replacement procedures
The steps to replace ColorgrafX X2 inks are:
Procedures
1. Ensure the ink bottle you replace is the same
color as the original.
– The ink holder labels on the printer are
Tip
color coded with the color ink to be used.
Always match the ink holder label color to the
ink color in the replacement bottle.
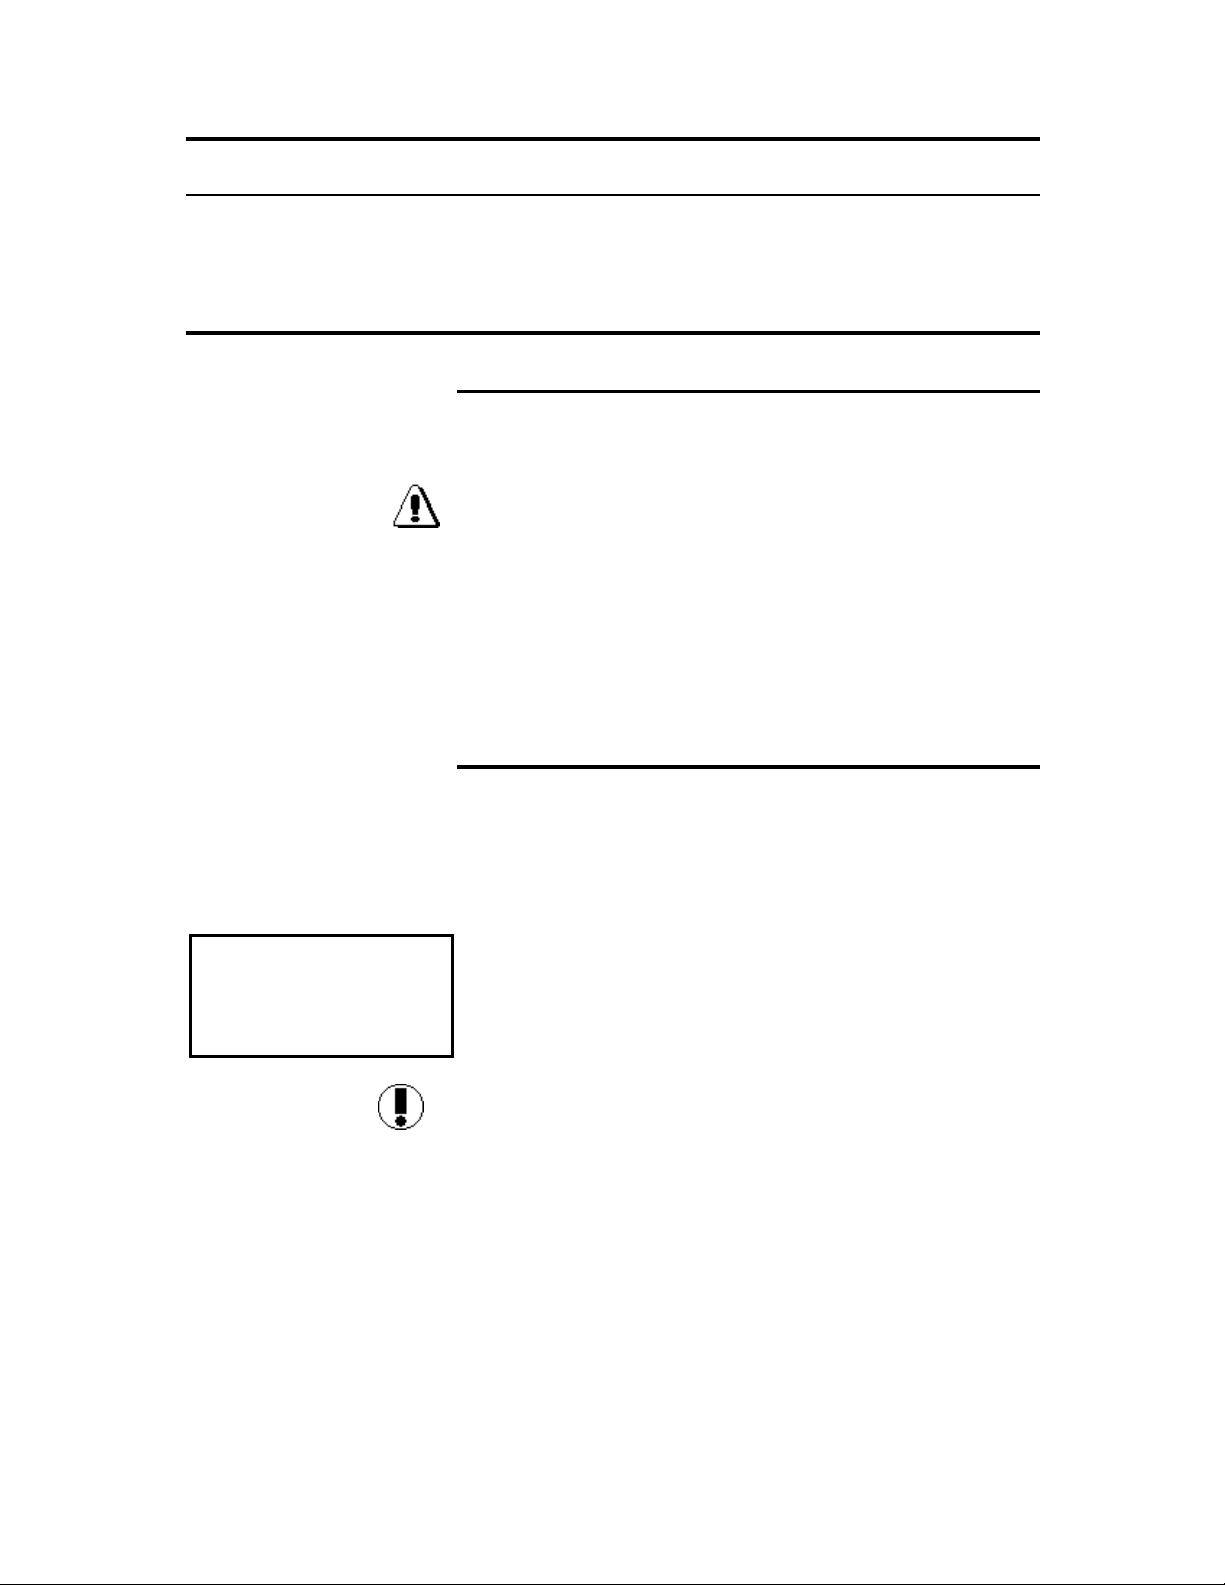
2. Remove the ink bottle.
3. Remove the cap from the new ink bottle.
Supplies 29
Page 42

Replacing ink bottles (con’t)
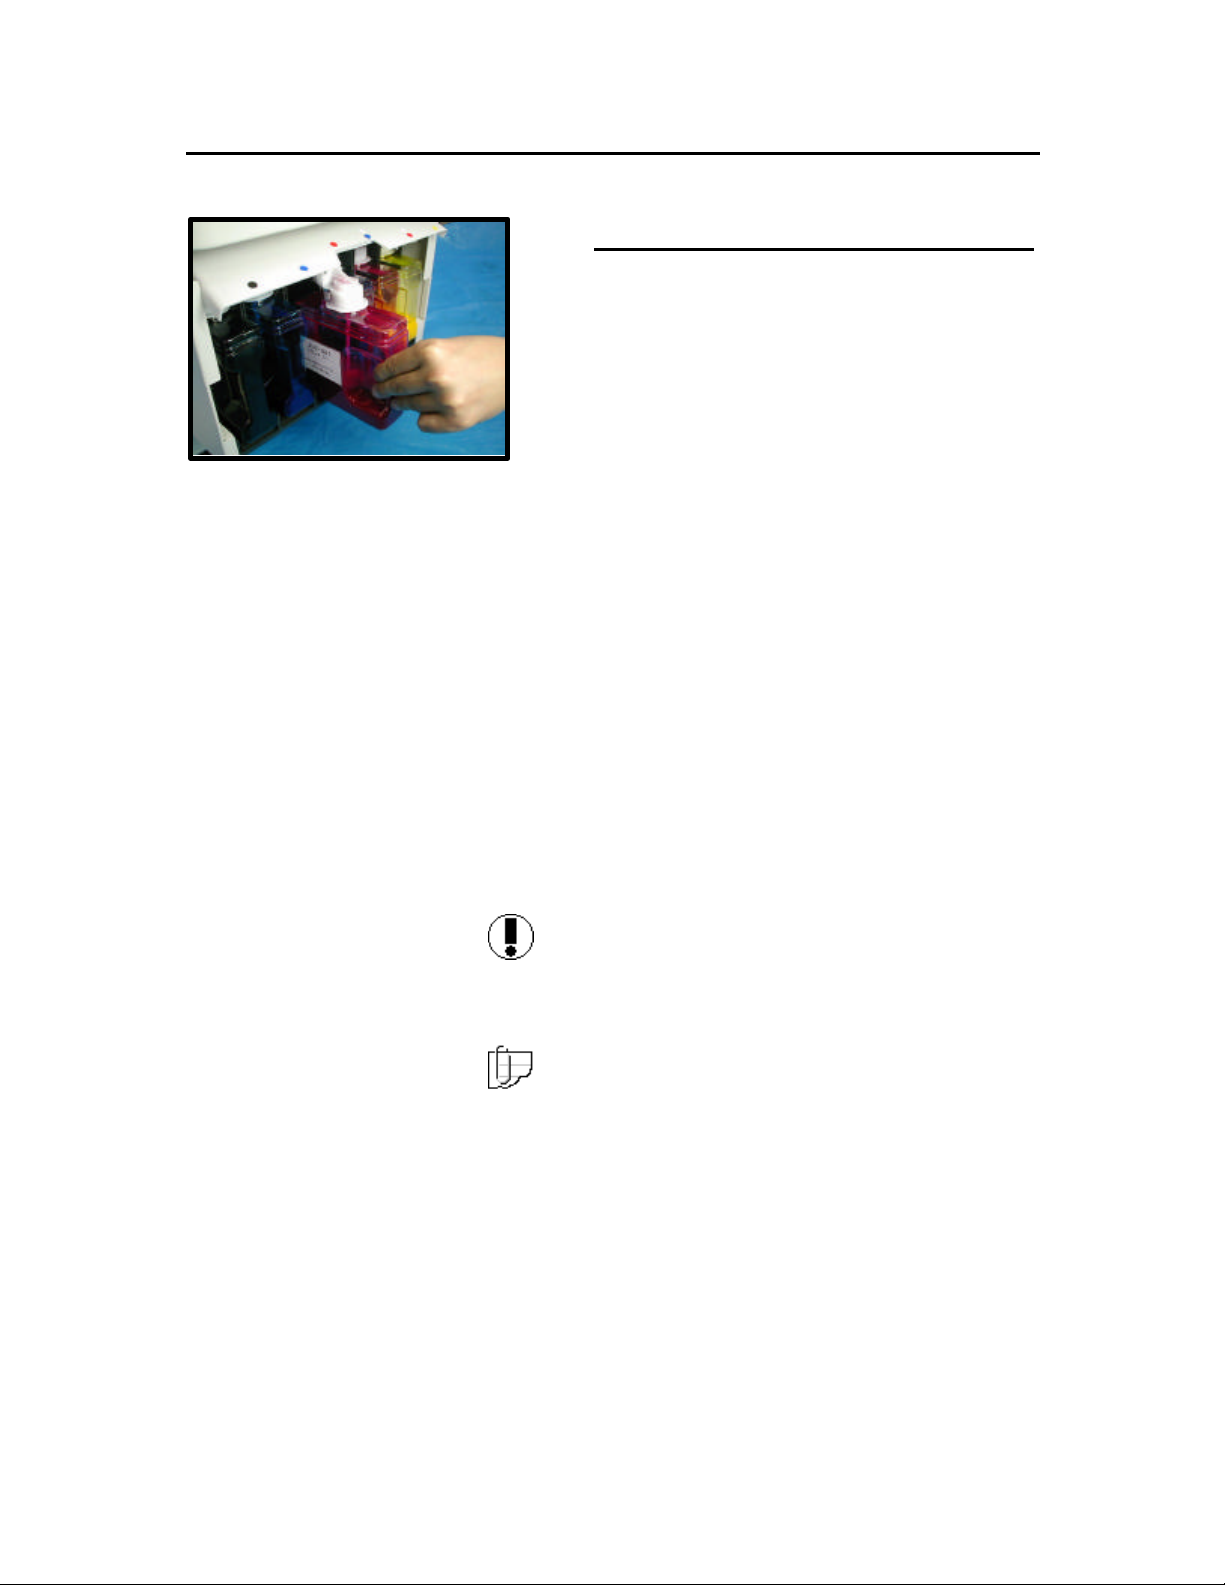
Replacement procedures
4. Insert the new ink bottle in the ink bottle holder.
Important: Ink spills should be cleaned
immediately using soap and water. Dispose of
all used cleaning materials as approved by local
and federal requirements.
5. Ensure that the waste ink bottle is in place and
properly seated.
6. Press Button 3 (PRESS TO RESET). The
printer will automatically replenish the ink.
Replacing the waste ink bottle
Precautions
The following precautions must be strictly enforced when handling
inks.
WARNING: Combustible. Keep ink away from open flames. Do
not drink, drop into eyes, or spill onto your skin. Keep the ink
out of reach of children. The ink can cause difficulty in
breathing and damage your eyes.
The waste ink bottle has an absorber inside the bottle to absorb the
waste ink. Do not take the absorbent materials out of the bottle.
Dispose of the waste ink bottle after packing it into the zip-lock plastic
bag that is included with the new waste ink bottle. Firmly close the
zip-lock seal.
Dispose of the waste ink bottles in accordance with local and federal
regulations.
30 Supplies
Page 43

Replacing the waste ink bottle (con’t)
When to replace the waste ink bottle
The waste ink bottle should be replaced when the waste ink bottle is
filled with the waste ink.
* WASTE BOTTLE FULL
/NOT INSTALLED
SEE USER GUIDE
[ER: 4621]
Procedures
For cases where the waste ink bottle is full, the LCD will display
the
Waste Bottle Full
The amount of waste ink in the waste ink bottle is measured by
the waste ink bottle’s weight. The waste ink bottle tray acts as a
scale and must move freely to properly measure the amount of
waste ink in the bottle and prevent waste ink over-flow.
Caution: If the printer continues to run without detecting the
change in the waste ink bottle’s weight, the waste ink bottle
could overflow and contaminate the printer and floor.
message.
Replacement procedures
The steps to replace waste ink bottle are:
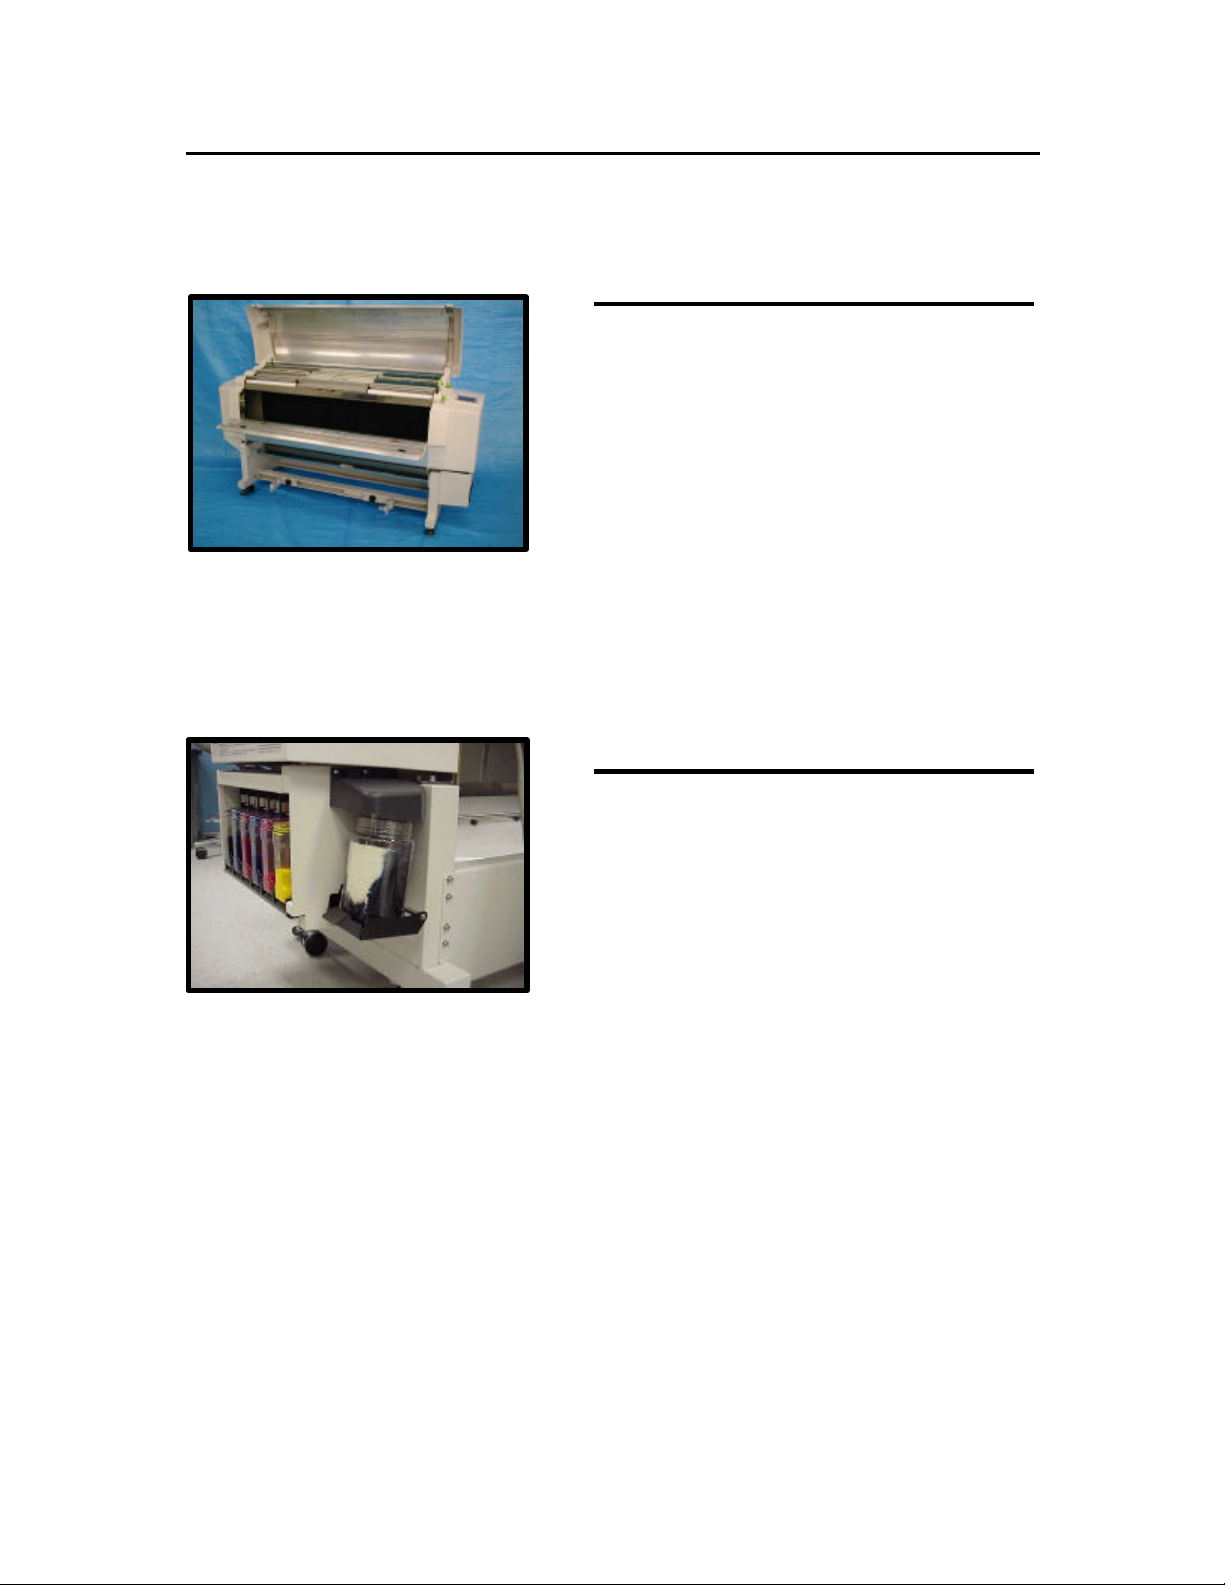
1. Locate the waste ink bottle on the right rear side
of the printer.
2. Pick up the waste ink bottle and tilt it to remove
4. Set the new waste ink bottle on the waste ink
the bottle from the waste ink bottle tray.
3. Place the waste ink bottle into the disposable
plastic bag.
3. Properly dispose of the used waste ink bottle.
bottle tray. Ensure that the bottle is properly
seated on the tray before continuing.
Supplies 31
Page 44

Loading and removing media
Supported media
The ColorgrafX X2 printer can print on a variety of media including
paper, films, vinyl, and other special media. The list of available
media changes to meet customer requirements, so check with your
sales representative to determine what media is currently available
and in what roll sizes.
Procedures
IMPORTANT!
Caution: Using media other than the recommended media can
cause media jams, blurred images, or printer failure.
The printer can hold two large rolls of media with either the same or
different sizes. Refer to the ColorgrafX X2 Inkjet Graphics
Applications Guide to acquire a list of sizes by media type.
Loading media in the printer
The following procedure outlines the process to load media in the
printer.
1. If changing media type, be sure to change the media type
before closing the covers.
After you load the media and close the covers, the printer
will automatically load media through the printer and attempt
to cut it as part of the self-test. If you have not set the cutter,
for example, to handle the newly loaded media correctly, you
could cause a media jam when the printer attempts to cut
the new media.
2. Insert an end cap into one end of the new media roll until it
is firmly seated, being careful not to damage the other,
exposed end of the media roll. The end cap should be snug,
but not jammed on the roll for optimum use.
Note: When opening a new roll of media, open one end of
the inner packaging at a time. Stand the roll on end.
Expose the top end, and put the end cap on.
32 Supplies
Page 45

Loading and removing media (con’t)
Loading media in the printer (con’t)
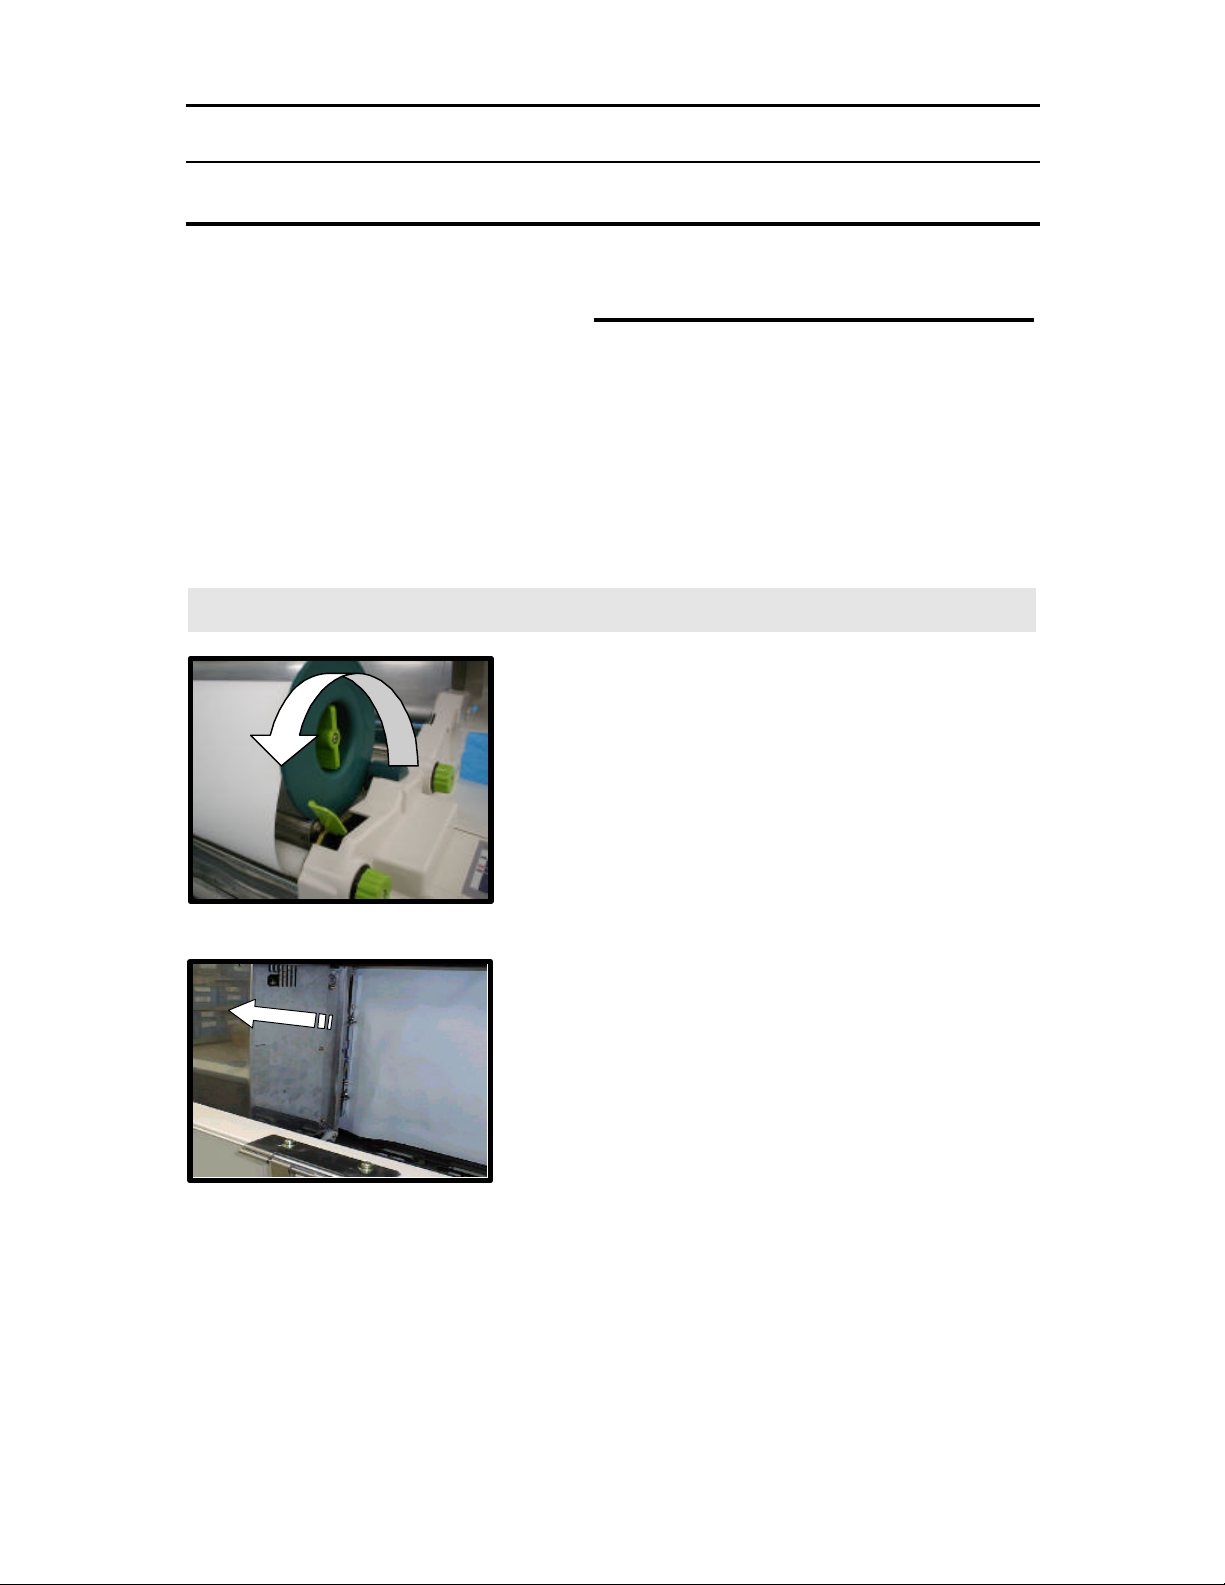
3. Turn the locking knob on the media end cap to its locked
position to secure it in the media roll.
4. Repeat steps 2 and 3 for the opposite end of the media roll.
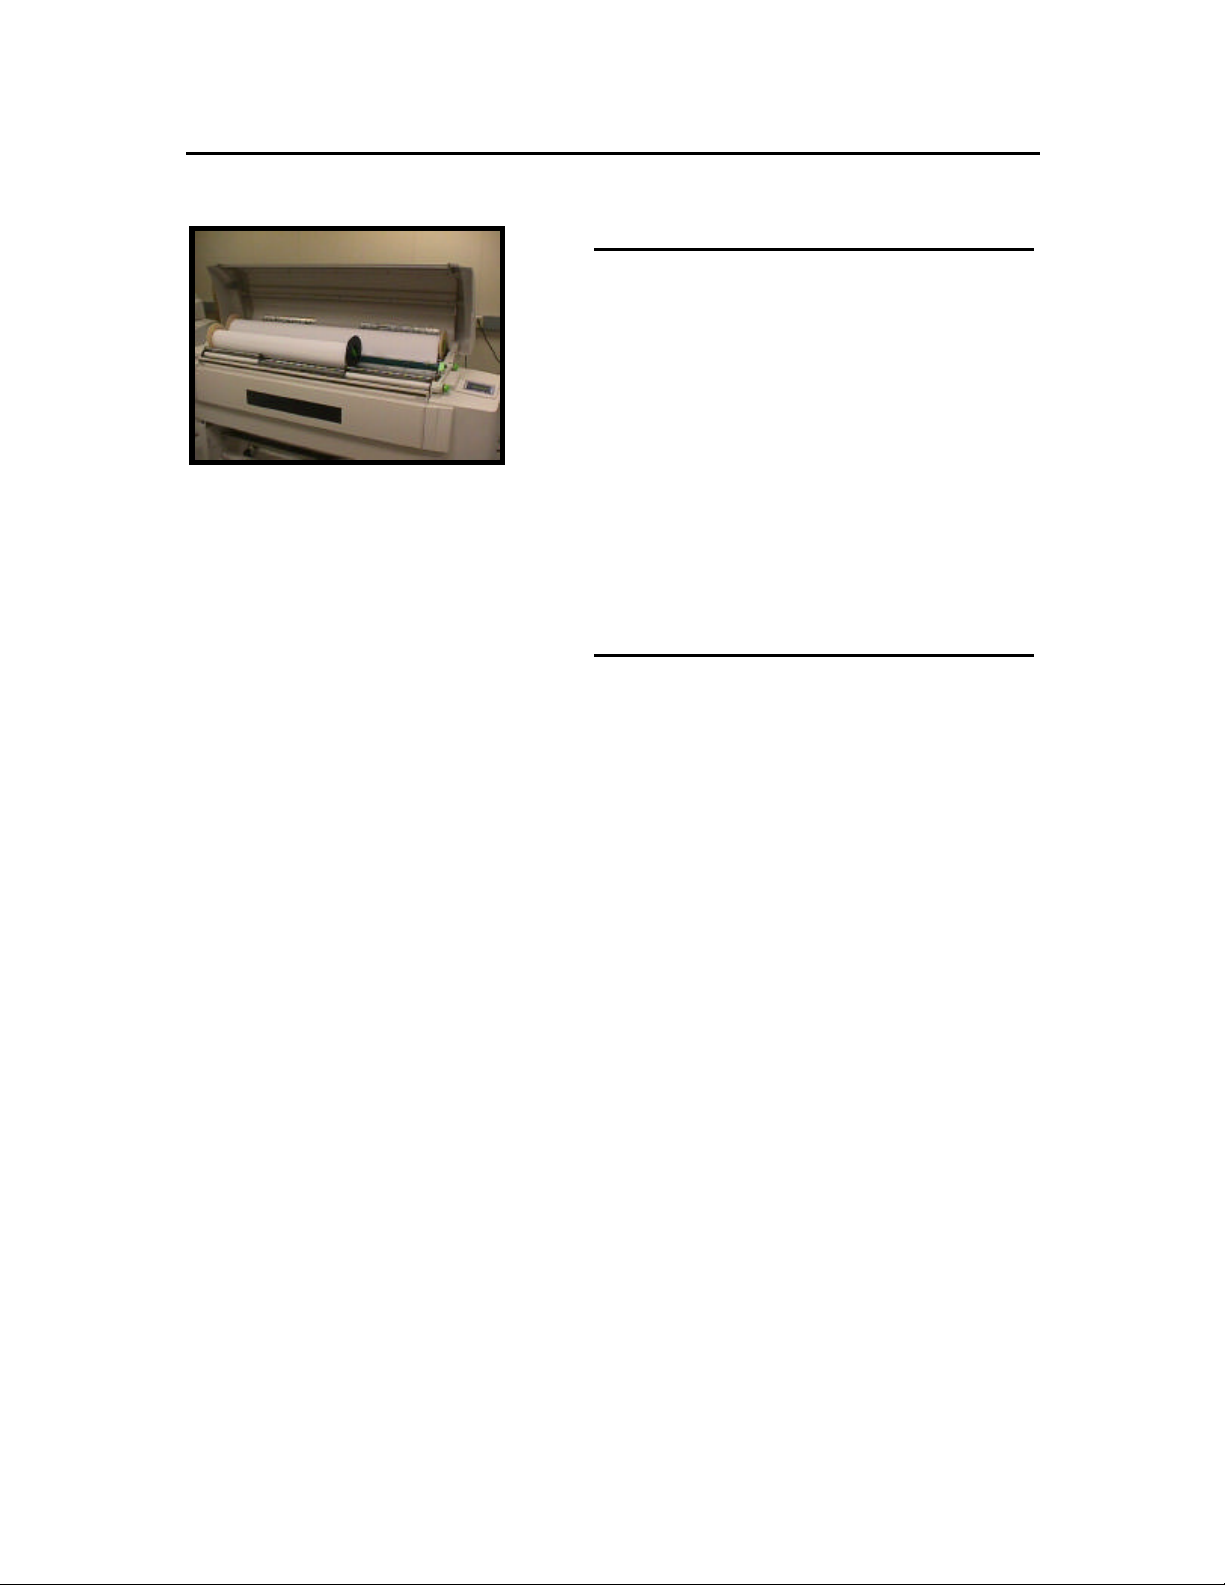
5. Open the printer’s top cover.
6. Set the new media roll on the printer.
7. Media width guides are provided on the printer’s media roll
feeder.
Set position Media Size
First position 54 inches (1372 mm)
Second position 50 inches (1270 mm)
Third position 42 inches (1067 mm)
Fourth position
Fifth position
36 inches (914 mm)
23.4 inches (594 mm) / 11" (279 mm)
8. Set the right end cap at the position matching the media
width. The front guides are freely–rotating support rollers.
9. Rotate the media end cap to unroll 3 to 4 inches of media
from the roll.
10. Insert the leading edge into the feeder’s media input.
Caution - Media rolls, particularly the larger widths, are
heavy and awkward to handle. Ask for assistance when
installing these media rolls to avoid personal injury, damage
to the printer or damage to the media.
Supplies 33
Page 46

Loading and removing media (con’t)
l
Loading media in the printer (con’t)
Feed roller knob
11. Rotate the feed roller knob toward you. Continue
to forward the media until you hear a beep from
the printer. The printer will sense the new
media’s leading edge. Ensure that there is even
tension and no wrinkles on the media.
12. Close the printer’s top cover. The printer will
start initializing, and you should hear activity as
it checks and positions the newly loaded media
roll.
After completing its self-test, the printer will
forward some of the newly loaded media
through the print path and then cut it. This
assures that the media has a clean-cut leading
edge when printing.
13. Examine the cut edge of the media to verify that
the cutter is properly set and is cutting the media
cleanly. If it is not a clean cut, change the
printer’s cutter setting to match the media type.
Refer to the
Media type
14. Ensure the printer is online and ready to receive
the next print job.
15. Set the media type and attributes at the
operations panel. Refer to the
section.
Menu
This completes installation of a new media roll in
the printer.
Operations
.
chapter as described in
Operations Pane
Feed roller knob
34 Supplies
Page 47

Loading and removing media (con’t)
r
When to replace media
EMPTY MEDIA ROLL
LOAD MEDIA
SEE USER GUIDE
[ER: 3A24]
The media should be replaced whenever the LCD display
displays
Empty Media Roll
Caution: The media rolls are heavy. Handle carefully and ask
for assistance to avoid personal injury, damage to the printer, o
damage to the media.
.
Procedures
Removing media
The steps to remove media are:
1. Open the printer top cover.
Be sure to open or close the top cover slowly,
holding with both hands while standing in front
of the printer. Be careful to not let your fingers
or hands get caught when the cover closes.
When changing media rolls, the release lever on
the right side of the printer is not used and
should be left in its closed position.
Supplies 35
Page 48
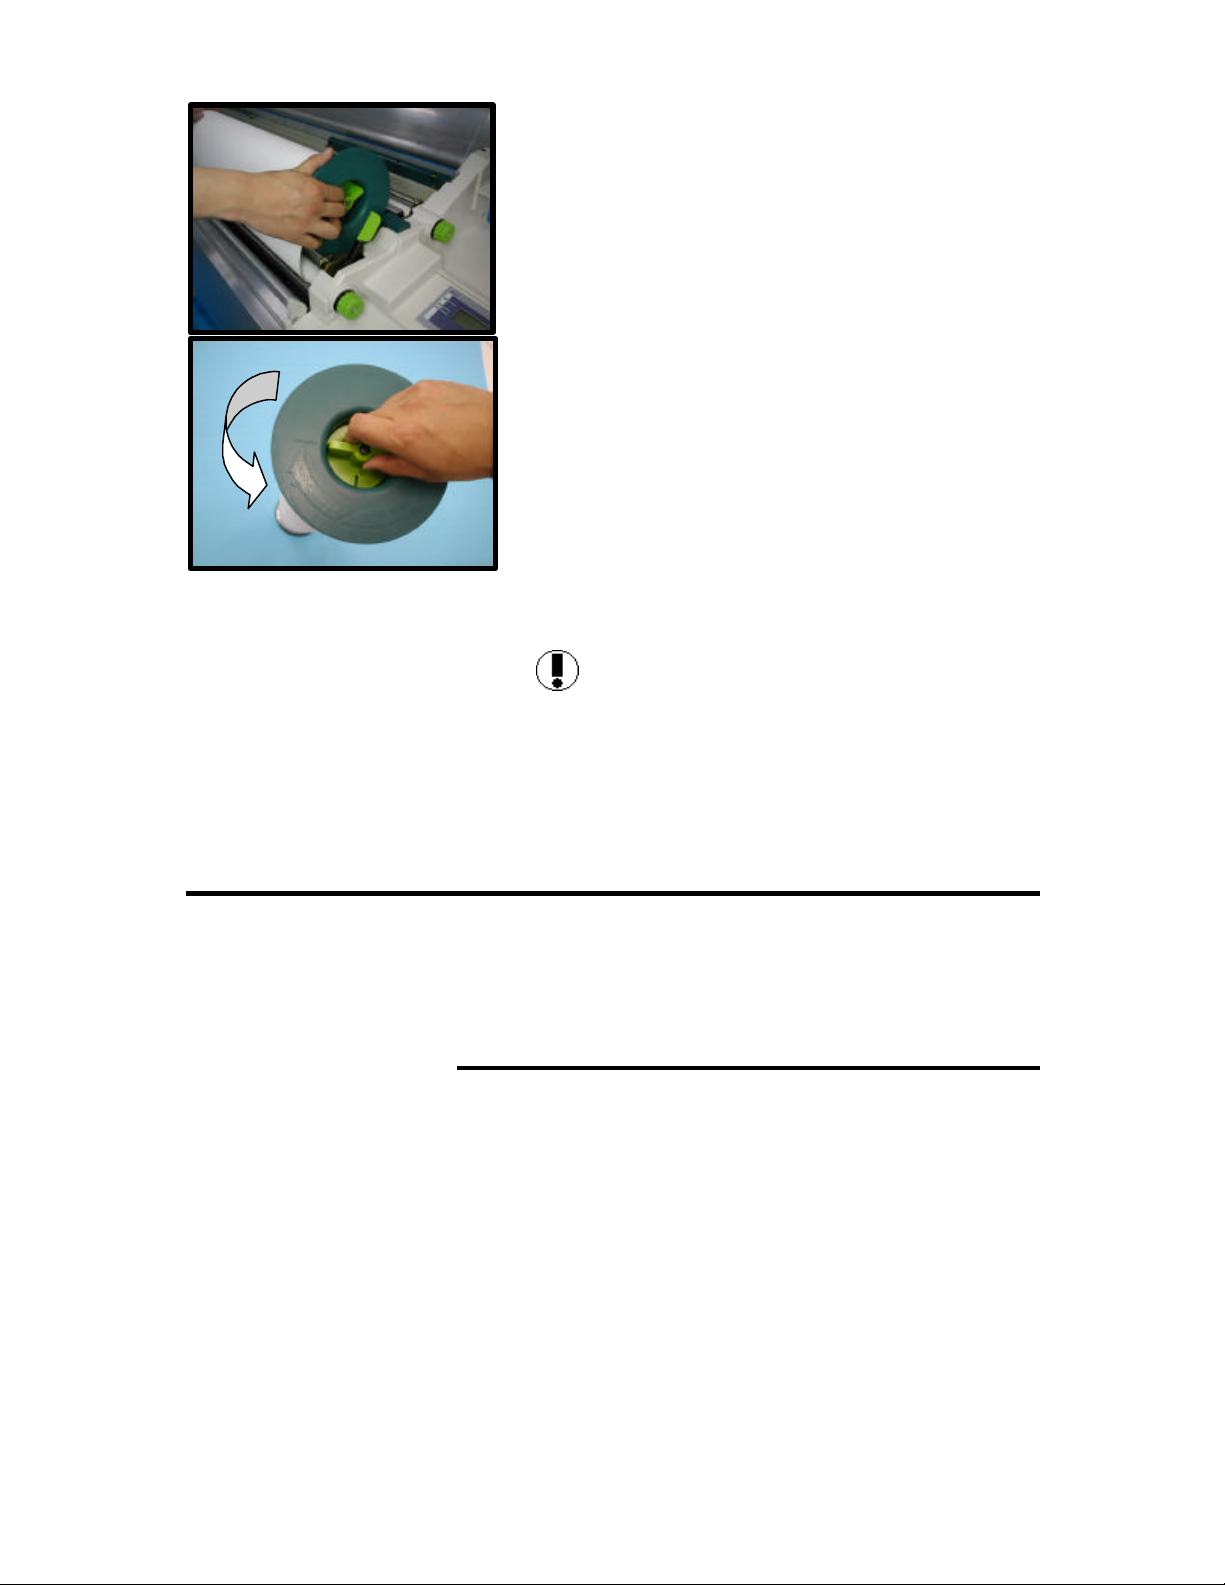
2. Rotate the end cap rearward to rewind the
media onto the media roll.
3. Remove the media roll from the feeder.
Supply storage
4. Remove the end caps from both ends of the
media roll by turning the light green locking knob
in the RELEASE direction and then pulling the
caps away from the media roll.
Tip: Use a low-adhesion tape, such as masking
tape, to keep the media from unrolling after it is
removed from the printer. A high-adhesion tape
can damage the leading edge of the media
when it is removed.
5. Store the media roll in the horizontal position,
being careful not to
the exposed ends of the media roll.
Caution: The ends of media roll are vulnerable
to mechanical damage whenever the media roll
end caps are removed. Use caution while
handling media as damaged media can damage
the printer or cause printing problems. Never
store unprotected media rolls upright.
dent or otherwise damage
To keep your supplies in good condition, you should always observe
the following storage requirements.
Ink bottle storage
When storing ink bottles:
Select a cool location with good ventilation.
1. Do not place ink bottles directly on the floor.
2. Use ink within 18 months of date of manufacture.
3. Avoid storing ink bottles where:
The bottles are exposed to direct sunlight.
−
The bottles are exposed to high temperature or humidity.
−
36 Supplies
Page 49

Supply storage (con’t)
Media storage
When storing media:
1. Select a cool, well ventilated area.
2. Don't place media rolls directly on the floor. In humid conditions,
be sure to leave space for air circulation between the floor and
the media.
3. Avoid storing media where it might be exposed to direct sunlight,
high temperature, or high humidity.
4. Use media within 2 years of date of manufacture.
5. Unless otherwise instructed, store all media flat (horizontally).
6. If the media is not to be used immediately after opening the
package, securely reseal the media package.
7. If the media in the printer has not been used for a long time, the
media on the outside of the roll will degrade first. It is a good
practice to feed some media and cut off the degraded or wrinkled
area.
8. If the media storage and printer environments differ greatly, let
the media stand in the printing environment for at least two hours
before using.
Supplies 37
Page 50

Maintaining print quality
Overview
The ColorgrafX X2 inkjet printer is a self-maintaining printer. That is,
it requires no
cover head maintenance for optimum performance, maximum
resolution, and sharp details.
Head Maintenance
Normal maintenance
The printer has, at the print head home position, a vacuum pump
positioned over the print head. During the purging process, the
vacuum pump forcibly pulls ink through the print head nozzles,
removing any debris or dry ink particles. The waste ink from this
process is gathered and sent to the waste ink bottle.
After completing the print head purging process, any remaining ink
on the surface of the print head is removed by an automatic wiper.
Manual maintenance process
maintenance. The procedures in this sections
routine
Procedures
The printer performs automatic head cleaning during routine use.
However, when a void occurs, the trouble can be corrected using the
following head cleaning procedure:
1. If a void occurs, print out the same image again. The automatic
head cleaning operation occurs before each print operation, thus
forcing an extra head cleaning cycle.
2. If the print still has voids, select HEAD MAINTENANCE>
NORMAL PURGING commands on the printer’s operation panel.
READY MENUÎ
HEAD MAINTENANCE Î
CUT Î
<MORE>
3. Each time the HEAD MAINTENANCE command is executed, the
printer’s inking system is purged of a small amount of ink.
4. Print the image once again.
5. If the print still shows voids, return to the HEAD MAINTENANCE
option; however, select STRONG PURGING.
6. Call your service representative if you cannot correct the print
quality.
<HEAD MAINTENANCE> S
STRONG PURGING Î
NORMAL PURGING Î
38 Maintaining print quality
Page 51

Head Maintenance (con’t)
Test Print
You can print the nozzle test pattern through the operation panel.
This is performed to check for clogged nozzles.
Procedures
1. Press the Menu mode button.
2. Press the button associated with the TEST PRINT option to enter
the test print mode.
<MENU> S
TEST PRINT Î
HEAD MAINTENANCE Î
<MORE>
<TEST PRINT>
NOZZLE TEST Î
<MORE>
S
<NOZZLE TEST>
* W/O INFO. +
FRONT -
<ROLL> PRINT Î
3. Press the button associated with the NOZZLE TEST option.
4. Use the arrow buttons to select the FRONT or REAR roll.
4. Press the button associated with the PRINT option to execute the
print.
6. Verify that the adjustment was successful. If not, repeat the
process. If this still does not resolve the problem, call your
service representative.
S
Maintaining Print Quality 39
Page 52
Jam clearance
Clearing a media jam
Procedures
Carriage
Carriage
Wrinkles on
Wrinkles on
the right side
the right side
Overview
If the printer has a media jam, clear it using the
following procedure. Diagrammatic labels indicating
the summarized steps are attached inside of the
equipment.
Important - Repeated media jams indicate the
printer is not operating normally. Refer to the
section "Error messages and troubleshooting" from
Appendix A
suggested corrective actions.
1. Open the top and front covers. Pull up the
release lever to release pressure as shown in
illustration to the left.
2. Check the position of the carriage. If it does not
return to the home position, manually move the
carriage away from the platen.
which includes probable causes and
40 Jam clearance
Page 53

Clearing a media jam (con’t)
a. If the jam/wrinkles are found on the right
side of the carriage, slide it to the left.
Carriage
Wrinkles on
Wrinkles on
the left side
the left side
3. If the media is protruding from the media exit,
Carriage
5. Cut the media with scissors or a knife.
b. If on the left side, slide it to the right end. To
avoid print head damage, ensure that the
media does not contact the print heads.
cut that portion of the media using scissors or a
knife.
4. If the jam occurred before the media was
ejected from the media exit, pull out the media
for easy cutting.
Jam clearance 41
Page 54

Clearing a media jam (con’t)
9. Insert the leading edge of the media to the
6. Rewind the media rearward.
7. Set the media again.
8. Close the release lever.
feeder. Refer to
removing media
10. Close the top and front covers. The printer will
initialize automatically.
11. If the jam error message does not clear, go to
More tips for clearing jam
Operations: Loading and
.
following this section.
42 Jam clearance
Page 55
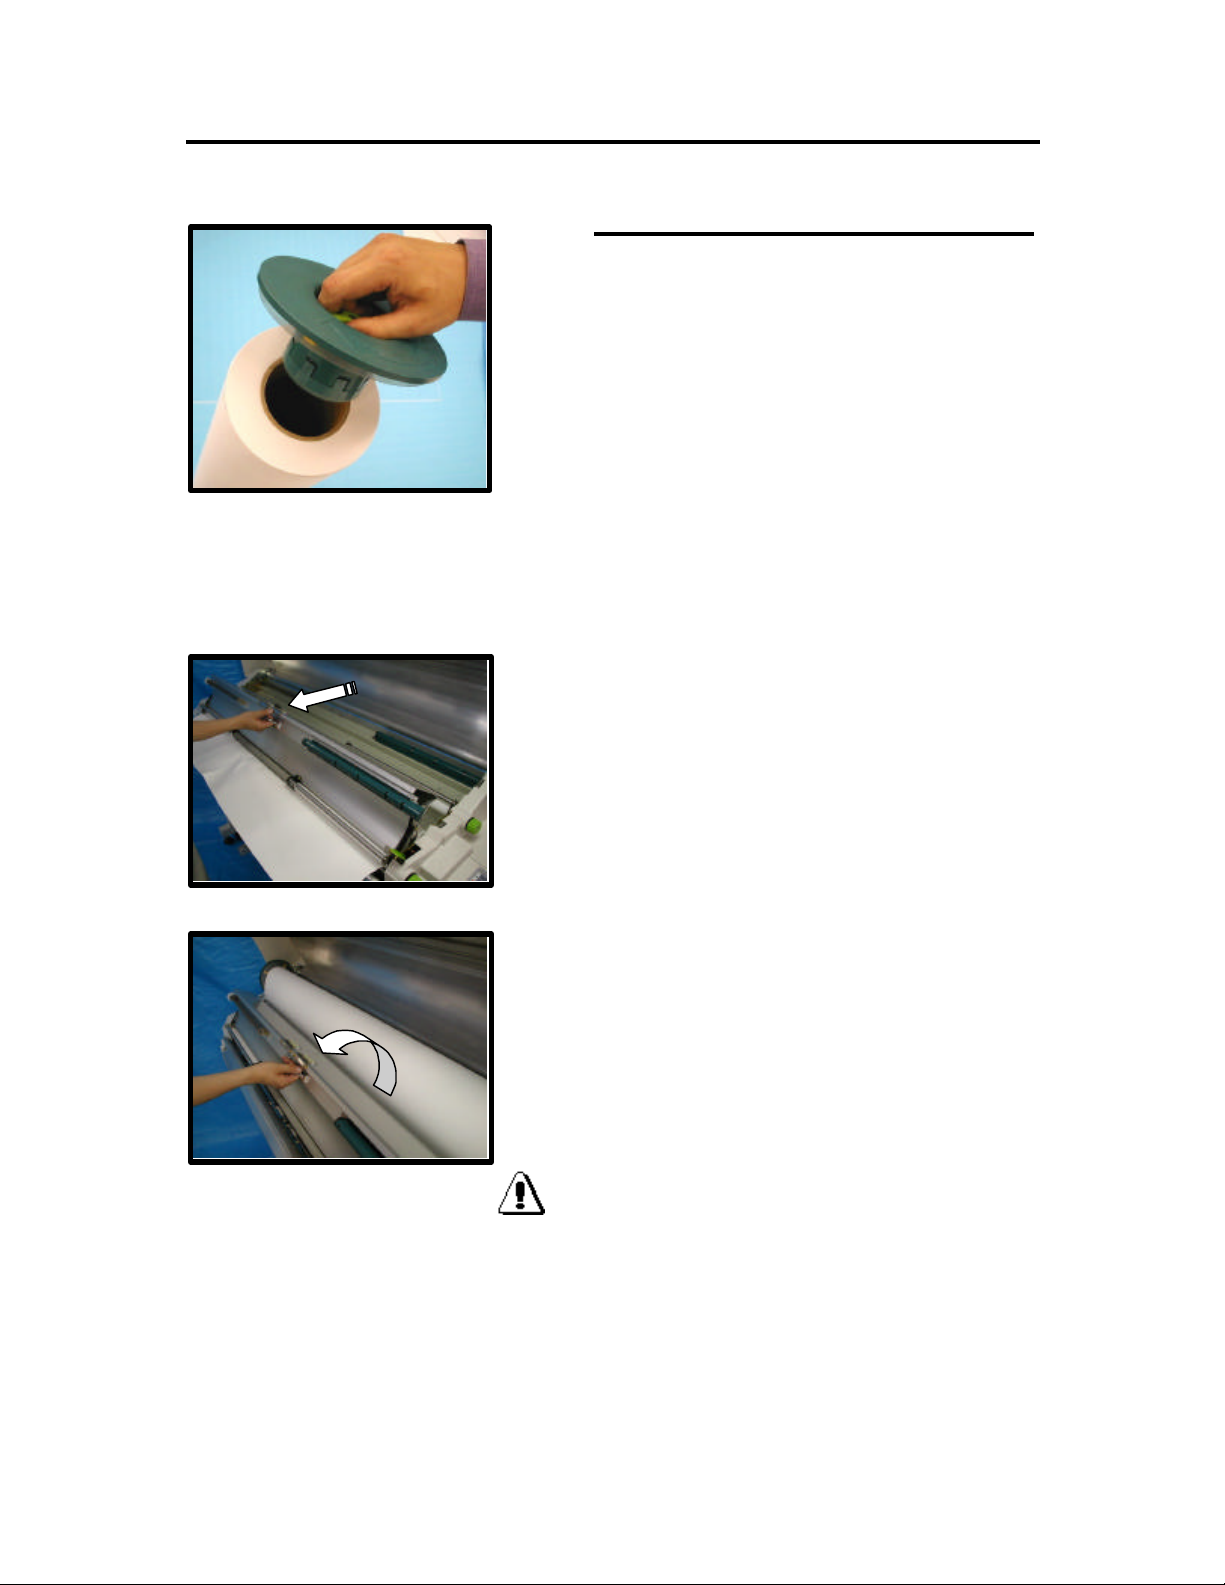
Clearing a media jam (con’t)
e. Carefully open the feed guide unit as
More tips for clearing media jams
1. If the jam error message does not clear, doublecheck the following points.
2. Inspect the edge of the media roll to ensure
there is no damage.
3. Determine if the media is wrinkled on the media
roll. If yes, replace the media roll.
4. Ensure the end caps are set properly. Refer to
Loading and removing media
5. Inspect the media feeders. If pieces of media
remain in the media path, remove them. The
steps to inspect the media feeders are:
a. Open the printer’s top and front covers.
b. Rewind the loaded media.
c. Remove all media rolls from the printer.
d. Grasp the handle of the printer’s feed guide
unit.
indicated in the illustration to the left. Be
sure to open the feed guide completely.
WARNING: The feed guide unit can open
quickly and fall unexpectedly into your
hands.
for installation.
Jam clearance 43
Page 56
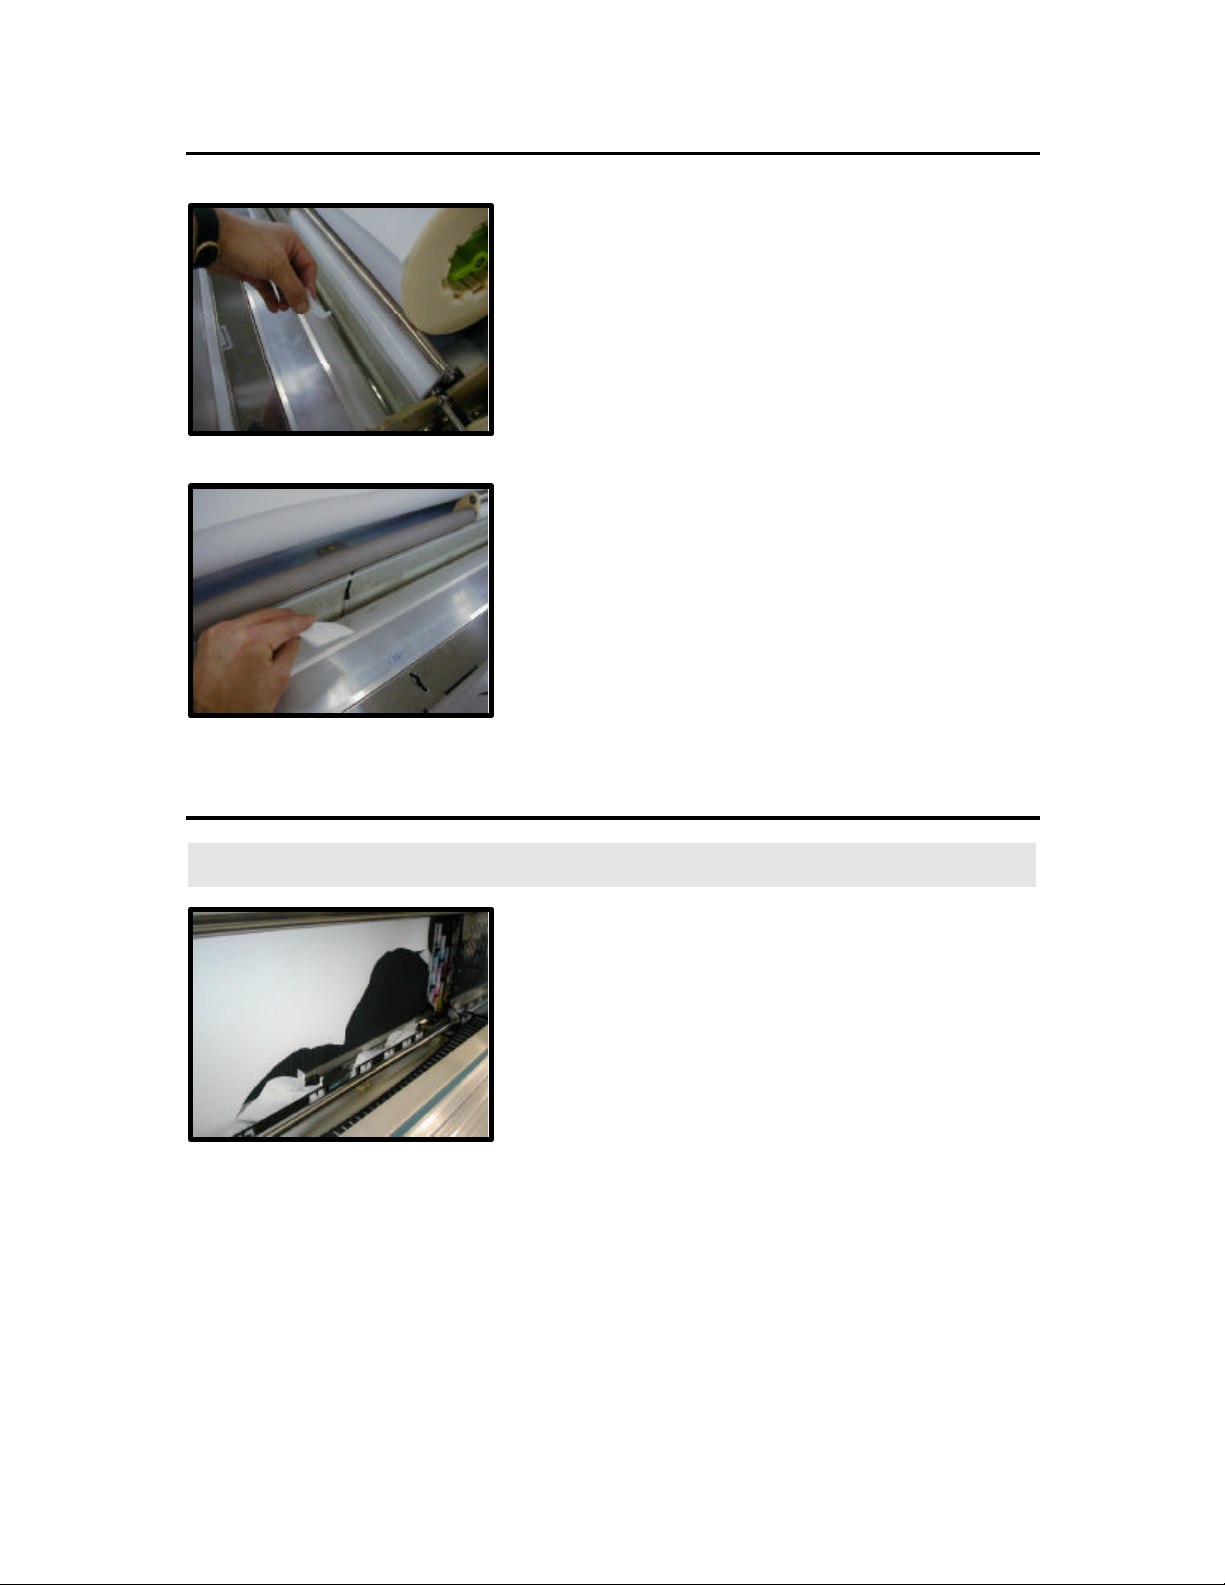
Clearing a media jam (con’t)
g. If the printer has a sticky substance such as
f. If the printer has residual pieces of media,
clear the pieces of media.
glue, clean the media path with alcohol and
cleaning paper.
h. If, after performing the stated clearing
activities, you still receive an error message
indicating a jam, contact your service
representative.
Clearing a cutter jam
Procedures
When a cutter jam occurs, typically the cutter unit
blade is stuck.
1. Follow the procedure, clearing a media jam. Be
sure to prevent the print head from contacting
the media.
44 Jam clearance
Page 57

2. Carefully remove the jammed media from the
cutter unit.
3. If the jam occurred before the media was
ejected from the media exit, pull out the media
for easy cutting.
a. Cut the media with scissors or a knife.
b. Ensure the media roll is undamaged. If so,
replace the media roll.
c. Verify that the Cut Mode is set as desired.
d. If the cutter blade is damaged, replace the
blade. Further jams will occur as long as a
damaged blade is being used.
e. If, after replacing the cutter blade, you still
receive an error message indicating a jam,
contact your service representative.
Jam clearance 45
Page 58

In case of difficulty
Overview
If you suspect your printer is not working properly or you are
experiencing poor quality output, follow the procedures in this chapter
to isolate the cause, then follow the suggestions to correct the
problem.
First check for an error message on the printer's LCD. If an error
condition is not displayed, use the observed symptoms to pinpoint
the cause and the appropriate corrective action.
Trouble isolation procedures
Quick checks
When you suspect your printer is not functioning properly, check the
following items first:
Printer doesn't turn on
If your printer does not turn on, check the following
items:
1. Check that the printer's power plug is plugged
into the outlet.
2. Check that power is available at the outlet.
3. Check that the printer's power switch is turned
ON.
4. Check that the printer's circuit breakers are
closed.
Caution - An open circuit breaker indicates a
possible electrical problem. Determine the
cause of the open circuit breaker before
proceeding.
46 Appendix A: In Case of Difficulty
Page 59

Trouble isolation procedures (con’t)
Poor image quality
When you experience poor print quality, check the
following first:
1. Check that the proper media for the print
resolution is being used.
2. Check that the approved ink is being used, and it
is within its expiration date.
3. Check (at the digital front end) that the proper
RIP color curve is loaded for the loaded media.
4. Check that automatic print head cleaning has
been performed.
5. If the above checks are OK, check the chart on
the following pages for additional suggestions.
Printer test
To perform a quick overall printer test, use the
following procedure:
1. Turn the printer OFF using its power switch.
2. Ensure that the power cable is firmly connected
to the equipment.
3. Wait at least 30 seconds.
4. Turn the printer ON using its power switch.
5. Print a test pattern (refer to the
Quality
printing a test pattern).
If the test pattern prints properly, the printer is
probably working correctly and the difficulty is most
likely with the host computer or the interface
connection. If image quality is still poor, perform
some or all of the following automatic adjustments.
section, under
Maintaining Print
Print for details on
Test
Adjustment auto mode
Proper adjustment of the ColorgrafX X2 printer is the
key to high-quality, consistent, color image output.
This section covers the details for aligning and
registering the print heads.
Head alignment is automatically performed through
the operation panel menu.
Appendix A: In Case of Difficulty 47
Page 60

Trouble isolation procedures (con’t)
Adjustment auto mode (con’t)
Procedures
1. Press the MENU button and enter to the MENU
mode.
2. Use the right and left key to scroll the menu
display. Select the
display status.
<MENU> S
ADJUSTMENT, AUTO Î
3. Press the button associated with the Adjustment,
Auto option.
4. Press the button associated with EXECUTE
(bottom button) to perform automatic adjustment.
5. If you want to correct specific areas, scroll
through the ADJUSTMENT, AUTO options, and
then press the EXECUTE button. The following
table describes the various options.
<MORE>
ADJUSTMENT, AUTO
Option Description
MAG. SINGLE
MAG. MULTI
Magnification correction in the sub scanning direction (for 1 pass).
Magnification correction in the sub scanning direction. (for multi pass )
<MAG. SINGLE> S
PRESS EXECUTE KEY
<ADJUSTMENT, AUTO>
MAG. SINGLE
MAG. MULTI Î
<MORE>
S
Î
<MAG. MULTI> S
PRESS EXECUTE KEY
EXECUTE Î
EXECUTE Î
48 Appendix A: In Case of Difficulty
Page 61

Trouble isolation procedures (con’t)
Adjustment auto mode (con’t)
Option Description
BI-DIR DENSITY Optical density correction in the bi-directional print mode.
FIRING TIMING
PRINT POSITION
ALL
Placement error correction between two HEAD, in the main scanning
direction.
Correction of the print position.
All adjustment.
COLOR SELECT
This command selects the ink bottle being adjusted.
<ADJUSTMENT, AUTO>
BI-DIR DENSITY Î
FIRING TIMING Î
<MORE>
<ADJUSTMENT, AUTO> S
PRINT POSITION Î
<MORE>
<ADJUSTMENT, AUTO> S
COLOR SELECTION Î
<MORE>
S
ALL Î
<BI-DIR DENSITY> S
PRESS EXECUTE KEY
<FIRING TIMING> S
PRESS EXECUTE KEY
<PRINT POSITION> S
PRESS EXECUTE KEY
<ALL> S
PRESS EXECUTE KEY
<COLOR SELECTION>
K C M LC LM Y
1 1 1 1 1 1
EXECUTE Î
EXECUTE Î
EXECUTE Î
EXECUTE Î
S
<CSR> ENTER Î
Appendix A: In Case of Difficulty 49
Page 62
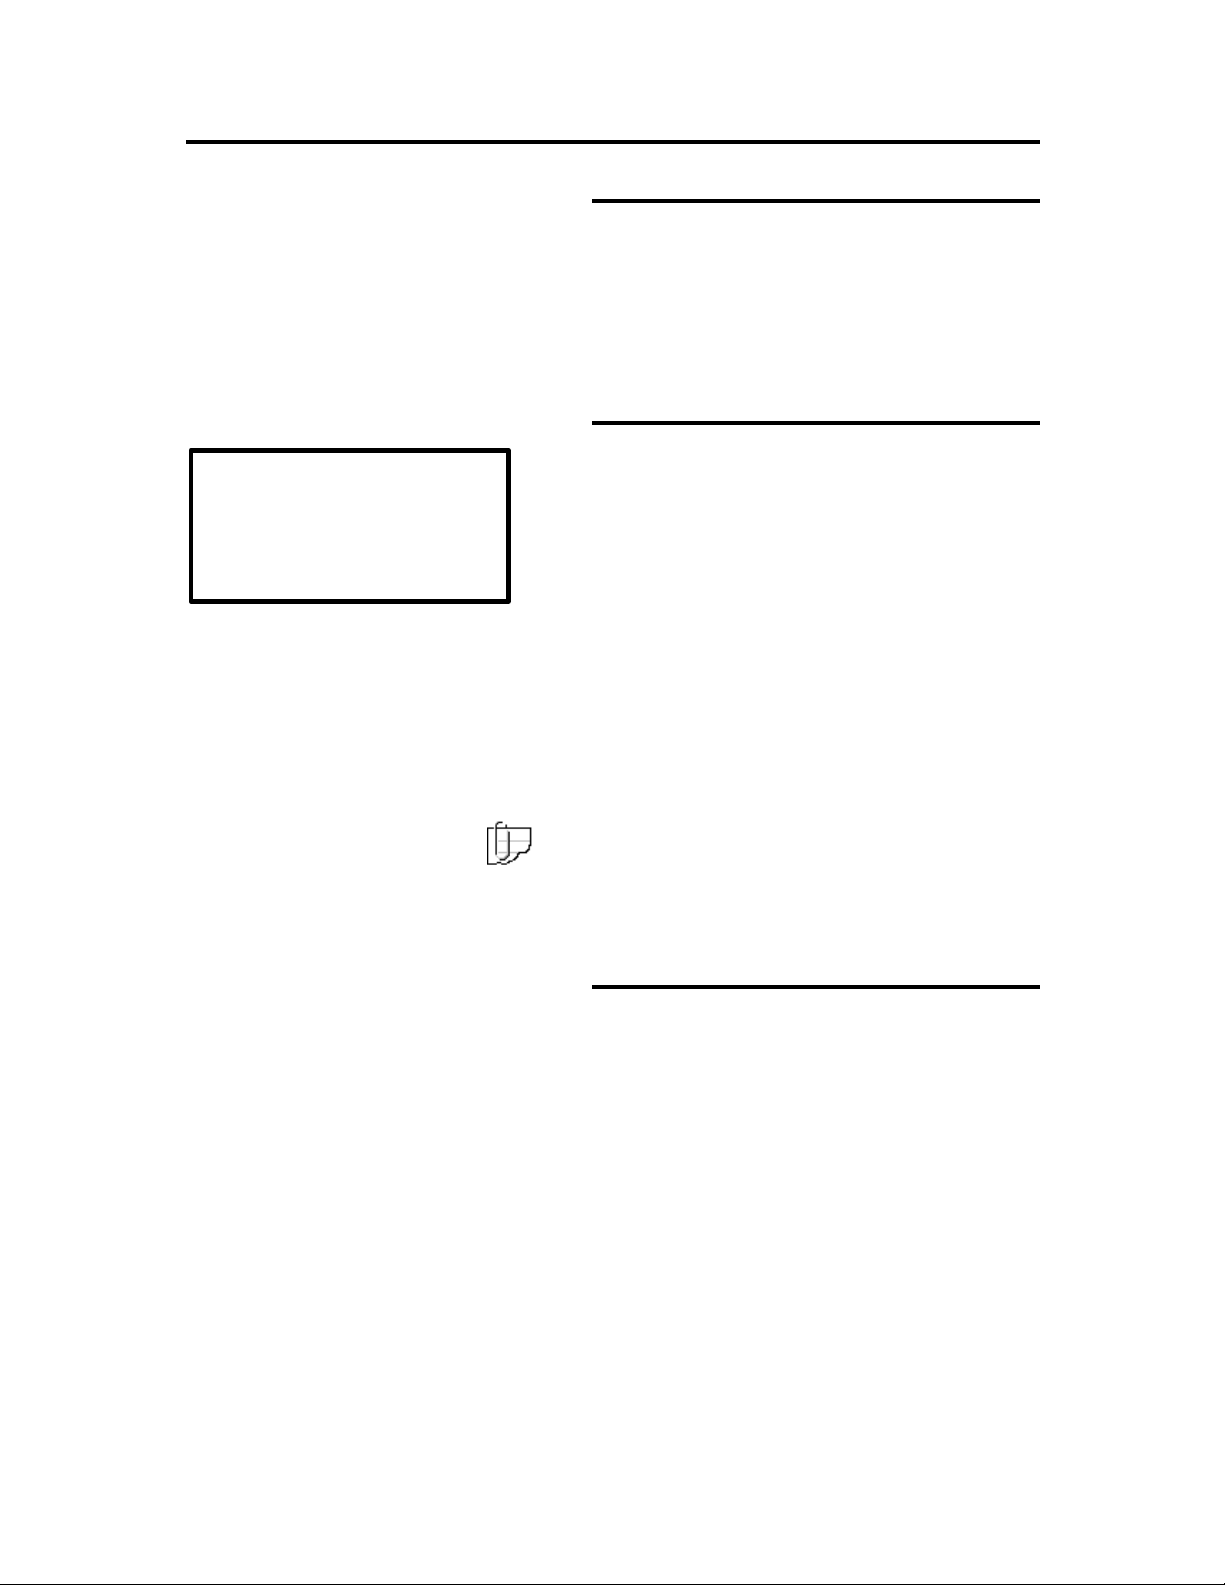
Trouble isolation procedures (con’t)
Magnification adjustment mode
The vertical media movement between carriage
head passes is governed by the number of cycles of
the media transport system's forward motor. This
enables fine-tuning the amount of media vertical
movement associated with each pass of the print
heads, preventing a void between the inked areas
laid down with each print-head pass.
Control panel menu item
<MAGNIFICATION> S
* 0.00 % +
CLEAR
Î
-
The vertical magnification adjustment is set
independently for each of the different media rolls
that can be used with the printer. Media type mode
selects the magnification parameter that is
appropriate to the media selected. However, you
can select and change the values for the installed
media. In this case you must verify the selected
value by trial and error, printing with your media for
optimum results.
The value entered can be any value between
–0.50% and +0.50% in 0.01 intervals. Set the value
and print your patterns to find the most appropriate
value for your media.
For more detailed procedures, refer to the
Operations Panel Menu
section,
Media Attribute
.
Note: Adjusting magnification is only
recommended to fine tune an image. A setting
change can affect other modes for different images
and different media type. True size proportions
can be compromised.
Computer interface test
Use the following procedure to check the computer
interface:
1. Turn the printer power switch OFF.
2. Ensure that the interface cables is securely
connected to the printer. You should also
ensure that you’re using the proper host
computer interface cable.
3. Turn the printer's power switch ON.
50 Appendix A: In Case of Difficulty
Page 63

Trouble isolation procedures (con’t)
Computer interface test (con’t)
4. In the SCSI Select utility, verify that the printer
has the same SCSI ID set as is being addressed
by the host computer.
5. In the SCSI Select utility, set the transfer rate to
10 MB/sec and disable disconnect.
6. Print from the host computer to ensure that all of
the elements are connected and working
properly.
7. If you are able to print using commands from the
host computer, the computer/printer interface is
working properly. The problem probably exists
elsewhere. Contact your service representative
for assistance.
Common operating problems
The following are some common operating problems with symptom
descriptions and suggested actions.
Symptom Potential Problem Suggested Solution
Cutter does not cut
cleanly
Cutter does not operate
“Ink Empty” is displayed
when the ink exists
Poor image quality
Banding --
Blurred print
Incorrect cutter setting at
operation panel
Cutter is stuck
Using the wrong side of the
media
Using incorrect media
-- Replace the cutter.
Check the cutter mode. If
the mode is set to NO CUT,
set the mode to NORMAL
CUT.
Manually move the cutter to
the right
-- Ensure that the ink cap is fully
inserted into the ink bottle.
Change the print mode to
print in higher mode.
Perform the adjustment
procedure in
Magnification
Ensure the media is properly
installed in the printer.
Ensure that 720 dpi printing
is not performed on media
designed for 360 dpi printing
or vice versa.
Media Attribute,
Appendix A: In Case of Difficulty 51
Page 64
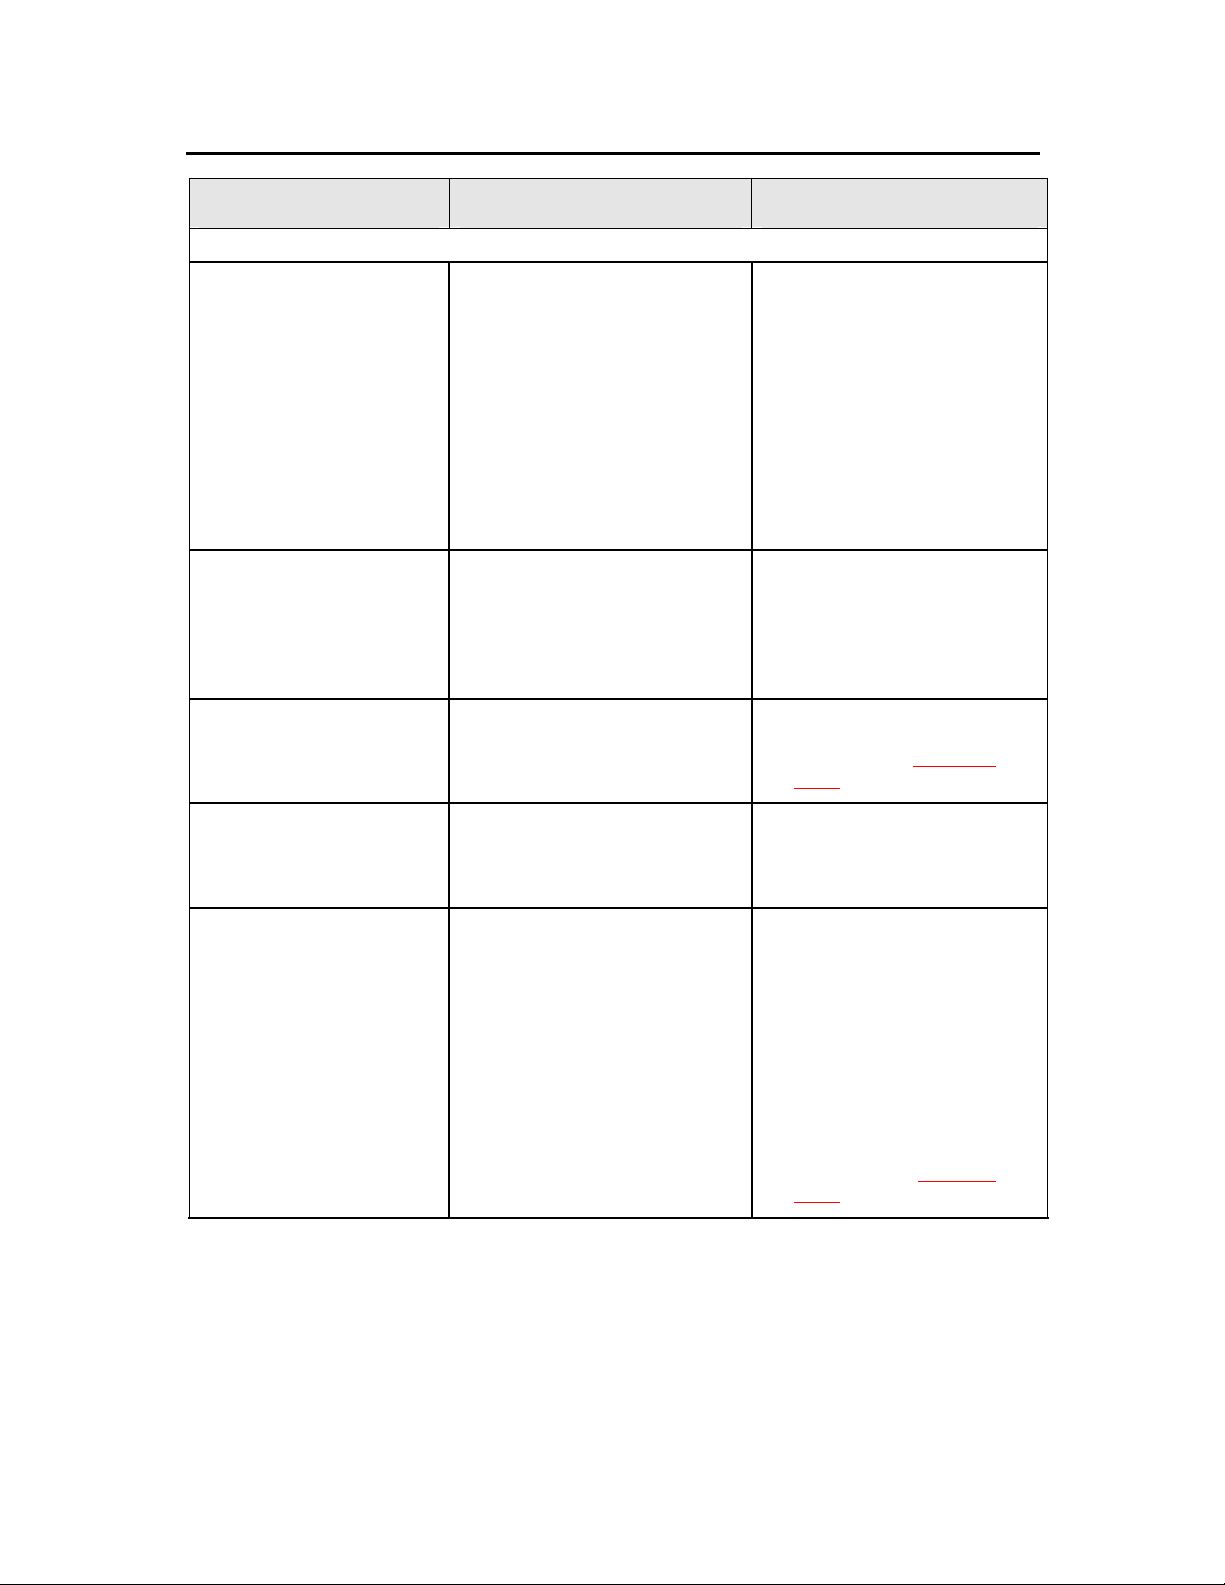
Common operating problems (con’t)
Symptom Potential Problem Suggested Solution
Poor image quality (con’t)
Contaminated print --
front surface
Contaminated print:
back surface
Dark prints
Different colors than
expected
Media leading edge is curled.
The head cleaning
mechanism may not have
completely cleaned the print
heads
A dirty or contaminated pinch
roller
A dirty or contaminated area
on the platen
The printer might be set for
the wrong media
The color displayed on the
host computer monitor and
the print colors are not
necessarily the same
Determine if the media
leading edge is curled. If it is
curled, cut off the curled
area. The curls might be
caused by media wrinkle. If
you have wrinkled media,
feed the media until the
wrinkles disappear, then cut
the media.
Clean the heads using the
Head Maintenance
procedure.
Clean the pinch roller.
Clean the platen.
Ensure that 720 dpi printing
is not being performed on
360 dpi media
Ensure both the monitor and
printer are calibrated.
-
Light or blank prints The RIP processor is sending
the printer invalid data.
The room temperature is out
of recommended range.
The printer may be set to the
wrong media setting
Check the RIP software to
ensure it is producing valid
data.
Adjust the room temperature
to be in the range between
60°F (15°C) to 85°F (30°C) ;
preferably 72°F (23°C), and
let the equipment stabilize at
the new room temperature.
Ensure that 360 dpi printing
is not being performed on
720 dpi media
-
52 Appendix A: In Case of Difficulty
Page 65

Symptom Potential Problem Suggested Solution
Poor image quality (con’t)
Vertical lines are not
straight
Voids or contamination
Printer does not start
printing
Error conditions
False error conditions
regarding media, i.e.,
media skew errors,
carriage jams, media
jams, etc.
Onyx PosterShop 5.0 specific
While using PosterShop:
after sending very first
print, the window
displays, “An error
occurred while initializing
printer communication
port for job ‘___’. ONX /
Would you like to retry or
cancel?
Error in the timing adjustment
(the correction in the main
scanning direction)
The head cleaning
mechanism might not have
thoroughly cleaned the print
heads during normal print
cycles
There is a poor interface wiring
connection between the printer
and the host computer
Media loaded improperly
SCSI configuration improperly
set.
Adjust the main scanning
direction using
Auto Mode
Perform the print head
cleaning procedure:
Maintenance
Check the interface wiring and
repair if necessary. Perform the
Computer interface test
described in this section and
make any changes required.
Ensure the media is loaded
in the roll locators
the appropriate slot.
Click Cancel and OK at the
abort print window. Go to
Tools>Printer Manager
Select the X2 printer and
click the Configure button.
Select the Printer Port tab
and click Configure.
Ensure that the SCSI ID is
set to the proper ID number.
(If you don’t know, quit and
restart the computer. The ID
will be displayed during
restart or in the SCSI Select
Utility.) Ensure that the
SCSI adapter (in
Tool>>Printer
Manager>>configure
button>>Printer Port
tab>>configure button
correct. (If you don’t know
the number, try 0 – 3 until
one works.) If this does not
fix the problem, quit and
restart PosterShop and try
again.
Adjustment,
.
.
Head
exactly
.
) is
in
Appendix A: In Case of Difficulty 53
Page 66

Print job is return
aborted
Incompleted print job;
message stating, “seek
to a tile”
Inappropriate
template.
settings template used if
another template is not
specified when an image file
is opened.)
Job size is larger than 1GB.
settings
(“Last Print” is the
Check Print Setup settings
and ensure that the media
and roll settings correlate. If
it constantly seems to default
to the incorrect roll with each
file that you open and print,
apply a different template.
If possible, reduce image
size. PosterShop cannot
print jobs that are larger than
1 GB.
54 Appendix A: In Case of Difficulty
Page 67
LCD error messages
When the printer detects an error during use, it displays an error
message on the printer's operations panel, that is, the LCD.
User resolvable
The user can resolve these errors. Each message box contains the
error type, suggested action, and the error number.
Error Message Error Message Error Message
AUTO ADJ. FAILURE
ON K HEAD
SEE USER GUIDE
[ER:2921]
AUTO ADJ. FAILURE
ON C HEAD
SEE USER GUIDE
[ER:2922]
AUTO ADJ. FAILURE
ON M HEAD
SEE USER GUIDE
[ER:2923]
AUTO ADJ. FAILURE
ON LC HEAD
SEE USER GUIDE
[ER:2924]
AUTO ADJ. FAILURE
ON LM HEAD
SEE USER GUIDE
[ER:2925]
AUTO ADJ. FAILURE
ON Y HEAD
SEE USER GUIDE
[ER:2926]
CARRIAGE JAM:RIGHT
RESET MEDIA
SEE USER GUIDE
[ER:3311]
CARRIAGE JAM:LEFT
RESET MEDIA
SEE USER GUIDE
[ER:3312]
SCANNING ERROR:
RESET MEDIA
SEE USER GUIDE
[ER:3321]
SCANNING ERROR:
RESET MEDIA
SEE USER GUIDE
[ER:3322]
SCANNING ERROR:
RESET MEDIA
SEE USER GUIDE
[ER:3331]
SCANNING ERROR:
RESET MEDIA
SEE USER GUIDE
[ER:3332]
RELEASE LEVER
OPENED CLOSE THE
LEVER
[ER:3A11]
MEDIA SET ERROR
RESET FRONT ROLL
SEE USER GUIDE
[ER:3A21]
MEDIA SET ERROR
RESET REAR ROLL
SEE USER GUIDE
[ER:3A22]
MEDIA SET ERROR
INCOMPATIBLE MEDIA
SEE USER GUIDE
[ER:3A31]
MEDIA SET ERROR
INCOMPATIBLE MEDIA
SEE USER GUIDE
[ER:3A32]
MEDIA SET ERROR
RESET FRONT ROLL
SEE USER GUIDE
[ER:3A41]
MEDIA SET ERROR
RESET REAR ROLL
SEE USER GUIDE
[ER:3A42]
SKEW, FRONT
RESET ROLL
SEE USER GUIDE
[ER:3A51]
SKEW, REAR
RESET ROLL
SEE USER GUIDE
[ER:3A52]
EMPTY, ROLL
LOAD MEDIA
SEE USER GUIDE
[ER:3A61]
NOT SELECTABLE
REMOVE CURRENT MEDIA
[ER:3A71]
SKEW, FRONT
RESET ROLL
SEE USER GUIDE
[ER:3A81]
SKEW, REAR
RESET ROLL
SEE USER GUIDE
[ER:3A82]
JAM1, FRONT ROLL
REMOVE MEDIA
SEE USER GUIDE
[ER:3B11]
JAM1, REAR ROLL
REMOVE MEDIA
SEE USER GUIDE
[ER:3B12]
Appendix A: In Case of Difficulty 55
Page 68

Error Message Error Message Error Message
JAM2, FRONT ROLL
REMOVE MEDIA
SEE USER GUIDE
[ER:3B21]
JAM2, REAR ROLL
REMOVE MEDIA
SEE USER GUIDE
[ER:3B22]
JAM3, FRONT ROLL
REMOVE MEDIA
SEE USER GUIDE
[ER:3B31]
JAM3, REAR ROLL
REMOVE MEDIA
SEE USER GUIDE
[ER:3B32]
JAM4, FRONT ROLL
REMOVE MEDIA
SEE USER GUIDE
[ER:3B41]
JAM4, REAR ROLL
REMOVE MEDIA
SEE USER GUIDE
[ER:3B42]
JAM5, FRONT ROLL
REMOVE MEDIA
SEE USER GUIDE
[ER:3B51]
JAM5, REAR ROLL
REMOVE MEDIA
SEE USER GUIDE
[ER:3B52]
JAM6, FRONT ROLL
REMOVE MEDIA
SEE USER GUIDE
[ER:3B61]
JAM6, REAR ROLL
REMOVE MEDIA
SEE USER GUIDE
[ER:3B62]
JAM7, END OF ROLL
REMOVE MEDIA
SEE USER GUIDE
[ER:3B71]
CUTTER BLADE STUCK
MOVE BLADE
MANUALLY
SEE USER GUIDE
[ER:3C11]
TOP COVER OPENED
CLOSE THE COVER.
[ER:3D11]
FRONT COVER
OPENED
CLOSE THE COVER.
[ER:3D12]
WASTE BOTTLE FULL
/NOT INSTALLED
SEE USER GUIDE
[ER:4621]
K INK EMPTY
LOAD INK CARTRIDGE
[ER:4631]
C INK EMPTY
LOAD INK CARTRIDGE
[ER:4632]
M INK EMPTY
LOAD INK CARTRIDGE
[ER:4633]
LC INK EMPTY
LOAD INK CARTRIDGE
[ER:4634]
LM INK EMPTY
LOAD INK CARTRIDGE
[ER:4635]
Y INK EMPTY
LOAD INK CARTRIDGE
[ER:4636]
K INK EMPTY
FILLING INK
[ER:4641]
C INK EMPTY
FILLING INK
[ER:4642]
M INK EMPTY
FILLING INK
[ER:4643]
LC INK EMPTY
FILLING INK
[ER:4644]
LM INK EMPTY
FILLING INK
[ER:4645]
Y INK EMPTY
FILLING INK
[ER:4646]
JAM8, TAKE UP ROLL
RE-ROLL MEDIA
PRESS TO RESET
[ER:4B11]
SCSI ERROR:
SEE USER GUIDE
[ER:1271]
56 Appendix A: In Case of Difficulty
Page 69
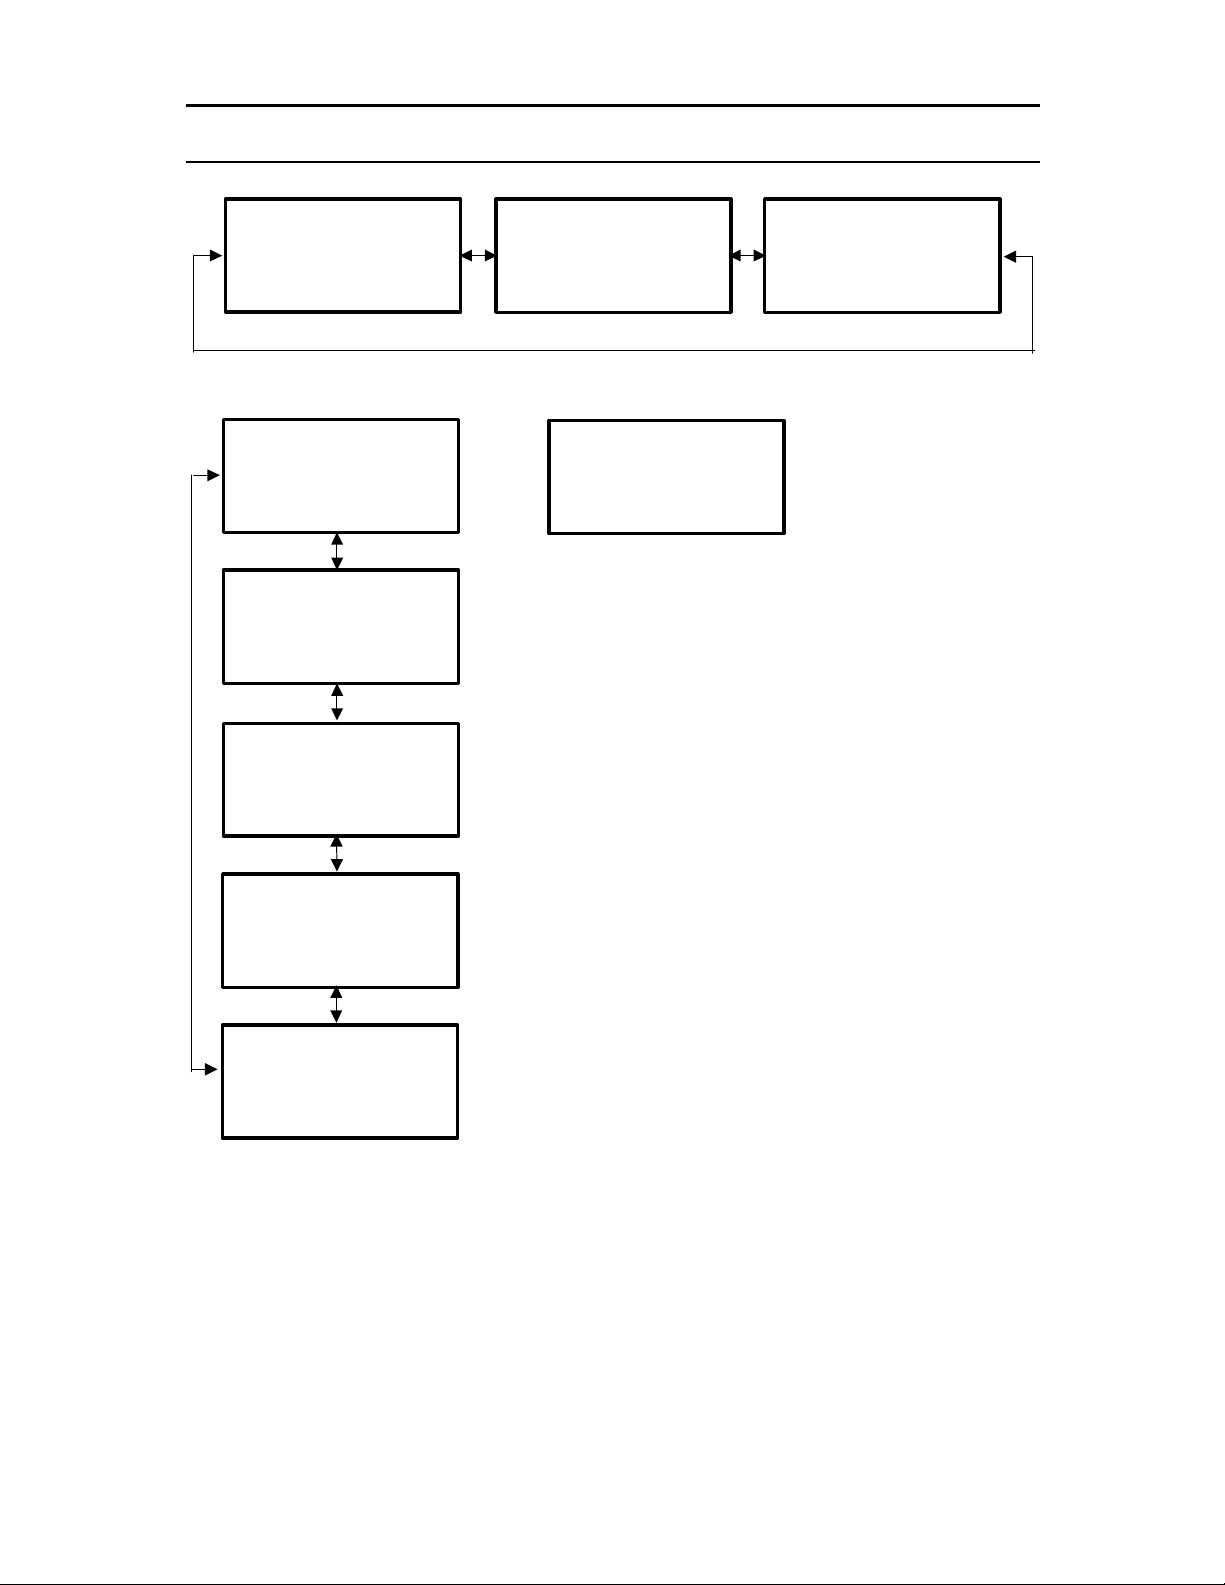
Menu Tree
READY MENUÎ
HEAD MAINTENANCE
CUT Î
<MORE>
From
MENU
<MENU> S
SET Î
<MORE>
<MENU> S
TEST PRINT Î
HEAD MAINTENANCE Î
<MORE>
<MENU> S
ADJUSTMENT, AUTO
Î
Î
READY MENU
R: 360 PRES 36 ggg
F: 720 PRES 54
ggg
From
HEAD MAINTENANCE
<HEAD MAINTENANCE> S
STRONG PURGING
NORMAL PURGING Î
From
CUT
Cuts the media
No further options
Î
Î
Î
READY MENU
RWD ALL Î
<MORE> FWD Î
Î
RWD
Î
Î
<MORE>
<MENU> S
REPLACING BLADE Î
<MORE>
<MENU> S
LIFE COUNTER Î
<MORE>
Appendix B: Menu Tree 57
Page 70
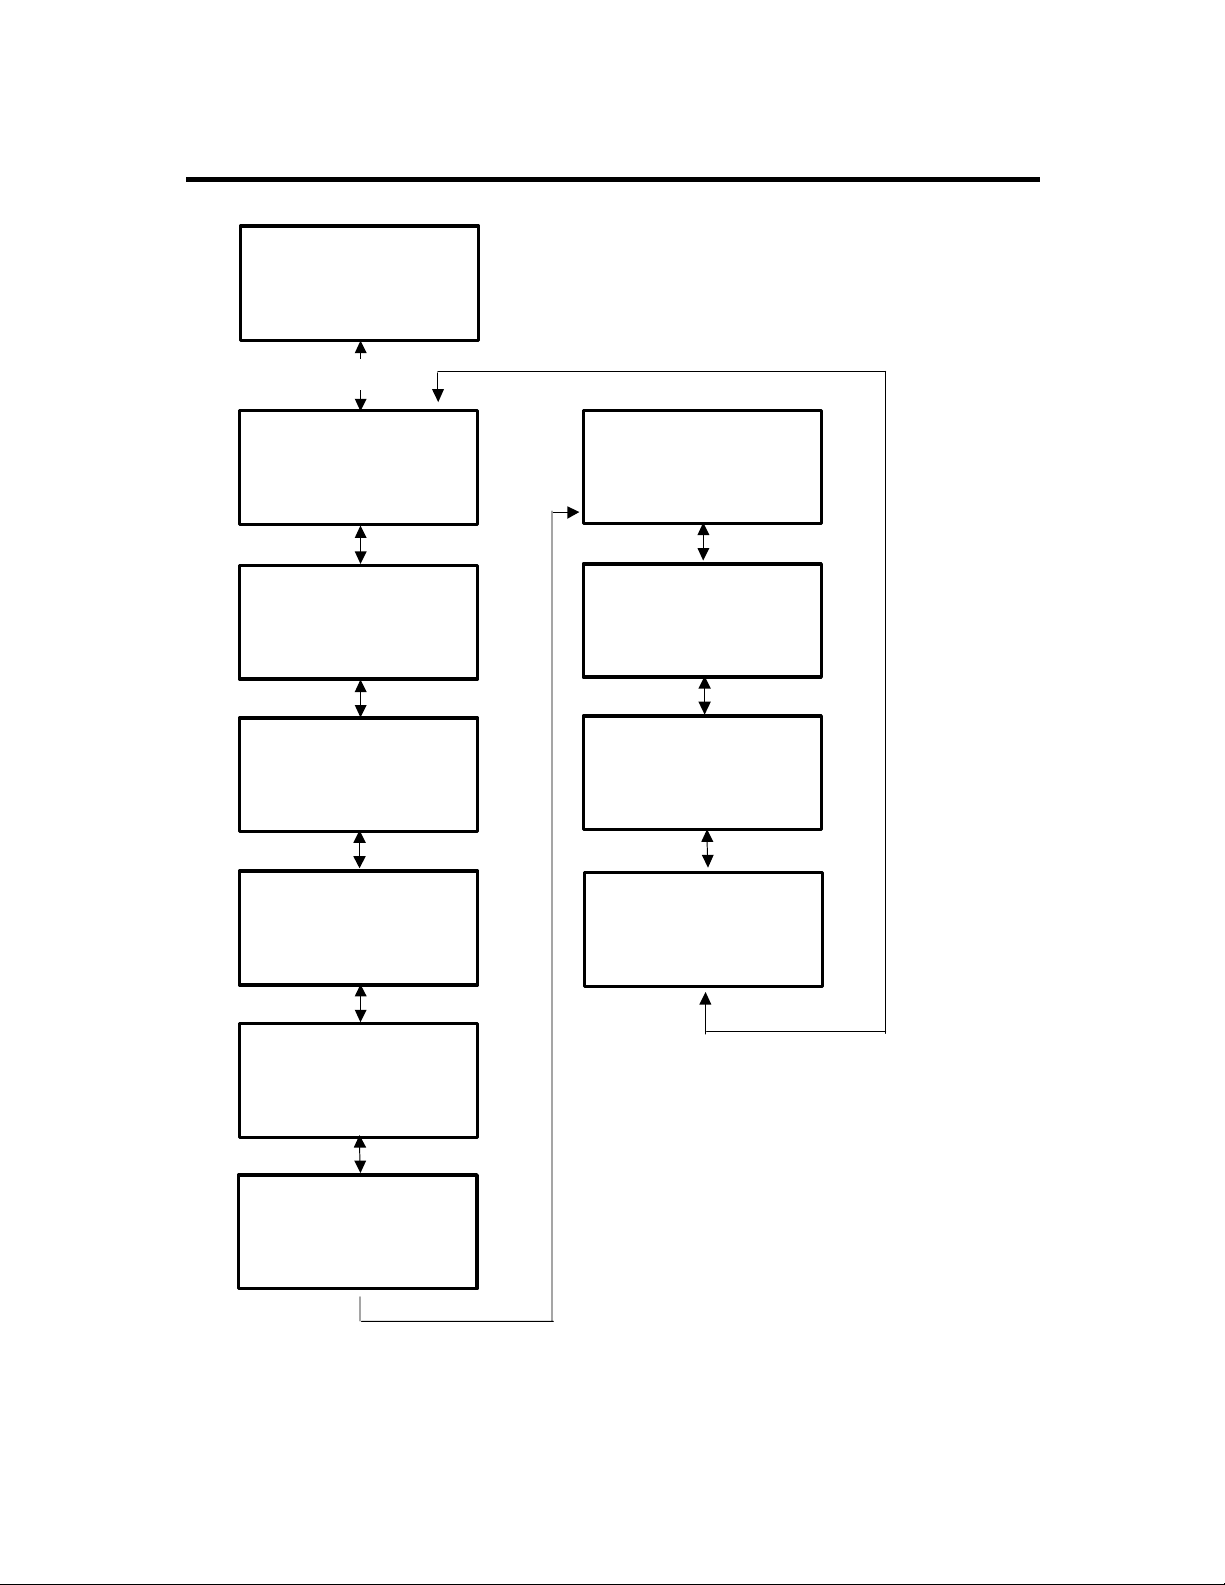
SET menu – first level only
<MENU> S
SET
Î
<MORE>
From SET
<SET> S
ROLL SELECT Î
<MORE>
<SET> S
MEDIA TYPE, REAR Î
MEDIA TYPE, FRONT Î
<MORE>
<SET> S
MEDIA ATTRIBUTE Î
POWER SAVE
<MORE>
<SET> S
MAINT. INTERVAL Î
INIT CUT
<MORE>
Î
Î
<SET> S
UNIT SELECTÎ
WINDING DIRECTIONÎ
<MORE>
<SET> S
AUTO CAP Î
REWIND DELAY Î
<MORE>
<SET> S
FEED CORRECTION Î
INTER PAGE GAP Î
<MORE>
<SET> S
LANGUAGE
<MORE>
Î
<SET> S
DATE SET
TIME SET
<MORE>
<SET> S
SCSI ID Î
I/F TIME OUT
<MORE>
Î
Î
Î
58 Appendix B: Menu Tree
Page 71

SET menu – detailed
OPTIONS
<SET> S
ROLL SELECT Î
<MORE>
<SET> S
MEDIA TYPE, REAR Î
MEDIA TYPE, FRONT
<MORE>
<SET> S
MEDIA ATTRIBUTE
POWER SAVE Î
<MORE>
Î
Î
<ROLL SELECT> S
* FRONT +
ENTER Î
<MEDIA TYPE, REAR> S
* 360 PRESENTATION +
ENTER Î
<MEDIA TYPE, FRONT> S
* 720 PRESENTATION +
ENTER
<MEDIA ATTRIBUTE> S
* 360 PRESENTATION Î
* 720 PRESENTATION Î
<MORE>
<MORE> cycles through
all available media
<360 PRESENTATION> S
WAIT CARRIAGE Î
WAIT CUT Î
<MORE>
Î
FRONT
BACK
-
360 PRESENTATION
720 PRESENTATION
-
-
WHITE MATTE FILM
BACKLIT FILM 360
BACKLIT FILM 720
POLY CLOTH
POLY CANVAS
PHOTO-BASE
REINFORCED 360
PSV 360
LINE ART PAPER
0.0sec-30.0sec
(in 0.1sec interval)
0.0sec-30.0sec
(in 0.1sec interval)
<360 PRESENTATION> S
MAGNIFICATION Î
CUT MODE
<MORE>
<POWER SAVE> S
* OFF +
ENTER Î
Î
-
-0.50%-+0.50%
(in 0.1sec interval)
NORMAL CUT
NO CUT
OFF --60min
(in 5min interval)
Note: the following media do NOT have the WAIT CUT option as
these media must be cut manually: Poly Cloth, Poly Canvas,
Reinforced 360, and PSV 360. Additionally, CUT MODE is visible for
these media, but is automatically disabled and cannot be changed.
Appendix B: Menu Tree 59
Page 72
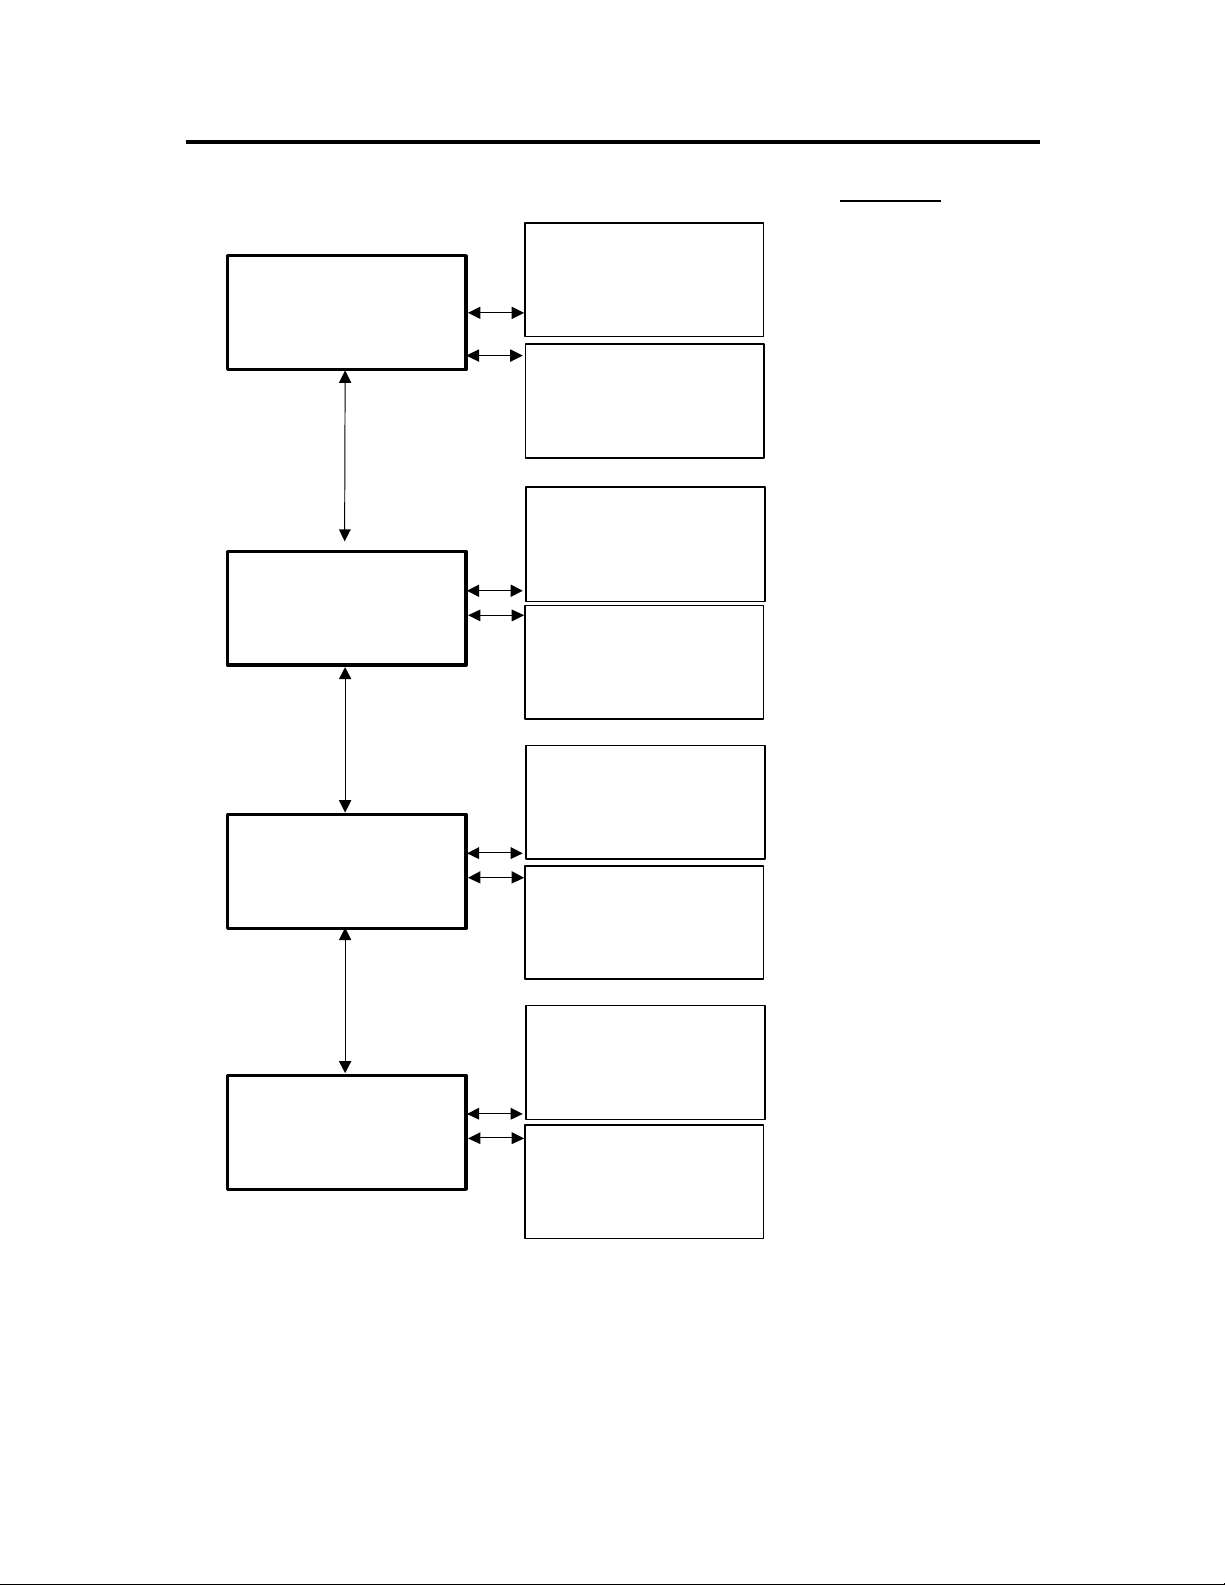
SET menu – detailed (con’t)
OPTIONS
<SET> S
MAINT. INTERVAL
INIT CUT Î
<MORE>
<SET> S
DATE SET
TIME SETÎ
<MORE>
<SET> S
SCSI ID
I/F TIME OUT Î
<MORE>
Î
Î
Î
<MAINT. INTERVAL> S
* LONG +
ENTER Î
<INIT CUT> S
* YES +
ENTER Î
<DATE SET> S
* 2000/01/01 +
YYYY/MM/DD -
<CSR> ENTER Î
<TIME SET> S
* 12:34:56 +
HH:MM:SS -
<CSR> ENTER Î
<SCSI ID> S
* 1 +
ENTER Î
<I/F TIME OUT> S
* OFF +
ENTER Î
LONG
-
-
-
-
MIDDLE
SHORT
NONE
YES
NO
1 – 6
OFF
10sec
30sec
60sec
120sec
<UNIT SELECT> S
Feet/m
OFF
IMAGE OUT
IMAGE IN
<SET> S
UNIT SELECT
WINDING DIRECTION Î
<MORE>
Î
* FEET +
-
ENTER Î
<WINDING DIRECTION> S
* OFF +
-
ENTER Î
60 Appendix B: Menu Tree
Page 73

SET menu – detailed (con’t)
<SET> S
AUTO CAP
REWIND DELAY Î
<MORE>
<SET> S
FEED CORRECTION Î
INTER PAGE GAP Î
<MORE>
<SET> S
MEDIA FLATTENING
LANGUAGE Î
<MORE>
Î
Î
<AUTO CAP> S
* OFF +
ENTER
<REWIND DELAY> S
* OFF +
ENTER Î
<FEED CORRECTION> S
* NOT EXECUTE +
ENTER Î
<INTER PAGE GAP> S
* 1 INCH +
ENTER Î
<MEDIA FLATTENING> S
* NONE +
ENTER
<LANGUAGE> S
* ENGLISH +
ENTER
Î
Î
Î
OPTIONS
-
OFF
-
-
-
-
-
1 min – 60 min
EXECUTE
NON EXECUTE
UNCONTROLLED
0 – 12
(1 inch interval)
LONG
MIDDLE
SHORT
NONE
ENGLISH
GERMAN
FRENCH
PORTUGUESE
SPANISH
ITALIAN
JAPANESE
EST PRINT menu
<TEST PRINT> S
NOZZLE TEST
<MORE>
To Head Maintenance menu
Î
Appendix B: Menu Tree 61
<NOZZLE TEST> S
* W/O INFO. +
FRONT -
<ROLL> PRINT
<ROLL> cycles between
FRONT & BACK.
W/O INFO
WITH INFO
Î
Page 74

HEAD MAINTENANCE menu
From Test Print menu
<HEAD MAINTENANCE> S
STRONG PURGING Î
NORMAL PURGING Î
DJUSTMENT, AUTO menu
<ADJUSTMENT, AUTO> S
MAG. SINGLE Î
MAG. MULTI Î
<MORE>
<ADJUSTMENT, AUTO> S
BI-DIR DENSITY Î
FIRING TIMING Î
<MORE>
<MAG. SINGLE> S
PRESS EXECUTE KEY
EXECUTE Î
<MAG. MULTI>
PRESS EXECUTE KEY
EXECUTE Î
<BI-DIR DENSITY> S
PRESS EXECUTE KEY
EXECUTE Î
<FIRING TIMING> S
PRESS EXECUTE KEY
OPTIONS
No options – automatically
executes when either
STRONG or NORMAL is
selected.
No further options
S
<ADJUSTMENT, AUTO>
PRINT DIRECTION Î
<MORE>
<ADJUSTMENT, AUTO> S
COLOR SELECTION Î
<MORE>
To Replacing Blade menu
ALL Î
EXECUTE Î
<PRINT DIRECTION> S
PRESS EXECUTE KEY
S
<ALL>
PRESS EXECUTE KEY
<COLOR SELECTION> S
K C M LC LM Y
1 1 1 1 1 1
EXECUTE Î
S
EXECUTE Î
<CSR> ENTER Î
62 Appendix B: Menu Tree
Page 75

REPLACING BLADE menu
From Adjustment, Auto menu
<REPLACING BLADE> S
MOVE TO THE CENTER Î
LIFE COUNTER menu
<LIFE COUNTER> S
LIFE COUNTER 1
LIFE COUNTER 2 Î
<MORE>
Î
OPTIONS
No further options
.
<FRONT ROLL USAGE> S
* xxx.x feet
<MORE>
<REAR ROLL USAGE> S
* xxx.x feet
<MORE>
<FRONT ROLL USAGE> S
* xxx.x feet
To SET menu
<MORE> ENTER Î
CLEAR Î
<REAR ROLL USAGE> S
* xxx.x feet
CLEAR Î
<MORE> ENTER
Î
Appendix B: Menu Tree 63
 Loading...