

Page 1
MODEL
UX-K01
2.4GHz Cordless Handset
Charge the battery for about 10 hours before initial use.
Cargue la batería durante
Introduction
Connecting the Cordless Handset Charger
Installing and Charging the Battery
Registering the Cordless Handset
Enterring a Name for the Cordless Handset
Maintenance
OPERATION MANUAL
10 horas
aproximadamente antes del primer uso.
Page 2

FCC regulatory information
This device complies with part 15 of the FCC rules. Operation is subject to the following two
conditions: (1) this device may not cause harmful interference, and (2) this device must accept
any interference received, including interference that may cause undesired operation.
WARNING - FCC Regulations state that any unauthorized changes or modifications to this equipment
not expressly approved by the manufacturer could void the user’s authority to operate this equipment.
Note: This equipment has been test ed and f oun d to comply wi th the li mits f or a Class B digi tal
device, pursuant to Part 15 of the FCC Rules.
These limits are designed to provide reasonable protection against harmful interference in a
residential installation.
This equipment generates, uses and can radiate radio frequency energy and, if not installed
and used in accordance with the instructions, may cause harmful interference to radio
communications. However, there is no guarantee that interference will not occur in a
particular installation. If this equipment does cause harmful interference to radio or television
reception, which can be determined by turning the equipment off and on, the user is
encouraged to try to correct the interference by one or more of the following measures:
- Reorient or relocate the receiving antenna.
- Increase the separation between the equipment and the receiver.
- Connect the equipment into an outlet on a circuit different from that to which the receiver is
connected.
- Consult the dealer or an experienced radio/TV technician for help.
IMPORTANT NOTICE
For body worn operation, t his ph one has bee n tested and meets FCC RF e xposure guide lines
when used with an accessory that contains no metal and that positions the handset a
minimum of 1.5 cm from the body.
Use of other accessories may not ensure compliance with FCC RF exposure guidelines.
This equipment complies with Part 68 of the FCC rules and the requirements adopted by the ACTA. On
the rear of this equipment is a label that contains, among other information, a product identifier in the
format US:AAAEQ##TXXXX. If requested, this number must be provided to the telephone company.
If this equipment causes harm to the telephone network, the telephone company will notify you in
advance that temporary discontinuance of service may be required. But if advance notice isn't practical,
the telephone company will notify the customer as soon as possible. Also, you will be advised of your
right to file a complaint with the FCC if you believe it is necessary.
The telephone company may make changes in its facilities, equipment, operations or procedures that
could affect the operation of the equipment. If this h appens the telephone company will pro vide advance
notice in order for you to make necessary modifications to maintain uninterrupted service.
If trouble is experienced with this equipment, or for repair or warranty information, please contact
Sharp's Customer Assistance Center . The n umber is 1-877-794-8675. If the equipment is causing harm
to the telephone network, the telephone company may request that you disconnect the equipment until
the problem is resolved.
This equipment contains no user-repairable parts. Refer all servicing to qualified service personnel.
This equipment is hearing aid compatible.
This accessory cordless handset, along with the base unit, has received TCB approval.
Page 3
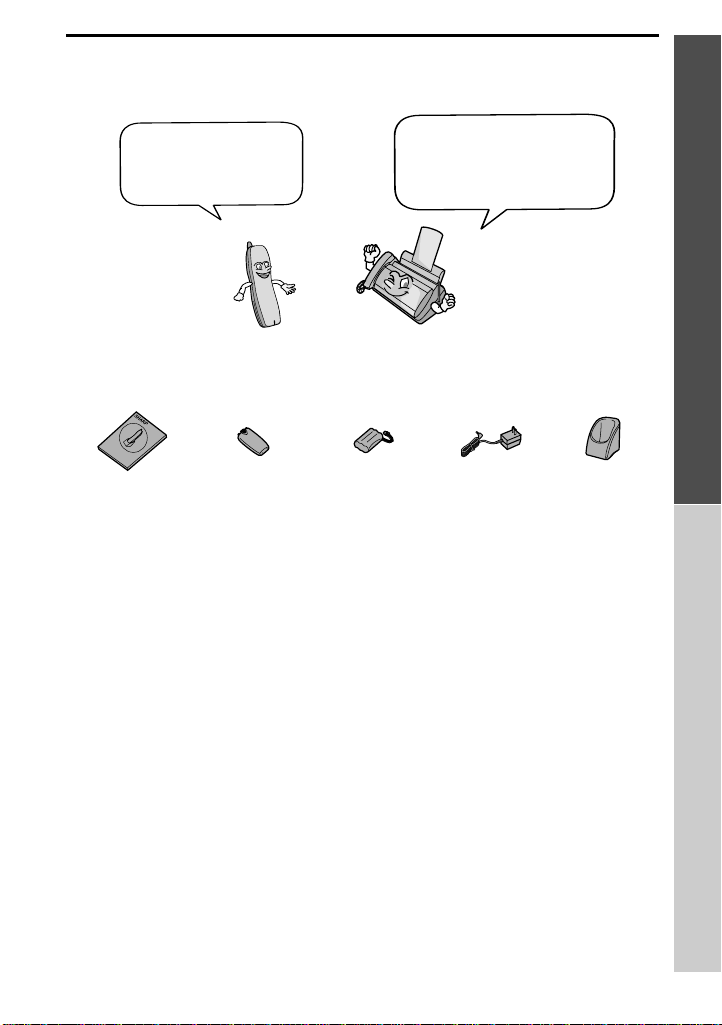
Introduction
Thank you for
purchasing a UX-K01
cordless handset.
T o use the UX-K01 cor dless
handset, you must have a
SHARP UX-CC Series fax
machine.
Accessories
Operation
manual
Battery
cover
Battery
pack
AC adapter
Specifications
Frequency 2.4 GHz (2.405 to 2.475 GHz)
Dimensions Width: 1.8" (46 mm)
Weight Approx. 0.3 lbs. (115 g) (without battery)
Battery 3.6 V Ni-MH battery; capacity: 850 mAh
Power consumption
Initial charging
Battery life
Battery life in standby
mode
Depth: 1.7" (42 mm)
Height: 7.1" (180 mm) (not including antenna)
Approx. 1.3 W (in standby mode)
Approx. 10 hours for initial charge
Approx. 4 hours (240 minutes) (at room temp.)
Approx. 2 days with one full charge (at room
temperature)
Battery life (both normal and in standby mode)
may vary depending on usage, range from base
machine, and environmental conditions such as
temperature.
Cordless
handset charger
English
Español
As a part of our policy of continuous improvement, SHARP reserves the right to make design
and specification changes for product improvement without prior notice. The performance
specification figures indicated are nominal values of production units. There may be some
deviations from these values in individual units.
1
Page 4

Important safety information
Do not disassemble this product or attempt any procedur es not described in this manual. Ref er
all servicing to qualified service personnel.
Do not use this product near water , or when y o u ar e wet. For example, do not use th is pr oduc t
near a bath tub, w ash bo wl, kitc hen sink or laundry tub , in a we t basement, or near a s wimming
pool. Take care not to spill any liquids on the product.
Unplug the product from the power outlet and consult a qualified service representative if any
of the following situations occur:
- Liquid has been spilled into the product or the product has been
exposed to rain or water.
- The product produces odors, smoke, or unusual noises.
- The power cord is frayed or damaged.
- The product has been dropped or the housing damaged.
Do not allow anything to rest on the power cord, and do not install the product where people
may walk on the power cord.
The AC adapter must only be connected to a 120 V, 60 Hz outlet. Connecting it to any other
kind of outlet will damage the machine and void the warranty.
Never insert objects of any kind into slots or openings on the product. This could create a risk
of fire or electric shock. If an object falls into the product that you cannot remove, unplug the
product and consult a qualified service representative.
Do not place this product on an unstable cart, stand or table. The product could be seriously
damaged if it falls.
Battery
Use only the battery specified in this manual. Use only the provided charger to charge the
battery.
Do not open or mutilate the battery pack. Corrosive fluid may leak out and cause injury or
burns to the eyes and skin. The fluid may be toxic if swallowed. In case of contact with eyes,
flush with clean water (do not rub), and seek medical attention immediately.
Do not store or carry the battery with other metal objects such as keys or pins. These may
short the battery and cause it to overheat.
Do not allow the battery to become wet.
Do not dispose of the battery in a fire or heat the battery. The battery may explode.
Health care facilities and equipment
Radio frequency energy emitted from the cordless handset equipment may cause medical
equipment to malfunction. Verify that any personal medical equipment you are using is
adequately shielded from external radio frequency energy before using the cordless handset
equipment. Do not use the cordless handset equipment in health care facilities where such
use is prohibited.
2
Page 5

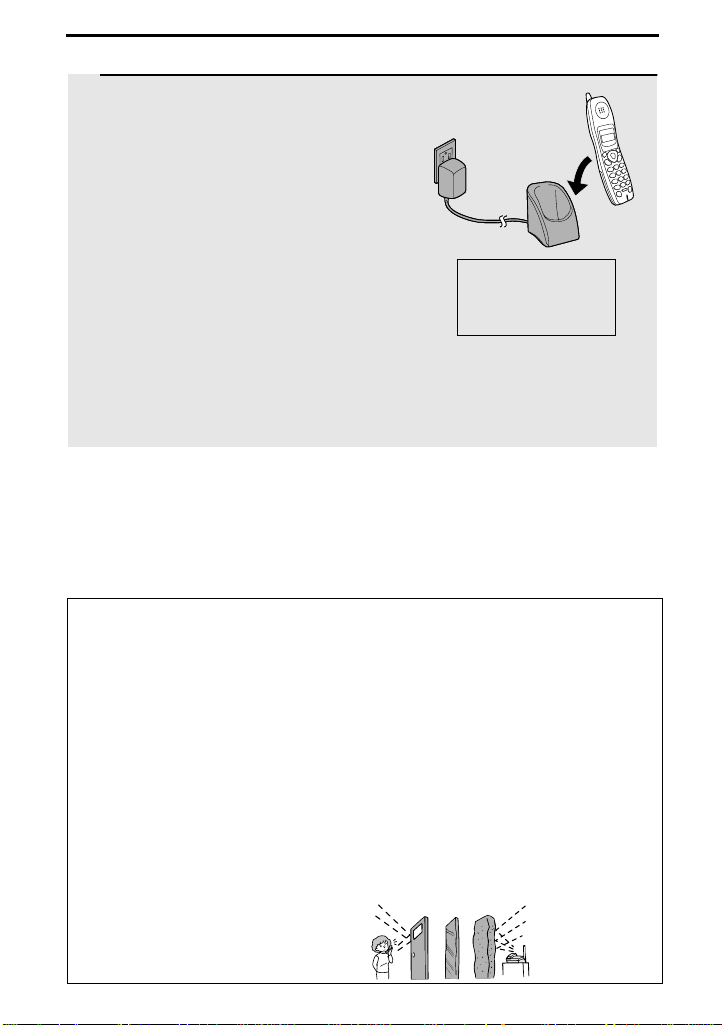
Connecting the Cordless Handset Charger
1 Connect the AC ad apter to the
cordless handset charger.
Place the cord
in the holders.
2 Plug the AC adapter into a standard
120 V AC outlet.
Important: Never cover the charger
and AC adapter with a b lank et, cloth, or
other material. Excessive heating may
result, causing a fire.
Installing and Charging the Battery
1 Connect the battery connector ➊, and then place th e batt ery pack in the
cordless handset.
Black
Red
Red
Black
English
2 Place the battery cover on the cordless
handset, making sure it snaps firmly
into place.
• Make sure the wires are not caught or
pinched by the cover.
Español
3
Page 6
3 Place the cordless handset in the
charger with the dial pad facing
forward.
• Important! The dial pad must face
forward, or the battery will not charge.
• While charging the f irst time , the dis pla y
may show PLEASE REGISTER. Be
sure to let the battery charge for 10
hours, and then register the cordless
handset as explained on the following
page.
♦ The cordless handset and charger may feel warm while charging. This is
normal.
♦ The battery cannot be overcharged. When not using the cordless handset,
keep it in the charger to ensure that it is always charged.
When the battery needs charging, LOW BATTERY will appear in the display
and you will hear beeps during a phone conversation. Place the cordless
handset in the charger and let it charge.
Note: If the bat tery is extremely low, nothing may appear in the dis play during
the first several minutes that the cordless handset is in the charger. The
battery will begin to charge normally after several minutes.
Walkie-Talkie capability
Two cordless han dsets can be use d f or w alki e-talki e lik e c ommun ication. The
talking range of the cordless handsets is 1200 ft. (400 m) (line of sight; talki ng
range may decrease depending on transmission conditions), and there is no
need to be in the talking range of the fax machine.
Talking range (distance from fax machine) for phone calls
The talking range of the cordless handset for phone calls is approximately
1200 ft. (400 m) (line of sight; talking range may decrease depending on
transmission conditions) from the fax machine. If you hear noise or
interference while talking, move closer to the fax machine.
Charge the battery
10 hours
at least
the first time!
♦ When outside the talking range , OUT OF RANGE appears in the displ a y. If
you move out of the talking range while talking on the cordless handset,
the handset will beep and you may hear interference.
Large metal objects,
metal structures, and
thick walls reduce th e
talking range.
4
Reinforced concreteMetalAluminum sash
Page 7
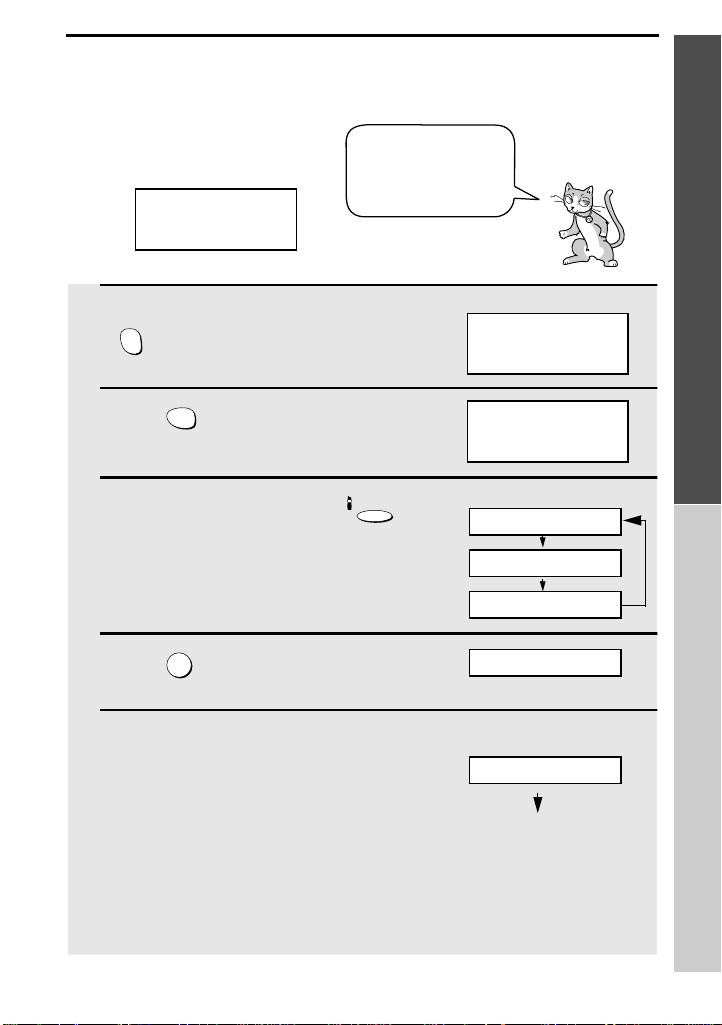
Registering the Cordless Handset
After the initial charging,
the cordless handset
display shows:
PLEASE REGISTER
To use the cordless
handset, you must
first register it with
the fax machine.
1 On the cordless handset, hold down
INTER
until the display at right appears.
COM
2 Press on the cordless handset.
3 On the fax machine, hold down
4 Press on the fax machine.
1
INTERCOM
until the display at right appears.
1
Cordless handset display:
MODE SELECT
1: HS ENTRY
2: HS DELETE
HS ENTRY MODE
Fax machine display:
MODE SELECT
1: HS ENTRY
2: HS DELETE
PRESS HS NUMBER
English
5 On the fax machine, enter a number
from 2 to 4. This number identifies the
cordless handset.
Example: “2” is selected
HS2 ENTERED
• This completes the registration
procedure.
Note: If ALREADY STORED appears in the display, the number you selected
has already been assigned to another cordless handset. Try a different
number. (If you need to use a number that is already in use, delete the
cordless handset that uses that number as explained on page 10.)
Both displays return to the
normal standby display
Español
5
Page 8

Note: If you take no action for one minute during the registration procedure,
the procedure will be canceled. In thi s case, start from Step 1 again.
The fax machine is identified
by the number “0”, and the
cordless handset that was
included with the fax is
identified by the number “1”.
Entering a Name for the Cordless Handset
Enter a name for the cordless handset in the fax machine.
♦ The fax machine will transmit the name that you enter to your cordless
handset. The name will appear in the c ordless handset’s display.
1 Press once and 3 times on
FUNCTION
the fax machine.
2 Press once and once.
3 Press once.
4 Press to select SET.
1
5 Enter the number of the cordless
handset for which you wish to enter a
name.
Example:
6
2
Fax machine display:
ENTRY MODE
HS NAME SET
1=SET, 2=CLEAR
SELECT HS NO.
ENTER (1-4)
Example: Cordless handset 2
HS2 SELECTED
Page 9
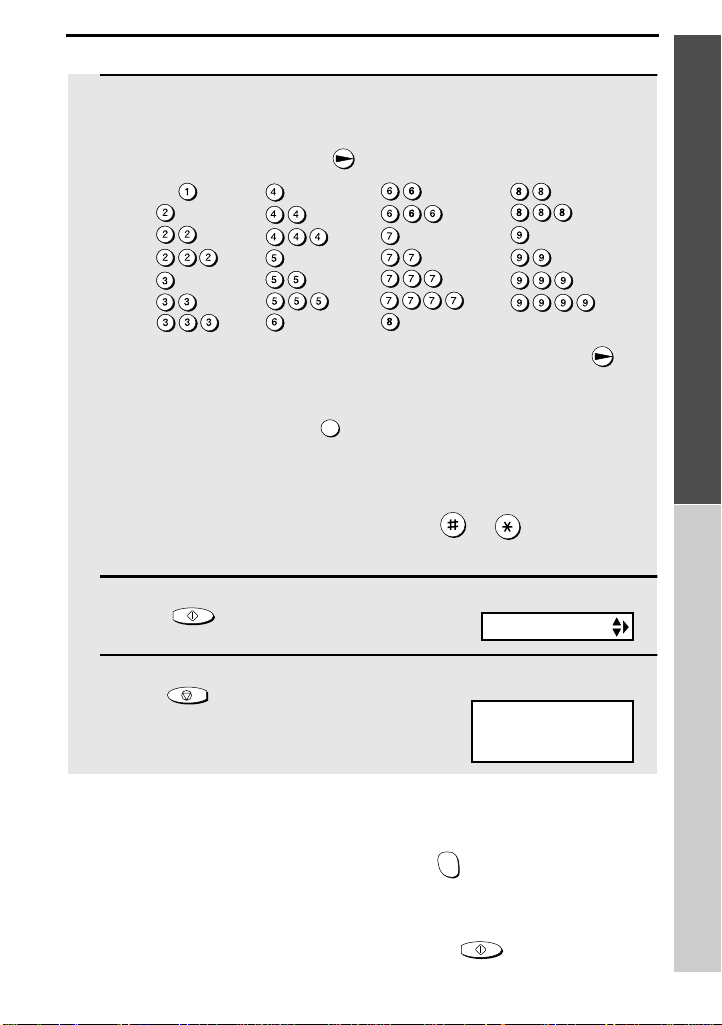
6 Enter the name by pressing number keys for each letter as shown in the
chart below. Up to 10 ch aracters can be entered.
Example: BILL = 22 444 555 555
SPACE =
A =
B =
C =
D =
E =
F =
G =
H =
I =
J =
K =
L =
M =
♦ To enter two letters in succession that require the same key, press
after entering the first letter.
♦ To clear a mistake, press .
♦ To enter a lower case letter, continue pressing the k ey f o r the letter until the
lower case letter appears .
♦ To enter one of the following symbols, press or repeatedly:
. / ! " # $ % & ’ ( ) + + , - : ; < = > ? @ [ ¥ ] ^ _ ' { | }
SPEAKER
N =
O =
P =
Q =
R =
S =
T =
U =
V =
W =
X =
Y =
Z =
) (
English
7 Press to store the name.
START/MEMORY
8 Press to exit.
STOP
Display:
OWN NUMBER SET
The handset number and name
appear in the standby display:
HANDSET2
BILL
Note: If other cordless handset s f or the UX-CC Series f ax mach ine are in use
when the above procedure is performed, the name of the new cordless
handset will not be transmitted to those cordless handsets (the name will not
appear by the cordless handset number when is pressed on those
INTER
COM
cordless handsets to use the intercom and call transfer functions). In this
event, repeat the name entry procedure. The stored name automatically
appears in the display in Step 6, so simply press to retransmit the
START/MEMORY
name to those cordless handsets, and then exit the procedure with Step 8.
Español
7
Page 10

The cordless
handset is now
ready to be used!
For info rmation on
operating the cordless
handset, see your UX-CC
Series fax machine manual.
Maintenance
Replacing the Cordless Handset Battery
Like any other battery, the rechargeable battery will eventually wear out. T he
battery can normally be used for about two years, although this will vary
depending on the conditions of use.
If you find that LOW BATTERY appears in the cordless handset display soon
after the battery is charged, replace it with the following battery:
Replacement battery: Use only a Sh arp UX-B A 01 battery
(3.6 V Ni-MH battery, capacity: 850 mAh)
Caution:
There is a danger of explosion if the battery is incorrectly replaced. Replace
only with the same or equivalent type recommended by the manufacturer.
Dispose of used batteries according to the manufacturer's instructions.
Battery disposal
The battery pack contains a Nickel Metal Hydride battery. The battery must be
disposed of properly. Contact local agencies for information on recycling and
disposal plans in your area.
8
Page 11

Deleting (changing) the cordless handset name
Follow the steps bel ow if y ou need to delete the cordle ss handset name. If you
wish to change the name, delete it and then enter a new name.
1 Press once and 3 times on
FUNCTION
the fax machine.
2 Press once and once.
3 Press once.
4 Press to select CLEAR.
2
Fax machine display:
ENTRY MODE
HS NAME SET
1=SET, 2=CLEAR
SELECT HS NO.
ENTER (1-4)
5 Enter the n umbe r of t he cor dle ss ha ndse t f or wh ich y o u wis h to c lear the
name.
6 Press to clear the name and then press to exit.
START/MEMORY
STOP
English
Español
9
Page 12

Deleting a cordless handset
If you wish to stop using a cordless handset, follow these steps to delete it
(cancel the registration in the fax machine).
1 On the cordless handset, hold down
INTER
until the display at right appears.
COM
2 Press on the cordless handset.
3 Press on the cordless handset.
4 On the fax machine, hold down
5 Press on the fax machine.
6
2
START
INTERCOM
until the display at right appears.
2
On the fax machine, enter the number
of the cordless handset that you wish
to delete.
Cordless handset display:
MODE SELECT
1: HS ENTRY
2: HS DELETE
Example: Cordless handset 2
HS2 DELETE: OK?
PRESS START KEY
PLEASE REGISTER
Fax machine display:
MODE SELECT
1: HS ENTRY
2: HS DELETE
PRESS HS NUMBER
Example: Cordless handset 2
DELETE HS2?
7 Press on the fax machine.
START/MEMORY
Note: To ensure correct operation, be sure to perform the deletion procedure
both on the cordless handset and on the fax machine, as explained above.
10
Page 13

Introducción
Gracias por haber
adquirido un teléfono
inalámbrico UX-K01.
Para utilizar el teléfono
inalámbrico UX-K01 debe
tener un aparato de fax
SHARP UX-CC Series.
Accesorios
Manual
de uso
T apa de la
batería
Paquete de
baterías
Adaptador
de CA
Cargador del
teléfono
inalámbrico
Especificaciones
Frecuencia 2,4 GHz (2,405 a 2,475 GHz)
Dimensiones Anchura: 1,8" (46 mm)
Peso 0,3 lbs aproximadamente (115 g) (sin batería)
Batería Batería de Ni-MH de 3,6 V; capacidad: 850 mAh
Consumo
Carga inicial
Duración de la batería
Duración de la batería en
modo de espera
Como parte de nuestra política de mejora permanente, SHARP se reserva el derecho de
modificar, sin previo aviso, tanto el diseño como las especificaciones en virtud del
perfeccionamiento del producto. Las cifras indicadas en las especificaciones de rendimiento
corresponden a valores nominales de las unidades de producción. En unidades particulares
pueden existir divergencias con estos valores.
Fondo: 1,7" (42 mm)
Altura: 7,1" (180 mm) (excluida la antena)
1,3 W aproximadamente (en el modo de espera)
10 horas de carga inicial aproximadamente
4 horas aproximadamente (240 minutos) (a temperatura
ambiente)
2 días aproximadam ente si está c argada compl etamente
(a temperatura ambiente)
La duración de la batería (tanto en el modo normal como
en el de espera) puede v ariar dependiend o del uso , de l a
distancia desde la máquina base y de las condiciones
ambientales tales como la temperatura.
English
Español
1
Page 14

Información importante de seguridad
No desmonte este aparato ni lle v e a cabo a cci ones que no est uvieran des critas en el presente
manual. Encargue cualquier reparación a personal cualificado para este efecto.
No instale ni utilice el aparato cer ca del agua o si usted es tá moj ado. Por ejemplo, no utilice el
aparato cerca de una bañera, lavabo, fregadero o lavadero, en un sótano húmedo o cerca de
una piscina. Preste atención a no derramar líquidos sobre el aparato.
Desenchufe el aparato de la toma de corriente y diríjase a uno de nuestros concesionarios
autorizados si se presenta una de las situaciones siguientes:
- Se ha derramado líquido dentro del aparato o ha estado expuesto a la lluvia o al agua.
- El aparato produce olores, humo o ruidos extraños.
- El cable de alimentación está deshilachado o dañado.
- El aparato se ha caído o la caja se ha dañado.
No permita que ningún objeto presione el cable de cone xión a la red ni instale e l aparato en un
lugar donde exista riesgo de que personas transiten sobre dicho cable.
El adaptador de CA sólo debe conectarse a una toma de 120 V y 60 Hz. La conexión a
cualquier otro tipo de toma de corriente resultará en avería del aparato y anulación de la
garantía.
No introduzca jamás objetos de ningún tipo en las ranuras o aberturas del aparato. Ello
resultaría en peligro de incendios o de descargas eléctricas. Si cayera algún objeto en el
interior del aparato que no pueda sacar, desenchúfelo y diríjase a uno de nuestros
concesionarios autorizados.
No coloque el aparato sobre un carro, estante o mesa inestables. Si el aparato se cayera,
podría dañarse seriamente.
Batería
Utilice únicamente la batería especificada en este manual. Use solamente el cargador
suministrado para cargar la batería.
No abra ni rompa el paquete de baterías. Podría escaparse líquido corrosivo y provocarle
heridas o quemaduras en los ojos o en la piel. El líquido puede resultar tóxico si se ingiere.
En caso de entrar en contacto con los oj os, láveselos con agua abundante (no se los frote) y
acuda al médico inmediatamente.
No guarde ni transporte la batería junto con otros objetos metálicos como llaves o alfileres,
por ejemplo. Podrían cortocircuitar la batería y hacer que se caliente excesivamente.
No deje que la batería se moje.
No arroje la batería al fuego ni la caliente. Podría explotar.
Centros y equipos sanitarios
La energía de radiofrecuencia emit ida por el equi po de teléf ono ina lámbrico puede pr ov ocar el
funcionamiento anómalo de equipos médicos. En caso de que usted utilizara alg ún tipo de
equipo médico, asegúrese de que éste está bien protegido contra la energía externa de
radiofrecuencia antes de utilizar el equipo de teléfono inalámbrico. No utilice el equipo de
teléfono inalámbrico en centros sanitarios en los que su uso está prohibido.
2
Page 15

Conexión del cargador del teléfono inalámbrico
1 Conecte el adaptador de CA
al cargador del teléfono
inalámbrico.
Coloque el cable
en los soportes.
2 Enchufe el adaptador a CA en una
toma de CA de 120 V normal.
Importante: No cubra nunca el cargador ni el
adaptador de CA con mantas, trapos ni ningún
otro tipo de material. Podría calentarse
excesivamente y provocar un incendio.
Instalación y carga de la batería
1 Conecte el conector de la batería ➊ y coloque a continuación el paquete
de baterías en el teléfono inalámbrico.
Negro
Rojo
Rojo
Negro
English
Ponga la tapa de la batería en el
2
teléfono inalámbrico asegurándose de
que encaje firmemente en el lugar
correcto.
• Asegúrese de que la tapa no pille o
tome ningún cable.
Español
3
Page 16

3 Coloque el teléfono inalámbrico en el
cargador con el bloque de marcado
mirando hacia delante.
• ¡Importante! Si no coloca el bloque de
marcado hacia delante, la ba tería no se
cargará.
• Al cargarlo por primera vez, en la pantalla
puede aparecer PLEASE REGISTER.
Asegúrese de dejar la batería cargando
durante 10 horas y, a continuación, r egistre
el teléfono inalámbrico según se indica en
la página siguiente.
♦ El teléfono inalámbrico y el cargador se pueden calentar durante la carga.
Esto es normal.
♦ La batería nunca se cargará excesivamente. Si no utiliza el teléfono
inalámbrico, colóquelo en el cargador para asegurarse de que está
siempre cargado.
Cuando de deba cargar la batería, en el display aparecerá LOW BATTERY y
escuchará unos pitidos mientras habla por teléfono. Coloque el teléfono
inalámbrico en el cargador y deje que se cargue.
Nota:
Si la batería está demasiado baja, puede que no aparezca nada en el
display durante los primeros minutos que el teléfono inalámbrico se encuentra en
el cargador. La batería empezará a cargarse normalmente tras varios minutos.
Capacidad de Transmisor/Receptor
Los teléfonos inalámbricos se pueden utilizar para una comuni cación similar a
la que se establece con los transmisores/receptores. La distancia de alcance
de los teléfonos inalámbricos es de 400 metros
disminuir dependiendo de las condiciones de la transmision)
encontrarse dentro de la distancia de alcance del aparato de fax.
Distancia de alcance (distanc ia des d e el apar at o de fax) para llamadas
telefónicas
El alcance de conversación del teléfono inalámbrico es de 1200 pies
aproximadamente (400 m) (línea recta). Si escucha ruidos o interferencias
mientras habla con el teléfono inalámbrico, acérquese al aparato telefax.
♦ Si se encuentra fuera del alcance de conversación, en el display aparecerá
OUT OF RANGE. Si se sale del alcance de con v er sación mientra s habla con
el teléfono inalámbrico, escuchará unos pitidos y puede que oiga
interferencias.
Los objetos metálicos de gran
tamaño, estructuras metálicas
y paredes gruesas reducen el
alcance de conversación.
¡Cargue la batería por
lo menos durante 10
horas la primera vez!
(línea recta; el alcance puede
Bastidores
de aluminio
y no es necesario
Hormigón
Metal
armado
4
Page 17

Registro del teléfono inalámbrico
Tras haber realizado la
carga inicial, en el display
del teléfono inalámbrico
aparece:
PLEASE REGISTER
1 Mantenga op rimi da la t ec la del te léfono
inalámbrico hasta que aparezca el display
que se muestra a la derecha.
2 Oprima la tecla del teléfono
inalámbrico.
1
3 Mantenga oprimida la tecla del
aparato de fax hasta que aparezca el
display de la derecha.
4 Oprima en el aparato de fax.
1
Para poder utilizar el t eléf ono
inalámbrico, debe registrarlo
primero utilizando el aparato
telefax.
INTER
COM
INTERCOM
Display del teléfono inalámbrico:
MODE SELECT
1: HS ENTRY
2: HS DELETE
HS ENTRY MODE
Display del aparato telefax:
MODE SELECT
1: HS ENTRY
2: HS DELETE
PRESS HS NUMBER
English
5 Introduzca un número del 2 al 4 en el
aparato telefax. Este número es el que
identifica al teléfono inalámbrico. Con
esto finaliza el procedimiento de registro.
• Con esto finaliza el procedimiento de
registro.
Nota: Si aparece ALREADY STORED en el display, el número seleccionado
ya fue asignado a otro teléfono inalámbrico. Introduzca otro número. (Si
necesita introducir un número que ya está en uso, borre el teléfono
inalámbrico que está utilizando dicho número tal como se explica en la
página 10).
Ejemplo: se ha seleccionado "2"
HS2 ENTERED
Los dos displays vuelven al
display de espera normal
Español
5
Page 18

Nota: Si transcurre más de un minuto sin realizar ninguna operación durante
el proceso de registro, el proceso quedará cancelado . En es te caso, vuelva a
empezar por el Paso 1.
El aparato de fax se iden tifica
por el número "0" y el
teléfono inalámbrico incluido
con el fax el número "1".
Introducción de un nombre para el teléfono
inalámbrico
Introduzca un nombre para el teléfono inalámbrico en el aparato telefax.
♦ El aparato de fax transmitirá el nombre que haya introducido al teléfono
inalámbrico. El nombre aparecerá en la pantalla del teléfono inalámbrico.
1 Oprima una vez la tecla y 3
veces la tecla del aparato telefax.
FUNCTION
2 Oprima una vez y una vez.
3 Oprima una vez.
4 Oprima para seleccionar SET.
1
5 Introduzca el número del teléfono
inalámbrico al que desea otorgar un
nombre.
Ejemplo:
6
2
Display del aparato telefax:
ENTRY MODE
HS NAME SET
1=SET, 2=CLEAR
SELECT HS NO.
ENTER (1-4)
Ejemplo: Teléfono inalámbrico 2
HS2 SELECTED
Page 19

6 Introduzca el nombre oprimiendo las teclas numéricas
correspondientes a cada letra según se muestra en el diagrama de
abajo. Se pueden introducir hasta 10 caracteres.
Ejemplo: BILL = 22 444 555 555
ESPACIO
A =
B =
C =
D =
E =
F =
=
G =
H =
I =
J =
K =
L =
M =
♦ Si introduce dos letras sucesivas para las que se necesita la misma tecla,
pulse tras haber introducido la primera letra.
N =
O =
P =
Q =
R =
S =
T =
U =
V =
W =
X =
Y =
Z =
English
♦ Para borrar un error, pulse .
SPEAKER
♦ Para introducir una letra en minúsculas, siga oprimiendo la tecla
correspondiente a la letra hasta que aparezca la minúscula.
♦ Para introducir uno de los símbolos siguientes, oprima o varias
veces:
. / ! " # $ % & ’ ( ) + + , - : ; < = > ? @ [ ¥ ] ^ _ ' { | }
7 Oprima para guardar el nombre.
8 Oprima para salir.
Nota:
START/MEMORY
STOP
Si se están utilizand o otros teléfonos inalámbricos para el aparato de
fax Serie UX-CC mientras se realiza el anterior procedimiento, el nombre del
é
nuevo tel
inal
cuando se presione la tecla
fono inalámbrico no será transmitido a dichos teléfonos
á
mbricos (el nom bre no aparecerá por el número de teléfono inalámbrico
INTERCOM
de esos aparatos inalámbricos para
utilizar las funciones del intercom y transferencia de llamadas). En este caso,
ó
repita el procedimiento de inserci
á
aparece auto m
á
presionar para retransmitir el nombre a dic hos teléfonos
deber
inal
á
mbricos y, a continuación, salir del procedimiento con el Paso 8
ticamente en la pantalla en el Paso 6, por lo que simplemente
START/MEMORY
n del nombre. El no m br e al m acenado
) (
Display:
OWN NUMBER SET
El nombre y el número del teléfono
aparecen en el display de espera:
HANDSET2
BILL
Español
.
7
Page 20

Para obtener información sobre el
¡Ya puede utilizar
el teléfono
inalámbrico!
funcionamiento del tel
á
mbrico, consulte el manual del
inal
aparato de fax UX-CC Series.
é
Mantenimiento
Cambio de la batería del teléfono inalámbrico
Al igual que todas las otras baterías, la batería recargable se gastará con el
paso del tiempo. No rmalmente, la batería se puede utilizar durante dos años,
si bien su duración puede variar según sean las condiciones de uso.
Si en la pantalla del teléfono inalámbrico aparece LOW BATTERY poco
después de que la batería haya sido cargada, sustitúyala por la siguiente
batería:
Batería de repue sto: Utilice únicamente una batería UX-BA01 de Sharp
(batería de Ni-MH de 3,6 V, capacidad: 850 mAh).
Cuidado:
La batería puede explotar si no la cambia correctamente. Cámbiela únicamente por una del mismo tipo o equivalente recomendada por el fabricante.
Deseche las baterías gastadas siguiendo las instrucciones del fabricante.
fono
Desecho de la batería
El paquete de baterías contiene una bater ía de Níquel Metal Hidruro. Debe
desechar la batería correctamente . Póngase en contacto con los puestos
locales para obtener información sobre los planes de reciclado y desecho de
su zona.
8
Page 21

Borrado (cambio) del nombre del teléfono inalámbrico
Siga los pasos descritos a continuación para borrar el nombre del teléfono
inalámbrico. Si desea cambiar el nombre, bórrelo y a continuación introduzca
uno nuevo.
1 Oprima la tecla una vez y la
tecla 3 veces del aparato telefax.
FUNCTION
2 Oprima una vez y una vez.
3 Oprima una vez.
4 Oprima para seleccionar CLEAR.
2
Display del aparato telefax:
ENTRY MODE
HS NAME SET
1=SET, 2=CLEAR
SELECT HS NO.
ENTER (1-4)
5 Introduzca el número del teléfono inalámbrico cuyo nombr e desea borrar.
6 Oprima la tecla para borrar el nombre y a continuación oprima
STOP
para salir.
START/MEMORY
English
Español
9
Page 22

Borrado de un teléfono inalámbrico
Y
Si desea dejar de utilizar un teléfono inalámbrico, siga los pasos siguientes
para borrarlo (cancele el registro en el aparato telefax).
1 Mantenga oprimida la tecla del
teléfono inalámbrico hasta que
aparezca el display de la derecha.
INTER
COM
Display del teléfono inalámbrico:
MODE SELECT
1: HS ENTRY
2: HS DELETE
2 Oprima la tecla del teléfono
inalámbrico.
3 Oprima la tecla del teléfono
inalámbrico.
4 Mantenga oprimida la tecla del
aparato de fax hasta que aparezca el
display de la derecha.
5 Oprima la tecla del aparato telefax.
2
START
INTERCOM
2
6 Introduzca en el aparato de fax el
número del te l éfono inalámbrico que
desea borrar.
7 Oprima la tecla del aparato
telefax.
Nota: Para asegurarse de que el funcionamiento sea correcto, asegúrese de
realizar el procedimiento de borr ado tanto en el teléf ono inalámbrico como en
el aparato de fax según lo indicado arriba.
START/MEMOR
Ejemplo: Teléfono inalámbrico 2
HS2 DELETE:OK?
PRESS START KEY
PLEASE REGISTER
Display del aparato telefax:
MODE SELECT
1: HS ENTRY
2: HS DELETE
PRESS HS NUMBER
Ejemplo: Teléfono inalámbrico 2
DELETE HS2?
10
Page 23

END USER LIMITED WARRANTY
SHARP ELECTRONICS CORPORATION warrants to the first end user purchaser that this Shar p
brand product (the "Product"), when shipped in its original container, will be free from defective
workmanship and materials, and agrees that it will, at its option, either repair the defect or replace
the defective Product or part thereof with a new or remanufactured equivalent at no charge to the
purchaser for parts or labor for the period(s) set forth below.
This warranty does no t appl y to any appearance items of the Product nor to the additional excluded
item(s) set forth below nor to any product the exterior of which has been damaged or defaced,
which has been subjected to misuse, abnormal service or handling, or which has been altered or
modified in design or construction.
In order to enforce the rights under this limited warranty, the pur chaser should follow the steps set
forth below and provided proof of purchase to the servicer.
To the extent permitted by applicable state law, the warranties set for th herein are in lieu of, and
exclusive of, all other warranties, express or implied. Specifically, ALL OTHER WARRANTIES
OTHER THAN THOSE SET FORTH ABOVE ARE EXCLUDED. ALL EXPRESS AND IMPLIED
WARRANTIES INCLUDING THE WARRANTIES OF MERCHANTABILITY, FITNESS FOR USE,
AND FITNESS FOR A PARTICULAR PURPOSE ARE SPECIFICALLY EXCLUDED. If, under
applicable state law, implied warranties may not validly be disclaimed or excluded, the duration of
such implied warranties is limited to the period(s) from the date of purchase set forth below.
Neither the sales personnel of the seller nor any oth er pers on is aut horized to mak e an y warranties
other than those described above, or to extend the duration of any warranties beyond the time
period described above on behalf of Sharp.
The warranties described herein shall be the sole and exclusive warranties granted by Sharp and
shall be the sole and exclusive remedy available to the purchaser. Correction of defects, in the
manner and for the period of time described herein, shall constitute complete fulfillment of all
liabilities and responsibilities of Sharp to the purchaser with respect to the Product, and shall
constitute full satisfaction of all claims, whether based on contact, negligence, strict liability or
otherwise. In no event shall Sharp be liable, or in any way responsible, for any damages or defects
in the Product which were caused by repairs or attempted repairs performed by anyone other than
an authorized servicer. Nor shall Shar p be liable or in any way responsible for any incidental or
consequential economic or property damage. Some states do not allow limits on warranties or on
remedies for breach in certain transactions; in such state the limits herein may not apply.
Your Product: Accessory cordless handset UX-K01
Warranty Period for this Product:
Additional items excluded
from warranty coverage:
What to do to obtain service:
the Product.
For product infor mation or customer assistance, please visit http://www.sharpusa.com on the
World Wide Web or call 1-877-794-8675.
Ninety (90) days parts and labor from date of purchase.
Any consumable items such as paper or Imaging Film supplied with
Call Sharp at 1-877-794-8675 to obtain a Return Authorization Number and
shipping instructions. A technician will troubleshoot your problem with you
on the phone and if it is determined that your Product needs service, you
will have your choice of having your unit repaired or replaced to any U.S.
location. Be sure to have Proof of Purchase available.
SHARP ELECTRONICS CORPORATION
Sharp Plaza,
Mahwah, New Jersey 07430-2135
Page 24

IMPORTANT SERVICE INFORMATION
If a Problem Occurs
Most operational qu estions can be answered by referring to this "Operation Manual"
Also, for your convenience, you will find answers to most frequently asked
questions on our website at www.sharpusa.com/, or by sending e-mail to faxsupport@sharpsec.com.
Should you require further assistance, call 1-877-794-8675; a Customer Relations Specialist will
assist you. Befor e your call, plea se be ready to provide the model num ber of your product, serial
number, date of purchase, description of the problem, and a valid credit card number (should it be
required).
How Exchange is Obtained
A replacement unit in exchange for your fax is provided by Sharp to any U.S. location. You will be
required to provide consent for acceptance of an exchange unit and provide credit card authorization.
At that time, Sharp will ship to you, at no cost, an exchange for your defective product. The exchange
unit we ship to you will be new or remanufactured. Upon your receipt of the exchange unit, packaging
and shipping instructions will be enclosed for you to return the defective unit. Upon Sharp's receipt of
the defective unit, your credit card hold will be released.
How Warranty Re pair Service is Obtained
If you prefer that we repair your unit instead of replaci ng i t, our Customer Relations Specialists at 1877-794-8675 will explain how to obtain warranty repair service. Please be sure to retain the
original packaging materials in order to facilitate shipm ent. Upon repair of your unit, Sharp will
promptly return it at no cost to you at any U.S. location.
Service After Exp iration of Warranty Coverage
Should you require service repair after warranty coverage has expired, contact Sharp at 1-877-7948675 for information.
To Purchase Consumables From Sharp
Visit www.sharpplace.com/ or cal l Sharp at 1-877-794-8675 to order replacement Sharp Thermal
Ribbons & Accesor ies. Before your call, please be ready to provide the model number of your
product, and a valid credit card number. Consumables may a lso be obtained thr ough your reseller.
Page 25

Page 26

Page 27

SHARP ELECTRONICS CORPORATION
Sharp Plaza, Mahwah, New Jersey 07430-2135
http://www.sharpusa.com
SHARP CORPORATION
Please record the model number and serial number below, for easy
reference, in case of loss or theft. These numbers are located on the
rear side of the unit. Space is also provided for other relevant
information.
Model Number UX-K01
Serial Number
Date of Purchase
Place of Purchase
FOR YOUR RECORDS
PRINTED IN THAILAND
(TCADH3390XHZZ)
 Loading...