

Page 1

MODEL
UX-CD600
OPERATION MANUAL
COMMUNICATION CENTER
1. Installation
2. Using the Cordless Handset
3. Using the Answering System
4. Sending Faxes
5. Receiving Faxes
6. Making Copies
7. Special Functions
8. Printing Lists
9. Maintenance
10. Troubleshooting
To ensure Sharp
quality, look for
the Sharp Genuine
Supplies Logo on
Your business
products. We
provide a full line
of supplies that
are designed and
tested to maximize
the life and
performance of all
Sharp products.
Sharp
For your convenience, Genuine Sharp Supplies, Accessories, and
additional Sharp Products can be purchased from the Authorized Sharp
Reseller where you purchased your product or on-line at:
C
2002 Sharp Electronics Corporation
Design and specifications are subject to change without notice.
Place
congratulations
www.SharpPlace.com
visit SharpPlace
on the purchase of your new Sharp Product!
to enter periodic contests and drawings!
Page 2

WARNING - FCC Regulations state that any unauthorized changes or modifications to this equipment
not expressly approved by the manufacturer could void the user’s authority to operate this equipment.
Note: This equipment has been tested and found to comply with the limits for a Class B digital
device, pursuant to Part 15 of the FCC Rules.
These limits are designed to provide reasonable protection against harmful interference in a
residential installation.
This equipment generates, uses and can radiate radio frequency energy and, if not installed
and used in accordance with the instructions, may cause harmful interference to radio
communications. However, there is no guarantee that interference will not occur in a
particular installation. If this equipment does cause harmful interference to radio or television
reception, which can be determined by turning the equipment off and on, the user is
encouraged to try to correct the interference by one or more of the following measures:
- Reorient or relocate the receiving antenna.
- Increase the separation between the equipment and the receiver.
- Connect the equipment into an outlet on a circuit different from that to which the receiver is
connected.
- Consult the dealer or an experienced radio/TV technician for help.
IMPORTANT NOTICE
Fax machine
FCC Radiation Exposure Statement:
This equipment complies with FCC radiation exposure limits set forth for at uncontrolled
equipment.
This equipment should be installed and operated with minimum distance at least 20 cm
between the radiator and persons body (excluding extremities: hands, wrists, feet and legs)
and must not be co-located or operated with any other antenna or transmitter.
Cordless handset
This phone (Cordless Handset) has been tested and shown to comply with the FCC RF
Exposure guidelines.
For body worn operation, this phone has been tested and meets the FCC RF exposure
guidelines for use with accessories that contains no metal and that positions the handset a
minimum of 1.5 cm from the body. Use of other accessories may not ensure compliance with
FCC RF exposure guidelines.
The maximum SAR levels tested for this phone (Cordless Handset)
has been shown to be 1.220 W/kg at head and 0.446 W/Kg at body.
ABOUT THE TELEPHONE CONSUMER PROTECTION ACT OF 1991
"The Telephone Consumer Protection Act of 1991 makes it unlawful for any person to use a
computer or other electronic device to send any message via a telephone facsimile machine
unless such message clearly contains in a margin at the top or bottom of each transmitted
page or on the first page of the transmission the following information:
(1) The date and time of transmission.
(2) Identification of either the business, business entity or individual sending the message.
(3) Telephone number of either the sending machine, business, business entity or individual.
In order to program this information into your facsimile machine, please refer to the
appropriate instructions in the operation manual."
As an ENERGY STA R® partner, SHARP has
determined that this product meets the ENERGY
®
STA R
guidelines for energy efficiency.
Page 3

Introduction
Welcome, and thank
you for choosing a
SHARP UX-CD600
Communication Center
and cordless handset!
In addition to the cordless handset that
comes with the communication center,
you can purchase up to seven
accessory cordless handsets. The
cordless handsets can be used for
intercom communication, and each
cordless handset has its own personal
box in the answering system.
Fax machine and general specifications.
Imaging film Initial starter roll (included with machine):
32 ft. (10 m) (approx. 30 letter-size pages)
Replacement roll (not included):
UX-5CR 164 ft. (50 m) (one roll yields
approx. 150 letter-size pages)
Paper tray capacity Letter: Approx. 50 sheets (20-lb. copier paper
at room temperature; maximum stack height
should not be higher than the line on the tray)
Legal: 5 sheets
Recommended paper weight: 20-lb. Copy Bond
Recording system Thermal transfer recording
Effective printing width 8.3" (210 mm) max.
Memory size* 448 KB (approx. 24 average pages with no
voice messages recorded, or 20 minutes of
voice messages (including OGMs) with no
faxes in memory)
Modem speed 14,400 bps with auto fallback to lower speeds.
Transmission time* Approx. 6 seconds (only when ECM is on)
Compression scheme MR, MH, MMR
Compatibility ITU-T (CCITT) G3 mode
*Based on Sharp Standard Chart at standard resolution, excluding time for protocol signals
(i.e., ITU-T phase C time only).
1
Page 4

Automatic dialing Common book: 99 numbers
Private book: 50 numbers (each cordless
handset has 1 private book)
Applicable telephone line Public switched telephone network
Number of connectable lines Tw o
Telephone function Yes (cannot be used if power fails)
Reception modes AUTO ATTENDANT / TEL / TAD
Automatic document feeder 10 pages max. (letter/A4, 20 lb paper)
Input document size Automatic feeding:
Width: 5.8 to 8.5" (148 to 216 mm)
Length: 5.5 to 11" (140 to 279 mm)
Manual feeding:
Width: 5.8 to 8.5" (148 to 216 mm)
Length: 5.5 to 23.6" (140 to 600 mm)
Effective scanning width 8.3" (210 mm) max.
Resolution Horizontal: 203 pels/inch (8 pels/mm)
Vertical:
Standard: 98 lines/inch (3.85 lines/mm)
Fine /Halftone: 196 lines/inch (7.7 lines/mm)
Super fine: 391 lines/inch (15.4 lines/mm)
Halftone (grayscale) 64 levels
Contrast control Automatic/Dark selectable
Copy function Single / Multi (99 copies/page)
Display 16-digit LCD display, 2 lines, 2 colors
Power requirements 120 V AC, 60 Hz
Power consumption Standby: 4.0 W
Maximum: 100 W
Operating temperature 41 - 95°F (5 - 35°C)
Humidity 25 - 85% RH
2
Page 5

Dimensions (without
attachments)
Width: 13.9" (353 mm)
Depth: 7.6" (193 mm)
Height: 6.9" (174 mm)
Weight (without
Approx. 6.2 lbs. (2.8 kg)
attachments)
Cordless handset specifications
Frequency 2.4 GHz (2.405 to 2.475 GHz)
Dimensions Width: 1.8" (46 mm)
Depth: 1.7" (42 mm)
Height: 7.1" (180 mm) (not including antenna)
Weight Approx. 0.3 lbs. (115 g) (without battery)
Battery 3.6 V Ni-MH battery; capacity: 850 mAh
Power consumption
Initial charging
Battery life
Battery life in standby
mode
Accessory cordless handset UX-K02 (up to 7 handsets can be added)
Approx. 1.3 W (in standby mode)
Approx. 12 hours for initial charge
Approx. 8 hours (480 minutes) (at room temp.)
Approx. 36 hours with one full charge (at room
temperature)
Battery life (both normal and in standby mode)
may vary depending on usage, range from
base machine, and environmental conditions
such as temperature
.
As a part of our policy of continuous improvement, SHARP reserves the right to make design
and specification changes for product improvement without prior notice. The performance
specification figures indicated are nominal values of production units. There may be some
deviations from these values in individual units.
3
Page 6

Important safety information
Do not disassemble this machine or attempt any procedures not described in this manual.
Refer all servicing to qualified service personnel.
Do not install or use the machine near water, or when you are wet. For example, do not use the
machine near a bath tub, wash bowl, kitchen sink or laundry tub, in a wet basement, or near a
swimming pool. Take care not to spill any liquids on the machine.
Unplug the machine from the power outlet and telephone jack and consult a qualified service
representative if any of the following situations occur:
- Liquid has been spilled into the machine or the machine has been
exposed to rain or water.
- The machine produces odors, smoke, or unusual noises.
- The power cord is frayed or damaged.
- The machine has been dropped or the housing damaged.
Do not allow anything to rest on the power cord, and do not install the machine where people
may walk on the power cord.
This machine must only be connected to a 120 V, 60 Hz, grounded (3-prong) outlet.
Connecting it to any other kind of outlet will damage the machine and invalidate the warranty.
Never insert objects of any kind into slots or openings on the machine. This could create a risk
of fire or electric shock. If an object falls into the machine that you cannot remove, unplug the
machine and consult a qualified service representative.
Do not place this machine on an unstable cart, stand or table. The machine could be seriously
damaged if it falls.
Never install telephone wiring during a lightning storm.
Never install telephone jacks in wet locations unless the jack is specifically designed for wet
locations.
Never touch bare telephone wires or terminals unless the telephone line has been
disconnected at the network interface.
Use caution when installing or modifying telephone lines.
Avoid using a telephone (other than a cordless type) during an electrical storm. There may be
a remote risk of electric shock from lightning.
Do not use a telephone to report a gas leak in the vicinity of the leak.
The power outlet must be installed near the equipment and must be easily accessible.
Battery
Use only the battery specified in this manual. Use only the provided charger to charge the
battery.
Do not open or mutilate the battery pack. Corrosive fluid may leak out and cause injury or
burns to the eyes and skin. The fluid may be toxic if swallowed. In case of contact with eyes,
flush with clean water (do not rub), and seek medical attention immediately.
4
Page 7

Do not store or carry the battery with other metal objects such as keys or pins. These may
short the battery and cause it to overheat.
Do not allow the battery to become wet.
Do not dispose of the battery in a fire or heat the battery. The battery may explode.
Health care facilities and equipment
Radio frequency energy emitted from the cordless handset equipment may cause medical
equipment to malfunction. Verify that any personal medical equipment you are using is
adequately shielded from external radio frequency energy before using the cordless handset
equipment. Do not use the cordless handset equipment in health care facilities where such
use is prohibited.
5
Page 8

Table of Contents
A Look at the Operation Panel 8
1. Installation 14
Unpacking Checklist . . . . . . . . . . . . . . . . . . . . . . . . . . . . . . . . . . . . . 14
Setting Up. . . . . . . . . . . . . . . . . . . . . . . . . . . . . . . . . . . . . . . . . . . . . 15
Loading the Imaging Film . . . . . . . . . . . . . . . . . . . . . . . . . . . . . . . . . 26
Loading Printing Paper. . . . . . . . . . . . . . . . . . . . . . . . . . . . . . . . . . . 28
Entering Your Name and Fax Number . . . . . . . . . . . . . . . . . . . . . . . 30
Setting the Date and Time . . . . . . . . . . . . . . . . . . . . . . . . . . . . . . . . 32
Setting the Reception Mode . . . . . . . . . . . . . . . . . . . . . . . . . . . . . . . 34
Line Settings. . . . . . . . . . . . . . . . . . . . . . . . . . . . . . . . . . . . . . . . . . . 35
Volume Adjustment - Machine . . . . . . . . . . . . . . . . . . . . . . . . . . . . . 39
Volume Adjustment - Cordless Handset. . . . . . . . . . . . . . . . . . . . . . 40
2. Using the Cordless Handset 42
Making a Phone Call . . . . . . . . . . . . . . . . . . . . . . . . . . . . . . . . . . . . 42
Receiving a Phone Call . . . . . . . . . . . . . . . . . . . . . . . . . . . . . . . . . . 43
Receiving a Fax Using the Cordless Handset . . . . . . . . . . . . . . . . . 44
Using Auto Attendant Mode . . . . . . . . . . . . . . . . . . . . . . . . . . . . . . . 45
Storing and Using Auto-Dial Numbers . . . . . . . . . . . . . . . . . . . . . . . 48
Redial . . . . . . . . . . . . . . . . . . . . . . . . . . . . . . . . . . . . . . . . . . . . . . . . 52
Using the Intercom Feature . . . . . . . . . . . . . . . . . . . . . . . . . . . . . . . 53
Transferring Calls and Making Conference Calls. . . . . . . . . . . . . . . 56
Making Phone Calls at the Machine . . . . . . . . . . . . . . . . . . . . . . . . . 59
3. Using the Answering System 61
Recording an Outgoing Message. . . . . . . . . . . . . . . . . . . . . . . . . . . 62
Setting a Passcode for a Personal Box . . . . . . . . . . . . . . . . . . . . . . 63
Operating the Answering System . . . . . . . . . . . . . . . . . . . . . . . . . . . 65
Optional Answering System Settings . . . . . . . . . . . . . . . . . . . . . . . . 70
Transfer Function . . . . . . . . . . . . . . . . . . . . . . . . . . . . . . . . . . . . . . . 73
Remote Operations . . . . . . . . . . . . . . . . . . . . . . . . . . . . . . . . . . . . . 76
4. Sending Faxes 82
Transmittable Documents. . . . . . . . . . . . . . . . . . . . . . . . . . . . . . . . . 82
6
Page 9

Table of Contents
Loading the Document . . . . . . . . . . . . . . . . . . . . . . . . . . . . . . . . . . . 83
Adjusting the Resolution and Contrast . . . . . . . . . . . . . . . . . . . . . . . 84
Sending a Fax by Normal Dialing . . . . . . . . . . . . . . . . . . . . . . . . . . . 86
Sending a Fax by Automatic Dialing. . . . . . . . . . . . . . . . . . . . . . . . . 88
Sending a Fax From Memory . . . . . . . . . . . . . . . . . . . . . . . . . . . . . . 95
5. Receiving Faxes 98
Receiving Faxes Automatically . . . . . . . . . . . . . . . . . . . . . . . . . . . . . 98
Receiving Faxes Manually . . . . . . . . . . . . . . . . . . . . . . . . . . . . . . . 100
Optional Reception Settings . . . . . . . . . . . . . . . . . . . . . . . . . . . . . . 102
Substitute Reception to Memory. . . . . . . . . . . . . . . . . . . . . . . . . . . 104
6. Making Copies 105
7. Special Functions 107
Caller ID and Call Waiting ID (Requires Subscription to Service). . 107
Polling (Requesting a Fax Transmission) . . . . . . . . . . . . . . . . . . . . 114
8. Printing Lists 115
9. Maintenance 119
Replacing the Cordless Handset Battery . . . . . . . . . . . . . . . . . . . .122
10. Troubleshooting 124
Problems and Solutions . . . . . . . . . . . . . . . . . . . . . . . . . . . . . . . . . 124
Messages and Signals . . . . . . . . . . . . . . . . . . . . . . . . . . . . . . . . . . 131
Clearing Paper Jams . . . . . . . . . . . . . . . . . . . . . . . . . . . . . . . . . . . 137
Ordering Parts. . . . . . . . . . . . . . . . . . . . . . . . . . . . . . . . . . . . . . . . . 139
FCC Regulatory Information . . . . . . . . . . . . . . . . . . . . . . . . . . . . . . 140
Quick Reference Guide 143
Guía de referencia rápida 145
Index 147
7
Page 10

A Look at the Operation Panel
Fax machine
SPEAKER key
1
1 2 3 4 5 1096 7 11
SPEAKER
STOP
COPY/HELP/POLL
START/MEMORY
RESOLUTION/
RECEPTION MODE
FLASH
REC/
MEMO
CONFERENCE
14 2112 13
Line1 Line2
PLAY/
HOLD
INTERCOM/
ZA
REDIAL SPEED
15
TEL
16
8
FUNCTION
17
DELETEREPEAT
SKIP
18 19 20
Press this key to talk with the other party through the speakerphone during a
call (speak toward “MIC” on the operation panel; page 59). This key can also
be used to listen to the line and fax tones through the speaker when faxing a
document (page 86).
RESOLUTION / RECEPTION MODE key
2
When a document is in the feeder, press this key to adjust the resolution for
faxing or copying (page 84). At any other time, press this key to select the
reception mode (the icon of the currently selected reception mode will appear
in the display; page 34).
FLASH key
3
This key is used for Call Waiting and other special services that require
subscription from your phone company. Your phone company will provide you
with details on how to use the key.
REC/MEMO key
4
Press this key to record an outgoing message, phone conversation, or memo
(pages 45, 62, 67 and 68).
PLAY/HOLD key
5
Press this key to play recorded messages (page 66). During a phone
conversation, press this key to put the other party on hold (page 59).
8
Page 11

Display
11
6
This displays messages and prompts to help you operate the machine.
MIC
7
The microphone is located here. Speak toward MIC when using the
speakerphone or when recording an outgoing message or memo.
UP and DOWN arrow keys
8
Enlarge/reduce setting: When making a copy of a document, press these
keys to select an enlarge/reduce setting (page 105).
Volume setting: When a document is not in the feeder, press these keys to
change the handset volume when the handset is lifted, the speaker volume
when the SPEAKER key has been pressed, or the ringer volume at any other
time (page 39).
FUNCTION key settings: Press these keys after pressing the FUNCTION
key to scroll through the FUNCTION MODE settings.
Line 1 key
9
Press this key to select line 1 when making a call from the machine or sending
a fax (pages 59 and 86).
Line 2 key
10
Press this key to select line 2 when making a call from the machine or sending
a fax (if you have connected a second line to the machine) (pages 59 and 86).
Panel release
11
Press this release to open the operation panel.
STOP key
12
Press this key to cancel an operation before it is completed.
COPY/HELP/POLL key
13
When a document is in the feeder, press this key to make a copy of a
document (page 105). When a document is not in the feeder, press this key to
print out the Help List, a quick reference guide to the operation of your fax
machine. This key is also used after dialling to poll (request fax transmission
from) another machine (page 114).
START/MEMORY key
14
Press this key after dialing to begin fax transmission (page 86). Press this key
before dialing to send a fax through memory (page 95). The key can also be
pressed in the date and time display to show the percentage of memory
currently used.
9
Page 12

INTERCOM/CONFERENCE key
15
Press this key to page or locate a cordless handset (page 55). During a phone
call, press the key to transfer the call to a cordless handset or begin a
conference call (page 57).
Left and right arrow keys
16
Auto-dial numbers: When sending a fax or making a phone call, press these
keys to scroll through your auto-dial numbers (page 91), the “REVIEW
CALLS” list (only available if you have Caller ID) (page 111), and the last
number dialed (redial; page 93).
FUNCTION key settings: Press the right arrow key after scrolling with the up
and down arrow keys to select a FUNCTION key setting.
FUNCTION key
17
Press this key followed by the arrow keys to select special functions and
settings.
REPEAT key
18
Press this key while listening to a message to play it again (page 66).
SKIP key
19
Press this key while listening to a message to skip to the next message (page
66).
DELETE key
20
Press this key to erase recorded messages (page 67).
Number keys
21
Use these keys to dial numbers, and enter numbers and letters when storing
auto-dial numbers.
Machine display
This appears
when the
machine is
using line 1.
Note: The Line 1 or Line 2 icon
does not appear when a cordless
handset is using Line 1 or Line 2.
10
This appears
when the
machine is
using line 2.
Line1 Line2
This appears
when the
reception
mode is set
to Auto
Attendant.
TEL
This appears
when the
reception
mode is set
to TEL.
This appears
when the
reception mode
is set to TAD
(the answering
system is turned
on).
Page 13

Cordless handset
1
2
12
3
4
5
6
7
8
9
10
11
UP
FUNCTION
REMOTE
/PAUSE
/FLASH
REVIEW
START
TALK
DOWN
ABC DEF
1
23
JKLGHI MNO
456
RECEPTION
TUVPQRS WXYZ
789
PLAY NEW
PLAY
0
REPEAT
SKIP DELETE
REDIAL
INTER
COM
CONFERENCE
SEARCH
OFF
STOP
HOLD
ERASE
13
14
15
16
17
18
19
20
22
23
21
Antenna
1
Display
2
This displays messages and prompts to help you use the cordless handset.
UP and DOWN arrow keys
3
Receiver volume: When talking on the cordless handset, press these keys to
adjust the receiver volume (page 41). This also adjusts the volume when
using a headset (purchased separately) connected to the cordless handset.
Ringer volume: When not talking on the cordless handset, press these keys
to adjust the cordless handset ringer volume (page 41).
Scroll through numbers: Press these keys to scroll when searching for an
auto-dial number (page 50) or reviewing received calls (only available when
you have Caller ID; page 112).
11
Page 14

FUNCTION/PAUSE key
11
4
This key is used during the procedures for storing and editing auto dial
numbers (pages 48 and 51). When entering a number for automatic dialing,
press this key to insert a pause between digits.
TALK k e y
5
Press this key to make or answer a call (pages 42).
REVIEW (left) arrow key
6
Press the REVIEW arrow key and then the UP or DOWN arrow key to scroll
through your 30 most recent calls (only available if you have Caller ID) (page
112).
Number keys
7
Use these keys to dial numbers, and enter numbers and letters when storing
auto-dial numbers.
PLAY NEW key
8
REMOTE
Press this key after pressing to listen to new messages recorded in the
personal box of the cordless handset (page 68).
PLAY key
9
Press this key after pressing to listen to all messages recorded in the
personal box of the cordless handset (page 68).
REPEAT key
10
Press this key while listening to a message to play it again (page 68).
/FLASH
REMOTE
/FLASH
INTERCOM/CONFERENCE key
11
Press this key to page the machine or another cordless handset (page 53), or
to transfer a call or begin a conference call (page 56).
START key
12
Press this key to start fax reception from the cordless handset (page 44), or to
complete entries when storing, editing, or deleting auto-dial numbers.
REMOTE/FLASH key
13
Press this key to change the reception mode on the machine (page 58), or to
listen to messages recorded in the general box or the cordless handset’s
personal box (page 68). The key is also used to access special services from
your phone company that require subscription (contact your phone company
for details).
12
Page 15

OFF key
14
Press this key to end a call.
SEARCH (right) arrow key
15
Use this key to search for an auto dial number (page 50). This key can also be
used to move the cursor right when entering or editing an auto-dial number or
name.
RECEPTION key
16
Press this key after pressing to change the reception mode on the
machine (page 58).
STOP key
17
Press this key to stop playback of messages (page 69).
DELETE
18
Press this key while listening to a message to delete it (page 68). To delete all
your messages, press this key after playback ends (while the display shows
REMOTE MODE), followed by (page 69).
HOLD/ERASE key
19
Hold: Press this key during a call to put the other party on hold (page 44).
Erase: Press this key to delete a phone number when searching through your
recently received calls (only when you have Caller ID) (page 112), or when
searching through your auto-dial numbers (page 51). Press the key to delete
a digit or character when storing or editing an auto-dial number.
REMOTE
/FLASH
START
SKIP key
20
Press this key while listening to your messages to skip to the next message
(page 68).
REDIAL key
21
Press this key to redial the last number dialed using the cordless handset
(page 52).
Headset jack
22
This jack lets you connect a headset (purchased separately) to the cordless
handset.
Battery cover
23
Remove this cover to install or replace the handset battery.
13
Page 16

1. Installation
Unpacking Checklist
Before setting up,
make sure you
have all of the
following items.
If any are missing,
contact your
dealer or retailer.
Paper tray Paper tray
Handset Handset
Cordless
handset
extension
cord
Battery
cover
Battery
pack
Operation
manual
Two-line
telephone cord
AC adapter
Gears (2)
Imaging film
(initial starter roll)
Cordless
handset charger
14
Page 17

Setting Up
Setting Up
Selecting a location for the machine
To maximize the talking range of the cordless handset, we recommend
installing the machine in a high and central location away from obstructions
such as walls.
High and central
location with no
obstructions
Keep the machine away from other
electrical appliances such as TVs,
microwave ovens, computers, other
cordless phones, and notebook
computers and access points that
communicate on a wireless LAN.
1. Installation
Do not place the
machine in direct
sunlight.
Do not place the
machine near
heaters or air
conditioners.
Keep dust away from
the machine.
Keep the area
around the
machine clear.
15
Page 18

Setting Up
Connecting the machine’s handset
Connect the machine’s handset as shown and place it on the handset rest.
♦ The ends of the handset cord are identical, so they will go into either jack.
Make sure the handset
cord goes into the jack
marked with a handset
symbol on the side of
the machine!
Use the handset to make ordinary phone calls,
or to transmit and receive faxes manually.
Connecting the power cord
Plug the power cord into a 120 V, 60 Hz, grounded AC (3-prong) outlet.
Caution!
Do not plug the power cord into any other kind of outlet. This will damage the
machine and is not covered under the warranty.
The machine does not
have a power on/off
switch, so the power is
turned on and off by
simply plugging in or
unplugging the power
cord.
16
Page 19

Connecting the phone lines
LINE 2
LINE 1/2
LINE 2
LINE 1/2
LINE 2
LINE 1/2
If you have two phone lines, both lines can be connected to the machine. The
phone lines can be used simultaneously. For example, you can make a phone
call using the machine’s handset on line 1 while sending a fax on line 2, or
make simultaneous phone calls using one cordless handset on line 1 and
another cordless handset on line 2.
♦ Line 1 is primarily for phone calls. Line 2 is primarily for fax.
If you are connecting two lines:
Two-line jack: If you have a two-line phone jack (RJ-14C), insert one end of
the provided telephone line cord into the two-line jack and the other end into
the jack on the machine marked LINE 1/2.
Setting Up
1. Installation
Single-line jacks: If you have two single-line jacks (RJ-11C), connect one
end of the provided line cord to the LINE 1/2 jack on the machine and the
other end to the single-line jack that you wish to use as line 1 (line 1 is
primarily for phone calls). Connect one end of an additional line cord (not
included) to the LINE 2 jack on the machine and the other end to the singleline jack that you wish to use as line 2 (line 2 is primarily for fax).
17
Page 20

Setting Up
LINE 2
LINE 1/2
If you are connecting only one line:
Insert one end of the provided telephone line cord into your phone jack and
the other end into the jack on the machine marked LINE 1/2.
♦
Do not connect the line cord to the LINE 2 jack!
♦ Be sure to disable line 2 as explained on page 37.
About the Dial Mode:
The machine is initially set for touch-tone dialing. If you are on a pulse dial
(rotary) line, you will need to change the dial mode setting as explained on
page 35.
Note: If your area experiences a high incidence of lightning or power surges,
we recommend that you install surge protectors for the power and telephone
lines. Surge protectors can be purchased at most telephone specialty stores.
18
Page 21

Setting Up
Attach the paper tray and paper tray extension
Attach the paper tray.
Attach the paper tray extension.
Click!
Insert
horizontally
and rotate up
1. Installation
Note: The paper tray extension has a top side
and a bottom side. If the tabs do not go into
the holes, turn the support over.
About condensation
If the machine is moved from a cold to a warm place, it is possible that
condensation may form on the scanning glass, preventing proper scanning of
documents for transmission. To remove the condensation, turn on the power and
wait approximately two hours before using the machine.
19
Page 22

Setting Up
Raising the base antenna
Raise the base antenna to ensure clear communication with the cordless
handset.
If you hear noise when
using the cordless
handset or the machine’s
handset, change the
angle of the antenna until
the noise is minimized.
Connecting the cordless handset charger
1
Connect the AC adapter to the cordless
handset charger.
Fit the cord into
the holders.
2
Plug the AC adapter into a standard
120 V AC outlet.
Important: Never cover the charger and AC adapter with a blanket, cloth, or
other material. Excessive heating may result and cause fire.
20
Page 23

Setting Up
Installing the battery and charging the cordless handset
1
Connect the battery connector ➊
1
Connect the battery connector ➊, and then place the battery pack in the
cordless handset.
• Place the wires as shown.
Black
Red
2
Place the battery cover on the cordless
handset, making sure it snaps firmly
into place.
• Make sure the wires are not caught or
pinched by the cover.
Red
Black
1. Installation
3
Place the cordless handset in the
charger with the dial pad facing
forward.
• Important! The dial pad must face
forward, or the battery will not charge.
• The battery charges automatically while
the cordless handset is in the charger.
While charging, the display shows
CHARGING. When charging is
completed, the display shows IN
CHARGER.
• The cordless handset and charger may
feel warm while charging. This is
normal.
The battery cannot be overcharged. When not using the cordless handset,
keep it in the charger to ensure that it is always charged.
Charge the battery
at least
the first time!
12 hours
21
Page 24

Setting Up
When the battery needs charging, LOW BATTERY will appear in the display
and you will hear beeps during a phone conversation. If you need to continue
the conversation, transfer the call to the machine or another cordless handset
(see page 56). Place the cordless handset in the charger and let it charge.
Note: If the battery is extremely low, nothing may appear in the display during
the first several minutes that the cordless handset is in the charger. The
battery will begin to charge normally after several minutes.
To ensure that the battery
charges properly, wipe the
charger contacts once a
month with a cotton swab.
Important:
Place the cordless handset away from the machine. If placed too close to the
machine, the cordless handset may not ring correctly and phone calls may be
cut off.
Talking range
The talking range of the cordless handset may decrease depending on
transmission conditions. If you hear noise or interference while talking on the
cordless handset, move closer to the machine.
♦ When outside the talking range, HANDSET? will appear in the display. If
you move out of the talking range while talking on the cordless handset,
your call will be disconnected. Move closer to the machine and then press
to restore communication with the machine (“HANDSET?” will be
TALK
cleared and the normal standby display will appear).
Reinforced concreteMetalAluminum sash
Large metal objects,
metal structures, and
thick walls reduce the
talking range.
22
Page 25

Entering a name for the cordless handset
You can enter a name for the cordless handset in the machine.
♦ The machine will transmit the name that you enter to your cordless
handset. The name will appear in the cordless handset’s display.
Setting Up
1. Installation
1
FUNCTION
Press once and twice on
Machine display:
ENTRY MODE
the machine.
2
Press once and once.
3
Press once.
4
Press to select SET.
HS NAME SET
HS NAME SET
1=SET, 2=CLEAR
SELECT HS NO.
ENTER (1 - 8)
(To clear a name, press .)
5
Press . (“1” is the handset number
ENTER HS NAME
HS1 SELECTED
of the cordless handset that came with
the machine.)
6
Enter the name by pressing number keys for each letter as shown in the
chart below. Up to 10 characters can be entered.
(If you are clearing a name, skip this step and go directly to Step 7.)
Example: BILL = 22 444 555 555
SPACE =
A =
B =
C =
D =
E =
F =
G =
H =
I =
J =
K =
L =
M =
N =
O =
P =
Q =
R =
S =
T =
U =
V =
W =
X =
Y =
Z =
♦ To enter two letters in succession that require the same key, press
after entering the first letter.
23
Page 26

Setting Up
♦ To clear a mistake, press .
SPEAKER
♦ To enter a lower case letter, continue pressing the key for the letter until the
lower case letter appears.
♦ To enter one of the following symbols, press or repeatedly:
. / ! " # $ % & ’ ( ) + + , - : ; < = > ? @ [ ¥ ] ^ _ ' { | }
7
Press to store the name.
8
Press to exit.
START/MEMORY
STOP
The handset number
and name appear in
the standby display of
the cordless handset
) (
Display:
OWN NUMBER SET
HANDSET1
BILL
♦ In the event that you need to change the name, clear it (press “2” in Step 4
on the previous page and then follow Steps 5, 7, and 8), and then repeat
the name entry procedure to enter the new name.
♦ If you purchase an additional cordless handset and enter it’s name after
registering it in the machine, the name is also transmitted to all other
cordless handsets that you have for the machine. For this reason, make
sure that all cordless handsets are within the talking range of the machine,
their batteries are sufficiently charged, and that none are in use before
entering the name of the new cordless handset. To check whether the
name of the new cordless handset was successfully transmitted to the
other cordless handsets, press on each of the other cordless handsets
INTER
COM
24
followed by or until the number of the new cordless handset
appears in the display. The name will appear next to the number if it was
transmitted successfully. If the name does not appear, repeat the name
entry procedure.
Page 27

Connecting a headset
You can connect a headset (purchased separately) to the headset jack.
Remove the cap and insert the connector as shown.
Accessory cordless handsets
Setting Up
1. Installation
You can use up to 7
additional UX-K02
cordless handsets
with the UX-CD600.
For information on setting up an accessory cordless handset for use with the
UX-CD600, see the manual that accompanies the accessory handset.
Please purchase
accessory UX-K02
handsets at your
dealer or retailer.
25
Page 28

Loading the Imaging Film
Loading the Imaging Film
The fax machine uses a roll of imaging film to create printed text and images.
The print head in the machine applies heat to the imaging film to transfer ink
to the paper. Follow the steps below to load or replace the film.
The initial starter roll of
imaging film included with
the UX-CD600 can print
about 30 letter-size pages.
1
Remove the paper from the paper tray
and open the operation panel (press
➊).
If you are loading the imaging film for
the first time, go to Step 4.
2
Remove the used film and
empty spool.
When replacing the film,
use a roll of Sharp UX-
5CR imaging film. One
roll can print about 150
letter-size pages.
Use only Sharp Genuine
Supplies with this logo:
2
1
3
Remove the two green gears from the
spools.
DO NOT DISCARD THE TWO GREEN
GEARS!
26
Page 29

Loading the Imaging Film
4
Remove the new roll of imaging film
from its packaging.
• Cut the band that holds the rolls
together.
5
Insert the green gears.
Make sure the
gears fit into the
slots in the ends
of the rolls.
6
Insert the film into the print
compartment.
Thick roll
to rear
1. Installation
1 slot
2 slots
Fit ends of rolls
onto hubs
7
Rotate the front gear as shown until
the film is taut.
8
Close the operation panel (press down
on both sides to make sure it clicks
into place).
27
Page 30

Loading Printing Paper
Loading Printing Paper
You can load letter or legal size paper in the paper tray. Recommended paper
weight is 20-lb. Copy Bond. The maximum number of sheets is as follows:
Letter size:
Legal size: 5 sheets
1
Fan the paper, and then tap the edge
against a flat surface to even the stack.
Make sure the stack edges are even.
2
Insert the stack of paper into the tray,
Approx. 50 sheets (20-Ib. copier paper at room temperature;
maximum stack height should not be higher than the line on the
tray)
PRINT SIDE DOWN
.
• If paper remains in the tray, take it out and combine it into a single stack
with the new paper.
• Be sure to load the paper so that printing takes place on the print side of
the paper. Printing on the reverse side may result in poor print quality.
•
GENTLY LOAD PAPER INTO THE PAPER TRAY
•
DO NOT FORCE IT DOWN INTO THE FEED SLOT
The stack
should not
be higher
than this line
.
.
Note: Do not use paper that has already been printed on, or paper that is curled.
Note: If at any time the display shows the
message at right, check the printing paper. If the
tray is empty, add paper. If there is paper in the
tray, take it out and then reinsert it. When you are
finished, press
START/MEMORY
.
ADD PAPER &
PRESS START KEY
28
Page 31

Loading Printing Paper
Setting the paper size
The machine has been set at the factory to scale received faxes to letter size
paper. If you loaded legal paper, you must change the paper size setting to
LEGAL.
1. Installation
1
2
3
4
5
FUNCTION
Press once and once.
Press once and 4 times.
Press once.
Select the paper size:
LETTER: LEGAL:
Press to return to the date and time display.
STOP
Display:
OPTION SETTING
PAPER SIZE SET
PAPER SIZE SET
1=LETTER,2=LEGAL
The display briefly shows
your selection, then:
COPY CUT-OFF
Print contrast setting
The machine has been set at the factory to print at normal contrast. If desired,
you can change the print contrast setting to LIGHT.
1
2
FUNCTION
Press once and once.
Press once and 5 times.
Display:
OPTION SETTING
PRINT CONTRAST
3
Press once.
4
Select the print contrast:
NORMAL: LIGHT:
5
Press to return to the date and time display.
STOP
PRINT CONTRAST
1:NORMAL
The display briefly shows
your selection, then:
PAPER SIZE SET
29
Page 32

Entering Your Name and Fax Number
Entering Your Name and Fax Number
Before you can begin sending
faxes, you must enter your
name and fax (telephone)
number. You also need to set
the date and time.
Important!
FCC regulations require that your name, telephone/fax number, and the date and
time appear on each fax message you send. Enter your name and fax number
here and set the date and time as explained in the following section to have the fax
machine include this information automatically at the top of your fax messages.
STOP
Note: Only one fax number
can be entered. If you have
connected two lines to the
machine, it is recommended
that you enter the number of
line 2, as line 2 is normally
used as a fax line.
Once you enter this
information, it will
automatically appear at
the top of each fax page
you send.
1
2
3
FUNCTION
Press once and twice on
the machine.
Press once.
Press once.
30
START/MEMORY
FUNCTION
Display:
ENTRY MODE
OWN NUMBER SET
ENTER FAX #
Page 33

Entering Your Name and Fax Number
4
Enter your fax number by pressing the number keys (max. 20 digits).
• To insert a space between digits, press .
1. Installation
• To clear a mistake, press .
5
Press to enter the fax number in memory.
6
Enter your name by pressing number keys for each letter as shown in
START/MEMORY
SPEAKER
the chart below. Up to 24 characters can be entered.
Example: SHARP = 7777 44 2 777 7
SPACE =
A =
B =
C =
D =
E =
F =
G =
H =
I =
J =
K =
L =
M =
N =
O =
P =
Q =
R =
S =
T =
U =
V =
W =
X =
Y =
Z =
♦ To enter two letters in succession that require the same key, press
after entering the first letter.
♦ To clear a mistake, press .
SPEAKER
♦ To enter a lower case letter, continue pressing the key for the letter until the
lower case letter appears. To enter one of the following symbols, press
or repeatedly: . / ! " # $ % & ’ ( ) + + , - : ; < = > ? @ [ ¥ ] ^ _ ' { |
) (
}
7
Press .
8
Press to return to the date and time display.
START/MEMORY
STOP
Display:
DATE&TIME SET
31
Page 34

Setting the Date and Time
Setting the Date and Time
The date and time appear
in the display and are
printed at the top of every
page you fax. Set the date
and time as shown below.
STOP
START/MEMORY
1
2
3
4
FUNCTION
Press once and twice.
Press once and once.
Press once.
Enter a two-digit number for the month (“01” for January, “02” for
February, “12” for December, etc.).
Example: January
The currently set date
appears (example):
FUNCTION
Display:
ENTRY MODE
DATE&TIME SET
DATE&TIME SET
DATE 08-15-2004
DATE&TIME SET
DATE 01-15-2004
• To correct a mistake, press to move the cursor back to the mistake and
then enter the correct number.
5
Enter a two-digit number for the day (“01” to “31”).
DATE&TIME SET
DATE 01-05-2004
32
Example: the 5
th
Page 35

Setting the Date and Time
The currently set time
6
Enter the year (four digits).
Example: 2004
7
Enter a two-digit number for the hour (“01” to “12”) and a two-digit
number for the minute (“00” to “59”).
Example: 9:25
8
Press to select A.M. or to select P.M.
appears (example):
DATE&TIME SET
TIME 12:19 PM
DATE&TIME SET
TIME 09:25 PM
1. Installation
9
Press to start the clock.
10
Press to return to the date and time display.
START/MEMORY
STOP
HS NAME SET
Daylight Saving Time
If desired, you can set the clock to move forward and backward automatically
at the beginning and end of Daylight Saving Time. Follow these steps:
1
2
3
4
FUNCTION
Press once and once.
Press once and 7 times.
Press once.
Press to select YES, or to select NO.
Display:
OPTION SETTING
DAY LIGHT SAVE
DAY LIGHT SAVE
1=YES, 2=NO
RECEIVE RATIO
5
Press to return to the date and time display.
STOP
33
Page 36

Setting the Reception Mode
Setting the Reception Mode
The machine has three modes for receiving calls and faxes:
AUTO ATTENDANT ( ) mode:
Select this mode when you wish to route callers to specific cordless handsets.
The machine will automatically answer all incoming calls without ringing and
your recorded greeting will play. After listening to the instructions in your
greeting, the caller will press the number of the desired person and only the
cordless handset of that person will ring. The caller can also press their Start
key to send a fax. For more information on this mode, see page 44.
TEL mode:
Select this mode when you want to receive phone calls and faxes without
routing callers. The machine and all cordless handsets will ring normally when
a call comes in.
be answered on the machine’s handset or on one of the cordless
handsets
after which the machine will answer automatically and receive faxes. For more
information on this mode, see page 100.
TAD ( )mode:
Select this mode when you go out and want the answering system to answer
all calls. Voice messages will be recorded, and faxes will be received
automatically (“TAD” stands for “Telephone Answering Device”.) For more
information on this mode, see page 61.
All calls, including faxes, that are received on line 1 must
. For calls received on line 2, you can set a certain number of rings
Setting the reception mode
Make sure a document
RESOLUTION/
RECEPTION MODE
press until the icon of the desired mode appears in the display.
RESOLUTION/
RECEPTION MODE
Note: TAD mode cannot be selected unless a general outgoing message has
been recorded as explained on page 62.
34
is not loaded in the document feeder
JAN-02 10:30
RESOLUTION/
RECEPTION MODE
JAN-02 10:30
JAN-02 10:30
, and then
TEL
Page 37

Line Settings
Line Settings
Setting the dial mode
The machine is set for tone dialing. If you are on a pulse dial line, you must set
the machine for pulse dialing. Press the panel keys as explained below.
♦ If you have connected two lines, the dial mode must be set separately for
line1 and line 2.
1
Press once and once.
2
Press once.
3
To set the dial mode for line 1, press
2, press 3 times.
4
Press once.
FUNCTION
twice. To set the dial mode for line
Example:
DIAL MODE (L1)
Display:
OPTION SETTING
DIAL MODE (L1)
DIAL MODE (L2)
DIAL MODE (LINE1)
1=TONE, 2=PULSE
1. Installation
or
5
Select the dial mode:
TONE: PULSE:
6
The display briefly shows your selection and then the next option
setting. Press to exit the option settings.
Entering tone signals during a call on a pulse dial line
If you are on a pulse dial line and need to enter tone signals during a call,
press . After this, pressing the number keys will send tone signals. When
you hang up, the machine will return to pulse dialing.
STOP
35
Page 38

Line Settings
Specifying how the line is selected (dialing line setting)
If you have connected two lines to the machine, use this setting to specify how
the line is selected when you make a phone call or send a fax by manual
dialing. The settings are MANUAL and AUTO. When MANUAL is selected,
you must manually select the line each time you make a phone call. When
AUTO is selected, the machine will automatically select an open line.
The machine is initially set to MANUAL. If you wish to change the setting to
AUTO, follow the steps below.
Note: The dialing line setting does not apply to faxes sent by automatic dialing
(see page 88). When you send a fax by automatic dialing, the machine will
normally use line 2. The machine will only use line 1 if line 2 is busy.
1
2
3
4
5
FUNCTION
Press once and once on
the machine.
Press once and twice.
Press once.
Press to select AUTO (the
machine will automatically select the
line), or to select MANUAL (you
must select the line each time you
dial).
Press to return to the date and time display.
STOP
Display:
OPTION SETTING
DIALING LINE
DIALING LINE
1=AUTO, 2=MANUAL
The display briefly shows
your selection, then:
LINE 2 INVALID
36
Page 39

Line Settings
Disabling line 2 (line 2 invalid setting)
If you have only connected one line to the machine, follow the steps below to
disable line 2. This will make it impossible to select line 2 when making a call
or sending a fax, thereby preventing accidental selection of the line.
1
2
3
4
5
FUNCTION
Press once and once on
the machine.
Press once and once.
Press once.
Press to select YES (disable line
2), or press to select NO (enable
line 2).
Press to return to the date and time display.
STOP
Display:
OPTION SETTING
LINE 2 INVALID
LINE 2 INVALID
1=YES, 2=NO
The display briefly shows
your selection, then:
NUMBER OF RING
1. Installation
37
Page 40

Line Settings
Voice mail message alert (requires subscription to service)
If you subscribe to a voice mail service from your phone company and your
service includes a visual alert feature that tells you when you have new
messages, you can have “VOICE MAIL” appear in the display of both the
machine and the cordless handset when you have new messages (“VOICE
MAIL 2” will appear when you have new messages on line 2).
To enable this feature, follow the steps below. Note that the feature must be
enabled separately for each line that has voice mail service.
1
2
3
4
5
6
FUNCTION
Press once and once.
Press once.
To enable the voice mail message
indicator for line 1, press 9 times.
To enable the voice mail message
indicator for line 2, press 8 times.
Press once.
Press to select YES (enable the message indicator), or press
to select NO (disable the message indicator).
The display briefly shows your selection and then the next option
setting. Press to exit the option settings.
STOP
Example:
VOICE MAIL (L1)
Display:
OPTION SETTING
VOICE MAIL (L1)
or
VOICE MAIL (L2)
VOICE MAIL (L1)
1=YES, 2=NO
38
Page 41

Volume Adjustment - Machine
Volume Adjustment - Machine
SPEAKER
You can adjust the volume
of the speaker, handset,
and ringer using the up
and down arrow keys.
Speaker
1
While using the speaker to make a phone call or send a fax, press
or to adjust the volume.
(To use the speaker to make a phone call, press , press or
to select the line if “WHICH LINE?’ appears in the display, and then
press the number keys to dial.)
SPEAKER
1. Installation
Machine handset
1
When talking through the handset,
press or to select the desired
volume level.
• Note: The volume reverts to MIDDLE
each time you replace the handset.
Display:
RECEIVER: HIGH
RECEIVER: MIDDLE
RECEIVER: LOW
39
Page 42

Volume Adjustment - Cordless Handset
Machine ringer
1
Press or to select the desired
volume level.
(Make sure has not been
pressed, the handset is not lifted, and a
document is not loaded in the feeder.)
SPEAKER
Display:
• The ringer rings once at the selected
level, and then the date and time
reappear in the display.
2
If you selected “RINGER: OFF OK ?” to turn off the ringer, press
START/MEMORY
.
RINGER: HIGH
RINGER: MIDDLE
RINGER: LOW
RINGER: OFF OK ?
• Note that even when the ringer is turned off, the machine will ring when
paged by a cordless handset.
Volume Adjustment - Cordless Handset
40
You can adjust the volume
of the ringer and handset,
receiver using the up and
down arrow keys.
Page 43

Volume Adjustment - Cordless Handset
Cordless handset receiver volume
1
When talking on the cordless handset,
press or to select the desired
volume level.
• Note: The volume reverts to MIDDLE
each time you hang up (press ).
OFF
OFF
Cordless handset ringer
1. Installation
Cordless handset display:
RECEIVER: HIGH
RECEIVER: MIDDLE
RECEIVER: LOW
1
When you are not talking on the
cordless handset, press or to
select the desired ringer volume level.
• The ringer will ring once at the selected
level.
• If you selected “RINGER: OFF OK ?” to
turn off the ringer, press . Note that
even when the ringer is turned off, the
cordless handset will ring when paged
by the machine or another cordless
handset.
START
Cordless handset display:
RINGER: HIGH
RINGER: MIDDLE
RINGER: LOW
RINGER: OFF OK ?
OK: PRESS START
41
Page 44

2. Using the Cordless Handset
Making a Phone Call
OFF
TALK
1
Pick up the cordless handset and press .
OFF
TALK
2
If the display at right appears, press
to select line 1 or to select
1
line 2.
(If the display at right does not appear,
go directly to Step 3.)
3
When you hear the dial tone, dial the number.
4
When you are ready to end the call, press .
ABC
2
Cordless handset display:
WHICH LINE?
PRESS 1 OR 2
The above display will appear
if the dialing line setting is set
to MANUAL (page 36) and the
line 2 invalid setting is set to
NO (page 37).
OFF
OFF
• You can also end the call by simply placing the cordless handset in the
charger.
If the display shows LINE BUSY, the
selected line is busy. Select the other
line or wait until the busy line is free. If
the display shows BUSY, the system
is busy. Wait until the system is free.
42
Page 45
Receiving a Phone Call
You can also dial by entering
the phone number first and
then pressing .
♦ Check the number in the display before pressing . If there is a
mistake, press to clear the mistake and then enter the correct digits.
HOLD
ERASE
TALK
TALK
♦ If “WHICH LINE?” appears in the display while entering the number, press
to select line 1 or to select line 2 and then continue entering
1
the number.
Note: If a pause is needed between any of the digits to access an outside
line or a special service, press . The pause will appear as a hyphen (-).
2
ABC
FUNCTION
/PAUSE
Receiving a Phone Call
1
When the cordless handset rings, pick it up and press any key (except
) to answer. Talk to the other party.
OFF
OFF
Handset
2. Cordless
• If the cordless handset is in the charger, simply pick it up to answer (you do
not need to press a key).
2
When you are ready to end the call, press .
OFF
OFF
• You can also end the call by simply placing the cordless handset in the
charger.
Note: If BUSY appears in the display when a call comes in, it will not be
possible to take the call. First stop using part of the system (for example, stop
an intercom conversation or stop accessing the machine from a cordless
handset) so that BUSY no longer appears, and then answer.
43
Page 46

Receiving a Fax Using the Cordless Handset
If calls come in on both lines simultaneously
If calls come in on both lines simultaneously, the display will alternately show
<<< RINGING >>> to indicate that there is a call on line 1, and
<<<RINGING 2>>> to indicate that there is a call on line 2.
<<< RINGING >>>
To take the call on line 1, press any key (other than ) while
“
<<< RINGING >>>” appears. To take the call on line 2, press any key (other
than ) while “
OFF
OFF
<<<RINGING 2>>>” appears.
<<<RINGING 2>>>
OFF
OFF
Putting a Call on Hold
To put the other party on hold during a call, press . The cordless handset
will beep while the call is on hold. When you are ready to resume the call,
HOLD
press once again. Note that placing the cordless handset in the charger
will not break the connection while a call is on hold, and thus phone charges
may continue to apply.
HOLD
Receiving a Fax Using the Cordless Handset
If you hear a fax tone after answering a call on the cordless handset, or if the
other party speaks to you and then wants to send a fax, press . This
signals the machine to begin fax reception.
START
Using Auto Attendant Mode
Press to begin
START
fax reception
44
Page 47

Using Auto Attendant Mode
Auto Attendant mode is used to route callers to specific handsets. The
machine will automatically answer all incoming calls without ringing and your
recorded greeting will play. After listening to the instructions in your greeting,
the caller will press the number of the desired person and only the cordless
handset of that person will ring. The caller can also press their Start key to
send a fax.
Note: Auto Attendant mode can only respond to one call at a time. If calls are
received on both lines at the same time, Auto Attendant mode will only answer
the call that comes in first.
Recording a greeting for Auto Attendant mode
Follow the steps below to record a greeting for Auto Attendant mode on the
machine. The following is an example:
“Hello. You've reached ______ . Press 1 for Susan, 2 for Bob, 3 for George, 4
for Ann, 5 for Ed, 6 for Mary, 7 for Betty, or 8 for Jim now. To page all phones,
press your ‘star’ key. To send a fax, please press your facsimile Start key now.
To repeat this message, press 9. Thank you for calling.”
♦ The number that is pressed for a person is the number of that person’s
cordless handset (the number that is assigned to the cordless handset
when it is registered). The machine’s handset is 0, and the cordless
handset that came with the machine is 1. The caller can page all phones by
pressing the star (*) key, and can repeat the greeting by pressing 9.
♦ If nobody answers after a device is paged, or if Auto Attendant mode is
used without recording a greeting, the answering system will answer (TAD
mode; see Chapter 3). However, if an outgoing message has not been
recorded for TAD mode, the caller will be disconnected.
Handset
2. Cordless
1
Press once and once on
the machine.
2
Press once.
REC/
MEMO
Display:
FEB-20 10:30
AUTO ATTENDANT
FEB-20 10:30
START: RECORD
45
Page 48

Using Auto Attendant Mode
3
Press and speak facing “MIC” on the operation panel to
record the message.
START/MEMORY
• The greeting can be up to 60 seconds long. While recording, the display will
show the time left to record.
4
When finished, press .
STOP
Selecting Auto Attendant mode
To select Auto Attendant mode,
RESOLUTION/
RECEPTION MODE
press until
appears in the display.
RESOLUTION/
RECEPTION MODE
JAN-02 10:30
Note: When a call comes in on an open line, Auto Attendant mode will not
operate in the situations below. Instead, all cordless handsets (and the
machine if not being used for a phone call or fax) will ring normally.
♦ The machine’s handset or speakerphone is in use, or a fax is being sent or
received.
♦ An intercom call is taking place, or a cordless handset is accessing the
machine to listen to messages or use the common auto-dial book.
♦ A copy is being made or a list is being printed.
46
Page 49

Using Auto Attendant Mode
Setting the ring duration
In Auto Attendant mode, after the caller listens to your greeting and presses a
key to call a particular person, the cordless handset of that person (or the
machine handset) will make a special ringing sound (called pseudo ringing)
for 15 seconds.
If the call is not answered during this time, the answering system will activate
and the OGM (greeting) recorded for the personal box corresponding to the
cordless handset will play (if an OGM for the personal box has not been
recorded, the general OGM will play). This allows the caller to leave a
message. (See Chapter 3.)
If desired, you can change the amount of time the cordless handset will ring
before the answering system activates. Selections for the duration are 15
seconds (this is the initial setting), 30 seconds, 60 seconds, and 120 seconds.
Use the operation panel of the machine to change the setting.
Handset
2. Cordless
1
2
3
4
5
FUNCTION
Press once and once on
the machine.
Press once and 4 times.
Press once.
Press a number from 1 to 4 to select the desired pseudo ring time.
: 15 seconds : 30 seconds
: 60 seconds : 120 seconds
The display briefly shows
your selection, then:
Press to return to the date and time display.
STOP
Machine display:
OPTION SETTING
PSEUDO RING
PSEUDO RING
1=15 SECONDS
FAX SIGNAL RX
47
Page 50

Storing and Using Auto-Dial Numbers
Storing and Using Auto-Dial Numbers
You can store your most frequently dialed numbers for automatic dialing.
Numbers can be stored in the Common book or the Private book.
♦ Up to 99 numbers can be stored in the Common book. These numbers are
shared with the machine and other cordless handsets, and can be stored
using a cordless handset as explained below, or the machine as explained
on page 88.
♦ Up to 50 numbers can be stored in the Private book. Each cordless
handset has its own Private book, and the numbers are stored using the
cordless handset as explained below.
1
Press .
2
Press to select the Common book,
or to select the Private book.
3
Press .
4
Enter the number by pressing the number keys.
(Note: A space cannot be entered.)
• To clear a mistake, press .
SEARCH
FUNCTION
/PAUSE
HOLD
ERASE
Cordless handset display:
SELECT SEARCH
▲: COMMON
▼: PRIVATE
Example: Common book selected
COMMON DIAL
▲▼: SEARCH
FUNCTION: ENTRY
ENTER TEL #
_
• If a pause is required between any of the digits to access a special service
FUNCTION
or an outside line, press . The pause appears as a hyphen (two
seconds per pause). Several pauses can be entered in a row.
/PAUSE
48
Page 51

Storing and Using Auto-Dial Numbers
5
Press .
6
Enter a name by pressing number keys for each letter as shown in the
START
chart below. Up to 15 characters can be entered. (If you do not wish to
enter a name, go directly to Step 7.)
Example: SHARP = 7777 44 2 777 7
SPACE =
A =
2
B =
C =
D =
3
E =
F =
1
ABC
ABC2ABC
2
ABC2ABC2ABC
2
DEF
DEF3DEF
3
DEF3DEF3DEF
3
G =
H =
I =
J =
K =
L =
M =
GHI
4
GHI4GHI
4
GHI4GHI4GHI
JKL
5
JKL5JKL
5
JKL5JKL5JKL
MNO
6
N =
O =
P =
4
Q =
R =
5
S =
T =
MNO
MNO
6
6
MNO6MNO
MNO
6
6
PQRS
7
PQRS7PQRS
7
PQRS7PQRS7PQRS
7
PQRS7PQRS7PQRS7PQRS
TUV
8
TUV8TUV
U =
V =
W =
X =
Y =
Z =
7
8
TUV
TUV8TUV
8
WXYZ
9
WXYZ9WXYZ
9
WXYZ9WXYZ9WXYZ
WXYZ9WXYZ9WXYZ9WXYZ
♦ To enter two letters in succession that require the same key, press
after entering the first letter.
♦ To enter a lower case letter, continue pressing the key for the letter until the
lower case letter appears.
♦ To clear a mistake, press .
HOLD
ERASE
Handset
2. Cordless
8
9
9
♦ To enter one of the following symbols, press or repeatedly:
. / ! " # $ % & ’ ( ) + + , - : ; < = > ? @ [ ¥ ] ^ _ ' { | }
7
Press .
8
Return to Step 2 to store another number, or press to exit.
START
) (
SELECT SEARCH
▲: COMMON
▼: PRIVATE
OFF
OFF
49
Page 52

Storing and Using Auto-Dial Numbers
Dialing an auto-dial number
1
Press once.
2
Press to select the Common book,
or to select the Private book.
3
Press or until the number you wish to dial appears in the
display.
4
Press .
SEARCH
TALK
• If “WHICH LINE?” appears in the display, press to select line 1 or
ABC
to select line 2.
2
Cordless handset display:
SELECT SEARCH
▲: COMMON
▼: PRIVATE
Example: Common book selected
COMMON DIAL
▲▼: SEARCH
FUNCTION: ENTRY
1
• The number is automatically dialed.
Editing an auto-dial number
If you need to make changes to a previously stored auto-dial number, follow
these steps:
1
Press once.
2
Press to select the Common book,
or to select the Private book.
3
Press or until the number you wish to edit appears in the
display.
SEARCH
Cordless handset display:
SELECT SEARCH
▲: COMMON
▼: PRIVATE
Example: Common book selected
COMMON DIAL
▲▼: SEARCH
FUNCTION: ENTRY
50
Page 53

Storing and Using Auto-Dial Numbers
FUNCTION
4
Press .
5
Press the number keys to enter the new number.
/PAUSE
• To clear a mistake, press . If a pause is required between any of the
digits to access a special service or an outside line, press .
HOLD
ERASE
• If you do not wish to change the number, go directly to Step 6.
6
Press .
7
Press the number keys to enter the new name (see Step 6 on page 49).
START
• If you do not wish to change the name, go directly to Step 8.
8
Press .
9
Press to exit.
START
OFF
OFF
SELECT SEARCH
▲: COMMON
▼: PRIVATE
Clearing an auto-dial number
FUNCTION
/PAUSE
Handset
2. Cordless
If you need to clear an auto-dial number, follow these steps:
1
Press once.
2
Press to select the Common book,
or to select the Private book.
SEARCH
Example: Common book selected
Cordless handset display:
SELECT SEARCH
▲: COMMON
▼: PRIVATE
COMMON DIAL
▲▼: SEARCH
FUNCTION: ENTRY
51
Page 54

Redial
3
Press or until the number you wish to clear appears in the
display.
4
Press .
5
Press .
6
Press to exit.
HOLD
ERASE
START
OFF
OFF
ERASE?
PRESS START KEY
SELECT SEARCH
▲: COMMON
▼: PRIVATE
Redial
You can automatically redial the last number dialed on the cordless handset.
Note: The machine and cordless handsets each retain their own separate
redial numbers.
1
Press .
• Check the display to make sure the number that appears is the number you
REDIAL
wish to dial. (If the wrong number appears, press to clear it.)
2
Press .
TALK
• If “WHICH LINE?” appears in the display, press to select line 1 or
ABC
to select line 2.
2
OFF
OFF
1
• The number is automatically dialed.
52
Page 55

Using the Intercom Feature
Using the Intercom Feature
You can use the
machine and cordless
handsets as an
intercom system.
♦ When using the Intercom feature, you will not hear your voice through the
handset receiver when you speak.
♦ It may not be possible to page another cordless handset or the machine
when other cordless handsets or the machine are already in use.
♦ When two cordless handsets are used for Intercom conversation, the
cordless handsets must be within the talking range of the machine and the
machine must be powered on.
Note: If a call comes in on line 2 while a cordless handset is paging the
machine, neither the machine nor the cordless handsets will ring.
Paging the machine from a cordless handset
Handset
2. Cordless
1
Press on the cordless handset.
2
Press on the cordless handset to
select the machine.
3
The machine rings.
4
The other person picks up the machine handset to answer.
5
Talk with the other person. When you are ready to end the conversation,
press .
INTER
COM
The numbers and names of the other cordless
handsets appear (even the numbers of cordless
handsets that are not registered)
0
Number and name
of calling handset
OFF
OFF
Cordless handset
display example:
INTERCOM:▲▼
2: BILL
3: SUE
Cordless handset display:
INTERCOM
0: BASE STATION
Machine display:
INTERCOM
1: BOB
53
Page 56

Using the Intercom Feature
Paging a cordless handset from another cordless handset
1
Press on the cordless handset.
2
Enter the number of the cordless
INTER
COM
The numbers and names of the other cordless
handsets appear (even the numbers of cordless
handsets that are not registered)
handset that you wish to page.
Example:
3
The selected cordless handset rings.
4
The other person presses any key (except ) on the cordless
ABC
2
Number and name
of calling handset
Cordless handset
display example:
INTERCOM:▲▼
2: BILL
3: SUE
INTERCOM
2: BILL
Display of paged handset:
INTERCOM
1: BOB
OFF
OFF
handset to answer.
5
Talk with the other person. When you are ready to end the conversation,
press .
OFF
OFF
Note: If the other person breaks the connection or the machine is powered
off during an intercom conversation, you will hear a busy tone from the
cordless handset. Press to stop the busy tone.
OFF
OFF
54
Page 57

Using the Intercom Feature
Paging a cordless handset from the machine
(cordless handset locator)
You can use this procedure to page a cordless handset, or locate a handset in
the event that you misplace it.
1
Pick up the machine handset.
• If you wish to use the speakerphone, skip this step (the speaker will
activate automatically in Step 2 below).
INTERCOM/
2
3
CONFERENCE
Press on the machine, and
enter the number of the cordless
handset that you wish to page.
Example:
The selected cordless handset rings.
• This allows you to locate the cordless
handset if you have misplaced it.
4
The other person presses any key (except ) on the cordless
handset to answer.
5
Talk with the other person (if you use the speakerphone, speak toward
“MIC” on the operation panel). When you are ready to end the
conversation, replace the handset or press as appropriate.
Machine display:
INTERCOM
3: SUE
Display of selected
cordless handset:
INTERCOM
0: BASE STATION
OFF
OFF
SPEAKER
Handset
2. Cordless
If a call comes in while the Intercom feature is being used
If an outside call comes in while you are using the Intercom feature, the
person who wishes to take the call should first stop the Intercom call (press
on the cordless handset or replace the machine handset), and then
OFF
OFF
answer the outside call (press any key except on the cordless handset
or pick up the machine handset).
OFF
OFF
55
Page 58

Transferring Calls and Making Conference Calls
Transferring Calls and Making Conference
Calls
You can transfer a call to the machine or to a cordless handset.
You can make a 3-person conference call with one outside person and two
people using cordless handsets (or the machine handset).
♦ To make a conference call, first call the outside person (or have the outside
person call you), then transfer the call to the third person, and then press
the INTERCOM/CONFERENCE key (see the appropriate transfer
procedure below depending on whether you are using a cordless handset
or the machine handset).
Transferring a call from a cordless handset to the machine
or to another cordless handset (conference call)
1
During the call, press on the
cordless handset.
2
To transfer the call to the machine, press .
To transfer the call to a cordless handset, enter the number of the
handset.
3
The selected cordless handset (or the machine) rings.
4
The other person answers on the cordless handset or machine. Tell the
other person that you are transferring the call, or that you are starting a
conference call.
• If nobody answers, press to return to the initial caller.
5
If you are transferring the call, press to hang up.
If you are making a conference call, press and begin the call.
INTER
COM
The numbers and names
of the other cordless
handsets appear
TALK
OFF
OFF
Cordless handset
display example:
TRANSFER:▲▼
2: BILL
3: SUE
0
INTER
COM
56
Page 59

Transferring Calls and Making Conference Calls
Transferring a call from the machine to a cordless handset
(conference call)
INTERCOM/
1
During the call, press on the
machine.
2
Enter the number of the cordless handset to which you wish to transfer
the call.
Example: .
3
The selected cordless handset rings.
4
The other person answers on the cordless handset. Tell the other
person that you are transferring the call, or that you are starting a
conference call.
• If nobody answers, press to return to the initial caller.
5
If you are transferring the call, replace the handset.
If you are making a conference call, press and begin the call.
CONFERENCE
INTERCOM/
CONFERENCE
The numbers and names of the
cordless handsets alternately appear
CONFERENCE
Machine display:
CALL TRANSFER
1: JOHN
INTERCOM/
Handset
2. Cordless
57
Page 60

Transferring Calls and Making Conference Calls
Changing the reception mode on the machine
Note: If a call comes in on line 2 while a cordless handset is being used to
change the reception mode, neither the machine nor the cordless handsets
will ring.
REMOTE
1
Press .
2
Press until the desired reception
/FLASH
JKL
5
RECEPTION
mode appears in the display.
REMOTE
3
Press or to exit REMOTE MODE.
/FLASH
OFF
OFF
Cordless handset display:
REMOTE MODE
Example: TEL mode
RECEPTION
TEL
Locking the cordless handset
You can lock the cordless handset to prevent accidental operation. Hold down
START
on the cordless handset until “LOCK” appears in the display next to the
cordless handset name. When this is done, pressing the keys on the cordless
handset will have no effect. To unlock the cordless handset, hold down
again until “LOCK” no longer appears.
START
♦ If a call comes in while the cordless handset is locked, the cordless handset
will ring normally. Hold down until the cordless handset unlocks and
then speak with the other party. (It is not necessary to press another key to
answer after unlocking the cordless handset.)
58
START
Page 61

Making Phone Calls at the Machine
Making Phone Calls at the Machine
You can make and receive calls using the machine’s handset or the
speakerphone.
♦ If calls come in on both lines simultaneously and you answer with the
machine’s handset, the call that came in first will be answered.
Making a phone call
Handset
2. Cordless
1
Pick up the handset or press .
2
If the display at right appears, press
to select line 1 or to select
line 2.
(If the display at right does not appear,
go directly to Step 3.)
3
Wait until you hear the dial tone and then dial the number.
• If you pressed , speak toward “MIC” on the operation panel to talk
with the other party.
4
When you are ready to end the call, replace the handset. If you used the
speakerphone, press to hang up.
SPEAKER
SPEAKER
SPEAKER
WHICH LINE?
PRESS 1 OR 2
The above display will appear
if the dialing line setting is set
to MANUAL (page 36) and the
line 2 invalid setting is set to
NO (page 37).
Putting a call on hold
To put the other party on hold during a phone conversation, press .
When this is done, they cannot hear you. You can put the handset back in the
cradle without breaking the connection. When you are ready to speak with the
other party again, pick up the handset. If you did not put the handset back in
the cradle, press again to resume conversation.
PLAY/
HOLD
PLAY/
HOLD
59
Page 62

Making Phone Calls at the Machine
Using an auto-dial number
If the number that you wish to dial has been stored in the Common book in the
machine (see page 88), you can dial it automatically.
1
Press (or ) until the name of the other party appears in the
display (if no name was stored, the number will appear).
2
Lift the handset or press .
SPEAKER
• If “WHICH LINE?” appears in the display, press to select line 1 or
to select line 2.
• The number is automatically dialed.
Redial
You can automatically redial the last number dialed on the machine.
Note: The machine and the cordless handsets each retain their own separate
redial numbers.
1
Press once. <REDIAL> appears in the display, followed by the last
number dialed. Make sure the number that appears is the number you
wish to dial.
2
Lift the handset or press .
• If “WHICH LINE?” appears in the display, press to select line 1 or
to select line 2.
SPEAKER
• The number is automatically dialed.
60
Page 63
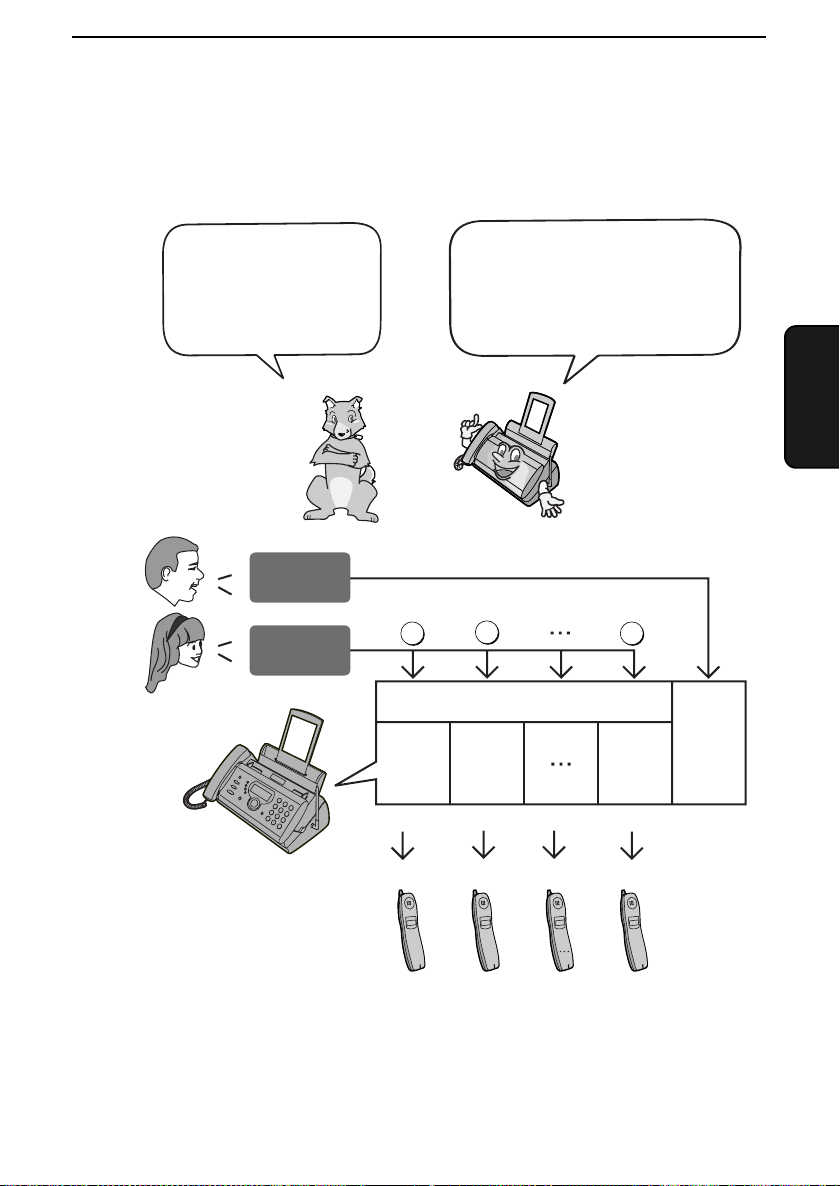
3. Using the Answering System
The answering system allows you to receive both voice messages and faxes
while you are out.
The answering system
has one general box
and eight personal
boxes for callers to
leave messages.
General
Message
Personal
Message
To use the answering system,
you must record a greeting for
the general box, and a
greeting for each personal box
you wish to use.
Press
1
2
Personal Box
12 8
System
3. Answering
8
General
Box
1
Each cordless handset can be used to listen to the
messages in its corresponding personal box (the
personal box with the same number as the cordless
handset).
(A personal box can still be used even if you do not
have the corresponding accessory cordless handset.)
2
8
61
Page 64

Recording an Outgoing Message
Recording an Outgoing Message
The outgoing message (OGM) is the greeting that the system plays after
answering a call to inform callers that they can leave a message or send a fax.
Follow the steps below to record an outgoing message for the general box,
and an outgoing message for each personal box that you wish to use.
Example of general outgoing message:
“Hello. You've reached ______ . No one is available to take your call right now.
If you would like to leave a message, please speak after the beep. If you
would like to leave a personal message, press 1 for Susan, 2 for Bob, 3 for
George, 4 for Ann, 5 for Ed, 6 for Mary, 7 for Betty, or 8 for Jim now. To send a
fax, please press your facsimile Start key now. Thank you for calling.”
Example of personal outgoing message:
“This is Susan’s personal box. Please leave a message after the beep.”
1
Press .
2
Press until the message that you
wish to record appears in the display
(“OGM (GENERAL)” for the general
box, “OGM (BOX 1)” for personal box 1,
“OGM (BOX 2) for personal box 2, etc.).
Note: MEMO RECORDING is for recording a
memo (page 67), OGM (TRANSFER) is for
the Transfer function (page 73), and AUTO
ATTENDANT Is for Auto Attendant mode
(page 44).
REC/
MEMO
Display:
FEB-20 10:30
MEMO RECORDING
FEB-20 10:30
MEMO RECORDING
FEB-20 10:30
OGM (GENERAL)
FEB-20 10:30
OGM (BOX1)
FEB-20 10:30
OGM (BOX8)
FEB-20 10:30
OGM (TRANSFER)
FEB-20 10:30
AUTO ATTEN DANT
62
Page 65

Setting a Passcode for a Personal Box
3
Press once.
4
Press and speak facing “MIC” on the operation panel to
record the message.
START/MEMORY
FEB-20 10:30
START: RECORD
• While recording, the display will show the time left to record.
5
When finished, press .
STOP
To delete or check an outgoing message
To delete or check an outgoing message, follow Steps 1 through 3 of the
above procedure to select the message, and then press to delete or
PLAY/
to check. Note that the general outgoing message cannot be deleted.
HOLD
If you need to change it, simply repeat the recording procedure.
Note: If a passcode has been set for a personal box as explained below,
deleting the OGM of the personal box will also clear its passcode.
DELETE
Setting a Passcode for a Personal Box
System
3. Answering
You can set a 3-digit passcode for each personal box. When this is done, the
passcode must be entered to listen to messages in a personal box at the
machine. (Note: When listening to the messages in a personal box from its
corresponding cordless handset, it is not necessary to enter the passcode. )
♦ An outgoing message must be recorded for a personal box before a
passcode can be set.
1
2
FUNCTION
Press once and once.
Press once and once.
Display:
T.A.D. SETTING
BOX PASSCODE
63
Page 66

Setting a Passcode for a Personal Box
3
Press once.
4
Press to set a passcode.
(To clear a previously set passcode,
press .)
5
Enter the number of the personal box
for which you wish to set a passcode.
Example: for Box 1
(If you are clearing a passcode, enter
the number of the box and go to Step
7.)
6
Enter a 3-digit number for the passcode. The first digit of the number
must be 0 or 9.
7
Press .
8
Return to Step 5 to set another passcode, or press to return to
the date and time display.
START/MEMORY
BOX PASSCODE
1=SET, 2=CLEAR
ENTER BOX # (1-8)
1=BOX-1
ENTER PASSCODE
1DIGIT: 0,9
ENTER BOX # (1-8)
1=BOX-1
STOP
Note: If you wish to change a passcode, clear the passcode and then enter a
new passcode. If you forget a passcode, clear it and enter a new passcode.
64
Page 67

Operating the Answering System
Operating the Answering System
Activating the answering system
To turn on the answering system so that callers can leave messages, press
RESOLUTION/
RECEPTION MODE
until appears in the display (this selects TAD mode).
RESOLUTION/
RECEPTION MODE
JAN-02 10:30
♦ It will not be possible to set the reception mode to TAD mode ( ) if a
general outgoing message has not been recorded.
Note: In TAD mode, the machine will automatically switch to fax reception if it
detects 6 seconds of silence after answering a call. For this reason, if a caller
pauses for this length of time while leaving a message, they will be cut off.
Number of rings in TAD mode
When the machine is set to TAD mode, it will answer incoming calls after two
rings if it has received at least one message (in any of the boxes), or after four
rings if it has not received any messages. (See
Tol l Sa ve r
applies to both lines.
Note: The number of rings setting (page 99) does not apply to TAD mode.
Toll Saver
No received messages
NOTHING
Received messages
Hello!
Hi!
Hi!
on page 77.) This
System
3. Answering
4 Rings
Ring
Ring
Ring
Ring
2 Rings
Ring
Ring
65
Page 68

Operating the Answering System
Listening to received messages (at the machine)
When you return, the machine display will show the number of messages
recorded in each box. Follow the steps below to listen to your messages.
1
PLAY/
Press .
HOLD
• If you only want to listen to new messages (messages not previously
listened to), continue to hold down for at least three seconds.
2
If you wish to listen to the messages in a personal box, press the
number of the box.
Example: for Box 1
3
If the personal box has a passcode, enter the passcode.
Example:
4
The messages will play.
PLAY/
HOLD
• As each message plays, the date and time of recording will appear briefly in
the display. If no messages were received, NO MESSAGES will appear.
• Repeat: To listen to a message a second time, press before
playback of that message ends. To move back to the previous message,
press within 3 seconds of the beginning of the current message.
REPEAT
REPEAT
• Skip: To skip forward to the next message, press .
Note: Playback will stop if you receive a call, lift the handset, or press .
SKIP
♦ You can print out a list of your received messages that shows the date and
time that each was received. See page 115.
66
STOP
Page 69

Operating the Answering System
Erasing received messages
It is important to erase received messages after you listen to them to ensure
that the memory does not become full.
♦ Erasing all messages in the general box: To erase all messages in the
general box, press , , and then .
FUNCTION
DELETE
START/MEMORY
♦ Erasing all messages in a personal box: To erase all messages in a
personal box, press , , enter the number of the box, and then
enter the passcode if needed.
FUNCTION
DELETE
♦ Erasing a single message: To erase a single message, press
while the message is being played.
Recording memos
System
3. Answering
DELETE
You can record memos for yourself and other users of the machine. These
are recorded in the general box, and will be played back together with
incoming messages when the key is pressed.
1
Press once and once.
2
Press and speak facing “MIC” on the operation panel.
3
When you have finished speaking, press .
REC/
MEMO
START/MEMORY
PLAY/
HOLD
STOP
67
Page 70
Operating the Answering System
Recording phone conversations (2-way recording)
To record a phone conversation, hold down the key during the
REC/
MEMO
conversation that you wish to record. When you are finished, release the key.
The conversation is recorded in the general box and will be played back when
PLAY/
the key is pressed.
HOLD
Listening to messages from a cordless handset
You can use your cordless handset to listen to messages received in your
personal box (the personal box with the same number as your cordless
handset), or messages received in the general box.
♦ When you have received new messages in your personal box, NEW
MESSAGES appears in your cordless handset display.
Note: If a call comes in on line 2 while a cordless handset is being used to
listen to messages, neither the machine nor the cordless handsets will ring.
REMOTE
1
Press .
2
If you wish to listen to messages in the general box, press .
/FLASH
(Otherwise, go directly to Step 3.)
Cordless handset display:
REMOTE MODE
0
PQRS
3
Press to listen to all messages in the box, or to listen to only
7
PLAY
TUV
8
PLAY NEW
new messages.
4
While listening to your messages, you can do any of the following:
• Repeat: To repeat a message, press .
• Skip: To skip forward, press .
0
SKIP
REPEAT
• Delete: To delete the message you are currently listening to, press .
68
DELETE
Page 71

Operating the Answering System
WXYZ
• Stop: To stop playback and exit remote mode, press .
5
To return to the STAND-BY display, press or .
OFF
OFF
9
STOP
REMOTE
/FLASH
• If you take no action for 60 seconds in REMOTE MODE, the cordless
handset will automatically return to the standby display.
Deleting all messages from a cordless handset
You can use your cordless handset to delete all messages in your personal
box, or all messages in the general box.
System
3. Answering
REMOTE
1
/FLASH
Press .
Cordless handset display:
REMOTE MODE
(Note: This step is not necessary if you
are already in REMOTE MODE.)
2
If you wish to delete all messages in the general box, press .
(Otherwise, go directly to Step 3.)
Personal box:
3
Press .
DELETE
4
Press to delete the messages.
• To cancel, press , , or .
START
9
STOP
BOX
DELETE ALL?
PRESS START KEY
WXYZ
OFF
OFF
REMOTE
/FLASH
General box:
GENERAL
DELETE ALL?
PRESS START KEY
0
69
Page 72

Optional Answering System Settings
Optional Answering System Settings
Setting ICM time
Incoming messages (ICMs) are the messages which callers leave for you in
the answering system. The answering system is set at the factory to allow
each caller a maximum of 4 minutes to leave a message. If desired, you can
change this setting to 15, 30, or 60 seconds.
1
2
3
4
5
FUNCTION
Press once and once.
Press once.
Press once.
Press a number from 1 to 4 to select the desired ICM recording time.
: 15 seconds : 30 seconds
: 60 seconds : 4 minutes
The display briefly shows
your selection, then:
Press to return to the date and time display.
STOP
Display:
T.A.D. SETTING
RECORDING TIME
RECORDING TIME
1=15 SECONDS
REMOTE CODE
Fax reception on TAD failure
If the memory for recording incoming messages becomes full while you are
out, the answering system will no longer be able to record messages. The ON
TAD FAILURE setting is used to select whether or not the machine will switch
to automatic fax reception when this happens:
♦ Automatic fax reception YES: The machine will receive faxes automatically.
With this setting, you can still use the remote commands to listen to your
messages and then erase them (see
70
Remote Operations
on page 76).
Page 73

Optional Answering System Settings
♦ Automatic fax reception NO: The machine will answer after 20 rings, after
which it will wait to receive a remote command. Most callers will hang up
before it answers; however, when you call the machine from a remote
location, you can wait until it answers, listen to your messages, and then
erase them (see
The initial setting is NO . If you want to change the setting to YES, press the
panel keys as follows:
Remote Operations
on page 76).
1
2
3
4
5
FUNCTION
Press once and once.
Press once and 4 times.
Press once.
Press to select YES (turn on
automatic fax reception), or to
select NO.
Press to return to the date and time display.
STOP
Display:
T.A.D. SETTING
ON TAD FAILURE
ON TAD FAILURE
1=YES, 2=NO
The display briefly shows
your selection, then:
OGM ONLY MODE
OGM only mode
If needed, you can turn off recording of incoming messages. In this case, your
outgoing message will play, but callers will not be able to leave a message
(this applies to all boxes). The machine will receive faxes sent by auto dialing.
(Note: If the machine initially answers a call in Auto Attendant mode and then
switches to OGM only mode (TAD mode) because nobody answers the paged
device, fax reception will not be possible.)
System
3. Answering
1
Press once and once.
2
Press once and 3 times.
FUNCTION
Display:
T.A.D. SETTING
OGM ONLY MODE
71
Page 74

Optional Answering System Settings
3
Press once.
4
Press to turn on OGM only mode,
or to turn it off.
5
Press to return to the date and time display.
STOP
OGM ONLY MODE
1=YES, 2=NO
The display briefly shows
your selection, then:
CPC DETECTION
CPC Detection
When a caller hangs up, the central telephone exchange issues a CPC
(Calling Party Control) signal. When the answering system detects this signal,
it stops recording so that periods of silence are not recorded.
However, if you subscribe to special services such as Call Waiting or Call
Forwarding, signals used by these services may be mistaken for a CPC
signal, causing the answering system or cordless handset to hang up during a
call. If you experience this problem, follow these steps to turn off CPC
Detection.
1
Press once and once.
FUNCTION
Display:
T.A.D. SETTING
2
Press once and twice.
3
Press once.
4
Press to turn on CPC Detection,
or to turn it off.
5
Press to return to the date and time display.
STOP
72
CPC DETECTION
CPC DETECTION
1=YES, 2=NO
The display briefly shows
your selection, then:
BOX PASSCODE
Page 75

Transfer Function
Transfer Function
The Transfer function is used to have the machine automatically call you at a
specified number every time it receives an incoming message in a specified
box. This lets you hear your messages immediately after they come in, even
when you are at a remote location.
To use the Transfer function, you must first program the number that you wish
the machine to call (the transfer number), and record the transfer message
that plays when you answer the phone at the remote location.
When you go out and wish to use the transfer function, turn it on. When you
return and no longer wish to use the transfer function, turn it off.
♦ The Transfer function can be used when the machine is in either TAD mode
or Auto Attendant mode.
Hint: Use the Transfer function in Auto Attendant mode when you will be
going out but other people in your office or home will be in and will answer
calls routed to their cordless handsets.
Note: The machine will normally use line 2 to call you. Line 1 will only be used
if line 2 is busy.
Programming the transfer number
To use the Transfer function, you must first give the machine the number to
call (the transfer number).
1
Press once and once.
2
Press once and twice.
3
Press once.
4
Press the number keys to enter the transfer number.
FUNCTION
Display:
T.A.D. SETTING
TRANSFER TEL #
ENTER TEL #
System
3. Answering
• To insert a pause between any two digits of the number, press .
5
Press .
START/MEMORY
TRANSFER FUNC
FUNCTION
73
Page 76

Transfer Function
6
Press to return to the date and time display.
STOP
Recording the transfer message
The transfer message plays when you answer the telephone, and informs you
that the call is a transfer call. The following is an example:
“Hello. This is a transfer call for (YOUR NAME). Enter your remote code
number now.”
1
Press once and twice.
2
Press once.
3
Press and speak facing “MIC” on the operation panel to
record the message.
REC/
MEMO
START/MEMORY
• The transfer message can be up to 15 seconds long. While recording, the
display will show the time left to record.
Display:
FEB-20 10:30
OGM (TRANSFER)
FEB-20 10:30
START: RECORD
4
When finished, press .
STOP
Checking or erasing the transfer message
To check or erase the transfer message, follow Steps 1 and 2 of the above
procedure, and then press to check the message, or to erase
the message.
PLAY/
HOLD
Turning the Transfer function on and off
When you go out and wish to use the Transfer function, turn it on as follows:
74
DELETE
Page 77

Transfer Function
1
2
3
4
5
6
7
FUNCTION
Press once and once.
Press once and 3 times.
Press once.
Press to turn on the Transfer function. (To turn off, press .)
Press the number of the box for which
you want the Transfer function to
operate (for the general box, press
).
Press to return to the date and time display.
Each time the answering system receives a message in the selected box,
it will call your programmed transfer number. When you answer, you will
hear your recorded message telling you that the call is a transfer call. On
the dial pad of your phone, enter , your remote code number (see
page 76) if the general box or a personal box without a passcode was
selected in Step 5, or the box passcode number if a personal box with a
passcode was selected, and then . Your messages will play.
STOP
Display:
T.A.D. SETTING
TRANSFER FUNC
TRANSFER FUNC
1=YES, 2=NO
The display briefly shows
your selection, then:
ON TAD FAILURE
System
3. Answering
• You can also perform any of the remote operations described in
Operations
Note: When you hang up after a transfer call, the machine will not
immediately resume normal operation. If you want the machine to accept calls
immediately after a transfer call, enter twice before hanging up (if
hanging up during message playback, first enter and to stop
playback, then enter twice).
later in this chapter (see page 76).
Remote
75
Page 78

Remote Operations
Remote Operations
When you are out, you can call the machine from any touch-tone telephone
and play back your messages using the remote commands. You can also use
these commands to change the reception mode and other settings.
Remote code number
After calling the machine, you must enter your remote code number to listen
to messages in the general box, or to messages in a personal box that does
not have a passcode (page 77).
The remote code number has been set to "001" at the factory. To change the
number, follow the steps below.
1
2
3
4
5
6
FUNCTION
Press once and once.
Press once and once.
Press once.
Press the number keys to enter a 3-digit remote code number.
Press to store the remote
number.
Press to return to the date and time display.
START/MEMORY
STOP
Display:
T.A.D. SETTING
REMOTE CODE
REMOTE CODE=
SELECT 3 DIGITS
TRANSFER TEL #
76
Page 79

Remote Operations
Toll Saver
When you call the machine to listen to your messages, it will answer after two
rings if it has received at least one message in any of the boxes, or after four
rings if it has not received any messages.
This allows you to save money on telephone charges, particularly if you are
calling long distance. If the machine does not answer after the second ring,
you can simply hang up before it answers, saving yourself the cost of that call.
Retrieving your messages
Note: You can only access one box per call. If you wish to access more than
one box, you must make a separate call for each box.
1
Call the machine from a touch-tone telephone. When the general
outgoing message begins, press on the telephone.
• You will hear a short beep, and the outgoing message will stop.
System
3. Answering
2
If you wish to listen to the messages in a personal box, enter the number
of that box (otherwise, go directly to Step 3).
Example: for Box 1
3
If you are accessing the general box, enter your remote code.
If you are accessing a personal box, enter the passcode of the box (if the
box does not have a passcode, enter your remote code).
When finished, press .
1
• You will hear a series of beeps equal to the number of messages recorded
in the box, or one long beep if four or more messages have been received.
The machine will then play back the messages, beeping once at the end of
each message. When all messages have been played back, you will hear a
long beep.
• If no messages have been received, you will hear a short beep. You can
either hang up, or perform any of the operations described in the following
section,
Other remote operations
.
77
Page 80

Remote Operations
4
While the messages are playing, you can do any of the following:
• Repeat: To listen to a message a second time, press and on the
telephone before that message ends. To move back to the previous
message, press and during the first 3 seconds of the current
message.
2
• Skip forward: To skip forward to the next message, press and
on the telephone.
2
5
• Stop: To stop playback, press and on the telephone. After this,
you can enter any of the commands described in the following section,
Other remote operations
.
• Play new messages: To listen to only your new messages, first stop
playback by pressing and , and then press and .
6
• Erase a message: To erase the message you are currently listening to,
press and before it ends.
5
When you have finished listening to your messages, you can do any of
the following:
• Erase all messages: Press , , and .
3
3 3
• Repeat playback: Press and .
7
• Perform other operations: You can enter any of the commands described
in the following section,
Other remote operations
.
• Hang up: If you do not erase your messages first, they will be saved and
any new messages will be recorded after them. If you want the machine to
resume normal operation immediately, press twice before hanging up
(in some cases, particularly when the Transfer function is used, the
machine may not accept new calls for one or two minutes after you hang up
unless you press twice).
78
Page 81

Remote Operations
Note: You can also call the machine and perform remote operations when the
reception mode is set to Auto Attendant, or TEL mode if you call your line 2
number (unless the number of rings is set to 0). In this case, when you call the
machine, press immediately after it answers (press before you hear
the fax tone in TEL mode on line 2), and then continue from Step 2 above.
Comments:
♦ When a remote command is accepted by the machine, you will hear one
beep. If an incorrect command is entered, you will hear four beeps. In the
latter case, re-enter the correct command.
♦ When entering a command, do not pause longer than 10 seconds between
each digit. If you do, you will hear a 4-beep error signal and the digits
entered up to that point will be cleared. In this case, re-enter the command
from the beginning.
♦ If you pause for longer than 10 seconds before entering a command, or
make two errors while entering your remote code number, the line will be
disconnected. (This prevents unauthorized people from attempting to
guess your remote code number.)
Other remote operations
After listening to your messages, you can perform any of the following
operations by pressing the appropriate keys on the telephone.
Note: The following commands cannot be entered while messages are being
played back. If you do not want to wait until playback ends to enter a
command, first stop playback by pressing and , and then enter the
command.
Changing the reception mode
Select a new reception mode by pressing the keys as follows:
♦ TA D m od e : , , and .
♦ Auto Attendant mode: , , and .
♦ TEL mode: , , and .
8 1
8 3
Note: If TEL mode is
2
8
selected, you will only be
able to access the machine
for remote operation if you
call your line 2 number and
the number of rings is not
set to 0.
System
3. Answering
79
Page 82

Remote Operations
Recording a new outgoing message
Note: You can only record a new outgoing message for the box you accessed
at the beginning of the call.
1
Press and on the telephone.
2
When you hear a short beep, speak into the telephone to record the new
message.
4
• The message can be up to 15 seconds long. After 15 seconds (or earlier if
the machine detects silence after you finish speaking), you will hear a
beep, and the new message will be played back.
Turning the Transfer function on or off
To turn Transfer on: Press , , and on the telephone, followed
by the number of the box for which you want the Transfer function to operate
(press for the general box) and .
To turn Transfer off: Press , , and on the telephone.
9 1
9
2
Changing the transfer telephone number
1
Press , , and on the telephone.
2
After you hear a short beep, enter the new telephone number. When
finished, press .
• To insert a pause between any two digits of the number, press .
80
9
Page 83

Remote Operations
Recording a new transfer message
1
Press , , and on the telephone.
2
When you hear a short beep, speak into the telephone to record the new
message.
9 3
• The time for the transfer message is fixed at 15 seconds. After 15 seconds
(or earlier if the machine detects silence after you finish speaking), you will
hear a beep, and the new message will be played back automatically.
Recording a memo
You can record a memo for yourself or other users of the machine. The memo
will be recorded in the general box.
1
Press and on the telephone.
System
3. Answering
2
When you hear a short beep, speak into the telephone to record the
memo.
3
When you are finished, press and on the telephone.
• If the machine detects silence, it will stop recording automatically.
OGM only mode
To turn on OGM only mode: Press , , and on the telephone.
(Outgoing messages will play, but callers will not be able to record a
message. Faxes sent by automatic dialling will be received)
To turn off OGM only mode: Press , , and on the telephone.
1 1
1
2
81
Page 84

4. Sending Faxes
Transmittable Documents
Size and weight
The size and weight of documents that you can load in the document feeder
depend on whether you load one page at a time or several pages at once.
Loading one page at a time:
Minimum size
5.8"
(148 mm)
5.5"
(140 mm)
Maximum size
8.5"
(216 mm)
23.6"
(600 mm)
Minimum weight Maximum weight
14 lbs.
(52 g/m² )
42 lbs.
(157 g/m²)
Loading up to 10 pages at once:
Minimum size Maximum size
5.8"
(148 mm)
5.5"
(140 mm)
Minimum weight Maximum weight
14 lbs.
(52 g/m² )
21.5 lbs.
(80 g/m²)
Note: Letters or graphics on the edges of a document will not be scanned.
0.2"(5 mm)
Letters in the
shaded area will
not be scanned.
8.5"
(216 mm)
11"
(279 mm)
82
8.3"(210 mm)
0.2"(5 mm)
The illustration shows the
scanning margins for lettersize documents. The scanning
width is 8.3” (210 mm). The
horizontal margins decrease
for smaller-width documents.
Page 85

Loading the Document
Other restrictions
♦ The scanner cannot recognize yellow, greenish yellow, or light blue ink.
♦ Ink, glue, and correcting fluid on documents must be dry before they pass
through the document feeder.
♦ All clips, staples, and pins must be removed from documents before loading
in the feeder. If these are not removed, they may damage the machine.
♦ Documents which are patched, taped, torn, smaller than the minimum size,
carbon backed, easily smudged, or have a slick coated surface should be
photocopied, and the copy loaded in the feeder.
Loading the Document
Up to 10 pages can be placed in the feeder at one time. The pages will
automatically feed into the machine starting from the bottom page.
♦ If you need to send or copy more than 10 pages, place the additional pages
gently and carefully in the feeder just before the last page is scanned. Do
not try to force them in, as this may cause double-feeding or jamming.
♦ If your document consists of several large or thick pages which must be
loaded one at a time, insert each page into the feeder as the previous page
is being scanned. Insert gently to prevent double-feeding.
1
Adjust the document guides to the
width of your document.
2
Insert the document face down in the
document feeder. The top edge of the
document should enter the feeder first.
• READY TO SEND will appear in the
display.
Faxes
4. Sending
83
Page 86

Adjusting the Resolution and Contrast
3
Adjust the resolution and/or contrast settings as explained in
Resolution and Contrast
explained on page 86.
below, then dial the receiving machine as
Adjusting the Resolution and Contrast
If desired, you can adjust the resolution and contrast before sending a
document.
The default resolution
setting is STANDARD
and the default contrast
setting is AUTO.
Note: The resolution and contrast settings are only effective for sending a
document. They are not effective for receiving a document.
You must adjust the
settings each time
you don’t want to use
the default settings.
Resolution settings
STANDARD Use STANDARD for ordinary documents. This
setting gives you the fastest and most
economical transmission.
FINE Use FINE for documents containing small letters
or fine drawings.
SUPER FINE Use SUPER FINE for documents containing
very small letters or very fine drawings.
HALF TONE Use HALF TONE for photographs and
illustrations. The original will be reproduced in
64 shades of gray.
84
Page 87

Adjusting the Resolution and Contrast
Contrast settings
AUTO Use AUTO for normal documents.
DARK Use DARK for faint documents.
1
Load the document(s).
• The document must be loaded before
the resolution and contrast can be
adjusted.
RESOLUTION/
2
RECEPTION MODE
Press one or more times until
the desired resolution and contrast
settings appear in the display.
• The first time you move through the list
of resolution settings, the contrast
setting AUTO will appear next to each
resolution setting. The second time you
move through the list, the contrast
setting DARK will appear.
Note: In order to transmit in SUPER FINE resolution, the receiving fax machine
must also have that resolution. If it doesn’t, your machine will automatically step
down to the next best available setting.
Display:
STANDARD :AUTO
FINE :AUTO
SUPER FINE :AUTO
HALF TONE :AUTO
STANDARD :DARK
HALF TONE :DARK
Faxes
4. Sending
85
Page 88

Sending a Fax by Normal Dialing
Sending a Fax by Normal Dialing
With Normal Dialing, you pick up the handset (or press ) and dial by
pressing the number keys.
SPEAKER
♦ If a person answers, you can talk with them before sending the fax.
♦ Normal Dialing allows you to listen to the line and make sure the other fax
machine is responding.
1
Load the document(s).
• READY TO SEND will appear in the
display.
RESOLUTION/
• If desired, press to set the
resolution and/or contrast.
2
Pick up the handset or press .
3
If the display at right appears, press
to select line 1 or to select
line 2.
(If the display at right does not appear,
go directly to Step 4.)
RECEPTION MODE
SPEAKER
or
WHICH LINE?
PRESS 1 OR 2
The above display will appear
if the dialing line setting is set
to MANUAL (page 36) and the
line 2 invalid setting is set to
NO (page 37).
SPEAKER
4
Listen for the dial tone and then press
the number keys to dial the number of
the receiving machine.
86
DELETEREPEAT
SKIP
Page 89

Sending a Fax by Normal Dialing
5
Wait for the connection. Depending on the setting of the receiving
machine, you will either hear a fax tone or a person will answer.
• If the other party answers, ask them to press their Start key (if you pressed
SPEAKER
, speak toward “MIC” on the operation panel). This causes the
receiving machine to issue a fax tone.
6
When you hear the fax tone, press . Replace the handset if
you used it.
START/MEMORY
• If the transmission is completed successfully, the fax will beep once.
• If an error occurs, the fax will beep three times and print a Transaction
Report to inform you of the problem (see page 117).
Note: If the transmission is unsuccessful and DOCUMENT JAMMED appears
in the display, remove the document as explained on page 137. (This may
occur if the other fax machine doesn’t respond properly when you attempt to
send the document.)
Faxes
4. Sending
87
Page 90

Sending a Fax by Automatic Dialing
Sending a Fax by Automatic Dialing
You can store your most frequently dialed fax or phone numbers in the
machine for automatic dialing.
♦ Auto-dial numbers can be stored using either the machine or the cordless
handset (to store a number using the cordless handset, see page 48).
♦ Numbers stored using the fax machine are stored in the Common book. A
total of 99 numbers can be stored.
♦ When you send a fax by automatic dialing (including Direct Keypad Dialing,
redial, and automatic redialing), the machine will normally use line 2. The
machine will only use line 1 if line 2 is busy (or if line 2 is not connected or
disabled).
Storing fax and phone numbers for automatic dialing
1
2
3
FUNCTION
Press once and once.
Press once.
Enter the fax or voice number by pressing the number keys.
(Note: A space cannot be entered.)
• To clear a mistake, press .
SPEAKER
Display:
<NEW NUMBER>
ENTER FAX #
• If a pause is required between any of the digits to access a special service
or an outside line, press . The pause appears as a hyphen (two
seconds per pause). Several pauses can be entered in a row.
4
Press .
START/MEMORY
FUNCTION
88
Page 91

Sending a Fax by Automatic Dialing
5
Enter a name by pressing number keys for each letter as shown in the
chart below. Up to 15 characters can be entered. (If you do not wish to
enter a name, go directly to Step 6.)
Example: SHARP = 7777 44 2 777 7
SPACE =
A =
B =
C =
D =
E =
F =
G =
H =
I =
J =
K =
L =
M =
N =
O =
P =
Q =
R =
S =
T =
U =
V =
W =
X =
Y =
Z =
♦ To enter two letters in succession that require the same key, press
after entering the first letter.
♦ To enter a lower case letter, continue pressing the key for the letter until the
lower case letter appears.
♦ To enter one of the following symbols, press or repeatedly:
. / ! " # $ % & ’ ( ) + + , - : ; < = > ? @ [ ¥ ] ^ _ ' { | }
6
Press .
7
Return to Step 2 to store another number, or press to return to
START/MEMORY
the date and time display.
) (
Display:
<NEW NUMBER>
STOP
Faxes
4. Sending
Note: The fax machine uses a lithium battery to keep automatic dialing numbers
and other programmed information in memory when the power is turned off.
Battery power is consumed primarily when the power is off. With the power kept
continuously off, the life of the battery is about 5 years. If the battery dies, have
your dealer or retailer replace it. Do not try to replace it yourself.
89
Page 92

Sending a Fax by Automatic Dialing
Editing and clearing auto-dial numbers
If you need to make changes to a previously stored auto-dial number, or clear
a number, follow these steps:
1
2
3
4
FUNCTION
Press once and once.
Press or until the number you wish to edit or clear appears in
the display.
Press once.
Press for EDIT or for CLEAR.
Example
Display:
<NEW NUMBER>
1234567890
1=EDIT, 2=CLEAR
• If you selected CLEAR, go to Step 8.
5
If you selected EDIT, make the desired changes to the number.
• Press or to move the cursor to the digit or digits you wish to
change, and then enter the new digit. The new digit will replace the old
digit.
• If you do not wish to change the number, go directly to Step 6.
6
Press .
7
Make the desired changes to the name.
START/MEMORY
• Press or to move the cursor to the letter or letters you wish to
change, and then press the appropriate number key repeatedly until the
desired letter appears (see Step 5 on page 89). The new letter will replace
the old letter.
• If you do not wish to change the name, go directly to Step 8.
90
Page 93

Sending a Fax by Automatic Dialing
8
Press .
9
Return to Step 2 to edit or clear another number, or press to
return to the date and time display.
START/MEMORY
Using an auto-dial number
Once you have stored a fax number, you can use it to send a fax.
1
Load the document(s).
• READY TO SEND will appear in the
display.
RESOLUTION/
• If desired, press to set the
resolution and/or contrast.
2
Press (or ) until the name of the other party appears in the
display (if no name was stored, the number will appear).
RECEPTION MODE
STOP
Faxes
4. Sending
3
Press . Dialing and transmission begins.
START/MEMORY
• If the transmission is completed successfully, the fax will beep once.
• If an error occurs, the fax will beep three times and print a Transaction
Report to inform you of the problem (see page 117).
91
Page 94

Sending a Fax by Automatic Dialing
Sending a fax by Direct Keypad Dialing
You can also enter a full number with the number keys and then press the
START/MEMORY
number when you don't need to speak to the other party before faxing.
1
Load the document(s).
• READY TO SEND will appear in the
display.
• If desired, press to set the
resolution and/or contrast.
2
Enter the number of the receiving machine by pressing the number
keys.
• If a pause is required between any of the digits to access a special service
or an outside line, press . The pause will appear as a hyphen (two
seconds per pause). Several pauses can be entered in a row.
key to begin dialing. You can use this method to dial a full
RESOLUTION/
RECEPTION MODE
FUNCTION
3
Check the display. If the number of the receiving machine shown is
correct, press .
• If the number is not correct, press to backspace and clear one digit
at a time, and then re-enter the correct digit(s).
START/MEMORY
STOP
92
Page 95

Sending a Fax by Automatic Dialing
Redial
You can automatically redial the last number dialed on the fax machine.
Note: The fax machine and the cordless handset each retain their own
separate redial numbers.
1
Load the document(s).
RESOLUTION/
• If desired, press to set the
resolution and/or contrast.
2
Press once. <REDIAL> appears in the display, followed by the last
number dialed. Make sure the number that appears is the number you
wish to dial.
RECEPTION MODE
Faxes
4. Sending
3
Press . Dialing begins.
START/MEMORY
Note: If a fax transmission is unsuccessful and DOCUMENT JAMMED
appears in the display, remove the document as explained on page 137. (This
may occur if the other fax machine doesn’t respond properly when you
attempt to send the document.)
Automatic redialing
If you use automatic dialing (including Direct Keypad Dialing) to send a fax
and the line is busy, the fax machine will automatically redial the number. The
fax machine will make three redial attempts at intervals of five minutes. During
this time, RECALLING will appear in the display, followed by a two-digit
number assigned to the fax job. You will not be able to dial any other locations
while the message appears.
93
Page 96

Sending a Fax by Automatic Dialing
♦ You can press to clear the message and stop automatic redialing.
STOP
♦ Under certain conditions (for example if a person answers the call on a
telephone), automatic redialing may stop before three redialing attempts
are made.
Error Correction Mode
The fax machine is set to automatically correct any distortions in a
transmission due to noise on the telephone line before printing at the
receiving end. This function is called Error Correction Mode (ECM). ECM is
effective for both transmissions and receptions, and is only effective when the
other fax machine has ECM as well.
When there is considerable noise on the line, you may find that transmission
with ECM turned on takes longer than normal. If you prefer a faster
transmission time, you can try turning ECM off.
1
2
FUNCTION
Press once and once.
Press once and 9 times.
Display:
OPTION SETTING
ECM MODE
3
Press once.
4
Press to select YES, or to
select NO.
5
Press to return to the date and
time display.
STOP
94
ECM MODE
1=YES, 2=NO
The display briefly shows
your selection, then:
VOICE MAIL (L1)
Page 97

Sending a Fax From Memory
Sending a Fax From Memory
You can scan a document into the machine’s memory and send the document
from memory. This increases transmission speed and allows you to send a fax
to multiple destinations in a single operation. After transmission, the
document is automatically cleared from memory.
♦ When you send a fax from memory, the machine will normally use line 2.
The machine will only use line 1 if line 2 is busy (or if line 2 is not connected
or disabled).
Note: If a power failure occurs while sending a fax from memory, you will need
to repeat the operation.
Broadcasting (sending a fax to multiple destinations)
This function allows you to send the same fax to as many as 20 different
destinations in just one operation.
♦ When sending to multiple destinations, only auto-dial numbers can be used
to dial the numbers of the receiving machines.
1
Load the document(s).
RESOLUTION/
• If desired, press to set the
resolution and/or contrast.
2
Press .
3
Press (or ) until the name of the destination appears in the
display (if no name was stored, the number will appear).
4
Press to select the destination.
START/MEMORY
RECEPTION MODE
Faxes
4. Sending
95
Page 98

Sending a Fax From Memory
5
Repeat Steps 3 and 4 for each of the other destinations to which you
wish to send the fax (maximum of 20).
• To check your selected destinations, press to scroll through them. To
delete a destination, scroll to the destination and then press .
6
When you are ready to begin transmission, press .
START/MEMORY
• A Transaction Report is automatically printed out after Broadcasting is
completed. Check the "Note" column of the report to see if any of the
destinations are marked "Busy" or have a communication error code. If so,
send the document to those destinations again.
Memory transmission
You can also send a fax through memory when sending to a single
destination. This is convenient when sending to destinations where the line is
often busy, as it saves you from waiting to pick up the original document and
frees the feeder for other operations.
To send a fax through memory, load the document, press , and
then dial using one of the following methods:
♦ Press the number keys to enter the fax number and then press
START/MEMORY
.
START/MEMORY
STOP
♦ Press repeatedly to select an auto-dial number and press
START/MEMORY
.
♦ Press once to select the last number dialed and press .
96
START/MEMORY
Page 99

Sending a Fax From Memory
If the memory becomes full...
If the memory becomes full while the document is being scanned, MEMORY
IS FULL and SEE MANUAL will alternately appear in the display.
♦ Press if you want to transmit the pages which have been
♦ Press if you want to cancel the entire transmission.
START/MEMORY
stored up to that point in memory. The remaining pages will be ejected from
the feeder. After transmission, the memory will be cleared and you can
transmit the remaining pages. You will also need to transmit the page which
was being scanned when the memory filled up.
STOP
Faxes
4. Sending
97
Page 100

5. Receiving Faxes
Receiving Faxes Automatically
Automatic reception in Auto Attendant and TAD modes
When the reception mode is set to Auto Attendant or TAD, the machine will
automatically receive faxes.
To select Auto Attendant or
RESOLUTION/
TAD mode, press
until or appears in
the display.
RECEPTION MODE
RESOLUTION/
RECEPTION MODE
JAN-02 10:30
JAN-02 10:30
or
Automatic reception in TEL mode on line 2
When the reception mode is set to TEL, the machine will automatically
answer calls that come in on line 2 on four rings. If the call is a fax, the fax will
be received automatically.
4 rings Fax reception
♦ The number of rings on which the machine answers calls in TEL mode on
line 2 can be changed. See
♦ Automatic reception of faxes is not possible on line 1. To receive a fax
manually on line 1, see page 100.
98
Changing the number of rings
on page 99.
 Loading...