

Page 1
IMPORTANT
PLEASE KEEP THE EXTERNAL & INTERNAL PACKAGING SAFE.
PLEASE DO NOT THROW IT AWAY.
IN THE UNLIKELY EVENT OF A HARDWARE FAILURE, OUR
REPAIR CENTRE WILL ASK YOU TO PUT YOUR SHARP
FACSIMILE IN THIS BOX.
THANK YOU FOR YOUR ASSISTANCE.
FACSIMILE
OPERATION MANUAL
MODEL
UX-BD80/UX-BD90
1. Installation
2. Using the Cordless Handset
3. SMS Text Messaging
4. Using the Answering Machine
5. Sending Faxes
6. Receiving Faxes
7. Making Copies
8. Special Functions
9. Printing Lists
10. Maintenance
11. Troubleshooting
Page 2

MAINS PLUG WIRING INSTRUCTIONS
This equipment is fitted with a moulded type mains plug which incorporates a detachable
fuse cover, under no circumstances should the plug be used without the fuse cover fitted.
In the unlikely event of the socket outlet in your home not being compatible with the plug
supplied, cut off the mains plug and fit an appropriate type observing the wiring code
below.
DANGER: The fuse from the cut-off plug should be removed and the plug should be
disposed of in a safe manner. Under no circumstances should the cut-off plug be
inserted into a socket outlet as a serious electric shock may occur.
If you are not sure how to do this, get help from a qualified electrician.
IMPORTANT
The wires in this mains lead are coloured in accordance with the following code:
GREEN-AND-YELLOW: Earth
BLUE: Neutral
BROWN: Live
As the colours of the wires in the mains lead of this apparatus may not correspond with
the coloured markings identifying the terminals in your plug, proceed as follows:The wire
which is coloured GREEN-AND-YELLOW must be connected to the terminal in the plug
which is marked by the letter E, or by the safety earth symbol or coloured green or
green-and-yellow.The wire which is coloured BLUE must be connected to the terminal
which is marked with the letter N or coloured black.The wire which is coloured BROWN
must be connected to the terminal which is marked with the letter L or coloured red.
This apparatus must be protected by a 13A fuse in the mains plug or distribution board.
"WARNING: THIS APPARATUS MUST BE EARTHED"
This equipment complies with the requirements of Directive 1999/5/EC.
Dieses Gerät entspricht den Anforderungen der EU-Richtlinie 1999/5/EG.
Cet appareil est conforme aux exigences de la directive 1999/5/CE.
Este aparato satisface las exigencias de las Directiva 1999/5/CE.
Quest’apparecchio è conforme ai requisiti delle direttiva 1999/5/CE.
Dit apparaat voldoet aan de eisen van de richtlijn 1999/5/EG.
Este equipamento obedece às exigências da directiva 1999/5/CE.
Η υυ αυ αναπονα απα ων οηγα 1999/5/ΕK.
Denna utrustning uppfyller kraven enligt direktiv 1999/5/EC.
Dette udstyr overholder kravene i direktiv 1999/5/EF.
Dette produktet oppfyller kravene i direktiv 1999/5/EC.
Tämä laite täyttää direktiivi 1999/5/EY.
This is a facsimile product operating in British and Irish analogue public switched telephone networks which
follow the TBR21 Standard.
The Declaration of Conformity can be viewed at the following URL address.
http://www.sharp.de/doc/UX-BD80.pdf
http://www.sharp.de/doc/UX-BD90.pdf
Page 3
1
Introduction
*Quality mode is initially turned off. To turn on Quality mode, see page 27.
**Based on Sharp Standard Chart at standard resolution, excluding time for protocol signals
(i.e., ITU-T phase C time only).
Print cartridge yield*
(at 4% coverage**)
Initial cartridge
Quality mode OFF: Approx. 300 A4 pages
Quality mode ON: Approx. 200 A4 pages
Replacement cartridge: SHARP UX-C70B
Quality mode OFF: Approx. 600 A4 pages
Quality mode ON: Approx. 400 A4 pages
Paper tray capacity Approx. 50 A4-size sheets
(at room temperature; maximum stack height
should not be higher than the line on the tray)
Recording system Thermal inkjet
Print resolution
600
× 600 dpi
Effective printing width 203 mm max.
Memory size** 448 KB (approx. 24 average pages with ECM
turned off; 20 minutes of voice messages
(including OGMs))
Automatic dialling 30 numbers
Welcome, and thank you for choosing a SHARP fax machine and cordless
handset.
In addition to the cordless handset(s) included with the machine (two cordless
handsets are included with the UX-BD90, one cordless handset is included
with the UX-BD80), other cordless handsets that support the DECT/GAP
standard can also be added. The total number of cordless handsets that can
be used with the machine is six.
The UX-BD80/90 base (fax machine) complies with the GAP (Generic Access
Prophile) standard and supports the following functions: Outgoing calls,
incoming calls, intercom.
Additional bases and handsets must comply with the GAP standard.
This Sharp fax machine supports SMS messaging. To use this feature, see
page 73.
Page 4

2
Modem speed 14,400 bps with auto fallback to lower speeds.
Transmission time** Approx. 6 seconds (only when ECM is on)
Compatibility ITU-T (CCITT) G3 mode
Compression scheme MR, MH, MMR
Telephone function Yes (cannot be used if power fails)
Applicable telephone line Public switched telephone network (TBR21) / PBX
Reception modes TEL/FAX, TEL, FAX, A.M.
Automatic document
feeder
10 sheets max. (A4, 80 g/m
2
paper)
Input document size Automatic feeding:
Width: 148 to 216 mm
Length: 140 to 297 mm
Manual feeding:
Width: 148 to 216 mm
Length: 140 to 600 mm
Effective scanning width 210 mm max.
Scanning Resolution Horizontal: 8 lines/mm
Vertical:
Standard: 3.85 lines/mm
Fine /Halftone: 7.7 lines/mm
Super fine: 15.4 lines/mm
Halftone (grayscale) 64 levels
Contrast control Automatic/Dark selectable
Copy function Single/Multi/Sort (99 copies/page)
Display 16-digit LCD display, 2 lines
Power requirements 230 V AC, 50 Hz
Power consumption Standby (with cordless handset charging in
cradle): 6.0 W
Maximum: 35 W
Operating temperature 15 - 32°C
Page 5

3
Cordless handset specifications
As a part of our policy of continuous improvement, SHARP reserves the right to make design
and specification changes for product improvement without prior notice. The performance
specification figures indicated are nominal values of production units. There may be some
deviations from these values in individual units.
Humidity 25 - 80% RH
Dimensions (without
attachments)
Width: 354 mm
Depth: 247 mm
Height: 138 mm
Weight (without
attachments)
Approx. 3.2 kg
Standard DECT (Digital Enhanced Cordless
Telecommunications)
GAP (Generic Access Profile)
Frequency 1.88 to 1.9 GHz
Duplex operation TDMA (Time Division Multiple Access)
Dimensions Width: 51 mm
Depth: 29 mm
Height: 145 mm
Weight Approx. 130 g (with battery)
Battery 1.2 V Ni-MH battery; capacity: 630 mAh x 3 pcs
(min. 600 mAh)
Power consumption
Initial charging
Battery life
Battery life in standby
mode
Approx. 1.0 W (in standby mode)
Approx. 12 hours for initial charge
Approx. 10 hours (600 minutes) (at room temp.)
Approx. 120 hours with one full charge (at room
temperature)
Battery life (both normal and in standby mode)
may vary depending on usage, range from
base machine, and environmental conditions
such as temperature
.
Page 6

4
Important:
This fax machine is not designed for use on a line which has call waiting, call forwarding, or
certain other special services offered by your telephone company. If you attempt to use the fax
machine in conjunction with any of these services, you may experience errors during
transmission and reception of facsimile messages.
The fax machine is not compatible with digital telephone systems.
System PIN number
Please fill in your system PIN in the space provided below. For information on the System PIN
number, see page 67.
Important safety information
Do not disassemble this machine or attempt any procedures not described in this manual.
Refer all servicing to qualified service personnel.
Do not install or use the machine near water, or when you are wet. For example, do not use the
machine near a bath tub, wash bowl, kitchen sink or laundry tub, in a wet basement, or near a
swimming pool. Take care not to spill any liquids on the machine.
Unplug the machine from the power outlet and telephone socket and consult a qualified
service representative if any of the following situations occur:
- Liquid has been spilled into the machine or the machine has been
exposed to rain or water.
- The machine produces odors, smoke, or unusual noises.
- The power cord is frayed or damaged.
- The machine has been dropped or the housing damaged.
Do not allow anything to rest on the power cord, and do not install the machine where people
may walk on the power cord.
This machine must only be connected to a 230 V, 50 Hz, earthed (3-prong) outlet. Connecting
it to any other kind of outlet will damage the machine.
Never insert objects of any kind into slots or openings on the machine. This could create a risk
of fire or electric shock. If an object falls into the machine that you cannot remove, unplug the
machine and consult a qualified service representative.
Do not place this machine on an unstable cart, stand or table. The machine could be seriously
damaged if it falls.
Never install telephone wiring during a lightning storm.
Never install telephone sockets in wet locations unless the socket is specifically designed for
wet locations.
Page 7

5
Never touch bare telephone wires or terminals unless the telephone line has been
disconnected at the network interface.
Use caution when installing or modifying telephone lines.
Avoid using a telephone (other than a cordless type) during an electrical storm. There may be
a remote risk of electric shock from lightning.
Do not use a telephone to report a gas leak in the vicinity of the leak.
The power outlet must be installed near the equipment and must be easily accessible.
Batteries
Use only the batteries specified in this manual. Use only the provided charger to charge the
batteries.
Do not use new and old batteries together. Do not use different types of batteries together.
When replacing batteries, make sure that the "+" and "-" sides are placed correctly.
Do not mutilate the batteries. Corrosive fluid may leak out and cause injury or burns to the
eyes and skin. The fluid may be toxic if swallowed. In case of contact with eyes, flush with
clean water (do not rub), and seek medical attention immediately.
Do not store or carry a battery with other metal objects such as keys or pins. These may short
the battery and cause it to overheat.
Do not allow a battery to become wet.
Do not dispose of a battery in a fire or heat a battery. The battery may explode.
Do not let children replace the batteries.
Do not attempt to recharge a non-rechargeable battery.
Health care facilities and equipment
Radio frequency energy emitted from the cordless handset equipment may cause medical
equipment to malfunction. Verify that any personal medical equipment you are using is
adequately shielded from external radio frequency energy before using the cordless handset
equipment. Do not use the cordless handset equipment in health care facilities where such
use is prohibited.
Important:
This facsimile is only designed for use in the country where approved.
Page 8

6
Table of Contents
A Look at the Operation Panel 9
1. Installation 16
Unpacking Checklist . . . . . . . . . . . . . . . . . . . . . . . . . . . . . . . . . . . . . 16
Setting Up. . . . . . . . . . . . . . . . . . . . . . . . . . . . . . . . . . . . . . . . . . . . . 17
Loading Printing Paper. . . . . . . . . . . . . . . . . . . . . . . . . . . . . . . . . . . 20
Connecting the Power Cord . . . . . . . . . . . . . . . . . . . . . . . . . . . . . . . 21
Installing the Print Cartridge . . . . . . . . . . . . . . . . . . . . . . . . . . . . . . . 22
Connecting the Telephone Line Cord. . . . . . . . . . . . . . . . . . . . . . . . 29
Setting Up the Cordless Handset . . . . . . . . . . . . . . . . . . . . . . . . . . . 30
Entering Your Name and Fax Number . . . . . . . . . . . . . . . . . . . . . . . 33
Setting the Date and Time . . . . . . . . . . . . . . . . . . . . . . . . . . . . . . . . 35
Setting the Reception Mode . . . . . . . . . . . . . . . . . . . . . . . . . . . . . . . 37
Flash Select Setting for PBX . . . . . . . . . . . . . . . . . . . . . . . . . . . . . . 39
Volume Adjustment (on the Machine) . . . . . . . . . . . . . . . . . . . . . . . 40
2. Using the Cordless Handset 44
About the Cordless Handset System . . . . . . . . . . . . . . . . . . . . . . . . 44
Making a Phone Call . . . . . . . . . . . . . . . . . . . . . . . . . . . . . . . . . . . . 46
Receiving a Phone Call . . . . . . . . . . . . . . . . . . . . . . . . . . . . . . . . . . 47
Receiving a Fax Using the Cordless Handset . . . . . . . . . . . . . . . . . 48
Storing and Using Auto-Dial Numbers . . . . . . . . . . . . . . . . . . . . . . . 48
Dialling From the Incoming/Outgoing Call List (Redial) . . . . . . . . . . 54
Using the Intercom Feature . . . . . . . . . . . . . . . . . . . . . . . . . . . . . . . 55
Transferring Calls . . . . . . . . . . . . . . . . . . . . . . . . . . . . . . . . . . . . . . . 57
Adjusting the Ringing Melody and Volume. . . . . . . . . . . . . . . . . . . . 60
Other Features . . . . . . . . . . . . . . . . . . . . . . . . . . . . . . . . . . . . . . . . . 62
Registering Cordless Handsets . . . . . . . . . . . . . . . . . . . . . . . . . . . . 65
3. SMS Text Messaging 73
Sending an SMS Message. . . . . . . . . . . . . . . . . . . . . . . . . . . . . . . . 74
Receiving SMS Messages . . . . . . . . . . . . . . . . . . . . . . . . . . . . . . . . 79
Viewing the Outbox . . . . . . . . . . . . . . . . . . . . . . . . . . . . . . . . . . . . . 81
Printing or Deleting all Messages. . . . . . . . . . . . . . . . . . . . . . . . . . . 83
SMS Settings . . . . . . . . . . . . . . . . . . . . . . . . . . . . . . . . . . . . . . . . . . 84
Page 9

Table of Contents
7
4. Using the Answering Machine 86
Recording an Outgoing Message . . . . . . . . . . . . . . . . . . . . . . . . . . . 86
Operating the Answering Machine . . . . . . . . . . . . . . . . . . . . . . . . . . 87
Optional Answering Machine Settings . . . . . . . . . . . . . . . . . . . . . . . 91
Transfer Function . . . . . . . . . . . . . . . . . . . . . . . . . . . . . . . . . . . . . . . 93
Remote Operations. . . . . . . . . . . . . . . . . . . . . . . . . . . . . . . . . . . . . . 97
5. Sending Faxes 104
Transmittable Documents . . . . . . . . . . . . . . . . . . . . . . . . . . . . . . . . 104
Loading the Document . . . . . . . . . . . . . . . . . . . . . . . . . . . . . . . . . . 105
Adjusting the Resolution and Contrast . . . . . . . . . . . . . . . . . . . . . . 107
Sending a Fax by Normal Dialling. . . . . . . . . . . . . . . . . . . . . . . . . . 110
Sending a Fax by Automatic Dialling . . . . . . . . . . . . . . . . . . . . . . . 111
Using the Speakerphone to Make a Phone Call . . . . . . . . . . . . . . .120
Batch Page Numbering. . . . . . . . . . . . . . . . . . . . . . . . . . . . . . . . . . 121
Sending a Fax From Memory . . . . . . . . . . . . . . . . . . . . . . . . . . . . . 122
6. Receiving Faxes 125
Using TEL/FAX Mode . . . . . . . . . . . . . . . . . . . . . . . . . . . . . . . . . . . 125
Using A.M. Mode . . . . . . . . . . . . . . . . . . . . . . . . . . . . . . . . . . . . . . 126
Using FAX Mode. . . . . . . . . . . . . . . . . . . . . . . . . . . . . . . . . . . . . . . 127
Using TEL Mode . . . . . . . . . . . . . . . . . . . . . . . . . . . . . . . . . . . . . . . 128
Optional Reception Settings . . . . . . . . . . . . . . . . . . . . . . . . . . . . . . 130
Substitute Reception to Memory. . . . . . . . . . . . . . . . . . . . . . . . . . . 132
7. Making Copies 133
8. Special Functions 136
Caller ID (Requires Subscription to Service) . . . . . . . . . . . . . . . . .136
Blocking Reception of Unwanted Faxes . . . . . . . . . . . . . . . . . . . . . 141
Polling (Requesting a Fax Transmission) . . . . . . . . . . . . . . . . . . . . 142
PBX operations . . . . . . . . . . . . . . . . . . . . . . . . . . . . . . . . . . . . . . . . 143
9. Printing Lists 144
10. Maintenance 148
Page 10

Table of Contents
8
Cleaning the Machine . . . . . . . . . . . . . . . . . . . . . . . . . . . . . . . . . . .148
Improving Print Quality . . . . . . . . . . . . . . . . . . . . . . . . . . . . . . . . . . 151
Replacing the Cordless Handset Batteries . . . . . . . . . . . . . . . . . . . 156
11. Troubleshooting 158
Problems and Solutions . . . . . . . . . . . . . . . . . . . . . . . . . . . . . . . . . 158
Messages and Signals . . . . . . . . . . . . . . . . . . . . . . . . . . . . . . . . . . 165
Clearing Paper Jams . . . . . . . . . . . . . . . . . . . . . . . . . . . . . . . . . . . 170
Quick Reference Guide 172
Index 174
Page 11
9
1. Installation
Z
A
RESOLUTION/
RECEPTION
INK
REC/MEMO
PLAY/HOLD
R
POLL
DELETEREPEAT
SKIP
DIGITAL
SPEAKERPHONE
4 5 61 7 82 3
12 139 14 15 16 17 1810 11
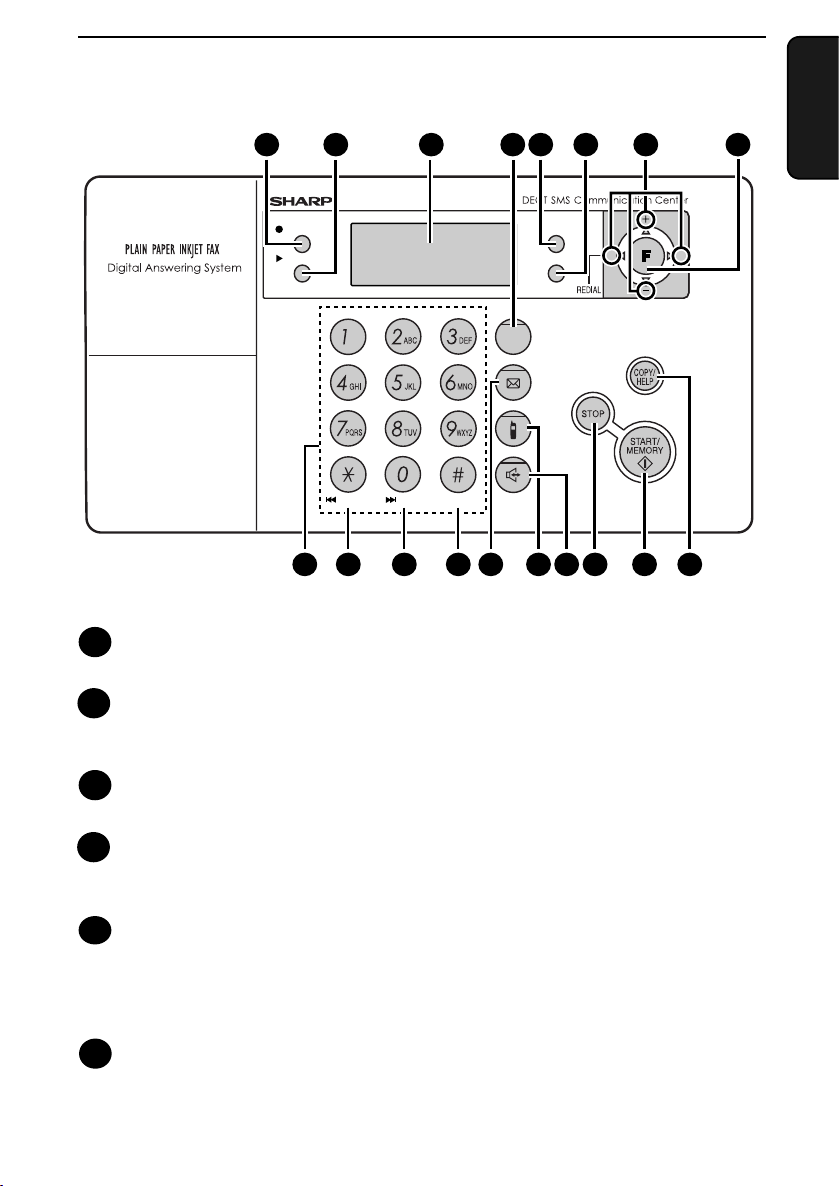
REC/MEMO key
Press this key to record an outgoing message or memo.
PLAY/HOLD key
Press this key to play recorded messages (page 89). During a phone call on
the speakerphone, press this key to place the call on hold (page 120).
Display
This displays messages and prompts to help you operate the machine.
R key
If you are on a Flash-type PBX, use this key to dial out (first press the R key
and then dial the number; page 110).
RESOLUTION/RECEPTION key
When a document is in the feeder, press this key to adjust the resolution for
faxing or copying (page 108). At any other time, press this key to select the
reception mode (the selected reception mode will appear in the display; page
37).
INK key
Press this key before installing or replacing the print cartridge to move the
print cartridge holder to the cartridge replacement position (page 23).
A Look at the Operation Panel
1
2
3
4
5
6
Page 12

10
Arrow keys
Use these keys to scroll through and select settings, and to search for autodial numbers (page 116).
FUNCTION key
Press this key followed by the arrow keys to select special functions and
settings.
Number keys
Use these keys to dial numbers, and enter numbers and letters when storing
auto-dial numbers.
REPEAT key
Press this key while listening to a message to play it again.
SKIP key
Press this key while listening to a message to skip to the next message.
DELETE key
Press this key to erase recorded messages.
SMS key
Press this key to send an SMS message, check received SMS messages,
and access SMS settings (page 73).
Intercom key
Press this key to page or locate the cordless handset (page 56).
DIGITAL SPEAKERPHONE key
Press this key to make a phone call using the speakerphone (speak facing the
operation panel at a distance of about 50 cm to 1m; page 120). This key can
also be used to listen to the line and fax tones through the speaker when
faxing a document (page 110).
This key also functions as a delete key when composing an SMS message.
STOP key
Press this key to cancel an operation before it is completed.
START/MEMORY key
Press this key after dialling to begin fax transmission (page 111). Press this
key before dialling to send a fax through memory (page 122). The key can
also be pressed in the date and time display to show the percentage of
memory currently used.
COPY/HELP/POLL key
When a document is in the feeder, press this key to make a copy of the
document (page 134). At any other time, press this key to print out the Help
List, a quick reference guide to the operation of your fax machine. This key
can also be used after dialling another fax machine to receive a document
(previously loaded in the other machine’s feeder) without assistance from the
operator of the other machine (polling, page 142).
11
10
9
8
7
12
13
14
15
16
17
18
Page 13
11
1. Installation
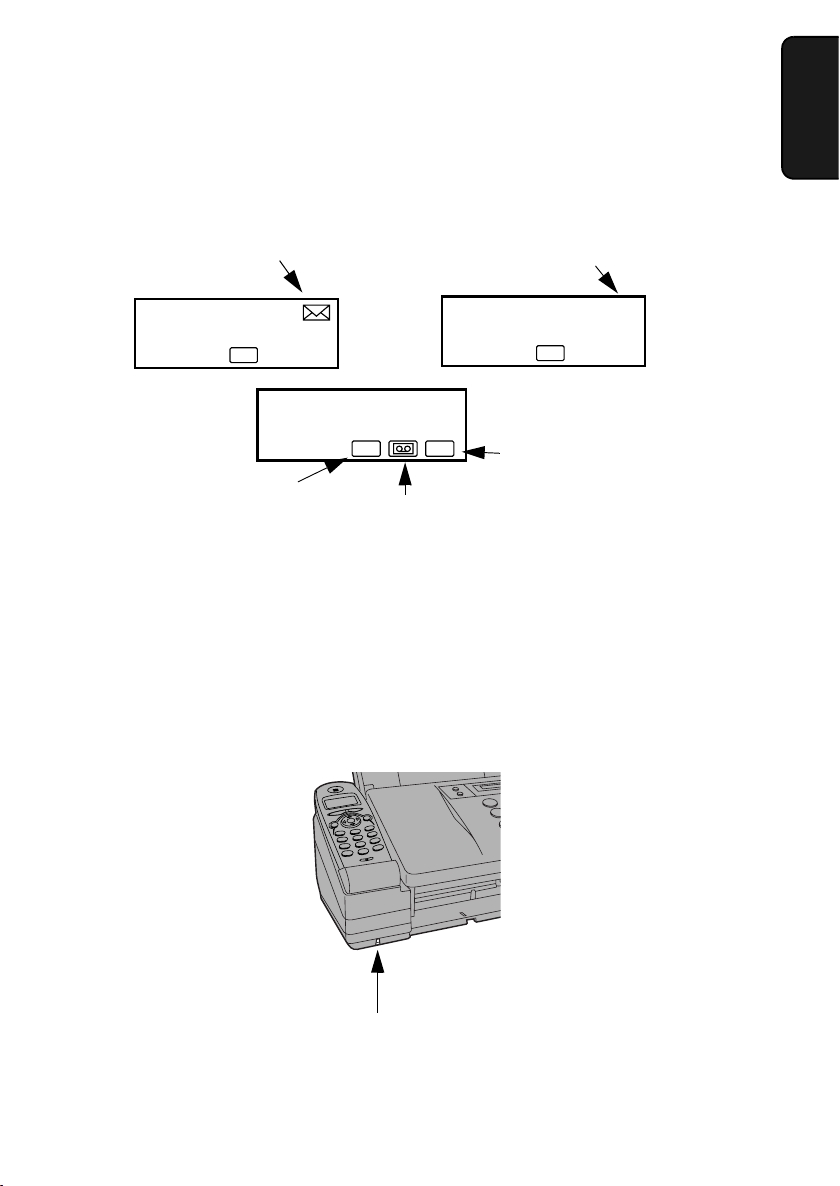
Icons in the display
This appears when
the reception mode
is set to TEL.
This appears when
the reception mode
is set to FAX.
This appears when the
reception mode is set
to A.M. (the answering
system is turned on).
Note: Both the TEL and FAX icons appear
when the reception mode is set to TEL/FAX.
The envelope icon
appears while an
SMS message is
being received.
The exclamation point icon appears when the
inbox is full. When checking the messages in
your outbox, this appears if the message
being viewed was not sent successfully.
TEL FAX
TEL
01-JAN 10:30
!
01-JAN 12:00
TEL
The microphone is located here. Speak facing this
location when using the speakerphone.
Microphone location
Page 14
12
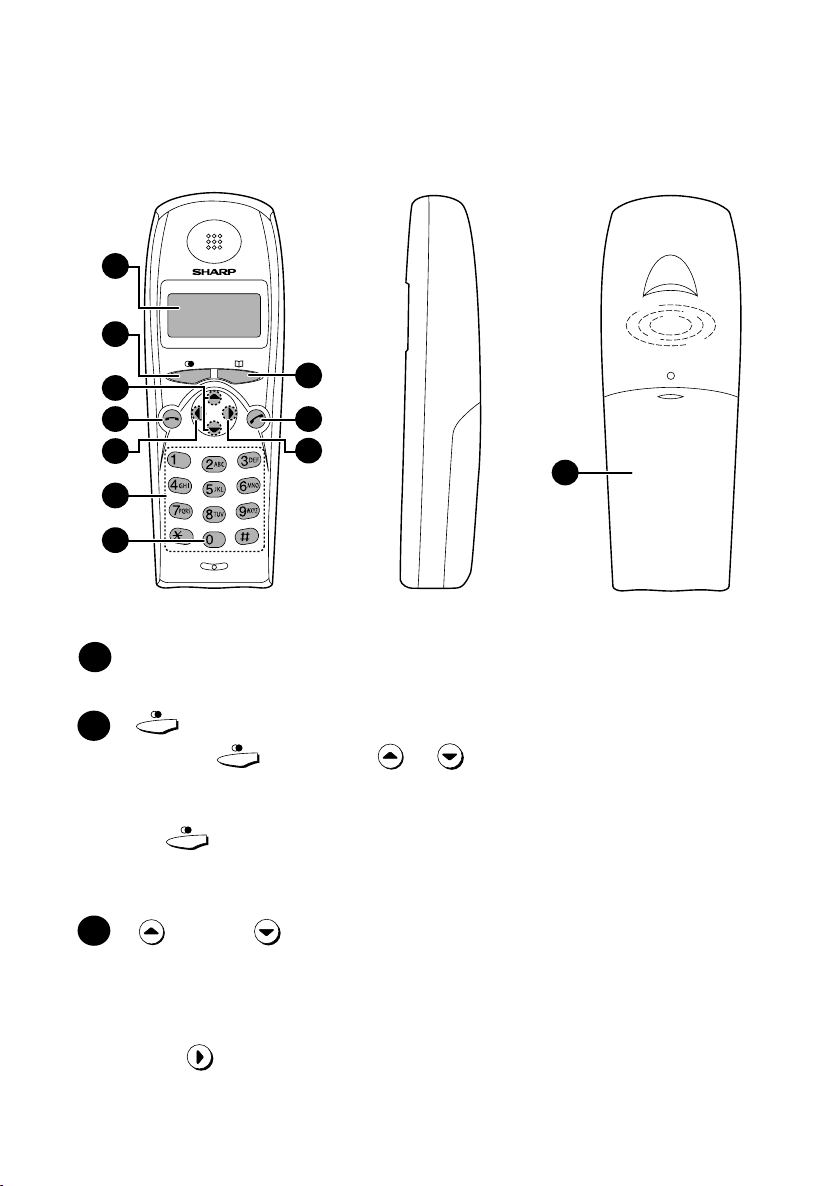
Cordless handset
1
2
4
6
7
5
8
3
9
10
11
Display
This displays messages and prompts to help you use the cordless handset.
key
Press the key and then or key to scroll through the most
recent calls made and received on the cordless handset (received calls will
only appear if you have Caller ID). If you have Caller ID, you can hold down
the key to access the Caller ID list in the fax machine. During a phone
conversation, this key can be pressed to issue a flash signal. If you are on a
flash-type PBX, this key can be used to dial out.
key and key
Receiver volume: When talking on the cordless handset, press these keys to
adjust the receiver volume.
Scroll through option settings: When not talking on the cordless handset,
press these keys to scroll through the option settings. To select a setting,
press .
1
2
3
Page 15
13
1. Installation
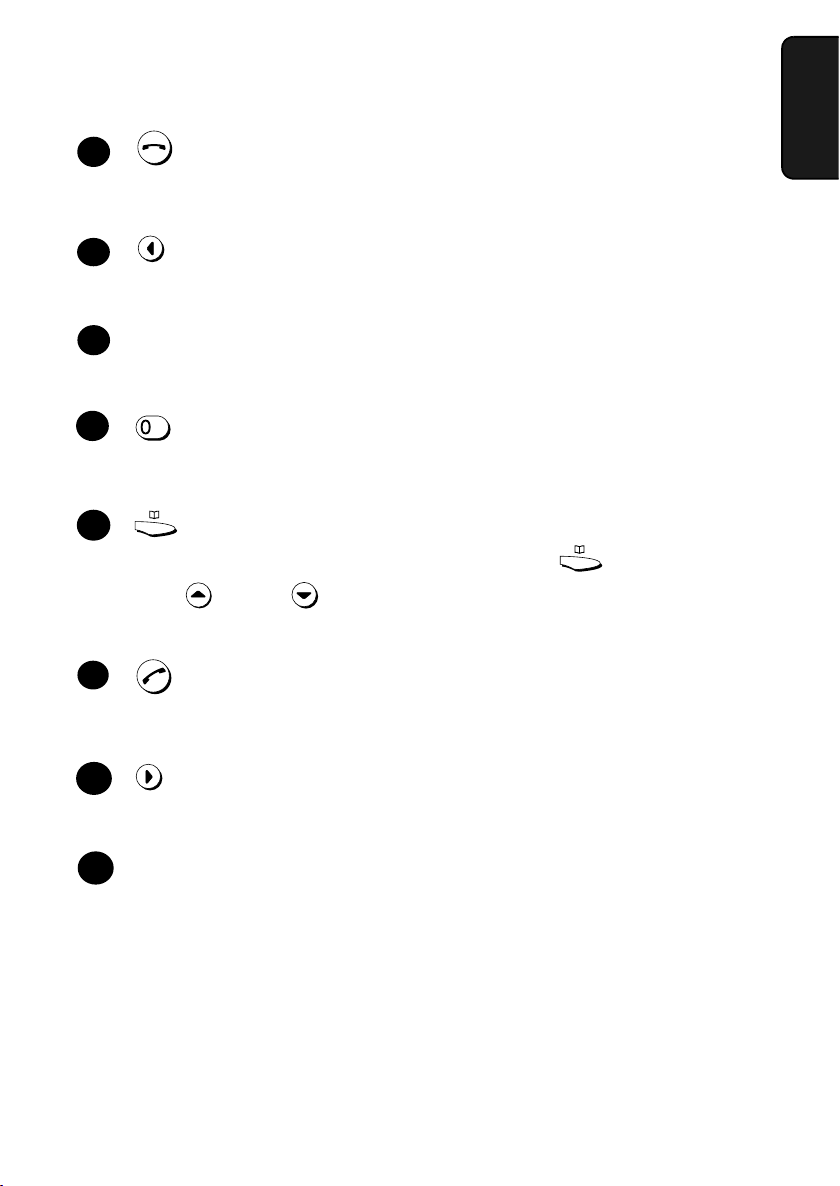
(OFF) key
Press this key to end a call. To turn off the power of the cordless handset, hold
down this key until the display goes blank.
key
Use this key to clear an entry, or to move back to the previous level in the
settings. Press this key during a call to put the other party on hold.
Number keys
Use these keys to dial numbers, and enter numbers and letters when storing
auto-dial numbers.
key
When entering an auto-dial number, hold this key down until a hyphen
appears to insert a pause between digits.
key
Use this key to search for an auto dial number (press key and then
press key and key to scroll through your auto-dial numbers). If you
hear a fax tone when you answer a call, press this key to begin fax reception.
(TALK) key
Press this key to make or answer a call. To turn on the power of the cordless
handset when it is off, hold down this key until the display turns on.
key
Press this to select settings and complete entries when programming
information in the cordless handset.
Battery cover
Remove this cover to install or replace the handset battery.
5
6
11
10
9
8
7
4
Page 16
14
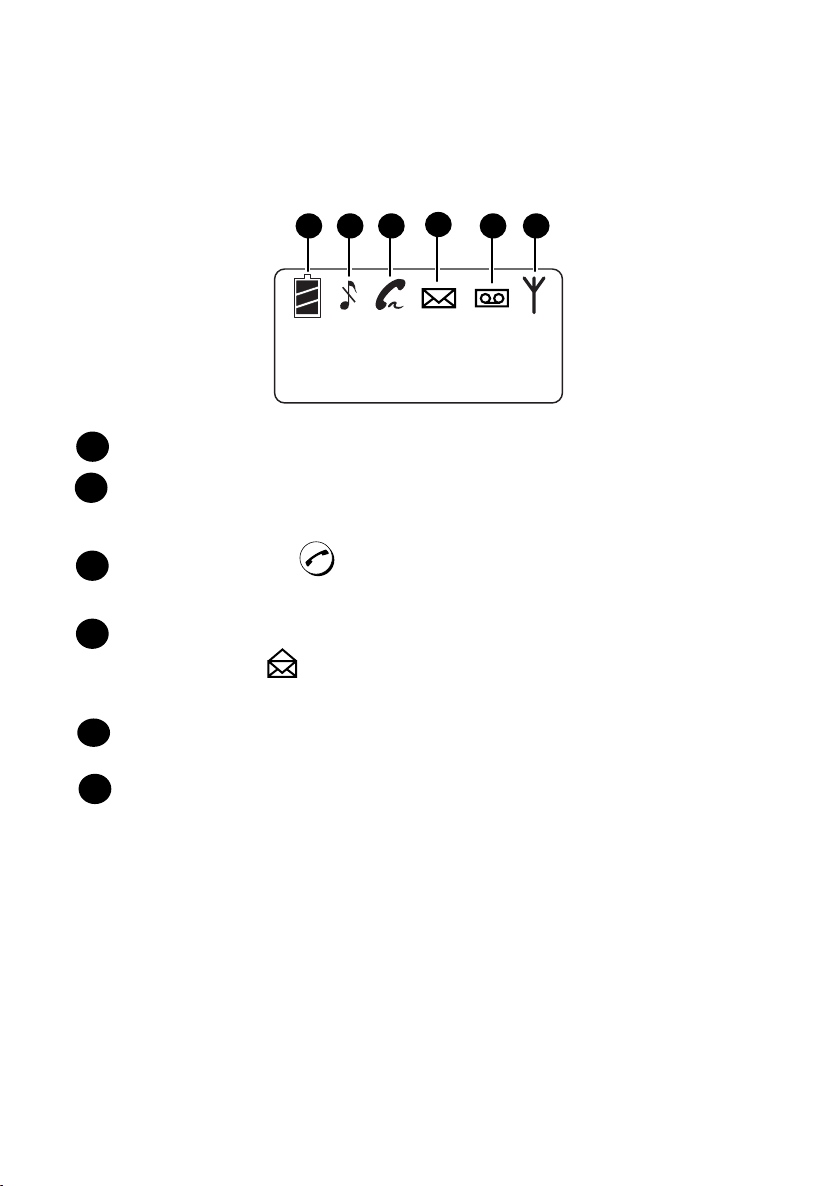
Icons in the cordless handset display
--1--
1 2 3 5 6
4
This indicates how much power is left in the batteries.
This indicates that the cordless handset ringer (and the beeps that sound
when keys are pressed) are turned off (silent ring).
This indicates when is pressed on the cordless handset, and blinks
when a call comes in.
This appears when a new SMS message has been received in the machine
(this changes to when all SMS messages have been read). Note that the
cordless handset cannot be used to read SMS messages.
This appears when new messages have been received in the fax machine’s
answering system.
This appears when the cordless handset and the fax machine are able to
communicate.
1
2
3
4
5
6
Page 17
15
1. Installation
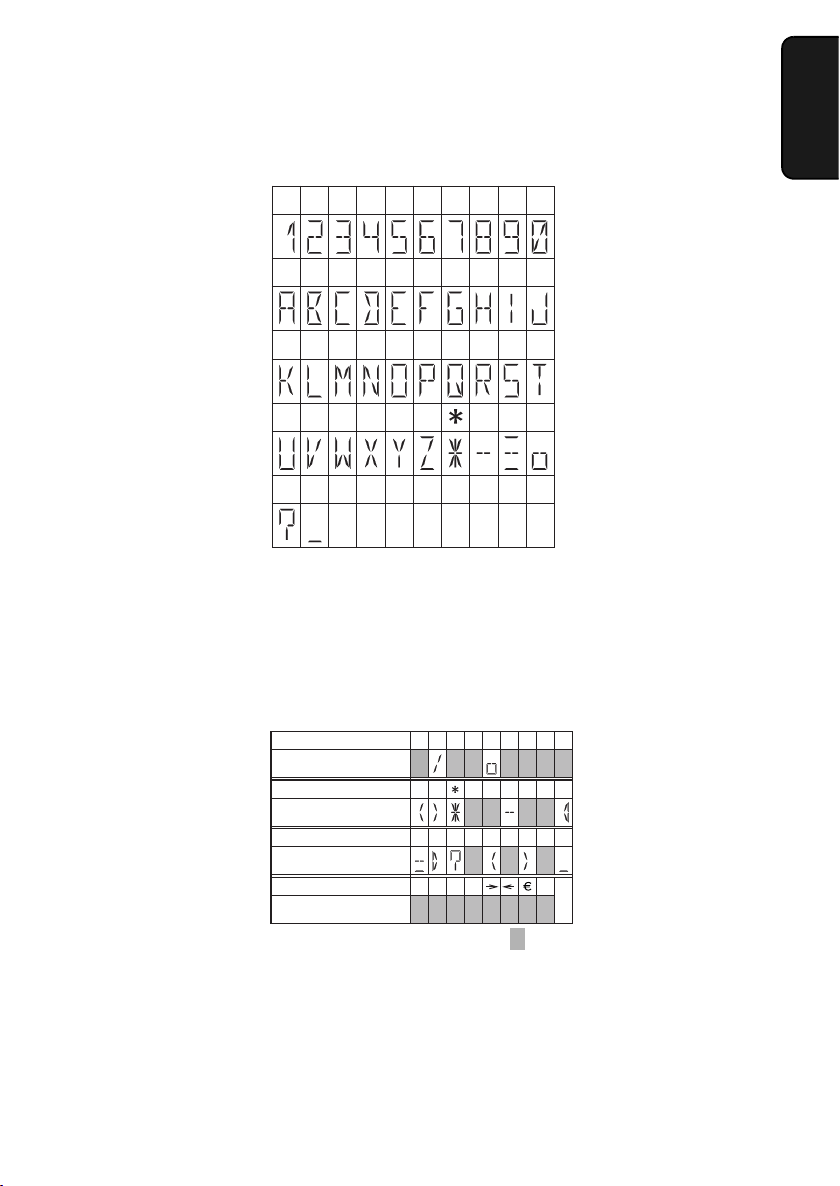
1234567890
ABCDEFGH I J
KLMNOPQRST
UVWX Y Z
-
pause
#
?_
. / ! ´´ # $ % &
Cordless handset
’
( ) +
, - :
Fax machine
Cordless handset
; <
= > ? @[¥
Fax machine
Cordless handset
]
ˆ
-
{ | }`
Fax machine
Cordless handset
:space
Fax machine
£
Note that lower case letters in the fax machine display will appear as upper
case letters in the cordless handset display, and a letter with an umlaut will
appear as a space.
In addition, the following characters appear differently in the fax machine and
cordless handset displays:
Characters that appear in the cordless handset display
Page 18
16
1. Installation
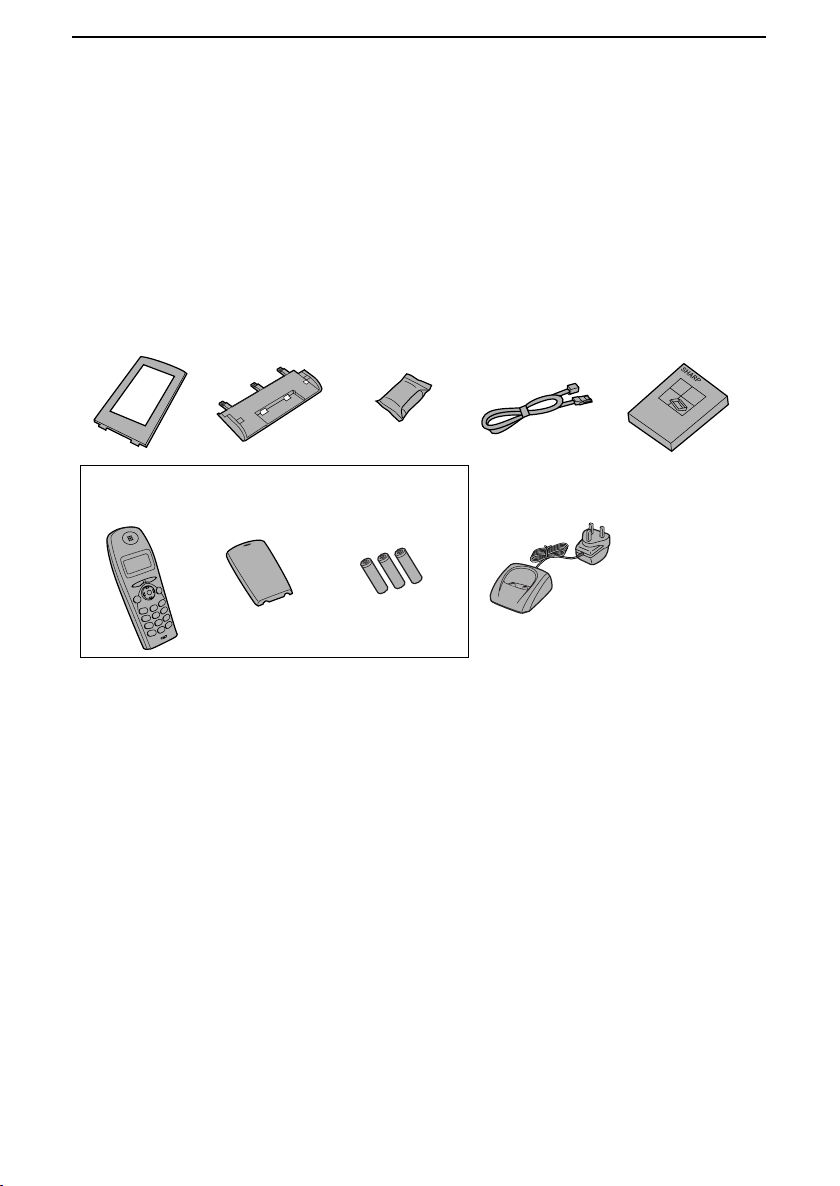
Unpacking Checklist
Before setting up, make sure you have all of the following items. If any are
missing, contact your dealer or retailer.
Operation
manual
Cordless
handset
Telephone
line cord
Print
cartridge
Paper tray
Paper tray
extension
Battery
cover
Rechargeable
batteries (3)
Cordless handset
charger (UX-BD90 only)
Note: The UX-BD90
comes with 2
cordless handsets
Page 19
Setting Up
17
1. Installation
Setting Up
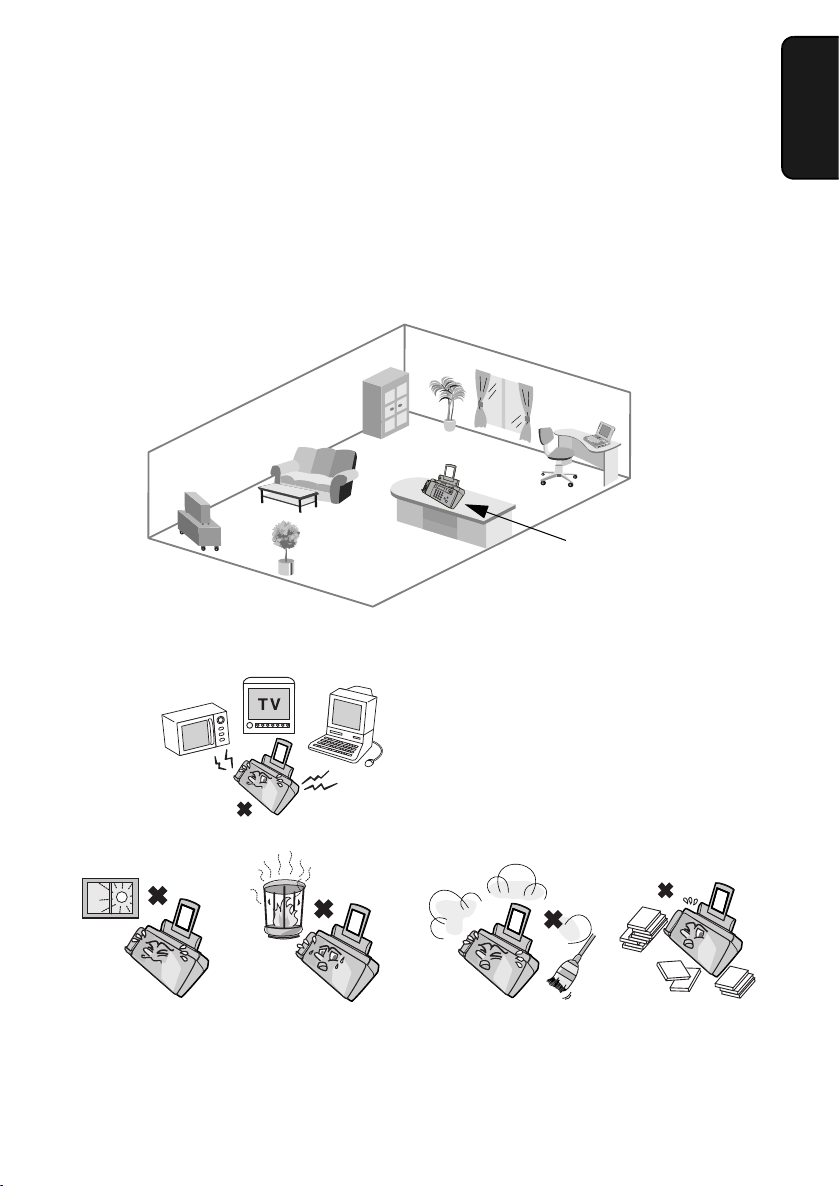
Selecting a location for the machine
To maximize the talking range of the cordless handset, install the fax machine
in a high and central location away from obstructions such as walls.
Keep the machine away from other
electrical appliances such as TVs,
microwave ovens, computers, and
other cordless phones.
High and central
location with no
obstructions
Do not place
the machine in
direct sunlight.
Do not place the
machine near heaters
or air conditioners.
Keep dust away
from the machine.
Keep the area
around the
machine clear.
Page 20
Setting Up
18
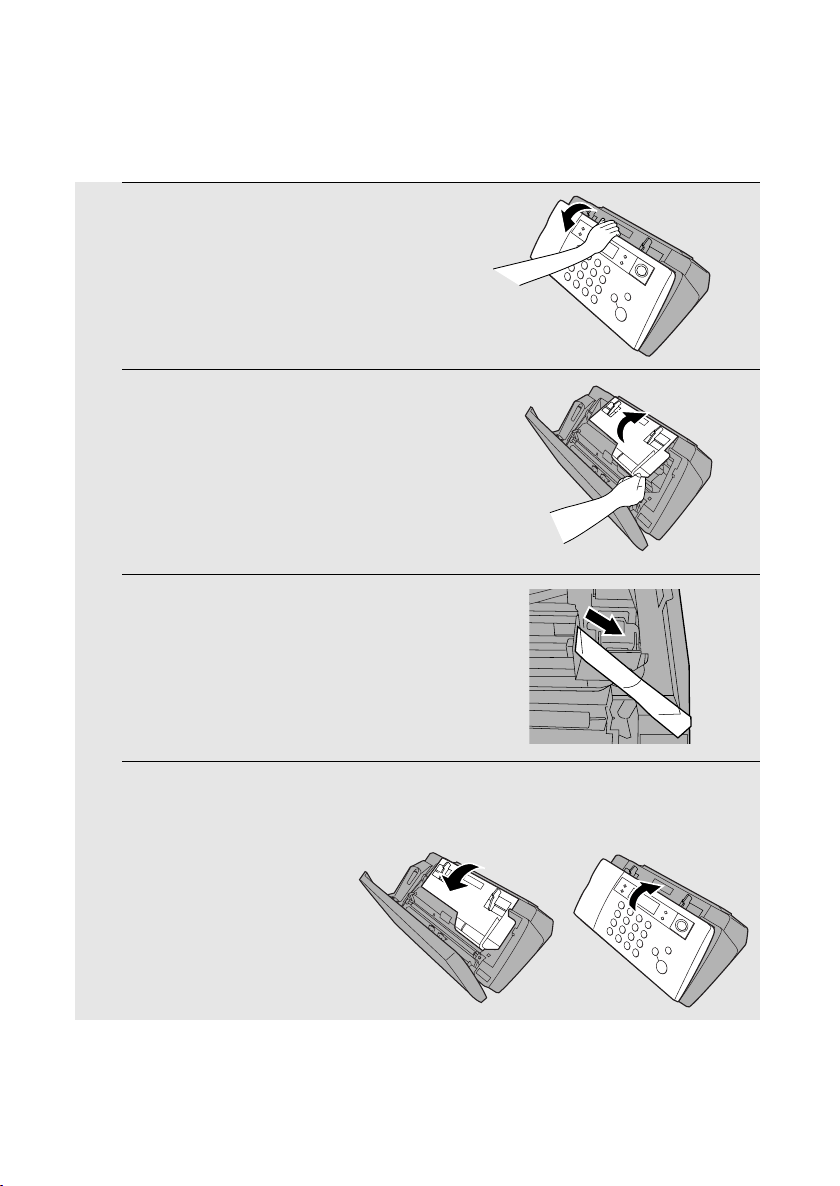
1
Open the operation panel.
2
Open the print compartment cover.
3
Remove the tape.
4
Close the print compartment cover and
then the operation panel.
Removing the packing tape
Page 21
Setting Up
19
1. Installation
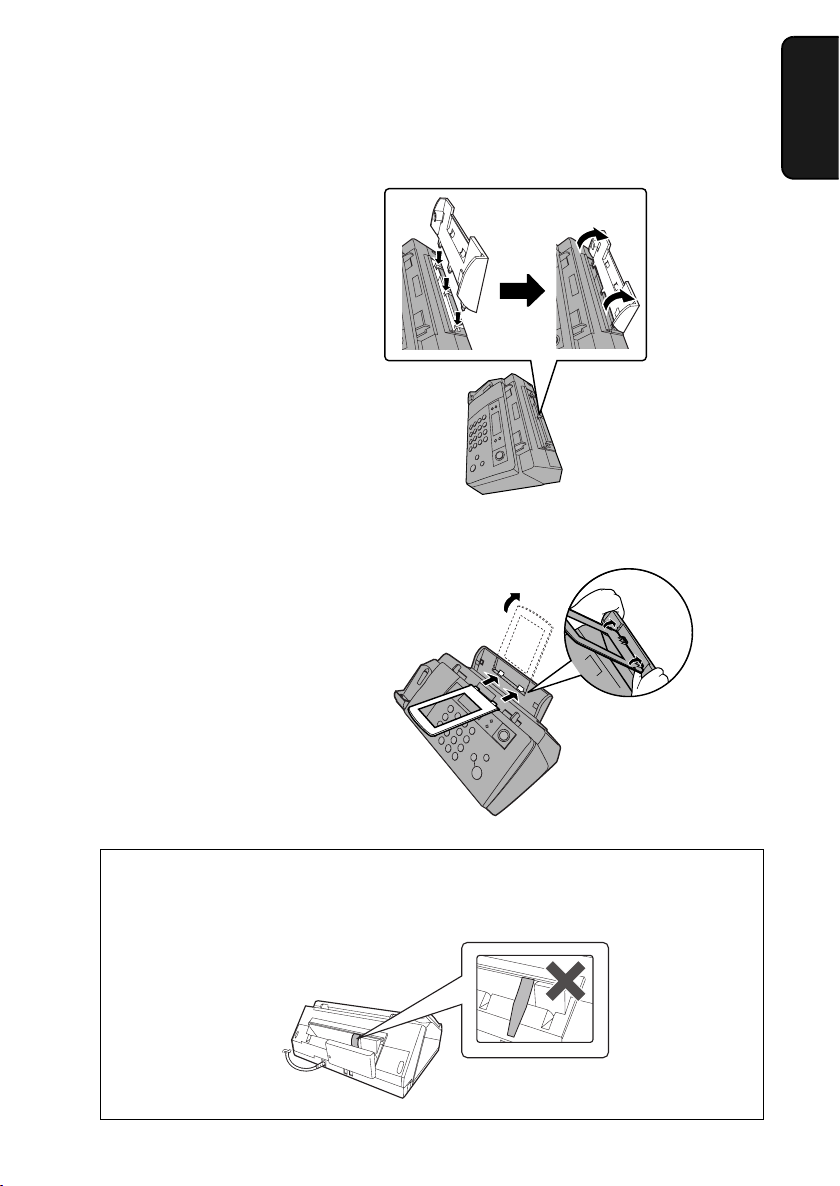
Attaching the paper tray
Attach the paper tray.
Attach the paper tray extension.
Click!
Note: The paper tray extension
has a top side and a bottom
side. If the tabs do not go into
the holes, turn the support over.
Insert
horizontally
and rotate up
Caution!
Do not pull out the black plastic strip shown below. If the strip is pulled out,
paper will not feed correctly.
Page 22
Loading Printing Paper
20
Loading Printing Paper
You can load up to 50 sheets of A4-size paper (60 - 80 g/m2) in the paper tray
(at room temperature; maximum stack height should not be higher than the
line on the tray).
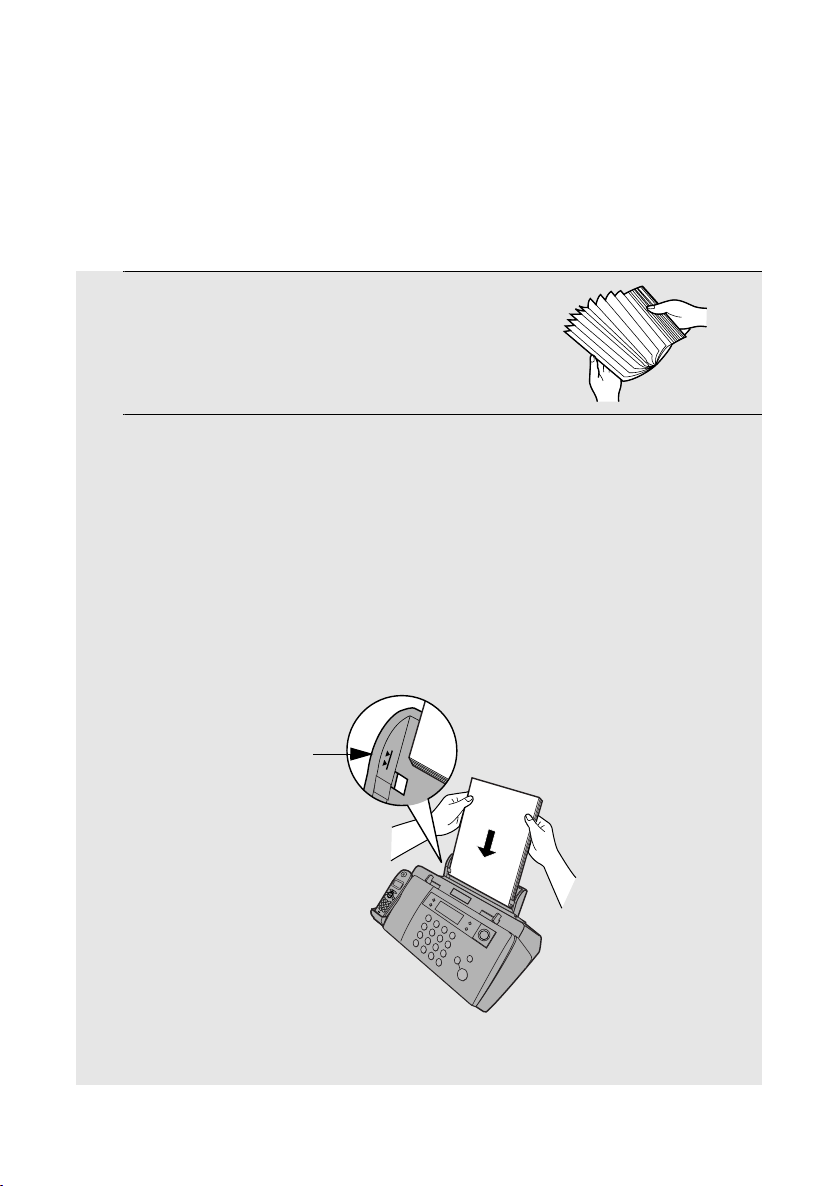
1
Fan the paper, and then tap the edge
against a flat surface to even the stack.
Make sure the stack edges are even.
2
Insert the stack of paper into the tray,
PRINT SIDE UP
.
• If paper remains in the tray, take it out and combine it into a single stack
with the new paper.
• Be sure to load the paper so that printing takes place on the print side of
the paper. Printing on the reverse side may result in poor print quality.
•
GENTLY LOAD PAPER INTO THE PAPER TRAY
.
•
DO NOT FORCE IT DOWN INTO THE FEED SLOT
.
Note: Do not use paper that has already been printed on, or paper that is curled.
The stack
should not
be higher
than this line
Page 23
Connecting the Power Cord
21
1. Installation
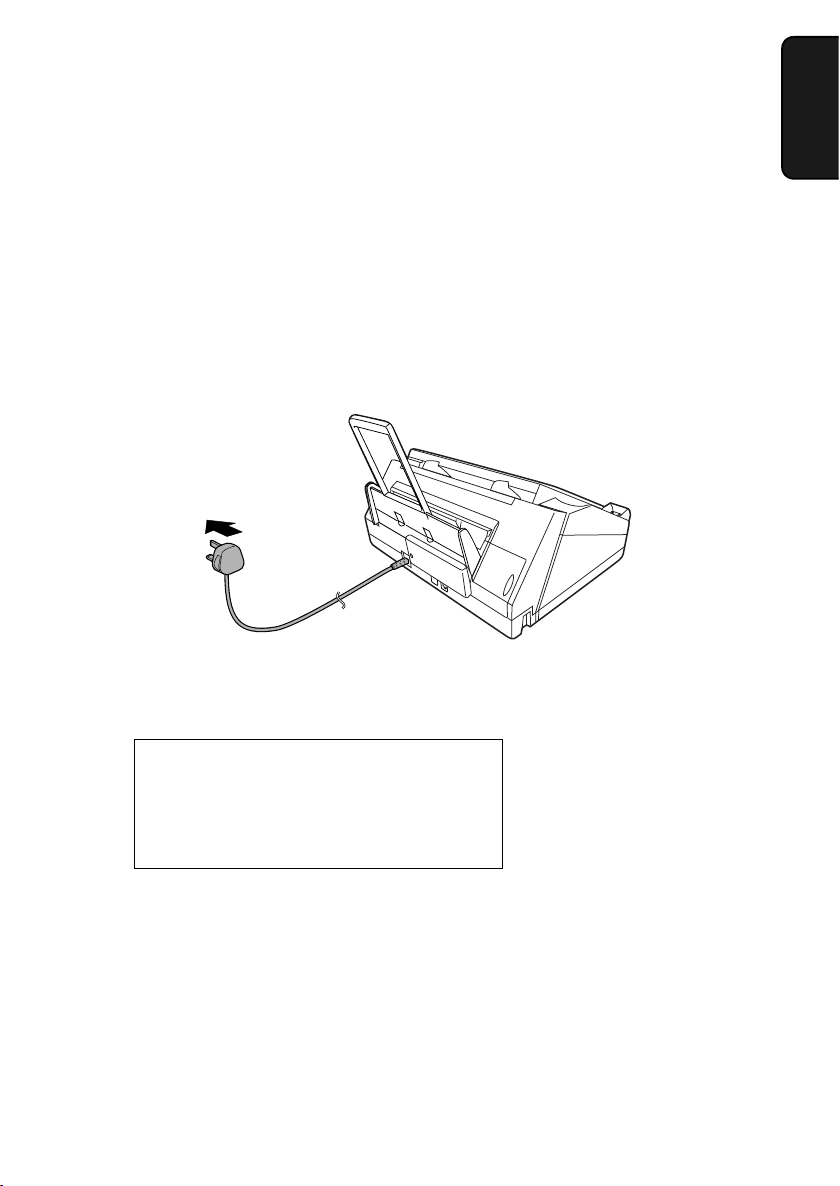
Connecting the Power Cord
Plug the power cord into a 230 V, 50 Hz, earthed (3-prong) outlet.
Caution!
♦ Make sure you have removed all of the packing tape before plugging
in the power cord (see page 18). Plugging in the power cord without doing
so may damage the machine.
♦ The power outlet must be installed near the equipment and must be easily
accessible.
Note: If your area experiences a high incidence of lightning or power surges,
we recommend that you install surge protectors for the power and telephone
lines. Surge protectors can be purchased at most telephone specialty stores.
“CHECK CARTRIDGE” normally appears
in the display the first time you plug in the
machine. This message appears until you
install the print cartridge.
The machine does not have a power on/off switch, so the power is turned on
and off by simply plugging in or unplugging the power cord.
About condensation
If the machine is moved from a cold to a warm place, it is possible that
condensation may form on the scanning glass, preventing proper scanning of
documents for transmission. To remove the condensation, turn on the power and
wait approximately two hours before using the machine.
Page 24

Installing the Print Cartridge
22
If PRINTER ERROR or PRINTER ERROR/CHECK PAPER appears...
In the event that the display shows either of the above messages, you must clear the
error before installing the print cartridge. The error can usually be cleared by pressing
, or if a paper jam has occurred, by removing the paper jam (see page 171).
Installing the Print Cartridge
Follow these steps to install or replace the print cartridge.
♦ When replacing the print cartridge, be sure to use a SHARP UX-C70B
cartridge.
Print cartridge yield (at 4% coverage)
Initial cartridge
Quality mode OFF:
Approx. 300 A4 pages
Quality mode ON: Approx. 200 A4 pages
Replacement cartridge (SHARP UX-C70B)
Quality mode OFF: Approx. 600 A4 pages
Quality mode ON: Approx. 400 A4 pages
Quality mode is initially turned off. To turn on Quality mode, see page 27.
Caution!
Do not open the print compartment cover or insert your hand in the machine
while it is printing.
Note: Keep print cartridges sealed in their packages until you are ready to
install them. It is recommended that you do not use a cartridge that has been
left unused for a long time after opening, as the print quality may be
considerably degraded.
♦ Make sure the machine’s power cord is plugged in and paper is loaded
before installing or replacing the print cartridge.
♦ If a document is inserted in the feeder, remove the document before
installing or replacing the print cartridge (see page 106).
Page 25
Installing the Print Cartridge
23
1. Installation
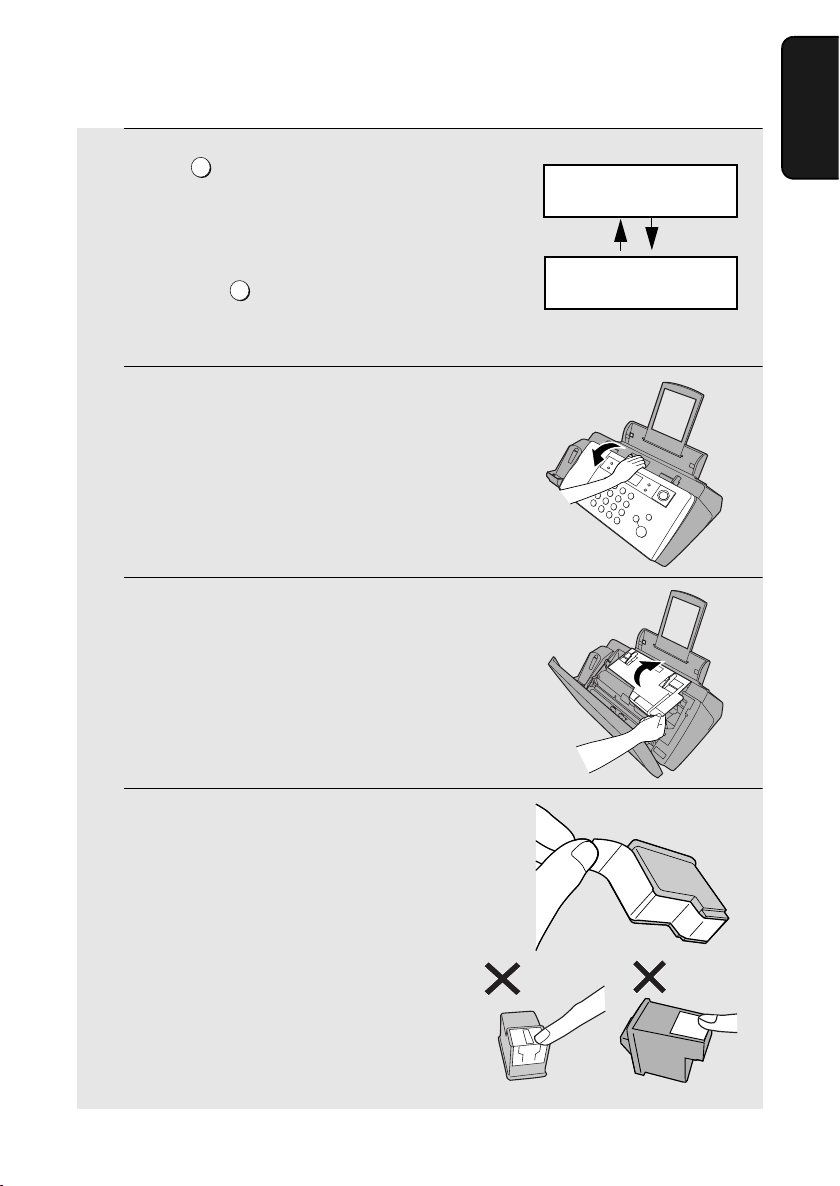
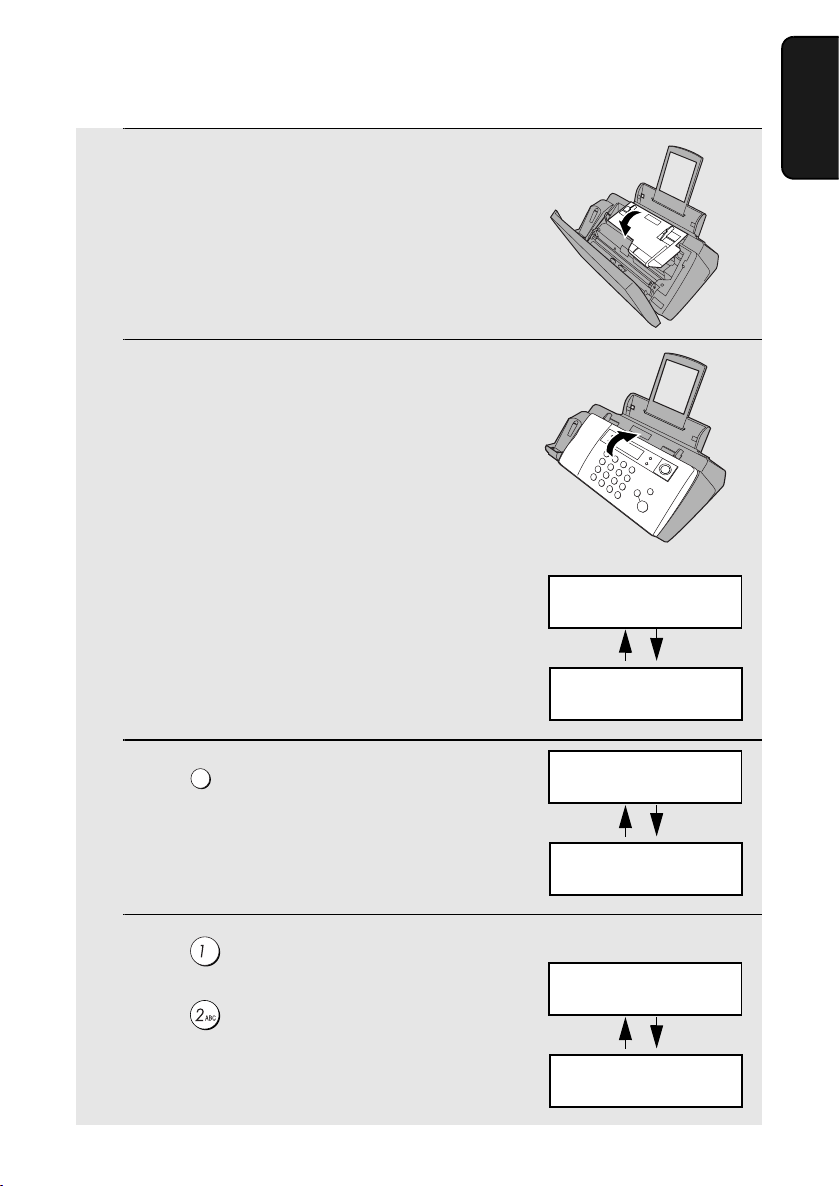
1
Press .
• Make sure the cordless handset is not
in use. If the cordless handset is in use,
pressing will have no effect.
• The print cartridge holder moves to the cartridge replacement position.
2
Open the operation panel.
3
Open the print compartment cover.
4
Remove
only
the tape from the new
cartridge.
• Important: Make sure you remove all
of the tape.
• CAUTION! DO NOT touch the gold
contact area on the cartridge.
INK
INK
Display:
29-MAY 12:00
PRESS INK KEY
29-MAY 12:00
REPLACE INK &
Page 26
Installing the Print Cartridge
24
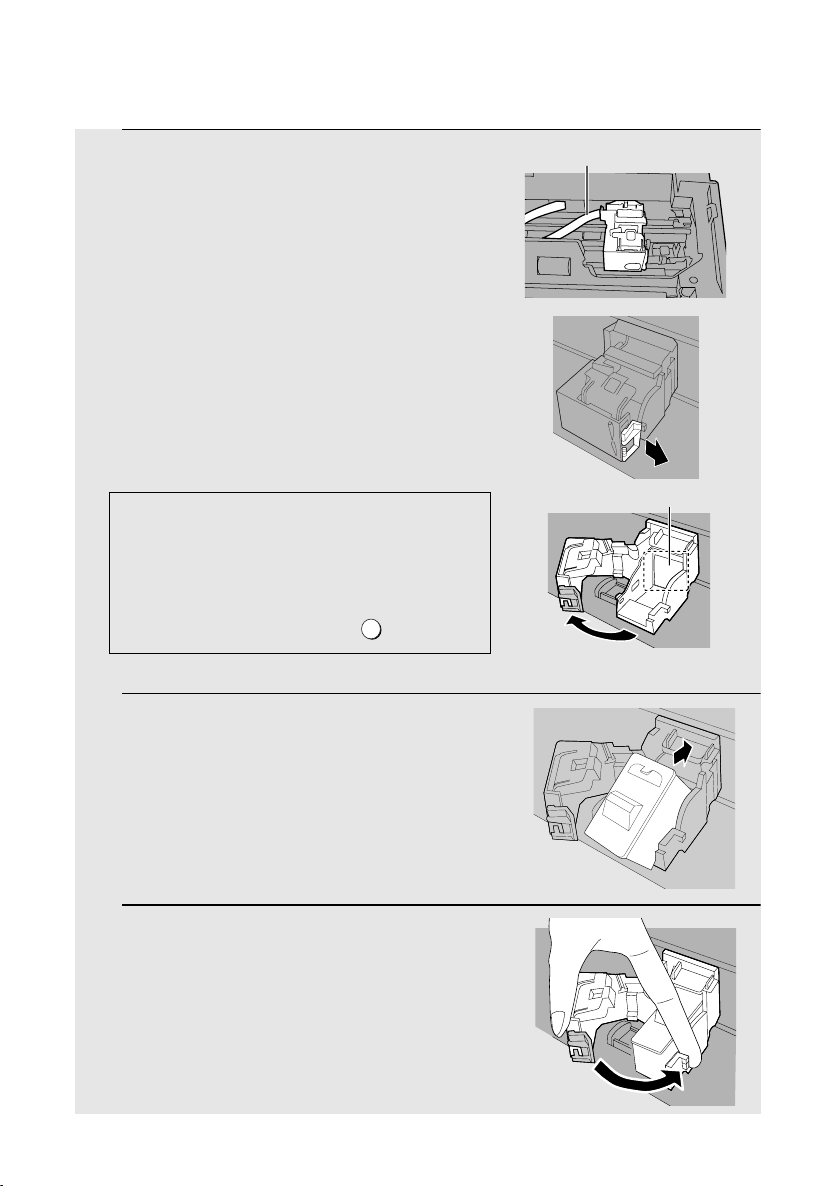
5
Make sure the cartridge holder has
moved slightly away from the right side
of the compartment, and then pull the
green lever and open the cartridge
holder cover.
• If you are replacing the cartridge,
remove the old cartridge. If you are
going to use the old cartridge again,
place it in an air-tight container.
• CAUTION! DO NOT touch the contact
area inside the cartridge holder, or pull
on the cable that is connected to the
cartridge holder.
6
Insert the new print cartridge into the
cartridge holder.
7
Place your index finger on the tab as
shown and close the cartridge holder
cover with your thumb. Make sure the
cover clicks into place.
Gold contact area
Note: If the print compartment cover is left open
for approximately 30 minutes with a cartridge
installed, the cartridge will automatically return
to its home position. To make the cartridge
return to the cartridge replacement position
when this has happened, press .
INK
Cable
Page 27
Installing the Print Cartridge
25
1. Installation
8
Close the print compartment cover.
9
Close the operation panel, pressing
down firmly to make sure it clicks into
place.
10
Press to make the print cartridge
holder return to its home position.
11
Press (NEW) if the cartridge you
installed is new.
Press (OLD) if the cartridge you
installed is old.
INK
Display when “NEW”
is selected:
Display:
29-MAY 12:00
PRESS INK KEY
29-MAY 12:00
REPLACE INK &
29-MAY 12:00
1=NEW, 2=OLD
29-MAY 12:00
CHANGE CARTRIDGE
29-MAY 12:00
OK: PRESS START
29-MAY 12:00
NEW CART. OK?
Page 28
Installing the Print Cartridge
26
12
Press .
If you selected “OLD” in the previous
step, this completes the installation
procedure. (Note: If you find that print
quality is not satisfactory after
reinstalling the old cartridge, align the
cartridge as explained on page 151.)
If you selected “NEW”, the display will
show the alternating messages at
right. Continue with the following steps
to align the print cartridge.
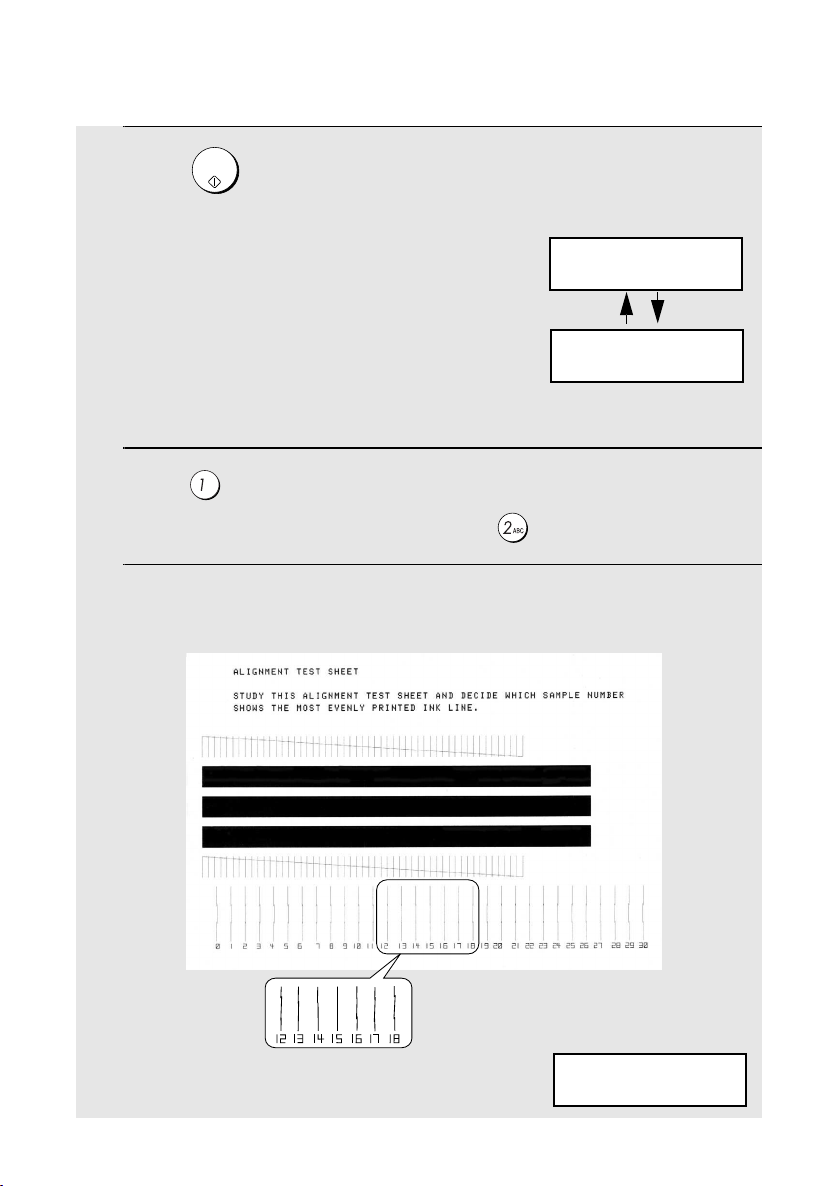
13
Press to print an alignment page. (To enter an alignment value
without printing an alignment page, press .)
14
In the alignment page that the machine prints, locate the line that comes
closest to forming a completely straight line.
START/
MEMORY
In this example, “15” comes
closest to forming a straight line.
After the alignment page is
printed, the display shows:
29-MAY 12:00
ENTER (0-30) 15
Display when “NEW”
is selected:
29-MAY 12:00
1=PRINT, 2=SET
29-MAY 12:00
ALIGN CARTRIDGE
Page 29
Installing the Print Cartridge
27
1. Installation
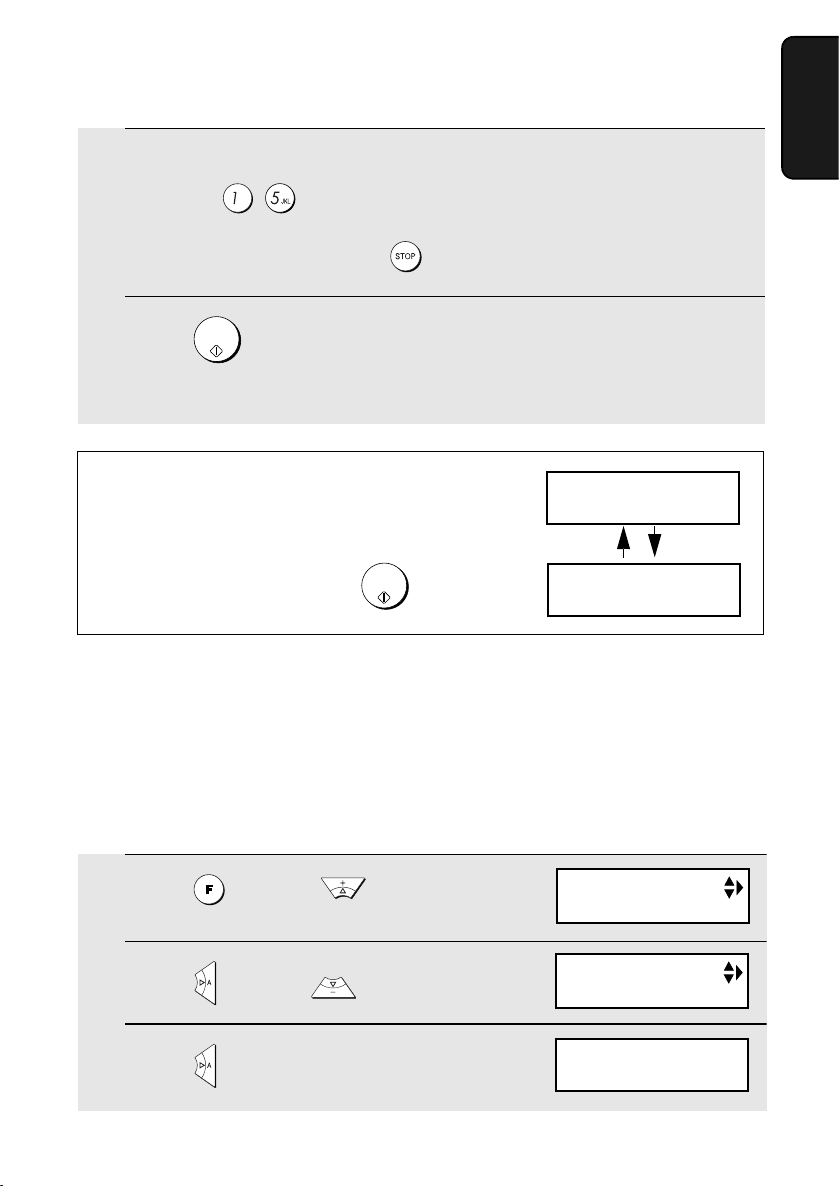
15
Press the number keys to enter the number of the straightest line.
Example:
• If you make a mistake, press and then repeat the entry.
16
Press .
• This completes the alignment procedure.
START/
MEMORY
Note: If at any time the display shows the
alternating messages at right, check the printing
paper. If the tray is empty, add paper. If there is
paper in the tray, take it out and then reinsert it.
When you are finished, press .
START/
MEMORY
Quality mode (using more/less ink)
If you prefer a higher quality image when printing faxes and copies, turn on
Quality mode. If you wish to use less ink or speed up ink drying time, turn off
Quality mode.
♦ Quality mode is initially turned off.
1
Press once and 3 times.
2
Press once and twice.
3
Press once.
29-MAY 12:00
PRESS START KEY
29-MAY 12:00
ADD PAPER &
Display:
PRINT SET-UP
QUALITY MODE
QUALITY MODE
1=ON, 2=OFF
Page 30
Installing the Print Cartridge
28
4
Press to turn on Quality mode, or
to turn it off.
5
Press to return to the date and time display.
The display briefly shows
your selection, then:
High-quality fax print setting (fast/slow printing of faxes)
The high-quality fax print setting controls the speed at which faxes are printed.
If you prefer a higher quality image at a slower printing speed, turn on this
setting. If you prefer a faster printing speed over image quality, turn off the
setting.
Important: This setting is only effective when Quality mode (page 27) is
turned on.
Note: This setting only affects the printing speed. It does not affect the
amount of ink used.
♦ The high-quality fax print setting is initially turned on.
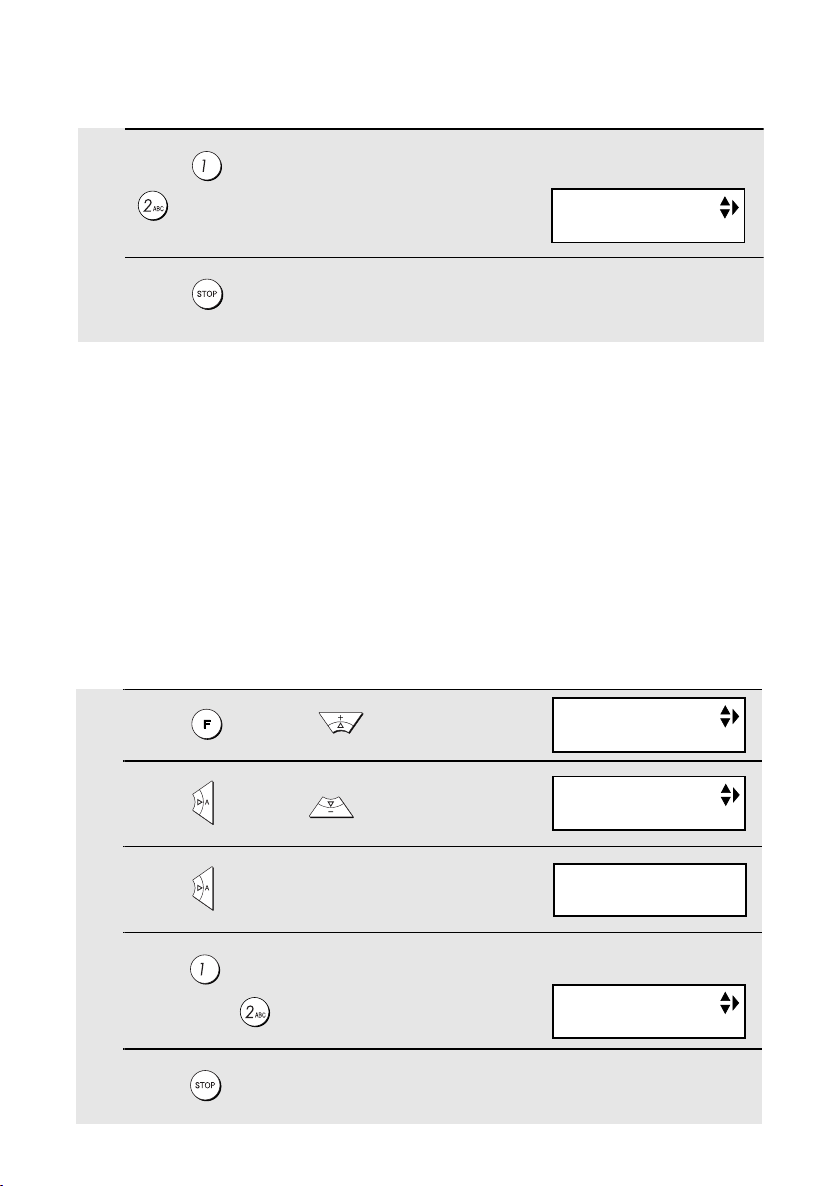
1
Press once and 3 times.
2
Press once and 3 times.
3
Press once.
4
Press (YES) to turn on high quality
fax print, or (NO) to turn it off.
5
Press to return to the date and time display.
The display briefly shows
your selection, then:
Display:
HQ FAX PRINT
HQ FAX PRINT
1=YES, 2=NO
HQ FAX PRINT
PRINT SET-UP
HQ COPY
Page 31

Connecting the Telephone Line Cord
29
1. Installation
Connecting the Telephone Line Cord
Insert one end of the line cord into the socket on the back of the machine
marked TEL. LINE. Insert the other end into a wall telephone socket.
Extension phone (optional)
If desired, you can connect an extension phone to the TEL. SET socket on the
fax machine.
1
Remove the seal covering the TEL. SET socket.
TEL.SET
TEL.LINE
Page 32

Setting Up the Cordless Handset
30
Setting Up the Cordless Handset
Installing the batteries and charging the cordless handset
♦ Be sure to read the battery precautions on page 5.
1
Insert the batteries into the cordless handset, making sure that the “+”
and “-” sides are placed correctly.
+-+
-+-
2
Connect the extension phone line to the TEL. SET socket using an
appropriate adapter (please purchase an adapter separately).
• Eire: Insert the extension phone line directly into the TEL. SET socket.
TEL.LINE
TEL.SET
Page 33

Setting Up the Cordless Handset
31
1. Installation
1
Connect the battery connector ➊
2
Place the battery cover on the cordless
handset, making sure it snaps firmly
into place.
3
Place the cordless handset in the
cradle on the machine with the dial pad
facing up.
• Important! The dial pad must face up,
or the batteries will not charge.
• The batteries charge automatically
while the cordless handset is in the
cradle. While charging, the display
shows:
When charging is finished, the battery
icon appears full:
♦ The cordless handset may feel warm while charging. This is normal.
♦ The batteries cannot be overcharged. When not using the cordless
handset, keep it in the cradle to ensure that it is always charged.
♦ When the batteries need charging, will blink in the display and you will
hear beeps during a phone conversation. If you need to continue the
conversation, transfer the call to the machine or to another cordless
handset (see page 57). Place the cordless handset in the cradle and let it
charge.
Note: If the batteries are extremely low, nothing may appear in the display
during the first several minutes that the cordless handset is in the cradle. The
battery will begin to charge normally after several minutes.
♦ To ensure that the battery charges properly, wipe the charger contacts once
a month with a cotton swab.
Charge the batteries
for at least 12 hours
the first time!
Page 34

Setting Up the Cordless Handset
32
Reinforced concreteMetalAluminum sash
Talking range
The talking range of the cordless handset is approximately 200 m (line of
sight; talking range may decrease depending on transmission conditions). If
you hear noise or interference while talking on the cordless handset, move
closer to the fax machine.
Large metal objects,
metal structures, and
thick walls reduce the
talking range.
Using the cordless handset charger (on models with a
second cordless handset)
If your model includes a charger and a second cordless handset, install the
batteries in the second cordless handset as explained in the previous section
and then use the charger to charge the second cordless handset as explained
below.
1
Plug the AC adapter into a standard
230 V AC outlet.
• Important: Never cover the charger
and AC adapter with a blanket, cloth, or
other material. Excessive heating may
result and cause fire.
2
Place the cordless handset in the
charger with the dial pad facing
forward.
• Important! The dial pad must face
forward, or the batteries will not charge.
• See Step 3 in the previous section for
information on charging.
Page 35

Entering Your Name and Fax Number
33
1. Installation
Entering Your Name and Fax Number
Before you begin sending faxes, enter your name and fax (telephone) number.
You also need to set the date and time as explained in the following section.
Once you enter this information, it will automatically appear at the top of each
fax page you send.
1
Press once and 3 times.
2
Press once.
3
Press once.
4
Enter your fax number by pressing the number keys (max. 20 digits).
• To insert a space between digits, press . To enter “+”, press .
• To clear a mistake, press .
DIGITAL
SPEAKERPHONE
Display:
Z
A
REC/MEMO
DELETEREPEAT
SKIP
INK
POLL
RESOLUTION/
RECEPTION
PLAY/HOLD
R
DIGITAL
SPEAKERPHONE
START/
MEMORY
ENTRY MODE
OWN NUMBER SET
ENTER TEL/FAX #
Page 36

Entering Your Name and Fax Number
34
5
Press .
6
Enter your name by pressing number keys for each letter as shown in
the chart below. Up to 24 characters can be entered.
Example: SHARP = 7777 44 2 777 7
♦ To enter two letters in succession that require the same key, press after
entering the first letter.
♦ To clear a mistake, press .
♦ To enter a lower case letter, continue pressing the key for the letter until the
lower case letter appears. To enter one of the following symbols, press
or repeatedly:
7
Press .
8
Press to return to the date and time display.
START/
MEMORY
DIGITAL
SPEAKERPHONE
START/
MEMORY
Display:
A =
B =
C =
D =
E =
F =
G =
H =
I =
J =
K =
L =
M =
N =
O =
P =
Q =
R =
S =
T =
U =
V =
W =
X =
Y =
Z =
SPACE =
DATE&TIME SET
Page 37

Setting the Date and Time
35
1. Installation
Setting the Date and Time
The date and time appear in the display and are printed at the top of every
page you fax. Set the date and time as shown below.
1
Press once and 3 times.
2
Press once and once.
3
Press once.
4
Enter a two-digit number for the day (“01” to “31”).
Example: the 5
th
• To correct a mistake, press to move the cursor back to the mistake and
then enter the correct number.
Z
A
REC/MEMO
DELETEREPEAT
SKIP
INK
POLL
RESOLUTION/
RECEPTION
PLAY/HOLD
R
DIGITAL
SPEAKERPHONE
START/
MEMORY
DATE&TIME SET
Display:
ENTRY MODE
The currently set date
appears (example):
DATE&TIME SET
DATE 15-08-2004
DATE&TIME SET
DATE 05-08-2004
Page 38

Setting the Date and Time
36
5
Enter a two-digit number for the month (“01” for January, “02” for
February, “12” for December, etc.).
Example: January
6
Enter the year (four digits).
Example: 2004
7
Enter a two-digit number for the hour (“00” to “23”) and a two-digit
number for the minute (“00” to “59”).
Example: 9:25
8
Press to start the clock.
9
Press to return to the date and time display.
START/
MEMORY
The currently set time
appears (example):
DATE&TIME SET
DATE 05-01-2004
DATE & TIME SET
TIME 12:19
05-JAN 09:25
PRESS START KEY
ANTI JUNK #
Page 39

Setting the Reception Mode
37
1. Installation
Setting the Reception Mode
The machine has four modes for receiving incoming faxes.
Note: SMS messages can be received in any of the reception modes.
FAX mode:
Select this mode when you only want to receive faxes on your line. The fax
machine will automatically answer all calls and receive incoming faxes.
TEL mode:
This mode is the most convenient for receiving phone calls. Faxes can also be
received; however, all calls must first be answered by pressing on the
machine or by answering on the cordless handset.
TEL/FAX mode:
This mode is convenient for receiving both faxes and voice calls. When a call
comes in, the machine will detect whether it is a voice call (including manually
dialled faxes), or an automatically dialled fax. If it is a voice call, the machine
will make a special ringing sound to alert you to answer. If it is an
automatically dialled fax, reception will begin automatically.
A.M. mode ( ):
Select this mode when you go out and want the built-in answering machine to
answer all calls. Voice messages will be recorded, and fax messages will be
received automatically. (Note: A.M. mode cannot be selected unless an
outgoing message has been recorded as explained on page 86.)
DIGITAL
SPEAKERPHONE
Page 40

Setting the Reception Mode
38
For more information on receiving faxes in FAX, TEL and TEL/FAX modes,
see Chapter 6. For more information on using A.M. mode, see Chapter 4.
Setting the reception mode
Make sure a document
is not loaded in the document feeder
, and then
press until the desired mode appears in the display.
RESOLUTION/
RECEPTION
Z
A
POLL
RESOLUTION/
RECEPTION
PLAY/HOLD
R
DIGITAL
SPEAKERPHONE
REC/MEMO
DELETEREPEAT
SKIP
INK
RESOLUTION/
RECEPTION
RESOLUTION/
RECEPTION
02-JAN 10:30
02-JAN 10:30
02-JAN 10:30
02-JAN 10:30
FAX
TEL FAX
TEL
Page 41

Flash Select Setting for PBX
39
1. Installation
Flash Select Setting for PBX
Note: This setting is normally only used in Germany. In other countries, you
can try changing the setting if you encounter difficulty with the default setting.
If your fax machine is connected to a PBX and the PBX uses the “Flash”
method to connect to an outside line, you must select the appropriate Flash
Select setting depending on whether your PBX line is a normal telephone line
or a high-speed line.
1
Press once and 4 times.
2
Press once and 4 times.
3
Press once.
4
Select (SHORT TIME) if your PBX
line is a normal telephone line.
Select (LONG TIME) if your PBX
line is a high-speed line.
5
Press to return to the date and time display.
The display briefly shows
your selection, then:
Display:
OPTION SETTING
FLASH SELECT
FLASH SELECT
1: SHORT TIME
FAX SIGNAL RX
Page 42

Volume Adjustment (on the Machine)
40
Volume Adjustment (on the Machine)
You can adjust the volume of the speaker and ringer on the machine using the
up and down arrow keys.
Note: To adjust the volume of the cordless handset receiver, see page 46. To
adjust the volume of the cordless handset ringer, see page 60.
1
Press .
2
Press or to select the
desired volume level.
• Press again to turn off the
speaker.
DIGITAL
SPEAKERPHONE
DIGITAL
SPEAKERPHONE
Speaker
Z
A
POLL
RESOLUTION/
RECEPTION
PLAY/HOLD
R
DIGITAL
SPEAKERPHONE
REC/MEMO
DELETEREPEAT
SKIP
INK
DIGITAL
SPEAKERPHONE
Page 43

Volume Adjustment (on the Machine)
41
1. Installation
1
Press or to select the
desired volume level.
(Make sure has not been
pressed and a document is not loaded
in the feeder.)
• The ringer will ring once at the selected
level.
2
If you selected RINGER: OFF OK ? to
turn off the ringer, press .
DIGITAL
SPEAKERPHONE
START/
MEMORY
Machine ringer
Display:
29-MAY 12:00
RINGER: HIGH
29-MAY 12:00
RINGER: MIDDLE
29-MAY 12:00
RINGER: LOW
29-MAY 12:00
RINGER: OFF OK ?
Page 44

Volume Adjustment (on the Machine)
42
Error beep off
The machine normally sounds three beeps to alert you when an error occurs
during transmission, reception, or copying. The machine also sounds a
double-beep when you press an invalid key on the operation panel. If you wish
to turn off the error beep, follow the steps below.
1
Press once and 4 times.
2
Press once and 3 times.
3
Press once.
4
Press to turn on the error beep or
to turn off the error beep.
5
Press to return to the date and time display.
The display briefly shows
your selection, then:
End beep off
The fax machine normally sounds one long beep when transmission,
reception, or copying ends normally (for an SMS message, the end beep only
sounds when a message is received, not when a message is sent). If you
wish to turn off the end beep, follow the steps below.
1
Press once and 4 times.
2
Press once and twice.
Display:
OPTION SETTING
ERROR BEEP
ERROR BEEP
1=YES, 2=NO
END BEEP
Display:
OPTION SETTING
END BEEP
Page 45

Volume Adjustment (on the Machine)
43
1. Installation
3
Press once.
4
Press to turn on the end beep or
to turn off the end beep.
5
Press to return to the date and time display.
The display briefly shows
your selection, then:
Key tone off
The fax machine normally sounds a beep (key tone) each time you press a
key on the operation panel. If you wish to turn off the key tone, follow the steps
below.
1
Press once and 4 times.
2
Press once and once.
3
Press once.
4
Press to turn on the key tone or
to turn off the key tone.
5
Press to return to the date and time display.
The display briefly shows
your selection, then:
END BEEP
1=YES, 2=NO
KEY TONE
Display:
OPTION SETTING
KEY TONE
KEY TONE
1=YES, 2=NO
FINE PRIORITY
Page 46

44
2. Using the Cordless Handset
About the Cordless Handset System
Note: The cordless handset cannot be used to send SMS messages or read
received SMS messages. Only the machine can be used for SMS messaging.
However, will appear in the cordless handset display to inform you when
a new SMS message has been received. (This will change to when all
received SMS messages have been read at the machine.)
Additional cordless handsets
In addition to the cordless handset(s) included with the machine (two cordless
handsets are included with the UX-BD90, one cordless handset is included
with the UX-BD80), other cordless handsets that support the DECT/GAP
standard can also be added. The total number of cordless handsets that can
be used with the machine is six.
The UX-BD80/90 base (the machine) complies with the GAP (Generic Access
Prophile) standard and supports the following functions: Outgoing calls,
incoming calls, intercom. Additional bases and handsets must comply with the
GAP standard.
Note: Due to the wide variety of GAP handsets of different manufacture and
specifications, full functionality with the UX-BD80/90 cannot be guaranteed.
♦ To add a cordless handset, it must be registered in the machine. See page
65.
Page 47

About the Cordless Handset System
45
2. Cordless
Handset
Additional bases
One cordless handset can be used with up to four bases. By purchasing
additional bases, the range of use of the cordless handset can be expanded.
(Note that once a cordless handset receives a call, it must remain within the
communication range of the base that is transmitting the call.)
♦ A call can only be transferred from a cordless handset to the base that it is
currently using, or to another cordless handset that is using the same base.
♦ To use a cordless handset with additional bases, the cordless handset must
be registered in each of those bases. See page 65.
Page 48

Making a Phone Call
46
1
Pick up the cordless handset and press .
• appears in the display.
• Note: If the cordless handset display shows BUSY, you must wait until the
machine is no longer in use to use the cordless handset.
2
When you hear the dial tone, dial the
number.
• If you are on a Flash-type PBX and are
dialing out, press , wait for the
connection to the outside line, and then
dial the number.
3
When you are ready to end the call, press .
• If the END CALL setting is set to “ON” (see page 63), you can also end the
call by simply placing the cordless handset in the cradle (or charger if you
have one).
Cordless handset receiver volume
To adjust the volume of the cordless handset receiver when talking on the
cordless handset, press or .
Making a Phone Call
Page 49

Receiving a Phone Call
47
2. Cordless
Handset
Receiving a Phone Call
1
When the cordless handset rings, pick it up and press to answer.
Talk with the other party.
2
When you are ready to end the call, press .
• If the END CALL setting is set to “ON” (see page 63), you can also end the
call by simply placing the cordless handset in the cradle (or charger if you
have one). The call will end even if it has been placed on hold.
Putting a Call on Hold
To put the other party on hold during a call, press . While the call is on
hold, “C” will blink in the display. When you are ready to resume the call,
press once again.
♦ If the END CALL setting is set to “ON” (see page 63), placing the cordless
handset in the cradle (or charger if applicable) will end the call, even if the
call is on hold.
♦ If the END CALL setting is set to “OFF”, placing the cordless handset in the
cradle (or charger if applicable) will not break the connection while a call is
on hold, and thus phone charges may continue to apply.
You can also dial by entering the phone number first and then pressing .
♦ Check the number in the display before pressing . If there is a
mistake, press to clear the mistake and then enter the correct
digits.
Note: If a pause is needed between any of the digits to access an outside
line or a special service, hold down until “ ” appears.
Page 50

Receiving a Fax Using the Cordless Handset
48
Press to begin
fax reception
Note: If the machine detects a fax signal after you answer a call on the
cordless handset, it will begin reception automatically.
Receiving a Fax Using the Cordless Handset
If you hear a fax tone after answering a call on the cordless handset, or if the
other party speaks to you and then wants to send a fax, press . This
signals the machine to begin fax reception (for more information, see page
129).
Storing and Using Auto-Dial Numbers
You can store your most frequently dialed numbers for automatic dialing.
Numbers can be stored in the cordless handset or in the machine. To store a
number in the cordless handset, follow the steps below.
♦ Up to 20 numbers can be stored in the “phone book” in the cordless
handset. Numbers stored in the cordless handset can only be used by the
cordless handset.
♦ To store a number in the machine, see page 111. The cordless handset can
also use numbers that are stored in the machine.
1
Press .
2
Press .
3
Press .
Cordless handset display:
1 PHONE BK
11 NEW
NAME?
Page 51

Storing and Using Auto-Dial Numbers
49
2. Cordless
Handset
4
Enter a name for the auto-dial number. To enter each letter, hold down
the key for the letter as shown in the chart below until the letter appears
in the display. Up to 8 characters can be entered.
To clear a mistake, press . To clear all entered letters, hold down .
5
Press .
6
Enter the number by pressing the number keys. Up to 24 digits can be
entered. (Note: A space cannot be entered.)
•
To clear a mistake, press . To clear all entered digits, hold down .
• If a pause is needed between any of the digits to access an outside line or
a special service, hold down until “ ” appears
. Several pauses can
be entered in a row.
• If you are on a PBX that requires dialing a number to dial out and are
storing a number for an outside line, enter the number, hold down
until “ ” appears to insert a pause, and then enter the phone number.
(When you dial the auto-dial number, you will automatically dial out without
the need to dial the number for an outside line.) Note that if you are on a
Flash-type PBX, you must press the key each time you dial out using
an auto-dial number (the key cannot be stored in an auto-dial
number).
7
Press .
A, B, C =
D, E, F =
G, H, I =
SPACE, PAUSE ( ), - =
J, K, L =
M, N, O = # ( ), ?, _ =
P, Q, R, S =
W, X, Y, Z =
=
T, U, V =
NUMBER?
DONE
Page 52

Storing and Using Auto-Dial Numbers
50
Dialling an auto-dial number
Note: If you are on a Flash-type PBX and are dialing out, press before
performing the procedure below.
1
Press once.
2
Press or until the auto-dial number that you wish to dial
appears in the display.
• To go directly to names that begin with a certain letter, hold down the
number key with that letter until the letter appears in the display, and then
press until the desired name appears.
• To check the number of a name in the display, press .
• If you wish to dial an auto-dial number that is stored in the machine, press
until BASE appears in the display, press , and then press or
until the desired number appears. Note that auto dial numbers in the
machine that begin with an “R” (to dial out from a flash-type PBX) will not
appear.
3
Press .
• The number is automatically dialed.
8
Return to Step 2 to store another number, or press repeatedly to
exit.
Page 53

Storing and Using Auto-Dial Numbers
51
2. Cordless
Handset
1
Enter the first 3 letters of the name of the auto dial number that you wish
to dial. To enter each letter, hold down the number key with the desired
letter until the letter appears in the display.
• If you do not wish to enter all 3 letters, you can press and then enter
one letter. (If a different name appears in the display, press or
until the desired name appears.)
2
The name of the auto-dial number that begins with those 3 letters
appears. (If there is no name that begins with those letters, the closest
name will appear.)
• If the correct name does not appear, press or until it appears.
3
Press .
• The number is automatically dialed.
Quick Search
You can also quickly dial an auto dial number by entering the first 3 letters of
the name.
Page 54

Storing and Using Auto-Dial Numbers
52
Editing an auto-dial number
If you need to make changes to a previously stored auto-dial number, follow
these steps:
1
Press .
2
Press and then .
3
Press .
• The name of one of your stored auto-dial numbers appears.
4
Press or until the name of the number that you wish to edit
appears in the display.
5
Press .
6
Edit the name.
• Press to delete letters (hold down to delete all the letters). Press
the number keys to enter new letters (see Step 4 on page 49).
• If you do not wish to change the name, go directly to Step 7.
7
Press .
8
Edit the number.
• Press to delete digits (hold down to delete all digits). Press the
number keys to enter new digits.
• If a pause is required between any of the digits to access a special service
or an outside line, hold down until “ ” appears.
Cordless handset display:
1 PHONE BK
12 EDIT
Page 55

Storing and Using Auto-Dial Numbers
53
2. Cordless
Handset
Deleting an auto-dial number
If you need to delete an auto-dial number, follow these steps:
1
Press .
2
Press and then .
3
Press .
• The name of one of your stored auto-dial numbers appears.
4
Press or until the number that you wish to delete appears in
the display.
5
Press .
6
Press repeatedly to exit.
• If you do not wish to change the number, go directly to Step 9.
9
Press .
10
Press repeatedly to exit.
Cordless handset display:
1 PHONE BK
13 DELETE
DONE
DONE
Page 56

Dialling From the Incoming/Outgoing Call List (Redial)
54
Dialling From the Incoming/Outgoing Call
List (Redial)
The cordless handset keeps a list of the most recent calls that you have made
and received on the cordless handset. You can view this list and automatically
dial a number in the list.
♦ Important: Received calls only appear in the list if you subscribe to a Caller
ID service and have activated the Caller ID function (see page 136).
♦ If you subscribe to a Caller ID service and have activated the Caller ID
function, you can also view the Caller ID list that is kept in the machine.
(This list shows the most recent 30 calls received by the machine; see page
138.)
1
To view the incoming/outgoing call list in the cordless handset, press
(do not hold down). (Note: You can also hold down
until the first number in the list appears in the display.)
To view the Caller ID list in the fax machine, hold down until
“CALLS” (and then a name) appears in the display.
2
Press or until the name that you wish to call appears.
• If you are viewing the Caller ID list, you can press or to check
the number of a name that appears in the display. To check the time of the
call, press .
3
Press . The number is automatically dialed.
• To exit the list without calling a number, press repeatedly.
Note: If the Caller ID information consists of only the name and not the
number of the caller, the call will not appear in the cordless handset display.
Page 57

Using the Intercom Feature
55
2. Cordless
Handset
Using the Intercom Feature
You can use the machine and cordless handset as an intercom system.
♦ It may not be possible to page another cordless handset or the machine
when other cordless handsets or the machine are already in use.
♦ When using the machine’s speakerphone and a cordless handset for an
intercom call, do not bring the cordless handset close to the machine. This
may cause feedback (a loud howling sound).
Paging the machine or another cordless handset from a
cordless handset
1
Enter the number (1 to 6) of the
cordless handset that you wish to
page, or press to page all
cordless handsets.
To page the machine, press .
0
Cordless handset display
(example of paging the
fax machine)
Deleting all calls from the incoming/outgoing list
To delete all calls from the incoming/outgoing list in the cordless handset,
follow the steps below. (To erase all calls from the Caller ID list, see page
139.)
1
Press twice.
2
Press once.
3
Press to delete the calls.
• To cancel, press .
4
Press to repeatedly to exit.
2 CALLS
Cordless handset display:
21 DELETE
Page 58

Using the Intercom Feature
56
Paging a cordless handset from the machine
(cordless handset locator)
You can use this procedure to page a cordless handset, or locate a handset in
the event that you misplace it.
1
Press on the machine and enter
the number of the cordless handset
that you wish to page. (Press to
page all cordless handsets.)
Example:
2
The selected cordless handset rings.
• This allows you to locate the cordless handset if you have misplaced it.
3
The other person presses on the cordless handset to answer.
Machine display:
2
Press .
• appears in the display.
• If the number of the cordless handset or machine (0 to 6) is stored in the
cordless handset’s phonebook with a name, the name will appear.
3
The paged device rings and the other person answers. (To answer on
the machine, the other person presses .)
4
Talk with the other person. When you are ready to end the conversation,
press .
DIGITAL
SPEAKERPHONE
INTERCOM
3
Page 59

Transferring Calls
57
2. Cordless
Handset
Transferring Calls
You can transfer a call to the machine or to a cordless handset.
Transferring a call from a cordless handset to the machine
Note: It is not possible to talk with the person who answers on the machine
before transferring a call.
1
During the call, press on the cordless handset (the call is put on
hold).
2
Press to select the machine.
• To cancel the transfer and return to the initial caller, press .
3
Press to transfer the call to the machine.
• The other person presses on the machine to answer.
DIGITAL
SPEAKERPHONE
If a call comes in while the Intercom feature is being used
If an outside call comes in while you are using the Intercom feature, the
person who wishes to take the call should first stop the Intercom call (press
on the cordless handset or press or on the machine), and
then answer the outside call (press on the cordless handset or press
on the machine).
DIGITAL
SPEAKERPHONE
DIGITAL
PEAKERPHON
4
Talk with the other person (speak facing the operation panel). When you
are ready to end the conversation, press or .
DIGITAL
SPEAKERPHONE
Page 60

Transferring Calls
58
Transferring a call from a cordless handset to another
cordless handset
1
During the call, press on the cordless handset (the call is put on
hold).
2
Enter the number of the handset, or press to page all cordless
handsets (this does not include the machine).
• To cancel the transfer and return to the initial caller, press .
3
Press .
• You can speak to the person who answers on the cordless phone. When
finished, press to complete the transfer.
• To complete the transfer without speaking to the person who answers,
press .
• If nobody answers, press to return to the initial caller.
• The display will return to the standby display.
• If nobody answers within 30 seconds, all cordless handsets will start
ringing. If nobody answers within the next 30 seconds, the call will be
disconnected.
Page 61

Transferring Calls
59
2. Cordless
Handset
Transferring a call from the machine to a cordless handset
Note: A call can only be transferred once.
1
During the call, press on the
machine.
• The numbers of cordless handsets will
appear.
2
Enter the number of the cordless
handset to which you wish to transfer
the call. (Press to page all
cordless handsets.)
Example:
3
The selected cordless handset rings and the other person answers.
Press to complete the transfer.
• If nobody answers, press or to return to the initial caller.
DIGITAL
SPEAKERPHONE
Machine display:
Machine display:
CALL TRANSFER
3
29-MAY 12:00
PRESS HANDSET #
29-MAY 12:00
1 2 3 4 5 6 *
Page 62

Adjusting the Ringing Melody and Volume
60
Adjusting the Ringing Melody and Volume
You can select one of six ringing melodies for the cordless handset, as well as
adjust the ringer volume or turn it off.
Selecting a ringing melody
1
Press 3 times.
2
Press once.
3
Press once.
4
Enter the number (from 1 to 6) of the
desired melody (or press or
until the desired number appears and
press ).
• The selected melody will sound. To
select a different melody, repeat steps 3
and 4.
5
Press repeatedly to exit.
Cordless handset display:
3 RING
31 MELODY
1
DONE
Adjusting the ringer volume
1
Press 3 times.
Cordless handset display:
3 RING
Page 63

Adjusting the Ringing Melody and Volume
61
2. Cordless
Handset
2
Press once and then once.
3
Press once.
4
Press or to select a volume
level from 1 to 4 and then press .
(You can also simply enter the number
of the desired volume level.)
5
Press repeatedly to exit.
32 VOLUME
3
DONE
Turning off the cordless handset ringer
If you do not wish the cordless handset to ring when a call is received, follow
these steps to turn the ringer off. When this is done, will appear in the
display. This will also turn off the beep that is sounded each time a key is
pressed on the cordless phone.
1
Press 3 times.
2
Press once and then twice.
3
Press once.
4
Press or to select ON or OFF
and then press .
5
Press repeatedly to exit.
Cordless handset display:
3 RING
33 SILENT
OFF
DONE
Page 64

Other Features
62
Turning beep sounds on and off
A beep normally sounds when you press a key on the cordless handset. To
turn the beep sounds on or off, follow these steps.
1
Press 3 times.
2
Press once and then once.
3
Press once.
4
Press or to select ON or OFF
and then press .
5
Press repeatedly to exit.
Cordless handset display:
3 RING
34 BEEPS
ON
DONE
Other Features
Call time
To check the duration of your most recent call, follow these steps:
1
Press twice.
2
Press once and then once.
Cordless handset display:
2 CALLS
22 TIME
Page 65

Other Features
63
2. Cordless
Handset
3
Press once. The duration appears.
4
Press repeatedly to exit.
End call setting
When this setting is turned on, calls can be ended by simply replacing the
handset in the cradle (or charger if you have one) (there is no need to press
). Note that a call will end even if it has been placed on hold.
1
Press 3 times.
2
Press once.
3
Press once.
4
Press or to select ON or OFF
and then press .
5
Press repeatedly to exit.
Cordless handset display:
4 SET
41 END CALL
Turning the cordless handset power on and off
To conserve battery power, you can turn the cordless handset off. To turn off
the power, hold down until the display goes blank. To turn the power on,
hold down until the display turns on. The power also turns on
automatically when the cordless handset is placed in the cradle (or charger if
you have one).
DONE
Page 66

Other Features
64
Listening to messages from the cordless handset
When new messages have been received in the fax machine’s answering
system, will appear in the display. To listen to the messages from your
cordless handset, follow the steps below.
1
Press once.
2
Press once.
3
Press to play all messages in the answering system, or to
play only new messages.
• To repeat a message, press .
• To skip a message, press .
• To delete a message, press while the message is playing.
• To stop playback, press .
4
When finished, press repeatedly to exit.
Cordless handset display:
6 ANSWER
ANSWER
Page 67

Registering Cordless Handsets
65
2. Cordless
Handset
Registering Cordless Handsets
In order to be used, a cordless handset must first be registered in the
machine. The cordless handset that came with the machine is already
registered. To register an additional cordless handset, follow the steps in
Automatic registration
or
Custom registration
on the following pages.
♦ Use automatic registration when you are only registering the cordless
handset in one base (the machine) and the system PIN number has not
been changed from its initial setting (0000) (see page 67). This is the
easiest method of registration and does not require entering the System
PIN number.
♦ Use custom registration when the system PIN number has been changed
to a number other than 0000. The system PIN number must be entered
during registration.
♦ A cordless handset can be registered in up to four bases. To register the
cordless handset in multiple bases, repeat the custom registration
procedure using each base. To select which base the cordless handset will
normally be used with, see page 70.
Automatic registration
Use automatic registration when you are only registering the cordless handset
in one base (the machine) and the system PIN number has not been changed
from its initial setting (0000).
On the machine
1
Press once and twice.
2
Press once.
3
Press once.
Machine
display:
DECT SETTING
HS ENTRY
HS ENTRY
PRESS START KEY
Page 68

Registering Cordless Handsets
66
4
Press .
On the cordless handset
5
Press repeatedly until the display
at right appears.
6
On the cordless handset, press
3 times.
7
When registration is finished, the
machine and cordless handset will
show the messages at right. Note the
number that is assigned to the
cordless handset (“2” is shown as an
example).
Press on the machine to exit.
START/
MEMORY
Machine display:
Cordless handset display:
The cordless handset
display changes as
follows each time you
press :
5 BASE
51 REGIST
AUTO
REGIST
2
HS 2 REGISTERED
HS ENTRY
WAITING HS ENTRY
Page 69

Registering Cordless Handsets
67
2. Cordless
Handset
Programming a system PIN
The system PIN is a 4-digit ID number that is used to prevent unauthorized
registration of a cordless handset in a base. When the system PIN is set to a
number other than 0000 (the initial factory setting), a cordless handset must
be registered using custom registration and the correct system PIN must be
entered on the cordless handset during registration. Follow these steps to
program a system PIN in the machine.
♦ To prevent other people from adding cordless handsets without your
authorization, it is recommend that you change the system PIN to a number
other than 0000. Note that it is also necessary to enter the system PIN in
order to delete a cordless handset.
1
On the machine, press once and
twice.
2
Press once and once.
3
Press once.
4
Enter the current system PIN (4 digits).
• The system PIN is initially set to 0000 at the factory.
• To clear a mistake, press .
5
Press .
6
Enter the new system PIN that you wish to program (4 digits).
7
Press .
DIGITAL
SPEAKERPHONE
START/
MEMORY
START/
MEMORY
Machine
display:
DECT SETTING
SYSTEM PIN
OLD PASSWORD
ENTER 4 DIGITS
Page 70

Registering Cordless Handsets
68
8
Enter the new system PIN once again for confirmation.
9
Press .
10
Press to return to the date and time display.
START/
MEMORY
Custom registration
Use this procedure to register a cordless handset when the system PIN in the
machine has been set to other than 0000, or when you are registering the
cordless handset in multiple bases.
On the fax machine
1
Press once and twice.
2
Press once.
3
Press once.
4
Press .
On the cordless handset
5
Press repeatedly until the display
at right appears.
START/
MEMORY
5 BASE
Cordless handset display:
Machine
display:
DECT SETTING
HS ENTRY
HS ENTRY
PRESS START KEY
HS ENTRY
WAITING HS ENTRY
Page 71

Registering Cordless Handsets
69
2. Cordless
Handset
6
Press once.
7
Press once and once.
8
Press once and then press or
to select the number (1 to 4) that
you would like to assign to the
machine (this number is used to
identify the machine when the cordless
handset is registered in multiple
bases). Press to enter the number.
9
Enter the 4-digit system PIN number that is programmed in the machine.
10
Press .
11
Enter the number that you would like to
assign to the cordless handset.
12
When registration is finished, the
machine and cordless handset will
show the messages at right (the
handset number “2” is shown as an
example).
Press on the machine to exit.
CUSTOM
CODE ?
REGIST
Cordless handset display:
REGIST
2
1 2 3 4 5 6
51 REGIST
Machine display:
HS ENTRY
HS 2 REGISTERED
Page 72

Registering Cordless Handsets
70
Giving priority to a base
When a cordless handset is registered in multiple bases, use the following
setting to select which base the cordless handset will normally be used with.
♦ The initial setting is NONE. When NONE is selected (or when the selected
base is not powered on), the cordless handset will be used with the first
base that is powered on.
1
On the cordless handset, press
repeatedly until the display at right
appears.
2
Press once and once.
3
Press once.
• NONE or the number of the currently selected base appears in the display.
4
Enter the number (1 to 4) of the base to be given priority. (The number is
the number that was assigned to the base during custom registration of
the cordless handset.)
To select NONE, press .
(Entering a number that has not been assigned will have no effect.)
5
Press repeatedly to exit.
52 PRIOR
Cordless handset display:
5 BASE
Page 73

Registering Cordless Handsets
71
2. Cordless
Handset
1
On the fax machine, press once
and twice.
2
Press once and twice.
3
Press once.
4
Press or until the desired language appears in the display.
5
Press .
6
Press to return to the date and time display.
START/
MEMORY
Cordless handset display language
Use this setting to select the language used in the cordless handset display.
♦ This setting is selected on the machine.
Machine
display:
DECT SETTING
HS LANGUAGE
Page 74

Registering Cordless Handsets
72
1
On the machine, press once and
twice.
2
Press once and once.
3
Press once.
4
Enter the number of the cordless handset that you wish to delete.
5
Press .
6
Enter the 4-digit system PIN number that is programmed in the machine.
• If the system PIN was not changed from the initial factory setting, enter
“0000”.
• If you have forgotten the system PIN, it will not be possible to delete the
cordless handset.
7
Press .
8
Press to return to the date and time display.
START/
MEMORY
START/
MEMORY
Deleting a cordless handset
Follow these steps if you need to delete a cordless handset (cancel the
registration in the machine).
HS DELETE
PRESS HANDSET #
Machine
display:
DECT SETTING
HS DELETE
PASSWORD
ENTER 4 DIGITS
Page 75

73
3. SMS Text
Messages
3. SMS Text Messaging
Your fax machine can be used to send and receive SMS (Short Message
Service) text messages.
Requirements:
To use this feature, you must:
♦ Subscribe to British Telecom SMS service. The telephone number of the
British Telecom SMS Center has been preset in the machine. To subscribe,
simply send an SMS message and you will be automatically registered for
SMS service. For further information regarding the BT SMS service, please
refer to the BT website at www.bt.com/text.
Note: Registration for SMS service is free of charge.
Note: As the British Telecom service requires recognition of your telephone
number to provide the SMS service, 1470 (release number withheld) is
automatically dialled before the number programmed into the Center
Outbox. You can still withhold your number for normal telephone or fax
calls.
♦ Have Caller ID service activated on your telephone line.
Important:
This machine is designed for use with British Telecom SMS service and may
not operate correctly with other services. As of the printing of this manual, this
machine is not capable of sending or receiving e-mail over the Internet.
Note: SMS Messaging cannot be used from within a PBX.
Printing the SMS Quick Reference Sheet
For a quick reference to the SMS functions, press and to print the
SMS Quick Reference Sheet.
POLL
Page 76

Sending an SMS Message
74
Sending an SMS Message
This section explains how to write and send an SMS message. A maximum of
160 characters can be entered in one message.
♦ When sending a message, you can manually enter the full phone number
of the recipient, or select the number from your list of auto-dial numbers.
Sending an SMS message (entering the number manually)
1
Press once and twice.
• Note: If you have an unread received message, the message will appear
when you press . Read the message first (see page 79) and then
perform this procedure.
2
Press .
3
Press .
4
Enter the number of the recipient. Up to 20 digits can be entered. (Note
that a space cannot be entered.)
Important: The number must include the area code.
• To clear a mistake, press .
• If a pause is required between any of the digits, press . The pause
appears as a hyphen. Several pauses can be entered in a row.
5
Press .
DIGITAL
SPEAKERPHONE
START/
MEMORY
Display:
ENTER #
WRITE MESSAGE
ENTER #
MANUAL DIAL
Page 77

Sending an SMS Message
75
3. SMS Text
Messages
6
Enter the message by pressing number keys for each letter as shown in
the following chart.
Example:
I WILL COME. = 444 1 9 444 555 555 1 222 666 6 33
♦ To enter two letters in succession that require the same key, press after
entering the first letter.
♦ You can move the cursor with the arrow keys (up, down, left, and right).
Note that if you press when the cursor is at the very first character of
the message, you will return to Step 4.
♦ To clear a mistake, press . You can also move the cursor to a
mistake and then enter the correct character. The new character will
replace the mistake. If you wish to insert a character between characters,
press first and then enter the character you wish to insert.
♦ To enter a lower case letter, continue pressing the key for the letter until the
lower case letter appears.
♦ To enter one of the following symbols, press or repeatedly:
♦ When you have finished entering your message, you can check it by
pressing to print it out.
DIGITAL
SPEAKERPHONE
£
POLL
A =
B =
C =
D =
E =
F =
G =
H =
I =
J =
K =
L =
M =
N =
O =
P =
Q =
R =
S =
T =
U =
V =
W =
X =
Y =
Z =
SPACE =
Page 78

Sending an SMS Message
76
7
When you are ready to send the message, press . The fax machine
will automatically call your SMS center and send the message.
• After the message is sent, it is placed in the outbox. If the message was not
sent successfully, the fax machine will make 3 attempts at 5-minute
intervals to resend the message (see page 118), and an exclamation mark
(!) will appear with the message when you view it in the outbox (see page
81). No exclamation mark will appear if the message was sent successfully.
START/
MEMORY
Sending an SMS message using an auto-dial number
If the number of the recipient has been stored as an auto-dial number, you
can use the auto-dial number to send an SMS message.
♦ The procedure for storing auto-dial numbers is explained on page 111.
1
Press once and twice.
• Note: If you have an unread received message, the message will appear
when you press . Read the message first (see page 79) and then
perform this procedure.
2
Press once and once.
3
Press .
4
Press (or ) until the desired recipient appears in the display (if no
name was stored, the number will appear).
Important: The stored number must include the area code.
Your first auto-dial
number appears here
Display:
ENTER #
AAA
WRITE MESSAGE
ENTER #
AUTO DIAL
Page 79

Sending an SMS Message
77
3. SMS Text
Messages
5
Press .
6
Enter the message by pressing number keys for each letter as shown in
the following chart.
Example:
I WILL COME. = 444 1 9 444 555 555 1 222 666 6 33
♦ To enter two letters in succession that require the same key, press after
entering the first letter.
♦ You can move the cursor with the arrow keys (up, down, left, and right).
Note that if you press when the cursor is at the very first character of
the message, you will return to Step 4.
♦ To clear a mistake, press . You can also move the cursor to a
mistake and then enter the correct character. The new character will
replace the mistake. If you wish to insert a character between characters,
press first and then enter the character you wish to insert.
♦ To enter a lower case letter, continue pressing the key for the letter until the
lower case letter appears.
♦ To enter one of the following symbols, press or repeatedly:
START/
MEMORY
DIGITAL
SPEAKERPHONE
£
A =
B =
C =
D =
E =
F =
G =
H =
I =
J =
K =
L =
M =
N =
O =
P =
Q =
R =
S =
T =
U =
V =
W =
X =
Y =
Z =
SPACE =
Page 80

Sending an SMS Message
78
♦ When you have finished entering your message, you can check it by
pressing to print it out.
7
When you are ready to send the message, press . The fax machine
will automatically call your SMS center and send the message.
• After the message is sent, it is placed in the outbox. If the message was not
sent successfully, the fax machine will make 3 attempts at 5-minute
intervals to resend the message (see page 118), and an exclamation mark
(!) will appear with the message when you view it in the outbox (see page
81). No exclamation mark will appear if the message was sent successfully.
POLL
START/
MEMORY
If a message is cancelled before being sent...
If a message is cancelled due to interruption by fax reception or because you
pressed before sending it, the text that was entered prior to cancellation
will appear again the next time you write a message.
Page 81

Receiving SMS Messages
79
3. SMS Text
Messages
Receiving SMS Messages
Each time you receive an SMS message, your SMS center will call the fax
machine and send the message. The envelope in the display appears while
the message is being received.
Viewing unread messages
When you have unread messages, you can go directly to the most recent
unread message by pressing once. To read the message, press .
(Note that when there are no unread messages, pressing once displays
the SMS menu.)
♦ For more information on viewing messages in the inbox, see the following
procedure.
The envelope appears
while a message is
being received
01-JAN 12:00
TEL
Viewing messages in the inbox
Follow the steps below to view messages in the inbox.
1
Press . Your most recently
received unread message appears in
the display.
• If you have no unread messages, the
display will show INBOX. Press to
show your most recently received
message.
Example display
Number of sender
A black square
appears if the
message is
unread
Message
number
Date and time
message was
received
01-234-5678
■ 10 31MAR 09:25
Page 82

Receiving SMS Messages
80
2
Press or until the message you wish to read appears in the
display.
• You can press and then to delete a message when it appears
in the display, or press to print the message.
3
To read the message, press . The text of the message appears in the
display.
• Press or as needed to scroll through the message.
4
When you have finished reading the message, you can do any of the
following:
• Reply: To reply to the sender, press twice. The number of the sender
appears in the display. Continue from Step 5 on page 74.
• Delete: To delete the message, press and then .
• Print: To print the message, press .
• Read other messages: To return to the message list, press .
• Exit: To return to the date and time display, press .
START/
MEMORY
POLL
START/
MEMORY
POLL
Note: If a received message uses fonts or image formats not supported by
the fax machine, those characters or images will appear as blanks.
Page 83

Viewing the Outbox
81
3. SMS Text
Messages
When you press , the following
message briefly appears:
While the inbox is full, you will not be able to receive any new messages.
Delete one or more messages as explained in the preceding procedure, or
delete all messages as explained on page 83.
!
TEL
01-JAN 12:00
If the inbox is full...
The inbox can hold a maximum of 10 messages. When the inbox is full, an
exclamation mark will appear in the date and time display.
“!” appears when the
inbox is full.
Viewing the Outbox
You can view the most recent 10 messages that you have sent in the outbox.
♦ If a message appears in the outbox with an exclamation mark (!), it was not
sent successfully and will need to be resent.
1
Press once and once.
2
Press . Your most recently sent
message appears in the display.
Display:
Example display
Number of recipient
Message
number
Date and time
message was
sent
INBOX IS FULL
DELETE MESSAGE
01-234-5678
10 31MAR 09:25
OUTBOX
Page 84

Viewing the Outbox
82
3
Press or to scroll through your sent messages.
• If an exclamation mark (!) appears with a message, the message was not
sent successfully. If you press , UNSENT appears followed by E0 or
FE. E0 indicates that there was no Caller ID service. FE indicates that an
error occurred during transmission. The fax machine will make 3 attempts
at 5-minute intervals to resend the message.
• You can press and then to delete a message when it appears
in the display, or press to print the message.
4
If you wish to read or resend a message that appears in the display,
press . The text of the message appears.
• Press or as needed to scroll through the message.
5
When you have finished reading the message, you can do any of the
following:
• Edit/resend: To resend (and edit if needed) the message, press twice.
The number of the recipient appears in the display. Continue from Step 5
on page 74.
• Delete: To delete the message, press and then .
• Print: To print the message, press .
• Read other messages: To return to the message list, press .
• Exit: To return to the date and time display, press .
START/
MEMORY
POLL
START/
MEMORY
POLL
Page 85

Printing or Deleting all Messages
83
3. SMS Text
Messages
Printing or Deleting all Messages
Printing all messages
Follow these steps to print all messages in the inbox or outbox.
1
Press once and 3 times.
2
Press .
3
Press to print all messages in the
inbox, or to print all messages in
the outbox.
4
Press .
START/
MEMORY
1
Press once and twice.
2
Press .
3
Press to delete all messages from
the inbox, or to delete all
messages from the outbox.
4
Press .
START/
MEMORY
Display:
Deleting all messages
Follow these steps to delete all messages from the inbox or outbox.
Display:
1:INBOX 2:OUTBOX
ALL PRINT OK ?
1:INBOX 2:OUTBOX
ALL DELETE OK ?
ALL PRINT
ALL DELETE
Page 86

SMS Settings
84
1
Press once and once.
2
Press once and once.
3
Press .
4
Press to select ON.
(To turn off the function, press .)
5
Press to return to the date and time display.
SMS Settings
The following settings have been preset at the factory to allow you to use
British Telecom SMS service. Normally the settings do not need to be
changed.
SMS Receive function
The SMS Receive function allows you to receive SMS messages. This
function is initially turned on. If you wish to refuse reception of all SMS
messages, you can turn this function off. (Note: Turning off this setting only
turns off SMS message reception. SMS message transmission is still
possible.)
The display briefly shows
your selection, then:
Display:
SMS RECEIVE
1=ON, 2=OFF
SMS SETTING
SMS RECEIVE
SMS CENTER #
Page 87

SMS Settings
85
3. SMS Text
Messages
SMS center numbers
The numbers for the British Telecom SMS center have been pre-stored in your
fax machine. Normally these numbers do not need to be changed. In the
event that a change is necessary, use the following procedure. Two numbers
must be entered:
♦ Outgoing number: This number is used to send SMS messages. Your fax
machine automatically dials this number when sending an SMS message.
♦ Incoming number: This number is used to receive SMS messages. When
your SMS center calls your fax machine to send an SMS message, your fax
machine checks the caller’s number (transmitted to your fax machine by
Caller ID) against this stored number. This allows your fax machine to verify
that the SMS center is sending a message.
1
Press and once.
2
Press .
3
Press .
4
Press to enter the outgoing number, or to enter the incoming
number.
5
Enter the number (maximum of 32 digits).
• To clear a mistake, press .
• To enter a pause between any of the digits, press . The pause appears
as a hyphen.
6
Press .
7
Press to exit.
DIGITAL
SPEAKERPHONE
START/
MEMORY
Display:
SMS CENTER #
1=OUT,2=IN
SMS SETTING
SMS CENTER #
SMS RECEIVE
Page 88

86
1
Press once and once.
2
Press once.
3
Pick up the cordless handset and press .
4
Speak into the cordless handset to record a message.
• The outgoing message can be up to 60 seconds long. While recording, the
display will show the time left to record.
5
When finished, press on the cordless handset or on the
machine.
REC/MEMO
4. Using the Answering Machine
The built-in answering machine allows you to receive both voice messages
and faxes while you are out.
♦ To use the answering machine, you will first need to record an outgoing
message. When you go out, turn on the answering machine by setting the
reception mode to A.M.
Recording an Outgoing Message
The outgoing message (OGM) is the greeting that the machine plays after
answering a call to inform callers that they can leave a message or send a fax.
Follow the steps below to record a message.
Example:
“Hello. You've reached ______ . No one is available to take your call right now.
Please leave a message after the beep or press your facsimile Start key to
send a fax. Thank you for calling.”
Note: Make sure that no other cordless handsets are in use when recording
the message (the conversation on the cordless handset may also be
recorded).
Display:
01-JAN 10:30
OGM1(GENERAL)
Page 89

Operating the Answering Machine
87
4. Answering
Machine
To listen to the outgoing message
To listen to the outgoing message, follow Steps 1 and 2 of the above
procedure and then press . Note that the general outgoing message
cannot be erased. If you need to change it, simply repeat the recording
procedure.
Operating the Answering Machine
Activating the answering machine
To turn on the answering machine so that callers can leave messages, press
until appears in the display.
PLAY/HOLD
RESOLUTION/
RECEPTION
RESOLUTION/
RECEPTION
♦ It will not be possible to set the reception mode to A.M. if an outgoing
message has not been recorded.
Note: In A.M. mode, the machine will automatically switch to fax reception if it
detects six seconds of silence after answering a call. For this reason, if a
caller pauses for this length of time while leaving a message, they will be cut
off.
01-JAN 12:00
Page 90

Operating the Answering Machine
88
Number of rings in A.M. mode (Toll Saver function)
The number of rings on which the machine answers incoming calls in A.M.
mode depends on whether the Toll Saver function is turned on, and if it is on,
whether you have messages.
♦ The Toll Saver function is initially turned on.
ON
OFF
No received messages
4 Rings
Received messages
2 Rings
Toll Saver Toll Saver
NOTHING
Hello!
Hi!
Hi!
Ring
Ring
Ring
Ring
Ring
Ring
Ring
Ring
Ring
Ring
(Answer according to
NUMBER OF RINGS setting)
To adjust the NUMBER
OF RINGS setting, see
page 127.
To turn off the Toll Saver
function, see page 98.
Page 91

Operating the Answering Machine
89
4. Answering
Machine
Listening to received messages
If you have received messages, the display will show the number of messages
received. Follow the steps below to listen to your messages.
1
Press .
• If you only want to listen to new messages (messages not previously
listened to), continue to hold down for at least two seconds.
2
The messages will play.
• As each message plays, the date and time of recording will appear briefly in
the display. If no messages were received, NO MESSAGES will appear.
• Repeat: To listen to a message a second time, press before
playback of that message ends. To move back to the previous message,
press within 3 seconds of the beginning of the current message.
• Skip: To skip forward to the next message, press .
Note: Playback will stop if you receive a call, lift the handset, or press .
PLAY/HOLD
PLAY/HOLD
REPEAT
REPEAT
SKIP
♦ You can print out a list of your received messages that shows the date and
time that each was received. See page 144.
Page 92

Operating the Answering Machine
90
Erasing received messages
It is important to erase received messages after you listen to them to ensure
that the memory does not become full.
♦ Erasing all messages: To erase all messages, press , , and
then .
♦ Erasing a single message: To erase a single message, press
while the message is being played.
DELETE
START/
MEMORY
DELETE
Recording memos
You can record memos for yourself and other users of the machine. These will
be played back together with incoming messages when is pressed.
Note: Make sure that no other cordless handsets are in use when recording
the memo (the conversation on the cordless handset may also be recorded).
PLAY/HOLD
1
Press once and once.
2
Pick up the cordless handset, press , and speak into the cordless
handset to record your memo.
3
When you have finished speaking, press on the cordless handset
or on the machine.
REC/MEMO
Page 93

Optional Answering Machine Settings
91
4. Answering
Machine
1
Press once and once.
2
Press once and once.
3
Press .
4
Press a number from 1 to 4 to select the desired ICM recording time.
5
Press to return to the date and time display.
15 seconds 60 seconds
30 seconds 4 minutes
Optional Answering Machine Settings
Setting ICM time
Incoming messages (ICMs) are the messages which callers leave for you on
the built-in answering machine. The answering machine is set at the factory to
allow each caller a maximum of 4 minutes to leave a message. If desired, you
can change this setting to 15, 30, or 60 seconds.
Display:
The display briefly shows
your selection, then:
FAX mode on A.M. failure
If the memory for recording incoming messages becomes full while you are
out, the answering machine will no longer be able to record messages. The
ON A.M. FAILURE setting is used to choose the response of the machine to
incoming calls when this happens:
♦ YES (switch to FAX mode): The reception mode will switch to FAX mode,
allowing the machine to continue to receive faxes automatically. With this
setting, you can still use the remote commands to listen to your messages
and then erase them (see
Remote Operations
on page 97).
A.M. SETTING
RECORDING TIME
REMOTE CODE
RECORDING TIME
1=15 SECONDS
Page 94

Optional Answering Machine Settings
92
1
Press once and once.
2
Press once and twice.
3
Press .
4
Press to select YES (switch to
FAX mode), or to select NO.
5
Press to return to the date and time display.
♦ NO (do not switch to FAX mode): The machine will answer after 19 rings,
after which it will wait to receive a remote command. Most callers will hang
up before it answers; however, when you call the machine from a remote
location, you can wait until it answers, listen to your messages, and then
erase them (see
Remote Operations
on page 97).
The initial setting is NO. If you want to change the setting to YES, press the
panel keys as follows:
OGM only mode
If needed, you can turn off recording of incoming messages. In this case, your
outgoing message will play, but callers will not be able to leave a message.
(The machine will still receive faxes sent by automatic dialling.)
1
Press once and once.
2
Press once and once.
The display briefly shows
your selection, then:
Display:
A.M. SETTING
ON A.M.FAILURE
ON A.M.FAILURE
1=YES, 2=NO
OGM ONLY MODE
Display:
A.M. SETTING
OGM ONLY MODE
Page 95

Transfer Function
93
4. Answering
Machine
3
Press .
4
Press to turn on OGM only mode,
or to turn it off.
5
Press to return to the date and time display.
Transfer Function
The Transfer function is used to have the machine automatically call you at a
specified number every time it receives an incoming message. This lets you
hear your messages immediately after they come in, even when you are at a
remote location.
To use the Transfer function, you must first program the number that you wish
the machine to call (the transfer number), and record the transfer message
that plays when you answer the phone at the remote location.
When you go out and wish to use the transfer function, turn it on. When you
return and no longer wish to use the transfer function, turn it off.
Programming the transfer number
To use the Transfer function, you must first program the number to call (the
transfer number).
1
Press once and once.
2
Press once and 3 times.
3
Press .
The display briefly shows
your selection, then:
OGM ONLY MODE
1=YES, 2=NO
TOLL SAVER
Display:
A.M. SETTING
TRANSFER TEL #
ENTER TEL #
Page 96

Transfer Function
94
4
Press the number keys to enter the transfer number.
• To insert a pause between any two digits of the number, press .
5
Press .
6
Press to return to the date and time display.
START/
MEMORY
Recording the transfer message
The transfer message plays when you answer the telephone, and informs you
that the call is a transfer call. It can be up to 15 seconds long. To record a
transfer message, follow the steps below. The following is an example:
“Hello. This is a transfer call for (YOUR NAME). Enter your remote code
number now.”
Note: Make sure that no other cordless handsets are in use when recording
the message (the conversation on the cordless handset may also be
recorded).
1
Press once and twice.
2
Press once.
3
Pick up the cordless handset and press .
4
Speak into the cordless handset to record the message.
• The transfer message can be up to 15 seconds long. While recording, the
display will show the time left to record.
REC/MEMO
Display:
TRANSFER FUNC
01-JAN 10:30
OGM2 (TRANSFER)
Page 97

Transfer Function
95
4. Answering
Machine
5
When finished, press on the cordless handset or on the
machine.
Checking or erasing the transfer message
To check or erase the transfer message, follow Steps 1 and 2 of the above
procedure, and then press to check the message, or to
erase the message.
PLAY/HOLD
DELETE
Turning the Transfer function on and off
When you go out and wish to use the Transfer function, turn it on as follows:
1
Press once and once.
2
Press once and 3 times.
3
Press once.
4
Press to turn on the Transfer
function.
(Press to turn the function off.)
5
Press to return to the date and time display.
The display briefly shows
your selection, then:
Display:
A.M. SETTING
TRANSFER FUNC
ON A.M.FAILURE
TRANSFER FUNC
1=YES, 2=NO
Page 98

Transfer Function
96
6
Each time the machine receives an incoming message, it will call your
programmed transfer number. When you answer, you will hear your
recorded message telling you that the call is a transfer call. On the dial
pad of your phone, enter , your remote code number (see page 97),
and . The machine will play back your messages.
• You can also perform any of the remote operations described in
Remote
Operations
later in this chapter (see page 97).
Note: When you hang up after a transfer call, the machine will not
immediately resume normal operation. If you want the machine to accept calls
immediately after a transfer call, enter twice before hanging up (if you
want to hang up during message playback, first enter and to stop
playback, then enter twice).
Page 99

Remote Operations
97
4. Answering
Machine
1
Press once and once.
2
Press once and twice.
3
Press .
4
Press the number keys to enter a 3-digit remote code number.
5
Press to store the remote number, and then to return to the
date and time display.
START/
MEMORY
Remote Operations
When you are out, you can call the machine from any tone dial telephone and
play back your messages using the remote commands. You can also use
these commands to change the reception mode and other settings.
Remote code number
To access the machine to perform remote operations, you must first enter your
remote code number. The remote code number has been set to "001" at the
factory. If you wish to use a different number, follow these steps:
Display:
A.M. SETTING
REMOTE CODE
REMOTE CODE=
SELECT 3 DIGITS
Page 100

Remote Operations
98
Toll Saver
When you call the machine to listen to your messages, it will answer after two
rings if it has received at least one message, or after four rings if it has not
received any messages.
This allows you to save money on telephone charges, particularly if you are
calling long distance. If the machine does not answer after two rings, you can
simply hang up before it answers, saving yourself the cost of that call.
If you do not want to use the Toll Saver function, you can turn it off by following
the steps below. In this case, the machine will answer after the number of
rings set with the NUMBER OF RINGS setting (see
Changing the number of
rings
on page 127).
1
Press once and once.
2
Press once.
3
Press once.
4
Press to turn on the Toll Saver
function, or to turn it off.
5
Press to return to the date and time display.
The display briefly shows
your selection, then:
Display:
A.M. SETTING
TOLL SAVER
TOLL SAVER
1=YES, 2=NO
RECORDING TIME
 Loading...