

Page 1
UX-40 / UX-60 FACSIMILE
MODEL
UX-40
UX-60
FACSIMILE
OPERATION MANUAL
1. Installation
2. Sending Documents
3. Receiving Documents
4. Making Copies
5. Making Telephone Calls
6. Answering Machine Connection
7. Special Functions
8. Printing Reports and Lists
9. Maintenance
10. Troubleshooting
Page 2
all-ux40.book Page 9 Thursday, November 18, 1999 2:35 PM
1. Installation
Unpacking Checklist
Before setting up,
make sure you have
all of the following
items.
Handset
Handset lead
If any are missing,
contact your dealer or
retailer.
Original document
support
1. Installation
Emergency labels
Operation
manual
Fax paper
(Sample roll)
Extension
telephone socket
adapter
Telephone
line cord
9
Page 3
216 mm
600 mm
297 mm
216 mm
all-ux40.book Page 33 Thursday, November 18, 1999 2:35 PM
2. Sending Documents
Transmittable Documents
Size and weight
The size and weight of documents that you can load in the document
feeder depend on whether you load one page at a time or several pages
at once.
Loading one page at a time:
2. Sending
Documents
Minimum
size
148 mm
140 mm
Minimum
weight
52 g/m²
Loading several pages at once:
Minimum
148 mm
size
140 mm
Minimum
weight
52 g/m²
Maximum
size
Maximum
weight
Maximum
size
Maximum
weight
157 g/m²
80 g/m²
33
Page 4
FAX
TEL
A.M.
TEL/FAX
all-ux40.book Page 54 Thursday, November 18, 1999 2:35 PM
3. Receiving Documents
Using TEL/FAX Mode
Press the
RECEPTION MODE
RESOLUTION/
key
until the arrow in the
TEL/FAX
.
RESOLUTION
RECEPTION MODE
display points to
When the reception mode is set to TEL/FAX, your fax machine
automatically answers all calls on two rings. After answering, your
fax monitors the line for about five seconds to see if a fax tone is
being sent.
♦
If your fax machine detects a fax tone (this means that the call is an
automatically dialled fax), it will automatically begin reception of
the incoming document.
♦
If your fax machine doesn’t detect a fax tone (this means that the
call is a voice call or manually dialled fax), it will make a ringing
sound (called pseudo ringing) for 30 seconds to alert you to answer.
If you don’t answer within this time, your fax will send a fax tone to
the other machine to allow the calling party to send a fax manually
if they desire.
Only the fax will alert you to voice calls or manually dialled faxes
Note:
by pseudo ringing. An extension phone connected to the same line will
not ring after the connection has been made. The handset of a parallel
extension telephone can, however, be picked up to answer the call. If
pseudo ringing does not stop when the handset is lifted, press "#" key on
the dial pad of the phone (this is only possible from a tone dial phone). If
pseudo ringing is not cancelled in this way, the fax machine will send fax
tones down the line, rendering conversation impossible.
54
Page 5
all-ux40.book Page 61 Thursday, November 18, 1999 2:35 PM
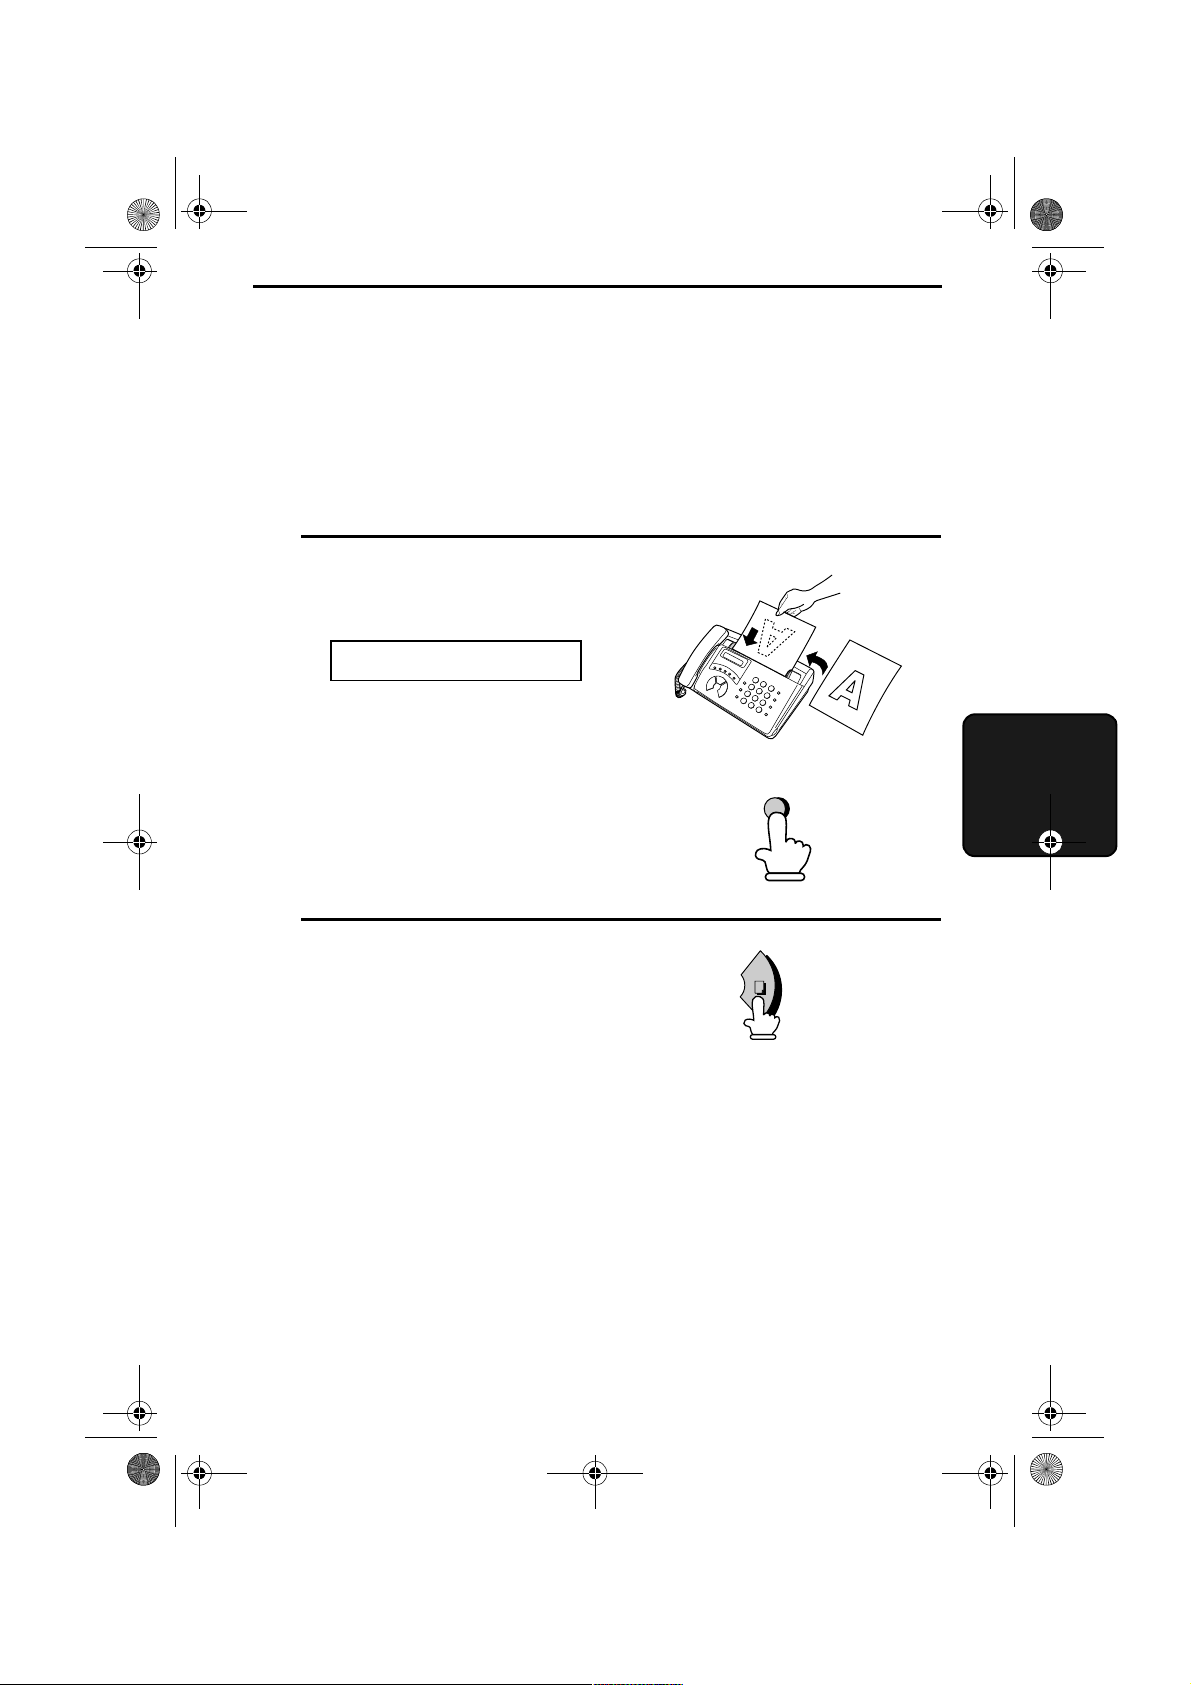
4. Making Copies
Your fax machine can also be used to make copies.
♦
You can use this function to make a sample copy of a document
before faxing to see if the resolution or contrast needs adjustment.
1
Load the document.
The display will show:
READY TO SEND
•
If desired, adjust the resolution and/
or contrast.
RESOLUTION
RECEPTION MODE
Copies
4. Making
2
Press the
COPY/HELP
key.
COPY/
HELP
61
Page 6
all-ux40.book Page 62 Thursday, November 18, 1999 2:35 PM
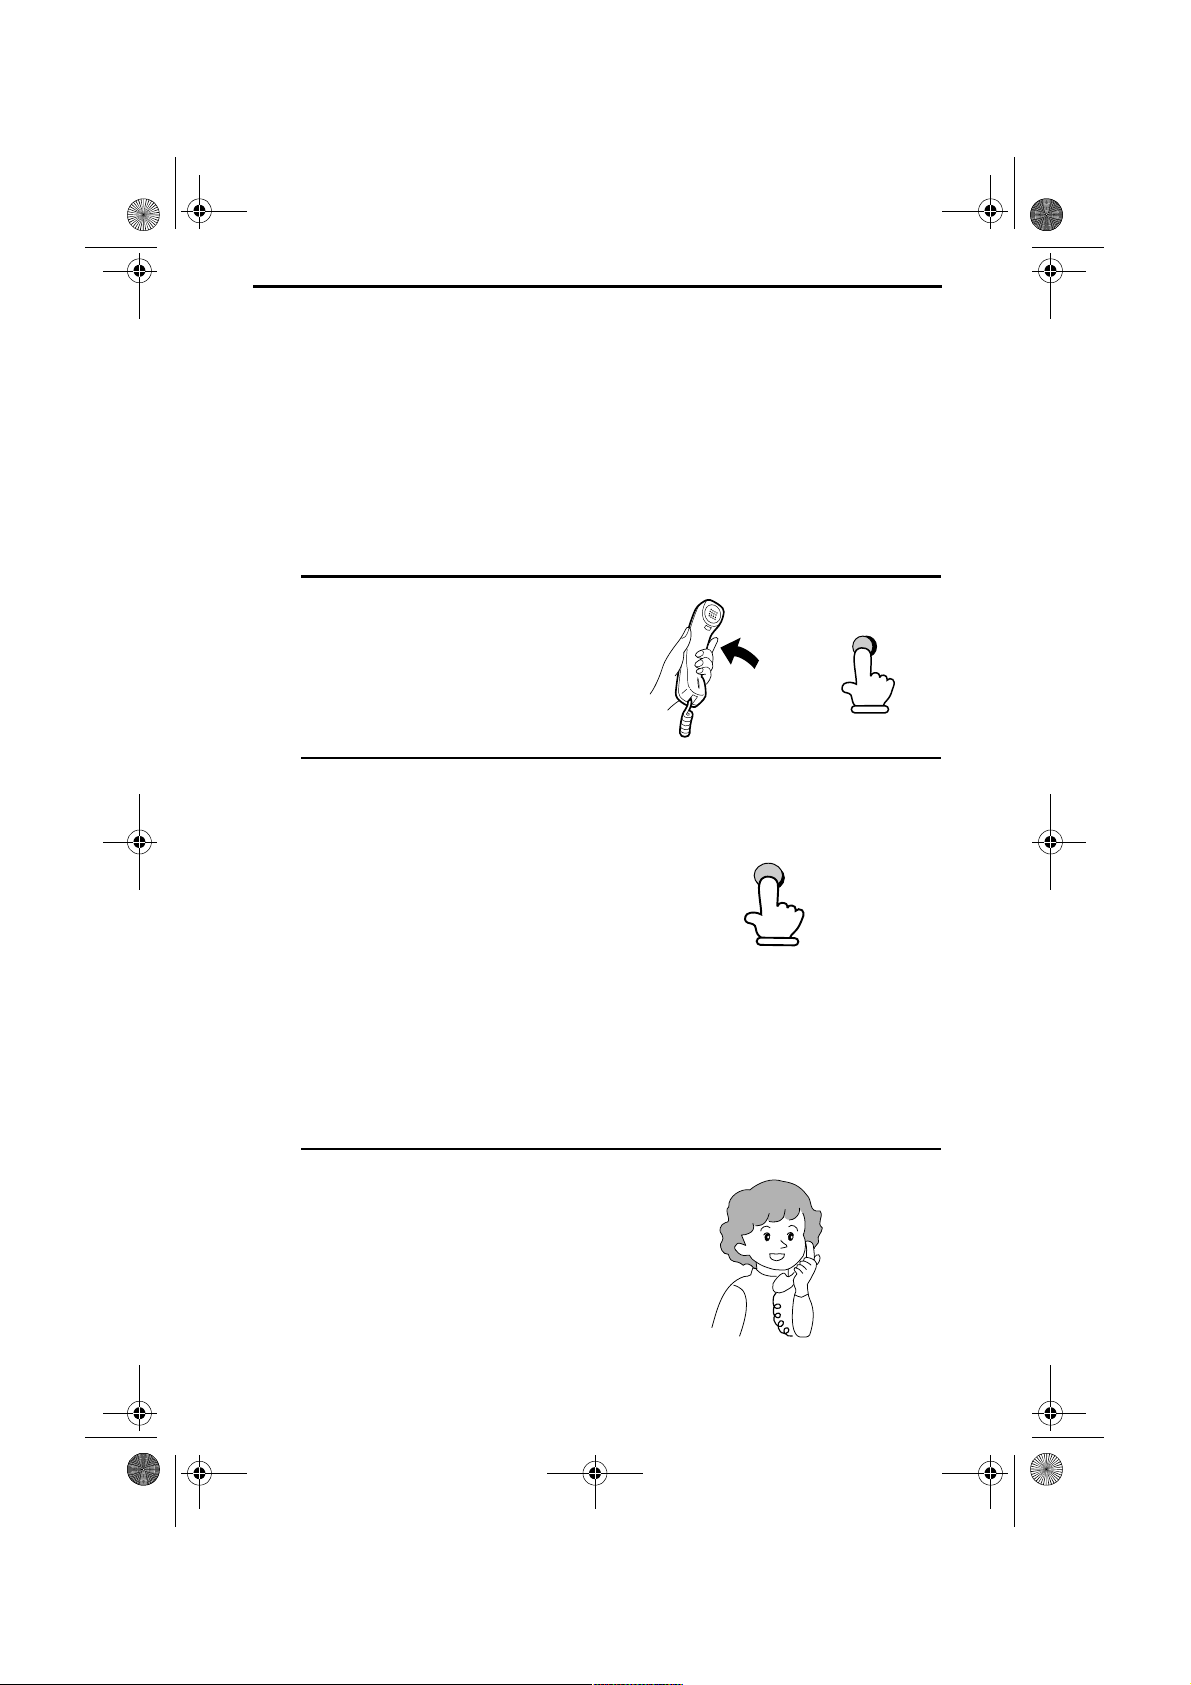
5. Making Telephone Calls
Your fax machine can be used like a regular telephone to make and
receive voice calls.
♦
This equipment is not designed for making emergency telephony
calls when the power fails. Alternative arrangements should be
made for access to emergency service.
1
Pick up the handset or press the
SPEAKER
tone.
2
Dial the number using one of the
following methods:
Normal Dialling:
•
telephone number with the numeric
keys.
key. Listen for the dial
Enter the full
SPEAKER
or
A
Rapid Key Dialling:
•
appropriate Rapid Key.
Speed Dialling:
•
DIAL
key, and enter the 2-digit
Speed Dial number with the
numeric keys.
3
Speak with the other party when they
answer.
•
If you pressed the
pick up the handset to talk.
62
Press the
SPEAKER
Press the
SPEED
Example: Press
Rapid Key A
key,
Page 7
all-ux40.book Page 66 Thursday, November 18, 1999 2:35 PM
6. Answering Machine Connection
Connecting an Answering Machine
If desired, you can connect an answering machine to your fax
machine's
voice messages and faxes when you are out.
TEL. SET
socket. This will allow you to receive both
1
Remove the seal covering the
SET
socket.
2
Connect the answering machine's
telephone line plug to the TEL. SET
socket using the extension telephone
socket adaptor provided.
For Eire:
•
Insert the plug of the
answering machine line directly
into the
If desired, you can
connect an
extension phone to
your answering
machine's extension
phone socket.
TEL. SET
socket.
TEL.
TEL.
SET
TEL.
LINE
Make sure the
TEL. LINE
socket
is connected to
the wall socket.
66
To answering machine's
telephone line socket.
Page 8
FUNCTION
all-ux40.book Page 73 Thursday, November 18, 1999 2:35 PM
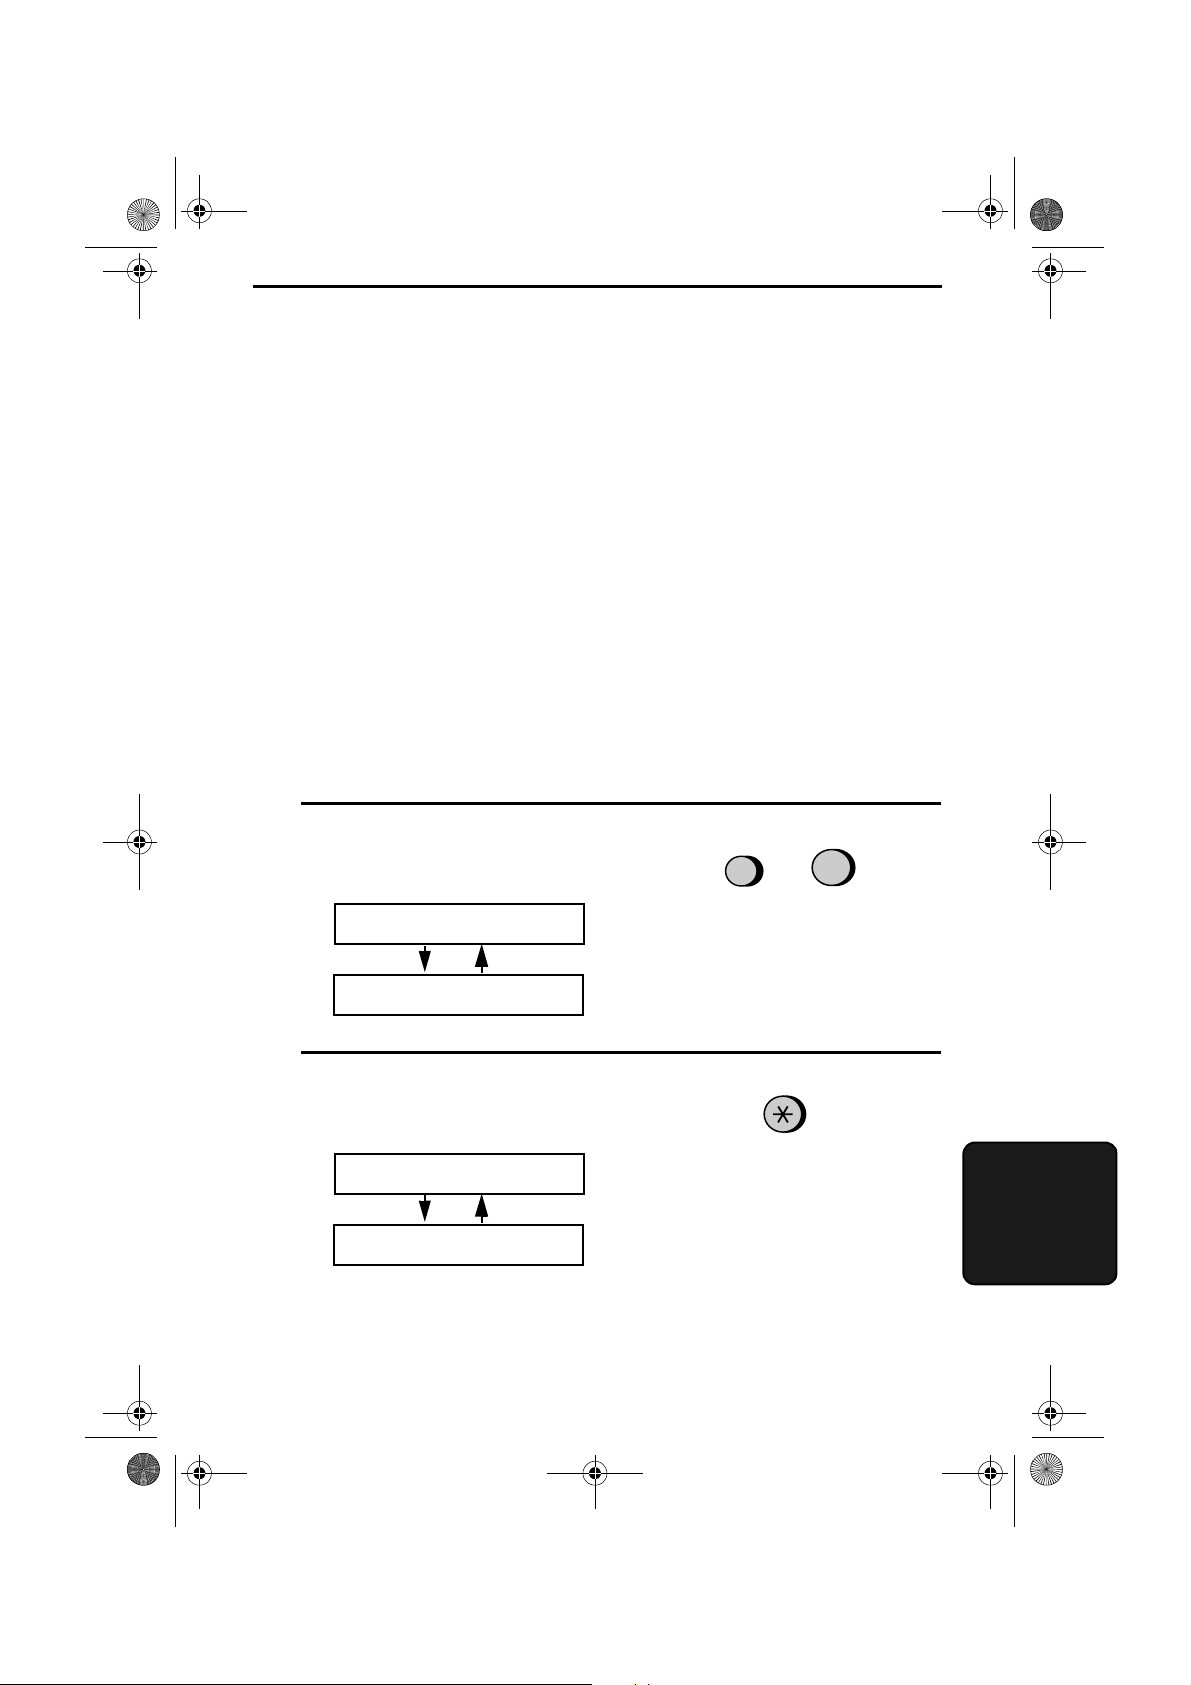
7. Special Functions
Caller ID (Requires Subscription to Service)
If you subscribe to a caller identification service from your telephone
company, you can set your fax machine to display the name and/or the
number of the caller while the fax rings. Caller-ID may not function if
the machine is connected to a PBX.
Important:
♦
To use this function, you must subscribe to a caller identification
service from your telephone company.
♦
Your fax may not be compatible with some caller identification services.
1
.
Press these keys:
The display will show:
OPTION SETTING
PRESS * OR #
2
Press the
The display will show:
CALLER-ID
1=YES,2=NO
key once.
****
4
Functions
7. Special
73
Page 9
all-ux40.book Page 85 Thursday, November 18, 1999 2:35 PM
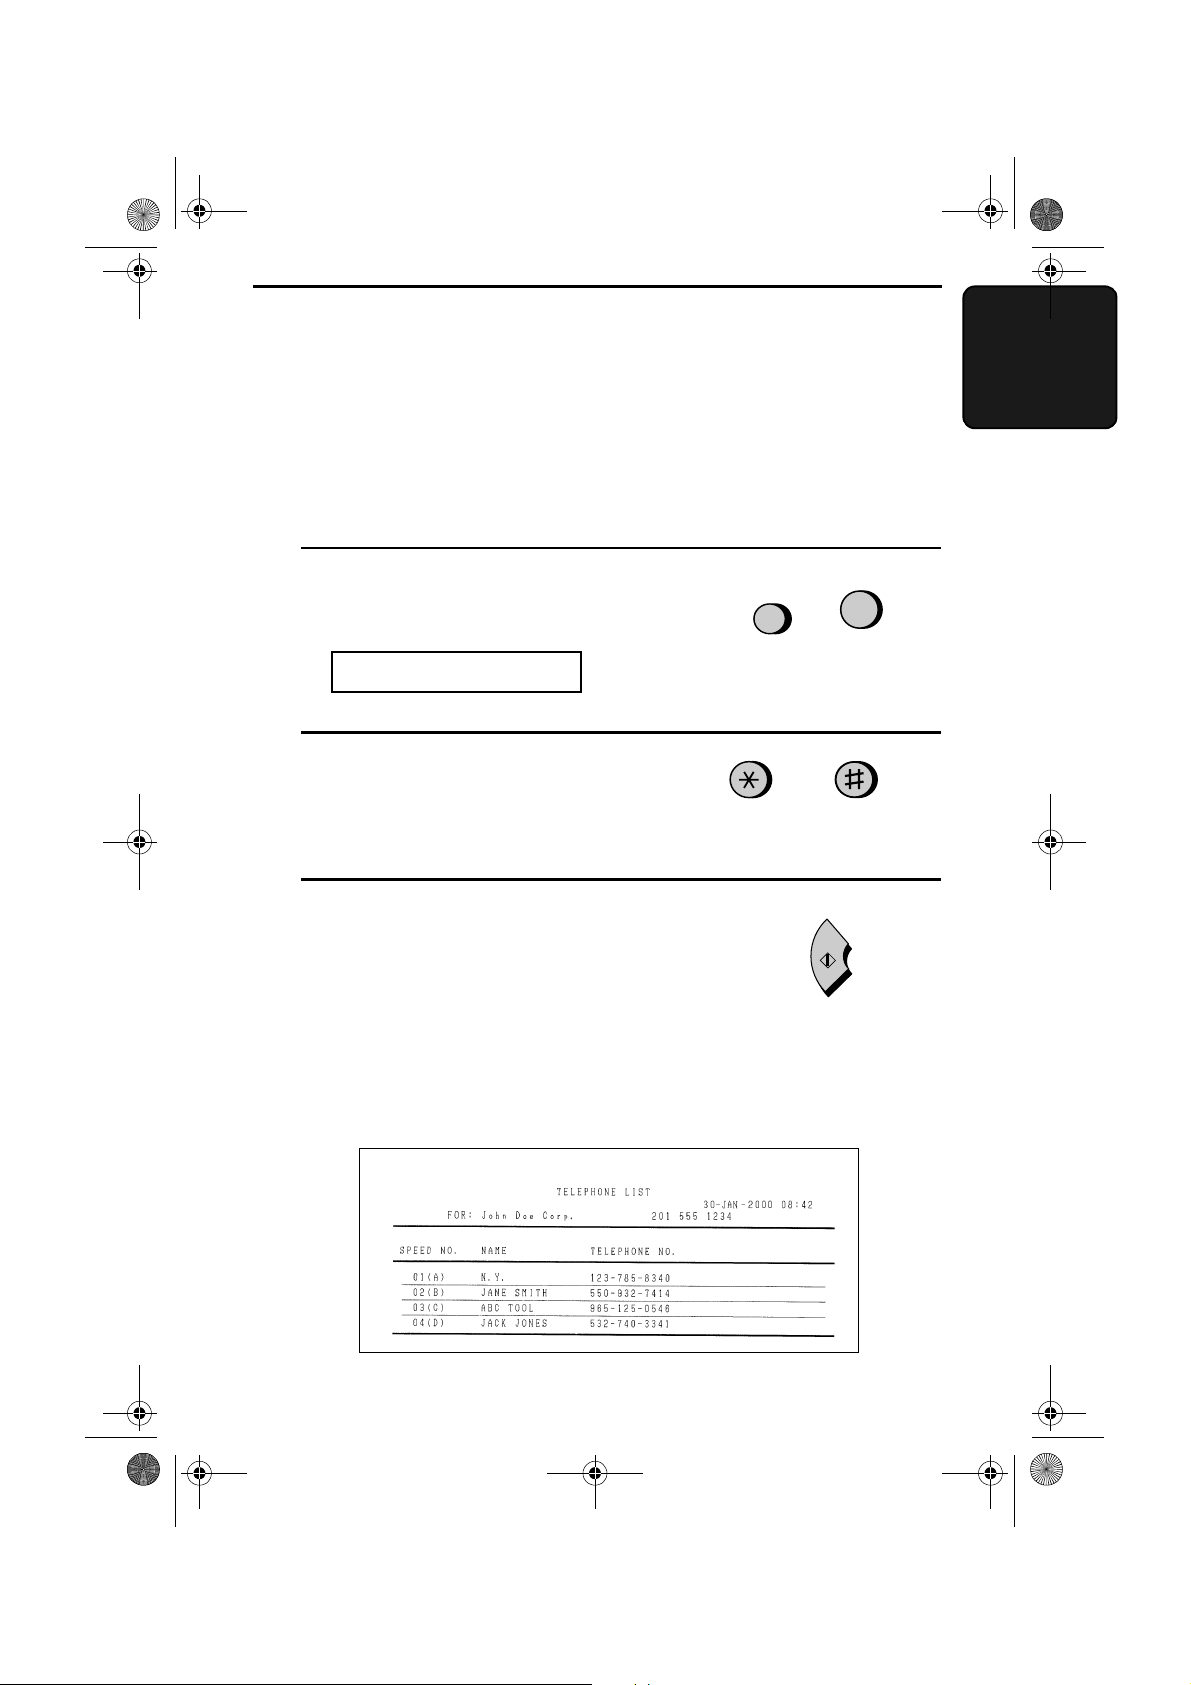
8. Printing Lists
You can print the Telephone Number List showing the fax/telephone
numbers you have stored for automatic dialling, and the Anti Junk
Number List showing the numbers you are blocking.
To print a list, follow the steps below.
Lists
8. Printing
1
Press the
The display will show:
2
Press the * key or # key until the
desired list appears in the display.
3
Press the
Telephone Number List
This list shows the fax numbers that have been programmed for
automatic dialling.
FUNCTION
LISTING MODE
START
key to print the list.
key and 2.
FUNCTION
2
or
START
85
Page 10
all-ux40.book Page 87 Thursday, November 18, 1999 2:35 PM
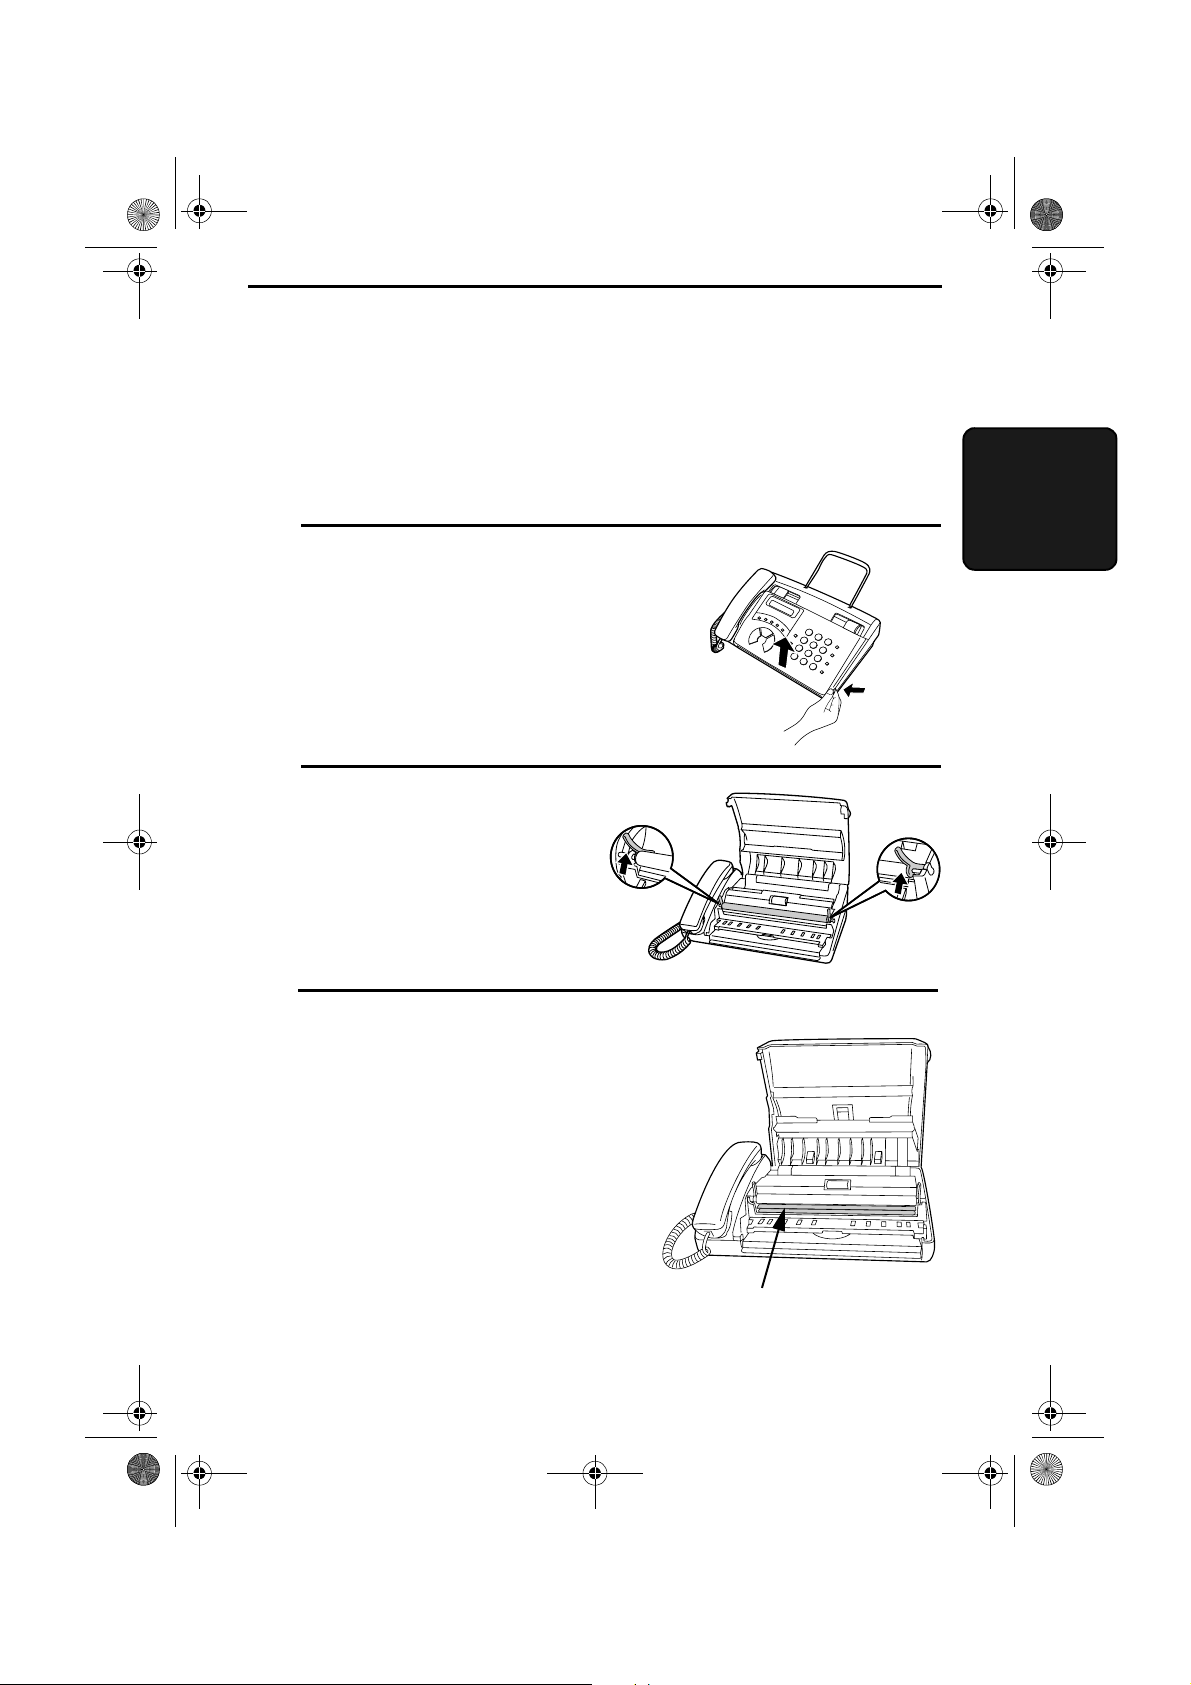
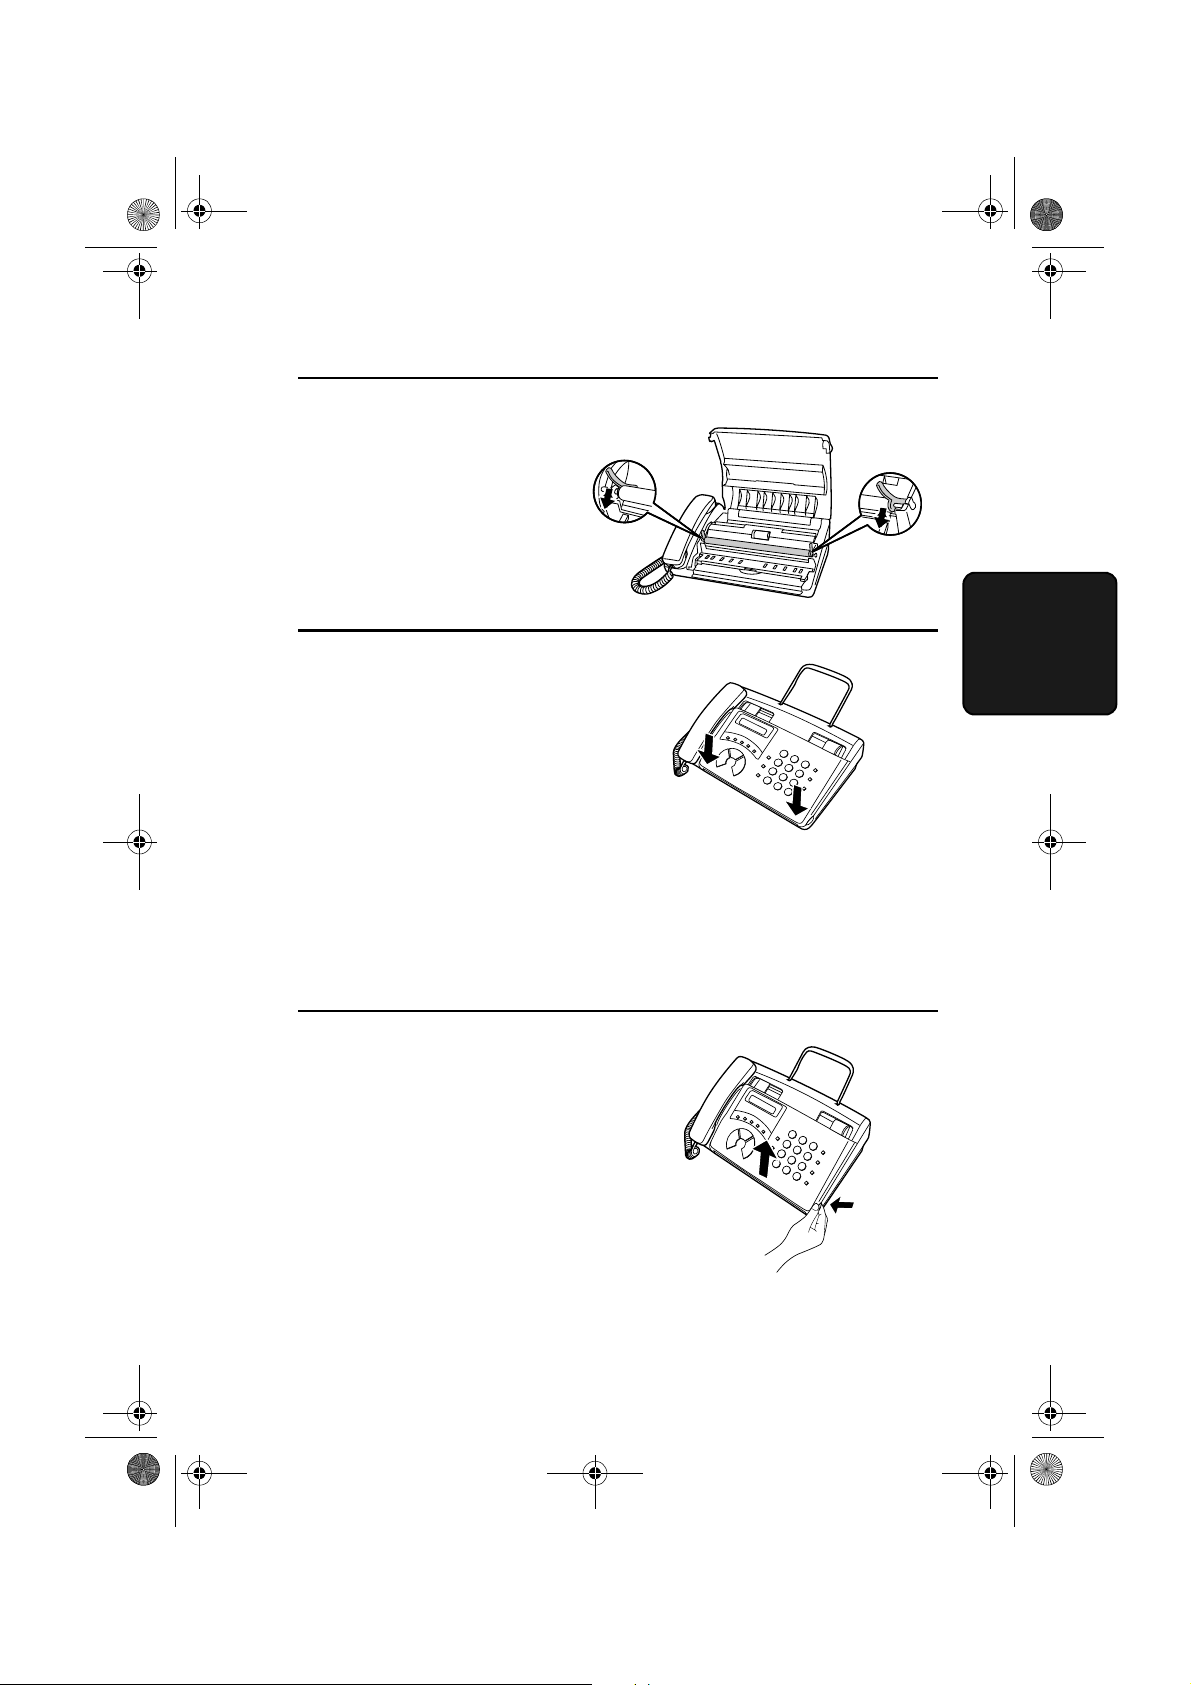
9. Maintenance
Cleaning the scanning glass and rollers
Clean the scanning glass and rollers frequently to ensure the quality of
your transmitted images and copies.
1
Grasp the finger hold and pull up to
open the operation panel.
9. Maintenance
2
Flip up the green levers on each side
of the white roller.
3
Wipe the scanning glass and rollers
with a cotton pad.
•
Make sure that all dirt and stains
(such as correcting fluid) are
removed, as dirt will cause vertical
lines on transmitted images and
copies.
Scanning
glass
87
Page 11
all-ux40.book Page 89 Thursday, November 18, 1999 2:35 PM
10. Troubleshooting
Problems and Solutions
Line error
Problem Solution
LINE ERROR appears in
the display.
Try the transaction again. If the error persists, check
the following:
• Check the connection. The cord from the
socket to the wall socket should be the
LINE
correct type for the fax machine.
• Make sure th ere are no modem devi ces sharing the
same telephone line.
• Check with the other party to make sure their fax
machine is functioning properly.
• Have your telephone line checked for line noise.
• Try connecting the fax machine to a different
telephone line.
• If the problem still occurs, your fax machine may
need service.
TEL.
shotting
10. Trouble-
89
Page 12
all-ux40.book Page 90 Thursday, November 18, 1999 2:35 PM
Problems and Solutions
Dialling and transmission problems
Problem Solution
No dial tone when you
pick up the handset.
Dialling is not possible. • Make sure the power cord is properly plugged into
The power is on, but no
transmission takes place.
• Make sure the handset cord is connected to the
correct soc ket. See
Connections
a power outlet.
• Make sure that the telephone line is properly
connected to both the
wall socket.
• Make sure that the correct line cord for the fax
machine is used.
• Make sure that the receiving machine has paper.
• Make sure that the telephone line cord is plugged
into the
socket.
• If the receiving machine is in manual mode with no
attendant, reception will not be possible.
• Check the display for error messages.
• Pick up the handset and check for a dial tone.
TEL. LINE
Connecting the handset
in Chapter 1.
TEL. LINE
socket, and not the
in
socket and the
TEL. SET
Nothing is printed at the
receiving end.
A distorted image is
received at the other end.
90
• Make sure that the document for transmission is
placed face down in the feeder.
• Noise on the telephone line may cause distortion.
Try sending the document again.
• Make a copy of the document on y ou r fax machine.
If the copy is also distorted, your fax machine may
need service.
Page 13

all-ux40.book Page 91 Thursday, November 18, 1999 2:35 PM
Reception and copying problems
Problem Solution
Problems and Solutions
The power is on, but no
reception takes place.
The printing paper comes
out blank when you try to
receive a document.
The received document is
faint.
Received images are
distorted.
• Make sure that the telephone line cord is plugged
into the
socket. Make sure the correct line cord is used.
• Make sure that the document is loaded properly in
the feeder of the transmitting machine. Make a
copy or print a report to confirm the printing ability
of your machine.
• Make sure that the thermal paper is properly
loaded in your fax machine. (If the roll has been
loaded incorrectly, nothing will be printed.)
• Ask the other party to send higher contrast
documents. If the contrast is still too low, your fax
machine may need service. Make a copy or print a
report to check your machine’s printing ability.
• Make sure you are using the recommended
thermal paper. See
Chapter 1.
• Noise on the telephone line may cause distortion.
Have the oth er party try sending the document
again.
• Make a copy or print a report on your fax machine.
If the copy or report is also distorted, your fax
machine may need service.
TEL. LINE
socket, and not the
Loading the Thermal Paper
TEL. SET
in
shooting
10. Trouble-
A received document or
copy prints out in strips.
The quality of copies is
poor and/or black spots
appear.
• Make sure the oper ation pa nel is com pletely c losed
(press down on both sides of the panel).
• Any dirt or material on the scanning glass will
cause spots to appear on copies and transmitted
faxes. Clean the scanning glass as explained in
Chapter 9.
91
Page 14
all-ux40.book Page 92 Thursday, November 18, 1999 2:35 PM
Problems and Solutions
Reception/copying is
interrupted.
• If reception or copying takes place continuously for
a long time, the print head may overheat. Turn off
the power and let it cool down.
Answering machine connection
Problem Solution
The answering machine
connection does not
operate properly.
• Make sure your fax machine's reception mode is
set to A.M.
• Make sure your fax machine's
connected to the wall socket. Make sure your fax
machine's
answering ma chine's telephone lin e soc ket (no t the
answering machine's extension phone socket).
• Try reducing the length of the OGM (preferably to
10 seconds).
• Make sure that the Quiet Detect Time setting is set
to three or four seconds (see Chapter 6).
TEL. SET
TEL. LINE
socket is connected to your
socket is
92
Page 15
all-ux40.book Page 93 Thursday, November 18, 1999 2:35 PM
General problems
Problem Solution
Problems and Solutions
Nothing appears in the
display.
The machine does not
respond when you press
any of its ke y s .
Automatic document
feeding does not work for
transmission or copying.
Voice calls taken on an
extension phone are
interrupted by the fa x.
No reception occurs w h en
polling is attempted.
• Make sure the power cord is properly plugged into
a power outlet.
• Connect another el ectrical applia nce to the o utlet to
see if it has power.
• If a beep sound is not made when you press the
keys, unplug the power cord and then plug it in
again several seconds later.
• Check the size and weight of the document (see
Transmittable Doc ume nts
• The fax may interrupt during a voice call if the
reception mode is set to A.M. To prevent
interruption on a tone dial extension phone, press
any three keys on the extension phone after
answering. (N ote: Do not enter the co de to activate
fax reception.)
• Make sure you have not run out of paper.
• Make sure t he t ransmitting machi ne is in aut omatic
reception mode.
• If the transmitting machine has polling security,
make sure that your fax number has been entered
both in your machine and in the transmitting
machine.
in Chapter 2).
shooting
10. Trouble-
93
Page 16
all-ux40.book Page 94 Thursday, November 18, 1999 2:35 PM
Messages and Signals
Messages and Signals
Display messages
If you have turned on the Caller ID function, see Caller ID in Chapter 7
Note:
for display messages related to Caller ID.
COVER OPEN The operation panel is open. Close it.
DOCUMENT JAMMED The original document is jammed. See the following
section,
FUNCTION MODE The
LINE BUSY This appears if you attempt to send a fax by
automatic dialing and the line is b usy or the receiving
fax machine doesn’t answer (even after automatic
redialing). Press the
LINE ERROR Transmission or reception was not successful. Press
the
again. If the error pers ists, s ee
and Solutions
NO DATA This appears if you attempt to search for an
automatic dialling number when none have been
stored.
NO # STORED You have tried to dial or clear a Rapid Key or Speed
Dial number that hasn’t been programmed (a full
number hasn’t been assigned to it).
OFF HOOK This appears if you f orgot to rep lace the ha ndset afte r
using it to dial an d send a f ax. Rep lace the handset or
press the
Clearing Paper Jams
FUNCTION
STOP
key has been pressed.
STOP
key to clear the message and then try
in this chapter.
key to clear the message.
STOP
.
key to clear the message.
Line Error
Problems
in
ON HOOK DIAL The
OUT OF PAPER You ha ve run out of thermal paper. Load a new roll of
SPEAKER
machine is waiting for you to dial.
thermal paper as explained in
Paper
in Chapter 1.
key has been pressed and the fax
Loading the Thermal
94
Page 17
all-ux40.book Page 95 Thursday, November 18, 1999 2:35 PM
Messages and Signals
OVER HEAT The print head has overheated. Operation can be
PAPER JAMMED The printing paper is jammed. See the following
READY TO SEND A document has been loaded and the fax machine is
RECALLING This appears if you attempt to send a fax by
SEARCH DIAL The
TOTAL PAGE(S) 01 Number of pages transmitted, received, or copied.
continued after it cools.
section,
Ensure that there is sufficient space in front of the
machine for recording paper to exit correctly.
waiting for you to begin faxing or copying.
automatic dialling and the line is busy or the receiving
fax machine does not answer. Your fax machine will
automatically reattempt the call. (See
Redialling
Chapter 2.)
to search for an automatic dialling number, or press
the
(See
Fax by Automatic Dialling
Clearing Paper Jams
Sending a Fax by Automatic Dialling
in
SEARCH/R
STOP
Searching for an auto-dial number
key has be en pres sed. Press # or *
key to return to the date and time display.
.
in Chapter 2.)
Automatic
Sending a
in
in
shooting
10. Trouble-
Audible signals
Continuous tone 3 seconds Indicates the end of transmission,
Intermittent tone
(3 beeps)
Rapid intermittent
tone
5 seconds
(1 second on, 1
second off)
Continuous
(0.7 seconds on,
0.3 seconds off)
reception, or copying.
Indicates incomplete transmission,
reception, or copying.
Indicates that the handset is off hook.
95
Page 18

all-ux40.book Page 96 Thursday, November 18, 1999 2:35 PM
Clearing Paper Jams
Clearing Paper Jams
Clearing a jammed document
If the original document doesn’t feed properly during transmission or
copying, or DOCUMENT JAMMED appears in the display, first try
pressing the
operation panel and remove it.
Important:
Do not try to remove a document without first releasing it as
explained below. This may damage the feeder mechanism.
1
Grasp the finger hold and pull up to
open the operation panel.
START
key. If the document doesn’t feed out, open the
2
Flip up the green levers on each side
of the white roller.
3
.
Remove the document.
96
Page 19
all-ux40.book Page 97 Thursday, November 18, 1999 2:35 PM
4
Flip down the green levers on each
side of the white roller.
5
Close the operation panel, making
sure it clicks into place.
•
Press down on both front corners of
the panel to make sure it clicks into
place.
Clearing Paper Jams
shooting
10. Trouble-
Clearing jammed paper
1
Unplug the fax machine. Grasp the
finger hold and pull up to open the
operation panel.
97
Page 20

UX-60
all-ux40.book Page 98 Thursday, November 18, 1999 2:35 PM
Clearing Paper Jams
2
Flip up the front paper guide.
UX-40
3
.
Remove the paper roll.
UX-60:
•
paper from the paper compartment.
Remove any cut pieces of
Press the knob to make sure the
front side of the metal guide is dow n.
4
Cut off the wrinkled part of the paper.
5
Reload the paper.
•
Jammed paper is often caused by
improper loading. Be sure to carefully follow the instructions for
paper loading given in
98
Thermal Paper
•
Make sure that there is sufficient
space in front of the machine for
the paper to exit correctly.
in Chapter 1.
Loading the
Page 21
all-ux40.book Page 99 Thursday, November 18, 1999 2:35 PM
Index
A
Anti Junk Fax, 79
Anti Junk Number List
Audible signals
Auto-dial numbers, storing
,
86
,
95
,
43
C
Caller ID, 73
Chain Dialling
Contrast
Copies, making
-
78
, 45,
63
,
38
,
61
D
Date, setting, 26
Dialling
, 45,
Chain
Direct Keypad
Normal
Rapid Key
Speed
Direct Keypad Dialling
Display messages
Document feeder
Document guides
Document restrictions
Document sizes
Document, maximum scanning size
, 40,
, 48,
63
62
, 47,
62
,
,
,
,
33
,
94
35
35
49
62
,
49
,
34
F
FAX reception mode, 29, 55
Fax Signal Receive
,
60
H
Halftone setting, 38
Handset
Housing, cleaning
,
13
,
88
J
Jams, clearing, 96
-
98
L
Letters, entering, 24
Line error
Loading paper
Loading the document
,
89
, 18 -
21
,
35
N
Normal Dialling, 40, 62
Number of rings in FAX reception mode
56
,
O
Original document support, 16
P
21
-
98
,
43
Paper jams, clearing, 96
,
,
, 18 -
15
77
Paper, thermal
Pauses in automatic dialling
Power cord
Priority Call
R
,
Rapid Key Dialling, 47, 62
34
Reception mode
FAX mode
,
Setting
TEL mode
TEL/FAX mode
Redialling
Removing original document
Resolution
Ringer volume
Rollers, cleaning
, 41, 51,
,
38
29
, 29,
, 29,
,
32
,
87
63
55
57
,
54
,
36
99
Page 22
all-ux40.book Page 100 Thursday, November 18, 1999 2:35 PM
Index
S
Scanning glass, cleaning, 87
Search Dial
Sender’s name and number, entering
-
25
Speaker volume
Speed Dialling
, 50,
, 48,
63
,
31
62
T
TEL reception mode, 29, 57
, 18 -
,
26
,
16
,
54
,
59
,
16
,
85
21
TEL. LINE jack
,
TEL/FAX reception mode
22
Tel/Fax Remote Number
Telephone line cord
Telephone Number List
Thermal paper
Time, setting
100
Page 23
all-ux40.book Page 0 Thursday, November 18, 1999 2:35 PM
Länderunterscheidungstabelle
Dieses Gerät funktioniert nur in den in der Tabelle aufgeführten Telefonnetzen, nachdem Sie die in derselben Tabelle genannten Einstellungen durchgeführt haben.
ÖSTERREICH keine keine Deutsch Deutsch keine 2polig
FRANKREICH keine ja Französisch Französisch
DEUTSCHLAND keine ja Deutsch Deutsch
GRIECHENLAND keine keine Englisch Englisch
IRLAND keine ja Englisch Englisch leitungskabel 3polig
ITALIEN keine keine Italienisch Italienisch leitungskabel 2polig
PORTUGAL ja keine Englisch Englisch keine 2polig
SPANIEN keine keine Spanisch Spanisch leitungskabel 2polig
VEREINIGT. KÖNIGREICH keine ja Englisch Englisch
Die Original-Ländereinstellung ist auf dem Typenschild angegeben.
Wenn der auf dem Typenschild angegebene Ländername (Abkürzung) zu dem Land paßt, in dem das Gerät aufgestellt werden soll bzw. zu dem Netz paßt, an das das Gerät
angeschlossen werden soll, sind keine weiteren Einstellungen erforderlich.
Sollten Sie beabsichtigen das, Telefonnetz an ein anderes Netzwerk anzuschließen, dann sollten Sie sich an Ihren Vertragshändler wenden, der Sie über die durchzuführenden
Einstellungen informieren wird.
Impulswahi Rufnummernkennung Spracheinstellung Bedienungshandbuch Zubehör für TEL-Leitung Netzkabel
leitungskabel
leitungskabel
leitungskabel
adapter
2polig
2polig
2polig
3polig
Tabla diferenciadora de países
Este equipo está destinado a funcionar en las redes de los países que figuren en la tabla. La compatibilidad con cada una de ellas depende del adecuado posicionamiento de los
ajustes que se mencionan en la misma.
Marcador de impulsos Caller-ID (CLIP) Ajuste de idioma M anual de operaciones Accesorios para línea de TEL Cable de alimentación
AUSTRIA
FRANCIA
ALEMANIA
GRECIA
IRLANDA
ITALIA
PORTUGAL
ESPAÑA
REINO UNIDO
no no
no sí
no sí
no no
no sí
no no
sí no
no no
no sí
Alemán
Francés
Alemán Alemán cable de línea 2 PIN
Inglés Inglés cable de línea 2 PIN
Inglés Inglés cable de línea 3 PIN
Italiano Italiano cable de línea 2 PIN
Inglés Inglés no 2 PIN
Español
Inglés
Alemán no
Francés
Español
Inglés adaptador
cable de línea 2 PIN
cable de línea 2 PIN
2 PIN
3 PIN
El ajuste inicial de país está men cionado en la placa de evalu ación.
Si el nombre abreviado en la placa es igual al país/red de uso destinado, entonces no es necesario realizar los ajustes.
Si se tiene la intención de pasar el Fax de una red a otra y de conectar el Fax a la otra red, el usuario debe contactar con el distribuidor local para realizar los ajustes respectivos.
Table de différenciation par pays
Cet équipement est conçu pour fonctionner sur le réseau des pays repris dans le tableau. La compatibilité de chacun d’entre eux dépend des régla ges correspondants repris dans
ce même tableau.
Numérotation type décimal Identification des appeles entrants (CLIP) Langue param étrée Manuel d'utilisation Accessoire pour ligne TEL Cordon d'alimentation
AUTRICHE non non Allemand Allemand non 2 broches
FRANCE non oui Français Français câble pour ligne 2 broches
ALLEMAGNE non oui Allemand Allemand câble pour ligne 2 broches
GRECE non
IRLANDE non
ITALIE non non Italien Italien câble pour ligne 2 broches
PORTUGAL oui non Anglais Anglais non 2 broches
ESPAGNE non non Espagnol Espagnol câble pour ligne 2 broches
ROYAUME-UNI non oui Anglais Anglais adaptateur 3 broches
Le paramétrage initial du pays est renseigné sur la plaque de spécification.
Si le nom qui figure en abrégé sur la plaque de spécification correspond au pays/réseau d'utilisation voulu, aucun paramétrage n'est nécessaire.
Si son intention est de déplacer le facsimilé d'un réseau à un autre et de connecter le facsimilé à cet autre réseau, il est conseillé à l'utilisateur de contacter le distributeur local
pour connaître les valeurs de paramétrage locales.
non Anglais Anglais
oui Anglais Anglais
câble pour ligne 2 broches
câble pour ligne 3 broches
Page 24

all-ux40.book Page 1 Thursday, November 18, 1999 2:35 PM
Tabella della differenziazione dei Paesi
Questo apparecchio è predisposto per funzionare con la rete dei Paesi, menzionati nella tabella. La compatibilità con ognuno di essi dipende dalla realizzazione adeguata della
regolazione, menzionata nella stessa tabella.
Selezione ad impulsi
AUSTRIA
FRANCIA no si Francese Francese cavo linea 2 PIN
GERMANIA no si Tedesco Tedesco cavo linea 2 PIN
GRECIA no no Inglese Inglese cavo linea 2 PIN
IRLANDA no si Inglese Inglese cavo linea 3 PIN
ITALIA
PORTOGALLO
SPAGNA
INGHILTERRA no si Inglese Inglese adattatore 3 PIN
L'impostazione iniziale del Paese è menzionata inizialmente sulla targhetta dei dati del modello.
Se l'abbreviazione del nome sulla targhetta dei dati coincide con il Paese / la rete in cui si utilizza, non occorre nessun'impostazi one.
Se si intende spostare il fax da una rete all'altra e collegare il fax ad un'altra rete, l'utente deve mettersi in contatto con il distributore locale per le rispettive impostazioni.
no no
no no
si no
no no
ID chiamata (CLIP)
Impostazione lingua Manuale operativo Accessori linea TEL Cavo alimentazione rete
Tedesco Tedesco
Italiano Italiano cavo linea 2 PIN
Inglese Inglese
Spagnolo Spagnolo cavo linea 2 PIN
no
no
2 PIN
2 PIN
Tabel met landelijke verschillen
Deze apparatuur werd geconcipierd voor het gebruik met het netwerk van de in de tabel vermelde landen. De compatibilit eit van de apparatuur is afhankelijk van de geschikte
uitvoering van de aanpassing die in dezelfde tabel wordt vermeld.
Pulskiezen Oproeper-ID (CLIP) Taalinstelling Gebruiksaanwijzing Accessoires voor TEL leiding Net kabel
OOSTENRIJK geen geen Duits Duits geen 2 PIN
FRANKRIJK geen ja Frans Frans leidingkabel 2 PIN
DUITSLAND geen ja Duits Duits leidingkabel 2 PIN
GRIEKENLAND geen geen Engels Engels leidingkabel 2 PIN
IERLAND geen ja Engels Engels leidingkabel 3 PIN
ITALIË geen geen Italiaans Italiaans leidingkabel 2 PIN
PORTUGAL ja geen Engels Engels geen 2 PIN
SPANJE geen geen Spaans Spaans leidingkabel 2 PIN
GROOT-BRITTANNIË geen ja Engels Engels adapter 3 PIN
De oorspronkelijk e landsinstelling wordt op het typeplaatje vermeld.
Wanneer de afgekorte naam op het typeplaatje overeenstemt met het land van van toepassing /toegepaste netwerk zijn er geen instellingen nodig.
Wanneer men van plan is de faxtoestel van een netwerk naar een ander te verplaatsen en de faxtoestel aan een ander netwerk aan te sluiten, dient de gebruiker contact op te
nemen met de plaatselijke dealer voor de betreffende instellingen.
Tabela de diferenciação por países
Este equipamento está preparado para funcionar nas redes telefónicas dos países mencionados na tabela. A compatibilidade com cada uma destas redes depende da realização
correcta do ajuste mencionado na mesma tabela.
Discagem por impulsos ID-Chamador (CLIP) Idioma definido M anual deintruções Acessórios para lig. linha telefónica Cabo de alimentação
ÁUSTRIA nenhum nenhum Alemão Alem ão nenhum 2 PINOS
FRANÇA nenhum sim Francês Francês cabo de acesso à rede 2 PINOS
ALEMANHA nenhum sim Alemão Alemão cabo de acesso à rede 2 PINOS
GRÉCIA nenhum nenhum Inglês Inglês cabo de acesso à rede 2 PINOS
IRLANDA nenhum sim Inglês Inglês cabo de acesso à rede 3 PINOS
ITÁLIA nenhum nenhum Italiano Italiano cabo de acesso à rede 2 PINOS
PORTUGAL sim nenhum Inglês Inglês nenhum 2 PINOS
ESPANHA nenhum nenhum Espanhol Espanho l cabo de acesso à rede 2 PINOS
REINO UNIDO nenhum sim Inglês Inglês adaptador 3 PINOS
O idioma definido consta da chapa de características.
Se o nome abreviado da chapa de características corresponder ao país/rede em que vai ser utilizado, não é necessário efec tuar qualquer alteração.
Se for necessário desligar o aparelho de fax da rede actual para o ligar a outra rede, o utilizador deverá contactar o revendedor mais próximo para efectuar as respectivas alterações.
Page 25
all-ux40.book Page 2 Thursday, November 18, 1999 2:35 PM
Maakohtainen erotaulukko
Laite on valmisteltu toimimaan yhdessä maakohtaisten verkkojen kanssa, jotka mainitaan taulukossa. Laitteen ja verkon yhteensopivuus riippuu aina siitä, että asetukset, jotka
mainitaan samassa taulukossa, on tehty oikein.
Pulssivalinta
ITÄVALTA ei ei
RANSKA ei on Ranska Ranska johtokaapeli 2-nast.
SAKSA ei on Saksa Saksa johtokaapeli 2-nast.
KREIKKA ei ei Englanti Englanti johtokaapeli 2-nast.
IRLANTI ei on Englanti Englanti johtokaapeli 3-nast.
ITALIA ei ei
PORTUGALI on ei
ESPANJA ei ei
ENGLANTI ei on Englanti Englanti adapteri 3-nast.
Alkuperäinen maan asetus mainitaan tehokilvessä.
Jos tehokilven lyhenne vastaa tulevan käyttömaan/-verkon arvoja, asetuksia ei tarvitse tehdä.
Jos on tarkoitus muuttaa telefax verkosta toiseen ja liittää telefax toiseen verkkoon, käyttäjän tulisi ottaa yhteyttä paikalliseen myynt iliikkeeseen asetusten vuoksi.
Soittahan ID (CLIP)
Kieliasetus Käyttöohje Puh.-johtovarusteet Virtajohto
Saksa Saksa
Italia Italia
Englanti Englanti
Espanja Espanja
ei 2-nast.
johtokaapeli 2-nast.
ei 2-nast.
johtokaapeli 2-nast.
Landstabell
Den här utrustningen är förberedd för att fungera med de länders system som anges i tabellen. Kompatibiliteten med var och en av dem beror på att riktig inställning genomföras
som nämns i samma tabell.
Impulsavalg Opkalds-ID (CLIP) Språk inställning Handbok Tillbehör För telefonlinje Strömk älla
ÖSTERRIKE
FRANKRIG
TYSKLAND ingen ja Tyska Tyska linjekabel 2 PIN
GREKLAND ingen ingen Engelska Engelska linjekabel 2 PIN
IRLAND ingen ja Engelska Engelska linjekabel 3 PIN
ITALIAN ingen ingen Italienska Italienska linjekabel 2 PIN
PORTUGAL
SPANIEN
STORBRITANNIEN
De ursprungliga landsinställningarna finns på tillverkningsskylten.
Om det förkortade namnet på tillverkningsskylten överensstämmer med valt land/nätverk, behövs inga inställningar.
Om fax-apparatet skall flyttas från ett nätverk till ett annat och koppla fax-apparatet till ett annat nätverk, kontakta återförsäljare för respektive inställningar.
ingen ingen Tyska Tyska ingen 2 PIN
ingen ja Fransk Fransk linjekabel 2 PIN
ja ingen Engelska Engelska ingen 2 PIN
ingen ingen Spanska Spanska linjekabel 2 PIN
ingen ja Engelska Engelska
adapter
3 PIN
Tabel til differentiering af lande
Dette udstyr er forberedt til at fungere med netværket i de lande , der er omtalt i tabellen. Kompatibiliteten med enhver af dem, afhænger af den adækvate realisering af indstillingen, der er omtalt i samme tabel.
Pulsval Caller-ID (CLIP) Sprogindstilling Betjeningsvejledning Tilbehör for TLF-ledning Net kabel
ÖSTRIG nej nej Tysk Tysk nejt 2 PIN
FRANKRIKE nej ja Fransk a Franska telefonledning 2 PIN
TYSKLAND nej ja Tysk Tysk telefonledning 2 PIN
GREKLAND nej nej Engelsk Engelsk telefonledning 2 PIN
IRLAND nej ja Engelsk Engelsk telefonledning 3 PIN
ITALIEN nej nej Italiensk Italiensk telefonledning 2 PIN
PORTUGAL ja nej Engelsk Engelsk nej 2 PIN
SPANIEN nej nej Spansk Spansk telefonledning 2 PIN
ENGLAND nej ja Engelsk Engelsk adapter 3 PIN
Startindstillingen for landet er angivet på mærkeskiltet.
Hvis det forkortede navn på mærkeskiltet svarer til det önskede land/netværk i hvilket apparatet skal bruges, er indstillinger ikke nödvendige.
Hvis man önsker at flytte faxem fra et netværk til et andet og at forbinde faxem til det andet netværk, skal brugeren kontakte den lokale forhandler for at erfare de respektive indstillinger.
Page 26
all-ux40.book Page 3 Thursday, November 18, 1999 2:35 PM
Country Differentiation Table
This equipment is prepared to function with the network of the countries which is mentioned in the table. The compatibility with each of them depends on the adequate realization
of the adjustment which is mentioned on the same table.
Pulse Dialling
AUSTRIA none none German German none 2 PIN
FRANCE none yes French French line cable 2 PIN
GERMANY none yes German Germ an line cable 2 PIN
GREECE none none English English line cable 2 PIN
IRELAND none yes English English line cable 3 PIN
ITALY none none Italian Italian li ne cable 2 PIN
PORTUGAL yes none English English none 2 PIN
SPAIN none none Spanish Spanish line cable 2 PIN
UNITED KINGDOM none yes English English Adapter 3 PIN
The initial country setting is mentioned on the rating plate.
If the abbreviated name on the rating plate is matching with the intended country/network of usage, then no settings are needed.
If it is intended to move the Facsimile from one network to another and to connect the Facsimile to the other network, the us er should contact to the local dealer for the respective
settings.
Caller-ID (CLIP)
Language Setting Operation Manual Accessory for TEL Line Power Cord
Landsdifferensieringstabell
Utstyret er klargjort for å kunne fungere i nettverkene til de land som er nevnt i tabellen. Kompatibiliteten til hvert av dem avhenger av korrekt utføring av de justeringer som er
nevnt i samme tabell.
Pulsvalg Anroper-ID (CLIP) Språkinnstilling B ruksanvisning Tilbehør for TEL linje Strømledning
ØSTERRIKE nei nei Tysk Tysk n ei 2 PIN
FRANKRIKE nei ja Fransk Fransk Linjekable 2 PIN
TYSKLAND nei ja Tysk Tysk Linjekable 2 PIN
HELLAS nei nei Engelsk Engelsk Linjekable 2 PIN
IRLAND nei ja Engelsk Engelsk Linjekable 3 PIN
ITALIA nei nei Italiensk Italiensk Linjekable 2 PIN
PORTUGAL ja nei Engelsk Engelsk nei 2 PIN
SPANIA nei nei Spansk Spansk Linjekable 2 PIN
STORBRITANNIA nei ja Engelsk Engelsk Adapter 3 PIN
Den fabrikkmessige landsinnstillingen er oppgitt på typeskiltet.
Hvis det forkortede navnet på typeskiltet tilsvarer brukerlandet/nettverket, er det ikke nødvendig med en innstilling.
Hvis faksapparatet skal flyttes fra et nettverk til et annet og faksapparaet skal koples til dette andre nettverket, bør brukeren ta kontakt med forhandleren på stedet for å utføre de
nødvendige innstillingene.
Πίνακας διαφορισμού χωρών
Ο εξοπλισμός αυτός έχει προ ετοιμαστεί για τη λειτουργία σε δίκτυο των χωρών που αναφέρονται στον πίνακα. Η εκάσ τοτε συμβατότ ητά του εξαρτάται από την κατάλληλη
υλοποίηση της ρύθμισης που αναφέρεται στον ίδιο πίνακα.
ΑΥΣΤΡΙΑ όχι όχι Γε ρμανικά Γερμανικά όχι
ΓΑΛΛΙΑ όχι ναι Γαλλικά Γαλλικά καλώδ. γραμμής
ΓΕΡΜΑΝΙΑ όχι ναι Γερμανικά Γερμανικά καλώδ. γραμμής
ΕΛΛΑΔΑ όχι όχι Αγγλικά Αγγλικά καλώδ. γραμμής
IΡΛΑΝΔΙΑ όχι ναι Αγγλικά Αγγλικά καλώδ. γραμμής
IΤΑΛΙΑ όχι όχι Ιταλικά Ιταλικά καλώδ. γραμμής
ΠΟΡΤΟΓΑΛΙΑ ναι όχι Αγγλικά Αγγλικά όχι
ΙΣΠΑΝΙΑ όχι όχι Ισπανικά Ισπανικά καλώδ. γραμμής
Μ. ΒΡΕΤΑΝΙΑ όχι ναι Αγγλικά Αγγλικά Προσαρμογέας
Η αρχική ρύθμιση χώρας αναφέρεται στην πινακίδα.
Εάν η συντομογραφία του ονόματος στην πινακίδα συμπίπτει με το προβλεπόμενο δίκτυο/χώρα χρήσης, τότε δεν είναι απαραίτητες οι ρυθμίσε ις.
Εάν προβλέπεται να μετακινηθεί το Tέλεφαξ από ένα δίκτυο σε άλλο και να συνδεθεί το Tέλεφαξ στο άλλο δίκτυο, πρέπει ο χρήστης να έρθει σε επαφή με τον τοπικό
αντιπρόσωπο για τις σχετικές ρυθμίσεις.
ΠαλμοΕπιλογή Καλών-ID (CLIP) Γλώσσα ρύθμισης Οδηγίες λειτουργίας Αξ εσουάρ για γραμμή TΗΛ Καλώδιο τροφοδοσίας
2 PIN
2 PIN
2 PIN
2 PIN
3 PIN
2 PIN
2 PIN
2 PIN
3 PIN
Page 27

all-ux40.book Page 110 Thursday, November 18, 1999 2:35 PM
SHARP ELECTRONICS (U.K.) LTD.
Sharp House, Thorp Road, Newton Heath, Manchester, M40 5BE
SHARP CORPORATION
PRINTED IN SPAIN
(TINSE4055FFZZ)
Page 28
all-ux40.book Page 88 Thursday, November 18, 1999 2:35 PM
4
Flip down the green levers on each
side of the white roller.
5
Flip up the front paper guide and wipe
the black roller under it.
6
Flip down the front paper guide.
7
Close the operation panel.
•
Press down on both front corners of
the panel to make sure it clicks into
place.
Cleaning the housing
Wipe the external parts and surface of the machine with a dry cloth.
Caution!
Do not use benzene or thinner. These solvents may damage or
discolour the machine.
88
Page 29

all-ux40.book Page 86 Thursday, November 18, 1999 2:35 PM
Printing Lists
Passcode List
This list shows setting made for polling security, your name and fax/
telephone number as entered in the machine, and a sample of the
header printed at the top of every page you transmit
PRINT)
(HEADER
Anti Junk Number List
This list shows the numbers from which reception is not allowed.
86
Page 30
all-ux40.book Page 74 Thursday, November 18, 1999 2:35 PM
Caller ID
3
Press 1 to turn on Caller ID, or 2 to
turn it off.
The display will show:
NUMBER OF RINGS
YES NO
or
1
2
4
Press the
date and time display.
STOP
key to return to the
STOP
74
Page 31

all-ux40.book Page 75 Thursday, November 18, 1999 2:35 PM
How Caller ID opera te s
When you receive a call, the name and/or phone number of the caller
will alternately appear in the display, beginning just before the second
ring. The information will continue to be displayed until the line is
disconnected.
At present most Caller-ID equipped telephone networks only
Note:
supply the caller’s number, therefore the caller’s name will only appear
providing that the caller’s name and number have been programmed into
memory.
Display example
Caller ID
DOE JOHN
525-8693
Caller’s name Caller’s nu m be r
Display messages
One of the following messages will appear while the fax rings if caller
information is not available.
NO SERVICE No caller information was received from
your telephone company. Make sure that the
telephone company has activated your
service.
CALLER-ID
ERROR
Noise on the telephone line prevented
reception of caller information.
WITHHELD Caller information was not provided by the
telephone company at the caller’s request.
Functions
7. Special
75
Page 32

all-ux40.book Page 76 Thursday, November 18, 1999 2:35 PM
Caller ID
Viewing the Caller ID list
If you subscribe to a Caller ID service and have turned on the Caller
ID function, your fax machine will keep information on the most
recent 20 calls and faxes you have received. You can view this
information, which consists of the name and number (and name, if
programmed)of each caller, in the Caller ID List.
♦
After you have received 20 calls, each new call will delete the oldest call.
Follow the steps below to view the Caller ID List in the display. If
desired, you can immediately dial a number when it appears.
1
Press these keys:
The display will show:
SEARCH
2
R
REVIEWING CALLS
2
Press the * key to scroll through the
list from the most recent call, or the #
key to scroll through the list from the
oldest call.
3
If you want to dial one of the numbers
in the list, scroll through the list until
the number appears in the display.
•
If you want to send a fax, load the
document and then press the
START
76
key.
or
START
Page 33

FUNCTION
all-ux40.book Page 77 Thursday, November 18, 1999 2:35 PM
•
If you want to make a voice call,
pick up the handset or press the
SPEAKER
key. Dialling will begin
automatically. (If you pressed the
SPEAKER
key, pick up the
handset when the other party
answers.)
Caller ID
4
Press the
STOP
key when you have
STOP
finished viewing the list.
To delete calls from the Caller ID list
If you want to delete a single call from the caller list, press the 0 key
while the call appears in the display. If you want to delete all calls
from the list, hold the 0 key down for at least 3 seconds while you are
viewing any number in the list.
Priority Call
If desired, you can set your fax to make a special ringing sound when
you receive a call from a designated phone number. This lets you
know immediately who is calling without having to look at the
display.
To use this function, enter the desired phone number by following the
steps below (only one phone number can be entered).
1
Press these keys:
3
The display will show:
PRIORITY CALL #
Functions
7. Special
77
Page 34

START
all-ux40.book Page 78 Thursday, November 18, 1999 2:35 PM
Caller ID
2
Press 1 to enter a number, or 2 to clear
a number. (If you pressed 2, go to
Step 4.)
3
Enter the phone number, including the
area code, by pressing the number
keys (max. of 20 digits).
SET CLEAR
or
1
2
4
Press the
STOP
START
key.
key and then the
Blocking voice calls
With Caller ID turned on, you can use the Anti Junk Fax function
described in
Blocking Reception of Unwanted Faxes
in this chapter to
block voice calls as well as fax receptions (the Anti Junk Fax function
normally only blocks faxes).
In this case, when a voice call or a fax transmission comes in from a
number you have specified as a "Junk Number", your fax will break
the connection as soon as it receives the calling phone number from
the caller ID service.
To use this function, enter the number in the Anti Junk Number List as
explained in
Blocking Reception of Unwanted Faxes
on the following
page.
This function cannot be used if you are using the Priority Call
Note:
function.
STOP
78
Page 35

FUNCTION
all-ux40.book Page 79 Thursday, November 18, 1999 2:35 PM
Blocking Reception of Unwanted Faxes
Blocking Reception of Unwanted Faxes
The Anti Junk Fax function allows you to block reception of faxes
from parties which you specify. This saves paper by not printing out
unwanted "junk" faxes.
To use this function, enter the fax numbers from which you do not
want to receive faxes as shown below.
♦
Up to five numbers can be entered in the Anti Junk Number List.
♦
To clear a number from the Anti Junk Number List, you need to
know the 1-digit number which identifies it. If you have forgotten
this number, print out the Anti Junk Number List as explained in
Chapter 7.
♦
For blocking faxes you must have either the telephone number as
programmed into the transmitting machine or, if Caller-ID is
enabled, the telephone number of the calling party.
1
Press these keys:
The display will show:
ENTRY MODE
2
Press the
The display will show:
STORE JUNK #
1=SET,2=CLEAR
key twice.
****
3
Functions
7. Special
79
Page 36

3
all-ux40.book Page 80 Thursday, November 18, 1999 2:35 PM
Blocking Reception of Unwanted Faxes
3
Press 1 to enter a number in the Anti
Junk Number List, or 2 to clear a
number from the list.
Entering:
4
from “1” to “5” with the numeric
keys. This number identifies the fax
number that you will enter in the next
step.
Enter a 1-digit number
SET CLEAR
or
1
2
1
(Example)
Clearing:
that identifies the fax number you
want to clear, and go to Step 6.
5
Enter the fax number.
6
Press the
7
Return to Step 4 to enter (or clear)
another fax number, or press the
STOP
time display.
Enter the 1-digit number
START
key to return to the date and
key.
2 2
4
5 6
START
Step 4 or
7
(Example)
STOP
80
Page 37

FUNCTION
all-ux40.book Page 81 Thursday, November 18, 1999 2:35 PM
Polling (Requesting a Fax Transmission)
P o lling (Requesting a Fax Transmission)
Polling allows you to call another fax machine and have it send a
document (previously loaded in its feeder) to your machine without
operator assistance. In other words, the receiving fax machine, not the
transmitting fax machine, initiates the transmission.
To use the polling function, you must first set Rapid Key E/POLL for
use as a polling key.
♦
When Rapid Key E/POLL is set as a polling key, it cannot be used
for Rapid Key dialling.
1
Press these keys:
The display will show:
4
POLLING
2
Press 1 to turn on the function, or 2 to
turn it off.
3
Press the
date and time display.
STOP
key to return to the
YES NO
or
1
2
STOP
81
Functions
7. Special
Page 38

all-ux40.book Page 82 Thursday, November 18, 1999 2:35 PM
Polling (Requesting a Fax Transmission)
Requesting transmission
Rapid Dial Keys cannot be used for polling. To dial a Rapid Dial
Note:
location, press the
SPEED DIAL
key and then enter the 2-digit number
corresponding to the Rapid Key.
1
Dial the fax machine you want to poll
using one of the following methods:
•
Pick up the handset (or press the
SPEAKER
key) and dial the full
number. Wait for the fax
answerback tone.
GHI
PQRS
ABC
DEF
3
2
1
JKL
MNO
4
7
6
5
TUV
WXYZ
9
8
•
Press the
SPEED DIAL
key and
enter a 2-digit Speed Dial number.
(Example)
•
Enter the full number using the
numeric keys.
2
Press Rapid Key E/POLL.
•
If you used the handset, replace it
E/
POLL
when POLLING appears in the
display. Reception will begin.
Turnaround polling
After polling a fax machine, you can send a document to that machine
on the same connection. Simply place the document to be sent in the
feeder and follow the steps described above in
transmission
. When polling is finished, the document will be
Requesting
automatically transmitted.
♦
The other fax machine must also have Turnaround Polling capability.
82
Page 39

START
all-ux40.book Page 83 Thursday, November 18, 1999 2:35 PM
Polling (Requesting a Fax Transmission)
Being polled (polling standby)
To let another fax machine poll your fax, press the
RECEPTION MODE
key to set the reception mode to FAX or TEL/
RESOLUTION/
FAX and load the document(s).
Transmission will take place when the other fax machine calls your
machine and activates polling. Automatic reception is possible while
your fax is on polling standby.
Polling security
Polling Security allows you to prevent unauthorized polling of your
machine. When this function is turned on, polling will only take place
when the fax number of the polling fax machine has been entered in
your machine's list of permitted fax numbers (called "passcode
numbers"). The number of the polling fax must also be correctly
programmed into itself for identification.
To use Polling Security, follow the steps below to turn the function on,
and then enter permitted numbers as shown on the following page.
1
Press these keys:
FUNCTION
3
The display will show:
SECURITY SELECT
2
Press 1 to turn polling security on, or
2
to turn it off.
3
Press the
STOP
START
key.
key and then the
YES NO
or
1
2
STOP
83
Functions
7. Special
Page 40

3
all-ux40.book Page 84 Thursday, November 18, 1999 2:35 PM
Polling (Requesting a Fax Transmission)
Storing and clearing fax numbers for polling permission
You can store up to 10 fax numbers in your machine's list of permitted
numbers. (Enter each number as it is programmed in the calling
party’s machine, not the Caller ID number.)
1
Press these keys:
The display will show:
PASSCODE # MODE
2
Press 1 to store a number, or 2 to clear
a number.
Storing:
3
01 to 10. This number identifies the
fax number you will store in the next
step.
Clearing:
identifies the fax number you want to
clear, and go to Step 5.
4
Enter the fax number.
Enter a 2-digit number from
Enter the number which
FUNCTION
3
2 2
SET CLEAR
or
1
0
4
2
1
(Example)
5 6
(Example)
7
5
Press the
6
Return to Step 3 to enter (or clear)
another number, or press
return to the date and time display.
84
START
key.
STOP
to
START
STOP
Step 3 or
Page 41

all-ux40.book Page 67 Thursday, November 18, 1999 2:35 PM
Changing the outgoing message
The outgoing message (OGM) of your answering machine should be
changed to inform callers who want to send a fax to press their Start
key. For example, your message might go as follows:
"Hello. You've reached the ABC company. No one is available to take
your call right now. Please leave a message after the beep or press
your facsimile Start key to send a fax. Thank you for calling."
♦
It is advisable to keep the length of the message under 10 seconds.
If it is too long, you may have difficulty receiving faxes sent by
automatic dialing.
♦
If your outgoing message must be longer than 10 seconds, leave a
pause of about four seconds at the beginning of the message. This
will give your fax a chance to detect fax tones sent when automatic
dialling is used.
Connecting an Answering Machine
Activating the answering machine connection
Before you go out, activate the answering machine connection as
follows:
1
Set the reception mode to A.M.
RESOLUTION
RECEPTION MODE
2
Set your answering machine to auto
TEL
TEL/FAX
answer.
♦
Your answering machine must be set to answer on a maximum of
two rings. If not, you may not be able to receive faxes sent by automatic dialling.
FAX
A.M.
Machine
6. Answering
67
Page 42

all-ux40.book Page 68 Thursday, November 18, 1999 2:35 PM
Connecting an Answering Machine
♦
If your answering machine has a toll saver function, make sure that
it will answer by the fourth ring.
If your answering machine has a remote retrieval function, make
Note:
sure the code used to activate remote retrieval is different from the code
used to activate fax reception with an extension telephone (see Chapter
3, Receiving Documents). If they are the same, entering the code from an
outside telephone to retrieve messages will cause the fax machine to be
activated.
How answering machine mode operates
While you are out, all of your incoming calls will be answered by
your answering machine and its outgoing message will play. Voice
callers can leave a message. During this time, your fax will quietly
monitor the line. If your fax detects a fax tone or a duration of silence
greater than four seconds, it will take over the line and begin
reception.
68
♦
If the connection is not good or there is noise on the line, the
answering machine and/or fax machine may not respond properly.
♦
The call counter on your answering machine may indicate that
voice messages were received, when only fax messages were
received.
♦
To prevent the fax from taking over the line and beginning reception if you call in from an external phone or answer on an extension
phone, press any three keys (other than the code to activate fax
reception, "5", "*", and "*") on the dial pad of the phone. This can
only be performed from a phone capable of tone dialling.
When you return and turn
off your answering
machine, b e sure to change
the reception mode back to
TEL/FAX, FAX, or TEL!
Page 43

all-ux40.book Page 69 Thursday, November 18, 1999 2:35 PM
Optional A.M. Mode Settings
If necessary, you can use the following settings to improve the
response of the answering machine connection to incoming calls.
Quiet Detect Time
This function causes the fax machine to take over the line and begin
reception if a certain duration of silence is detected after the
answering machine answers.
Time selections for the period of silence are 1 to 10 seconds. Quiet
Detect Time has been set to 4 seconds at the factory. This gives the
best performance with most answering machines; however, you may
need to adjust this setting depending on the disconnect time of your
answering machine.
Optional A.M. Mode Settings
Some answering machines may have unusually fast disconnect times
(equal to or very slightly less than 4 seconds), which means that the
answering machine may disconnect the line before fax reception can
begin. In this case, try a Quiet Detect Time setting of about 3 seconds.
If the fax machine is interrupting callers before they can leave a
message, try a longer Quiet Detect Time setting. If your outgoing
message includes a period of silence, make sure that the setting is
longer than that period of silence, or re-record your outgoing message
to shorten the silence.
Quiet Detect Time can be turned off by entering "00" for the time.
Note:
Note, however, that the fax machine will not be able to receive faxes sent
manually by Normal Dialling.
Machine
6. Answering
69
Page 44

4
all-ux40.book Page 70 Thursday, November 18, 1999 2:35 PM
Optional A.M. Mode Settings
To change the setting, follow the steps below.
1
Press these keys:
FUNCTION
The display will show:
QUIET DETECT TM.
2
Enter a number from 01 to 10, or
enter 00 to turn off the function.
0
5
3
Press the
date and time display.
STOP
key to return to the
(Example)
STOP
70
Page 45

all-ux40.book Page 71 Thursday, November 18, 1999 2:35 PM
Select Auto Receive
When this function is turned on, your fax will answer the call after 5
rings if the answering machine for some reason fails to answer before
that time. This ensures that you will receive fax messages even if the
answering machine’s tape fills up or the answering machine is not
turned on.
This function has been turned off at the factory. If you want to turn it
on, follow the steps below:
When this function is turned on, make sure that the answering
Note:
machine is set to answer on 4 rings or less. If it isn’t, the fax will always
answer first, preventing callers from leaving voice messages.
Optional A.M. Mode Settings
1
Press these keys:
The display will show:
SELECT AUTO RCV
2
Press 1 to turn on the function, or 2 to
turn it off.
3
Press the
STOP
key to return to the
date and time display.
FUNCTION
4
YES NO
1
or
STOP
2
71
Machine
6. Answering
Page 46

4
all-ux40.book Page 72 Thursday, November 18, 1999 2:35 PM
Optional A.M. Mode Settings
Quiet Detect Start Time
This setting can be used to delay the start of the Quiet Detect Time
function. For example, if you want to insert a pause at the beginning
of your answering machine’s outgoing message to ensure clear
detection of fax signals, you can use this setting to delay the start of
silence detection so that the pause will not cause the fax to take over
the line.
Quiet Detect Start Timing has been turned off at the factory. If you
want to use this function, turn it on as explained below. As general
guide, the delay time should be slightly longer than the pause before
the outgoing message.
1
Press these keys:
FUNCTION
The display will show:
QUIET START TIME
2
Press a number from 00 to 15.
3
Press the
date and time display.
72
STOP
key to return to the
0
5
(Example)
STOP
Page 47

all-ux40.book Page 63 Thursday, November 18, 1999 2:35 PM
Comments:
♦
While the handset of the fax is lifted (off hook), an extension phone
connected directly to the fax cannot be used to speak with the other
party.
♦
The fax may interrupt a voice call received on an extension phone if
the reception mode is set to A.M. and there is a period of silence
during the conversation. If you are on a tone dial phone, you can
prevent this by pressing any three keys on the phone immediately
after you answer. (Note: Do not enter the code to activate fax reception: 5, *, *.)
Chain Dialling
After lifting the handset, you can dial any combination of Normal
Dialling, Rapid Key Dialling and Speed Dialling numbers. For
example, if you have stored an area code or an access code for a
special service in a Rapid Key, you can press the Rapid Key for that
area code or access code, then dial the remainder of the number by
pressing a Rapid Key, pressing number keys, or pressing the
DIAL
key and entering a two-digit Speed Dial number.
Making Telephone Calls
SPEED
Searching for an auto-dial number
You can use the
SEARCH/R
key to search for a Rapid Key or Speed
Dial number. First search for the number as described in
an auto-dial number
Chapter 2, then pick up the handset or press the
Sending a Fax by Automatic Dialling
in
SPEAKER
number will be dialled automatically (do not press the
Redial
The last number dialled can be redialled by pressing the
(it is not necessary to pick up the handset or press the
key). When the other party answers, pick up the handset to talk.
Searching for
in
key. The
START
key).
REDIAL
SPEAKER
5. Making
Telephone Calls
key
63
Page 48

all-ux40.book Page 64 Thursday, November 18, 1999 2:35 PM
Making Telephone Calls
PBX operations
If your fax is connected to a PBX, you can use it to perform the
following operations:
Making enquiry calls:
During a call, you can put the other party on
hold, make a further call to a third party, and then go back to your
original caller.
Transferring calls:
You can transfer a call to another number on the
same PBX without operator assistance.
Your fax machine is also fully compatible with British Telecom
Network Services and Telecom Eireann Phone Plus Services and can
be used in conjunction with any facility that requires a recall
command.
The recall method on the fax machine is TBR. Recall facilities will
Note:
not be available on a PBX which does not accept Timed Break Recall as
it’s recall signal.
Making enquiry calls
1
During the telephone conversation,
press the
SEARCH/R
key. This puts
SEARCH
the other party on hold.
R
2
When you hear the dial tone, dial the
number of the third party for the
enquiry call.
3
When you have finished the enquiry
call, you will be automatically
returned to the original caller as soon
as the third party hangs up.
64
Page 49

all-ux40.book Page 65 Thursday, November 18, 1999 2:35 PM
Transferring calls
1
During the telephone conversation,
press the
SEARCH/R
key. This puts
the other party on hold.
2
When you hear the dial tone, dial the
number to which you want to transfer
the call. When the other party
answers, hang up, and the call will be
transferred.
•
If the other party does not answer,
press the
SEARCH/R
key again to
return to the original caller.
Making Telephone Calls
SEARCH
R
65
5. Making
Telephone Calls
Page 50

all-ux40.book Page 55 Thursday, November 18, 1999 2:35 PM
Using A.M. Mode
In A.M. mode, your fax will automatically receive voice and fax
messages. See Chapter 6 for more information.
Using FAX Mode
To select FAX mode,
press the
RECEPTION MODE
until the arrow in the
display points to FAX.
Using FAX Mode
RESOLUTION/
key
3. Receiving
Documents
RESOLUTION
RECEPTION MODE
TEL/FAX
TEL
FAX
A.M.
When the reception mode is set to FAX, the fax machine will
automatically answer all calls on two rings and receive incoming
faxes.
2 rings Fax reception
♦
If you pick up the handset before the machine answers, you can talk
to the other party and/or receive a document as explained in
TEL Reception mode
. (see page 57)
Using
55
Page 51

FUNCTION
all-ux40.book Page 56 Thursday, November 18, 1999 2:35 PM
Using FAX Mode
Changing the number of rings
If desired, you can change the number of rings on which the fax
machine answers incoming calls in FAX and TEL/FAX modes. Any
number from 2 to 5 can be selected.
1
Press these keys:
The display will show:
NUMBER OF RINGS
ENTER (2-5) (2)
2
Enter the desired number of rings
(any number from 2 to 5).
The display will show:
TEL/FAX REMOTE #
3
Press the
date and time display.
STOP
key to return to the
4
3
Example: 3 rings
STOP
56
Page 52

all-ux40.book Page 57 Thursday, November 18, 1999 2:35 PM
Using TEL Reception Mode
To select TEL mode,
press the
RECEPTION MODE
until the arr ow in the
display points to TEL.
RESOLUTION
RECEPTION MODE
Using TEL Reception Mode
RESOLUTION/
key
FAX
TEL
3. Receiving
Documents
TEL/FAX
When the reception mode is set to TEL, you must answer all calls by
picking up the fax machine’s handset or an extension phone connected
to the same line.
Answering with the fax’s handset
1
When the fax machine rings, pick up
the handset.
2
If you hear a fax tone, wait until the
display shows RECEIVING and then
replace the handset.
Beep
RECEIVING
Note:
If you have set the Fax Sig n al
Receive set ting to NO, press the
key to begin reception. (see page 60)
A.M.
START
57
Page 53

all-ux40.book Page 58 Thursday, November 18, 1999 2:35 PM
Using TEL Reception Mode
3
If the other party first speaks with you
and then wants to send a fax, press the
START
your
key after speaking. (Press
START
key before the sender
presses their Start key.)
•
When RECEIVING appears in the
display, hang up.
START
RECEIVING
Answering with an extension phone
1
Answer the extension phone when it
rings.
2
If you hear a soft fax tone, wait until
your fax responds (the extension
phone will go dead if it is connected
to your fax, or you will hear
pronounced, high-pitched tones if the
phone is connected to a separate wall
socket), then hang up.
58
Beep
Phone goes dead
or pronounced,
high-pitche d to ne s
Page 54

FUNCTION
all-ux40.book Page 59 Thursday, November 18, 1999 2:35 PM
3
If the fax doesn't respond, or if the
other party first talks to you and then
wants to send a fax, press 5, *, and *
on the extension phone (only on a
tone dial phone). When you hear a
pronounced tone, hang up.
5
Comments:
♦
Your fax will not accept the signal to begin reception (
document is loaded in its feeder.
♦
If you have set the Fax Signal Receive setting to NO, press 5, *,
and * on the extension phone to begin reception.
Using TEL Reception Mode
5
) if a
**
3. Receiving
Documents
Changing the number for remote fax activation
If desired, you can use a number other than 5 to activate fax reception
from an extension telephone. You can select any number from 0 to 9.
1
Press these keys:
The display will show:
TEL/FAX REMOTE #
2
Press a number from 0 to 9 .
4
1
(Example)
59
Page 55

STOP
all-ux40.book Page 60 Thursday, November 18, 1999 2:35 PM
Using TEL Reception Mode
3
Press the
date and time display.
Fax Signal Receive
Your fax will automatically begin reception if you hear a high-pitched
fax tone after answering a call on your fax or an extension phone. If
you use a computer fax modem to send documents on the same line,
you must turn this function off in order to prevent your fax from
mistakenly attempting to receive documents from the computer fax
modem. Follow the steps below to change the setting.
1
Press these keys:
STOP
key to return to the
FUNCTION
4
The display will show:
FAX SIGN AL RX
2
Press 1 to turn on the function, or 2 to
turn it off.
3
Press the
date and time display.
60
STOP
key to return to the
YES NO
or
1
2
STOP
Page 56

all-ux40.book Page 34 Thursday, November 18, 1999 2:35 PM
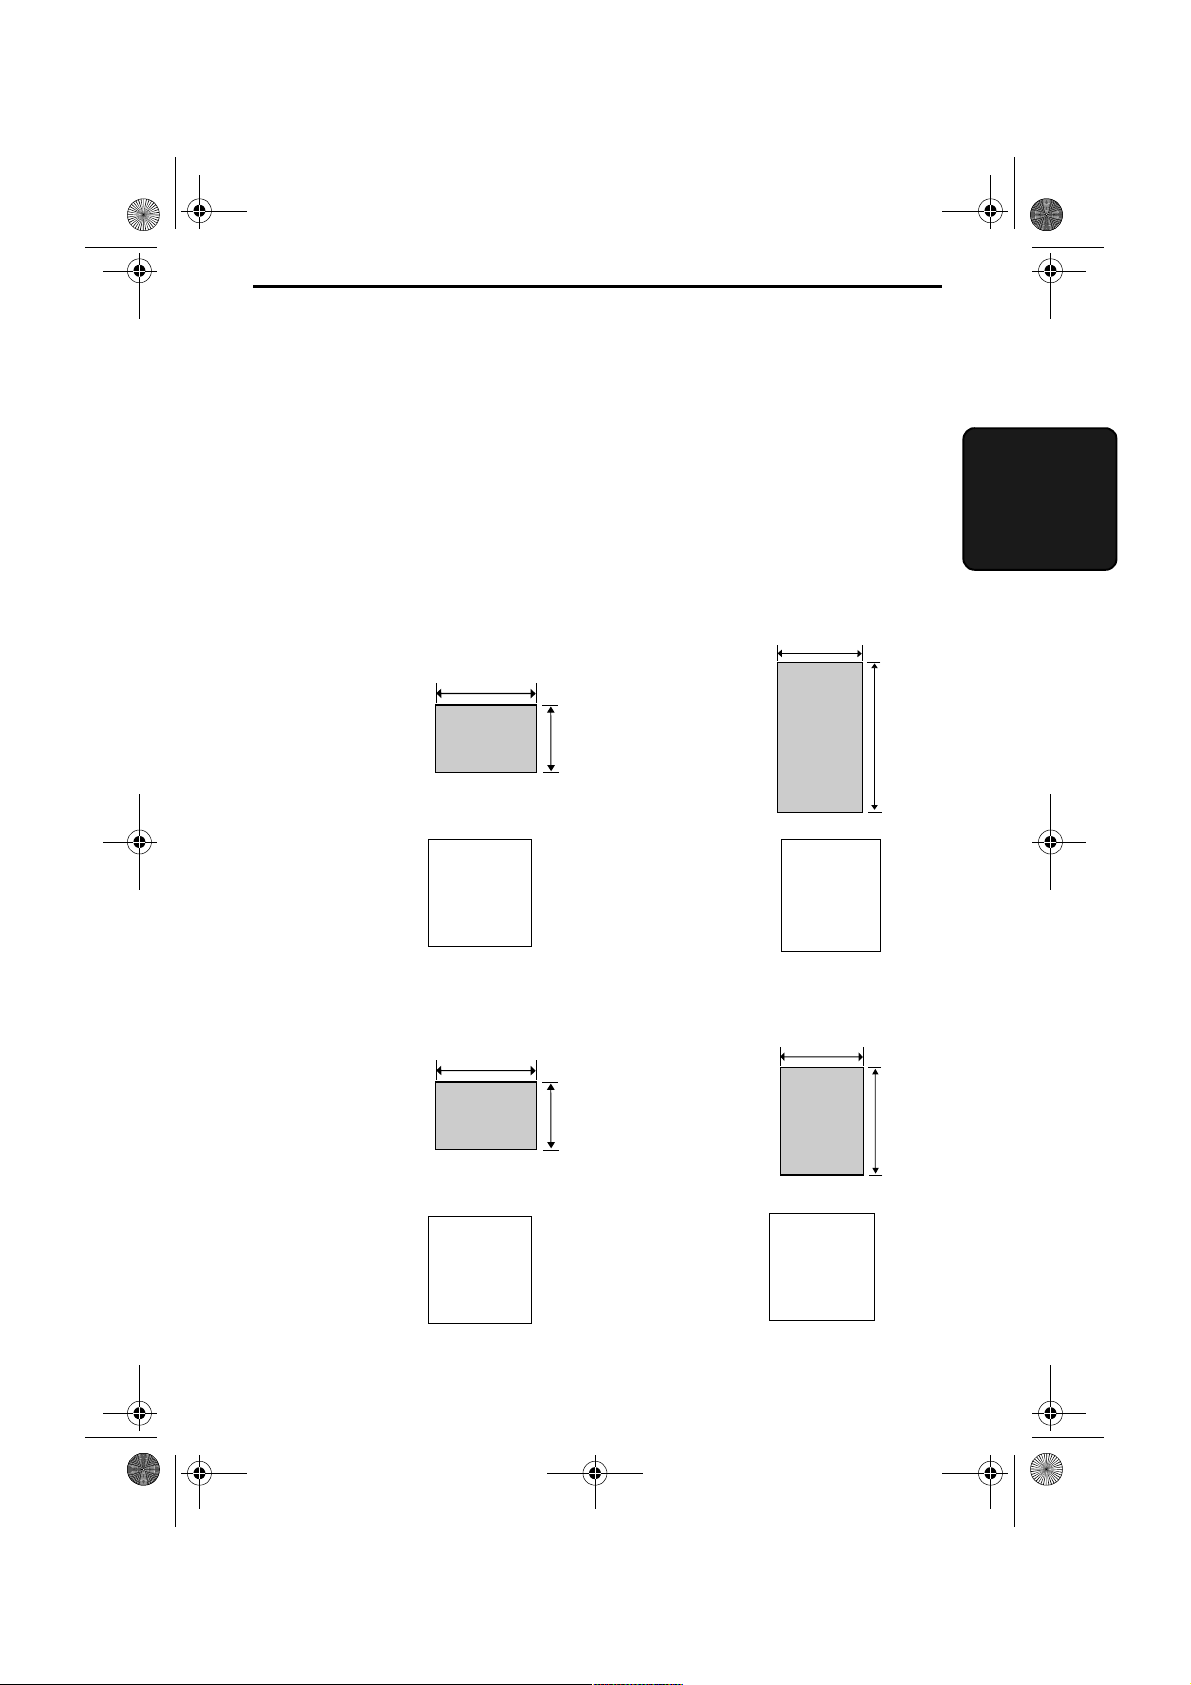
Transmittable Documents
Note:
Letters or graphics on the edges of a document will not be
scanned.
4 mm
Other restrictions
♦
The scanner cannot recognise yellow, greenish yellow, or light blue
ink.
♦
Ink, glue, and correcting fluid on documents must be dry before
they pass through the document feeder.
5 mm
5 mm
Letters in the
shaded area will
not be scanned.
4 mm
34
♦
All clips, staples, and pins must be removed from documents before
loading in the feeder. If these are not removed, they may damage
the machine.
♦
Documents which are patched, taped, torn, smaller than the minimum size, carbon backed, easily smudged, or have a slippery
coated surface should be copied on a photocopying machine, and
the copy loaded in the feeder.
Page 57

all-ux40.book Page 35 Thursday, November 18, 1999 2:35 PM
Loading the Document
Up to 5 pages can be placed in the feeder at one time. The pages will
automatically feed into the machine starting from the bottom page.
♦
If you need to send or copy more than 5 pages, place the additional
pages (up to the maximum allowed) gently and carefully in the
feeder just before the last page is scanned. Do not try to force them
in, as this may cause double-feeding or jamming.
♦
If your document consists of several large or thick pages which
must be loaded one at a time, insert each page into the feeder as the
previous page is being scanned. Insert gently to prevent doublefeeding.
1
Adjust the document guides to the
width of your document.
Loading the Document
2. Sending
Documents
2
Place the document face down and
push it gently into the document
feeder. The top edge of the document
should enter the machine first.
•
The feeder will draw the leading
edge of the document into the
machine. The display will show:
READY TO SEND
35
Page 58

E
all-ux40.book Page 36 Thursday, November 18, 1999 2:35 PM
Loading the Document
3
Adjust the resolution and/or contrast
settings (if desired) as explained in
the section
Resolution and Contrast
on the following pages, then dial the
receiving machine as explained in
Sending a Fax by Normal Dialling
later in this chapter.
Removing a document from the feeder
If you need to remove a
document from th e f eede r ,
open the operation panel.
RESOLUTION/
RECEPTION MOD
Important!
Do not try to remove a document without opening the operation panel.
This may damage the feeder mechanism.
1
Grasp the finger hold and pull up to
open the operation panel.
36
Page 59

all-ux40.book Page 37 Thursday, November 18, 1999 2:35 PM
2
Remove the document.
3
Close the operation panel.
•
Press down on both front corners of
the panel to make sure it clicks into
place.
Loading the Document
2. Sending
Documents
37
Page 60

all-ux40.book Page 38 Thursday, November 18, 1999 2:35 PM
Adjusting the Resolution and Contrast
Adjusting the Resolution and Contrast
If desired, you can adjust the resolution and contrast before sending a
document.
The defa ult resolution
setting is STA NDARD
and the default contrast
setting is AUTO.
You must adjust the
resolution and/or
contrast each time you
don’t want to use the
default settings.
The resolution and contrast settings are only effective for sending and
Note:
copying a document. They are not effective for receiving a document.
Resolution settings
STANDARD Use STANDARD for ordinary documents.
This setting gives you the fastest and most
economical transmission.
FINE Use FINE for documents containing small
letters or fine drawings.
SUPER FINE Use SUPER FINE for documents containing
very small letters or very fine drawings.
HALF TONE Use HALF TONE for photographs and
illustrations. The original will be reproduced
in 64 shades of gray.
Contrast settings
AUTO Use AUTO for normal documents.
DARK Use DARK for faint documents.
38
Page 61

E
all-ux40.book Page 39 Thursday, November 18, 1999 2:35 PM
Adjusting the Resolutio n and Contras t
1
Load the document(s).
•
The document must be loaded
before the resolution and contrast
can be adjusted.
2. Sending
Documents
2
Press the
RECEPTION MODE
RESOLUTION/
key one or
more times until the desired
resolution and contrast settings
appear in the display.
•
The first time you move through
the list of resolution settings, the
contrast setting AUTO will appear
next to each resolution setting. The
second time you move through the
list, the contrast setting DARK will
appear.
RESOLUTION/
RECEPTION MOD
STANDARD :AUTO
FINE :AUTO
SUPER FINE :AUTO
HALF TONE :AUTO
STANDARD :DARK
FINE :DARK
SUPER FINE :DARK
HALF TONE :DARK
In order to transmit in SUPER FINE resolution, the receiving fax
Note:
machine must also have that resolution. If it doesn’t, your machine will automatically step down to the next best available setting.
39
Page 62

3
all-ux40.book Page 40 Thursday, November 18, 1999 2:35 PM
Sending a Fax by Normal Dialling
Sending a Fax by Normal Dialling
With Normal Dialling, you pick up the handset (or press the
SPEAKER
♦
If a person answers, you can talk with them through the handset
before sending the fax. (If you pressed the
must pick up the handset to talk.)
♦
Normal Dialling allows you to listen to the line and make sure the
other fax machine is responding.
1
Load the document(s).
The display will show:
key) and dial by pressing the number keys.
SPEAKER
key, you
READY TO SEND
•
Set the resolution and/or contrast if
desired.
2
Pick up the handset or press the
SPEAKER
tone.
3
Dial the number of the receiving
machine by pressing the number keys.
key. Listen for the dial
2 2
RESOLUTION
RECEPTION MODE
4
SPEAKER
or
5 6
(Example)
7
40
Page 63

Beep
all-ux40.book Page 41 Thursday, November 18, 1999 2:35 PM
4
Wait for the connection. Depending
on the setting of the receiving
machine, you will either hear a
facsimile reception tone or the other
person will answer.
•
If the other party answers, ask them
to press their Start key (if you
pressed the
SPEAKER
key, pick
up the handset to speak with them).
This causes the receiving machine
to issue a reception tone.
5
When you hear the reception tone,
press the
START
key. Replace the
handset if you used it.
Sending a Fax by Normal Dialling
START
2. Sending
Documents
•
When transmission is completed,
the fax will beep once.
Using the REDIAL key
You can press the
send a document, press the
REDIAL
key to redial the last number dialled. To
START
key when you hear the fax tone
after the connection is made. Note that the speaker is automatically
activated when you press the
REDIAL
key.
41
Page 64

all-ux40.book Page 42 Thursday, November 18, 1999 2:35 PM
Sending a Fax by Automatic Dialling
Sending a Fax by Automatic Dialling
You can dial a fax or telephone number by simply pressing a Rapid
Key, or by pressing the
number.
♦
To use Automatic Dialling, you must first store the full fax or telephone number in your fax machine.
♦
When you store a fax or telephone number, you select a two-digit
Speed Dial number for it. Forty Speed Dial numbers are available.
SPEED DIAL
key and entering a two-digit
Speed Dial numbe rs 01
through 05 are for
Rapid Key (one-touch)
Dialling.
Speed Dial numbers 06
through 40 are for
dialling with the
SPEED DIAL
key.
Rapid Keys
B
A
START
STOP
A
SPEED
DIAL
0
START
6
SPEED DIAL key
TEL FAX
TEL/FAX A.M.
C
D
E/
POLL
COPY/
RECEPTION MODE
HELP
VOLUME
FUNCTION
RESOLUTION/
ABC
1
JKL
GHI
4
PQRS
TUV
7
SYMBOLS
DEF
23
MNO
65
WXYZ
8
9
0
SPEED
DIAL
REDIAL
SEARCH
SPEAKER
R
42
Page 65

FUNCTION
3
all-ux40.book Page 43 Thursday, November 18, 1999 2:35 PM
Sending a Fax by Automatic Dialling
Storing fax and telephone numbers for Automatic Dialling
1
Press these keys:
3
The display will alternately show:
FA X / TE L # MODE
1=SET,2=CLEAR
2
Press the 1 key to select SET.
1
The display will alternately show:
2. Sending
Documents
FAX/TEL # SET
ENTER SPEED #
3
Enter a two-digit Speed Dial number
by pressing the number keys (01 to
05 for Rapid Key Dialling, 06 to 40
for Speed Dialling).
4
Enter the fax or voice number by
pressing the number keys.
(Note: A space cannot be entered.)
•
To clear a mistake, press the
SPEED DIAL
♦
If a pause is required between any of the digits to access a special
service or an outside line, press the
appear as a hyphen. Several pauses can be entered in a row.
key.
2 2
REDIAL
0
(Example)
4
key. The pause will
1
5 6
(Example)
7
43
Page 66

all-ux40.book Page 44 Thursday, November 18, 1999 2:35 PM
Sending a Fax by Automatic Dialling
5
Press the
6
Enter the name of the party by
START
key.
pressing the number keys as shown
below. (If you don’t want to enter a
name, go directly to Step 7.)
SPACE =
A =
B =
C =
D =
E =
F =
G =
H =
I =
Example: SHARP = 77777 444 22 7777 77
J =
K =
L =
M =
N =
O =
P =
Q =
R =
S =
SPEAKER
START
T =
U =
V =
W =
X =
Y =
Z =
44
♦
To clear a mistake, press the
♦
To enter two letters in succession that require the same key, press
SPEAKER
7
Press the
the
START
key after entering the first letter.
key.
SPEED DIAL
key.
START
Page 67

FUNCTION
all-ux40.book Page 45 Thursday, November 18, 1999 2:35 PM
Sending a Fax by Automatic Dialling
8
Return to Step 3 to store another
number, or press the
STOP
key to
return to the date and time display.
To confirm that auto-dial numbers have been stored correctly, print
Note:
out the Telephone List. The procedure for doing this can be found in
Chapter 8,
Printing Lists
.
Chain Dialling for are a and access codes
You can also store an area code or access code in a Rapid Key or
Speed Dial number. To use this number to dial, see
Chapter 5,
Note:
number can only be used if the handset is lifted or the
pressed before dialling.
Making Telephone Calls
An area code or access code stored in a Rapid Key or Speed Dial
.
Step 3 or
STOP
Chain Dialling
SPEAKER
key is
in
2. Sending
Documents
Numbers stored for automatic dialling will appear on the Tele-
Note:
phone Number List printout, so this facility should not be used to store
least cost routing or system access passwords which need to remain private.
Clearing auto-dial numbers
1
Press these keys:
The display will show:
FAX/TEL # MODE
1=SET,2=CLEAR
3
45
Page 68

all-ux40.book Page 46 Thursday, November 18, 1999 2:35 PM
Sending a Fax by Automatic Dialling
2
Press 2 to select CLEAR.
3
Enter the Speed Dial number that you
want to clear by pressing the number
keys.
0
2
1
(Example)
4
Press the
5
Return to Step 3 to clear another
number, or press the
return to the date and time display.
Making changes
To make changes in a number previously stored, repeat the
programming procedure. Select the Rapid Key or Speed Dial number
for which you want to make changes in Step 3, and then change the
number and/or name when they appear in the display in Steps 4 and 6.
Note:
numbers and other programmed data in memory when the power is
turned off. Battery power is consumed primarily when the power is off.
With the power kept continuously off, the life of the battery is about 5
years. If the battery dies, have your dealer or retailer replace it. Do not try
to replace it yourself.
START
The fax machine uses a lithium battery to keep automatic dialling
key.
STOP
key to
START
Step 3 or
STOP
46
Page 69

E
all-ux40.book Page 47 Thursday, November 18, 1999 2:35 PM
Sending a Fax by Automatic Dialling
Rapid Key Dialling
If the number you want to dial has been stored for Automatic Dialling
as a Speed Dial number from 01 to 05, you can dial it by pressing the
corresponding Rapid Key.
1
Load the document(s).
The display will show:
READY TO SEND
•
Set the resolution and/or contrast if
desired.
RESOLUTION/
RECEPTION MOD
2. Sending
Documents
2
Press the Rapid Key for the desired
Speed Dial number as follows:
Speed Dial 01: Rapid Key A
Speed Dial 02: Rapid Key B
Speed Dial 03: Rapid Key C
Speed Dial 04: Rapid Key D
Speed Dial 05: Rapid Key E
•
The name of the receiving party
will appear in the display. If no
name was stored, the fax number
will appear. (If the name or number
is incorrect, press the
•
The document will be automatically
STOP
transmitted once the connection is
established.
A
Example: To dial Speed
Dial number 01, press
Rapid Key A.
key.)
47
Page 70

E
D
all-ux40.book Page 48 Thursday, November 18, 1999 2:35 PM
Sending a Fax by Automatic Dialling
Speed Dialling
Speed Dialling can be used to dial any number that has been stored for
Automatic Dialling.
1
Load the document(s).
The display will show:
READY TO SEND
•
Set the resolution and/or contrast if
desired.
RESOLUTION/
RECEPTION MOD
2
Press the
SPEED DIAL
enter the Speed Dial number by
pressing the numeric keys.
•
To enter numbers 1 through 9, first
enter 0 and then the number.
3
Check the display. If the name or
number shown is correct, press the
START
key. (If not, press the
key and then repeat Step 2.)
48
key and then
STOP
SPEE
DIAL
0
9
(Example)
START
Page 71

RESOLUTION/
RECEPTION MODE
3
all-ux40.book Page 49 Thursday, November 18, 1999 2:35 PM
Sending a Fax by Automatic Dialling
Direct Keypad Dialling
You can also enter a full number with the number keys and then press
START
the
key to begin dialling. You can use this method to dial a
full number when you don’t need to speak to the other party before
faxing.
1
Load the document(s).
The display will show:
READY TO SEND
•
Set the resolution and/or contrast if
desired.
2. Sending
Documents
2
Enter the number of the receiving
machine by pressing the numeric
keys.
•
If a pause is required between any
of the digits to access a special
service or an outside line, press the
REDIAL
key. The pause will
appear as a hyphen. Several pauses
can be entered in a row.
3
Check the display. If the number of
the receiving machine shown is
correct, press the
•
If it is not correct, press the
START
key.
key to backspace and clear one
digit at a time, and then re-enter the
correct digit(s).
2 2
STOP
4
5 6
(Example)
START
7
49
Page 72

E
SEARCH
R
2
5
8
GHI
JKL
MNO
TUV
WXYZ
PQRS
ABC
DEF
1
4
7
3
6
9
all-ux40.book Page 50 Thursday, November 18, 1999 2:35 PM
Sending a Fax by Automatic Dialling
Searching for an auto-dial number
If you don’t remember the Rapid Key or Speed Dial number in which
you have programmed a particular fax number, you can search for the
number by following the steps below. Once you have found the
number, you can dial and transmit the loaded document by simply
pressing the
1
Load the document(s).
START
key.
The display will show:
READY TO SEND
•
Set the resolution and/or contrast if
desired.
RESOLUTION/
RECEPTION MOD
2
Press the
SEARCH/R
key and then
the 1 key.
3
Enter the first letter of the stored
name by pressing the appropriate
number key (the key below the
marked letter) one or more times until
the letter appears in the display. If the
name begins with a special character
or number, press 1.
♦
If you don’t remember the first letter, go to Step 4 (you will scroll
through the list from the beginning).
♦
If a name wasn’t stored for the number, press 0. This will cause
numbers, not names, to appear when you scroll.
50
1
Page 73

all-ux40.book Page 51 Thursday, November 18, 1999 2:35 PM
Sending a Fax by Automatic Dialling
4
Press the # key or the * key to scroll
through the names (numbers if you
pressed 0). Stop when the desired
name appears in the display.
•
If no names have been stored that
begin with the entered letter, you
will scroll from the next name, in
alphabetical order, in the list. If no
names/numbers have been stored at
all, NO DATA will appear.
or
2. Sending
Documents
5
Press the
will be automatically transmitted
START
key. The document
START
once the connection is established.
Automatic redi alling
If you use automatic dialling (including Direct Keypad Dialling) and
the line is busy, the fax machine will automatically redial the number.
The fax machine will make 2 redialling attempts at an interval of 5
minutes.
♦
To stop automatic redialling, press the
STOP
key.
51
Page 74

all-ux40.book Page 52 Thursday, November 18, 1999 2:35 PM
Sending a Fax by Automatic Dialling
Transaction Report
The Transaction Report is printed automatically after you send or
receive a fax to allow you to check whether the transaction was
successful.
Your fax machine is set at the factory to print the report after each
transmission. To change the condition under which the report is
printed, follow the steps below.
♦
The Transaction Report cannot be printed on demand.
1
Press these keys:
The display will show:
TRANSACTION LIST
2
Press a number from 1 to 4 to select
the condition for printing.
ALWAYS PRINT A report will be printed after each
1
ERROR PRINT A report will be printed only when an
2
SEND ONLY A report will be printed after each
3
NEVER PRINT A report will never be printed.
4
3
Press the
date and time display.
STOP
key to return to the
FUNCTION
4
transmission, reception, or error.
error occurs.
transmission.
STOP
52
Page 75

all-ux40.book Page 53 Thursday, November 18, 1999 2:35 PM
Sending a Fax by Automatic Dialling
Explanation of headings
2. Sending
Documents
SENDER/
RECEIVER
The fax number of the other machine involved in the
transaction. If this machine does not have an ID function,
the communication mode will appear (for example,
"G3").
PAGES
Number of pages transmitted or received.
NOTE OK
P. FA IL
and the problem persists, try a different outlet. If
necessary, have an electrician check your power lines.
JAM
occurred. Make sure the paper or document is loaded
properly. Make sure the operation panel is shut securely.
NO PAPER
COM.E-0
prevented the transaction. See
CANCEL
STOP
or the other machine requested transmission using a
function which your fax does not have. If you were
attempting to fax, make sure a document is in the feeder.
If you were receiving, contact the faxing party to see how
they are trying to send to you.
- Transmission/reception was normal.
- A power failure occurred. If you have power
- A problem with the paper or original document
- You ran out of paper during reception.
to
COM.E-7
- A telephone line error
Line Error
in Chapter 10.
- Transmission was cancelled because the
key was pressed, no document was in the feeder,
53
Page 76

3
5
all-ux40.book Page 10 Thursday, November 18, 1999 2:35 PM
A Look at the Operation Panel
A Look at the Operation Panel
2
1
RECEPTION
MODE
TEL FAX
TEL FAX
DOWN VOLUME UP
A.M.
TEL/FAX A.M.
DEF
GHI
PQRS
ABC
JKL
TUV
START
B
A
MNO
WXYZ
C
STOP
SPEED DIAL
D
REDIAL
HOLD/SEARCH
SPEAKER
E/
POLL
COPY/
HELP
3
4
RESOLUTION FUNCTION
VOLUME
01
03
FUNCTION
05
RESOLUTION/
RECEPTION MODE
07
09
GHI
02
04
PQRS
06
08
10/POLL
ABC
1
JKL
4
TUV
7
5
DEF
2
STOP
23
MNO
65
COPY/HELP
WXYZ
8
9
SYMBOLS
START
0
6
SPEED
DIAL
REDIAL
SEARCH
R
SPEAKER
7
10
11
Rapid Dial Keys
1
8 9
Press one of these keys to dial a fax number automatically. The E key
can also be set for use as a Polling key.
Display
2
This displays messages and prompts during operation and
programming.
FUNCTION key
3
Press this key to select various special functions.
VOLUME key
4
Press this key to adjust the volume of the speaker when the
SPEAKER
key has been pressed, or the volume of the ringer at all
other times.
Number keys
5
Use these keys to dial numbers, and enter numbers and letters when
storing auto-dial numbers.
10
12
13
14
Page 77

7
8
all-ux40.book Page 11 Thursday, November 18, 1999 2:35 PM
SPEED DIAL key
6
Press this key to dial a fax or voice number using an abbreviated 2digit Speed Dial number.
REDIAL key
7
Press this key to automatically redial the last number dialled.
START key
8
Press this key to begin transmission when using Speed Dialling,
Direct Keypad Dialling, or Normal Dialling.
9
STOP key
Press this key to cancel an operation before it is completed.
COPY/HELP key
10
When a document is in the feeder, press this key to make a copy of a
document. At any other time, press this key to print out the Help List,
a quick reference guide to the operation of your fax machine.
A Look at the Operation Panel
1. Installation
11
RESOLUTION/RECEPTION MODE key
When a document is in the feeder, press this key to adjust the
resolution for faxing or copying. At any other time, press this key to
select the reception mode (an arrow in the display will point to the
currently selected reception mode).
SPEAKER key
12
Press this key to listen to the line and fax tones through the speaker
when faxing a document.
This is not a speakerphone.
Note:
talk with the other party.
SEARCH/R key
13
Press this key to search for an automatic dialling number, or, if you
are on a P.B.X. extension, press this key to transfer a call. The key can
also be used to review calls when Caller ID is in use.
Panel release
14
Grasp this finger hold and pull toward you to open the operation
panel.
You must pick up the handset to
11
Page 78

all-ux40.book Page 12 Thursday, November 18, 1999 2:35 PM
Connections
Connections
Points to keep in mind when setting up
Do not place the mach ine in
direct sunlight.
Keep dust away from the
machine.
Do not place the machine near
heaters or air cond it io ne rs.
Kee p the area in front of th e
machine clea r to al low received
documents to exit the machine.
About condensation
If the machine is moved from a cold to a warm place, it is possible
that condensation may form on the scanning glass, preventing proper
scanning of documents for transmission. To remove the condensation,
turn on the power and wait approximately two hours before using the
machine.
12
Page 79

all-ux40.book Page 13 Thursday, November 18, 1999 2:35 PM
Connections
Connecting the Handset
Connect the handset as shown and place it on the handset rest.
♦
The ends of the handset cord are identical, so they will go into
either socket.
Make sure the handset
cord goes into the
socket marked with a
handset symbol on th e
side of the machin e!
1. Installation
Use the handset to
make ordinary phone
calls, or to transmit and
receive faxes manually.
13
Page 80

UX-60
all-ux40.book Page 14 Thursday, November 18, 1999 2:35 PM
Connections
Removing the packing paper
1
Grasp the finger hold and pull up to
open the operation panel.
2
Flip up the front paper guide.
For UX-60:
3
Remove the tape from
the cutter unit.
For UX-40:
Remove the packing
paper.
4
Flip down the front paper guide and
then close the operation panel.
Note: Do not peel off or
bend this strip of film.
UX-40
14
UX-40
UX-60
Page 81

all-ux40.book Page 15 Thursday, November 18, 1999 2:35 PM
Connecting the power cord
Plug the power cord into a 230 V, 50 Hz, earthed (3-prong) AC outlet.
Caution:
The mains outlet (socket-outlet) should be installed near the
equipment and be easily accessable.
Connections
1. Installation
The machine does not ha ve
a power on/off switch, so
the power is turned on and
off by simpl y plugging in or
unplugging the power cord.
If your area experiences a high incidence of lightning or power
Note:
surges, we recommend that you install surge protectors for the power and
telephone lines. Surge protectors can be purchased at most telephone specialty stores.
15
Page 82

all-ux40.book Page 16 Thursday, November 18, 1999 2:35 PM
Connections
Connecting the telephone line cord
Insert one end of the line cord into the socket on the back of the
machine marked
TEL. LINE
. Insert the other end into a wall
telephone socket.
TEL.
SET
TEL.
LINE
Attaching the original document support
Attach the original document support as shown below.
16
Page 83

all-ux40.book Page 17 Thursday, November 18, 1999 2:35 PM
Connections
Extension phone (optional)
If desired, you can connect an extension phone to the
socket on the fax.
♦
To connect an answering machine to your fax, see Chapter 6,
Answering Machine Connection
1
Remove the seal covering the
SET
socket.
2
Connect the extension phone line to
TEL. SET
the
socket using the
.
TEL.
provided extension telephone socket
adapter.
TEL. SET
1. Installation
Note for Eire:
•
The adapter is not
necessary. Insert the plug of the
extension phone line directly into
TEL. SET
the
socket.
TEL.
SET
TEL.
LIN
E
17
Page 84

all-ux40.book Page 18 Thursday, November 18, 1999 2:35 PM
Loading the Thermal Paper
Loading the Thermal Paper
Your fax machine prints
incoming faxes on a
special kind of paper
called thermal paper.
1
Grasp the finger hold as shown and
pull up to open the operation panel.
The fax machine’s print
head creates text and
images by applying heat
to the thermal paper.
2
Flip up the front paper guide.
UX-40
18
UX-60
Press the knob to make sure the
front side of the metal guide is down.
Page 85

all-ux40.book Page 19 Thursday, November 18, 1999 2:35 PM
3
Unwrap the roll of thermal paper and
place it in the compartment.
Important:
♦
paper unrolls as shown. (The paper is only coated on one side for
printing. If the roll is placed incorrectly, the paper will come out
blank after printing.)
The roll must be placed so that the leading edge of the
Loading the Thermal Paper
YES
NO!
1. Installation
4
Insert the leading edge of the paper
into the slot as shown. Continue to
push the paper through the slot until it
comes out the opening in the front of
the machine.
19
Page 86

all-ux40.book Page 20 Thursday, November 18, 1999 2:35 PM
Loading the Thermal Paper
5
Make sure the paper comes out
straight, and then flip down the paper
guide.
UX-40
6
Close the operation panel, making
sure it clicks into place.
UX-60
20
UX-40:
•
will feed out. Grasp the paper by
the edge and pull upward to tear it
off.
UX-60:
•
will be cut off.
A short length of the paper
A short length of the paper
Click!
Page 87

all-ux40.book Page 21 Thursday, November 18, 1999 2:35 PM
Replacing the thermal paper
When the paper runs out, OUT OF PAPER will appear in the display.
Reception and copying will no longer be possible. To replace the
paper, first take out the old roll, then load the new roll as described
above.
To assure a long life for your fax and obtain the best reproduction
quality, we recommend that you use the following Sharp thermal
paper, which is available from your dealer or retailer:
FO-20PR6 THERMAL PAPER (30 m roll)
The use of any other paper may result in poor copy quality and
excessive build-up of residue on the head.
Handling thermal paper
Loading the Thermal Paper
1. Installation
Do not unpack the paper until you are ready to use it. It may become
discoloured if:
♦
It is stored at high humidity or high temperature.
♦
It is exposed to direct sunlight.
♦
It comes in contact with glue, thinner, or a freshly copied blueprint.
♦
A rubber eraser or adhesive tape is used on it, or it is scratched.
21
Page 88

FUNCTION
all-ux40.book Page 22 Thursday, November 18, 1999 2:35 PM
Entering Your Name and Fax Number
Entering Your Name and Fax Number
Befor e you can begin using
your fax machine, you must
enter your name and fax
(telephone) number. You
also need to set the date
and time.
B
A
STOP key
START
START key
Once you enter this
information, it will
automatically ap pea r at th e
top of each fax page you
send.
TEL FAX
TEL /FAX A.M.
E/
POLL
COPY/
HELP
GHI
VOLUME
4
PQRS
FUNCTION
7
RESOLUTION/
RECEPTION MODE
C
D
STOP
1
ABC
23
JKL
MNO
WXYZ
TUV
8
SYMBOLS
0
SPEED
DEF
REDIAL
65
SEARCH
9
SPEAKER
3 key
DIAL
R
# key
FUNCTION key
1
Press these keys:
The display will show:
ENTRY MODE
22
3
Page 89

all-ux40.book Page 23 Thursday, November 18, 1999 2:35 PM
Entering Your Name and Fax Number
2
Press the # key twice.
The display will show:
OWN NUMBER SET
3
Press the
The display will show:
4
Enter your fax number by pressing
the number keys (max. of 20 digits).
•
To insert a space between digits,
press the # key. To enter a “+”, press
the * key.
•
If you make a mistake, press the
SPEED DIAL
clear the mistake.
START
ENTER FAX #
key.
key to backspace and
1. Installation
START
5
Press the
START
number in memory.
The display will show:
ENTER YOUR NAME
key to enter the fax
START
23
Page 90

all-ux40.book Page 24 Thursday, November 18, 1999 2:35 PM
Entering Your Name and Fax Number
6
Enter your name by pressing number
keys for each letter as shown in the
chart below. Up to 24 characters can
be entered.
Example: SHARP = 77777 444 22 7777 77
SPEAKER
SPACE =
A =
B =
C =
D =
E =
F =
G =
H =
I =
♦
To enter two letters in succession that require the same key, press
SPEAKER
the
SPEAKER
(The
R
key moves the cursor backward.)
♦
To clear a mistake, press the
♦
To change case, press the
♦
To select one of the following symbols, press the # key or the * key
J =
K =
L =
M =
N =
O =
P =
Q =
R =
S =
T =
U =
V =
W =
X =
Y =
Z =
key after entering the first letter.
key moves the cursor forward, and the
SPEED DIAL
REDIAL
key.
key.
SEARCH/
repeatedly:
. / ! " # $ % & ’ ( ) * + , - : ; < = > ? @ [ ¥ ] ^ _ ' { | }
→ ←
Cursor:
A dark square mark in the display that indicates where a number
or letter will be entered.
24
Page 91

all-ux40.book Page 25 Thursday, November 18, 1999 2:35 PM
Entering Your Name and Fax Number
7
Press the
START
The display will show:
STORED
8
Press the
STOP
date and time display.
key.
key to return to the
1. Installation
START
STOP
25
Page 92

all-ux40.book Page 26 Thursday, November 18, 1999 2:35 PM
Setting the Date and Time
Setting the Date and Time
The data and t ime appear
in the displa y and reports,
and are printed at the top
of every page you
transmit.
Set the date and time by pressing the keys on the operation panel as
shown below.
STOP key
START key
1
Press these keys:
The display will show:
ENTRY MODE
2
Press these keys:
The display will show:
DATE & TIME SET
TEL FAX
TEL /FAX A.M.
C
B
D
A
STOP
START
E/
POLL
COPY/
HELP
1
GHI
VOLUME
4
PQRS
FUNCTION
7
RESOLUTION/
RECEPTION MODE
ABC
DEF
23
JKL
MNO
WXYZ
TUV
8
SYMBOLS
0
SPEED
REDIAL
65
SEARCH
9
SPEAKER
3 key
DIAL
R
key
*
FUNCTION key
FUNCTION
3
26
Page 93

all-ux40.book Page 27 Thursday, November 18, 1999 2:35 PM
Setting the Date and Time
3
Press the
•
The currently set date will appear in
the display.
4
Enter a two-digit number for the day
(“01” to “31”).
•
To correct a mistake, press the
SPEED DIAL
back to the mistake and then enter the
correct number.
5
Enter a two-digit number for the
month (“01” for January, “02” for
February, “12” for December, etc.).
START
key.
key to move the cursor
START
0
5
Example: the 5th
0
Example: Januar y
1
1. Installation
6
Enter the year (four digits).
7
Enter a two-digit number for the hour
(“00” to “23”) and a two-digit number
for the minute (“00” to “59”).
0 0
0
2
Example: 2000
0
9
2
Example: 9:25
5
27
Page 94

all-ux40.book Page 28 Thursday, November 18, 1999 2:35 PM
Setting the Date and Time
8
Press the
START
clock.
The display will show:
STORE JUNK #
9
Press the
STOP
date and time display.
This fax machine is Year 2000 compliant.
Note:
key to start the
key to return to the
START
STOP
28
Page 95

all-ux40.book Page 29 Thursday, November 18, 1999 2:35 PM
Setting the Reception Mode
Setting the Reception Mode
Your fax machine has four modes for receiving incoming calls and
faxes:
TEL
mode:
This is the most convenient mode for receiving phone calls. You can
also receive faxes; however, all calls must first be answered by
picking up the fax's handset or an extension phone connected to the
same line.
FAX
mode:
Select this mode when you only want to receive faxes. The fax
machine will automatically answer all calls and receive incoming
faxes.
TEL/FAX
This mode is convenient for receiving both faxes and voice calls.
When a call comes in, the fax will detect whether it is a voice call
(including manually dialled fax transmissions), or an automatically
dialled fax. If it is a voice call, the fax will make a special ringing
sound to alert you to answer. If it is an automatically dialled fax
transmission, reception will begin automatically.
mode:
1. Installation
A.M.
mode:
Use this mode only if you have connected an answering machine to
the fax (see Chapter 6). Select this mode when you go out to receive
voice messages in your answering machine and faxes on your fax
machine.
29
Page 96

E
all-ux40.book Page 30 Thursday, November 18, 1999 2:35 PM
Setting the Reception Mode
Setting the reception mode
1
Make sure the document feeder is
empty.
No
document
2
Press the
RECEPTION MODE
RESOLUTION/
key until the
arrow in the display points to the
desired mode.
TEL FAX
TEL /FAX A.M.
C
B
D
E/
A
POLL
STOP
START
RESOLUTION/
RECEPTION MOD
COPY/
HELP
GHI
VOLUME
PQRS
FUNCTION
RESOLUTION/
RECEPTION MODE
ABC
1
23
JKL
4
TUV
789
SYMBOLS
0
SPEED
DEF
DIAL
MNO
REDIAL
65
WXYZ
SEARCH
R
SPEAKER
05 NOV 10:30
05 NOV 10:30
05 NOV 10:30
05 NOV 10:30
RESOLUTION/
RECEPTION MODE key
FAX
TEL
A.M.
TEL/FAX
FAX
TEL
A.M.
TEL/FAX
FAX
TEL
A.M.
TEL/FAX
FAX
TEL
A.M.
TEL/FAX
30
Page 97

all-ux40.book Page 31 Thursday, November 18, 1999 2:35 PM
Volume Adjustment
Volume Adjustment
You can adjust the volume of the speaker and the ringer using the
VOLUME
Speaker
1
Press the
2
Press the
times to select the desired level.
key.
SPEAKER
VOLUME
TEL FAX
TEL /FAX A.M.
C
B
D
A
START
E/
POLL
STOP
COPY/
RECEPTION MODE
HELP
key.
key one or more
VOLUME
FUNCTION
RESOLUTION/
ABC
1
JKL
GHI
4
PQRS
TUV
789
SYMBOLS
DEF
23
MNO
65
WXYZ
0
SPEED
DIAL
REDIAL
SEARCH
R
SPEAKER
SPEAKER
VOLUME
1. Installation
VOLUME key
The display will show:
SPEAKER: MIDDLE
SPEAKER: HIGH
SPEAKER: LOW
3
Press the
SPEAKER
to turn off the speaker.
key once again
SPEAKER
31
Page 98

all-ux40.book Page 32 Thursday, November 18, 1999 2:35 PM
Volume Adjustment
Ringer
1
Press the
VOLUME
key to select the
desired volume. (Make sure the
SPEAKER
key has not been pressed
and the handset is not lifted.)
The display will show:
RINGER: MIDDLE
RINGER: HIGH
RINGER : OFF OK?
RINGER: LOW
2
If you want to turn off the ringer,
continue to press the
VOLUME
until RINGER: OFF OK? appears in
the display, and then press the
START
key.
VOLUME
key
RINGER : OFF OK?
32
•
When the ringer is switched off, the
pseudo ringer will still sound in
TEL/FAX mode to alert you to
voice calls.
START
Page 99

all-ux40.book Page 1 Thursday, November 18, 1999 2:35 PM
MAINS PLUG WIRING INSTRUCTIONS
This equipment is f itted with a m oulded typ e mains pl ug which in corporates a d etachab le
fuse cov er , u nder no ci rcumstan ces sho uld the pl ug be used without the fuse co v er fitt ed.
In the unlikely event of the socket outlet in your home not being compatible with the plug supplied,
cut off the mains plug and fit an appropriate type observing the wiring code below.
DANGER:
The fuse from the cut-off plug should be removed and the plug should be
disposed of in a safe manner. Under no circumstances should the cut-off plug be
inserted into a socket outlet as a serious electric shock may occur.
If you are not sure how to do this, get help from a qualified electrician.
IMPORTANT
The wires in this mains lead are coloured in accordance with the following code:
GREEN-AND-YELLOW: Earth
BLUE: Neutral
BROWN: Live
As the colours of the wires in the mains lead of this apparatus may not correspond with the coloured
markings identifying the terminals in your plug, proceed as follows:The wire which is coloured
GREEN-AND-YELLOW
, or by the safety earth symbol or coloured green or green-and-yellow.The wire which is
E
coloured
black.The wire which is coloured
the letter L or coloured red.
must be connected to the terminal which is marked with the letter N or coloured
BLUE
This apparatus must be protected by a 13A fuse in the mains plug or distribution board.
must be connected to the terminal in the plug which is marked by the letter
BROWN
must be connected to the terminal which is marked with
"WARNING: THIS APPARATUS MUST BE EARTHED"
This equipment complies with the requirements of Directives 98/13/EC and 89/336/EEC, 73/23/EEC both
amended by 93/68/EEC.
Dieses Gerät entspricht den Anforderungen der EU-Richtlinien 98/13/EU und 89/336/EWG sowie 73/23/EWG,
die durch die Richtlinie 93/68/EWG geändert wurden.
Cet appareil est conforme aux exigences de la directive 98/13/CEE ainsi que des directives 89/336/CEE et 73/23/
CEE modifiées par la directive 93/68/CEE.
Este aparato satisface las exigencias de las Directivas 98/13/CE y 89/336/CEE, 73/23/CEE modificadas ambas
por medio de la 93/68/CEE.
Quest’apparecchio è conforme ai requisiti delle direttive 98/13/CE e 89/336/EEC, 73/23/EEC, entrambe emendate dalla 93/68/EEC.
Dit apparaat voldoet aan de eisen van de richtlijnen 98/13/EG en 89/336/EEG, 73/23/EEG, beide gewijzigd door
93/68/EEG.
Este equipamento obedece às exigências das directivas 98/13/CEE, 89/336/CEE e 73/23/CEE, cujas versões
foram todas corrigidas pela directiva 93/68/CEE.
Η συσκευή αυτή ανταποκρίνεται στις απαιτήσεις των οδηγιών 98/13/Ε.Ε. και 89/336/ΕΟΚ, 73/23/ΕΟΚ όπως
τροποποιήθηκαν και οι δύο από τη ν οδηγία 93/68/ΕΟΚ.
Denna utrustning uppfyller kraven enligt direktiven 98/13/EC och 89/336/EEC, 72/23/EEC båda med tillägget 93/
68/EEC
Dette udstyr overholder kravene i direktiverne 98/13/EU og 89/336/EEC, 73/23/EEC begge med ændringer i.h.t
93/68/EEC.
Dette produktet oppfyller kravene i direktivene 98/13/EC og 89/336/EEC, 73/23/EEC, begge komplettert av 93/68/
EEC.
Tämä laite täyttää direktiivien 98/13/EEC ja 89/336/EEC, 73/23/EEC vaatimukset, joista kumpaakin jälkimmäistä
on muutettu direktiivillä 93/68/EEC. : Low voltage directive 93/68/EEC : CE Mark reguration
Page 100

all-ux40.book Page 1 Thursday, November 18, 1999 2:35 PM
The equipment has been approved in accordance with Council Decision 98/482/EC and 1999/303/EC for pan-European single
terminal connection to the public switched telephone network (PSTN). However, due to differences between the individual PSTNs
provided in different countries, the approval does not, of itself, give an unconditional assurance of successful operation on every
PSTN network termination point.
In the event of problems, you should contact your equipment supplier in the first instance.
Dieses Gerät wurde gemäß der Entscheidung 98/482/EG und 1999/303/EG des Rates europaweit zur Anschaltung als einzelne
Endeinrichtung an das öffentliche Fernsprechnetz zugelassen. Aufgrund der zwischen den öffentlichen Fernsprechnetzen
verschiedener Staaten bestehenden Unterschiede stellt diese Zulassung an sich jedoch keine unbedingte Gewähr für einen
erfolgreichen Betrieb des Geräts an jedem Netzabschlusspunkt dar.
Falls beim Betrieb Probleme auftreten, sollten Sie sich zunächst an ihren Fachhändler wenden.
Este equipo ha sido homologado de conformidad con la Decisión 98/482/CE y 1999/303/CE del Consejo para la conexión
paneuropea de un terminal simple a la red telefónica pública conmutada (RTPC). No obstante, a la vista de las diferencias que
existen entre las RTPC que se ofrecen en diferentes países, la homologación no constituye por sí sola una garantía incondicional
de funcionamiento satisfactorio en todos los puntos de terminación de la red de una RTPC.
En caso de surgir algún problema, procede ponerse en contacto en primer lugar con el proveedor del equipo.
Cet équipement a reçu l'agrément, conformément à la décision 98/482/CE du Conseil ainsi qu’à la norme européenne 1999/303/
EC, concernant la connexion paneuropéenne de terminal unique aux réseaux téléphoniques publics commutés (RTPC). Toutefois,
comme il existe des différences d'un pays à l'autre entre les RTPC, l'agrément en soi ne constitue pas une garantie absolue de
fonctionnement optimal à chaque point de terminaison du réseau RTPC.
En cas de problème, vous devez contacter en premier lieu votre fournisseur.
La presente apparecchiatura terminale è stata approvata in conformità della decisione 98/482/CE e 1999/303/CE del Consiglio per
la connessione paneuropea come terminale singolo ad una rete analogica PSTN. A causa delle differenze tra le reti dei differenti
paesi, l'approvazione non garantisce però di per sé il funzionamento corretto in tutti i punti di terminazione di rete PSTN.
In caso di problemi contattare in primo luogo il fornitore del prodotto.
Dit apparaat is goedgekeurd volgens Beschikking 98/482/EG en 1999/303/EG van de Raad voor de pan-Europese aansluiting van
enkelvoudige eindapparatuur op het openbare geschakelde telefoonnetwerk (PSTN). Gezien de verschillen tussen de individuele
PSTN's in de verschillende landen, biedt deze goedkeuring op zichzelf geen onvoorwaardelijke garantie voor een succesvolle
werking op elk PSTN-netwerkaansluitpunt.
Neem bij problemen in eerste instantie contact op met de leverancier van het apparaat.
Este equipamento foi aprovado para ligação pan-europeia de um único terminal à rede telefónica pública comutada (RTPC) nos
termos da Decisão 98/482/CE e 1999/303/CE. No entanto, devido às diferenças existentes entre as RTPC dos diversos países, a
aprovação não garante incondicionalmente, por si só, um funcionamento correcto em todos os pontos terminais da rede da RTPC.
Em caso de problemas, deve entrar-se em contacto, em primeiro lugar, com o fornecedor do equipamento.
Tämä laite on hyväksytty neuvoston päätöksen 98/482/EY ja 1999/303/EY mukaisesti liitettäväksi yksittäisenä laitteena yleiseen
kytkentäiseen puhelinverkkoon (PSTN) EU:n jäsenvaltioissa. Eri maiden yleisten kytkentäisten puhelinverkkojen välillä on
kuitenkin eroja, joten hyväksyntä ei sellaisenaan takaa häiriötöntä toimintaa kaikkien yleisten kytkentäisten puhelinverkkojen
liityntäpisteissä.
Ongelmien ilmetessä ottakaa viipymättä yhteyttä laitteen toimittajaan.
Utrustningen har godkänts i enlighet med rådets beslut 98/482/EG och 1999/303/EG för alleuropeisk anslutning som enskild
terminal till det allmänt tillgängliga kopplade telefonnätet (PSTN). På grund av de skillnader som finns mellan telefonnätet i olika
länder utgör godkännandet emellertid inte i sig självt en absolut garanti för att utrustningen kommer att fungera tillfredsställande
vid varje nätsanslutningspunkt i telefonnätet.
Om problem uppstår bör ni i första hand kontakta leverantören av utrustningen.
Udstyret er i henhold til Rådets beslutning 98/482/EF og 1999/303/EF godkendt til at blive opkoblet på de offentlige telefonnet
som enkeltforbundet terminal. På grund af forskelle mellem de offentlige telefonnet i de forskellige lande giver godkendelsen dog
ikke i sig selv ubetinget garanti for, at udstyret kan fungere korrekt på samtlige nettermineringspunkter på de offentlige telefonnet.
I tilfælde af problemer bør De i første omgang henvende Dem til leverandøren af udstyret.
Utstyret er i henhold til rådsdirektiv 98/482/EF og 1999/303/EF godkjent for tilkopling til det offentlige telefonnett. På grunn av
forskjeller mellom de offentlige telefonnettene i forskjellige land, gir godkjennelsen ikke i seg selv noen garanti for at utstyret
fungerer korrekt på samtlige nettermineringspunkt.
Hvis det skulle oppstå problemer i forbindelse med bruken av utstyret, bør i første omgang utstyrsleverandøren kontaktes.
Ο εξοπλισμός έχει εγκριθεί για πανευρωπαϊκή σύνδεση μεμονωμένου τερματικού με το δημ όσιο τηλεφωνικό δίκτυο μεταγωγής
(PSTN), σύμφωνα με την απόφαση 98/482/ΕΚ και 1999/303/EK του Συμβουλίου 7 ωστόσο, επειδή υπάρχουν διαφορές μεταξύ
των επιμέρους PSTN που παρέχονται σε διάφορες χώρες, η έγκριση δεν παρέχει αφ' εαυτής ανεπιφύλακτη εξασφάλιση επιτυχούς
λειτουργίας σε κάθε σημείο απόληξης του δικτύου PSTN.
Εάν ανακύψουν προβλήματα, θα πρέπει κατ' αρχάς να απευθύνεστε στον προμηθευτή του εξοπλισμού σας.
 Loading...