

Page 1
MODEL
UX-370
FACSIMILE
OPERATION MANUAL
1. Installation
2. Sending Documents
3. Receiving Documents
4. Making Copies
5. Making Telephone Calls
6. Answering Machine Connection
7. Special Functions
8. Option Settings
9. Printing Reports and Lists
10. Maintenance
11. Troubleshooting
Page 2
CAUTION:
For a complete electrical disconnection pull out the mains plug.
VORSICHT:
Zur vollständigen elektrischen Trennung vom Netz den Netzstecker ziehen.
ATTENTION:
Pour obtenir une mise hors-circuit totale, débrancher la prise de courant secteur.
AVISO:
Para una desconexión eléctrica completa, desenchufar el enchufe del tomacorriente.
VARNING:
För att helt koppla från strömmen, dra ut stickproppen.
ATTENZIONE:
Per un totale scollegamento elettrico rimuovere la spina di corrente.
"The mains outlet (socket-outlet) shall be installed near the equipment and shall be easily accessible."
"De aansluiting op de stroomvoorziening (stopkontakt) moet nabij het apparaat zijn aangebracht en moet gemak-
kelijk bereikbaar zijn."
Ett nätuttag (vägguttag) bör befinna sig nära utrustningen och vara lätt att tillgå.
La presa di corrente deve essere installata vicino all’apparecchio, e deve essere facilmente accessibile.
El tomacorriente principal se debe encontrar cerca del aparato y debe ser fácil de acceder a él.
"Die Netzsteckdose (Wandsteckdose) sollte in der Nähe des Geräts installiert werden und leicht zugänglich sein."
Stikkontakten skal være placeret nær faxen og være let tilgængelig.
Pääpistoke (pistokkeen poisto) tulee asentaa lähelle laitetta ja tulee olla helposti poistettavissa.
Stikkontakten må være montert i nærheten av utstyret og den må være lett tilgjengelig.
La prise de courant principale (d’alimentation) doit être située près de l’appareil et facilement accessible.
This equipment complies with the requirements of Directives 89/336/EEC and 73/23/EEC as amended by
93/68/EEC.
Dieses Gerät entspricht den Anforderungen der EG-Richtlinien 89/336/EWG und 73/23/EWG mit Änderung
93/68/EWG.
Ce matériel répond aux exigences contenues dans les directives 89/336/CEE et 73/23/CEE modifiées par la directive
93/68/CEE.
Dit apparaat voldoet aan de eisen van de richtlijnen 89/336/EEG en 73/23/EEG, gewijzigd door 93/68/EEG.
Dette udstyr overholder kravene i direktiv nr. 89/336/EEC og 73/23/EEC med tillæg nr. 93/68/EEC.
Quest’ apparecchio è conforme ai requisiti delle direttive 89/336/EEC e 73/23/EEC, come emendata dalla direttiva
93/68/EEC.
Este equipamento obedece às exigências das directivas 89/336/CEE e 73/23/CEE, na sua versão corrigida pela
directiva 93/68/CEE.
Este aparato satisface las exigencias de las Directivas 89/336/CEE y 73/23/CEE, modificadas por medio de la
93/68/CEE.
Denna utrustning uppfyller kraven enligt riktlinjerna 89/336/EEC och 73/23/EEC så som kompletteras av 93/68/EEC.
Dette produktet oppfyller betingelsene i direktivene 89/336/EEC og 73/23/EEC i endringen 93/68/EEC.
Tämä laite täyttää direktiivien 89/336/EEC ja 73/23/EEC vaatimukset, joita on muutettu direktiivillä 93/68/EEC.
89/336/EEC : EMC directive 73/23/EEC : Low voltade directive 93/68/EEC : CE Mark regulation
Page 3

Quick Reference Guide
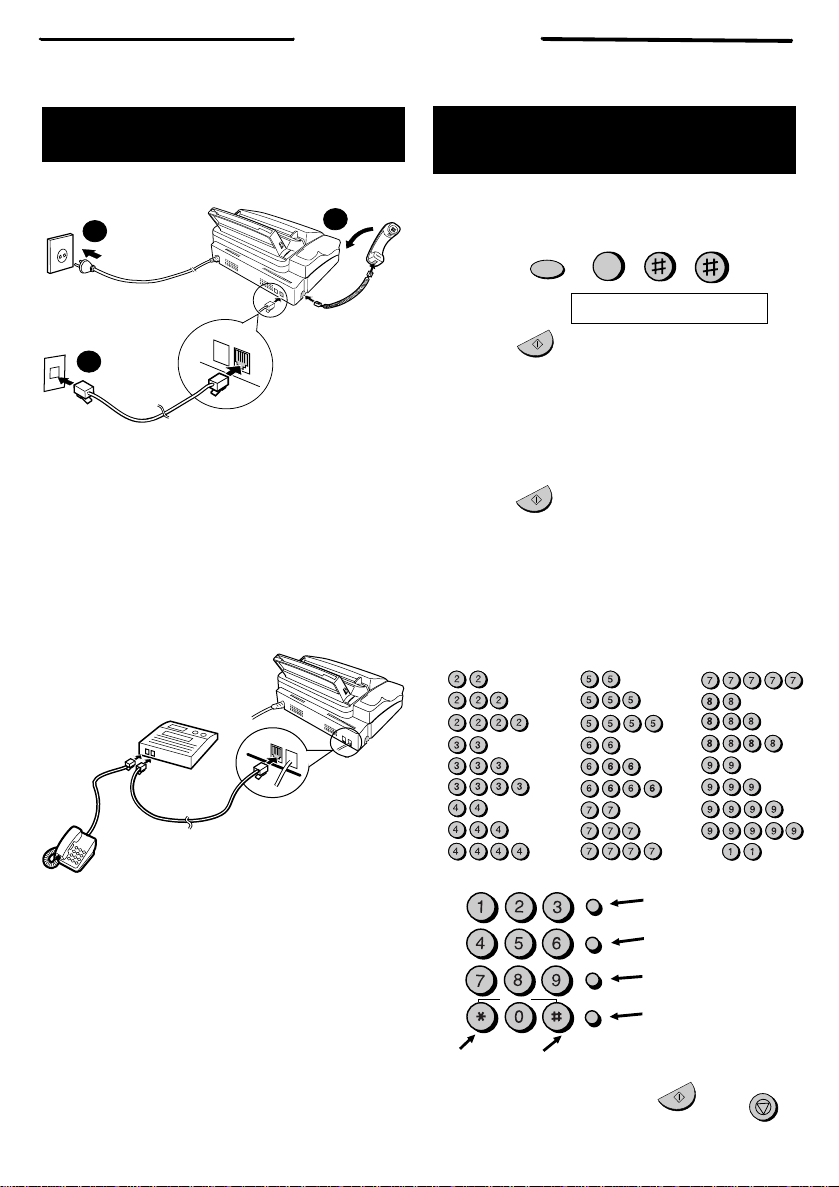
INSTALLATION
2
TEL.
SET
TEL.
LINE
3
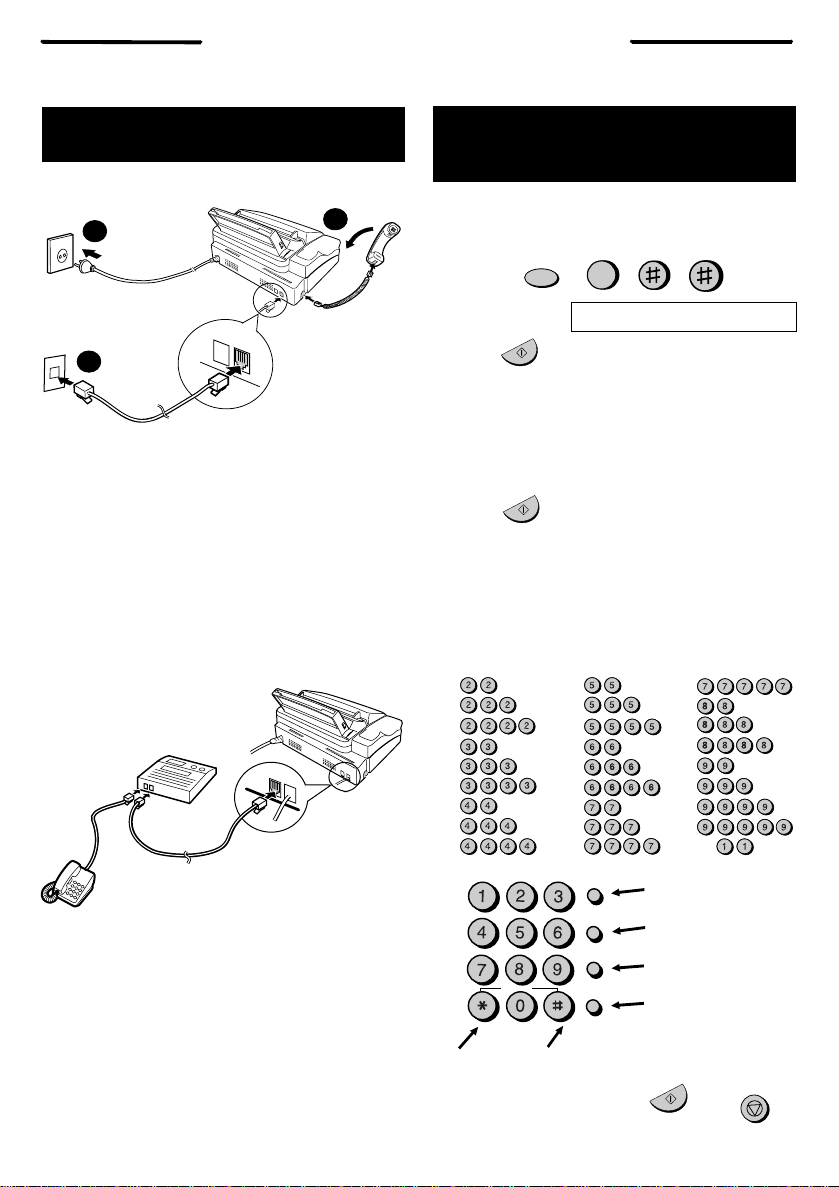
1. Connect the handset as shown.
2. Plug the powe r cord int o an ea rthe d, 220-2 30 V
outlet.
3.
Plug one end of the telephone line into the TEL.
LINE socket on the rear of the fax, and the
other end into yo ur tele ph on e wall socket .
Connecting an answering machine and/or
extension telephone
1
TEL.
SET
TEL.
LINE
ENTERING YOUR NAME AND
NUMBER
Imaging film and paper must be loaded to
Note:
perform the following operation.
1. Press:
Display shows:
2. Press:
3. Enter your fax number (max. of 20 digits) by
pressing the numb er keys .
♦If you make a mistake, press the SEARCH/R key
to move the cursor back to the mistake, then enter
the correct num ber or letter.
4. Press:
5. Enter your name by pressing the appropriate
number keys as shown below.
♦To enter two letters in succession that require
the same key, press the SPEAKER key after
entering the first letter.
A =
B =
C =
D =
E =
F =
G =
H =
I =
FUNCTION
START/MEMORY
START/MEMORY
3
OWN NUMBER SET
J =
K =
L =
M =
N =
O =
P =
Q =
R =
S =
T =
U =
V =
W =
X =
Y =
Z =
SPACE =
1.
Remove the seal covering the TEL. SET socket
on the rear of the fax. Connect an extensio n
telephone or answering machine to the TEL.
SET socket.
2. If desired, connect an extensio n phon e to the
answering machine.
- English (1) -
DEF
GHI
PQRS
ABC
JKL
TUV
SYMBOLS
MNO
WXYZ
SPEED DIAL
REDIAL
SEARCH
SPEAKER
Deletes highlighted
letter.
Upper/lower case
shift key.
Moves cursor to the
R
left.
Moves cursor to the
right.
Press either key one or more times to select
and enter a symbol.
6. When finished, press:
START/MEMORY
STOP
Page 4
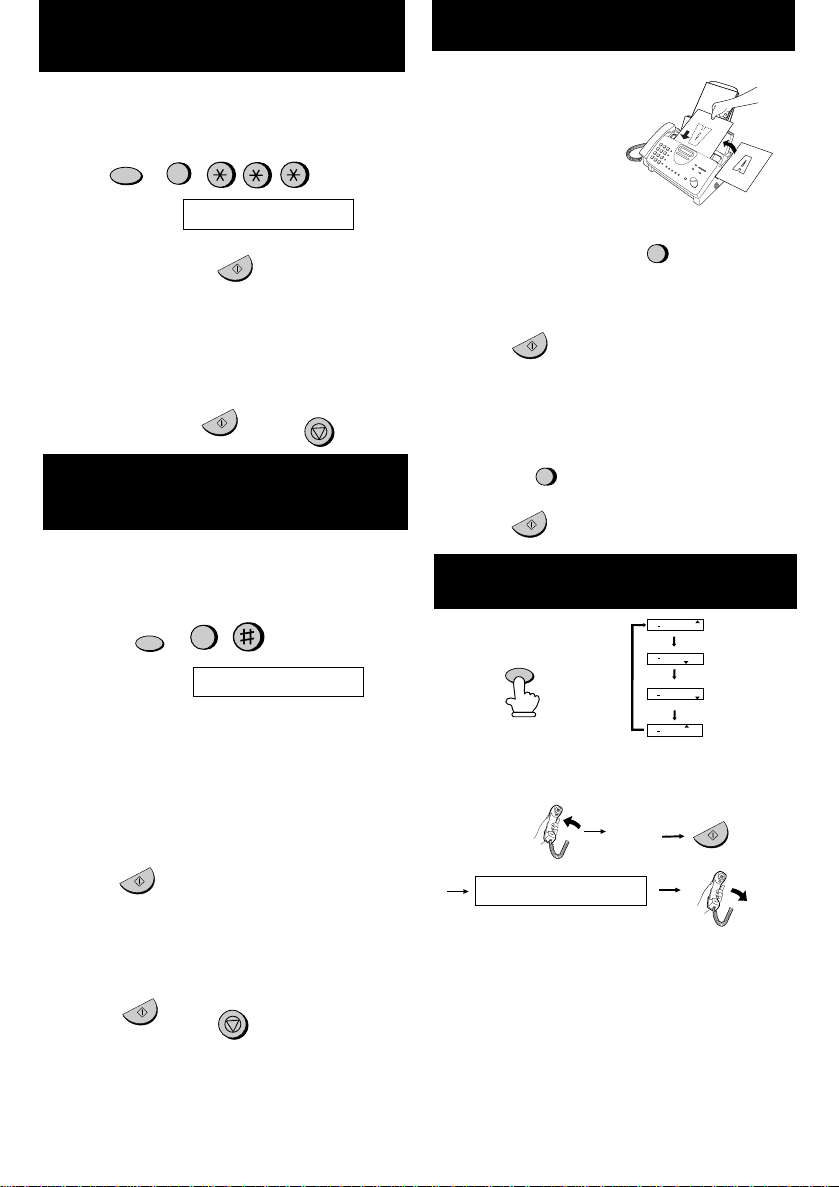
SETTING THE DATE AND TIME
Imaging film and paper must be loaded to
Note:
perform the following operation.
Press:
FUNCTION
3
SENDING DOCUMENTS
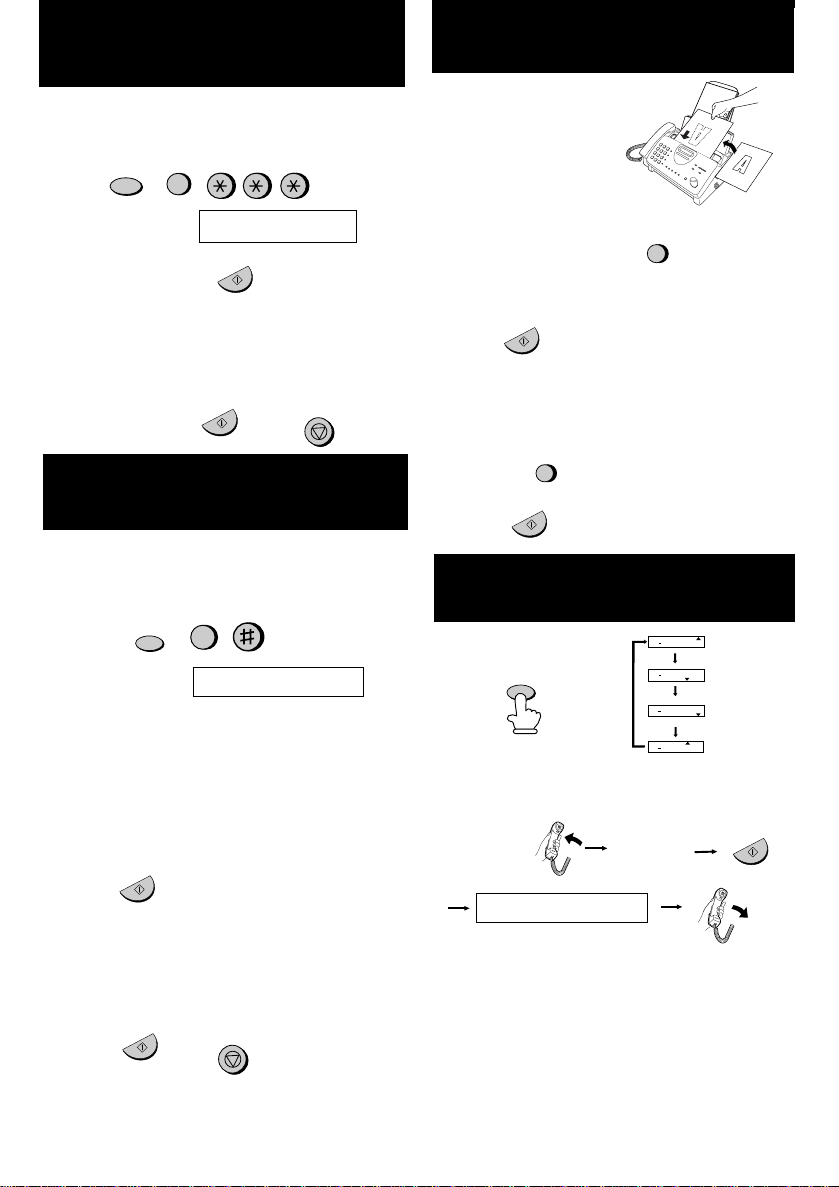
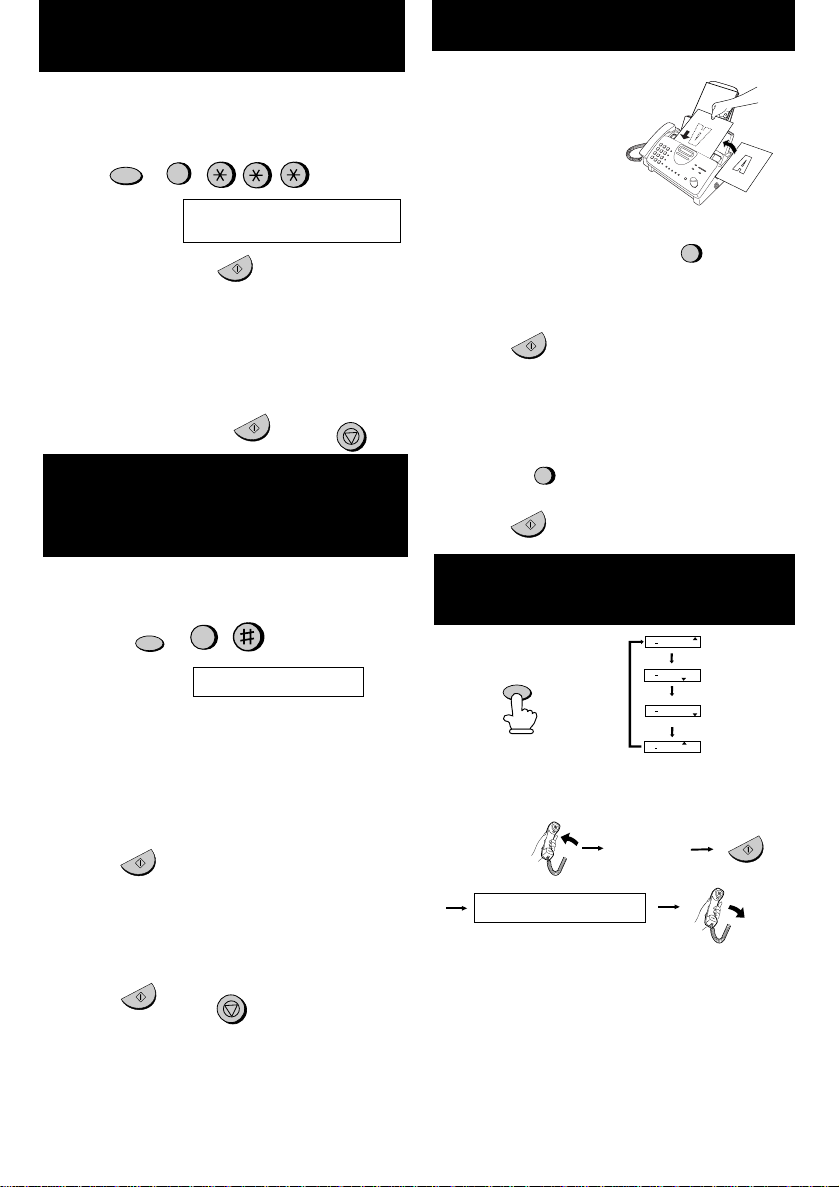
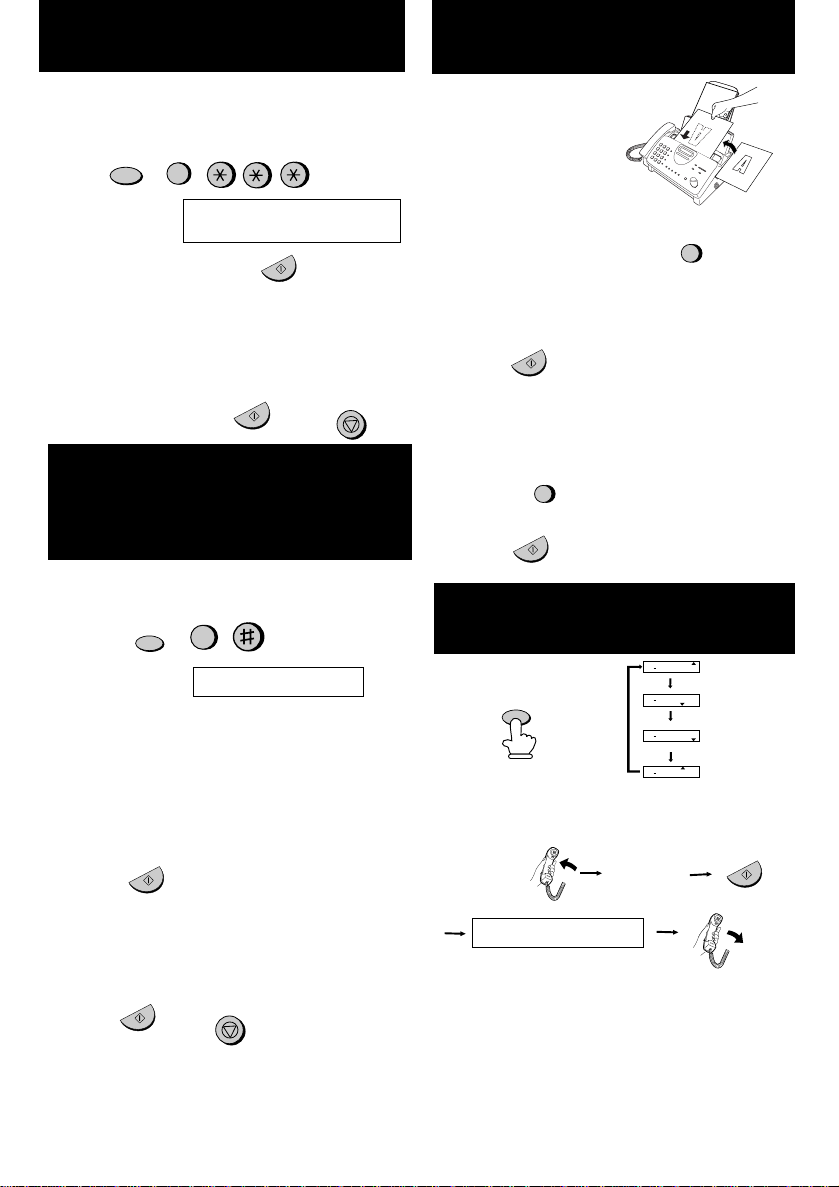
Place your document
(up to 10 pages) face
down in the document
feeder.
Display shows:
Press the START key:
DATE & TIME SET
START/MEMORY
Enter two digits for the Day (01 through 31).
Enter two digits for the Mont h (01 thro ug h 12).
Enter four digit s for the Year (Ex: 1999).
Enter two digits for the Hou r (00 throu gh 23).
Enter two digits for the Minu te (00 throu gh 59).
When finished, press:
START/MEMORY
STOP
STORING AND CLEARING
NUMBERS FOR AUTO DIALING
Imaging film and paper must be loaded to
Note:
perform the following operation.
1. Press:
Display shows:
2.
Press 1 to s tore a number or 2 to clear a
num ber.
3. Enter a 2-digit Speed Dial number (from 01 to
05 for Rapid Key Dialling, or 06 to 45 for Speed
Dialling). (If you are clearing a numb er, go to
Step 7.
4. Enter the full telephone/fax number.
5. Press:
6. Enter the name of the location by pressing
number keys (max. of 20 characters). (Refer to
the letter entry table in ENTERING YOUR
NAME AND NUMBER.)
7. Press:
FUNCTION
START/MEMORY
START/MEMORY
3
FAX/TEL # MODE
STOP
Normal Dialling
1. Lift the handset or press
SPEAKER
2.Dial the fax number.
3. Wait for the reception tone (if a person answers,
ask them to press their Start key)
4. Press:
START/MEMORY
Rapid Key Dialling
Press the appropriate Rap id Key. Transmi ssion
will begin automatically.
Speed Dialling
1. Press:
SPEED DIAL
2. Enter 2-digit Speed Dial number.
3. Press:
START/MEMORY
RECEIVING DOCUMENTS
FAX
TEL
14 FEB 10:30
A.M.
TEL/FAX
FAX
RECEPTION
Press:
MODE
FAX mode: The fax auto m atica lly answe r s on 1 or
2 rings and receives the incoming document.
TEL mode:
Fax
tone
RECEIVING
TEL/FAX mo de:
The fax machine automatically answers on 1 or 2
rings and receives faxes. Voice calls (inclu ding
manually dialled fax transmi ssions) are signal led
by a special ringing sound.
A.M. mode : Select this mod e whe n an answe ring
machine is connected to the fax and the answering machine is turned on.
14 FEB 10:30
14 FEB 10:30
14 FEB 10:30
TEL
TEL/FAX
TEL
TEL
TEL/FAX
A.M.
FAX
A.M.TEL/FAX
FAX
A.M.
START/MEMORY
- English (2) -
Page 5
Snabbreferens
INSTALLATION
2
TEL.
SET
TEL.
LINE
3
1. Anslut hörluren så som visas.
2. Stick in elsladden i ett jordat 220-230 V uttag.
3.
Stick in en ändan av telefonsladden i TEL LINE
uttaget på faxens baksida och den andra änden
i teleutta get.
Anslutning av telefonsvarare och /eller en
sidoapparat
1
TEL.
SET
TEL.
LINE
MATA IN DITT NAMN OCH
NUMMER
Transferfilm och papper måste vara
Obs:
laddat för att följan de funktio n skall kunna
utföras.
1. Tryck på
Displayen visar:
2. Tryck på
3. Mata in ditt faxnummer (max. 20 siffror) genom att
trycka på sifferknapparna.
♦Om du gör fel trycker du på SEARCH/R k n appe n
för att ta bort det felaktig a och matar därefter in rätt
siffra eller bokstav.
4. Tryck på
5. Mata in ditt namn genom att trycka på
sifferknapparn a så som visas nedan.
♦För att mata in två bokstäver efter varandra,
vilka kräver samma knapp, trycker du på
SPEAKER knappen efter det du matat in första
bokstaven.
A =
B =
C =
D =
E =
F =
G =
H =
I =
FUNCTION
3
ANGE EGET NUMMER
START/MEMORY
START/MEMORY
J =
K =
L =
M =
N =
O =
P =
Q =
R =
S =
T =
U =
V =
W =
X =
Y =
Z =
SPACE =
1.
Ta bort skyddet från TEL. SET uttaget på
faxens baksida. Ansl ut en sidoap pa rat ell er
telefonsvarare till TEL. SET uttaget.
2. Om du vill kan du ansluta en sidoapparat till
telefonsvararen.
3. Alternativt kan anslutning ske i faxens
mellanpropp.
GHI
PQRS
Tryck var knap p en eller flera gånge r för att
välja och mata in en symbol.
6. När du är klar trycker du på:
- Svenska (1) -
ABC
JKL
TUV
SYMBOLS
DEF
MNO
WXYZ
SPEED DIAL
REDIAL
SEARCH
SPEAKER
Raderar markerad
bokstav.
övre/undre läge
skifttangent.
Flyttar markören
R
mot vänster.
Flyttar markören
mot höger.
START/MEMORY
STOP
Page 6

INSTÄLLNING AV DATUM OCH
TID
Transferfilm och papper måste vara
Obs:
laddat för att följan de funktio n skall kunna
utföras.
Tryck på
FUNCTION
3
SÄNDA DOKUMENT
Placera dokumentet
(upp till 10 sidor) med
framsidan neråt i
dokumentmataren.
Displayen visar:
Tryck på
START/MEMORY knap pen:
ANGE DATUM & TID
START/MEMORY
Mata in två siffror för månaden (01 till 12).
Mata in två siffror för dagen (01 till 31).
Mata in två siffror för året (Ex: 1999).
Mata in två siffror för timman (00 till 23).
Mata in två siffror för minuten (00 till 59).
När du är klar trycker du på:
START/MEMORY
STOP
SPARA OCH RADERA
NUMMER FÖR SNABBVAL
Transfe rfil m och pappe r måste vara
Obs:
laddat för att följande funktion skall kunna
utföras.
1. Tryck på
Displayen visar:
2.
Tryck på 1 för att spara ett num m er ell er på 2
för att radera ett nummer.
3. Mata in ett 2-siffrigt kortvalsnummer (från 01 till
05 för snabbval, eller 06 till 45 för
kortnum mer val). ( Om du rad era r ett num m er
skall du gå till steg 7.
4. Mata in hela telefon/faxnumret
5. Tryck på
6. Mata in namnet genom att trycka på
sifferknapparna (max. 20 tecken). (se
inmatningstabellen i MATA IN DITT NAMN OCH
NUMMER.)
7. Tryck på
FUNCTION
START/MEMORY
START/MEMORY
3
FAX/TEL NR
STOP
Normalval
1. Lyft på luren eller tryck på
SPEAKER
2. Slå faxnumret.
3. Vänta på mottagningssignalen (om en person
svarar ber du denn a att trycka på startknappen)
4. Tryck på
START/MEMORY
Snabbval
Tryck på lämplig snabbvalstangent. Överföringen
startar automatiskt.
Kortnummerval
1. Tryck på
SPEED DIAL
2. Mata in ett 2-siffrigt kortvalsnummer.
3. Tryck på
START/MEMORY
MOTTAGNING AV DOKUMENT
FAX
TEL
14 FEB 10:30
A.M.
TEL/FAX
FAX
RECEPTION
Tryck på
MODE
FAX läge: Faxapparaten svarar automatiskt efter
en eller två signaler och mottag er de t inko mma nd e
doku ment .
TEL läge:
Fax
signaler
TAR EMOT
TEL/FAX läge: Detta läge är bäst för mottagning
av både telefonsamtal och faxdokument. Vid
inkommande samtal avgör telefaxen om det rör sig
om ett normalt samtal (inklusive manuellt valda
faxöverföringar), eller om en faxöverföring.
A.M. läge: Välj detta läget när en telefonsvarare är
ansluten till faxap pa rat en och telefonsvarare n är
påslagen.
14 FEB 10:30
14 FEB 10:30
14 FEB 10:30
TEL
A.M.
TEL/FAX
FAX
TEL
A.M.TEL/FAX
FAX
TEL
A.M.
TEL/FAX
START/MEMORY
- Svenska (2) -
Page 7

Hurtig reference
INSTALLATION
2
TEL.
SET
TEL.
LINE
3
1. Forbind telefonen som vist.
2. Stik netkablet ind i en jordet, 220-230 V
stikdåse.
3.
Stik den ene ende af tel efonl ednin gen i TEL.
LINE stikdåsen på bagsiden af
telefaxapparatet, og den anden ende i
telefonstikdåsen på væggen.
Tilslutning af en telefonsvarer og/eller en
ekstra telefon
1.
Fjern afdækningen der dækker TEL. SET på
bagsiden af telefaxapp ara te t. Tilslut en ekstra
telefon eller en tel efo ns varer til TEL. SET
stikdåsen.
2. Hvis ønsket, tilslut en ekstra telefon til
telefonsvareren.
1
TEL.
SET
TEL.
LINE
INDTAST DERES NAVN OG
Bemærk:
1. Tryk:
Displayet viser:
2. Tryk:
3. Ind tast Dere s telefaxn umm er (ma ks. 20 cifre) ved
at trykke på cifferta st ern e.
♦Hvis De laver en fejl, tryk på SEARCH/R tasten for
at flytte markøren tilbage til fejlen og indtast derpå
det korrekte tal eller bogstav.
4. Tryk:
5. Indtast Deres navn ved at trykke på de
tilsvarende ciffertaster, som vist nedenf or.
♦For at indtaste to ens bogstaver, der kræver et
tryk på samme taste, efter hinanden, trykkes på
SPEAKER tasten efter at det første bogstav er
indtastet.
A =
B =
C =
D =
E =
F =
G =
H =
I =
Tryk på en vilkårlig tast, en eller flere gange, for at
vælge og indtaste et symbol.
6. Efter afslutning, tryk:
- Dansk (1) -
NUMMER
Folie og papir skal være ilagt for at
kunne gennemføre følgend e
procedu re.
GHI
PQRS
FUNCTION
START/MEMORY
START/MEMORY
ABC
JKL
TUV
SYMBOLS
3
SET EGET NUMMER
J =
K =
L =
M =
N =
O =
P =
Q =
R =
DEF
SPEED DIAL
MNO
REDIAL
WXYZ
SEARCH
R
SPEAKER
S =
T =
U =
V =
W =
X =
Y =
Z =
SPACE =
Sletter markerede
bogstaver.
store/små bogstaver
skiftetaste.
flytter markøren mod
venstre.
flytter markøren mod
højre.
STOP
START/MEMORY
Page 8
INDSTILLING AF DATO og
KLOKKESLÆT
OVERFØRSEL AF
DOKUMENTER
Bemærk:
Folie og papir skal være ilagt for at
kunne gennemføre følgend e
procedu re.
Tryk:
Tryk START tasten:
FUNCTION
Displayet viser:
3
SET DATO & TID
START/MEMORY
Indtast to cifte for dagen (01 til 31) .
Indtast to cifre for måneden (01 til 12).
Indtast fire cifre for året (f.eks. 1999).
Indtast to cifre for timetallet (00 til 23).
Indtast to cifre for minutterne (00 til 59).
Efter afslutning, tryk:
START/MEMORY
STOP
GEMME ELLER SLETTE
NUMRE FOR AUTO OPKALD
Bemærk:
1. Tryk:
Displayet viser:
2.
Tryk 1 for at gemme et nummer eller 2 for at
slette et numme r.
3. Indtast et 2-cifret kodetal for hurtig opringning
(fra 01 til 05 for opkald med hurtigtast, eller 06
til 45 for kort nummer opkald). Hvis De sletter et
nummer, gå til trin 7.
4. Indtast det fuldstændige telefon/telefaxnummer.
5. Tryk:
Folie og papir skal være ilag t for at
kunne gennemføre f ølgende
procedure.
FUNCTION
3
FAX/TLF NR.REG.
START/MEMORY
Anbring dokumentet
med tekstsiden nedad
(indtil 10 sider) i
dokumentindføringen
Normalt opkald
1. Løft røret eller tryk
SPEAKER
2. Vælg telefaxnummeret
3. Vent på modtagetonen (hvis en person svarer,
bed vedkommende om at trykke starttasten)
4. Tryk:
START/MEMORY
Hurtigopkald
Tryk på den tilsvarende hurtigtast. Overførslen
starter automatisk.
Kortnummer opkald
1. Tryk:
SPEED DIAL
2. Indtast et 2-cifret kortnummer.
3. Tryk:
START/MEMORY
MODTAGELSE AF
DOKUMENTER
FAX
TEL
14 FEB 10:30
A.M.
TEL/FAX
FAX
RECEPTION
Tryk:
MODE
AX position: Faxapparatet svarer automatisk efter
1 eller 2 opkald og modtager dokumentet.
TEL position:
Telefax
tone
MODTAGER
14 FEB 10:30
14 FEB 10:30
14 FEB 10:30
TEL
A.M.
TEL/FAX
FAX
TEL
A.M.TEL/FAX
FAX
TEL
A.M.
TEL/FAX
START/MEMORY
6. Indtast navnet på modtageren, ved at trykke på
ciffertasterne (maks. 20 bogstaver). (Referer til
bogstav-indtastningstabelle n i INDTAST
DERES NAVN OG NUMMER.)
7. Tryk:
START/MEMORY
STOP
- Dansk (2) -
TEL/FAX position: Telefaxapparatet svarer
automatisk efter 1 eller 2 opkald og modtager
derefter telef ax. Taleop ka ld (inkl. manuel t valgte
telefax transmissioner) signaliseres med en
speciel ringetone.
A.M. position: Vælg denne position, hvis
telefonsvareren er tilsluttet til telefaxapparatet og
der er tændt for telefonsvareren.
Page 9
Hurtigreferanse
INSTALLASJON
2
TEL.
SET
TEL.
LINE
3
1. Kople til telefonrøret som vist.
2. Kople strømkabelen til en jordet, 220-23 0 V
stikkontakt.
3.
Kople telefonledningens ene ende til TEL.LINE
kontakten på baksiden av telefaxen og den
andre enden til telefon-veggkontakten.
Tilkopling av en telefonsvarer og/eller et
biapparat
1.
Fjern forseglingen som dekker TEL.SET
kontakten på baksiden av telefaxen. Kople et
biapparat eller en telefonsvarer til TEL.SET
kontakten.
2. Kople om ønsket et biapparat til
telefonsvareren.
1
TEL.
SET
TEL.
LINE
INNLEGGING AV DITT NAVN
Merknad:
1. Trykk:
Displayet viser:
2. Trykk:
3. Legg inn faxnummeret ditt (maks. 20 tegn) ved å
trykke på talltastene.
♦Hvis du gjør en feil, så trykk SEARCH/R tasten for
å bevege markøren tilbake til feilen og legg deretter
inn det riktige tallet eller den riktige bokstaven.
4. Trykk:
5. Legg inn navnet ditt ved å trykke de tilsvarende
talltastene som vist nedenfor.
♦For å legge inn to bokstaver etter hverandre
som ligger på den samme taste n skal
SPEAKER tasten trykkes etter at den første
bok sta ve n er l ag t in n.
A =
B =
C =
D =
E =
F =
G =
H =
I =
Trykk en tast en eller flere gange r for å velg e og
legge inn et symbol.
6. Når dette er gjort, så trykk:
- Norsk (1) -
OG NUMMER
Trykkfolie og papir må være satt i for å
utføre operasjonen nedenfor.
GHI
PQRS
FUNCTION
START/MEMORY
START/MEMORY
ABC
JKL
TUV
SYMBOLS
3
SET EGET NUMMER
J =
K =
L =
M =
N =
O =
P =
Q =
R =
DEF
SPEED DIAL
MNO
REDIAL
WXYZ
SEARCH
R
SPEAKER
Sletter uthevet
bokstav.
Skiftta st store/sm å
bokstaver.
Beveger markøren
til venstre.
Beveger markøren
til høyre.
START/MEMORY
S =
T =
U =
V =
W =
X =
Y =
Z =
SPACE =
STOP
Page 10
INNSTILLING AV DATO OG
KLOKKESLETT
SENDING AV DOKUMENTER
Merknad:
Trykkfolie og papir må være satt i for å
utføre operasjonen nedenfor.
Trykk:
Trykk START taste n:
FUNCTION
Displayet viser:
3
SET DATO & TID
START/MEMORY
Legg inn to sifre for dag (01 til 31 ).
Legg inn to sifre for måne d (01 til 12).
Legg inn fire sifre for år (F.eks. 1999).
Legg inn to sifre for time (00 til 12).
Legg inn to sifre for minu tt (00 til 59 ).
Når dette er gjort, så trykk:
START/MEMORY
STOP
LAGRING OG SLETTING AV
TALL FOR AUTOMATISK
RINGING
Merknad:
1. Trykk:
Displayet viser:
2.
Trykk 1 for å lagre et tall eller 2 for å slette et
tall.
3. Legg inn et 2-sifret kortnummer (fra 01 til 05 for
hurtigvalg eller 06 til 45 for kortnummer). (Hvis
du skal slette et nummer, gå til skritt 7.
4. Legg inn hele telefon-/ faxnu mme ret .
5. Trykk:
6. Legg inn navnet ved å trykke talltastene (maks.
20 tegn). (Se bokstavinnleggingstabellen under
INNLEGGING AV DITT NAVN OG NUMMER).
7. Trykk:
Trykkfolie og papir må være satt i for å
utføre operasjo ne n nede nfor.
FUNCTION
3
FAX/TLF NR.REG.
START/MEMORY
STOP
START/MEMORY
Legg dokumentet (opp
til 10 sider) i
dokume ntm a tere n
med forsiden ned.
Vanlig oppringing
1. Løf t opp telefonrøret eller trykk
SPEAKER
2. Slå faxnummeret.
3. Vent på mottakstonen (hvis en person svarer,
så be han/hun om å trykke start-tasten)
4. Trykk:
Hurtigvalg
START/MEMORY
Trykk den tilsvarende hurtigvalgtasten.
Overføringen vil da starte automatisk.
Kortnummer
1. Trykk:
SPEED DIAL
2. Legg inn 2-sifret kortnummer.
3. Trykk:
START/MEMORY
MOTTAKING AV
DOKUMENTER
FAX
TEL
14 FEB 10:30
A.M.
TEL/FAX
FAX
RECEPTION
Trykk:
MODE
FAX modus: Faxen svarer automatisk etter ett
eller to ring og mottar doku me nt et so m komme r.
TEL modus:
Faxtone
MODTAGER
TEL/FAX modus:
Faxmaskinen svarer automatisk etter 1 eller 2 ring
og mottar faxer. Taleanrop (inklusive
faxove rføring er so m er slå tt ma nu elt) signali se r es
ved hjelp av en spesiell ringetone.
A.M. modus: Bruk denne modusen hvis det er
koplet en telefonsvarer til faxen og telefonsvareren
er slått på.
14 FEB 10:30
14 FEB 10:30
14 FEB 10:30
TEL
A.M.
TEL/FAX
FAX
TEL
A.M.TEL/FAX
FAX
TEL
A.M.
TEL/FAX
START/MEMORY
- Norsk (2) -
Page 11

Pika Ohje
ASENNUS
2
TEL.
SET
TEL.
LINE
3
1. Liitä kuuloke kuva n osoitt am al la taval la.
2. Liitä sähköjohto maadoitettuun 220-230 V
koskettimeen.
3. Liitä puhelinjohdon toinen pää telekopiolaitteen
takaosassa olevaan TEL. LINE pistorasiaan ja
toinen pää puhelinpistorasiaan.
Puhelinvastaajan ja/tai lisäpuhelimen
liittäminen
1. Poista telekopiolaitteen takaosassa olevaa
TEL. SET pistorasiaa peittävä suljin. Liitä
lisäpuhelin tai puhelinvastaaja TEL. SET
pistorasiaan.
2. Liitä halutessasi lisäpuhelin puhelinvasta aja an.
1
TEL.
SET
TEL.
LINE
OMAN NIMEN JA NUMERON
SYÖTTÖ
Huom.:
1. Paina:
Näytössä näkyy:
2. Paina:
3. Syötä faxnumero (kork. 20 numeroa)
numeronäppäimillä.
♦Jos teet virheen, siirrä kursori takaisin virheen
kohdalle painamalla SEARCH/R näppäintä ja
syötä oikea numero tai kirjain.
4. Paina:
5. Syötä nimesi painamalla vastaavia
numeron äp pä im iä kuten alla esitetä än .
♦Kahden kirjaimen syöttämiseksi peräkkäin,
jotka vaativat saman näppäimen, paina
SPEAKER näppäintä, kun olet syöttänyt
ensimmäisen kirjaime n.
A =
B =
C =
D =
E =
F =
G =
H =
I =
Seuraava toiminto edellyttää, että
laitteesee n on lai tet tu vä rina uh a ja
paperi.
FUNCTION
3
OMAN NUMERON AS.
START/MEMORY
START/MEMORY
J =
K =
L =
M =
N =
O =
P =
Q =
R =
DEF
GHI
PQRS
ABC
JKL
TUV
SYMBOLS
MNO
WXYZ
SPEED DIAL
REDIAL
SEARCH
SPEAKER
R
S =
T =
U =
V =
W =
X =
Y =
Z =
SPACE =
Poistaa korostetun
kirjaimen.
Vaihtaa kirjasin
kokoa.
Siirtää kursoria
vasemmalle.
Siirtää kursoria
oikealle.
Valitse ja syötä symboli painamalla
jompaakumpaa näppäintä yhden tai useamman
kerran.
6. Kun olet valmis, paina:
- Suomi (1) -
STOP
START/MEMORY
Page 12
PÄIVÄMÄÄRÄN JA
KELLONAJAN ASETTAMINEN
Huom.:
Paina:
Seuraava toiminto edellyttää, että
laitteesee n on lai tet tu vä rina uh a ja
paperi.
FUNCTION
3
DOKUMENTTIEN
LÄHETTÄMINEN
Laita dokumenttisi
(korkeintaan 10 sivua)
tekstipuoli alaspäin
dokumentinsyöttöalustalle
.
Näytö ss ä nä kyy:
PÄIVÄMÄÄRÄN &
KELLONAJAN ASETUS
Paina START näppäintä:
START/MEMORY
Syötä kaksi numeroa päivälle (01 - 31).
Syötä kaksi numeroa kuukaudelle (01 - 12).
Syötä neljä numeroa vuodelle (esim.: 1999).
Syötä kaksi numeroa tunnille (00 - 23).
Syötä kaksi numeroa minuutille (00 - 59).
Kun olet valmis, paina:
START/MEMORY
STOP
AUTOMAATTISTEN NUMERON-
VALINTOJEN ASETUS JA
POISTO
Huom.:
1. Paina:
Näytössä näkyy:
2.
Paina 1 nu me ron asetta mi seksi mui sti in tai 2
numeron poistamiseksi.
3. Syötä 2-numeroinen pikavalintanumero (01 - 05
lyhytvalintanäppäimelle tai 06 - 45
pikavalinnalle). (Jos aiot poistaa numeron, siirry
kohtaan 7).
4. Syötä täydellinen puhelin/faxnumero.
5. Paina:
6. Syötä vastaanottajan nimi painamalla
numeronäppäimiä (kork. 20 merkkiä). (Katso
kirjaintensyöttötaulukkoa kohdasta OMAN
NIMEN JA NUMERON SYÖTTÖ.)
7. Paina:
Seuraava toimi nto ede llyttä ä, että
laitteeseen on laitettu värinauha ja
paperi.
FUNCTION
3
PUH/FAX NOMEROT
START/MEMORY
STOP
START/MEMORY
- Suomi (2) -
Normaali numerovalinta
1. Nosta kuuloke tai paina
SPEAKER
2. Valitse faxnumero.
3. Odota, kunn e s kuul et va sta anottoä än en (jo s
henkilö vastaa, pyydä häntä painamaan oman
laitteensa START-näppäintä)
4. Paina:
START/MEMORY
Lyhytvalintanäp pä in
Paina vastaavaa lyhytvalinta nä ppäi ntä.
Tiedonsiirto alkaa automaattisesti.
Pikavalinta
1. Paina:
SPEED DIAL
2. Syötä 2-numeroinen pikavalintanumero.
3. Paina:
START/MEMORY
DOKUMENTTIEN
VASTAANOTTAMINEN
FAX
TEL
14 FEB 10:30
A.M.
TEL/FAX
FAX
RECEPTION
Paina:
MODE
FAX tila: Teleko pi olaite vastaa auto maa ttisesti 1
tai 2 hälytykseen ja vastaanottaa saapuvan
dokumentin.
TEL tila:
Faxääni
VASTAANOTTO
PUH/FAX tila:
Telekopio lai te va sta a autom a att i sest i 1 tai 2
hälytykseen ja vastaanottaa telefaxit. Puhelut
(mukaan lukien käsin valitut telefaxlähetykset)
tunnistaa erikoisesta hälytysäänestä.
A.M. tila : Valit se tämä mod us, kun
puhelinvastaaja on liitetty telefaxiin ja kun
puhelinvastaaja on kytketty päälle.
14 FEB 10:30
14 FEB 10:30
14 FEB 10:30
TEL
A.M.
TEL/FAX
FAX
TEL
A.M.TEL/FAX
FAX
TEL
A.M.
TEL/FAX
START/MEMORY
Page 13

Introduction
Welcome, and thank you for
choosing a Sharp facsimile!
When using your fax, follow
the safety guidelines given
below.
Important safety information
• Do not disassembl e this machine or attempt any p rocedures not described
in this manual. Refer all servicin g to qu alified service personnel.
• This machine must only be connected to a 220-230 V, 50 Hz, earthed
(2-prong) outlet. Connecting it to any other kind of outlet may damage
the machine.
• Do not ins tall or use the machine n e ar wat er, or when you are wet. T ake
care not to spill any liquids on the machine.
• Unplug the m achine from the t elephone socket and th en the pow er outlet
and consult a qualified service representative if any of the following
situations occur:
- Liquid has been spilled i nto the machine or the machine has b een
exposed to rain or water.
- The machine produces odors, smoke, or unusual noises .
- The power cord is frayed or damaged.
- The machine has been dropped or the housing damaged.
• Do not allow anything to rest on the power cord, and do not install the
machine where people may walk on the power lead.
1
Page 14

• Never insert objects of any kind into slots or openings on the machine.
This could create a risk of fire or electric shock. If an object falls into the
machine that you cannot safely remove, unplug the machine and consult
a qualified service representative.
• Do not place thi s machine on an unstable cart, st and or table. The machi ne
could be seriously damaged if it falls.
• Never install tel ephone wiri ng duri ng a lig htn ing storm.
• Never install telephone sockets in wet locations unless the socket is
specifically designed for wet locations .
• Never touch uninsulated telephone wires or terminals unless the tele-
phone line has been disconnected at the network interface.
• Use caution when installing or modifying telephone lines.
• Avoid using a telep hone (ot her than a cordless typ e) during an electri cal
storm. There may be a remote risk of electric shock from lightning .
• Do not use a telephone to report a gas leak in the vicinit y of the leak.
• The socket-outlet must be inst alled near the equipment and must be easily
accessible.
Important:
•• This facsimile ma chine is only design ed for use in the count ry where
approved.
2
Page 15

Table of Contents
1 Installation 5
Unpacking Checklist. . . . . . . . . . . . . . . . . . . . . . . . . . . . . . . . . . . . . . . . 5
A Look at the Operation Panel . . . . . . . . . . . . . . . . . . . . . . . . . . . . . . . . 6
Connections. . . . . . . . . . . . . . . . . . . . . . . . . . . . . . . . . . . . . . . . . . . . . . . 8
Loading the Imaging Film. . . . . . . . . . . . . . . . . . . . . . . . . . . . . . . . . . . 14
Loading Printing Paper . . . . . . . . . . . . . . . . . . . . . . . . . . . . . . . . . . . . . 19
Entering Your Name and Fax Num ber. . . . . . . . . . . . . . . . . . . . . . . . . 21
Setting the Date and Tim e. . . . . . . . . . . . . . . . . . . . . . . . . . . . . . . . . . . 24
Selecting the Recepti on Mode . . . . . . . . . . . . . . . . . . . . . . . . . . . . . . . 27
Volume Adjust ment . . . . . . . . . . . . . . . . . . . . . . . . . . . . . . . . . . . . . . . 29
2 Sending Documents 31
Transmittable Documents. . . . . . . . . . . . . . . . . . . . . . . . . . . . . . . . . . . 31
Loading the Document . . . . . . . . . . . . . . . . . . . . . . . . . . . . . . . . . . . . . 33
Resolution and Contrast . . . . . . . . . . . . . . . . . . . . . . . . . . . . . . . . . . . . 35
Sending a Fax by Normal Dialling. . . . . . . . . . . . . . . . . . . . . . . . . . . . 37
Sending a Fax by Automatic Dialling. . . . . . . . . . . . . . . . . . . . . . . . . . 39
3 Receiving Documents 48
Using TEL/FAX Mo d e . . . . . . . . . . . . . . . . . . . . . . . . . . . . . . . . . . . . . 48
Using FAX Mode . . . . . . . . . . . . . . . . . . . . . . . . . . . . . . . . . . . . . . . . . 49
Using A.M. Mode . . . . . . . . . . . . . . . . . . . . . . . . . . . . . . . . . . . . . . . . . 50
Using TEL Mode. . . . . . . . . . . . . . . . . . . . . . . . . . . . . . . . . . . . . . . . . . 51
Substitute Reception to Memory. . . . . . . . . . . . . . . . . . . . . . . . . . . . . . 55
4 Making Copies 56
5 Making Telephone Calls 59
6 Answering Machine Connection 63
Preparations. . . . . . . . . . . . . . . . . . . . . . . . . . . . . . . . . . . . . . . . . . . . . . 63
Using the Connection . . . . . . . . . . . . . . . . . . . . . . . . . . . . . . . . . . . . . . 64
Optional A.M. Connection Settings . . . . . . . . . . . . . . . . . . . . . . . . . . . 66
3
Page 16

7 Special Functions 68
Caller ID . . . . . . . . . . . . . . . . . . . . . . . . . . . . . . . . . . . . . . . . . . . . . . . . 68
Broadcasting . . . . . . . . . . . . . . . . . . . . . . . . . . . . . . . . . . . . . . . . . . . . . 73
Cover Sheet. . . . . . . . . . . . . . . . . . . . . . . . . . . . . . . . . . . . . . . . . . . . . . 75
Batch Page Numbering. . . . . . . . . . . . . . . . . . . . . . . . . . . . . . . . . . . . . 78
Blocking Reception of Unwanted Faxes . . . . . . . . . . . . . . . . . . . . . . . 80
Sending Docu ments From Memory. . . . . . . . . . . . . . . . . . . . . . . . . . . 82
Polling (R eq uesting a Fax Transmission). . . . . . . . . . . . . . . . . . . . . . . 84
Timer Operations . . . . . . . . . . . . . . . . . . . . . . . . . . . . . . . . . . . . . . . . . 87
8 Option Settings 89
9 Printing Reports and Lists 98
10 Maintenance 102
11 Troubleshooting 106
Problems and Solut ion s . . . . . . . . . . . . . . . . . . . . . . . . . . . . . . . . . . . 106
Messages and Signals. . . . . . . . . . . . . . . . . . . . . . . . . . . . . . . . . . . . . 111
Clearing Paper Jams . . . . . . . . . . . . . . . . . . . . . . . . . . . . . . . . . . . . . . 114
Specifications 117
4
Page 17
1
Chapter
Installation
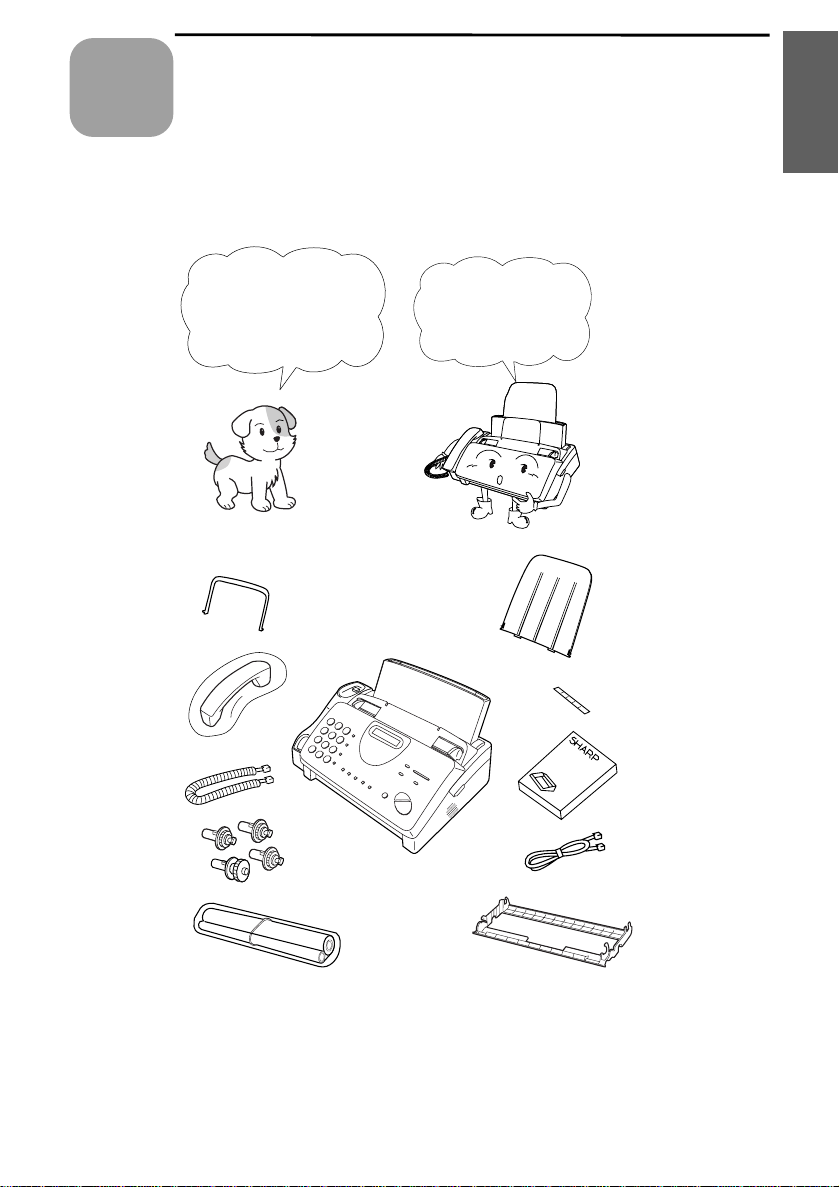
Unpacking Checklist
1. Installation
Original
document
support
Handset
Handset
lead
Gears (4)
Before setting up,
make sure you have
all of the following
items.
If any are missing,
contact your d ealer
or retailer.
Paper tray
extension
Rapid key
labels
Operation
manual
Telephone
line cord
Imaging film
(initial starter
roll)
Imaging
film
cartridge
5
Page 18
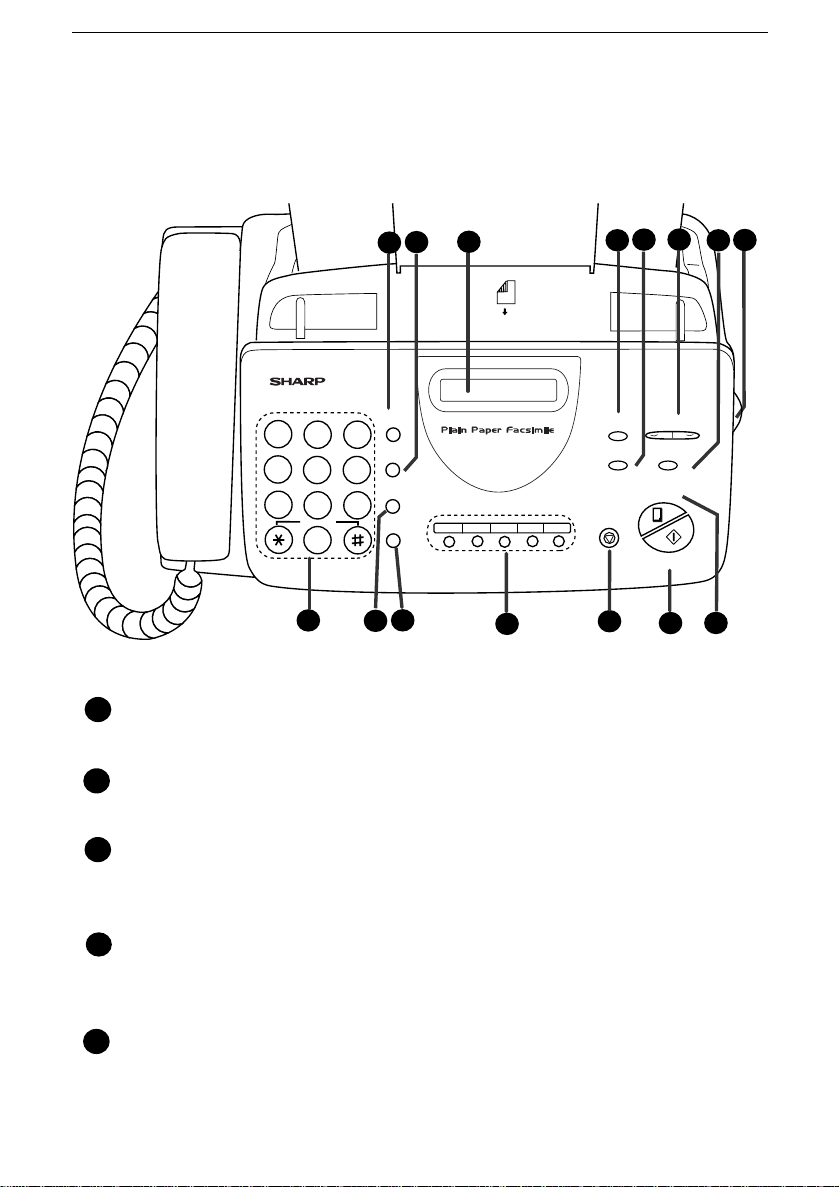
A Look at the Operation Panel
A Look at the Operation Panel
3
2
1
TEL FAX
A.M.
TEL/FAX
05/POLL04030201
12
SPEED DIAL key
1
GHI
PQRS
DEF
MNO
WXYZ
SPEED
DIAL
3
REDIAL
6
SEARCH
R
9
SPEAKER
11
10
ABC
1
2
JKL
4
5
TUV
7
8
SYMBOLS
0
9
Press this key to dial a 2-digi t Sp eed Dial num ber.
REDIAL key
2
Press this key to automati c ally redial the last num ber diall ed .
5 6
4
VOLUME
RECEPTION
DOWN UP
MODE
RESOLUTION FUNCTION
COPY/HELP
STOP
START/MEMORY
13
14
15
8
7
3
Display
This displays mes sages and promp ts during op erati on and
programming.
4
RECEPTION MO DE ke y
Press this key to select the reception mode. An arrow in the displ ay
will point to the currently selected reception mode.
5
RESOLUTI ON k ey
Press this key to adjust the resolution and contrast before sendin g or
copying a document.
6
Page 19

A Look at the Operation Panel
VOLUME keys
6
Press these keys to adjust the volume of the speaker when the
SPEAKER key has been pressed, or the volum e of the ringer at all
other times.
7
FUNCTION key
Press this key to select various special functions.
8
Panel release
Grasp this finger hold and pull toward you to open the operation panel.
9
Number keys
Use these keys to dial numbers, and enter n umb ers and letters duri ng
number/name storing procedures.
10
SEARCH/R key
Press this key to search for an automatic dialling number, or, if you are
on a P.B.X. extension, press this key to transfer a call.
11
SPEAKER ke y
Press this key to hear the line and fax tones through the speaker before
sending a document, or dialling a voice number.
Note: This i s no t a sp ea k e rp h on e . You must pick up the handset to
talk with the other party.
1. Installation
12
Rapid Dial Keys
Press one of these keys to dial a fax or voice number automatically.
(Note that you must atta ch the Rapi d Key labels.)
13
STOP key
Press this key to cancel operat ion s befo re they are completed.
14
START/MEMORY key
Press this key to send or receive a document, or to scan a document
into memory befo re sending i t.
15
COPY/HELP key
When a document is in the feeder, press this key to make a copy. At
any other time, pr ess this key to print out the Help List, a quick
reference guide to the operation of your fax.
7
Page 20
Connections
Connections
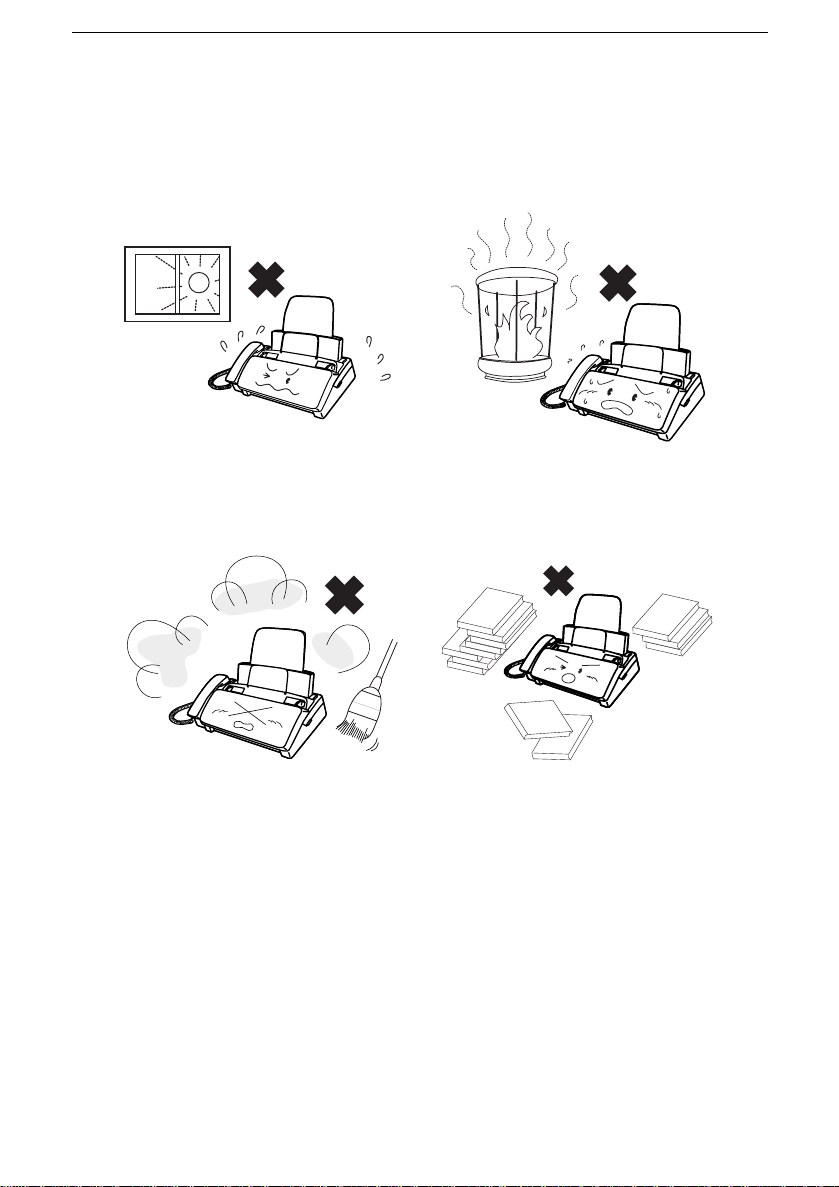
Points to keep in mind w hen setting u p
Do not place the machine in
direct sunlight.
Keep dust away from the
machine.
Do not place the machine near
heaters or air conditioners.
Keep the area around the
machine clear.
About condensation
If the machine is moved from a cold to a warm place, it is possibl e that
condensation may form on the scann ing glass, preventi ng prop er
scanning of documents for transmission . To remove the condensation,
turn on the power and wait approximately two hours before usin g the
machine.
8
Page 21
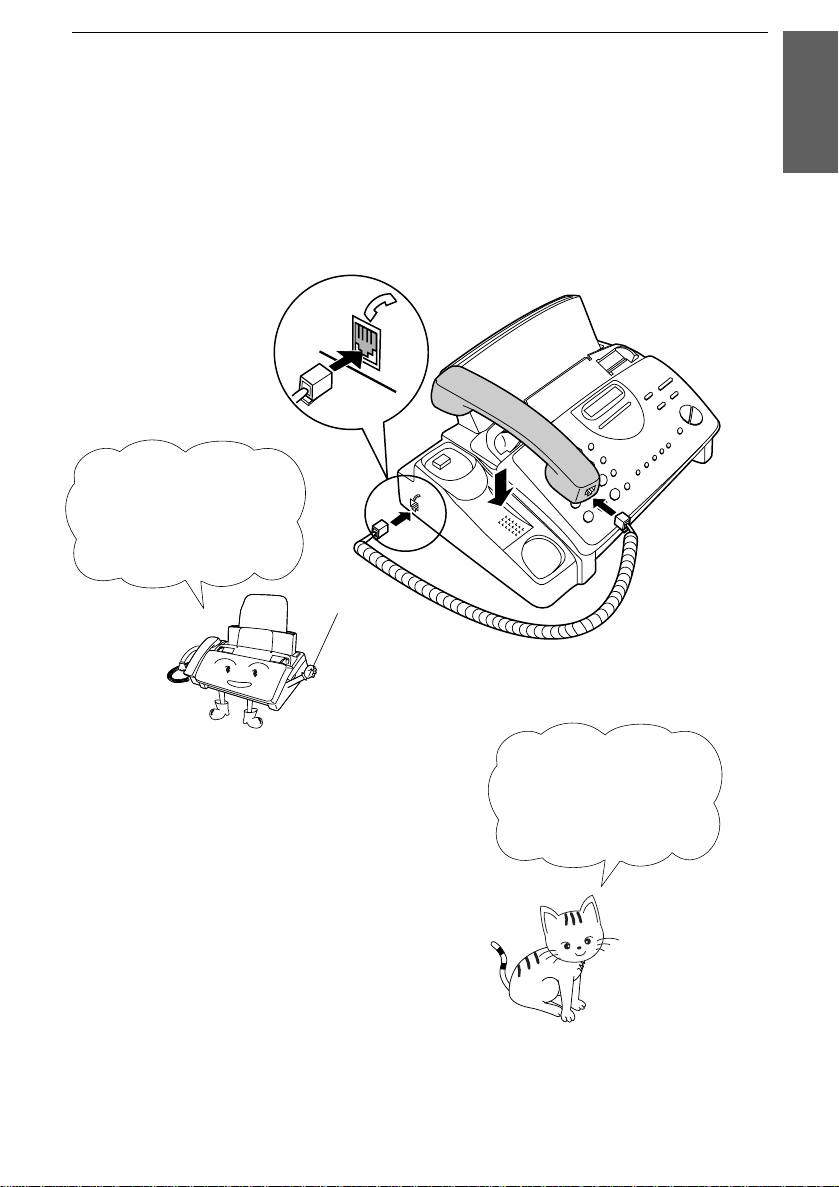
Handset
Connect the handset as shown and pla ce it on th e handset r est.
♦ The ends of the handset lead are identical, so they will go into
either socket.
Make sure the handset
cord goes into the
socket marked with a
handset symbol on the
side of the machine!
Connections
1. Installation
Use the handset to
make ordinary phone
calls, or to transmit
and receive
documents manually.
9
Page 22
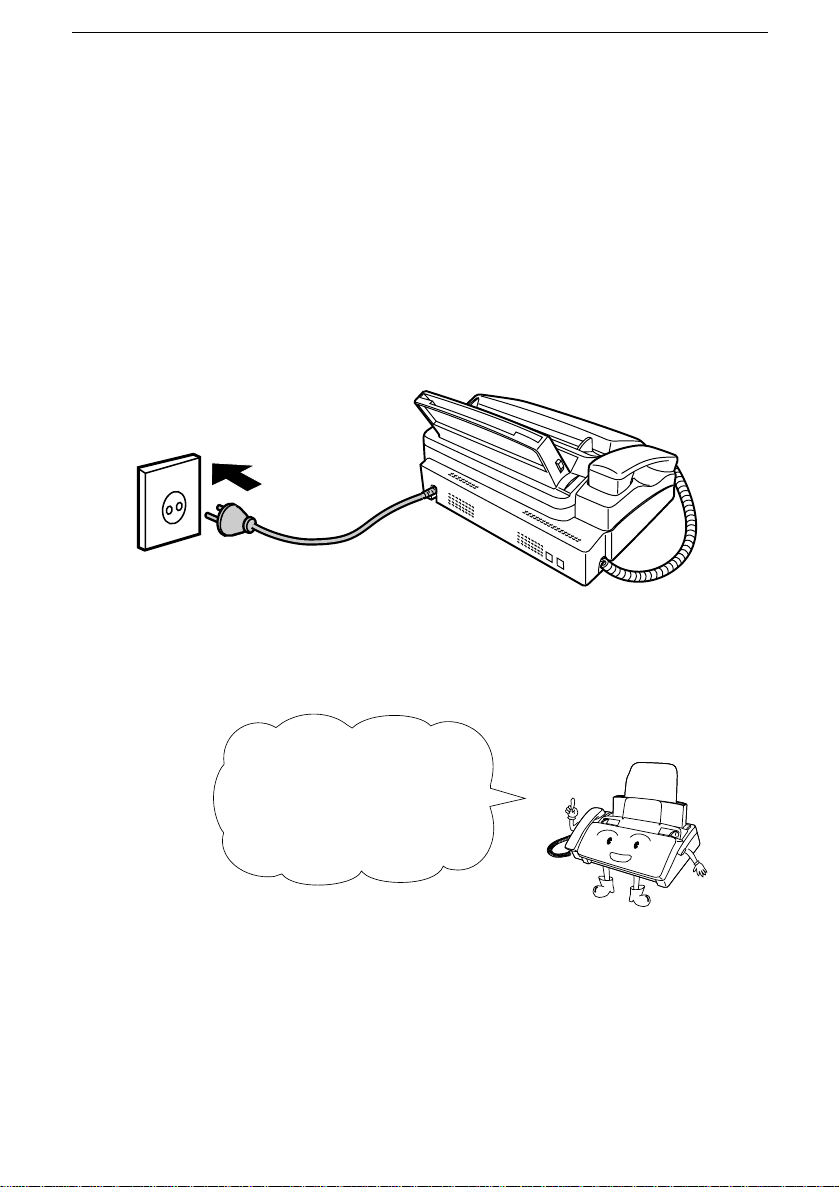
Connections
Power le a d
Plug the pow er lead into a 220 - 230 V, 50 Hz, ea rthed (2-prong) AC
outlet.
♦ Caution: The mains outlet (socket outlet) should be installed near
the equipment and be easily accessable.
The machine does not
have a power on/off switch,
so the power is turned on
and off by simply plugging
or unplugging the power
lead.
Note: If your area experiences a high incidence of lightn ing or power
surges, we recommend that you install surge protectors for the power and
telephone lines. Surge protectors can be purchased from your dealer or at
most telephone specialty stores.
10
Page 23
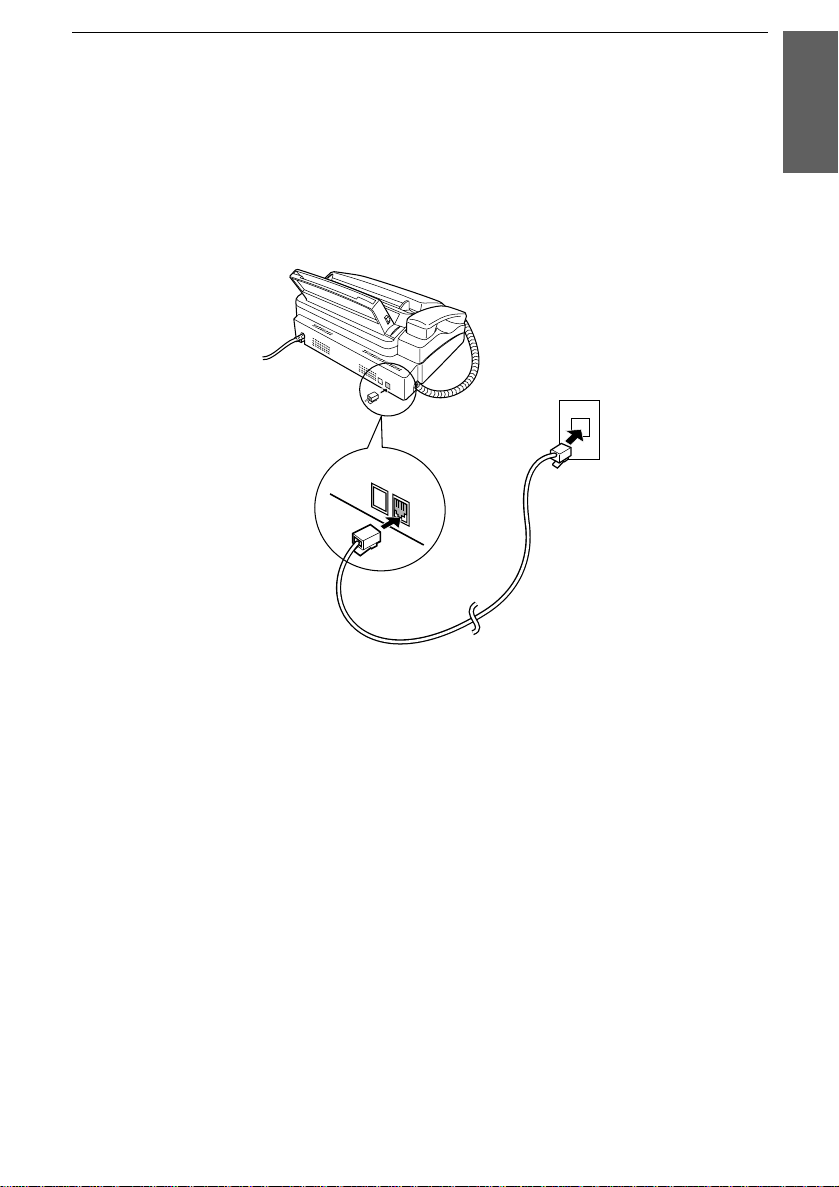
Telephone li ne c ord
Insert one end of the line cord into the socket on the back of the
machine marked TE L. LINE . In se rt the other end into a wall
telephone socket.
TEL.
SET
TEL.
LINE
Connections
1. Installation
Comments:
•• In Germany, the machine is supplied with a N-coded line cable, enabl ing
you to use an extension (cor dless) te lepho ne on the same line . If you don ’t
have the standard NFN-outlet of TELEKOM, you can purchase an
NFN-adapter at your retailer.
•• Your fa x is set for t one diall ing . If you ar e on a pulse only dia l l ine , you must
set the fax for pulse dialling by chan gin g Opti on Se tt ing 7. Thi s proc edu re i s
described in Cha pt er 8, Option Settings.
•• If you are conne ct in g the ma ch ine to a PBX, you will need to ma ke
appropria te sett in gs for Opt io n Set ti ng 14. See Chapte r 8, Opti on Settings .
•• If you inte nd t o use a com put er fax mode m on the sam e phone lin e, you m ust
reset Option Setti ng 15 (Fax Sig nal Receive ) to OFF in order to preve nt
transmission a nd rece ption e rror s. Thi s proc edu re is desc rib ed in Cha pte r 8,
Option Settings.
11
Page 24
Connections
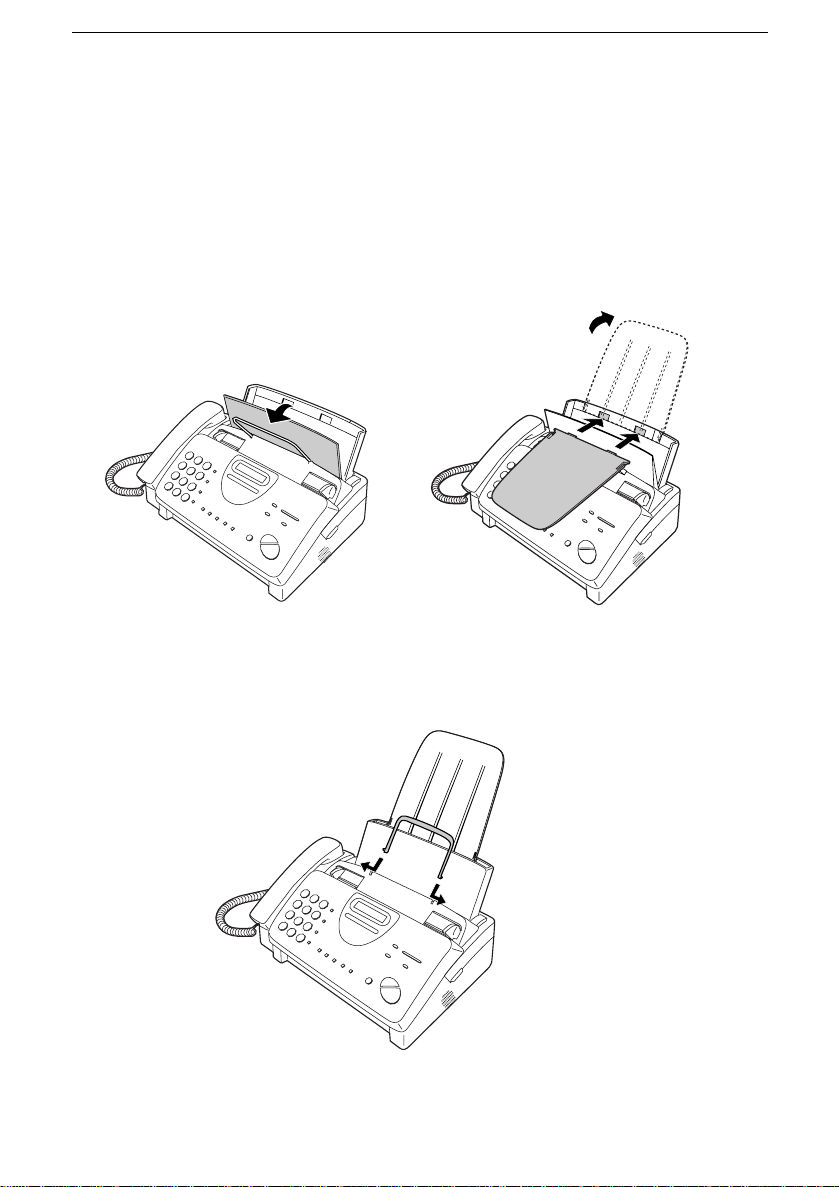
Trays
Attach the paper tray extension.
♦ Pull the paper release plate forward. Insert the paper tray
extension horizontally into the notches in the paper tray. Rotate
the paper tray extension up until it snaps into place.
Attach the ori ginal document support.
12
Note: The original
document support
has a top side and a
bottom side. If you
cannot insert the
tabs on the support
into the holes, turn
the support over.
Page 25

Other devices
If desired, you can use an answering machine or an extension
telephone on the same line as your fax. The answering machine or
extension telephone c an be connected directly to the TEL. SET socket
on your fax (note that this socket is not availabl e in some countries), or
to another wall socket.
♦ Connecting an answ ering machine to the fax or a wall socket will
allow you to re ceive both voice and fax messages on the same line
while you are out. For details on using this feature, see Chapter 6.
♦ You can use an extension phone connected to the fax or a wall
socket to make and receive calls like any normal telephone. For
details on receiving faxes from the extension phone, see Chapter 3.
Germany:
The TEL. SET socket is not available on the fax. We recommend that
you plug the answering machine line cable into the right connector of
the TAE wall outlet, a (e.g.: cordless) telepho ne int o the middl e
connector an d fax line cord into th e left conn ector.
Connections
1. Installation
Switzerland, Austria:
An extension phone cannot be used. An answering machine can be
used if it is connected to a wall socket (the TEL. SET socket is not
available).
France:
The TEL. SET socket is not available on the fax. To connect an
answering machine or extensio n telephone to a wall socket, a special
cable is required. For more details, consult your dealer.
13
Page 26
Loading the Imaging Film
Loading the Imaging Film
Your fax uses a roll of imaging film to create printed text and images.
The print head in the fax applies heat to the imaging film to transfer
ink to the paper. Follow the steps below to load or replace the film.
The initial starter roll
of imaging film
included with your
fax can print about
30 A4 pages.
Note: If there is paper in the paper tray, pull the paper release plate forward
and remove the paper before loading the imaging film.
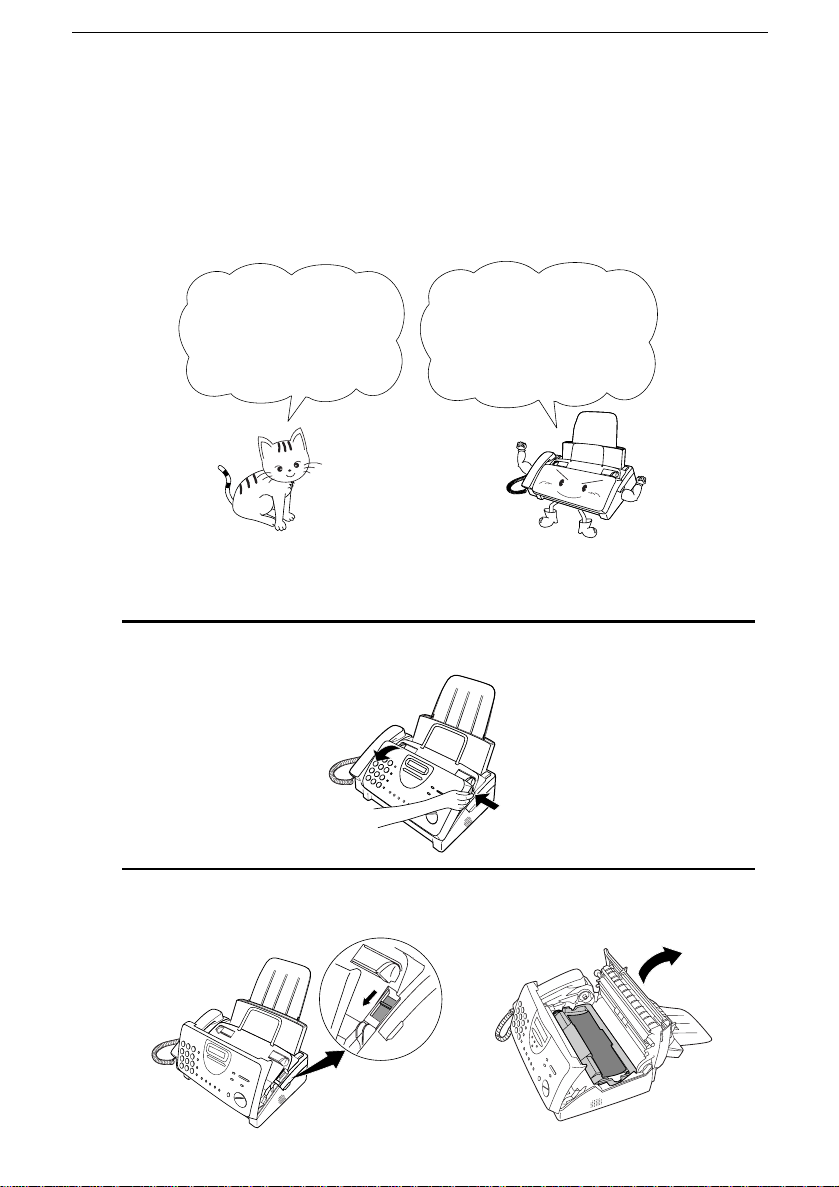
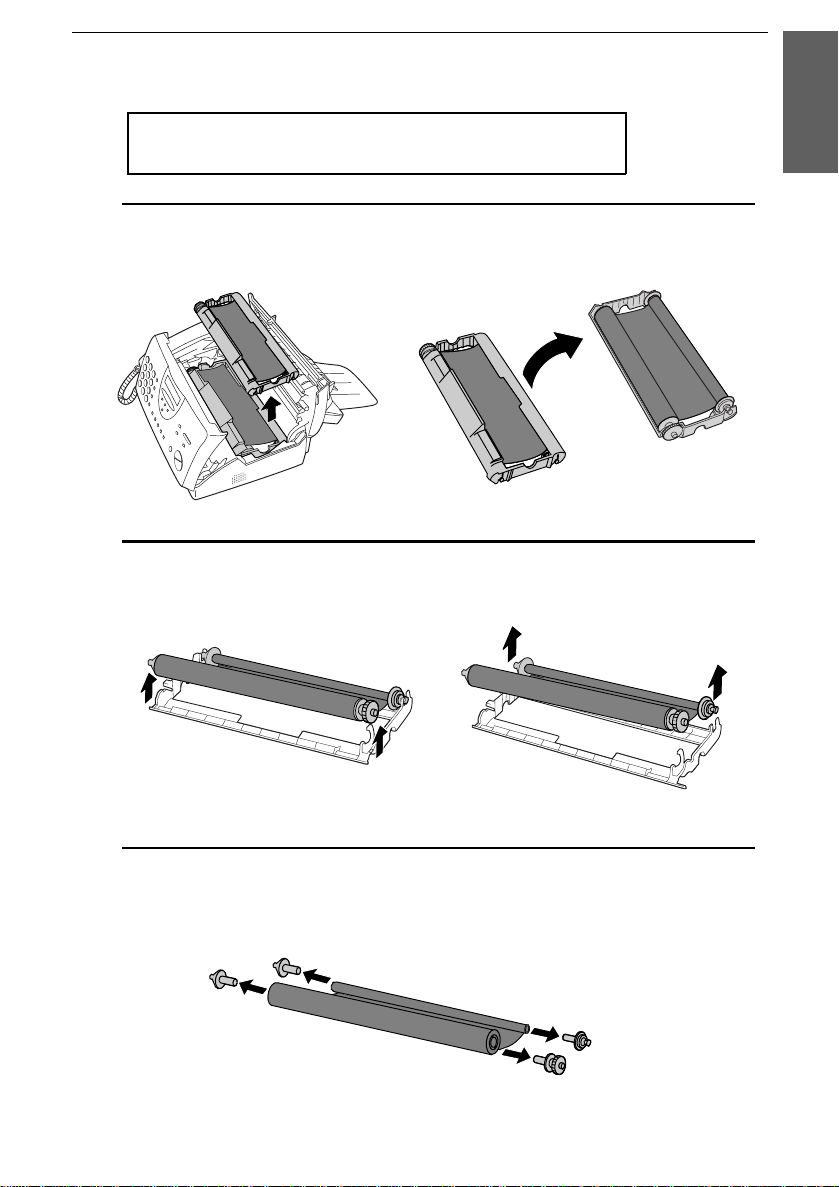
1
Open the operation panel by grasping the finge r hold and pulling up.
When replacing the
film, use a roll of Sharp
UX-3CR imaging film.
One roll can print about
95 A4 pages.
2
Pull the green rele ase on the right side of the machine forward, and
open the print compartment cover.
14
Page 27
Loading the Imaging Film
If you are installing the imaging film for the first time,
go to Step 6.
3
Remove the imaging film cartridge from the print compartment
(grasp the handle at the front of the cartridge) and turn it over.
4
Remove the used film from the cartridge.
1. Installation
5
Remove the four green gears from the used film.
DO NOT DISCARD THE FOUR GR EEN GEARS!
15
Page 28
Loading the Imaging Film
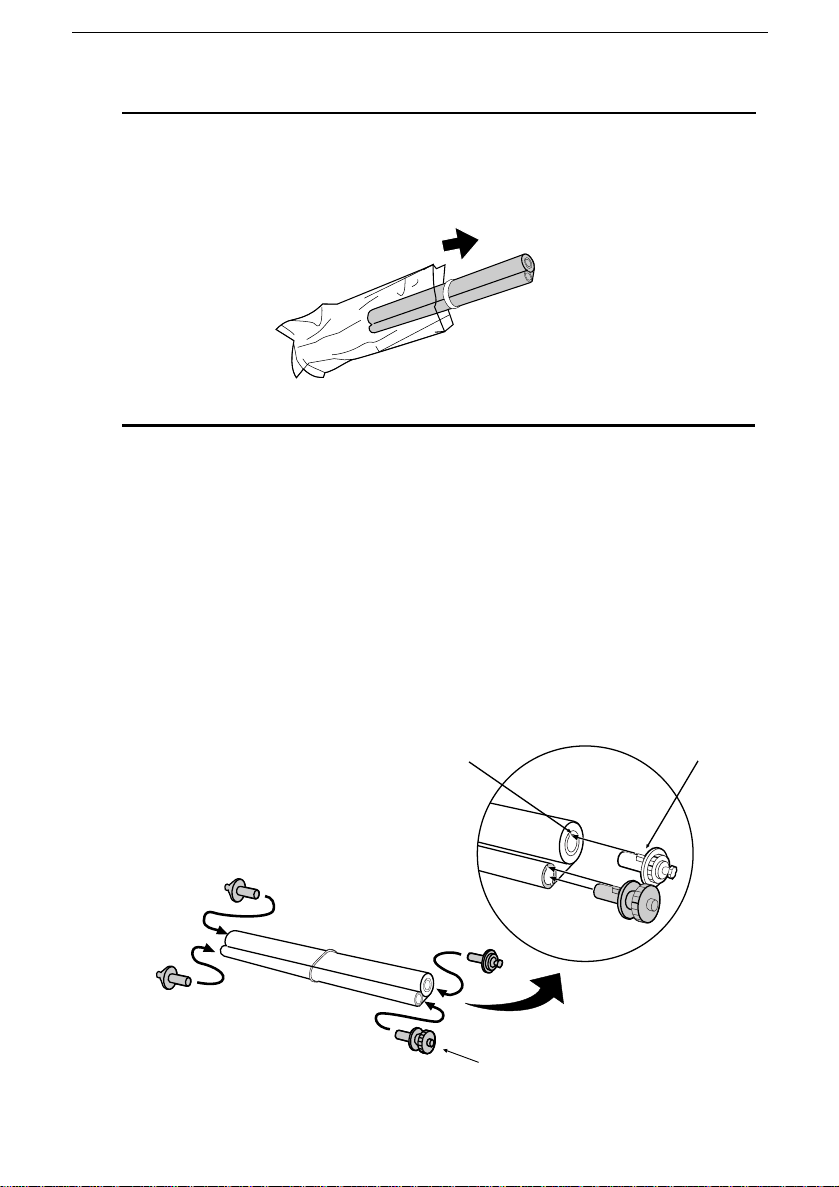
6
Remove the new roll of imaging film from its packaging.
•• Do not yet remove the band that holds the rolls together.
7
Insert the large gear into the green end of the empty spool. Make
sure the two protrusions on the large ge ar fit firmly into the slots in
the end of the spool.
Insert the remaining three gears into the spools, making sure the
protrusion on each gear fits firmly into one of the slots in the end of
each spool.
•• If needed, pull the spools apart slightly to allow the gears to fit (the
band will stre tch).
Slot
Large gear
16
Protrusion
Page 29
Loading the Imaging Film
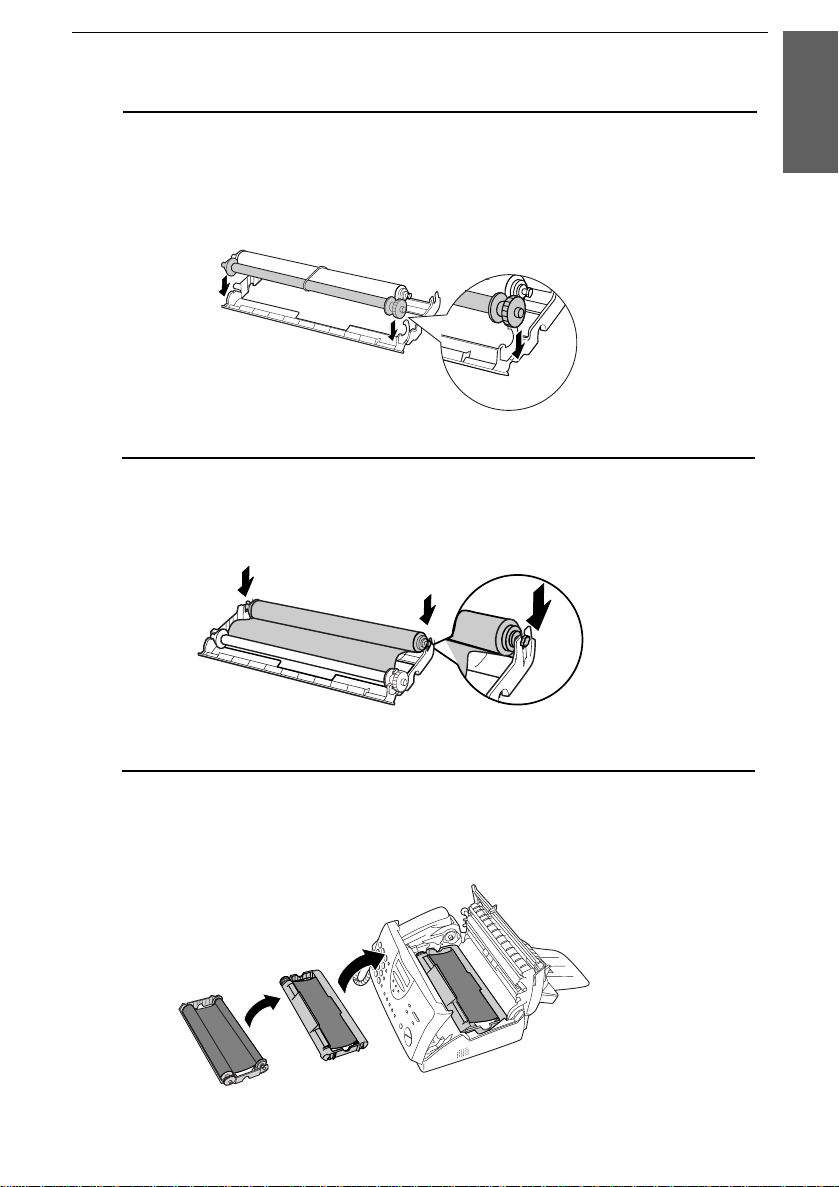
8
Insert the la rge gear into the large holder on the imaging f ilm
cartridge (make sure i t clicks into place), and then insert the small
gear on the other end of the spool into its holder.
9
Cut the band that holds the two spools together. Unroll the film
slightly and insert the small gears into their holders.
1. Installation
10
Turn the cartridge over, grasp the handle, and insert the cartridge
into the print compartment.
17
Page 30
Loading the Imaging Film
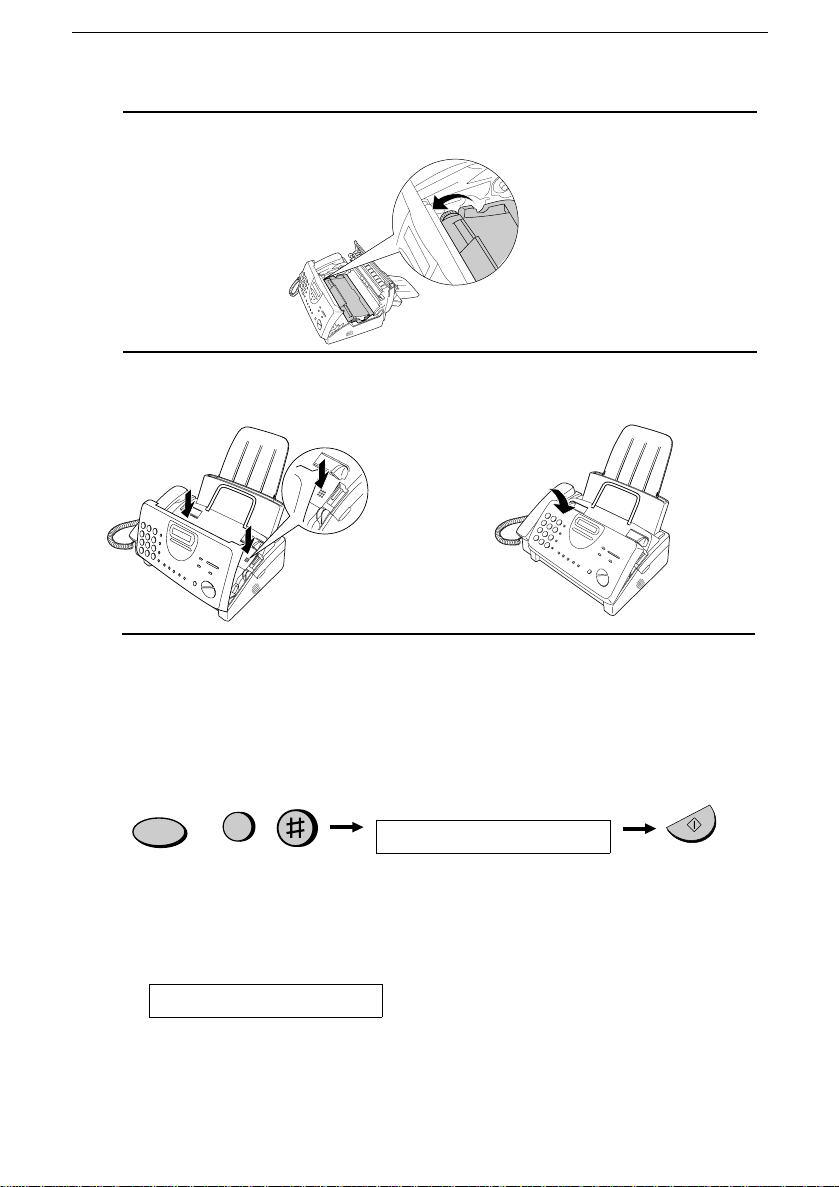
11
Rotate the large gear toward you until the film is taut.
12
Close the print compartment cover (press do wn on both sides to
make sure it clicks into place), and then close the operation panel.
Click!
13
Load paper in the paper tray and then press the following keys to
initialize the film.
Note: Paper must be loaded before the film can be initialized. To load
paper, see the following section, Loading the Printing Paper.
FUNCTION
6
Display shows:
INITIALIZE FILM
When to replace the ima ging film
Replace the imaging film when the display sh ows:
FILM END
Use the following imagi ng film, whi ch is available from your dealer or
retailer:
Sharp UX-3CR Imaging Film
18
START/MEMORY
Page 31

Loading Printing Paper
Loading Printing Paper
You can load A4 size paper in the paper tray. The maximum number
of sheets is:
♦ 60 for paper from 60 to 75 g/m
♦ 50 for paper from 75 to 90 g/m
1
Fan the paper, and then tap the edge against a flat surface to even the
stack.
2
Pull the paper release plate toward you.
2
2
1. Installation
3
Insert the sta ck of paper into the tray, print side down.
•• If paper remains in the tray, take it out and combine it into a single
stack with the new paper before adding the new paper.
Be sure to load the
paper so that printing
takes place on the
print side of the
paper. Printing on the
reverse side will result
in poor print quality.
19
Page 32

Loading Printing Paper
4
Push the paper release plate back down.
If the paper
release plate is
not pushed down,
paper feed errors
will result.
Note: When receiving faxes or copying documents, do not allow a large
number of pages to accumulate in the output tray. This may obstruct the
outlet and cause paper jams.
5
Your fax has been set at the factory to print at normal contrast.
Depending o n the type of paper you have loaded, you may find that
you obtain better print quality by changing the setting to LIGHT.
Press these keys:
FUNCTION
6
The display will show:
PRINT CONTRAST
Press 1 to select NORMAL or 2 to select LIGHT.
NORMAL LIGHT
or
2
The display will show:
1
COPY CUT -O FF
Press the STOP key to return to the date and time display.
STOP
20
Page 33

Entering Your Name and Number
Entering Your Name and Fax Number
Before you can begin using
your fax, you need to enter
your name and the
telephone number of your
fax. You also need to set
the date and time.
3 key
213
4
5 6
7
9
8
0
Once you enter this
information, it will
automatically appear
at the top of each fax
page you send.
1. Installation
FUNCTION key
START/MEMORY
key
# key
STOP key
Note: The imaging film and printing paper must be loaded before your
name and fax number can be entered.
1
Press these keys:
The display will show:
2
Press the # key twice:
The display will show:
FUNCTION
3
ENTRY MODE
OWN NUMBER SET
21
Page 34

Entering Your Name and Fax Number
3
Press the START/MEMORY key.
START/MEMORY
The display will show:
4
Enter your fax number by pressing the number keys. Up to 20 digits
ENTER FAX #
can be entered.
•• To insert a space between digits, press the # ke y. To insert a "+",
press the * key.
•• If you make a mistake, press the SEARCH/R key to move the
cursor back to the mistake and then enter the correct number. The
new number will replace the old number.
Example:
5
55
21 43
Cursor: A dark square mark in the display that indicates where a
number or lette r will be entered.
5
Press the START/MEMORY key to enter the fax number in
memory.
START/MEMORY
The display will show:
6
Enter your name by pressing the number keys as shown in the
ENTER YOUR NAME
following cha rt. Up to 24 charac ters can be entered.
•• To enter two letters in succession that require the same key, press
the SPEAKER key after entering the first letter to advance the
cursor.
Example: SHARP = 7 7 7 7 7 4 4 4 2 2 7 7 7 7 7 7
22
SPEAKER
Page 35

Entering Your Name and Number
A =
B =
C =
D =
E =
F =
G =
H =
I =
GHI
PQRS
ABC
JKL
TUV
SYMBOLS
DEF
MNO
WXYZ
J =
K =
L =
M =
N =
O =
P =
Q =
R =
SPEED DIAL
REDIAL
SEARCH
SPEAKER
R
Press either key repeatedly to select
one of the following symbols:
./!"#$%&’()++,-:;<=>?@[ ¥]^_p{|}→←
S =
T =
U =
V =
W =
X =
Y =
Z =
SPACE =
Press this key to delete the letter
highlighted by the cursor.
Press this key to change case.
Press this key to move
the cursor to the left.
Press this key to move
the cursor to the right.
1. Installation
7
Press the START/MEMORY key to save your name in memory.
START/MEMORY
The display will show:
8
Press the STOP key to return to the date and time display.
SECURITY SELECT
STOP
23
Page 36

Setting the Date and Time
Setting the Date and Time
The date and time
appear in the display
and reports, and are
printed at the top of
every page you fax.
3 key
213
4
5 6
7
9
8
0
FUNCTION key
START/MEMORY
key
*
key
Note: The imaging film and printing paper must be loaded before the date
and time can be set.
1
Press these keys:
FUNCTION
STOP key
3
The d ispla y will show:
2
Press the * key thr e e times.
Denmark :
The displa y will show:
Note: The fax is Year 2000 compliant.
24
ENTRY MODE
DATE & TIME SET
Page 37

Setting the Date and Time
3
Press the START/MEMORY ke y.
START/MEMORY
•• The currently set date will appear in the display.
4
Enter a two-digit numb er for the day ("01" to "31").
•• To correct a mistake, pr ess the SPEED DIAL key to move the
cursor back to the mistake, and then enter the correct number.
1. Installation
Example: the 5th
5
Enter a two-digit num ber for the month ("01" for January, "02" for
February, "12" for Decem b er, etc. ).
Example: January
6
Enter the year (four digits).
Example: 1999
7
Enter a two-digit number fo r the hour ("00" to "23") and a two-digit
number for the minute ("00" to "59").
Example: 9:25
0 5
0
0
1
9 91
9
9
2
5
25
Page 38

Setting the Date and Time
8
Press the START/MEMORY key to start the clock.
START/MEMORY
The displa y will show:
9
Press the STOP key to return to the date and time display.
Note: The time setting will change automatically at the beginning and end
of summertime.
STORE JUNK #
STOP
26
Page 39

Selecting the Reception Mode
Selecting the Reception Mode
Your fax machine has four modes for receiving incoming call s and
faxes:
TEL mode:
This mode is the most convenient for receiving phone cal ls. Fax es can
also be received; however, all calls must first be answered by picking
up the fax’s handset or an extension phone connected to the same line.
FAX mode:
Select this mode when you only want to receive faxes on your line.
The fax machine will automatically answer all calls and receive
incoming faxes.
TEL/FAX mode:
This mode is convenient for receiving bot h faxes and voice calls.
When a call comes in, the fax will detect whether it is a voice call
(including manually di all ed fax transmis sio ns), or an automatic ally
dialled fax. If it is a voice call, the fax will make a special ringing
sound to alert you to answer. If it is an automatically dialled fax
transmission, receptio n wil l begin autom ati cally.
A.M. mode:
Use this mode only if you have connected an answering machine to
the fax (see Chapter 6). Select thi s mode when you go out to receiv e
voice messages in your answering machine and faxes on your fax
machine.
1. Installation
27
Page 40

Selecting the Reception Mode
Setting the reception mode
Press the RECEPTION MODE key until the arrow in the display
points to the desired mode.
RECEPTION MODE key
213
4
5 6
7
9
8
0
FAX
TEL
RECEPTION
MODE
14 FEB 10:30
14 FEB 10:30
TEL/FAX
TEL
TEL/FAX
A.M.
FAX
A.M.
FAX
TEL
14 FEB 10:30
A.M.TEL/FAX
FAX
TEL
14 FEB 10:30
A.M.
TEL/FAX
For more info rmati on on r ecei vin g faxes in TEL, TEL/FAX and F A X
modes, see Chapter 3, Receiving Documents. For more information on
using A.M . mode, see Chapter 6.
28
Page 41

Volume Adjustment
Volume Adjustment
4
7
Speaker
1
Press the SPEAKER key.
You can adjust the
volume of the speaker
and ringer using the
UP and DOWN keys.
213
5 6
9
8
0
SPEAKER key
DOWN key
1. Installation
UP key
SPEAKER
2
Press the UP or DOWN key.
DOWN
3
When the display shows the desired
UP
or
volume level , press the SPEAKER
key to turn off the speaker.
Display:
SPEAKER: HIG H
SPEAKER: MIDDLE
SPEAKER: LO W
SPEAKER
29
Page 42

Volume Adjustment
Ringer
1
Press the UP or DOWN key. (Make
sure the SPEAKER key ha s not been
pressed and the h an dset is not lifted.)
Display:
DOWN
•• The ringer will ring once at the
UP
or
selected level, then the date and
time will reappe ar in the display.
2
If you selected RINGE R:OFF OK ?,
press the START/MEMORY key.
RINGER: HIG H
RINGER: MIDDLE
RINGER: LO W
RINGER:OFF OK ?
START/MEMORY
30
Page 43

Sending
2
Chapter
Transmittable Documents
Size and weight
Documents
The size and weight of documents that you can load in the documen t
feeder depend on whether you load one page at a time or several pages
at once.
Loading one page at a tim e:
210 mm
Minimum
size
Minimum
weight
148 mm
140 mm
52 g/m²
Maximum
size
600 mm
Maximum
weight
157 g/m²
Loading several pages at once:
Minimum
size
148 mm
140 mm
Maximum
size
210 mm
297 mm
2. Sending
Documents
Minimum
weight
52 g/m²
Maximum
weight
80 g/m²
31
Page 44

Transmittable Document s
Note: Letters or graphics on the edges of a document will not be
scanned.
5 mm
Letters in the
shaded area will
not be scanned.
4 mm
5 mm
4 mm
Other restrictions
♦ The scanner cannot recognise yellow, greenish yellow, or light
blue ink.
♦ Ink, glue, and correcting fluid on documents must be dry before
they pass through the document feeder.
♦ All clips, sta ples, and pins must be removed f rom documents
before loading in the feeder. If these are not removed, they may
damage the machine.
♦ Documents which are patched, taped, torn, smaller than the
minimum size, carbon backed, easily smudged, or have a slippery
coated surface should be photocopied, and the copy loaded in the
feeder.
32
Page 45

Loading the Document
Loading the Document
Up to 10 pages can be placed in the feeder at one time. The pages will
automaticall y feed into the machine sta rting from the botto m page.
♦ If you need to send or copy more than 10 pages, place the
additional pages gently and carefully in the feeder just before the
last page is scanned. Do not try to force them in, as this may cause
double-feeding or jamming.
♦ If your document con sists of several large or thick pages which
must be loaded one at a time, insert each page into the feeder as
the previous page is being scanned. Insert gently to prevent
double-feeding.
1
Adjust the document guides to the
width of your document.
2. Sending
Documents
2
Place the document face down and
push it gently into the document
feeder. The top edge of the document
should enter the machine first.
•• The feeder will draw the leading
edge of the document into the
machine. The display will show :
READY TO SEND
3
Adjust the resolution and/or contrast
setting (if desired) as explained in the
section Resolution and Contrast, then
dial the receiving machine as explained
in Sending a Fax by Normal Dialling.
RESOLUTION
33
Page 46

Loading the Document
Removi ng a document from the feeder
If you need to
remove a document
from the feeder, open
the operation panel.
Important:
Do not try to remove a document without opening the operation
panel. This may damage the feeder mechanism.
1
Open the operation panel by grasping
the finger hold and pulling up.
2
Remove the document.
3
Close the operation panel, making sure
it clicks into place.
34
Click!
Page 47

Resolution and Contrast
Resolution and Contrast
If desired, you can adjust the resolution and contrast before sending a
document.
The default resolution
setting is STANDARD
and the default
contrast setting is
AUTO.
Note: The resolution and contrast settings are only effective for
transmitting a document. They are not effective for receiving a document.
You must adjust the
settings each time
you don’t want to use
the default settings.
Resolution settings
STANDARD: Use STANDARD for ordinar y documents. This
setting gives you the fastest and most economical
transmission.
FINE: Use FINE for documents containing small letters
or fine drawings.
SUPER FINE: Use SUPER FINE for documents containing very
small letters or very fine drawings.
2. Sending
Documents
HALF TONE: Use HALF TONE for photographs and
illustrations. The original will be reproduced in 64
shades of grey.
Contrast settings
AUTO Use AUTO for norma l documents.
DARK Use DARK for fa int documents.
35
Page 48

Resolution and Contrast
1
Load the document(s).
•• The document must be loaded
before the resolution and contras t
can be adjusted.
2
Press the RESOLUTION key one or
more times until the desired resolution
and contrast settings appear in the
display.
•• The first time you move through the
list of resolution settings, the
contrast setting AUTO will appear
next to each resolution setting. The
second time yo u move through the
list, the contrast setting DARK will
appear.
RESOLUTION
Display:
STANDARD :AUTO
FINE :AUTO
SUPER FINE :AUTO
HALF TONE :AUTO
STANDARD :DARK
FINE :DARK
SUPER FINE :DARK
HALF TONE :DARK
Note: In order to transmit in FINE or SUPER FINE resolution, the
receiving fax machine must also have that resolution. If it doesn’t, your
machine will automatically step down to the next best available setting.
36
Page 49

Sending a Fax by Norm al Dialing
Sending a Fax by Normal Dialling
With Normal Dial ling, you pi ck up th e handset (or press the
SPEAKER key) and dial by pressing the number keys.
♦ If a person answe rs, you can talk with them through the handset
before sen ding the fax. (If you pressed the SPEAKER key, you
must pick up the handset to talk.)
♦ Normal Dialling allows you to listen to the line and make sure the
other fax machine is responding.
1
Load the document(s).
The display will show:
READY TO SEND
2. Sending
Documents
•• Set the resolution a nd/or contrast if
desired.
2
Pick up the handset or press the
SPEAKER key. Listen for the dial
tone.
3
Dial the number of the receiving
machine by pressing the numeric keys.
RESOLUTION
1
GHI
4
PQRS
7
or
ABC
JKL
TUV
2
5
8
SPEAKER
DEF
3
MNO
6
WXYZ
9
37
Page 50

Sending a Fax by Normal Dialing
4
Wait for the connection. Depending on
the setting of the receiving machine,
you will either hear a facsimile
reception tone or the other person will
answer.
•• If the other party answers, (lift the
handset if the SPEAKER key was
pressed) ask them to press their
START key. This causes the
receiving machine to issue a
reception tone.
5
When you hear the reception tone,
press the START/MEMORY key.
Replace the handset if you used it.
•• When transmission is completed,
the fax will beep once.
Beep
START/MEMORY
Using the REDIAL ke y
You can press the REDIAL key to redi al the last number dialled . To
send a document, proceed from Step 4 of Normal Dialling . Note that
the speaker will be automatically activated when you press the
REDIAL key.
Facsimile reception tone: This is a pronounced, high-p itched tone
that the receiving machine sends to the transmitti ng machine to
indicate that it is ready to receive.
38
Page 51

Sending a Fax by Automatic Dialing
Sending a Fax by Automatic Dialling
You can dial a fax or telephone num ber by simply pressing a Rapid
Key, or by pressing the SPEED DIAL key and entering a two-di gi t
number.
♦ To use Automatic Dialling, you must fir st store the full fax or
telephone number in your fax machine.
♦ When you store a fax or telephone number, you select a two-digit
Speed Dial number for it. 45 Speed Dial numbers are available.
Speed Dial numbers
01 through 05 are for
Rapid Key
(one-touch) Dialling.
Speed Dial numbers
06 through 45 are for
dialling with the
01
SPEED DIAL
1 1
SPEED DIAL key.
SPEED DIAL key
213
4
Attach the strip
of Rapid Key
labels above the
5 6
7
9
8
0
Rapid Keys.
START/MEMORY
2. Sending
Documents
Rapid keys
When you store a
number in a Rapid
Key, write the name
of the party on the
label.
39
Page 52

Sending a Fax by Automatic Dialing
Storing fax and telephone numbers for Automatic Dialling
1
Press these keys:
The display will show:
2
Press 1 to select SET.
The display will show:
3
Enter a two-digit Spee d Dial number by pr essing the number keys
(01 to 05 for Ra pid Key Dialling, 06 to 45 for Speed Dialling).
4
Enter the fax or voice number by pressing the number keys (max. of
32 digits including pauses).
FUNCTION
FAX/TEL # MODE
3
1
FAX/TEL # SET
ENTER SPEED #
0
1
(Example)
•• Press the SPEED DIAL key to clear a mistake.
•• If a pause is requi re d between any of the digits to access a speci al
service or an outside line, press the REDIAL key. The pause will
appear as a hyphen. Several pauses can be entered in a row.
•• If you are on a PBX, do not enter the access code for the public
line. If the number is within your PBX, enter an R before the
number.
•• Press the SEARCH/R key to enter a space between digits.
5
Press the START/MEMORY key.
START/MEMORY
40
Page 53

Sending a Fax by Automatic Dialing
6
Enter the name of the party by pressing the number keys as shown in
the chart below. Up to 20 characters can be entered.
•• If you don’t want to enter a name, skip this step.
•• To enter two letters in succession that require the same key, press
the SPEAKER key after entering the first letter to advance the
cursor.
Example: SHARP = 7 7 7 7 7 4 4 4 2 2 7 7 7 7 7 7
SPEAKER
2. Sending
Documents
A =
B =
C =
D =
E =
F =
G =
H =
I =
7
Press the START/MEMORY key.
8
Return to Step 3 to store another number, or press STOP to exit. If
J =
K =
L =
M =
N =
O =
P =
Q =
R =
S =
T =
U =
V =
W =
X =
Y =
Z =
SPACE =
START/MEMORY
the number will be used for Rapid Key Dialling, you can write the
name on the appropriate Rapid Key label.
STOP
Step 3 or
Storing area codes and a cc es s codes
You can also store an area code or access code in a Rapid Key or
Speed Dial number. To use thi s number to di al, see Chain Dialing in
Chapter 5, Making Telephone Calls.
Note: An area code or access code stored in a Rapid Key or Speed Dial
number can only be used if the handset is lifted or the SPEAKER key
pressed before dialling.
41
Page 54

Sending a Fax by Automatic Dialing
Clearing numbe rs
1
Press these keys:
The display will show:
2
Press 2 to select CLEAR.
3
Enter the Speed Dial number that you want to clear by pressing the
FUNCTION
3
FAX/TEL # MODE
2
number keys.
0
1
4
Press the START/MEMORY key.
START/MEMOR Y
5
Return to Step 3 to clear another number, or press STOP to exit.
STOP
Step 3 or
(Example)
Making change s
To make changes in a number previously stored, repeat the storing
procedure. Select the Speed Dial num be r for which you want to make
changes in Step 3, and then change the number and/or name when they
appear in the display (St eps 4 and 6, respect ivel y).
♦ A lithi um bat tery kee ps autom ati c diall ing number s in memo ry
The machine uses a lithi um bat te ry t o kee p au tom a ti c di al li ng num bers and
other program me d data in memory when the power i s turn ed off. Batte ry
power is consumed prima rily when the powe r is off. With the power kept
continuou sly of f, the life of t he batt er y is about 5 years. If the battery di es,
have your dealer or retail er replace it. Do not try to rep lace it yourself.
42
Page 55

Sending a Fax by Automatic Dialing
Rapid Key Dialling
If the number you want to dial has been stored for Automati c Dial ling
as a Speed Dial number from 01 to 05, you can dial it by pressing the
corresponding Rapid Key.
1
Load the document(s).
The display will show:
READY TO SEND
•• Set the resolution a nd/or contrast if
desired.
2
Press the Rapid Key corre sponding to
RESOLUTION
the desired Speed Dial number.
•• The name of the receiving party will
01 02 03
appear in the display. If no name
was stored, the fax number will
appear. (If the name or number is
incorrect, press the STOP key.)
2. Sending
Documents
•• The document will be automatically
transmitted once the connection is
made.
Example: To dial Speed
Dial number 01, press
Rapid Key 01.
43
Page 56

Sending a Fax by Automatic Dialing
Speed Dialling
Speed Dialling can be used to dial any numb er that has been stored for
Automatic Dial ling.
1
Load the document(s).
The display will show:
READY TO SEND
•• Set the resolution a nd/or contrast if
desired.
2
Press the SPEED DIAL key and then
enter the two digits of the Speed Dial
RESOLUTION
SPEED DIAL
number by pressing the number keys.
•• To enter numbers 1 through 9, first
enter 0 and then the number.
2 0
(Example)
3
Check the display. If the name or
number shown is correct, press the
START/MEMORY key. (If not,
press the STOP key and then repeat
Step 2.)
44
START/MEMOR Y
Page 57

Sending a Fax by Automatic Dialing
Direct Keypad Dialling
You can also enter a full number with th e number keys and th en press
the START/MEMORY key to begin di all ing . You can use this
method to dial a full number when you don’t need to speak to the
other party before faxing.
Note: Direct Keypad Dialling cannot be used to dial a number within the
same PBX as your fax machine. To send a document to a fax machine in
your PBX, use Normal Dialling.
1
Load the document(s).
The display will show:
READY TO SEND
2. Sending
Documents
•• Set the resolution a nd/or contrast if
desired.
2
Enter the number of the receiving
machine by pressing the numeric keys.
•• If a pause is required between any
of the digits to access a special
service or an outside line, press the
REDIAL key. The pause will
appear as a hyphen. Several pauses
can be entere d in a row.
3
Check the display. If the number of the
receiving machine shown is correct,
press the START/MEMORY key.
•• If it is not correct, press the STOP
key to backspace and clear one digit
at a time, and then re-enter th e
correct digit(s).
RESOLUTION
GHI
PQRS
ABC
2
1
JKL
4
5
TUV
7
8
START/MEMOR Y
DEF
3
MNO
6
WXYZ
9
45
Page 58

Sending a Fax by Automatic Dialing
Using the SEARCH/R key
If you don’t remember the Rapid Key or Speed Dial number in whic h
you have stored a particular fax number, you can se arch for the
number by followi ng th e steps below. Once you have found the
number, you can dial i t and transmit the load ed document by simpl y
pressing the START/MEMORY key.
1
Load the document(s).
The display will show:
READY TO SEND
•• Set the resolution a nd/or contrast if
desired.
2
Press the SEARCH/R key and then
the 1 key.
3
Enter the first letter of the store d name
by pressing the appropriate number
key (the key which corresponds to the
required letter) one or more times until
the letter appears in the disp lay. If the
name begins with a special character or
number, press 1.
•• If you don’t remember the first
letter, go to Step 4 (you will scrol l
through the list from the beginning).
•• If a name wasn’t stored for the
number, press 0. This will cause
numbers, not names, to appear when
you scroll.
RESOLUTION
SEARCH
1
GHI
4
PQRS
ABC
JKL
TUV
1
DEF
3
2
MNO
6
5
WXYZ
9
8
R
7
46
Page 59

4
Press the # key or the * key to scroll
through the names (numbers if you
pressed 0). Stop when the desired
name appears in the display.
•• If no names have been stored that
begin with the entered letter, you
will scroll from the next name, in
alphabetical order, in the list. If no
names/numbers have been stored at
all, NO DATA will appear.
5
Press the START/MEMORY key.
The document will be automatically
transmitted once the connection is
made.
Sending a Fax by Automatic Dialing
or
START/MEMORY
2. Sending
Documents
Automatic redia ll ing
If you use automatic diallin g (inclu din g Direct Keypad Diallin g) and
the line is busy, the machine wil l aut omat icall y redial th e number. Up
to 2 redialling attemp ts will be made at intervals of 2.5 minutes.
♦ To stop automatic redialling, press the STOP key.
47
Page 60

Receiving
3
Chapter
Using TEL/FAX Mode
Documents
Press the
RECEPTION MODE
key until the arrow in
the display points to
TEL/FAX.
RECEPTION
MODE
TEL/FAX
When the reception mode is set to TEL/FAX, your fax automat icall y
answers all calls on 1 or 2 rings. After answering, your fax monitors
the line for about 5 seconds to see if a fax tone is being sent.
♦ If your f ax detects a fax tone (this means that the call is an
automatically dialled fax), it will automatically begin reception of
the incoming document.
♦ If your fax doesn’t detect a fax tone (this means that the call is a
voice call or manually dialled fax), it will make a ringing sound
(called p seudo ringing) for 15 seconds to alert you to answer. If
you don’t answer within this time, your fax will send a fax tone to
the other machine to allow the calling party to send a fax manually
if they desire.
Comments:
TEL
FAX
A.M.
•• Only the fax wil l alert yo u to voice call s or m anu ally di alle d faxes by pseudo
ringing. An extensi on phone connecte d to the same line wi ll not ring a fte r th e
connecti on has been made .
•• The durati on of pseud o ringin g ca n be adju ste d with Opti on Se tt ing 8. See
Chapte r 8, Opti on Setting s.
48
Page 61

Using FAX Mode
Receiving Documents
Press the
RECEPTION MODE
key until the arrow in
the display points to
FAX.
RECEPTION
MODE
TEL/FAX
TEL
FAX
A.M.
When the reception mode is set to FAX, the machine wil l
automatically answer all calls on 1 ring and receive incoming faxes.
1 ring Fax reception
♦ You can change the number of rings on which the machine
answers calls by changing Option Setting 3. (See Chapter 8,
Option Settings.)
♦ If you pick up the handset before the machine answers, you can
talk to the other party and/or receive a document as desc ribed in
Using TEL mode.
Documents
3. Receiving
49
Page 62

Receiving Documents
Using A.M. Mode
Press the
RECEPTION MODE
key until the arrow in
the display points to
A.M.
RECEPTION
MODE
TEL/FAX
TEL
FAX
A.M.
In A.M. mode, your fax will aut omat icall y receive voice and fax
messages if you have connected an answering machine to the fax
machine. See Chapt e r 6 for more details.
50
Page 63

Using TEL Mode
Receiving Documents
Press the
RECEPTION MODE
key until the arrow in
the display points to
TEL.
RECEPTION
MODE
TEL
TEL/FAX
FAX
A.M.
When the reception mode is set to TEL, you must answer all calls
using the fax machine’s hands et or an extensio n phon e connected to
the same line.
Answer ing wi th the fax’ s ha ndse t
1
Pick up the handset when the machine rings.
2
If you hear a fax tone, wait until the display shows RECEIVING and
then replace the handset.
Beep
RECEIVING
Documents
3. Receiving
Note: If you have set Option
Setting 15 (Fax signal receive) to
NO, press the
START/MEM ORY
key to begin reception.
51
Page 64

Receiving Documents
3
If the other party first talks and then wants to send a fax, press the
START/MEMORY key after speaking (press your
START/MEMORY key before the sender presses their Start key).
•• Make sure that the display shows RECEIVING, then replace the
handset.
START/MEMORY
RECEIVING
Answering wi th an extens ion phone
1
Answer the extension phone when it rings.
2
If you hear a fax tone when you answer an extension phone, wait
until your fax answers (the extension pho ne will go dead), and then
hang up.
Beep
Phone goes dead
3
If the fax doesn’t respond, or if the other party first talks to you and
then wants to send a fax, pre ss 5, *, and * on the extension phone
(only on a tone dial phone). This signals the fax to begin reception.
Hang up.
5
52
Page 65

Comments:
Receiving Documents
•• Your fax will not accept the signa l to beg in rece pt ion (5
loaded in its feeder.
**
) if a document is
•• If you have set Option Set ti ng 15 to NO and hear a fax tone when you a nswer
the extension phone, you must press 5, *, and * if you are on a tone dial
phone, or walk ov er to the fax , pick up the handset , and press th e
START/MEMORY key if you ar e on a pulse dia l only ph one .
•• The code us e d to act iv at e fa x rec eption fro m a tone dia l extension phone
(5**) can be changed if de sir ed. See Opti on Se tt ing 4 (Tel/ Fax Remot e
Number) in Chapter 8, Option Settings .
2 in 1 Print
To save paper, you can have the size of your incoming faxes reduced
by 55%. This will allow you to receive, for example, a 2-page
document on one page (note that th is may not be possib le if the
document pages are longer than your printing paper). To t urn on this
function, foll ow the st ep s below.
1
Press these keys:
FUNCTION
6
Documents
3. Receiving
The display will show:
2
Press 1 to turn on the function, or 2 to turn it off.
The display will show:
3
Press the STOP key.
2 IN 1 PRINT
YES NO
or
1 2
PRINT CONTRAST
STOP
53
Page 66

Receiving Documents
Reception Ratio
The fax has been set at the factory to automaticall y r educ e the size of
received documents to fit the size of the printing paper. This ensures
that data on the edges of the document are not cut off. If desired, you
can turn this function off and have received documents printed at full
size.
Note: If a document is too long to fit on the printing paper, the remainder
will be printed on a second page. In this case, the cut-off point may occur
in the middle of a line.
Note: Automatic reduction may not be possible if the received document is
too large, contains too many fine graphics or images, or is sent at high
resolution. In this case , the remainder of the document will be printed on a
second page.
1
Press these keys:
FUNCTION
6
The display will show:
2
Press 1 to turn automatic reduction on, or 2 to turn it off.
RECEPTION RATIO
AUTO 100%
or
1 2
If you selected AUTO, go to Step 3. If you selected 100%, go to Step
4.
3
If you selected AUTO, select the reception ratio to be used in the
event that the memory becomes full (automatic reduction is not
possible when the memory is full). Press 1 for 93% or 2 for 100%.
93% 100%
or
1 2
54
Page 67

Receiving Documents
4
Press the STOP key.
STOP
Substitute Reception to Memory
In situations where printing is not possi bl e, such as when your fax runs
out of paper, the imaging film needs replacement, or the paper jams,
incoming faxes will be received to memory.
When you have received a document in memory, FAX RX IN
MEMORY will appear in the display, alte rnatin g wit h OUT OF
PAPER, FILM END, or PAPER JAMM ED. When you add paper,
replace the imaging film, or clear the jam, the stored documents will
automatically prin t out.
♦ If you received documents in memory because the fax ran out of
paper, be sure to add paper which is the same size as the paper
previously used. If not, the document print-out size may not match
the size of the printing paper.
Documents
3. Receiving
Caution!
•• When documents are stored in memory, do not turn t he power of f. Thi s wil l
erase all of the con te nts.
•• If docum ent s rec ei ve d in mem or y are lost due to a power fa il ure or ot her
interruptio n of the power supply, a CLEAR RE PORT will be prin ted out
when the power is restore d. This gi ves i nfor ma ti on about the recep tions lo st,
includin g the fax num ber s o f the transmitting mac hi nes i f the y ar e av ai la ble .
55
Page 68

Making
4
Chapter
Your fax can also be used to make copies. Single and multipl e copies
(up to 99 per original) can be made, enabling your fax to double as a
convenience office copier.
1
Load the document(s) face down.
(Maximum of 10 pa ges.)
The display will sho w:
Copies
READY TO SEND
•• Set the resolution and/or contrast if
desired. (The default setting for
copying is S-FINE.)
2
Press the COPY/HELP key.
The display will show:
COPY MOD E
1: MULTI COPY
2: SORT COPY
START: COPY
♦ If you are only making one copy of the original (or of each
original) and don’ t want to make a reduction or enlarge ment
setting, press the START/MEMORY key twice. Copying will
begin.
♦ If you are only making one copy of the original (or of each
original) and want to make an enlargement or reduction setting,
press the START/MEMORY key and go to Step 5.
RESOLUTION
COPY/HELP
56
Page 69

3
Press 1 (MULTI COPY) if you do not
want the copies sorted. Press 2 (SORT
COPY) if you want the copies sorted.
MULTI
1
Making Copies
SORT
2
or
Example of three
copies each of three
originals
Sorted
(SORT COPY)
C
B
A
The display will show:
4
If you are making one copy per
C
C
B
B
A
A
ENTER # (01-99)
original, pre ss the START/MEMORY
key. If you are making multiple copies
per original, enter the number of copies
per origina l (if the number is less than
10, enter a "0" before the number).
The display will show:
5
Set the amount of reduction or
COPY RATIO
enlargement by entering a number
from 1 to 5 as shown below (or press
the START/MEMORY key to
automatically select 100%). Copying
will begin.
1: AUTO (automatic size a djustment to
match the size of the printing paper)
2: 50%
3: 100% (no reduction or enlargement)
4: 125%
5: 135%
Originals
C
B
A
Not sorted
A
A
A
B
B
(MULTI COPY)
B
C
C
C
0
Copies
4. Making
9
Example: Nine
copies per original
2
Example: 50%
57
Page 70

Making Copies
Note: If you place a large number of orig inals in the feeder, the memory
may become full before all of them can be scanned (MEMORY IS FULL
will appear in the display). If this happ ens, press the START/MEMORY
key to copy the originals which have been scanned, and then repeat the
copy procedure for the remaining originals, including the original which
was being scanned when the memory became full.
Copy Cut-off
When making a copy of a document that is longer than the printi ng
paper, use the copy cut-off sett ing to select whether the remaini ng part
of the document will be cut off or printed on a second page. The intial
setting is YES (cut off the r emaind er). To change the setti ng, follo w
the steps below.
1
Press these keys:
FUNCTION
6
The display will show:
COPY CUT -O FF
2
Press 1 to set copy cut-off to YES (the
remaining part of the document will
not be printed), or 2 to set copy cut-of f
to NO (the remaining part will be
printed on a second page).
The display will show:
INITIALIZE FILM
3
Press the STOP k ey to return to the
date and time display.
58
YES
1
STOP
or
NO
2
Page 71

Making
5
Chapter
Your fax can be used like a regular telephone to make and receive
voice calls.
♦ To ma ke or receive a phone call, the power must be on.
1
Pick up the handset or press the
SPEAKER key. Listen for the dial
tone.
2
Dial the number using one of the
following methods:
•• Normal Dialling: Enter the full
•• Rapid Key Dialling: Press the
•• Speed Dialling: Press the SPEED
Telephone Calls
telephone number with the numeric
keys.
appropriate Rapid Key.
DIAL key, and enter the 2-digit
Speed Dial number with the
numeric keys.
GHI
PQRS
or
ABC
2
1
JKL
4
5
TUV
7
8
DEF
3
MNO
6
WXYZ
9
SPEAKER
5. Making
Phone Calls
3
Speak with the other party when they
answer.
•• If you pressed the SPEAKER key,
pick up the handset to talk.
59
Page 72

Making Telephone Calls
Comments:
•• While the handset of the fax is lifted (off hook), an exten sion phone
connect ed dire ctly to the fax cannot be used to spea k wit h the oth er party.
•• The fax may interru pt a voice call rece ived on a n exten sion phone if the
recept ion mod e is set to A.M. and there i s a period of silence durin g the
conversa tion. If you are on a tone dial phone, you can preve nt this by
pressing an y three keys on the phone imm edi atel y afte r you answer . (Note :
Do not enter the code to activate fax reception: 5, *, *.)
Chain Diall ing
After lifting the handset, you can dial any comb inat ion of Normal
Dialling, Rapid K ey Dialling and Speed Dialli ng numbers. For
example, if you have stored an area code or an access code for a
special service in a Rapid Key, you can press the Rapid Key for that
area code or access code, th en dial t he remainder of the number by
pressing a Rapid Key, pressing num ber key s, or pressing t he SPEED
DIAL key and entering a two-digi t Spe ed Dial num ber.
Using the SEARCH/R key
You can use the SEARCH/R key to search for a Rapid Key or Speed
Dial number. First search for the number as described in Usi ng th e
SEARCH/R key in Sen din g a Fax by Automatic Dia ll ing in Chapter 2,
then pick up the han dset or press th e SPEAKER key. The number
will be dialled aut omat icall y (do not press the START/ MEMORY
key).
Redial
The last number called can be redialled by pressing the REDIAL key
(it is not necessary to pick up the handset or press the SPEAKER
key). When the other party answers, pick up the han dset t o talk.
60
Page 73

Making Telephone Calls
Issuing tone signa ls
If you are on a pulse dial line, you c an use the "*" key to temporarily
issue tone signals when you press t he numeric keys. This allo ws you
to use certain telephone services which require entering tone signals.
When you need to enter one or more tone sign als, pr ess the "*" key
and then press the appropriate numeric keys.
To change back to pulse mode, simpl y hang up (the diall in g mod e
automatic ally changes back to the sett ing of Option S etting 7 when
you hang up).
PBX operations
If your fax is connected to a PBX, you can use it to perform the
following operations:
Note: Make sure that the correct setting is selected for Option Setting 14-4
(see Chapter 8, Option Settings).
♦ Making enquiry calls: During a call, you can put the other party
on hold, make a further call to a third party, and then go back to
your original caller.
♦ Transferring calls: You can transfer a call to another number on
the same PBX without operator assistance.
5. Making
Phone Calls
Making enquiry ca l ls
1
During the telephone conversation,
press the SEARCH/R key. This puts
the other party on hold.
SEARCH
R
61
Page 74

Making Telephone Calls
2
When you hear the dial tone, dial the
number of the third party for the
enquiry call.
3
When you have finished the enquiry
call, you will be automatically returned
to the original caller as soon as the
third party hangs up.
Transferring calls
1
During the telephone conversation,
press the SEARCH/R key. This puts
the other party on hold.
SEARCH
R
2
When you hear the dial tone, dial the
number to which you want to transfer
the call. When the other party answers,
hang up, and the call will be
transferred.
•• If the other party does not answer,
press the SEARCH/R key again to
return to the original caller.
62
Page 75

Answering
6
Chapter
Preparations
If you have connected an answering machine to your fax as described
in Connections in Chapter 1, you can receive both voice messages and
fax transmissions on the same line whil e you are out. To use the
connection, first change the outgoing message of your answering
machine, and then set the reception mode of your fax to A.M. when
you go out.
Changing the outgoing message
The outgoing message (OGM) of your answering machine should be
changed to inform callers who want to send a fax to press their Start
key. For example, your message might go as follows:
"Hello. You’ve reached the ABC company. No one is available to take
your call right now. Please leave a message after the beep or press
your facsimile Start key to send a fax. Than k you for calli ng. "
Comments:
Machine Connection
•• It is advisable to keep the leng th of the message under 10 se con ds. If it is too
long, you m ay have dif fic ul ty re ce iv ing faxe s sent by au tom a ti c di al li ng.
•• Your callers can even leave a voice message and send a fax messag e on the
same call. Modify yo ur out goi ng messa ge to explain that they can fi rst leave
a voice message, and then press their Start key to send a fax.
Machine
6. Answering
63
Page 76

Activating the Answering Machine Hookup
Using the Connection
1
Set the reception mode of your fax to A.M. by pressing the
RECEPTION MODE key.
RECEPTION
MODE
2
Set your answ ering machine to auto answer.
TEL/FAX
TEL
FAX
A.M.
•• Your answering machine must be set to answer on a maximum of
two rings. If not, you may not be able to receive faxes sent by
automatic dialling.
Note: If your answering machine has a remote retrieval function, make
sure the code used to activate remote retrieval is different from the code
used to activate fax reception with an extension telephone (see Chapter 3,
Receiving Documents). If they are the same, entering the code from an
outside telephone to retrieve messages will cause the fax machine to be
activated.
64
Page 77

Activating the Answering Machine Hookup
How answering machine mode operates
While you are out, all of your incoming call s will be answered by the
answering machine and its outgoing message will play. Voic e callers
can leave a message. During this time, your fax will qui etly moni to r
the line. If your fax detects a fax tone or a duration of silence greater
than four seconds, it will take over the line and begin receptio n.
♦ If the connection is no t good or there is noise on the line, the
answering machine and/or fax machine may not respond properly.
♦ The c all counter on your answering machine may indicate that
voice messages were received, when only fax messages were
received.
Note: To prevent the fax from taking over the line and beginning reception
if you call in from an external phone or answer on an extension phone,
press any three keys (other than the code to activate fax reception, " 5",
"*", and "*") on the dial pad of the phone. This can only be performed
from a phone capable of tone dialling.
When you return and
turn off your answering
machine, be sure to
change the reception
mode back to FAX/TEL,
FAX, or TEL!
Machine
6. Answering
65
Page 78

Activating the Answering Machine Hookup
Optional A.M. Connection Settings
If necessary, you can use the following sett in gs to improve th e
response of the answering machine connection to incoming calls.
Quiet Detect Time
This function causes the fax machine to take over the line and begin
reception if a certain duration of silence is detected after the answering
machine answers.
Time selections for the period of silence are 1 to 10 seconds. Quiet
Detect Time has been set to 6 seconds at the factory. This gives the
best performance with most answering machines; however, you may
need to adjust this settin g depending on the discon ne ct time of your
answering machine.
♦ Some answering machines may have unusually fast disconnect
times (equal to or very slightly less than 4 second s), which means
that the answering machine may disconnect the line before fax
reception can begin. In this case, try a Quiet Detect Time setting
of about 3 seconds.
♦ If the fax machine is interrupting callers before they ca n leave a
message, try a longer Quiet Detect T ime setting. If your outgoing
message includes a period of silence, make sure that the setting is
longer than that period of silence, or re-record your outgoing
message to shorten the silence.
To change the Quiet Detect Time setting, reset Option S ett ing 9 as
explained in Chapte r 8, Option Settings.
Note: Quiet Detect Time can be turned off by entering "00" for the time.
Note, however, that the fax machine will not be able to receive faxes sent
manually by Normal Dialling.
66
Page 79

Activating the Answering Machine Hookup
Select Au to Rece ive
When this function is turned on, your fax will answ er the call after 5
rings if the answering machine for some reason fails to answer before
that time. This ensures that you wil l receive fax messages even if the
answering machine’s tape fills up or the answering machine is not
turned on.
This function has been turned off at the factory. If you want to turn it
on, reset Option Settin g 12 as explained in Chapter 8, Option Sett in gs.
Note: When this function is turned on, make sure that the answering
machine is set to answer on 4 rings or less. If it isn’t, the fax will always
answer first, preventing callers f rom leaving voice messages.
Quiet Detect Start Timing
This setting can be used to delay th e start of the Quiet Detect Time
function. For exampl e, if you want to insert a pause at the beginnin g of
your answering machine’s outgoin g message to ensure clear detection
of fax signals, you can use this settin g to delay the start of silence
detection so that the pause wil l not cause the fax to take over the line.
Quiet Detect Start Timin g has been turned off at the factory. If you
want to use this function, turn it on by resetting Optio n Set ting 10 to
the desired delay time (1 to 15 seconds). This procedure is explained
in Chapter 8, Option Settings. As a general guide, the delay time
should be slight ly longer than t he pau se before the outgoi ng m essage.
Off Hook Hold
This setting can be used to make the fax autom aticall y take over the
line and attempt reception after a set number of seconds.
For normal operation , we recommend that you do not turn this
function on; howev er, if you ar e having tro ubl e receivin g faxes in
A.M. mode, yo u can try various t im e settings t o se e if it helps. Turn
the function on by setting Option Settin g 11 to the desired number of
seconds (1 to 255 seconds). This procedure is explained in Chapter 8,
Option Setting s.
Machine
6. Answering
67
Page 80

Special
7
Chapter
Caller ID
Note: The Caller ID function is no t available in some countries.
If you subscribe to a caller identification service from your telephone
company, you can set your fax to display t he name and numb er of the
caller while the fax rings.
Important:
•• To use this function, you must subs cribe to a calle r identification
•• Your fax may not be compatible with some caller iden tific atio n
Functions
service from your telephone company.
services.
1
Press these keys:
The display will show:
2
Press the * key three times.
The display will show:
3
Press 1 to turn on Caller ID, or 2 to turn
it off.
The display will show:
68
OPTION SETTING
CALLER-ID
COVER SHEET MODE
FUNCTION
YES
1
or
4
NO
2
Page 81

4
Press the STOP key to return to the
STOP
date and time display.
♦ Set Option Setting 3 (Number of Rings to Answer) to 2 or more
rings (see Chapter 8).
How Caller ID operates
When you receive a call, the name an d / or phone number of th e call er
will alternately appear in the displ ay, beginn ing just be fore the second
ring. The informati on wil l contin ue to be dis played un til you pick up
the handset, or until t he fax answers automati cal ly if it is in FAX
mode.
Note: Some caller ID services may not provide the name of the caller. In
this case, only the phone number will appear.
Display example:
Caller ID
DOE JOHN 444-555-6666
Caller’s name Caller’s number
Display messages
One of the following messages will appear while the fax rings if caller
information is not available.
NO SERVICE No caller information was received from your
telephone company. Make sure that the telephone
company has activated your service.
CALLER-ID
ERROR
Noise on the telephone line prevented reception
of caller information.
OUT OF AREA The call was made from an area which does not
have a caller identification service, or the caller’s
service is not compatible with that of your local
phone company.
PRIVATE CALL Caller information was not provided by the
telephone company at the caller’s request.
69
Functions
7. Special
Page 82

Caller ID
Viewing the Call er ID list
If you subscribe to a Caller ID service and have turned on the Caller
ID function, your fax machine will keep information on the most
recent 20 calls and faxes you have received. You can view this
information, which consi st s of the name and numbe r of each caller, in
the Caller ID List.
♦ After you have rece ived 20 calls, each new c all will delete the
oldest call.
Follow the step s below to view th e Caller ID List in the di spl ay . If
desired, you can immediately di al a numb er when it app ears.
To print out the list, see Chapter 9, Printi ng Report s and Lists .
1
Press these keys:
SEARCH
R
2
The display will show:
2
Press the * key to scroll through the
list from the most recent call, or the #
key to scroll through the list from the
oldest call.
70
REVIEWING CALLS
or
Page 83

3
If you want to dial one of the numbers
in the list, scroll through the list until
the number appears in the display.
•• If you want to send a fax, load the
document an d t hen press the
START/MEMORY key.
•• If you want to make a voice call,
pick up the handset or press the
SPEAKER key. Dialing will begin
automatically. (If you pressed the
SPEAKER key, pick up the handset
when the other party answers.)
4
Press the STOP key when you have
finished viewing the list.
Caller ID
START/MEMORY
STOP
To delete calls from the calle r lis t
If you want to delete a single call from the caller list, press the "0" key
while the call appears in the display. If you want to delete all calls
from the list, hold the "0" key down for at least 3 seconds while you
are viewing any number in the list.
Priority Cal l
If desired, you can set your fax to make a special ringing sound when
you receive a call from a designated pho ne numb er. This lets yo u
know immediatel y who is callin g wit hout having to look at t he disp lay.
To use this function, enter the desi red phone num b er by follo wing the
steps below (only one phone number can be entered).
71
Functions
7. Special
Page 84

Caller ID
1
Press the keys shown at rig ht.
PRIORITY CALL # will appear in the
display.
2
Press 1 to enter a number, or 2 to clear
a number. (If you pressed 2, go to Step
4.)
3
Enter the phone number, including the
area code, by pressing the nu mber keys
(max. of 20 digits).
4
Press the START/MEMORY key and
then the STOP key.
FUNCTION
1
5
5 5 1
START/MEMORY
or
3
2
2
(Example)
STOP
3 4
Blocking voice calls
With Caller ID turned on, you can use the Ant i Junk Fax funct ion
described in Blocking Reception of Unwanted Faxes in this chapter to
prevent voice calls as well as fax receptions (the Anti Junk Fax
function can normally only prevent faxes).
In this case, when a voice call or a fax transmission comes in from a
number you hav e speci fied as a "Junk Num ber", your f ax will br eak
the connection as soon as it receives the calling pho ne numb er from
the caller ID service (before the second ring).
To use this function, set Opt ion Settin g 16 to YES as described in
Chapter 8, Option Setti ngs, and then ente r the number in the Anti Junk
Number List as explain ed in Blocking Reception of Unwanted Faxes
in this chapter.
72
Page 85

Broadcasting
This function allo ws you t o send th e same docu ment to as many as 20
different locations with just one operation. First sto re the document in
memory, then enter the numbers of the receiving machines. The
document will be transmitted t o each location .
♦ You can only use Rapid Keys or Speed Dial numbers to dial the
numbers of the receiving machines.
1
Load the document(s).
The display will show:
READY TO SEND
2
Press the START/MEMORY key and
then 2.
START/MEMORY
Broadcasting
2
3
Dial the receiving machines by using
one or both of the following methods.
(a maximum of 20 stations can be
selected).
•• Enter one or more Speed Dial
numbers by pressing the numeric
keys.
•• Press one or more Rapid Keys.
4
Press the START/MEMORY key.
•• Set the resolution and/or contrast if
desired.
2
01 02 03
START/MEMORY
RESOLUTION
2
(Example)
73
Functions
7. Special
Page 86

Broadcasting
5
Press the START/MEMORY key.
Transmission will begin.
•• A Transaction Report is
automatica lly printed out after
Broadcasting is completed. Check
the "Note" column of the r eport to
see if any of the locations are
marked "Busy" or have a
communication error code. If so,
send the document to those locations
again.
START/MEMORY
74
Page 87

Cover Sheet
You can have the fax generate a cover sheet and send it as the last
page of each of your fax transmis sions.
You can select a
message.
For the recipient’s name
to appear, you must dial
using a Speed Dial or
Rapid Key number with
the name programmed.
Your name and number
must be programmed as
explained in Chapter 1.
Cover Sheet
Follow the steps below to turn on the cover sheet function . Once the
cover sheet function is turned on, cover sheets will be included wit h all
tranmissi ons until you turn it off.
1
Press these keys:
FUNCTION
4
The display will show:
OPTION SETTING
2
Press these keys:
The display will show:
COVER SHEET MODE
75
Functions
7. Special
Page 88

Cover Sheet
3
Press 1 (YES) to turn on the cover
sheet function, or 2 (NO) to turn it off.
The display will show:
AUTO PRINT OUT
YES NO
or
1
2
4
Press the STOP key to return to the
date and time display.
STOP
Selecting a header message (optional)
When the cover sheet function is turned on, you can also select a
message which will appear as a header at the top of the cover sheet.
Note that the message selection is onl y effective for one transmission .
1
Load the document(s).
•• The document must be loaded
before a message can be selected.
•• The cover sheet function must be
turned on.
2
Press these keys:
The display will show:
COVER SHEET HEAD
76
FUNCTION
5
Page 89

3
Select a message by entering a number
from 1 to 4:
1: URGENT
2: IMPORTANT
3: CONFIDENTIAL
4: PLS. DISTRIBUTE
4
Dial the receiving machine and
transmit the document.
Note: To cancel a cover sheet header setting, press the S TOP key or
remove the document from the feeder.
1
Cover Sheet
(Example)
77
Functions
7. Special
Page 90

Batch Page Numbering
Batch Page Numbering
You can change the page numbering of the transmit ted docum ent from
simple numbering ("P.0 1", "P.02" , etc.) to batch numberi ng, which
means that a slash and the total number of pages being sent are added
after each page number (for example, "P. 01/ 05" , "P.02 /05 ", etc.). This
allows the receiver to check for missing pages.
1
Load the document(s).
•• The document must be loaded
before batch page numbering can be
set.
2
Press these keys:
The display will show:
FUNCTION
PAGE COUNTER SET
3
Enter the total number of pages ("01"
to "99") by pressing the number keys.
•• If you are sending a cover sheet, do
not include it in the total numbe r of
pages (the number will be adjusted
automatically).
4
Dial the receiving machine and
transmit the document.
78
0
8
Example:
Eight pages
Page 91

Batch Page Numbering
Comments:
•• If you nee d to cancel a batch num ber entry, re move the document from the
feeder or press th e STOP key.
•• If the number of pages actually transmitted does not coincide with the batch
number entered, the alarm will sound and PAGE COUNT ERROR will
appear in the display . PAGE E. will also appe ar in the NOTE colum n of the
Transac ti on Re port if it ha s bee n set to print out.
79
Functions
7. Special
Page 92

Blocking Reception of Unwanted Faxes
Blocking Reception of Unwanted Faxes
The Anti Junk Fax function all ows you to block recepti on of faxes
from parties which you speci fy . This saves paper by not printing out
unwanted "junk" faxes.
To use this function, first turn it on by set ti ng Opt ion Settin g 16 to
YES as explained in Chapter 8, and then ent er the fax numb ers from
which you do not want to receive faxes as shown below.
Comments:
•• Up to 5 numbers can be entered in the Anti Junk Num be r List .
•• The Anti Junk function will not operate for a number which has also been
stored as a Priori ty Ca ll num be r.
•• To clear a number from the Anti Junk Number List , you need to know the
1-digit numb er which identifi es it . If you have forgo tten t his nu mber, print
out the Anti Junk Numbe r L ist as expla ined in Chap ter 9.
1
Press the keys shown at rig ht.
STORE JUNK # will appear in the
display.
FUNCTION
3
Denmark :
2
Press 1 to store a number in the Anti
Junk Numbe r List, or 2 to clear a
number from the list.
3
Storing: Enter a 1-digit number from
1 to 5. This number identifies the
fax/voice number you will store in the
next st e p.
Clearing: Enter the number which
identifies the fax/voice number you
want to clear, and go to Step 5.
80
FUNCTION
SET CLEAR
1
1
3
or
2
(Example)
Page 93

4
Enter the full number you want to
block (max. of 20 digits).
5
Press the START/MEMORY key.
Blocking Reception of Unwanted Faxes
5
5
5
21
3
4
(Example)
START/MEMORY
6
Return to Step 3 to enter (or clear)
another number, or press STOP to exit.
STOP
Step 3 or
81
Functions
7. Special
Page 94

Sending Documents From Memory
Sending Documents From Memory
With this function, the original document is scanned immediatel y,
stored in memory, and then transmit ted once the connecti on to the
receiving machine is made. This is convenient when transmittin g to
places where the line is often busy, as it saves you from waiting to
pick up the original document and frees the feeder for other
operations. After transmission, the document will be cleared from
memory.
♦ Only one memory transmission can be set at a time.
♦ The amount of memory currently occupied appears as a
percentage in the display while the document is being scanned.
1
Load the document(s).
The display will show:
READY TO SEND
••
Set the resolution and/or contrast if
desired.
2
Press the START/MEMORY key and
then 1.
The display will sho w:
ENTER STATION #
82
RESOLUTION
START/MEMORY
1
Page 95

3
Enter the number of the receiving
machine using one of the following
methods:
•• Press a Rapid Key.
•• Press the SPEED DIAL key and
enter a Speed Dial number.
•• Enter a full telephone number by
pressing the number keys.
4
Press the START/MEMORY key if
you entered a Speed Dial number or a
full number.
•• The document will be scanned and
stored in memory. Your fax will
then dial the receiving machine and
transmit the document (redialling
will be done automatically if
necessary).
Sending Documents From Memory
01 02 03
(Example)
START/MEMOR Y
If the memory becomes full...
If the memory becomes full while the docum en t is being scanned,
MEMORY IS FULL will app ear in the dis play.
♦ Press the START/MEMORY key if you want to transmit the
pages which have been stored up to that point in memory. The
remaining pages will be ejected from the feeder. After
transmission, the memory will be cleared and you can transmit the
remaining pages. You will also need to transmit the page which
was being scanned when the memory filled up.
♦ Press the STOP key if you want to cancel the entire transmission.
83
Functions
7. Special
Page 96

Polling (Requesting a Fax Transmission)
Polling (Requesting a Fax Transmission)
Polling allows you to call anoth er fax machine and have it send a
document (previously loaded in its feeder) to your machine without
operator assistance. In other words, the receiving fax machine, not the
transmitting fax machine, ini ti ates the transmission. You can use your
machine to both poll and be polled by ot hers.
To use the polling function , you mus t first set Rapi d Key 05/POLL fo r
use as a polling key. This is done by ch angin g Opti on S ett ing 17, as
described in Chapter 8, Option Settings. (Note that when Rapid Key
05/POLL is set as a polling key, it c annot be used for Rapid Ke y
Dialling.)
Requesting transm iss ion
Note: Rapid Dial Keys cannot be used for polling. To dial a Rapid Dial
location, press the SPEED DIAL key and then enter the 2-digit number
corresponding to the Rapid Key.
1
Dial the fax machine you want to poll
using one of the following methods:
•• Pick up the handset (or press the
SPEAKER key) and dial the full
number. Wait for the fax
answerback tone.
(Example)
PQRS
ABC
DEF
3
2
1
JKL
MNO
GHI
4
7
6
5
TUV
WXYZ
9
8
•• Press the SPEED DIAL key and
enter a 2-digit Speed Dial number.
•• Enter the full number using the
numeric keys.
2
Press Rapid Key 05/POLL.
•• If you used the handset, replace it
when POLLING appears in the
display. Reception will begin.
84
05/POLL
Page 97

Polling (Requesting a Fax Trans mission)
Being polled (polling standby)
To let another fax machine poll your fax, press the RE CEPTION
MODE key t o set the re ceptio n mod e to FAX, lo ad the documen t(s),
and press Rapid Key 05/POLL. "P" wi ll appear in the disp lay.
Transmission will take place when the other fax machine calls your
machine and activates polling. Aut omat ic reception is poss ible whilst
your fax is on polling standb y.
Polling security
Polling Security allo ws you t o preven t unauthori zed po ll ing of your
machine. When this function is turned on, polling will only take place
when the fax number of the polling fax machine has been entered in
your machine’s list of permitted fax num bers (called "passcode
numbers"). The number of the polling fax must also be correctly
programmed into itself for identificati on.
To use Polling Security, follo w the steps below to turn the function
on, and then enter permitt ed numbers as sho wn on th e followi ng page.
1
Press the keys shown at rig ht.
ENTRY MODE will appear in the
display.
2
Press the # key three times .
SECURITY SELECT will appear in
the display.
3
Press 1 to turn polling secu rity on, or 2
to turn it off.
4
Press the START/MEMORY key and
then the STOP key.
FUNCTION
1
START/MEMORY
or
3
2
Functions
7. Special
STOP
85
Page 98

Polling (Requesting a Fax Transmission)
Storing and clearing fax numbers for polling permission
You can store up to 10 fax numbers in your machine’s l ist of permit ted
numbers.
1
Press the keys shown at rig ht.
ENTRY MODE will appear in the
display.
2
Press the # key four time s.
PASSCODE # MODE will appear in
the display.
3
Press 1 to store a number, or 2 to clear
a number.
4
Storing: Enter a 2-digit number from
01 to 10. This number identifies the
fax number you will store in the next
step.
Clearing: Enter the number which
identifies the fax number you want to
clear, and go to Ste p 6.
FUNCTION
1
0
3
or
1
(Example)
2
5
Enter the fax number (max. of 20
digits).
6
Press the START/MEMORY key.
7
Return to Step 4 to enter (or clear)
another number, or press STOP to exit.
86
0
6 2 1 3
START/MEMORY
Step 4 or
(Example)
STOP
3
7
Page 99

Timer Operations
Timer Operations
The Timer function allows you to set a transmiss ion and/or pol li ng
operation to be performed automatically at a time you specify. One
transmission ope ration and one polling operation can be set at the
same time, and the times th ey will be performed can be specified up to
24 hours in advance.
As an example, you can use this function t o take advantage o f
off-peak telephone rates without having to be there when the operation
is performed.
Note: Only a Speed Dial number can be used to dial the receiving machine.
Setting a timer operation
1
Press the keys shown at rig ht.
TIMER MODE w ill appear in the
display.
FUNCTION
1
2
Press # to set a transmission operation
(SEND MODE), or * to set a polling
operation (POLLING MODE).
3
Press 1 to select SET.
4
Enter the time at which you want the
operation to take place in 24-hour
format (2 digits for the hour and 2
digits for the minute).
5
Press the START/MEMORY key.
1
0
START/MEMORY
or
9
2
Example: 9:25
5
Functions
7. Special
87
Page 100

Timer Operations
6
Enter the Speed Dial number of the
receiving fax machine.
0
5
•• If this is a polling operation, go to
Step 9.
7
Press the START/MEMORY key.
8
Adjust the resolution and/or contrast if
START/MEMORY
RESOLUTION
(Example)
desired (skip to the next step if you
don’t want to change settings).
9
Press the START/MEMORY key and
then the STOP key. If this is a
START/MEMORY
transmission operation, load the
document in the feeder sometime
before the specified time of
transmission.
To cancel an operation
If you need to cancel an operation after it has been set, follow the steps
below.
1
Press the keys shown at rig ht.
FUNCTION
TIMER MODE w ill appear in the
display.
STOP
1
2
Press # to cancel a transmission
operation, or * to cancel a polling
operation.
3
Press 2 to select CLEAR.
4
Press the START/MEMORY key and
then the STOP key.
88
or
2
STOP
START/MEMORY
 Loading...