

Page 1
MODEL : MX-B200
DIGITAL MULTIFUNCTIONAL SYSTEM
START GUIDE
DIGITALES MULTIFUNKTIONSGERÄT
STARTANLEITUNG
SYSTEME MULTIFONCTIONS NUMERIQUE
GUIDE DE DEMARRAGE
DIGITAAL MULTIFUNCTIONEEL SYSTEEM
STARTERSGIDS
COPIADORA LÁSER DIGITAL
GUÍA DE INICIO
SISTEMA MULTIFUNZIONALE DIGITALE
GUIDA DI BASE
SISTEMA MULTIFUNÇÕES DIGITAL
GUIA DE INICIAÇÃO RÁPIDA
E
N
D
E
F
R
N
L
E
S
I
T
P
T
Page 2
Required in IEC-950 (EN 60 950) - Europe
• The equipment should be installed near an accessible socket outlet for easy disconnection.
Required in Appendix ZB of BS 7002 (En 60 950) — United Kingdom
MAINS PLUG WIRING INSTRUCTIONS
The mains lead of this equipment is already fitted with a mains plug which is either a non-rewireable
(moulded) or a rewireable type. Should the fuse need to be replaced, a BSI or ASTA approved fuse
to BS1362 marked or and of the same rating as the one removed from the plug must
be used.
Always refit the fuse cover after replacing the fuse on the moulded plug. Never use the plug without
the fuse cover fitted.
In the unlikely event of the socket outlet in your home not being compatible with the plug supplied
either cut-off the moulded plug (if this type is fitted) or remove by undoing the screws if a rewireable
plug is fitted and fit an appropriate type observing the wiring code below.
DANGER: The fuse should be removed from the cut-off plug and the plug destroyed immediately
and disposed of in a safe manner. Under no circumstances should the cut-off plug be inserted
elsewhere into a 13A socket outlet as a serious electric shock may occur.
To fit an appropriate plug to the mains lead, follow the instructions below:
IMPORTANT: The wires in this mains lead are coloured in accordance with the following code:
GREEN-AND-YELLOW: Earth
BLUE: Neutral
BROWN: Live
As the colours of the wires in this mains lead may not correspond with coloured markings
identifying the terminals in your plug, proceed as follows:
The wire which is coloured GREEN-AND YELLOW must be connected to the terminal in the plug
which is marked with the letter E, or by the safety earth symbol Å@, or coloured green or greenand-yellow.
The wire which is coloured BLUE must be connected to the terminal which is marked with the letter
N or coloured black.
The wire which is coloured BROWN must be connected to the terminal which is marked with the
letter L or coloured red.
If you have any doubt, consult a qualified electrician.
WARNING: THIS APPARATUS MUST BE EARTHED.
Page 3
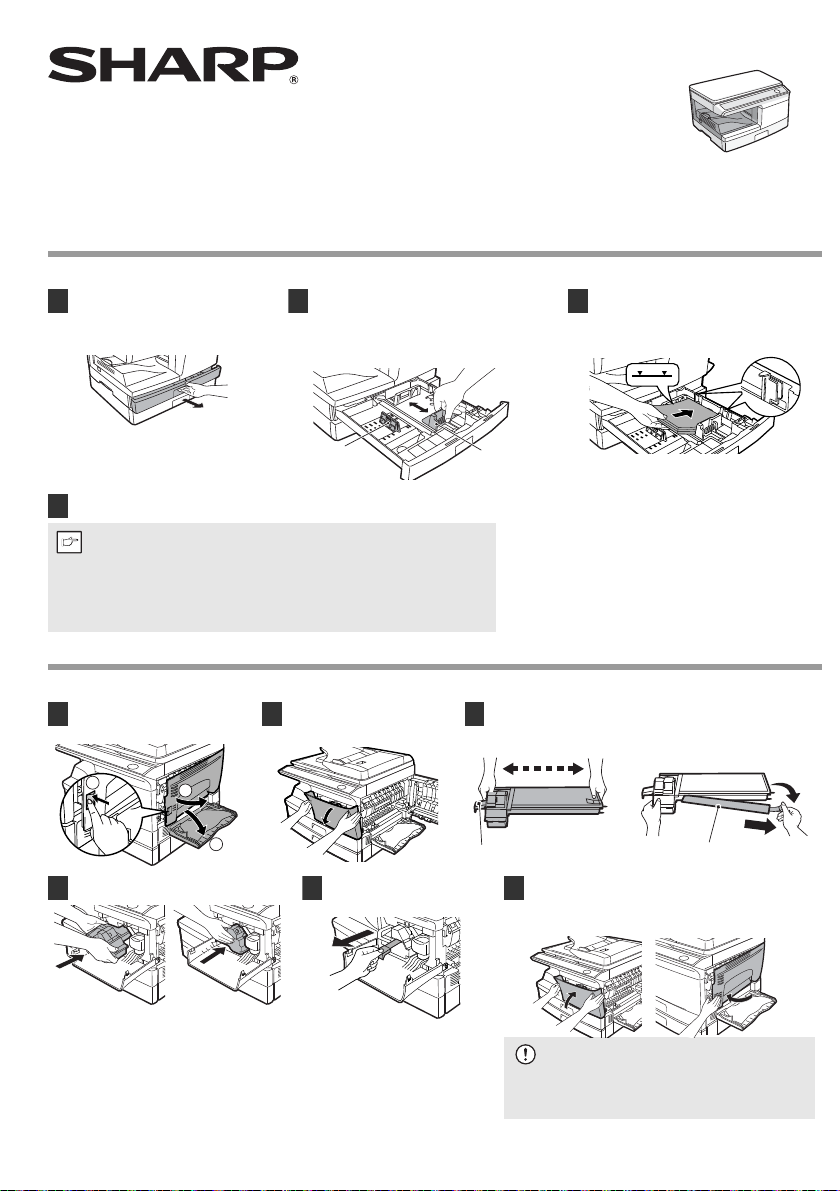
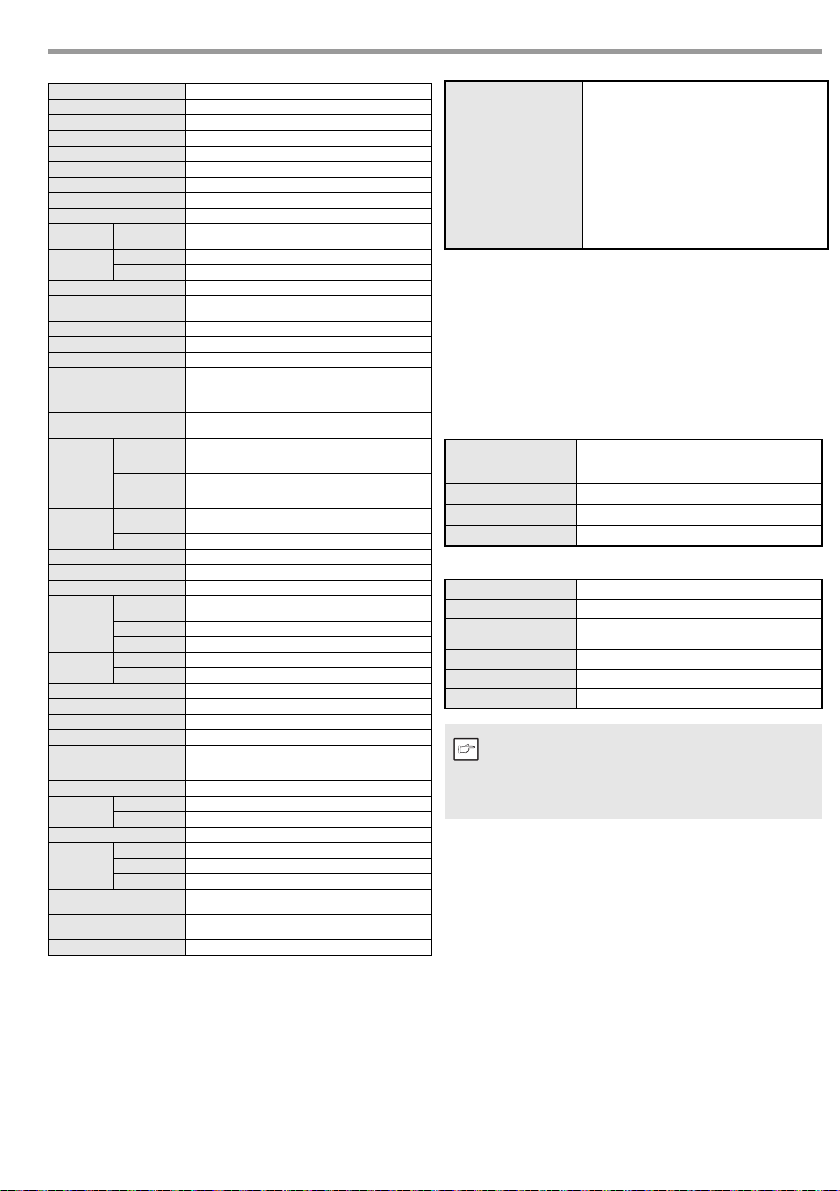
MODEL:MX-B200
1
2
3
4 - 5
Shutter
Toner seal
ON
Operation Guide CD-ROM
* To view the Operation Guide in PDF format,
Adobe
®
Reader® or Acrobat® Reader® of
Adobe Systems Incorporated is required.
Adobe
®
Reader® can be downloaded from the
following URL:
http://www.adobe.com/
DIGITAL MULTIFUNCTIONAL SYSTEM
START GUIDE
This guide explains how to install the machine, and indicates important points to note for installation and usage. Read and understand this guide to
ensure that you install the machine correctly. The Operation Guide for the machine is on the accompanying CD-ROM. The procedure for viewing the
guide is explained in "4. HOW TO USE THE OPERATION GUIDE". After installation, read the Operation Guide to make full use of all the machine
has to offer.
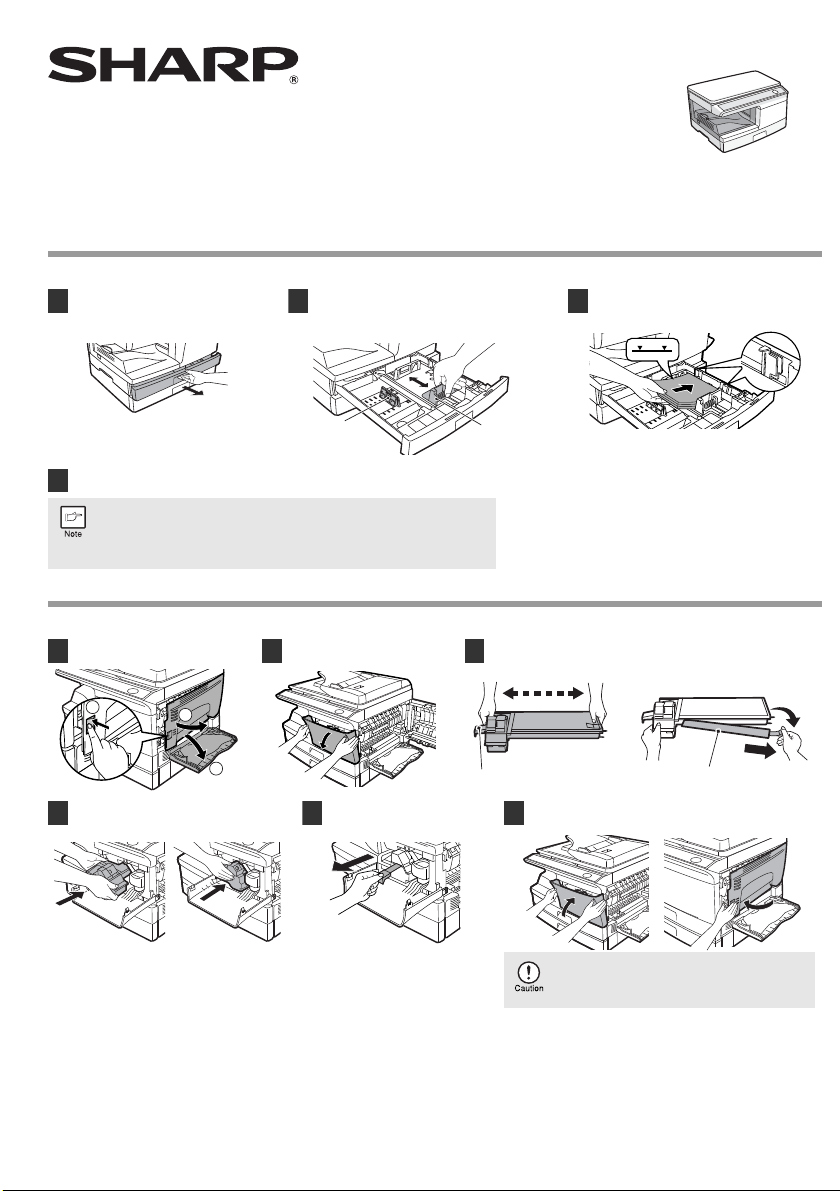
1. LOADING PAPER
Raise the handle of the paper tray and
1
pull the paper tray out until it stops.
Squeeze the lever of paper guide (A) and slide
2
the guide to match with the width of the paper.
Move paper guide (B) to the appropriate slot
as marked on the tray.
Fan the paper and insert it into the tray. Make
3
sure the edges go under the corner hooks.
(B)
Gently push the paper tray back into the unit.
4
• Be sure that paper is free of rips, dust, wrinkles, and curled or bent edges.
• Make sure all the paper in the stack is the same size and type.
• When loading paper, ensure there is no space between the paper and the
guide, and check if the guide is not set too narrow causing the paper to bend.
Loading paper in these ways will result in document skew or a paper jam.
2. INSTALLING THE TONER CARTRIDGE
Open the multi-bypass tray, and
1
then open the side cover.
Gently insert the toner cartridge until it
4
locks in place.
Push gently on both sides of the
2
front cover to open the cover.
Remove the tape from the
5
shutter.
7
(A)
Grasp the cartridge on both sides and shake it horizontally four or five
3
times. After shaking the cartridge, remove the toner seal.
Close the front cover and then the side cover by pressing
6
the round projections near the side cover open button.
When closing the covers, be sure to close the front
cover securely and then close the side cover. If the
covers are closed in the wrong order, the covers may
be damaged.
1
Page 4
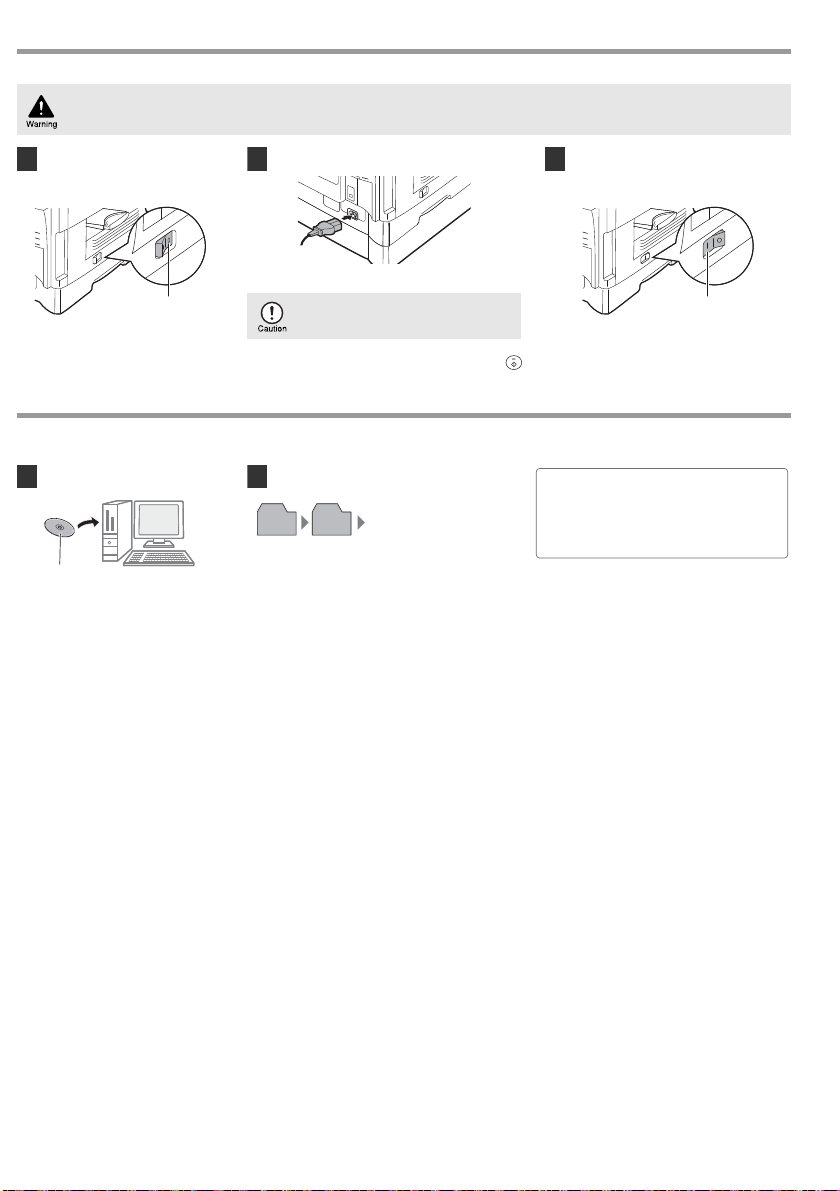
3. CONNECTING THE POWER CORD / POWER ON
ON
Operation Guide CD-ROM
* To view the Operation Guide in PDF format,
Adobe
®
Reader® or Acrobat® Reader® of
Adobe Systems Incorporated is required.
Adobe
®
Reader® can be downloaded from the
following URL:
http://www.adobe.com/
If you use the unit in a country other than the country where the unit was purchased, you will need to make sure that your local power supply is
compatible with your model. If you plug the unit into an incompatible power supply, irreparable damage to the unit will result.
Ensure that the power switch of the
1
unit is in the "OFF" position.
OFF
About the scan head
The scan head lamp remains on constantly when the unit is in the ready condition (when the start ( ) indicator is illuminated).
The unit adjusts the scan head lamp periodically to maintain copying quality. At this time, the scan head moves automatically. This is normal and does not
indicate unit trouble.
Insert the attached power cord into the power cord
2
socket at the rear of the unit.
Plug the other end of the power cord into the
nearest outlet.
• Only insert the power cord into a properly
grounded wall socket.
• Do not use extension cords or power strips.
Turn the power switch on the left side of the
3
unit to the "ON" position.
4. HOW TO USE THE OPERATION GUIDE
Detailed explanations of the functions that can be used on the machine are provided in the Operation Guide in PDF format.
Insert the supplied CD-ROM into your
1
computer's CD-ROM drive.
A paper form operation manual can be obtained from your authorized SHARP dealer or upon request by contacting SHARP.
SHARP Manufacturing France - Customer Documentation Department
Route de Bollwiller
68 360 SOULTZ - FRANCE
or by fax (+33) 3.89.74.87.78
Please inform the model name, the serial number of the machine and the language needed. Do not forget to add your name and your address.
Display the contents of the CD-ROM, and open
2
the Operation Guide file.
Operation Guide file (PDF)
Manual English
2
Page 5
SPECIFICATIONS
20 cm
10 cm
10 cm
In some areas, the "POWER" switch positions are marked "I" and " " on
the copier instead of "ON" and "OFF".
If your copier is so marked, please read "I" for "ON" and " " for "OFF".
Caution!
For a complete electrical disconnection, pull out the main plug.
The socket-outlet shall be installed near the equipment and shall
be easily accessible.
Model MX-B200
Type Digital multifunctional system, desk-top type
Copy / printer system Dry, electrostatic transfer
Originals Sheets, bound documents
Printer function Available
Scanner function Available
Paper tray 250 sheets
Multi-bypass tray 50 sheets
Paper output tray 200 sheets *
Original
Document
sizes
glass/SPF
Document
Original
glass
feed
SPF Up to 50 sheets
Max. A4
1 sheet
Copy / printing size A6 to A4*
Image loss
Copy speed 20 pages/min. (A4)
Print speed *
5
Continuous copying Max. 99 pages subtractive counter
First-copy time *
(Approximately)
Warm-up time *
(Approximately)
Document
glass
Copy
ratio
SPF
Document
Exposure
glass
system
SPF Moving original
Max. 4 mm *
Max. 4.5 mm *
20 pages/min. (A4)
6
8.0 seconds (When user program 24 is set to OFF)
10.7 seconds (When user program 24 is set to ON)
7
-
Variable: 25% to 400% in 1% increments
Fixed: 50%, 70%, 86%, 100%, 141%, 200%
Variable: 50% to 200% in 1% increments
Fixed: 50%, 70%, 86%, 100%, 141%, 200%
Moving optical source, slit exposure (stationary
platen) with automatic exposure
Fusing system Heat rollers
Development system Magnetic brush development
Light source Cold cathode fluorescent lamp
600 x 300 dpi (Auto/Manual mode)
600 x 600 dpi (Photo mode)
Resolution
Copier
Printer 600 dpi
Scanner 600 x 600 dpi
Scan 256 levels
Gradation
Output 2 levels
Bit depth 1 bit or 8 bit/pixel
Sensor Colour CCD
Scanning speed Max. 2.88 ms/line
Memory 32 MB
Power supply
Local voltage ±10% (For this machine's power
supply requirement, see the name plate located
on the back of the machine.)
Power consumption Max. 1.0 kW
Width 802 mm
Overall
dimensions
Depth 445 mm
Weight (Approximately) *815.9 kg
Width 518 mm
Unit
Depth 445 mm
dimensions
Height 298 mm
Operating conditions
Emulation
Temperature: 10°C to 30°C
Humidity: 20% to 85%
SHARP SPLC
(Sharp Printer Language with Compression)
Interface port USB interface (USB 2.0 Hi Speed)
1
2
3
4
(total 376 steps)
(total 151 steps)
Sound power level L
Copying mode: 6.4 B
Standby mode: 3.5 B
Sound pressure level L
Copying mode: 47 dB
Noise level
*1 When standard A4 paper is used under the operating conditions.
*2 Feed paper lengthwise only.
*3 Leading and trailing edges.
*4 Along the other edges in totals.
*5 Print speed during printing of the second sheet and following sheets
when using A4 plain paper in the tray 1 and performing continuous one-
sided printing of the same page.
*6 First copy time may vary depending on the status of the machine.
*7 Warm-up time may vary depending on some environments.
*8 Not including toner cartridge.
Standby mode: 19 dB
Sound pressure level L
Copying mode: 52 dB
Standby mode: 19 dB
Noise emission measurement in accordance
with ISO7779.
wAd
pAm
(reference) (Bystander positions)
pAm
(reference) (Operator position)
Optional equipment
Single pass feeder (MX-SP10)
2
Acceptable originals
Weight: 56 g/m
Size: A5 to A4
Capacity: Up to 50 sheets
to 90 g/m
2
Power supply Drawn from the unit.
Weight
(Approximately)
2.3 kg
Dimensions 496 mm (W) x 359 mm (D) x 89 mm (H)
250-sheet paper feed unit (MX-CS10)
Paper size A5 to A4
Paper weight 56 g/m2 to 80 g/m
Paper capacity
One paper tray with capacity for 250 sheets of
80 g/m
Weight 3.0 kg
Dimensions 498 mm (W) x 445 mm (D) x 87 mm (H)
Power supply Drawn from the unit
As a part of our policy of continuous improvement, SHARP
reserves the right to make design and specification changes for
product improvement without prior notice. The performance
specification figures indicated are nominal values of production
units. There may be some deviations from these values in
individual units.
2
paper
2
3
Page 6
CAUTIONS
Each instruction also covers the optional units used with this product.
Caution label on the unit
The label ( , ) in the fusing area of the unit indicates the following:
: Caution, risk of danger
: Caution, hot surface
Cautions on using
Follow the cautions below when using this unit.
Warning:
• The fusing area is hot. Exercise care in this area when removing misfed
paper.
• Do not look directly at the light source. Doing so may damage your eyes.
Caution:
• Place the unit on a firm, level surface.
• Do not install the unit in a humid or dusty location.
• When the unit is not used for a long time, for example during prolonged
holidays, turn the power switch off and remove the power cord from the outlet.
• When moving the unit, be sure to turn the power switch off and remove the
power cord from the outlet.
• Do not switch the unit rapidly on and off. After turning the unit off, wait 10
to 15 seconds before turning it back on.
• Do not cover the unit with a dust cover, cloth or plastic film while the power
is on. Doing so may prevent heat radiation, damaging the unit.
• Use of controls or adjustments or performance of procedures other than
those specified herein may result in hazardous radiation exposure.
• The socket-outlet shall be installed near the machine and shall be easily
accessible.
Important points when selecting an installation site
Do not install your unit in areas that are:
• damp, humid, or very dusty
• exposed to direct sunlight
• poorly ventilated
• subject to extreme temperature or humidity changes, e.g., near an air
conditioner or heater.
Be sure to allow the required space
around the machine for servicing
and proper ventilation.
Cautions on handling
Be careful in handling the unit as
follows to maintain the performance of
this unit.
Do not drop the unit, subject it to shock or strike it against any object.
Store spare toner cartridges in a cool dry place without removing from
the package before use.
• If they are exposed to direct sunlight or excessive heat, poor copies may
result.
Do not touch the photoconductive drum (green portion).
• Scratches or smudges on the drum will cause dirty copies.
Proper storage
Store the supplies in a location that is:
• clean and dry,
• at a stable temperature,
• not exposed to direct sunlight
Store paper in the wrapper and lying flat.
• Paper stored out of the wrapper or in packages standing on end may curl
or get damp, resulting in paper misfeeds.
CAUTION:
Do not install the machine in a location with poor air circulation.
A small amount of ozone is created inside the m achine during printing. The
amount of ozone created is not sufficient to be h armful; however, an
unpleasant odor may be noticed during large copy runs, and thus the machine
should be installed in a room with a ventilation fan or windows that provide
sufficient air circulation. (The odor may occasionally cause headaches.)
* Install the machine so that people are not directly exposed to exhaust from
the machine. If installed near a window, ensure that the machine is not
exposed to direct sunlight.
Supply and Consumables
The supply of spare parts for a repair of the appliance is guaranteed for at least
7 years following the termination of production. Spare pa rts are those par ts of
the apparatus which may break down within the scope o f ordinary use of the
product, whereas those parts which normally exceed the life of the pr oduct are
not considered spare parts. Consumables also, are available for 7 years
following the termination of p roduction.
MSDS (Material Safety Data Sheet)
The MSDS (Material Safety Data Sheet) can be viewed at the following URL
address: http://www.sharp-world.com/corporate/info/index.html
10 cm
20 cm
10 cm
In some areas, the "POWER" switch positions are marked "I" and " " on
the copier instead of "ON" and "OFF".
If your copier is so marked, please read "I" for "ON" and " " for "OFF".
Caution!
For a complete electrical disconnection, pull out the main plug.
The socket-outlet shall be installed near the equipment and shall
be easily accessible.
Shielded interface cables must be used with this equipment to maintain
compliance with EMC regulations.
Laser information
Wave length
Pulse times 12.88 µs ±12.88 ns/7 mm
Output power Max 0.2 mW
At the production line, the ou tput power of the scanner unit is adjusted to 0.18
MILLIWATT PLUS 5% and is maintained constant by the operation of the
Automatic Power Control (APC).
Caution
Use of controls or adjustments or performance of procedures other than those
specified herein may result in hazardous radiation exposure.
This Digital Equipment is CLASS 1 LASER PRODUCT (IEC 60825-1 Edition
1.2-2001)
This product is designed for commercial application only and as such it falls
outside the scope of Regulation (EC) 1275/2008 implementing EU Directive
2005/32/EC on eco-design requirements for stand by and off mode electric
power consumption. Sharp does not recommend the product for domestic
application and will not accept any liability for such use.
The products that meet the ENERGY STAR® guidelines carry the logo shown
above.
The products without the logo may not meet the ENERGY STAR
SOFTWARE LICENSE
The SOFTWARE LICENSE will appear when you install the software from the
CD-ROM. By using all or any portion of the soft ware on the CD-ROM or in the
unit, you are agreeing to be bound by the terms o f the SOFTWARE LICENSE.
Trademark acknowledgements
•Microsoft®, Windows®, Windows® 2000, Windows® XP, Windows Vista® and
Internet Explorer
Corporation in the U.S.A. and other countries.
®
, the Adobe® logo, Acrobat®, the Adobe® PDF logo, and ReaderTM are
• Adobe
registered trademarks or trademarks of Adobe Systems Incorporated in the
United States and other countries.
• IBM, P C/AT, and PowerPC are trademarks of Internat ional Business Machine s
Corporation.
• Shar pdesk is a trademark of Sharp Corporation.
• All o ther trademarks and copyrights are the property of their respective owners.
Do not make copies of anything which is prohibited from copying by law.
The following items are normally prohibited from copying by national
law. Other items may be prohibited by local law.
Money Stamps Bonds Stocks
Bank drafts Checks Passports Driver's licences
Emission density (measured according to RALUZ122: Edition
June 2006)
Measured
chemicals
Ozone
Dust Black and white 4.0 gm/h or less
Styrene Black and white 1.0 gm/h or less
Benzene Black and white 0.05 gm/h or less
TVOC
780 nm+15 nm
-10 nm
®
Products that have earned the ENERGY STAR
to protect the environment t hrough superior energy efficiency.
®
are registered trademarks or trademarks of Microsoft
Condition of
copier
When copier is in
operation
When on standby - 2.0 gm/h or less
Colour mode Diffusion speed
Black and white 1.5 gm/h or less
Black and white 10 gm/h or less
are designed
®
guidelines.
Page 7
MODELL :MX-B200
1
2
3
4 - 5
Klappe
Tonersiegel
Achtung
Warnung
Achtung
Bedienungsanleitung CD-ROM
Manual German
Datei Bedienungsanleitung
(PDF)
* Um die Bedienungsanleitung im PDF-Format
anzuzeigen, ist Adobe
®
Reader oder Acrobat
®
Reader® von Adobe Systems Incorporated
erforderlich. Adobe
®
Reader® kann von der
folgenden URL heruntergeladen werden:
http://www.adobe.com/
DIGITALES MULTIFUNKTIONSGERÄT
STARTANLEITUNG
Diese Anleitung erklärt, wie man das Gerät installiert und hebt die Punkte hervor, die für die Installation und Nutzung des Gerätes wichtig sind. Sie
müssen die Bedienungsanleitung lesen und verstehen, um das Gerät richtig zu installieren. Die Bedienungsanleitung des Geräts ist auf der
mitgelieferten CD-ROM. Wie Sie sich die Anleitung ansehen können, wird in "4. BENUTZUNG DER BEDIENUNGSANLEITUNG" erklärt. Lesen Sie
nach der Installation die Bedienungsanleitung, damit Sie das Gerät in vollem Umfang nutzen können.
1. EINLEGEN VON PAPIER
Heben Sie den Griff des Papierfachs
1
an und ziehen Sie das Papierfach bis
zum Anschlag heraus.
Drücken Sie den Hebel der Papierführung (A)
2
und verschieben Sie die Führung passend zur
Breite des Papiers. Schieben Sie die
Papierführung (B) zum geeigneten Schlitz
entsprechend der Kennzeichnung auf dem
Fach.
Fächern Sie das Papier auf und legen Sie es
3
in das Papierfach. Achten Sie darauf, dass
sich die Kanten unter den Haken an der Ecke
befinden.
(B)
Schieben Sie das Papierfach vorsichtig in das Gerät zurück.
4
• Achten Sie darauf, dass das Papier nicht gerissen, nicht verstaubt und nicht
geknickt ist und dass die Kanten nicht gewellt oder umgebogen sind.
• Achten Sie darauf, dass das gesamte Papier im Stapel dasselbe Format hat
Hinweis
und vom selben Typ ist.
• Wenn Sie das Papier einlegen, achten Sie darauf, dass das Papier dicht an der
Führung anliegt. Prüfen Sie, dass die Führung nicht zu eng eingestellt ist,
damit sich das Papier nicht wellt. Ansonsten wird das Papier schräg
eingezogen oder es entsteht Papierstau.
2. INSTALLING THE TONER CARTRIDGE
Öffnen Sie zuerst das Fach für den
1
Mehrfacheinzug, dann die
Seitenabdeckung.
Schieben Sie die Entwicklereinheit
4
vorsichtig hinein, bis sie einrastet.
Drücken Sie leicht auf beide
2
Seiten der vorderen Abdeckung,
um die Abdeckung zu öffnen.
Entfernen Sie das Klebeband
5
von der Lasche am
Tonerdichtstreifen.
(A)
Halten Sie die Kassette an beiden Seiten fest und schütteln Sie sie
3
vier- oder fünfmal in horizontaler Richtung. Ziehen Sie anschließend
den Tonerdichtstreifen ab.
Schließen Sie die vordere Abdeckung und dann die
6
seitliche Abdeckung, indem Sie die runden
Sicherungsknöpfe neben der Verriegelungstaste der
seitlichen Abdeckung drücken.
7
Wenn Sie die Abdeckungen schließen, achten Sie
darauf, dass Sie die vordere Abdeckung fest
schließen. Schließen Sie dann die Seitenabdeckung.
Werden die Abdeckungen in der falschen
Reihenfolge geschlossen, können die Abdeckungen
beschädigt werden.
5
Page 8
3. ANSCHLIESSEN DES NETZKABELS / EINSCHALTEN
Warnung
Achtung
Bedienungsanleitung CD-ROM
Manual German
Datei Bedienungsanleitung
(PDF)
* Um die Bedienungsanleitung im PDF-Format
anzuzeigen, ist Adobe
®
Reader oder Acrobat
®
Reader® von Adobe Systems Incorporated
erforderlich. Adobe
®
Reader® kann von der
folgenden URL heruntergeladen werden:
http://www.adobe.com/
Wenn Sie das Gerät in einem anderen Land benutzen als in dem Land, in dem Sie das Gerät kauften, müssen Sie prüfen, ob Ihr Modell mit Ihrer
örtlichen Stromversorgung benutzt werden kann. Wenn Sie das Gerät an eine ungeeignete Spannungsversorgung stecken, wird das Gerät
irreparabel beschädigt.
Achten Sie darauf, dass der
1
Netzschalter des Geräts
ausgeschaltet ist "AUS/OFF".
AUS
Der Abtastkopf
Die Lampe des Abtastkopfs leuchtet ständig, wenn das Gerät betriebsbereit ist (wenn die Start ( ) anzeige leuchtet).
In regelmäßigen Abständen passt das Gerät die Lampe des Abtastkopfes an, um die Kopierqualität zu erhalten. Dann bewegt sich der Abtastkopf
automatisch. Das ist ein normaler Vorgang und bedeutet nicht, dass das Gerät fehlerhaft ist.
Stecken Sie das mitgelieferte Netzkabel in die
2
Netzsteckdose auf der Rückseite des Geräts.
Stecken Sie das andere Ende des Netzkabels in
die nächste Steckdose.
• Stecken Sie das Netzkabel nur in eine
ordnungsgemäß geerdete Steckdose.
• Benutzen Sie keine Verlängerungskabel
oder Mehrfachsteckdosen.
Schalten Sie den Netzschalter auf der linken
3
Seite des Geräts auf "EIN/ON".
EIN
4. BENUTZUNG DER BEDIENUNGSANLEITUNG
Detaillierte Erklärungen der Gerätefunktionen finden Sie in der Bedienungsanleitung im PDF-Format.
Legen Sie die mitgelieferte CD-ROM
1
in das CD-ROM-Laufwerk Ihres
Computers.
Eine Benutzeranleitung in Papierform kann über Ihren autorisierten SHARP-Händler oder auf Anfrage direkt bei SHARP bezogen werden.
SHARP Manufacturing France - Customer Documentation Department
Route de Bollwiller
68 360 SOULTZ - FRANCE
oder per Fax (+33) 3.89.74.87.78
Geben Sie bitte den Modellnamen und die Seriennummer der Maschine an, sowiedie benötigte Sprache. Vergessen Sie nicht, Ihren Namen und Ihre Adresse
anzugeben.
Zeigen Sie den Inhalt der CD-ROM an und
2
öffnen Sie die Datei der Bedienungsanleitung.
6
Page 9
TECHNISCHE DATEN
Hinweis
20 cm
10 cm
10 cm
Modell MX-B200
Typ Digitales Multifunktionsgerät, Tischgerät
Kopier-/Druckersystem Trockene, elektrostatische Übertragung
Vorlagen Einzelblätter, gebu ndene Dokumente
Drucker-Funktion Verfügbar
Scanner-Funktion Verfügbar
Papierfach 250 Blätter
Mehrfacheinzug 50 Blätter
Papierauswurffach 200 Blätter*
Originalfor-
mate
Vorlageneinzug
Kopier-/Druckformat A6 bis A4 *
Bildverlust
Kopiergeschwindigkeit 20 Seiten/Min. (A4)
Druckgeschwindigkeit *520 Seiten/Min. (A4)
Kontinuierliches Kopieren Max. 99 Seiten, abwärts zählendes Zählwerk
Zeit für 1. Kopie*
(Ungefähr)
Warmlaufzeit*
(Ungefähr)
Abbildungsverhältnis
Belichtungssystem
Fixiersystem Heizwalzen
Entwicklungssystem M agnetbürstenentwicklung
Lichtquelle Kalte Kathodenleuchtstofflampe
Auflösung
Abstufungen
Bit-Tiefe 1 Bit oder 8 Bit/Pixel
Sensor Farb-CCD
Abtastgeschwindigkeit Max. 2,88 ms/Zeile
Speicher 32 MB
Stromversorgung
Leistungsaufnahme Max. 1,0 kW
Gesamtabmessungen
Gewicht (ungefähr) *
Geräteabmessungen
Betriebsbedingungen
Emulation
Schnittstellenanschluss USB-Schnittstelle (USB 2.0 Hi-Speed)
Vorlagenglas/
SPF
Vorlagenglas 1 Blatt
SPF Bis zu 50 Blätter
6
7
Vorlagenglas
SPF
Vorlagenglas
SPF Bewegliche Vorlage
Kopierer
Drucker 600 dpi
Scanner 600 x 600 dpi
Scannen 256 Stufen
Ausgabe 2 Stufen
Breite 802mm
Tiefe 445 mm
8
Breite 518mm
Tiefe 445 mm
Höhe 298 mm
1
Max. A4
2
3
Max. 4 mm *
Max. 4,5 mm *
8,0 Sekunden (wenn das Benutzerprogramm 24 auf AUS/
OFF gestellt ist)
10,7 Sekunden (wenn das Benutzerprogramm 24 auf EIN/ON
gestellt ist)
-
Einstellbar: 25% bis 400% in 1-%-Schritten
Fest: 50%, 70%, 86%, 100%, 141%, 200%
Einstellbar: 50% bis 200% in 1-%-Schritten
Fest: 50%, 70%, 86%, 100%, 141%, 200%
Bewegliche optische Quelle, Schlitzbelichtung (sta-
tionäre Schreibwalze) mit automatischer Belichtung
600 x 300 dpi (Auto-/Manueller-Modus)
600 x 600 dpi (Foto-Modus)
Örtliche Spannung ±10% (Die Stromversorgungsda ten
für dieses Gerät sind auf dem Typenschild auf der
Rückseite des Geräts angegeben.)
15,9 kg
Temperatur: 10°C bis 30°C (50°F bis 86°F)
Feuchtigkeit: 20% bis 85% (50°F bis 86°F)
SHARP SPLC
(Sharp Printer Language with Compression)
4
(Insgesamt 376 Schritte)
(Insgesamt 151 Schritte)
Schallpegel L
Schalldruckpegel L
Geräts)
Geräuschpegel
*1 Wenn Standard-DIN-A4-Papier unter den Betriebsbedingungen benutzt
wird.
*2 Das Papier nur der Länge nach zuführen.
*3 Obere und untere Kanten.
*4 Summe der anderen Kanten.
*5 Druckgeschwindigkeit während des Druckens des zweiten Blatts und der
folgenden Blätter, wenn normales DIN-A4-Papier in Fach 1 benutzt wird
und dieselbe Seite ständig einseitig gedruckt wird.
*6 Die Zeit für die Erstkopie hängt vom Zustand der Maschine ab.
*7 Die Aufwärmzeit kann von einigen Umgebungsbedingungen abhängen.
*8 (ohne Tonerkassette)
Schalldruckpegel L
Geräts)
Messungen Geräuschemission gemäß
ISO7779.
wAd
Kopier-Modus: 6,4 B
Standby-Modus: 3,5 B
Kopier-Modus: 47 dB
Standby-Modus: 19 dB
Kopier-Modus: 52 dB
Standby-Modus: 19 dB
pAm
(Bezugswert) (in Umgebung des
pAm
(Bezugswert) (in Umgebung des
Zubehör
Automatischer Originaleinzug (MX-SP10)
Verwendbare
Originale
Gewicht 56 g/m
Format: A5 to A4
Kapazität Bis zu 50 Blätter
2
Stromversorgung Vom Gerät gezogen
(Ungefähr) 2,3 kg
Abmessungen 496 mm (B) x 359 mm (T) x 89 mm (H)
bis 90 g/m
2
250-Blatt Papierkassette (MX-CS10)
Papierformat A5 bis A4
Papiergewicht 56 g/m2 bis 80 g/m
Papierkapazität
Ein Papierfach mit einer Kapazität von 250 Blatt
2
-Papier
80g/m
Gewicht 3,0 kg
Abmessungen 498 mm (B) x 445 mm (T) x 87 mm (H)
Stromversorgung Vom Gerät gezogen
Bedingt durch fortlaufende technische Verbesserungen behält
sich SHARP das Recht vor, das Design und die Spezifikationen
zur Verbesserung des Produkts ohne vorherige Ankündigung
zu ändern. Die angegebenen Leistungsangaben sind
Nennwerte von Geräten aus der laufenden Produktion. Bei
einzelnen Geräten können sich Abweichungen von diesen
Werten ergeben.
2
7
Page 10
WARNHINWEISE
20 cm
10 cm
10 cm
In einigen Ländern sind die "STROM"-Schalterpositionen der Kopierer mit
"I" und "O " anstelle von "EIN" und "AUS" markiert.
Ist Ihr Kopierer so markiert, lesen Sie bitte "I" für "EIN" und " " für "AUS".
Vorsicht!
Für die komplette Trennung vom Stromnetz ziehen Sie den
Netzstecker aus der Steckdose. Die Netzsteckdose sollte sich
in der Nähe des Geräts befinden und leicht zugänglich sein.
Jede Anleitung bezieht auch die mit diesen Produkten verwendeten optionalen
Einheiten ein.
Warnetikett auf dem Gerät
Das Etikett ( , ) in dem Fixierbereich des Geräts gibt Folgendes an:
: Achtung, Gefahr
: Achtung, heiße Oberfläche
Warnhinweise zum Gebrauch des Geräts
Beachten Sie beim Arbeiten mit diesem Gerät die folgenden Warnhinweise.
Warnung:
• Der Fixierbereich ist heiß. Beim Entfernen von gestautem Papier ist in
diesem Bereich Vorsicht geboten.
• Schauen Sie nicht direkt in die Lichtquelle. Ansonsten können die Augen
geschädigt werden.
Achtung:
• Stellen Sie das Gerät auf eine feste, ebene Fläche.
• Installieren Sie das Gerät nicht in einer feuchten oder staubigen Umgebung.
• Wenn das Gerät über einen längeren Zeitraum nicht verwendet wird, z.B. bei
einem längeren Urlaub, schalten Sie das Gerät am Netzschalter aus und ziehen
Sie den Netzstecker aus der Steckdose.
• Wenn Sie das Gerät bewegen, schalten Sie es am Netzschalter aus und
ziehen Sie den Netzstecker aus der Steckdose.
• Schalten Sie das Gerät nicht schnell hintereinander ein und aus. Warten Sie
nach dem Ausschalten des Geräts etwa 10-15 Sekunden, bevor Sie es wieder
einschalten.
• Decken Sie das Gerät nicht mit einer Staubschutzhaube, einem Tuch oder
einer Plastikfolie ab, während es eingeschaltet ist. Anderenfalls wird die
Wärmeausstrahlung behindert, wodurch das Gerät beschädigt werden kann.
• Nehmen Sie keine Überprüfungen, Einstellungen oder Maßnahmen vor, die in
diesem Handbuch nicht beschrieben sind, da Sie sich anderenfalls
gefährlichen Strahlungen aussetzen könnten.
• Die Netzsteckdose sollte sich in der Nähe des Geräts befinden und leicht
zugänglich sein.
Wichtige Punkte bei der Auswahl des Aufstellungsorts
Stellen Sie das Gerät nicht an solchen Orten auf:
• feuchte, nasse oder sehr staubige Orte
• Orte, die direktem Sonnenlicht ausgesetzt sind
• schlecht belüftete Orte
• Orte, die starken Temperatur- oder Feuchtigkeitsschwankungen ausgesetzt
sind, z.B. nahe einer Klimaanlage oder einer Heizung.
Lassen Sie rund um das Gerät genügend Platz für Wartungs- und
Belüftungszwecke.
Vorsichtsmaßnahmen bei
der Benutzung
Wie im Folgenden beschrieben, seien
Sie vorsichtig bei der Benutzung des
Gerätes, um die Leistungsfähigkeit des
Gerätes nicht zu beeinträchtigen.
Lassen Sie das Gerät nicht fallen,
schützen Sie es vor Stößen und schlagen Sie es nicht gegen andere
Gegenstände.
Lagern Sie Ersatz-Tonerkassetten in der Originalverpackung an einem
kühlen, trockenen Ort.
• Wenn die Tonerkassetten direktem Sonnenlicht oder hohen Temperaturen
ausgesetzt werden, kann die Qualität der Kopien leiden.
Berühren Sie nicht die Bildtrommel (der grüne Bereich).
• Kratzer oder Flecken auf der Trommel haben verschmutzte Kopien zur Folge.
Richtige Lagerung
Bewahren Sie die Verbrauchsmaterialien an einem Platz auf, der:
• trocken und sauber ist,
• eine konstante Temperatur aufweist,
• nicht dem direkten Sonnenlicht ausgesetzt
Lagern Sie Papier flach liegend in seiner Verpackung.
• Papier, das ohne Umhüllung oder stehend gelagert wird, kann wellig und
feucht werden und bei der Verarbeitung Papierstaus verursachen.
VORSICHT:
Stellen Sie das Gerät nicht an einem Ort mit schlechter Belüftung auf.
Beim Drucken entsteht eine geringe Menge Ozon im Gerät. Die erzeugte
Menge Ozon ist unschädlich, bei größeren Kopieraufträgen kann jedoch ein
unangenehmer Geruch auftreten. Aus diesem Grund sollte das Gerät in einem
gut belüfteten Raum mit Ventilator oder Fenstern aufgestellt werden. (Der
Geruch kann Kopfschmerzen verursachen.)
* Das Gerät muss so aufgestellt werden, dass sich keine Person direkt im
Luftaustritt befindet. Beim Aufstellen in der Nähe eines Fensters darf das
Gerät keiner direkten Sonneneinstrahlung ausgesetzt sein.
Ersatzteile und Verbrauchsmaterialien
Für die Reparatur des Geräts ist eine Ersatzteilversorgung für mindestens 7
Jahre ab Produktionseinstellung sichergestellt. Ersatzteile sind solche Teile,
die typischerweise im Rahmen der üblichen Nutzung eines Produkts ausfallen
können. Andere, regelmäßig die Lebensdauer des Produkts überdauernde
Teile sind dagegen keine Ersatzteile. Verbrauchsmaterialien sind ebenfalls für
7 Jahre ab Produktionseinstellung erhältlich.
8
Zur Aufrechterhaltung der Konformität mit den EMC-Richtlinien muss das
Gerät mit abgeschirmten Schnittstellenkabeln verwendet werden.
Informationen zum Laser
Wellenlänge
Impulsdauer 12,88 µs ±12,88 ns/7 mm
Ausgangsleistung Max. 0,2 mW
In der Produktionslinie ist die Ausgangsleistung der Scannereinheit auf 0,18
MILLIWATT PLUS 5% eingestellt und wird durch eine automatische
Stromversorgungssteuerung (Automatic Power Control, APC) konstant
gehalten.
Warnhinweis
Nehmen Sie keine Überprüfungen, Einstellungen oder Maßnahmen vor, die in
diesem Handbuch nicht beschrieben sind, da Sie sich anderenfalls
gefährlichen Strahlungen aussetzen könnten.
Dieses digitale Gerät ist ein LASERPRODUKT der KLASSE 1 (IEC 60825-1
Edition 1.2-2001)
Dieses Produkt ist ausschließlich für die kommerzielle Nutzung konzipiert und
fällt daher nicht unter die Verordnung (EG) 1275/2008, mit der die Richtlinie
2005/32/EC des Europäischen Parlaments und des Rates über die
Ökodesign-Anforderungen für den Stromverbrauch im Standby- und
ausgeschalteten Zustand umgesetzt wird. Sharp empfiehlt das Produkt nicht
zur Verwendung in Privathaushalten und ist für eine solche Verwendung nicht
haftbar zu machen.
Produkte, die die ENERGY-STAR®-Richtlinie erfüllen, tragen das oben
abgebildete Logo.
Produkte ohne das Logo erfüllen die ENERGY-STAR
nicht.
SOFTWARE-LIZENZ
Die SOFTWARE-LIZENZ wird angezeigt, wenn Sie die Software von der CDROM installieren. Wenn Sie die gesamte oder einen Teil der Software auf der CDROM oder in dem Gerät verwenden, stimmen Sie den Bedingungen der
SOFTWARE-LIZENZ zu.
Anerkannte Warenzeichen
•Microsoft®, Windows®, Windows® 2000, Windows® XP, Windows Vista® und
Internet Explorer
Microsoft Corporation in den USA und in anderen Ländern.
®
, das Adobe®-Logo, Acrobat®, das Adobe®-PDF-Logo und ReaderTM
• Adobe
sind eingetragene Warenzeichen oder Warenzeichen von Adobe Systems
Incorporated in den USA und in anderen Ländern.
• IBM, PC/AT und PowerPC sind Warenzeichen der International Business
Machines Corporation.
• Sharpdesk ist ein Warenzeichen der Sharp Corporation.
• Alle anderen Warenzeichen und Urheberrechte sind das Eigentum ihrer
jeweiligen Inhaber.
Erstellen Sie keine Kopien von Originalen, deren Vervielfältigung gesetzlich
verboten ist. Das Kopieren der folgenden Originale ist in der Regel durch
nationale Gesetze verboten. Das Kopieren weiterer Originale kann durch
örtlich geltende Gesetze verboten sein.
Geld Briefmarken Wertpapiere Aktien
Bankwechsel Schecks Pässe Führerscheine
Emissionsdichte (Messung gemäß RAL-UZ 122: Ausgabe Juni
2006)
Gemessene
Chemikalien
Ozon
Staub Schwarzweiß max. 4,0 mg/h
Styrol Schwar zweiß max. 1,0 mg/h
Benzol Schwar zweiß max. 0,05 mg/h
TVOC
780 nm+15 nm
-10 nm
®
Mit dem ENERGY STAR
sich durch ein besonders energiesparendes Design aus und
schützen die Umwelt.
®
sind eingetragene Warenzeichen oder Warenzeichen der
Zustand des
Kopierers
Wenn der Kopierer in
Betrieb ist
Wenn der Kopierer im
Standby-Modus ist
ausgezeichnete Produkte zeichnen
®
-Richtlinie möglicherweise
Modus Diffusionsgeschwindigkeit
Schwarzweiß max. 1,5 mg/h
Schwarzweiß max. 10 mg/h
-
max. 2,0 mg/h
Page 11

MODELE : MX-B200
Remarque
1
2
3
4 - 5
Obturateur
Ruban de protection du toner
Attention
Avertissement
ON (Marche)
Attention
CD-ROM Guide d’utilisation
Manual French
Fichier Guide
d’utilisation (PDF)
* Pour visualiser le Guide d’utilisation au format
PDF, Adobe
®
Reader® ou Acrobat® Reader®
d’Adobe Systems Incorporated est nécessaire.
Vous pouvez télécharger Adobe
®
Reader® à
l’adresse suivante :
http://www.adobe.com/
SYSTEME MULTIFONCTIONS NUMERIQUE
GUIDE DE DEMARRAGE
Ce guide détaille la procédure d'installation de la machine, et souligne certains points importants relatifs à l'installation et à l'utilisation. Veuillez lire
ce guide pour assurer une installation correcte de l'appareil. Le Mode d'emploi de l'appareil se trouve sur le CD-ROM fourni. La procédure
concernant la visualisation de ce mode d'emploi est détaillée à la section "4. INFORMATIONS RELATIVES AU MODE D'EMPLOI". Après
l'installation, lisez le Mode d'emploi pour tirer pleinement parti des fonctions de l'appareil.
1. CHARGEMENT DU PAPIER
Soulevez la poignée du magasin et
1
tirez la cassette jusqu'à l'amener en
butée.
Appuyez sur le levier du guide papier (A) et
2
faites glisser le guide en fonction de la largeur
du papier. Déplacez le guide papier (B) jusqu'à
l'emplacement approprié, comme indiqué sur
le magasin.
Déramez le papier et insérez-le dans le
3
magasin. Assurez-vous que les bords passent
sous les crochets dans les coins.
(B)
Poussez doucement le magasin d'alimentation papier dans l'appareil.
4
• Vérifiez que le papier n'est pas déchiré, taché, plié, ni corné.
• Vérifiez que toutes les feuilles de la pile sont du même format et du même type.
• Lorsque vous chargez le papier, vérifiez qu'il n'y pas d'espace entre les feuilles
et le guide-papier, et à l'inverse, que ce dernier n'est pas placé trop près des
feuilles et ne les tord pas. Si vous chargez le papier ainsi, les documents
seront copiés de travers ou un bourrage papier pourrait survenir.
2. INSTALLATION DE LA CARTOUCHE DE TONER
Ouvrez le plateau d'alimentation
1
auxiliaire multiple, puis la porte
latérale.
Insérez délicatement la cartouche de toner
4
jusqu'à ce qu'elle s'enclenche.
Poussez doucement sur les
2
deux côtés de la porte avant
pour l'ouvrir.
Retirez l'étiquette de
5
l'obturateur.
7
(A)
Saisissez la cartouche par ses deux extrémités et secouez-la à
3
l'horizontale quatre ou cinq fois. Après avoir secoué la cartouche,
retirez le ruban de protection du toner.
Fermez la porte avant, puis la porte latérale en appuyant
6
sur les zones arrondies situées à côté du bouton
d'ouverture de la porte latérale.
Veillez à refermer correctement la porte avant, puis
fermez la porte latérale. Si vous fermez les portes
dans l'ordre inverse, vous risquez de les
endommager.
9
Page 12

3. CONNEXION DU CORDON D'ALIMENTATION / MISE SOUS TENSION
Avertissement
ON (Marche)
Attention
CD-ROM Guide d’utilisation
Manual French
Fichier Guide
d’utilisation (PDF)
* Pour visualiser le Guide d’utilisation au format
PDF, Adobe
®
Reader® ou Acrobat® Reader®
d’Adobe Systems Incorporated est nécessaire.
Vous pouvez télécharger Adobe
®
Reader® à
l’adresse suivante :
http://www.adobe.com/
Si vous utilisez l'appareil dans un pays autre que celui où vous l'avez acheté, vous devez vous assurer que l'alimentation électrique locale est
compatible avec votre modèle. Si vous branchez votre appareil sur une alimentation électrique non compatible, vous risquez de l'endommager
de manière irréversible.
Assurez-vous que l'interrupteur de
1
mise sous tension de l'appareil est
en position OFF.
OFF (Arrêt)
À propos de la tête de scanner
La lampe de la tête de scanner reste allumée tant que l'appareil est prêt à fonctionner (témoin de démarrage ( ) allumé).
L'appareil règle régulièrement la lampe de la tête de scanner afin de garantir la qualité de reproduction. La tête du scanner se déplace alors
automatiquement. Il s'agit d'une procédure normale, qui n'indique en aucun cas une défaillance de l'appareil.
Insérez le cordon d'alimentation fourni dans la
2
prise prévue à cet effet, située à l'arrière de
l'appareil.
Branchez l'autre extrémité du cordon
d'alimentation dans la prise murale la plus proche.
• Branchez le cordon d'alimentation
uniquement sur une prise de courant
murale correctement reliée la terre.
• N'utilisez pas de rallonges ou de
multiprises.
Mettez l'interrupteur de mise sous tension
3
sur le côté gauche de l'appareil en position
ON.
4. INFORMATIONS RELATIVES AU MODE D'EMPLOI
La description détaillée des fonctions pouvant être utilisées sur cette machine figure dans le Mode d'emploi au format PDF.
Insérez le CD-ROM fourni dans le
1
lecteur de votre ordinateur.
Vous pouvez obtenir un mode d'emploi en version papier auprès de votre revendeur SHARP ou sur demande auprès de SHARP.
SHARP Manufacturing France - Customer Documentation Department
Route de Bollwiller
68 360 SOULTZ - FRANCE
ou par fax au (+33) 3.89.74.87.78
Veuillez indiquer le modèle, le numéro de série de l'appareil ainsi que la langue souhaitée. N'oubliez pas d'ajouter votre nom et votre adresse.
Affichez le contenu du CD-ROM, et ouvrez le
2
fichier Mode d'emploi.
10
Page 13

CARACTERISTIQUES
Remarque
20 cm
10 cm
10 cm
Modèle MX-B200
Type Système multifonction numérique de bureau
Système de copie / imprimante Transfert électrostatique à sec
Originaux Feuilles, documents reliés
Fonction imprimante Disponible
Fonction de numérisation Disponible
Magasin d'alimentation papier 250 feuilles
Plateau d'alimentation auxiliaire
multiple
Bac de sortie papier 200 feuilles*
Formats
d'originaux
Alimentation
des originaux
Dimensions de copie/
d'impression
Perte d'image
Vitesse de copie 20 pages/min. (A4)
Vitesse d'impression *
Copie en continu 99 copies max. ; compteur soustractif
Première copie*
(Environ)
Temps de préchauffage*
(Environ)
Taux de
reproduction
Système
d'exposition
Système de fixation Rouleaux chauffants
Système de développement Développement par brosse magnétique
Source lumineuse Lampe fluorescente à cathode froide
Résolution
Nuances
Profondeur 1 ou 8 bits/pixel
Capteur CCD Couleur
Vitesse de numérisation Max. 2,88 ms/ligne
Mémoire 32 Mo
Alimentation électrique
Consommation élec trique Max.1,0 kW
Dimensions
globales
Poids (approximatif) *
Dimensions de
l'appareil
Conditions d'utilisation
Emulation
Port d'interface Interface USB (USB 2.0 Haut débit)
Vitre
d'exposition/
SPF
Vitre
d'exposition
SPF Jusqu'à 50 feuilles
6
Vitre
d'exposition
SPF
Vitre
d'exposition
SPF Déplacement de l'original
Copieur
Imprimante 600 ppp
Scanner 600 x 600 ppp
Numérisation 256 niveaux
Sortie 2 niveaux
Longueur 802 mm
Largeur 44 5 mm
8
Longueur 518 mm
Largeur 44 5 mm
Hauteur 298 mm
50 feuilles
1
Max. A4
1 feuille
2
A6 à A4 *
3
Max. 4 mm *
Max. 4,5 mm*
5
20 pages/min. (A4)
8,0 secondes (lorsque le programme utilisateur 24 est
désactivé)
10,7 secondes (lorsque le programme utilisateur 24
est activé)
7
-
Variable : 25% à 400% par incréments de 1 %
Fixe : 50 %, 70 %, 86 %, 100 %, 141 %,
Variable : 50 % à 200 % par incréments de 1 %
Fixe : 50 %, 70 %, 86 %, 100 %, 141 %,
Exposition par fente avec déplacement de la
source optique (vitre d'exposition fixe ), fonction
d'exposition automatique
600 x 300 ppp (mode Auto/Manuel)
600 x 600 ppp (mode Photo)
Tension locale ±10 % (L'alimentatio n électrique
requise par l'appareil est indiquée sur la plaque
signalétique située à l'arrière de l'appareil.)
15,9 kg
Température : 10°C à 30°C
Humidité : 20 % à 85 %
SHARP SPLC
(Langage d'imprimante Sharp compressé)
4
(376 pas au total)
200 %
(151 pas au total)
200 %
Niveau de puissance sonore LwAd
Mode copie : 6,4 B
Mode veille : 3,5 B
Niveau de pression acoustique LpAm (référence) (à
proximité)
Mode copie : 47 dB
Niveau sonore
*1 Lorsque le format A4 est utilisé et selon les conditions d'utilisation.
*2 Introduisez le papier dans le sens de la longueur uniquement.
*3 Bords avant et arrière.
*4 Sur les bords latéraux, au total.
*5 Vitesse pour l'impression de la deuxième page et des pages suivantes
sur papier A4 ordinaire à partir du magasin 1, et dans le cas d'une
impression recto continue de la même page.
*6 Le temps de sortie de la première page peut varier en fonction de l'état
de l'appareil.
*7 Temps de préchauffage variable selon les environnements.
*8 N'inclut pas la cartouche de toner
Mode veille : 19 dB
Niveau de pressio n acoustique LpAm (référence) (position
de l'opérateur)
Mode copie : 52 dB
Mode veille : 19 dB
Mesure des émissions sonores selon la norme
ISO 7779.
Equipement en option
Chargeur automatique de documents (MX-SP10)
2
Originaux
admissibles
Alimentation
électrique
Grammage : 56 g/m
Format : A5 à A4
Capacité : Jusqu'à 50 feuilles
Tirée de l'appareil.
à 90 g/m
2
Poids (approximatif) 2,3 kg
Dimensions 496 mm (L)x 359 mm (l) x 89 mm (H)
Magasin papier de 250 feuilles (MX-CS10)
Format du papier A5 à A4
Grammage 56 g/m2 à 80 g/m
Capacité papier
Un magasin d'alimentation avec une capacité
de 250 feuilles de 80 g/m
Poids 3,0 kg
Dimensions 498 mm (L)x 445 mm (l) x 87 mm (H)
Alimentation
électrique
Dans le cadre de la politique d'amélioration continue de la
société, SHARP se réserve le droit de procéder à des
modifications de la conception et des spécifications visant à
améliorer le produit, et ce sans préavis. Les spécifications et
performances indiquées correspondent aux valeurs nominales.
Elles peuvent être légèrement différentes selon les appareils.
Tirée de l'appareil.
2
2
11
Page 14

AVERTISSEMENTS
20 cm
10 cm
10 cm
Dans certains cas, les positions marche "ON" et arrêt "OFF" de l'interrupteur
d'alimentation sont remplacées par les symboles "I" et "O". Si tel est le cas
sur votre appareil, lire "I" pour "on" et "O" pour"OFF".
ATTENTION !
Pour mettre l'appareil complètement hors tension, débranchez la
prise principale. Utilisez une prise de courant située à proximité
de l'appareil et facilement accessible.
Chaque instruction couvre aussi les unités en option utilisées avec ce produit.
Etiquette d'avertissement sur l'appareil
Le pictogramme ( , ) dans l'unité de fixation de l'appareil indique les
éléments suivants :
: Attention, danger potentiel
: Attention, surface chaude
Précautions d'utilisation
Veuillez respecter les mises en garde ci-dessous lors de l'utilisation de cet
appareil.
Avertissement :
• L'unité de fixation dégage de la chaleur. Faites très attention lorsque vous
retirez du papier mal engagé de cette zone.
• Ne regardez jamais directement la so urce de lumière, cela pourrait abîmer vos
yeux.
Attention :
• Installez l'appareil sur une surface stable et horizontale.
• N'installez pas l'appareil dans un endroit humide ou poussiéreux.
• Si vous n'utilisez pas l'appareil pendant une période prolongée, mettez-le hors
tension et débranchez le cordon d'alimentation.
• Avant de déplacer l'appareil, vérifiez que l'interrupteur de mise sous tension est
en position d'arrêt et que le cordon d'alimentation est débranché de la prise
électrique.
• Evitez d'allumer et d'éteindre rapidement l'appareil. Une fois l'appareil hors
tension, attendez 10 à 15 secondes pour le remettre sous tension.
• Ne recouvrez pas l'appareil d'un couvercle anti-poussière, d'un drap ou un d'un
film plastique lorsqu'il est sous tension. Cela pourrait empêcher l'évacuation de
la chaleur et endommager l'appareil.
• L'utilisation de commandes, de réglages ou de procédures autres que ceux
mentionnés dans ce guide peut entraîner une exposition dangereuse aux
rayonnements.
• Utilisez une prise de courant située à proximité de l'appareil et facilement
accessible.
Points importants à prendre en compte pour le choix du
site d'installation
N'installez pas cet appareil dans des endroits :
• humides ou très poussiéreux
• exposés au rayonnement direct du soleil
•peu aérés
• soumis à de fortes variations de température ou d'humidité, par exemple à
proximité d'un climatiseur ou d'un appareil de chauffage.
Veillez à laisser un espace suffisant autour de l'appareil afin de permettre
un accès facile et une bonne ventilation.
Précautions relatives à la
manutention
Manipulez l'appareil avec précaution,
de la manière indiquée ci-dessous,
afin de garantir des performances
optimales.
Evitez de faire tomber l'appareil ou de le cogner contre un autre objet.
Stockez les cartouches de toner dans un endroit frais et sec, et ne les
sortez pas de leur emballage avant utilisation.
• Si les cartouches sont exposées à la lumière directe du soleil ou à une chaleur
excessive, la qualité de la copie pourra s'en ressentir.
Ne touchez pas le tambour photoconducteur (partie verte).
• Si la cartouche est endommagée, les copies réalisées ne seront pas propres.
Stockage correct
Stockez les fournitures dans un endroit :
• propre et sec,
• dont la température est stable,
• non exposé au rayonnement direct du soleil.
Stockez le papier à plat dans son emballage.
• Si vous ne conservez pas le papier dans son emballage ou si vous le placez à
la verticale, il pourrait se courber ou devenir humide, ce qui provoquerait des
bourrages.
ATTENTION :
N'installez pas l'appareil dans un endroit mal ventilé.
L'impression entraîne la génération d'une petite quantité d'ozone à l'intérieur de
l'appareil. La quantité d'ozone générée n'est pas suffisante pour être nocive ;
une odeur désagréable peut toutefois être dégagée lors des travaux de copie
volumineux, raison pour laquelle l'appareil doit être installé dans une pièce
équipée d'un système de ventilation ou de fenêtres permettant une circulation
suffisante de l'air. (L'odeur peut éventuellement provoquer des maux de tête.)
* Installez l'appareil de sorte que les utilisateurs ne soient pas directement
exposés aux dégagements éventuels. Si l'appareil est installé à côté d'une
fenêtre, veillez à ce qu'il ne soit pas exposé au rayonnement direct du soleil.
Approvisionnement et consommables
La fourniture de pièces détachées pour la réparation de l'appareil est garantie
pendant au moins 7 ans après la fin de la fabrication. Les pièces détachées
sont les pièces de l’appareil qui risquent de se casser au cours de l’utilisation
normale du produit, tandis que les pièces qui dépassent normalement la durée
de vie du produit ne doivent pas être considérées comme des pièces
détachées. Les consommables sont également commercialisés pendant 7
années après l'arrêt de la fabrication.
12
Afin de respecter la réglementation sur la compatibilité électromagnétique
(EMC), il est recommandé d'utiliser des câbles d'interface blindés.
Informations relatives au laser
Longueur d'onde
Impulsions 12,88 µs ± 12,88 ns /7 mm
Puissance de sortie 0,2 mW maxi
En production, la puissance de sortie du scanner est réglée sur 0,18
MILLIWATT PLUS 5 %. Elle est maintenue constante grâce au contrôle
automatique de puissance (APC).
Attention
L'utilisation de commandes, de réglages ou de procédures autres que ceux
mentionnés dans ce guide peut entraîner une exposition dangereuse aux
rayonnements.
Cet équipement numérique est un APPAREIL LASER DE CLASSE 1 (IEC
60825-1 Edition 1.2-2001)
Ce produit a été conçu pour une application commerciale uniquement, et de ce
fait, n'entre pas dans le champ d'application de la réglementation (EC) 1275/
2008 de la directive européenne 2005/32/EC relative au exigences en matière
d'écoconception applicables à la consommation d'énergie à l'arrêt et en veille.
Sharp ne recommande pas ce produit pour une application domestique, et
n'endossera aucune responsabilité dans le cadre d'une telle application.
Les produits conformes aux directives ENERGY STAR® portent le logo indiqué cidessus.
Les produits ne portant pas ce logo peuvent ne pas être conformes aux directives
ENERGY STAR
LICENCE DU LOGICIEL
La LICENCE du LOGICIEL apparaîtra lorsque vous installerez le logiciel à partir
du CD-ROM. En utilisant tout ou partie du logiciel sur le CD-ROM ou dans
l'appareil, vous acceptez d'être lié par les termes de la LICENCE du LOGICIEL.
Marques déposées
•Microsoft®, Windows®, Windows® 2000, Windows® XP, Windows Vista® et
Internet Explorer® sont des marques commerciales ou des marques déposées
de Microsoft Corporation aux Etats-Unis et dans d'autres pays.
®
, le logo Adobe®, Acrobat®, le logo Adobe® PDF et ReaderTM sont des
• Adobe
marques déposées ou des marques commerciales d'Adobe Systems
Incorporated aux Etats-Unis et dans d'autres pays.
• IBM, PC/AT et PowerPC sont des marques d'International Business Machines
Corporation.
• Sharpdesk est une marque déposée de Sharp Corporation.
• Les autres marques déposées et copyrights sont la propriété de leurs
détenteurs respectifs.
Ne réalisez pas de copies de documents dont la reproduction est
interdite par la loi. La reproduction des éléments suivants est
normalement interdite par une loi nationale. La reproduction d'autres
documents peut également être interdite par une loi locale.
Billets de banque Timbres Obligations Actions
Traites bancaires Chèques Passeports Permis de conduire
Concentration des émissions (mesures conformes à la norme
RAL-UZ 122 : Edition Juin 2006)
Emissions
chimiques
Ozone
Poussière Noir et blanc 4 mg/h ou moins
Styrène Noir et blanc 1 mg/h ou moins
Benzène Noir et blanc 0,05 mg/h ou moins
COVT
780 nm+15 nm
- 10 nm
®
Les produits labellisés ENERGY STAR
protéger l'environnement par un rendement énergétique
supérieur.
®
.
Statut de
l'appareil
En marche
En veille - 2 mg/h ou moins
Mode Vitesse de diffusion
Noir et blanc 1,5 mg/h ou moins
Noir et blanc 10 mg/h ou moins
sont conçus pour
Page 15

MODEL:MX-B200
Opmerking
1
2
3
4 - 5
Sluiter
Tonerzegel
Attentie
Attentie
Cd-rom met Gebruikershandleiding
* Om de Gebruikersgids in PDF-formaat te
bekijken is Adobe
®
Reader® of Acrobat®
Reader
®
van Adobe Systems Incorporated
vereist. Adobe
®
Reader® kan gedownload
worden via
http://www.adobe.com/
DIGITAAL MULTIFUNCTIONEEL SYSTEEM
STARTERSGIDS
Deze gids biedt meer informatie over de installatie van de machine en bevat belangrijke aandachtspunten voor installatie en gebruik. Lees en
begrijp deze gids om te verzekeren dat u de machine juist installeert. De Gebruikersgids voor de machine bevindt zich op de meegeleverde CDROM. De procedure om de gids te raadplegen vindt u in het deel "4. GEBRUIK VAN DE GEBRUIKERSGIDS". Na installatie, lees de Gebr uikersgids
zodat u de mogelijkheden van de machine optimaal kunt benutten.
1. HET LADEN VAN PAPIER
Til het handvat van de papierlade
1
omhoog en trek de papierlade zo ver
mogelijk naar buiten.
Knijp de hefboom van de papiergeleider (A) in
2
en pas de geleider aan de breedte van het
papier aan. Beweeg de papiergeleider (B)
naar de betreffende gleuf zoals op de lade is
gemarkeerd.
Waaier het papier en plaats het in de lade.
3
Zorg ervoor dat de randen onder de hoeken
zitten.
(B)
Schuif de papierlade weer voorzichtig in het apparaat.
4
• Zorg dat het papier vrij is van scheuren, stof, kreukels en omgekrulde of
gevouwen hoeken.
• Controleer of het papier in de papierstapel van het zelfde soort en formaat is.
• Zorg bij het laden van papier, dat er geen ruimte tussen het papier en de
papiergeleider is en dat de papiergeleider niet te nauw is ingesteld zodat het
papier niet buigt. Anders zullen er papierstoringen ontstaan.
2. INSTALLATIE VAN DE TONERCARTRIDGE
Open de handinvoer en vervolgens
1
de zijklep.
Voer de tonercartridge zachtjes in tot deze
4
in positie klikt.
Druk voorzichtig op de beide
2
uiteinden van de voorplaat en
open deze.
Verwijder de tape van de sluiter.
5
7
(A)
Pak de cartridge bij de uiteinden vast en schud deze 4 of 5 keer in
3
horizontale richting. Verwijder daarna de tonerdichting.
Sluit de zijklep door op de ronde uitsteeksels bij de
6
opentoets van de zijklep te drukken.
Wanneer u de kleppen sluit, zorg ervoor dat de
voorzijdeklep goed gesloten is en sluit dan de zijklep.
Indien de kleppen in de verkeerde volgorde gesloten
worden, kunnen deze beschadigd worden.
13
Page 16

3. HET AANSLUITEN VAN HET NETSNOER / HET APPARAAT INSCHAKELEN
Waarschuwing
Attentie
Cd-rom met Gebruikershandleiding
* Om de Gebruikersgids in PDF-formaat te
bekijken is Adobe
®
Reader® of Acrobat®
Reader
®
van Adobe Systems Incorporated
vereist. Adobe
®
Reader® kan gedownload
worden via
http://www.adobe.com/
Indien u het land waar u het toestel gebruikt verschilt van het land van aankoop, moet u ervoor zorgen dat de plaatselijke netspanning
compatibel is met uw model. Indien u het toestel aansluit op een onjuiste netspanning, zal het toestel onherstelbare schade oplopen.
Zorg ervoor dat de stroomschakelaar
1
van het toestel zich in de positie
"OFF" (UIT) bevindt.
UIT AAN
Over de scanunit
De lamp van de scanunit is voortdurend ingeschakeld wanneer het toestel zich in de "klaar"-status bevindt (wanneer de start ( )indicatie brandt).
Het toestel past de lamp van de scanunit regelmatig aan om de kopieerkwaliteit te behouden. Op dat ogenblik beweegt de scanunit automatisch. Dit is
normaal en duidt niet op een storing.
Voer het netsnoer in de netsnoerplug in aan de
2
achterzijde van het toestel.
Steek het andere einde van het netsnoer in het
dichtstbijzijnde stopcontact.
• Sluit het netsnoer enkel aan op een geaard
stopcontact.
• Gebruik geen verlengsnoeren of
stekkerdozen.
Schakel de stroomschakelaar aan de
3
linkerzijde van het toestel in de positie "ON"
(AAN).
4. GEBRUIK VAN DE GEBRUIKERSGIDS
Een uitgebreide verduidelijking van de functies van de machine staan beschreven in de Gebruikersgids in PDF-formaat.
Plaats de CD-ROM in de CD-ROM-
1
drive van uw computer.
Een gedrukte versie van de gebruikersgids is beschikbaar bij uw erkende SHARP-dealer of op verzoek door contactname met SHARP.
SHARP Manufacturing France - Customer Documentation Department
Route de Bollwiller
68 360 SOULTZ - FRANKRIJK
of per fax (+33) 3.89.74.87.78
Vermeld de naam van het model, het serienummer van de machine en de vereiste taal. Vergeet niet uw naam en adres te vermelden.
Geef de inhoud van de CD-ROM weer en open
2
het bestand Gebruikersgids.
Bestand met
Manual Dutch
Gebruikershandleiding (PDF)
14
Page 17

SPECIFICATIES
Opmerking
20 cm
10 cm
10 cm
Model MX-B200
Type Digitaal multifunctioneel systeem, desktoptype
Kopieer-/printersysteem Droge elektrostatische transfer
Originelen Bladen, gebonden documenten
Printerfunctie Beschikbaar
Scannerfunctie Beschikbaar
Papierlade 250 vel
Handinvoerlade 50 vel
Papieruitvoerlade 200 vel*
Origineel-
Glasplaat/SPF Max. A4
formaten
Glasplaat 1 vel
Origineleninvoer
SPF Tot 50 vellen
Kopieer-/afdrukformaat A6 tot A4 *
Beeldverlies
Kopieersnelheid 20 pagina's/min. (A4)
Afdruksnelheid *
Continu Kopie modus Max. 99 pagina's; aflopende teller
Duurtijd voor eerste
kopie*
(Ongeveer)
Opwarmtijd*
(Ongeveer)
Kopieerfactor
Belichtings
systeem
Fuseersysteem Verwarmings rollen
Ontwikkelingsysteem Magnetische borstel ontwikkeling
Lichtbron Koude katode fluoresceren d licht
Resolutie
Gradatie
Bitdiepte 1 bit of 8 bits/pixel
Sensor Kleur CCD
Scansnelheid Max. 2,88 ms/lijn
Geheugen 32 MB
Stroomvoeding
Stroomverbruik Max. 1.0 kW
Totale afmetingen
Gewicht (bij benadering) *815.9 kg
Afmeringen
van het toestel
Bedrijfscondities
Emulatie
Interfacepoort USB-interface (USB 2.0 Hi Speed)
5
6
7
Glasplaat
SPF
Glasplaat
SPF Bewegend origineel
Kopieermachine
Printer 600 dpi
Scanner 600 x 600 dpi
Scannen 256 niveaus
Uitvoer 2 niveaus
Breedte 802 mm
Diepte 445 mm
Breedte 518 mm
Diepte 445 mm
Hoogte 298 mm
1
2
3
Max. 4 mm *
Max. 4,5 mm*
20 pagina's/min. (A4)
8.0 seconden (Wanneer gebruikersprogramma 24 is ingesteld
op OFF)
10.7 seconden (Wanneer gebruikersprogramma 24 is ingesteld op OFF)
-
Variabel: 25% tot 400% in stappen van 1%
Vast: 50%, 70%, 86%, 100%, 141%, 200%
Variabel: 50% tot 200% in stappen van 1%
Vast: 50%, 70%, 86%, 100%, 141%, 200%
Bewegende optische bron, glijdende belichting (vaste
kant) met automatische belichtingsfunctie
600 x 300 dpi (Auto/Manuele mo dus)
600 x 600 dpi (Foto-modus)
Lokaal voltage ±10% (zie de naamplaat achterop de
kopieermachine voor de stroomtoevoereisen.)
Temperatuur: 10°C tot 30°C
Luchtvochtigheid: 20% tot 85%
SHARP SPLC
(Sharp Printer Language with Compression)
4
(totaal 376 stappen)
(totaal 151 stappen)
Geluidsniveau LwAd
Kopiëren: 6,4 B
Standby-modus: 3,5 B
Geluidsdrukniveau LpAm (referentie) (plaats van de omstanders)
Geluidsniveau
*1 Bij gebruik van gewoon A4-papier onder normale
bedrijfsomstandigheden.
*2 Papiertoevoer alleen in de lengte.
*3 Boven- en onderrand.
*4 Langs de randen in totaal.
*5 Afdruksnelheid tijdens het afdrukken van het tweede en de volgende
vellen bij gebruik van gewoon A4-papier in lade 1 en bij continu
enkelzijdig afdrukken van dezelfde pagina.
*6 Tijdsduur voor eerste kopie kan verschillen afhankelijk van de status van
de machine.
*7 Opwarmtijd kan verschillen afhankelijk van bepaalde omgevingsfactoren.
*8 (exclusief tonercartridge).
Kopiëren: 47 dB
Standby-modus: 19 dB
Geluidsdrukniveau LpAm (referentie) (plaats van de gebruiker)
Kopiëren: 52 dB
Standby-modus: 19 dB
Meting van geluidsemissie conform ISO7779.
Randapparatuur
Eenmalig doorvoerende origineelinvoer (MX-SP10)
Geschikte originelen
Gewicht: 56 g/m2 tot 90 g/m
Formaat: A5 tot A4
Capaciteit: Tot 50 vellen
Stroomvoeding Afgenomen van de machine.
Gewicht (Ongeveer) 2,3 kg
Afmetingen 496 mm (B) x 359 mm (D) x 89 mm (H)
2
Invoereenheid voor 250 bladen (MX-CS10)
Papierformaat A5 tot A4
Papiergewicht 56 g/m2 tot 80 g/m
Papiercapaciteit
Een papierlade voor 250 vellen van 80 g/m
papier
Gewicht 3,0 kg
Afmetingen 498 mm (B) x 445 mm (D) x 87 mm (H)
Stroomvoeding Afgenomen van de machine.
Als onderdeel van ons streven naar continue verbetering van
onze producten, behoudt SHARP het recht voor wijzigingen in
ontwerp en technische gegevens aan te brengen zonder
aankondiging vooraf. De vermelde gegevens over het
vermogen zijn nominale waarden van productieapparaten. Bij
individuele apparaten kunnen er afwijkingen van deze waarden
optreden.
2
2
15
Page 18

WAARSCHUWINGEN
20 cm
10 cm
10 cm
In bepaalde gebieden is zijn de posities van de "POWER"-schakelaar
aangeduid als "I" en "O" i.p.v. "On" en "OFF".
In dit geval is "I" AAN en "O" UIT.
Opgelet !
Voor een volledige uitschakeling, schakel de hoofdzekering uit.
Het stopcontact moet zich naast het apparaat bevinden en goed
toegankelijk zijn.
Elke instructie geldt ook voor de optionele uitrusting die bij deze producten
wordt gebruikt.
Waarschuwingslabel op het toestel
Het label ( , ) in de heatereenheid van het apparaat geeft het
volgende aan:
: Opgelet, potentieel gevaar
: Opgelet, warm oppervlak
Waarschuwingen voor gebruik
Volg de waarschuwingen op bij gebruik van dit toestel.
Waarschuwing:
• Het gebied van de heater is heet. Wees voorzichtig in dit gebied bij het
verwijderen van vastgelopen papier.
• Kijk niet direct in een lichtbron. Anders kunt u uw ogen beschadigen.
Opgelet:
• Plaats het apparaat op een stevige vlakke ondergrond.
• Installeer het apparaat niet op een vochtige of stoffige plaats.
• Wanneer het apparaat langere tijd niet wordt gebruikt, bijvoorbeeld tijdens lange
vakantieperiodes, moet u de stroom uitschakelen en het netsnoer uit het
stopcontact halen.
• Wanneer u het kopieerapparaat verplaatst, dient u de aan-/uitschakelaar uit te
zetten en de stekker uit het stopcontact te trekken.
• Zet het apparaat niet snel na elkaar aan en uit. Wacht 10 tot 15 seconden na
het uitschakelen van het apparaat voordat u het weer inschakelt.
• Bedek het apparaat niet met een stofkap, kleed of plasticfolie terwijl de stroom
ingeschakeld is. Anders wordt de warmte-uitstraling verhindert, waardoor het
apparaat beschadigd kan worden.
• Andere besturingen, aanpassingen, gebruik of procedures dan beschreven in
deze handleiding kunnen leiden tot gevaarlijke blootstelling aan straling.
• De contactdoos moet in de nabijheid van de apparatuur geïnstalleerd zijn en
eenvoudig toegankelijk zijn.
Belangrijke punten bij de keuze van een
opstellingsplaats
Installeer de kopieermachine niet op plaatsen die:
• vochtig, nat of erg stoffig zijn
• aan direct zonlicht worden blootgesteld
• slecht geventileerd zijn
• onderhevig zijn aan extreme temperatuurwisselingen of veranderingen in de
luchtvochtigheid, zoals in de nabijheid van een airconditioningapparaat of
radiator .
Laat voldoende ruimte open rond
de kopieermachine voor
onderhoud en behoorlijke
ventilatie.
Voorzorgsmaatregelen bij
gebruik
Om de prestaties van het toestel te behouden, let erop dat u het toestel als volgt
behandelt.
Laat het toestel niet vallen, stel het niet bloot aan schokken en botsingen
met andere objecten.
Bewaar reserve tonerpatronen op een koe le droge plaats zonder deze uit de
verpakking te nemen.
• Wanner deze aan direct zonlicht of extreme hitte worden blootgesteld, kan de
kwaliteit van de kopieën gereduceerd worden.
Raak de fotogeleidende drum niet aan (groene gedeelte).
• Krassen of vlekken op de drum veroorzaken slechte kopieën.
Correcte opslag
Bewaar de onderdelen op een plaats, die
• schoon en droog is,
• een stabiele temperatuur heeft
• niet aan direct zonlicht wordt blootgesteld.
Bewaar papier in de verpakking en vlak liggend.
• Papier dat uit de verpakking wordt bewaard, of in een rechtop staande
verpakking kan omkrullen of vochtig worden, waardoor er papierstoringen
kunnen ontstaan.
OPGELET:
Installeer het apparaat niet op een plaats waar de luchtcirculatie slecht is.
Tijdens het afdrukken komt er in het apparaat een kleine hoeveelheid ozon vrij. De
hoeveelheid ozon is onvoldoende om schadelijk te zijn, maar er kan wel een
onaangename geur ontstaan als er veel kopieën na elkaar worden gemaakt;
installeer het apparaat daarom in e en ruimte waar een ventilator of ramen voor
voldoende luchtcirculatie zorgen. (De geur kan in bepaalde gevallen tot hoofdpijn
leiden.)
* Installeer het apparaat zodanig dat personen niet rechtstreeks worden
blootgesteld aan de uitlaat van het apparaat. Als het apparaat dicht bij een raam
staat, moet u voorkomen dat er direct zonlicht op valt.
Toebehoren en verbruiksgoederen
De levering van reserveonderdelen voor reparatie van de machine is gegarandeerd
tot tenminste 7 jaar na beëindiging van de productie. Reserveonderdelen zijn
onderdelen van het apparaat die d efect kunnen raken binnen de termijn van het
normale gebruik van het product. Onderdelen die normaal langer meegaan dan de
levensduur van het product worden niet als reserveonderdelen beschouwd. Ook
verbruiksgoederen zijn gedurende 7 jaar na beëindiging van de productie
beschikbaar.
16
Om aan de EMC-reglementen te voldoen, moet u afgeschermde
interfacekabels bij dit apparaat gebruiken.
Laserinformatie
Golflengte
Impulstijden 12,88 µs ±12,88 ns /7 mm
Uitgangsvermogen Max 0.2 mW
Op de productielijn wordt het uitgangsvermogen van de scannereenheid
aangepast naar 0.18 MILLIWATT PLUS 5% en wordt constant gehouden door
de werking van de automatische faseregeling (APC).
Opgelet
Andere besturingen, aanpassingen, gebruik of procedures dan beschreven in
deze handleiding kunnen leiden tot gevaarlijke blootstelling aan straling.
Dit digitale apparaat is een KLASSE 1 LASERPRODUCT (IEC 60825-1 Editie
1.2-2001)
Dit product is enkel geschikt voor commercieel gebruik en is als dusdanig niet
onderhevig aan Richtlijn (EC) 1275/2008 met implementatie van EU-richtlijn
2005/32/EC inzake eco-designvereisten m.b.t. elektrisch stroomverbruik in
standby- en uit-modus. Sharp adviseert om dit toestel niet te gebruiken voor
huishoudelijke doeleinden en zal voor zulk gebruik geen aansprakelijkheid
aanvaarden.
Producten die aan de ENERGY STAR®-richtlijnen voldoen, zijn voorzien van het
hierboven getoonde logo.
Producten zonder dit logo voldoen mogelijk niet aan de ENERGY STAR
richtlijnen.
SOFTWARELICENTIE
De SOFTWARELICENTIE wordt weergegeven wanneer u de software installeert
vanaf de cd-rom. Wanneer u alle software of een deel van de software op de CDROM of op het apparaat gebruikt, verplicht u zich te houden aan de voorwaarden
van de SOFTWARELICENTIE.
Informatie over handelsmerken
•Microsoft®, Windows®, Windows® 2000, Windows® XP, Windows Vistar®en
Internet Explorer® zijn gedeponeerde handelsmerken of handelsmerken van
Microsoft Corporation in de Verenigde Staten en andere landen.
®
, het Adobe®-logo, Acrobat®, het Adobe® PDF-logo en ReaderTM zijn
• Adobe
gedeponeerde handelsmerken van Adobe Systems Incorporated in de
Verenigde Staten en andere landen.
• IBM, PC/AT en PowerPC zijn handelsmerken van International Business
Machines Corporation.
• Sharpdesk is een handelsmerk van Sharp Corporation.
• Alle overige handelsmerken en auteursrechten behoren toe aan hun
respectieve eigenaren.
Kopieer geen materiaal dat volgens de wet niet gekopieerd mag
worden. De volgende zaken mogen volgens de nationale wetgeving
normaal niet gekopieerd worden. Lokale wetten kunnen andere zaken
verbieden.
Geld Postzegels Aandelen Obligaties
Rekeninguittreksels Cheques Paspoorten Rijbewijzen
Emissieconcentratie (meting conform RAL-UZ 122: Uitgave juni
2006)
Chemische
emissie
Ozon
Stof Zwart-wit 4 ,0 mg/h of minder
Styreen Zwart-wit 1,0 mg/h of minder
Benzeen Zwart-wit 0,05 mg/h of minder
TVOC
780 nm+15 nm
-10 nm
®
Producten die de ENERGY STAR
ontworpen om het milieu te beschermen via superieure
energieefficiency.
Toestand van de
kopieermachine
Wanneer
kopieermachine in
werking is
Wanneer
kopieermachine in
standby is
hebben verkregen zijn
Modus Diffusiesnelheid
Zwart-wit 1 ,5 mg/h of minder
Zwart-wit 10 mg/h of minder
-
2,0 mg/h of minder
®
-
Page 19

MODELO: MX-B200
Nota
1
2
3
4 - 5
Obturador
Precinto del tóner
Precaución
Advertencia
Precaución
CD-ROM de la guía de funcionamiento
* Para ver la guía de funcionamiento en formato
PDF, necesita Adobe
®
Reader® o Acrobat®
Reader
®
de Adobe Systems Incorporated
Puede descargar Adobe
®
Reader® en la
siguiente dirección :
http://www.adobe.com/
COPIADORA LÁSER DIGITAL
GUÍA DE INICIO
En esta guía se explica cómo instalar la copiadora y se resaltan puntos importantes relativos a la instalación y al uso. Lea detenidamente esta guía
para asegurarse de que instala la copiadora correctamente. La guía de funcionamiento se encuentra en el CD-ROM adjunto. El procedimiento para
acceder a la guía se explica en "4. CÓMO UTILIZAR LA GUÍA DE FUNCIONAMIENTO". Después de la instalación, lea la guía de funcionamiento
para informarse sobre todas las funciones que ofrece su copiadora.
1. CARGA DEL PAPEL
Levante el asidero de la bandeja del
1
papel y tire de dicha bandeja hasta
que se detenga.
Comprima la palanca de la guía del papel (A)
2
y deslice la guía para ajustarla a la anchura
del papel. Desplace la guía del papel (B) hasta
la ranura adecuada, como se encuentra
marcado en la bandeja.
Abra el papel en abanico e introdúzcalo en la
3
bandeja. Asegúrese de que los bordes
quedan bajo los ganchos de las esquinas.
(B)
Empuje suavemente la bandeja del papel hacia el interior de la unidad.
4
• Asegúrese de que el papel se encuentra libre de desgarros, polvo, arrugas y
bordes enrollados o doblados.
• Verifique que todo el papel amontonado es del mismo tamaño y tipo.
• Al cargar el papel, asegúrese de que no queda espacio entre el papel y la guía,
y compruebe que dicha guía no se encuentra colocada demasiado apretada,
haciendo que se doble el papel. Cargar el papel de este modo provocará
distorsión en los documentos o atascos del papel.
2. INSTALAR EL CARTUCHO DEL TÓNER
Abra la bandeja de alimentación
1
"bypass" múltiple y, a continuación,
la cubierta lateral.
Introduzca con cuidado el cartucho del
4
tóner hasta que se fije en su lugar.
Tire con cuidado por ambos
2
lados de la cubierta frontal para
abrirla.
Retire la cinta adhesiva del
5
obturador.
(A)
Agarre el cartucho por ambos lados y agítelo horizontalmente cuatro
3
o cinco veces. Después de agitar el cartucho, retire el precinto del
tóner.
Cierre la cubierta frontal y luego la cubierta lateral
6
presionando los salientes redondos situados al lado del
botón de apertura de la cubierta lateral.
7
Al cerrar las cubiertas, asegúrese de que cierra
firmemente la cubierta frontal y, a continuación, la
lateral. Las cubiertas podrían resultar dañadas si se
cierran con un orden inadecuado.
17
Page 20

3. CONEXIÓN DEL CABLE DE ALIMENTACIÓN / ENCENDIDO
Si utiliza la unidad en un país diferente al país en el que se ha realizado la compra, deberá cerciorarse de que el suministro de corriente local es
compatible con su modelo. Si enchufa la unidad a un suministro de alimentación no compatible, podría sufrir daños irreparables.
Advertencia
Asegúrese de que el conmutador de
1
alimentación de la unidad se
encuentra en la posición
).
(Apagado
Acerca de la cabeza de escaneo
La luz de la cabeza de escaneo permanece encendida de forma constante cuando la unidad está preparada (cuando el indicador de inicio ( ) está
iluminado).
La unidad ajusta la luz de la cabeza de escaneo periódicamente, para mantener la calidad del copiado. En ese momento, la cabeza de escaneo se mueve
automáticamente. Esto es normal y no indica ningún problema de la unidad.
OFF
APAGADO
Inserte el cable de alimentación, que se
2
proporciona, en la toma del cable de alimentación
en la parte trasera de la unidad.
Enchufe el otro extremo del cable de alimentación
en la toma más cercana.
• Introduzca el cable de alimentación
exclusivamente en un enchufe con toma de
Precaución
tierra adecuada.
• No utilice cables prolongadores ni regletas
de alimentación.
Sitúe el conmutador de alimentación que se
3
encuentra en el lateral izquierdo de la
unidad, en la posición "ON" (Encendido).
ENCENDIDO
4. CÓMO UTILIZAR LA GUÍA DE FUNCIONAMIENTO
En la guía de funcionamiento en formato PDF se ofrece una descripción detallada de las funciones de la máquina.
Inserte el CD-ROM incluido en la
1
unidad de CD-ROM del ordenador.
CD-ROM de la guía de funcionamiento
Puede obtener un manual de funcionamiento en su distribuidor SHARP autorizado o solicitándolo directamente a SHARP.
SHARP Manufacturing France - Departamento de documentación del cliente
Route de Bollwiller
68 360 SOULTZ - FRANCIA
o por fax (+33) 3.89.74.87.78
Por favor, indique el nombre del modelo, el número de serie y el idioma deseado. No olvide añadir su nombre y dirección.
Visualice el contenido del CD-ROM y abra el
2
archivo Guía de funcionamiento.
Archivo de la guía de
Manual Spanish
funcionamiento (PDF)
* Para ver la guía de funcionamiento en formato
PDF, necesita Adobe
®
de Adobe Systems Incorporated
Reader
Puede descargar Adobe
siguiente dirección :
http://www.adobe.com/
®
Reader® o Acrobat®
®
Reader® en la
18
Page 21

ESPECIFICACIONES
Nota
20 cm
10 cm
10 cm
Modelo MX-B2 00
Tipo Sistema multifuncional digital tipo escritorio
Sistema de copiadora /
impresora
Originales Hojas, documentos encuadernados
Función de impresora Disponible
Función de escáner Disponible
Bandeja de papel 250 hojas
Bandeja de alimentación
"bypass" múltiple
Bandeja de salida del papel 200 hojas*
Tamaños de
original
Alimentación de originales
Tamaño de copia / impresión
Pérdida de imagen
Velocidad de copiado 20 páginas/min. (A4)
Velocidad de impresión *520 páginas/min. (A4)
Copiado continuo Máx. 99 copias; contador sustractivo
Duración de la primera
copia*
(Aproximadamente)
Tiempo de calentamiento*
(Aproximadamente)
Relación de
copia
Sistema de
exposición
Sistema de fusión Rodillos térmicos
Sistema de revelado Revelado del cepillo magnético
Fuente de luz Lámpara fluorescente de cátodo frío
Resolución
Graduación
Profundidad de bit 1 bit u 8 bits/píxel
Sensor CCD color
Velocidad de escaneado Máx. 2,88 ms/línea
Memoria 32 MB
Alimentación
Consumo eléctri co Máx. 1,0 KW
Dimensiones
externas
Peso (aproximado) *
Dimensiones
de la unidad
Condiciones de func ionamiento
Simulación
Puerto de interfaz Interfa z USB interface (USB 2.0 alta v elocidad)
Cristal para
documentos/
SPF
Cristal para
documentos
SPF Hasta 50 hojas
6
Cristal para
documentos
SPF
Cristal para
documentos
SPF Original en movimiento
Copiadora
Impresora 600 dpi
Escáner 600 x 600 dpi
Escanear 256 niveles
Salida 2 niveles
Anchura 802 mm
Profundidad 445 mm
Anchura 518 mm
Profundidad 445 mm
Altura 298 mm
Seca, transferencia electrostática
50 hojas
1
Máx. A4
1 hoja
2
A6 a A4*
3
Máx. 4 mm *
Máx. 4,5 mm *
8,0 segundos cuando el programa de usuario 24 está configurado en OFF.
10,7 segundos cuando el programa de usuario 24 está configurado en ON.
7
-
Variable: 25% a 400% en incrementos del 1%
Fijos: 50%, 70%, 86%, 100%, 141%, 200%
Variable: 50% a 200% en incrementos del 1%
Fijos: 50%, 70%, 86%, 100%, 141%, 200%
Fuente óptica en movimiento, ranura de exposición
(pantalla estacionaria) con exposición a utomática
600 x 300 ppp (modo Automático/Manual)
600 x 600 ppp (Modo Fotografía)
Voltaje local ±10% (Para saber cuále s son los requisitos de la fuente de alimentación de esta máquina,
véase la placa situada en la parte posterior de la
misma.)
8
15,9 kg
Temperatura: del 10°C al 30°C
Humedad: del 20% al 85%
SHARP SPLC
(Lenguaje de impresión Sharp con compresión)
4
(total 376 etapas)
(total 151 etapas)
Nivel de potencia acústica LwAd
Modo de copia: 6,4 B
Modo de espera: 3,5 B
Nivel de presión acústica LpAm (refer encia) (posiciones de los
usuarios)
Modo de copia: 47 dB
Nivel de ruido
*1 Cuando se utiliza papel A4 estándar en las condiciones de
funcionamiento indicadas.
*2 Introduzca siempre el papel longitudinalmente.
*3 Bordes frontal y posterior.
*4 A lo largo de los otros bordes.
*5 Velocidad de impresión al imprimir la segunda hoja y las siguientes con
papel estándar A4 en la bandeja 1 e impresión continua a una cara de la
misma página.
*6 El tiempo que tarda en hacerse la primera copia puede variar en función
del estado de la máquina.
*7 El tiempo de calentamiento puede variar en función del entorno.
*8 Sin incluir el cartucho del tóner.
Modo de espera: 19 dB
Nivel de presión acústica LpAm (referencia) (posición del operador)
Modo de copia: 52 dB
Modo de espera: 19 dB
Registro de las emisiones acústicas conforme a ISO
7779.
Equipamiento opcional
Alimentador automático de documentos (MX-SP10)
Originales aceptables
Gramaje: 56 g/m2 a 90 g/m
Tamaño: A5 a A4
Capacidad: Hasta 50 hojas
Alimentación Obtenida desde la máquina.
Peso (aproximado) 2,3 kg
Dimensiones 496 mm (An) x 359 mm (P) x 89 mm (Al)
2
Unidad de alimentación de papel de 250 hojas (MX-CS10)
Tamaño de papel A5 a A4
Gramaje del papel 56 g/m2 a 80 g/m
Capacidad de papel
Una bandeja de papel con capacidad para 250
hojas de 80 g/m
Gramaje 3,0 kg
Dimensiones 498 mm (An) x 445 mm (P) x 87 mm (Al)
Alimentación Obtenida desde la máquina
Como parte de nuestra política de continuas mejoras, SHARP
se reserva el derecho a realizar modificaciones en el diseño y
en las especificaciones sin previo aviso con el fin de mejorar el
producto. Las especificaciones de rendimiento indicadas
corresponden a valores nominales de las unidades de
producción. En unidades particulares pueden existir
divergencias con estos valores.
2
2
19
Page 22

PRECAUCIONES
20 cm
10 cm
10 cm
En algunas áreas, las posiciones del interruptor de alimentación están
señaladas con "I" y "O" en la copiadora, en lugar de “ON” (encendido)
y “OFF” (apagado). I equivale a ON, y O equivale a OFF.
¡Precaución!
Para una desconexión eléctrica completa, saque el enchufe
principal de la toma. La toma del enchufe debe estar instalada
cerca del equipo y ser de fácil acceso.
Cada instrucción se aplica también a las unidades opcionales utilizadas con
este producto.
Etiqueta de precaución en la unidad
La etiqueta ( , ) adherida al área de fusión de la unidad indica lo
siguiente:
Precaución, posible peligro
: Precaución, superficie caliente
Precauciones de utilización
Siga las medidas de precaución indicadas a continuación para el uso de esta
unidad.
Advertencia:
• La zona de fusión está caliente. Tenga cuidado en esta zona cuando retire el
papel atascado.
• No mire directamente hacia la fuente de luz. Podría sufrir daños en los ojos.
Precaución:
• Coloque la unidad sobre una superficie firme y nivelada.
• No instale la unidad en un lugar húmedo o polvoriento.
• Cuando la unidad lleve tiempo sin utilizarse, por ejemplo, durante unas
vacaciones prolongadas, apague el interruptor de la alimentación y retire el cable
de alimentación de la toma de corriente.
• Para desplazar la unidad, asegúrese de desconectar el interruptor y de
desenchufar el cable de alimentación.
• No pase rápidamente del apagado al encendido de la unidad. Después de
haberla apagado, espere de 10 a 15 segundos antes de volver a ponerla en
marcha.
• No cubra la unidad con una funda anti-polvo, con un paño o con una película
de plástico mientras que la alimentación permanece activada. Ello impide la
radiación del calor, provocando daños en la unidad.
• El uso de controles o ajustes o la ejecución de procedimientos diferentes a los
aquí especificados, podría provocar una exposición peligrosa a radiaciones.
• El enchufe estará instalado cerca del equipamiento y dispondrá de fácil
acceso.
Puntos importantes al seleccionar el lugar de instalación
No instale la unidad en zonas:
• expuestas a la luz directa del sol
• con ventilación pobre
• mal ventiladas
• sujetas a cambios extremos de temperatura o humedad, por ejemplo cerca de
sistemas de aire acondicionado o estufas.
Asegúrese de dejar el espacio
necesario alrededor de la máquina
para cuando se tengan que efectuar
labores de asistencia técnica y para
que el aparato se ventile
correctamente.
Precauciones durante el
manejo
Procure manejar la unidad como se describe seguidamente, para mantener el
rendimiento de ésta.
No deje caer la unidad, no la someta a impactos ni la golpee contra otros
objetos.
Guarde los cartuchos de tóner de repuesto en un lugar frío y seco, y no los
saque de su envoltorio hasta que no los vaya a utilizar.
• Si se exponen a la luz solar directa o a un calor excesivo, es posible que se
obtengan copias con una calidad deficiente.
No toque el tambor fotoconductivo (la parte de color verde).
• Si el tambor tiene arañazos o borrones, las copias saldrán manchadas.
Almacenamiento adecuado
Almacene los consumibles en un lugar:
• limpio y seco,
• a temperatura estable,
• no expuestos a la luz directa del sol
Guarde el papel en su envoltura y en posición plana.
• El papel almacenado fuera de su envoltura o en embalajes colocados sobre un
extremo podría enroscarse o humedecerse, produciéndose atascos de papel.
PRECAUCIÓN:
No instale la máquina en una ubicación con mala circulación de aire.
Durante la impresión, se produce u na pequeña cantidad de ozono en el interior de
la máquina. La cantidad de ozono generada no es suficiente para considerarse
perjudicial, no obstante, es posible que note un olor desagr adable durante tiradas
largas y, por ello, la máquina deberá instalarse en una sala provista de un ventilador
o de ventanas que ofrezcan ventilación suficiente. (El olor puede provocar dolores
de cabeza ocasionales.)
* Instale la máquina de forma que las personas no queden directamente expuestas
a los vapores de escape de la máquina. Si la instala cerca de una ventana,
asegúrese de que la máquina no queda expuesta a la luz solar directa.
Suministros y consumibles
El suministro de piezas de repuesto para reparaciones de la aplicación está
garantizado durante por lo menos 7 años a partir del final de la producción. Piezas
de repuesto son aquellas piezas del aparato que se pueden romper durante el uso
normal del producto, mientras que aquellas piezas que nor malmente sobrepasan la
vida útil del producto no se consideran como piezas de repuesto. Los consumibles
también estarán disponibles durante 7 años a partir del final de la pro ducción.
20
Se deben usar cables protegidos con el aparato para garantizar el
cumplimiento con las regulaciones EMC.
Información sobre el láser
Longitud de onda
Períodos de pulso 12,88 µs ±12,88 ns/7 mm
Potencia de salida Máx 0,2 mW
En la línea de producción, la potencia de salida del módulo de escáner está
regulada a 0,18 MILIVATIOS MÁS 5%, y se mantiene constante mediante el
funcionamiento del Control Automático de la Potencia (APC).
Precaución
El uso de controles o ajuste s o la ejecución de procedimientos diferentes a lo s
aquí especificados, podría provocar una exposición peligrosa a radiaciones.
Este equipo digital es un PRODUCTO LÁSER CLASE 1 (IEC 60825-1 Edición
1.2-2001)
Este producto está diseña do para su uso comercial únicamente, y como tal no
se rige por el Reglamento (EC) 1275/2008 impuesto por la directiva de la UE
2005/32/EC sobre requisitos de ecodiseño para el consumo de energía
eléctrica en modo de espera y apagado. Sharp desaconseja el uso doméstico
del producto, y declinará toda responsabilidad derivada de tal uso.
Los productos que cumplen las directrices de ENERGY STAR® llevan el logo que
figura más arriba.
Es posible que los productos sin este logo no cumplan las directrices de
ENERGY STAR
LICENCIA DE SOFTWARE
La LICENCIA DEL SOFTWARE aparece cuando se instala el software desde el
CD-ROM. Utilizando todo o alguna parte del software del CD-ROM o en la
unidad, acepta los términos de la LICENCIA DEL SOFTWARE.
Declaración y reconocimiento de marcas registradas
•Microsoft®, Windows®, Windows® 2000, Windows® XP, Windows Vista® e
Internet Explorer
Corporation en EE.UU. y otros países.
®
, el logotipo de Adobe®, Acrobat®, el logotipo de Adobe® PDF y
• Adobe
ReaderTM son marcas comerciales o marcas registradas de Adobe Systems
Incorporated en EE.UU. y otros países.
• IBM, PC/AT, y PowerPC son marcas comerciales de International Business
Machines Corporation.
• Sharpdesk es una marca comercial de Sharp Corporation.
• El resto de las marcas comerciales y derechos de autor son propiedad de sus
respectivos titulares.
No imprima nada cuya reproducción esté prohibida por las leyes. La copia de los
documentos siguientes está prohibida, normalmente, por las leyes nacionales. Las
leyes locales podrían prohibir la impresión de otros elementos.
Dinero Sellos Bonos Acciones
Extractos bancarios Cheques Pasaportes Permisos de conducción
Concentración de emisiones (medidas con arreglo a RAL-UZ
122: Edición junio de 2006)
Emisiones
químicas
Ozono
Polvo Blanco y negro 4,0 mg/h o menos
Estireno Blanco y negro 1,0 mg/h o menos
Benceno Blanco y negro 0,05 mg/h o menos
COVT
780 nm+15 nm
-10 nm
Los Productos que han conseguido el ENERGY STAR
diseñados para proteger el medio ambiente a través de una
mejor eficiencia en el consumo de energía.
®
.
®
son marcas registradas o marcas comerciales de Microsoft
Estado de la
copiadora
Copiadora en
funcionamiento
En modo de
espera
Modo
Blanco y negro 1,5 mg/h o menos
Blanco y negro 10 mg/h o menos
-
Velocidad de
difusión
2,0 mg/h o menos
®
están
Page 23

MODELLO:MX-B200
Nota
1
2
3
4 - 5
Mascherina
Sigillo del toner
Attenzione
Avvertenza
Attenzione
CD-ROM Guida Operativa
* Per visualizzare la Guida Operativa in formato PDF, è
necessario utilizzare le applicazioni Adobe
®
Reader®
o Acrobat® Reader
®
di Adobe Systems Incorporated.
Adobe
®
Reader® può essere scaricato al seguente
indirizzo web:
http://www.adobe.com/
SISTEMA MULTIFUNZIONALE DIGITALE
GUIDA DI BASE
La presente guida descrive come installare l'unità e attira l'attenzione dell'utente su alcuni aspetti importanti dell'installazione e dell'uso
dell'apparecchiatura. Leggere e assicurarsi di comprendere appieno il contenuto di questa guida al fine di garantire un'installazione corretta della
macchina. La Guida Operativa è consultabile sul CD-ROM in dotazione. La procedura di visualizzazione della guida è descritta in "4. COME USARE
IL MANUALE OPERATIVO". Dopo l'installazione, leggere la Guida Operativa per conoscere e trarre vantaggio da tutte le funzionalità offerte da
questa macchina.
1. CARICAMENTO DELLA CARTA
Sollevare la maniglia del vassoio di
1
alimentazione e tirarlo fino a quando
non si blocca.
Premere la levetta del guidacarta (A) e far
2
scorrere la guida fino ad ottenere una
corrispondenza con la larghezza della carta.
Spostare il guidacarta (B) verso la scanalatura
indicata sul vassoio.
Smazzare la carta ed inserirla nel vassoio.
3
Fare attenzione che i bordi dei fogli finiscano
sotto i ganci angolari.
(B)
Spingere con cautela il vassoio della carta nell'unità.
4
• Assicurarsi che la carta non abbia strappi, grinze, polvere e bordi piegati o
ondulati.
• Assicurarsi che tutta la carta della risma sia dello stesso formato e tipo.
• Quando si carica la carta per copie, assicurarsi che tra la carta e la guida non ci
sia troppo spazio o che la guida non aderisca troppo alla carta, causando un
inceppamento. Se si carica la carta in questo modo si possono causare
inceppamenti e le copie risulteranno storte.
2. INSTALLAZIONE DELLA CARTUCCIA DEL TONER
Aprire il vassoio di bypass
1
multifoglio, quindi aprire la
copertura laterale.
Inserire con cautela la cartuccia finché non
4
scatta in posizione.
Premere delicatamente su
2
entrambi i lati del coperchio
anteriore per aprire.
Rimuovere il nastro dalla
5
mascherina.
(A)
Afferrare la cartuccia da entrambi i lati e agitarla in senso orizzontale
3
per quattro o cinque volte. Dopo aver agitato la cartuccia, rimuovere il
sigillo del toner.
Chiudere il pannello di copertura frontale, poi quello
6
laterale, esercitando una pressione sulle sporgenze
arrotondate poste in corrispondenza del pulsante di
apertura del pannello laterale.
7
Quando si chiudono i pannelli di copertura, bloccare
dapprima saldamente il pannello frontale e in un
secondo tempo chiudere quello laterale. I pannelli
possono essere danneggiati se vengono chiusi nella
sequenza inversa.
21
Page 24

3. COLLEGAMENTO DEL CAVO DI ALIMENTAZIONE / ACCENSIONE
Se l'unità viene utilizzata in un paese diverso da quello dell'acquisto, assicurarsi che l'alimentazione di rete sia compatibile con il modello.
Inserendo la spina in una presa di alimentazione non compatibile, si provocano danni irreparabili all'unità.
Avvertenza
Assicurarsi che l'interruttore di
1
alimentazione dell'unità sia in
posizione "OFF" (Spento).
SPENTO ACCESO
Informazioni sulla testina di scansione
La lampada della testina di scansione rimane sempre accesa quando l'unità si trova nello stato di macchina pronta (indicatore Start ( illuminato).
L'unità
regola periodicamente la lampada della testina di scansione per mantenere costante la qualità di copia. Al momento della regolazione la testina si
muove automaticamente. Si tratta di una condizione normale che non indica un malfunzionamento dell'unità.
Inserire il cavo di alimentazione fornito
2
nell'apposita presa situata sul retro dell'unità.
Inserire l'altra estremità del cavo di alimentazione
nella presa di corrente più vicina.
• Inserire il cavo di alimentazione soltanto in
una presa a muro dotata di collegamento a
Attenzione
terra idoneo.
• Non utilizzare prolunghe o morsetti.
Commutare l'interruttore di alimentazione
3
posto sul lato sinistro dell'unità sulla
posizione "ON" (Acceso).
4. COME USARE IL MANUALE OPERATIVO
Spiegazioni dettagliate delle funzioni che possono essere utilizzate con l'unità sono fornite nella Guida Operativa in formato PDF.
Inserire il CD-ROM fornito nell'unità
1
per CD-ROM del computer.
CD-ROM Guida Operativa
Il manuale operativo in versione cartacea può essere richiesto al proprio rappresentante autorizzato SHARP o direttamente a SHARP.
SHARP Manufacturing France - Customer Documentation Department
Route de Bollwiller
68 360 SOULTZ - FRANCE
oppure via fax al numero (+33) 3.89.74.87.78
Indicare il nome del modello, il numero di serie della macchina e la lingua richiesta. Non dimenticare di aggiungere il proprio nome e recapito.
Visualizzare i contenuti del CD-ROM e aprire il
2
file Guida Operativa.
File Guida Operativa (PDF)
Manual Italian
* Per visualizzare la Guida Operativa in formato PDF, è
necessario utilizzare le applicazioni Adobe
o Acrobat® Reader
Adobe
indirizzo web:
http://www.adobe.com/
®
di Adobe Systems Incorporated.
®
Reader® può essere scaricato al seguente
®
Reader®
22
Page 25

SPECIFICHE
Nota
20 cm
10 cm
10 cm
In alcuni paesi le posizioni dell'interruttore di alimentazione sono indicate
con I e O sulla copiatrice invece che con ON e OFF. In questo caso, I
corrisponde a ON (acceso) e O a OFF (spento).
AVVERTENZA!
Per una disconnessioine elettrica completa, staccare la spina
principale. La presa di corrente deve essere installata accanto
all'apparecchiatura ed essere facilmente accessibile.
Modello MX-B200
Tipo Sistema multifunzionale digitale da desktop
Sistema di copia / stampa Trasferimento elettrostatico a secco
Originali Fogli, documenti
Funzione stampante Disponibile
Funzione scanner Disponibile
Vassoio carta 250 fogli
Vassoio di bypass
multifoglio
Vassoio uscita carta 200 fogli*
Formati
originale
Alimentazio
ne originali
Formato copia / stampa Da A6 a A4*
Perdita di immagine
Velocità di riproduzione 20 pag./min. (A4)
Velocità di stam pa *
Copia in continuo Max. 99 pagine; contatore in sottrazione
Velocità prima copia*
(approssimativa)
Tempo di riscaldamento*
(approssimativo)
Rapporto di
copia
Sistema di
esposizione
Sistema di fusione Rulli fusore
Tecnologia di sviluppo Sviluppo spazzola magnetica
Sorgente ottica Lampada fluorescente a catodo freddo
Risoluzione
Gradazione
Profondità di colore 1 bit o 8 bit/pixel
Sensore CCD a colori
Velocità scansione Max. 2,88 ms/linea
Memoria 32 MB
Alimentazione
Consumo di energia Max. 1,0 kW
Dimensioni
complessive
Peso (approssimativo) *8159 kg
Dimensioni
dell'unità
Condizioni di esercizio
Emulazione
Porta interfaccia Interfaccia USB (USB 2.0 Hi Speed)
Lastra di
esposizione/
SPF
Lastra di
esposizione
SPF Fino a 50 fogli
Lastra di
esposizione
SPF
Lastra di
esposizione
SPF Originale mobile
Copiatrice
Stampante 600 dpi
Scanner 600 x 600 dpi
Scansione 256 livelli
Uscita 2 livelli
Larghezza 802 mm
Profondità 445 mm
Larghezza 518 mm
Profondità 445 mm
Altezza 298 mm
50 fogli
1
Max. A4
1 foglio
2
3
Max. 4 mm *
Max. 4,5 mm *
5
20 pag./min. (A4)
6
8,0 secondi (quando il programma utente 24 è inattivo)
10,7 secondi (quando il programma utente 24 è attivo)
7
-
Variabile: dal 25% al 400%, c on incrementi dell'1%
Fisso: 50%, 70%, 86%, 100%, 141% e 200%
Variabile: dal 50% al 200%, c on incrementi dell'1%
Fisso: 50%, 70%, 86%, 100%, 141% e 200%
Sorgente ottica mobile, esposizione a filo (lastra fissa)
con esposizione automatica
600 x 300 dpi (modalità Automatic a/Manuale)
600 x 600 dpi (modalità Fotografia )
Tensione locale ±10% (per i requis iti di alimentazione
dell'unità, consultare la targhetta posizionata sul retro
della macchina).
Temperatura: compresa tra 10°C e 30°C
Umidità: compresa tra il 20% e l'85%
SHARP SPLC
(Sharp Printer Language with Compression)
4
(totale 376 passi)
(totale 151 passi)
Livello di potenza sonora LwAd
Modalità di copia: 6,4 B
Modalità standby 3,5 B
Livello di pressione sonora LpA m (riferimento) (Posizione astante)
Modalità di copia: 47 dB
Livello di rumorosità
*1 Quando si utilizza la carta standard A4 nelle condizioni indicate.
*2 Solo carta alimentata longitudinalmente.
*3 Bordi di entrata e di uscita.
*4 Lungo gli altri bordi complessivi.
*5 Velocità di stampa durante la stampa del secondo foglio e i fogli seguenti
quando viene utilizzata carta semplice in formato A4 nel vassoio 1 e si
esegue la stampa continua di una facciata sulla stessa pagina.
*6 La velocità di uscita della prima copia può variare a seconda dello stato
della macchina.
*7 Il tempo di riscaldamento può variare da ambiente ad ambiente.
*8 Esclusa la cartuccia del toner.
Modalità standby: 19 dB
Livello di pressione sonora LpAm (riferimento) (Posizione
operatore)
Modalità di copia: 52 dB
Modalità standby: 19 dB
Misurazione dell'emissione sonora conformemente a
ISO 7779.
Apparecchiature opzionali
Alimentatore a singola passata (MX-SP10)
2
Formati accettabili
degli originali
Peso: 56 g/m
Formato: da A5 a A4
Capacità: Fino a 50 fogli
a 90 g/m
2
Alimentazione Dall'unità.
Peso
(approssimativo)
Dimensioni
3 kg
2
496 mm (largh.) x 359 mm (prof.) x 89 mm
(alt.)
Unità di alimentazione carta da 250 fogli (MX-CS10)
Formato carta Da A5 a A4
Peso carta 56 g/m2 a 80 g/m
Capacità di carta
Un vassoio con una capacità di 250 fogli di
carta da 80 g/m
Peso 30 kg
Dimensioni 498 mm (largh.) x 445 mm (prof.) x 87 mm (alt.)
Alimentazione Dall'unità.
Come parte della nostra politica di miglioramento continuo,
SHARP si riserva la facoltà di apportare modifiche al design ed
alle specifiche senza preavviso, allo scopo di migliorare il
prodotto. I dati indicati relativi alle specifiche sulle prestazioni
sono valori nominali di unità di produzione. Le singole unità
possono presentare valori differenti da quelli riportati.
2
2
23
Page 26

AVVERTENZE
20 cm
10 cm
10 cm
In alcuni paesi le posizioni dell'interruttore di alimentazione sono indicate
con I e O sulla copiatrice invece che con ON e OFF. In questo caso, I
corrisponde a ON (acceso) e O a OFF (spento).
AVVERTENZA!
Per una disconnessioine elettrica completa, staccare la spina
principale. La presa di corrente deve essere installata accanto
all'apparecchiatura ed essere facilmente accessibile.
Ogni istruzione è estesa inoltre alle unità opzionali utilizzate insieme al
presente prodotto.
Etichetta di Avvertenza sull'unità
Le etichette ( , ) poste nella zona dell'unità fusore, indicano quanto
segue:
: Attenzione, pericolo
: Attenzione, superficie calda
Precauzioni d'uso
Mentre si utilizza l'unità attenersi a quando indicato di seguito.
Avvertenza:
• L'unità di fusione è molto calda. Fare attenzione mentre si estrae la carta
inceppata.
• Non fissare con gli occhi la sorgente di luce. La luce potrebbe causare lesioni
agli occhi.
Attenzione:
• Collocare l'unità su una superficie piana e stabile.
• Non installare l'unità in ambienti umidi o polverosi.
• Quando l'unità non viene utilizzata per molto tempo, ad esempio un periodo di
vacanza prolungato, disattivare l'alimentazione e togliere il cavo di alimentazione
dalla presa.
• Quando si sposta l'unità, assicurarsi che l'interruttore di alimentazione si trovi
in posizione OFF e togliere il cavo dalla presa.
• Non accendere o spegnere ripetutamente l'unità. Dopo aver spento l'unità,
attendere da 10 a 15 secondi prima di riaccenderla.
• Non co prire l'unità con coperture antipolvere, pellicol e di plastica o coperture di
tessuto mentre l'alimentazione è collegata. In questo modo si ostacola la
dissipazione del calore, danneggiando l'unità.
• L'uso di comandi o regolazioni oppure l'esecuzione di procedure diverse da
quelle specificate in questa documentazione possono comportare una
esposizione dannosa alle radiazioni.
• La presa di corrente deve essere installata vicino alla macchina e deve essere
facilmente accessibile.
Fattori importanti per la scelta del luogo di installazione
Non installare l'unità in ambienti:
• bagnati, umidi o molto polverosi,
• esposti alla luce solare diretta
• non sufficientemente aerati
• sottoposti a temperature estreme o variazioni di umidità, ad esempio in
prossimità di condizionatori o riscaldatori.
Verificare che intorno all'unità vi sia
spazio sufficiente per effettuare
operazioni di manutenzione e
garantire un'adeguata aerazione.
Precauzioni sulla
manipolazione
Fare attenzione a come si maneggia l'unità. È necessario attenersi alle seguenti
indicazioni per garantire nel tempo il corretto funzionamento dell'unità.
Non fare cadere l'unità. Essa non deve essere sottoposta ad urti o colpi
contro qualsiasi tipo di oggetto.
Conservare le cartucce del toner in un luogo fresco e asciutto, senza
estrarle dalla confezione prima dell'uso.
• Se esposte alla luce diretta del sole o a temperature elevate, le copie possono
risultare di scarsa qualità.
Non toccare il tamburo fotosensibile (parte verde).
• Graffi o incrostazioni sul cilindro macchiano le copie.
Conservazione adeguata dei ricambi
Conservare le parti di consumo in un luogo:
• pulito e asciutto,
• con una temperatura costante,
• non esposto ai raggi diretti del sole
Conservare la carta nell'involucro e in posizione orizzontale.
• La carta conservata senza il proprio involucro o in confezioni collocate in
posizione verticale può diventare ondulata o inumidirsi e causare
inceppamenti.
ATTENZIONE:
Non installare la macchina in un luogo non ventilato adeguatamente.
Durante la stampa si crea una piccola quantità di ozono all'interno della macchina.
La quantità di ozono prodotta è troppo esigua per essere dann osa; tuttavia è
possibile che si percepisca un odore sgradevole durante l'esecuzione di un gran
numero di copie; è perciò consigliabile installare la macchina in una s tanza dotata di
ventola o di finestre, in modo da garantire che la circolazione dell'aria sia sufficient e.
(È possibile che l'odore causi occasionalmente mal di testa).
* Installare la macchina in modo che le persone non siano esposte direttamen te allo
scarico dell'unità. Se la macchina è installata in prossimità di una finestra,
assicurarsi che non sia esposta alla luce diretta del sole.
Fornitura di parti di ricambio e materiale di consumo
La fornitura di parti di ricambio pe r l'eventuale riparazione dell'unità è garantita per
almeno 7 anni dopo il termine della produzione. Le parti di ricambio sono quei
componenti della macchina che potreb bero rompersi nell'ambito dell'uso ordinario
del prodotto, mentre i componenti che di solito presentano una durata superiore
rispetto a quella del prodotto non sono da considerarsi compo nenti di ricambio.
Anche i materiali di consumo sono disponibili per 7 anni dopo il termine della
produzione.
24
Per mantenere la conformità alle norme EMC, con questa apparecchiatura
devono essere utilizzati cavi di interfaccia schermati.
Informazioni sul laser
Lunghezza d'onda
Tempi di impulso 12,88 µs ±12,88 ns /7 mm
Potenza emessa Max. 0,2 mW
Sulla linea di produzione, la potenza emessa dallo scanner è impostata a 0,18
MILLIWATT PIÙ 5% ed è mantenuta costante dall'operazione di Controllo
Automatico della Potenza (APC).
Avvertenza
L'uso di comandi o regolazioni oppure l'esecuzione di procedure diverse da
quelle specificate in questa documentazione possono comportare una
esposizione dannosa alle radiazioni.
Questa apparecchiatura digitale è un PRODOTTO LASER DI CLASSE 1 (IEC
60825-1 Edizione 1.2-2001)
Questo prodotto è stato conc epito unicamente per l'uso in ambito commerciale
e pertanto esula dalla sfera di applicazione della Regolamentazione (CE)
1275/2008 che implementa la Direttiva UE 2005/32/CE relativa ai requisiti di
eco-compatibilità dei consumi di energia elettrica in modalità di standby e OFF.
Sharp non consiglia l'uso di questo prodotto per applicazioni domestiche e non
accetta alcuna responsabilità derivante da un tale uso.
I prodotti conformi alle linee guida ENERGY STAR® hanno il logo mostrato sopra.
È possibile che i prodotti sprovvisti del logo non soddisfino le linee guida
ENERGY STAR
LICENZA SOFTWARE
La LICENZA SOFTWARE verrà visualizzata quando si esegue l'installazione del
software dal CD-ROM. Utilizzando tutto il software (o parte di esso) sul CD-ROM
o sull'unità, l'utente accetta i termini della LICENZA SOFTWARE.
Riconoscimento marchi registrati
•Microsoft®, Windows®, Windows® 2000, Windows® XP, Windows Vista® e
Internet Explorer® sono marchi di fabbrica depositati o marchi di fabbrica di
Microsoft Corporation negli Stati Uniti e in altri paesi.
®
, il logo Adobe®, il logo Acrobat®, il logo PDF Adobe® e il logo ReaderTM
• Adobe
sono marchi di fabbrica depositati o marchi di fabbrica di Adobe Systems
Incorporated negli Stati Uniti e in altri paesi.
• IBM, PC/AT e PowerPC sono marchi di fabbrica di International Business
Machines Corporation.
• Sharpdesk è un marchio di fabbrica di Sharp Corporation.
• Tutti gli altri marchi di fabbrica e copyright appartengono ai rispettivi proprietari.
Non effettuare copie di alcun materiale proibito dalla legge. Copiare
quanto segue rappresenta di norma una violazione delle leggi
nazionali. È possibile che le leggi locali possano proibire la copia di
altro materiale.
Banconote Francobolli Obbligazioni Azioni
Assegni circolari Assegni Passaporti Licenze di guida
Concentrazione di emissione (misurazione secondo RAL-UZ
122: Edizione giugno 2006)
Emissione
chimica
Ozono
Polvere Bianco e nero 4,0 mg/h o meno
Stirene Bianco e nero 1,0 mg/h o meno
Benzene Bianco e nero 0,05 mg/h o meno
COVT
780 nm+15 nm
-10 nm
I prodotti che hanno ottenuto il logo ENERGY STAR
garantiscono la tutela dell'ambiente tramite un'efficienza
energetica di livello superiore.
®
.
Condizione
dell'unità
Unità in funzione
Unità in standby - 2,0 mg/h o meno
Modalità
Bianco e nero 1,5 mg/h o meno
Bianco e nero 10 mg/h o meno
Velocità di
diffusione
®
Page 27

MODELO: MX-B200
Nota
1
2
3
4 - 5
Obturador
Selo do toner
Advertência
Aviso
Advertência
CD-ROM do Manual de Funcionamento
Manual Portuguese
Ficheiro de Manual de
Funcionamento (PDF)
* Para visualizar o Manual de Funcionamento em
formato PDF, é necessário o Adobe
®
Reader® or
Acrobat
®
Reader® da Adobe Systems Incorporated.
Pode descarregar o Adobe
®
Reader® a partir do
seguinte URL:
http://www.adobe.com/
SISTEMA MULTIFUNÇÕES DIGITAL
GUIA DE INICIAÇÃO RÁPIDA
Este guia explica o modo de instalação da máquina, e indica pontos importantes a anotar para a instalação e utilização. Leia e entenda este guia
para assegurar que instala a máquina correctamente. O Manual de Funcionamento da máquina está no CD-ROM fornecido. O procedimento para
visualização do manual é explicado em "4. COMO UTILIZAR O MANUAL DE FUNCIONAMENTO". Após a instalação, leia o Manual de
Funcionamento para tirar o máximo partido de todas as funções disponibilizadas pela máquina.
1. CARREGAR PAPEL
Levante o manípulo do tabuleiro de
1
papel e puxe o tabuleiro de papel até
parar.
Aperte a alavanca da guia do papel (A) e
2
deslize a guia de modo a corresponder à
largura do papel. Desloque a guia do papel (B)
para a ranhura correcta, conforme indicado no
tabuleiro.
Separe o papel e introduza-o no tabuleiro.
3
Certifique-se de que as extremidades ficam
encaixadas por baixo dos ganchos dos
cantos.
(B)
Volte a empurrar lentamente o tabuleiro do papel da unidade.
4
• Certifique-se de que o papel não tem dobras, pó, rugas ou extremidades
enroladas.
• Certifique-se de que o papel empilhado é do mesmo tipo e tamanho.
• Ao colocar o papel, certifique-se de que não existe espaço entre o papel e a
guia e verifique se a guia não está demasiado apertada, dobrando o papel. Ao
colocar o papel desta forma provocará a distorção e encravamento do
documento.
2. INSTALAÇÃO DO CARTUCHO DE TONER
Abra o tabuleiro manual e, em
1
seguida, o painel lateral.
Insira cuidadosamente o cartucho de toner
4
até ficar bloqueado no local apropriado.
Pressione suavemente nos dois
2
lados do painel frontal para abrir
a tampa.
Retire a fita do obturador.
5
(A)
Agarre em ambos os lados do toner e agite-o horizontalmente, quatro
3
ou cinco vezes. Depois de agitar o cartucho, retire o selo do toner.
Feche o painel frontal e depois o painel lateral premindo
6
as saliências redondas junto ao botão de abertura do
painel lateral.
7
Ao fechar os painéis, certifique-se de que fecha bem
o painel e depois feche o painel lateral. Se os painéis
forem fechados de modo errado, podem ficar
danificados.
25
Page 28

3. LIGAR O CABO DE ALIMENTAÇÃO / LIGAR
Aviso
Advertência
CD-ROM do Manual de Funcionamento
Manual Portuguese
Ficheiro de Manual de
Funcionamento (PDF)
* Para visualizar o Manual de Funcionamento em
formato PDF, é necessário o Adobe
®
Reader® or
Acrobat
®
Reader® da Adobe Systems Incorporated.
Pode descarregar o Adobe
®
Reader® a partir do
seguinte URL:
http://www.adobe.com/
Se utilizar a unidade num país, excepto no país onde a unidade foi adquirida, precisará certificar-se de que o fornecimento de energia local seja
compatível com o seu modelo. Se ligar a unidade a uma fonte de alimentação não compatível, podem ocorrer danos irreparáveis na unidade.
Certifique-se de que o interruptor de
1
ligação da unidade está na posição
"OFF" (desligada).
DESLIGADO LIGADO
Sobre a cabeça de digitalização
A lâmpada da cabeça de digitalização permanece ligada, quando a unidade está na posição preparada (quando o indicador iniciar ( ) está aceso).
A unidade regula, periodicamente, a lâmpada da cabeça de digitalização de modo a manter a qualidade da cópia. Nesse momento, a cabeça de digitalização
desloca-se automaticamente. Esta situação é normal e não indica uma avaria na unidade.
Introduza o cabo de alimentação anexo na tomada
2
do cabo de alimentação situada na parte posterior
da unidade.
Ligue a outra extremidade do cabo de alimentação
à tomada mais próxima.
• Introduza o cabo de alimentação numa
tomada devidamente ligada à terra.
• Não utilize extensões ou fios de
alimentação.
Gire o interruptor de ligação, na parte
3
esquerda da unidade, para a posição "ON"
(Ligada).
4. COMO UTILIZAR O MANUAL DE FUNCIONAMENTO
No Manual de Funcionamento em formato PDF são disponibilizadas explicações detalhadas das funções que podem ser utilizadas na máquina.
Introduza o CR-ROM na unidade de
1
CD-ROM do computador.
Pode obter um manual de funcionamento impresso junto do seu fornecedor SHARP autorizado ou contactar a SHARP para o solicitar.
SHARP Manufacturing France - Customer Documentation Department
Route de Bollwiller
68.360 SOULTZ - FRANÇA
ou por fax através do número (+33) 3.89.74.87.78
Indique o nome do modelo, o número de série da máquina e o idioma necessário. Não se esqueça de indicar o seu nome e endereço.
Exiba o conteúdo do CD-ROM, e abra o ficheiro
2
Manual de Funcionamento.
26
Page 29

ESPECIFICAÇÕES
Nota
20 cm
10 cm
10 cm
Nalgumas áreas, as posições do interruptor "LIGAR" estão assinaladas
com "I" e " " na copiadora em vez de "ON" (LIGADO) e "OFF" (DESLIGADO).
Se a sua copiadora estiver assinalada dessa forma, leia "I"
como "ON" e " " como "OFF".
Aviso!
Para desligar por completo a alimentação eléctrica, desligue a ficha
da electricidade. A tomada deve ser instalada próximo do
equipamento e estar facilmente acessível.
Modelo MX-B200
Tipo Sistema multifunções digital, tipo desktop
Cópia / sistema de
impressão
Originais Folhas, documentos en cadernados
Função de impressora Disponível
Função de scanner Disponível
Cassete de papel 250 folhas
Tabuleiro múltiplo manual 50 folhas
Tabuleiro de saída do
papel
Tamanhos
dos
originais
SPF Máx.
Tamanho de cópia/
impressão
Perda de imagem
Velocidade de cópia 20 páginas/min. (A4)
Velocidade de impressão
*
Cópia contínua Máx. 99 páginas contador decrescente
Tempo até à primeira
cópia *
(aproximadamente)
Tempo de aquecimento *
(aproximadamente)
Escala de
ampliação/
redução
Sistema de
exposição
Sistema do fusor Rolos fusores
Sistema de revelação Revelação por escova magnética
Fonte de luz Lâmpada fluorescente catódica fria
Resolução
Gradação
Profundidade de bits 1 bit ou 8 bits/pixel
Sensor CCD a cores
Velocidade de
digitalização
Memória 32 MB
Alimentação eléctrica
Consumo de energia 1,0 kW máx.
Dimensões
globais
Peso (Aproximadamente) *8159 kg
Dimensões
da unidade
Condições de
funcionamento
Emulação
Porta do interface Interface USB (Alta velocidade USB 2.0)
Vidro de
exposição/
SPF
Vidro de
exposição
SPF Até 50 folhas
5
6
Vidro de
exposição
SPF
Vidro de
exposição
SPF Deslocar original
Copiadora
Impressora 600 dpi
Scanner 600 x 600 dpi
Digitalizar 256 níveis
Saída 2 níveis
Largura 802 mm
Profundidade 445 mm
Largura 518 mm
Profundidade 445 mm
Altura 298 mm
Seco, transferência electrostática
1
200 folhas *
Máx. A4
Vidro de exposição 1 folha
2
A6 a A4*
3
Max. 4 mm *
Máx. 4,5 mm *
20 páginas/min. (A4)
8,0 segundos (Quando o programa do utilizador 24 estiver
desactivado (OFF))
10,7 segundos (Quando o programa do utilizador 24 estiver
activado (ON)
7
-
Variável: 25% a 400% em incrementos de 1%
Fixo: 50%, 70%, 86%, 100%, 141%, 200%
Variável: 50% a 200% em incrementos de 1%
Fixo: 50%, 70%, 86%, 100%, 141%, 200%
Fonte óptica móvel, exposição de ranhura (platina
estática) com exposição automática
600 x 300 ppp (modo Auto/Manual)
600 x 600 ppp (Modo fotografia)
Máx. 2,88 ms/linha
Tensão local ±10% (Para obter informações sobre os
requisitos de alimentação eléctrica desta máquina,
consulte a chapa que se encontra na parte de trás da
máquina.)
Temperatura: 10°C a 30°C
Humidade: 20 % a 85 %
SHARP SPLC
(Linguagem de Impressão Sharp com compressão)
4
(total 376 passos)
(total 151 passos)
Nível de potência sonora LwAd
Modo de cópia: 64 B
Modo de espera: 3,5 B
Nível de pressão sonora LpAm (refer ência) (posições do observador)
Nível de ruído
*1 Quando se utiliza papel A4 padrão nas condições de funcionamento
seguintes.
*2 Apenas no comprimento da alimentação do papel.
*3 Início e fim das margens.
*4 Ao longo das outras margens em totais.
*5 Velocidade de impressão da segunda folha e das seguintes ao usar
papel normal A4 no tabuleiro 1 e realizando impressão contínua de um
lado da mesma página.
*6 O tempo da primeira cópia pode variar dependendo do estado da
máquina.
*7 O tempo de aquecimento pode variar dependendo de alguns ambientes.
*8 Cartucho do toner não incluindo.
Modo de cópia: 47 dB
Modo de espera: 19 dB
Nível de pressão sonora LpAm (referência) (posição do operador)
Modo de cópia: 52 dB
Modo de espera: 19 dB
Medição de emissão de ruídos de aco rdo com a norma
ISO7779.
Equipamento opcional
Alimentador de documentos (MX-SP10)
Originais aceitáveis
Peso: 56 g/m
Tamanho : A5 a A4
Capacidade: Até 50 folhas
2
Alimentação eléctrica Retirada da unidade
Peso
(Aproximadamente)
23 kg
Dimensões 496 mm (L) x 359 mm (P) x 89 mm (A)
até 90 g/m
2
Unidade de alimentação de 250 folhas (MX-CS10)
Tamanho do papel A5 a A4
Gramagem 56 g/m2 até 80 g/m
Capacidade de papel
Um tabuleiro de papel com capacidade para
250 folhas de papel de 80 g/m
Gramagem 30 kg
Dimensões 498 mm (L) x 445 mm (P) x 87 mm (A)
Alimentação eléctrica Retirada da unidade
Como parte da nossa política de melhoria contínua, a SHARP
reserva-se o direito de alterar o desenho e as especificações
para melhoria do produto sem aviso prévio. Os valores das
especificações de desempenho indicados são valores
nominais de unidades de produção. Poderá haver variações
destes valores nas unidades individuais.
2
2
27
Page 30

PRECAUÇÕES
20 cm
10 cm
10 cm
Nalgumas áreas, as posições do interruptor "LIGAR" estão assinaladas
com "I" e " " na copiadora em vez de "ON" (LIGADO) e "OFF" (DESLIGADO).
Se a sua copiadora estiver assinalada dessa forma, leia "I"
como "ON" e " " como "OFF".
Aviso!
Para desligar por completo a alimentação eléctrica, desligue a ficha
da electricidade. A tomada deve ser instalada próximo do
equipamento e estar facilmente acessível.
Cada instrução abrange igualmente as unidades opcionais utilizadas com este
produto.
A unidade possui etiquetas de advertência
A etiqueta ( , ) na área de fusão da unidade indica o seguinte:
: Advertência, risco de perigo
: Advertência, superfície quente
Advertências relativas à utilização
Siga as seguintes precauções quando utilizar a unidade.
Aviso:
• A unidade de fusão está quente. Tome as devidas precauções quando retirar
papel bloqueado nesta zona.
• Não olhe directamente para a fonte de luz. Fazê-lo poderá causar danos nos
olhos.
Aviso:
• Coloque a unidade numa superfície firme e estável.
• Não coloque a unidade num local húmido ou com poeiras.
• Quando a máquina não for ser utilizada durante um longo período de tempo, por
exemplo durante as férias, desligue o interruptor de alimentação e retire o cabo de
alimentação da tomada.
• Ao deslocar a unidade, certifique-se de desligar a unidade e retirar o cabo de
alimentação da tomada.
• Não ligue e desligue a unidade demasiado rápido. Depois de desligar a
unidade, aguarde 10 a 15 segundos antes de voltar a ligá-la.
• Enquanto a unidade estiver ligada, não a tape com uma protecção com pó, um
pano ou uma película de plástico. Se o fizer estará a obstruir a saída de calor,
danificando a unidade.
• A utilização de controlos ou a justes, ou o recurso a procedimentos que não os
especificados neste manual, poderá resultar na exposição a radiações
perigosas.
• A tomada deve ser instalada próximo da máquina e facilmente acessível.
Aspectos importantes ao escolher um local para
instalação
Não instalar a unidade em áreas que estejam:
• húmidos ou com muito pó
• exposto à luz directa do Sol
• com pouca ventilação
• sujeitos a mudanças extremas de temperatura ou humidade, por exemplo,
perto de um aparelho de ar condicionado ou de um aquecedor.
Certifique-se de que deixa espaço livre suficiente à volta da máquina para
permitir a assistência técnica e uma ventilação adequada.
Advertências relativas ao
manuseamento
De modo a manter o desempenho da
unidade proceda com cuidado quando
manusear a unidade nos seguintes
casos.
Não deixe cair a unidade, não a
submeta a choques ou embata em objectos.
Armazene os cartuchos de toner sobresselentes dentro da respectiva
embalagem, num local seco e fresco.
• Se forem expostos à luz directa do sol ou a calor excessivo, as cópias poderão
ter fraca qualidade.
Não toque no tambor fotocondutor (peça verde).
• A existência de riscos ou borrões no tambor originará cópias sujas.
Armazenamento adequado
Armazene os acessórios num local que esteja:
• limpo e seco;
• a uma temperatura estável;
• não exposto à luz directa do sol
Guarde o papel na embalagem e na posição horizontal.
• O papel armazenado fora da embalagem ou em embalagens na posição
vertical pode ficar ondulado ou húmido, originando bloqueios de papel.
ADVERTÊNCIA:
Não instale a máquina num local com pouca circulação de ar.
Durante o funcionamento, é produzida uma pequena qua ntidade de ozono no
interior da máquina durante a impressão. A quantidade de ozono criada não é
suficiente para representar um perigo, no entanto, pode ser sentido um odor
desagradável durante a execução de cópias de grandes dimensões pelo que a
máquina deve ser instalada numa divisão com uma ventoinha ou com uma janela
que forneçam uma circulação de a r suficiente. (O odor pode provocar
ocasionalmente dores de cabeça.)
* Instale a máquina de forma a que as pessoas não fiquem expostas directamente
às descargas da máquina. Se a máquina estiver instalada perto de uma janela,
certifique-se de que não esteja exposta à luz solar directa.
Acessórios e consumíveis
Após o abandono da produção, o fornecimento de peças sobresselentes para
reparação da máquina é garantido durante, pelo menos, 7 anos. Peças
sobresselentes são as peças do aparelho que podem avaria r-se durante o período
normal de utilização do produto, enquanto que as peças que normalm ente excedem
o tempo de vida do produto não são consider adas sobresselentes. Os consumíveis
também estão disponíveis durante 7 anos após o abandono da produção.
28
Têm de ser utilizados cabos de interface blindado com este equipamento
para manter a conformidade com as normas CEM.
Informação sobre o laser
Comprimento de onda
Durações dos impulsos 12,88 µs ±12,88 ns/7 mm
Potência de saída Máx.0,2 mW
Na linha de produção, a potência de saída da unidade de scanner é regulada
para 0,18 MILLIWATT MAIS 5% e é mantida constante pelo funcionamento do
sistema APC (Automatic Power Control - Controlo Automático da Potência).
Aviso
A utilização de controlos ou ajustes, ou o recurso a procedimentos que não os
especificados neste manual, poderá resultar na exposição a radiações
perigosas.
Este Equipamento Digital é um PRODUTO LASER DE CLASSE 1 (IEC
60825-1 Edição 1.2-2001)
Este produto está concebido apenas para aplicação comercial e, como tal,
situa-se fora do âmbito do Regulamento (EC) 1275/2008 que implementa a
Directiva da UE 2005/32/EC sobre requisitos de concepção ecológica para
consumo de energia eléctrica em modo de inactividade e desligado. A Sharp
não recomenda o produto para aplicação doméstica e não aceitará qualquer
responsabilidade por essa utilização.
Os produtos que cumprem as directrizes ENERGY STAR® ostentam o logótipo
apresentado anteriormente.
Os produtos sem o logótipo podem não cumprir as directrizes ENERGY STAR
LICENÇA DE SOFTWARE
A LICENÇA DE SOFTWARE será visualizada quando instalar o software a partir
do CD-ROM. A sua utilização do software no CD-ROM ou na máquina, na sua
totalidade ou em parte, pressupõe a sua concordância com os termos da
LICENÇA DE SOFTWARE.
Reconhecimento de marcas comerciais
•Microsoft®, Windows®, Windows® 2000, Windows® XP, Windows Vista® e
Internet Explorer
Microsoft Corporation nos EUA e em outros países.
®
, o logótipo Adobe®, Acrobat®, o logótipo Adobe® PDF, e ReaderTM são
• Adobe
marcas comerciais registadas ou marcas comerciais da Adobe Systems
Incorporated nos Estados Unidos e em outros países.
• IBM, PC/AT, e PowerPC são marcas registadas da International Business
Machines Corporation.
• Sharpdesk é uma marca registada da Sharp Corporation.
• Todas as outras marcas registadas e direitos autorais pertencem aos
respectivos proprietários.
Não efectue cópias de qualquer documentação que esteja sujeita a proibição de
cópia por lei. A cópia dos seguintes itens é normalmente proibid a pelas leis
nacionais. Outros itens podem ser proibidos por leis locais.
Dinheiro Selos Títulos Acções
Ordens de pagamento Cheques Passaportes Cartas de condução
Concentração de emissões (medição de acordo com RAL-UZ
122: Edição Jun. 2006)
Emissões
químicas
Ozono
Pó Preto e branco 4,0 mg/h ou menos
Estireno Preto e branco 1,0 mg/h ou menos
Benzeno Preto e branco 0,05 mg/h ou menos
COVT
780 nm+15 nm
-10 nm
Produtos que obtiveram o ENERGY STAR® são
desenhados para proteger o ambiente através de uma
superior eficiência de energia.
®
são marcas comerciais registadas ou marcas comerciais da
Condição da
copiadora
Com a copiadora
em
funcionamento
Em standby - 2,0 mg/h ou menos
Modo
Preto e branco 1,5 mg/h ou menos
Preto e branco 10 mg/h ou menos
Velocidade de
difusão
®
.
Page 31

Page 32

SHARP ELECTRONICS (Europe) GmbH
Sonninstraße 3, D-20097 Hamburg
Printed in France
TINSX2159TSZZ
*TINSX2159TSZZ*
 Loading...