

Page 1
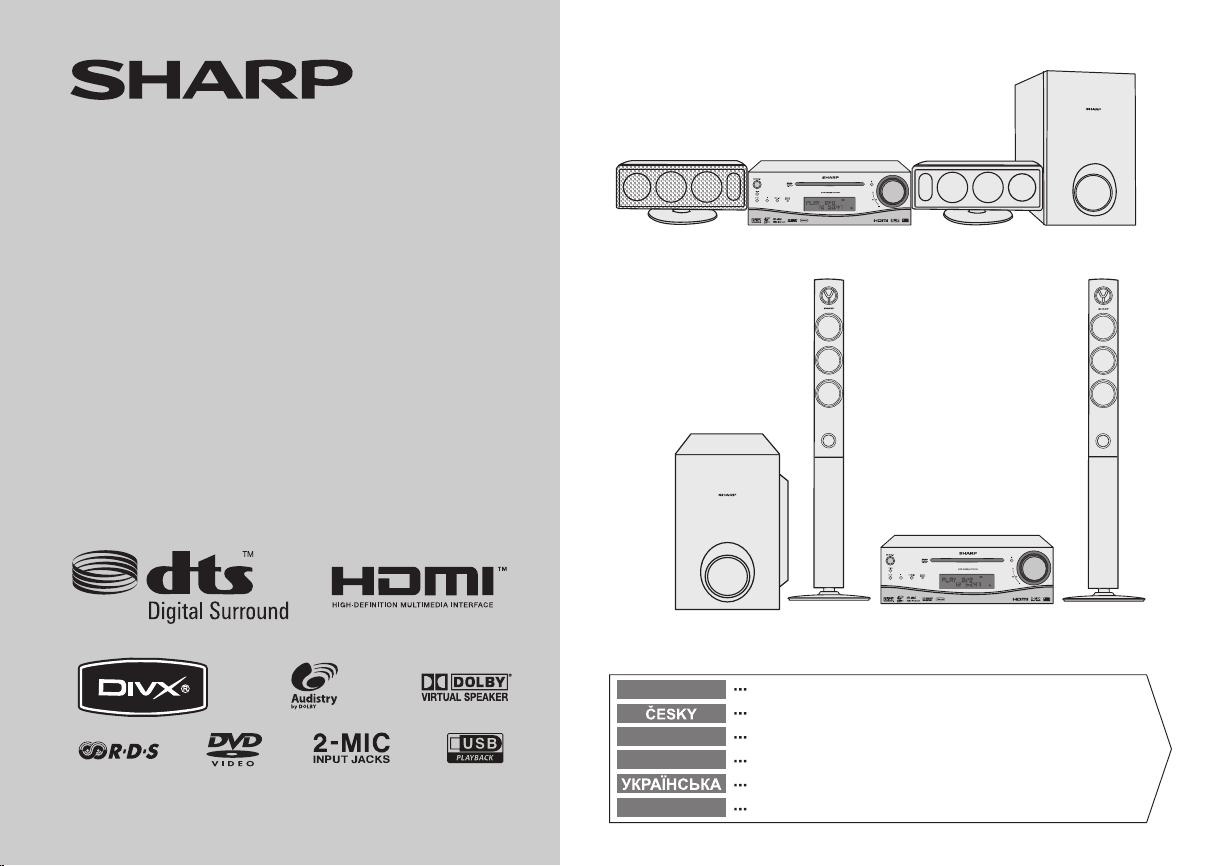
ZESTAW KINA DOMOWEGO Z ODTWARZACZEM DVD
DOMACI KINO S DVD
ZOSTAVA DOMACEHO KINA A DVD
HAZIMOZI RENDSZER DVD-VEL
СИСТЕМА ДОМАШНЬОГО КІНОТЕАТРУ З DVD
DVD CINEMA
MODEL
MODEL
MODEL
MODELL
МОДЕЛЬ
MODEL
HT-DV40H3
HT-DV50H3
INSTRUKCJA OBSŁUGI
NÁVOD K POUŽITÍ
NÁVOD NA POUŽÍVANIE
HASZNÁLATI ÚTMUTATÓ
ІНСТРУКЦІЯ З ЕКСПЛУАТАЦІЇ
OPERATION MANUAL
MODEL : HT-DV40H3
SPEAKERS : CP-DV40H
SUBWOOFER : CP-SW40H
MODEL : HT-DV50H3
SPEAKERS : CP-DV50H
SUBWOOFER : CP-SW40H
Note:
This product is not compatible with MTP and AAC file systems.
POLSKI
SLOVENSKY
MAGYAR
ENGLISH
Patrz strony od i do ii oraz od PL-1 do PL-68.
Viz strany iii až iv a CZ-1 až CZ-68.
Prosím, pozrite si strany v až vi a SK-1 až SK-68.
Lásd az vii - viii és HU-1 - HU-68 oldalakat.
Дивіться: сторінки від ix до x, а також від UA-1 до UA-68.
Please refer to pages xi to xii and E-1 to E-68.
Page 2

HT-DV40H3
HT-DV50H3
PL - WAŻNE INFORMACJE
z Jeśli urządzenie jest przełączone do trybu czuwania, jego
wewnętrzne elementy znajdują się pod napięciem. W takim przypadku urządzenie może zostać ponownie włączone przez zaprogramowany zegar lub za pomocą pilota zdalnego sterowania.
z Wewnątrz urządzenia nie ma żadnych elementów wyma-
gających naprawy lub obsługi użytkownika. Nie wolno demontować obudowy urządzenia, ponieważ stwarza to ryzyko po-
rażenia prądem. Naprawy należy zlecać autoryzowanym
serwisom. Urządzenie należy odłączyć od sieci przed
przystąpieniem do jakiejkolwiek naprawy lub kiedy nie będzie
używane przez dłuższy czas.
z Urządzenie należy chronić przed nadmierną wilgocią i zamocze-
niem, żeby uniknąć ryzyka wywołania poż
prądem. Nie wolno niczego ustawiać na urządzeniu, np. kwiatów
w wazonie napełnionym wodą.
z Produkt jest urządzeniem laserowym klasy 1.
aru lub porażenia
Urządzenie chronione jest amerykańskimi patentami o numerach 4
631 603, 4 577 216, 4 819 098 i 4 907 093 udostępnionymi tylko
w ograniczonym stopniu.
W opisywanym urządzeniu zastosowano technologię ochrony praw
autorskich zabezpieczoną patentami w Stanach Zjednoczonych i innymi prawami własności intelektualnej należącymi do Macrovision
Corporation i innych posiadaczy praw.
Stosowanie tej technologii dopuszczalne jest wyłącznie za zgodą Macrovision Corporation i jest przeznaczone do celów ograniczonego
odtwarzania domowego lub innego, chyba że zgoda Macrovision Corporation traktuje inaczej.
Wszelkie modyfikacje lub demontaż urządzenia są zabronione.
Wyprodukowano na licencji zgodnej z amerykańskimi patentami
o numerach 5,451,942; 5,956,674; 5,974,380; 5,978,762; 6,487,535
oraz innymi amerykańskimi i zagranicznymi patentami. DTS i DTS
Digital Surround są zarejestowanymi znakami handlowymi, a logo
i symbole DTS są znakami handlowymi Digital TheaterSystems, Inc.
© 1996-2007 DTS, Inc.
z Opisywane urządzenie wyposażone jest w laser niskiej mocy.
Nie wolno demontować jego obudowy, a wszelkie naprawy
należy zlecać w autoryzowanym serwisie.
Informacje o prawach autorskich:
z Kopiowanie, rozpowszechnianie, publiczne odtwarzanie lub
wypożyczanie zawartości płyty bez zezwolenia jest prawnie
zabronione (bez względu na to, czy jest to działalność dochodowa, czy nie).
z Opisywane urządzenie jest wyposażone w system zabezpiec-
zający przed kopiowaniem powodujący obniżenie jakości
obrazu podczas wykonywania kopii na taśmę wideo.
Ochrona przed kopiowaniem:
Opisywane urządzenie wyposażone jest w system ochrony kopii
opracowany przez firmę Macrovision.
Kod chroniący płytę DVD uniemożliwia normalne odtwarzanie kopii
wykonanych na taśmie wideo.
Wyprodukowano na licencji firmy Dolby Laboratories. "Dolby", "Pro
Logic", symbol podwójnego D, Audistry oraz symbol muszli akustycznej są znakami handlowymi firmy Dolby Laboratories.
"HDMI, logo HDMI i High-Definition Multimedia Interface są znakami
handlowymi lub zarejestrowanymi znakami handlowymi firmy HDMI
Licensing LLC."
DivX®, DivX® Certified i pozostałe znaki są znakami handlowymi
firmy DivX® -Networks, Inc., ich wykorzystywanie wymaga stosownej
licencji.
i
Page 3

PL - INFORMACJE DOTYCZĄCE USUWANIA ZUŻYTEGO URZĄDZENIA
A. Informacje dla użytkowników (prywatne
gospodarstwa domowe) dotyczące
usuwania odpadów
B. Informacje dla użytkowników
biznesowych dotyczące usuwania
odpadów
HT-DV40H3
HT-DV50H3
Uwaga: Państwa produkt
oznaczony jest tym symbolem.
Oznacza to, że zużytego
sprzętu elektrycznego
i elektronicznego nie należy
łączyć z odpadami
z gospodarstw domowych.
Dla tego typu produktów istnie-
je odrębny system zbiórki
odpadów.
1. W krajach Unii Europejskiej
Uwaga: Jeśli chcą Państwo usunąć to urządzenie,
prosimy nie używać zwykłych pojemników na śmieci!
Zużyty sprzęt elektryczny i elektroniczny należy usuwać
oddzielnie, zgodnie z wymogami prawa dotyczącymi
odpowiedniego przetwarzania, odzysku i recyklingu
zużytego sprzętu elektrycznego i elektronicznego.
Po wdrożeniu przepisów unijnych w Państwach
Członkowskich prywatne gospodarstwa domowe
na terenie krajów UE mogą bezpłatnie* zwracać zużyty
sprzęt elektryczny i elektroniczny do wyznaczonych
punktów zbiórki odpadów. W niektórych krajach* można
bezpłatnie zwrócić stary produkt do lokalnych punktów
sprzedaży detalicznej pod warunkiem, że zakupią
Państwo podobny nowy produkt.
*) W celu uzyskania dalszych informacji na ten temat
należy skontaktować się z lokalnymi władzami.
Jeśli zużyty sprzęt elektryczny i elektroniczny jest
wyposażony w baterie lub akumulatory, należy je
usunąć oddzielnie, zgodnie z wymogami lokalnych
przepisów.
Jeśli ten produkt zostanie usunięty we właściwy sposób,
pomogą Państwo zapewnić, że odpady zostaną
poddane przetworzeniu, odzyskowi i recyklingowi, a tym
samym zapobiec potencjalnym negatywnym skutkom
dla środowiska naturalnego i zdrowia ludzkiego, które
w przeciwnym razie mogłyby mieć miejsce na skutek
niewłaściwej obróbki odpadów.
2. Kraje pozaunijne
Jeśli chcą Państwo pozbyć się produktu, należy
skontaktować się z władzami lokalnymi i uzyskać
informacje na temat prawidłowej metody usunięcia
produktu.
1. W krajach Unii Europejskiej
W przypadku gdy produkt używany jest do celów
handlowych i zamierzają go Państwo usunąć:
Należy skontaktować się z dealerem firmy SHARP, który
poinformuje o możliwości zwrotu wyrobu. Być może
będą Państwo musieli ponieść koszty zwrotu
i recyklingu produktu. Produkty niewielkich rozmiarów
(i w małej liczbie) można zwrócić do lokalnych punktów
zbiórki odpadów.
2. Kraje pozaunijne
Jeśli chcą Państwo usunąć ten produkt, należy
skontaktować się zwładzami lokalnymi i uzyskać
informacje na temat prawidłowej metody jego usunięcia.
ii
Page 4

HT-DV40H3
HT-DV50H3
CZ - ŮLEŽITÉ INFORMACE
z Pokud je tlačítko ON/STAND-BY nastaveno do polohy STAND-
BY, zařízení je i přesto pod nápětím.Pokud je tlačítko ON/STANDBY nastaveno do polohy STAND-BY zařízení lze spustit režimem
časovače nebo dálkovým ovladačem.
z Zařízení neobsahuje části, které by si mohl uživatel sám oprav-
it. Nesundavejte kryt, pokud nejste osobou k tomu kvalifikovanou. Toto zařízení je pod napětím, proto před jakoukoliv
servisní činnosti odpojte zařízení nejprve ze zdroje, totéž
proveďte, pokud se zařízení dlouhodobě nepoužívá.
z Chraňte zařízení před kontaktem s vodou, zabraníte tím možnosti
vzniku zkratu. Na zařízení nepokládejte zádné předměty plněné
tekutinou, např. vázy.
z Je to laserový výrobek třídy 1.
z Po otevření a uvolnění zámků se vystavujete neviditelnému lase-
rovému záření. Vyvarujte se přímému pohledu do paprsku.
Informace o autorských právech:
z ·Neautorizované kopírování, šíření, veřejné uvádění, přenos,
veřejné provozování a pronajímání (nezáleží na tom, jestli jsou
nebo nejsou tyto aktivity provozovány za účelem získu)
obsahu disku jsou zákonem zakázány.
z Tento systém je vybaven technologii chránící před
kopírováním, která při kopírování obsahu disku na videokazetu
způsobuje degradaci obrazů.
Ochrana proti kopírování:
Toto z ařízení podporuje ochranu proti kopírování Macrovision.
Pokud obsah disků DVD, které jsou chráněny proti kopírováním kódem, budete kopírovat pomocí videorekordéru, ochranný kód
zapříčiní, že nebude možné videopásku běžně přehrávat.
Licence pro patentové nároky na tento přístroj podle U.S. čísla patentů 4,631,603, 4,577,216, 4,819,098, a 4,907,093 je poskytnutá
pouze pro omezené prohlížení.
Tento systém je chráněn americkými patenty a dalšími právy na duchovní vlastnost a právem kopírování, které náleží společnosti Macrovision Corporation.
Použití technologie Macrovision chránící před nezákonným kopírováním je povoleno společností Macrovision a je určeno pouze pro
domácí použití, pokud nebylo písemně povoleno k jiným účelům
společností Macrovision Corporation.
Dekompilace nebo rozebírání je zakázáno.
Vyrobeno v licenci under podle U.S. čísla patentů 5,451,942;
5,956,674; 5,974,380; 5,978,762; 6,487,535 a dalšími americkými
a zahraničními patenty. DTS, DTS Digital Surround jsou registrované
obchodní znáčky a logo DTS jsou obchodní znáčky společnosti Dig-
ital Theater Systems, Inc. © 1996-2007 DTS, Inc.
Vyrobeno v licenci Dolby Laboratories. "Dolby", "Pro Logic", symbol
dvojitého D, Audistry a logo Audistry jsou obchodní znáčky
společnosti Dolby Laboratories.
"HDMI, logo HDMI a High-Definition Multimedia Interface jsou obchodní znáčky nebo registrované obchodní znáčky HDMI Licensing
LLC."
DivX® , DivX® Certified a příbuzná loga jsou obchodní znáčky
společnosti DivX® -Networks, Inc. a jsou použity v licenci.
iii
Page 5

CZ - INFORMACE O LIKVIDACI POUŽITÉHO VYBAVENÍ
A. Informace o likvidaci pro uživatele
(domácnosti)
B. Informace o likvidaci pro podnikatelské
subjekty
HT-DV40H3
HT-DV50H3
Upozornění: Váš výrobek je
označen tímto symbolem. Zna-
mená to, že je zakázáno likvi-
dovat použitý elektický nebo
elektronický výrobek s běžným
domácímodpadem. Pro tyto
výrobky je k dispozici samostatný sběrný systém.
1. V zemích Evropské unie
Upozornění: Toto zařízení nelikvidujte v běžných odpadkových koších!
Použíté elektické a elektronické vybavení je třeba likvidovat samostatně a v souladu s legislativou, která
vyžaduje řádnou likvidaci, obnovení a recyklaci
použitého elektického a elektronického vybavení.
Na základě dohody členských států mohou domácnosti
v zemích Evropské unie vracet použité elektrické a elektronické vybavení v určených sběrnách zdarma*.
V některých zemích* od vás může místní prodejce odebrat zdarma použitý výrobek, pokud zakoupíte nový podobný.
*) Další podrobnosti vám sdělí orgány místní správy.
Pokud použité elektrické nebo elektronické vybavení
obsahuje baterie nebo akumulátory, zlikvidujte je pře-
dem samostatně v souladu s místními vyhláškami.
Řádnou likvidací toho výrobku pomáháte zajistit, že
bude odpad vhodným způsobem zlikvidován, obnoven
a recyklován a zabráníte tak možnému poškození životního prostředí a zdraví obzvatel, ke kterému by mohlo
dojít v případě nesprávné likvidace.
2. V ostatních zemích mimo Evropskou unii
Chcete-li tento výrobek zlikvidovat obrat’te se na místní
orgány, které vás seznámí s vhodnou metodou likvidace.
1. V zemích Evropské unie
Chcete-li zlikvidovat výrobek, který je používán pro
ponikatelské účely:
Obrat’te se na prodejce SHARP, který vás informuje o
odebrání výrobku. Odebrání a recyklace mohou být zpoplatněny. Malé výrobky (a malá množství) mohou odebírat místní sběrny odpadu.
2. V ostatních zemích mimo Evropskou unii
Chcete-li tento výrobek zlikvidovat obrat’te se na místní
orgány, které vás seznámí s vhodnou metodou likvidace.
iv
Page 6

HT-DV40H3
HT-DV50H3
SK - DÔLEŽITÉ INFORMÁCIE
z Keď je tlačidlo ON/STAND-BY (ZAP./POHOTOVOSTNÝ REŽIM)
nastavený do polohy STAND-BY (POHOTOVOSTNÝ REŽIM),
nachádza sa v jednotke ešte stále 5,451,942; 5,956,674,380;
5,978,72; 6,487,545 napätie.Keď je tlačidlo ON/STAND-BY (ZAP./
POHOTOVOSTNÝ REŽIM) nastavený do polohy STAND-BY
(POHOTOVOSTNÝ REŽIM), prístroj sa môže uviesť do prevádzky pomocou režimu Časovač alebo pomocou diaľkového
ovládača.
z Tento prístroj neobsahuje žiadne súčiastky, ktoré môže opraviť
užívateľ. Pokiaľ na to nemáte kvalifikáciu, nikdy neodoberajte
kryty. V tomto prístroji je nebezpečné napätie, pred akýmkoľvek
servisom alebo keď ho nebudete dlhšiu dobu používať, odpojte
ho z elektrickej siete.
z Aby ste zabránili požiaru a nebezpečenstvu skratu, zabráňte kon-
taktu zariadenia s vodou. Na prístroj neklaďte žiadne predmety
naplnené tekutinami (ako napríklad vázy).
z Výrobok je laserová jednotka 1. triedy.
z Pod krytom sa nachádza zdroj neviditeľného laserového žiare-
nia. Nepozerajte sa na snímač lasera priamo alebo pomocou
optických nástrojov.
Prístroj podlieha patentom č. 4 631 603, 4 577 216,4 819 098 a 4 907
093 v USA, a je licencovaný len na obmedzené použitie.
Tento výrobok obsahuje technológiu ochrany autorského zákona, ktorá
je chránená určitými patentmi podanými v USA a inými zákonmi na
ochranu intelektuálneho vlastníctva vlastnených spoločnosťou Macrovision Corporation a inými majiteľmi práv.
Použitie tejto technológie na ochranu autorských práv musí byť schválené spoločnosťou Macrovision Corporation a je určené len na
domáce a iné obmedzené použitie (pokiaľ to nie je inak schválené
spoločnosťou Macrovision Corporation).
Reverse engineering a rozoberanie sú zakázané.
Vyrobené na základe licencie (č. pat. v USA: 5,451,942; 5,956,674;
5,974,380; 5,978,762; 6,487,535 a iní v USA a medzinárodní).
DTS a "DTS Digital Out" sú obchodné značky spoločnosti Digital
Theater Systems, Inc. © 1996-2007 DTS
Vyrobené na základe licencie od spoločnosti Dolby Laboratories.
"Dolby","Pro Logic", symbol dvojitého D, Audistry, a logo zvukovej
mušle sú obchodné značky spoločnosti Dolby Laboratories.
"HDMI, logo HDMI a High-Definition Multimedia Interfacesú obchodné značky spoločnosti HDMI Licensing LLC."
Informácie o copyrighte:
z Je zakázané neautorizovane kopírovať, vysielať, zobrazovať na
verejnosti, prenášať, predvádzať na verejnosti a požičiavať (bez
ohľadu na to, či sú také aktivity s cieľom zisku) obsah disk.
z Tento systém je vybavený technológiou na ochranu pred kopíro-
vaním, ktorá pri kopírovaní obsahu disku na videokazetu spôsobuje podstatnú degradáciu obrazu.
Ochrona przed kopiowaniem:
Tento prístroj podporuje ochranu pred kopírovaním Macrovision.
Pri kopírovaní obsahu disku DVD, ktorý obsahuje ochranu pred kopírovaním, pomocou videorekordéra kód ochrany pred kopírovaním
zabráni normálnemu prehrávaniu kópie na videokazete.
DivX®, DivX® Certified a príslušné logá sú obchodné značky
spoločnosti DivX® -Networks, Inc. a sú použité na základe licencie.
v
Page 7

SK - INFORMÁCIE O LIKVIDÁCII POUŽITÉHO ZARIADENIA
A. Informácie o likvidácii pre používateľov
(domácnosti)
B. Informácie o likvidácii pre komerčných
používateľov
HT-DV40H3
HT-DV50H3
Pozor: Výrobok je označený
týmto symbolom. Znamená to,
že použité elektrické a ele-
ktronické výrobky by sa nemali
miešat’ s bežným domovým
odpadom. Pre tieto výrobky ex-
istuje samostatný zberný sys-
tém.
1. V Európskej únii
Pozor: Ak chcete zlikvidovat’ toto zariadenie, nepoužívajte bežný kôš na odpadky!
Použité elektrické a elektronické zariadenia musia byt’
spracované oddelene a podľa platných zákonov, ktoré
vyžadujú správne zaobchádzanie, obnovu a recyklovanie použitých elektrických a elektronických zariadení.
Podľa implementácie v jednotlivých členských štátoch
môžu domácnosti v štátoch EÚ vrátit’ použité elektrické
a elektronické zariadenia na určené zberné miesta bez
poplatkov*.
V niektorých štátoch* môžu vaše staré výrobky zdarma
odobrat’ tiež miestni maloobchodní predajcovia, ak si
zakúpite podobný nový výrobok.
*) Ďalšie podrobnosti sa dozviete od vašich miestnych
orgánov.
Ak sa vo vašich použitých elektrických alebo elektronických zariadeniach nachádzajú batérie, zlikvidujte ich
samostatne vopred, podľa miestnych požiadaviek.
Správnou likvidáciou tohto výrobku pomôžete pri zabezpečení toho, aby odpad prešiel potrebnou úpravou, obnovou a recykláciou a takto sa predchádzalo možným
negatívnym vplyvom na životné prostredie a zdravie osôb, ku ktorým by inak mohlo dochádzat’ v dôsledku
nevhodného zaobchádzania s odpadom.
2. V ostatných štátoch mimo EÚ
Ak si želáte znehodnotit’ tento výrobok, obrát’te sa na
vaše miestne orgány a informujte sa o správnej metóde
likvidácie.
1. V Európskej únii
Ak sa výrobok používa na komerčné účely a chcete ho
znehodnotit’:
Obrát’te sa na vášho predajcu SHARP, ktorý vás informuje o spätnom odobratí výrobku. Môžu vám byt’ úč-
tované náklady vyplývajúce zo spätného odobratia a recyklácie. Malé výrobky (a malé množstvá) môžu spätne
odobrat’ vaše lokálne zberné miesta.
2. V ostatných štátoch mimo EÚ
Ak si želáte znehodnotit’ tento výrobok, obrát’te sa na
vaše miestne orgány a informujte sa o správnej metóde
likvidácie.
vi
Page 8

HT-DV40H3
HT-DV50H3
HU - SPECIÁLIS MEGJEGYZÉSEK
z Amikor az ON/STAND-BY gomb STAND-BY helyzetben van, a
készülék belseje még hálózati feszültség alatt van.Ha az ON/
STAND-BY gomb STAND-BY (készenlét) módba van kapcsolva,
bekapcsolhatja a készüléket a távvezérlővel vagy az időzítés
móddal.
z A készülék nem tartalmaz felhasználó által javítható részeket.
A készülék fedelét csak szakember távolíthatja el. A készülék
belsejében eletromos feszültség van, mindig húzza ki a tápkábelt a csatlakozóból mielőtt bármilyen javítási munkát végez
vagy ha hosszabb ideig nem használja a készüléket.
z lA tűzveszély és az áramütés veszélyének megelőzése érde-
kében ügyeljen arra, hogy a készülék ne érintkezzen folyadékokkal. Ne helyezzen semmilyen folyadékkal töltött tárgyat (pl.
vázát) a készülékre!
z A készülék 1. OSZTÁLYBA SOROLT LÉZERTERMÉK.
A készülék USA szabadalmi száma: 4,631,603, 4,577,216,
4,819,098, és 4,907,093, csak korlátozott megtekintés engedélyezve.
Ez a termék szerzői jogi védelmi technológiát tartalmaz, amelyet az
Egyesült Állomok szabadalmi és egyéb szellemi termékekre vonatkozó jogai védenek, melyek tulajdonosa Macrovision Vállalat és egyéb
jogtulajdonosok.
E szerzői jogokat védő technológia alkalmazását engedélyeznie kell a
Macrovision cégnek, és a Macrovision egyéb felhatalmazása nélkül
csak háztartási vagy egyéb korlátozott megtekintési célokra lehet
használni.
Visszafejtése vagy szétbontása tilos!
Gyártva licensze alapján (USA szabadalmi száma: 5,451,942;
5,956,674; 5,974,380; 5,978,762; 6,487,535). DTS és DTS Digital
Surround a Digital Theater Systems, Inc. bejegyzett védjegyei. Szimbólum és a logó "DTS" a Digital Theater Systems, Inc. védjegyei. ©
1996-2007 DTS, Inc.
vii
z Opisywane urządzenie wyposażone jest w laser niskiej mocy.
Nie wolno demontować jego obudowy, a wszelkie naprawy
należy zlecać w autoryzowanym serwisie.
Szerzői jogokra vonatkozó tudnivalók:
z A lemezek tartalmának illetéktelen másolását, sugárzását, közönség
elé tárását, továbbítását, közönség előtti előadását és kölcsönzését
a törvény tiltja függetlenül attól, hogy a fenti tevékenységek
végrehajtása anyagi haszon szerzésével jár-e vagy sem.
z A jelen rendszer szerzőijog-védelmi technológiával van felsz-
erelve, mely videokazettára történő másolás esetén gondoskodik a lemezeken található képi anyag minőségének
jelentékeny romlásáról.
Szerzői jogok védelme:
Ez a készülék a Macrovision másolásvédelmi technológiáját támogatja.
Másolásvédelmi kóddal ellátott DVD lemezeknél, ha a DVD lemez
tartalmát videómagnót használva lemásolják, a másolásvédelmi kód
megakadályozza a videókazetta másolat normál lejátszását.
Gyártva a Dolby Laboratories licensze alapján. A "Dolby", "Pro Logic", dupla D szimbólum, "Audistry" és a kagyló logó a Dolby Laboratories védjegyei.
"HDMI", a HDMI logó és a High-Definiton Multimédia Interface
a HDMI Licensing LLC bejegyzett védjegyei.
DivX® , DivX® Certified és kapcsolódó logók a DivX® -Networks,
Inc. védjegye és licensze alapján felhasználtak.
Page 9

HU - TÁJÉKOZTATÓ A MEGFELELŐ ÁRTALMATLANÍTÁSRÓL
A. Hulladék-elhelyezési tájékoztató
felhasználók részére (magán háztartások)
B. Hulladék-elhelyezési tájékoztató vállalati
felhasználók részére
HT-DV40H3
HT-DV50H3
Figyelem: A terméket ezzel a
jelöléssel láttákel. Ez azt jelen-
ti, hogy a használt elektromos
és elektronikus termékeket
nem szabad az általános
háztartási hulladékkal keverni.
Ezekhez a termékekhez külön
hulladékgyűjtő rendszer
üzemel.
1. Az Európai Unióban
Figyelem: Ha a készüléket ki akarja selejtezni, kérjük,
ne a közönséges szemeteskukát használja!
A használt elektromos és elektronikus berendezéseket
külön, és a használt elektromos és elektronikus
berendezések szabályszerű kezeléséről,
visszanyeréséről és újrahasznosításáról rendelkező
jogszabályokkal összhangban kell kezelni.
A tagállamok általi végrehajtást követően az EU
államokon belül a magán háztartások használt
elektromos és
elektronikai berendezéseiket díjmentesen juttathatják
vissza a kijelölt gyűjtőlétesítményekbe*. Egyes
országokban* a helyi kiskereskedés is díjmentesen
visszaveheti Öntől a régi terméket, ha hasonló új
terméket vásárol.
*) A további részletekről, kérjük, érdeklődjön az
önkormányzatnál.
Ha használt elektromos vagy elektronikus
berendezésében elemek vagy akkumulátorok vannak,
kérjük,
előzetesen ezeket selejtezze ki a helyi előírásoknak
megfelelően.
A termék szabályszerű kiselejtezésével Ön segít
biztosítani azt, hogy a hulladék keresztülmenjen a
szükséges kezelésen, visszanyerési és
újrahasznosítási eljáráson, ezáltal közreműködik a
lehetséges káros környezeti és humán egészségi
hatások megelőzésében, amelyek ellenkező esetben a
helytelen hulladékkezelés következtében
előállhatnának.
2. Az EU-n kívüli egyéb országokban
Ha a terméket ki szeretné selejtezni, kérjük, forduljon az
önkormányzathoz, és érdeklődjön a helyes
hulladékelhelyezési módszerről.
1. Az Európai Unióban
Ha a terméket üzleti célokra használta, és ki kívánja
selejtezni:
Kérjük, forduljon a SHARP kereskedéshez, ahol
tájékoztatják Önt a termék visszavételéről. Lehetséges,
hogy a visszavételből és újrahasznosításból eredő
költségeket felszámítják. Előfordulhat, hogy a helyi
hulladékbegyűjtő létesítmény átveszi a kisebb
termékeket (és kis mennyiségeket).
2. Az EU-n kívüli egyéb országokban
Ha a terméket ki szeretné selejtezni, kérjük, forduljon az
önkormányzathoz, és érdeklődjön a helyes hulladékelhelyezési módszerről.
viii
Page 10

HT-DV40H3
HT-DV50H3
ix
UA - ВАЖЛИВА ІНФОРМАЦІЯ
z У режимі очікування пристрою його внутрішні елементи
знаходяться під напругою. Том у в режимі очікування
пристрій можна увімнкути за допомогою пульта або
автоматично за допомогою таймера.
z В середині пристрою немає елементів, які б вимагали
обслуговування зі сторони користувача. Верхню кришку
може зняти тільки кваліфікований працівник сервісного
центру. Внутрішні елементи пристрою знаходяться під
напругою. Перед
Ви довго не користувалися пристроєм, слід витягнути
штепсель з електричної розетки.
z Оберігайте пристрій від від дії води та вологи.
z Даний продукт є лазерним пристроєм класу 1.
z Даний комплект домашнього кінотеатру містить у собі
лазерний пристрій слабкої потужності. Щоб запевнити
відповідне обслуговування, забороняється самотужки
виконувати демонтаж
обладнання виконується в авторизованих сервісних
центрах фірми Sharp.
Інформація про авторське право:
z Законом забороняється копіювати, розповсюджувати,
публічно відтворювати зміст диску без відповідного дозволу
(незалежно від того, чи це діяльність для заробітку чи ні).
z Даний пристрій має відповідні забезпечення, які
захищають від копіювання. Технологія полягає у тому, що
під час
погіршується.
копіювання на відеоплівку якість запису значно
Охорона від копіювання:
Пристрій забезпечено системою охорони від копіювання
фірми Macrovision.
Код, який охороняє диск DVD, робить неможливим
відтворення копії, котру виконано на відеоплівці.
тим, як зняти кришку, або у випадку, коли
даного пристрою. Ремонт
Номери американських патентів, які охороняють пристрій:
4631603, 4577216, 4819098 і 4907093. Вони доступні тільки у
незначному обсязі.
У даному пристрої застосовано технологію охорони
авторських прав, забезпечену патентами в Сполучених
Штатах Америки та іншими правами інтелектуальної
власності, які належать до Macrovision Corporation.
Користування цією технологією здійснюється тільки за згодою
Macrovision Corporation. Мета забезпечень - обмежене
відтворення в домашніх умовах.
Різного виду модифікування та
заборонений.
Виготовлено за ліцензією (номери американських патенті
5,451,942; 5,956,674; 5,974,380; 5,978,762; 6,487,535 та інши в
Сполучених Штатах Америки i за кордоном.)
“DTS” і “DTS Digital Surround” - це зареєстровані торговельні
знаки фірми Digital Theater Systems, Inc. Логотипі DTS - це
торговельні знаки фірми Digital Theater Systems, Inc.
© 1996-2007 DTS, Inc.
Виготовлено за ліцензією фірми Dolby Laboratories. “Dolby”,
„Dolby Pro Logic”, подвійна літера D, Audistry та логотип Audistry - це торговельні знаки фірми Dolby Laboratories.
„HDMI, логотип HDMI i High-Definition Multimedia Interface – це
торговельні знаки або зареєстровані торговельні знаки фірми
HDMI Licensing LLC.”
DivX
®, DivX® Certified та інші знаки – це торговельні знаки
фірми DivX® - Networks, Inc., їх використання вимагає
відповідної ліцензії.
демонтаж пристрою
Page 11

UA - ІНФОРМАЦІЯ ПРО ЗНИЩЕННЯ СПРАЦЬОВАНОГО ОБЛАДНАННЯ
Увага: Даний продукт
зазначений такою
позначкою. Це означає, що
спрацьованого електричного
або електронного пристрою
не можна з’єднувати з
відходами домашнього
господарства. Тому для
цього типу пристроїв існує
спеціальна система збору.
A. Інформація про утилізацію відходів
для користувачів (приватні домашні
господарства)
1. В країнах-членах Європейського
союзу
Увага: Якщо Ви хочете усунути даний пристрій, не
викидайте його у звичайні контейнери для сміття!
Спрацьоване електричне або електронне
обладнання слід усувати окремо, згідно з вимогами
законодавства про відповідну переробку та
рециклінг спрацьованого електронного та
електричного обладнання.
Згідно із відповідним законодавством в країнахчленах ЄС, приватні домашні господарства, які
знаходяться на території країн Євросоюзу, можуть
безкоштовно* здавати спрацьоване обладнання в
пункти збору відходів. В деяких країнах* можна
безкоштовно віддати старий продукт в місцеві пункти
роздрібного продажу при умові, що Ви купите схожий
новий продукт.
*) Для детальнішої інформації зверніться до
представників місцевої влади.
Якщо в електричном у або електронному обладнанні
є акумулятори або батарейки, слід їх усунути окремо,
згідно із місцевими законами.
Якщо даний продукт буде усунено згідно з вимогами,
то відходи буде піддано відповідній переробці та
рециклінгові, а завдяки цьому можна буде запобігти
потенційним негативним наслідкам для натурального середовища та людського здоров”я, які, в свою
чергу, можуть мати місце у випадку неправильної
утилізації відходів.
2. Країни, які не входять в ЄС
Якщо Ви хочете усунути даний продукт, слід
сконтактуватися із відповідними місцевими владами,
які повинні надати Вам інформацію про правильну
утилізацію даного продукту.
B. Інформація про утилізацію відходів
для бізнес-користувачів
1. В країнах-членах Європейського
союзу
У випадку, коли продукт використовувався з комерційною метою, і Ви плануєте його усунути:
Сконтактуйтеся з представником фірми SHARP, який
надасть інформацію про можливості повернення
спрацьованого пристрою. Можливо, Вас обтяжать
коштами рециклінгу продукту. Продукти невеликих
розмірів (в малій кількості) можна повертати в
місцеві пункти збору відходів.
2. Країни, які не входять в ЄС
Якщо Ви хочете усунути даний продукт, слід
сконтактуватися із відповідними місцевими владами,
які повинні надати Вам інформацію про правильну
утилізацію даного продукту.
HT-DV40H3
HT-DV50H3
x
Page 12

HT-DV40H3
HT-DV50H3
ENG - SPECIAL NOTES
z When the ON/STAND-BY button is set at STAND-BY position,
mains voltage is still present inside the unit. When the ON/
STAND-BY button is set at STAND-BY position, the unit may
be brought into operation by the timer mode or remote control.
z This unit contains no user serviceable parts. Never remove
covers unless qualified to do so. This unit contains dangerous
voltages, always remove mains plug from the socket before any
service operation and when not in use for a long period.
z To prevent fire or shock hazard, do not expose this appliance to
dripping or splashing. No objects filled with liquids, such as vases,
shall be placed on the apparatus.
z This product is classified as a CLASS 1 LASER PRODUCT.
z This product contains a low power laser device. To ensure con-
tinued safety do not remove any cover or attempt to gain access
to the inside of the product. Refer all servicing to qualified personnel.
Copyright Information:
z Unauthorised copying, broadcast, public display, transmission,
public performance and rental (regardless of whether or not
such activities are for profit) of disc contents are prohibited by
law.
z This system is equipped with copy protection technology that
causes substantial degradation of images when the contents of
a disc are copied to a video tape.
Apparatus Claims of U.S. Patent Nos. 4,631,603,
4,577,216,4,819,098, and 4,907,093, licensed for limited viewing
uses only.
This product incorporates copyright protection technology that is protected by method claims of certain U.S. patents and otherintellectual
property rights owned by Macrovision Corporation and other rights
owners.
Use of this copyright protection technology must be authorised by Macrovision Corporation, and is intended for home and other limited viewing uses only unless otherwise authorised byMacrovision Corporation.
Reverse engineering or disassembly is prohibited.
Manufactured under license under U.S. Patent #’s: 5,451,942;
5,956,674; 5,974,380; 5,978,762; 6,487,535 & other U.S. and world
wide patents issued & pending. DTS and DTS Digital Surround are
registered trademarks and the DTS logos and Symbol are trademarks of DTS, Inc. © 1996-2007 DTS, Inc. All Rights Reserved.
Manufactured under license from Dolby Laboratories. “Dolby”,
“Pro Logic”, the double-D symbol, Audistry and the sound shell
logo are trademarks of Dolby Laboratories.
"HDMI, the HDMI logo and High-Definition Multimedia Interfaceare
trademarks or registered trademarks of HDMI Licensing LLC."
DivX® , DivX® Certified and associated logos are trademarks of DivX® -Networks, Inc. and are used under license.
xi
Copy Protection:
This unit supports Macrovision copy protection. On DVD discs that include a copy protection code, if the contents of the DVD disc are copied using a VCR, the copy protection code prevents the videotape
copy from playing normally.
Page 13

ENG - INFORMATION ON PROPER DISPOSAL
A. Information on Disposal for Users
private households)
B. Information on Disposal for Business
Users
HT-DV40H3
HT-DV50H3
Attention: Your product
is marked with this symbol.
It means that used electrical
and electronic products
should not be mixed with gen-
eral household waste. There is
a separate collection system
for these products.
1. In the European Union
Attention: If you want to dispose of this equipment,
please do not use the ordinary dustbin!
Used electrical and electronic equipment must be treated separately and in accordance with legislation that requires proper treatment, recovery and recycling of used
electrical and electronic equipment.
Following the implementation by member states, private
households within the EU states may return their used
electrical and electronic equipment to designated collection facilities free of charge*. In some countries* your local retailer may also take back your old product free of
charge if you purchase a similar new one.
*) Please contact your local authority for further details.
If your used electrical or electronic equipment has batteries or accumulators, please dispose of these separately beforehand according to local requirements.
By disposing of this product correctly you will help ensure that the waste undergoes the necessary treatment,
recovery and recycling and thus prevent potential negative effects on the environment and human health which
could otherwise arise due to inappropriate waste handling.
2. In other Countries outside the EU
If you wish to discard this product, please contact your
local authorities and ask for the correct method of disposal.
1. In the European Union
If the product is used for business purposes and you
want to discard it:
Please contact your SHARP dealer who will inform you
about the take-back of the product. You might be
charged for the costs arising from take-back and recycling. Small products (and small amounts) might be taken back by your local collection facilities.
2. In other Countries outside the EU
If you wish to discard of this product, please contact your
local authorities and ask for the correct method of
disposal.
xii
Page 14
HT-DV40H3
HT-DV50H3
ENGLISH
Introduction
Thank you for purchasing this SHARP product. To obtain the best
performance from this product, please read this manual carefully. It
will guide you in operating your SHARP product.
This manual contains two different home cinema systems, and may
not be available in all countries.
z HT-DV40H3 DVD Cinema consisting of HT-DV40H3 (main unit),
CP-DV40H (speaker) and CP-SW40H (subwoofer system).
z HT-DV50H3 DVD Cinema consisting of HT-DV50H3 (main unit),
CP-DV50H (speaker) and CP-SW40H (subwoofer system).
Special Note
Supply of this product does not convey a license nor imply any right
to distribute content created with this product in revenue-generating
broadcast systems (terrestrial, satellite, cable and/or other
distribution channels), revenue-generating streaming applications
(via Internet, intranets and/or other networks), other revenuegenerating content distribution systems (pay-audio or audio-ondemand applications and the like) or on revenue-generating physical
media (compact discs, digital versatile discs, semiconductor chips,
hard drives, memory cards and the like). An independent license for
such use is required. For details, please visit http://mp3licensing.com
MPEG Layer-3 audio coding technology licensed from Fraunhofer
IIS and Thomson.
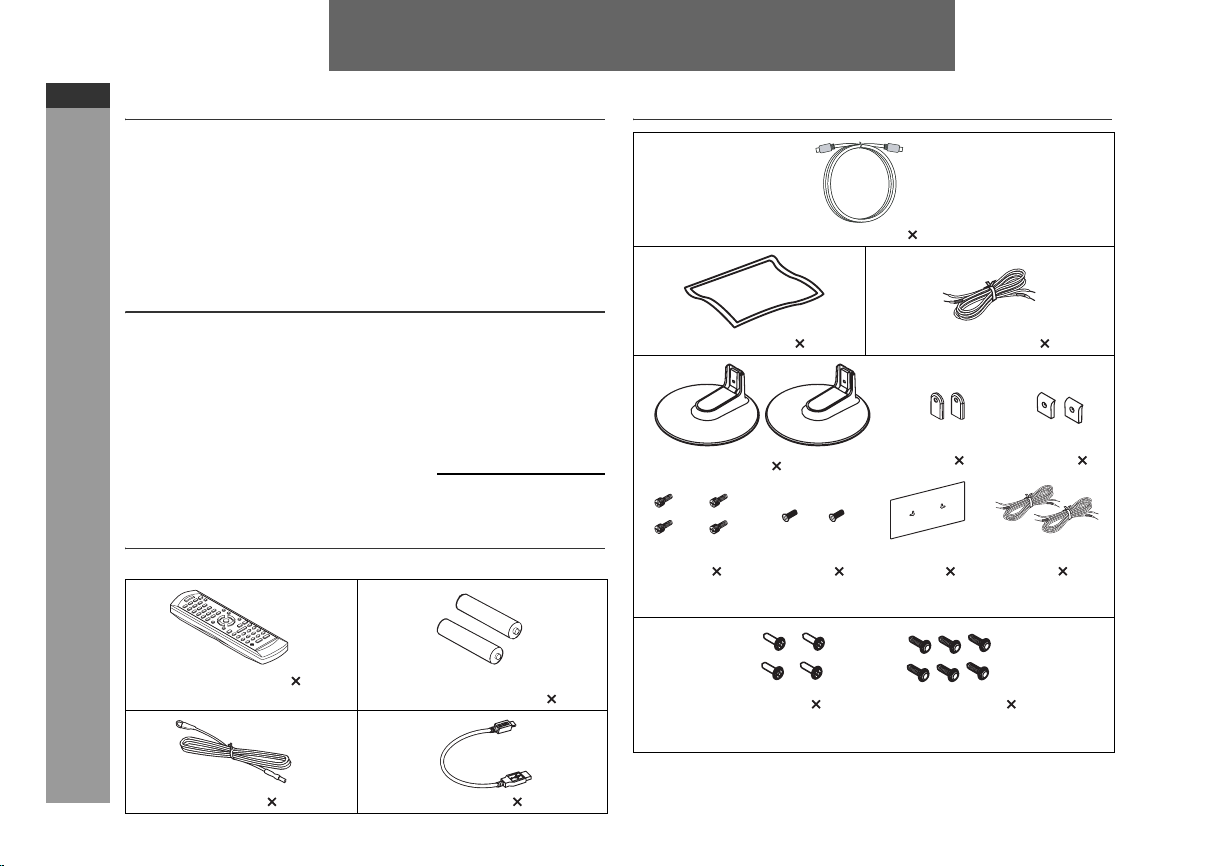
Accessories
General Information
Please confirm that the following accessories are included.
ENGLISH
Cleaning cloth 1 Subwoofer wire 1
Stands 2
Special
screws 4
HDMI cable 1
Flush
screws 2
CP-DV40H
Stand
covers 2
Pattern
paper 1
Deco back
covers 2
Speaker
wires 2
E-1
Remote control 1 “AA” size batteries (UM/SUM-3,
R6, HP-7 or similar) 2
FM aerial 1 USB cable 1
Screws 4 Washer screws 6
CP-DV50H
Page 15

Contents
Page
General Information
Precautions . . . . . . . . . . . . . . . . . . . . . . . . . . . . . . . . . . . . . . . . . 3
Controls and indicators . . . . . . . . . . . . . . . . . . . . . . . . . . . . . .4 - 8
Description of discs . . . . . . . . . . . . . . . . . . . . . . . . . . . . . . . .9 - 10
Preparation for Use
System installation . . . . . . . . . . . . . . . . . . . . . . . . . . . . . . . . . . 11
System connections . . . . . . . . . . . . . . . . . . . . . . . . . . . . . .12 - 17
Connecting to a conventional TV/monitor . . . . . . . . . . . . . . . . 18
Audio connection to other equipment . . . . . . . . . . . . . . . . . . . 19
Remote control . . . . . . . . . . . . . . . . . . . . . . . . . . . . . . . . . . . . . . 20
Changing the set up menu . . . . . . . . . . . . . . . . . . . . . . . . .21 - 27
Basic Operation
General control . . . . . . . . . . . . . . . . . . . . . . . . . . . . . . . . . . . . . 28
Setting the clock (Remote Control only) . . . . . . . . . . . . . . . . . 29
Enjoying surround sound (sound mode) . . . . . . . . . . . . .30 - 33
DVD Operation
Playing a disc
Playback . . . . . . . . . . . . . . . . . . . . . . . . . . . . . . . . . . . . . . . 34 - 35
Various disc functions . . . . . . . . . . . . . . . . . . . . . . . . . . . . .35 - 36
To resume playback after stopping (resume play) . . . . . . . . . 36
DVD mode operation indicators . . . . . . . . . . . . . . . . . . . . . . . . 36
Basic operation
To locate the beginning of a chapter track (skip) . . . . . . . . . . 37
Fast forward/Fast reverse (search) . . . . . . . . . . . . . . . . . . . . . . 37
To start playback from the desired point (direct play) . . . . . . 38
Useful operation
Still picture/Frame advance . . . . . . . . . . . . . . . . . . . . . . . . . . . . 39
Slow motion play . . . . . . . . . . . . . . . . . . . . . . . . . . . . . . . . . . . . 39
To change the angle . . . . . . . . . . . . . . . . . . . . . . . . . . . . . . . . . . 40
To zoom images (zoom) . . . . . . . . . . . . . . . . . . . . . . . . . . . . . . . 40
To play the contents between the specified points repeatedly
(A-B repeat) . . . . . . . . . . . . . . . . . . . . . . . . . . . . . . . . . . . . . . . . . 40
To select a subtitle or audio language from the disc menu . . 40
To play in the desired order (programmed play) . . . . . . . . . . . 41
To play repeatedly (repeat play) . . . . . . . . . . . . . . . . . . . . . . . . 42
To change the display on TV screen . . . . . . . . . . . . . . . . . . . . 42
To change the display on main unit . . . . . . . . . . . . . . . . . 42 - 43
To change the subtitle language. . . . . . . . . . . . . . . . . . . . . . . . 43
To change the audio language (audio output) . . . . . . . . . . . . 43
Page
CD, CD-R and CD-RW Operation
Listening to a CD or MP3/WMA disc . . . . . . . . . . . . . . . . . . . . 44
Advanced CD or MP3/WMA disc playback . . . . . . . . . . . . . . . 45
DivX and JPEG disc operation
Playback on the DivX and JPEG menu screen. . . . . . . . . . . . . 46
Zoom function . . . . . . . . . . . . . . . . . . . . . . . . . . . . . . . . . . . . . . 47
Rotating a picture . . . . . . . . . . . . . . . . . . . . . . . . . . . . . . . . . . . 47
USB Memory Playback
Playback on USB memory device . . . . . . . . . . . . . . . . . . . . . . 48
To remove USB memory device . . . . . . . . . . . . . . . . . . . . .48 - 49
Advanced USB playback . . . . . . . . . . . . . . . . . . . . . . . . . . . 49 - 50
Radio Operation
Listening to the radio . . . . . . . . . . . . . . . . . . . . . . . . . . . . .50 - 51
Advanced Features
Using the Radio Data System (RDS) . . . . . . . . . . . . . . . . .52 - 56
Playing karaoke . . . . . . . . . . . . . . . . . . . . . . . . . . . . . . . . . .57 - 58
Timer and sleep operation (Remote Control only) . . . . . .59 - 62
Headphone connection . . . . . . . . . . . . . . . . . . . . . . . . . . . . . . . 63
References
Troubleshooting chart . . . . . . . . . . . . . . . . . . . . . . . . . . . . . 63 - 66
Maintenance . . . . . . . . . . . . . . . . . . . . . . . . . . . . . . . . . . . . . . . . 66
Specifications . . . . . . . . . . . . . . . . . . . . . . . . . . . . . . . . . . .67 - 68
HT-DV40H3
HT-DV50H3
ENGLISH
General Information
E-2
Page 16
HT-DV40H3
HT-DV50H3
ENGLISH
General Information
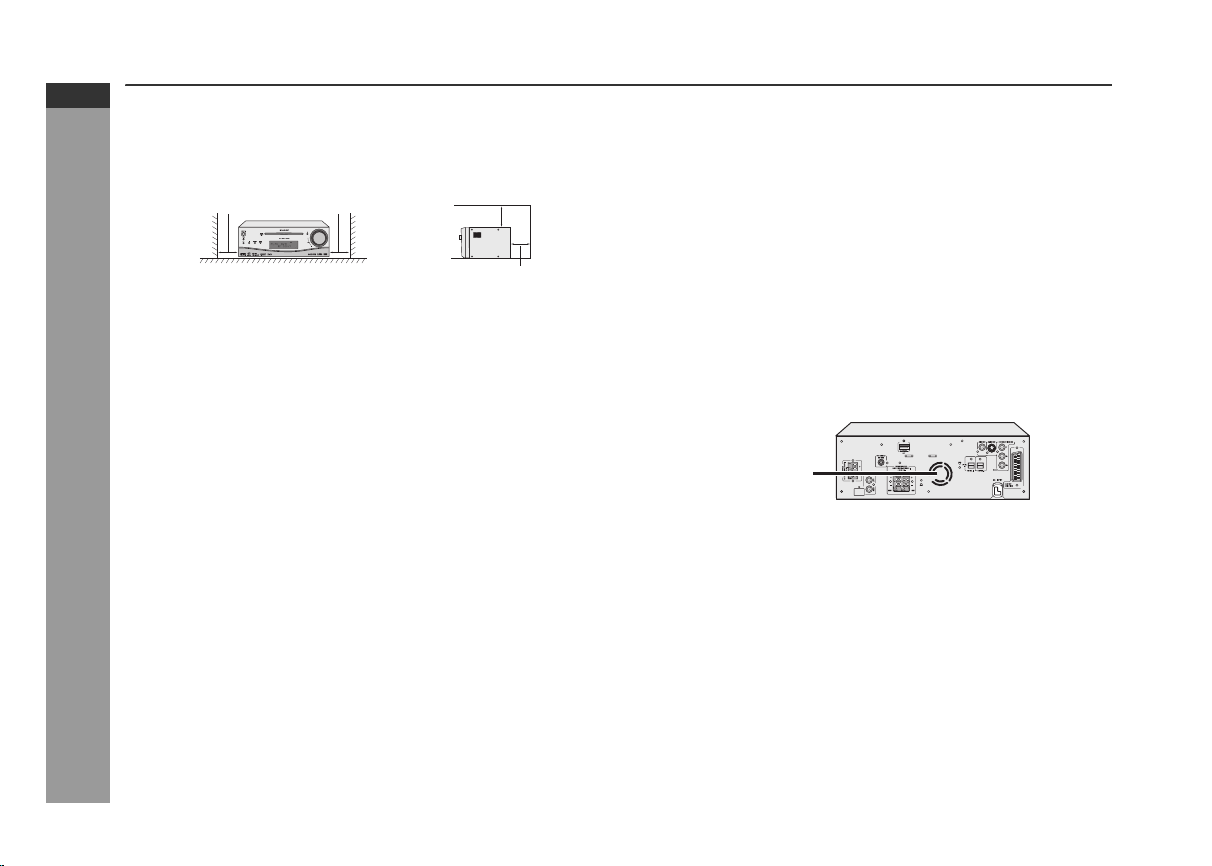
Precautions
General
z Please ensure that the equipment is positioned in a well-ventilated
area and ensure that there is at least 10 cm (4") of free space
along the sides, top and back of the equipment.
10 cm (4")
z Do not place subwoofer system on the same surface as main unit
to prevent sound interruption during playback.
z Use the unit on a firm, level surface free from vibration.
z Keep the unit away from direct sunlight, strong magnetic fields,
excessive dust, humidity and electronic/electrical equipment
(home computers, facsimiles, etc.) which generate electrical
noise.
z Do not place anything on top of the unit.
z Do not expose the unit to moisture, to temperatures higher than
60
°C (140°F) or to extremely low temperatures.
z If your system does not work properly, disconnect the AC power
lead from the wall socket. Plug the AC power lead back in, and
then turn on your system.
z In case of an electrical storm, unplug the unit for safety.
z Hold the AC power plug by the head when removing it from the
wall socket, as pulling the lead can damage internal wires.
z The AC power plug is used as a disconnect device and shall
always remain readily operable.
z Do not remove the outer cover, as this may result in electric
shock. Refer internal service to your local SHARP service
facility.
z The ventilation should not be impeded by covering the ventilation
openings with items, such as newspapers, tablecloths, curtains,
etc.
10 cm (4")
10 cm (4")
10 cm (4")
z No naked flame sources, such as lighted candles, should be
placed on the apparatus.
z Attention should be drawn to the environmental aspects of battery
disposal.
z This unit should only be used within the range of 5°C - 35°C
(41°F - 95°F).
z The apparatus is designed for use in moderate climates.
Warning:
The voltage used must be the same as that specified on this unit.
Using this product with a higher voltage other than that which is
specified is dangerous and may result in a fire or other type of
accident causing damage. SHARP will not be held responsible for
any damage resulting from use of this unit with a voltage other than
that which is specified.
Cooling fan
This unit is fitted with a cooling fan at the rear for improved cooling.
Do not cover the opening in this section with any obstacles.
Cooling fan
Caution:
The unit will get warm whilst being used. Do not touch the warm
areas of the unit for prolonged periods to avoid injury.
Volume control
The sound level at a given volume setting depends on speaker
efficiency, location, and various other factors. It is advisable to avoid
exposure to high volume levels. Do not turn the volume on to full at
switch on. Listen to music at moderate levels. Excessive sound
pressure from earphones and headphones can cause hearing loss.
E-3
Page 17
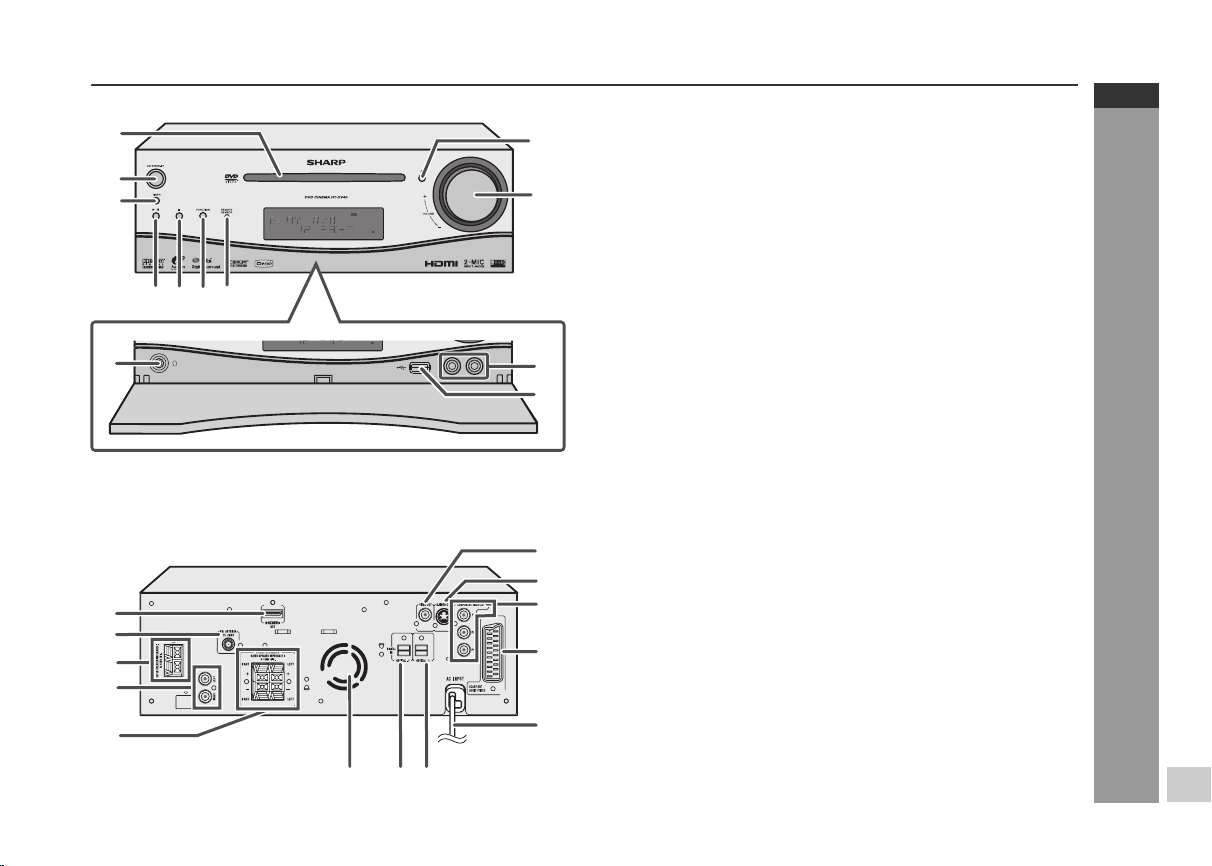
Controls and indicators
1
2
3
67
5
4
8
DOOR OPEN
9
10
11
12
Front panel
Reference page
1. CD Compartment . . . . . . . . . . . . . . . . . . . . . . . . . . . . . . . . . 34
2. On/Stand-by Button . . . . . . . . . . . . . . . . 28, 34, 41, 50, 62, 65
3. Timer Indicator . . . . . . . . . . . . . . . . . . . . . . . . . . . . . . . . . . . 60
4. DVD/CD/USB Play/Pause Button . . . . . . . . . . . 35, 39, 44, 48
5. Disc or USB Stop Button . . . . . . . . . . . . . . . . . . . . . . . . 35, 48
6. Function Button . . . . . . . . . . . . . . . . . . . . . . . . . . . . . . . . . . 28
7. Remote Sensor . . . . . . . . . . . . . . . . . . . . . . . . . . . . . . . . . . . 20
8. Headphone Socket . . . . . . . . . . . . . . . . . . . . . . . . . . . . . . . . 63
9. Disc Open/Close Button . . . . . . . . . . . . . . . . . . . . . . . . . . . 35
10. Volume Control . . . . . . . . . . . . . . . . . . . . . . . . . . . . . . . . . . 28
11. Microphone socket . . . . . . . . . . . . . . . . . . . . . . . . . . . . . . . . 57
12. USB Terminal . . . . . . . . . . . . . . . . . . . . . . . . . . . . . . . . . . . . 48
HT-DV40H3
HT-DV50H3
ENGLISH
Rear panel
9
10
1
2
3
11
12
4
5
6
87
13
1. HDMI Socket . . . . . . . . . . . . . . . . . . . . . . . . . . . . . . . . . . . . . 18
2. FM 75 Ohms Aerial Socket . . . . . . . . . . . . . . . . . . . . . . . . . 17
3. Subwoofer Terminals . . . . . . . . . . . . . . . . . . . . . . . 12, 13, 17
4. Auxiliary Input Sockets . . . . . . . . . . . . . . . . . . . . . . . . . . . . 19
5. Front Speaker Terminals . . . . . . . . . . . . . . . . . . . . . . . . 12, 13
6. Cooling Fan . . . . . . . . . . . . . . . . . . . . . . . . . . . . . . . . . . . . . . 3
7. Optical Digital Input 1 Socket . . . . . . . . . . . . . . . . . . . . . . 19
8. Optical Digital Input 2 Socket . . . . . . . . . . . . . . . . . . . . . . . 19
9. Video Output Socket . . . . . . . . . . . . . . . . . . . . . . . . . . . . . . 18
10. S-Video Output Socket . . . . . . . . . . . . . . . . . . . . . . . . . . . . 18
11. Component Video Out Sockets . . . . . . . . . . . . . . . . . . . . . . 18
12. SCART Output Socket (Audio + Video). . . . . . . . . . . . . . . . 18
13. AC Power Lead . . . . . . . . . . . . . . . . . . . . . . . . . . . . . . . . . . . 17
Reference page
General Information
E-4
Page 18
HT-DV40H3
HT-DV50H3
ENGLISH
General Information
Controls and indicators (continued)
1 2 3 4 5 6 7 8 9 10 11
MP3WMARDSTA
FOL
D
TITLE
CHA
P
13
14 15
DA
ILY
ST
D
16 17
IGITAL
VS PL
PTYI TP
TOTAL
20 21 22 23
M
TS
MEMOR
24
18 19
IV
CNB
Y
SLEEP
DA
ILY
D
VS PL
M
TS
MEMOR
M
H
z
SS
12
ST
IGITAL
IV
CNB
Y
A1
262527
SS
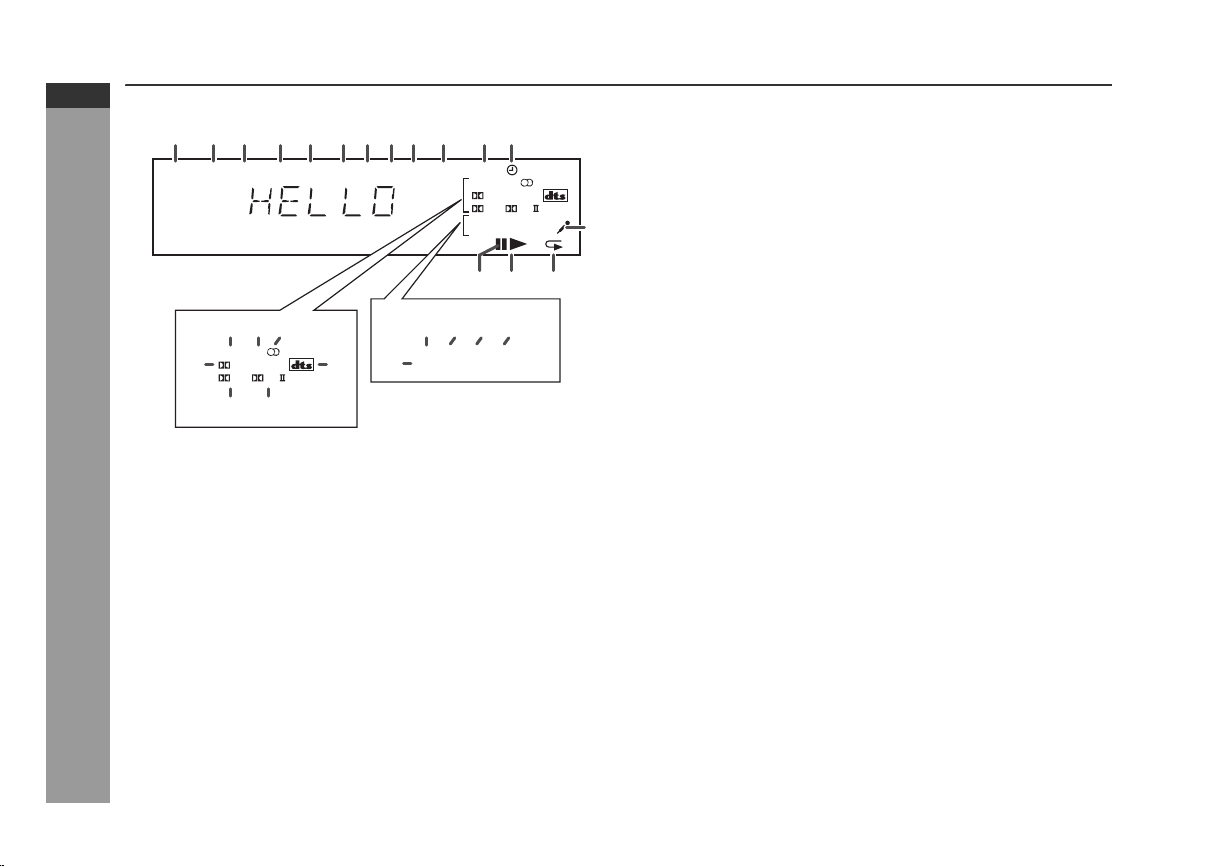
Display
1. Chapter Indicator . . . . . . . . . . . . . . . . . . . . . . . . . . . . . . . . . 42
2. Title Indicator . . . . . . . . . . . . . . . . . . . . . . . . . . . . . . . . . . . . 42
3. Folder Indicator . . . . . . . . . . . . . . . . . . . . . . . . . . . . . . . . . . 46
4. MP3 Indicator . . . . . . . . . . . . . . . . . . . . . . . . . . . . . . . . . . . . 43
5. WMA Indicator . . . . . . . . . . . . . . . . . . . . . . . . . . . . . . . . . . . 44
28
B
6. RDS Indicator. . . . . . . . . . . . . . . . . . . . . . . . . . . . . . . . . . . . . 52
7. Traffic Announcement Indicator . . . . . . . . . . . . . . . . . . . . . 52
8. Dynamic PTY Indicator . . . . . . . . . . . . . . . . . . . . . . . . . . . . . 52
9. Traffic Programme Indicator . . . . . . . . . . . . . . . . . . . . . . . . 52
10. Total Indicator . . . . . . . . . . . . . . . . . . . . . . . . . . . . . . . . . . . . 36
11. Sleep Indicator . . . . . . . . . . . . . . . . . . . . . . . . . . . . . . . . . . . 62
12. Timer Play Indicator . . . . . . . . . . . . . . . . . . . . . . . . . . . . . . . 60
13. Daily Timer Indicator . . . . . . . . . . . . . . . . . . . . . . . . . . . . . . 60
14. FM Stereo Mode Indicator . . . . . . . . . . . . . . . . . . . . . . . . . . 51
15. FM Stereo Receiving Indicator. . . . . . . . . . . . . . . . . . . . . . . 51
16. Dolby Digital Signal Indicator . . . . . . . . . . . . . . . . . . . . . . . 43
17. DTS Indicator . . . . . . . . . . . . . . . . . . . . . . . . . . . . . . . . . . . . 23
18. Dolby Virtual Speaker Indicator . . . . . . . . . . . . . . . . . . . . . 32
19. Dolby Pro Logic II Indicator . . . . . . . . . . . . . . . . . . . . . . . . . 32
20. Mono to Stereo Indicator . . . . . . . . . . . . . . . . . . . . . . . . . . . 33
21. Intelligent Volume Indicator . . . . . . . . . . . . . . . . . . . . . . . . 33
22. Natural Bass Indicator . . . . . . . . . . . . . . . . . . . . . . . . . . . . . 33
23. Sound Space Indicator . . . . . . . . . . . . . . . . . . . . . . . . . . . . 33
24. Memory Indicator . . . . . . . . . . . . . . . . . . . . . . . . . . . . . . . . . 41
25. Disc or USB Pause Indicator . . . . . . . . . . . . . . . . . . . . . . . . 35
26. Disc or USB Play Indicator . . . . . . . . . . . . . . . . . . . . . . . . . 34
27. Disc or USB Repeat Indicator . . . . . . . . . . . . . . . . . . . . 42, 49
28. Karaoke indicator . . . . . . . . . . . . . . . . . . . . . . . . . . . . . . . . . 57
Reference page
E-5
Page 19
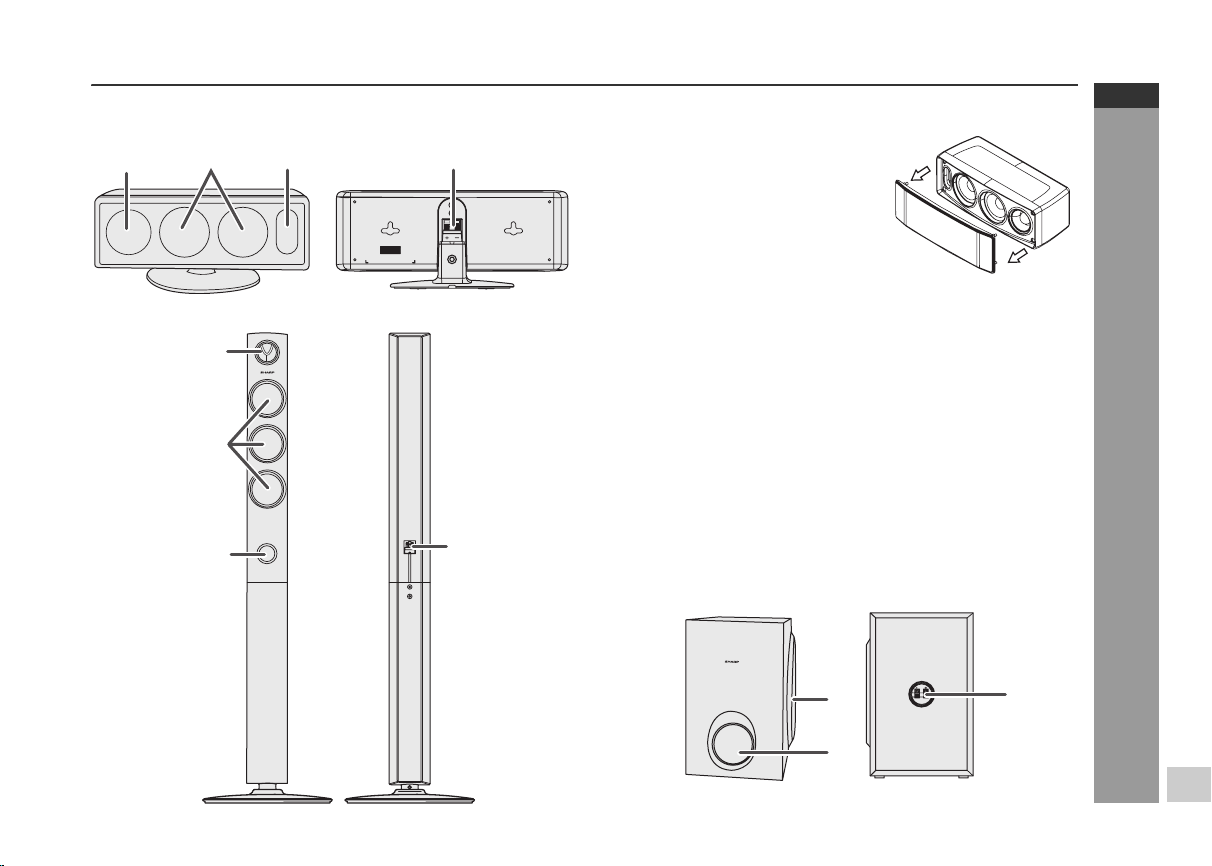
CP-DV40H
3
123 4
LEFT
Speaker system
(CP-DV40H)
1. Tweeter
2. Woofers
3. Bass Reflex Duct
4. Speaker Terminals
Speaker grilles are removable:
Make sure nothing comes into contact
with the speaker diaphragms when you
remove the speaker grilles.
HT-DV40H3
HT-DV50H3
ENGLISH
CP-DV50H
Speaker system (CP-DV50H)
1
2
1. Tweeter
2. Woofers
3. Bass Reflex Duct
4. Speaker Terminals
Speaker grilles are not removable.
Subwoofer (CP-SW40H)
1. Subwoofer
2. Bass Reflex Duct
3. Speaker Terminals
3
4
Subwoofer grilles are not removable.
General Information
1
2
E-6
Page 20

HT-DV40H3
HT-DV50H3
ENGLISH
General Information
Controls and indicators (continued)
1
23
24
25
26
27
+100
29
30
28
31
32
33
34
35
36
37
40 41 42
39
38
43
10
11
12
13
14
15
16
17
18
19
20
21
22
2
3
4
5
6
7
8
1 2 3
4 5 6
7 8 9
9
Remote control
Reference page
1. Remote Control Transmitter . . . . . . . . . . . . . . . . . . . . . . . . 20
2. DVD Direct Button . . . . . . . . . . . . . . . . . . . . . . . . . . . . . . . . 38
3. DVD On Screen Button . . . . . . . . . . . . . . . . . . . . . . . . . . . . . 42
6. Direct Search Buttons . . . . . . . . . . . . . . . . . 27, 38, 41, 45, 46
9. Memory or Dimmer Button . . . . . . . . 28, 29, 41, 51, 53, 59, 62
10. DVD/CD/MP3/WMA Repeat Button . . . . . . . . . . . . . . . . 42, 49
11. Menu Button . . . . . . . . . . . . . . . . . . . . . . . . . . . . . . . . . . . . . 40
12. Enter Button . . . . . . . . . . . . . . . . 21, 27, 34, 38, 40, 41, 46, 48
13. Cursor Left Button . . . . . . . . . . . 21, 34, 38, 40, 41, 46, 47, 48
14.
DVD Chapter Skip/DVD/MP3/WMA Fast Reverse/CD/MP3/WMA
Track Down/Tuner Preset Down and Time Down Button
. . . . . . . . . . . . . . . . . . . . . . . . . . . 29, 35, 37, 51, 53, 54, 59, 62
15.
Tuning Down or Cursor Down Button
16. USB Play or Pause Button . . . . . . . . . . . . . . . . . . . . . . . . . . 48
17. Video Mode Button . . . . . . . . . . . . . . . . . . . . . . . . . . . . . . . . 22
18. DVD/CD/MP3/WMA/Stop Button. . . . . . . . . . . . . . . . . . . 35, 45
19. Audio Button . . . . . . . . . . . . . . . . . . . . . . . . . . . . . . . . . . 10, 43
20.
Dolby Virtual Speaker Button
21. Shift Button . . . . . . . . . . . 17, 21, 28, 31, 32, 40, 45, 49, 53, 54
22. Volume Up or Down Buttons . . . . . . . . . . . . . . . . . . . . . . . . 28
23. Clear or Display Button . . . . . . . . . . . . . . . . . . . . . . 42, 51, 53
24. On/Stand-by Button . . . . 20, 21, 28, 29, 34, 50, 51, 53, 59, 65
25. Clock or Timer Button. . . . . . . . . . . . . . . . . . . . . . . . 29, 59, 62
26. MIC Volume Up Button . . . . . . . . . . . . . . . . . . . . . . . . . . . . . 57
27. MIC Volume Down Button . . . . . . . . . . . . . . . . . . . . . . . . . . 57
28. Karaoke Button . . . . . . . . . . . . . . . . . . . . . . . . . . . . . . . . . . . 57
29. DVD Angle Button . . . . . . . . . . . . . . . . . . . . . . . . . . . . . . 10, 40
30. DVD Subtitle Button . . . . . . . . . . . . . . . . . . . . . . . . . . . . 10, 43
31. DVD Zoom Button . . . . . . . . . . . . . . . . . . . . . . . . . . . . . . 40, 47
32. Return Button . . . . . . . . . . . . . . . . . . . . . . . . . . . . . . . . . . . . 34
33. Tuning Up or Cursor Up Button. . . . . . . 21, 34, 40, 41, 47, 50
. . 21, 34, 40, 41, 47, 50
. . . . . . . . . . . . . . . . . . . . . . . 31
E-7
Page 21

34. Cursor Right Button . . . . . . . . . . 21, 34, 38, 40, 41, 46, 47, 48
35. DVD Chapter Skip/DVD/MP3/WMA Fast Forward/CD/MP3/
WMA Track Up/Tuner Preset Up and Time Up Button. . . . . .
. . . . . . . . . . . . . . . . . . . . . . . . . . . . . . 29, 35, 37, 51, 53, 54, 62
36. DVD Slow Button. . . . . . . . . . . . . . . . . . . . . . . . . . . . . . . . . . 39
37. DVD/CD/MP3/WMA Play or Pause Button. . . . . . . . . . . 35, 39
38. DVD/CD/MP3/WMA Still Button . . . . . . . . . . . . . . . . . . . . . . 39
39. DVD/CD/MP3/WMA Button . . . . . . . . . . . . . . . . . . . . . . . . . 34
40. USB Button . . . . . . . . . . . . . . . . . . . . . . . . . . . . . . . . . . . 48, 60
41. Auxiliary Button . . . . . . . . . . . . . . . . . . . . . . . . . . . . . . . . . . 19
42. Tuner Button . . . . . . . . . . . . . . . . . . . . . . . . . . . . . . . 50, 53, 54
43. TV Operation Buttons . . . . . . . . . . . . . . . . . . . . . . . . . . . . . . . 8
TV Operation Buttons (Only SHARP TV):
On/Stand-by
Button
Volume Up
and Down
Buttons
Set the TV
power to
“ON” or
“STAND-BY”.
Turn up/down
the TV volume.
Input Select
Button (TV)
Channel Up
and Down
Buttons
Press the
button to
switch the
input source.
Switch up/
down the TV
channels.
HT-DV40H3
HT-DV50H3
ENGLISH
Remote control with shift button
Reference page
2. RDS ASPM Button . . . . . . . . . . . . . . . . . . . . . . . . . . . . . . . . 53
3. RDS PTY Button . . . . . . . . . . . . . . . . . . . . . . . . . . . . . . . . . . 54
4. Sound Space Buton . . . . . . . . . . . . . . . . . . . . . . . . . 31, 32, 33
5.
Natural Bass Button
7.
Intelligent Volume Button
8. Sound Mode Button . . . . . . . . . . . . . . . . . . . . . . . . . . . . . . . 31
9. Set Up Button . . . . . . . . . . . . . . . . . . . . . . . . . . . . . . . . . . . . 21
10. A-B Repeat Button . . . . . . . . . . . . . . . . . . . . . . . . . . . . . . . . 40
11. Top Menu Button. . . . . . . . . . . . . . . . . . . . . . . . . . . . . . . . . . 40
20. Demo Button . . . . . . . . . . . . . . . . . . . . . . . . . . . . . . . . . . . . . 17
22. Subwoofer level
23. RDS DISP Button . . . . . . . . . . . . . . . . . . . . . . . . . . . . . . . . . 52
26. Echo Level Up Button. . . . . . . . . . . . . . . . . . . . . . . . . . . . . . 57
27. Echo Level Down Button . . . . . . . . . . . . . . . . . . . . . . . . . . . 57
29.
Mono to Stereo Button
31.
Random Button
. . . . . . . . . . . . . . . . . . . . . . . . . . 31, 32, 33
. . . . . . . . . . . . . . . . . . . . . 31, 32, 33
-
or + Button . . . . . . . . . . . . . . . . . . . . . . 28
. . . . . . . . . . . . . . . . . . . . . . . . 31, 32, 33
. . . . . . . . . . . . . . . . . . . . . . . . . . . . . . . . 45, 49
Note:
Some models of SHARP TV may not be operable.
General Information
E-8
Page 22
HT-DV40H3
HT-DV50H3
ENGLISH
Description of discs
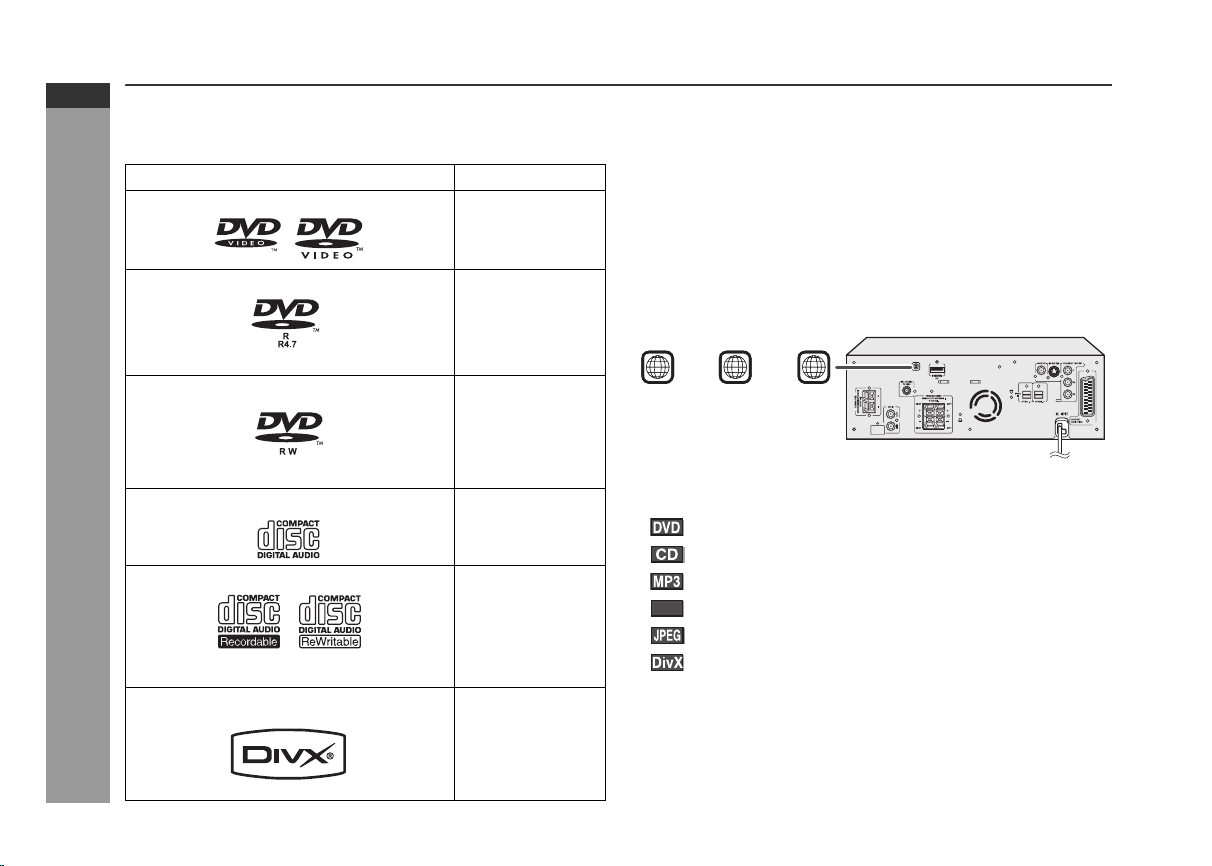
Types of playable discs
The DVD player can play back discs bearing any of the following
marks:
Disc type Disc contents
DVD Video Disc Audio and video
DVD-R
(movies)
Audio and video
(movies)
(*1): Playability depends on recording device or disc condition
(special disc, scratches, dirt or dirt on pick up).
(*2): The DVD-R/DVD-RW/CD-R/CD-RW may not be played back
properly depending on the recording equipment or the disc.
(*3): JPEG or JPG picture discs are also playable on this unit.
However, pictures may not be clear (depends on resolution and
recording method).
(*4): If the file size is larger than 10 Mb, it will take some time for the
file to be displayed.
z For unplayable discs, see page 10.
Types of playable DVD discs vary depending on the region. This unit
can play back only DVDs with the same region number written on the
back of the unit.
General Information
E-9
Disc recorded in Video Mode (*1)(*2)
DVD-RW
Disc recorded in Video Mode (*2)
Audio CD Audio
CD-R/CD-RW (*1)(*2)
Or CD-R/CD-RW recorded in JPEG
format (*3) (*4)
®
Video disc (Ver 6 and below) Audio and video
DivX
Audio and video
(movies)
Audio and picture
(movies)
or
22 3 4
Icons used in this operation manual
Some functions may not be available depending on discs. The
following icons indicate the discs that can be used in the section.
... Indicates DVDs.
... Indicates audio CDs.
... Indicates CD-R/RW with MP3 recording.
... Indicates CD-R/RW with WMA recording.
WMA
... Indicates CD-R/RW with JPEG recording.
... Indicates CD-R/RW with DivX
z Some operations may not be performed depending on discs even
if they are described in this manual.
z During operation, “INVALID KEY” may be displayed on the screen.
This means that the operations described in this manual are
prohibited by the disc.
or
®
recording.
Page 23
Discs that cannot be played
DVDs without the region num-
ber on the back of the unit.
z
DVDs with SECAM system
z
DVD-ROM
z
DVD-RAM
z
DVD-Audio
z
The discs above cannot be played at all, or no sound is heard
although images appear on the screen or vice versa.
z
Incorrect operation may damage the speakers and can have an
adverse effect on your hearing when played at high volume settings.
z
You cannot play illegally produced discs.
Notes:
z A disc which has scratches or fingerprints may not play properly.
Refer to “Care of compact discs” (page 66) and clean the disc.
z Do not play discs of special shapes (heart or octagon shaped) as
they can be ejected whilst rotating and cause injury.
z
CDG
z
CDV
z
Photo CD
z
CD-ROM
z
SACD
z
Discs recorded in
special formats, etc.
z
DVD+R
z
DVD+RW
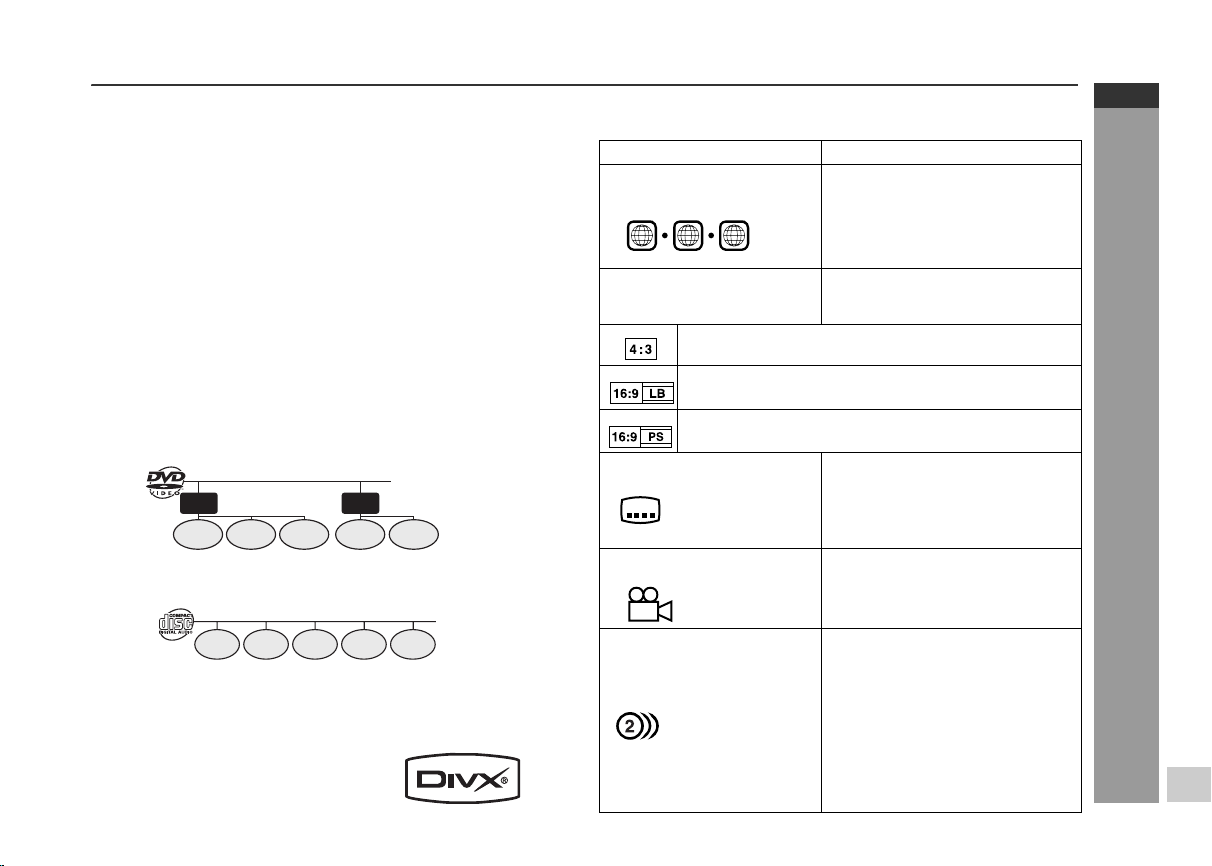
Title, chapter and track
DVDs are divided into “titles” and “chapters”. If the disc has more
than one movie on it, each movie is a separate “title”. “Chapters” are
subdivisions of titles.
Title 1 Title 2
Chapter 1
Chapter 2
Chapter 3 Chapter 1 Chapter 2
Audio CDs consist of “tracks”.
A “track” is each tune on an audio CD.
Track 1 Track 2 Track 3 Track 4 Track 5
Note:
Title, chapter, or track numbers may not be recorded on some discs.
DivX®
z
Official DivX CertifiedTM product
z
Plays all versions of DivX® video
(including DivX
playback of DivX
(DivX version cannot be upgraded on this
product.)
®
6) with standard
®
media files
Icons used on DVD discs
Check the icons on the DVD case before playing your discs.z
Display Description
Region number (playable
area number)
2 3 4
Format recorded on the DVD To adopt the video format to the
Recorded in 4:3.
You can enjoy wide images on a wide-screen TV and
letterbox size images on the 4:3 size TV.
You can enjoy wide images on a wide-screen TV and
4:3 images with the side edges cut on the 4:3 size TV.
Type of subtitles recorded Recorded subtitle languages.
Example:
2
1: English
2: French
Number of camera angles Number of angles recorded on the
2
Number of audio tracks and
audio recording systems
Example:
1: Original
<English> (Dolby
Digital 2 Surround)
2: English (Dolby
Digital 5.1
Surround)
DVD discs are programmed with
region numbers indicating
countries in which they can be
played. This system can play discs
with region number on the back of
the unit.
connected TVs (“wide-screen TV”
or “4:3 size TV”).
Language can be selected with the
SUBTITLE button.
DVD.
Angles can be selected with the
ANGLE button.
The number of audio tracks and
audio recording systems are
indicated.
zThe audio recorded on the DVD
can be switched by using the
AUDIO button.
zThe number of audio tracks and
recording systems vary
depending on the DVD. Check
them in the DVD's manual.
HT-DV40H3
HT-DV50H3
ENGLISH
General Information
E-10
Page 24

HT-DV40H3
HT-DV50H3
ENGLISH
System installation
HT-DV40H
Installation image:
3
Subwoofer
CP-DV40H
speakers
(left and right)
Unit
Magnetically shielded speakers
The speakers can be placed beside or near the TV as they are
magnetically shielded. However, uneven colours may appear on the
screen depending on the type of TV.
If colour variation occurs:
Turn off the TV (from the power switch). After 15 - 30 minutes, turn
the TV on again.
If the colour variation is still present:
Move the speakers further away from the TV. Refer to the operation
manual of the TV for details.
Note:
The speakers and subwoofer are magnetically shielded.
E-11
Preparation for Use
HT-DV50H
Installation image:
3
CP-DV50H
speakers
(left and right)
Subwoofer
Unit
Page 25
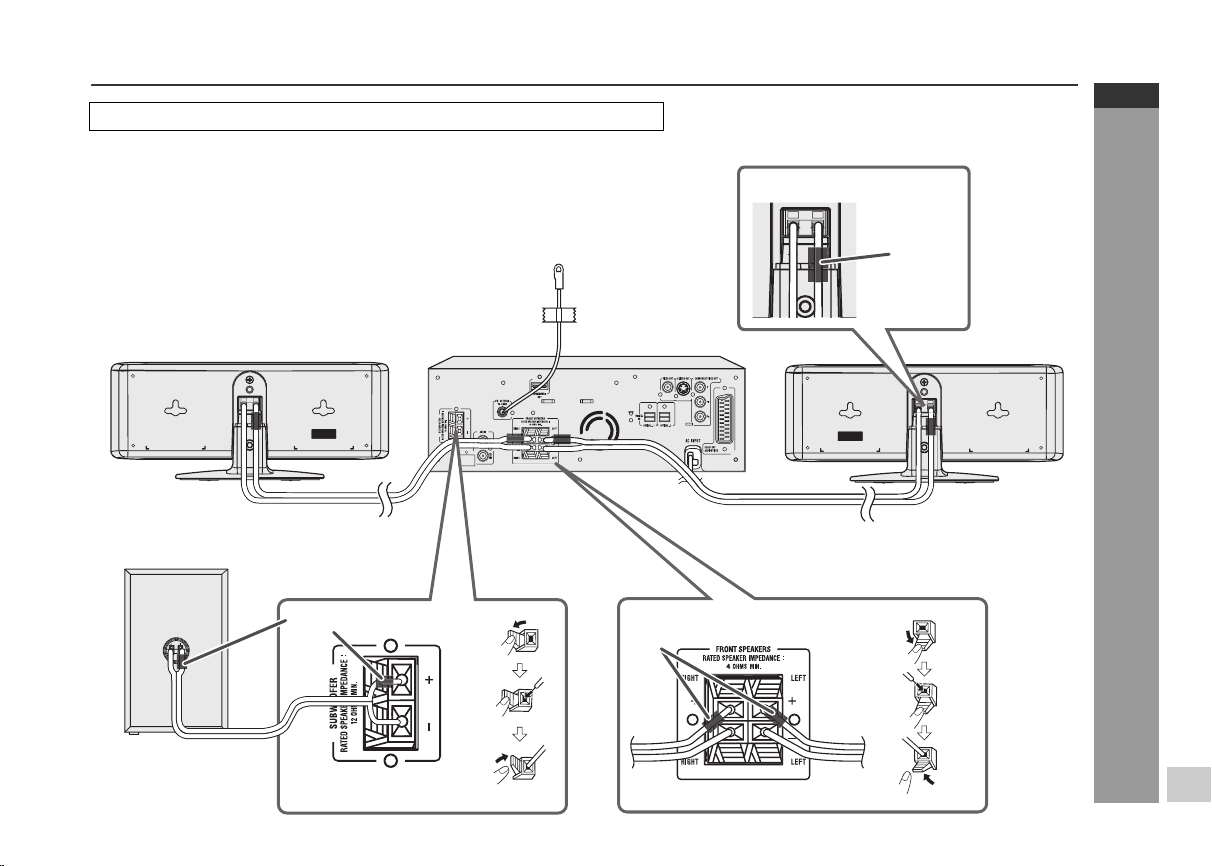
System connections
Make sure to unplug the AC power lead before making any connections.
HT-DV40H3
Left speaker
HT-DV40H3
HT-DV50H3
ENGLISH
Right speaker
Subwoofer
RIGHT
Purple
FM aerial
Red
Left speaker
LEFT
To a wall socket
Preparation for Use
Red
E-12
Page 26
HT-DV40H3
HT-DV50H3
ENGLISH
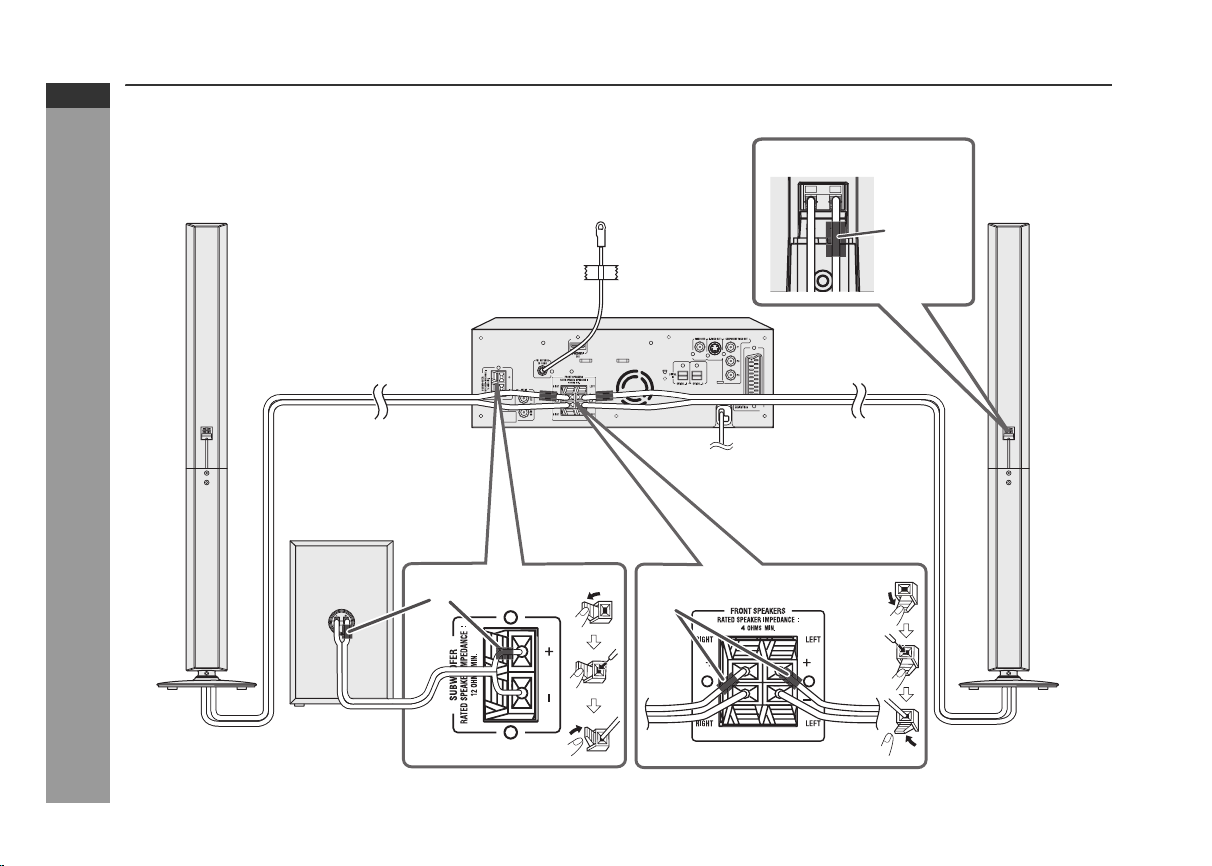
System connections (continued)
HT-DV50H3
Left speaker
Right speaker
Subwoofer
FM aerial
Left speaker
Red
To a wall socket
Preparation for Use
Purple
Red
E-13
Page 27

Make sure to leave the AC power lead disconnected when connecting the speakers.
To prevent accidental short circuits between + and - terminals, connect the speaker wires to the speakers first, then to the unit.
CP-DV40H
To install the speaker stand
1 Align the hole on the speaker stand to the hole on speaker.
Fix them securely with the special screw provided.
Speaker stand
2 Route the speaker wire through the speaker stand hole. Connect
the wire without insulation tube to the speaker minus (
and the wire with red insulation tube to the speaker plus (+)
terminal.
Special screw
Stand hole
Speaker
-
) terminal,
To mount the speakers on the wall
Caution:
z
Be very careful to prevent the speaker [2.1kg (4.6 lbs.)] from falling
when mounting on the wall.
z Before mounting, check the wall strength. (Do not put on the
veneer plaster or whitewashed wall. The speakers may fall.) If
unsure, consult a qualified service technician.
z Mounting screws are not supplied. Use appropriate ones.
z
Check all mounting screws for looseness and that they are engaged
in the speakers.
z
Mount the speakers on the wall using 2 screws each for horizontal
position and using 1 screw each for vertical position.
z
Select a good location. If not, accidents may occur or the speaker
may get damaged.
z
Avoid placing on a bed, sofa, water tank, sink and hallway wall.
z
To avoid accidents, fix the speaker wires to the wall. You may trip over
them.
z
SHARP is not responsible for accidents resulting from improper
installation.
Driving screws
SHARP designed the speakers so you may hang them on the wall.
Use proper screws (not supplied). See below for size and type.
3.2 mm (1/8")
3 Connect the other end to the main unit.
4 Attach the stand cover.
5 mm (3/16")
9 mm (3/8")
HT-DV40H3
HT-DV50H3
ENGLISH
Preparation for Use
Stand cover
Special screw
Min. 22 mm (7/8")
E-14
Page 28

HT-DV40H3
HT-DV50H3
ENGLISH
System connections (continued)
1 Horizontal position : Fix the pattern paper and fix two
Vertical position : Fix the pattern paper and screws into
screws into the wall with a distance of
160 mm (6-5/16") in between.
the wall.
Installing the speakers
1 Align the deco back cover to the hole on the speaker.
Fix them securely with the flush screw.
E-15
(Horizontal position) (Vertical position)
)
"
6
1/
5
-6( mm 061
Pattern paper
for speaker
Pattern paper for
speaker
2 Make a hole in the wall using a drill.
32 mm (1-1/4")
8 - 9 mm (3/8")
3 Fix a wall mount plug into the hole using a hammer, until it
is flush with the wall surface.
Preparation for Use
4 Fix screws into the wall for the speaker, as shown in
the illustration.
z Make sure that the screw and the wall can support a
load of 20 kg (45 lbs).
z Fix the screws, so the screw head extends about 5.5 mm
(7/32") from the wall.
Wall surface
Wall mounting
screw
Wall surface
5.5 mm
(7/32")
Speaker box
Deco back
cover
Flush screw
2 Tighten the screws and remove the paper. Hook the
speaker on the screw heads and make sure it is properly
secured.
(Horizontal position) (Vertical position)
Speaker
Wall surface Wall surface
wire
Speaker
wire
Page 29

CP-DV50H
1 Route the speaker wire through a stand hole and attach the
bottom cabinet to stand.
2 Fix them securely with the supplied 3 washer screws.
Bottom
cabinet
Speaker
wire
Stand
3 Attach the top cabinet to bottom cabinet and fix them securely
with the supplied 2 screws.
Top
cabinet
4 Connect the wire without insulation tube to the speakers minus
(
-
) terminal, and the wire with red insulation tube to the speakers
plus (+) terminal.
5 Connect the other end of speaker wire to the main unit.
Warning:
z Fix the speaker stand properly according to this manual. Improper
fixing may cause speaker to fall leading to injury or breakage.
z To ensure a proper fixing, contact your dealer or installer.
z During fixing, be careful not to pinch your fingers.
z Do not modify or change the stand. It may cause the speaker to
fall leading to injury or breakage.
HT-DV40H3
HT-DV50H3
ENGLISH
Preparation for Use
E-16
Page 30

HT-DV40H3
HT-DV50H3
ENGLISH
Preparation for Use
E-17
System connections (continued)
Subwoofer
1 Connect the wire without insulation tube to the SUBWOOFER
minus (-) terminal, and the wire with purple insulation tube to
the SUBWOOFER plus (+) terminal.
Purple
Caution:
z Never mistake the FRONT SPEAKERS and the SUBWOOFER
terminals. The unit or the speakers may be damaged.
z If you use other speakers with an impedance lower than that
specified, the unit may be damaged. Front speakers: 4 ohms,
Subwoofer: 12 ohms.
z Do not mistake the right and the left
channels. The right speaker is the one on the
right side when you face the unit.
z Do not let the bare speaker wires touch
each other.
z Do not allow any objects to fall into or to be
placed in the bass reflex duct.
z Do not stand or sit on the subwoofer/
speakers. You may be injured.
Aerial connection
Supplied FM aerial:
Connect the FM aerial wire to the FM 75 OHMS
socket and position the FM aerial wire in the
direction where the strongest signal can be
received.
Note:
Placing the aerial on the unit or near the AC
power lead may cause noise pickup.
Place the aerial away from the unit for better
reception.
Incorrect
FM
aerial
External FM aerial
Use an external FM aerial if you require better reception.
Consult your dealer.
75 ohms
coaxial cable
Note:
When an external FM aerial is used, disconnect the supplied FM
aerial wire.
External
FM aerial
AC power connection
After checking all the connections have been made correctly, plug
the AC power lead of this unit into the wall socket. If you plug in the
unit first, the unit will enter the stand-by mode.
Wall socket
(AC 220 - 240 V ~ 50 Hz)
Note:
Unplug the AC power lead from the wall socket if the unit will not be
in use for a prolonged period of time.
Demonstration mode
The first time the unit is plugged in, the unit
will enter the demonstration mode. You will
see words scroll.
To cancel the demonstration mode:
When the unit is in the power stand-by mode
(demonstration mode), press the SHIFT and
DEMO buttons on the remote control. The unit
will enter the low power consumption mode.
To return to the demonstration mode:
When the unit is in the power stand-by mode, press the SHIFT and
DEMO buttons on the remote control again.
Page 31

Connecting to a conventional TV/monitor
Caution:
Turn off all other equipment before making connections.
If the TV/monitor has video input, connect it to
the VIDEO OUT socket on the rear of the unit.
TV
Video signal
(not supplied)
To video
input socket
If the TV/monitor has S-video input, connect it to
the S-VIDEO OUT socket on the rear of the unit.
TV
Video signal
Notes:
z Change the TV input in accordance with the connected socket.
z Do not connect other equipment between the TV and this unit. If
they are connected via a VCR, pictures may be distorted.
z If your TV has different indications for the component video
inputs (Y, CB and CR or Y, B-Y and P-Y), connect sockets with
its matching colour.
z Do not connect to a component video input socket designed for
the high-vision system, which is not DVD-compatible (the images
may be distorted or not appear).
If the TV/monitor has scart input, connect it to
the SCART OUT socket on the rear of the unit.
(Do not connect the SCART cable to any
equipment other than a TV/monitor.)
To select SCART function:
z
On main unit: Press FUNCTION button repeatedly until SCART is displayed.
z
On remote control: Press AUX button repeatedly until SCART is
displayed
HT-DV40H3
HT-DV50H3
ENGLISH
.
TV
S-video cable
(not supplied)
To S-video
input socket
If the TV/monitor has component video input,
connect it to the COMPONENT VIDEO OUT
socket on the rear of the unit.
TV
Component
video cable
(not supplied)
To component
video input socket
To SCART
input socket
SCART cable
(not supplied)
Video/Audio signal
If the TV/monitor has HDMI input, connect it to
the HDMI socket on the rear of the unit.
TV
HDMl cable
To HDMI
input socket
Preparation for Use
E-18
Page 32

HT-DV40H3
HT-DV50H3
ENGLISH
Audio connection to other equipment
You can hear the sound of other equipment via this product. Connect
the DVD player, VCR or digital tuner to a TV directly to receive the
images (refer to the operation manual of each equipment).
Caution:
Turn off the other equipment before making this connection.
Connection for the analogue sound (VCR, etc.)
To select AUX function:
z On main unit: Press FUNCTION button repeatedly until AUX is
displayed.
z On remote control: Press AUX button repeatedly until AUX is
displayed.
Connection for the digital tuner sound (or other
If the digital equipment has an optical output socket, you can enjoy
better sound by connecting it to the optical digital input socket of the
main unit using the optical digital cable.
To select OPTICAL 1 or OPTICAL 2 function:
z On main unit: Press FUNCTION button repeatedly until
z On remote control: Press AUX button repeatedly until
optical digital equipment such as an MD player)
OPTICAL 1 or OPTICAL 2 is displayed.
OPTICAL 1 or OPTICAL 2 is displayed.
E-19
To audio input sockets (AUX IN)
Preparation for Use
Audio cable
(commercially available)
To audio
output sockets
TV
VCR, DVD recorder, etc.
Optical digital cable
(commercially available)
TV
Digital tuner, etc.
To optical
digital audio
output socket
To optical digital
audio input socket
Digital equipment such
as a digital music player
Page 33

Remote control
Battery installation
1 Open the battery cover.
2 Insert the supplied batteries according to the direction
indicated in the battery compartment.
When inserting or removing the batteries, push them towards the
battery terminals.
3 Close the cover.
Precautions for battery use:
z Replace all old batteries with new ones at the same time.
z Do not mix old and new batteries.
z Remove the batteries if the unit will not be used for long periods
of time. This will prevent potential damage due to battery leakage.
Caution:
z Do not use rechargeable batteries (nickel-cadmium battery, etc.).
z Installing the batteries incorrectly may cause the unit to
malfunction.
z Batteries (battery packed or batteries installed) shall not be
exposed to excessive heat such as sunshine, fire or the like.
Notes concerning use:
z Replace the batteries if the operating distance is reduced or if the
operation becomes erratic. Purchase 2 “AA” size batteries
(UM/SUM-3, R6, HP-7 or similar).
z Periodically clean the transmitter on the remote control and the
sensor on the unit with a soft cloth.
z Exposing the sensor on the unit to strong light may interfere with
operation. Change the lighting or the direction of the unit if this
occurs.
z Keep the remote control away from moisture, heat, shock, and
vibrations.
Test of the remote control
After installing the unit (see pages 11 - 19), check that the remote
control operates correctly.
Point the remote control directly at the remote sensor on the unit.
The remote control can be used within the range shown below:
Press the ON/STAND-BY button. Does the power turn on? Now, you
can use the unit.
Remote sensor
HT-DV40H3
HT-DV50H3
ENGLISH
Preparation for Use
Battery removal:
Open the battery cover and pull up the battery to take out.
0.2 m - 6 m
(8" - 20’)
1 2 3
4 5 6
7 8 9
E-20
Page 34

HT-DV40H3
HT-DV50H3
ENGLISH
Changing the set up menu
1 2 3
4 5 6
7 8 9
+100
1 Turn on the TV.
2 Set the TV to the correct input, eg. “AV1”, “VIDEO”, etc.
3 Turn on the unit by pressing the
ON/STAND-BY button.
zThe SHARP startup screen appears.
Note:
Startup screen will be displayed when
both S-Video cable and SCART cable
are connected to the TV. If only the SVideo cable is connected, the screen
may be blank. To set up S-Video mode,
use video out cable or SCART cable.
4 Press the SHIFT and SET UP buttons.
E-21
5 Press the or button to select a menu.
z See the list on pages 22 - 27 for set up menu.
6 Press the , , or button to change the setting and
Preparation for Use
press the ENTER button.
7 After setting is completed, select
“EXIT SET UP”, then press the ENTER
button to return to the main page.
Notes:
z The setting are stored even if the unit is set to stand-by mode.
z The backup function protects the stored setting for a few hours
should there be a power failure or AC power lead disconnection.
z System set up can be performed during playback mode.
Page 35

Set up menu Selectable parameters (* indicates default setting) Description
SYSTEM
SET UP
TV SYSTEM NTSC
PAL*
AUTO
Select the correct colour system (TV standard).
(for details, see page 26)
HT-DV40H3
HT-DV50H3
ENGLISH
VIDEO S-VIDEO
TV TYPE 4:3 PS*
SCART*
COMP. P-SCAN ON
COMP. P-SCAN OFF
4:3 LB
16:9
PASSWORD _ _ _ _ Change the password (for details, see page 27).
RATING 1 KID SAFE
2 G
3 PG
4 PG13
5 PG-R
6 R
7 NC-17
8 ADULT*
DEFAULT RESTORE This resets all settings, except for PARENTAL to
LANGUAGE
SET UP
OSD
LANGUAGE
ENGLISH*
RUSSIAN
UKRAINIAN
HUNGARIAN
SLOVAK
CZECH
POLISH
SPANISH
Select “S-VIDEO or SCART or COMP. P-SCAN
ON or COMP. P-SCAN OFF” mode if connecting
unit to TV (for details, see page 18).
Selection can also be made using remote control
VIDEO MODE button.
The screen mode should be set according to the
connected TV type (for details, see page 26).
Set a restriction level for DVD viewing (for details,
see page 27).
Enter a 4-digit password.
It is set to 0000 by default.
the factory defaults.
You can select the desired OSD (On Screen
Display) language for the set up menu or
playback control screen.
Example: To select Ukrainian language, choose
“UKRAINIAN” from the menu. Press ENTER
button and below screen will appear in Ukrainian.
АНГЛІЙСЬКА*
РОСІЙСЬКА
УКРАЇНСЬКА
УГОРСЬКА
СЛОВЕНСЬКА
ЧЕСЬКА
ПОЛЬСЬКА
ІСПАНСЬКА
Preparation for Use
E-22
Page 36

HT-DV40H3
HT-DV50H3
ENGLISH
Preparation for Use
Changing the set up menu (continued)
Set up menu Selectable parameters (* indicates default setting) Description
LANGUAGE
SET UP
AUDIO
SET UP
AUDIO
LANG
SUBTITLE
LANG
MENU
LANG
DivX [R]
VOD
ENGLISH*
FRENCH
SPANISH
CHINESE
RUSSIAN
ITALIAN
ENGLISH*
FRENCH
SPANISH
CHINESE
RUSSIAN
ITALIAN
OFF
ENGLISH*
FRENCH
SPANISH
CHINESE
RUSSIAN
ITALIAN
REGISTRATION
CODE
********
AUDIO OUT SP DIF/OFF
SP DIF/RAW
SP DIF/PCM*
Select the language audible from the speakers.
Select the subtitle displayed on the TV screen.
Select the disc menu language.
SHARP provide you the DivX registration code that
allows you to rent and purchase videos using the
DivX service. Please go to www.divx.com/vod
more information.
Useful whilst using HDMI cable. When playing a
disc recorded with Dolby Digital or DTS, the
corresponding digital signals will be output from
the HDMI output socket.
z PCM : Choose this setting if the TV with HDMI
technology cannot support Dolby Digital or DTS
to avoid noise or mute from the TV.
z RAW : Choose this setting if the TV with HDMI
technology can support Dolby Digital or DTS.
for
E-23
Page 37

Set up menu Selectable parameters (* indicates default setting) Description
VIDEO
SET UP
BRIGHTNESS To adjust TV screen brightness level.
CONTRAST To adjust TV screen contrast level.
HUE To adjust TV screen hue level.
12
10
8
6
4
2
0
12
10
8
6
4
2
0
+6
+4
+2
0
-2
-4
-6
HT-DV40H3
HT-DV50H3
ENGLISH
Preparation for Use
E-24
Page 38

HT-DV40H3
2
0
8
0
4
2
6
HT-DV50H3
ENGLISH
Changing the set up menu (continued)
Set up menu Selectable parameters (* indicates default setting) Description
SATURATION To adjust TV screen saturation level.
1
1
E-25
Preparation for Use
DIGITAL
SET UP
EXIT
SET UP
HDMI OUTPUT 480P/576P
720P*
1080 I
DYNAMIC
RANGE
To select HDMI resolution.
Dynamic Range Control can be set from OFF to FULL.
FULL : Dynamic Range Control set to maximum.
Full
OFF
6/8
4/8
2/8
OFF
The setting is completed.
: Dynamic Range Control set to off.
Page 39

TV display setting
ci
Indicator Setting
4:3 PS When playing a wide image (16:9)
4:3 LB When playing a wide image (16:9)
16:9 A wide image (16:9) is displayed
disc, the left and right sides of the
image are cut (pan scan) to display
a natural-looking 4:3 size image.
A wide image disc without pan
scan is played back in 4:3
letterbox.
A 4:3 disc is played in 4:3.
disc, black bands are inserted at
the top and bottom and you can
enjoy full wide images (16:9) on a
4:3 size TV.
A 4:3 disc is played in 4:3.
when playing a wide image (16:9)
disc.
Refer pages 21 - 25 “Changing the set up menu” and follow the
changing steps provided.
DVD disc type Unit setting
NTSC NTSC
PAL PAL
Language setting
Indicator Setting
OSD
LANGUAGE
AUDIO
LANG
A language for screen display can be set for the set up
menu, message, etc.
English French
DISC LOADING DISQUE CHARGEMENT
A language for audio can be set.
You can specify a language for conversation and narration.
English French
HT-DV40H3
HT-DV50H3
ENGLISH
zWhen playing a 4:3 image disc, the image size
depends on the setting of the connected TV.
zIf you play back a wide image (16:9) disc with this unit
connected to a 4:3 TV, the vertically shrunk image is
displayed.
Note:
When playing disc with a fixed video format, the display setting will
not change even if the TV screen size is changed.
TV system setting
Indicator Setting
NTSC Select this mode for the NTSC TV.
PAL Select this mode for the PAL TV.
AUTO Select this mode for the multi-system TV.
Note:
To achieve optimal picture setting when playing back a DVD
disc, ensure the setting of the main unit TV system are the same as
the disc video system.
SUBTITLE
LANG
MENU
LANG
Thank you
A language for subtitle can be set.
The subtitle are displayed in a specified language.
English French
Thank you
A language for disc menus can be set.
Menu screens are displayed in a specified language.
English French
CAST
STAFF
Merci
ACTEURS
PERSONNEL
Mer
Preparation for Use
E-26
Page 40

HT-DV40H3
HT-DV50H3
ENGLISH
Preparation for Use
Changing the set up menu (continued)
Rating setting
1 Select “SYSTEM SET UP” on the Set up menu screen (see
steps 1 - 6 on page 21).
2 Before setting “RATING”, ensure password is unlocked
“ ”. The “RATING” level cannot be set if the password is
locked “ ”.
3 After selecting “RATING” in steps 1 - 6 on page 21, select the
rating level and press the ENTER button to confirm.
4 After entering rating level, select “PASSWORD” to lock the
password key.
5 Enter a 4-digit password using the Direct Search buttons
and press the ENTER button.
*If this is the first time, enter “0000” as factory default password.
Indicator Setting
1 KID SAFE Only DVD software intended for children can be
2 G to 7 NC-17 Only DVD software intended for general use and
8 ADULT DVD software of any grade (adult/general/
* Level 8: for most restrictive viewing ===> Level 1: for general
audiences viewing.
The smaller the number, the greater the level of restriction.
Note:
Whilst playing a disc with parental lock, the display may appear
requesting a password in order to watch some restricted scenes. In
such case, enter the password to temporarily change the parental
level.
played back.
children can be played back.
children) can be played back.
Password setting
From the set up menu, select “SYSTEM SET UP”, “PASSWORD”
and choose “----- ”.
1 When setting the password for the first time, enter the
factory default password by pressing “0000”. The “ ” will
be unlocked.
2 Enter your new password (maximum 4-digits) using the
Direct Search buttons and press ENTER button to return.
The “ ” will be locked.
3 Enter again the same new password and press ENTER
button to return. The “ ” will be unlocked.
4 To change to another password, repeat steps 2 - 3.
5 Exit set up.
Note:
If you forget your password, cancel the current password by pressing
“0000” using the Direct Search buttons.
E-27
Page 41

General control
1 2 3
4 5 6
7 8 9
HT-DV40H3
HT-DV50H3
Volume auto fade-in
z If you turn off and on the main unit with volume set to 34 or
higher, the volume starts at 20 and fades in to the last set level.
z If you turn off and on the main unit with the volume level set to less
than 34, the volume starts at the last level volume setting.
ENGLISH
Volume control
+100
Volume
ring
Main unit operation:
When the VOLUME control is turned clockwise, the volume will
increase. When it is turned anti-clockwise, the volume will decrease.
Remote control operation:
Press the VOLUME (+ or –) button to increase or decrease the volume.
...
39 MAX0 1
To turn the power on
Press the ON/STAND-BY button to turn the power on.
After use:
Press the ON/STAND-BY button to enter the power stand-by mode.
Illumination light control
Press the MEMORY/DIMMER button for more than 2 seconds to
adjust the brightness of the display and volume ring.
Volume ring light and display bright
Volume ring light off and display dim
Volume ring light off and display gets dimmer
Auto power off function
In the stop mode of discs/USB operation, the main unit enters the
stand-by mode after 15 minutes of inactivity.
Subwoofer level control
The subwoofer level can be adjusted.
To increase the level, hold down the
SHIFT button and press the
SUBWOOFER LEVEL + button.
To decrease the level, hold down the
SHIFT button and press the
SUBWOOFER LEVEL
-
button.
...
+4
+5-5 -4
Notes:
z When sound from the subwoofer is distorted, decrease the
subwoofer level.
z When changing the subwoofer level, the output level of the
SUBWOOFER PRE OUT is also changed.
Function
When the FUNCTION button on main unit is pressed, the current
function will change to different mode. Press the FUNCTION button
repeatedly to select desired function.
DVD/CD USB TUNER OPTICAL 1
OPTICAL 2AUX INSCART
Note:
The backup function will protect the memorised function mode for a
few hours should there be a power failure or the AC power lead
becomes disconnected.
Basic Operation
E-28
Page 42

HT-DV40H3
HT-DV50H3
ENGLISH
Basic Operation
E-29
Setting the clock (Remote Control only)
1 2 3
4 5 6
7 8 9
+100
In this example, the clock is set for the 24-hour (0:00) display.
1 Press the ON/STAND-BY button to turn the power on.
2 Press the CLOCK/TIMER button.
3 Within 10 seconds, press the or button to select
“CLOCK”, and press the MEMORY/DIMMER button.
4 Press the or button to select 24-hour or 12-hour
display and then press the MEMORY/DIMMER button.
“0:00” The 24-hour display will appear.
(0:00 - 23:59)
“AM 12:00” The 12-hour display will appear.
(AM 12:00 - PM 11:59)
“AM 0:00” The 12-hour display will appear.
(AM 0:00 - PM 11:59)
5 Press the or button to adjust the hour and then
press the MEMORY/DIMMER button.
Press the or button once to advance the time by 1 hour.
Hold it down to advance continuously.
6 Press the or button to adjust the minutes and then
press the MEMORY/DIMMER button.
Press the or button once to advance the time by 1
minute. Hold it down to change the time in 5-minute intervals.
To confirm the time display:
[When the unit is in the stand-by mode]
Press the CLOCK/TIMER button.
The time display will appear for about 10 seconds.
[When the power is on]
Press the CLOCK/TIMER button.
Within 10 seconds, press the or button to display the time.
The time display will appear for about 10 seconds.
Note:
The “CLOCK” will appear or time will flash to confirm the time
display when the AC power supply is restored after a power failure
or unplugging the unit. If incorrect, readjust the clock as follows.
To readjust the clock:
Perform “Setting the clock” from step 1. If the “CLOCK” does not
appear in step 3, step 4 (for selecting the 24-hour or 12-hour
display) will be skipped.
To change the 24-hour or 12-hour display:
1 Clear all the programmed contents. [Refer to “Factory reset,
clearing all memory” on page 63 for details.]
2 Perform “Setting the clock” from step 1.
Page 43

Enjoying surround sound (sound mode)
Preset sound modes and sound image
Voice of narration comes out from the
You can enjoy normal stereo sounds.
centre; you can hear cheers and feel
the atmosphere in the theatre with a
wide sound field like 5.1ch.
Appropriate for sports broadcasting
such as baseball and football.
HT-DV40H3
HT-DV50H3
ENGLISH
Enjoy a wide sound field like 5.1ch as
well as enhanced powerful bass
sounds.
Suitable for movies, etc.
Easy to listen to bass sounds such as
voice of narration (even at low
volume) due to well-controlled bass
sounds.
Suitable for news, etc.
Enhanced bass sounds create
clear-cut and spacious sounds at
2.1ch.
Appropriate for music, etc.
Words are easy to hear and loud
sounds are controlled; even at low
volume, you can enjoy a wide sound
field like 5.1ch.
Suitable for listening to sounds of
movies at low volume.
Bass frequencies are emphasised.
You can select the BASS level.
Treble frequencies are emphasised.
You can select the TREBLE level.
Notes:
z Subwoofer sound levels for preset sound modes are set to
the recommended levels.
z You can adjust a subwoofer sound level by each preset sound
mode (see page 28). Return the settings to default by resetting
(see page 65).
Basic Operation
E-30
Page 44

HT-DV40H3
HT-DV50H3
ENGLISH
Enjoying surround sound (sound mode) (continued)
Preset sound mode
Select any of the 8 preset modes already set to the optimal sound
quality levels.
Select a desired sound mode by pressing the SHIFT and SOUND
MODE buttons simultaneously.
DisplayPreset sound mode
STANDARD
CINEMA
NEWS
Dolby Virtual Speaker (DVS) sound mode
The Dolby Virtual Speaker (DVS) creates virtual surround sound
comparable to the 5.1ch sound produced by the 2.1ch speaker.
When setting DVS to “ON” for 2 channel stereo signals, Dolby Pro
Logic (see page 32) brings out virtual sound effects through the
signals converted into 5.1ch.
Press the DVS button.
The Dolby Virtual Speaker indicator lights up and set change to DVS
WIDE mode. Press DVS button again to change to DVS
REFERENCE mode.
Press the DVS button again to return to “DVS OFF”.
E-31
MUSIC
SPORT
NIGHT
BASS
Basic Operation
TREBLE
Bass control
1. Press the SHIFT and SOUND MODE buttons simultaneously to
select “BASS”.
2. Within 10 seconds, press the VOLUME (+ or –) button to adjust the
bass.
-5 +5
Treble control
1. Press the SHIFT and SOUND MODE buttons simultaneously to
select “TREBLE”.
2. Within 10 seconds, press the VOLUME (+ or –) button to adjust the
treble.
-5 +5
Notes:
z The DVS default setting is “WIDE” mode.
z When setting the DVS mode to “WIDE” or “REFERENCE”, the
preset sound mode and Audistry (SOUND SPACE mode, MONO
TO STEREO mode) are cancelled. (The NATURAL BASS mode
and the INTELLIGENT VOLUME mode are not cancelled.)
z Monaural signals do not generate surround effects.
z In case input signal is Dual mono type and DVS is set to “WIDE”
or “REFERENCE”, the sound may not be output correctly.
z When unit is turned on for the first time, selecting BASS
mode using the SOUND MODE button will automatically set the
DVS to OFF. Subsequently, when BASS mode is selected again,
the DVS setting will follow the current user setting.
z When headphone is inserted, DVS setting and BASS/TREBLE
setting, set earlier by user will be cancelled. However the DVS
setting will not be recovered when the headphone is unplugged.
Page 45

ON The Dolby Virtual Speaker creates multichannel-like
:Disabled:Enabled
Possible combinations
sound effects.
Compared with the cinema mode, the bass sound level is
slightly reduced.
The Dolby Pro Logic indicator also lights up if 2ch sound
signals are detected.
OFF The Dolby Virtual Speaker is deactivated.
Audistry sound mode
Enjoy a variety of sounds by each or any combination of the 4 modes.
Press the SHIFT and desired mode button simultaneously.
Press it again to cancel.
6
1 2 3
4 5 6
7 8 9
3
+100
9
HT-DV40H3
HT-DV50H3
ENGLISH
Basic Operation
SOUND
SPACE
When you select
“SOUND SPACE”
When you select
“NATURAL BASS”
When you select
“INTELLIGENT VOLUME”
When you select
“MONO TO STEREO”
When you select
”
“DVS
NATURAL
BASS
INTELLIGENT
VOLUME
MONO TO
STEREO
E-32
Page 46

HT-DV40H3
HT-DV50H3
ENGLISH
Basic Operation
Enjoying surround sound (sound mode) (continued)
Notes:
SOUND SPACE
(Sound stage expansion)
The 4 speakers create
spacious stereo sounds.
NATURAL BASS
(Bass sound expansion)
The system's low-frequency
characteristics realise the
optimal bass sounds.
INTELLIGENT VOLUME
(Peak limiter and expander)
Appropriate listener-friendly
volumes realised; the volume is
decreased during loud sounds,
and increased during low
sounds.
(The SOUND SPACE indicator
lights up.)
(The NATURAL BASS indicator
lights up.)
(The INTELLIGENT VOLUME
indicator lights up.)
z When setting each mode of Audistry to “ON”, the preset sound
mode setting is cancelled.
z When setting the SOUND SPACE or MONO TO STEREO mode
to “ON”, the DVS setting is also cancelled. (It is not cancelled even
if the NATURAL BASS or INTELLIGENT VOLUME mode is set to
“ON”.)
E-33
MONO TO STEREO
(Mono Stereo conversion)
You can enjoy monaural sound
sources with a stereo-like
effect.
(The MONO TO STEREO
indicator lights up.)
Page 47

Playing a disc
Turn on the TV, and switch the input to the “VIDEO 1”, “VIDEO
2”, etc. accordingly.
1 2 3
4 5 6
7 8 9
+100
HT-DV40H3
HT-DV50H3
Playback
WMA
ENGLISH
1 Press the ON/STAND-BY button to turn the power on.
2 “SHARP” startup screen appears on the TV screen.
NO DISC
3
Press the DVD/CD button on the remote control.
4
Insert the disc into the disc slot, label side up.
z
The disc must be fully inserted into the disc slot before playing.
If “NO DISC” appears due to improper disc insertion, switch off
the AC power supply and then switch it on again.
12 cm (5")
8 cm (3")
or
z
8 cm disc can be inserted without an adaptor.
z
Due to the structure of the disc information, it takes longer to
read an MP3/WMA disc than a normal CD (approximately 20 to
90 seconds).
DVD Operation
5 Some discs play automatically. If playback does not start,
press the (DVD/CD ) button.
Disc play indicator
When the menu appears on the TV screen:
On DVD:
z Select item by using cursor ( , , or ) button and press
ENTER button.
z To return to the previous display, press the RETURN
button.
E-34
Page 48

HT-DV40H3
HT-DV50H3
ENGLISH
Playing a disc (continued)
z Playback will begin from track 1.
z After the last track on the disc is played, the unit will stop
automatically.
To remove the disc:
In the stop mode, press the button.
Various disc functions
Function Main
Play Press in the stop mode.
unit
Remote
control
Operation
Caution:
z Do not play discs of special shapes (heart, octagon, etc). They
may cause malfunctions.
z Do not push the disc whilst it is moving.
z If the power fails whilst the disc is moving, wait until the power is
restored.
z If TV or radio interference occurs during CD operation, move the
unit away from the TV or radio.
Auto power on function
When you press any of these buttons during stand-by mode, the unit
turns on.
z FUNCTION button (main unit): The unit turns on and the last of
previous function is activated. (DVD/CD/USB/TUNER/OPTICAL
1/OPTICAL 2/AUX IN/SCART)
z / button (main unit): The unit turns on and starts playback the
last of previous function of DVD/CD or USB.
DVD Operation
z DVD/CD button (remote control): The unit turns on and the "DVD/
CD" function is activated.
z USB button (remote control): The unit turns on and the "USB"
function is activated.
z AUX button (remote control): The unit turns on and the last of
previous function is activated. (OPTICAL 1/OPTICAL 2/AUX IN /
SCART)
z TUNER button (remote control): The unit turns on and the
"TUNER" function is activated.
z USB / button (remote control): The unit turns on and the
"USB" function is activated.
z DVD/CD / button (remote control): The unit turns on and the
"DVD/CD" function is activated.
E-35
Stop Press in the playback mode.
Pause Press in the playback mode.
Track
up/
Track
down
Fast
forward/
Fast
reverse
Notes for CD or MP3/WMA disc:
z When the end of the last track is reached during fast forward,
playback will stop. When the beginning of the first track is reached
during fast reverse, the unit will enter the playback mode.
z Rewritable multi-session discs with unfinished writing, can still be
played.
Press the / button to resume
playback from the paused point.
Press in the playback or stop
mode.
If you press the button in the stop
mode, press the / button to
start the desired track.
Press and hold down in the
playback mode.
Release the button to resume
playback.
Page 49

To interrupt playback
Press the (DVD/CD ) button.
To resume playback from the same point, press the (DVD/CD
) button.
To stop playback
DVD:
Press the button twice.
Audio CD/MP3/WMA/JPEG/DivX:
Press the button.
CD:
Caution:
z The unit gets slightly warm when used for a long time. It does not
mean the unit is damaged.
z When attempting to play disc with scratches or of a different
region number, or unplayable or restricted (*1) discs, an error
message will appear on the TV display and the disc will not play.
(*1) Viewing is prohibited on some DVDs according to the audience
age.
Notes:
z Stop positions may be recorded on some discs. When you play
such a disc, playback stops here.
z During an operation, “INVALID KEY” may appear indicating that
the operation is disabled by the disc.
Total indicator
To resume playback after stopping
(resume play)
You can resume playback from the point playback is stopped.
1 Whilst a disc is playing, press the
button.
The system stores the point you
stopped.
RESUME
2 To restart play, press the (DVD/CD ) button.
To cancel the resume playback:
Press the button twice.
Notes:
z The resume playback feature is disabled on some discs.
z Depending on the disc, playback may resume from slightly before
the stopped position.
DVD mode operation indicators
The following are examples of operation indicators that appear
during DVD playback.
Operation TV screen Unit display
When the unit is on
without a disc.
Disc data is being read.
First time stop
Second time stop
Play
Pause
READ
PRE STOP 9
STOP 9
SEQ PLAY
PAUSE 8
HT-DV40H3
HT-DV50H3
ENGLISH
DVD Operation
E-36
Page 50

HT-DV40H3
HT-DV50H3
ENGLISH
Basic operation
To locate the beginning of a chapter track (skip)
You can move to other tracks with simple operations.
DVD Operation
Whilst a disc is playing, press the or button.
z Use the button to skip to the next chapter (track).
z Use the button twice to skip to the previous chapter
(track).
Notes:
z Some discs do not display the chapter (track) and the skip feature
is disabled.
z On a DVD, skip does not operate between titles.
1 2 3
4 5 6
7 8 9
+100
WMA
1 2 3
4 5 6
7 8 9
+100
Fast forward/Fast reverse (search)
You can search the desired point as you play the disc.
1 Whilst a disc is playing, press and hold the or
button.
The scanning speed will change as follows at each press of the
button.
PLAY (Normal play)
PLAY (Normal play)
The disc is forwarded by the button and backward by the
button.
WMA
Forward X 2 Forward X 4 Forward X 8 Forward X 20
Backward X 2 Backward X 4 Backward X 8 Backward X 20
2 Press the (DVD/CD ) button to return to the normal
playback.
Notes:
z On some discs, the search is disabled.
z On a DVD, search does not operate between titles.
z On audio CD, the search can be operated between tracks.
z Whilst searching on a DVD, the sound is not heard and the
subtitles only appear at x 2 speed search.
z When search is performed during the DVD playback, pictures may
not be forwarded or reversed in the search speed specified in this
manual, depending on the disc or the scene being played.
z The search does not operate on JPEG discs.
z Whilst searching on an audio CD, MP3 or WMA disc, the sound
can only be heard at x 2 speed search.
E-37
Page 51

To start playback from the desired point
(direct play)
To select and play the desired title and chapter:
1 Whilst in the stop or playback mode, press the DIRECT
button.
TV screen
TT 00/02 CH 000/025 y 01:41:14
2 Select the title or chapter by pressing the or button and
enter the title or chapter number using the Direct Search
buttons.
Example:
To select chapter 1: Press “1”.
To select chapter 12: Press “1” and “2”.
To select chapter 22: Press “2” and “2”.
3 Press the ENTER button after confirm.
To play by specifying time (time search):
You can play back from the desired point by specifying the time.
1 Press DIRECT button.
Input desired time here
TV screen
TT 01/03 CH 000/025 y 00:00:00
hour min sec
2 Press button on the remote control to select time
column.
The time will be reset as “00:00:00”.
3 Specify the time with the Direct Search buttons, and then
press the ENTER button.
TT 01/03 CH 000/025 01:23:40
HT-DV40H3
HT-DV50H3
ENGLISH
Notes:
z Direct play feature is disabled on some discs.
z Some DVD discs may not display the chapter number. You can
specify the desired point only in the current title and not in other
titles.
z To specify 1 hour 23 minutes and 40 seconds, enter “01:23:40”.
z If you enter the wrong number, press or button for the
desired time.
Notes:
z Some discs cannot play from the specified point.
z Time search feature is disabled on some discs.
DVD Operation
E-38
Page 52

HT-DV40H3
HT-DV50H3
ENGLISH
Useful operation
1 2 3
4 5 6
7 8 9
+100
Slow motion play
You can slow down the playback speed.
1 Whilst a disc is playing, press the SLOW button
repeatedly to select the desired speed.
The speed changes as follows:
SF 1/2
SF 1/2
PLAY (Normal play)
2
Press the (DVD/CD ) button to return to the normal
playback.
SF 1/3 SF 1/4 SF 1/5 SF 1/6 SF 1/7
Notes:
z On some discs with movies inside, the slow-motion play function
is disabled.
z The sound is muted during slow-motion play.
DVD Operation
Still picture/Frame advance
You can freeze the picture during playback.
1 Whilst a disc is playing, press the
STILL button.
2 Each press of the STILL button advances the frame in
the still mode.
3 Press the (DVD/CD ) button to return to the normal
p
playback.
Note: The sound is muted during still picture.
E-39
TV screen
STEP
Page 53

To change the angle
You can change the angle of view when playing a DVD disc that
contains scenes recorded from multiple angle.
When “ ” is displayed in the upper left corner of the TV
screen, press the ANGLE button repeatedly to select the
desired angle number.
Notes:
z The angle number is not displayed if angles are not recorded on
z Refer to the manual of the disc as the operation may vary
2
the disc.
depending on the disc.
To zoom images (zoom)
You can zoom in and zoom out the image during playback.
1 Whilst a disc is playing, press the ZOOM button.
Each press of the ZOOM button cycles through the zoom setting
as belows:
PLAY (Normal play)
ZOOM 2 ZOOM 3
ZOOM:OFF
ZOOM 1/4
ZOOM 1/2ZOOM 4
ZOOM 1/3
2 To shift the view and display the
desired part of a zoomed image,
press the , , or button
repeatedly.
To return to normal view:
Press the ZOOM button repeatedly to select “ZOOM:OFF”.
Notes:
z Images may become distorted when zoomed.
z Subtitles cannot be zoomed.
z For JPEG ZOOM function, please refer page 47 for details.
To play the contents between the specified
points repeatedly (A-B repeat)
WMA
You can play the desired portion repeatedly by specifying it during
playback.
1
Whilst a disc is playing, press
simultaneously
TV screen
REPEAT A -
This registers the start point (A).
2
Press SHIFT and A B button simultaneously again to enter
the end point (B).
TV screen
REPEAT A - B
This starts A-B repeat from the start point (A) to the end point (B).
3
Press SHIFT and A B button simultaneously to return
to the normal playback.
Notes:
z A-B repeat play is disabled on some discs.
z A-B repeat play for DVD is possible only within a chapter.
z Some scenes on DVD may not allow A-B repeat play.
.
SHIFT and A
Unit display
POINT A 4A
Unit display
B
button
4A BPOINT B 4B
To select a subtitle or audio language from the
disc menu
You can select the desired subtitle or audio language and sound
system [Dolby Digital (5.1ch) or Dolby Digital (2ch)] on your DVD if it
has disc menu.
1 Whilst in the stop or playback mode, press the TOP
MENU/MENU button to display the disc menu.
2 Press the , , or button to change the setting and
press the ENTER button.
Note:
The procedure shown here provides only general steps. The actual
procedure for using the disc menu depends on the disc. See the disc
jacket for details.
HT-DV40H3
HT-DV50H3
ENGLISH
DVD Operation
E-40
Page 54

HT-DV40H3
HT-DV50H3
ENGLISH
Useful operation (continued)
To play in the desired order (programmed play)
You can play back the desired tracks in a specific order.
Maximum of 16 tracks can be programmed.
1 Whilst in the stop mode, press the MEMORY/DIMMER
button.
The PROGRAM screen shows as follows on CD and USB:
PROG
2 Enter a track and chapter number with the Direct Search
buttons.
The PROGRAM screen shows as follows on DVD:
PROG
DVD Operation
The PROGRAM screen shows as follows on CD and USB:
PROG
z For the next entry, repeat the procedure above to enter
z If you enter the wrong number, you can change the title/
z If the track number is 2 digits or more, example track 12, just
z Folder programmed is not possible.
WMA
TV screen
PLAY CLEAR
TV screen
T C T C T C T C
01:12
PLAY CLEAR
TV screen
0015
0013
0102
PLAY CLEAR
other track numbers by pressing Direct Search buttons after
pressing ENTER button.
track number by pressing Direct Search buttons again
before pressing ENTER button.
Unit display
Unit display
1) ENTER TITLE
2) ENTER CHAPTER
Unit display
press “1” and “2” by Direct Search buttons.
3 Select “PLAY” at the PROGRAM menu by pressing , ,
or button and press ENTER button on remote control to
start play.
To change the programmed contents:
Repeat the above procedure from step 1.
To cancel the programmed play mode:
Select “CLEAR” at the PROGRAM menu by pressing , , or
button and press ENTER button on remote control to cancel the
programmed play mode.
Notes:
z If the disc is ejected, the programmed sequence will be cancelled.
z The programme will be automatically cancelled if you press the
ON/STAND-BY button to enter the stand-by mode or change the
function from DVD/CD to another.
z During the programme operation, pressing the RANDOM button
will automatically cancel the programme.
z Removing the USB memory device will automatically cancel the
programmed sequence.
z Select “CLEAR” at the PROGRAM menu and press ENTER
button, the programmed sequence will be cancelled.
1 2 3
4 5 6
7 8 9
+100
1 2 3
4 5 6
7 8 9
+100
E-41
Page 55

To play repeatedly (repeat play)
P
P
TITLE Indicat
You can play a chapter (track) or a title repeatedly by specifying it
during playback.
WMA
1 Whilst a disc is playing, press the button to Repeat 1.
TV screen
REP: [CHAPTER]
Each time the button is pressed, the repeat play mode changes
in the following order.
The repeat play mode changes as follows on DVD:
REP: [CHAPTER]
REP: [TITLE]
REP: [OFF]
“CHAP REPP”
“TITLE RE ”P
“NORMAL”
The repeat play mode changes as follows on audio CD:
REP: [REP 1]
REP: [REP ALL]
REP:
[OFF] “NORMAL”
“1-REPEAT
“ALL REPEAT P”
The repeat play mode changes as follows on MP3/WMA:
REP: [REP 1]
REP: [REP DIR]
REP: [REP ALL]
REP: [OFF]
“1-REPEAT P”
“FOLD REPEAT P”
“ALL REPEAT P”
“NORMAL”
Unit display
CHAP REP
1
Repeat the currently
1
”
playing track.
Repeat the currently
playing disc.
The normal playback.
Repeat the currently
1
playing track.
Repeat the currently
playing directory.
Repeat the currently
playing disc.
The normal playback.
41
Repeat the currently
playing chapter.
Repeat the currently
playing title.
The normal playback
2 To return to the normal playback, press the button
repeatedly to select “NORMAL”.
Notes:
z After performing repeat play, be sure to press the button.
Otherwise, the disc will play continuously.
z On some discs, the repeat play function is disabled.
To change the display on TV screen
You can display or hide the operation indicators on the TV screen.
Whilst a disc is playing, press the ON SCREEN button. (The display
is changed at each press.)
DVD:
Current title
number
DVD
TT 1/28 CH 1/14
1/4ENG 5.1CH 1/5 ENG OFF
Current Subtitle and Audio Language
.
DVD
TT 1/28 CH 1/14
DVD
TT 1/28 CH 1/14
DVD
OFF
Current chapter
number
C 00:00:52
Total number of chapters
Total number of titles
Elapsed playback time for the total chapter
p
C –00:04:59
Remaining playback time for the current chapter
T 00:01:14
Elapsed playback time for the current title
T –01:27:40TT 1/28 CH 1/14
Remaining playback time for the current title
To change the display on main unit
WMA
Whilst a disc is playing, press the CLEAR/DISPLAY button.
(The display is changed at each press.)
DVD:
CHAPTER Indicator
Current chapter number
Current title number
HT-DV40H3
HT-DV50H3
ENGLISH
DVD Operation
or
E-42
Page 56

HT-DV40H3
HT-DV50H3
ENGLISH
Useful operation (continued)
MP3/WMA:
z Title, Artist and Album name is displayed if it is recorded on the disc.
z Display content can be changed by pressing the CLEAR/
DISPLAY button on remote control.
Title Display Function Display
To change the subtitle language
You can change the subtitle language or hide subtitles during
playback.
Whilst a disc is playing, press the
SUBTITLE button repeatedly to select
the desired subtitle language.
[ENGLISH]:
Album Display Artist Display
Note:
If “UNKNOWN” is displayed, it means Title or Artist or Album name
is not recorded.
DVD Operation
The subtitle language, audio language and TV type you select during
playback are reset each time you set this unit to stand-by mode or
switch the input. To keep your own settings, set them in the Set up
E-43
menu (see page 21).
1 2 3
4 5 6
7 8 9
+100
Notes:
z On some discs, the subtitle language cannot be changed.
z If no subtitles are recorded on the disc, “OFF” is displayed.
z It may take time to switch the subtitle language to the selected
one.
z Subtitles cannot be hidden on some DVDs.
To change the audio language (audio output)
During playback, you can change the audio language (audio output).
Whilst a disc is playing, press the
AUDIO button repeatedly to select the
desired audio number.
[ENGLISH]:
You can select desired languages.
Notes:
z On some discs, the audio language cannot be changed.
z For the audio language and audio system, refer to the manual of
the disc.
Page 57

Listening to a CD or MP3/WMA disc
This system can play back a standard CD, CD-R/RW in the CD
format and CD-R/RW with MP3 or WMA files, but cannot record on
them.
Some audio CD-R and CD-RW discs may not be playable due
to the state of the disc or the device that was used for recording.
MP3:
MP3 is a form of compression. It is an acronym which stands
for MPEG Audio Layer 3.
MP3 is a type of audio code which is processed by significant
compression from the original audio source with very little loss
in sound quality.
z This system supports MPEG 1 Layer 3 and VBR files.
z During VBR file playback, time counter in the display may differ
from its actual playback time.
z Bitrate which is supported by MP3 is 32 ~ 320 kbps.
WMA:
WMA files are Advanced System Format files that include audio
files which are compressed with Windows Media Audio codec.
WMA is developed by Microsoft as an audio format file for
Windows Media Player.
z “MP3” and “WMA” indicator will light up after the unit reads
information on an MP3 or WMA disc.
z Bitrate which is supported by WMA is 64 ~ 160 kbps.
The following playback functions are the same as DVD
operations.
Page
Playing a disc . . . . . . . . . . . . . . . . . . . . . . . . . . . . . . . . . . . .34 - 36
To locate the beginning of a chapter track (skip) . . . . . . . . . . 37
Fast forward/Fast reverse (search) . . . . . . . . . . . . . . . . . . . . . . 37
To start playback from the desired point (direct play) . . . . . . 38
To play the contents between the specified points repeatedly
(A-B repeat) . . . . . . . . . . . . . . . . . . . . . . . . . . . . . . . . . . . . . . . . . 40
To play in the desired order (programmed play) . . . . . . . . . . . 41
To play repeatedly (repeat play) . . . . . . . . . . . . . . . . . . . . . . . . 42
To change the display on TV screen . . . . . . . . . . . . . . . . . . . . 42
To change the display on main unit . . . . . . . . . . . . . . . . . . 42 - 43
1 2 3
4 5 6
7 8 9
+100
HT-DV40H3
HT-DV50H3
ENGLISH
CD, CD-R and CD-RW Operation
E-44
Page 58

HT-DV40H3
HT-DV50H3
ENGLISH
Advanced CD or MP3/WMA disc playback
To play in random order (random play)
WMA
The tracks on the disc play back can be played in random order
automatically.
In the stop or playback mode, press the SHIFT button and then
the RANDOM button.
All the tracks play in random order.
[ON]Random
To cancel random play:
To cancel random playback, press the SHIFT and RANDOM buttons,
so that the random “R**” character will disappear.
Notes:
z On some disc, this function cannot be used.
z If RANDOM button is pressed whilst in programmed playback,
playback will enter random mode and programme is cancelled.
z In random play, the unit will select and play tracks automatically.
(You cannot select the order of the tracks.)
z If you press the or button during random play, you
can move to the track selected next by the random operation.
CD, CD-R and CD-RW Operation
z In random function, playback will continue until button is
pressed.
To start playback from the desired point
(direct play)
By using the Direct Search buttons, the desired tracks on the current
disc can be played.
Use the Direct Search buttons
on the remote control to select
the desired track whilst playing
or in the stop mode.
1 2 3
Unit DisplayTV screen
Notes:
z A track number higher than the number of tracks on the disc
cannot be selected.
4 5 6
7 8 9
Selected track number
1 2 3
4 5 6
7 8 9
+100
+100
z During random play, direct search is not possible.
z For CD-R/RW discs recorded in the MP3 or WMA format, you can
select the track number but cannot select the folder by pressing
the Direct Search buttons.
Notes:
z This unit only supports “MPEG-1 Audio Layer-3” and “MPEG-2
Audio Layer-3” format. (Sampling Frequency is 32, 44.1, 48kHz)
z “MPEG-2.5 Audio Layer-3” and MP1, MP2 format are not
supported.
z Playback order for MP3 files may differ sometimes depending on
the writing software used during file downloading.
z Bitrate which is supported by MP3 is 32~320 kbps, WMA is
64~160 kbps.
z For MP3/WMA files, please put “.MP3” “.WMA” extension. Files
cannot be played back if there is no MP3/WMA extension.
z Playlists are not supported on this unit.
z This unit only supports MP3 ID3-Tag version 1.x.
z The display playback time may not be displayed correctly when
playing back a variable bitrate file.
z Copyright protected WMA files cannot be played back.
E-45
Page 59

DivX and JPEG disc operation
Playing a disc . . . . . . . . . . . . . . . . . . . . . . . . . . . . . . . . . . . .34 - 36
To locate the beginning of a chapter track (skip) . . . . . . . . . . 37
Fast forward/Fast reverse (search) . . . . . . . . . . . . . . . . . . . . . . 37
To start playback from the desired point (direct play) . . . . . . 38
Still picture/Frame advance . . . . . . . . . . . . . . . . . . . . . . . . . . . 39
Slow motion play (DivX only) . . . . . . . . . . . . . . . . . . . . . . . . . . 39
To change the angle . . . . . . . . . . . . . . . . . . . . . . . . . . . . . . . . . . 40
To zoom images (zoom) . . . . . . . . . . . . . . . . . . . . . . . . . . . . . . . 40
To play the contents between the specified points repeatedly
(A-B repeat) . . . . . . . . . . . . . . . . . . . . . . . . . . . . . . . . . . . . . . . . . 40
To select a subtitle or audio language from the disc menu . . 40
To play in the desired order (programmed play) . . . . . . . . . . . 41
To play repeatedly (repeat play) . . . . . . . . . . . . . . . . . . . . . . . . 42
To change the display on TV screen. . . . . . . . . . . . . . . . . . . . . 42
To change the display on main unit . . . . . . . . . . . . . . . . . .42 - 43
To change the audio language . . . . . . . . . . . . . . . . . . . . . . . . . 43
1 2 3
4 5 6
7 8 9
+100
Page
Playback on the DivX and JPEG menu screen
You can play CD-R/RW recorded in the DivX and JPEG formats.
1 Load a disc containing DivX and JPEG files, the menu
screen appears.
.... indicates folders
.... indicates JPEG data
.... indicates MP3/WMA data
.... indicates DivX or MPEG data
2 Press the or button to select , or and then
press the ENTER button.
3 Select a folder or a track using the , , or button.
z Playback starts when you press (DVD/CD ) or ENTER
button.
z The next file picture can be automatically displayed after a
while for JPEG format if you select (DVD/CD ) button
to start playback.
z Using the Direct Search buttons, you can open file directly.
HT-DV40H3
HT-DV50H3
ENGLISH
CD, CD-R and CD-RW Operation
E-46
Page 60

HT-DV40H3
/2
n.
n.
HT-DV50H3
ENGLISH
DivX and JPEG disc operation (continued)
Zoom function
1 During playback, press the ZOOM button.
2 Each press of the ZOOM button cycles through the zoom
setting as follows:
NORMAL PLAY (ZOOM : OFF)
ZOOM 2 ZOOM 3 ZOOM 4
Rotating a picture
1 During playback, press the , , or button.
The image rotates as below:
button : 90 degree rotation in a clockwise direction.
3 To shift the view and display the desired part of a zoomed
image, press the , , or button repeatedly.
Press the button.
Press the button.
CD, CD-R and CD-RW Operation
To return to normal view:
Press the ZOOM button again, “ZOOM:OFF” will appear on the
screen.
E-47
ZOOM 1/3ZOOM 1/4
Press the butto
Press the butto
ZOOM 1
button : 90 degree rotation in an anti-clockwise direction.
button : Horizontal mirror image.
button : Vertical mirror image.
Page 61

Playback on USB memory device
Playback on USB memory device
You can play USB recorded in JPEG, MP3 and WMA formats.
Note:
This product is not compatible with MTP and AAC file systems.
1 Open the bottom door. Connect the USB device. Press the
(USB ) button.
z To select USB function, press the (USB ) button.
WMA
1 2 3
4 5 6
7 8 9
+100
To remove USB memory device
To remove USB memory device
1 Press the button.
2 Disconnect USB memory device from the USB terminal.
The following functions are the same as DVD or CD operations:
Page
To locate the beginning of a chapter track (skip) . . . . . . . . . . 37
Fast forward/Fast reverse (search) . . . . . . . . . . . . . . . . . . . . . . 37
To start playback from the desired point (direct play) . . . . . . 38
Slow motion play . . . . . . . . . . . . . . . . . . . . . . . . . . . . . . . . . . . . 39
To zoom images (zoom). . . . . . . . . . . . . . . . . . . . . . . . . . . . . . . 40
To play the contents between the specified points repeatedly
(A-B repeat) . . . . . . . . . . . . . . . . . . . . . . . . . . . . . . . . . . . . . . . . . 40
To play in the desired order (programmed play) . . . . . . . . . . . 41
Random play . . . . . . . . . . . . . . . . . . . . . . . . . . . . . . . . . . . . . . . . 45
HT-DV40H3
HT-DV50H3
ENGLISH
2 Press the or button to select data types recorded in
USB memory device.
3
Press ENTER button to choose folder types.
4 Select desired track to be played back by pressing , ,
or . Then press ENTER or (USB ) button. This
function is only visible when connected to TV.
Note:
If USB memory device is not connected, “NO MEDIA” will be shown
on the display.
USB Memory Playback
E-48
Page 62

HT-DV40H3
.
HT-DV50H3
ENGLISH
To remove USB memory device
(continued)
Notes:
z SHARP will not be held liable for the loss of data whilst the USB
memory device is connected to the audio system.
z Files compressed in MP3 and / or WMA format can be played
back when connected to the USB terminal.
z This USB memory’s format support FAT 16 or FAT 32.
z SHARP cannot guarantee that all USB memory devices will work
on this audio system.
z This USB memory cannot be operated via USB hub.
z If “UNSUPPORT WMA” is displayed, it means “Copyright
protected WMA file” is selected.
z The USB terminal in this unit is not intended for a PC connection
but is used for music streaming with a USB memory device.
z The larger the capacity of the USB storage device, the longer it will
take for the data to be read.
z Some USB multi-reader devices may not work correctly with the
USB terminal on this unit.
z External storage devices cannot be played back using the USB
terminal on this unit.
z This unit only supports “MPEG-1 Audio Layer-3” and “MPEG-2
Audio Layer-3” format. (Sampling Frequency is 32, 44.1, 48kHz)
z “MPEG-2.5 Audio Layer-3” and MP1, MP2 format are not
supported.
z Playlists are not supported on this unit.
z The playback time may not be displayed correctly when playing
back a variable bitrate file.
USB Memory Playback
z Use only the supplied USB cable.
Advanced USB playback
Repeat play (REMOTE CONTROL ONLY)
Repeat play can play single track and all track sequence
continuously.
1 2 3
4 5 6
7 8 9
+100
Whilst a disc is playing, each time the button is pressed, the repeat
mode changes in the following order:
In case of an USB mode:
REP: [REP 1]
REP: [REP DIR]
REP: [REP ALL]
REP: [OFF] “NORMAL”
Random play (REMOTE CONTROL ONLY)
The tracks can be played in random order automatically.
To random play all tracks:
Press the SHIFT and RANDOM buttons on the remote control so
that random indicator lights up in the display window.
“1-REPEAT”
“FOLD REPEAT”
“ALL REPEAT”
Repeat the currently
playing track.
Repeat the currently
playing directory.
Repeat the currently
playing USB.
The normal playback
E-49
Page 63

To cancel random playback, press again the SHIFT and RANDOM
buttons, so that the random indicator will disappear.
Notes:
z If you press the or button during random play, you
can move to the track selected next by the random operation.
z In random play, the unit will select and play tracks automatically.
(You cannot select the order of the tracks.)
z If you press the REPEAT button during random play, playback will
enter repeat mode and random will be cancelled.
z In random function, playback will continue until button is
pressed.
Caution:
After performing repeat, be sure to press the button.
Otherwise, it will play continuously.
Notes:
z This unit only supports “MPEG-1 Audio Layer-3” and “MPEG-2
Audio Layer-3” format. (Sampling Frequency is 32, 44.1, 48kHz)
z “MPEG-2.5 Audio Layer-3” and MP1, MP2 format are not
supported.
z Playback order for MP3 files may differ sometimes depending on
the writing software used during file download.
z Bitrate which is supported by MP3 is 32~320 kbps, WMA is
64~160 kbps.
z For MP3/WMA files, please put “.MP3” “.WMA” extension. Files
cannot be played back if there is no MP3/WMA extension.
z Playlists are not supported on this unit.
z This unit only supports MP3 ID3-Tag version 1.x.
z The display playback time may not be displayed correctly when
playing back a variable bitrate file.
z Copyright protected WMA files cannot be played back.
Listening to the radio
1 2 3
4 5 6
7 8 9
+100
Tuning
1 Press the ON/STAND-BY button to turn the power on.
2 Press the TUNER on the remote control.
3 Press the TUNING ( or ) button to tune in to the
desired station.
Manual tuning:
Press the TUNING ( or ) button as many times as required
to tune in to the desired station.
Auto tuning:
When the TUNING ( or ) button is pressed for more than 0.5
seconds, scanning will start automatically and the tuner will
stop at the first receivable broadcast station.
HT-DV40H3
HT-DV50H3
ENGLISH
Radio Operation
E-50
Page 64

HT-DV40H3
HT-DV50H3
ENGLISH
Listening to the radio (continued)
Notes:
z When radio interference occurs, auto scan tuning may stop
automatically at that point.
z Auto scan tuning will skip weak signal stations.
z To stop the auto tuning, press the TUNING ( or ) button again.
z When an RDS (Radio Data System) station is tuned in, the
frequency will be displayed first, and then the RDS indicator will
light up. Finally, the station name will appear.
z Full auto tuning can be achieved for RDS stations “ASPM”, see
page 53.
To receive an FM stereo transmission:
Press the TUNER button to select stereo mode and “ST” indicator
will be displayed.
z “ ” will appear when an FM broadcast is in stereo.
z If the FM reception is weak, press the TUNER button to extinguish
the “ST” indicator. The reception changes to monaural, and the
sound becomes clearer.
FM stereo receiving indicator
4 Within 30 seconds, press the MEMORY/DIMMER button to
store that station in memory.
If the “MEMORY” and preset number indicators disappear
before the station is memorised, repeat the operation from step
2.
5 Repeat steps 1 - 4 to set other stations, or to change a
preset station.
When a new station is stored in memory, the station previously
memorised for that preset channel number will be erased.
Note:
The backup function protects the memorised stations for a few
hours should there be a power failure or the AC power lead become
disconnected.
E-51
FM stereo mode indicator
Memorising a station
Up to 30 stations for FM band can be stored and recalled at the push
Radio Operation
of a button. (PRESET ( or ) )
1 Perform steps 1 - 3 in “Tuning” on page 50.
2 Press the MEMORY/DIMMER button to enter the preset
tuning saving mode.
3 Within 30 seconds, press the PRESET ( or ) button to
select the preset channel number.
Store the stations in memory, in order, starting with preset
channel 1.
To recall a memorised station
Press the PRESET ( or ) button for less than 0.5 seconds
to select the desired station.
To scan the preset stations
The station saved in memory can be scanned automatically. (Preset
memory scan)
1
Press the PRESET ( or ) button for more than 0.5
seconds. The preset number will flash and the programmed
stations will be tuned in sequentially, for 5 seconds each.
2 Press the PRESET ( or ) button again when the desired
station is located.
To erase entire preset memory
1 Press the ON/STAND-BY button to enter the stand-by mode.
2 Press and hold CLEAR/DISPLAY button until "TUNER CLEAR"
appears.
Page 65

Using the Radio Data System (RDS)
RDS is a broadcasting service which a growing number of FM
stations provide. These FM stations send additional signals
along with their regular programme signals. They send their
station names, and information about the type of programme
such as sport, music, etc.
When tuned to an RDS station, “RDS” and the station name will be
displayed.
“TP” (Traffic Programme) will appear on the display when the
received broadcast carries traffic information, and “TA” (Traffic
Announcement) will appear whilst a traffic information is on air.
“PTYI” (Dynamic PTY Indicator) will appear whilst the Dynamic PTY
station is received.
Information provided by RDS
Each time the RDS DISP button is pressed, the display will
switch as follows:
1 2 3
4 5 6
7 8 9
+100
HT-DV40H3
HT-DV50H3
ENGLISH
You can control the RDS by using the buttons on the remote
control only.
Station name (PS) Programme type (PTY)
Frequency Radio text (RT)
When tuning in to a station other than an RDS station or to an RDS
station which sends weak signal, the display will change in the
following order:
NO PS NO PTY
FM 98.80 MHz
NO RT
Advanced Features
E-52
Page 66

HT-DV40H3
HT-DV50H3
ENGLISH
Advanced Features
E-53
Using the Radio Data System (RDS) (continued)
Using the Auto Station Programme Memory
(ASPM)
Whilst in the ASPM operation mode, the tuner will automatically
search for new RDS stations. Up to 30 stations can be stored.
If you have already stored some stations in memory, the number of
new stations you can store will be less.
1 Press the TUNER button to select the FM band.
2 Press and hold down the SHIFT and RDS ASPM button on
the remote control for at least 3 seconds.
1 After “ASPM” has flashed for about 4 seconds, scanning will
start (87.50 - 108.00 MHz).
2 When an RDS station is found, “RDS” will appear for a short
time and the station will be stored in memory.
3 After scanning, the number of stations stored in memory will
be displayed for 4 seconds, and then “END” will appear for
4 seconds.
To stop the ASPM operation before it is complete:
Press the SHIFT and RDS ASPM button whilst it is scanning
for stations.
The stations which are already stored in memory will be kept there.
Notes:
z If the same station is broadcasting on different frequencies, the
strongest frequency will be stored in memory.
z Any station which has the same frequency as the one stored in
memory will not be stored.
z If 30 stations have already been stored in memory, the scan will
be aborted. If you want to redo the ASPM operation, erase the
preset memory.
z If no station is stored in memory, “END” will appear for about 4
seconds.
z If the RDS signals are very weak, station names may not be
stored in memory.
To erase all of the contents of preset memory:
1 Press the ON/STAND-BY button to enter the power stand-by
mode.
2 Press CLEAR/DISPLAY button for more than 2 seconds until
“TUNER CLEAR” appears.
z After performing this operation, all of the preset memory
information will be erased.
To store a station name again if the wrong name was stored in
memory:
It may be impossible to store station names in memory using the
ASPM function if there is lots of noise or if the signal is too weak. In
this case, perform as follows.
1 Press the PRESET
are correct.
2 If you find a wrong name whilst receiving the station, wait until the
correct name is displayed. And then press the MEMORY/
DIMMER button.
3 Within 30 seconds, press the MEMORY/DIMMER button whilst
the preset channel number is flashing.
z The new station name has been stored in memory correctly.
( or ) button to check whether the names
Page 67

Notes:
z The same station name can be stored in different channels.
z In a certain area or during certain time periods, the station names
may temporarily be different.
Notes for RDS operation
If any of the following events occur, it does not mean that the
unit is faulty:
z “PS”, “NO PS” and a station name appear alternately, and the unit
does not operate properly.
z If a particular station is not broadcasting properly or a station is
conducting tests, the RDS reception function may not work
properly.
z When you receive an RDS station whose signal is too weak,
information like the station name may not be displayed.
z “NO PS”, “NO PTY” or “NO RT” will flash for about 5 seconds, and
then the frequency will be displayed.
Notes for radio text:
z The first 10 characters of the radio text will appear for 4 seconds
and then they will scroll across the display.
z If you tune in to an RDS station which is not broadcasting any
radio text, “NO RT” will be displayed when you switch to the radio
text position.
z Whilst radio text data is received or when the text contents
change, “RT” will be displayed.
To recall stations in memory
To specify programmed types and select stations (PTY search):
You can search a station by specifying the programme type (news,
sports, traffic programme, etc. ... see pages 55 - 56) from the stations
in memory.
1 Press the TUNER button to select the FM band.
2 Press the SHIFT and RDS PTY button on the remote
control.
“SELECT” and “PTY TI” will appear alternately for about 6
seconds.
3 Within 6 seconds, press the PRESET ( or ) button to
select the programme type.
Each time the button is pressed, the programme type will
appear. If the button is held down for more than 0.5 seconds,
the programme type will appear continuously.
4 Whilst the selected programme type is flashing (within 6
seconds), press the SHIFT and RDS PTY button again.
HT-DV40H3
HT-DV50H3
ENGLISH
Advanced Features
After the selected programme type has been lit for 2 seconds,
“SEARCH” will appear, and the search operation will start.
E-54
Page 68

HT-DV40H3
HT-DV50H3
ENGLISH
Advanced Features
Using the Radio Data System (RDS) (continued)
Notes:
z If the display has stopped flashing, start again from step 2. If the
unit finds a desired programme type, the corresponding channel
number will flash for about 4 seconds, and then the station name
will flash for 7 seconds, which will remain lit.
z If you want to listen to the same programme type of another
station, press the SHIFT and RDS PTY button whilst the channel
number or station name is flashing. The unit will look for the next
station.
z If no station can be found, “NOT FOUND” will appear for 4
seconds.
If you select the traffic programme:
If you select the traffic programme (TP) in step 3, “TP” will appear.
(This does not mean that you can listen to the traffic information at
that time.)
When the traffic information is broadcast, “TA” will appear.
Descriptions of the PTY (Programme Type) codes, TP (Traffic
Programme) and TA (Traffic Announcement).
You can search for and receive the following PTY, TP and TA
signals.
NEWS Short accounts of facts, events and publicly
AFFAIRS Topical programme expanding or enlarging upon
INFO Programmes whose purpose is to impart advice in
SPORT Programme concerned with any aspect of sport.
EDUCATE Programme intended primarily to educate, of which
DRAMA All radio plays and serials.
CULTURE Programmes concerned with any aspect of national
SCIENCE Programmes about the natural sciences and
VARIED Used for mainly speech-based programmes usually
POP M Commercial music, which would generally be
ROCK M Contemporary modern music, usually written and
EASY M Current contemporary music considered to be
expressed views, reportage and actuality.
the news, generally in different presentation style or
concept, including debate, or analysis.
the widest sense.
the formal element is fundamental.
or regional culture, including language, theatre, etc.
technology.
of light-entertainment nature, not covered by other
categories. Examples include: quizzes, panel
games, personality interviews.
considered to be of current popular appeal, often
featuring in current or recent record sales charts.
performed by young musicians.
“easy-listening”, as opposed to Pop, Rock or
Classical, or one of the specialised music styles,
Jazz, Folk or Country. Music in this category is often
but not always, vocal, and usually of short duration.
E-55
Page 69

LIGHT M Classical music for general, rather than specialist
appreciation. Examples of music in this category
are instrumental music, and vocal or choral works.
CLASSICS Performances of major orchestral works,
symphonies, chamber music, etc., and including
Grand Opera.
OTHER M Musical styles not fitting into any of the other
categories. Particularly used for specialist music of
which Rhythm & Blues and Reggae are examples.
WEATHER Weather reports and forecasts and meteorological
information.
FINANCE Stock Market reports, commerce, trading, etc.
CHILDREN For programmes targeted at a young audience,
primarily for entertainment and interest, rather than
where the objective is to educate.
SOCIAL Programmes about people and things that influence
them individually or in groups. Includes: sociology,
history, geography, psychology and society.
RELIGION Any aspect of beliefs and faiths, involving a God or
Gods, the nature of existence and ethics.
PHONE IN Involving members of the public expressing their
views either by phone or at a public forum.
TRAVEL Features and programmes concerned with travel to
near and far destinations, package tours and travel
ideas and opportunities. Not for use for
announcements about problems, delays, or
roadworks affecting immediate travel where TP/TA
should be used.
LEISURE Programmes concerned with recreational activities
in which the listener might participate. Examples
include, Gardening, Fishing, Antique collecting,
Cooking, Food & Wine, etc.
JAZZ Polyphonic, syncopated music characterised by
improvisation.
COUNTRY Songs which originate from, or continue the musical
tradition of the American Southern State
characterised by a straightforward melody and
narrative story line.
NATION M Current Popular Music of the Nation or Region in
that country's language, as opposed to
International “Pop” which is usually US or UK
inspired and in English.
OLDIES Music from the so-called “golden age” of popular
music.
FOLK M Music which has its roots in the musical culture of a
particular nation, usually played on acoustic
instruments. The narrative or story may be based
on historical events or people.
DOCUMENT Programme concerned with factual matters,
presented in an investigative style.
TEST Broadcast when testing emergency broadcast
equipment or receivers.
ALARM ! Emergency announcement made under
exceptional circumstances to give warning of
events causing danger of a general nature.
NONE No programme type (receive only).
TP Broadcasts which carry traffic announcements.
TA Traffic announcements are being broadcast.
HT-DV40H3
HT-DV50H3
ENGLISH
Advanced Features
E-56
Page 70

HT-DV40H3
HT-DV50H3
ENGLISH
Advanced features
Playing karaoke
You can enjoy karaoke to DVDs, video CDs, audio CDs and MP3
Discs by connecting separately available microphone to this unit.
1 2 3
4 5 6
7 8 9
+100
1 Press the ON/STAND-BY button to turn the power on.
Set the MIC VOL control to MIN to protect the speakers
2
from shock noise and to avoid disturbing noises.
Connect the microphone to the MIC 1 or MIC 2 socket or
3
both sockets for enjoying duets.
z
Use a microphone with a 6.3 mm (1/4") plug, an impedance of
600 ohms.
z
Use a standard plug adaptor when using a microphone with a
3.5 mm (1/8") diameter plug.
Press the DVD/CD, TUNER, USB or AUX button to select
4
the audio source and play it.
Adjust the volume of the audio source using the VOLUME
5
control.
To control the volume of both microphones, press MIC
6
VOL (+) to increase and MIC VOL (-) to decrease.
Press the ECHO (+ or -) on the remote control whilst press-
7
ing down the SHIFT button, to adjust the microphone echo.
Notes:
z
When you sing too loud through the microphone, your voice may be
distorted depending on the devices connected. If this happens, lower
the microphone volume.
z If an extremely sensitive microphone is used, howling may be
generated.
z Unidirectional microphone is more appropriate for vocal use.
z
When you connect or disconnect a microphone, the sound is muted for a
few seconds.
If squealing occurs:
z Reduce the microphone volume.
z Change the direction of the microphone.
z Reduce the volume of the main unit.
z Move the microphone away from the speakers.
Caution:
z When not using the microphone, remove it from the MIC socket.
z When connecting or disconnecting the microphone, set the MIC
VOLUME control to MIN.
z When using only one microphone, unplug the other.
E-57
Page 71

To change the audio mode/Bi-LANGUAGE
setting
Sound of the playback source can be switched among the STEREO,
L-CH, R-CH, and V-CANCEL (VOCAL CANCEL) modes.
The audio mode function is used when the left and right channels
have individual signals from each other.
Press the KARAOKE button on the remote
control until the desired audio mode is displayed.
Each time the KARAOKE button is pressed,
the mode will change as follows:
STEREO L-CH
R-CH
V-CANCEL
STEREO Sounds on the left and right channels are played.
L-CH Sounds on the left channel only are played.
R-CH Sounds on the right channel only are played.
V-CANCEL The main vocal is lowered.
Notes:
z
The initial audio mode setting is “STEREO”.
z
In any mode other than the STEREO mode,
z
The setting will remain unchanged when you change the disc, you set the
unit to the stand-by mode or the function is changed from the CD to
another function.
z
When playing a sound multiplexed disc on which a vocal and music have
been separately recorded, select the audio mode as desired.
“”
will appear.
1 2 3
4 5 6
7 8 9
+100
To change general stereo source to karaoke
source
Even ordinary discs not recorded specifically for karaoke can be
used for karaoke just by toning down the main vocal.
Press the KARAOKE button on the remote control until “V-CANCEL” appears in the display.
Notes:
z
Use discs recorded in stereo. The function will not work with mono
sources.
z
With some discs the original vocals may still be heard.
Notes on sound multiplexed karaoke discs:
Sound multiplexed karaoke discs are discs on which the main vocal and
the BGM (Background music) have been recorded on one of the two
channels and only the BGM on the other.
z
The function will not work properly with discs which do not belong to this
group.
z
Discs on which vocal has been recorded on the left channel and music on
the right may not play properly.
HT-DV40H3
HT-DV50H3
ENGLISH
Advanced Features
E-58
Page 72

HT-DV40H3
HT-DV50H3
ENGLISH
Advanced Features
Timer and sleep operation (Remote Control only)
Timer playback:
The unit turns on and plays the desired source (DVD/CD, USB,
TUNER, OPTICAL 1, OPTICAL 2, AUX IN, SCART) at a preset
time.
This unit has 2 types of timer: ONCE TIMER and DAILY TIMER.
Once timer: Once timer play works for one time only at a preset
time.
Daily timer: Daily timer play works at the same preset time
every day.
For example, set the timer as a wake-up call every morning.
Using the once timer and daily timer in combination:
For example, use the once timer to listen to a radio programme, and
use the daily timer to wake up.
1 Set the daily timer (pages 59 - 61).
2 Set the once timer (pages 59 - 61).
1 minute or more
Once timer
Start
Daily timer
Stop Start Stop
Note:
When set times for the daily timer and once timer overlap, the once
timer takes priority. Allow an interval of at least 1 minute between
operations.
Timer playback
Before setting timer:
1 Check that the clock is set to the correct time (refer to page 29).
If it is not set, you cannot use the timer function.
2 For timer playback: Load discs to be played.
1 Press the ON/STAND-BY button to turn the power on.
2 Press the CLOCK/TIMER button.
3 Within 10 seconds, press the or button to select
“ONCE” or “DAILY”, and press the MEMORY/DIMMER
button.
Set the clock to the correct time if “ONCE” or “DAILY” does not
appear.
1 2 3
4 5 6
7 8 9
+100
E-59
Page 73

4 Within 10 seconds, press the or button to select
“ONCE SET” or “DAILY SET”, and press the MEMORY/
DIMMER button.
5 Press the or button to adjust the hour and then
press the MEMORY/DIMMER button.
The illustrations show the timer playback setting in the daily
timer mode.
6 Press the or button to adjust the minutes and then
press the MEMORY/DIMMER button.
7 Set the time to finish as in steps 5 and 6 above.
8 Switch input with the or button, and then press the
MEMORY/DIMMER button.
To select the timer playback source: DVD/CD, USB, OPTICAL
1, OPTICAL 2, AUX IN, SCART or TUNER.
z When you select the tuner, select a station by pressing the
or button, and then press the MEMORY/DIMMER
button.
z If a station has not been programmed, “NO PRESET” will be
displayed and timer setting will be cancelled.
9 Adjust the volume using the VOLUME control, and then
press the MEMORY/DIMMER button.
Do not turn the volume up too high.
10 Press the ON/STAND-BY button to enter the power stand-
by mode.
The “TIMER” indicator lights up and the unit is ready for timer
playback.
HT-DV40H3
HT-DV50H3
ENGLISH
Advanced Features
Continued to the next page
E-60
Page 74

HT-DV40H3
HT-DV50H3
ENGLISH
Advanced Features
Timer and sleep operation (Remote Control only) (continued)
11 When the preset time is reached, playback will start.
The volume will increase gradually until it reaches the preset
volume.
12 When the timer end time is reached, the system will enter
the power stand-by mode automatically.
Once timer:
The timer will be cancelled.
The “ ” indicator will blink during timer playback.
r
Daily timer:
The timer will operate at the same time every day. It will
continue until the daily timer setting is cancelled. Cancel the
daily timer when it is not in use.
The “DAILY ” indicator will blink during timer playback.
Note:
When performing timer playback using another unit connected to the
USB terminal/OPTICAL 1/OPTICAL 2/AUX IN/SCART sockets,
select USB or OPTICAL 1 or OPTICAL 2 or AUX or SCART in step 8.
This unit will turn on or enter the power stand-by mode automatically.
However, the connected unit to USB terminal/OPTICAL 1/OPTICAL
2/AUX IN/SCART sockets will not turn on or off.
r
Checking the timer setting in the timer stand-by mode:
1 Press the CLOCK/TIMER button.
2 Within 10 seconds, press the or button to select “ONCE”
or “DAILY”, and press the MEMORY/DIMMER button.
3 Within 10 seconds, press the or button to select “ONCE
CALL” or “DAILY CALL”, and press the MEMORY/DIMMER
button.
The unit returns to the timer stand-by mode after displaying the
settings in order.
Cancelling the timer setting in the timer stand-by mode:
1 Press the CLOCK/TIMER button.
2 Within 10 seconds, press the or button to select “ONCE”
or “DAILY”, and press the MEMORY/DIMMER button.
3 Within 10 seconds, press the or button to select “ONCE
OFF” or “DAILY OFF”, and press the MEMORY/DIMMER button.
Timer will be cancelled (the setting will not be cancelled).
Reusing the memorised timer setting:
The timer setting will be memorised once it is entered. To reuse the
same setting, perform the following operations.
1 Turn the power on and press the CLOCK/TIMER button.
2 Within 10 seconds, press the or button to select “ONCE”
or “DAILY”, and press the MEMORY/DIMMER button.
3 Within 10 seconds, press the or button to select “ONCE
ON” or “DAILY ON”, and press the MEMORY/DIMMER button.
4 Press the ON/STAND-BY button to enter the power stand-by
mode.
E-61
Page 75

Sleep operation
S
automatically stop
e
The radio, discs and USB can all be turned off automatically.
1 Play back the desired sound source.
2 Press the CLOCK/TIMER button.
3 Within 10 seconds, press the
or button to select
“SLEEP”, and press the
MEMORY/DIMMER button.
4 Press the or button to select the time.
(Maximum: 3 hours - Minimum: 1 minute)
z 3 hours - 5 minutes 5-minute intervals
z 5 minutes - 1 minute 1-minute intervals
5 Press the MEMORY/DIMMER
button.
“SLEEP” will appear.
To cancel the sleep operation:
Press the ON/STAND-BY button whilst “SLEEP” is indicated.
To cancel the sleep operation without setting the unit to the stand-by
mode, proceed as follows.
1 Whilst “SLEEP” is indicated, press the CLOCK/TIMER button.
2 Within 10 seconds, press the or button to select “SLEEP
OFF”, and press the MEMORY/DIMMER button.
To use timer and sleep operation together
Sleep and timer playback:
For example, you can fall asleep listening to the radio and wake up
to CD the next morning.
1 Set the sleep time (see left, steps 1 - 5).
2 Whilst the sleep timer is set, set the timer playback (steps 2 -
10, pages 59 - 60).
HT-DV40H3
HT-DV50H3
ENGLISH
6 The unit will enter the power stand-by mode automatically
after the preset time has elapsed.
The volume will be turned down 1 minute before the sleep
operation finishes.
To confirm the remaining sleep time:
1 Whilst “SLEEP” is indicated, press the CLOCK/TIMER button.
2 Within 10 seconds, press the or button to select “SLEEP
X : XX”.
“X : XX” is sleep remaining time.
z The remaining sleep time is displayed for about 10 seconds.
z You can change the remaining sleep time whilst it is displayed by
pressing the MEMORY/DIMMER button (steps 4 - 5).
leep timer setting
1 minute - 3 hours Desired time
Sleep operation will
Timer playback setting
Timer playback start time
End tim
Advanced Features
E-62
Page 76

HT-DV40H3
HT-DV50H3
ENGLISH
Advanced Features
Headphone connection
z Before plugging in or unplugging the headphones, reduce the
volume.
z Be sure your headphones have a 3.5 mm (1/8") diameter plug and
impedance between 16 and 50 ohms. The recommended
impedance is 32 ohms.
z Plugging in the headphones disconnects the speakers
automatically. Adjust the volume using the VOLUME control.
Troubleshooting chart
Many potential problems can be resolved by the owner without
calling a service technician.
If something is wrong with this product, check the following before
calling your authorised SHARP dealer or service centre.
General
Symptom Possible cause
z The power is not turned
on.
z No sound is heard. z Is the volume level set to “0”?
z The sounds from
speakers are not well
balanced.
z Noise is heard during
playback.
z When a button is pressed,
the unit does not respond.
z Interference or noise
occurs on the TV image.
z The display on the unit is
dark.
z No images are displayed. z Is the TV turned on?
z Is the unit unplugged?
z Are the headphones connected?
z Are the speaker wires
disconnected?
z Are the speaker wires connected
to the wrong channels?
z Move the unit away from any
computers or mobile phones.
z Set the unit to the power stand-
by mode and then turn it back on.
z If the unit still malfunctions,
disconnect the unit from the
mains for 30 seconds, then
reconnect.
z Is the unit placed near TV with
internal aerial? Use an external
aerial.
z Is the display in the dimmer
mode?
z Is the TV input switched on?
E-63
Page 77

DVD player
Symptom Possible cause
z Even though a disc is
loaded, “No Disc” is
displayed.
z Playback sounds are
skipped.
z The control buttons
do not function.
Music or video
playback is
interrupted.
z Pictures and sound
are skipped.
z The unit does not
operate even if the
power is on.
z Is the disc loaded upside down?
z Is the disc very dirty?
z Does the disc satisfy the standards?
z Is the unit located near excessive
vibrations?
z Is condensation formed inside the
unit?
z Is the disc very dirty?
z Does the disc satisfy the standards?
z Is the unit located near excessive
vibrations?
z Is condensation formed inside the
unit?
z Is the disc very dirty?
z Is the unit located near excessive
vibrations?
z Is condensation formed inside the
unit?
z Is a disc other than a DVD (region
number at the back of the unit), audio
CD, CD-R or CD-RW loaded?
Symptom Possible cause
z Images cannot be
played back. (Sound
is not heard.)
z Are the video and audio cables
connected improperly?
z Is a disc other than a DVD (region
number 2 or ALL), audio CD, CD-R or
CD-RW loaded?
z Is the disc very dirty?
z Is the disc loaded upside down?
z Is the optical pick up dirty?
z Is the TV input set to video (VIDEO 1,
VIDEO 2, etc.)?
z Is the unit turned on?
USB
Symptom Possible cause
z Device cannot be
detected.
z Playback does not
start.
z Wrong time display.
z Wrong file name
display.
z Is there any MP3/WMA file available?
z Is the device properly connected?
z Is it MTP device?
z Does the device contain AAC files only?
z Is it a copyright protected WMA file?
z Is it a false MP3 file?
z Is Variable Bitrate file being played
back?
z Is the File Name written in Chinese or
Japanese characters?
HT-DV40H3
HT-DV50H3
ENGLISH
References
Karaoke
Symptom Possible cause
z The vocal part of a
multiplexed disc is
not heard.
z Is the karaoke mode set to "L-CH", "R-
CH" or "V-CANCEL"?
E-64
Page 78

HT-DV40H3
HT-DV50H3
ENGLISH
References
E-65
Troubleshooting chart (continued)
Remote control
Symptom Possible cause
z The remote control does
not operate.
Tuner
Symptom Possible cause
z The radio makes unusual
noises continuously.
Condensation
Sudden temperature changes, storage or operation in an extremely
humid environment may cause condensation inside the cabinet (CD
pickup, etc.) or on the transmitter on the remote control.
Condensation can cause the unit to malfunction. If this happens,
leave the power on with no disc in the unit until normal playback is
possible (about 1 hour). Wipe off any condensation on the transmitter
with a soft cloth before operating the unit.
If trouble occurs
When this product is subjected to strong external interference
(mechanical shock, excessive static electricity, abnormal supply
voltage due to lightning, etc.) or if it is operated incorrectly, it may
malfunction.
If such a problem occurs, do the following:
1 Set the unit to the stand-by mode and turn the power on again.
2 If the unit is not restored in the previous operation, unplug and
plug in the unit, and then turn the power on.
z Is the AC power lead of the unit
plugged in?
z Is the battery polarity correct?
z Are the batteries dead?
z Is the distance or angle
incorrect?
z Is there a strong light shinning on
the remote sensor?
z Is the unit placed near the TV or
computer?
z Is the FM aerial or AM loop aerial
placed properly? Move the aerial
away from the AC power lead if it
is located nearby.
Note:
If neither operation above restores the unit, clear all the memory by
resetting it.
Before transporting the unit
Remove the CD from the unit. Make sure there is no CD in the disc
tray. Then, set the unit to the power stand-by mode. Carrying the
unit with disc left inside can damage the unit.
Factory reset, clearing all memory
1 Press the ON/STAND-BY button to enter the power stand-by
mode.
2 Whilst pressing down the button, press the ON/STAND-BY
button until “CLEAR ALL” appears.
Caution:
This operation will erase all data stored in memory including clock,
timer settings, tuner preset and CD programme.
Page 79

Error indicators and warning
When you load an unplayable disc or fail to perform operations
properly, the following messages are displayed on the unit and the
TV screen.
Display Meaning
E7 z Malfunction of surround circuit.
z Place the unit away from noise source and
plug the AC power lead into another wall
socket. (*)
ERROR z The unit considers the DVD mechanism is
defective. (*)
FAN LOCK z The cooling fan on the rear of the unit does
not run. Unplug the AC power lead and
check if foreign object get caught around the
cooling fan.
NO DISC z The disc is not loaded.
NO SIGNAL z The digital audio input socket is not
connected properly.
z Unspecified signal is received and cannot
be recognised.
NO SUPPORT z When copyright protected WMA file is
played back.
(*): Set the main unit to the stand-by mode and turn the power on
again, or unplug and plug it back in. Should the same message
appear, contact your authorised SHARP dealer or service centre.
Care of compact discs
Compact discs are fairly resistant to damage, however mistracking
can occur due to an accumulation of dirt on the disc surface. Follow
the guidelines below for maximum enjoyment from your CD
collection and player.
z Do not write on either side of the disc, particularly the non-label
side from which signals are read. Do not mark this surface.
z Keep your discs away from direct sunlight, heat, and excessive
moisture.
z Always hold the CDs by the edges. Fingerprints, dirt, or water on
the CDs can cause noise or mistracking. If a CD is dirty or does
not play properly, clean it with a soft, dry cloth, wiping straight out
from the centre, along the radius.
NO
YES
Correct
Maintenance
Cleaning the cabinet
Periodically wipe the cabinet with a soft cloth and a diluted soap
solution, then with a dry cloth.
Caution:
z Do not use chemicals for cleaning (petrol, paint thinner, etc.). It
may damage the cabinet finish.
z Do not apply oil to the inside of the unit. It may cause
malfunctions.
HT-DV40H3
HT-DV50H3
ENGLISH
References
E-66
Page 80

HT-DV40H3
HT-DV50H3
ENGLISH
References
E-67
Specifications
As part of our policy of continuous improvement, SHARP reserves the right to make design and specification changes for product
improvement without prior notice. The performance specification figures indicated are nominal values of production units. There may be
some deviations from these values in individual units.
Main Unit
Power source AC 220 - 240 V ~ 50 Hz
Power
consumption
Output power PMPO: 500 W
Video output
terminals
Audio input
terminals
Audio output
terminals
Dimensions Width: 300 mm (11-13/16")
Weight 3.8 kg (8.4 lbs.)
* The consumption value is obtained when the demonstration
mode is cancelled in the power stand-by mode. Refer to page 17
to cancel the demonstration mode.
Power on: 82 W
Power stand-by: 0.6 W (*)
Front speaker:
MPO: 150 W (75 W + 75 W) (DIN 45 324)
RMS: 150 W (75 W + 75 W) (DIN 45 324)
RMS: 90 W (45 W + 45 W) (DIN 45 500)
Subwoofer:
MPO: 100 W (DIN 45 324)
RMS: 100 W (DIN 45 324)
RMS: 55 W (DIN 45 500)
SCART output: SCART terminal x 1
Video output: RCA type x 1
S-video output: S-terminal x 1
Component video output: (Y/P
HDMI output : HDMI x 1
Supports 480p/570p/720p/1080i output formats.
Optical digital input (DIGITAL 1): Square type x 1
Optical digital input (DIGITAL 2): Square type x 1
Analogue input : 500 mV / 47 kOhms
Microphone inputs: 1 mV / 600 ohms x 2
Speakers: 4 ohms
Subwoofer: 12 ohms
Headphones: 16 - 50 ohms
(recommended: 32 ohms)
Height: 106 mm (4-1/8")
Depth: 300 mm (11-13/16")
B/PR) x 1
USB
USB host
interface
Support file z MPEG 1 Layer 3
Bitrate support z MP3 (32 - 320 kbps)
Other z Maximum total number of MP3/WMA files is
File system
support
z Complies with USB 1.1/2.0 (Full Speed)
Mass Storage Class.
z Support Bulk only and CBI protocol.
z MPEG 2 Layer 3
z WMA (Non DRM)
z WMA (64 - 160 kbps)
65 535.
z Maximum total number of folders is 512
INCLUSIVE of root directory. (Folders which
have non playable files also counted.)
z The ID3TAG information supported are
TITLE, ARTIST and ALBUM only.
z Support ID3TAG version 1 and version 2.
z Support USB devices with Microsoft
Windows/DOS/FAT 12/FAT 16/FAT 32.
z 2 kbyte block length for sector.
Tuner
Frequency
range
Other
FM: 87.5 - 108.0 MHz
Maximum number of stations that can be stored is 30.
Page 81

DVD player
Signal system PAL/NTSC colour
Supported disc
types
Video signal Horizontal resolution: 500 lines
Audio signal Frequency
DVD (with the same region number at the
back of the unit), audio CD, CD-R, CD-RW,
JPEG, DivX (version 3.0 ~ 6.0)
S/N ratio: 70 dB
characteristics
S/N radio CD: 94 dB (1 kHz)
Dynamic range Linear PCM DVD: 95 dB
Total harmonic
distortion ratio
Linear PCM DVD:
20 Hz to 20 kHz
(sampling rate: 48 kHz)
20 Hz to 20 kHz
(sampling rate: 96 kHz)
CD: 20 Hz to 20 kHz
CD: 94 dB
0.01% maximum
CP-DV40H Speaker
Type 2-way type speaker system
Maximum input
power
Rated input power 75 W
Impedance 4 ohms
Dimensions Width: 300 mm (11-13/16")
Weight 2.1 kg (4.6 lbs.)/each
2.5 cm (1") tweeter
8 cm (3-1/8") woofer (x 2)
150 W
Height: 129 mm (5-1/16")
Depth: 160 mm (6-5/16")
CP-DV50H Speaker
Type 2-way type speaker system
Maximum input
power
Rated input power 75 W
Impedance 4 ohms
Dimensions Width: 100 mm (3-15/16")
Weight 7.1 kg (15.65 lbs.)/each
2.5 cm (1") tweeter
6.5 cm (2-1/2") woofer (x 3)
150 W
Height: 1243 mm (48-15/16")
Depth: 114 mm (4-1/2")
Subwoofer
Type Subwoofer system
Maximum input
power
Rated input power 100 W
Impedance 12 ohms
Dimensions Width: 220 mm (8-11/16")
Weight 7.6 kg (16.7 lbs.)
20 cm (8 ") subwoofer
200 W
Height: 354 mm (13-15/16")
Depth: 438 mm (17-1/4")
HT-DV40H3
HT-DV50H3
ENGLISH
References
E-68
Page 82

NOTATKI/POZNÁMKY/POZNÁMKY/JEGYZETEK/НОТАТКИ/MEMO
Page 83

NOTATKI/POZNÁMKY/POZNÁMKY/JEGYZETEK/НОТАТКИ/MEMO
Page 84

SHARP ELECTRONICS (Europe) Gmb
H
Sonninstraße 3, D-20097 Hamburg
TINSZA309AWZZ
7L R AS 2
0
Page 85

U P
HT-DV40H3/HT-DV50H3 DVD CINEMA
DOWN
 Loading...