


62
Se reporter aux pages F-1 à F-62.
Consulte las páginas S-1 a S-62.
FRANÇAIS
ESPAÑOL
Please refer to pages E-1 to E-62.
ENGLISH
HT-DV30H DVD Cinema consisting of HT-DV30H (main unit) and
CP-DV30H (speaker system).
HT-DV30H DVD Cinema constitué de HT-DV30H (appareil principal) et
CP-DV30H (enceinte).
El Cine en DVD HT-DV30H que consiste en HT-DV30H (unidad principal)
y CP-DV30H (altavoz).
HT-DV30H DVD
影院由
HT-DV30H
(主機)和
CP-DV30H
(揚聲器系統)
組成。

ENGLISH
Apparatus Claims of U.S. Patent Nos. 4,631,603, 4,577,216,
4,819,098, and 4,907,093, licensed for limited viewing uses only.
This product incorporates copyright protection technology that is
protected by method claims of certain U.S. patents and other
intellectual property rights owned by Macrovision Corporation and
other rights owners.
Use of this copyright protection technology must be authorised by
Macrovision Corporation, and is intended for home and other
limited viewing uses only unless otherwise authorised by
Macrovision Corporation.
Reverse engineering or disassembly is prohibited.
Manufactured under license under U.S. Patent #’s: 5,451,942;
5,956,674; 5,974,380; 5,978,762; 6,487,535 & other U.S. and
world wide patents issued & pending. DTS and DTS Digital
Surround are registered trademarks and the DTS logos and
Symbol are trademarks of DTS, Inc. © 1996-2007 DTS, Inc. All
Rights Reserved.
Manufactured under license from Dolby Laboratories. “Dolby”,
“Pro Logic”, the double-D symbol, Audistry and the sound shell
logo are trademarks of Dolby Laboratories.
“HDMI, the HDMI logo and High-Definition Multimedia Interface
are trademarks or registered trademarks of HDMI Licensing LLC.”
DivX
®
, DivX® Certified and associated logos are trademarks of
DivX®-Networks, Inc. and are used under license.

E-2
ENGLISH
HT-DV30H
1
General Information
Accessories
Please confirm that the following accessories are included.
Remote control 1 “AA” size batteries (UM/SUM-3,
R6, HP-7 or similar) 2
FM aerial 1 USB cable 1
HDMI cable 1

Page
Page
To play in the desired order (programmed play) . . . . . . . . . . . 37
To play repeatedly (repeat play) . . . . . . . . . . . . . . . . . . . . . . . . 38
To change the display on TV screen. . . . . . . . . . . . . . . . . . . . . 38
To change the display on main unit . . . . . . . . . . . . . . . . . 38 - 39
To change the subtitle language . . . . . . . . . . . . . . . . . . . . . . . . 39
To change the audio language (audio output) . . . . . . . . . . . . 39
CD, CD-R and CD-RW Operation
Listening to a CD or MP3/WMA disc . . . . . . . . . . . . . . . . . . . . 40
Advanced CD or MP3/WMA disc playback . . . . . . . . . . . . . . . 41
DivX and JPEG disc operation
Playback on the DivX and JPEG menu screen. . . . . . . . . . . . . 42
Zoom function . . . . . . . . . . . . . . . . . . . . . . . . . . . . . . . . . . . . . . 43
Rotating a picture . . . . . . . . . . . . . . . . . . . . . . . . . . . . . . . . . . . . 43
USB Memory Playback
Playback on USB memory device . . . . . . . . . . . . . . . . . . . . . . 44
To remove USB memory device . . . . . . . . . . . . . . . . . . . . 44 - 45
Advanced USB playback . . . . . . . . . . . . . . . . . . . . . . . . . . 45 - 46
Radio Operation
Listening to the radio . . . . . . . . . . . . . . . . . . . . . . . . . . . . . 46 - 47
Advanced Features
Using the Radio Data System (RDS) . . . . . . . . . . . . . . . . 48 - 52
Timer and sleep operation (Remote Control only). . . . . . 53 - 56
Headphone connection . . . . . . . . . . . . . . . . . . . . . . . . . . . . . . . 57
Enhancing your system . . . . . . . . . . . . . . . . . . . . . . . . . . . . . . . 57
References
Troubleshooting chart . . . . . . . . . . . . . . . . . . . . . . . . . . . . 58 - 60
Maintenance . . . . . . . . . . . . . . . . . . . . . . . . . . . . . . . . . . . . . . . . 60
Specifications . . . . . . . . . . . . . . . . . . . . . . . . . . . . . . . . . . . 61 - 62

E-4
ENGLISH
HT-DV30H
1
General Information
No naked flame sources, such as lighted candles, should be
placed on the apparatus.
Attention should be drawn to the environmental aspects of battery
disposal.
This unit should only be used within the range of 5˚C - 35˚C
(41˚F - 95˚F).
The apparatus is designed for use in moderate climates.
Warning:
The voltage used must be the same as that specified on this unit.
Using this product with a higher voltage other than that which is
specified is dangerous and may result in a fire or other type of
accident causing damage. SHARP will not be held responsible for
any damage resulting from use of this unit with a voltage other than
that which is specified.
Cooling fan
This unit is fitted with a cooling fan at the rear for improved cooling.
Do not cover the opening in this section with any obstacles.
Caution:
The unit will get warm whilst being used. Do not touch the warm
areas of the unit for prolonged periods to avoid injury.
Volume control
The sound level at a given volume setting depends on speaker
efficiency, location, and various other factors. It is advisable to avoid
exposure to high volume levels. Do not turn the volume on to full at
switch on. Listen to music at moderate levels. Excessive sound
pressure from earphones and headphones can cause hearing loss.
Cooling fan

Front panel
Reference page
1. CD Compartment . . . . . . . . . . . . . . . . . . . . . . . . . . . . . . . . . 30
2. On/Stand-by Button . . . . . . . . . . . . . . . . 24, 30, 37, 46, 55, 59
3. Timer Indicator . . . . . . . . . . . . . . . . . . . . . . . . . . . . . . . . . . . 54
4. DVD/CD/USB Play/Pause Button . . . . . . . . . . . 31, 35, 40, 44
5. Disc or USB Stop Button . . . . . . . . . . . . . . . . . . . . . . . . 31, 44
6. Function Button . . . . . . . . . . . . . . . . . . . . . . . . . . . . . . . . . . 24
7. Remote Sensor . . . . . . . . . . . . . . . . . . . . . . . . . . . . . . . . . . . 16
8. Headphone Socket . . . . . . . . . . . . . . . . . . . . . . . . . . . . . . . . 57
9. Disc Eject Button . . . . . . . . . . . . . . . . . . . . . . . . . . . . . . . . . 31
10. Volume Control . . . . . . . . . . . . . . . . . . . . . . . . . . . . . . . . . . . 24
11. USB Terminal . . . . . . . . . . . . . . . . . . . . . . . . . . . . . . . . . . . . 44
Rear panel
Reference page
1. HDMI Socket . . . . . . . . . . . . . . . . . . . . . . . . . . . . . . . . . . . . . 14
2. FM 75 Ohms Aerial Socket . . . . . . . . . . . . . . . . . . . . . . . . . 13
3. Auxiliary Input Sockets . . . . . . . . . . . . . . . . . . . . . . . . . . . . 15
4. SUBWOOFER PRE OUT . . . . . . . . . . . . . . . . . . . . . . . . . . . . 57
5. Front Speaker Terminals . . . . . . . . . . . . . . . . . . . . . . . . . . . 13
6. Cooling Fan . . . . . . . . . . . . . . . . . . . . . . . . . . . . . . . . . . . . . . . 4
7. Optical Digital Input 1 Socket . . . . . . . . . . . . . . . . . . . . . . . 15
8. Optical Digital Input 2 Socket . . . . . . . . . . . . . . . . . . . . . . . 15
9. Video Output Socket . . . . . . . . . . . . . . . . . . . . . . . . . . . . . . 14
10. S-Video Output Socket . . . . . . . . . . . . . . . . . . . . . . . . . . . . 14
11. Component Video Out Sockets . . . . . . . . . . . . . . . . . . . . . . 14
12. SCART Output Socket (Audio + Video) . . . . . . . . . . . . . . . . 14
13. AC Power Lead . . . . . . . . . . . . . . . . . . . . . . . . . . . . . . . . . . . 13
9
10
11
12
13
10
9
111

E-6
ENGLISH
HT-DV30H
1
General Information
Display
Reference page
1. Chapter Indicator . . . . . . . . . . . . . . . . . . . . . . . . . . . . . . . . . 38
2. Title Indicator . . . . . . . . . . . . . . . . . . . . . . . . . . . . . . . . . . . . 38
3. Folder Indicator . . . . . . . . . . . . . . . . . . . . . . . . . . . . . . . . . . 42
4. MP3 Indicator . . . . . . . . . . . . . . . . . . . . . . . . . . . . . . . . . . . . 39
5. WMA Indicator . . . . . . . . . . . . . . . . . . . . . . . . . . . . . . . . . . . 40
6. RDS Indicator . . . . . . . . . . . . . . . . . . . . . . . . . . . . . . . . . . . . 48
7. Traffic Announcement Indicator . . . . . . . . . . . . . . . . . . . . . 48
8. Dynamic PTY Indicator . . . . . . . . . . . . . . . . . . . . . . . . . . . . . 48
9. Traffic Programme Indicator . . . . . . . . . . . . . . . . . . . . . . . . 48
10. Total Indicator . . . . . . . . . . . . . . . . . . . . . . . . . . . . . . . . . . . 31
11. Sleep Indicator . . . . . . . . . . . . . . . . . . . . . . . . . . . . . . . . . . . 55
12. Timer Play Indicator . . . . . . . . . . . . . . . . . . . . . . . . . . . . . . . 54
13. Daily Timer Indicator . . . . . . . . . . . . . . . . . . . . . . . . . . . . . . 54
14. FM Stereo Mode Indicator . . . . . . . . . . . . . . . . . . . . . . . . . . 47
15. FM Stereo Receiving Indicator . . . . . . . . . . . . . . . . . . . . . . 47
16. Dolby Digital Signal Indicator . . . . . . . . . . . . . . . . . . . . . . . 39
17. DTS Indicator . . . . . . . . . . . . . . . . . . . . . . . . . . . . . . . . . . . . 19
18. Dolby Virtual Speaker Indicator . . . . . . . . . . . . . . . . . . . . . 28
19. Dolby Pro Logic II Indicator . . . . . . . . . . . . . . . . . . . . . . . . . 28
20. Mono to Stereo Indicator . . . . . . . . . . . . . . . . . . . . . . . . . . . 29
21. Intelligent Volume Indicator . . . . . . . . . . . . . . . . . . . . . . . . 29
22. Natural Bass Indicator . . . . . . . . . . . . . . . . . . . . . . . . . . . . . 29
23. Sound Space Indicator . . . . . . . . . . . . . . . . . . . . . . . . . . . . 29
24. Memory Indicator . . . . . . . . . . . . . . . . . . . . . . . . . . . . . . . . . 37
25. Disc or USB Pause Indicator . . . . . . . . . . . . . . . . . . . . . . . . 31
26. Disc or USB Play Indicator . . . . . . . . . . . . . . . . . . . . . . . . . 30
27. Disc or USB Repeat Indicator . . . . . . . . . . . . . . . . . . . . 38, 45
Speaker system
1. Tweeter
2. Woofer
3. Bass Reflex Duct
4. Speaker Terminals
Speaker grilles are removable:
Make sure nothing comes into contact with the speaker diaphragms
when you remove the speaker grilles.
B
27

Remote control
Reference page
1. Remote Control Transmitter . . . . . . . . . . . . . . . . . . . . . . . . 16
2. DVD Direct Button . . . . . . . . . . . . . . . . . . . . . . . . . . . . . . . . 34
3. DVD On Screen Button . . . . . . . . . . . . . . . . . . . . . . . . . . . . . 38
4. Direct Search Buttons . . . . . . . . . . . . . . . . . 23, 34, 37, 41, 42
5. Memory or Dimmer Button. . . . . . . . 24, 25, 37, 47, 49, 53, 56
6. DVD/CD/MP3/WMA Repeat Button . . . . . . . . . . . . . . . . 38, 45
7. Menu Button . . . . . . . . . . . . . . . . . . . . . . . . . . . . . . . . . . . . . 36
8. Enter Button . . . . . . . . . . . . . . . . 17, 23, 30, 34, 36, 37, 42, 44
9. Cursor Left Button . . . . . . . . . . . 17, 30, 34, 36, 37, 42, 43, 44
10. DVD Chapter Skip/DVD/MP3/WMA Fast Reverse/CD/MP3/
WMA Track Down/Tuner Preset Down and Time Down
Button. . . . . . . . . . . . . . . . . . . . . . 25, 31, 33, 47, 49, 50, 53, 56
11. Tuning Down or Cursor Down Button . 17, 30, 36, 37, 43, 46
12. USB Play or Pause Button . . . . . . . . . . . . . . . . . . . . . . . . . . 44
13. Video Mode Button . . . . . . . . . . . . . . . . . . . . . . . . . . . . . . . . 18
14. DVD/CD/MP3/WMA/Stop Button. . . . . . . . . . . . . . . . . . . 31, 41
15. DVD/CD/MP3/WMA Button . . . . . . . . . . . . . . . . . . . . . . . . . . 30
16. USB Button . . . . . . . . . . . . . . . . . . . . . . . . . . . . . . . . . . . . . . 44
17. Auxiliary Button. . . . . . . . . . . . . . . . . . . . . . . . . . . . . . . . . . . 54
18. Tuner Button . . . . . . . . . . . . . . . . . . . . . . . . . . . . . . . 46, 49, 50
19. Audio Button . . . . . . . . . . . . . . . . . . . . . . . . . . . . . . . . . . . . . 39
20. Dolby Virtual Speaker Button . . . . . . . . . . . . . . . . . . . . . . . 27
21. Shift Button . . . . . . . . . . . 13, 17, 24, 27, 28, 36, 41, 45, 49, 50
22. Volume Up or Down Buttons . . . . . . . . . . . . . . . . . . . . . . . . 24
23. Clear or Display Button . . . . . . . . . . . . . . . . . . . . . . 38, 47, 49
24. On/Stand-by Button . . . . 16, 17, 24, 25, 30, 46, 47, 49, 53, 59
25. Clock or Timer Button. . . . . . . . . . . . . . . . . . . . . . . . 25, 53, 56
30. DVD Angle Button. . . . . . . . . . . . . . . . . . . . . . . . . . . . . . 10, 36
31. DVD Subtitle Button . . . . . . . . . . . . . . . . . . . . . . . . . . . . 10, 39
32. DVD Zoom Button . . . . . . . . . . . . . . . . . . . . . . . . . . . . . . 36, 43
33. Return Button . . . . . . . . . . . . . . . . . . . . . . . . . . . . . . . . . . . . 30
34. Tuning Up or Cursor Up Button . . . . . . . 17, 30, 36, 37, 43, 46
23
24
25
26
27
28
29
30
31
32
33
34
35
36
38
39
40
37

E-8
ENGLISH
HT-DV30H
1
General Information
Note:
Some models of SHARP TV may not be operable.
TV Operation Buttons (Only SHARP TV):
On/Stand-by
Button
Set the TV
power to
“ON” or
“STAND-BY”.
Input Select
Button (TV)
Press the
button to
switch the
input source.
Volume Up
and Down
Buttons
Turn up/down
the TV volume.
Channel Up
and Down
Buttons
Switch up/
down the TV
channels.

Types of playable DVD discs vary depending on the region. This unit
can play back only DVDs with the same region number written on the
back of the unit.
(*1): Playability depends on recording device or disc condition
(special disc, scratches, dirt or dirt on pick up).
(*2): The DVD-R/DVD-RW/CD-R/CD-RW may not be played back
properly depending on the recording equipment or the disc.
(*3): JPEG or JPG picture discs are also playable on this unit.
However, pictures may not be clear (depends on resolution and
recording method).
(*4): If the file size is larger than 10 Mb, it will take some time for the
file to be displayed.
For unplayable discs, see page 10.
Icons used in this operation manual
Some functions may not be available depending on discs. The
following icons indicate the discs that can be used in the section.
... Indicates DVDs.
... Indicates audio CDs.
... Indicates CD-R/RW with MP3 recording.
... Indicates CD-R/RW with WMA recording.
... Indicates CD-R/RW with JPEG recording.
... Indicates CD-R/RW with DivX
®
recording.
Some operations may not be performed depending on discs even
if they are described in this manual.
During operation, “INVALID KEY” may be displayed on the screen.
This means that the operations described in this manual are
prohibited by the disc.
22 3 4
or
or
WMA

E-10
ENGLISH
HT-DV30H
1
General Information
Icons used on DVD discs
Check the icons on the DVD case before playing your discs.
Display Description
Region number (playable
area number)
DVD discs are programmed with
region numbers indicating
countries in which they can be
played. This system can play discs
with region number on the back of
the unit.
Format recorded on the DVD To adopt the video format to the
connected TVs (“wide-screen TV”
or “4:3 size TV”).
Recorded in 4:3.
You can enjoy wide images on a wide-screen TV and
letterbox size images on the 4:3 size TV.
You can enjoy wide images on a wide-screen TV and
4:3 images with the side edges cut on the 4:3 size TV.
Type of subtitles recorded Recorded subtitle languages.
Example:
Language can be selected with the
SUBTITLE button.
1: English
2: French
Number of camera angles Number of angles recorded on the
DVD.
Angles can be selected with the
ANGLE button.
Number of audio tracks and
audio recording systems
The number of audio tracks and
audio recording systems are
indicated.
Example:
1: Original
<English> (Dolby
Digital 2 Surround)
The audio recorded on the DVD
can be switched by using the
AUDIO button.
The number of audio tracks and
recording systems vary
depending on the DVD. Check
them in the DVD's manual.
2: English (Dolby
Digital 5.1
Surround)
2 3 4
2
2

CP-DV30H
speakers
(left and right)
Unit

E-12
ENGLISH
HT-DV30H
1
Preparation for Use
Left speaker
Red
To a wall socket
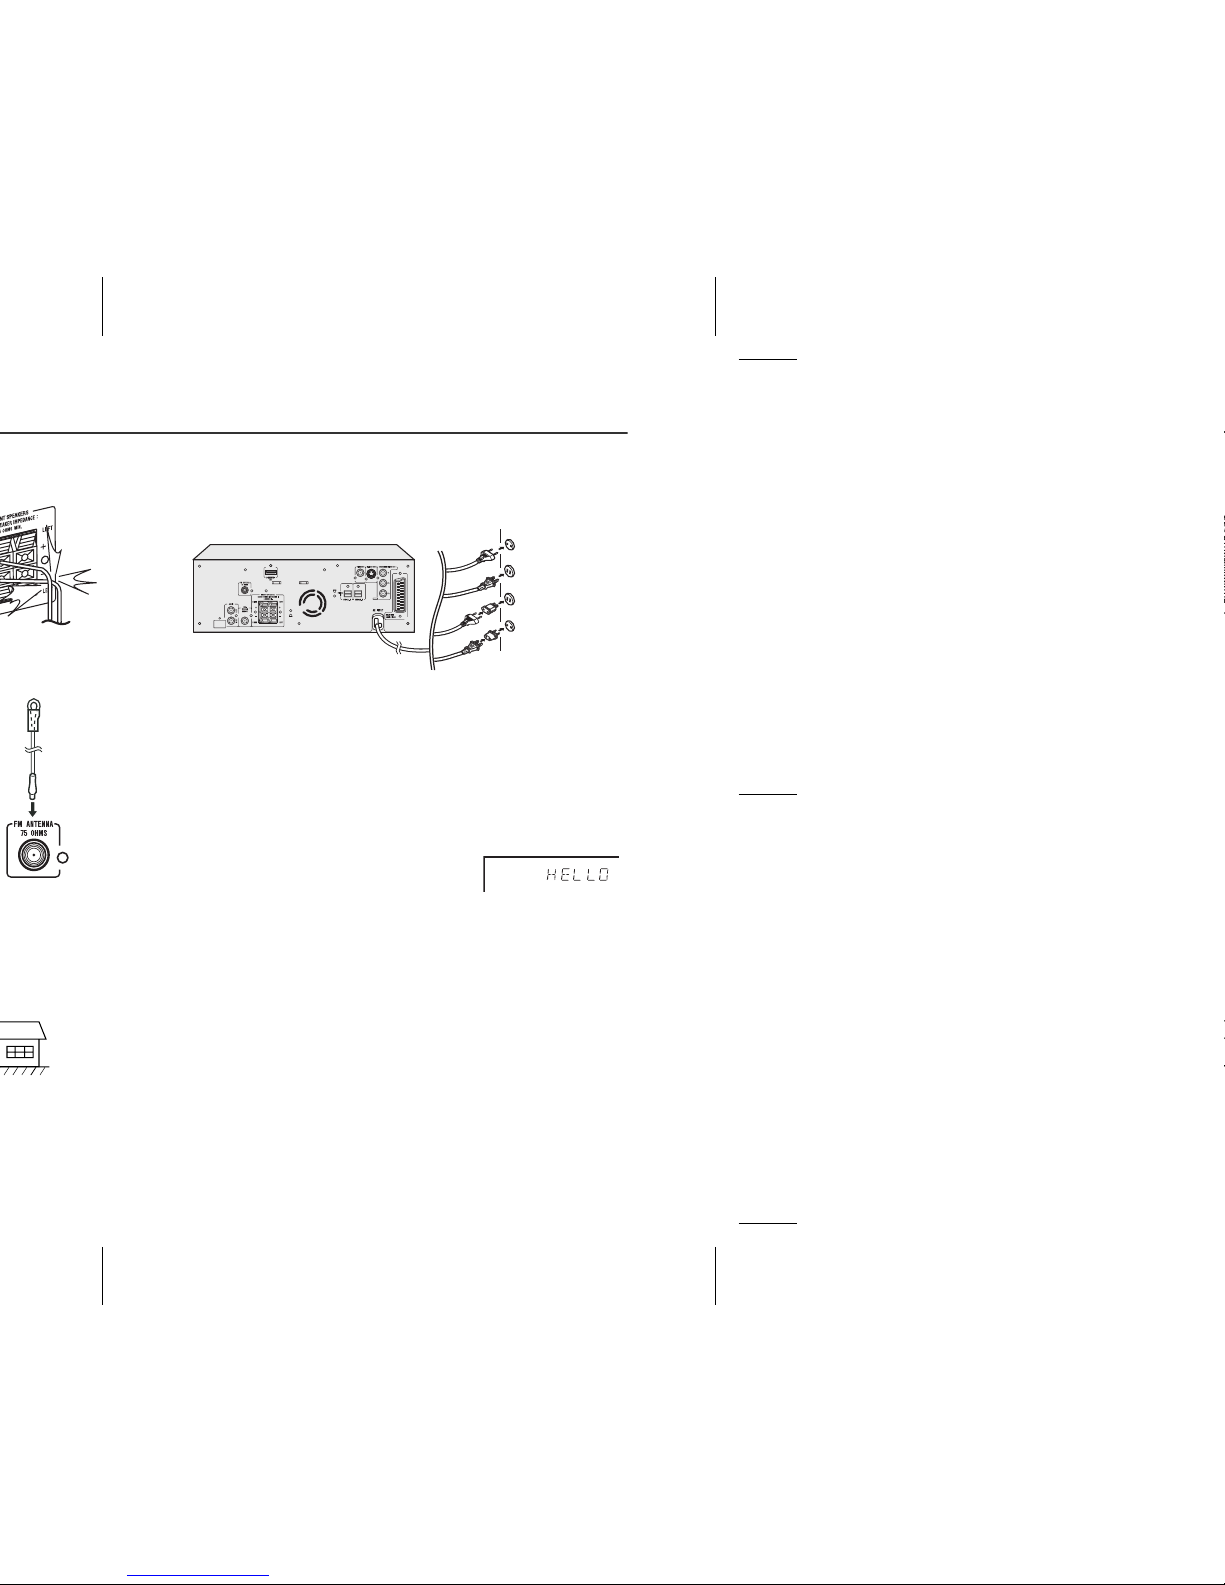
AC power connection
After checking all the connections have been made correctly, plug
the AC power lead of this unit into the wall socket. If you plug in the
unit first, the unit will enter the stand-by mode.
Note:
Unplug the AC power lead from the wall socket if the unit will not be
in use for a prolonged period of time.
Demonstration mode
The first time the unit is plugged in, the unit
will enter the demonstration mode. You will
see words scroll.
To cancel the demonstration mode:
When the unit is in the power stand-by mode
(demonstration mode), press the SHIFT and
DEMO buttons on the remote control. The unit
will enter the low power consumption mode.
To return to the demonstration mode:
When the unit is in the power stand-by mode, press the SHIFT and
DEMO buttons on the remote control again.
Wall socket
(AC 220 - 240 V ~ 50 Hz)

E-14
ENGLISH
HT-DV30H
1
Preparation for Use
Notes:
Change the TV input in accordance with the connected socket.
Do not connect other equipment between the TV and this unit. If
they are connected via a VCR, pictures may be distorted.
If your TV has different indications for the component video
inputs (Y, CB and CR or Y, B-Y and P-Y), connect sockets with its
matching colour.
Do not connect to a component video input socket designed for
the high-vision system, which is not DVD-compatible (the images
may be distorted or not appear).
If the TV/monitor has scart input, connect it to
the SCART OUT socket on the rear of the unit.
(Do not connect the SCART cable to equipment
other than the TV/monitor)
To select SCART function:
On main unit: Press FUNCTION button repeatedly until SCART
is displayed.
On remote control: Press AUX button repeatedly until
SCART is displayed.
If the TV/monitor has HDMI input, connect it to
the HDMI socket on the rear of the unit.
TV
TV
To SCART
input socket
SCART cable
(not supplied)
Video/Audio signal
HDMl cable
To HDMI
input socket
TV

Connection for the digital tuner sound (or other
optical digital equipment such as an MD player)
If the digital equipment has an optical output socket, you can enjoy
better sound by connecting it to the optical digital input socket of the
main unit using the optical digital cable.
To select OPTICAL 1 or OPTICAL 2 function:
On main unit: Press FUNCTION button repeatedly until
OPTICAL 1 or OPTICAL 2 is displayed.
On remote control: Press AUX button repeatedly until
OPTICAL 1 or OPTICAL 2 is displayed.
To optical digital
audio input socket
Optical digital cable
(commercially available)
To optical
digital audio
output socket
Digital equipment such
as a digital music player
Digital tuner, etc.
TV

E-16
ENGLISH
HT-DV30H
1
Preparation for Use
Notes concerning use:
Replace the batteries if the operating distance is reduced or if the
operation becomes erratic. Purchase 2 “AA” size batteries
(UM/SUM-3, R6, HP-7 or similar).
Periodically clean the transmitter on the remote control and the
sensor on the unit with a soft cloth.
Exposing the sensor on the unit to strong light may interfere with
operation. Change the lighting or the direction of the unit if this
occurs.
Keep the remote control away from moisture, heat, shock, and
vibrations.
Test of the remote control
After installing the unit (see pages 11 - 15), check that the remote
control operates correctly.
Point the remote control directly at the remote sensor on the unit.
The remote control can be used within the range shown below:
Press the ON/STAND-BY button. Does the power turn on? Now, you
can use the unit.
1 2 3
4 5 6
7 8 9
Remote sensor
0.2 m - 6 m
(8" - 20’)

Notes:
The setting are stored even if the unit is set to stand-by mode.
The backup function protects the stored setting for a few hours
should there be a power failure or AC power lead disconnection.
System set up can be performed during playback mode.
1 Turn on the TV.
2 Set the TV to the correct input, eg. “AV1”, “VIDEO”, etc.
3 Turn on the unit by pressing the
ON/STAND-BY button.
The SHARP startup screen appears.
Note:
Startup screen will be displayed when
both S-Video cable and SCART cable
are connected to the TV. If only the SVideo cable is connected, the screen
may be blank. To set up S-Video mode,
use video out cable or SCART cable.
4 Press the SHIFT and SET UP buttons.
5 Press the or button to select a menu.
See the list on pages 18 - 23 for set up menu.
6 Press the , , or button to change the setting and
press the ENTER button.
7 After setting is completed, select
“EXIT SET UP”, then press the ENTER
button to return to the main page.

E-18
ENGLISH
HT-DV30H
1
Preparation for Use
PAL*
AUTO
Select the correct colour system (TV standard).
(for details, see page 22).
SCART*
COMP. P-SCAN ON
COMP. P-SCAN OFF
Select “S-VIDEO or SCART or COMP. P-SCAN
ON or COMP. P-SCAN OFF” mode if connecting
unit to TV (for details, see page 14).
Selection can also be made using remote control
VIDEO MODE button.
4:3 LB
16:9
The screen mode should be set according to the
connected TV type (for details, see page 22).
2 G
3 PG
4 PG13
5 PG-R
6 R
7 NC-17
8 ADULT*
Set a restriction level for DVD viewing (for details,
see page 23).
Enter a 4-digit password.
It is set to 0000 by default.
the factory defaults.
ENGLISH*
FRENCH
SPANISH
CHINESE
GERMAN
ITALIAN
PORTUGUESE
DUTCH
You can select the desired OSD (On Screen
Display) language for the set up menu or playback
control screen.
Example: To select French language, choose
“FRENCH” from the menu. Press ENTER button
and below screen will appear in French.
DÉFIN. LANGUE
LANGUES OSD
LANGUE AUDIO
LNG. SS-TITRE
LANG. MENU
DivX [R] VOD
QUITTER SET UP
ANGLAIS
FRANÇAIS
ESPAGNOL
CHINOIS
ALLEMAND
ITALIEN
PORTUGAIS
HOLLANDAIS

ENGLISH*
FRENCH
SPANISH
CHINESE
GERMAN
ITALIAN
Select the language audible from the speakers.
ENGLISH*
FRENCH
SPANISH
CHINESE
GERMAN
ITALIAN
OFF
Select the subtitle displayed on the TV screen.
ENGLISH*
FRENCH
SPANISH
CHINESE
GERMAN
ITALIAN
Select the disc menu language.
REGISTRATION
CODE
********
SHARP provide you the DivX registration code
that allows you to rent and purchase videos using
the DivX service. Please go to www.divx.com/vod
for more information.
SP DIF/RAW
SP DIF/PCM*
Useful whilst using HDMI cable. When playing a
disc recorded with Dolby Digital or DTS, the
corresponding digital signals will be output from
the HDMI output socket.
PCM : Choose this setting if the TV with HDMI
technology cannot support Dolby Digital or
DTS to avoid noise or mute from the TV.
RAW : Choose this setting if the TV with HDMI
technology can support Dolby Digital or DTS.

E-20
ENGLISH
HT-DV30H
1
Preparation for Use
12
10
8
0
4
2
6
12
10
8
0
4
2
6
+6
+4
+2
0
-2
-4
-6

720P*
1080 I
To select HDMI resolution.
Dynamic Range Control can be set from OFF to FULL.
FULL : Dynamic Range Control set to maximum.
OFF
:
Dynamic Range Control set to off.
The setting is completed.
12
10
8
0
4
2
6
Full
6/8
4/8
OFF
2/8

E-22
ENGLISH
HT-DV30H
1
Preparation for Use
Refer pages 17 - 21 “Changing the set up menu” and follow the
changing steps provided.
Language setting
DVD disc type
Unit setting
NTSC
NTSC
PAL
PAL
Indicator
Setting
OSD
LANGUAGE
A language for screen display can be set for the set up
menu, message, etc.
AUDIO
LANG
A language for audio can be set.
You can specify a language for conversation and narration.
SUBTITLE
LANG
A language for subtitle can be set.
The subtitle are displayed in a specified language.
MENU
LANG
A language for disc menus can be set.
Menu screens are displayed in a specified language.
English French
DISC LOADING DISQUE CHARGEMENT
English French
Thank you
Merci
English French
Merci
Thank you
English French
ACTEURS
PERSONNEL
CAST
STAFF

Password setting
From the set up menu, select “SYSTEM SET UP”, “PASSWORD”
and choose “----- ”.
1 When setting the password for the first time, enter the
factory default password by pressing “0000”. The “ ” will
be unlocked.
2 Enter your new password (maximum 4-digits) using the
Direct Search buttons and press ENTER button to return.
The “ ” will be locked.
3 Enter again the same new password and press ENTER
button to return. The “ ” will be unlocked.
4 To change to another password, repeat steps 2 - 3.
5 Exit set up.
Note:
If you forget your password, cancel the current password by pressing
“0000” using the Direct Search buttons.
E-24
ENGLISH
HT-DV30H
1
Basic Operation
Volume auto fade-in
If you turn off and on the main unit with volume set to 34 or
higher, the volume starts at 20 and fades in to the last set level.
If you turn off and on the main unit with the volume level set to less
than 34, the volume starts at the last level volume setting.
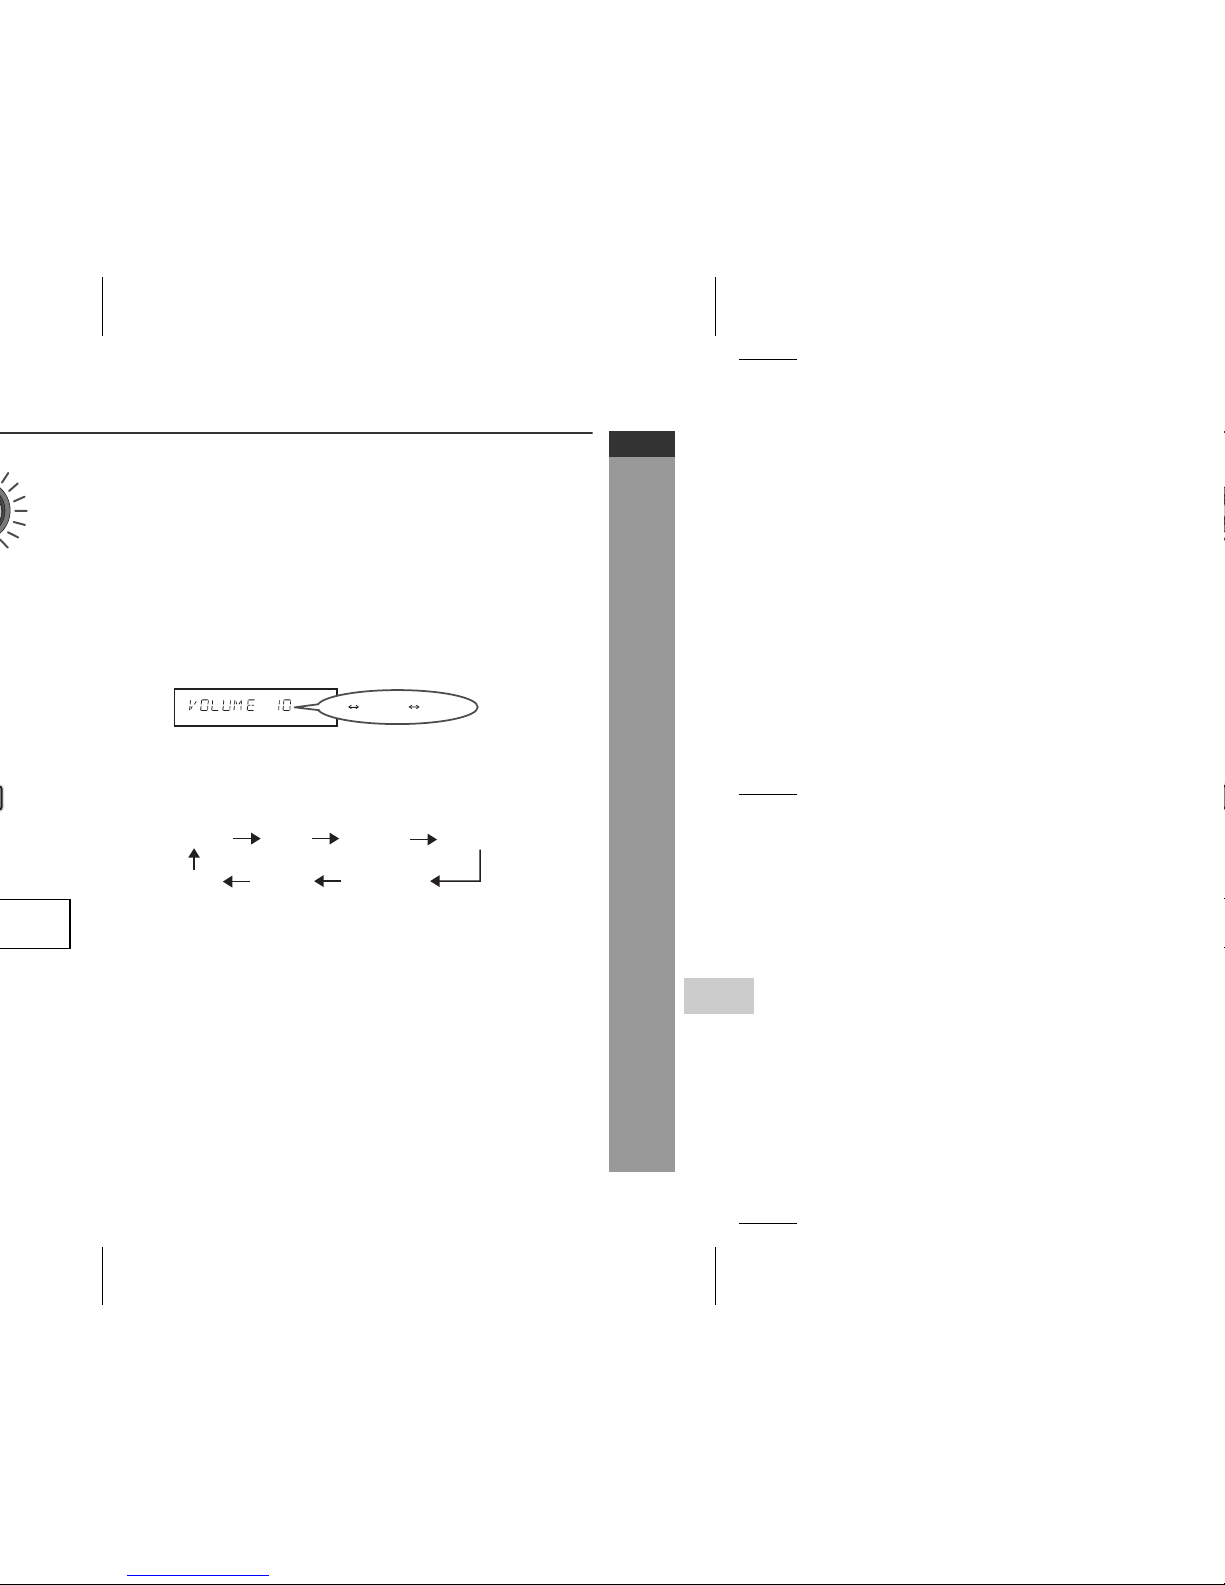
Volume control
Main unit operation:
When the VOLUME control is turned clockwise, the volume will
increase. When it is turned anti-clockwise, the volume will decrease.
Remote control operation:
Press the VOLUME (+ or –) button to increase or decrease the volume.
Function
When the FUNCTION button on main unit is pressed, the current
function will change to different mode. Press the FUNCTION button
repeatedly to select desired function.
Note:
The backup function will protect the memorised function mode for a
few hours should there be a power failure or the AC power lead
becomes disconnected.
39 MAX0 1
...
DVD/CD USB TUNER OPTICAL 1
OPTICAL 2AUX INSCART

To confirm the time display:
[When the unit is in the stand-by mode]
Press the CLOCK/TIMER button.
The time display will appear for about 10 seconds.
[When the power is on]
Press the CLOCK/TIMER button.
Within 10 seconds, press the or button to display the time.
The time display will appear for about 10 seconds.
Note:
The “CLOCK” will appear or time will flash to confirm the time
display when the AC power supply is restored after a power failure
or unplugging the unit. If incorrect, readjust the clock as follows.
To readjust the clock:
Perform “Setting the clock” from step 1. If the “CLOCK” does not
appear in step 3, step 4 (for selecting the 24-hour or 12-hour
display) will be skipped.
To change the 24-hour or 12-hour display:
5 Press the or button to adjust the hour and then
press the MEMORY/DIMMER button.
Press the or button once to advance the time by 1 hour.
Hold it down to advance continuously.
6 Press the or button to adjust the minutes and then
press the MEMORY/DIMMER button.
Press the or button once to advance the time by 1
minute. Hold it down to change the time in 5-minute intervals.
1 Clear all the programmed contents. [Refer to “Factory reset,
clearing all memory” on page 59 for details.]
2 Perform “Setting the clock” from step 1.

E-26
ENGLISH
HT-DV30H
1
Basic Operation
Voice of narration comes out from the
centre; you can hear cheers and feel
the atmosphere in the theatre with a
wide sound field like 5.1 ch.
Appropriate for sports broadcasting
such as baseball and football.
Words are easy to hear and loud
sounds are controlled; even at low
volume, you can enjoy a wide sound
field like 5.1 ch.
Suitable for listening to sounds of
movies at low volume.
Bass frequencies are emphasised.
You can select the BASS level.
Treble frequencies are emphasised.
You can select the TREBLE level.

Dolby Virtual Speaker (DVS) sound mode
The Dolby Virtual Speaker (DVS) creates virtual surround sound
comparable to the 5 channel sound produced by the 2 channel speaker.
When setting DVS to “ON” for 2 channel stereo signals, Dolby Pro
Logic (see page 28) brings out virtual sound effects through the
signals converted into 5 channel.
Press the DVS button.
The Dolby Virtual Speaker indicator lights up and set change to DVS
WIDE mode. Press DVS button again to change to DVS
REFERENCE mode.
Press the DVS button again to return to “DVS OFF”.
Notes:
The DVS default setting is “WIDE” mode.
When setting the DVS mode to “WIDE” or “REFERENCE”, the
preset sound mode and Audistry (SOUND SPACE mode, MONO
TO STEREO mode) are cancelled. (The NATURAL BASS mode
and the INTELLIGENT VOLUME mode are not cancelled.)
Monaural signals do not generate surround effects.
In case input signal is Dual mono type and DVS is set to “WIDE”
or “REFERENCE”, the sound may not be output correctly.
When unit is turned on for the first time, selecting BASS
mode using the SOUND MODE button will automatically set the
DVS to OFF. Subsequently, when BASS mode is selected again,
the DVS setting will follow the current user setting.
When headphone is inserted, DVS setting and BASS/TREBLE
setting, set earlier by user will be cancelled. However the DVS
setting will not be recovered when the headphone is unplugged.

E-28
ENGLISH
HT-DV30H
1
Basic Operation
Audistry sound mode
Enjoy a variety of sounds by each or any combination of the 4
modes.
Press the SHIFT and desired mode button simultaneously.
Press it again to cancel.
1 2 3
4 5 6
7 8 9
+100
6
3
9
When you select
“SOUND SPACE”
When you select
“NATURAL BASS”
When you select
“INTELLIGENT VOLUME”
When you select
“MONO TO STEREO”
When you select
“DVS”
SOUND
SPACE
NATURAL
BASS
INTELLIGENT
VOLUME
MONO TO
STEREO
:Disabled
:Enabled
Possible combinations

Notes:
When setting each mode of Audistry to “ON”, the preset sound
mode setting is cancelled.
When setting the SOUND SPACE or MONO TO STEREO mode
to “ON”, the DVS setting is also cancelled. (It is not cancelled even
if the NATURAL BASS or INTELLIGENT VOLUME mode is set to
“ON”.)

E-30
ENGLISH
HT-DV30H
1
DVD Operation
Playback
1
Press the ON/STAND-BY button to turn the power on.
2
“SHARP” startup screen appears on the TV screen.
3
Press the DVD/CD button on the remote control.
4
Insert the disc into the disc slot, label side up.
The disc must be fully inserted into the disc slot before playing.
If “NO DISC” appears due to improper disc insertion, switch off
the AC power supply and then switch it on again.
8 cm disc can be inserted without an adaptor.
Due to the structure of the disc information, it takes longer to
read an MP3/WMA disc than a normal CD (approximately 20 to
90 seconds).
5
Some discs play automatically. If playback does not start,
press the (DVD/CD ) button.
When the menu appears on the TV screen:
On DVD:
Select item by using cursor ( , , or ) button and press
ENTER button.
To return to the previous display, press the RETURN
button.
WMA
NO DISC
8 cm (3")
or
12 cm (5")
Disc play indicator

Various disc functions
Notes for CD or MP3/WMA disc:
Function Main
unit
Remote
control
Operation
Play Press in the stop mode.
Stop Press in the playback mode.
Pause Press in the playback mode.
Press the / button to resume
playback from the paused point.
Track
up/
Track
down
Press in the playback or stop
mode.
If you press the button in the stop
mode, press the / button to
start the desired track.
Fast
forward/
Fast
reverse
Press and hold down in the
playback mode.
Release the button to resume
playback.
When the end of the last track is reached during fast forward,
playback will stop. When the beginning of the first track is reached
during fast reverse, the unit will enter the playback mode.
Rewritable multi-session discs with unfinished writing, can still be
played.

E-32
ENGLISH
HT-DV30H
1
DVD Operation
To resume playback after stopping
(resume play)
You can resume playback from the point playback is stopped.
To cancel the resume playback:
Press the button twice.
Notes:
The resume playback feature is disabled on some discs.
Depending on the disc, playback may resume from slightly before
the stopped position.
DVD mode operation indicators
The following are examples of operation indicators that appear
during DVD playback.
1 Whilst a disc is playing, press the
button.
The system stores the point you
stopped.
2 To restart play, press the (DVD/CD ) button.
Operation TV screen Unit display
When the unit is on
without a disc.
Disc data is being read.
First time stop
Second time stop
Play
Pause
RESUME
READ
PRE STOP 9
STOP 9
SEQ PLAY
PAUSE 8

Fast forward/Fast reverse (search)
You can search the desired point as you play the disc.
Notes:
On some discs, the search is disabled.
On a DVD, search does not operate between titles.
On audio CD, the search can be operated between tracks.
Whilst searching on a DVD, the sound is not heard and the
subtitles only appear at x 2 speed search.
When search is performed during the DVD playback, pictures may
not be forwarded or reversed in the search speed specified in this
manual, depending on the disc or the scene being played.
The search does not operate on JPEG discs.
Whilst searching on an audio CD, MP3 or WMA disc, the sound
can only be heard at x 2 speed search.
1 Whilst a disc is playing, press and hold the or
button.
The scanning speed will change as follows at each press of the
button.
The disc is forwarded by the button and backward by the
button.
2 Press the (DVD/CD ) button to return to the normal
playback.
WMA
Forward X 2 Forward X 4 Forward X 8 Forward X 20
PLAY (Normal play)
Backward X 2 Backward X 4 Backward X 8 Backward X 20
PLAY (Normal play)

E-34
ENGLISH
HT-DV30H
1
DVD Operation
To play by specifying time (time search):
You can play back from the desired point by specifying the time.
Notes:
Some discs cannot play from the specified point.
Time search feature is disabled on some discs.
1 Press DIRECT button.
2 Press button on the remote control to select time
column.
The time will be reset as “00:00:00”.
3 Specify the time with the Direct Search buttons, and then
press the ENTER button.
To specify 1 hour 23 minutes and 40 seconds, enter “01:23:40”.
If you enter the wrong number, press or button for the
desired time.
TT 01/03 CH 000/025 y 00:00:00
startup
TV screen
hour min sec
Input desired time here
TT 01/03 CH 000/025 01:23:40

Slow motion play
You can slow down the playback speed.
Notes:
On some discs with movies inside, the slow-motion play function
is disabled.
The sound is muted during slow-motion play.
1 Whilst a disc is playing, press the SLOW button
repeatedly to select the desired speed.
The speed changes as follows:
2
Press the (DVD/CD ) button to return to the normal
playback.
SF 1/2
PLAY (Normal play)
SF 1/3 SF 1/4 SF 1/5 SF 1/6 SF 1/7
SF 1/2

E-36
ENGLISH
HT-DV30H
1
DVD Operation
To play the contents between the specified
points repeatedly (A-B repeat)
You can play the desired portion repeatedly by specifying it during
playback.
Notes:
A-B repeat play is disabled on some discs.
A-B repeat play for DVD is possible only within a chapter.
Some scenes on DVD may not allow A-B repeat play.
To select a subtitle or audio language from the
disc menu
You can select the desired subtitle or audio language and sound
system [Dolby Digital (5.1ch) or Dolby Digital (2ch)] on your DVD if it
has disc menu.
Note:
The procedure shown here provides only general steps. The actual
procedure for using the disc menu depends on the disc. See the disc
jacket for details.
ZOOM 1/2ZOOM 4
ZOOM 1/3
1
Whilst a disc is playing, press
SHIFT and A
B
button
simultaneously
.
This registers the start point (A).
2
Press SHIFT and A B button simultaneously again to enter
the end point (B).
This starts A-B repeat from the start point (A) to the end point (B).
3
Press SHIFT and A
B
button simultaneously to return
to the normal playback.
1 Whilst in the stop or playback mode, press the TOP
MENU/MENU button to display the disc menu.
2 Press the , , or button to change the setting and
press the ENTER button.
WMA
REPEAT A -
POINT A 4A
TV screen
Unit display
REPEAT A - B
4A BPOINT B 4 B
TV screen
Unit display

To change the programmed contents:
Repeat the above procedure from step 1.
To cancel the programmed play mode:
Select “CLEAR” at the PROGRAM menu by pressing , , or
button and press ENTER button on remote control to cancel the
programmed play mode.
Notes:
If the disc is ejected, the programmed sequence will be cancelled.
The programme will be automatically cancelled if you press the
ON/STAND-BY button to enter the stand-by mode or change the
function from DVD/CD to another.
During the programme operation, pressing the RANDOM button
will automatically cancel the programme.
Removing the USB memory device will automatically cancel the
programmed sequence.
Select “CLEAR” at the PROGRAM menu and press ENTER
button, the programmed sequence will be cancelled.
3 Select “PLAY” at the PROGRAM menu by pressing , ,
or button and press ENTER button on remote control to
start play.
1 2 3
4 5 6
7 8 9
+100
1 2 3
4 5 6
7 8 9
+100

E-38
ENGLISH
HT-DV30H
1
DVD Operation
To change the display on TV screen
You can display or hide the operation indicators on the TV screen.
Whilst a disc is playing, press the ON SCREEN button. (The display
is changed at each press.)
To change the display on main unit
Whilst a disc is playing, press the CLEAR/DISPLAY button.
(The display is changed at each press.)
DVD:
.
DVD:
TT 1/28 CH 1/14
1/4ENG 5.1CH 1/5 ENG OFF
DVD
C 00:00:52
C –00:04:59
T 00:01:14
OFF
TT 1/28 CH 1/14
DVD
TT 1/28 CH 1/14
DVD
T –01:27:40TT 1/28 CH 1/14
DVD
p
Current title
number
Current chapter
number
Total number of chapters
Total number of titles
Elapsed playback time for the total chapter
Current Subtitle and Audio Language
Remaining playback time for the current chapter
Elapsed playback time for the current title
Remaining playback time for the current title
WMA
CHAPTER Indicator
Current chapter number Current title number
TITLE Indicator

To change the subtitle language
You can change the subtitle language or hide subtitles during
playback.
Notes:
On some discs, the subtitle language cannot be changed.
If no subtitles are recorded on the disc, “OFF” is displayed.
It may take time to switch the subtitle language to the selected
one.
Subtitles cannot be hidden on some DVDs.
To change the audio language (audio output)
During playback, you can change the audio language (audio output).
Notes:
On some discs, the audio language cannot be changed.
For the audio language and audio system, refer to the manual of
the disc.
Whilst a disc is playing, press the
SUBTITLE button repeatedly to select
the desired subtitle language.
Whilst a disc is playing, press the
AUDIO button repeatedly to select the
desired audio number.
You can select desired languages.
[ENGLISH]:
[ENGLISH]:
: [1 ENGLISH D 5.1CH]
: [2 ENGLISH D 2CH]

E-40
ENGLISH
HT-DV30H
1
CD, CD-R and CD-RW Operation
The following playback functions are the same as DVD
operations.
Page
Playing a disc . . . . . . . . . . . . . . . . . . . . . . . . . . . . . . . . . . . . 30 - 32
To locate the beginning of a chapter track (skip) . . . . . . . . . . 33
Fast forward/Fast reverse (search) . . . . . . . . . . . . . . . . . . . . . . 33
To start playback from the desired point (direct play) . . . . . . 34
To play the contents between the specified points repeatedly
(A-B repeat) . . . . . . . . . . . . . . . . . . . . . . . . . . . . . . . . . . . . . . . . . 36
To play in the desired order (programmed play) . . . . . . . . . . . 37
To play repeatedly (repeat play) . . . . . . . . . . . . . . . . . . . . . . . . 38
To change the display on TV screen . . . . . . . . . . . . . . . . . . . . 38
To change the display on main unit . . . . . . . . . . . . . . . . . .38 - 39
1 2 3
4 5 6
7 8 9
+100

Notes:
A track number higher than the number of tracks on the disc
cannot be selected.
During random play, direct search is not possible.
For CD-R/RW discs recorded in the MP3 or WMA format, you can
select the track number but cannot select the folder by pressing
the Direct Search buttons.
Notes:
This unit only supports “MPEG-1 Audio Layer-3” and “MPEG-2
Audio Layer-3” format. (Sampling Frequency is 32, 44.1, 48kHz)
“MPEG-2.5 Audio Layer-3” and MP1, MP2 format are not
supported.
Playback order for MP3 files may differ sometimes depending on
the writing software used during file downloading.
Bitrate which is supported by MP3 is 32~320 kbps, WMA is
64~160 kbps.
For MP3/WMA files, please put “.MP3” “.WMA” extension. Files
cannot be played back if there is no MP3/WMA extension.
Playlists are not supported on this unit.
This unit only supports MP3 ID3-Tag version 1.x.
The display playback time may not be displayed correctly when
playing back a variable bitrate file.
Copyright protected WMA files cannot be played back.
Use the Direct Search buttons
on the remote control to select
the desired track whilst playing
or in the stop mode.
Selected track number
1 2 3
4 5 6
7 8 9
+100
1 2 3
4 5 6
7 8 9
+100

E-42
ENGLISH
HT-DV30H
1
CD, CD-R and CD-RW Operation
Page
Playback on the DivX and JPEG menu screen
You can play CD-R/RW recorded in the DivX and JPEG formats.
1 Load a disc containing DivX and JPEG files, the menu
screen appears.
2 Press the or button to select , or and then
press the ENTER button.
3 Select a folder or a track using the , , or button.
Playback starts when you press (DVD/CD ) or ENTER
button.
The next file picture can be automatically displayed after a
while for JPEG format if you select (DVD/CD ) button
to start playback.
Using the Direct Search buttons, you can open file directly.
.... indicates folders
.... indicates JPEG data
.... indicates MP3/WMA data
.... indicates DivX or MPEG data
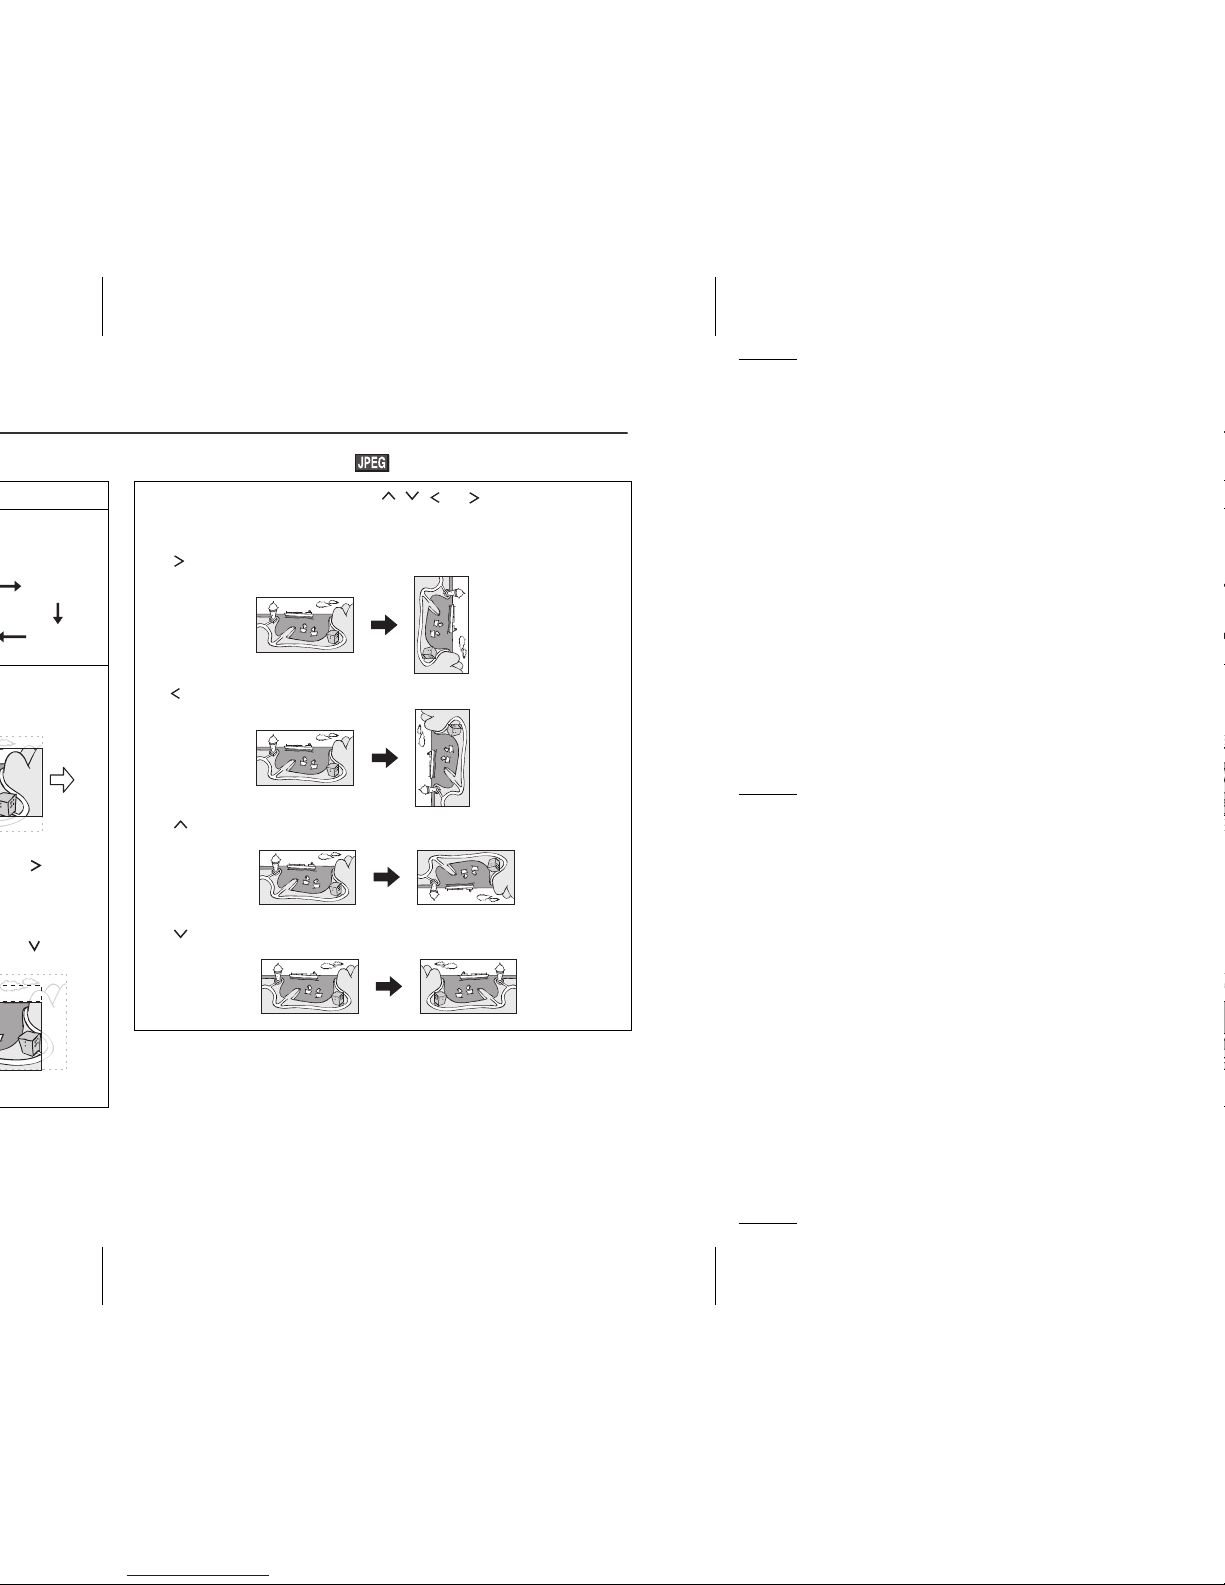
Rotating a picture
ZOOM 1/2
1 During playback, press the , , or button.
The image rotates as below:
button : 90° rotation in a clockwise direction.
button : 90° rotation in an anti-clockwise direction.
button : Horizontal mirror image.
button : Vertical mirror image.
E-44
ENGLISH
HT-DV30H
1
USB Memory Playback
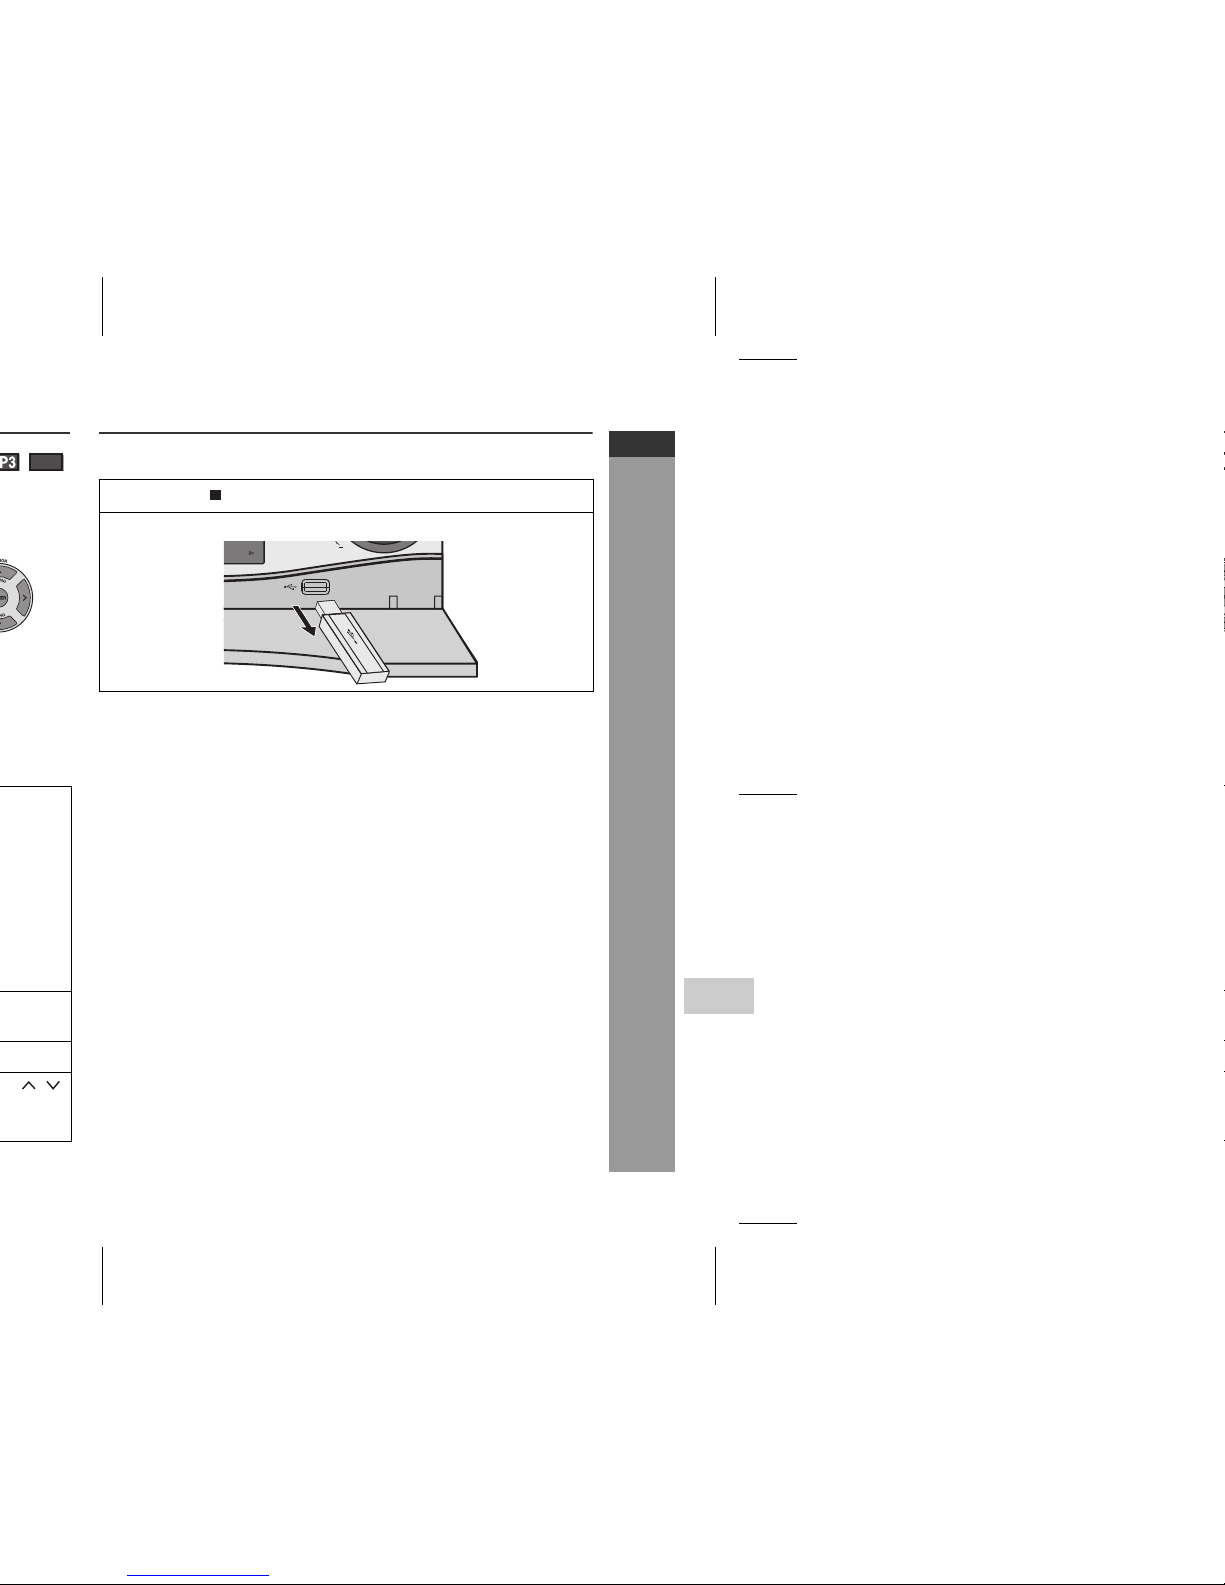
To remove USB memory device
To remove USB memory device
The following functions are the same as DVD or CD operations:
Page
To locate the beginning of a chapter track (skip) . . . . . . . . . . 33
Fast forward/Fast reverse (search) . . . . . . . . . . . . . . . . . . . . . . 33
To start playback from the desired point (direct play) . . . . . . 34
Slow motion play . . . . . . . . . . . . . . . . . . . . . . . . . . . . . . . . . . . . 35
To zoom images (zoom). . . . . . . . . . . . . . . . . . . . . . . . . . . . . . . 36
To play the contents between the specified points repeatedly
(A-B repeat) . . . . . . . . . . . . . . . . . . . . . . . . . . . . . . . . . . . . . . . . . 36
To play in the desired order (programmed play) . . . . . . . . . . . 37
Random play . . . . . . . . . . . . . . . . . . . . . . . . . . . . . . . . . . . . . . . . 41
Note:
If USB memory device is not connected, “NO MEDIA” will be shown
on the display.
WMA
1 Press the button.
2 Disconnect USB memory device from the USB terminal.

Advanced USB playback
Repeat play (REMOTE CONTROL ONLY)
Repeat play can play single track and all track sequence
continuously.
Whilst a disc is playing, each time the button is pressed, the repeat
mode changes in the following order:
Random play (REMOTE CONTROL ONLY)
The tracks can be played in random order automatically.
In case of an USB mode:
To random play all tracks:
Press the SHIFT and RANDOM buttons on the remote control so
that random indicator lights up in the display window.
1 2 3
4 5 6
7 8 9
+100
REP: [REP 1]
REP: [REP DIR]
“1-REPEAT”
“ALL REPEAT”
Repeat the currently
playing track.
Repeat the currently
playing directory.
REP: [REP ALL]
REP: [OFF] “NORMAL”
Repeat the currently
playing USB.
The normal playback
.
“FOLD REPEAT”
E-46
ENGLISH
HT-DV30H
1
Radio Operation
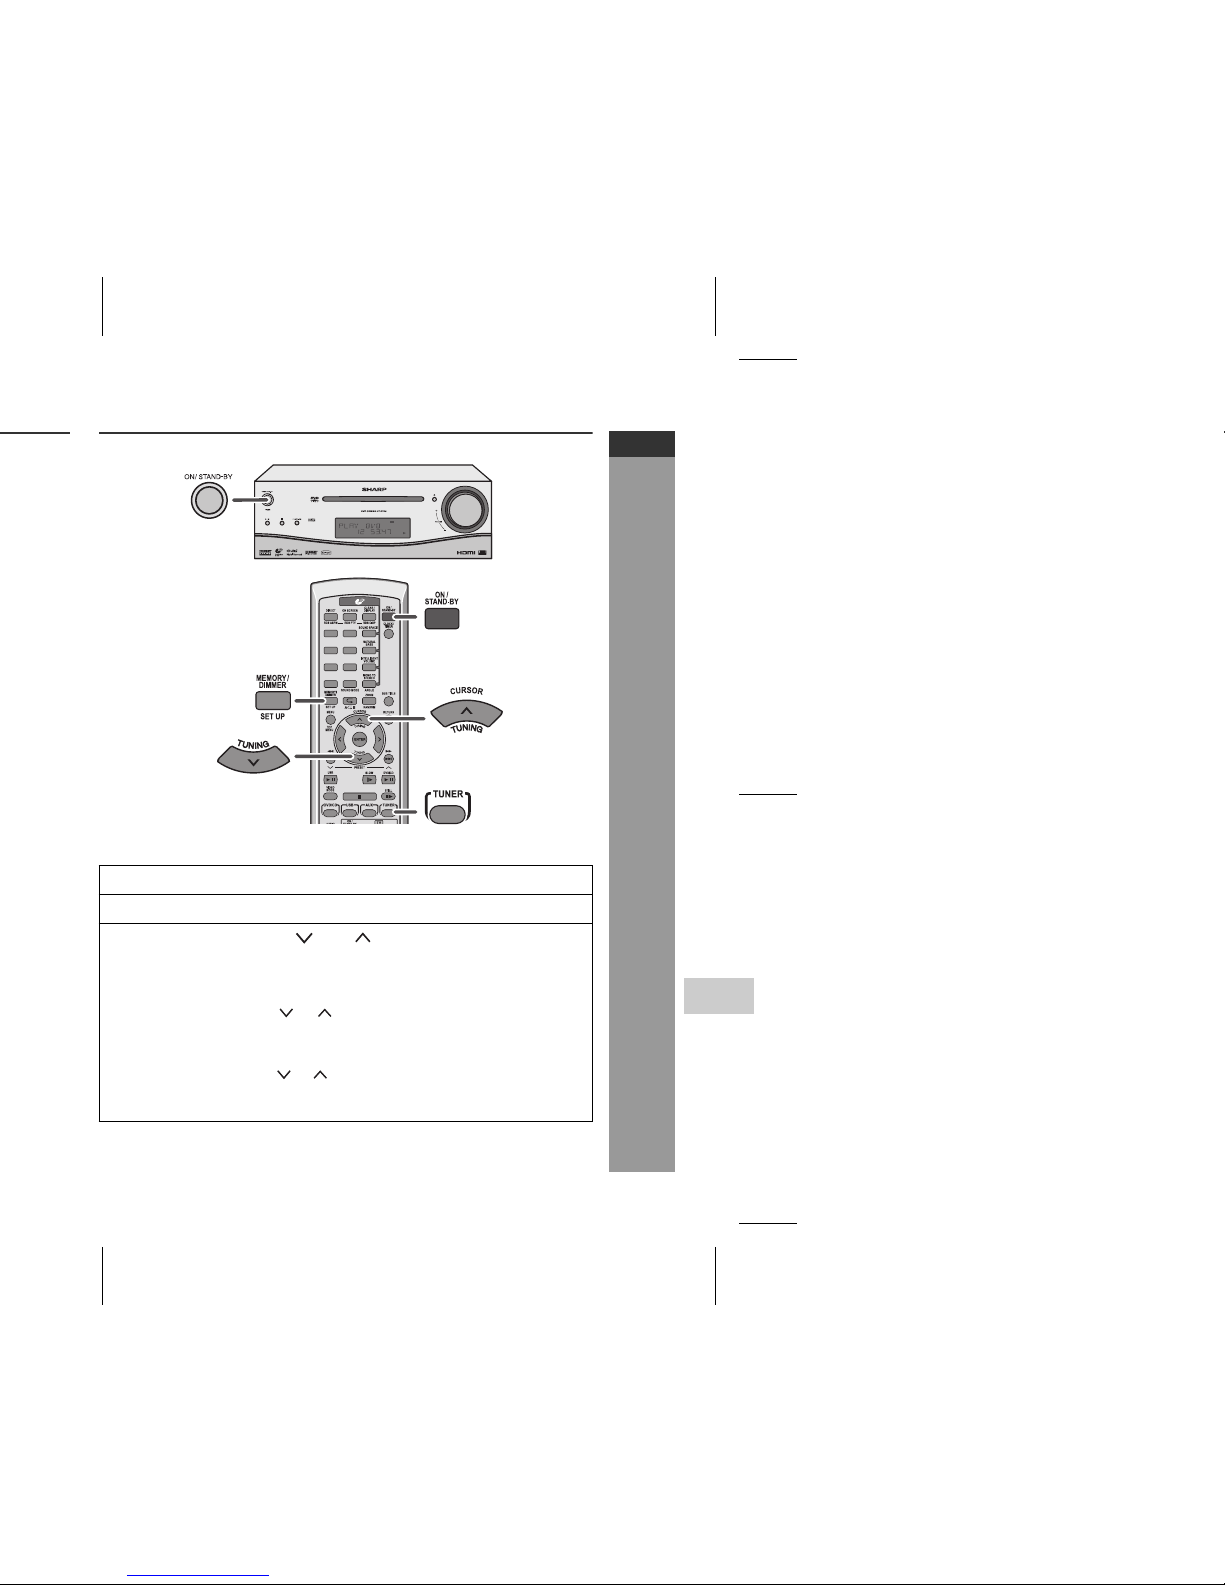
Listening to the radio
Tuning
1 Press the ON/STAND-BY button to turn the power on.
2 Press the TUNER button on the remote control.
3 Press the TUNING ( or ) button to tune in to the
desired station.
Manual tuning:
Press the TUNING ( or ) button as many times as required
to tune in to the desired station.
Auto tuning:
When the TUNING ( or ) button is pressed for more than 0.5
seconds, scanning will start automatically and the tuner will
stop at the first receivable broadcast station.
1 2 3
4 5 6
7 8 9
+100

Note:
The backup function protects the memorised stations for a few hours
should there be a power failure or the AC power lead become
disconnected.
To recall a memorised station
Press the PRESET ( or ) button for less than 0.5 seconds
to select the desired station.
To scan the preset stations
The station saved in memory can be scanned automatically. (Preset
memory scan)
To erase entire preset memory
4 Within 30 seconds, press the MEMORY/DIMMER button to
store that station in memory.
If the “MEMORY” and preset number indicators disappear
before the station is memorised, repeat the operation from step
2.
5 Repeat steps 1 - 4 to set other stations, or to change a
preset station.
When a new station is stored in memory, the station previously
memorised for that preset channel number will be erased.
1
Press the PRESET ( or ) button for more than 0.5
seconds. The preset number will flash and the programmed
stations will be tuned in sequentially, for 5 seconds each.
2 Press the PRESET ( or ) button again when the desired
station is located.
1 Press the ON/STAND-BY button to enter the stand-by mode.
2 Press and hold CLEAR/DISPLAY button until “TUNER CLEAR”
appears.

E-48
ENGLISH
HT-DV30H
1
Advanced Features
Information provided by RDS
Each time the RDS DISP button is pressed, the display will
switch as follows:
When tuning in to a station other than an RDS station or to an RDS
station which sends weak signal, the display will change in the
following order:
Station name (PS) Programme type (PTY)
Frequency Radio text (RT)
1 2 3
4 5 6
7 8 9
+100
NO PS NO PTY
FM 98.80 MHz
NO RT

To stop the ASPM operation before it is complete:
Press the SHIFT and RDS ASPM button whilst it is scanning
for stations.
The stations which are already stored in memory will be kept there.
Notes:
If the same station is broadcasting on different frequencies, the
strongest frequency will be stored in memory.
Any station which has the same frequency as the one stored in
memory will not be stored.
If 30 stations have already been stored in memory, the scan will
be aborted. If you want to redo the ASPM operation, erase the
preset memory.
If no station is stored in memory, “END” will appear for about 4
seconds.
If the RDS signals are very weak, station names may not be
stored in memory.
To erase all of the contents of preset memory:
To store a station name again if the wrong name was stored in
memory:
It may be impossible to store station names in memory using the
ASPM function if there is lots of noise or if the signal is too weak. In
this case, perform as follows.
1 Press the ON/STAND-BY button to enter the power stand-by
mode.
2 Press CLEAR/DISPLAY button for more than 2 seconds until
“TUNER CLEAR” appears.
After performing this operation, all of the preset memory
information will be erased.
1 Press the PRESET ( or ) button to check whether the names
are correct.
2 If you find a wrong name whilst receiving the station, wait until the
correct name is displayed and then press the MEMORY/
DIMMER button.
3 Within 30 seconds, press the MEMORY/DIMMER button whilst
the preset channel number is flashing.
The new station name has been stored in memory correctly.

E-50
ENGLISH
HT-DV30H
1
Advanced Features
To recall stations in memory
To specify programmed types and select stations (PTY search):
You can search a station by specifying the programme type (news,
sports, traffic programme, etc. ... see pages 51 - 52) from the stations
in memory.
1 Press the TUNER button to select the FM.
2 Press the SHIFT and RDS PTY button on the remote
control.
“SELECT” and “PTY TI” will appear alternately for about 6
seconds.
3 Within 6 seconds, press the PRESET ( or ) button to
select the programme type.
Each time the button is pressed, the programme type will
appear. If the button is held down for more than 0.5 seconds,
the programme type will appear continuously.
4 Whilst the selected programme type is flashing (within 6
seconds), press the SHIFT and RDS PTY button again.
After the selected programme type has been lit for 2 seconds,
“SEARCH” will appear, and the search operation will start.

Descriptions of the PTY (Programme Type) codes, TP (Traffic
Programme) and TA (Traffic Announcement).
You can search for and receive the following PTY, TP and TA
signals.
NEWS Short accounts of facts, events and publicly
expressed views, reportage and actuality.
AFFAIRS Topical programme expanding or enlarging upon
the news, generally in different presentation style or
concept, including debate, or analysis.
INFO Programmes whose purpose is to impart advice in
the widest sense.
SPORT Programme concerned with any aspect of sport.
EDUCATE Programme intended primarily to educate, of which
the formal element is fundamental.
DRAMA All radio plays and serials.
CULTURE Programmes concerned with any aspect of national
or regional culture, including language, theatre, etc.
SCIENCE Programmes about the natural sciences and
technology.
VARIED Used for mainly speech-based programmes usually
of light-entertainment nature, not covered by other
categories. Examples include: quizzes, panel
games, personality interviews.
POP M Commercial music, which would generally be
considered to be of current popular appeal, often
featuring in current or recent record sales charts.
ROCK M Contemporary modern music, usually written and
performed by young musicians.
EASY M Current contemporary music considered to be
“easy-listening”, as opposed to Pop, Rock or
Classical, or one of the specialised music styles,
Jazz, Folk or Country. Music in this category is
often but not always, vocal, and usually of short
duration.

E-52
ENGLISH
HT-DV30H
1
Advanced Features
COUNTRY Songs which originate from, or continue the musical
tradition of the American Southern State
characterised by a straightforward melody and
narrative story line.
NATION M Current Popular Music of the Nation or Region in
that country’s language, as opposed to
International “Pop” which is usually US or UK
inspired and in English.
OLDIES Music from the so-called “golden age” of popular
music.
FOLK M Music which has its roots in the musical culture of a
particular nation, usually played on acoustic
instruments. The narrative or story may be based
on historical events or people.
DOCUMENT Programme concerned with factual matters,
presented in an investigative style.
TEST Broadcast when testing emergency broadcast
equipment or receivers.
ALARM ! Emergency announcement made under
exceptional circumstances to give warning of
events causing danger of a general nature.
NONE No programme type (receive only).
TP Broadcasts which carry traffic announcements.
TA Traffic announcements are being broadcast.

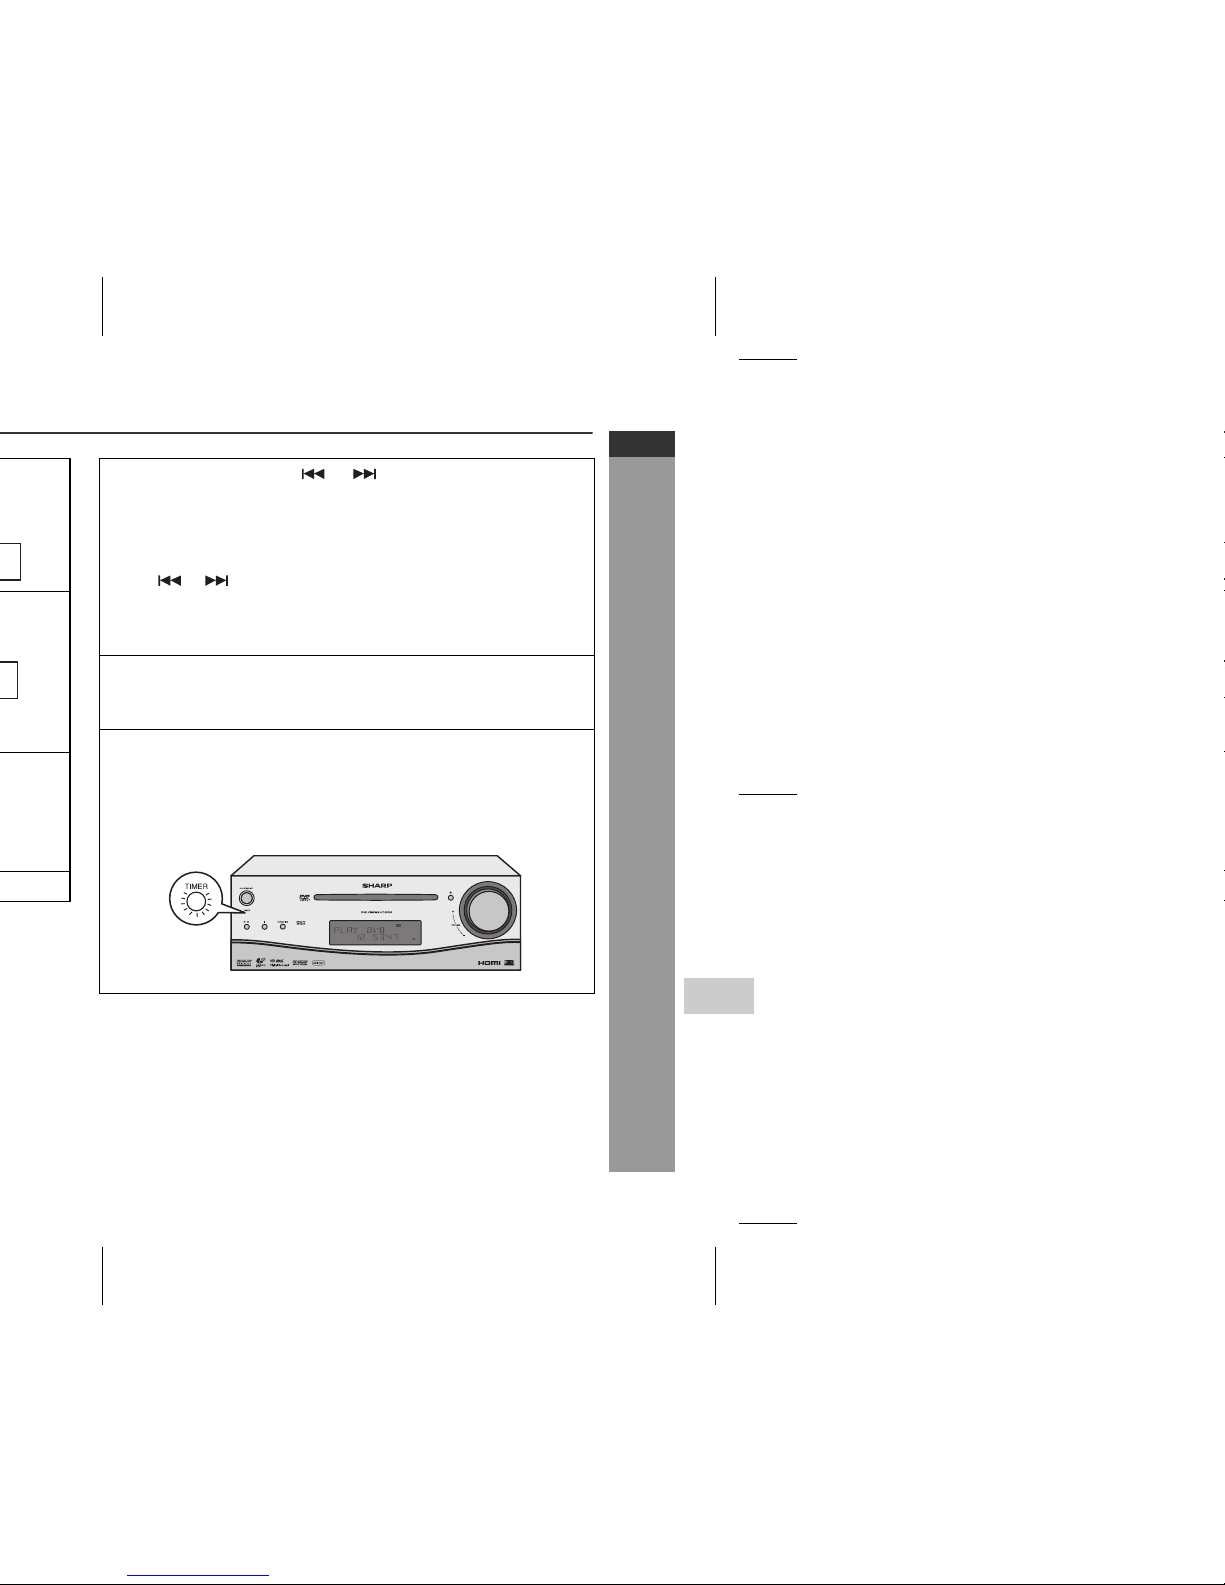
Timer playback
Before setting timer:
1 Check that the clock is set to the correct time (refer to page 25).
If it is not set, you cannot use the timer function.
2 For timer playback: Load discs to be played.
1 Press the ON/STAND-BY button to turn the power on.
2 Press the CLOCK/TIMER button.
3 Within 10 seconds, press the or button to select
“ONCE” or “DAILY”, and press the MEMORY/DIMMER
button.
Set the clock to the correct time if “ONCE” or “DAILY” does not
appear.
1 2 3
4 5 6
7 8 9
+100
E-54
ENGLISH
HT-DV30H
1
Advanced Features
8 Switch input with the or button, and then press the
MEMORY/DIMMER button.
To select the timer playback source: DVD/CD, USB, OPTICAL
1, OPTICAL 2, AUX IN, SCART or TUNER.
When you select the tuner, select a station by pressing the
or button, and then press the MEMORY/DIMMER
button.
If a station has not been programmed, “NO PRESET” will be
displayed and timer setting will be cancelled.
9 Adjust the volume using the VOLUME control, and then
press the MEMORY/DIMMER button.
Do not turn the volume up too high.
10 Press the ON/STAND-BY button to enter the power stand-
by mode.
The “TIMER” indicator lights up and the unit is ready for timer
playback.
Continued to the next page

Checking the timer setting in the timer stand-by mode:
Cancelling the timer setting in the timer stand-by mode:
Reusing the memorised timer setting:
The timer setting will be memorised once it is entered. To reuse the
same setting, perform the following operations.
1 Press the CLOCK/TIMER button.
2 Within 10 seconds, press the or button to select “ONCE”
or “DAILY”, and press the MEMORY/DIMMER button.
3 Within 10 seconds, press the or button to select “ONCE
CALL” or “DAILY CALL”, and press the MEMORY/DIMMER
button.
The unit returns to the timer stand-by mode after displaying the
settings in order.
1 Press the CLOCK/TIMER button.
2 Within 10 seconds, press the or button to select “ONCE”
or “DAILY”, and press the MEMORY/DIMMER button.
3 Within 10 seconds, press the or button to select “ONCE
OFF” or “DAILY OFF”, and press the MEMORY/DIMMER button.
Timer will be cancelled (the setting will not be cancelled).
1 Turn the power on and press the CLOCK/TIMER button.
2 Within 10 seconds, press the or button to select “ONCE”
or “DAILY”, and press the MEMORY/DIMMER button.
3 Within 10 seconds, press the or button to select “ONCE
ON” or “DAILY ON”, and press the MEMORY/DIMMER button.
4 Press the ON/STAND-BY button to enter the power stand-by
mode.

E-56
ENGLISH
HT-DV30H
1
Advanced Features
To cancel the sleep operation:
Press the ON/STAND-BY button whilst “SLEEP” is indicated.
To cancel the sleep operation without setting the unit to the stand-by
mode, proceed as follows.
To use timer and sleep operation together
Sleep and timer playback:
For example, you can fall asleep listening to the radio and wake up
to CD the next morning.
1 Whilst “SLEEP” is indicated, press the CLOCK/TIMER button.
2 Within 10 seconds, press the or button to select “SLEEP
OFF”, and press the MEMORY/DIMMER button.
1 Set the sleep time (see left, steps 1 - 5).
2 Whilst the sleep timer is set, set the timer playback (steps 2 -
10, pages 53 - 54).
Sleep timer setting
Timer playback setting
Sleep operation will
automatically sto
p
Timer playback start time
End time
1 minute - 3 hours Desired time

Enhancing your system
Subwoofer connection
When a commercially available subwoofer with a built-in amplifier is
connected to this unit, you can enjoy sound with emphasised bass.
Connect an RCA lead from a commercially available speaker with a
built-in amplifier to the SUBWOOFER PRE-OUT socket.
Subwoofer with a
built-in amplifier

E-58
ENGLISH
HT-DV30H
1
References
DVD player
Symptom Possible cause
Even though a disc
is loaded, “No Disc”
is displayed.
Is the disc loaded upside down?
Is the disc very dirty?
Does the disc satisfy the standards?
Is the unit located near excessive
vibrations?
Playback sounds
are skipped.
Is condensation formed inside the unit?
The control buttons
do not function.
Music or video
playback is
interrupted.
Is the disc very dirty?
Does the disc satisfy the standards?
Is the unit located near excessive
vibrations?
Is condensation formed inside the unit?
Pictures and sound
are skipped.
Is the disc very dirty?
Is the unit located near excessive
vibrations?
Is condensation formed inside the unit?
The unit does not
operate even if the
power is on.
Is a disc other than a DVD (region
number at the back of the unit), audio
CD, CD-R or CD-RW loaded?
Images cannot be
played back.
(Sound is not
heard.)
Are the video and audio cables
connected improperly?
Is a disc other than a DVD (region
number 2 or ALL), audio CD, CD-R or
CD-RW loaded?
Is the disc very dirty?
Is the disc loaded upside down?
Is the optical pick up dirty?
Is the TV input set to video (VIDEO 1,
VIDEO 2, etc.)?
Is the unit turned on?

Condensation
Sudden temperature changes, storage or operation in an extremely
humid environment may cause condensation inside the cabinet (CD
pickup, etc.) or on the transmitter on the remote control.
Condensation can cause the unit to malfunction. If this happens,
leave the power on with no disc in the unit until normal playback is
possible (about 1 hour). Wipe off any condensation on the
transmitter with a soft cloth before operating the unit.
If trouble occurs
When this product is subjected to strong external interference
(mechanical shock, excessive static electricity, abnormal supply
voltage due to lightning, etc.) or if it is operated incorrectly, it may
malfunction.
If such a problem occurs, do the following:
1 Set the unit to the stand-by mode and turn the power on again.
2 If the unit is not restored in the previous operation, unplug and
plug in the unit, and then turn the power on.
Note:
If neither operation above restores the unit, clear all the memory by
resetting it.
Before transporting the unit
Remove the CD from the unit. Make sure there is no CD in the disc
tray. Then, set the unit to the power stand-by mode. Carrying the
unit with disc left inside can damage the unit.
Factory reset, clearing all memory
1 Press the ON/STAND-BY button to enter the power stand-by
mode.
2 Whilst pressing down the button, press the ON/STAND-BY
button until “CLEAR ALL” appears.

E-60
ENGLISH
HT-DV30H
1
References
Care of compact discs
Compact discs are fairly resistant to damage, however mistracking
can occur due to an accumulation of dirt on the disc surface. Follow
the guidelines below for maximum enjoyment from your CD
collection and player.
Do not write on either side of the disc, particularly the non-label
side from which signals are read. Do not mark this surface.
Keep your discs away from direct sunlight, heat, and excessive
moisture.
Always hold the CDs by the edges. Fingerprints, dirt, or water on
the CDs can cause noise or mistracking. If a CD is dirty or does
not play properly, clean it with a soft, dry cloth, wiping straight out
from the centre, along the radius.
Maintenance
Cleaning the cabinet
Periodically wipe the cabinet with a soft cloth and a diluted soap
solution, then with a dry cloth.
Caution:
Do not use chemicals for cleaning (petrol, paint thinner, etc.). It
may damage the cabinet finish.
Do not apply oil to the inside of the unit. It may cause
malfunctions.
NO
YES
Correct

USB
Tuner
USB host
interface
Complies with USB 1.1/2.0 (Full Speed)
Mass Storage Class.
Support Bulk only and CBI protocol.
Support file MPEG 1 Layer 3
MPEG 2 Layer 3
WMA (Non DRM)
Bitrate support MP3 (32 - 320 kbps)
WMA (64 - 160 kbps)
Other Maximum total number of MP3/WMA files is
65 535.
Maximum total number of folders is 512
INCLUSIVE of root directory. (Folders which
have non playable files also counted.)
The ID3TAG information supported are
TITLE, ARTIST and ALBUM only.
Support ID3TAG version 1 and version 2.
File system
support
Support USB devices with Microsoft
Windows/DOS/FAT 12/FAT 16/FAT 32.
2 kbyte block length for sector.
Frequency
range
FM: 87.5 - 108 MHz
Other Maximum station can be stored is 30 preset.

E-62
ENGLISH
HT-DV30H
1
References
Type 2-way type speaker system
2.5 cm (1") tweeter
12 cm (4-3/4") woofer
Maximum input
power
150 W
Rated input power 75 W
Impedance 4 ohms
Dimensions Width: 165 mm (6-7/16")
Height: 260 mm (10-1/4")
Depth: 229 mm (9-1/16")
Weight 3.1 kg (6.8 lbs.)/each

HT-DV30H DVD CINEMA
U P
DOWN
 Loading...