

Page 1

R
FU-P40S
AIR PURIFIER
OPERATION MANUAL
ENGLISH
Free Standing
直立式
空氣清新機
使用說明書
中文
*Plasmacluster is a trademark of
Sharp Corporation.
*Plasmacluster“離子簇”是聲寶
公司的商標。
Page 2

Page 3

ENGLISH
FEATURES
Plasmacluster Ion Control
The unit controls the ratio of negative ions
and positive ions depending on the condition of the room.
• Clean Mode
Approximately the same numbers of positive and negative ions are discharged.
This mode is effective for reducing some
airborne mold.
• Ion Control Mode
Plenty of negative ions exist in natural
surroundings such as waterfalls or forests.
In this mode, negative ions will be released in an increased rate, in order to
bring the room air close to this natural
environment.
• AUTO Plasmacluster Ion Mode
The unit will switch between Clean Mode
and Ion Control Mode automatically depending on the amount of impurities in the
air detected by the dust and odor sensors.
CONTENTS
IMPORTANT SAFETY INSTRUCTIONS ....
•WARNING....................................................E-2
• CAUTIONS CONCERNING OPERATION...E-2
• REMOTE CONTROL LIMITATIONS ............E-2
• INSTALLATION GUIDELINES .....................E-3
• FILTER GUIDELINES ..................................E-3
• HOW SHARP AIR PURIFIER WORKS........E-3
PART NAMES.......................................... E-4
• MAIN UNIT DISPLAY...................................E-4
• INCLUDED ...................................................E-4
• BACK ...........................................................E-4
PREPARATION........................................ E-5
• INSERTING BATTERIES
IN THE REMOTE CONTROL ......................E-5
• REMOTE CONTROL USE ...........................E-5
• FILTER INSTALLATION...............................E-6
OPERATION ............................................ E-8
• MAIN UNIT OPERATION.............................E-8
• REMOTE CONTROL OPERATION .......... E-10
E-2
ENGLISH
• Filters
1) Pre-Filter
It collects large particles.
2) Washable Active Carbon Filter
Its deodorizing performance can be
maintained by washing.
3) HEPA (High Efficiency
Particulate Air) Filter with
Microbial Control Filter
High-efficiency particle collection including pollen and dust.
CARE AND MAINTENANCE................. E-11
• MAIN UNIT .................................................E-11
• ODOR SENSOR / DUST SENSOR ...........E-11
• PRE-FILTER ..............................................E-11
•WASHABLE ACTIVE CARBON
FILTER CARE ........................................... E-12
• FILTER REPLACEMENT
GUIDELINES ............................................ E-13
TROUBLE SHOOTING.......................... E-14
SPECIFICATIONS ................................. E-15
Thank you for purchasing the SHARP Air Purifier. Please read this manual carefully for the correct
usage information. Before using this product, be sure to read the section: “Important Safety Instructions.”
After reading this manual, retain it in a convenient location for future reference.
E-1
Page 4

IMPORTANT SAFETY INSTRUCTIONS
When using electrical appliances, basic safety precautions should be followed, including the
following:
WARNING - To reduce the risk of electrical shock, fire or injury to persons:
• Read all instructions before using the air purifier.
• Use only a 220-240 volt outlet.
• Do not use the air purifier if the power cord or plug is damaged or the connection to the wall
outlet is loose.
• Periodically remove dust from the power plug.
• Do not insert fingers or foreign objects into the intake or air outlet.
•When removing the power plug, always hold the plug and never pull the cord.
Electrical shock and/or fire from short circuit may occur as result.
• Do not use this air purifier near gas appliances or fireplaces.
• Remove the power plug from the wall outlet before cleaning the unit and when not using the
unit.
Electrical shock from bad insulation and / or fire from short circuit may occur as a result.
• If the power cord is damaged, it must be replaced by the manufacturer, its service agent,
Sharp authorized service or similarly qualified person in order to avoid a hazard.
• Do not operate when using aerosol insecticides or in rooms where there is oily residue, incense,
sparks from lit cigarettes, chemical fumes in the air or a humidity condition.
• Use care when cleaning the air purifier. Strong corrosive cleansers may damage the exterior.
• Only Sharp Authorized Servicers should service this air purifier. Contact the nearest Servicer for any
problems, adjustments, or repairs.
• The batteries must be removed from the remote control before disposal, and the batteries must be
disposed of safely.
CAUTIONS CONCERNING OPERATION
• Do not block the intake and air outlet.
• Do not use the unit near or on hot objects, such as range or where it may come into contact with
steam.
• Always hold the handle on the back of the main unit when moving it.
• Holding the front panel when carrying may cause it to detach, thus dropping the unit and resulting in
bodily injury.
• Do not operate the unit without the filter.
Not only it does not improve filter performance, it may cause electric shock or malfunction.
• Clean the exterior with a soft cloth only.
The unit surface may be damaged or cracked.
In addition, the sensor may malfunction as a result.
REMOTE CONTROL LIMITATIONS
DO NOT USE THE REMOTE CONTROL IN THE FOLLOWING LOCATIONS:
• Any location where there is inverter lighting equipment or electronic spontaneous lighting
equipment
The remote control may become inoperative. In this case, move away from such lighting equipment
or change direction.
• Location exposed to direct sunlight or fluorescent.
The unit may not receive signals from the remote control.
E-2
Page 5

INSTALLATION GUIDELINES
• During the operation of the product, please place the unit at least 2m away from equipments
which involve electric wave such as televisions, radios or wave clocks, in case electrical
interference occurs to such equipments.
• Leave at least 60cm of space from the wall.
The motor may overheat, causing a malfunction.
•Avoid a location where the sensor is exposed to direct wind.
The unit may not operate properly.
•Avoid locations where curtains, etc., come into contact with the intake or air outlet.
Curtains, etc., may become dirty or a malfunction may occur.
•Avoid locations where the unit is exposed to condensation, due to drastic temperature changes.
• Place on a stable surface with sufficient air circulation.
• Do not install when there is generation of lampblack, such as in a kitchen, etc.
The unit surface may crack or the sensor may malfunction as a result.
• The wall behind the air outlet may become dirty as time passes. When using the unit for extensive
period in the same location, use a vinyl sheet, etc., to prevent the wall from becoming dirty. In addition, periodically clean the wall, etc.
FILTER GUIDELINES
• Follow the instructions in this manual for correct care and maintenance of the filters.
ENGLISH
HOW SHARP AIR PURIFIER WORKS
An air purifier draws in room air from its air intake, lets the air pass through an Active Carbon Filter
(Deodorizing Filter) and a HEP A Filter (dust collection filter) inside of the unit, then discharges the air
from its air outlet. The air purifier repeats this process by moving its internal fan.
As air passes through, the HEPA Filter can remove dust particles. The Active Carbon Filter gradually
absorbs odor elements as they repeatedly pass through the filter.
(Odor elements are absorbed by HEPA Filter as well.)
Some odor ingredients absorbed by the filters may become separated and may be discharged through
the air outlet and result in additional odor. Depending on the usage environment, this odor may become
strong in a shorter period than expected.
In this case, purchase the optional replacement filter kit FZ-P40SF.
NOTE
• The air purifier is designed to remove
air-suspended dust and odor, but not
harmful gases (for example, carbon
monoxide contained in cigarette
smoke). If the odor sources still exist,
it cannot completely remove the odor .
(for example, odors from construction
materials and pet odors).
• It is suggested to open the window a
bit when you are smoking in order to
facilitate ventilation.
HEPA Filter
Active Carbon Filter
E-3
Page 6

PART NAMES
MAIN UNIT DISPLAY
Odor Sensor
AUTO Operation Indicator Light
15min. HIGH operation Indicator Light
Pollen Mode Indicator Light
Fan Speed Indicator Lights
CLEAN-SIGN Light
OFF Timer Display Indicator Lights
Filter Indicator Light
Remote Control Receiver
Plasmacluster
Indicator Light
Odor Sensor
Dust Sensor
POWER ON/OFF Button See Page E-8
MODE Button See Page E-8
Sensor Sensitivity Select Switch
Sensor sensitivity can be adjusted to “Normal ( )”
or “Sensitive ( )” by this switch.
INCLUDED
Remote Control (1 unit)
Battery (AA battery x 2 )
BACK
Main Unit
Band See Page E-7
Filter Frame
HEPA Filter (white) See Page E-7,13
(with Microbial Control Filter (blue))
Washable Active Carbon Filter (black)
See Page E-7,12,13
Pre-Filter
Front Panel
Remote Control
See Page E-10
Tab
Handle
Air Outlet
Date Label
Power Cord
• Operation manual
Power Plug
(shape of plug depends on country)
E-4
Page 7

PREPARATION
INSERTING BATTERIES IN THE REMOTE CONTROL
Remove the back cover
1
Press and slide the back cover to
remove.
Insert batteries
2
Insert batteries with and as
shown below.
Close the back cover
3
ENGLISH
Battery Information
• The battery life is about 1 year.
• The batteries for this remote control are for initial use only . Change the batteries
when necessary.
• Incorrect usage of the batteries may cause battery fluid leakage and/or damage.
Take care of the following when handling:
•When replacing the batteries, replace both batteries with new ones of the same
type. (Use 2 AA manganese batteries.)
•When not using the unit or remote control for an extended period, remove the
batteries.
• The batteries are for initial use only and may be depleted within 1 year.
REMOTE CONTROL USE
• Operate with the remote control facing the main
unit receiver.
•The signal range is about 7m.
•Make sure there are no objects blocking the
path of the signal.
•A beep sound will be heard from the main unit
when a signal is received.
Receiver
Transmitter
NOTE
•Avoid dropping or damaging the remote
control, using in a high humidity condition, in
direct sunlight or near a heat source.
E-5
Page 8
PREPARATION
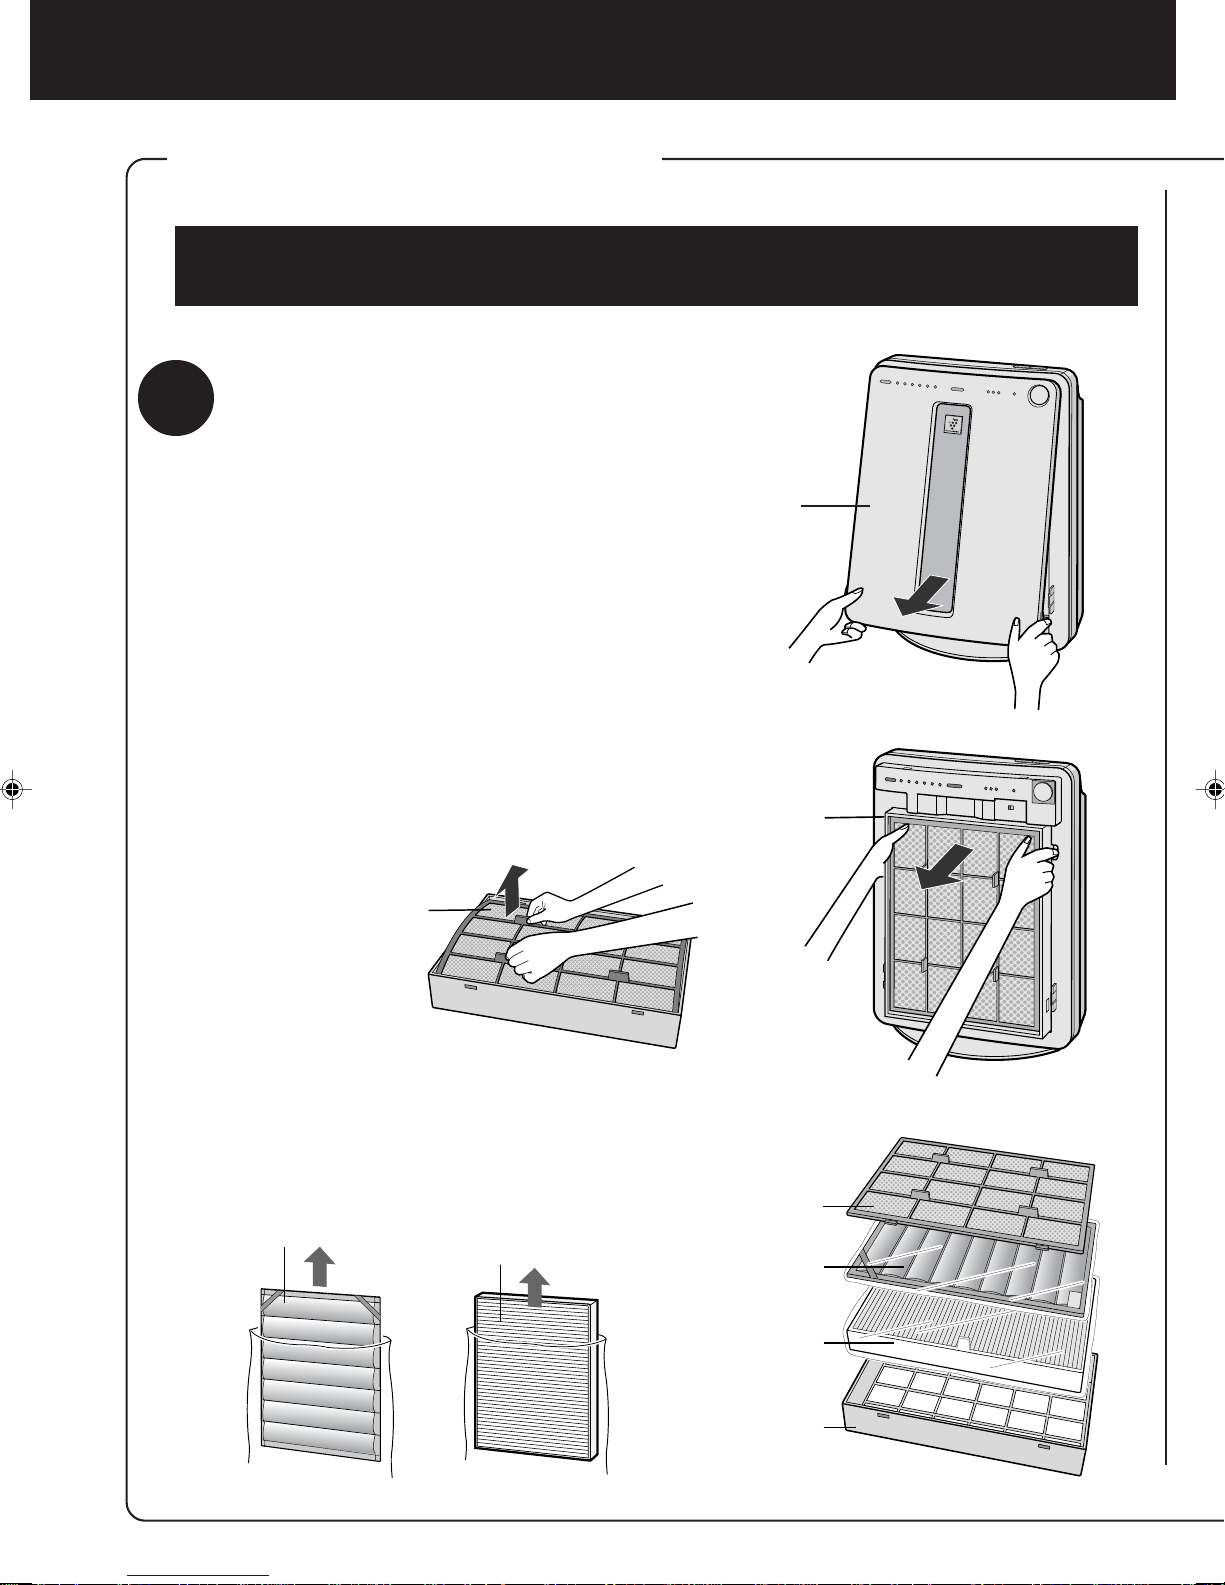
FILTER INSTALLATION
To maintain the quality of the filters, they are installed in the main unit within plastic bags.
Be sure to remove the filters from the plastic bags before using the unit.
Be sure to remove the power plug from the wall outlet.
1
Remove the filters
Remove the Front Panel.
1
Pull the bottom of the Front Panel.
Pull out the Filter Frame and remove
2
the Pre-Filter, Active Carbon Filter and
HEPA Filter.
Pre-Filter
Front Panel
Filter Frame
Remove the Active Carbon Filter
3
(black) and HEPA Filter (white) from
the plastic bags.
Active Carbon Filter
Pre-Filter
HEPA Filter
Active Carbon Filter
HEPA Filter
Filter Frame
E-6
Page 9

2
Tabs
Install the filters
Place the HEPA Filter
1
within the Filter Frame with
the tabs facing up.
Do not install the filter backwards or
the unit will not operate properly.
Place the Active Carbon Filter
2
on top of the HEPA Filter
with the bands (2 places)
facing up.
Place the Pre-filter through
3
the bands (2 places) located
in the corners of the Active
Carbon Filter.
Insert the tabs of the pre-filter into
the associated holes of the Filter
Frame.
HEPA Filter
Filter Frame
Band
Active Carbon Filter
ENGLISH
HEP A Filter
Filter Frame
Tabs (4 places)
Band
Mount the Filter Frame to
4
the main unit.
Fill in the usage start date
5
on the Date Label.
Use the date as a guide for the
Filter Replacement schedule.
Holes
Main unit
Filter Frame
Band
Date Label
E-7
Page 10
OPERATION
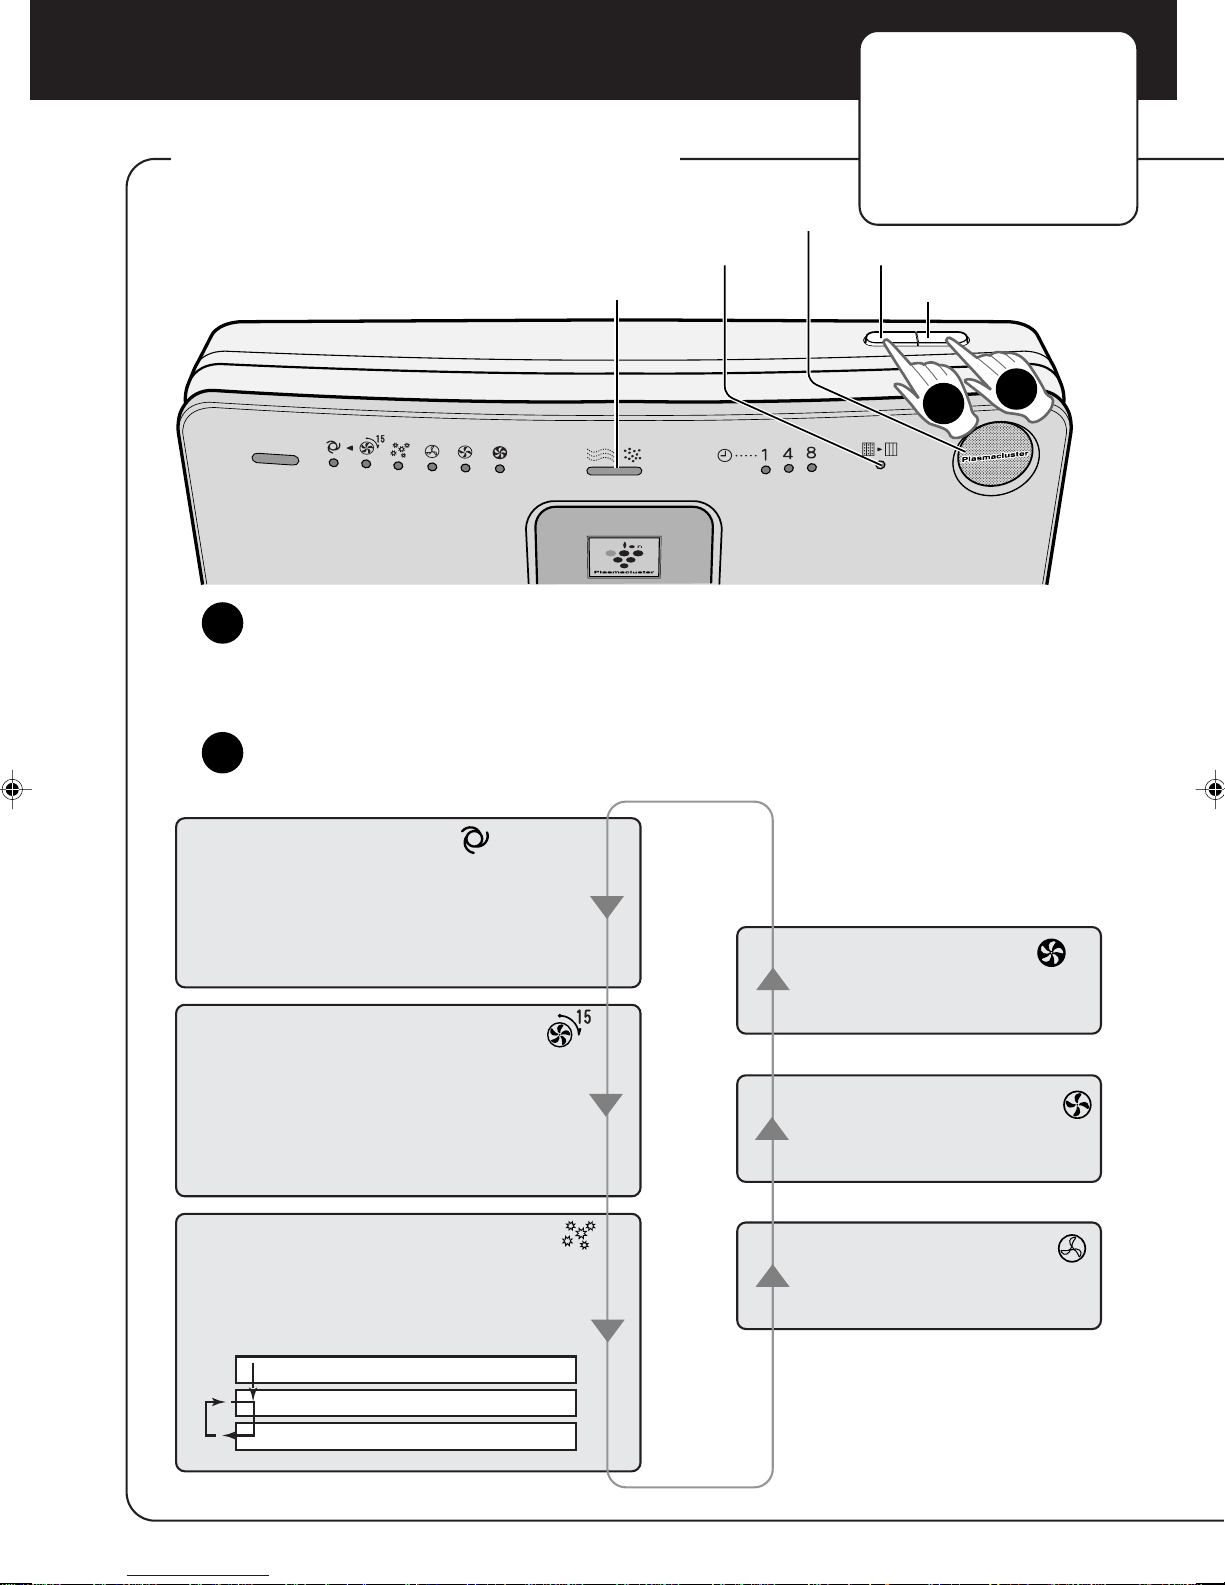
MAIN UNIT OPERATION
Plasmacluster Indicator Light
Main Unit Controls
• AUTO
• 15 min. HIGH
• POLLEN
• SILENT
• NORMAL
• MAX
Filter Indicator Light
Clean-Sign Light
MODE Button
Power ON/OFF Button
2
Power ON/OFF Button
1
• Used to start operation (short beep) and stop operation (long beep)
• Plasmacluster Indicator Light and Fan Speed Indicator Light turn on/off.
• Unless unplug the power cord, the operation starts in the previous mode the unit
was operated in.
MODE Button
2
• The operation mode can be switched.
1
AUTO operation
The fan speed is automatically switched
(HIGH*, NORMAL, SILENT) depending
on the amount of pollution in the air. The
sensors detect the pollution for efficient
air purification.
15 min. HIGH* operation
The unit will operate at HIGH* fan speed
for 15 minutes, then will operate at Auto
operation.
The operation mode is effective when
quick removal of impurities in the air is
desired.
POLLEN mode operation
The unit will operate at HIGH* fan speed
for 10 minutes, then will alternate
between NORMAL and HIGH for 20
minutes.
10 minutes: HIGH fan speed
20 minutes:
20 minutes: HIGH fan speed
NORMAL fan speed
MAX operation
The unit will operate at a fan
speed of MAX.
NORMAL operation
The unit will operate at a fan
speed of NORMAL.
SILENT operation
The unit will operate quietly
using minimal air intake.
*HIGH fan speed is an
intermediate speed
between NORMAL
and MAX.
E-8
Page 11

DETERMINING THE BASE IMPURITY RATE
For the first 30 seconds after the power plug is inserted into the wall outlet,
the unit will check the conditions of the air. If operation is set to ON during this
time, the CLEAN-SIGN LIGHT will alternately flash in green, orange and red.
PLASMACLUSTER INDICATOR LIGHT
Plasmacluster ion operation is selected using the remote control.
Blue light
When the Plasmacluster ion operation is in Clean Mode, or in AUTO
Plasmacluster Ion Mode and the air in the room is impure, the light will
activate and the unit will operate in Clean Mode.
Green light
When the Plasmacluster ion operation is in the Ion Control Mode, or in
AUTO Plasmacluster Ion Mode and the air in the room is clean, this light will
activate and the unit will operate in Ion Control Mode.
Light off
There are no Plasmacluster ions being generated.
• The light can be turned off by using the ‘Display ON/OFF Button’ on the
Remote Control. In this case, Plasmacluster ions are generated.
(Please turn off the light when not required.)
ENGLISH
CLEAN-SIGN LIGHT
The color changes according to the air condition.
Clean (Green) Slightly Impure (Orange) Very Impure (Red)
ABOUT THE CLEAN-SIGN
• The condition of the CLEAN-SIGN depends on the room air condition
detected by the Dust and Odor Sensor when the plug is inserted into the wall
outlet.
• It is possible to have a green CLEAN-SIGN with impurities in the air at the
time that the air purifier was just introduced to the room environment. After
a while, however, the base impurity rate will be adjusted to detect room air
condition correctly.
• Use the Display ON/OFF Button on the remote control to turn off the
Indicator light.
FILTER INDICATOR LIGHT
Clean the Active Carbon Filter when the Filter Indicator Light activates.
(The indicator light will activate in about 2 months, when using the unit or 24
hours daily.) (See Page E-12)
E-9
Page 12

OPERATION
REMOTE CONTROL OPERATION
POWER ON/OFF Button
• When you press the
POWER ON/OFF Button, a
short beep will sound and
operation will start in AUT O
Mode.
• Unless unplug the power
cord, the operation starts in
the previous mode the unit
was operated in.
•To stop, press the POWER
ON/OFF Button again.
A long beep will sound and
operation will stop.
Auto (Fan Speed) Button
The fan speed switches automatically depending on the
amount of impurities in the air.
Manual (Fan Speed) Button
The fan speed can be
switched among Silent,
NORMAL and MAX settings.
15 min. HIGH Button
See page E-8
Display ON/OFF Button
Switches the Plasmacluster
Indicator Light and CLEANSIGN Light either ON or OFF .
Plasmacluster
Operations available with
the Remote Control
• AUTO
• MANUAL
• POLLEN
• OFF TIMER
• 15 min. HIGH
• DISPLAY ON/OFF
Plasmacluster Ion mode
selections
• AUTO
• CLEAN
• ION CONTROL
• OFF
Transmitter
Filter Reset Button
When the Washable Active Carbon Filter is cleaned and
reinserted into the main unit,
press the Filter Reset Button.
Pollen Mode Operation
Button
See Page E-8
Off Timer Button
The set time switches every time
the button is pressed as shown
below.
1 hour 4 hours
Cancel 8 hours
• The indicator light shows the
remaining time.
• The unit will stop operation
when the timer is up.
Plasmacluster Ion Mode Selections
AUTO
When pressed, the unit will switch between Clean
Mode and the Ion Control Mode automatically depending on the amount of impurities in the air as
detected by the dust and odor sensors. Clean
Mode will operate for 1 minute when the Auto
function is selected.
(ION CONTROL)
When pressed, the unit will constantly operate in
Ion Control Mode.
The Plasmacluster Ion Indicator Light is green.
(CLEAN)
When pressed, the unit will constantly
operate in the Clean Mode, in which
the same numbers of positive and
negative ions are discharged. The
Plasmacluster Indicator Light is blue.
OFF
The generation of ions will cease and
the Plasmacluster Indicator Light will
go out.
E-10
Page 13

CARE AND MAINTENANCE
To maintain optimum performance of this air purifier, please clean the unit including
the sensors and filters periodically.
When cleaning the unit, be sure to unplug the power cord, and never handle the plug
with wet hands. Electrical shock and/or bodily injury may occur as a result.
MAIN UNIT
To prevent dirt or stains on the main unit, clean as often as necessary. If stains are allowed to
remain, they may become hard to clean.
Wipe with a dry, soft cloth
For stubborn stains or dirt, use a soft cloth dampened with warm water.
Do not use volatile fluids
Benzene, paint thinner, polishing powder, etc., may damage the surface.
Do not use detergents
Detergent ingredients may damage the unit.
Keep the unit away from water
ODOR SENSOR / DUST SENSOR
The sensitivity of the sensor will become
unstable if the odor/dust sensor is dirty or
blocked. Remove dust from the surfaces
of the sensor openings using a vacuum
cleaner.
Hole of odor sensor
Hole of dust sensor
FILTER CLEANING
Remove the Front Panel, Clean the surface of the Pre-Filter lightly with a vacuum cleaner.
If it is contaminated heavily, remove it from the Filter Frame to wash it.
ENGLISH
NOTE
• In case of washing, use a soft brush etc. and cold/warm
water.
•Metal brushes or scrub brushes may cause damage.
• After washing, leave it in the shade until it gets dried.
Then place it back to the frame.
• Never wash or clean the HEPA Filter using the nozzle of
a vacuum cleaner directly.
This will greatly decrease the performance of the filters.
E-11
Page 14

CARE AND MAINTENANCE
WASHABLE ACTIVE CARBON FILTER CARE
HAND WASH ONLY!
DO NOT TUMBLE DRY!
Care Cycle
When the Filter Indicator Light lights up,
this indicates that the filter needs to be
cleaned. If the unit is kept on 24 hours a
day then the Filter Indicator Light will activate in about 2 months.
The Filter Indicator Light is for reference.
Clean the filter as often as necessary
when odor persists.
Remove
1
visible dirt
with a
vacuum
cleaner.
Fill a large container with
2
warm water, add a mild
kitchen detergent and stir .
Dilute as indicated
on the detergent
container.
Allow the filter to soak ap-
3
proximately 30 minutes before washing.
If the filter surface
is very dirty , scrub
with an old toothbrush.
Remove excess water
5
The filter will be saturated with water after rinsing. To decrease drying time, wrap the filter in
an old thick towel so that excess water can be
removed.
CAUTION
Some carbon may adhere to
the towel, but it is harmless.
Dry the filter outdoors
6
if possible in a well
ventilated area.
CAUTION
• The wet filter is heavy. Fix it securely for drying to
make sure it does not fall down.
• The filter takes longer to dry in winter, on rainy days.
Wash it on a day when the weather is good and
dry it in the sun.
Move it indoors at night to prevent freezing.
• Dry the filter outdoors in a well ventilated area. If
dried indoors, the water dripping off the filter may
soil your floor.
• Make sure that the activated carbon has not shifted
to one side inside the filter. If it has, distribute it
evenly with your fingers.
• Let the filter dry thoroughly.
If used while the filter is still moist, then the air that
is exhausted from the main unit will have an odor.
It may take 1 or 2 days to dry.
Reinstalling the Filter.
7
Reinstall the filter as shown on Page E-6,7
CAUTION
Handle with care to
prevent damage to
the activated carbon
particles.
Rinse thoroughly with clean
4
water
CAUTION
If rinsing in a container, be sure to
rinse 3 to 4 times so
that the odor is
rinsed thoroughly
from the filter.
Once the Active Carbon Filter has
8
been cleaned, connect the power
cord to the outlet and press the Filter
Reset Button on the Remote Control.
• Once the Filter Reset
Button has been activated, you will hear a
beep sound that
means the unit has
been reset.
• The Filter indicator
light will then go out
automatically.
Filter Reset Button
E-12
Page 15

FILTER REPLACEMENT GUIDELINES
Depending on the usage environment, air outlet odor may become strong
after several months.
If dust or odors cannot be removed easily, replace the filters.
(Refer to HOW SHARP AIR PURIFIER WORKS E-3)
Guide for filter replacement timing
• The following filter life and replacement period is based on the condition of smoking 10
cigarettes per day and the dust collection/deodorization power is reduced by half compared
with that of new filters.
We recommend to replace the filters more frequently if the product is used in a condition
significantly severer than normal household use.
• HEPA Filter
• Active Carbon Filter About 5 years after opening
(with Microbial Control Filter)
About 5 years after opening
REPLACING THE FILTERS
See page E-6,7 for directions on how
1
to install the filters when replacing.
After replacing the filters:
2
Be sure to press the Filter Reset Button on the
Remote Control with the power cord connected to the
outlet.
A short beep will be heard and the operation hours
stored in the memory will be reset.
The Filter Indicator Light will then go out automatically.
Fill in the usage start date of the filters
3
on the Date Label
Replacement Filters
Model: FZ-P40SF
• HEPA Filter
• Active Carbon Filter: 1 unit
Please consult your dealer for purchase of
replacement filters.
(with Microbial Control Filter)
.
: 1 unit
ENGLISH
Date Label
Disposal of Filters
Please dispose of replaced filters according to the local disposal laws and regulations.
HEPA Filter
• Filter: Polypropylene
• Frame: Polyester
•Microbial Control Filter: Polypropylene, Polyethylene
Active Carbon Filter Materials:
• Deodorizer: Activated charcoal
• Net: Polypropylene 60%, Polyester 40%
(with Microbial Control Filter)
materials:
E-13
Page 16

TROUBLESHOOTING
Before calling for repair, please review the list below, since the problem may not be a unit malfunction.
SYMPTOM
The Remote Control does not
work
Odors and smoke are not
removed
The CLEAN-SIGN Light lights
green even when the air is
impure
The CLEAN-SIGN Light lights
orange or red even when the air
is clean
The Plasmacluster Indicator
Light remains green (or blue)
and does not change
A clicking or ticking sound is
heard from the unit
REMEDY (not a malfunction)
• Have the batteries been depleted?
• Are the batteries inserted correctly?
• Is a fluorescent lighting in the room flickering due to service
life?
• Clean or Replace the filters if they appear to be heavily soiled.
(Refer to E-12,E-13)
• The air could be impure at the time the unit was plugged in.
(Refer to E-9)
• The sensitivity of the sensor becomes unstable when the
opening of the odor sensor is dirty or is clogged.
Clean the dust around the sensor opening using a vacuum
cleaner. (Refer to E-11)
• When in Clean Mode ( or Ion Control Mode), the Plasmacluster
Indicator Light color will not change.
• Clicking sound is emitted when the unit is in the Ion Control
Mode, and ticking sound is emitted when the unit is generating
ions.
If the sound is irritating, set the unit away from you.
The discharged air has an
aroma or odor.
The unit does not operate when
cigarette smoke is in the air.
The Filter Indicator Light
remains activated even after
replacing filter.
The Plasmacluster Indicator
Light or the CLEAN-SIGN Light
will not activate.
ERROR DISPLAY
LAMP INDICATION
• Check to see if the filters are heavily soiled.
Replace the filters.
• Plasmacluster Air Purifiers emit small traces of ozone which
may produce an odor. The amount of ozone emitted by the ion
generator is very little which is below the saety levels set by
the IEC 60335-2-65, and it is harmless to the human body.
• Is the unit installed in a location that is difficult for the sensor to
detect cigarette smoke?
• Are the odor sensor openings blocked or clogged?
(In this case, clean the openings.) (Refer to E-11)
• After replacing filters, connect the power cord to an outlet and
press the Filter Reset Button on the remote control. (Refer to
E-12)
• Check to see if the Display OFF Mode on the Remote Control
is selected. If so, then press the Display ON/OFF Button on
the Remote Control to activate the indicator light.
(Refer to E-10)
REMEDY
The “Silent” Fan Speed Indicator Light blinks.
Fan motor disconnected or abnormal.
Operation stops.
• Pressing the ON/OFF button will reset the error display, but if
error occurs again, contact the shop where you purchased the
unit.
E-14
Page 17

SPECIFICATIONS
Model
Power supply
Fan speed level
Fan
Speed
Operation
* The applicable floor surface area is the surface area for operating the unit in MAX fan level.
• Applicable floor surface area indicates the space where a certain amount of dust particle can be
removed in 30 minutes.
Rated power
Air Flow Volume
Applicable floor surface
Cord Length
Dimensions
Weight
MAX
34 W
240 m
3
/hour
415mm(W)x200mm(D)x570mm(H)
FU-P40S
220-240V 50/60Hz
NORMAL
8.1 W
120 m
3
/hour
~31m2*
2.5m
6.7kg
SILENT
3.3 W
30 m3/hour
Standby Power
In order to operate the electrical circuits while the power plug is inserted in the wall outlet, this
product consumes about 0.7W of standby power.
For energy conservation, unplug the power cord when the unit is not in use.
ENGLISH
E-15
Page 18

Page 19

中文
特性
離子簇控制
本機將根據室內空氣狀況控制正負離子的
比率。
• 淨化模式
釋放出大約相等數量的正負離子。
此模式有助減少空氣中的霉菌。
• 離子控制模式
大量的負離子存在於大自然環境(如﹕瀑
布、森林)中。 在此模式下﹐負離子被釋
放的比率會增加﹐從而使室內空氣接近大
自然環境。
• 自動離子簇模式
本機將會根據灰塵和異味感應器所感測的
空氣污濁程度﹐從而自動轉換為淨化模式
或離子控制模式。
• 過濾網
目錄
重要安全事項 ..............................................
• 警告 ............................................................. C-2
• 操作本機的注意事項 .................................... C-2
• 遙控器限制 .................................................. C-2
• 安裝指南 ...................................................... C-3
• 過濾網指南 .................................................. C-3
• 聲寶空氣清新機操作原理 ............................. C-3
部件名稱 .................................................. C-4
• 主機部件 ...................................................... C-4
• 附件 ............................................................. C-4
• 背部 ............................................................. C-4
準備工作 .................................................. C-5
• 安裝遙控器電池 ........................................... C-5
• 使用遙控器 .................................................. C-5
• 安裝過濾網 .................................................. C-6
操作 ......................................................... C-8
• 主機操作 ...................................................... C-8
• 遙控器操作 ................................................ C-10
C-2
中文
1) 前過濾網
用於吸附較大的灰塵粒子。
2) 可清洗活性碳過濾網
可通過清洗保持其除臭功能。
3) 備有微生物控制過濾網的HEPA過
濾網(高效能微粒空氣過濾網)
可以高效吸附微粒﹐包括花粉和灰
塵。
保養和清潔 ............................................ C-11
• 主機 ........................................................... C-11
• 異味感應器/灰塵感應器 ............................. C-11
• 前過濾網 .................................................... C-11
• 可清洗活性碳過濾網保養 ........................... C-12
• 過濾網更換指南 ......................................... C-13
維修前的檢查事項 .................................. C-14
規格 ....................................................... C-15
多謝您購買聲寶空氣清新機。請仔細閱讀此說明書﹐以了解正確的使用信息。在使用本產品之
前﹐請務必閱讀“重要安全事項”這一節。
閱讀後請妥善保管此說明書﹐以便日後翻閱。
C-1
Page 20

重要安全事項
當使用電器時﹐必須遵守基本的安全預防措施﹐包括以下各方面﹕
警告 — 為了減少電擊、火災或受傷等危險﹕
• 在使用空氣清新機之前請閱讀所有注意事項。
• 只能使用220-240V的插座。
• 如果電線或插頭已經損壞﹐或者壁裝電源插座已經鬆脫﹐請勿使用空氣清新機。
• 定期清除電源插頭上的灰塵。
• 請勿將手指或異物插入進氣口或排氣口。
• 當拔掉電源插頭時﹐必須緊握插頭而不要拉扯電線。
否則可能導致電擊和/或因短路引起火災。
• 請勿在靠近氣體設備或壁爐的地方使用空氣清新機。
• 當清潔本機或不使用本機時﹐請從壁裝電源插座上拔掉插頭。
否則可能導致因絕緣不良引起的電擊和/或因短路引起的火災。
• 如果電源線損壞﹐必須由生產商或其代理、聲寶公司的特約維修中心或具有相同資格的人員來更換﹐
以免發生危險。
• 當使用噴霧殺蟲劑時請勿使用本機﹐或若房間內有油渣、焚香時的煙、點燃香煙的火苗、空氣中的化
學氣體或濕氣重時也不要使用本機。
• 清潔空氣清新機時請加以小心。腐蝕性強的清潔劑會損壞本機的表面。
• 只有聲寶特約維修人員才能維修本空氣清新機。當需要調整、修理或有任何問題時﹐請聯絡就近的維
修人員。
• 電池處理前必須從遙控器中取出﹐並且必須安全處理。
操作本機的注意事項
• 請勿堵塞進氣口和排氣口。
• 不要靠近或在熱源體上(如可能接觸到蒸汽的場所)使用本機。
• 移動本機時﹐要一直緊握主機後面的手柄。
• 移動時若握前面板﹐會導致前面板脫落﹐從而摔落主機﹐造成傷害。
• 請勿在沒有過濾網的情況下操作本機。
這不僅不能增強過濾網的性能﹐反而會導致電擊或故障。
• 只能使用一塊軟布清潔表面。
否則本機表面可能會損壞或破裂。
此外﹐還可能導致感應器故障。
遙控器限制
請勿在下列情況下使用遙控器﹕
• 任何有變頻器的照明設備或電子燈光設備的地方。
遙控器可能會失靈。在這種情況下﹐使本機遠離這些燈光設備或改變其方向。
• 陽光或螢光直接照射的地方。
本機可能接收不到來自遙控器的信號。
C-2
Page 21

安裝指南
• 操作本機時﹐要使其遠離帶有電波的設備(如﹕電視機、收音機或時鐘)至少2米﹐以防產生電波干
擾。
• 遠離牆壁至少60厘米。
因為馬達可能會過熱﹐引起故障。
• 請勿安裝在感應器直接對風口的地方。
否則可能會影響本機正常操作。
• 請勿安裝在窗簾等可能會接觸到進氣口或排氣口的地方。
否則該物會被污染或導致本機故障。
• 請勿安裝在由於溫度劇烈變化而導致本機直接暴露於冷凝環境的地方。
• 安裝位置必須穩固﹐且通風良好。
• 請勿安裝在會產生黑煙的地方(如廚房等)。
否則可能會導致本機表面破裂或感應器故障。
• 排氣口後面的牆壁可能會隨時間變髒。當在同一個位置持續使用本機一段時間時﹐請在牆壁上貼上
一張軟膠墊﹐以免牆壁變髒。此外﹐還可以定期清潔牆壁。
過濾網指南
• 遵照說明書的指示﹐了解正確保養和清潔過濾網的方法。
聲寶空氣清新機操作原理
空氣清新機經進氣口吸入室內空氣﹐使其通過機內的活性碳過濾網(除臭過濾網)和HEPA過濾網(集塵
過濾網)﹐然後從排氣口排出。空氣清新機通過其內部風扇的操作不斷重複此過程。
當空氣通過時﹐HEPA過濾網能夠除去灰塵粒子。當異味成分多次通過活性碳過濾網時﹐便逐步被吸收。
(異味成分也被HEPA過濾網吸收。)
有些已被過濾網吸附的異味分子可能會離開過濾網﹐然後隨出風口吹出。根據不同的使用環境﹐這些異
味可能在比預期更短的時間內變得強烈。
在這種情況下﹐請選購過濾網更換配件FZ-P40SF。
注意
• 本空氣清新機用於去除空氣中懸浮的
灰塵和異味﹐而不能去除有害氣體
(如﹕香煙煙霧中含有的一氧化
碳)。如果異味的源頭依然存在﹐異
味將不能徹底被去除。(如﹕來自建
築材料和寵物身上的異味)。
• 建議抽煙時將窗戶稍微打開﹐以便空
氣流通。
中文
HEPA過濾網
活性碳過濾網
C-3
Page 22

部件名稱
主機部件
異味感應器
自動操作指示燈
15分鐘高風速操作指示燈
花粉模式指示燈
風速指示燈
淨化度指示燈
定時關機顯示指示燈
過濾網指示燈
遙控接收器
離子簇指示燈
異味感應器
灰塵感應器
電源開/關按鈕
見第C-8頁
模式按鈕 見第C-8頁
感應器靈敏度選擇開關
可透過此開關把感應器靈敏度調校到“標
準”或“高”。
主機
彈力帶
見第C-7頁
附件
遙控器 (1個)
電池 (AA電池﹐2枚)
• 使用說明書
背部
C-4
過濾網框架
HEPA過濾網(白色)見第C-7、13頁
(備有微生物控制過濾網(藍色))
可清洗活性碳過濾網(黑色)
見第C-7、12、13頁
前過濾網
前面板
遙控器
見第C-10頁
頁片
手柄
排氣口
日期標簽
電源線
電源插頭
(插頭形狀因國家而異)
Page 23

準備工作
安裝遙控器電池
打開後蓋
1
按下並滑動﹐以打開後蓋。
裝入電池
2
依照圖示的正 負 極標記裝入
電池。
推回後蓋
3
關於電池
• 電池大約可用一年。
• 該遙控器使用的電池是為初次使用。必要時需更換電池。
• 不正確的使用電池可能會導致電池漏液和/或損壞。
操作時請注意以下事項﹕
• 更換電池時﹐請同時更換兩枚相同類型的新電池。(使用2枚AA錳性電池。)
• 當長時間不使用本機或遙控器時﹐請取出電池。
• 電池必須為初次使用﹐並且電量可能在1年內耗盡。
使用遙控器
• 對主機接收器操作遙控器。
• 信號覆蓋範圍約為7米。
• 確認沒有物體阻擋遙控器的信號。
• 當接收到信號時﹐主機會發出“嗶”聲。
中文
接收器
注意
• 避免掉下或損壞遙控器﹐或是在過度潮濕、
陽光直接照射或靠近熱源的地方使用遙控
器。
發射器
C-5
Page 24

準備工作
安裝過濾網
為確保過濾網的質量﹐過濾網以塑膠袋包裝並安裝在主機中。
使用本機之前﹐必須將過濾網從塑膠袋中取出。
確定已經將電源插頭從插座中拔掉。
1
取出過濾網
取下前面板。
1
拉動前面板的底部。
拉出過濾網框架並取出前過濾網、活性碳
2
過濾網和HEPA過濾網。
前過濾網
前面板
過濾網框架
從塑膠袋中取出活性碳過濾網(黑色)和
3
HEPA過濾網(白色)。
活性碳過濾網
前過濾網
HEPA過濾網
活性碳過濾網
HEPA過濾網
過濾網框架
C-6
Page 25

安裝過濾網
2
將HEPA過濾網放進過濾網框
1
架內﹐並且頁片朝向上方。
頁片
HEPA過濾網
請勿將過濾網以相反方向安裝﹐否則
將影響本機正常操作。
將活性碳過濾網放在HEPA過濾
2
網上面﹐彈力帶(2根)朝向上
方。
將前過濾網插入位於活性碳過
3
濾網角部的彈力帶(2 根)
內。
將前過濾網的頁片裝入過濾網框架上
的相應孔內。
過濾網框架
彈力帶
活性碳過濾網
HEPA過濾網
過濾網框架
彈力帶
孔
頁片(4個)
中文
將過濾網框架裝入主機。
4
在日期標簽上填寫開始使用的
5
日期。
該日期將作為日後過濾網更換的時
間參考。
主機
過濾網框架
彈力帶
日期標簽
C-7
Page 26

操作
主機操作
主機控制
• 自動
• 15分鐘高風速
• 花粉
• 靜音
• 標準
• 最大
離子簇指示燈
過濾網指示燈
淨化度指示燈
電源開/關按鈕
1
• 用於開始操作本機(短嗶聲)和停止操作本機(長嗶聲)。
• 離子簇指示燈和風速指示燈開/關。
• 除非拔掉電源線﹐否則主機啟動後將維持前一次的操作模式。
模式按鈕
2
• 可以切換操作模式。
模式按鈕
電源開/關按鈕
2
1
自動操作
風速將根據空氣污染含量自動切換(高
風速*、正常、靜音)。感應器將感測空
氣污濁程度﹐以便有效地淨化空氣。
15分鐘高風速*操作
主機以高風速*操作15分鐘﹐之後將轉為
自動操作。
當需要快速去除空氣中的雜質時﹐該功
能很有效。
花粉模式操作
主機以高風速*操作10分鐘﹐之後交替地
以20分鐘標準和高風速*模式操作。
10分鐘﹕高風速
20分鐘﹕標準風速
20分鐘﹕高風速
最大風速操作
本機將以最大風速操作。
標準操作
本機將以標準風速操作。
靜音操作
本機將以最小進風操作。
* 高風速是介乎於標準和最大
之間的風速。
C-8
Page 27

確定雜質比率基準
接通電源後的30秒﹐主機將感測室內空氣狀況。如果在此期間開始操作﹐淨化度指示
燈將會以綠色、橙色和紅色交替閃爍。
離子簇指示燈
使用遙控器選擇離子簇操作。
藍色燈亮
當離子簇以淨化模式操作﹐或者為自動模式且室內空氣污濁時﹐藍色指示燈
會點亮﹐並且主機將以淨化模式操作。
綠色燈亮
當離子簇以離子控制模式操作﹐或者為自動模式且室內空氣清新時﹐綠色指
示燈會點亮﹐並且主機將以離子控制模式操作。
燈熄滅
沒有離子簇產生。
• 可使用遙控器上的“顯示開/關按鈕”關掉指示燈。此時將會產生離子簇。
(不需要時請關掉指示燈。)
中文
淨化度指示燈
指示燈顏色會隨空氣狀況而改變。
潔淨(綠色) 輕度污濁(橙色) 嚴重污濁(紅色)
關於淨化度指示
• 淨化信號的狀態取決於接通電源後由灰塵和異味感應器感測出的室內空氣
狀況。
• 當空氣清新機剛剛啟動時﹐即使室內空氣中有雜質﹐淨化度指示燈仍有可能
顯示為綠色。但是﹐一段時間之後﹐空氣清新機將會調整雜質比率基準﹐並
準確地感測室內空氣狀況。
• 使用遙控器上的顯示開/關按鈕來關掉指示燈。
過濾網指示燈
當過濾網指示燈點亮時﹐請清洗活性碳過濾網。
(當本機一天24小時操作時﹐指示燈會在大約2個月後點亮。)
(見第C-12頁)
C-9
Page 28

操作
遙控器操作
電源開/關按鈕
• 按此按鈕可聽到嗶聲﹐並且
本機將以自動模式操作。
• 除非拔掉電源線﹐否則主機
啟動後將維持前一次的操作
模式。
• 要停止操作﹐再次按電源
開/關按鈕。
此時會聽到長嗶聲﹐並且本
機停止操作。
遙控功能
• 自動
• 手動
• 花粉
• 定時關機
• 15分鐘高風速
• 顯示開/關
離子簇模式選擇
• 自動
• 淨化
• 離子控制
• 關
發射器
過濾網重設按鈕
當清洗了活性碳過濾網後要重新
裝入主機時﹐請按過濾網重設按
鈕。
自動(風速)按鈕
風速將根據室內空氣的污染
程度自動轉換。
手動(風速)按鈕
風速可以在靜音、標準和最
大風速之間轉換。
Plasmacluster
15分鐘高風速按鈕
見第C-8頁
顯示開/關按鈕
打開或關掉離子簇指示燈和
淨化度指示燈。
離子簇模式選擇
AUTO(自動)
按此按鈕﹐本機將會根據灰塵和異味感應器感測
的空氣污濁程度而在淨化模式和離子控制模式之
間自動轉換。當選擇了自動功能時﹐淨化模式將
會操作1分鐘。
花粉模式操作按鈕
見第C-8頁
關機定時器按鈕
每按一次該按鈕﹐設定時間將按
以下順序設定﹕
1小時 4小時
取消 8小時
• 指示燈將顯示剩餘時間。
• 到達設定時間後﹐本機將停止操
作。
(淨化)
按此按鈕﹐本機將持續地以淨化模式
操作﹐並釋放出相等數量的正負離
子。離子簇指示燈為藍色。
(離子控制)
按此按鈕﹐本機將持續地以離子控制模式操作。
離子簇指示燈為綠色。
OFF(關)
將停止產生離子﹐並且離子簇指示燈
熄滅。
C-10
Page 29

保養和清潔
為了保持空氣清新機的最佳性能﹐請定期清潔本機﹐包括感應器和過濾網。
清潔本機時﹐請拔掉電源線﹐並切記不要用濕手觸摸電源插頭。否則可能會導致電擊和/或受
傷。
主機
為防止主機積聚灰塵和污垢﹐需經常清潔主機。時間長了頑固的污垢將變得難以清洗。
使用一塊柔軟的乾布擦拭
對於頑固污漬﹐使用一塊溫水浸過的軟布擦拭。
請勿使用揮發性液體
苯、油漆稀釋劑以及打蠟粉等可能會損壞主機表面。
請勿使用清潔劑
清潔劑可能會損壞主機。
請勿讓本機進水
異味感應器/灰塵感應器
如果異味/灰塵感應器變髒或堵塞﹐其靈敏
度將會變得不穩定。使用吸塵機除去感應
器表面的灰塵。
前過濾網
取下前面板﹐用吸塵機輕輕地清潔前過濾網的表面。
如果髒的很厲害﹐將其從過濾網框架中取出清洗。
注意
• 如要進行清洗﹐請使用一個軟刷以及冷/溫水。
• 金屬刷或硬刷可能會損壞過濾網。
• 清洗後將其放在陰涼處風乾。
然後將其放回框架內。
• 請勿用吸塵機吸嘴直接清潔HEPA過濾網。
否則將會大大降低過濾網的性能。
中文
異味感應器
灰塵感應器
C-11
Page 30

保養和清潔
可清洗活性碳過濾網保養
只能手洗!
嚴禁烘乾!
保養周期
當過濾網指示燈點亮時﹐指示過濾網需要
清洗。如果主機一天24小時操作﹐則大約
兩個月後過濾網指示燈會點亮。
過濾網指示燈僅作為參考。
當出現異味時﹐請清洗過濾網。
用吸塵機除去
1
明顯的灰塵。
用大容器盛滿溫水﹐然後加入
2
溫和的廚房清潔劑並攪拌。
按照清潔劑包裝指
示進行稀釋。
清洗前將過濾網浸泡大約30分
3
鐘。
如果過濾網表面過
髒﹐用一個舊牙刷
進行擦洗。
注意
除去多餘的水
5
沖洗後過濾網會濕透。 為了減少風乾時間﹐請
用一條舊的厚毛巾包裹過濾網﹐吸去多餘的
水分。
注意
一些活性碳粒子可能會粘附在
毛巾上﹐但是對身體無害。
如果可能的話﹐在室外
6
通風良好處曬乾過濾
網。
注意
• 濕的過濾網會很重。曬乾時將其穩固地固定﹐防止
倒下。
• 冬天或雨天可能需要較長的時間曬乾。
最好在天氣好時清洗過濾網﹐並將其放於太陽下曬
乾。
晚上要將過濾網移到室內﹐以防凍結。
• 在室外通風良好處曬乾過濾網。如果在室內曬乾﹐
過濾網滴下的水可能會弄髒地板。
• 請確定活性碳沒有傾移到過濾網的一側。如果有﹐
檢查並用手指使其平均地分佈。
• 讓過濾網徹底風乾。
如果於過濾網還未乾透時使用﹐主機排出的空氣將
會有異味。大約需要1至2天風乾過濾網。
重新安裝過濾網。
7
按照第C-6、7頁的圖示重新安裝過濾網。
清洗時須加以小
心﹐以防損壞活性
碳粒子。
用清水徹底沖洗
4
注意
如果在容器內沖
洗﹐一定要沖洗3至
4次﹐以便徹底去除
過濾網的異味。
清洗了活性碳過濾網後﹐接通電源並按
8
遙控器上的過濾網重設按鈕。
• 啟動過濾網重設按鈕
後﹐您將聽到嗶聲﹐
表示本機已重新啟
動。
• 然後過濾網指示燈會
自動熄滅。
C-12
過濾網重設按鈕
Page 31

過濾網更換指南
根據不同的使用環境﹐幾個月後排氣口的異味可能會變得強烈。
如果灰塵或異味不易去除﹐請更換過濾網。
(參見聲寶空氣清新機操作原理 第C-3頁)
過濾網更換時間指南
• 以下的過濾網使用壽命和更換時間是以每天吸10支煙﹐且集塵/除臭效能比初次使用時減少一
半來計算。
如果本機使用在比一般家用情況更嚴重的環境下﹐建議頻密地更換過濾網。
• HEPA過濾網
• 活性碳過濾網 打開後約5年
(備有微生物控制過濾網)
打開後約5年
更換過濾網
關於更換時過濾網的安裝指南﹐請參見第
1
C-6、7頁。
更換過濾網之後﹕
2
接通電源後按遙控器上的過濾網重設按鈕。
您將會聽到短嗶聲﹐並且所存儲的操作時間將會被重
新設定。
然後過濾網指示燈會自動熄滅。
在日期標簽上填寫過濾網開始使用的日
3
期。
更換用的過濾網
型號﹕FZ-P40SF
• HEPA過濾網(備有微生物控制過濾網): 1 只
• 活性碳過濾網: 1 只
請向您的經銷商咨詢購買更換用的過濾網事
宜。
中文
日期標簽
棄置過濾網
請根據當地法律規定來棄置已使用的過濾網。
HEPA過濾網(備有微生物控制過濾網)材料﹕
• 過濾網﹕聚丙烯
• 框架﹕聚酯
• 微生物控制過濾網﹕聚丙烯﹐聚乙烯
活性碳過濾網材料﹕
• 除臭劑﹕活性碳
• 網﹕60%聚丙烯﹐40%聚酯
C-13
Page 32

維修前的檢查事項
在要求修理之前﹐請檢查以下症狀﹐因為有些問題可能並不是由於本機故障而引起的。
症狀
遙控器無法使用
不能去除異味和煙霧
即使空氣污濁時﹐淨化度指示燈
依然為綠色
即使空氣潔淨時﹐淨化度指示燈依
然為橙色或紅色
離子簇指示燈持續為綠色(或藍
色)﹐沒有變化
主機發出喀嚓/滴答聲
補救措施(並非故障)
• 電池是否已耗盡?
• 電池安裝是否正確?
• 室內的螢光燈是否已接近使用壽命而閃爍?
• 如果過濾網已很髒﹐請更換。
(參見第C-12、13頁)
• 剛接通電源時空氣可能污濁。
(參見第C-9頁)
• 當異味感應器變髒或堵塞時﹐其靈敏度將會變得不穩定。
使用吸塵機除去感應器周圍的灰塵。(參見第C-11頁)
• 在淨化模式(或離子控制模式)下﹐離子簇指示燈顏色將不變。
• 當本機處於離子控制模式時會發出喀嚓聲﹐當本機釋放離子時
會發出滴答聲。
如果您覺得該聲音很煩﹐可以將本機移開。
排出的空氣有異味
即使空氣中有煙霧時﹐主機也不操
作
即使在更換過濾網之後﹐過濾網
指示燈仍然點亮
離子簇指示燈或淨化度指示燈不點
亮
錯誤顯示
指示燈
• 檢查過濾網是否已經很髒。
更換過濾網。
• 離子簇空氣清新機釋放少量臭氧﹐這可能會產生異味。離子產
生器釋放出的臭氧量很少﹐低於IEC 60335-2-65規定的安全標
準﹐所以對人體無害。
• 本機是否安裝在感應器難以感測到煙霧的地方?
• 異味感應器是否被堵塞?
(如果是﹐請清潔開口處。)(參見第C-11頁)
• 更換過濾網之後﹐接通電源並按遙控器上的過濾網重設按鈕。
(參見第C-12頁)
• 檢查是否已選擇遙控器上的顯示關模式。如果是﹐請按遙控器
上的顯示開/關按鈕﹐以打開指示燈。
(參見第C-10頁)
補救措施
“靜音”風速指示燈閃爍
風扇馬達切斷或異常。
操作停止。
• 按開/關按鈕將重設錯誤顯示﹐但是若再次出現錯誤﹐請聯絡您
購買本機的商店。
C-14
Page 33

規格
型號
電源
風速操作
風速
額定功率
風速
適用面積
電源線長度
尺寸
重量
* 適用面積是指以最大風速操作本機的面積計算。
• 適用面積表示該空間內所含的灰塵粒子可以在30分鐘內消除。
最大
34 瓦
240 立方米/小時
415毫米(寬)x200毫米(深)x570毫米(高)
220-240伏 50/60赫茲
關於減少備用耗電量
當電源插頭插進插座時﹐本機在備用情況下所耗的電量為0.7瓦。
若需節省用電﹐請在不使用本機時拔掉電源插頭。
FU-P40S
標準
8.1 瓦
120 立方米/小時
~31平方米*
2.5米
6.7公斤
靜音
3.3 瓦
30 立方米/小時
中文
C-15
Page 34

ENGLISH
Page 35

ENGLISH
Page 36

SHARP CORPORATION
TINS-A125KKRZ 04DK CN 1
 Loading...