

Page 1
R
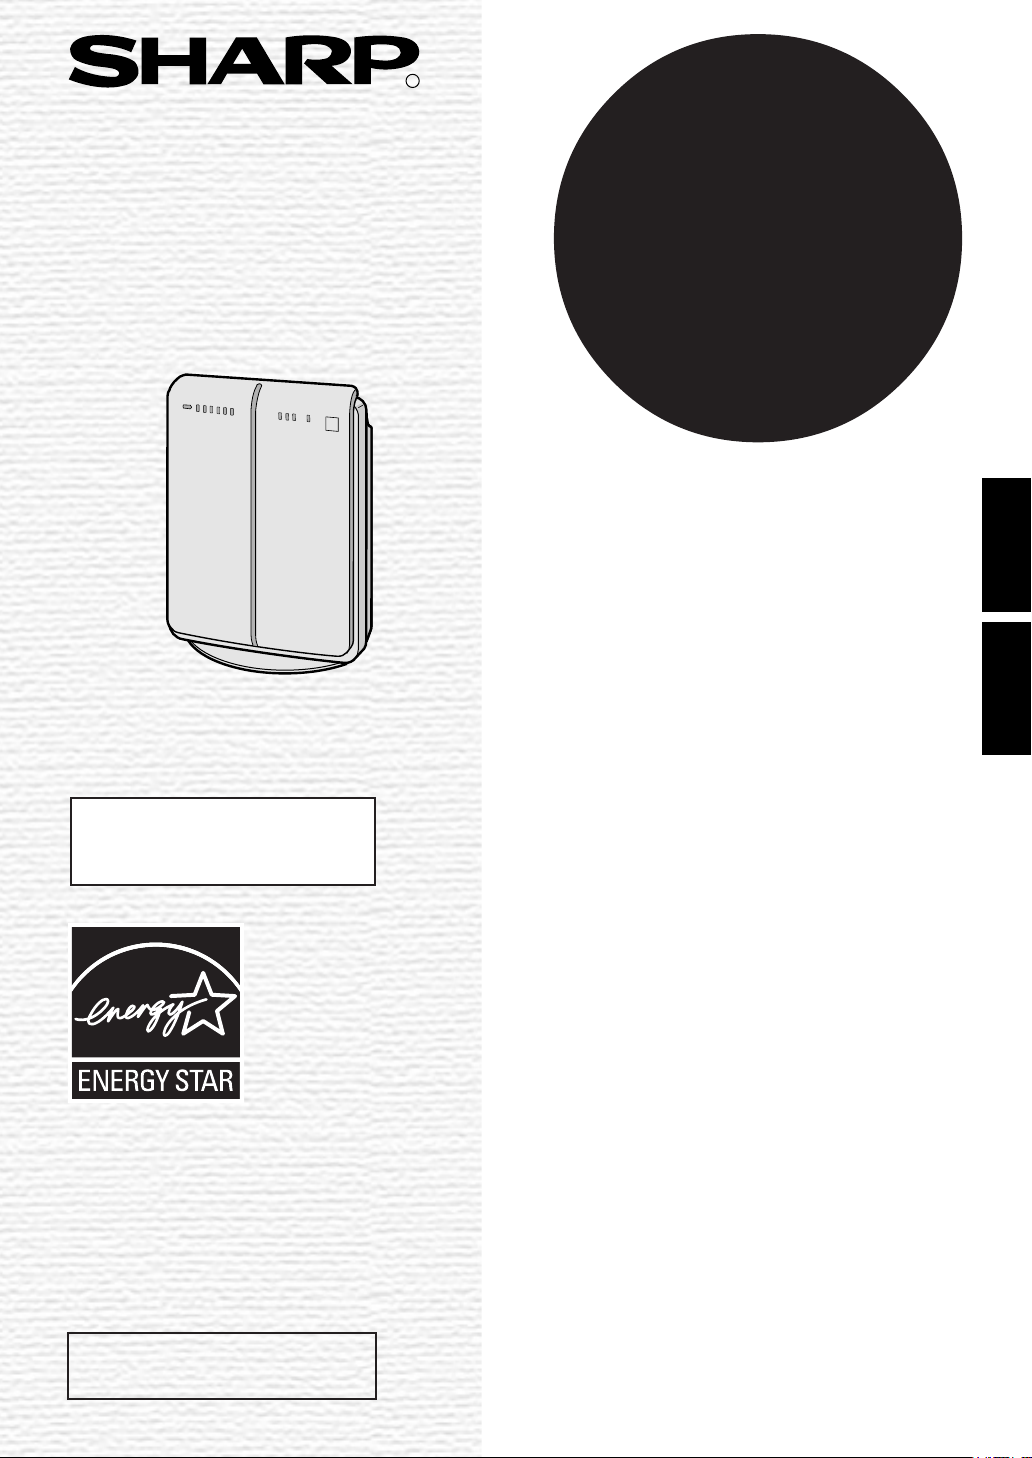
FP-P35CX
AIR PURIFIER
OPERATION MANUAL
ENGLISH
PURIFICADOR DE AIRE
Free standing type
Tipo vertical sin soporte
This product earned the ENERGY STAR by meeting
strict energy efficiency guidelines set by the US EPA.
US EPA does not endorse any manufacturer claims of
healthier indoor air from the use of this product.
The energy efficiency of this ENERGY STAR qualified
model is measured based on a ratio between the
model’s CADR for Dust and the electrical energy it
consumes, or CADR/Watt.
MANUAL DE USO
ESPAÑOL
Read and save these instructions.
Lea y ahorre estas instrucciones.
Page 2
Please read before operating your new Air Purifier
The air purifier uses an internal fan to drawer room air through its air intake.
Once in the unit, the air passes through a Pre-Filter and a True HEPA Filter
(dust collection filter), and then discharges through the air outlet.
A new True HEPA Filter can remove 99.97% of dust particles (as small as 0.3
microns) suspended in the air moving through it.
Some odor ingredients absorbed by the filters may become separated and
may be discharged through the air outlet, resulting in additional odor. If the
purifier is used in an environment with significantly more severe conditions
than normal household use, the order may become stronger for a short period
of time.
If the odor persists, then the filter is expended fully and it is necessary to
install a new filter using replacement kit FZ-P35HFU (sold separately).
NOTE
• The air purifier is designed to remove air-suspended dust, but not harmful gases (for example, carbon
monoxide contained in cigarette smoke).
• The unit cannot completely remove any order if the source of the odor is not removed or neutralized
(for example, pet odors and odors from construction materials).
• When someone is smoking. it is suggested that a window be opened slightly to facilitate ventilation.
TRUE HEPA Filter
Pre - Filter
Page 3

ENGLISH
FEATURES
• Dual Filtration System.
1) Pre- Filter
It collects large particles.
2) True HEPA (High Efficiency
Particulate Air) Filter.
High-efficiency particle collection including pollen and dust.
• Automatic operation available
with Dust Sensor .
• Silent operation is quiet as
rustling leaves.
CONTENTS
• FOR CUSTOMER ASSISTANCE(U.S)....
• CONSUMER LIMITED WARRANTY(U.S)
IMPORTANT SAFETY INSTRUCTIONS ....
• WARNING.................................................... E-4
• CAUTIONS CONCERNING OPERATION ...E-5
• INSTALLATION GUIDELINES ..................... E-5
• FILTER GUIDELINES ..................................E-5
PART NAMES.......................................... E-6
• MAIN UNIT DISPLAY ...................................E-6
• INCLUDED................................................... E-6
• BACK ...........................................................E-6
PREPARATION........................................ E-7
• FILTER INSTALLATION ...............................E-7
OPERATION ............................................ E-8
• MAIN UNIT OPERATION .............................E-8
CARE AND MAINTENANCE .................E-10
• MAIN UNIT................................................ E-10
• DUST SENSOR ........................................ E-10
• FILTER CLEANING................................... E-10
• FILTER REPLACEMENT
GUIDELINES ............................................. E-11
E-2
E-3
E-4
ENGLISH
ESPAÑOL
TROUBLE SHOOTING.......................... E-12
SPECIFICATIONS ................................. E-13
Thank you for purchasing the SHARP Air Purifier. Please read this manual carefully for the correct usage information. Before using this product, be sure to read the section: “Important Safety
Instructions.”
After reading this manual, retain it in a convenient location for future reference.
E-1
Page 4

FOR CUSTOMER ASSISTANCE
To aid in answering questions if you call for service or for reporting loss or theft, please use
the space below to record the model and serial number located on the back side of the unit.
MODEL NUMBER
SERIAL NUMBER
DATE OF PURCHASE
Dealer Name
Address
City
State
Zip
Telephone
(the United States)
TO PHONE: Dial 1-800-BE-SHARP (237-4277) for:
SERVICE (for your nearest Sharp Authorized Servicer)
PARTS (for your Authorized Parts Distributor)
ACCESSORIES
ADDITIONAL CUSTOMER INFORMATION
TO WRITE: For service problems, warranty information, missing items and other assistance:
Sharp Electronics Corporation
Customer Assistance Center
1300 Naperville Drive
Romeoville, IL 60446-1091
TO ACCESS OUR WEB SITE: www.sharpusa.com
Please provide the following information when you write or call: model number, serial
number, date of purchase, your complete mailing address (including zip code), your daytime
telephone number (including area code) and description of the problem.
E-2
Page 5
CONSUMER LIMITED WARRANTY
CONSUMER LIMITED WARRANTY FOR U.S. USERS
SHARP ELECTRONICS CORPORATION warrants to the first consumer purchaser that this Sharp brand product (the
“Product”), when shipped in its original container, will be free from defective workmanship and materials, and agrees that
it will, at its option, either repair the defect or replace the defective Product or part thereof with a new or remanufactured
equivalent at no charge to the purchaser for parts or labor for the period(s) set forth below.
This warranty does not apply to any appearance items of the Product nor to the additional excluded item(s) set forth below
nor to any Product the exterior of which has been damaged or defaced, which has been subjected to improper voltage or
other misuse, abnormal service or handling, or which has been altered or modified in design or construction.
In order to enforce the rights under this limited warranty, the purchaser should follow the steps set forth below and provide
proof of purchase to the servicer.
The limited warranty described herein is in addition to whatever implied warranties may be granted to purchasers by law.
ALL IMPLIED WARRANTIES INCLUDING THE WARRANTIES OF MERCHANTABILITY AND FITNESS FOR USE ARE
LIMITED TO THE PERIOD(S) FROM THE DATE OF PURCHASE SET FORTH BELOW. Some states do not allow
limitations on how long an implied warranty lasts, so the above limitation may not apply to you.
Neither the sales personnel of the seller nor any other person is authorized to make any warranties other than those
described herein, or to extend the duration of any warranties beyond the time period described herein on behalf of Sharp.
The warranties described herein shall be the sole and exclusive warranties granted by Sharp and shall be the sole and
exclusive remedy available to the purchaser. Correction of defects, in the manner and for the period of time described
herein, shall constitute complete fulfillment of all liabilities and responsibilities of Sharp to the purchaser with respect to the
Product, and shall constitute full satisfaction of all claims, whether based on contract, negligence, strict liability or
otherwise. In no event shall Sharp be liable, or in any way responsible, for any damages or defects in the Product which
were caused by repairs or attempted repairs performed by anyone other than an authorized servicer. Nor shall Sharp be
liable or in any way responsible for any incidental or consequential economic or property damage. Some states do not
allow the exclusion of incidental or consequential damages, so the above exclusion may not apply to you.
ENGLISH
ESPAÑOL
THIS WARRANTY GIVES YOU SPECIFlC LEGAL RIGHTS. YOU MAY ALSO HAVE OTHER RIGHTS WHICH VARY
FROM STATE TO STATE.
Your Product Model Number & Description:
Warranty Period for this Product:
Additional Item(s) Excluded From Warranty
Coverage:
Where to Obtain Service:
What to Do to Obtain Service:
TO OBTAIN SUPPLY, ACCESSORY OR PRODUCT INFORMATION, CALL 1-800-BE-SHARP, OR VISIT OUR WEBSITE AT
www.sharpusa.com
FP-P35CX Air Purifier. Be sure to have this information available when
you need service for your Product.
One (1) year parts and labor from date of purchase.
Appearance items of the Product, filters, accessories, or any printed
materials. Product which has been used for rental and/or commercial
purposes.
From a Sharp Authorized Servicer located in the United States. To find
the location of the nearest Sharp Authorized Servicer, call Sharp Toll Free
at 1-800-BE-SHARP.
Ship prepaid or carry in your Product to a Sharp Authorized Servicer. Be
sure to have Proof of Purchase available. If you ship the Product, be sure
it is insured and packaged securely.
R
SHARP ELECTRONICS CORPORATION
Sharp Plaza, Mahwah, New Jersey 07430-2135
E-3
Page 6

IMPORTANT SAFETY INSTRUCTIONS
When using electrical appliances, basic safety precautions should be followed, including the
following:
WARNING - To reduce the risk of electrical shock, fire or injury to persons:
• Read all instructions before using the air purifier.
• Use only a 120-volt outlet with a polarized receptacle.
• This appliance has a polarized plug (one blade is wider than the other ). To reduce the risk of electric
shock, this plug is intended to fit in a polarized only one way. If the plug does not fit fully in the outlet,
reverse the plug. If it still does not fit, contact a qualified electrician. Do not attempt to defeat this
safety feature.
• Do not use the air purifier if the power cord or plug is damaged or the connection to the wall
outlet is loose.
• Periodically remove dust from the power plug.
• Do not insert fingers or foreign objects into the intake or air outlet.
• When removing the power plug, always hold the plug and never pull the cord.
Electrical shock and/or fire from short circuit may occur as result.
• Do not remove the power plug when your hands are wet.
• Do not use this air purifier near gas appliances or fireplaces.
• Remove the power plug from the wall outlet before cleaning the unit and when not using the
unit.
Electrical shock from bad insulation and / or fire from short circuit may occur as a result.
• If the power cord is damaged, it must be replaced by the manufacturer, its service agent,
Sharp authorized service or similarly qualified person in order to avoid a hazard.
• Do not operate when using aerosol insecticides or in rooms where there is oily residue, incense,
sparks from lit cigarettes, chemical fumes in the air or in very high humidity condition, such as a
bathroom.
• Use care when cleaning the air purifier. Strong corrosive cleansers may damage the exterior.
• Only Sharp Authorized Servicers should service this air purifier. Contact the nearest Servicer for any
problems, adjustments, or repairs.
NOTE - Radio or TV Interference
If this air purifier should cause interference to radio or television reception, try to correct the interference
by one or more of the following measures:
• Reorient or relocate the receiving antenna.
• Increase the separation between the air purifier and radio/TV receiver.
• Connect the equipment into an outlet on a circuit different from that to which the receiver is connected.
• Consult the dealer or an experienced radio/TV technician for help.
E-4
Page 7

IMPORTANT SAFETY INSTRUCTIONS
CAUTIONS CONCERNING OPERATION
• Do not block the intake and air outlet.
• Do not use the unit near or on hot objects, such as a range or where it may come into contact with
steam.
• Do not use the unit on its side.
• Always hold the handle on the back of the unit when moving it.
Holding the front panel when carrying may cause it to detach, thus dropping the unit and resulting in
bodily injury.
• Do not operate the unit without the filter.
• Do not wash and reuse HEPA filter .
Not only does it not improve filter performance, it may cause electric shock or malfunction.
• Clean the exterior with a soft cloth only.
The unit surface may be damaged or cracked.
In addition, the sensor may malfunction as a result.
INSTALLATION GUIDELINES
• During the operation of the product, please place the unit at least 7 feet (2m) away from
equipment which involve electric wave such as televisions, radios or wave clocks, in case
electrical interference occurs to such equipment.
• Avoid a location where the sensor is exposed to direct wind.
The unit may not operate properly.
• Avoid locations where curtains, etc., come into contact with the intake or air outlet.
Curtains, etc., may become dirty or a malfunction may occur.
• Avoid locations where the unit is exposed to condensation, due to drastic temperature changes.
• Place on a stable surface with sufficient air circulation.
• Do not install when there is generation of lampblack, such as in a kitchen, etc.
The unit surface may crack or the sensor may malfunction as a result.
• Leave at least 2 feet (60cm) of space from the wall.
The wall behind the air outlet may become dirty as time passes. When using the unit for extensive
period in the same location, use a vinyl sheet, etc., to prevent the wall from becoming dirty. In addition, periodically clean the wall, etc.
FILTER GUIDELINES
• Follow the instructions in this manual for correct care and maintenance of the filters.
ENGLISH
ESPAÑOL
E-5
Page 8
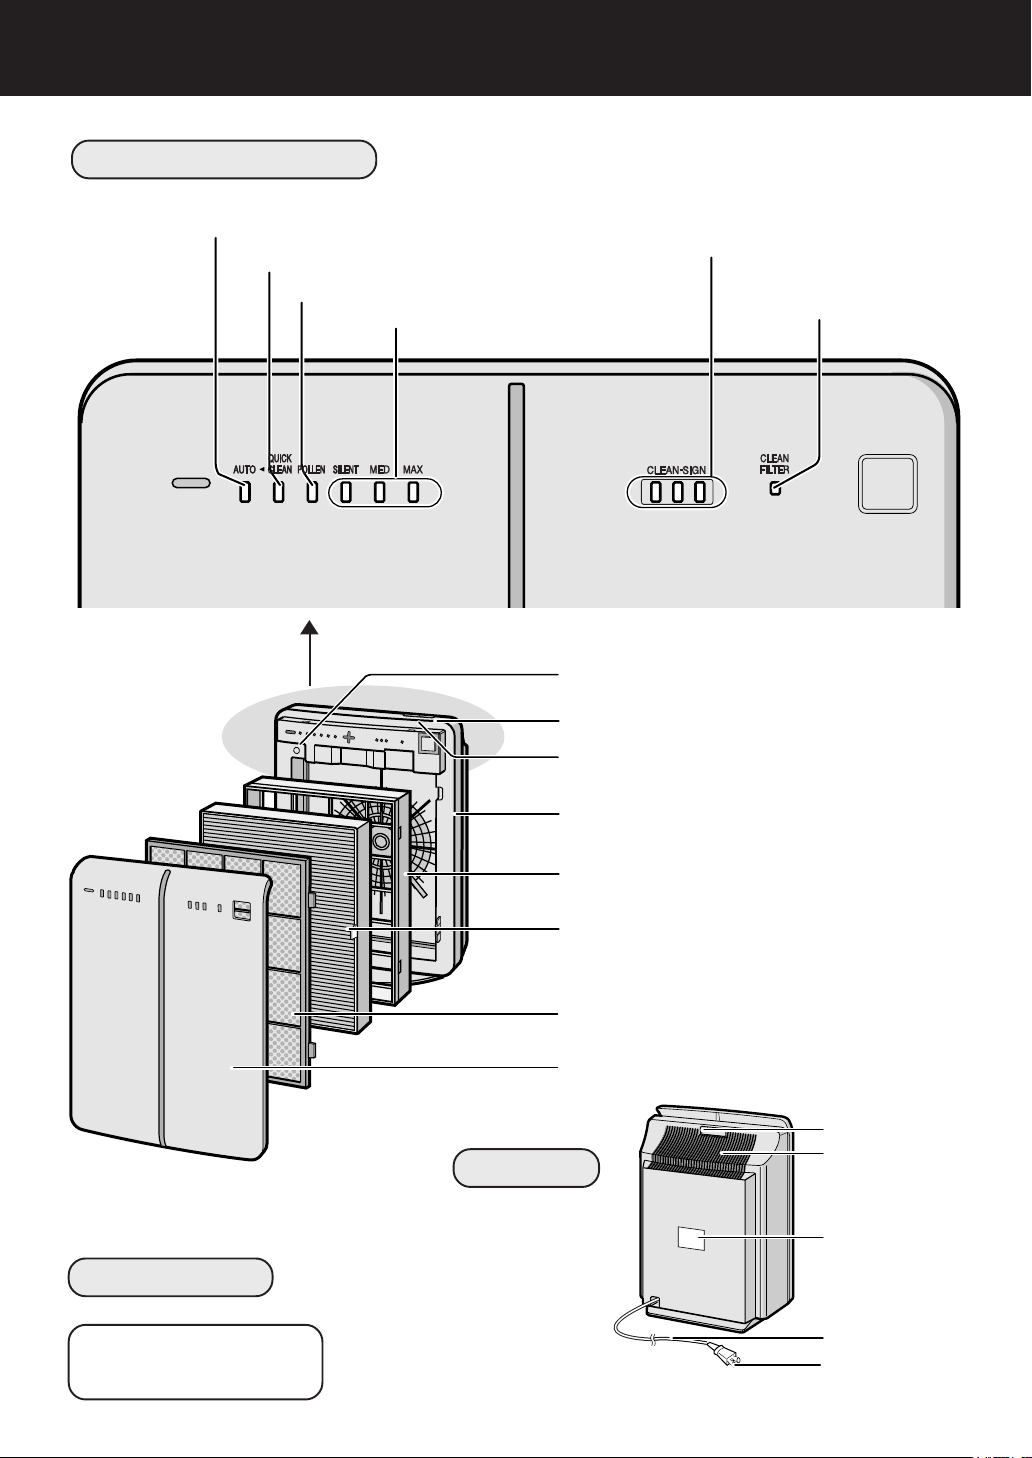
PART NAMES
MAIN UNIT DISPLAY
AUTO Operation Indicator Light
QUICK CLEAN operation Indicator Light
POLLEN Mode Indicator Light
Fan Speed Indicator Lights
CLEAN-SIGN Light
(green,orange,red)
CLEAN FILTER
Indicator Light
Dust Sensor
POWER ON/OFF Button
MODE Selection Button See Page E-8
See Page E-8
INCLUDED
• Operation manual
BACK
Main Unit
Filter Frame
True HEPA Filter (white)
Pre-Filter
Front Panel
(Shape of plug depends on country.)
See Page E-7,11
Handle
Air Outlet
Date Label
Power Cord
Power Plug
E-6
Page 9
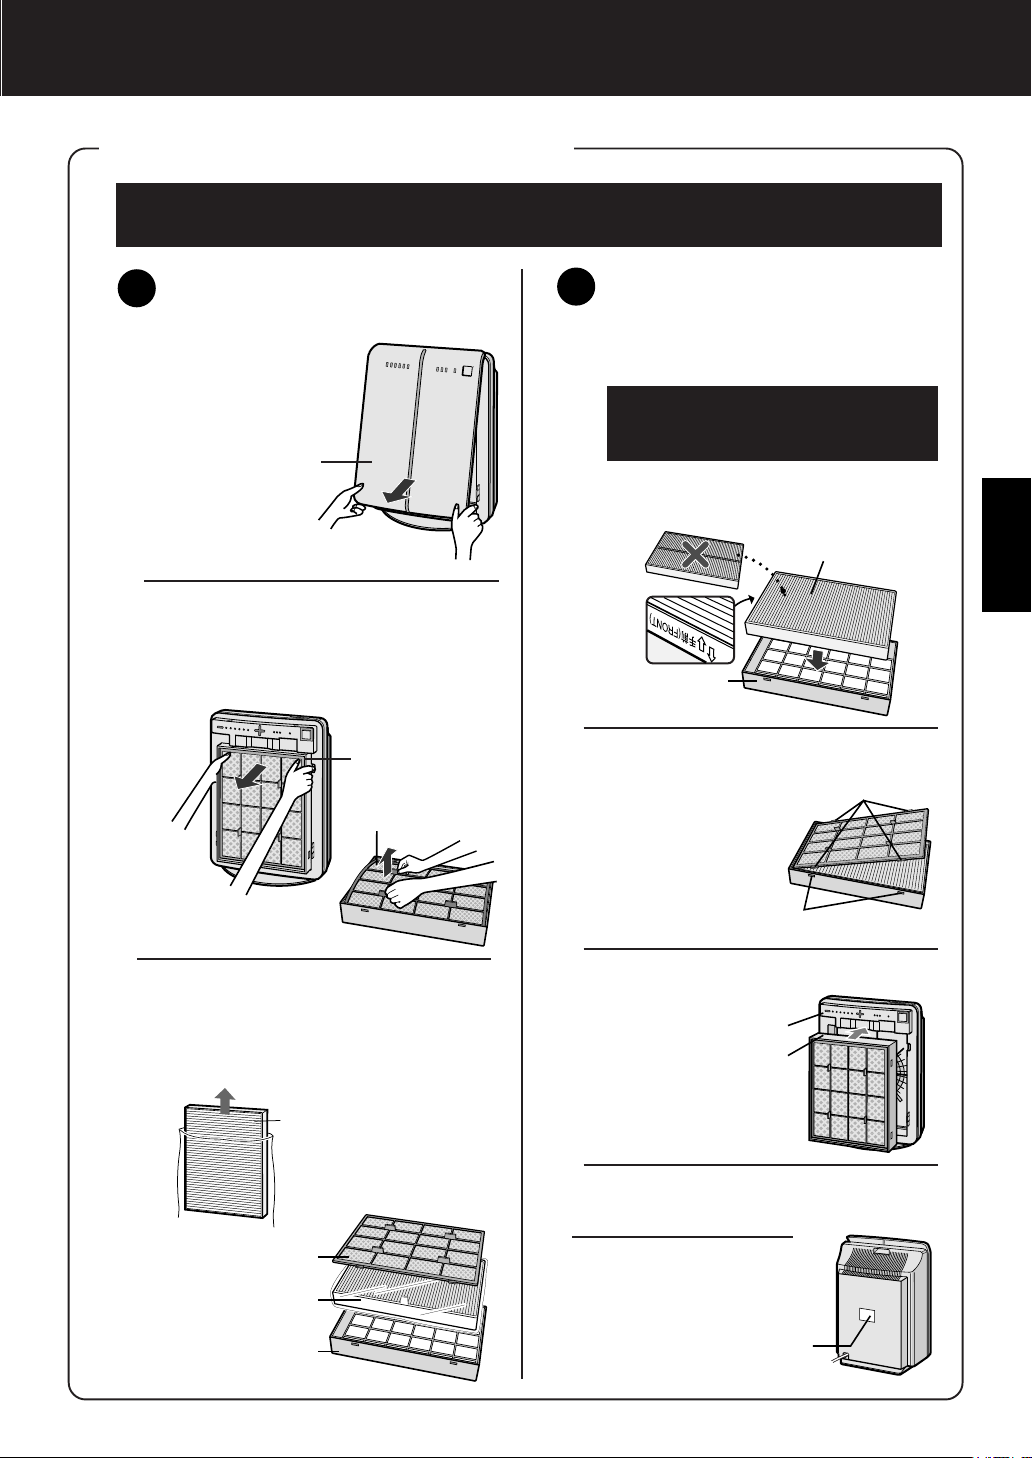
PREPARATION
FILTER INSTALLATION
To maintain the quality of the filter, that is installed in the main unit within the
plastic bag. Be sure to remove the filter from the plastic bag before using the unit.
Be sure to remove the power plug from the wall outlet.
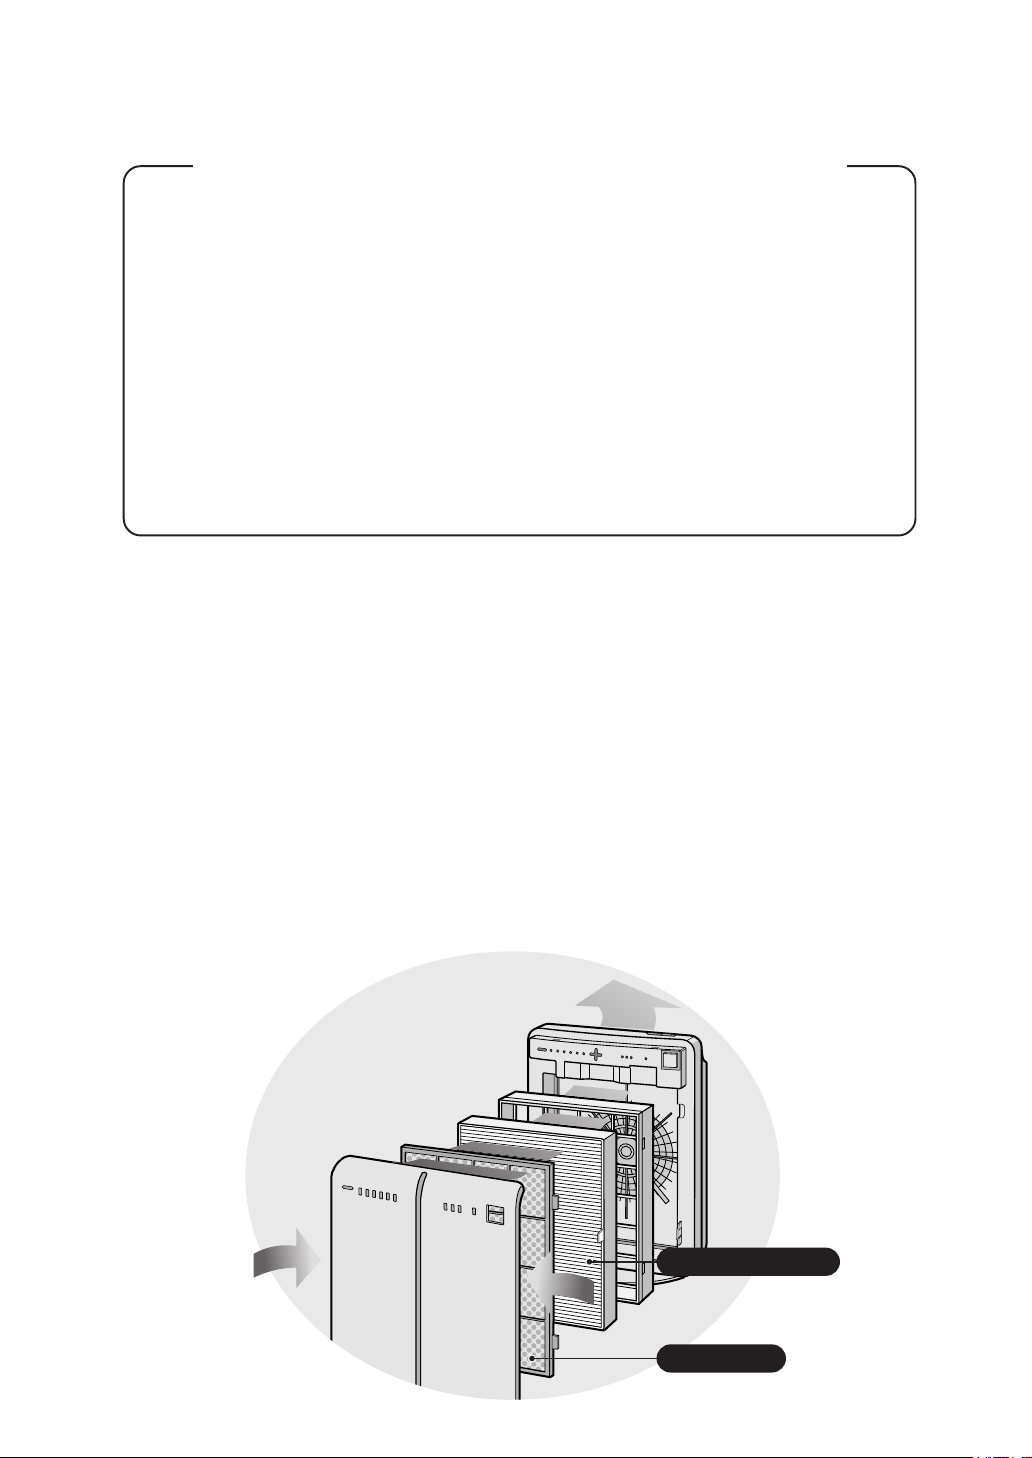
Remove the filters
1
Remove the
1
Front Panel.
Pull the bottom of
the Front Panel.
Front Panel
Pull out the Filter Frame
2
and remove the Pre-Filter,
and the True HEPA Filter.
Filter Frame
Pre-Filter
Install the filters
2
Place the True HEPA Filter
1
within the Filter Frame.
Please make sure that the True
HEPA Filter is placed in proper
orientation.
Do not install the filter backwards or
the unit will not operate properly.
True HEPA Filter
Filter Frame
Place the Pre-filter.
2
Insert the tabs of
the pre-filter into
the associated
holes of the Filter
Frame.
Tabs (4 places)
ENGLISH
ESPAÑOL
Remove the True HEPA
3
Filter (white) from the plastic
bag.
True HEPA Filter
Pre-Filter
True HEPA Filter
Filter Frame
E-7
Holes
Mount the Filter Frame to the
3
main unit.
Main unit
Filter Frame
Fix the Front Panel to the main
4
unit.
Fill in the usage
5
start date on the
Date Label.
Date Label
Page 10

OPERATION
MAIN UNIT OPERATION
Main Unit Controls
• AUTO
• QUICK CLEAN
• POLLEN
• SILENT
• MEDIUM
• MAX
Clean Filter Indicator Light
Clean Sign Light
Power ON/OFF Button
1
• Used to start operation (short beep) and stop operation (long beep)
• Fan Speed Indicator Light turn on/off.
• Unless the power cord is unplugged, the operation starts in the previous mode the
unit was operated in.
MODE Selection Button
2
• The operation mode can be switched.
MODE Selection Button
Power ON/OFF Button
AUTO operation
The fan speed is automatically switched
(HIGH*, MEDIUM, SILENT) depending
on the amount of impurities in the air.
The sensor detect the impurities for efficient air purification.
MAX operation
The unit will operate at a fan
speed of MAX.
QUICK CLEAN operation
The unit will operate at HIGH* fan speed
for 15 minutes, then will operate at Auto
operation.
The operation mode is effective when
quick removal of impurities in the air is
desired.
POLLEN mode operation
The unit will operate at HIGH* fan speed
for 10 minutes, then will alternate
between MEDIUM and HIGH* for 20
minutes.
10 minutes: HIGH fan speed
20 minutes:
20 minutes: HIGH fan speed
MEDIUM fan speed
MEDIUM operation
The unit will operate at a fan
speed of MEDIUM.
SILENT operation
The unit will operate quietly
using minimal air intake.
* HIGH fan speed is an interme-
diate speed between MEDIUM
and MAX.
E-8
Page 11

DETERMINING THE BASE IMPURITY RATE
For the first 30 seconds after the power plug is inserted into the wall outlet,
the unit will check the conditions of the air. If operation is set to ON during this
time, the CLEAN-SIGN LIGHT will alternately flash in green, orange and red.
CLEAN-SIGN LIGHT
The color changes according to the air condition.
Clean (Green) Slightly Impure (Orange) Very Impure (Red)
ABOUT THE CLEAN-SIGN
• The condition of the CLEAN-SIGN depends on the room air condition
detected by the Dust Sensor when the plug is inserted into the wall outlet.
• It is possible to have a green CLEAN-SIGN with impurities in the air at the
time that the air purifier was just introduced to the room environment. After
a while, however, the base impurity rate will be adjusted to detect room air
condition correctly.
ENGLISH
ESPAÑOL
CLEAN FILTER INDICATOR LIGHT
Clean the Pre-Filter when the CLEAN FILTER Indicator Light activates.
(The indicator light will activate in about 2 months, when using the unit 24
hours daily.)
Be sure to press the MODE selection Button for 3 seconds after cleaning the
pre-filter. A long beep will be heard and the operation hours stored in the
memory will be reset. Then the Filter Indicator Light will go out automatically.
E-9
Page 12

CARE AND MAINTENANCE
To maintain optimum performance of this air purifier, please clean the unit including
the sensor and filters periodically.
When cleaning the unit, be sure to unplug the power cord, and never handle the plug
with wet hands. Electrical shock and/or bodily injury may occur as a result.
Dust Sensor
Main Unit
True HEPA Filter
Do not wash the True HEPA Filter.
Washing will not improve filter performance, and it may
cause electric shock or malfunction.
Pre-Filter
MAIN UNIT
To prevent dirt or stains on the main unit, clean as often as necessary. If stains are allowed to
remain, they may become hard to clean.
Care Cycle
1 month
Wipe with a dry, soft cloth
For stubborn stains or dirt, use a soft cloth dampened with warm water.
Do not use volatile fluids
Benzene, paint thinner, polishing powder, etc., may damage the surface.
Do not use detergents
Detergent ingredients may damage the unit.
Keep the unit away from water
DUST SENSOR
The sensitivity of the sensor will become
unstable if the sensor is dirty or blocked.
Remove dust from the surfaces of the sensor opening using a vacuum cleaner.
Care Cycle
FILTER CLEANING
Clean the top surface of the Pre- Filter lightly with a
vacuum cleaner.
When Pre- Filter is very dirty, wash it in water with mild
kitchen detergent and dry it well in the shade.
After cleaning, press the MODE Selection Button for the
3 seconds with the power cord connected to the outlet.
A long beep will be heard and the operation hours will be
reset. Then the Filter Indicator Light will go out
automatically,
2 months
Opening of dust sensor
Care Cycle
2 months
Pre-Filter
E-10
Page 13

FILTER REPLACEMENT GUIDELINES
The replacement period differs depending on the room environment, the
usage hours and location of Air Purifier.
If dust or odors persists, replace the filters.
(Refer to “Please read before operating your new Air Purifier”)
Guide for filter replacement timing
• The filter life can be greatly reduced in poor environments.
The presence of cigarette smoke, pet dander and other concentrations of airborne particles
will cause filters to become clogged in less time. Please check filters regulary and replace as
needed.
• True HEPA Filter : Up to 5 years after opening
REPLACING THE FILTER
See page E-7 for directions on how to install the filters when
1
replacing.
Fill in the usage start date of the filter
2
on the Date Label.
Date Label
Replacement Filter
Model: FZ-P35HFU
• True HEPA Filter : 1 unit
For replacement filters contact Sharp for information.
1-800-BE-SHARP or website at www.sharpusa.com
Disposal of the Filter
Please dispose of replaced filter according to the local disposal laws and regulations.
True HEPA Filter materials:
• Filter: Polypropylene
• Frame: Polyester
ENGLISH
ESPAÑOL
E-11
Page 14

TROUBLESHOOTING
Before calling for repair, please review the list below, since the problem may not be a unit malfunction.
SYMPTOM
Smoke is not removed
The CLEAN-SIGN Light
illuminates green even when the
air is impure
The CLEAN-SIGN Light
illuminates orange or red even
when the air is clean
The discharged air has an aroma
or odor.
The unit does not operate when
cigarette smoke is in the air.
The CLEAN FILTER Indicator
Light remains activated even
after replacing filter.
REMEDY (not a malfunction)
• Clean or replace the filters if they appear to be heavily soiled.
(Refer to E-11)
• The air could be impure at the time the unit was plugged in.
(Refer to E-9)
• The sensitivity of the sensor become unstable when the opening of the dust sensor is dirty or is clogged.
Clean the dust around the sensor opening using a vacuum
cleaner. (Refer to E-10)
• Check to see if the filters are heavily soiled.
• Clean or replace the filters.
• Is the unit installed in a location that is difficult for the sensor to
detect cigarette smoke?
• Is the Dust sensor opening blocked or clogged?
(In this case, clean the opening.) (Refer to E-10)
• After cleaning the pre-filter, press the MODE Selection Button
for 3 seconds to reset.
(Refer to E-9)
ERROR DISPLAY
LAMP INDICATION
The “Silent” Fan Speed Indicator
Light blinks.
REMEDY
Fan motor disconnected or abnormal.
Operation stops.
• Pressing the POWER ON/OFF button will reset the error
display, but if error occurs again, contact the shop where you
purchased the unit.
E-12
Page 15

SPECIFICATIONS
Model
Power supply
Fan
Speed
Operation
Filter type
The applicable floor surface area is appropriate for operating the unit at maximum fan speed.
*1
Fan Speed Adjustment
Rated Power
Fan Speed CFM
Noise Level
Applicable Floor Surface
CADR(Dust/Smoke/Pollen)
Cord Length
Dimensions
Weight
Dust collection
Sensor
Special Program Mode
Optional accessories
(m3/min)
MAX
35W
176(5.0)
48 dBA
16-3/8in(W)x7-7/8in(D)x23in(H)
415mm(W)x200mm(D)x585mm(H)
Pre-filter & True HEPA with Microbial control
Pollen / Quick CLEAN operation
Replacement filter [Model :FZ-P35HFU ]
FP-P35CX
120V 60Hz
MED
6.5 W
85(2.4)
30 dBA
228sq.ft(21.2m
150/147/153
8.3ft(2.5m)
13.4 lbs(6.1kg)
DUST
2)
SILENT
28(0.8)
14 dBA
*1
3.0 W
ENGLISH
ESPAÑOL
Standby Power
In order to operate the electrical circuits while the power plug is inserted in the wall outlet, this
product consumes about 0.3W of standby power.
For energy conservation, unplug the power cord when the unit is not in use.
E-13
Page 16

Lea atentamente antes de
utilizar su nuevo purificador de aire
El purificador de aire aspira el aire de la habitación desde su toma de aire,
permite el paso del aire a través de un pre-filtro, y un filtro verdadero de
HEPA (filtro captador de polvo) en el interior de la unidad, y descarga finalmente
el aire a través de la salida de aire. La unidad purificadora de aire repite este
proceso moviendo su ventilador interno.
Conforme el aire pasa a través de la unidad, un filtro verdadero de HEPA
nuevo puede eliminar un 99,97% de las partículas de polvo, de un tamaño de
hasta 0,3 micras. El filtro de carbón activado absorbe gradualmente los
elementos olorosos que pasan repetidamente por el filtro. (Los elementos de
olor son absorbidos también por el filtro verdadero de HEPA).
Algunos ingredientes olorosos absorbidos por el filtro pueden ser separados
y descargados a través de la salida de aire y resultar en un nuevo olor.
Dependiendo del entorno en que se utilice la unidad, especialmente cuando
el producto se utiliza en condiciones notablemente más severas que en el
caso del uso doméstico normal, este olor puede tornarse fuerte en un periodo
más corto del esperado.
Si el olor persiste, será señal de que el filtro están gastados y es necesario
comprar un juego opcional de filtros de reemplazo FZ-P35HFU.
NOTA
• El purificador de aire ha sido diseñado para eliminar polvo y olores suspendidos en el aire, no así en
el caso de gases perjudiciales (por ejemplo, el monóxido de carbono que contiene el humo de un
cigarrillo). Si aún existen las fuentes de olor, no podrá eliminar el olor completamente (por ejemplo,
los olores de los materiales de construcción o el olor de las mascotas).
• Se sugiere que se abra la ventana un poco si está fumando para facilitar la ventilación.
Filtro verdadero de HEPA
Pre-Filtro
Page 17

ESPAÑOL
CARACTERÍSTICAS
• EI sistema dual de la filtración.
1) Pre-Filtro
Recoge partículas grandes.
2) Filtro verdadero de HEPA(aira
particulado de alta eficacia).
Recolección de partículas de alta
eficacia, induides polen y polvo.
• Funcionamiento automático
disponible con Sensor de Polvo.
• El mado silencioso es tan
callado como el murmullo de las
hojas.
ÍNDICE
INSTRUCCIONES DE SEGURIDAD
IMPORTANTES ..........................................
• ADVERTENCIA............................................S-2
• PRECAUCIONES CONCERNIENTES AL
FUNCIONAMIENTO .................................... S-3
• DIRECTRICES DE INSTALACIÓN ..............S-3
• DIRECTRICES ACERCA DEL FILTRO....... S-3
NOMBRES DE LOS COMPONENTES ... S-4
• PANTALLA DE VISUALIZACIÓN DE LA
UNIDAD PRINCIPAL ....................................S-4
• INCLUIDO .................................................... S-4
• POSTERIOR ................................................ S-4
PREPARATIVOS ..................................... S-5
• INSTALACIÓN DEL FILTRO ........................S-5
FUNCIONAMIENTO ................................ S-6
• FUNCIONAMIENTO
DE LA UNIDAD PRINCIPAL ........................S-6
CUIDADO Y MANTENIMIENTO.............. S-8
• UNIDAD PRINCIPAL.................................... S-8
• SENSOR DE POLVO ...................................S-8
• LIMPIEZA DEL FILTRO ...............................S-8
•
DIRECTRICES DE REEMPLAZO DEL FILTRO ..
S-2
S-9
ENGLISH
ESPAÑOL
RESOLUCIÓN DE PROBLEMAS ......... S-10
ESPECIFICACIONES ............................ S-11
Gracias por adquirir el purificador de aire de
SHARP. Para obtener información sobre el uso
correcto del aparato, lea detenidamente este
manual. Antes de utilizar el producto, asegúrese
de leer la sección “Instrucciones de seguridad
importantes”.
Después de leer el manual, guárdelo en un lugar
apropiado para poder consultarlo en el futuro.
S-1
Page 18

INSTRUCCIONES DE SEGURIDAD IMPORTANTES
Cuando se utilizan aparatos eléctricos, deben seguirse unas precauciones de seguridad básicas,
entre las que se incluyen las siguientes:
ADVERTENCIA - Para reducir el riesgo de que se produzcan descargas eléctricas, incendios
o lesiones a personas:
• Lea todas las instrucciones antes de utilizar el purificador de aire.
• Utilice solamente una salida de alimentación de 120 V con un tomacorriente polarizado.
• El purificador de aire posee un enchufe polarizado (una patilla es más ancha que la otra). Este
enchufe encajará en un tomacorriente polarizado en una sola postura. Inicialmente, si el enchufe no
encaja en el tomacorriente déle la vuelta. Si aun así no encaja, póngase en contacto con un electricista
o persona de servicio calificada.
• No use el purificador de aire si el cable o el enchufe de alimentación están dañados o si la
conexión al tomacorriente de la pared no es segura.
• Quite periódicamente el polvo del enchufe de alimentación.
• No introduzca los dedos u objetos extraños en la entrada o la salida de aire.
• Al desconectar el enchufe de alimentación, asegúrese de tomar el enchufe y de no tirar nunca
del cable.
De lo contrario, podrían producirse descargas eléctricas y/o incendios causados por cortocircuitos.
• Ne quite elenchufe con las manos mojadas.
• No utilice el purificador de aire cerca de artefactos a gas o chimeneas.
• Desconecte el enchufe de alimentación del tomacorriente de la pared antes de limpiar el
aparato y cuando no lo esté utilizando.
Pueden producirse descargas eléctricas y/o incendios como resultado de un mal aislamiento o por
cortocircuitos.
• Si el cable de alimentación está dañado, deberá ser reemplazado por el fabricante, su
representante de servicio o por un agente de servicio autorizado de Sharp o una persona
equivalente calificada, para evitar peligros.
• No utilice el aparato junto con insecticidas en aerosol o en habitaciones donde haya residuos aceitosos,
incienso, chispas de cigarrillos encendidos, gases derivados de productos químicos en el aire o en
un ambiente muy húmedo, como un baño.
• Tenga cuidado al limpiar el purificador de aire. Los limpiadores corrosivos pueden dañar el exterior
del mismo.
• Sólo deberían reparar este purificador de aire los agentes de servicio autorizados de Sharp. Si tiene
algún problema o para realizar ajustes o reparaciones, póngase en contacto con el agente de servicio
más cercano.
NOTA - Interferencias en radio o TV
Si este purificador de aire causa interferencias en la recepción de ondas de radio o televisión, intente
corregir la interferencia llevando a cabo una o más de las acciones siguientes:
• Cambie la orientación o la posición de la antena receptora.
• Aumente la separación entre el purificador de aire y el receptor de radio/TV.
• Conecte el equipo a un tomacorriente de un circuito diferente de aquél al que está conectado el
receptor.
• Consulte con su distribuidor o con un técnico experimentado en radio/TV para pedirle ayuda.
S-2
Page 19

PRECAUCIONES CONCERNIENTES AL FUNCIONAMIENTO
• No bloquee la entrada y la salida de aire.
• No use el aparato cerca o encima de objetos calientes, como una cocina o en lugares donde pueda
entrar en contacto con vapor.
• No utilice la unidad echada de costado.
• Tome siempre el mango situado en la parte posterior de la unidad principal para moverla.
Si la toma por el panel frontal el panel podría desprenderse y causar la caída del aparato, lo que a su
vez puede ocasionarle lesiones.
• No haga funcionar el aparato sin los filtros.
• No lave y vuelva a utilizar el filtro HEPA.
No sólo no mejora el rendimiento del filtro, podría causar descargas eléctricas o averías.
• Limpie el exterior del aparato solamente con un paño suave.
La superficie del aparato podría dañarse o agrietarse.
Además, los sensores podrían comenzar a funcionar de forma incorrecta.
DIRECTRICES DE INSTALACIÓN
• Durante el funcionamiento del producto, sitúe el aparato, al menos, a 7pies (2m) de equipos
que hagan uso de ondas electromagnéticas, como televisores, radios o relojes de onda corta,
para evitar que se produzca una interferencia eléctrica con dichos equipos.
• Evite instalar el aparato en lugares donde los sensores estén directamente expuestos al viento.
De lo contrario, el aparato podría funcionar incorrectamente.
• Evite instalar el aparato en lugares donde elementos tales como cortinas, etc. entren en
contacto con la entrada o la salida de aire.
Las cortinas, etc., podrían ensuciarse o el aparato podría comenzar a funcionar de forma incorrecta.
• Evite instalar el aparato en lugares donde esté expuesto a la condensación, debido a los
cambios drásticos de temperatura.
• Sitúe el aparato en una superficie estable con suficiente circulación de aire.
• No instale el aparato cuando haya generación de hollín, como en una cocina, etc.
La superficie del aparato podría agrietarse el sensor podrían comenzar a funcionar de forma incorrecta.
• Deje un espacio de al menos 2 pies (60cm) entre el aparato y la pared.
La pared situada detrás de la salida de aire puede ensuciarse con el paso del tiempo. Al usar el
aparato durante períodos prolongados en un mismo lugar, use una hoja de vinilo, etc., para evitar
que la pared se ensucie. Además, limpie periódicamente la pared, etc.
ENGLISH
ESPAÑOL
DIRECTRICES ACERCA DEL FILTRO
• Siga las instrucciones de este manual para un cuidado y mantenimiento correcto del filtro.
S-3
Page 20

NOMBRES DE LOS COMPONENTES
PANTALLA DE VISUALIZACIÓN DE LA UNIDAD PRINCIPAL
Luz indicadora de funcionamiento AUTO
Luz indicadora de funcionamiento en
limpieza rápida (QUICK CLEAN)
Luz indicadora del modo de polen
Luces indicadoras de la
velocidad del ventilador
Lua de la SEÑAL DE LIMPIAR
Luz indicadora del filtro
Sensor de polvo
Botón ON/OFF de encendido/apagado
Consulte la página S-6
Botón de selección de MODO
Consulte la página S-6
Unidad principal
Bastidor del filtro
Filtro verdadero de HEPA
Consulte las páginas S-5, 9
Pre-filtro
Panel delantero
PARTE POSTERIOR
Mango
Salida de aire
Etiqueta de la fecha
SE INCLUYE
• Manual de funcionamiento
Cable de alimentación
Clavija de alimentación
(El tamaño de la clavija puede variar dependiendo de los países)
S-4
Page 21

PREPARATIVOS
Asegúrese de retirar el enchufe de alimentación
del tomacorriente de la pared.
INSTALACIÓN DE LOS FILTROS
Para mantener la calidad del filtro, esto se encuentran embalados en bolsa de plástico
dentro de la unidad principal. Asegúrese de retirar el filtro de la bolsa de plástico
antes de utilizar la unidad.
Quitar los filtros
1
Quite el panel
1
frontal.
Tire de la parte
inferior del panel
frontal.
Panel frontal
Tire para retirarel marco de
2
filtros y quite el pre-filtro, el filtro
verdadero de HEPA.
Marco de filtros
Pre-filtro
Instalación de los filtros
2
Coloque el filtro verdadero de
HEPA en el marco de filtros.
1
Cerciórese de que el filtro
verdadero de HEPA esté colocado
en la orientación apropiada.
No instale el filtro al revés. Si lo hace,
la unidad no funcionará
correctamente.
Marco de filtros
Coloque el pre-filtro.
2
Inserte las
pestañas del prefiltro en los orificios
correspondientes
del marco de filtros.
True HEPA Filter
Filtro verdadero
de HEPA
Pestañas (4 lugares)
ENGLISH
ESPAÑOL
Saque el filtro verdadero de
HEPA (blanco) de la bolsa de
3
plástico.
Filtro verdadero de HEPA
Pre-filtro
Filtro verdadero de HEPA
Marco de filtros
S-5
Orificios
Monte el marco de filtros en la
3
unidad principal.
Unidad principal
Marco de filtros
Sujete el panel frontal a la
unidad principal.
4
Escriba la fecha
5
de inicio de uso
en la etiqueta de
fecha.
Etiqueta de fecha
Page 22

FUNCIONAMIENTO
FUNCIONAMIENTO DE LA UNIDAD
PRINCIPAL
Controles de la
unidad principal
• AUTO
• LIMIPIEZA RÁPIDA
• POLEN
• SILENCIOSO
• MEDIO
• MÁX
Luz indicadora de LIMPIE EL FILTRO
Luz de la SEÑAL DE LIMPIAR
Botón de ENCENDIDO/APAGADO
• Se utiliza para iniciar el funcionamiento (sonido corto) y detener el funcionamiento (sonido
1
largo)
• Enciende/apaga la luz indicadora de Plasmacluster y la luz indicadora de velocidad del
ventilador.
• A menos que se desenchufe el cable de alimentación, el funcionamiento comenzará en el
modo anterior en el que funcionó la unidad.
Botón de selección de MODO
2
• Conmuta el modo de funcionamiento.
Botón de selección de MODO
Botón de ENCENDIDO/
APAGADO
Funcionamiento AUTO
La velocidad del ventilador cambia
automáticamente (ALTA*, MEDIO,
SILENCIOSO) dependiendo de la cantidad de
impurezas en el aire. EI sensor detectan las
impurezas para purificar el aire eficazmente.
Funcionamiento MÁX
La unidad funcionará a velocidad
de ventilador MÁX.
Funcionamiento LIMPIEZA RÁPIDA
La unidad funcionará a velocidad de ventilador
ALTA* durante 15 minutos. Después funcionará en
modo AUTO.
El modo de funcionamiento es eficaz si se desea
eliminar rápidamente impurezas del aire.
Funcionamiento en modo POLEN
La unidad funcionará a velocidad de
ventilador ALTA* durante 10 minutos, y
después alternará entre velocidad MEDIO y
ALTA* durante 20 minutos.
10 minutos: Velocidad de ventilador ALTA
20 minutos: Velocidad de ventilador MEDIO
20 minutos: Velocidad de ventilador ALTA
S-6
Funcionamiento
MEDIO
La unidad funcionará a
velocidad de ventilador MEDIO.
Funcionamiento
SILENCIOSO
La unidad funcionará
silenciosamente usando una
toma mínima de aire.
* La velocidad de ventilador ALTA
es una velocidad intermedia
entre MEDIO y MÁX.
Page 23

DETERMINACIÓN DE LA TASA DE IMPUREZAS BASE
Durante los 30 primeros segundos después de insertar el enchufe de
alimentación en el tomacorriente de la pared, la unidad comprobará las
condiciones del aire. Si el funcionamiento está ACTIVADO en ese momento, la
LUZ de la SEÑAL DE LIMPIAR parpadeará alternativamente en verde,
anaranjado y rojo.
LUZ DE LA SEÑAL DE LIMPIAR
El color cambia según la condición del aire.
Limpio (Verde) Ligeramente impuro (Anaranjado) Muy impuro (Rojo)
ACERCA DE LA SEÑAL DE LIMPIAR
• La condición de la SEÑAL DE LIMPIAR depende de la condición del aire detectado
en la habitación por el sensor de polvo cuando se inserta el enchufe en el
tomacorriente de la pared.
• Es posible que aparezca una SEÑAL DE LIMPIAR verde incluso si existen impurezas
en el aire al momento de introducir el purificador de aire en la habitación. Después de
unos minutos, no obstante, la tasa de impurezas se ajustará para detectar la condición
del aire de la habitación correctamente.
ENGLISH
ESPAÑOL
LUZ INDICADORA DE LIMPIE EL FILTRO
Limpie el pre-filtro cuando se encienda la luz indicadora de LIMPIE EL FILTRO.
(La luz indicadora se activará en unos 2 meses si utiliza la unidad 24 horas al día.)
Asgúrese de pulsar el botón de MODO durante 3 segundos después de limpiar el
prefiltro. Escuchará un sonido largo que indicará que el tiempo de funcionamiento
almacenado en la memoria habrá sido reiniciado.
La luz indicadora de filtro desaparecerá automáticamente.
S-7
Page 24

CUIDADO Y MANTENIMIENTO
Para mantener este purificador de aire en condiciones óptimas de funcionamiento, limpie el
aparato periódicamente, incluyendo los filtros y sensores.
Mientras limpia la unidad, asegúrese de desconectar el cable de alimentación y nunca tome el
enchufe con las manos mojadas. Puede ocurrir como resultado una descarga eléctrica y/o una
lesión corporal.
Sensor de polvo
Unidad principal
Filtro verdadero de HEPA
No lave el filtro verdadero de HEPA.
Al lavarlo no mejorará el rendimiento del filtro y
puede producirse incluso una descarga eléctrica o
un funcionamiento incorrecto.
Pre-filtro
UNIDAD PRINCIPAL
Para evitar que se acumule suciedad o polvo en la unidad principal, límpiela con la frecuencia
necesaria. Si deja que se acumule suciedad, puede resultar difícil de limpiar.
Ciclo de mantenimiento
1 mes
Limpie con un paño suave y seco
En el caso de suciedad fuerte, utilice un paño suave humedecido con agua tibia.
No utilice líquidos volátiles
La bencina, diluyentes de pintura, pulimentos, etc., podrían dañar la superficie.
No utilice detergentes
Los ingredientes del detergente podrían dañar la unidad.
Mantenga la unidad alejada del agua
SENSOR DE POLVO
La sensibilidad del sensor será
inestable si el sensor de polvo está
sucio o bloqueado. Elimine el polvo de
la superficie del orificio del sensor
utilizando una aspiradora.
LIMPIEZA DEL FILTRO
Limpie la superficie del pre-filtro con cuidado utilizando una
aspiradora, tal y como se muestra en la ilustración.
Cuando el pre-filtro esté muy sucio, lávelo con agua mezclada con un
detergente de cocina suave y déjelo que se seque completamente en
un lugar a la sombra.
Asgúrese de pulsar el botón de MODO durante 3 segundos
después de limpiar el prefiltro. Escuchará un sonido largo que
indicará que el tiempo de funcionamiento almacenado en la
memoria habrá sido reiniciado.
La luz indicadora de filtro desaparecerá automáticamente.
Ciclo de mantenimiento
Orificio del sensor de
polvo
Ciclo de mantenimiento
2 meses
2 meses
Pre-filtro
S-8
Page 25

DIRECTRICES DE REEMPLAZO DE LOS FILTROS
El período de reemplazo difiere según el entorno de la habitación, las horas de uso y la
posición del purificador de aire.
Si persiste el olor o el polvo, reemplace los filtros.
(Consulte la sección “Lea atentamente antes de utilizar su nuevo purificador de aire”)
Guía para saber cuándo reemplazar el filtro
• La vida del filtro puede reducirse en gran medida en entornos dificiles.
La presencia de humo de cigarrillos, pelusa de mascotas y otras concentraciones de partículas
en el aire provocará que los filtros se congestionen en menor tiempo. Revise los filtros
con regularidad y reemplácelos si es necesario.
• Filtro verdadero de HEPA hasta 5 años después de desembalarlo
REEMPLAZO DEL FILTRO
Consulte las páginas S-5, para leer las
instrucciones de instalación de los filtros
1
al reemplazarlos.
Escriba la fecha de inicio de uso del
2
filtro en la etiqueta de fecha.
Filtro de reemplazo
Modelo: FZ-P35HFU
• Filtro verdadero de HEPA: 1 unidad
Para obtener información sobre filtros de reemplazo, póngase en contacto con Sharp.
1-800-BE-SHARP o sitio web en www.sharpusa.com
Eliminación del filtro
Deshágase del filtro reemplazados según las leyes y normativas de eliminación locales.
Materiales del filtro verdadero de HEPA:
• Filtro: Polipropileno
• Marco: Poliéster
Etiqueta de
fecha
ENGLISH
ESPAÑOL
S-9
Page 26

RESOLUCIÓN DE PROBLEMAS
Antes de solicitar una reparación, revise la lista siguiente. Puede que su problema no se deba a
una avería de su equipo.
SÍNTOMA
No se elimina el humo .
Las luz de la SEÑAL DE
LIMPIAR es verde incluso
cuando el aire no es puro.
La luz de la SEÑAL DE LIMPIAR
se ilumina en color anaranjado
o rojo incluso si el aire está
limpio.
El aire descargado tiene un
aroma o un olor.
La unidad no funciona cuando
hay humo de cigarrillo en el
aire.
La luz indicadora de LIMPIE EL
FILTRO permanece activada
incluso después de haber
reemplazado el filtro.
REMEDIO (no se trata de una avería)
• Limpie o reemplace los filtros si parecen estar muy sucios.
(Consulte las páginas S-9)
• Puede que el aire sea impuro en el momento en el que se
conectó la unidad. (Consulte la página S-7)
• La sensibilidad del sensor puede ser inestable cuando el
orificio del sensor de polvo esté sucio o congestionado.
Limpie el polvo alrededor del orificio del sensor con una
aspiradora. (Consulte la página S-8)
• Compruebe que los filtros no estén muy sucios.
Limpie o reemplace los filtros.
• ¿Se encuentra la unidad instalada en un lugar en el que sea
difícil para el sensor detectar el humo de cigarrillo?
• ¿Están bloqueados o congestionados los orificios del sensor
de olor ?
(En ese caso, limpie el orificio. Consulte la página S-8.)
• Después de limpiar el prefiltro, pulse el botón de selección
de MODO durante 3 segundos. (Consulte la página S-7)
PANTALLA DE ERROR
LUZ INDICADORA
La luz indicadora de velocidad
de ventilador “Silencioso” es
intermitente.
REMEDIO
El motor del ventilador está desconectado o no está en
condiciones normales.
El funcionamiento se detiene.
• Presionando el botón de ENCENDIDO/APAGADO se
reiniciara la pantalla de error, pero si vuelve a ocurrir un
error, póngase en contacto con la tienda en la que compró
la unidad.
S-10
Page 27

SPECIFICATIONS
Modelo
Fuente de alimentación
Nivel de velocidad del ventilador
Funcionamiento
de velocidad
del ventilador
Tipo del filtro
La superficie de suelo aplicable es el área que se necesita para utilizar el aparato funcionando a
*1
nivel máximo de ventilador.
Potencia nominal
Volumen de caudal de aire CFM(m
Nivel de ruido
Superficie de suelo aplicable
CADR(Polvo/Humo/Polen)
Longitud del cable
Dimensiones
Peso
Recolección del polvo
Sensores
Modo de programas especiales
Accesorios opcionales
3
/min)
MAX
35W
176(5,0)
45 dBA
16-3/8in(W)x7-7/8in(D)x23in(H)
415mm(W)x200mm(D)x585mm(H)
Pre-filtro & filtro verdadero de HEPA con control de microbios
Polen / LIMPIEZA RÁPIDA
Filtros de reemplazo [Modelo : FZ-P35HFU]
FP-P35CX
120V 60Hz
MEDIO
6,5 W
85(2,4)
30 dBA
228sq.ft(21,2m
150/147/153
8,3ft(2,5m)
13,4 lbs(6,1kg)
Polvo
SILENCIOSO
2)
*1
3,0 W
28(0,8)
14 dBA
ENGLISH
ESPAÑOL
Consumo de energía en modo de espera
A fin de poder utilizar los circuitos eléctricos mientras el enchufe de alimentación está conectado
en el tomacorriente de pared este producto consume aproximadamente 0,3 W en modo de espera.
Para ahorrar energía, desenchufe el cable de alimentación cuando no vaya a usar el aparato.
S-11
Page 28

R
R
R
SHARP ELECTRONICS CORPORATION
Sharp Plaza, Mahwah,
New Jersey 07430-2135 U.S.A.
SHARP CORPORATION
Osaka, Japan
SHARP ELECTRONICS CORPORATION
Sharp Plaza, Mahwah,
New Jersey 07430-2135 U.S.A.
SHARP CORPORATION
Osaka, Japan
SHARP ELECTRONICS OF CANADA LTD.
335 Britannia Road East Mississauga,
Ontario L4Z 1W9 Canada
SHARP CORPORATION
Osaka, Japan
Printed in China / Imprimé en Chine
Printed in China / Imprimé en Chine
TINSKA004KKRZ 06M-
TINSKA003KKRZ 06H-
 Loading...