

1
Chapter
Installation
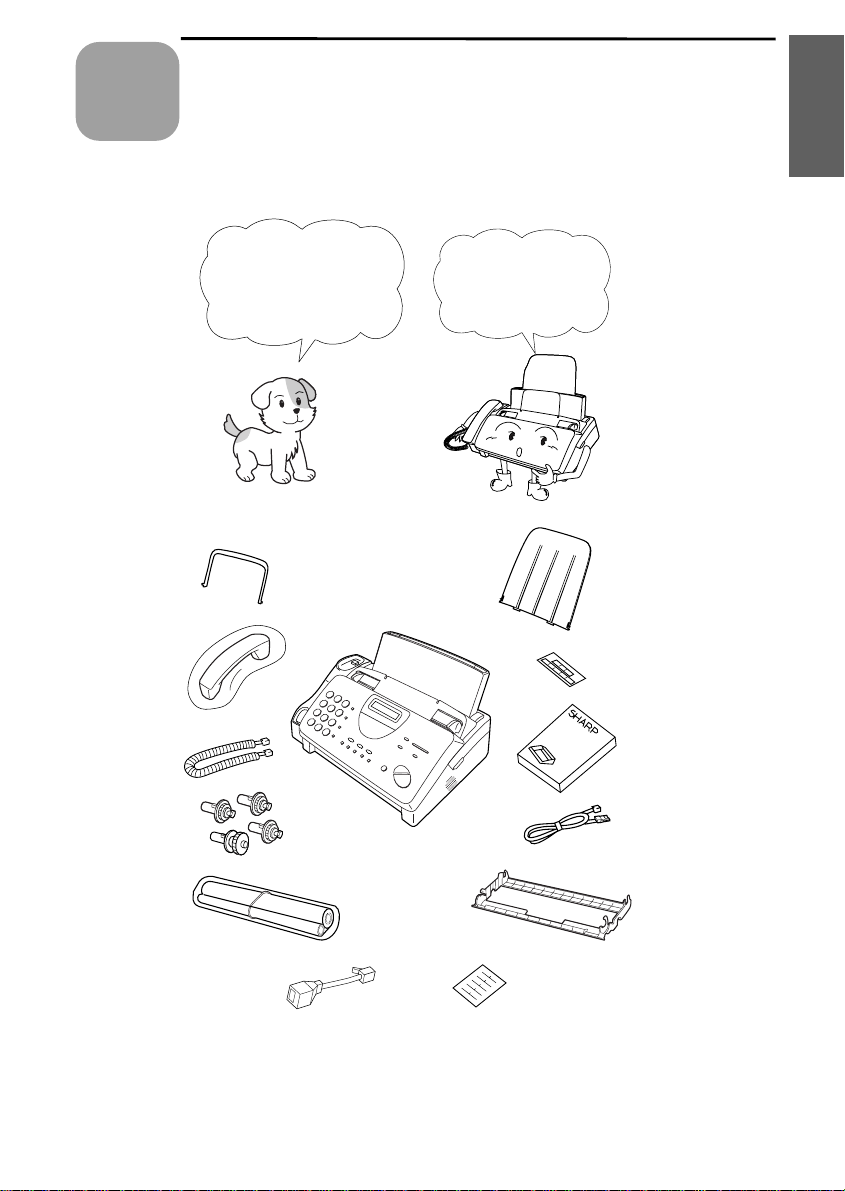
Unpacking Checklist
1. Installation
Original
document
support
Handset
Handset
lead
Gear s (4)
Before setting up,
make sure you have
all of the following
items.
If any are missing,
contact your dealer
or retailer.
Paper tray
extension
Rapid key
labels
Operatio n
manual
Telephone
line cord
Imaging film
(initial starter
roll)
Extension
telephone
socket adapter
Imaging
film
cartridge
Emergency
labels
9

A Look at the Operation Panel
A Look at the Operation Panel
3
2
1
TEL FAX
A.M.
TEL/FAX
0201
03
08/POLL07060504
12
SPEED DIAL key
1
GHI
PQRS
DEF
MNO
WXYZ
SPEED
DIAL
3
REDIAL
6
SEARCH
R
9
SPEAKER
11
10
ABC
1
2
JKL
4
5
TUV
7
8
SYMBOLS
0
9
Press this key to dial a 2-digi t Sp eed Dial num ber.
REDIAL key
2
Press this key to automati c ally redial the last num ber diall ed .
5 6
4
VOLUME
RECEPTION
DOWN UP
MODE
RESOLUTION FUNCTION
COPY/HELP
STOP
START
13
14
15
8
7
3
Display
This displays mes sages and promp ts during op erati on and
programming.
4
RECEPTION MO DE ke y
Press this key to select the reception mode. An arrow in the displ ay
will point to the currently selected reception mode.
5
RESOLUTI ON k ey
Press this key to adjust the resolution and contrast before sendin g or
copying a document.
10

A Look at the Operation Panel
VOLUME keys
6
Press these keys to adjust the volume of the speaker when the
SPEAKER key has been pressed, or the volume of the ringer at all
other times.
7
FUNCTION key
Press this key to select various special functions.
8
Panel release
Grasp this finger hold and pull toward you to open the operation panel.
Number keys
9
Use these keys to dial numbers, and enter numbers and letters during
number/nam e st o rin g pr oc ed ur es.
10
SEARCH/R key
Press this key to search for an automatic dialling number, or, if you are
on a P.B.X. extension, press this key to transfer a call.
11
SPEAKER key
Press this key to hear the line and fax tones through the speaker before
sending a document, or dialling a voice number.
Note: This is not a speakerphone. You must pick up the handset to
talk with the other party.
1. Installation
12
Rapid Dial Keys
Press one of these keys to dial a fax or voice number automatically.
(Note that you must attach the Rapid Key labels.)
13
STOP key
Press this key to cancel operations before they are completed.
14
START key
Press this key to send or receive a document manually when off hook.
15
COPY/HELP key
When a document is in the feeder, press this key to make a copy. At
any other time, press this key to print out the Help List, a quick
reference guide to the operation of your fax.
11
Connections
Connections
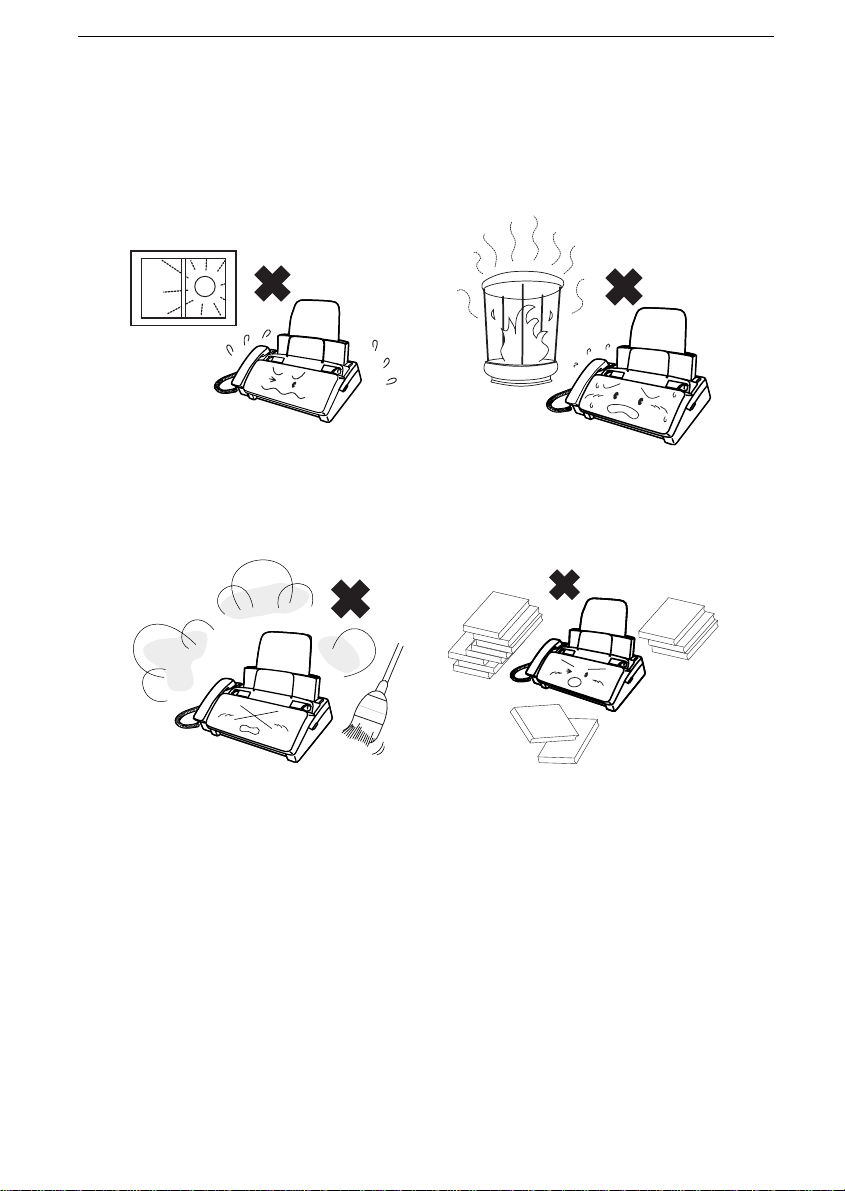
Points to keep in mind w hen setting u p
Do not place the machine in
direct sunlight.
Keep dust away from the
machine.
Do not place the machine near
heaters or air conditioners.
Keep the area around the
machine clear.
About condensation
If the machine is moved from a cold to a warm place, it is possibl e that
condensation may form on the scann ing glass, preventi ng prop er
scanning of documents for transmission . To remove the condensation,
turn on the power and wait approximately two hours before usin g the
machine.
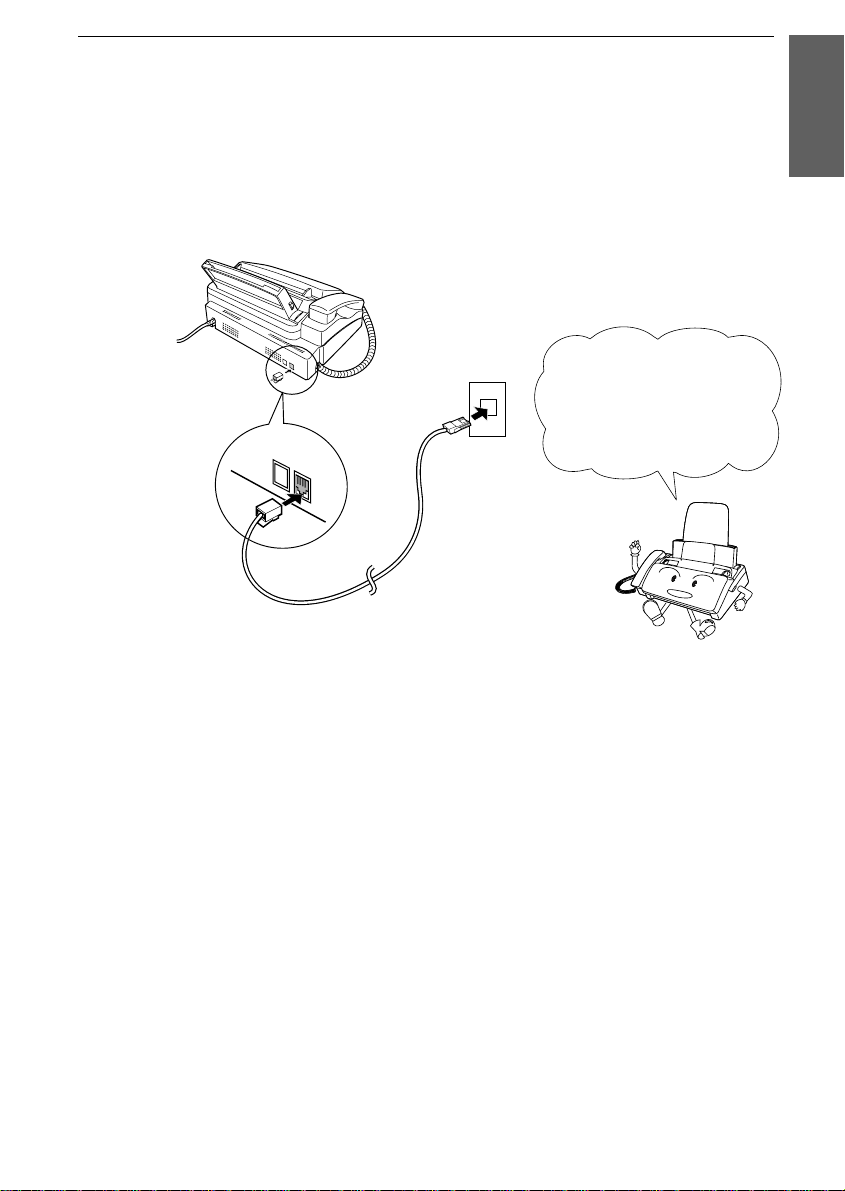
12
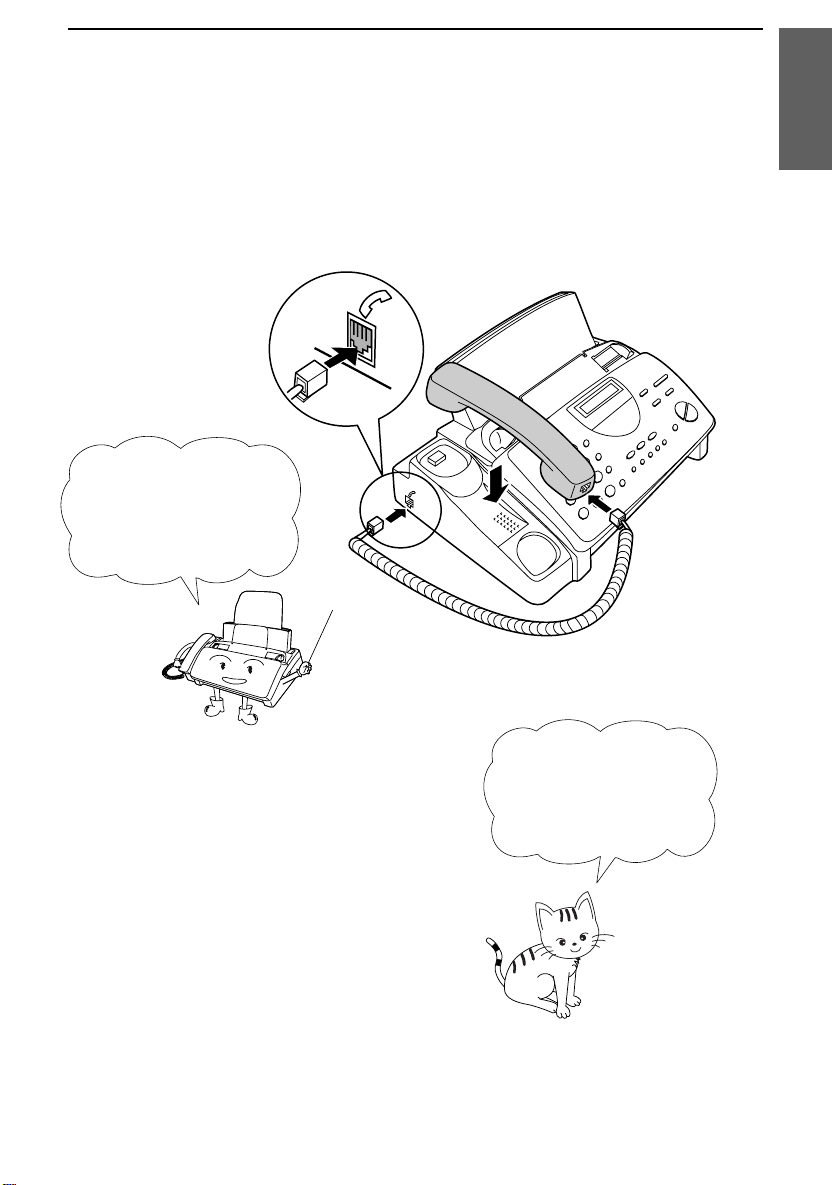
Handset
Connect the handset as shown and place it on the handset rest.
The ends of the handset lead are identical, so they will go into
♦
either socket.
Make sure the handset
lead goes into the
socket marked with a
handset symbol on the
side of the machine!
Connections
1. Installati on
Use the handset to
make ordinary phone
calls, or to transmit
and receive
documents manually.
13
Connections
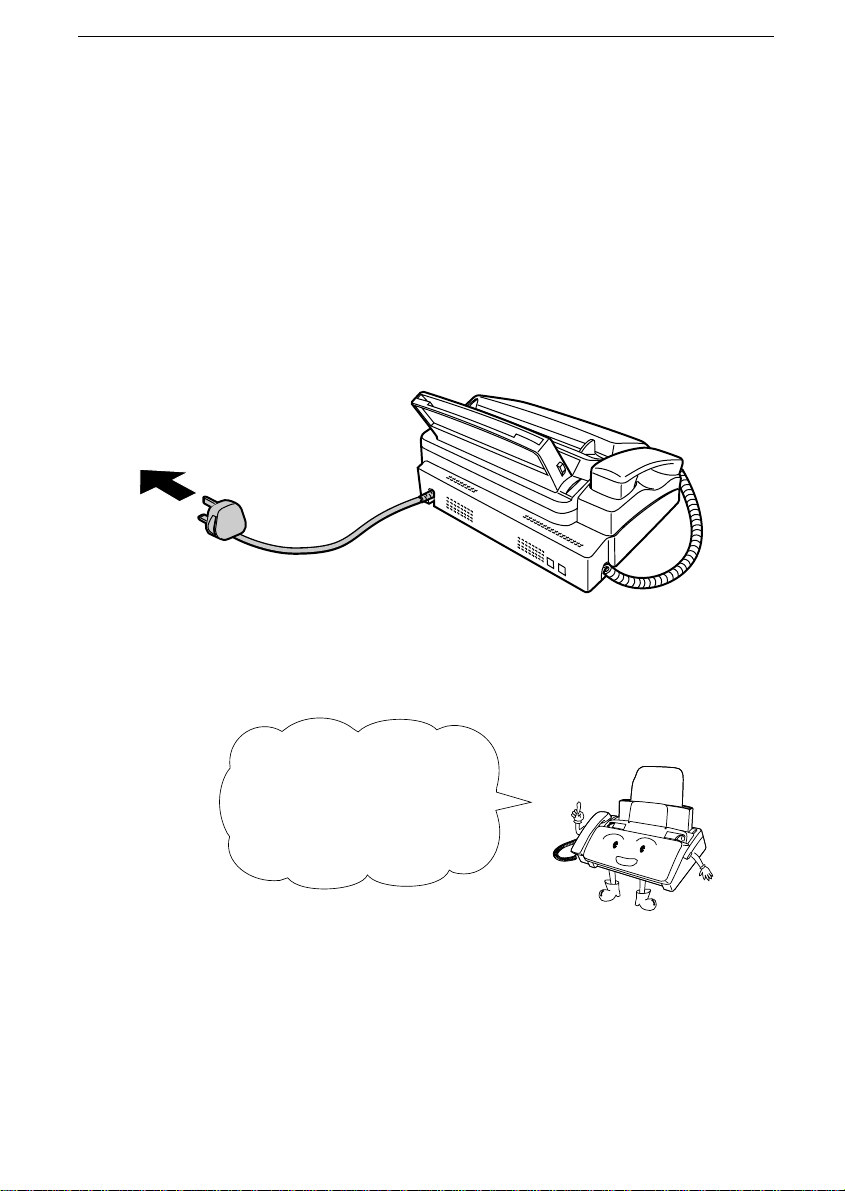
Power le a d
Plug the pow er lead into a 230 V, 50 Hz, ea rthed (3-prong) AC outl et .
♦ Caution: The mains outlet (socket outlet) should be installed near
the equipment and be easily accessable.
The machine does not
have a power on/off switch,
so the power is turned on
and off by simply plugging
or unplugging the power
lead.
Note: If your area experiences a high incidence of lightning or power
surges, we recommend that you install surge protectors for the power and
telephone lines. Surge protectors can be purchased from your dealer or at
most telephone specialty stores.
14
Telephone li ne c ord
Insert one end of the line cord into the socket on the back of the
machine marked TE L. LINE . In s e rt the other end into a wall
telephone socket.
TEL.
SET
TEL.
LINE
Connections
Be sure to insert the
telephone line cord into
TEL. LINE socket.
the
Do not insert it into the
TEL. SET socket.
1. Installation
Comments:
•• Your fa x is set for t one diall ing . If you ar e on a pulse only dia l l ine , you must
set the fax for pulse dialling by chan gin g Opti on Se tt ing 9. Thi s proc edu re i s
described in Cha pt er 8, Option Settings.
•• If you are connect in g the fax to a PBX, you may need to reset the fax to the
appropriate recall mode for the PBX. This is do ne by settin g Option Se tting
15 as described in Chapter 8.
•• If you inte nd t o use a com put er fax mode m on the sam e phone lin e, you m ust
reset Optio n Setti ng 16 (Fa x Sig nal Rec ei ve ) to NO in orde r to preve nt
transmission a nd rece ption e rror s. Thi s proc edu re is desc rib ed in Cha pte r 8,
Option Settings.
•• The facsimi le machine will not ring in response to inco ming c alls an d cannot
be used to make outgo ing calls in the absenc e of mai ns powe r to the ma chine .
For this reason it is recom mende d th at the fax is not left as the only telephone
instrume nt on line when in this st at e.
•• Your fax cannot be used on a key system withou t the necessary adaptation of
the system. Plea se co nsul t the insta ll ers of the syste m if thi s is re qui red .
15

Connections
Trays
Attach the paper tray extension.
♦ Pull the paper release plate forward. Insert the paper tray
extension horizontally into the notches in the paper tray. Rotate
the paper tray extension up until it snaps into place.
Attach the ori ginal document support.
16
Note: The original
document support
has a top side and a
bottom side. If you
cannot insert the
tabs on the support
into the holes, turn
the support over.

Connections
Extension phone (optional)
If desired, you can connect an extension ph one to the TEL. SET
socket on the fax.
♦ To connect an answering machine to your fax, see Chapter 6,
Answering Machine Connection.
♦ Eire: Remo ve the seal covering the socket marked TEL. SET on
the fax. Insert the plug of the extension phone line directly into the
TEL. SET sock et .
1
Remove the seal covering the TEL.
SET socket.
2
Connect the extension phone line to
the TEL. SET socket using the
provided extension telephone socket
adapter.
1. Installation
TEL.
SET
TEL.
LINE
Comments:
•• The safety stat us of t his soc ke t is TN V, and is provi ded for the connect io n of
approved tele pho ne equi pm ent only. To ensure con tinue d safe ty compl ia nce,
do not connect any other equipment to this socket.
•• More t han one e xte n si on te le p ho ne m ay be connect ed t o the sam e line as the
fax, provi ded that th e tota l RE N val ue does no t ex ceed 4. This i ncl udes an
answering machine if connected as shown above.
17

Loading the Imaging Film
Loading the Imaging Film
Your fax uses a roll of imaging film to create printed text and images.
The print head in the fax applies heat to the imaging film to transfer
ink to the paper. Follow the steps below to load or replace the film.
The initial starter roll
of imaging film
included with your
fax can print about
30 A4 pages.
Note: If there is paper in the paper tray, pull the paper release plate
forward and remove the paper before loadin g the imaging film.
1
Open the operation panel by grasping the finger hold and pulling up.
When replacing the
film, use a roll of Sharp
UX-3CR imaging film.
One roll can print about
95 A4 pages.
2
Pull the green rele ase on the right side of the machine forward, and
open the print compartment cover.
18

Loading the Imaging Film
If you are installing the imaging film for the first time,
go to Step 6.
3
Remove the imaging film cartridge from the print co mpartment
(grasp the handle at the front of the cartridge) and turn it over.
4
Remove the used film from the cartridge.
1. Installation
5
Remove the four green gears from the used film.
DO NOT DISCARD THE FOUR GR EEN GEARS!
19

Loading the Imaging Film
6
Remove the new roll of imaging film from its packaging.
•• Do not yet remove the band that holds the rolls together.
7
Insert the large gear into the green end of the empty spool. Make
sure the two protrusions on the large gear f it firmly into the slots in
the end of the spool.
Insert the remaining three gears into the spools, making sure the
protrusion on each gear fits firmly into one of the slots in the end of
each spool.
•• If needed, pull the spools apart slightly to allow the gears to fit (the
band will stre tch).
Slot
Large gear
20
Protrusion

Loading the Imaging Film
8
Insert the la rge gear into the large holder on the imaging film
cartridge (make sure it clicks into place), and then insert the smal l
gear on the other end of the spool into its holder.
9
Cut the band that holds the two spools together. Unroll the film
slightly and insert the small gears into their holders.
1. Installation
10
Turn the cartridge over, grasp the handle, and insert the cartridge
into the print compartment.
21

Loading the Imaging Film
11
Rotate the large gear toward you until the film is taut.
12
Gently close the print compartment cover (press down on both sides
to make sure it clicks into place), and then close the operation panel.
Click!
13
Load paper in the paper tray and then press the following keys to
initialize the film.
Note: Paper must be loaded before the film can be initialized. To load
paper, see the following section, Loading the Printing Paper.
FUNCTION
6
Display shows:
INITIALIZE FILM
When to replace the ima ging film
Replace the imaging film when the display sh ows:
FILM END
Use the following imagi ng film, whi ch is available from your dealer or
retailer:
Sharp UX-3CR Imaging Film
22
START

Loading Printing Paper
Loading Printing Paper
You can load A4 size paper in the paper tray. The maximum number
of sheets is:
♦ 60 for paper from 60 to 75 g/m
♦ 50 for paper from 75 to 90 g/m
1
Fan the paper, and then tap the edge against a flat surface to even the
stack.
2
Pull the paper release plate toward you.
2
2
1. Installation
3
Insert the sta ck of paper into the tray, print side down.
•• If paper remains in the tray, take it out and combine it into a single
stack with the new paper before adding the new paper.
Be sure to load the
paper so that printing
takes place on the
print side of the
paper. Printing on the
reverse side will result
in poor print quality.
23

Loading Printing Paper
4
Push the paper release plate back down.
If the paper
release plate is
not pushed down,
paper feed errors
will result.
Note: When receiving faxes or copying documents, do not allow a
large number of pages to accumul ate in th e outpu t tray. This may
obstruct the outlet and cause paper jams.
5
Your fax has been set at the factory to print at normal contrast.
Depending o n the type of paper you have loaded, you may find that
you obtain better print quality by changing the setting to LIGHT.
Press these keys:
FUNCTION
6
The display will show:
PRINT CONTRAST
Press 1 to select NORMAL or 2 to select LIGHT.
NORMAL LIGHT
or
2
The display will show:
1
COPY CUT -O FF
Press the STOP key to return to the date and time display.
STOP
24

Entering Your Name and Number
Entering Your Name and Fax Number
Before you can begin using
your fax, you need to enter
your name and the
telephone number of your
fax. You also need to set
the date and time.
3 key
213
4
5 6
7
9
8
0
Once you enter this
information, it will
automatically appear
at the top of each fax
page you send.
1. Installation
FUNCTION key
START key
1
Press these keys:
The display will show:
2
Press the # key twice:
The display will show:
# key
STOP key
FUNCTION
3
ENTRY MODE
OWN NUMBER SET
25

Entering Your Name and Fax Number
3
Press the START key.
START
The display will show:
4
Enter your fax number by pressing the number keys. Up to 20 digits
ENTER FAX #
can be entered.
•• To insert a space between digits, press the # key.
•• If you make a mistake, press the SEARCH/R key to move the
cursor back to the mistake and then enter the correct number. The
new number will replace the old number.
Example:
5
55
21 43
Cursor: A dark square mark in the display that indicates where a
number or lette r will be entered.
5
Press the START key to enter the fax number in memory.
START
The display will show: ENTER YOUR NAME
6
Enter your name by pressing the number keys as shown in the chart
below. Up to 24 characters can be entered.
•• To enter two letters in succession that require the same key, press
the SPEAKER key after e ntering the first letter.
Example: SHARP = 7 7 7 7 7 4 4 4 2 2 7 7 7 7 7 7
26
SPEAKER

Entering Your Name and Number
A =
B =
C =
D =
E =
F =
G =
H =
I =
GHI
PQRS
ABC
JKL
TUV
SYMBOLS
DEF
MNO
WXYZ
J =
K =
L =
M =
N =
O =
P =
Q =
R =
SPEED DIAL
REDIAL
SEARCH
SPEAKER
R
Press either key repeatedly to select
one of the following symbols:
./!"#$%&’()++,-:;<=>?@[ ¥]^_p{|}→←
S =
T =
U =
V =
W =
X =
Y =
Z =
SPACE =
Press this key to delete the letter
highlighted by the cursor.
Press this key to change case.
Press this key to move
the cursor to the left.
Press this key to move
the cursor to the right.
1. Installation
7
Press the START key to save your name in memory.
START
The display will show:
8
Press the STOP key to return to the date and time display.
SECURITY SELECT
STOP
27

Setting the Date and Time
Setting the Date and Time
The date and time
appear in the display
and reports, and are
printed at the top of
every page you fax.
3 key
213
4
5 6
7
9
8
0
FUNCTION key
START key
*
key
1
Press these keys:
The display will show:
2
Press the * key three times.
The display will show:
Note: The fax is Year 2000 compliant.
28
STOP key
FUNCTION
3
ENTRY MODE
DATE & TIME SET

Setting the Date and Time
3
Press the START key.
START
•• The currently set date will appear in the display.
4
Enter a two-digit number for the day ("01" to "31").
•• To correct a mistake, press the SPEED DIAL key to move the
cursor back to the mistake, and then enter the correct number.
1. Installation
Example: the 5th
5
Enter a two-digit number for the month ("01" for January, "02" for
February, "12" for December, etc.).
Example: January
6
Enter the year (four digits).
Example: 1999
7
Enter a two-digit number for the hour ("00" to "23") and a two-digit
number for the minute ("00" to "59").
Example: 9:25
0 5
0
0
1
9 91
9
9
2
5
29

Setting the Date and Time
8
Press the START key to start the clock.
START
The display will show:
9
Press the STOP key to return to the date and time display.
STORE JUNK #
STOP
30

Selecting the Reception Mode
Selecting the Reception Mode
Your fax machine has four modes for receiving incoming call s and
faxes:
TEL mode:
This mode is the most convenient for receiving phone cal ls. Fax es can
also be received; however, all calls must first be answered by picking
up the fax’s handset or an extension phone connected to the same line.
FAX mode:
Select this mode when you only want to receive faxes on your line.
The fax machine will automatically answer all calls and receive
incoming faxes.
TEL/FAX mode:
This mode is convenient for receiving bot h faxes and voice calls.
When a call comes in, the fax will detect whether it is a voice call
(including manually di all ed fax transmis sio ns), or an automatic ally
dialled fax. If it is a voice call, the fax will make a special ringing
sound to alert you to answer. If it is an automatically dialled fax
transmission, receptio n wil l begin autom ati cally.
A.M. mode:
Use this mode only if you have connected an answering machine to
the fax (see Chapter 6). Select thi s mode when you go out to receiv e
voice messages in your answering machine and faxes on your fax
machine.
1. Installation
31

Selecting the Reception Mode
Setting the reception mode
Press the RECEPTION MODE key until the arrow in the display
points to the desired mode.
RECEPTION MODE key
213
4
5 6
7
9
8
0
FAX
TEL
RECEPTION
MODE
14 FEB 10:30
14 FEB 10:30
TEL/FAX
TEL
TEL/FAX
A.M.
FAX
A.M.
FAX
TEL
14 FEB 10:30
A.M.TEL/FAX
FAX
TEL
14 FEB 10:30
TEL/FAX
A.M.
For more informatio n on receiving faxes in TEL, TEL/FAX and F AX
modes, see Chapter 3, Receiving Documents. For more inform atio n on
using A.M. mode, see Chapter 6.
32

Volume Adjustment
Volume Adjustment
4
7
Speaker
1
Press the SPEAKER key.
213
5 6
8
0
You can adjust the
volume of the speaker
and ringer using the
UP and DOWN keys.
DOWN key
9
1. Installation
UP key
SPEAKER
2
Press the UP or DOWN key.
DOWN
3
When the display shows the desired
or
volume level , press the SPEAKER
key to turn off the speaker.
UP
Display:
SPEAKER: HIG H
SPEAKER: MIDDLE
SPEAKER: LO W
SPEAKER
33

Volume Adjustment
Ringer
1
Press the UP or DOWN key. (Make
sure the SPEAKER key has not been
pressed and the h an dset is not lifted.)
Display:
DOWN
The ringer will ring once at the
••
or
UP
RINGER: HIG H
RINGER: MIDDLE
RINGER: LO W
selected level, then the date and
time will reappe ar in the display.
2
If you selected RINGE R:OFF OK ?,
press the START key.
RINGER:OFF OK ?
START
Note: When set to TEL mode, the fax machine will ring even if the
ringer is turned off. When set to TEL/FAX mode, the special "pseudo
ringing" sound will be generated if the ma chine detects a voice call or
manually dialled fax.
34
 Loading...