

Page 1

ELECTRONIC PRINTING CALCULATOR
DRUCKENDER TISCHRECHNER
CALCULATRICE IMPRIMANTE ÉLECTRONIQUE
CALCULADORA IMPRESORA ELECTRÓNICA
CALCOLATRICE ELETTRONICA STAMPANTE
ELEKTRONISK SKRIVANDE OCH VISANDE RÄKNARE
ELEKTRONISCHE REKENMACHINE MET AFDRUK
CALCULADORA ELETRÔNICA COM IMPRESSORA
ELEKTRONISESTI TULOSTAVA LASKIN
SZALAGOS ASZTALI KALKULÁTOR
ENGLISH ............................................................... Page 2
CALCULATION EXAMPLES ................................. Page 82
DEUTSCH ..............................................................Seite 10
RECHNUNGSBEISPIELE ..................................... Seite 82
FRANÇAIS .............................................................Page 18
EXEMPLES DE CALCULS .................................... Page 83
ESPAÑOL .............................................................. Página 26
EJEMPLOS DE CÁLCULOS ................................. Página 83
ITALIANO .............................................................. Pagina 34
ESEMPI DI CALCOLO ...........................................Pagina 84
SVENSKA .............................................................. Sida 42
RÄKNEEXEMPEL ..................................................Sida 84
NEDERLANDS ...................................................... Pagina 50
REKENVOORBEELDEN ....................................... Pagina 85
PORTUGUÊS ........................................................ Página 58
EXEMPLOS DE CÁLCULO ................................... Página 85
SUOMI ................................................................... Sivu 66
LASKENTAESIMERKKEJÄ ................................... Sivu 86
MAGYAR ............................................................... Oldal 74
SZÁMÍTÁSI PÉLDÁK ............................................. Oldal 86
EL-2901RC
OPERATION MANUAL
BEDIENUNGSANLEITUNG
MODE D’EMPLOI
MANUAL DE MANEJO
MANUALE DI ISTRUZIONI
BRUKSANVISNING
GEBRUIKSAANWIJZING
MANUAL DE INSTRUÇÕES
KÄYTTÖOHJE
HASZNÁLATI ÚTMUTATÓ
Page 2

Page 3

Caution!
The socket outlet shall be installed near the equipment and shall be easily accessible.
Vorsicht!
Die Netzsteckdose muß in der Nähe des Gerätes angebracht und leicht zugänglich sein.
Attention!
La prise de courant murale doit être installée à proximité de l’appareil et doit être facilement
accessible.
Aviso!
El tomacorriente debe estar instalado cerca del equipo y debe quedar bien accesible.
Attenzione!
La presa della corrente deve essere installata in prossimità dell’apparecchio ed essere
facilmente accessibile.
Observera!
Anslut till ett vägguttag som återfinns nära enheten och är lätt åtkomligt.
Let op!
Het stopcontact moet in de buurt van het apparaat zijn en ook gemakkelijk toegankelijk zijn.
Atenção!
A tomada elétrica deve estar perto do equipamento e ser de fácil acesso.
Huomautus!
Pistorasia tulee asentaa laitteen lähelle paikkaan, jossa sen käyttöä on helppoa.
Figyelem!
A kalkulátort úgy érdemes elhelyezni, hogy a hálózati csatlakozó aljzatot könnyen el lehessen
érni.
1
Page 4
ENGLISH
OPERATIONAL NOTES
To insure trouble-free operation of your SHARP
calculator, we recommend the following:
1. The calculator should be kept in areas free from
extreme temperature changes, moisture, and
dust.
2. A soft, dry cloth should be used to clean the
calculator. Do not use solvents or a wet cloth.
3. Since this product is not waterproof, do not use
it or store it where fluids, for example water, can
splash onto it. Raindrops, water spray, juice,
coffee, steam, perspiration, etc. will also cause
malfunction.
4. If service should be required, use only a SHARP
servicing dealer, a SHARP approved service
facility or SHARP repair service.
5. If you pull out the power cord to cut electricity
completely, the presently stored exchange rate
will be cleared.
6. Do not wind the AC cord around the body or
otherwise forcibly bend or twist it.
CONTENTS
Page
• OPERATING CONTROLS ................................ 3
• INK ROLLER REPLACEMENT ......................... 5
• PAPER ROLL REPLACEMENT ........................6
• ERRORS ........................................................... 7
• SPECIFICATIONS............................................. 8
• IN CASE OF ABNORMAL CONDITIONS ......... 9
• CALCULATION EXAMPLES ........................... 82
• EURO CONVERSION ..................................... 96
• COST / SELL / MARGIN CALCULATION ....... 99
SHARP will not be liable nor responsible for any
incidental or consequential economic or
property damage caused by misuse and/or
malfunctions of this product and its peripherals,
unless such liability is acknowledged by law.
2
Page 5
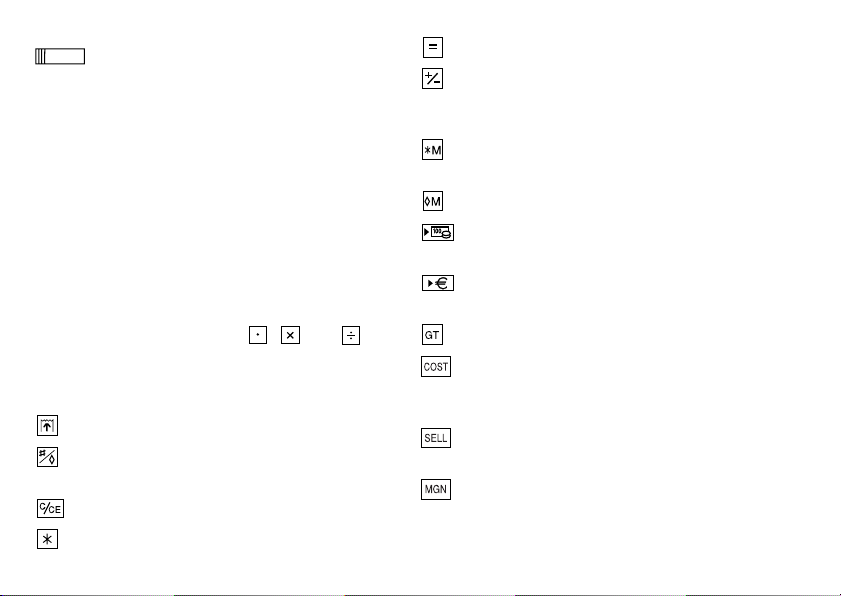
OPERATING CONTROLS
GT •
RATE
SET
F 6 3 2 1 0 A
OFF • P P•IC
“OFF”: Power OFF
“•”: Power ON. Set to the non print mode.
“P”: Power ON. Set to the print mode.
“P•IC”: Power ON. Set to the print and item count
Note: The counter has a maximum capacity of 3
Example: Set Decimal Selector to 2.
4 ÷ 9 = 0.444 ... , 5 ÷ 9 = 0.555 ...
ON
POWER SWITCH; PRINT / ITEM
COUNT MODE SELECTOR:
mode.
For addition or subtraction, each time is
pressed, 1 is added to the item counter, and
each time is pressed, 1 is subtracted.
• The count is printed when the calculated
result is obtained.
• Pressing of , clears the
counter.
digits (up to ±999). If the count exceeds the
maximum, the counter will recount from zero.
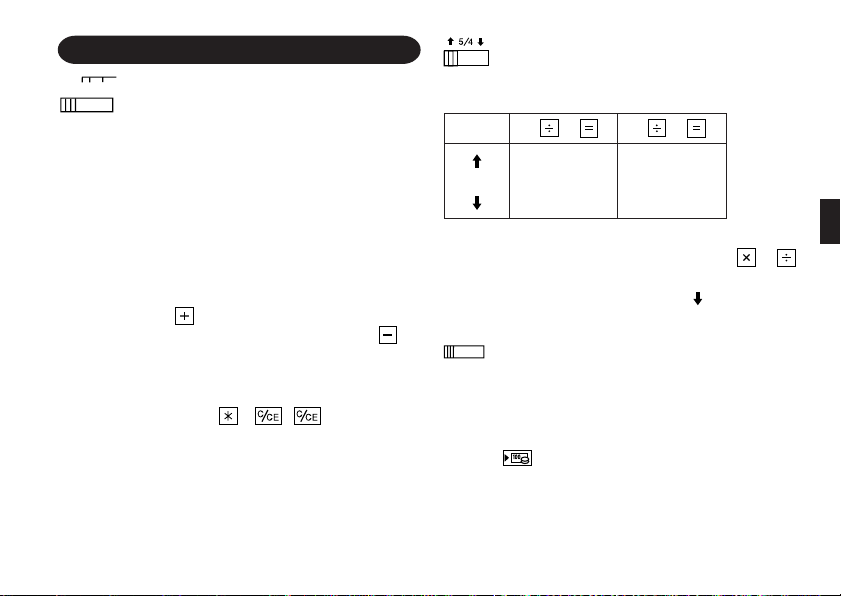
ROUNDING SELECTOR:
4 9 5 9
0.45 0.56
5/4 0.44 0.56
0.44 0.55
Note: The decimal point floats during successive
calculation by the use of or .
If the decimal selector is set to “F” then the answer
is always rounded down ( ).
GRAND TOTAL / RATE SETTING MODE
SELECTOR:
“GT”: Grand Total
“•”: Neutral
“RATE SET”: Rate setting
• Enter the adding exchange rate, then press .
• A maximum of 6 digits can be stored (decimal point
is not counted as a digit).
• Only one rate can be stored. If you enter a new
rate, the previous rate will be cleared.
DECIMAL / ADD MODE SELECTOR:
“6 3 2 1 0”: Presets the number of decimal places
in the answer.
“F”: The answer is displayed in the floating decimal
system.
3
Page 6
“A”: The decimal point in addition and subtraction
entries is automatically positioned to the 2nd
digit from the lowest digit of entry number. Use
of the add mode permits addition and
subtraction of numbers without entry of the
decimal point. Use of , and will
automatically override the add mode and
decimally correct answers will be printed.
PAPER FEED KEY
NON-ADD / SUBTOTAL KEY
CLEAR / CLEAR ENTRY KEY
TOTAL KEY
EQUAL KEY
CHANGE SIGN KEY:
Changes the algebraic sign of a number (i.e.,
positive to negative or negative to positive).
RECALL AND CLEAR MEMORY KEY
RECALL MEMORY KEY
CONVERSION KEY (TO A NATIONAL
CURRENCY)
CONVERSION KEY (TO THE EURO
CURRENCY)
GRAND TOTAL KEY
COST PRICE ENTRY KEY:
Press this key to enter the cost price.
SELLING PRICE ENTRY KEY:
Press this key to enter the selling price.
MARGIN ENTRY KEY:
Press this key to enter the margin.
DISPLAY
Display format:
Symbols:
M: Appears when a number is in the memory.
–:Appears when a number is negative.
• : Appears when a number is in the grand total
memory.
E:Appears when an overflow or other error is
detected.
* Although all available symbols are shown here
for instruction purposes, these symbols will not
appear on the screen simultaneously.
4
Page 7
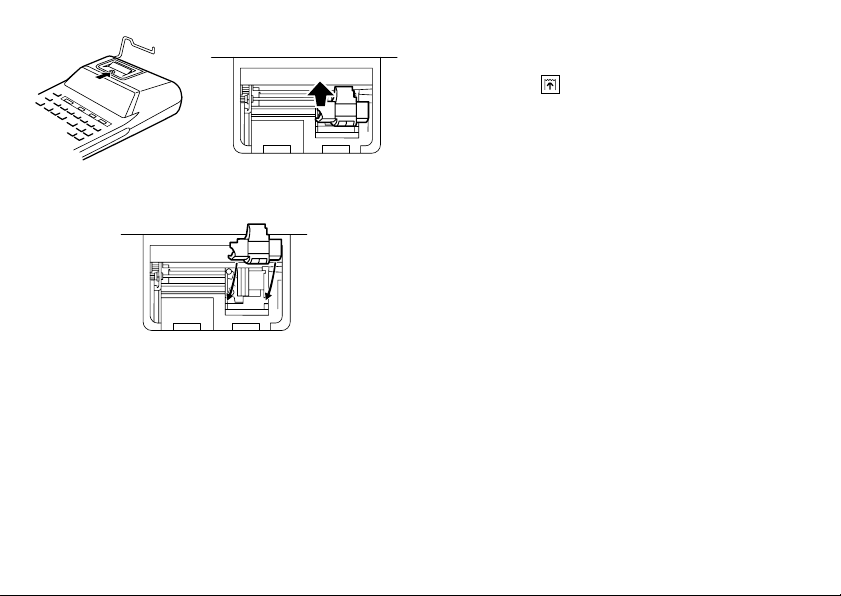
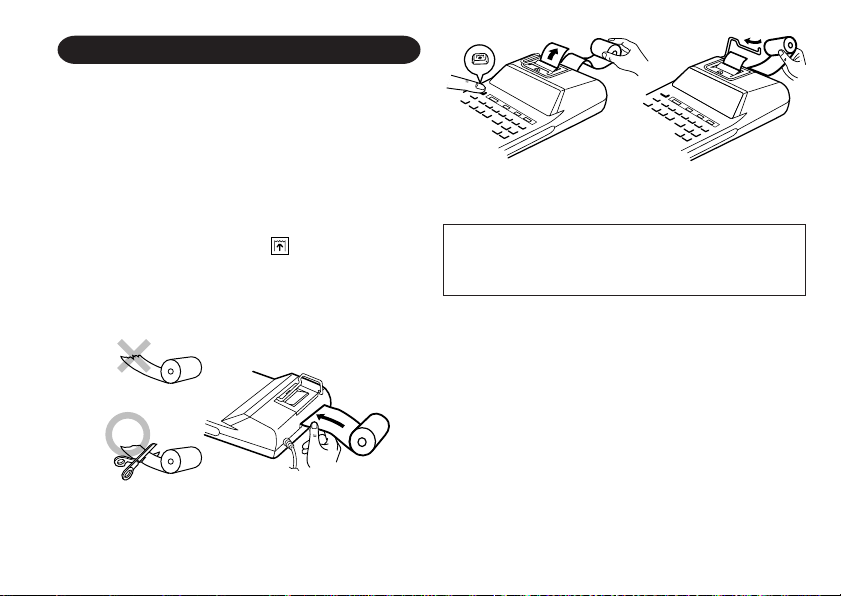
INK ROLLER REPLACEMENT
If printing is blurry even when the ink roller is in the
proper position, replace the roller.
Ink roller: Type EA-772R
WARNING
APPLYING INK TO WORN INK ROLLER OR
USE OF UNAPPROVED INK ROLLER MAY
CAUSE SERIOUS DAMAGE TO PRINTER.
1) Set the power switch to OFF.
2) Remove the printer cover. (Fig. 1)
3) Hold the top of the ink roller and remove the roller
by pulling it toward you and then upward. (Fig.
2)
4) Install the new ink roller in the correct position.
Make sure that the roller is securely in place.
(Fig. 3)
5) Put back the printer cover.
Fig. 1 Fig. 2
Fig. 3
Cleaning the printing mechanism
If the print becomes dull after long time usage,
clean the printing wheel according to the
following procedures:
1) Remove the printer cover and the ink roller.
2) Install the paper roll and feed it until it comes
out of the front of the printing mechanism.
3) Put a small brush (like a tooth brush) lightly to
5
Page 8
the printing wheel and clean it by pressing .
4) Put back the ink roller and the printer cover.
Note: • Do not rotate the printing mechanism
manually, this may damage the printer.
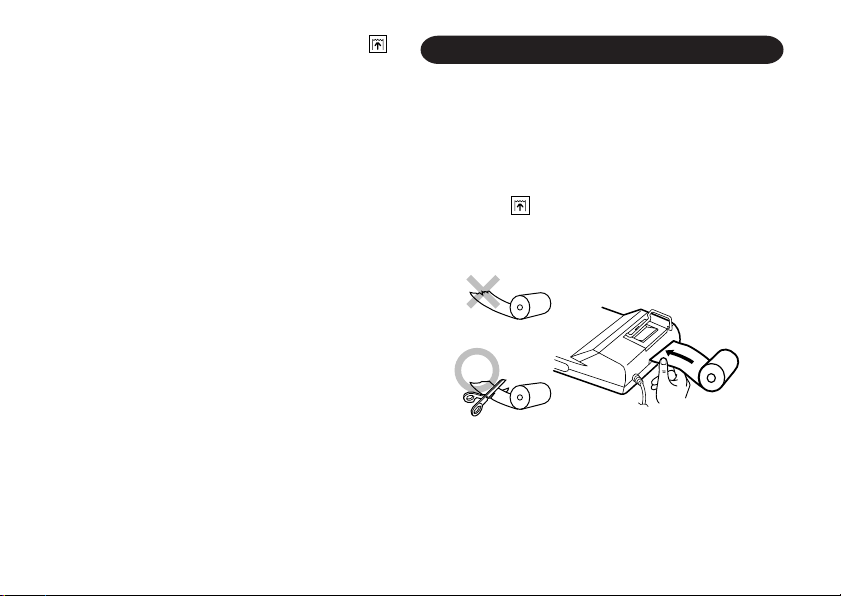
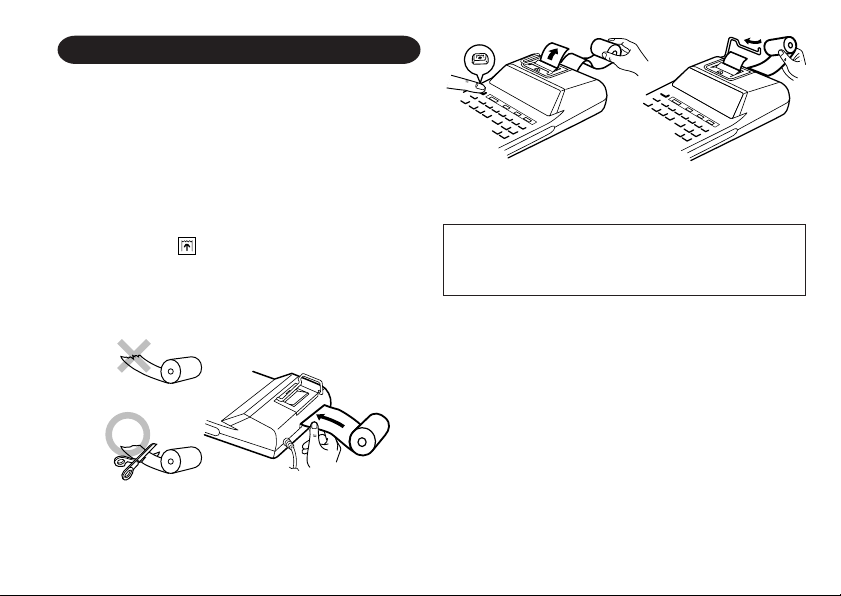
PAPER ROLL REPLACEMENT
Never insert paper roll if torn. Doing so will
cause paper to jam.
Always cut leading edge with scissors first.
1) Insert the leading edge of the paper roll into the
opening. (Fig. 1)
2) Turn the power on and feed the paper by
pressing . (Fig. 2)
3) Lift the attached metal paper holder up and insert
the paper roll to the paper holder. (Fig. 3)
Fig. 1
6
Page 9
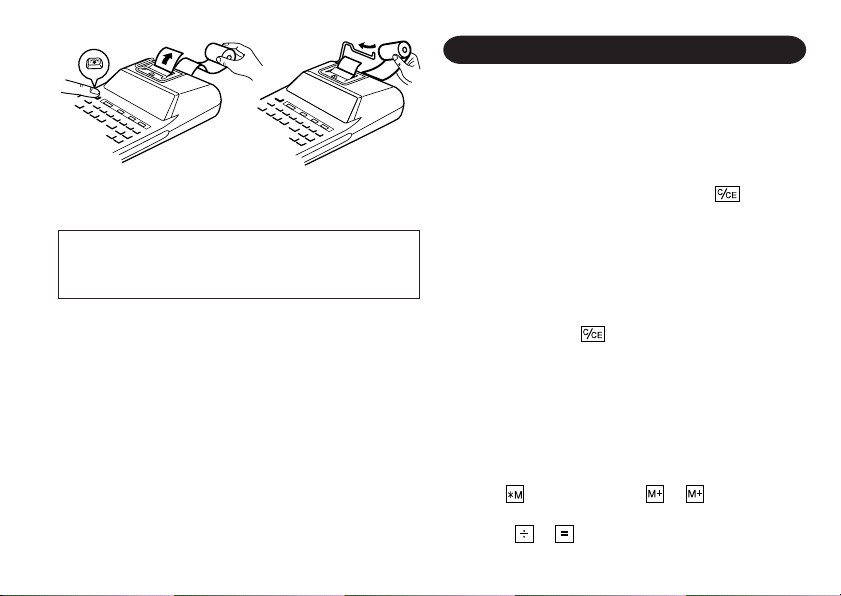
Fig. 2 Fig. 3
DO NOT PULL PAPER BACKWARDS AS THIS
MAY CAUSE DAMAGE TO PRINTING
MECHANISM.
ERRORS
There are several situations which will cause an
overflow or an error condition. When this occurs,
“E” will be displayed. The contents of the memory
at the time of the error are retained.
If an “0䡠E” is displayed at the time of the error, “– –
– – – – –” will be printed in red and must be
used to clear the calculator.
Also, in rare cases, printing may stop midway and
the indication “E” appear on the display. This is not
a malfunction but is caused when the calculator is
exposed to strong electromagnetic noise or static
electricity from an external source. Should this
occur, press the key and then repeat the
calculation from the beginning.
Error conditions:
1. When the integer portion of an answer exceeds
12 digits.
2. When the integer portion of the contents of the
memory exceeds 12 digits.
(Ex. 999999999999 1 )
3. When any number is divided by zero.
(Ex. 5 0 )
7
Page 10

SPECIFICATIONS
Operating capacity: 12 digits
Power source: AC: 220V–230V, 50Hz
PRINTING SECTION
Printer: Mechanical printer
Printing speed: Approx. 2.1 lines/sec.
(At temperature 25°C
(77°F), when “741.9 + ” is
printed. The printing speed
will vary with the number
of rows and the figure
types to be printed.)
Printing paper: 57 mm (2-1/4") - 58 mm (2-
9/32") wide
80 mm (3-5/32") in
diameter (max.)
Operating temperature: 0°C – 40°C (32°F – 104°F)
Power consumption: 41 mA
Dimensions: 193 mm (W) × 256 mm (D)
× 62.5 mm (H)
(7-19/32" (W) × 10-3/32"
(D) × 2-15/32" (H))
Weight: Approx. 1.0 kg (2.20 Ib.)
Accessories: 1 paper roll, 1 ink roller
(installed), and operation
manual
WARNING
THE VOLTAGE USED MUST BE THE SAME
AS SPECIFIED ON THIS CALCULATOR.
USING THIS CALCULATOR WITH A HIGHER
VOLTAGE THAN THAT WHICH IS SPECIFIED
IS DANGEROUS AND MAY RESULT IN A FIRE
OR OTHER TYPE OF ACCIDENT CAUSING
DAMAGE. WE ARE NOT RESPONSIBLE FOR
ANY DAMAGE RESULTING FROM USE OF
THIS CALCULATOR WITH A VOLTAGE
OTHER THAN THAT WHICH IS SPECIFIED.
8
Page 11

IN CASE OF ABNORMAL CONDITIONS
When this unit is exposed to strong RF noise and/
or extreme physical shock during the operation, or
when the power cord is plugged into the AC outlet,
the unit may start functioning abnormally which, in
some rare occasion all keys - including the power
key and the key - cease to respond.
If such abnormal conditions are observed, unplug
the AC cord from the socket. Keep the unit
unplugged for about 5 seconds, reconnect the AC
plug, then turn on the power.
9
Page 12
DEUTSCH
HINWEISE ZUM BETRIEB
Um störungsfreien Betrieb dieses SHARPRechners sicherzustellen, beachten Sie bitte die
folgenden Punkte:
1. Den Rechner nicht an Orten aufbewahren, an
denen er extremen Temperaturschwankungen,
Feuchtigkeit oder Staub ausgesetzt ist.
2. Zum Reinigen des Rechners ein trockenes,
weiches Tuch benutzen. Keine Lösungsmittel
oder feuchten Lappen verwenden.
3. Da dieses Produkt nicht wasserdicht ist, sollten
Sie es nicht an Orten benutzen oder lagern, die
extremer Feuchtigkeit ausgesetzt sind. Schützen
Sie das Gerät vor Wasser, Regentropfen,
Sprühwasser, Saft, Kaffee, Dampf, Schweiß
usw., da der Eintritt von irgendwelchen
Flüssigkeit zu Funktionsstörungen führen kann.
4. Sollte eine Reparatur erforderlich sein, wenden
Sie sich dazu bitte stets an einen SHARPFachhändler, eine von SHARP autorisierte
Reparaturwerkstatt oder eine SHARPKundendienststelle.
5. Wenn Sie das Netzkabel von der Steckdose
abtrennen, um die Stromversorgung vollständig
zu unterbrechen, wird der aktuell gespeicherte
Wechselkurs gelöscht.
6. Das Netzkabel nicht um das Gerät wickeln oder
anderweitig gewaltsam verbiegen oder
verdrehen.
INHALT
• BETRIEBSTASTEN......................................... 11
• ERSETZEN DER TINTENROLLE................... 13
• ERSETZEN DER PAPIERROLLE................... 15
• FEHLER ..........................................................16
• TECHNISCHE DATEN .................................... 16
• BEI FUNKTIONSPROBLEMEN ......................17
• RECHNUNGSBEISPIELE ............................... 82
• EURO-UMRECHNUNG .................................. 96
•
KOSTEN/VERKAUF/SPANNE-RECHNUNG ..
SHARP übernimmt keine Verantwortung oder
Haftung für irgendwelche zufälligen oder aus
der Verwendung folgenden wirtschaftlichen oder
sachlichen Schäden, die aufgrund der falschen
Verwendung bzw. durch Fehlfunktionen dieses
Gerätes und dessen Zubehör auftreten,
ausgenommen diese Haftung ist gesetzlich
festgelegt.
10
Seite
99
Page 13
BETRIEBSTASTEN
GT •
RATE
SET
OFF • P P•IC
“OFF”: Strom AUS
“•”: Strom EIN. Nicht-Drucken gewählt.
“P”: Strom EIN. Drucken gewählt.
“P•IC”: Strom EIN. Drucken und Postenzähler
Hinweis: Der Zähler umfasst maximal 3 Stellen (bis
Beispiel: Rundungsschalter auf “2” stellen.
4 ÷ 9 = 0.444 ... , 5 ÷ 9 = 0.555 ...
ON
EIN/AUS-SCHALTER;
WAHLSCHALTER FÜR DRUCKEN/
POSTENZÄHLER:
gewählt.
Bei Additionen bzw. Subtraktionen wird die
Postenanzahl mit jedem Drücken von
um 1 erhöht und mit jedem Drücken von
um 1 vermindert.
• Der Zählerstand wird ausgedruckt, wenn
der Rechner das Ergebnis berechnet hat.
• Durch Drücken von , wird der
Zählerstand gelöscht.
zu ±999). Wenn dieses Maximum
überschritten wird, beginnt der Zähler
wieder von Null.
RUNDUNGSSCHALTER
4 9 5 9
0.45 0.56
5/4 0.44 0.56
0.44 0.55
Hinweis: Aufeinanderfolgende Berechnungen mit
oder werden als Fließpunkt-
operationen ausgeführt.
Wenn der Dezimalwahlschalter auf “F” gestellt ist,
wird das Ergebnis stets abgerundet ( ).
WAHLSCHALTER FÜR GESAMTSUMME/
RATENEINSTELLUNG:
“GT”: Gesamtsumme
“•”: Neutral
“RATE SET”: Rateneinstellung
• Zuerst die Umwandlungsrate eingeben, dann
drücken.
• Es können maximal 6 Stellen gespeichert werden
(der Dezimalpunkt wird nicht als Stelle mitgezählt).
• Es kann nur eine Rate gespeichert werden. Durch
Eingeben einer neuen Rate wird die vorherige
gelöscht.
11
Page 14
F 6 3 2 1 0 A
DEZIMAL/ADDITIONSHILFEWAHLSCHALTER:
“6 3 2 1 0”: Zum Voreinstellen der Anzahl im
Ergebnis erscheinender Dezimalstellen.
“F”:Für Darstellung des Ergebnisses im
Fließpunkt-Dezimalsystem.
“A”: Bei Additionen und Subtraktionen wird der
Dezimalpunkt automatisch vor die von der
niedrigsten Stelle gesehen zweite Stelle der
eingegebenen Zahl gesetzt. Mit der
Additionshilfe können Additionen und
Subtraktionen von Zahlen ohne Eingabe eines
Dezimalpunktes ausgeführt werden.
Durch Verwendung von , und wird
die Additionshilfe automatisch übergangen und
das Ergebnis mit korrekter Dezimalpunktsetzung ausgedruckt.
PAPIERVORSCHUBTASTE
NICHT-RECHNEN/ZWISCHENSUMMETASTE
LÖSCHEN/EINGABE LÖSCHEN-TASTE
SUMME-TASTE
GLEICHTASTE
VORZEICHENWECHSEL-TASTE:
Zum Umkehren des Vorzeichens einer Zahl (d.h.
positiv in negativ oder negativ in positiv).
SPEICHERABRUF- UND SPEICHER
LÖSCHEN-TASTE
SPEICHERABRUF-TASTE
UMRECHNUNGSTASTE (IN EINE
LANDESWÄHRUNG)
UMRECHNUNGSTASTE (IN DIE EUROWÄHRUNG)
GESAMTSUMME-TASTE
KOSTENPREIS-EINGABETASTE:
Zum Eingeben des Kostenpreises (Einstandspreis)
drücken.
VERKAUFSPREIS-EINGABETASTE:
Zum Eingeben des Verkaufspreises drücken.
SPANNE-EINGABETASTE:
Zum Eingeben der Spanne drücken.
12
Page 15
ANZEIGE
Anzeigeformat:
Symbole:
M:Erscheint, wenn eine Zahl im Speicher
gespeichert ist.
–:Erscheint bei negativen Zahlen.
• : Erscheint, wenn eine Zahl im Gesamtsumme-
Speicher gespeichert ist.
E:Erscheint, wenn ein Überlauf oder sonstiger
Fehler aufgetreten ist.
* Obwohl hier zur besseren Erklärung alle Symbole
dargestellt werden, erscheinen nicht alle Symbole
gleichzeitig auf der Anzeige.
ERSETZEN DER TINTENROLLE
Wenn der Ausdruck undeutlich wird, obwohl die
Farbrolle richtig eingesetzt ist, sollte diese
ausgetauscht werden.
Tintenrolle: Typ EA-772R
WARNUNG
DAS DRUCKWERK KANN ERNSTLICH
BESCHÄDIGT WERDEN, WENN VERSUCHT
WIRD, EINE VERBRAUCHTE TINTENROLLE
MIT TINTE AUFZUFÜLLEN ODER EINE NICHT
ZUGELASSENE TINTENROLLE ZU
VERWENDEN.
1) Den Ein/Aus-Schalter auf “OFF” (Aus) stellen.
2) Die Druckwerkabdeckung entfernen. (Abb. 1)
3) Die Tintenrolle oben anfassen und entnehmen,
indem Sie sie zu sich und dann nach oben
ziehen. (Abb. 2)
4) Die neue Tintenrolle korrekt positioniert
einsetzen und sich noch einmal vergewissern,
dass die Rolle fest sitzt.
5) Die Druckwerkabdeckung wieder anbringen.
13
Page 16
3) Eine kleine Bürste (z.B. Zahnbürste) locker
gegen das Typenrad halten und dieses durch
Drücken von reinigen.
4) Tintenrolle und Druckwerkabdeckung wieder
anbringen.
Abb. 1 Abb. 2
Abb. 3
Reinigen des Druckwerks
Falls der Ausdruck nach längerem Gebrauch
unscharf wird, sollte nach folgender Anleitung
das Typenrad gereinigt werden.
1) Druckwerkabdeckung und Tintenrolle entfernen.
2) Die Papierrolle einsetzen und das Papier
vorlaufen lassen, bis der Anfanag auf der
Vorderseite des Druckwerks erscheint.
Hinweis: • Die Druckwalze nicht manuell bewegen,
dies führt zur Beschä digung des
Druckers.
14
Page 17
ERSETZEN DER PAPIERROLLE
Niemals eine Rolle mit gerissenem Papier
einsetzen. Dies könnte einen Papierstau
verursachen.
Immer zuerst die Vorderkante des Papiers mit
einer Schere gerade schneiden.
1) Das Papier mit der Vorderkante in den Schlitz
einsetzen. (Abb. 1)
2) Das Gerät einschalten und das Papier durch
Drücken von zuführen. (Abb. 2)
3) Den am Gerät angebrachten Metall-Papierhalter
anheben und die Papierrolle auf den Papierhalter
schieben. (Abb. 3)
Abb. 1
Abb. 2 Abb. 3
DAS PAPIER NICHT IN RÜCKWÄRTSRICHTUNG ZIEHEN. DAS DRUCKWERK KÖNNTE
DADURCH BESCHÄDIGT WERDEN.
15
Page 18
FEHLER TECHNISCHE DA TEN
In einer Reihe verschiedener Situationen können
Überlauf oder Fehlerzustände auftreten. In solchen
Fällen wird “E” angezeigt. Der Speicherinhalt zum
Zeitpunkt des Fehlers bleibt dabei erhalten.
Bei Anzeige von “0䡠E” bei einem Fehler wird in Rot
“– – – – – – –” ausgedruckt. Zum Beheben des
Fehlerzustands muss gedrückt werden.
In seltenen Fällen kann auch vorkommen, dass der
laufende Druckvorgang stoppt und “E” im Display
erscheint. Dies stellt keine Störung dar, sondern tritt
auf, wenn der Rechner starker elektromagnetischer
Beeinflussung oder statischer Elektrizität von
externen Quellen ausgesetzt ist. In solchen Fällen
bitte drücken und die Berechnung noch einmal
ab Anfang neu durchführen.
Fehlerbedingungen:
1. Wenn der ganzzahlige Teil des Ergebnisses 12
Stellen überschreitet.
2. Wenn der ganzzahlige Teil des Speicherinhalts
12 Stellen überschreitet (z.B. 999999999999
1 )
3. Wenn eine Zahl durch Null dividiert wird (z.B. 5
0 )
Kapazität: 12 Stellen
Stromversorgung: Ws 220V–230V / 50Hz
DRUCKWERK
Prinzip: Mechanischer Drucker
Druckgeschwindigkeit: Ca. 2,1 Zeilen/Sek.
(bei 25 °C Temperatur und
Drucken von “741.9 + ”.
Die Druckgeschwindigkeit
schwankt je nach
Reihenzahl und
gedrucktem Zifferntyp.)
Papierrolle: 57 mm - 58 mm breit
Betriebstemperatur: 0 °C bis -40 °C
Leistungsaufnahme: 41 mA
Abmessungen: 193 mm (B) × 256 mm (T)
Gewicht: Ca. 1,0 kg
Zubehör: 1 Papierrolle, 1 Tintenrolle
Geräuschpegel: 58 dB (Drucken),
16
80 mm ø (max.)
× 62,5 mm (H)
(eingesetzt), Bedienungsanleitung
gemessen nach DIN
45635
Page 19

Sicherheitschinweise: Die versorgende Steck-
dose muß nahe am Gerät
angebracht und leicht
zugänglich sein.
WARNUNG
DIE VERWENDETE STROMSPANNUNG
MUSS MIT DER AUF DEM RECHNER
ANGEGEBENEN ÜBEREINSTIMMEN. ES IST
GEFÄHRLICH, DEN RECHNER MIT EINER
HÖHEREN STROMSPANNUNG ALS DER AUF
DEM GERÄT ANGEGEBEN ZU BETREIBEN.
DIES KANN ZU FEUER ODER ANDEREN
UNFÄLLEN MIT SCHÄDEN FÜHREN. DER
HERSTELLER IST NICHT VERANTWORTLICH FÜR SCHÄ DEN, DIE DURCH DIE
VERWENDUNG DES RECHNERS MIT EINER
ANDEREN ALS DER VORGESCHRIEBENEN
STROMSPANNUNG VERURSACHT
WERDEN.
BEI FUNKTIONSPROBLEMEN
Wenn das Gerät bei der Benutzung starken HFStörungen und/oder heftigen Erschütterungen
ausgesetzt ist und beim Anschließen des
Netzkabels an die Netzsteckdose können
Funktionsstörungen auftreten, bei denen in seltenen
Fä llen auch sämtliche Bedienelementeeinschließlich Ein/Aus-Schalter und -Taste ausfallen.
In solchen Fällen bitte den Netzstecker ziehen und
das Gerät mindestens ca. 5 Sekunden vom Netz
getrennt lassen. Dann den Netzstecker wieder
anschließen und das Gerät einschalten.
17
Page 20
FRANÇAIS
PRÉCAUTIONS
Afin d’assurer un fonctionnement sans ennui de la
calculatrice SHARP, veuillez prendre les
précautions suivantes:
1. Ne pas laisser la calculatrice dans les endroits
sujets à de forts changements de température,
à l’humidité, et à la poussière.
2. Pour le nettoyage de la calculatrice, utiliser un
chiffon doux et sec. Ne pas utiliser de solvants
ni un chiffon humide.
3. Cet appareil n’étant pas étanche, il ne faut pas
l’utiliser ou l’entreposer dans des endroits où il
risquerait d’être mouillé, par exemple par de
l’eau. La pluie, l’eau brumisée, les jus de fruits,
le café, la vapeur, la transpiration, etc. sont à
l’origine de dysfonctionnements.
4. Si une réparation s’avérait nécessaire, confier
l’appareil à un distributeur agréé par SHARP et
assurant l’entretien, à un service d’entretien
agréé par SHARP, ou à un centre d’entretien
SHARP.
5. Si la fiche du cordon d’alimentation est
débranchée de telle sorte que l’alimentation
électrique se trouve complètement coupée, le
taux de conversion présentement mis en
mémoire est effacé.
6. Ne pas entourer le cordon électrique autour du
corps de l’appareil ou ne pas le courber ou le
tordre fortement.
Conforme au règlement (CE) no 1103/97
TABLE DES MATIÈRES
Page
• LES COMMANDES ......................................... 19
• REMPLACEMENT DU CYLINDRE
ENCREUR ....................................................... 21
• REMPLACEMENT DU ROULEAU DE
PAPIER............................................................ 23
• ERREURS .......................................................24
• FICHE TECHNIQUE ....................................... 24
• EN CAS D’ANOMALIE ....................................25
• EXEMPLES DE CALCULS ............................. 83
• CONVERSION EURO ..................................... 96
• CALCUL DU PRIX DE REVIENT / VENTE /
MARGE............................................................ 99
SHARP ne peut pas être tenu responsable pour
tout incident ou dommage économique
consécutif ou matériels, causés par une
mauvaise utilisation et/ou un mauvais
fonctionnement de cet appareil et de ses
périphériques, à moins qu’une telle
responsabilité ne soit reconnue par la loi.
18
Page 21
LES COMMANDES
GT •
RATE
SET
OFF • P P•IC
“OFF”: Mise hors tension.
“•”: Mise sous tension. Pour choisir le mode de
“P”: Mise sous tension. Pour choisir le mode de
“P•IC”: Mise sous tension. Pour choisir le mode
Note: La capacité du compteur est de 3 chiffres
ON
INTERRUPTEUR; SÉLECTEUR DE
MODE D’IMPRESSION / COMPTAGE
D’ARTICLES:
non impression.
impression.
d’impression et de comptage d’articles.
Lors des additions et des soustractions,
chaque fois que l’on appuie sur , une
unité est ajoutée au compteur d’articles et
chaque fois que l’on appuie sur , une
unité est retranchée.
• Le compte est imprimé lorsque le résultat
calculé est obtenu.
• Le compteur revient à zéro en agissant
sur , .
maximum (jusqu’à ±999). Si le compte
dépasse ce maximum, le compteur repartira
de zéro.
SÉLECTEUR D’ARRONDI:
Exemple: Placer le sélecteur de décimale sur 2.
4 ÷ 9 = 0.444 ... , 5 ÷ 9 = 0.555 ...
4 9 5 9
0.45 0.56
5/4 0.44 0.56
0.44 0.55
Note: La virgule flotte durant un calcul successif en
utilisant ou .
Si le sélecteur de décimale est sur la position “F”,
le résultat est toujours arrondi à la valeur inférieure
( ).
SÉLECTEUR DE MODE DE TOTAL
GÉNÉRAL / RÉGLAGE DE TAUX:
“GT”: Total général
“•”: Neutre
“RATE SET”: Réglage du taux
• Entrez d’abord le taux de conversion, puis
appuyez sur .
• 6 chiffres, au plus, peuvent être mis en mémoire
(le point décimal ne compte pas pour un chiffre).
• Un seul taux peut être mémorisé; la mise en
mémoire d’un taux efface le précédent.
19
Page 22
F 6 3 2 1 0 A
SÉLECTEUR DE MODE DÉCIMAL /
ADDITION:
“6 3 2 1 0”: Il préétablit le nombre de décimales
dans le résultat.
“F”: Le résultat est affiché dans le système à virgule
flottante.
“A”: Lors des opérations d’addition et de soustrac-
tion, le point décimal est automatiquement
placé à gauche du 2ème chiffre en partant de
la droite. Le mode addition permet l’addition et
la soustraction de nombres sans que la frappe
du point décimal soit nécessaire. L’emploi des
, et annule automatiquement le mode
addition et permet l’impression du résultat, le
point décimal étant placé à l’endroit approprié.
TOUCHE DE MONTÉE DE PAPIER
TOUCHE DE NON ADDITION / TOTAL
PARTIEL
TOUCHE EFFACEMENT / D’EFFACEMENT
DES ENTRÉES
TOUCHE TOTAL
TOUCHE SIGNE ÉGAL
TOUCHE DE CHANGEMENT DE SIGNE:
Permet de changer le signe algébrique d’un nombre
(c.à.d. de positif à négatif ou de négatif à positif).
TOUCHE DE RAPPEL ET D’EFFACEMENT
DE LA MÉMOIRE
TOUCHE DE RAPPEL DE LA MÉMOIRE
TOUCHE DE CONVERSION (EN MONNAIE
LOCALE)
TOUCHE DE CONVERSION (EN EURO)
TOUCHE DE TOTAL GÉNÉRAL
TOUCHE D’ENTRÉE DU PRIX DE
REVIENT:
Appuyez sur cette touche pour entrer le prix de
revient.
TOUCHE D’ENTRÉE DU PRIX DE VENTE:
Appuyez sur cette touche pour entrer le prix de
vente.
TOUCHE D’ENTRÉE DE LA MARGE:
Appuyez sur cette touche pour entrer la marge.
20
Page 23

AFFICHAGE
Format d’affichage:
Symboles:
M:Visualisé lorsqu’un nombre est mis en
mémoire.
–:Visualisé lorsque le nombre est négatif.
• : Apparaît lorsqu’un nombre se trouve dans la
mémoire du total général.
E:Visualisé en cas d’erreur ou de dépasse-ment
de capacité.
* Bien que tous les symboles sont présentés ici
dans un souci d’information, ils ne s’affichent pas
tous sur l’écran simultanément.
REMPLACEMENT DU CYLINDRE ENCREUR
Si l’impression est floue bien que le cylindre encreur
soit dans la position convenable, remplacer ce
cylindre.
Cylindre encreur: Type EA-772R
AVERTISSEMENT
LE FAIT D’APPLIQUER DE L’ENCRE A UN
CYLINDRE ENCREUR ABÎME, OU
D’UTILISER UN CYLINDRE ENCREUR NONAPPROUVE PEUT CAUSER DE GRAVES
DÉGÂTS A L’IMPRIMANTE.
1) Placer l’interrupteur sur la position OFF.
2) Retirer le couvercle de l’imprimante. (Fig. 1)
3) Saisir le rouleau encreur à la partie supérieure
puis le tirer à soi et vers le haut en exerçant une
pression. (Fig. 2)
4) Installer le nouveau cylindre encreur dans la
position correcte. S’assurer que le cylindre soit
bien en place. (Fig. 3)
5) Remettre en place le couvercle de l’imprimante.
21
Page 24

3) Placer une petite brosse (telle qu’une brosse à
dents) sur la roue imprimante et la nettoyer en
appuyant sur .
4) Remettre le cylindre encreur et le couvercle de
l’imprimante en place.
Fig. 1 Fig. 2
Fig. 3
Nettoyage du mécanisme d’impression
Si l’impression devient faible après une longue
période d’utilisation, nettoyer la roue imprimante
en suivant les instructions ci-dessous:
1) Retirer le couvercle de l’imprimante et le cylindre
encreur.
2) Mettre le rouleau de papier en place et faire
avancer le papier jusqu’à ce qu’il sorte par l’avant
du mécanisme d’impression.
Note: • Éviter de faire tourner la roue imprimante
à la main, l’imprimante pourrait être
endommagée de cette manière.
22
Page 25
REMPLACEMENT DU ROULEAU DE PAPIER
Ne tentez pas d’introduire le papier s’il est
déchiré. En procédant ainsi, vous risquez un
bourrage.
Avant tout, coupez soigneusement le début de
la bande au moyen d’une paire de ciseaux.
1) Engagez l’extrémité du rouleau de papier dans
l’ouverture. (Fig. 1)
2) Mettez l’appareil sous tension et faites avancer
le papier en appuyant sur . (Fig. 2)
3) Soulevez le support métallique pour papier et
introduisez le rouleau de papier dans le support
pour papier. (Fig. 3)
Fig. 1
Fig. 2 Fig. 3
NE PAS TIRER LE PAPIER EN ARRIÈRE, CAR
CELA POURRAIT ENDOMMAGER LE
MÉCANISME IMPRIMANT.
23
Page 26

ERREURS FICHE TECHNIQUE
Il existe plusieurs cas qui entraînent un
dépassement de capacité ou une situation
d’erreur. Si cela se produit, “E” sera affiché. Le
contenu de la mémoire au moment de l’erreur est
préservé.
Si un “0䡠E” s’affiche au moment de l’erreur, “– – – –
– – –” s’imprime en rouge et il faut utiliser pour
effacer l’erreur.
De plus, dans certains cas rares, l’impression peut
s’arrêter au milieu et l’indication “E” apparaître sur
l’affichage. Ce n’est pas un mauvais fonctionnement
mais un problème qui se produit quand la calculatrice est exposée à du bruit électromagnétique
important ou à de l’électricité statique d’une source
extérieure. Si cela se produit, appuyez sur la touche
puis recommencez le calcul du début.
Conditions d’erreur:
1. Lorsque la partie entière d’un résultat dépasse
12 chiffres.
2. Lorsque la partie entière du nombre en mémoire
excède 12 chiffres.
(Ex. 999999999999 1 )
3. Lorsqu’un nombre est divisé par zéro.
(Ex. 5 0 )
Capacité de travail: 12 chiffres
Alimentation: CA: 220V–230V, 50Hz
SECTION IMPRESSION
Imprimante: Imprimante mécanique
Vitesse d’impression: Env. 2,1 lignes/s
(À la température de 25°C,
quand “741.9 + ” est
imprimé. La vitesse d’impression varie en fonction
du nombre de lignes et de
la police de caractères à
imprimer.)
Papier d’impression: Largeur: 57 mm – 58 mm
Diamètre (maxi.): 80 mm
Température: 0°C – 40°C
Consommation: 41 mA
Dimensions: 193 mm (L) × 256 mm (P)
× 62,5 mm (H)
Poids: Env. 1,0 kg
Accessoires: 1 rouleau de papier, 1
cylindre encreur (installé),
et mode d’emploi
24
Page 27

ATTENTION
LA TENSION DU SECTEUR DOIT ÊTRE LA
MÊME QUE CELLE POUR LAQUELLE LA
CALCULATRICE A ÉTÉ CONÇUE.
L’UTILISATION D’UNE TENSION PLUS
ÉLEVÉ E EST DANGEREUSE ET PEUT
PROVOQUER UN INCENDIE OU UN
ACCIDENT. SHARP NE PEUT PAS ÊTRE
TENUE RESPONSABLE DES DOMMAGES
QUI RÉSULTERAIENT DE L’UTILISATION
D’UNE TENSION SECTEUR PLUS ÉLEVÉE
QUE CELLE POUR LAQUELLE LA
CALCULATRICE A ÉTÉ CONÇUE.
EN CAS D’ANOMALIE
Lorsque l’appareil est soumis à un bruit
radiofréquence puissant ou violemment heurté
tandis qu’il est en fonctionnement, ou encore au
moment où la fiche du cordon d’alimentation est
branchée sur une prise secteur, il se peut qu’il
présente une anomalie qui se traduit, dans de rares
occasions, par le fait que toutes les touches, y
compris la touche d’alimentation et la touche
cessent de fonctionner.
Dans le cas où une telle anomalie se présente,
débranchez la fiche du cordon d’alimentation au
niveau de la prise secteur. Conservez l’appareil
débranché pendant 5 secondes environ puis
rebranchez la fiche du cordon d’alimentation et
remettez l’appareil sous tension.
25
Page 28

ESPAÑOL
NOTAS AL MANEJARLA
A fin de que su calculadora SHARP funcione sin
averías, le recomendamos lo siguiente:
1. Evite dejar la calculadora en ambientes en que
haya cambios de temperatura, humedad y polvo
bastante notables.
2. Al limpiar la calculadora, utilice un paño suave y
seco. No use disolventes ni tampoco un paño
húmedo.
3. Debido a que este producto no es a prueba de
agua, no deberá ser utilizado o guardado en
lugares donde pudiera ser salpicado por líquidos,
por ejemplo agua. Gotas de lluvia, salpicaduras
de agua, jugos o zumos, café, vapor, transpiración, etc. también perjudican el funcionamiento
del producto.
4. Si necesita reparar esta unidad, diríjase sólo a
un distribuidor SHARP, a un centro de servicio
autorizado por SHARP o a un centro de
reparaciones SHARP.
5. Si desconecta el cable de alimentación para
cortar completamente el suministro de
electricidad, el tipo de cambio actualmente
guardado se borrará.
6. No bobine el cable de CA alrededor de la
calculadora, y no lo doble o retuerza a la fuerza.
ÍNDICE
Página
• CONTROLES DE FUNCIONAMIENTO .......... 27
• CAMBIO DEL RODILLO ENTINTADOR ......... 29
• CAMBIO DEL ROLLO DEL PAPEL ................ 31
• ERRORES ....................................................... 32
• ESPECIFICACIONES TÉCNICAS .................. 32
• EN CASO DE CONDICIONES
ANORMALES ..................................................33
• EJEMPLOS DE CÁLCULOS........................... 83
• CONVERSIÓN DE EUROS ............................ 96
• CÁLCULO DE COSTES / VENTAS /
MARGENES ....................................................99
SHARP no será responsable de ningún daño
imprevisto o resultante, en lo económico o en
propiedades, debido al mal uso de este
producto y sus periféricos, a menos que tal
responsabilidad sea reconocida por la ley.
26
Page 29
CONTROLES DE FUNCIONAMIENTO
GT •
RATE
SET
OFF • P P•IC
“OFF”: Apagado (OFF)
“•”: Encendido (ON). Fija el modo de no
“P”: Encendido (ON). Fija el modo de impresión.
“P•IC”: Encendido (ON). Fija el modo de impresión
Nota: El contador tiene una capacidad de un
ON
INTERRUPTOR DE CORRIENTE;
SELECTOR DEL MODO DE
IMPRESIÓN / MODO PARA CONTAR
ARTÍCULOS:
impresión.
y de cuenta de artículos.
En las sumas o restas, cada vez que se
apriete se añadirá 1 al contador de
artículos, y cada vez que se apriete se
restará 1.
• La cuenta queda impresa cuando se
obtiene el resultado calculado.
• Al apretar , se borra el
contenido del contador.
máximo de 3 cifras (hasta ±999). Si la cuenta
excede el máximo, el contador vuelve a
contar partiendo de cero.
SELECTOR DE REDONDEO:
Ejemplo: Fija el selector decimal en 2.
4 ÷ 9 = 0.444 ... , 5 ÷ 9 = 0.555 ...
4 9 5 9
0.45 0.56
5/4 0.44 0.56
0.44 0.55
Nota: El punto (= coma) decimal flota mientras se
hacen cálculos sucesivos usando o .
Si el selector decimal se coloca en “F”, la respuesta
siempre se redondea por defecto ( ).
SELECTOR DEL MODO DE TOTAL
GLOBAL / FIJACIÓN DE TIPOS:
“GT”: Total global
“•”: Neutra
“RATE SET”: Fijación de tasa
• Introduzca el tipo de cambio de adición y luego
pulse .
• Se puede guardar un máximo de 6 dígitos (la
coma decimal no cuenta como un dígito).
• Sólo puede almacenar un tipo. Si introduce un
nuevo tipo, borrará el anterior.
27
Page 30
F 6 3 2 1 0 A
SELECTOR DEL MODO DE DECIMAL /
SUMA:
“6 3 2 1 0”: Prefija el número de lugares decimales
de la respuesta.
“F”: La respuesta aparecerá en la exhibición en el
sistema decimal flotante.
“A”: El punto decimal en los registros de suma y
resta se coloca automáticamente en la
segunda cifra a partir de la cifra más baja del
número registrado. Utilizando el modo de suma
se pueden sumar y restar números sin registrar
el punto decimal. El uso de , y anula
automáticamente el modo de suma e imprime
las respuestas decimalmente correctas.
TECLA DE AVANCE DEL PAPEL
TECLA DE NO SUMA / TOTAL PARCIAL
TECLA DE BORRADO / BORRADO DE
ENTRADA
TECLA TOTAL
TECLA IGUAL
TECLA DE CAMBIO DE SIGNO:
Cambia el signo algebraico de un número (es decir,
de positivo a negativo o de negativo a positivo).
TECLA DE TOTAL Y BORRADO DE
MEMORIA
TECLA DE TOTAL PARCIAL EN MEMORIA
TECLA DE CONVERSIÓN (A UNA
MONEDA NACIONAL)
TECLA DE CONVERSIÓN (A EUROS)
TECLA DE TOTAL GLOBAL
TECLA DE INTRODUCCIÓN DEL PRECIO
DE COSTE:
Pulse esta tecla para introducir el precio de coste.
TECLA DE INTRODUCCIÓN DEL PRECIO
DE VENTA:
Pulse esta tecla para introducir el precio de venta.
TECLA DE INTRODUCCIÓN DEL
MARGEN:
Pulse esta tecla para introducir el margen.
28
Page 31

EXHIBICIÓN
Formato de la exhibición:
CAMBIO DEL RODILLO ENTINTADOR
Si la impresión queda borrosa aunque esté bien
colocado el rodillo entintador, reemplace el rodillo.
Rodillo entintador: Tipo EA-772R
Símbolos:
M:Aparece cuando un número se almacena en
la memoria.
–:Aparece cuando el número es negativo.
• : Aparece cuando un nú mero está en la
memoria de total global.
E:Aparece cuando se detecta un error o se
supera la capacidad.
* Aunque los símbolos disponibles se muestran
aquí a modo de explicación, éstos no aparecerán
en la pantalla simultáneamente.
ADVERTENCIA
ECHANDO TINTA EN UN RODILLO
ENTINTADOR ROTO O USANDO UN
RODILLO ENTINTADOR NO AUTORIZADO
PUEDE CAUSAR DETERIOROS GRAVES EN
LA IMPRESORA.
1) Poner el interruptor de corriente en “OFF”.
2) Sacar la tapa de la impresora. (Fig. 1)
3) Sujete la parte superior del rodillo entintador y
extraiga el rodillo tirando de él hacia usted y
hacia arriba. (Fig. 2)
4) Instalar el nuevo rodillo entintador en la posición
correcta. Cerciorarse de que el rodillo esté
firmemente colocado en su sitio. (Fig. 3)
5) Poner de nuevo en su lugar la tapa de la
impresora.
29
Page 32

Fig. 1 Fig. 2
Fig. 3
Limpieza del mecanismo de impresión
Si la impresión se debilita después de usar la
calculadora durante un largo tiempo, limpiar la
rueda de impresión de acuerdo con el siguiente
procedimiento:
1) Quitar la tapa de la impresora y el rodillo
entintador.
2) Instalar el rollo de papel y hacerlo avanzar hasta
que salga por la parte delantera del mecanismo
de impresión.
3) Apoyar un cepillo pequeño (similar a un cepillo
de dientes) ligeramente sobre la rueda de
impresión y limpiarla apretando .
4) Volver a colocar el rodillo entintador y la tapa de
la impresora.
Nota: • Tratar de no girar la rueda de impresión
manualmente, de lo contrario dañará la
impresora.
30
Page 33

CAMBIO DEL ROLLO DEL PAPEL
Nunca introduzca un rollo de papel roto. Esto
causará atascos del papel.
Corte siempre en primer lugar el borde anterior.
1) Introduzca el borde del papel del rollo de papel
en la abertura. (Fig. 1)
2) Conecte la alimentación y haga avanzar el papel
apretando . (Fig. 2)
3) Levante el soporte metálico para papel
incorporado e introduzca el rollo de papel en el
soporte. (Fig. 3)
Fig. 1
Fig. 2 Fig. 3
NO TIRAR DEL PAPEL HACIA ATRÁS PUES
PUEDE OCASIONAR DAÑOS AL MECANISMO
DE IMPRESIÓN.
31
Page 34

ERRORES ESPECIFICACIONES TÉCNICAS
Existen diversos casos en los que ocurre un
exceso de capacidad o una condición de error. Al
producirse esto, aparecerá “E”. Los contenidos de
la memoria, en el momento del error, quedan
retenidos.
Si, al ocurrir el error, se visualiza el símbolo “0䡠E”,
se imprimirá en rojo “– – – – – – –” y se deberá usar
para borrar la calculadora.
Además, en casos muy raros, la impresión puede
pararse en la mitad, y en el visualizador puede
aparecer la indicación “E”. Esto no significa mal
funcionamiento, sino que se debe a que la
calculadora ha estado expuesta a ruido electromagnético intenso o electricidad estática de una
fuente externa. Cuando ocurra esto, presione la
tecla y después repita el cálculo desde el
principio.
Condiciones de error:
1. Cuando la parte entera de un resultado excede
las 12 cifras.
2. Cuando la parte entera de los contenidos de la
memoria supera las 12 cifras.
(Ej. 999999999999 1 )
3. Cuando se divide un número cualquiera por un
divisor de cero. (Ej. 5 0 )
Capacidad de cálculo: 12 cifras
Alimentación de
corriente: CA: 220V–230V, 50Hz
SECCIÓN DE LA IMPRESORA
Impresora: Impresora mecánica
Velocidad de
impresión: Aprox. 2,1 líneas/seg.
Papel de impresión: 57 mm – 58 mm de ancho,
Temperatura: 0°C – 40°C
Potencia: 41 mA
Dimensiones: 193 mm (An) × 256 mm (P)
Peso: Aprox. 1,0 kg
Accesorios: 1 rollo de papel, 1 rodillo
32
(A una temperatura de
25°C, cuando se imprime
“741.9 + ”. La velocidad de
impresión variará con el
número de filas y los tipos
de figuras que desean
imprimir.)
80 mm de diámetro (máx.)
× 62,5 mm (Al)
entintador (instalado), y
manual de manejo
Page 35

AVISO
EL VOLTAJE UTILIZADO DEBE SER EL
ESPECIFICADO EN ESTA CALCULADORA.
ES PELIGROSO USAR ESTA CALCULADORA
CON UN VOLTAJE SUPERIOR AL
ESPECIFICADO YA QUE PODRÍA
PRENDERSE FUEGO O PRODUCIRSE OTRO
TIPO DE ACCIDENTES CON DAÑOS
PERSONALES. NO NOS HACEMOS
RESPONSABLES DE CUALQUIER DAÑO
QUE PUEDA OCASIONARSE AL UTILIZAR
ESTA CALCULADORA CON UN VOLTAJE
SUPERIOR AL ESPECIFICADO.
EN CASO DE CONDICIONES ANORMALES
Si expone esta unidad a ruido de RF intenso y/o a
golpes fuertes durante la operación, o cuando
enchufe el cable de alimentación en un
tomacorriente de CA, la unidad puede comenzar a
funcionar de forma anormal, por lo que, en algunos
casos raros, todas las teclas – incluyendo la de
alimentación y la tecla – pueden no ofrecer
respuesta.
Si experimenta estas condiciones anormales,
desenchufe el cable de alimentación de CA del
tomacorriente. Deje la unidad desenchufada
durante unos 5 segundos, vuelva a enchufar el
cable de alimentación de CA, y después conecte la
alimentación.
33
Page 36

ITALIANO
NOTE INTRODUTTIVE
Per mantenere questa calcolatrice SHARP nelle
migliori condizioni operative, si consiglia di
osservare le precauzioni seguenti.
1. Non conservare la calcolatrice in luoghi soggetti
a forti variazioni di temperatura, umidi o
polverosi.
2. Per pulire la calcolatrice, usare soltando un
panno morbido ed asciutto. Non usare solventi
e non inumidire il panno.
3. Poiché il prodotto non è impermeabile non
utilizzarlo o riporlo in luoghi in cui si può bagnare.
Anche gocce di pioggia, spruzzi d’acqua, succhi,
caffè, vapore, esalazioni, etc. possono causare
malfunzionamenti.
4. Ove risultino necessari degli interventi tecnici,
rivolgersi esclusivamente ad un rivenditore
SHARP, ad un centro di assistenza autorizzato
SHARP o ad un centro di riparazioni SHARP.
5. Se, per togliere completamente la corrente, viene
scollegato il cavo dell’alimentazione, il tasso di
cambio impostato verrà cancellato.
6. Non arrotolare il cavo di alimentazione intorno
al corpo dell’apparecchio, e non piegare a forza
il cavo stesso ad angoli molto acuti.
INDICE
Pagina
• COMANDI PER L’USO ................................... 35
• SOSTITUZIONE DEL NASTRO
INCHIOSTRATO .............................................. 37
• SOSTITUZIONE DEL ROTOLO DI CARTA.... 39
• ERRORI ........................................................... 40
• DATI TECNICI .................................................40
• IN CASO DI FUNZIONAMENTO
ANORMALE .................................................... 41
• ESEMPI DI CALCOLO .................................... 84
• CONVERSIONE DI EURO.............................. 96
• CALCOLO DEL COSTO, DEL PREZZO DI
VENDITA E DEL PROFITTO........................... 99
SHARP respinge ogni responsabilità per
qualsiasi incidente o danno economico o
materiale causato da errato impiego e/o
malfunzionamento di questo prodotto e delle
sue periferiche salvo che la responsabilità sia
riconosciuta dalla legge.
34
Page 37

COMANDI PER L’USO
GT •
RATE
SET
OFF • P P•IC
“OFF”: Apparecchio spento
“•”: Apparecchio acceso. Disposto su modalità
“P”: Apparecchio acceso. Disposto su modalità
“P•IC”: Apparecchio acceso. Disposto su modalità
Nota: Il contatore ha una capacità massima di 3
ON
INTERRUTTORE; SELETTORE FRA
MODALITÀ DI STAMPA E MODALITÀ
DI CONTADDENDI:
di non-stampa.
di stampa.
di stampa e di contaddendi.
Per l’addizione e la sottrazione, ad ogni
successiva pressione del tasto si
aggiunge una unità alla cifra di conteggio
degli addendi, e ad ogni successiva
pressione del tasto viene sottratta una
unità alla cifra di conteggio degli addendi.
• Il conteggio viene stampato al momento
della visualizzazione del risultato del
calcolo.
• L’indicazione del contatore può essere
cancellata agendo una volta sul tasto
o due volte sul tasto .
cifre (fino a ±999). Superata questa cifra il
conteggio ricomincia da zero.
SELETTORE DI ARROTONDAMENTO:
Esempio: Posizionare il selettore della posizione
della virgola decimale su 2.
4 ÷ 9 = 0,444 ... , 5 ÷ 9 = 0,555 ...
4 9 5 9
0.45 0.56
5/4 0.44 0.56
0.44 0.55
Nota: Eseguendo dei calcoli in successione per
mezzo dei tasti o la virgola decimale
cambia di posizione in relazione al calcolo.
Se il selettore di posizione della virgola decimale è
posizionato su “F”, il risultato viene sempre
arrotondato ( ).
SELETTORE FRA LA MODALITÀ DI
TOTALE FINALE E LA MODALITÀ DI
PREDISPOSIZIONE DELLA
PERCENTUALE:
“GT”: Totale finale
“•”: Posizione neutra
“RATE SET”: Predisposizione della percentuale
35
Page 38

• Immettere il tasso di cambio, quindi premere .
• È possibile memorizzare un massimo di 6 cifre (il
separatore decimale non viene considerato una
cifra).
• Si può memorizzare una sola percentuale.
Memorizzandone una nuova percentuale, quella
precedente viene cancellata.
F 6 3 2 1 0 A
SELETTORE FRA LA MODALITÀ DEI
DECIMALE E LA MODALITÀ DI
ADDIZIONE:
“6 3 2 1 0”: Determina il numero di cifre decimali
del risultato.
“F”: Con il selettore siu questa posizione, i risultati
vengono visualizzati con il sistema a virgola
mobile.
“A”: La virgola decimale per le addizioni e
sottrazioni viene posizionata automaticamente
sulla seconda cifra a partire dalla cifra più
bassa del numero digitato. L’impiego della
modalità di addizione permette l’addizione e la
sottrazione di numeri senza la digitazione della
virgola decimale. L’uso dei tasti , e
esclude automaticamente tale modalità di
addizione, e i risultati vengono quindi stampati
correttamente, con la virgola nella posizione
determinata dalla posizione del selettore
corrispondente.
TASTO D’AVANZAMENTO DELLA CARTA
TASTO DI NON ADDIZIONE O DI TOTALE
PARZIALE
TASTO DI CANCELLAZIONE O DI
CANCELLAZIONE DELLA DIGITAZIONE
TASTO DEL TOTALE
TASTO DI UGUALE
TASTO DI INVERSIONE DEL SEGNO:
Per cambiare il segno algebrico di un numero (da
positivo a negativo o viceversa).
TASTO DI RICHIAMO E CANCELLAZIONE
DELLA MEMORIA
TASTO DI RICHIAMO DELLA MEMORIA
TASTO CONVERSIONE (IN UNA VALUTA
NAZIONALE)
TASTO CONVERSIONE (IN EURO)
TASTO DEL TOTALE GENERALE
TASTO DI DIGITAZIONE DEL COSTO:
Agire su questo tasto prima di digitare la cifra del
costo.
36
Page 39

TASTO DI DIGITAZIONE DEL PREZZO DI
VENDITA:
Agire su questo tasto prima di digitare la cifra del
prezzo di vendita.
TASTO DI DIGITAZIONE DEL PROFITTO:
Agire su questo tasto prima di digitare la cifra del
profitto desiderato.
DISPLAY
Formato del display:
Simboli:
M:Compare quando si inserisce un numero in
memoria.
–:Compare davanti ad un numero negativo.
• : Compare quando vi è un totale generale in
memoria.
E:Compare in caso di errori operativi, o quando
il numero di cifre da visualizzare supera il limite
massimo consentito.
* Tutti i simboli disponibili sono stati visualizzati qui
insieme a scopo esemplificativo, ma i simboli
stessi non compaiono mai simultaneamente sullo
schermo.
SOSTITUZIONE DEL NASTRO INCHIOSTRATO
Se, con il nastro inchiostrato correttamente inserito,
la stampa risulta sfocata procedere alla sostituzione
del nastro.
Rullo inchiostrato: Tipo EA-772R
ATTENZIONE
L’AGGIUNTA DI INCHIOSTRO AL RULLO
INCHIOSTRATO O L’USO DI UN RULLO
DIVERSO DA QUELLO RACCOMANDATO
PUO’ CAUSARE GRAVI DANNI ALLA
STAMPANTE.
1) Spegnere la calcolatrice (interruttore di
accensione su “OFF”).
2) Togliere il coperchio della stampante (fig. 1).
3) Afferrare la parte superiore del nastro
inchiostrato e togliere il rullo stesso tirandolo
prima verso se stessi e poi verso l’alto (fig. 2).
4) Installare il nuovo rullo inchiostrato nella sua
posizione corretta. Verificare che il rullo del
nastro inchiostrato sia inserito saldamente e ben
a fondo (fig. 3).
5) Rimettere il coperchio della stampante.
37
Page 40

Fig. 1 Fig. 2
Fig. 3
Pulizia del meccanismo di stampa
Se dopo un certo tempo d’uso della calcolatrice
la stampa diviene opaca, pulire il cilindro di
stampa nel modo descritto qui di seguito:
1) Togliere il coperchio della stampante ed il nastro
inchiostrato.
2) Inserire il rotolo di carta e far avanzare la carta
fino a quando l’estremità fuoriesce sul davanti
del meccanismo di stampa.
3) Appoggiare una piccola spazzola (tipo
spazzolino da denti) leggermente a contatto del
cilindro di stampa e pulire il cilindro facendolo
avanzare tramite azione sul tasto .
4) Rimettere il nastro inchiostrato e il coperchio
della calcolatrice.
Note: • Non far girare a mano il cilindro di stampa;
ciò potrebbe causare danni all’apparechio.
38
Page 41

SOSTITUZIONE DEL ROTOLO DI CARTA
Non inserire assolutamente rotoli di carta se la
carta stessa risulta strappata. Ciò può causare
l’inceppamento della carta. Prima di inserire la
carta, tagliare sempre con le forbici il bordo
d’inserimento.
1) Inserire nell’apertura il bordo di guida del rotolo
di carta (Fig. 1).
2) Attivare l’apparecchio e far avanzare la carta
agendo sul tasto (Fig. 2).
3) Sollevare il portacarta di metallo e inserire il
rotolo di carta nel supporto portacarta (Fig. 3).
Fig. 1
Fig. 2 Fig. 3
NON FAR RETROCEDERE IL MOVIMENTO
DEL ROTOLO DI CARTA. CIÒ POTREBBE
DANNEGGIARE IL MECCANISMO DI STAMPA.
39
Page 42

ERRORI DATI TECNICI
In vari casi possono verificarsi eccedenze nel
numero di cifre visualizzabile sul quadrante, o altre
condizioni di errore. In tali casi sul quadrante
compare l’indicazione “E”. Il contenuto della
memoria fino al momento in cui si verifica l’errore
viene mantenuto.
Se, quando si verifica l’errore, compare il messaggio
“0䡠E” e viene stampata in rosso l’indicazione “– – –
– – – –” si deve usare il tasto per azzerare la
calcolatrice.
Inoltre, in casi molto rari, la stampa in corso può
interrompersi, e sul quadrante comparire il simbolo
“E”. Non si tratta di una disfunzione ma di un
fenomeno che si verifica quando la calcolatrice si
trova esposta a forti elettromagnetismi, o elettricità
statica, da sorgenti esterne circostanti. In tali casi,
agire sul tasto per ripristinare la calcolatrice e
ripetere il calcolo dall’inizio.
Condizioni d’errore:
1. Se la parte intera di un risultato supera le 12
cifre.
2. Cuando la parte entera de los contenidos de la
Se la parte intera del contenuto della memoria
consiste in più di 12 cifre.
(Es. 999999999999 1 )
3. Dividendo un qualsiasi numero per zero. (Es. 5
0 )
Capacità di calcolo: 12 cifre
Alimentazione: a corrente alternata a
220V–230V, 50 Hz
SEZIONE DELLA STAMPANTE
Stampante: Stampante meccanica
Velocità di stampa: Ca. 2,1 righe/sec. (alla
temperatura di 25°C,
quando viene stampata
l’indicazione “741.9 + “. La
velocità di stampa può
variare in relazione al
numero di righe ed al tipo
di cifre da stampare)
Carta da stampa: 57 – 58 mm di larghezza
80 mm diametro esterno
(max.)
Gamma utile delle temperature
di funzionamento: da 0°C a 40°C
Consumo: 41 mA
Dimensioni: 193 (largh.) × 256 (prof.) ×
62,5 (alt.) mm
Peso: ca. 1,0 kg
Accessori: 1 rotolo di carta, 1 nastro
inchiostrato (montato),
manuale di istruzioni
40
Page 43

AVVERTENZA
LA TENSIONE UTILIZZATA DEVE ESSERE
QUELLA SPECIFICATA SULLA
CALCOLATRICE. L’USO DELLA
CALCOLATRICE CON UNA TENSIONE
MAGGIORE DI QUELLA SPECIFICATA È
PERICOLOSO E PUÒ PROVOCARE INCENDI
O ALTRI TIPI DI INCIDENTI CHE CAUSANO
DANNI. NON CI RITERREMO RESPONSABILI
PER NESSUN DANNO RISULTANTE DA UN
USO DELLA CALCOLATRICE CON TENSIONE
DIVERSA DA QUELLA SPECIFICATA.
IN CASO DI FUNZIONAMENTO ANORMALE
Se la calcolatrice si trova esposta e forti disturbi di
origine elettromagnetica o in caso di urti
particolarmente violenti, o nel momento in cui il cavo
di alimentazione viene inserito nella presa di
corrente alternata di rete, la calcolatrice può iniziare
a funzionare in modo anormale, al punto che, ma in
casi molto rari, tutti i tasti, ivi compresi il tasto di
accensione ed il tasto di cancellazione possono
non rispondere all’azione di pressione esercitata
sugli stessi.
In tali casi staccare il cavo di alimentazione dalla
presa di corrente alternata di rete, attendere circa
5 secondi e procedere nuovamente al collegamento
alla sorgente di alimentazione, prima di riaccendere
l’apparecchio.
41
Page 44

SVENSKA
För att försäkra långvarig och felfri användning av
denna räknare från SHARP rekommenderar vi det
följande:
1. Använd och förvara räknaren på ett ställe som
ej utsätts för extrema temperaturväxlingar, fukt
eller damm.
2. Torka av räknaren med en mjuk, torr trasa.
Använd inte några lösningar eller en våt trasa.
3. Eftersom denna produkt inte är vattentät bör den
inte användas eller förvaras där den kan komma
i kontakt med väska (t ex vatten). Regndroppar,
vattenspray, juice, kaffe, ånga, svett etc. orsakar
också funktionsstörningar.
4. Anlita endast en SHARP-handlare eller en av
SHARP auktoriserad serviceverkstad eller
reparatör om produkten kräver service.
5. Den nu lagrade växelkursen raderas om
nätkabeln kopplas ur.
6. Linda inte nätkabeln runt stommen och undvik
att böja eller tvinna den.
INNEHÅLLOBSERVERA VID ANVÄNDNING
Sida
• REGLAGENS FUNKTIONER ......................... 43
• BYTE AV FÄRGRULLE ................................... 45
• BYTE AV PAPPERSRULLEN .........................47
• FEL .................................................................. 48
• TEKNISKA DATA .............................................48
• I HÄNDELSE AV ONORMALA
FÖRHÅLLANDEN ........................................... 49
• RÄKNEEXEMPEL ...........................................84
• OMVANDLING AV EURO................................ 96
• BERÄKNING AV KOSTNAD/
FÖRSÄLJNING/MARGINAL ........................... 99
SHARP åtar sig inget ansvar för några som helst
obetydliga eller betydande skador eller förluster
till följd av felaktigt bruk och/eller felfunktioner
hos denna produkt och dess kringutrustning,
såvida inte sådant ansvar är lagfäst.
42
Page 45

REGLAGENS FUNKTIONER
GT •
RATE
SET
OFF • P P•IC
“OFF”: Strömmen av.
“•”: Strömmen på. Står i läget för icke-utskrift.
“P”: Strömmen på. Står i läget för utskrift.
“P•IC”: Strömmen på. Står i läget för utskrift och
Anm: Posträknaren har en maximal kapacitet på 3
Exempel: När decimalväljaren står på 2
4 ÷ 9 = 0.444 ... , 5 ÷ 9 = 0.555 ...
ON
STRÖMBRYTARE; LÄGESVÄLJARE
FÖR UTSKRIFT/ POSTRÄKNING:
posträkning.
Vid addition och subtraktion läggs 1 till
posträknaren vid vart tryck på och 1 dras
ifrån vid vart tryck på .
• Posträkningen skrivs ut nä r
räkneresultatet erhålls.
• Ett tryck på , o due volte sul tasto
tömmer posträknaren.
siffror (upp till ±999). Posträknaren nollställs
om denna gräns överskrids.
AVRUNDNINGSVÄLJARE:
4 9 5 9
0.45 0.56
5/4 0.44 0.56
0.44 0.55
Anm: Decimalpunkten blir flytande under
efterföljande beräkningar när eller
används.
Svaret avrundas alltid nedåt ( ) när decimalväljaren
står på “F”.
LÄGESVÄLJARE FÖR SLUTSVAR/
SATSINSTÄLLNING:
“GT”: Slutsvar
“•”: Neutralt läge
“RATE SET”: Satsinställning
• Mata in växelkursen och tryck sedan på .
• Maximalt 6 siffror kan lagras (decimalpunkten
räknas inte som en siffra).
• Det går bara att lagra en sats i taget. Den tidigare
satsen raderas vid inmatning av en ny sats.
43
Page 46

F 6 3 2 1 0 A
DECIMALVÄLJARE/LÄGET ADD:
“6 3 2 1 0”: Inställning av antalet decimaler i svaret.
“F”: Svaret visas med flytande decimal.
“A”: Vid inmatning av addition och subtraktion
placeras decimalpunkten automatiskt vid den
2:a siffran från den lägsta siffran i det inmatade
talet. Användning av detta läge medger alltså
addition och subtraktion utan att mata in
decimalpunkten. Användning av , och
åsidosätter automatiskt detta läge och
skriver ut svaret med rätt antal decimaler.
PAPPERSMATARTANGENT
TANGENT FÖR ICKE-ADDITION/DELSVAR
TANGENT FÖR TÖMNING/RADERING
SVARSTANGENT
LIKHETSTANGENT
TECKENÄNDRINGSTANGENT:
Ändrar det algebraiska tecknet för ett tal (t.ex. från
positiv till negativ eller från negativ till positiv).
TANGENT FÖR ÅTERKALLNING OCH
MINNESTÖMNING
TANGENT FÖR MINNESÅTERKALLNING
OMVANDLINGSTANGENT (TILL EN
NATIONELL VALUTA)
OMVANDLINGSTANGENT (TILL EURO)
SLUTSVARSTANGENT
INFÖRINGSTANGENT FÖR KOSTNADSPRIS:
Tryck på tangenten för att mata in kostnadspriset.
INFÖRINGSTANGENT FÖR FÖRSÄLJNINGSPRIS:
Tryck på tangenten för att mata in försäljningspriset.
INFÖRINGSTANGENT FÖR MARGINAL:
Tryck på tangenten för att mata in marginalen.
44
Page 47

BILDSKÄRM
Visningsformat:
BYTE AV FÄRGRULLE
Byt ut färgrulle när utskriften börjar bli suddig trots
att färgbandet är isatt på rätt sätt.
Färgrulle: Typ EA-772R
Symboler:
M:Visas när ett tal förekommer i minnet.
–:Visas när ett tal är negativt.
• : Visas när ett tal förekommer i slutsvarsminnet.
E:Visas när ett spill eller annat fel upptäckts.
* Även om alla tillgängliga symboler visas här i
instruktionssyfte, kommer dessa symboler inte att
visas samtidigt på displayen.
VARNING
ATT TILLFÖRA BLÄCK PÅ ETT FÖRBRUKAT
FÄ RGRULLE ELLER ATT ANVÄNDA EJ
GODKÄNT FÄ RGRULLE KAN ORSAKA
ALLVARLIGA SKADOR PÅ SKRIVAREN.
1) Ställ strömbrytaren på OFF.
2) Ta av skrivarlocket. (Bild 1)
3) Håll i färgrullens ovansida och ta ur färgrulle
genom att dra det mot dig och sedan uppåt. (Bild
2)
4) Sätt i det nya färgrullen i rätt position. Kontrollera
att bandet sitter ordentligt på plats. (Bild 3)
5) Sätt tillbaka skrivarlocket.
45
Page 48

på skrivarhjulet och rengör sedan med ett tryck
på .
4) Sätt tillbaka bläckrullen och sätt på skrivarlocket.
Bild 1 Bild 2
Bild 3
Rengöring av skrivarmekanismen
Om utskriften börjar bli otydlig efter en längre
tids bruk ska du rengöra skrivarhjulet på
följande sätt:
1) Ta av skrivarlocket och ta ur färgrullen.
2) Sätt i pappersrullen och mata fram den tills
papperet kommer ut från skrivarmekanismens
framsida.
3) Placera en liten borste (t.ex. en tandborste) lätt
Anm: • Vrid inte på skrivarmekanismen för hand
då detta kan orsaka skador på skrivaren.
46
Page 49

BYTE AV PAPPERSRULLEN
Sätt aldrig i en sönderriven pappersrulle. Detta
kan orsaka papperstrassel.
Klipp alltid av den inledande remsan med en sax.
1) För in pappersrullens inledande remsa i
öppningen. (Bild 1)
2) Slå på strömmen och mata fram papperet med
ett tryck på . (Bild 2)
3) Lyft upp den fastsatta metallpappershållaren och
placera pappersrullen på pappershållaren. (Bild
3)
Bild 1
Bild 2 Bild 3
DRA ALDRIG PAPPERET BAKÅT DÅ DETTA
KAN ORSAKA SKADOR PÅ
SKRIVARMEKANISMEN.
47
Page 50

FEL TEKNISKA DATA
Ett flertal förhållanden kan orsaka spill eller fel. “E”
visas på skä rmen när detta inträffar.
Minnesinnehållet vid tidpunkten när felet uppstod
bevaras dock.
Om indikeringen “0䡠E” visas på skärmen kommer
“– – – – – – –” att skrivas ut i rött, och tangenten
ska användas för att tömma räknaren.
I sällsynta fall kan det hända att utskrift stoppas
halvvägs och indikeringen “E” visas på skärmen.
Detta tyder inte på fel utan har orsakats av att
räknaren utsatts för kraftiga elektromagnetiska
störningar eller statisk elektricitet från en yttre källa.
Tryck på tangenten om detta inträffar och börja
sedan om beräkningen från början.
Upphov till fel:
1. När heltalsdelen i ett svar överstiger 12 siffror.
2. När heltalsdelen av innehållet i minnet överstiger
12 siffror. (T.ex. 999999999999 1 )
3. Vid försök att dividera ett tal med noll.
(T.ex. 5 0 )
Driftskapacitet: 12 siffror
Strömförsörjning: 220V–230V växelström,
50 Hz
SKRIVARDEL
Skrivare: Mekanisk skrivare
Utskriftshastighet: Ca. 2,1 rader/sek.
(Utskrift av “741.9 + ” vid
en temperatur på 25°C.
Utskriftshastighet kan
variera beroende på
antalet rader och
teckentyperna som skrivs
ut.)
Utskriftspapper: 57 – 58 mm brett
80 mm i diameter (max.)
Brukstemperatur: 0°C - 40°C
Strömförbrukning: 41 mA
Mått (B × D × H): 193 × 256 × 62,5 mm
Vikt: Ca. 1,0 kg
Medföljande tillbehör: 1 pappersrulle, 1 färgrulle
(isatt) och bruksanvisning
48
Page 51

VARNING
ANVÄND DEN SPÄ NNING SOM STÅR
ANGIVEN PÅ RÄKNAREN. ANVÄNDNING AV
EN HÖGRE SPÄNNING ÄN DEN ANGIVNA
KAN ORSAKA BRAND OCH ANDRA
ALLVARLIGA SKADOR. VI ÅTAR OSS INGET
ANSVAR FÖR SKADOR SOM ORSAKAS AV
ATT RÄKNAREN ANVÄNDS MED FELAKTIG
SPÄNNING.
I HÄNDELSE AV ONORMALA FÄRGRULLE
Räknaren kan börja fungera onormalt om den
utsätts för kraftiga radiofrekvensstörningar och/eller
om den utsätts för kraftiga stötar eller när nätkabeln
ansluts till ett vägguttag, och i sällsynta fall kan det
hä nda att samtliga tangenter – inklusive
strömbrytaren och – blir obrukbara. Om detta
inträffar ska du koppla bort nätkabeln från
vägguttaget, vänta i cirka 5 sekunder, ansluta
nätkabeln på nytt och sedan slå på strömmen.
49
Page 52

NEDERLANDS
OPMERKINGEN BETREFFENDE HET GEBRUIK
Neem de volgende punten in acht om een
storingsvrij gebruik van uw SHARP calculator te
verkrijgen:
1. Stel de calculator niet bloot aan extreme
temperatuursschommelingen en houd het
apparaat uit de buurt van vochtige en stoffige
plaatsen.
2. De calculator kan met een zachte, droge doek
worden schoongemaakt. Gebruik geen
oplosmiddelen of een natte doek.
3. Omdat dit product niet waterbestendig is mag
het niet gebruikt of bewaard worden waar
vloeistoffen, bijv, water, erop kunnen spatten
Regendruppels, waternevel, sap, koffie, stoom,
zweet, enz zullen storingen veroorzaken.
4. Als de calculator defect is, dient u deze naar een
SHARP servicedealer, een officieel SHARP
servicecentrum of een SHARP reparatiecentrum
te brengen.
5. Als u de stekker uit het stopcontact haalt en zo
de stroomvoorziening volledig afsluit, zal de
wisselkoers die op dit moment in het geheugen
is opgeslagen worden gewist.
50
6. Wikkel het netsnoer niet om de calculator. Buig
het snoer niet met geweld en verdraai het snoer
ook niet.
INHOUDSOPGAVE
Pagina
• BEDIENINGSORGANEN ................................51
• INKTROL VERVANGEN ..................................53
• PAPIERROL VERVANGEN............................. 55
• FOUTEN .......................................................... 56
• TECHNISCHE GEGEVENS ............................ 56
• BIJ EEN ABNORMALE WERKING ................. 57
• REKENVOORBEELDEN................................. 85
• EUROKOERS .................................................. 96
• INKOOPPRIJS/VERKOOPPRIJS/
WINSTMARGE BEREKENINGEN .................. 99
SHARP kan niet aansprakelijk worden gesteld
voor directe of indirecte financiële verliezen of
beschadigingen veroorzaakt door een verkeerd
gebruik en/of defect van dit product en de
bijbehorende randapparatuur, tenzij deze
aansprakelijkheid wettelijk erkend is.
Page 53

BEDIENINGSORGANEN
GT •
RATE
SET
OFF • P P•IC
“OFF”: De calculator is uitgeschakeld.
“•”: De calculator is ingeschakeld. De “niet-
“P”: De calculator is ingeschakeld. De
“P•IC”: De calculator is ingeschakeld. De
Opmerking: De teller heeft drie cijfers (de
ON
AAN/UIT-SCHAKELAAR;
AFDRUKKEN/POSTENTELLERKEUZESCHAKELAAR:
afdrukken” instelling is gekozen.
“afdrukken” instelling is gekozen.
“afdrukken en postenteller” instelling is
gekozen.
Als op wordt gedrukt om op te tellen,
wordt er 1 opgeteld bij de postenteller; als
op wordt gedrukt om af te trekken, wordt
er 1 afgetrokken van de postenteller.
• Het aantal posten wordt afgedrukt
wanneer de uitkomst wordt gegeven.
• Druk op , om de tellerstand
van de postenteller te wissen.
maximale tellerstand is ±999). Als de
maximale tellerstand overschreden
wordt, telt de teller verder vanaf nul.
AFRONDINGSKEUZESCHAKELAAR:
Voorbeeld: De afrondingskeuze-schakelaar staat
op “2”.
4 ÷ 9 = 0.444 ... , 5 ÷ 9 = 0.555 ...
4 9 5 9
0.45 0.56
5/4 0.44 0.56
0.44 0.55
Opmerking: Het decimaalteken ‘drijft’ bij
opeenvolgende berekeningen waarbij
of gebruikt wordt.
Als de decimaal-keuzeschakelaar op “F” staat, wordt
de uitkomst altijd naar beneden ( ) afgerond.
EINDTOTAAL/TARIEFINSTELLINGKEUZESCHAKELAAR:
“GT”: Eindtotaal
“•”: Neutraalstand
“RATE SET”: Tariefinstelling
• Voer de aanvullende wisselkoers in en druk
vervolgens op .
• U kunt een getal van maximaal 6 cijfers invoeren
(de komma telt niet mee als apart cijfer).
• Er kan slechts één belastingtarief worden
51
Page 54

vastgelegd. Als u een nieuw tarief invoert, zal het
oude tarief gewist worden.
F 6 3 2 1 0 A
DECIMAAL/DECIMAALTEKENINVOEGING KEUZESCHAKELAAR:
“6 3 2 1 0”: Kies het gewenste getal overeen-
komstig het aantal decimaalplaatsen
dat u in de uitkomst wilt hebben.
“F”: De uitkomst wordt in het drijvend
decimaaltekensysteem weergegeven.
“A”: Het decimaalteken wordt bij optellen en
aftrekken automatisch links van het tweede
cijfer, geteld vanaf rechts, geplaatst. Bij gebruik
van de decimaalteken-invoegingsfunctie
kunnen getallen worden opgeteld of
afgetrokken zonder dat het decimaalteken
wordt ingevoerd.
Bij gebruik van , of wordt de
decimaalteken-invoegingsfunctie automatisch
opgeheven en wordt de decimaal correcte
uitkomst afgedrukt.
PAPIERTOEVOERTOETS
NIET TOEVOEGEN/SUBTOTAALTOETS
WISSEN/INVOER-WISSEN TOETS
TOTAALTOETS
GELIJKTEKENTOETS
POSITIEF/NEGATIEF-OMSCHAKELTOETS:
Voor het veranderen van het algebraïsche teken van
een getal (d.w.z. van positief naar negatief, of
negatief naar positief).
OPROEP- EN WISTOETS VOOR HET
GEHEUGEN
OPROEPTOETS VOOR HET GEHEUGEN
CONVERSIETOETS (NAAR EEN
NATIONALE MUNT)
CONVERSIETOETS (NAAR EURO)
EINDTOTAALTOETS
INKOOPPRIJS-INVOERTOETS:
Druk op deze toets om de inkoopprijs in te voeren.
VERKOOPPRIJS-INVOERTOETS:
Druk op deze toets om de verkoopprijs in te voeren.
WINSTMARGE-INVOERTOETS:
Druk op deze toets om de winstmarge in te voeren.
52
Page 55

DISPLAY
Displayformaat:
Symbolen:
M: Verschijnt wanneer er een getal in het
geheugen is.
–:Geeft een negatief getal aan.
• : Verschijnt wanneer er een getal in het
eindtotaalgeheugen is.
E:Verschijnt wanneer er een overloopfout of
andere fout optreedt.
* Alhoewel alle beschikbare symbolen hier
gelijktijdig worden afgebeeld, zullen deze nooit
tegelijk op het scherm verschijnen.
INKTROL VERVANGEN
Als de cijfers niet duidelijk worden afgedrukt maar
de inktrol juist geplaatst is, moet de inktrol worden
vervangen.
Inktrol: Type EA-772R
WAARSCHUWING
HET AANBRENGEN VAN INKT OP EEN
VERSLETEN INKTROL OF HET GEBRUIK
VAN EEN NIET VOORGESCHREVEN
INKTROL KAN RESULTEREN IN ERNSTIGE
BESCHADIGINGEN AAN DE PRINTER.
1) Zet de aan/uit-schakelaar op OFF.
2) Verwijder het printerdeksel. (Afb. 1)
3) Pak de bovenkant van de inktrol vast en verwijder
de inktrol door deze naar u toe te trekken en
dan naar boven. (Afb. 2)
4) Plaats de nieuwe inktrol in de juiste positie. Zorg
dat de rol stevig op z'n plaats zit. (Afb. 3)
5) Breng het printerdeksel weer aan.
53
Page 56

Afb. 1 Afb. 2
Afb. 3
Reinigen van het afdrukmechanisme
Als de afdruk na langdurig gebruik wazig wordt,
dient u het afdrukwiel als volgt te reinigen:
1) Verwijder het printerdeksel en de inktrol.
2) Plaats de papierrol en voer het papier door tot
dit uit de voorzijde van het afdrukmechanisme
komt.
3) Duw een kleine borstel (zoals een tandenborstel)
lichtjes tegen het afdrukwiel en reinig het wiel
door op te drukken.
4) Breng de inktrol en het printerdeksel weer aan.
Opmerking: • Draai het afdrukmechanisme niet
met de hand rond, want dit kan
beschadiging van de printer
veroorzaken.
54
Page 57

PAPIERROL VERVANGE
Plaats nooit een gescheurde papierrol. Dit om
te voorkomen dat het papier vastloopt.
Knip de aanloopstrook met een schaar netjes
recht af.
1) Steek de aanloopstrook van de papierrol in de
opening. (Afb. 1)
2) Schakel de calculator in en druk op om het
papier door te voeren. (Afb. 2)
3) Haal de metalen papierhouder van de calculator
omhoog en schuif de papierrol over de houder.
(Afb. 3)
Afb. 1
Afb. 2 Afb. 3
TREK HET PAPIER NIET IN
ACHTERWAARTSE RICHTING TERUG
AANGEZIEN DIT ZOU KUNNEN RESULTEREN
IN BESCHADIGING VAN HET
AFDRUKMECHANISME.
55
Page 58

FOUTEN
Er zijn diverse situaties die een overloopfout of een
andere fout kunnen veroorzaken. Als dit gebeurt,
verschijnt het foutsymbool “E”. De gegevens die in
het geheugen vastgelegd zijn op het moment dat
de fout optreedt blijven bewaard.
Als bij het optreden van de fout “0䡠E” op het display
wordt aangegeven, zal “– – – – – – –” in rood worden
afgedrukt en moet gebruikt worden om de
calculator in de begintoestand terug te zetten.
Ook kan in sommige gevallen het afdrukken
tussentijds onderbroken worden en de aanduiding
“E” op het display verschijnen. Dit is geen defect
maar gebeurt wanneer de calculator aan sterke
elektromagnetische storingen of statische
elektriciteit van een externe bron staat blootgesteld.
Mocht dit voorkomen, druk dan op de toets en
voer de berekening opnieuw vanaf het begin uit.
Foutcondities:
1. Als het integer-gedeelte van een uitkomst meer
dan 12 cijfers heeft.
2. Als het integer-gedeelte van het getal in het
geheugen meer dan 12 cijfers heeft.
(Bijv. 999999999999 1 )
3. Als een getal gedeeld wordt door nul.
(Bijv. 5 0 )
TECHNISCHE GEGEVENS
Rekencapaciteit: 12 cijfers
Stroomvoorziening: 220V–230V wisselstroom,
50 Hz
PRINTEENHEID
Printer: Mechanische printer
Afdruksnelheid: Ca. 2,1 regels/sec.
(bij een temperatuur van
25°C, wanneer “741.9 + ”
wordt afgedrukt. De
afdruksnelheid varieert
afhankelijk van het aantal
rijen en de cijfers die
worden afgedrukt.)
Papier: 57 mm - 58 mm breed
80 mm diameter (max.)
Bedrijfstemperatuur: 0°C - 40°C
Stroomverbruik: 41 mA
Afmetingen: 193 (B) × 256 (D) × 62,5
(H) mm
Gewicht: Ca. 1,0 kg
Toebehoren: 1 ro l papier, 1 inktrol
(aangebracht) en
gebruiksaanwijzing
56
Page 59

WAARSCHUWING
DEZE CALCULATOR MAG UITSLUITEND OP
DE VOORGESCHREVEN NETSPANNING
WORDEN GEBRUIKT. WANNEER DE
CALCULATOR OP EEN HOGERE SPANNING
WORDT GEBRUIKT, KAN DIT RESULTEREN
IN BRAND OF EEN ANDERE GEVAARLIJKE
SITUATIE, MET BESCHADIGING VAN DE
CALCULATOR TOT GEVOLG. DE FABRIKANT
KAN NIET AANSPRAKELIJK WORDEN
GESTELD VOOR EVENTUELE
BESCHADIGINGEN DIE HET GEVOLG ZIJN
VAN HET GEBRUIK OP EEN SPANNING DIE
HOGER IS DAN DE VOORGESCHREVEN
SPANNING.
BIJ EEN ABNORMALE WERKING
Als het apparaat tijdens gebruik aan sterke RF-ruis
en/of harde schokken wordt blootgesteld, of
wanneer het netsnoer in een stopcontact wordt
gestoken, kan het apparaat soms abnormaal gaan
functioneren en is het mogelijk dat alle toetsen inclusief de aan/uit-toets en de toets - niet meer
werken.
Mocht dit gebeuren, haal dan de stekker uit het
stopcontact, wacht ongeveer 5 seconden, steek de
stekker weer in het stopcontact en schakel het
apparaat opnieuw in.
57
Page 60

PORTUGUÊS
Para garantir um funcionamento livre de
problemas da sua calculadora SHARP,
recomendamos o seguinte:
1. A calculadora deve ser mantida em áreas livres
de mudanças bruscas na temperatura, bem
como de umidade e poeira.
2. Utilize um pano macio e seco para limpar a
calculadora. Não utilize solventes nem um pano
molhado.
3. Dado que este produto não é à prova de água,
não o use ou guarde em lugares nos quais possa
vir a ser exposto a salpicos de líquidos, como
água, por exemplo. Gotas de chuva, água
pulvcrizada, café, vapor, suor, etc. originam
falhas de funcionamento.
4. Se for preciso consertar o produto, utilize apenas
um revendedor SHARP, um posto de serviço
aprovado pela SHARP ou um posto de
assistência SHARP.
5. Se puxar o cabo de alimentação para cortar a
electricidade completamente, a taxa de conversão
armazenada actualmente será limpada.
6. Não dobre o cabo de CA ao redor do corpo nem
o dobre ou o torça excessivamente.
ÍNDICENOTAS SOBRE A OPERAÇÃO
Página
• CONTROLES DE OPERAÇÃO ...................... 59
• TROCA DO ROLO DE TINTA ......................... 61
• TROCA DO ROLO DE PAPEL ........................63
• ERROS ............................................................64
• ESPECIFICAÇÕES ......................................... 64
• NO CASO DE PROBLEMAS .......................... 65
• EXEMPLOS DE CÁLCULOS ..........................85
• CONVERSÃO DE EUROS ............................. 96
• CÁLCULO DE CUSTO/VENDA/MARGEM ..... 99
A SHARP não se responsabilizará por quaisquer
danos econômicos ou de propriedade,
incidentais ou conseqüentes, causados pelo uso
incorreto e/ou mau funcionamento deste produto
e seus periféricos, a menos que se reconheça
a responsabilidade por lei.
58
Page 61

CONTROLES DE OPERAÇÃO
GT •
RATE
SET
OFF • P P•IC
“OFF”: Desliga a calculadora.
“•”: Liga a calculadora. Seleciona o modo sem
“P”: Liga a calculadora. Seleciona o modo de
“P•IC”: Liga a calculadora. Seleciona o modo de
Nota: O contador tem uma capacidade máxima de
ON
INTERRUPTOR DE ALIMENTAÇÃO;
SELETOR DO MODO DE
IMPRESSÃO/CONTAGEM DE ITENS:
impressão.
impressão.
impressão e de contagem de itens.
Para adição e subtração, cada vez que se
pressiona , 1 unidade é adicionada ao
contador de itens, e cada vez que se
pressiona , 1 unidade é subtraída.
• A contagem é impressa quando o
resultado do cálculo é obtido.
• Pressionar , limpa o
contador.
3 dígitos (até ±999). Se a contagem excede
do máximo, o contador recomeça de zero.
SELETOR DE ARREDONDAMENTO:
Exemplo: Com o seletor decimal ajustado para 2.
4 ÷ 9 = 0.444 ... , 5 ÷ 9 = 0.555 ...
4 9 5 9
0.45 0.56
5/4 0.44 0.56
0.44 0.55
Nota: A vírgula decimal (um ponto no mostrador)
flutua durante cálculos sucessivos pelo uso
de ou .
Se o seletor decimal estiver ajustado para “F”, a
resposta será sempre arredondada para baixo ( ).
SELETOR DO MOTOR DE TOTAL
GERAL/DEFINIÇÃO DA TAXA:
“GT”: Total geral
“•”: Neutro
“RATE SET”: Definição da taxa
• Introduza a taxa de conversão e, em seguida,
prima .
• Um máximo de 6 dígitos podem ser armazenados
(a vírgula decimal (um ponto no visor) não é
contada como um dígito).
• Apenas uma taxa pode ser armazenada. Se você
59
Page 62

introduzir uma nova taxa, a taxa anterior será
apagada.
F 6 3 2 1 0 A
SELETOR DE MODO DECIMAL/
ADIÇÃO:
“6 3 2 1 0”: Predefine o número de casas decimais
na resposta.
“F”: A resposta é exibida no sistema decimal
flutuante.
“A”:A vírgula decimal nas entradas de adição e
subtração é posicionada automaticamente no
2º dígito a partir do dígitos mais baixo do
número introduzido. O uso do modo de adição
permite a adição e subtração de números sem
a entrada da vírgula decimal. O uso de ,
e sobrepõe automaticamente o modo
de adição e imprime as respostas no sistema
decimal correto.
TECLA DE ALIMENTAÇÃO DE PAPEL
TECLA DE SEM ADIÇÃO/SUBTOTAL
TECLA DE CANCELAR/LIMPAR
TECLA DE TOTAL
TECLA DE IGUAL
TECLA DE MUDAR SINAL:
Muda o sinal algébrico de um número (isto é,
positivo para negativo ou negativo para positivo).
TECLA DE CHAMAR E LIMPAR MEMÓRIA
TECLA DE CHAMAR MEMÓRIA
TECLA DE CONVERSÃO (PARA UMA
MOEDA NACIONAL)
TECLA DE CONVERSÃO (PARA A MOEDA
EURO)
TECLA DE TOTAL GERAL
TECLA DE ENTRADA DE PREÇO DE
CUSTO:
Pressione esta tecla para introduzir o preço de
custo.
TECLA DE ENTRADA DO PREÇO DE
VENDA:
Pressione esta tecla para introduzir o preço de
venda.
TECLA DE ENTRADA DE MARGEM:
Pressione esta tecla para introduzir a margem.
60
Page 63

MOSTRADOR
Formato de exibição:
TROCA DO ROLO DE TINTA
Se a impressão estiver borrada quando o rolo de
tinta estiver na posição adequada, troque o rolo.
Rolo de tinta: Tipo EA-772R
Símbolos:
M:Aparece quando um número está na memória.
–:Aparece quando um número é negativo.
• : Aparece quando um número está na memória
do total geral.
E:Aparece quando um estouro ou outro erro foi
detectado.
* Embora todos os símbolos disponíveis sejam
mostrados aqui para o propósito de instrução,
esses símbolos nã o aparecem na tela
simultaneamente.
ADVERTÊNCIA
APLICAR TINTA NUM ROLO DE TINTA GASTO
OU UTILIZAR UM ROLO DE TINTA NÃO
APROVADO PODE CAUSAR SÉRIOS DANOS
À IMPRESSORA.
1) Coloque o interruptor de alimentação na posição
OFF.
2) Retire a tampa da impressora. (Fig. 1)
3) Segure a parte superior do rolo de tinta e retire
o rolo puxando-o para si e depois para cima.
(Fig. 2)
4) Instale o novo rolo de tinta na posição correta.
Certifique-se de que o rolo esteja firmemente
em posição. (Fig. 3)
5) Recoloque a tampa da impressora.
61
Page 64

Fig. 1 Fig. 2
Fig. 3
Limpeza do mecanismo de impressão
Se a impressão tornar-se fraca após um longo
período de uso, limpe a roda de impressão de
acordo com o seguinte procedimento:
1) Retire a tampa da impressora e o rolo de tinta.
2) Instale o rolo de papel e alimente-o até que saia
da frente do mecanismo de impressão.
3) Coloque uma escova pequena (como uma
escova de dentes) ligeiramente na roda de
impressão e limpe-a pressionando .
4) Recoloque o rolo de tinta e a tampa da
impressora.
Nota: • Não gire o mecanismo de impressão
manualmente, pois isto pode danificar a
impressora.
62
Page 65

TROCA DO ROLO DE PAPEL
Nunca coloque um rolo de papel se o papel
estiver rasgado. Fazer isso poderia emperrar o
papel.
Antes de mais nada, sempre corte a borda de
introdução com tesouras.
1) Insira a borda de introdução do papel na
abertura. (Fig. 1)
2) Ligue a calculadora e alimente o papel
pressionando . (Fig. 2)
3) Levante o porta-papel de metal e insira o rolo
de papel no porta-papel. (Fig. 3)
Fig. 1
Fig. 2 Fig. 3
NÃO PUXE O PAPEL PARA TRÁS, POIS ISSO
PODERIA CAUSAR DANOS AO MECANISMO
DE IMPRESSÃO.
63
Page 66

ERROS
Há várias situações que causam um estouro ou uma
condição de erro. Neste caso, “E” aparece no
mostrador. O conteúdo da memória no momento
do erro é retido.
Se “0䡠E” for exibido no momento do erro, “– – – – –
– –” será impresso em vermelho e a tecla deve
ser utilizada para limpar o cálculo.
Do mesmo modo, em raros casos, a impressão
pode parar no meio com o aparecimento de “E” no
mostrador. Isso não é um mau funcionamento mas
ocorre quando a calculadora é exposta a um forte
ruído eletromagnético ou eletricidade estática de
uma fonte externa. Se isso ocorrer, pressione a tecla
e repita o cálculo desde o começo.
Condições de erro:
1. Quando a porção do número inteiro de uma
resposta excede de 12 dígitos.
2. Quando a porção do número inteiro do conteúdo
da memória excede de 12 dígitos.
(Ex.: 999999999999 1 )
3. Quando qualquer número é dividido por zero.
(Ex.: 5 0 )
ESPECIFICAÇÕES
Capacidade de
operação: 12 dígitos
Fonte de energia: CA: 220V–230V, 50 Hz
SEÇÃO DE IMPRESSÃO
Impressora: Impressora mecânica
Velocidade de
impressão: Aprox. 2,1 linhas/seg.
Papel de
impressão: 57 mm – 58 m de largura
Temperatura de
funcionamento: 0ºC – 40ºC
Consumo de energia: 41 mA
Dimensões: 193 mm (L) × 256 mm (P)
Peso: Aprox. 1,0 kg
Acessórios: 1 rolo de papel, 1 rolo de
64
(a uma temperatura de
25ºC, quando “741.9 + ” é
impresso. A velocidade de
impressão pode variar
com o número de linhas e
dos tipos de figuras
impressos.)
80 mm de diário de
mergulho (máx.)
× 62,5 mm (A)
tinta (instalado), e manual
de instruções
Page 67

ADVERTÊNCIA
A VOLTAGEM USADA DEVE SER IGUAL À
ESPECIFICADA NESTA CALCULADORA.
UTILIZAR ESTA CALCULADORA COM UMA
VOLTAGEM MAIS ALTA DO QUE A VOLTAGEM
ESPECIFICADA É PERIGOSO E PODE
CAUSAR UM FOGO OU OUTRO TIPO DE
ACIDENTE RESULTANDO EM DANOS. NÃO
SOMOS RESPONSÁVEIS POR QUAISQUER
DANOS RESULTANTES DO USO DESTA
CALCULADORA COM UMA VOLTAGEM
DIFERENTE DA ESPECIFICADA.
NO CASO DE PROBLEMAS
Quando esta calculadora for exposta a um forte
ruído eletromagnético e/ou impacto durante o seu
funcionamento, ou quando o cabo de alimentação
for conectado a uma tomada elétrica, a calculadora
pode funcionar incorretamente, o que fará, em
algumas raras ocasiões, que as teclas - incluindo
as teclas de alimentação e – não funcionem.
Neste caso, desconecte o cabo de alimentação da
tomada elétrica. Deixe a calculadora desconectada
durante aproximadamente 5 segundos, conecte o
cabo de alimentação, e ligue a calculadora.
65
Page 68

SUOMI
Jotta SHARP-laskimesi toimisi ongelmitta,
suosittelemme seuraavaa:
1. Laskinta ei saa pitää erittäin kuumassa tai
kylmässä paikassa eikä sellaisessa paikassa,
jossa on huomattavasti kosteutta tai pölyä.
2. Laskin tulee puhdistaa pehmeällä ja kuivalla
kankaalla. Älä käytä liuottimia tai märkää
kangasta.
3. Koska tämä tuote ei ole vedenpitävä, älä käytä
tai säilytä sitä sellaisissa paikoissa, missä sille
voi roiskua nestettä, esimerkiksi vettä. Sadepisarat, vesisumu, mehu, kahvi, höyry, hiki tms.
voivat myös aiheuttaa virhetoimintoja.
4. Jos laskinta täytyy huoltaa, pyydämme viemään
sen SHARP-jälleenmyyjälle, huoltamoon, jonka
SHARP on hyväksynyt tai SHARP-korjaamoon.
5. Jos virtajohto irrotetaan sähkövirran
katkaisemiseksi kokonaan, muistiin tallennettu
vaihtokurssi pyyhkiytyy pois.
6. Älä kierrä virtajohtoa laitteen ympärille äläkä
muullakaan tavalla taita tai väännä sitä väkisin.
SISÄLLYSLUETTELOKÄYTTÖHUOMAUTUKSIA
Sivu
• NÄPPÄIMISTÖ ................................................67
• MUSTERULLAN VAIHTO ............................... 69
• PAPERIRULLAN VAIHTO ...............................71
• VIRHEET ......................................................... 72
• TEKNISET TIEDOT ......................................... 72
• VIRHETILANTEET ..........................................73
• LASKENTAESIMERKKEJÄ ............................86
• EURO-MUUNTO .............................................96
• OMAKUSTANNUSHINNAN/
MYYNTIHINNAN/MARGINAALIN
LASKEMINEN ................................................. 99
SHARP ei ole vastuussa mistään satunnaisista,
seurauksena olevista taloudellisista
menetyksistä tai omaisuusvahingoista, jotka
aiheutuvat tämän laitteen ja liitettyjen laitteiden
virheellisestä käytöstä ja/tai viasta, ellei tällainen
vastuu ole laissa määritetty.
66
Page 69

NÄPPÄIMISTÖ
GT •
RATE
SET
OFF • P P•IC
“OFF”: Virran katkaisu
“•”: Virran kytkeminen. Säätö muodolle, jossa
“P”: Virran kytkeminen. Säätö tulostusmuodolle.
“P•IC”: Virran kytkeminen. Säätö tulostukselle ja
Huomautus: Laskuri voi näyttää korkeintaan 3
Esimerkki: Aseta desimaalivalitsin kohtaan 2.
4 ÷ 9 = 0.444 ... , 5 ÷ 9 = 0.555 ...
ON
VIRTAKYTKIN; TULOSTUKSEN/
OSALASKUMUODON VALITSIN:
tulostusta ei tapahdu.
osalaskumuodolle.
Yhteen- ja vähennyslaskussa jokainen
näppäimen painallus lisää luvun 1
osalaskuriin ja jokainen näppäimen
painallus vähentää luvun 1.
• Lasku tulostuu, kun tulos on saatu.
• Laskuri tyhjenee painettaessa näppäintä
, .
numeroa (korkeintaan +-999). Jos
lasku ylittää maksimiarvon, laskuri
laskee uudelleen nollasta.
PYÖRISTYKSEN VALITSIN:
4 9 5 9
0.45 0.56
5/4 0.44 0.56
0.44 0.55
Huomautus: Desimaalipilkku on liukuva
perättäisten laskutoimitusten aikana
käytettäessä näppäimiä tai .
Jos desimaalivalitsin asetetaan kohtaan “F”, tulos
pyöristetään automaattisesti alaspäin ( ).
KOKONAISSUMMAN/VEROPROSENTIN
SÄÄTÖMUODON VALITSIN:
“GT”: Kokonaissumma
“•”: Normaalitila
“RATE SET”: Veroprosentin säätö
• Näppäile vaihtokurssi ja paina sitten painiketta
.
• On mahdollista tallentaa 6 numeroa
(desimaalipilkkua ei lasketa numeroksi).
• On mahdollista tallentaa vain yksi veroprosentti.
Jos näppäilet uuden veroprosentin, aiemmin
tallennettu pyyhkiytyy pois.
67
Page 70

F 6 3 2 1 0 A
DESIMAALI/LISÄYSMUODON
VALITSIN:
“6 3 2 1 0”: Säätää ennakkoon vastauksen
desimaalipilkkujen paikkojen
lukumäärän.
“F”: Vastaus näkyy liukuvalla desimaali-
järjestelmällä.
“A”: Yhteen- ja vähennyslaskuissa desimaalipilkku
asetetaan automaattisesti 2. numerolle
näppäillyn luvun pienimmästä numerosta.
Lisäysmuodon käyttö mahdollistaa numerojen
lisäyksen ja vähennyksen näppäilemättä
desimaalipilkkua. Näppäinten , ja
käyttö ohittaa automaattisesti lisäysmuodon ja
desimaalipilkku asettuu oikeaan kohtaan
tulostuksen aikana.
PAPERIN SYÖTTÖNÄPPÄIN
EI LISÄYSTÄ/OSASUMMAN NÄPPÄIN
POISTON/NÄPPÄILYN POISTONÄPPÄIN
LOPPUSUMMA
YHTÄ SUURI KUIN -NÄPPÄIN
ETUMERKIN VAIHTO:
Muuttaa numeron algebrallista merkitystä (siis
positiivinen negatiiviseksi ja negatiivinen
positiiviseksi).
ENSIMMÄISESTÄ MUISTISTA PALAUTUS
JA MUISTIN TYHJENNYS
ENSIMMÄISESTÄ MUISTISTA PALAUTUS
MUUNTONÄPPÄIN (MAAN OMAAN
VALUUTTAAN)
MUUNTONÄPPÄIN (EURO-VALUUTTAAN)
KOKONAISSUMMAN NÄPPÄIN
OMAKUSTANNUSHINNAN
SYÖTTÖNÄPPÄIN:
Näppäile omakustannushinta tällä näppäimellä.
MYYNTIHINNAN SYÖTTÖNÄPPÄIN:
Näppäile myyntihinta tällä näppäimellä.
MARGINAALIN SYÖTTÖNÄPPÄIN:
Näppäile voittomarginaali tällä näppäimellä.
68
Page 71

NÄYTTÖ
Näyttömuoto:
MUSTERULLAN VAIHTO
Jos tulostus on epäselvä vaikka musterulla on
oikeassa asennossa, vaihda rulla.
Musterulla: Tyyppi EA-772R
Symbolit
M:Näkyy, kun muistissa on numero.
–:Näkyy, kun numero on negatiivinen.
• : Näkyy, kun kokonaissumman muistissa on
numero.
E:Näkyy, kun kapasiteetti on ylitetty tai sattunut
jokin muu virhe.
* Vaikka kaikki käytössä olevat symbolit näkyvät
tässä selostusta varten, ne eivät tule näkyviin
näyttöön samanaikaisesti.
VAROITUS
MUSTEEN LISÄÄMINEN KULUNEESEEN
MUSTERULLAAN TAI MUUN KUIN
HYVÄKSYTYN RULLAN KÄYTTÖ SAATTAA
VAHINGOITTAA TULOSTINTA PAHASTI.
1) Aseta virtakytkin asentoon OFF.
2) Irrota tulostimen kansi. (Kuva 1)
3) Ota kiinni musterullan päästä ja ota rulla pois
vetämällä sitä itseesi päin ja sitten ylöspäin.
(Kuva 2).
4) Aseta uusi musterulla paikalleen oikein.
Varmista, että rulla on hyvin paikallaan. (Kuva
3)
5) Aseta tulostimen kansi takaisin paikalleen.
69
Page 72

3) Aseta pieni harja (esimerkiksi hammasharja)
kevyesti tulostuspyörää vasten ja puhdista pyörä
painamalla .
4) Aseta musterulla ja tulostimen kansi takaisin
paikalleen.
Kuva 1 Kuva 2
Kuva 3
Tulostusmekanismin puhdistaminen
Jos tulostus toimii heikosti pitkän käyttöajan
jälkeen, puhdista tulostuspyörä seuraavalla
tavalla:
1) Irrota tulostimen kansi ja musterulla.
2) Asenna paperirulla paikalleen ja syötä paperia
kunnes sitä tulee ulos tulostusmekanismin
edestä.
Huomautus: • Älä pyöritä tulostusmekanismia
kä sin, se saattaa vahingoittaa
tulostinta.
70
Page 73

PAPERIRULLAN VAIHTO
Älä koskaan aseta paikalleen paperirullaa, jonka
paperi on revennyt. Revennyt paperi juuttuu
helposti kiinni.
Leikkaa aina ensin alkureuna pois sakseilla.
1) Aseta paperirullan alkureuna aukkoon. (Kuva 1)
2) Kytke virta ja syötä paperia painamalla . (Kuva
2)
3) Nosta kiinnitetty metallinen paperinpidin ylös ja
aseta paperirulla paperinpitimeen. (Kuva 3)
Kuva 1
Kuva 2 Kuva 3
ÄLÄ VEDÄ PAPERIA TAAKSEPÄIN, SILLÄ SE
SAATTAA VAHINGOITTAA TULOSTUSMEKANISMIA.
71
Page 74

VIRHEET
Useat eri tilanteet voivat auheuttaa kapasiteetin
ylittymisten tai virhetilan. Jos näin käy, “E” tulee
näkyviin. Muistin sisältö pysyy tallessa virhetilan
aikana.
Jos “0䡠 E” näkyy virheen aikana, “– – – – – – –”
tulostuu punaisella ja laskin on nollattava
näppäimellä .
Joskus tulostus saattaa myös pysähtyä kesken ja
merkintä “E” tulla näkyviin näyttöön. Tämä ei ole
oire viasta vaan näin käy, kun laskimeen kohdistuu
voimakas ulkoisen lähteen aiheuttama
sähkömagneettinen häiriö. Jos näin käy, paina
näppäintä ja suorita lasku uudelleen alusta.
Virhetilat:
1. Kun vastauksen kokonaisluku on suurempi kuin
12-numeroinen.
2. Kun muistisisällön kokonaisluku on suurempi
kuin 12-numeroinen.
(Esimerkiksi: 999999999999 1 )
3. Kun mikä tahansa luku jaetaan nollalla.
(Esimerkiksi: 5 0 )
TEKNISET TIEDOT
Käyttökapasiteetti: 12 numeroa
Virtalähde: Vaihtovirta: 220V–230V,
50 Hz
TULOSTINOSA
Tulostin: Mekaaninen tulostin
Tulostusnopeus: Noin 2,1 riviä/s
(25°C lä mmössä, kun
“741.9+” tulostuu.
Tulostusnopeus vaihtelee
riippuen tulostettavien
rivien lukumäärä stä ja
numeroiden tyypistä.)
Tulostuspaperi: 57 mm - 58 mm leveä
80 mm halkaisijaltaan
(maks.)
Käyttölämpötila: 0°C - 40°C
Virrankulutus: 41 mA
Mitat: 193 mm (L) × 256 mm (S)
× 62,5 mm (K)
Paino: Likim. 1,0 kg
Varusteet: 1 paperirulla, 1 musterulla
(asennettu) ja käyttöohje
72
Page 75

VAROITUS
KÄYTETTÄVÄN JÄNNITTEEN TULEE OLLA
SAMA KUIN TÄMÄN LASKIMEN TEKNISISSÄ
OMINAISUUKSISSA ILMOITETTU. LASKIMEN
KÄ YTTÖ ILMOITETTUA JÄNNITETTÄ
SUUREMMALLA JÄNNITTEELLÄ ON
VAARALLISTA JA SE SAATTAA AIHEUTTAA
TULIPALON TAI MUUNLAISIA
ONNETTOMUUKSIA JA VAHINKOJA. EMME
OTA VASTUUTA MISTÄÄN VAHINGOISTA,
JOTKA AIHEUTUVAT TÄMÄN LASKIMEN
KÄ YTÖSTÄ MUULLA KUIN NÄISSÄ
OHJEISSA MAINITULLA JÄNNITTEELLÄ.
VIRHETILANTEET
Kun tämä laite joutuu alttiiksi voimakkaalle RFkohinalle ja/tai siihen kohdistuu huomattavan
voimakas isku toiminnan aikana tai kun virtajohto
liitetään pistorasiaan, laite saattaa toimia
epätavalliseen tapaan, jolloin kaikki näppäimet virtanäppäin ja näppäin mukaan luettuina eivät toimi.
Kytke tällaisessa tapauksessa virtajohto irti
pistorasiasta. Anna laitteen olla kytkettynä irti
virrasta noin 5 sekuntia, kytke virtapistoke sitten
takaisin ja kytke virta.
73
Page 76

MAGYAR
HASZNÁLATI TUDNIVALÓK
A SHARP kalkulátora zavartalan működése
érdekében ügyeljen az alábbiakra:
1. A kalkulátort olyan helyen tartsa, amely mentes
a szélsőséges hőmérséklet ingadozásoktól,
nedvességtől és portól.
2. A számológépet puha, száraz textíliával tisztítsa!
Ne használjon oldószereket vagy nedves
textíliát.
3. Mivel a készülék nem vízbiztos, ne használja,
ne tárolja olyan helyen, ahol folyadék, például
víz kerülhet bele. Esőcseppek, vizes spray,
gyümölcslé, kávé, gőz, izzadság, stb. szintén a
készülék hibás működését okozhatják.
4. Ha a számológép javításra szorul, forduljon
SHARP szakszervízhez!
5. Ha kihúzza a hálózati kábelt hogy teljesen
áramtalanítsa a gépet, akkor az éppen tárolt
átváltási árfolyam kitörlődik.
6. Ne vezesse a hálózati kábelt a teste körül, vagy
erősen megtörve, csavarodva!
TARTALOM
Oldal
• KEZELŐSZERVEK .........................................75
• A FESTÉKHENGER CSERÉJE ......................77
• A PAPÍRTEKERCS CSERÉJE ........................79
• HIBAJELZÉSEK ..............................................80
•MŰSZAKI ADATOK ......................................... 80
• RENDELLENESSÉG ESETÉN ....................... 81
• SZÁMÍTÁSI PÉLDÁK ...................................... 86
• EURÓÁTVÁLTÁS ............................................ 96
• ÖNKÖLTSÉGI ÁR/ELADÁSI ÁR/
HASZONSZÁMÍTÁS ....................................... 99
A SHARP cég nem vállal sem közvetlen. sem
közvetett felelősséget olyan felmerült anyagi
veszteségekért, amely a gép illetve tartozékai
helytelen használatából és/vagy annak
meghibásodásából erednek, kivéve az olyan
kötelezetfséget, amelyet törvénty ír elő.
74
Page 77

KEZELŐSZERVEK
GT •
RATE
SET
OFF • P P•IC
„OFF”: Kikapcsolva
„•”: Bekapcsolva, nem nyomtató üzemmódra
„P”: Bekapcsolva, nyomtató üzemmódra állítva.
„P•IC”: Bekapcsolva, nyomtató és tételszámláló
Megjegyzés: Az tételszámláló kapacitása
ON
BEKAPCSOLÓ, NYOMTATÁS/
TÉTELSZÁMLÁLÓ ÜZEMMÓDBEÁLLÍTÓ:
állítva.
üzemmódra állitva.
Minden alkalommal, amikor a gombot
megnyomják eggyel nö vekszik a
tételszámláló, minden alkalommal, amikor
megnyomják a gombot eggyel csökken.
• Amikor megvan az eredmény, a számítást
kinyomtatja a gép.
• A , billentyűk megnyomása
tisztázza a számlálót.
legfeljebb három számjegy (±999-ig)
terjed. A lehetéges maximum
meghaladása esetén, a számláló
nullától újra számol.
SZÁMKEREKÍTÉS BEÁLLÍTÓ:
Például: Állítsa a tizedesbeállítót 2-re.
4 ÷ 9 = 0.444 ... , 5 ÷ 9 = 0.555 ...
4 9 5 9
0.45 0.56
5/4 0.44 0.56
0.44 0.55
Megjegyzés: A tizedespont elmozdítható az
egymást követő számítások során az
, billentyűk segítségével.
Ha a tizedes beállító „F”-re van állítva, akkor az
eredmény mindig lefelé van kerekitve ( ).
VÉGÖSSZEG / ADÓKULCS
ÜZEMMÓDBEÁLLÍTÓ:
„GT”: Végösszeg
„•”: Meghatározatlan
„RATE SET”: adókulcs-beállítás
• Először írja be az átváltási árfolyamot, majd
nyomja meg a billentyűt.
• Legfeljebb 6 számjegyet lehet tárolni. (A tizedes
pont nem számít külön egységnek.)
• Egyszerre csak egy adókulcs őrizhető meg. Ha
75
Page 78

új adókulcsot táplálunk be, akkor ezzel az előzőt
kitöröljük.
F 6 3 2 1 0 A
TIZEDES / HOZZÁADÁS
ÜZEMMÓDBEÁLLÍTÓ:
„6 3 2 1 0”:Elő re beállítja, hogy hány tizedes
pontosságú legyen az eredmény.
„F”: Az eredmény a szabadon mozgó tizedes
számrendszerbenben jelenik meg.
„A”: A tizedes pont az összeadás és kivonás esetén
automatikusan a beütött számjegy legutolsó
számjegyétől számított második helyre kerül.
A hozzáadá s üzemmód hasznalatá val
lehetséges a számok összeadása és kivonása
a tizedes pont kitétele nélkül. A , ,
billentyűk haszná lata automatikusan
hatálytalanítja a hozzáadás üzemmódot és
tizedes pontossággal jelenik meg az eredmény.
PAPÍRADAGOLÓ BILLENTYŰ
NEM HOZZÁADÁS / RÉSZÖSSZEG
BILLENTYŰ
TÖRLŐ / TÉTELTÖRLŐ BILLENTYŰ
ÖSSZEG BILLENTYŰ
EGYENLŐ BILLENTYŰ
JELVÁLTÓ BILLENTYŰ:
Megváltoztatja a szám algebrai jelét (pl. a negatív
számot pozitívvá, a pozitív számot negatívvá teszi.)
VISSZAHÍVÓ ÉS MEMÓRIAKITÖRLŐ
BILLENTYŰ
MEMÓRIA-VISSZAHÍVÓ BILLENTYŰ
ÁTVÁLTÁSBILLENTYŰ (A NEMZETI
VALUTÁRA)
ÁTVÁLTÁSBILLENTYŰ (EURÓRA)
VÉGÖSSZEG BILLENTYŰ
ÖNKÖLTSÉGI ÁR BEÍRÓBILLENTYŰ:
Ennek a billentyűnek a megnyomásával írja be az
önköltségi árat.
ELADÁSI ÁR BEÍRÓBILLENTYŰ:
Ennek a billentyűnek a megnyomásával írja be az
eladási árat.
HASZON BEÍRÓBILLENTYŰ:
Ennek a billentyűnek a megnyomásával írja be a
haszon összegét.
76
Page 79

A KIJELZŐ
Kijelzési formátum:
Kijelzőn látható szimbólumok:
M:Akkor jelenik meg, ha van adat a memóriában.
–:Negatív szám esetén jelenik meg.
• : Akkor jelenik meg, ha a végösszeg
memóriában adat van.
E:Túlcsordulás vagy egyéb hiba esetén jelenik
meg.
* Bár szemléltetés céljából az összes
rendelkezésre álló jel be van itt mutatva, ezek a
jelek nem fognak egyszerre megjelenni a kijelzőn.
A FESTÉKHENGER CSERÉJE
Ha a papírtekercsre nyomtatott karakterek túl
halvánnyá válnak, akkor először ellenőrizze, hogy
a festékhenger megfelelően van e behelyezve. Ha
igen, és a gép továbbra is halványan nyomtat, akkor
szükségessé vált a henger cseréje.
A festékhenger típusa: EA-772R
FIGYELMEZTETÉS
A HASZNÁLT FESTÉKHENGER
ÚJRAFESTÉKEZÉSE VAGY NEM EREDETI
SHARP KELLÉKANYAG HASZNÁLATA
(EA772R) A GÉP IDŐ ELŐ TTI
ELHASZNÁLÓDÁSÁHOZ, ROSSZABB
ESETBEN A NYOMTATÓMECHANIKA
BESZÁRADÁSÁHOZ, AZAZ A GÉP KOMOLY
KÁROSODÁSÁHOZ, TÖNKREMENETELÉHEZ
VEZET!
1) Kapcsolja ki a gépet a hálózati kapcsoló OFF
állásba állításával.
2) Távolítsa el a nyomtató fedelét. (1. ábra)
3) Fogja meg a tintahenger tetejét és vegye ki úgy,
hogy először maga felé, majd felfelé húzza. (2.
ábra)
77
Page 80

4) Helyezze be az új tintahengert a megfelelő
állásban. Ellenőrizze, hogy stabilan a helyére
került-e. (3. ábra)
5) Helyezze vissza a nyomtatófedelet.
1) Távolítsa el a nyomtatófedelet és a
festékhengert.
2) Fűzzön be papírt és továbbítsa addig, amíg
kibújik a nyomtató szerkezetből.
3) Egy kisebb kefét (pl. fogkefe) érintsen a
nyomtatóhengerhez és a papírtovábbító gombot
lenyomva a henger megtisztítható a
rárakódott szennyeződésektől.
4) Helyezze vissza a festékhengert majd a
nyomtatófedelet.
1. ábra 2. ábra
3. ábra
A nyomtató tisztítása
Ha a nyomtatót már huzamosabb ideje
használja, akkor azt szükséges időnként
megtisztítani az alábbi eljárás szerint.
Megjegyzés: Ne forgassa a nyomtatószerkezetet
kézzel, mert ezzel megrongálhatja a
nyomtatót.
78
Page 81

A PAPÍRTEKERCS CSERÉJE
Soha ne helyezzen a gépbe tépett papírhengert,
mert az papírbecsípődést okozhat.
Első lépésként, mindig vágja le a papírtekercs
elejét ollóval.
1) Helyezze be a papírtekercs elejét a nyílásba. (1.
ábra)
2) Kapcsolja be a gépet és az billentyű
megnyomásával, kezdje el adagolni a papírt. (2.
ábra)
3) Emelje fel a rögzített, fém papírtartót és tegye
rá a papírtekercset. (3. ábra)
1. ábra
2. ábra 3. ábra
SOHA NE HÚZZA VISSZAFELÉ A PAPÍRT,
MERT A NYOMTATÓ MECHANIKÁJA
MEGSÉRÜLHET!
79
Page 82

HIBAJELZÉSEK MŰSZAKI ADATOK
Számos olyan helyzet van, ami túlcsordulást vagy
más meghibásodást okozhat. Ekkor jelenik meg az
„E” kijelzés. A memória tartalma nem veszik el a
hiba ideje alatt.
Ha „0䡠E” jelenik meg, és a nyomtató piros „– – – –
– – –”-t nyomtat, akkor a billentyűvel kell
törölni.
Ritkán az is előfordul, hogy menetközben leáll a
nyomtató és megjelenik az „E” kijelzés. Ez nem
mű ködési hiba, hanem az okozza, hogy a
számoló gép valamilyen kü lső eredetű, erős
elektromágneses zajnak vagy eletrosztatikus
töltésnek van kitéve. Ebben az esetben nyomja meg
a billentyűt és ismételje meg a számítást előről.
A hibát okozhatja:
1. Ha az eredmény egész része meghaladja a 12
számjegyet.
2. Ha a memóriában tárolt érték egész része
meghaladja a 12 számjegyet.
(pl. 999999999999 1 )
3. Ha 0-val való osztást kisérel meg.
(pl. 5 0 )
Kijelző: 12 digites, fluoreszkáló
Áramforrás: Váltóáram: 220V–230V,
NYOMTATÓ EGYSÉG
Nyomtató: mechanikus nyomtató
Nyomtatási sebesség: kb. 2.1 sor/mp
Papírméret: 57 mm vagy 58 mm
Üzemi hőmérséklet: 0°C - 40°C
Teljesítményfelvétel: 41 mA
Méretek: 193(Sz) × 256(H) ×
Tömeg: kb.1.0 kg
Tartozékok: 1 papírtekercs, 1
80
50Hz
(Ha 25 fokon, a
„741.9 + ”-t nyomtatjuk,
akkor a nyomtatási
sebesség, a sorok
számátol, a betűfajtától
függően változik.
széles
Max. 80 mm átmérőjű
tekercs
62.5(M) mm
festékhenger (behelyezve)
használati útmutató.
,
Page 83

FIGYELMEZTETÉS!
A KALKULÁTORT A MŰSZAKI
JELLEMZŐKNEK MEGFELELŐ HÁLÓZATI
FESZÜLTSÉGRŐL LEHET ÜZEMELTETNI.
MÁS FESZÜLTSÉG HASZNÁLATA
VESZÉLYES, MERT TÜZET VAGY MÁS
BALESETVESZÉLYT OKOZHAT. A SHARP
CÉG NEM VÁLLAL FELELŐSSÉGET A
KALKULÁTOR NEM MEGFELELŐ
FESZÜLTSÉGGEL VALÓ ÜZEMELTETÉSÉBŐL
EREDŐ KÁROKÉRT.
RENDELLENESSÉG ESETÉN
Amikor a gép erős rádiófrekvenciás zajnak és/vagy
erős fizikai ütésnek van kitéve mű ködés
közben,vagy amikor a gép zsinórja az AC
konnektorba van dugva, előfordulhat, hogy a gép
rendellenesen kezd működni és rika esetekben nem
reagál egyetlen billentyű (beleértve a ki-bekapcsoló
gomb és az billentyű) megnyomására sem.
Ilyenkor húzza ki a csatlakozót a konnektorból.
Tartsa legalább 5 másodpercig bedugatlanul, majd
újra dugja vissza és kapcsolja be a gépet.
81
Page 84

CALCULATION EXAMPLES
RECHNUNGSBEISPIELE
1. Set the decimal selector as specified in each
example.
The rounding selector should be in the “5/4”
position unless otherwise specified.
2. The grand total/rate set mode selector should
be in the “•” position (off) unless otherwise
specified.
3. The print / item count mode selector should be
in the “P” position unless otherwise specified.
4. Press prior to beginning any calculation.
5. If an error is made while entering a number, press
or and enter the correct number.
6. After entering a value, press , or to
activate the Cost/Sell/Margin Calculation mode.
In case of performing different calculation tasks,
key must be pressed first to cancel the
Cost/Sell/Margin mode.
7. Example procedures are listed in following
manner unless otherwise specified.
1. Den Dezimalwahlschalter wie im jeweiligen
Beispiel angegeben einstellen.
Der Rundungsschalter in Stellung “5/4”
belassen, sofern nicht anders angegeben.
2. Den Wahlschalter für Gesamtsumme/
Rateneinstellung in Stellung “•” (Aus) belassen,
sofern nicht anders angegeben.
3. Den Wahlschalter für Drucken/Postenzähler in
Stellung “P” belassen, sofern nicht anders
angegeben.
4. Vor Beginn einer Berechnung stets
drücken.
5. Zum Korrigieren bei Eingabefehlern oder
drücken und die korrekte Zahl eingeben.
6. Nach dem Eingeben eines Wertes mit ,
oder den Rechenmodus für Kosten/Verkauf/
Spanne wählen. Wenn Berechnungen anderer
Art erfolgen sollen, ist zuvor zu drücken,
um den Modus Kosten/Verkauf/Spanne
aufzuheben.
7. Die Beispiele für das Vorgehen sind, insofern
nicht anders angegeben, folgendermaßen
dargestellt.
82
Page 85

EXEMPLES DE CALCULS EJEMPLOS DE CÁLCULOS
1. Régler le sélecteur de décimale tel que spécifié
dans chaque exemple.
Le sélecteur d’arrondi, doit être placé sur la
position “5/4” sauf indication contraire.
2. Sauf indication contraire, le sélecteur de mode
de grand total/taux doivent être placés sur la
position “•” (arrêt).
3. Sauf indication contraire, le sélecteur
d’impression / comptage d’articles doit être placé
sur la position “P”.
4. Appuyez sur avant tout calcul.
5. En cas d’erreur à l’introduction d’un nombre,
appuyer sur ou et introduire le nombre
correct.
6. Après avoir entré une valeur, appuyez sur ,
ou pour mettre en service le mode de
calcul du prix de revient/prix de vente/marge.
Pour réaliser un calcul différent, vous devez
d’abord appuyer sur la touche pour
annuler le mode de calcul du prix de revient/prix
de vente/marge.
7. Sauf indication contraire, les méthodes figurent
de la manière suivante.
1. Colocar el selector decimal según se especifica
en cada ejemplo.
El selector de redondeo debe estar en la posición
“5/4” salvo que se especifique lo contrario.
2. El selector del modo de gran total/tipo deben
estar en la posición “•” (desconexión) salvo que
se especifique lo contrario.
3. El selector de impresión / cuenta de artículos
deber estar en la posición “P” salvo que se
especifique lo contrario.
4. Pulse antes de empezar cualquier
cálculo.
5. Si se hace un error al ingresar un número,
apretar o e ingresar el número correcto.
6. Después de introducir un valor, pulse , o
para activar el modo de cálculo de coste/
venta/margen. En el caso de realizar cálculos
diferentes, deberá pulsarse primero la tecla
para cancelar el modo de coste/venta/
margen.
7. Los procedimientos de ejemplos están puestos
de la siguiente manera, a menos que se
especifique lo contrario.
83
Page 86

ESEMPI DI CALCOLO RÄKNEEXEMPEL
1. Regolare il selettore della virgola decimale come
specificato in ciascum esempio.
Salvo indicazione contraria, il selettore di
arrotondamento deve essere lasciato nella
posizione “5/4”.
2. Salvo indicazione contraria, il selettore fra la
modalità del totale generale e la modalità di
predisposizione della percentuale deve essere
predisposto sulla posizione “•”.
3. Salvo indicazione contraria, il selettore fra la
modalità di stampa e la modalità di contaddendi
deve essere predisposto sulla posizione “P”.
4. Agire sempre due volte sul tasto prima
di cominciare qualsiasi calcolo.
5. Se si effettua un errore nel corso della digitazione
agire su o su e digitare poi la cifra
corretta.
6. Dopo la digitazione di una certa cifra, agire su
, o per attivare la modalità di calcolo
del costo, del prezzo di vendita o del profitto,
rispettivamente. Se si effettuano calcoli di altro
tipo, agire prima due volte sul tasto per
disattivare la modalità di calcolo del costo, del
prezzo di vendita o del profitto.
7. Le seguenti procedure esemplificative sono
elencate nel modo seguente, salvo diverse
indicazioni.
1. Ställ in decimalväljaren såsom anges i varje
exempel.
Avrundningsväljaren bör stå i läget “5/4” om inget
annat anges.
2. Lägesväljaren för slutsvar/satsinställning bör stå
i läget “•” (avslaget) om inget annat anges.
3. Lägesväljaren för utskrift/posträkning bör stå i
läget ”P” om inget annat anges.
4. Tryck alltid på innan en beräkning
påbörjas.
5. Om du råkar göra ett fel vid inmatning av ett tal
ska du trycka på eller och sedan mata
in rätt tal.
6. Mata in ett värde och tryck sedan på ,
eller för att aktivera beräkningsläget för
kostnad/försäljning/marginal. Om du ska utföra
en annan typ av beräkning ska du först trycka
på för att lämna beräkningsläget för
kostnad/försäljning/marginal.
7. Proceduren i exemplen förtecknas på följande
sätt såvida inte annat anges.
84
Page 87

REKENVOORBEELDEN EXEMPLOS DE CÁLCULOS
1. Stel de decimaal-keuzeschakelaar in zoals
aangegeven in elk voorbeeld.
De afrondingskeuzeschakelaar dient op “5/4” te
staan, tenzij anders vermeld.
2. De eindtotaal/tariefinstelling-keuzeschakelaar
dient op “•” (uitgeschakeld) te staan, tenzij
anders vermeld.
3. De afdrukken/postenteller-keuzeschakelaar
dient op “P” te staan, tenzij anders vermeld.
4. Druk op voordat u begint met het
uitvoeren van een berekening.
5. Als u een fout maakt tijdens het invoeren van
een getal, druk dan op of en voer het
juiste getal in.
6. Druk na het invoeren van een getal op ,
of om de inkoopprijs/verkoopprijs/
winstmarge berekeningsfunctie te activeren. Wilt
u overschakelen naar een andere rekenfunctie,
dan moet u eerst op drukken om de
inkoopprijs/verkoopprijs/winstmarge berekeningsfunctie te annuleren.
7. De rekenvoorbeelden worden op de volgende
wijze weergegeven, tenzij anders vermeld.
1. Ajuste o seletor decimal conforme especificado
em cada exemplo.
O seletor de arredondamento deve estar na
posição “5/4”, salvo indicação em contrário.
2. O seletor do modo de total geral/definição de
taxa deve estar na posição “•” (desativado),
salvo indicação em contrário.
3. O seletor de modo de impressão/contagem de
itens deve estar na posição “P”, salvo indicação
em contrário.
4. Pressione antes de iniciar qualquer
cálculo.
5. Se cometer um erro ao introduzir um número,
pressione ou , e introduza o número
correto.
6. Depois de introduzir um valor, pressione ,
ou para ativar o modo de cálculo de custo/
venda/margem. No caso de realizar tarefas de
cálculo diferentes, pressione primeiro
para cancelar o modo de custo/venda/margem.
7. Os procedimentos dos exemplos são
relacionados como segue, salvo indicação em
contrário.
85
Page 88

LASKENTAESIMERKKEJÄ
SZÁMÍTÁSI PÉLDÁK
1. Aseta desimaalivalitsin kussakin esimerkissä
mainitulla tavalla.
Pyöristyksen valitsin tulee asettaa asentoon
“5/4” ellei toisin mainita.
2. Kokonaissumman/veroprosentin säätömuodon
valitsin tulee asettaa asentoon “•” (pois päältä)
ellei toisin mainita.
3. Tulostuksen/osalaskumuodon valitsimen on
oltava asennossa “P” ellei toisin mainita.
4. Paina ennen laskutoimitusten aloittamista
.
5. Jos teet virheen numeroa näppäillessäsi, paina
tai ja näppäile oikea numero.
6. Kun arvo on näppäilty, paina , tai
käynnistääksesi omakustannushinnan/myyntihinnan/
marginaalin laskumuodon. Jos suoritetaan muita
laskutoimituksia, näppäintä on painettava
ensin omakustannushinnan/myyntihinnan/marginaalin
laskumuodon peruuttamiseksi.
7. Esimerkkitoimenpiteet on näytetty seuraavassa
järjestyksessä ellei toisin mainittu.
1. Állítsa be a tizedesjegy kapcsolót a példáknak
megfelelően.
A kerekítés kapcsolót állítsa “5/4” helyzetbe, ha
nincs máshogy megadva.
2. A végösszeg/ adókulcs üzemmód beállító,
hacsak nincs más megjelölve, legyen a “•”
állásban (kikapcsolva).
3. A nyomtatás/tételszámlálás kapcsolót mindig “P”
állásban kell tartani, ha nincs másképpen
megadva.
4. Nyomja meg a billentyű t minden
művelet megkezdése előtt.
5. Ha szám bevitele közben hiba történik, akkor
nyomja meg a vagy a gombot, és gépelje
be a helyes értéket.
6. Egy érték beírása után, nyomja meg a ,
vagy a billentyűt, hogy aktiválja a önköltségi
ár/eladási ár/ haszon számító üzemmódot. Ha
eltérő számítási feladatokat végez, akkor előszőr
a billentyűt nyomja meg, hogy törölje a
, , üzemmódot.
7. A példák a következő formában jelennek meg:
86
Page 89

EXAMPLE: BEISPIEL: EXEMPLE:
EJEMPLO: ESEMPIO: EXEMPEL:
VOORBEELD: EXEMPLO: ESIMERKKI:
PÉLDA:
(123 + 456) × 2 =
Operation Print Note
Vorgang Ausdruck Hinweis
Opération Impression Note
Operación Impresión Nota
Operazione
Operation Utskrift Anmärkning
Bediening Afdruk Opmerking
Operação Impressão Nota
Toiminto Tulostus Huomautus
Művelet Nyomtatás Megjegyzés
Stampa Nota
F 6 3 2 1 0 A
REPEAT ADDITION AND SUBTRACTION /
WIEDERHOLUNG VON ADDITION UND
SUBTRAKTION /
SOUSTRACTION SUCCESSIVES / REPETICIÓN
DE SUMAS Y RESTAS /
ADDIZIONE E SOTTRAZIONE / REPETERAD
ADDITION OCH SUBTRAKTION / HERHAALD
OPTELLEN EN AFTREKKEN / ADIÇÃO E
SUBTRAÇÃO REPETIDA / TOISTUVA YHTEENJA VÄHENNYSLASKU /
(ISMÉTLŐDŐ) ÖSSZEADÁS ÉS KIVONÁS
123 + 123 + 123 + 456 – 100 – 100 =
ADDITION ET
RIPETIZIONE DI
TÖBBTAGÚ
F 6 3 2 1 0 A
123 123.00 +
456 456.00 +
579.00 ✱
❇ 579.00 × ❇
2 2
.
1,158.00 ✱
Re-entry of total
Erneute Eingabe der Summe
Réintroduction du total
Reingreso del total
Reinserimento del totale
Återinmatning av svaret
=
Opnieuw invoeren van totaal
Reintrodução do total
Summan uudelleennäppäily
Az összeg újrabeírása
87
Page 90

Operation Display Print
OFF • P P•IC
ON
Vorgang Anzeige Ausdruck
Opération Affichage Impression
Operación Exhibición Impresión
Operazione
Display Stampa
Operation På skärmen Utskrift
Bediening Display Afdruk
Operação Exibição Impressão
Toiminto Näyttö Tulostus
Művelet Kijelző Nyomtatás
(1) (2) (3)
123 123. 123
246. 123
369. 123
456 825. 456
100 725. 100
625. 100
625.
625
ADDITION AND SUBTRACTION WITH ADD
MODE / ADDITION UND SUBTRAKTION IN DER
ADDITIONSBETRIEBSART / ADDITION ET
SOUSTRACTION AVEC MODE D’ADDITION /
SUMA Y RESTA CON MODO DE SUMA /
ADDIZIONE E SOTTRAZIONE CON MODALITÀ
DI ADDIZIONE / ADDITION OCH
SUBTRAKTION MED LÄGET ADD / OPTELLEN
EN AFTREKKEN MET DE DECIMAALINVOEGINGSFUNCTIE / ADIÇÃO E
.
+
.
+
.
+
.
+
.
–
.
–
.
✱
SUBTRAÇÃO COM MODO DE ADIÇÃO /
YHTEEN- JA VÄHENNYS LISÄYSMUODOLLA /
ÖSSZADÁS ÉS KIVONÁS A TIZEDESVESSZŐ
NÉLKÜLI MÓDBAN
12.45 + 16.24 + 19.35 – 5.21 =
F 6 3 2 1 0 A
(1) (2) (3)
*11245 12.45 12.45 +
1624 28.69 16.24 +
1935 48.04 19.35 +
521 42.83 5.21 –
.............
002
42.83 42.83 ✱
88
Page 91

*1 : was not used in the entries.
OFF • P P•IC
ON
*1 : Bei der Eingabe wurde nicht verwendet.
*1 : La n’a pas été utilisée dans les entrées.
*1 : La no ha sido usada en los registros.
*1 : non è stato usato nelle entrate.
*1 : användes inte vid inmatning.
*1 : werd niet gebruikt bij het invoeren van het
getal.
*1 : não foi usado nas entradas.
*1 : ei ole käytetty näppäiltäessä.
*1 : Bevitelnél a tizedespont nem használható.
MIXED CALCULATIONS /
BERECHNUNGEN
CÁLCULOS MIXTOS /
GEMISCHTE
/ CALCUL COMPLEXE /
CALCOLI MISTI /
BLANDAD RÄKNING / GEMENGDE
BEREKENINGEN / CÁLCULOS MISTOS /
SEKALAISIA LASKUTOIMITUKSIA /
VEGYES
SZÁMÍTÁSOK
A. 5 × 2 + 12 =
(1) (2) (3)
5 5. 5
2 2
10. 10.✱
F 6 3 2 1 0 A
.
×
.
=
10. 10
12 22. 12
22. 22.✱
89
.............
002
.
+
.
+
Page 92

B. (10 + 2) × 5 =
(1) (2) (3)
10 10. 10
2 12. 2
12. 12
5 5
60. 60.✱
OFF • P P•IC
ON
.
+
.
+
.
×
.
=
F 6 3 2 1 0 A
CONSTANT / KONSTANTE / CALCULS AVEC
CONSTANTE / CONSTANTES / COSTANTE /
KONSTANTRÄKNING / CONSTANTE /
CONSTANTE / VAKIO / KONSTANS
SZÁMÍTÁSOK
A. 62.35 × 11.11 =
62.35 × 22.22 =
(1) (2) (3)
62.35 62.35 62.35 ×
11.11 11.11 =
692.7085 692.7085 ✱
22.22 22.22 =
1,385.417 1,385.417 ✱
90
F 6 3 2 1 0 A
Page 93

B. 11.11 ÷ 77.77 =
22.22 ÷ 77.77 =
F 6 3 2 1 0 A
(1) (2) (3)
11.11 11.11 11.11
77.77 77.77 =
0.14285714285 0.14285714285 ✱
22.22 22.22 =
0.28571428571 0.28571428571 ✱
POWER / POTENZ / PUISSANCE / POTENCIA /
POTENZA / POTENSRÄKNING /
MACHTSVERHEFFEN / POTÊNCIA / POTENSSI /
HATVÁNYOZÁS
÷
A. 5.252 =
(1) (2) (3)
5.25 5.25 5.25 ×
27.563
91
F 6 3 2 1 0 A
5.25 =
27.563 ✱
Page 94

B. 53 =
(1) (2) (3)
5 5. 5
25.
125.
5 5. 5
25. 5
125.
25
25
125
125
.
×
.
5
=
.
✱
.
=
.
✱
.
×
.
×
.
5
=
.
✱
F 6 3 2 1 0 A
F 6 3 2 1 0 A
PERCENT / PROZENT / POURCENTAGE /
PORCENTAJES / PERCENTUALE /
PROCENTRÄKNING / PERCENTAGE /
PORCENTAGEM / PROSENTTI /
SZÁZALÉKSZÁMÍTÁS
A. 100 × 25% =
(1) (2) (3)
100 100. 100
25 25.%
25.00 25.00 ✱
B. (123 ÷ 1368) × 100 =
(1) (2) (3)
123 123. 123
1368 1,368.%
8.99 8.99 ✱
92
F 6 3 2 1 0 A
.
×
F 6 3 2 1 0 A
.
÷
Page 95

RECIPROCAL / KEHRWERT / INVERSES /
RECÍPROCOS / RECIPROCO /
RECIPROKA TAL / RECIPROQUE /
RECÍPROCA / KÄÄNTEISARVO / RECIPROK
SZÁMÍTÁS
1
7
=
F 6 3 2 1 0 A
(1) (2) (3)
7 7. 7
1. 7
7
0.14285714285 ✱
0.14285714285
ITEM COUNT CALCULATION /
BERECHNUNG MIT DEM POSTENZÄHLER /
CALCUL DE COMPTE D’ARTICLES /
CÁLCULO DE CUENTA DE ARTÍCULOS /
CALCOLO CONTEGGIO VOCI /
RÄKNING MED POSTRÄKNAREN /
REKENEN MET DE POSTENTELLER /
CÁLCULO DA CONTAGEM DE ITENS /
TEKIJÄLASKURI / SZÁMÍTÁS A
TÉTELSZÁMLÁLÓVAL
.
÷
.
.
Bill No. Number of bills Amount
÷
Rechnung Nr.
Facture n° Nbre de factures Montant
=
N° de factura Cantidad de facturas Importe
Numero di fattura
Fakturanr. Antal fakturor Belopp
Rekeningnr. Aantal rekeningen Bedrag
N° da fatura Número de faturas Quantia
Laskunr. Laskujen lukumäärä Määrä
Anzahl der Rechnungen
Numero delle fatture Importo
Számlaszám A számlák száma Összeg
1 1 $100.55
2 1 $200.00
3 1 $200.00
4 1 $400.55
5 1 $500.65
Total / Summe / Total
Total / Totale / Svar
(a) (b)
Totaal / Total / Summa /
Összesen
93
Betrag
Page 96

ON
OFF • P P•IC
F 6 3 2 1 0 A
(1) (2) (3)
100.55 100.55 100.55 +
200 300.55 200.00 +
500.55 200.00 +
400.55 901.10 400.55 +
500.65 1,401.75 500.65 +
.............
005
1,401.75 1,401.75 ✱ (b)
GRAND TOTAL / ENDSUMME / TOTAL
GÉNÉRAL / TOTAL GLOBAL / TOTALE
GENERALE / SLUTSVAR / EINDTOTAAL /
TOTAL GERAL / KOKONAISSUMMA /
VÉGÖSSZEG
100 + 200 + 300 =
+) 300 + 400 + 500 =
Grand total / Endsumme / Total général /
Total global / Totale generale / Slutsvar /
Eindtotaal / Total geral / Kokonaissumma /
Végösszeg
(a)
94
Page 97

F 6 3 2 1 0 A
OFF • P P•IC
ON
(1) (2) (3)
100 100. 100
200 300. 200
300 600. 300
600.✱ +
600.
300 300.
400 700.
500 1,200.
•
•
•
•
300
400
500
1,200.✱ +
1,200.
•
1,800.✱✱
1,800.
RATE
MEMORY / SPEICHER / MÉMOIRE / MEMORIA /
SET
GT •
MEMORIA / MINNE / GEHEUGEN / MEMÓRIA /
MUISTILASKENTA / MEMÓRIA
46 × 78 =
+) 125
÷
.
+
.
+
.
+
–)72× 8 =
Total / Summe / Total
Total / Totale / Svar
Totaal / Total / Summa /
5 =
F 6 3 2 1 0 A
GT •
RATE
SET
Összesen
(1) (2) (3)
.
+
.
+
.
+
2
*
46 46. 46.×
78 78.=
M
3,588.
25.
M
M
125 125.
5 5.=
3,588.+M
125.÷
25.+M
95
576.
M
M
72.×
576.–M
72 72.
8 8.=
3,037.◊
M
3,037.
M
Page 98

*2 : Press to clear the memory before starting
a memory calculation.
*2 : Vor dem Beginn einer Speicherberechnung
drücken Sie , um den Speicher zu löschen.
*2 : Effacer le contenu de la mémoire ( ) avant
de procéder à un calcul avec mémoire.
*2 : Apretar para cancelar la memoria antes de
empezar a efectuar un cálculo con memoria.
*2 : Premere per cancellare la memoria prima
di iniziare un calcolo con memoria.
*2 : Tryck på för att tömma minnet innan
minnesräkning startas.
*2 : Voordat u begint met het maken van een
geheugenberekening drukt u op om het
geheugen te wissen.
*2 : Pressione para limpar a memória antes de
começar um cálculo com memória.
*2 : Tyhjennä muisti painamalla näppäintä
ennen muistilaskun aloittamista.
*2 : A memória segítségével történő számítás
megkezdése előtt nyomja meg a gombot a
memória törléséhez.
EURO CONVERSION
EURO-UMRECHNUNG
CONVERSION EURO
CONVERSIÓN DE EUROS
CONVERSIONE DI EURO
OMVANDLING AV EURO
EUROCONVERSIE
CONVERSÃO DE EUROS
EURO-MUUNTO
EURÓÁTVÁLTÁS
EXAMPLE 1: Set the following rate provision-
ally: 1 euro = 1.95583 DEM.
Convert 1,000 euro to DEM.
BEISPIEL 1: Eingabe der vorläufigen Rate: 1
Euro = 1,95583 DEM.
Umrechnung von 1.000 Euro in
DEM.
EXEMPLE 1: Choisir le taux suivant
provisoirement: 1 euro = 1,95583
DEM.
Convertir 1.000 euros en DEM.
EJEMPLO 1: Ponga el tipo de cambio
siguiente de forma provisional.
1 euro = 1,95583 marcos
96
Page 99

alemanes
GT •
RATE
SET
GT •
RATE
SET
GT •
RATE
SET
Convierta 1.000 euros a marcos
alemanes
ESEMPIO 1: Impostare temporaneamente il
tasso di cambio seguente
1 euro = 1,95583 DEM
Convertire 1.000 euro in marchi
tedeschi
EXEMPEL 1: Ställ in följande provisoriska
växelkurs:
1 euro = 1,95583 DEM
Omvandla 1.000 euro till DEM.
VOORBEELD 1: Voer een voorlopige koers in:
1 Euro = 1,95583 DEM.
Omrekenen van 1.000 Euro naar
DEM.
EXEMPLO 1: Defina a seguinte taxa
provisoriamente:
1 euro = 1,95583 DEM
Converta 1.000 euros em DEM.
ESIMERKKI 1: Vaihtokurssiksi säädetään
seuraava oletusarvo: 1 euro =
1,95583 DEM
1.000 euroa muunnetaan
DEM:ksi.
PÉLDA 1: Állítsa be átmenetileg a
következő árfolyamot: 1
euró=1,95583 DEM
Váltson át 1.000 eurót DEM-re.
(1) (2) (3)
1.95583 1.95583
GT •
RATE
SET
1.95583 1.95583 =
- - - - - - - - - - - - - - - - - - - - - - - - - - - - - - - - - - - -
1000 1,000
1,955.83 1,955.83 ∆
97
F 6 3 2 1 0 A
∆
.
Page 100

EXAMPLE 2: Convert 1,000 DEM to the euro
currency.
(1 euro = 1.95583 DEM,
provisionally.)
BEISPIEL 2: Umrechnung von 1.000 DEM in
Euro.
(1 Euro = 1,95583 DEM,
vorläufiger Wert.)
EXEMPLE 2: Convertir 1.000 DEM en euro.
(1 euro = 1,95583 DEM
provisoire-ment.)
EJEMPLO 2: Convierta 1.000 marcos
alemanes a euros.
(1 euro = 1,95583 marcos
alemanes provisionalmente)
ESEMPIO 2: Convertire 1.000 marchi tedeschi
in euro.
(1 euro = 1,95583 DEM,
temporaneamente).
EXEMPEL 2: Omvandla 1.000 DEM till euro.
(Provisorisk växelkurs är 1 euro
= 1,95583 DEM.)
VOORBEELD 2: Omrekenen van 1.000 DEM naar
Euro.
(1 Euro = 1,95583 DEM;
voorlopig ingevoerde koers)
EXEMPLO 2: Converta 1.000 DEM em euros
(1 euro = 1,95583 DEM,
provisoriamente.)
ESIMERKKI 2: 1.000 DEM muunnetaan
euroiksi.
(Oletetaan, että 1 euro = 1,95583
DEM.)
PÉLDA 2: Váltson át 1.000 DEM-et euróra.
(1 euró=1,95583 DEM
átmenetileg)
F 6 3 2 1 0 A
(1) (2) (3)
1000 1,000
511.29 511.29 ∆ ∆
98
.
 Loading...