


EL-2607R
ELECTRONIC PRINTING CALCULATOR
DRUCKENDER TISCHRECHNER
CALCULATRICE IMPRIMANTE ÉLECTRONIQUE
SZALAGOS ASZTALI KALKULÁTOR
OPERATION MANUAL
BEDIENUNGSANLEITUNG
MODE D’EMPLOI
HASZNÁLATI ÚTMUTATÓ
ENGLISH ............................................... Page 2
CALCULATION EXAMPLES............. Page 34
DEUTSCH .............................................. Seite 10
RECHNUNGSBEISPIELE ................ Seite 34
FRANÇAIS ............................................. Page 18
EXEMPLES DE CALCULS ............... Page 35
MAGYAR................................................ Oldal 26
SZÁMÍTÁSI PÉLDÁK ........................ Oldal 35

Caution!
The socket outlet shall be installed near the equipment and shall be easily accessible.
Vorsicht!
Die Netzsteckdose muß in der Nähe des Gerätes angebracht und leicht zugänglich
sein.
Observera!
Anslut till ett vägguttag som återfinns nära enheten och är lätt åtkomligt.
Let op!
Het stopcontact moet in de buurt van het apparaat zijn en ook gemakkelijk
toegankelijk zijn.
Atenção!
A tomada elétrica deve estar perto do equipamento e ser de fácil acesso.
Attention!
La prise de courant murale doit être installée à proximité de l’appareil et doit être
facilement accessible.
Aviso!
El tomacorriente debe estar instalado cerca del equipo y debe quedar bien accesible.
Attenzione!
La presa della corrente deve essere installata in prossimità dell’apparecchio ed
essere facilmente accessibile.
Huomautus!
Pistorasia tulee asentaa laitteen lähelle paikkaan, jossa sen käyttöä on helppoa.
Figyelem!
A kalkulátort úgy érdemes elhelyezni, hogy a hálózati csatlakozó aljzatot könnyen
el lehessen érni.
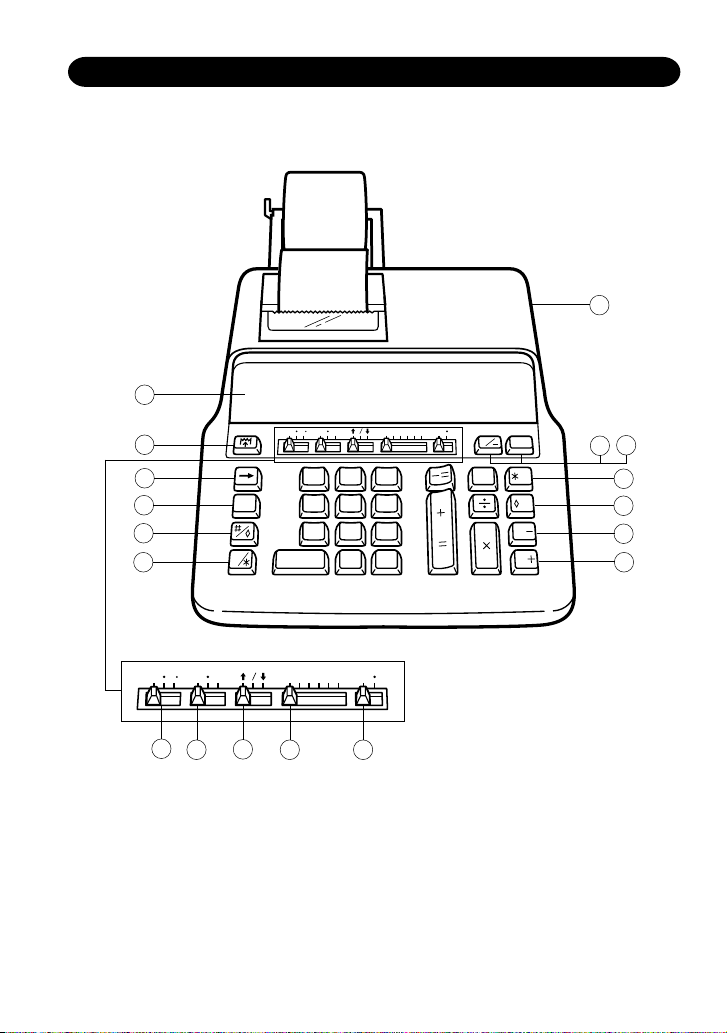
THE KEYBOARD DIE TASTATUR LE CLAVIER A BILLENTYŰZET
1
18
5
4
8
7
45
2
1
000
GT
0
9
6
3
•
+
MU
M
%
M
M
M
1716
15
14
13
12
10
11
7
P P IC K A F 6 3 2 1
8
9
GT
CE
0
5
P PIC K A F6321
2
4
54
GT
0
63
– 1 –

ENGLISH
INTRODUCTION
Thank you for your purchase of the SHARP electronic calculator, model EL-2607R. Your
SHARP calculator is specially designed to save work and increase efficiency in all business
applications and general office calculations. Careful reading of this manual will enable
you to use your new SHARP calculator to its fullest capability.
OPERATIONAL NOTES
To insure trouble-free operation of your SHARP calculator, we recommend the following:
1. The calculator should be kept in areas free from extreme temperature changes,
moisture, and dust.
2. A soft, dry cloth should be used to clean the calculator. Do not use solvents or a wet
cloth.
3. If you are not going to use the calculator for a time period, please pull out the power
cord to cut electricity completely.
4. If service should be required, use only a SHARP servicing dealer, a SHARP approved
service facility or SHARP repair service.
5. Do not wind the AC cord around the body or otherwise forcibly bend or twist it.
6. Since this product is not waterproof, do not use it or store it where fluids, for example
water, can splash onto it. Raindrops, water spray, juice, coffee, steam, perspiration,
etc. will also cause malfunction.
SHARP will not be liable nor responsible for any incidental or consequential economic
or property damage caused by misuse and/or malfunctions of this product and its
peripherals, unless such liability is acknowledged by law.
WARNING
THE VOLTAGE USED MUST BE THE SAME AS SPECIFIED ON THIS CALCULATOR.
USING THIS CALCULATOR WITH A HIGHER VOLTAGE THAN THAT WHICH IS
SPECIFIED IS DANGEROUS AND MAY RESULT IN A FIRE OR OTHER TYPE OF
ACCIDENT CAUSING DAMAGE. WE ARE NOT RESPONSIBLE FOR ANY DAMAGE
RESULTING FROM USE OF THIS CALCULATOR WITH A VOLTAGE OTHER THAN
THAT WHICH IS SPECIFIED.
– 2 –

CONTENTS
Page
• OPERATING CONTROLS ........................................................................................3
• INK ROLLER REPLACEMENT ................................................................................ 7
• PAPER ROLL REPLACEMENT................................................................................8
• ERRORS .................................................................................................................. 9
• SPECIFICATIONS ....................................................................................................9
• CALCULATION EXAMPLES...................................................................................34
OPERATING CONTROLS
POWER SWITCH
PRINT/ITEM COUNT MODE SELECTOR:
“P” (Print mode): The calculator functions as a print /display calculator.
“•” (Neutral): The calculator functions as a display calculator. (Non-
print mode)
“P•IC”: The calculator functions as a print/display calculator with an item
counter.
The counter will count the number of times that
pressed in addition.
Note: • Each time is used in subtraction, 1 will be subtracted from the
count.
• The count is printed when the calculated result is obtained.
• Pressing of
CE
, or clears the counter.
*
• The counter has the capacity of a maximum of 3 digits (up to ±999).
If the count exceeds the maximum, the counter will recount from
zero.
+
has been
=
CONSTANT/ADD MODE SELECTOR:
“K” : The following constant functions will be performed:
Multiplication: The calculator will automatically remember the first number
entered (the multiplicand) and instruction.
Division: The calculator will automatically remember the second
number entered (the divisor) and instruction.
“•” : Neutral
“A” : Use of the Add mode permits addition and subtraction of numbers
without an entry of the decimal point. When the Add mode is activated,
– 3 –
the decimal point is automatically positioned according to the decimal
selector setting.
Use of , , and will automatically override the Add mode
and decimally correct answers will be printed at the preset decimal
position.
ROUNDING SELECTOR:
“ ” : An answer is rounded up.
“5/4” : An answer is rounded off.
“ ” : An answer is rounded down.
Example: Set Decimal Selector to 2.
4 ⴓ 9 = 0.444 ... , 5 ⴓ 9 = 0.555 ...
5/4 0.44 0.56
Note: The decimal point floats during successive calculation by the use of
or .
If the decimal selector is set to “F” then the answer is always rounded
down ( ).
DECIMAL SELECTOR:
Presets the number of decimal places in the answer.
In the “F” position, the answer is displayed in the floating decimal system.
4 9
+
=
0.45 0.56
0.44 0.55
5 9
+
=
GRAND TOTAL MODE SELECTOR:
“GT”: This selector will accumulate the following:
(“✱+” will be printed.)
1. Addition and subtraction totals obtained with
2. Product and quotient totals obtained with
3. Answers obtained with or .
“•”: Neutral, GT OFF
PAPER FEED KEY
LAST DIGIT CORRECTION KEY:
Operation of this key in entered numbers or calculated results shifts the
number one digit to the right together with the decimal point. Used for one
digit correction.
– 4 –
CE
+
or .
=
.
*

GRAND TOTAL KEY:
+
=
CE
*
Prints and clears the “GT” memory contents.
NON-ADD/SUBTOTAL KEY:
Non-add – When this key is pressed right after an entry of a number in
the Print mode, the entry is printed on the left-hand side with
“#”.
This key is used to print out numbers not subjects to calculation
such as code, date, etc.
Subtotal – Used to get subtotal(s) of additions and/or subtractions. When
pressed following
and the calculation may be continued.
By pressing this key even in the Non-print mode, the displayed number
is printed with “P”.
CE
CLEAR ENTRY/CLEAR AND TOTAL KEY:
*
Clear entry – When pressed after a number and before a function,
clear the number.
Clear and total – When pressed after a function key, prints the total of
addition and subtraction with “ ✱ ”. This key also serves
as a clear key for the calculation register and resets an
error condition. The contents of the memory are not
affected by use of
MEMORY PLUS KEY
MEMORY MINUS KEY
RECALL MEMORY KEY
or , the subtotal is printed with “ ◊ ”
.
RECALL AND CLEAR MEMORY KEY
CHANGE SIGN KEY:
Changes the algebraic sign of a number (i.e., positive to negative or negative
to positive).
MARKUP KEY:
Used to perform mark-ups, percent change and automatic add-on/discount.
– 5 –

DISPLAY
Display format:
Symbols:
M : Memory symbol
Appears when a number is in memory.
– : Minus symbol
Appears when a number is a negative.
E : Error symbol
Appears when an overflow or other error is detected.
: Grand total memory symbol
•
Appears when a number is in the grand total memory.
– 6 –
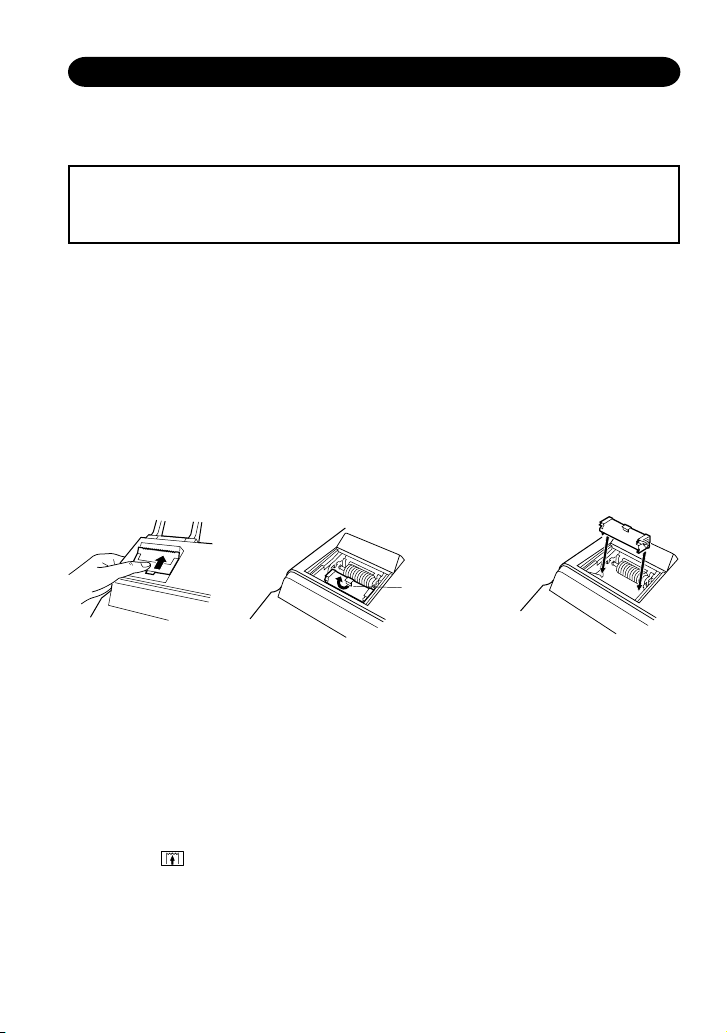
INK ROLLER REPLACEMENT
If printing is blurry even when the ink roller is in the proper position, replace the roller.
Ink roller: Type EA-741R
WARNING
APPLYING INK TO WORN INK ROLLER OR USE OF UNAPPROVED INK ROLLER
MAY CAUSE SERIOUS DAMAGE TO PRINTER.
1. Set the power switch to the OFF.
2. Remove the printer cover by sliding it. (Fig. 1)
3. Move the knob of the ink roller slightly towards you and then lift it up (in the direction
of the arrow). Take care not to catch the ink roller under the case. (Fig. 2)
4. Install the new ink roller and push the knob of the ink roller. Make sure that the ink
roller is securely in place. (Fig. 3)
5. Put back the printer cover.
Note: When you clean the printer cover, remove the printer cover by sliding it. (Fig. 1)
Then clean the printer cover by using a soft, dry cloth. Do not use solvents or a
wet cloth.
Knob of the
ink roller
Fig. 1
Cleaning the printing mechanism
If the print becomes dull after long time usage, clean the printing wheel according
to the following procedures:
1) Install the paper roll and feed it until it comes out of the front of the print mechanism.
2) Remove the printer cover and the ink roller.
3) Put a small brush (like a tooth brush) lightly to the printing wheel and clean it by
pressing .
4) Put back the ink roller and the printer cover.
Fig. 2
– 7 –
Fig. 3

PAPER ROLL REPLACEMENT
1. Assemble the paper holder. (Fig. 1)
2. Insert the leading edge of the paper into the opening directly behind the print
mechanism. (Fig. 2)
3. Press the paper feed key and feed the paper under the edge of the paper cutter.
(Fig. 3)
4. Place the paper roll in the paper holder at the back of the calculator. (Fig. 4)
Fig. 1
Paper holder
Paper holder
Paper cutter
Paper feed key
Fig. 3
Fig. 2
Paper roll
Fig. 4
DO NOT PULL PAPER BACKWARDS AS THIS MAY CAUSE DAMAGE TO PRINTER
MECHANISM.
– 8 –

CE
*
CE
*
ERRORS
There are several situations which will cause an overflow or an error condition. When
this occurs, the error symbol “E” will be displayed and all keys will electronically lock.
The contents of the memory at the time of the error are retained.
If an “0.E” is printed on the tape at the time of the error,
must be used to clear the
calculator. If an “E” with any numerals except zero is printed on the tape or if an “E” is
not printed on the tape, the error may be cleared with
or and the calculation can
still be continued.
Error conditions:
1. Entry of more than 12 digits or 11 decimals.
This error can be cleared with
CE
*
or .
2. When the integer portion of an answer exceeds 12 digits.
3. When the integer portion of the contents of the memory exceeds 12 digits.
(Ex. 999999999999 1 )
4. When any number is divided by zero. (Ex. 5 0
+
)
=
SPECIFICATIONS
Power source: AC: 220V–230V, 50Hz
Operating capacity: 12 digits
Calculations: Four arithmetic, constant multiplication and division, power,
add-on, discount, repeat addition and subtraction, reciprocal
grand total, item count, markup, memory, etc.
PRINTING SECTION
Printing speed: Approx. 3.0 lines/sec.
Printing paper: 57 mm (2-1/4″) ~ 58 mm (2-9/32″) wide
80 mm (3-5/32″) in diameter (max.)
Operating temperature: 0°C ~ 40°C (32°F ~ 104°F)
Power consumption: 73 mA
Dimensions: 220 (W) × 274 (D) × 69 (H) mm
8-21/32″ (W) × 10-25/32″ (D) × 2-23/32″ (H)
Weight: Approx. 1.4 kg (3.1 Ibs.)
Accessories: 1 paper roll, 1 ink roller (installed), paper holder and operation
manual
– 9 –

CE
*
CE
*
CALCULATION EXAMPLES
1. Set the decimal selector as specified in each example.
The rounding selector should be in the “5/4” position unless otherwise specified.
2. The grand total mode selector and the constant/add mode selector should be in the
“•” position (off position) unless otherwise specified.
3. The print/item count mode selector should be in the “P” position unless otherwise
specified.
4. If an error is made while entering a number, press
or and enter the correct
number.
5. Example procedures are listed in following manner unless otherwise specified.
Operation Display Print
RECHNUNGSBEISPIELE
1. Die Einstellung des wahlschalter für dezimal nimmt man den Anleitungen in den
einzelnen Beispielen entsprechend vor.
Den Rundungsschalter läßt man, falls nicht anders ausgewiesen, in der “5/4”-Stellung.
2. Der Gesamtsummen-, Konstantenbetriebs- und der Additionshilfe-Wahlschalter läßt
man, falls nicht anders ausgewiesen, in der “•”-Stellung (Aus-Stellung).
3. Falls nicht anders ausgewiesen, stellt man den Druckbetriebs/PostenzählerWahlschalter auf “P”.
4. Zur Korrektur von Eingabefehlern drückt man
ein.
5. Beispiele für das Vorgehen werden folgendermaßen dargestellt, wenn nicht anders
angegeben.
oder und gibt die Zahl korrekt
Bedienung Anzeige Druck
– 34 –
REPEAT ADDITION AND SUBTRACTION
WIEDERHOLTE ADDITION UND SUBTRAKTION
ADDITION ET SOUSTRACTION SUCCESSIVES
TÖBBTAGÚ (ISMÉTLŐDŐ) ÖSSZEADÁS ÉS KIVONÁS
123 + 123 + 123 + 456 – 100 – 100 =
+
123
456
100
=
+
=
+
=
+
=
CE
*
123. 123.+
246. 123.+
369. 123.+
825. 456.+
725. 100.–
625. 100.–
625. 625
.
✱
ADDITION AND SUBTRACTION WITH ADD MODE
ADDITION UND SUBTRAKTION MIT ADDITIONSHILFE
ADDITION ET SOUSTRACTION AVEC MODE D’ADDITION
ÖSSZADÁS ÉS KIVONÁS A TIZEDESVESSZŐ NÉLKÜLI MÓDBAN
12.45 + 16.24 + 19.35 – 5.21 =
*11245
*1: was not used in the entries. *1: wurde nicht für die Eingabe verwendet.
*1: La
+
=
+
1624
=
+
1935
=
521
CE
*
n’a pas été utilisée dans les entrées. *1: Bevitelnél a tizedespont nem használható.
12.45 12.45 +
28.69 16.24 +
48.04 19.35 +
42.83 5.21 –
42.83 42.83 ✱
– 36 –

MIXED CALCULATIONS / GEMISCHTE RECHNUNG /
CALCUL COMPLEXE / VEGYES SZÁMÍTÁSOK
A. (10 + 2) × 5 =
+
10
=
+
2
=
10. 10.+
12. 2.+
12.◊
5
B. 5 × 2 + 12 =
5 5. 5
2
12
+
=
60. 60
12. 12
+
=
10. 10
+
=
+
=
CE
*
10. 10
22. 12.+
22. 22
.
5.=
.
.
2.=
.
.
.
×
✱
×
✱
+
✱
– 37 –

CONSTANT
A. 62.35 × 11.11 =
62.35 × 22.22 =
/
KONSTANTEN
/
CONSTANTE
/
KONSTANS SZÁMÍTÁSOK
➀
➁
62.35 62.35 62.35 ×
11.11
22.22
B. 11.11 ⴓ 77.77 =
22.22 ⴓ 77.77 =
11.11 11.11 11.11 ⴓ
77.77
22.22
+
=
692.71 692.71 ✱
+
=
1,385.42 1,385.42 ✱
➀
➁
+
=
0.143 0.143 ✱
+
=
0.286 0.286 ✱
11.11 = K
22.22 = K
77.77
= K
22.22
= K
➀
➁
➀
➁
– 38 –
POWER / POTENZBERECHNUNGEN / PUISSANCE / HATVÁNYOZÁS
A. 5.252 =
5.25 5.25 5.25 ×
B. 53 =
+
=
27.563 27.563 ✱
5.25 =
5 5. 5
+
=
25. 25
+
=
125. 125
5 5. 5
+
=
25. 5
125. 125
.
5.
.
25.
.
.
.
5.=
.
×
= K
✱
= K
✱
×
×
✱
PERCENT / PROZENT / POURCENTAGE / SZÁZALÉKSZÁMÍTÁS
A. 100 × 25% =
100 100. 100
25 25.%
25.00 25.00 ✱
B. 123 ⴓ 1368 = (%)
.
×
123 123. 123.ⴓ
1368 1,368.%
8.99 8.99 ✱
– 39 –

RECIPROCAL / REZIPROKRECHNUNGEN / INVERSES /
RECIPROK SZÁMÍTÁS
1
=
7
7 7. 7.ⴓ
1. 7.ⴓ
+
=
7.=
0.14285714285 0.14285714285 ✱
ADD-ON AND DISCOUNT / AUFSCHLAG UND ABSCHLAG /
MAJORATION ET RABAIS / ÁREMELÉS ÉS ÁRENGEDMÉNY
A. 5% add-on to 100. / Ein Aufschlag von 5% zu 100. / Majoration de 5% de 100. /
5%-kal növelje meg a 100 egységárat.
5.00
.
×
Increased amount
Zusatzbetrag
Majoration
Növekmény
New amount
Neuer Betrag
Total majoré
Új érték
100 100. 100
5 5.%
105.00 105.00 ✱
B. 10% discount on 100. / Ein Abschlag von 10% von 100. / Rabais de 10% sur 100. /
Számoljon ki 10% árengedményt 100 egységárra.
–10.00
.
×
Discount
Abschlag
Remise
Árengedmény
Net amount
Netto-Betrag
Montant net
Nettó érték
100 100. 100
10 –10.%
90.00 90.00 ✱
– 40 –

MARKUP AND MARGIN
Markup and Profit Margin are both ways of calculating percent profit.
● Profit margin is percent profit vs. selling price.
● Markup is percent profit vs. cost.
– Cost is the cost.
– Sell is the selling price.
– GP is the gross profit.
– Mkup is the percent profit based on cost.
– Mrgn is the percent profit based on selling price.
AUFSCHLAG UND GEWINNSPANNE
Aufschlag und Gewinnspanne sind beides Möglichkeiten zur Berechnung des Gewinns
in Prozent.
● Gewinnspanne ist der Gewinn in Prozent, basierend auf dem Verkaufspreis.
● Gewinnaufschlag in der Gewinn in Prozent, basierend auf dem Einkaufspreis.
– Cost ist der Einkaufspreis.
– Sell ist der Verkaufspreis.
– GP ist der Brutto-Verdienst.
– Mkup ist der Gewinnaufschlag in Prozent, basierend auf dem Einkaufspreis.
– Mrgn ist die Gewinnspanne in Prozent, basierend auf dem Verkaufspreis.
HAUSSE ET MARGE BÉNÉFICIAIRE
Le calcul des majorations et des marges bénéficiaires sont deux façons de calculer un
pourcentage de profit.
● La marge bénéficiaire est un pourcentage de profit par rapport au prix de vente.
● La majoration est un pourcentage de profit par rapport au prix d’achat.
– Cost est le prix d’achat.
– Sell est le prix de vente.
– GP est le bénéfice brut.
– Mkup est le bénéfice par rapport au coût.
– Mrgn est le bénéfice par rapport au prix de vente.
HASZONKULCS ÉS ÁRRÉS
A százakékos haszon két számítási módja a haszonkulcs és az árrés számítása.
● Az árrés megadja, hogy a haszon az eladási ár hány százaléka.
● A haszonkulcs megadja, hogy a haszon a költségek hány százaléka.
– A Cost a költségeket jelenti.
– A Sell az eladási árat jelenti.
– A GP a bruttó hasznot jelenti.
– A Mkup a százalékos haszon a költségekhez képest.
– Az Mrgn a százalékos haszon az eladási árhoz képest.
– 41 –

To find
Gesucht wird
Pour trouver
Keresett érték
Mrgn Sell, Cost Cost
Mkup Sell, Cost Sell
Sell Cost, Mrgn Cost Mrgn
Cost Sell, Mrgn Sell Mrgn
Sell Cost, Mkup Cost Mkup
Cost Sell, Mkup Sell Mkup
Knowing
Bekannt ist
Quand on connaît
Ismert érték
Operation
Vorgehen
Opération
Műveletsor
Sell
+
Cost
=
EXAMPLE / BEISPIEL /
EXEMPLE / PÉLDA
Cost $200
+
=
Sell $250
GP $50
Mkup 25%
Mrgn 20%
200 200. 200.ⴓ Cost
20 20. %M Mrgn
250.00 ✱ Sell
50.00 50.00 GP GP
PERCENT CHANGE / PROZENTUALE VERÄNDERUNG /
VARIATION EN POUR CENT / SZÁZALÉKOS VÁLTOZÁS SZÁMÍTÁSA
● Calculate the dollar difference (a) and the percent change (b) between two yearly
sales figures $1,500 in one year and $1,300 in the previous.
● Berechnung der Dollardifferenz (a) und der prozentualen Veränderung (b) zwischen
den beiden Jahresumsatzzahlen $1.500 in einem Jahr und $1.300 im vorherigen Jahr.
● Calculer la différence en dollars (a) et la variation en pour cent (b) entre deux prix.
1.500 $ pour cette année et 1.300 $ pour l’année précédente.
● Számítsa ki a különbséget (a) és a százalékos változást (b), ha az éves eladás 1300
Ft-ról 1500 Ft-ra nő!
1500
1300
+
=
1,500.00 1,500.00 +
200.00 1,300.00 –
200.00 ✱ (a)
15.38 15.38 %C (b)
– 42 –

PERCENT PRORATION / PROZENTUALES VERHÄLTNIS /
DISTRIBUTION PROPORTIONNELLE EN POURCENTAGE /
SZÁZALÉKOS ARÁNY
● Calculate the percentage of each of the parts to the whole.
● Ermitteln Sie den Prozentanteil von Aufwand zum
Gesamtaufwand.
● Calculer le pourcentage que chaque article représente par
rapport au tout.
● Számítsa ki az összetevők arányát az egészhez képest!
2
*
+
123
456
789
123
=
+
=
+
=
123.00 123.00 +
579.00 456.00 +
1,368.00 789.00 +
8.99 8.99 %P (a)
M
8.99 8.99 + M
456 456.F
789 789.F
M
33.33 33.33 %P (b)
M
33.33 33.33 + M
M
57.68 57.68 %P (c)
Expenses
Aufwand
Dépenses
Költségek
$ 123 (a)
456 (b)
789 (c)
(D) (d)
1,368.00 ✱ (D)
123.F
%
M
57.68 57.68 + M
M
100.00 100.00 ◊ M (d)
*2 : Press to clear the memory before starting a memory calculation.
*2 : Zum Löschen aller früheren Eingaben in den Speicher drückt man .
*2 : Effacer le contenu de la mémoire ( ) avant de procéder à un calcul avec mémoire.
*2 : A memória segítségével történő számítás megkezdése előtt nyomja meg a gombot a
memória törléséhez.
– 43 –

ITEM COUNT CALCULATION / RECHNEN MIT POSTENZÄHLER /
CALCUL DE COMPTE D’ARTICLES /
SZÁMÍTÁS A TÉTELSZÁMLÁLÓVAL
Bill No.
Rechnungs-Nr.
Facture n°
Számlaszám
1 1 $100.55
2 1 $200.00
3 1 $200.00
4 1 $400.55
5 1 $500.65
Total Total
Total Összesen:
100.55
200
400.55
500.65
Number of bills
Anzahl der Rechnungen
Nbre de factures
A számlák száma
Amount
Betrag
Montant
Összeg
(a) (b)
CE
*
+
=
+
=
+
=
+
=
+
=
CE
*
100.55 100.55 +
300.55 200.00 +
500.55 200.00 +
901.10 400.55 +
1,401.75 500.65 +
005 (a)
1,401.75 1,401.75 ✱ (b)
– 44 –

GRAND TOTAL / ENDSUMMEN-BERECHNUNG / TOTAL GÉNÉRAL /
VÉGÖSSZEG
100 + 200 + 300 =
+) 300 + 400 + 500 =
+) 500 – 600 + 700 =
Grand total / Endsumme /
Total général / Végösszeg
CE
*
+
100
=
+
200
=
+
300
=
CE
*
+
300
=
+
400
=
+
500
=
CE
*
+
500
=
600
+
700
=
CE
*
100. 100.+
300. 200.+
600. 300.+
600.
300.
700.
1,200.
1,200.
500.
100.
600.
600.
2,400. 2,400
➀
➁
➂
4
.
600
✱ +
•
•
•
•
•
•
•
•
•
300.+
400.+
500.+
1,200
500.+
600.–
700.+
600
➀
.
✱ +
➁
.
✱ +
➂
.
✱G
4
– 45 –

MEMORY / SPEICHERRECHNUNG / MÉMOIRE / MEMÓRIA
A. 46 × 78 =
+) 125
ⴓ
–) 72 × 8 =
➀ + ➁ + ➂
3
*
46 46. 46. ×
78 78.=
125 125.
5 5.=
72 72.
8 8.=
B. (123 + 45) × (456 – 89) =
3
*
123 123.
45 45.
+
456
=
89
5 =
➀
➁
➂
=
3,588.
3,037.
4
576.
456.
367.
25.
M
M
M
M
M
M
M
M
M
M
3,588.
125.ⴓ
25.
.
72
576.
3,037. ◊M
123.
45.
456.+
89.–
367.◊
+M
+M
×
–M
+M
+M
➀
➁
➂
4
M
367.
M
168.
+
=
*3 : Press to clear the memory before starting a memory calculation.
*3 : Zum Löschen aller früheren Eingaben in den Speicher drückt man .
*3 : Effacer le contenu de la mémoire ( ) avant de procéder à un calcul avec mémoire.
*3 : A memória segítségével történő számítás megkezdése előtt nyomja meg a gombot a
memória törléséhez.
61,656.
M
367
168. ◊M
168.=
61,656
.
×
.
✱
– 46 –

– 47 –

This equipment complies with the requirements of Directives 89/336/EEC and
73/23/EEC as amended by 93/68/EEC.
Dieses Gerät entspricht den Anforderungen der EG-Richtlinien 89/336/EWG
und 73/23/EWG mit Änderung 93/68/EWG.
Ce matériel répond aux exigences contenues dans les directives 89/336/CEE et
73/23/CEE modifiées par la directive 93/68/CEE.
Dit apparaat voldoet aan de eisen van de richtlijnen 89/336/EEG en 73/23/EEG,
gewijzigd door 93/68/EEG.
Dette udstyr overholder kravene i direktiv nr. 89/336/EEC og 73/23/EEC med
tillæg nr. 93/68/EEC.
Quest’ apparecchio è conforme ai requisiti delle direttive 89/336/EEC e
73/23/EEC, come emendata dalla direttiva 93/68/EEC.
H ВБО·Щ¿ЫЩ·ЫЛ ·˘Щ‹ ·УЩ·oОЪ›УВЩ·И ЫЩИ˜ ··ИЩ‹ЫВИ˜ ЩˆУ Ф‰ЛБИТУ ЩЛ˜
E˘Ъˆ·˚О‹˜ EУˆЫЛ˜ 89/336/EOK О·И 73/23/EOK, fiˆ˜ ФИ О·УФУИЫМФ› ·˘ЩФ›
Ы˘МПЛЪТıЛО·У ·fi ЩЛУ Ф‰ЛБ›· 93/68/EOK.
Este equipamento obedece às exigências das directivas 89/336/CEE e
73/23/CEE, na sua versão corrigida pela directiva 93/68/CEE.
Este aparato satisface las exigencias de las Directivas 89/336/CEE y 73/23/CEE,
modificadas por medio de la 93/68/CEE.
Denna utrustning uppfyller kraven enligt riktlinjerna 89/336/EEC och 73/23/EEC
så som kompletteras av 93/68/EEC.
Dette produktet oppfyller betingelsene i direktivene 89/336/EEC og 73/23/EEC i
endringen 93/68/EEC.
Tämä laite täyttää direktiivien 89/336/EEC ja 73/23/EEC vaatimukset, joita on
muutettu direktiivillä 93/68/EEC.
Ez a berendezés megfelelel a nemzetközi direktíváknak: 89/336/EEC és
73/23/EEC-nek, valamint ezek módosításainak - 93/68/EEC 89 – is.
– 48 –


SHARP CORPORATION
PRINTED IN CHINA / IMPRIMÉ EN CHINE / KÍNÁBAN NYOMTATVA
02GT(TINSZ0579EHZZ)
 Loading...