


Sharp AR-5127 User Manual
AR-5127 Series
SOFTWARE SETUP
Thank you for purchasing the SHARP Digital Laser Copier/Printer AR-5127. To use the printer features of the machine, install the software and set up the machine as explained in this manual.
NOTE:
●In this manual, screen images and operating procedures are mainly for Windows XP.
ABOUT THE SOFTWARE CD-ROM
The SHARP Digital Laser Copier/Printer AR-5127 SOFTWARE CD-ROM contains the following software.
●Printer driver
To use the digital laser copier/printer as a printer, a printer driver must be installed.
●AR-5127 Series printer operation manual
The online manual for printer feature is provided as a PDF manual.
●Acrobat Reader Version 5.0
Software that allows you to view the printer operation manual on your computer.
INSTALLING THE PRINTER DRIVER
Installation of software from the installer in the CD-ROM is described below.
Checking the hardware and software requirements
You will need the following hardware and software in order to install the printer driver.
Computer Type |
IBM PC/AT or compatible computer equipped with a USB or bi- |
|
directional parallel interface and a CD-ROM drive |
|
|
Operating System |
Windows 95, Windows 98, Windows Me, |
|
Windows NT 4.0 (Service Pack 5 or later)*, |
|
Windows 2000*, Windows XP* |
|
|
CPU and RAM |
Requirements of the operating system must be satisfied. |
|
|
* The administrator's authorisation is required to install this software using this installer.
For details, see the readme text on the installer screen.
- 1 -

Installing onto Windows XP (USB/parallel interface)
Before starting the installation, make sure the USB or parallel interface cable is not connected to the printer.
1.Insert the supplied CD-ROM into your CD-ROM drive.
2.Click the 'start' button, click 'My Computer' (  ), and then double-click the CD-ROM (
  ) icon.
NOTE:
●When any of 'Found New Hardware Wizard' messages appear during the software installation, be sure to click the 'Cancel' button.
3. Double-click the 'Setup' (  ) icon.
NOTE:
●If the language selection screen appears after you double click the 'Setup' icon, select the language you wish to use and click the 'OK' button. (Normally, the correct language is selected automatically.)
4.After confirming the message in the 'Welcome' window, click the 'Next' button.
5.Read the message in the readme window, and then click the 'Next' button.
6.Follow the on-screen instructions to install the printer driver.
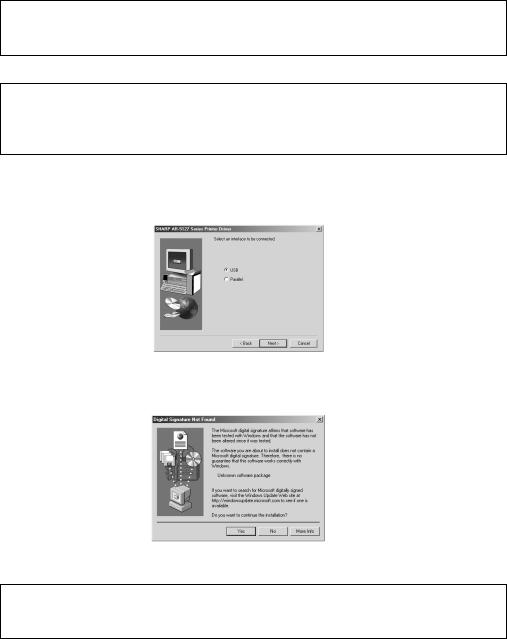
●If the following screen appears (the message may appear more than once), click the 'Continue Anyway' button.
7.When the 'The printer driver installation is complete.' dialog box appears, click the 'OK' button.
NOTE:
●After the installation, a message to restart your computer may be displayed. In this case, click the 'Yes' button to restart your computer.
8.Connect the USB interface cable or parallel interface cable. (p. 6)
●Windows will detect the printer and the Plug and Play screen will appear.
9.Follow the instructions in the Plug and Play screen to begin the installation.
●You have completed the installation of the printer driver.
NOTE:
●The 'Hardware Installation' dialog box will appear. Click the 'Continue Anyway' button.
-2 -
Installing onto Windows 98/Me/2000 (USB interface)
Before starting the installation, make sure the USB interface cable is not connected to the printer.
1.Insert the supplied CD-ROM into your CD-ROM drive.
2.Double-click 'My Computer' (  ), and then double-click the CD-ROM (
  ) icon.
NOTE:
●When any of 'Hardware Found', or 'Found New Hardware Wizard' messages appear during the software installation, be sure to click the 'Cancel' button.
3. Double-click the 'Setup' (  ) icon.
NOTE:
●If the language selection screen appears after you double click the 'Setup' icon, select the language you wish to use and click the 'OK' button. (Normally, the correct language is selected automatically.)
4.After confirming the message in the 'Welcome' window, click the 'Next' button.
5.Read the message in the readme window, and then click the 'Next' button.
6.Select 'USB' and then click the 'Next' button.
7.Follow the on-screen instructions to install the printer driver.
●In Windows 2000, if the following screen appears (the message may appear more than once), click the 'Yes' button in Windows 2000.
8.When the 'The printer driver installation is complete.' dialog box appears, click the 'OK' button.
NOTE:
●After the installation, a message to restart your computer may be displayed. In this case, click the 'Yes' button to restart your computer.
9.Connect the USB interface cable. (p. 6)
●Windows will detect the printer and the Plug and Play screen will appear.
10.Follow the instructions in the Plug and Play screen that appears in your version of Windows to begin the installation.
●You have completed the installation of the printer driver.
-3 -
Installing onto Windows 95/98/Me/NT4.0/2000 (Parallel interface)
Before starting the installation, make sure the USB or parallel interface cable is not connected to the printer.
1.Insert the supplied CD-ROM into your CD-ROM drive.
2.Double-click 'My Computer' (  ), and then double-click the CD-ROM (
  ) icon.
NOTE:
●When any of 'Hardware Found', or 'Found New Hardware Wizard' messages appear during the software installation, be sure to click the 'Cancel' button.
3. Double-click the 'Setup' (  ) icon.
NOTE:
●If the language selection screen appears after you double click the 'Setup' icon, select the language you wish to use and click the 'OK' button. (Normally, the correct language is selected automatically.)
4.After confirming the message in the 'Welcome' window, click the 'Next' button.
5.Read the message in the readme window, and then click the 'Next' button. (If you are using Windows 95/NT 4.0, go to step 7.)
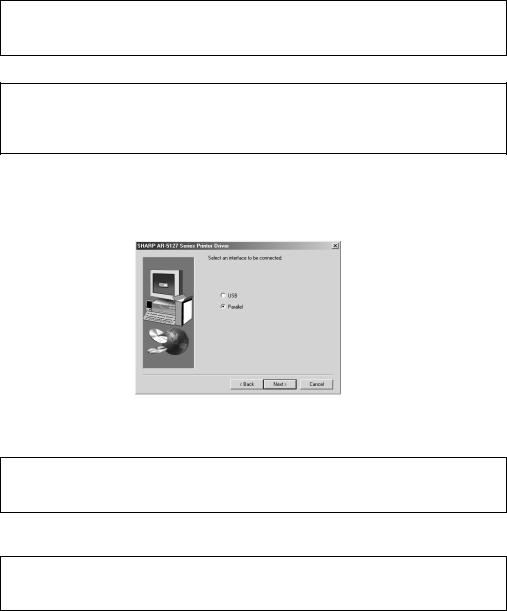
6.Select 'Parallel' and click the 'Next' button.
7.Follow the on-screen instructions to install the printer driver.
8.When the 'The printer driver installation is complete.' dialog box appears, click the 'OK' button.
NOTE:
●After the installation, a message to restart your computer may be displayed. In this case, click the 'Yes' button to restart your computer.
9.Connect the parallel interface cable.
●You have completed the installation of the printer driver.
NOTE:
●For parallel interface connection ensure that your computer and printer are turned off before connecting the cable. (p. 6)
- 4 -
 Loading...