

Page 1
ELECTRONIC CONTROL UNIT
comply with the requirements of Directives
GB
LRX 2102 NEW
Single-phase electronic control unit for the automation of
sliding gates with incorporated radio receiver.
- Mod. LG 2102R NEW
- Mod. LRS 2102 NEW
- Mod. LRS 2102 NEW SET : 433.92 MHz “narrow band”
- Mod. LRH 2102 NEW
I
MPORTANT FOR THE USER
- The device can be used by children over 8 years of age
and persons with reduced physical or psychological
abilities or with little knowledge and experience only if
supervised or educated in its operation and safe use, in
order to also understand the dangers involved in its use.
- these instructions are also available at the website
www.seav.com
- Do not allow children to play with the device and keep
the radio controls away from their reach.
- Frequently examine the system to detect any signs of
damage. Do not use the device if it is in need of repair
work.
-Always remember to disconnect the power supply
before carrying out any cleaning or maintenance.
- Cleaning and maintenance must not be carried out by
unsupervised children
- ATTENTION: keep this instruction manual safe and
observe the important safety requirements contained
herein. Failure to comply with the requirements may
cause damage and serious accidents.
I
MPORTANT FOR
1) Before automating the gate, check that it is in good
conditions, in compliance with the Machinery Directive
and with EN 12604.
2) Check that the location where the installation is
located enables compliance with operating temperature
limits specified for the device.
3) The safety of the final installation and compliance
with all prescribed Standards (EN 12453 - EN 12445) is
the responsibility of the person who assembles the
various parts to construct a total closing.
4) It’s recommended to use safety devices with a
connection self test.
5) Once installation is finished, it is recommended that
all necessary checks be performed (appropriate
programming of the control panel and correct installation
of safety devices) to ensure that compliant installation
has been performed.
6) Fix the control unit to the wall using the appropriate
support. This support should be facing downwards:
insert the screws in the spaces provided.
7) The control unit does not have any type of isolating
device for the 230 Vac line. It is therefore the
responsibility of the installer to set up an isolating device
inside the system. It is necessary to install an omnipolar
switch, surge category III. It must be positioned to
provide protection from accidental closing, pursuant to
point 5.2.9 of EN 12453.
the
INSTALLER
: Without radio receiver
: 433.92 MHz
: 868.3 MHz “narrow band”
Cables for power and connection to the motor suitable
for insertion in the pg9 cable glands provided must have
an outside diameter between 4.5 and 7 mm. The
internal conductor wires must have a nominal section of
0.75mm2. If a raceway is not used, use H05RR-F
cables. Pay careful attention when fastening the cables
so that they are anchored in a stable manner.
Furthermore, care is required when drilling holes in the
outside casing where connecting and power supply
cables will pass, and when assembling the cable glands,
so that everything is installed so as to maintain the
panel's IP protection characteristics.
8) Cables for power and connection to the motor
suitable for insertion in the pg9 cable glands provided
must have an outside diameter between 4.5 and 7 mm.
The internal conductor wires must have a nominal
section of 0.75mm2. If a raceway is not used, use
H05RR-F cables. Pay careful attention when fastening
the cables so that they are anchored in a stable manner.
Furthermore, care is required when drilling holes in the
outside casing where connecting and power supply
cables will pass, and when assembling the cable glands,
so that everything is installed so as to maintain the
panel's IP protection characteristics.
9) The gearmotor used to move the frame must comply
with that prescribed at point 5.2.7 of EN 1245
10) In compliance with 5.4.2 of EN 12453, it is
recommended to use gearmotors equipped with an
electric-mechanical release device, so that the door can
be moved manually in case of necessity.
11) In compliance with 5.4.3. of EN 12453, use electricmechanical release systems or similar devices which
stop the door safely in the end run position.
12) The various electrical components external to the
control unit must be cabled in accordance with standard
EN 60204-1 as amended, and as set forth in point 5.2.7
of EN 12453. Power cables may have a maximum
diameter of 14 mm.
must be fixed using the cable glands provided.
Power supply and connection cables
13) The assembly of a push button panel for manual
control must be completed positioning the push button
panel in such a way that the user is not placed in a
dangerous position.
14) The safety function ensured by the control unit is
active only during closing, therefore, protection on
opening must be ensured in the installation phase with
measures (guards or safety distances) independent of
the control circuit.
15) For proper functioning of the radio receiver, if using
one or more control units, the installation at a minimum
distance of at least 3 metres one from the other is
recommended.
The below products:
Electronic Control Unit:
LG 2102 NEW - LRS 2102 NEW
LRS 2102 NEW SET - LRH 2102 NEW
R&TTE 99/5/EC, EMC 2004/108/EC, LVD
2006/95/EC.
Page 2
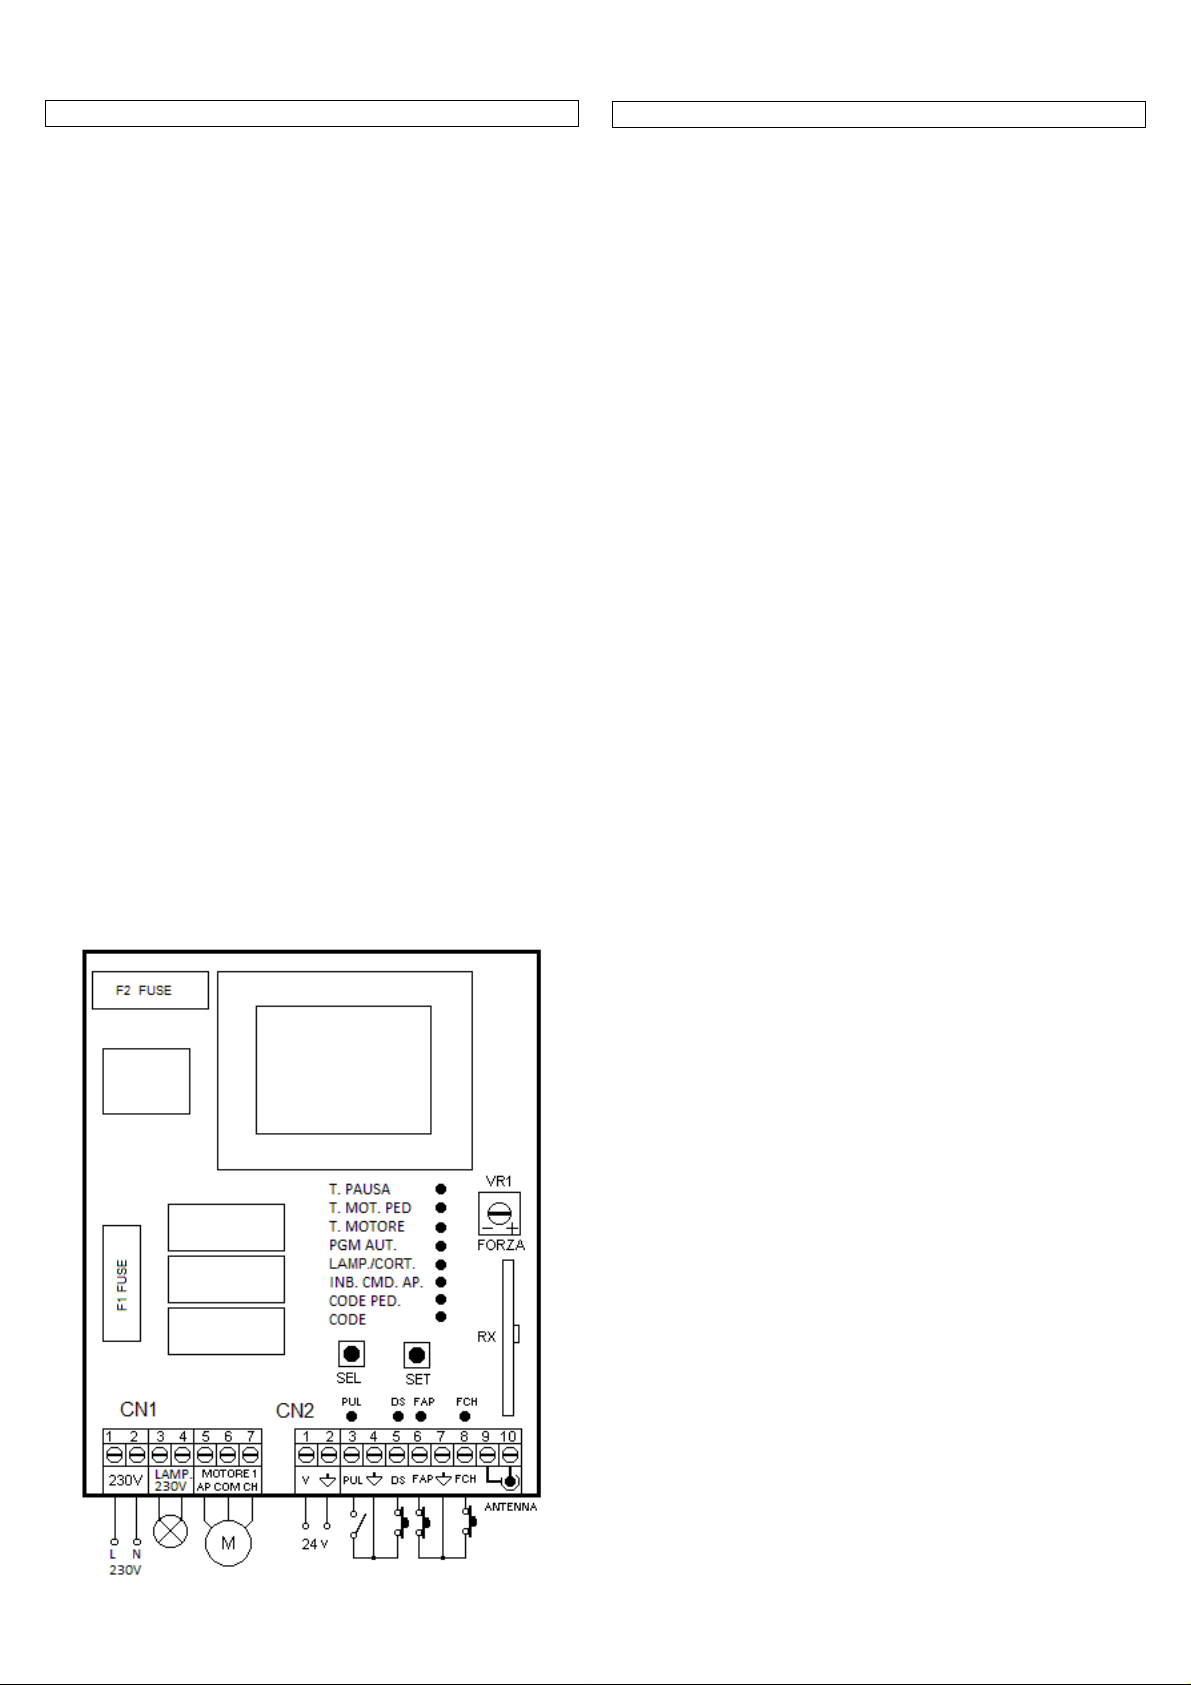
TECHNICAL DATA:
- Power supply : 230 Vac 50/60Hz 900W(4A) max.
- Flashing beacon output : 230 Vac 50/60Hz
100W Resistive Load max.
50W Inductive Load max.
- Motor output : 230 Vac 50/60Hz 750 W max.
- Auxiliary power output : 24 Vac 3 W max.
- Stop limit and low voltage commands : 24 Vcc
- Working temperature : -10 ÷ 55 °C
- Radio receiver : see model
- Op. transmitters : 12-18 Bit or Rolling Code
- Max stored TX codes : 120(CODE + CODE PED)
- Box dimensions : 110x121x47 mm.
- Container : ABS V-0 (IP54).
TERMINAL BOARD CONNECTIONS:
CN1:
1 : 230 V ac line input (Phase).
2 : 230 V ac line input (Neutral).
3 : 230 V ac flashing line input (Neutral).
4 : 230 V ac flashing line input (Phase).
5 : Opening motor output.
6 : Common motor output.
7 : Closing motor output.
CN2:
1 : Service power supply output 24Vac 6 W.
2 : Service power supply output GND.
3 : Open-close command button input (NA).
4 : Common GND input.
5 : Safety device input (NC).
6 : Opening stop limit input (NC).
7 : Common GND input.
8 : Closing stop limit input (NC).
9 : Earth antenna input.
10: Antenna hot pole input.
2 rev. 1.0 29/09/2014
OPERATING FEATURES:
Step-by-step operation:
By using either the radio-control ( CODE led on ) or the low
voltage buttons to activate the gate, you obtain the following
action:
the first impulse activates the opening mechanism until the
motor time expires or the opening limit switch is reached, the
second impulse closes the gate. If an impulse is sent before
the motor time expires or one of the two end runs are reached,
the control unit will stop both opening and closing movements.
An additional control re-starts motion in the opposite direction.
Automatic closing :
The control unit closes the gate automatically without sending
additional commands.
The choice of this operating mode is described in the
instructions for setting the delay period.
Pedestrian Passage:
The control unit allows, using either the radio-control (
CODE PED led on) or the Pedestrian button, the Motor to
run for a programmable amount of time.
Photocells:
The control unit allows Photocells to be powered and
connected in accordance with directive EN 12453.
- DS Input (NC)
Photocell operation is ignored during opening, whereas during
closing they will reverse the direction of movement.
Opening and Closing Limit Switch:
The control unit allows the Opening and Closing Limit Switch
connection (NC). When it is triggered during the respective
operating phases, movement stops immediately.
If not used, this input must be bridged.
Motor Power and Speed adjustment:
The electronic control unit is equipped with a VR1 trimmer to
adjust motor Power and Speed, fully managed by the
microprocessor. The adjustment can be made within a range of
50% and 100% of the Maximum Power.
Nevertheless, every movement has an initial surge, powering
the motor for 2 seconds at the maximum power even if motor
power adjustment is enabled.
Attention: You will need to repeat the teach-in phase if you
wish to adjust the VR1 trimmer as operation and deceleration
times may be affected.
Deceleration:
The motor deceleration function is used on the gates to stop
them from reaching their final position at a high speed in the
opening and closing phases.
The control unit allows deceleration to be programmed for the
desired points (before the gates are completely open or closed)
during Motor Timer programming (see Main menu).
If you are using the "Automatic programming" function (see
menu 2) it is also possible to include a deceleration phase (see
Main menu).
Operation with TIMER:
The control unit can have a timer set up instead of an openclose control button.
Example: at 08:00 the timer closes the contact and the control
unit opens the gate. At 18:00 the timer opens the contact and
the control unit closes the gate. During the interval between
08:00 and 18:00, at the end of the opening phase, the control
unit disables the flashing beacon, automatic closing and radio
controls.
Page 3
PROGRAMMING :
The SEL key: this selects the type of function to be
memorised, which is indicated by a flashing Led.
Repeatedly press the key to select the desired function. The
selection will remain active for 10 seconds, indicated by a
flashing Led. If no other operations are carried out during this
time, the control board will return to its previous state.
The SET key: this programs the information according to the
type of function previously selected with the SEL button.
IMPORTANT: The SET key function can also be replaced by
the radio-control, if previously programmed (CODE led on).
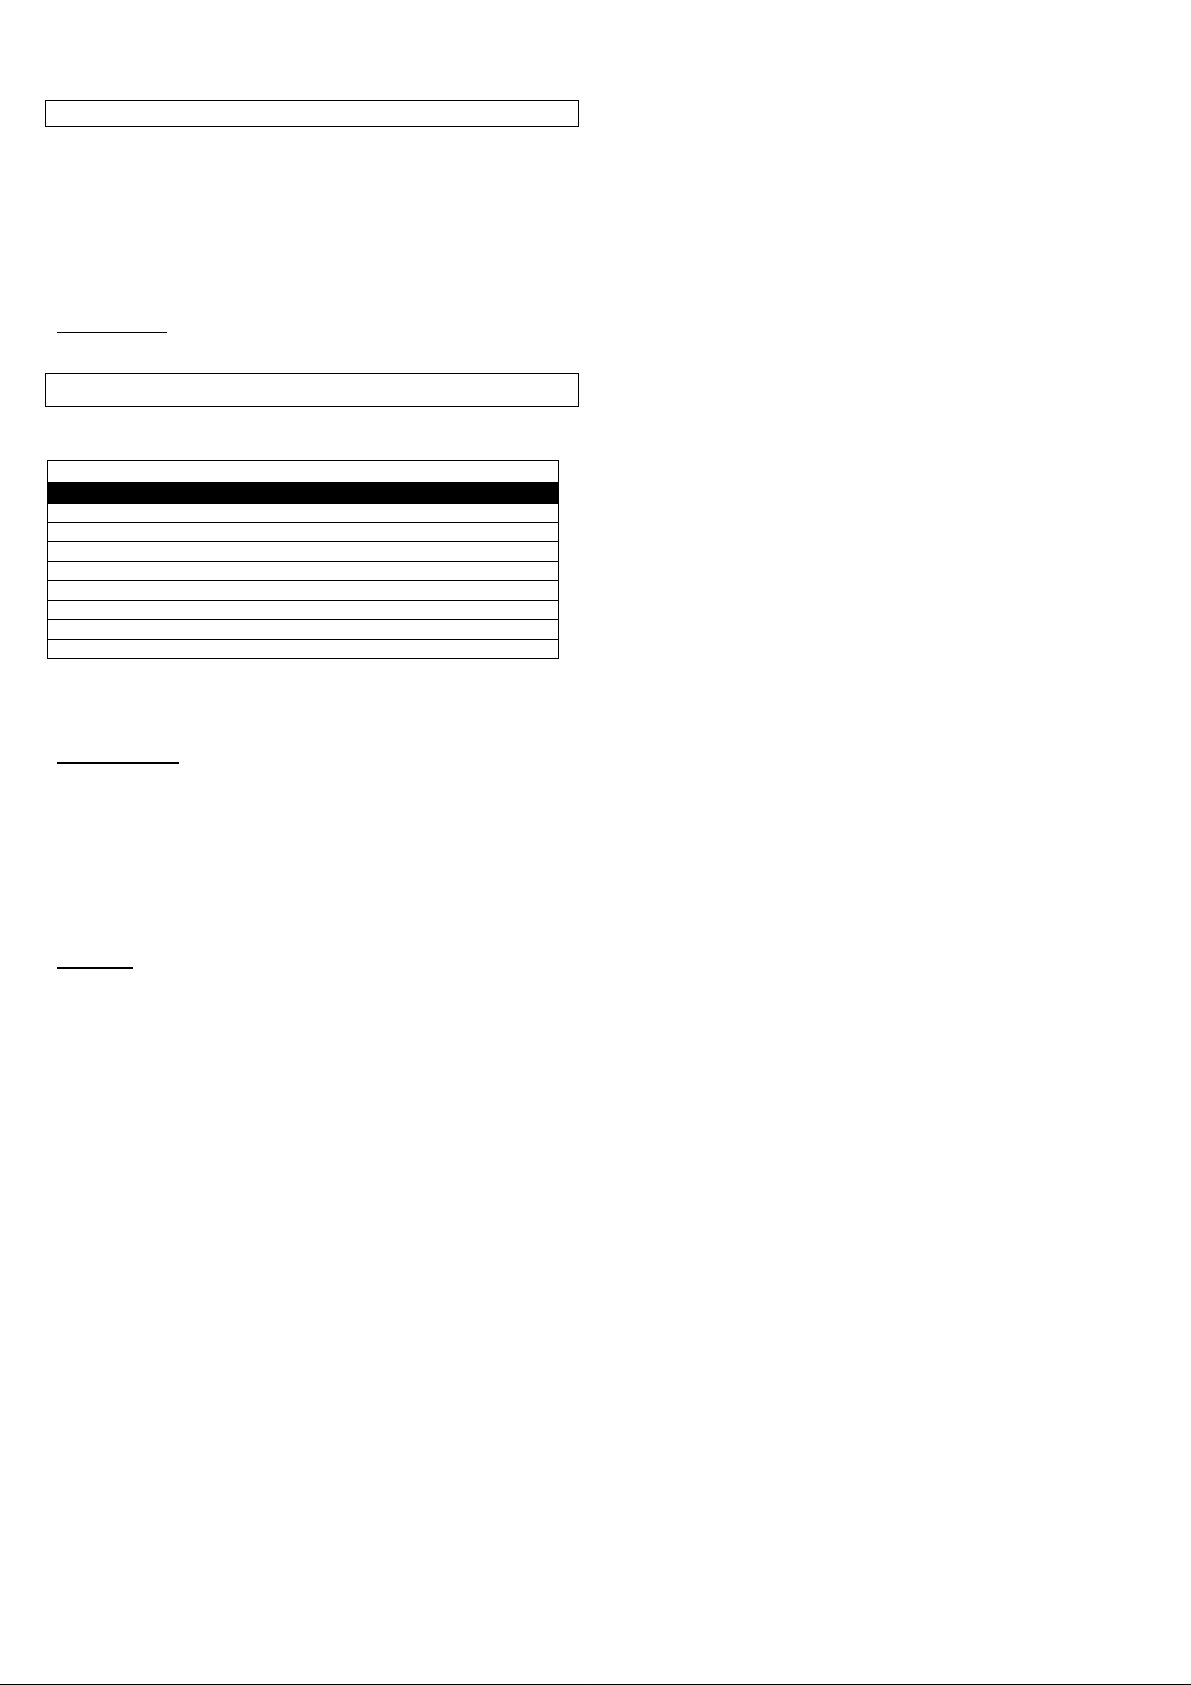
MAIN MENU
The control unit is provided by the manufacturer with the
possibility of selecting a number of important functions.
---------------------- MAIN MENU -----------------
Led Reference Led off Led On
1) CODE No code Code entered
2) CODE PED. No code Code entered
3) IN.CMD.AP. Disabled Enabled
4) LAMP/CORT Flashing Courtesy Light
5) PGM. AUT PGM Automatic=OFF PGM Automatic=ON
6) T. MOT. Motor time 30 sec. Programmed time
7) T.MOT.PED Mot. Time Ped. 10 sec. Programmed time
8) T. PAUSA No auto close With auto close
1) CODE: (Radio-control code)
The control unit allows up to 120 radio-controls to be
memorised with different types of fixed or rolling codes.
Programming.
The transmission code is programmed in the following way: use
the SEL key to move to the flashing CODE LED, at the same
time send the pre-selected code from the radio-control you
wish to use; when the CODE LED stays on steadily,
programming is finished. If all 120 available codes have been
memorised, by repeating the programming operation, all
programming LEDs will start to flash, indicating that it is not
possible to memorise any more codes.
Deletion.
Memorised codes can be deleted in the following way: press
the SEL key, the CODE LED will start flashing, then press the
SET key, the CODE LED will switch off and the procedure is
finished.
2) CODE PED:(Code for the Ped./ S Door radio-control)
The programming and deleting procedure is the same as the
one illustrated above except that the selected Led should be for
PEDESTRIAN CODE.
3) IN. CMD. AP.: (Command inhibition during opening and
pause time, if entered)
The command inhibition function during opening and pause
time, if entered, is used when automation includes a loop
detector. During the opening or pause phase the control unit
does not consider the commands sent by the loop detector with
every passage.
The factory settings of the control unit have disabled command
inhibition during opening and pause time. If it is necessary to
enable it, do the following: use the SEL key to move to the
flashing IN.CMD.AP LED then press the SET key. The
IN.CMD.AP LED will light up steady. Repeat the procedure if
you wish to restore the previous configuration.
4) LAMP/CORT. : (Selection of the flashing light or the
courtesy light)
The control unit has a 230 Vac output, for connection to a
flashing light or a courtesy light.
The control unit is supplied by the manufacturer with the
Flashing function enabled. If you wish to enable the flashing
beacon function, including during pauses, proceed as follows:
using the SEL key to move to the LAMP/CORT flashing LED
then press the SET key, and the LAMP/CORT flashing LED will
switch on steady.
Repeat the operation if you wish to restore the factory setting.
If you wish to enable the courtesy light, repeat the operation
described above, pressing the SEL button twice instead of
once (making the LAMP/CORT LED flash rapidly). Repeat the
operation if you wish to restore the factory setting.
5) PGM. AUT. : (Automatic Programming):
With this control unit it is possible to carry out Automatic
Programming ( SIMPLIFIED).
First, move the gates to their half-way position, press the SEL
button until the PGM. AUT. LED flashes and then press and
hold the SET button down. The control unit completes the Auto
programming phase by executing a complete opening and
closing phase (hold the SET key down until Auto Programming
is finished). At the same time, the Deceleration cycle is
automatically configured at 15% of the complete cycle.
During Automatic Programming, you can use the radio-control
key on the control unit instead of the SET key, only if previously
memorised.
6) T. MOT and DECELERATION:
time of max 4 minutes)
(Programming a motor operation
The control unit is factory supplied with a predefined motor
operating time of 30 sec. without deceleration.
If it is necessary to modify the motor operating time,
programming must be carried out when the gate is closed, as
follows: use the SEL key to move to the flashing T.MOT LED,
then press the SET key briefly. The Motor will begin its opening
cycle. When it starts the initial point of deceleration, press the
SET key again. At the same time, the motor will decelerate until
it reaches the required position. Press the SET key to finish the
opening cycle. The T. MOT LED will then start flashing quickly.
Now repeat motor time programming and the deceleration
operation for the closing cycle. If you do not want the control
unit to decelerate, when the opening and closing phase is
finished, press the SET key twice during programming, instead
of just once.
During programming it is possible to use the radio-control key
located on the control unit, instead of the SET key, only if
previously memorised.
7) T. MOT. PED:
minutes max.)
(Programming a pedestrian operating time of 4
The control unit is factory supplied with a predefined Pedestrian
Motor operating time of 10 sec. without deceleration.
If it is necessary to modify the pedestrian operating time,
programming must be carried out when the gate is closed, as
follows: use the SEL key to move to the flashing T.MOT PED.
LED, then press the SET key briefly. The Motor will start the
Opening cycle; press the SET key again at the point where you
wish to start deceleration: the T. MOT. PED. LED will start
flashing at a slower rate and the Motor will decelerate; when it
reaches the required point, press the SET key to finish the
Opening cycle. At this point the T. MOT PED. LED will start
flashing at its standard pace again and the Motor will begin the
Closing phase; repeat the above operations for the Closing
phase.
If you do not want the control unit to decelerate, when the
opening and closing phase is finished, press the SET key twice
during programming, instead of just once.
During programming it is possible to use the radio-control key
located on the control unit, instead of the SET key, only if
previously memorised.
8) T. PAUSA :
The control unit is factory supplied without automatic closing.
(Automatic closing time programming max. 4 minutes)
If
you wish to enable automatic closing, proceed as follows:
using the SEL key to move to the flashing T. PAUSA
LED, press the SET key briefly, then wait for the amount
3 rev. 1.0 29/09/2014
Page 4
of time you wish to set for automatic closing; briefly press
APCH or CH=ON
H) T. PAUSA Alternate ON/OFF flashing light
the SET key again, and in that moment the automatic
closing time will be memorised and the T. PAUSA LED
will stay on steady.
(without automatic closing), move to the flashing T. PAUSA
LED, then press the SET key twice within 2 seconds. The Led
will switch off and the operation will be finished.
During programming it is possible to use the radio-control key
located on the control unit, instead of the SET key, only if
previously memorised.
EXTENDED MENU 1
The control unit is supplied by the manufacturer with the
possibility of directly selecting the main menu functions only.
If you wish to enable the functions described in Extended Menu
1, proceed as follows: press and hold the SET button for 5
seconds, after which amount of time the T. MOT. PED and T.
PAUSA LEDs will start flashing alternately. The user then has
30 seconds to select the functions for Extended Menu 1 from
the SEL and SET buttons. After another 30 seconds the control
unit will go back to the main menu.
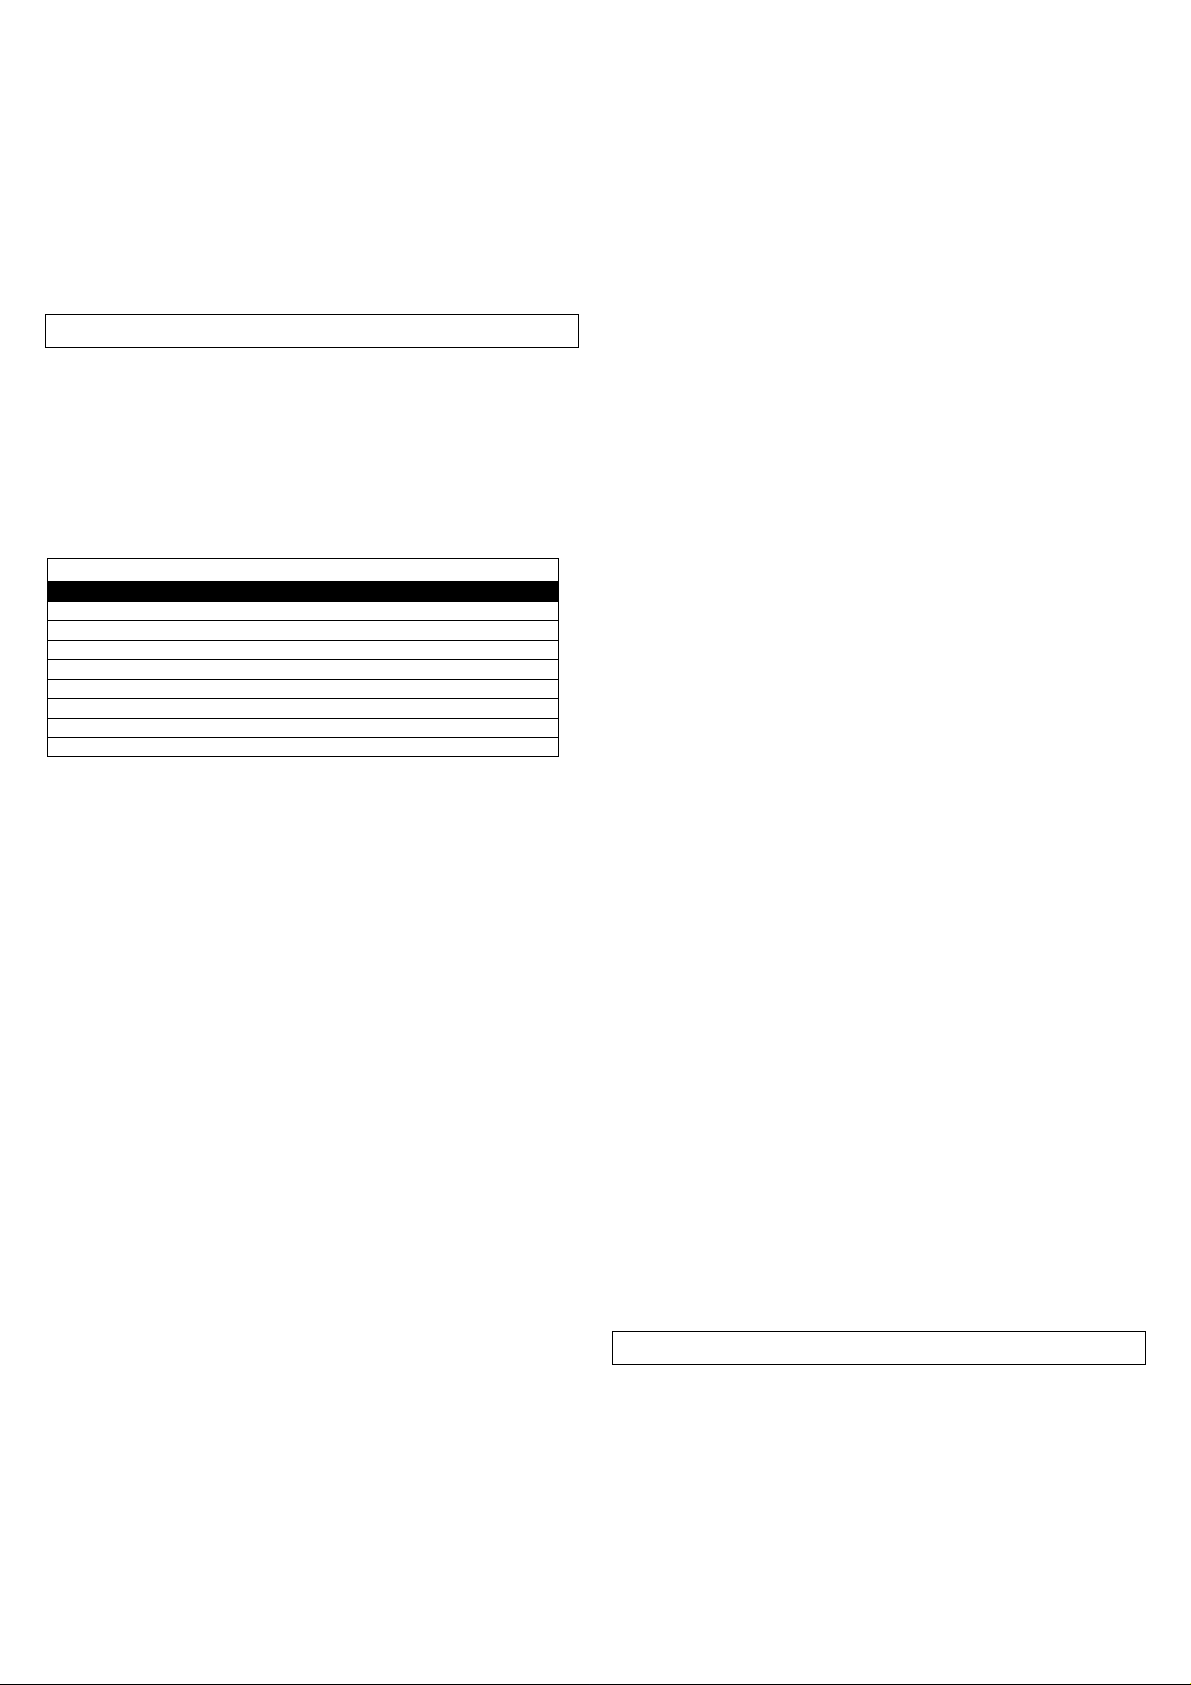
---------------------- EXTENDED MENU 1 -----------------
Led Reference Led Off Led On
A) CODE Step-by-Step Inverting
B) CODE PED Electronic Brake = OFF Electronic Brake= ON
C) IN.CMD.AP. Dead man=OFF Dead man
D) LAMP/CORT Deceleration = OFF Deceleration = ON
E) PGM. AUT Follow Me = OFF Follow Me = ON
F) T.MOT Remote PGM = OFF Remote PGM = ON
G) T. MOT.PED Alternate ON/OFF flashing light
If you wish to restore the initial condition
A) CODE (
The control unit is supplied by the manufacturer with Automatic
mode disabled. If you wish to enable the function, proceed as
follows: make sure that you have enabled extended menu 1
(reported by alternately flashing T. MOT PED Leds and T.
PAUSA Led), by using the SEL key to select the flashing CODE
LED, and then press the SET key. At this point the CODE LED
lights up steady and programming is finished.
Accordingly, using either the radio-control or the low voltage
push button panel to operate the gate, you will obtain the
following function: the first impulse controls opening until the
motor time expires, the second impulse controls gate closing. If
an impulse is sent before the motor time expires, the control
unit changes the direction of motion in the opening and closing
phases. Repeat the procedure if you wish to restore the
previous configuration.
B) CODE PED ( Electronic Brake ) :
The control unit is supplied by the manufacturer with the
electronic brake function disabled. If you wish to enable the
function, proceed as follows: check that Extended Menu 1 is
enabled (T. MOT. PED and T. PAUSA LEDs start flashing
alternately), use the SEL button to move to the flashing PED
CODE LED then press the SET key: at that point the PED
CODE LED will light up steady and programming is complete.
Accordingly, the control unit slows down gate advancement by
inertia, when there is a stop or command to change the
direction of motion. Repeat the procedure if you wish to restore
the previous configuration.
C) IN. CMD. AP. ( Anti-collision Function ) :
The control unit is supplied by the manufacturer with the Anticollision (pedestrian) Function disabled. If you wish to enable
the function, proceed as follows: check that Extended Menu 1
is enabled (T. MOT. PED and T. PAUSA Leds flash
simultaneously), use the SEL button to move to the flashing IN.
CMD. AP. LED and then press the SET button. At this point
Step-by-Step / Automatic Operation
4 rev. 1.0 29/09/2014
) :
the IN. CMD. AP. LED will light up steady and programming is
complete. The control unit will now operate in Anti-Collision
(pedestrian) mode.
If you wish to enable the Anti-Collision (pedestrian) function for
the closing phase only, repeat the operation described above,
pressing the SEL key twice (making the IN.CMD.AP. LED flash
quickly). Repeat the procedure if you wish to restore the
previous configuration.
D) LAMP/CORT ( Deceleration ):
As mentioned above, it is possible to programme a
deceleration phase on the control unit for opening or closing,
whereas deceleration is automatically enabled with the
Automatic Programming function. If you do not wish to
implement any deceleration, it can be excluded: therefore, if
you are using Automatic Programming, the Deceleration phase
will not be enabled, whereas if you are using Motor Time
Programming, as you are programming you will not be given
the possibility of programming deceleration during the opening
and closing phases. If, prior to excluding deceleration, it was
programmed from the Motor Time Programming function, it will
be necessary to repeat programming all over again. If you wish
to exclude deceleration, proceed as follows: make sure
Extended Menu 1 is enabled (reported by T.MOT.PED and T.
PAUSA Leds flashing alternately). Using the SEL key, move to
the flashing LAMP/CORT. LED and then press the SET key:
the LAMP/CORT. will turn off definitely and programming will be
complete. Repeat the procedure if you wish to restore the
previous configuration.
E) PGM. AUT ( Follow Me ) :
It is possible to set the "Follow Me" function on the control unit:
this function can only be programmed if a Pause Time has
already been programmed, and it is used to shorten the Pause
time to 5 sec after the photocell disengages, i.e. the gate
closes 5 seconds after the user has passed through. If you
wish to enable the function, proceed as follows: check that
Extended Menu 1 is enabled (T. MOT. PED and T. PAUSA
Leds flash simultaneously), use the SEL button to move to the
flashing PGM. AUT. LED and then press the SET key: the
PGM. AUT. LED will light up steady and programming is
complete. Repeat the procedure if you wish to restore the
previous configuration.
F) T. MOT (Remote programming of radio control):
The control unit allows the transmission code to be
programmed by remote, without using the SEL key.
To programme the transmission code from remote proceed as
follows: send the radio control code continuously for more than
10 seconds and the control unit will enter the programming
mode as described above for the CODE LED in the main menu.
The control unit is supplied by the manufacturer with remote
programming of the transmission code not enabled; to enable
the function proceed as follows: check that the extended menu
1 is enabled (the T. MOT. PED and T. PAUSA LEDs start
flashing alternatively), use the SEL key to navigate to the
.T:MOT LED when the corresponding LED is flashing and
press the SET key: the T.MOT LED is enabled and
programming is complete. Repeat the operation to restore the
previous configuration.
EXTENDED MENU 2
The control unit is supplied by the manufacturer with the
possibility of directly selecting the main menu functions only.
If you wish to enable the programming of the deceleration
power carried out by the control unit, proceed as follows:
access Extended Menu 1 (as described in the relative
paragraph), then press and hold the SET button down again for
5 seconds, after which amount of time the T. MOT. PED and T.
PAUSA LEDs will flash simultaneously. The user then has 30
seconds to select the deceleration power using the SEL and
SET buttons. After, another 30 seconds the control unit will go
back to the main menu.
Page 5
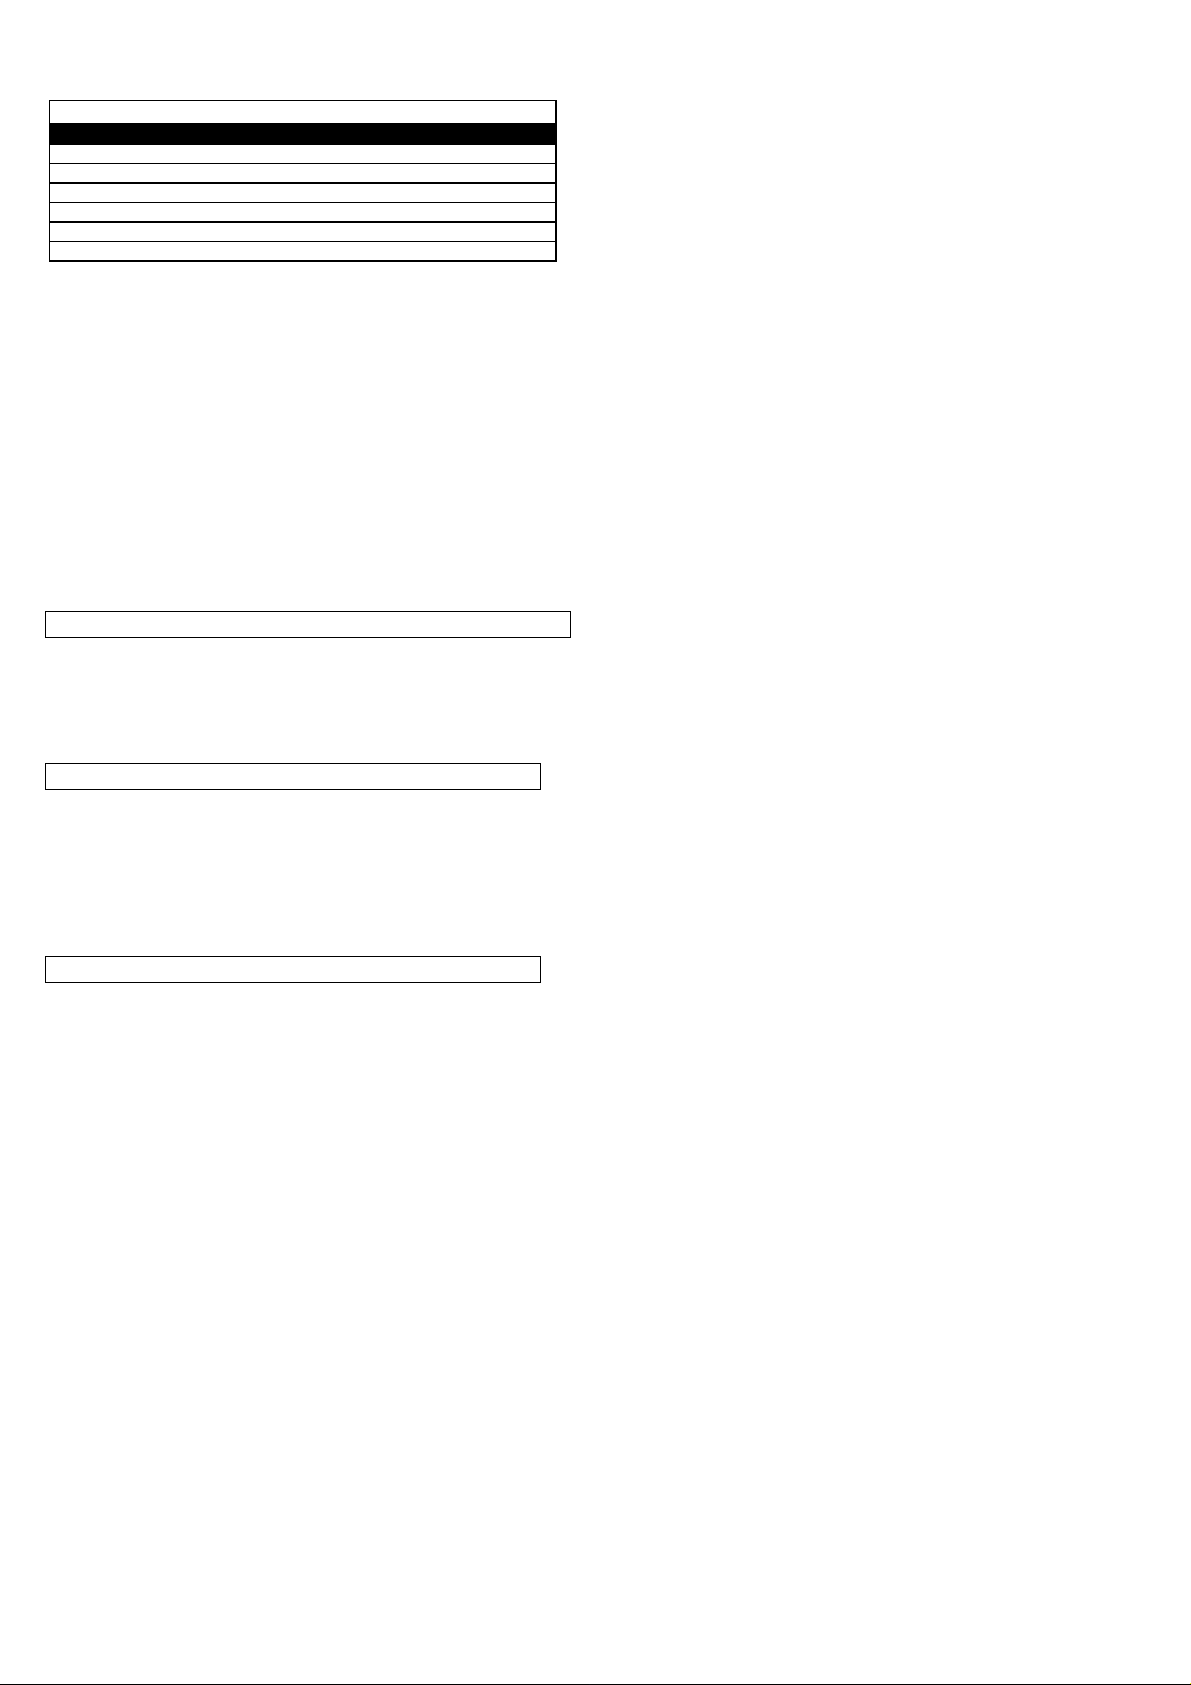
---------------------- EXTENDED MENU 2 -----------------
Level Leds On
1 CODE
2 CODE – CODE PED.
3 CODE – CODE PED – IN.CMD.AP.
4 CODE – CODE PED – IN.CMD.AP. – LAMP/CORT
5 CODE – CODE PED – IN.CMD.AP. – LAMP/CORT – PGM.AUT
6 CODE – CODE PED– IN.CMD.AP. – LAMP/CORT – PGM.AUT – T.MOT
Deceleration Programming
The control unit allows you to programme the power used to
carry out the deceleration phase.
It is possible to choose between 6 different levels of power:
every combination of lit Leds corresponds to a level according
to the table above; in other words, starting from the lowest led
(LED CODE) and moving upwards, each Led corresponds to a
higher power level. Using the SEL key it is possible to scroll
through the different power levels; for every selected power
level, the highest respective Led will flash (for example, if level
4 is selected the CODE, CODE PED. and IN.CMD.AP. leds
light up steady, whereas the LAMP/CORT led will flash); press
SET to confirm.
Level 3 is selected in the default configuration.
RESET :
To reset the default configuration of the control unit, press the
SEL and SET buttons simultaneously; all RED signal Leds will
switch on and then immediately off again.
DIAGNOSTICS :
Control input test:
On each low voltage control input, the control unit uses a LED
signal to make the status readily known.
Operating logic: when a LED is on it means the input is closed,
when a LED is off it means the input is open.
LED MANAGEMENT :
After 3 minutes of inactivity in the programming procedure,
there is the automatic shutdown of the Leds for energy
savings. A single press of the SEL or SET key, or a movement
command will activate the LED light up according to settings
programmed previously.
5 rev. 1.0 29/09/2014
 Loading...