


GB
Operating Instructions
SAT-Finder plus
Contents
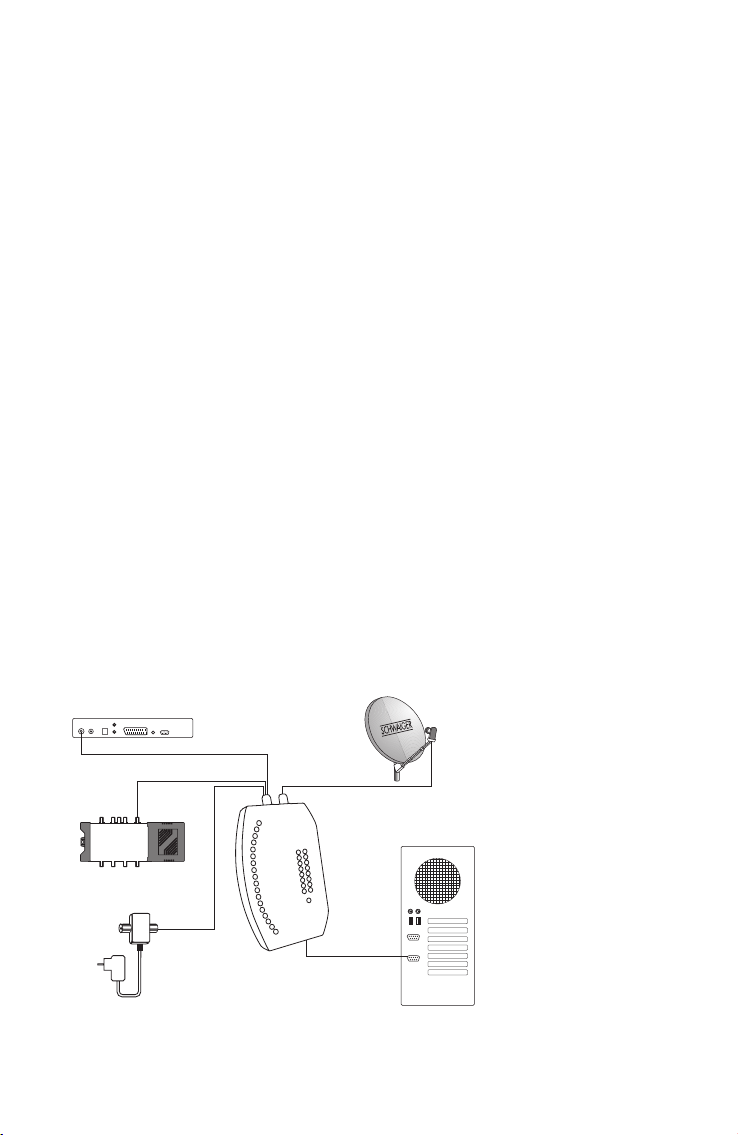
PC
GW 9000
Multischalter
Receiver
SAT Finder plus
COM
updat
e
1. Getting started
1.1 Package contents
1.2 Safety information
1.3 Connecting the SAT-Finder plus
1.4 Start-up process
2. Searching and finding
2.1. Automatic search
2.2. Manual search
2.3. RESET
3. LED displays
3.1. LEVEL
3.2. QUALITY
3.3. MODE
3.4. SATELLITES
4. Appendix
4.1. Updating the SAT-Finder plus
4.2. Footprints / reception areas for the satellites
Connection example
2

1. Getting started
1.1 Package contents
SAT-Finder plus
Connection cable 70 cm
Carrying strap
Quick reference guide (in 16 languages)
Operating instructions
1.2 Safety information
Before using the unit for the first time, read and follow the safety instructions carefully!
Be sure to think of your own safety when setting up your system (slippery roof, risk of falling).
Do not use the SAT-Finder plus if there is visible damage to the unit or the connecting cables. Be
careful that the cables do not pose a risk of tripping.
Make sure that you don’t trap or crush the connecting cables.
The antenna used must be earthed.
The SAT-Finder plus is only designed for the short-term set up of a satellite system. Continuous use
can damage the unit.
The unit must not be used in the immediate vicinity of inflammable materials.
Only have repairs carried out by our qualified service personnel. Attempts to open or repair the
unit yourself will void the warranty.
1.3 Connecting the SAT-Finder plus
Using the coax cable supplied with the unit, connect the socket on the SAT-Finder plus marked ‘LNB’
directly to your LNB. Then connect a power source to the ‘REC’ socket, either via a DVB-receiver,
multiswitch or the SCHWAIGER GW9000.
Only tighten the nuts by hand.
Important:
As some receivers do not correctly conform to the norm for H/V switching voltages, we recommend
that if you have old or especially long cables to use the GW9000 DC splitter for power supply
purposes, to ensure that the SAT-Finder plus has sufficient power.
Suitable LNB types:
• Single-LNB
• Twin-LNB
• Quad / Quattro-Switch - LNB
• Quattro-LNB
3

If the SAT-Finder plus is to be connected directly to a Quattro-LNB, use the following table to
connect it to one of the four LNB outputs so that the desired satellite can be identified.
Horizontal High Band (H/H)
Orbit positions from east to west
position 53 42 39 28 26 23 19 16 13 7 5 1 4 5 7 8 30
identifiable - x o x x x x - x - x x - x x - x
Horizontal Low Band (H/L)
Orbit positions from east to west
position 53 42 39 28 26 23 19 16 13 7 5 1 4 5 7 8 30
identifiable - o x x x o o - x x - x x x o x o
Vertical High Band (V/H)
Orbit positions from east to west
position 53 42 39 28 26 23 19 16 13 7 5 1 4 5 7 8 30
identifiable - - - - - - - - - - - - - - - - -
Vertical Low Band (V/L)
Orbit positions from east to west
position 53 42 39 28 26 23 19 16 13 7 5 1 4 5 7 8 30
identifiable x - - - - - - x - - - - - - - - -
x clearly identifiable o still identifiable - not identifiable
1.4 Start-up process
After the power source has been connected, the Power-LED will show the SAT-Finder plus’s power
status and the boot sequence will begin.
4

After approx. 3-5 seconds the unit’s firmware has been loaded into its RAM memory and component
initialisation will begin. Subsequently, all LEDs will light up briefly and the SAT-Finder plus is ready
for use.
The entire start-up process takes around 7 seconds.
2. Searching and finding
2.1 Automatic satellite search
When the red Power-LED is on, the SAT-Finder plus is ready for use and you can align the satellite
dish. It should be turned or adjusted in small steps otherwise you might easily miss a satellite, just
like with analogue SAT-finders.
Turn the satellite dish vertically until the LEVEL LEDs light up.
When a sufficiently strong signal is received (when 3 LEDs are “on”), the SAT-Finder plus will analyse
the transponder found – this is shown by the MODE-LED flashing.
If the quality of the signal is very low (up to 3 LEDs “on”), continue to turn the satellite dish further
until sufficient signal quality, approx. 4-6 LEDs, is shown. As soon as the SAT-Finder plus has recog
nised the satellite, this will be indicated by a green LED on the satellite summary and the quality of
the signal will be shown by the QUALITY-LEDs lighting up.
If due to discrepancies in the data the satellite cannot be precisely identified, the LED for the satellite
assumed to be the correct one based on the data received so far will continue to flash.
The SAT-Finder plus will then switch to wait mode, and if it is the satellite you were searching for
you can start with the fine tuning of the satellite dish.
If a satellite has been identified, but it is not the one you were looking for, then you now know
which orbit position/direction the satellite dish is pointing in, making it possible to target the desired
satellite. To do this, turn the satellite dish in the corresponding direction until the SAT-Finder plus
switches back to automatic search mode and starts to search for a satellite signal again.
Repeat this procedure until you have found the desired satellite.
-
2.2 Manual search / satellite preselection
Manual search allows a preselection of satellites that are located close to each other.
By pressing the left “A” button once the currently active LED will move on one step, thus selecting
the next satellite. The satellites you can select are: 8°W Telecom2D, 7°W Nilesat, 5°W Atlanticbird
and 4°W Amos.
Turn the satellite dish vertically until the LEVEL LEDs light up.
5

When a sufficiently strong signal is received (when 3 LEDs are “on”), the SAT-Finder plus will analyse
the transponder found – that is shown by the MODE-LED flashing.
If the quality of the signal is very low (up to 3 LEDs “on”), continue to turn the satellite dish further
until sufficient signal quality, approx. 4-6 LEDs, is shown. As soon as the SAT-Finder plus has recog
nised the satellite, this will be indicated by a green LED on the satellite summary and the quality of
the signal will be shown by the QUALITY-LEDs lighting up.
If due to discrepancies in the data the satellite cannot be precisely identified, the LED for the satellite
assumed to be the correct one based on the data received so far will continue to flash.
The SAT-Finder plus will then switch to wait mode, and if it is the satellite you were searching for
you can start with the fine tuning of the Satellite dish.
If you press the “B” button the SF9000 will switch back to automatic search.
2.3 Reset
If you press both buttons together and hold them down for approx. 5 seconds, this will reset the
SAT-Finder plus.
3. LED displays
3.1 LEVEL (signal strength)
Signal strength is displayed to the user via 8 LEDs. Each LED can either be “off”, “flashing slowly”,
“flashing quickly” or “on”, giving a total of 24 stages providing as fine a graduation as possible
for signal strength.
-
3.2 QUALITY (signal quality)
Signal quality is displayed to the user via 8 LEDs.
3.3 MODE (mode of operation)
Shows the operating mode, “flashing” or “on”.
3.4 Satellite display
Satellite display works similarly to the display of operating/search mode, using the status “off”,
“flashing” and “on”, with meanings as shown in the following table:
6
 Loading...