

Page 1

Washing Machine Spirit Industrial
WSI 100 / 125 / 150 / 200 / 250 / 300
Operating Instructions
300685J 01/11
Page 2
WSI 100 / 125 / 150 / 200 / 250 / 300 page 2
Page 3

WSI 100 / 125 / 150 / 200 / 250 / 300 page 3
Dear Customer
We are pleased that you have chosen a Schulthess
washing machine.
Your new washing machine is the result of many years
of development work. The highest quality requirements,
both in development and manufacture, guar ant ee a
long lifetime .
Its design meets all the current and future demands of
modern laundry care. It off ers you a varied and individual
choice of programmes.
Please read these instructions carefully to enable you
to use all the possibilities and advantages of your new
washing machine.
Please note in particular the chapter «Safety »
If the presc r ibed m aintenanc e work s s hould be
neglected or carried out incor r ectly, for obvious
reasons we shall not be able to fulfil our guarantee
obligations in accordance with our term s of delivery.
Dimensions and other values are in accordance
with the state at the time of going to press.
We reserve the right to make t echnical changes which
serve the purpose of further development or shall be
regarded as necessary for constructional reasons
at any time and without any prior notice.
Any reprint – even in extract – is only permitted with
approval in writing and details of the source.
Schulthess Maschinen AG
CH-8633 Wolfhausen
Telefon (055) 253 51 11, Fax (055) 253 54 70
Page 4

WSI 100 / 125 / 150 / 200 / 250 / 300 page 4
Contents
1 Safety ......................................................................................................... 6
1.1 General potential danger through: ................................................................................... 6
1.2
Safety advice ...................................................................................................................... 6
1.3
Use in accordance with the intended purpose ............................................................... 6
1.3.1
The machine's field of application .................................................................... 6
1.3.2
Limits of the application .................................................................................... 6
1.3.3
Restriction on use .............................................................................................. 7
1.4
Emissions ........................................................................................................................... 7
1.4.1
The weighted continuous sound intensity level ............................................. 7
1.5
Sources of danger ............................................................................................................. 7
1.5.1
General ................................................................................................................ 7
1.5.2
Door glass ........................................................................................................... 8
1.5.3
Mildew, odour ..................................................................................................... 8
1.6
Authorised users ................................................................................................................ 8
1.7
Procedure in a case of emergency ................................................................................... 8
2 Transport / Storage / Installation ............................................................ 9
2.1 Transport and storage ....................................................................................................... 9
2.1.1
Dimensions ......................................................................................................... 9
2.1.2
Fastening points for lifting devices .................................................................. 9
2.1.3
Storage conditions ............................................................................................. 9
2.2
Instructions for unpacking ................................................................................................ 9
2.3
Instructions for installation, alignment, fastening ......................................................... 9
2.3.1
General ................................................................................................................ 9
2.3.2
Space requirement at the intended location .................................................. 10
2.3.3
Requirement for the supporting surface ........................................................ 10
2.3.4
Ergonomics ....................................................................................................... 10
2.3.5
Removing from the pallet ................................................................................ 10
2.3.6
Removing the transport safety protection ..................................................... 11
2.3.7
Installation ......................................................................................................... 12
2.4
Instructions for the conne ction of energy, water and waste ou tlet ............................ 13
2.4.1
Electrical connection ....................................................................................... 13
2.4.2
Water connection ............................................................................................. 13
2.4.3
Steam direct and indirect connection ............................................................ 14
2.5
Instructions for putting into operation for the first time .............................................. 15
3 Operating ................................................................................................ 16
3.1 Machine description ........................................................................................................ 16
3.1.1
General arrangement ....................................................................................... 16
3.1.2
Door ................................................................................................................... 16
Tip: For easier closing, m o isten the door seal!
............................................................ 16
3.1.2.2 Opening the door m anually
................................................................................ 17
3.1.3
Detergent dispenser ......................................................................................... 17
3.1.4
The detergent dispenser eq u ipment .............................................................. 19
3.1.5
Water recycling integrated in the base (option) ............................................ 20
3.1.6
Details on the type plate .................................................................................. 21
3.2
Operating and display elements ..................................................................................... 22
Page 5

WSI 100 / 125 / 150 / 200 / 250 / 300 page 5
3.3 Programme selection ...................................................................................................... 23
3.4
Programme correction .................................................................................................... 23
3.5
Programme start and programme interruption ............................................................. 23
3.6
EMERGENCY OFF switch ............................................................................................... 23
3.7
Preset time ........................................................................................................................ 23
3.8
Additional dosage ............................................................................................................ 24
3.9
Temperature lowering ..................................................................................................... 24
3.10
Programme abortion ........................................................................................................ 24
3.11
Programme end ................................................................................................................ 24
3.12
Programme status display .............................................................................................. 24
3.12.1
Standard programmes (keyboard symbols) .................................................. 25
3.12.2
Commercial programmes ................................................................................ 25
3.13
Special programmes ........................................................................................................ 27
3.13.1
Load a Wash-Card ............................................................................................ 27
3.13.2
Wet-cleaning ..................................................................................................... 27
3.14
Hints on washing textiles ................................................................................................ 27
3.14.1
Preparing laundry ............................................................................................. 27
3.14.2
Loading amounts (dry lau n d ry) ....................................................................... 27
3.14.3
Preparing the appliance ................................................................................... 28
3.14.4
Work end ........................................................................................................... 28
4 Faults ....................................................................................................... 29
4.1 Instructions for troubleshooting .................................................................................... 29
5 Maintenance / Servicing ........................................................................ 31
5.1 General hints .................................................................................................................... 31
5.2
Cleaning materials ........................................................................................................... 32
5.3
Maintenance plan for the operating personnel ............................................................. 32
6 Taking out of use .................................................................................... 34
Page 6

WSI 100 / 125 / 150 / 200 / 250 / 300 page 6
1 Safety
1.1 General potential danger through:
• Non-observance of the instructions
• Use contrary to the intended purpose
• Inadequately qualified staff
1.2 Safety advice
The following symbols are used in these operating instructions:
Warning!
indicates a possibly dangerous situation.
In the event of non-compliance with the instruction, deat h or the most
severe injuries may occur.
Caution!
indicates a possibly dangerous situation.
In the event of non-compliance with the instruction, slig ht inj ur ies m ay
occur.
Important!
indicates application tips and other useful items of information.
1.3 Use in accordance with the intended purpose
1.3.1 The machine's field of application
• The washing machines of the WSI 100-300 series are suitable exclusively for the washing
or wet cleaning, as well as the spin-drying of all textiles intended for this t r eatment according to their care label
1.3.2 Limits of the application
• Waterpr oof textiles, such as shower curtains, etc. as well as shoes, boots and sim ilar
hollow bodies made from textiles, or also duvets, blankets, cushions, etc. cause a great
unbalanced mass during spinning. This can lead to reduced spinning or the termination of
spinning.
• Dyeing, decolourant and deliming agents must be suitable for use in washing
machines.
Important!
Unauthorised modifications and changes to the machine are
forbidden for safety reason!
Page 7

WSI 100 / 125 / 150 / 200 / 250 / 300 page 7
1.3.3 Restriction on use
Warning!
Explosion hazard!
The washing machines of the WSI 100-300 series must not be used
for dry cleaning. There is a danger of fire and explosion with the solvents used for that purpose. T he washing machines are not explosionproof!
Do not store any volatile and inflammable materials in the vicinity of the
washing machines.
Important!
The operating, maintenance and servicing direct ions given in these
Operating Instructions mus t be s t r ict ly observed.
Read the Operating Instructions caref ul l y before putt i ng t he machine into operation!
Keep the Operating Instructions in a safe place near the appliance in
order to be able to refer to t hem at any tim e.
If the equipment is passed on to a new operator , be s ur e t o also hand
over the whole document to the new owner.
1.4 Emissions
1.4.1 The weighted continuous sound intensit y level
The continuous sound intensity level ≤ 70 dB(A) measured at a distance of one metre and a
height of 1.6 metre.
1.5 Sources of danger
1.5.1 General
Warning!
Explosion hazard!
Never use solvents for cleaning.
• Never remove safety devices or put them out of operat ion t hr ough changes to the
• machine.
• Before every opening of the casing for maintenance reasons, be sure to always switch off the
main power switch!
•
When washing at high t em per atures, hot steam may escape from the ventilation pipes be-
hind the machine.
•
If there is a puddle on the floor near t he m ac hine (hos e r upt ure, leakage or similar), wipe it
dry and eliminate the cause (see chapter «Problems»), other wise slipping hazard.
•
Do no place any objects on the top cover of the machine: T hey mig ht s lip off and fall to the
floor during the spinning process.
Page 8

WSI 100 / 125 / 150 / 200 / 250 / 300 page 8
•
Textiles which contain inflammable chemicals, solvent-based detergents, must be rinsed well
in clear water by hand before washing. There is a risk t hat par ts of the machine could be
damaged and poisonous vapour released. There is also a risk of fire and explosion.
•
When closing the door, m ake sure not to pinch your fingers.
•
Please observe that after interrupting a wash programme, the laundry may still be very hot:
Burn hazard.
Only remove cooled laundry from the drum.
• At the end of the programm e turn off the tap and switch of f the power.
• Do not stand on the machine.
• Do not sit, lean or support yourself on t he loading door . ( danger of tipping!)
• Under no circumstances spray the machine with water or clean it with a steam cleaner.
• If the machine is not needed for a longer period of time, turn off the tap and disconnect it
from the power supply.
• Touch the power plug with dry hands only. Only pull the plug, do not pull the cable.
• If the mains lead to this device becomes damaged, it must be replaced with a special lead
available from the manufacturer or the manufacturer's customer service.
1.5.2 Door glass
• Dur ing washing cycles at the boil, the door glass can become up to 82 °C hot.
If touched for lengthier periods there is a danger of burning the skin.
1.5.3 Mildew, odour
• After removing the laundry, always leave the door open or ajar for t he purpose of ventilation
and drying of the moist interior of the drum. This prevents the occurr ence of odours, formation of mildew, etc.
1.6 Authorised users
• Only authorised persons may work with the WSI 100-300 washing machines.
The minimum age for user s is 16 years.
The operator must
• make the Operating Instructions available to the user
• and ensure that the user has read and understood t hem
Important!
Make sure by appropriate instructions and internal checks t hat
the workplace surroundings are always clean and uncluttered with
objects.
1.7 Procedure in a case of emergency
Important!
In a case of emergency, press the red emergency off switch i m-
mediately!
Page 9

WSI 100 / 125 / 150 / 200 / 250 / 300 page 9
2 Transport / Storage / Installation
2.1 Transport and storage
2.1.1 Dimensions
Packing
dimensions
WSI 100 WSI 125 WSI 150 WSI 200 WSI 250 WSI 300
without socle
in mm
960x800x1480 960x970x1480 960x970x1480 1150x910x1665 1150x1080x1665 1150x1080x1665
with socle
in mm
960x800x1690 960x970x1690 960x970x1690 1150x910x1900 1150x1080x1900 1150x1080x1900
2.1.2 Fastening points for lifti ng devices
The machines are delivered on pallets which can be transported by fork lif t trucks.
2.1.3 Storage conditions
The machines are to be stored in a dry, fr os t-free place.
2.2 Instructions for unpacking
The return of undamaged pac king material into the material cycle saves on raw materials and
reduces the occurrence of waste. T he Schulthes s c om pany or your authorised
specialist dealer will generally gladly take the packing back.
If you dispose of the transport pac king yourself, please take it sort ed to your local
authority's nearest material recycling centr e.
The red transport safety catches, or possibly transport rails, fastening plates and the wooden
transport base, as well as the other wooden parts can also be returned if not used.
Important!
Packing material is not a plaything f or c hildren.
2.3 Instructions for installation, alignment, fastening
2.3.1 General
• The washing machine may only be installed and put into operation by our Customer Service
or an authorised specialist dealer.
• In the event of great dif ferences between the temperature during t r ansport and that at the
place of installation, you must wait for twelve hours before put t ing the machine into operation.
Any condensation which may have formed in the appliance can dry out in this period.
• Do not connect a damaged appliance (e.g. t r ansport damage). In case of doubt, contact our
Customer Service department.
• Do not install the washing machine in rooms exposed to frost.
• The washing machines are not explosion proof. Ther efore, do not use the washing machine
in rooms in which inflammable or explosive gases or vapours occur.
Page 10
WSI 100 / 125 / 150 / 200 / 250 / 300 page 10
• In order to make later maint enance work easier for our Customer Service technicians, you
should not go below the minimum dimensions and distance from t he wall stated in the inst allation plan.
• After correct installation of the washing machine, do not fail to fit all the dism ant led external
panelling parts again.
2.3.2 Space requirement at the intended locati on
You will find the necessary space requirement in the following installation plans:
WSI 100 WSI 125 WSI 150 WSI 200 WSI 250 W SI 300
300716 300718 300718 302308 302309 302309
2.3.3 Requirement for the supporting surface
It is not necessary to have a foundation for t he machine. However, any unevenness in the floor
must be levelled out.
For perfect operation it is impor t ant for the washing machine to be installed horizontally level.
2.3.4 Ergonomics
Important!
In the event of the non-existence of a base, you are rec om m ended to
improve the working height for t he st aff either by means of a concrete
base or the steel base available as an option.
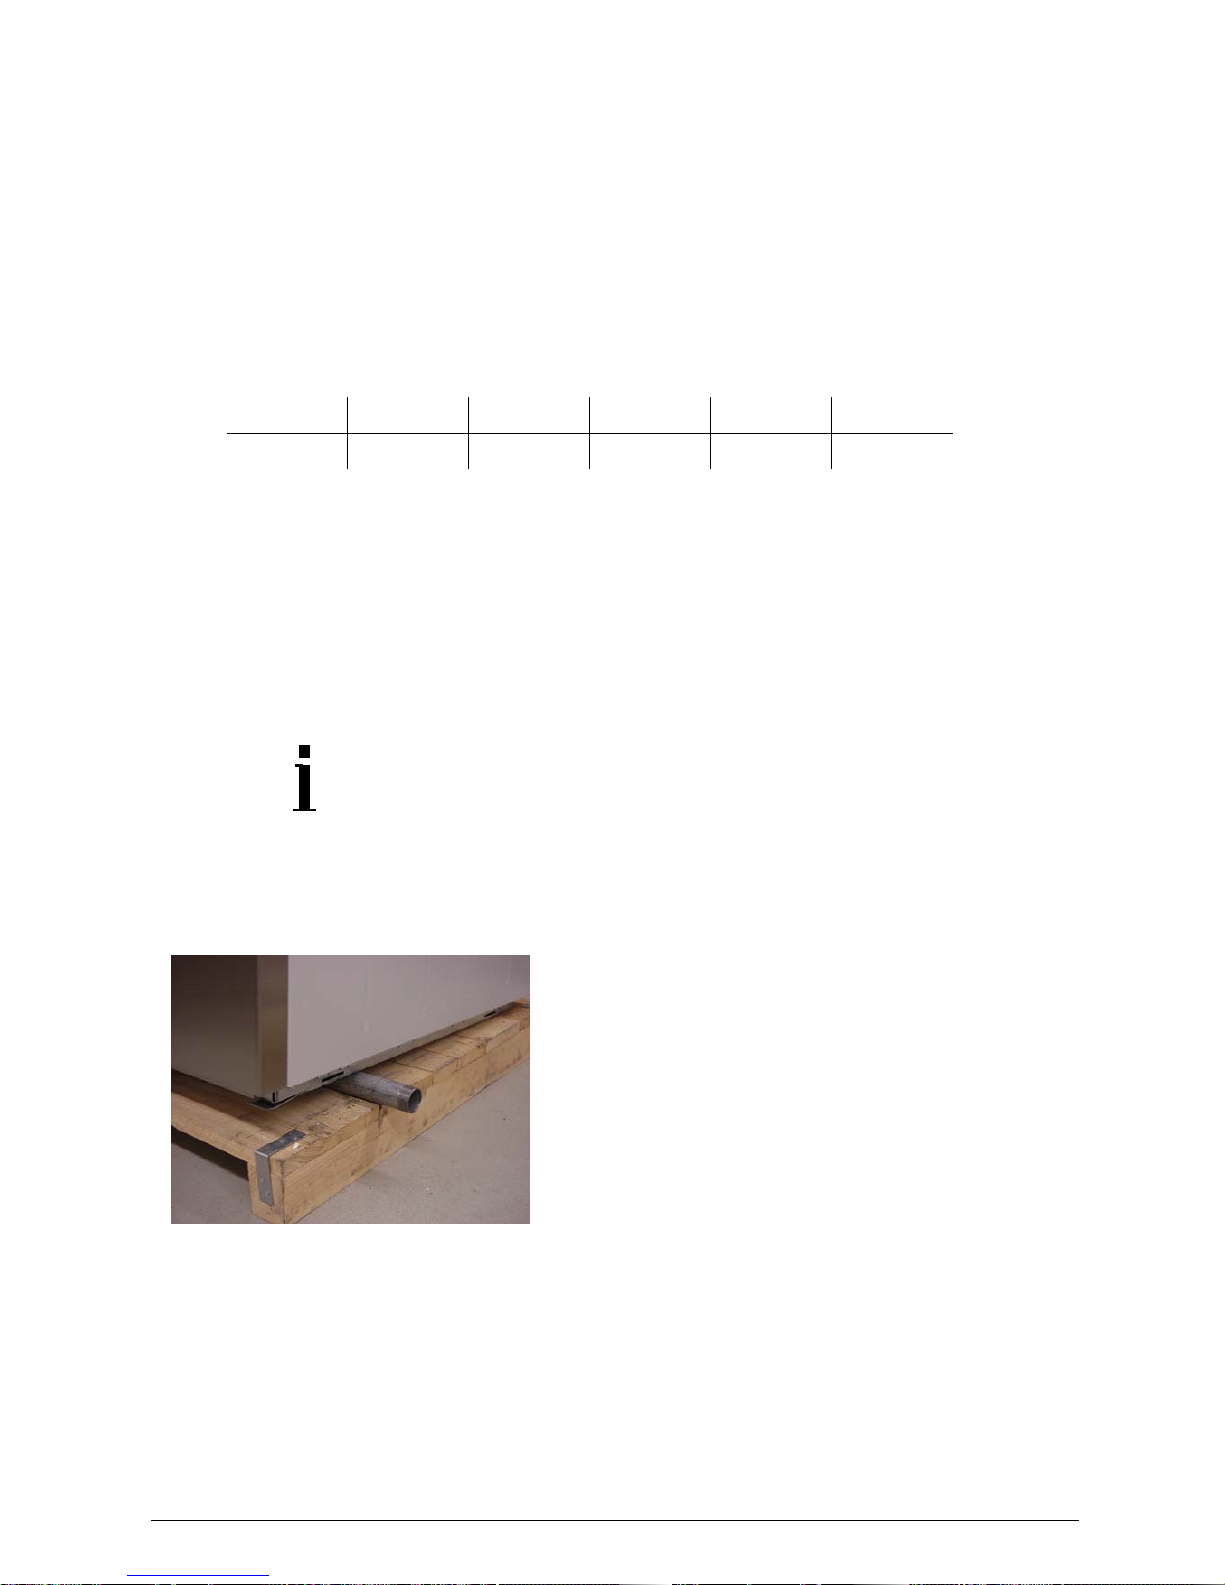
2.3.5 Removing from the pallet
Lift the machine at the side with a crowbar and slide
pipes underneath.
Then roll the machine from the pallet.
Page 11
WSI 100 / 125 / 150 / 200 / 250 / 300 page 11
2.3.6 Removing the transport safety protection
Important!
The machine must not be shifted without t r ansport safety catches and
transport rails. You can keep the safety catches in a safe place in your
premises or return them to Schulthess and r equest them again when
you need them.
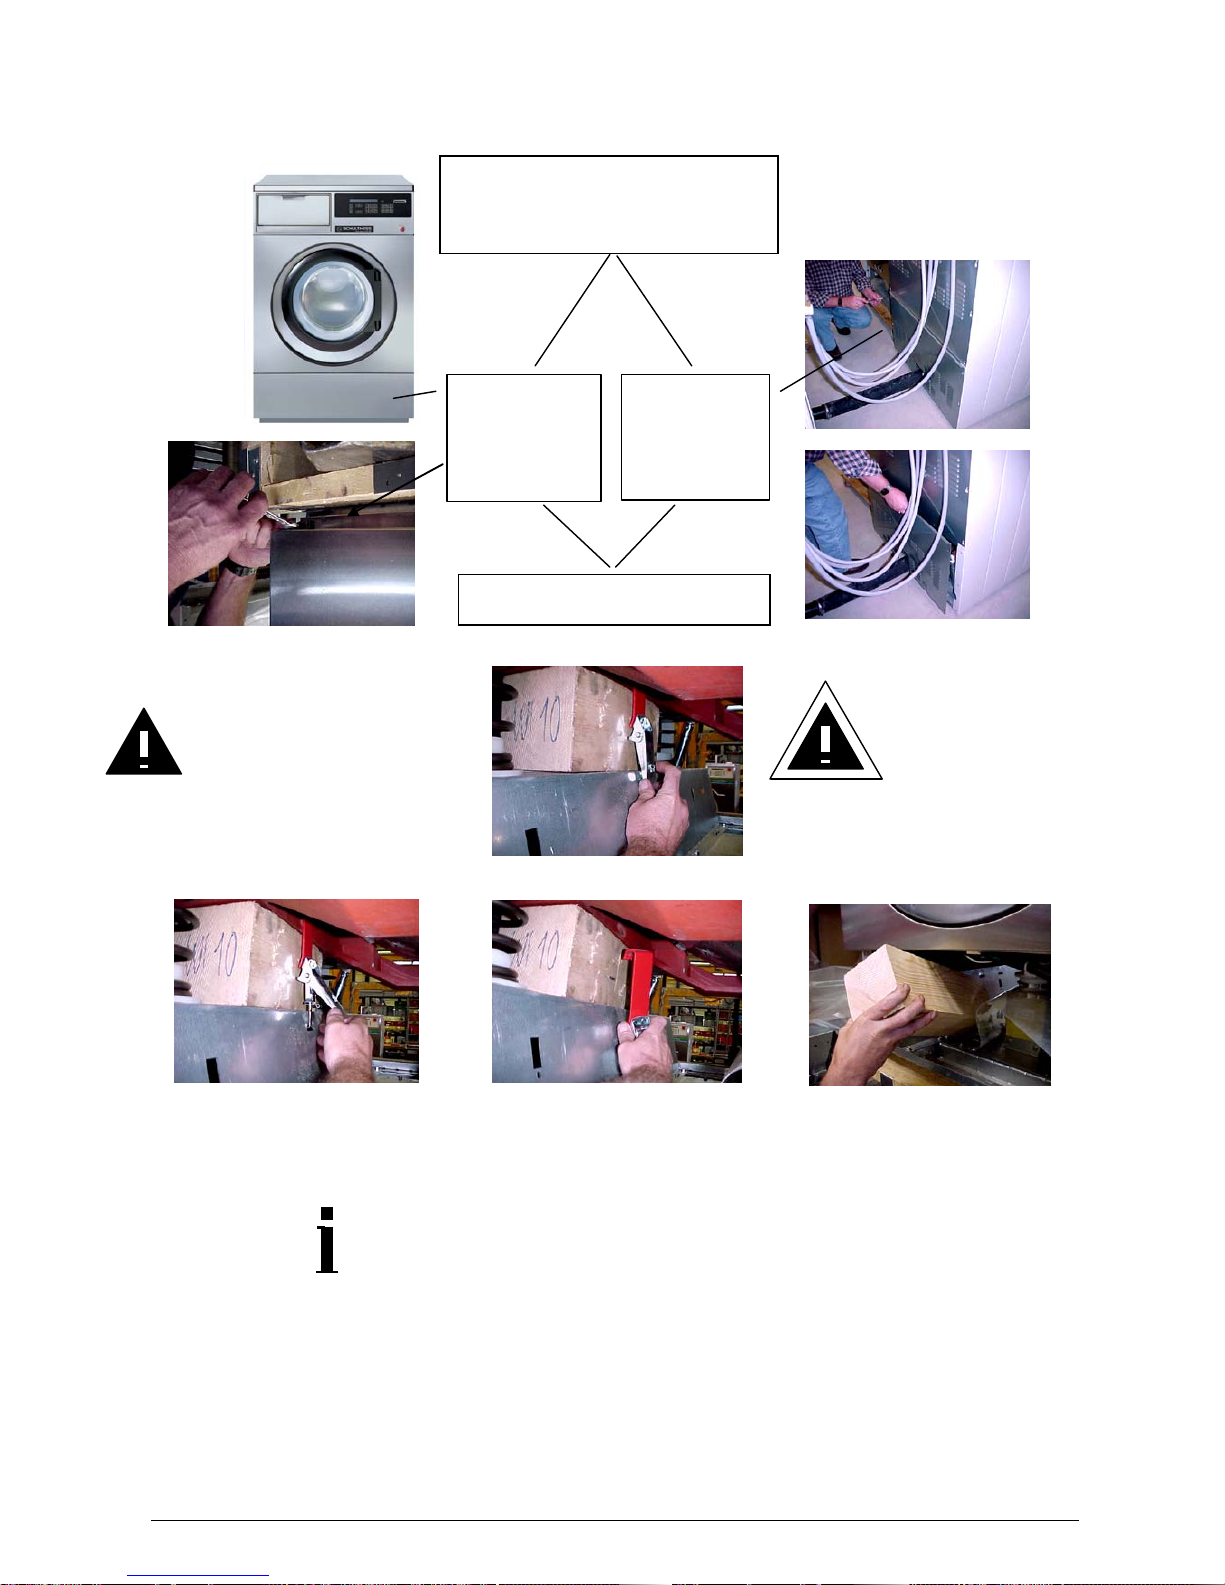
The transport safet y protection
can be removed either a) from
the front or b) f r om behind.
a)
Remove the
lower front
traverse
b)
Remove the
rear bottom
panel
Then proceed as shown below.
Important!
After removing
the transport
safety catches,
the covers are to
be fitted again.
Important!
Do not put into
operation if the
safety catches
are still fitted!
Page 12

WSI 100 / 125 / 150 / 200 / 250 / 300 page 12
2.3.7 Installation
2.3.7.1. Without feet
If the floor or existing base is adequately level, it is possible to dispense with the feet. It is
sufficient to lay the enclosed insulating mat s under the 4 corners of the machine and secure
them with 2 screws and dowels.
Lift machine Place insulating mat underneath
Secure the machine with 2 of the dowels supplied.
1. Remove the rear bottom panel.
2. Lay the insulating mat underneath
(drill holes exist in the chassis).
3. Drill holes
4. Screw in
5. Fit rear panel again.
2.3.7.1. With feet
Align the machine horizontally by adjusting the levelling feet.
1.
Lift the machine.
2. Screw the four feet into the threaded holes.
3. Align the machine (water-level).
4. Secure all 4 feet with counternuts.
Page 13

WSI 100 / 125 / 150 / 200 / 250 / 300 page 13
2.4 Instructions for the connection of energy, water and waste outlet
For this purpose, please note the following enclosed plans:
Type WSI 100 WSI 125 WSI 150 WSI 200 WSI 250 WSI 300
Connection diagram 300724 300725 300726 302312 302313 302314
Installation plan
Space requirement, water
and waste water
connections
300716 300718 300718 302308 302309 302309
Water inst allation diag r am
for hard, soft and hot water
300480 300480 300480 300480 300480 300480
2.4.1 Electrical connection
• The machine is to be connected by an authorised electr ical fitter in accordance with na-
tional regulations and in keeping with the regulations of the regional electricity company.
• Please observe the enclosed instructions and the installation plan. These plans are impor-
tant for a correct elect r ical connect ion in accordance with regulations.
• The machine must be connected only to the voltage and frequency stated on the type
plate. Please note the fuse protection st ated on the plate.
Important!
After completing the electr ical connect ion, do not fail to replace all the
dismantled outside panelling parts again.
2.4.2 Water connection
• The machine is to be connected in accordance with national regulat ions and t he appr opri-
ate regulations of the reg ional water company.
• The four valve blocks are to be connected to t he appr opr iat e water in accor dance with our
water installation diagram (see also the water connection stick er on t he r ear s ide of the
machine)
Details on the water connection sticker on the rear side of the machine:
Definition
Parameter
DO5=1
DO5=2
DO5=3
DO5=3
¾“
¾“
¾“
Water connections
¾“
Customer's water
Soft = green, hard = blue, warm = red
Page 14

WSI 100 / 125 / 150 / 200 / 250 / 300 page 14
• On principle the connecting hoses supplied should be used for the water c onnection (3/4“).
In the event of a replacement, use only hose qualities with a bursting pressure of at least
70 bar pressure and for a water temperature of 90° centigrade. Original spare parts fulfil
these requirements.
• In order to ensure a trouble fr ee pr ogramme run, a water pressure (flow pressure) of at
least 3 bar / maximum 10 bar is required.
• The warm water temperature must not exceed max. 90 degrees centigrade.
2.4.3 Steam direct and indirect connecti on
In the case of machines which are operated by steam
a stop plug is inserted in the threaded connecting piece.
The stop plug has a pre-drilled hole of Ø 2. 8 m m
ex works. Depending on t he c ustomer's steam
pressure, this hole must be widened in accordance
with the following table.
Steam stop plug
Nut to connection
Bottom rear panel
Steam direct P = 4 °C
Ø Diameter plug drill hole
Page 15

WSI 100 / 125 / 150 / 200 / 250 / 300 page 15
2.5 Instructions for putting into operation for the first time
Important!
Do not put the machine into operation if the feed pipe is damaged or the appliance
shows visible damage. Get into contact with our Customer Service department.
To clean the machine a 90° programme ( without laundry) without pr ewash should
be run.
Important!
Safety devices and operating elements must not be r em oved, br idg ed or put out
of action.
Use the machine only when all the removable outside panels are fitted and there
is thus no access to electrically live or rotating machine parts.
Important!
Never allow children to play in, on or in the vicinity of the machine or to operate
the machine. Ensure the necessary supervision, and also keep domestic animals
away from the appliance.
Before removing laundry, always make sure that the drum is standing still and
never reach into the drum while it is still rotating (danger of injury).
The waste water produced during washing and rinsing is not drinking water!
Let this soapy water flow out into a waste water drainage system suitable for t he
purpose.
Remember that the door glass becomes hot during washing and do not touch the
glass during the washing process (danger of bur ns) .
Before closing the door and start ing a washing pr ogramme, make sure that t here
are no extraneous objects or domestic animals inside the dr um .
Steam indirect P = 4 °C
Ø Diameter plug drill hole
bar
Page 16

WSI 100 / 125 / 150 / 200 / 250 / 300 page 16
3 Operating
3.1 Machine description
3.1.1 General arrangement
3.1.2 Door
Tip: For easier closing, moisten the door seal!
3.1.2.1 Opening while in operation
The washing machine can only be put into operation when the door is shut.
While the machine is running , t he door cannot be opened.
At the end of the programme, the display appears:
PROGRAM END
THE DOOR CAN BE OPENED
The door is automatically locked when it is closed.
In the event of a programme abortion. the door can be opened exactly as described above.
Unlocks the
Open door by pull-
Lower
front traverse
Door
Detergent dispenser
Base (option)
WRG (option)
Operating panel
Page 17

WSI 100 / 125 / 150 / 200 / 250 / 300 page 17
3.1.2.2 Opening the door manually
•
Remove black rubber cover on the
left side of the door
• Apply screwdriver and press down-
ward.
• The door is unlocked
Important!
The safety functions of the control system will t hus be put out of action!
Make sure that there is no water left in the machine ( danger of scalding) and the
drum is standing still (danger of inj ur y).
3.1.3 Detergent dispenser
3.1.3.1 General arrangem ent
Important!
Regardless of whether using powder or liqui detergents:
• Always use all 5 beakers for dispensing the detergents.
• Always close the flap!
In this way you will prot ect yourself from eye injuries!
Important!
If you use chlorine or other bleaches such as sodium hypochlorite:
• You must be sure to place the chlorine beaker in position 1 (right at the outside).
• Only pour in immediately before use (danger of corr osion)
In order to achieve an efficient flushing in of chlorine, a special beaker can be r equested from the After-Sales Service. Art. No. 300992.
1 First prewash or chlorine
2 Second prewash
3 Rinsing
4 Special detergent
5 After tr eatment (fabric finisher, starch)
Detergent dispenser flap
1 2 3 4 5
Page 18

WSI 100 / 125 / 150 / 200 / 250 / 300 page 18
3.1.3.2 Inserting the beakers
Slide the beakers into the supporting rails.
3.1.3.3 Detergent beakers
0.25 l
0.5 l
0.75 l
1.0 l
Maximum filling
level
Maximum filling level
for liquids
Beaker
Handle
Page 19

WSI 100 / 125 / 150 / 200 / 250 / 300 page 19
3.1.4 The detergent dispenser equipment
Your washing machine is equipped as standard with 5 powder beakers.
The connections for liquid detergent metering and water recycling are prepared in the det ergent dispenser.
Retrofitting of the options liquid deterg ent m etering and water recycling can thus also be carried out at some later time.
Powder
There are five 1 litre beakers at your disposal for powder detergents. Determine t he
dosage in accordance with the detergent supplier's details. In the case of correct dosage,
a slight foam will form in the drum. Take care to have a correct dosage of detergent.
Overdosage leads to:
• formation of too much foam
• low washing mechanism
• poor rinsing result
Underdosage leads to:
• greying of the laundry
• bad washing result
Reduce the amount of detergent for smaller l aundr y loads!
Liquid detergent metering (option)
Up to 8 liquid detergents can be connected to your washing machine.
Detergents, receptacles, m et er ing pumps and detergent pipes from t he pumps into our detergent dispenser do not for m part of the scope of supply.
Clarify the use of liquid detergents with your supplier.
Please note our instructions for liquid detergent metering.
8 connections for metering liquid detergents (prepared
as standard)
5 beaker-rinsing
3 main water inlets
Connection for recycling wa-
ter (prepared as standard)
Page 20

WSI 100 / 125 / 150 / 200 / 250 / 300 page 20
3.1.5 Water recycling integrated in the base (opti on)
Saving of up to: Water 25%
Energy 25%
Detergents 10%
Important !
When putting the machine with water recycling into operation, at the
time of putting into operat ion t he washing programmes are to be
parameterised individually according to the type of fabric. Consult your
detergent supplier too.
Important !
Do not use recycled water from coloureds for whites, as also not vice
versa (discoloration).
Do not recycle water from laundry that has been severely soiled with
oil.
Unlock the flap
Remove the flap
Pull out the tub
Remove the filter
Page 21

WSI 100 / 125 / 150 / 200 / 250 / 300 page 21
3.1.6 Details on the type plate
Machine number
Product number
Construction year
rpm
Voltage
Mains frequency
Heating power
Kinetic energy
of the drum
Load
Protection system
Power current
inspectorate
Volume
Fuse
Motor power
Type number
Page 22

WSI 100 / 125 / 150 / 200 / 250 / 300 page 22
3.2 Operating and display elements
1 Whit es 95°
2 Coloureds 60°
3 Delicates 40°
4 Wool 30°
5 Easy-care laundry
6 Programme with prewash
7 Button for reducing t he washing t em per ature
8 Reduced spinning speed
9 Metering of additional detergent dur ing operation
10 Pre-set time
11 Open door
12 Start/Stop button
13 Buttons for programm ing washing pr ogrammes
14 Cursor buttons for changing numerical values
15 Numerical keyboard for the input of num er ical values
16 SCS Schulthess Control System (Interface f or c ost um er s er vice)
17 Text display
18 Emergency Off
19 Wash-Card
Main switch
at the appliance backside
Dos
18 Emergency Off Switch
Page 23

WSI 100 / 125 / 150 / 200 / 250 / 300 page 23
3.3 Programme selection
Standard programmes
You can choose between standard and special programmes.
The standard programmes ar e s elect ed with the function keys 1- 6.
The programme selected appears in t he t ext display.
After selecting the prog ramme, you can start the machine with the Start
button 12.
The 13 standard programmes ar e list ed in section 3.12.
Special programmes Commerce
There are 20 further special com m er cial programmes at your disposal. They are filed under
the programme numbers 01 - 20 and they can be selected as described below.
A further 50 individual special programmes are also selected by entering the programme
number. These 50 special programm es ar e washing pr ogrammes transmitted by
WSI-CARDs in to the machine or program m es pr ogrammed directly on the machine.
See also under section 3.13.
3.4 Programme correction
In the event of selecting the wrong programme, press the cancel button " C" 15 and select
the programme once again.
3.5 Programme start and programme interruption
The washing programme selected is started by pressing the Start/Stop button 12.
You can interrupt and restart a prog r amme in progress by pressing Start/St op button once
again.
3.6 Emergency Off switch
The Emergency Off switch 18 may only be used in case of danger and causes an immediate
stoppage of the extractor. The switch remains locked in the activated state.
Please do not use the Emergency Off switch in norm al operation to stop the machine!
The activated Emergency Off switch can be unlocked after remedying the fault or elimination
of the danger by turning the r ed m ushroom button to the right.
In order to put the machine back int o oper at ion again, unlock the Emergency Off switch and
press the Start/Stop button 12.
3.7 Preset time
With the pres et time button 10, the start of the washing programme selected can be delayed
for max. 99 hours.
The delaying time can be set in 0.5 hour steps by means of t he cursor buttons 14.
After activating the Start / St op but ton 12, the washing machine will not star t until after
the delay time set. The time remaining unt il the start is shown in the text display 17.
Repeated actuation of the Start but t on will cause the prog r amme to start immediately.
Page 24

WSI 100 / 125 / 150 / 200 / 250 / 300 page 24
3.8 Additional dosage
By means of the 9 button, additional deterg ent c an be added dur ing washing or rinsing.
Flushing in is by means of cup no. 1
Important!
Close the flap to the detergent dispenser again befor e you
put in any additional dosage.
3.9 Temperature loweri ng
By means of button 7 you can reduce the washing temperatur e. The temperature selection
is made by means of the cursor button.
3.10 Progr amme abortion
If a programme in progress is to be aborted prematurely, the t wo buttons "C" and “P" are to
be pressed simultaneously.
3.11 Programme e nd
The end of a washing programme is indicated by the sounding of a buzzer.
In the display 17 the text appears:
"PROGRAMME END
DOOR CAN BE OPENED"
Open the door and remove the laundry.
3.12 Programme status display
The programme run and the cur r ent programme status and the r em aining time are shown in
the display.
Page 25

WSI 100 / 125 / 150 / 200 / 250 / 300 page 25
3.12.1 Standard programmes ( keyboard symbols)
Detergent beakers Programme time [min.]
95° Boil
3(+5) 73
60° Coloureds
3(+5) 55
40° Delicates
3(+5) 44
30° Wool
3(+5) 33
95° Whites with prew.
1+3(+5) 80
60° Coloureds with prew.
1+3(+5) 66
40° Delicates with prew.
1+3(+5) 52
95° Easy-care
3(+5) 67
60° Easy-care
3(+5) 51
40° Easy-care
3(+5) 50
95° Easy-care with prew.
1+3(+5) 71
60° Easy-care m with prew.
1+3(+5) 55
40° Easy-care with prew.
1+3(+5) 50
3.12.2 Commercial progr am mes
Hospital and home laundry
Nr. Display Process Beakers
Time
[min.]
01
95° Blood and urine stained 2x Prer., 1x Prew. 1+3 (+5) 123
02
95° Incontinents laundry 1x Prer., 1x Prew 1+3 (+5) 97
03
95° Nappies
1x Prer., 1x Prew
1x Int: rinse
1+3 (+5) 113
04
95° Kitchen linen 2x Prewash 1+2+3 (+5) 103
Hotel and catering operations
Nr. Display Process Beakers
Time
[min.]
05
95° Guests' laundry 3 (+5) 67
06
60° Guests' laundry 3 (+5) 56
07
95° Baker a. pastrycook laundry
1x Prer., 2x Prew. 1+2+3 (+5) 103
08
95° Blood-stained l. butcher 2x Prer., 2x Prew. 1+2+3 (+5) 129
Page 26

WSI 100 / 125 / 150 / 200 / 250 / 300 page 26
Commercial business
Nr. Display Process Beakers
Time
[min.]
09
95° Oil-soiled clothes 2x Prewash 1+2+3 (+5) 96
10
60° Hairdresser's l. express 3 (+5) 61
11
60° Quilts and cushions
2x Prer.,1x Prew. 1+3 (+5) 69
12
40° Curtains 1x Prewash 1+3 (+5) 60
13
95° Whites, express 3 (+5) 61
14
60° Coloureds, express 3 (+5) 49
15
40° Delicates, express 3 (+5) 43
16
95° Easy-care, express 3 (+5) 54
17
60° Easy-care, express 3 (+5) 40
18
40° Easy-care, express 3 (+5) 35
19
1x rinse and spin 18
20
3x rinse and spin 31
21
Tank emptying
22
Tank cleaning programm e
Wetclean
Nr. Display Process Beakers
Time
[min.]
23
30° Outerwear 42
24
40° Dockers, Jeans 47
25
35° Wedding Dress 41
26
35° Curtains 39
27
25° Angora 32
28
25° Silk 32
29
25° Wool 32
30
30° Bedpads 60
31
30° Bedpads Intensive 68
32
40° Rinsing, Impregnation 27
33
40° Washing, Impregnation 69
34
50° Shirts 51
35
20° Leather 39
36
Preparing Impregnation 8
Page 27

WSI 100 / 125 / 150 / 200 / 250 / 300 page 27
3.13 Special programmes
Up to 50 washing programmes can be program m ed dir ectly on the machine or loaded by
means of the chip cards. You can produce chip card pr ogrammes yourself with the appropriate software on a PC or obtain them fr om our work s .
3.13.1 Load a Wash-Card
1. Select an empty programme space e.g. 38
2. Insert the card into the chip card aperture 19
3. On the keyboard 15 actuate the Enter button
Now the chip card programme is stored in this prog r am me space.
Please note: Any programme already in this progr am m e s pace will be overwritten.
You can read how you can programme a washing programme of your own in the
instructions for pr ogramming the washing machine (300620).
3.13.2 Wet-cleaning
These programs must be act ivated in machine' s basic setting. You will find the description of
how to do this in the programming instruct ions 300620 for the appliance.
Please note that only detergents and additives suitable for wet-c leaning m ay be used.
3.14 Hints on washing textiles
Please consult the care labels sewn into the textiles and the details given by the laundry
manufacturers.
3.14.1 Preparing laundry
You will achieve the best washing effect if you sort the laundry in accordance with the type of
fabric and the soiling .
All pockets and bags should be emptied so that no extraneous obj ec t s c an find their way into
the machine and cause damage.
Folded parts should be loosened up and long cords knotted.
Laundry with cords and particularly tricky items for washing can also be washed in nets.
However, place max. 1.5 kg in one net and also always load with nets up to the loading
amounts shown below!
3.14.2 Loading amounts (dry laundry)
Machine Type WSI 100 WSI 125 WSI 150 WSI 200 WSI 250 WSI 300
Drum content 100 litres 125 litres 150 litres 200 litres 250 litres 300 litres
Boil, coloureds 10 kg 12.5 kg 15 kg 20 kg 25 kg 30 kg
Easy-care laundry 5 kg 7 kg 7,5 kg 10 kg 12.5 kg 15 kg
Delicates / Wool 3 kg 4 kg 5 k g 7 kg 9 kg 10 kg
The machine works most economically if the m aximum load am ount s s t ated are utilised to
the full.
Page 28

WSI 100 / 125 / 150 / 200 / 250 / 300 page 28
Your machine is equipped with an automatic unbalance detection system. In t he cas e of too
great an unbalance (mostly in the event that the machine is far too underloaded) the laundry
will be redistributed once again before spinning. If the unbalance is once ag ain t oo great the
spinning speed will be reduced and the programme ended normally.
Important!
Underloading is uneconomic and leads to increased wear and tear to
the laundry and the machine.
3.14.3 Preparing the appli ance
• Open the water shut -off cock (customer's)
• Turn on t he m ain switch (cus t om er 's)
• Open the door
• Load the laundry piece by piece and loosely
• Close the door
The appliance is ready for operation if a text appears in t he t ext display.
The display then looks e.g. like this:
The name of the standard programme or the number of the special programme which was
used last will be displayed.
Choose the desired programme in accordance with chapter 3. 2 ff. and start it with
3.14.4 Work end
After use, switch electric power off by switching off the main switch.
The door seal and the ledge part must be cleaned daily.
Important!
The working life of the rubber door seal will be prolonged if the door is
left a few inches ajar after us e.
Instructions for the oper at or
Page 29

WSI 100 / 125 / 150 / 200 / 250 / 300 page 29
4 Faults
4.1 Instructions for troubleshooting
The following fault and error mess ages are shown in the text display
Display:
Text display dark
Cause: -
Remedy: Switch customer's main switch on.
Display:
Time monitoring filling procedure
Cause: Water c ock is closed or
Filter in the water-inlet pipe clogged.
Remedy: Open water cock or clean filter
Display:
No water outflow
Cause:
Outflow fault outside the machine
Remedy: Check customer's outflow
Display:
Emergency Off actuated or door open
Cause: Door not closed or locking bolt not locked into place or Emergency Off
switch actuated.
Remedy: Close door properly (Press hard against the door handle) or unlock Emer-
gency Off-button
Display:
Imbalance too great
Cause: The unbalance detector has detected t oo great an unbalance
Remedy: Avoid underloading the machine
Display:
Imbalance sensor
Cause: Sensor defective.
Remedy: Inform Customer Service
Display:
Spreading speed too low
Cause:
Laundry weight too low or water not let out.
Remedy:
Check laundry quantity. Check outlet
Display:
Programme space is empty
Cause: There is no programme st ored under the programme no. selected.
Remedy: Select valid number.
Page 30

WSI 100 / 125 / 150 / 200 / 250 / 300 page 30
Display:
Hardware
Cause: Error in electronic system.
Remedy: Inform Customer Service.
Display:
Hardware (FC)
Cause: Frequency converter defective or no supply voltage at frequency converter
or door not properly locked. Second locking bolt not engaged.
Remedy: Close door properly (press hard against the door handle) or replace
frequency converter.
When you notify our Custom er Ser vice depart m ent about an operating fault, please infor m us
of the machine type and the machine number.
You will find these details on the type plate on the inside of the door.
Machine type
Machine number
Page 31

WSI 100 / 125 / 150 / 200 / 250 / 300 page 31
Maintenance / Servicing
4.2 General hints
• Before beginning the cleaning works, t he elect r ic power supply to the
machine must be switched off at t he c ust omer's main switch.
• The machine is only separated electrically from the m ains supply if the
mains plug has been pulled out or the customer's main switch or fuse
protection has been switched off.
• No high-pressure cleaner and no jet of wat er m ay be used for clean-
ing the machine.
• No changes , alt er at ions or attempts at repair, especially using tools such
as screwdrivers, etc. may be carried out on or in the
appliance. Incorrectly executed repairs can lead to serious
accidents, damage and operating disorders
.
Important!
• The drum has been manufactured from stainless special steel.
Ferriferous water or extraneous objects in t he laundr y to be washed (e.g.
paper clips, nails and suchlike) can lead to the formation of extraneous
rust in the drum.
• In order that the washing machine can dry aft er use, the door should not
be shut, but left just aj ar.
• In the event of irregular and incorrect maintenance, deterioration in performance and operating f ault s cannot be ruled out.
• Repair works on the extractor may be carried out only by our
Customer Service department or by authorised, tr ained specialist personnel. Incorrectly executed repairs can lead to serious accidents, damage and operating disorders. In t he c ase of any
possible repairs only original spare parts may be used.
Page 32

WSI 100 / 125 / 150 / 200 / 250 / 300 page 32
4.3 Cleaning materials
Warning!
Do not use any solvents for cleaning!
These agents can damage part s of the appliance, develop noxious vapours and
are an explosion hazard!
Clean the machine cabinet, operating panel, plastic parts and rubber parts using just a mild
cleaning agent or a soft, m oist cloth and then rub them dry again.
A chrome steel cleanser is recommended f or cleaning those parts of the cabinet made of
special steel.
A special chrome steel cleanser can be obtained from our Cust omer Service department.
Do not use any scouring cleansers!
Do not scratch or scrape with sharp objects.
4.4 Maintenance plan for the operating pers onnel
Machine part What must be done How often
Detergent dispenser
Non-compliance with the maintenance
instructions can lead to surface cor rosion!
Remove the beakers and free the whole interior of t he
dispenser of any detergent residue.
Very important if using chlorine!
daily
when finishing
work
Beaker
Rinse out
daily
when finishing
work
Door rubber and door
glass
Clean and dry, then leave door ajar.
daily
when finishing
work
Cabinet
Clean surface.
weekly
Water valves
Filters are fitted in the inlet valves which must be
checked from time to time for soiling and if necessary
should be cleaned as follows:
Close the water cock beforehand!
Unscrew the reinforced hose and full the filter out of
the valve with a pair of pliers. Clean the filter with
water and insert it into the valve again. Connect the
hoses again and tighten the swivel nut slightly with a
spanner.
every 2 months
Page 33

WSI 100 / 125 / 150 / 200 / 250 / 300 page 33
Machine part What must be done How often
Water r ecycling t ank
(option)
Non-compliance with the maintenance
instructions can lead to silting up and the
formation of bacteria!
- Pum p water out (programme number 21)
- Open flap and pull out tub.
- Rem ove filter
- Cle a n filter
- Open the tub
outflow
- Rinse out t ub
- Rem ove deposits
- Disinfect the tray
- Close t he tub
outflow
- Insert filter again.
- Slide tub in and fit cover again
for hygienic
reasons 2 days
at the latest after
the last use
or
if used daily
1x per week
or
in accordance
with the
company's own
hygienic
concept
.
Water r ecycling pum p
- Begin as above
- Undo t he pum p
holder
- Pull the holder out
under the pump
- Place t he pum p
at the back
- Rem ove the pum p
filter with a
- screwdriver
- Clean t he pum p
wheel
- Assemble everything again in the reverse sequence.
Once a month
or
If the pump no
longer draws
despite a full
tank
or
in accordance
with the
company's
own hygiene
plan.
Page 34

WSI 100 / 125 / 150 / 200 / 250 / 300 page 34
5 Taking out of use
Make your worn-out appliance incapable of operation before disposal.
Before disposing of the appliance, the mains cable is to be cut off from the appliance
and the door removed so that children at plan cannot become lock ed in and not get into mor-
tal danger!
The appliance should be correctly disposed of.
 Loading...