

Page 1
SPIRIT TC 5596
Produkte-Nr.
No. du produit 5596.1
No. di prodotto
Product No.
Instruktions-Nr.
No. d’instruction 632 321.AA
No. dell’istruzione
Instruction No.
Bedienungsanleitung
für Kondensationstrockner im Eigenheim
Mode d’emploi pour séchoirs
à condensation dans maisons individuelles
Istruzioni per l’uso di asciugatrici
a condensazione in case monofamiliari
Instructions for the use of condensing dryers
in private homes
Page 2

Liebe Kundin, lieber Kunde
Wir freuen uns, dass Sie sich für einen SchulthessWäschetrockner entschieden haben.
Ihr neuer Wäschetrockner entstand in mehrjähriger
Entwicklungsarbeit. Höchste Qualitätsansprüche sowohl in
der Entwicklung als auch in der Fertigung garantieren
ihm eine lange Lebensdauer.
Seine Konzeption erfüllt alle heutigen und zukünftigen
Anforderungen moderner Wäschepflege. Sie ermöglicht
Ihnen eine vielfältige und individuelle Programmwahl.
Sparsamster Energieverbrauch und kurze Trocknungszeiten
sichern Ihnen beim Betrieb Ihres Wäschetrockners
höchste Wirtschaftlichkeit.
Bitte lesen Sie diese Bedienungsanleitung sorgfältig durch,
um alle Möglichkeiten und Vorteile Ihres neuen Wäschetrockners nutzen zu können.
Beachten Sie zudem die Sicherheitshinweise auf Seite 4,
sowie das beiliegende Garantie- und Kundendienstheft.
Wir wünschen Ihnen viel Freude an Ihrem neuen
Schulthess-Gerät.
Ihre
Schulthess Maschinen AG
Chère cliente, cher client
Nous sommes fort heureux que vous vous soyez décidé
pour un séchoir Schulthess.
Votre nouvelle acquisition est le fruit de plusieurs années
d’efforts de développement. Des normes de qualité extrêmement rigoureuses en matière de mise au point comme
de fabrication lui garantiront une longue durée de vie.
Sa conception répond à toutes les exigences actuelles
et futures de l’entretien moderne du linge. Elle permet un
choix varié et personnalisé entre ses programmes.
Sa sobriété en matière de consommation d’énergie et
la brièveté de ses temps de séchage vous garantiront un
fonctionnement particulièrement économique.
Nous vous prions de lire avec soin le présent mode
d’emploi, afin que vous puissiez profiter de tous les avantages et possibilités de votre nouveau séchoir.
Observez en outre les instructions de sécurité p. 16 et
conservez avec soin le livret de garantie et d’après-vente
ci-joint.
Nous vous souhaitons beaucoup de plaisir avec votre
nouvelle machine Schulthess.
Cordialement
Schulthess Maschinen SA
Cara cliente, caro cliente
Siamo lieti cheabbiate scelto un’asciugabiancheria Schulthess.
La vostra nuova asciugatrice e nata dopo molti anni
di ricerche. Le alte esigenze di qualità richieste e durante
la fase di fabbricazione vi garantiscono un apparecchio
di lunga durata.
La sua concezione soddisfa tutte le richieste odierne e
future per un moderno trattamento della biancheria.
Vi consente di selezionare i programmi in modo vario e
personalizzato.
Il forte risparmio di energia e tempi di asciugatura
più brevi vi garantiscono la massima economicità durante
il funzionamento della vostra asciugatrice.
Vi preghiamo di leggere attentamente queste istruzioni
per l’uso, per poter sfruttare tutte le possibilità ed
i vantaggi che vi offre il vostro nuovo della vostra nuova
asciugatrice.
Osservate inoltre le istruzioni per la sicurezza a pagina 28
e conservate il libretto del Servizio Assistenza ed il
certificato di garanzia.
Vi auguriamo di poter utilizzare con gioia la vostra nuova
macchina Schulthess.
Vostra
Schulthess Maschinen SA
Dear Customer
We are pleased that you have chosen a Schulthess dryer.
Your new dryer is the result of many years of develop-
ment work. The highest quality requirements, both in
development and manufacture, guarantee a long lifetime.
Its design meets all the current and future demands of
modern laundry care. It offers you a varied and individual
choice of programmes.
Sparing use of energy and short drying times help to
ensure that you can use your dryer as economically as
possible.
Please read these instructions carefully to enable you to
use all the possibilities and advantages of your new dryer.
Please also note the safety notice on page 40 and the
enclosed guarantee and customer services booklet.
We hope you will be very happy with your new
Schulthess machine.
Yours,
Schulthess Maschinen AG.
Page 3

Inhaltsverzeichnis
Worauf Sie achten müssen
X Entsorgungshinweise 4
Z Verpackung des Neugerätes 4
Z Altgeräte 4
X Sicherheitshinweise und Warnungen 4
Ihr neuer Wäschetrockner
X Umweltschutz und Sparhinweise 4
X Gerätebeschreibung 5
X Wäschehinweise 6
Z Wäsche sortieren 6
Z Tipps zum Trocknen 6
Inbetriebnahme
X Vorbereitung 6
X Einfülltür öffnen 6
X Wäsche einfüllen 6
X Einfülltür schliessen 6
Trocknen
X Programmtabelle 7
X Trocknen 8
Z Trocken-Programme 8
Z Mix Programm 8
Z Zeit-Programme 8
Z Wolle finish 8
Z Express 8
Z Zusatzfunktionen wählen 8
Z Programm starten 8
Z Programmablauf / Programmstand 8
Z Programm ändern 9
Z Programm abbrechen 9
Z Wäsche nachlegen 9
Z Programmende 9
Z Wäsche entnehmen 9
Z Gerät ausschalten 9
X Zusatzfunktionen 9
Z Pflegeleicht 9
Z Startzeitvorwahl 9
Z Schontrocknen 9
Z Knitterschutz 9
Z Schnellgang 9
Wartung, Pflege, Reinigung
X Gerät reinigen 10
Z Kondenswasserbehälter entleeren 10
Z Filter reinigen 10
Z Luftkühler reinigen 10/11
Z Feuchtigkeitssensor reinigen 11
Grundeinstellungen
X Anfangsfeuchte 11
X Trocknungsgrad 11
X Knitterschutz 12
X Uhrzeiteinstellung 12
X Sprache 12
X Erweiterte Grundeinstellungen 12
Z Kindersicherung 12
Z Netzanschluss reduzieren 12
Z LCD-Helligkeits-/Kontrasteinstellung 12
Z Summer 12
Z Stand-by-Funktion 12
Z Optische Schnittstelle 12
Störungen
X Kleine Störungen selbst beheben 12/13
X Störungsmeldungen 13
Kundendienst
X Produkte- und Geräte-Nr. 13
Garantieabonnement 13
Notizen 14
Sommaire français
X Voir page 15
Sommario italiano
X Vedere pagina 27
Contents english
X see page 39
D EUTSCH
Page 4
4
Entsorgungshinweise
Verpackung des Neugerätes
Verpackungsmaterial ordnungsgemäss entsorgen.
Verpackungsmaterial ist kein Spielzeug.
Durch die Aufbereitung und Wiederverwendung werden
Rohstoffe eingespart und Abfallvolumen verringert.
Die Verpackung kann dem Fachhändler oder Lieferanten
zurückgegeben werden.
Alle verwendeten Verpackungsmaterialien sind umweltverträglich und wiederverwendbar. Der Karton besteht
aus 80% bis 100% Altpapier.
Holzteile sind nicht chemisch behandelt. Die Folien sind
aus Polyethylen (PE), die Umbänderung aus Polypropylen
(PP). Diese Materialien sind reine KohlenwasserstoffVerbindungen und recycelbar.
Altgeräte
Ausgediente Geräte sind unbrauchbar zu machen:
Nachdem der Netzstecker gezogen bzw. der Anschluss
vom Elektriker demontiert worden ist, Netzkabel durchtrennen und entfernen. Türschloss zerstören oder entfernen, damit spielende Kinder sich nicht einsperren und
in Lebensgefahr geraten.
Das Altgerät enthält wertvolle Werkstoffe, die einer Wiederverwertung zugeführt werden sollten. Stellen Sie sicher,
dass Ihr altes Gerät ordnungsgemäss entsorgt wird.
Anschriften von Sammelstellen oder Rücknahmeorten für
die Entsorgung von Altgeräten erfahren Sie bei Ihrer
Gemeindeverwaltung. Bitte helfen Sie auf diese Weise bei
einer umweltverträglichen Entsorgung bzw. Wiederverwertung mit.
Sicherheitshinweise und
Warnungen
Dieses Gerät entspricht den einschlägigen
Sicherheitsbestimmungen für Elektrogeräte.
Vor der Inbetriebnahme beachten:
Lesen Sie die beiliegenden Druckschriften sorgfältig durch,
bevor Sie Ihren Wäschetrockner in Betrieb nehmen.
Sie enthalten wichtige Informationen zu Installation, zum
Gebrauch und zur Sicherheit des Gerätes.
Reparaturen dürfen nur von geschultem Fachpersonal
durchgeführt werden. Durch unsachgemässe Reparaturen
können erhebliche Sachschäden und Gefahren für den
Benützer entstehen.
Druckschriften für Mitbenützer oder Nachbesitzer sorgfältig aufbewahren.
Das Gerät entsprechend der Aufstellungsanleitung
installieren.
Ein Gerät mit sichtbaren Schäden nicht anschliessen.
Im Zweifelsfall Kundendienst oder Händler befragen.
Beim Trocknen beachten:
Kinder nicht mit dem Gerät unbeaufsichtigt lassen.
Haustiere vom Gerät fernhalten.
Das Gerät nur im Haushalt zum Trocknen von Textilien
benutzen.
Nach Programmende beachten:
Nicht in die drehende Trommel greifen.
Zum Schutz des Gerätes beachten:
Nicht auf das Gerät steigen.
Setzen, lehnen oder stützen Sie sich nicht
auf die Einfülltür (Kippgefahr!).
Bei einem Transport beachten:
Vorsicht beim Transport des Gerätes! (Verletzungsgefahr!)
Das Gerät nicht an vorstehenden Bauteilen anheben!
Den Anschluss der Abluftleitung nicht an einen Kamin
anschliessen, an den ein Gas-, Kohleofen bzw. Herd, oder
eine Gas-Raumheizung angeschlossen ist.
Durch Rücksaugung besteht Vergiftungsgefahr!
Umweltschutz und Sparhinweise
So sparen Sie Strom, Zeit und Kosten
X Am sparsamsten und umweltfreundlichsten trocknen
Sie, wenn Sie die maximale Wäschemenge einfüllen.
X Die maximal angegebene Wäschemenge nicht überschreiten (siehe Programmtabelle Seite 7).
X Die Wäsche vor dem Trocknen durch Schleudern im
Waschautomat oder in einer Wäscheschleuder gründlich
entwässern. Je höher die Schleuderdrehzahl, umso kürzer
ist die Trocknungszeit und geringer der Stromverbrauch.
X Auch pflegeleichte Wäsche schleudern.
X Beim Trocknen muss für eine gute Raumbelüftung
gesorgt werden (Fenster oder Tür öffnen).
X Den Filter nach jeder Wäschetrocknung säubern.
Page 5
5
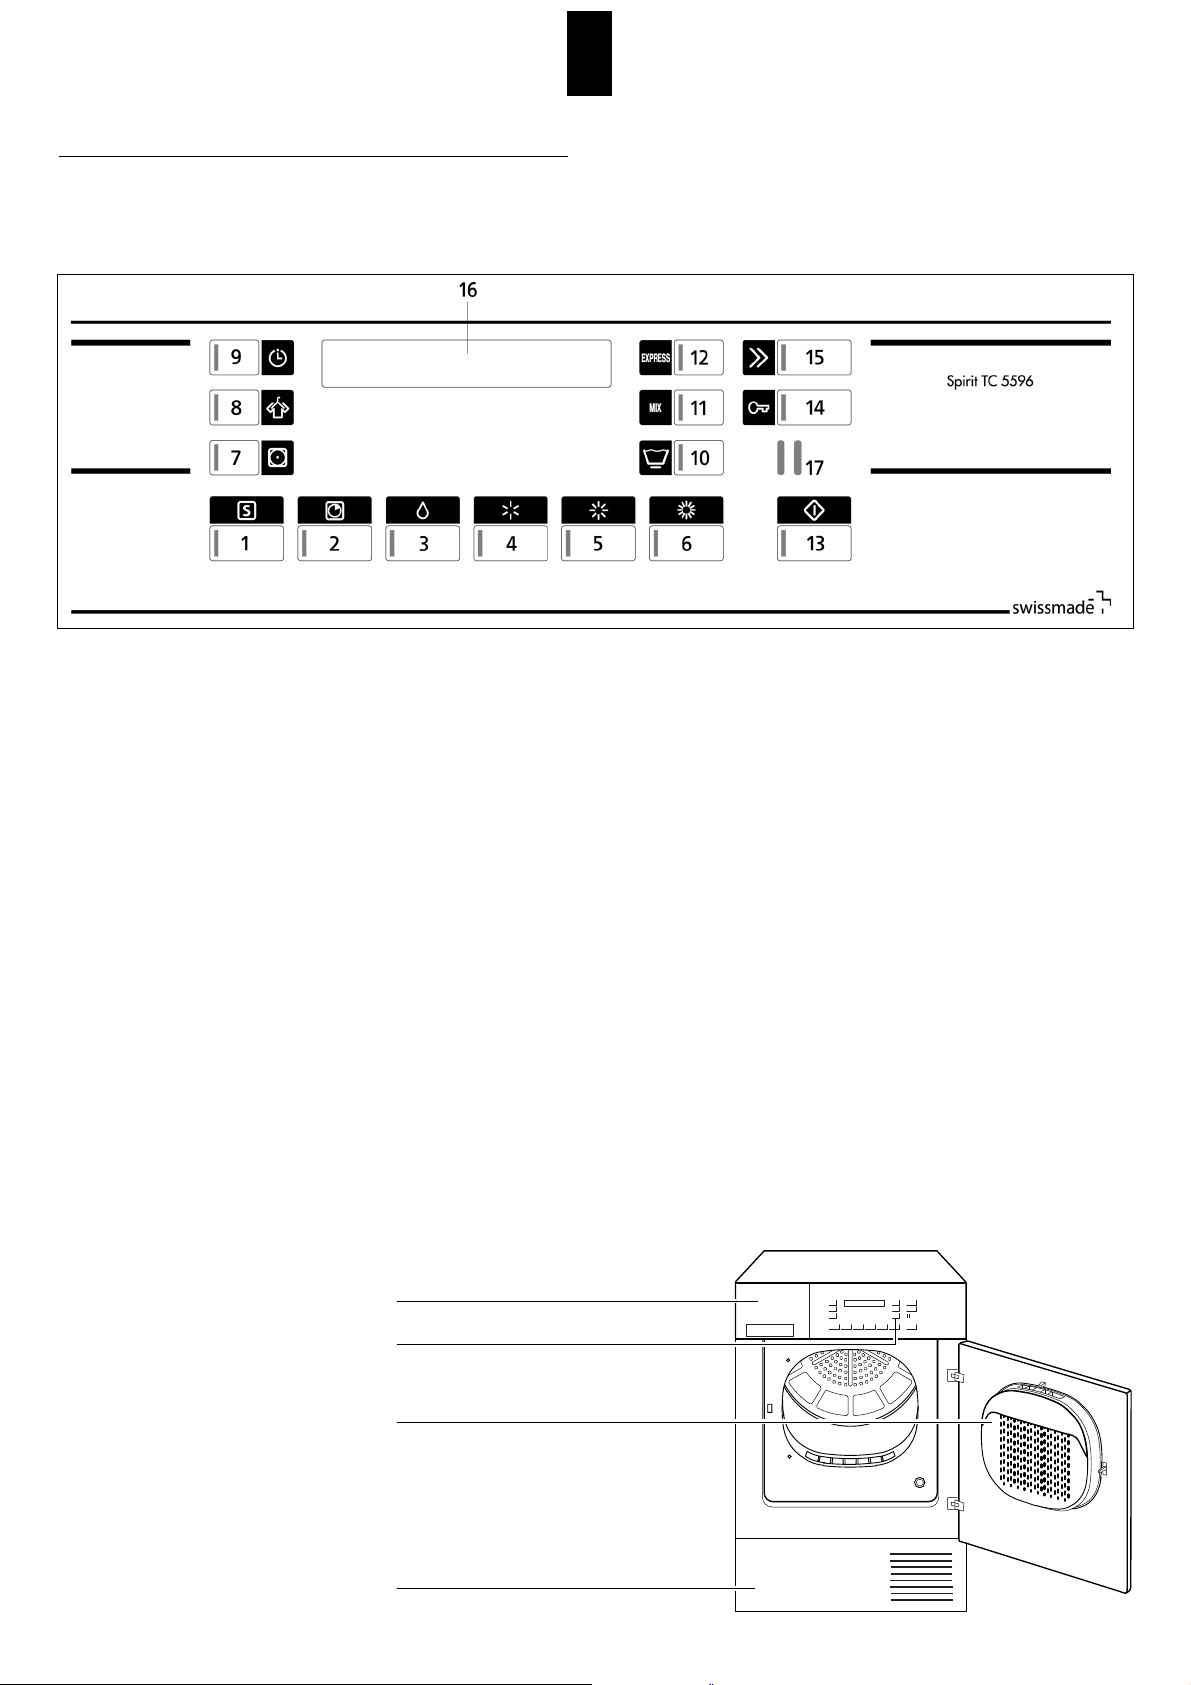
Bedienungs- und Anzeigefeld
Einfülltür mit Filter
Programme
1 Spezialprogramm/Wolle finish
2 Zeitprogramm
3 Bügelfeucht
4 Leichttrocken
5 Schranktrocken
6 Extratrocken
11 Mix-Wäsche
12 Express
Zusatzfunktionen
7 Schontrocken
8 Knitterschutz
9 Startzeitvorwahl
10 Pflegeleicht
13 Programmstart
14 Einfülltür öffnen
15 Schnellgang
Anzeigen
16 Displayanzeige
Schnittstellen
17 SCS-Schulthess Control System
(PC-Schnittstelle für Kundendienst)
Gerätebeschreibung
Bedienungs- und Anzeigefeld
Page 6
6
Wäschehinweise
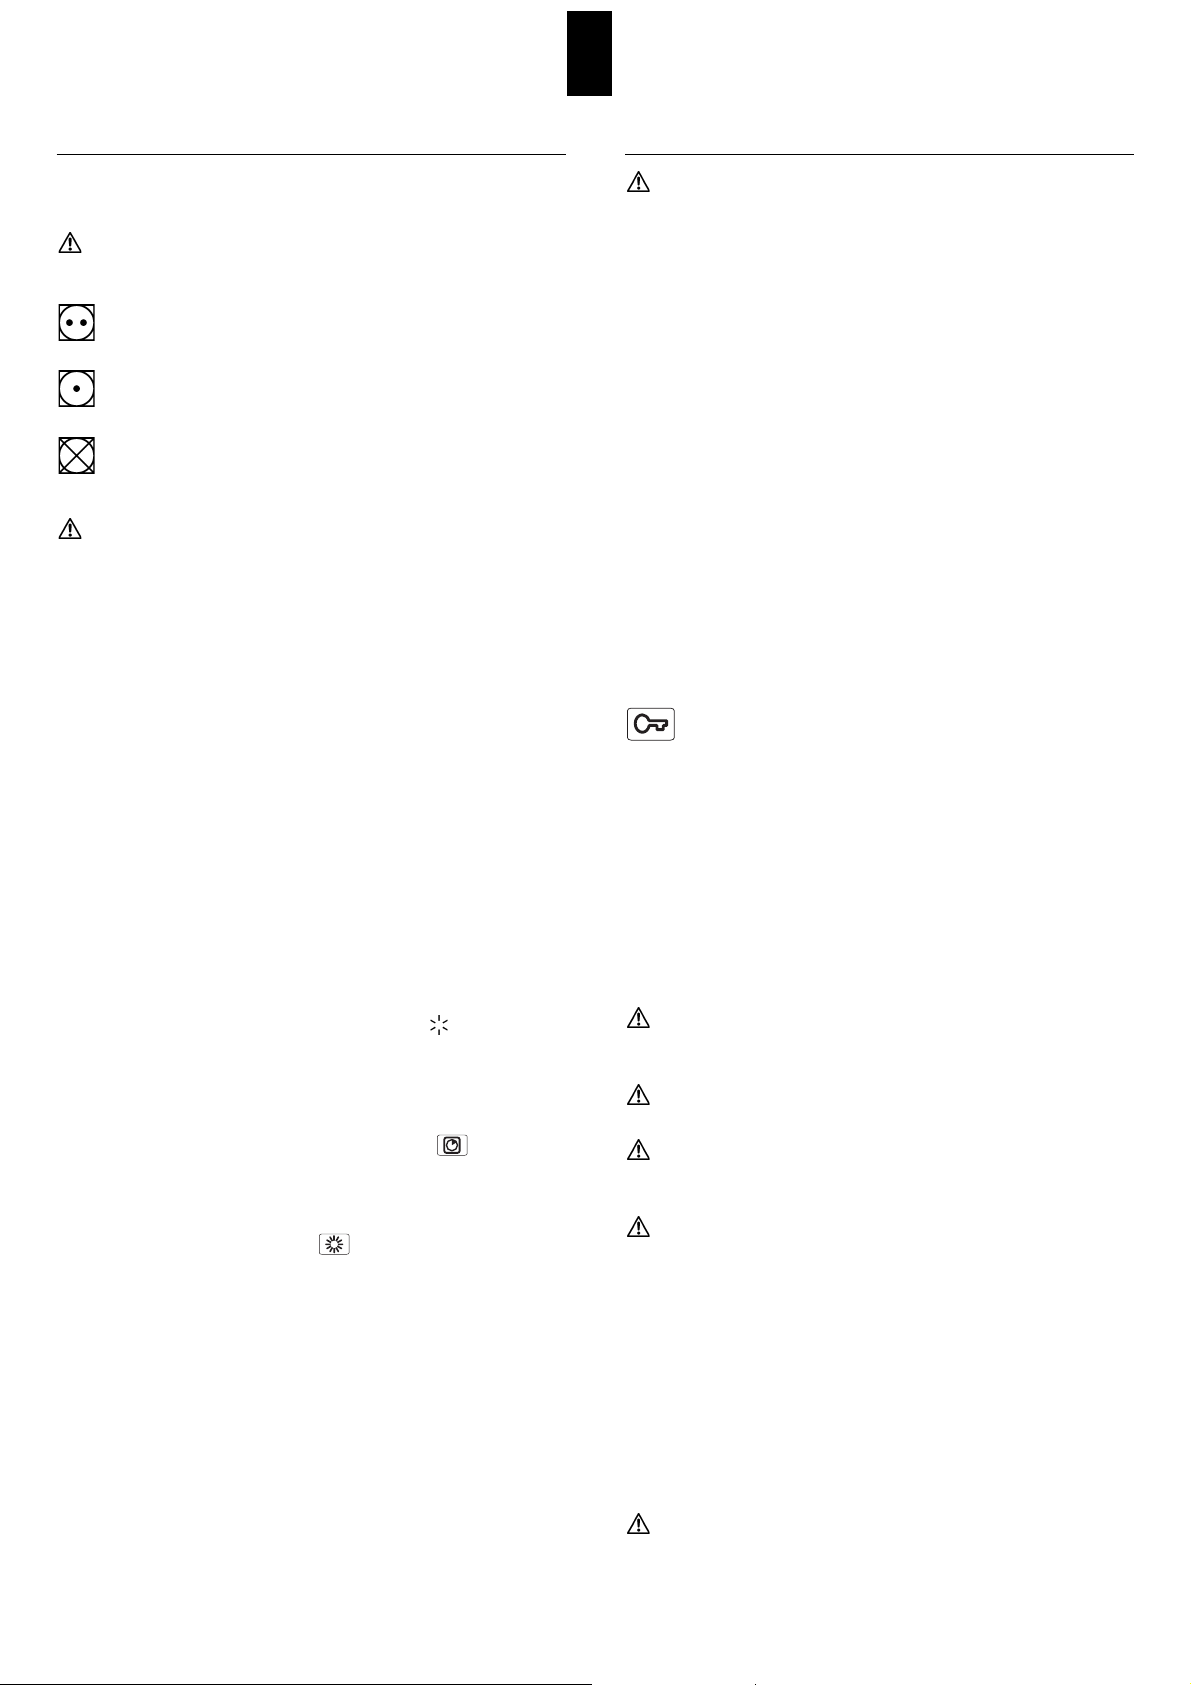
Wäsche sortieren
Beachten Sie die Trocknungs-Symbole
in den Textilien.
Trocknen mit normaler Temperatur.
Trocknen mit niedriger Temperatur.
Nicht maschinell Trocknen.
Folgende Textilien nicht im Gerät trocknen
z Empfindliche Gewebe (Seide, synthetische Gardinen etc.):
Knitterbildung!
z Tropfnasse Wäsche: Energieverschwendung!
z Wolle oder Textilien mit Wollanteil (Ausser mit dem
Spezialprogramm Wolle finish): Verfilzungsgefahr!
X Um ein gleichmässiges Trocknungsergebnis zu erzielen,
die Wäsche nach Gewebeart und gewünschtem
Trockungsziel sortieren.
Die maximalen Beladungsmengen nicht überschreiten, da
Überfüllen das Trocknungsergebnis beeinträchtigt und die
Wäsche stark knittert.
Tipps zum Trocknen
X Schliessen Sie Reissverschlüsse, Haken und Ösen.
Lose Gürtel, Schürzenbänder usw. zusammenbinden.
X Pflegeleichte Wäsche möglichst in leicht feuchtem
Zustand (Trocknungsziel «Leichttrocken» wählen) aus
dem Gerät nehmen und an der Luft kurz nachtrocknen
lassen. Bei Übertrocknen besteht Knittergefahr.
X Wäschestücke, die nach dem Trocknen eines Wäschepostens mit stark unterschiedlichen Gewebearten noch
zu feucht sind, können im Zeitprogramm nachgetrocknet werden.
X Gewirkte Textilien, z.B. Trikotwäsche, können
beim Trocknen etwas einlaufen. Für diese Textilien kein
Programm «Extratrocken» verwenden.
Inbetriebnahme
Das Gerät entsprechend der Aufstellungsanleitung
installieren.
Bevor das Gerät das erste Mal in Betrieb genommen
wird, die Trommel mit einem feuchten Tuch auswischen.
Vorbereitung
Überprüfen Sie, ob:
X der Flusenfilter eingesetzt ist. (siehe Reinigung/
Wartung Seite 10)
X der Netzstecker eingesteckt oder Wandschalter
eingeschaltet ist.
Das Gerät ist betriebsbereit, sofern sämtliche Kontrolllampen blinken oder im Schlafmodus erloschen sind.
Falls eine Kontrolllampe dauernd leuchtet, wie folgt
vorgehen:
X Mit Schnellgangtaste auf Position Programmende
tippen, bis Kontrolllampe leuchtet. Warten, bis Kontrolllampe blinkt und Taste «Tür» betätigen. (ggfls. Wäsche
entnehmen)
Einfülltür öffnen
X Drücken Sie die Taste «Tür».
z Die Einfülltür springt auf.
X Achtung: Die Tür springt nur auf, wenn die Hauptstromzufuhr eingeschaltet ist. Sollte vor dem Tür öffnen
kein Strom vorhanden sein, dann kann die Tür manuell
durch einen kurzen Druck auf Höhe des Verschlussriegels
geöffnet werden.
z Trommelbeleuchtung wird beim Öffnen der Tür
eingeschaltet.
Wäsche einfüllen
Vor dem Einfüllen der Wäsche darauf achten, dass sich
keine Fremdkörper oder eventuell eingesperrte Tiere in
der Trommel befinden.
Nur Textilien, die mit Wasser gewaschen wurden, im Gerät
trocknen.
Wäsche, die mit entzündlichen Lösungsmitteln behandelt
wurden, z.B. mit Fleckenentferner oder Waschbenzin,
nicht im Gerät trocknen (Explosionsgefahr!).
Textilien, die Schaumgummi enthalten oder die mit
Haarfestiger, Nagellackentferner oder ähnlichen Mitteln
behaftet sind, nicht im Gerät trocknen (Brandgefahr!).
X Legen Sie die Wäsche gut aufgelockert in die Trommel,
grosse und kleine Stücke gemischt.
Einfülltür schliessen
X Schliessen Sie die Einfülltür, indem Sie diese zudrücken,
bis der Verschluss hörbar einschnappt.
X Achten Sie darauf, dass beim Schliessen der Einfülltür
keine Wäschestücke eingeklemmt werden.
Bei nicht geschlossener Tür verhindert ein Sicherheitsschalter
die Inbetriebnahme des Gerätes.
Page 7
7
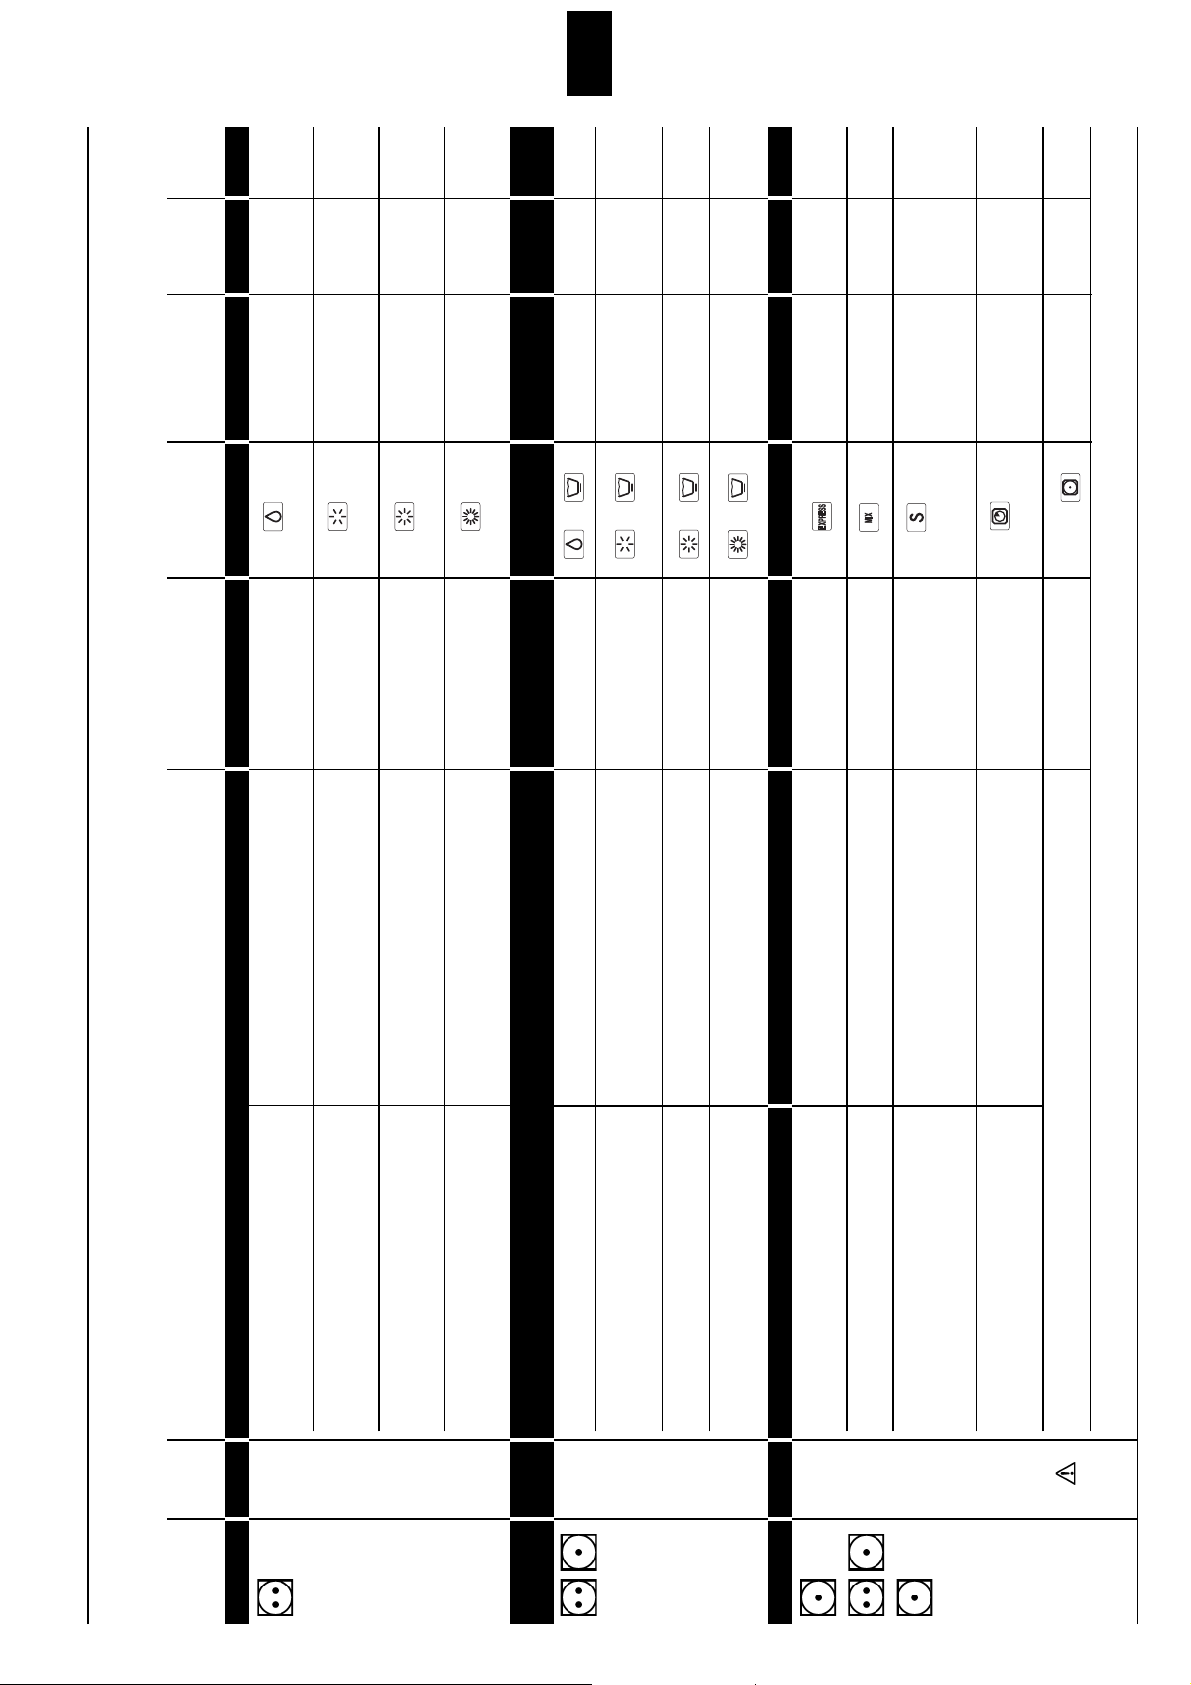
Programmtabelle
Pflege- max. Textilien/Wäscheart
Programme Tasten für Geschleudert im Strom- Dauer
kennzeichen
Wäsche- Trocknungsziel Programmwahl Waschautomat verbrauch ca. Min.
menge
bei U/min. ca. kWh
5 kg z Bett- und Tischwäsche, Handtücher X für Wäsche, die mit einem Bügeleisen Bügelfeucht 1600 1,5 50
T-Shirts. Polohemden, Arbeitsbekleidung gebügelt werden soll 1400 1,7 58
1200 1,9 65
z T-Shirts, Polohemden, Kleider, Hosen, X für Wäsche, die nicht oder nur leicht Leichttrocken 1600 1,7 69
Arbeitsbekleidung, Unterwäsche nachgebügelt werden soll 1400 1,9 77
1200 2,2 84
z Frottier-, Geschirr- und Handtücher, X für Wäsche, die nicht gebügelt Schranktrocken 1600 2,0 74
Bettwäsche, Unterwäsche, Baumwollsocken werden soll 1400 2,2 81
1200 2,5 88
z Frottier-Bademäntel und -Bettwäsche X für besonders dicke oder mehrlagige Stoffe Extratrocken 1600 2,2 82
keine Unterwäsche und Socken 1400 2,4 90
1200 2,7 97
2,5 kg z Hosen, Kleider, Röcke, Hemden X für Wäsche, die mit einem Bügeleisen Bügelfeucht
+
800 0,9 37
gebügelt werden soll 600 0,9 40
z Hosen, Kleider, Röcke, Hemden, Blusen X für Wäsche, die nicht oder nur leicht Leichttrocken
+
800 0,9 40
Miederwäsche, Leggins, Sportbekleidung nachgebügelt werden soll 600 1,1 43
mit grossem synthetischen Faseranteil
z Oberhemden, Blusen, Sportbekleidung X für Wäsche, die nicht gebügelt Schranktrocken
+
800 1,1 52
Bett- und Tischwäsche, Trainingsanzüge werden soll 600 1,1 55
z Anoraks, Decken X für besonders dicke oder mehrlagige Stoffe Extratrocken
+
800 1,2 57
600 1,4 60
2 kg z Sportbekleidung, Sport- und Wetterbekleidung Express 600 0,8 40
Synthetikwäsche und Mischgewebe Die Wäsche wird schranktrocken
3 kg z Mix Baumwolle und Mischgewebe Mix 800 1,9 62
Gemischte Wäscheposten Die Wäsche wird Extratrocken 600 2,2 67
3 kg z Wolle finish Die Wäsche wird flauschiger, aber nicht Spezialprogramm 800 0,1 5
Waschmaschinenfeste Wolle getrocknet. Direkt nach Programmende die Wolle finish
Wäsche entnehmen und auf einem
Frottétuch flach zum Trocknen legen.
z Zeittrocknen Zum Nachtrocknen von noch feuchten Zeittrocknen
Einzelne Wäschestücke, Wäschestücke mit Wäschestücken 10 - 150 Min.
geringem Feuchtigkeitsgehalt zum Trocknen von Kopfkissen
Bei temperaturempfindlichen Textilien zusätzlich Taste «Schontrocknen» drücken! +
Die angegebenen Verbrauchswerte und die Programmdauer sind Richtwerte, die unter Normbedingungen ermittelt wurden. Schwankungen bis zu 10% sind möglich.
Bei Geräten mit reduzierter elektrischer Anschlussleistung verlängern sich die Programmzeiten entsprechend.
Koch- und Buntwäsche aus Baumwolle oder Leinen Elektronikprogramme
Pflegeleichte (bügelfreie) Wäsche aus Synthetic- und Mischgewebe sowie Elektronikprogramme
Baumwolle mit Bügelfreiausrüstung z.B. Viskose, Cupro, Modal, Polyester
Sonderprogramme
Page 8
8
Trocknen
Trocken-Programme
Das elektronische Abtastsystem kontrolliert laufend den
aktuellen Trocknungsgrad Ihrer Wäsche und beendet das
Programm automatisch beim Erreichen des eingestellten
Trocknungsziels.
Programm für Koch- und Buntwäsche oder pflegeleichte
Textilien nach Programmtabelle auswählen.
X Programmtaste antippen.
z Die Kontrolllampe des gewählten Programmes leuchtet.
X Für pflegeleichte Textilien
Zusatzfunktion «Pflegeleicht» wählen.
Mix-Programm: 3kg
Hier können gemischte Wäscheposten aus Baumwolle
und pflegeleichten Textilien getrocknet werden. Die
Wäsche wird Extratrocken.
X Programmtaste antippen.
z Die Kontrolllampe leuchtet.
z Programmdauer ca. 65 Min.
Zeit-Programme
Zeitprogramm zum Trocknen von einzelnen Wäschestücken oder zum Nachtrocknen von bereits vorgetrockneten Textilien mit geringem Feuchtigkeitsgehalt.
Die einzustellende Trocknungszeit richtet sich nach der
Wäscheart, der Wäschemenge und der Wäschefeuchtigkeit.
X Programmtaste antippen.
z Die Kontrolllampe Zeitprogramm leuchtet und die
minimale Trocknungszeit von 10 Min. wird angezeigt.
X Trocknungszeit durch wiederholtes Antippen der Taste
bis max. 150 Min. wählen.
Spezialprogramm Wolle finish: 3kg
Spezialprogramm für waschmaschinenfeste Wolle oder
Textilien mit Wollanteil. Vorbereitung der Textilien zum
Trocknen. Die Wäsche wird flauschiger aber nicht getrocknet. Direkt nach Programmende die Wäsche entnehmen
und zum Trocknen locker auf Frottiertuch ausbreiten.
X Programmtaste antippen.
z Die Kontrolllampe leuchtet.
z Programmdauer ca. 5 Min.
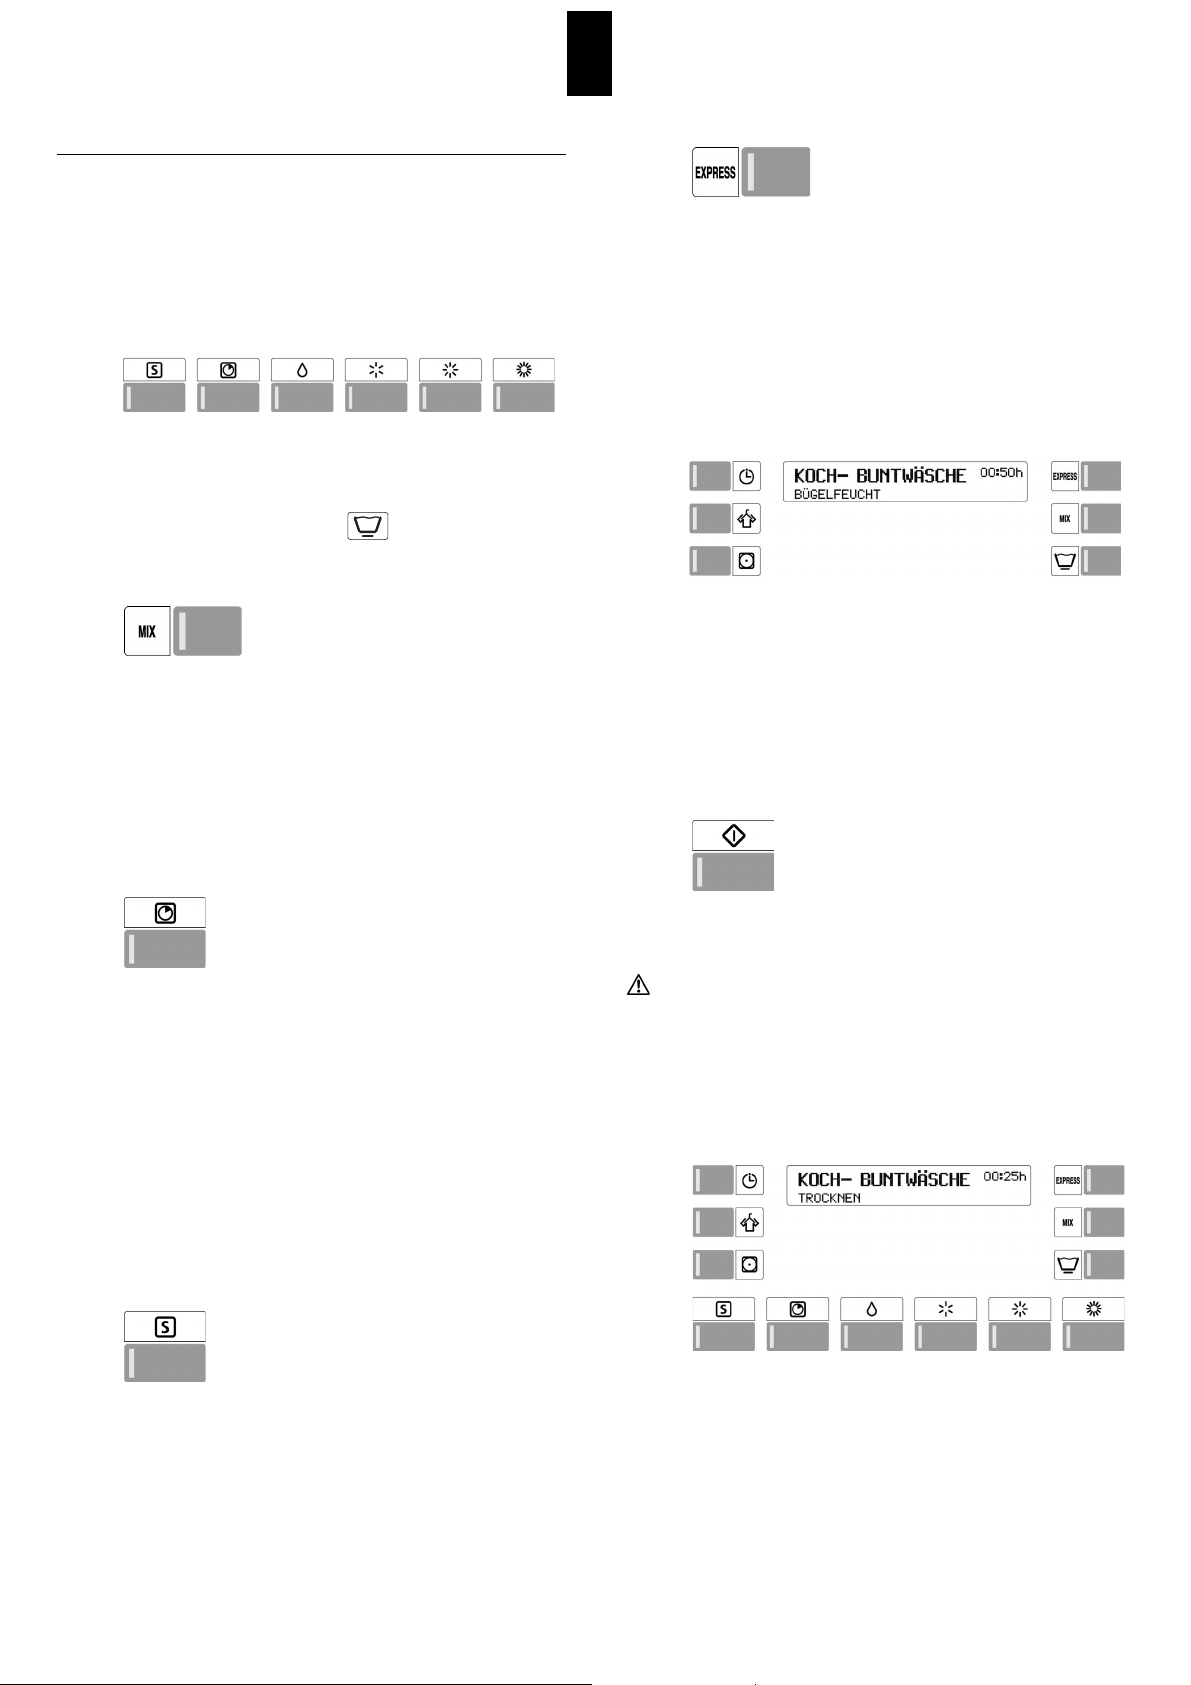
Express: 2 kg
Spezialprogramm um Synthetikwäsche schnell zu trocknen. Z.B. Sportbekleidung aus Synthetik oder
Mischgewebe. Die Wäsche wird Schranktrocken.
X Programmtaste antippen.
z Die Kontrolllampe leuchtet.
z Programmdauer ca. 40 Min.
Zusatzfunktionen wählen
Nach der Programmwahl blinken die Kontrolllampen der Zusatzfunktionen, die bei Bedarf zugeschaltet werden können.
X Gewünschte Funktionstaste(n) antippen
(siehe Zusatzfunktionen Seite 9).
z Die Kontrolllampe(n) der gewählten Zusatzfunktion(en)
leuchtet(en).
Programm starten
X Starttaste antippen.
z Die Kontrolllampe leuchtet und das Programm läuft
automatisch ab.
Bei aktiver Kindersicherung:
X Starttaste gedrückt halten und Schnellgangtaste
betätigen.
Programmablauf / Programmstand
X Bei Elektronik-Programmen wird die Wäschefeuchtigkeit
durch ein elektronisches Abtastsystem ständig kontrolliert.
X Die verbleibende Programmdauer wird angezeigt.
Diese Restzeit wird während dem Trocknen mehrmals
neuberechnet, das effektive Programmende variiert deshalb um wenige Minuten.
X Bei Zeit-Programmen wird die Restzeit bis zum
Programmende angezeigt.
Page 9

Programm vor dem Programmstart ändern
X Gewünschte Programmtaste erneut antippen.
z Alle Kontrolllampen der wählbaren Zusatzfunktionen
blinken wieder und alle Einstellungen sind gelöscht.
X Evtl. Zusatzfunktionen wählen.
X Programm starten.
Programm abbrechen
X Programm durch mehrmaliges Antippen der
Schnellgangtaste abbrechen, bis Kontrolllampe
«Programmende» blinkt.
Bei aktiver Kindersicherung:
X Gleichzeitig Starttaste gedrückt halten.
X Programm neu wählen.
Wäsche nachlegen
ist jederzeit möglich.
X Drücken Sie die Türöffnungstaste.
z Die Trommel bleibt stehen.
X Legen Sie die Wäsche ein.
X Schliessen Sie die Tür.
X Der Trocknungsvorgang wird fortgesetzt
Bei aktiver Kindersicherung:
X gleichzeitig Start- und Schnellgangtaste gedrückt halten.
Programmende
Das Programmende wird durch den Anzeigewert 0h00
sowie durch die blinkende Kontrolllampe
«Programmende / Knitterschutz» angezeigt.
z Signal ertönt (nur bei eingeschalteter Summerfunktion).
X Bei eingeschaltetem Knitterschutz dreht sich die
Trommel, nach Programmende, in kurzen Abständen weiter damit die Wäsche nicht knittert (30 oder 60 Minuten).
Spätestens jetzt sollte die Wäsche entnommen werden.
Wäsche entnehmen
X Drücken Sie die Türöffnungstaste.
z Die Trommel wird beleuchtet.
X Entnehmen Sie die Wäsche.
X Reinigen Sie den Filter (Seite 10).
X Schliessen Sie die Tür.
Gerät ausschalten
X Schalten Sie den Wandschalter aus.
Zusatzfunktionen
Neben den verschiedenen Standardtrocknungsprogrammen bietet Ihnen Ihr Wäschetrockner die Möglichkeit
einer individuellen Programmgestaltung.
Durch die Wahl einer oder mehrerer Zusatzfunktionen
können Sie Ihr Trocknungsprogramm gezielt auf die
jeweiligen Besonderheiten Ihrer Wäsche abstimmen.
X
Sie haben zudem die Möglichkeit, Ihren Wäschetrockner
durch Veränderung der Grundeinstellungen
auf Ihre Bedürfnisse anzupassen (siehe Seite 11).
Pflegeleicht
Für pflegeleichte Textilien aus Synthetic- oder Mischgeweben, sowie Baumwolle mit Bügelfreiausrüstung.
Startzeitvorwahl
Durch ein- oder mehrmaliges Antippen der Taste
Startzeitvorwahl kann die Programmstartzeit um bis zu
23,5 Stunden verzögert werden.
Dies ermöglicht z.B. das Ausnützen des Niedertarifs für
Nachtstrom. Beginn und damit auch Ende eines
Programmes können an individuelle Lebensgewohnheiten
angepasst werden.
In der Displayanzeige wird die Startzeit und die zu erwartende Zeit für das Programmende angezeigt.
Nach dem Betätigen der Starttaste beginnt die
Vorwahlzeit.
Nach Erreichen der Startzeit startet das gewählte
Programm automatisch. Die aktuelle Programmdauer wird
angezeigt.
Hinweis
z Bei einem Stromunterbruch bleibt die aktuelle Zeit
gespeichert. Die Dauer des Stromunterbruchs wird nicht
berücksichtigt.
Schontrocknen
Die Taste Schontrocknen muss bei sehr temperaturempfindlichen Textilien aus Kunstfasermischgeweben z.B.
Acrylfasern, gedrückt werden. Die Temperatur wird reduziert und die Trocknungszeit etwas verlängert.
Knitterschutz
Mit dieser Taste aktivieren Sie den Knitterschutz am Ende
des Trocknungsvorganges. Der Knitterschutz vermindert die
Falten in der Wäsche, das bedeutet weniger bügeln.
Schnellgang
Das Programm kann durch Betätigen der
Schnellgangtaste verkürzt oder abgebrochen werden.
(Siehe Programm ändern/-abbrechen).
9
Page 10
Wartung / Pflege / Reinigung
Gerät reinigen
Vor Reinigungs-, Pflege- und Wartungsarbeiten ist darauf
zu achten, dass die Stromzufuhr ausgeschaltet ist.
Keinesfalls das Gerät mit Wasser abspritzen.
Keine Lösungsmittel verwenden! Diese Mittel können
Geräteteile beschädigen, entwickeln giftige Dämpfe und
sind explosionsgefährlich!
Gehäuse und Bedienteile nur mit Seifenlauge oder mit
einem handelsüblichen, lösungsmittelfreien, nicht scheuernden Reinigungsmittel reinigen.
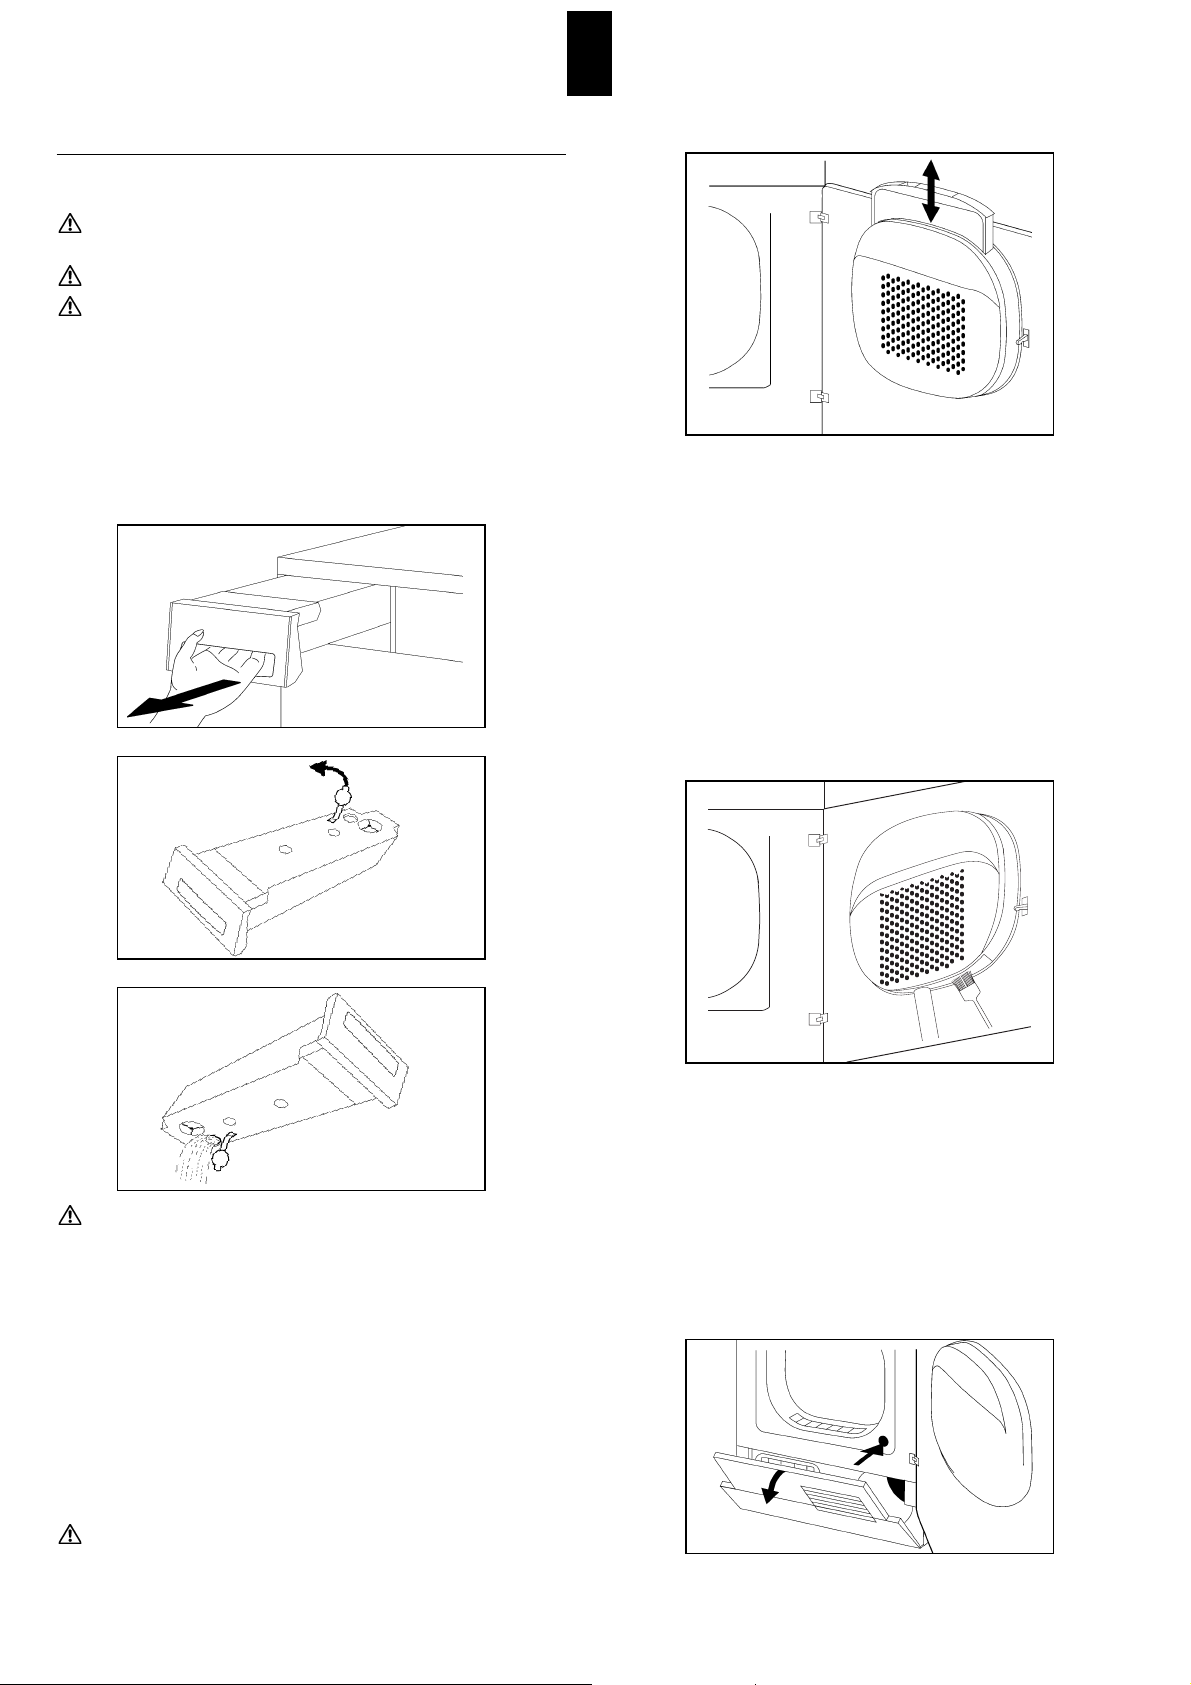
Kondenswasserbehälter entleeren
(entfällt bei Geräten mit Direktablauf)
Kondenswasser ist kein Trinkwasser!
Das beim Trocknen anfallende Kondenswasser wird in
einem Behälter aufgefangen, der nach jedem
Trocknungsgang entleert werden muss.
1. Ziehen Sie den Behälter heraus.
2. Nehmen Sie den Verschlussdeckel ab.
3. Giessen Sie das Kondenswasser aus.
4. Schliessen Sie den Verschlussdeckel.
5. Schieben Sie den Behälter wieder bis zum Einrasten ein.
Sie können den Kondensatbehälter auch während des
laufenden Programmes entleeren.
Wenn die Anzeige H-01 «Behälter entleeren» während
des Betriebs aufleuchtet und das Signal ertönt, muss der
Behälter sofort entleert werden.
X Danach mit Starttaste das Programm fortsetzen.
Filter reinigen
Beim Gebrauch der Wäsche entsteht Faserabrieb
(Wäscheflusen), der beim Trocknen frei wird und sich im
Filter an der Innenseite der Tür sammelt. Deshalb muss
der Flusenfilter nach jeder Trocknung gereinigt werden.
1. Drücken Sie die Türöffnertaste.
2. Ziehen Sie den Filter heraus.
3. Streichen Sie mit der Hand über den Filter und entfernen Sie
dadurch die Flusen. Es kann durchaus vorkommen, dass ein
vermeintlich ordentlich gereinigter Filter, auf Grund eines feinen in den Filtermaschen zurückbleibenden unsichtbaren
Belages, undurchlässig werden kann. Halten Sie denFilter
mit einer Fläche nach oben und giessen Sie etwas Wasser
darüber. Ist er nicht durchlässig, dann ist der Filter mit einer
Bürste unter fliessendem Wasser zu reinigen.
3.1 Von Zeit zu Zeit ist es erforderlich, ebenfalls den
Filterhalter zu reinigen. Verwenden Sie dazu einen
Staubsauger oder Reinigungspinsel.
3.2 Führen Sie das Staubsaugerrohr bzw. den
Reinigungspinsel in die Öffnung für den Flusenfilter.
Entfernen Sie gründlich die liegengebliebenen Flusen.
4. Setzen Sie den Filter wieder richtig ein.
5. Schliessen Sie die Tür.
Luftkühler reinigen
Der Luftkühler sollte 3– 4 mal pro Jahr gereinigt werden;
bei häufiger Benutzung öfter.
10
Page 11
11
1. Öffnen Sie die Einfülltür.
2. Drücken Sie die Taste, die Wartungsklappe springt auf.
3. Öffnen Sie die Wartungsklappe ganz.
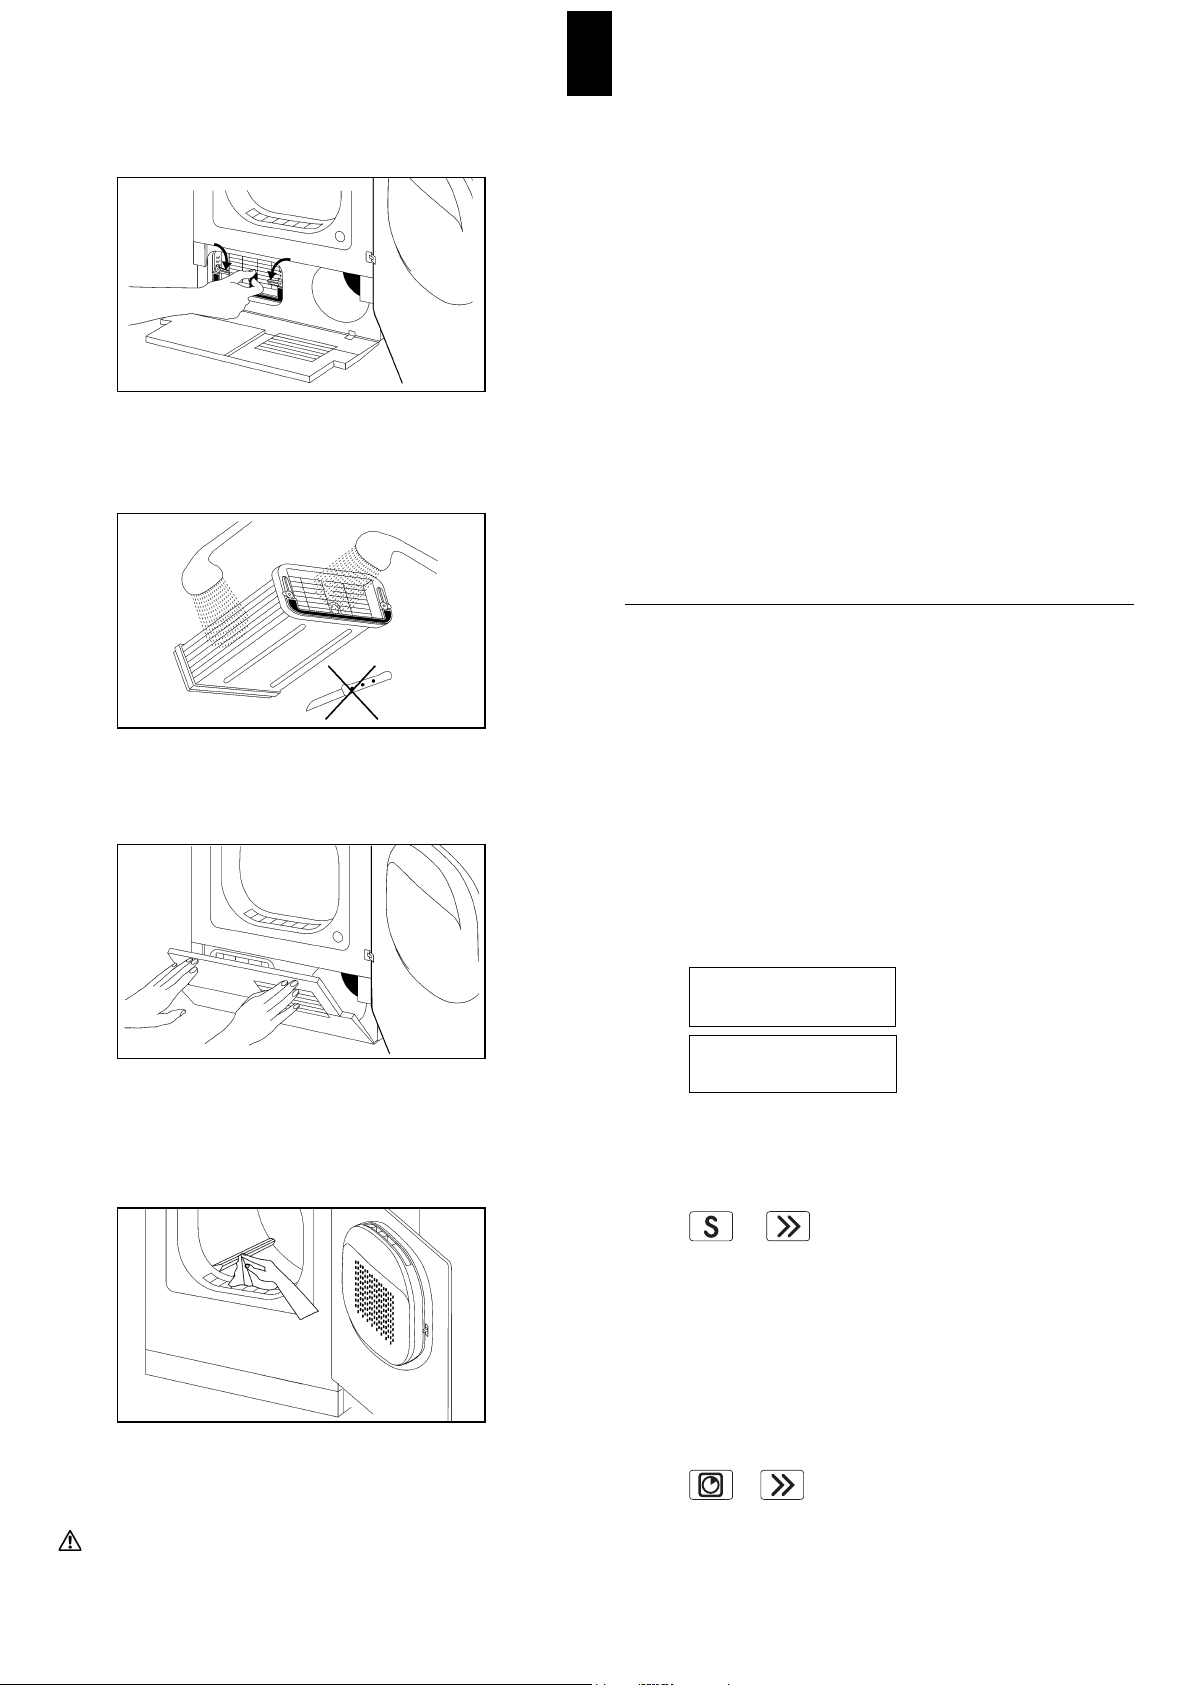
4. Drehen Sie die beiden Verschlusshebel in Pfeilrichtung
zueinander.
5. Ziehen Sie den Luftkühler heraus.
6. Luftkühler vollständig reinigen, Wasser gut abtropfen
lassen.
7. Luftkühler wieder einschieben. Griff muss unten sein.
Verschlusshebel wieder zurückdrehen.
8. Wartungsklappe gleichzeitig rechts und links andrücken
(siehe Abbildung), bis Verriegelung einrastet.
Nur bei richtig geschlossener Wartungsklappe lässt sich
die Einfülltür schliessen!
Feuchtigkeitssensor reinigen
Nach längerer Betriebszeit können sich auf den Feuchtigkeitssensoren an den Mitnehmern und an der Trommelinnenseite feine Ablagerungen (Kalk, Gewebeveredler)
bilden.
Bei Elektronikprogrammen kann dies dazu führen, dass
das gewünschte Trocknungsziel nicht erreicht wird.
Ablagerungen mit einem in Essig getränkten Tuch abwischen.
Entleerung des Geräts bei Frostschutz oder vor Transport
Steht das Gerät in einem frostgefährdetem Raum oder
soll es transportiert werden, muss das Gerät vollständig
entleert werden.
1. Entleeren Sie den Kondenswasserbehälter (Seite 10).
2. Wählen Sie ein beliebiges Trocknungsprogramm.
3. Drücken Sie die Starttaste. Danach wird das noch im
Gerät vorhandene Kondenswasser in den Behälter
gepumpt.
4. Brechen Sie nach ca. 5 Minuten das Programm mit der
Schnellgangtaste ab und entleeren Sie den Kondensatbehälter erneut.
Grundeinstellungen
Das Gerät hat eine Grundeinstellung ab Werk. Es kann
bei der Inbetriebnahme oder später mit den nachstehenden Funktionen auf individuelle Bedürfnisse angepasst
werden.
Die Grundeinstellungen können nur verändert werden,
wenn kein Trocknungsprogramm läuft. Zum Ändern einer
Grundeinstellung muss (müssen) immer zuerst die
Programmtaste(n) in gedrückter Stellung gehalten und
dann die Schnellgangtaste betätigt werden. Die entsprechenden Funktionen werden in der Digitalanzeige angezeigt. Bei gehaltener (gehaltenen) Programmtaste(n) und
mehrmaligem Antippen der Schnellgangtaste ändert die
Anzeige.
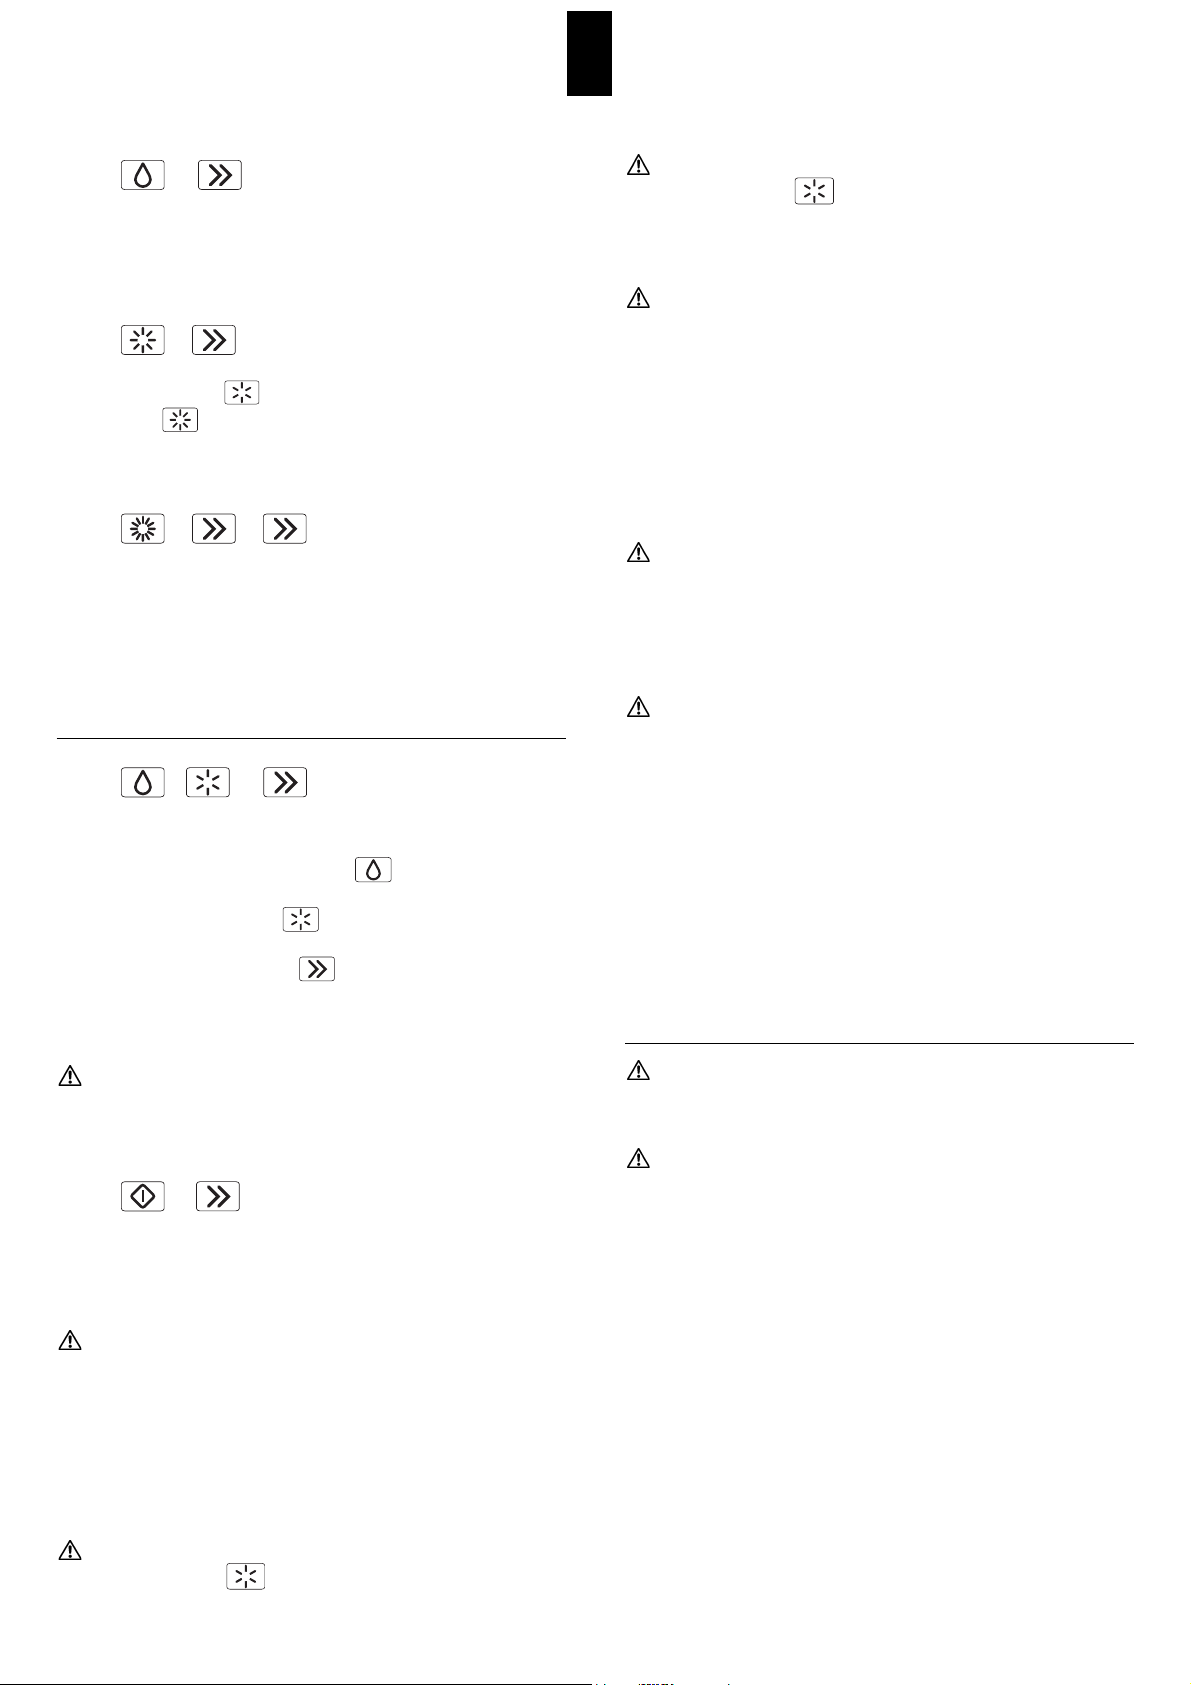
Beispiel:
Funktion ausgeschaltet
Funktion eingeschaltet
Anfangsfeuchte (ab Werk 50%)
+
Die Genauigkeit der Restzeitanzeige wird erhöht, wenn
der Trockner an die Schleuderdrehzahl Ihrer
Waschmaschine angepasst wird.
Schleuderdrehzahl 1600 U/min. bzw. 50% Anfangsfeuchte
Schleuderdrehzahl 1200 U/min. bzw. 60% Anfangsfeuchte
Trocknungsgrad (ab Werk AUS)
+
Bei eingeschalteter Funktion werden die Trocknungsgrade
in den Elektronik-Programmen (Schrank- und Extratrocken)
leicht erhöht und die Wäsche etwas trockener.
TROCKNUNGSGRAD
HÖHER
TROCKNUNGSGRAD
NORMAL
11
Page 12
212
Knitterschutz (ab Werk EIN)
+
Bei eingeschalteter Funktion beginnt am Programmende
die Knitterschutzphase von max. 60 Minuten.
Uhrzeiteinstellung (ab Werk ist die Uhr nicht eingestellt)
+
Mit der Taste können die Stunden und mit der
Taste die Minuten eingestellt werden.
Sprache (ab Werk DEUTSCH)
+÷
Die Grundsprache wird umgestellt und bleibt nach dem
Ausschalten oder nach dem Schlafmodus erhalten.
Erweiterte Grundeinstellungen
++
X Durch gleichzeitiges Antippen dieser drei Tasten, erfolgt
die Anzeige der erweiterten Grundeinstellungen.
X Wiederholtes Antippen der -Taste zeigt die mögli-
chen Einstellungen an.
X Das Antippen der -Taste ermöglicht das
Verändern der Einstellungen.
X Durch Antippen der -Taste wird die Anzeige der
Einstellungen abgebrochen.
Kindersicherung (ab Werk AUS)
«Erweiterte Grundeinstellungen» wählen!
Die Kindersicherung soll ein zufälliges Starten, Verändern oder
Löschen eines Programmes durch Kleinkinder verhindern.
Gerätebedienung bei eingeschalteter Kindersicherung:
+
Halten Sie die Starttaste gedrückt und betätigen Sie die
Schnellgangtaste.
Netzanschluss reduziert (ab Werk AUS)
«Erweiterte Grundeinstellungen» wählen!
Bei reduzierter Anschlussspannung verlängern sich die
Programmzeiten entsprechend.
Aus = 400 V 2N ~ 3,25 kW / 10 AT
Aus = 230 V 1N ~ 3,25 kW / 16 AT
Ein = 230 V 1N ~ 2,05 kW / 10 AT
LCD-Helligkeitseins tellung (ab Werk 150)
«Erweiterte Grundeinstellungen» wählen!
Mit der Taste kann die Helligkeit oder Schrift auf
dem Display verändert werden.
LCD-Kontrasteinstellung (ab Werk 32)
«Erweiterte Grundeinstellungen» wählen!
Mit der Taste kann der Kontrast auf dem Display
verändert werden.
Summer (ab Werk LAUTSTÄRKE 2)
«Erweiterte Grundeinstellungen» wählen!
Bei eingeschaltetem Summer ertönt am Programmende
in regelmässigen Abständen ein Signal. Die Lautstärke ist
in 3 Stufen einstellbar.
Aus
Lautstärke 1
Lautstärke 2
Lautstärke 3
Stand-by-Funktion (ab Werk EIN)
«Erweiterte Grundeinstellungen» wählen!
Bei eingeschalteter Stand-by-Funktion schaltet die
Steuerung wenn kein Trocknungsprogramm läuft in den
Energiespar-Zustand. Alle Anzeigen sind dunkel.
Optische Schnittstelle (ab Werk AUS)
«Erweiterte Grundeinstellungen» wählen!
Wenn die optische Schnittstelle (SCS) eingeschaltet ist,
kann der Kundendienst über einen PC mit der Maschine
kommunizieren.
Störungen
Reparaturen, Änderungen oder Eingriffe an Elektrogeräten
dürfen nur von geschultem Fachpersonal durchgeführt werden. Durch unsachgemässe Reparaturen können erhebliche
Sachschäden und Gefahren für den Benutzer entstehen.
Bei Reparaturen dürfen nur Originalersatzteile eingesetzt
werden.
Kleine Störungen selbst beheben
Das Gerät geht nach Betätigen einer
Programmtaste nicht in Betrieb:
X Überprüfen Sie, ob der Wandschalter eingeschaltet und
der Netzstecker eingesteckt ist.
X Überprüfen Sie, ob alle Sicherungen intakt sind oder
der Sicherungsautomat ausgelöst hat.
Das Gerät läuft nicht an:
X Starttaste nicht gedrückt.
X Startzeitvorwahl eingestellt, Start erst nach Ablauf der
vorgewählten Startzeit.
Das Trocknungsziel wurde nicht erreicht bzw.
die Trocknungszeit dauert zu lange.
X Feuchtigkeitssensor an den Mitnehmern in der
Trommel reinigen (siehe Seite 11).
X Stromausfall (Sperrzeiten von EW beachten).
Page 13

Kundendienst
Bevor Sie den Kundendienst rufen, prüfen Sie, ob Sie die
Störung selbst beheben können. (siehe «kleine Störungen
selbst beheben» Seite 12.)
In Beratungsfällen entstehen Ihnen, auch während der
Garantiezeit, Kosten bei Einsatz eines Service-Technikers.
Wenn Sie eine Störung nicht selbst beheben können,
ziehen Sie den Netzstecker oder schalten Sie den
Wandschalter aus und rufen Sie den Kundendienst.
Wählen Sie die zentrale Kundendienst-Nummer
(siehe Umschlag-Rückseite). Sie werden automatisch mit
der zuständigen Kundendienst-Niederlassung in Ihrer
Region verbunden.
Geben Sie bitte dem Kundendienst die Produkte- und
Gerätenummer an. Sie finden diese Angaben auf dem
Typenschild auf der Innenseite der Tür.
Notieren Sie hier die Nummer Ihres Gerätes.
Produkte-Nr.
Geräte-Nr.
Garantieabonnement
Nach Ablauf der normalen Garantiezeit von 2 Jahren
kann diese durch ein Garantieabonnement beliebig verlängert werden. Wir senden Ihnen gerne die gewünschten Unterlagen. Beachten Sie dazu das beiliegende
Garantie- und Kundendienstheft.
13
Die Wäsche wird bei der maximal möglichen
Einstellung nicht trocken.
X Trommel überladen.
X Wäsche nicht ausreichend geschleudert.
X Raumbelüftung nicht ausreichend.
(Tür oder Fenster öffnen).
X Filter in der Tür durch Flusen verstopft (Filter reinigen).
Trommelbeleuchtung funktioniert nicht.
X Glühlampe defekt. Aus Sicherheitsgründen darf die
Lampe nur durch den Kundendienst oder einen
Fachmann ausgewechselt werden.
Feuchtigkeit im Raum steigt stark an.
X Raum nicht genügend belüftet. Für ausreichende
Belüftung sorgen.
Tür geht nicht auf:
X Sollte vor dem Türöffnen kein Strom vorhanden sein,
dann kann die Tür manuell durch einen kurzen Druck auf
Höhe des Verschlussriegels geöffnet werden.
Störungsmeldungen
Bei den nachstehenden Störungsanzeigen kann das
Programm nach Beheben der Störung durch Betätigen
der Starttaste wieder gestartet werden.
Kindersicherung
X Halten Sie die Starttaste gedrückt und betätigen Sie die
Schnellgangtaste.
Einfülltür offen
X Tür zudrücken bis Verschluss richtig einschnappt.
Falls das Gerät eine Funktionsstörung F– – anzeigt:
X Brechen Sie das Programm mit der Schnellgangtaste
ab und wählen Sie ein neues Programm.
Bei wiederholter Fehleranzeige:
X Stromzufuhr für ca. 1 Minute unterbrechen und
wieder einschalten (Netzstecker ziehen oder Wandschalter
ausschalten).
z Das Gerät ist wieder betriebsbereit, wenn die Kontrolllampen der Programme blinken.
X Wählen Sie ein neues Programm.
Bei nochmaliger Fehleranzeige:
X Fehlermeldung notieren.
X Netzstecker ziehen oder Wandschalter ausschalten.
X Kundendienst benachrichtigen.
Page 14

14
Notizen / Notes / Note
Page 15
Sommaire
Remarques importantes
X Conseils pour la mise au rebut 16
Z Emballage de votre nouvelle machine 16
Z Machine usagée 16
X Consignes de sécurité et avertissements 16
Votre nouveau sèche-linge
X Protection de l'environnement et
X économies d'énergie 16
X Description de la machine 17
X Conseils sur le linge 18
Z Tri du linge 18
Z Conseils pour le séchage 18
Mise en service
X Préparation 18
X Ouverture de la porte 18
X Chargement du linge 18
X Fermeture de la porte 18
Séchage
X Tableau des programmes 19
X Séchage 20
Z Programmes de séchage 20
Z Programme mixte 20
Z Programmes chronométrés 20
Z Finition laine 20
Z Express 20
Z Sélection de fonctions additionnelles 20
Z Démarrage du programme 20
Z Déroulement / Etat du programme 20
Z Modification du programme 21
Z Interruption du programme 21
Z Rajout de linge 21
Z Fin du programme 21
Z Retrait du linge 21
Z Mise hors tension de la machine 21
X Fonctions additionnelles 21
Z Linge d'entretien facile 21
Z Démarrage différé 21
Z Séchage douceur 21
Z Dispositif anti-froissage 21
Z Marche rapide 21
Entretien, maintenance, nettoyage
X Nettoyage de l’appareil 22
Z Vidange du réservoir d’eau
X de condensation 22
Z Nettoyage du filtre 22
Z Nettoyage du refroidisseur d'air 22/23
Z Nettoyage du capteur d'humidité 23
Réglages de base
X Humidité initiale 23
X Degré de séchage 23
X Dispositif anti-froissage 24
X Réglage de l'heure 24
X Langue 24
X Réglages de base étendus 24
Z Sécurité enfants 24
Z Puissance raccordée réduite 24
Z Luminosité/Contraste de l'affichage LCD 24
Z Signal sonore 24
Z Fonction Stand-by 24
Z Interface optique 24
Pannes
X Remédier soi-même aux petites pannes 24/25
X Messages d'erreurs 25
Service après-vente
X N° du produit et de la machine 25
Contrat de garantie 25
Notes 26
Inhaltsverzeichnis Deutsch
X Siehe Seite 3
Sommario italiano
X Vedere pagina 27
Contents english
X see page 39
F RANÇAIS
Page 16
16
Conseils pour la mise au rebut
Emballage de votre nouvel appareil
Débarrassez-vous de l’emballage comme il se doit.
Les matériaux de l’emballage ne sont pas des jouets.
Le recyclage de l’emballage permet d’épargner des
matières premières et de réduire les volumes de déchets.
L’emballage pourra être restitué au commerçant spécialisé
ou au fournisseur.
Tous les matériaux d’emballage utilisés sont écologiques
et recyclables. Le carton est constitué de 80 à 100% de
vieux papiers.
Les pièces en bois n’ont pas été traitées chimiquement.
Les feuilles sont en polyéthylène (PE); les banderoles, en
polypropylène (PP). Ces matériaux, recyclables, sont exclusivement des composés d’hydrocarbures.
Anciens appareils
Les appareils mis au rebut doivent être rendus inutilisables.
Après avoir tiré la fiche réseau, ou fait défaire le branche-
ment par l’électricien, sectionnez et enlevez le câble
de réseau. Détruisez la serrure pour éviter que, en jouant,
des enfants s’y enferment et mettent leur vie en danger.
Votre ancien appareil contient des matières précieuses,
qu’il convient d’envoyer au recyclage. Assurez-vous qu’il
sera mis au rebut comme il se doit. Vous obtiendrez
auprès de votre mairie les adresses des points de collecte
et des lieux de reprise destinés à la mise au rebut des
vieux appareils.
Nous vous prions de contribuer ainsi à une élimination ou
un recyclage respectueux de l’environnement.
Conseils de sécurité et consignes
Cet appareil est conforme aux normes de sécurité des
appareils électriques.
À observer avant la mise en service!
Lisez attentivement les notices jointes avant de mettre en
service votre séchoir.
Elles contiennent des informations importantes pour
l’installation, l’utilisation et la sécurité de l’appareil.
Les réparations sont de la compétence exclusive du personnel technique dûment formé. Mal effectuées,
elles peuvent entraîner de notables dégâts matériels et
de graves dangers pour l’utilisateur.
Conservez soigneusement les notices, à l’intention des
autres utilisateurs actuels et futurs.
Installez l’appareil conformément aux instructions de
montage.
Ne branchez pas un appareil visiblement endommagé. En
cas de doute, posez la question au service après-vente ou
au revendeur.
À observer lors du séchage:
Ne laissez pas d’enfants sans surveillance à proximité de
l’appareil.
Éloignez les animaux domestiques de l’appareil.
N’utilisez l’appareil qu’en milieu domestique, pour sécher
des textiles.
À observer après la fin du programme:
Ne mettez pas la main dans le tambour lorsqu’il tourne.
À observer pour protéger l’appareil:
Ne grimpez pas sur l’appareil.
Ne vous asseyez pas et ne vous appuyez pas sur la porte
(danger de basculement!).
À observer lors du transport:
Attention lors du transport de l’appareil! (risque de blessure!)
Ne soulevez pas l’appareil avec les parties avant!
Ne raccordez pas le conduit d’air résiduel à une cheminée
à laquelle est branché un poêle à gaz ou à charbon,
ou un appareil de chauffage à gaz. Les retours de gaz ou
de fumée entraînent un danger d’empoisonnement.
Protection de l’environnement
et économie d’énergie
Economie de courant, de temps et d’argent
X Vous sécherez avec le maximum d’économie, et en
préservant au mieux l’environnement, si vous chargez la
machine avec le plus possible de linge.
X Ne dépassez cependant pas les quantités maximales
indiquées. (V. le tableau des programmes, p. 19).
X Avant le séchage, débarrassez complètement le linge
de son eau par essorage dans une machine à laver automatique ou une essoreuse. Plus la vitesse d’essorage sera
élevée, plus le temps de séchage sera bref, et moins vous
consommerez d’électricité.
X Essorez également le linge d’entretien facile.
X Lors du séchage, il faut assurer une bonne aération de
la pièce (ouvrez les fenêtres ou la porte).
X Nettoyez le filtre après chaque séchage.
X Maintenez le filtre à air bien propre.
X Ne couvrez et ne collez pas la grille d’air de refroi-
dissement, afin de permettre l’aspiration d’une quantité
suffisante de cet air.
Page 17

17
Commandes et affichage
Porte avec filtre
Programmes
1 Programme spécial/Finition laine
2 Programme chronométré
3 Prêt à repasser
4 Légèrement sec
5 Prêt à ranger
6 Très sec
11 Linge mélangé
12 Express
Fonctions additionnelles
7 Linge délicat
8 Anti-froissage
9 Démarrage différé
10 Linge d'entretien facile
13 Démarrage du programme
14 Ouverture de la porte
15 Marche rapide
Affichages
16 Afficheur
Interfaces
17 SCS-Schulthess Control System
(interface PC pour le S.A.V.)
Description de la machine
Commandes et affichage
Page 18

18
Conseils sur le linge
Tri du linge
Tenez compte des symboles d’entretien figurant
sur les textiles.
Séchage à température normale.
Séchage à basse température.
Ne pas sécher à la machine.
Ne pas sécher à la machine les textiles suivants:
z
la laine et les tissus à base de laine (excepté avec le pro-
gramme Finition laine): danger de feutrage!
z les tissus fragiles (soie, rideaux en synthétique, etc.):
risque de froissage!
z le linge dégoulinant: gaspillage d’énergie!
X Afin d’obtenir un résultat de séchage uniforme, triez le
linge selon le type de tissu et l’objectif de séchage désiré.
Ne dépassez pas les quantités maximales, car la surcharge
nuit au résultat du séchage et le linge sera complètement
froissé.
Conseils pour le séchage
X Fermez fermetures-éclair, crochets et oeillets. Nouez les
rubans de tablier et les ceintures qui sont détachées, etc.
X Pour les tissus d’entretien facile, sortez-les de l’appareil, si possible, à l’état légèrement humide (objectif de
séchage: «Légèrement sec» ), et complétez par un
bref séchage à l’air. Un séchage excessif entraîne des
risques de froissage.
X Les pièces de linge encore trop humides après le
séchage d’un lot à base de types de tissu très différents
peuvent subir un complément de séchage en programme
chronométré .
X Les textiles tricotés peuvent rétrécir un peu au séchage. Ne pas utiliser le programme «Extra sec» pour ces
matériaux..
Mise en service
Installez la machine conformément aux instructions de
montage.
Avant de mettre la machine en service pour la première
fois, essuyer le tambour au moyen d’un linge humide.
Préparation
Vérifiez:
X si le filtre à peluches est en place (v. nettoyage /
entretien, p. 22);
X si la fiche réseau est branchée, ou si l’interrupteur
mural est allumé;
L’appareil est prêt à l’emploi dès que tous les témoins de
contrôle sont allumés ou éteints en mode repos. Si un
témoin reste allumé en permanence, procédez comme
suit:
X pressez la touche de marche rapide jusqu’à ce que le
programme s’achève et que le témoin correspondant
s’allume. Attendez qu’il se mette à clignoter et pressez la
touche «Porte» (enlever éventuellement le linge).
Ouverture de la porte
X Pressez la touche «Porte».
z La porte s’ouvre d’un coup
X Attention: elle ne s’ouvre que si l’alimentation
principale en courant est assurée. Si, avant l’ouverture de
la porte, il n’y a plus de courant (par exemple, les pièces
de monnaie sont épuisées), il est possible d’ouvrir la porte
manuellement en appuyant brièvement au niveau du
verrou de fermeture.
z L’éclairage du tambour s’allume à l’ouverture
de la porte.
Chargement du linge
Avant de charger le linge, assurez-vous qu’aucun corps
étranger n’est présent dans le tambour, ou même que
des animaux y sont enfermés.
Ne séchez dans l’appareil que des textiles ayant été lavés
à l’eau.
Ne pas introduire des pièces de linge traitées préalablement avec des nettoyants inflammables (détachants ou
white-spirit par ex.). Risque d'explosion!
Ne séchez pas dans l’appareil des textiles contenant du
caoutchouc mousse ou ayant été tachés par du fixatif
pour cheveux, du dissolvant pour vernis à ongles ou des
produits similaires (danger d’incendie!).
X Placez le linge de façon bien aérée dans le tambour,
petites et grandes pièces mélangées.
Fermeture de la porte
X Fermez la porte, en la poussant en position jusqu’à ce
que la fermeture émette un déclic audible.
X Veillez à ce qu’aucune pièce de linge ne reste coincée
lors de la fermeture de la porte.
Si la porte n’est pas fermée, un interrupteur de sécurité
empêche la mise en service de l’appareil.
Page 19

Tableau des programmes
Conseil Quantité Textiles/type de linge
Programmes Touches de Vitesse d’essorage Co nsomm. Durée
d’entretien
max. Objectifs de séchage sélection des dans la machine d’électricité approx.
de linge
programmes à laver t/min. kWh, env. en min.
5 kg z Literie et linge de table, serviettes, T-shirts, X Pour linge à repasser au fer Prêt à repasser 1600 1,5 50
polos, vêtements de travail 1400 1,7 58
1200 1,9 65
z T-shirts, polos, robes, pantalons, vêtements X Pour linge n’exigeant pas de repassage Légèrement sec 1600 1,7 69
de travail, sous-vêtements ou seulement un repassage léger 1400 1,9 77
1200 2,2 84
z serviettes éponge, torchons à vaiselle, X Pour linge n’exigeant pas de repassage Prêt à ranger 1600 2,0 74
torchons à main, literie, sous-vêtements, 1400 2,2 81
chaussettes en coton 1200 2,5 88
z Peignoirs et literie en tissu-éponge, X Pour tissus particulièrement épais Très sec 1600 2,2 82
pas les sous-vêtements et les chaussettes ouen plusieurs couches 1400 2,4 90
1200 2,7 97
2,5 kg z Pantalons, robes, jupes, chemises X Pour linge à repasser au fer Prêt à repasser
+
800 0,9 37
600 0,9 40
z Pantalons, robes, jupes, chemises, chemisiers, X Pour linge n’exigeant pas de repassage Légèrement sec
+
800 0,9 40
corsets, caleçons, vêtements de sport à forte ou seulement un repassage léger 600 1,1 43
quote-part de fibres synthétiques
z Chemises, chemisiers, vêtements de sport, X Pour linge n’exigeant pas de repassage Prêt à ranger
+
800 1,1 52
literie et linge de table, Survêtements 600 1,1 55
z Anoraks, couvertures X Pour tissus particulièrement épais Très sec
+
800 1,2 57
ou en plusieurs couches 600 1,4 60
2 kg z Vêtements de sport Vêtements de sport et d’extérieur Express 600 0,8 40
fibres synthétiques et mélangées Le linge sort sec «prêt à ranger»
3 kg z Mixte Coton et fibres mélangées Mixte 800 1,9 62
Linge mélangé Le linge sort super sec 600 2,2 67
3 kg z Finition laine Le linge devient moins humide sans sécher Programme spécial 800 0,1 5
Laine lavable en machine complètement. Extraire le linge juste après Finition laine
la fin du programme et le poser sur une
serviette éponge pour qu’il sèche.
z Séchage chronométré Pour finir de sécher des pièces de linge Séchage chronométré
Pièces de linge isolées, encore humides 10 à 150 min.
Pièces de linge peu humides au sec des coussins de tête
Pour les textiles sensibles aux températures, presser la touche «délicat»! +
Les valeurs de consommation et durées de programme indiquées sont orientatives et ont été déterminées en conditions normalisées. Des variations jusqu’à 10% sont possibles.
Pour les appareils à puissance connectée réduite, demandez les durées de programme correspondantes.
19
Blanc/Couleurs en coton ou en lin Programmes électron.
Linge d’entretien facile (sans repassage) en synthétique et fibres mélangées, ainsi Programmes électron.
qu’en coton à apprêt éliminant le repassage, tels que (viscose, fibre acrylique, polyester)
Programmes spéciaux
Page 20

20
Séchage
Programmes séchage
Le système électronique de palpation, avec ses capteurs
sensibles, évalue en continu le degré d’humidité momentané de votre linge, et met automatiquement fin au programme dès qu’est atteint l’objectif de séchage imposé.
Sélectionnez conformément au tableau le programme
pour blanc/couleurs ou synthétiques.
X Pressez la touche de programme.
z Le témoin du programme choisi s’allume.
X Pour les tissus synthétiques
Choisir la fonction additionnelle «Entretien facile».
Programme mixte: 3kg
Vous permet de sécher du linge mélangé en coton et des
textiles d'entretien facile. Le linge sortira très sec.
X Appuyer sur la touche programme.
z Le voyant s'allume.
z Durée du programme: env. 65 min.
Programmes chronométrés
Programme chronométré pour le séchage de pièces de
linge individuelles, ou comme complément de séchage
pour textiles déjà séchés et à faible contenu d’humidité. La
durée de séchage sera choisie d’après le type et la quantité
de linge ainsi qu’en fonction de l’humidité de celui-ci.
X Pressez la touche de programme.
z Le témoin du programme chronométré s’allume, et la
durée minimale de séchage, 10 min, s’affiche.
X Imposez la durée du séchage en pressant la touche de
façon répétée, jusqu’à un maximum de 150 min.
Programme spécial Finition laine: 3kg
Programme spécial pour la laine lavable en machine ou les
textiles composés de laine. Préparation des textiles au
séchage. Le linge retrouve son aspect moelleux mais n'est
pas séché. Directement après la fin du programme, retirer
le linge et l’étaler sans l’étirer sur une serviette éponge.
X Pressez la touche de programme.
z Le témoin du programme choisi s’allume.
z La durée du programme est ca. 5 min.
Express: 2 kg
Programme spécial permettant de sécher rapidement du
linge en fibres synthétiques (vêtements de sport en synthétique ou en fibres mélangées). Le linge sort prêt à ranger.
X Appuyer sur la touche programme.
z Le voyant s'allume.
z Durée du programme: env. 40 min.
Sélection de fonctions additionnelles
Une fois le programme sélectionné, on voit s’allumer les
témoins des fonctions additionnelles pouvant être insérées
en cas de besoin.
X Pressez la ou les touches de fonction désirées
(v. fonctions additionnelles, p. 21).
z Le ou les témoins de la/des fonction(s) additionnelle(s)
choisie(s) s’allume(nt).
Démarrage du programme
X Pressez la touche de démarrage.
z Le témoin s’allume, et le programme se déroule automatiquement.
Si la sécurité enfants est activée:
X Tout en tenant pressée la touche de marche rapide,
agissez sur la touche de démarrage.
Déroulement du programme / état du programme
X Dans les programmes électroniques, l’humidité du linge
est constamment contrôlée par un système électronique
de palpation.
z La durée restante du programme est affichée. Ce temps
restant est recalculé plusieurs fois au cours du cycle de
séchage, la fin effective du programme varie donc de
quelques minutes.
X Dans les programmes chronométrés, le temps restant
demeure affiché jusqu’à la fin du programme.
Page 21

21
Modification du programme avant son démarrage
X Pressez à nouveau la touche du programme désiré.
z Tous les témoins des fonctions additionnelles
choisissables se remettent à clignoter, et tous les réglages
sont effacés.
X Choisissez éventuellement les fonctions additionnelles.
X Mettez le programme en marche.
Interruption du programme
X Pour interrompre le programme, pressez à plusieurs
reprises la touche de marche rapide, jusqu’à ce que le
témoin «Fin de programme» clignote.
Si la sécurité enfants est activée:
X Tenez pressée la touche de démarrage.
X Sélectionnez à nouveau le programme.
Rajouts de linge
Possibles à tout moment.
X Pressez la touche d’ouverture de la porte.
z Le tambour s’arrête.
X Rajoutez le linge.
X Refermez la porte.
X Le séchage reprend.
Sécurité enfants activée:
X Appuyer simultanément sur la touche Start et sur la
touche Marche rapide.
Fin du programme
La fin du programme est annoncée par l’affichage
de 0h00 ainsi que par le clignotement du témoin «Fin du
programme / anti-froissage».
z Un signal résonne (seulement si le vibreur a été
enclenché).
X
A la fin du programme, lorsque la protection anti-plis est
activée, le tambour continue à tourner à intervalles réguliers
pour que le linge ne se froisse pas (30 ou 60 min.).
C’est au
plus tard à ce moment qu’il conviendra d’enlever le linge.
Enlèvement du linge
X Pressez la touche d’ouverture de la porte.
z L’éclairage s’allume dans le tambour.
X Enlevez le linge.
X Nettoyez le filtre (p. 22).
X Refermez la porte.
Mise hors service de l’appareil
X Eteignez l’interrupteur mural.
Fonctions additionnelles
Outre les divers programmes standard de séchage, votre
séchoir à linge vous offre la possibilité de personnaliser
ses programmes.
Le choix d’une ou plusieurs fonctions additionnelles vous
permettra d’ajuster votre programme de séchage d’après
les particularités spécifiques de votre linge.
X
Vous avez en outre la possibilité d’adapter votre séchoir
à
vos besoins en modifiant ses réglages de base (v. p. 23).
Linge d’entretien facile
Pour les textiles d’entretien facile en tissu synthétique ou
fibres mélangées, ainsi que pour le coton à apprêt éliminant le repassage.
Démarrage différé
En pressant une ou plusieurs fois la touche de Démarrage
différé, on peut retarder jusqu’à 23,5 heures le démarrage
du programme
Ceci permet par ex. de profiter du tarif réduit de nuit pour
l’électricité. On peut adapter le début et donc aussi la fin
d’un programme à ses habitudes individuelles de vie.
L’écran indique l’heure de démarrage et l’heure prévue de
la fin du programme.
Après avoir appuyé sur la touche de démarrage, le
compte à rebours commence.
Une fois l’heure de démarrage atteinte, le programme
sélectionné démarre automatiquement et l’affichage
indique la durée du programme.
Indications
z En cas de coupure de courant, le temps choisi demeure
en mémoire. La durée de la coupure n’est pas prise en
considération.
Séchage du linge délicat
La touche «Délicat» doit être enclenchée pour les textiles
en synthétique et fibres mélangées sensibles aux températures, tels que acrylique, p.ex. La température est réduite
et le temps de séchage un peu plus long.
Dispositif anti-froissage
En appuyant sur cette touche, vous activez la fonction antifroissage en fin de séchage. Cette fonction réduit les plis dans
le linge, et facilite donc le repassage.
Marche rapide
On peut abréger ou interrompre le programme en pressant la touche de marche rapide.
(V. modification/interruption du programme, p. 18).
Page 22

22
Entretien / maintenance / nettoyage
Nettoyage de l’appareil
Avant toute opération d’entretien, maintenance ou nettoyage, assurez-vous que l’alimentation électrique a été coupée.
N’aspergez en aucun cas l’appareil avec de l’eau.
N’utilisez pas de solvants! Ces produits peuvent endom-
mager des pièces de l’appareil, dégagent des
vapeurs toxiques et engendrent un danger d’explosion!
Ne nettoyez le corps de l’appareil et les éléments de commande qu’au moyen d’eau savonneuse ou d’un nettoyant
commercial non abrasif et exempt de solvants.
Vidange du réservoir d’eau de condensation
(pas nécessaire pour les appareils avec écoulement direct)
L’eau de condensation n’est pas potable! L’eau de condens
ation qui se forme au cours du séchage est recueillie dans
un réservoir qu’il faudra vidanger après chaque séchage.
1. Retirez le réservoir.
2. Enlevez le couvercle de fermeture.
3. Déversez l’eau de condensation.
4. Refermez le couvercle.
5. Réinsérez le réservoir d’eau de condensation jusqu’à ce
qu’un déclic soit perceptible. Vous pouvez également
vidanger ce réservoir pendant la marche de l’appareil.
Si l’indication H-01 «Vidanger le réservoir» apparaît
pendant la marche et le signal résonne, il faudra vidanger
immédiatement ce réservoir.
X Poursuivre ensuite le programme, au moyen de la
touche de démarrage.
Nettoyage du filtre
Pendant l’emploi du linge, il se forme sur le linge, par
frottement, des peluches. Celles-ci s’en détachent pendant
le séchage et s’accumulent dans le filtre monté sur la
face intérieure de la porte. Aussi faudra-t-il nettoyer ce filtre
après chaque séchage.
1. Pressez la touche pour ouvrir la porte.
2. Retirez le filtre.
3. Passez la main sur le filtre: ceci en détachera les peluches. Il
se peut qu’un filtre apparemment bien nettoyé puisse devenir imperméable en raison d’un dépôt fin invisible subsistant
dans les mailles du filtre. Tenez le filtre, l’une de ses surfaces
étant orientée vers le haut, et versez un peu d’eau par-dessus. S’il ne laisse pas passer l’eau, il convient de le nettoyer
par voie humide, éventuellement au moyen d’une brosse.
3.1 De temps en temps, il faut également nettoyer le portefiltre. Pour ce faire, utilisez un aspirateur ou un pinceau de
nettoyage.
3.2 Introduisez le tube de l'aspirateur ou le pinceau de nettoyage dans l'ouverture du filtre à peluches. Enlevez toutes les peluches incrustées.
4. Remettez le filtre correctement en place.
5. Refermez la porte.
Nettoyage du refroidisseur d’air
Il convient de nettoyer le refroidisseur d’air 3–4 fois par an;
plus souvent en cas d’emploi plus fréquent.
Page 23

23
1. Ouvrez la porte.
2. Pressez la touche, le volet d’entretien s’ouvre d’un coup.
3. Ouvrez entièrement le volet d’entretien.
4. Tournez les deux leviers de fermeture l’un vers l’autre,
dans le sens des flèches.
5. Extrayez le refroidisseur d’air.
6. Nettoyez à fond le refroidisseur d’air; laissez bien l’eau
s’égoutter.
7. Remettez en place le refroidisseur d’air. La poignée doit se
trouver en bas. Ramenez les leviers de fermeture dans
leur position d’origine.
8. Pressez dans sa position le volet d’entretien à la fois
à gauche et à droite (v. figure), jusqu’à ce qu’un déclic
soit perceptible.
On ne pourra refermer la porte que si le volet d’entretien
est correctement fermé.
Nettoyage du capteur d’humidité
Après un certain temps d’utilisation, de fins dépôts (calcaire, produits de finissage des tissus) peuvent se former sur
les capteurs d’humidité, au niveau des taquets d’entraînement et sur la face interne du tambour.
Lors de l’emploi des programmes électroniques, ceci
peut empêcher l’obtention du résultat de séchage désiré.
Eliminer les dépôts en essuyant au moyen d’un linge
imbibé de vinaigre.
Vidange de l’appareil en cas de danger de gel ou
avant le transport
Si l’appareil se trouve dans un local exposé au gel, ou doit
être transporté, il faudra le vidanger complètement.
1. Vidangez le réservoir d’eau de condensation (p. 22),
(pas nécessaire pour les appareils avec écoulement direct).
2. Choisissez un programme de séchage quelconque.
3. Pressez la touche de démarrage. L’eau de condensation
encore présente dans l’appareil sera alors aspirée dans le
réservoir.
4. Après 5 minutes environ, interrompez le programme
au moyen de la touche de marche rapide, et vidanger à
nouveau le réservoir d’eau de condensation.
Réglages de base
Le réglage de base de l'appareil a été effectué en usine,
mais on peut l'adapter selon ses exigences individuelles,
lors de la mise en service ou ultérieurement, au moyen
des fonctions suivantes.
Les réglages de base ne peuvent être modifiés que si
aucun programme de séchage n'est en cours. Pour modifier un réglage de base, il faut tout d'abord maintenir
la/les touche(s) de programme enfoncée(s), puis appuyer
sur la touche de marche rapide. Les fonctions correspondantes s'affichent alors sur l'afficheur numérique. En
appuyant de manière répétée sur la touche de marche
rapide, la/le(s) touche(s) de programme demeurant enfoncée(s), l'affichage change.
Exemple:
Fonction désactivée
Fonction activée
Humidité initiale (en usine 50%)
+
L'exactitude du temps restant affiché est optimisée lorsque
le sèche-linge s'ajuste à la vitesse d'essorage de votre
lave-linge.
Essorage à 1.600 t/min,
respectivement 50% d'humidité initiale
Essorage à 1.200 t/min,
respectivement 60% d'humidité initiale
Degré de séchage (en usine OFF)
+
Lorsque cette fonction est activée, le degré de séchage
des programmes électroniques (prêt à ranger et très sec)
augmente légèrement et le linge sort un peu plus sec.
DEGRÉ DE SÉCHAGE
PLUS FORT
DEGRÉ DE SÉCHAGE
NORMAL
Page 24

24
Dispositif anti-froissage (en usine ON)
+
Lorsque la fonction est activée, la phase de défroissage de
60 minutes commence à la fin du programme.
Réglage de l'heure (non effectué en usine)
+
La touche permet de régler les heures et la touche
les minutes.
Langue (en usine ALLEMAND)
+÷
Vous permet de modifier la langue de base, qui restera
conservée même après une mise hors tension ou le mode
veille.
Réglages de base étendus
++
X Pour accéder aux autres réglages de base, appuyer
simultanément sur ces trois touches.
X Une pression répétée sur la touche montre les
réglages possibles.
X Pour modifier les réglages, appuyer sur la touche
X Pour supprimer l'affichage des réglages, appuyer sur la
touche .
Sécurité enfants (en usine OFF)
Sélectionner «Réglages de base étendus»!
La sécurité enfants vous protège contre tout démarrage,
modification ou annulation fortuit(e)s du programme par les
enfants.
Pour utiliser les commandes de la machine lorsque la
sécurité enfants est activée:
+
Maintenir la touche Start enfoncée et appuyez sur la touche Marche rapide.
Puissance raccordée réduite (en usine OFF)
Sélectionner «Réglages de base étendus»!
Sur les machines disposant d'une puissance raccordée rédui-
te, la durée des programmes se prolonge en conséquence.
Off = 400 V 2N ~ 3,25 kW / 10 AT
Off = 230 V 1N ~ 3,25 kW / 16 AT
On = 230 V 1N ~ 2,05 kW / 10 AT
Luminosité de l'affichage LCD (en usine 150)
Sélectionner «Réglages de base étendus»!
La touche permet de régler la luminosité ou la poli-
ce de l'affichage.
Contraste de l'affichage LCD (en usine 32)
Sélectionner «Réglages de base étendus»!
La touche permet de régler le contraste de l'affichage.
Volume du signal sonore (en usine SUR 2)
Sélectionner «Réglages de base étendus»!
Signal sonore activé, la fin du programme est indiquée par
un signal acoustique retentissant à intervalles réguliers. Le
volume de ce signal peut être réglé sur 3 niveaux à l'aide
de la touche.
Off
Volume 1
Volume 2
Volume 3
Fonction Stand-by (en usine ON)
Sélectionner «Réglages de base étendus»!
Fonction Stand-by activée, la commande met la machine
en mode économie d'énergie si aucun programme de
séchage n'est en cours. Tous les affichages sont alors
éteints.
Interface optique (en usine OFF)
Sélectionner «Réglages de base étendus»!
Interface optique (SCS) activée, le S.A.V. peut communi-
quer avec la machine via un PC.
Pannes
Les réparations, modifications et interventions sur des
appareils électriques ne doivent être effectuées que par du
personnel spécialisé dûment formé. Des réparations mal
faites peuvent entraîner de considérables dommages
matériels et des risques élevés pour l’utilisateur.
On utilisera seulement des pièces originales lors des
réparations.
Réparer soi-même les petites pannes
L’appareil ne se met pas en marche après . . .
avoir pressé une touche de programme:
X Vérifiez si l’interrupteur mural est allumé, et si la fiche
réseau est branchée.
X
Vérifiez si tous les fusibles sont intacts et si le disjoncteur
automatique ne s’est pas déclenché.
L’appareil ne démarre pas:
X Touche de démarrage non actionnée.
X Démarrage différé inséré. Le démarrage n’aura lieu
qu’après le retard imposé.
Page 25

25
Le séchage ne donne pas le résultat désiré ou
dure trop longtemps.
X Nettoyez le capteur d’humidité annexé aux taquets
d’entraînement dans le tambour (v. p. 23).
X Coupure du courant (tenir compte des interruptions
imposées par la société de distribution).
Le linge n’est pas sec même à la puissance
maximale de séchage possible.
X Tambour surchargé.
X Linge insuffisamment essoré.
X Aération de la pièce insuffisante
(ouvrir porte et fenêtre).
X Filtre de porte bouché par des peluches (le nettoyer).
L’éclairage ne s’allume pas dans le tambour.
X Ampoule défaillante. Pour des raisons de sécurité, elle
ne pourra être remplacée que par le service après-vente
ou par un technicien.
L’humidité monte fortement dans le local.
X Local pas assez aéré. Assurez une ventilation suffisante.
La porte ne s’ouvre pas:
X Si, avant l’ouverture de la porte, il n’y a plus de courant
(par exemple, les pièces de monnaie sont épuisées), il est
possible d’ouvrir la porte manuellement en appuyant
brièvement au niveau du verrou de fermeture.
Messages de panne
En présence des messages de panne suivants, on peut
remettre le programme en marche en pressant la touche
de démarrage, après élimination des pannes.
Sécurité enfants
X Appuyer simultanément sur la touche Start et sur la
touche Marche rapide.
Porte ouverte
X Poussez sur la porte jusqu’à ce que la fermeture
s’encliquette correctement.
Si l’appareil affiche une panne de fonctionnement F– –:
X Interrompez le programme au moyen de la touche de
marche rapide, et choisissez un nouveau programme.
En cas de message répété de panne:
X Coupez l’alimentation électrique pendant 1 minute
environ, puis rétablissez-la. (Retirez la fiche réseau ou
fermez l’interrupteur mural)
z L’appareil est de nouveau prêt à fonctionner dès que
les témoins des programmes clignotent.
X Choisissez un nouveau programme.
Si le message de panne se répète encore:
X Notez le message de panne.
X Fermez le robinet de l’eau et retirez la fiche réseau
ou fermez l’interrupteur mural.
X Informez le service après-vente.
Service après-vente
Avant d’appeler le service après-vente, vérifiez si vous ne
pouvez pas remédier vous-même à la panne (v. «Pannes»,
p. 24).
Si vous faites appel à un technicien d’assistance, des coûts
vous seront facturés pour ses conseils même pendant la
période de garantie.
Si vous ne pouvez réparer vous-même la panne, retirez
la fiche réseau ou fermez l’interrupteur mural, fermez le
robinet de l’eau et appelez le service après-vente.
Composez le numéro central de celui-ci (v. verso de la
couverture). Vous serez automatiquement mis en rapport
avec le point d’assistance compétent pour votre région.
Indiquez au service après-vente le message d’erreur F —
ainsi que le numéro du produit et celui de l’appareil. Vous
trouverez ces données sur la plaque signalétique visible
dans le cadre de la porte quand elle est ouverte. Notez ici
le numéro de votre appareil:
Numéro de produit
Numéro de l’appareil
Abonnement de garantie
Après l’expiration de la période normale de garantie,
2 ans, celle-ci pourra être prolongée sans limites au
moyen d’un abonnement de garantie. C’est avec plaisir
que nous vous enverrons les documents nécessaires.
Observez à ce propos ce qui est mentionné dans le livret
de garantie et d’assistance ci-joint.
Page 26

26
Notizen / Notes / Note
Page 27

Indice
Da tenere sempre in considerazione
X Consigli per lo smaltimento dell'asciugatrice 28
Z Imballaggio della nuova asciugatrice 28
Z La vostra vecchia asciugatrice 28
X Indicazioni per la sicurezza e avvertenze 28
La vostra nuova asciugatrice
X Protezione dell'ambiente e consigli per
X risparmiare 28
X Descrizione dell'asciugatrice 29
X Consigli per il bucato 30
Z Assortimento dei capi 30
Z Consigli per l'asciugatura 30
Messa in funzione
X Operazioni preliminari 30
X Apertura dello sportello 30
X Introduzione della biancheria 30
X Chiusura dello sportello 30
Come asciugare
X Tabella dei programmi 31
X Asciugatura 32
Z Programmi elettronici 32
Z Programma misto 32
Z Programmi a tempo 32
Z Finitura lana 32
Z Programma Espresso 32
Z Selezione di funzioni supplementari 32
Z Avvio del programma 32
Z Durata e fase di svolgimento
X del programma 32
Z Cambiamento di programma 33
Z Interruzione del programma 33
Z Aggiunta di biancheria 33
Z Fine del programma 33
Z Estrazione della biancheria 33
Z Spegnimento dell'asciugatrice 33
X Funzioni supplementari 33
Z Capi normali 33
Z Impostazione timer 33
Z Asciugatura delicata 33
Z Protezione antipiega 33
Z Ciclo veloce 33
Manutenzione / Cura / Pulizia
X Pulizia dell'apparecchio 34
Z Svuotare il contenitore dell’acqua
Z di condensazione 34
Z Pulizia del filtro 34
Z Pulizia del raffreddatore dell'aria 34/35
Z Pulizia dei sensori d'umidità 35
Impostazione di base
X Umidità iniziale 35
X Grado d'asciugatura 35
X Protezione antipiega 36
X Regolazione dell'ora 36
X Lingua 36
X Impostazioni estese 36
Z Dispositivo di sicurezza per i bambini 36
Z Tensione di allacciamento ridotta 36
Z Regolazione luminosità/
Z contrasto del display 36
Z Cicalino 36
Z Funzione di stand-by 36
Z Interfaccia ottica 36
Anomalie di funzionamento
X Eliminazione in proprio di piccole anomalie 36/37
X Segnalazioni di guasto 37
Servizio assistenza
X Numero di prodotto e di macchina 37
Garanzia in abbonamento 37
Appunti 38
Inhaltsverzeichnis Deutsch
X Siehe Seite 3
Sommaire français
X Voir page 15
Contents english
X see page 39
I TALIANO
Page 28

28
Consigli per il riciclo
Imballaggio dell’asciugatrice nuova
Smaltire il materiale d’imballaggio secondo le norme.
Il materiale d’imballaggio non è un giocattolo.
Attraverso il suo trattamento e recupero si risparmiano
materie prime e si riduce il volume dei rifiuti. L’imballaggio
può essere restituito al rivenditore o al fornitore.
Tutti i materiali d’imballaggio utilizzati sono compatibili
con l’ambiente e riciclabili. Il cartone è costituito dall’80%
al 100% da carta riciclata.
Le parti in legno non sono state trattate chimicamente.
I fogli sono in polietilene (PE), i nastri di fasciatura in
polipropilene (PP). Questi materiali sono composti puri di
idrocarburi e sono riciclabili.
La vostra vecchia asciugatrice
Rendere inutilizzabili gli apparecchi fuori uso.
Dopo aver sfilato la spina, o dopo che l’elettricista ha
smontato il cavo d’allacciamento, tagliare e togliere
il cavo di connessione. Distruggere o togliere la serratura
dello sportello, per evitare che i bambini giocando
rimangano imprigionati e possano rischiare la vita.
Il vostro vecchio apparecchio contiene materiali preziosi,
che devono essere inviati ad un centro di recupero.
Assicuratevi che il vostro vecchio apparecchio venga smaltito secondo le norme. Chiedere alla propria amministrazione municipale l’indirizzo dei centri di raccolta o luoghi
di recupero per lo smaltimento degli apparecchi fuori
uso. Vi preghiamo di contribuire in questo modo ad uno
smaltimento ecologico ed al recupero dei materiali.
Consigli per la sicurezza
ed avvertimenti
Questo apparecchio soddisfa le norme per la sicurezza
relative agli apparecchi elettrici.
Cosa fare prima della messa in funzione:
Leggere attentamente le istruzioni allegate, prima
di mettere in funzione la vostra asciugatrice. Ci sono
importanti informazioni relative all’installazione, all’uso
ed alla sicurezza dell’apparecchio.
Le riparazioni devono essere eseguite esclusivamente da
personale specializzato. Le riparazioni non idonee possono
provocare gravi danni materiali e causare pericoli per
l’utente.
Conservare con cura tutta la documentazione per altre
persone che utilizzano l’asciugatrice o per eventuali proprietari
futuri.
Installare l’apparecchio secondo le relative istruzioni.
Non collegare un apparecchio che presenti danni evidenti.
In caso di dubbio, chiedere informazioni al Servizio
Assistenza o al rivenditore.
Durante l’asciugatura fare attenzione a quanto segue:
Non lasciare i bambini in prossimità dell’apparecchio,
senza controllarli.
Tenere gli animali domestici lontani dall’apparecchio.
L’apparecchio è concepito esclusivamente per
l’asciugazione domestica di tessuti.
Fare attenzione a fine programma:
Non introdurre la mano nel cestello rotante.
Per la salvaguardia dell’asciugatrice:
Non salire sulla macchina.
Non sedersi, né sorreggersi, né appoggiarsi sull’ obló.
(Pericolo di ribaltamento!)
Durante il trasporto fare attenzione a quanto segue:
Attenzione durante il trasporto dell’asciugatrice:
pericolo di ferirsi! Non sollevare l’apparecchio facendo
presa sulle parti sporgenti!
Non collegare l’allacciamento del tubo di scarico ad un
camino, a cui è collegato una stufa a gas o a carbone,
la cucina o il riscaldamento a gas. Con il ritorno dei fumi
c’è pericolo di avvelenamento!
Rispetto per l’ambiente e
consigli per risparmiare
Per risparmiare corrente, tempo e costi
X Il sistema d’asciugazione più economico e meno nocivo
per l’ambiente è quello di caricare la quantità massima di
biancheria consentita.
X
Non superare la quantità massima di biancheria indicata
(vedere la tabella dei programmi a pagina 31).
X Centrifugare i capi in lavatrice o in una centrifuga prima
di asciugarli, per eliminare completamente l’acqua.
Maggiore è la velocità di centrifugazione, minori saranno i
tempi di asciugatura e, di conseguenza, i consumi
d’energia elettrica.
X Centrifugare anche i capi delicati.
X Durante il processo di asciugatura si deve provvedere
ad una buona aerazione dell’ambiente (aprire la finestra
o la porta).
X Pulire il filtro dopo ogni asciugazione.
Page 29

29
Pannello di comando e visualizzazione
Sportello di riempimento con filtro
Programmi
1 Programma speciale/Finitura lana
2 Programma a tempo
3 Umido per stiratura
4 Asciugatura leggera
5 Asciugatura normale
6 Asciugatura intensa
11 Biancheria mista
12 Programma espresso
Funzioni supplementari
7 Asciugatura delicata
8 Protezione antipiega
9 Impostazione timer
10 Capi di facile manutenzione
13 Avvio del programma
14 Apertura dello sportello di riempimento
15 Ciclo veloce
Indicatori
16 Display digitale
Interfacce
17 SCS-Schulthess Control System
(interfaccia PC per assistenza clienti)
Descrizione dell'asciugatrice
Pannello di comando e visualizzazione
Page 30

30
Consigli per il bucato
Selezione dei capi
Controllare i simboli di asciugatura sulle
etichette dei tessuti.
Asciugazione a temperatura normale.
Asciugazione a bassa temperatura.
Non asciugare con l’asciugatrice.
Non utilizzare l’asciugatrice per i seguenti tessuti:
z Lana o tessuti in misto lana (tranne con il programma
Finition lana): pericolo d’infeltrimento!
z Tessuti sensibili (seta, tende sintetiche ecc.): formazione
di pieghe!
z Biancheria troppo bagnata: spreco di energia!
X Per ottenere un’asciugazione uniforme, suddividere la
biancheria per tipo di tessuto e per grado d’asciugazione
desiderato.
Non superare la quantità massima di carico consentita,
poiché il sovraccarico pregiudica i risultati dell’asciugazione
e sgualcisce molto la biancheria.
Consigli per l’asciugazione
X Chiudere le cerniere lampo, i ganci e gli occhielli.
Allacciare le cinture aperte, legare insieme i nastri dei
grembiuli, ecc.
X Se possibile, togliere i capi delicati dall’asciugatrice
ancora leggermente umidi (selezionare il grado di
asciugatura leggero ). In caso d’eccessiva asciugatura
c’è il rischio che si sgualciscano.
X I capi che risultassero ancora umidi al termine del ciclo
d’asciugazione (carico misto cotonati) possono essere
asciugati con un programma a tempo .
X I tessuti lavorati, ad. es. i capi in maglia, potrebbero
restringersi con l’asciugazione. Per questo tipo di tessuti
non utilizzare il programma «Asciugatura forte» .
Messa in funzione
Installare l’asciugatrice seguendo le relative istruzioni.
Prima di mettere in funzione l’asciugatrice per la
prima volta, pulire il cestello con un panno umido.
Preparazione
Controllare che:
X Sia inserito il filtro per i pelucchi.
(Vedi «Pulizia / Manutenzione» a pagina 34).
X La spina sia inserita o l’interruttore a parete acceso.
L’asciugatrice è pronta ad entrare in funzione, se tutte le
spie di controllo lampeggiano oppure sono spente.
Nel caso che una spia rimanga continuamente accesa,
procedere come segue:
X Premere il tasto «Ciclo veloce», finché non si accende
la spia di controllo «Fine del programma». Attendere
che la spia di controllo lampeggi, quindi premere il tasto
«Sportello» (eventualmente estrarre la biancheria).
Apertura dell’oblò
X Premere il tasto «Sportello».
z L’oblò si apre.
X Attenzione: L’obló si apre, solamente se è inserita
l’alimentazione di corrente principale. Se dovesse essere
mancata la corrente prima dell’apertura dell’obló (ad
esempio per mancanza di moneta), allora può essere
aperto manualmente premendo all’altezza del bloccaggio
dell’obló.
z La luce del cestello si accende al momento
dell’apertura dello sportello.
Inserimento della biancheria
Prima di inserire la biancheria accertarsi che nel cestello
non si trovino corpi estranei, né animali domestici che
eventualmente si sono nascosti.
Utilizzare l’asciugatrice solo per i capi che sono stati lavti
ad acqua.
Non asciugare nell'apparecchio capi che in precedenza
siano stati trattati con solventi infiammabili, per es. con
smacchiatori o benzina per smacchiare (pericolo di
esplosione)!
Non utilizzare l’asciugatrice per tessuti che contengono
gommapiuma o che sono impregnati di lacca,
acetone per unghie o sostanze simili (pericolo di incendio)!
X Inserire nel cestello i capi ben aperti, mischiando i capi
grandi e piccoli.
Chiusura dell’oblò
X Per chiudere l’oblò, premerlo finché non si sente scattare chiaramente la serratura.
X Accertarsi che nel chiudere l’oblò non vi rimangano
impigliati dei capi.
Se lo sportello non è stato chiuso, un dispositivo di
sicurezza impedisce la messa in funzione dell’apparecchio.
Page 31

Tabella dei programmi
Simbolo Quantità Tessuto/Tipo di biancheria
Grado d’asciugatura Tasti per la Centrifugato in Consumo Durata
sull’etichetta
max. di del programma selezione del lavatrice alla di corrente in min.
bianch.
programma velocità giri/min. in kWh ca. circa
5 kg z Lenzuola, tovaglie, asciugamani, X Per capi da stirare con ferro Stiratura con ferro 1600 1,5 50
T-Shirts. magliette polo, vestiti da lavoro 1400 1,7 58
1200 1,9 65
z T-Shirts, magliette polo, abiti, pantaloni, X Per capi che non devono essere stirati Asciugatura leggera 1600 1,7 69
vestiti da lavoro, biancheria intima, o che devono essere stirati poco 1400 1,9 77
calzini in cotone 1200 2,2 84
z Asciugamani di spugna e non, canovacci X Per capi che non devono essere stirati Asciugatura normale 1600 2,0 74
per piatti, lenzuola, biancheria intima, 1400 2,2 81
calzini in cotone 1200 2,5 88
z Accappatoi e lenzuola in spugna X Tessuti particolarmente spessi ed a più strati Asciugatura forte 1600 2,2 82
Mai biancheria intima e calze 1400 2,4 90
1200 2,7 97
2,5 kg z Pantaloni, abiti, gonne, camicie X Per capi che devono essere stirati con ferro Stiratura con ferro
+
800 0,9 37
600 0,9 40
z Pantaloni, abiti, gonne, camicie, bluse, capi X Per capi che non devono essere stirati Asciugatura leggera
+
800 0,9 40
di corsetteria, fuseaux, capi di abbigliamento o devono essere stirati poco 600 1,1 43
sportivo ad alto contenuto di fibre sintetiche
z Camicie da uomo, bluse, capi di abbiglia- X Per capi che non devono essere stirati Asciugatura normale
+
800 1,1 52
mento sportivo, lenzuola, tovaglie, tute sportive 600 1,1 55
z Giacche a vento, coperto X Tessuti particolarmente spessi o à più strati Asciugatura forte
+
800 1,2 57
600 1,4 60
2 kg z Abbigliamento sportivo, Indumenti sportivi e idrorepellenti Espresso 600 0,8 40
capi in fibre sintetiche e tessuto misto Il bucato viene asciugato normalemente
3 kg z Misto Cotone e tessuti misti Misto 800 1,9 62
Capi di abbigliamento misti Il bucato diventa extra-asciutto 600 2,2 67
3 kg z Finitura lana La biancheria diventa più vaporosa, ma non Programma speciale 800 0,1 5
Lana resistente al lavaggio meccanico asciutta. Subito dopo la fine del programma, Finitura lana
estrarre la biancheria e metterla ad asciugare
ben distesa su un telo di spugna
z Asciugatura a tempo Per l’asciugatura successiva di capi ancora Asciugatura a tempo
Capi singoli, capi pocco umidi umidi 10 - 150 Min.
alla siccità dei cuscini di testa
Per i tessuti particolarmente sensibili alle temperature premere il tasto «Asciugatura delicata»! +
I valori di consumo presentati sono indicativi e sono stati rilevati in condizioni di esercizio normali. Sono possibili scostamenti fino ad un limite del 10%.
Negli apparecchi con potenza allacciata ridotta, i tempi dei programmi si prolungano.
31
Capi resistenti e colorati in cotone o lino Programma elettronico
Capi delicati (che non si stirano) in tessuto sintetico e misto, cotone da Programma elettronico
non stirare, ad es. viscosa, cupro, modal, poliestere
Programmi speciali
Page 32

32
Asciugazione
Programmi d’asciugazione
Il sistema di rilevamento elettronico, dotato di sensori
precisi, controlla costantemente il grado d’asciugazione dei
vostri capi e termina il programma automaticamente al
momento in cui è stato raggiunto il grado d’asciugazione
impostato.
Selezionare il programma per tessuti resistenti, colorati o
delicati, seguendo la tabella dei programmi.
X Premere il tasto del programma.
z Si accende la spia luminosa del programma selezionato.
X Per i tessuti delicati selezionare la
funzione supplementare «Capi delicati» .
Programma misto: 3kg
Per l'asciugatura intensa di capi misti in cotone e articoli
tessili di facile manutenzione.
X Premere il tasto di avvio del programma.
z La spia di controllo si illumina.
z Durata del programma: ca. 65 min.
Programmi a tempo
Per asciugare singoli capi di biancheria o per finire di asciu
gare tessuti già preasciugati con un basso contenuto
di umidità. Il tempo d’asciugazione da impostare dipende
dal tipo di biancheria, dalla quantità di biancheria e dal
contenuto di umidità.
X Premere il tasto del programma.
z Si accende la spia luminosa «Programma a tempo» e
viene indicato il tempo d’asciugatura minimo di 10 min.
X Selezionare il tempo d’asciugazione, fino ad un
massimo di 150 min, premendo più volte il tasto.
Programma speciale Finitura lana: 3kg
Programma speciale per i capi in lana lavabili in lavatrice
oppure per tessuti in misto lana. Preparazione dei tessuti
per l’asciugatura. La biancheria diventa più morbida, ma
non completamente asciutta. Togliere la biancheria subito
dopo la fine del programma e metterla ad asciugare ben
distesa sul telo di spugna.
X Premere il tasto del programma.
z Si accende la spia luminosa del programma selezionato.
z La durata del programma ca. 5 min.
Programma Espresso: 2 kg
Programma speciale per l'asciugatura rapida di capi in tessuto sintetico, per es. abbigliamento sportivo in tessuto sintetico o misto. La biancheria esce asciutta normale.
X Premere il tasto di avvio del programma.
z La spia di controllo si illumina.
z Durata del programma: ca. 40 min.
Selezionare le funzioni supplementari
Dopo aver selezionato il programma, lampeggiano le spie
luminose delle funzioni supplementari, che all’occorrenza possono essere inserite.
X
Premere il tasto, oppure i tasti, delle funzioni desiderate.
(Vedi funzioni supplementari a pagina 33).
z Si accende la spia luminosa della funzione selezionata,
ovvero si accendono le spie luminose delle funzioni
selezionate.
Avvio del programma
X Premere il tasto «Avvio».
z La spia luminosa si accende ed il programma parte
automaticamente.
Nel caso sia inserito il dispositivo di sicurezza per i bambini:
X Tenere premuto il tasto «Ciclo veloce» ed azionare il
tasto «Avvio».
Svolgimento del programma / Fase del programma
X Nei programmi elettronici il sistema di rilevamento
elettronico controlla costantemente il grado d’umidità
della biancheria.
z Viene visualizzata la durata residua del programma.
Questo tempo residuo viene ricalcolato più volte durante
l'asciugatura, pertanto l'effettiva fine del programma varia
di alcuni minuti.
X Nei programmi a tempo viene indicato il tempo che
rimane prima della fine del programma.
Page 33

33
Cambiare programma prima dell’avvio del programma
X Premere nuovamente il tasto del programma desiderato.
z Lampeggiano nuovamente tutte le spie di controllo
delle funzioni supplementari che possono essere selezionate e tutte le impostazioni vengono cancellate.
X Ev. selezionare le funzioni supplementari.
X Avviare il programma.
Interruzione del programma
X Interrompere il programma premendo più volte il tasto
«Ciclo veloce», finché non lampeggia la spia di controllo
«Fine programma».
Nel caso sia inserito il dispositivo di sicurezza per i bambini:
X Tenere premuto contemporaneamente il tasto «Avvio».
X Selezionare nuovamente il programma.
Aggiunta di biancheria
effettuabile in ogni momento.
X Premere il tasto «Sportello».
z Il tamburo si ferma.
X Introdurre la biancheria.
X Chiudere lo sportello
X Il processo di asciugatura riprende
Se è inserito il dispositivo di sicurezza per i bambini:
X Mantenere premuti entrambi i tasti «Avvio» e «Ciclo
veloce».
Fine programma
La fine del programma viene indicata dal valore sul
display 0h00 e dalla spia luminosa «Fine del programma/
Anti-piega» che lampeggia.
z Viene emesso un segnale acustico (solamente nel caso
in cui è inserita l’apposita funzione di segnalazione.)
X Se la biancheria non viene rimossa, il tamburo continua
a ruotare a brevi intervalli, in modo che la biancheria non
si sgualcisca (30 u 60 minuti).
Dopodiché la biancheria dovrebbe essere rimossa.
Togliere la biancheria
X Premere il tasto «Sportello».
z Il tamburo viene illuminato.
X Togliere la biancheria.
X Pulire il filtro (pagina 34).
X Chiudere lo sportello
Spegnere l’asciugatrice
X Spegnere l’interruttore a parete.
Funzioni supplementari
Oltre ai diversi programmi d’asciugazione standard la vostra
asciugatrice vi offre la possibilità di creare programmi
personalizzati. Selezionando una o più funzioni supplementari potete impostare il vostro programma di
asciugazione in base alle caratteristiche specifiche della
vostra biancheria.
X Avete inoltre la possibilità di standardizzare la vostra
asciugatrice alle vostre necessità personali, cambiando
le
impostazioni di base (vedi pagina 36).
Capi delicati
Per capi delicati in tessuto sintetico, tessuti misti o cotone
da non stirare.
Impostazione timer
Premendo una o più volte il tasto «Impostazione timer» si
può impostare l’ora d’avvio in modo che l’asciugabiancheria entri in funzione entro le 23,5 ore successive.
Questo consente, ad esempio, di sfruttare la tariffa ridotta
per la corrente erogata durante la notte. L’inizio e la fine
di un programma possono quindi essere adeguati alle
proprie abitudini di vita.
Nel display viene visualizzato il tempo di avvio ed il tempo
residuo per finire il programma.
L’ora preselezionata inizia a decorrere dopo l’attivazione
del tasto di avvio.
Una volta raggiunta l’ora di avvio, il programma si attiva
automaticamente e viene visualizzata la sua durata
effettiva.
Avvertenza
z In caso d’interruzione di corrente rimane memorizzato
il tempo attuale. Non viene tenuta in considerazione la
durata dell’interruzione di corrente.
Asciugatura delicata
Il tasto «Asciugatura delicata» deve essere premuto nel caso
di tessuti particolarmente sensibili alle temperature, quali
ad esempio le fibre acriliche. La temperatura viene ridotta
ed il tempo d’asciugazione viene leggermente prolungato.
Protezione antipiega
Premendo questo tasto si attiva la protezione antisgualcitura
alla fine del processo di asciugatura. Questo funzione impedisce la formazione di pieghe nella biancheria, facilitando la
stiratura.
Ciclo veloce
Il programma può essere ridotto o interrotto, premendo il
tasto «Ciclo veloce». (Vedi «Cambiamento/Interruzione del
programma» a pagina 32).
Page 34

34
Manutenzione / Cura / Pulizia
Pulizia dell’apparecchio
Prima di pulire l’apparecchio o eseguire lavori di manutenzione, accertarsi che la corrente sia disinserita.
Non spruzzare mai acqua sull’apparecchio.
Non utilizzare solventi! Queste sostanze potrebbero
danneggiare alcuni componenti dell’asciugatrice; sviluppano
vapori tossici e possono provocare un’esplosione!
Pulire la parte esterna ed i comandi dell’asciugatrice
semplicemente con acqua saponata o con un normale
detergente in commercio che non contenga solventi o che
non sia abrasivo.
Svuotare il contenitore dell’acqua di condensazione
(non occorre negli apparecchi con scarico diretto dell’acqua)
L’acqua di condensazione non è acqua potabile! Si crea du
rante il processo d’asciugazione viene raccolta in un contenitore,
che deve essere svuotato dopo ogni ciclo d’asciugazione.
1. Estrarre il contenitore.
2. Rimuvere il coperchio.
3. Eliminare l’acqua di condensazione.
4. Richiudere il coperchio.
5.
Rimontare il contenitore fino a sentire lo scatto della chiusura. Potete svuotare il contenitore dell’acqua anche mentre viene svolto il programma.
Se durante il funzionamento si accende la spia H-01
«Svuotare il contenitore» e viene emesso un segnale acustico, il contenitore deve essere scuotato immediatamente.
X Dopodiché continuare il programma con il tasto
«Avvio».
Pulizia del filtro
Utilizzando i capi di biancheria, si vengono a creare dei
filamenti, che durante l’asciugazione si staccano e vanno a
depositarsi nel filtro che si trova sul lato interno dello
sportello. Quindi il filtro deve essere pulito dopo ogni ciclo
d’asciugazione.
1. Premere il tasto «Sportello».
2. Estrarre il filtro.
3. Passare la mano sul filtro e rimuovere in questo modo
i filamenti di tessuto. Può accadere che un filtro,
presumibilmente pulito in modo corretto, possa diventare
impermeabile a causa di un fine sedimento invisibile
depositatosi nella mascherina del filtro. Tenere il filtro con
una superficie rivolta verso l’alto e versarvi sopra
dell’acqua. Se non lascia passare l’acqua, il filtro deve
essere pulito con una spazzola sotto l’acqua corrente.
3.1 Di tanto in tanto è necessario pulire anche il supporto del
filtro. A questo proposito utilizzare un'aspirapolvere o un
pennello per spolverare.
3.2 Introdurre il tubo dell’aspirapolvere o il pennello per spolverare nell’apertura del filtro per i filamenti di tessuto e
rimuovere interamente i filamenti residui.
4. Rimontare il filtro in modo corretto.
5. Chiudere lo sportello.
Pulizia del condensatore lamellare
Il condensatore lamellare dovrebbe essere pulito 3 - 4
volte l’anno: più spesso nel caso di utilizzo frequente.
Page 35

35
1. Aprire l’obló.
2. Premere il tasto, lo sportello di manutenzione si apre.
3. Aprire completamente lo sportello di manutenzione.
4. Ruotare verso l’interno entrambe le levette di chiusura in
direzione della freccia.
5. Estrarre il condensatore lamellare.
6. Pulire accuratamente il condensatore lamellare, lasciare
sgocciolare bene l’acqua.
7. Romontare il condensatore lamellare, con il manico rivolte
verso il basso. Ruotare le levette di chiusura nella loro
posizione originale.
8. Fare pressione sullo sportello di manutenzione sia a destra
che a sinistra contemporaneamente (vedi figura), fino a
bloccaggio avvenuto.
Solo se lo sportello di manutenzione è stato chiuso correttamente, si riesce a chiudere la porta.
Pulizia dei rilevatori d’umidità
Dopo un uso prolungato è possibile che si formino leggeri
residui di calcare o di ammorbidente dei tessuti sui rilevatori d’umidità che si trovano sui trascinatori e sulla parte
interna del tamburo.
Svuotare l’asciugatrice in caso di gelo o prima del
trasporto.
Svuotare l’asciugabiancheria in caso di gelo o prima del
trasporto
Se l’asciugabiancheria si trova in u locale dove la temperatura può andare sotto zero, oppure deve essere trasportata, è necessario svuotare completamente l’apparecchio.
1. Svuotare il contenitore dell’acqua di condensazione (p. 34).
2. Selezionare un programma d’asciugazione a scelta.
3. Premere il tasto «Avvio». L’acqua di condensazione
rimasta nell’apparecchio viene così pompata nell’apposito
raccoglitore.
4. Dopo circa 5 minuti interrompere il programma con il
tasto «Ciclo veloce» e svuotare nuovamente il contenitore
che raccoglie l’acqua di condensazione.
Impostazioni di base
Sebbene i parametri base dell'asciugatrice siano già stati
predisposti in fabbrica, prima dell'avviamento o in qualsiasi momento successivo le funzioni di seguito elencate vi
permettono di adattarli alle vostre esigenze personali.
Le impostazioni di base possono essere cambiatesolamente se nessun programma di asciugatura è in esecuzione.
Per cambiare un'impostazione di base si deve sempremantenere premuto il tasto (o i tasti) di programma e poi attivare il tasto «Ciclo veloce». Le relative funzioni vengono
visualizzate sul display. Tenendo premuto il tasto (o i tasti)
di programma e premendo più volte il tasto «Ciclo veloce», la visualizzazione cambia.
Esempio:
Funzione disinserita
Funzione inserita
Umidità iniziale (valore preimpostato 50%)
+
L'indicazione del tempo residuo sarà più esatta se leimpostazioni dell'asciugatrice vengono adattate alla velocità
di centrifugazione della vostra lavatrice.
Una velocità di centrifugazione di 1600 giri/min.
corrisponde al 50% di umidità iniziale
Una velocità di centrifugazione di 1200 giri/min.
corrisponde al 60% di umidità iniziale
Grado d'asciugatura (valore preimpostato NO)
+
Se è inserita questa funzione, il grado d'asciugaturadei
programmi elettronici (Asciugatura normale e forte) viene
leggermente aumentato ela biancheria risulta un po' più
asciutta.
GRADO D'ESSICCAZIONE
PIU ALTO
GRADO D'ESSICCAZIONE
NORMALE
Page 36

36
Protezione antipiega (valore preimpostato SI)
+
Attivando questa funzione, alla fine del programma iniziauna fase di protezione antipiega della durata di 60 min.
Impostazione dell'ora (non preimpostata in fabbrica)
+
Il tasto consente di regolare le ore e il tasto di
regolare i minuti.
Lingua (valore preimpostato: TEDESCO)
+÷
La lingua di base viene modificata e mantenuta anche
dopo lo spegnimento e la modalità di stand-by.
Impostazioni estese
++
X La pressione contemporanea su questi tre tasti attiva la
visualizzazione delle impostazioni estese.
X La pressione ripetuta sul tasto visualizza le
impostazioni disponibili.
X La pressione sul tasto permette di modificare le
varie impostazioni.
X La pressione sul tasto interrompe la visualizzazio-
ne delle impostazioni.
Dispositivo di sicurezza per bambini
(valore preimpostato: NO)
Selezionare «Impostazioni estese»!
Il dispositivo di sicurezza per i bambini serve ad evitareche i
bambini facciano partire casualmente il programma,oppure lo
cambino o lo cancellino.
Uso della macchina quando è inserito il dispositivo disicurezza per i bambini:
+
Tenere premuto il tasto «Avvio» e azionare il tasto «Ciclo
veloce».
Tensione di allacciamento ridotta
(valore preimpostato: NO)
Selezionare «Impostazioni estese»!
La riduzione della tensione di allacciamento comporta un
conseguente prolungamento dei tempi di programma.
No = 400 V 2N ~ 3,25 kW / 10 AT
No = 230 V 1N ~ 3,25 kW / 16 AT
Si = 230 V 1N ~ 2,05 kW / 10 AT
Regolazione della luminosità del display
(valore preimpostato: 150)
Selezionare «Impostazioni estese»!
Questo tasto consente di modificare la luminosità o
il tipo di carattere visualizzato.
Regolazione del contrasto del display
(valore preimpostato: 32)
Selezionare «Impostazioni estese»!
Questo tasto consente di modificare il livello di con-
trasto del display.
Volume del cicalino (valore preimpostato: VOLUME 2)
Selezionare «Impostazioni estese»!
Con cicalino attivato, al termine del programma viene
emesso un segnale acustico ad intervalli regolari. Questo
tasto consente di regolarne il volume su 3 livelli:
Inattivo
Volume 1
Volume 2
Volume 3
Funzione di stand-by (valore preimpostato: SI)
Selezionare «Impostazioni estese»!
Se nessun programma è in esecuzione, l'attivazione di
questa funzione commuta il funzionamento della macchina nello stato di risparmio energetico. Tutte le spie sono
spente.
Interfaccia ottica (valore preimpostato: NO)
Selezionare «Impostazioni estese»!
L'attivazione dell'interfaccia ottica (SCS) consente al Servizio
Assistenza di comunicare con la macchina tramite PC.
Anomalie
Riparazioni, modifiche o interventi su apparecchi elettrici
devono essere eseguiti esclusivamente da personale
specializzato. Le riparazioni non idonee possono provocare
gravi danni materiali e causare pericoli per l’utente.
Per le riparazioni devono essere utilizzati solamente
ricambi
originali.
Come eliminare da soli piccole anomalie
La macchina non entra in funzione dopo aver
premuto un tasto del programma:
X Controllare che l’interruttore a parete sia acceso e la
spina sia inserita.
X Controllare che tutti i fusibili siano intatti oppure che sia
scattato il salvavita.
L’apparecchio non entra in funzione:
X Non è stato premuto il tasto «Avvio».
X È impostata un’ora d’avvio. Parte solamente dopo che
è trascorso il tempo d’avvio selezionato.
Page 37

37
Il grado d’asciugazione desiderato non è stato
raggiunto o il tempo d’asciugazione è troppo
lungo.
X Pulire i rilevatori d’umidità sui trascinatori del cestello
(vedi pagina 35).
X Interruzione di corrente (Accertarsi che non ci sia stata
un’interruzione da parte dell’Azienda elettrica).
La biancheria non si asciuga nonostante sia stato
impostato il massimo grado di asciugatura.
X Il cestello è sovraccarico.
X La biancheria non è stata centrifugata a sufficienza.
X L’aerazione dell’ambiente non è sufficiente.
(Aprire la porta o la finestra).
X Il filtro nello sportello è otturato da filamenti di tessuto
(pulire il filtro).
L’illuminazione del cestello non funziona.
X La lampadina è guasta. Per motivi di sicurezza la
lampadina deve essere sostituita soltanto dal Servizio
Assistenza o da un tecnico.
Consistente aumento d’umidità nell’ambiente
X L’ambiente non è aerato sufficientemente. Provvedere
ad una sufficiente aerazione dell’ambiente.
L’obló è bloccato:
X Se dovesse essere mancata la corrente prima dell’apertura dell’obló (ad esempio per mancanza di moneta),
allora può essere aperto manualmente premendo all’altezza del bloccaggio dell’obló.
Segnalazioni di guasto
Nel caso vengano segnalate le seguenti anomalie, il
programma può essere fatto ripartire, premendo il tasto
«Avvio», dopo aver eliminato l’anomalia.
Dispositivo di sicurezza per i bambini
X Mantenere premuto il tasto «Avvio» e azionare il tasto
«Ciclo veloce».
Apertura della porta
X Premero lo sportello finché la chiusura non si inserisce
correttamente.
Se l’apparecchio segnala un messaggio di guasto F– –:
X Interrompere il programma con il tasto «Ciclo veloce»
e selezionare un nuovo programma.
Se la segnalazione di guasto viene ripetuta:
X Interrompere per circa 1 minuto l’alimentazione
di corrente e poi reinserirla. (Sfilare la spina o spegnere
l’interruttore a parete).
z L’apparecchio è nuovamente pronto ad entrare in funzione, se le spie luminose dei programmi lampeggiano.
X Selezionare un nuovo programma.
Se viene ancora indicata la segnalazione di guasto:
X Annotarsi il tipo di segnalazione di guasto.
X Sfilare la spina o spegnere l’interruttore a parete.
X Avvisare il Servizio Assistenza.
Servizio assistenza
Prima di rivolgervi al Servizio Assistenza, verificate se potete eliminare da soli l’anomalia. (Vedi «Eliminare da soli
piccole anomalie» a pagina 36).
In caso di consulenza, anche durante il periodo di garanzia,
vi saranno addebitati i costi per l’intervento di un tecnico.
Nel caso non siate in grado di eliminare da soli il guasto,
sfilare la spina o spegnere l’interruttore a parete e
rivolgersi al Servizio Assistenza.
Comporre il numero della sede centrale del Servizio
Assistenza (vedi retro della busta). Sarete collegati automaticamente con la filiale del Servizio Assistenza competente per la vostra zona.
Vi preghiamo di indicare al Servizio Assistenza il numero
di prodotto ed il numero dell’apparecchio. Troverete
questi dati sulla targa di identificazione situata all’interno
dello sportello. Segnare qui i numeri del vostro asciugabiancheria.
No. di prodotto
No. di apparecchio
Abbonamento di garanzia
Trascorso il normale periodo di garanzia di 2 anni, questo
può essere prolungato a scelta con un abbonamento di
garanzia. Siamo lieti di spedirvi la relativa documentazione.
Conservare il libretto del Servizio Assistenza ed il certificato
di garanzia allegati.
Page 38

38
Notizen / Notes / Note
Page 39

Contents
What you need to know
X Waste disposal advice 40
Z Packaging from your new machine 40
Z Old machine 40
X Safety advice and warnings 40
Your new dryer
X Environment and economy advice 40
X Machine description 41
X Laundry advice 42
Z Sorting laundry 42
Z Drying tips 42
Start up
X Preparation 42
X Opening the door 42
X Adding laundry 42
X Closing the door 42
Drying
X Programme table 43
X Drying 44
Z Drying programme 44
Z Mixed programme 44
Z Timer programme 44
Z Wool finish 44
Z Express 44
Z Selecting additional functions 44
Z Starting the programme 44
Z Programme progress /
Z Programme status 44
Z Changing the programme 45
Z Interrupting the programme 45
Z Adding more washing 45
Z Programme end 45
Z Removing the laundry 45
Z Switching off the machine 45
X Additional functions 45
Z Easy care 45
Z Start time preselect 45
Z Gentle drying 45
Z Crease protection 45
Z Fast forward 45
Maintenance, Care, Cleaning
X Cleaning the machine 46
Z Emptying the condensed water 46
Z Cleaning the filter 46
Z Cleaning the air cooler 46/47
Z Cleaning the moisture sensor 47
Basic settings
X Initial moisture content 47
X Level of dryness 47
X Crease protection 48
X Setting the time 48
X Language 48
X Extended basic settings 48
Z Child lock 48
Z Reduced mains power 48
Z LCD brightness / contrast settings 48
Z Alarm 48
Z Standby function 48
Z Optical interface 48
Problems
X Rectifying minor faults yourself 48/49
X Error messages 49
Customer services
X Product and serial numbers 49
Guarantee subscription 49
Notes 50/51
Inhaltsverzeichnis deutsch
X Siehe Seite 3
Sommaire français
X Voir page 15
Sommario italiano
X Vedere pagina 27
E NGLISCH
Page 40

40
Waste Disposal Advice
Packaging from your new machine
Dispose of all packaging materials properly.
Packaging materials are not toys.
Processing and reuse saves raw materials and reduces
waste volumes.
The packaging can be returned to the retailer or supplier.
All packaging materials used are environmentally friendly
and reusable. All card is made of 80 - 100 % recycled
paper.
Wood is not chemically treated. Films are made of polyethylene (PE), banding is made of polypropylene (PP).
These materials are pure hydrocarbon compounds and
are recyclable.
Old Machines
Worn out machines should be made unusable:
After unplugging the machine or after an electrician has
removed the connection, cut through and remove the
mains cable. Destroy or remove the door lock so that
playing children cannot become locked in and put their
lives at risk.
The old machine contains valuable materials which should
be sent for recycling. Ensure that your old machine is disposed of properly.
Addresses of recycling or collection sites for the disposal
of old machines can be obtained from your local authority. Please help to ensure environmentally friendly disposal and recycling.
Safety Advice and Warnings
This machine meets the stringent safety regulations for
electronic devices.
Before using the machine:
Read the enclosed documents carefully before using your
dryer.
They contain important information on the installation,
use and safety of the machine.
Repairs should only be carried out by trained specialists.
Incorrect repairs may cause considerable damage and
risks to the user.
Keep the documents safe for other users or subsequent
owners.
Install the machine according to the installation
instructions.
Do not plug in a machine with visible damage.
In case of doubt, ask customer services or your retailer.
When drying laundry:
Do not leave children unattended with the machine.
Keep pets away from the machine.
Only use the machine in the home for drying textiles.
At the end of the programme:
Do not reach into the rotating drum.
To protect your machine:
Do not climb on the machine.
Do not sit, lean or support yourself on the loading door
(it could tip!).
When transporting your machine:
Take care when transporting the machine (risk of injury)!.
Do not lift the machine by the fittings on the front!
Do not connect the exhaust duct to a chimney to which a
gas or coal fire or oven or a gas room heater is connected. There is a risk of poisoning if the machine sucks air
in from the chimney!
Environment and Economy Advice
How to save electricity, time and costs
X Your dryer will be most environmentally friendly and
economical if you fill the machine with the maximum
laundry load.
X Do not exceed the maximum stated laundry load (see
programme table, page 43).
X Remove as much water as possible from the laundry
before drying by spinning in a washing machine or spin
dryer. The higher the spin speed, the shorter the drying
time and lower the energy consumption.
X You should also spin easy care laundry.
X Ensure good room ventilation when drying (open a
window or door).
X Clean the filter after every drying cycle.
Page 41

41
Control and display area
Door with filter
Programmes
1 Special programme / Wool finish
2 Time programme
3 Iron dry
4 Light drying
5 Wardrobe dry
6 Extra dry
11 Mixed laundry
12 Express
Additional functions
7 Gentle dry
8 Crease protection
9 Start time preselect
10 Easy care
13 Programme start
14 Open door
15 Fast forward
Displays
16 Display
Interfaces
17 SCS-Schulthess Control System
(PC interface for customer services)
Machine description
Control and display area
Page 42

42
Laundry Advice
Sorting the laundry
Pay attention to the drying symbols on your
fabrics.
Dry at normal temperature.
Dry at low temperature
Do not tumble dry.
Do not dry the following fabrics in the machine:
z Sensitive fabrics (silk, synthetic curtains, etc.): creasing.
z Sensitive fabrics (silk, synthetic curtains, etc.): creasing.
z Wool or textiles containing wool (Unless using the spe-
cial Wool Finish programme): risk of felting!
X To achieve even drying results, sort the laundry by
fabric type and desired level of dryness.
Do not exceed the maximum load, because overfilling
affects the drying result and severely creases the laundry.
Tips for drying
X Do up all zips, hooks and eyes. Tie together loose
belts, apron strings etc.
X Remove easy care laundry from the dryer in a slightly
damp state if possible (Select target dryness «Light
Drying») and allow to finish drying in the air. Over drying
causes creases.
X Laundry which is still too damp after drying a load of
widely varying fabrics can be dried further using the timer
programme .
X Knitted fabrics, e.g. jersey underwear, can shrink
slightly during drying. Do not use the «Extra Dry» pro-
gramme for these fabrics .
Start-up
Install the machine according to the installation
instructions.
Before using the machine for the first time, wipe the
inside of the drum with a damp cloth.
Preparation
Check whether:
X The fluff filter is in place (see Cleaning / Maintenance,
page 46).
X The machine is plugged in or switched on at the wall.
The machine is ready for use if all the control lights are
flashing or have gone out in sleep mode. If one of the
control lights stays on, proceed as follows:
X With the fast forward button in the programme end
position, press until the control light comes on. Wait until
the control light flashes and press the «Door» button.
(remove laundry if necessary).
Open the door
X Press the «Door» button.
z The door pops open
X Caution: The door only pops open if the mains power
supply is switched on. If there is no power to open the
door, the door can be opened manually by pressing next
to the lock.
z The drum light comes on when the door is opened.
Add laundry
Before adding laundry, ensure that there are no foreign
bodies or even trapped pets in the drum.
Only dry fabrics which have been washed with water in
the dryer.
Laundry which has been treated with flammable solvents
e.g. stain remover or white spirits, should not be dried in
the dryer (Risk of explosion!).
Fabrics which contain foam rubber or which have hair
spray, nail polish remover or similar substances on them
should not be dried in the machine (fire risk!).
X Place the laundry loosely in the drum, mixing large
and small items.
Close the door
X Close the door by pushing it until the lock audibly
engages.
X Ensure when closing the door that no laundry gets
shut in it.
If the door is not closed, the safety switch will prevent the
machine from operating.
Page 43

Programme table
Care Max. Textile/Wash Type
Programme drying Programme Spun in washing Approx. Approx.
Symbol
load target selection button machine at rpm power duration
cons. kWh Min.
5 kg z Bed and table linen, towels, T-shirts, X for laundry to be ironed Iron dry 1600 1,5 50
polo shirts, work wear 1400 1,7 58
1200 1,9 65
z T-shirts, polo shirts, dresses, X for laundry which will not be Lightly dry 1600 1,7 69
trousers, work wear, underwear ironed or only lightly ironed 1400 1,9 77
1200 2,2 84
z Flannels, tea towels and towels, X for laundry which will not be ironed Wardrobe dry 1600 2,0 74
bed linen, underwear, cotton socks 1400 2,2 81
1200 2,5 88
z Towelling bathrobs and bed linen X for particularly thick or multilayered fabrics Extra dry 1600 2,2 82
no underwear or socks 1400 2,4 90
1200 2,7 97
2,5 kg z Trousers, dresses, skirts, shirts X for laundry to be ironed Iron dry
+
800 0,9 37
600 0,9 40
z Trousers, dresses, skirts, shirts, blouses, X for laundry which will not be Lightly dry
+
800 0,9 40
corsetry, leggins, sportswear with large ironed or only lightly ironed 600 1,1 43
proportion of synthetic fibres
z Over shirts, blouses, sportswear, X for laundry which will not be ironed Wardrobe dry
+
800 1,1 52
bed and table linen, tracksuits 600 1,1 55
z Anoraks, covers X for particularly thick or multilayered fabrics Extra dry
+
800 1,2 57
600 1,4 60
2 kg z Sportsvear Sports and weather gear Express 600 0,8 40
synthetics and mixed fibres The laundry will be wardrobe dry.
3 kg z Mix Cotton and mixed fibres Mix 800 1,9 62
Mixed laundry items The laundry will be extra dry 600 2,2 67
3 kg z Wool finish The laundry is tumbled, but not dried Special programme 800 0,1 5
Machine washable wool Remove the laundry directly after the Wool finish
end of the programme and lay on a
towel to dry flat
z Timer drying To finish drying damp laundry items Timer drying
Individual items, items with low moisture To drying pillows 10 - 150 minutes
content
For temperature sensitive fabrics press the additional «Gentle Dry» button! +
The power consuption values and programme durations given are guidelines determinded under standard conditions. Fluctuations of up to 10% are possible.
The programme will be correspondingly longer for machines with reduced mains power.
43
Boil and coloured wash, cotton or linen Electronic programme
Easy care (non-iron) laundry made of synthetic and mixed fibres and cotton Electronic programme
with non-iron trim, e.g. viscose, cupro, modal, polyester
Special programmes
Page 44

44
Drying
Drying programme
The electronic sampling system continually checks the cur-
rent level of dryness of your laundry and automatically
stops the programme when it reaches the specified level
of dryness.
Select the programme for boil and coloured washing or
easy care fabrics from the programme table.
X Press the programme button.
z The control light for the selected programme lights up.
X For easy care fabrics,
select the additional «Easy care» function .
Mixed programme: 3 kg
Mixed items made of cotton and easy care fabrics can be
dried here. The laundry will be extra dry.
X Press the control button.
z The control light comes on.
z Programme duration around 65 minutes.
Time programme
The time programme can be used for drying individual
items or to finish drying fabrics with a low moisture con-
tent that have already been partially dried. The drying
time required depends on the type and amount of laun-
dry and how damp it is.
X Press the programme button.
z The time programme control light lights up and the
minimum drying time of 10 minutes is displayed.
X Select the drying time by repeatedly pressing the
button, up to a maximum of 150 minutes.
Wool Finish special programme: 3 kg
Special programme for machine washable wool or fabrics
containing wool. Preparation of the fabrics for drying.
The laundry is softer, but not dry. Take the laundry out
immediately after the programme ends and lay it out loo-
sely on a towel to dry.
X Press the programme button.
z The control light is illuminated.
z Programme duration approx. 5 minutes..
Express: 2 kg
Special programme for drying synthetic fabrics quickly,
e.g. sportswear made of synthetic or mixed fibres.
The laundry will be wardrobe dry.
X Press the control button.
z The control light comes on.
z Programme duration around 40 minutes.
Select additional functions
After the programme has been selected, the control lights
flash for the additional functions which can be added if
required.
X Press the desired function button(s)
(see additional functions, page 45).
z The control light(s) for the selected additional
function(s) light up.
Start programme
X Press the start button.
z The control light is illuminated and the programme
starts automatically.
If the child lock is activated:
X Hold the start button down and press the fast forward
button.
Programme progress / Programme status
X For electronic programmes, the dampness of the
laundry is continually monitored by an electronic sampling
system.
X The programme time remaining is displayed. This
remaining time is recalculated several times during drying,
so the effective programme end will therefore vary by a
few minutes.
X For time programmes, the time remaining to the end
of the programme is displayed.
Page 45

45
Changing a programme before the start
X Press the desired programme button again.
z All control lights for the available additional functions
flash again and all settings are deleted.
X Select any additional functions.
X Start the programme.
Interrupting the programme
X Interrupt the programme by pressing the fast forward
button repeatedly, until the «Programme End» control
light flashes.
If the child lock is activated:
X Hold the start button down at the same time.
X Reselect the programme.
Adding more laundry
This is possible at any time.
X Press the door open button.
z Wait for the drum to stop.
X Add your laundry.
X Close the door again.
X The drying process is continued.
If the child lock is activated:
X Hold down the start and fast forward buttons at the
same time.
Programme end
The programme end is indicated by the display 0h00 and
the flashing «Programme End / Crease Protection» light.
z An audible signal (only if summer function is
switched on).
X If crease protection is switched on, the drum continues
to turn at short intervals after the end of the programme,
to prevent the laundry creasing (30 or 60 minutes). The
laundry should not be removed any later than this.
Remove the laundry
X Press the door open button.
z The drum light comes on.
X Remove the laundry.
X Clean the filter (page46).
X Close the door.
Switch off the machine
X Switch the machine off at the wall.
Additional Functions
Alongside the various standard drying programmes, your
dryer also offers you the opportunity to design your own
programmes.
By selecting one or more additional functions, you can
tailor your drying programme to the specifics of your
laundry.
X
You have the opportunity to tailor your dryer to your
needs by changing the basic settings (see page 47).
Easy care
For easy care fabrics made of synthetic or mixed fibres,
and cotton with a non-iron finish.
Start time preselect
By pressing the Start time preselect button one or more
times, the programme start time can be delayed by up to
23,5 hours.
This makes it possible to take advantage of cheaper
night-time electricity, for example. The start time and
consequently also the end time of a programme can be
tailored to your individual lifestyle.
The display shows the start time and anticipated
programme time end.
The preselected time starts when the start button is
pressed.
When the start time is reached, the selected programme
starts automatically. The current programme duration will
be displayed.
Note
z In the event of a power cut, the current time is stored.
The duration of the power cut is not taken into account.
Gentle drying
The gentle drying button must be pressed for very temperature sensitive fabrics such as acrylic fibres. The temperature is reduced and the drying time is extended slightly.
Protezione antipiega
Premendo questo tasto si attiva la protezione antisgualcitura
alla fine del processo di asciugatura. Questo funzione impedisce la formazione di pieghe nella biancheria, facilitando la
stiratura.
Fast forward
The programme can be shortened or interrupted by pressing the fast forward button. (see changing / interrupting
the programme, page45).
Page 46

46
Maintenance / Care / Cleaning
Cleaning the machine
Ensure that the power supply is switched off before any
cleaning, care or maintenance work.
Under no circumstances spray the machine with water.
Do not use solvents! These substances can damage parts
of the machine, produce poisonous vapour and carry the
risk of explosion!
Casings and control areas should only be cleaned with
soap or a commercially available, solvent-free, non-abrasi-
ve cleaning product.
Emptying the condensed water
(Not necessary on machines with direct drainage)
Condensed water is not drinking water!
The condensed water collected from drying is collected in
a container which must be emptied after each use.
1. Pull out the container.
2. Remove the cover.
3. Pour out the condensed water.
4. Close the cover
5. Slide the container all the way back in. You can also
empty the condensed water container while a programme
is running.
If the display H-01 «Empty Container» lights up during
operation and an audible signal is heard, the container
must be emptied immediately.
X Then continue the programme by pressing the start
button.
Cleaning the filter
When fabrics are used, the fibres are rubbed (laundry
fluff), which are released when the fabrics are dried,
collecting in the filter on the inside of the door. The fluff
filter must therefore be cleaned after every use.
1. Press the door open button.
2. Remove the filter.
3. Rub your hand over the filter and remove the fluff. It is pos-
sible that a filter that appears to be properly clean may
become impermeable due to fine, invisible deposits remaining in the filter mesh. Hold the filter with one flat surface
upwards and pour a little water on to it. If it is impermeable, clean the filter with a brush under running water.
3.1 From time to time, it is necessary to clean the filter holder.
Use a vacuum cleaner or cleaning brush.
3.2 Run the pipe of the vacuum cleaner or the brush around
the opening for the fluff filter. Remove any residual fluff.
4. Replace the filter properly.
5. Close the door.
Cleaning the air cooler
The air cooler elements should be cleaned 3 - 4 times a
year, or more often if used frequently.
Page 47

47
1. Open the door.
2. Press the button to release the maintenance flap.
3. Open the maintenance flap all the way.
4. Turn the two lock levers towards each other in the
direction of the arrow.
5. Pull out the air cooler.
6. Clean the air cooler element thoroughly, allow to drain well.
7. Replace the air cooler. The handle must be at the
bottom. Turn the lock levers back again to lock.
8. Push the maintenance flap closed on the left and right
sides at the same time (see diagram) until the lock
engages.
The door can only be closed if the maintenance flap is
closed properly!
Cleaning the moisture sensor
After long periods of operation, fine deposits (limescale,
fabric softener) can form on the moisture sensors on the
vanes and inside of the drum.
On electronic programmes, this can result in the desired
level of dryness not being reached. Wipe deposits away
with a cloth soaked in vinegar.
Emptying the machine for frost protection or transport
If the machine is in a room susceptible to frost or is to be
transported, it must be completely emptied.
1. Empty the condensed water container (page 46).
2. Select any drying programme.
3. Press the start button. Any condensed water remaining
in the machine will then be pumped into the container.
4. Stop the programme after around 5 minutes using the
fast forward button and empty the condensed water
container again.
Basic Settings
The machine has basic settings from the factory. It can be
adapted to the user's individual needs either when first
used or later using the following functions.
The basic settings can only be changed if no dry programme is. To change a basic setting, it is first necessary to
hold the programme button(s) pressed and then press the
fast forward button. The corresponding function is shown
on the digital display. The display changes when the fast
forward button is pressed repeatedly with the programme
button(s) held down.
Example:
Function switched off
Function switched on
Initial moisture content (ex factory 50%)
+
The accuracy of the time remaining is increased if the
dryer is adjusted to the spin speed of your washing
machine.
Spin speed 1600 rpm - 50 % residual moisture
Spin speed 1200 rpm - 60 % residual moisture
Level of dryness (ex factory OFF)
+
When this function is switched on, the level of dryness
for the electronic programmes (wardrobe and extra dry) is
slightly increased and the laundry will be slightly drier.
DRYING LEVEL
HIGHER
DRYING LEVEL
NORMAL
Page 48

48
Crease protection (ex factory ON)
+
When this function is switched on, the 60 minute crease
protection phase begins at the end of the programme.
Setting the time (the time is not set ex factory)
+
The hours can be set using the button and the
minutes using the button.
Language (ex factory GERMAN)
+÷
The basic language is changed and is retained even after
switching the machine off or putting it in sleep mode.
Extended basic settings
++
X By pressing these three buttons at the same time, the
display shows the extended basic settings.
X Repeatedly pressing the button shows the
possible settings.
X Pressing the button allows the settings to be
changed.
X Pressing the button interrupts the display of the
settings.
Child lock (ex factory OFF)
Select «Extended basic settings»!
The child lock is to prevent accidental starting, changing or
deletion of a programme by small children.
Operating the machine with the child lock switched on:
+
Hold the start button down and press the fast forward
button.
Reduced mains power (ex factory OFF)
Select «Extended basic settings»!
If the mains voltage is reduced, the programme times will
be extended accordingly.
Off = 400 V 2N ~ 3,25 kW / 10 AT
Off = 230 V 1N ~ 3,25 kW / 16 AT
On = 230 V 1N ~ 2,05 kW / 10 AT
LCD Brightness setting (ex factory 150)
Select «Extended basic settings»!
The button can be used to alter the brightness or
text on the display.
LCD Contrast setting (ex factory 32)
Select «Extended basic settings»!
The button can be used to alter the contrast on
the display.
Alarm volume (ex factory VOLUME 2)
Select «Extended basic settings»!
With the Alarm setting switched on, a signal sounds at
regular intervals at the end of the programme.
The volume can be adjusted in 3 levels.
Off
Volume 1
Volume 2
Volume 3
Standby function (ex factory ON)
Select «Extended basic settings»!
When the standby function is switched on, the controls
switch off when no drying programme is running in
energy saving mode. All displays are dark.
Optical interface (ec factory OFF)
Select «Extended basic settings»!
If the optical interface (SCS) is switched on, customer ser-
vices can communicate with the machine by PC.
Problems
Repairs, alterations or intervention on electronic equipment
should only be carried out by qualified specialists. Inexpert
repairs can cause considerable damage and risk to the user.
Only original spare parts should be used for repairs.
Rectifying minor faults yourself
The machine does not start after pressing a
programme button:
X Check whether the mains power is switched on at the
wall and the plug is in.
X Check whether all the fuses are intact or the safety
switch has tripped.
The machine does not start:
X The start button has not been pressed.
X Start time preselect has been set. Only starts at the
preselected start time.
The drying target is not achieved or the drying
time is too long:
X Clean the moisture sensors on the vanes in the drum
(see page 46).
X Power cut (check EW power cut times).
The laundry is not dry after the maximum
possible settings:
X Drum is overloaded.
X Laundry not sufficiently spun.
X Insufficient room ventilation (open a window or door).
X The filter in the door is blocked with fluff (clean filter).
Page 49

Drum lighting does not work:
X Faulty light bulb. For safety reasons, the lamp should
only be replaced by customer services or a specialist.
Dampness in the room increases significantly:
X The room does not have sufficient ventilation.
Ensure adequate ventilation.
Door does not open:
X If no power is available to open the door, you can
open the door manually by pressing next to the door
lock.
Error messages
If the following error messages are displayed, the
programme can be restarted by pressing the start button
once the error has been rectified.
Child lock
X Hold the start button down and press the fast forward
button.
Door open
X Push door closed until lock engages.
If the machine displays an F - - error message:
X Interrupt the programme using the fast forward button
and select a new programme.
If error messages appear repeatedly:
X Switch off the power for around 1 minute and switch
it back on again. (Pull out the plug or switch off at the
wall).
z The machine is ready for use again when the
programme control lights flash.
X Select a new programme.
If an error message appears again:
X Make a note of the error message.
X Unplug the machine or switch it off at the wall.
X Notify customer services.
Customer Services
Before you call customer services, check whether you can
rectify the problem yourself (see «Rectifying minor faults
yourself», page 48).
If advice is required, costs may be incurred if a service
technician is required, even during the guarantee period.
If you cannot rectify a problem yourself, unplug the
machine or switch it off at the wall and call customer
services.
Dial the central customer services number (see back
cover). You will be automatically connected to the
customer services branch for your region.
Give customer services product and serial numbers.
You will find this information on the type label on the
inside of the door.
Note the numbers for your machine here:
Product No.:
Serial No.:
Guarantee subscription
After the end of the normal 2 years guarantee period, this
can be extended if required with a guarantee subscription.
We will be happy to send you the relevant documents.
Please see also the enclosed guarantee and customer
services booklet.
49
Page 50

50
Notizen / Notes / Note
Page 51

51
Notizen / Notes / Note
Page 52

06.06 d/f/i/e Printed in Switzerland Subject to change without notice
Kundendienst
Tel.
0844 888 222
Zentrale Kundendienst-Nummern für die Schweiz
Fax
0844 888 223
Service après-vente
Tél.
0844 888 222
Numéros centralisés du service après-vente pour la Suisse
Fax
0844 888 223
Servizio assistenza
Tel.
0844 888 222
Numeri della sede centrale del Servizio Assistenza per la Svizzera
Fax
0844 888 223
Schulthess Maschinen AG/ SA
Postfach/ Case postale/Casella postale
CH-8633 Wolfhausen
Tel. 055.253 51 11
Fax 055.253 54 70
http://www.schulthess.ch
Schulthess Maschinen GmbH
Hetzendorferstrasse 191
A-1130 Wien
Tel. 01.803 98 00-20
Fax 01.803 98 00-30
 Loading...