

Page 1

Istruzioni per luso
FORNO
IT
Italiano, 1 Français, 33
GB
English,17
FR
NL
Nederlands,
49
FL 836 XA
FL 836 AN
FL 836 MT
FLR 936 XA
FLR 936 AN
FLR 936 MT
FLL 936 XA
FLL 936 AN
FLL 936 MT
FLL 936G XA
FLL 936G AN
FLL 936G MT
FLR 936G XA
FLR 936G AN
FLR 936G MT
FL 836G XA
FL 836G AN
FL 836G MT
Sommario
IT
Installazione, 2-3
Posizionamento
Collegamento elettrico
Descrizione dellapparecchio, 4-5
Vista dinsieme modello con apertura classica
Vista dinsieme modello con apertura laterale
Pannello di controllo modello con apertura classica
Pannello di controllo modello con apertura laterale
Display
Avvio e utilizzo, 6-7
Prima accensione
Impostare lorologio
Impostare il contaminuti
Sicurezza Bambini
Modalità DEMO
Avviare il forno
Targhetta caratteristiche
Programmi, 8-12
Programmi di cottura Crèation
Programmi di cottura automatici Succès
Programmare la cottura
Consigli pratici di cottura
Tabella cottura Crèation
Tabella cottura Succès
Precauzioni e consigli, 13
Sicurezza generale
Smaltimento
Risparmiare e rispettare lambiente
Manutenzione e cura, 14-15
Escludere la corrente elettrica
Pulire lapparecchio
Sostituire la lampadina
Montaggio del Kit Guide Scorrevoli
Pulizia automatica PIROLISI
Assistenza, 16
Assistenza attiva 7 giorni su 7
Page 2
560 m
m
.
45 mm.
Installazione
IT
È importante conservare questo libretto per poterlo
consultare in ogni momento. In caso di vendita, di
cessione o di trasloco, assicurarsi che resti insieme
allapparecchio per informare il nuovo proprietario sul
funzionamento e sui relativi avvertimenti.
Leggere attentamente le istruzioni: ci sono
importanti informazioni sullinstallazione, sulluso e
sulla sicurezza.
Posizionamento
Gli imballaggi non sono giocattoli per bambini e
vanno eliminati secondo le norme per la raccolta
differenziata (vedi Precauzioni e consigli).
Linstallazione va effettuata secondo queste
istruzioni e da personale professionalmente
qualificato. Una errata installazione può causare
danni a persone, animali o cose.
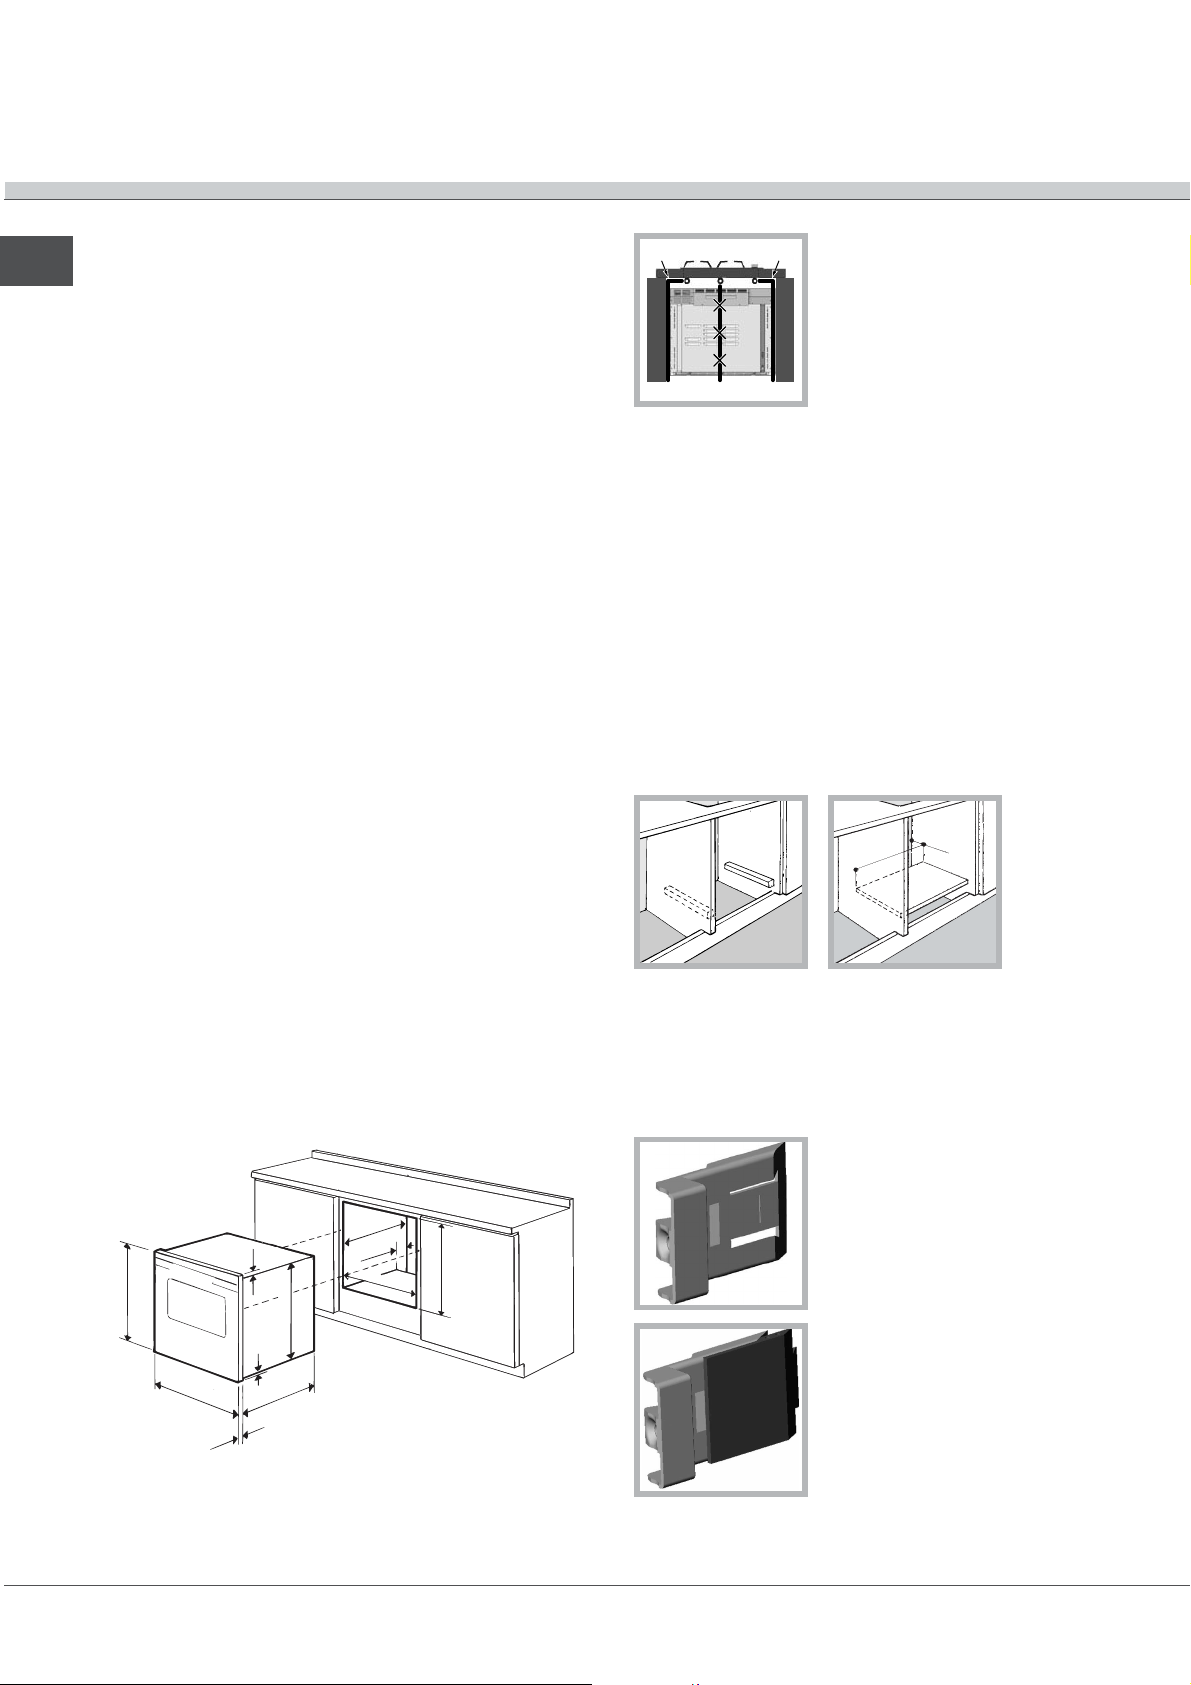
Incasso
Per garantire un buon funzionamento
dellapparecchio è necessario che il mobile abbia le
caratteristiche adatte:
OK OK
Nel caso di inserimento
sottotavolo, verificare che il
tubo del piano cottura sia
posizionato correttamente e
non possa interferire con il
forno durante linstallazione nè
ostruire le feritoie posteriori
del ventilatore di
raffreddamento
Una volta incassato lapparecchio non debbono
essere possibili contatti con le parti elettriche.
Le dichiarazioni di consumo indicate in targhetta
caratteristiche sono state misurate con questo tipo
di installazione.
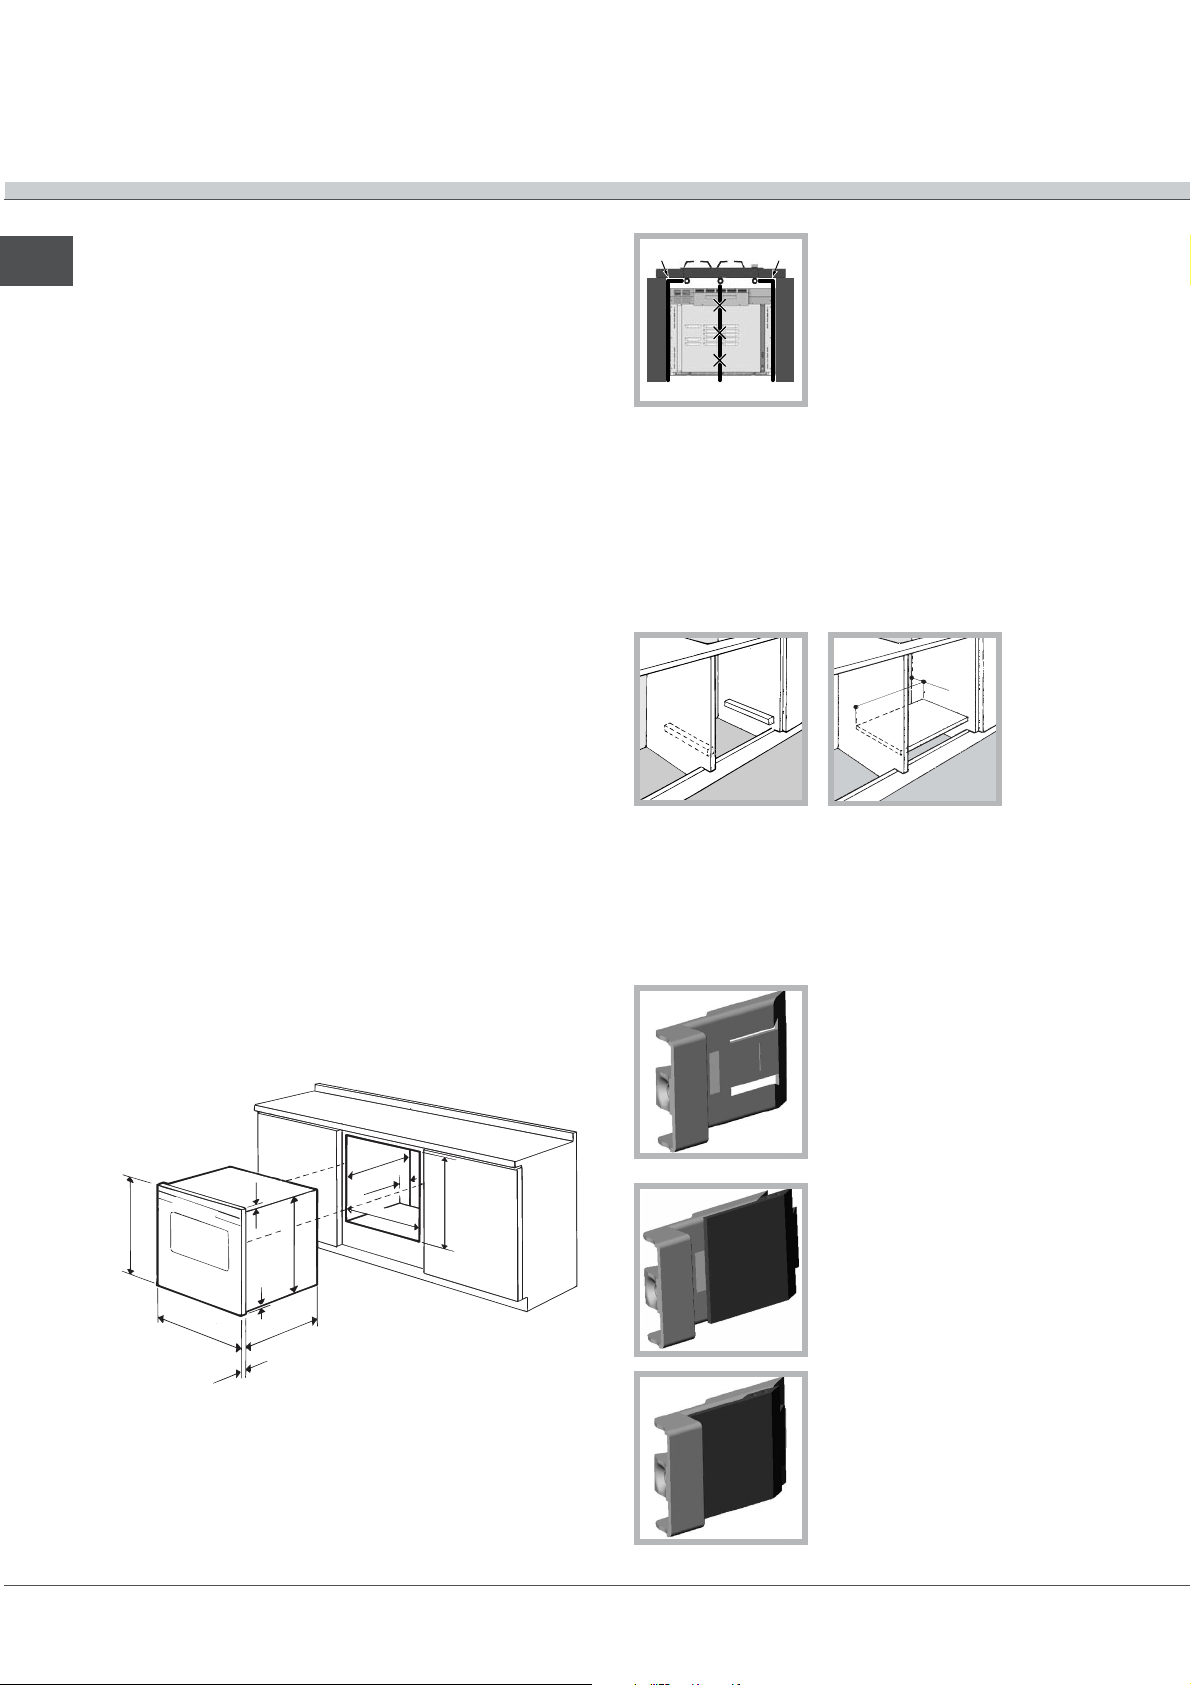
Aerazione
Per garantire una buona aerazione è necessario
eliminare la parete posteriore del vano. È preferibile
installare il forno in modo che appoggi su due listelli
in legno oppure su un piano continuo che abbia
unapertura di almeno 45 x 560 mm (vedi figure).
i pannelli adiacenti il forno devono essere di
materiale resistente al calore;
nel caso di mobili in legno impiallacciato, le colle
devono essere resistenti alla temperatura di
100°C;
per lincasso del forno, sia nel caso di inserimento
sottotavolo (vedi figura) che a colonna, il mobile
deve avere le seguenti dimensioni:
in.
. m
m
547 m
.
m
45 m
558 mm.
475 mm.
480 mm.
595 m
24,5 mm.
7 mm.
470 mm.
3 mm.
m
.
545 mm.
Centraggio e fissaggio
Regolare i 2 tacchetti posti lateralmente al forno,
in corrispondenza dei 2 fori superiori della cornice
perimetrale, in base allo spessore della fiancata del
mobile:
spessore di 20 mm: rimuovere
la parte mobile del tacchetto
(vedi figura);
spessore di 18 mm: utilizzare
la prima scanalatura, come
già predisposto dal
fabbricante (vedi figura);
2
Page 3

spessore di 16 mm: utilizzare
la seconda scanalatura
(vedi figura).
Per fissare lapparecchio al mobile: aprire la porta
del forno e avvitare 2 viti a legno nei 2 fori superiori
della cornice perimetrale.
Tutte le parti che assicurano la protezione debbono
essere fissate in modo tale da non poter essere tolte
senza laiuto di qualche utensile.
Collegamento elettrico
I forni dotati di cavo di alimentazione tripolare sono
predisposti per il funzionamento con corrente
alternata, con tensione e frequenza indicate nella
targhetta caratteristiche posta sullapparecchio (vedi
sotto).
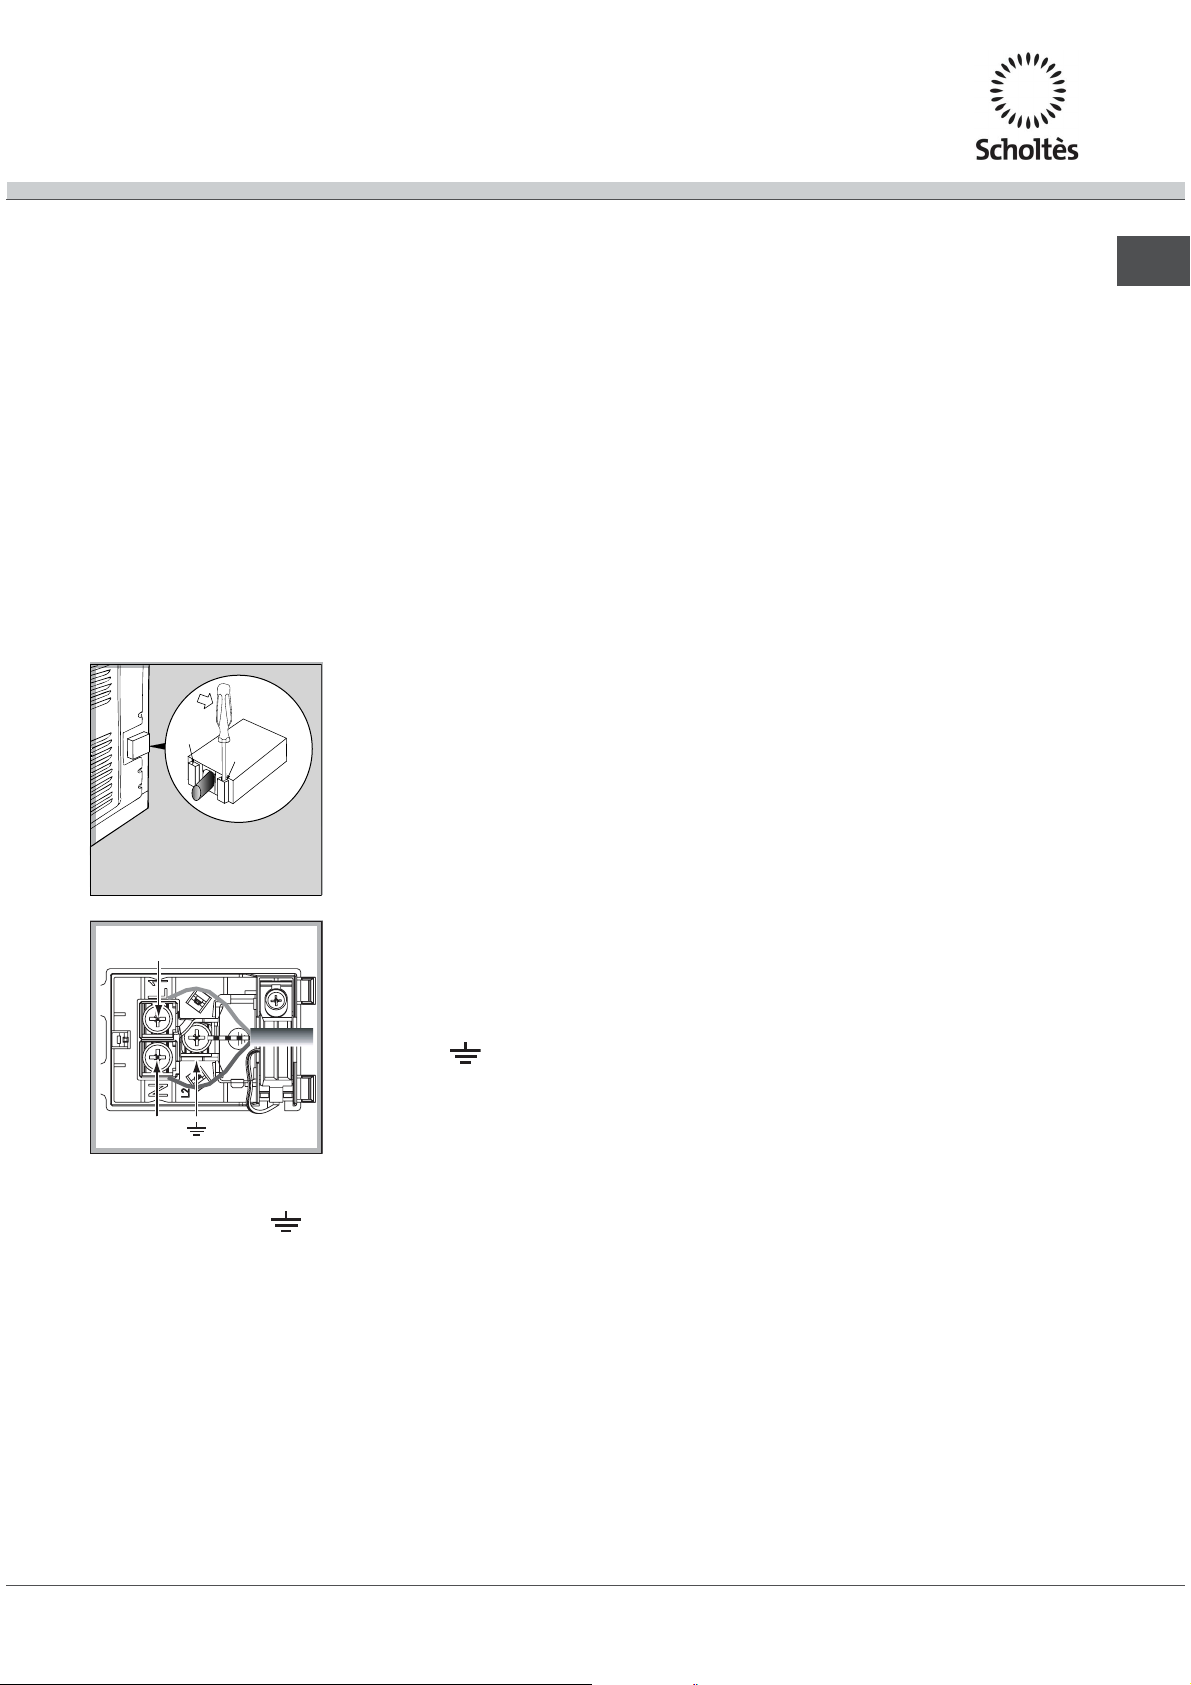
Montaggio del cavo di alimentazione
1. Aprire la morsettiera
facendo leva con un
cacciavite sulle
linguette laterali del
coperchio: tirare e
aprire il coperchio
(vedi figura).
2. Mettere in opera il
L
N
cavo di alimentazione:
svitare la vite del
serracavo e le tre viti
dei contatti L-Npoi fissare i cavetti
sotto
le teste delle viti
rispettando i colori Blu
(N) Marrone (L) GialloVerde
(vedi figura).
e
Allacciamento del cavo di alimentazione alla rete
Montare sul cavo una spina normalizzata per il
carico indicato nella targhetta caratteristiche (vedi a
fianco).
In caso di collegamento diretto alla rete è necessario
interporre tra lapparecchio e la rete un interruttore
onnipolare con apertura minima fra i contatti di 3 mm
dimensionato al carico e rispondente alle norme in
vigore (il filo di terra non deve essere interrotto
dallinterruttore). Il cavo di alimentazione deve
essere posizionato in modo tale che in nessun punto
superi di 50°C la temperatura ambiente.
Linstallatore è responsabile del corretto
collegamento elettrico e dellosservanza delle norme
di sicurezza.
Prima di effettuare lallacciamento accertarsi che:
la presa abbia la messa a terra e sia a norma di
legge;
la presa sia in grado di sopportare il carico
massimo di potenza della macchina, indicato
nella targhetta caratteristiche (vedi sotto);
la tensione di alimentazione sia compresa nei
valori nella targhetta caratteristiche (vedi sotto);
la presa sia compatibile con la spina
dellapparecchio. In caso contrario sostituire la
presa o la spina; non usare prolunghe e multiple.
Ad apparecchio installato, il cavo elettrico e la
presa della corrente devono essere facilmente
raggiungibili.
Il cavo non deve subire piegature o compressioni.
Il cavo deve essere controllato periodicamente e
sostituito solo da tecnici autorizzati (vedi
Assistenza).
Lazienda declina ogni responsabilità qualora
queste norme non
vengano rispettate.
IT
3. Fissare il cavo nellapposito fermacavo.
4. Chiudere il coperchio della morsettiera.
3
Page 4
IT
Descrizione
dellapparecchio
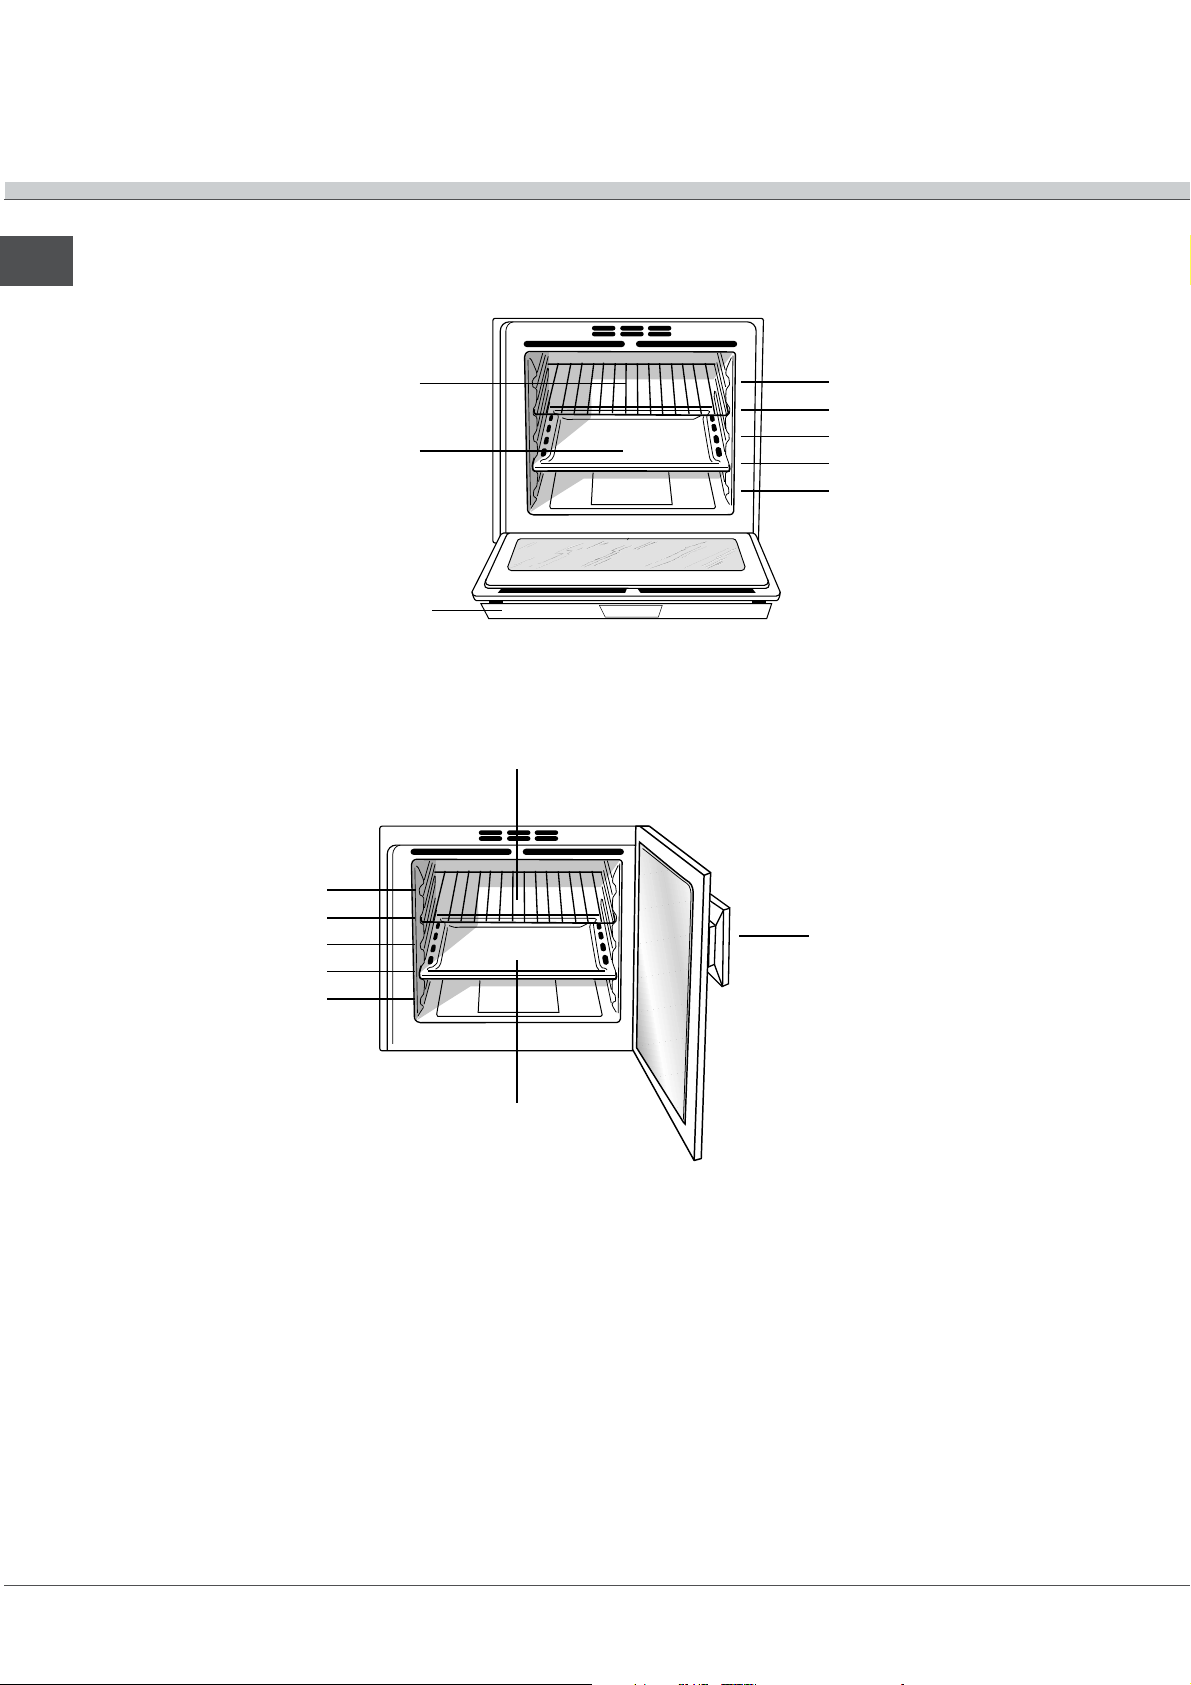
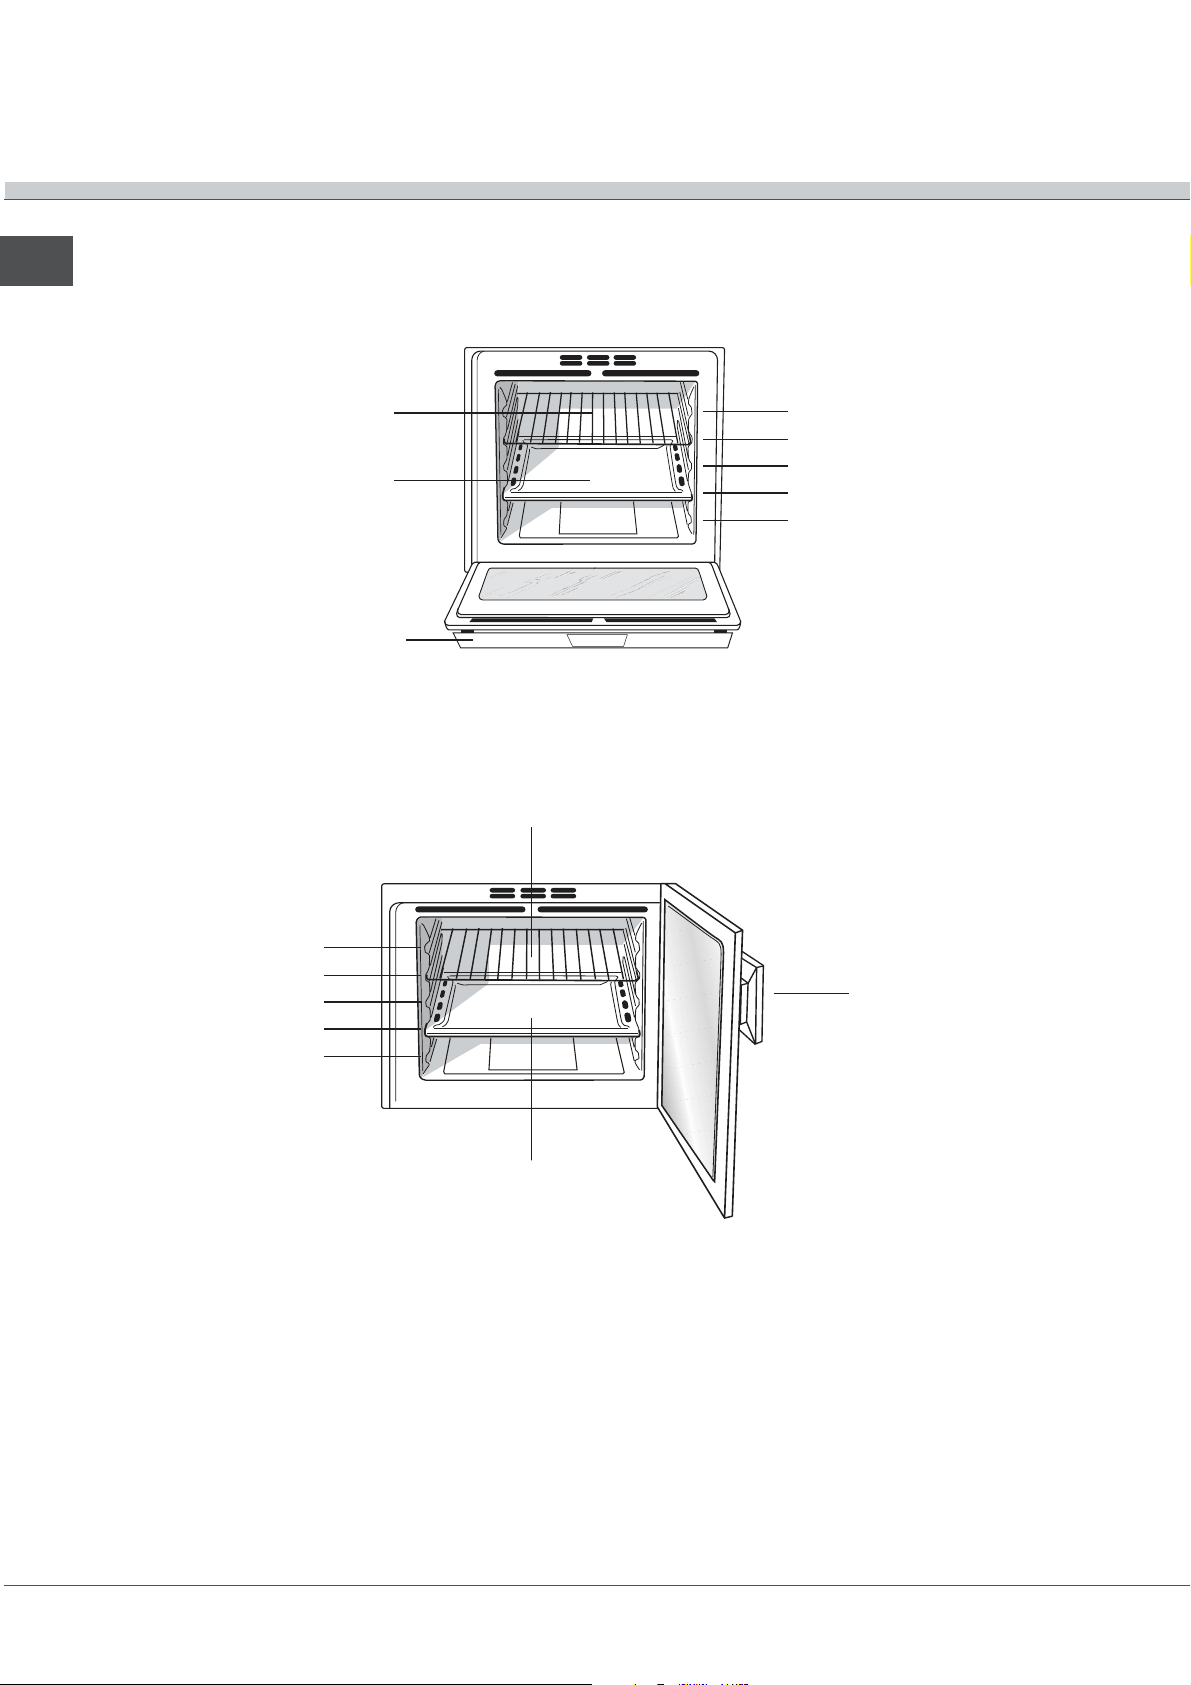
Vista dinsieme modello con apertura classica
GUIDE di
scorrimento dei
ripiani
Ripiano GRIGLIA
Ripiano LECCARDA
Pannello di controllo
Vista dinsieme modello con apertura laterale
Ripiano
GUIDE di
scorrimento dei
ripiani
posizione 5
posizione 4
posizione 3
posizione 2
posizione 1
GRIGLIA
posizione 5
posizione 4
posizione 3
posizione 2
posizione 1
Pannello di controllo
Ripiano
LECCARDA
4
Page 5
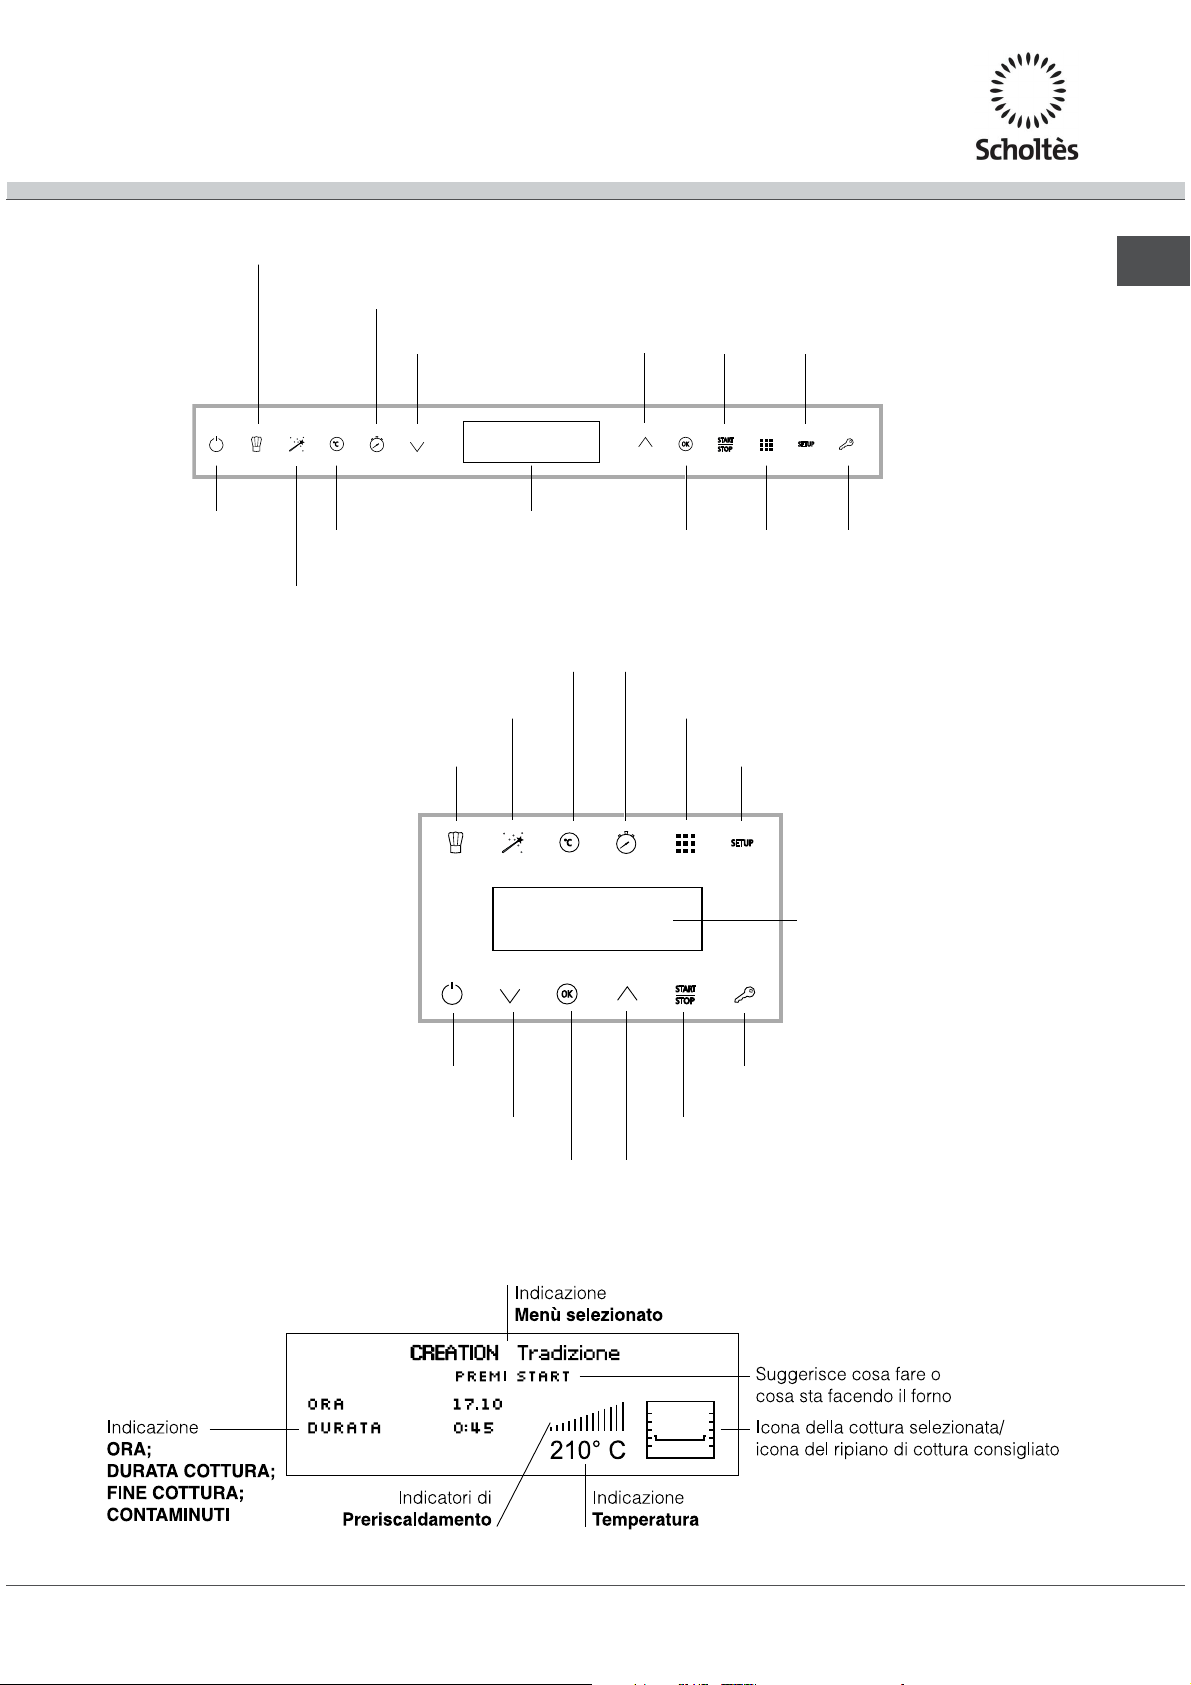
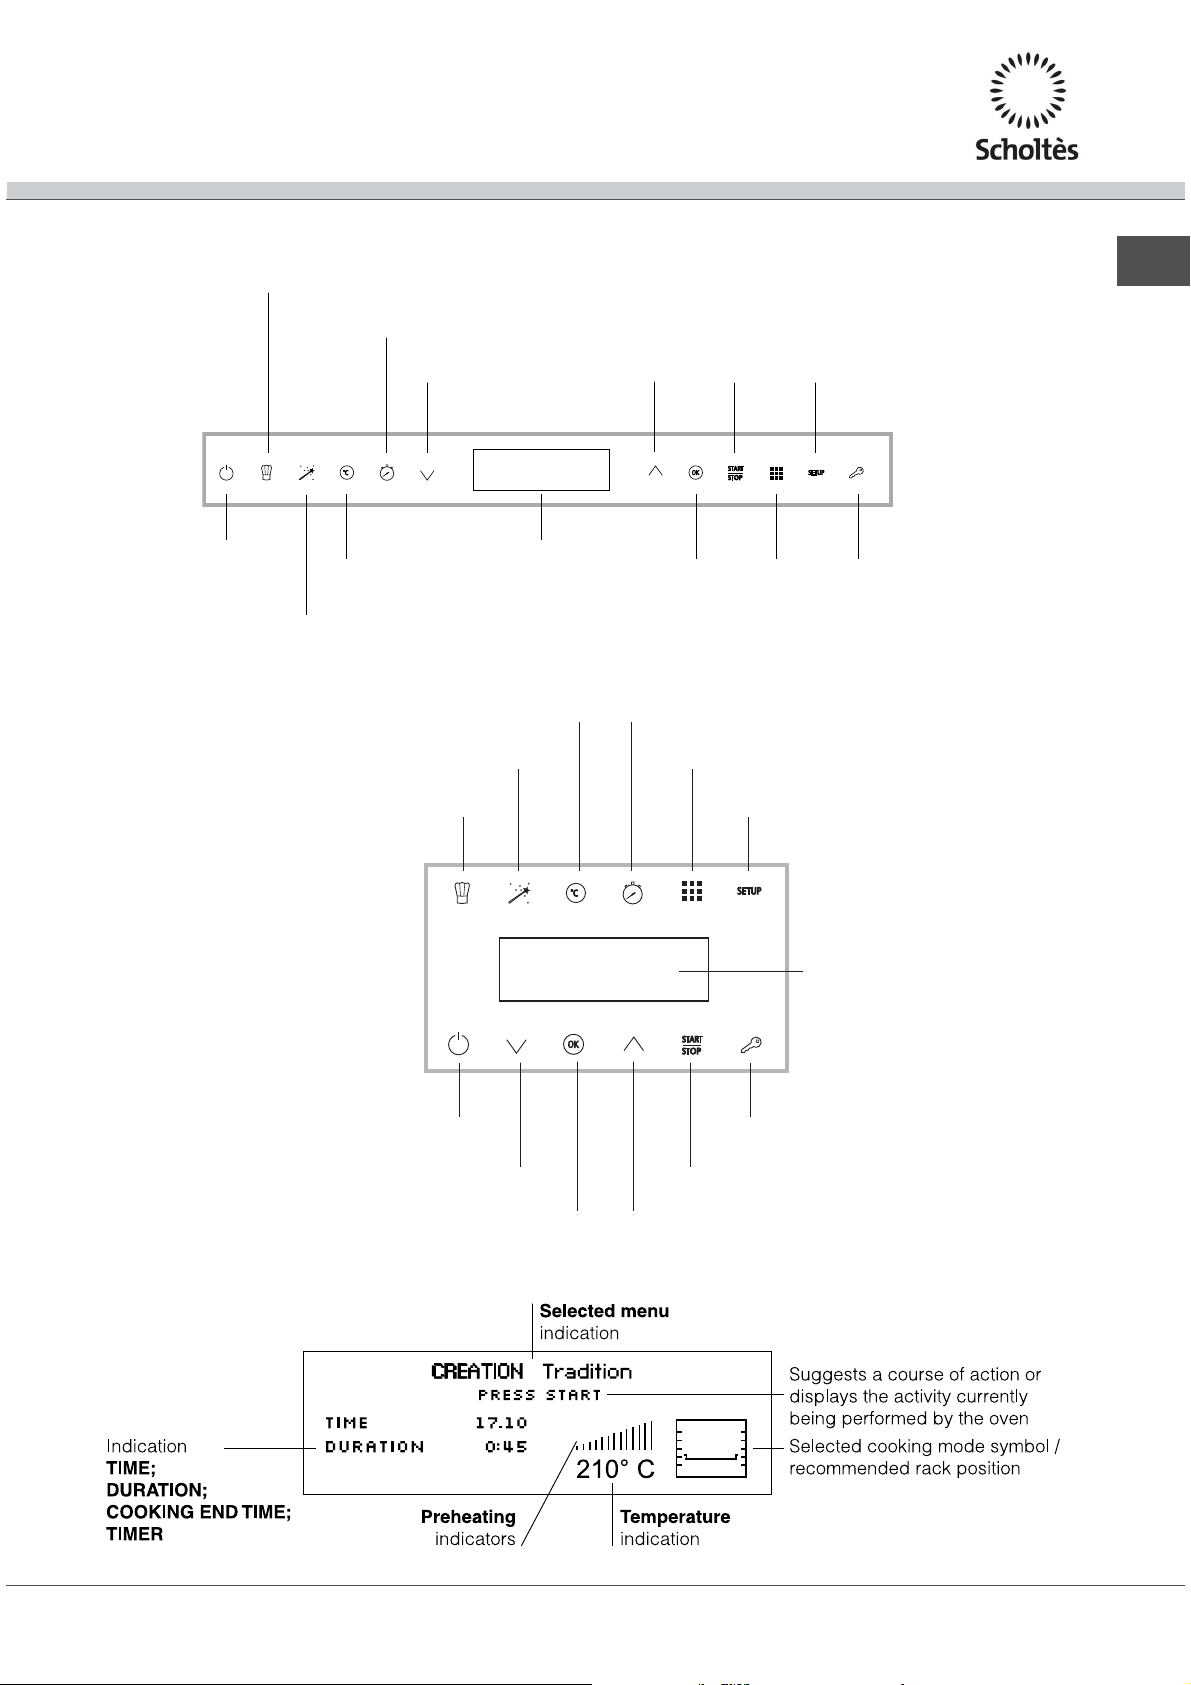
Pannello di controllo modello con apertura classica
Selezione
Programmi Crèation
Regolazione
Tempi
Freccia
Giù
Freccia
Su
START/
STOP
IT
Tasto
Impostazioni
ON/OFF Regolazione
Temperatura
Selezione
Programmi Succès
DISPLAY Tasto
Pannello di controllo modello con apertura laterale
Regolazione
Temperatura
Selezione
Programmi Succès
Selezione
Programmi Crèation
ON/OFF
Freccia
Giù
Tasto
OK
Regolazione
Tempi
Freccia
Su
Tasto
OK
Tasto
Pirolisi
START/
STOP
Pirolisi
Tasto
Impostazioni
Tasto
Blocco comandi
Tasto
Blocco comandi
DISPLAY
Display
5
Page 6

Avvio e utilizzo
IT
Alla prima accensione fare funzionare il forno a
vuoto per almeno unora alla temperatura massima e
a porta chiusa. Poi spegnere, aprire la porta del
forno
e aerare il locale. Lodore che si avverte è dovuto
allevaporazione delle sostanze usate per proteggere
il forno.
Ad ogni accensione il forno è impostato sul Menù
Crèation
Allaccensione del forno, se lutente non tocca
alcun tasto, il forno si spegnerà automaticamente
dopo 2 minuti
Prima accensione
Dopo lallacciamento alla rete elettrica, alla prima
alimentazione, accendere il pannello di controllo
premendo il tasto
nel menù SETUP. Per scegliere la lingua desiderata
selezionarla con i tasti
indica quale lingua è selezionata. Per confermare
premere il tasto OK.
Una volta effettuata la scelta, il display visualizzerà i
seguenti parametri:
LINGUA Selezione della lingua
ORA Impostazione dellora
TONO Tono della tastiera
OROLOGIO Visualizzazione dellorologio
INFO SICUREZZA Visualizzazione testo info
ESCI Uscita dal setup
Dopo aver impostato la lingua nel menù SETUP,
trascorso un tempo di 60 secondi di non utilizzo il
display passa al menù Crèation.
. Compare la lista delle lingue
e . Il carattere in grassetto
Impostare lorologio
Per impostare lorologio, accendere il forno
premendo il tasto
seguire la procedura indicata.
1. selezionare la voce ORA e premere il tasto OK
per modificare;
2. regolare lora tramite i tasti
3. premere il tasto OK per confermare;
4. ripetere loperazione per i minuti.
; premere il tasto SETUP e
o ;
Impostare il contaminuti
Il contaminuti è impostabile sia a forno spento che
acceso quando si è allinterno del menù di una
cottura: a tempo scaduto il forno emette un segnale
acustico, che si arresta dopo un minuto o premendo
una qualsiasi icona.
Per impostare il contaminuti premere il tasto
regolare i minuti tramite i tasti
o .
e
Premere il tasto OK per confermare.
Il contaminuti non controlla laccensione e lo
spegnimento del forno.
Sicurezza Bambini
La funzione Sicurezza Bambini permette di bloccare
la porta e i tasti del forno.
Per lattivazione premere il tasto
OK per confermare.
Per disattivare ripetere la procedura indicata.
La sicurezza bambini è attivabile quando il forno è in
cottura, oppure è spento, oppure è stato impostato
un fine cottura e premuto lo start. La sicurezza
bambini è disattivabile in tutti i casi precedenti e
anche quando il forno ha terminato la cottura.
e poi il tasto
Modalità Demo
Il forno ha la possibilità di funzionare in modalità
DEMO: si disattivano tutti gli elementi riscaldanti,
lasciando però operativi i comandi.
Per attivare la modalità DEMO, da forno acceso,
premere in sequenza il tasto
OK. Per disattivare, da forno acceso, premere in
sequenza il tasto
segnale acustico e il display visualizza Demo Off.
La modalità Demo è attivabile solo quando il forno è
acceso e non è stata avviata nessuna cottura.
ed il tasto . Viene emesso un
, il tasto ed il tasto
Avviare il forno
Ad ogni accensione il forno è impostato sul Menù
Crèation
1. Accendere il pannello di controllo premendo il
tasto
2. Premere il tasto del programma di cottura
desiderato Crèation
visualizza la lista dei programmi selezionabili.
4. Tramite i tasti
desiderato e confermare premendo OK. Il display
visualizza temperatura e durata preimpostate (solo la
durata per cotture Succès).
3. Premere il tasto START/STOP per avviare la
cottura.
4. Il forno entra nella fase di preriscaldamento.
5. Un segnale acustico e laccensione di tutti gli
indicatori preriscaldamento segnalano che il
preriscaldamento è completo.
6. Durante la cottura è sempre possibile:
- modificare la temperatura premendo il tasto
regolare tramite i tasti
premendo OK (solo per cotture Crèation);
.
o Succès . Il display
o selezionare il programma
,
o e confermare
6
Page 7
- programmare la durata di una cottura
g
(solo per cotture Crèation);
- interrompere la cottura premendo il tasto START/
STOP;
- impostare il contaminuti
- spegnere il forno premendo il tasto
;
.
7. In caso di black-out, se la temperatura del forno
non si è abbassata troppo, lapparecchio è dotato di
un sistema che riattiva il programma dal punto in cui
è stato interrotto. Le pianificazioni in attesa di avvio,
invece, non vengono ripristinate al ritorno della
corrente e devono essere riprogrammate.
Nei programmi ROSTICCERIA e GRILL non è
previsto il preriscaldamento.
Non appoggiare mai oggetti sul fondo del forno
perché si rischiano danni allo smalto.
Porre sempre i recipienti di cottura sulla griglia
in dotazione.
Ventilazione di raffreddamento
Per ottenere una riduzione delle temperature esterne,
una ventola di raffreddamento genera un getto daria
che esce sopra al pannello di controllo del forno.
Allinizio del programma PIROLISI la ventola funziona
a bassa velocità. Alla fine del programma PIROLISI la
ventola funziona alla massima velocità.
A fine cottura la ventola rimane attiva finché il forno
non è sufficientemente freddo.
Luce del forno
A forno spento la lampadina può essere accesa in
qualunque momento aprendo la porta del forno.
TARGHETTA CARATTERISTICHE
larghezza cm 43,5
Dimensioni *
Volume * lt. 58
Collegamenti
elettrici
ENERGY
LABEL *
altezza cm 32
profondità cm 41,5
tensione a 220-240V ~ 50/60Hz
potenza massima assorbita
2800W
Direttiva 2002/40/CE sulletichetta
dei forni elettrici.
Norma EN 50304
Consumo energia dichiarazione
Classe convezione Forzata -
IT
funzione di riscaldamento:
Rosticceria.
Questa apparecchiatura è
conforme alle seguenti Direttive
Comunitarie:
2006/95/CEE del 12/12/06 (Bassa
Tensione) e successive
modificazioni
* Senza
uide estrabili
2004/108/CEE del 15/12/04
(Compatibilità Elettromagnetica)
e successive modificazioni
93/68/CEE del 22/07/93 e
successive modificazioni.
2002/96/CE e successive
modificazioni.
1275/2008 stand-by/off mode.
7
Page 8

Programmi
IT
Programmi di cottura Crèation
Tutti i programmi hanno una temperatura di cottura
preimpostata. Essa può essere regolata manualmente,
impostandola a piacere tra 30°C e 300°C.
Il programma Création
manuali.
Per ciascuna di esse, il forno gestisce unicamente i
parametri essenziali per la riuscita di tutte le ricette,
dalle più semplici alle più sofisticate: temperatura,
fonte di calore, tasso d'umidità e circolazione forzata
dell'aria sono valori che vengono controllati
automaticamente.
Questo capitolo è stato realizzato con la preziosa
collaborazione del nostro esperto culinario. Invitiamo
a seguire i suoi consigli al fine di sfruttare appieno la
sua esperienza e ottenere una cottura sempre
perfetta.
Le funzioni di cottura, le temperature e i ripiani di
posizionamento delle pietanze da selezionare sono
esattamente gli stessi da lui usati abitualmente per
ottenere i migliori risultati.
Per ciascuna funzione Création, nella tabella
seguente viene indicato se la pietanza va infornata a
freddo o a caldo. Il rispetto di queste indicazioni
garantisce un risultato di cottura ottimale.
Se si desidera infornare a caldo, attendere la fine del
preriscaldamento, segnalata da una sequenza di
segnali acustici.
La temperatura viene determinata automaticamente in
base al tipo di cottura scelto; tuttavia è possibile
modificarla per adattarla alla specifica ricetta da
realizzare.
È possibile anche impostare una durata di cottura con
inizio immediato o ritardato.
Programma MULTILIVELLO
Si attivano tutti gli elementi riscaldanti ed entra in funzione la
ventola. Poiché il calore è costante in tutto il forno, laria
cuoce e rosola il cibo in modo uniforme. È possibile
utilizzare fino a un massimo di due ripiani
contemporaneamente.
Programma GRILL
Si attiva lelemento riscaldante superiore. La temperatura
elevata e diretta del grill è consigliata per gli alimenti che
necessitano di unalta temperatura superficiale. Effettuare le
cotture con la porta del forno chiusa.
comprende tutte le cotture
Programma GIRARROSTO
Si attiva lelemento riscaldante superiore ed entra in
funzione il girarrosto. La funzione è ottimizzata per le cotture
al girarrosto. Effettuare le cotture con la porta del forno
chiusa.
Programma GRATIN
Si attivano gli elementi riscaldanti superiore e circolare ed
entra in funzione la ventola. Unisce allirradiazione termica
unidirezionale la circolazione forzata dellaria allinterno del
forno. Ideale per cibi gratinati, lasagne, ecc...
Effettuare le cotture con la porta del forno chiusa.
Programma FORNO TRADIZIONE
Con questa cottura tradizionale è meglio utilizzare un solo
ripiano. Cottura raccomandata per cotture lente o
bagnomaria. Per la cottura a bagnomaria è consigliabile
mettere lacqua direttamente nella leccarda.
Programma ROSTICCERIA
Si attivano gli elementi riscaldanti superiore e circolare ed
entra in funzione la ventola. Unisce allirradiazione termica
unidirezionale la circolazione forzata dellaria allinterno del
forno. Ciò impedisce la bruciatura superficiale degli alimenti
aumentando il potere di penetrazione del calore.
Effettuare le cotture con la porta del forno chiusa.
Programma LIEVITAZIONE
Si attiva lelemento riscaldante circolare ed entra in funzione
la ventola solo in fase di riscaldamento. La temperatura del
forno è ideale per lattivazione del processo di lievitazione.
Durante la lievitazione tenere la porta del forno chiusa.
Programma BRIOCHE
Lutilizzo combinato dellelemento riscaldante
superiore e circolare rendono questo programma di
cottura ideale per dolci a base di lievito naturale.
Programma CROSTATE
Lutilizzo combinato dellelemento riscaldante
superiore e circolare rendono questo programma di
cottura ideale per dolci a pasta sfoglia o pasta frolla.
Programma DOLCI
Questo programma di cottura è indicato per tutti i dolci di
pasticceria non inclusi in BRIOCHE e CROSTATE (ad es.
piccoli bignè, pan di spagna, ecc...).
8
Page 9
Programma MERINGA BIANCA/AMBRATA
Le temperature sono preimpostate e non modificabili.
Il programma MERINGA BIANCA è ideale per lasciugatura
delle meringhe. Il programma MERINGA AMBRATA è
ideale per la cottura delle meringhe.
Programma SCONGELAMENTO
La ventola posta sul fondo del forno fa circolare laria
a temperatura ambiente attorno al cibo. E indicato per
lo scongelamento di qualsiasi tipo di cibo, ma in
particolare per cibi delicati che non vogliono calore
come ad esempio: torte gelato, dolci alla crema o con
panna, dolci di frutta.
Programmi BASSA TEMPERATURA
Questo tipo di cottura, utilizzato da anni dai
professionisti del settore, consente di cucinare gli
alimenti (carni, pesci, frutta, verdura) a temperature
molto basse (da 85 a 120 °C), garantendo una cottura
perfetta ed esaltando al massimo le qualità gustative.
I vantaggi non sono da sottovalutare:
essendo le temperature di cottura molto basse (in
genere, inferiori alla temperatura d'evaporazione),
la dispersione dei sughi di cottura dovuta
all'evaporazione viene notevolmente ridotta e
l'alimento acquista morbidezza;
nella cottura di carni, le fibre muscolari si ritirano
meno rispetto a una cottura classica. Il risultato è
una carne più tenera che non necessita di una fase
di riposo dopo la cottura. La doratura della carne
dovrà essere effettuata prima di infornare.
La cottura a bassa temperatura sottovuoto,
utilizzata da 30 anni dai più grandi chef, presenta
numerose qualità:
gastronomiche: consente di concentrare gli aromi
rispettando la caratteristiche gustative dell'alimento
e mantenendone la morbidezza e la tenerezza.
igieniche: poiché vengono rispettate le norme
d'igiene, questo tipo di cottura protegge gli alimenti
contro gli effetti nocivi dell'ossigeno e garantisce
una conservazione più prolungata delle pietanze
nel frigorifero.
organizzative: grazie al prolungamento della durata
di conservazione, è possibile preparare i piatti con
largo anticipo.
dietetiche: questa cottura limita l'utilizzo delle
sostanze grasse e permette quindi di realizzare una
cottura leggera e digeribile.
economiche: riduce notevolmente il calo di peso
dei prodotti.
Per utilizzare questa tecnica, è necessario
possedere una macchina sottovuoto dotata di
appositi sacchetti. Seguire attentamente le istruzioni
indicate per il confezionamento sottovuoto degli
alimenti.
La tecnica del sottovuoto permette anche la
conservazione dei prodotti crudi (frutta, verdura,
ecc.) e dei prodotti già cotti (cottura tradizionale).
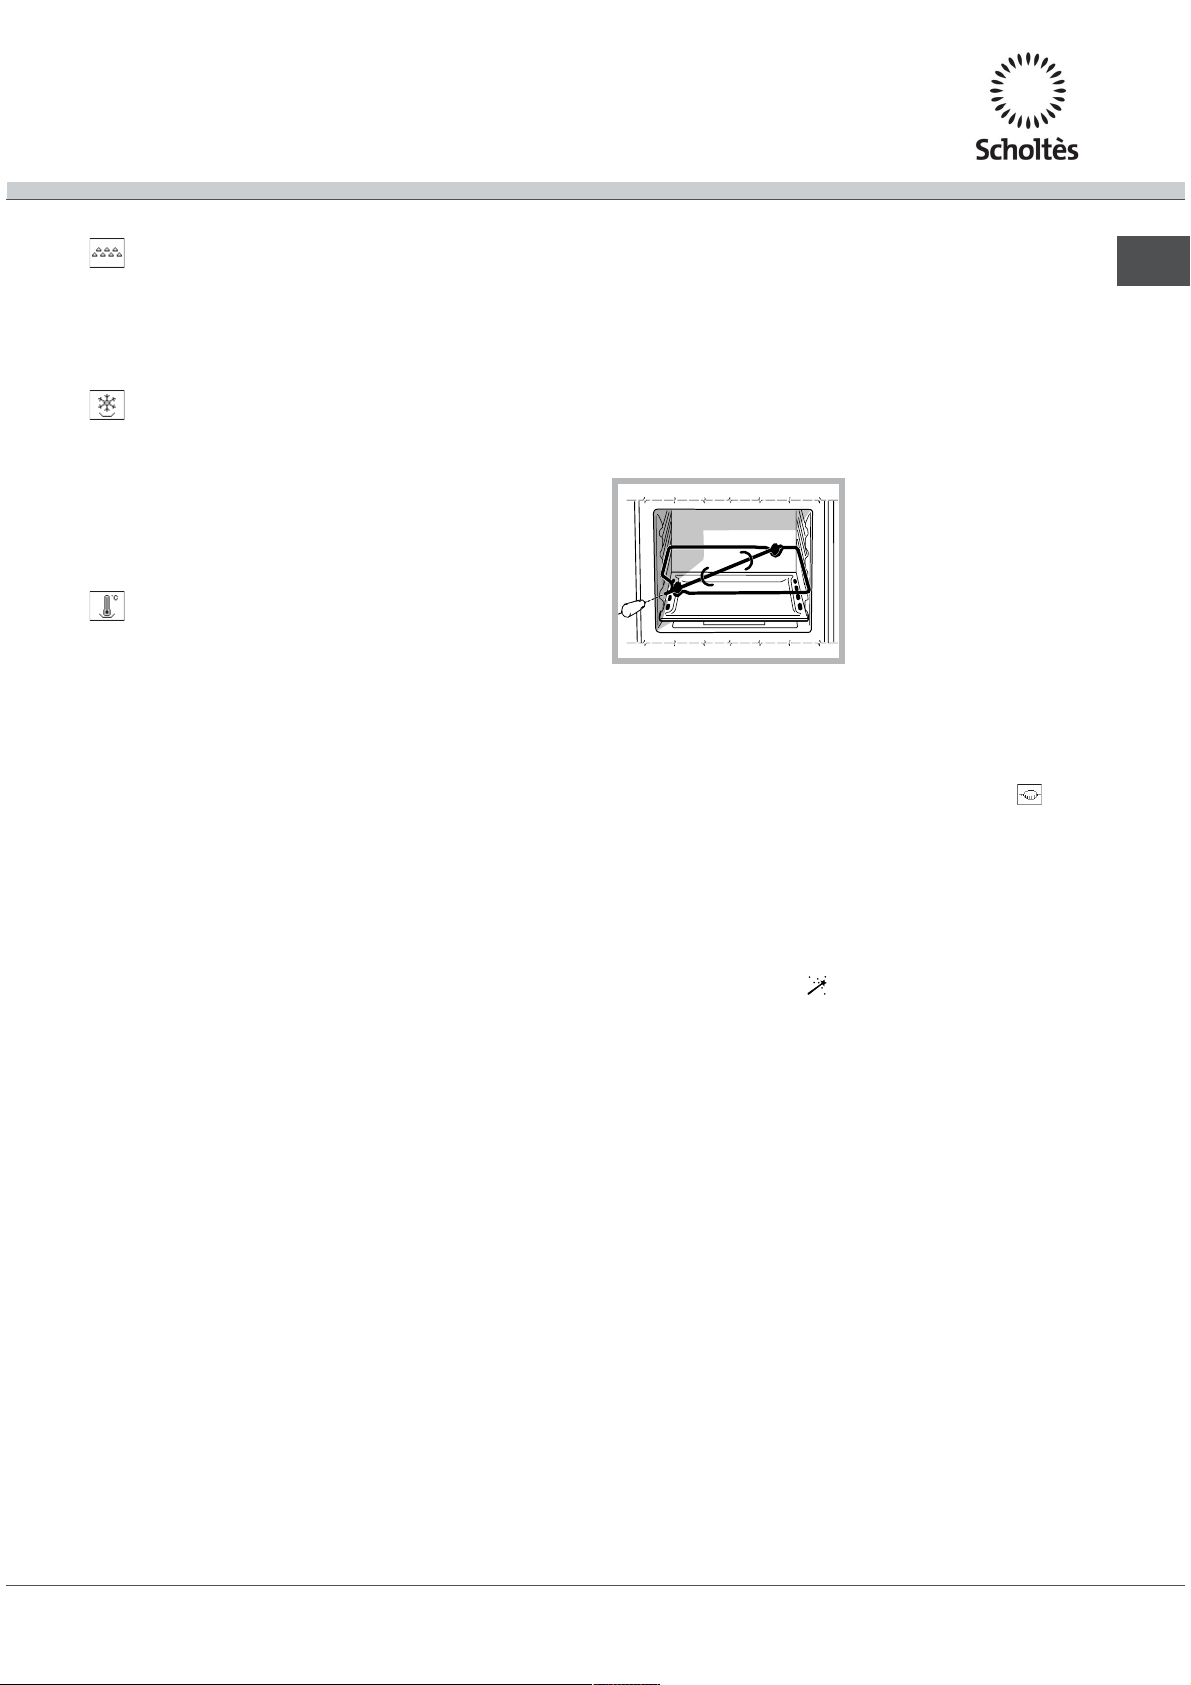
Girarrosto
Per azionare il girarrosto (vedi
figura) procedere come
segue:
1. mettere la leccarda in posizione 1;
2. mettere il sostegno del girarrosto in posizione 3 e
inserire lo spiedo nellapposito foro posto sulla parete
posteriore del forno;
3. azionare il girarrosto selezionando il programma
;
Programmi di cottura automatici Succès
Non aprite la porta forno per evitare di falsare i tempi e le
temperature di esecuzione delle cotture.
Il programma Succès
automatiche realizzate e impostate dal nostro chef.
Tutte le funzioni Succès sono completamente
automatiche: la temperatura e la durata di cottura
sono prestabilite e non possono essere modificate
tramite il sistema C.O.P.® (Cottura Ottimale
Programmata) che garantisce automaticamente un
risultato perfetto. La cottura si interrompe
automaticamente e il forno avvisa quando la
pietanza è cotta (solamente la funzione "Pizzeria"
richiede una valutazione finale da parte dell'utente).
Questo capitolo è stato realizzato con la preziosa
collaborazione del nostro esperto culinario. Invitiamo
a seguire i suoi consigli al fine di sfruttare appieno la
sua esperienza e ottenere una cottura sempre
perfetta. Le funzioni di cottura, le temperature e i
ripiani di posizionamento delle pietanze da
selezionare sono esattamente gli stessi da lui usati
abitualmente per ottenere i migliori risultati.
Tutte le cotture Succès sono ad infornatura a freddo
tranne Pizzeria (vedere paragrafo successivo).
Per i programmi ARROSTO... e CROSTATE... è
possibile programmare un inizio di cottura ritardato.
comprende tutte le cotture
IT
9
Page 10

IT
Programma ARROSTO...
Utilizzare questa funzione per cuocere carni di
vitello, maiale, agnello. Infornare a forno freddo. E
comunque possibile infornare anche a forno caldo.
Programma CROSTATE...
Questa funzione è ideale per la cottura di dolci sia a
base di lievito naturale, sia a base di lievito chimico e
senza lievito.Infornare a forno freddo. E comunque
possibile infornare anche a forno caldo.
Programma PIZZA / PIZZERIA
Utilizzare questa funzione per realizzare della pizza. Fare
riferimento al capitolo seguente per la ricetta e dettagli.
Per il programma PIZZA si deve sempre scegliere il
livello di cottura desiderato.
Per il programma PIZZERIA il forno indica il
momento di infornare tramite un segnale acustico
e la visualizzazione del messaggio CONFERMARE
INFORNATURA.
Programma PIZZA
Per ottenere i migliori risultati vi consigliamo di seguire
attentamente le indicazioni sotto riportate:
rispettare la ricetta;
il peso dellimpasto deve essere da 500g a 700g.
imburrare leggermente la leccarda.
Ricetta per il PANE :
1 Leccarda di 1000g Max, Ripiano basso
2 Leccarde di 1000g Max, Ripiani basso e medio
Ricetta per 1000g dimpasto : 600g Farina, 350g Acqua,
10g Sale, 25g lievito fresco (oppure 2 bustini in polvere)
Processo:
Mescolare la farina ed il sale in un grande recipiente.
Diluire il lievito nellacqua leggermente tiepida (circa 35
gradi).
Aprite la farina a fontana.
Versare il miscuglio di acqua e lievito
Lavorare fino ad ottenimento di un impasto omogeneo e
poco colloso, stirandolo col palmo della mano e
ripiegandolo su se stesso per 10 minuti.
Formare una palla e lasciarla lievitare a temperatura
ambiente per 1h00-1h30 (fino al raddoppio dellimpasto),
coprendolo con una pellicola plastica.
Dividere la palla per ottenere i diversi pani.
Disporli sulla leccarda su una carta forno.
Cospargere i pani di farina.
Fare dei tagli sui pani.
Mettere 1dl di acqua distillata fredda nella leccarda e
posizionarla sopra la teglia con l'impasto.
Infornare a forno freddo.
Lanciare la cottura
Alla fine della cottura, lasciare riposare i pani su una
griglia fino a completo raffreddamento.
PANE
Ricetta per la PIZZA :
1 Leccarda, Ripiano basso, a Forno Freddo o Caldo
Ricetta per 3 pizze di circa 550g : 1000g Farina, 500g
Acqua, 20g Sale, 20g Zucchero, 10cl Olio di Oliva, 20g
lievito fresco (oppure 2 bustini in polvere)
Lievitazione nell ambiente : 1 ora.
Infornare a forno freddo o caldo
Lanciare la cottura
Programma PANE
Utilizzare questa funzione per realizzare del pane. Fare
riferimento al capitolo seguente per la ricetta e dettagli.
Per ottenere i migliori risultati vi consigliamo di seguire
attentamente le indicazioni sotto riportate:
rispettare la ricetta;
il peso massimo per leccarda;
non dimenticare di mettere 1dl di acqua nella
leccarda sopra la teglia con l'impasto e lanciare la
cottura
con il forno freddo;
la lievitazione del impasto va fatto a temperatura
ambiante per 1 ora o 1 ora e mezzo, in funzione della
temperatura della stanza, e in pratica, fino al raddoppio
del impasto.
PIZZA
Programmare la cottura
La programmazione è possibile solo dopo aver
selezionato un programma di cottura.
Programmare la durata
Premere il tasto
1. Selezionare la voce DURATA e premere OK per
confermare.
2. Regolare il tempo premendo i tasti
3. Premere OK per confermare.
4. Selezionare la voce ESCI e premere OK per
confermare. Limpostazione viene memorizzata.
5. A tempo scaduto viene emesso un segnale acustico e
il forno si spegne.
Esempio: sono le 9:00 e viene programmata una durata
di 1 ora e 15 minuti. Il programma si arresta
automaticamente alle 10:15.
La durata è impostabile sono per cotture Crèation.
, poi:
e .
10
Page 11

Programmare una cottura ritardata
1. Premere il tasto
descritta per la durata.
2. Selezionare la voce FINE COTTURA e premere OK
per confermare.
3. Regolare lora tramite i tasti
4. Premere il tasto OK per confermare.
5. Premere nuovamente i tasti
minuti.
6. Premere il tasto OK per confermare.
9. Premere il tasto START per attivare la
programmazione.
10. A tempo scaduto viene emesso un segnale acustico e il
forno si spegne.
Esempio: sono le ore 9:00, viene programmata una
durata di 1 ora e 15 minuti e le 12:30 come ora di fine. Il
programma inizia automaticamente alle ore 11:15.
Il messaggio sul display cottura in attesa segnala che è
stata effettuata una programmazione. Sul display vengono
visualizzate lora di fine cottura e la durata.
Si può modificare lora di fine cottura finchè il forno è nella
modalità di attesa seguendo la procedura sopra indicata.
Per annullare una programmazione impostare la durata a
0:00 oppure spegnere il forno
e seguire la procedura da 1 a 3
o .
o per regolare i
.
Consigli pratici di cottura
IT
Nelle cotture ventilate non utilizzare le posizioni
1 e 5: sono investite direttamente dallaria calda che
potrebbe provocare bruciature sui cibi delicati.
Nelle cotture GIRARROSTO, GRATIN e ROSTICCERIA,
disporre la leccarda in posizione 1 per raccogliere i residui
di cottura (sughi e/o grassi).
MULTICOTTURA
Utilizzare le posizioni 2 e 4, mettendo alla 2 i cibi che
richiedono maggior calore.
Disporre la leccarda in basso e la griglia in alto.
GRATIN
Inserire la griglia in posizione 3 o 4, disporre
gli alimenti al centro della griglia.
Si consiglia di impostare la temperatura al massimo. Non
allarmarsi se la resistenza superiore non resta
costantemente accesa: il suo funzionamento è
controllato da un termostato.
Impostando la durata è possibile programmare una
cottura ritardata.
11
Page 12
IT
grig
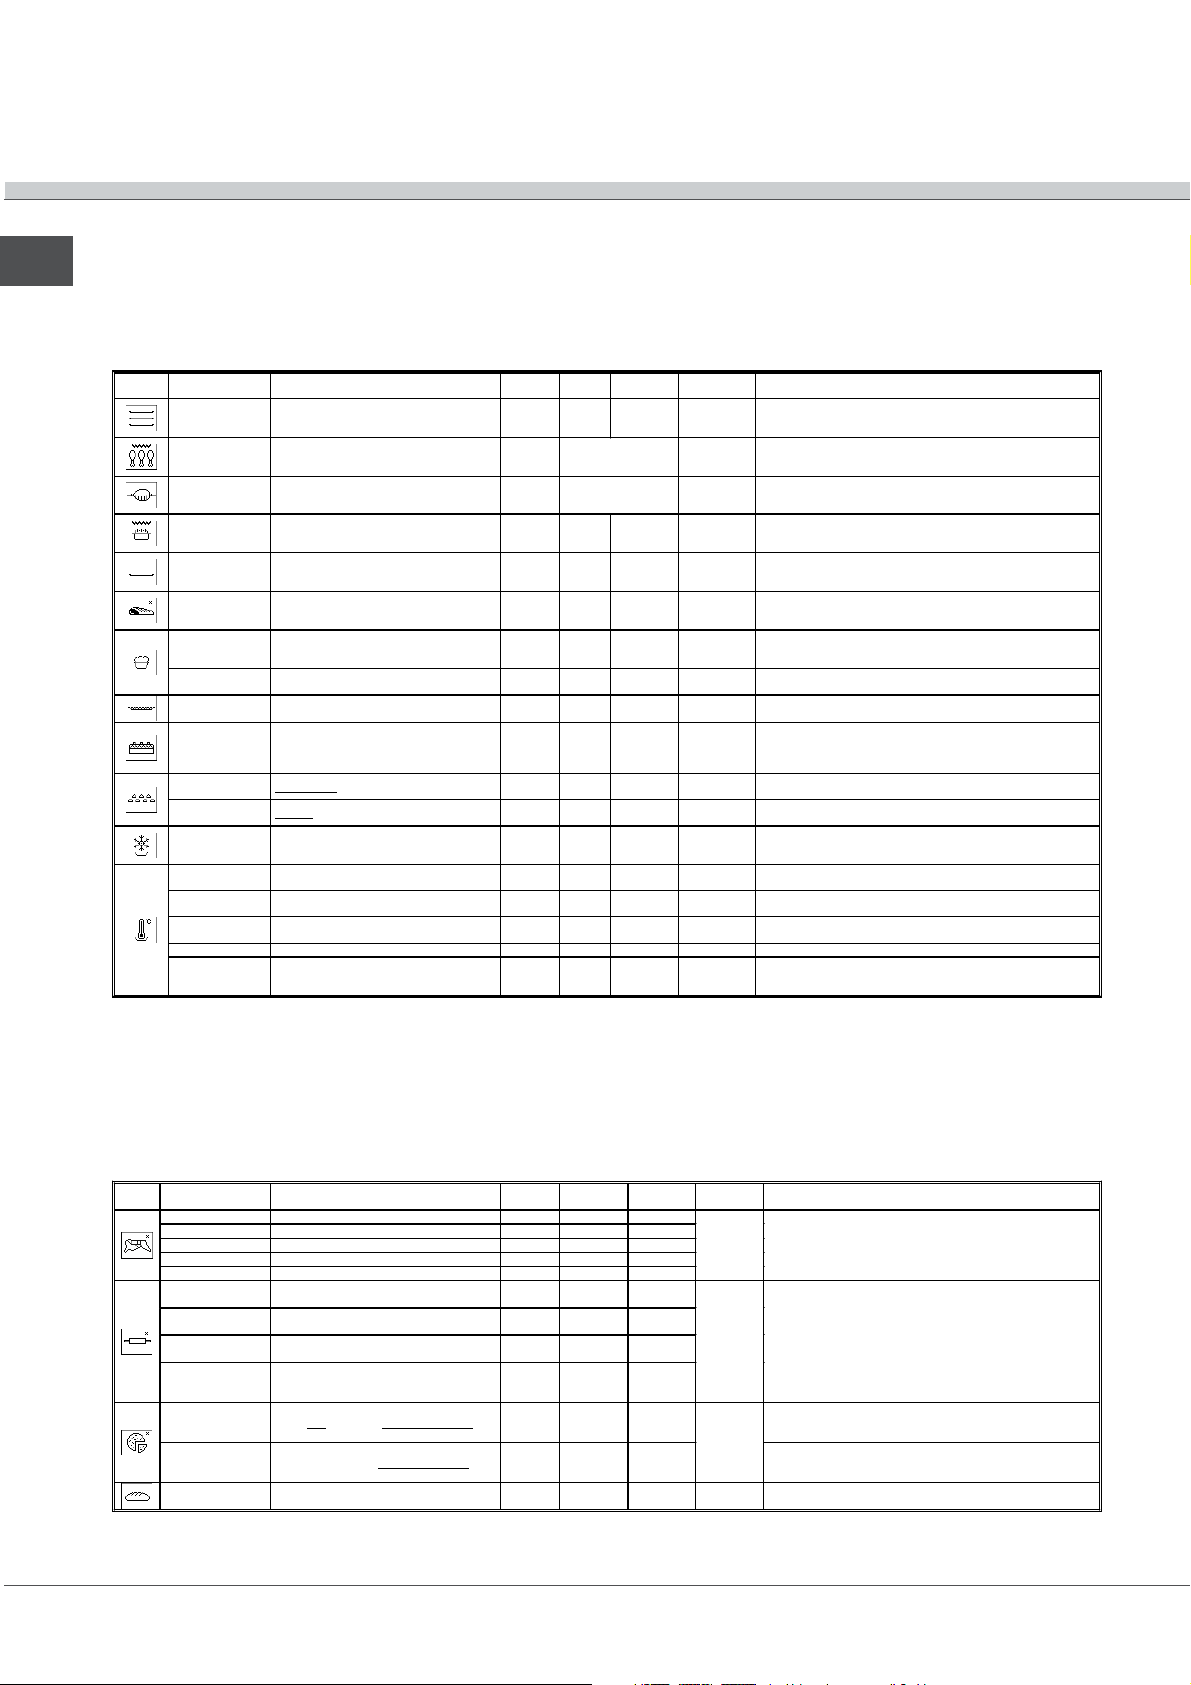
Tabella cottura Crèation
I programmi di cottura Crèation hanno le temperature di cottura preimpostata.
Livello
Livello
Funzione Cottura raccomandata per …
Multilivello
Gril l
Girarrosto Cottura di carni bianche o rosse 1 3 (girarrosto) Freddo
Grati n
Tradizione
Rosticceria Arrosti (carni bianche o rosse) 1 2 Freddo
Lievitazione
Brioche
Crostate
Dolci
Meringhe bianche Asciugatura delle meringhe 2caldo
Meringhe ambrate Cottura di meringhe 2Caldo
Scongelamento 1 2
Bassa
temperatura 85
Bassa
temperatura 95
Bassa
temperatura 120
Riscaldamento Piatti precotti 2 Freddo Temperatura (140 °C) non modificabile.
Pastorizzazione Frutta, verdura, ecc. 2 Freddo
Cottura contemporanea di più pietanze su
2 o 3 livelli senza trasmissione di odori o
sapori
Bistec che di manzo, pesci, grig liate, gra tin
al piatto, ecc.
Cibi al gratin (gratin di patate, zuppa
parmentier, lasagne, ecc.)
Cotture lente (backenhof, manzo
bourguignon, spezzatini, ecc.) o cotture a
bagno-maria (terrine, creme, ecc.)
Lievitazione degli impasti con lievito
naturale (brioc he, pane, torta all o
zuccher o, cro issant, ecc.)
Dolci di pastic ceria (a base di lie vito
naturale)
Torte dolci o salate (pasta frolla o pasta
sfoglia)
Tutti i dolci di pasticceria non inclusi in
Brioche e Crostat a (piccoli bignè, quatt ro
quarti, pan di spagna, panzerotti, clafoutis,
ecc.)
Carni, verdure, pesci, ecc. 2 Freddo
Carni, verdure, pesci, ecc. 2 Freddo
Carni, verdure, pesci, ecc. 2 Freddo
leccarda
13
1
2 Freddo
2Caldo
2 Freddo Temperatura (40 °C) non modificabile.
2Caldo
2Caldo
Livello
lia 1
griglia 2
cottur a su
3 livelli)
Il livello d ipende
dallo spessore degli
alimenti da gri gliare
2Caldo
5 (se
Infornatura Nota
caldo
Caldo
Se si utilizza questa funzione per una cottura singola, inserire la
leccarda sul 2° ripiano.
Se si desidera ritoccare la doratura di una pietanza gratinata già
cotta e calda, scegliere la funzione grill.
Temperatura (210 °C) non modificabile.
Per la cottura a bagno-maria, è possibile mettere l'acqua
direttamente nella leccarda.
La temperatura consigliata garantisce una cottura perfetta ed
evita la produzione di fumo. Se la carne è stata posizionata su un
vassoi o, ins erire l a leccar da sul 2° r ipiano.
Se si desidera cuocere una pizza, si consiglia di portare la
temperatura a 220 °C.
Perfet ta cottura a fuoco vivo d ella base e adeguat a doratu ra della
decorazione.
Se si utilizza un solo ripiano, posizionare la preparazione (bignè,
panzerotti, ecc .) o la tortiera (p an di spagna, ecc.) s ulla leccarda.
Temperatura (70 °C) non modificabile - Meringhe molto bianche e
croccanti - Durata di asciugatura relativamente lunga
Temperatura (110 °C) non modificabile - Meringhe dorate,
croccanti all ’esterno e soffici all ’interno.
Il metodo consiglia to rimane lo scongelamento lento in
frigorifero. Utilizzando il forno si ha un risparmio di tempo del
50%.Funzione idonea per tutti gli alimenti crudi o cotti.
I contenitori di piccole dimensioni possono essere posizionati su
2 livelli (leccarda 1° ripiano e gr iglia 3° ripiano). Lasciare
raffreddare i contenitori all’in terno del forno.
Tabella cottura Succès
I programmi di cottura Succès hanno temperatura e durata di cottura preimpostata.
Funzion e Cottura ra ccomanda ta per …
Arrosto di m anzo Arro sto di manz o 1 2
Arrosto di v itello Arrosto di v itello 1 2
Arrosto di maiale Arrosto di maiale 1 2
Pollo a rrosto Pollo a rrosto 1 2
Coscia d’agnello Coscia d’agnello 1 2
Crostate
Brioche
Cake
Dolci
Pizze Pizze alte, focacce (impas to di pane) 2
Pizzeria Pizze molto sottili (impasto di pane)
Pane * * *
Torte salate o dolci (pasta sablée, pasta
frolla o pasta sfoglia)
Dolci a base di lievito naturale (brioche,
dolce alle m andorle,ecc.)
Dolci a base di lievito chimico (quattro
quarti, biscotti marezzati, ecc.)
Dolci senza lievito (clafoutis, torta
pithivier alle mandorle, torta rustica,
ecc.)
Livello
leccarda
12
Livello
grig lia 1
2
2
2
4(pietra
refrattaria
su g riglia)
Livello
grig lia 2
2
Infornatur
a
Freddo
Freddo
Caldo
Nota
Se la carne è stata posizionata su un vass oio, appoggiare
quest'ultimo nella leccarda s ul 2° ripiano. In caso di forno
già caldo, è possibile infornare a caldo.
Per una cottura multipla, posizion are la leccarda sul 1°
ripiano e le griglie sul 3° e 5° ripiano. Se il forno è già caldo,
è possibile infornare a caldo.
Stendere l’impasto direttame nte sulla leccarda. Per una
cottura multipla, posizionar e la leccarda sul 1° ripiano e le
griglie sul 3° e 5° ripiano.
Inserire la pietra per pizza per preriscaldarla. Attendere la
visualizzazione del messa ggio CONFERMAR E
INFORNATURA per infornare la pizza con la pala
Page 13

Precauzioni e consigli
Lapparecchio è stato progettato e costruito in
conformità alle norme internazionali di sicurezza. Queste
avvertenze sono fornite per ragioni di sicurezza e devono
essere lette attentamente.
Sicurezza generale
La tastiera del forno non è a sfioramento pertanto per un
corretto utilizzo dei comandi si consiglia di esercitare una
leggera pressione sui tasti.
Lapparecchio è stato concepito per un uso di tipo non
professionale allinterno dellabitazione.
Lapparecchio non va installato allaperto, nemmeno se
lo spazio è riparato, perché è molto pericoloso lasciarlo
esposto a pioggia e temporali.
Per movimentare lapparecchio servirsi sempre delle
apposite maniglie poste sui fianchi del forno.
Non toccare la macchina a piedi nudi o le mani o i piedi
bagnati o umidi.
Lapparecchio deve essere usato per cuocere alimenti,
solo da persone adulte e secondo le istruzioni riportate
in questo libretto.
Durante l 'uso dell' apparecchio g l i elem enti
ri sca lda nti e a lcune p art i della p o r ta fo r no
di venta no m o lto c a lde. F are a ttenzione a
n
on t o ccarle e tener e i bambi m i a d i sta nz a .
Evitare che il cavo di alimentazione di altri
elettrodomestici entri in contatto con parti calde del
forno.
Non ostruire le aperture di ventilazione e di smaltimento
di calore.
Impugnare la maniglia di apertura della porta al centro:
ai lati potrebbe essere calda.
Utilizzare sempre guanti da forno per inserire o estrarre
recipienti.
Non rivestire il fondo del forno con fogli di alluminio.
Non riporre materiale infiammabile nel forno: se
lapparecchio viene messo inavvertitamente in funzione
potrebbe incendiarsi.
Non staccare la spina dalla presa della corrente tirando
il cavo, bensì afferrando la spina.
Non fare pulizia o manutenzione senza aver prima
staccato la spina dalla rete elettrica.
In caso di guasto, in nessun caso accedere ai
meccanismi interni per tentare una riparazione.
Contattare lAssistenza (vedi Assistenza).
Non appoggiare oggetti pesanti sulla porta del forno
aperta.
Evitare urti accidentali sulla maniglia che potrebbero
danneggiarne il vetro.
Non è previsto che l'apparecchio venga utilizzato da
persone (bambini compresi) con ridotte capacità
fisiche, sensoriali o mentali, da persone inesperte o che
non abbiano familiarità con il prodotto, a meno che non
vengano sorvegliate da una persona responsabile della
loro sicurezza o non abbiano ricevuto istruzioni
preliminari sull'uso dell'apparecchio.
Evitare che i bambini giochino con l'apparecchio.
Smaltimento
Smaltimento del materiale di imballaggio: attenersi alle
norme locali, così gli imballaggi potranno essere
riutilizzati.
La direttiva Europea 2002/96/CE sui rifiuti di
apparecchiature elettriche ed elettroniche (RAEE),
prevede che gli elettrodomestici non debbano essere
smaltiti nel normale flusso dei rifiuti solidi urbani. Gli
apparecchi dimessi devono essere raccolti
separatamente per ottimizzare il tasso di recupero e
riciclaggio dei materiali che li compongono ed impedire
potenziali danni per la salute umana e lambiente. Il
simbolo del cestino barrato è riportato su tutti i prodotti
per ricordare gli obblighi di raccolta separata.
Si potranno consegnare gli elettrodomestici dimessi al
servizio di raccolta pubblico, portarli presso le apposite
aree comunali o, se previsto dalla legge nazionale in
materia, renderli ai rivenditori contestualmente
allacquisto di un nuovo prodotto di tipo equivalente.
Tutti i principali produttori di elettrodomestici sono attivi
nella creazione e gestione di sistemi di raccolta e
smaltimento degli apparecchi dimessi.
Risparmiare e rispettare lambiente
Azionando il forno negli orari che vanno dal tardo
pomeriggio fino alle prime ore del mattino si collabora a
ridurre il carico di assorbimento delle aziende
elettriche. Le opzioni di programmazione dei programmi,
in particolar modo la cottura ritardata (vedi Programmi)
e la pulizia automatica ritardata (vedi Manutenzione e
cura), permettono di organizzarsi in tal senso.
Si raccomanda di effettuare sempre le cotture al
GIRARROSTO, GRILL e ROSTICCERIA a porta chiusa:
sia per ottenere migliori risultati che per un sensibile
risparmio di energia (10% circa).
Mantenere efficienti e pulite le guarnizioni, in modo che
aderiscano bene alla porta e non procurino dispersioni
di calore.
Questo prodotto soddisfa i requisiti imposti dalla
nuova Direttiva Europea sulla limitazione dei
consumi energetici in standby.
Se non si eseguono operazioni per 2 minuti,
lapparecchio si dispone automaticamente in
modalità standby.
La modalità standby è visualizzata con il messaggio
Eco Mode e con LCD spento.
Non appena si interagisce nuovamente con
lapparecchio, il sistema ritorna in modalità
operativa.
IT
13
Page 14
Manutenzione e cura
IT
Escludere la corrente elettrica
Prima di ogni operazione isolare lapparecchio dalla
rete di alimentazione elettrica.
Pulire lapparecchio
Le parti esterne smaltate o inox e le guarnizioni in
gomma possono essere pulite con una spugnetta
imbevuta di acqua tiepida, e sapone neutro. Se le
macchie sono difficili da asportare usare prodotti
specifici. Si consiglia di sciacquare
abbondantemente e di asciugare dopo la pulizia.
Non usare polveri abrasive o sostanze corrosive.
Linterno del forno va pulito preferibilmente ogni
volta dopo luso, quando è ancora tiepido. Usare
acqua calda e detersivo, risciaquare e asciugare
con un panno morbido. Evitare gli abrasivi.
Gli accessori possono essere lavati come normali
stoviglie, anche in lavastoviglie ad eccezione
delle guide scorrevoli.
Si consiglia di non spruzzare detergenti
direttamente sulla zona comandi ma di utilizzare
una spugnetta.
Pulire il vetro della porta con spugne e prodotti
non abrasivi e asciugare con un panno morbido;
non usare materiali ruvidi abrasivi o raschietti
metallici affilati che possono graffiare la superficie
e causare la frantumazione del vetro.
per la pulizia non utilizzare apparecchi a vapore
1. Togliere il coperchio in vetro, servendosi
di un cacciavite.
2. Svitare la lampadina e sostituirla con una analoga:
potenza 15 W, attacco E 14.
Rimontare il coperchio, prestando attenzione a
posizionare correttamente la guarnizione (vedi
figura).
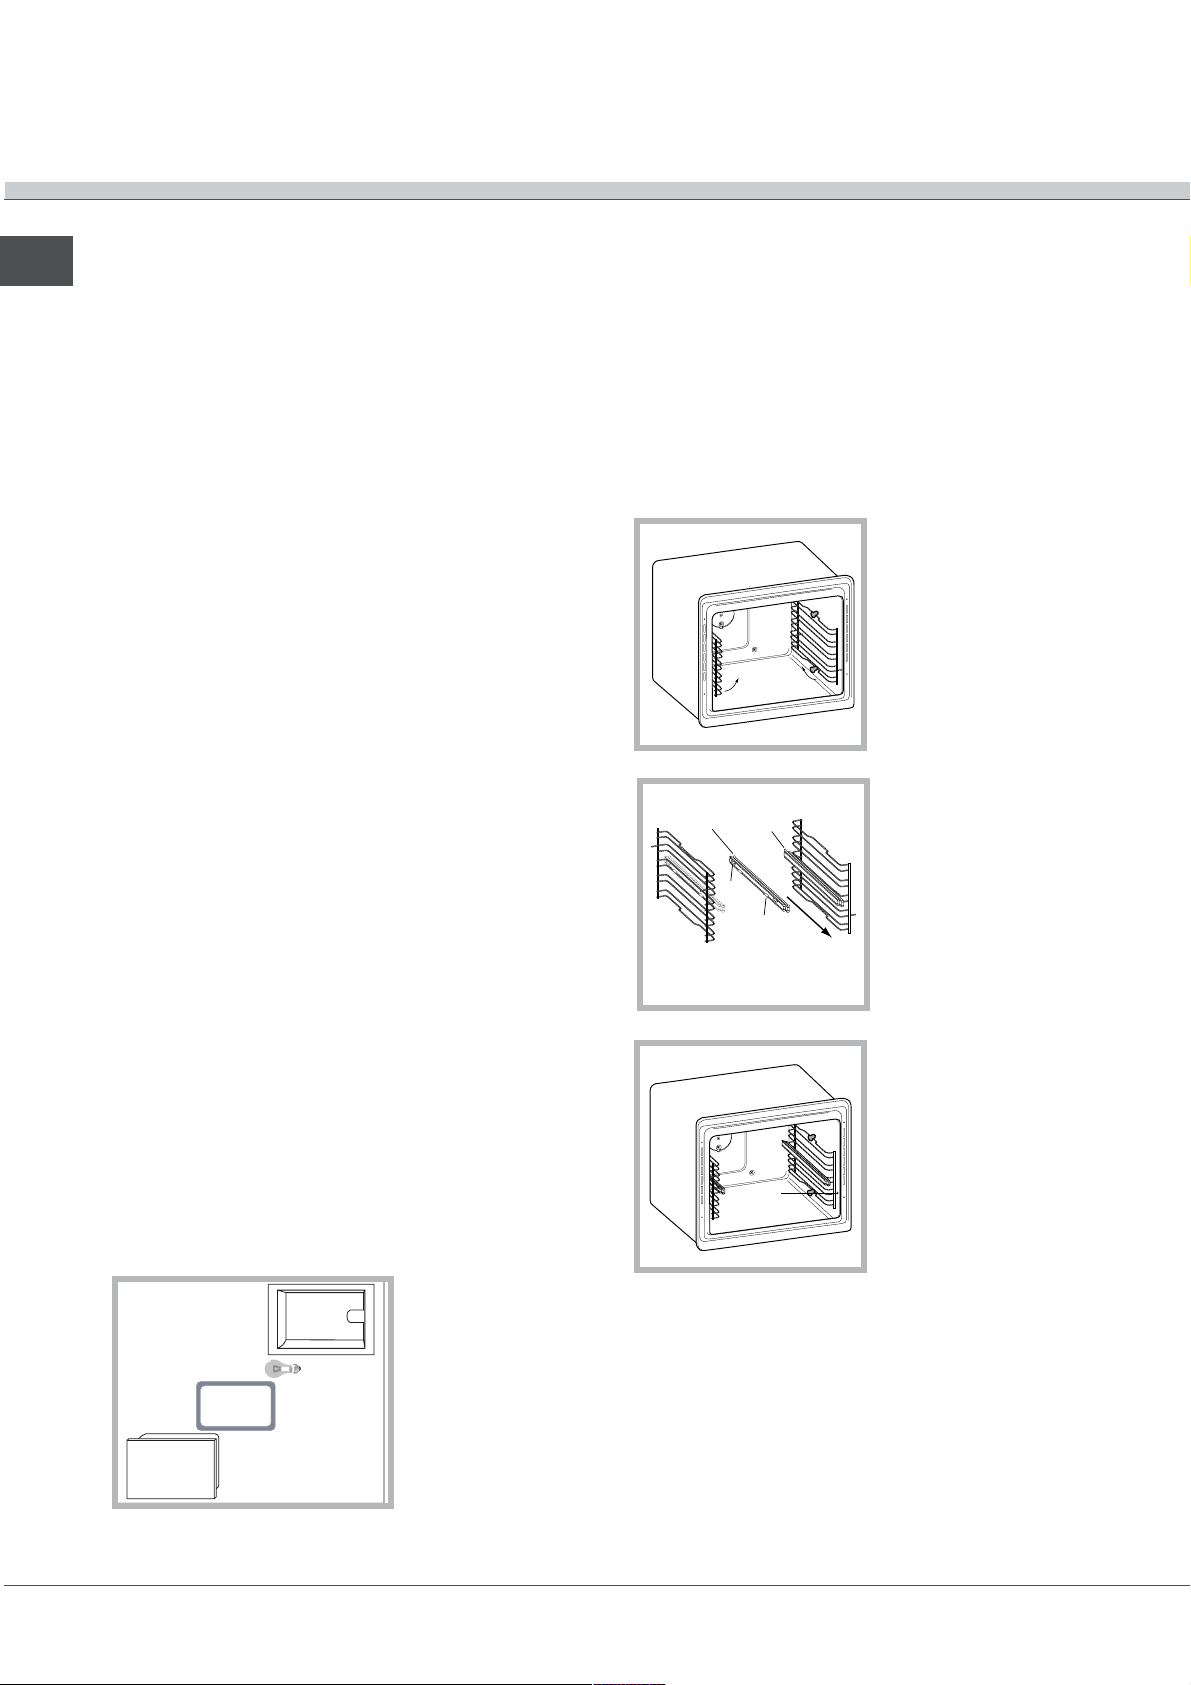
Montaggio del Kit Guide Scorrevoli
Per montare le guide scorrevoli:
1. Togliere i due telai
estraendoli dai
distanzieri A (vedi
figura).
2. Scegliere il ripiano in
cui inserire la guida
scorrevole. Facendo
attenzione al verso di
estrazione della guida
stessa, posizionare sul
telaio prima lincastro B
e poi lincastro C.
Guida
sinistra
Guida
destra
B
Verso di
C
estrazione
A
Controllare le guarnizioni
Controllare periodicamente lo stato della guarnizione
attorno alla porta del forno. In caso risulti
danneggiata rivolgersi al Centro Assistenza più
vicino (vedi Assistenza). È consigliabile non usare il
forno
fino allavvenuta riparazione.
Sostituire la lampadina
Per sostituire la
cavità
lampadina
guarnizione
coperchio
lampadina di
illuminazione del
forno:
3. Fissare i due telai
con le guide montate
negli appositi fori posti
sulle pareti del forno
(vedi figura). I fori per il
telaio sinistro sono
D
posizionati in alto,
mentre i fori per quello
destro sono in basso.
4. Infine incastrare i telai sui distanzieri A.
Non inserire le guide scorrevoli alla posizione 5.
14
Page 15
Pulizia automatica PIROLISI
Il programma PIROLISI porta la temperatura interna
del forno a raggiungere i 500°C e attiva il processo
di pirolisi, ossia la carbonizzazione dei residui. Lo
sporco viene letteralmente incenerito.
Durante la pulizia automatica, le superfici possono
diventare molto calde: tenere i bambini a distanza.
Attraverso il vetro della porta forno è possibile
notare alcune particelle che si illuminano: si tratta di
una combustione istantanea, assolutamente
normale, che non comporta alcun pericolo.
Il forno è in grado di avvisare lutente quando è
necessario effettuare un ciclo di pulizia; sul display
appare PIROLISI Consigliata - VUOI AVVIARE?;
selezionare si per scegliere il livello del ciclo di
pulizia desiderato.
Prima di attivare PIROLISI:
con una spugna umida togliere dallinterno del
forno i residui più consistenti. Non usare detergenti;
estrarre tutti gli accessori, le guide telescopiche e i
telai di supporto.
non lasciare strofinacci o presine sulla maniglia.
Se il forno è eccessivamente caldo la pirolisi
potrebbe non avviarsi. Aspettare che si raffreddi.
Lattivazione del programma è possibile solo dopo
aver chiuso la porta del forno.
Per attivare PIROLISI premere il tasto
premere il tasto
livello di PIROLISI desiderato con durata
preimpostata e non modificabile:
1. Economico (ECO): durata 1 ora;
2. Normale (NOR): durata 1 ora e 30 minuti;
3. Intensivo (INT): durata 2 ore.
Premere il tasto OK per confermare.
Premere il tasto START/STOP per iniziare la
PIROLISI.
. Con i tasti o scegliere il
poi
Dispositivi di sicurezza
la porta si blocca automaticamente non appena la
temperatura raggiunge valori elevati;
in caso di evento anomalo, lalimentazione degli
elementi riscaldanti viene interrotta;
a bloccaggio della porta avvenuto non è più
possibile modificare le impostazioni di durata e
fine.
La programmazione è possibile solo dopo aver
selezionato il programma PIROLISI.
Programmare la pulizia automatica ritardata
1. Premere il tasto
2. Selezionare la voce FINE COTTURA e premere OK per
confermare.
3. Regolare lora tramite i tasti
4. Premere il tasto OK per confermare.
5. Premere nuovamente i tasti
minuti.
6. Premere il tasto OK per confermare.
9. Premere il tasto START/STOP per attivare la
programmazione.
10. A tempo scaduto viene emesso un segnale acustico e il
forno si spegne.
Esempio: sono le ore 9:00, viene scelta una
PIROLISI con livello Economico e quindi con una
durata preimpostata di 1 ora. Si pianifica le 12:30
come ora di fine. Il programma inizia
automaticamente alle ore 11:30.
Il messaggio sul display pirolisi in attesa segnala che è
stata effettuata una programmazione. Sul display vengono
visualizzate lora, lora di fine pirolisi e la durata.
Per annullare una programmazione premere il tasto
Al termine della pulizia automatica
Per poter aprire la porta del forno sarà necessario
attendere che la temperatura del forno sia scesa a un
livello accettabile. A questo punto è possibile
constatare la presenza di alcuni depositi di polvere
bianca sul fondo e sulle pareti del forno: rimuoverle
con una spugna umida a forno freddo. Se invece si
desidera approfittare del calore immagazzinato per
avviare una cottura, le polveri possono anche restare:
non comportano alcun pericolo per gli alimenti da
cucinare.
.
o .
o per regolare i
.
IT
15
Page 16
Assistenza
IT
Attenzione:
Lapparecchio è dotato di un sistema di diagnostica automatica che consente di rilevare eventuali
malfunzionamenti. Questi vengono comunicati dal display tramite messaggi del tipo: ER seguito da numeri.
Provare a mantenere premuto per 6 secondi il tasto
In questo caso è necessario lintervento dellassistenza tecnica.
Prima di contattare lAssistenza:
Verificare se lanomalia può essere risolta autonomamente;
Riavviare il programma per controllare se linconveniente è stato ovviato;
In caso negativo, contattare il Servizio Assistenza Tecnico Autorizzato.
Non ricorrere mai a tecnici non autorizzati.
Comunicare:
Il tipo di anomalia;
il messaggio visibile sul display
Il modello della macchina (Mod.)
Il numero di serie (S/N)
Queste ultime informazioni si trovano sulla targhetta caratteristiche posta sullapparecchio
e verificare se linconveniente si verifica di nuovo.
Assistenza attiva 7 giorni su 7
In caso di necessità dintervento chiamare il Numero Unico Nazionale 199.199.199*.
Un operatore sarà a completa disposizione per fissare un appuntamento con il Centro Assistenza Tecnico
Autorizzato più vicino al luogo da cui si chiama.
È attivo 7 giorni su 7, sabato e domenica compresi, e non lascia mai inascoltata una richiesta.
*Al costo di 14,26 centesimi di Euro al minuto(iva inclusa) dal Lun. al Ven. dalle 08:00 alle 18:30, il Sab. dalle 08:00 alle
13:00 e di 5,58 centesimi di Euro al minuto (iva inclusa) dal Lun. al Ven. dalle 18:30 alle 08:00, il Sab. dalle 13:00 alle
08:00 e i giorni festivi, per chi chiama da telefono fisso.
Per chi chiama da radiomobile le tariffe sono legate al piano tariffario delloperatore telefonico utilizzato.
Le suddette tariffe potrebbero essere soggette a variazione da parte delloperatore telefonico; per maggiori informazioni
consultare il sito www.aristonchannel.com.
16
Page 17

Operating Instructions
OVEN
IT
Italiano, 1 Français, 33
GB
English, 17
FR
NL
Nederlands,
49
FL 836 XA
FL 836 AN
FL 836 MT
FLR 936 XA
FLR 936 AN
FLR 936 MT
FLL 936 XA
FLL 936 AN
FLL 936 MT
FLL 936G XA
FLL 936G AN
FLL 936G MT
FLR 936G XA
FLR 936G AN
FLR 936G MT
FL 836G XA
FL 836G AN
FL 836G MT
Contents
GB
Installation, 18-19
Positioning
Electrical connection
Description of the appliance, 20-21
Overall view of classical-opening model
Overall view of side-opening model
Control panel for classical-opening model
Control panel for side-opening model
Display
Start-up and use, 22-23
Switching the oven on for the first time
Setting the clock
Setting the timer
Child Lock
DEMO mode
Starting the oven
Data plate
Cooking modes, 24-28
Création cooking modes
Succès cooking modes
Programming the cooking mode
Practical cooking advice
Création cooking advice table
Succès cooking advice table
Precautions and tips, 29
General safety
Disposal
Respecting and conserving the environment
Care and maintenance, 30-31
Switching the appliance off
Cleaning the appliance
Replacing the light bulb
Assembling the sliding rack kit
Automatic cleaning using the PYROLYTIC cycle
Assistance, 32
Page 18
560 m
m
.
45 mm.
Installation
GB
Before operating your new appliance please read
this instruction booklet carefully. It contains
important information concerning the safe operation,
installation and maintenance of the appliance.
Please keep these operating instructions for future
reference. Make sure that the instructions are kept
with the appliance if it is sold, given away or moved.
Positioning
Keep all packaging materials out of the reach of
children. It may present a choking or suffocation
hazard (see Precautions and tips).
The appliance must be installed by a qualified
person in compliance with the instructions provided.
Incorrect installation may cause harm to people and
animals or may damage property.
Built-in appliance
Use the appropriate cabinet to ensure that the
appliance functions properly.
OK OK
If the appliance is fitted
under the counter, make sure
that the hob piping is
positioned correctly and that it
does not interfere with the
oven during installation or
obstruct the rear vents of the
cooling fan.
Ventilation
To ensure adequate ventilation is provided, the back
panel of the cabinet must be removed. It is
advisable to install the oven so that it rests on two
strips of wood, or on a completely flat surface with
an opening of at least 45 x 560 mm (see diagrams).
The panels adjacent to the oven must be made of
heat-resistant material.
Cabinets with a veneer exterior must be
assembled with glues which can withstand
temperatures of up to 100°C.
To install the oven under the counter (see
diagram) and in a kitchen unit, the cabinet must
have the following dimensions:
in.
. m
m
547 m
45 mm.
558 mm.
475 mm.
480 mm.
595 m
24,5 mm.
7 mm.
470 mm.
3 mm.
m
.
545 mm.
The appliance must not come into contact with
electrical parts once it has been installed.
The indications for consumption given on the data
plate have been calculated for this type of
installation.
Centring and fixing
Position the 2 tabs on the side of the oven so that
they are lined up with the 2 upper holes in the outer
frame. Adjust the tabs according to the thickness of
the cabinet side panel:
20 mm thick: take off the
removable part of the tab (see
diagram).
18 mm thick: use the first
groove, which has already
been set in the factory (see
diagram).
16 mm thick: use the second
groove
(
see diagram).
18
Page 19
Secure the appliance to the cabinet by opening the
oven door and placing 2 screws into the 2 upper
holes in the outer frame.
All parts which ensure the safe operation of the
appliance must not be removable without the aid of
a tool.
Electrical connection
Ovens equipped with a three-pole power supply
cable are designed to operate with alternating
current at the voltage and frequency indicated on
the data plate located on the appliance (see below).
Fitting the power supply cable
1. Open the terminal
board by inserting a
screwdriver into the
side tabs of the cover.
Use the screwdriver as
a lever by pushing it
down to open the cover
(see diagram).
L
N
the terminal marked (L) and the Yellow/Green wire to
the terminal marked
2. Install the power
supply cable by
loosening the cable
clamp screw and the
three wire contact
screws L-NConnect the wires to
the corresponding
terminals: the Blue wire
to the terminal marked
(N), the Brown wire to
(see diagram).
.
Connecting the supply cable to the mains
Install a standardised plug corresponding to the
load indicated on the data plate (see side).
The appliance must be directly connected to the
mains using an omnipolar circuit-breaker with a
minimum contact opening of 3 mm installed between
the appliance and the mains. The circuit-breaker
must be suitable for the charge indicated and must
comply with current electrical regulations (the
earthing wire must not be interrupted by the circuitbreaker). The supply cable must be positioned so
that it does not come into contact with temperatures
higher than 50°C at any point.
The installer must ensure that the correct electrical
connection has been made and that it is fully
compliant with safety regulations.
Before connecting the appliance to the power
supply, make sure that:
The appliance is earthed and the plug is compliant
with the law.
The socket can withstand the maximum power of
the appliance, which is indicated on the data
plate (see below).
The voltage is in the range between the values
indicated on the data plate (see below).
The socket is compatible with the plug of the
appliance. If the socket is incompatible with the
plug, ask an authorised technician to replace it.
Do not use extension cords or multiple sockets.
Once the appliance has been installed, the power
supply cable and the electrical socket must be
easily accessible.
The cable must not be bent or compressed.
The cable must be checked regularly and replaced
by authorised technicians only (see Assistance).
The manufacturer declines any liab
these safety measures not be observed.
ility should
GB
3. Secure the cable by fastening the clamp screw.
4. Close the cover of the terminal board.
19
Page 20
Description
of the appliance
GB
Overall view of classical-opening model
GRILL rack
DRIPPING PAN rack
Control panel
Overall view of side-opening model
GUIDE RAILS
for the sliding racks
position 5
position 4
position 3
position 2
position 1
GUIDE RAILS
for the sliding
racks
position 5
position 4
position 3
position 2
position 1
GRILL
rack
Control panel
DRIPPING PAN
rack
20
Page 21
Control panel for classical-opening model
k
Création cooking
modes selection
Time
adjustment
Down
arrow
Up
arrow
START/
STOP
GB
Setup
button
ON/OFF Temperature
adjustment
Succès cooking
modes selection
Control panel for side-opening model
Temperature
Succès cooking modes
selection
Création cooking modes
selection
ON/OFF
Down
arrow
Display
DISPLAY Pyrolysis
adjustment
OK
button
Time
adjustment
OK
button
Pyrolysis
button
START/
STOP
Up
arrow
button
Setup
button
Control panel loc
button
Control panel lock
button
DISPLAY
21
Page 22

Start-up and use
GB
The first time you switch your appliance on, heat the
empty oven to its maximum temperature for at least half an
hour, making sure the door is kept shut. Ensure that the
room is well ventilated before switching the oven off and
opening the oven door. The appliance may emit a slightly
unpleasant odour caused by protective substances used
during the manufacturing process burning away.
Every time the oven is switched on it is set to the
Création menu.
If the user does not touch any of the buttons after
the oven is switched on, it will switch off again
automatically after 2 minutes.
Switching the oven on for the first time
After connecting the oven to the electricity supply, the
first time it is switched on the user should also switch on
the control panel by pressing the
languages in the SETUP menu will appear. To choose
the desired language select it using the
buttons. The character in bold indicates which language
has been chosen. Press the OK button to confirm.
Once the selection has been made, the display will
show the following parameters:
LANGUAGE Choose language
TIME Set the time
SOUND Keypad sounds
CLOCK Display the clock
SAFETY INFO Display the info text
EXIT Exit the setup menu
After choosing the language in the SETUP menu, if
the display is not used for another 60 seconds it will
automatically revert to the Création menu.
button. The list of
and
Press the OK button to confirm.
The timer does not switch the oven on or off.
Child Lock
The Child Lock function may be used to lock the
oven door and controls.
To activate the function, press the
by the "OK" button to confirm the setting.
To deactivate the function, repeat the procedure
described above.
The child lock function can be activated when a
cooking programme is in progress or when the oven
is switched off, or when a cooking end time has
been set and the start button pressed. The child
lock function can also be deactivated in all the
above situations and after the oven has completed
the cooking programme.
button followed
Demo mode
The oven can operate in DEMO mode: all heating
elements are deactivated, and controls remain
operative.
To enable the DEMO mode, press the
the
button in sequence, followed by the "OK"
button, when the oven is switched on. To disable the
mode, press the
sequence when the oven is switched on.
A buzzer sounds and the display shows Demo
Off.
The Demo mode can only be activated when the
oven is switched on and no cooking programme has
been commenced.
button and the button in
, button and
Setting the clock
To set the clock, switch on the oven by pressing the
button, then press the SETUP button and follow
the steps described.
1. Select the TIME command and press OK to
begin modifying the value.
2. Adjust the hour figure using the
3. Press the OK button to confirm.
4. Repeat the process to set the minutes.
or buttons.
Setting the timer
The timer can be set while the oven is switched off
or while it is switched on, when navigating the menu
for a cooking mode. When the set time has elapsed,
the oven will emit a sound signal. This will
automatically stop after one minute or when any
symbol on the control panel is pressed.
To set the timer press the
minutes using the
22
or buttons.
button and adjust the
Starting the oven
Every time the oven is switched on it is set to the
Création menu.
1. Switch the control panel on by pressing the
2. Press the button relating to the desired Création
cooking mode
display will show the list of available programmes.
4. Use the
programme and confirm by pressing OK. The
display will show the temperature and the set duration
(only the duration is shown for Succès modes).
3. Press the START/STOP button to begin cooking.
4. The oven will begin its preheating stage.
5. When the preheating process has finished, a
buzzer sounds and all current preheating indicator
lights show that this stage has been completed:
6. During cooking it is always possible to:
- Modify the temperature by pressing the
or Succès cooking mode. The
or buttons to select the desired
button.
button,
Page 23

adjust the figure using the or buttons and
confirm by pressing OK (only for Création cooking
modes).
- Programme the duration of a cooking mode
(only for Création cooking modes).
- Stop cooking by pressing the START/STOP button.
- Set the timer
- Switch off the oven by pressing the
.
button.
7. In case of a blackout, if the oven was already
operating, an automatic system within the appliance
will reactivate the cooking mode from where it was
interrupted as long as the temperature did not drop
below a certain level. Programmed cooking modes
which have not started will not be restored and must
be reprogrammed.
There is no preheating stage for the ROASTING
and GRILL modes.
Never put objects directly on the bottom of the
oven; this will avoid the enamel coating being
damaged.
Always place cookware on the rack(s) provided.
Cooling ventilation
In order to reduce the external temperature of the
oven, a cooling fan generates a stream of air which
escapes above the oven control panel. At the
beginning of the PYROLYTIC cycle, the cooling fan
operates at low speed. At the end of the
PYROLYTIC cycle, the cooling fan operates at
maximum speed.
Once the cooking has been completed, the cooling
fan remains on until the oven has cooled down
sufficiently.
Oven light
When the oven is not in operation, the lamp can be
switched on at any time by opening the oven door.
TABLE OF CHARACTERISTICS
Dimensions *
Volume *
Electrical
connections
ENERGY
LABEL *
width 43.5 cm
height 32 cm
depth 41.5 cm
58 l
voltage: 220-240V ~ 50/60Hz
maximum power absorbed
2800 W
Directive 2002/40/EC on the label
of electric ovens.
Standard EN 50304
Declared energy consumption for
Forced convection Class – heating
GB
mode:
This appliance conforms to the
following European Economic
Community directives:
2006/95/EEC dated 12/12/06 (Low
Voltage) and subsequent
amendments;
* Without removable guide rails
2004/108/EEC dated 15/12/04
(Electromagnetic Compatibility) and
subsequent amendments;
93/68/EEC dated 22/07/93 and
subsequent amendments.
2002/96/EEC and subsequent
amendments.
1275/2008 stand-by/off mode.
Rotisserie.
23
Page 24

Cooking modes
GB
Création cooking modes
All cooking modes have a default cooking
temperature which may be adjusted manually
between 30 °C and 300 °C as desired.
The Création cooking mode
cooking modes.
The oven controls all essential aspects of each of
these cooking modes and makes it easier for you to
create the perfect dish, from the simplest recipe to
the most sophisticated culinary delights: the
temperature, heat source, humidity and fan assisted
operation are all controlled automatically.
This chapter was written with the help of our very
own culinary expert. We invite you to follow his
advice so you can benefit from his experience and
perfect your cooking skills.
The recommended cooking modes, temperatures
and oven shelf heights reflect our experts own
experience in the kitchen and will help you achieve
the very best results.
The table below specifies whether it is best to pre-heat
your oven or not for each Création cooking mode.
Observing these suggestions will guarantee perfect
results.
If you wish to place food in a preheated oven, wait
for the preheating stage to be completed (this will
be signalled by a series of beeps).
The temperature is set automatically, according to
the cooking mode selected; however, you may
adjust it to suit your recipe.
You can also set a cooking time with an immediate
or delayed start.
MULTILEVEL mode
All heating elements and the fan are activated. Since
the heat remains constant throughout the oven, the
air cooks and browns food in a uniform manner. A
maximum of two racks may be used at the same
time.
covers all manual
GRATIN mode
The top and circular heating elements switch on and
the fan begins to operate. This combination of
features increases the effectiveness of the
unidirectional thermal radiation of the heating
elements through forced circulation of the air
throughout the oven. This mode is ideal for cooking
gratin dishes, lasagne, etc...
Always cook in this mode with the oven door closed.
OVEN TRADITION mode
When using this traditional cooking mode, it is best
to use one cooking rack only. Recommended for
slow cooking or cooking with a bain-marie. When
using a bain-marie, the water should be poured
directly into the dripping pan.
ROASTING mode
The top and circular heating elements switch on and
the fan begins to operate. This combination of
features increases the effectiveness of the
unidirectional thermal radiation of the heating
elements through forced circulation of the air
throughout the oven. This helps prevent food from
burning on the surface and allows the heat to
penetrate right into the food.
Always cook in this mode with the oven door closed.
PROVING mode
The circular heating element will come on and the
fan will operate during the preheating stage only.
The oven temperature is ideal for activating the
rising process. Always cook in this mode with the
oven door closed.
BRIOCHE mode
The combined use of the upper and circular heating
elements make this cooking mode ideal for desserts
containing natural yeast.
GRILL mode
The top heating element comes on. The high and
direct temperature of the grill is recommended for
food that requires high surface temperature. Always
cook in this mode with the oven door closed.
SPIT ROAST mode
The top heating element and the turnspit will be
activated. The function is ideal for spit cooking.
Always cook in this mode with the oven door closed.
24
PIES mode
The combined use of the upper and circular heating
elements make this cooking mode ideal for puff
pastry or flaky pastry desserts.
BAKED CAKES mode
This cooking mode is suitable for all baked desserts
which do not fall into the BRIOCHE or PIES category
(for example, small choux pastries, sponge cake,
etc...).
Page 25

LIGHTLY DONE/BROWNED MERINGUE mode
The default temperatures cannot be modified.
The LIGHTLY DONE MERINGUE cooking mode is
ideal for drying meringues. The BROWNED
MERINGUE cooking mode is ideal for browning
meringues.
To use this technique, you must use a vacuum-packing
machine and the appropriate bags. Follow the instructions
given relating to vacuum-packing food carefully.
The vacuum-packing technique may also be used
for raw products (fruit, vegetables, etc.) in addition
to pre-cooked products (traditional cooking).
GB
DEFROST mode
The fan at the bottom of the oven circulates roomtemperature air around the food. This programme is
suitable for defrosting any type of food, especially
delicate items that should not be heated, for
example: ice-cream cakes or cakes made with
custard, cream or fruit.
LOW TEMPERATURE modes
This type of cooking mode, used for years by
industry professionals, enables food (meat, fish, fruit
and vegetables) to be cooked at very low
temperatures (between 85 and 120°C), thereby
guaranteeing a perfect level of cooking and
enhancing the taste as much as possible.
The value of these advantages should not be
underestimated:
As the cooking temperatures are very low (in
general they are lower than the evaporation
temperature), the dispersion of cooking sauces
due to evaporation is substantially reduced and
the food becomes softer.
When cooking meat, the muscular fibres contract
less than they would during a classic cooking
programme. The result is a more tender meat
which does not need to be rested after it is
cooked. Meat should be browned before it is
placed in the oven.
Cooking foods which have been vacuum-packed
at low temperatures, a technique used for over 30
years
by the most prestigious chefs, brings many
advantages:
Culinary: flavours are concentrated and the taste,
softness and tenderness of the food are
maintained.
Hygienic: provided that hygiene regulations are
respected, this type of cooking protects the food
from the harmful effects of oxygen, guaranteeing
that the dishes may be stored for longer in the
refrigerator.
Organisational: thanks to the longer storage
period, dishes may be prepared well in advance.
Diet-related: this type of cooking limits the amount
of fatty substances used and therefore means
that the food is lighter and easier to digest.
Financial: the food shrinks less so there is more of
the product left after it has been cooked.
Spit roast
To operate the
rotisserie spit (see
diagram) proceed as
follows:
1. Place the dripping pan in position 1.
2. Place the rotisserie support in position 3 and
insert the spit in the hole provided on the back panel
of the oven.
3. Start the rotisserie spit by selecting the
cooking mode.
Succès automatic cooking modes
Do not open the oven door as this will disrupt the
cooking time and temperature.
The Succès
automatic cooking programmes devised and set by
our chef.
All Succès cooking modes are completely
automatic: the temperature and cooking duration
are pre-set values, guaranteeing a perfect result
every time - automatically. These values cannot be
adjusted using the C.O.P.
Cooking) system. Cooking ends automatically and
the oven informs you when the dish is ready (only
the Pizzeria function requires the user to check the
food before taking it out of the oven).
This chapter was written with the help of our very own
culinary expert. We invite you to follow his advice so
you can benefit from his experience and perfect your
cooking skills. The recommended cooking modes,
temperatures and oven shelf heights reflect our
experts own experience in the kitchen and will help
you achieve the very best results.
None of the Succès cooking modes - except the
Pizzeria function - require the oven to be preheated
(see following paragraph).
For the ROAST... and PIES... cooking modes, it is
possible to programme a delayed start.
function encompasses all the
®
(Programmed Optimal
25
Page 26

GB
ROAST... mode
Use this function to cook beef, pork and lamb. Place
the meat inside the oven while it is still cold. The
dish may also be placed in a preheated oven.
PIES mode
This function is ideal for cooking desserts which are
made using natural yeast, baking powder and
desserts which contain no yeast. Place the dish in
the oven while it is still cold. The dish may also be
placed in a preheated oven.
PIZZA / PIZZERIA mode
Use this function to make pizza. Please see the
following chapter for further details.
For the PIZZA mode, the desired cooking level must
be set.
For the PIZZERIA mode, the oven will signal when
the dish should be placed inside, using the buzzer
and the message CONFIRM START OF COOKING.
PIZZA mode
To obtain the best results, we recommend that you
carefully observe the instructions below:
Follow the recipe.
The weight of the dough should be between 500 g
and 700 g.
Lightly grease the dripping pan.
Recipe for PIZZA:
1 dripping pan on a low shelf level, hot or cold oven
Recipe for 3 pizzas weighing approximately 550 g:
1000 g flour, 500 ml water, 20 g salt, 20 g sugar,
100 ml olive oil, 20 g fresh yeast (or 2 sachets of
powder yeast)
Leavening at room temperature: 1 hour.
Place inside hot or cold oven.
Start the
BREAD mode
Use this function to make bread. Please see the
following chapter for further details.
To obtain the best results, we recommend that you
carefully observe the instructions below:
Follow the recipe.
Do not exceed the maximum weight of the
dripping pan.
Remember to put 100 ml of water in the dripping
pan above the tray holding the dough; commence
cooking while
The dough must be left to rise at room
PIZZA cooking mode.
the oven is still cold.
temperature for 1 1 ½ hours (depending on the
room temperature) or until the dough has doubled
in size.
Recipe for BREAD:
1 Dripping pan of 1000 g Max, lower level
2 Dripping pans each holding 1000 g Max, medium
and lower levels
Recipe for 1000 g of dough: 600 g flour, 350 ml
water, 10 g salt, 25 g fresh yeast (or 2 sachets of
powder yeast)
Method:
Mix flour and salt in a large bowl.
Dilute yeast in lukewarm water (approximately 35
degrees).
Make a small well in the mound of flour.
Pour in water and yeast mixture.
Knead dough by stretching and folding it over
itself with the palm of your hand for 10 minutes
until it has a uniform consistency and is not too
sticky.
Ball and cover the dough with plastic wrap and
leave it to leaven at room temperature for 1 1 ½
hours (until it has doubled in size).
Cut the dough into equal sized loaves.
Place them in the dripping pan on oven paper.
Cover the loaves with flour.
Make incisions on the loaves.
Pour 100 ml of cold distilled water into the dripping pan
and place it above the tray holding the dough.
Place the loaves inside the oven while it is still
cold.
Start the
Once baked, leave the loaves on one of the grill
racks until they have cooled completely.
BREAD cooking mode.
Programming the cooking mode
Programming is only possible after a cooking
mode has been selected.
Programming the duration
Press the
1. Select the DURATION command and press
OK to confirm.
2. Adjust the time by pressing the
3. Press OK to confirm.
4. Select the EXIT command and press OK to
confirm. This setting will be memorised.
5. When the set time has elapsed, a buzzer will
sound and the oven will switch off.
button, then:
and buttons.
26
Page 27

For example: it is 9:00 a.m. and a time of 1 hour
and 15 minutes is programmed. The programme
will stop automatically at 10:15 a.m.
Only the duration of Création cooking programmes
may be set.
Programming a delayed cooking mode
1. Press the
described in the duration procedure.
2. Select the COOKING END TIME command and
press OK to confirm.
3. Adjust the hour figure using the
4. Press the OK button to confirm.
5. Press the
minutes.
6. Press the OK button to confirm.
9. Press the START button to enable the
programming process.
10. When the set time has elapsed, a buzzer will
sound and the oven will switch off.
For example: it is 9:00 a.m., a time of 1 hour and
15 minutes is programmed and the end time is
set to 12:30. The programme will start
automatically at 11:15 a.m.
The message awaiting cooking shows that a
programme has been scheduled. The display shows
the cooking end time and the cooking duration
alternately.
The cooking end time may be modified while the
oven is waiting to start, by following the procedure
detailed above.
To cancel a programmed schedule, set the duration
to 0:00 or switch the oven off
button and repeat steps 1 to 3 as
or buttons.
or buttons again to set the
.
Practical cooking advice
GB
Do not place racks in position 1 and 5 during fanassisted cooking. This is because excessive direct
heat can burn temperature sensitive foods.
In the SPIT ROAST, GRATIN and ROASTING
cooking modes, place the dripping pan in position 1
to collect cooking residues (fat and/or grease).
MULTILEVEL
Use positions 2 and 4, placing the food which
requires more heat on 2.
Place the dripping pan on the bottom and the rack
on top.
GRATIN
Insert the rack in position 3 or 4. Place the food in
the centre of the rack.
We recommend that the temperature is set to its
maximum level. The top heating element is
regulated by a thermostat and may not always
operate constantly.
A delayed cooking programme may be scheduled
when setting the duration.
27
Page 28

GB
Création cooking advice table
The Création cooking programmes have default cooking temperatures.
Mode
Multilevel
Grill
Spit Roast
Grat in
Tradition
Roast ing
Baki ng
Brioche Baked desserts (made using natural yeast)
Pies
Baked Cakes
Lightly done meringue Dryi ng the meringues
Browned meringue Cooking
Defro st
Low temperature 85 Meat, vegetables, fish, etc.
Low temperature 95 Meat, vegetables, fish, etc.
Low temperature 120 Meat, vegetables, fish, etc.
Heati ng
Pasteurisation Fruit, vegetables, etc.
Cooking programme recommended for …
Cooking several dishes on 2 or 3 racks
simultaneousl y without the res pectiv e flavours or
aromas mingling
Beef steak, fish, gri lled food and gr atin dishes,
etc.
Cooking red or whit e meat roasts
Gratin/ baked foods (potato gr atin, parmenti er,
lasagne, etc.)
Slow-cooking dishes (hotpots , beef bourguignon,
casseroles, etc.) or bain-marie cooking (terrines,
crème caramel, etc.)
Roasts (white or red meat)
Baking process for dough made wit h yeast or
baking powder (brioches, bread, sugar pie,
croissants, etc.)
Sweet or savoury pastries (puff or flaky pastry)
All desserts not included in the Pies / Tarts and
Brioche categori es (choux pastri es, pound cake,
sponge cake, turnovers, clafoutis, etc.)
1 2
Pre-prepared dishes
the meringues
Shelf level Rack level 1 Rack level 2 Oven at start NotaNo te
1 3
The shelf height depends on the
1
1 3 (spit)
2 Cold
2 Pre-heated
1 2 Cold
2 Cold Temperature (4 0 °C) cannot be adjusted.
2 Pre-heated If you wish to cook a pizza, set the temperature to 220°C.
2 Pre-heated
2 Pre-heated
2 Pre-heated
2 Cold
2 Cold
2 Cold
2 Cold Temperature (140 °C) cannot be adjust ed.
2 Cold
size of the food to be gril led
2 Pr e-h eat ed
5 (if cooking
on 3 shelves)
Pre- heat ed
Pre-h eated
Cold
If you use this functi on for one dish onl y, place the oven t ray
on shelf 2.
If you wi sh to brown the top of a gratin dish whi ch is hot and
has already been cooked, select the grill function.
Temperature (210 °C) cannot be adjusted.
When using a bain-marie, you can pour the water directl y
into the dri pping pan.
The recommended temperature guarantees perfect cooking
and sealing of the roast and avoids the formation of smoke.
If your meat is in a r oasting dish, use the dr ipping pan on
shel f 2.
Perfect cooki ng from underneath and browning on t op for
decorati on.
If you use a single shelf, position the mixture (choux pastry,
turnovers, etc.) or the cake tin (sponge cake, etc.) on the
dripping pan.
Temperature (70°C) may not be adjusted - White and crisp
meringues - Long-dryi ng process.
Temperature (110 °C) may not be adjusted - Golden
meringues, cr ispy on the outsi de and soft in t he centre.
Therecommended method is stil l slow defrost ing in the
refrigerat or. Using the oven saves 50% of the normal
defrosti ng time. It is an ideal f unction for r aw or cooked
foods.
Small container s may be positi oned on 2 level s (drippi ng
pan on the 1st shelf and rack on the 3rd shelf) . Let the
containers cool inside the oven.
Succès cooking advice table
The Succès cooking programmes have default cooking temperatures and durations.
Mode
Roast Beef Roast beef
Roast veal Roast veal 1 2
Roast pork Roast pork 1 2
Roast chicken Roast chicken 1 2
Leg of lamb Leg of lamb 1 2
Pies Sweet or savoury pastries (shortcrust, puff or flaky)
Brioc he
Rich fruit cake
Cakes
Pizza
Pizzeria Very thin pi zza (bread dough)
Bread * * *
Cooking progr amme recommended f or …
Desserts made with natural yeast (brioches,
almond cake, e tc.)
Desserts made with baking powder (marbled
biscuits, po und cake, etc.)
Desserts without yeast (cla foutis, almond pithi vier,
torta rusti ca, etc.)
Deep-pan pizza, focaccia (br ead dough)
Shelf level Rack level 1 Rack level 2 Oven at start Note
1 2
2
2
2
2
2
4 (place stone
firebrick on shelf)
Cold
Cold
Pre-heated
If your mea t is in a r oasting dish, use the drippi ng pan on
shelf 2. These dishes may also be placed in a hot oven if
necessary.
To cook several items at once, place the dripping pan on
the first shelf and the grids on the third and fift h shelves.
These dishes may also be placed i n a hot oven.
Lay the f ood directly o n the dr ipping pan. To c ook
several items at once, place the dripping pan on the fi rst
shelf and the gr ids on the third and fi fth shelves.
Place the pizza firebrick in the oven to pre-heat it . Wait
until the message CONFIRM START OF COOKING
appears before placing t he pizza in the oven with t he
pizza shov el.
28
Page 29

Precautions and tips
This appliance has been designed and manufactured in
compliance with international safety standards. The following
warnings are provided for safety reasons and must be read
carefully.
General safety
The oven control panel is not a touch-pad, therefore the
buttons should be pressed lightly yet firmly to ensure you have
performed the intended operations.
The appliance was designed for domestic use inside the
home and is not intended for commercial or industrial use.
The appliance must not be installed outdoors, even in
covered areas. It is extremely dangerous to leave the
appliance exposed to rain and storms.
When moving or positioning the appliance, always use the
handles provided on the sides of the oven.
Do not touch the appliance with bare feet or with wet or
damp hands and feet.
The appliance must be used by adults only for the
preparation of food, in accordance with the instructions
provided in this booklet.
D o not touc h the heating elements and parts
of t he ov en door when th e applia n c e is in
use; t h ese parts become ex
children well away from th e a ppli a n c e .
Ensure that the power supply cables of other electrical
appliances do not come into contact with the hot parts of
the oven.
The openings used for the ventilation and dispersion of
heat must never be covered.
Always grip the oven door handle in the centre: the ends
may be hot.
Always use oven gloves when placing cookware in the
oven or when removing it.
Do not use aluminium foil to line the bottom of the oven.
Do not place flammable materials in the oven: If the
appliance is switched on accidentally, it could catch fire.
When unplugging the appliance, always pull the plug from
the mains socket; do not pull on the cable.
Never perform any cleaning or maintenance work without
having disconnected the appliance from the electricity
mains.
If the appliance breaks down, under no circumstances should you
attempt to perform the repairs yourself. Repairs carried out by
inexperienced persons may cause injury or further malfunctioning
of the appliance. Contact a Service Centre (see Assistance).
Do not rest heavy objects on the open oven door.
Avoid accidental knocks to the handle as this could
damage the glass.
The appliance should not be operated by people (including
children) with reduced physical, sensory or mental
capacities, by inexperienced individuals or by anyone who
is not familiar with the product. These individuals should, at
the very least, be supervised by someone who assumes
responsibility for their safety or receive preliminary
trem e l y hot. K eep
instructions relating to the operation of the appliance.
Do not let children play with the appliance.
Disposal
When disposing of packaging material: observe local legislation
so that the packaging may be reused.
The European Directive 2002/96/EC relating to Waste Electrical
and Electronic Equipment (WEEE) states that household
appliances should not be disposed of using the normal solid
urban waste cycle. Exhausted appliances should be collected
separately in order to optimise the cost of re-using and recycling
the materials inside the machine, while preventing potential
damage to the atmosphere and to public health. The crossedout dustbin is marked on all products to remind the owner of
their obligations regarding separated waste collection.
Exhausted appliances may be collected by the public waste
collection service, taken to suitable collection areas in the area
or, if permitted by current national legislation, they may be
returned to the dealers as part of an exchange deal for a new
equivalent product.
All major manufacturers of household appliances
participate in the creation and organisation of systems for
the collection and disposal of old and disused appliances.
Respecting and conserving the
environme nt
You can help to reduce the peak load of the electricity supply
network companies by using the oven in the hours between late
afternoon and the early hours of the morning. The cooking
mode programming options, the delayed cooking mode (see
Cooking modes) and delayed automatic cleaning mode (see
Care and Maintenance) in particular, enable the user to
organise their time efficiently.
Always keep the oven door closed when using the SPIT
ROASTING, GRILL and ROASTING modes. This will
achieve improved results while saving energy
(approximately 10%).
Check the door seals regularly and wipe them clean to
ensure they are free of debris so that they adhere properly
to the door, thus avoiding heat dispersion.
This product complies with the requirements of the
latest European Directive on the limitation of power
consumption of the standby mode.
If no operations are carried out for a period of 2
minutes, the appliance automatically switches to the
standby mode.
The standby mode is visualised by the "Eco Mode"
message and the LCD turned off.
As soon as interaction with the machine resumes,
the system's operating mode is restored.
GB
29
Page 30

Care and maintenance
GB
Switching the appliance off
Disconnect your appliance from the electricity
supply before carrying out any work on it.
Cleaning the appliance
The stainless-steel or enamel-coated external
parts as well as the rubber seals may be cleaned
using a sponge that has been soaked in
lukewarm water and neutral soap. Use specialised
products for the removal of stubborn stains. After
cleaning, rinse and dry thoroughly. Do not use
abrasive powders or corrosive substances.
The inside of the oven should ideally be cleaned
after each use, while it is still lukewarm. Use hot
water and detergent, then rinse well and dry with
a soft cloth. Do not use abrasive products.
All accessories - with the exception of the sliding
racks - can be washed like everyday crockery,
and are even dishwasher safe.
We advise against spraying detergents directly
onto the control panel; instead spray the product
onto a sponge.
Clean the glass part of the oven door using a
sponge and a non-abrasive cleaning product,
then dry thoroughly with a soft cloth. Do not use
rough abrasive material or sharp metal scrapers
as these could scratch the surface and cause the
glass to crack.
Do not use steam equipment to clean the
appliance.
1. Remove the glass cover using a screwdriver.
2. Remove the light bulb and replace it with a similar
one: Wattage 15 W, cap E 14.
Replace the glass cover, making sure the seal is
positioned correctly (see diagram).
Assembling the sliding rack kit
To assemble the sliding racks:
1. Remove the two
frames, lifting them
away from the spacers
A (see figure).
2. Choose which shelf
to use with the sliding
rack. Paying attention
to the direction in which
the sliding rack is to be
extracted, position joint
B and then joint C on
the frame.
Left
guide rail
B
Right guide
rail
Direction
C
of extraction
A
Inspecting the seals
Check the door seals around the oven regularly. If
the seals are damaged, please contact your nearest
After-sales Service Centre (see Assistance). We
recommend that the oven is not used until the seals
have been replaced.
Replacing the light bulb
To replace the
oven light bulb:
Glass door
Oven
compartment
Lamp
Seal
3. Secure the two
frames with the guide
rails using the holes
provided on the oven
walls (see diagram).
The holes for the left
D
frame are situated at
the top, while the holes
for the right frame are
at the bottom.
4. Finally, fit the frames on spacers A.
Do not place the sliding racks in position 5.
30
Page 31

Automatic cleaning using the
PYROLYTIC cycle
During the PYROLYTIC cycle, the internal
temperature of the oven reaches 500°C. The
pyrolytic cycle is activated and burns away food
and grime residues. Dirt is literally incinerated.
Keep children away from the appliance during the
automatic cleaning cycle as surfaces may become very
hot. Particles may ignite inside the oven due to the
spontaneous combustion process. There is no cause for
concern: this process is both normal and hazard-free.
The oven advises the user when it is necessary to
perform a cleaning cycle; the display shows the text
PYROLYTIC CYCLE recommended - START?;
select yes to set the desired cleaning cycle level.
Before initiating the PYROLYTIC CYCLE:
Remove large or coarse food residues from inside
of the oven using a damp sponge. Do not use
detergents.
Remove all the accessories, the guide rails and
the supporting frames.
Do not place tea towels or pot holders over the
oven handle.
If the oven is too hot, the pyrolytic cycle may not
start. Wait for the oven to cool down.
The programme may only be started once the oven
door has been closed.
To activate the PYROLYTIC cycle, press the
button followed by the button. Select the desired
PYROLYTIC cycle level by adjusting
PYROLYTIC cycle has three default time settings
which cannot be modified:
1. Economy (ECO): 1 hour
2. Normal (NOR): 1 hour and 30 minutes
3. Intensive (INT): 2 hours.
Press the OK button to confirm.
Press the START/STOP button to begin the
PYROLYTIC cycle.
or . The
Safety devices
The door is locked automatically as soon as the
temperature exceeds a certain value.
Should a malfunction occur, the heating elements
will switch off.
Once the oven door has been locked, you cannot
change the cycle time and end time settings.
Programming is possible only after selecting the
PYROLYTIC cycle mode.
Programming delayed automatic cleaning
1. Press the
2. Select the COOKING END TIME command and
press OK to confirm.
3. Adjust the hour figure using the
4. Press the OK button to confirm.
5. Press the
minutes.
6. Press the OK button to confirm.
9. Press the START/STOP button to enable the
programming process.
10. When the set time has elapsed, a buzzer will
sound and the oven will switch off.
For example: it is 9:00 a.m. and the Economy
PYROLYTIC cycle has been selected: default set
time 1 hour. 12:30 is selected as the end time. The
programme will start automatically at 11:30 a.m.
The message awaiting pyrolytic cycle shows that a
programme has been scheduled. The display shows
the pyrolytic cycle end time and the duration
alternately.
To cancel programming press the
Once the automatic cleaning cycle is over
You will have to wait until the temperature inside the
oven has cooled down sufficiently before you can
open the oven door. You will notice some white dust
deposits on the bottom and the sides of your oven;
remove these deposits with a damp sponge once
the oven has cooled down completely. Alternatively,
you can make use of the already heated oven, in
which case it is not necessary to remove the
deposits, they are completely harmless and will not
affect your food in any way.
button.
or buttons.
or buttons again to set the
button.
GB
31
Page 32

Assistance
GB
Warning:
The appliance is fitted with an automatic diagnostic system which detects any malfunctions. Malfunctions are
displayed by messages of the following type: ER followed by numbers.
Try holding the
Call for technical assistance if it does.
Before calling for Assistance:
Check whether you can fix the problem yourself.
Restart the programme to check whether the malfunction has disappeared.
If it has not, contact the Authorised Technical Assistance Service.
Never use the services of an unauthorised technician.
Please have the following information handy:
The type of problem encountered.
The message displayed.
The appliance model (Mod.).
The serial number (S/N).
The latter two pieces of information can be found on the data plate located on the appliance.
x button down for 6 seconds and check whether the malfunction has occurred again.
32
Page 33

Mode demploi
FOUR
IT
Italiano, 1 Français, 33
GB
English,17
FR
NL
Nederlands,
49
FL 836 XA
FL 836 AN
FL 836 MT
FLR 936 XA
FLR 936 AN
FLR 936 MT
FLL 936 XA
FLL 936 AN
FLL 936 MT
FLL 936G XA
FLL 936G AN
FLL 936G MT
FLR 936G XA
FLR 936G AN
FLR 936G MT
FL 836G XA
FL 836G AN
FL 836G MT
Sommaire
FR
Installation, 34-35
Positionnement
Raccordement électrique
Description de lappareil, 36-37
Vue densemble du modèle à ouverture de porte
classique
Vue densemble du modèle à ouverture de porte
latérale
Tableau de bord du modèle à ouverture de porte
classique
Tableau de bord du modèle à ouverture de porte
latérale
Afficheur
Mise en marche et utilisation, 38-39
Première mise en service
Régler lhorloge
Programmer le minuteur
Sécurité enfants
Mode Démonstration
Mise en marche du four
Plaque signalétique
Programmes, 40-44
Programmes de cuisson Création
Programmes de cuisson automatiques Succès
Comment programmer une cuisson
Conseils de cuisson
Tableau de cuisson Création
Tableau de cuisson Succès
Précautions et conseils, 45
Sécurité générale
Mise au rebut
Economies et respect de lenvironnement
Nettoyage et entretien, 46-47
Mise hors tension
Nettoyage de lappareil
Remplacement de lampoule déclairage
Montage du Kit glissières coulissantes
Nettoyage automatique par PYROLYSE
Assistance, 48
Page 34

560 m
m
.
45 mm.
Installation
FR
Conserver ce mode demploi pour pouvoir le consulter
à tout moment. En cas de vente, de cession ou de
déménagement, veiller à ce quil suive lappareil pour
informer le nouveau propriétaire sur son fonctionnement
et lui fournir les conseils correspondants.
Lire attentivement les instructions : elles
contiennent des conseils importants sur linstallation,
lutilisation et la sécurité de lappareil
Positionnement
Les emballages ne sont pas des jouets pour
enfants, il faut les mettre au rebut en respectant la
réglementation sur le tri sélectif des déchets (voir
Précautions et conseils).
Linstallation doit être effectuée par un
professionnel du secteur conformément aux
instructions du fabricant. Une mauvaise installation
peut causer des dommages à des personnes, des
animaux ou des biens.
Encastrement
Pour garantir le bon fonctionnement de lappareil, il
faut que le meuble possède des caractéristiques
bien précises :
les panneaux adjacents doivent être fabriqués
dans un matériau résistant à la chaleur;
dans le cas notamment de meubles plaqués bois,
il faut que les colles résistent à une température
de 100°C ;
la cavité du meuble pour encastrement du four,
tant sous plan (voir figure) quen colonne , doit
avoir les dimensions suivantes :
OK OK
En cas d'installation sous
plan, s'assurer que le tuyau
de la table de cuisson est
correctement positionné et ne
risque pas de gêner
l'installation du four ni boucher
les fentes arrières du
ventilateur de refroidissement.
Aération
Pour garantir une bonne aération, la cavité
dencastrement doit être dépourvue de paroi arrière.
Il est conseillé dinstaller le four de manière à ce
quil repose sur deux cales en bois ou bien sur un
plan dappui continu qui ait une découpe dau moins
45 x 560 mm (voir figures).
Centrage et fixation
Positionner les 2 taquets situés sur les côtés du four
en face des 2 trous supérieurs pratiqués sur le
cadre et les régler selon lépaisseur de la joue du
meuble :
épaisseur 20 mm : enlever la
partie amovible du taquet (voir
figure
) ;
in.
. m
m
547 m
45 mm.
558 m
m
.
480 mm.
595 m
24,5 mm.
7 mm.
470 mm.
3 mm.
m
.
545 mm.
Après encastrement de lappareil, il ne doit plus y
avoir possibilité de contact avec les parties
électrifiées.
Les déclarations de consommation indiquées sur
létiquette des caractéristiques ont été mesurées
pour ce type dinstallation
34
475 mm.
épaisseur 18 mm : utiliser la
première rainure, comme
prévu par le fabricant (voir
figure);
épaisseur 16 mm : utiliser la
deuxième rainure
(voir figure).
Page 35

Pour fixer lappareil au meuble : ouvrir la porte du
four et visser 2 vis à bois dans les 2 trous
supérieurs du cadre.
Toutes les parties qui servent de protection doivent
être fixées de manière à ne pouvoir être enlevées
quavec laide dun outil.
Raccordement électrique
Les fours munis dun câble dalimentation tripolaire
sont prévus pour un fonctionnement au courant
alternatif à la tension et à la fréquence indiquées sur
la plaquette signalétique apposée sur lappareil (voir ci-
dessous).
Branchement du câble dalimentation au réseau
électrique
Monter sur le câble une prise normalisée pour la
charge indiquée sur létiquette des caractéristiques
(voir ci-contre).
En cas de raccordement direct au réseau, il faut
intercaler entre lappareil et le réseau un interrupteur
à coupure omnipolaire ayant au moins 3 mm
décartement entre les contacts, dimensionné à la
charge et conforme aux normes en vigueur (le fil de
terre ne doit pas être interrompu par linterrupteur).
Le câble dalimentation ne doit atteindre, en aucun
point, une température dépassant de 50°C la
température ambiante.
FR
Montage du câble dalimentation
1. Pour ouvrir le bornier,
faire pression à laide
dun tournevis sur les
languettes latérales du
couvercle : tirer et
ouvrire le couvercle
(voir figure).
L
N
3. Fixer le câble dans le serre-câble prévu.
4. Fermer le couvercle du bornier.
2. Montage du câble
dalimentation :
dévisser la vis du serrecâble ainsi que les trois
vis des contacts L-N-
puis fixer les fils
sous les têtes de vis en
respectant les couleurs
Bleu (N) Marron (L)
Jaune-Vert
figure).
(voir
Linstallateur est responsable du bon raccordement
électrique de lappareil et du respect des normes de
sécurité.
Avant de procéder au branchement, sassurer que :
la prise est bien munie dune terre conforme à la loi;
la prise est bien apte à supporter la puissance
maximale de lappareil, indiquée sur la plaque
signalétique (voir ci-dessous);
la tension dalimentation est bien comprise entre
les valeurs indiquées sur la plaque signalétique
(voir ci-dessous);
la prise est bien compatible avec la fiche de
lappareil. Si ce nest pas le cas, remplacer la
prise ou la fiche, ne pas utiliser de rallonges ni de
prises multiples.
Après installation de lappareil, le câble électrique
et la prise de courant doivent être facilement
accessibles
Le câble ne doit être ni plié ni excessivement
écrasé.
Il doit être contrôlé périodiquement et ne peut être
remplacé que par un technicien agréé (voir
Assistance).
N
ous déclinons toute responsabilité en cas de
non respect des normes énumérées ci-dessus.
35
Page 36

Description de
lappareil
FR
Vue densemble du modèle à ouverture de porte classique
Support GRILLE
Support LECHEFRITE
Tableau de bord
Vue densemble du modèle à ouverture de porte latérale
GLISSIERES
de coulissement
niveau 5
niveau 4
niveau 3
niveau 2
niveau 1
GLISSIERES
de coulissement
niveau 5
niveau 4
niveau 3
niveau 2
niveau 1
Support
GRILLE
Tableau de bord
Support
LECHEFRITE
36
Page 37

Tableau de bord du modèle à ouverture de porte classique
Sélection
Programmes Création
Réglage
Temps
Flèche vers le
Bas
Flèche
vers le
Haut
START/
STOP
FR
Touche
Sélections
ON/OFF Réglage
Température
Sélection
Programmes Succès
AFFICHEUR Touche
Touche
OK
Tableau de bord du modèle à ouverture de porte latérale
Réglage
Température
Sélection
Programmes Succès
Sélection
Programmes Création
ON/OFF
Flèche vers le
Bas
Touche
OK
Réglage
Temps
Touche
Pyrolyse
START/
STOP
Flèche vers le
Haut
Afficheur
Pyrolyse
Touche
sélections
AFFICHEUR
Touche
verrouillage commandes
Touche
Verrouillage
Commandes
37
Page 38

Mise en marche et
utilisation
FR
Lors de sa première mise en service, faire
fonctionner le four à vide, porte fermée, pendant au
moins une heure en réglant la température à son
maximum. Puis éteindre le four, ouvrir la porte et
aérer la pièce. Lodeur qui se dégage est due à
lévaporation des produits utilisés pour protéger le
four.
A chaque allumage, le four est réglé sur le Menu
Création
Si à lallumage du four, lutilisateur nactive aucune
touche, le four séteindra automatiquement au bout
de 2 minutes.
Première mise en service
Après raccordement de lappareil au secteur et à sa
première mise en service, allumer le tableau de bord
par pression sur la touche
disponibles est affichée dans le menu REGLAGE.
Sélectionner la langue désirée à laide des touches
et . La langue choisie est affichée en caractère
gras. Appuyer sur OK pour confirmer.
Une fois que le choix a été effectué, les paramètres
suivants sont affichés :
LANGUE Sélection de la langue
HEURE Réglage de lheure
SON Volume du clavier
HORLOGE Affichage de lhorloge
INFO SECURITE Affichage du texte info
SORTIE Pour sortir du réglage
Après la sélection de la langue dans le menu
REGLAGE et si aucune opération nest effectuée
dans les 60 secondes qui suivent, lafficheur passe
au menu Création.
. La liste des langues
Le minuteur ne contrôle pas lallumage et larrêt du
four.
Sécurité enfants
La fonction Sécurité enfants permet de verrouiller la
porte et les touches du four.
Pour l'activer, appuyer sur la touche
pour confirmer.
Pour la désactiver, procéder de même.
La sécurité enfants est activable quand une cuisson
est en cours, quand le four est éteint ou quand une
fin de cuisson a été programmée et que START a
été enfoncé. La sécurité enfants est désactivable
quand la cuisson au four est terminée et dans tous
les cas précédents.
puis sur "OK"
Mode Demo (Démonstration)
Le four peut fonctionner en mode DEMO : dans ce
cas tous les éléments chauffants sont désactivés et
seules les commandes fonctionnent.
Pour activer le mode de fonctionnement DEMO,
quand le four est allumé, appuyer sur la touche
puis sur la touche
désactiver, quand le four est allumé, appuyer
d'abord sur la touche
Un signal sonore retentit et lécran affiche Demo
Off.
Le mode de fonctionnement Demo n'est activable
que si le four est allumé et qu'aucune cuisson n'est
en cours.
et enfin sur "OK". Pour le
puis sur la touche .
,
Mise en marche du four
A chaque allumage, le four est réglé sur le Menu
Création
Régler lhorloge
Pour régler lhorloge, appuyer dabord sur la touche
pour allumer le four ; appuyer ensuite sur la
toucheSETUP et suivre la procédure indiquée.
1. sélectionner HEURE et appuyer sur OK pour
modifier ;
2. régler lheure à laide des touches
3. appuyer sur OK pour confirmer ;
4. procéder de même pour les minutes.
ou ;
Programmer la minuterie
Le minuteur est programmable tant four éteint que
four allumé quand on se trouve à lintérieur du menu
dune cuisson : une fois le temps écoulé, le four
émet un signal sonore qui sarrête au bout dune
minute ou après pression sur une icône quelconque.
Pour régler le minuteur appuyer sur la touche
régler les minutes à laide des touches
Appuyer sur OK pour confirmer.
38
et
ou .
1. Appuyer sur la touche
de commandes.
2. Appuyer sur la touche du programme de cuisson
désiré Création
programmes sélectionnables est affichée.
4. Sélectionner le programme désiré à laide des
touches
confirmer. Lécran affiche la température et la durée
présélectionnées (pour les cuissons Succès, il
naffiche que la durée).
3. Appuyer sur la touche START/STOP pour
démarrer la cuisson.
4. Le four se place en préchauffage.
5. Un signal sonore suivi de lallumage de tous les
indicateurs de préchauffage signale la fin du
préchauffage.
6. En cours de cuisson, il est possible à tout
moment de :
- modifier la température par pression sur la touche
ou Succès . La liste des
ou et appuyer sur OK pour
pour allumer le tableau
Page 39

, la régler à laide des touches ou et
g
appuyer sur OK pour confirmer (uniquement pour
cuissons Création);
- programmer la durée dune cuisson
(uniquement pour cuissons Création);
- interrompre la cuisson par pression sur la touche
START/STOP ;
- régler le minuteur
- éteindre le four par pression sur la touche
;
.
7. En cas de coupure de courant, si la température du
four nest pas trop redescendue, un dispositif spécial
fait repartir le programme à partir du moment où il a
été interrompu. Les programmations en attente de
démarrage ne sont par contre pas rétablies et doivent
être reprogrammées dès rétablissement du courant.
Aucun préchauffage nest prévu pour les
programmes ROTISSERIE et GRIL.
Ne jamais poser dobjets à même la sole du four,
lémail risque de sabîmer.
Il faut toujours enfourner les plats sur la grille
fournie avec lappareil.
Système de refroidissement
Pour obtenir un abaissement des températures
extérieures, un système de refroidissement souffle
de lair à lextérieur par une fente située au-dessus
du bandeau du four. Au début du programme
PYROLYSE le ventilateur fonctionne à faible vitesse.
A la fin du programme PYROLYSE le ventilateur
fonctionne à sa vitesse maximum.
Le ventilateur continue à tourner après larrêt du
four jusquà ce que ce dernier se soit suffisamment
refroidi.
Eclairage du four
Four éteint, il sallume dès ouverture de la porte du
four.
PLAQUE SIGNALETIQUE
largeur 43,5 cm
Dimensions *
Volume * l 58
Raccordements
électriques
ETIQUETTE
ENERGIE *
* Sans
lissières télescopiques
hauteur 32 cm
profondeur 41,5 cm
tension 220-240V ~ 50/60Hz
puissance maximale absorbée
2800W
Directive 2002/40/CE sur
l'étiquette des fours électriques.
Norme EN 50304
Consommation énergie
déclaration Classe convection
Forcée fonction four :
Rôtisserie.
Cet appareil est conforme aux
Directives Communautaires
suivantes :
2006/95/CEE du 12/12/06 (Basse
Tension) et modifications
successives
2004/108/CEE du 15/12/04
(Compatibilité
électromagnétique) et
modifications successives
93/68/CEE du 22/07/93 et
modifications successives.
2002/96/CE et modifications
successives.
1275/2008 stand-by/off mode.
FR
39
Page 40

Programmes
FR
Programmes de cuisson Création
Tous les programmes ont une température de
cuisson présélectionnée. Il est possible de la régler
manuellement, entre 30°C et 300°C au choix.
Le programme Création
cuissons manuelles.
Pour chacune delles, le four ne gère que les
paramètres essentiels pour la réussite de toutes les
recettes, des plus simples aux plus élaborées:
température, source de chaleur, taux dhumidité et
circulation forcée de lair sont les valeurs qui sont
contrôlées en automatique.
Ce chapitre a été réalisé avec le précieux concours
de notre conseiller culinaire. Nous conseillons de
suivre ses conseils pour profiter à plein de son
savoir-faire et obtenir des résultats de cuisson
parfaits.
Le choix des modes de cuisson, des températures
ainsi que les niveaux denfournement sont ceux quil
utilise quotidiennement pour obtenir les meilleurs
résultats.
Pour chaque fonction Création, le tableau suivant
indique si le plat doit être enfourné à froid ou à
chaud. Le respect de ces indications garantit des
résultats de cuisson optimaux.
Pour enfourner à chaud, attendre la fin du
préchauffage signalée par une suite de signaux
sonores.
La température est fixée automatiquement selon le
type de cuisson choisi. Il est tout de même possible
de la modifier pour ladapter à une recette spéciale.
Il est aussi possible de sélectionner une durée de
cuisson avec départ immédiat ou différé.
Programme MULTINIVEAUX
Mise en marche de tous les éléments chauffants
ainsi que de la turbine. La chaleur est constante et
bien répartie à lintérieur du four, lair cuit et dore de
façon uniforme en tous points. Possibilité de cuire
au maximum sur deux niveaux en même temps.
Programme GRIL
La résistance de voûte est branchée. La température
élevée et directe du gril est conseillée pour tous les
aliments qui exigent une température élevée en
surface. Cuisson porte du four fermée.
Programme TOURNEBROCHE
Mise en marche de la résistance de voûte ainsi que
du tournebroche. Cette fonction est optimisée pour
les cuissons au tournebroche. Cuisson porte du four
fermée.
comprend toutes les
Programme GRATIN
Mise en marche de la résistance de voûte et de la
résistance circulaire ainsi que de la turbine.
Lirradiation thermique unidirectionnelle sajoute au
brassage de lair pour une répartition uniforme de la
chaleur dans lenceinte du four. Lidéal pour gratins,
lasagnes, etc...
Cuisson porte du four fermée.
Programme FOUR TRADITION
Pour cette cuisson traditionnelle mieux vaut cuire sur
un seul niveau. Conseillée pour des cuisson lentes
ou au bain-marie. Pour le bain-marie, nous
préconisons de mettre leau directement dans le
plateau émaillé.
Programme ROTISSERIE
Mise en marche de la résistance de voûte et de la
résistance circulaire ainsi que de la turbine.
Lirradiation thermique unidirectionnelle sajoute au
brassage de lair pour une répartition uniforme de la
chaleur dans lenceinte du four. Plus de risques de
brûler les aliments en surface et plus grande
pénétration de la chaleur.
Cuisson porte du four fermée.
Programme ETUVE
Mise en marche de lélément chauffant circulaire et
de la turbine mais uniquement pendant la phase de
réchauffage. La température du four est idéale pour
faire lever les pâtes. Pendant la phase de levage, ne
pas ouvrir la porte du four.
Programme BRIOCHE
Grâce au fonctionnement combiné de la résistance
de voûte et de la résistance circulaire, ce
programme de cuisson est idéal pour les gâteaux à
base de levure de boulanger.
Programme TARTES
Grâce au fonctionnement combiné de la résistance
de voûte et de la résistance circulaire, ce
programme de cuisson est idéal pour la pâte
feuilletée ou la pâte brisée.
Programme GATEAUX
Ce programme de cuisson est conseillé pour toute la
pâtisserie, BRIOCHES et TARTES mises à part,
(petits choux par exemple ou génoise, etc...).
40
Page 41

Programme MERINGUE BLANCHE/AMBREE
Les températures sont présélectionnées et non
modifiables.
Le programme MERINGUE BLANCHE est lidéal
pour faire sécher les meringues. Le programme
MERINGUE AMBREE na pas son pareil pour la
cuisson des meringues.
Programme DECONGELATION
La turbine au fond du four fait circuler lair à
température ambiante autour des aliments. Cette
fonction convient à la décongélation de nimporte quel
type daliment, mais est particulièrement indiquée pour
les aliments délicats qui ne supportent pas la chaleur
comme par exemple : les vacherins, les gâteaux à la
crème ou à la chantilly, les gâteaux aux fruits.
Programmes BASSE TEMPERATURE
Ce type de cuisson, que les professionnels du
secteur ont adopté depuis des années, permet de
cuisiner (viandes, poissons, fruits, légumes) à des
températures très basses (de 85 à 120 °C) et
dobtenir une cuisson parfaite qui exalte au plus
haut point les qualités gustatives.
Des avantages à ne pas négliger :
les températures de cuisson étant très basses
(inférieures en principe à la température
dévaporation), la dispersion des jus de cuisson
est considérablement réduite et laliment gagne
en moelleux;
les fibres musculaires des viandes rétrécissent
moins par rapport à une cuisson classique.
Résultat : la viande est plus tendre et na pas
besoin de reposer après sa cuisson. Il faut faire
dorer (sur plaque de cuisson) la viande avant de
lenfourner.
La cuisson à basse température sous vide,
adoptée depuis trente ans par les plus grands
chefs, présente de nombreuses qualités :
gastronomiques : elle permet de maîtriser les
arômes tout en respectant les caractéristiques
gustatives de laliment qui maintient tout son
moelleux et sa tendresse.
hygiéniques : les normes dhygiène étant respectées,
ce type de cuisson protège les aliments contre les
effets nocifs de loxygène et prolonge la durée de
conservation au réfrigérateur des plats cuisinés.
dorganisation : grâce au prolongement de leur
durée de conservation, les plats peuvent être
préparés longtemps à lavance.
diététiques : cette cuisson qui exige moins de
matières grasses permet dobtenir des plats
légers et digestes.
économiques : elle réduit considérablement la
perte de poids des produits.
Pour utiliser cette technique, il faut disposer dune
machine à faire le vide et de sachets spéciaux.
Suivre attentivement les instructions du fabricant
pour lemballage sous vide des aliments.
La technique de mise sous vide permet de
conserver des produits crus (fruits, légumes, etc.) et
des produits déjà cuits (cuisson traditionnelle).
Tournebroche
Pour actionner le tournebroche (voir figure) procéder
comme suit :
1. placer la lèchefrite
au gradin 1 ;
2. placer le berceau au
gradin 3 et encastrer le
bout arrière de la
broche dans le trou
situé au fond de
lenceinte;
3. actionner le tournebroche en sélectionnant le
programme
;
Programmes de cuisson automatiques
Succès
Pour éviter de fausser les temps de cuisson et de
modifier les températures, éviter douvrir la porte du
four.
Le programme Succès
cuissons automatiques réalisées et sélectionnées
par notre chef.
Toutes les fonctions Succès sont totalement
automatiques : la température et la durée de
cuisson sont présélectionnées et ne peuvent pas
être modifiées à laide du système C.O.P.®
(Cuisson Optimale Programmée) qui garantit
automatiquement un résultat parfait. La cuisson
sinterrompt automatiquement et le four signale que
le plat est cuit (il ny a que la fonction Pizzeria qui
exige un contrôle final de la part de lutilisateur).
Ce chapitre a été réalisé avec le précieux concours
de notre conseiller culinaire. Nous conseillons de
suivre ses conseils pour profiter pleinement de son
savoir-faire et obtenir des résultats de cuisson
parfaits. Les modes de cuisson, les températures et
les niveaux denfournement sont ceux quil utilise
quotidiennement pour obtenir des résultats
incomparables.
Toutes les cuissons Succès doivent être enfournées
à froid sauf Pizzeria (voir paragraphe suivant).
comprend toutes les
FR
41
Page 42

FR
Pour les programmes ROTI... et TARTES...
possibilité de programmer un départ de cuisson
différé.
gradin 5;
faire lever la pâte jusquà ce quelle ait
pratiquement doublé de volume.
Programme ROTI
Choisir cette fonction pour cuisiner de la viande de
veau, de porc, dagneau. Enfourner à froid. Il est
aussi possible denfourner à chaud.
Programme TARTES
Cette fonction est ce quil y a de mieux pour la
cuisson de gâteaux à base de levure de boulanger,
de levure chimique ou sans levure. Enfourner à froid.
Il est aussi possible denfourner à chaud.
Programme PIZZA / PIZZERIA
Cest la fonction idéale pour la cuisson des pizzas.
Se reporter au paragraphe suivant pour une recette
détaillée.
Pour le programme PIZZA il faut toujours choisir le
degré de cuisson désiré.
Pour le programme PIZZERIA le four avertit quil
est temps denfourner par un signal sonore et par
laffichage du message CONFIRMER
ENFOURNEMENT.
Programme PIZZA
Pour obtenir de meilleurs résultats, nous
recommandons de suivre attentivement les conseils
suivants :
suivre la recette à la lettre;
le poids de la pâte doit être compris entre 500g et
700g.
beurrer légèrement la plaque.
Recette PIZZA :
1 Plaque, gradin du bas, four froid ou chaud
Recette pour 3 pizzas denviron 550g : 1.000g de
farine, 500g deau, 20g de sel, 20 g de sucre, 10 cl
dhuile dolive, 20g de levure de boulanger fraîche
(ou bien 2 sachets en poudre)
Levage à température ambiante : 1 heure.
Enfourner à froid ou à chaud
Démarrer la cuisson
PIZZA
Recette du PAIN :
Le poids maxi de la pâte à cuire ne devra pas
dépasser 1500g
Recette pour 1000g de pâte : 600g de farine, 350g
deau, 10g de sel, 25g de levure de boulanger
fraîche (ou bien 2 sachets en poudre)
Procédé :
Mélanger la farine et le sel dans un grand
récipient.
Diluer la levure de boulanger dans de leau
légèrement tiède (35 degrés environ).
Disposer la farine en fontaine.
Verser le mélange deau et de levure
Mélanger et pétrir jusquà obtenir une pâte
homogène et peu collante, létirer avec la paume
de la main et la replier sur elle-même pendant 10
minutes.
Former une boule et laisser lever à température
ambiante pendant 1 heure- 1 heure et demie
(jusquà ce quelle ait doublé de volume), couvrir
avec du film plastique.
Division possible de la boule pour obtenir
plusieurs pains.
Dèposer la pâte sur la lèchefrite profonde recouverte
de papier sulfurisé et enfourner au gradin 2.
Saupoudrer les pains de farine.
Pratiquer des entailles sur les pains.
Mettre 1dl d'eau froide dans la lèchefrite et enfourner au
gradin 5.
Enfourner à froid.
Démarrer la cuisson
En fin de cuisson, laisser reposer les pains sur
une grille jusquà refroidissement.
PAIN
Comment programmer une cuisson
La programmation nest possible quaprès avoir
sélectionné un programme de cuisson.
Programme PAIN
Cest la fonction idéale pour la cuisson du pain. Se
reporter au paragraphe suivant pour une recette
détaillée. Pour obtenir de meilleurs résultats, nous
recommandons de suivre attentivement les conseils
suivants :
suivre la recette à la lettre;
respecter le poids maximal pour chaque plaque;
mettre 1dl d'eau froide dans la lèchefrite et enfourner au
42
Programmer la durée
Appuyer sur la touche
1. Sélectionner DUREE et appuyer sur OK pour
confirmer.
2. Régler le temps par pression sur les touches
3. Appuyer sur OK pour confirmer.
4. Sélectionner SORTIE et appuyer sur OK pour
confirmer. La sélection est mémorisée.
puis :
et .
Page 43

5. Une fois le temps écoulé, un signal sonore retentit
et le four séteint.
Exemple : il est 9h00 et la durée programmée est
de 1h15. Le programme sarrête automatiquement
à 10h15.
Conseils de cuisson
FR
Pour les cuissons ventilées ne pas utiliser les
gradins 1et 5: ils sont directement frappés par lair
chaud qui pourrait brûler les mets délicats.
La durée nest sélectionnable que pour les
cuissons Création.
Programmation dune cuisson différée
1. Appuyer sur la touche
de 1 à 3 décrite pour la durée.
2. Sélectionner FIN DE CUISSON et appuyer sur
OK pour confirmer.
3. Régler lheure à laide des touches
4. Appuyer sur OK pour confirmer.
5. Appuyer à nouveau sur les touches
régler les minutes.
6. Appuyer sur OK pour confirmer.
9. Appuyer sur la touche START pour activer la
programmation.
10. Une fois le temps écoulé, un signal sonore
retentit et le four séteint.
Exemple : il est 9h00, la durée programmée est
de 1h15 et lheure de fin de cuisson est fixée à
12h30. Le programme démarre automatiquement
à 11h15.
Le message cuisson en attente affiché à lécran
signale quune programmation a eu lieu. Lafficheur
affiche à tour de rôle lheure de fin de cuisson et la
durée.
Lheure de fin de cuisson peut être modifiée tant que
le four est en mode attente, suivre la procédure
indiquée plus haut.
Pour annuler une programmation, sélectionner la
durée 0:00 ou bien éteindre le four
et suivre la procédure
ou ;
ou pour
.
En cas de cuisson en mode TOURNEBROCHE,
GRATIN ou ROTISSERIE, placer la lèchefrite au
gradin 1 pour récupérer les jus ou graisses de
cuisson.
MULTICUISSONS
Utiliser les gradins 2 et 4 et placer au 2 les plats
qui exigent davantage de chaleur.
Placer la lèchefrite en bas et la grille en haut.
GRATIN
Placez la grille au gradin 3 ou 4, enfournez vos
plats au milieu de la grille.
Nous conseillons de sélectionner la température la
plus élevée. Ne pas sinquiéter si la résistance de
voûte nest pas allumée en permanence: son
fonctionnement est contrôlé par un thermostat.
La sélection de la durée permet de programmer
une cuisson différée.
43
Page 44

FR
Tableau de cuisson Création
Les programmes de cuisson Création ont des températures de cuisson prédéfinies.
Gradi n
Gradi n
Gradi n
Fonction Cuisson préconisée pour …
Multiniveaux
Gril
Tournebroche Cuisson des viandes blanches ou rouges 1 3 (tournebroche) Froid
Grati n
Tradition
Rôtisserie Rôtis (viandes blanches ou rouges) 1 2 Froid
Etuve
Brioches Pâtisserie (à base de levure de boulanger) 2 Chaud Pour cuire une pizza, la température préconisée est de 220 °C.
Tartes
Pâtisserie
Meringues
blanches
Meringues
ambrées
Décongélation 1 2
Basse
température 85
Basse
température 95
Basse
température 120
Récha uffage Pla ts préc uits 2 F roid Tempér ature (140 °C ) non mod ifiable.
Pasteurisation
Cuisson simultanée de plusieurs plats sur
2 ou 3 niveaux sans transmission d’odeur
ou de saveur
Côtes de boeuf, poisson, grillades, gratins
sur assiette, …
Plats au gratin (gratin de pommes de terre,
soupe Parmentier, lasagnes, etc.)
Cuissons m ijotées (beac keoffe,
bourguignon, braisés, etc.) ou cuissons au
bain-marie (terrines, crèmes, …)
Levage de pâtes à base de levure de
boulanger (brioches, pain, tarte au sucre,
croissants, etc.)
Tartes salées ou su crées (pâte brisée o u
feuill etée)
Toutes les pâtiss eries, Brioches et tartes
mises à part (petits choux, 4/4, génoise,
chaussons, clafoutis, etc.)
Séchage des meringues
Cuisson de meringues
Viande s, légumes, poisso ns, et c. 2 F roid
Viande s, légumes, poisso ns, et c. 2 F roid
Viande s, légumes, poisso ns, et c. 2 F roid
Fruits, légumes, etc. 2 Froid
plateau
grille 1
émaillé
13
1
2Froid
2Chaud
2 Froid Température (40 °C) non modifiable.
2Chaud
2chaud
2Chaud
5 (en cas
de cuis son
niveaux)
Le gradin est
fonction de
l’épa isseur de
l’ali ment
2Chaud
grille 2
sur 3
Enfournement Note
chaud
Chaud
En cas d’utilisation de cette fonction pour une seule cuisson,
placer le plat eau émaillé au gradin 2.
Pour bien faire dorer le dessus d’un gratin déjà cuit et encore
chaud, choisir la fonction gril.
Température (210 °C) non modifiable.
Pour le bain-marie, possibilité de mettre l’eau directement dans
le plateau émaillé.
La température préconisée garantit une saisie et une cuisson
parfaites et évite la production de fumée. Si la viande est dans un
plat, placer le pl ateau é maillé au gr adin 2.
Cuisson parfaite à température élevée du fond et dorage adéquat
de la garniture.
En cas d’utilisation d’un seul niveau, enfourner la préparation
(choux, chaussons, etc.) ou le moule à gâteau (génoise, etc.) sur
le plateau émaillé.
Température (70 °C) non modifiable – Meringues bien blanches et
craquantes – Durée de séchage plutôt long
Température (110 °C) non modifiable – Meringues dorées,
craquantes à l’extérieur et moelleuses à l’intérieur.
La méthode préconisée est toujours une décongélation lente au
réfrigérateur. L’utilisation du four permet d’économiser 50% de
temps. Fonction id éale pour tous les alime nts crus ou cuits.
Les bocaux de petites dimensions peuvent être enfournés sur 2
niveaux (plateau émaillé au gradin 1 et gr ille au gradin 3). L aisser
refroidir les bocaux à l’intérieur du four.
Tableau de cuisson Succès
Les programmes de cuisson Succès ont une température et une durée de cuisson prédéfinies.
Fonction Cuisson préconisée pour …
Rôti de bœuf
Rôti de veau Rôti de veau
Rôti de porc Rôti de porc
Poulet grille Poulet rôti
Gigot d’agneau Gigot d’agneau
Tartes
Brioches
Gateaux
Cake
Pizza
Rôti de boeuf 1 2
Tartes salées ou sucrées (pâte sablée ou
brisée ou feuille tée)
Préparations à base de levure de
boulanger (brioches, kouglofs, …)
Préparations à base de levure
chimique (quatre-quarts, marbrés,…)
Gâteaux sans levur e (clafoutis, p ithiviers,
feuilleté s,…)
Pizzas à pâte épaisse,
fougasses (pâte à pain)
Gradin
plateau
émaillé
Pizzeria Pizzas à pâte très fine (pâte à pain)
Pain * * *
Gradin
grille 1
12
12
12
12
2
2
2
2
2
4 (pierre à
pizza)
Gradin
grille 2
Enfournement Note
Si la viande es t dans un plat, p lacer ce d ernier dans le platea u
Froid
émail lé au gra din 2. Po ssibilité d’enf ourner à chaud si le four
est déjà chaud.
Pour une cuisson multiple , positionner le plateau émaillé au
Froid
gradin 1 et les grilles aux g radins 3 e t 5. Possibilité d’enfourn er
à cha ud si le fo ur est d éjà chau d.
Etaler la pâte à pain directement d ans le plateau émaillé Po ur
une cu isson multipl e, position ner le platea u émaillé au gradin 1
Chaud
et les grilles aux gradins 3 et 5.
Enfourner la pierre à pizza pour la préchauffer. Attendre
l’affichage CONFIRMER E NFOURNEMENT pour enfou rner la
pizza avec la pelle à pizza
44
Page 45

Précautions et conseils
Cet appareil a été conçu et fabriqué conformément aux normes
internationales de sécurité. Ces conseils sont fournis pour des
raisons de sécurité et doivent être lus attentivement.
Sécurité générale
Le clavier du four nest pas à touches sensitives (effleurement),
pour bien utiliser les commandes nous conseillons donc dexercer
une légère pression sur les touches.
Cet appareil a été conçu pour un usage familial, de type non
professionnel.
Cet appareil ne doit pas être installé en extérieur, même dans
un endroit abrité, il est en effet très dangereux de le laisser
exposé à la pluie et aux orages.
Pour déplacer lappareil, se servir des poignées prévues à cet
effet sur les côtés du four.
Ne pas toucher à lappareil pieds nus ou si les mains ou les
pieds sont mouillés ou humides
Cet appareil qui sert à cuire des aliments ne doit être utilisé
que par des adultes conformément aux instructions du mode
demploi.
En cours de fonctionnement, les éléments
chauffants et certaines parties de la porte
peuvent devenir très chauds. Attention à ne pas
les toucher et à garder les enfants à distance.
Eviter que le cordon dalimentation dautres petits
électroménagers touche à des parties chaudes du four.
Les orifices ou les fentes daération ou dévacuation de la
chaleur ne doivent pas être bouchés
Toujours saisir la poignée en son milieu : elle risque dêtre très
chaude à ses extrémités.
Utiliser toujours des gants de protection pour enfourner ou
sortir des plats du four.
Ne jamais tapisser la sole du four de papier aluminium.
Ne pas ranger de matériel inflammable à lintérieur du four : il
pourrait prendre feu si lappareil était par inadvertance mis en
marche.
Ne pas tirer sur le câble pour débrancher la fiche de la prise
de courant.
Neffectuer aucune opération de nettoyage ou dentretien
sans avoir auparavant débranché la fiche de la prise de
courant.
En cas de panne, nessayer en aucun cas daccéder aux
mécanismes internes pour tenter de réparer lappareil.
Contacter le service dAssistance (voir Assistance).
Ne pas poser dobjets lourds sur la porte du four ouverte.
Attention aux heurts accidentels qui pourraient endommager
la vitre.
Cet appareil nest pas prévu pour être utilisé par des
personnes (y compris les enfants) dont les capacités
physiques, sensorielles ou mentales sont réduites, ou des
personnes dénuées dexpérience ou de connaissance, sauf si
elles ont pu bénéficier, par lintermédiaire dune personne
responsable de leur sécurité, dune surveillance ou
dinstructions préalables concernant dutilisation de lappareil.
S'assurer que les enfants ne jouent pas avec l'appareil.
FR
Mise au rebut
Mise au rebut du matériel demballage : se conformer aux
réglementations locales, les emballages pourront ainsi être
recyclés.
La directive européenne 2002/96/CE relative aux déchets
déquipements électriques et électroniques (DEEE), prévoit que
les électroménagers ne peuvent pas être traités comme des
déchets solides urbains courants. Les appareils usagés doivent
faire lobjet dune collecte séparée pour optimiser le taux de
récupération et de recyclage des matériaux qui les composent
et empêcher tout danger pour la santé et pour lenvironnement.
Le symbole de la poubelle barrée est appliqué sur tous les
produits pour rappeler quils font lobjet dune collecte sélective.
Les électroménagers usagés pourront être remis au service de
collecte public, déposés dans les déchetteries communales
prévues à cet effet ou, si la loi du pays le prévoit, repris par les
commerçants lors de lachat dun nouvel appareil de même type.
Tous les principaux fabricants délectroménagers sappliquent
à créer et gérer des systèmes de collecte et délimination des
appareils usagés.
Economies et respect de
lenvironnement
Pour faire des économies délectricité, utiliser autant que
possible le four pendant les heures creuses. Les options de
programmation des cuissons et plus particulièrement la
cuisson différée (voir Programmes) et le nettoyage
automatique différé (voir Nettoyage et entretien), permettent
de sorganiser en ce sens.
Pour les cuissons au TOURNEBROCHE, au GRIL et
ROTISSERIE, nous recommandons de garder la porte du four
fermée : les résultats obtenus sont meilleurs et la
consommation dénergie est moindre (environ 10%
déconomie).
Garder les joints propres et en bon état pour quils adhèrent
bien à la porte et ne causent pas de déperdition de chaleur.
Ce produit est conforme à la nouvelle Directive
Européenne sur la réduction de la consommation
d'énergie en mode standby.
Sans opérations pendant 2 minutes, l'appareil se
place automatiquement en mode veille.
Le mode standby est signalé par l'affichage du
message "Eco Mode" et par l'écran LCD éteint.
A la moindre intervention sur l'appareil, le système
se remet en mode de fonctionnement normal.
45
Page 46

Nettoyage et entretien
FR
Mise hors tension
Avant toute opération de nettoyage ou dentretien
couper lalimentation électrique de lappareil.
Nettoyage de lappareil
Nettoyer lextérieur émaillé ou inox et les joints en
caoutchouc à laide dune éponge imbibée deau
tiède additionnée de savon neutre Si les taches
sont difficiles à enlever, utiliser des produits
spéciaux. Il est conseillé de rincer abondamment
et dessuyer après le nettoyage. Ne pas utiliser
de poudres abrasives ni de produits corrosifs.
Nettoyer lenceinte après toute utilisation, quand
le four est encore tiède. Utiliser de leau chaude et
du détergent, rincer et essuyer avec un chiffon
doux. Eviter tout produit abrasif.
Tous les accessoires peuvent être lavés
normalement comme de la vaisselle courante et
passent au lave-vaisselle, sauf les glissières
coulissantes.
Nous conseillons de ne pas vaporiser le produit
de nettoyage directement sur le bandeau de
commandes mais de se servir dune éponge.
Nettoyer la vitre de la porte avec des produits non
abrasifs et des éponges non grattantes, essuyer
ensuite avec un chiffon doux. Ne pas utiliser de
matériaux abrasifs ou de racloirs métalliques
aiguisés qui risquent de rayer la surface et de
briser le verre.
pour le nettoyage, ne pas utiliser d'appareils à
vapeur
Contrôle des joints
Contrôler périodiquement létat du joint autour de la
porte du four. Sil est abîmé, sadresser au service
après-vente le plus proche de son domicile (voir
Assistance). Mieux vaut ne pas utiliser le four tant
quil nest pas réparé.
Remplacement de lampoule déclairage
Pour changer
cavité
lampe
lampoule
déclairage du
four :
1. Enlever le couvercle en verre à laide dun
tournevis.
2. Dévisser lampoule et la remplacer par une autre
de même type : puissance 15 W, culot E 14.
Remettre le couvercle en place en prenant bien soin
de repositionner correctement le joint (voir figure).
Montage du Kit glissières coulissantes
Pour monter les glissières coulissantes :
1. Enlever les deux
cadres à gradins en les
dégageant des
A
Glissière
gauche
Glissière
droite
B
Sens
C
d'extraction
D
bas.
4. Emboîter enfin les cadres sur les entretoises A.
Ne pas introduire les glissières coulissantes au
niveau 5.
entretoises A (voir
figure).
2. Choisir le gradin sur
lequel monter la
glissière coulissante.
Positionner sur le cadre
dabord le dispositif de
fixation B puis le C en
veillant à bien
respecter le sens
dextraction de la
glissière.
3. Fixer les deux
cadres à gradins avec
glissières assemblées
dans les trous prévus
sur les parois du four
(voir figure). Les trous
pour le cadre de
gauche sont placés en
haut tandis que les
trous pour celui de
droite sont placés en
46
joint
hublot
Page 47

Nettoyage automatique par PYROLYSE
Pendant le programme PYROLYSE la température à
lintérieur du four atteint 500°C et lance le processus
de pyrolyse, de carbonisation autrement dit des
salissures alimentaires. Les salissures sont
littéralement incinérées.
Pendant la pyrolyse, les surfaces peuvent devenir
très chaudes : garder les enfants à distance. Il peut
arriver de voir, à travers la vitre, des particules qui
silluminent: il sagit dune combustion instantanée,
phénomène tout à fait normal et sans danger.
Le four avertit lutilisateur quand il est temps
deffectuer un cycle de nettoyage; lécran affiche
PYROLYSE Conseillée DEMARRER?;
sélectionner oui pour choisir le niveau du cycle de
nettoyage désiré.
Avant dactiver la PYROLYSE :
Les sécurités
FR
la porte se verrouille automatiquement dès que la
température atteint des valeurs élevées;
en cas danomalie de fonctionnement,
lalimentation des résistances est
automatiquement coupée;
une fois que la porte est verrouillée, aucune
modification de sélection de durée et de fin nest
plus possible.
La programmation nest possible quaprès avoir
sélectionné le programme PYROLYSE.
Programmer un nettoyage automatique
différé
enlever avec une éponge humide les salissures
en excès. Ne pas utiliser de détergents;
sortir tous les accessoires, les glissières
télescopiques et les supports.
ne pas placer de serviettes ou de maniques sur la
poignée du four.
Si le four est excessivement chaud, la pyrolyse
pourrait ne pas démarrer. Attendre quil refroidisse.
Lactivation du programme nest possible quaprès
avoir fermé la porte du four.
Pour activer la PYROLYSE appuyer dabord sur la
touche
des touches
désiré, sa durée étant prédéfinie et non modifiable :
1. Economique (ECO) : durée 1 heure;
2. Normal (NOR) : durée 1 heure 30;
3. Intensif (INT) : durée 2 heures;
Appuyer sur OK pour confirmer.
Appuyer sur START/STOP pour lancer la
PYROLYSE.
puis sur la touche . Choisir à laide
ou le niveau de PYROLYSE
1. Appuyer sur la touche .
2. Sélectionner FIN DE CUISSON et appuyer sur
OK pour confirmer.
3. Régler lheure à laide des touches
4. Appuyer sur OK pour confirmer.
5. Appuyer à nouveau sur les touches
régler les minutes.
6. Appuyer sur OK pour confirmer.
9. Appuyer sur START/STOP pour activer la
programmation.
10. Une fois le temps écoulé, un signal sonore
retentit et le four séteint.
Exemple : il est 9 h, choix dune PYROLYSE
niveau Economique avec une durée
présélectionnée de 1 heure. Lheure finale de la
pyrolyse est fixée à 12h30. Le programme
démarre automatiquement à 11h30.
Le message pyrolyse en attente affiché à lécran
signale quune programmation a eu lieu. Lafficheur
affiche à tour de rôle lheure, lheure finale de la
pyrolyse et sa durée.
Pour annuler une programmation, appuyer sur la
touche
A la fin du nettoyage automatique
Pour pouvoir ouvrir la porte du four, il faudra attendre
que la température du four descende à un niveau
acceptable. Il se peut que des résidus blancs
poussiéreux se déposent sur lenceinte du four : les
enlever avec une éponge humide après
refroidissement complet de lappareil. Pourquoi ne
pas profiter de la chaleur emmagasinée pour faire
démarrer une cuisson sans se soucier des résidus
poussiéreux: ils sont tout à fait inoffensifs.
.
ou .
ou pour
47
Page 48

Assistance
FR
Attention :
Lappareil possède un système dautotest qui permet de détecter toute anomalie de fonctionnement. Ces
anomalies sont affichées sous la forme: ER suivi de chiffres.
Exercer une pression de 6 secondes sur la touche
Si cest le cas, contacter un service dassistance technique.
Avant dappeler le service de dépannage :
Vérifier sil est possible de résoudre le problème soi-même;
Redémarrer le programme pour contrôler si le problème a été résolu;
Si ce nest pas le cas, contacter le service dAssistance technique agréé.
Ne jamais faire appel à des techniciens non agréés.
Indiquer :
le type danomalie;
le code erreur affiché
le modèle de lappareil (Mod.)
son numéro de série (S/N)
Ces informations figurent sur la plaque signalétique apposée sur lappareil
et vérifier si linconvénient se répète.
48
Page 49

Gebruiksaanwijzing
OVEN
GBIT FR
Italiaans, 1 Français, 32
English, 17
NL
Nederlands,
49
FL 836 XA
FL 836 AN
FL 836 MT
FLR 936 XA
FLR 936 AN
FLR 936 MT
FLL 936 XA
FLL 936 AN
FLL 936 MT
FLL 936G XA
FLL 936G AN
FLL 936G MT
FLR 936G XA
FLR 936G AN
FLR 936G MT
FL 836G XA
FL 836G AN
FL 836G MT
Inhoud
NL
Installatie, 50-51
Plaatsing
Elektrische aansluiting
Beschrijving van het apparaat, 52-53
Aanzichttekening model met normale opening
Aanzichttekening model met zijdelingse opening
Bedieningspaneel model met normale opening
Bedieningspaneel model met zijdelingse opening
Display
Starten en gebruik, 54-55
Eerste ontsteking
De klok instellen
De timer instellen
Kinderslot
Demomodus
De oven starten
Typeplaatje
Programmas, 56-60
Kookprogrammas Création
Automatische kookprogrammas Succès
De bereiding programmeren
Praktische kooktips
Kooktabel Création
Kooktabel Succès
Voorzorgsmaatregelen en advies, 61
Algemene veiligheid
Afvalverwijdering
Energiebesparing en milieubesef
Onderhoud en verzorging, 62-63
De elektrische stroom afsluiten
Reinigen van het apparaat
Vervangen van het lampje
Montage van de Geleiders Kit
Automatische reiniging PYROLYSE
Service, 64
Page 50

560 m
m
.
45 m
m
.
Installatie
NL
Bewaar dit boekje zorgvuldig voor eventuele
raadpleging in de toekomst. Wanneer u het product
weggeeft, verkoopt, of wanneer u verhuist, dient u
dit boekje bij het apparaat te bewaren zodat alle
nodige informatie voorhanden blijft.
Lees de gebruiksaanwijzingen zorgvuldig door: er
staat belangrijke informatie in over installatie, gebruik
en veiligheid.
Plaatsing
Het verpakkingsmateriaal is niet bestemd voor
kinderen en dient daarom te worden verwijderd volgens
de geldende normen voor gescheiden afvalverzameling
( zie Voorzorgsmaatregelen en advies).
De installatie moet worden uitgevoerd dooreen
bevoegde installateur en volgens de instructies van
de fabrikant. Een verkeerde installatie kan schade
berokkenen aan personen, dieren of dingen.
Inbouw
Voor een goede werking van het apparaat moet het
keukenmeubel de juiste kenmerken hebben:
OK OK
Als u de oven onder het
aanrecht plaatst, dient u te
controleren of de buis van de
kookplaat juist is gemonteerd,
of hij niet de
installatiehandelingen van de
oven belemmert en of hij de
openingen aan de achterzijde
van de ventilator niet verstopt.
Ventilatie
Om een goede ventilatie te kunnen garanderen is
het noodzakelijk de achterkant van het meubel te
verwijderen. Het verdient de voorkeur de oven op
twee houten balken te plaatsen, of eventueel op een
enkele plank die een opening heeft van tenminste 45
x 560 mm (zie afbeeldingen).
de zijkanten van de kastjes die aan de oven
grenzen moeten hittebestendig zijn;
in het bijzonder moet, in geval van meubels met
fineer, de lijm bestand zijn tegen temperaturen
van 100°C;
voor het inbouwen van de oven, zowelonder het
aanrecht ( zie figuur ) alsin stapelbouw, dient
het meubel de volgende afmetingen te hebben:
in.
. m
m
547 m
45 mm.
558 m
m
475 mm.
.
480 mm.
595 m
24,5 mm.
7 mm.
470 mm.
3 mm.
m
.
545 mm.
Centreren en bevestigen
Regel de 2 stelvoetjes aan de zijkant van de oven in
overeenkomst met de 2 gaten in de lijst aan de hand
van de dikte van de zijkant van het meubel:
als de dikte 20 mm is:
verwijder het regelbare
gedeelte van het stelvoetje (
zie afb.);
als de dikte 18 mm is: gebruik
de eerste gleuf zoals door de
fabriek is voorzien ( zie afb.);
als de dikte 16 mm is: gebruik
de tweede gleuf
(zie afbeelding).
Nadat het apparaat is ingebouwd, mag er geen contact
meer mogelijk zijn met de elektrische onderdelen.
Het energieverbruik dat staat aangegeven op het
typeplaatje is gebaseerd op dit soort installatie.
50
Page 51

Om het apparaat aan het keukenkastje te
bevestigen: open de ovendeur en schroef de 2
houtschroeven in de 2 bovenste gaten in de zijrand.
Alle beschermende onderdelen moeten zodanig
worden bevestigd dat ze niet kunnen worden
verwijderd zonder gereedschap te gebruiken.
Elektrische aansluiting
De ovens met driepolige voedingskabel
functioneren met de wisselstroom, spanning en
frequentie die aangegeven staan op het typeplaatje
op het apparaat ( zie onder).
Monteren voedingskabel
1. Licht de lipjes aan
de zijkant van het
deksel van het
klemmenbord op met
een schroevendraaier:
trek het deksel van het
klemmenbord open
(zie afbeelding).
L
N
3. Bevestig de kabel aan de speciale kabelklem.
4. Sluit het deksel van het klemmenbord.
2. De voedingskabel in
werking stellen: draai de
schroef van de kabelklem
en de drie schroeven van
de contacten L-Nen bevestig de draden
onder de schroeven met
inachtneming van de
kleuren: Blauw (N) Bruin
(L) Geel-Groen
afb.).
los,
( zie
Het aansluiten van de voedingskabel aan het
elektrische net
Gebruik voor de voedingskabel een stekker die
genormaliseerd is voor de lading aangegeven op het
typeplaatje( zie hiernaast).
Wanneer het apparaat rechtstreeks op het net wordt
aangesloten moet u tussen het apparaat en het net
een meerpolige schakelaar aanbrengen met een
afstand tussen de contacten van minstens 3 mm,
aangepast aan het elektrische vermogen en
voldoend aan de geldende normen (de aarding mag
niet worden onderbroken door de schakelaar). De
voedingskabel moet zodanig worden geplaatst dat
hij nergens een temperatuur bereikt van 50°C hoger
dan de kamertemperatuur.
De installateur is verantwoordelijk voor een correcte
elektrische aansluiting en het in acht nemen van de
veiligheidsnormen.
Voor het aansluiten moet u controleren dat:
het stopcontact geaard is en voldoet aan de
geldende normen;
de contactdoos in staat is het maximale
vermogen van het apparaat te verdragen, zoals
aangegeven op het typeplaatje ( zie onder );
de spanning zich bevindt tussen de waarden die
staan aangegeven op het typeplaatje ( zie onder);
de contactdoos en de stekker overeenkomen. Als
dat niet zo is, dient u ofwel de stekker ofwel de
contactdoos te vervangen; gebruik geen
verlengsnoeren of dubbelstekkers.
Wanneer het apparaat geïnstalleerd is, moeten de
elektrische kabel en de contactdoos gemakkelijk te
bereiken zijn.
De kabel mag niet gebogen of samengedrukt
worden.
De kabel moet van tijd tot tijd worden
gecontroleerd en mag alleen door erkende monteurs
worden vervangen ( zie Service).
De
fabrikant kan niet aansprakelijk worden
gesteld wanneer deze normen niet worden
nageleefd.
NL
51
Page 52

Beschrijving
van het apparaat
NL
Aanzichttekening model met normale opening
Rooster GRILL
Rooster LEKPLAAT
Bedieningspaneel
Aanzichttekening model met zijdelingse opening
GELEIDERS
van de roosters
stand 5
stand 4
stand 3
stand 2
stand 1
GELEIDERS
van de roosters
stand 5
stand 4
stand 3
stand 2
stand 1
Rooster
GRILL
Bedieningspaneel
Rooster
LEKPLAAT
52
Page 53

Bedieningspaneel model met normale opening
Selectie
Programma's
Crèation
Regelen
Tijden
Pijl
Omlaag
Pijl
Omhoog
START/
STOP
NL
Toets
Instellingen
ON/OFF Regelen
Temperatuur
Selectie
Programma's Succès
DISPLAY
Bedieningspaneel model met zijdelingse opening
Regelen
Temperatuur
Programma's Succès
Programma's Crèation
ON/OFF
Selectie
Selectie
Pijl
Omlaag
Toets
OK
Display
Regelen
Tijden
Pijl
Omhoog
Toets
OK
Toets
Thermolyse
Toets
Thermolyse
Toets
Instellingen
DISPLAY
Toets
Blokkering Bedieningspaneel
START/
STOP
Toets
Blokkering
Bedieningspaneel
53
Page 54

Starten en gebruik
NL
Wij raden u aan bij het eerste gebruik de oven
minstens een uur leeg te laten functioneren, op
maximum temperatuur en met de deur dicht. Nadat
u de oven heeft uitgedaan, opent u de ovendeur en
lucht u het vertrek. De lucht die u ruikt komt door het
verdampen van de middelen die worden gebruikt
om de oven te beschermen.
Als u de oven inschakelt, is deze ingesteld op het
Menu Création
Als de gebruiker bij het inschakelen van de oven
geen enkele toets aanraakt, zal de oven automatisch
na 2 minuten uitgaan.
Eerste ontsteking
Na het aansluiten op het elektrische net, bij de eerste
inbedrijfstelling, doet u het bedieningspaneel aan door te
drukken op de toets
een lijst talen. Selecteer de gewenste taal door middel
van de toetsen
geselecteerde taal aan. Druk OK om te bevestigen.
Zodra u een keuze heeft gemaakt toont het display
de volgende parameters:
TAAL Selecteren van de taal
TIJD Instellen van de tijd
GELUID Geluid van de toetsen
KLOK Weergave van de klok
VEILIGHEIDSINFORMATIE Weergave info tekst
UIT Setup verlaten
Nadat u de taal heeft gekozen in het SETUP menu,
en nadat er 60 seconden zijn verstreken sinds u
hem niet meer heeft gebruikt, zal het display
overgaan naar het menu Création.
. In het SETUP menu verschijnt
en . De vetgetypte tekst geeft de
De klok instellen
Om de klok in te stellen, doet u de oven aan door te
drukken op de toets
en volg de aangegeven procedure.
1. selecteer de optie TIJD en druk op OK om te
wijzigen;
2. regel de uren door middel van de toetsen
3. druk op de OK toets om te bevestigen;
4. herhaal de handeling voor de minuten.
. Druk op de toets SETUP
of ;
De timer instellen
De timer kan worden ingesteld als de oven aan of uit is
als men in een bereidingsmenu is: als de tijd
verstreken is hoort u een geluidssignaal dat ofwel
vanzelf na een minuut uitgaat of door uzelf kan worden
afgezet door op een willekeurig symbool te drukken.
Om de timer in te stellen drukt u op de toets
regelt u de minuten door middel van de toetsen
Druk op de OK toets om te bevestigen.
en
of .
De timer heeft geen invloed op het in- of
uitschakelen van de oven.
Kinderslot
Door middel van de Kinderslot functie kunt u de
deur en de toetsen van de oven blokkeren.
Om deze functie in te schakelen drukt u op de
toets en daarna op de "OK" toets om te bevestigen.
Om de functie uit te schakelen herhaalt u de
aangegeven procedure.
Het kinderslot kan worden ingeschakeld wanneer de
oven aan of uit is, of wanneer u een einde bereiding
heeft ingesteld en na op start te hebben gedrukt.
Het kinderslot kan in alle voorgaande gevallen
worden uitgeschakeld, ook wanneer de oven de
bereiding heeft beëindigd.
Demomodus
De oven kan in demomodus werken: alle
verwarmingselementen worden uitgeschakeld, maar
de bediening blijft actief.
Om de demomodus in te schakelen als de oven aan
is, drukt u eerst op de
toets en uiteindelijk op "OK". Om de demomodus uit
te schakelen als de oven aan is, drukt u eerst op de
toets en daarna op de toets.
U hoort een geluidssignaal en op het display
verschijnt Demo Off.
De demomodus kan alleen worden ingeschakeld als
de oven aanstaat en geen enkele bereiding is
gestart.
, toets, daarna op de
De oven starten
Als u de oven inschakelt, is deze ingesteld op het
Menu Création
1. Schakel het bedieningspaneel in door middel van
de toets
2. Druk op de toets van het gewenste Création
kookprogramma
Het display toont de lijst programmas waaruit u kunt
kiezen.
4. Door middel van de toetsen
gewenste programma. Druk OK om te bevestigen. Het
display toont de vooringestelde temperatuur en duur (voor
de Succès bereidingen alleen de duur).
3. Druk op de START/STOP toets om de bereiding te starten.
4. De oven begint met voorverwarmen.
5. Een geluidssignaal en de ontsteking van alle aanwijzers
van de voorverwarming geven aan dat de voorverwarming
compleet is.
6. Tijdens het koken kunt u nog altijd:
- de temperatuur wijzigen door te drukken op de
toets
.
of Succès kookprogramma .
of selecteert u het
; regelen door middel van de toetsen of
54
Page 55

en bevestigen door te drukken op OK (alleen
voor Création bereidingen);
- programmering duur bereiding
(alleen voor Création bereidingen);
- de bereiding onderbreken door op de toets START/
STOP te drukken;
- de timer instellen
- de oven uitschakelen door te drukken op de toets
;
.
7. Als de stroom uitvalt en de oventemperatuur is niet te
laag geworden, gaat de oven automatisch terug naar het
punt waar het kookprogramma is onderbroken. De
geprogrammeerde functies worden echter niet onthouden.
U dient ze daarom bij het terugkeren van de stroom
opnieuw in te stellen.
Bij de programmas ROOSTEREN en GRILL is geen
voorverwarming nodig.
Zet nooit voorwerpen op de bodem van de oven; u
riskeert hiermee het email te beschadigen.
Plaats de ovenschalen altijd op bijgeleverde roosters.
Ventilator
Om de oven van buiten niet te heet te laten worden,
brengt een ventilator een luchtstroom teweeg die
tussen het bedieningspaneel en de ovendeur naar
buiten komt. Aan het begin van het programma
PYROLYSE draait de ventilator op lage snelheid.
Aan het einde van het programma PYROLYSE draait
de ventilator op maximale snelheid.
Aan het einde van de kooktijd blijft de ventilator
draaien totdat de oven voldoende is afgekoeld.
Ovenverlichting
Als de oven uit is, kan het ovenlicht op ieder
willekeurig moment aan worden gedaan door de
ovendeur te openen.
* Zonder uitneembare geleiders
TYPEPLAATJE
Afmetingen *
Inhoud *
Elektrische
aansluitingen
ENERGY
LABEL *
breedte 43,5 cm
hoogte 32 cm
diepte 41,5 cm
liter 58
spanning 220-240V ~ 50/60Hz
maximum opgenomen vermogen
2800W
Richtlijn 2002/40/EG op het etiket
van elektrische ovens.
Norm EN 50304
Energieverbruikverklaring Klasse
geforceerde convectie verwarmingsfunctie:
Deze apparatuur voldoet aan de
volgende EU voorschriften:
2006/95/EEG van 12/12/06
(Laagspanning) en daaropvolgende
wijzigingen
2004/108/EEG van 15/12/04
(Elektromagnetische
Compatibiliteit) en daaropvolgende
wijzigingen
93/68/EEG van 22/07/93 en
daaropvolgende wijzigingen.
2002/96/CE en daaropvolgende
wijzigingen.
1275/2008 stand-by/off mode.
Braden.
NL
55
Page 56

Programmas
NL
Kookprogrammas Création
Alle programmas hebben een vooringestelde
kooktemperatuur. Deze kan handmatig worden
aangepast en naar wens worden ingesteld tussen de
30°C en de 300°C.
Het programma Création
bereidingen.
Voor iedere bereiding bestuurt de oven de essentiële
gegevens voor het slagen van alle recepten, van de
eenvoudigste tot de ingewikkeldste: temperatuur,
warmtebron, vochtigheidsgraad en geforceerde
luchtcirculatie zijn waarden die automatisch onder
controle worden gehouden.
Dit hoofdstuk is vervaardigd met de zeer gewaardeerde
medewerking van onze culinaire expert. Wij raden u aan
zijn advies op te volgen en van zijn ervaring te
profiteren om altijd een perfect resultaat te bereiken.
De kookfuncties, de temperaturen en de plaatsing
van de gerechten in de oven zijn degenen die hij
zelf gebruikt voor het beste resultaat.
Voor iedere Création functie vindt u in de volgende tabel
informatie of het gerecht in de koude of warme oven
moet worden geplaatst. Als u zich aan deze aanwijzingen
houdt, is een optimaal resultaat gegarandeerd.
Als u gerechten in een warme oven wilt plaatsen, moet u
wachten tot het einde van de voorverwarming,
aangegeven met een opeenvolging van geluidssignalen.
De temperatuur wordt automatisch bepaald op basis
van het gekozen soort bereiding; toch kunt u de
temperatuur veranderen om hem aan te passen voor
een specifiek recept dat u wilt bereiden.
Het is ook mogelijk een bereidingstijd met een
onmiddellijke of uitgestelde start in te stellen.
Programma MULTILEVEL
Alle verwarmingselementen gaan aan en de
ventilator gaat draaien. Aangezien de warmte in de
hele oven constant is, zorgt de lucht dat de
gerechten op gelijkmatige wijze gekookt en
gebakken worden. Het is mogelijk maximaal twee
roosters tegelijk te gebruiken.
Programma GRILL
Het bovenste verwarmingselement gaat aan. Het
koken onder de grill is vooral aan te raden voor
gerechten die een hoge en directe temperatuur aan
de buitenkant nodig hebben. Kook met de ovendeur
dicht.
omvat alle handmatige
Programma DRAAISPIT
Het bovenste verwarmingselement gaat aan en het
draaispit komt in beweging. Deze functie is optimaal
voor het braden aan het draaispit. Kook met de
ovendeur dicht.
Programma GRATINEREN
De bovenste en cirkelvormige
verwarmingselementen gaan aan en de ventilator
gaat draaien. Hiermee wordt de thermische
verspreiding uit één richting gecombineerd met de
geforceerde luchtcirculatie in de oven. Ideaal voor
gegratineerde schotels, lasagne, enz
Kook met de ovendeur dicht.
Programma TRADITIE OVEN
Met deze traditionele kookwijze is het beter een
enkel rooster te gebruiken. Aanbevolen kookfunctie
voor langzame bereidingen of au bain-marie. Voor
de bereiding au bain-marie raden wij u aan het water
rechtstreeks in de bakplaat gieten.
Programma ROOSTEREN
De bovenste en cirkelvormige
verwarmingselementen gaan aan en de ventilator
gaat draaien. Hiermee wordt de thermische
verspreiding uit één richting gecombineerd met de
geforceerde luchtcirculatie in de oven. Eventueel
verbranden van de buitenkant wordt zo vermeden;
de warmte dringt gemakkelijker door naar de
binnenkant.
Kook met de ovendeur dicht.
Programma RIJZEN
Het bovenste cirkelvormige verwarmingselement
gaat aan en de ventilator gaat pas in de
verwarmingsfase draaien. De oventemperatuur is
ideaal voor het rijsproces. Houd tijdens het rijzen de
ovendeur dicht.
Programma BRIOCHE
Het gecombineerde gebruik van het bovenste en
cirkelvormige verwarmingselement maken dit
kookprogramma ideaal voor taarten met
bakkersgist.
Programma TAARTEN
Het gecombineerde gebruik van het bovenste en
cirkelvormige verwarmingselement maken dit
kookprogramma ideaal voor taarten van bladerdeeg
of kruimeldeeg.
56
Page 57

Programma CAKE
Dit kookprogramma is ideaal voor cake, maar niet
voor BRIOCHES en TAARTEN (bv. wel voor kleine
soesjes, cake, enz).
Programma LICHTGEBAKKEN MERINGUE
De temperaturen zijn vooringesteld en niet wijzigbaar.
Het programma LICHTGEBAKKEN MERINGUE is
ideaal voor het drogen van meringues. Het
programma DOORGEBAKKEN MERINGUE is ideaal
voor het bereiden van meringues.
Programma ONTDOOIEN
De ventilator achter in de oven doet de lucht op
kamertemperatuur rondom de gerechten circuleren.
Dit is aangewezen voor het ontdooien van iedere
soort etenswaren, maar speciaal voor fijne gerechten
die geen hitte verdragen zoals bijvoorbeeld:
ijstaarten, slagroomtaarten, vruchtentaarten.
Programmas LAGE TEMPERATUUR
Deze kookfunctie, die reeds lang door vakmensen
gebruikt, maakt het mogelijk allerlei gerechten te bereiden
(vlees, vis, fruit, groente) op zeer lage temperaturen (van
85°C tot 120 °C); hiermee wordt een perfecte bereiding
gegarandeerd die de smaak op zijn best doet uitkomen.
De voordelen moeten niet worden onderschat:
aangezien de temperaturen van de bereiding laag
zijn (meestal lager dan de verdampingstemperatuur),
wordt het verlies van kooksappen, te wijten aan de
verdamping, aanmerkelijk beperkt en wordt het
gerecht mals en zacht;
bij het bereiden van vlees krimpen de spiervezels
minder in dan bij een traditionele bereidingswijze. U
krijgt dus mals vlees dat niet hoeft te rusten nadat
het uit de oven komt. Het bruin bakken van het vlees
moet worden gedaan voordat u het in de oven zet.
Het luchtdicht bereiden op lage temperatuur, dat
al sinds 30 jaar door de beroemdste koks wordt
gebruikt, biedt vele voordelen:
gastronomische: de geuren worden geconcentreerd
voor het behoud van de kenmerkende smaken
terwijl het gerecht zacht en mals blijft.
hygiënische: aangezien de hygiënische normen
worden gerespecteerd beschermt deze kookwijze
de etenswaren tegen de schadelijk effecten van
zuurstof en garandeert het een lange
houdbaarheid in de koelkast.
organisatorische: dankzij de lange houdbaarheid
kunt u de gerechten lang van tevoren klaarmaken.
diëtetische: deze bereidingswijze beperkt het
gebruik van vetten waardoor u licht verteerbare
gerechten klaar kunt maken.
economische: het gewichtverlies van de
producten wordt aanzienlijk beperkt.
Voor gebruik van deze techniek moet u dus
beschikken over een vacuümmachine voorzien van de
nodige zakjes. Volg de instructies voor het luchtdicht
verpakken van etenswaren aandachtig door.
De vacuümtechniek maakt ook het conserveren van
rauwe producten mogelijk (fruit, groente, enz.) en
van voorgekookte producten (traditionele bereiding).
Draaispit
Voor het activeren van
het draaispit ( zie afb.)
gaat u als volgt te
werk:
1. plaats de lekplaat in stand 1;
2. zet de steun van het draaispit op de 3e stand en
steek de vleespen in het gat achterin de oven;
3. activeer het draaispit door het programma
te
selecteren;
Automatische kookprogrammas Succès
Open de ovendeur niet om te voorkomen dat de
tijdsduur en de kooktemperatuur worden ontregeld.
Het programma Succès
bereidingen, verzorgd en ingesteld door onze chef.
Alle Succès functies zijn volledig automatisch: de
temperatuur en de tijdsduur zijn ingesteld en kunnen
niet worden gewijzigd door het systeem C.O.P.
(Cottura Ottimale Programmata (Optimale
Geprogrammeerde Bereiding) die automatisch een
perfect resultaat garandeert. De bereiding wordt
automatisch onderbroken en de oven geeft aan
wanneer het gerecht klaar is (alleen bij de functie
Pizzeria moet de gebruiker aan het einde inspringen).
Dit hoofdstuk is vervaardigd met de zeer
gewaardeerde medewerking van onze culinaire expert.
Wij raden u aan zijn advies op te volgen en van zijn
ervaring te profiteren om altijd een perfect resultaat te
bereiken. De kookfuncties, de temperaturen en de
plaatsing van de gerechten in de oven zijn degenen
die hij zelf gebruikt voor het beste resultaat.
Bij alle Succès bereidingen moeten de gerechten in
de koude oven worden geplaatst, met uitzondering
van de functie Pizzeria (zie volgende paragraaf).
bevat alle automatische
®
NL
57
Page 58

NL
Voor het BRAADPROGRAMMA en het programma
TAARTEN is het mogelijk een uitgestelde start te
programmeren.
BRAADPROGRAMMA
Gebruik deze functie voor het braden van kalfs-,
varkens- en lamsvlees. Plaats het vlees in de koude
oven. U kunt de gerechten eventueel ook in de
warme oven plaatsen.
Programma TAARTEN
Deze functie is ideaal voor het bereiden van zowel
taarten met bakkersgist als met gedroogde gist, of
zonder gist. Plaats in de koude oven. U kunt de
gerechten eventueel ook in de warme oven plaatsen.
Programma PIZZA / PIZZERIA
Gebruik deze functie voor het bereiden van pizzas.
Zie volgende hoofdstuk voor recepten en details.
Bij het programma PIZZA dient men altijd het
gewenste bereidingsniveau te selecteren.
Bij het programma PIZZERIA geeft de oven aan
wanneer u het gerecht in de oven moet plaatsen
door middel van een geluidssignaal en het bericht
BEVESTIG GERECHT IN OVEN.
Programma PIZZA
Voor de beste resultaten raden wij u aan de
volgende aanwijzingen nauwkeurig te volgen:
houdt u zich aan het recept;
het gewicht van het deeg moet tussen de 500 g
en de 700 g zijn.
vet de bakplaat iets in.
Recept voor PIZZA:
1 bakplaat, lage ovenstand, oven koud of warm
Recept voor 3 pizzas van ongeveer 550 g: 1000 g
meel, 500 g water, 20 g zout, 20 g suiker, 10 cl
olijfolie, 20 g bakkersgist (of 2 zakjes gedroogde
gist)
Rijzen op kamertemperatuur: 1 uur
In koude of warme oven plaatsen
Start de bereiding
PIZZA
vergeet niet 1 dl water in de lekplaat boven de
ovenschaal met het deeg te plaatsen en het
bakproces te beginnen in
het deeg moet circa 1 tot 1½ uur op
kamertemperatuur rijzen. De exacte duur hangt af
van de kamertemperatuur. Het deeg is voldoende
gerezen als het volume is verdubbeld.
Recept voor BROOD:
1 bakplaat van 1000 g max, onderste ovenstand
2 bakplaten van 1000 g max, onderste en middelste
stand
Recept voor 1000 g deeg: 600 g meel, 350 g water, 10
g zout, 25 g bakkersgist (of 2 zakjes gedroogde gist)
Procedure:
Meng het meel en het zout in een grote kom.
Doe de gist in lauw water (circa 35 graden).
Maak een kuil in het meel.
Giet er het mengsel van water en gist in
Kneed het geheel totdat een homogeen deeg is
gevormd dat niet plakkerig is, door het deeg 10
minuten lang met de palm van de hand plat te
drukken en vervolgens weer dicht te vouwen.
Vorm een bal en laat deze circa 1 tot 1½ uur rijzen
(totdat het volume verdubbeld is), bedekt met
een plastic folie.
Verdeel de bal om de verschillende broden te
maken.
Leg ze op ovenpapier op de bakplaat.
Bestrooi de broden met meel.
Maak sneden in de broden.
Giet 1 dl koud gedistilleerd water in de lekplaat en
plaats hem boven de ovenschaal met het deeg.
Plaats het brood in de koude oven.
Start het programma
Aan het einde van de kooktijd laat u de broden
rusten op een rooster totdat ze geheel zijn
afgekoeld.
een koude oven;
BROOD
De bereiding programmeren
De programmering is alleen mogelijk wanneer een
kookprogramma is geselecteerd.
Programma BROOD
Gebruik deze functie voor het bakken van brood Zie
volgende hoofdstuk voor recepten en details.
Voor een optimaal resultaat raden wij u aan de
volgende aanwijzingen nauwkeurig op te volgen:
houdt u zich aan het recept;
het maximum gewicht per bakplaat;
58
De duur programmeren
Druk op de toets
1. Selecteer de optie DUUR en druk op OK om te
bevestigen.
2. Regel de tijd door te drukken op de toetsen
3. Druk OK om te bevestigen.
4. Selecteer de optie UIT en druk OK om te
bevestigen. De instelling wordt bewaard.
, daarna:
en .
Page 59

5. Als de tijd verstreken is, hoort u een
geluidssignaal en gaat de oven uit.
B.v.: het is 9:00 uur en u programmeert een duur
van 1 uur en 15 minuten. Het programma stopt
automatisch om 10:15 uur.
Praktische kooktips
NL
Gebruik voor het koken met de heteluchtoven nooit
de standen 1 en 5: in deze standen zou de hete
lucht de fijne gerechten kunnen verbranden.
U kunt de duur alleen instellen voor Création
bereidingen.
Programmeren van een uitgestelde bereiding
1. Druk op de toets
duur van punt 1 t/m 3.
2. Selecteer de optie EINDE BEREIDING en druk
OK om te bevestigen.
3. Regel de uren door middel van de toetsen
4. Druk OK om te bevestigen.
5. Druk nogmaals op de toetsen
minuten te regelen.
6. Druk OK om te bevestigen.
9. Druk op de toets START voor het inschakelen
van de programmering.
10. Als de tijd verstreken is, hoort u een
geluidssignaal en gaat de oven uit.
B.v.: het is 9:00 uur, u programmeert een duur
van 1 uur en 15 minuten en de eindtijd om 12:30.
Het programma zal automatisch om 11:15
beginnen.
Het bericht op het display wacht op koken geeft
aan dat er een programmering is uitgevoerd. Op het
display verschijnen de eindtijd en de duur van de
bereiding.
U kunt de eindtijd wijzigen totdat de oven wacht op
koken zoals aangegeven in bovenstaande
procedure.
Om een programmering te annuleren stelt u de duur
in op 0:00 of schakelt u de oven uit
en volg de procedure van de
of .
en om de
.
Bij de functies DRAAISPIT, GRATINEREN en
ROOSTEREN raden wij u aan de lekplaat op stand 1
te zetten om vet of jus op te vangen.
MULTIKOKEN
Gebruik de standen 2 en 4, en plaats de gerechten
die meer warmte nodig hebben op stand 2.
Plaats de lekplaat op de onderste stand en het
rooster op de hoogste.
GRATINEREN
Plaats de grill op stand 3 of 4, plaats de
gerechten op het midden van de grill.
Wij raden u aan de temperatuur op maximum te
zetten. Het is normaal dat het bovenste
verwarmingselement niet constant aan blijft: zijn
werking wordt geregeld door een thermostaat.
Als u een kookduur instelt, kunt u een uitgestelde
kooktijd programmeren.
59
Page 60

NL
Kooktabel Création
De Création kookprogrammas hebben een vooringestelde kooktemperatuur.
Functie Aanbevolen berei ding voor... Niveau b akplaat Niveau rooster 1 Niveau rooster 2 In oven pl aatsen N.B.
Multilevel
Grill Runderb iefstuk, v is, grill , gratin, enz. 1
Draaispit Het braden van wit of rood vlees 1 3 (braadspit) Koud
Gratineren Aard appelschotel au grati n, uiensoep, l asagne, enz. 2 Koud
Traditie
Roosteren Braadstukken ( wit of rood vl ees) 1 2 Koud
Rijzen
Brioche Gebak en t aarten (met bakkersgi st) 2 Warm
Taart Taa rten of qui ches (krui meldeeg of bla derdeeg) 2 Warm
Cake
Lichegebakken
meringue
Doorgebakken
meringue
Ontdooien 1 2
Lage temperatuur
85
Lage temperatuur
95
Lage temperatuur
120
Verhitten Vo orgekookte ger echten 2 Koud Temperatu ur (140 °C) nie t wijzigbaar.
Pasteur isatie Fruit, groe nte, enz. 2 K oud
Gelijktij dig bereiden van meer dere gerechten o p 2
of 3 niveaus zonder het overdragen van geur of
smaak
Langzame bereidi ng (backenhof, boeuf
bourguigno n, goulash, enz.) of au bain-mari e
(terrines, crèmes, enz.)
Rijzen van deeg met bakkersgi st (croissants,
brood, taa rten, enz.)
Alle taarten en gebak be halve croissan ts en taarten
met harde bodem (soe sjes, pound cake, cake,
clafoutis, enz. )
van het schuimgebak 2 warm
Drogen
van het schuimgebak 2 Warm
Bereiding
Vlees, groente, vis, enz. 2 Koud
Vlees, groente, vis, enz. 2 Koud
Vlees, groente, vis, enz. 2 Koud
1 3
Het niveau hangt af van de di kte
van de te grillen etenswaren
2 Warm
2 K oud Temperatuur (40 °C) ni et wijzigba ar.
2 Warm
5 (bij ber eiding
op 3 niveaus)
warm
Warm
Als u deze funct ie gebruikt voor ee n enkele
bereidi ng zet u de bakplaa t op het 2
Als u het kors tje van een gere cht au grati n wilt
afmaken kiest u de grill f unctie.
Temperatuur (21 0 °C) niet wij zigbaar.
Voor de bereid ing au bain-marie kunt u het water
rechtstreeks i n de bakplaat gieten.
De aanbevole n temperatuur gar andeert een
perfecte berei ding en voorkomt rookvor ming. Als
het vlees op een schaal li gt, plaatst u de bakplaat
e
niveau.
op het 2
Voor het berei den van pizza raden wi j u aan de
temperat uur op 220 °C te zet ten.
Bodem perfect gaar en goede af werking van de
bovenkant.
Als u slechts een nivea u gebruikt, plaatst u het
gerecht (soesjes , enz.) of de taartvorm (c ake, enz.)
op de bakplaat .
Temperatuur (70 °C) ni et wijzigbaar – Kroka nt wit
schuimgebak - Droogf ase redelijk lang
Temperatuur (11 0 °C) niet wij zigbaar - Goudkl eurig
schuimgebak, kroka nt van buiten en zacht van
binnen.
Langzaam ontdooien in de koelkast blijft de bes te
methode. Me t het gebrui k van de oven bespa art u
50% van de tijd. Deze func tie is geschikt voor alle
rauwe of gekookte et enswaar.
Kleine bakjes kunne n op 2 niveaus worden
geplaatst (bakpl aat 1
Laat de bakjes in de oven afk oelen.
e
niveau en rooster 3e niveau).
e
niveau.
Kooktabel Succès
De Succès kookprogrammas hebben een vooringestelde kooktemperatuur en -duur.
Functie
Gebraden
Rundvlees
Gebraden
Kalfsvlees
Gebraden
Varkensvlees
Gebraden kip Gebraden kip 1 2
Lamspoot Lam sbout 1 2
Taarten
Brioche
Koekjes
Fruit cak e
Pizza
Aanbevolen bereiding voor...
Runderrol lade
Kalfsrollade 1 2
Varkensrollade 1 2
Vruchtentaarten o f quiches (zandtaartde eg,
kruimeldeeg of blad erdeeg)
Gebak en taarten m et bakkersgist (croissa nts,
amandeltaart enz.)
Gebak en t aarten met gedroogd e gist (pound
cake, gemarmerde koe kjes, enz.)
Gebak zond er gist (clafoutis, amandelt aart,
boerentaart, en z.)
Dikke pizza's (brooddee g)
Pizza Dunne pizza’ s (broo ddeeg)
Brood * * *
Niveau bakplaat Niveau rooster 1 Niveau rooster 2
1 2
2
2
2
2
2
4 (vuurvaste steen
op rooster)
In oven
plaatsen
Koud
Koud
Warm
N.B.
Als het vlees op ee n schotel ligt, zet u
deze op de bakplaat o p het 2
U kunt het vlees ook in d e oven doen
als de oven al warm is.
Voor bereiding op meer dere niveaus
plaatst u de bakpla at op het 1
en de roost ers op het 3
Als de oven al warm is kunt u toch de
etenswaren in de o ven doen.
Plaats het deeg d irect op de bakplaat.
Voor bereiding op meer dere niveaus
plaatst u de bakpla at op het 1
en de roost ers op het 3
Plaats de steen vo or de pizza om hem
voor te verwarmen. W acht tot het
verschijnen van de boodschap
BEVESTIGING GERECHT IN OVEN
voordat u de pizza inlaadt met de
schep
e
niveau.
e
niveau
e
en 5e niveau.
e
niveau
e
en 5e niveau .
60
Page 61

Voorzorgsmaatregelen
en advies
Dit apparaat is ontworpen en vervaardigd volgens de
geldende internationale veiligheidsvoorschriften. Deze
aanwijzingen zijn geschreven voor uw veiligheid en u dient ze
derhalve goed door te nemen.
Algemene veiligheid
Het bedieningspaneel van de oven is niet van het type
touch-screen, derhalve dient u de toetsen licht in te drukken.
Dit apparaat is vervaardigd voor niet-professioneel gebruik
binnenshuis.
Het apparaat dient niet buitenshuis te worden geplaatst,
ook niet in overdekte toestand. Het is erg gevaarlijk als het
in aanraking komt met regen of als het onweert.
Maak gebruik van de handgrepen aan de zijkant van de
oven om het apparaat te verplaatsen.
Raak de oven niet blootsvoets of met natte handen of
voeten aan.
Het apparaat dient om gerechten te koken. Het mag
uitsluitend door volwassenen worden gebruikt en alleen
volgens de instructies die beschreven staan in deze
handleiding.
T i j dens het ge bruik van de oven worden de
verwarmingse l e m enten en enkele delen van
de ovendeur zee
houd kind e r en o p een afstand.
Voorkom dat elektrische snoeren van andere kleine
keukenapparaten op warme delen van de oven
terechtkomen.
Laat de ventilatieopeningen en warmteafvoer vrij.
Pak het handvat van de ovendeur alleen in het midden vast:
aan de zijkant zou het heet kunnen zijn.
Gebruik altijd ovenwanten om gerechten in de oven te
zetten en eruit te halen.
Plaats geen aluminiumfolie op de bodem van de oven.
Plaats geen brandbaar materiaal in de oven: als de oven
plotseling aan zou worden gezet, zou dit materiaal vlam
kunnen vatten.
Trek de stekker nooit uit het stopcontact door aan het
snoer te trekken, maar altijd door de stekker direct beet te
pakken.
Maak de oven niet schoon of voer geen onderhoud uit als
de stekker nog in het stopcontact zit.
Probeer in geval van storingen nooit zelf de interne
mechanismen van het apparaat te repareren. Neem
contact op met de Technische Dienst (zie Service).
Plaats geen zware voorwerpen op de open ovendeur.
Zorg ervoor niet per ongeluk tegen het handvat te stoten,
aangezien u hiermee riskeert het glas te beschadigen.
Dit apparaat mag niet worden gebruikt door personen
(kinderen inbegrepen) met een beperkt lichamelijk,
sensorieel of geestelijk vermogen of personen die niet de
nodige ervaring of kennis hebben met het apparaat, tenzij
onder toezicht van een persoon die verantwoordelijk is voor
hun veiligheid of nadat hun is uitgelegd hoe het apparaat
r heet. Raak ze niet aan en
werkt.
Voorkom dat kinderen met het apparaat spelen.
Afvalverwijdering
Het verwijderen van het verpakkingsmateriaal: houdt u aan
de plaatselijke normen zodat het materiaal hergebruikt kan
worden.
De Europese richtlijn 2002/96/EG, betreffende afgedankte
elektrische en elektronische apparatuur (AEEA), voorziet
dat huishoudelijke apparatuur niet met het normale afval
mag worden meegegeven. De verwijderde apparaten
moeten apart worden opgehaald om het terugwinnen en
recyclen van de materialen waaruit ze bestaan te
optimaliseren en te voorkomen dat er eventuele schade
voortvloeit voor de gezondheid en het milieu. Het symbool
van de afvalemmer met een kruis staat op alle producten
om de consument eraan te herinneren dat dit gescheiden
afval is.
U kunt oude apparaten laten ophalen of afgeven bij de
reinigingsdienst of, indien dit door de landelijke wetten
wordt voorzien, ze bij aanschaf van eenzelfde soort nieuw
product, inleveren bij de verkoper ervan.
Alle belangrijkste fabrikanten van huishoudelijke apparaten zijn
actief bij het beheer van verzamel- en verwijderingsystemen
van afgedankte apparatuur.
Energiebesparing en milieubehoud
Door de oven te gebruiken vanaf het late middaguur tot
aan de vroege ochtend zorgt u ervoor dat uw
elektriciteitscentrale minder wordt belast tijdens het
spitsuur. De optie waarmee u programmas
voorprogrammeert, in het bijzonder de uitgestelde
bereiding (zie Programmas) en de vertraagde
automatische reiniging (zie Onderhoud en verzorging),
kunnen u hierbij helpen.
Houd bij de functies DRAAISPIT, GRILL en ROOSTEREN
altijd de ovendeur dicht: dit om betere resultaten te
bereiken en voor een grotere energiebesparing (circa
10%).
Houd de afdichtingen altijd schoon zodat ze goed
aansluiten op de deur en er geen hitte vrij kan komen.
Dit product voldoet aan de eisen die gesteld
worden door de nieuwe Europese Richtlijn voor
energiebesparing voor apparaten in de standbystand.
Wanneer 2 minuten lang geen handelingen worden
uitgevoerd, gaat het apparaat automatisch in de
standy-stand.
De standby-stand wordt weergegeven middels het
bericht "Eco Mode" en met LCD uit.
Wanneer weer een handeling aan het apparaat wordt
uitgevoerd, gaat het systeem onmiddellijk weer over
in de operationele stand.
NL
61
Page 62

Onderhoud en verzorging
NL
De elektrische stroom afsluiten
Sluit altijd eerst de stroom af voordat u tot enige
handeling overgaat.
Reinigen van het apparaat
De buitenkant, dus zowel het email en het roestvrij
staal als de rubberen afdichtingen, kunnen met
een spons en een sopje worden afgenomen. Als
de vlekken moeilijk te verwijderen zijn, kunt u een
speciaal reinigingsmiddel gebruiken. Na het
reinigen dient u alles goed af te spoelen en te
drogen. Gebruik geen schuurmiddelen of
bijtende producten.
De binnenkant van de oven kunt u het beste direct
na gebruik schoonmaken, als hij nog lauw is.
Gebruik warm water en een schoonmaakmiddel,
spoel vervolgens af en droog met een zachte
doek. Gebruik geen schuurmiddelen.
De accessoires kunnen gewoon worden
afgewassen (eventueel ook in de vaatwasser),
met uitzondering van de geleiders.
We raden u aan de schoonmaakmiddelen niet
direct op het bedieningspaneel te spuiten maar
een sponsje te gebruiken.
Reinig het glas van de deur met een spons en
niet schurende producten. Droog met een zachte
doek. Gebruik geen ruwe schurende materialen of
scherpe schrapertjes die het oppervlak zouden
kunnen krassen waardoor als gevolg het glas zou
kunnen barsten.
Gebruik voor het reinigen geen stoomapparaat.
Controleer de afdichtingen
Controleer regelmatig de staat van de afdichtingen
rondom de ovendeur. In het geval de afdichtingen
beschadigd zijn, dient u zich tot de dichtstbijzijnde
Technische Dienst te wenden ( zie Service). Gebruik
de oven niet voordat de reparatie is uitgevoerd.
Vervangen van het lampje
Voor het
Ovenruimte
Lamp
Afdichting
Glasplaat
vervangen van het
ovenlampje:
2. Schroef het lampje los en vervang het met
eenzelfde soort lampje: vermogen 15 W, fitting E 14.
Zet het deksel weer op zijn plaats en let erop dat de
afdichting goed is bevestigd (zie afb.).
Montage van de Geleiders Kit
Zo monteert u de geleiders:
1. Verwijder de twee
draagrekken door ze uit
de afstandleiders A te
A
Linker
glijder
Rechter
glijder
B
C
Uittrekrichting
D
gaten voor het rechter draagrek zich aan de
onderkant bevinden.
4. Zet tenslotte de draagrekken vast op de
afstandleiders A.
Plaats de geleiders nooit in stand 5.
trekken (zie
afbeelding).
2. Kies het niveau
waarop u de geleiders
wilt plaatsen. Plaats
eerst de drukknop B
op het draagrek en
vervolgens de
drukknop C. Let goed
op de uittrekrichting
van de geleider.
3. Bevestig de twee
draagrekken, met de
geleiders al op hun
plaats, in de speciale
gaten op de wanden
van de oven (zie
afbeelding). De gaten
voor het linker draagrek
bevinden zich aan de
bovenkant, terwijl de
1. Dient u het glazen lampenkapje los te halen met
behulp van een schroevendraaier.
62
Page 63

Automatische reiniging PYROLYSE
Het programma PYROLYSE brengt de
oventemperatuur op 500°C om het pyrolyseproces
(ofwel het verbranden van voedselrestjes) te starten.
Het vuil wordt letterlijk as.
Gedurende de automatische reiniging kunnen de
oppervlakken zeer heet worden: houd kinderen op
een afstand. Door de ovendeur heen kunt u zien dat
bepaalde deeltjes zullen oplichten: dit is een
plotselinge verbranding, hetgeen een absoluut
normaal verschijnsel is wat geen enkel gevaar met
zich mee brengt.
Veiligheidsmechanismen
de deur wordt automatisch geblokkeerd zodra de
temperatuur erg hoog wordt;
als er iets onverwachts of vreemds gebeurt zal de
verwarming worden onderbroken;
als de deur geblokkeerd is kunnen de tijdsduur en
de eindtijd niet meer veranderd worden.
De programmering is alleen mogelijk nadat u het
programma PYROLYSE heeft geselecteerd.
NL
De oven waarschuwt de gebruiker wanneer een
schoonmaakcyclus moet worden uitgevoerd. Op het
display verschijnt PYROLYSE Aangeraden - WILT U
STARTEN?; selecteer ja om het gewenste
reinigingsniveau te selecteren.
Voor het activeren van de PYROLYSE:
verwijder met een natte spons het ergste vuil uit
de oven. Gebruik geen schoonmaakmiddelen;
verwijder alle accessoires, telescopische
geleiders en ovenrekken uit de oven.
laat geen keukendoeken of pannenlappen op het
handvat hangen.
Als de oven te heet is kan het gebeuren dat de
pyrolyse niet start. Wacht tot de oven wat is
afgekoeld.
Het programma zal alleen van start gaan als de
ovendeur gesloten is.
Om de PYROLYSE te activeren drukt u op de toets
en daarna op de toets . Door middel van de toetsen
of kiest u het gewenste PYROLYSE niveau. De
ingestelde duur kan niet worden gewijzigd:
1. Economisch (ECO): duur 1 uur;
2. Normaal (NOR): duur anderhalf uur;
3. Intensief (INT): duur 2 uur.
Druk OK om te bevestigen.
Druk op de toets START/STOP om de PYROLYSE
te starten.
Programmeren van een uitgestelde reiniging
1. Druk op de toets
2. Selecteer de optie EINDE BEREIDING en druk
OK om te bevestigen.
3. Regel de uren door middel van de toetsen
4. Druk OK om te bevestigen.
5. Druk nogmaals op de toetsen
minuten te regelen.
6. Druk OK om te bevestigen.
9. Druk op de toets START/STOP voor het
inschakelen van de programmering.
10. Als de tijd verstreken is, hoort u een
geluidssignaal en gaat de oven uit.
B.v.: het is 9:00 uur, u kiest het Economische
niveau van PYROLYSE met een vooringestelde tijd
van 1 uur. U programmeert 12:30 als eindtijd. Het
programma zal automatisch om 11:30 beginnen.
Het bericht op het display wacht op pyrolyse
geeft aan dat er een programmering is uitgevoerd.
Op het display verschijnen de tijd, de eindtijd en de
duur van de pyrolyse.
Om een programma te annuleren drukt u op de toets
Na de automatische reiniging
De ovendeur kan pas worden geopend als de
temperatuur tot op een acceptabel niveau is gezakt.
U zult nu wat wit poeder waarnemen op de bodem
en op de wanden van de oven: verwijder dit als de
oven is afgekoeld met een natte spons. Als u wilt
profiteren van de overgebleven warmte van de oven
om te gaan koken, kunt u het witte poeder rustig
laten liggen: het levert geen enkel gevaar op voor de
gerechten die u wilt gaan koken.
.
of .
en om de
.
63
Page 64

Servicedienst
NL
Belangrijk:
Het apparaat is voorzien van een diagnostisch systeem dat eventuele storingen opspoort. Deze kunt u op het
display aflezen met berichten zoals: ER gevolgd door nummers.
Probeer 6 seconden lang op de toets
In dit geval moet u de technische dienst inschakelen.
Voor u contact opneemt met de Technische Dienst:
Controleer of u de storing niet zelf kunt oplossen;
Start het programma opnieuw om te controleren of het probleem is opgelost;
Als dit niet het geval is, dient u contact op te nemen met een Erkende Technische Servicedienst.
Wendt u nooit tot niet erkende monteurs.
Dit dient u door te geven:
Het soort storing;
het bericht dat op het display verschijnt
Het model apparaat (Mod.)
Het serienummer (S/N)
Deze informatie bevindt zich op het typeplaatje op het apparaat.
te drukken en te controleren of de storing opnieuw optreedt.
64
Page 65

NL
65
Page 66

NL
66
Page 67

NL
67
Page 68

NL
11/2009 - 195053508.05
XEROX FABRIANO
68
 Loading...