

Page 1
Art.Nr.
5907709901
AusgabeNr.
5907709850
Rev.Nr.
30/01/2019
ASP30-ES
Nass- Trockensauger
DE
Originalbetriebsanleitung
Wet and dry vacuum cleaner
GB
Translation of Original Operating Manual
Aspirateur eau et poussières
FR
Traduction de la notice originale
Aspiratutto
IT
Traduzioni del manuale d‘uso originale
Vysavač pro vysávání zamokra
CZ
i zasucha
Překlad originálního návodu k obsluze
13
20
28
36
5
Nedves- szárazszívó
HU
Az eredeti használati útmutató fordítása
Mokro-suchý vysávač
SK
Preklad originálu návodu na obsluhu
43
51
Nat-/droogzuiger
NL
Vertaling van de originele
gebruiksaanwijzing
Märkä-kuivaimuri
FI
Käännös alkuperäisestä käyttöohjeesta
59
67
ACHTUNG!: Vor Inbetriebnahme die Bedienungsanleitung genau durchlesen!
CAUTION!: Read the manual carefully before operating this machine!
ATTENTION!: Lire la notice intégralement avant l’utilisation de la machine!
Nachdrucke, auch auszugsweise, bedürfen der Genehmigung. Technische Änderungen vorbehalten. Abbildungen beispielhaft!
www.scheppach.com service@scheppach.com +(49)-08223-4002-99 +(49)-08223-4002-58
Page 2
1
12
11
1
2
2
2
3
10
9
8
7
6
3
16
4
5
17
18
13
14
15
19
24
1
6
5
23
20
21
22
2
www.scheppach.com / service@scheppach.com / +(49)-08223-4002-99 / +(49)-08223-4002-58
Page 3

4
5
5
5
6
6
8
17
2
7
6
7
23
5
7
1
2
4 4
9
2
23
9
19
10
12
11
10
B
18
9
14
16
10
13
22
16
A
16
21
20
www.scheppach.com / service@scheppach.com / +(49)-08223-4002-99 / +(49)-08223-4002-58
3
Page 4
14
15
B
24
16
18
A
22
17
12
19
8
11
13
3
24
20
20
21
22
4
www.scheppach.com / service@scheppach.com / +(49)-08223-4002-99 / +(49)-08223-4002-58
Page 5

Erklärung der Symbole auf dem Gerät
Warnung! Bei Nichteinhaltung Lebensgefahr, Verletzungsgefahr oder Beschädigung des
Werkzeugs möglich!
m
Vor Inbetriebnahme Bedienungsanleitung und Sicherheitshinweise lesen und beachten!
www.scheppach.com / service@scheppach.com / +(49)-08223-4002-99 / +(49)-08223-4002-58
DE | 5
Page 6

Inhaltsverzeichnis: Seite:
1. Einleitung 7
2. Gerätebeschreibung 7
3. Lieferumfang 7
4. Bestimmungsgemäße Verwendung 8
5. Sicherheitshinweise 8
6. Technische Daten 9
7. Montage 9
8. Bedienung 10
9. Reinigung und Wartung 10
10. Lagerung 11
11. Elektrischer Anschluss 11
12. Entsorgung und Wiederverwertung 11
13. Störungsabhilfe 12
6 | DE
www.scheppach.com / service@scheppach.com / +(49)-08223-4002-99 / +(49)-08223-4002-58
Page 7

1. Einleitung
Hersteller:
scheppach
Fabrikation von Holzbearbeitungsmaschinen GmbH
Günzburger Straße 69
D-89335 Ichenhausen
Verehrter Kunde,
wir wünschen Ihnen viel Freude und Erfolg beim Arbeiten mit Ihrem neuen Gerät.
Neben den in dieser Bedienungsanleitung enthaltenen Si cherheitshinweisen und den besonderen Vorschriften Ih res Landes sind die für den Betrieb von
Holzbearbeitungs maschinen allgemein anerkannten
technischen Regeln zu beachten.
Wir übernehmen keine Haftung für Unfälle oder
Schäden, die durch Nichtbeachten dieser Anleitung
und den Sicherheitshinweisen entstehen.
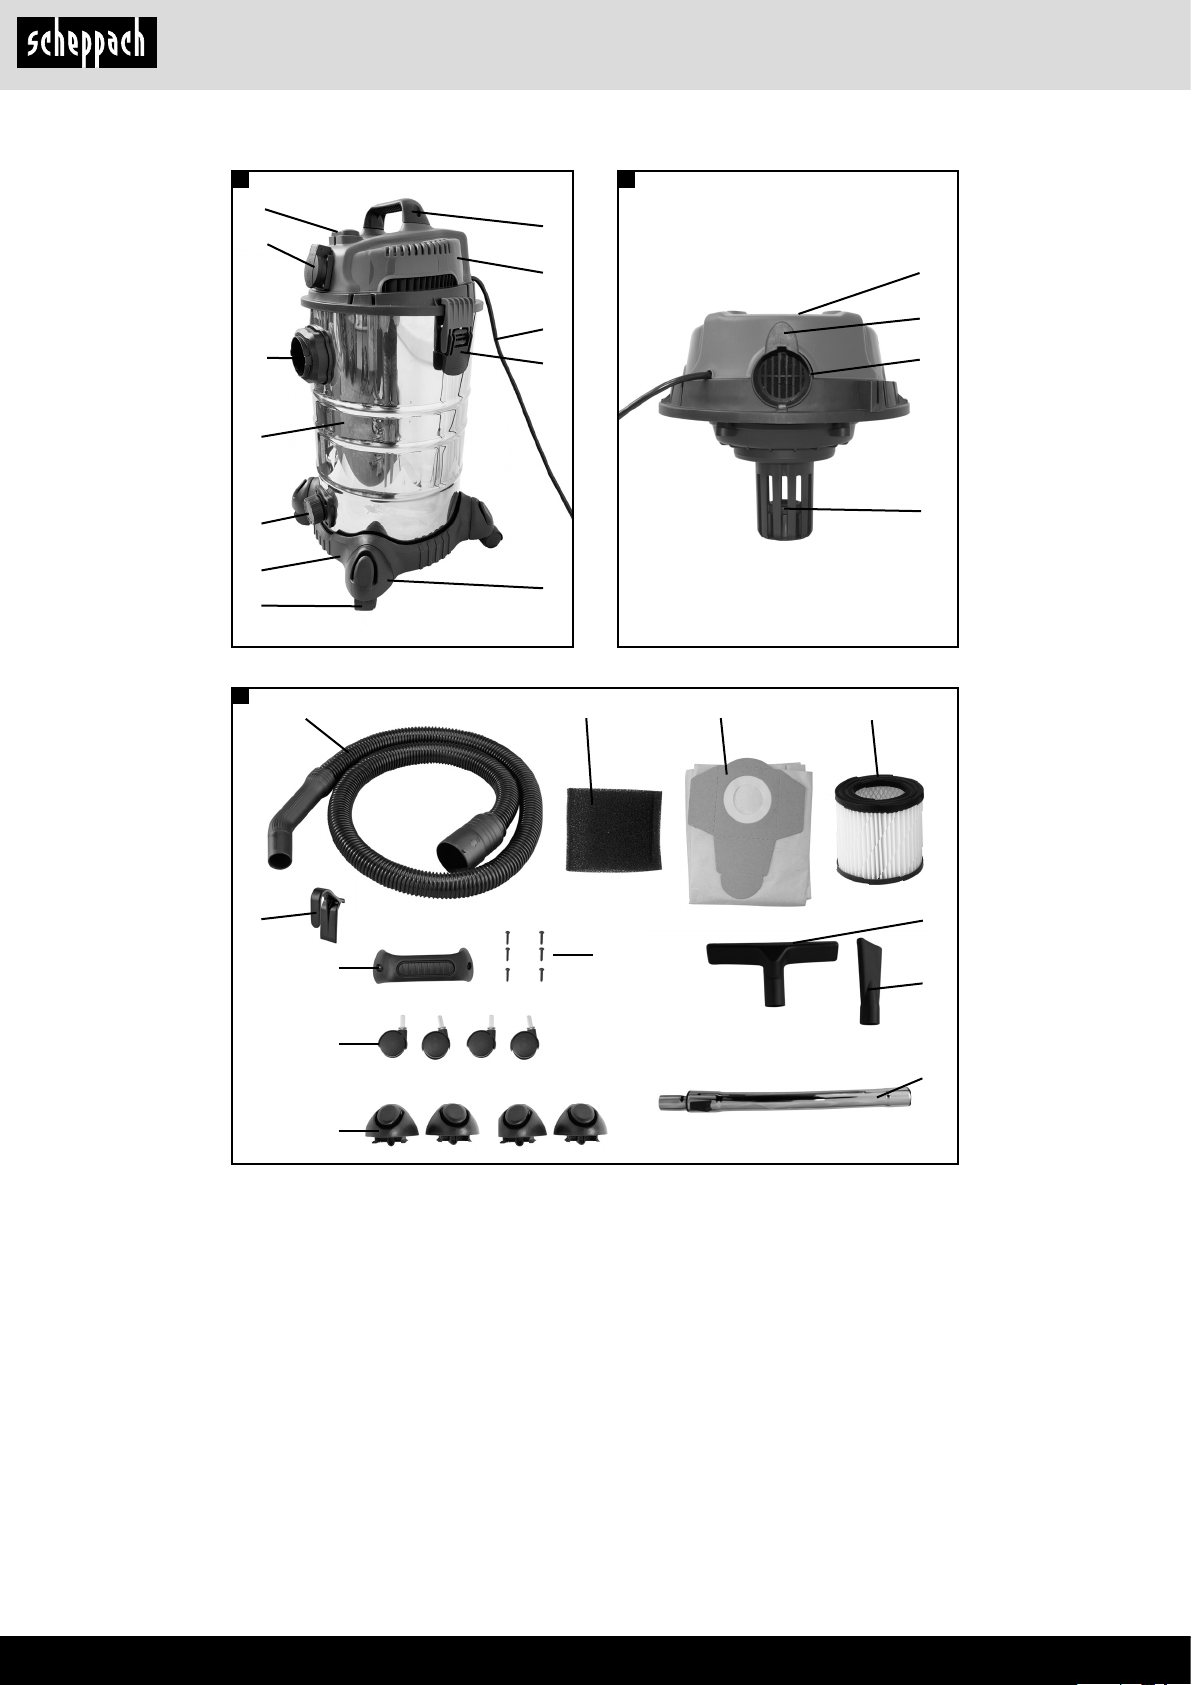
2. Gerätebeschreibung (Abb. 1)
Hinweis:
Der Hersteller dieses Gerätes haftet nach dem geltenden Produkthaftungsgesetz nicht für Schäden,
die an diesem Gerät oder durch dieses Gerät entstehen bei:
• unsachgemäßer Behandlung,
• Nichtbeachtung der Bedienungsanweisung,
• Reparaturen durch Dritte, nicht autorisierte Fach-
kräfte,
• Einbau und Austausch von nicht originalen Ersatzteilen,
• nicht bestimmungsgemäßer Verwendung,
• Ausfällen der elektrischen Anlage bei Nichtbeach-
tung der elektrischen Vorschriften und VDE-Bestimmungen 0100, DIN 57113 / VDE0113.
Beachten Sie:
Lesen Sie vor der Montage und vor Inbetriebnahme
den ge samten Text der Bedienungsanleitung durch.
Diese Bedienungsanleitung soll es Ihnen erleichtern,
Ihr Elektrowerkzeug kennenzulernen und dessen
bestimmungsgemäßen Einsatzmöglichkeiten zu nutzen.
Die Bedienungsanleitung enthält wichtige Hinweise,
wie Sie mit dem Elektrowerkzeug sicher, fachgerecht
und wirt schaft lich arbeiten, und wie Sie Gefahren
vermeiden, Reparaturkosten sparen, Ausfallzeiten
verringern und die Zuverlässigkeit und Lebensdauer
des Elektrowerkzeugs erhöhen.
Zusätzlich zu den Sicherheitsbestimmungen dieser
Bedienungsanleitung müssen Sie unbedingt die für
den Be trieb des Elektrowerkzeugs geltenden Vorschriften Ihres Landes beachten.
Bewahren Sie die Bedienungsanleitung, in einer
Plas tik hülle geschützt vor Schmutz und Feuchtigkeit,
bei dem Elektrowerkzeug auf. Sie muss von jeder
Bedienungsperson vor Aufnahme der Arbeit gelesen
und sorgfältig beachtet wer den. An dem Elektrowerkzeug dürfen nur Personen arbeiten, die im Gebrauch
des Elektrowerkzeugs unterwiesen und über die damit verbundenen Gefahren unterrichtet sind. Das gefor der te Mindestalter ist einzuhalten.
1. Handgri
2. Maschinenkopf
3. Anschlussleitung
4. Verriegelungshaken
5. Rollenaufnahme (4x)
6. Lenkrollen (4x)
7. Radaufnahmeplatte
8. Wasserablassschraube
9. Edelstahlbehälter
10. Absaugschlauchanschluss
11. Steckdose mit Einschaltautomatik
12. Ein-/Ausschalter
13. Obere Kabelhalterung
14. Anschluss Blasfunktion
15. Filterkorb mit Sicherheitsschwimmerventil
16. 3m Absaugschlauch
17. Schaumstolter
18. Papierlterbeutel
19. Faltenlter
20. Bodendüse
21. Fugendüse
22. Metallverlängerungsrohr
23. Schraube (6x)
24. Untere Kabelhalterung
3. Lieferumfang
• Önen Sie die Verpackung und nehmen Sie das
Gerät vorsichtig heraus.
• Entfernen Sie das Verpackungsmaterial sowie Verpackungs-/ und Transportsicherungen (falls vorhanden).
• Überprüfen Sie, ob der Lieferumfang vollständig ist.
• Kontrollieren Sie das Gerät und die Zubehörteile
auf Transportschäden.
• Bewahren Sie die Verpackung nach Möglichkeit
bis zum Ablauf der Garantiezeit auf.
m ACHTUNG!
Gerät und Verpackungsmaterialien sind kein Kinderspielzeug! Kinder dürfen nicht mit Kunststobeuteln,
Folien und Kleinteilen spielen! Es besteht Verschluckungs- und Erstickungsgefahr!
www.scheppach.com / service@scheppach.com / +(49)-08223-4002-99 / +(49)-08223-4002-58
DE | 7
Page 8

30L Nass-/Trockensauger (1x)
3m Absaugschlauch (1x)
Schaumstolter (1x)
Papierlterbeutel (1x)
Faltenlter zum Trockensaugen (1x)
Rollenaufnahme (4x)
Rollen (4x)
Handgri (1x)
Schraube (6x)
Bodendüse (1x)
Fugendüse (1x)
Verlängerungsrohr aus Metal (1x)
Kabelhalterung (1x)
Bedienungsanleitung (1x)
4. Bestimmungsgemäße
Verwendung
Der Nass-Trockensauger ist geeignet zum Nass- und
Trockensaugen unter Verwendung des entsprechenden Filters. Das Gerät ist nicht bestimmt zum Aufsaugen von brennbaren, explosiven oder gesundheitsgefährdenden Stoen.
Die Maschine darf nur nach ihrer Bestimmung verwendet werden. Jede weitere darüber hinausgehende Verwendung ist nicht bestimmungsgemäß. Für
daraus hervorgerufene Schäden oder Verletzungen
aller Art haftet der Benutzer/Bediener und nicht der
Hersteller.
Bitte beachten Sie, dass unsere Geräte bestimmungsgemäß nicht für den gewerblichen, handwerklichen oder industriellen Einsatz konstruiert wurden.
Wir übernehmen keine Gewährleistung, wenn das
Gerät in Gewerbe-, Handwerks- oder Industriebetrieben sowie bei gleichzusetzenden Tätigkeiten eingesetzt wird.
5. Sicherheitshinweise
m GEFAHR!
• Das Gerät nur an Wechselstrom anschließen. Die
Spannung muss mit dem Typenschild des Gerätes
übereinstimmen.
• Netzstecker und Steckdose niemals mit feuchten
Händen anfassen.
• Netzstecker nicht durch Ziehen an der Anschluss-
leitung aus der Steckdose ziehen.
• Anschlussleitung mit Netzstecker vor jedem Be-
trieb auf Schäden prüfen. Beschädigte Anschlussleitung unverzüglich durch autorisierten Kundendienst/ Elektro-Fachkraft austauschen lassen, um
Gefährdungen zu vermeiden.
• Zur Vermeidung von Elektrounfällen empfehlen
wir, Steckdosen mit vorgeschaltetem FehlerstromSchutzschalter (max. 30 mA Nennauslöse-Stromstärke) zu benutzen.
• Vor allen Pege– und Wartungsarbeiten das Gerät
ausschalten und den Netzstecker ziehen.
• Reparaturarbeiten und Arbeiten an elektrischen
Bauteilen dürfen nur vom autorisierten Kundendienst durchgeführt werden.
m WARNUNG!
• Dieses Gerät ist nicht dafür bestimmt, durch Per-
sonen mit eingeschränkten physischen, sensorischen oder geistigen Fähigkeiten oder mangels
Erfahrungen und/ oder mangels Wissen benutzt zu
werden, es sei denn, sie werden durch eine für ihre
Sicherheit zuständige Person beaufsichtigt oder
erhielten von ihr Anweisungen, wie das Gerät zu
benutzen ist und haben die daraus resultierenden
Gefahren verstanden.
• Kinder dürfen das Gerät nur dann verwenden,
wenn sie über 8 Jahre alt sind und wenn sie durch
eine für ihre Sicherheit zuständige Person beaufsichtigt werden oder von ihr Anweisungen erhielten, wie das Gerät zu benutzen ist und die daraus
resultierenden Gefahren verstanden haben.
• Kinder dürfen mit dem Gerät nicht spielen.
• Kinder beaufsichtigen, um sicherzustellen, dass
sie nicht mit dem Gerät spielen.
• Die Reinigung und Anwenderwartung dürfen von
Kindern nicht ohne Aufsicht durchgeführt werden.
• Verpackungsfolien von Kindern fernhalten, es besteht Erstickungsgefahr!
• Gerät nach jedem Gebrauch und vor jeder Reinigung/Wartung ausschalten.
• Brandgefahr. Keine brennenden oder glimmenden
Gegenstände aufsaugen.
• Der Betrieb in explosionsgefährdeten Bereichen
ist untersagt.
• Bei Schaumbildung oder Flüssigkeitsaustritt das
Gerät sofort ausschalten oder den Netzstecker
ziehen!
• Keine Scheuermittel, Glas oder Allzweckreiniger
verwenden! Gerät niemals in Wasser tauchen.
Bestimmte Stoe können durch die Verwirbelung mit
der Saugluft explosive Dämpfe oder Gemische bilden! Nachfolgende Stoe niemals aufsaugen:
• Explosive oder brennbare Gase, Flüssigkeiten und
Stäube (reaktive Stäube)
• Reaktive Metall-Stäube (z.B. Aluminium, Magnesium, Zink) in Verbindung mit stark alkalischen und
sauren Reinigungsmitteln
• Unverdünnte starke Säuren und Laugen
• Organische Lösungsmittel (z.B. Benzin, Farbver-
dünner, Aceton, Heizöl).
Zusätzlich können diese Stoe die am Gerät verwendeten Materialien angreifen.
8 | DE
www.scheppach.com / service@scheppach.com / +(49)-08223-4002-99 / +(49)-08223-4002-58
Page 9
m WARNUNG!
Dieses Elektrowerkzeug erzeugt während des Betriebs ein elektromagnetisches Feld. Dieses Feld
kann unter bestimmten Umständen aktive oder passive medizinische Implantate beeinträchtigen. Um
die Gefahr von ernsthaften oder tödlichen Verletzungen zu verringern, empfehlen wir Personen mit
medizinischen Implantaten ihren Arzt und den Hersteller vom medizinischen Implantat zu konsultieren,
bevor das Elektrowerkzeug bedient wird.
6. Technische Daten
Netzspannung 220-240V~ 50/60Hz
Leistung 1400W
Maximale Leistung Gerä-
testeckdose
Gesamtleistung 3400W
Wassertank Kapazität 30L
Absaugleistung 20 kPA
Schutzart IPX4
Schutzklasse I
2000W
7. Montage
m ACHTUNG!
Stellen Sie vor dem Gebrauch sicher, dass das Gerät korrekt und vollständig montiert ist.
Auspacken (Fig.1+2+3)
• Entriegeln Sie die Verriegelungshaken (4) und entfernen Sie den Maschinenkopf (2). Das Zubehör bendet
sich im Edelstahlbehälter (9). Nur das Metalverlängerungsrohr (22) bendet sich außerhalb des Edelstahlbehälters (9) in der Verpackung. Entfernen Sie sämtliches Zubehör aus dem Edelstahlbehälter (9).
Montage der Rollenaufnahmen (5) (Abb. 4+5)
• Stellen sie den Edelstahlbehälter (9) auf den Kopf
(der Maschinenkopf (2) muss entfernt werden).
• Schieben Sie die Rollenaufnahmen (5) in die dafür
vorgesehenen Aussparungen an der Radaufnahmeplatte (7). (4x)
• Befestigen Sie die Rollenaufnahmen (5) mit einem
Schraubendreher (nicht im Lieferumfang enthalten)
mit je einer Schraube (23). (4x)
Montage der Lenkrollen (6) (Abb. 6)
• Drücken Sie die vier Lenkrollen (6) in die Löcher
der Rollenaufnahmen (5).
Montage des Maschinenkopfes (2) und des Handgris (1) (Abb. 7)
• Setzen Sie den Maschinenkopf (2) auf den Edelstahlbehälter (9). Sichern Sie den Maschinenkopf
(2) mit den Verriegelungshaken (4). Achten Sie bei
der Montage des Maschinenkopf (2) darauf, dass
die Verriegelungshaken (4) richtig einrasten.
• Setzen Sie den Gri (1) auf den Maschinenkopf (2) und
befestigen Sie diesen mit zwei Schrauben (23) mit einem
Schraubendreher (nicht im Lieferumfang enthalten).
Montage des Schaumstolters (17) (Abb. 3+8)
Verwenden Sie das Gerät niemals ohne Filter! Stellen
Sie immer sicher, dass die Filter korrekt montiert sind
• Schaumstolter (17) montieren: Zum Nasssaugen
den mitgelieferten Schaumstolter (17) über den Filterkorb mit Sicherheitsschwimmerventil (15) schieben.
Montage des Faltenlters (19) (Abb. 3+9)
Zum Trockensaugen schieben Sie den Faltenlter
(19) auf den Filterkorb mit Sicherheitsschwimmerventil (15). Der Faltenlter (19) ist nur für das Trockensaugen geeignet!
Montage des Papierlterbeutels (18) (Abb. 3+10)
Zum Saugen von feinem, trockenem Schmutz wird
empfohlen, zusätzlich einen Papierlterbeutel (18) zu
verwenden.
• Den Papierlterbeutel (18) über die Saugönung
im Edelstahlbehälter (9) schieben. Der Papierlterbeutel (18) ist nur zum Trockensaugen geeignet.
Der Papierlterbeutel (18) erleichtert die Entsorgung des abgesaugten Staubes.
Absaugschlauch (16) montieren (Abb. 3+11+12)
Schließen Sie den Absaugschlauch (16) an den entsprechenden Anschluss, je nach gewünschter Anwendung, am Nass- und Trockensauger an.
Staubsaugen:
Den Absaugschlauch (16) an den Absaugschlauchanschluss (10) anschließen. Schieben Sie dazu das
Ende des Absaugschlauches (16) mit den beiden
Nippeln in den Absaugschlauchanschluss (10) (A).
Setzen Sie die beiden Nippel in die Vertiefungen ein.
In der Endposition den Absaugschlauch im Uhrzeigersinn drehen (B).
Blasen:
Schließen Sie den Absaugschlauch (16) an den Anschluss mit Blasfunktion (14) an. Schieben Sie das
Ende des Absaugschlauches (16) mit den beiden
Nippeln in den Anschluss mit Blasfunktion (14). Setzen Sie die beiden Nippel in die Vertiefungen ein.
Eine Drehung ist hier nicht erforderlich.
www.scheppach.com / service@scheppach.com / +(49)-08223-4002-99 / +(49)-08223-4002-58
DE | 9
Page 10

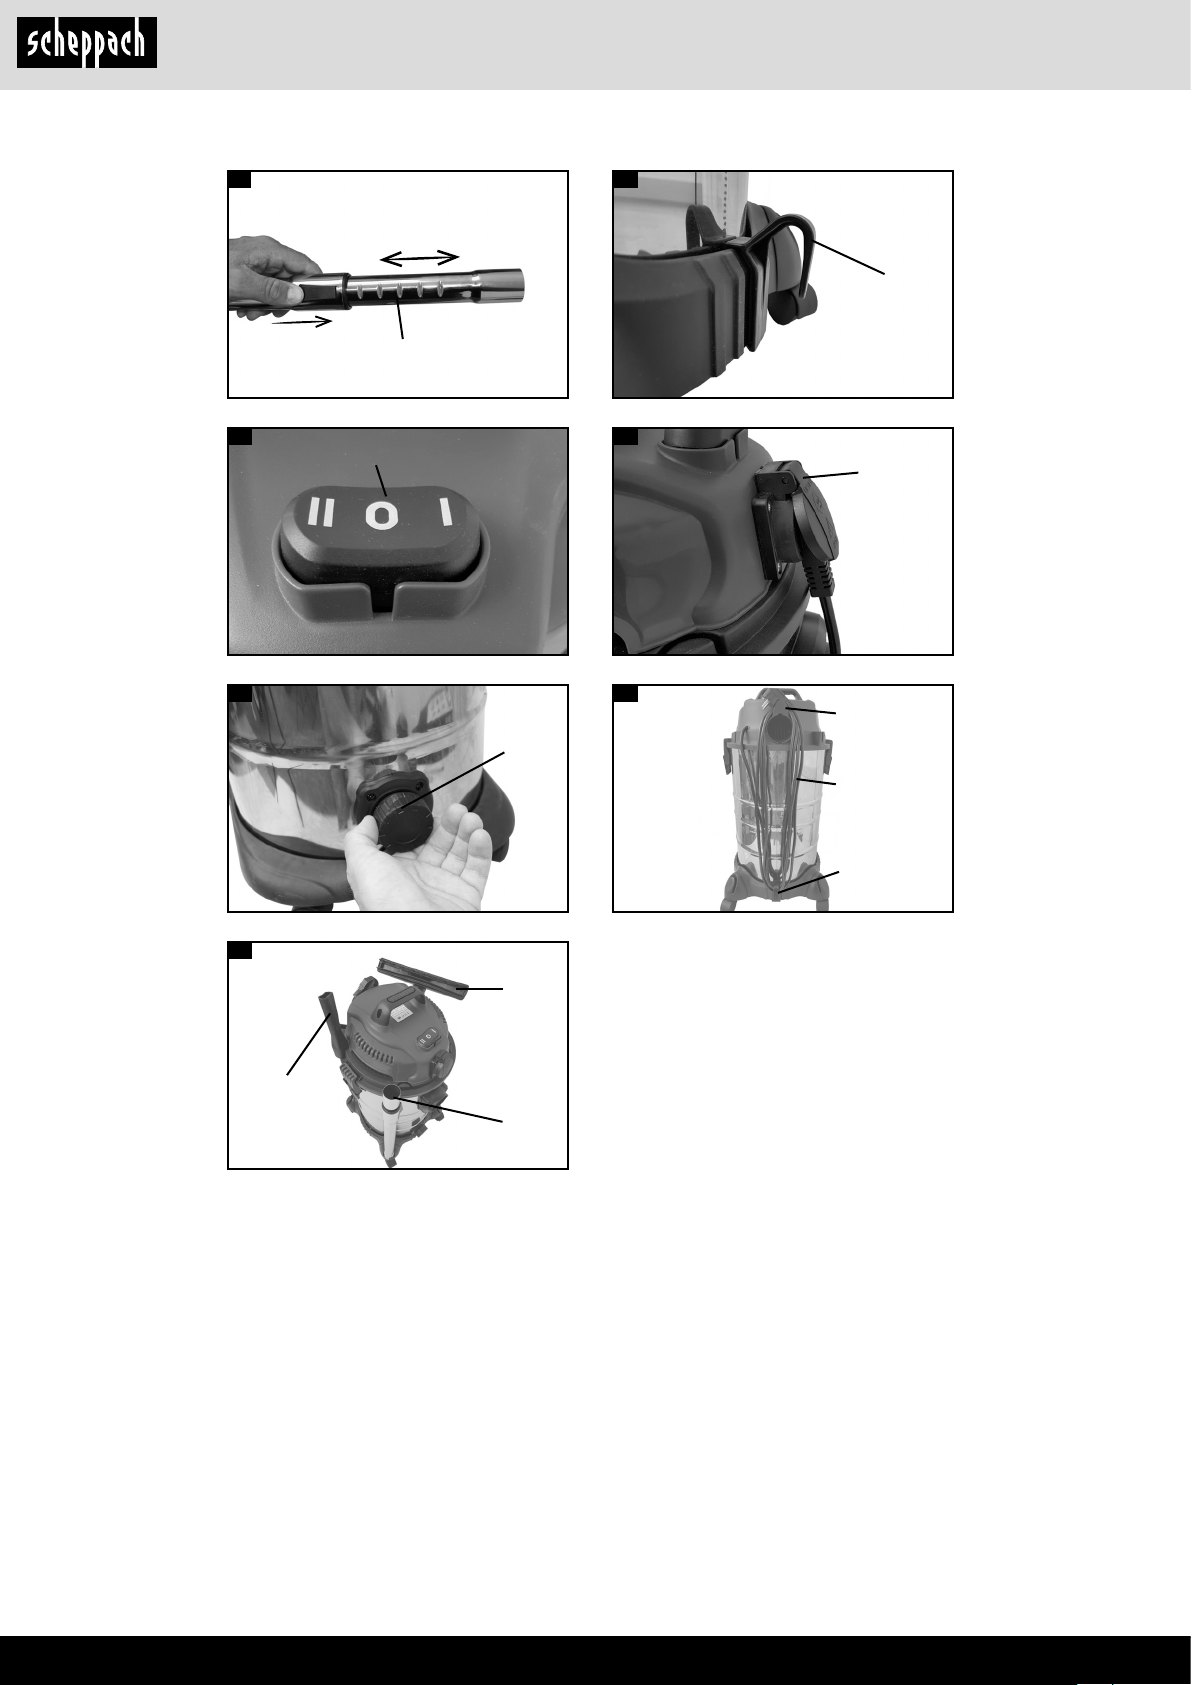
Metalverlängerungsrohr (22), Absaugschlauch
(16) und Düsen (20/21) montieren (Abb. 13)
• Verbinden Sie das Metalverlängerungsrohr (22) mit
dem gekrümmten Ende des Absaugschlauches (16).
• Montieren Sie die Boden (20)- oder Fügendüse (21)
an das andere Ende des Metalverlängerungsrohr
(22).
• Um die individuelle Länge des Metallverlängerungsrohrs (22) einzustellen, schieben Sie den Schieber
nach vorne (A). (Abb. 14)
• Ziehen Sie das Rohr auf die entsprechende Länge
(B). Stellen Sie sicher, dass der Schieberegler einrastet. (Abb. 14)
Montage der unteren Kabelhalterung (Abb. 3+15)
• Hängen Sie die untere Kabelhalterung (24) auf der
Geräterückseite an der Radaufnahmeplatte (7) ein.
Die obere Kabelhalterung (13) bendet sich am Anschluss für Blasfunktion (14).
Nasssaugen (Abb. 3+8)
Verwenden Sie zum Nasssaugen den Schaumstolter (17). Stellen Sie sicher, dass der Schaumstolter
(17) korrekt montiert ist.
Ist der Edelstahlbehälter (9) voll, schließt das Sicherheitsschwimmerventil (15) die Saugönung und der
Saugvorgang wird unterbrochen.
m ACHTUNG!
Das Gerät ist nicht zum Absaugen von brennbaren
Flüssigkeiten geeignet. Verwenden Sie zum Nasssaugen nur den mitgelieferten Schaumstolter (17).
Wasserablassschraube (Abb. 18)
Zum einfacheren Entleeren des Edelstahlbehälters
(9) beim Nasssaugen ist dieser mit einer Wasserablassschraube (8) ausgestattet. Wasserablassschraube (8) durch Linksdrehung önen und Flüssigkeit ablassen.
8. Bedienung
m WARNUNG!
Schalten Sie das Gerät aus, wenn beim Nasssaugen
mit der Abluft Flüssigkeit oder Schaum austritt.
Ein- / Ausschalten / Automatik (Abb.16-17)
Der ON / OFF-Schalter (12) hat drei Einstellungen:
1 Schalterstellung 0: Aus
2 Schalterstellung II: Ein
• Drücken Sie zum Einschalten den Ein- / Ausschalter (12).
• Drücken Sie den Ein- / Ausschalter (12) erneut, um
das Gerät auszuschalten.
3 Schalterstellung I: Automatikbetrieb (Der Staubsauger wird über ein elektrisches Werkzeug eingeschaltet).
• Schließen Sie das Netzkabel Ihres Elektrowerk-
zeugs an die automatische Steckdose an (Abb. 17).
• Schließen Sie den Absaugschlauch an den Staub-
absauganschluss Ihres Elektrowerkzeugs an.
Überprüfen Sie, dass die Verbindung sicher und luftdicht ist.
• Stellen Sie den Schalter am Absaugsystem auf die
Position „I“ = Automatikbetrieb.
Trockensaugen (Abb. 3+9+10)
Verwenden Sie den Faltenlter (19) zum Trockensaugen. Zusätzlich kann der Papierlterbeutel (18) verwendet werden. Dadurch bleibt der Faltenlter (19) länger
frei von Staub und die Saugleistung länger erhalten.
Zudem wird die Entsorgung des Staubes erleichtert.
Stellen Sie immer sicher, dass die Filter korrekt montiert sind.
9. Reinigung und Wartung
m WARNUNG!
Vor jeglicher Einstellung, Instandhaltung oder Instandsetzung Netzstecker ziehen!
Reinigung
Es wird empfohlen, das Gerät nach jedem Gebrauch
zu reinigen. Spritzen sie das Gerät nicht mit Wasser
ab oder reinigen es unter ießendem Wasser. Dies
könnte zu Stromschlägen führen und das Gerät beschädigen.
Entleeren sie den Edelstahlbehälter (9) nach jedem
Betrieb: Nach dem Önen der Ablassschraube (8)
kann die aufgenommene Flüssigkeit abgelassen werden. In dem Edelstahlbehälter (9) verbleibt ein Flüssigkeitsrückstand. Um Restüssigkeit zu entfernen,
den Maschinenkopf (2) durch Önen der Verriegelungshaken (4) vom Edelstahlbehälter (9) nehmen.
Den üssigen Rückstand ausgießen. Reinigen Sie
den Behälter mit einem leicht feuchten Tuch.
• Ersetzen Sie einen vollen Papierlterbeutel
• Halten Sie das Gerät immer sauber. Verwenden
Sie keine Reinigungsmittel oder Lösungsmittel.
• Halten Sie die Lüftungsschlitze immer sauber und
frei von Schmutz und Staub.
• Reinigen Sie das Gerät nur mit einer weichen Bürste oder einem leicht feuchten Tuch.
• Reinigen Sie den Schaumstolter (17) mit etwas
Schmierseife unter ießendem Wasser und lassen
Sie ihn an der Luft trocknen.
Wartung
Das Gerät ist wartungsfrei
10 | DE
www.scheppach.com / service@scheppach.com / +(49)-08223-4002-99 / +(49)-08223-4002-58
Page 11
Service-Informationen
Es ist zu beachten, dass bei diesem Produkt folgende Teile einem gebrauchsgemäßen oder natürlichen Verschleiß unterliegen bzw. folgende Teile als
Vebrauchsmaterialien benötigt werden.
Verschleißteile*: Schaumstolter, Papierlterbeutel,
Faltenlter
* nicht zwingend im Lieferumfang enthalten!
10. Lagerung
Solch schadhafte Elektro-Anschlussleitungen dürfen
nicht verwendet werden und sind aufgrund der Isolationsschäden lebensgefährlich.
Elektrische Anschlussleitungen regelmäßig auf Schäden überprüfen. Achten Sie darauf, dass beim Überprüfen die Anschlussleitung nicht am Stromnetz hängt.
Elektrische Anschlussleitungen müssen den einschlägigen VDE- und DIN-Bestimmungen entsprechen. Verwenden Sie nur Anschlussleitungen mit
Kennzeichnung H05VV-F.
Ein Aufdruck der Typenbezeichnung auf dem Anschlusskabel ist Vorschrift.
Lagern Sie das Gerät und dessen Zubehör an einem
dunklen, trockenen und frostfreiem sowie für Kinder
unzugänglichem Ort. Die optimale Lagertemperatur
liegt zwischen 5 und 30˚C.
Bewahren Sie das Elektrowerkzeug in der Originalverpackung auf.
Decken Sie das Elektrowerkzeug ab, um es vor
Staub oder Feuchtigkeit zu schützen.
Bewahren Sie die Bedienungsanleitung bei dem
Elektrowerkzeug auf.
• Wickeln Sie die Anschlussleitung (3) um die obere Kabelhalterung (13) am Anschluss Blasfunktion
(14) und die untere Kabelhalterung (24). (Abb. 19)
• Auf der Oberseite des Maschinenkopfes (2) benden
sich vier Vertiefungen an welcher die Bodendüse (20)
und die Fugendüse (21) zur Lagerung angebracht
werden können. Auf den Rollenaufnahmen (5) benden sich Vertiefungen, an welchen Sie das Metalverlägerungsrohr (22) anbringen können. (Abb. 20)
• Das restliche Zubehör können Sie im Edelstahlbehälter (9) aufbewahren.
11. Elektrischer Anschluss
Der installierte Elektromotor ist betriebsfertig angeschlossen. Der Anschluss entspricht den einschlägigen VDE- und DIN-Bestimmungen. Der kundenseitige Netzanschluss sowie die verwendete
Verlängerungsleitung müssen diesen Vorschriften
entsprechen.
Schadhafte Elektro-Anschlussleitung
An elektrischen Anschlussleitungen entstehen oft
Isolationsschäden.
Ursachen hierfür können sein:
• Druckstellen, wenn Anschlussleitungen durch
Fenster oder Türspalten geführt werden.
• Knickstellen durch unsachgemäße Befestigung
oder Führung der Anschlussleitung.
• Schnittstellen durch Überfahren der Anschlussleitung.
• Isolationsschäden durch Herausreißen aus der
Wandsteckdose.
• Risse durch Alterung der Isolation.
Wechselstrommotor
• Die Netzspannung muss 230 V~ betragen.
• Verlängerungsleitungen bis 25 m Länge müssen einen
Querschnitt von 1,5 Quadratmillimeter aufweisen.
Anschlüsse und Reparaturen der elektrischen Ausrüstung dürfen nur von einer Elektro-Fachkraf t durchgeführt werden.
12. Entsorgung und Wiederverwertung
Das Gerät bendet sich in einr Verpackung um Transportschäden zu verhindern. Diese Verpackung ist
Rohsto und ist somit wieder verwendbar oder kann
dem Rohstokreislauf zurückgeführt werden. Das
Gerät und dessen Zubehör bestehen aus verschiedenen Materialien, wie z.B. Metall und Kunststoe.
Führen Sie defekte Bauteile der Sondermüllentsorgung zu. Fragen Sie im Fachgeschäft oder in der Gemeindeverwaltung nach!
Altgeräte dürfen nicht in den Hausmüll!
Dieses Symbol weist darauf hin, dass dieses
Produkt gemäß Richtlinie über Elektro- und
Elektronik-Altgeräte (2012/19/EU) und natio-
nalen Gesetzen nicht über den Hausmüll entsorgt werden darf. Dieses Produkt muss bei einer
dafür vorgesehenen Sammelstelle abgegeben werden. Dies kann z. B. durch Rückgabe beim Kauf eines ähnlichen Produkts oder durch Abgabe bei einer
autorisierten Sammelstelle für die Wiederaufbereitung von Elektro- und Elektronik- Altgeräte geschehen. Der unsachgemäße Umgang mit Altgeräten
kann aufgrund potentiell gefährlicher Stoe, die häug in Elektro- und Elektronik-Altgeräten enthalten
sind, negative Auswirkungen auf die Umwelt und die
menschliche Gesundheit haben. Durch die sachgemäße Entsorgung dieses Produkts tragen Sie außerdem zu einer eektiven Nutzung natürlicher Ressourcen bei. Informationen zu Sammelstellen für
Altgeräte erhalten Sie bei Ihrer Stadtverwaltung,
dem öentlich-rechtlichen Entsorgungsträger, einer
autorisierten Stelle für die Entsorgung von Elektround Elektronik-Altgeräten oder Ihrer Müllabfuhr.
www.scheppach.com / service@scheppach.com / +(49)-08223-4002-99 / +(49)-08223-4002-58
DE | 11
Page 12
13. Störungsabhilfe
Störung Mögliche Ursache Abhilfe
Motor läuft nicht
Verminderte
Absaugleistung
Überprüfen Sie, ob der Netzstecker
eingesteckt ist?
Überprüfen Sie, ob die Steckdose
Strom hat?
Überprüfen Sie, ob den Staubsauger
Ein/- Ausschalter eingeschaltet ist?
Bürste ist blockiert? Schalten Sie den Staubsauger aus um Blockierungen
Staubbeutel ist voll mit Staub? Staubbeutel ausbauen und entleeren.
Filter ist voll mit Staub? Filter ausbauen und entleeren.
Stecken Sie die Netzstecker wieder in die Steckdose
ein.
Rufen Sie ein Elektriker.
Ein/- Ausschalter einschalten.
zu beheben.
12 | DE
www.scheppach.com / service@scheppach.com / +(49)-08223-4002-99 / +(49)-08223-4002-58
Page 13
Explanation of the symbols on the equipment
Warning! Danger to life, risk of injury or damage to the tool are possible by ignoring!.
m
Caution - Read the operating instructions to reduce the risk of inquiry
www.scheppach.com / service@scheppach.com / +(49)-08223-4002-99 / +(49)-08223-4002-58
GB | 13
Page 14

Table of contents: Page:
1. Introduction 15
2. Device description 15
3. Scope of delivery 15
4. Proper use 16
5. Safety instructions 16
6. Technical Data 17
7. Installation 17
8. Operation 17
9. Maintenance and cleaning 18
10. Storage 18
11. Electrical connection 18
12. Disposal and recycling 19
13. Troubleshooting 19
14 | GB
www.scheppach.com / service@scheppach.com / +(49)-08223-4002-99 / +(49)-08223-4002-58
Page 15

1. Introduction
Manufacturer:
scheppach
Fabrikation von Holzbearbeitungsmaschine GmbH
Günzburger Straße 69
D-89335 Ichenhausen
Dear Customer,
We hope your new tool brings you much enjoyment
and success.
In addition to the safety requirements in these operating instructions and your country’s applicable regulations, you should observe the generally recognized
technical rules concerning the operation of woodworking machines.
We accept no liability for damage or accidents which
arise due to non-observance of these instructions
and the safety information.
2. Device description (Fig. 1)
Note:
According to the applicable product liability laws, the
manufacturer of the device does not assume liability
for damages to the product or damages caused by
the product that occurs due to:
• Improper handling,
• Non-compliance of the operating instructions,
• Repairs by third parties, not by authorized service
technicians,
• Installation and replacement of non-original spare
parts,
• Application other than specied,
• A breakdown of the electrical system that occurs
due to the non-compliance of the electric regulations and VDE regulations 0100, DIN 57113 /
VDE0113 .
We recommend:
Read through the complete text in the operating instructions before installing and commissioning the
device. The operating instructions are intended to
help the user to become familiar with the machine
and take advantage of its application possibilities in
accordance with the recommendations. The operating instructions contain important information on how
to operate the machine safely, professionally and
economically, how to avoid danger, costly repairs, reduce downtimes and how to increase reliability and
service life of the machine.
In addition to the safety regulations in the operating
instructions, you have to meet the applicable regulations that apply for the operation of the machine in
your country. Keep the operating instructions package with the machine at all times and store it in a
plastic cover to protect it from dirt and moisture.
Read the instruction manual each time before operating the machine and carefully follow its information. The machine can only be operated by persons
who were instructed concerning the operation of the
machine and who are informed about the associated
dangers. The minimum age requirement must be
complied with.
1. Handle
2. Machine head
3. Connection cable
4. Locking hooks
5. Castor mounts (4x)
6. Castors (4x)
7. Caster mounting base
8. Screw cap for draining o liquids
9. Stainless steel container
10. Suction connection
11. Socket with auto switch-on device
12. On/o switch
13. Top cable holder
14. Connection for blower function
15. Filter basket with safety oat valve
16. 3m suction hose
17. Foam lter
18. Paper lter bag
19. Folded lter
20. Floor nozzle
21. Joint nozzle
22. Metal extension tube
23. Screw (6x)
24. Bottom cable holder
3. Scope of delivery
• Open the packaging and remove the device care-
fully.
• Remove the packaging material as well as the
packaging and transport bracing (if available).
• Check that the delivery is complete.
• Check the device and accessory parts for trans-
port damage.
• If possible, store the packaging until the warranty
period has expired.
m ATTENTION!
The device and packaging materials are not toys!
Children must not be allowed to play with plastic
bags, lm and small parts! There is a risk of swallowing and suocation!
www.scheppach.com / service@scheppach.com / +(49)-08223-4002-99 / +(49)-08223-4002-58
GB | 15
Page 16

30L wet/dry vacuum (1x)
3 m suction hose (1x)
Foam lter (1x)
Paper lter bag (1x)
Folded lter for dry vacuuming (1x)
Castor mount (4x)
Castors (4x)
Handle (1x)
Screw (6x)
Floor nozzle (1x)
Joint nozzle (1x)
Metal extension tube (1x)
Cable holder (1x)
Operating manual (1x)
4. Proper use
The wet and dry vacuum cleaner is designed for wet
and dry vacuuming using the appropriate lter. The
appliance is not suitable for the vacuuming of combustible, explosive or harmful substances.
The equipment is to be used only for its prescribed
purpose. Any other use is deemed to be a case of
misuse. The user / operator and not the manufacturer
will be liable for any damage or injuries of any kind
caused as a result of this.
Please note that our equipment has not been designed for use in commercial, trade or industrial applications. Our warranty will be voided if the equipment
is used in commercial, trade or industrial businesses
or for equivalent purposes.
5. Safety instructions
m DANGER!
• The appliance may only be connected to alternat-
ing current. The voltage must correspond with the
type plate on the appliance.
• Never touch the mains plug and the socket with
wet hands.
• Do not pull the plug from the socket by pulling on
the connecting cable.
• Check the power cord with mains plug for damage
before every use. To avoid risks, arrange immediately the exchange by an authorized customer
service or a skilled electrician, if the power cord
is damaged.
• To avoid accidents due to electrical faults we recommend the use of sockets with a line-side current-limiting circuit breaker (max. 30 mA nominal
tripping current).
• Turn o the appliance and remove the mains plug
prior to any care and maintenance work.
• Repair works may only be performed by the authorised customer service.
m WARNING!
• This appliance is not intended for use by persons
with limited physical, sensory or mental capacities
or lacking experience and/or skills, unless such
persons are accompanied and supervised by a
person in charge of their safety or they have received precise instructions on the use of this appliance and have understood the resulting risks.
• Children may only use this appliance if they are
over the age of 8 and supervised by a person in
charge of their safety, or if they have received instructions on the use of this appliance and have
understood the resulting risks.
• Children must not play with this appliance.
• Supervise children to prevent them from playing
with the appliance.
• Cleaning and user maintenance must not be performed by children without supervision.
• Keep packaging lm away from children - risk of
suocation!
• Switch the appliance o after every use and prior
to every cleaning/maintenance procedure.
• Risk of re. Do not vacuum up any burning or glowing objects.
• The appliance may not be used in areas where a
risk of explosion is present.
• Immediately switch the appliance o or pull the
power plug if foam forms or liquids escape!
• Do not use abrasives, glass or universal cleaners!
Never immerse the appliance in water.
Certain materials may produce explosive vapours
or mixtures when agitated by the suction air! Never
vacuum up the following materials:
• Explosive or combustible gases, liquids and dust
particles (reactive dust particles)
• Reactive metal dust particles (such as aluminium,
magnesium, zinc) in combination with highly alka-
line or acidic detergents
• Undiluted, strong acids and alkalies
• Organic solvents (such as petrol, paint thinners,
acetone, heating oil).
In addition, these substances may cause the appliance materials to corrode.
m WARNING!
This electric tool generates an electromagnetic eld
during operation. This eld can impair active or passive medical implants under certain conditions. In order to prevent the risk of serious or deadly injuries,
we recommend that persons with medical implants
consult with their physician and the manufacturer of
the medical implant prior to operating the electric tool.
16 | GB
www.scheppach.com / service@scheppach.com / +(49)-08223-4002-99 / +(49)-08223-4002-58
Page 17
6. Technical Data
Mains voltage 220-240V~ 50/60Hz
Power
Maximum device socket power
Tot a l power
Water tank capacity 30L
Suction performance 20 Kpa
Protection category IPX4
Protection class I
1400W
2000W
3400W
Installing the folded lter (19) (g. 3+9)
For dry vacuuming, slide the folded lter (19) provided
over the lter basket with safety oat valve (15). The
folded lter (19) is only suitable for dry vacuuming!
Installing the paper lter bag (18) (g. 3+10)
It is recommended to use an additional paper lter
bag (18) when vacuuming ne, dry dirt.
• Slide the paper lter bag (18) over the suction opening in the stainless steel container (9). The paper lter bag (18) is only suitable for dry vacuuming. The
paper lter bag (18) makes it easier to dispose of
the dust collected.
7. Installation
m IMPORTANT!
Prior to use, ensure that the device has been correctly and fully assembled.
Unpacking (Fig. 1+2+3)
• Release the locking hooks (4) and remove the machine head (2). The accessories are located inside
the stainless steel container (9). Only the metal extension tube (22) is located outside the stainless steel
container (9) in the packaging. Remove all of the accessories from the stainless steel container (9).
Installing the castor mounts (5) (g. 4+5)
• Turn the stainless steel container (9) upside-down
(the machine head (2) must be removed).
• Push the castor mounts (5) into the cut-outs provided on the wheel mounting base (7). (4x)
• Fasten the castor mounts (5) with a screwdriver
(not included in the delivery) and one screw each
(23). (4x)
Installing the castors (6) (g. 6)
• Press the four castors (6) into the holes in the wheel
mounting base (5).
Installing the machine head (2) and the handle (1)
(Fig. 7)
• Place the machine head (2) on the stainless steel
container (9). Secure the machine head (2) with
the locking hooks (4). When installing the machine
head (2), ensure that the locking hooks (4) latch into
place correctly.
• Place the handle (1) on the machine head (2) and
fasten it with two screws (23) with a screwdriver
(not included in the delivery).
Installing the foam lter (17) (g. 3+8)
Never use the device without lter! Always ensure
that the lters are correctly tted!
• Installing the foam lter (17): For wet vacuuming,
slide the foam lter (17) provided over the lter basket with safety oat valve (15).
Installing the suction hose (16) (g. 3+11+12)
Connect the suction hose (16) to the corresponding
port, depending on the desired use, on the wet and
dry vacuum.
Vacuuming:
Connect the suction hose (16) to the suction hose port
(10). To do so, slide the end of the suction hose (16)
with the two nipples into the suction hose port (10)
(A). Insert the two nipples into the recesses. Once
the suction hose is fully inserted, turn it clockwise (B).
Blowing:
Connect the suction hose (16) to the blowing function connection port (14). Slide the end of the suction
hose (15) with the two nipples into the blowing function connection port (14). Insert the two nipples into
the recesses. It is not necessary to turn it here.
Installing the metal extension tube (22), suction
hose (16) and nozzles (20/21) (g. 13)
• Connect the metal extension tube (22) with the bent
end of the suction hose (16).
• Fit the oor nozzle (20) or joint nozzle (21) to the
other end of the metal extension tube (22).
• Push the slide piece forwards (A) to change the
length of the metal extension tube (22). (Fig. 14)
• Pull the tube to the desired length (B). Ensure that
the slide lock latches into place. (Fig. 14)
Installing the bottom cable holder (g. 3+15)
• Clip the bottom cable holder (24) onto the wheel
mounting base (7) at the rear of the device. The
top cable holder (13) is on the connection port for
the blower function (14).
8. Operation
m WARNING!
Switch the device o if liquid or foam emerges with
the exhaust air during wet vacuuming.
Switch on / switch o / automatic (g. 16-17)
The ON/OFF switch (12) has three settings:
1 switch setting 0: O
www.scheppach.com / service@scheppach.com / +(49)-08223-4002-99 / +(49)-08223-4002-58
GB | 17
Page 18

2 switch setting II: On
Press the on/o switch (12) to switch on.
Press the on/o switch (12) again to switch the device
o.
3 switch setting I: Automatic mode (the vacuum
cleaner will be switched
on by an electric tool).
• Plug your electrical tool’s cable into the automatic
socket (g. 17).
• Connect the suction hose to the suction connection
on your electrical tool.
Check that the connection is secure and airtight.
• Set the switch on the vacuum system to position “I”
= Automatic mode.
To remove residual liquid, take o the machine head
(2) by releasing the locking hooks (4) from the stainless steel container (9). Pour out the liquid residue.
Clean the container with a damp cloth.
• Replace paper lter bag when full
• Always keep the device clean. Do not use cleaning
agents or solvents.
• Keep the ventilation slots clean and free of dirt and dust.
• Clean the device only with a soft brush or a damp cloth.
• Clean the foam lter (17) with a little soap and run-
ning water and then leave it to air dry.
Maintenance
The device is maintenance-free.
Dry vacuuming (g. 3+9+10)
Use the folded lter (19) for dry vacuuming. The paper lter bag (18) can be used in addition. This ensures that the folded lter (19) remains free of dust for
longer and maintains the vacuum power for longer.
In addition, the disposal of the dust is also easier.
Always ensure that the lters are correctly tted.
Wet vacuuming (g. 3+8)
Use the foam lter (17) for wet vacuuming. Ensure
that the foam lter (17) is correctly tted.
If the stainless steel container (9) is full, the safety
oat valve (15) closes the suction port and suction
operation is interrupted.
m IMPORTANT!
The device is not suitable for vacuuming ammable
liquids. For wet vacuuming, use the only the foam lter
(17) provided.
Water drain plug (8) (g. 18)
The stainless steel container (9) is equipped with a
water drain plug (8) in order to make it easier to drain.
Open the water drain plug (8) by turning it counterclockwise and drain out the liquid.
9. Maintenance and cleaning
m WARNING!
Prior to any adjustment, maintenance or service
work disconnect the mains power plug!
Service information
Please note that the following parts of this product
are subject to normal or natural wear and that the following parts are therefore also required for use as
consumables. Wear parts*: Foam lter, Paper lter
bag, Folded lter for dry vacuuming
* Not necessarily included in the scope of delivery!
10. Storage
Store the device and its accessories in a dark, dry and
frost-proof place that is inaccessible to children. The
optimum storage temperature is between 5 and 30˚C.
Store the electrical tool in its original packaging.
Cover the electrical tool in order to protect it from
dust and moisture.
Store the operating manual with the electrical tool.
• Wind the mains cable (3) around the top cable holder (13) at the connection port for the blower function (14) and the bottom cable holder (24). (Fig. 19)
• There are four recesses on the top side of the machine head (2) for storing the oor nozzle (20) and
the joint nozzle (21). There are also recesses on
the wheel mounting base (5) for attaching the metal extension tube (22). (Fig. 20)
• The remaining accessories can be stored in the
stainless steel container (9).
11. Electrical connection
Cleaning
It is recommended to clean the device after each use.
Do not spray the device with water or clean it under
running water. This can result in electric shocks and
can damage the device.
Empty the stainless steel container (9) after each use:
After opening the screw cap to drain out the liquids
(8), the liquid collected can be drained out. Residual
liquid remains in the stainless steel container (9).
18 | GB
www.scheppach.com / service@scheppach.com / +(49)-08223-4002-99 / +(49)-08223-4002-58
The electrical motor installed is connected and ready for
operation. The connection complies with the applicable
VDE and DIN provisions.
The customer‘s mains connection as well as the extension cable used must also comply with these regulations.
Important information
In the event of an overloading the motor will switch
itself o. After a cool-down period (time varies) the
motor can be switched back on again.
Page 19
Damaged electrical connection cable
The insulation on electrical connection cables is often damaged.
This may have the following causes:
• Passage points, where connection cables are
passed through windows or doors.
• Kinks where the connection cable has been improperly fastened or routed.
• Places where the connection cables have been cut
due to being driven over.
• Insulation damage due to being ripped out of the
wall outlet.
• Cracks due to the insulation ageing.
Such damaged electrical connection cables must not
be used and are life-threatening due to the insulation damage.
Check the electrical connection cables for damage
regularly. Make sure that the connection cable does
not hang on the power network during the inspection.
Electrical connection cables must comply with the
applicable VDE and DIN provisions. Only use connection cables with the marking „H05VV-F“.
The printing of the type designation on the connection cable is mandatory.
AC motor
• The mains voltage must be 230 V~
• Extension cables up to 25 m long must have a
cross-section of 1.5 mm2.
Connections and repairs of electrical equipment may
only be carried out by an electrician.
Please provide the following information in the event
of any enquiries:
12. Disposal and recycling
DThe equipment is supplied in packaging to preven it
from being damaged in transit. The raw materials in
this packaging can be reused or recycled. The equipment and its accessories are made of various types
of material, such as metal and plastic. Defective components must be disposed of as special waste. Ask
your dealer or your local council.
Old devices must not be disposed of with
household waste!
This symbol indicates that this product must
not be disposed of together with domestic
waste in compliance with the Directive
(2012/19/EU) pertaining to waste electrical
and electronic equipment (WEEE). This product must
be disposed of at a designated collection point. This
can occur, for example, by handing it in at an authorised collecting point for the recycling of waste electrical and electronic equipment. Improper handling
of waste equipment may have negative consequences for the environment and human health due to potentially hazardous substances that are often contained in electrical and electronic equipment. By
properly disposing of this product, you are also contributing to the eective use of natural resources.
You can obtain information on collection points for
waste equipment from your municipal administration,
public waste disposal authority, an authorised body
for the disposal of waste electrical and electronic
equipment or your waste disposal company.
13. Troubleshooting
Fault Possible cause Remedy
Check whether the plug is plugged in. Plug the mains plug back in to the socket.
Motor does not run
Reduced vacuuming
power
Check whether there is power to the
socket.
Check whether the vacuum cleaner
on/o switch is switched on.
Is the brush blocked? Switch the vacuum cleaner o to remove the
Is the dust bag full of dust? Remove and empty the dust bag.
Is the lter full of dust? Remove and empty the lter.
Call an electrician.
Switch the on/o switch on.
blockages.
GB | 19
www.scheppach.com / service@scheppach.com / +(49)-08223-4002-99 / +(49)-08223-4002-58
Page 20
Légende des symboles gurant sur l’appareil
Attention! Danger de mort et risque de blessures et d’endommagement de la machine en cas de non
respect des instructions.
m
AVERTISSEMENT - pour réduire le risque de blessure, lisez le mode d’emploi!
20 | FR
www.scheppach.com / service@scheppach.com / +(49)-08223-4002-99 / +(49)-08223-4002-58
Page 21

Table des matières: Page:
1. Introduction 22
2. Description de l’appareil 22
3. Étendue des fournitures 22
4. Utilisation conforme à l’aectation 23
5. Consignes de sécurité 23
6. Caractéristiques techniques 24
7. Montage 24
8. Utilisation 25
9. Maintenance 25
10. Stockage 26
11. Raccordement électrique 26
12. Mise au rebut et recyclage 26
13. Aide au dépannage 27
www.scheppach.com / service@scheppach.com / +(49)-08223-4002-99 / +(49)-08223-4002-58
FR | 21
Page 22

1. Introduction
Fabricant:
scheppach
Fabrikation von Holzbearbeitungsmaschine GmbH
Günzburger Straße 69
D-89335 Ichenhausen
Cher client,
Nous espérons que votre nouvelle machine vous apportera de la satisfaction et de bons résultats.
En plus des consignes de sécurité contenues dans
ce manuel d‘utilisation et des réglementations spéci-
ques de votre pays, vous devez respecter les règles
techniques généralement reconnues pour l‘utilisation
de la machine.
Nous déclinons toute responsabilité pour les accidents et dommages dus au non-respect de ce mode
dʼemploi et des consignes de sécurité.
2. Description de l’appareil (g. 1)
Remarque:
Selon la loi en vigueur sur la responsabilité du fait des
produits, le fabricant n’est pas tenu pour responsable
de tous les dommages subis par cet appareil et pour
tous les dommages résultant de son utilisation, dans
les cas suivants :
• Mauvaise manipulation,
• Non-respect des instructions d‘utilisation,
• Travaux de réparation eectués par des tiers, par
des spécialistes non agréés,
• Remplacement et montage de pièces de rechange
qui ne sont pas d‘origine.
• Utilisation non conforme,
• Lors d’une défaillance du système électrique en cas
de non-respect des réglementations électriques et
des normes VDE 0100, DIN 57113 / VDE0113.
Nous vous recommandons:
De lire intégralement le manuel d’utilisation, avant
d’eectuer le montage et la mise en service.
Le présent manuel d‘utilisation vous facilitera la prise
en main et la connaissance de la machine, tout en
vous permettant d‘en utiliser pleinement le potentiel
dans le cadre d’une utilisation conforme. Les instructions importantes qu’il contient vous apprendront
comment travailler avec la machine de manière sûre,
rationnelle et économique ; comment éviter les dangers, réduire les coûts de réparation et réduire les
périodes d’indisponibilité ; comment enn augmenter
la abilité et la durée de vie de la machine. En plus
des consignes de sécurité contenues dans ce manuel d‘utilisation, vous devez respecter scrupuleusement les réglementations et les lois applicables lors
de l‘utilisation de la machine dans votre pays.
Conservez le manuel d‘utilisation dans une pochette
plastique pour le protéger de la saleté et de l‘humidité, auprès de la machine. Avant de commencer à
travailler avec la machine, chaque utilisateur doit lire
le manuel d‘utilisation puis le suivre attentivement.
Seules les personnes formées à l‘utilisation de la machine et conscientes des risques associés sont autorisées à travailler avec la machine. L‘âge minimum
requis doit être respecté.
1. Poignée
2. Tête de l’aspirateur
3. Câble de raccordement
4. Crochet de fermeture
5. Support de roulette (4x)
6. Roulettes orientables (4x)
7. Plaque support
8. Bouchon leté de vidange du liquide
9. Cuve en acier inoxydable
10. Embouchure du tuyau d‘aspiration
11. Prise de courant avec démarrage simultané
12. Interrupteur Marche / Arrêt
13. Partie supérieure du support de câble d‘alimentation
14. Branchement pour la fonction d’aspiration
15. Panier ltrant avec otteur de sécurité anti-débordement
16. Tuyau d’aspiration de 3m
17. Filtre en mousse
18. Sac ltrant en papier
19. Filtre en papier plissé
20. Brosse pour le sol
21. Suceur
22. Rallonge de tuyau en métal
23. Vis (6x)
24. Partie inférieure du support de câble d’alimentation
3. Étendue des fournitures
• Ouvrez l’emballage et sortez-en délicatement l’appareil.
• Retirez les matériaux d’emballage, ainsi que les pro-
tections mises en place pour le transport (s’il y a lieu).
• Vériez que la fourniture est complète.
• Vériez que l’appareil et les accessoires n’ont pas
été endommagés lors du transport.
• Conservez si possible l’emballage jusqu’à la n de
la période de garantie.
m ATTENTION!
L’appareil et les matériaux d’emballage ne sont pas
des jouets ! Les enfants ne doivent en aucun cas
jouer avec les sacs en plastique, lms d’emballage et
pièces de petite taille ! Il existe un risque d’ingestion
et d’asphyxie!
22 | FR
www.scheppach.com / service@scheppach.com / +(49)-08223-4002-99 / +(49)-08223-4002-58
Page 23

Aspirateur Eau et poussière de 30L (1x)
Tuyau d’aspiration de 3m (1x)
Filtre en mousse (1x)
Sac ltrant en papier (1x)
Filtre plissé pour l‘aspiration de poussière (1x)
Support de roulette (4x)
Roulettes (4x)
Poignée (1x)
Vis (6x)
Brosse pour le sol (1x)
Suceur (1x)
Rallonge de tuyau en métal (1x)
Support de cable d’alimentation (1x)
Manuel d‘utilisation (1x)
4. Utilisation conforme à
l’aectation
L’aspirateur sec/humide est adapté pour aspirer de
l’eau et de la poussière en utilisant le ltre correspondant. L’appareil n’est pas conçu pour aspirer
des substances combustibles, explosives ni dangereuses pour la santé.
La machine doit exclusivement être employée conformément à son a ectation. Chaque utilisation allant
au-delà de cette a ectation est considérée comme
non conforme. Pour les dommages en résultant ou les
blessures de tout genre, le producteur décline toute
responsabilité et l’opérateur/l’exploitant est responsable.
Veillez au fait que nos appareils, conformément au règlement, n’ont pas été conçus pour être utilisés dans
un environnement professionnel, industriel ou artisanal. Nous déclinons toute responsabilité si l’appareil
venait à être utilisé professionnellement, artisanalement ou par des sociétés industrielles, tout comme
pour toute activité équivalente.
5. Consignes de sécurité
m DANGER!
• L‘appareil doit être raccordé uniquement au courant
alternatif. La tension doit être identique avec celle
indiquée sur la plaque signalétique de l’appareil.
• Ne jamais saisir la che secteur ni la prise de courant avec des mains humides.
• Ne pas debrancher la che secteur en tirant le
câble d‘alimentation.
• Vérier avant chaque utilisation que le câble
et la che secteur ne sont pas endommagés.
Un câble d’alimentation endommagé doit immédiatement être remplacé par le service après-vente
ou un électricien agréé.
• Pour éviter des accidents électriques nous recommandons d’utiliser des prises de courant avec un
interrupteur de protection contre les courants de
fuite placé en amont (courant de déclenchement
nominal maximal de 30 mA).
• Avant tout travail d‘entretien et de maintenance,
mettre l‘appareil hors tension et débrancher la
che secteur.
• Seul le service après-vente agréé est autorisé à
eectuer des travaux de réparation ou des travaux
concernant les pièces électriques de l‘appareil.
m AVERTISSEMENT!
• Cet appareil n‘est pas destiné à être utilisé par
des personnes ayant des capacités physiques,
sensorielles ou mentales réduites ou manquant
d‘expérience et/ou de connaissances, sauf si ces
mêmes personnes sont sous la supervision d‘une
personne responsable de leur sécurité ou ont été
formées à l‘utilisation de l‘appareil.
• Des enfants ne peuvent utiliser l‘appareil que s‘ils
ont plus de 8 ans et s‘ils sont sous la surveillance
d‘une personne compétence ou s‘ils ont reçu de
sa part des instructions d‘utilisation de l‘appareil
et s‘ils ont compris les dangers qui peuvent en
résulter.
• Les enfants ne doivent pas jouer avec l‘appareil.
• Surveiller les enfants pour s‘assurer qu‘ils ne
jouent pas avec l‘appareil.
• Le nettoyage et la maintenance par l‘utilisateur ne
doivent pas être eectués par des enfants sans
surveillance.
• Tenir les lms plastiques d‘emballages hors de
portée des enfants, risque d‘étouement !
• Mettre l‘appareil hors service après chaque utilisation et avant chaque nettoyage/entretien.
• Risque d‘incendie. N’aspirer aucun objet enammé
ou incandescent.
• Il est interdit d’utiliser l’appareil dans des zones
présentant des risques d’explosion.
• En cas de formation de mousse ou de fuite,
éteindre immédiatement l‘appareil ou bien débran-
cher la prise secteur!
• N‘utiliser aucun produit moussant, pour vitres ou
multiusage ! Ne jamais plonger l‘appareil dans l‘eau.
Des substances déterminées peuvent provoquer la
formation de vapeurs ou de mélanges explosifs par
tourbillonnement avec l’air aspiré. Ne jamais aspirer
les substances suivantes:
• Des gazes, liquides et poussières (poussières réactives) explosifs ou inammables
• Poussières réactives de métal (p.ex. aluminium,
magnésium, zinc) en rapport avec des détergents
alcalins et acides
• Acides forts et lessives non diluées
www.scheppach.com / service@scheppach.com / +(49)-08223-4002-99 / +(49)-08223-4002-58
FR | 23
Page 24
• Solvants organiques (p.ex. essence, dilutif de cou-
leur, acétone, fuel).
Par ailleurs, elles peuvent s’avérer agressives pour
les matériaux utilisés sur l’appareil.
m AVERTISSEMENT!
Pendant son fonctionnement, cet outil électrique génère un champ électromagnétique. Ce champ peut
dans certaines circonstances nuire aux implants médicaux actifs ou passifs. Pour réduire les risques de
blessures graves voire mortelles, nous recommandons aux personnes porteuses d‘implants médicaux
de consulter leur médecin, ainsi que le fabricant de
leur implant avant d‘utiliser l‘outil électrique.
6. Caractéristiques techniques
Tension secteur 220-240V~ 50/60Hz
Puissance 1400W
Puissance maxi admissible
de la prise pour outil élec-
trique
Puissance absorbée totale 3400W
Capacité du réservoir d’eau 30L
Puissance d’aspiration 20 Kpa
Indice de protection IPX4
Classe de protection I
2000W
7. Montage
m ATTENTI O N!
Avant d’utiliser l’aspirateur, assurez-vous qu’il est
correctement et complètement assemblé.
Montage des roulettes (6) (Fig. 6)
• Emmanchez les quatre roulettes orientables (6)
dans les trous de xation prévus à cet eet (5).
Montage de la tête de l’aspirateur (2) et de la
poignée (1) (Fig. 7)
• Placez la tête de l’aspirateur (2) sur la cuve en inox
(9). Fixez la tête de l’aspirateur (2) à l’aide des crochets de fermeture (4). Veillez lors du montage de
la tête de l’aspirateur (2) à ce que les crochets de
fermeture (4) s’encliquettent correctement.
• Placez la poignée (1) sur la tête de l’aspirateur (2)
et xez-la à l’aide de deux vis (23) en utilisant un
tournevis (non fourni).
Montage du ltre en mousse (17) (Fig. 3+8)
N’utilisez jamais l’aspirateur sans ltre ! Assurez-vous
toujours que les ltres sont correctement montés!
• Pour monter le ltre en mousse (17): pour aspirer
du liquide, poussez le ltre en mousse (17) au-dessus du panier ltrant équipé de la soupape à otteur anti-débordement (15).
Montage du ltre plissé (19) (Fig. 3+9)
Pour aspirer des matières sèches, poussez le ltre
plissé (19) au-dessus du panier ltrant équipé de la
soupape à otteur anti-débordement (15). Le ltre
plissé (19) ne doit être utilisé que lors de l‘aspiration
de matières sèches!
Montage du sac ltrant en papier (18) (Fig. 3+10)
Pour aspirer de la poussière ne et sèche, il est
conseillé d’utiliser en plus un sac ltrant en papier (18).
• Emmanchez le sac ltrant en papier (18) sur l’ouverture d‘aspiration de la cuve en inox (9). Le sac ltrant
en papier (18) ne doit être utilisé que lors de l‘aspiration de matières sèches. Le sac ltrant en papier (18)
facilite l’élimination de la poussière aspirée.
Déballage (Fig.1+2+3)
• Déverrouillez les crochets de fermeture (4) et enlevez la tête de l’aspirateur (2). Les accessoires se
trouvent dans la cuve en inox (9). Seule la rallonge
de tuyau en métal (22) est dans l’emballage, à l’extérieur de la cuve en inox (9). Enlevez tous les accessoires de la cuve en inox (9).
Montage des supports de roulettes (5) (Fig. 4+5)
• Placez la cuve en inox (9) à l’envers (la tête de l’aspirateur (2) doit avoir été enlevée).
• Insérez les supports de roulettes (5) dans les évidements prévus à cet eet dans la plaque support
(7) (4x).
• Fixez chaque support de roulette (5) à l’aide d’un
tournevis (non fourni) et d’une vis (23) (4x).
24 | FR
www.scheppach.com / service@scheppach.com / +(49)-08223-4002-99 / +(49)-08223-4002-58
Montage du tuyau d‘aspiration (16) (Fig. 3+11+12)
Branchez le tuyau d’aspiration (16) sur l’embouchure
correspondante selon l’utilisation que vous voulez
faire de l’aspirateur eau et poussière.
Pour aspirer:
Branchez le tuyau d’aspiration (16) à l’embouchure prévue pour le tuyau d‘aspiration (10). Pour ce faire, poussez l’extrémité du tuyau d‘aspiration (16), munie de deux
tétons, dans l’embouchure d’aspiration (10) (A). Introduisez les deux tétons dans les évidements. Une fois mis
en place, tournez le tuyau dans le sens horaire (B).
Pour souer:
Branchez le tuyau d’aspiration (16) à l’embouchure
prévue pour le souage (14). Insérez l’extrémité du
tuyau d’aspiration (16) munie de deux tétons dans
l’embouchure de souage (14). Introduisez les deux
tétons dans les évidements. Il n’est pas nécessaire
de tourner le tuyau.
Page 25

Montage de la rallonge de tuyau en métal (22),
du tuyau d’aspiration (16) et des accessoires
(20/21) (Fig.13)
• Emmanchez la rallonge de tuyau en métal (22) sur
l’extrémité coudée du tuyau d’aspiration (16).
• Emmanchez la brosse (20) ou le suceur (21) sur
l’extrémité de la rallonge de tuyau en métal (22).
• Pour régler la longueur de la rallonge de tuyau en mé tal (22) poussez le curseur vers l’avant (A). (Fig.14)
• Tirez sur le tuyau pour atteindre la longueur voulue (B).
Assurez-vous que le curseur s’encliquette. (Fig.14)
Montage du support de câble d‘alimentation
(Fig. 3+15)
Accrochez le support inférieur de câble d’alimentation (24) au dos de l’aspirateur sur la plaque support
des roulettes (7). Le support supérieur de câble d’alimentation (13) se trouve sur l‘embouchure de soufage (14).
8. Utilisation
Assurez-vous toujours que les ltres sont correctement mis en place.
Aspiration de liquide (Fig 3+8)
Utilisez le ltre en mousse (17) pour aspirer du liquide. Assurez-vous que le ltre en mousse (17) est
correctement mis en place.
Lorsque la cuve en inox (9) est pleine, la soupape
de sécurité (15) ferme l’embouchure d’aspiration et
l‘aspiration est interrompue.
m ATTENTION!
Cet aspirateur n’est pas conçu pour aspirer des liquides inammables. Utilisez uniquement le ltre en
mousse (17) fourni pour aspirer du liquide.
Vis de vidange d‘eau (8) (Fig. 18)
Pour vidanger facilement la cuve en inox (9) lors de
l’aspiration de liquide, la cuve est pourvue d’une vis
de vidange (8). Ouvrez la vis de vidange (8) en la
tournant vers la gauche et laissez le liquide s’écouler.
m ATTENTI O N!
Arrêtez l’aspirateur lorsque l’air recyclé est chargé de
liquide ou de mousse lors de l’aspiration de liquide.
Interrupteur Marche / Arrêt / Automatique (Fig. 16-17)
L’interrupteur Marche / Arrêt (12) a trois positions :
1 Interrupteur en position 0 : Arrêt
2 Interrupteur en position II : Marche
Pour mettre l’aspirateur en marche, appuyez sur l’interrupteur Marche / Arrêt (12).
Appuyez de nouveau sur l’interrupteur Marche / Arrêt
(12) pour arrêter l’aspirateur.
3 Interrupteur en position I : Fonction automatique
(l’aspirateur est mis en marche par un outil électrique
qui a été branché sur la prise prévue à cet eet).
• Branchez le câble d’alimentation de l’outil élec-
trique que vous désirez utiliser à la prise automatique
(Fig.17).
• Branchez le tuyau d’aspiration à l’embouchure de
dépoussiérage de votre outil électrique.
Vériez que la connexion est correcte et qu’il n’y a
pas de fuite d’air.
• Placez l’interrupteur de l’aspirateur en position «I» =
Démarrage automatique
Aspiration de matière sèche (Fig. 3+9+10)
Utilisez le ltre plissé (19) pour aspirer de la matière
sèche. Vous pouvez également utiliser en plus le sac
ltrant en papier (18), ceci permettra au ltre plissé
(19) de rester plus longtemps exempt de poussière,
ce qui maintiendra également la puissance d’aspiration plus longtemps.
L’utilisation du sac ltrant en papier rend aussi l’élimination de la poussière plus facile.
9. Maintenance
m AVERTISSEMENT!
Avant tout réglage, entretien ou réparation, débranchez la che du secteur!
Nettoyage
Il est conseillé de nettoyer l’aspirateur après chaque
utilisation. N’aspergez pas l’aspirateur avec de l’eau
et ne le nettoyez pas à l’eau courante. Cela pourrait
provoquer des courts-circuits et endommager l’aspirateur.
Videz la cuve en inox (9) après chaque utilisation.
Après avoir ouvert le couvercle leté de vidange (8)
le liquide peut s’écouler. Il restera une certaine quantité de liquide au fond de la cuve en inox (9), pour éliminer ce reste de liquide, enlevez la tête de l’aspirateur (2) de la cuve en inox (9) en ouvrant les crochets
de fermeture (4) ry faites s’écouler le reste de liquide
et nettoyez la cuve avec un chion humide
• Remplacez le sac ltrant en papier s’il est plein.
• Veillez à ce que l’aspirateur soit toujours propre et
n’utilisez pas de produits de nettoyage ou de solvants pour le nettoyer.
• Veillez à ce que les ailettes de refroidissement du
moteur soient toujours propres et non obturées par
de la poussière ou des impuretés.
• Utilisez uniquement une brosse douce ou un chiffon humide pour nettoyer l’aspirateur.
• Nettoyez le ltre en mouse (17) à l’eau courante
avec un peu de savon noir et faites-le sécher à l’air.
www.scheppach.com / service@scheppach.com / +(49)-08223-4002-99 / +(49)-08223-4002-58
FR | 25
Page 26

Entretien
L’aspirateur ne nécessita pas d’entretien.
Informations concernant le service après-vente
Il faut tenir compte du fait que pour ce produit les
pièces suivantes sont soumises à une usure liée à
l‘utilisation et sont donc des consommables non cou-
verts par la garantie.
Pièces d’usure*: Filtre en mousse, Sac ltrant en papier, Filtre plissé pour l‘aspiration de poussière
*Ne font pas partie de l’ensemble de livraison !
10. Stockage
Entreposer l’appareil et ses accessoires dans un lieu
sombre, sec et à l’abri du gel. En outre, ce lieu doit
être hors de portée des enfants. La température de
stockage optimale se situe entre 5 °C et 30 °C.
Conserver l’outil électrique dans son emballage d’origine.
Recouvrir l’outil électrique an de le protéger de la
poussière ou de l’humidité.
Conserver la notice d’utilisation à proximité de l’outil
électrique.
• Enroulez le câble d’alimentation (3) autour du support supérieur de câble d’alimentation (12) situé
sur l’embouchure d’aspiration (13) et du support de
câble d’alimentation inférieur (23). (Fig.18)
• Sur le dessus de la tête de l’aspirateur (2), il y a 4
évidements dans lesquels vous pouvez ranger la
brosse de sol (19) et le suceur (20). Les supports
de roulettes (5) comportent des évidements dans
lesquels vous pouvez insérer la rallonge de tuyau
en métal (21). (Fig.19)
• Vous pouvez entreposer les autres accessoires
dans la cuve en inox (9).
11. Raccordement électrique
Le moteur électrique installé est prêt à fonctionner
une fois raccordé. Le raccordement correspond aux
dispositions VDE et DIN en vigueur.
Le branchement au secteur eectué par le client ainsi que la rallonge électrique utilisée doivent correspondre à ces prescriptions.
Câble de raccordement électrique défectueux
Des détériorations de l‘isolation sont souvent présentes sur les câbles de raccordement électriques.
Les causes peuvent en être:
• Des points de pression, si les câbles ont été passés par des fenêtres ou des portes entrebâillées.
• Des pliures dues à une xation ou à un cheminement incorrects des câbles.
• Des coupures si l’on roulé sur les câbles.
• Des détériorations de l‘isolation dues à un arrache-
ment hors de la prise murale.
• Des ssures dues au vieillissement de l‘isolation.
Des câbles de raccordement électriques endommagés de la sorte ne doivent pas être utilisés et, en raison de leur isolation défectueuse, ils présentent un
danger de mort.
Vérier régulièrement que les câbles de raccordement électriques ne sont pas endommagés. Lors du
contrôle, veiller à ce que le câble de raccordement
ne soit pas connecté au réseau. Les câbles de raccordement électriques doivent correspondre aux dispositions VDE et DIN en vigueur. N‘utilisez que des
câbles de raccordement marqués du sigle H05VV-F.
L‘inscription du type sur le câble de raccordement est
obligatoire.
Moteur à courant alternatif
• La tension du réseau doit être de 230 V~.
• Les conducteurs des rallonges d‘une longueur
maxi. de 25 m doivent présenter une section de 1,5
mm2.
Les raccordements et réparations de l‘équipement
électrique doivent être réalisés par un électricien.
12. Mise au rebut et recyclage
L’appareil se trouve dans un emballage permettant
d’éviter les dommages dus au transport. Cet emballage est une matière première et peut donc être
réutilisé ultérieurement ou être réintroduit dans le
circuit des matières premières. L’appareil et ses accessoires sont en matériaux divers, comme par ex.
des métaux et matières plastiques. Éliminez les composants défectueux dans les systèmes d’élimination
des déchets spéciaux. Renseignez-vous dans un
commerce spécialisé ou auprès de l’administration
de votre commune!
Ne pas jeter les vieux appareils avec les déchets
ménagers!
Ce symbole indique que conformément à la
directive relative aux déchets d’équipements
électriques et électroniques (2012/19/UE) et
aux lois nationales, ce produit ne doit pas être
jeté avec les déchets ménagers. Ce produit doit être
remis à un centre de collecte prévu à cet eet. Le
produit peut par ex. être retourné à l’achat d’un produit similaire ou être remis à un centre de collecte
autorisé pour le recyclage d’appareils électriques et
électroniques usagés. En raison des substances potentiellement dangereuses souvent contenues dans
les appareils électriques et électroniques usagés, la
manipulation non conforme des appareils usagés
peut avoir un impact négatif sur l’environnement et
la santé humaine.
26 | FR
www.scheppach.com / service@scheppach.com / +(49)-08223-4002-99 / +(49)-08223-4002-58
Page 27

Une élimination conforme de ce produit contribue
en outre à une utilisation ecace des ressources
naturelles. Pour plus d’informations sur les centres
de collecte des appareils usagés, veuillez contacter
votre municipalité, le service communal d’élimination
des déchets, un organisme agréé pour éliminer les
déchets d’équipements électriques et électroniques
ou le service d’enlèvement des déchets.
13. Aide au dépannage
Panne Cause possible Remède
Le moteur ne
fonctionne pas.
Diminution de
la puissance
d'aspiration.
Vériez que le connecteur secteur est
branché.
Vériez que la prise est sous tension. Appelez un électricien.
Vériez que l’interrupteur On/O de
l'aspirateur à poussières est activé.
La brosse est-elle bloquée ? Mettez l’aspirateur à poussières hors tension pour
Le sac à poussières est-il plein ? Démontez et videz le sac à poussière.
Le ltre est-il plein de poussières ? Démontez et videz le ltre.
Rebranchez le connecteur secteur dans la prise.
Activez l’interrupteur On/O.
éliminer les blocages.
www.scheppach.com / service@scheppach.com / +(49)-08223-4002-99 / +(49)-08223-4002-58
FR | 27
Page 28

Spiegazione dei simboli sull’apparecchio
Attenzione! Possibile per il mancato rispetto Pericolo di morte, rischio di lesioni o danni allo strumento!
m
Avvertimento – Per ridurre il rischio di lesioni leggete le istruzioni per l’uso!
28 | IT
www.scheppach.com / service@scheppach.com / +(49)-08223-4002-99 / +(49)-08223-4002-58
Page 29

Indice: Pagina:
1. Introduzione 30
2. Descrizione dell’apparecchio 30
3. In dotazione 30
4. Utilizzo proprio 31
5. Norme di sicurezza 31
6. Dati tecnici 32
7. Montaggio 32
8. Uso 33
9. Manutenzione 33
10. Conservazione 34
11. Ciamento elettrico 34
12. Smaltimento e riciclaggio 34
13. Risoluzione dei guasti 35
www.scheppach.com / service@scheppach.com / +(49)-08223-4002-99 / +(49)-08223-4002-58
IT | 29
Page 30

1. Introduzione
Fabbricante:
scheppach
Fabrikation von Holzbearbeitungsmaschinen GmbH
Günzburger Straße 69
D-89335 Ichenhausen
Non ci assumiamo alcune responsabilità in caso di
incidenti o danni dovuti al mancato rispetto delle presenti istruzioni e delle avvertenze di sicurezza
2. Descrizione dell’apparecchio
(Fig. 1)
Egregio cliente,
Le auguriamo un piacevole utilizzo del Suo nuovo
apparecchio.
Avvertenza:
Ai sensi della legge sulla responsabilità dei prodotti attualmente in vigore, il fabbricante non è responsabile
per eventuali danni che si dovessero vericare a questa apparecchiatura o a causa di questa in caso di:
• utilizzo improprio,
• inosservanza delle istruzioni per l’uso,
• riparazioni eettuate da specialisti terzi non au-
torizzati,
• installazione e sostituzione di ricambi non originali,
• utilizzo non conforme,
• avaria dell’impianto elettrico in caso di inosser-
vanza delle disposizioni in materia elettrica e delle
norme VDE 0100, DIN 57113 / VDE0113.
Da osservare:
Prima del montaggio e della messa in funzione, leggere tutto il testo delle istruzioni per l‘uso.
Le presenti istruzioni per l’uso le consentono di cono-
scere l‘utensile elettrico e di sfruttare le sue possibili-
tà d’impiego conformi.
Le istruzioni per l‘uso contengono avvertenze impor-
tanti su come utilizzare l‘utensile elettrico in modo
sicuro, corretto ed economico e su come evitare i
pericoli, risparmiare sui costi di riparazione, ridurre
i tempi di inattività ed aumentare l‘adabilità e la durata dell‘utensile elettrico.
Oltre alle disposizioni di sicurezza contenute nelle
qui presenti istruzioni per l‘uso, è necessario altresì
osservare le norme in vigore nel proprio Paese per
l‘utilizzo dell‘utensile elettrico.
Conservare le istruzioni per l’uso vicino all‘utensile elettrico, protette da sporcizia e umidità in una
copertina di plastica. Esse devono essere attentamente lette e scrupolosamente osservate da tutti gli
operatori prima di iniziare il lavoro.
Sull‘utensile elettrico possono lavorare soltanto persone che sono state istruite sul suo uso e sui pericoli
ad esso collegati. L‘età minima richiesta per gli operatori deve essere assolutamente rispettata.
Oltre agli avvisi di sicurezza contenuti nelle presenti
istruzioni per l‘uso e alle disposizioni speciali in vigore nel proprio Paese, devono essere rispettate le
regole tecniche generalmente riconosciute per l‘esercizio di macchine di lavorazione del legno.
1. Impugnatura
2. Testa della macchina
3. Linea di allacciamento
4. Gancio di blocco
5. Supporto delle ruote (4x)
6. Ruote orientabili (4x)
7. Piastra di supporto delle ruote
8. Coperchio a vite per lo scarico di liquidi
9. Contenitore in acciaio inox
10. Attacco del essibile di aspirazione
11. Presa con attivazione automatica
12. Interruttore ON/OFF
13. Portacavi superiore
14. Attacco per funzione di soaggio
15. Filtro a cestello con valvola a galleggiante di sicurezza
16. Flessibile di aspirazione da 3m
17. Filtro in materiale espanso
18. Sacchetto del ltro di carta
19. Filtro a pieghe
20. Spazzola per pavimenti
21. Bocchetta a lancia
22. Tubo di prolunga in metallo
23. Vite (6x)
24. Portacavi inferiore
3. In dotazione
• Aprite l’imballaggio e togliete con cautela l’appa-
recchio dalla confezione.
• Togliete il materiale d’imballaggio e anche i fermi
di trasporto / imballaggio (se presenti).
• Controllate che siano presenti tutti gli elementi forniti.
• Vericate che l’apparecchio e gli accessori non
presentino danni dovuti al trasporto.
• Se possibile, conservate l’imballaggio no alla sca-
denza della garanzia.
m ATTENZIONE!
L’apparecchio e il materiale d’imballaggio non sono
giocattoli! I bambini non devono giocare con sacchetti di plastica, lm e piccoli pezzi! Sussiste pericolo di ingerimento e soocamento!
Aspiratore a secco e a umido da 30L (1x)
Flessibile di aspirazione da 3m (1x)
Filtro in materiale espanso (1x)
Sacchetto del ltro di carta (1x)
Filtro a pieghe per aspirazione a secco (1x)
30 | IT
www.scheppach.com / service@scheppach.com / +(49)-08223-4002-99 / +(49)-08223-4002-58
Page 31

Supporto delle ruote (4x)
Ruote (4x)
Impugnatura (1x)
Vite (6x)
Spazzola per pavimenti (1x)
Bocchetta a lancia (1x)
Tubo di prolunga in metallo (1x)
Portacavi (1x)
Istruzioni per l'uso (1x)
4. Utilizzo proprio
La sega circolare manuale è adatta ad eettuare tagli diritti nel legno, in materiali simili al legno o materie plastiche.
L’apparecchio deve venire usato solamente per lo
scopo a cui è destinato. Ogni altro tipo di uso che esuli
da quello previsto non è un uso conforme. L’utilizzatore/l’operatore, e non il costruttore, è responsabile dei
danni e delle lesioni di ogni tipo che ne risultino.
Tenete presente che i nostri apparecchi non sono stati
costruiti per l’impiego professionale, artigianale o industriale. Non ci assumiamo alcuna garanzia quando
l’apparecchio viene usato in imprese commerciali, artigianali o industriali, o in attività equivalenti.
5. Norme di sicurezza
m PERICOLO!
• Collegare l‘apparecchio solo a corrente alternata.
La tensione deve corrispondere a quella indicata
sulla targhetta dell‘apparecchio.
• Non toccare mai la spina e la presa con le mani
bagnate.
• Non staccare la spina dalla presa tirando il cavo
di collegamento.
• Prima di ogni utilizzo controllare che il cavo di allacciamento e la spina di alimentazione non pre-
sentino danni. Far sostituire immediatamente il cavo di allacciamento danneggiato dal servizio clienti
autorizzato/da un elettricista specializzato.
• Per evitare incidenti elettrici raccomandiamo di
collegare l‘apparecchio a prese elettriche dotate
di interruttore dierenziale (con corrente dierenziale nominale I dn non superiore a 30 mA).
• Prima di ogni intervento di cura e di manutenzione,
spegnere l‘apparecchio e staccare la spina.
• Lavori di riparazione e lavori sugli impianti elettrici
possono essere eettuati solo dal servizio clienti
autorizzato.
m AVVERTIMENTO!
• Questo apparecchio non è indicato per essere
usato da persone con delle limitate capacità siche, sensoriali o mentali e da persone che abbiano
poca esperienza e/o conoscenza dell‘apparecchio
a meno che non vengano supervisionati per la loro
sicurezza da una persona incaricata o che abbiano
da questa ricevuto istruzioni su come usare l‘apparecchio e dei pericoli da esso derivante.
• I bambini possono utilizzare l‘apparecchio solo se
maggiori dell‘età di 8 anni e a meno che non vengano supervisionati per la loro sicurezza da una
persona incaricata o che abbiano da questa ricevuto istruzioni su come usare l‘apparecchio e dei
pericoli da esso derivante.
• I bambini non devono giocare con l‘apparecchio.
• Sorvegliare i bambini per assicurarsi che non gio-
chino con l‘apparecchio.
• La pulitura e la manutenzione utente non devono
essere eseguiti dai bambini senza sorveglianza.
• Tenere le pellicole di imballaggio fuori dalla portata
dei bambini. Rischio di asssia!
• Disattivare l‘apparecchio dopo ogni impiego e prima di ogni pulizia/manutenzione.
• Pericolo d‘incendio. Non aspirare oggetti brucianti o ardenti.
• E‘ vietato l‘utilizzo in ambienti a rischio di esplosione.
• In caso di formazione di schiuma o fuoriuscita di
liquido, spegnere immediatamente l‘apparecchio
o tirare la spina di rete!
• Non usare detergenti abrasivi, detergenti per il
vetro o detergenti universali! Non immergere mai
l‘apparecchio in acqua.
Determinate sostanze possono formare Insieme
all’aria di aspirazione vapori e miscele esplosivi Non
aspirare mai le seguenti sostanze:
• gas esplosivi o inammabili, liquidi e polveri (polveri reattive)
• Polveri di metallo reattive (ad es. alluminio, magnesio, zinco) insieme a detergenti fortemente al-
calini ed acidi
• Acidi e soluzioni alcaline allo stato puro
• Soluzioni organiche (ad es. benzina, diluenti per
vernici, acetone o gasolio).
Queste sostanze possono inoltre corrodere i mate-
riali dell’apparecchio.
m AVVISO!
Questo elettroutensile genera un campo magnetico
durante l‘esercizio. Tale campo può danneggiare impianti medici attivi o passivi in particolari condizioni.
Per ridurre il rischio di lesioni serie o mor tali, si racco-
manda alle persone con impianti medici di consultare
il proprio medico e il produttore dell‘impianto medico
prima di utilizzare l‘elettroutensile.
www.scheppach.com / service@scheppach.com / +(49)-08223-4002-99 / +(49)-08223-4002-58
IT | 31
Page 32

6. Dati tecnici
Tensione di rete 220-240V~ 50/60Hz
Potenza 1400W
Potenza massima presa di
corrente dell’apparecchio
Potenza totale 3400W
Capacità del serbatoio
dell'acqua
Potenza di aspirazione 20 Kpa
Tipo di protezione IPX4
Classe di isolamento I
2000W
30L
7. Montaggio
m ATTENZIONE!
Prima dell‘uso, assicurarsi che il dispositivo sia
montato correttamente e in modo completo.
Disimballaggio (Fig.1+2+3)
• Sbloccare il gancio di blocco (4) e rimuovere la testa della macchina (2). Gli accessori si trovano nel
contenitore in acciaio inox (9). Solo il tubo di prolunga in metallo (22) si trova all’esterno del contenitore
in acciaio inox (9) nell’imballaggio. Rimuovere tutti
gli accessori dal contenitore in acciaio inox (9).
Montaggio dei supporti delle ruote (Fig. 4+5)
• Posizionare il contenitore in acciaio inox (9) sulla testa (occorre rimuovere la testa della macchina (2)).
• Spingere i supporti delle ruote (5) nelle apposite scanalature sulla piastra di supporto delle ruote (7). (4x)
• Fissare i supporti delle ruote (5) con un cacciavite
(non compreso nella fornitura), ciascuno con una
vite (23). (4x)
Montaggio delle ruote (6) (Fig. 6)
• Premere le quattro ruote orientabili (6) nei fori del
supporto delle ruote (5).
Mont aggi o della test a della macch i na (2) e dell ‘ impugnatura (1) (Fig. 7)
• Posizionare la testa della macchina (2) sul contenitore in acciaio inox (9). Fissare la tesa della macchina (2) con il gancio di blocco (4). Durante il montaggio della testa della macchina (2), assicurarsi che
il gancio di blocco (4) sia innestato correttamente.
• Inserire l‘impugnatura (1) sulla testa della macchina
(2) e ssarla con due viti (23) mediante un cacciavite (non incluso con nella fornitura).
Montaggio del ltro in materiale espanso (16)
(Fig. 3+8)
Non utilizzare mai il dispositivo senza ltro! Assicurarsi sempre che i ltri siano montati correttamente!
• Montare il ltro in materiale espanso (17): per l‘aspirazione a umido, inlare il ltro in materiale
espanso in dotazione (17) sopra al ltro a cestello
con valvola a galleggiante di sicurezza (15).
Montaggio del ltro a pieghe (19) (Fig. 3+9)
Per l‘aspirazione a secco, spingere il ltro a pieghe
(19) sul ltro a cestello con valvola a galleggiante di
sicurezza (15). Il ltro a pieghe (19) è adatto solo per
l‘aspirazione a secco!
Montaggio del sacchetto del ltro di carta (18)
(Fig. 3+10)
Per aspirare sporco asciutto e ne, consigliamo di
utilizzare anche un sacchetto del ltro di carta (18).
• Spingere il sacchetto del ltro di carta (18) sopra l‘apertura di aspirazione nel contenitore in acciaio inox
(9). Il sacchetto del ltro dell‘aria (18) è adatto solo per
l‘aspirazione a secco. Il sacchetto del ltro di carta
(18) semplica lo smaltimento della polvere aspirata.
Montaggio del essibile di scarico (16) (Fig.
3+11+12)
Collegare il essibile di scarico (16) al relativo attacco
sull’aspiratore a secco e a umido, in funzione dell’applicazione desiderata.
Aspirazione della polvere:
Collegare il essibile di aspirazione (16) al relativo attacco (10). Spingere a tale proposito l’estremità del
essibile di aspirazione (16) con i due raccordi lettati
nel relativo attacco (10) (A). Inserire i due raccordi
lettati nelle scanalature. In posizione nale, ruotare
il essibile di aspirazione in senso orario (B).
Soaggio:
Collegare il essibile di aspirazione (16) all’attacco
con funzione di soaggio (14). Spingere l’estremità
del essibile di aspirazione (16) con i due raccordi
lettati nell’attacco per la funzione di soaggio (14).
Inserire i due raccordi lettati nelle scanalature. In
questo caso non è necessaria una rotazione.
Montaggio del tubo di prolunga in metallo (22),
del essibile di aspirazione (16) e degli ugelli
(20/21) (Fig. 13)
• Collegare il tubo di prolunga in metallo (22) all’estremità curva del essibile di scarico (16).
• Montare la spazzola per pavimenti (20) o la bocchetta a lancia (21) sull’estremità del tubo di prolunga in metallo (22).
• Per regolare la lunghezza individuale del tubo
di prolunga in metallo (22), spingere il cursore in
avanti (A). (Fig. 14)
• Tirare il tubo no a una lunghezza adeguata (B).
Accertarsi che il regolatore scorrevole sia innestato. (Fig. 14)
32 | IT
www.scheppach.com / service@scheppach.com / +(49)-08223-4002-99 / +(49)-08223-4002-58
Page 33

Montaggio del portacavi inferiore (Fig. 3+15)
• Agganciare il portacavi inferiore (24) sul retro del
dispositivo alla piastra di supporto delle ruote (7). Il
portacavi superiore (13) si trova sull’attacco per la
funzione di soaggio (14).
8. Uso
m AVVERTENZA!
Spegnere il dispositivo se durante l‘aspirazione a umido
fuoriesce insieme all‘aria di scarico liquido o schiuma.
Accensione / Spegnimento / Modalità automatica (Fig. 16-17)
L’interruttore ON / OFF (12) presenta tre impostazioni:
1 Posizione dell’interruttore 0: OFF
2 Posizione dell’interruttore II: ON
• Premere l’interruttore ON/OFF (12) per accendere.
• Premere nuovamente l’interruttore ON/OFF (12)
per spegnere il dispositivo.
3 Posizione dell’interruttore I: Modalità automatica
(l’aspirapolvere si attiva mediante uno strumento
elettrico).
• Collegare il cavo di rete del proprio elettroutensile
alla presa automatica (Fig. 16).
• Collegare il essibile di scarico all’attacco di aspirazione della polvere del proprio elettroutensile.
Vericare che il collegamento sia sicuro e a tenuta
d’aria.
• Portare l’interruttore sul sistema di aspirazione in
posizione “I” = Modalità automatica.
Aspirazione a secco (Fig. 3+9+10)
Utilizzare il ltro a pieghe (19) per l‘aspirazione a
secco. Si può inoltre utilizzare il sacchetto del ltro di
carta (18). In questo modo il ltro a pieghe (19) rimane
libero più a lungo da polvere, mantenendo la sua potenza di aspirazione per una durata maggiore.
Si semplica inoltre lo smaltimento della polvere.
Assicurarsi sempre che i ltri siano montati correttamente.
Aspirazione a umido (Fig. 3 + 8)
Utilizzare per l’aspirazione a umido il ltro in materiale espanso (17). Assicurarsi che il ltro in materiale
espanso sia montato correttamente (17).
Quando il contenitore in acciaio inox (9) è pieno, la
valvola a galleggiante di sicurezza (15) chiude l’a-
pertura di aspirazione e il processo di aspirazione si
interrompe.
Vite di scarico dell’acqua (8) (Fig. 18)
Per semplicare lo svuotamento del contenitore in
acciaio inox (9) all’atto dell’aspirazione a umido, esso
è dotato di una vite di scarico dell’acqua (8). Aprire la
vite di scarico dell’acqua (8) girando verso sinistra e
scaricare il liquido.
9. Manutenzione
m Avviso!
Prima di qualsiasi regolazione, riparazione o manutenzione, staccare la spina!
Pulizia
Si consiglia di pulire il dispositivo dopo ogni uso. Non
spruzzare il dispositivo con acqua, né pulirlo sotto
acqua corrente. Questo potrebbe provocare scariche
elettriche e danneggiare il dispositivo stesso.
Svuotare il contenitore in acciaio inox (9) dopo ogni
utilizzo: Dopo l’apertura del coperchio a vite per lo
scarico di liquidi (8), è possibile scaricare il liquido assorbito. All’interno del contenitore in acciaio inox (9) rimangono dei residui di liquido. Per rimuovere il liquido
residuo, estrarre la testa della macchina (2), aprendo
il gancio di blocco (4), dal contenitore in acciaio inox
(9). Svuotare i residui di liquido. Pulire il contenitore
con un panno leggermente umido.
• Sostituire il sacchetto del ltro di carta, se pieno
• Tenere sempre pulito il dispositivo. Non utilizzare
detergenti o solventi.
• Mantenere sempre pulite le bocchette di ventilazione e prive di sporco e polvere.
• Pulire il dispositivo solo con una spazzola morbida
o un panno leggermente umido.
• Pulire il ltro in materiale espanso (17) con un po’
di sapone in pasta e sotto l’acqua corrente, lasciandolo asciugare all’aria.
Manutenzione
Il dispositivo non richiede manutenzione.
Informazioni sul Servizio Assistenza
Si deve tenere presente che le seguenti parti di questo prodotto sono soggette a un‘usura naturale o do-
vuta all‘uso ovvero che le seguenti parti sono necessarie come materiali di consumo.
Parti soggette ad usura *: Filtro in materiale espanso,
Sacchetto del ltro di carta, Filtro a pieghe
m ATTENZIONE!
Il dispositivo non è adatto all’aspirazione di liquidi inammabili. Utilizzare per l’aspirazione a umido solo il
ltro in materiale espanso in dotazione (17).
www.scheppach.com / service@scheppach.com / +(49)-08223-4002-99 / +(49)-08223-4002-58
* non necessariamente compreso tra gli elementi forniti!
IT | 33
Page 34

10. Conservazione
Conservate l’apparecchio e i suoi accessori in un
luogo buio, asciutto, al riparo dal gelo e non accessibile ai bambini. La temperatura ottimale per la conservazione è compresa tra i 5 e i 30°C.
Conservate l’elettroutensile nell’imballaggio originale.
Coprire l’elettroutensile per proteggerlo da polvere
o umidità.
Conservare le istruzioni per l’uso nei pressi dell’elettroutensile.
• Avvolgere la linea di allacciamento (3) attorno al
portacavi superiore (13) sull’attacco per la funzione di soaggio (14) e attorno al portacavi inferiore
(24). (Fig. 18)
• Nella parte superiore della testa della macchina (2)
sono presenti quattro incavi nei quali è possibile
conservare la spazzola per pavimenti (20) e la bocchetta a lancia (21). Sui supporti delle ruote (5) sono
presenti invece degli incavi nei quali è possibile inserire il tubo di prolunga in metallo (22). (Fig. 20)
• Gli altri accessori possono essere conservati nel
contenitore in acciaio inox (9).
11. Ciamento elettrico
Utilizzare soltanto i cavi di alimentazione con la dicitura H05VV-F.
La stampa della denominazione del modello sul cavo
di alimentazione è obbligatoria.
Motore a corrente alternata
• La tensione di alimentazione deve essere di 230
V ~
• I cavi di prolunga no a 25 m di lunghezza devono
avere una sezione di 1,5 millimetri quadrati.
Gli allacciamenti e le riparazioni all‘impianto elettrico
possono essere eseguiti soltanto da un elettricista
qualicato.
12. Smaltimento e riciclaggio
L’apparecchio si trova in una confezione per evitare i
danni dovuti al trasporto. Questo imballaggio rappresenta una materia prima e può perciò essere utilizzato di nuovo o riciclato. L’apparecchio e i suoi accessori sono fatti di materiali diversi, per es. metallo e
plastica. Consegnate i pezzi difettosi allo smaltimento di riuti speciali. Per informazioni rivolgetevi ad
un negozio specializzato o all’amministrazione comunale!
Il motore elettrico installato è collegato e pronto per
l‘esercizio. L‘allacciamento è conforme alle disposizioni VDE e DIN pertinenti.
L‘allacciamento alla rete del cliente e il cavo di prolunga utilizzato devono essere conformi a tali norme.
Cavo di alimentazione elettrica difettoso
Sui cavi di alimentazione elettrica si vericano spesso danni all‘isolamento.
Le cause possono essere le seguenti:
• Schiacciature, laddove i cavi di alimentazione vengono fatti passare attraverso nestre o interstizi
di porte.
• Piegature a causa del ssaggio o della conduzione
dei cavi stessi eseguiti in modo non appropriato.
• Tagli causati dal transito sui cavi di alimentazione.
• Danni all‘isolamento causati dalle operazioni di di-
stacco dalla presa a parete.
• Cricche a causa dell‘invecchiamento dell‘isolamento.
Tali cavi di alimentazione elettrica difettosi non pos-
sono essere utilizzati e rappresentano un pericolo
mortale a causa dei danni all‘isolamento.
Controllare regolarmente che i cavi di alimentazione elettrica non siano danneggiati. Assicurarsi che,
durante tale controllo, il cavo di alimentazione non
sia collegato alla rete elettrica.
I cavi di alimentazione elettrica devono essere conformi alle disposizioni VDE e DIN pertinenti.
Non smaltire i dispositivi usati insieme ai riuti
domestici!
Questo simbolo indica che il prodotto non deve essere smaltito con i riuti domestici come
da direttiva per gli strumenti elettrici ed elet-
tronici usati (2012/19/UE) e in base alle leggi
nazionali. Questo prodotto deve essere consegnato
presso un apposito centro di raccolta. Questo può
essere eseguito ad es. restituendo il prodotto vecchio all’atto dell’acquisto di un prodotto simile o con-
segnandolo presso un centro di raccolta autorizzato
al riciclaggio di strumenti elettrici ed elettronici usa-
ti. La gestione impropria di dispositivi usati può ripercuotersi negativamente sull’ambiente e sulla salute umana, a causa di sostanze potenzialmente
pericolose spesso contenute negli strumenti elettrici
ed elettronici. Uno smaltimento corretto del prodotto
contribuisce inoltre a sfruttare in modo eciente le
risorse. Le informazioni sui centri di raccolta per dispositivi usati sono reperibili presso la propria amministrazione comunale, l’azienda municipalizzata
per la nettezza urbana, un centro autorizzato allo
smaltimento di strumenti elettrici ed elettronici usati
o presso il servizio di nettezza urbana.
34 | IT
www.scheppach.com / service@scheppach.com / +(49)-08223-4002-99 / +(49)-08223-4002-58
Page 35

13. Risoluzione dei guasti
Guasto Possibile causa Rimedio
La spina è inserita nella presa? Inserire nuovamente la spina nella presa.
Il motore non
funziona
Potenza di
aspirazione ridotta
La presa è collegata alla rete
elettrica?
L’interruttore on/o è stato azionato? Accendere l’interruttore on/o.
La spazzola è bloccata? Spegnere l’aspirapolvere per rimuovere il blocco.
Il sacchetto della polvere è pieno? Smontare il sacchetto e svuotarlo.
Il ltro è intasato di polvere? Smontare il ltro e pulirlo.
Chiamare l’elettricista.
www.scheppach.com / service@scheppach.com / +(49)-08223-4002-99 / +(49)-08223-4002-58
IT | 35
Page 36

Vysvětlení symbolů na přístroji
Pozor! Možná za nedodržení Nebezpečí ohrožení života, riziko zranění nebo poškození nářadí!
m
Před uvedením do provozu si přečtěte a dodržujte návod k obsluze a bezpečnostní pokyny.
36 | CZ
www.scheppach.com / service@scheppach.com / +(49)-08223-4002-99 / +(49)-08223-4002-58
Page 37

Obsah: Strana:
1. Úvod 38
2. Popis zařízení 38
3. Rozsah dodávky 38
4. Použití podle účelu určení 39
5. Bezpečnostní pokyny 39
6. Technické údaje 40
7. Montáž 40
8. Obsluha 40
9. Údržba 41
10. Uložení 41
11. Elektrická přípojka 41
12. Likvidace a recyklace 42
13. Odstraňování závad 42
www.scheppach.com / service@scheppach.com / +(49)-08223-4002-99 / +(49)-08223-4002-58
CZ | 37
Page 38

1. Úvod
výrobce:
scheppach
Fabrikation von Holzbearbeitungsmaschinen GmbH
Günzburger Straße 69
D-89335 Ichenhausen
Vážený zákazníku,
přejeme Vám hodně radosti a úspěchů při práci s Vaším novým přístrojem.
Poznámka:
V souladu s platnými zákony, které se týkají odpovědnosti za výrobek, výrobce zařízení nepřebírá
odpovědnost za poškození výrobku nebo za škody
způsobené výrobkem, ke kterým z následujících důvodů:
• Nesprávná manipulace.
• Nedodržení pokynů pro obsluhu.
• Opravy prováděné třetí stranou, opravy neprová-
děné v autorizovaném servisu.
• Montáž neoriginálních dílů nebo použití neoriginálních dílů při výměně.
• Jiné než specikované použití.
• Porucha elektrického systému, která byla způso-
bena nedodržením elektrických předpisů a předpisů VDE 0100, DIN 57113, VDE0113.
Doporučujeme:
Před montáží a obsluhou tohoto zařízení si přečtěte
kompletní text v návodu k obsluze. Pokyny pro obsluhu jsou určeny k tomu, aby se uživatel seznámil
s tímto zařízením a aby při jeho použití využil všech
jeho možností v souladu s uvedenými doporučeními.
Tento návod k obsluze obsahuje důležité informace
o tom, jak provádět bezpečnou, profesionální a hospodárnou obsluhu stroje, jak se zabránit rizikům, jak
ušetřit náklady na opravy, jak zkrátit doby prostojů a
jak zvýšit spolehlivost a prodloužit provozní životnost
stroje. Mimo bezpečnostních předpisů uvedených v
návodu k obsluze musíte dodržovat take platné předpisy, které se týkají provozu stroje ve vaší zemi.
Uchovávejte návod k obsluze stále v blízkosti stroje a
uložte jej do plastového obalu, aby byl chráněn před
nečistotami a vlhkostí. Přečtěte si návod k obsluze
před každým použitím stroje a pečlivě dodržujte v
něm uvedené informace. Stroj mohou obsluhovat
pouze osoby, které byly řádně proškoleny v jeho obsluze a které byly řádně informovány o rizicích spojených s jeho obsluhou. Při obsluze stroje musí být
splněn stanovený minimální věk.
Kromě bezpečnostních pokynů, které jsou obsaženy
v návodu k obsluze, a zvláštních předpisů vaší země,
je při provozu dřevoobráběcích strojů zapotřebí dodržovat všeobecně uznávaná technická pravidla.
Nepřebíráme žádnou záruku za nehody nebo škody
způsobené nedodržením tohoto návodu a bezpečnostních pokynů.
2. Popis zařízení (obr. 1)
1. Rukojeť
2. Hlava stroje
3. Přípojné vedení
4. Zajišťovací hák
5. Upevnění válečků (4x)
6. řídicí válečky (4x)
7. Upínací deska kola
8. Kryt se šrouby k vypouštění tekutin
9. Nádoba z ušlechtilé oceli
10. Přípojka odsávací hadice
11. Zásuvka s automatikou zapnutí
12. Spínač / vypínač
13. Horní držák kabelu
14. Přípojka funkce vyfouknutí
15. Koš ltru s bezpečnostním plovoucím ventilem
16. odsávací hadice 3m
17. Pěnový ltr
18. Sáček papírového ltru
19. Skládaný ltr
20. Nástavec pro vysávání podlahy
21. Štěrbinový nástavec
22. Kovová prodlužovací trubka
23. Šroub (6x )
24. Dolní držák kabelu
3. Rozsah dodávky
• Otevřete balení a opatrně vyjměte přístroj.
• Odstraňte materiál obalu a obalové a přepravní
pojistky (pokud je jimi výrobek opatřen).
• Zkontrolujte, zda je obsah dodávky úplný.
• Zkontrolujte přístroj a díly příslušenství, zda se při
přepravě nepoškodily.
• Uchovejte obal dle možností až do uplynutí záruční doby.
m POZOR!
Přístroj a obalové materiály nejsou hračka! Dětem
nepatří do rukou plastikové sáčky, fólie ani drobné
součástky! Hrozí nebezpečí jejich spolknutí a
udušení!
30L mokrý/suchý vysavač (1x)
3m odsávací hadice (1x)
Pěnový ltr (1x)
Sáček papírového ltru (1x)
Skládaný ltr pro suché vysávání (1x)
Uložení válečků (4x)
38 | CZ
www.scheppach.com / service@scheppach.com / +(49)-08223-4002-99 / +(49)-08223-4002-58
Page 39

Válečky (4x)
Rukojeť (1x)
Šroub (6x)
Nástavec pro vysávání podlahy (1x)
Štěrbinový nástavec (1x)
Prodlužovací trubka z kovu (1x)
Držák kabelu (1x)
Návod k obsluze (1x)
4. Použití podle účelu určení
Vysavač pro vysávání zasucha i zamokra je vhodný
na vysávání zasucha i zamokra při použití příslušného ltru. Přístroj není určen k vysávání hořlavých,
výbušných nebo zdraví škodlivých látek.
Přístroj smí být používán pouze podle svého účelu
určení. Každé další, toto překračující použití, neodpovídá použití podle účelu určení. Za z toho vyplývající
škody nebo zranění všeho druhu ručí uživatel/obsluhující osoba a ne výrobce.
Dbejte prosím na to, že naše přístroje nebyly podle
svého účelu určení konstruovány pro živnostenské,
řemeslnické nebo průmyslové použití. Nepřebíráme
žádné ručení, pokud je přístroj používán v živnostenských, řemeslných nebo průmyslových podnicích a při
srovnatelných činnostech.
5. Bezpečnostní pokyny
m NEBEZPEČÍ!
• Přístroj zapojujte pouze na střídavý proud. Napětí musí
být shodné s údaji o napětí na typovém štítku přístroje.
• Zástrčky a zásuvky se nikdy nedotýkejte mokrýma rukama.
• Síťovou zástrčku neodpojuje ze zásuvky taháním
za síťový kabel.
• Před každým použitím přístroje zkontrolujte, zda
napájecí vedení a zástrčka nejsou poškozeny. Poškozené napájecí vedení je nutné nechat neprodleně vyměnit autorizovanou servisní službou, resp.
odborníkem na elektrické přístroje.
• Abyste zabránili úrazům vlivem el. proudu, doporučujeme používat zásuvky s předřazeným proudovým chráničem (jmenovitá hodnota síly proudu
vypínacího mechanismu max. 30 mA).
• Než začnete provádět jakoukoliv péči nebo údržbu, zařízení vypněte a vytáhněte zástrčku ze sítě.
• Veškeré opravářské práce na elektrických částech
přístroje smí provádět pouze autorizovaný zákaznický servis.
m VAROVÁNÍ!
• Toto zařízení není určeno k tomu, aby je používaly
osoby s omezenými fyzickými, smyslovými nebo
duševními schopnostmi nebo osoby zcela bez zkušeností a/nebo znalostí, ledaže by tak činily pod
dohledem osoby pověřené zajištěním jejich bezpečnosti nebo poté, co od ní obdržely instruktáž,
jak se zařízením zacházet a uvědomují si nebezpečích, která s používáním přístroje souvisí.
• Děti smí přístroj používat pouze tehdy, pokud jsou
starší 8 let a pokud na jejich bezpečnost dohlíží
příslušná osoba nebo pokud o ní získali pokyny,
jak se přístroj používá a uvědomují si nebezpečím,
která s používáním přístroje souvisí.
• Není dovoleno, aby si děti s přístrojem hrály.
• Na děti je třeba dohlížet, aby bylo zajištěno, že si
se zařízením nebudou hrát.
• Čištění a údr žbu přístroje nesmí provádět děti bez
dozoru.
• Balicí fólii udržujte mimo dosah dětí, hrozí nebezpečí udušení!
• Po každém použití a vždy před čištěním / údržbou
zařízení vypněte.
• Nebezpečí požáru. Nevysávejte hořící či doutnající předměty.
• Nikdy nepracujte s vysokotlakým čističem v prostorách, ve kterých hrozí nebezpečí exploze!
• Přístroj bezpodmínečně okamžitě vypněte, začne-
-li se tvořit pěna či uniká-li z přístroje kapalina!
• Nepoužívejte abrazivní čisticí prostředky, čističe
na sklo nebo víceúčelové čističe! Přístroj nikdy nesmíte ponořit do vody.
V kontaktu s nasávaným vzduchem může u určitých
látek dojít ke tvorbě explozivních par či směsí. Níže
uvedené látky se nesmí nasávat:
• výbušné nebo hořlavé plyny, tekutiny a prach (reaktivní prach)
• reaktivní kovový prach (např. hliník, hořčík, zinek)
ve spojení se silně alkalickými a kyselými čisticími prostředky
• nezředěné silné kyseliny a louhy
• organická rozpouštědla (např. benzin, ředidla ba-
rev, aceton, topný olej).
Kromě toho mohou tyto látky způsobit nežádoucí
škody na materiálu přístroje.
m UPOZORNĚNÍ!
Tento elektrický nástroj vytváří během provozu
elektromagnetické pole. Toto pole může za určitých
podmínek ovlivňovat aktivní nebo pasivní zdravotní
implantáty. Pro snížení rizika vážných nebo smrtelných úrazů doporučujeme osobám se zdravotními
implantáty, aby se před obsluhou tohoto elektrického
nástroje obrátily na svého lékaře nebo na výrobce
zdravotního implantátu.
www.scheppach.com / service@scheppach.com / +(49)-08223-4002-99 / +(49)-08223-4002-58
CZ | 39
Page 40

6. Technické údaje
Síťové napětí 220-240V~ 50/60Hz
Výkon 1400W
Maximální výkon přístro-
jové zásuvky
Celkový výkon 3400W
Kapacita zásobníku na
vodu
Odsávací výkon 20 Kpa
Druh krytí IPX4
Třída ochrany I
2000W
30L
7. Montáž
m POZOR!
Před použitím zajistěte, aby byl přístroj správně a
kompletně namontován.
Vybalení (obr. 1+2+3)
• Odblokujte zajišťovací háky (4) a odstraňte hlavu
stroje (2). Příslušenství se nachází v nádobě z
ušlechtilé oceli (9). Jen kovová prodlužovací trubka
(22) se nachází mimo nádobu z ušlechtilé oceli (9)
v balení. Odstraňte veškeré příslušenství z nádoby
z ušlechtilé oceli (9).
Montáž skládaného ltru (19) (obr. 3+9)
Pro suché sání nasuňte skládaný ltr (19) na koš ltru
s bezpečnostním plovoucím ventilem (15). Skládaný
ltr (19) je vhodný pouze pro suché sání!
Montáž sáčku papírového ltru (18) (obr. 3+10)
K nasávání jemných, suchých nečistot se doporučuje, dodatečně použít sáček papírového ltru (18).
• Sáček papírového ltru (18) nasuňte na sací otvor
nádoby z ušlechtilé oceli (9). Sáček papírového ltru
(18) je vhodný pouze k suchému sání. Sáček papírového ltru (18) ulehčuje likvidaci vysátého prachu.
Namontujte odsávací hadici (16) (obr. 3+11+12)
Napojte odsávací hadici (16) na odpovídající přípojku,
dle požadované aplikace, na mokrý a suchý vysavač.
Vysávání:
Odsávací hadici (16) napojte na přípojku odsávací
hadice (10). K tomu nasuňte konec odsávací hadice
(16) s oběma vsuvkami do přípojky odsávací hadice
(10) (A). Nasaďte obě vsuvky do prohlubní. V koncové pozici otočte odsávací hadici ve směru hodinových ručiček (B).
Foukání:
Napojte odsávací hadici (16) na přípojku s funkcí profouknutí (14). Nasuňte konec odsávací hadice (16)
s oběma vsuvkami do přípojky s funkcí profouknutí
(14). Nasaďte obě vsuvky do prohlubní. Otáčení se
zde nedoporučuje.
Montáž uložení válečků (5) (obr. 4+5)
• Postavte nádobu z ušlechtilé oceli (9) na hlavu (hlava stroje (2) musí být odstraněna).
• Posuňte upevnění válečků (5) do k tomu určených
vybrání upínací desky kola (7). (4x)
• Upevněte upevnění válečků (5) šroubovákem (není
obsahem dodávky) vždy po jednou šroubu (23). (4x)
Montáž válečků (6) (obr. 6)
• Zatlačte čtyři řídicí válečky (6) do otvorů uložení kol (5).
Montáž hlavy stroje (2) a rukojeť (1) (obr.7)
• Nasaďte hlavu stroje (2) na nádobu z ušlechtilé
oceli (9). Zajistěte hlavu stroje (2) zajišťovacími
háky (4). Při montáži hlavy stroje (2) dbejte na to,
aby zajišťovací háky (4) správně zaskočily.
• Nasaďte úchyt (1) na hlavu stroje (2) a upevněte ji
dvěma šrouby (23) pomocí šroubováku (není obsahem dodávky).
Montáž pěnového ltru (17) (obr. 3+8)
Přístroj nikdy nepoužívejte bez ltru! Vždy zajistěte,
aby byly ltry správně namontovány.
• Namontujte pěnový ltr (17): Pro mokré sání nasuňte společně dodaný pěnový ltr (17) na koš ltru s
bezpečnostním plovoucím ventilem (15).
Namontujte kovovou prodlužovací trubku (22),
odsávací hadici (20/21) a trysky (obr. 13)
Spojte kovovou prodlužovací trubku (22) se zahnutým koncem odsávací hadice (16).
Namontujte nástavec pro vysávání podlahy (20) nebo
štěrbinový nástavec (21) na opačný konec kovové
prodlužovací trubky (22).
Pro nastavení individuální délky kovové prodlužovací
trubky (22), posuňte posuvník dopředu (A). (obr. 14)
Natáhněte trubku do odpovídající délky (B). Zajistěte,
aby posuvný regulátor zaskočil. (obr. 14)
Montáž spodního držáku kabelu (obr. 3+15)
Zavěste spodní držák kabelu (24) na zadní stranu přístroje na upínací desku kola (7). Horní držák kabelu
(13) se nachází na přípojce pro funkci vyfouknutí (14).
8. Obsluha
m VÝSTRAHA!
Vypněte přístroj, pokud při mokrém vysávání vystupuje s odváděným vzduchem kapalina nebo pěna.
Zapnutí/vypnutí/automatika (obr. 16-17)
Spínač ON / OFF (12) má tři nastavení:
1 poloha spínače 0: Vyp
2 poloha spínače II: Zap
40 | CZ
www.scheppach.com / service@scheppach.com / +(49)-08223-4002-99 / +(49)-08223-4002-58
Page 41

• Pro zapnutí stiskněte spínač zap/vyp (12).
• Pro vypnutí přístroje opětovně stiskněte spínač
zap/vyp (12).
3 poloha spínače I: Automatický provoz (vysavač se
zapne pomocí elektrického nástroje)
• Napojte síťový kabel vašeho elektrického nástroje
na automatickou zásuvku (obr. 16).
• Napojte odsávací hadici na přípojku vašeho elektrického nástroje. Zkontrolujte, zda je spojení bezpečné a vzduchotěsné.
• Nastavte spínač odsávacího systému do polohy „I“
= automatický provoz.
Pro odstranění zbytkové kapaliny odeberte hlavu
stroje (2) otevřením zajišťovacích háků (4) z nádob
z ušlechtilé oceli (9). Vylijte kapalné zbytky. Vyčistěte
nádobu lehce vlhkým hadříkem.
• Nahraďte plný sáček papírového ltru
• Přístroj vždy udržujte v čistotě. Nepoužívejte čisticí
prostředky nebo rozpouštědla.
• Ventilační štěrbiny vždy udržujte čisté a bez prachu.
• Přístroj vyčistěte jen měkkým kartáčkem nebo leh-
ce vlhkým hadříkem.
• Vyčistěte pěnový ltr (17) s trochou tekutého mýdla
pod tekoucí vodou a nechte jej na vzduchu vyschnout.
Suché vysávání (obr. 3+9+10)
Použijte skládaný ltr (19) pro suché vysávání. Dodatečně můžete použít sáček papírového ltru (18).
Tím zůstane skládaný ltr (19) déle bez prachu a sací
výkon zachován.
K tomu se zjednoduší likvidace prachu.
Vždy zajistěte, aby byly ltry správně namontovány.
Mokré vysávání (obrázek 3+8)
Pro mokré vysávání použijte pěnový ltr (17). Zajistěte, aby byl pěnový ltr (17) správně namontován.
Je-li nádoba z ušlechtilé oceli (9) plná, zavře bezpečnostní plovoucí ventil (15) sací otvor a přeruší se
proces sání.
m POZOR!
Přístroj se nehodí k vysávání hořlavých kapalin. Pro
mokré vysávání použijte pouze společně dodaný pěnový ltr (17).
Vodní vypouštěcí šroub (8) (obr. 18)
Pro jednoduché vyprázdnění nádoby z ušlechtilé
oceli (9) u mokrého vysávání slouží výbava vodním
vypouštěcím šroubem (8). Vodní vypouštěcí šroub (8)
otevřete otáčením doleva a vypusťte kapalinu.
9. Údržba
m UPOZORNĚNÍ!
Před každým nastavením, údržbou nebo opravou vytáhněte síťovou zástrčku!
Čištění
Doporučujeme vy č i st i t př ístroj po ka ž d é m po u ž i tí. Ne stříkejte na přístroj vodou a nečistěte jej pod tekoucí
vodou. To může vést k úderům elektrickým proudem
a poškodit přístroj.
Vyprázdněte nádobu z nerezové oceli (9) po každém
provozu: Po otevření šroubovacího krytu k vypuštění
kapalin (8) může být vypuštěna posbíraná kapalina. V
nádobě z ušlechtilé oceli (9) zůstává zbytek kapaliny.
Údržba
Přístroj nevyžaduje údržbu.
Servisní informace
Je třeba dbát na to, že u tohoto přístroje podléhají
následující díly opotřebení přiměřenému použití nebo
přirozenému opotřebení, resp. jsou potřebné jako
spotřební materiál.
Rychle opotřebitelné díly*: Pěnový ltr, Sáček papírového ltru, Skládaný ltr
* není nutně obsaženo v rozsahu dodávky!
10. Uložení
Skladujte přístroj a jeho příslušenství na tmavém,
suchém a nezamrzajícím místě a mimo dosah dětí. Optimální teplota skladování leží mezi 5 a 30 ˚C.
Uložte elektrický přístroj v originálním balení.
Elektrický přístroj zakryjte, aby byl chráněný před
prachem nebo vlhkem.
Návod k obsluze uložte u přístroje.
• Obalte přípojné (3) vedení kolem horního držáku
kabelu (13) na připojení funkce vyfouknutí (14) a
dolní držák kabelu (24). (obr. 18)
• Na horní straně hlavy stroje (2) se nachází čtyři
prohlubně ve kterých je možno uložit nástavec pro
vysávání podlahy (20) a štěrbinový nástavec (21).
Na upevnění válečků (5) se nachází prohlubně, na
kterých mžete umístit prodlouženou kovovou trubku (22). (obr. 20)
• Zbylé příslušenství můžete ukládat do nádoby z
ušlechtilé oceli (9).
11. Elektrická přípojka
Instalovaný elektromotor je zabudován v provozuschopném stavu. Přípojka musí odpovídat příslušným předpisům VDE a DIN.
Těmto předpisům musí odpovídat síťová přípojka zákazníka i použité prodlužovací kabely.
www.scheppach.com / service@scheppach.com / +(49)-08223-4002-99 / +(49)-08223-4002-58
CZ | 41
Page 42

Vadný elektrický přívodní kabel
U elektrických přívodních kabelů často dochází k poškození izolace.
Jeho příčinami mohou být:
• Poškození tlakem, je-li přívodní kabel veden oknem nebo štěrbinou ve dveřích.
• Prohnutí kvůli nevhodnému upevnění nebo vedení
přívodního kabelu.
• Zlomení kvůli přejíždění přes přívodní kabel.
• Poškození izolace kvůli vytrhnutí z elektrické zá-
suvky ve stěně.
• Protržení v důsledku stárnutí izolace.
Tyto vadné elektrické přívodní kabely nesmí být používány a kvůli poškození izolace jsou životu nebezpečné.
Pravidelně kontrolujte poškození elektrických přívodních kabelů. Dávejte pozor, aby nebyl přívodní kabel
při kontrole připojen do elektrické sítě.
Elektrické přívodní kabely musí odpovídat příslušným předpisům VDE a DIN. Používejte pouze přívodní kabely s označením H 07 RN.
Uvedení typového označení na přívodním kabelu je
povinné.
Motor na střídavý proud
• Napětí v síti musí činit 230 V~
• Prodlužovací kabely do délky 25 m mít průměr 1,5
milimetru čtverečního.
Připojení a opravy elektrického vybavení mohou provádět pouze odborní elektrikáři.
12. Likvidace a recyklace
Přístroj je uložen v balení, aby bylo zabráněno poškození při přepravě. Toto balení je surovina a tím
znovu použitelné nebo může být dáno zpět do cirkulace surovin. Příslušenství je vyrobeno z rozdílných
materiálů, jako např. kov a plasty. Defektní součástky
odevzdejte k likvidaci zvláštních odpadů. Zeptejte se
v odborné prodejně nebo na místním zastupitelství!
Odpadní zařízení nesmějí být likvidována spolu s
domácím odpadem!
Tento symbol upozorňuje, že tento výrobek
nesmí být podle směrnice o odpadních elektrických a elektronických zařízeních (2012/19/
EU) a vnitrostátních zákonů likvidován spolu
s domácím odpadem. Tento výrobek musí být odevzdán ve sběrném středisku určeném k tomuto účelu. To lze provést například vrácením při nákupu podobného výrobku nebo odevzdáním v autorizovaném
sběrném středisku pro recyklaci odpadních elektrických a elektronických zařízení. Nesprávné zacházení s odpadními zařízeními může mít vzhledem k potenciálně nebezpečným látkám, které jsou v
odpadních elektrických a elektronických zařízeních
často obsažené, negativní dopad na životní prostředí a lidské zdraví. Správnou likvidací tohoto výrobku
přispíváte také k efektivnímu využívání přírodních
zdrojů. Informace o sběrných střediscích pro odpadní zařízení můžete získat u svého magistrátu, veřejnoprávní instituce pro nakládání s odpady, autorizovaného orgánu pro likvidaci odpadních elektrických
a elektronických zařízení nebo služby svozu odpadu.
13. Odstraňování závad
Porucha Možná příčina Řešení
Zkontrolujte, je zasunutá zástrčka? Síťovou zástrčku znovu zasuňte do zásuvky.
Motor se nerozběhne
Snížený odsávací
výkon
42 | CZ
Zkontrolujte, je v zásuvce proud? Zavolejte elektrikáře.
Zkontrolujte, je zapnutý spínač/
vypínač vysavače?
Zablokovaný kartáč? Pro odstranění zablokování vysavač vypněte.
Není sáček na prach plný prachu? Sáček na prach vyjměte a vyprázdněte.
Není ltr plný prachu? Vyjměte a vyprázdněte ltr.
Zapněte spínač/vypínač.
www.scheppach.com / service@scheppach.com / +(49)-08223-4002-99 / +(49)-08223-4002-58
Page 43

A készüléken található szimbólumok magyarázata
Figyelem! A használati utasítás be nem tartása életveszélyt, sérülésveszélyt vagy a szerszám károsodását idézheti elő!
m
Üzembe helyezés előtt olvassa el a kezelési útmutatót és a biztonsági előírásokat, és mindig tartsa be
azokat!
www.scheppach.com / service@scheppach.com / +(49)-08223-4002-99 / +(49)-08223-4002-58
HU | 43
Page 44

Tartalomjegyzék: Oldal:
1. Bevezetés 45
2. A készülék részei 45
3. Szállítási terjedelem 45
4. Rendeltetésszerűi használat 46
5. Biztonsági tanácsok 46
6. Műszaki adatok 47
7. Összeszerelés 47
8. Kezelés 48
9. Karbantartás 48
10. Tárolás 49
11. Elektromos csatlakoztatás 49
12. Megsemmisítés és újrahasznosítás 49
13. Hibaelhárítás 50
44 | HU
www.scheppach.com / service@scheppach.com / +(49)-08223-4002-99 / +(49)-08223-4002-58
Page 45

1. Bevezetés
Gyártó:
scheppach Fabrikation von
Holzbearbeitungsmaschinen GmbH
Günzburger Straße 69
D-89335 Ichenhausen
Tisztelt vásárló!
Sok örömet és sikert kívánunk Önnek, amikor az új
készülékét használja.
Kedves Vásárló!
A hatályban lévő termékfelelősségi törvény értelmében a berendezés gyártója nem vonható felelősségre a berendezésen vagy vele kapcsolatban keletkező
károkért a következő esetekben:
• szakszerűtlen kezelés,
• a használati utasítások be nem tartása,
• harmadik személy által végzett, szakképzetlen ja-
vítások,
• nem eredeti alkatrészek beszerelése és cseréje,
• szakszerűtlen használat,
• az elektromos rendszer kiesése az elektromos elő-
írások, illetve a VDE 0100, DIN 57113 / VDE 0113
szabályozások be nem tartása miatt.
Javaslatok:
Mielőtt a berendezést összeszerelné, és üzembe helyezné olvassa el a használati útmutató teljes szövegét.
Az üzemelési utasítások célja a készülékkel való ismerkedésének megkönnyítése és a használati lehetőségeinek megismertetése.
Az üzemelési utasítások fontos megjegyzéseket tartalmaz a készülék biztonságos, szakszerű és gazdaságos használatával kapcsolatosan, a veszélyek
elkerülésére, a javítási költségek megspórolására, a
kiesési idő csökkentésére, és a készülék megbízhatóságának és élettartamának növelésére.
A használati útmutatóba foglalt biztonsági utasításokon kívül mindenképpen be kell tartani a nemzeti
érvényben lévő szabályozásokat a készülék üzemelésével kapcsolatosan.
Az üzemelési utasításokat helyezze egy tiszta,
műanyag mappába, hogy megóvja a szennyeződéstől és a nedvességtől, és tárolja a készülék közelében. A munka elkezdése előtt minden gépkezelőnek
el kell olvasnia az utasításokat és gondosan be kell
tartania őket. Csak olyan személyek használhatják a
készüléket, akiket kiképeztek a gép használatáról, és
a lehetséges veszélyekről, illetve kockázatokról. Be
kell tartani az előírt minimális kort.
A jelen üzemelési utasításokba foglalt biztonsági előírások és a helyi országos különleges előírások kiegészítéseként be kell tartani az általánosan elismert
műszaki előírásokat a fafeldolgozó szerszámgépek
üzemelésekor.
Az útmutató, valamint a biztonsági előírások gyelmen kívül hagyásából származó balesetekért és károkért nem vállalunk felelősséget.
2. A készülék részei (1. ábra)
1. Markolat
2. Gépfej
3. Csatlakozó vezeték
4. Reteszelő kampó
5. Görgőtartó (4 db)
6. Vezetőgörgők (4 db)
7. Keréktartó lemez
8. Csavaros fedél folyadékok leeresztéséhez
9. Nemesacél tartály
10. Szívócső-csatlakozó
11. Csatlakozó aljzat bekapcsoló automatikával
12. Be-/Kikapcsoló
13. Felső kábeltartó
14. Fúvó funkció csatlakozója
15. Szűrőkosár biztonsági úszószeleppel
16. 3 m-es szívócső
17. Habszivacs szűrő
18. Papír szűrőzsák
19. Redős szűrő
20. Padló porszívófej
21. Réstisztító fej
22. Fém hosszabbító csőtoldat
23. Csavar (6 db)
24. Alsó kábeltartó
3. Szállítási terjedelem
• Nyissa ki a csomagolást és vegye ki óvatosan a
készüléket a csomagolásból.
• Távolítsa el a csomagolási anyagot valamint a cso-
magolási- / és szállítási biztosítékot (ha létezik).
• Ellenőrizze le, hogy teljes a szállítás terjedelme.
• Ellenőrizze le a készüléket és a tartozékrészeket
szállítási károkra.
• Ha lehetséges, akkor őrizze meg a csomagolást a
garanciaidő lejáratának a végéig.
m FIGYELEM!
A készülék és a csomagolási anyag nem gyerekjáték! Nem szabad a gyerekeknek a műanyagtasakokkal, foliákkal és aprórészekkel játszaniuk! Fennáll a
lenyelés és a megfulladás veszélye!
30 l Nedves/Száraz porszívó (1 db)
3 m-es szívócső (1 db)
Habszivacs szűrő (1 db)
Papír szűrőzsák (1 db)
Redős szűrő száraz porszívózáshoz (1 db)
Görgőtartó (4 db)
www.scheppach.com / service@scheppach.com / +(49)-08223-4002-99 / +(49)-08223-4002-58
HU | 45
Page 46

Görgők (4 db)
Markolat (1 db)
Csavar (6 db)
Padló porszívófej (1 db)
Réstisztító fej (1 db)
Fém hosszabbító csőtoldat (1 db)
Kábeltartó (1 db)
Kezelési utasítás (1 db)
4. Rendeltetésszerűi használat
A nedves- szárazszívó a megfelelő szűrő használata
melett nedves- és szárazszívásra alkalmas. A készülék nem lett gyullékony, robbanó vagy az egészségre
káros anyagok felszívására meghatározva.
A gépet csak rendeltetése szerint szabad használni.
Ezt túlhaladó bármilyen használat, nem számít rendeltetésszerűnek. Ebből adódó bármilyen kárért vagy
bármilyen fajta sérülésért a használó ill. a kezelő felelős és nem a gyártó.
Kérjük vegye gyelembe, hogy a készülékeink rendeltetésük szerint nem az ipari, kézműipari vagy gyári
használatra lettek konstruálva. Nem vállalunk szavatosságot, ha a készülék ipari, kézműipari vagy gyári
üzemek területén valamint egyenértékű tevékenységek területén van használva.
5. Biztonsági tanácsok
m VES ZÉLY!
• A készüléket csak váltóárammal szabad üzemel-
tetni. A feszültségnek meg kell egyeznie a készülék típustábláján található tápfeszültséggel.
• Ne fogja meg nedves kézzel a hálózati csatlakozót és dugaljat.
• A hálózati dugót ne a csatlakozókábel húzásával
távosítsa el a hálózati dugaljból.
• A hálózati kábel és a hálózati dugasz épségét minden használat előtt ellenőrizze. A sérült hálózati kábelt haladéktalanul ki kell cseréltetni egy jogosult
ügyfélszolgálatos vagy elektromos szakemberrel.
• Az elektromos balesetek elkerülése érdekében javasoljuk, hogy a dugaljat előkapcsolt FI védőkapcsolóval (max. 30 mA névleges kioldó áramerősség) használják.
• Minden ápolási- és karbantartási munka megkezdése előtt kapcsolja ki a készüléket és húzza ki a
hálózati csatlakozót.
• Elektromos alkatrészeken történő javításokat és
munkákat csak jóváhagyott szerviz szolgálat végezhet el.
m FIGYELMEZTETÉS!
• Ez a készülék nem alkalmas arra, hogy korlátozott
zikai, érzékelő vagy szellemi képességgel rendelkező vagy tapasztalat és/vagy ismeret hiányában
lévő személyek használják, kivéve, ha a biztonságukért felelős személy felügyeli őket, vagy betanították őket a készülék használatára és megértették
az ebből eredő veszélyeket.
• Gyermekek a készüléket csak akkor használhatják,
ha 8 év felettiek, és ha a biztonságukért felelős
személy felügyeli őket, vagy ha megtanították őket
a készülék használatára és megértették az ebből
eredő veszélyeket.
• Gyermekeknek nem szabad a készülékkel játszani!
• Gyerekeket felügyelni kell, annak biztosításáért,
hogy a készülékkel ne játszanak.
• Tisztítást és felhasználó általi karbantartást nem
szabad gyermekeknek felügyelet nélkül elvégezni.
• A csomagolófóliát tartsa gyermekektől távol, fulladás veszélye áll fenn!
• A készüléket minden használat után, és minden
tisztítás/karbantartás előtt kapcsolja ki.
• Égésveszély. Ne szívjon fel égő vagy parázsló tárgyat.
• Tilos a tűzveszélyes helyiségekben történő üze-
meltetés.
• A készüléket hab képződése vagy folyadék kifolyása esetén azonnal ki kell kapcsolni vagy ki kell
húzni a hálózati dugót!
• Ne használjon súrolószert, üveget vagy univerzális tisztítószert! A készüléket tilos vízbe meríteni.
Bizonyos anyagok a beszívott levegővel robbanékony gőzöket vagy keverékeket alkothatnak! A következő anyagokat soha ne szívja fel:
• Robbanékony vagy éghető gázok, folyadékok és
por (reaktív por)
• Reaktív fémport (pl. alumínium, magnézium, cink)
erős lúgos és savas tisztítószerekkel összekapcsolva.
• Hígítatlan erős savakat és lúgokat
• Organikus oldószereket (pl. benzin, hígító, aceton,
fűtőolaj).
Ezek az anyagok továbbá a készülékben használt
anyagokat is megtámadhatják.
m FIGYELMEZTETÉS!
Ez az elektromos kéziszerszám működés közben
elektromágneses mezőt képez. Ez a mező bizonyos
körülmények között befolyásolhatja az aktív és passzív
orvosi implantátumok működését. A súlyos és halálos
sérülések veszélyének csökkentése érdekében javasoljuk, hogy az orvosi implantátumokkal élő személyek
az elektromos kéziszerszám kezelése előtt kérjék ki
orvosuk és az implantátum gyártójának véleményét.
46 | HU
www.scheppach.com / service@scheppach.com / +(49)-08223-4002-99 / +(49)-08223-4002-58
Page 47

6. Műszaki adatok
Hálózati feszültség 220-240V~ 50/60Hz
Teljesítmény 1400W
A készülék csatlakozóaljza-
tának maximális teljesítmé-
nye
Összteljesítmény 3400W
A víztartály kapacitása 30L
Szívóteljesítmény 20 Kpa
Védelmi fokozat IPX4
Védelmi osztály I
2000W
7. Összeszerelés
• A habszivacs szűrő (17) felszerelése: Nedves porszívózáshoz tolja a szállítási terjedelem részét képező habszivacs szűrőt (17) a biztonsági úszószelepes szűrőkosár fölé (15).
A redős szűrő felszerelése (19) (3+9. ábra)
Száraz porszívózáshoz tolja a redős szűrőt
(19) a biztonsági úszószelepes szűrőkosárra (15). A redős szűrő (19) kizárólag száraz porszívózásra alkalmas!
A papír szűrőzsák felszerelése (18) (3+10. ábra)
A nom, száraz por felszívásához javasoljuk egy további papír szűrőzsák (18) használatát. A papír szűrőzsákot (18) tolja a nemesacél tartályban (9) található szívónyílás fölé. A papír szűrőzsák (18) kizárólag
száraz porszívózásra alkalmas! A papír szűrőzsák
(18) megkönnyíti a felszívott por ártalmatlanítását.
m FIGYELEM!
Használat előtt győződjön meg róla, hogy a készülék megfelelően és teljesen össze van szerelve.
Kicsomagolás (1+2+3. ábra)
• Reteszelje ki a reteszelő kampót (4), majd távolítsa
el a gépfejet (2). A tartozékok a nemesacél tartályban (9) találhatók. Csak a fém hosszabbító csőtoldat (22) található a nemesacél tartályon kívül (9)
a csomagolásban. Vegyen ki minden tartozékot a
nemesacél tartályból (9).
A görgőtartók felszerelése (5) (4+5. ábra)
• Állítsa fejre a nemesacél tartályt (9) (el kell távolítania a gépfejet (2)).
• Tolja a görgőtartókat (5) a kerékrögzítő lemez (7)
erre a célra kialakított mélyedéseibe. (4 db)
• Rögzítse a görgőtartókat (5) egy csavarhúzó segítségével (nem képezi a szállítási terjedelem részét)
egy-egy csavarral (23). (4 db)
A görgők felszerelése (6) (6. ábra)
• Nyomja a négy vezetőgörgőt (6) a keréktartón található lyukakba (5).
Gépfej (2) és fogantyú (1) felszerelése (7. ábra)
• Helyezze a gépfejet (2) a nemesacél tartályra (9). A
reteszelő kampókkal (4) biztosítsa a gépfejet (2). A
gépfej felszerelésekor (2) ügyeljen rá, hogy a reteszelő kampók (4) megfelelően bereteszelődjenek.
• Helyezze a fogantyút (1) a gépfejre (2), majd rögzítse azt két csavarral (23) egy csavarhúzó segítségével (nem képezi a szállítási terjedelem részét).
A habszivacs (17) szűrő felszerelése (3+8. ábra)
Soha ne használja a készüléket szűrő nélkül! Minden
esetben győződjön meg róla, hogy a szűrők megfelelően vannak-e beszerelve.
A szívócső felszerelése (16) (3+11+12. ábra)
Csatlakoztassa a szívócsövet (16) a kívánt alkalmazásnak megfelelő csatlakozóra a nedves és száraz
porszívón.
Porszívózás:
Csatlakoztassa a szívócsövet (16) a szívócső csatlakozóra (10). Ehhez tolja a szívócső (16) végét a két
csőcsatlakozóval a szívócső csatlakozóba (10) (A). A
két csőcsatlakozót helyezze a mélyedésekbe. Fordítsa el a szívócsövet végső pozíciójában az óramutató
járásával megegyező irányban (B).
Fúvó funkció:
Csatlakoztassa a szívócsövet (16) a fúvó funkció
csatlakozójára (14). Ehhez tolja a szívócső (16) végét
a két csőcsatlakozóval a fúvó funkció csatlakozójába
(14). A két csőcsatlakozót helyezze a mélyedésekbe.
Nem szükséges elfordítania azt.
Fém hosszabbító csőtoldat (22), szívócső (16) és
fúvókák (20/21) felszerelése (13. ábra)
• Kösse össze a fém hosszabbító csőtoldatot (22) a
szívócső (16) hajlított csővégével.
• Szerelje fel a padló porszívó fejet (20) vagy a réstisztító fejet (21) a fém hosszabbító csőtoldat (22)
másik végére.
• A fém hosszabbító csőtoldat (22) egyedi hosszának
beállításához tolja el előre felé a tolózárat (A). (14. ábra)
• Húzza ki a csövet a megfelelő hosszra (B). Győződjön meg róla, hogy a tolózár bereteszelődött-e.
(14. ábra)
Alsó kábeltartó felszerelése (3+15. ábra)
• Akassza be a kábeltartót (24) a készülék hátoldalán a keréktartó lemezen (7). A felső kábeltartó (13)
a fúvó funkció csatlakozójánál (14) található.
www.scheppach.com / service@scheppach.com / +(49)-08223-4002-99 / +(49)-08223-4002-58
HU | 47
Page 48

8. Kezelés
9. Karbantartás
m FIGYELMEZTETÉS!
Kapcsolja ki a készüléket, ha nedves porszívózás
esetén a távozó levegővel együtt folyadék vagy hab
távozik.
Be- / Kikapcsolás / Automatika (16-17. ábra)
Az ON / OFF-kapcsoló (12) három pozícióba állítható:
1. kapcsolóállás 0: Ki
2. kapcsolóállás II: Be
• Bekapcsoláshoz nyomja meg a be- / kikapcsoló
gombot (12).
• Az elektromos szerszám kikapcsolásához még
egyszer nyomja meg a be/ki kapcsolót (12).
3. kapcsolóállás I: Automatikus üzemmód (A porszí-
vót egy
elektromos szerszám kapcsolja be).
• Az elektromos készülék hálózati csatlakozó kábelét csatlakoztassa az automata csatlakozó aljzatra
(16. ábra).
• A szívó tömlőt csatlakoztassa az elektromos készülék porszívó csatlakozójára. Győződjön meg
róla, hogy a csatlakozás biztos és légmentesen zár.
• Az elszívó rendszer kapcsolóját állítsa „I” = automatikus üzemmód állásba.
Száraz porszívózás (3+9+10. ábra)
Száraz porszívózáshoz használja a redős szűrőt (19).
Kiegészítésként a papír szűrőzsák (18) is használható. Ezáltal a redős szűrő (19) hosszabb ideig marad
pormentes és a szívóteljesítmény tovább biztosított.
Ezenkívül a por ártalmatlanítása is könnyebb.
Minden esetben győződjön meg róla, hogy a szűrők
megfelelően vannak-e beszerelve.
Nedves porszívózás (3 + 8. ábra)
Nedves porszívózáshoz használja a habszivacs szűrőt (17). Győződjön meg róla, hogy a habszivacs szűrő (17) a helyén van-e.
Ha a nemesacél tartály (9) tele van, a biztonsági
úszószelep (15) elzárja a szívónyílást, és a szívás folyamata megszakad.
m FIGYELEM!
A készülék nem alkalmas tűzveszélyes folyadékok felszívására. Nedves porszívózáshoz használja a szállítási terjedelem részét képező habszivacs szűrőt (17).
m FIGYELEM!
Minden egyes beállítás, karbantartás vagy javítás
előtt húzza ki a hálózati csatlakozót!
Tisztítás
Javasoljuk, hogy a készüléket minden használat után
tisztítsa meg. Ne permetezze le vízzel a készüléket,
és ne tisztítsa meg folyó víz alatt! Ez áramütéshez és
sérülésekhez vezethet a készüléken.
Minden egyes használat után tisztítsa ki a nemesacél
tartályt (9): A folyadékok leeresztésére szolgáló csavaros fedél eltávolítása után (8) leeresztheti a felszívott folyadékot. A nemesacél tartályban (9) folyadék
marad vissza. A visszamaradt folyadék eltávolításához vegye le a gépfejet (2) a reteszelő kampó (4) kinyitásával a nemesacél tartályról (9). A visszamaradt
folyadékot öntse ki! Enyhén benedvesített kendővel
tisztítsa meg a tartályt.
• Ha a papír szűrőzsák megtelt, cserélje ki azt.
• Mindig tartsa tisztán a készüléket. Ne használjon
tisztító- és oldószereket.
• A szellőzőréseket mindig száraz, tiszta, valamint
portól mentes állapotban kell tartani.
• A készüléket csak puha kefével vagy egy enyhén
benedvesített kendővel tisztítsa meg.
• Kenőszappannal tisztítsa meg a hibaszivacs szűrőt
(16) folyó víz alatt, majd hagyja a levegőn megszáradni.
Karbantartás
A készülék nem igényel karbantartást.
Szervíz-információk
Figyelembe kell venni, hogy ennél a terméknél a következő részek már használat szerinti vagy természetes kopásnak vannak alávetve ill. a következő részekre van mint fogyóeszközökre szükség.
Gyorsan kopó részek*: Habszivacs szűrő, Papír szűrőzsák, Redős szűrő
* nincs okvetlenül a szállítás terjedelmében!
Vízleeresztő csavar (8) (18. ábra)
Nedves porszívózáskor a nemesacél tartály (9) egyszerűbb kiürítéséhez az egy vízleeresztő csavarral
(8) van felszerelve. A vízleeresztő csavart (8) balra
elfordítva nyissa ki azt, majd engedje le a folyadékot.
48 | HU
www.scheppach.com / service@scheppach.com / +(49)-08223-4002-99 / +(49)-08223-4002-58
Page 49

10. Tárolás
A készüléket és tartozékait sötét, száraz és fagymentes helyen, gyermekektől elzárva tárolja. Az optimális
tárolási hőmérséklet 5 és 30˚C között van. Az elektromos szerszámot az eredeti csomagolásában őrizze.
Takarja le az elektromos szerszámot, ezzel védve
portól és nedvességtől.
A kezelési útmutatót az elektromos szerszámmal
együtt őrizze meg.
• Tekerje a csatlakozó vezetéket (3) a felső kábeltartó (13) köré a fúvó funkció csatlakozón (14), illetve
az alsó kábeltartó (24) köré. (19. ábra)
• A gépfej (2) felülső oldalán négy darab mélyedés található, amelyekre a padló porszívófej (20) és a réstisztító fej (21) tárolás céljából rögzíthető. A görgőtartó lemezen (5) mélyedések találhatók, amelyekre a
fém hosszabbító (22) csőtoldat rögzíthető. (. ábra)
• A további tartozékokat a nemesacél tartályban (9)
tárolhatja.
11. Elektromos csatlakoztatás
A telepített elektromos motor üzemkészen csatlakozik. A csatlakozás megfelel a vonatkozó VDE és DIN
rendelkezéseknek.
A vásárló által használt hálózati csatlakozó, valamint az általa használt hosszabbító vezeték is feleljen meg ezeknek az előírásoknak.
Sérült elektromos csatlakozóvezetékek
Az elektromos csatlakozóvezetékek szigetelése
gyakran megsérül.
Ennek oka lehet:
• Nyomási helyek, ha a csatlakozóvezetéket ablakvagy ajtóréseken keresztül vezeti.
• Törési helyek a csatlakozóvezetékek szakszerűtlen rögzítése vagy vezetése miatt.
• Vágási helyek a csatlakozóvezetéken való áthajtás miatt.
• Szigetelés sérülése a fali csatlakozóaljzatból való
kiszakítás miatt.
• Repedések a szigetelés öregedése miatt.
Ne használjon ilyen sérült elektromos csatlakozóvezetékeket, mivel használatuk a szigetelés sérülése
miatt életveszélyes.
Rendszeresen ellenőrizze, hogy nem sérültek-e az
elektromos csatlakozóvezetékek. Ügyeljen arra, hogy
ellenőrzéskor a vezeték ne csatlakozzon a hálózatra.
Az elektromos csatlakozóvezetékek feleljenek meg
a vonatkozó VDE és DIN rendelkezéseknek. Csak
H05VV-F jelölésű csatlakozóvezetékeket használjon.
A csatlakozóvezeték típusának megnevezését a vezetéken fel kell tüntetni.
Váltóáramú motor
• A hálózati feszültség 230 V~ legyen
• A 25 méternél rövidebb hosszabbító vezetékek ke-
resztmetszete 1,5 négyzetmilliméter legyen.
Az elektromos berendezések csatlakoztatását és javítását csak villamossági szakember végezheti.
12. Megsemmisítés és újrahasznosítás
A szállítási károk megakadályozásához a készülék egy csomagolásban található. Ez a csomagolás nyersanyag és ezáltal ismét felhasználható vagy
pedig visszavezethető a nyersanyagi körforgáshoz.
A készülék és annak a tartozékai különböző anyagokból állnak, mint például fémből és műanyagokból.
Vigye a károsult alkatrészeket a különhulladék megsemmisítési helyhez. Érdeklődjön utánna a szaküzletben vagy a községi közigazgatásnál!
Ne dobja a használt berendezéseket a háztartási
hulladékba!
Ez a szimbólum arra hívja fel a gyelmet,
hogy a terméket az elektromos és elektronikus berendezések hulladékairól szóló irányelv
(2012/19/EU) és a nemzeti tör vények ér telmében nem szabad a háztartási hulladékba dobni. Ezt
a terméket egy erre alkalmas gyűjtőhelyen kell leadni. Ez történhet például egy hasonló termék vásárlásakor történő visszaadással vagy az elektromos
és elektronikus berendezések hulladékait újrahasznosító hivatalos gyűjtőhelyen történő leadással. A
használt berendezések szakszerűtlen kezelése a
használt elektromos és elektronikai berendezésekben gyakran megtalálható potenciálisan veszélyes
anyagok miatt negatív hatással lehet a környezetre
és az emberek egészségére. Ezen termék szakszerű ártalmatlanításával ráadásul a természeti erőforrások hatékony használatához is hozzájárul. A használt berendezések gyűjtőhelyeivel kapcsolatban a
városvezetésnél, a helyi közterület-fenntartónál, az
elektromos és elektronikus berendezések hivatalos
gyűjtőhelyén vagy a hulladékszállító vállalatnál érdeklődhet.
www.scheppach.com / service@scheppach.com / +(49)-08223-4002-99 / +(49)-08223-4002-58
HU | 49
Page 50

13. Hibaelhárítás
Üzemzavar Lehetséges ok Megoldás
A motor nem
működik
Csökkent
szívóteljesítmény
Ellenőrizze, hogy be van-e dugva a
hálózati csatlakozódugó.
Ellenőrizze, hogy kap-e áramot a
csatlakozóaljzat.
Ellenőrizze, hogy megnyomta-e a
porszívó be-/kikapcsoló gombját.
Elzáródott a kefe? Kapcsolja ki a porszívót az elzáródás
A porzsák megtelt porral? Vegye ki a porzsákot, és ürítse ki.
A szűrő megtelt porral? Vegye ki a szűrőt, és ürítse ki.
Ha nincs, dugja be a hálózati csatlakozódugót a
csatlakozóaljzatba.
Ha nem, hívjon villanyszerelőt.
Ha nem, nyomja meg.
megszüntetéséhez.
50 | HU
www.scheppach.com / service@scheppach.com / +(49)-08223-4002-99 / +(49)-08223-4002-58
Page 51

Vysvetlenie symbolov na prístroji
Pozor! Nebezpečenstvo ohrozenia života, riziko zranenia alebo poškodenia náradia v prípade nedodržania pokynov!
m
Pred uvedením do prevádzky si prečítajte návod na obsluhu a bezpečnostné upozornenia a
dodržiavajte ich!
www.scheppach.com / service@scheppach.com / +(49)-08223-4002-99 / +(49)-08223-4002-58
SK | 51
Page 52

Obsah: Strana:
1. Úvod 53
2. Popis prístroja 53
3. Rozsah doručenia 53
4. Správne použitie prístroja 54
5. Bezpečnostné pokyny 54
6. Technické údaje 55
7. Montáž 55
8. Obsluha 56
9. Údržba 56
10. Skladovanie 56
11. Elektrická prípojka 57
12. Likvidácia a recyklácia 57
13. Odstraňovanie porúch 58
52 | SK
www.scheppach.com / service@scheppach.com / +(49)-08223-4002-99 / +(49)-08223-4002-58
Page 53

1. Úvod
Výrobca:
scheppach
Fabrikation von Holzbearbeitungsmaschinen GmbH
Günzburger Straße 69
D-89335 Ichenhausen
Vážený zákazník,
Želáme Vám veľa zábavy a úspechov pri práci s Vaším novým prístrojom.
Poznámka,
V súlade s platnými zákonmi, ktoré sa týkajú zodpovednosti za výrobok, výrobca zariadenia nepreberá
zodpovednosť za poškodenia výrobku alebo za škody spôsobené výrobkom, ku ktorým došlo z nasledujúcich dôvodov:
• nesprávnej manipulácie,
• nedodržania pokynov na obsluhu,
• opravy vykonanej treťou stranou, opravy nevyko-
nanej v autorizovanom servise,
• montáže neoriginálnych dielcov alebo použitia neoriginálnych dielcov pri výmene,
• iného než špecikované použitia,
• poruchy elektrického systému, ktorá bola spôso-
bená nedodržaním elektrických predpisov a predpisov VDE 0100, DIN 57113, VDE0113.
Odporúčame:
Pred montážou a obsluhou tohto zariadenia si prečítajte kompletný text v návode na obsluhu. Pokyny na
obsluhu sú určené na to, aby sa používateľ oboznámil s týmto zariadením a aby pri jeho použití využil
všetky jeho možnosti v súlade s uvedenými odporučeniami. Tento návod na obsluhu obsahuje
dôležité informácie o tom, ako vykonávať bezpečnú, profesionálnu a hospodárnu obsluhu stroja, ako
zabrániť rizikám, ako ušetriť náklady na opravy, ako
skrátiť časy prestojov a ako zvýšiť spoľahlivosť a predĺžiť prevádzkovú životnosť stroja. Okrem bezpečnostných predpisov uvedených v návode na obsluhu
musíte dodržiavať tiež platné predpisy, týkajúce sa
prevádzky stroja vo vašej krajine.
Uchovávajte návod na obsluhu stále v blízkosti stroja a uložte ho do plastového obalu, aby bol chránený pred nečistotami a vlhkosťou. Prečítajte si návod
na obsluhu pred každým použitím stroja a dôkladne
dodržiavajte v ňom uvedené informácie. Stroj môžu
obsluhovať iba osoby, ktoré boli riadne preškolené v
jeho obsluhe a ktoré boli riadne informované o rizikách spojených s jeho obsluhou. Pri obsluhe stroja
musí byť splnený stanovený minimálny vek.
Popri bezpečnostných pokynoch a upozorneniach
obsiahnutých v tomto návode na obsluhu a zvláštnych predpisoch vašej krajiny je nutné dodržiavať
všeobecne uznávané technické predpisy pre prevádzku.
Nepreberáme ručenie za žiadne nehody alebo škody, ktoré vznikli nedodržaním tohto návodu a bezpečnostných upozornení.
2. Popis prístroja (obr. 1)
1. Rukoväť
2. Hlava stroja
3. Prípojné vedenie
4. Blokovací háčik
5. Upnutie valčeka (4x)
6. Vodiace kladky (4x)
7. Upínacia doska pre kolieska
8. Závitový uzáver pre vypúšťanie kvapalín
9. Nádoba z ušľachtilej ocele
10. Hadicová prípojka na odsávanie
11. Zásuvka s automatikou zapnutia
12. Zapínač/vypínač
13. Horný držiak kábla
14. Prípojka pre funkciu vyfukovania
15. Filtračný kôš s bezpečnostným plavákovým ven-
tilom
16. 3 m odsávacej hadice
17. Filter na penu
18. Papierové ltračné vrecko
19. Skladaný lter
20. Podlahová hubica
21. Štrbinová hubica
22. Kovová predlžovacia rúra
23. Skrutka (6x)
24. Spodný držiak kábla
3. Rozsah doručenia
• Otvorte obal a opatrne vyberte prístroj.
• Odstráňte obalový materiál, ako aj obalové a pre-
pravné poistky (ak sú použité).
• Skontrolujte, či je rozsah dodávky kompletný.
• Prístroj a diely príslušenstva skontrolujte ohľadom
poškodení spôsobených prepravou.
• Obal podľa možnosti uschovajte až do uplynutia
záručnej doby.
m POZOR!
Prístroj a obalové materiály nie sú hračkami pre deti! Deti sa nesmú hrať s plastovými vreckami, fóliami
ani drobnými súčiastkami! Vzniká nebezpečenstvo
prehltnutia a udusenia!
30 l mokro/suchý vysávač (1x)
3 m odsávacej hadice (1x)
Filter na penu (1x)
Papierové ltračné vrecko (1x)
Skladaný lter na suché vysávanie (1x)
Upnutie valčeka (4x)
www.scheppach.com / service@scheppach.com / +(49)-08223-4002-99 / +(49)-08223-4002-58
SK | 53
Page 54

Valčeky (4x)
Rukoväť (1x)
Skrutka (6x)
Podlahová hubica (1x)
Štrbinová hubica (1x)
Predlžovacia rúra z kovu (1x)
Držiak kábla (1x)
Návod na obsluhu (1x)
4. Správne použitie prístroja
Morko-suchý vysávač je určený na vysávanie za
mokra a za sucha pri použití príslušného ltra. Prístroj nie je vhodný na vysávanie horľavých, explozívnych ani zdraviu škodlivých látok.
Prístroj smie byť použitý len na ten účel, na ktorý bol
určený. Každé iné odlišné použitie sa považuje za nespĺňajúce účel použitia. Za škody alebo zranenia akéhokoľvek druhu spôsobené nesprávnym používaním
ručí používateľ / obsluhujúca osoba, nie však výrobca.
Prosím berte ohľad na skutočnosť, že naše prístroje neboli
svojim určením konštruované na profesionálne, remeselnícke ani priemyselné použitie. Nepreberáme žiadne záručné ručenie, ak sa prístroj bude používať v profesionálnych, remeselníckych alebo priemyselných prevádzkach
ako aj na činnosti rovnocenné s takýmto použitím.
5. Bezpečnostné pokyny
m NEBEZPEČENSTVO!
• Zariadenie pripájajte iba na striedavý prúd. Na-
pätie musí zodpovedať údajom na typovom štítku
zariadenia.
• Nikdy sa nedotýkajte sieťovej zásuvky a vidlice
vlhkými rukami.
• Sieťovú zástrčku neťahajte zo zásuvky za sieťový kábel.
• Pred každým použitím skontrolujte, či nie je poškodený prívodný kábel alebo sieťová vidlica. Poškodený prívodný kábel dajte bezodkladne vymeniť
autorizovanej servisnej službe alebo kvalikovanému elektrotechnikovi.
• Na predchádzanie úrazom spôsobeným elektrickým prúdom odporúčame používať sieťové zásuvky s predradeným ochranným ističom proti zvodovým prúdom (menovitý spínací prúd max. 30 mA).
• Pred každým ošetrením a údržbou zariadenie vypnite a vytiahnite zástrčku.
• Opravy a práce na elektrických konštrukčných
dielcoch môže vykonávať výhradne autorizovaná
servisná služba.
m VÝSTRAHA!
• Tento prístroj nie je určený nato, aby ho používa-
li osoby s obmedzenými fyzickými, senzorickými
alebo duševnými schopnosťami alebo nedostatkom skúseností a/alebo nedostatočnými vedomosťami, môžu ho použiť iba v tom prípade, ak sú kvôli
vlastnej bezpečnosti pod dozorom spoľahlivej osoby alebo od nej dostali pokyny, ako sa má prístroj
používať a pochopili nebezpečenstvá vychádzajúce z prístroja.
• Deti môžu používať prístroj iba vtedy, ak sú staršie
než 8 rokov a ak sú kvôli vlastnej bezpečnosti pod
dozorom spoľahlivej osoby, alebo od nej dostali
pokyny, ako sa má prístroj používať, a pochopili
nebezpečenstvá vychádzajúce z prístroja.
• Deti sa nesmú hrať s prístrojom.
• Deti by mali byť pod dozorom, aby sa zabezpečilo,
že sa s prístrojom nebudú hrať.
• Deti nemôžu vykonávať čistenie a užívateľskú
údržbu bez dohľadu dospelej osoby.
• Obalové fólie uchovávajte mimo dosahu detí. Vzniká nebezpečenstvo udusenia!
• Prístroj po každom použití a pred každým čistením
alebo údržbou vypnite.
• Nebezpečie vzniku požiaru. Nevysávajte horiace
alebo tlejúce predmety.
• Používanie v priestoroch so zvýšením nebezpečenstvom výbuchu je zakázané.
• Pri vytváraní peny alebo vytekaní kvapaliny zariadenie okamžite vypnite alebo vytiahnite zástrčku
elektrickej siete!
• Nepoužívajte žiadne abrazívne pôsobiace prípravky, prípravky na sklo ani univerzálne čističe! Spotrebič nikdy neponárajte do vody.
Určité látky môžu v dôsledku rozvírenia nasávaného
vzduchu vytvoriť výbušné pary alebo zmesi! Nikdy
nevysávajte nasledovné látky:
• Výbušné alebo horľavé plyny, kvapaliny a prach
(reaktívny prach)
• Reaktívny kovový prach (naopr. hliník, magnézium,
zinok) v spojení so silne alkalickými a kyslými čistiacimi prostriedkami
• Neriedené silné kyseliny a lúhy
• Organické rozpúšťadlá (napr. benzín, riedidlo na
farbu, acetón, vykurovací olej).
Tieto látky môžu dodatočne naleptať materiály použité vo vysávači.
m VAROVANIE!
Tento elektrický prístroj vytvára počas prevádzky
elektromagnetické pole. Toto pole môže za určitých
okolností ovplyvniť aktívne alebo pasívne implantáty.
Na zníženie nebezpečenstva závažných alebo smrteľných poranení odporúčame osobám s implantátmi
prekonzultovať situáciu so svojím lekárom a výrobcom implantátu ešte predtým, ako začnú obsluhovať
elektrický prístroj.
54 | SK
www.scheppach.com / service@scheppach.com / +(49)-08223-4002-99 / +(49)-08223-4002-58
Page 55

6. Technické údaje
Sieťové napätie 220-240V~ 50/60Hz
Výkon 1400W
Maximálny výkon prístro-
jovej zásuvky
Celkový výkon 3400W
Kapacita nádržky na vodu 30L
Odsávací výkon 20 Kpa
Druh krytia IPX4
Trieda ochrany I
2000W
Montáž skladaného ltra (19) (obr. 3+9)
Na suché vysávanie posuňte skladaný lter
(19) na ltračný kôš s bezpečnostným plavákovým
ventilom (15). Skladaný lter (19) je vhodný iba na suché vysávanie!
Montáž papierového ltračného vrecka (18) (obr. 3+10)
Na vysávanie jemnej, suchej nečistoty sa odporúča,
použiť dodatočne papierové ltračné vrecko (18).
• Papierové ltračné vrecko (18) posuňte nad odsávací otvor v nádobe z ušľachtilej ocele (9). Papierové ltračné vrecko (18) je vhodné iba na suché
vysávanie. Papierové ltračné vrecko (18) uľahčuje
odstráňovanie vysávaného prachu.
7. Montáž
m POZOR! Pred použitím zaistite, aby bol prístroj
správne a úplne namontovaný.
Vybalenie (obr. 1+2+3)
1 Odblokujte blokovací háčik (4) a odstráňte hlavu
stroja (2). Príslušenstvo sa nachádza v nádobe
s ušľachtilou oceľou (9). Iba kovová predlžovacia
rúra (22) sa nachádza v balení mimo nádoby s
ušľachtilou oceľou (9). Odstráňte celé príslušenstvo z nádoby z ušľachtilej ocele (9).
Montáž upnutí valčekov (5) (obr. 4+5)
• Nádobu z ušľachtilej ocele (9) postavte na hlavu
(hlava stroja (2) sa musí odstrániť).
• Upnutia valčekov (5) posuňte do určených vybraní
na upínacej doske pre kolieska (7). (4x)
• Upnutia valčekov (5) upevnite pomocou skrutkovača (nie je súčasťou dodávky) vždy jednou skrutkou
(23). (4x)
Montáž valčekov (6) (obr. 6)
• Štyri vodiace kladky (6) zatlačte do otvorov uchopení koliesok (5).
Montáž hlavy stroja (2) a rukoväte (1) (obr. 7)
• Hlavu stroja (2) nasaďte na nádobu z ušľachtilej
ocele (9). Hlavu stroja (2) zaistite blokovacími háčikmi (4). Pri montáži hlavy stroja (2) dbajte na to,
aby blokovacie háčiky (4) správne zaklapli.
• Rukoväť (1) nasaďte na hlavu stroja (2) a upevnite túto dvomi skrutkami (23) pomocou skrutkovača
(nie je súčasťou dodávky).
Montáž odsávacej hadice (16) (obr. 3+11+12)
Odsávaciu hadicu (16) napojte na príslušnú prípojku,
v závislosti od požadovaného použitia na mokro-suchý vysávač.
Vysávanie prachu:
Odsávaciu hadicu (16) napojte na hadicovú prípojku na
odsávanie (10). Na to posuňte koniec odsávacej hadice
(16) s obomi vsuvkami do prípojky na odsávanie (10) (A).
Obe vsuvky vložte do priehlbín. V koncovej polohe otočte
odsávaciu hadicu v smere hodinových ručičiek (B).
Vyfukovanie:
Odsávaciu hadicu (16) napojte na prípojku s funkciou
vyfukovania (14). Posuňte koniec odsávacej hadice
(16) s obomi vsuvkami do prípojky s funkciou vyfukovania (14). Obe vsuvky vložte do priehlbín. Zatočenie
tu nie je potrebné
Montáž kovovej predlžovacej rúry (22), odsávacej
hadice (16) a hubíc (20/21) (obr. 13)
• Spojte kovovú predlžovaciu rúru (22) so zakriveným koncom odsávacej hadice (16).
• Podlahovú hubicu (20) alebo štrbinovú hubicu (21) namontujte na druhý koniec kovovej predlžovacej rúry (22).
• Pre nastavenie individuálnej dĺžky kovovej predlžovacej
rúry (22) posuňte posúvač smerom vpred (A). (obr. 14)
• Rúru potiahnite na príslušnú dĺžku (B). Zabezpečte,
aby posuvný regulátor zaklapol. (obr. 14)
Montáž spodného držiaka kábla (obr. 3+15)
Spodný držiak kábla (24) zaveste na zadnej strane
prístroja na upínacej doske pre kolieska. Horný držiak kábla (13) sa nachádza na prípojke pre funkciu
vyfukovania (14).
Montáž ltra na penu (17) (obr. 3+8)
Prístroj nikdy nepoužívajte bez ltra! Vždy zabezpečte, aby boli ltre správne namontované.
• Montáž ltra na penu (17): Na mokré vysávanie posuňte dodaný lter na penu (17) nad ltračný kôš s
bezpečnostným plavákovým ventilom (15).
www.scheppach.com / service@scheppach.com / +(49)-08223-4002-99 / +(49)-08223-4002-58
SK | 55
Page 56

8. Obsluha
9. Údržba
m VAROVANIE!
Prístroj vypnite, ak pri mokrom vysávaní s odpadovým vzduchom vyteká kvapalina alebo pena.
Zapnutie/vypnutie/automatika (obr. 16-17)
Spínač ON/OFF (12) má tri nastavenia:
1 Poloha spínača 0: Vyp.
2 Poloha spínača II: Zap.
• Na zapnutie stlačte zapínač/vypínač (12).
• Opätovne stlačte zapínač/vypínač (12), aby ste prí-
stroj vypli.
3 Poloha spínača I: Automatická prevádzka (vysávač
sa zapne prostredníctvom
elektrického prístroja).
• Zapojte sieťový kábel vášho elektrického prístroja
do automatickej zásuvky (obr. 16).
• Odsávaciu hadicu napojte na prípojku odsávania
prachu vášho elektrického prístroja. Skontrolujte,
aby bolo spojenie bezpečné a vzduchotesné.
• Spínač na systéme odsávania prepnite na polohu
„I“ = automatická prevádzka.
Suché odsávanie (obr. 3+9+10)
Na suché odsávanie použite skladaný lter (19). Dodatočne sa môže použiť papierové ltračné vrecko
(18). Tým zostane skladaný lter (19) dlhšie bez prachu a sací výkon sa udrží dlhšie. Okrem toho sa uľah čí likvidácia prachu. Vždy zabezpečte, aby boli ltre
správne namontované.
Mokré vysávanie (obr. 3 + 8)
Na mokré vysávanie použite lter na penu (17). Zabezpečte, aby bol lter na penu (17) správne namontovaný.
Ak je nádoba z ušľachtilej ocele (9) plná, uzatvorí
bezpečnostný plavákový ventil (15) odsávací otvor a
vysávanie sa preruší.
m POZOR!
Prístroj nie je vhodný na vysávanie horľavých kvapalín. Na mokré vysávanie používajte iba dodaný lter
na penu (17).
m VAROVANIE!
Pred každým nastavením, údržbou alebo opravou vytiahnite sieťovú zástrčku!
Čistenie
Prístroj sa odporúča vyčistiť po každom použití. Prístroj nezmývajte vodou alebo nečistite pod tečúcou
vodou. To by mohlo viesť k úderom elektrickým prúdom a to by mohlo poškodiť prístroj.
Nádobu z ušľachtilej ocele (9) čistite po každej prevádzke: Po otvorení závitového uzáveru na vypustenie kvapaliny (8) sa môže zachytená kvapalina vypustiť. V nádobe z ušľachtilej ocele (9) zostane zvyšok
kvapaliny. Na odstránenie zvyškovej kvapaliny odoberte hlavu stoja (2) otvorením blokovacieho háčika
(4) z nádoby z ušľachtilej ocele (9). Tekutý zvyšok
vylejte. Nádobu vyčistite mierne navlhčenou handrou.
• Plné papierové ltračné vrecko nahraďte.
• Prístroj udržiavajte vždy čistý. Nepoužívajte žiadne
čistiace prostriedky alebo rozpúšťadlá.
• Vetracie štrbiny udržiavajte vždy čisté a bez nečistôt a prachu.
• Prístroj čistite iba mäkkou kefkou alebo mierne
navlhčenou handrou.
• Filter na penu (17) vyčistite trochou mazľavého
mydla pod tečúcou vodou a nechajte ho vysušiť na
vzduchu.
Údržba
Prístroj je bezúdržbový.
Servisné informácie
Je potrebné dbať na to, že v prípade tohto výrobku
podliehajú nasledujúce diely bežnému pracovnému
alebo prirodzenému opotrebeniu, resp. sú nasledujúce diely považované za spotrebný materiál.
Diely podliehajúce opotrebeniu*: Filter na penu, Papierové ltračné vrecko, Skladaný lter
* nie je bezpodmienečne obsiahnuté v objeme dodávky!
Vypúšťacia skrutka pre vodu (8) (obr. 18)
Na jednoduchšie vyprázdnenie nádoby z ušľachtilej
ocele (9) pri mokrom vysávaní je tento vybavený vypúšťacou skrutkou pre vodu (8). Vypúšťaciu skrutku
pre vodu (8) otvorte otočením doľava a vypustite kvapalinu.
56 | SK
www.scheppach.com / service@scheppach.com / +(49)-08223-4002-99 / +(49)-08223-4002-58
10. Skladovanie
Skladujte prístroj a jeho príslušenstvo na tmavom, suchom a nezamŕzajúcom mieste mimo dosahu detí. Optimálna teplota pre skladovanie je medzi 5 až 30 °C.
Skladujte tento elektrický prístroj v originálnom balení.
Elektrický prístroj zakryte, aby ste ho chránili pred
prachom alebo vlhkosťou.
Návod na obsluhu skladujte pri elektrickom prístroji.
• Prípojné vedenie naviňte (3) okolo horného držiaka
kábla (13) na prípojku pre funkciu vyfukovania (14)
a spodný držiak kábla (24). (obr. 19)
Page 57

• Na hornej strane hlavy stroja (2) sa nachádzajú štyri priehlbiny, do ktorých sa môžu z dôvodu uskladnenia umiestniť podlahová hubica (20) a štrbinová
hubica (21). Na upnutiach valčekov (5) sa nachádzajú priehlbiny, do ktorých sa môže umiestniť kovová predlžovacia rúra (22). (obr. 20)
• Zvyšné príslušenstvo môžete uchovávať v nádobe
z ušľachtilej ocele (9).
11. Elektrická prípojka
12. Likvidácia a recyklácia
Prístroj sa nachádza v obale za účelom zabránenia
poškodeniu pri transporte. Tento obal je vyrobený
zo suroviny a tým pádom je ho možné znovu použiť
alebo sa môže dať do zberu na recykláciu surovín.
Prístroj a jeho príslušenstvo sa skladajú z rôznych
materiálov, ako sú napr. kovy a plasty. Poškodené
súčiastky odovzdajte na vhodnú likvidáciu špeciálneho odpadu. Informujte sa v odbornej predajni alebo
na miestnych úradoch!
Nainštalovaný elektromotor je pripojený a pripravený na prevádzku. Pripojenie zodpovedá príslušným
ustanoveniam VDE a DIN.
Sieťová prípojka na strane zákazníka, ako aj predlžovacie vedenie musia zodpovedať týmto predpisom.
Poškodené elektrické prípojné vedenie
Na elektrických prípojných vedeniach často vznikajú
škody na izolácii.
Príčinami môžu byť:
• Stlačené miesta, keď sa prípojné vedenia vedú cez
okno alebo medzeru medzi dverami.
• Zalomené miesta v dôsledku neodborného upevnenia alebo vedenia prípojného vedenia.
• Rozrezané miesta vzniknuté pri prejazde cez prípojné vedenie.
• Škody na izolácii pri vytrhnutí zo zásuvky v stene.
• Trhliny pri zostarnutí izolácie.
Takéto poškodené elektrické prípojné vedenia sa
nesmú používať a z dôvodu poškodenia izolácie sú
životunebezpečné.
Elektrické prípojné vedenia pravidelne kontrolujte ohľadne poškodení. Dávajte pozor na to, aby pri
kontrole prípojného vedenia nebolo toto pripojené k
elektrickej sieti.
Elektrické prípojné vedenia musia zodpovedať príslušným ustanoveniam VDE a DIN. Používajte iba
prípojné vedenia s označením H 07 RN.
Vytlačenie označenia typu na prípojnom kábli je
predpis.
Staré zariadenia nevyhadzujte do domového odpadu!
Tento symbol upozorňuje na to, že tento výrobok sa musí zlikvidovať podľa smernice o
odpade z elektrických a elektronických zaria-
dení (2012/19/EÚ) a nesmie sa zlikvidovať s
domovým odpadom. Tento výrobok sa musí odovzdať na to určenému zbernému stredisku. K tomu
môže dôjsť napríklad vrátením pri nákupe podobného výrobku alebo odovzdaním autorizovanému zbernému stredisku na recykláciu odpadu z elektrických
a elektronických zariadení. Neodborné zaobchádzanie so starými zariadeniami môže mať v dôsledku
potenciálne nebezpečných látok, ktoré obsahuje odpad z elektrických a elektronických zariadení, negatívny vplyv na životné prostredie a zdravie osôb. Odbornou likvidáciou tohto výrobku navyše prispievate
k efektívnemu využívaniu prírodných zdrojov. Informácie o zberných strediskách pre staré zariadenia
získate od vašej miestnej správy, verejnoprávnej inštitúcie zaoberajúcej sa likvidáciou odpadu, autorizovaného úradu pre likvidáciu odpadu z elektrických
a elektronických zariadení alebo od vášho odvozu
odpadkov.
Motor na striedavý prúd
• Sieťové napätie musí predstavovať 230 V~.
• Predlžovacie vedenia do dĺžky 25 m musia vyka-
zovať priemer 1,5 mm².
Prípojky a opravy elektrickej výbavy smie vykonávať
iba vyučený elektrikár.
www.scheppach.com / service@scheppach.com / +(49)-08223-4002-99 / +(49)-08223-4002-58
SK | 57
Page 58

13. Odstraňovanie porúch
Porucha Možná príčina Náprava
Motor nebeží
Znížený sací výkon
Skontrolujte, či je sieťová zástrčka
zasunutá?
Skontrolujte, či je v zásuvke prúd? Zavolajte elektrikára.
Skontrolujte, či je zapnutý zapínač/
vypínač vysávača?
Kefa je blokovaná? Pre odstránenie blokovania vypnite vysávač.
Vrecko na prach je plné prachu? Demontujte a vyprázdnite vrecko na prach.
Filter je plný prachu? Demontujte a vyprázdnite lter.
Znovu zasuňte sieťovú zástrčku do zásuvky.
Zapnite zapínač/vypínač.
58 | SK
www.scheppach.com / service@scheppach.com / +(49)-08223-4002-99 / +(49)-08223-4002-58
Page 59

Verklaring van de symbolen op het toestel
Waarschuwing! Bij het niet in acht nemen, bestaat levensgevaar, gevaar op letsel of beschadiging aan het werktuig!
m
Lees voorafgaand aan de inbedrijfstelling de gebruikshandleiding en de veiligheidsvoorschriften!
www.scheppach.com / service@scheppach.com / +(49)-08223-4002-99 / +(49)-08223-4002-58
NL | 59
Page 60

Inhoudsopgave: Pagina:
1. Inleiding 61
2. Beschrijving van het toestel 61
3. Inhoud van de levering 61
4. Doelmatig gebruik 62
5. Veiligheidsvoorschriften 62
6. Technische gegevens 63
7. Montage 63
8. Bediening 64
9. Onderhoud 64
10. Opslag 65
11. Elektrische aansluiting 65
12. Afvalverwijdering en recyclage 65
13. Foutenherstel 66
60 | NL
www.scheppach.com / service@scheppach.com / +(49)-08223-4002-99 / +(49)-08223-4002-58
Page 61

1. Inleiding
Fabrikant:
scheppach
Fabrikation von Holzbearbeitungsmaschinen GmbH
Günzburger Straße 69
D-89335 Ichenhausen
Wij kunnen niet aansprakelijk worden gesteld voor
ongevallen of schade, veroorzaakt door niet-naleving
van deze handleiding en de veiligheidsvoorschriften.
2. Beschrijving van het toestel
(Afb. 1)
Geachte klant,
Wij wensen u veel plezier en succes bij het werken
met uw nieuwe apparaat.
Advies:
Volgens de van toepassing zijnde wet voor productaansprakelijkheid is de producent van dit apparaat
niet aansprakelijk voor schade die ontstaat door of
door middel van dit apparaat in geval van:
• Onjuist gebruik,
• Niet-naleving van de gebruiksinstructies,
• Reparaties door derden, niet-erkende getrainde
werklui,
• Installatie en vervanging van niet-originele reser-
veonderdelen,
• Ongepast gebruik, falen van het elektronisch sys-
teem ten gevolge van niet-naleving van de elek-
trische specicaties en de VDE 0100, DIN 57113 /
VDE 0113 voorschriften.
Aanbevelingen:
Lees de volledige handleiding voor de montage en
besturing van het apparaat. Deze handleiding is bedoeld om het gebruik van het apparaat gemakkelijker
te maken voor u en om vertrouwd te geraken met het
gebruik van het apparaat. De handleiding bevat belangrijke nota’s over hoe veilig, goed en economisch
gebruik te maken van uw apparaat, en over hoe u
gevaar kan vermijden, reparatiekosten kann besparen, downtime kan verminderen en de betrouwbaarheid en levensduur van uw apparaat kan vergroten.
Bovenop de veiligheidsvoorschriften in deze handleiding, moet u ook voldoen aan de geldende voorschriften van uw land in verband met het gebruik
van het apparaat. Plaats de gebruiksaanwijzing in
een doorzichtig plastic map om deze te beschermen
tegen vuil en vocht, en bewaar ze in de nabijheid
van het apparaat. De instructies moeten gelezen
en nauw gevolgd worden door iedereen vooraleer
het apparaat te gebruiken. Enkel getrainde personen die op de hoogte gebracht zijn van de mogelijke
gevaren en risico’s mogen het apparaat gebruiken.
De vereiste minimumleeftijd moet worden voldaan.
Als aanvulling op de veiligheidsvoorschriften in deze handleiding en de speciale voorschriften van uw
land, moeten ook de algemeen erkende technische
regels voor het gebruik van houtverwerkende apparaten in acht genomen worden.
1. Handgreep
2. Machinekop
3. Snoer
4. Vergrendelingshaken
5. Wielopname (4x)
6. Zwenkwielen (4x)
7. Wielopnameplaat
8. Schroefdeksel voor het aftappen van vloeistoen
9. Stalen reservoir
10. Afzuigslangaansluiting
11. Stopcontact met inschakelautomatisme
12. Aan/uit-schakelaar
13. Bovenste kabelhouder
14. Aansluiting blaasfunctie
15. Filterkorf met veiligheidsvlotterklep
16. 3 m afzuigslang
17. Schuimstof lter
18. Papieren lterzak
19. Vouwlter
20. Grondsproeier
21. Voegensproeier
22. Metalen verlengbuis
23. Schroef (6x)
24. Onderste kabelhouder
3. Inhoud van de levering
• Open de verpakking en haal het apparaat er voor
- zichtig uit.
• Verwijder het verpakkingsmateriaal evenals de verpakkings- en transportbeveiligingen (indien voorhanden).
• Controleer of de inhoud van de levering volledig is.
• Controleer het apparaat en de hulpstukken op
transportschade.
• Bewaar de verpakking indien mogelijk tot na het
verstrijken van de garantietijd.
m LET OP!
Het apparaat en de verpakkingsmaterialen zijn
geen kinderspeelgoed! Kinderen mogen niet met
kunststof zakken, folies en kleine onderdelen spelen!
Er bestaat gevaar voor inslikken en verstikkingsgevaar!
30L nat-/droogzuiger (1x)
3 m afzuigslang (1x)
Schuimstof lter (1x)
Papieren lterzak (1x)
Vouwlter voor droogzuigen (1x)
www.scheppach.com / service@scheppach.com / +(49)-08223-4002-99 / +(49)-08223-4002-58
NL | 61
Page 62

Wielopname (4x)
Wielen (4x)
Handgreep (1x)
Schroef (6x)
Grondsproeier (1x)
Voegensproeier (1x)
Verlengbuis uit metaal (1x)
Kabelhouder (1x)
Gebruikshandleiding (1x)
4. Doelmatig gebruik
De nat-droogzuiger is geschikt voor het nat- en
droogzuigen met gebruik van het overeenkomstige
lter. Het apparaat is niet bedoeld voor het opzuigen
van brandbare, explosieve of gezondheidsschadelijke stoen.
De machine mag uitsluitend voor het voorgeschreven
doel worden gebruikt. Elk ander of verdergaand gebruik is niet volgens de voorschriften. De gebruiker/
bediener en niet de fabrikant is aansprakelijk voor ontstane schade of elke vorm van letsel.
Let erop dat onze apparaten volgens het beoogd gebruik niet voor bedrijfsmatige, ambachtelijke of industriële toepassingen zijn ontworpen. Wij aanvaarden
geen aansprakelijkheid wanneer het apparaat in bedrijfsmatige, ambachtelijke of industriële ondernemingen of bij soortgelijke werkzaamheden wordt ingezet.
5. Veiligheidsvoorschriften
m GEVA AR!
• Het apparaat uitsluitend op wisselstroom aanslui-
ten. De spanning moet overeenstemmen met het
typeplaatje van het apparaat.
• Netstekker en stopcontact nooit met vochtige handen aanpakken.
• De netstekker niet door te trekken aan het snoer
uit het stopcontact halen.
• Snoer met netstekker voor elke gebruik op schade
controleren. Beschadigd snoer direct door een geautoriseerde klantenservice/elektromonteur laten
vervangen om gevaren te vermijden.
• Om elektro-ongevallen te vermijden is het raadzaam om het stopcontact met voorgeschakelde
aardlekschakelaar (min. 30 mA nominale actieve
stroomsterkte) te gebruiken.
• Voor alle verzorgings- en onderhoudswerkzaamheden het apparaat uitschakelen en de netstekker
uit het stopcontact verwijderen.
• Reparatiewerkzaamheden en werkzaamheden
aan elektrische bouwdelen mogen alleen door een
geautoriseerde klantenservice worden uitgevoerd.
m WAARSCHUWING!
• Dit apparaat is niet bestemd voor gebruik door per-
sonen met fysieke, sensorische of verstandelijke
beperkingen of met een gebrek aan ervaring en/
of kennis, tenzij zij onder toezicht staan van een
voor hun veiligheid verantwoordelijke persoon, of
van hem of haar instructies krijgen hoe het apparaat moet worden gebruikt en hebben de daaruit
resulterende gevaren begrepen.
• Kinderen mogen het apparaat alleen dan gebruiken als zij ouder zijn dan 8 jaar en als zij onder
toezicht staan van een persoon die verantwoordelijk is voor de veiligheid of aanwijzingen geeft
over het gebruik van het apparaat en zij de hieruit
resulterende gevaren hebben begrepen.
• Kinderen mogen niet met het apparaat spelen.
• Kinderen moeten onder toezicht staan om ervoor
te zorgen dat zij niet met het apparaat spelen.
• De reiniging en het onderhoud door de gebruiker
mag niet worden uitgevoerd door kinderen die niet
onder toezicht staan.
• Verpakkingsfolies uit de buurt van kinderen houden. Er bestaat verstikkingsgevaar!
• Apparaat na elk gebruik en voor elke reiniging/onderhoud uitschakelen.
• Brandgevaar Geen brandende of glimmende objecten opzuigen.
• Gebruik op plaatsen met ontplongsgevaar is verboden.
• Bij schuimvorming of het uittreden van vloeistof
het apparaat direct uitschakelen of de netstekker
uit het stopcontact halen!
• Geen smeermiddel, glas of allesreiniger gebruiken!
Apparaat nooit in water dopen.
• Bepaalde stoen kunnen door de samenvoeging
met de aangezogen lucht explosieve dampen of
mengsels vormen! De hierna vermelde stoen
nooit opzuigen:
• Explosieve of brandbare gassen, vloeistoen en
stof (reactief stof)
• Reactief metaal-stof (bijv. Aluminium, magnesium,
zink) in combinatie met sterk alkalische en zure
reinigingsmiddelen
• Onverdunde sterke zuren en logen
• Organische oplosmiddelen (bijv. Benzine, verfver-
dunner, aceton, stookolie).
• Bovendien kunnen deze stoen de in het apparaat
gebruikte materialen aantasten.
62 | NL
www.scheppach.com / service@scheppach.com / +(49)-08223-4002-99 / +(49)-08223-4002-58
Page 63

m WAARSCHUWING!
Dit elektrisch apparaat genereert een elektromagnetisch veld als het is ingeschakeld. Dit veld kan onder
bepaalde omstandigheden interfereren met actieve
of passieve medische implantaten.
Om het risico op ernstig of dodelijk letsel te beperken, raden we personen met medische implantaten
aan om hun arts en de fabrikant van het medische
implantaat te raadplegen voordat de machine wordt
gebruikt.
6. Technische gegevens
Netspanning 220-240V~ 50/60Hz
Macht 1400W
Apparaat -stopcontact
voor maximaal vermogen
Totaal vermogen 3400W
Capaciteit Watertank 30L
Zuiging 20 Kpa
Bescherming IPX4
Beschermingsklasse I
2000W
7. Montage
m LET OP!
Zorg er voor gebruik van het apparaat voor dat het
apparaat correct en volledig gemonteerd is.
Uitpakken (Afb.1+2+3)
Ontgrendel de vergrendelingshaken (4) en verwijder
de machinekop (2). De accessoires bevinden zich in
het stalen reservoir (9). Alleen de metalen verlengbuis (22) bevindt zich buiten het stalen reservoir (9)
in de verpakking. Verwijder alle accessoires uit het
stalen reservoir (9).
Montage van de wielopname (5) (afb. 4+5)
• Zet het stalen reservoir (9) op de kop (de machinekop (2) moet worden verwijderd).
• Schuif de wielopname (5) in de daarvoor aanwezige uitsparingen aan de wielopnameplaat (7). (4x)
• Bevestig de wielopnamen (5) met een schroevendraaier (niet bij de levering inbegrepen) met telkens
één bout (23). (4x)
Montage van de wielen (6) (afb. 6)
• Druk de vier zwenkwielen (6) in de gaten van de
wielopname (5).
Montage van de machinekop (2) en de handgreep
(1) (afb. 7)
• Zet de machinekop (2) op het stalen reservoir (9).
Borg de machinekop (2) met de vergrendelingshaken (4). Let er bij de montage van de machinekop
(2) op dat de vergrendelingshaken (4) correct vastklikken.
• Zet de greep (1) op de machinekop (2) en bevestig
deze met twee schroeven (23) met een schroevendraaier (niet bij de levering inbegrepen).
Montage van het schuimstof lter (17) (afb. 3+8)
Gebruik het apparaat nooit zonder lter! Controleer
altijd of de lters correct zijn gemonteerd.
• Schuimstof lter (17) monteren: Voor het natzuigen
het meegeleverde schuimstof lter (17) over het lterkorf met de veiligheidsvlotterklep (15) schuiven.
Montage van het vouwlter (19) (afb. 3+9)
Voor het droogzuigen, schuift u het vouwlter
(19) op de lterkorf met veiligheidsvlotterklep (15).
Het vouwlter (19) is alleen geschikt voor het droogzuigen!
Montage van de papieren lterzak (18) (afb. 3+10)
Voor het zuigen van jn, droog vuil is het raadzaam
om bovendien een papieren lterzak (18) te gebruiken.
• De papieren lterzak (18) over de zuigopening in
het stalen reservoir (9) schuiven. De papieren lterzak (18) is alleen geschikt voor droogzuigen. De
papieren lterzak (18) vereenvoudigt de verwijdering van het afgezogen stof.
Afzuigslang (16) monteren (afb. 3+11+12)
Sluit de afzuigslang (16) aan op de overeenkomstige
aansluiting, afhankelijk van de gewenste toepassing,
op de nat- en droogzuiger aan.
Stofzuigen:
De afzuigslang (16) op de afzuigslangaansluiting (10) aansluiten. Schuif daartoe het uiteinde van de afzuigslang (16)
met de beide nippels in de afzuigslangaansluiting (10) (A).
Plaats de beide nippels in de verdiepingen. In de eindpositie de afzuigslang met de klok mee draaien (B).
Blazen:
Sluit de afzuigslang (16) aan op de aansluiting met
blaasfunctie (14). Schuif het uiteinde van de afzuigslang (16) met de beide nippels in de aansluiting met
blaasfunctie (14). Plaats de beide nippels in de verdiepingen. Hiertoe is een rotatie niet noodzakelijk.
Metalen verlengingsbuis (22), afzuigslangen (16)
sproeiers (20/21) monteren (afb. 13)
• Verbind de metalen verlengingsbuis (22) met het
gekromde uiteinde van de afzuigslang (16).
• Monteer de grond (20) of voegensproeier (21) aan
het andere uiteinde van de metalen verlengingsbuis (22).
www.scheppach.com / service@scheppach.com / +(49)-08223-4002-99 / +(49)-08223-4002-58
NL | 63
Page 64

• Om de individuele lengte van de metalen verlen-
gingsbuis (22) in te stellen, schuif de schuiver naar
voren (A). (Afb. 14)
• Trek de buis tot de overeenkomstige lengte (B).
Zorg ervoor dat de schuifregelaar vastklikt. (Afb.
14)
Montage van de onderste kabelhouder (afb. 3+15)
Hang de onderste kabelhouder (24) op de achterkant
van het apparaat aan de wielopnameplaat (7) in. De
bovenste kabelhouder (13) bevindt zich op de aansluiting voor de blaasfunctie (14).
m LET OP!
Het apparaat is niet geschikt voor het opzuigen van
brandbare vloeistoen. Gebruik voor het natzuigen alleen het meegeleverde schuimstof lter (17).
Wateraftapschroef (8) (afb. 18)
Voor het eenvoudiger legen van het stalen reservoir
(9) bij natzuigen, is deze uitgerust met een wateraftapschroef (8). Wateraftapschroef (8) door linksom
draaien openen en vloeistof aftappen.
9. Onderhoud
8. Bediening
m WAARSCHUWING!
Schakel het apparaat uit als bij het natzuigen met de
afvoerlucht vloeistof of schuim uittreedt.
Aan- / Uitschakelen / Automatiek (Afb.16-17)
De aan-/uitschakelaar (12) heeft drie instellingen:
1 schakelaarpositie 0: Uit
2 schakelaarpositie II: Aan
• Druk voor het inschakelen op de aan/uit-schakelaar
(12).
• Druk opnieuw op de aan/uit-schakelaar (12) om het
apparaat uit te schakelen.
3 schakelaarpositie I: Automatisch bedrijf (de stofzuiger wordt via een elektrisch gereedschap ingeschakeld).
• Sluit het netsnoer van uw elektrisch gereedschap
aan op het automatische stopcontact (afb. 16).
• Sluit de afzuigslang aan op de stofafzuigaansluiting
van uw elektrisch gereedschap. Controleer of de
verbinding veilig en luchtdicht is.
• Zet de schakelaar op het afzuigsysteem op positie
“I” = Automatisch bedrijf.
Droogzuigen (afb. 3+9+10)
Gebruik het vouwlter (19) voor droogzuigen. Bovendien kan de papieren lterzak (18) worden gebruikt.
Daardoor blijft het vouwlter (19) langer vrij van stof
en zo blijft het zuigvermogen langer behouden.
Bovendien wordt de verwijdering van het stof vereenvoudigt.
Controleer altijd of de lters correct zijn gemonteerd.
Natzuigen (afb. 3+8)
Gebruik het schuimstof lter (17) voor het natzuigen.
Controleer of het schuimstof lter (17) correct is gemonteerd.
Als het stalen reservoir (9) vol is, sluit de veiligheidsvlotterklep (15) de zuigopening en het zuigproces
wordt onderbroken.
m ATTENTIE! Telkens voor het instellen, het uitvoeren van onderhoud of reparaties de stekker uit het
stopcontact trekken!
Reiniging
Het is raadzaam om het apparaat na elk gebruik te
reinigen. Spuit het apparaat niet af met water en reinig het apparaat niet onder stromend water. Dit kan
leiden tot stroomschokken en zo kan het apparaat beschadigd raken.
Leeg het stalen reservoir (9) na elk gebruik: Na het
openen van het schroefdeksel voor het aftappen van
vloeistoen (8) kan de opgenomen vloeistof worden
afgetapt. In het stalen reservoir (9) blijven nog vloeibare resten achter. Om de resterende vloeistof te verwijderen, de machinekop (2) door het openen van de
vergrendelingshaken (4) van het stalen reservoir (9)
verwijderen. De vloeibare resten eruit gieten. Reinig
het reservoir met een licht vochtige doek.
• Vervang een volle papieren lterzak
• Houd het apparaat altijd schoon. Gebruik geen rei-
nigings- of oplosmiddelen.
• Houd de ventilatiesleuven altijd schoon en vrij van
vuil en stof.
• Reinig het apparaat alleen met een zachte borstel
of een licht vochtige doek.
• Reinig het schuimstof lter (17) met wat smeerzeep
onder stromend water en laat deze volledig in de
lucht drogen.
Onderhoud
Het apparaat is onderhoudsvrij.
Service-informatie
U moet er rekening mee houden dat bij dit product
de volgende delen onderhevig zijn aan een slijtage
door gebruik of een natuurlijke slijtage, resp. dat de
volgende delen nodig zijn als verbruiksmaterialen.
Slijtstukken*: Schuimstof lter, Papieren lterzak,
Vouwlter
64 | NL
* niet verplicht bij de leveringsomvang begrepen!
www.scheppach.com / service@scheppach.com / +(49)-08223-4002-99 / +(49)-08223-4002-58
Page 65

10. Opslag
Sla het apparaat en de hulpstukken op een donkere,
droge en vorstvrije plaats en voor kinderen ontoegankelijke plaats op. De optimale opslagtemperatuur
ligt tussen 5 en 30˚C. Bewaar het elektrisch apparaat
in de originele verpakking. Dek het elektrisch apparaat af om het tegen stof of vocht te beschermen.
Bewaar de gebruikshandleiding bij het elektrische
apparaat.
• Wikkel het snoer (3) om de bovenste kabelhouder
(13) op de aansluiting blaasfunctie (14) en de onderste kabelhouder (24). (Afb. 20)
• Aan de bovenzijde van de machinekop (2) bevinden zich vier verdiepingen, waarop de grondsproeier (20) en de voegensproeier (21) voor de opslag
kunnen worden bevestigd. Op de wielopnamen (5)
bevinden zich verdiepingen, waarop u de metalen
verlengingsbuis (22) kunt aanbrengen. (Afb. 20)
• De resterende accessoires kunt u in het stalen reservoir (9) bewaren.
11. Elektrische aansluiting
De geïnstalleerde elektromotor is bedrijfsklaar
aangesloten. De aansluiting voldoet aan de relevante VDE- en DIN-voorschriften. De netaansluiting van
de klant en het gebruikte verlengsnoer moeten eveneens aan deze voorschriften voldoen.
Defecte elektrische aansluitkabel
Bij elektrische aansluitkabels treedt vaak schade aan
de isolatie op.
Mogelijke oorzaken zijn:
• Versleten plekken, als aansluitkabels door vensterof deuropeningen worden geleid.
• Knikken door een onvakkundige bevestiging of geleiding van de aansluitkabel.
• Snijplekken omdat over de aansluitkabel is ger
den.
• Beschadigde isolatie omdat de stekker uit het stopcontact is getrokken.
• Scheuren door veroudering van de isolatie.
Dergelijke defecte elektrische aansluitkabels mogen
niet worden gebruikt en zijn levensgevaarlijk als de
isolatie is beschadigd. Controleer de elektrische
aansluitkabels regelmatig op schade. Let erop dat bij
het controleren de aansluitka - bel niet op het elektriciteitsnet is aangesloten. Elektrische aansluitkabels
moeten aan de relevante VDE- en DIN-voorschriften
voldoen. Gebruik uitsluitend aansluitkabels met de
aanduiding H05VV-F. Op de aansluitkabel moet de
type-aanduiding vermeld staan.
Wisselstroommotor
De netspanning moet 230 VAC zijn
Verlengsnoeren moeten tot een lengte van 25 m een
doorsnede hebben van 1,5 vierkante millimeter.
Aansluitingen en reparaties van de elektrische uitrusting mogen uitsluitend door een elektromonteur
worden uitgevoerd.
Vermeld in geval van vragen de volgende gegevens:
• Stroomtype van de motor
• Gegevens van het typeplaatje van de machine
• Gegevens van het typeplaatje van de motor
12. Afvalverwijdering en recyclage
Het toestel bevindt zich in een verpakking om transportschade te voorkomen. Deze verpakking is een
grondstof en bijgevolg herbruikbaar of kan in de
grondstofkringloop teruggebracht worden. Batterijen horen niet thuis bij het huisvuil. Gooi ze niet in het
vuur of in het water. Batterijen moeten worden ingezameld, gerecycleerd of milieuvriendelijk verwijderd.
Het toestel en zijn accessoires bestaan uit diverse
materialen, zoals b.v. metaal en kunststof. Ontdoe u
van defecte onder delen op de inzamelplaats waar u
gevaarlijke afvalstoen mag afgeven. Informeer u in
uw speciaalzaak of bij uw gemeentebestuur!
Oude apparatuur mag niet bij het huisafval
worden gegooid!
Dit symbool geeft aan dat dit product conform de
richtlijn inzake verbruikte elektrische en elektronische apparatuur (2012/19/EU) en nationale wettelijke
bepalingen niet bij het huishoudelijk vuil mag worden
gegooid. Dit product moet bij een hiervoor bestemde
verzamelpunt worden afgegeven. Dit kan bijv. door teruggave bij de aanschaf van een soortgelijk product
of door inlevering bij een erkend inzamelpunt voor het
recyclen van verbruikte elektrische en elektronische
apparatuur. Het onjuist afvoeren van oude apparatuur kan door mogelijke gevaarlijke stoen, die veelal
in verbruikte elektrische en elektronische apparatuur
zijn verwerkt, negatieve eecten op het milieu en de
gezondheid van de mens hebben. Door een juiste afvoer van dit product levert u bovendien een bijdrage
aan een eectief gebruik van natuurlijke ressources.
Informatie inzake inzamelpunten voor verbruikte apparatuur kunt u opvragen bij de gemeente, de publieke afvalverwerker, een erkend afvalverwerkingsstation
voor het afvoeren van verbruikte elektrische en elektronische apparatuur of uw afvalverwerkingsstation.
www.scheppach.com / service@scheppach.com / +(49)-08223-4002-99 / +(49)-08223-4002-58
NL | 65
Page 66

13. Foutenherstel
Storing Mogelijke oorzaak Oplossing
Motor loopt niet
Verminderde
zuigkracht
Controleer of de stekker in het
stopcontact zit.
Controleer of het stopcontact stroom
heft.
Controleer of de aan / uit-schakelaar
van de stofzuiger aanstaat.
Borstel is geblokkeerd. Schakel de stofzuiger uit om blokkades te verhelpen.
Stofzak zit vol met stof. Verwijder de stofzak en leeg deze.
Filter zit vol met stof. Verwijder lter en leeg.
Steek de stekker in het stopcontact.
Bel een elektricien.
Druk op de aan / uit-schakelaar.
66 | NL
www.scheppach.com / service@scheppach.com / +(49)-08223-4002-99 / +(49)-08223-4002-58
Page 67

Laitteessa olevien merkkien selitys
Varoitus! Jos ohjeet laiminlyödään, seurauksena voi olla hengenvaara, vammautumisvaara
tai työkalun vioittuminen!
m
Ennen käyttöönottoa lue käyttöohje ja turvallisuusohjeet ja noudata niitä!
www.scheppach.com / service@scheppach.com / +(49)-08223-4002-99 / +(49)-08223-4002-58
FI | 67
Page 68

Sisällysluettelo: Sivu:
1. Johdanto 69
2. Laitteen kuvaus 69
3. Toimituksen sisältö 69
4. Määräystenmukainen käyttö 70
5. Turvallisuusmääräykset 70
6. Tekniset tiedot 70
7. Asennus 71
8. Käyttö 71
9. Puhdistus ja huolto 72
10. Varastointi 72
11. Sähköliitäntä 72
12. Hävittäminen ja kierrätys 73
13. Häiriöiden poistaminen 73
68 | FI
www.scheppach.com / service@scheppach.com / +(49)-08223-4002-99 / +(49)-08223-4002-58
Page 69

1. Johdanto
2. Laitteen kuvaus (kuva 1)
Valmistaja:
scheppach
Fabrikation von Holzbearbeitungsmaschinen GmbH
Günzburger Straße 69
D-89335 Ichenhausen
Arvoisa asiakas,
toivotamme sinulle paljon iloa ja menestystä työssäsi
uuden laitteen kanssa.
Ohje:
Tämän laitteen valmistaja ei voimassa olevan tuotevastuulain mukaan vastaa vahingoista, jotka syntyvät
tähän laitteeseen tai sen aiheuttamina seuraavista
syistä:
• epäasianmukainen käsittely,
• käyttöohjeen noudattamatta jättäminen,
• kolmannen osapuolen, ei valtuutetun korjaajan te-
kemät korjaukset,
• muiden kuin alkuperäisten varaosien asennus tai
vaihto laitteeseen,
• määräystenvastainen käyttö,
• sähkölaitteiston toimimattomuus, kun sähköä kos-
kevia määräyksiä ja VDE-määräyksiä 0100, DIN
57113 / VDE0113 ei ole noudatettu.
1. Kahva
2. Koneen pää
3. Liitäntäjohto
4. Lukituskoukku
5. Rullapidike (4x)
6. Ohjausrullat (4x)
7. Pyörän kiinnityslevy
8. Vedenpoistoruuvi
9. Jaloterässäiliö
10. Poistoimuliitäntä
11. Pistorasia käynnistysautomatiikalla
12. Päälle-/pois-kytkin
13. Ylempi johdonpidike
14. Puhallustoiminnon liitäntä
15. Suodatinkori turvauimuriventtiilillä
16. 3m poistoimuletku
17. Vaahtomuovisuodatin
18. Paperisuodatinpussi
19. Laskossuodatin
20. Lattiasuulake
21. Kapea suulake
22. Metallinen pidennysputki
23. Ruuvi (6x)
24. Alempi johdonpidike
Ota huomioon:
Lue ennen asennusta ja käyttöönottoa käyttöohjeen
koko teksti.
Tämän käyttöohjeen tarkoituksena on helpottaa tutustumista sähkötyökaluun sekä sen käyttöä määräystenmukaisissa käyttömahdollisuuksissa.
Käyttöohje sisältää tärkeitä ohjeita siitä, miten työskentelet sähkötyökalullasi turvallisesti, oikein ja
taloudellisesti, ja miten vältät vaarat, säästät korjauskuluissa, vähennät seisokkiaikoja ja lisäät sähkötyökalun luotettavuutta ja elinkaarta.
Tässä käyttöohjeessa olevien turvallisuusmääräysten lisäksi sinun on ehdottomasti otettava huomioon
myös käyttömaassa voimassa olevat määräykset
sähkötyökalun käytöstä.
Säilytä käyttöohjetta muovikotelossa lialta ja kosteudelta suojattuna sähkötyökalun yhteydessä. Jokaisen sähkötyökalua käyttävän on luettava se ennen
töiden aloitusta ja noudatettava siinä olevia ohjeita.
Sähkötyökalulla saavat työskennellä vain henkilöt,
jotka ovat saaneet opastuksen sen käyttöön ja ovat
perillä siihen liittyvistä vaaroista. Vaadittua vähimmäisikää on noudatettava.
Tässä käyttöohjeessa olevien turvallisuusohjeiden ja
käyttömaassa voimassa olevien erikoismääräyksien
ohella on otettava huomioon myös puuntyöstökoneiden käyttöä yleisesti koskevat tekniset säännöt.
Emme ota vastuuta onnettomuuksista tai vahingoista, jotka seuraavat tämän käyttöohjeen ja turvallisuusohjeiden laiminlyönnistä.
3. Toimituksen sisältö
• Avaa pakkaus ja ota laite varovasti ulos.
• Poista pakkausmateriaali sekä pakkaus-/ja kulje-
tusvarmistimet (jos sellaiset on).
• Tarkasta, että toimitus on täydellinen.
• Tarkasta, onko laitteessa tai lisätarvikkeissa kul-
jetusvaurioita.
• Säilytä pakkaus jos mahdollista takuuajan päättymiseen asti
m HUOMIO!
Laite ja pakkausmateriaalit eivät ole lasten leikkikaluja! Lapset eivät saa leikkiä muovipussien, kalvojen
tai pienosien kanssa! Vaarana osien joutuminen nieluun sekä tukehtumisen vaara!
30L märkä-kuivaimuri (1x)
3m poistoimuletku (1x)
Vaahtomuovisuodatin (1x)
Paperisuodatinpussi (1x)
Laskossuodatin kuivaimurointia
varten
Rullapidike (4x)
Rullat (4x)
Kahva (1x)
Ruuvit (6x)
Lattiasuulake (1x)
Kapea suulake (1x)
(1x)
www.scheppach.com / service@scheppach.com / +(49)-08223-4002-99 / +(49)-08223-4002-58
FI | 69
Page 70

Metallinen pidennysputki (1x)
Alempi johdonpidike (1x)
Käyttöohje (1x)
4. Määräystenmukainen käyttö
Märkä-kuivaimuri sopii käytettäväksi märkä- ja kuivaimuun käyttäen vastaavaa suodatinta. Laitetta ei
ole tarkoitettu tulenarkojen, räjähdysalttiden tai terveydelle vaarallisten aineiden imemiseen.
Konetta saa käyttää vain määräystenmukaiseen
käyttöön. Mikään sen ylittävä käyttö ei ole määräystenmukaista käyttöä. Näin syntyvistä vahingoista ja
loukkaantumisista vastaa käyttäjä itse, ei valmistaja.
Ota huomioon, että laitteitamme ei määräystenmukaisessa käytössä ole tarkoitettu yritys-, ammattilaistai teollisuuskäyttöön. Valmistajan takuu ja vastuu ei
ole voimassa, jos laitetta käytetään yritystoiminnassa, käsityöläisammateissa tai teollisuudessa tai jossakin vastaavissa tehtävissä.
5. Turvallisuusmääräykset
m VAARA!
• Liitä laite vain vaihtovirtaan.Jännitteen on oltava
sama kuin laitteen tyyppikilvessä ilmoitettu jännite.
• Älä koskaan tartu märillä käsillä virtapistokkeeseen.
• Älä irrota verkkojohtoa pistokkeesta vetämällä johdosta.
• Tarkasta aina ennen käyttöä, että liitosjohto ja virtapistoke ovat ehjät. Anna valtuutetun asiakaspalvelun/sähköalan ammattilaisen välittömästi vaihtaa
vaurioitunut liitosjohto.
• Sähkötapaturmien välttämiseksi suosittelemme
käyttämään pistorasioita, joissa on esikytketyt
virhevirran turvakytkimet (maks. 30 mA nimellislaukaisuvirran voimakkuus).
• Kytke laite pois päältä ennen kaikkia hoito- ja huoltotöitä ja vedä virtapistoke irti pistorasiasta.
• Vain valtuutettu huoltoliike saa suorittaa korjaustyöt ja sähköisiin rakenneosiin kohdistuvat työt.
• Vanhemmat lapset saavat käyttää laitetta vain, jos
he ovat yli 8-vuotiaita ja turvallisuusneuvoston valvonnassa tai hänelle on annettu ohjeita laitteesta.
• Lasten ei pidä pelata laitteen kanssa.
• Lapsia on valvottava, jotta varmistetaan, että ne
eivät leiki laitteesta.
• Lapset eivät saa puhdistaa tai puhdistaa laitetta
ilman valvontaa
• Pidä pakkauskalvot lasten ulottumattomissa, tukahduttava vaara!
• Kytke laite pois päältä jokaisen käytön jälkeen ja
ennen jokaista puhdistusta / huoltoa.
• Palovaara. Älä tyhjennä palavia tai hehkuvia esineitä.
• Käyttö räjähdysvaarallisissa tiloissa on kielletty.
• Jos vaahtoa kehittyy tai nestettä poistetaan, sam-
muta laite välittömästi tai irrota pistoke pistorasiasta!
• Älä käytä hioma-aineita, lasia tai monikäyttöisiä
puhdistusaineita! Älä koskaan upota laitetta veteen.
Tietyt aineet voivat muodostaa räjähtäviä höyryjä tai
seoksia pyörivän virtauksen seurauksena imuilman
mukana! Älä koskaan lataa seuraavia ainesosia:
• räjähtävät tai palavat kaasut, nesteet ja pöly (reaktiivinen pöly)
• Reaktiiviset metallipölyt (esim. Alumiini, magnesium, sinkki) voimakkaasti emäksisillä ja hapanta
puhdistusaineilla
• laimentamattomat, vahvat hapot ja emäkset
• Orgaaniset liuottimet (esim. Bensiini, väriaineet,
asetoni, polttoöljy).
Lisäksi nämä materiaalit voivat syövyttää laitteen
käyttämiä materiaaleja.
m VAROITUS!
Tämä sähkötyökalu tuottaa käytön aikana sähkömagneettisen kentän. Tämä kenttä voi määrätyissä olosuhteissa heikentää aktiivisten tai passiivisten
lääketieteellisten implanttien toimintaa. Vakavan tai
jopa kuolemaan johtavan loukkaantumisen vaaran
välttämiseksi suosittelemme henkilöitä, joilla on lääketieteellinen implantti, neuvottelemaan lääkärinsä ja
implantin valmistajan kanssa, ennen kuin he käyttävät sähkötyökalua.
6. Tekniset tiedot
m VAROITUS!
• Laitetta ei ole tarkoitettu henkilöille, joilla on rajoi-
tetut fyysiset, sensoriset tai henkiset kyvyt tai joilla
ei ole tarvittavia kokemuksia ja laitteita / taitietoa,
ellei heidän turvallisuutensa valvonnasta ole annettu tai antanut heille tarvittavaa Käyttää laitteen
käyttöohjeita.
70 | FI
www.scheppach.com / service@scheppach.com / +(49)-08223-4002-99 / +(49)-08223-4002-58
Verkkojännite 220-240V~ 50/60Hz
Teho 1400W
Suurin teho Laitteen
pistorasia
Kokonaisteho 3400W
Vesisäiliön tilavuus 30L
Imuteho 20 kPA
2000W
Page 71

Kotelointiluokka IPX4
Suojaluokka I
7. Asennus
m HUOMIO!
Varmista ennen käyttöä, että laite on asennettu oikein ja täydellisesti.
Purkaminen pakkauksesta (kuva 1+2+3)
• Avaa lukituskoukku (4) ja poista koneen pää (2). Lisävaruste on jaloterässäiliössä (9). Vain metallinen
pidennysputki (22) on pakattu jaloterässäiliön (9) ulkopuolelle. Poista kaikki tarvikkeet jaloterässäiliöstä (9).
Rullapidikkeiden asennus (5) (kuva 4+5)
• Aseta jaloterässäiliö (9) pään päälle (koneen pää
(2) on poistettava).
• Työnnä rullapidikkeet (5) niitä varten oleviin koloihin pyörän kiinnityslevyssä (7). (4x)
• Kiinnitä rullapidikkeet (5) ruuvimeisselillä (ei sisälly
toimitukseen) käyttäen yhtä ruuvia pidikettä kohti
(23). (4x)
Rullien asennus (6) (kuva 6)
• Paina neljä ohjausrullaa (6) pyörän kiinnityskohdissa (5) oleviin aukkoihin
Koneen pään (2) ja kahvan asennus (1) (kuva 7)
• Aseta koneen pää (2) jaloterässäiliön (9) päälle.
Varmista koneen pää (2) lukituskoukuilla (4). Kun
asennat koneen pään (2), varmista, että lukituskoukut (4) lukittuvat oikein.
• Aseta kahva (1) koneen pään (2) päälle ja kiinnitä
se kahdella ruuvilla (23) käyttäen ruuvimeisseliä (ei
sisälly toimitukseen).
Paperisuodatinpussin asennus (18) (kuva 3+10)
Hienon, kuivan lian imurointiin suosittelemme käyttämään paperisuodatinpussia (18).
• Työnnä paperisuodatinpussi (18) jaloterässäiliössä (9) imuaukon yli. Paperisuodatinpussi (18) sopii vain kuivaimurointiin.
Paperisuodatinpussi (18) helpottaa pois imuroidun
pölyn hävittämistä.
Poistoimuletkun (16) asennus (kuva. 3+11+12)
Liitä poistoimuletku (16) vastaavaan liitäntään märkä-/kuivaimurissa, halutun käyttösovelluksen mukaan.
Pölyn imurointi:
Liitä poistoimuletku (16) poistoimuletkun liitäntään
(10). Työnnä tätä varten poistoimuletkun (16) pää
poistoimuletkun liitännässä (10) (A) molempiin nippoihin. Aseta molemmat nipat syvennyksiin. Kierrä
poistoimuletkua pääteasennossa myötäpäivään (B).
Puhaltaminen:
Liitä poistoimuletku (16) puhallustoiminnon liitäntään
(14). Työnnä poistoimuletkun (16) pää puhallustoiminnon liitännässä (14) molempiin nippoihin. Aseta
molemmat nipat syvennyksiin. Kiertäminen ei ole tarpeen.
Metallisen pidennysputken (22), poistoimuletkun
(16) ja suulakkeiden (20/21) asennus (kuva 13)
• Yhdistä metallinen pidennysputki (22) poistoimuletkun (16) kaarevaan päähän.
• Asenna lattia- (20) tai rakosuulake (21) kootun metallisen pidennysputken (22) toiseen päähän.
• Metallisen pidennysputken (22) pituuden säätämiseksi yksilöllisesti on liukuosaa työnnettävä eteenpäin (A). (kuva 14)
• Vedä putki asianmukaiseen pituuteen (B). Varmista,
että liukusäädin lukittuu. (kuva 14)
Vaahtomuovisuodattimen asennus (17)
(kuva 3+8)
Älä koskaan käytä laitetta ilman suodatinta! Varmista
aina, että suodattimet on asennettu oikein.
• Vaahtomuovisuodattimen (17) asentaminen: Työnnä
märkäimua varten mukana toimitettu vaahtomuovisuodatin (17) suodatinkorin yli turvauimuriventtiilin (15)
kanssa.
Laskossuodattimen (19) asennus (kuva 3+9)
Laita kuivaimurointia varten laskossuodatin (19) suodatinkoriin turvauimuriventtiilin (15) kanssa. Laskossuodatin (19) sopii vain kuivaimurointiin!
Alemman johdonpidikkeen asennus (kuva 3+15)
• Kiinnitä alempi johdonpidike (24) laitteen takapuolella pyöränkiinnityslevyyn (7). Ylempi johdonpidike
(13) sijaitsee puhallustoiminnon liitännässä (14).
8. Käyttö
m VAROITUS!
Kytke laite pois päältä, jos märkäimussa poistoilman
mukana tulee ulos nestettä tai vaahtoa.
Kytkeminen päälle / pois / automatiikka
(kuva 16-17)
ON / OFF -kytkimellä (12) on kolme asentoa:
1 Kytkimen asento 0: Pois
2 Kytkimen asento II: Päälle
• Paina päälle-/pois-kytkintä (12) kytkeäksesi päälle.
• Paina päälle-/pois-kytkintä (12) uudelleen kytkeäk-
sesi laitteen pois.
FI | 71
www.scheppach.com / service@scheppach.com / +(49)-08223-4002-99 / +(49)-08223-4002-58
Page 72

3 Kytkimen asento I: Automaattikäyttö (pölynimuri
kytketään päälle sähkötyökalun kautta).
• Liitä sähkötyökalun verkkokaapeli automaattiseen
pistorasiaan (Kuva 17).
• Liitä poistoimuletku sähkötyökalusi pölynimuriliitäntään.
Tarkasta, että liitos on turvallinen ja ilmatiivis.
• Aseta poistoimujärjestelmän kytkin asentoon
„I“ = automaattikäyttö.
• Pidä laite aina puhtaana. Älä käytä mitään puhdistusaineita tai liuotinaineita.
• Pidä tuuletusraot aina puhtaina ja varmista, etteivät
ne ole lian ja pölyn tukkimia.
• Puhdista laite pehmeällä harjalla tai hieman kostutetulla pyyhkeellä.
• Puhdista vaahtomuovisuodatin (17) pienellä määrällä saippuavettä juoksevan veden alla ja anna
kuivua ilmassa.
Kuivaimurointi (kuva 3+9+10)
Käytä laskossuodatinta (19) kuivaimurointiin. Lisäksi
voidaan käyttää paperisuodatinpussia (18). Näin laskossuodatin (19) pysyy pitempään pölyttömänä ja imuteho säilyy pitempään hyvänä. Lisäksi pölyn hävitys
helpottuu. Varmista aina, että suodattimet on asennettu
oikein.
Märkäimurointi (kuva 3+8)
Käytä vaahtomuovisuodatinta (17) märkäimurointiin.
Varmista, että vaahtomuovisuodatin (17) on asennettu oikein.
Jos jaloterässäiliö (9) on täynnä, turvauimuriventtiili
(15) sulkee imuaukon ja imurointi keskeytetään.
m HUOMIO!
Laite ei sovellu palavien nesteiden imurointiin. Käytä märkäimurointiin vain mukana toimitettua vaahtomuovisuodatinta (17).
Vedenpoistoruuvi (kuva 18) (kuva 18)
Jotta jaloterässäiliön (9) tyhjentäminen märkäimuroinnissa olisi helpompaa, se on varustettu vedenpoistoruuvilla (8). Avaa vedenpoistoruuvi (8) kiertämällä vasemmalle ja valuta neste ulos.
9. Puhdistus ja huolto
m HUOMIO!
Irrota virtapistoke aina ennen säätötöitä, kunnostusta
ja korjausta.
Puhdistus
Suosittelemme puhdistamaan laitteen aina käytön
jälkeen. Älä suihkuta vettä laitteeseen äläkä puhdista
sitä juoksevan veden alla. Se voi johtaa sähköiskuihin
ja vahingoittaa laitetta.
Tyhjennä jaloterässäiliö (9) käytön jälkeen: Kun tyhjennysruuvi (8) on avattu, voidaan talteen otettu neste
valuttaa ulos. Jaloterässäiliöön (9) jää nestejäämiä.
Jäännösnesteen poistamiseksi koneen pää (2) on
otettava pois jaloterässäiliöstä (9) avaamalla lukituskoukku (4). Kaada nestejäämät pois. Puhdista säiliö
hieman kostutetulla pyyhkeellä.
• Vaihda täysinäinen paperisuodatinpussi
Huolto
Laite on huoltovapaa.
Asiakaspalvelutiedot
Huomaa, että seuraaviin tämän tuotteen osiin kohdistuu käytöstä johtuvaa, luonnollista kulumista, ja että
seuraavia osia tarvitaan käyttömateriaaleina.
Kuluvat osat*: Vaahtomuovisuodatin, Paperisuodatinpussi, Laskossuodatin
* ei välttämättä kuulu toimitukseen!
10. Varastointi
Säilytä laitetta ja sen lisätarvikkeita pimeässä, kuivassa ja jäätymättömässä paikassa, jonne lapsilla
ei ole pääsyä. Optimaalinen varastointilämpötila on
5 - 30˚C.
Säilytä sähkötyökalua alkuperäisessä pakkauksessaan.
Peitä sähkötyökalu suojataksesi sen pölyltä ja kosteudelta.
Säilytä käyttöohje sähkötyökalun yhteydessä.
• Kiedo liitäntäjohto (3) puhallustoiminnon liitännässä (14) olevan ylemmän johdonpidikkeen (13) ja
alemman johdonpidikkeen (24) ympärille. (kuva 19)
• Koneen pään (2) yläpuolella on neljä syvennystä,
joihin lattiasuulake (20) ja rakosuulake (21) voidaan
laittaa säilöön. Rullapidikkeissä (5) on syvennykset,
joihin metallinen pidennysputki (22) voidaan asettaa.
(kuva 20)
• Muita varusteita voidaan säilyttää jaloterässäiliössä (9).
11. Sähköliitäntä
Asennettu sähkömoottori on liitetty käyttövalmiiksi.
Liitäntä vastaa asiaankuuluvia VDE- ja DIN-määräyksiä. Asiakkaan tekemän virtaliitännän sekä käytetyn jatkojohdon täytyy vastata näitä määräyksiä.
Viallinen sähköliitosjohto
Sähkön liitosjohtoihin syntyy usein eristysvaurioita.
Syynä siihen voi olla:
• Painalluskohdat, kun liitosjohdot viedään ikkunan
tai ovenraon läpi.
72 | FI
www.scheppach.com / service@scheppach.com / +(49)-08223-4002-99 / +(49)-08223-4002-58
Page 73

• Taittumis kohdat, kun liitosjohto kiinnitetään tai ohjataan epäasianmukaisesti.
• Leikkaantumis kohdat, kun liitosjohdon yli ajetaan.
• Eristysvauriot vedettäessä johto seinäpistorasias-
ta.
• Eristeen vanhenemisesta johtuvat halkeamat.
Tällaisia viallisia sähköliitosjohtoja ei saa käyttää, sillä ne
ovat eristysvaurioiden takia hengenvaarallisia.
Tarkasta sähkön liitosjohdot säännöllisesti vaurioiden
varalta. Varmista, että liitosjohto ei tarkastuksen aikana
ole kiinni virtaverkossa.
Sähkön liitosjohtojen on vastattava asiaankuuluvia
VDE- ja DIN-määräyksiä. Käytä vain liitosjohtoja, joissa
on merkintä H05VV-F.
Tyyppimerkintä on pakollinen liitosjohdossa.
Vaihtovirtamoottori
• Verkkojännitteen on oltava 230 V~ .
• Jatkojohtojen, joiden pituus on alle 25 m, läpimitan
on oltava 1,5 neliömillimetriä.
Sähkövarusteiden liitännän ja korjaukset saa tehdä vain
sähköasentaja.
Vanhat laitteet eivät kuuluu kotitalousjätteeseen!
Tämä symboli osoittaa, ettei tuotetta saa hävittää kotitalousjätteen seassa sähkö- ja elektroniikkalaitteiden hävittämistä koskevan direk-
tiivin (2012/19/EU) ja kansallisten lakien
mukaisesti. Tuote on toimitettava asianmukaiseen
keräyspisteeseen. Tämä voi tapahtua palauttamalla
tuote ostettaessa vastaava tuote tai toimittamalla
tuote valtuutettuun keräyspisteeseen sähkö- ja elektroniikkalaitteiden jälleenkäsittelyä varten.
Epäasianmukaisella vanhojen laitteiden käsittelyllä
saattaa olla negatiivisia vaikutuksia ympäristölle ja
ihmisten terveydelle sähkö- ja elektroniikkalaitteiden
usein sisältämien mahdollisten vaarallisten aineiden
vuoksi. Lisäksi tuotteen asianmukainen hävitys edesauttaa luonnollisten resurssien tehokasta hyödyntämistä.
Tietoja vanhojen laitteiden keräyspisteistä saat kuntasi hallinnosta, julkisoikeudellisesta jätehuollosta,
valtuutetusta sähkö- ja elektroniikkalaitteiden hävityspisteestä tai jätelaitokselta.
12. Hävittäminen ja kierrätys
Laite on pakkauksessa kuljetusvaurioiden ehkäisemiseksi. Tämä pakkaus on raaka-ainetta ja siten uudelleen käytettävissä tai se voidaan viedä kierrätykseen.
Laite ja sen lisätarvikkeet koostuvat eri materiaaleista, kuten esim. metallista ja muovista. Vie vialliset rakenneosat erikoisjätteen keräykseen.
Kysy lisätietoja alan erikoisliikkeestä tai kunnanvirastosta!
13. Häiriöiden poistaminen
Häiriö Mahdollinen syy Poistaminen
Moottori ei käy
Vähentynyt imurointi
teho
Tarkasta, onko verkkopistoke paikoillaan?
Tarkasta, tuleeko pistorasiaan virtaa? Kutsu sähköasentaja.
Tarkasta onko pölynimurin virtakytkin
päällä?
Ovatko harjat tukkeutuneet? Kytke pölyimuri päälle tukosten poistamiseksi.
Onko pölysäiliö täynnä pölyä? Irrota pölysäiliö ja tyhjennä se.
Onko suodatin täynnä pölyä? Irrota suodatin ja tyhjennä se.
Aseta verkkopistoke pistorasiaan.
Kytke virtakytkin päälle.
www.scheppach.com / service@scheppach.com / +(49)-08223-4002-99 / +(49)-08223-4002-58
FI | 73
Page 74

74
www.scheppach.com / service@scheppach.com / +(49)-08223-4002-99 / +(49)-08223-4002-58
Page 75

www.scheppach.com / service@scheppach.com / +(49)-08223-4002-99 / +(49)-08223-4002-58
75
Page 76

76
www.scheppach.com / service@scheppach.com / +(49)-08223-4002-99 / +(49)-08223-4002-58
Page 77

CE - Konformitätserklärung Originalkonformitätserklärung
CE - Declaration of Conformity
CE - Déclaration de conformité
scheppach Fabrikation von Holzbearbeitungsmaschinen GmbH, Günzburger Str. 69, D-89335 Ichenhausen
erklärt folgende Konformität gemäß EU-Richtlinie und Normen für
DE
den Artikel
hereby declares the following conformity under the EU Directive
GB
and standards for the following article
déclare la conformité suivante selon la directive UE et les normes
FR
pour l’article
dichiara la seguente conformità secondo le direttive e le normati-
IT
ve UE per l‘articolo
declara la conformidad siguiente según la directiva la UE y las
ES
normas para el artículo
declara o seguinte conformidade com a Directiva da UE e as
PT
normas para o seguinte artigo
erklærer hermed, at følgende produkt er i overensstemmelse med
DK
nedenstående EUdirektiver og standarder
verklaart hierbij dat het volgende artikel voldoet aan de daarop
NL
betrekking hebbende EG-richtlijnen en normen
vakuuttaa täten, että seuraava tuote täyttää ala esitetyt EU-direk-
FI
tiivit ja standardit
försäkrar härmed följande överensstämmelse enligt EU-direktiv
SE
och standarder för följande artikeln
deklaruje, ze produkt jest zgodny z nastepujacymi dyrektywami
PL
UE i normami
pareiškia, taip atitiktis pagal ES direktyvos ir standartai šį straips-
LT
nį
az EU-irányelv és a vonatkozó szabványok szerinti következo
HU
megfeleloségi nyilatkozatot teszi a termékre
izjavlja sledeco skladnost z EU-direktivo in normami za artikel
SI
prohlašuje následující shodu podle smernice EU a norem pro
CZ
výrobek
prehlasuje nasledujúcu zhodu podla smernice EU a noriem pre
SK
výrobok
ovime izjavljuje da postoji sukladnost prema EU-smjernica i nor-
HR
mama za sljedece artikle
potvrđuje sledeću usklađenost prema smernicama EZ i normama
RS
za artikal
declară următoarea conformitate corespunzător directivelor şi
RO
normelor UE pentru articolul
декларира съответното съответствие съгласно Дирек-тива
BG
на ЕС и норми за артикул
Marke / Brand: SCHEPPACH
Art.-Bezeichnung / Article name: NASS- TROCKENSAUGER - ASP30-ES
WET AND DRY VACUUM CLEANER - ASP30-ES
ASPIRATEUR EAU ET POUSSIÈRES - ASP30-ES
Art.-Nr. / Art. no.: 5907709901
2014/29/EU
2014/35/EU
X
2014/30/EU
X
X 2006/42/EC
Annex IV
Notied Body:
Notied Body No.:
Certicate No.:
2004/22/EC
2014/68/EU
2011/65/EU*
X
89/686/EC_96/58/EC
90/396/EC
2000/14/EC_2005/88/EC
Annex V
Annex VI
Noise: measured L
P = xx KW; L/Ø = cm
Notied Body:
Notied Body No.:
2010/26/EC
Emission. No:
WA
= xx dB(A); guaranteed L
= xx dB(A)
WA
Standard references:
EN 60335-2-2:2010+A11:2012+A1:2013; EN 60335-1:2012+AC:2014+A11:2014;
EN 62233:2008; EN 55014-1:2006/+A1:2009/+A2:2011; EN 55014-2:2015; EN 61000-3-2:2014; EN 61000-3-3:2013
Die alleinige Verantwortung für die Ausstellung dieser Konformitätserklärung trägt der Hersteller.
This declaration of conformity is issued under the sole responsibility of the manufacturer.
Le fabricant assume seul la responsabilité d‘établir la présente déclaration de conformité.
* Der oben beschriebene Gegenstand der Erklärung erfüllt die Vorschriften der Richtlinie 2011/65/EU des Europäischen Parlaments und
des Rates vom 8. Juni 2011 zur Beschränkung der Verwendung bestimmter gefährlicher Stoe in Elektro- und Elektronikgeräten.
The object of the declaration described above fulls the regulations of the directive 2011/65/EU of the European Parliament and Council
from 8th June 2011, on the restriction of the use of certain hazardous substances in electrical and electronic equipment.
L’appareil décrit ci-dessus dans la déclaration est conforme aux réglementations de la directive 2011/65/EU du Parlement Européen et du
Conseil du 8 juin 2011 visant à limiter l’utilisation de substances dangereuses dans la fabrication des appareils électriques et électroniques.
Ichenhausen, den 30.01.2019 __________________________
Unterschrift / Markus Bindhammer / Technical Director
First CE: 2016
Subject to change without notice
www.scheppach.com / service@scheppach.com / +(49)-08223-4002-99 / +(49)-08223-4002-58
Documents registar: Christian Wilhelm
Günzburger Str. 69, D-89335 Ichenhausen
Page 78

78
www.scheppach.com / service@scheppach.com / +(49)-08223-4002-99 / +(49)-08223-4002-58
Page 79

Garantiebedingungen Revisionsdatum 20. August 2018
Sehr geehrte Kundin, sehr geehrter Kunde,
unsere Produkte unterliegen einer strengen Qualitätskontrolle. Sollte ein Gerät dennoch nicht einwandfrei funktionieren, bedauern wir dies sehr und bitten Sie, sich an unseren Servicedienst unter der unten angegebenen Adresse zu wenden. Gerne stehen wir Ihnen auch telefonisch über die Servicerufnummer zur Verfügung. Die nachfolgenden Hinweise sollen Ihnen für eine problemlose Bearbeitung und Regulierung
im Schadensfall dienen.
Für die Geltendmachung von Garantieansprüchen - innerhalb Deutschland - gilt folgendes:
1. Diese Garantiebedingungen regeln unsere zusätzlichen Hersteller-Garantieleistungen für Käufer (private Endverbraucher) von Neugeräten. Die gesetzlichen Gewährleistungsansprüche werden von dieser
Garantie nicht berührt. Für diese ist der Händler zuständig, bei dem Sie das Produkt erworben haben.
2. Die Garantieleistung erstreckt sich ausschließlich auf Mängel an einem von Ihnen erworbenen neuen Gerät, die auf einem Material- oder Herstellungsfehler beruhen und ist - nach unserer Wahl - auf die
unentgeltliche Reparatur solcher Mängel oder den Austausch des Gerätes beschränkt (ggf. auch Austausch mit einem Nachfolgemodell). Ersetzte Geräte oder Teile gehen in unser Eigentum über. Bitte beachten
Sie, dass unsere Geräte bestimmungsgemäß nicht für den gewerblichen, handwerklichen oder beruichen Einsatz konstruiert wurden. Ein Garantiefall kommt daher nicht zustande, wenn das Gerät innerhalb der
Garantiezeit in Gewerbe-, Handwerks- oder Industriebetrieben verwendet wurde oder einer gleichzusetzenden Beanspruchung ausgesetzt war.
3. Von unseren Garantieleistungen ausgenommen sind:
- Schäden am Gerät, die durch Nichtbeachtung der Montageanleitung, nicht fachgerechte Installation, Nichtbeachtung der Bedienungsanleitung (z.B. Anschluss an eine falsche Netzspannung oder Stromart)
bzw. der Wartungs- und Sicherheitsbestimmungen oder durch Einsatz des Geräts unter ungeeigneten Umweltbedingungen sowie durch mangelnde Pege und Wartung entstanden sind.
- Schäden am Gerät, die durch missbräuchliche oder unsachgemäße Anwendungen (wie z.B. Überlastung des Gerätes oder Verwendung von nicht zugelassenen Werkzeugen bzw. Zubehör), Eindringen von
Fremdkörpern in das Gerät (wie z.B. Sand, Steine oder Staub), Transportschäden, Gewaltanwendung oder Fremdeinwirkungen (wie z. B. Schäden durch Herunterfallen) entstanden sind.
- Schäden am Gerät oder an Teilen des Geräts, die auf einen bestimmungsgemäßen, üblichen (betriebsbedingten) oder sonstigen natürlichen Verschleiß zurückzuführen sind sowie Schäden und/oder Abnutzung von Verschleißteilen.
- Mängel am Gerät, die durch Verwendung von Zubehör-, Ergänzungs- oder Ersatzteilen verursacht wurden, die keine Originalteile sind oder nicht bestimmungsgemäß verwendet werden.
- Geräte, an denen Veränderungen oder Modikationen vorgenommen wurden.
- Geringfügige Abweichungen von der Soll-Beschaenheit, die für Wert und Gebrauchstauglichkeit des Geräts unerheblich sind.
- Geräte an denen eigenmächtig Reparaturen oder Reparaturen , insbesondere durch einen nicht autorisierten Dritten, vorgenommen wurden.
- Wenn die Kennzeichnung am Gerät bzw. die Identikationsinformationen des Produktes (Maschinenaufkleber) fehlen oder unlesbar sind.
- Geräte die eine starke Verschmutzung aufweisen und daher vom Servicepersonal abgelehnt werden.
Schadensersatzansprüche sowie Folgeschäden sind von dieser Garantieleistung generell ausgeschlossen.
4. Die Garantiezeit beträgt regulär 24 Monate* (12 Monate bei Batterien / Akkus) und beginnt mit dem Kaufdatum des Gerätes. Maßgeblich ist das Datum auf dem Original-Kaufbeleg. Garantieansprüche müssen jeweils nach Kenntniserlangung unverzüglich erhoben werden. Die Geltendmachung von Garantieansprüchen nach Ablauf der Garantiezeit ist ausgeschlossen. Die Reparatur oder der Austausch des Gerätes
führt weder zu einer Verlängerung der Garantiezeit noch wird eine neue Garantiezeit durch diese Leistung für das Gerät oder für etwaige eingebaute Ersatzteile in Gang gesetzt. Dies gilt auch bei Einsatz eines VorOrt-Services. Das betroene Gerät ist in gesäubertem Zustand zusammen mit einer Kopie des Kaufbelegs, - hierin enthalten die Angaben zum Kaufdatum und der Produktbezeichnung - der Kundendienststelle
vorzulegen bzw. einzusenden. Wird ein Gerät unvollständig, ohne den kompletten Lieferumfang eingesendet, wird das fehlende Zubehör wertmäßig in Anrechnung / Abzug gebracht, falls das Gerät ausgetauscht
wird oder eine Rückerstattung erfolgt. Teilweise oder komplett zerlegte Geräte können nicht als Garantiefall akzeptiert werden. Bei nicht berechtigter Reklamation bzw. außerhalb der Garantiezeit trägt der
Käufer generell die Transportkosten und das Transportrisiko. Einen Garantiefall melden Sie bitte vorab bei der Servicestelle (s.u.) an. In der Regel wird vereinbart, dass das defekte Gerät mit einer kurzen
Beschreibung der Störung per Abhol-Service (nur in Deutschland) oder - im Reparaturfall außerhalb des Garantiezeitraums - ausreichend frankiert, unter Beachtung der entsprechenden Verpackungs- und Versandrichtlinien, an die unten angegebene Serviceadresse eingesendet wird. Beachten Sie bitte, dass Ihr Gerät (modellabhängig) bei Rücklieferung, aus Sicherheitsgründen - frei von allen Betriebsstoen
ist. Das an unser Service-Center eingeschickte Produkt, muss so verpackt sein, dass Beschädigungen am Reklamationsgerät auf dem Transportweg vermieden werden. Nach erfolgter Reparatur / Austausch senden
wir das Gerät frei an Sie zurück. Können Produkte nicht repariert oder ausgetauscht werden, kann nach unserem eigenen freien Ermessen ein Geldbetrag bis zur Höhe des Kaufpreises des mangelhaften Produkts
erstattet werden, wobei ein Abzug aufgrund von Abnutzung und Verschleiß berücksichtigt wird. Diese Garantieleistungen gelten nur zugunsten des privaten Erstkäufers und sind nicht abtret- oder übertragbar.
5. Für die Geltendmachung Ihres Garantieanspruches kontaktieren Sie bitte unser Service-Center (via Post, eMail oder telefonisch).
Bitte verwenden Sie vorzugsweise unser Formular auf unserer Homepage: https://www.scheppach.com/Reparaturservice.aspx.
Bitte senden Sie uns keine Geräte ohne vorherige Kontaktaufnahme und Anmeldung bei unserem Service-Center.
Für die Inanspruchnahme dieser Garantiezusagen ist der Erstkontakt mit unserem Service-Center zwingende Voraussetzung.
6. Bearbeitungszeit - Im Regelfall erledigen wir Reklamationssendungen innerhalb 14 Tagen nach Eingang in unserem Service-Center. Sollte in Ausnahmefällen die genannte Bearbeitungszeit überschritten
werden, so informieren wir Sie rechtzeitig.
7. Verschleißteile - Verschleißteile sind: a) mitgelieferte, an- und/oder eingebaute Batterien / Akkus sowie b) alle modellabhängigen Verschleißteile (siehe Bedienungsanleitung). Von der Garantieleistung
ausgeschlossen sind tief entladene bzw. an Gehäuse und oder Batteriepolen beschädigte Batterien / Akkus.
8. Kostenvoranschlag - Von der Garantieleistung nicht oder nicht mehr erfasste Geräte reparieren wir gegen Berechnung. Auf Nachfrage bei unserem Service-Center können Sie die defekten Geräte für einen
Kostenvoranschlag einsenden und ggf. dem Service-Center schriftlich (per Post, eMail) die Reparaturfreigabe erteilen. Ohne Reparaturfreigabe erfolgt keine weitere Bearbeitung.
9. Andere Ansprüche, als die oben genannten, können nicht geltend gemacht werden.
Die Garantiebedingungen gelten nur in der jeweils aktuellen Fassung zum Zeitpunkt der Reklamation und können ggf. unserer Homepage (www.scheppach.com) entnommen werden.
Bei Übersetzungen ist stets die deutsche Fassung maßgeblich.
scheppach Fabrikation von Holzbearbeitungsmaschinen GmbH · Günzburger Str. 69 · 89335 Ichenhausen (Deutschland) · www.scheppach.com
Telefon: +49 [0] 8223 4002 99 oder +800 4002 4002 (Service-Hotline/Freecall Rufnummer dt. Festnetz**) · Telefax +49 [0] 8223 4002 20 · E-Mail: service@scheppach.com · Internet: http://www.scheppach.com
* Produktabhängig auch über 24 Monate; länderbezogen können erweiterte Garantieleistungen gelten
** Verbindungskosten: kostenlos aus dem deutschen Festnetz
Änderungen dieser Garantiebedingungen ohne Voranmeldung behalten wir uns jederzeit vor.
79
www.scheppach.com / service@scheppach.com / +(49)-08223-4002-99 / +(49)-08223-4002-58
Page 80

Garantie DE
Oensichtliche Mängel sind innerhalb von 8 Tagen nach Erhalt der Ware anzuzeigen, andernfalls verliert der Käufer sämtliche Ansprüche wegen solcher Mängel. Wir leisten Garantie für
unsere Maschinen bei richtiger Behandlung auf die Dauer der gesetzlichen Gewährleistungsfrist
ab Übergabe in der Weise, dass wir jedes Maschinenteil, dass innerhalb dieser Zeit nachweisbar
in Folge Material- oder Fertigungsfehler unbrauchbar werden sollte, kostenlos ersetzen. Für
Warranty GB
Apparent defects must be notied within 8 days from the receipt of the goods. Otherwise, the
buyerís rights of claim due to such defects are invalidated. We guarantee for our machines in
case of proper treatment for the time of the statutory warranty period from delivery in such a
way that we replace any machine par t free of charge which provably becomes unusable due
to faulty material or defects of fabrication within such period of time. With respect to parts not
Garantie FR
Les défauts visibles doivent être signalés au plus tard 8 jours après la réception de la marchandise, sans quoi l’acheteur perd tout droit au dédommagement.
Nous garantissons nos machines, dans la mesure où elles sont utilisées de façon conforme,
pendant la durée légale de garantie à compter de la réception, sachant que nous remplaçons
gratuitement toute pièce de la machine devenue inutilisable du fait d’un défaut de matière ou
Garanzia IT
Vizi evidenti vanno segnalati entro 8 giorni dalla ricezione della merce, altrimenti decadono tutti
i diritti dellíacquirente inerenti a vizi del genere. Appurato un impiego corretto da parte dellíacquirente, garantiamo per le nostre macchine per tutto il periodo legale di garanzia a decorrere
dalla consegna in maniera tale che sostituiamo gratuitamente qualsiasi componente che entro
tale periodo presenti dei vizi di materiale o di fabbricazione tali da renderlo inutilizzabile. Per
Garantie NL
Zichtbare gebreken moeten binnen de 8 dagen na ontvangst van de goederen worden gemeld,
zo niet verliest de verkoper elke aanspraak op grond van deze gebreken. Onze machines
worden geleverd met een garantie voor de duur van de wettelijke garantietermijn. Deze termijn
gaat in vanaf het moment dat de koper de machine ontvangt. De garantie houdt in dat wij elk
onderdeel van de machine dat binnen de garantietermijn aantoonbaar onbruikbaar wordt als
gevolg van materiaal- of productiefouten, kosteloos vervangen. De garantie vervalt echter bij
Takuu FI
Ilmeisistä puutteista tulee ilmoittaa kahdeksan päivän kuluessa tavaran vastaanottamisesta.
Muutoin ostaja ei voi vaatia korvausta ko. puutteista. Annamme takuun oikein käsitellyille
koneillemme lakisääteiseksi takuuajaksi tavaran luovutuksesta alkaen siten, että vaihdamme
korvauksetta minkä tahansa koneenosan, joka osoittautuu tämän ajan kuluessa käyttökelvot-
Záruka SK
Zrejmé vady musia byť predstavené v priebehu 8 dni po obdržaní tovaru, ináč zákazník stratí
všetky nároky týkajúce sa takejto vady. Ponúkame záruku na naše aparáty, ktoré sú správne
používané počas zákonného termínu záruky tak, že bezplatne vymeníme každú časť aparátu,
ktorá sa v priebehu tohto času môže stať dokázateľne nefunkčnou dôsledkom materiálnej či
Szavatosság HU
A nyilvánvaló hibákat ki kell jelenteni számított 8 napon belül az áruk, különben a vevő elveszti
minden igényt az ilyen hibák. Kínálunk garanciát a gépeinket a megfelelő kezelés időtartamának
hallgatólagos garancia a szállítás időpontját oly módon, hogy cserélje ki minden egyes része ezen
idő alatt észlelhető a sorban anyag-vagy gyártási legyen hiábavaló, ingyen. Az alkatrészeket, hogy
Záruka CZ
Viditelné vady jsou poukazatelné během 8 dní od obdržení zboží, jinak ztrácí zákazník všechny
nároky týkající se takovýchto vad. Poskytujeme záruku na naše stroje, s kterými je správně
zacházeno, na dobu zákonnné záruční lhůty začínající od doručení tak, že bezplatně vyměníme
každou část stroje, která se během této doby může stát prokazatelně nepoužitelnou následkem
Teile, die wir nicht selbst herstellen, leisten wir nur insoweit Gewähr, als uns Gewährleistungsansprüche gegen die Vorlieferanten zustehen. Die Kosten für das Einsetzen der neuen Teile trägt
der Käufer. Wandlungs- und Minderungsansprüche und sonstige Schadensersatzansprüche
sind ausgeschlossen.
manufactured by us we only warrant insofar as we are entitled to warranty claims against the
upstream suppliers. The costs for the installation of the new par ts shall be borne by the buyer.
The cancellation of sale or the reduction of purchase price as well as any other claims for damages shall be excluded.
d’usinage durant cette période. Toutes les pièces que nous ne fabriquons pas nous-mêmes ne
sont garanties que si nous avons la possibilité d’un recours en garantie auprès des fournisseurs
respectifs. Les frais de main d’œuvre occasionnés par le remplacement des pièces sont à la
charge de l’acquéreur. Tous droits à rédhibition et toutes prétentions à une remise ainsi que tous
autres droits à dommages et intérêts sont exclus
componenti non fabbricati da noi garantiamo solo nella misura nella quale noi stessi possiamo
rivendicare diritti a garanzia nei confronti dei nostri fornitori. Le spese per il montaggio dei
componenti nuovi sono a carico dellíacquirente. Sono escluse pretese di risoluzione per vizi, di
riduzione o ulteriori pretese di risarcimento danni.
verkeerd gebruik of verkeerde behandeling van de machine. Voor onderdelen die wij niet zelf
produceren, geven wij enkel de garantie die wij zelf krijgen van de oorspronkelijke leverancier.
De kosten voor de montage van nieuwe onderdelen vallen ten laste van de koper. Eisen tot het
aanbrengen van veranderingen of het toestaan van een korting en overige schadeloosstellingsclaims zijn uitgesloten.
tomaksi raaka-aine- tai valmistusvirheestä johtuen. Osille, joita emme valmista itse, annamme
takuun vain mikäli osien toimittaja on antanut niistä takuun meille. Uusien osien asennuskustannukset maksaa ostaja. Purku- ja vähennysvaatimukset ja muut vahingonkorvausvaatimukset
eivät tule kysymykseen.
výrobnej vady. Na časti ktoré sami nevyrábame, poskytujeme záruku iba v rozsahu, v ktorom
nám prísluší nárok na záručné plněnie k subdodávateľovi. Za trovy týkajúce sa inštalácie novej
súčiastky je zodpovedný zákazník. Nárok na výmenu tovara, na zľavu a iné nároky na nahradenie škody sú vylúčené.
nem termel magunkat, hogy csak olyan garanciát, hiszen jogosultak jótállási igények beszállítókkal
szemben. A költségek beillesztése az új részek a vevőnek. Átalakítása és csökkentése
követelések és egyéb kártérítési igények ki vannak zárva.
materiálové či výrobní vady. Na díly, které sami neopravujeme, poskytujeme záruku pouze v
rozsahu , v němž nám přísluší nárok na záruční plnění vůči subdodavateli . Náklady na instalaci
nového dílu nese zákazník. Nárok na výměnu zboží, na slevu a jiné nároky na odškodnění jsou
vyloučené.
www.scheppach.com / service@scheppach.com / +(49)-08223-4002-99 / +(49)-08223-4002-58
 Loading...