

Page 1
Removing fixtures and fittings
Work description
Seats
BeGe
Seat assembly
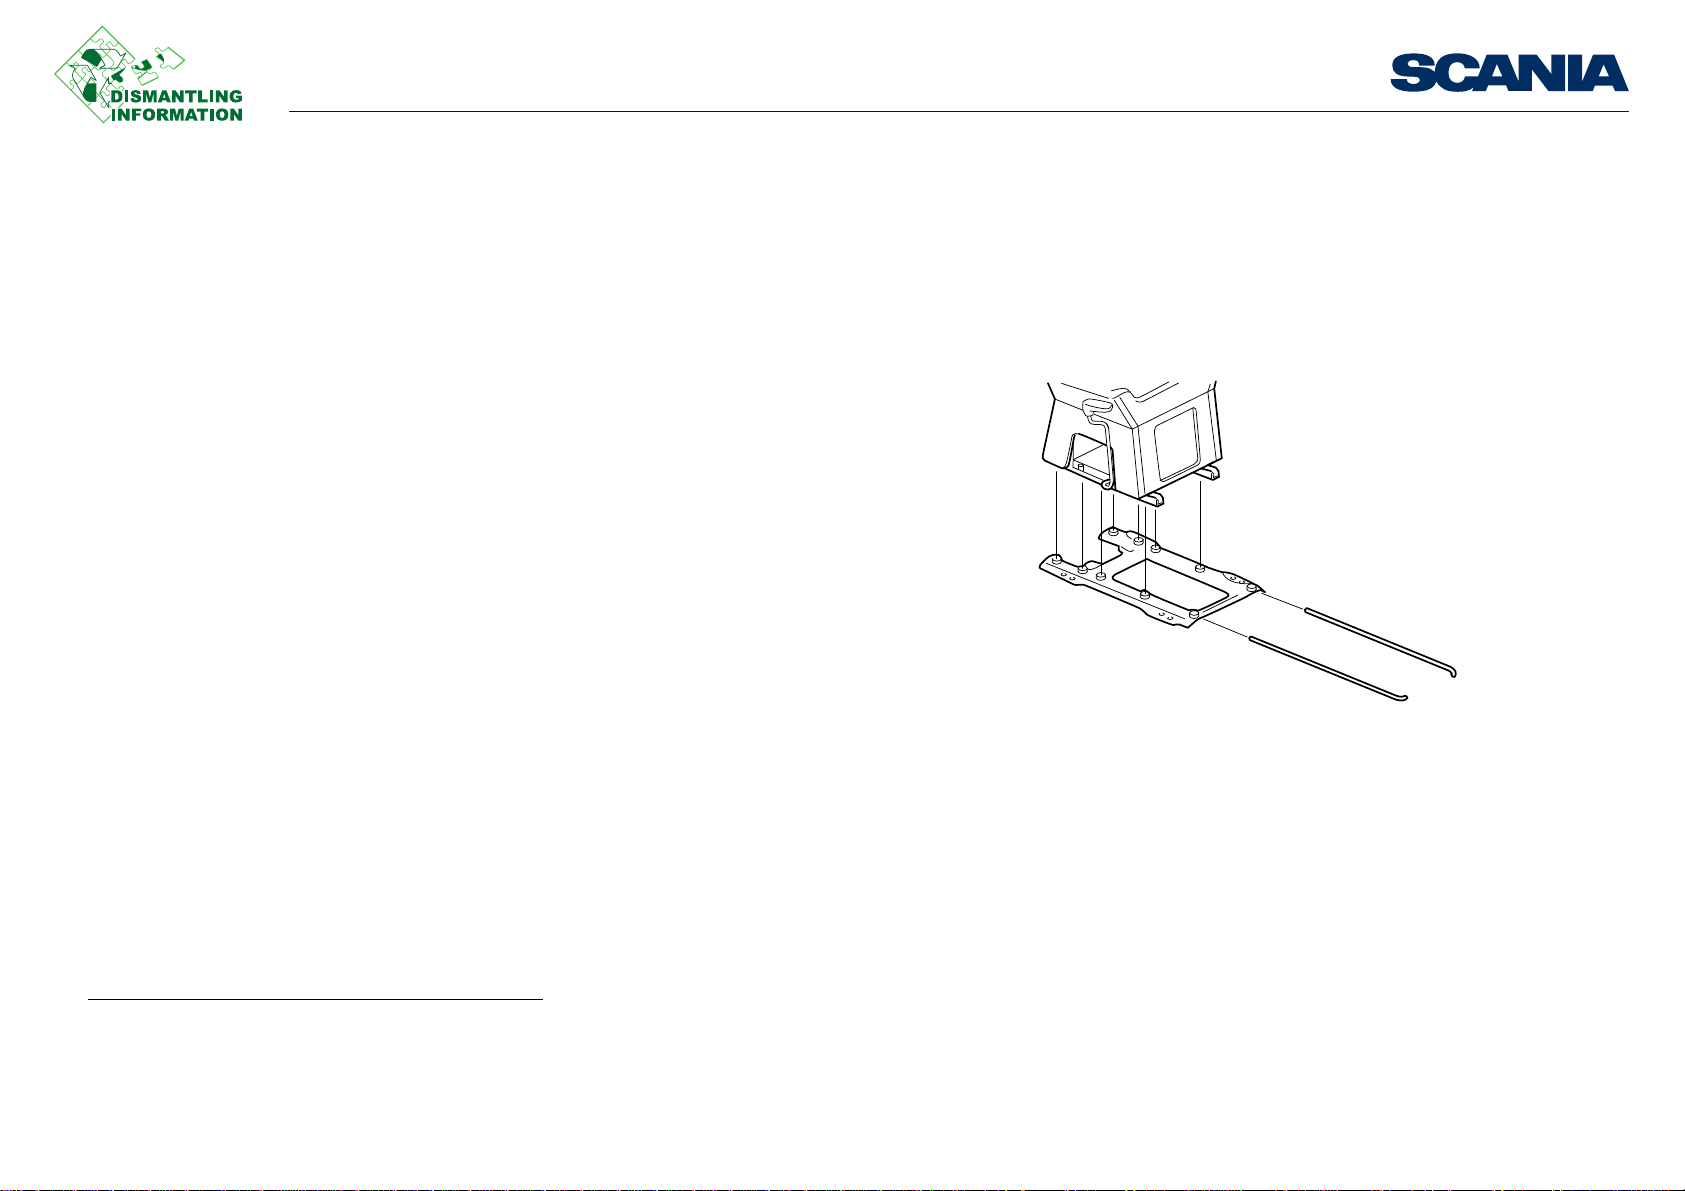
1. Tap down the lock tabs on the seat base and turn the pins 90 degrees, pull out the
pins.
2. Remove the electrical connections to the seat base and backrest heaters.
3. Lift the seat straight up and take it out of the cab.
Seat base, G and P cabs
Remove the parts as follows:
1. Start with the seat, according to the instructions above.
2. Upper side covers and handle.
3. Back cover.
4. Gas spring.
5. Seat and electrical connection.
6. Slide rail and slide rail release.
1
Work description
Seat base, R and T cabs
Remove the parts as follows:
1. Start with the seat, according to the instructions above.
2. Lower and upper covers and handle.
3. Back cover.
1. Option
03:22-00 Issue 1 en-GB 1 (44)
©
Scania CV AB 2012, Sweden
Page 2
Removing fixtures and fittings
4. Gas spring.
5. Seat and electrical connection.
6. Upper seat base.
7. Slide rail and slide rail release.
Work description
03:22-00 Issue 1 en-GB 2 (44)
©
Scania CV AB 2012, Sweden
Page 3
Removing fixtures and fittings
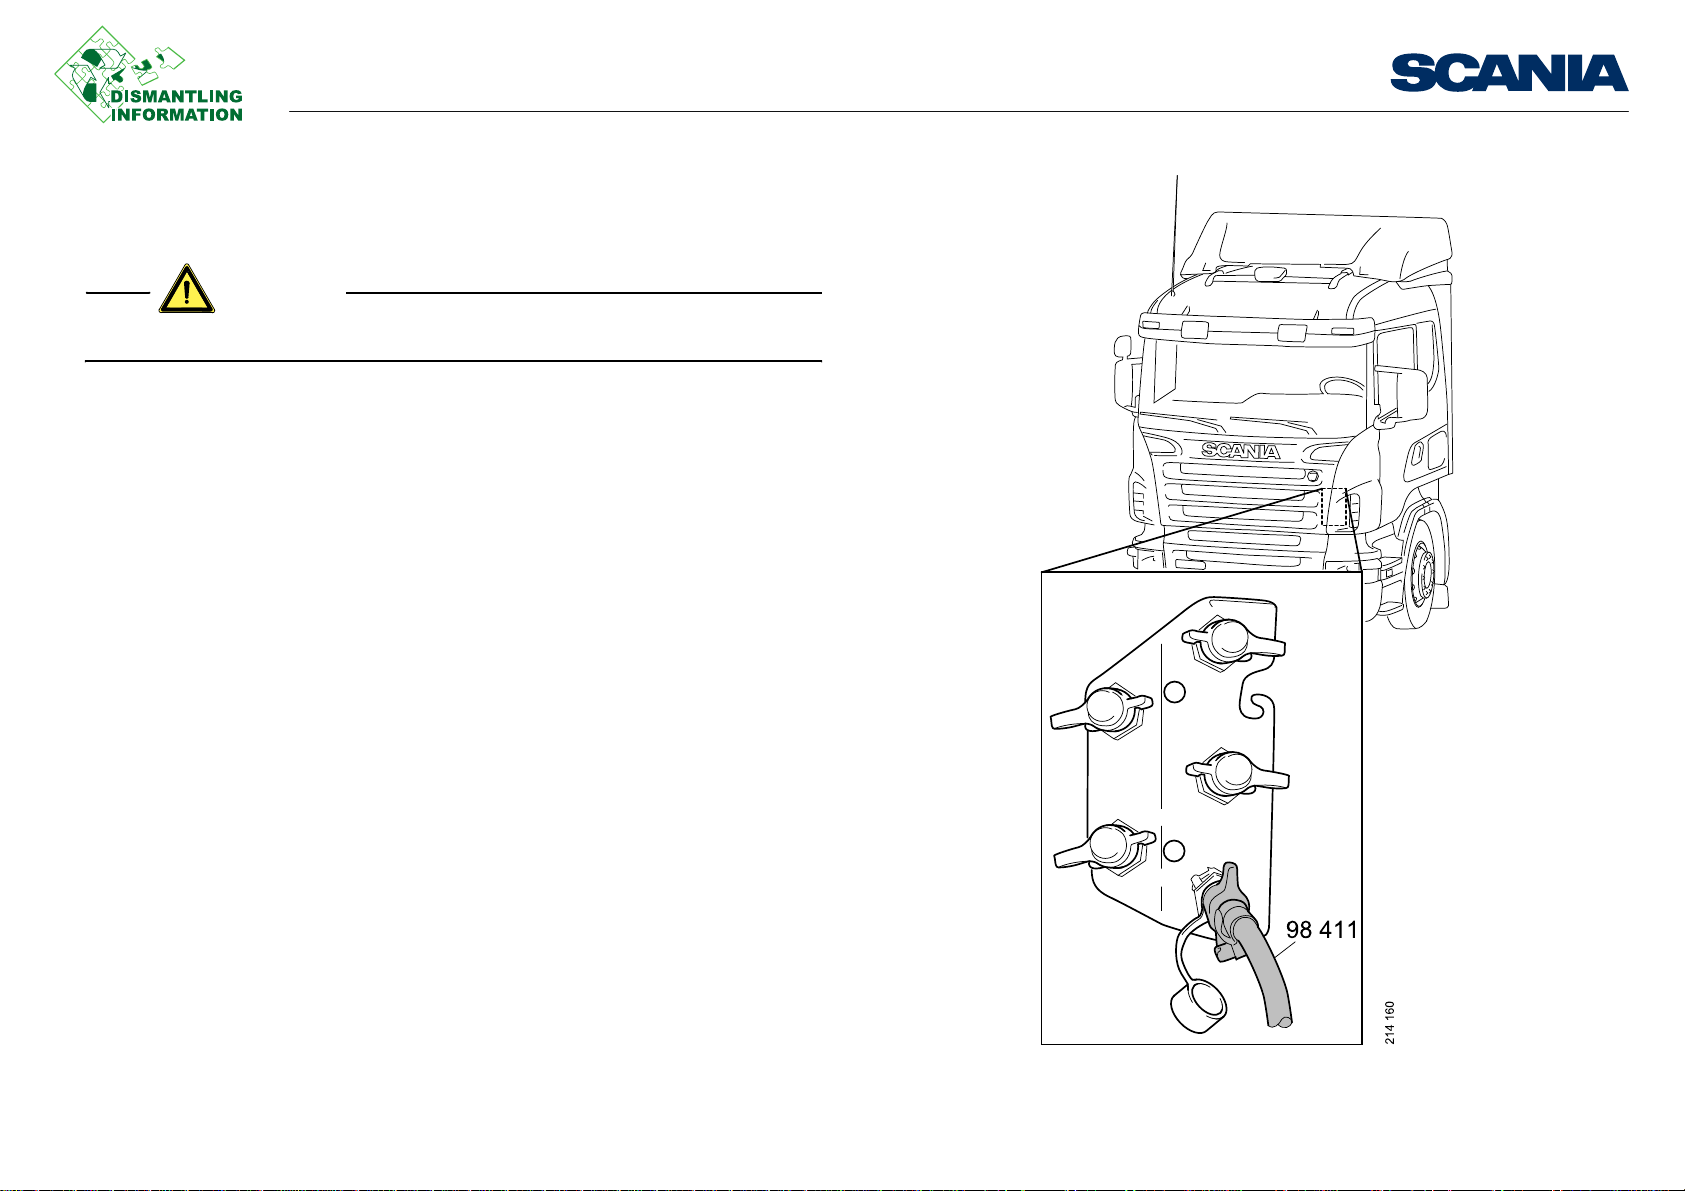
WARNING!
Isringhausen
Seat assembly
Release the air pressure in the seat before starting work.
1. Connect tool 98 411 to the compressed air circuit for accessory systems and emp-
ty the air from the compressed air circuit for accessory systems.
Work description
03:22-00 Issue 1 en-GB 3 (44)
©
Scania CV AB 2012, Sweden
Page 4
Removing fixtures and fittings
1
2
209 521
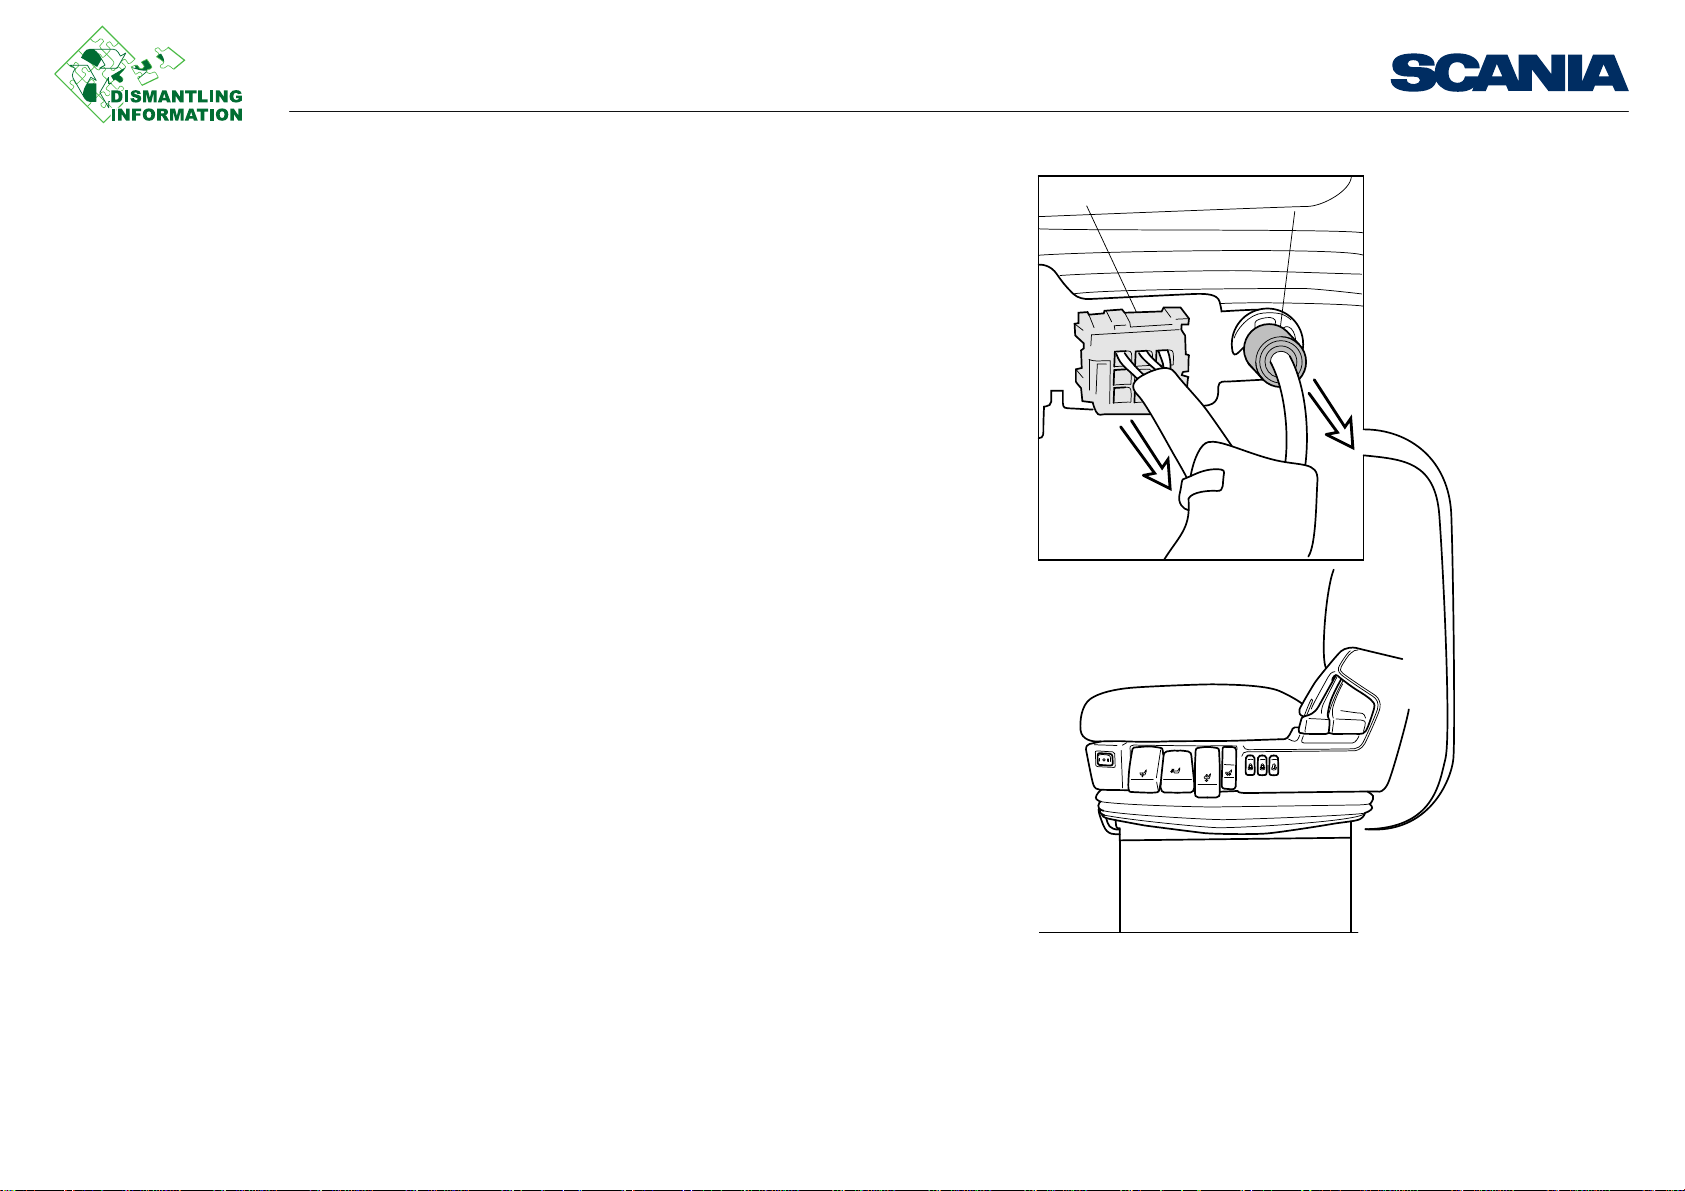
1. Contact housing
2. Quick release coupling for compressed air input
2. Slide the seat forwards.
3. Disconnect electrica l connector (1) and remove the air hose from the quick re-
lease coupling (2) by first pressing the inner ring inwards and then pulling out the
hose.
Work description
03:22-00 Issue 1 en-GB 4 (44)
©
Scania CV AB 2012, Sweden
Page 5
Removing fixtures and fittings
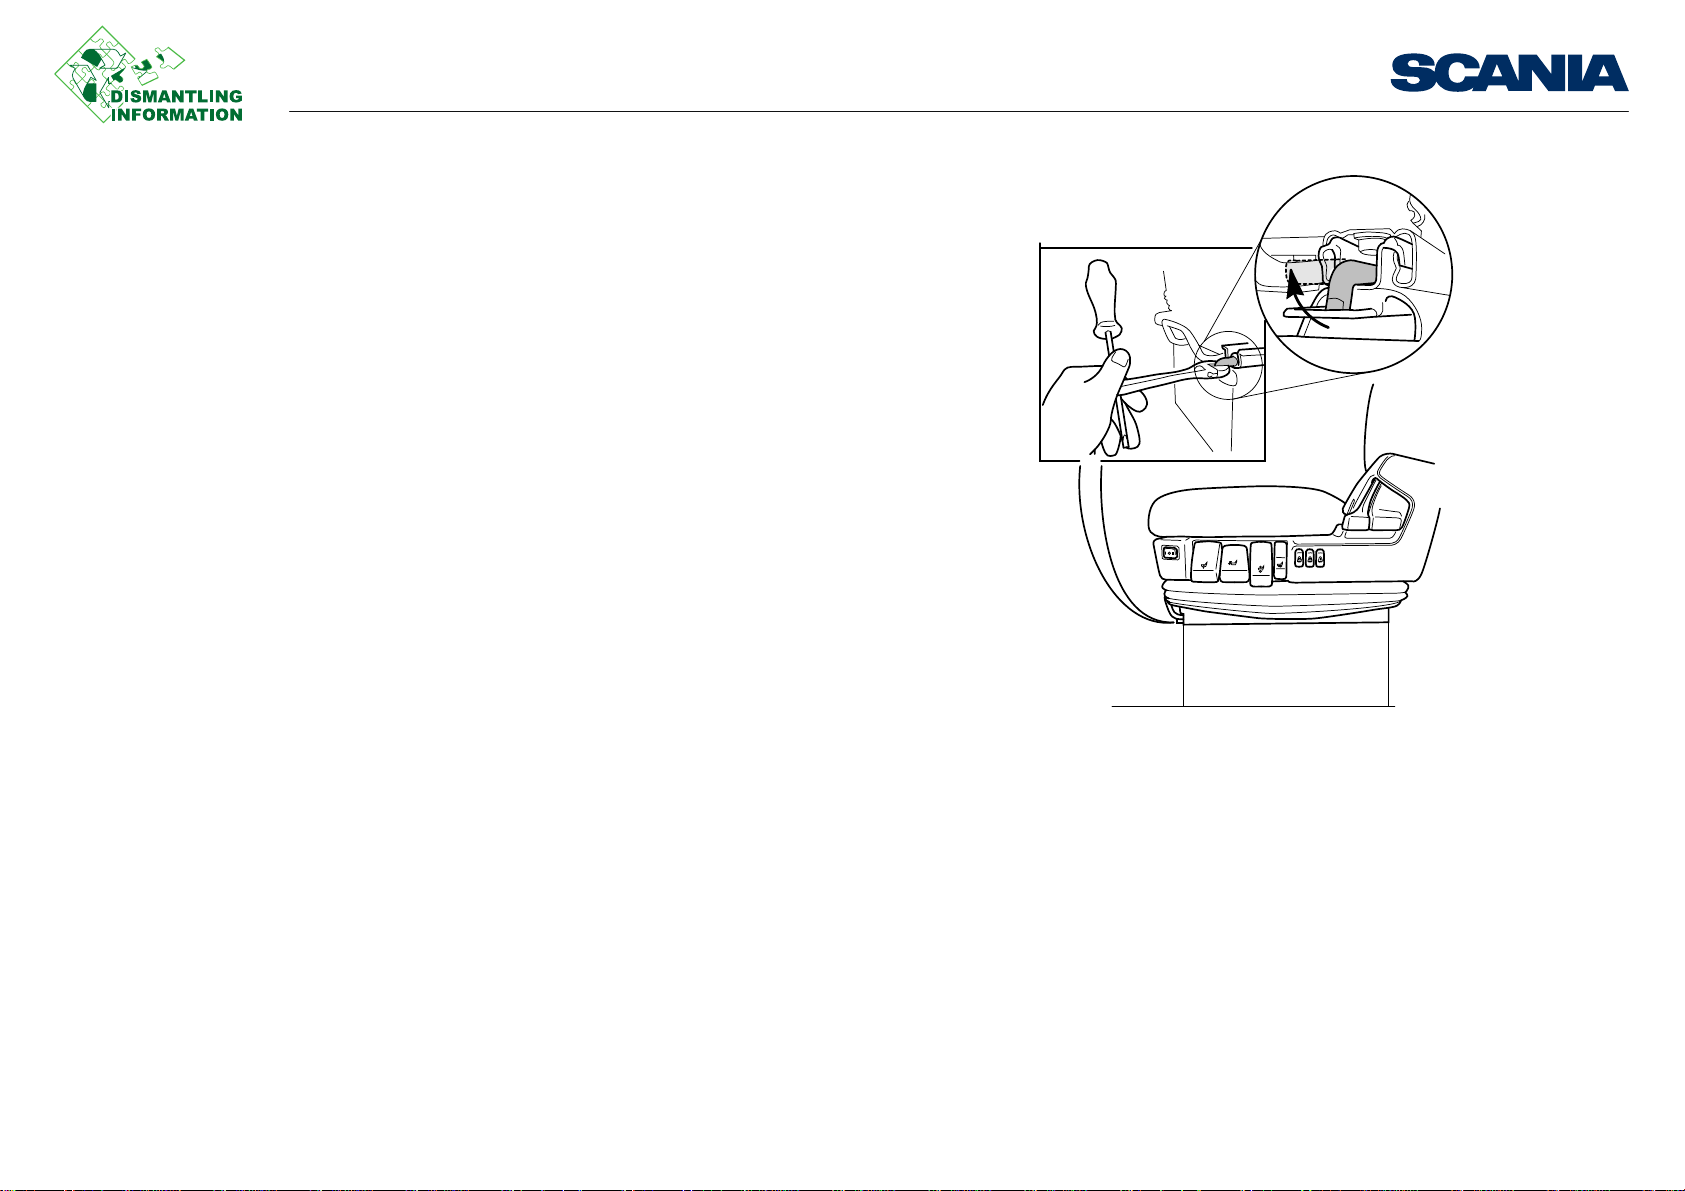
209 522
4. Turn the lock pins 90 degrees and remove them. Use water pump pliers or an ad-
justable spanner and screwdriver.
5. Lift the seat out of the cab.
Work description
03:22-00 Issue 1 en-GB 5 (44)
©
Scania CV AB 2012, Sweden
Page 6

Removing fixtures and fittings
Note:
200 047
1
2
3
4
5
6
7
1
2
8
1. Plastic plug, 4 off
2. Screws, 3 off
3. Screw
4. Screws, 2 off
5. Spring
6. Shaft
7. LS valve
Side casing with button panel
Remove the parts in the following order:
1. Seat squab.
2. Screw (4) in the front casing and plugs (1) in the rear casing.
3. Screws (2) and (3) in the side casing.
4. Pull both backrest controls upwards and remove the side casing at the same time.
5. LS-valve (7). Undo retaining screw on inside of casing.
6. Switch (8) for electric heater.
When the backrest control is in the raised position, the backrest is not secured.
Side casing without button panel
1. Remove the seat squab.
2. Undo the screws (2).
3. Remove the buckle and elec trical connector.
4. Move the backrest to its farthest forward position and undo the screw (3) from
the inside.
Front and rear casings
1. The front casing is removed by undoing both screws (4).
2. The rear casing is removed by removing the 4 plastic plugs (1). This is done by
first poking out the pin in the middle with a small screwdriver or similar.
1
Work description
1. Option
03:22-00 Issue 1 en-GB 6 (44)
©
Scania CV AB 2012, Sweden
Page 7
Removing fixtures and fittings
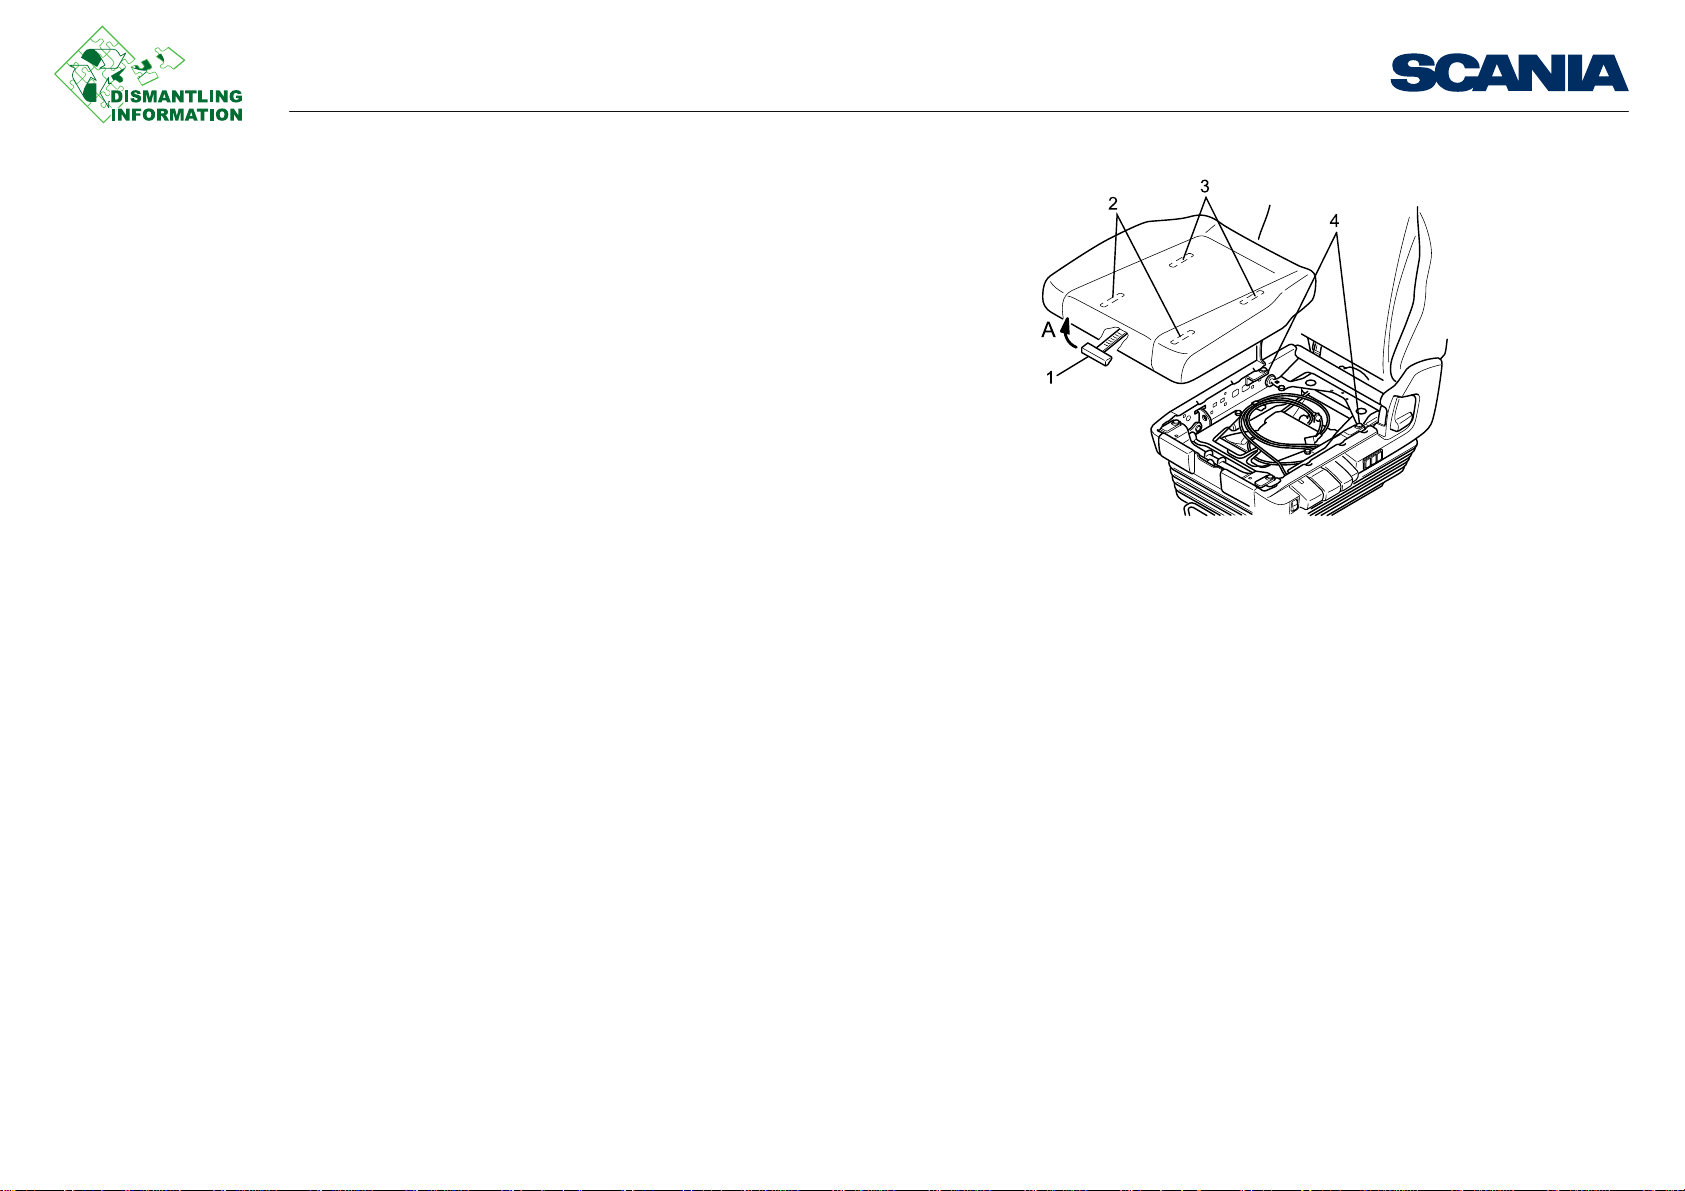
200 049
Seat squab
1. Handle
2. Front brackets
3. Rear brackets
4. Slider, 4 off
Seat squab
Upholstery and heated seat pad
1. Use a flat screwdrive r and loosen the upholste ry at the rear edge of the squab.
Work description
03:22-00 Issue 1 en-GB 7 (44)
©
Scania CV AB 2012, Sweden
Page 8

Removing fixtures and fittings
200 046
2. Move the screwdriver around the squab to completely release the upholstery.
3. Turn the squab and undo the hook and loop fastener used to attach the upholstery.
Work description
03:22-00 Issue 1 en-GB 8 (44)
©
Scania CV AB 2012, Sweden
Page 9
Removing fixtures and fittings
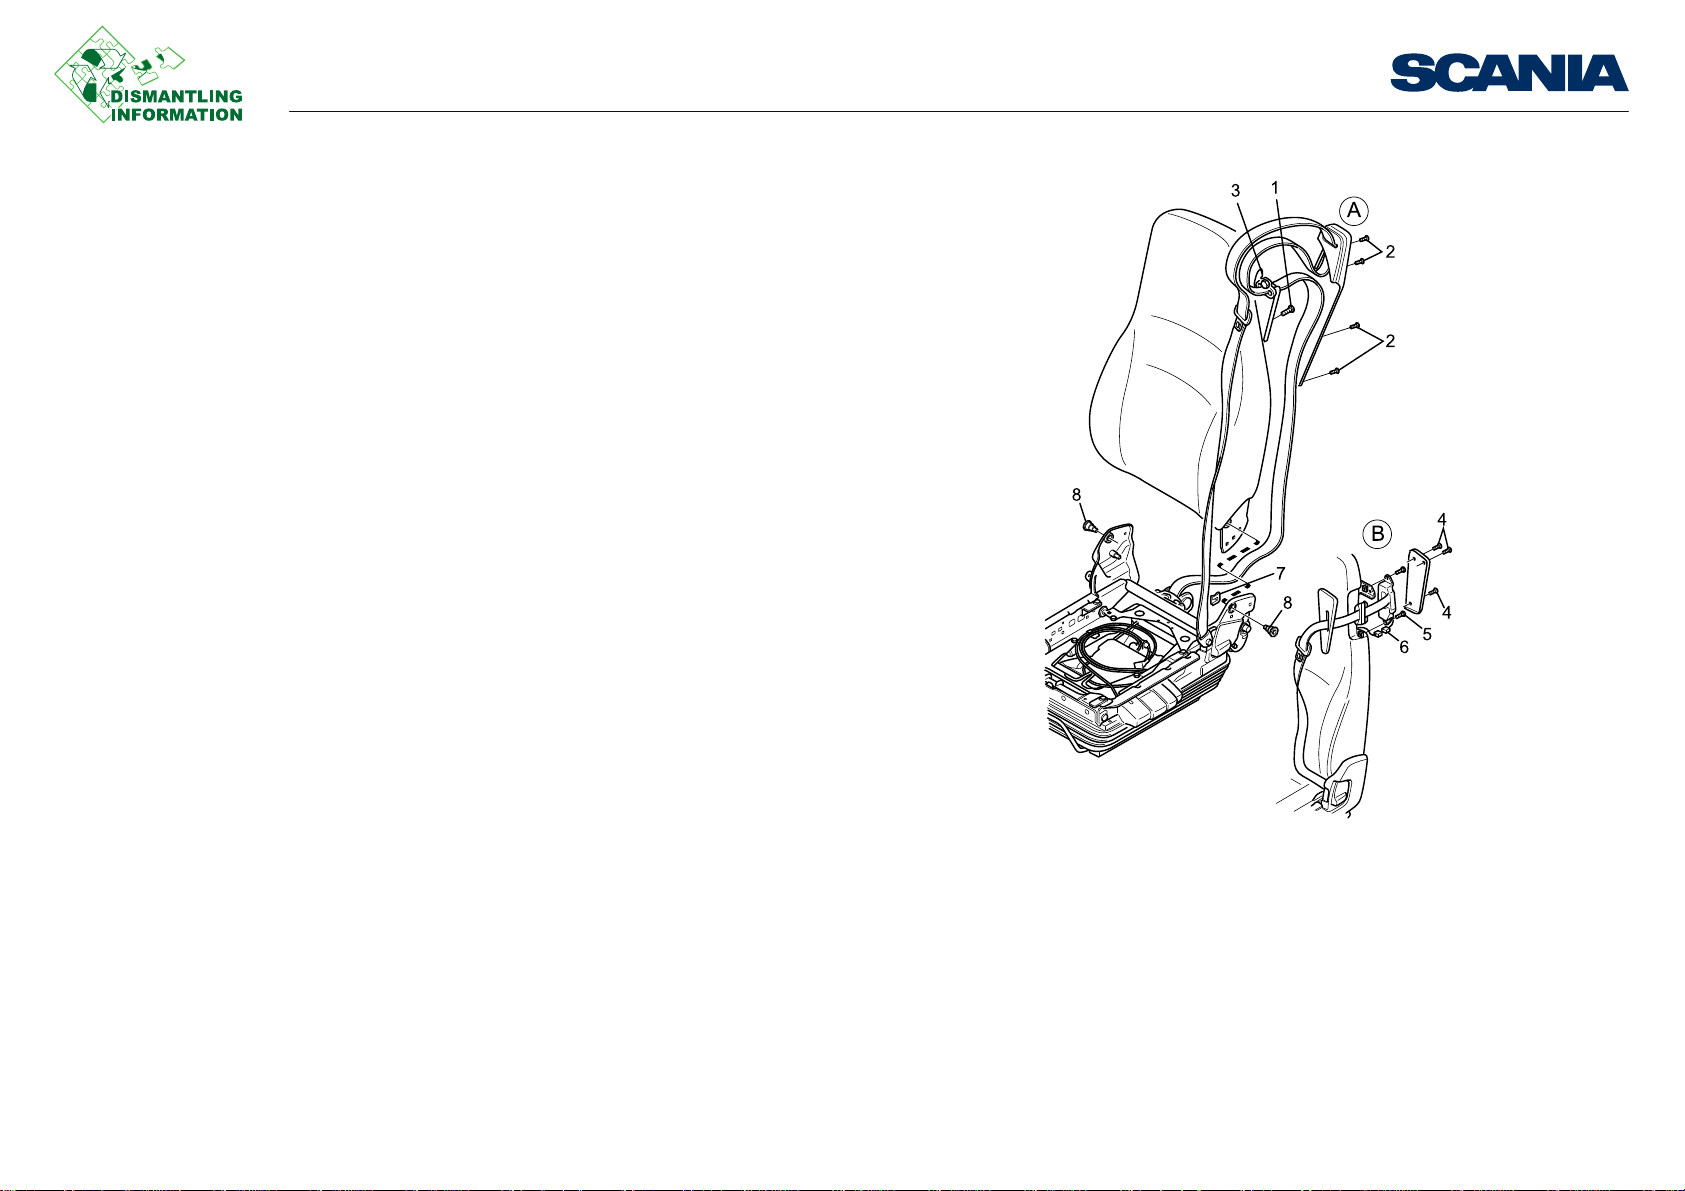
200 044
Basic and Medium seats (A), Luxury seat (B)
1. Screw
2. Screws, 4 off
3. Belt guide
4. Screws, 3 off
5. Screws, 2 off
6. Connector for belt pretensioner
7. Retaining plate
8. Screws, 2 off
Backrest
Basic and Medium seats
1. Remove the seat squab and side casings.
2. Detach the electric heating connection for the backrest on the rear of the seat, the
electrical connector for the belt pretensioner and the air hoses for the lumbar support, if fitted.
3. Remove the belt guide casing by undoing the screws (2).
4. Undo the screw (1) and remove the belt guide (3).
5. Fold the backrest forwards and remove the retaining plate (7) and undo the
screws (8) on the same side as the buckle.
6. Pry apart the brackets at the screw holes (8) and lift out the backrest.
Work description
03:22-00 Issue 1 en-GB 9 (44)
©
Scania CV AB 2012, Sweden
Page 10

Removing fixtures and fittings
200 031
Backrest, luxury seat
1. Lock washer
2. Spring
3. Spring
4. Washer
5. Lever
6. Guide 7. Lever
8. Lock washer
9. Guide
10. Cable tie
11. Plastic plug
12. End of wire
13. Lever
Luxury seat
1. Remove the seat squab and the protective casings round the seat.
2. Remove the belt and its protective casings.
3. Lift up the backrest controls and remove the plastic plug locking the adjusting
wire attachment for tilting the upper backrest. Detach the end of the wire.
4. Remove the retaining ring (8) and remove the wire from the guide (9).
5. Cut the cable tie (10).
6. Remove the retaining ring locking the wire at the hole in the seat frame and re-
move the wire.
7. Detach the electric heating connection for the backrest on the rear of the seat, the
electrical connector for the belt pretensioner and the air hoses for the lumbar support, if fitted. Cut the cable tie.
8. Remove the lock tab (7) and unscrew the screws (8) and the lock plate on the
same side as the buckle.
9. Pry apart the brackets at the screw holes (8) and lift out the backrest
Work description
03:22-00 Issue 1 en-GB 10 (44)
©
Scania CV AB 2012, Sweden
Page 11
Removing fixtures and fittings
1
2
3
4
5
6
7
8
10
9
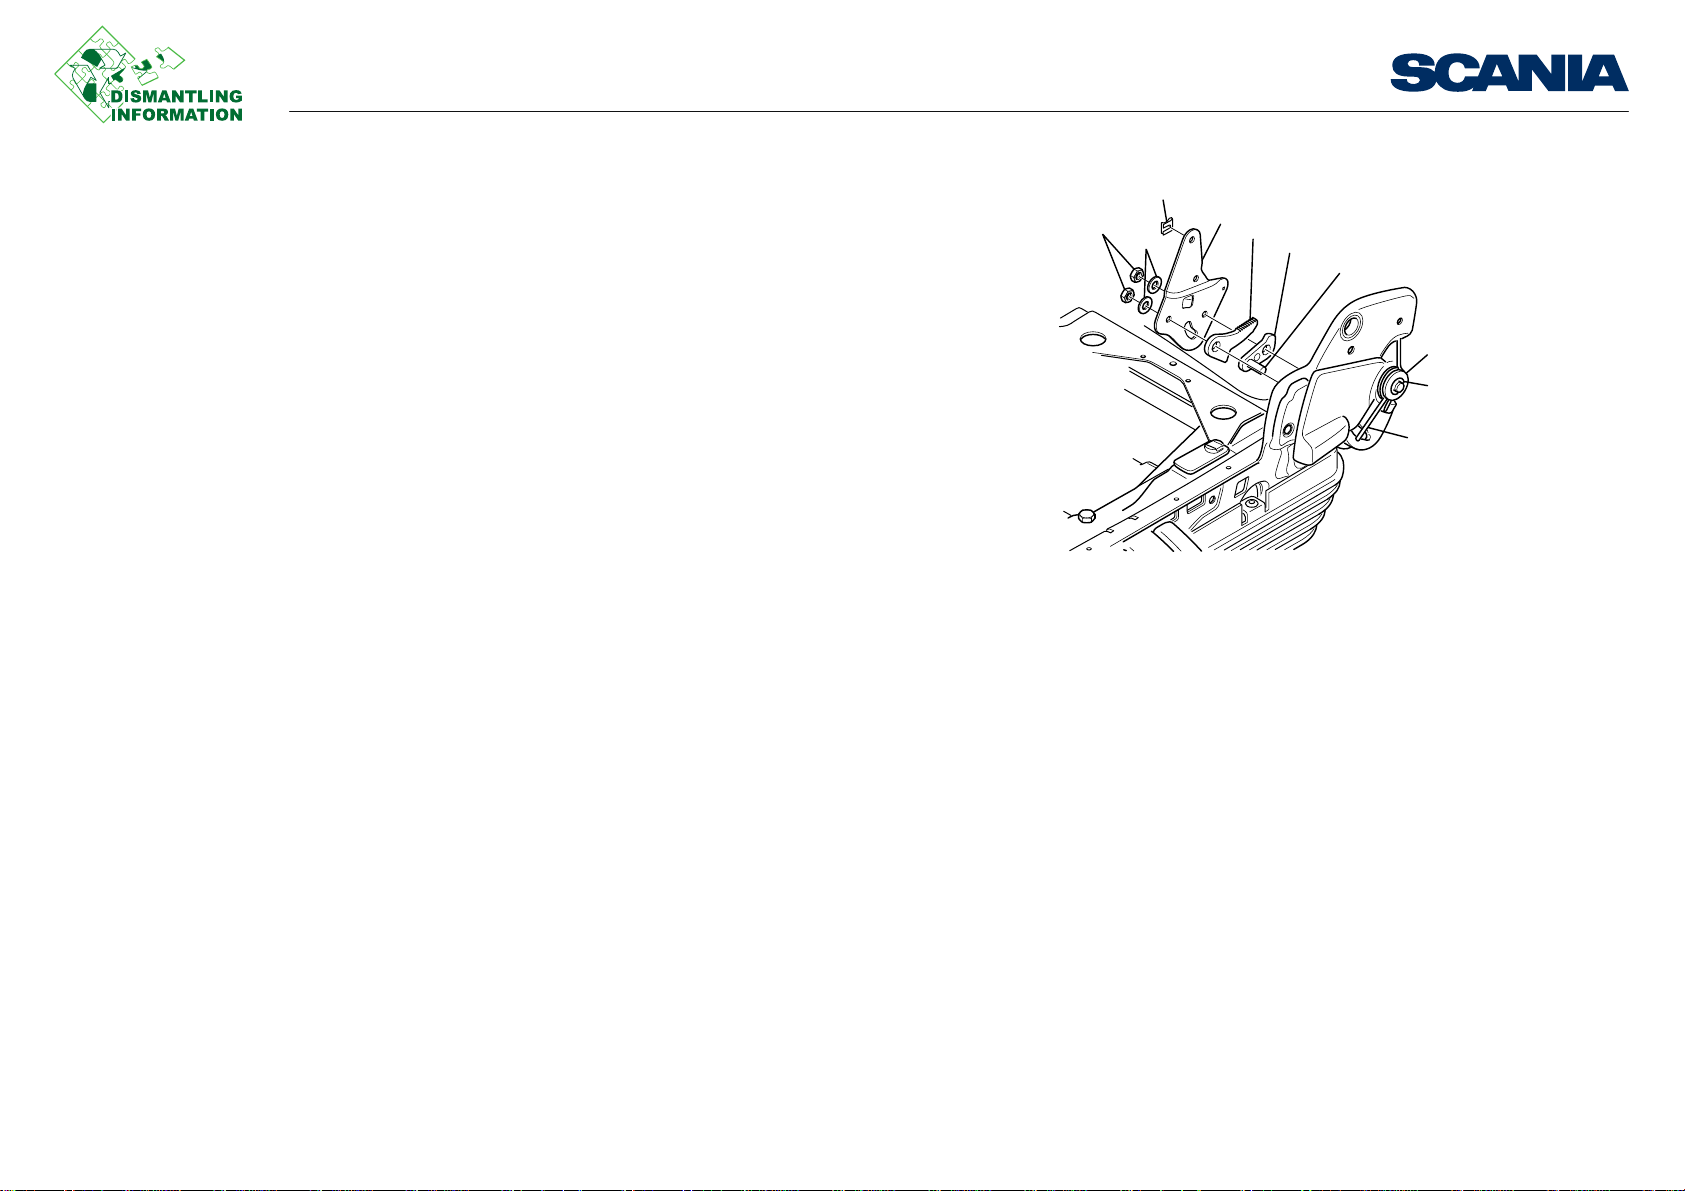
200 045
1. Locking clamp
2. Nuts, 2 off
3. Washers, 2 off
4. Metal plate
5. Toothed segment
6. Securing plate
7. Shaft
8. Spring
9. Washer
10. Lock washer
Backrest locking device
All models:
1. Remove the seat squab and backrest.
2. Detach the spring (8) from the shaft (7).
3. Undo the nuts (2) and remove the washers (3).
4. Remove the metal plate (4), toothed segment (5) and securing plate (6).
Work description
03:22-00 Issue 1 en-GB 11 (44)
©
Scania CV AB 2012, Sweden
Page 12
Removing fixtures and fittings
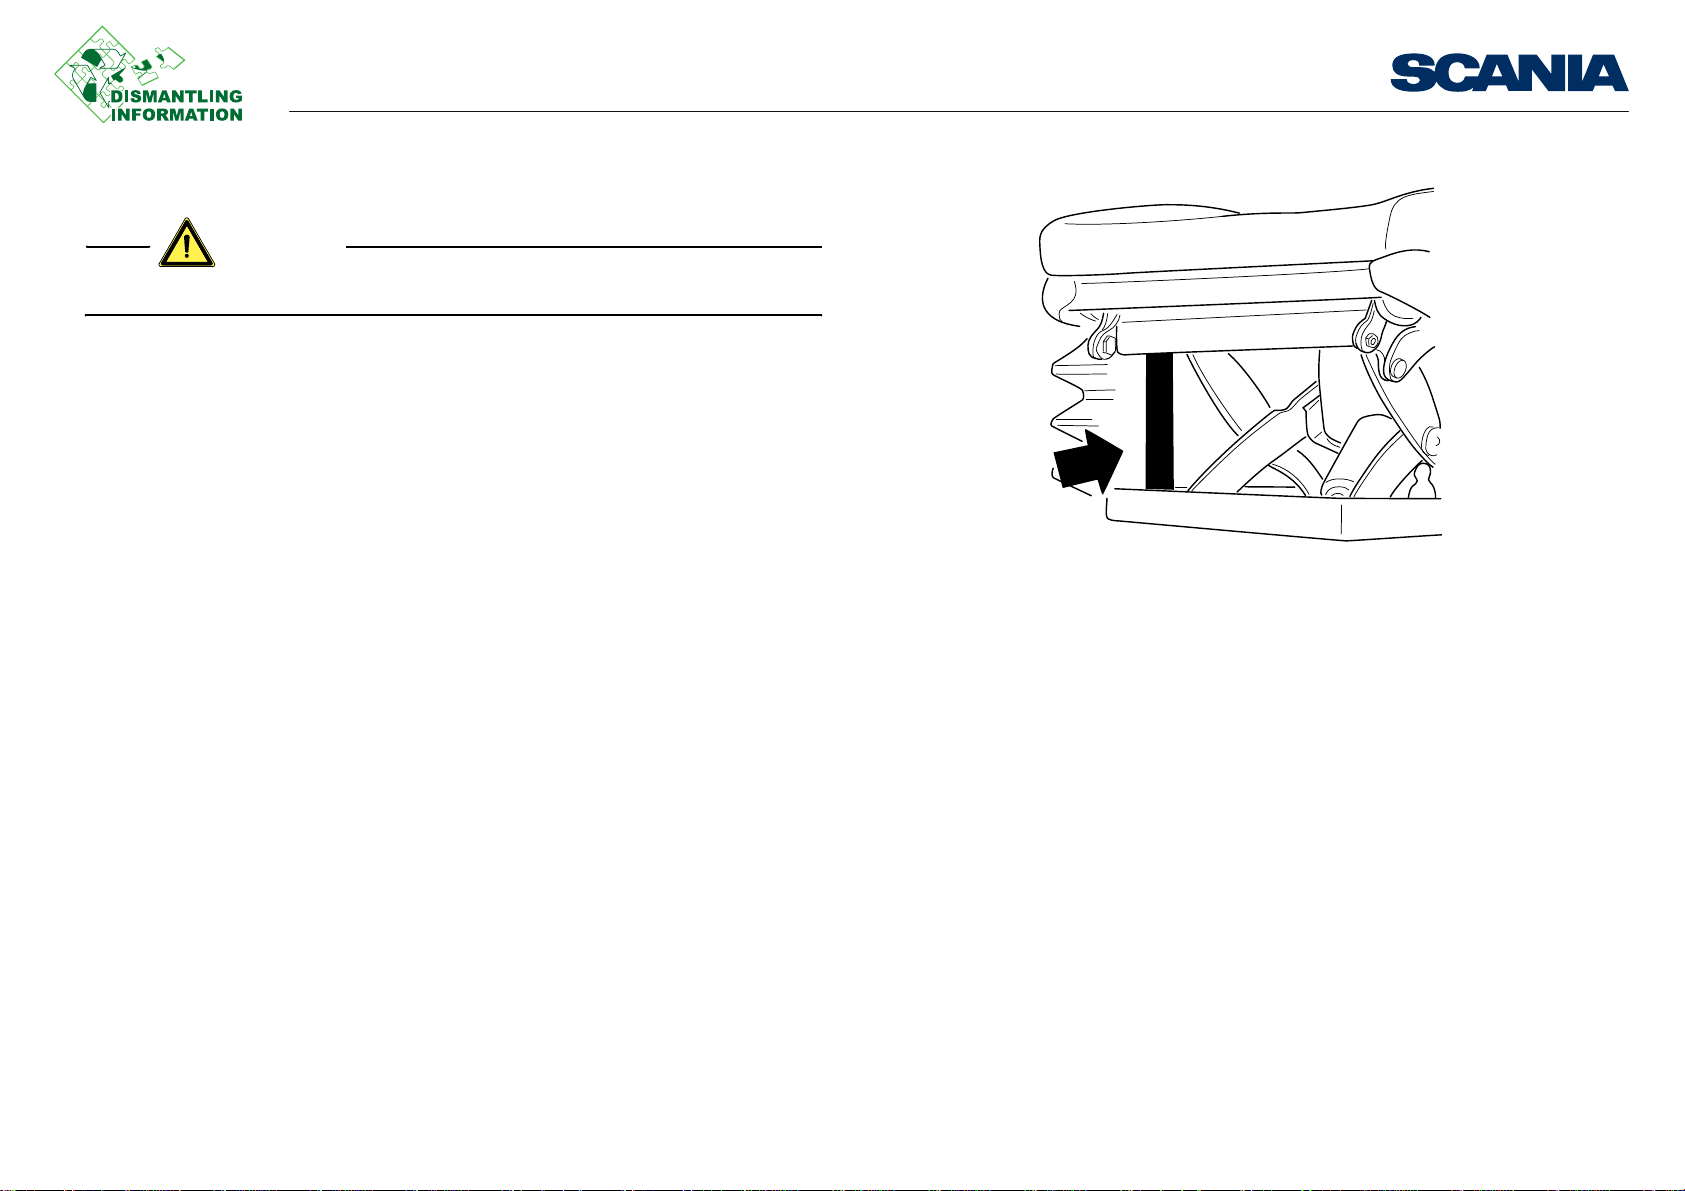
WARNING!
200 060
Shock absorbers
Secure the spring unit in its highest position with a strut.
Work description
03:22-00 Issue 1 en-GB 12 (44)
©
Scania CV AB 2012, Sweden
Page 13
Removing fixtures and fittings
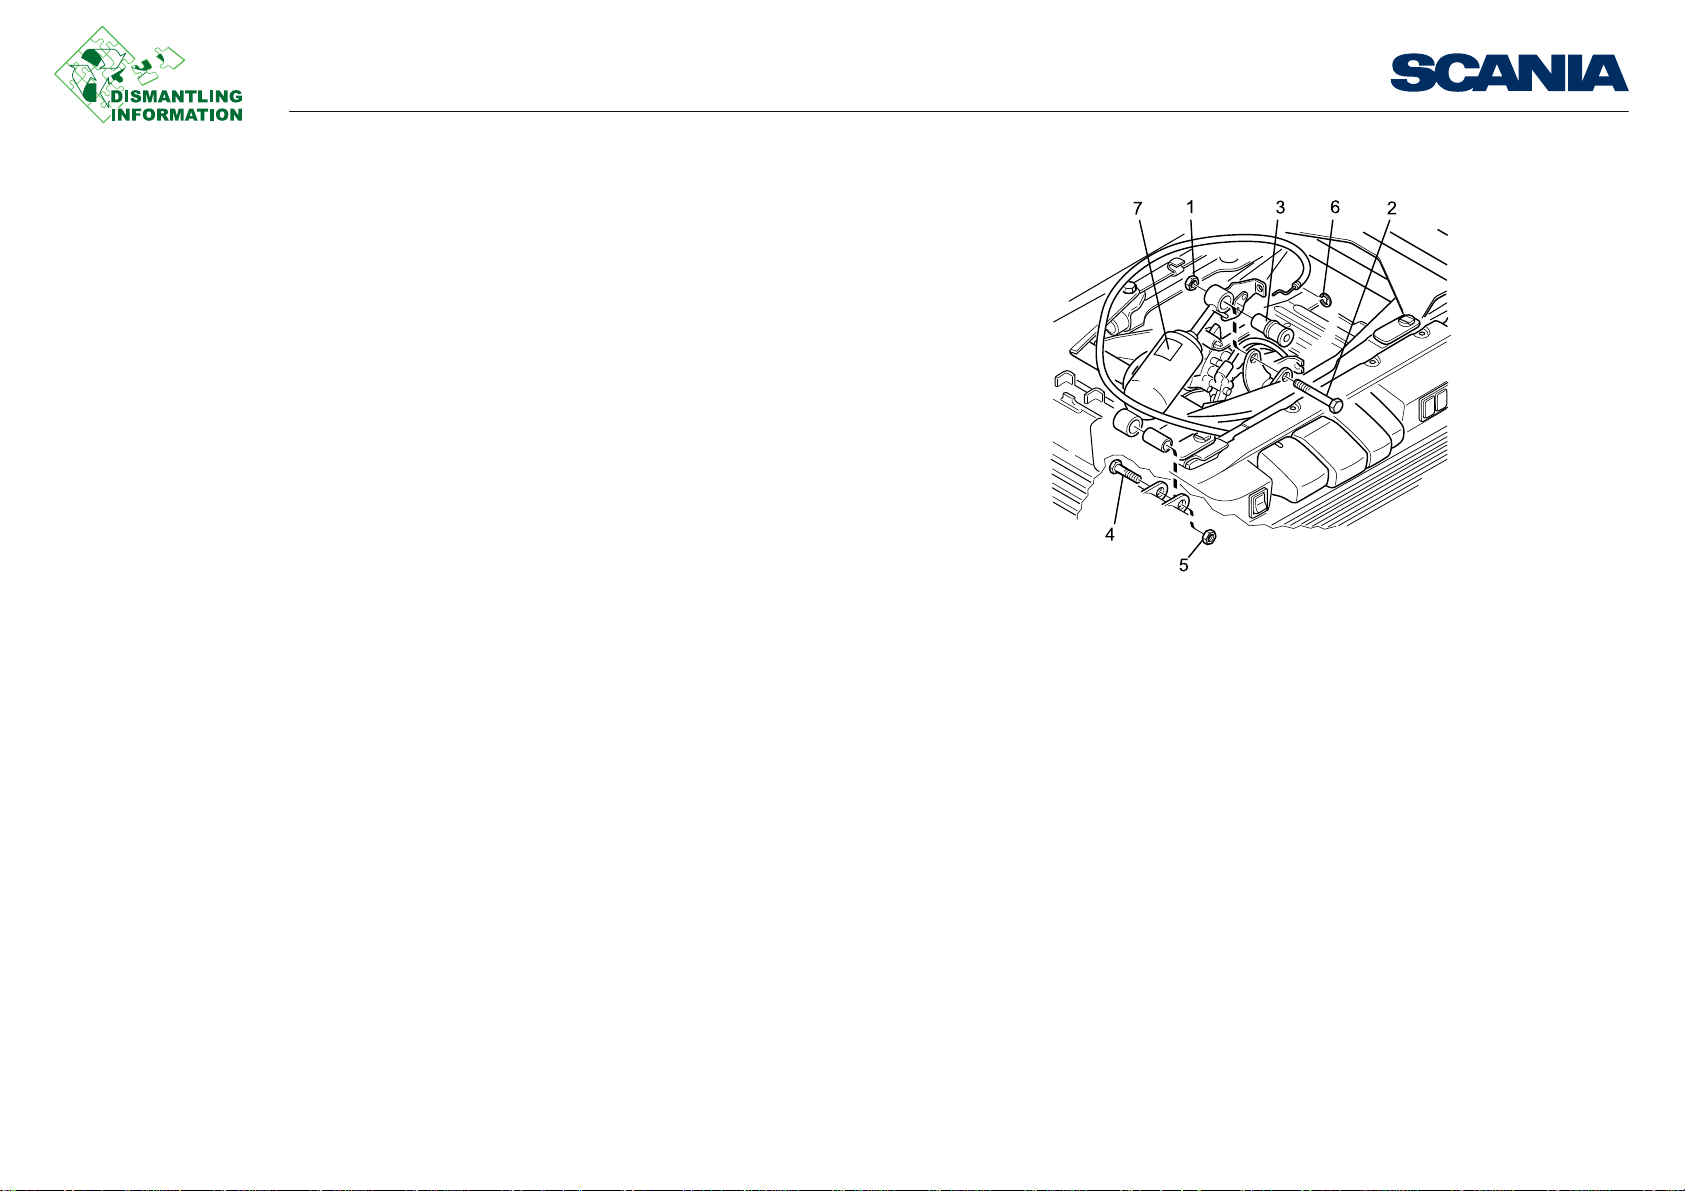
200 054
1. Nut
2. Screw
3. Sleeve
4. Screw
5. Nut
6. Lock washer
7. Marking
Remove the parts as follows:
1. Seat squab.
2. Nut (1) and screw (2).
3. Lower attachment of protection boot.
4. Screw (4) and nut (5).
5. Wire cable with lock washer (6).
Work description
03:22-00 Issue 1 en-GB 13 (44)
©
Scania CV AB 2012, Sweden
Page 14
Removing fixtures and fittings
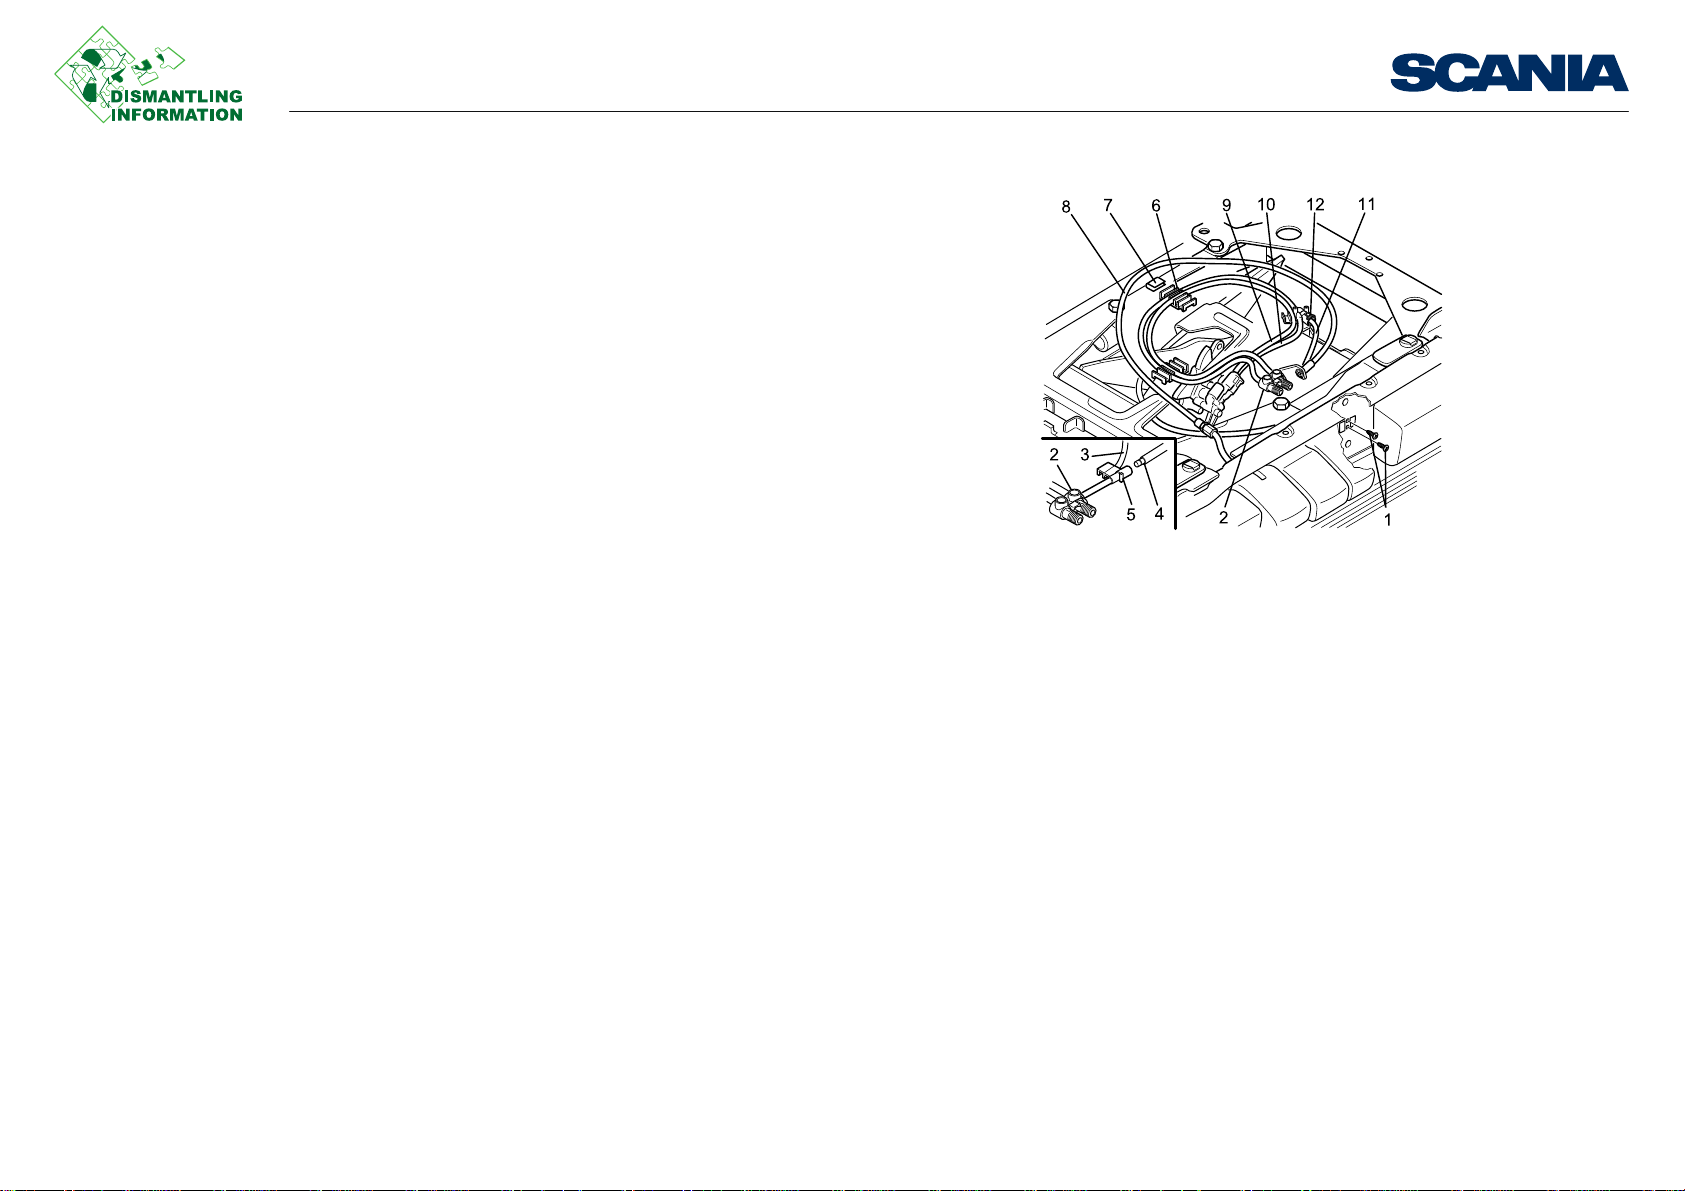
200 059
1. Screw, 2 off
2. Quick lowering valve
3. Hose, transparent
4. Hose, lumbar support
5. Connection
6. Hose holder
7. Clamp
8. Wire cable for damping adjustment
9. Hose, red
10. Hose, yellow
11. Hose, yellow (height adjustment)
Hose package
1. Remove the control for the squab lowering valve.
2. Unscrew both screws (1) and loosen the valve from behind (2).
3. Undo the hose (3, transparent) from the connection on the back of the squab and
the hose (4, lumbar support) from connection (5).
4. Undo the hose holder (6) from the clamp (7) and release the wire cable for the
damping adjustment (8) from the holder (6).
5. Undo the hose (9, red) and the hose (10, yellow) from the valve for the height
adjustment and the hose (11, yellow) from the Y coupling (12).
Work description
03:22-00 Issue 1 en-GB 14 (44)
©
Scania CV AB 2012, Sweden
Page 15

Removing fixtures and fittings
WARNING!
Safety belt with belt pretensioner
• Cut the power to the vehicle before starting work.
• The belt pretensioner contains an explosive charge. Do not perform any other
work besides that described here.
• Carry the belt pretensioner with the mouth of the detonator pipe pointing downwards. Do not hold your fingers over the detonator pipe or on the wire rope.
• The belt pretensioner must be handled and stored in compliance with local regulations.
Work description
03:22-00 Issue 1 en-GB 15 (44)
©
Scania CV AB 2012, Sweden
Page 16
Removing fixtures and fittings
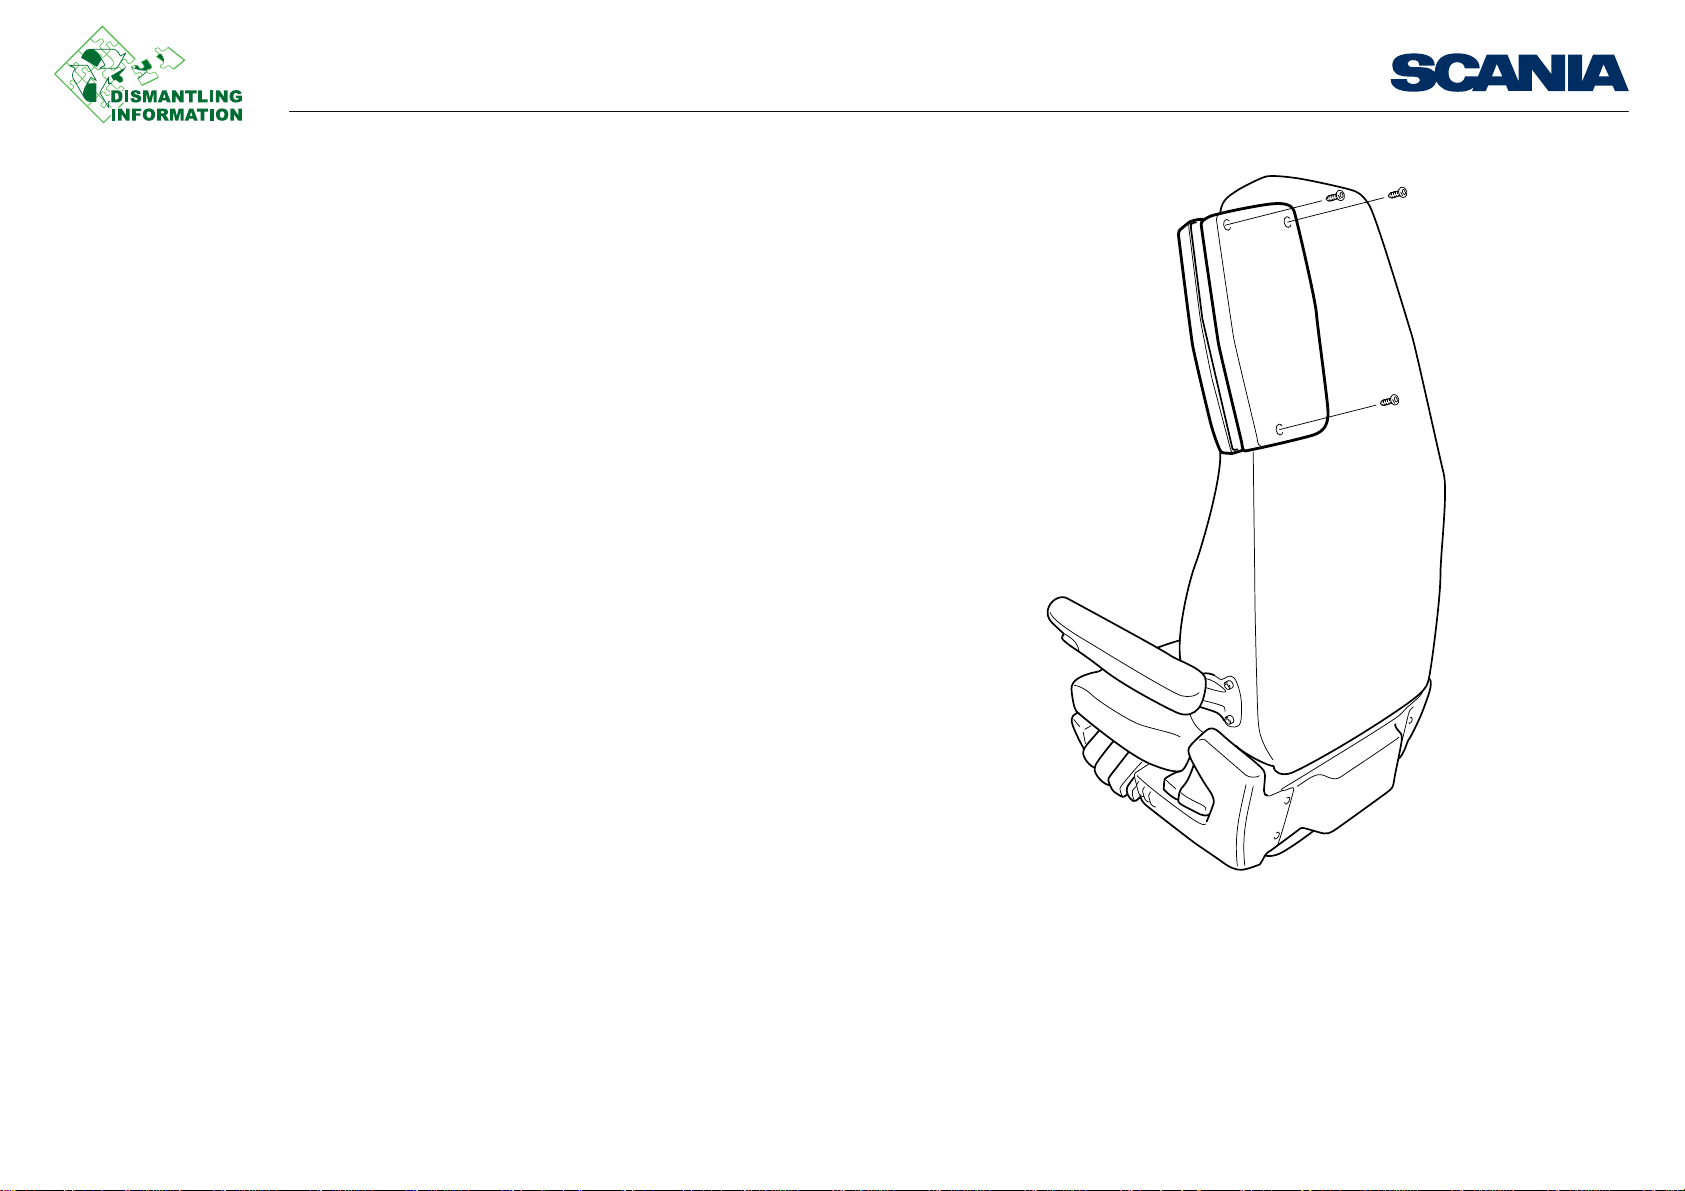
136 995
Luxury seat
1. Cut the belt.
2. Push the upper part of the backrest forward as far as it will go.
3. Remove the cover retaining scre ws.
Work description
03:22-00 Issue 1 en-GB 16 (44)
©
Scania CV AB 2012, Sweden
Page 17

Removing fixtures and fittings
IMPORTANT!
1
2
3
1
1. Screws
2. Cable harness
3. Inertia reel
4. Disconnect the cable harness (2) under the belt pretensioner.
5. Remove the inertia reel (3) and detonator pipe.
6. Remove the screws (1).
Handle and store the belt pretensioner in compliance with local regulations.
Work description
03:22-00 Issue 1 en-GB 17 (44)
©
Scania CV AB 2012, Sweden
Page 18

Removing fixtures and fittings
IMPORTANT!
1
137 469
1
137 468
1. Cable harness
Medium seat
1. Remove the rear lower casing.
2. Cut the belt.
3. Disconnect the cable harness.
4. Remove the screw for the inertia reel.
5. Remove the inertia reel and the detonator pipe.
Work description
Handle and store the belt pretensioner in compliance with local regulations.
03:22-00 Issue 1 en-GB 18 (44)
©
Scania CV AB 2012, Sweden
Page 19

Removing fixtures and fittings
Sleeping equipment
Lower bed
1. Remove the mattress pad, mattress and support pad.
2. Detach the damping cylinder on the bottom plate.
3. Remove the bottom plate.
4. Detach the bracket for the lower bunk mounting device.
Work description
03:22-00 Issue 1 en-GB 19 (44)
©
Scania CV AB 2012, Sweden
Page 20
Removing fixtures and fittings
5. Undo the bed support screws.
Press up the blanking piece with a screwdriver or similar.
Work description
03:22-00 Issue 1 en-GB 20 (44)
©
Scania CV AB 2012, Sweden
Page 21
Removing fixtures and fittings
Note:
6. Remove the bed support and mounting bracket. Lift out the bed.
2 persons are required to lift out the bed.
Work description
03:22-00 Issue 1 en-GB 21 (44)
©
Scania CV AB 2012, Sweden
Page 22

Removing fixtures and fittings
300 mm
15 mm
212 164
Separator inserts
Lower bed, extendable
1. Fabricate 2 separator inserts from squa re tube or similar. The dimensions are to
be 15x15x300 mm. These are later engaged in the rails when the bed is to be removed.
2. Remove the passenger seat.
Work description
03:22-00 Issue 1 en-GB 22 (44)
©
Scania CV AB 2012, Sweden
Page 23
Removing fixtures and fittings
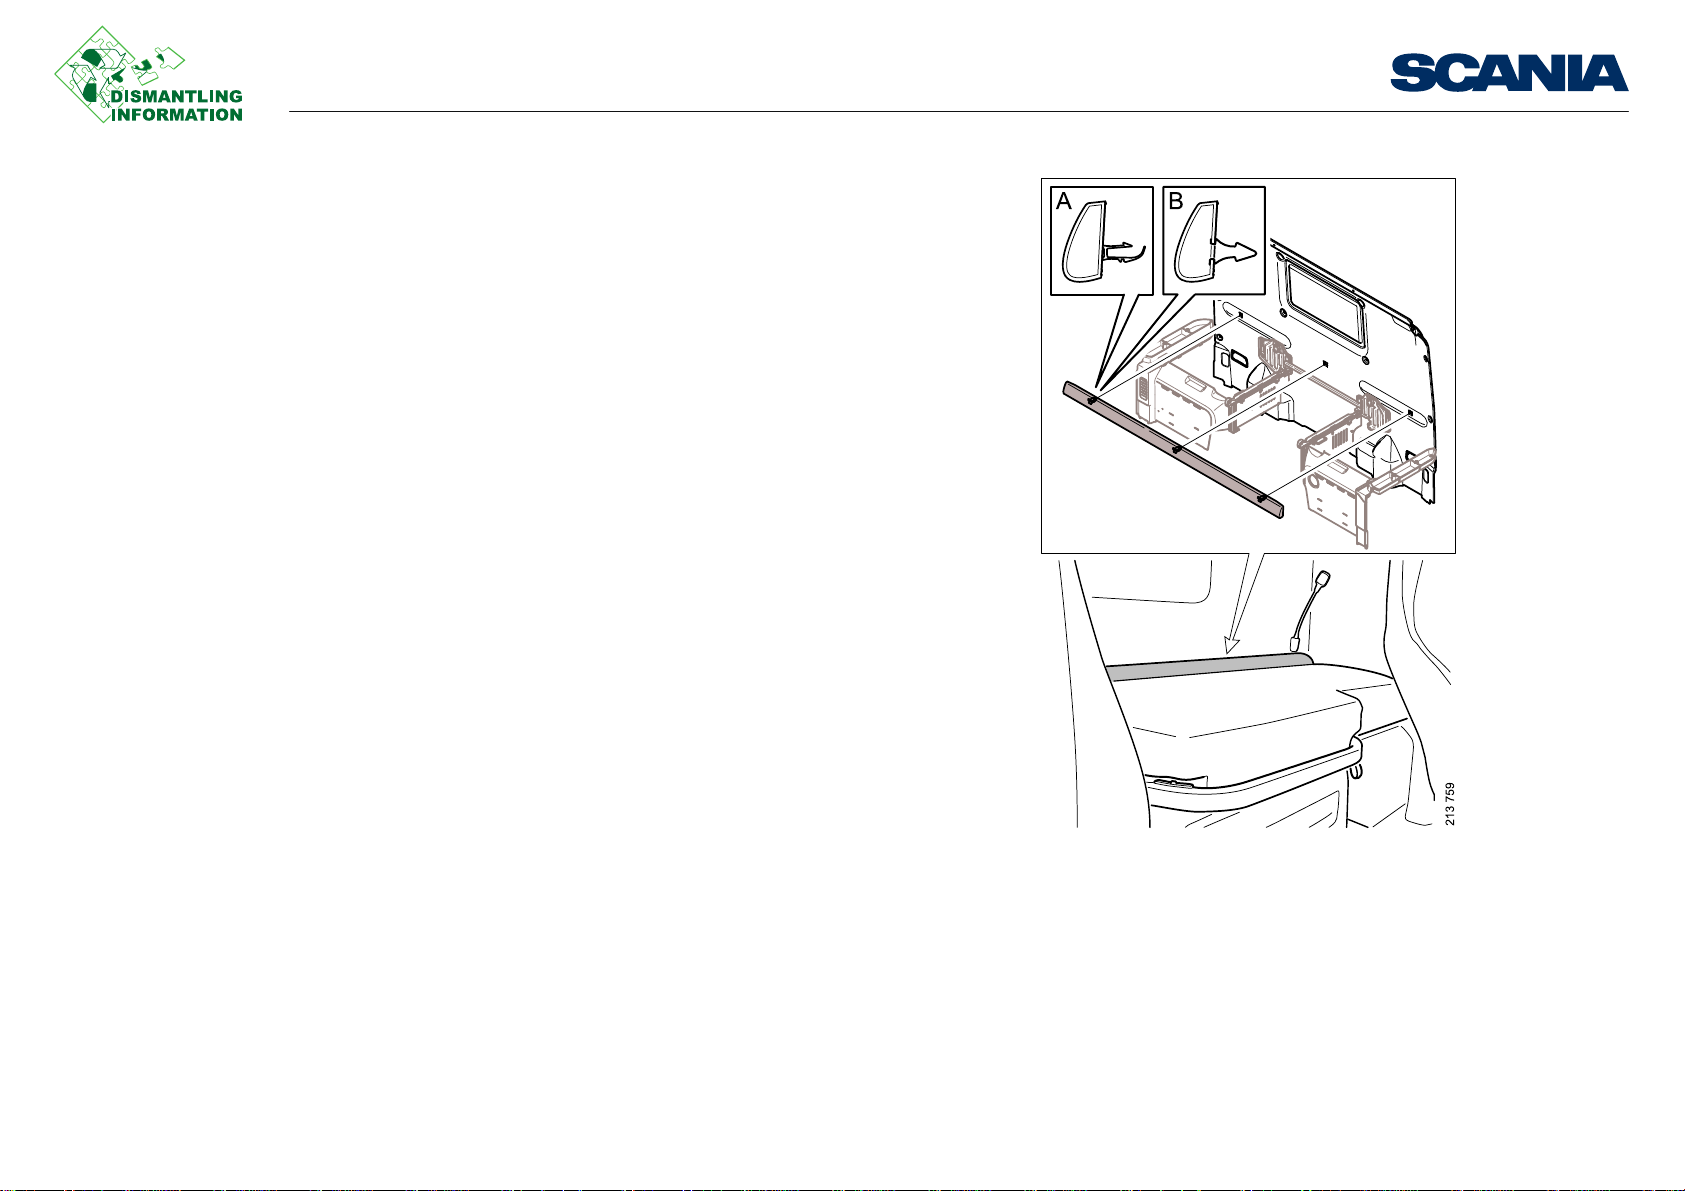
A. Plastic clamp
B. Metal clamp
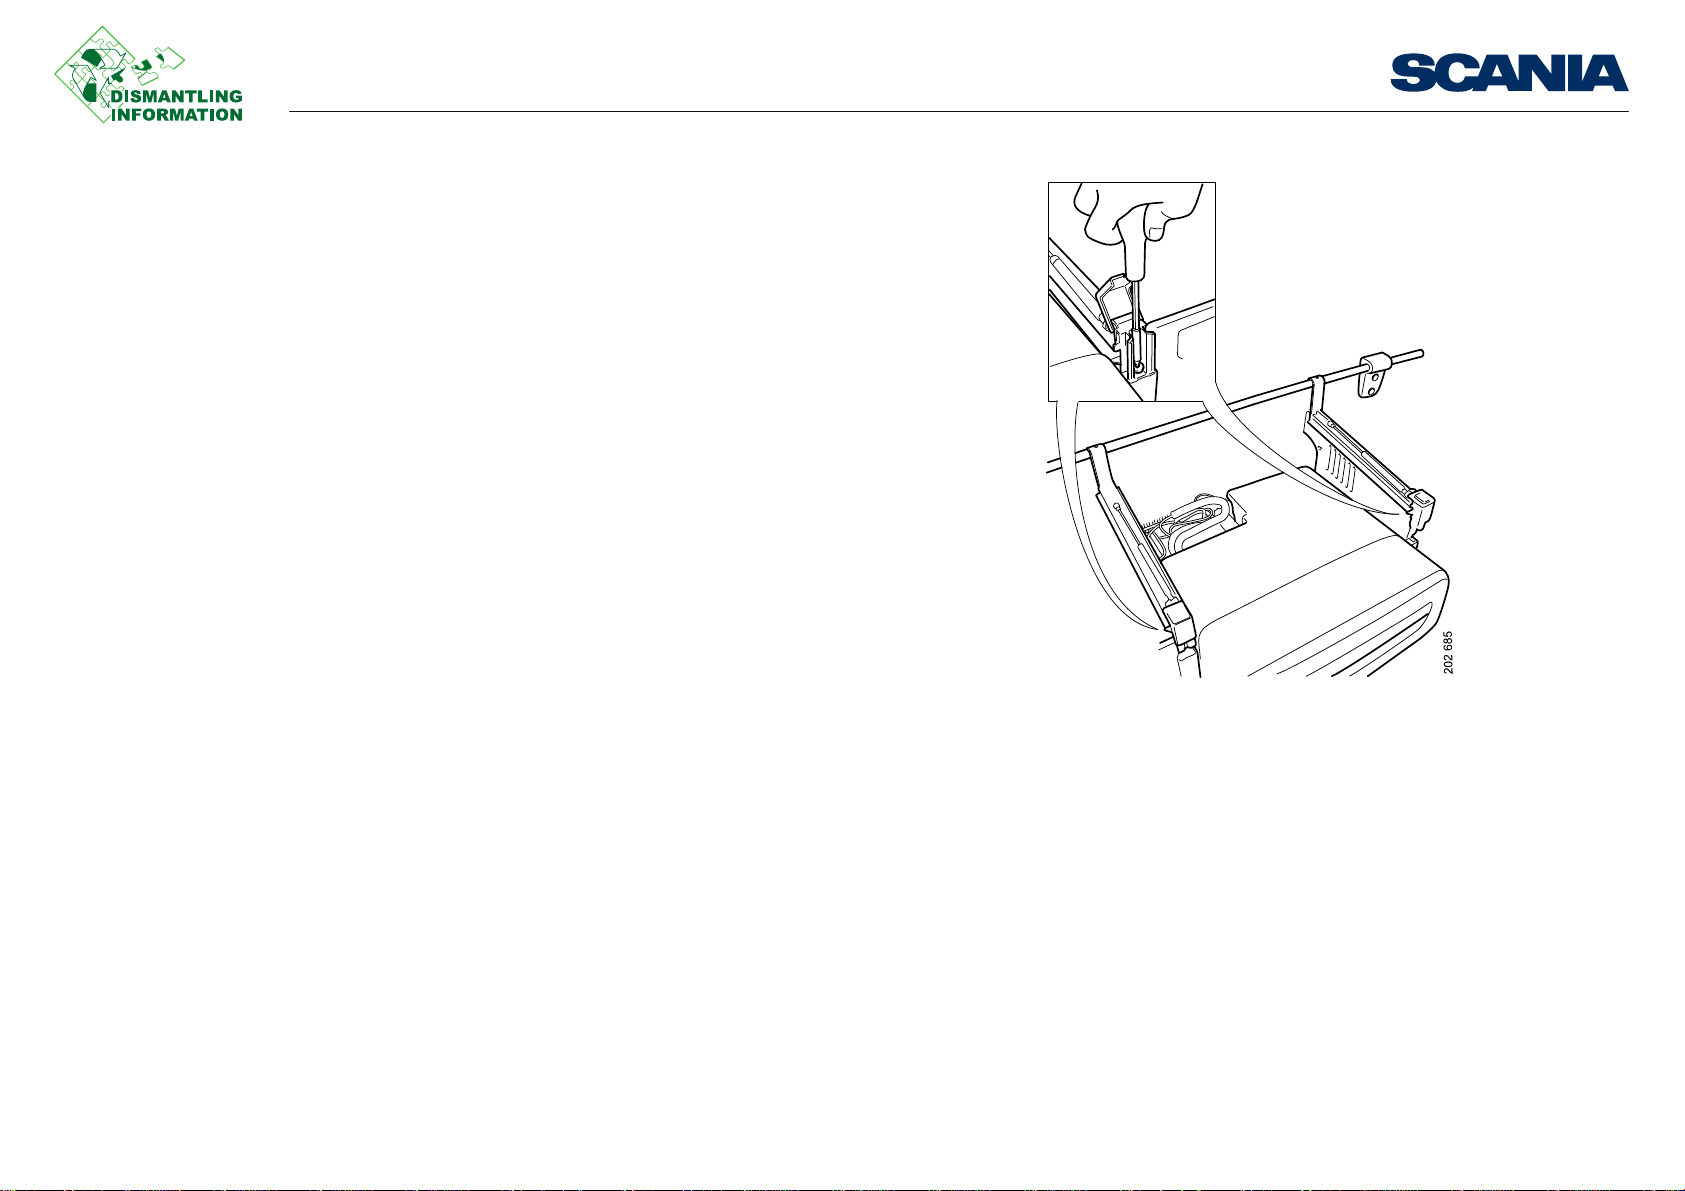
3. Remove the seal between the bed and wall.
Work description
03:22-00 Issue 1 en-GB 23 (44)
©
Scania CV AB 2012, Sweden
Page 24

Removing fixtures and fittings
212 166
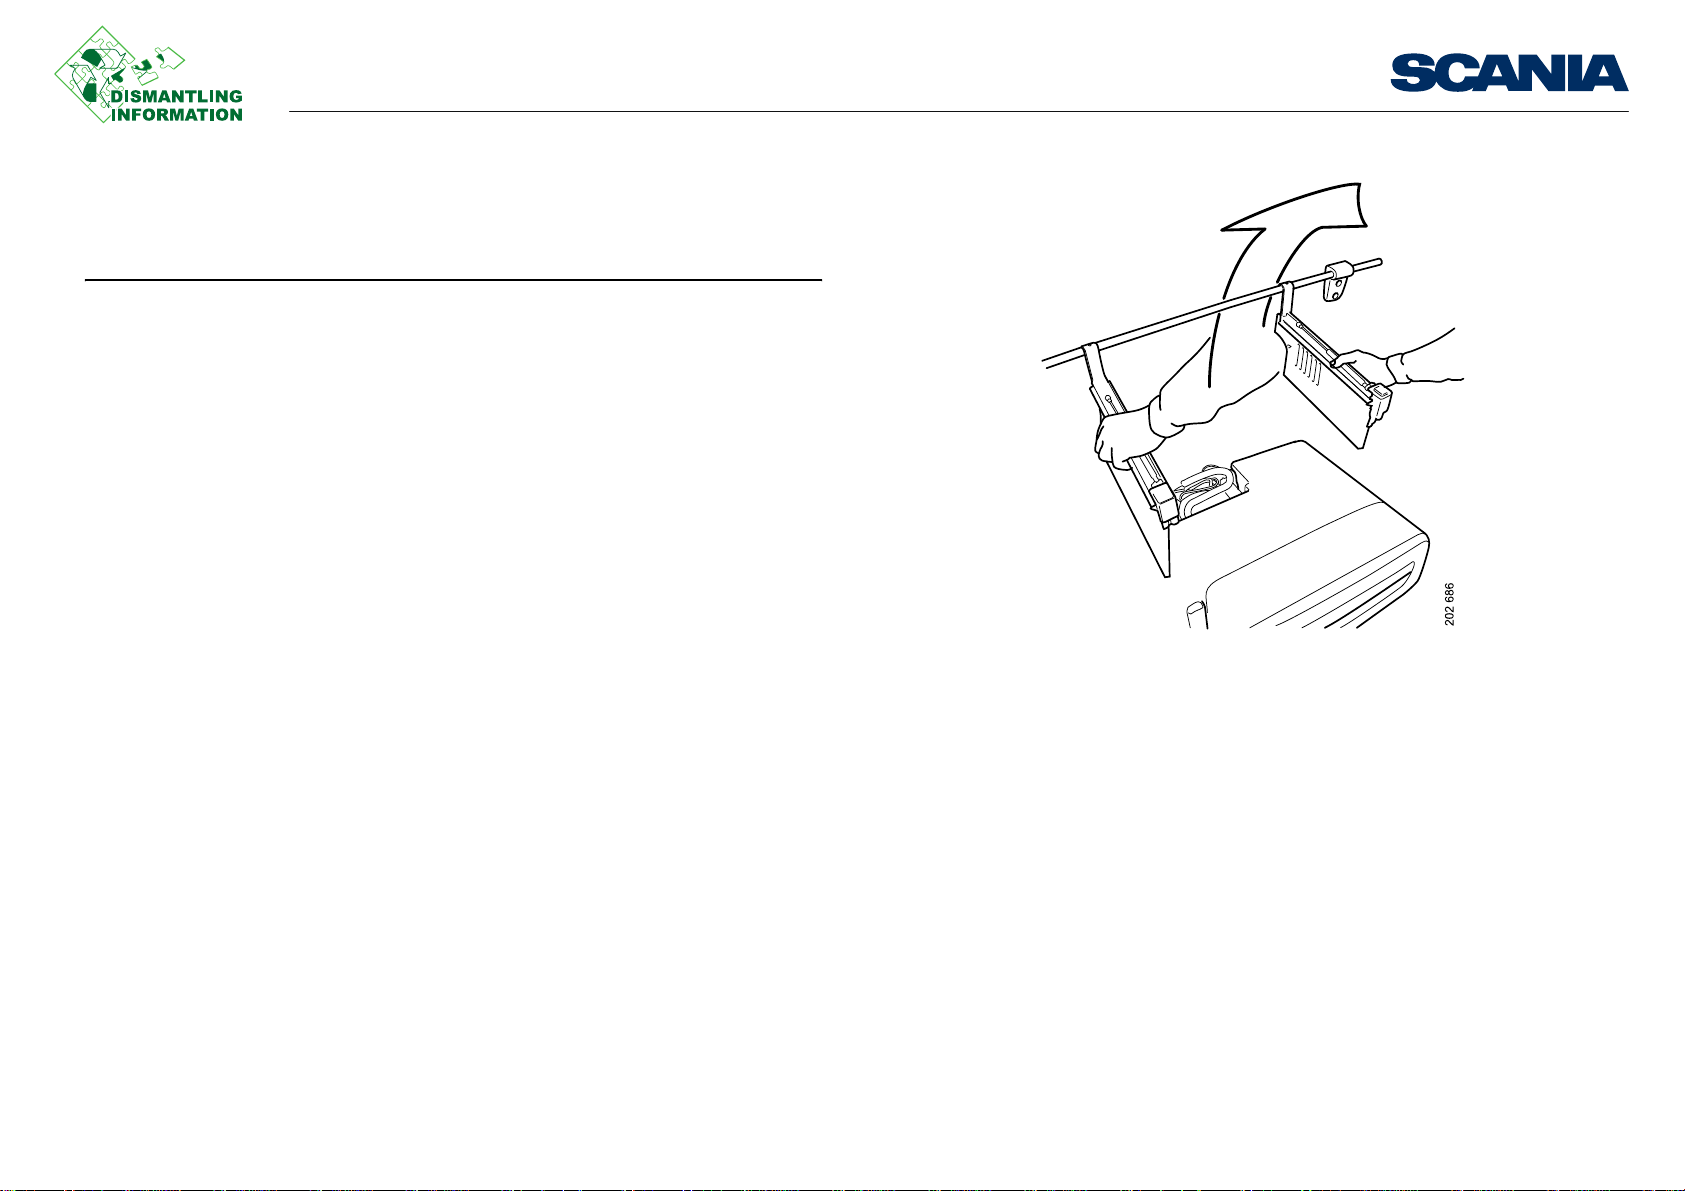
4. Pull the latch to fold up the bed.
5. Place the separator inserts on the rails. These prevent the bed from locking when
it is folded down again.
6. Detach the gas springs on the underside of the bed.
7. Fold down the bed.
Work description
03:22-00 Issue 1 en-GB 24 (44)
©
Scania CV AB 2012, Sweden
Page 25

Removing fixtures and fittings
Note:
212 167
8. Unclip the bed from the wall brackets and lift out the bed.
2 persons are required to lift out the bed.
Work description
03:22-00 Issue 1 en-GB 25 (44)
©
Scania CV AB 2012, Sweden
Page 26

Removing fixtures and fittings
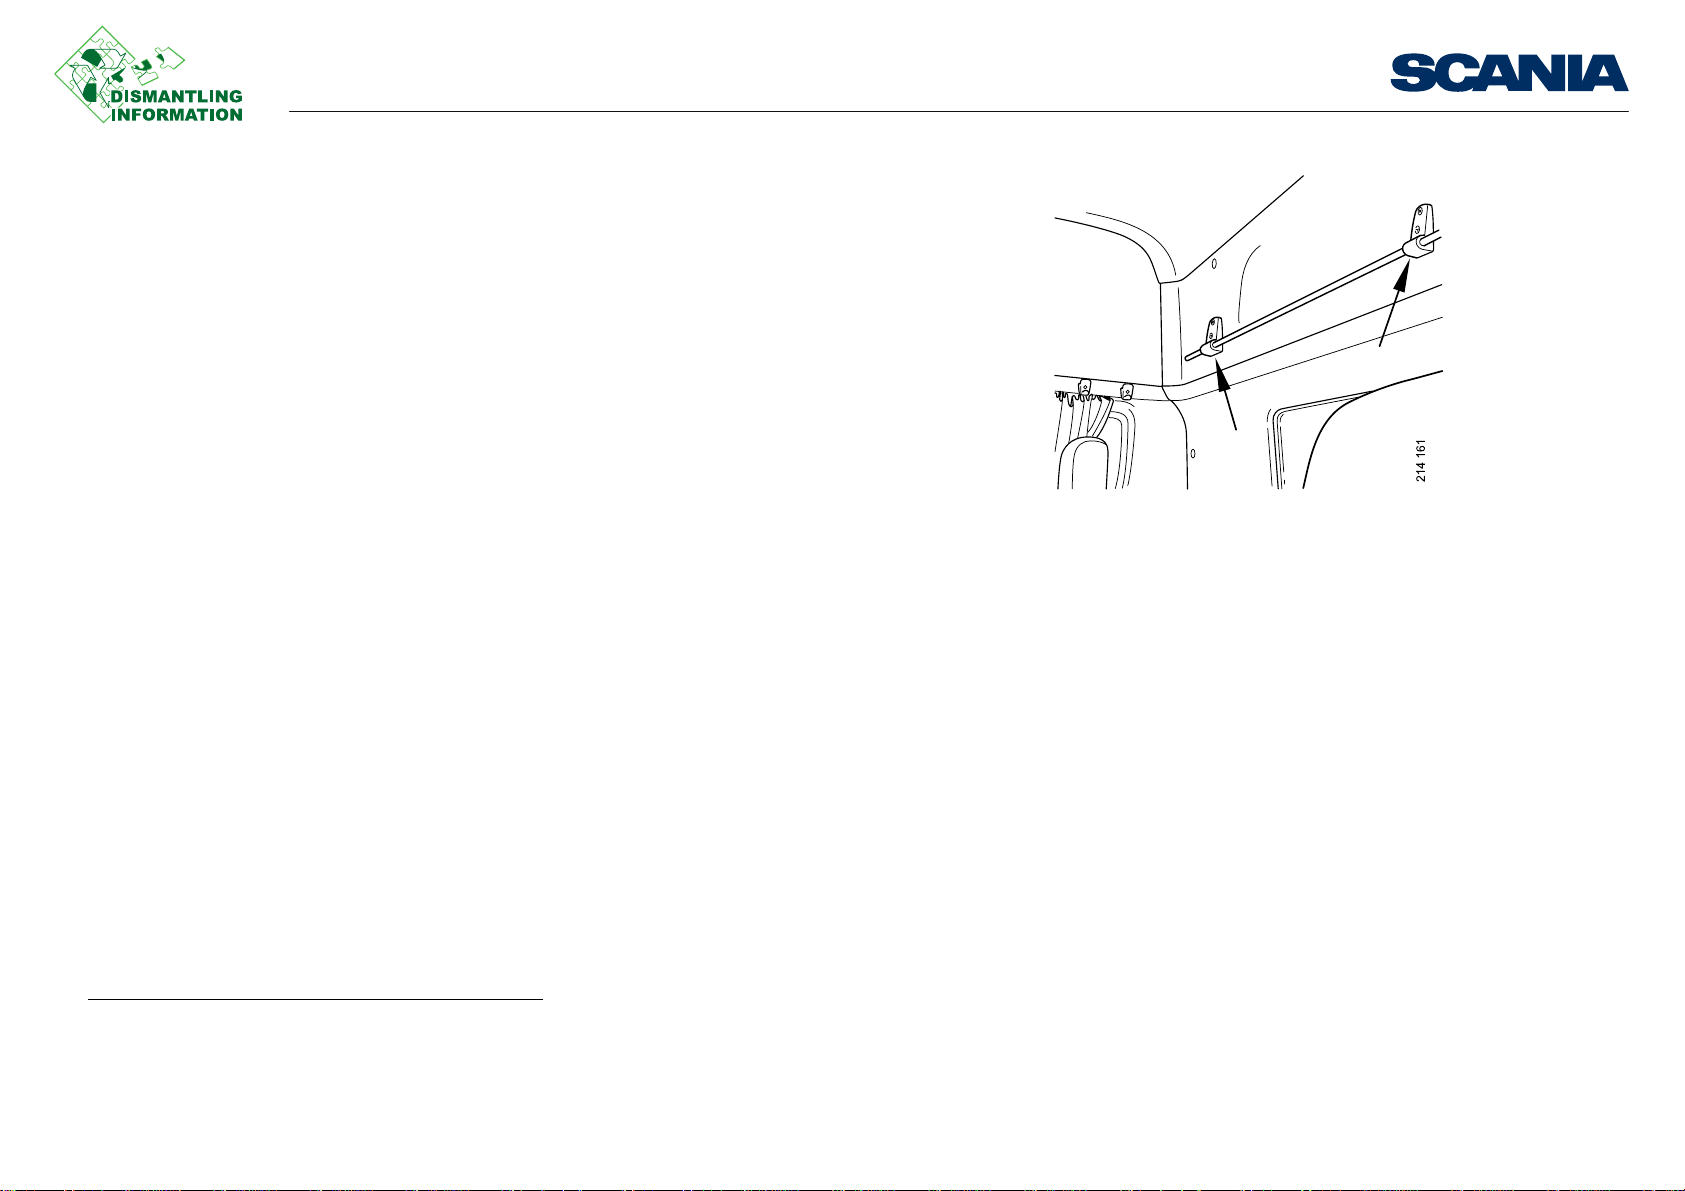
Note:
211 880
Upper bed
Remove the bed by unclipping the safety net and removing the belt hooks in the roof.
Bend back the locking tabs on the bed wall brackets.
2 persons are required to lift out the bed.
Work description
03:22-00 Issue 1 en-GB 26 (44)
©
Scania CV AB 2012, Sweden
Page 27

Removing fixtures and fittings
A
B
A
A
B
B
Storage
Front lower storage in G and R cab
Remove the parts in the following order:
1. Covers under the instrument panel to gain access to the 3 hidden screws of the
storage box and screws (A and B).
2. Pull out the storag e box to disconnect the cigarette lighter connector.
Work description
03:22-00 Issue 1 en-GB 27 (44)
©
Scania CV AB 2012, Sweden
Page 28

Removing fixtures and fittings
3. Disconnect the cigarette lighter connector.
4. Remove the storage box.
Work description
03:22-00 Issue 1 en-GB 28 (44)
©
Scania CV AB 2012, Sweden
Page 29

Removing fixtures and fittings
IMPORTANT!
R19 Highline roofshelf
The work description describes how to remove the entire roofshelf.
First remove the following parts:
• Driver's seat
• Passenger seat
•Upper bed
• Curtain rail
• Curtain retainer
• Coat hooks and lamps
• Wall and ceiling panels according to description above.
This involves heavy lifting, so some of the work must be carried out by 2 people.
1
1
Work description
326 510
1. Remove the two-way radio, tachograph and switch panels.
326 515
1. Option
03:22-00 Issue 1 en-GB 29 (44)
©
Scania CV AB 2012, Sweden
Page 30

Removing fixtures and fittings
326 516
1
2
2. Remove the trim panels by first pressing them upwards and then lifting them out.
– The outer trim panels are hooked into the roofshelf.
– Panels in the middle are attached with 4 hooks.
Work description
3. Remove the shelf in the centre compartment and the shelves above the passenger
area.
4. Remove the gas springs for the hatches from the inner bracket. Remove all hatch-
es.
326 517
03:22-00 Issue 1 en-GB 30 (44)
©
Scania CV AB 2012, Sweden
Page 31

Removing fixtures and fittings
326 518
5. Remove the screws securing the lower panel of the roofshelf. The two-way radio
panel will come with it.
6. Remove all electrical connections.
7. Remove the roofshelf.
Work description
03:22-00 Issue 1 en-GB 31 (44)
©
Scania CV AB 2012, Sweden
Page 32
Removing fixtures and fittings
Panels
The work description shows how to remove the wall and ceiling panels (upper rear
panel, ceiling side panel and ceiling panel) in the cab of R19 Topline.
Rear wall panel
In order to remove the ceiling panels, the wall panels and passenger seat must be removed first.
Remove the parts in the order below:
Work description
1. Upper bed.
2. Brackets for bed mounting device.
1
1
1. Option
03:22-00 Issue 1 en-GB 32 (44)
©
Scania CV AB 2012, Sweden
Page 33

Removing fixtures and fittings
3. Clamp screws (8 off) or clamps that secure the upper rear panel to the cab struc-
ture.
The 2 lower clamp screws or clamps of the ceiling panels are hidden under the
wall panel. So remove the rear wall panel to gain access to the clamp screws.
Work description
03:22-00 Issue 1 en-GB 33 (44)
©
Scania CV AB 2012, Sweden
Page 34
Removing fixtures and fittings
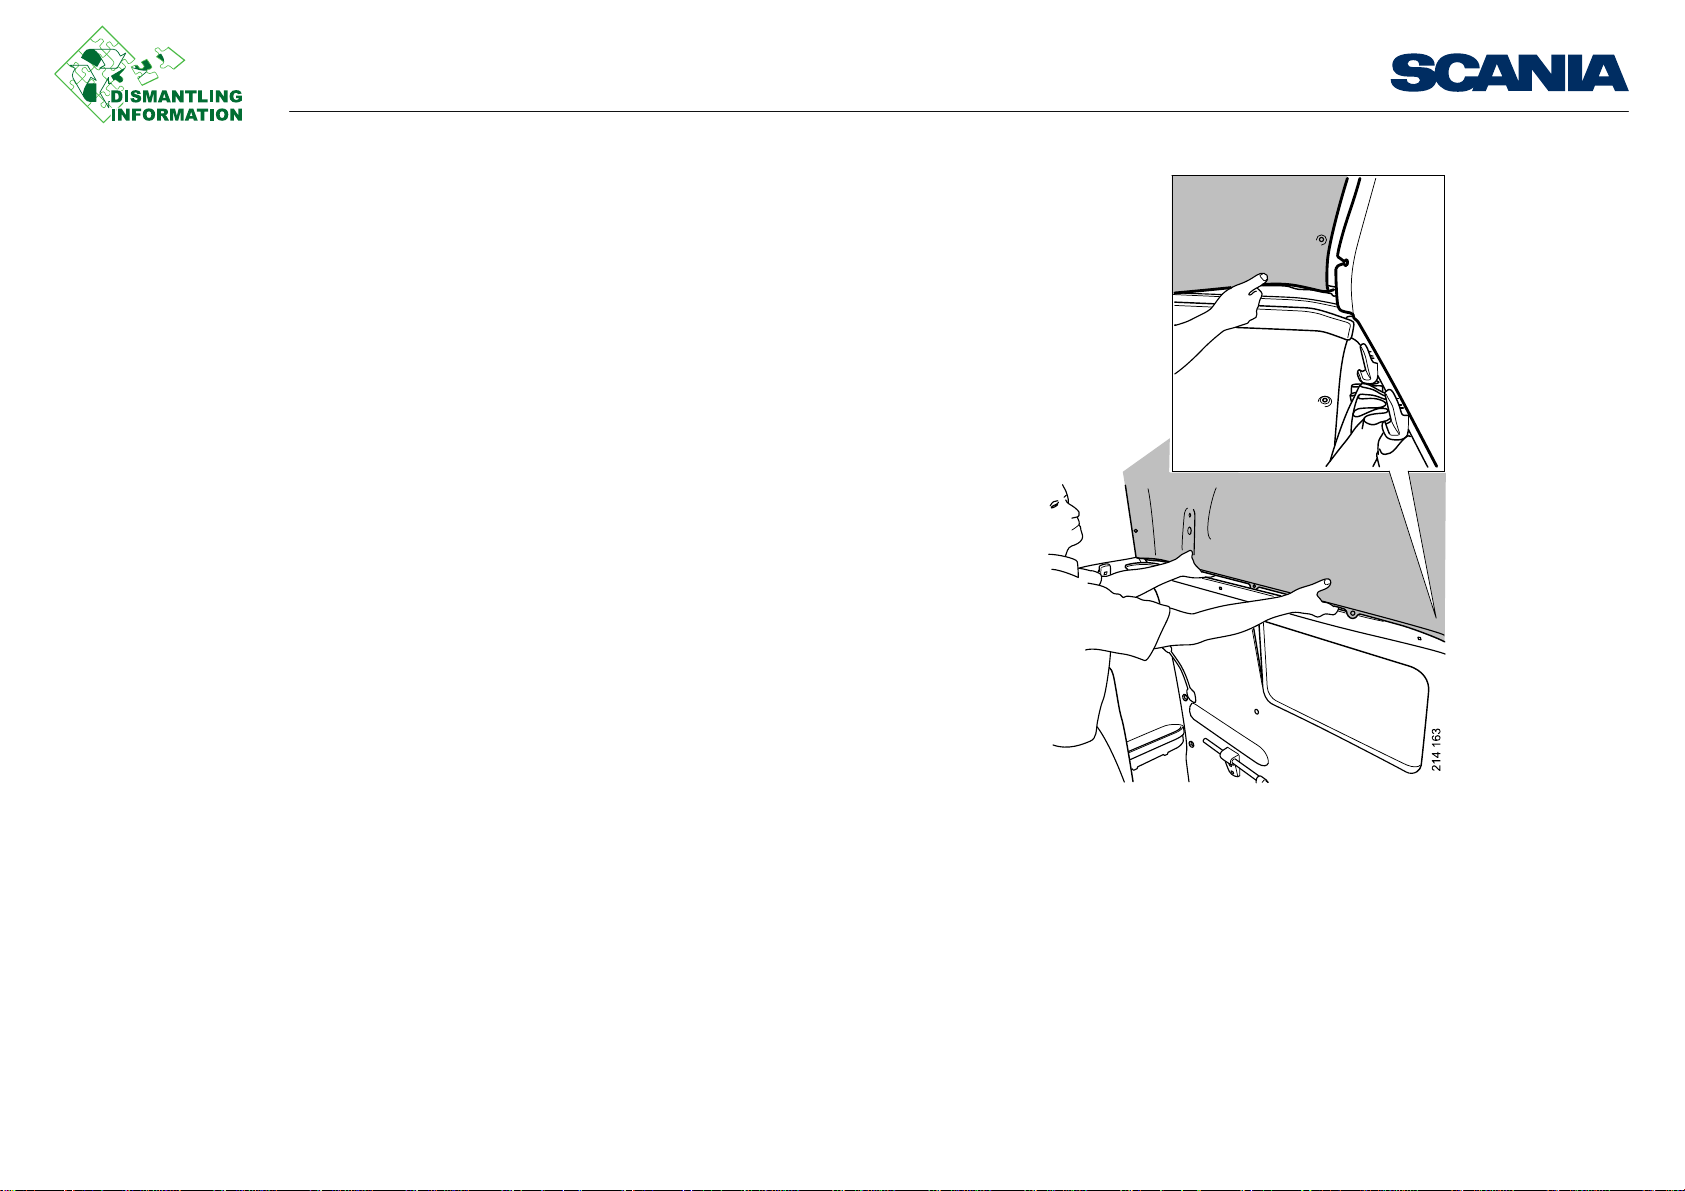
4. Undo the upper rear panel by lifting it upwards slightly and then pulling it out-
wards from the centre.
Work description
03:22-00 Issue 1 en-GB 34 (44)
©
Scania CV AB 2012, Sweden
Page 35

Removing fixtures and fittings
Side panels
Remove the panels in the order below:
1. Door trim panels on front door pillar.
Work description
03:22-00 Issue 1 en-GB 35 (44)
©
Scania CV AB 2012, Sweden
Page 36

Removing fixtures and fittings
Note:
2. Door trim pane ls above door
The screw is under the curtain rail.
Work description
03:22-00 Issue 1 en-GB 36 (44)
©
Scania CV AB 2012, Sweden
Page 37

Removing fixtures and fittings
3. Screws which secure the roof side panels to the cab structure.
Work description
03:22-00 Issue 1 en-GB 37 (44)
©
Scania CV AB 2012, Sweden
Page 38

Removing fixtures and fittings
4. Pull the roof side panel upwards somewhat (1) and then backwards (2) and down
(3) so that it is released from the groove in the storage box.
Work description
03:22-00 Issue 1 en-GB 38 (44)
©
Scania CV AB 2012, Sweden
Page 39

Removing fixtures and fittings
Ceiling panels
Remove the panels in the order below:
1. Brackets for the bed belt mounting.
2. Roof hatch frame.
3. Rivets and ceiling panel.
Work description
03:22-00 Issue 1 en-GB 39 (44)
©
Scania CV AB 2012, Sweden
Page 40

Removing fixtures and fittings
Wall panels
First remove the rear panel and seats. Use tool 588 920 to remove the clamps.
Rear panel
1. Bed lamps and other parts.
1
Work description
1. Option
03:22-00 Issue 1 en-GB 40 (44)
©
Scania CV AB 2012, Sweden
Page 41

Removing fixtures and fittings
588 920
2. Clamp screws or clamps that secure the panels to the cab structure.
Work description
333 254
Clamp screws, up to December 2009 Clamps, from January 2010
3. Pull the panel outwards and up.
4. Remove the rear panel.
03:22-00 Issue 1 en-GB 41 (44)
©
Scania CV AB 2012, Sweden
Page 42

Removing fixtures and fittings
202 691
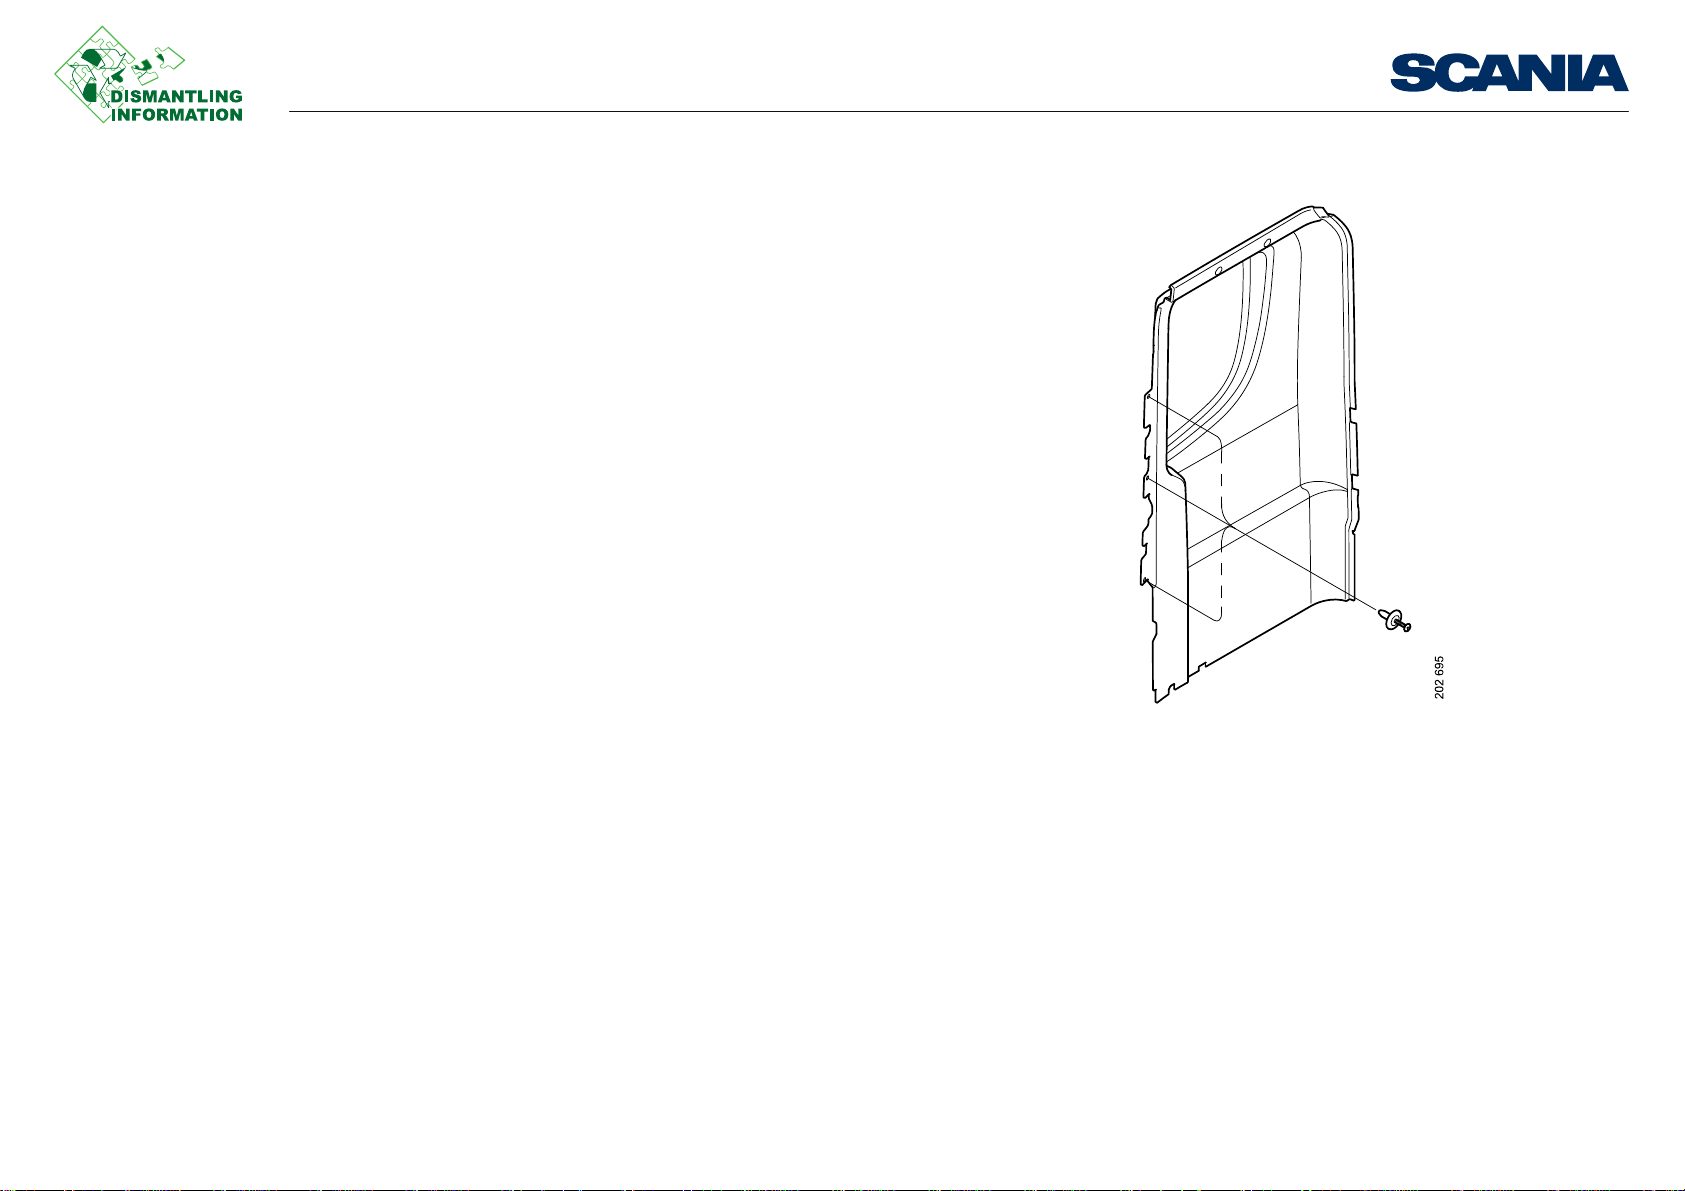
Side panel
Remove the parts in the order below:
1. Coat hooks and curtain tiebacks.
2. Curtain rail.
3. Panel beside the door.
Work description
03:22-00 Issue 1 en-GB 42 (44)
©
Scania CV AB 2012, Sweden
Page 43

Removing fixtures and fittings
4. Storage compartment and plastic disc by the bed support.
5. Bed support.
Work description
03:22-00 Issue 1 en-GB 43 (44)
©
Scania CV AB 2012, Sweden
Page 44
6. Clamp screws.
7. Side panel.
Removing fixtures and fittings
Work description
03:22-00 Issue 1 en-GB 44 (44)
©
Scania CV AB 2012, Sweden
 Loading...