

Page 1
Model Nos.:
Nos. de Modelo:
N
os
de modèle :
DP26648
DP32648
© 2008 Sanyo Manufacturing Corporation
Welcome to the World of Sanyo
Thank you for purchasing this Sanyo LCD High-Definition
Digital Television. You made an excellent choice for
Performance, Reliability, Features, Value, and Styling.
ENGLISH
LCD HDTV
Owner’s Manual
Table of Contents . . . . 4
ESPAÑOL
TV de LCD HDTV
Manual de Instrucciones
Contenido . . . . . . . . . 22
FRANÇAIS
TVHD ACL
Manuel d’instructions
Table des matières . . 39
Need assistance?
Visit our Web site at
www.sanyoctv.com
or call toll free
1-800-877-5032
We can Help!
Part No. / No. de Parte / Node piece : 1JC6P1P0302--
Page 2
2
Need help? Visit our Web site at www.sanyoctv.com or Call 1-800-877-5032
1. Read these instructions.
2. Keep these instructions.
3. Heed all warnings.
4. Follow all instructions.
5. Do not use this apparatus near water.
6. Clean only with dry cloth.
7. Do not block any ventilation openings. Install in
accordance with the manufacturer’s instructions.
8. Do not install near any heat sources such as radiators,
heat registers, stoves, or other apparatus (including
amplifiers) that produce heat.
9. Do not defeat the safety purpose of the polarized or
grounding-type plug. A polarized plug has two blades with
one wider than the other. A grounding-type plug has two
blades and a third grounding prong. The wide blade or the
third prong are provided for your safety. If the provided
plug does not fit fully into your outlet, consult an electrician for replacement of the obsolete outlet.
10. Protect the power cord from being walked on or
pinched particularly at plugs, convenience receptacles,
and the point where they exit from the apparatus.
11. Only use attachments/accessories specified by the
manufacturer.
12. Use only with the cart, stand, tripod,
bracket, or table specified by the manufacturer, or sold with the apparatus.
When a cart is used, use caution
when moving the cart/apparatus combination to avoid injury from tip-over.
13. Unplug this apparatus during lightning storms or when
unused for long periods of time.
14. Refer all servicing to qualified service personnel.
Servicing is required when the apparatus has been
damaged in any way, such as power-supply cord or
plug is damaged, liquid has been spilled or objects have
fallen into the apparatus, the apparatus has been
exposed to rain or moisture, does not operate normally,
or has been dropped.
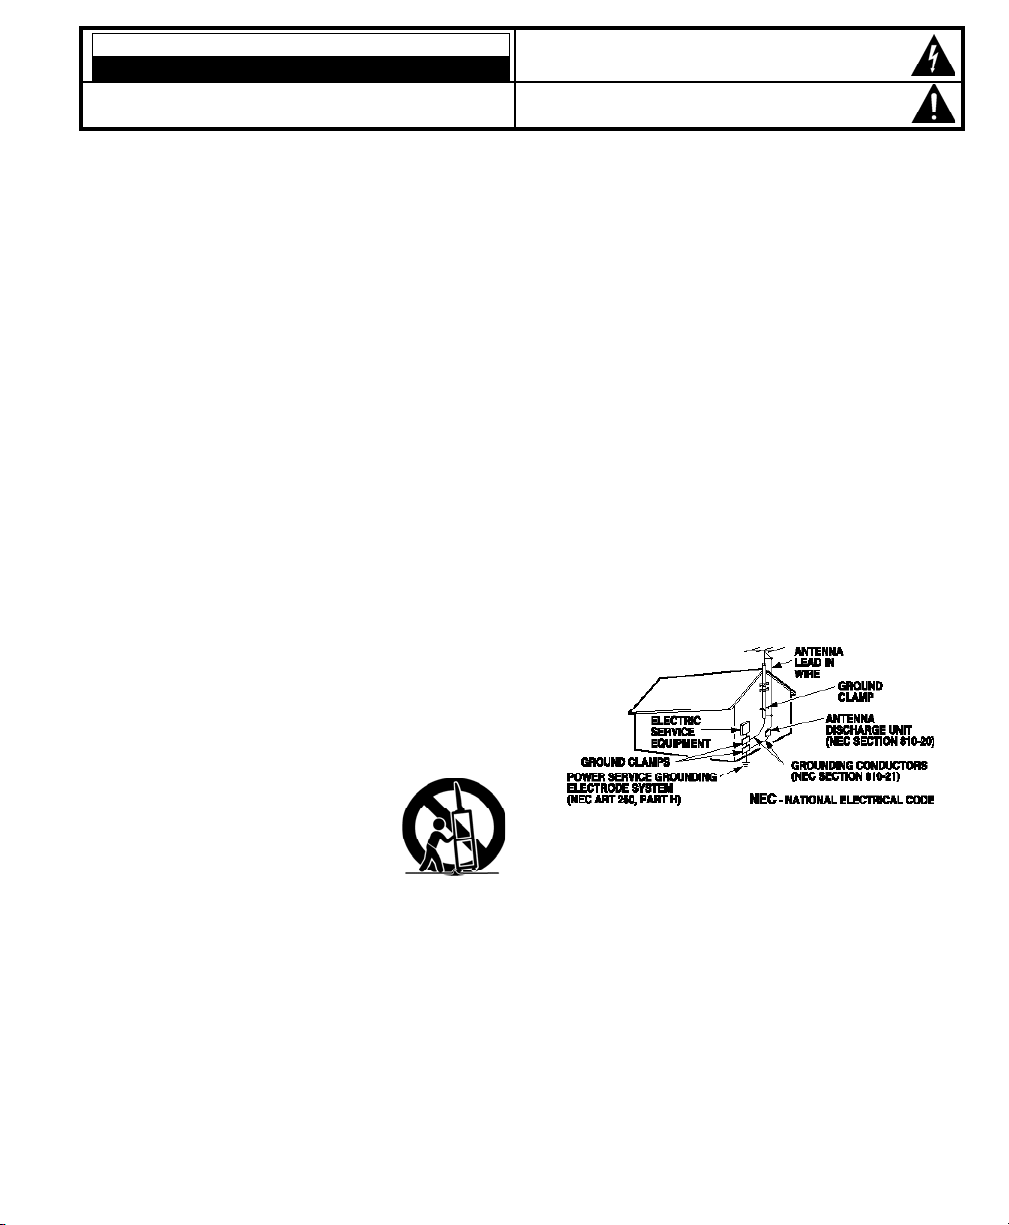
15. If an outside antenna is connected to the television
equipment, be sure the antenna system is grounded so
as to provide some protection against voltage surges
and built up static charges. In the U.S. Selection 810-21
of the National Electrical Code provides information with
respect to proper grounding of the mast and supporting
structure, grounding of the lead-in wire to an antenna
discharge unit, size of grounding conductors, location of
antenna discharge unit, connection to grounding electrodes, and requirements for the grounding electrodes.
16. An outside antenna system should not be located in the
vicinity of overhead power lines or other electrical light
or power circuits, or where it can fall into such power
lines or circuits. When installing an outside antenna
system, extreme care should be taken to keep from
touching such power lines or circuits as contact with
them might be fatal.
EXAMPLE OF ANTENNA GROUNDING ACCORDING
TO NATIONAL ELECTRICAL CODE,ANSI/NFPA 70
“Note to CATV system installer:
This reminder is provided to call the CATV system installer’s
attention to Article 820-40 of the NEC that provides guidelines for
proper grounding and, in particular, specifies that the cable
ground shall be connected to the grounding system of the building, as close to the point of cable entry as practical.”
17. Wall or Ceiling Mounting—The product should be
mounted to a wall or ceiling only as recommended by
the manufacturer.
18. "Apparatus shall not be exposed to dripping or splashing
and no objects filled with liquids, such as vases, shall be
placed on the apparatus."
19. When the MAINS plug is used as the disconnect device,
the disconnect device shall remain readily operable.
CAUTION
RISK OF ELECTRIC SHOCK DO NOT OPEN
CAUTION: TO REDUCE THE RISK OF ELECTRIC SHOCK, DO NOT REMOVE COVER (OR
BACK). NO USER-SERVICEABLE PARTS INSIDE. REFER SERVICING TO QUALIFIED SERVICE PERSONNEL.
THIS SYMBOL INDICATES THAT DANGEROUS VOLTAGE CONSTITUTING A
RISK OF ELECTRIC SHOCK IS PRESENT WITHIN THIS UNIT.
THIS SYMBOL INDICATES THAT THERE ARE IMPORTANT OPERATING AND
MAINTENANCE INSTRUCTIONS IN THE LITERATURE ACCOMPANYING THIS
UNIT.
WARNING: TO REDUCE THE RISK OF FIRE OR ELECTRIC SHOCK, DO NOT EXPOSE THIS APPLIANCE TO
RAIN OR MOISTURE.
IMPORTANT SAFETY INSTRUCTIONS
Page 3
3
Need help? Visit our Web site at www.sanyoctv.com or Call 1-800-877-5032
FCC INFORMATION
This equipment has been tested and found to comply with the limits for a Class B digital device, pursuant to Part 15 of the FCC Rules. These limits are designed to provide reasonable protection against
harmful interference in a residential installation. This equipment generates, uses and can radiate radio
frequency energy and, if not installed and used in accordance with the instructions, may cause harmful
interference to radio communications. However, there is no guarantee that interference will not occur
in a particular installation. If this equipment does cause harmful interference to radio or television
reception, which can be determined by turning the equipment off and on, the user is encouraged to try
to correct the interference by one or more of the following measures:
– Reorient or relocate the receiving antenna.
– Increase the separation between the equipment and receiver.
– Connect the equipment into an outlet on a circuit different from that to which the receiver is connected.
– Consult the dealer or an experienced radio/TV technician for help.
CAUTION: FCC Regulations state that improper modifications or unauthorized changes to this unit may
void the user’s authority to operate the unit.
TRADEMARKS
Manufactured under license from Dolby
Laboratories. “Dolby” is a trademark of Dolby
Laboratories.
“As an Energy Star® Partner, Sanyo
Manufacturing Corporation has determined that this product meets the
Energy Star® guidelines for energy
efficiency.”
This symbol on the nameplate
means the product is Listed by
Underwriters’ Laboratories Inc. It is
designed and manufactured to
meet rigid U.L. safety standards
against risk of fire, casualty and
electrical hazards.
PROTECTING THE LCD SCREEN
The screen can be damaged if it is not maintained
properly. Do not use hard objects such as hard
cloth or paper. Do not use excessive pressure when cleaning the
screen; excessive pressure can
cause permanent discoloration
or dark spots.
NEVER spray liquids on the
screen.
HANDLING PRECAUTIONS
• Handle by the cabinet only. Never touch the
screen when handling.
• Excessive pressure on the screen can cause
permanent discoloration or dark spots.
• Handling damage is not covered under warranty.
SPECIFICATIONS
Power Requirement: Source: AC 120V, 60Hz
AC Power Consumption (average):
DP26648 120 watts
DP32648 160 watts
CONTAINS MERCURY LAMPS,
DISPOSE OF PROPERLY
Page 4
4
Need help? Visit our Web site at www.sanyoctv.com or Call 1-800-877-5032
CONTENTS
IMPORTANT SAFETY INSTRUCTIONS . . . . . . . . . . . . . . . 2
FCC INFORMATION . . . . . . . . . . . . . . . . . . . . . . . . . . . . . . . .3
TRADEMARKS . . . . . . . . . . . . . . . . . . . . . . . . . . . . . . . . . . . .3
PROTECTING THE LCD SCREEN . . . . . . . . . . . . . . . . . . . . . .3
PRECAUTIONS—
Handling . . . . . . . . . . . . . . . . . . . . . . . . . . . . . . . . . . . . . . .3
Disposal . . . . . . . . . . . . . . . . . . . . . . . . . . . . . . . . . . . . . . . .3
SPECIFICATIONS . . . . . . . . . . . . . . . . . . . . . . . . . . . . . . . . . .3
CONTENTS . . . . . . . . . . . . . . . . . . . . . . . . . . . . . . . . . . . . . . .4
ASSEMBLY—ATTACHING THE TV STAND . . . . . . . . . . . .4
INSTALLATION—
Positioning the LCD HDTV . . . . . . . . . . . . . . . . . . . . . . . .5
Wall Mounting (Optional) . . . . . . . . . . . . . . . . . . . . . . . . .5
GETTING STARTED—
Precautions . . . . . . . . . . . . . . . . . . . . . . . . . . . . . . . . . . . .5
Remote Control Battery Installation . . . . . . . . . . . . . . . .5
Antenna Connections to off-air or cable . . . . . . . . . . . .5
Controls and Jacks . . . . . . . . . . . . . . . . . . . . . . . . . . . . . .6
Remote Control Operation . . . . . . . . . . . . . . . . . . . . . . . .7
Connections . . . . . . . . . . . . . . . . . . . . . . . . . . . . . . . . . . . .8
Power Connection / Initial Channel Search . . . . . . . . .9
ADVANCED AV CONNECTIONS—
HDMI 1 / 2 . . . . . . . . . . . . . . . . . . . . . . . . . . . . . . . . . . . . .10
Digital Audio / Audio Out Jacks (Fixed Analog) . . . .10
PC CONNECTIONS . . . . . . . . . . . . . . . . . . . . . . . . . . . . . . . .11
PC Menu Navigation Map . . . . . . . . . . . . . . . . . . . . . . .11
PC MONITOR OPERATION—
PC Preparation . . . . . . . . . . . . . . . . . . . . . . . . . . . . . . . . .11
PC Monitor Setup . . . . . . . . . . . . . . . . . . . . . . . . . . . . . .11
PC Menu Operating Tips . . . . . . . . . . . . . . . . . . . . . . . .11
Manual Adjustments . . . . . . . . . . . . . . . . . . . . . . . . . . . .11
ON-SCREEN MENU OPERATION—
Menu Navigation Map . . . . . . . . . . . . . . . . . . . . . . . . . .12
Manual Channel Search . . . . . . . . . . . . . . . . . . . . . . . .12
Channel Scan Memory . . . . . . . . . . . . . . . . . . . . . . . . . .13
Adding Channels to Scan Memory . . . . . . . . . . . . .13
Deleting Channels from Scan Memory . . . . . . . . . .13
V-Guide (Parental Control)
V-Guide Operation . . . . . . . . . . . . . . . . . . . . . . . . . . .14
V-Guide Operation (Advanced) . . . . . . . . . . . . . . . .15
Picture / Sound Adjustment
Adjusting the Picture / Sound Manually . . . . . . . . .16
Advanced Picture / Sound Adjustments . . . . . . . . .16
Digital Caption . . . . . . . . . . . . . . . . . . . . . . . . . . . . . . . . .17
Menu Language . . . . . . . . . . . . . . . . . . . . . . . . . . . . . . . .17
Energy (power) Saver . . . . . . . . . . . . . . . . . . . . . . . . . . .17
HELPFUL HINTS–Problems/Solutions . . . . . . . . . . . . . . .18
WARRANTY . . . . . . . . . . . . . . . . . . . . . . . . . . . . . . . . . . . . . .19
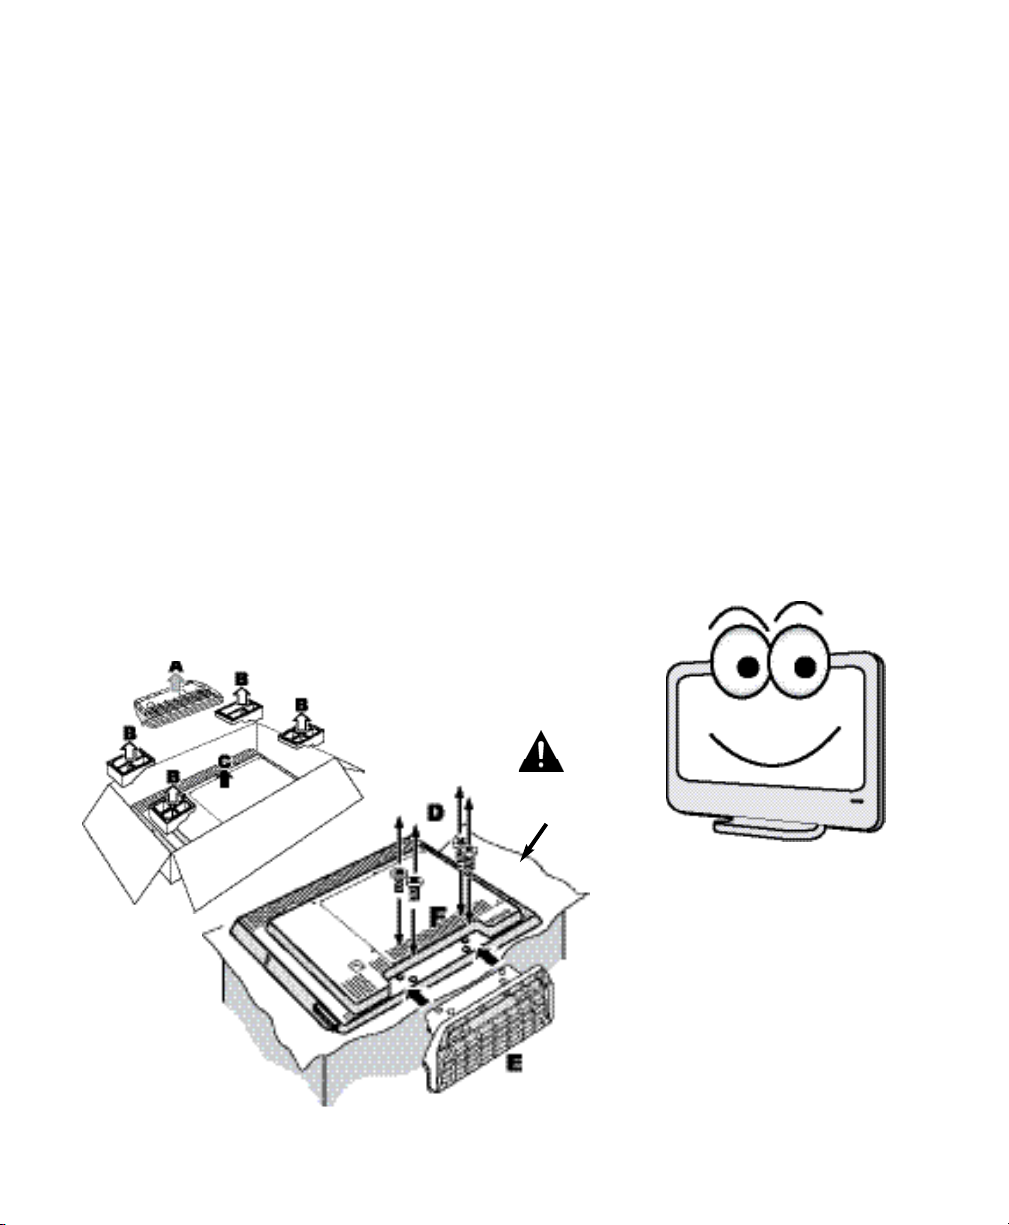
ASSEMBLY—ATTACHING THE TV STAND
NOTE: Skip this Step if you are wall-mounting the unit.
Tools Needed: Phillips screwdriver
Hello!
I’m your new Sanyo Widescreen LCD HDTV. Don’t plug me in
just yet! Please read this manual carefully so you can learn about my many
features, such as, my integrated HD
Tuner, V-Guide control, Digital
Channels, my PC Input and many
more...
Padded
Surface
(remove screws from
stand mounting inserts
[D] before installing
stand base.)
Page 5
5
Need help? Visit our Web site at www.sanyoctv.com or Call 1-800-877-5032
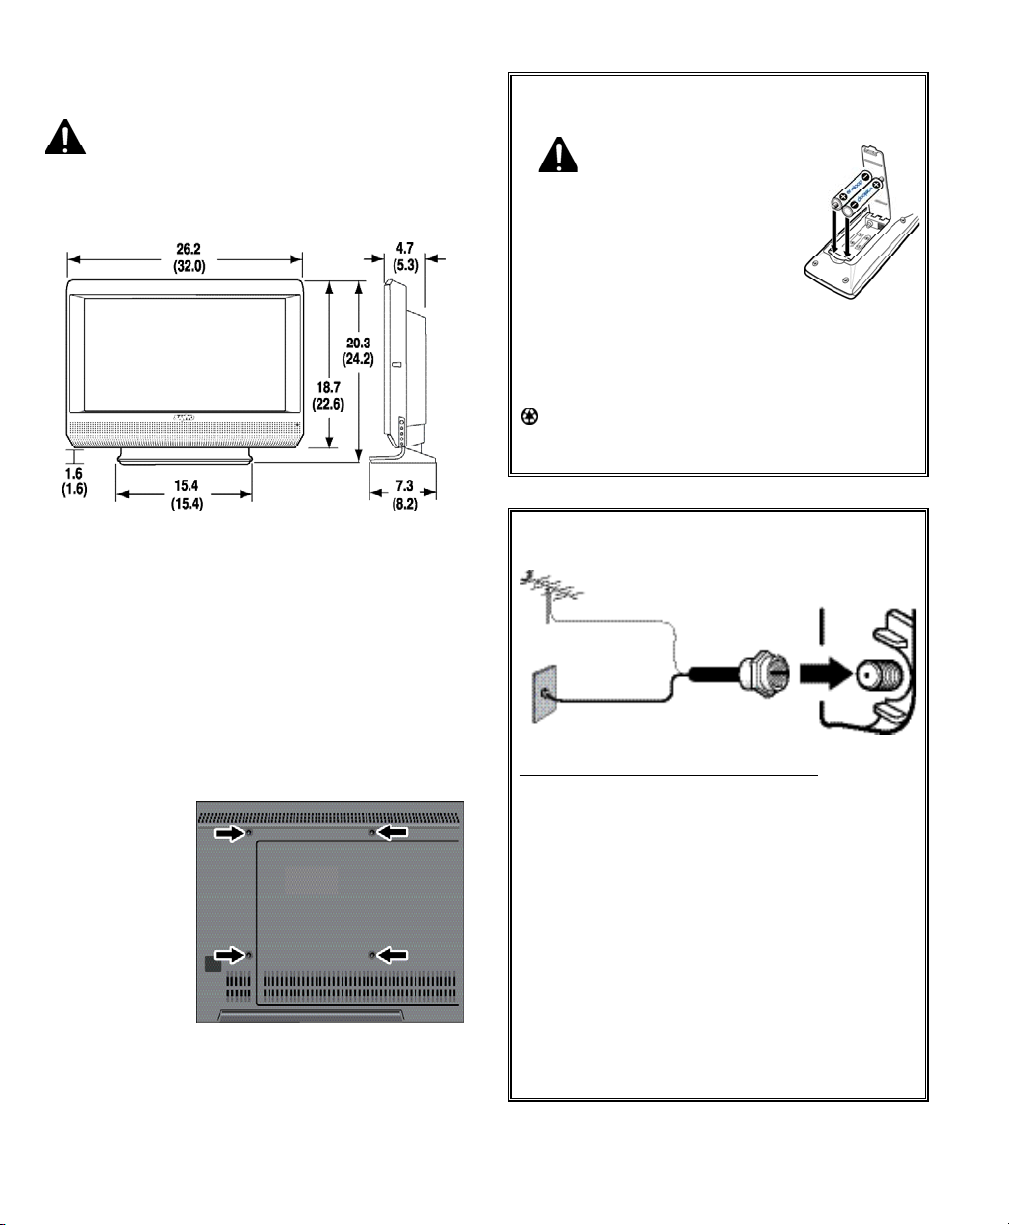
POSITIONING THE LCD HDTV
Always use a firm-flat surface when posi-
tioning your HDTV. Do not position the unit in a
confined area. Allow adequate space for proper
ventilation.
NOTE: All dimensions are in inches.
WALL MOUNTING (OPTIONAL)
Use the screws that are threaded into the standmounting inserts on the back of your HDTV to
secure it to a wall mounting kit.
NOTE:Wall Mounting kit is not supplied.
VESA standard interface:
200 x 200
Mounting screws measurements:
M6 Diameter, Length—12mm (min.) 16mm (max.)
Wall Mounting
Inserts
INSTALLATION
1
Install supplied batteries in the Remote.
(2
”AAA” eneloop Ni-MH rechargeable batteries)
PRECAUTIONS
Do not use rechargeables together with
dry cells, other types, mixed new and old,
or batteries with different charge levels.
Do not expose the Remote or batteries
to moisture or heat.
Match the “+” and “–” signs on the batteries with marks
inside the Remote Control.
For eneloop battery recharging, please refer to your
battery charger’s instructions
(battery charger not included).
Please recycle used up rechargeable batteries.
For more information visit: www.eneloopusa.com
GETTING STARTED
2
Antenna Connection for off-air signals
THE TUNER IN THIS HDTV CAN RECEIVE:
a. Digital and Analog off-air signals from an
antenna.
OR
b. Analog or ClearQAM cable channels from a
direct Cable TV connection.
NOTES: You must use the on-screen
MENU
to
Search for ClearQAM Cable channels. (See
page 12.)
For the best picture, connect your Cable box
or Satellite receiver to HDMI1, 2, or component jacks (Video2 or 3).
This HDTV can receive ANY unscrambled RF
signal being broadcast.
ANTENNA
CABLE
OR
ANALOG / DIGITAL
ANTENNA IN
DP26648
(DP32648)
Page 6
6
Need help? Visit our Web site at www.sanyoctv.com or Call 1-800-877-5032
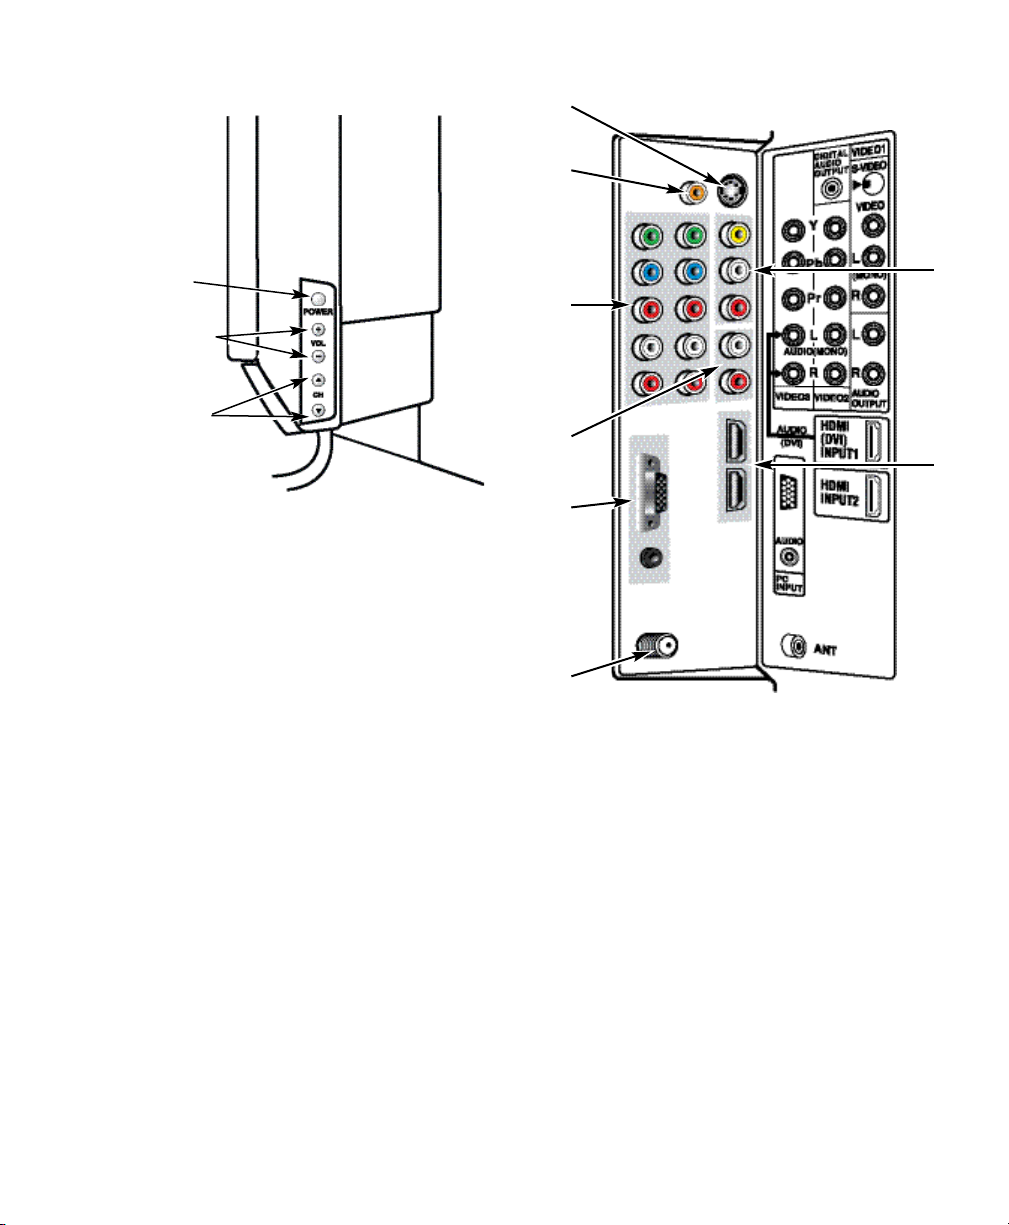
GETTING STARTED—CONTROLS AND JACKS
S-Video Input (VIDEO1), PAGE 8—To enhance
video detail use the S-Video jack instead of the
Video jack, if available on your external equipment. (An S-Video connection will override a
connection to the Video1 input jack.)
Digital Audio Output (Coaxial), PAGE 10—Use
a Phono-Type (Coaxial) Digital Audio Out
Cable to connect Digital Audio Output to an
advanced stereo home theater system
equipped with Dolby® Digital 5.1.
Component Video Input (VIDEO2 or VIDEO3),
PAGE 8—Connect digital video equipment to
the Video Green (Y), Blue (Pb), Red (Pr) jacks,
and matching Audio White (L ) and Red (R)
jacks. These jacks will automatically detect
the type of signal being received.
Stereo Audio Out (L/R) Jacks, PAGE 10—
Connect stereo audio equipment to these jacks.
PC Input (15-Pin Monitor and Mini Stereo
Audio) Page 11—Connect computer and
audio outputs to these terminals.
• MONITOR RGB (D-SUB)
• AUDIO R/L (Stereo Mini Jack)
Analog / Digital Antenna Input, PAGE 5—
Connect an RF antenna or Analog Cable system to this jack.
AV Input (VIDEO1), PAGE 8—Connect analog
video equipment here.
HDMI Input (INPUT1 or INPUT2), PAGE 10—
An all digital AV interface that accepts uncompressed video signals for the very best picture
possible. HDMI supports HDCP copy protection, allowing transmission of copy-protected
digital content. The signal can also include
Dolby
®
Digital or PCM audio, when available.
LEFT-SIDE PANEL
RIGHT-SIDE
PANEL
Volume
– + keys
Power
key
Channel
keys
Page 7
7
Need help? Visit our Web site at www.sanyoctv.com or Call 1-800-877-5032
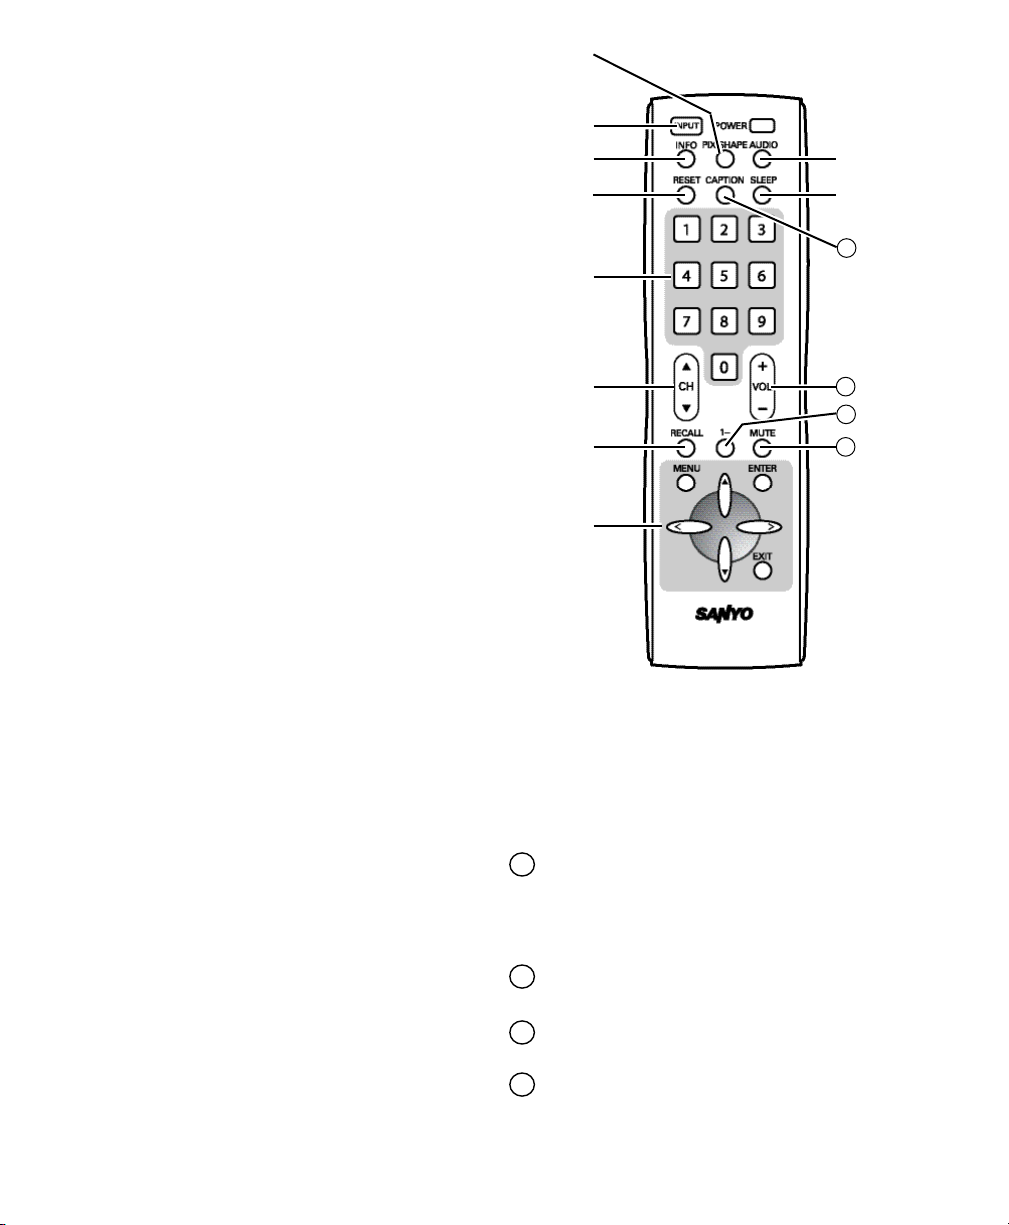
Audio Key—Press to select the desired audio
mode, if available.
Sleep Key—Press SLEEP then “0” to set the
Off Timer. Off time can be set in 30-minute
increments up to 3 hours.
NOTE:The Off Timer cancels if the TV is turned off or if
a power failure occurs.
Caption Key—Press to select mode options:
Digital CC1 ~ CC6, or Analog CC1 ~ CC4,
QuikCap, or OFF. (QuikCap turns captions on
or off with the Mute function.) Digital Captions
can be changed using the menu settings.
Volume Keys—Press VOL – + to decrease or
increase the audio volume.
1– – Key—For Cable channels above 99, press
this key, then press the other two numbers.
Mute Key—Press to mute or restore the sound.
REMOTE CONTROL OPERATION
PIX Shape Key—Press to choose between
options Pix1 ~ Pix4. Available options depend
on the signal and the broadcast’s aspect ratio.
Input Key—Press to select the source to
view: Analog RF, Digital RF, Video 1, Video 2,
Video 3, HDMI 1, HDMI 2, or PC Input.
Info Key—Press to display Channel Banner
information.
Digital Antenna Banner may contain: Tuner
ID, Channel Number, Station ID, Program
Rating, Signal Strength, Detailed Program
Info, Audio Information, & Program Title.
Analog Antenna Banner may contain: Tuner
ID, Channel Number, Station ID, Program
Rating, & Audio Information.
Cable Banner may contain: Tuner ID,
Channel Number, Station ID (analog only),
Program Rating, Signal Strength, & Audio
Information.
Reset Key—Press this key twice to restore factory settings. The TV will automatically start
Channel Search and clear customized settings.
NOTE:The Channel Scan Memory database will be
replaced.
Number Keys—Press two keys to select a
channel. Example: Press 0 then 6 to select
channel 6. (See #13.)
Channel Scanning (CH ) Keys—Press to
scan through the channels in memory.
Recall Key—Press to switch between the last
two channels selected.
Menu Navigational Keys:
Menu—Press to display on-screen menu.
Cursor (up) (down) keys—Press these
keys to move the cursor up and down.
Cursor < (left) > (right) keys—Press these
keys to move the cursor left and right.
Enter Key—Press to select an option from
the menu system, when required.
Exit Key—Press to exit from the menu.
12
13
11
14
Point
towards HDTV
11
12
13
14
Page 8
8
Need help? Visit our Web site at www.sanyoctv.com or Call 1-800-877-5032
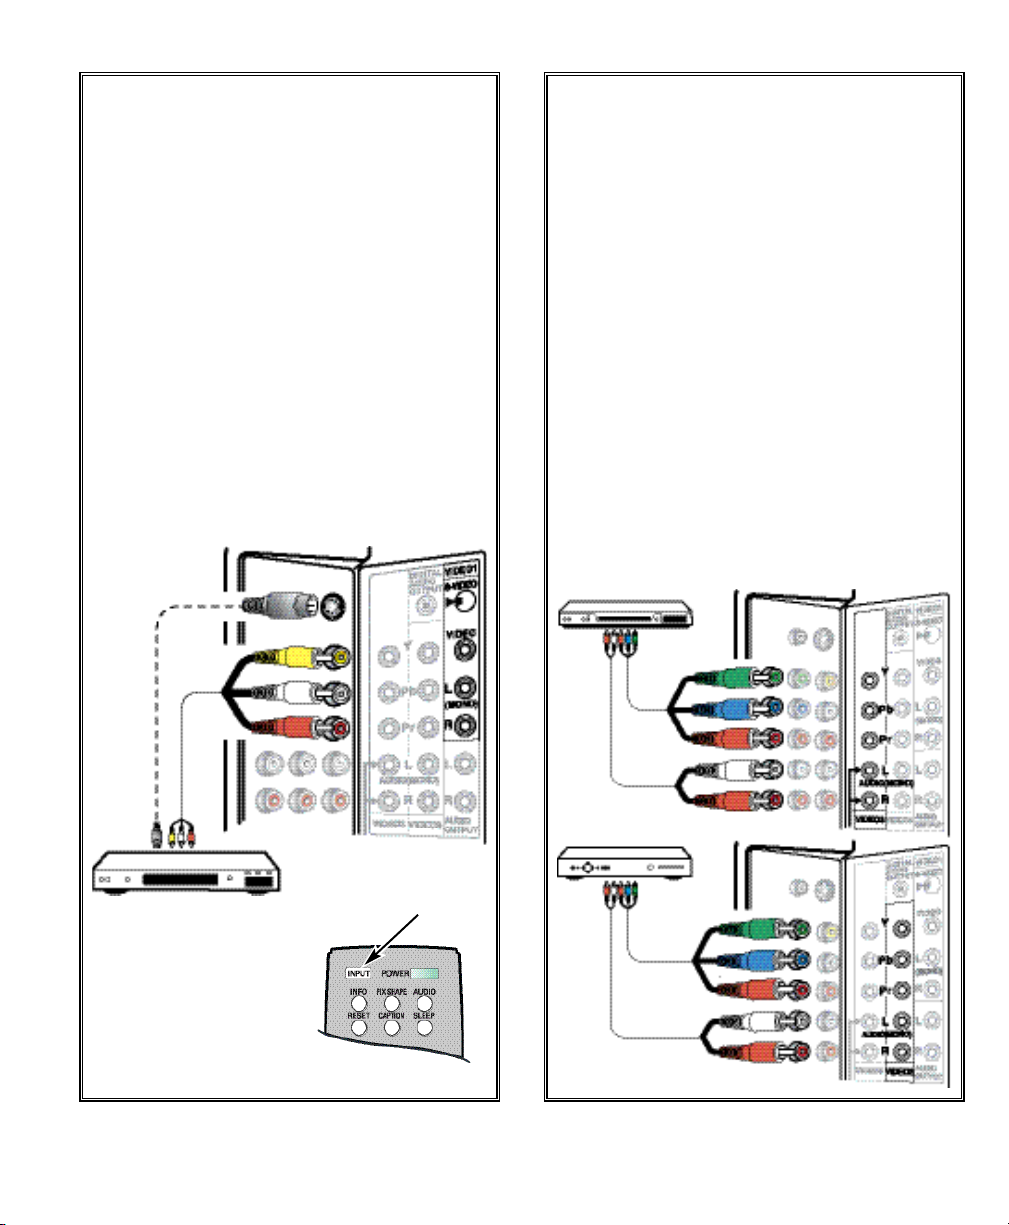
3
Analog Signal Connections—
Video1 (optional)
Connect an analog device, such as, an Analog
Cable Box, Satellite Receiver, or VCR
Composite connectors are included on your
new HDTV to provide continued compatibility
with older analog devices, such as a VCR. The
S-Video connector will provide the best analog
resolution. If you have an S-Video connector
on your old analog equipment, you should use
it instead of the standard video connector.
(Cables are not supplied.)
1. Connect an AV cable to the VIDEO1 jacks on
the HDTV and to your analog AV equipment, as shown. Match the connector colors to jack colors.
2. Press the INPUT key to step through the
signal inputs to select Video 1.
ANALOG DEVICE
4
Digital Signal Connections—
Video2 & Video3 (optional)
Connect Digital devices, such as, an HD Cable
Box, HD Satellite Receiver, DVD Player, and
Game System
The Component jacks on this HDTV will accept
HDTV, EDTV, and SDTV video signals, making
Component a great choice when connecting
your compatible external devices.
1. Connect a COMPONENT cable to a set of
Green, Blue, and Red video jacks (Video2 or
Video3) on the HDTV and to your digital
device, as shown. (Cable is not supplied.)
2. Connect an AUDIO cable to the matching
set of White and Red audio jacks, as shown.
(Cable is not supplied.)
3. Press the INPUT key to step through the
signal inputs to select Video 2 or Video 3.
DVD PLAYER
SATELLITE RECEIVER
GETTING STARTED—CONNECTIONS
INPUT KEY
Page 9
9
Need help? Visit our Web site at www.sanyoctv.com or Call 1-800-877-5032
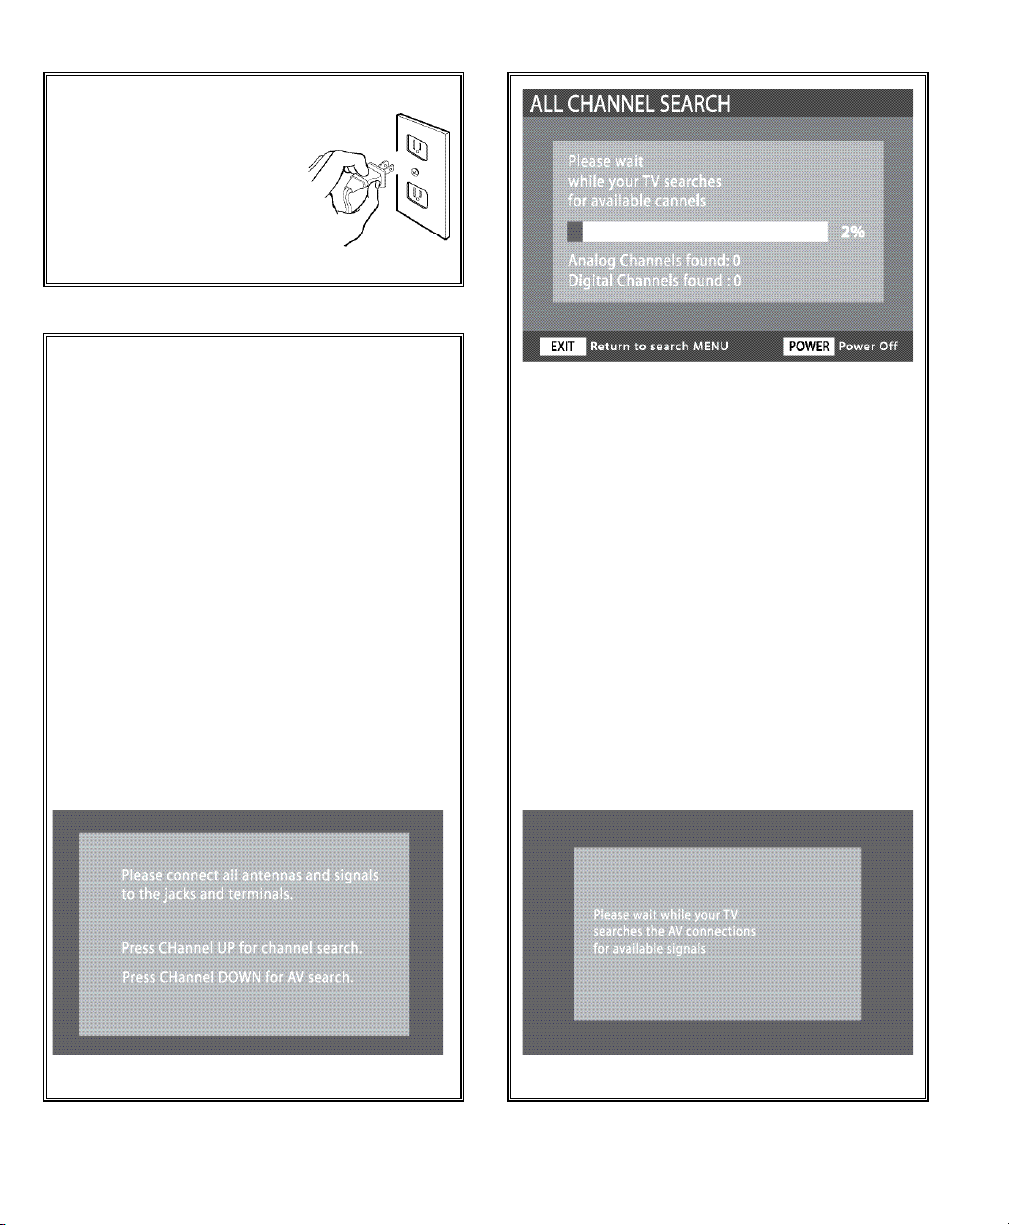
INITIAL CHANNEL SEARCH
7
Press the CHANNEL (Up) key to search
for signals connected to the Antenna
terminal.
Channel Search will check for Antenna and
Cable signals. If Antenna signals are detected,
the HDTV searches for both analog and digital
off-air channels. If Cable signals are detected,
the HDTV will search for analog Cable channels.
Channels are stored in Channel Memory and
can be scanned using the CHANNEL (Up)
and (Down) keys.
If no Antenna signals are detected, the HDTV
will begin an AV search.
If neither of these searches detected a valid
signal, the HDTV will tune to input Video1.
INITIAL DISPLAY
AV SEARCH
NOTE:Be sure all the external video devices you con-
nected to the HDTV are powered ON before
you begin an AV Search.
8
Press the CHANNEL (Down) key to
search for signals from devices you connected to the AV input jacks (Initial Display).
AV Search will begin checking the AV inputs for
valid signals, beginning with input Video1.
When a valid signal is detected, the search
process ends and the HDTV tunes to that input
source.
If a valid signal is not detected on any of the AV
inputs, the HDTV will tune to input Video1.
CHANNEL SEARCH DISPLAY
AV SIGNAL SEARCH DISPLAY
GETTING STARTED—POWER CONNECTION / CHANNEL SEARCH
POWER CONNECTION
5
Plug in AC power cord
(120V AC, 60 Hz).
6
Press the POWER key.
(Follow the on-screen
instructions.)
To 120V AC outlet.
Page 10
10
Need help? Visit our Web site at www.sanyoctv.com or Call 1-800-877-5032
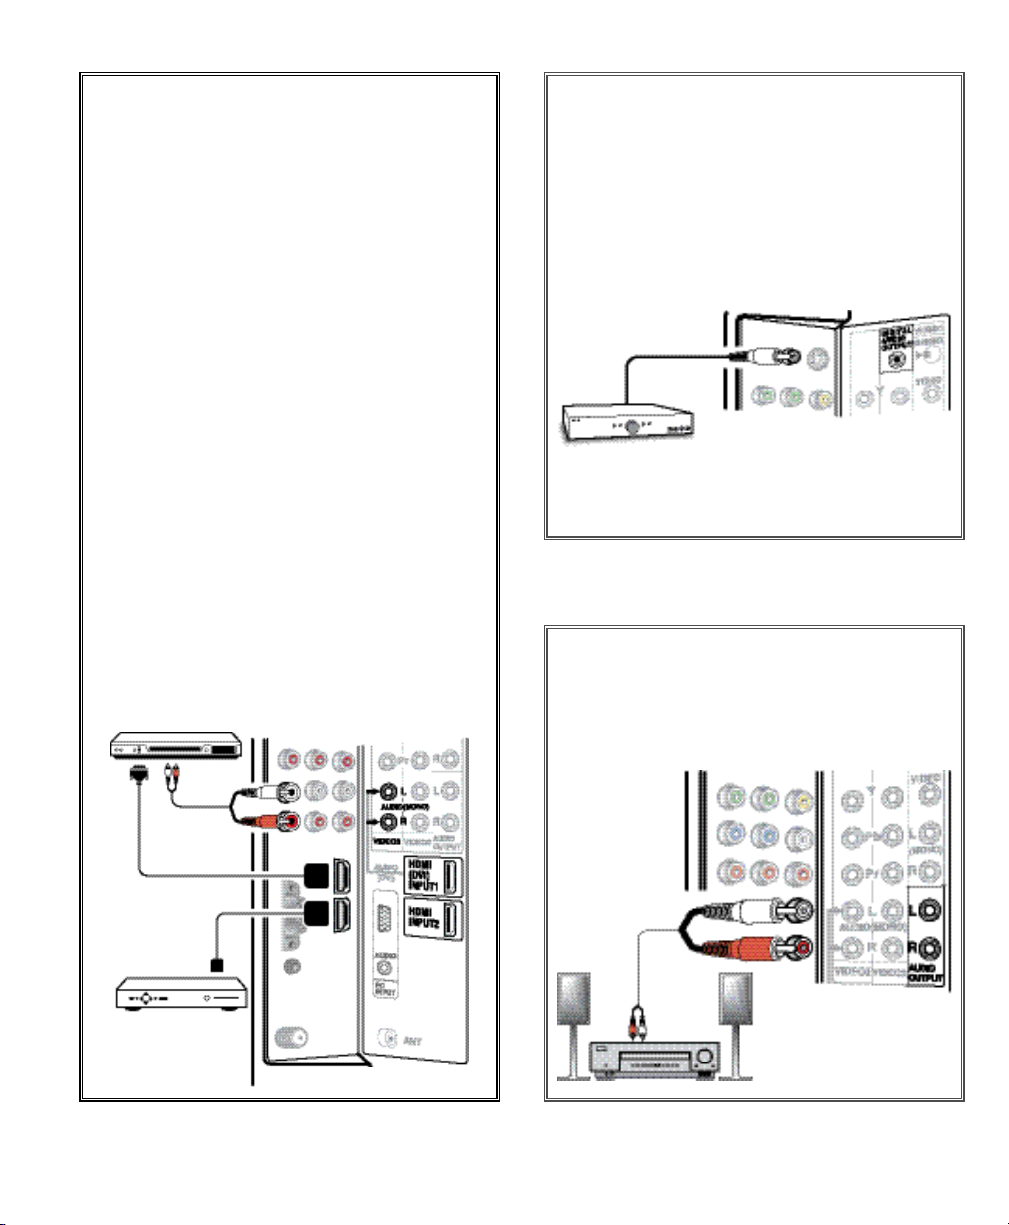
ADVANCED AV CONNECTIONS
ADVANCED DIGITAL SIGNAL
CONNECTIONS—HDMI TO HDMI
Connect compatible Digital devices, such as,
an HD Cable Box, HD Satellite Receiver, DVD
Player, and Game System
HDMI—High-Definition Multimedia Interface.
An all digital AV interface that accepts uncompressed video signals for the very best picture
possible. It supports HDCP copy protection,
allowing transmission of copy-protected digital content. The signal can also include Dolby
®
Digital or PCM audio, when available.
1
Connect an HDMI cable to one of the
HDTV’s HDMI inputs and to your external
device. (Cable is not supplied.)
NOTE:Press the INPUT key to step through the signal
inputs to select HDMI 1 or HDMI 2.
DVI TO HDMI
1
Use an adapter (not supplied) to connect a
DVI device to an HDMI input jack.
2
Connect the device’s audio out to the
VIDEO3 Audio In L/R.
NOTE:Audio is available only when using HDMI1.
DVD PLAYER
SATELLITE
RECEIVER
AUDIO OUT JACKS (FIXED ANALOG)
1
Connect the Stereo Audio Out jacks to
a stereo amplifier, as shown.
NOTE:Do not connect external speakers directly to
the HDTV.
DIGITAL AUDIO
1
Connect the Digital Audio output to a
multichannel receiver, as shown.
NOTE:Dolby®Digital 5.1 audio is available at the
Digital Audio Output only when received as
part of a Digital Antenna signal being viewed
on the screen.
LEFT-SIDE
VIEW OF
HDTV BACK
PHONO-TYPE
DIGITAL AUDIO
CABLE
(Not supplied)
MULTICHANNEL
RECEIVER
STEREO
AMPLIFIER
BACK VIEW OF HDTV
BACK VIEW OF HDTV
Page 11
11
Need help? Visit our Web site at www.sanyoctv.com or Call 1-800-877-5032
PC MONITOR OPERATION
PC PREPARATION
To avoid an “Out of Range” condition, preset
your PC’s output resolution to an XGA value, such
as, 1024 x 768, before you disconnect it from your
regular monitor.
PC MONITOR SETUP
The Frequency, Resolution, Dot Clock, Phase,
Horizontal Position, and Vertical Position are set
automatically when Auto Adjustment is selected.
PC MENU OPERATING TIPS
Picture and Sound settings in the PC Menu do not
affect other input settings.
Press RESET twice to reset ALL settings to factory
defaults.
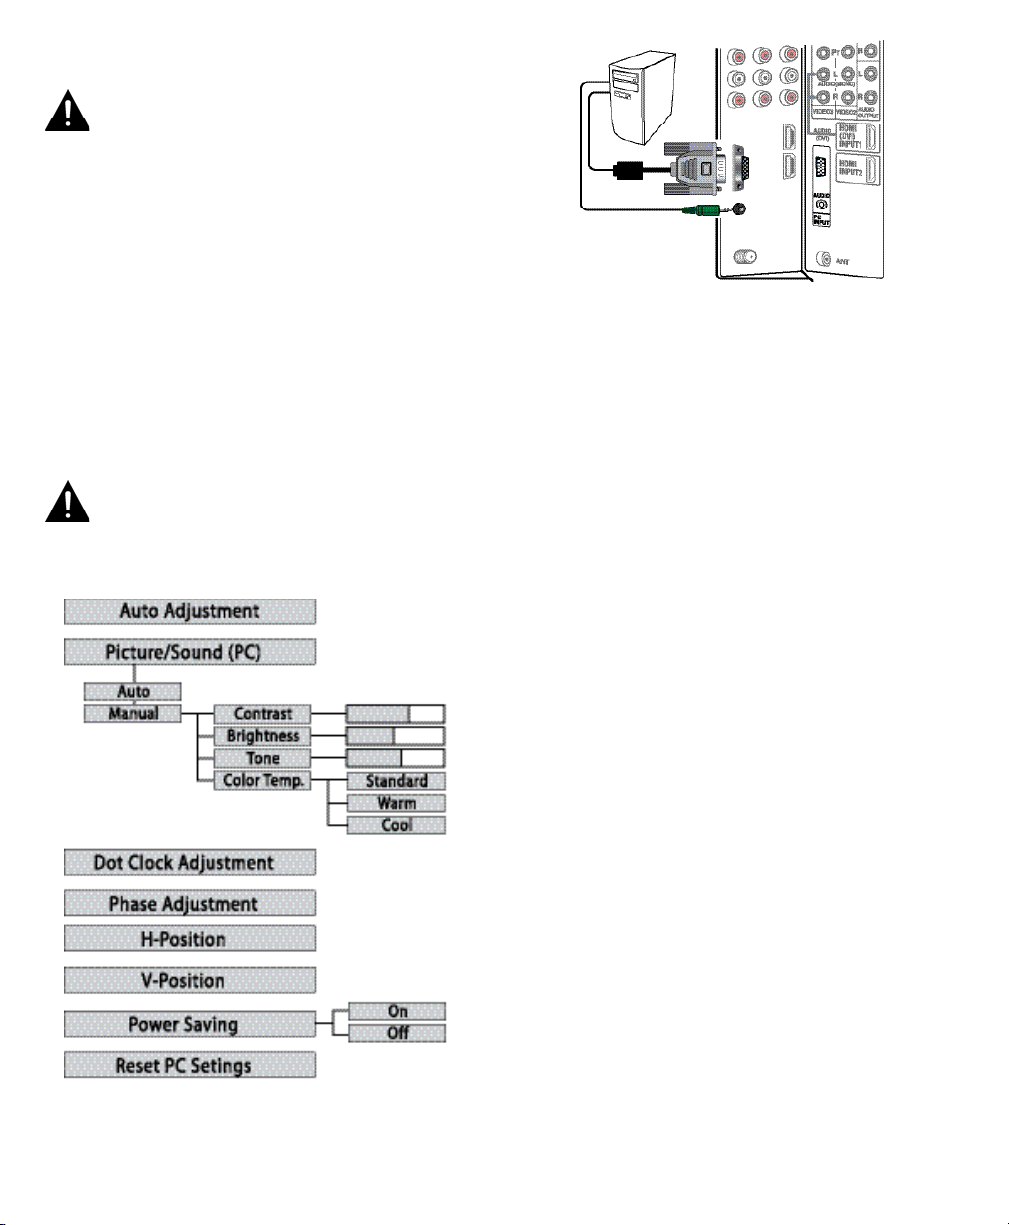
MANUAL ADJUSTMENTS
Color Temp.—Press ENTER to choose setting.
Dot Clock—Dot Clock adjusts the Dot frequency
to match your computer’s dot frequency.
Phase—Adjust the Phase when the picture
appears to flicker or is blurred.
H–Position—Moves the image horizontally.
V–Position—Moves the image vertically.
Power Saving—When the HDTV no longer detects
H- and V-sync signals from the PC, it switches to
standby mode. It will return to normal operation
when H- and V-sync signals are again detected.
Reset PC Settings—Resets all the PC Menu
options to Factory default values.
PC CONNECTIONS
NOTE: Before connecting any cables, disconnect
the AC Power Cords of both the HDTV and
Personal Computer from the AC outlets.
1
Connect an RGB cable from the monitor output on your PC to the RGB connector on the
HDTV and tighten the screws. (Monitor Cable
not supplied.)
2
Insert one end of a Stereo Mini-Audio cable
into the PC Audio Out jack and the other end
into the HDTV PC Audio Input jack. (Stereo
Mini-Audio Cable not supplied.)
HINT: Volume can be adjusted both from the PC and
the HDTV
VOLUME and keys.
3
Select Auto Adjustment from the PC Setup
Menu.
NOTE: Power on the HDTV and any other peripheral equipment before powering on the computer.
PC MENU NAVIGATION MAP
Page 12
12
Need help? Visit our Web site at www.sanyoctv.com or Call 1-800-877-5032
IMPORTANT FACT: This HDTV maintains only one database of digital channels. Therefore, when you search for
cable channels, the database of antenna digital channels
will be deleted. You will only be able to receive those
ClearQAM channels your cable company provides.
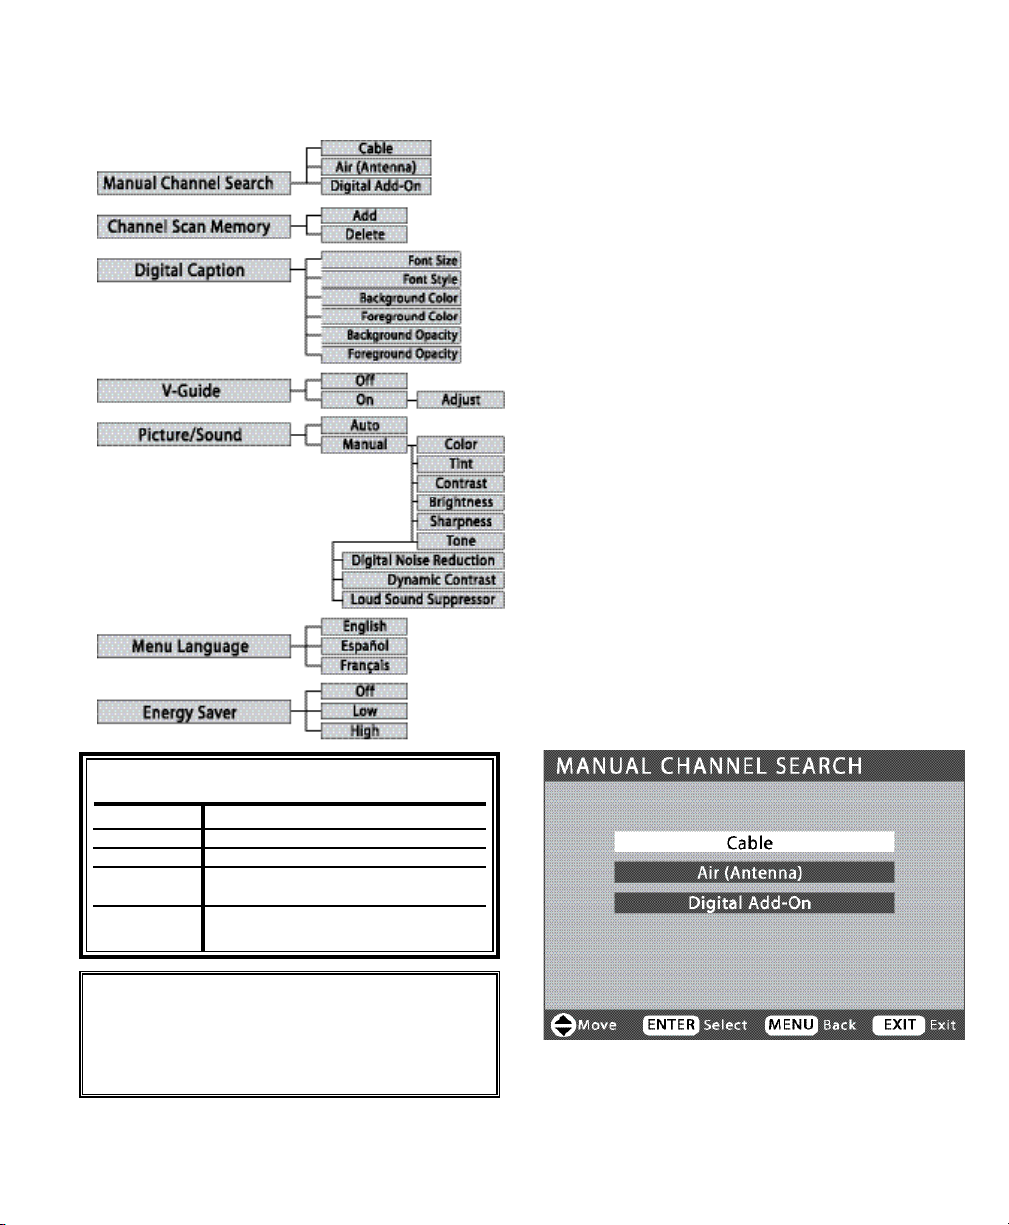
ON-SCREEN MENU OPERATION
MANUAL CHANNEL SEARCH
MANUAL CHANNEL SEARCH HAS THREE CATEGORIES
• Cable • Air (Antenna) • Digital Add-On
Cable Search looks for analog cable channels and
unscrambled (ClearQAM) digital cable channels.
This search may take several minutes. After the
search is complete, the HDTV will tune to the lowest ClearQAM channel, if available. Otherwise, the
HDTV will tune to the lowest analog cable channel.
Air(Antenna) Search will search for analog and
digital channels that are broadcast over-the-air.
After the search is complete, the HDTV will tune to
the lowest Digital channel or the lowest analog
channel. If no digital or analog channels are
found, the HDTV will tune to Video 1.
Digital Add-On Search will add new digital channels that are found to the Channel Scan Database.
1
Press the MENU key on the remote control to
display the Main menu. (See page 7.)
2
Use the CURSOR keys to highlight
Manual Channel Search. Press ENTER.
3
Use the CURSOR keys to select Cable,
Air (Antenna), or Digital Add-On.
After the search is complete, the HDTV will exit the
menu system and return to normal TV viewing.
MENU NAVIGATION MAP
MAIN MENU SUB-MENU OPTIONS
NOTE:“Not available” will appear on the screen
when an option is unavailable.
TUNING MODE UNAVAILABLE MENU OPTION(S)
Analog RF Digital Caption
Digital RF None (all Menu options available)
Video 1 Manual Channel Search, Channel Scan
Memory, Digital Caption
Video 2/3 and Manual Channel Search, Channel Scan
Memory, Digital Caption, V-Guide
HDMI 1/2
NOTE: For information on local digital channels,
visit www.antennaweb.org.
Page 13
13
Need help? Visit our Web site at www.sanyoctv.com or Call 1-800-877-5032
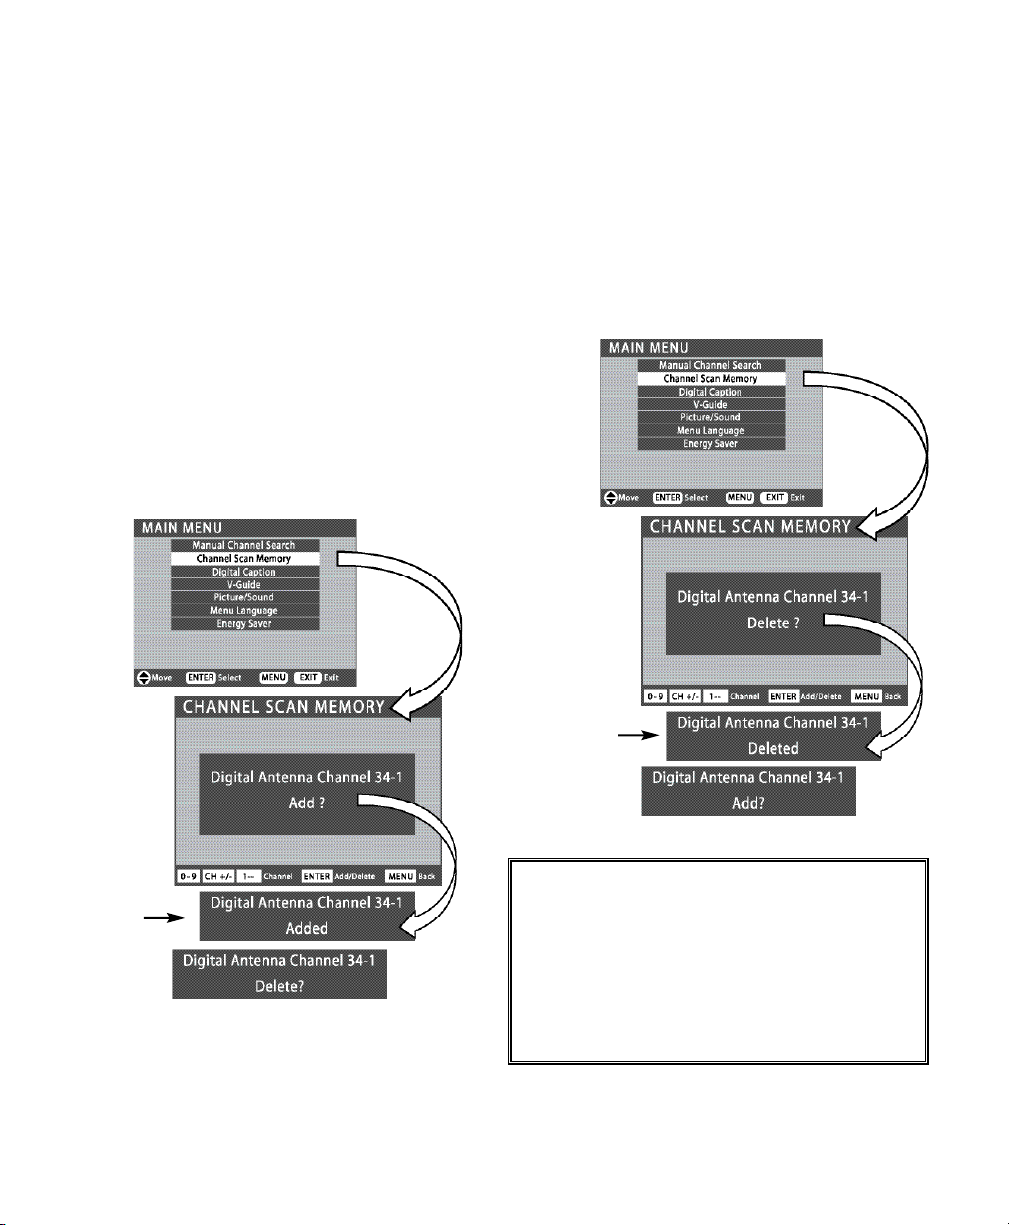
DELETING CHANNELS FROM SCAN MEMORY
3
Use the CHANNEL or NUMBER keys to
select the channel you want to Delete.
NOTE: Use the 1– – key to select cable channels above
99.
4
Press ENTER to Delete the channel from
Channel Scan Memory.
5
Press EXIT to return to normal TV viewing.
(Menu operations continued on page 14.)
This Display
appears after
you press
ENTER.
After 3 seconds the TV screen will display “Delete?”
After 3 seconds the TV screen will display “Add?”
CHANNEL SCAN MEMORY
Channel Scan Memory is a database of active
channels you scan through using the CHANNEL
keys. Customize it by deleting or adding
channels.
1
Press the MENU key on the remote control to
display the Main menu. (See page 7.)
2
Use the CURSOR keys to highlight
Chanel Scan Memory. Press ENTER.
ADDING CHANNELS TO SCAN MEMORY
3
Use the NUMBER keys to select the channel
you want to Add.
NOTE: Use the 1– – key to select cable channels above
99.
4
Press ENTER to Add the channel to Channel
Scan Memory.
This Display
appears after
you press
ENTER.
Channel Scan
Memory Screens
IMPORTANT FACTS: When a digital channel is deleted,
all of that channel’s sub-channels are deleted as well.
Only previously deleted digital channels can be added
back to the Channel Scan Memory.
Tune to “deleted” channels using the number keys.
If one digital sub-channel is added back to the Channel
Scan Memory list, all of that channel’s sub-channels will
be added back.
Page 14
14
Need help? Visit our Web site at www.sanyoctv.com or Call 1-800-877-5032
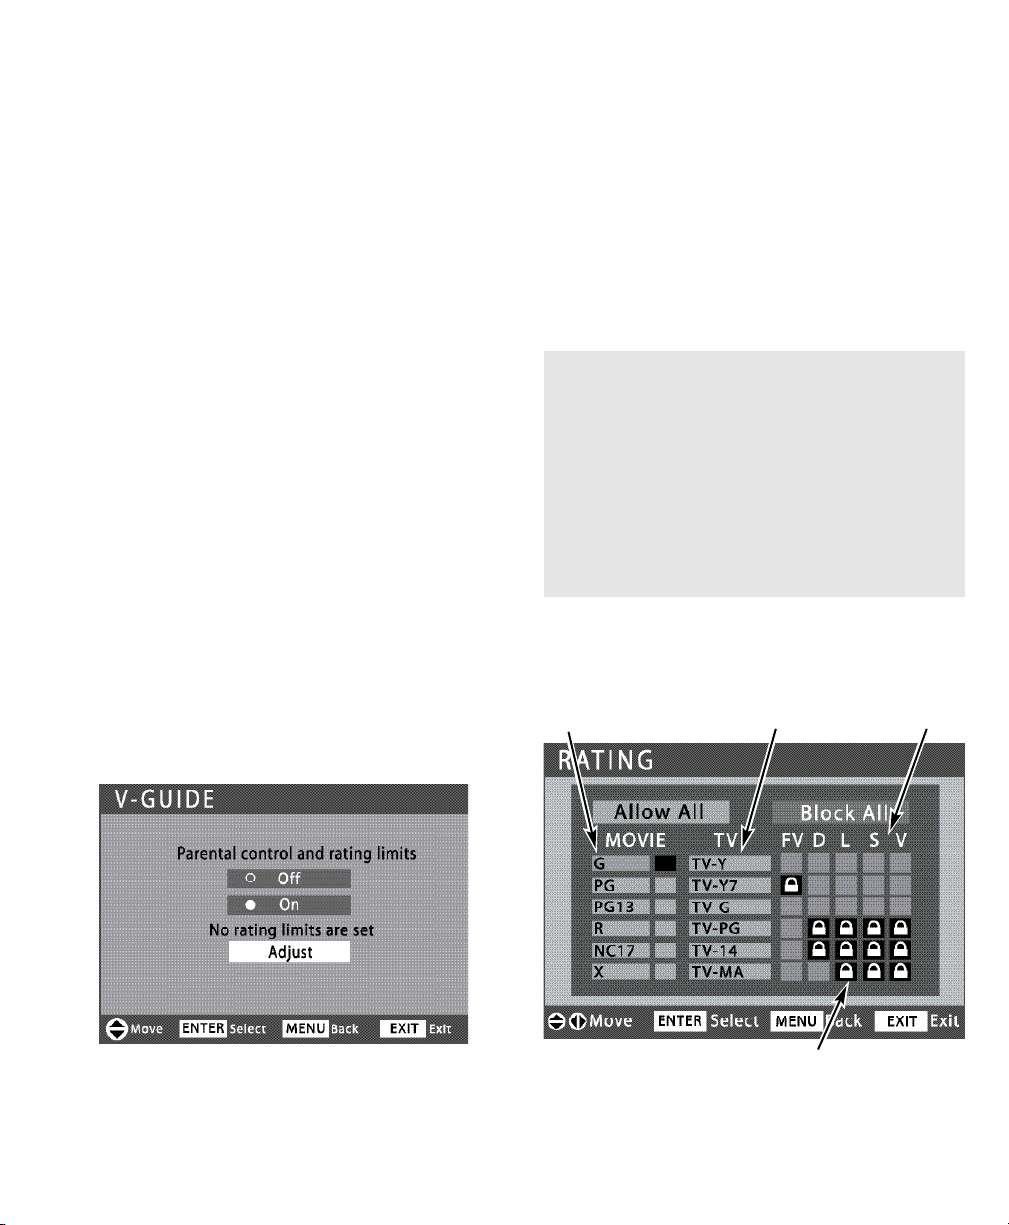
STANDARD V-GUIDE RATINGS—AT-A-GLANCE
MPAA (Movie) RATING
BLOCKED RATINGS
(Lock symbol)
TV RATING
CONTENT RATING
V-GUIDE (PARENTAL CONTROL)
NOTE: THIS FEATURE IS DESIGNED TO COMPLY
WITH THE UNITED STATES OF AMERICA’S FCC
V-CHIP REGULATIONS. THEREFORE, IT MAY
NOT FUNCTION WITH BROADCASTS THAT
ORIGINATE IN OTHER COUNTRIES.
This Sanyo television is equipped with an electronic V-Chip to interpret MPAA (Motion Picture
Association of America) and TV Parental
Guidelines rating codes. When these codes are
detected, the HDTV will automatically display or
block the program, depending upon choices you
make when setting up the V-Guide system.
Use this feature to block automatically programs
with content you deem as inappropriate for your
children to view.
MORE INFORMATION
Additional information about MPAA and V-Chip
rating can be found at: www.mpaa.org and
www.v-chip.org, respectively.
V-GUIDE OPERATION
1
Use the CURSOR keys to highlight
V-Guide in the Main menu. Press ENTER.
2
Use the CURSOR keys to highlight On,
in the V-Guide menu. Press ENTER.
3
Use the CURSOR keys to highlight
Adjust. Press ENTER.
4
Use the CURSOR and < >keys to select
MOVIE, TV, or Content Ratings. (A green
square will appear beside the selected item.)
NOTE:Content ratings are under the letters FV, D, L, S,
and V.
5
Press the ENTER key to Block or Unblock
selected rating. A lock symbol will appear
beside the selected rating option indicating
that it is blocked
.
OPERATING TIPS
V-Guide settings are effective for Analog chan-
nels, Digital channels, and Video1 signals.
You can block portions of a TV rating by
choosing one or more of the Content ratings
(D, L, S, and V). By blocking just the L and S
content ratings of TV-14, for example, TV-14
rated programs with a D and/or V content rating could still be viewed.
ON-SCREEN MENU OPERATION (CONTINUED)
Page 15
15
Need help? Visit our Web site at www.sanyoctv.com or Call 1-800-877-5032
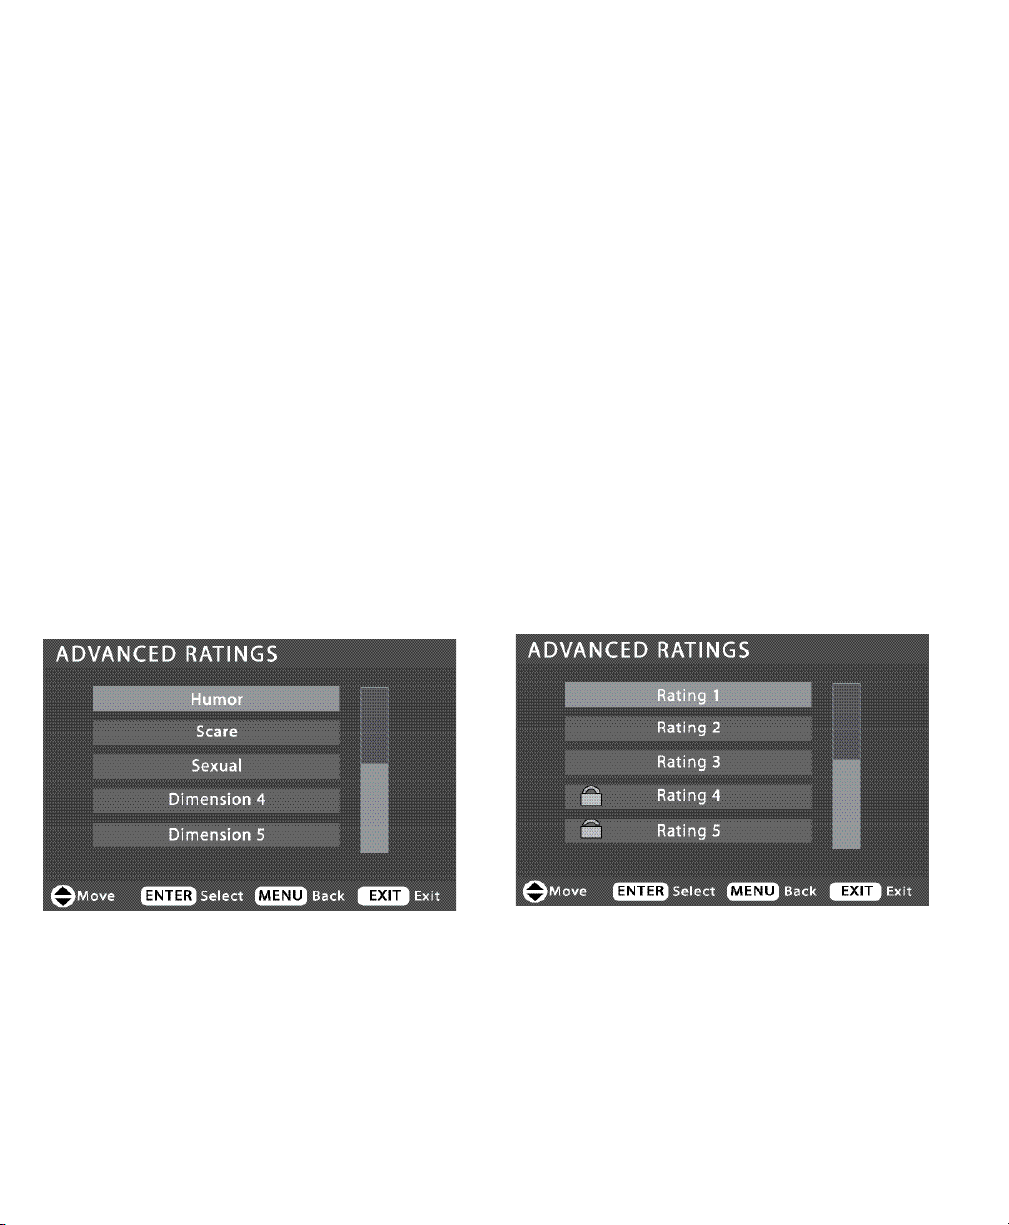
REGIONAL V-GUIDE OPERATION (ADVANCED)
V-Chip Regional Ratings 5 (RRT5) is an advanced
V-Chip ratings system for digital channels that
are received with an antenna. Your new Sanyo
HDTV supports this alternative system.
When the HDTV detects compatible RRT5 data, it
is downloaded and stored in memory and the
menu is modified to include an advanced adjustment option.
When the Adjust (Advanced) setup option is
selected the Advanced Rating screen appears.
1
Use the CURSOR keys to highlight
V-Guide in the Main menu. Press ENTER.
2
Use the CURSOR keys to highlight On,
in the V-Guide control menu. Press ENTER.
3
Use the CURSOR keys to highlight
Adjust (Advanced). Press ENTER.
4
Use the CURSOR and < > keys to select
a rating.
HINT: There may be more ratings than can be displayed
on one screen. When vertical scroll bars appear,
use the
CURSOR
keys to gain access to the
additional ratings.
5
Press the ENTER key to Block or Unblock
selected rating. A Lock symbol will appear
beside the selected rating option indicating
that it is blocked.
The advanced rating table will reflect previous
choices you may have made.
NOTE:If the HDTV is reset to factory defaults or if a
Manual Cable Search is performed, only the
Adjust option will appear in the menu. The
Adjust (Advanced) option will reappear when the
HDTV again detects RRT5 data.
The V-Guide ratings screen below is just an
example. Actual rating options will vary by
region. For example, the RRT5 ratings for San
Francisco, California may differ from those in
Little Rock, Arkansas.
Page 16
16
Need help? Visit our Web site at www.sanyoctv.com or Call 1-800-877-5032
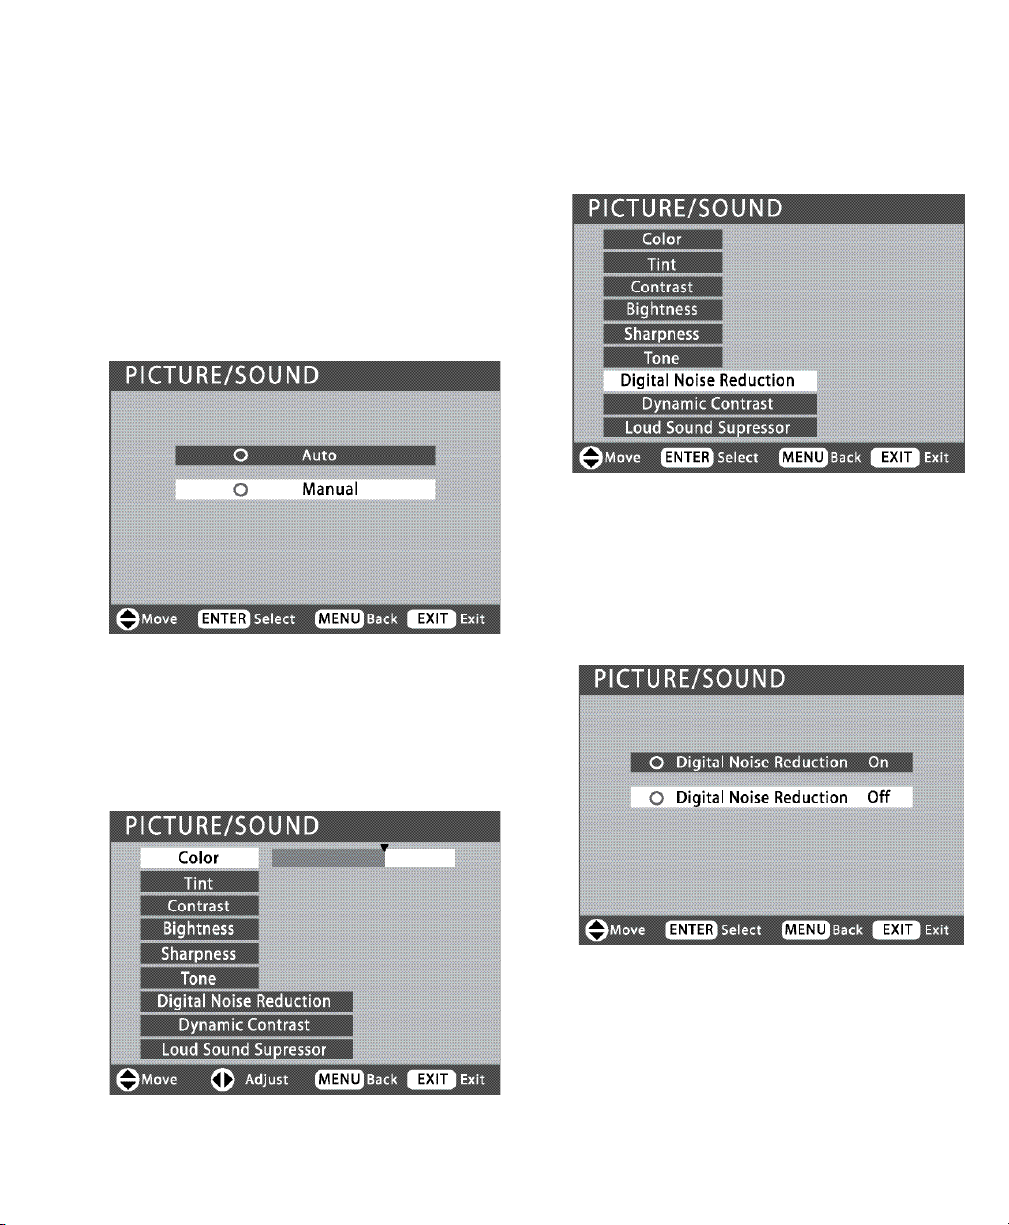
PICTURE / SOUND ADJUSTMENT
Choose Auto to accept predetermined values for
each parameter.
Choose Manual to adjust Picture / Sound values
individually to suit your personal preferences.
ADJUSTING THE PICTURE / SOUND MANUALLY
1
Use the CURSOR keys to highlight
Picture / Sound. Press ENTER.
2
Use the CURSOR keys to highlight
Manual. Press ENTER.
ADJUSTING THE PICTURE / SOUND LEVELS
3
Use the CURSOR keys to select Color,
Tint, Contrast, Brightness, Sharpness, or
Tone.
4
Use the CURSOR < > keys to adjust the levels.
ADVANCED PICTURE / SOUND ADJUSTMENTS
3
Use the CURSOR keys to select Digital
Noise Reduction, Dynamic Contrast, or Loud
Sound Suppressor.
ON-SCREEN MENU OPERATION (CONTINUED)
4
Press the right CURSOR > key for options.
5
Use the keys to highlight On or Off. Press
ENTER.
6
Press the MENU key to return to the previous
menu or the EXIT key to return to normal
viewing.
Page 17
17
Need help? Visit our Web site at www.sanyoctv.com or Call 1-800-877-5032
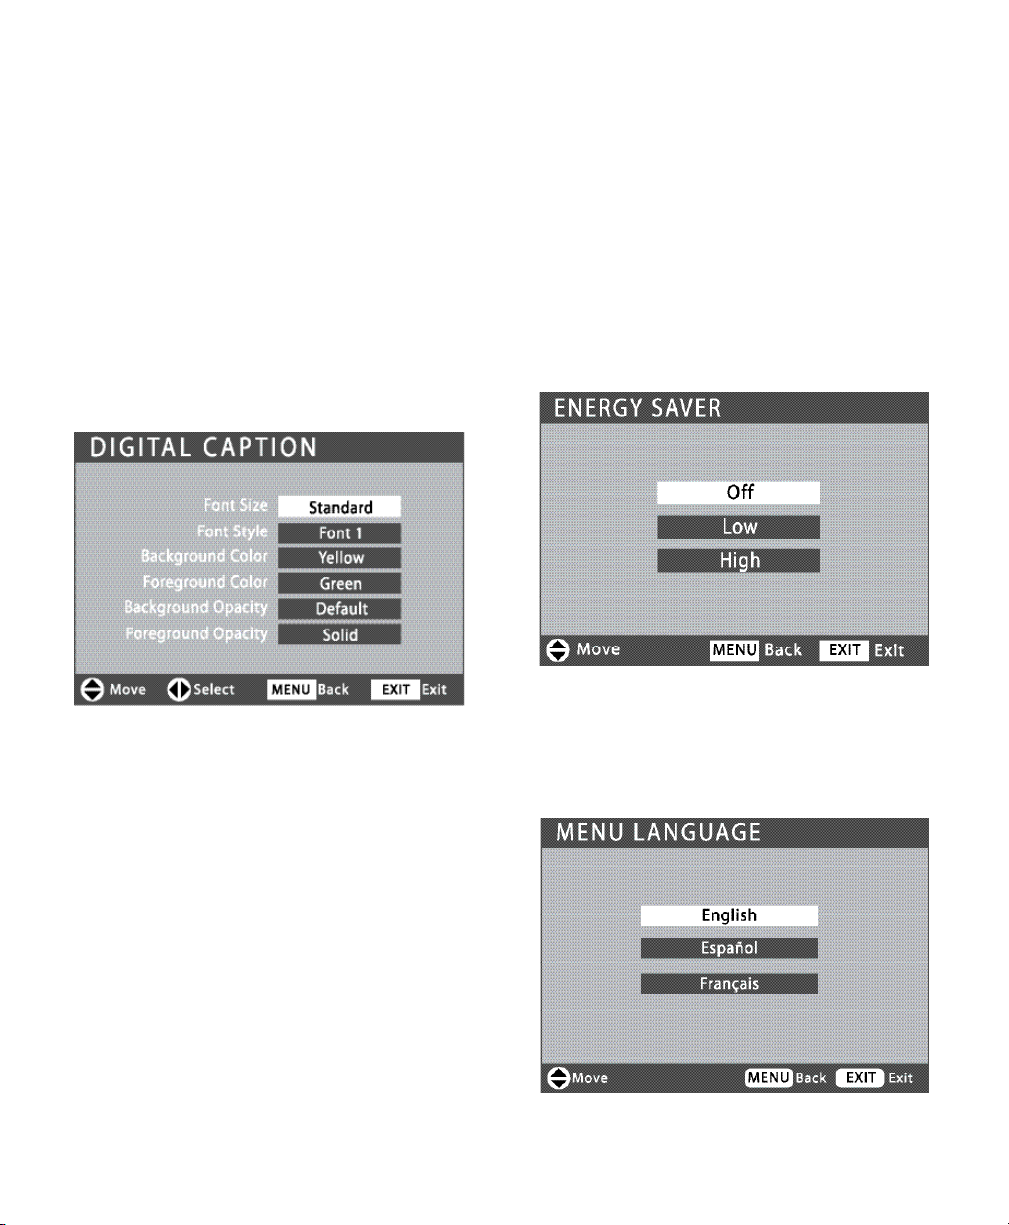
ENERGY (POWER) SAVER
This power saving feature reduces the backlight
brightness level. The options are:
• OFF—the feature is off and the power con-
sumption is normal.
• LOW—power saving level is low and the back-
light brightness level is lower than normal.
• HIGH—power saving level is high and the back-
light brightness is set to the lowest level.
1
Use the CURSOR keys to highlight
Energy Saver. Press ENTER.
2
Use the CURSOR keys to select Off, Low,
or High.
DIGITAL CAPTIONING
Captioning is textual information transmitted
along with the picture and sound. Turning
Captioning ON causes the HDTV to open these
captions (digital or analog) and superimpose
them on the screen. (Local broadcasters decide
which caption signals to transmit.)
Digital Captions can be changed using the menu
settings as shown.
1
Use the CURSOR keys to highlight
Digital Caption. Press ENTER.
2
Use the CURSOR keys to select the
option you want to adjust.
3
Use the CURSOR <> keys to adjust the
value.
NOTE: The Energy Saver settings level varies with the
Picture/Sound mode.
NOTES: If Background Opacity is set to transpar-
ent, captions may be difficult to see.
Only true EIA 708B Digital Closed-Captions
are affected by all of these settings.
MENU LANGUAGE
1
Use the CURSOR keys to highlight Menu
Language. Press ENTER.
2
Use the CURSOR keys to select English,
Español, or Français. Press EXIT.
Page 18

18
Need help? Visit our Web site at www.sanyoctv.com or Call 1-800-877-5032
HELPFUL HINTS—Problems/Solutions
If you are having problems with your HDTV,
check this trouble shooting chart to find one
or more possible solutions.
Before returning your HDTV, please visit our
website at www.sanyoctv.com or call us
toll free at 1.800.877.5032.
We can Help!
Problem: Check these Conditions: Try these Solutions: Page No.
No picture, sound
(Digital Picture)
Check antenna/external connections
May be station trouble, NO signal
broadcast.
MUTE function may be ON.
Adjust antenna.
Try a different channel.
Press RESET twice to restart channel
search. (All customized settings will be
cancelled.)
Adjust Volume.
5, 7
16
No Captioning
Check if station is broadcasting a
Closed-Caption signal.
Select another channel.
Press CAPTION to select
captioning mode.
7, 17
Cannot customize
Caption
Digital Caption signal is not being
broadcast.
Press CAPTION to select Analog
captioning.
7, 17
Can’t display picture
on a full screen
Press PIX SHAPE to change setting.
7
Poor Picture/Sound
(watching Analog)
Check if program is in color.
Check antenna/external connections.
Color or Tint misadjusted.
May be station trouble.
Maybe MUTE function is ON.
Try a different channel.
Adjust antenna.
Press RESET twice to restart channel
search.
Adjust Volume and/or Picture.
5, 7
16
“No Signal” message appears on
screen
Check Audio / Video connections.
Check external equipment
connections.
Check external equipment setting.
Check antenna connection.
Press INPUT.
Switch on external equipment.
Turn antenna, install signal booster.
Set external equipment output connections to match input connections.
5 – 10
Pixilation of Digital
image
Press INFO and check signal
strength.
Turn antenna, install signal booster.
Install outdoor Digital antenna.
5, 7
Cannot select or
scan some channels
Channel may be removed from memory.
Check antenna connections.
No digital signal being broadcast.
V-Guide is set to block programming.
Weak Signal.
Select Channel Scan Memory to add
channels or start channel search.
Set V-Guide to “ALLOW ALL” or press
RESET twice to clear all settings and
restart channel search.
Turn antenna, install signal booster.
7
13 – 15
No Cable channels
above number 13
Cable Channel Indicator C should
appear next to channel number.
Search for Cable channels using Manual
Channel Search.
13
Remote Control
will not operate TV
Check batteries.
Check if TV is plugged in.
Replace batteries.
Aim remote control at front of TV.
5, 7
Cabinet makes popping sound.
This is a normal condition during
warm-up and cool down of the plastic
cabinet parts.
Page 19

19
Need help? Visit our Web site at www.sanyoctv.com or Call 1-800-877-5032
For your protection in the event of theft or loss of this product, please fill in the information requested below and KEEP IN A SAFE PLACE FOR YOUR OWN PERSONAL RECORDS.
Model No.______________________________ Date of Purchase _________________________
Serial No.______________________________ Purchase Price ___________________________
Where Purchased_________________________
(Located on back of unit)
Sanyo Manufacturing Corp.
3333 Sanyo Road, Forrest City, AR 72335
ONE-YEAR LIMITED PARTS AND LABOR WARRANTY
THIS LIMITED PARTS AND LABOR WARRANTY IS VALID ONLY ON SANYO TELEVISIONS PURCHASED AND USED IN
THE UNITED STATES OF AMERICA, CANADA, AND PUERTO RICO, EXCLUDING ALL OTHER U.S. TERRITORIES AND
PROTECTORATES. THIS LIMITED WARRANTY APPLIES ONLY TO THE ORIGINAL RETAIL PURCHASER, AND DOES NOT
APPLY TO PRODUCTS USED FOR INDUSTRIAL OR COMMERCIAL PURPOSES.
WARRANTY APPLICATION
FOR ONE YEAR from the date of original retail purchase Sanyo Manufacturing Corporation (SMC) warrants this TV to
be free from manufacturing defects in materials and workmanship under normal use and conditions for parts and labor.
For the FIRST 90 DAYS from the date of original retail purchase, Sanyo Manufacturing Corporation will replace any
defective TV via exchange at the retailer. To ensure proper warranty application, keep the original-dated-sales receipt
for evidence of purchase. Return the defective TV to the retailer along with the receipt and the included accessories,
such as the remote control. The defective TV will be exchanged for the same model, or a replacement model of equal
value, if necessary. Replacement model will be contingent on availability and at the sole discretion of Sanyo
Manufacturing Corporation.
THE FOREGOING WARRANTY IS EXCLUSIVE AND IN LIEU OF ALL OTHER WARRANTIES OF MERCHANTABILITY OR
FITNESS FOR A PARTICULAR PURPOSE.
OBLIGATIONS
For one year
from the date of purchase, Sanyo Manufacturing Corporation warrants this product to be free from
defects in material and workmanship under normal use and conditions. During the first 90 days
under this warranty
for any manufacturing defect or malfunction Sanyo Manufacturing Corporation will provide a new TV via exchange at
the retailer.
HOW TO MAKE A CLAIM UNDER THIS WARRANTY
Please call 1-800-877-5032. Please be prepared to give us the television’s model number and serial number when you
call. The model number and serial number are printed on a label attached to the back of the unit.
For customer assistance, call toll free 1-800-877-5032.
Weekdays 7:30 AM – 7:00 PM Central Time
Saturday 7:30 AM – 4:00 PM Central Time
This warranty expresses specific contractual rights; retail purchasers may have additional statutory rights which vary
from state to state.
(EFFECTIVE: March 1, 2007)
Page 20

20
¿Necesita ayuda?
Visite nuestro sitio en internet www.sanyoctv.com o Llame al 1-800-877-5032
PRECAUCIÓN
RIESGO DE TOQUE ELECTRICO NO ABRIR!
PRECAUCIÓN : PARA REDUCIR EL RIESGO DE TOQUE ELECTRICO, NO QUITE LA CUBIERTA (O
LA TAPA TRASERA). NO HAY PARTES ADENTRO QUE LAS PUEDA REPARAR EL USUARIO.
REFIERASE A PERSONAL CALIFICADO PARA REPARAR EL APARATO.
ESTE SÍMBOLO INDICA QUÉ VOLTAJES PELIGROSOS QUE CONSTITUYEN UN RIESGO DE TOQUE ELÉCTRICO ESTAN PRESENTES DENTRO
DE ESTA UNIDAD.
ESTE SÍMBOLO INDICA QUE HAY INSTRUCCIONES IMPORTANTES DE
OPERACIÓN Y MANTENIMIENTO EN LA LITERATURA QUE SE ANEXA A
ESTA UNIDAD.
ADVERTENCIA : PARA REDUCIR EL RIESGO DE FUEGO O TOQUE ELÉCTRICO, NO EXPONGA ESTE
APARATO A LLUVIA O HUMEDAD.
IMPORTANTES MEDIDAS DE SEGURIDAD
1. Lea estas instrucciones.
2. Guarde estas instrucciones.
3. Preste atención a los avisos.
4. Siga todas las instrucciones.
5. No use este aparato cerca del agua.
6. Limpie sólo con un trapo seco.
7. No obstruya las aperturas para ventilación. Instale de
acuerdo a las instrucciones del fabricante.
8. No se instale cerca de ninguna fuente de calor como radiadores, registros de calor, estufas, u otros aparatos
(incluyendo amplificadores) que produzcan calor.
9. Por seguridad, no elimine la conexión de tierra de la clavija. Una clavija polarizada tiene una hoja más ancha que la
otra. Una clavija de tipo conexión a tierra, tiene dos hojas y
un tercer conector mas prolongado. La hoja ancha o el
conector prolongado están provistas para su seguridad. Si
la plaga o clavija proveída no asienta correctamente en el
contacto eléctrico, consulte a un electricista para que esa
toma de ac obsoleta sea remplazada.
10. Proteja el cordón de potencia de que sea pisado o
perforado, particularmente en las hojas y del punto donde
este sale del aparato.
11. Sólo use anexos o accesorios especificados por el
fabricante.
12. Use únicamente con el carro, estante, tripie,
soporte o mesa especificada por el fabricante, o
vendida con el aparato. Cuando se use un carro,
tenga precaución cuando mueva la combinación
de carro/aparato para evitar lesiones en caso de
que se caiga.
13. Desconecte este aparato en caso de relampagueo o cuando
no se use por un periodo de tiempo prolongado.
14. Refiera todas las reparaciones a personal de servicio calificado. Se requiere de servicio cuando el aparato se ha dañado de cualquier forma, como si el cordón de potencia se
dañara de alguna forma, se ha derramado líquido sobre el
aparato o algún objeto le ha caído encima, el aparato se ha
expuesto a la lluvia o humedad, que no opere normalmente
o que se haya caído.
15. Si una antena externa se ha conectado al televisor,
asegurese que el sistema de tierra de la antena este de
forma que provea alguna protección contra fugas de voltaje o cargas electrostáticas. En la sección 810-21 del código
nacional eléctrico de lo Estados Unidos se menciona información con respecto a la manera adecuada de instalar el
sistema de tierra al mástil principal, aterrizaje del cableado
para la unidad de descarga de la antena, tamaño de los conductores de tierra, localización de la unidad de descarga
de la antena, conexión a los electrodos de tierra, y
requerimientos de los electrodos de tierra.
16. Un sistema de antena externo no debe instalarse cerca de
líneas de electricidad o circuitos de potencia o alumbrado, o
donde puedan caer sobre líneas de energía eléctrica o
circuitos cuyo contacto con ellos puede ser fatal.
17. Montaje en pared o techo—Este producto deberá de ser
montado en la pared o techo siguiendo las recomendaciones
del fabricante.
18.
"Este aparato no deberá de ser expuesto a ser mojado, y
no se deberán de colocar recipientes con líquido encima
de él."
19. Si el conector del cable de AC se usa como artículo de
desconexión principal, entonces este deberá de
permanecer accesible todo el tiempo.
EJEMPLO DE ATERRIZAMIENTO DE ANTENA DE ACUERDO
AL CÓDIGO ELÉCTRICO NACIONAL
(National Electrical Code, ANSI/NFPA 70)
“Nota al instalador del sistema de cable CATV :
Este recordatorio es dado para llamar la atención del instalador del sistema de cale CATV al Artículo 820-40 del NEC que provee guias para el
aterrizamiento adecuado y, en particular, específica que la tierra del cable
deberá de estar conectada al sistema de tierra del edificio, tan cercano al
punto de entrada del cable como sea práctico.”
Page 21

21
¿Necesita ayuda?
Visite nuestro sitio en internet www.sanyoctv.com o Llame al 1-800-877-5032
INFORMACIÓN FCC
Este equipo ha sido probado y se encontró en acuerdo a los límites para un aparato digital Clase B, en
acorde a la Parte 15 de las Reglas FCC. Estos límites están diseñados para proveer una protección razonable contra interferencia nociva en una instalación residencial. Este equipo genera, usa y puede irradiar energía de radio frecuencia y si no es instalado o usado de acuerdo a las instrucciones, puede llegar a causar interferencia nociva a radio comunicaciones. Sin embargo, no es completamente seguro
que no ocurrirá interferencia alguna en una instalación en particular. Si este equipo llega a causar interferencia nociva a la recepción de radio o televisión, la cual puede ser determinada por medio de apagar
y encender el equipo, se recomienda al usuario intentar corregir la interferencia mediante una o varias
de las siguientes medidas:
– Reorientar o mover la antena de recepción.
– Aumentar la separación entre el equipo y el receptor.
– Conectar el equipo a un enchufe en un circuito diferente al cual esté conectado el receptor.
– Consultar al vendedor o a un técnico de radio y televisión con experiencia para más ayuda.
PPRREECCAAUUCCIIÓÓNN::
Regulaciones de la FCC advierten que modificaciones inadecuadas o cambios no auto-
rizados a esta unidad pueden anular la autorización del usuario para operar la unidad.
MARCAS REGISTRADAS
Manufacturado bajo licencia de Dolby
Laboratories. “Dolby ” el símbolo son marcas registradas de Laboratorios Dolby
.
“Como un Asociado de ENERGY STAR®,
Sanyo Manufacturing Corporation, ha
determinado que este producto
cumple con los lineamientos en eficiencia energética de E
NERGY STAR
®”
.
Este símbolo impreso, significa que
el producto está listado por
Underwriters’ Laboartories Inc. El
diseño y manufactura de este producto, reúne los rígidos estándares
de U.L., contra riesgos de incendio,
accidentes o descargas eléctricas.
ESPECIFICACIONES
Requerimientos de Potencia:
Fuente: AC 120V, 60Hz
Consumo de Potencia:
DP26648 120 watts
DP32648 160 watts
PROTEGER LA PANTALLA LCD
La pantalla podría dañarse si no se le dá un mantenimiento adecuado. NO use objetos duros como
trapos gruesos o papel. NO utilize presión excesiva cuando se
limpie la pantalla de LCD; ésto
podría causar decoloración permanente o puntos negros en la
misma.
NUNCA aplique líquidos en aerosol a la pantalla.
PRECAUCIONES DE
MANEJO
• Manéjese sólo por el gabinete. Nunca toque la
pantalla cuando está siendo manejado.
• Presión excesiva en la pantalla puede causar
decoloración permanente o puntos negros.
• Daño por manejo no está cubierto por la
garantía.
CONTIENE LÁMPARAS DE
MERCURIO, DESECHAR
DE MANERA APROPIADA
Page 22

22
¿Necesita ayuda?
Visite nuestro sitio en internet www.sanyoctv.com o Llame al 1-800-877-5032
CONTENIDO
IMPORTANTES MEDIDAS DE SEGURIDAD . . . . . . . . . .20
INFORMACIÓN FCC . . . . . . . . . . . . . . . . . . . . . . . . . . . . . . .21
MARCAS REGISTRADAS . . . . . . . . . . . . . . . . . . . . . . . . . .21
ESPECIFICACIONES . . . . . . . . . . . . . . . . . . . . . . . . . . . . . . .21
PROTEGER LA PANTALLA LCD . . . . . . . . . . . . . . . . . . . . .21
Precauciones de Manejo . . . . . . . . . . . . . . . . . . . . . . . .21
Modo de Deshecho . . . . . . . . . . . . . . . . . . . . . . . . . . . . .21
CONTENIDO . . . . . . . . . . . . . . . . . . . . . . . . . . . . . . . . . . . . .22
ENSAMBLE DE LA BASE A LA HDTV . . . . . . . . . . . . . . . .22
INSTALACIÓN—
Colocando la HDTV de LCD . . . . . . . . . . . . . . . . . . . . .23
Montaje en la Pared . . . . . . . . . . . . . . . . . . . . . . . . . . . .23
PARA COMENZAR—
Precauciones . . . . . . . . . . . . . . . . . . . . . . . . . . . . . . . . . .23
Instalación de Baterías . . . . . . . . . . . . . . . . . . . . . . . . .23
Conexión de Antena para señales de Aire . . . . . . . . .23
Paneles de Control y Conectores . . . . . . . . . . . . . . . . .24
Operación del Control Remoto . . . . . . . . . . . . . . . . . . .25
Conexiones . . . . . . . . . . . . . . . . . . . . . . . . . . . . . . . . . . . .26
Conexión Eléctrica / Búsqueda de Canales Inicial . .27
CONEXIONES AVANZADAS DE SEÑAL DIGITAL—
HDMI 1 / 2 . . . . . . . . . . . . . . . . . . . . . . . . . . . . . . . . . . . . .28
DVI a HDMI . . . . . . . . . . . . . . . . . . . . . . . . . . . . . . . . . . . .28
Salida de Audio Digital y Análoga (L/R) . . . . . . . . . . . .28
CONEXIONES DE PC . . . . . . . . . . . . . . . . . . . . . . . . . . . . . .29
Mapa de Navegación del Menú PC . . . . . . . . . . . . . . .29
OPERACIÓN DEL MONITOR PARA PC —
Configuración de la PC . . . . . . . . . . . . . . . . . . . . . . . . . .29
Configuración del Monitor HDTV . . . . . . . . . . . . . . . . .29
Tips de Operación del Menú de PC . . . . . . . . . . . . . . .29
Ajustes Manuales . . . . . . . . . . . . . . . . . . . . . . . . . . . . . .29
OPERACIÓN DEL MENÚ EN PANTALLA . . . . . . . . . . . . .30
Mapa de Navegación del Menú . . . . . . . . . . . . . . . . . .30
Búsqueda Manual de Canales . . . . . . . . . . . . . . . . . . .30
Memoria de Canales . . . . . . . . . . . . . . . . . . . . . . . . . . . .31
Agregar Canales a la Memoria . . . . . . . . . . . . . . . .31
Quitar Canales de la Memoria . . . . . . . . . . . . . . . . .31
Guía-V (Control Paternal) . . . . . . . . . . . . . . . . . . . . . . .32
Operación de Guía-V . . . . . . . . . . . . . . . . . . . . . . . . .32
Operación Guía-V Regional (Avanzado) . . . . . . . . .33
Ajustes de Imagen y Sonido . . . . . . . . . . . . . . . . . . . . .34
Ajustes Manuales de Imagen y Sonido . . . . . . . . .34
Ajustes Avanzados de Imagen y Sonido . . . . . . . .34
Caption Digital . . . . . . . . . . . . . . . . . . . . . . . . . . . . . . . . .35
Ahorrador de Energía . . . . . . . . . . . . . . . . . . . . . . . . . . .35
Lenguaje de Menú . . . . . . . . . . . . . . . . . . . . . . . . . . . . . .35
SUGERENCIAS ÚTILES–Problemas/Soluciones . . . . . . .36
GARANTÍA . . . . . . . . . . . . . . . . . . . . . . . . . . . . . . . . . . . . . . .37
ENSAMBLE DE LA BASE A LA HDTV
Hola!
S
oy tu nuevo televisor Sanyo
de pantalla ancha LCD HDTV. No me
conectes todavía! Por favor lee con
cuidado este manual para saber de
mis funciones tales como: sintonizador HD integrado, Control
Paternal, Canales Digitales, mi entrada para PC y mucho más…
Superficie
plana y
acolchonada.
NOTA: Omita este paso en caso de montar la unidad a la pared.
Herramienta Necesaria: Desarmador de cruz. (Remueva
los tornillos de la base de la HDTV
[D] antes de instalar su pedestal).
Page 23

23
¿Necesita ayuda?
Visite nuestro sitio en internet www.sanyoctv.com o Llame al 1-800-877-5032
COLOCANDO LA HDTV DE LCD
Siempre utilize una superficie firme y
plana al colocar su HDTV. No se coloque la HDTV
en áreas confinadas. Mantenga suficiente espacio para una buena venitlación.
NOTA: Todas las dimensiones están en centímetros (cm).
MONTAJE EN LA PARED
Use los tornillos colocados en los huecos para el
ensamble de la base en la parte inferior trasera de
la HDTV para asegurarla al estuche especial de
montaje en pared.
NOTA: Este estuche no está incluido.
Interfase Estándar VESA:
200 x 200
Medida de los tornillos:
Diámetro M6, Longitud – 12mm (mínimo); 16mm (máximo)
Orificios para
montaje
INSTALACIÓN PARA COMENZAR
2
Conexión de Antena para señales de Aire
ESTA HDTV PUEDE SINTONIZAR :
a. Señales Digitales y Análogas de una antena
aerea.
O
b. Canales de TV por Cable análogos o sin
codificar.
NOTAS: Se debe usar el MENU en pantalla para bus-
car canales de TV por Cable sin codificar.
Para obtener la mejor imagen, conecte su
Decodificador o Receptor Satelital a las
entradas de HDMI1, 2 o Video 2 ó 3.
Esta HDTV puede recibir CUALQUIER señal
RF que sea transmitida.
ANTENA
CABLE
O
ENTRADA DE ANTENA
ANÁLOGA / DIGITAL
DP26648
(DP32648)
1
Instale las baterías en el Control Remoto.
(2 baterías
eneloop recargables ”AAA” Ni-MH)
PRECAUCIONES
No utilize recargables junto con desechables, otros tipos, mezcladas con nuevas y
viejas o baterías con diferente carga.
No exponga el Control Remoto o las
baterías al calor o humedad.
Asegurese de que las marcas “+” y “-” de las baterías correspondan con las de el Control Remoto.
Para recargar las baterías eneloop por favor siga las
instrucciones de el cargador de baterías
(no incluido).
Por favor recicle baterías recargables desgastadas.
Para más información visite: www.eneloopusa.com
Page 24

24
¿Necesita ayuda?
Visite nuestro sitio en internet www.sanyoctv.com o Llame al 1-800-877-5032
PARA COMENZAR—PANELES DE CONTROL Y CONECTORES
Entrada S-Video (VIDEO1), PÁGINA 26—Para
realzar los detalles de la imagen, utilize
S-Video en lugar de los conectores de Video,
de ser disponibles en su equipo externo. (La
conexión de S-Video anulará la conexión en el
conector de VIDEO1).
Salida de Audio Digital (Coaxial), PÁGINA
28—Use un cable de Audio Digital tipo
“Phono” (Coaxial) para conectar la salida de
Audio Digital a un sistema de audio avanzado
equipado con Dolby
®
Digital 5.1.
Entrada Video Componente (VIDEO2 o
VIDEO3), PÁGINA 26—Conecte equipo de
video digital a los conectores Y (verde), Pr
(azul), Pb (rojo) y los de Audio L/R. Estos
conectores automáticamente detectarán el
tipo de señal siendo recibida.
Conectores de Salida de Audio Análogo
(L/R), PÁGINA 28—Conecte equipo externo
de audio aquí.
Entrada para PC y Estéreo Audio Mini
PÁGINA 29—Conecte salidas de computadora
y audio a estos conectores.
• MONITOR RGB (D-SUB)
• AUDIO R/L (Conector Estéreo Mini)
Entrada de Antena Análoga/Digital, PÁGINA
23—Conecte una antena de RF o sistema de
Cable Análogo a este conector.
Entrada Audio/Video (VIDEO1), PÁGINA 26—
Conecte equipo de video análogo aquí.
Entrada HDMI1/2 (Interfase Multimedia de
Alta Definición), PÁGINA 28—Interfase completamente digital que acepta señales de
video sin compresión para obtener la mejor
cálidad de imagen posible. HDMI soporta protección de copia HDCP, lo que permite la
transmisión de contenido digital protegido.
La señal también puede incluir audio Dolby®
Digital o PCM, si está disponible.
Teclas de
Volumen – +
Teclas de
Canales
CH
Tecla de
Power
PANEL IZQUIERDO
PANEL
DERECHO
Page 25

25
¿Necesita ayuda?
Visite nuestro sitio en internet www.sanyoctv.com o Llame al 1-800-877-5032
Tecla Audio—Selecciona el modo de audio
deseado, de ser disponible.
Tecla Sleep—Presione SLEEP y luego “0”
para incrementar el apagado automático en
intervalos de 30 minutos hasta 3 horas.
NOTA: Este modo se cancela al apagar la HDTV.
Tecla Caption—Despliega los modos de:
Digital CC1 a CC6, o Análogo CC1 a CC4,
QuikCap o Apagado. La apariencia de los
subtítulos puede ser modificada en el menú.
Teclas de Volumen—Incrementa (+) o dismi-
nuye (–) la intensidad del sonido.
Tecla “1– – ”—Para canales mayores al 99, presione seguido de los dos números restantes.
Tecla Mute—Cancela o restaura el audio.
OPERACIÓN DEL CONTROL REMOTO
Tecla PIX Shape—Utilize para elegir opciones
entre Pix1 – Pix4. Las opciones disponibles
dependen de la señal y la relación de aspecto
transmitida.
Tecla de INPUT—Presione para seleccionar la
fuente de video que desea ver: RF Análogo, RF
Digital, Video 1, Video 2, Video 3, HDMI 1,
HDMI 2 o PC Input.
Tecla Info—Despliega información en un
recuadro.
La Barra de Antena Digital puede tener: Tipo
de señal, Núm. de Canal, ID de Estación,
Clasificación de Programa, Fuerza de Señal,
Información Detallada del Programa, Info. de
Audio y Título del programa.
La Barra de Antena Análoga puede tener:
Tipo de señal, Núm. de Canal, ID de Estación,
Clasificación de Programa e Info. de Audio.
La Barra de Cable puede tener: Tipo de
señal, Núm. de Canal, ID de Canal (sólo
análogo), Clasificación del Programa, Fuerza
de Señal e Info. de Audio.
Tecla Reset—Presionar dos veces para regre-
sar a valores de fábrica. La Búsqueda de
Canales comenzará automáticamente.
NOTA: La lista anterior de canales será reemplazada.
Teclas Numéricas—Presione dos teclas por
canal. Ejem: Presione 0 y 6 para el canal 6.
Teclas de Canal CH—Presione para nave-
gar los canales en la memoria.
Tecla Recall—Cambia entre los últimos dos
canales accesados.
Teclas de Navegación del Menú:
Menu—Muestra el menú en pantalla.
Teclas de Cursor —Mueven el cursor
hacia arriba o abajo.
Teclas de Cursor < > —Mueven el cursor
hacia la izquierda o derecha.
Tecla Enter—Activa la opción seleccionada,
cuando se requiera.
Tecla Exit—Presionar para salir del menú.
12
13
11
14
Apunte hacia
la HDTV
11
12
13
14
Page 26

26
¿Necesita ayuda?
Visite nuestro sitio en internet www.sanyoctv.com o Llame al 1-800-877-5032
3
Conexiones para Señal Análoga—
Video1 (opcional)
Conecte un dispositivo análogo tal como un
Decodificador de Cable, Receptor Satelital o
Videocasetera.
Entradas RCA (compuestas) están incluidas en
su nueva HDTV para proveer compatibilidad
con dispositivos análogos anteriores, tales
como una Videocasetera. El conector S-Video
proveerá la mejor imagen análoga. Si se cuenta
con un dispositivo con salida S-Video, se
recomienda su uso sobre el conector estándar.
1. Conecte un cable AV a la entrada VIDEO 1 de
la HDTV y a su equipo análogo, como se
muestra. Concuerde el color del cable con la
entrada respectiva. (cable no incluido)
2. Presione la tecla INPUT para cambiar de
señal y seleccionar Video 1.
DISPOSITIVO ANÁLOGO
4
Conexiones de Señal Digital—
Video1 y Video3 (opcional)
Conecte dispositivos digitales tales como
Decodificadores de Cable, Satelite HD y/o
Reproductor DVD.
Las entradas de Componente de esta HDTV
aceptan varias señales digitales, haciendolas
una muy buena opción para una buena calidad
y resolución de imagen.
1. Conecte un cable de COMPONENTE a un
grupo de entradas Verde, Azul y Roja
(Video2 o 3) de la HDTV y a su dispositivo
digital, como se muestra (cable no incluído).
2. Conecte un cable de AUDIO al grupo correspondiente de entradas Roja y Blanca, como
se muestra (cable no incluído).
3. Presione la tecla INPUT para cambiar de
señal y seleccionar Video 2 ó 3.
REPRODUCTOR DVD
RECEPTOR SATELITAL
PARA COMENZAR—CONEXIONES
TECLA INPUT
Page 27

27
¿Necesita ayuda?
Visite nuestro sitio en internet www.sanyoctv.com o Llame al 1-800-877-5032
CONEXIÓN ELÉCTRICA
3
Conecte el cordón de
potencia de AC (120V
AC, 60 Hz).
4
Presione la tecla de
POWER (siga las instrucciones en pantalla).
BÚSQUEDA DE CANALES INICIAL
5
Presione la tecla CH para buscar señales
conectadas a la entrada de Antena.
La Búsqueda de Canales buscará señales de
Antena y Cable. Si señales de Antena Aerea son
detectadas, la HDTV buscará señales tanto
análogas como digitales. Si se detectan señales
de Cable, la HDTV buscará sólo canales análogos
de Cable.
Los canales se almacenan en la Memoria y
pueden ser seleccionados usando las teclas de
CHANNEL y .
Si no detecta señales de Antena Aerea o Cable,
la HDTV comenzará una búsqueda de AV.
Si ninguna de estas búsquedas detecta una
señal válida, la HDTV sintonizará la entrada de
Video1.
PANTALLA INICIAL
BÚSQUEDA AV
NOTA:Asegúrese que todos los dispositivos externos
de video que conecte a su HDTV estén prendidos antes de comenzar la búsqueda AV.
6
Presione la tecla CH para buscar señales
de dispositivos conectados a entradas AV.
La búsqueda AV comenzará por revisar las
entradas AV con señal válida, comenzando por
la entrada Video1. Cuando se detecta una señal
válida, el proceso de búsqueda termina y la
HDTV la sintoniza.
Si no se detecta una señal válida en ninguna
entrada AV, la HDTV sintonizará la entrada
Video1.
PANTALLA DE BÚSQUEDA DE CANALES
PANTALLA DE BÚSQUEDA AV
PARA COMENZAR—
CONEXIÓN ELÉCTRICA / BÚSQUEDA DE CANALES
A la toma de 120VAC
Page 28

28
¿Necesita ayuda?
Visite nuestro sitio en internet www.sanyoctv.com o Llame al 1-800-877-5032
CONEXIONES AVANZADAS AV
CONEXIONES AVANZADAS DE
SEÑAL DIGITAL—HDMI A HDMI
Conecte dispositivos digitales compatibles
como un Decodificador HD, Receptor Satelital
HD, Reproductor DVD y Consola de Juego.
HDMI—Interfase completamente digital que
acepta señales de video sin compresión para
obtener la mejor cálidad de imagen posible.
HDMI soporta protección de copia HDCP, lo
que permite la transmisión de contenido digital protegido. La señal también puede incluir
audio Dolby® Digital o PCM, si está disponible.
1
Conecte un cable HDMI a una de las
entradas HDMI de la HDTV y a su dispositivo externo (cable no incluido).
NOTA:Presione la tecla
INPUT
para seleccionar la
señal de entrada HDMI 1 o HDMI 2.
DVI A HDMI
1
Use un adaptador (no incluido) para conectar un dispositivo DVI a una entrada HDMI.
2
Conecte la salida de audio del dispositivo a
la entrada de Audio L/R del grupo VIDEO3.
NOTA: Audio sólo es disponible cuando se usa HDMI1.
REPRODUCTOR DVD
RECEPTOR
SATELITAL
SALIDA DE AUDIO ESTÉREO
(ANÁLOGO L/R)
1
De la salida Audio Out conecte el amplificador de estéreo, como se muestra.
NOTA:No conecte bocinas externas directamente a
la HDTV.
SALIDA DE AUDIO DIGITAL
1
Conecte la Salida de Audio Digital a un
receptor mulitcanal, como se muestra.
NOTA:Audio Dolby® Digital 5.1 está disponible de la
salida de audio digital sólo cuando se recibe
como parte de la señal de antena digital.
VISTA
IZQUIERDA
DEL PANEL
TRASERO
CABLE DE AUDIO
DIGITAL TIPO
“PHONO”
(No Incluido)
RECEPTOR
MULTICANAL
AMPLIFICADOR
ESTÉREO
PANEL TRASERO HDTV
PANEL TRASERO HDTV
Page 29

29
¿Necesita ayuda?
Visite nuestro sitio en internet www.sanyoctv.com o Llame al 1-800-877-5032
CONFIGURACIÓN DE LA PC
Para evitar una condición “Fuera de Rango”, baje la
resolución en su PC a un valor XGA, como lo es
1024 x 768 px, antes de quitar su monitor actual.
CONFIGURACIÓN DEL MONITOR HDTV
La Frecuencia, Resolución, Dot Clock, Fase,
Posición Horizontal y Vértical son ajustadas
automáticamente cuando se selecciona la opción
de Auto Ajuste.
TIPS DE OPERACIÓN DEL MENU DE PC
Ajustes de Imagen y Sonido en el Menú de PC no
afectan ajustes de otras entradas.
Presione RESET dos veces para restaurar a los
valores de fábrica.
AJUSTES MANUALES
Temp. de Color—Presione ENTER para selec-
cionar el ajuste.
Dot Clock—Dot Clock ajusta la Frecuencia de
Barrido para igualarla a la de su PC.
Fase—Ajuste la Fase cuando la imagen aparenta
estar borrosa o vibrar.
Posición-H—Mueve la imagen horizontalmente.
Posición-V—Mueve la imagen verticalmente.
Ahorro de Energía—Cuando la HDTV deje de
detectar señal de la PC, cambia a modo de espera.
Regresará a operación normal cuando vuelva a
detectar señal de la PC.
Regresar a ajustes de PC—Reestablece todos los
valores iniciales de fábrica del Menú de PC.
OPERACIÓN
DEL MONITOR PARA PC
NOTA: Antes de conectar algún cable, desenchufe de la toma AC los cables de corriente
tanto del Televisor HDTV como el de la PC.
1
Conecte un cable RGB de la salida de monitor
de la PC al conector PC Input de la HDTV
(cable RGB no incluido).
2
Inserte un extremo de un cable de Audio
Estéreo Mini a la salida de audio de la PC y el
otro extremo a la entrada de audio PC Input
en la HDTV (cable de Audio Estéreo Mini no
incluido).
TIP : El volumen puede ser ajustado con la PC y/o con las
teclas
VOLUME y de la HDTV.
3
Utilize la opción de Auto Ajuste del Menú de
PC.
NOTA: Encender la HDTV y cualquier otro equipo
externo antes de encender la computadora.
MAPA DE NAVEGACION DEL MENÚ PC
CONEXIONES DE PC
Page 30

30
¿Necesita ayuda?
Visite nuestro sitio en internet www.sanyoctv.com o Llame al 1-800-877-5032
INFO. IMPORTANTE: Esta HDTV mantiene una sola base de
datos para canales digitales. Por lo tanto cuando busque
canales digitales de Cable, la base de datos de canales digitales será borrada. Usted sólo podrá recibir aquellos
canales ClearQAM provistos por su compañía de cable.
OPERACIÓN DEL MENÚ EN PANTALLA
BÚSQUEDA MANUAL DE CANALES
• Cable • Aire (Antena) • Adición Digital
Búsqueda en Cable agrega canales análogos y
digitales sin codificar. Esta búsqueda puede
tomar varios minutos. Cuando termine, la HDTV
sintonizará el canal digital sin codificar más bajo
de estar disponible. De no ser así, la HDTV
sintonizará el canal análogo más bajo.
Búsqueda en Aire (Antena) agrega canales digitales y análogos transmitidos por Aire. Al terminar, la HDTV sintonizará el canal Digital o
Análogo más bajo. De no haber señal, la HDTV
sintonizará Video 1.
Búsqueda de Adición Digital agrega cualquier
canal digital nuevo a la base de datos.
1
Presione la tecla MENU para exhibir el menú
principal.
2
Use las teclas CURSOR para resaltar
Búsqueda Manual. Presione ENTER.
3
Use las teclas de CURSOR para seleccionar Cable, Aire (Antena) o Adición Digital.
Al terminar la búsqueda, la HDTV saldrá del Menú
y regresará a la pantalla normal.
MAPA DE NAVEGACIÓN DEL MENÚ
MENÚ PRINCIPAL OPC. SUB-MENÚ
NOTA:“No disponible” aparecerá en la pantalla cuan-
do una opción no se pueda utilizar.
TIPO DE SEÑAL OPCIONES DE MENÚ NO DISPONIBLES
RF Análogo Caption DTV (subtítulos)
RF Digital Ninguna (todas las opciones son disponibles)
Video 1 Búsqueda Manual de Canales, Memoria de
Canales, Caption DTV
Video 2/3 Búsqueda Manual de Canales, Memoria de
Canales, Caption DTV, Guía-V
BÚSQUEDA MANUAL DE CANALES TIENE 3 CATEGORÍAS
NOTA: Para información sobre canales digitales
locales, visite www.antennaweb.org.
HDMI 1/2
Page 31

31
¿Necesita ayuda?
Visite nuestro sitio en internet www.sanyoctv.com o Llame al 1-800-877-5032
(Operaciones del Menú continuan en la página 32).
QUITAR CANALES DE LA MEMORIA
3
Use la tecla CHANNEL o las teclas
numéricas para seleccionar el canal que
desea quitar.
NOTA: Use la tecla
1– –
para seleccionar canales de
cable mayores al 99.
4
Presione ENTER para Quitar el canal de
la Memoria.
5
Presione EXIT para regresar a la pantalla
normal.
Esta pantalla
aparece
después de
presionar
ENTER.
Luego de 3 segundos, en la pantalla
aparecerá el mensaje "Saltar?"
MEMORIA DE CANALES
Memoria de Canales es una base de datos de
canales almacenados que se pueden accesar con
las teclas de CH . Modifíquela agregando o
quitando canales.
1
Presione la tecla MENU para exhibir el menú
principal.
2
Use las teclas de CURSOR para resaltar
Memoria de Canales. Presione ENTER.
AGREGAR CANALES A LA MEMORIA
3
Use la teclas NUMÉRICAS para seleccionar
el canal que desea agregar.
NOTA: Use la tecla
1– –
para seleccionar canales de
cable mayores al 99.
4
Presione ENTER para Agregar el canal a
la Memoria.
Pantallas de
Memoria de
Canales
Luego de 3 segundos, en la pantalla
aparecerá el mensaje "Agregar?"
INFORMACIÓN IMPORTANTE
:
Cuando un
canal digital es eliminado, todos sus sub-canales
también son eliminados. Sólo aquellos canales
digitales previamente eliminados pueden ser
agregados nuevamente a la base de datos.
Sintonize canales “saltados” usando las teclas
numéricas. Si un sub-canal digital se agrega de
nuevo a la base de datos, entonces todos los subcanales de ese canal serán agregados de nuevo.
Esta pantalla
aparece
después de
presionar
ENTER.
Page 32

32
¿Necesita ayuda?
Visite nuestro sitio en internet www.sanyoctv.com o Llame al 1-800-877-5032
¿Necesita ayuda?
Visite nuestro sitio en internet www.sanyoctv.com o Llame al 1-800-877-5032
CLASIFICACIÓN
DE
CONTENIDO
GUÍA-V (CONTROL PATERNAL)
NOTA: ESTA FUNCIÓN ESTÁ DISEÑADA PARA
CUMPLIR CON REGULACIONES DE LA FCC
PARA V-CHIP EN LOS ESTADOS UNIDOS DE
AMÉRICA, ESTA FUNCIÓN PUDIERA NO ACTIVARSE CON SEÑALES QUE ORIGINEN DE
OTROS PAISES.
Esta televisión Sanyo está equipada con un circuito electrónico V-CHIP para interpretar los códigos de clasificación de la MPAA y ordenamientos
de Control Paternal en TV digital. Cuando estos
códigos son detectados la HDTV desplegará o
bloqueará la señal dependiendo de las opciones
hechas en el sistema Guía-V.
Utilize esta función para bloquear programas con
contenido que considere inapropiado para sus
hijos.
MÁS INFORMACIÓN
Puede consultar información adicional sobre la
clasificación V-Chip y MPAA en las páginas:
www.v-chip.org y www.mpaa.org.
OPERACIÓN DE GUÍA-V
1
Utilize las teclas de CURSOR para
resaltar Guía-V en el Menú principal.
Presione ENTER.
2
Utilize las teclas de CURSOR para
resaltar Prendido en el Menú de Guía-V.
Presione ENTER.
3
Utilize las teclas de CURSOR para seleccionar Ajustar. Presione ENTER.
4
Utilize las teclas de CURSOR y < > para
seleccionarCINE, TV, o Clase de Contenido
(un cuadro verde aparecerá a un lado de la
selección).
NOTA:La clasificación de contenido está bajo: FV, D, L,
S y V.
5
Presione la tecla ENTER para Bloquear o
Permitir clasificaciones seleccionadas. Un
símbolo de candado aparecerá a un lado de
la opción de clasificación seleccionada indicando que está bloqueada.
CLASIFICACIÓN DE
PELÍCULA
CLASIFICACIÓN
DE TV
CLASIFICACIONES BLOQUEADAS
OPERACIÓN DEL MENÚ EN PANTALLA (CONTINUACIÓN)
TIPS DE OPERACIÓN:
Los valores de la Guía-V son efectivos para
canales Análogos, canales Digitales y señales de
Video1.
Usted puede bloquear porciones de la clasifi-
cación escogiendo una o más de las clasificaciones de contenido (D, L, S, y V). Bloqueando
sólo las clasificaciones de contenido L y S de
TV-14, por ejemplo, programas con clasificación
TV-14 con una clasificación de contenido D y/o
V todavía podrían verse.
EJEMPLO DE CLASIFICACIÓN DE GUÍA-V
Page 33

33
¿Necesita ayuda?
Visite nuestro sitio en internet www.sanyoctv.com o Llame al 1-800-877-5032
OPERACIÓN GUÍA-V REGIONAL (AVANZADO)
La Clasificación V-Chip Regional 5 (RRT5) es un
sistema de clasificación avanzada V-Chip para
canales digitales recibidos por medio de antena.
Su nueva HDTV Sanyo es compatible con este
sistema alterno.
Cuando la HDTV detecta información RRT5 compatible, es descargada y almacenada en la
memoria y el menú es modificado para incluir la
opción de Ajuste Avanzado.
Cuando se selecciona la opción de Ajuste
(Avanzado), se despliega la pantalla de Clasificación Avanzada.
1
Utilize las teclas de CURSOR para
resaltar Guía-V en el Menú principal.
Presione ENTER.
2
Utilize las teclas de CURSOR para
resaltatar Prendido en el menú de Guía-V.
Presione ENTER.
3
Utilize las teclas de CURSOR para
resaltar Ajuste (Avanzado). Presione ENTER.
4
Utilize las teclas de CURSOR y < > para
seleccionar una clasificación.
5
Presione ENTER para Bloquear o Permitir la
clasificación seleccionada. Un candado
aparecerá a un lado de la clasificación indicando que está bloqueada.
La tabla de clasificación avanzada reflejará
opciones previamente seleccionadas.
NOTA: Si la HDTV se restaura a los valores originales
de fábrica o si se realiza una Búsqueda de Cable
Manual, sólo aparecerá en el Menú la opción de
Ajustar. La opción de Ajustar (Avanzado) reaparecerá cuando la HDTV detecte una vez más
información RRT5.
La pantalla de Guía-V que se muestra abajo sólo
es un ejemplo. Las opciones desplegadas dependerán de la región. Por ejemplo, las clasificaciones RRT5 en San Francisco, California pueden
variar a las de Little Rock, Arkansas.
TIP : Puede haber más clasificaciones de las que se
despliegan en pantalla. Cuando aparezca una
barra de desplazamiento vertical, use las teclas
de
CURSOR
para poder accesar las clasifi-
caciones adicionales.
Page 34

34
¿Necesita ayuda?
Visite nuestro sitio en internet www.sanyoctv.com o Llame al 1-800-877-5032
AJUSTES DE IMAGEN / SONIDO
Seleccione Auto para aceptar valores predeterminados para cada parámetro.
Seleccione Manual para ajustar los valores de
Imagen y Sonido a sus preferencias personales.
AJUSTES MANUALES DE IMAGEN Y SONIDO
1
Use las teclas de CURSOR para seleccionar Imagen / Sonido. Presione ENTER.
2
Use las teclas de CURSOR para seleccionar Manual. Presione ENTER.
AJUSTES A LOS NIVELES DE IMAGEN Y SONIDO
3
Use las teclas de CURSOR para seleccionar Tinte, Contraste, Brillo, Nitidez o Tono.
4
Use las teclas de CURSOR < > para ajustar
los valores.
AJUSTES AVANZADOS DE IMAGEN Y SONIDO
3
Use las teclas de CURSOR para seleccionar Reducción Digital de Ruido, Contraste
Dinámico o Supresor de Ruido Excesivo.
4
Presione la tecla del CURSOR > para las
opciones.
5
Use las teclas para seleccionar Perndido
o Apagado. Presione ENTER.
6
Presione la tecla MENU para regresar al
Menú previo o la tecla EXIT para regresar a la
pantalla normal.
OPERACIÓN DEL MENÚ EN PANTALLA (CONTINUACIÓN)
Page 35

35
¿Necesita ayuda?
Visite nuestro sitio en internet www.sanyoctv.com o Llame al 1-800-877-5032
CAPTION DIGITAL
Caption Digital es información de texto oculta,
transmitida junto con la imagen y el sonido. Al
activar esta característica, la HDTV abre estos
subtítulos y los sobre impone a la imagen. (Las
estaciones de televisión deciden cual señal de
transmisión captada “subtítulos” enviar).
Estos subtítulos se pueden personalizar utilizando el menú como se muestra.
1
Use las teclas de CURSOR para seleccionar Caption DTV. Presione ENTER.
2
Use las teclas de CURSOR para elegir la
opción que desea ajustar.
3
Use las teclas de CURSOR < > para ajustar el
valor.
LENGUAJE DE MENÚ
1
Use las teclas de CURSOR para elejir
Lenguaje de Menú. Presione ENTER.
2
Use las teclas de CURSOR para elejir
English, Español o Français. Presione EXIT.
NOTA: Los niveles de ajustes del modo de Ahorro de
Energía varian dependiendo del modo de
Imagen y Sonido.
AHORRADOR DE ENERGÍA
Esta función de ahorro de energía reduce el nivel
de brillo de la HDTV. Las opciones son:
• APAGADO—la función no está activada y el
consumo de energía es normal.
• BAJO—el nivel de ahorro de energía es bajo y
el brillo de la HDTV es más bajo de lo normal.
• ALTO—el nivel de ahorro de energía es alto y el
nivel de brillo de la HDTV es el más bajo.
1
Use las teclas de CURSOR para elejir
Ahorrador de Energía. Presione ENTER.
2
Use las teclas de CURSOR para elejir
Apagado, Bajo o Alto.
NOTAS: Si Opacidad es seleccionada a transparente,
los subtítulos pueden ser difíciles de ver.
Solamente las Transmisiones Captadas
(Closed captions) Digitales establecidas por
el estándar EIA 708B son afectadas por todos
estos ajustes.
Page 36

36
¿Necesita ayuda?
Visite nuestro sitio en internet www.sanyoctv.com o Llame al 1-800-877-5032
Si experimenta problemas con su HDTV,
revise esta tabla para encontrar una o más
posibles soluciones.
Antes de regresar su HDTV, por favor visite
nuestro sitio de internet www.sanyoctv.com
o llame sin costo al 1.800.877.5032.
Nosotros le podemos ayudar!
SUGERENCIAS ÚTILES—Problemas/Soluciones
Problema Confirme las Siguientes Condiciones
Intente estas Soluciones Página
No Imagen / Sonido
(Imagen Digital)
Revise la conexión de Antena o Equipo
externo.
Podría ser un problema de la transmisora.
Podría estar la función MUTE activada.
Ajuste la Antena.
Seleccione un canal diferente.
Presione la tecla RESET dos veces o reinicie
una búsqueda de canales.
Ajuste el Volumen.
23, 25
34
No Subtítulos
(Caption Digital)
Revise si la estación está transmitiendo
señal Caption. Seleccione otro canal.
Presione la tecla CAPTION para activar la
función.
25, 35
Subtítulos no se
pueden personalizar.
Carencia de señal Caption Digital.
Presione la tecla CAPTION para seleccionar
Caption Análogo.
25, 35
No se muestra la
imagen completa en
la pantalla.
Presione la tecla de PIX SHAPE para
expandir o acercar la imagen.
25
Recepción pobre
de Imagen / Sonido.
Revise si el programa es a color.
Revise las conexiones de Antena o equipo
externo.
Color o Tinte mal ajustados.
Podría ser problema de la estación.
Podría estar la función MUTE activada.
Seleccione un canal diferente.
Ajuste la antena.
Presione la tecla RESET dos veces o reinicie
una búsqueda de canales.
Ajuste el Volumen y/o Imagen.
23–25
34
El mensaje de “No
señal” aparece en la
pantalla.
Revise las conexiones de Audio/Video.
Revise las conexiones del equipo externo.
Revise los ajustes del equipo externo
Revise la conexión de la Antena
Presione la tecla INPUT.
Prenda el equipo externo.
Gire la antena. Instale un amplificador de señal.
Iguale las salidas del equipo externo
con las conexiones de entrada.
23–28
Distorción de la
Imagen Digital.
Presione INFO y revise el nivel de la señal.
Gire la antena, Instale un amplificador de señal.
Instale una antena Digital Externa.
23, 25
No selecciona o
no busca algunos
canales.
El canal pudo haber sido removido
de la memoria.
Revise las conexiones de antena.
Ninguna señal digital está siendo transmitida.
Señales están débiles.
Opción de bloqueo Guía-V activada.
Seleccione
Memoria de Canales
y manualmente agregue los canales o inicie una
búsqueda.
Gire la antena, Instale un amplificador de señal.
Elija la opción Guía-V para permitir todos o
presione la tecla RESET dos veces para
reiniciar una búsqueda de canales.
25
31–33
No canales de Cable
disponibles arriba
del número 13.
El indicador de canal de cable C debe de
aparecer a un costado del número del canal.
Busque canales de Cable utilizando la
Búsqueda Manual de Canales
.
30
El Control Remoto
no opera la TV.
Revise si las baterías están insertadas.
Revise que el televisor esté conectado.
Reemplazar las baterías.
Dirija el Control Remoto al frente del televisor.
23, 25
El gabinete de la
HDTV hace ruidos.
Esta es una condición normal de los gabinetes de plástico durante el calentamiento o
el enfriamiento.
Page 37

37
¿Necesita ayuda?
Visite nuestro sitio en internet www.sanyoctv.com o Llame al 1-800-877-5032
GARANTÍA LIMITADA DE UN AÑO EN PARTES Y MANO DE OBRA
ESTA GARANTÍA LIMITADA DE PARTES Y MANO DE OBRA ES VALIDA SÓLO EN TELEVISORES SANYO COMPRADOS
Y USADOS EN LOS ESTADOS UNIDOS DE AMÉRICA, CANADA Y PUERTO RICO, EXCLUYENDO CUALQUIER OTRO
TERRITORIO Y PROTECTORADO DE E.E.U.U. ESTA GARANTÍA LIMITADA APLICA SÓLO A COMPRADORES
MINORISTAS Y NO APLICA A PRODUCTOS UTILIZADOS CON FINES COMERCIALES O INDUSTRIALES.
APLICACIÓN DE LA GARANTÍA
POR UN AÑO, desde la fecha de la compra original, Sanyo Manufacturing Corporation (SMC) garantiza esta televisión
de estar libre de defectos de manufactura en materiales y mano de obra bajo uso y condiciones normales para partes
y trabajo.
Por los PRIMEROS 90 DÍAS, desde la fecha de la compra original, Sanyo Manufacturing Corporation remplazará
cualquier televisión defectuosa vía el vendedor original. Para asegurar la apropiada aplicación de la garantía,
conserve el recibo original de compra fechado como evidencia de compra. Regrese la TV defectuosa al vendedor
junto con su recibo de compra además de todos los accesorios incluidos, como el control remoto. La TV defectuosa
será cambiada por una del mismo modelo, o un modelo equivalente o de igual valor, si es necesario. El reemplazo
del TV será en contingencia y disponibilidad y a la exclusiva discreción de Sanyo Manufacturing Corporation.
ESTA GARANTÍA ES EXCLUYENTE DE Y EN LUGAR DE TODAS LAS OTRAS GARANTÍAS DE COMERCIALIZACIÓN O USO
PARA UN PROPÓSITO ESPEC
ÍFICO.
OBLIGACIONES
Por un año
, desde la fecha de la compra original, Sanyo Manufacturing Corporation (SMC) garantiza esta televisión
de estar libre de defectos de manufactura en materiales y mano de obra bajo condiciones normales de uso. Durante
los primeros 90 días
bajo esta garantía para cualquier defecto de manufactura o mal funcionamiento Sanyo
Manufacturing Corporation proveerá una nueva TV vía intercambio con el vendedor.
CÓMO HACER UN RECLAMO BAJO ESTA GARANTÍA.
Por favor llame al 1-800-877-5032. Por favor esté preparado para darnos el número de modelo de la televisión cuando llame. El número de modelo y el número de serie están impresos en la etiqueta agregada en la parte trasera de la
unidad.
Para asistencia al consumidor, llame sin costo al 1-800-877-5032
Lunes a Viernes 7:30 AM – 7:00 PM Hora Central
Sábado 7:30 AM – 4:00 PM Hora Central
Esta garantía expresa derechos contractuales específicos; minoristas podrán tener derechos estatutarios
adicionales que pueden variar de estado a estado.
(EFECTIVO: Marzo 1, 2007)
Para su protección en caso de robo o pérdida de esté producto, por favor llene la siguiente información requerida y GUARDELA en un lugar seguro para su registro personal:
No. de Modelo__________________________ Fecha de compra __________________________
No. de Serie ___________________________ Precio de compra __________________________
Lugar de compra __________________________
(Localizada en la parte posterior)
Sanyo Manufacturing Corp.
3333 Sanyo Road, Forrest City, AR 72335
Page 38

38
Besoin d’aide?
Visitez notre site web à
www.sanyoctv.com
ou appelez le 1-800-877-5032
PROTECTION DE L’ÉCRAN
D’AFFICHAGE ACL
L'écran est susceptible d'être endommagé s'il
n'est pas entretenu convenablement. NE PAS
utiliser d'objets durs tels qu'un chiffon rugueux
ou du papier rigide. NE PAS
appuyer trop fort en nettoyant l'écran ACL; une pression
excessive peut causer une
décoloration permanente ou
des taches d'ombre. Ne
jamais pulvériser de liquides
sur l'écran.
MESURES DE SÉCURITÉ
Afin d’éviter les risques d’incendie ou de choc
électrique, n’exposez pas l’appareil à la pluie ni
à l’humidité.
Afin d’éviter les risques de choc électrique,
n’enlevez pas le panneau arrière. L’appareil est
entièrement transistorisé et ne contient aucune
pièce remplaçable ou réparable par l’utilisateur.
En cas de problème, confiez l’appareil à un
réparateur qualifié.
Le téléviseur est muni d’un cordon d’alimentation CA à fiche polarisée dont une lame est plus
large que l’autre. MISE EN GARDE : pour éviter
le risque de choc électrique, faites correspondre
la lame large de la fiche à la fente large de la
prise, puis enfichez à fond. Ceci est une mesure
de sécurité conçue pour ne brancher la fiche que
d’une seule façon sur une prise électrique.
Lorsque vous utilisez le téléviseur avec des jeux
vidéo, ne saturez pas la luminosité ni le contraste.
Avec le temps, ceci pourrait causer l’impression
permanente de l’image du champ de jeu sur
l’écran. Ne placez pas cet appareil sur un chariot, un support ou une table instable. Il risquerait
de tomber, de s’endommager et d’entraîner de
graves blessures.
Utilisez uniquement un chariot, une table ou un
support recommandé par le fabricant ou vendu
avec l’appareil. Lors de son installation, suivez
les instructions du fabricant
et utilisez les accessoires
d’installation recommandés.
Prenez garde lorsque vous
déplacez le téléviseur s’il se
trouve sur un chariot.
Des arrêts brutaux, une
force excessive et des
surfaces inégales peuvent renverser le chariot et
l’appareil.
Lisez attentivement le présent manuel et
conservez-le.
Alimentation : 120 V CA, 60 Hz
Consommation :
DP26648 120 watts
DP32648 160 watts
Renseignements au sujet des marques de
commerce :
Fabriqué sous licence de Dolby Laboratories.
« Dolby » est une marque de commerce de
Dolby Laboratories.
FICHE TECHNIQUE
En tant que partenaire d’ENERGY
STARMD, Sanyo Manufacturing
Corporation a déterminé que ce produit répond, pour son rendement
énergétique, aux normes d’E
NERGY
STARMD.
Ce symbole sur la plaque d’identification indique que le produit est
approuvé par Underwriters
Laboratories Inc. Il a été conçu et
fabriqué selon les normes strictes
de sécurité UL contre les risques
d’incendie, de blessures et de chocs
électriques.
CONTIENT DES LAMPES AU
MERCURE, À JETER DE
FAÇON APPROPRIÉE
Page 39

39
Besoin d’aide?
Visitez notre site web à
www.sanyoctv.com
ou appelez le 1-800-877-5032
TABLE DES MATIÈRES
INFORMATION FCC
Cet équipement a été testé et déclaré conforme aux limites fixées pour un appareil de Classe B, selon la Partie 15 du
règlement FCC. Ces limites sont destinées à assurer une protection raisonnable contre des interférences nocives
dans une installation résidentielle. Cet équipement génère, utilise et peut irradier une énergie de fréquence radio et
s’il n’est pas installé ou utilisé conformément aux instructions, il peut provoquer des interférences nuisibles aux communications radio. Cependant, il est impossible de garantir qu’aucune interférence ne soit créée suivant le type d’installation. Si cet équipement vient à générer une interférence nuisible à la réception de la radio ou de la télévision,
qui peut être mise en évidence en allumant et en éteignant l’appareil, on recommandera à l’utilisateur d’essayer de
corriger cette interférence au moyen d’une ou plusieurs méthodes :
- en réorientant ou en déplaçant l’antenne réceptrice.
- en augmentant la distance entre l’équipement et le récepteur.
- en connectant l’équipement à une prise d’un circuit électrique différent de celui sur lequel est connecté le récepteur.
- en demandant l’aide d’un vendeur ou d’un technicien de radio et télévision expérimenté.
PRÉCAUTION : Le règlement FCC avertit que des modifications inadéquates ou non autorisées sur cette unité peuvent annuler l’autorisation de l’utilisateur pour opérer l’unité.
MESURES DE SÉCURITÉ . . . . . . . . . . . . . . . . . . . . . . . . . . .38
FICHE TECHNIQUE . . . . . . . . . . . . . . . . . . . . . . . . . . . . . . . .38
PROTECTION DE L’ÉCRAN D’AFFICHAGE ACL . . . . . . . .38
TABLE DES MATIÈRES . . . . . . . . . . . . . . . . . . . . . . . . . . . .39
INFORMATION FCC . . . . . . . . . . . . . . . . . . . . . . . . . . . . . . .39
ASSEMBLAGE DE LA BASE À LA TV . . . . . . . . . . . . . . . .40
INSTALLATION —
Position du téléviseur LCD . . . . . . . . . . . . . . . . . . . . . . .40
Montage mural (optionnel) . . . . . . . . . . . . . . . . . . . . . .40
POUR COMMENCER —
Panneaus latéraux arrière gauche/droit . . . . . . . . . . .41
Utilisation de la télécommande . . . . . . . . . . . . . . . . . .42
Installation des piles . . . . . . . . . . . . . . . . . . . . . . . . . . . .43
Branchement d’antenne aérienne ou câble . . . . . . . .43
Connexions . . . . . . . . . . . . . . . . . . . . . . . . . . . . . . . . . . . .44
Branchement électrique . . . . . . . . . . . . . . . . . . . . . . . .45
Rech. de chaînes initiale . . . . . . . . . . . . . . . . . . . . . . . .45
Recherche AV . . . . . . . . . . . . . . . . . . . . . . . . . . . . . . . . .45
BRANCHEMENTS AVANCÉS DE AV —
HDMI 1 / 2 . . . . . . . . . . . . . . . . . . . . . . . . . . . . . . . . . . . . .46
DVI à HDMI . . . . . . . . . . . . . . . . . . . . . . . . . . . . . . . . . . . .46
Audio numérique et audio analoguique . . . . . . . . . . .46
BRANCHEMENTS DE PC . . . . . . . . . . . . . . . . . . . . . . . . . .47
Carte de navigation du menu PC . . . . . . . . . . . . . . . . .47
OPÉRATION DE L’ÉCRAN POUR PC —
Configuration du PC . . . . . . . . . . . . . . . . . . . . . . . . . . . .47
Configuration de l’écran (TVN) . . . . . . . . . . . . . . . . . . .47
Conseils d’opération du menu PC . . . . . . . . . . . . . . . . .47
Réglages manuels . . . . . . . . . . . . . . . . . . . . . . . . . . . . . .47
FONCTIONNEMENT DU MENU À L'ÉCRAN
Diagramme de navigation du menu . . . . . . . . . . . . . . .48
Recherche manuele des chaînes . . . . . . . . . . . . . . . . .49
Mémoire des chaînes
Pour ajouter un canal . . . . . . . . . . . . . . . . . . . . . . . .50
Pour supprimer les chaînes . . . . . . . . . . . . . . . . . . .50
Réglage image / son . . . . . . . . . . . . . . . . . . . . . . . . . . . .51
Réglages manuels de l’image et du son . . . . . . . . .51
Réglages avancés de l’image et du son . . . . . . . . .52
Langue du menu . . . . . . . . . . . . . . . . . . . . . . . . . . . . . . .52
Sous-titres num. . . . . . . . . . . . . . . . . . . . . . . . . . . . . . . . .53
Économiseur d’énergie . . . . . . . . . . . . . . . . . . . . . . . . . .53
DÉPANNAGE – poblèmes / solutions . . . . . . . . . . . . . . . .54
GARANTIE . . . . . . . . . . . . . . . . . . . . . . . . . . . . . . . . . . . . . . .56
Page 40

40
Besoin d’aide?
Visitez notre site web à
www.sanyoctv.com
ou appelez le 1-800-877-5032
ASSEMBLAGE DE LA BASE À LA TV
Bonjour !
Je suis ton nouveau
téléviseur Sanyo écran large LCD
TVN. Ne me branche pas tout de
suite! Lis s’il te plaît avec attention ce
manuel et découvre mes nombreuses
fonctions comme celles de mon syntoniseur HD intégré, Contrôle
Parental, Chaînes numériques, entrée
pour PC et beaucoup d’autres…
superficie
plane et
molletonnée
REMARQUE : toutes les dimensions sont
millimètres (mm).
MONTAGE MURAL (OPTIONNEL)
Utilisez les vis placées dans les fentes inférieures
à l’arrière du TVN pour l’assujettir à la base spéciale de montage mural.
REMARQUE : la trousse de montage n’est pas comprise.
Norme d'interface VESA 200 x 200.
Dimensions des vis de montage du ACL:
Diamètre M6, longueur — de 12 mm (min).
à 16 mm (max.)
Fentes situées à
l’arrière
INSTALLATION
DP26648
(DP32648)
POUR SÉPARER LA TV DE SON
SUPPORT
Utilisez toujours une surface plane et
ferme pour installer votre TVN. Ne placez
pas le téléviseur dans un endroit trop
exigu. Laissez assez d’espace pour assurer une
ventilation appropriée.
REMARQUE : vous pouvez omettre ce chapitre dans le cas où vous
installez l’unité sur le mur.
Outils requis : tournevis à vis cruciforme
(enlevez les vis de la base du TVN
[D] avant d’installerson socle.)
Page 41

41
Besoin d’aide?
Visitez notre site web à
www.sanyoctv.com
ou appelez le 1-800-877-5032
PANNEAUX LATÉRAUX ARRIÈRE
GAUCHE/DROIT
Touches de
volume
(VOL – +)
Touches
de canal
(CH )
Touches de
mise en
marche et
d’arrêt
(power)
Entrée S-vidéo (VIDEO1), PAGE 44 — Pour
améliorer les détails vidéo, utilisez les prises
S-vidéo (VIDEO1) au lieu des prises vidéo, si
votre équipement extérieur en est doté. (Les
connexions S-vidéo remplaceront celles des
prises d’entrée VIDEO1.)
Sortie audio numérique, PAGE 46 — Utilisez
un câble de sortie audio numérique de type
phono pour connecter la sortie audio
numérique à un système de pointe de cinéma
maison équipé du système Dolby
®
Digital 5.1.
Entrée composant vidéo (VIDEO2/ 3), PAGE 44
— Branchez l’appareil numérique de vidéo
aux entrées vidéo verte (Y), bleue (Pb) et
rouge (Pr) ainsi que les fiches blanche et
rouge de l’audio. Ces entrées détectent
automatiquement le type de signal reçu.
Prises de sortie audio analogiques (G/D),
PAGE 46 — Branchez l’équipement audio
extérieur ici.
Entrée pour PC et stéréo audio mini PAGE 47
— Branchez les sorties de l’ordinateur et de
l’audio à ces connecteurs.
• MONITEUR RGB (D-SUB)
• AUDIO R/L (prise stéréo mini)
Prises audio/vidéo (VIDEO1), PAGES 44 —
Branchez l’équipement vidéo standard ici.
Entrée HDMI 1/2 (interface multimédia haute
définition), PAGE 46 — Interface complètement numérique qui accepte des signaux
vidéos sans compression pour obtenir la
meilleure qualité d’image possible. HDMI
comporte la protection de copie HDCP, ce qui
permet la transmission de contenu
numérique protégé. Le signal peut aussi
inclure audio Dolby Digital ou PCM, s’ils sont
disponibles.
Entrée pour antenne analogique ou pour
antenne numérique, PAGE 42 — Branchez une
antenne RF ou un système de câble
analogique sur cette prise.
PANNEAU LATÉRAL
GAUCHE
PANNEAU LATÉRAL
DROIT
Page 42

42
Besoin d’aide?
Visitez notre site web à
www.sanyoctv.com
ou appelez le 1-800-877-5032
Touches de canal (CH haut bas) —
Appuyez sur la touche pour parcourir les
chaînes en mémoire.
Touche de rappel (Recall) — Appuyez pour
rappeler le dernier canal visionné.
Touche de navigation du Menu :
Menu — Appuyez pour afficher le menu à
l’écran.
Touches du curseur — Appuyez pour déplacer
le curseur de haut en bas.
Touches du curseur — Appuyez pour déplacer
le curseur de gauche à droite.
Touche Enter (entrée) — Appuyez pour activer
l’option sélectionnée lorsque c’est nécessaire.
Touche Exit (sortie) — Appuyez pour sortir du
menu.
UTILISATION DE LA TÉLÉCOMMANDE
Touche de forme de l’image — Cette touche
sert à modifier la forme de l’image. Les
options disponibles dépendent du signal reçu
et du format de l’image. Ils peuvent comprendre : PIX1, PIX2, PIX3, et PIX4.
Touche d’entrée — Cette touche sert à modifier la source d’entrée du signal d’entrée selon
les choix suivants : Analogique RF, Numérique
RF, Vidéo 1, Vidéo 2, Vidéo 3, HDMI 1, HDMI 2
ou entrée pour PC.
Touche info — Appuyez pour afficher l’é-cran
d’information.
La bannière de l’antenne numérique peut
contenir : les coordonnées du syntoniseur, le
numéro de chaîne, les coordonnées de la
station, la classification du programme, l’intensité du signal reçu, des informations
détaillées sur l’émission, sur l’audio et le titre
de l’émission.
La bannière de l’antenne analogique peut
contenir : les coordonnées du syntoniseur, le
numéro de chaîne, les coordonnées de la
station, la classification du programme et
des informations audio.
La bannière du Câble peut contenir : les
coordonnées du syntoniseur, le numéro de
chaîne, les coordonnées de la station (seulement analogiques), la classification du programme, l’intensité du signal reçu, et des
informations audio.
Touche reset — Appuyez deux fois pour
revenir à la configuration initiale d’usine. La
recherche des chaînes commencera automatiquement.
REMARQUE : la liste antérieure des chaînes sera rem-
placée.
Touches numériques — Vous devez appuyer
sur deux touches pour choisir un canal. Par
exemple : appuyez sur 0 et sur 6 pour choisir
le canal 6. (Voir nº 13 ci-dessous.)
11
12
13
14
ORIENTEZ VERS
LA TVN
Page 43

43
Besoin d’aide?
Visitez notre site web à
www.sanyoctv.com
ou appelez le 1-800-877-5032
POUR COMMENCER —
12
13
11
14
Touche audio — Appuyez sur celle-ci pour
sélectionner le mode audio désiré (s'il est
disponible).
Touche de sommeil — Appuyez sur cette
touche, puis sur la touche « 0 » pour régler le
minuteur de mise en veille. L'heure peut être
réglée par blocs de 30 minutes, jusqu'à une
durée de 3 heures.
REMARQUE : la minuterie est annulée lorsque le
téléviseur est éteint.
Touche Caption (Sous-titre) — Appuyez pour
sélectionner les options : Numériques CC1 à
CC6, analo-giques CC1 à CC4, QuickCap ou
éteint. (QuickCap affiche ou enlève les soustitres avec l’option Silence.) L’aspect des soustitres peut être modifié par le menu de configuration.
Touches de volume — Appuyez sur les touches VOL + – pour régler le volume.
Touche “1– –” — Pour les chaînes analogiques du câble supérieurs à 99, tenez-la
enfoncée, puis inscrivez les deux autres
chiffres.
Touche Mute (silence) — Appuyez pour couper
ou remettre le son.
2
Branchement d’antenne aérienne ou câble LE SYNTONISEUR DE CETTE TVN PEUT RECEVOIR :
a. Les signaux numériques ou analogiques
provenant d'une antenne RF.
OU
b. Les chaînes du câble, qu'ils soient analogiques
ou ClearQAM.
REMARQUE : vous devez chercher leschaînes ClearQAM
en utilisant l'option recherche du menu.
Pour obtenir la meilleure image, branchez
le décodeur ou le récepteur satellite à l’entrée HDMI1, 2 ou aux entrées de
Composant Vidéo 2 ou 3.
Cette TVN peut recevoir TOUT signal RF
non brouillé diffusé.
OU
ANTENNE RF
CÂBLE
Entrée d'antenne
analogique et
numérique
1
Placez les piles dans la télécommande.
(2 piles rechargeables eneloop Ni-MH « AAA »)
PRÉCAUTIONS
Ne pas utiliser en même temps que des
piles jetables ou d’un autre type, ne pas
mélanger des piles anciennes et nouvelles ou des piles de charge différente.
Ne pas exposer la télécommande ou
ses piles à l’humidité ou à la chaleur.
Les signes + et – des piles doivent correspondre à ceux de
l’intérieur de la télécommande.
Pour recharger les piles eneloop, prière de suivre les
instructions du chargeur de batteries
(non inclus).
Recyclez les piles rechargeables usagées.
Pour plus d’information visitez le site :
www.eneloopusa.com
Page 44

44
Besoin d’aide?
Visitez notre site web à
www.sanyoctv.com
ou appelez le 1-800-877-5032
POUR COMMENCER — CONNEXIONS
3
Branchements pour un signal analogique
– Vidéo 1 (optionnel)
Branchez un équipement analogique tel que
décodeur de câble, récepteur satellite ou
magnétoscope.
Les prises composite vidéo sont inclues dans
votre nouveau TVN pour assurer la compatibilité avec les équipements analogiques
antérieurs, tel un magnétoscope. La prise SVidéo fournira la meilleure image analogique.
Si vous disposez d’une sortie S-Vidéo sur votre
ancien équipement analogique, il est
préférable de l’utiliser au lieu de la prise vidéo
standard. (Câbles non fournis.)
1. Branchez un câble AV sur l’entrée Vidéo 1 de
la TVN et sur votre équipement analogique,
comme illustré sur le croquis. Respectez la
concordance de couleur entre le câble et
l’entrée correspondante.
2. Appuyez sur la touche INPUT pour changer
la source d’entrée et sélectionner Vidéo 1.
APPAREIL
ANALOGIQUE
4
Branchements de signal numérique –
Vidéo 2 et Vidéo 3 (optionnels)
Branchez les appareils numériques tels que
décodeurs de câble HD, satellite HD et/ou
lecteur de DVD.
Les entrées de composant vidéo de ce TVN
acceptent plusieurs signaux vidéos
numériques, ce qui en fait une très bonne
option pour des images de qualité et de bonne
définition. (Câbles non fournis.)
1. Branchez un câble de COMPOSANT VIDÉO
à une série d’entrées Vert, Bleu et Rouge
(Vidéo 2 ou 3) du TVN et à votre appareil
numérique, comme illustré sur le croquis.
2. Branchez un câble AUDIO aux entrées correspondantes Rouge et Blanche, comme
illustré sur le croquis.
3. Appuyez sur la touche INPUT pour changer
la source d’entrée et sélectionner Vidéo 2
out Video 3.
LECTEUR DE DVD
RÉCEPTEUR
SATELLITE
Page 45

45
Besoin d’aide?
Visitez notre site web à
www.sanyoctv.com
ou appelez le 1-800-877-5032
POUR COMMENCER —
BRANCHEMENT ÉLECTRIQUE / RECHERCHE DES CHAÎNES
BRANCHEMENT ÉLECTRIQUE
3
Branchez le cordon d'alimentation CA
(120 V CA, 60 Hz).
4
Appuyez sur la touche
POWER. (Suivez les
directives à l'écran.)
Vers la prise
120 V CA
RECH. DE CHAÎNES INITIALE
5
Appuyez sur la touche CHANNEL (Up)
pour rechercher les signaux transmis par
l’antenne.
La recherche de chaînes se fait à la fois sur l’antenne et sur le Câble. Si des signaux de l’antenne aérienne sont détectés, le TVN cherchera
aussi bien les signaux analogiques que
numériques. Si des signaux du Câble sont
détectés, le TVN cherchera seulement les
chaînes analogiques du Câble.
Les chaînes sont mises en mémoire et peuvent
être sélectionnées en utilisant les touches
CHANNEL (haut) et (bas).
Si aucun signal d’antenne ou de Câble n’est
détecté, le TVN commencera une recherche AV.
Si aucune de ces recherches ne détecte de signal valide, le TVN va sélectionner l’entrée de
Vidéo 1.
ÉCRAN INITIAL
RECHERCHE AV
REMARQUE : assurez-vous que tous les appareils
externes de vidéo branchés à votre
TVN soient allumés avant de commencer la recherche AV.
6
Appuyez sur la touche CHANNEL (bas)
pour rechercher les signaux des appareils
branchés sur les entrées AV.
La recherche AV commencera par vérifier les
entrées AV ayant un signal, en commençant
par l’entrée Vidéo 1. Quand un signal est détecté, le processus de recherche se termine et le
TVN va le syntoniser.
Si aucun signal n’est détecté en entrée AV, le
TVN sélectionnera l’entrée Vidéo 1.
ÉCRAN DE RECHERCHE DE CHAÎNES
ÉCRAN DE RECHERCHE AV
Page 46

46
Besoin d’aide?
Visitez notre site web à
www.sanyoctv.com
ou appelez le 1-800-877-5032
BRANCHEMENTS AVANCÉS DE AV
BRANCHEMENTS AVANCÉS DE
SIGNAL NUMÉRIQUE – HDMI À
HDMI
Branchez des appareils numériques compatibles tels qu’un décodeur HD, récepteur satellite HD, lecteur DVD et console de jeu vidéo.
HDMI — interface multimédia haute définition.
Interface complètement numérique qui
accepte des signaux vidéos sans compression
pour obtenir la meilleure qualité d’image possible. HDMI comporte la protection de copie
HDCP, ce qui permet la transmission de contenu numérique protégé. Le signal peut aussi
inclure audio Dolby Digital ou PCM, s’ils sont
disponibles.
1
Branchez un câble HDMI sur une des
entrées HDMI du TVN et à votre appareil
externe. (Câble non fournis.)
REMARQUE : appuyez sur la touche INPUT pour
sélectionner le signal d’entrée HDMI1
ou HDMI2.
DVI À HDMI
1
Utilisez un adaptateur (non fournis) pour
connecter un dispositif DVI à une entrée
HDMI.
2
Branchez la sortie audio du dispositif à l’entrée audio L/R de Vidéo3.
REMARQUE : l’audio est disponible seulement si on
utilise HDMI1.
RÉCEPTEUR
SATELLITE
PRISES DES SORTIES AUDIO
(ANALOGIQUE)
1
Branchez la prise de sortie Audio à un
amplificateur stéréo, comme illustré sur le
croquis.
REMARQUE : nebranchez jamais de haut-paleurs
extérieurs directement au téléviseur.
AUDIO NUMÉRIQUE
1
Branchez un récepteur à canaux multiples
sur la sortie audio numérique du téléviseur,
tel qu'illustré.
REMARQUE : le signal audio numérique Dolby
®
5.1 n'est disponible à la sortie audio
numérique que lorsqu'il fait partie
d'un signal d'antenne numérique.
BARRIÈRE DE LA TVN
LECTEUR DE DVD
BARRIÈRE DE LA TVN
CÂBLE DE SORTIE
AUDIO NUMÉRIQUE
DE TYPE PHONO
(non fourni)
RÉCEPTEUR À CANAUX MULTIPLES
BARRIÈRE DE
LA TVN
AMPLIFICATEUR
STÉRÉOPHONIQUE
Page 47

47
Besoin d’aide?
Visitez notre site web à
www.sanyoctv.com
ou appelez le 1-800-877-5032
OPÉRATION DE
L’ÉCRAN POUR PC
CONFIGURATION DU PC
Pour éviter de se retrouver en condition « hors
norme », baissez la définition de votre PC à une
valeur XGA, par exemple 1024 x 768 pixels, avant
de débrancher votre écran normal.
CONFIGURATION DE L’ÉCRAN (TVN)
La fréquence, la définition, le dot clock, la phase,
le positionnement horizontal et vertical sont
réglés automatiquement lorsque vous sélectionnez l’option Réglage automatique.
CONSEILS D’OPÉRATION DU MENU PC
Les réglages de l’image et su son dans le menu
PC n’affectent pas les réglages des autres entrées.
Appuyez sur le bouton RESET deux fois pour
restaurer les valeurs initiales de la configuration
d’usine.
RÉGLAGES MANUELS
Température de couleur – Appuyez sur ENTER
pour sélectionner le réglage.
Réglage horloge à points – Ajustez la fréquence
de balayage pour la synchroniser à celle du PC.
Réglage de la Phase – Réglez la phase lorsque
l’image devient floue ou tremblante.
Position H – Déplace l’image horizontalement
Position V – Déplace l’image verticalement
Economie d’énergie – Quand le TVN ne détecte
plus de signal du PC, il passe en mode de veille. Il
revient à son mode de fonctionnement normal
dès qu’il reçoit un signal du PC.
Retour aux réglages du PC – Rétablit toutes les
valeurs initiales de configuration d’usine du
menu PC.
BRANCHEMENTS DE PC
REMARQUE : avant de brancher le moindre
câble, débranchez les prises de courant du
Téléviseur TVN et de l’ordinateur.
1
Branchez un câble RGB entre la sortie de
l’écran du PC et la prise d’entrée PC du TVN,
puis serrez les vis (câble RGB non fournis).
2
Insérez l’extrémité d’un câble Audio Stéréo
Mini à la sortie du PC et l’autre extrémité à
l’entrée audio PC du TVN (câble audio stéréo
mini non fournis).
CONSEIL : Le volume peut se régler depuis le PC et/ou
avec les touches
VOLUME et du TVN.
3
Utilisez Réglage automatique du menu PC.
REMARQUE : allumez le TVN et tout autre
appareil externe avant d’allumer l’ordinateur.
CARTE DE NAVIGATION DU MENU PC
Page 48

48
Besoin d’aide?
Visitez notre site web à
www.sanyoctv.com
ou appelez le 1-800-877-5032
FONCTIONNEMENT DU MENU À L'ÉCRAN
MENU PRINCIPAL OPTION SOUS-MENU
DIAGRAMME DE NAVIGATION DU MENU
REMARQUE : la mention « non disponible » apparaîtra à l’écran quand
une option n’est pas disponible.
MODE SYNTONISEUR OPTIONS TV INDISPONIBLES
Analogique RF Sous-Titres Num.
Numérique RF Aucun (Toutes les options du Menu sont disponibles)
Vidéo 1 Recherche manuelle de chaînes, Mémoire des chaînes,
Sous-Titres Num.
Vidéo 2/3 Recherche manuelle de chaînes, Mémoire des chaînes,
Sous-Titres Num., Guide V
HDMI 1/2
Page 49

49
Besoin d’aide?
Visitez notre site web à
www.sanyoctv.com
ou appelez le 1-800-877-5032
FAITS IMPORTANT
: ce téléviseur ne conserve qu’une seule base de données des
chaînes numériques. Lorsque vous
recherchez des chaînes numériques de
câble, la base de données de chaînes
numériques par antenne sera donc effacée.
Vous ne pourrez recevoir que les chaînes
ClearQAM fournis par votre câblodiffuseur.
La recherche manuelle des chaînes
comprend 3 catégories :
• Câble • Ondes (antenne) • Ajout de TVN
La recherche par le câble s’effectue sur les
chaînes analogiques et sur les chaînes
numériques non brouillées (ClearQAM). Cette
recherche prendra quelques minutes. Quand elle
se termine, le TVN va syntoniser la chaîne
numérique non brouillée la plus basse disponible.
Si ce n’est pas le cas, le TVN syntonisera la chaîne
analogique la plus basse.
La recherche par onde (antenne) s’effectue sur les
chaînes numériques et analogiques transmises
par voie aérienne. Quand elle se termine, le TVN
va syntoniser la chaîne numérique ou analogique
la plus basse. Si ce n’est pas le cas, le TVN syntonisera Vidéo 1.
Ajout de TVN ajoute toute nouvelle chaîne à la
base de données.
1
Appuyez sur la touche MENU pour afficher le
menu principal.
2
Utilisez les touches de CURSEUR vers le
haut ou vers le bas pour sélectionner
Recherche manuelle des chaînes. Appuyez
sur ENTER.
3
Utilisez les touches de CURSEUR vers le
haut ou vers le bas pour sélectionner Câble,
Ondes (antenne) ou Ajout de TVN.
En fin de recherche, le TVN sortira du menu et
retournera à l’écran normal.
RECHERCHE MANUELLE DES CHAÎNES
REMARQUE : pour s’informer sur les chaînes numériques
locales, visitez le site www.antennaweb.org.
Page 50

50
Besoin d’aide?
Visitez notre site web à
www.sanyoctv.com
ou appelez le 1-800-877-5032
Pour ajouter un canal à la mémoire
des chaînes
3
Utilisez les touches numériques pour
choisir le canal désiré Ajouter.
REMARQUE : utilisez la touche 1- - pour sélectionner
des chaînes du câble supérieures à 99.
4
Appuyez sur ENTER pour ajouter le canal
à Mémoire des chaînes.
MEMOIRE DES CHAINES
La Mémoire des Chaînes est une base de données
des chaînes actives qui peuvent être sélectionnées en utilisant les touches CH . Vous pouvez
la modifier en ajoutant ou en suppriment des
chaînes.
Cet affichage
disparaît
lorsque vous
appuyez sur la
touche ENTER.
Au bout de trois secondes, l’écran de
télévision affichera « Supprimer? »
1
Appuyez sur la touche MENU pour
afficher le menu principal.
2
Utilisez le CURSEUR vers le haut ou
vers le bas pour sélectionner Mémoire
des chaînes. Appuyez sur ENTER.
Pour supprimer les chaînes de la mémoire
des chaînes
3
Utilisez les touches numériques pour
choisir le canal désiré supprimer.
REMARQUE : utilisez la touche 1- - pour sélectionner
des chaînes du câble supérieures à 99.
4
Appuyez sur ENTER pour supprimer le
canal à Mémoire des chaînes.
5
Appuyez sur EXIT pour retourner au visionnement normal du téléviseur
Cet affichage
disparaît
lorsque vous
appuyez sur la
touche ENTER.
Au bout de trois secondes, l’écran de
télévision affichera « Ajouter? »
ÉCRAN DE MODIFI-
CATION DES
CHAÎNES EN
MÉMOIRE
Page 51

51
Besoin d’aide?
Visitez notre site web à
www.sanyoctv.com
ou appelez le 1-800-877-5032
FAITS IMPORTANT : lorsqu'un canal numérique est supprimé, tous les sous-chaînes de ce
canal sont également supprimés.Seuls les
chaînes numériques déjà supprimés peuvent
être rajoutés dans la base de données.
Syntonisez les chaînes « effacées » en utilisant
les touches numériques. Si un sous-canal
numérique est rajouté à la base de données,
tous les sous-chaînes de ce canal seront également rajoutés.
GUIDE V (SURVEILLANCE PARENTALE)
REMARQUE : CETTE FONCTION PERMET DE
RESPECTER LA RÉGLEMENTATION SUR LA
PUCE V DE LA FCC DES ÉTATS-UNIS. IL SE
PEUT QU’ELLE NE FONCTIONNE PAS AVEC LES
ÉMISSIONS ORIGINAIRES D’AUTRES PAYS. CE
TÉLÉVISEUR N’EST PAS COMPATIBLE AVEC LE
SYSTÈME D’EMISSION DE GUIDE V CANADIEN,
DONC, LES INSTRUCTIONS NE SONT PAS
FOURNIES POUR CETTE FONCTION.
RÉGLAGE IMAGE / SON
Sélectionnez Auto pour assigner des valeurs
prédéterminées pour chaque paramètre.
Sélectionnez Manuel pour régler les valeurs de
l’image et du son selon vos préférences.
RÉGLAGES MANUELS DE L’IMAGE ET DU SON
1
Utilisez le CURSEUR vers le haut ou vers
le bas pour sélectionner Image / Son. Appuyez
sur ENTER.
2
Utilisez le CURSEUR vers le haut ou vers
le bas pour sélectionner Manuel. Appuyez sur
ENTER.
FONCTIONNEMENT DU MENU
À L'ÉCRAN
(SUITE)
(Suite à la page 52)
Page 52

52
Besoin d’aide?
Visitez notre site web à
www.sanyoctv.com
ou appelez le 1-800-877-5032
LANGUE DU MENU
1
Utilisez le CURSEUR vers le haut ou
vers le bas pour sélectionner Langue du
Menu. Appuyez sur ENTER.
2
Utilisez le CURSEUR vers le haut ou
vers le bas pour sélectionner English,
Español, ou Français. Appuyez sur EXIT.
RÉGLAGES AUX NIVEAUX DE L’IMAGE ET DU SON
3
Utilisez le CURSEUR vers le haut ou vers
le bas pour sélectionner Couleur, Teinte,
Contraste, Luminosité, Netteté, ou Tonalité.
4
Utilisez les touches de CURSEUR < > pour
ajuster les niveaux.
RÉGLAGES AVANCÉS DE L’IMAGE ET DU SON
3
Utilisez le CURSEUR vers le haut ou vers
le bas pour sélectionner Réduction num-
érique du bruit, Contraste dynamique, ou
Suppresseur de sons forts.
4
Appuyez sur la touche du CURSEUR > pour
les options.
FONCTIONNEMENT DU MENU À L'ÉCRAN (SUITE)
5
Utilisez le CURSEUR vers le haut ou vers
le bas pour sélectionner Marche ou Arrêt.
Appuyez sur ENTER.
6
Appuyez sur la touche MENU pour revenir au
menu précédent ou sur la touche EXIT pour
revenir à l’écran initial.
Page 53

53
Besoin d’aide?
Visitez notre site web à
www.sanyoctv.com
ou appelez le 1-800-877-5032
ÉCONOMISEUR D’ÉNERGIE
Ce dispositif d'économie d'énergie réduit le
niveau d'intensité du rétroéclairage. La fonction
d'économie d'énergie comprend les options
suivantes :
• ARRÊT – la fonction n'est pas activée, la
consommation d'énergie est normale.
• BAS – lorsque la fonction d'économie
d'énergie est réglée sur faible, le niveau
d'intensité du rétroéclairage est plus faible
que le niveau normal.
• HAUT – lorsque la fonction d'économie
d'énergie est réglée sur élevée, le niveau
d'intensité du rétroéclairage est réglé à son
niveau le plus faible.
1
Utilisez le CURSEUR vers le haut ou
vers le bas pour sélectionner Economiseur
d’energie. Appuyez sur ENTER.
2
Utilisez les touches du CURSEUR <>pour
sélectionner Arrêt, Bas ou Haut.
SOUS-TITRES NUM.
Le sous-titrage est l'information textuelle cachée
transmise avec l'image et le son. Si le sous-titrage
est activé, le téléviseur haute définition ouvre ces
sous-titres (numériques ou analogiques) et les
superpose à l'écran. Les diffuseurs locaux décident quels sous-titres transmettre.
Les sous-titres numériques peuvent être modifiés grâce aux réglages du menu tel qu’illustré.
1
Utilisez le CURSEUR vers le haut ou
vers le bas pour sélectionner Sous-titres
num. Appuyez sur ENTER.
2
Utilisez les touches du CURSEUR pour
choisir l’option que vous désirez.
3
Utilisez les touches du CURSEUR <>pour
régler la valeur.
REMARQUE : si le réglage de l'opacité est transpar-
ent, les sous-titres pourraient être
difficiles à lire.
Seuls les véritables sous-titres codés
numériques EIA 708B sont affectés par
tous ces réglages.
REMARQUE : les réglages de l'économiseur d'én-
ergie varieront en fonction du mode
Image / Son.
Page 54

54
Besoin d’aide?
Visitez notre site web à
www.sanyoctv.com
ou appelez le 1-800-877-5032
Si vous avez des problèmes avec votre téléviseur,
révisez ce tableau pour trouver une ou plusieurs
solutions possibles.
Avant de nous retourner votre téléviseur haute
définition, veuillez visiter notre site Web
www.sanyoctv.com ou appelez-nous sans frais
au 1-800-877-5032.
Nous pouvons vous aider!
DÉPANNAGE — problèmes/solutions
Problème Vérifiez ces situations Essayez ces solutions Page
Pas d’image ou de
son (image
numérique).
Vérifiez le branchement de l’antenne/de
l’équipement extérieur.
Il se peut que la station ait un problème et
qu’elle ne diffuse AUCUN signal.
La fonction Mute peut avoir été activée.
Ajustez l’antenne.
Essayez un autre canal.
Appuyez sur la touche RESET deux fois ou
recommencez la recherche des chaînes.
Ajustez le volume.
42
43
Pas de sous-titrage.Vérifiez si la station diffuse un signal de
sous-titrage.
Choisissez un autre canal.
Appuyez sur la touche CAPTION pour choisir
le sous-titrage.
42
Je ne peux pas
personnaliser les
sous-titres.
Aucun signal de sous-titrage numérique
n’est diffusé.
Appuyez sur la touche CAPTION pour choisir
le sous-titrage analogique.
42
53
L'image plein écran
ne peut être affichée.
Utilisez la touche PIX SHAPE pour agrandir
l'image ou faire un zoom.
42
Pixillation de l'image
numérique.
Appuyez sur la touche INFO et vérifiez la
puissance du signal.
Faites pivoter l'antenne, installez un
préamplificateur d'antenne.
Installez une antenne numérique extérieure.
42
Image/son
médiocre (image
analogique).
Vérifiez si l’émission est diffusée en
couleurs.
Vérifiez le branchement de l’antenne/de
l’équipement extérieur.
La couleur/la teinte peut être mal réglée.
Il se peut que la station ait un problème.
La fonction Mute peut avoir été activée.
Essayez un autre canal.
Ajustez l’antenne.
Appuyez sur la touche RESET deux fois ou
recommencez la recherche des chaînes.
Ajustez le volume et / ou image.
42
43
52
53
Le message
« Pas de signal »
apparaît à l'écran.
Vérifiez les branchements audio/vidéo.
Vérifiez le branchement de l’équipement
extérieur.
Vérifiez les réglages de l’équipement
extérieur.
Vérifiez le branchement de l’antenne.
Appuyez sur la touche INPUT.
Mettez l’équipement extérieur en marche.
Faites pivoter l’antenne, installez un
préamplificateur d’antenne.
Réglez les connexions de sortie de
l’équipement extérieur afin qu’elles
correspondent aux connexions d’entrée.
42
43
44
46
Page 55

55
Besoin d’aide?
Visitez notre site web à
www.sanyoctv.com
ou appelez le 1-800-877-5032
Problème Vérifiez ces situations Essayez ces solutions Page
Je ne peux ni choisir
ni balayer certains
chaînes.
Le canal peut avoir été effacé de la mémoire.
Vérifiez le branchement de l’antenne.
Aucun signal numérique n’est diffusé.
Signal faible.
Choisissez
Mémoire des chaînes
et ajoutez les
chaînes manuellement, ou effectuez une
recherche des chaînes.
Faites pivoter l’antenne, installez un
préamplificateur d’antenne.
43
50
Pas de chaînes de
câble supérieurs
à 13.
L’indicateur des chaînes du câble C devrait
apparaître à côté du numéro du canal.
Recherchez des chaînes du Câble en utilisant
Recherche manuelle des chaînes.
49
Je ne peux pas utiliser ma TVN.
Vérifiez les piles.
Vérifiez si le téléviseur est branché.
Remplacez les piles.
Orientez la télécommande vers l’avant
de la TVN.
42
45
Le coffret émet un
claquement.
Cet état de choses est normal pendant le
chauffage et le refroidis-sement des pièces
en plastique du coffret.
Page 56

GARANTIE LIMITÉE D'UN AN POUR PIÈCE ET MAIN-D' ŒUVRE
CETTE GARANTIE LIMITÉE POUR PIÈCE ET MAIN-D'UVRE N'EST VALABLE QUE SUR LES TÉLÉVISEURS SANYO ACHETÉS ET
UTILISÉS AUX ÉTATS-UNIS D'AMÉRIQUE, AU CANADA, ET À PORTO RICO, À L'EXCLUSION DE TOUT AUTRE TERRITOIRE ET
PROTECTORAT DES ÉTATS-UNIS D'AMÉRIQUE.
CETTE GARANTIE LIMITÉE NE S'APPLIQUE QU'AU PREMIER ACHETEUR; ELLE NE S'APPLIQUE PAS AUX PRODUITS
UTILISÉS À DES FINS INDUSTRIELLES OU COMMERCIALES.
APPLICATION DE LA GARANTIE
PENDANT UN AN à compter de la date d'achat chez le revendeur d'origine, Sanyo Manufacturing Corporation (SMC)
garantit que ce téléviseur est exempt de tout défaut de pièce et main-d'œuvre dans des conditions d'utilisation normale, tant
pour les pièces que pour la main-d'œuvre.
Pendant les 90 PREMIERS JOURS à compter de la date d'achat chez le revendeur d'origine, Sanyo Manufacturing
Corporation remplacera tout téléviseur présentant des défauts par un échange chez le détaillant. Pour assurer une applica-
tion correcte de la garantie, veuillez conserver l'original du reçu de vente faisant apparaître la date, comme preuve
d'achat. Retournez le téléviseur défectueux au détaillant accompagné du reçu et de tous les accessoires inclus, tels que
la télécommande. Le téléviseur défectueux sera échangé contre un appareil du même modèle ou d'un modèle de remplacement d'une valeur égale, s'il y a lieu. Le modèle de remplacement dépendra de la disponibilité, à la seule discrétion de
Sanyo Manufacturing Corporation.
LA GARANTIE EXPOSÉE AUX PRÉSENTES EST EXCLUSIVE EST REMPLACE TOUTE AUTRE GARANTIE DE QUALITÉ
MARCHANDE OU ADAPTÉE À UN BUT PARTICULIER.
OBLIGATIONS
Pendant un an
à compter de la date d'achat, Sanyo Manufacturing Corporation (SMC) garantit que ce téléviseur est exempt
de tout défaut de pièce et main-d'œuvre dans des conditions d'utilisation normale. Au titre de cette garantie et au cours des
90 premiers jours
, Sanyo Manufacturing Corporation fournira un nouveau téléviseur par un échange chez le détaillant pour
tout défaut ou dysfonctionnement.
COMMENT BÉNÉFICIER DE CETTE GARANTIE
Veuillez appeler le 1-800-877-5032. Munissez-vous du numéro de modèle du téléviseur et de son numéro de série lorsque
vous nous appelez. Les numéros de modèle et de série sont imprimés sur une étiquette figurant au dos de l'appareil.
Pour obtenir de l'aide, veuillez joindre notre service à la clientèle au numéro gratuit 1-800-877-5032.
En semaine : de 7 h 30 à 19 h 00, heure normale du Centre
Le samedi : de 7 h 30 à 16 h 00, heure normale du Centre
Cette garantie expose des droits contractuels spécifiques; les acheteurs au détail peuvent bénéficier de droits statutaires
qui varient d'un État ou d'une province à l'autre.
(Date d'entrée en vigueur : le 1er mars 2007)
Sanyo Manufacturing Corp.
3333 Sanyo Road, Forrest City, AR 72335
À titre de protection en cas de vol ou de perte de ce produit, veuillez indiquer ci-dessous les renseignements demandés et GARDER CETTE FEUILLE EN LIEU SÛR, AVEC VOS PAPIERS PERSONNELS.
Node modèle ________________________________ Date d’achat _______________________
N
o
de série _________________________________ Prix d’achat _______________________
Lieu d’achat _______________________
(Indiqué à l’arrière de l’appareil)
US1-F 26–N6CE / 32-N6DE GXBJ
[This manual printed with Soy Ink.]
 Loading...