

SGS 43
D
Gebrauchsanweisung
Glaswaage
G
Instruction for use
Glass scale
F
Mode d'emploi
Pèse-personne en verre
E
Instrucciones para el uso
Báscula de vidrio
RUS
o
Инструкция по применению
Cтеклянные весы
Service-Adresse:
Hans Dinslage GmbH
Riedlinger Str. 28
88524 Uttenweiler
GERMANY
Tel.: +49 (0) 73 74 - 91 57 66
Fax: +49 (0) 73 74 - 92 07 23
E-mail: service@sanitas-online.de

2
DEUTSCH
Inhaltsverzeichnis
1. Zum Kennenlernen ............................................................................ 2
2. Zeichenerklärung ..............................................................................3
3. Sicherheitshinweise ..........................................................................3
4. Gerätebeschreibung .........................................................................4
5. Inbetriebnahme ................................................................................5
6. Montage des Bedienteils ..................................................................5
7. Information ........................................................................................5
8. Bedienung ......................................................................................... 6
9. Batterien wechseln ...........................................................................7
10. Gerät reinigen und pflegen ...............................................................7
11. Entsorgung .......................................................................................7
12. Was tun bei Problemen ....................................................................8
13. Technische Angaben ........................................................................9
14. Garantie ............................................................................................9
Lieferumfang
• Glaswaage
• Abnehmbares Bedienteil mit Display
• Wandhalterung
• 4 x 1,5 V Typ AAA Batterien (Waage)
• 2 x CR2032 3V Li Batterien (Bedienteil)
• Diese Gebrauchsanleitung
Bitte lesen Sie diese Gebrauchsanleitung aufmerksam durch, bewahren Sie sie für späteren Gebrauch auf,
machen Sie sie anderen Benutzern zugänglich und beachten Sie die Hinweise.
1. Zum Kennenlernen
Funktionen des Gerätes
Diese digitale Waage dient zum Wiegen. Die Waage ist mit einem Display ausgestattet, das die Messwerte
per Infrarot-Übertragung anzeigt.
Das Gewicht wird in 100-Gramm-Schritten angezeigt. Die Waage ist für die Eigenanwendung im privaten
Bereich bestimmt.
Außerdem verfügt die Waage über folgende weitere Funktionen:
• Umschalten zwischen Kilogramm, Pfund „LB“ und Stones „ST“.
• Automatische Abschaltfunktion.
• Batteriewechsel-Anzeige bei schwachen Batterien.
3
2. Zeichenerklärung
Folgende Symbole werden in der Gebrauchsanleitung verwendet.
Warnung Warnhinweis auf Verletzungsgefahren oder Gefahren für Ihre Gesundheit.
Achtung Sicherheitshinweis auf mögliche Schäden am Gerät/Zubehör.
Hinweis Hinweis auf wichtige Informationen.
3. Sicherheitshinweise
Bitte lesen Sie diese Gebrauchsanleitung aufmerksam durch, bewahren Sie sie für späteren Gebrauch auf,
machen Sie sie auch anderen Anwendern zugänglich und beachten Sie die Hinweise.
• Steigen Sie nicht einseitig auf den äußersten Rand der Waage: Kippgefahr!
• Halten Sie Kinder vom Verpackungsmaterial fern (Erstickungsgefahr).
Hinweise zum Umgang mit Batterien
• Batterien können bei Verschlucken lebensgefährlich sein. Bewahren Sie Batterien und Waage für Kleinkinder unerreichbar auf. Wurde eine Batterie verschluckt, nehmen Sie sofort medizinische Hilfe in Anspruch.
• Wechseln Sie schwächer werdende Batterien rechtzeitig aus.
• Wechseln Sie immer alle Batterien gleichzeitig aus und verwenden Sie Batterien des gleichen Typs.
• Batterien dürfen nicht geladen oder mit anderen Mitteln reaktiviert, nicht auseinander genommen, in
Feuer geworfen oder kurzgeschlossen werden.
• Auslaufende Batterien können Beschädigungen am Gerät verursachen. Wenn Sie das Gerät längere Zeit
nicht benutzen, nehmen Sie die Batterien aus dem Batteriefach.
• Wenn eine Batterie ausgelaufen ist, ziehen Sie Schutzhandschuhe an und reinigen Sie das Batteriefach
mit einem trockenen Tuch.
• Batterien können Giftstoffe enthalten, die die Gesundheit und die Umwelt schädigen. Entsorgen Sie die
Batterien deshalb unbedingt entsprechend der geltenden gesetzlichen Bestimmungen. Werfen Sie die
Batterien niemals in den normalen Hausmüll.
Allgemeine Hinweise
• Das Gerät ist nur zur Eigenanwendung, nicht für den medizinischen oder kommerziellen Gebrauch vorgesehen.
• Achtung, steigen Sie nicht mit nassen Füßen auf die Waage und betreten Sie die Waage nicht, wenn die
Oberfläche feucht ist – Rutschgefahr!
• Beachten Sie, dass technisch bedingt Messtoleranzen möglich sind, da es sich um keine geeichte Waage für den professionellen, medizinischen Gebrauch handelt.
• Die Belastbarkeit der Waage beträgt max. 150 kg (330 lb, 23 St). Bei der Gewichtsmessung werden die
Ergebnisse in 100 g-Schritten (0,2 lb) angezeigt.
• Stellen Sie die Waage auf einen ebenen, festen Boden; ein fester Bodenbelag ist Voraussetzung für eine
korrekte Messung.
• Schützen Sie das Gerät vor Stößen, Feuchtigkeit, Staub, Chemikalien, starken Temperaturschwankungen und zu nahen Wärmequellen (Öfen, Heizkörper).
• Reparaturen dürfen nur vom Kundenservice oder autorisierten Händlern durchgeführt werden. Prüfen
Sie jedoch vor jeder Reklamation zuerst die Batterien und wechseln Sie diese gegebenenfalls aus.
• Sollten Sie noch Fragen zur Anwendung unserer Geräte haben, so wenden Sie sich bitte an Ihren Händler oder an den Kundenservice.
• Alle Waagen entsprechen der EG Richtlinie 2004/108/EC. Sollten Sie noch Fragen zur Anwendung unserer Geräte haben, so wenden Sie sich bitte an Ihren Händler oder an den Kundenservice.
4
Aufbewahrung und Pflege
Die Genauigkeit der Messwerte und Lebensdauer des Gerätes hängt ab vom sorgfältigen Umgang:
Achtung
• Von Zeit zu Zeit sollte das Gerät gereinigt werden. Benutzen Sie keine scharfen Reinigungsmittel
und halten Sie das Gerät niemals unter Wasser.
• Stellen Sie sicher, dass keine Flüssigkeit auf die Waage gelangt. Tauchen Sie die Waage niemals
in Wasser. Spülen Sie sie niemals unter fließendem Wasser ab.
• Stellen Sie keine Gegenstände auf die Waage, wenn sie nicht benutzt wird.
• Schützen Sie die Waage vor Stößen, Feuchtigkeit, Staub, Chemikalien, starken Temperatur schwankungen und zu nahen Wärmequellen (Öfen, Heizungskörper).
Drücken Sie nicht mit Gewalt oder mit spitzen Gegenständen auf die Taste.
• Setzen Sie die Waage nicht hohen Temperaturen oder starken elektromagnetischen Feldern
(z. B. Mobiltelefone) aus.
Batterien
Warnung
• Batterien können bei Verschlucken lebensgefährlich sein. Bewahren Sie Batterien für Kleinkinder
unerreichbar auf.
Wurde eine Batterie verschluckt, muss sofort medizinische Hilfe in Anspruch genommen werden.
• Batterien nicht ins Feuer werfen. Explosionsgefahr!
Achtung
• Batterien dürfen nicht geladen oder mit anderen Mitteln reaktiviert, nicht auseinander genommen
oder kurzgeschlossen werden.
• Batterien entnehmen, wenn das Gerät längere Zeit nicht benutzt wird. So vermeiden Sie Schäden,
die durch Auslaufen entstehen können.
Reparatur
Achtung
• Sie dürfen das Gerät keinesfalls öffnen oder reparieren, da sonst eine einwandfreie Funktion nicht
mehr gewährleistet ist. Bei Nichtbeachten erlischt die Garantie.
• Wenden Sie sich bei Reparaturen an den Kundenservice oder an einen autorisierten Händler.
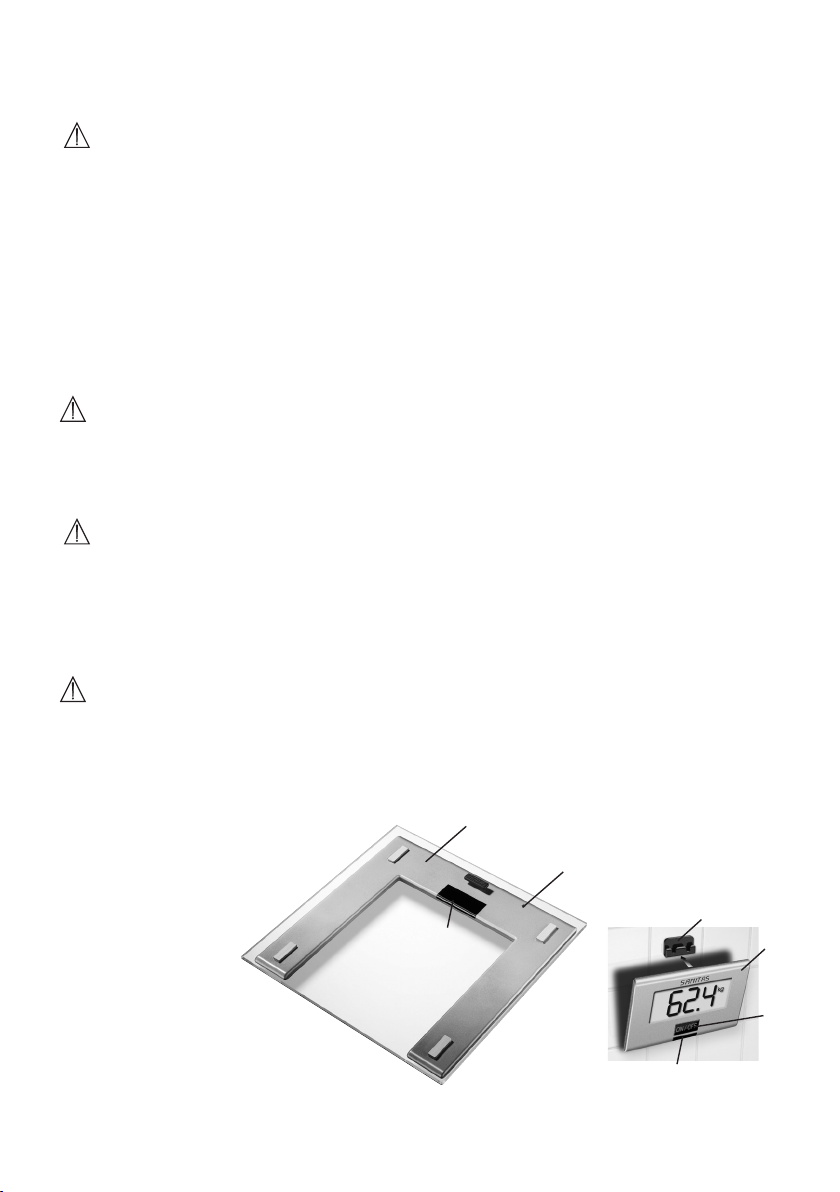
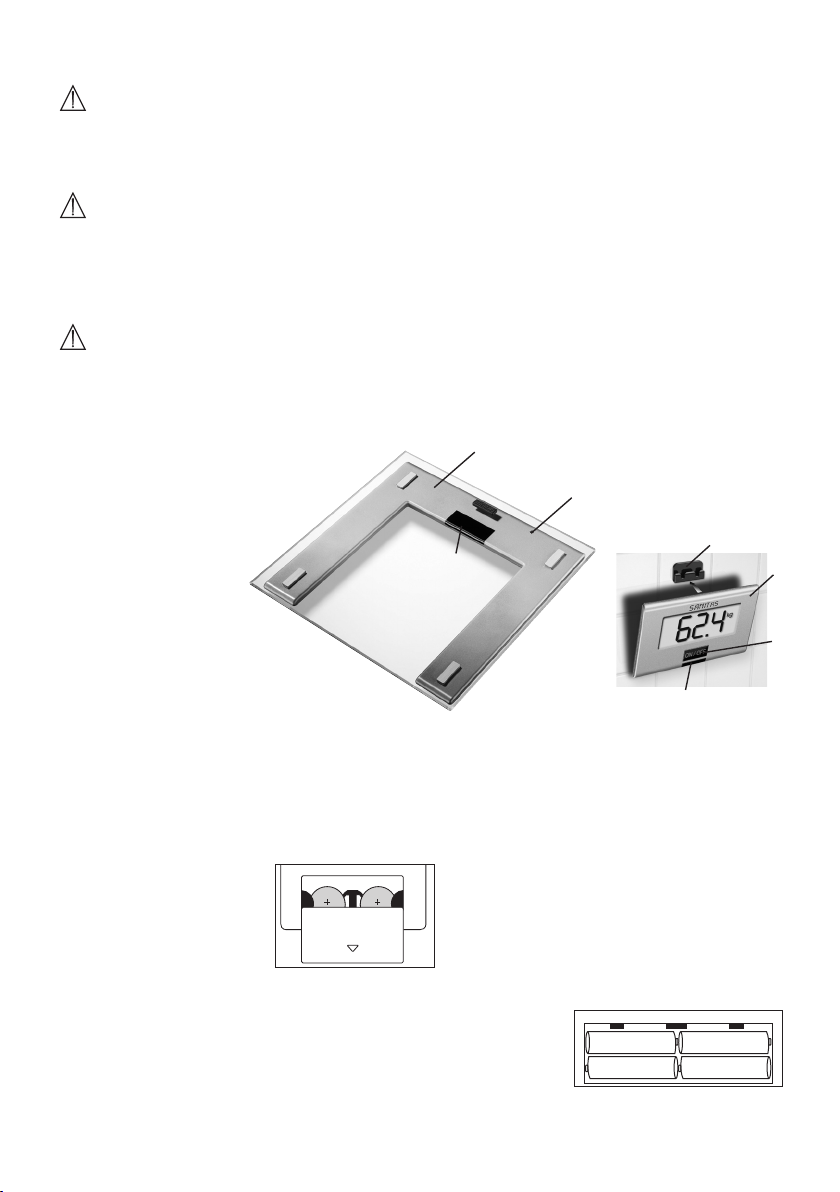
4. Gerätebeschreibung
Übersicht
1 Bedienteil mit Display
2 ON/OFF-Taste
3 Empfängereinheit
4 Waage
5 Sendeeinheit
6 LED
7 Wandhalterung
4
6
5
3
7
1
2
5
5. Inbetriebnahme
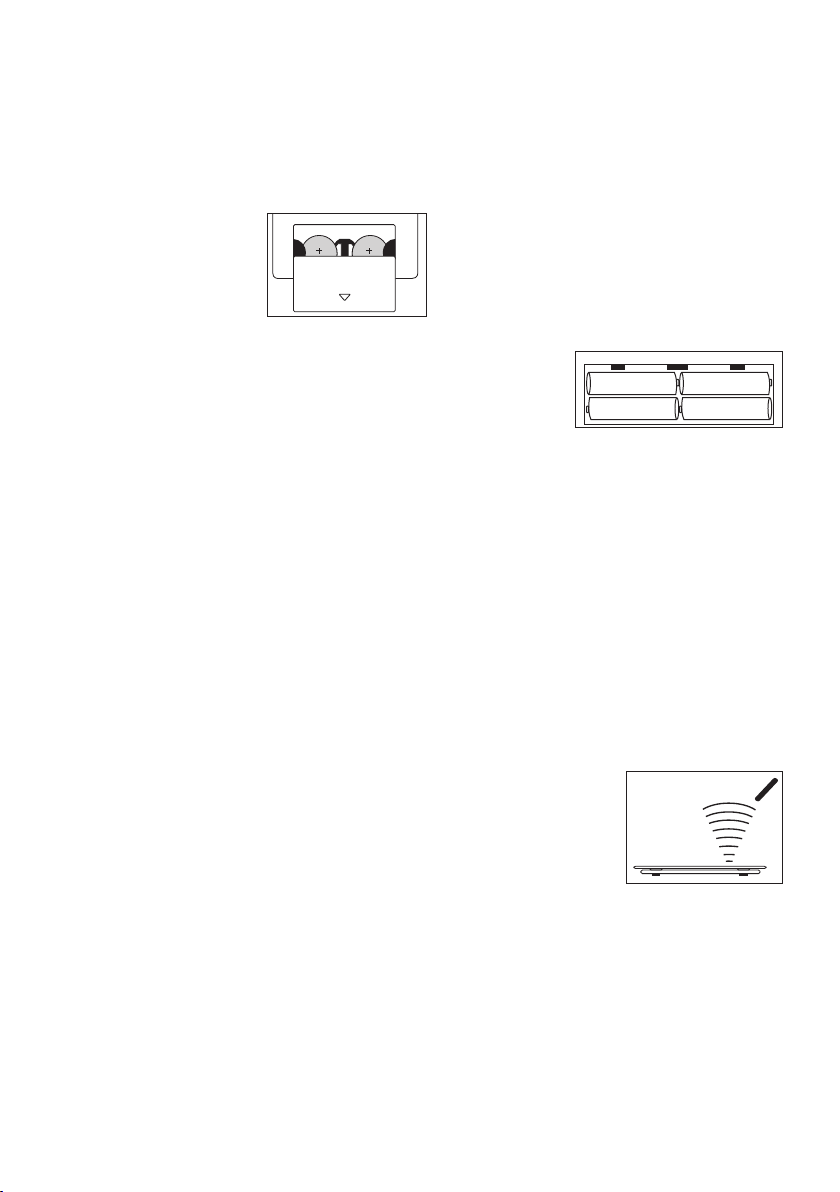
4 x 1,5 V Typ AAA
C
R
2
0
3
2
3
V
C
R
2
0
3
2
3
V
50°
max.
2m
Batterien einlegen
Falls vorhanden, ziehen Sie den Batterie-Isolierstreifen am Batteriefachdeckel beziehungsweise entnehmen Sie die Batterien aus dem Verpackungsschutz und setzen Sie die Batterien gemäß Polung in die
Waage und in das Bedienteil ein. Beachten Sie die Grafik im Batteriefach.
Bedienteil
2 x CR 2032 3V Li Batterien
Waage
4 x 1,5 V Typ AAA Batterien
Zeigt die Waage keine Funktion, so entfernen Sie die Batterien komplett
und setzen Sie sie erneut ein.
Hinweise zum Batteriewechsel, siehe S. 7.
Gewichtseinheit ändern
Im Auslieferungszustand ist die Waage auf die Einheiten „kg“ eingestellt. Auf der Rückseite des Bedienteils befindet sich ein Schalter mit dem Sie auf „Pfund” (LB) und „Stones” (ST) umstellen können.
Waage aufstellen
Stellen Sie die Waage auf einen ebenen und festen Untergrund. Eine feste Standfläche ist Voraussetzung
für eine korrekte Messung.
6. Montage des Bedienteils
Bedienteil aufbewahren
Das Bedienteil kann wahlweise in der Hand gehalten werden, in die Wandhalterung eingehängt werden
oder auch auf der Waage verbleiben.
Wandmontage
Mit dem doppelseitigen Klebestreifen können Sie die Wandhalterung an einer
Wand befestigen. Die Wandfläche muss dazu sauber, trocken, eben und fettfrei
sein.
• Entfernen Sie die Schutzfolie des Klebestreifens auf der Rückseite des Wandhalters.
• Drücken Sie den Wandhalter fest gegen die Wand.
• Achten Sie auf gerade Positionierung des Wandhalters.
• Beachten Sie auch, dass das Bedienteil und die Waage aufeinander ausgerichtet sein müssen.
7. Information
Allgemeine Tipps
• Wiegen Sie sich möglichst zur selben Tageszeit (am besten morgens), nach dem Toilettengang, nüchtern und ohne Bekleidung, um vergleichbare Ergebnisse zu erzielen.
• Stehen Sie während des Messvorgangs aufrecht und still.
6
8. Bedienung
50°
max.
2m
Gewicht messen
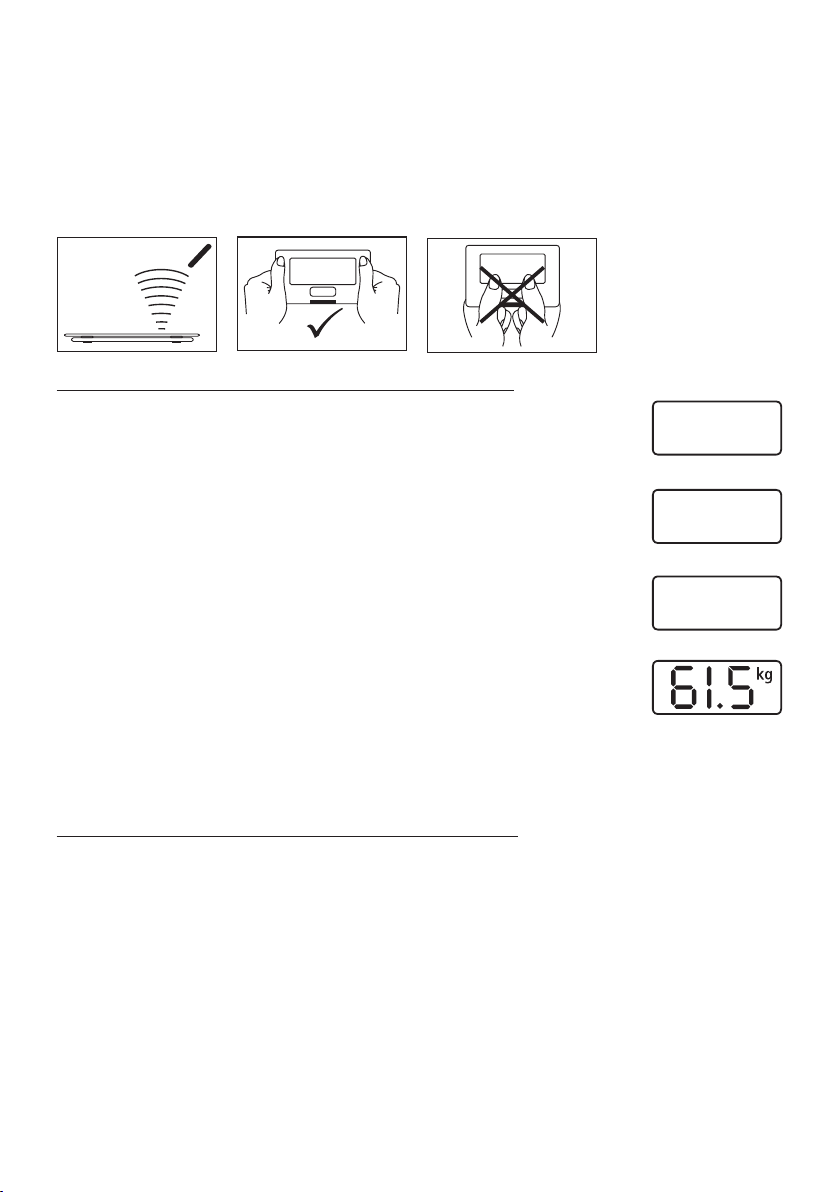
Stellen Sie die Waage auf einen ebenen festen Boden (kein Teppich); ein fester Bodenbelag ist Voraussetzung für eine korrekte Messung.
Achten Sie darauf, dass das Bedienteil und die Waage im direkten Kontakt zueinander stehen. Sende- und
Empfängereinheit nicht abdecken. Die maximale Distanz zwischen Bedienteil und Waage beträgt 2m.
Möglichkeit 1: Anschalten Bedienteil, danach Waagenplattform
Drücken Sie die Taste „ON/OFF“ auf dem Anzeigemodul. Im Display erscheint
„8888“ (Abb. 1).
Schlagen Sie nun mit dem Fuß kurz, kräftig und gut hörbar auf die Waage, um den
Erschütterungssensor zu aktivieren! Die LED an der Waage leuchtet zunächst rot
und wechselt dann nach ca. 5 Sekunden auf grün. Gleichzeitig wechselt die
Displayanzeige zu „0.0“ (Abb. 2).
Nun ist die Waage zum Messen Ihres Gewichtes bereit. Stellen Sie sich nun auf die
Waage. Stehen Sie ruhig auf der Waage mit gleichmäßiger Gewichtsverteilung auf
beiden Beinen. Die Waage beginnt sofort mit der Messung. Während der Messung
erscheint „----“ (Abb. 3).
Kurz darauf wird das Messergebnis angezeigt (Abb. 4).
8888
Abb. 1
kg
0.0
Abb. 2
----
Abb. 3
Wenn Sie die Trittfläche verlassen, schaltet sich die Waage nach ca. 10 Sekunden
ab. Solange bleibt das Messergebnis sichtbar.
Achten Sie darauf, dass Sie das Bedienteil und die Waage immer zuerst einschalten und die Anzeige „0.0“
(Abb. 2) abwarten, bevor Sie sie betreten.
Möglichkeit 2: Anschalten Waagenplattform, danach Bedienteil
Schlagen Sie mit dem Fuß kurz, kräftig und gut hörbar auf die Waage, um den Erschütterungssensor zu
aktivieren! Die LED leuchtet zunächst rot und wechselt dann nach ca. 5 Sekunden auf grün.
Drücken Sie nun die Taste „ON/OFF“ auf dem Bedienteil. Empfängt das Bedienteil das Signal der Waagenplattform, wird „0.0“ (Abb. 2) anzeigt.
Nun ist die Waage zum Messen Ihres Gewichtes bereit. Stellen Sie sich nun auf die Waage. Stehen Sie ruhig auf der Waage mit gleichmäßiger Gewichtsverteilung auf beiden Beinen. Die Waage beginnt sofort mit
der Messung. Während der Messung erscheint „----“(Abb. 3).
Kurz darauf wird das Messergebnis angezeigt (Abb. 4).
Wenn Sie die Trittfläche verlassen, schaltet sich die Waage nach ca. 10 Sekunden ab. Solange bleibt das
Messergebnis sichtbar.
Abb. 4
7
Achten Sie darauf, dass Sie das Bedienteil und die Waage immer zuerst einschalten und die Anzeige „0.0“
Pb Cd Hg
(Abb. 2) abwarten, bevor Sie sie betreten.
Waage ausschalten
Die Waage und das Bedienteil schalten sich nach ca. 10 Sekunden immer automatisch ab.
Um das Bedienteil manuell auszuschalten, drücken Sie die Taste „ON/OFF”.
9. Batterien wechseln
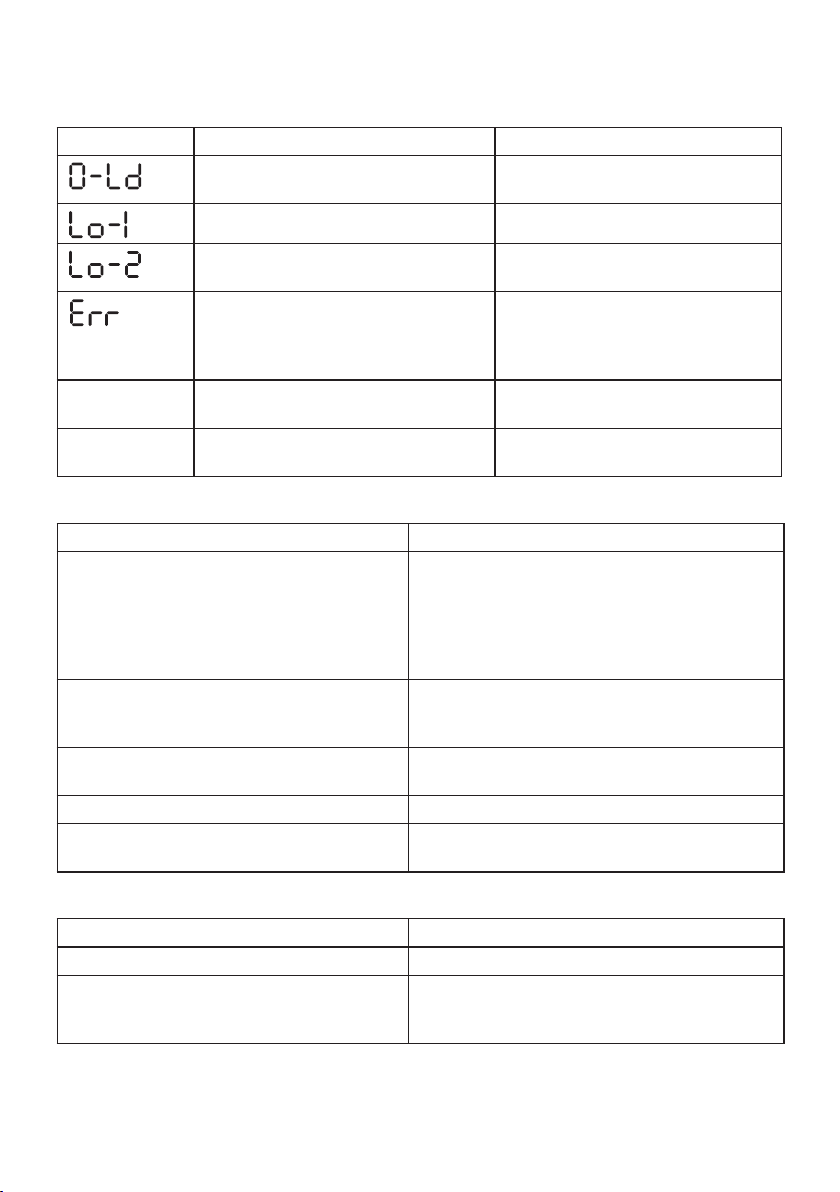
Das Bedienteil ist mit einer Batteriewechselanzeige ausgestattet. Im Display erscheint der Hinweis „Lo-1”
bzw. „Lo-2”, falls die Batterien zu schwach sind und das Gerät schaltet sich automatisch aus. Die Batterien müssen in diesem Fall möglichst bald ersetzt werden. Falls im Display „Lo-1” erscheint, müssen die
Batterien der Waage ausgewechselt werden (4 x 1,5 V Typ AAA). Sollte „Lo-2” angezeigt werden, müssen
die Batterien des Bedienteils ausgewechselt werden (2 x Lithium Batterien CR2032).
Bei der Waage müssen ebenfalls die Batterien ersetzt werden, wenn die LED an der Waage nach dem Aktivieren des Erschütterungssensors nicht leuchtet (4 x 1,5 V Typ AAA).
Hinweis:
• Verwenden Sie bei jedem Batteriewechsel Batterien gleichen Typs, gleicher Marke und gleicher
Kapazität.
• Verwenden Sie keine wiederaufladbaren Akkus.
• Verwenden Sie schwermetallfreie Batterien.
10. Gerät reinigen und pflegen
Von Zeit zu Zeit sollte das Gerät gereinigt werden.
Benutzen Sie zur Reinigung ein feuchtes Tuch, auf das Sie bei Bedarf etwas Spülmittel auftragen können.
Benutzen Sie keine scharfen Reinigungsmittel und halten Sie das Gerät niemals unter Wasser.
Achtung
• Verwenden Sie niemals scharfe Lösungs- und Reinigungsmittel!
• Tauchen Sie das Gerät keinesfalls unter Wasser!
• Gerät nicht in der Spülmaschine reinigen!
11. Entsorgung
Batterien und Akkus gehören nicht in den Hausmüll. Als Verbraucher sind Sie gesetzlich verpflichtet, gebrauchte Batterien zurückzugeben.
Sie können Ihre alten Batterien bei den öffentlichen Sammelstellen Ihrer Gemeinde oder überall dort abgeben, wo Batterien der betreffenden Art verkauft werden.
Hinweis:
Diese Zeichen finden Sie auf schadstoffhaltigen Batterien:
Pb = Batterie enthält Blei,
Cd = Batterie enthält Cadmium,
Hg = Batterie enthält Quecksilber.
Im Interesse des Umweltschutzes darf die Waage einschließlich der Batterien am Ende
ihrer Lebensdauer nicht mit dem Hausmüll entfernt werden. Die Entsorgung kann über
entsprechende Sammelstellen in Ihrem Land erfolgen.
Befolgen Sie die örtlichen Vorschriften bei der Entsorgung der Materialien.
Entsorgen Sie das Gerät gemäß der Elektro- und Elektronik Altgeräte EG-Richtlinie
2002/96/EC – WEEE (Waste Electrical and Electronic Equipment).
Bei Rückfragen wenden Sie sich an die für die Entsorgung zuständige kommunale Behörde.
8
12. Was tun bei Problemen?
Stellt die Waage bei der Messung einen Fehler fest, wird folgendes angezeigt.
Displayanzeige Ursache Behebung
Die maximale Tragkraft von 150 kg wurde
überschritten.
Die Batterien der Waage sind fast leer. Wechseln Sie die Batterien der Waage.
Nur bis 150 kg belasten.
Die Batterien des Bedienteils sind fast
leer.
Fehlerhafte bzw. keine Übertragung zwischen Waagenplattform und Bedienteil.
Keine Anzeige Die Batterien im Bedienteil sind vollstän-
Keine Messung möglich
Mögliche Fehler Behebung
Die Waage wurde vor dem Betreten nicht
aktiviert. Wenn Sie sich auf die Waage stellen,
bevor im Display „0.0“ angezeigt
wird, funktioniert die Waage nicht korrekt.
Verbindung zwischen Waage und Bedienteil
ist gestört.
Das Bedienteil ist zu weit von der Waage entfernt.
Die Batterien in der Waage sind leer. Wechseln Sie die Batterien (siehe Seite 7).
Das Verbindung zwischen Bedienteil und Waage
ist unterbrochen.
dig leer.
Die Batterien im Bedienteil sind nicht
richtig eingelegt.
Waage korrekt aktivieren (auf „0.0“ warten)
und Messung wiederholen.
Vor der Messung zuerst das Bedienteil und die Waage einschalten.
Ggf. 30 Sekunden warten und dann Messung
wiederholen.
Setzen Sie die Batterien der Waage und des Bedienteils erneut ein oder achten Sie darauf, dass die Sende- und Empfängereinheiten nicht abgedeckt sind.
Verringern Sie den Abstand zwischen Waage und
Bedienteil.
Sende- und Empfängereinheit nicht abgedecken.
Wechseln Sie die Batterien des
Bedienteils.
Waage auf eine ebene Fläche stellen
und korrekt aktivieren (auf „0.0“ warten)
und Messung wiederholen
(siehe Seite 6).
Wechseln Sie die Batterien
(siehe Seite 7).
Überprüfen Sie die korrekte Polung
(siehe Seite 5).
Falsche Gewichtsmessung
Mögliche Fehler Behebung
Waage steht auf Teppichboden. Waage auf ebenen und festen Boden stellen.
Waage hat falschen Nullpunkt. Waage anschalten und warten bis Sie von selbst
wieder ausschaltet (LED erlischt). Danach Messung
wiederholen.

9
13. Technische Angaben
Batterien Waage 4 x 1,5 V Typ AAA
Batterien Bedienteil 2 x Lithium Batterien CR2032
Messbereich 1 kg bis 150 kg
Einteilung Gewicht 100 g
Übertragung Infrarotübertragung
Technische Änderungen vorbehalten.
14. Garantie
Sie erhalten 3 Jahre Garantie ab Kaufdatum auf Material- und Fabrikationsfehler des Produktes.
Die Garantie gilt nicht:
• im Falle von Schäden, die auf unsachgemäßer Bedienung beruhen
• für Verschleißteile (z.B. Batterien)
• für Mängel, die dem Kunden bereits bei Kauf bekannt waren
• bei Eigenverschulden des Kunden
Die gesetzlichen Gewährleistungen des Kunden bleiben durch die Garantie unberührt.
Für Geltendmachung eines Garantiefalles innerhalb der Garantiezeit ist durch den Kunden der Nachweis
des Kaufes zu führen.
Die Garantie ist innerhalb eines Zeitraumes von 3 Jahren ab Kaufdatum gegenüber der
Hans Dinslage GmbH, Riedlinger Straße 28, 88524 Uttenweiler, Germany, geltend zu machen. Der Kunde
hat im Garantiefall das Recht zur Reparatur der Ware bei unserem eigenen oder bei von uns autorisierten
Werkstätten. Weitergehende Rechte werden dem Kunden (aufgrund der Garantie) nicht eingeräumt.
10
ENGLISH
Contents
1. Getting to know your instrument ....................................................10
2. Signs and symbols..........................................................................10
3. Safety notes ....................................................................................11
4. Unit description ...............................................................................12
5. Initial use ........................................................................................12
6. Setting up the control panel............................................................13
7. Information ......................................................................................13
8. Operation ........................................................................................13
9. Replacing batteries .........................................................................14
10. Cleaning and care of the unit ..........................................................14
11. Disposal .......................................................................................... 15
12. What if there are problems? ...........................................................15
13. Technical specifications .................................................................16
Included in delivery
• Glass scale
• Removable control unit with display
• Wall mount
• 4 x 1.5 V AAA batteries (scale)
• 2 x CR2032 lithium batteries (control unit)
• These instructions for use
Please read these instructions for use carefully and keep them for later use, be sure to make them accessible to other users and observe the information they contain. This diagnostic scale is designed to
make a significant contribution to your health.
1. Getting to know your instrument
Function of the unit
The digital scale is used for measuring weights. The scale has a display that receives the measured values
by infrared transmission. Weight is displayed in 100 g graduations. The scale is designed for private use.
This scale also has the following functions:
• Switch between kilograms, pounds („LB“) and stone („ST“).
• Automatic shutoff function
• Battery change indicator for weak batteries
2. Signs and symbols
The following symbols appear in these instructions.
Warning Warning instruction indicating a risk of injury or damage to health.
Important Safety note indicating possible damage to the unit/accessory.
Note Note on important information.

11
3. Safety notes
Please read these instructions for use carefully and keep them for later use, be sure to make them
accessible to other users and observe the information they contain.
• Do not stand on the outer edge to one side of the scale otherwise it may tip!
• Keep children away from packaging materials (risk of suffocation).
Notes on handling batteries
• Swallowing batteries can be extremely dangerous. Keep the batteries and scale out of the reach of small
children. Should a child swallow a battery, seek medical assistance immediately.
• Replace weak batteries before they discharge completely.
• Always replace all batteries at the same time and use batteries of the same type.
• Batteries must not be recharged, taken apart, thrown into an open fire or short circuited.
• Leaking batteries may damage the device. If you do not intend to use the device for longer periods, remove the batteries from the battery compartment.
• If a battery has leaked, put on protective gloves and clean the battery compartment with a dry cloth.
• Batteries can contain toxins that are harmful to health and the environment. Always dispose of batteries
in accordance with applicable legal regulations. Do not dispose of batteries with the normal household
waste.
General notes
• The unit is for personal use only and is not intended for medical or commercial applications.
• Caution! Do not step onto the scale with wet feet or when the scale‘s surface is damp - danger of slipping!
• Note that technical tolerances mean that results may vary, because the scale is not calibrated for professional medical use.
• The scale can accept a maximum load of 150 kg (330 lb, 23 st). The weight measurement is displayed in
increments of 100 g (0.2 lb).
• Place the scale on a firm level floor; a firm floor covering is required for correct measurement.
• Protect the unit against hard knocks, moisture, dust, chemicals, major temperature fluctuations and heat
sources which are too close (stoves, heating radiators).
• Repairs may only be carried out by customer service or authorised dealers. Before submitting any complaint, first check the batteries and replace them if necessary.
• Should you have any questions concerning the use of our devices, please contact your dealer or customer service.
• All scales comply with EC Directive 2004/108/EC. Should you have any questions concerning the use of
our devices, please contact your dealer or customer service.
Storage and maintenance
The precision of the measured values and service life of the unit depend on careful use:
Important
• The unit should be cleaned occasionally. Do not use abrasive detergents and never immerse the
unit in water.
• Ensure that no liquid gets on the scale. Never dip the scale into water. Never wash it under running
water.
• Do not place any objects on the scale when it is not being used.
• Protect the scale from impacts, moisture, dust, chemicals, large changes in temperature and
sources of heat that are too close (oven, radiator). Do not press the buttons using excessive force
or with pointed objects.
• Do not expose the scale to high temperatures or strong electromagnetic fields (e.g. mobile phones).
12
Batteries
4 x 1,5 V Typ AAA
C
R
2
0
3
2
3
V
C
R
2
0
3
2
3
V
Warning
• Swallowing batteries can be extremely dangerous. Keep the batteries out of the reach of small
children. If a battery is swallowed, get immediate medical help.
• Do not throw batteries into fire. Explosion hazard!
Important
• Batteries must not be recharged or reactivated by other means, taken apart or short-circuited.
• Remove batteries if the unit will not be used for an extended period of time. This prevents damage
that may occur from leaks.
Repairs
Important
• Never open or attempt to repair the unit yourself, as otherwise proper function is no longer
guaranteed. Failure to observe this regulation shall void the warranty.
• If you need to have the unit repaired, contact customer service or an authorised dealer.
4. Unit description
4
Overview
1 Control panel with display
2 ON/OFF button
3 Receiver
4 Scale
5 Transmitter
6 LED
7 Wall mount
5
6
7
3
5. Initial use
Inserting batteries
If present, pull the battery insulating strip off the battery compartment cover or remove the battery‘s protective film and insert the battery in the scale and the control panel with the correct polarity. Note the graphic in the battery compartment.
Control unit
2 x CR2032 lithium batteries
Scale
4 x 1.5 V AAA batteries
1
2
If the scale fails to operate, remove the batteries completely and reinsert
them.
For instructions on changing the batteries, see p. 14.

13
Changing the weight unit
50°
max.
2m
50°
max.
2m
On delivery the scale is set to the unit „kg“. A switch located on the back of the control panel enables you
to change to „pounds“ (lb) and „stone“ (st).
Setting up the scale
Set up the scale on a level and solid surface. A solid surface is a prerequisite for a correct measurement.
6. Setting up the control panel
Positioning the control panel
The control panel can be held in the hand, attached to the wall mount or be left on the scale.
Wall mounting
The wall mount can be attached to the wall with the double-sided adhesive
strip. The surface of the wall must be clean, plane and grease-free.
Remove the foil from the adhesive strip on the back of the wall mount
Press the wall mount firmly against the wall.
• Make sure that the wall mount is straight.
• Note that the control panel and the scale must also be aligned to each other.
7. Information
General tips
• If possible, always weigh yourself at the same time of day (preferably in the morning), after using the toilet, on an empty stomach and unclothed, in order to achieve comparable results.
• Stand still and upright during the measurement.
8. Operation
Weighing
Place the scale on a firm level floor (no carpet); a firm floor covering is
required for correct measurement.
Make sure that the control panel and the scale are in line of sight to each other. Do not cover the receiver
and transmitter. The maximum distance between control panel and scale is 2 m.
Option 1: switch on control panel, then scale platform
Press the „ON/OFF“ button on the display module. The display shows „8888“ (Fig. 1).
Audibly, briefly and firmly tap the scale with your foot to activate the vibration sensor.
The LED first shows red and then switches to green after about 5 seconds. The display simultaneously shows „0.0“ (Fig. 2).
Now the scale is ready to measure your weight. Now step onto the scale. Stand still
on the scale with your weight distributed evenly between both legs. The scale immediately begins to measure your weight. The display shows „----“ (Fig. 3).
8888
Fig. 1
kg
0.0
Fig. 2

14
Your measured weight is displayed shortly after this (Fig 4).
The scale switches off 10 seconds after you step down from it. The result remains visible during this time.
Make sure that you always switch on the scale first and wait for the display to show
„0.0“ (Fig. 2) before stepping on it.
Option 2: switch on scale platform, then control panel
Audibly, briefly and firmly tap the scale with your foot to activate the vibration sensor. The LED first shows
red and then switches to green after about 5 seconds.
Press the „ON/OFF“ button on the display module. If the control panel is receiving the signal from the scale it shows „0.0“ (Fig. 2).
Now the scale is ready to measure your weight. Now step onto the scale. Stand still on the scale with your
weight distributed evenly between both legs. The scale immediately begins to measure your weight. The
display shows „----“ (Fig. 3).
Your measured weight is displayed shortly after this (Fig 4).
The scale switches off 10 seconds after you step down from it. The result remains visible during this time.
Make sure that you always switch on the scale first and wait for the display to show „0.0“ (Fig. 2) before
stepping on it.
Switching off the scale
The scale and the control panel always switch off automatically after 10 seconds.
Press the „ON/OFF“ button to switch off the display module manually.
----
Fig. 3
Fig. 4
9. Replacing batteries
The control panel is equipped with a „replace battery“ indicator.
The display shows „Lo-1“ and „Lo-2“ when the batteries are beginning to run down and the scale switches
off automatically. The batteries must be replaced as soon as possible. If the display shows „Lo-1“, the batteries in the scale must be replaced (4 x 1.5 V AAA). If the display shows „Lo-2“, the batteries in the control panel must be replaced (2 x CR2032 lithium batteries).
The batteries in the scale must also be replaced if the LED on the scale does not light after activating the
vibration sensor (4 x 1.5 V AAA batteries).
Note:
• When changing batteries, always use batteries of the same type, brand and capacity.
• Do not use rechargeable batteries.
• Use batteries that are free of heavy metals.
10. Cleaning and care of the unit
The unit should be cleaned occasionally.
Clean using a damp cloth, to which you can apply a little detergent if necessary. Do not use abrasive detergents and never immerse the unit in water.

15
Important
Pb Cd Hg
• Do not use aggressive solvents or cleaning agents!
• Never immerse the unit in water!
• Do not wash the unit in a dishwasher!
11. Disposal
Standard and rechargeable batteries should not be disposed of separately from the household waste.
As a consumer, you are legally obliged to return used batteries for proper disposal. You can hand in your
used batteries at public collection points in your district or sales outlets where batteries of this type are
sold.
Note:
The codes below are printed on batteries containing harmful substances:
Pb = Battery contains lead,
Cd = Battery contains cadmium,
Hg = Battery contains mercury.
For environmental reasons, do not dispose of the scale with the batteries in the household waste at
the end of its useful life. Dispose of the unit at a suitable local collection or recycling point.
Observe the local regulations for material disposal.
Dispose of the unit in accordance with EC Directive 2002/96/EC – WEEE (Waste Electrical and
Electronic Equipment).
If you have any questions, please contact the local authorities responsible for waste disposal.
12. What if there are problems?
If the scale detects and error when measuring, the following is displayed.
Display Cause Remedy
The maximum load-bearing capacity of
150 kg was exceeded.
The scale batteries are almost flat. Replace the batteries of scale.
The load must not exceed 150 kg.
The control panel batteries are almost
flat.
Faulty or no transmission between scale
platform and control panel.
No display The batteries in the control panel are enti-
rely flat.
The batteries in the control panel are not
correctly installed.
Replace the batteries of control panel.
Place the scale on a flat surface and
activate it correctly (wait for the display
to show „0.0“) and repeat the measurement (see page 14).
Replace the batteries (see page 13).
Check that the polarity is correct (see
page 12).

16
No measurement possible
Possible errors Remedy
The scale was not activated before being
stepped on. If you step onto the scale before
„0.0“ appears in the display,
it will not function correctly.
Interference between scale and
control panel.
The control panel is too far from the scale. Reduce the distance between the scale and control
The scale batteries are flat. Replace the batteries (see page 14).
The connection between control panel and scale
is interrupted.
Incorrect weight measurement
Possible errors Remedy
Scale is on carpet. Place scale on a flat, solid surface.
Scale zero setting is incorrect. Switch on scale and wait until it switches off auto-
Activate the scale correctly (wait for „0.0“)
and repeat the measurement.
Switch on the control panel and the scale before the
measurement.
If necessary, wait 30 seconds and then repeat the
measurement.
Remove and replace the batteries in the scale and
control panel or make sure that the transmitter and
receiver are not covered.
panel.
Do not cover the receiver and transmitter.
matically (LED off). Then repeat measurement.
13. Technical specifications
Scale batteries 4 x 1.5 V AAA
Control unit batteries 2 x CR2032 lithium batteries
Measuring range 1 kg to 150 kg
Weight 100 g
Transmission Infrared transmission
Subject to technical modifications.

17
FRANÇAIS
Sommaire
1. Familiarisation avec l‘appareil ......................................................... 17
2. Symboles utilisés ............................................................................18
3. Consignes de sécurité ....................................................................18
4. Description de l‘appareil .................................................................19
5. Mise en service ..............................................................................20
6. Montage de l‘élément de commande .............................................20
7. Informations ....................................................................................20
8. Utilisation ........................................................................................ 21
9. Remplacement des piles ................................................................22
10. Nettoyage et entretien de l‘appareil ................................................22
11. Elimination ......................................................................................22
12. Que faire en cas de problèmes ? ....................................................23
13. Caractéristiques techniques ........................................................... 24
Eléments fournis
• Pèse-personne en verre
• Unité de commande démontable avec afficheur
• Support mural
• 4 x 1,5 V type AAA (pèse-personne)
• 2 x piles au lithium CR2032 (unité de commande)
• Mode d‘emploi
Lisez attentivement cette notice, conservez- la pour un usage ultérieur, mettez-la à la disposition des autres utilisateurs et suivez les consignes qui y figurent. Ce pèsepersonne impédancemètre se révélera être
un allié de poids pour votre santé.
1. Familiarisation avec l‘appareil
Fonctions de l‘appareil
Cette balance numérique sert à peser. Elle est pourvue d‘un écran qui indique les valeurs de mesure par
transmission infrarouge. Le poids s’affiche par incréments de 100 grammes. La balance est destinée à un
usage personnel dans le domaine privé.
Le pèse-personne dispose en outre des fonctions complémentaires suivantes :
• Commutation entre kilogramme, livre „LB“ et stone „ST“.
• Fonction de désactivation automatique
• Affichage de remplacement de piles lorsque les piles faiblissent.

18
2. Symboles utilisés
Voici les symboles utilisés dans la notice d‘utilisation :
Avertissement Ce symbole vous avertit des risques de blessures ou des dangers pour votre santé.
Attention Ce symbole vous avertit des éventuels dommages au niveau de l‘appareil ou
d‘un accessoire.
Remarque Ce symbole indique des informations importantes.
3. Consignes de sécurité
Lisez attentivement cette notice, conservez-la pour un usage ultérieur, mettez-la également à la disposition des autres utilisateurs et suivez les consignes qui y figurent.
• Ne montez pas sur un seul côté ni sur le bord du pèse-personne : il risquerait de basculer et de vous faire tomber !
• Ne laissez pas l‘emballage à la portée des enfants (risque d‘étouffement).
Remarques relatives aux piles
• Les piles sont extrêmement dangereuses si elles sont avalées. Les piles et le pèsepersonne doivent être
tenus hors de portée des enfants. Si l‘un deux avale une pile, consultez immédiatement un médecin !
• Remplacez à temps les piles usagées.
• Changez systématiquement les piles à temps et utilisez des piles de même type.
• Les piles ne doivent être ni rechargées, ni réactivées par d‘autres méthodes, ni démontées, ni jetées au
feu, ni court-circuitées.
• Des piles qui fuient peuvent endommager l‘appareil. Si vous n‘utilisez pas l‘appareil pendant une période prolongée, retirez les piles du compartiment à piles.
• Si l‘une des piles a fui, enfilez des gants protecteurs et nettoyez le compartiment à piles avec un chiffon
sec.
• Les piles peuvent contenir des produits toxiques qui sont nuisibles pour la santé et l‘environnement. Eliminez les piles conformément aux dispositions légales en vigueur. Ne jetez jamais les piles avec les ordures ménagères.
Remarques générales
• L‘appareil est prévu pour un usage exclusivement personnel. Il n‘est en aucun cas destiné à des fins
médicales ou commerciales.
• Attention, ne montez pas sur la balance les pieds mouillés et ne posez pas les pieds sur le plateau de
pesée s‘il est humide – vous pourriez glisser !
• Notez que des tolérances de mesure d’ordre technique sont possibles, car cette balance n‘est pas étalonnée en vue d‘un usage médical professionnel.
• La portée maximale de la balance est de 150 kg (330 lb, 23 St). Lors de la pesée, les résultats s‘affichent
par incréments de 100 g (0,2 lb, 0,2 lb).
• Placez le pèse-personne sur un sol plan et stable ; une surface ferme est la condition préalable à une
mesure exacte.
• Protégez le pèse-personne des chocs, de l‘humidité, de la poussière, des produits chimiques, des variations importantes de température et des sources de chaleur (four, radiateur).
• Les réparations doivent être effectuées uniquement par le service après-vente ou des revendeurs agréés. Cependant, avant toute réclamation, vérifiez d‘abord les piles et changez-les le cas échéant.
• Pour toute question sur l‘utilisation de nos appareils, adressez-vous à votre revendeur ou à notre service
après-vente.
• Tous les pèse-personnes sont conformes à la directive CEM 2004/108/CEE. Pour toute question sur
l‘utilisation de nos appareils, adressez-vous à votre revendeur ou à notre service après-vente.

19
Stockage et entretien
La précision des valeurs mesurées et la durée de vie de l‘appareil dépend du maniement avec soin :
Attention
• Nettoyez de temps en temps l‘appareil. N‘utilisez pas de produits de nettoyage agressifs et
n‘immergez jamais l‘appareil dans l‘eau.
• Assurez-vous qu‘aucun liquide ne parvienne sur le pèse-personne. Ne plongez en aucun cas le
pèse-personne dans l‘eau. Ne rincez en aucun cas le pèse-personne à l‘eau courante.
• Ne posez pas d‘objets sur le pèsepersonne lorsqu‘il n‘est pas utilisé.
• Protégez le pèse-personne contre les chocs, l‘humidité, les poussières, les produits chimiques, les
fortes fluctuations de températures et la proximité de sources de chaleur (fours, radiateurs).
N‘appuyez pas sur les touches en forçant ou avec des objets pointus.
• N‘exposez pas le pèse-personne à des températures trop élevées ou à de forts champs
électromagnétiques (p. ex. téléphones mobiles).
Piles
Avertissement
• Les piles sont extrêmement dangereuses si elles sont avalées. Conservez les piles hors de portée
des enfants en bas âge. Si une pile a été avalée, consultez immédiatement une aide médicale.
• Ne pas jeter les piles au feu. Danger d‘explosion !
Attention
• Les piles ne doivent pas être chargées ni réactivées avec d‘autres moyens, ni désassemblées ou
court-circuitées.
• Retirez les piles lorsque l‘appareil n‘est pas utilisé pendant une période prolongée. Vous éviterez
ainsi des endommagements pouvant résulter de l‘écoulement des piles.
Réparation
Attention
• Vous ne devez en aucun cas ouvrir ou réparer l‘appareil, faute de quoi le fonctionnement
de l‘appareil ne serait plus garanti. En cas de non-respect de ce point, la garantie est annulée.
• En cas de réparations, veuillez vous adresser au service après-vente ou à un revendeur autorisé.
4. Description de l‘appareil
Aperçu
1 Élément de commande avec écran
2 Touche ON/OFF
3 Unité de réception
4 Balance
5 Unité d‘émission
6 Témoin DEL
7 Fixation murale
4
6
7
5
1
2
3

20
5. Mise en service
4 x 1,5 V Typ AAA
C
R
2
0
3
2
3
V
C
R
2
0
3
2
3
V
50°
max.
2m
Insertion des piles
Tirez éventuellement sur la languette isolante de la pile sur le couvercle du compartiment à piles ou retirez
les piles de leur emballage de protection et introduisez-les dans la balance et dans l‘élément de commande en respectant la polarité. Observez le schéma figurant dans le compartiment à piles.
Unité de commande
2 x piles au lithium CR2032
Pèse-personne
4 x 1,5 V type AAA
Si le pèse-personne n‘affiche aucune fonction, retirez entièrement les piles et remettez- les en place.
Remarques pour le changement de piles, voir page 22.
Modification de l‘unité de poids
À la livraison de la balance, le réglage des unités est en « kg ». Au dos de l‘élément de commande, un interrupteur vous permet de commuter sur « livres » (LB) et « stones » (ST).
Installation du pèse-personne
Posez le pèse-personne sur un support stable et plan. Une surface d‘assise solide constitue la condition
préalable pour une mesure correcte.
6. Montage de l‘élément de commande
Mise en place de l‘élément de commande
L‘élément de commande peut, au choix, être gardé à la main, être accroché à la fixation murale ou être
fixé sur la balance.
Montage mural
Vous pouvez appliquer la fixation murale au mur à l‘aide de la bande adhésive
double face. Pour ce faire, veillez à ce que la surface du mur soit propre, sèche,
lisse et non graisseuse.
• Retirez le film de protection de la bande adhésive au dos de la fixation murale.
• Appuyez la fixation murale contre le mur.
• Veillez au bon positionnement de la fixation murale.
• Veillez également à ce que l‘élément de commande et la balance soient orientés l‘un vers l‘autre.
7. Informations
Conseils généraux
• Pesez-vous, si possible, à la même heure (de préférence le matin), après la selle, à jeun et nu(e) afin
d‘obtenir des résultats comparables.
• Ne bougez pas pendant la mesure.

21
8. Utilisation
50°
max.
2m
Mesure du poids
Posez la balance sur un sol plan et stable (sans tapis ni moquette) ; une surface ferme est la condition
préalable à une mesure exacte.
Assurez-vous que l‘élément de commande et la balance soient en contact direct. Ne recouvrez pas l‘unité
d‘émission et l‘unité de réception. L‘élément de commande et la balance doivent se trouver à une distance
maximale de 2 m l‘un de l‘autre.
Option 1 : Allumer l‘élément de commande, puis le plateau de la balance
Appuyez sur la touche „ON/OFF“ sur le module d‘affichage. „ 8888“ s‘affiche à
l‘écran (fig. 1)
Du pied, donnez un petit coup énergique bien audible sur la balance afin d’activer le
capteur de secousses ! Le témoin DEL s‘allume tout d‘abord en rouge et passe ensuite au vert au bout de 5 secondes env. Au même moment, l‘affichage de l‘écran
passe à „0.0“ (fig. 2).
La balance est prête à mesurer votre poids. Montez sur la balance. Tenez-vous debout immobile sur la balance en répartissant votre poids de manière égale sur les
deux jambes. La balance commence la mesure immédiatement. Pendant la mesure,
l‘écran indique „----“ (fig. 3).
Le résultat de la mesure s‘affiche presque aussitôt (fig. 4).
Quand vous quittez le plateau, la balance s‘éteint au bout de 10 secondes env. Entre-temps, le résultat de mesure reste visible.
8888
fig. 1
kg
0.0
fig. 2
----
fig. 3
fig. 4
Veillez à toujours allumer l‘élément de commande et la balance en premier et à attendre que l’affichage
« 0.0 » (fig. 2) s’allume pour monter.
Option 2 : Allumer le plateau de la balance, puis l‘élément de commande
Du pied, donnez un petit coup énergique bien audible sur la balance afin d’activer le capteur de secousses ! Le témoin DEL s‘allume tout d‘abord en rouge et passe ensuite au vert au bout de 5 secondes env.
Appuyez sur la touche „ON/OFF“ sur l‘élément de commande. Si l‘élément de commande reçoit le signal
du plateau de la balance, l‘écran affiche „0,0“ (fig. 2).
La balance est prête à mesurer votre poids. Montez sur la balance. Tenez-vous debout immobile sur la
balance en répartissant votre poids de manière égale sur les deux jambes. La balance commence la mesure immédiatement. Pendant la mesure, l‘écran indique „----“ (fig. 3).
Le résultat de la mesure s‘affiche presque aussitôt (fig. 4).
Quand vous quittez le plateau, la balance s‘éteint au bout de 10 secondes env. Entre-temps, le résultat de
mesure reste visible.

22
Veillez à toujours allumer l‘élément de commande et la balance en premier et à attendre que l’affichage
Pb Cd Hg
« 0.0 » (fig. 2) s’allume pour monter.
Mise hors tension du pèse-personne
La balance et l‘élément de commande s‘éteignent toujours automatiquement au bout de 10 secondes
env.
Pour éteindre manuellement l‘élément de commande, appuyez sur la touche „ON/OFF“.
9. Remplacement des piles
L‘élément de commande est pourvu d‘un affichage de changement de piles.
L‘écran indique „ Lo-1“ ou „Lo-2“ si la batterie est trop faible et la balance s‘éteint automatiquement. Dans
ce cas, les piles doivent être remplacées le plus tôt possible. Si l‘écran indique „Lo-1“, il convient de remplacer les piles de la balance (4 x 1,5 V type AAA). Si l‘écran affiche „Lo-2“, il convient de remplacer les piles de l‘élément de commande (2 x piles au lithium CR2032).
Les piles de la balance doivent également être remplacées lorsque le témoin DEL de la balance ne
s‘allume plus après activation du capteur de secousses (4 x 1,5 V type AAA).
Remarque :
• Utilisez pour chaque changement de piles, des piles de même type, de même marque et de même
capacité.
• N‘utilisez pas d‘accumulateurs rechargeables.
• Utilisez des piles sans métal lourd.
10. Nettoyage et entretien de l‘appareil
Nettoyez de temps en temps l‘appareil.
Utilisez pour le nettoyage un chiffon humide, sur lequel vous pouvez appliquer au besoin un peu de produit vaisselle. N‘utilisez pas de produits de nettoyage agressifs et n‘immergez jamais l‘appareil dans l‘eau.
Attention
• N‘utilisez en aucun cas de dissolvants ou produits de nettoyage agressifs !
• N‘immergez en aucun cas l‘appareil !
• Ne nettoyez pas l‘appareil dans le lavevaisselle!
11. Elimination
Les piles usagées ne doivent pas être jetées avec les ordures ménagères. En tant que consommateur /
consommatrice, la législation vous impose de restituer les piles usagées. Vous pouvez déposer les piles
usagées dans les points de collecte locaux réservés à cet usage ou dans tout magasin vendant des piles
de ce type.
Remarque :
Ce pictogramme se trouve sur les piles à substances nocives :
Pb = pile contenant du plomb,
Cd = pile contenant du cadmium,
Hg = pile contenant du mercure.
Afin de respecter l‘environnement, ne jetez pas le pèse-personne ni les piles dans les ordures
ménagères, une fois ceux-ci devenus inutilisables. L‘élimination doit se faire par le biais des points de
collecte compétents dans votre pays.

23
Respectez les réglementations locales en matière d‘élimination de matériaux.
Eliminez l‘appareil conformément à la directive européenne 2002/96/EC – WEEE (Waste
Electrical and Electronic Equipment) relative aux appareils électriques et électroniques usagés.
Pour toute question, adressez-vous aux collectivités locales responsables de l‘élimination et du
recyclage de ces produits.
12. Que faire en cas de problèmes ?
L‘affichage suivant apparaît si le pèse-personne détecte une erreur lors de la mesure.
Affichage Cause Remède
Absence
d’affichage
La portée maximale de 150 kg a été dépassée.
Les piles de la balance sont presque déchargées
Les piles de l‘élément de commande sont
presque déchargées.
Transmission défectueuse ou inexistante
entre le plateau de la balance et l‘élément
de commande.
Les piles de l‘élément de commande sont
totalement déchargées.
Les piles de l‘élément de commande ne
sont pas bien insérées.
La balance ne peut pas mesurer audelà de 150 kg.
Veuillez remplacer les piles de la balance.
Veuillez remplacer les piles de
l‘élément de commande.
Posez la balance sur une surface plane, activez-la correctement (attendre
l‘affichage de „0.0“ à l‘écran) et reprenez la mesure (voir page 21).
Veuillez remplacer les piles (voir page
22).
Vérifiez que la polarité a été respectée
(voir page 20).
Pas de mesure possible
Causes possibles d‘erreurs Remède
La balance n‘a pas été activée avant son utilisation. Si vous montez sur la balance avant que
« 0.0 » s‘affiche, elle ne fonctionne pas correctement.
La liaison entre la balance et l‘élément de commande est perturbée.
L‘élément de commande est trop éloigné de la
balance.
Les piles de la balance sont déchargées. Veuillez remplacer les piles (voir page 22).
La liaison entre l‘élément de commande et la ba-
lance est interrompue.
Activez la balance correctement (attendre l‘affichage
de „0.0“ à l‘écran) et reprenez la mesure.
Avant la mesure, allumez en premier l‘élément de
commande et la balance.
Attendez éventuellement 30 secondes et reprenez
la mesure.
Insérez à nouveau les piles de la balance et de
l‘élément de commande et assurez-vous que les unités d‘émission et de réception ne sont pas recouvertes.
Réduisez la distance entre la balance et l‘élément de
commande.
Ne recouvrez pas l‘unité d‘émission et l‘unité de réception.

24
Mesure de poids erronée
Causes possibles d‘erreurs Remède
La balance se trouve sur le tapis. Posez la balance sur un sol plan et stable.
Le point zéro de la balance est mauvais. Allumez la balance et attendez qu‘elle s‘éteigne
d‘elle-même (le témoin DEL s‘éteint). Répétez ensuite la mesure.
13. Caractéristiques techniques
Piles du pèse-personne 4 x 1,5 V type AAA
Piles de l‘unité de commande 2 x piles au lithium CR2032
Plage de mesure 1 kg à 150 kg
Incréments d‘affichage poids 100 g
Transmission Transmission par infrarouge
Sous réserve de modifications techniques.
ESPAÑOL
Índice
1. Introducción ....................................................................................25
2. Aclaración de las ilustraciones .......................................................25
3. Indicaciones de seguridad ..............................................................25
4. Descripción del aparato ..................................................................27
5. Puesta en marcha ..........................................................................27
6. Montaje del panel de mando .......................................................... 27
7. Información .....................................................................................28
8. Manejo ............................................................................................ 28
9. Cambio de pilas ..............................................................................29
10. Limpieza y cuidado del aparato ...................................................... 29
11. Eliminación .....................................................................................30
12. Resolución de problemas ...............................................................30
13. Características técnicas..................................................................31
Volumen de suministro
• Báscula de vidrio
• Panel de mando desmontable con pantalla
• Soporte para la pared
• 4 × 1,5 V tipo AAA (báscula)
• 2 pilas de litio CR2032 (panel de mando)
• Estas instrucciones para el uso
Lea atentamente estas instrucciones para el uso, consérvelas para su posterior utilización, póngalas a
disposición de otros usuarios y tenga en cuenta las indicaciones. Con esta báscula para diagnóstico hace
una contribución decisiva a su salud.

25
1. Introducción
Funciones del aparato
Esta báscula digital sirve para pesar. La báscula está equipada con una pantalla que indica los valores de
medición por transmisión de infrarrojos. El peso se indica en pasos de 100 gramos. La báscula está destinada para el uso propio en el sector privado.
Además, la báscula dispone también de las siguientes funciones:
• Conmutación entre kilogramos, libras „LB“ y stones „ST“.
• Función de desconexión automática
• Indicación de cambio de pila en caso de carga baja.
2. Aclaración de las ilustraciones
En estas instrucciones de uso se utilizan los símbolos siguientes.
Advertencia Nota de advertencia sobre peligro de lesiones o riesgo para su salud.
Atención: Indicación de seguridad sobre posibles daños en el aparato/accesorios.
Aviso Aviso sobre informaciones importantes.
3. Indicaciones de seguridad
Lea atentamente estas instrucciones de uso, consérvelas para su posterior utilización, póngalas a
disposición de otros usuarios y tenga en cuenta las indicaciones.
• No se coloque sobre el borde más exterior de la báscula: peligro de vuelco.
• Mantenga a los niños alejados del material de embalaje (peligro de asfixia).
Indicaciones para el manejo de pilas
• Las pilas pueden representar un grave riesgo para la salud en caso de que se traguen. Mantenga las pilas y la báscula fuera del alcance de los niños pequeños. En caso de tragarse una pila, acuda de inmediato al médico.
• Cambie las pilas que tengan poca carga con la debida antelación.
• Cambie siempre todas las pilas al mismo tiempo y utilice pilas del mismo tipo.
• Las pilas no se pueden cargar o reactivar por otros medios, desmontar, echar al fuego o poner en cortocircuito.
• Las fugas en las pilas pueden ocasionar daños en el aparato. Si no va a utilizar el aparato durante un
periodo prolongado, retire las pilas del compartimento.
• Si una pila se derrama, póngase guantes de protección y limpie el compartimento de las pilas con un
paño seco.
• Las pilas pueden contener sustancias nocivas para la salud y el medio ambiente. Elimínelas según lo establecido en la normativa legal correspondiente. No tire nunca las pilas a la basura doméstica normal.
Indicaciones generales
• El aparato es de uso únicamente privado, no se puede utilizar con fines médicos o comerciales.
• Atención: procure no subir a la báscula con los pies mojados o si la superficie está húmeda, pues corre
el riesgo de resbalarse.
• Tenga en cuenta que las limitaciones técnicas pueden producir variaciones en la medición, puesto que
no se trata de una báscula para el uso médico profesional.
• La capacidad de carga de la báscula es de 150 kg como máximo (330 lb, 23 St). En el pesaje, los resultados se indican en pasos de 100 g (0,2 lb, 0,2 lb).
• Coloque la báscula sobre una superficie recta y estable; esta es una condición previa para garantizar
una medición correcta.

26
• Proteja el dispositivo frente a los golpes, la humedad, el polvo, los productos químicos, los cambios
bruscos de temperatura y la proximidad a las fuentes de calor (hornos, radiadores).
• Sólo el servicio de asistencia al cliente o los comerciantes autorizados pueden realizar reparaciones en
el aparato. Antes de una reclamación, compruebe primero las pilas y cámbielas si fuera necesario.
• Si aún tiene preguntas sobre la utilización de nuestro aparato, póngase en contacto con el vendedor o el
servicio de asistencia al cliente.
• Todas las básculas cumplen la Directiva CE 2004/108/EC. Si aún tiene preguntas sobre la utilización de
nuestro aparato, póngase en contacto con el vendedor o el servicio de asistencia al cliente.
Limpieza y conservación
La precisión de la báscula, así como su vida útil, dependen de su correcta utilización.
Atención:
• El aparato debe limpiarse de vez en cuando. No utilice detergentes agresivos y no sumerja el
aparato nunca en agua.
• Asegúrese de que no entre líquido en la báscula. No sumerja la báscula en agua.
No la lave nunca con agua.
• No coloque ningún objeto encima de la báscula si no la está utilizando.
• Proteja el aparato contra los golpes, la humedad, el polvo, los productos químicos, los cambios
bruscos de temperatura y las fuentes de calor (hornos, radiadores). No presione las teclas
demasiado fuerte o con objetos afilados.
• No exponga la báscula a temperaturas elevadas o a campos electromagnéticos de gran intensidad
(p. ej., teléfonos móviles).
Pilas
Advertencia
• Las pilas pueden representar un grave riesgo para la salud en caso de que se traguen. Mantenga
las pilas fuera del alcance de los niños. En caso de tragarse una pila, acuda de inmediato al
médico.
• No arroje las pilas al fuego: peligro de explosión.
Atención:
• Las pilas no se pueden cargar o reactivar por otros medios, desmontar o poner en cortocircuito.
• Extraiga la pila si no utiliza el aparato durante un tiempo prolongado. Así evitará los posibles daños
en caso de fugas en la pila.
Reparación
Atención:
• No debe abrir ni reparar el aparato en ningún caso; de lo contrario no se garantiza su correcto
funcionamiento. En caso de no cumplir esta condición, se anulará la garantía.
• Para cualquier reparación, diríjase al Servicio de Asistencia Técnica o a un distribuidor autorizado.

27
4. Descripción del aparato
4 x 1,5 V Typ AAA
C
R
2
0
3
2
3
V
C
R
2
0
3
2
3
V
Vista general
1 Elemento de mando con pantalla
2 Botón ON/OFF
3 Unidad receptora
4 Báscula
4
6
7
5
5 Unidad emisora
6 LED
7 Soporte para montaje
mural
3
5. Puesta en marcha
Colocación de las pilas
Si la hay, tire de la cinta aislante de las pilas situada en la tapa del compartimento de las pilas, extraiga las
pilas de la protección del embalaje y colóquelas con la polaridad correcta en la báscula y el elemento de
mando. Observe el gráfico en el compartimento de las pilas.
Panel de mando
2 pilas de litio CR2032 3V
Báscula
4 × 1,5 V tipo AAA
1
2
Si la báscula no muestra ninguna función, retire las pilas por completo y
colóquelas de nuevo.
Para consultar las indicaciones relativas al cambio de pilas, véase la página 29.
Cambio de unidades
La báscula se entrega de fábrica configurada en “kg”. En el lado trasero del elemento de mando hay un
interruptor con el que puede cambiar las unidades a “libras” (LB) y “stone” (ST).
Colocación de la báscula
Coloque la báscula sobre una superficie firme y plana para obtener una medición correcta.
6. Montaje del elemento de mando
Colocación del elemento de mando
El elemento de mando puede sostenerse en la mano, colgarse en el soporte para montaje mural o permanecer sobre la báscula.

28
Montaje en la pared
50°
max.
2m
50°
max.
2m
Con las cintas adhesivas de doble cara puede fijar el soporte para montaje mural a la pared. Para ello, la superficie de la pared debe estar limpia, seca, lisa y
sin grasa.
• Extraiga la lámina protectora de la cinta adhesiva del lado trasero del soporte
para montaje mural.
• Apriete el soporte para montaje mural contra la pared.
• Procure que el soporte para montaje mural esté recto.
• Tenga en cuenta que el elemento de mando y la báscula deben estar uno en frente del otro.
7. Información
Consejos generales
• Intente pesarse siempre a la misma hora (mejor por la mañana) tras haber estado en el servicio, en ayunas y sin ropa para obtener resultados comparables.
• Manténgase durante el proceso de medición erguido y quieto.
8. Manejo
Cálculo del peso
Coloque la balanza sobre un suelo firme y plano (no una alfombra); el recubrimiento firme del suelo es una
condición necesaria para una medición correcta.
Procure que el elemento de mando y la báscula estén en contacto directo. No cubra la unidad emisora ni
la receptora. La distancia máxima entre el elemento de mando y la báscula es de 2 m.
Posibilidad 1: encender el elemento de mando y luego la plataforma de la báscula
Pulse el botón “ON/OFF” en el módulo indicador. En la pantalla aparece „8888“
(fig. 1)
Pise la balanza de forma breve, fuerte y bien audible para activar el sensor de vibraciones. Primero el LED se ilumina en rojo y, pasados 5 segundos, cambia a verde.
Simultáneamente, el indicador de la pantalla cambia a „0.0“ (fig. 2).
La báscula ya está lista para medir su peso. Suba a la báscula. Permanezca quieto
sobre la báscula, distribuyendo uniformemente el peso en ambas piernas. La báscula
comienza inmediatamente a medir el peso. Durante la medición aparece „----“ (fig. 3).
En breve se indica el resultado de la medición (fig. 4).
Después de bajarse de la báscula, se desconecta automáticamente después de
unos 10 segundos. El resultado de la medición permanece visible hasta la desconexión.
Asegúrese de encender siempre primero el elemento de mando y la báscula y esperar a la indicación „0.0“ (fig. 2) antes de subirse.
8888
fig. 1
kg
0.0
fig. 2
----
fig. 3
fig. 4

29
Posibilidad 2: encender la plataforma de la báscula y luego el elemento de mando
Pise la báscula de forma breve, fuerte y bien audible para activar el sensor de vibraciones Primero el LED
se ilumina en rojo y, pasados 5 segundos, cambia a verde.
Pulse el botón “ON/OFF” en el elemento de mando. Si el elemento de mando recibe la señal de la plataforma de la báscula, muestra „0.0“ (fig. 2).
La báscula ya está lista para medir su peso. Suba a la báscula. Permanezca quieto sobre la báscula, distribuyendo uniformemente el peso en ambas piernas. La báscula comienza inmediatamente a medir el
peso. Durante la medición aparece „----“ (fig. 3).
En breve se indica el resultado de la medición (fig. 4).
Después de bajarse de la báscula, se desconecta automáticamente después de unos 10 segundos. El resultado de la medición permanece visible hasta la desconexión.
Asegúrese de encender siempre primero el elemento de mando y la báscula y esperar a la indicación
„0.0“ (fig. 2) antes de subirse.
Desconexión de la báscula
Pasados 10 segundos aproximadamente, la báscula y el elemento de mando se apagan automáticamente.
Para apagar manualmente el elemento de mando, pulse el botón “ON/OFF”.
9. Cambio de pilas
El elemento de mando está provisto de un indicador de cambio de pilas.
Si las pilas se están agotando y la báscula se apaga automáticamente, en la pantalla aparece la indicación „Lo 1” o „Lo 2“. En este caso las pilas deben cambiarse cuanto antes. Si en la pantalla aparece „Lo 1“,
deben cambiarse las pilas de la báscula (4 × 1,5 V tipo AAA). Si se indica „Lo 2“, deben cambiarse las pilas
del elemento de mando (2 pilas de litio CR2032).
También deben cambiarse las pilas de la báscula si los LED de la báscula no se iluminan tras la activación
del sensor de vibraciones (4 × 1,5 V tipo AAA).
Aviso:
• Al cambiar las pilas, utilice siempre pilas del mismo tipo, de la misma marca y con la misma
capacidad.
• No utilice pilas recargables.
• Emplee pilas sin metales pesados.
10. Limpieza y cuidado del aparato
El aparato debe limpiarse de vez en cuando.
Utilice un paño húmedo para la limpieza y, en caso necesario, aplique un poco de lavavajillas. No utilice
detergentes agresivos y no sumerja el aparato nunca en agua.
Atención:
• No use nunca detergentes o disolventes agresivos
• No sumerja nunca el aparato en agua
• No lave el aparato en el lavavajillas!

30
11. Eliminación
Pb Cd Hg
Las pilas y los acumuladores no deben tirarse a la basura doméstica. Como consumidor está obligado
por ley a devolver las pilas usadas. Puede entregar las pilas usadas en los puntos limpios oficiales de su
municipio o en cualquier sitio donde se vendan pilas de este tipo.
Aviso:
En las pilas que contienen sustancias nocivas aparecen los siguientes símbolos:
Pb = la pila contiene plomo,
Cd = la pila contiene cadmio,
Hg = la pila contiene mercurio.
Para proteger el medio ambiente, la báscula y las pilas no se pueden eliminar junto con la basura
doméstica al final de su vida útil. La eliminación se puede efectuar a través del punto de recogida
correspondiente en su país.
Siga las disposiciones locales referentes a la eliminación de materiales.
Elimine el aparato según la directiva CE sobre residuos de aparatos eléctricos y electrónicos
2002/96/EC – WEEE (Waste Electrical and Electronic Equipment).
Si tiene alguna duda o consulta le rogamos que se ponga en contacto con el organismo
responsable de su municipio.
12. Resolución de problemas
Si la báscula encuentra un error en la medición, se muestra el siguiente mensaje:
Indicación en
pantalla
Ninguna indicación
Causa Reparación
Se ha sobrepasado la capacidad de carga máxima de 150 kg.
Las pilas de la báscula están prácticamente agotadas.
Las pilas del elemento de mando están
prácticamente agotadas.
Transmisión incorrecta o inexistente entre la plataforma de la báscula y el elemento de mando.
Las pilas del elemento de mando están
completamente agotadas.
Las pilas del elemento de mando no
están bien colocadas.
La carga no puede superar los 150 kg.
Cambie las pilas de la báscula.
Cambie las pilas del elemento de mando.
Coloque la báscula sobre una superficie plana y actívela correctamente (espere hasta que indique „0.0“) y repita la
medición (véase la página 28).
Cambie las pilas (véase la página 29).
Compruebe que la polaridad sea la
correcta (véase la página 27).

31
No es posible realizar la medición
Posible fallo Reparación
La báscula no se ha activado antes de subirse.
Si sube a la báscula antes de que la pantalla indique „0.0“, la báscula no funciona correctamente.
Fallo en la conexión entre la báscula y el elemento de mando.
El elemento de mando está muy lejos de la báscula.
Las pilas de la báscula están agotadas. Cambie las pilas (véase la página 29).
La conexión entre el elemento de mando y la
báscula está interrumpida.
Medición de peso incorrecta
Posible fallo Reparación
La báscula está sobre un suelo de moqueta. Coloque la báscula sobre una superficie plana y
La báscula tiene un punto cero incorrecto. Encienda la báscula y espere hasta que usted mis-
Active la báscula correctamente (espere a que indique „0.0“) y vuelva a repetir la medición. Antes de
la medición, primero encienda el elemento de mando y la báscula.
En caso necesario, espere 30 segundos y luego repita la medición.
Vuelva a colocar las pilas de la báscula y el elemento
de mando o asegúrese de que la unidad emisora y
receptora no estén cubiertas.
Reduzca la distancia entre la báscula y el elemento
de mando.
No cubra la unidad emisora ni la receptora.
firme.
mo la vuelva a apagar (el LED se apaga). Después
repita la medición.
13. Características técnicas
Pilas de la báscula 4 × 1,5 V tipo AAA
Pilas del panel de mando 2 pilas de litio CR2032
Rango de medición De 1 a 150 kg
Graduación del peso 100 g
Transmisión Transmisión por infrarrojos
Reservado el derecho a realizar modificaciones técnicas.

32
РУССКИЙ
Оглавление
1. Для ознакомления ........................................................................32
2. Пояснения к символам .................................................................33
3. Указания по технике безопасности ............................................33
4. Описание прибора ........................................................................34
5. Подготовка к работе .................................................................... 35
6. Монтаж блока управления ...........................................................35
7. Информация ..................................................................................35
8. Управление ...................................................................................36
9. Замена элементов питания ..........................................................37
10. Чистка прибора и уход за ним ......................................................37
11. Утилизация ....................................................................................37
12. Что делать при возникновении каких-либо проблем? ..............38
13. Технические данные .....................................................................39
13. Гарантия .........................................................................................39
Комплект поставки
• Cтекляные весы
• Съёмный пульт управления с дисплеем
• Настенный держатель
• 4 x 1,5 В, тип AAA (весы)
• 2 литиевые батарейки CR2032 (пульт управления)
• Инструкция по применению
Сохраните инструкцию на случай возможной передачи другому пользователю. Наши диагностические
весы являются ценным приобретением
для людей, заботящихся о своём здоровье.
1. Для ознакомления
Функции прибора
Данные весы служат для взвешивания. Весы оснащены дисплеем, который показывает результаты
измерения, передаваемые по инфракрасному интерфейсу. Вес указывается с шагом 100 грамм. Весы
предназначены для личного пользования.
Кроме того, весы имеют ещё следующие функции:
• переключение с килограммов на фунты «LB» и стоуны «ST»;
• автоматическое отключение;
• индикатор состояния батарейки показывает, что батарейка разряжается;

33
2. Пояснения к символам
В инструкции по применению используются следующие символы.
Предостережение Предупреждает об опасности травмирования или
Внимание Указывает на возможные повреждения прибора/принадлежностей.
Указание Отмечает важную информацию.
3. Указания по технике безопасности
Внимательно прочитайте данную инструкцию и следуйте указаниям, приведённым в ней. Сохраните
инструкцию для дальнейшего использования и на случай возможной передачи другому пользователю.
• Не вставайте на одну сторону весов у самого края. Опасность опрокидывания!
• Не давайте детям упаковочные материалы от весов (опасность удушья).
Обращение с элементами питания
• Элементы питания содержат вредные при попадании внутрь организма вещества. Проследите, чтобы
маленькие дети не имели доступа к элементам питания. Если кто- либо проглотит элемент питания,
следует немедленно обратиться к врачу.
• Регулярно заменяйте элементы питания.
• Заменяйте одновременно сразу все элементы питания. Используйте при этом элементы одного типа.
• Элементы питания нельзя перезаряжать или реактивировать с помощью различных средств, не
разбирайте их, не бросайте в огонь и не замыкайте накоротко.
• Разряженные элементы питания могут стать причиной неисправности прибора. При длительном
перерыве в использовании прибора выньте элементы питания из батарейного отсека.
• Если один из элементов питания разрядился, наденьте защитные перчатки и почистите батарейный
отсек сухой салфеткой.
• Элементы питания могут содержать токсичные вещества, вредные для здоровья и окружающей
среды. В связи с этим утилизируйте элементы питания в строгом соответствии с действующими
законодательными нормами. Ни в коем случае не выбрасывайте отработавшие элементы питания в
обычный мусор.
Общие указания
• Прибор разработан для персонального пользования и не предназначен для использования в
медицинских или коммерческих целях.
• Внимание! Не становитесь мокрыми ногами на весы! Не становитесь на весы, если их поверхность
мокрая! Вы можете поскользнуться!
• Учтите, что возможны погрешности измерения, т. к. речь идет не о поверенных весах для
профессионального, медицинского использования.
• Предельно допустимая нагрузка на весы составляет 150 кг (330 lb, 23 St). Результаты измерения веса
указываются с шагом 100 г (0,2 lb, 0,2 lb).
• Установите весы на ровное твёрдое покрытие; твёрдость и ровность площадки под весами является
необходимым условием для корректных измерений.
• Защищайте прибор от ударов, воздействия влаги, пыли, химических агентов, сильных температурных
колебаний. Не устанавливайте прибор в непосредственной близости от источников тепла (печи,
нагревательные приборы).
• Ремонтные работы должны выполняться в Сервисном центре или в авторизованной мастерской. При
возникновении отказа в работе сначала проверьте элементы питания. При необходимости замените их.
• При возникновении вопросов по использованию прибора обращайтесь к поставщику или в сервисный
центр.
• Все весы соответствуют Директиве ЕЭС 2004/108/EC. При возникновении вопросов по использованию
прибора обращайтесь в сервисный центр.

34
Хранение и уход
Точность взвешивания и срок службы прибора зависят от бережного обращения с ним:
Внимание
• Периодически следует чистить прибор. Не используйте абразивные моющие средства, не
погружайте прибор в воду.
• Следите за тем, чтобы на весы не попадала вода. Не погружайте весы в воду. Не мойте весы под
струёй воды.
• Если весы не используются для взвешивания, не ставьте на них никакие предметы.
• Защищайте весы от ударов, воздействия влаги, пыли, химических агентов, сильных
температурных колебаний и близких источников тепла (печи, нагревательные приборы). Не
нажимайте на кнопки острыми предметами или слишком сильно.
• Не подвергайте весы воздействию высокой температуры или сильного электромагнитного поля
(напр., мобильные телефоны).
Элементы питания
Предостережение
• Элементы питания содержат вредные при попадании внутрь организма вещества. Проследите,
чтобы маленькие дети не имели доступа к элементам питания. При случайном проглатывании
элемента питания следует немедленно обратиться к врачу.
• Не бросайте элементы питания в огонь. Опасность взрыва!
Внимание
• Элементы питания нельзя перезаряжать или реактивировать с помощью различных средств, не
разбирайте их и не замыкайте накоротко.
• Вынимайте элементы питания, если прибор не используется долгое время. Это поможет избежать
повреждений, которые могут возникнуть из-за подтекания элементов питания.
Ремонт
Внимание
• Ни в коем случае не открывайте и не ремонтируйте прибор, так как в этом случае не может быть
гарантировано его дальнейшее надлежащее функционирование. При несоблюдении этих условий
гарантия теряет свою силу.
• Для проведения ремонтных работ обратитесь в сервисную службу или к уполномоченному дилеру.
4. Описание прибора
Обзор
1 Блок управления с дисплеем
2 Кнопка ON/OFF
3 Блок приема
4 Весы
5 Блок передачи
6 Светодиод
7 Настенный держатель
4
6
7
5
3
1
2

35
5. Подготовка к работе
4 x 1,5 V Typ AAA
C
R
2
0
3
2
3
V
C
R
2
0
3
2
3
V
50°
max.
2m
Установка батареек
Если имеется, удалите изолирующую пленку с крышки отсека для батареек, или выньте батарейки
из защитной упаковки и установите в весы и в блок управления, учитывая полярность. Обращайте
внимание на рисунок в отсеке для батареек
Пульт управления
2 литиевые батарейки CR2032
Весы
4 x 1,5 В, тип AAA
Если весы не работают, извлеките и снова вставьте весь комплект
элементов питания.
Указания по замене батареек см. на странице 37.
Изменение весовых единиц
В состоянии при поставке весы настроены на единицу измерения «кг». На задней стороне блока
управления находится переключатель, которым Вы можете выполнить переключение на „фунты” (LB) и
„стоун” (ST).
Установка весов
Устанавливайте весы на ровную и твёрдую поверхность. Только на твёрдой поверхности весы будут
показывать правильный вес.
6. Монтаж блока управления
Установка блока управления
Блок управления можно, на выбор, держать в руке, подвесить в настенном держателе или же оставить
на весах.
Настенный монтаж
Двусторонней клейкой лентой Вы можете закрепить настенный держатель
на стене. Для этого поверхность стены должна быть чистой, сухой, ровной и
обезжиренной.
• Снимите защитную пленку клейкой ленты на задней стороне настенного
держателя.
• Сильно прижмите настенный держатель к стене.
• Следите за ровным расположением настенного держателя.
• Учтите, что блок управления и весы должны быть обращены друг к другу.
7. Информация
Общие советы
• Чтобы получить более точные результаты, взвешивайтесь примерно в одно и то же время суток (лучше
утром), посетив предварительно туалет, натощак и без одежды.
• Во время измерения стойте прямо и не шевелитесь.

36
8. Управление
50°
max.
2m
Измерение веса
Установите весы на прочный, ровный пол (но не на ковер); прочное напольное покрытие является
условием точных измерений.
Следите за тем, чтобы блок управления и весы находились в прямом контакте друг с другом. Не
перекрывать блок передачи и приема. Максимальное расстояние между блоком управления и весами
составляет 2 м.
Вариант 1: Включение блока управления, затем платформы весов
Нажмите кнопку „ON/OFF“ на модуле индикации. На дисплее появляется „8888“
(рис. 1).
Быстро, резко и сильно нажмите одной ногой на весы, чтобы активировать датчик
вибраций! Светодиод вначале загорается красным светом, а приблизительно через
5 секунд сменяет цвет на зеленый. Одновременно индикация на дисплее сменяется
на „0.0“ (рис. 2).
Теперь весы готовы к измерению веса. Встаньте на весы. Стойте на весах спокойно,
равномерно распределяя вес на обе ноги. Весы сразу же начинают измерение. Во
время измерения появляется индикация „----„ (рис. 3).
Сразу же после этого указывается полученный результат (рис. 4).
8888
fig. 1
kg
0.0
fig. 2
----
fig. 3
После того, как Вы сходите с платформы, весы отключаются приблизительно через
10 секунд. До тех пор результат измерений остается на дисплее.
Учтите, что, прежде чем встать на весы, Вы должны вначале включить блок
управления и весы и дождаться появления индикации „0.0“ (рис. 2).
Вариант 2: Включение платформы весов, затем блока управления
Быстро, резко и сильно нажмите одной ногой на весы, чтобы активировать датчик вибраций! Светодиод
вначале загорается красным светом, а приблизительно через 5 секунд сменяет цвет на зеленый.
Нажмите кнопку „ON/OFF“ на блоке управления. Если блок управления принимает сигнал платформы
весов, то появляется „0,0“ (рис. 2).
Теперь весы готовы к измерению веса. Теперь встаньте на весы. Стойте на весах спокойно, равномерно
распределяя вес на обе ноги. Весы сразу же начинают измерение. Во время измерения появляется
индикация „----„ (рис. 3).
Сразу же после этого указывается полученный результат (рис. 4).
После того, как Вы сходите с платформы, весы отключаются приблизительно через 10 секунд. До тех
пор результат измерений остается на дисплее.
fig. 4

37
Учтите, что, прежде чем встать на весы, Вы должны вначале включить блок управления и весы и
Pb Cd Hg
дождаться появления индикации „0.0“ (рис. 2).
Выключение весов
Весы и блок управления всегда отключаются автоматически приблизительно через 10 секунд.
Для выключения блока управления вручную нажмите кнопку „ON/OFF“.
9. Замена элементов питания
Блок управления оснащен индикатором замены батареек.
На дисплее появляется сообщение «Lo-1» или «Lo-2», если батарейки разряжены, и весы автоматически
выключаются. В этом случае необходимо как можно быстрее заменить батарейки. Если на дисплее
появляется «Lo-1», то необходимо заменить батарейки весов (4 x 1,5 В, тип AAA). Если появляется «Lo-2»
,то необходимо заменить батарейки блока управления (2 литиевые батарейки CR2032).
Батарейки в весах также необходимо заменить, если светодиод весов после активирования датчика
вибраций не загорается (4 x 1,5 В, тип AAA).
Указание:
• При замене элементов питания используйте элементы питания одинакового типа, одинаковой
марки и одинаковой ёмкости.
• Не используйте заряжаемые аккумуляторные батарейки.
• Используйте элементы питания, не содержащие тяжёлых металлов.
10. Чистка прибора и уход за ним
Периодически следует чистить прибор.
Для чистки используйте влажную тряпочку, на которую нанесите при необходимости моющее средство.
Не используйте абразивные моющие средства, не погружайте прибор в воду.
Внимание
• Ни в коем случае не пользуйтесь растворителями и чистящими средствами!
• Ни в коем случае не погружайте прибор в воду!
• Запрещается чистить прибор в стиральной или посудомоечной машине!
!
11. Утилизация
Использованные элементы питания и аккумуляторы утилизируются отдельно от бытового мусора.
Как потребитель Bы обязаны сдавать отработавшие элементы питания. Вы можете сдать их в
специализированные приёмные пункты по месту жительства, занимающиеся сбором такого вида
отходов.
Указание:
Эти знаки предупреждают о наличии в элементах питания следующих токсичных веществ:
Pb = свинец,
Cd = кадмий,
Hg = ртуть.
В интересах охраны окружающей среды отработавшие весы с элементами питания ни в
коем случае нельзя выбрасывать в обычный мусор. Утилизация должна производиться в
соответствии с местными законодательными нормами.

38
Соблюдайте местные законодательные нормы по утилизации отходов.
Прибор следует утилизировать согласно Директиве ЕС по отходам электрического и
электронного оборудования 2002/96/EC – WEEE (Waste Electrical and Electronic Equipment).
В случае вопросов обращайтесь в местную коммунальную службу, ответственную за
утилизацию отходов.
12. Что делать при возникновении каких-либо проблем?
Если при взвешивании произошла ошибка, на дисплей выводится одно из следующих
сообщений.
Дисплейное
сообщение
Причина Устранение
Был превышен макс. допустимый вес
150 кг.
Батарейки весов почти разряжены. Замените батарейки весов.
Не превышать нагрузку 150 кг.
Батарейки блока управления почти
разряжены.
Нет связи или плохая связь между
платформой весов и блоком управления.
Нет индикации Батарейки в блоке управления
Весы не производят измерений
Возможные ошибки Устранение
Весы не были активированы перед тем, как Вы
на них встали. Если Вы становитесь на весы
раньше, чем на дисплее появляется индикация
„0.0”, весы не функционируют должным образом.
Нарушена связь между весами и блоком
управления.
Блок управления находится на слишком
большом расстоянии от весов.
Батарейки в весах разряжены. Замените батарейки (см. стр. 36).
Связь между блоком управления и весами
прервана.
полностью разряжены.
Батарейки в блоке управления вложены
неверно.
Должным образом активировать весы (дождаться
появления „0.0“) и повторить измерение.
Перед измерением вначале включить блок
управления и весы.
При необходимости, подождать 30 секунд, а затем
повторить измерение.
Повторно вложите батарейки весов и блока
управления или убедитесь в том, что блоки
передачи и приема не перекрыты.
Уменьшите расстояние между весами и блоком
управления.
Не перекрывать блок передачи и приема.
Замените батарейки блока
управления.
Установить весы на ровную поверхность
и должным образом активировать
(дождаться появления „0.0“) и
повторить измерение (см. стр. 36).
Замените батарейки (см. стр. 37).
Проверьте полярность (см. стр. 35).

39
Весы показывают неправильный вес
Возможные ошибки Устранение
Весы стоят на ковре Установить весы на ровный, твердый пол.
Неверный нуль шкалы весов. Включить весы и дождаться, пока они
автоматически не отключатся (светодиод гаснет).
После этого повторить измерение.
13. Технические данные
Батарейки для весов 4 x 1,5 В, тип AAA
Батарейки для пульта управления 2 литиевые батарейки CR2032
Диапазон измерения от 1 кг до 150 кг
Шаг показаний веса 100 g
Передача сигнала Инфракрасная
Возможны технические изменения.
14. Гарантия
Мы предоставляем гарантию на дефекты материалов и изготовления на срок 24 месяца со дня
продажи через розничную сеть.
Гарантия не распространяется:
- на случаи ущерба, вызванного неправильным использованием
- на быстроизнашивающиеся части ( батарейки )
- на дефекты, о которых покупатель знал в момент покупки
- на случаи собственной вины покупателя.
Товар не подлежит обязательной сертификации
Срок эксплуатации изделия: от 3 до 5 лет
Фирма изготовитель: Бойрер Гмбх, Софлингер штрассе 218,
89077-УЛМ, Германия для фирмы Ханс Динслаге ЛТд
88524 Уттенвайлер , Германия
Сервисный центр: 109451 г. Москва, ул.Перерва, 62, корп.2
Тел(факс) 495—658 54 90
Дата продажи________________________ Подпись продавца______________________________________
Штамп магазина______________________________________________________________________________
Подпись покупателя __________________________________________________________________________

40
753.358 - 0509 Irrtum und Änderungen vorbehalten
 Loading...