

Page 1
SBM 21
D
Gebrauchsanleitung
Blutdruckmessgerät ................................................................ ( 2 – 1 0 )
G
Instruction for Use
Blood pressure monitor ....................................................(11 – 18)
F
Mode d’emploi
Tensiomètre .....................................................................(19 – 27)
I Instruzioni per l’uso
Misuratore di pressione
r
Инструкция по применению
Прибор для измерения артериального
давления на предплечье ................................................(36 – 44)
Serviceadresse:
Hans Dinslage GmbH
Riedlinger Straße 28
88524 Uttenweiler, GERMANY
Tel.-Nr.: +49 (0) 73 74 / 91 57 66
Fax-Nr.: +49 (0) 73 74 / 92 07 23
E-mail: [email protected]
..................................................... (28 – 35)
Page 2
DEUTSCH
Bitte lesen Sie diese Gebrauchsanleitung aufmerksam durch,
bewahren Sie sie für späteren Gebrauch auf, machen Sie sie
anderen Benutzern zugänglich und beachten Sie die Hinweise.
1. Kennenlernen
Das Oberarm-Blutdruckmessgerät dient zur nichtinvasiven
Messung und Überwachung arterieller Blutdruckwerte von
erwachsenen Menschen.
Sie können damit schnell und einfach Ihren Blutdruck messen,
die Messwerte abspeichern und sich den Verlauf und Durchschnitt der Messwerte anzeigen lassen.
Bei eventuell vorhandenen Herzrhythmusstörungen werden Sie
gewarnt.
Die ermittelten Werte werden nach WHO-Richtlinien eingestuft
und grafisch beurteilt.
Bewahren Sie diese Gebrauchsanleitung für weitere Benutzung
auf und machen sie diese auch anderen Benutzern zugänglich.
2. Wichtige Hinweise
Hinweise zur Anwendung
•
Messen Sie Ihren Blutdruck immer zu gleichen Tageszeiten,
um eine Vergleichbarkeit der Werte zu gewährleisten.
•
Ruhen Sie sich vor jeder Messung ca. 5 Minuten aus!
•
Zwischen zwei Messungen sollten Sie 5 Minuten warten!
•
Die von Ihnen selbst ermittelten Messwerte können nur zu
Ihrer Information dienen – sie ersetzen keine ärztliche Untersuchung! Besprechen Sie Ihre Messwerte mit dem Arzt,
begründen Sie daraus auf keinen Fall eigene medizinische
Entscheidungen (z.B. Medikamente und deren Dosierungen)!
•
Es kann zu Fehlmessungen bei Erkrankungen des Herz-
Kreislaufsystems kommen, ebenso bei sehr niedrigem Blutdruck, Durchblutungs- und Rhythmusstörungen sowie bei
weiteren Vorerkrankungen.
•
Verwenden Sie das Gerät nur bei Personen mit dem für das
Gerät angegebenen Umfangbereich des Oberarmes.
•
Sie können das Blutdruckmessgerät mit Batterien betreiben.
Beachten Sie das eine Datenspeicherung nur möglich ist,
wenn Ihr Blutdruckmessgerät Strom erhält. Sobald die Batterien verbraucht sind, verliert das Blutdruckmessgerät Datum
und Uhrzeit.
•
Die Abschaltautomatik schaltet das Blutdruckmessgerät zur
Schonung der Batterien aus, wenn innerhalb von 3 Minuten
keine Taste betätigt wird.
Hinweise zur Aufbewahrung und Pflege
•
Das Blutdruckmessgerät besteht aus Präzisions- und
Elek tronik-Bauteilen. Die Genauigkeit der Messwerte und
Lebens dauer des Gerätes hängt ab vom sorgfältigen Umgang:
– Schützen Sie das Gerät vor Stößen, Feuchtigkeit, Schmutz,
starken Temperaturschwankungen und direkter Sonneneinstrahlung.
– Lassen Sie das Gerät nicht fallen.
2
Page 3
– Benutzen Sie das Gerät nicht in der Nähe von starken
elektro magnetischen Feldern, halten Sie es fern von Funkanlagen oder Mobiltelefonen.
– Verwenden Sie nur die mitgelieferte oder originale Ersatz-
Manschetten. Ansonsten werden falsche Messwerte ermittelt.
•
Drücken Sie nicht auf Tasten, solange die Manschette nicht
angelegt ist.
•
Falls das Gerät über einen längeren Zeitraum nicht benutzt
wird, wird empfohlen die Batterien zu entfernen.
Hinweise zu Batterien
•
Batterien können bei Verschlucken lebensgefährlich sein.
Bewahren Sie deshalb Batterien und Produkte für Kleinkinder
unerreichbar auf. Wurde eine Batterie verschluckt, muss
sofort medizinische Hilfe in Anspruch genommen werden.
•
Batterien dürfen nicht geladen oder mit anderen Mitteln
reakti viert, nicht auseinander genommen, in Feuer geworfen
oder kurzgeschlossen werden.
•
Nehmen Sie die Batterien aus dem Gerät heraus, wenn diese
verbraucht sind oder Sie das Gerät länger nicht benutzen.
So vermeiden Sie Schäden, die durch Auslaufen entstehen
können. Ersetzen Sie immer alle Batterien gleichzeitig.
•
Benutzen Sie keine verschiedenen Batterie-Typen,
Batterie-Marken oder Batterien mit unterschiedlicher Kapazität. Verwenden Sie vorzugsweise Alkaline-Batterien.
Hinweise zu Reparatur und Entsorgung
•
Batterien gehören nicht in den Hausmüll. Bitte entsorgen
Sie die verbrauchten Batterien an den dafür vorgesehenen
Sammel stellen.
•
Öffnen Sie nicht das Gerät. Bei nicht beachten erlischt die
Garantie.
•
Das Gerät darf nicht selbst repariert oder justiert werden.
Eine einwandfreie Funktion ist in diesem Fall nicht mehr gewährleistet.
•
Reparaturen dürfen nur vom Kundenservice oder
autori sierten Händlern durchgeführt werden. Prüfen Sie
jedoch vor jeder Reklamation zuerst die Batterien und
tauschen Sie diese gegebenenfalls aus.
•
Bitte entsorgen Sie das Gerät gemäß der Elektro- und
Elektronik Altgeräte EG-Richtlinie 2002/96/EC – WEEE
(Waste Electrical and Electronic Equipment).
Bei Rück fragen wenden Sie sich bitte an die für die Entsorgung zuständige kommunale Behörde.
3
Page 4
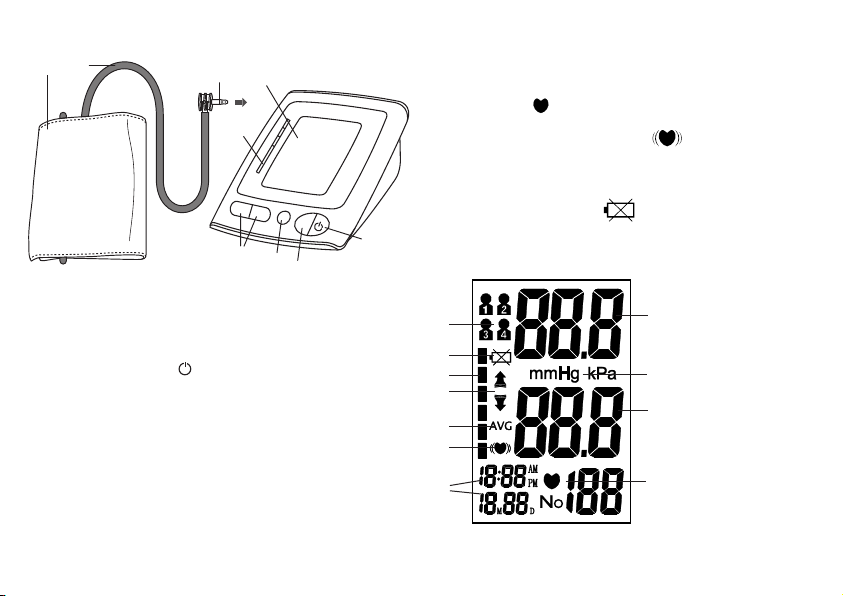
3. Gerätebeschreibung
4
1
2
3
6
7
8
9
5
-
+
M+
Anzeigen auf dem Display:
1. Systolischer Druck
2.
Einheit mmHg
3. Diastolischer Druck
4. Symbol Puls
5. Uhrzeit und Datum
und ermittelter Pulswert
6. Symbol Herzrhythmusstörungen
7. Durchschnittswerte der letzten 3 Messungen AVG
8. Aufpumpen, Luft ablassen (Pfeil)
9. WHO - Einstufung
10. Symbol Batteriewechsel
11. Symbol für Benutzer 1, 2, 3, 4
1. Manschette
2. Manschettenschlauch
3. Manschettenstecker
4. Display
5. START/STOPP-Taste
6. Speichertaste M+
7. Taste-SET
8. Funktionstasten -/+
9. WHO-Skala
11
1
10
9
8
2
3
7
6
5
4
4
Page 5
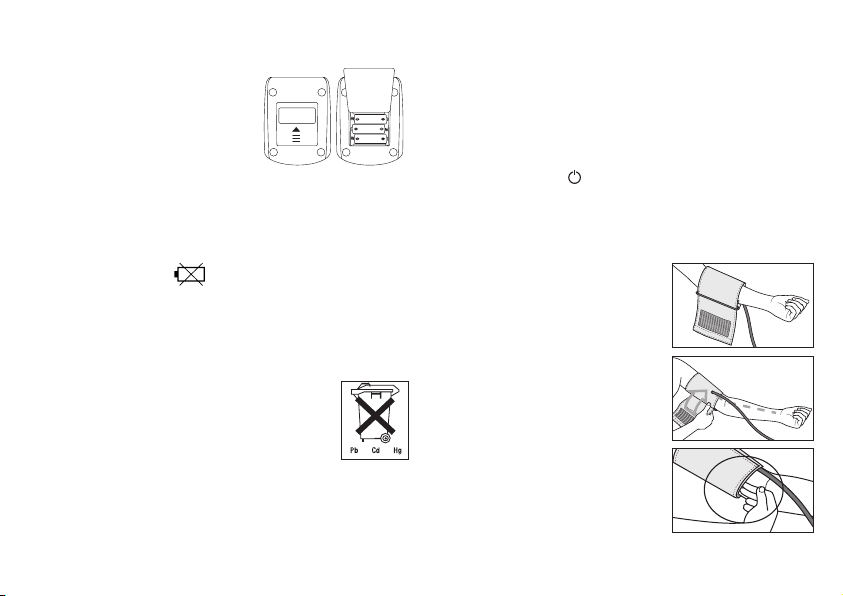
4. Messung vorbereiten
4 x AA (LR06) 1,5 V
Batterie einlegen
•
Entfernen Sie den Deckel des Bat-
teriefaches auf der Rück seite des
Gerätes.
•
Legen Sie vier Batterien vom
Typ 1,5 V AA (Alkaline Type LR06)
ein. Achten Sie unbedingt darauf,
dass die Batterien entsprechend
der Kennzeichnung mit korrekter Polung eingelegt werden.
Verwenden Sie keine wiederauf ladbaren Akkus.
•
Schließen Sie den Batteriefachdeckel wieder sorgfältig.
Wenn 4 akustische Warntöne ausgegeben werden und
gleichzeitig das Symbol
keine Messung mehr möglich und Sie müssen alle Batterien
erneuern. Sobald die Batterien aus dem Gerät entfernt werden,
muss die Uhrzeit neu eingestellt werden.Verbrauchte Batterien
gehören nicht in den Hausmüll. Entsorgen Sie diese über Ihren
Elektrofachhändler oder Ihre örtliche Wertstoff-Sammelstelle.
Dazu sind Sie gesetzlich verpflichtet.
Hinweis: Diese Zeichen finden Sie auf schadstoffhaltigen Batterien: Pb: Batterie enthält Blei, Cd:
Batterie enthält Cadmium, Hg: Batterie enthält
Quecksilber.
Datum und Uhrzeit einstellen
Sie sollten Datum und Uhrzeit unbedingt einstellen. Nur so
können Sie Ihre Messwerte korrekt mit Datum und Uhrzeit
speichern und später abrufen. Die Uhrzeit wird im 12-Stunden-
auf dem Display erscheint, ist
Format dargestellt, d. h. die Uhrzeit ab 13:00 Uhr wird mit
01:00 PM angezeigt.
Zur Einstellung von Datum und Uhrzeit gehen Sie wie folgt vor:
•
Bestätigen Sie 2 x die Taste SET.
•
Stellen Sie mit den Tasten + oder - zuerst den Monat 1-12 ein
und bestätigen Sie mit der Taste SET.
•
Stellen Sie Tag/Stunde/Minute ein und bestätigen Sie jeweils
mit der Taste SET.
D
rücken Sie die Taste um den Einstellungsmodus zu ver-
l
assen.
5. Blutdruck messen
Manschette anlegen
Legen Sie die Manschette am
entblößten linken Oberarm an. Die
Durchblutung des Arms darf nicht
durch zu enge Kleidungsstücke oder
Ähnliches eingeengt sein.
Die Manschette ist am Oberarm so
zu platzieren, dass der untere Rand
2 – 3 cm über der Ellenbeuge und
über der Arterie liegt. Der Schlauch
weist zur Handflächenmitte.
Legen Sie nun das freie Ende der
Man schette eng, aber nicht zu
stramm um den Arm und schließen
Sie den Klettverschluss.
Die Manschette sollte so stramm
angelegt sein, dass noch zwei Finger
unter die Manschette passen.
5
Page 6
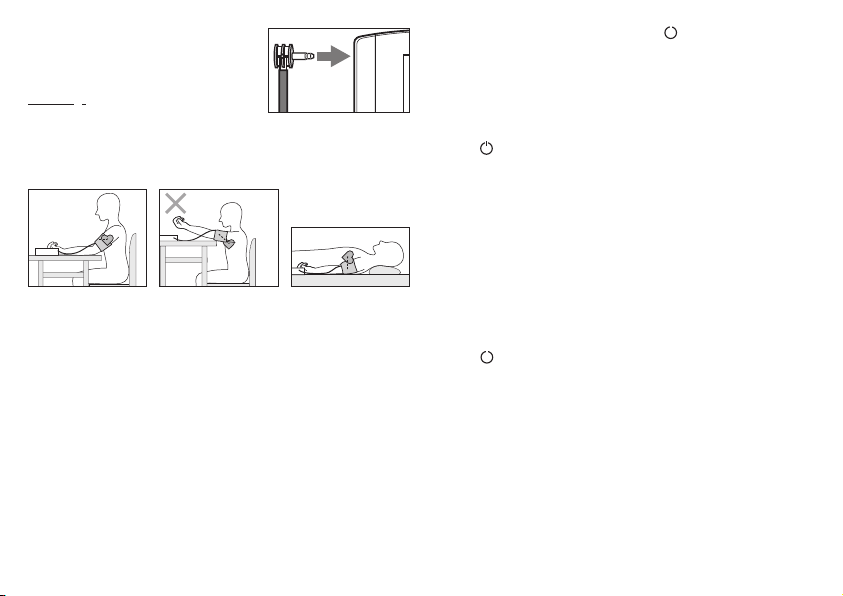
Stecken Sie nun den Manschetten schlauch in den Anschluss für den
Man schetten stecker.
Achtung: Das Gerät darf nur mit der
Original-Manschette betrieben werden. Die Manschette ist für einen Armumfang von 22 bis
36 cm geeignet.
Richtige Körperhaltung einnehmen
•
Ruhen Sie sich vor jeder Messung ca. 5 Minuten aus!
Ansonsten kann es zu Abweichungen kommen.
•
Sie können die Messung im Sitzen oder im Liegen durch-
führen. Achten Sie in jedem Falle darauf, dass sich die Manschette in Herzhöhe befindet.
•
Um das Messergebnis nicht zu verfälschen, ist es wichtig,
sich während der Messung ruhig zu verhalten und nicht zu
sprechen.
Speicher wählen
Drücken Sie die Taste SET. Wählen Sie den gewünschten Speicherplatz durch drücken der Funktionstasten -/+. Sie haben 4
Speicher á 30 Speicherplätze um die Messergebnisse von 4
verschiedenen Personen getrennt voneinander abzuspeichern
oder Messungen morgens und abends separat abzuspeichern.
Bestätigen Sie Ihre Wahl mit der Taste
.
Blutdruckmessung durchführen
•
Legen Sie, wie zuvor beschrieben, die Manschette an und
nehmen Sie die Haltung ein, in der Sie die Messung durchführen wollen.
• Starten Sie den Messvorgang durch längeres drücken der
Taste .
Nach dem Prüfen des Displays, wobei alle Ziffern
leuchten, pumpt sich die Manschette automatisch auf. Während des Aufpumpens ermittelt das Gerät bereits Messwerte,
die zur Abschätzung des nötigen Aufpumpdruckes dienen.
Sollte dieser Druck nicht ausreichen, pumpt das Gerät automatisch nach.
•
Dann wird der Druck in der Manschette langsam abgelassen
und der Puls erfasst.
•
Wenn die Messung beendet ist, wird der restliche Luftdruck
sehr schnell abgelassen. Der Puls, der systolische und der
diastolische Blutdruck werden angezeigt.
•
Sie können die Messung jederzeit durch das drücken der
Taste abbrechen.
•
Wird grundsätzlich ein höherer Aufpumpdruck benötigt, so
können Sie das Nachpumpen umgehen, indem Sie kurz nach
Beginn des Aufpumpvorganges die Taste M+ gedrückt halten, bis der gewünschte Manschettendruck erreicht ist. Dieser sollte ca. 30 mmHg über dem systolischen Wert liegen.
•
Das Symbol Err erscheint, wenn die Messung nicht ord-
nungsgemäß durchgeführt werden konnte. Beachten Sie das
Kapitel Fehlermeldung/Fehlerbehebung in dieser Gebrauchsanleitung und wiederholen Sie die Messung.
•
Das Gerät schaltet nach ca. 3 Minute automatisch ab.
Warten Sie vor einer erneuten Messung mindestens 5 Minuten!
6
Page 7
Ergebnisse beurteilen
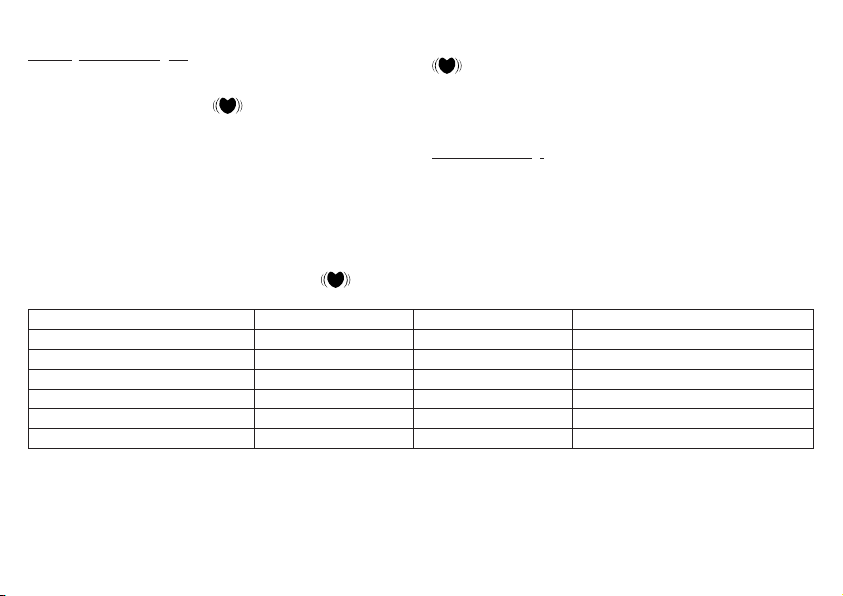
Herzrhythmusstörungen:
Dieses Gerät kann während der Messung eventuelle Störungen
des Herzrhythmus identifizieren und weist gegebenenfalls nach
der Messung mit dem Symbol
darauf hin.
Dies kann ein Indikator für eine Arrhythmie sein. Arrhythmie ist
eine Krankheit, bei der Herzrhythmus aufgrund von Fehlern im
bioelektrischen System, das den Herzschlag steuert, anormal
ist. Die Symptome (ausgelassene oder vorzeitige Herzschläge,
langsamer oder zu schneller Puls) können u.a. von Herzerkrankungen, Alter, körperliche Veranlagung, Genussmittel im
Übermaß, Stress oder Mangel an Schlaf herrühren. Arrhythmie
darauf, dass Sie sich 5 Minuten ausruhen und während der
Messung nicht sprechen oder bewegen. Sollte das Symbol
oft erscheinen, wenden Sie sich bitte an Ihren Arzt.
Selbstdiagnose und -Behandlung aufgrund der Messergebnisse
können gefährlich sein. Befolgen Sie unbedingt die Anweisungen Ihres Arztes.
WHO-Einstufung:
Gemäß den Richtlinien/Definitionen der Weltgesundheitsorgani sation (WHO) und neuester Erkenntnisse lassen sich die
Mess ergebnisse gemäss nachfolgender Tabelle einstufen und
beur teilen.
kann nur durch eine Untersuchung bei Ihrem Arzt festgestellt
werden.
Wiederholen Sie die Messung, wenn das Symbol nach
der Messung auf dem Display angezeigt wird. Bitte achten Sie
Bereich der Blutdruckwerte Systole (in mmHg) Diastole (in mmHg) Maßnahme
Stufe 3: starke Hypertonie > = 180 > = 110 einen Arzt aufsuchen
Stufe 2: mittlere Hypertonie 160 – 179 100 – 109 einen Arzt aufsuchen
Stufe 1: leichte Hypertonie 140 – 159 90 – 99 regelmäßige Kontrolle beim Arzt
Hoch normal 130 – 139 85 – 89 regelmäßige Kontrolle beim Arzt
Normal 120 – 129 80 – 84 Selbstkontrolle
Optimal < 120 < 80 Selbstkontrolle
Quelle: WHO, 1999
Die Balkengrafik im Display und die Skala auf dem Gerät geben
an, in welchem Bereich sich der ermittelte Blutdruck befindet.
Sollte sich der Wert von Systole und Diastole in zwei unter-
Hoch Normal und Diastole im Bereich Normal) dann zeigt Ihnen
die graphische WHO Einteilung auf dem Gerät immer den
höheren Bereich an, im beschriebenen Beispiel „Hoch Normal“.
schiedlichen WHO-Bereichen befinden (z.B. Systole im Bereich
7
Page 8

6. Messwerte speichern, abrufen und löschen
•
Die Ergebnisse jeder erfolgreichen Messung werden zusam-
men mit Datum und Uhrzeit abgespeichert. Bei mehr als 30
Messdaten gehen die jeweils ältesten Messdaten verloren.
•
Wählen Sie mit der Taste SET und danach mit den Tasten -/+
den gewünschten Benutzerspeicher und bestätigen Sie mit
der Taste
schnittswert AVG der letzten 3 gespeicherten Messwerte
des Benutzerspeichers angezeigt. Bei Betätigung der Taste
+ werden die jüngsten Messergebnisse angezeigt, bei der
Taste - die ältesten.
•
Der Durchschnittswert AVG kann erst ab 3 gespeicherten
Werten des jeweiligen Benutzerspeichers angezeigt werden.
•
Um den Speicher zu löschen, wählen Sie zunächst einen Be-
nutzerspeicher aus. Halten Sie die Taste SET ca. 3 Sekunden
gedrückt. Alle Werte des gegenwärtigen Benutzerspeichers
werden nach 3 kurzen Signaltönen gelöscht.
•
Möchten Sie den Benutzerspeicher ändern, beachten Sie
Kapitel „Speicher wählen“.
. Durch drücken der Taste M+ wird der Durch-
7. Gerät reinigen und aufbewahren
•
Reinigen Sie Gerät und Manschette vorsichtig nur mit einem
leicht angefeuchteten Tuch.
•
Verwenden Sie keine Reinigungs- oder Lösungsmittel.
•
Sie dürfen das Gerät auf keinen Fall unter Wasser halten, da
sonst Flüssigkeit eindringen kann und das Gerät beschädigt.
•
Wenn Sie das Gerät aufbewahren, dürfen keine schweren
Gegenstände auf dem Gerät stehen. Entnehmen Sie die
Batterien. Der Manschettenschlauch darf nicht scharf abgeknickt werden.
8. Fehlermeldung/Fehlerbehebung
Bei Fehlern erscheint auf dem Display die Fehlermeldung Err.
Fehlermeldungen können auftreten, wenn
1
. der Aufpumpdruck höher als 300 mmHg ist;
2. der Blutdruckmesswert außergewöhnlich hoch oder niedrig ist;
3
. Sie sich während der Messung bewegen oder sprechen.
Wiederholen Sie in diesen Fällen die Messung. Achten Sie
darauf, dass der Manschettenschlauch ordnungsgemäß eingesteckt ist und Sie sich nicht bewegen oder sprechen. Setzen
Sie gegebenenfalls die Batterien neu ein oder ersetzen Sie
diese.
9. Technische Angaben
Modell-Nr. SBM 21
Messmethode Oszillometrisch, nicht invasive Blut-
Messbereich systolisch 0 – 300 mmHg,
diastolisch 0 – 300 mmHg,
Puls 30-180 Schläge/Minute
Genauigkeit der systolisch ± 3 mmHg /
Druckanzeige diastolisch ± 3 mmHg /
Messunsicherheit max. zulässige Standardabweichung
Speicher 4 x 30 abspeicherbare Datenzeilen
Abmessungen L 155 mm x B 110 mm x H 70 mm
Gewicht Ungefähr 405 g
8
druckmessung am Oberarm
Puls ± 5 % des angezeigten Wertes
gemäß klinischer Prüfung:
systolisch 8 mmHg /diastolisch 8 mmHg
Page 9
Manschettengröße Manschette für Oberarmumfänge von
22 bis 36 cm
Zul. Betriebs- + 5 °C bis + 40 °C, < 85 % relative Lufttemperatur feuchte
Zul. Aufbewahrungs- - 10 °C bis + 55 °C, < 95 % relative Luftund Transport- feuchte
temperatur
Stromversorgung
4 x 1,5 V AA-Batterien
(Alkaline Type LR 06)
Batterie- Für ca. 250 Messungen, je nach Höhe
Lebensdauer des Blutdrucks bzw. Aufpumpdrucks
Zubehör Aufbewahrungstasche, Bedienungs-
anleitung, 4 AA-Batterien LR 06
Klassifikation Anwendungsteil Typ B
Schutzklasse: interne Versorgung, IPXO,
kein AP oder APG, Dauerbetrieb
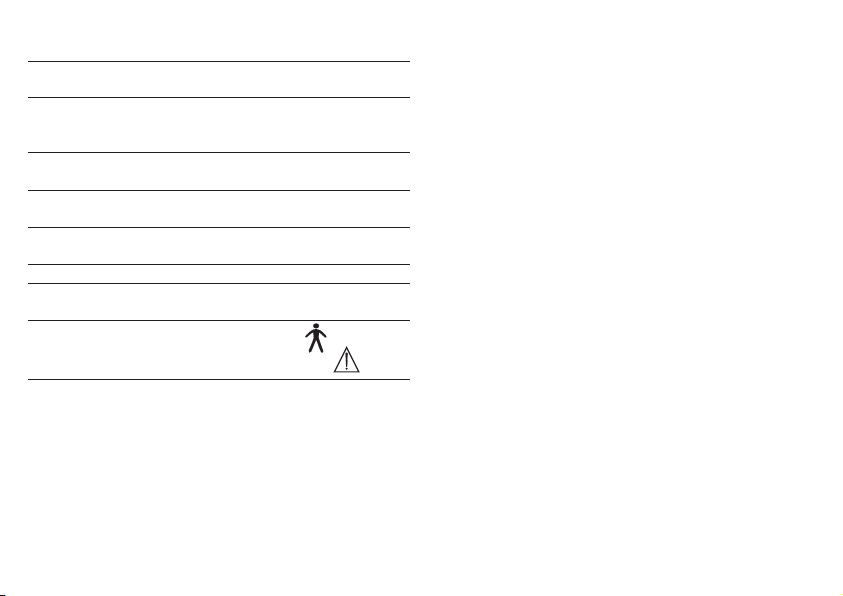
Zeichenerklärung Anwendungsteil Typ B
Achtung!
Gebrauchsanleitung lesen!
Änderungen der technischen Angaben ohne Benachrichtigung
sind aus Aktualisierungs gründen vorbehalten.
• Dieses Gerät entspricht der europäischen Norm EN60601-1-2
und unterliegt besonderen Vorsichtsmaßnahmen hinsichtlich
der elektromagnetischen Verträglichkeit. Bitte beachten Sie
dabei, dass tragbare und mobile HF-Kommunikationseinrichtungen dieses Gerät beeinflussen können. Genauere Angaben
können Sie unter der angegebenen Kundenservice-Adresse
anfordern.
• Das Gerät entspricht der EU-Richtlinie für Medizinprodukte
93/42/EC, dem Medizinproduktegesetz und den europäischen
Normen EN1060-1 (nicht invasive Blutdruckmessgeräte
Teil 1: Allgemeine Anforderungen) und EN1060-3 (nicht invasive Blutdruckmessgeräte Teil 3: Ergänzende Anforderungen
für elektromechanische Blutdruckmesssysteme).
•
Wenn Sie das Gerät zu gewerblichen oder wirtschaftlichen
Zwecken einsetzen, müssen Sie, entsprechend der „Betreiberverordnung für Medizinprodukte“, regelmäßige messtechnische Kontrollen durchführen. Auch bei privater Benutzung
empfehlen wir, eine messtechnische Kontrolle alle zwei Jahre
beim Hersteller.
9
Page 10

10. Garantie
Wir leisten 2 Jahre Garantie für Material- und Fabrikationsfehler
des Produktes. Die Garantie gilt nicht:
•
im Falle von Schäden, die auf unsachgemäßer Bedienung
beruhen,
•
für Verschleißteile,
• für Mängel, die dem Kunden bereits beim Kauf bekannt waren,
•
bei Eigenverschulden des Kunden.
Die gesetzlichen Gewährleistungen des Kunden bleiben durch
die Garantie unberührt. Für Geltendmachung eines Garantiefalles innerhalb der Garantiezeit ist durch den Kunden der
Nachweis des Kaufes zu führen. Die Garantie ist innerhalb
eines Zeitraumes von 2 Jahren ab Kaufdatum gegenüber der
Hans Dinslage GmbH, Riedlinger Straße 28, 88524 Uttenweiler,
Germany, geltend zu machen. Der Kunde hat im Garantiefall
das Recht zur Reparatur der Ware bei unseren eigenen oder bei
von uns autorisierten Werkstätten. Weiter gehende Rechte werden dem Kunden (auf Grund der Garantie) nicht eingeräumt.
10
Page 11
ENGLISH
Please read these instructions for use carefully and keep them
for later use, be sure to make them accessible to other users
and observe the information they contain.
1. Getting to know your instrument
The upper arm blood pressure monitor is used for non-invasive
measurement and monitoring of adults’ arterial blood pressure.
You can use it to measure your blood pressure quickly and easily, storing the results and displaying the progression of readings together with the average.
A warning is issued for anyone suffering from cardiac arrhythmia.
The values determined are classified and graphically evaluated
according to WHO guidelines.
Keep these instructions carefully for further use and also let
other users have access to them.
2. Important information
Advice on use
• Always measure your blood pressure at the sam time of day,
in order to ensure that values are comparable.
• Relax for approx. 5 minutes before each measurement.
• You should wait five minutes before measuring a second time.
• The readings that you take may only be used for information
purposes – they are not a substitute for a medical examination! Discuss your results with the doctor. Never use them to
make medical decisions independently (e.g. regarding medication and dosage thereof).
• There may be incorrect measurements where there is cardiocirculatory disease, as well as with very low blood pressure, circulatory disorders, dysrhythmia and other preexisting diseases.
• Only use the instrument on persons whose upper arm has
the right circumference for the instrument.
• You can operate the blood pressure monitor with batteries.
Note that it is only possible to save data when your blood pressure monitor is receiving power. As soon as the batteries are
dead, the date and time on the blood pressure monitor are lost.
• The automatic switch-off function switches off the blood
pressure monitor in order to preserve the batteries, if no button is pressed within 3 minutes.
Storage and Care
• The blood pressure monitor is made up of precision electronic components. Accuracy of readings and the instrument’s
service life depend on careful handling.
– You should protect the device from impact, moisture, dirt,
major temperature fluctuations and direct exposure to the
sun’s rays.
– Never drop the device.
– Do not use near strong electromagnetic fields, i.e. keep it
away from any radio systems and mobile phones.
– Only ever use the cuffs provided with the monitor or origi-
nal replacement cuffs. Otherwise erroneous results will be
recorded.
• Do not press any buttons until the cuff is in position.
11
Page 12
• If the instrument is not used for any length of time, we
4
1
2
3
6
7
8
9
5
-
+
M+
recommend removing the batteries.
Advice on batteries
• Batteries can be fatal if swallowed. You should therefore
store the batteries and products where they are inaccessible
to small children. If a battery has been swallowed, call a doctor immediately.
• Batteries should not be charged or reactivated with any other
means, nor should they be taken apart, thrown in the fire or
short-circuited.
• Remove the batteries from the instrument if they are worn
out or if you are not going to use the instrument for any
length of time. This prevents any damage as a result of leakage. Always replace all the batteries at the same time.
• Never use different types of battery, battery brands or batteries with different capacities. You should preferably use
alkaline batteries.
Repair and disposal
• Batteries do not belong in domestic refuse. Used batteries
should be disposed of at the collection points provided.
• Never open the instrument. If these instructions are not
heeded, the warranty will be null and void.
• Never attempt to repair the instrument or adjust it yourself.
We can no longer guarantee perfect functioning if you do.
• Repairs may only be performed by Customer Service or
authorized dealers. However, always check the batteries and
replace them if necessary prior to making any complaint.
• The appliance should be disposed of according to
Regulation 2002/96/EC-WEEE (Waste Electrical and
Electronic Equipment). In case of queries, please
contact the municipal authorities responsible for waste
disposal in your area.
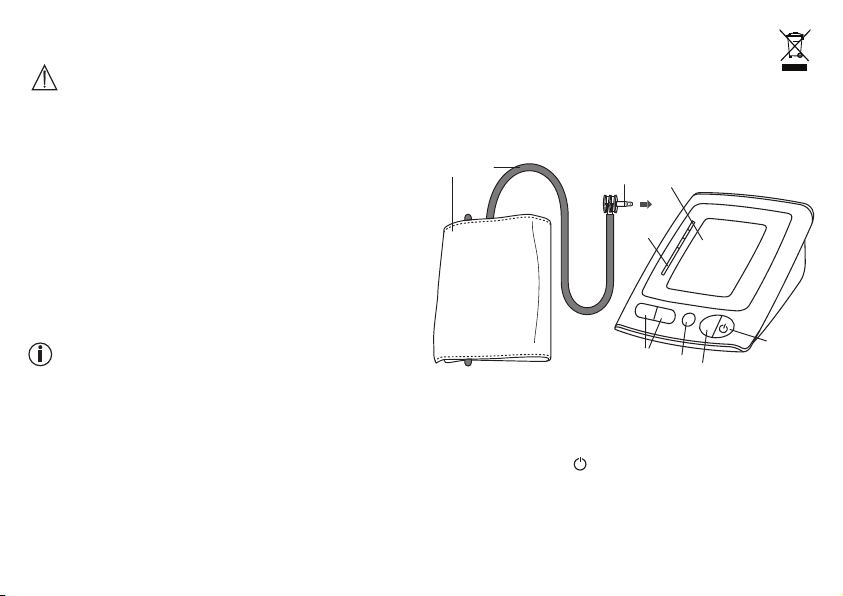
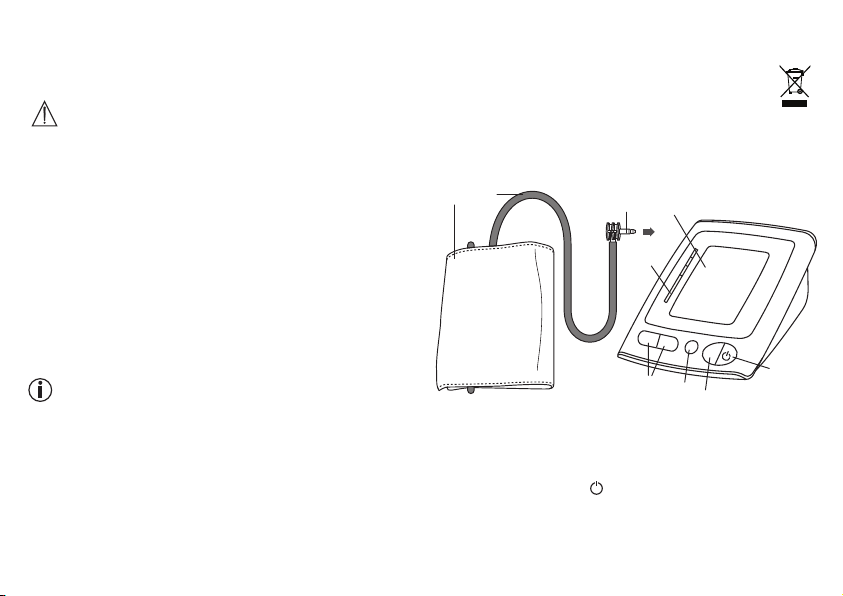
3. Unit description
1. Cuff
2. Cuff line
3. Cuff connector
4. Display
5. START/STOP button
6. Memory button M +
7. SET button
8. Function buttons -/+
9. WHO scale
12
Page 13
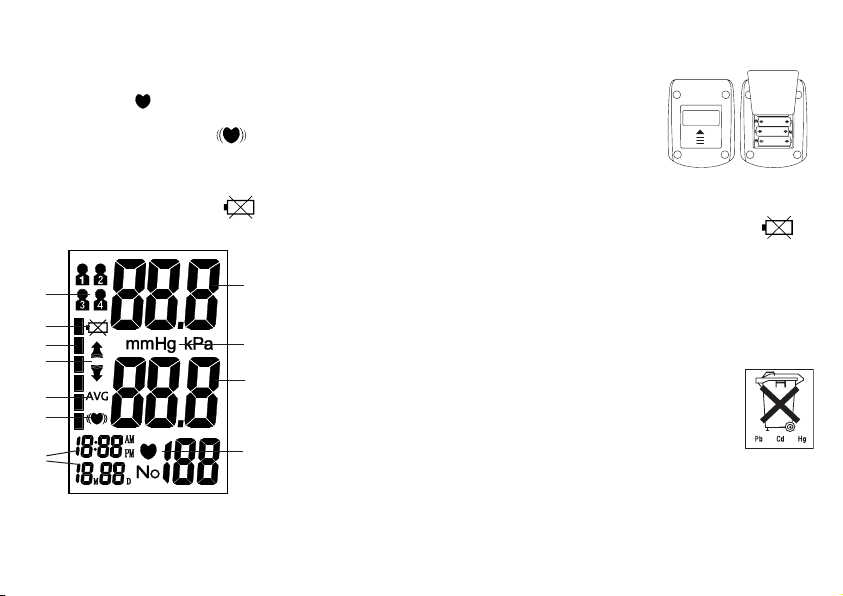
Icons in the display:
4 x AA (LR06) 1,5 V
1. Systolic pressure
2. Unit in mmHg
3. Diastolic pressure
4. Pulse symbol and calculated pulse value
5. Time and date
6. Cardiac arrhythmia symbol
7. Average values of the 3 most recent measurements – AVG
8. Pump up, release air (arrow)
9. WHO classification
10. Battery replacement symbol
11. Symbol for users 1, 2, 3 and 4
11
1
10
9
8
2
3
7
6
5
4
4. Prepare measurement
Inserting battery
• Remove the battery cover from the
back of the monitor.
• Insert four AA 1.5 V alkaline
batteries. Making absolutely
sure that you insert them with
the correct polarity as marked.
Never use rechargeable bat teries.
• Replace the battery cover carefully.
If 4 warning tones have been sounded and the symbol
appears simultaneously on the display, it is no longer possible
to perform a measurement and all batteries must be replaced.
Once the batteries have been removed from the device, the
time must be set again. Used batteries should not be disposed
of in normal household waste. Dispose of them via your electronics retailer or your local recycling point.
You are legally obligated to do so.
Note: Batteries containing pollutant substances
are marked as follows: Pb = Battery contains lead,
Cd = Battery contains cadmium, Hg = Battery
contains mercury.
13
Page 14
Setting date and time
You should set the date and time without fail. Otherwise, you
will not be able to save your measured values correctly with
a date and time and to access them again later. The time is
shown in 12-hour format i.e. the time from 13:00 is displayed
as 01:00 PM.
Proceed as follows to set the date and time:
• Confirm twice using the SET button.
• Use the + or - buttons to first set the month 1-12, and then
confirm using the SET button.
• Set the day/hour/minute and confirm each using the SET
button.
Press the button
to exit the settings mode.
5. Measuring blood
pressure
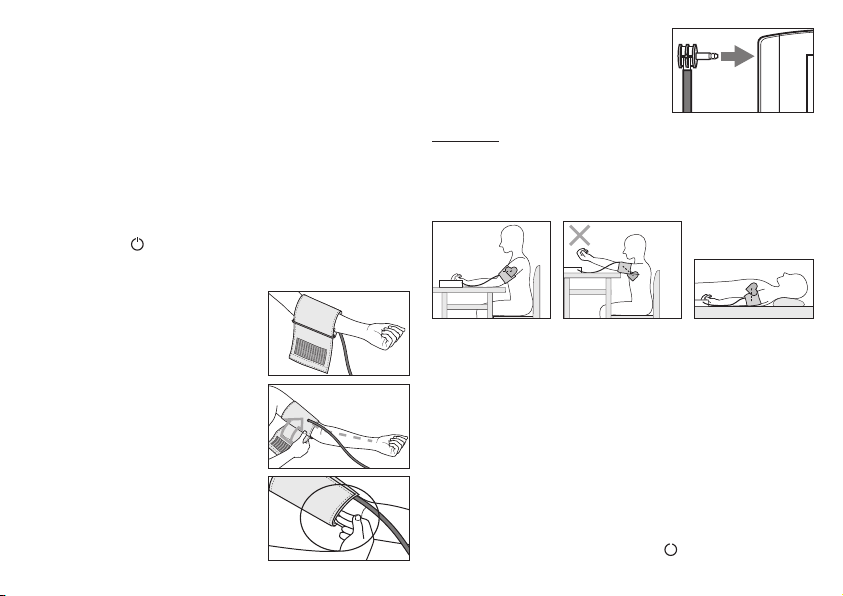
Positioning cuff
Fit the cuff round your bare left upper arm. Blood circulation in the
arm should not be restricted by tight
clothing or other objects.
The cuff should be placed on the
upper arm so that the lower edge is 2
to 3 cm above the bend of the elbow
and above the artery. The tube should
be in line with the centre of the palm.
Now place the free end of the cuff
snugly, but not too tightly, around
the arm, and fix it with the Velcro fas-
tener. The cuff should be fitted tight
enough to allow just two fingers to fit
beneath the cuff.
Insert the cuff tubing into the socket
for the cuff attachment.
Important: The instrument should only be operated with the
original cuff. The cuff is suitable for an arm circumference of
22 to 36 cm.
Correct posture
• Rest for approx. 5 minutes before each measurement. Otherwise there may be divergences.
• You can perform the measurement either sitting or lying down.
Always make sure that the cuff is on a level with your heart.
• In order not to distort the result, it is important to keep still
during the measurement and not talk.
Select memory
Press the SET button. Select the desired storage space by
pressing the -/+ function buttons. You have 4 memories with 30
spaces each to store the measurements of 4 different people
separately or to separate measurements taken in the morning
and at night.
Confirm your selection with the button
14
.
Page 15

Measuring blood pressure
• Put on the cuff as described previously and assume the
position in which you want to carry out the measurement.
• Start the measurement by holding the button . After checking the display, during which all numbers light up, the cuff
pumps up automatically. Whilst the cuff is pumping up, the
device already calculates measurements for estimating the
necessary pump pressure.
If this pressure is insufficient, the device automatically
pumps more pressure.
• Then the pressure in the cuff is slowly released and the pulse
is measured.
• When the measurement has been completed, the remain ing
air pressure is released very quickly. The pulse, the systolic
and the diastolic blood pressure are displayed.
• Measuring can be cancelled at any time by pressing the button .
• If a higher pump pressure is always required, you can bypass
the additional pumping process by holding the M+ button
shortly after the pumping process starts until the desired cuff
pressure is reached. This should be approx. 30 mmHg above
the systolic value.
•
The Err icon appears if it has not been possible to perform
the measurement properly. Observe the section in these instructions on error messages/troubleshooting and repeat the
measurement.
• The device switches off automatically after 3 minutes.
Wait at least 5 minutes before taking another measurement!
Evaluating results
Cardiac arrhythmia:
This instrument can identify possible cardiac arrhythmia
disorders during measurement and if necessary indicates the
measurement with the flashing icon
.
This may be an indicator for arrhythmia. Arrhythmia is a condition where the heart rhythm is abnormal as a result of defects
in the bioelectrical system controlling the heart beat. The
symptoms (omitted or premature heart beats, slow or excessively fast heart rate) may be caused, among other things,
by heart disease, age, physical predisposition, excessive use
of stimulants, stress or lack of sleep. Arrhythmia can only be
ascertained through examination by your doctor.
Repeat the measurement if the flashing icon
is displayed
after the measurement. Please note that you should rest for
5 minutes between measurements and not talk or move during the measurement. If the icon appears often, please
contact your doctor. Any self-diagnosis and treatment based
on the test results may be dangerous. It is vital to follow your
doctor’s instructions.
WHO classification:
According to WHO Guidelines/Definitions and the latest findings, the test results can be classified and evaluated according
to the following chart:
15
Page 16
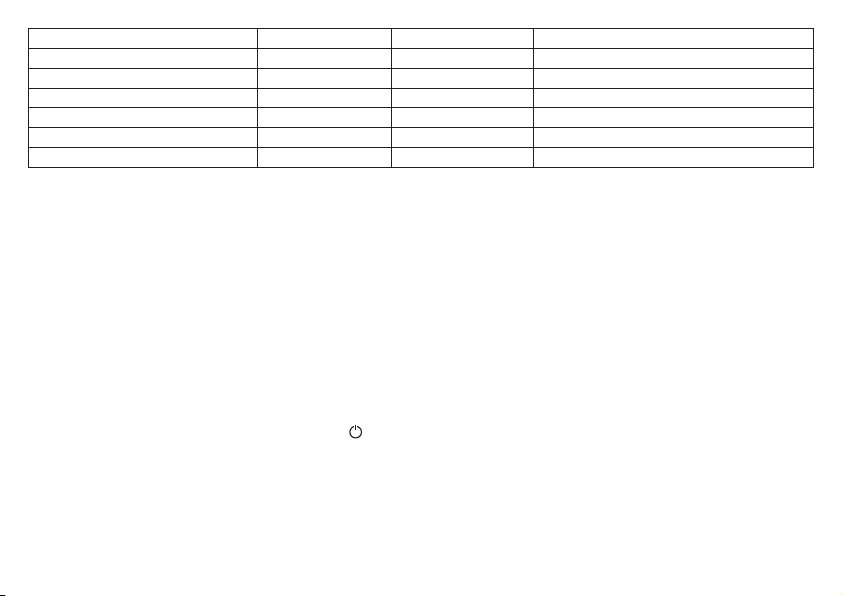
Range of blood pressure values
Grade 3: Severe hypertension > = 180 > = 110 Seek medical advice
Grade 2: Moderate hypertension 160 – 179 100 – 109 Seek medical advice
Grade 1: Mild hypertension 140 – 159 90 – 99 Have it checked regularly by doctor
High-normal 130 – 139 85 – 89 Have it checked regularly by doctor
Normal 120 – 129 80 – 84 Check it yourself
Optimal < 120 < 80 Check it yourself
Source: WHO, 1999
The bar graph in the display and the scale on the unit indicate
the range of the blood pressure which has been recorded.
If the values for systolic and diastolic pressure are in two different WHO ranges (e.g. systolic in the high-normal range and
diastolic pressure in the normal range) the graphic WHO classification on the unit indicates the higher range (high-normal in
the example described).
6. Saving, retrieving and deleting results
• The results of each successful measurement are stored
together with date and time. With more than 30 items of
measured data, the earliest items of data measured are lost.
• Use the SET button and then the -/+ buttons to select the
desired user memory and confirm using the button . Pressing the M+ button displays the average value AVG of the 3
most recent measurements stored in the user memory. By
pressing the + button, the most recent measurements are
displayed; by pressing the - button, the oldest are displayed.
• The average value AVG can only be displayed if there are 3
saved values in the respective user memory.
Systolic (in mmHg)
Diastolic (in mmHg)
• To clear the memory, you must first select a user memory.
Hold the SET button pressed for approx. 3 seconds. All the
values in the current user memory are deleted after 3 brief
beeps are output.
• If you wish to change the user memory, see “Select memory”.
Measure
7. Cleaning and storing the instrument
• Clean your device and cuff carefully only with a slightly moistened cloth.
• Do not use detergents or solvents.
• On no account must you immerse the computer in water,
otherwise liquid can enter it and cause demage.
• When storing the device, make sure that no heavy objects
are placed on top of it. Remove the batteries. The cuff tube
should not have any sharp kinks.
16
Page 17

8. Error messages / troubleshooting
In case of faults, the Err message appears in the display.
Error messages can occur when
1. inflation pressure is higher than 300 mmHg,
2. blood pressure is unusually high or low,
3. you move or talk during the measurement.
In the above cases, you must repeat the measurement. Make
sure that the cuff tube is properly inserted and that you do
not move or talk. Re-insert the batteries if necessary, or else
replace them.
9. Specifications
Model No. SBM 21
Method of Measurement Oscillometric, non-invasive blood
pressure measurement on the upper
arm
Range of Measurement systolic 0 – 300 mmHg,
diastolic 0 – 300 mmHg,
pulse 30 –180 beats/minute
Accuracy of the systolic ± 3 mmHg /
pressure reading diastolic ± 3 mmHg /
pulse ± 5 % of the displayed value
Measuring uncertainty max. permissible standard deviation
according to clinical testing:
systolic: 8 mmHg /diastolic: 8 mmHg
Sets of Memory 4 x 30 memory places
Unit Dimension L155 x W110 x H70 mm
Unit Weight Approx. 405 g
Cuff Size Cuff for upper arm circumference of
22 to 36 cm
Operating Temperature + 5 °C to + 40 °C, < 85 % RH
Storage-and - 10 °C to + 55 °C, < 95 % RH
transportemperature
Power Supply 4 x 1,5 V AA batteries (alkaline type
LR06)
Battery Life For approx. 250 measurements,
depending on blood pressure level
or inflation pressure
Accessories With storage pouch, instruction
manu al, 4 pcs AA battery LR 06
Classification Application part Type B
Protection class internal power supply, IPXO,
no AP or APG, continuous operation
Key to symbols Application part Type B
Important! Read the operating
instruction!
These specification are subject to change without notice for
purpose of improvement.
• This unit is in line with European Standard EN60601-1-2 and
is subject to particular precautions with regard to electromagnetic compatibility (EMC). Please note that portable and
mobile HF communication systems may interfere with this instrument. For more details, please contact customer service
at the address indicated.
17
Page 18

• The instrument is in line with the EU Medical Products
Directive 93/42/EC, the German medical products act and
European standards EN1060-1 (non-invasive blood pressure monitors, Part 1: general requirements) and EN1060-3
(non-invasive blood pressure monitors, Part 3: Supplementary Requirements for Electromechanical Blood Pressure
Measure ment Systems).
• If you are using the instrument for commercial or economic
purposes, you must check measurement precision regularly
in accordance with the “Operators’ Ordinance on Medical
Products”. Even in the case of private use, we recommend
checking measurement precision every two years at the
manufacturers.
18
Page 19
FRANÇAIS
Lisez attentivement ce mode d’emploi, conservez-le pour un
usage ultérieur, mettez-le à la disposition des autres utilisateurs et suivez les consignes.
1. Premières expériences
Le lecteur de tension artérielle au bras sert à la mesure non invasive et au contrôle de la tension artérielle chez l’adulte. Vous
pouvez ainsi mesurer votre tension artérielle de manière simple
et rapide, enregistrer les valeurs mesurées et afficher la courbe
et la moyenne des valeurs mesurées.
L’appareil vous prévient en cas d’arythmie cardiaque éventuelle.
Les valeurs obtenues sont classées conformément aux directives de l’OMS et évaluées sur le plan graphique.
Conservez ce mode d’emploi pour pouvoir vous y référer
ultérieurement et faites en sorte qu’il soit accessible aux autres
utilisateurs.
2. Remarques importantes
Remarques relatives à l’utilisation
•
Afin d’obtenir des valeurs comparables, mesurez toujours
votre tension artérielle au même moment de la journée.
•
Avant chaque mesure, reposez-vous pendant env. 5 minutes!
•
Patientez 5 minutes entre deux mesures!
•
Les valeurs mesurées par vos soins sont purement informati-
ves. Elles ne sauraient remplacer une consultation médicale!
Discutez des valeurs mesurées avec votre médecin. Ne
prenez aucune décision médicale individuelle à partir de ces
valeurs (par exemple auto-médication)!
•
En cas de circulation sanguine limitée sur un bras du fait de
maladies circulatoires chroniques ou aiguës (entre autres
des vasoconstrictions), la précision de la mesure au poignet
est limitée. Le cas échéant, optez plutôt pour un appareil de
mesure de la tension artérielle à appliquer sur le bras.
•
L’appareil ne doit être utilisé que sur des personnes présen-
tant un tour de bras adapté.
•
Le tensiomètre fonctionne sur piles. Notez que l’enregistre-
ment des données n’est possible que si votre tensiomètre
est sous tension. Dès que les piles sont usées, la date et
l’heure s’effacent du tensiomètre.
•
L’arrêt automatique permet de faire passer le tensiomètre en
mode économie d’énergie lorsqu’aucune touche n’est manipulée pendant un délai de 3 minutes.
Remarques relatives à la conservation et à l’entretien
•
L’appareil de mesure de la tension artérielle est constitué
de pièces électroniques, de grande précision. L’appareil
doit être conservé dans un environnement approprié afin de
garantir la précision des valeurs et d’optimiser la durée de
vie du produit :
– Protégez l’appareil des chocs et conservez-le à l’abri de
l’humidité, de la poussière, des variations thermiques et
d’une exposition directe au soleil.
– Ne laissez pas tomber l’appareil.
– N’utilisez pas l’appareil à proximité de forts champs élec-
tromagnétique. Eloignez-le des radios ou des télé phones
mobiles.
19
Page 20
– Utilisez uniquement les brassards de rechange fournis ou
d’origine. Dans le cas contraire, vous obtiendrez des valeurs mesurées erronées.
•
N’appuyez pas sur les touches tant que vous n’avez pas mis
le brassard.
•
Au cas où vous ne vous servez pas de l’appareil pendant
une longue période, nous vous recommandons de retirer les
piles.
Remarques relatives aux piles
•
L’ingestion de piles peut se révéler mortelle. Laissez par
conséquent les piles et les produits hors de portée des
jeunes enfants. Au cas où une pile a été avalée, faites immédiatement appel à un médecin.
•
Les piles ne doivent être ni rechargées ni réactivées par
d’autres méthodes ni démontées ni jetées dans le feu ni
court-circuitées.
•
Lorsqu’elles sont usagées ou si l’appareil ne doit pas être
utilisé avant longtemps, retirez les piles de l’appareil. Vous
éviterez ainsi les dommages liés aux fuites. Remplacez toujours toutes les piles en même temps.
•
N’utilisez pas des types ou des marques de piles différents
et n’utilisez pas des piles d’une capacité différente. Utilisez
de préférence des piles alcalines.
Remarques relatives à la réparation et à la mise au
rebut
•
Les piles ne sont pas des ordures ménagères. Veuillez jeter
les piles usagées dans les conteneurs prévus à cet effet.
•
N’ouvrez pas l’appareil. Le non-respect de cette consigne
annulera la garantie.
•
Vous ne devez en aucun cas réparer ou ajuster l’appareil
vous-même. Le cas contraire, aucun fonctionnement irréprochable n’est garanti.
•
Les réparations doivent être effectuées uniquement par le
service après-vente ou des revendeurs agréés. Cependant
avant de faire une réclamation, contrôlez d’abord les piles et
changez-les, le cas échéant.
•
Pour éliminer l’appareil, conformez-vous à la directive
sur les appareils électriques et électroniques 2002/96/
CE – DEEE (Déchets des équipements électriques
et électroniques). Pour toute question, adressez-vous aux
collectivités locales responsables de l’élimination de ces
déchets.
20
Page 21
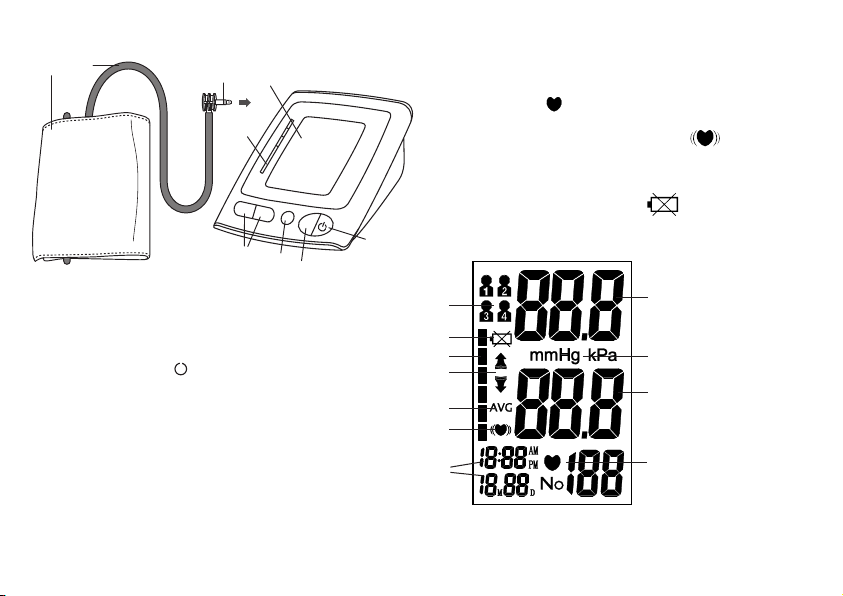
3. Description de l’appareil
4
1
2
3
6
7
8
9
5
-
+
M+
Affichages à l’écran :
1. Pression systolique
2. Unité mmHg
3. Pression diastolique
4. Symbole pouls
et valeur du pouls donnée
5. Heure et date
6. Symbole troubles du rythme cardiaque
7. Moyennes des 3 dernières mesures AVG
8. Pompage, dégonflage (flèche)
9. Classement OMS
10. Symbole changement des piles
11. Symbole utilisateur 1, 2, 3, 4
1. Brassard
2. Tuyau de brassard
3. Connexion au brassard
4. Écran
5. Touche START/STOP
6. Touche mémoire M+
7. Touche SET
8. Touches de fonction -/+
9. Échelle de l’OMS
11
1
10
9
8
7
2
3
6
5
21
4
Page 22
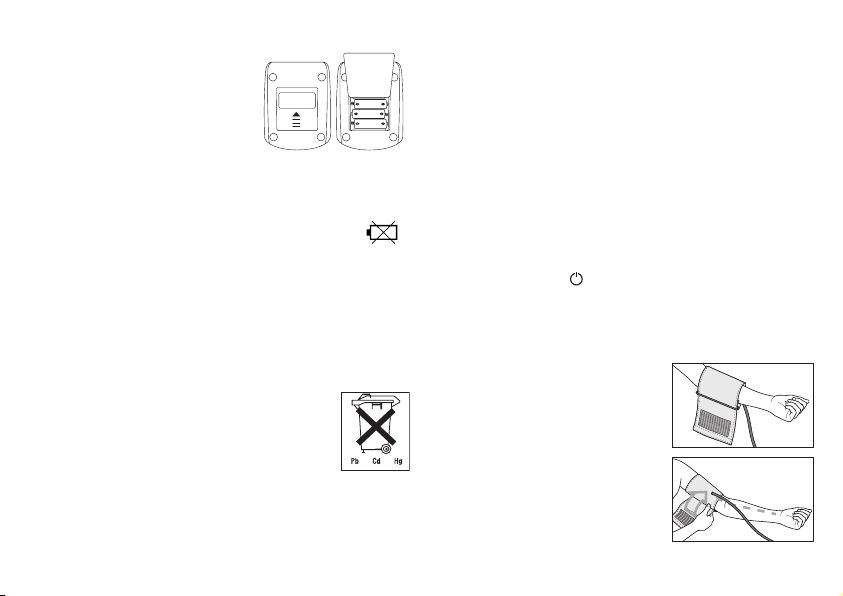
4. Préparation à la mesure
4 x AA (LR06) 1,5 V
Mise en place des piles
•
Otez le couvercle du compartiment
des piles situé à l’arrière de l’appareil.
•
Introduisez 4 piles alcalines
AA1,5 V. Respectez impérativement
la polarité marquée dans leur logement (pôles + et pôles). N’utilisez pas de piles rechargeables.
•
Refermez soigneusement le couvercle du compartiment des
piles.
Lorsque 4 signaux sonores sont émis et que le symbole
s’affiche simultanément à l’écran, aucune mesure n’est possible et vous devez changer toutes les piles. Dès que les piles
sont retirées de l’appareil, l’heure doit être de nouveau réglée.
Les piles usées ne doivent pas être jetées avec les ordures ménagères. Éliminez-les par le biais de votre revendeur électronique ou de votre point de collecte de matières recyclables local.
Vous y êtes légalement obligé(e).
Remarque : Vous trouverez les symboles suivants
sur les piles contenant des substances toxiques : Pb = pile contenant du plomb, Cd = pile
contenant du cadmium, Hg = pile contenant du
mercure.
Régler la date et l’heure
Vous devez impérativement régler la date et l’heure. Ce n’est
qu’ainsi que vous pouvez enregistrer et récupérer correctement
vos mesures avec la date et l’heure. L’heure est affichée au format 12 heures, c’est-à-dire qu’à partir de 13h, l’heure s’affiche
sous la forme 01:00 PM.
Pour le réglage de la date et de l’heure, veuillez procéder de la
manière suivante :
• Appuyez 2 x sur la touche SET.
• Réglez d’abord le mois 1-12 avec les touches + ou – et
confirmez avec la touche SET.
• Réglez le jour, l’heure, les minutes et confirmez à chaque fois
avec la touche SET.
Appuyez sur la touche
pour modifier le mode de réglage.
5. Mesure de la tension artérielle
Mise en place du brassard
Posez le brassard autour du bras
gauche nu. L’irrigation sanguine du
bras ne doit pas être entravée par des
vêtements trop serrés ou toute autre
chose.
Placez le brassard de telle sorte que
son bord inférieur se situe 2 à 3 cm
au-dessus du coude et au-dessus de
l’artère. Le cordon doit être orienté
en direction du milieu de la paume
de la main.
22
Page 23
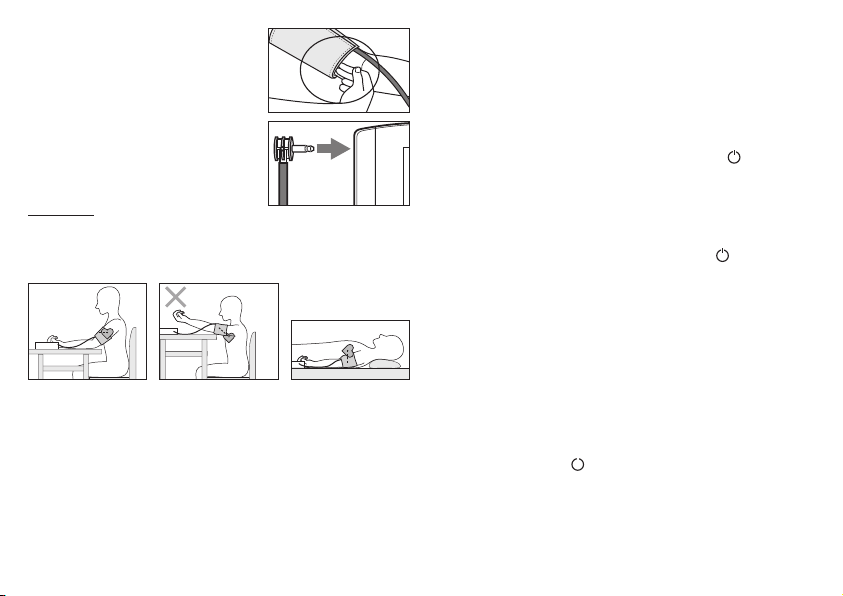
Enroulez bien l’extrémité libre du
brassard autour du bras, sans trop
serrer et fixez à l’aide de la bande
agrippante.
Le brassard devrait être suffisamment serré de sorte que deux doigts
seulement peuvent passer sous le
brassard.
Branchez le cordon dans la prise
prévue à cet effet.
Attention : L’appareil ne doit être utilisé qu’avec le brassard d’origine. Avec manchette pour tours
de bras de 22 à 36 cm.
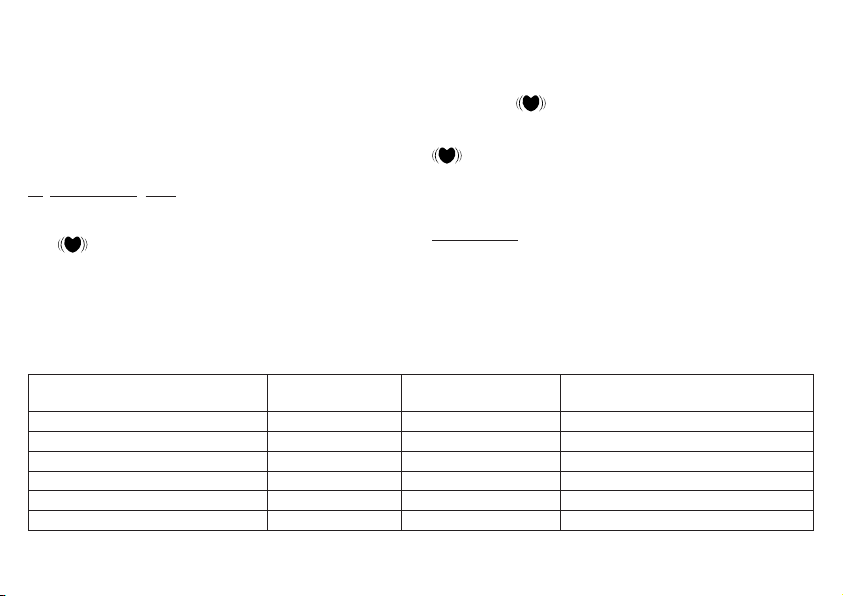
Adoption d’une posture correcte
•
Avant chaque mesure, reposez-vous pendant env. 5 minutes!
Cela peut sinon engendrer des écarts.
•
Vous pouvez effectuer la mesure en position assise ou cou-
chée. Quelque soit la position, veillez à ce que le brassard se
trouve à la hauteur du coeur. Pour ne pas fausser le résultat,
il est important de rester tranquille durant la mesure et de ne
pas parler.
•
Pour ne pas fausser le résultat de la mesure, il est important
de rester calme pendant la mesure et de ne pas parler.
Choix de la mémoire
Appuyez sur la touche SET. Sélectionnez l’emplacement de
sauvegarde souhaité en appuyant sur les touches de fonction
-/+. Vous disposez de 4 mémoires à 30 emplacements de
sauvegarde chacun pour enregistrer séparément les résultats
mesurés de 4 personnes différentes ou pour enregistrer séparément les mesures du matin et du soir.
Confirmez votre choix en appuyant sur la touche
.
Mesure de la tension artérielle
•
Mettez le brassard, comme décrit plus haut et installez-vous
dans la position dans laquelle vous voulez mesurer la pression.
• Démarrez la mesure en appuyant sur la touche de manière
prolongée. Après le contrôle de l’écran au cours duquel tous les
chiffres apparaissent, le brassard se gonfle automatiquement.
Pendant le gonflage, l’appareil donne déjà des valeurs de mesure servant à évaluer la pression de gonflage nécessaire.
Si cette pression ne suffit pas, l’appareil continue automati-
quement de pomper.
• Ensuite le brassard se dégonfle lentement et le pouls est saisi.
•
La mesure terminée, l’air restant encore dans le brassard
s’échappe très rapidement. Le pouls, la pression systolique
et diastolique sont affichés.
•
Vous pouvez interrompre la mesure à tout moment en ap-
puyant sur la touche .
•
Si une pression de gonflage supérieure est nécessaire, vous
pouvez éviter le regonflage en maintenant la touche M+
enfoncée juste après le début du gonflage, jusqu’à ce que la
pression de brassard souhaitée soit atteinte. Celle-ci doit se
situer à env. 30 mmHg au-dessus de la valeur systolique.
23
Page 24
•
Le symbole Err s’affiche lorsque la mesure n’a pas pu être
effectuée correctement. Consultez le chapitre Message d’erreur/suppression des erreurs dans le présent mode d’emploi
et recommencez la mesure.
•
L’appareil s’éteint automatiquement après env. 3 minutes.
Attendez au moins 5 minutes avant de faire une nouvelle
mesure.
Evaluation des résultats
Arythmies cardiaques :
Pendant la mesure, cet appareil peut identifier une arythmie
cardiaque éventuelle. Le cas échéant, après la mesure, le symbole
s’affiche.
Ce symbole peut indiquer une arythmie. L’arythmie est une
pathologie lors de laquelle, du fait de défauts dans le système
bioélectrique commandant les battements du cœur, le rythme
cardiaque est anormal. Les symptômes (battements du cœur
anarchiques ou précoces, pouls lent ou trop rapide) peuvent
entre autres être dus à des maladies cardiaques, à l’âge, à
une prédisposition corporelle, à une mauvaise hygiène de vie,
au stress ou au manque de sommeil. L’arythmie ne peut être
décelée que par une consultation médicale.
Si le symbole s’affiche à l’écran après la mesure, recommencez la mesure. Veillez à vous reposer pendant 5 minutes
et à ne pas parler ni bouger pendant la mesure. Si le symbole
apparaît souvent, veuillez consulter votre médecin. Tout
auto-diagnostic ou toute auto-médication découlant des résultats mesurés pourra se révéler dangereux. Respectez impérativement les indications de votre médecin.
Classe OMS :
Conformément aux directives/définitions de l’Organisation
mondiale de la santé (OMS) et selon les toutes dernières
connaissances, les résultats mesurés peuvent être classés et
évalués selon le tableau ci-après.
Plage des valeurs de tension
artérielle
Systole
(in mmHg)
Diastole
(in mmHg)
Mesure
Niveau 3 : forte hypertonie > = 180 > = 110 Consultez un médecin
Niveau 2 : hypertonie moyenne 160 – 179 100 – 109 Consultez un médecin
Niveau 1 : légère hypertonie 140 – 159 90 – 99 Surveillance médicale régulière
Elevée à normale 130 – 139 85 – 89 Surveillance médicale régulière
Normale 120 – 129 80 – 84 Contrôle individuel
Optimale < 120 < 80 Contrôle individuel
Source: WHO, 1999
24
Page 25

Si la valeur de systole et de diastole figure dans deux plages
OMS différentes (par exemple systole dans la plage Elevée à
normale et diastole dans la plage Normale), la répartition graphique de l’OMS sur l’appareil vous montre toujours la plage
la plus élevée, c’est-à-dire pour l’exemple décrit « Elevée à
normale ».
6. Enregistrement, appel et suppression des
valeurs mesurées
•
Les résultats de chaque mesure réussie sont enregistrés
avec la date et l’heure. En présence de plus de 30 données
mesurées, les données les plus anciennes sont supprimées.
•
Avec la touche SET puis avec les touches -/+, sélectionnez
la mémoire utilisateur souhaitée et confirmez avec la touche
. En appuyant sur la touche M+, la moyenne AVG des trois
dernières mesures enregistrées dans la mémoire utilisateur
s’affiche. Lorsque vous appuyez sur la touche +, le dernier
résultat mesuré s’affiche. Lorsque vous appuyez sur la touche -, le plus ancien s’affiche.
•
La moyenne AVG peut uniquement être affichée à partir de 3
valeurs enregistrées dans la mémoire utilisateur correspondante.
•
Pour effacer la mémoire, sélectionnez d’abord la mémoire
utilisateur. Maintenez la touche SET enfoncée pendant env.
3 secondes. Toutes les valeurs de la mémoire utilisateur actuelle sont supprimées après 3 brefs signaux sonores.
•
Si vous voulez modifier la mémoire utilisateur, reportez-vous
au chapitre « Choix de la mémoire ».
7. Nettoyage et rangement de l’appareil
•
Nettoyez l’appareil et le brassard en douceur à l’aide d’un
chiffon légèrement humide.
•
N’utiliser ni produits nettoyants, ni solvants.
•
Ne tenir en aucun cas l’appareil sous l’eau, car du liquide
rentrerait dans l’appareil et l’endommagerait.
•
Quand vous conservez l’appareil, ne posez pas d’objets
lourds sur celui-ci. Sortez les piles. Le tuyau flexible du brassard ne doit pas être plié sous un angle fermé.
8. Message d’erreur /suppression des erreurs
En présence d’erreurs, le message d’erreur Err s’affiche à
l’écran.
Des messages d’erreur peuvent apparaître quand
1
. la pression de gonflage est supérieure à 300 mmHg,
2
. la tension artérielle mesurée est exceptionnellement élevée
ou basse,
3
. vous bougez ou vous parlez pendant la mesure.
Dans tous ces cas, recommencez la mesure. Veillez à ce que
le flexible du brassard soit bien raccordé et veillez à ne pas
bouger ni parler. Si nécessaire, remettez les piles en place ou
remplacez les piles.
25
Page 26

9. Fiche technique
N° de modèle SBM 21
Méthode de mesure Mesure de la pression artérielle
oscillométrique, invasive au bras
Plage de mesure systolique : 0-300 mmHg,
diastolique : 0-300 mmHg,
Pouls : 30-180 pulsations / minute
Précision de l’affichage Tension systolique ± 3 mmHg /
Tension diastolique de la tension
± 3 mmHg / Pouls ± 5% du résultat
affiché
Incertitude de mesure Ecart type maximal autorisé confor-
me à l’examen clinique selon :
tension systolique 8 mmHg /
tension diastolique 8 mmHg
Mémoire 4 x 30 positions de mémoire
Dimensions L 155 x 110 x H 70 mm
Poids Environ 405 g
Taille du brassard Brassard pour tour de bras de
22 à 36 cm
Température de + 5 °C à + 40 °C à une humidité
fonctionnement autorisée relative de < 85 %
Température de stockage - 10 °C à + 55 °C à une humidité
autorisée relative de < 95 %
Alimentation électrique 4 piles 1,5 V AA (alcalines LR 06)
Durée de service des piles Pour 250 mesures environ, selon la
tension arérielle, à savoir la pression
de gonflage
Accessoires Avec étui de protection, mode
Classification Pièce d’utilisation de type B
Classe de protection alimentation interne, IPXO, AP et
APG inexistants, fonctionnement
continu
Explication des symboles Pièce d’utilisation de type B
Attention ! Lire le mode
d’emploi !
Pour des raisons de mise à jour, nous nous réservons le droit
de procéder sans préavis à toute modification de la fiche
technique.
•
Cet appareil est en conformité avec la norme européenne
EN60601-1-2 et répond aux exigences de sécurité spéciales
relatives à la compatibilité électromagnétique. Veuillez noter
que les dispositifs de communication HF portables et mobiles sont susceptibles d’influer sur cet appareil. Pour des
détails plus précis, veuillez contacter le service après-vente à
l’adresse ci-dessous.
•
L’appareil correspond à la directive européenne sur les pro-
duits médicaux 93/42/EC, à la loi sur les produits médicaux
et aux normes européennes EN1060-1 (appareils de mesure
non invasive de la tension artérielle partie 1 : exigences
générales) et EN1060-3 (appareils de mesure non invasive
de la tension artérielle partie 3 : exigences complémentaires
pour systèmes électro mécaniques de mesure de la tension
artérielle).
26
d’emploi, 4 piles de type AA
LR 06
Page 27

•
Si l’appareil est utilisé à des fins professionnelles ou com-
merciales, conformément à « l’ordonnance sur les produits
médicaux », des contrôles techniques réguliers doivent être
effectués. Y compris en cas d’utilisation privée, nous vous
recommandons de demander au fabricant de procéder à un
contrôle technique tous les 2 ans.
27
Page 28
ITALIANO
La preghiamo di leggere attentamente le presenti istruzioni, di conservarle per un’eventuale consultazione successiva, di metterle a
disposizione di altri utenti e di osservare le avvertenze ivi riportate.
1. Note introduttive
Lo sfigmomanometro da braccio serve per la misurazione non
invasiva e il monitoraggio della pressione sanguigna di persone
adulte.
Esso consente di misurare la pressione sanguigna rapidamente
e facilmente, nonché di salvare e visualizzare l’andamento e la
media dei valori misurati.
In presenza di eventuali disturbi del ritmo cardiaco l’apparecchio
emette un avviso. I valori rilevati sono classificati e valutati graficamente secondo le direttive dell’OMS (= WHO: Organizzazione
Mondiale della Sanità).
Conservare queste istruzioni per l’uso futuro e metterle a disposizione degli altri utenti.
2. Avvertenze importanti
Indicazioni sulla modalità d’uso
•
Misurare la pressione sanguigna sempre alle stesse ore del
giorno per ottenere dati attendibili per la comparazione.
•
Riposare per circa 5 minuti prima di ogni misurazione!
•
Mantenere un intervallo di circa 5 minuti fra due misurazioni!
• I valori misurati dall’utente possono servire solo a titolo infor-
mativo – essi non sostituiscono le visite mediche! Analizzare i
valori misurati con il proprio medico e non prendere in nessun
caso decisioni mediche (ad es. farmaci e il loro dosaggio).
•
Possibilità di misurazioni errate in presenza di malattie del
sistema cardiocircolatorio, ed egualmente in caso di pressione sanguigna estremamente bassa, disturbi dell’irrorazione
sanguigna, aritmie cardiache e altre malattie preesistenti.
•
Utilizzare lo sfigmomanometro solo su persone che possie-
dono una circonferenza del braccio compresa nel campo
indicato per l’apparecchio.
•
Lo sfigmomanometro può essere utilizzato esclusivamente a
batteria. Tener presente che il salvataggio dei dati è possibile
solo se lo sfigmomanometro riceve corrente. Lo sfigmomanometro perde la data e l’ora non appena le batterie sono scariche. I valori misurati salvati rimangono tuttavia memorizzati.
•
Se per tre minuti non vengono utilizzati pulsanti, il dispositivo
di arresto automatico spegne l’apparecchio per preservare le
batterie.
Indicazioni sulla custodia e sulla cura
•
Lo sfigmomanometro è formato da componenti di precisione
ed elettronici. La precisione dei valori misurati e la durata in
servizio dell’apparecchio dipendono dall’accuratezza con la
quale viene usato.
– Proteggere l’apparecchio da urti, umidità, polvere e sporci-
zia, forti variazioni della temperatura e raggi diretti del sole.
– Non far cadere l’apparecchio.
– Non utilizzare l’apparecchio in vicinanza di forti campi
elettromagnetici e tenerlo lontano da impianti radiofonici o
telefoni cellulari.
–
Usare esclusivamente i bracciali forniti in dotazione o ricam-
bi originali. In caso contrario saranno rilevati valori errati.
28
Page 29
•
4
1
2
3
6
7
8
9
5
-
+
M+
Non premere pulsanti finché il bracciale non è ben allacciato
al polso.
•
Si consiglia di rimuovere le batterie quando l’apparecchio
non viene usato per un lungo periodo.
Indicazioni sulle batterie
•
L’inghiottimento delle batterie può essere mortale. Conserva-
re quindi le batterie e i prodotti fuori della portata dei bambini
piccoli. In caso d’inghiottimento di una batteria, contattare
immediata-mente un medico.
•
Non ricaricare o riattivare le batterie con altri mezzi, non
scomporle, non gettarle nel fuoco, non cortocircuitarle.
•
Rimuovere le batterie quando sono scariche o l’apparecchio
non viene usato per un lungo periodo. In questo modo si
evitano danni causati da una eventuale fuoriuscita del liquido
dalle batterie. Sostituire sempre contemporaneamente tutte
le batterie.
•
Non utilizzare batterie di tipo e marca diversi oppure batterie
con differenti capacità. Utilizzare preferibilmente batterie
alcaline.
Indicazioni sulla riparazione e sullo smaltimento
• Non gettare le batterie nei rifiuti casalinghi. Smaltire le batterie
scariche negli appositi centri di raccolta dei materiali inquinanti.
•
Non aprire l’apparecchio. La non osservanza di questa pre-
scrizione invalida la garanzia.
•
Non riparare o regolare da soli l’apparecchio. In questo caso
non è più garantito un funzionamento corretto.
•
Le riparazioni devono essere eseguite esclusivamente dal
servizio assistenza di Sanitas o da ri-venditori autorizzati.
Prima di ogni reclamo verificare in primo luogo lo stato delle
batterie e sosti-tuirle, se necessario.
•
Smaltire l’apparecchio conformemente alla direttiva sui
vecchi apparecchi elettrici ed elettronici 2002/96/CEE
WEEE (Waste Electrical and Electronic Equipment). Per
domande specifiche su questo argomento rivolgersi all’ufficio
comunale competente per lo smaltimento ecologico.
3. Descrizione dell’apparecchio
1. Manicotto
2. Tubo del manicotto
3. Attacco del manicotto
4. Display
5. Pulsante START/STOP
6. Pulsante per la memorizzazione M+
7. Pulsante SET
8. Pulsanti funzione -/+
9. Scala OMS
29
Page 30
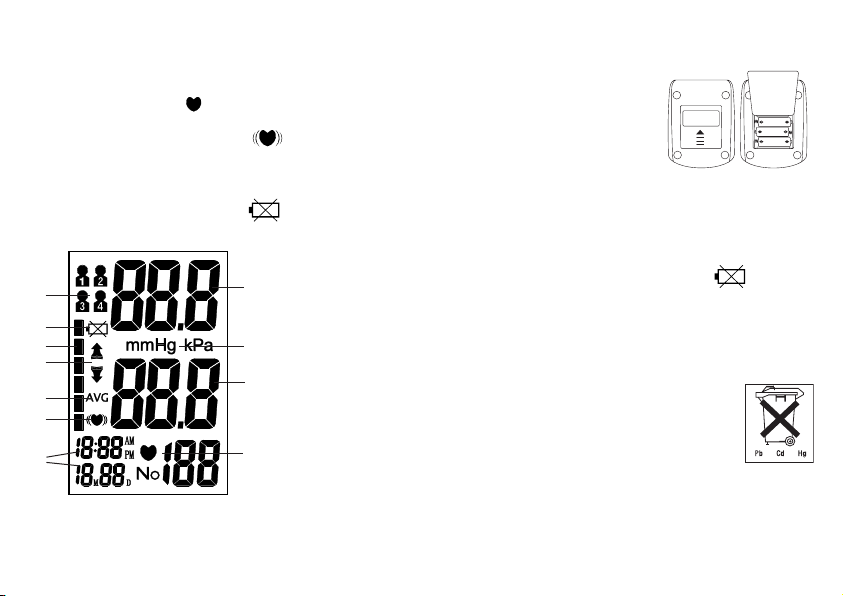
Indicazioni sul display:
4 x AA (LR06) 1,5 V
1. Pressione sistolica
2. Unità mmHg
3. Pressione diastolica
4. Icona battito cardiaco
e battito cardiaco rilevato
5. Ora e data
6. Icona disturbi del ritmo cardiaco
7. Medie delle ultime 3 misurazioni AVG
8. Pompaggio, scarico aria (freccia)
9. Classificazione OMS
10. Icona sostituzione delle batterie
11. Icona per utente 1, 2, 3, 4
11
1
10
9
8
2
3
7
6
5
4
4. Preparazione della misurazione
Inserimento delle batterie
•
Togliere il coperchio lato posteriore
dell’apparecchio.
•
Inserire 4 batterie del tipo alcaline
AA 1,5 V. Controllare assolutamente
che le batterie vengano inserite con
i poli corretti secondo le indicazioni.
Non devono essere utilizzate batterie
ricaricabili.
•
Richiudere accuratamente il coperchio del vano batterie.
Quando vengono emessi 4 segnali acustici e contemporaneamente viene visualizzata l'icona sul display non sono più possibili
misurazioni ed è necessario sostituire le batterie .
le batterie vengono rimosse dall'apparecchio, è necessario
reimpostare l'ora. Le batterie esauste non sono rifiuti domestici. Smaltirle presso un rivenditore di materiali elettrici o nel
punto di raccolta differenziata locale.
Lo smaltimento è un obbligo di legge.
Nota: Sulle batterie contenenti sostante nocive
sono riportate le sigle seguenti: Pb = la batteria
contiene piombo, Cd = la batteria contiene cadmio, Hg = la batteria contiene mercurio.
Quando
30
Page 31
Impostazione della data e dell’ora
La data e l'ora devono essere impostate necessariamente.
Solo in questo modo è possibile memorizzare le misurazioni
in modo corretto con data e ora ed essere quindi successivamente richiamate. L'ora è nel formato 12 ore, ossia le ore 13:00
sono indicate nel formato 01:00 PM.
Per impostare la data e l’ora procedere come segue:
• Premere due volte il pulsante SET.
• Impostare il mese da 1 a 12 con i pulsanti + e - e confermare
con il pulsante SET.
• Impostare giorno/ora/minuti e confermare con il pulsante SET.
Premere il pulsante per uscire dalla modalità di impostazione.
5. Misurazione della pressione sanguigna
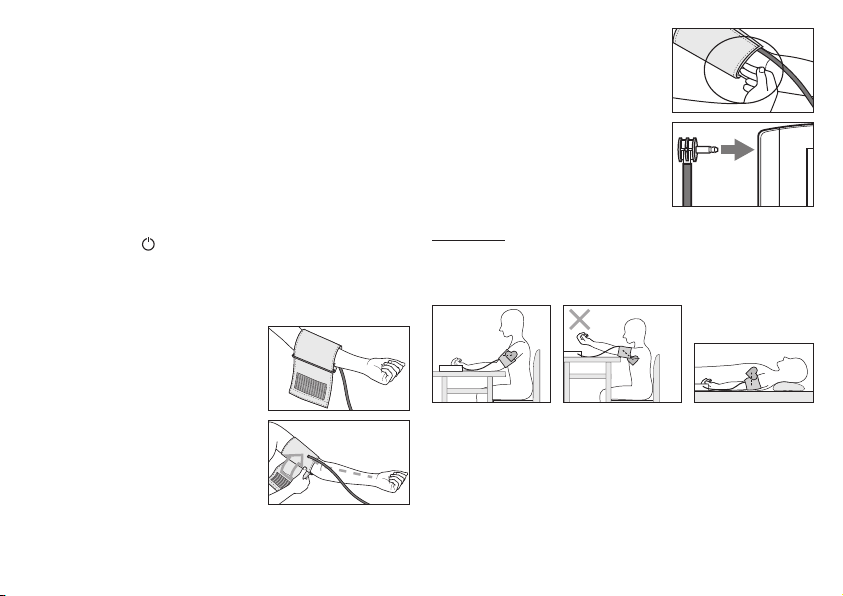
Applicare il bracciale
Applicare il bracciale al braccio libero
da indumenti. La circolazione sanguigna del braccio non dovrà risultare
impedita da indumenti troppo stretti
o simili.
Il bracciale va posizionato sul braccio
in modo che il suo bordo inferiore
venga a trovarsi 2 – 3 cm al di sopra
della piega del gomito e al di sopra
dell’arteria. Il flessibile dovrà essere
rivolto verso il centro del palmo della
mano.
Applicare quindi l’estremità libera
del bracciale intorno al braccio, in
maniera ben aderente ma non troppo
stretta, e chiudere con la chiusura a
strappo. Il bracciale dovrebbe essere
stretto intorno al braccio lasciando
sufficiente spazio per l’inserimento di
due dita.
Inserire quindi il flessibile del brac ciale nell’attacco della spina del
bracciale.
Attenzione: l’apparecchio deve essere utilizzato unicamente
con il bracciale originale.Il bracciale è adatto per una circonferenza braccio tra 22 e 36 cm.
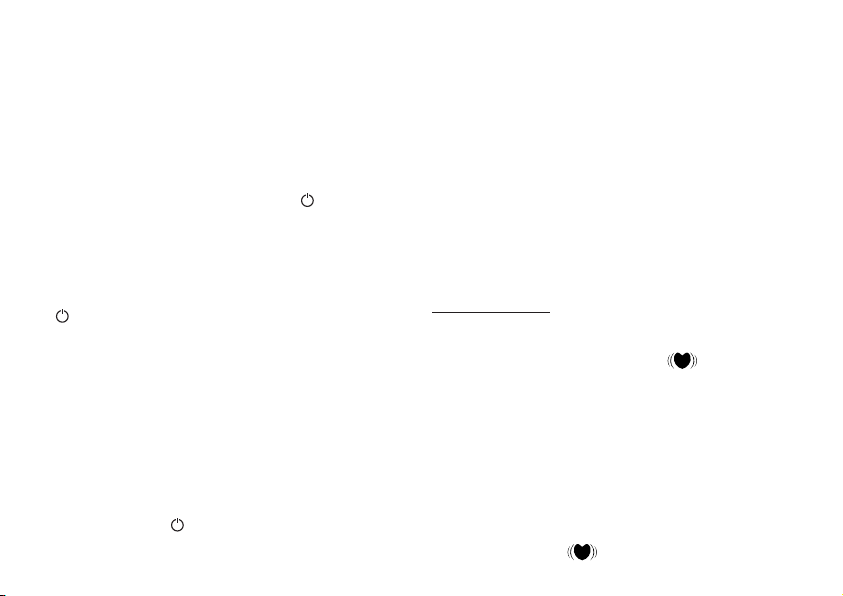
Assumere una posizione corretta del corpo
•
Riposare per circa 5 minuti prima di ogni misurazione!
In caso contrario l’apparecchio può fornire misure inesatte.
•
La misurazione può essere eseguita da seduti o sdraiati. Ad
ogni modo controllare che il bracciale si trovi all’altezza del
cuore. L’avambraccio va appoggiato in modo che il bracciale
venga a trovarsi all’altezza del cuore. Durante la misurazione,
per non influenzarne il risultato, è importante rimanere tranquilli e non parlare.
31
Page 32
•
Per non falsare il risultato della misurazione, è importante
mantenere un atteggiamento calmo e non parlare durante la
misurazione.
Selezionare la memoria
Premere il pulsante SET. Selezionare la posizione di memoria
desiderata premendo i pulsanti funzione -/+. Sono disponibili 4
memorie, ognuna da 30 posizioni, per poter memorizzare separatamente le misurazioni di 4 persone diverse o le misurazioni
mattutine e serali.
Confermare la selezione mediante il pulsante
.
Eseguire la misurazione della pressione sanguigna
•
Applicare il bracciale, come precedentemente descritto, e
mettersi nella posizione in cui si desidera eseguire la misurazione.
• Avviare il processo di misurazione tenendo premuto il pulsante . Dopo una verifica del display, durante la quale si accendono tutti i numeri, il manicotto si gonfia automaticamente.
Durante il pompaggio l'apparecchio rileva già i valori necessari a determinare la pressione di gonfiaggio necessaria.
Se la pressione risulta insufficiente, l'apparecchio provvede
automaticamente al gonfiaggio.
•
Il bracciale si sgonfia quindi lentamente ed il battito cardiaco
viene rilevato.
•
Al termine della misurazione, la pressione d’aria rimanente
viene scaricata rapidamente. Vengono visualizzati il battito
cardiaco, la pressione sistolica e diastolica.
•
La misurazione può essere interrotta in qualsiasi momento
premendo il pulsante .
•
Se è necessaria una pressione di pompaggio superiore, per
evitare una regolazione successiva, tenere premuto il pulsante M+ subito dopo l'inizio della procedura fino a quando
viene raggiunta la pressione del manicotto desiderata. La
pressione di pompaggio corretta dovrebbe superare il valore
sistolico di circa 30 mmHg.
•
L’indicazione Err appare quando la misurazione non è stata
effettuata correttamente. Consultare il capitolo Messaggi di
errore/Eliminazione dei guasti in questo libretto di istruzioni
per l’uso e ripetere la misurazione.
• L'apparecchio si spegne automaticamente dopo circa 3 minuti.
Attendere almeno 5 minuti prima di eseguire una nuova misurazione!
Valutare i risultati
Aritmie cardiache:
Questo apparecchio è in grado di identificare disfunzioni ritmiche del battito cardiaco durante la misurazione ed, eventualmente, le indica sul display con l’icona
.
Questa può essere un’indicazione di un’aritmia. L’aritmia è
una malattia che consiste nell’anomalia del ritmo del cuore
dovuta a disfunzioni nel sistema bioelettrico che comanda il
battito cardiaco. I sintomi (battiti cardiaci mancanti o prematuri,
frequenza lenta o accelerata dei battiti) possono essere causati
tra l’altro da malattie cardiache, età, predisposizione genetica,
ingerimento spropositato di dolciumi, stress o sonno insufficiente. L’aritmia può essere diagnosticata solo da una visita
cardiologica da parte di un medico.
Ripetere l’operazione quando al termine della misurazione sul
display appare l’icona .
32
Page 33
Tener presente che occorre riposare per 5 minuti e si deve
rimanere fermi senza parlare durante la misurazione. Se l’icona
compare frequentemente, consultare il proprio medico.
Autodiagnosi e autotrattamenti eseguiti in base ai valori misurati possono essere pericolosi. Seguire assolutamente le
indicazioni del proprio medico curante.
Classificazione dell’OMS:
conformemente alle direttive dell’Organizzazione Mondiale della Sanità (OMS = WHO) e sulla base delle nuove conoscenze, i
risultati delle misurazioni possono essere classificati e valutati
secondo la seguente tabella.
Campo dei valori della pressione
sanguigna
Pressione sistolica
(in mmHg)
Livello 3: ipertensione grave >=180
Livello 2: ipertensione moderata
Livello 1: ipertensione leggera
Normale-alto
Normale
Ottimale
Fuente: WHO, 1999
La grafica a barre sul display e la scala sull’apparecchio indicano il campo in cui si trova la pressione sanguigna misurata.
Se i valori di sistole e diastole si trovano in due campi OMS diversi (ad es. la sistole nel campo Normale-alto e la diastole nel
campo Normale), la classificazione grafica di OMS sull’apparecchio indica sempre il campo superiore, nel nostro esempio
„Normale-alto“.
160 – 179 100 – 109
140 – 159 90 – 99
130 – 139 85 – 89
120 – 129 80 – 84
< 120 < 80
Pressione diastolica
(in mmHg)
> = 110
Misura da prendere
visitare un medico
visitare un medico
controlli regolari presso un medico
controlli regolari presso un medico
autocontrollo
autocontrollo
6. Salvataggio, richiamo e cancellazione dei
valori misurati
• I valori rilevati da ogni misurazione eseguita con successo
sono memorizzati assieme alla data e all’ora. Una volta superati 30 valori misurati, vengono sovrascritti i dati più vecchi.
•
Selezionare la memoria utente desiderata con i pulsanti SET
e -/+, quindi confermare con il pulsante . Premendo nuovamente il pulsante M+, il sistema visualizza la media AVG delle
3 ultime misurazioni memorizzate nella posizione di memoria
utente. Premendo il pulsante + vengono visualizzati i valori
misurati più recenti, con il pulsante - i più vecchi.
33
Page 34

•
La media AVG viene visualizzata solo dopo che sono stati
memorizzati 3 valori per memoria utente.
•
Per cancellare una posizione di memoria, selezionarla. Tene-
re premuto il pulsante SET per circa 3 secondi. Tutti i valori
dell'attuale memoria utente verranno cancellati dopo tre brevi
segnali acustici.
•
Se si desidera cambiare la memoria utente, consultare il
capitolo „Selezionare la memoria“.
7. Pulizia e custodia dell’apparecchio
•
Pulire accuratamente l’apparecchio servendosi esclusiva-
mente di un panno leggermente inumidito.
•
Non utilizzare detergenti né solventi.
•
Non immergere assolutamente l’apparecchio in acqua: que-
sta potrebbe penetrare all’interno e provocare danni.
•
Se l’apparecchio viene conservato, non devono trovarsi og-
getti pesanti su di esso. Estrarre le batterie. Il tubo flessibile
del bracciale non deve essere piegato.
8. Messaggi di errore/Eliminazione dei guasti
In caso di anomalie, il display visualizza la segnalazione di
errore Err.
I messaggi di errore possono comparire nei seguenti casi:
1. l a pressione di insufflazione è superiore a 300 mmHg,
2. il valore misurato della pressione sanguigna è eccezionalmente alto o basso,
3. durante la misurazione il paziente si è mosso o ha parlato.
In questi casi ripetere la misurazione. Accertarsi che il tubo
flessibile del bracciale sia ben innestato e prestare attenzione a
non muoversi o a non parlare. Se necessario, inserire
le nuove batterie o sostituirle.
9. Dati tecnici
Modello N° SBM 21
Metodo di misurazione Misurazione oscillometrica, nonin-
Campo di misurazione sistolica 0-300 mmHg, diastolica
Precisione della visualizzazione
Incertezza di misurazione
Memoria 4 x 30 spazi si memoria
Dimensioni 155 x 110 x 70 mm (lunghezza x
Peso Circa 405 g
Dimensioni bracciale Con bracciale per dimensioni del
Temperatura d’esercizio ammissibile
34
vasiva della pressione sanguigna
sul braccio
0-300 mmHg battico cardiaco
30-180 battiti/minuto
sistolica ± 3 mmHg/
diastolica ± 3 mmHg/della pressione
polso ± 5 % del valore visualizzato
Scostamento standard massimo
ammissibile conforme a test clinico:
sistolica 8 mmHg/
diastolica 8 mmHg
larghezza x altezza)
braccio da 22 a 36 cm
da +5 °C a + 40 °C, < 85 % umidità
relativa dell’aria
Page 35
Temperatura di conservazione ammissibile
da -10 °C a +55 °C, < 95 % umidità
relativa dell’aria
Alimentazione Batterie 4 x 1,5 V AA (alcaline tipo
LR 06)
Durata funzionamento
batterie
Per circa 250 misurazioni, a seconda
del valore della pressione sanguigna
o della pressione d’insufflazione
Accessori Borsa di custodia, libretto di
istruzioni per l’uso, 4 batterie AA
LR 06
Classificazione Parte d’impiego tipo B
Classe di protezione alimentazione interna, IPXO, nes-
suna categoria AP o APG, esercizio
continuo
Spiegazione dei
simboli
parte d’impiego tipo B
Attenzione
– leggere le istruzioni
Il costruttore si riserva di aggiornare i dati tecnici senza dare
comunicazione.
•
Questo apparecchio è conforme alla norma europea
EN60601-1-2 ed è sottoposto a misure speciali concernenti
la compatibilità elettromagnetica 93/42/EC. Tener presente
che dispositivi di comunicazione portatili e mobili ad alta frequenza possono influenzare questo apparecchio. Richiedere
informazioni più dettagliate all’indirizzo indicato del servizio
assistenza clienti.
•
L’apparecchio è conforme alla direttiva EU concernente i
prodotti medicali, alla legge sui prodotti medicali e alle norme
EN1060-1 (sfigmomanometri non invasivi, parte 1: Requisiti
generali) e EN1060-3 (sfigmomanometri non invasivi, parte 3:
Requisiti complementari per sistemi elettromeccanici di misurazione della pressione sanguigna).
•
Se questo apparecchio viene utilizzato per fini commerciali
ed economici, si devono eseguire regolarmente controlli tecnici conformemente a quanto prescritto nella „Direttiva per
esercenti di prodotti medicali“. Anche per l’uso privato consigliamo un controllo tecnico a intervalli di 2 anni da eseguire
presso il produttore
35
Page 36
РУССКИЙ
Внимательно прочтите данную инструкцию по эксплуатации,
сохраняйте ее для дальнейшего использования, дайте
ее прочитать и другим пользователям и строго следуйте
приведенным в ней указаниям.
1. Ознакомление
Аппарат для измерения кровяного давления в плечевой
артерии служит для неинвазивного измерения и контроля
артериального давления у взрослых пациентов. С его
помощью Вы можете быстро и просто измерять Ваше
кровяное давление, вводить в память результаты измерений и
показывать изменения и средние значения давления.
Вы будете предупреждены при возможно имеющихся
нарушениях ритма сердца.
Результаты измерений классифицируются согласно
директивам ВОЗ и подвергаются графическому анализу.
Внимательно прочтите данную инструкцию по эксплуатации,
сохраните ее и ознакомьте с ней и других пользователей.
2. Важные указания
Указания по применению
•
Всегда измеряйте кровяное давление в одно и то же время
суток, чтобы обеспечить сравнимость результатов.
•
Перед каждым измерением расслабляйтесь в течение около
5 минут!
•
Между двумя измерениями рекомендуется подождать около
5 минут!
•
Полученные Вами результаты измерений могут служить
только для информации – они не заменяют медицинское
обследование! Обсудите результаты измерений с врачом, не
принимайте на их основании никаких медицинских решений
(например, выбор медикаментов и их дозировки)!
•
Неверные измерения могут возникать при заболеваниях
сердечно-сосудистой системы, а также при очень низком
артериальном давлении, нарушениях кровообращения и
сердечного ритма и других предболезнях.
•
Использовать аппарат только для людей, у которых объем
плеча соответствует указанному диапазону.
•
Прибор для измерения артериального давления может
работать от батареек. Учтите, что сохранение данных
возможно только в том случае, если прибор получает
электрический ток. Как только батарейки разряжаются,
прибор теряет настройки времени и даты.
•
Прибор для измерения артериального давления отключается
автоматически, если в течение 3 минут не была нажата
ни одна кнопка, это происходит для экономии энергии
батареек.
Указания по хранению и уходу
•
Аппарат состоит из прецизионных и электронных узлов.
Точность результатов измерений и срок службы аппарата
зависят от тщательности обращения:
36
Page 37
– Предохраняйте прибор от ударов, действия влаги,
грязи, сильных колебаний температуры и прямых
солнечных лучей.
– Не допускайте падений прибора.
– Не используйте прибор вблизи сильных электромагнитных
полей, например, вблизи радиоаппаратуры или мобильных
телефонов.
– Используйте только входящие в объем поставки или
оригинальные запасные манжеты. В противном случае
получаются неверные результаты измерений.
•
Не нажимать на кнопки, пока не надета манжета.
•
Если Вы длительное время не пользуетесь прибором,
рекомендуется вынуть батарейки.
Указания в отношении батареек
•
Проглатывание батареек может приводить к опасности для
жизни. Поэтому храните батарейки и изделия в недоступном
для детей месте. В случае проглатывания батарейки
незамедлительно обратитесь к врачу.
•
Запрещается заряжать или реактивировать батарейки
иными способами, разбирать их, бросать в огонь или
замыкать накоротко.
•
Вытащите батарейки из аппарата, если они разряжены или
если Вы длительное время не пользуетесь прибором. Таким
образом Вы предотвращаете ущерб, который может быть
вызван вылившимся электролитом. Всегда заменяйте все
батарейки одновременно.
•
Не используйте батарейки различных типов, марок или
батарейки с различной емкостью. Преимущественно
используйте щелочные батарейки.
Указания по ремонту и утилизации
•
Батарейки запрещается выбрасывать в бытовой
мусор. Утилизируйте использованные батарейки через
соответствующий пункт сбора отходов.
•
Не открывайте прибор. Несоблюдение ведет к потере
гарантии.
•
Запрещается самостоятельно ремонтировать или
регулировать прибор. В этом случае больше не
гарантируется безупречность работы.
•
Ремонт разрешается выполнять только службе технического
обеспечения фирмы или авторизированным сервисным
организациям. Но перед любыми рекламациями вначале
проверьте батарейки и, при необходимости,замените их.
•
Утилизируйте прибор согласно требованиям
Положения об утилизации электрического и
электронного оборудования 2002/96/EC – WEEE
(„Waste Electrical and Electronic Equipment“). По всем
вопросам по утилизации обращайтесь в соответствующую
коммунальную службу.
37
Page 38
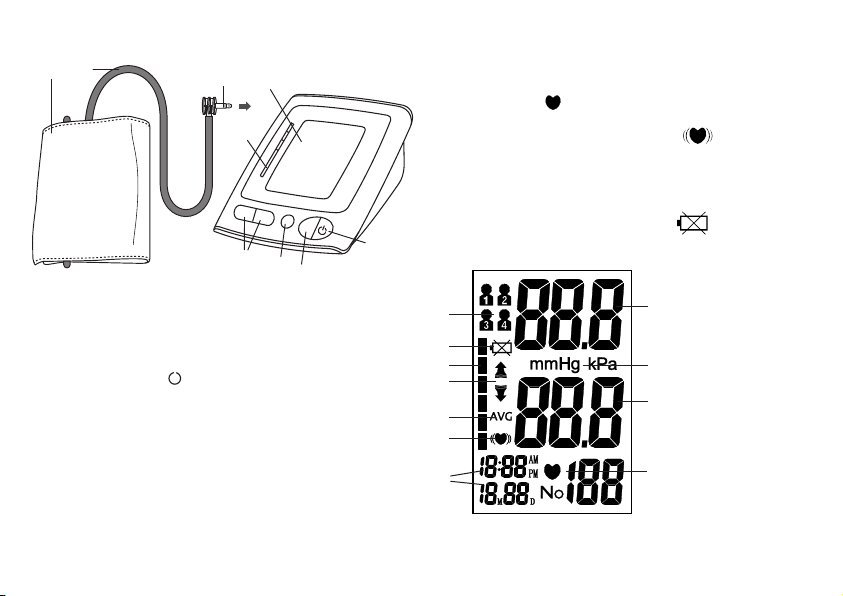
3. Описание прибора
4
1
2
3
6
7
8
9
5
-
+
M+
Индикация на дисплее:
1. Систолическое давление
2. Единица "мм ртутного столба"
3. Диастолическое давление
4. Символ пульса
и измеренное значение пульса
5. Время и дата
6. Символ нарушений сердечного ритма
7. Средние значения последних 3 измерений частоты
сердечных сокращений (AVG).
8. Накачивание, выпускание воздуха (стрелка)
9. Градация ВОЗ
10. Символ индикации смены батарейки
11. Символ для пользователя 1, 2, 3, 4
1. Манжета
2. Шланг манжеты
3. Штекер манжеты
4. Дисплей
5. Кнопка START/STOP
6. Кнопка сохранения M+
7. Кнопка SET
8. Функциональные кнопки -/+
9. Шкала ВОЗ
11
1
10
9
8
2
3
7
6
5
38
4
Page 39
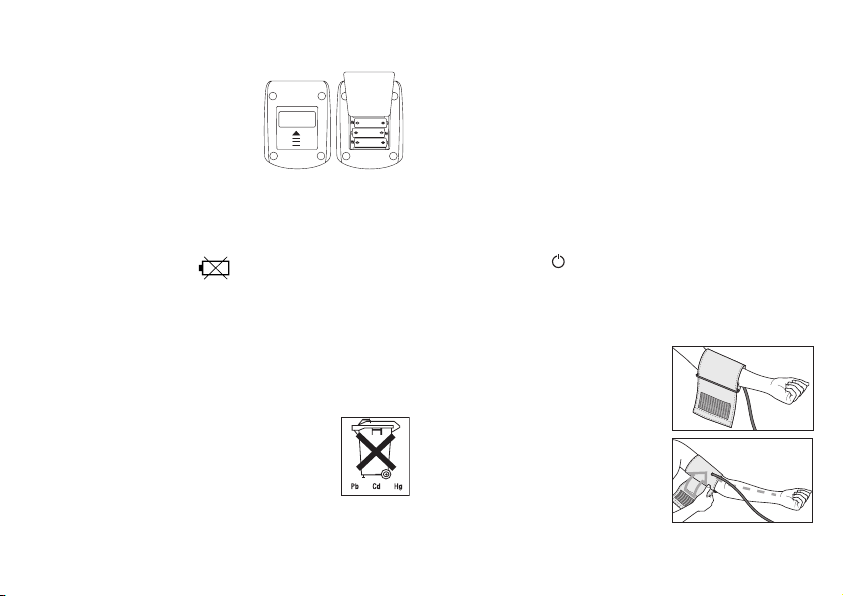
4. Подготовка к измерению
4 x AA (LR06) 1,5 V
Установка батарейки
•
Снимите крышку с батарейного
отсека на задней стенке аппарата.
•
Установите 4 алкалиновых
батарейки типа AA 1,5 В. Следите
за тем, чтобы батарейки были
вставлены с соблюдением
полярности. Заряжаемые
аккумуляторные батареи использовать нельзя.
•
Аккуратно закройте крышку батарейного отсека.
Если раздаются 4 звуковых сигнала и одновременно на
дисплее появляется символ , измерение больше
невозможно, необходимо заменить все батарейки . После
извлечения батареек время необходимо устанавливать заново.
Использованные батарейки не должны утилизироваться
вместе с бытовым мусором. Утилизируйте их через
специализированный магазин электрооборудования или
местный пункт сбора вторсырья.
Вы обязаны делать это по закону.
Информация: Эти обозначения ставятся на
батарейках, содержащих вредные материалы:
Pb = в батарейке содержится свинец, Cd = в
батарейке содержится кадмий, Hg = в батарейке
содержится ртуть.
Настройка даты и времени
Вам необходимо установить дату и время. Только так Вы
сможете правильно сохранять в памяти измеренные Вами
значения с датой и временем и затем выводить их на экран.
Время отображается в 12-часовом формате, т.е. время после
13:00 часов отображается как 01:00 PM.
Настройка даты и времени производится следующим образом:
• Подтвердите, дважды нажав на кнопку SET.
• Сначала с помощью кнопок + или - установите месяц (1-12),
затем подтвердите нажатием кнопки SET.
• Настройте день/час/минуты, каждый раз подтверждая
настройку кнопкой SET.
Нажмите на кнопку
, чтобы выйти из режима настройки.
5. Измерение кровяного давления
Наложить манжету
Наденьте манжету на обнаженное
левое предплечье. Примите
меры, чтобы слишком тесные
элементы одежды или что-либо
иное не нарушало нормальное
кровообращение на руке.
Манжета должна быть помещена
на предплечье так, чтобы нижняя
ее кромка была на 2 – 3 см выше
локтевого сгиба и располагалась над
артерией. Соединительная трубка
должна показывать в направлении середины ладони.
39
Page 40
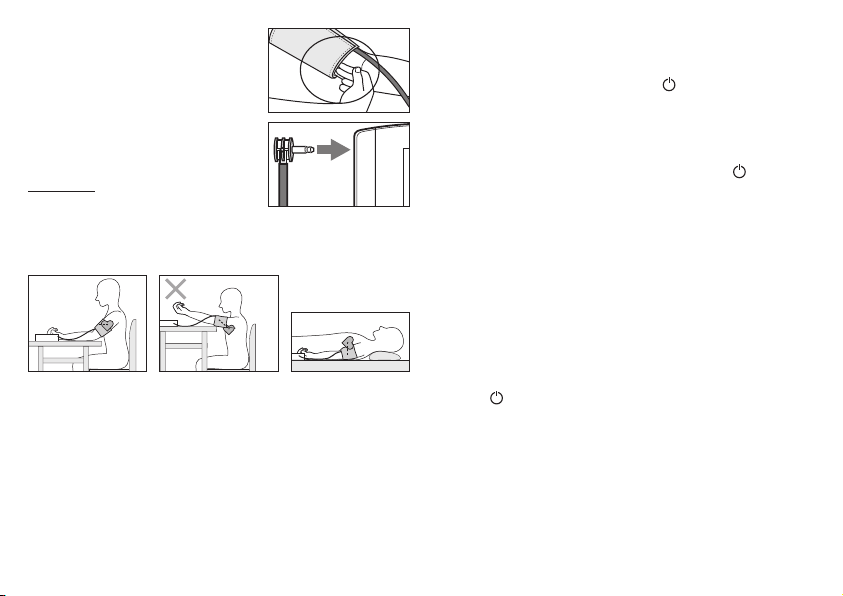
Заверните свободный конец манжеты
плотно, но не слишком, вокруг руки и
зажмите замок на липучках. Манжета
должна прилегать к руке настолько
плотно, чтобы под нее можно было
продеть не больше двух пальцев.
Наденьте теперь соединительную
трубку манжеты на штуцер манжеты.
Внимание! Эксплуатация прибора
допускается только с оригинальной
манжетой. Данная манжета пригодна для руки с окружностью
от 22 до 36 см.
Принять правильное положение
• Перед каждым измерением расслабляйтесь в течение около 5
минут! В противном случае возникают неточности измерения.
•
Измерения можно проводить в положении сидя или
в положении лежа.Следите при этом, чтобы манжета
находилась на уровне сердца.
•
Чтобы не исказить результаты измерения, следует вести
себя во время измерения спокойно и не разговаривать.
Выбор ЗУ
Нажмите кнопку SET. Выберите желаемую ячейку памяти
нажатием функциональных кнопок -/+. Имеется 4 памяти с
30 ячейками памяти в каждой, чтобы можно было раздельно
сохранить результаты измерения для четырех человек или
утренние и вечерние измерения.
Подтвердите выбор нажатием кнопки
.
Выполнить измерение кровяного давления
•
Наденьте манжету, как было описано выше, и примите
положение, в котором будет проводиться измерение.
• Начните процедуру измерения, нажимая на кнопку длительное
время. После проверки дисплея, при которой должны гореть
все цифры, манжета автоматически накачивается. Во время
накачивания прибор определяет значения измерения, которые
служат для оценки требуемого давления накачивания.
Если этого давления недостаточно, прибор автоматически
увеличит его.
•
После этого давление в манжете медленно опускается и
измеряется пульс.
•
По окончании измерения остаточное давление воздуха
быстро понижается. Появляются показания частоты пульса,
систолического и диастолического кровяного давления.
•
Измерение можно в любой момент прервать нажатием
кнопки .
•
Если принципиально требуется более высокое давление
накачивания, то можно обойтись без дополнительной
подкачки, если сразу после начала процедуры накачивания
нажать и удерживать кнопку M+, пока не будет достигнуто
требуемое давление в манжете. Оно должно превышать
систолическое давление примерно на 30 мм ртутного столба.
•
Пиктограмма
Err
появляется, если измерение не может быть
выполнено должным образом. Прочтите главу „Сообщения
40
Page 41
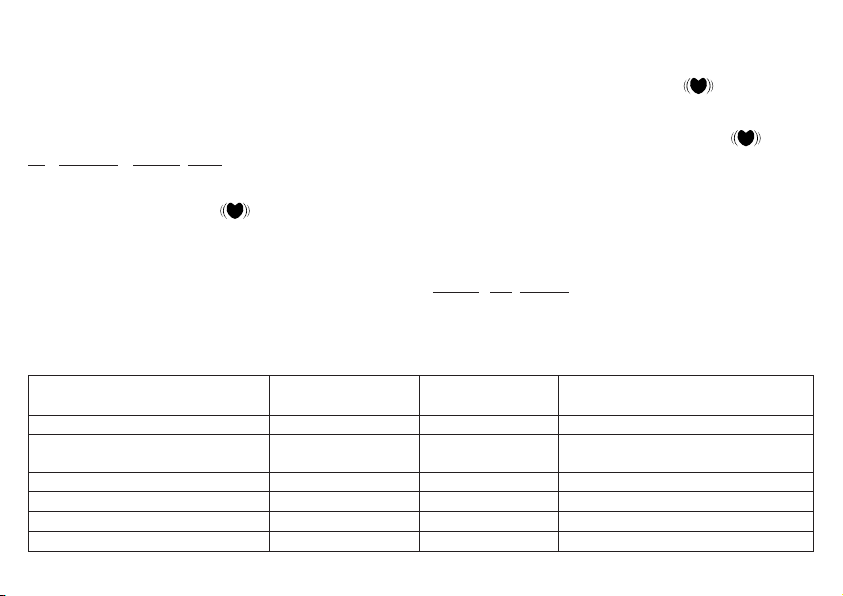
о неисправностях/Устранение неисправностей“ в данной
инструкции и повторите измерение.
• Прибор автоматически выключится примерно через 3 минуты.
Перед проведением нового измерения следует выждать не
менее 5 минут!
Оценка результатов
Нарушения сердечного ритма:
Данный аппарат может во время измерения идентифицировать
возможные нарушения сердечного цикла и в подобном случае
указывает на это пиктограммой .
Это может служить индикатором аритмии. Аритмия – это
заболевание, при котором сердечный ритм нарушается из-за
пороков в биоэлектрической системе, которая управляет
сердечными сокращениями. Симптомы (пропущенные или
преждевременные сердечные сокращения, медленный или
слишком быстрый пульс) могут вызываться, среди прочего,
заболеваниями сердца, возрастом, физиологической
предрасположенностью, чрезмерным употреблением
Диапазон значений артериального
давления
Уровень 3: сильная гипертония
Уровень 2: гипертония средней
тяжести
Уровень 1: легкая гипертония
Высокое нормальное
Нормальное
Оптимальное
Источник: ВОЗ, 1999
Систола (в мм рт. ст.)
> = 180 > = 110
160 – 179 100 – 109
140 – 159 90 – 99
130 – 139 85 – 89
120 – 129 80 – 84
< 120 < 80
41
тонизирующих и возбуждающих продуктов, стрессом или
недосыпанием. Аритмия может быть обнаружена только при
обследовании врачом.
Повторите измерение, если пиктограмма появляется
на дисплее после измерения. Учтите, что перед измерением
Вы должны 5 минут отдохнуть, а во время измерения не
должны говорить и двигаться. Если пиктограмма
появляется часто, обратитесь к врачу. Самодиагностика и
самолечение на основании результатов измерений могут
быть опасными. Обязательно выполняйте указания врача.
Согласно директивам/определения Всемирной организации
здравоохранения (ВОЗ) и новейшим исследованиям
результаты измерений можно классифицировать и оценить,
как указано в нижеследующей таблице.
Классификация ВОЗ:
Согласно директивам/определения Всемирной организации
здравоохранения (ВОЗ) и новейшим исследованиям
результаты измерений можно классифицировать и оценить,
как указано в нижеследующей таблице.
Диастола (в мм
рт. с т.)
Мера
Обратиться к врачу
Обратиться к врачу
Регулярный контроль у врача
Регулярный контроль у врача
Самоконтроль
Самоконтроль
Page 42

Пиктограмма на дисплее и шкала на аппарате указывают, в
каком диапазоне находится измеренное кровяное давление.
Если значения для систолы и диастолы находятся в двух
различных диапазонах по классификации ВОЗ (например,
систола в диапазоне „Высокое нормальное“, а диастола
в диапазоне „Нормальное“), то график в аппарате всегда
указывает более высокий диапазон, в описанном примере –
„Высокое нормальное“.
6. Сохранение, вызов и удаление результатов
измерения
•
Результаты каждого успешного измерения сохраняются
в памяти вместе с датой и временем. При более чем 30
результатах самый старый результат переписывается.
•
Выберите с помощью кнопки SET и затем кнопок -/+
желаемую ячейку памяти и подтвердите выбор нажатием
кнопки . Если нажать кнопку M+, отобразится среднее
значение частоты сердечных сокращений (AVG) из
последних 3 сохраненных в данной пользовательской
памяти измеренных значений. При нажатии кнопки +
отображаются последние результаты измерения, при
нажатии кнопки - самые ранние.
•
Среднее значение частоты сердечных сокращений
(AVG) может отображаться только при наличии 3 и
более сохраненных значений в соответствующей
пользовательской памяти.
•
Чтобы очистить память, выберите сначала
пользовательскую память. Удерживайте кнопку SET нажатой
в течение примерно 3 секунд. Все значения в выбранной
пользовательской памяти будут удалены после 3 коротких
звуковых сигналов.
•
Если Вы хотите сменить пользовательские ячейки, то
соблюдайте указания, приведенные в разделе „Выбор ЗУ“.
7. Очистка и хранение прибора
•
Осторожно очистите прибор и манжету слегка смоченной
тряпкой.
•
Запрещается использование чистящих средств или
растворителей.
•
Не допускайте попадание прибора в воду, т.к. в результате в
него может проникнуть жидкость и повредить прибор.
•
При хранении аппарата на него нельзя ставить тяжелые
предметы. Запрещается сильно перегибать соединительную
трубку манжеты.
8. Сообщения о неисправностях/
Устранение неисправностей
При неисправностях на дисплее появляется сообщение Err.
Сообщения о неисправностях могут появляться, если
1. давление накачивания превышает 300 мм рт. ст.
2. значение артериального давления необычно высокое или
низкое
3. во время измерения Вы двигаетесь или разговариваете.
В этих случаях повторите измерение. Следите за тем, чтобы
шланг манжеты был правильно вставлен и чтобы Вы не
двигались и не разговаривали. При необходимости, заново
установите батарейки или замените старые.
42
Page 43

9. Технические данные
Модель № SBM 21
Методы измерения Осциллометрическое неинвазивное
Диапазон измерения систолическое: 0-300 мм рт. ст.,
Точность индикации систолическое ± 3 мм рт. ст. /
давления диастолическое ± 3 мм рт. ст. /
Погрешность макс. допустимое стандартное
измерений отклонение согласно клиническим
запоминающее 4 x 30 ячеек памяти
устройство
Размеры 155 (длина) x 110 (ширина) x 70 (высота)
масса Около 405 г
размер манжеты Манжета для окружности плеча от
Допустимая рабочая от + 5 °C до + 40 °C, < 85 %
температура относительная влажность
Допустимая температура
Электропитание 4 АA-батарейки LR 06
измерение кровяного давления на
предплечье
диастолическое 0-300 мм рт. ст.,
пульс 40 –199 ударов в минуту
пульс ± 5 % индицируемых значений
испытаниям: систолическое давление
8 мм рт. ст. / диастолическое давление
8 мм рт. ст.
22 до 36 см
от - 10 °C до + 55 °C, <95 % хранения
относительная влажность
Срок службы батарейки Примерно для 250 измерений,
Вспомогательное Сумка для хранения, руководство
оборудование по эксплуатации,4 АА-батарейки
Классификация Раздел по применению, тип B
Класс защиты Внутреннее питание, IPXO, без AP
или APG, непрерывный режим
Примечание раздел применения Тип В
В целях усовершенствования мы сохраняем за собой право на
изменения технических данных без оповещения.
•
Данный прибор соответствует европейскому стандарту
EN60601-1-2 и является предметом особых мер
предосторожности в отношении электромагнитной
совместимости. При этом учитывайте, что переносные и
мобильные средства ВЧ-связи могут влиять на данный
прибор. Точную информацию Вы можете получить в
сервисных центрах.
•
Аппарат соответствует требованиям европейского
нормативного акта по медицинским изделиям, 93/42/EC
Закона о медицинских изделиях, а также европейских
стандартов EN1060-1 („Неинвазивные аппараты для
измерения кровяного давления“, часть 1: „Общие
43
в зависимости от величины
артериального давления и,
соответственно, достигаемого в
манжете давления
LR 06
Внимание: Прочитайте инструкцию
по применению
Page 44

требования“) и EN1060-3 („Неинвазивные аппараты для
измерения кровяного давления”, часть 3: „Дополнительные
требования к электромеханическим системам для
измерения кровяного давления“).
•
Если Вы используете аппарат в коммерческих целях, Вы
должны – согласно „Правил эксплуатации медицинских
изделий“ - регулярно проводить метрологический контроль.
Даже при личном использовании мы рекомендуем каждые
два года передавать аппарат в сервисную службу для
метрологического контроля.
10. Гарантия
Мы предоставляем гарантию на дефекты материалов и
изготовления этого прибора на срок 24 месяца со дня
продажи через розничную сеть.
Гарантия не распространяется:
- на случаи ущерба, вызванного неправильным
использованием
- на быстроизнашивающиеся части
( батарейки, манжета )
- на дефекты, о которых покупатель знал в момент покупки
- на случаи собственной вины покупателя.
Товар сертифицирован.
Срок эксплуатации изделия: от 3 до 5 лет
Фирма изготовитель: Бойрер Гмбх, Софлингер штрассе 218,
89077-УЛМ, Германия для фирмы Ханс
88524 Уттенвайлер, Германия
Динслаге ЛТд
Сервисный центр: 109451 г. Москва, ул.Перерва, 62, корп.2
Тел(факс) 495– 658 54 90
Дата продажи
Подпись продавца
Штамп магазина
Подпись покупателя
753.939 - 1010 Irrtum und Änderungen vorbehalten
44
 Loading...