

Page 1

Sports Camcorder
VP-X205L/X210L/X220L
ENGLISH
AF Auto-Focus
CCD Charge Coupled Device
DELETE
LCD Liquid Crystal Display
Owner’s Instruction Book
Before operating the unit, please read this Instruction
Book thoroughly, and retain it for future reference.
This product meets the intent of
Directive 89/336 CEE, 73/23 CEE, 93/68 CEE.
Use only approved battery packs.
Otherwise, there is a danger of overheating, fire or explosion.
Samsung is not responsible for problems occurring due to using unapproved batteries.
DISPLAY
W
T
MENU
MODE
HOLD
IN
C
D
AD68-00994F
Page 2

ENGLISH
Contents
Notices and Safety Precautions 8
Precautions when using the Sports Camcorder .................................................................................................................................................... 8
Notes Regarding COPYRIGHT .................................................................................................................................................................................. 9
Notes Regarding Moisture Condensation ............................................................................................................................................................... 9
Notes Regarding the Sports Camcorder ................................................................................................................................................................. 9
Notes Regarding the Battery Pack ......................................................................................................................................................................... 10
Notes Regarding the Lens ....................................................................................................................................................................................... 11
Notes Regarding the LCD Display .......................................................................................................................................................................... 11
Precautions Regarding Service .............................................................................................................................................................................. 11
Precautions Regarding Replacement Parts .......................................................................................................................................................... 11
Getting to Know Your Sports Camcorder 12
Features ..................................................................................................................................................................................................................... 12
Accessories Supplied with the Sports Camcorder .............................................................................................................................................. 13
Location of Controls 14
Rear & Left View ....................................................................................................................................................................................................... 14
Side & Bottom View .................................................................................................................................................................................................. 15
External Camera Module View ................................................................................................................................................................................ 16
LCD Display ............................................................................................................................................................................................................... 17
OSD (On Screen Display in Movie Record Mode/Movie Play Mode) ................................................................................................................ 17
OSD (On Screen Display in Photo Capture Mode/Photo View Mode) .............................................................................................................. 18
OSD (On Screen Display in MP3 Mode) ............................................................................................................................................................ 19
OSD (On Screen Display in Voice Record Mode/Voice Play Mode) ................................................................................................................. 20
OSD (On Screen Display in File Browser Mode/System Settings Mode) .........................................................................................................21
How to Use the Battery Pack 22
Battery Pack Installation / Ejection ........................................................................................................................................................................ 22
Maintaining the Battery Pack .................................................................................................................................................................................. 23
Charging the Battery Pack ...................................................................................................................................................................................... 25
22
Page 3

ENGLISH
Contents
Getting Started 26
The LED Colour ......................................................................................................................................................................................................... 26
Before You Start Operating the Sports Camcorder ............................................................................................................................................. 26
Using the MODE button ........................................................................................................................................................................................... 27
Using the Function button ....................................................................................................................................................................................... 28
Using the Joystick .................................................................................................................................................................................................... 28
Using the MENU button ........................................................................................................................................................................................... 28
Using the DISPLAY button ...................................................................................................................................................................................... 29
Using the DELETE button ........................................................................................................................................................................................ 29
Structure of the Folders and Files .......................................................................................................................................................................... 30
Recording Time and Capacity ................................................................................................................................................................................. 31
Using a Memory card (SD/MMC) (not supplied) ................................................................................................................................................... 33
Inserting / Ejecting the memory card (SD/MMC) (not supplied) ......................................................................................................................... 34
Movie Mode 35
Recording .................................................................................................................................................................................................................. 36
Recording............................................................................................................................................................................................................. 36
Zooming In and Out .............................................................................................................................................................................................37
Playing........................................................................................................................................................................................................................ 38
Playing Movie Files on the LCD monitor ............................................................................................................................................................38
Playing Multiple Movie Files ................................................................................................................................................................................ 39
Setting the Recording Options ............................................................................................................................................................................... 41
Setting the Movie Size .........................................................................................................................................................................................41
Setting the Movie Quality .................................................................................................................................................................................... 42
Setting the White Balance ................................................................................................................................................................................... 43
Setting the Program AE (Programmed Auto Exposure) .....................................................................................................................................44
Setting the Effect ................................................................................................................................................................................................. 45
Setting the EIS (Electronic Image Stabilizer) ...................................................................................................................................................... 46
Setting the Focus .................................................................................................................................................................................................47
Setting the BLC (Backlight Compensation) ........................................................................................................................................................ 48
Setting the Digital Zoom ...................................................................................................................................................................................... 49
Setting the Record Mode ....................................................................................................................................................................................50
33
Page 4

ENGLISH
Contents
Setting the Line In/Out .........................................................................................................................................................................................51
Setting the Viewing Options .................................................................................................................................................................................... 52
Deleting Movie Files ............................................................................................................................................................................................ 52
Setting the Play Mode ......................................................................................................................................................................................... 53
Locking Movie Files ............................................................................................................................................................................................. 54
Copying Movie Files ............................................................................................................................................................................................ 55
Photo Mode 56
Capturing ................................................................................................................................................................................................................... 57
Capturing Images ................................................................................................................................................................................................ 57
Zooming In and Out .............................................................................................................................................................................................58
Viewing ....................................................................................................................................................................................................................... 59
Viewing Photo Files on the LCD monitor ............................................................................................................................................................ 59
Viewing Multiple Photo Files ............................................................................................................................................................................... 60
Setting the Capturing Options ................................................................................................................................................................................ 61
Setting the White Balance ................................................................................................................................................................................... 61
Setting the Program AE (Programmed Auto Exposure) .....................................................................................................................................62
Setting the Effect ................................................................................................................................................................................................. 63
Setting the Flash ..................................................................................................................................................................................................64
Setting the Continuous Shot ............................................................................................................................................................................... 65
Setting the EIS (Electronic Image Stabilizer) ...................................................................................................................................................... 66
Setting the Focus .................................................................................................................................................................................................67
Setting the BLC (Backlight Compensation) ........................................................................................................................................................ 68
Setting the Digital Zoom ...................................................................................................................................................................................... 69
Setting the Viewing Options .................................................................................................................................................................................... 70
Deleting Photo Files ............................................................................................................................................................................................ 70
Setting the Slide show ......................................................................................................................................................................................... 71
Setting the DPOF (Digital Print Order Format) Function .................................................................................................................................... 72
Locking Photo Files ............................................................................................................................................................................................. 73
Copying Photo Files ............................................................................................................................................................................................ 74
MP3 Mode 75
Storing MP3 Files in the Sports Camcorder.......................................................................................................................................................... 76
44
Page 5

ENGLISH
Contents
Copying MP3 Files to the Sports Camcorder ..................................................................................................................................................... 76
Playing........................................................................................................................................................................................................................ 77
Playing MP3 Files ................................................................................................................................................................................................ 77
Setting the MP3 Play Options ................................................................................................................................................................................. 78
Deleting MP3 Files .............................................................................................................................................................................................. 78
Setting the Repeat Play....................................................................................................................................................................................... 79
Setting the Equalizer ........................................................................................................................................................................................... 80
Locking MP3 Files ............................................................................................................................................................................................... 81
Copying MP3 Files .............................................................................................................................................................................................. 82
Voice Recorder Mode 83
Recording .................................................................................................................................................................................................................. 84
Recording Voice Files .........................................................................................................................................................................................84
Playing........................................................................................................................................................................................................................ 85
Playing Voice Files .............................................................................................................................................................................................. 85
Setting the Voice Play Options ............................................................................................................................................................................... 86
Deleting Voice Files ............................................................................................................................................................................................. 86
Setting the Play Mode ......................................................................................................................................................................................... 87
Locking Voice Files.............................................................................................................................................................................................. 88
Copying Voice Files ............................................................................................................................................................................................. 89
Using File Browser 90
Viewing Files or Folders ...................................................................................................................................................................................... 91
Deleting Files or Folders ..................................................................................................................................................................................... 92
Locking Files ........................................................................................................................................................................................................ 93
Copying Files or Folders ..................................................................................................................................................................................... 94
Viewing File Information ...................................................................................................................................................................................... 95
Setting the Sports Camcorder 96
Setting Memory ......................................................................................................................................................................................................... 97
Selecting the Storage Type ................................................................................................................................................................................. 97
Setting USB Mode ..................................................................................................................................................................................................... 98
Setting USB Mode ............................................................................................................................................................................................... 98
55
Page 6

ENGLISH
Contents
Setting Memory ......................................................................................................................................................................................................... 99
Setting the File No. Function ............................................................................................................................................................................... 99
Formatting the Memory ..................................................................................................................................................................................... 100
Viewing Memory Space..................................................................................................................................................................................... 101
Adjusting the LCD monitor .................................................................................................................................................................................... 102
Adjusting the LCD Brightness ........................................................................................................................................................................... 102
Adjusting the LCD Colour .................................................................................................................................................................................. 103
Adjusting Date/Time ............................................................................................................................................................................................... 104
Setting Date&Time ............................................................................................................................................................................................ 104
Setting Date Format .......................................................................................................................................................................................... 105
Setting Time Format .......................................................................................................................................................................................... 106
Setting Date/Time Display ................................................................................................................................................................................. 107
Setting the System Settings .................................................................................................................................................................................. 108
Setting the Beep Sound .................................................................................................................................................................................... 108
Setting Start-up Mode .......................................................................................................................................................................................109
Resetting the Sports Camcorder ....................................................................................................................................................................... 110
Selecting Language ........................................................................................................................................................................................... 111
Setting the Auto Shut off ................................................................................................................................................................................... 112
Setting the Demonstration Function ..................................................................................................................................................................113
Viewing Version Information.............................................................................................................................................................................. 114
Using USB Mode ..................................................................................................................................................................................................... 115
Transferring files to a computer ........................................................................................................................................................................ 115
Printing with PictBridge .....................................................................................................................................................................................116
Using the PC Cam Function .............................................................................................................................................................................117
Using the External Camera Module 118
Recording with the External Camera Module ..................................................................................................................................................... 119
Recording Movie using the External Camera Module ...................................................................................................................................... 119
Wearing the External Camera Module ................................................................................................................................................................. 120
Mounting the External Camera Module on Rubber Mount ...............................................................................................................................120
Using the Long Mount Band ............................................................................................................................................................................ 121
66
Page 7

ENGLISH
Contents
Miscellaneous Information 122
USB Interface Environment ................................................................................................................................................................................... 123
USB connection to a computer ........................................................................................................................................................................ 123
System Environment ......................................................................................................................................................................................... 123
Installing Software .................................................................................................................................................................................................. 124
Installing DV Media Pro 1.0 ...............................................................................................................................................................................124
Ulead Video Studio ............................................................................................................................................................................................ 125
Connecting To Other Devices .............................................................................................................................................................................. 126
Connecting to a PC using a USB Cable ........................................................................................................................................................... 126
Connecting to a TV monitor .............................................................................................................................................................................. 127
Connecting to a VCR / DVD Recorder ............................................................................................................................................................. 128
Recording unscrambled content from other digital devices .............................................................................................................................129
Printing Photos ....................................................................................................................................................................................................... 130
Printing with DPOF ............................................................................................................................................................................................ 130
Maintenance 131
Cleaning and Maintaining the Sports Camcorder .............................................................................................................................................. 131
After using the Sports Camcorder .....................................................................................................................................................................131
Cleaning the Body ............................................................................................................................................................................................. 132
Using the Built-in Rechargeable Battery ........................................................................................................................................................... 132
Regarding the Battery .......................................................................................................................................................................................133
Using the Sports Camcorder Abroad ................................................................................................................................................................ 134
Troubleshooting 135
Self Diagnosis Display ........................................................................................................................................................................................... 135
Using the Menu 137
Specifications 139
Index 141
Power Sources (United Kingdom Only) 143
77
Page 8

ENGLISH
Notices and Safety Precautions
Precautions when using the Sports Camcorder
✤ Please note the following precautions for use:
✤ Please keep this device in a safe place. The device contains a lens that can be damaged by shock.
Keep away from the reach of the children.
■
Do not place your device in a wet place. Moisture and water may cause the device to malfunction.
■
To avoid electric shock, do not touch your device or power cable with wet hands.
■
Do not use the flash close to another’s eyes. The flash emits a strong light that may cause damage similar to direct
sunlight on one’s eyesight. Particular care should be observed if photographing infants, when the flash should be no less
than 3 feet from your subject.
■
If the device is not working properly, please consult your nearest dealer or authorized Samsung service facility.
Disassembling the device yourself may cause irrecoverable damage which will be difficult to repair.
■
Clean the device with a dry, soft cloth. Use a soft cloth moistened with a mild detergent solution for removing stains.
Do not use any type of solvent, especially benzene, as it may seriously damage the finish.
■
Keep your device away from rain and saltwater. After using, clean the device. Saltwater may cause the parts to corrode.
■
To disconnect the apparatus from the mains, the plug must be pulled out from the mains socket, therefore the mains plug
shall be readily operable.
■
Using the earphone or headphone for an extended time can cause a serious damage to your hearing.
- If you are exposed to a sound in higher than 85db for an extended time, you will be adversely affected on your
hearing. The higher the sound is, the more seriously damaged your hearing is (an ordinary conversation is made in 50
to 60 db and the noise level on the road is approximately 80 db).
- You are strongly advised to set the volume level to medium (the medium level is usually less than 2/3 of the
maximum).
■
If you feel a ringing in the ear(s), lower the volume or stop using the earphone or headphone.
■
Do not use the earphone while you are driving a bicycle, automobile or motorcycle.
- Otherwise it can cause a serious accident and, furthermore, it is prohibited by the law in some areas.
- Using the earphone on the way, in particular, on the crosswalk can lead to a serious accident.
■
For your safety, make sure the earphone cable should not get in the way of your arm or other surrounding objects while
you are taking exercise or a walk.
88
Page 9

ENGLISH
Notices and Safety Precautions
Notes Regarding COPYRIGHT
✤ Television programmes, movie video tapes, DVD titles, films and other programme materials may be copyrighted.
Unauthorized recording of copyrighted materials may infringe on the rights of the Copyright owners and is contrary to
copyright laws.
✤ All the trade names and registered trademarks mentioned in this manual or other documentation provided with your
Samsung product are trademarks or registered trademarks of their respective holders.
Notes Regarding Moisture Condensation
✤
A sudden rise in atmospheric temperature may cause condensation to form inside the Sports
Camcorder.
For Example:
✤ Entering or leaving a heated place on a cold day might cause condensation inside the product.
✤ To prevent condensation, place the product in a carrying case or a plastic bag before exposing it to a sudden change of
temperature.
Notes Regarding the Sports Camcorder
1. Do not leave the Sports Camcorder exposed to high temperature (above 60
For example, in a parked closed car in summer or exposed to direct sunlight.
2. Do not let the Sports Camcorder get wet.
Keep the Sports Camcorder away from rain, salt water, or any other form of moisture.
The Sports Camcorder will be damaged if immersed in water or subjected to high levels of moisture.
°
C or 140°F).
99
Page 10

ENGLISH
Notices and Safety Precautions
Notes Regarding the Battery Pack
✤ We recommend using the original battery pack that is available at the retailer where you purchased the Sports
Camcorder.
✤ Make sure the battery pack is fully charged before starting to record.
✤ To preserve battery power, keep the Sports Camcorder turned off when you are not operating it.
✤ If your device is left in STBY mode without being operated for more than 5 minutes, it will automatically turn itself off to
protect against unnecessary battery discharge.
✤ Make sure that the battery pack is attached firmly in place.
✤ The new battery pack provided with the product is not charged.
Before using the battery pack, you need to fully charge it.
✤ Do not drop the battery pack. Dropping the battery pack may damage it.
✤ Fully discharging a Lithium Polymer battery damages the internal cells. The battery pack may be prone to leakage when
fully discharged.
✤ To avoid damage to the battery pack, make sure to remove the battery when no charge remains.
✤ Clean the terminal to remove foreign substance before inserting the battery pack.
✳
When the battery reaches the end of its life, please contact your local dealer.
Batteries must be disposed of as chemical waste.
✳
Be careful not to drop the battery pack when you release it from the Sports Camcorder.
1010
Page 11
ENGLISH
Notices and Safety Precautions
Notes Regarding the Lens
✤ Do not film with the Sports Camcorder lens pointing directly at the sun.
Direct sunlight can damage the CCD (Charge Coupled Device, the imaging sensor).
Notes Regarding the LCD Display
1. The LCD monitor has been manufactured using the high precision technology. However, there may be tiny dots
(red, blue or green in colour) that appear on the LCD monitor. These dots are normal and do not affect the recorded
picture in any way.
2. When you use the LCD monitor under direct sunlight or outdoors, it may be difficult to see the picture clearly.
3. Direct sunlight can damage the LCD monitor.
Precautions Regarding Service
✤ Do not attempt to service the Sports Camcorder yourself.
✤ Opening or removing covers may expose you to dangerous voltage or other hazards.
✤ Refer all servicing to qualified service personnel.
Precautions Regarding Replacement Parts
✤ When replacement parts are required, be sure the service technician has used replacement parts specified by the
manufacturer and having the same characteristics as the original part.
✤ Unauthorized substitutions may result in fire, electric shock or other hazards.
Correct Disposal of This Product
(Waste Electrical & Electronic Equipment)
(Applicable in the European Union and other European countries with separate collection systems)
This marking shown on the product or its literature, indicates that it should not be disposed with other household wastes at the
end of its working life. To prevent possible harm to the environment or human health from uncontrolled waste disposal, please
separate this from other types of wastes and recycle it responsibly to promote the sustainable reuse of material resources.
Household users should contact either the retailer where they purchased this product, or their local government office, for
details of where and how they can take this item for environmentally safe recycling. Business users should contact their
supplier and check the terms and conditions of the purchase contract. This product should not be mixed with other commercial
wastes for disposal.
1111
Page 12

ENGLISH
Getting to Know Your Sports Camcorder
Features
●
Integrated Digital Camcorder/ DSC operation
An integrated digital imaging device that easily converts between a Digital Camcorder and a Digital Still Camera with comfortable and
easy recording.
●
High Resolution Image Quality (Digital Still Camera)
Employing 800K CCD Pixel, a maximum resolution of 640X480 is available.
●
100x Digital Zoom
Allows the user to magnify an image up to 100x its original size.
●
Colourful TFT LCD
A high-resolution(230K) colourful TFT LCD gives you clean, sharp images as well as the ability to review your recorded files immediately.
●
Electronic Image Stabilizer (EIS)
The EIS helps you reduce unstable images by compensating for natural shaking movements.
●
Various Digital Effects
The DSE (Digital Special Effects) allows you to give the film a special look by adding various special effects.
●
USB Interface for Data Transfer
You can transfer still images and movie files or any other files to a PC using the USB interface.
●
PC Cam for multi-entertaining
You can use this Sports Camcorder as a PC camera for video chatting, video conference and other PC camera applications.
●
Voice Record / Playback with vast memory
You can record voices and store it in the internal memory, memory card (not supplied) and play back the recorded voice files.
●
Download & Listen to MP3 Files
With the Sports Camcorder, you can play back MP3 files stored in the internal memory or memory card (not supplied).
Enjoy your favorite songs with your Sports Camcorder.
●
A Sports Camcorder equipped with External Camera Module
The Sports Camcorder is equipped with an External Camera Module, which enables you to directly record when connected to the main unit
●
Weatherproof (External Camera Module only)
The External Camera Module is weatherproof according to IP42 standard.
IP-Protection Level
4- The External Camera is protected against penetration from particles over 1mm in diameter.
2- The External Camera is protected against water sprayed from a vertical position above the centre of Sports Camcorder top
(Power LED facing up) at 15 degree angles.
●
Multi OSD Language
Supports various foreign languages to display the menu and information.
You can select the desired OSD language from OSD list.
●
Multi jack
The Multi jack functions as an Earphone, AV Input/Output or External Camera Module jack.
You can use various functions with only one jack.
1212
Page 13
Getting to Know Your Sports Camcorder
Accessories Supplied with the Sports Camcorder
✤
Make sure that the following basic accessories are supplied with your Sports Camcorder.
3
Basic Accessories
1. Lithium Polymer Battery pack
2. AC Power Adapter
3. Audio/Video Cable
4. USB Cable
5. Earphones
6. Hand Strap
7. Instruction Book/Quick Guide
8. Software CD
9. Lens Cover
10. External Camera Module
11. Rubber Mount
12. Long Mount Band
13. Carrying Case
Optional Accessory
14. Extended life Battery pack
1
.
Lithium Polymer Battery pack
5
.
Earphones
9
. Lens Cover
13
. Carrying Case
2
. AC Power Adapter
6
. Hand Strap
10
. External Camera Module11. Rubber Mount
14. Extended life Battery pack
. Audio/Video Cable
7
.
Instruction Book/Quick Guide
ENGLISH
4
. USB Cable
8
. Software CD
12
. Long Mount Band
[ Notes ]
✤ Parts and accessories are available at your local Samsung dealer and service centre.
✤ You can download programmes, the latest driver software, and audio/video CODECs from the Samsung Electronics webpage.
(www.samsung.com)
1313
Page 14

ENGLISH
Location of Controls
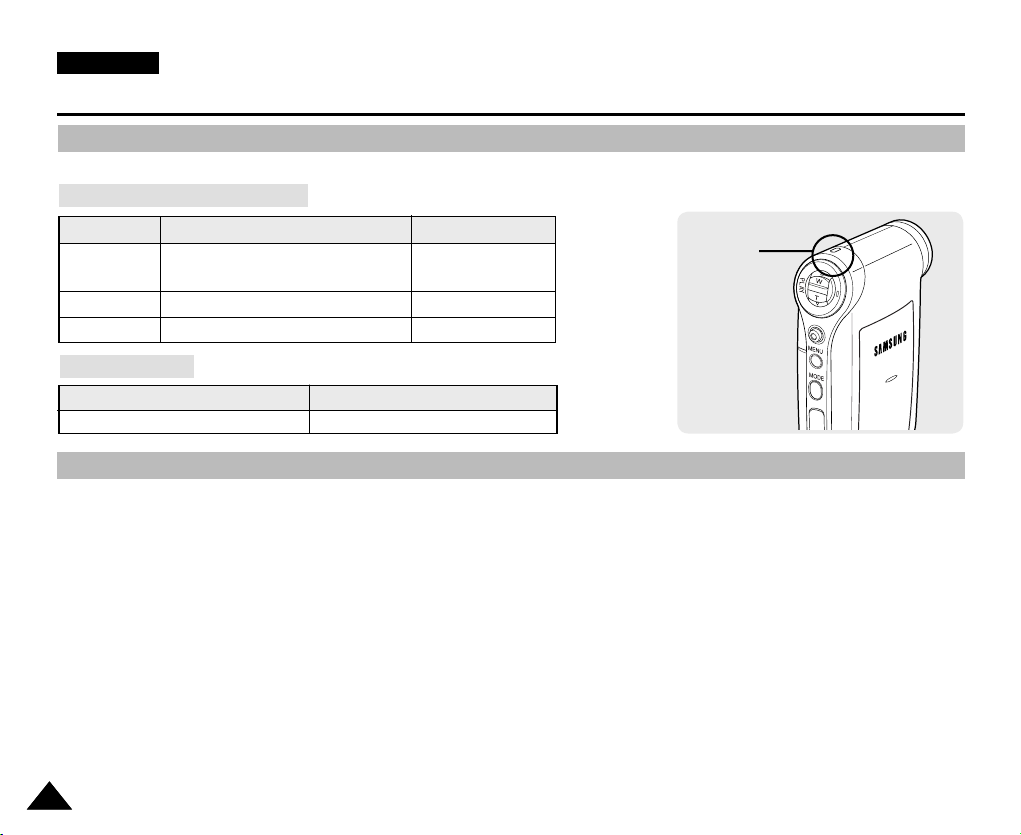
Rear & Left View
1
2
3
DISPLAY
DELETE
How to Connect
HOLD
W
MENU
MODE
7
8
T
9
Earphones
Connect the
earphones to the
multi jack as shown
in the diagram.
DELETE
DISPLAY
10
11
12
13
DC IN
14
W
T
NU
ME
DE
O
M
HOLD
IN
C
D
15
5 64
1. LCD monitor
2. DELETE button
3. DISPLAY button
4. Built-in speaker
5. POWER button
6. MP3/ External Camera Module HOLD switch
7. Record / Power /Charging indicator
8. PLAY button
9. Record /Stop button
10. [W/T] switch
11. Joystick (Up, Down, Left, Right, OK)
12. MENU button
13. MODE button
14. DC IN jack
15. Multi jack
[ Note ]
✤
Multi jack is a unified Earphones, AV Input/Output and External Camera Module jack.
1414
Page 15
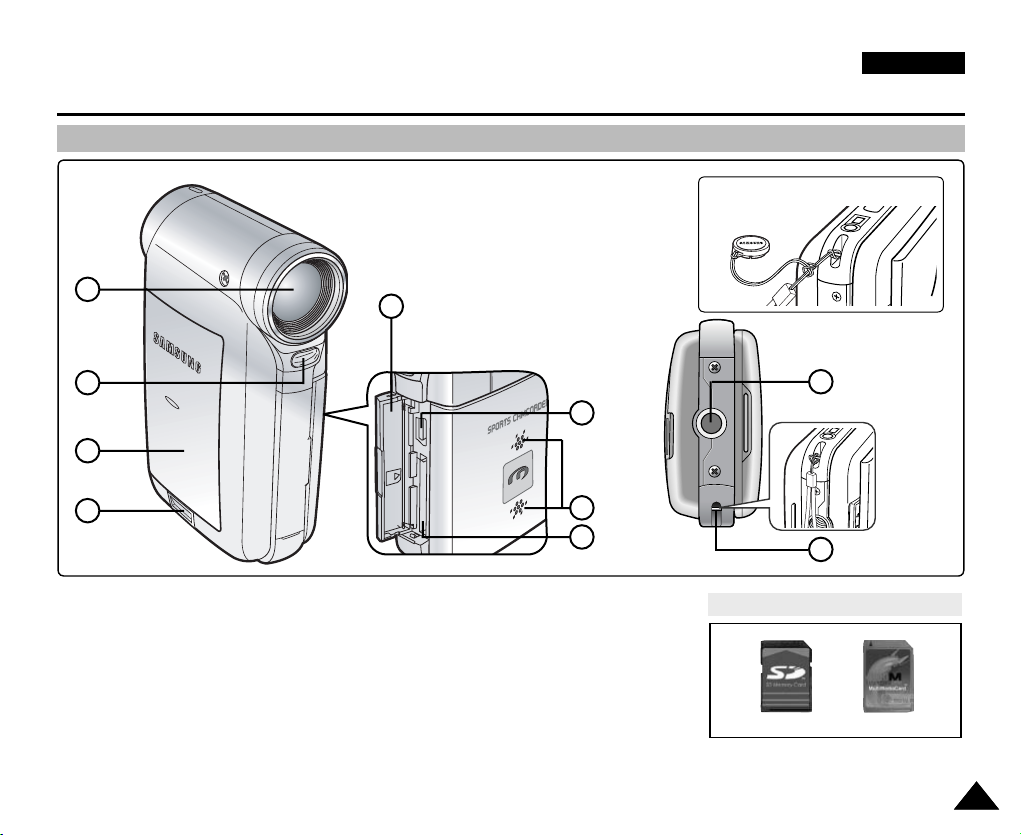
Location of Controls
USB
MMC/SD
Side & Bottom View
ENGLISH
Hanging Lens Cover on the
Sports Camcorder
1
2
3
4
1. Lens
2. Flash
3. Battery pack
4. Battery eject switch
5. Front cover
5
<Left Side>
6. USB port
7. Built-in microphone
8. Memory card slot
9. Tripod receptacle
10. Strap hook
9
6
7
8
Usable Memory Cards (2GB Max)
SD
10
MMC
1515
Page 16
ENGLISH
Location of Controls
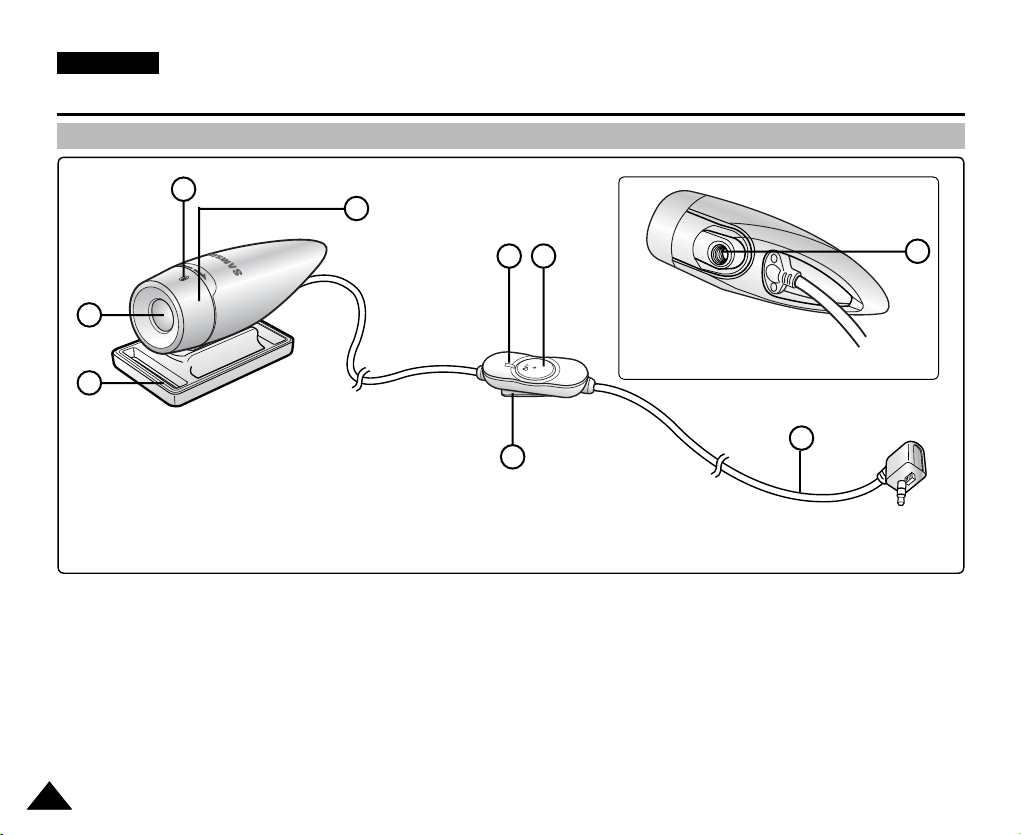
External Camera Module View
1
2
3
1. Built-in microphone
2. Lens
3. Rubber Mount
4. Picture Rotator
5. Record/Power indicator
4
65
Bottom View
9
8
7
6. POWER/Record /Stop button
7. Clip
8. External Camera Module cable
9. Rubber Mount receptacle
1616
Page 17

Location of Controls : LCD Display
S
F
Sepia
Recording...
STBY
12:00AM 2006.01.01
Move Play
00:00:00/00:40:05
100-0001
W
T
1X
10X
W
T
1X
10X
S
F
Sepia
Recording...
STBY
12:00AM 2006.01.01
Move Play
00:00:00/00:40:05
100-0001
12:00AM 2006.01.01
720X576
00:00:15/00:05:20
100-0001
W
T
1X
10X
W
T
1X
10X
S
F
Sepia
Recording...
STBY
12:00AM 2006.01.01
00:00:00/00:40:05
W
T
1X
10X
W
T
1X
10X
W
T
1X
10X
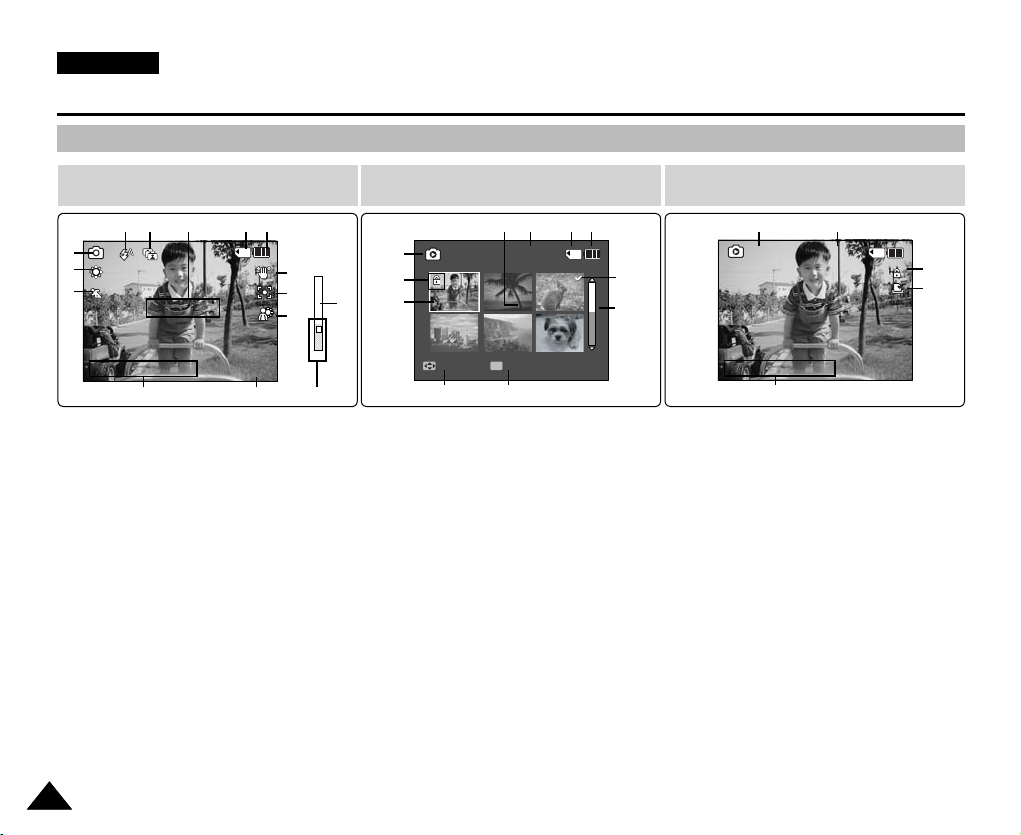
OSD (On Screen Display in Movie Record Mode/Movie Play Mode)
ENGLISH
Movie Record Mode
1
2
720i
F
3
4
5
S
1. Mode indicator
6
2. Image size indicator
3. Image quality indicator
4. White balance indicator
5. Program AE indicator
6. Date/Time indicator
7. Effect indicator
8. BLC indicator
9. Focus indicator
10 EIS indicator
11. Battery life indicator
12. Memory type indicator
13. Counter
(
14. Warning and note indicator
15. Record/STBY indicator
16. Optical zoom indicator
17. Digital zoom indicator
Elapsed time /Remaining time
Movie Play Mode
11121315 14
10
9
8
7
17
1
2
16
3
OK
4
5
1. Mode indicator
2. Lock indicator
3. Current display indicator
4. Move (Help Key)
5. Play (Help Key)
?
ERROR
9
1011
8
7
6
12. Image size indicator
13. Date/Time indicator
14. Volume indicator
15. Counter
(
Movie Play Mode
15
00:00:15/00:05:20
12
13 11
Elapsed time /Recorded time
2
14
100-0001
)
6. Damaged file indicator
*
*
)
7. Scroll bar
8. Multi selection indicator
9. Battery life indicator
10. Memory type indicator
11. Image counter (Current image)
[ Notes ]
✤ Settings indicated with * will not be retained when the Sports Camcorder is
turned off.
✤ The OSD indicators of this product are based on model VP-X205L.
✤ The OSD indicators are based on internal memory.
1717
Page 18
ENGLISH
Capturing...
12:00AM 2006.01.01
Move View
100-0001
1
Sepia
W
T
1X
10X
W
T
1X
10X
Capturing...
12:00AM 2006.01.01
Move View
100-0001
12:00AM 2006.01.01
100-0001
1
1
Sepia
W
T
1X
10X
W
T
1X
10X
Slide
Capturing...
12:00AM 2006.01.01
Sepia
W
T
1X
10X
W
T
1X
10X
W
T
1X
10X
W
T
1X
10X
Location of Controls : LCD Display
OSD (On Screen Display in Photo Capture Mode/Photo View Mode)
Photo Capture Mode Photo View Mode
10 91213 11
1
2
3
1. Mode indicator
2. White balance indicator
3. Program AE indicator
4. Date/Time indicator
5. Effect indicator
6. BLC indicator
7. Focus indicator
8. EIS indicator
9. Battery life indicator
10. Memory type indicator
11. Warning and note indicator
12. Multi shot indicator
13. Flash indicator
14. Optical zoom indicator
15. Digital zoom indicator
[ Notes ]
✤ Settings indicated with * will not be retained when the Sports Camcorder is turned off.
✤ The OSD indicators are based on internal memory.
1818
4
*
*
8
7
6
5
15
1
2
3
14
4
1. Mode indicator
2. Lock indicator
3. Current display indicator
4. Move (Help Key)
5. View (Help Key)
6. Scroll bar indicator
7. Multi selection indicator
8. Battery life indicator
9. Memory type indicator
10. Image counter indicator
(Current image)
11. DPOF indicator
1011
OK
5
89
7
6
Photo View Mode
13
12
12. Date/Time indicator
13. Slide indicator
10
2
11
Page 19
Location of Controls : LCD Display
Move Play
00:12
Life is cool.mp3
Everytime.mp3
Toxic.mp3
Don't push me.mp3
Love you.mp3
Move Play
00:12
Life is cool.mp3
Everytime.mp3
Toxic.mp3
Don't push me.mp3
Love you.mp3
Search
1/10
Pause
List
Life is cool.mp3
Sweetbox
POP
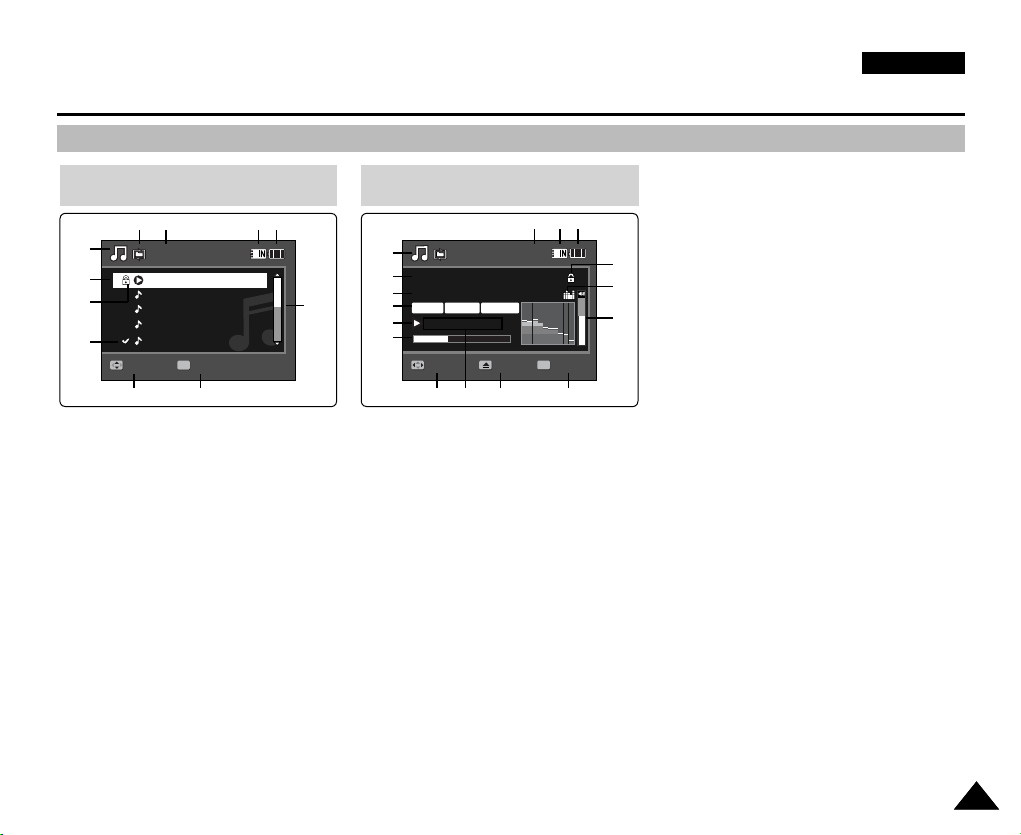
OSD (On Screen Display in MP3 Mode)
ENGLISH
MP3 Mode
1
2
3
11
Move
4
1. Mode indicator
2. File name indicator
3. Lock indicator
4. Move (Help Key)
5. Play (Help Key)
6. Scroll bar indicator
7. Battery life indicator
8. Memory type indicator
9. Counter(Elapsed time)
10. Repeat indicator
11. Multi selection indicator
810 9 7
1
2
6
OK
5
3
4
5
6
1. Mode indicator
2. File name indicator
3. Artist indicator
4. Sampling rate/Bit rate
5. Operation indicator
6. Progress bar indicator
7. Search (Help Key)
8. Counter(Elapsed time/Full time)
9. List (Help Key)
10. Play/Pause (Help Key)
11. Volume indicator
12. Equalizer indicator
13. Lock indicator
14. Battery life indicator
MP3 Mode
Stereo
44.1KHz
00:01:07/00:03:27
78
192Kbps
15. Memory type indicator
[ Notes ]
✤ Settings will be retained when the Sports Camcorder is turned off.
✤ MP3 files with tag information will display the artist name.
MP3 files with no tag information will leave the item blank.
16. File number indicator
(Current / Total)
1516 14
13
12
POP
11
OK
9
10
1919
Page 20
ENGLISH
Stop
2006/01/01 12:00:00 AM
SWAV0001.WAV
00:00:12/34:59:48
Stop
2006/01/01 12:00:00 AM
SWAV0001.WAV
00:00:12/34:59:48
Move Play
1/3
2006/01/01 12:00:00 AM
2006/01/01 12:00:10 AM
2006/01/01 12:00:20 AM
00:12
Stop
2006/01/01 12:00:00 AM
SWAV0001.WAV
00:00:12/34:59:48
2006/01/01 12:00:00 AM
SWAV0001.WAV
00:00:02/00:00:12
1/3
Search Pause
List
Move Play
1/3
2006/01/01 12:00:00 AM
2006/01/01 12:00:10 AM
2006/01/01 12:00:20 AM
00:12
Location of Controls : LCD Display
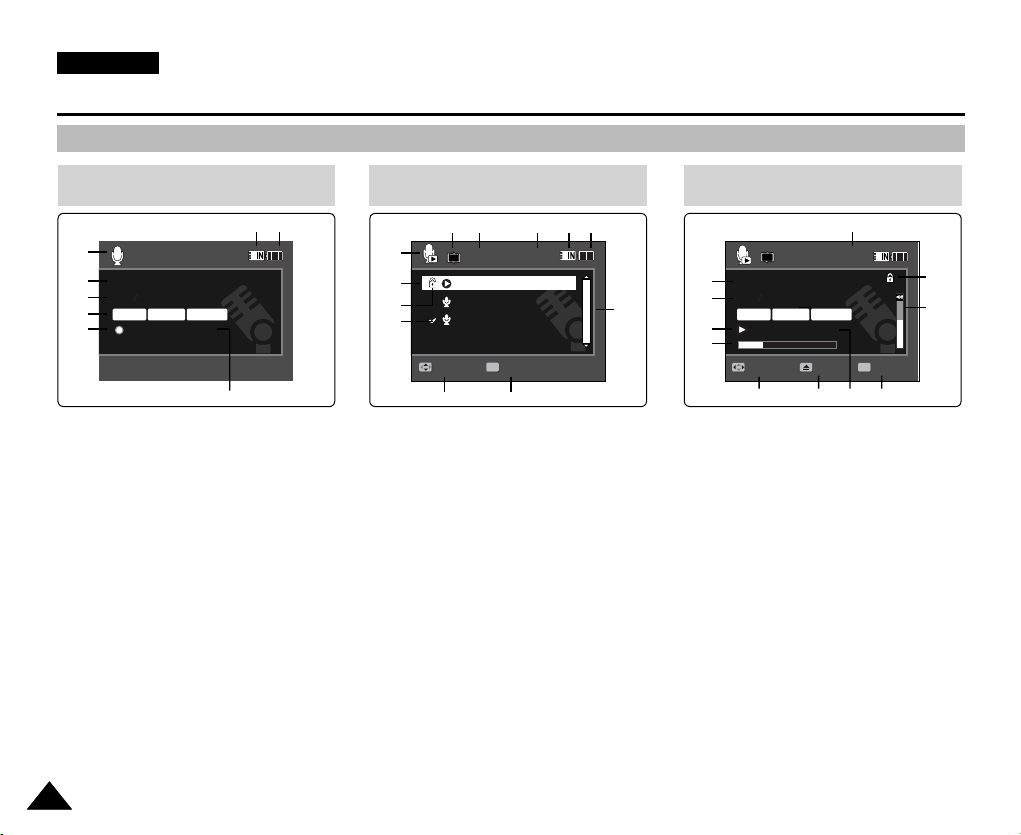
OSD (On Screen Display in Voice Record Mode/Voice Play Mode)
Voice Record Mode
87
1
2
3
Stereo
4
5
1. Mode indicator
2. File name indicator
3. Date/Time indicator
4. Sampling rate/Bit rate
5. Operation indicator
6. Counter
(Elapsed Time / Remaining Time)
7. Battery life indicator
8. Memory type indicator
[ Note ]
✤ Settings will be retained when the Sports Camcorder is turned off.
8.0KHz
64Kbps
6
1. Mode indicator
2. Date/Time indicator
3. Lock indicator
4. Move (Help Key)
5. Play (Help Key)
6. Scroll bar indicator
7. Battery life indicator
8. Memory type indicator
9. File number indicator
10. Counter(Elapsed time)
11. Repeat indicator
12. Multi selection indicator
Voice Play Mode
1
2
3
12
1
(Current / Total)
OK
2020
Voice Play Mode
64Kbps
11
10
9
OK
7
8
891011 7
1
1
6
54
2
Stereo
3
4
8.0KHz
56
1. File name indicator
2. Date/Time indicator
3. Operation indicator
4. Progress bar indicator
5. Search (Help Key)
6. List (Help Key)
7. Counter
(Elapsed time / Recorded time)
8. Play/Pause (Help Key)
9. Volume indicator
10. Lock indicator
11. File Number indicator
(Current / Total)
Page 21
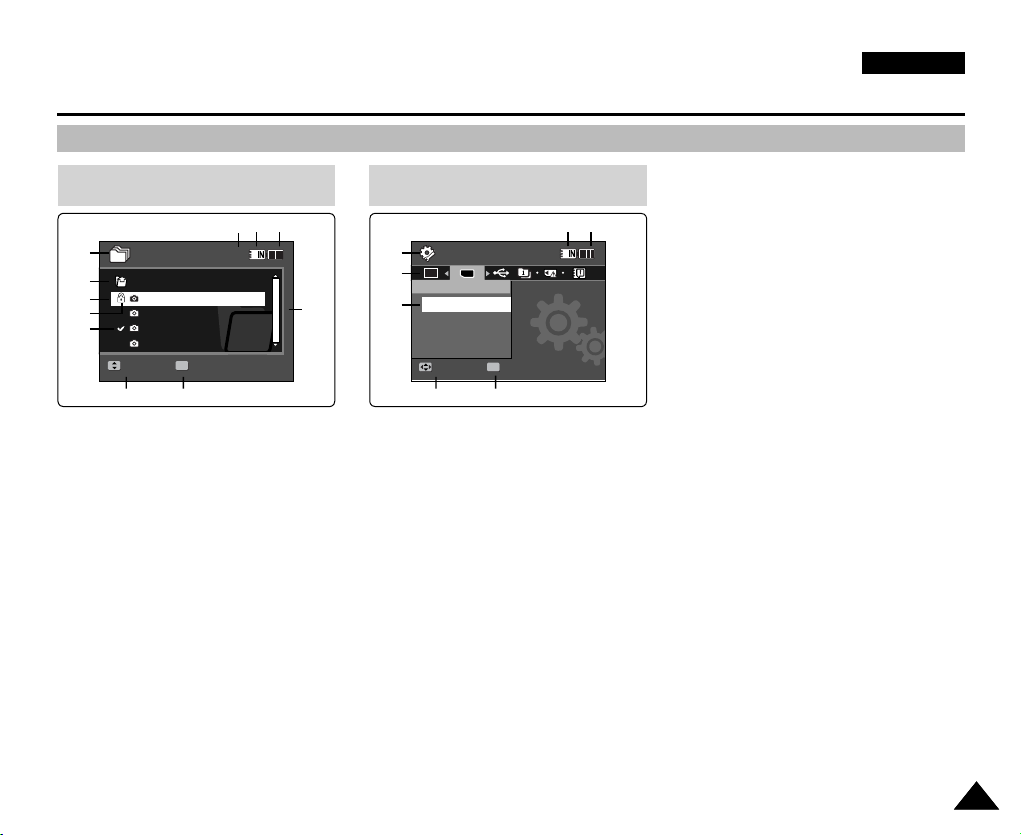
Move Play
/DCIM/100SSDVC
DCAM0002.JPG
DCAM0003.JPG
DCAM0004.JPG
DCAM0001.JPG
1/4
Move
Play
Location of Controls : LCD Display
System Settings
Move Select
Storage Type
External
Internal
Move Play
/DCIM/100SSDVC
DCAM0002.JPG
DCAM0003.JPG
DCAM0004.JPG
DCAM0001.JPG
Move Play
Dart
Coin
1/4
Move Play
OSD (On Screen Display in File Browser Mode/System Settings Mode)
ENGLISH
File Browser Mode
1
2
3
4
5
OK
1. Mode indicator
2. Current selected folder indicator
3. Current selected file indicator
OK
67
4. Lock indicator
5. Multi selection indicator
6. Move (Help Key)
7. Play (Help Key)
8. Scroll bar indicator
9. Battery life indicator
10. Memory type indicator
11. File number indicator
(Current / Total)
System Settings Mode
10 9
11
1
Ver .
2
8
3
TYPE
OK
4
5
6
7
1. Mode indicator
2. Menu tab
3. Setup item
4. Move (Help Key)
5. Select (Help Key)
6. Battery life indicator
7. Memory type indicator
2121
Page 22

ENGLISH
How to Use the Battery Pack
Battery Pack Installation / Ejection
It is recommended you purchase one or more additional battery packs to allow continuous use of your Sports Camcorder.
To insert the battery pack
Slide the battery pack into the groove until it clicks.
<Insert> <Eject>
To eject the battery pack
Pull the Battery eject switch to eject the battery
pack.
Battery
SB-P120A (1200mAh)
SB-P190A (1900mAh)
[ Notes ]
✤ Clean the terminals to remove foreign substances before inserting the battery pack.
✤ If the Sports Camcorder will not be in use for a while, remove the battery pack from the Sports Camcorder.
2222
1
2
Page 23

ENGLISH
How to Use the Battery Pack
Maintaining the Battery Pack
✤ The battery pack should be recharged in an environment of between 32
✤ The battery pack should never be charged in a room temperature that is below 32
✤ The life and capacity of the battery pack will be reduced if it is used in temperatures below 32
above 104
✤ Do not put the battery pack near any heat sources (fire or flames, for example).
✤ Do not disassemble, process, press or heat the battery pack.
✤ Do not allow the + and - terminals of the battery pack to be short-circuited. It may cause leakage, heat generation,
induce fire and overheating.
✤ It is recommended that you use the original Samsung battery pack that is available at the retailer where you purchased the
Sports Camcorder.
Continuous recording time based on battery type
If you close the LCD screen, it switches off automatically.
The continuous recording times given in the table below are approximations. Actual recording time depends on usage.
Battery
SB-P120A (1200mAh)
SB-P190A (1900mAh)
[ Warning ]
✤ When you eject the battery pack from the Sports Camcorder, hold the battery pack to prevent it from dropping to the floor.
°
F(40°C) for a long period.
Time
Continuous Recording Time
LCD ON Backlight OFF
Approx. 1 hr. 20 min.
Approx. 2 hr. 30 min.
Approx. 1 hr. 40 min.
Approx. 2 hr. 50 min.
°
F(0°C) and 104°F(40°C).
°
F(0°C).
°
F(0°C) or left in temperatures
[ Notes ]
✤ Prepare an extra battery if you use the Sports Camcorder outdoors.
✤ Contact a Samsung retailer to purchase a new battery pack.
✤ If you zoom in or out, the recording time becomes shorter.
✤ ‘The Continuous Recording Time' listed is approximate and is affected by functions such as zooming.
2323
Page 24

ENGLISH
12:00AM 2006/01/01 Sepia
Recording...
SS
FF
STBY
00:00:00:00:40:05
720i
How to Use the Battery Pack
Battery Level Display
The Battery Level Display shows the amount of battery power remaining in the battery pack.
Battery Level Indicator State Message
Fully charged
20~40% used
40~60% used
60~80% used
80~95% used
Exhausted(flickers)
The device will soon turn off.
Change the Battery Pack
as soon as possible.
(flickers)
The device will be forced to
turn off after 5 seconds.
Tips for Battery Identification
If the battery has been fully charged, the charge indicator is green.
If you are charging the battery, the colour of the charge indicator is orange.
The charge indicator flickers if the battery is abnormal.
Charging time based on battery type
Capacity
SB-P120A (1200mAh)
SB-P190A (1900mAh)
[ Notes ]
✤ You may charge your Sports Camcorder by connecting it to a PC with the USB cable.
using AC Power Adapter
Approx. 1 hr. 50 min
Approx. 3 hr. 20 min
✤ You may not charge via USB if the power is on.
✤ The charging time with the USB cable may differ depending on the PC.
2424
-
-
-
-
-
-
“Low battery”
using USB cable
Approx. 3hr. 40 min
Approx. 6hr. 20 min
Charge
indicator
Page 25
How to Use the Battery Pack
USB
USB
Charging the Battery Pack
ENGLISH
1. Turn off the Sports Camcorder by pressing the [POWER]
button.
2. Insert the battery pack to the unit.
3. Open the connector cover of the unit.
4. Charge the battery pack by using AC Power Adapter or
USB Cable.
AC Power Adapter
USB Cable
[ Note ]
✤ You may use the Sports Camcorder powered by the AC Power
Adapter indoors where available.
[ Warning ]
✤ It is recommended you fully charge the battery pack before use.
✤ You should only charge the battery in an environment between
32
°
F and 104°F.
✤ If ambient temperature is too low when charging, the battery may
take a long time to fully charge, or may not charge completely and
the green indicator will not turn on.
✤ Before connecting the cable, make sure that you don’t have any
foreign substances between connectors.
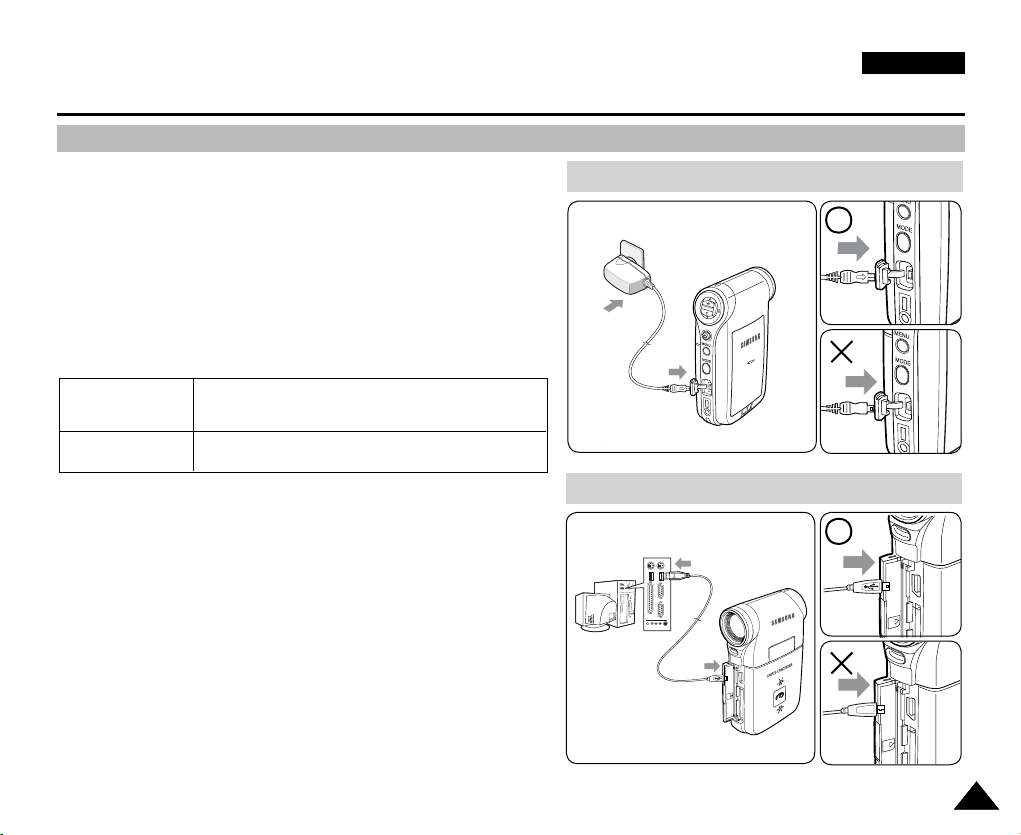
Connect the AC Power Adapter with the Sports
Camcorder and plug the AC Power Adapter to the
wall outlet.
Connect the USB Cable with the Sports Camcorder
and connect the other side to a USB port on your PC
Connecting the AC Power Adapter
DC IN jack
Connecting the USB Cable
USB port
USB
MMC/SD
2525
Page 26
ENGLISH
Getting Started
The LED Colour
The LED Colour indicates the power or charge status.
Recording / Charging Indicator
LED Colour
Red
Orange
Green
During Recording
Recording
<Movie and Voice Recorder mode>
-
-
Power Indicator
LED Colour
Blue
Before You Start Operating the Sports Camcorder
Before using the Sports Camcorder, refer to this page for easy operation. The memory card is not supplied.
1. Insert the battery pack and insert a memory card into the memory card slot. ➥page 34
2. Charge the battery pack by directly connecting the AC Power Adapter to the Sports Camcorder.
➥page 25
3. Press the [POWER] button to turn on the Sports Camcorder.
During Charging
-
Charging
Fully Charged
Power
On
Recording /
Charging Indicator
IN
DC
4. Select the desired mode by pressing the [MODE] button.
5. Press the [Record / Stop] button to take a picture, start recording movie / voice.
6. When finished, press the [POWER] button to turn the Sports Camcorder off.
2626
Page 27

ENGLISH
Getting Started
Using the MODE button
The [MODE] button is used to change the Sports Camcorder mode. Available modes are Movie, Photo, MP3, Voice Recorder,
File Browser and System Settings.
Setting the Mode
Set the desired mode by pressing the [MODE] button.
The Sports Camcorder switches to the designated mode.
Functions of Each Mode
Movie
Movie mode
You can record and play movie files.
Voice Recorder
Voice Recorder mode
You can record and listen to voice files.
File Browser mode
You can delete, lock, copy the file and view
file information.
System Settings mode
Using this mode, you can set / adjust settings
regarding the LCD display, Date / Time,
Photo
MP3
Photo mode
You can take and view photo files.
MP3 mode
You can play back mp3 files.
File Browser
System Settings
Reset and Memory management.
Power Saving Function
The LCD monitor is turned off after a certain period of time has passed (see below) in each mode in order to prevent
unnecessary battery power consumption.
Press any button to go back and turn on the LCD monitor.
Mode
Time
Movie
10 min.
Photo
3 min.
MP3
30 sec.
Voice Recorder
30 sec.
File Browser
30 sec.
System Settings
60 sec.
USB
60 sec.
2727
Page 28
ENGLISH
Getting Started
Using the Function button
The Function button is used to make a selection, move the cursor, select the functions and exit from the menu.
Using the Function button
Button
Recording /
Capturing
Playing/Viewing
Function button
Zoom out (▲)
Zoom in (
Change from Record/
Capture to Play/View
▼)
Recording
Multi-Play screen / List
-
Play/Pause
Change from Play/View to
Record/Capture
Move Upwards
Move Left
Confirm Selection
Select menu
Move Right
Move
Downwards
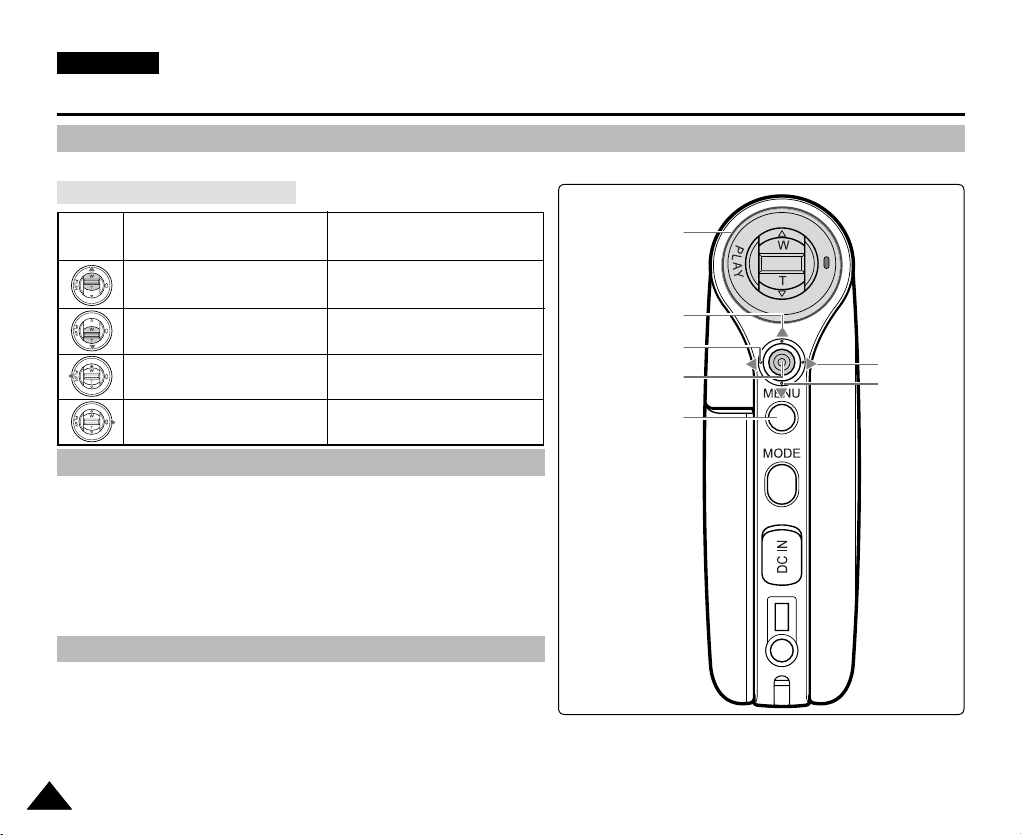
Using the Joystick
✤ The joystick is used to make a selection, move the cursor, select
functions, and exit from the menu.
1. Move the cursor left / right by moving the [Joystick].
2. Move the cursor up / down by moving the [Joystick].
◆
You can adjust the volume by moving the [Joystick] (up / down)
in Movie / MP3 / Voice Recorder playback modes
3. Confirm your selection by pressing the [Joystick(OK)].
Using the MENU button
1.
Set the desired mode by pressing the [MODE] button.
2. Press the [MENU] button.
3. Move the cursor by moving the [Joystick] up / down / left / right to select desired menu item, and then
press the [Joystick(OK)] to confirm.
4. Press the [MENU] button to finish.
2828
Page 29
Getting Started
HOLD
DISPLAY
DELETE
Move Play
100-0001
Move SelectSelect
100-0003
OK
?
ERROR
Cancel
OK
Multi Select
All
Using the DISPLAY button
Each press of the [DISPLAY] button toggles the OSD indicator on and off.
1. Open the LCD monitor.
2. Press the [POWER] button to turn on the Sports Camcorder.
◆
The Movie Record screen appears.
◆
You can select Movie Mode or Previous Mode as the Start-up mode in System Settings. ➥page 109
3. Press the [DISPLAY] button.
If you press the [DISPLAY] button in Movie and Photo modes
✤ Once : All indicators will disappear on the screen.
✤ Twice : The backlight turns off.
✤ 3 times : It returns to the initial screen.
[ Note ]
✤ Above description applies to the Movie and Photo mode.
If you press the [DISPLAY] button in another mode
✤ Once : The back light turns off.
DISPLAY
button
Using the DELETE button
The [DELETE] button is used to delete saved files.
◆
<OK>: The selected file is deleted.
◆
<Multi Select>: The selected files will be deleted.
◆
<All>: All files will be deleted.
◆
<Cancel>: Cancels deletion.
DELETE
button
✤ Twice : It returns to the initial screen.
[ Note ]
✤ Above description applies to the MP3/Voice Recorder/File Browser/System
Settings mode.
ENGLISH
2929
Page 30

ENGLISH
Getting Started
Structure of the Folders and Files
The movie files and photo files are stored in internal memory or on a memory card as shown below.
[ Notes ]
✤ Refer to page 33 for details about memory card.
✤ You can store general data in files and folders of the Sports
Camcorder.
✤ You can store up to 9,999 files and 999 folders.
✤ A file number from DCAM0001 is sequentially assigned to each
recorded file.
✤ Each folder is numbered from 100SSDVC and recorded in memory.
✤ A file name is stipulated by DCF(Design rule for Camera File system)
✤ DCAM✽✽✽✽.JPG: Photo file
SMOV✽✽✽✽.AVI: Movie file
SWAV✽✽✽✽.WAV: Voice file
✽✽✽✽✽✽✽✽.MP3: MP3 file
✤ MISC: DPOF files are stored.
✤ You can freely change the file or folder names in the MUSIC folder.
✤ Movie files made on other manufacturers' equipment may not play on
this Sports Camcorder.
Photo file
MP3 file
[ Warning ]
✤ Do not turn the power off while recording, playing, erasing
files or formatting.
✤ Turn the power off before you insert or eject the memory card to
avoid losing data.
✤ Save important files separately.
✤ Memory cards are made with precision technology. They are
sensitive and vulnerable to electric shock, temperature and humidity.
Be cautious with handling them to avoid losing data.
✤ Damaged data may not be recovered, and SAMSUNG is not
responsible for lost data. Make sure to back up important files on
your PC separately.
3030
Movie
file
Voice
file
Page 31

ENGLISH
Getting Started
Recording Time and Capacity
Movie Record Time
Media
Internal
Memory
SD/MMC
Capacity
512MB (VP-X205L)
1GB (VP-X210L)
2GB (VP-X220L)
32MB
64MB
128MB
256MB
512MB
1GB
2GB
Super Fine
352p
approx. 21min.
approx. 43min.
approx. 86min.
approx. 1min. 20sec.
approx. 3min.
approx. 4min.
approx. 11min.
approx. 21min.
approx. 43min.
approx. 86min.
approx. 14min.
approx. 29min.
approx. 58min.
approx. 50sec.
approx. 2min.
approx. 3min.
approx. 7min.
approx. 14min.
approx. 29min.
approx. 58min.
720i/720p
approx. 32min.
approx. 65min.
approx. 130min.
approx. 2min.
approx. 4min.
approx. 7min.
approx. 17min.
approx. 32min.
approx. 65min.
approx. 130min.
352p
Fine
720i/720p
approx. 21min.
approx. 43min.
approx. 86min.
approx. 1min. 20sec.
approx. 3min.
approx. 4min.
approx. 11min.
approx. 21min.
approx. 43min.
approx. 86min.
approx. 65min.
approx. 131min.
approx. 262min.
approx. 4min.
approx. 7min.
approx. 17min.
approx. 32min.
approx. 65min.
approx. 131min.
approx. 262min.
[ Notes ]
✤ The recording time and capacity is an approximation.
✤ The recording times shown are maximum figures based on using one function.
In actual use, using more than one function will reduce the capacity of each.
✤ The compressibility is changed automatically depending on the recorded images. The maximum recording time and
capacity can be changed in ‘Movie Record’.
✤ The Sports camcorder supports 2GB memory cards and lower. Any card above 2GB may not record or play properly.
✤ If you record movie files at Normal(352/720) quality to the internal memory or a memory card, the recording time increases
but the movie may have lower quality than other levels.
✤ The recording time and capacity may vary if a bad sector(section) is generated when you record movie files
to a memory card.
352p
Normal
720i/720p
approx. 32min.
approx. 65min.
approx. 130min.
approx. 2min.
approx. 4min.
approx. 7min.
approx. 17min.
approx. 32min.
approx. 65min.
approx. 130min.
3131
Page 32

ENGLISH
Getting Started
Number of Photos that can be taken
Media
Internal
Memory
SD/MMC
Capacity
512MB (VP-X205L)
1GB (VP-X210L) approx. 5754
2GB (VP-X220L) approx. 11511
32MB approx. 177
64MB approx. 357
128MB approx. 716
256MB approx. 1436
512MB approx. 2875
1GB approx. 5754
2GB approx. 11511
Quality
640x480
approx. 2875
Voice Record Time
Media Capacity Time
Internal
Memory
SD/MMC
512MB (VP-X205L)
1GB (VP-X210L) approx. 35hr.
2GB (VP-X220L) approx. 70hr.
32MB approx. 1hr.
64MB approx. 2hr.
128MB approx. 4hr.
256MB approx. 8hr.
512MB approx. 17hr.
1GB approx. 35hr.
2GB approx. 70hr.
approx. 17hr.
Number of MP3 files that can be saved
Media Capacity MP3 files
Internal
Memory
SD/MMC
512MB (VP-X205L)
1GB (VP-X210L) approx. 256files
2GB (VP-X220L) approx. 512files
32MB approx. 8files
64MB approx. 16files
128MB approx. 32files
256MB approx. 64files
512MB approx. 128files
1GB approx. 256files
2GB approx. 512files
approx. 128files
[ Notes ]
✤ Number of MP3 files that can be saved is based on 128Kbps
sampling / 4MB size.
✤ Capacity may vary depending on file size.
✤ You must only format the memory card on the Sports Camcorder.
➥page 100
✤ Do not format the memory card on your PC.
✤ If you set the light on, the number of photos that can be taken will
be reduced.
✤ The recordable time and number of files are maximum figures
based on using one function.
In actual use, using more than one function will reduce the capacity
of each.
✤ While saving to a memory card, recording may stop and a message
will appear saying <Low speed card. Please record at lower
quality.> It is because the writing speed of the memory card is slow.
We recommended using a memory card of 1.25MB/sec or greater.
3232
Page 33

ENGLISH
Getting Started
Using a Memory card (SD/MMC) (not supplied)
✤ Samsung is not responsible for data loss due to misuse.
✤ Turning the power off / ejecting the memory card during memory operation such as formatting, deleting, recording, and
playback may damage the data.
✤ You may modify the name of a file / folder stored in the memory card using a PC. The Sports Camcorder may not recognise
modified files.
✤ It is recommended that you power off before inserting or ejecting the memory card to avoid losing data.
✤ It is not guaranteed that you may use a memory card formatted on other devices. Be sure to format your memory card using
the Sports Camcorder.
✤ Save important files separately on other media, such as floppy disk, hard disk, or CD.
✤ You have to format newly-purchased memory cards, memory cards that the Sports Camcorder cannot recognise or the
cards that have data saved by other devices.
✤ A memory card has a certain life span. If you use it for a long time, you may not be able to record new data. In this case,
you have to purchase a new memory card.
✤ Do not bend, drop, or apply a strong impact to the memory card.
✤ Do not use or store in a hot, dusty or humid environment.
✤ Do not allow foreign substances on the memory card terminals. Use a soft dry cloth to clean the terminals if required.
✤ Use a memory card case to avoid losing data from moving and static electricity.
✤ After a period of use, the memory card may get warm. This is normal and not a malfunction.
✤ Damaged data may not be recovered, and SAMSUNG is not responsible for the lost data. Make sure to back up important
files separately on a PC.
✤ miniSD/RS-MMC cards must be inserted in a special card adapter in order to be used.
✤ Be sure to insert miniSD/RS-MMC cards in the dedicated card adapter before use. Inserting a card in the Sports Camcorder
without the adapter may damage the Sports Camcorder or the card.
✤ Do not insert an empty card adapter in the Sports Camcorder. Do not leave the adapter in the
Sports Camcorder while inserting or removing miniSD/RS-MMC cards. This may cause the
Sports Camcorder to malfunction.
Terminals
Protection
Tab
Label
<SD/MMC>
3333
Page 34

ENGLISH
USB
MMC/SD
SD Memory Card
SS
FF
STBY
00:00:00/00:40:05
720i
External memory inserted.
Do you want to change
memory to external?
OK
Cancel
USB
MMC/SD
S
F
STBY
00:00:00/00:40:05
External memory inserted.
Do you want to change
memory to external?
SD Memory Card
Getting Started
Inserting / Ejecting the memory card (SD/MMC) (not supplied)
Inserting a memory card
1. Open the Front cover.
Label
2. Insert the memory card into the memory card slot until it softly clicks.
3. Close the Front cover.
pasting portion
Caution: This screen will appear if the memory card is inserted with the power on.
◆ If you select <OK>, the memory type changes to ‘External’ and
if you select <Cancel>, files are stored in internal memory.
◆ If you insert a locked memory card, the [
] icon is displayed
next to the memory type indicator.
Ejecting a memory card
1. Open the Front cover.
2. Slightly push the memory card inwards to pop it out.
3. Pull the memory card out of the memory card slot and close the
Front cover.
3434
Page 35

12:00AM 2006/01/01 Sepia
Recording...
SS
FF
STBY
00:00:00:00:40:05
720i
ENGLISH
How to set to
How to set to
Movie mode
Movie mode
1. Press the [POWER] button to
turn on the Sports Camcorder.
HOLD
2. The Movie Record screen
appears.
MENU
MODE
Power
button
1
1
Movie Mode
Recording .......................................................................................36
Recording..................................................................................36
Zooming In and Out ..................................................................37
Playing.............................................................................................38
Playing Movie Files on the LCD monitor .................................38
Playing Multiple Movie Files .....................................................39
Setting the Recording Options ....................................................41
Setting the Movie Size ..............................................................41
Setting the Movie Quality .........................................................42
Setting the White Balance ........................................................43
Setting the Program AE (Programmed Auto Exposure) ..........44
Setting the Effect ......................................................................45
Setting the EIS (Electronic Image Stabilizer) ...........................46
Setting the Focus ......................................................................47
Setting the BLC (Backlight Compensation) .............................48
Setting the Digital Zoom ...........................................................49
Setting the Record Mode .........................................................50
Setting the Line In/Out ..............................................................51
Setting the Viewing Options .........................................................52
Deleting Movie Files .................................................................52
Setting the Play Mode ..............................................................53
Locking Movie Files ..................................................................54
Copying Movie Files .................................................................55
◆ Save important data / recordings separately on other media, to
avoid accidental loss due to a system failure or other reasons.
3535
Page 36

ENGLISH
12:00AM 2006/01/01 Sepia
Recording...
SS
FF
STBY
00:00:00:00:40:05
720i
12:00AM 2006/01/01 Sepia
Recording...
S
F
STBY
00:00:00:00:40:05
12:00AM 2006/01/01 Sepia
SS
FF
00:00:02:00:40:03
Recording...
720i
12:00AM 2006/01/01 Sepia
Recording...
S
F
STBY
00:00:00:00:40:05
12:00AM 2006/01/01 Sepia
Recording...
SS
FF
STBY
00:00:02:00:40:03
12:00AM 2006/01/01 Sepia
S
F
00:00:02:00:40:03
Recording...
720i
Recording...
00:00:00:00:40:05
00:00:02:00:40:03
Movie Mode : Recording
Recording
You can record movie and store it in memory.
Refer to the page 119 for recording movie using the External Camera Module.
1. Press the [POWER] button to turn on the Sports Camcorder.
◆
The Movie Record screen appears.
◆
You can select Movie mode or Previous mode as the start-up mode in System Settings.
➥page 109
2. Press [Record/Stop] button to start recording.
◆
[ ● ] indicator displays on the LCD monitor.
◆
The elapsed and remaining times are displayed and the Sports Camcorder starts
recording.
3. Press the [Record/Stop] button again to stop recording.
◆
The Sports Camcorder stops recording.
4. After recording, press the [POWER] button to turn off the Sports Camcorder to
prevent battery power consumption.
Reading the Counter
◆
The timestamp will be recorded along with the movie to enable faster searching.
◆
Elapsed time Remaining time
1
2
3
[ Notes ]
✤
If the Auto Shut Off is set, the Sports Camcorder turns off automatically after 5 minutes.
✤
Detach the battery pack when you finish recording to prevent unnecessary battery power consumption.
✤ To adjust the LCD screen brightness, set the <LCD Brightness> in System Settings mode. ➥page 102
✤ The LCD monitor brightness will not affect the brightness of the recording.
✤ If you are recording with the LCD monitor closed, the built-in microphone will not be facing forward, which can cause
deterioration of the sound strength. We recommend recording with the LCD screen open.
3636
Page 37

Movie Mode : Recording
12:00AM 2006/01/01 Sepia
SS
720i
FF
00:00:00/00:40:05
W
T
1X
10X
12:00AM 2006/01/01 Sepia
S
F
00:00:00/00:40:05
W
T
1X
10X
12:00AM 2006/01/01 Sepia
SS
720i
FF
00:00:02/00:40:03
W
T
1X
10X
12:00AM 2006/01/01 Sepia
S
F
00:00:00/00:40:05
W
T
1X
10X
12:00AM 2006/01/01 Sepia
S
F
00:00:02/00:40:03
W
T
1X
10X
12:00AM 2006/01/01 Sepia
SS
720i
FF
00:00:04/00:40:01
W
T
1X
10X
Zooming In and Out
Zooming allows you to change the size of the subject captured in a scene.
You can take advantage of the 10x optical electro motion zoom lens.
1. Press the [POWER] button to turn on the Sports Camcorder.
◆ The Movie Record screen appears.
◆ You can select Movie mode or Previous mode as the start-up mode in System Settings. ➥page 109
2. Press the [Record/Stop] button to start recording.
Slide the [W/T] switch up to zoom out.
●
The subject’s size is reduced, and you can record
movies as if you were far away from the subject.
●
On the zoom indicator in the LCD screen, the arrow
moves to W.
●
The smallest rate of zoom out is the default rate (original
resolution of the subject).
Slide the [ W/T] switch down to zoom in.
●
The subject is larger, and you can record movies as if you
were close to the subject.
●
On the zoom indicator the arrow moves to T.
●
The largest optical zoom ratio is 10x.
ENGLISH
Zoom Out
[ Notes ]
✤
Frequent use of zooming may result in higher battery power consumption.
✤
Optical zoom preserves the image quality.
✤
Refer to page 49 to read about Digital Zoom.
Zoom In
3737
Page 38

ENGLISH
Sepia
Recording...
12:00AM 2006/01/01
SS
720i
FF
STBY
00:00:00/00:40:05
720X576
00:00:00/00:05:20
100-0001
Sepia
Recording...
12:00AM 2006/01/01
S
F
STBY
00:00:00/00:40:05
12:00AM 2006/01/01
720X576
00:00:00/00:05:20
100-0001
Sepia
Recording...
12:00AM 2006/01/01
S
F
STBY
00:00:00/00:40:05
720X576
00:00:15/00:16:15
100-0004
Movie Mode : Playing
Playing Movie Files on the LCD monitor
You can view playback of movie files on the LCD monitor.
1. Press the [POWER] button to turn on the Sports Camcorder.
◆
The Movie Record screen appears.
2. Press the [PLAY] button or [Joystick(OK)].
◆
Switches to Movie Play mode.
3. Move the [Joystick] left / right to find the movie file you want to view.
◆ Each movement of the [Joystick] goes to the previous/next movie.
4. Press the [PLAY]button or [Joystick(OK)] to play the movie file you want.
◆
Each time you press the [PLAY] button or [Joystick(OK)], play or pause is selected
repeatedly.
1
2
[PLAY ]
button
3
[ Notes ]
✤ To adjust volume, move the [Joystick] up/down during playback.
✤ If there is no file stored to view, the message <No Files...> appears.
3838
4
Page 39

Movie Mode : Playing
Sepia
Recording...
12:00AM 2006/01/01
SS
720i
FF
STBY
00:00:00/00:40:05
720X576
00:00:00/00:05:20
100-0001
Sepia
Recording...
12:00AM 2006/01/01
S
F
STBY
00:00:00/00:40:05
720X576
00:00:00/00:05:20
100-0001
Sepia
Recording...
12:00AM 2006/01/01
S
F
STBY
00:00:00/00:40:05
Move Play
100-0001
OK
?
ERROR
12:00AM 2006/01/01
720X576
00:00:05/00:05:20
100-0001
720X576
00:00:00/00:05:20
100-0001
Sepia
Recording...
12:00AM 2006/01/01
S
F
STBY
00:00:00/00:40:05
Move Play
100-0001
Playing Multiple Movie Files
Using the [W/T] switch in Movie Play mode, you can display multiple images on the LCD monitor.
You can also select and play the desired movie file in a multi-view screen.
1. Press the [POWER] button to turn on the Sports Camcorder.
◆
The Movie Record screen appears.
2. Press the [PLAY] button or [Joystick(OK)] and move the [W/T] switch to
W(WIDE).
◆
3. Move the [Joystick] to left / right / up / down to find the movie file you want to
The Multi-view screen appears.
play.
ENGLISH
1
2
4. Press the [PLAY] button or [Joystick(OK)] to play the movie file you want.
◆
[ Notes ]
✤ If there is no file stored to view, the message <No Files...> appears.
✤ When the earphones, Audio / Video cable or External Camera Module is connected
to the Sports Camcorder, the built-in speaker will automatically turn off.
Each time you press the [PLAY] button or [Joystick(OK)], play or pause is selected
repeatedly.
3
4
3939
Page 40

ENGLISH
12:00AM 2006/01/01
720X576720X576
00:00:00/00:05:20
100-0001
12:00AM 2006/01/01
720X576
00:00:00/00:05:20
100-0001
12:00AM 2006/01/01
720X576720X576
00:00:05/00:05:15
100-0001
Movie Mode : Playing
Controls used to play the movie file
[PLAY] button or [Joystick(OK)]: Play or pause the movie file
[W] switch: The Multi-view screen appears.
[Joystick](left): In Movie Play mode: Press it to move to previous file.
Press and hold it to use RPS (Reverse Playback Search) function.
(RPS rate: 2x
[Joystick](right): In Movie Play mode: Press it to move to next file.
Press and hold it to use FPS (Forward Playback Search) function.
(FPS rate: 2x
In Movie Play mode: Press and hold it to play slowly when paused.
Adjusting the Sound
1. Press the [PLAY] button or [Joystick(OK)] to play the movie file in Movie Play
mode.
2. Move the [Joystick] up to increase the volume.
◆ Each time you move the [Joystick] up, the volume bar increases and the sound level will
get louder.
◆ The volume bar disappears after 1~2 seconds.
3. Move the [Joystick] down to decrease the volume.
◆ Each time you move the [Joystick] down, the volume bar decreases and the sound level will
get quieter.
◆ The volume bar disappears after 1~2 seconds.
[ Notes ]
✤
You can adjust the volume up to 10 steps.
✤
You can also play the movie file on a TV screen by connecting the Sports Camcorder to a TV. ➥page 127
✤
A video codec is required to play the movie files recorded on the Sports Camcorder on a computer.
Install the software provided in the Software CD to have the CODEC automatically installed in the system. If you do not have
the CD, search the product model name in the Download Centre on the Samsung Electronics home page (www.samsung.
com) to get the CODEC installation file. ➥page 124
4040
➝4x➝8x➝
➝4x➝8x➝
16x➝32x➝64x➝128x)
16x➝32x➝64x➝128x)
Press it to move to the next frame when paused.
1
3
Page 41

Movie Mode : Setting the Recording Options
Sepia
Recording...
12:00AM 2006/01/01
SS
720i
FF
STBY
00:00:00/00:40:05
Sepia
Recording...
12:00AM 2006/01/01
S
F
STBY
00:00:00/00:40:05
Movie
Move Exit
MENU
Select
OK
Size
352x288
720x576
352
720
AE
Sepia
Recording...
12:00AM 2006/01/01
S
F
STBY
00:00:00/00:40:05
Movie
Move ExitSelect
Size
352x288
720x576
Movie
Move Exit
MENU
SelectSelect
OK
Size
352x288
720x576
352
720
AE
352
720
Sepia
Recording...
12:00AM 2006/01/01
S
F
STBY
00:00:00/00:40:05
Sepia
Recording...
12:00AM 2006/01/01
SS
352p
FF
STBY
00:00:00/01:00:07
Movie
Move ExitSelect
Size
352x288
720x576
Movie
Move ExitSelect
Size
352x288
720x576
352
720
352
720
Setting the Movie Size
You can set the movie files size. The file storage capacity depends on the memory capacity and
movie file size.
1. Press the [POWER] button to turn on the Sports Camcorder.
◆ The Movie Record screen appears.
2. Press the [MENU] button.
Move the [Joystick] left / right to select <Size>.
3. Move the [Joystick] up / down to select an option, and then press the
[Joystick(OK)].
◆ Available options are: <720x576> / <352X288>
4. Press the [MENU] button to exit the menu.
◆ The selected function icon is displayed.
[ Notes ]
✤
If <TV> is selected in <Record Mode>, the size is set to 720i only.
If <PC> is selected in <Record Mode>, the size is set to 720p or 352p.
✤
Regarding detailed image capacity. ➥page 31.
✤
Higher resolution requires more memory space, which results in shorter maximum recording
time.
✤
When the screen size is set to 352(352X288), it is played back in smaller size than
720(720X576) on PC.
✤
While the menu screen is displayed, pressing the [Record / Stop] button will move to Movie
Record mode.
ENGLISH
1
2
3
4
4141
Page 42

ENGLISH
Sepia
Recording...
12:00AM 2006/01/01
SS
720i
FF
STBY
00:00:00/00:40:05
Sepia
Recording...
12:00AM 2006/01/01
S
F
STBY
00:00:00/00:40:05
Movie
Move Exit
MENU
Select
OK
Quality
AE
Fine
Super Fine
Normal
N
N
F
F
SFSF
Sepia
Recording...
12:00AM 2006/01/01
S
F
STBY
00:00:00/00:40:05
Movie
Move ExitSelect
Quality
Fine
Super Fine
Normal
N
F
SF
Movie
Move Exit
MENU
Select
OK
Quality
AE
Fine
Super Fine
Normal
N
N
F
F
SFSF
Sepia
Recording...
12:00AM 2006/01/01
S
F
STBY
00:00:00/00:40:05
Sepia
Recording...
12:00AM 2006/01/01
SS
720i
STBY
00:00:00/00:26:43
Movie
Move ExitSelect
Quality
Fine
Super Fine
Normal
N
F
SF
SFSF
Movie
Move ExitSelect
Quality
Fine
Super Fine
Normal
N
F
SF
Movie Mode : Setting the Recording Options
Setting the Movie Quality
You can set the movie file's quality. The files storage capacity depends on the memory
capacity and movie file quality.
1. Press the [POWER] button to turn on the Sports Camcorder.
◆
4242
The Movie Record screen appears.
2. Press the [MENU] button.
Move the [Joystick] left / right to select <Quality>.
3. Move the [Joystick] up / down to select an option, and then press the
[Joystick(OK)].
◆
4. Press the [MENU] button to exit the menu.
◆
[ Notes ]
✤
Regarding detailed image capacity. ➥page 31.
✤
While the menu screen is displayed, pressing the [Record / Stop] button will move to
Movie Record mode.
Available options are: <Super Fine> / <Fine> / <Normal>
The selected function icon is displayed.
1
2
3
4
Page 43

Movie Mode : Setting the Recording Options
Sepia
Recording...
12:00AM 2006/01/01
S
F
STBY
00:00:00/00:40:05
Movie
Move ExitExit
MENU
Select
OK
White Balance
Auto
A
Daylight
Fluorescent
AE
Sepia
Recording...
12:00AM 2006/01/01
S
F
STBY
00:00:00/00:40:05
Movie
Move ExitSelect
White Balance
Auto
Daylight
Fluorescent
Movie
Move Exit
MENU
Select
OK
White Balance
Auto
Fluorescent
Daylight
AE
SFSF
Sepia
Recording...
12:00AM 2006/01/01
S
F
STBY
00:00:00/00:40:05
Sepia
Recording...
12:00AM 2006/01/01
SS
720i
STBY
00:00:00/00:40:05
Movie
Move ExitSelect
White Balance
Auto
FF
Daylight
Fluorescent
Movie
Move ExitSelect
White Balance
Auto
Fluorescent
Daylight
Sepia
Recording...
12:00AM 2006/01/01
SS
720i
FF
STBY
00:00:00/00:40:05
Setting the White Balance
The White Balance may vary depending on the lighting conditions.
The White Balance is used to preserve natural colours under different lighting conditions.
1. Press the [POWER] button to turn on the Sports Camcorder.
◆
The Movie Record screen appears.
2. Press the [MENU] button.
Move the [Joystick] left / right to select <White Balance>.
3. Move the [Joystick] up / down to select an option, and then press the
[Joystick(OK)].
◆
4. Press the [MENU] button to exit the menu.
◆
◆
[ Notes ]
✤
When recording outdoors, the <Auto> setting will allow you to achieve the best results.
✤
As the lighting conditions change, set the appropriate white balance before recording.
✤
The subject used for <Custom> should be white colour. If not, the colour balance will not be
natural.
✤
While the menu screen is displayed, pressing the [Record / Stop] button will move to Movie
Record mode.
To set Custom, frame your Sports Camcorder on a white area (such as a wall),
filling the LCD monitor with white colour. Press the [Joystick(OK)] to set.
Auto
Daylight
Fluorescent
Tungsten
Custom
Automatically sets according to the recording environment.
Adjusts the colour according to daylight/indoor, outdoor light
Suitable for a fluorescent light environment.
Suitable for an incandescent light environment.
You can adjust the white balance as you wish based on the recording environment.
The selected function icon is displayed.
If <Auto> is selected, no icon will be displayed.
ENGLISH
1
2
3
4
4343
Page 44

ENGLISH
Sepia
Recording...
12:00AM 2006/01/01
S
F
STBY
00:00:00/00:40:05
Movie
Move Exit
MENU
Select
OK
Program AE
AE
Sports
Auto
Spotlight
AE
AUTO
Sepia
Recording...
12:00AM 2006/01/01
S
F
STBY
00:00:00/00:40:05
Movie
Move ExitSelect
Program AE
Sports
Auto
Spotlight
Movie
Move Exit
MENU
Select
OK
Program AE
Sports
Auto
Spotlight
AE
SFSF
Sepia
Recording...
12:00AM 2006/01/01
S
F
STBY
00:00:00/00:40:05
Sepia
Recording...
12:00AM 2006/01/01
SS
720i
STBY
00:00:00/00:40:05
Movie
Move ExitSelect
Program AE
Sports
Auto
Spotlight
FF
Movie
Move ExitSelect
Program AE
Sports
Auto
Spotlight
Sepia
Recording...
12:00AM 2006/01/01
SS
720i
FF
STBY
00:00:00/00:40:05
Movie Mode : Setting the Recording Options
Setting the Program AE (Programmed Auto Exposure)
Program AE modes are preset automatic exposure modes based upon an internal computer
programme. It allows you to adjust the aperture setting to suit different conditions.
1. Press the [POWER] button to turn on the Sports Camcorder.
◆
The Movie Record screen appears.
2. Press the [MENU] button.
Move the [Joystick] left / right to select <Program AE>.
3. Move the [Joystick] up / down to select an option, and then press the
[Joystick(OK)].
4. Press the [MENU] button to exit the menu.
◆
◆
Auto balances between the subject and background to get the best result.
Auto
The shutter speed automatically varies from 1/50 to 1/250 per second depending
on the scene.
Sports
Spotlight
Sand/Snow
For recording fast-moving people or objects. It is suitable for sports events
and recording outside in the car.
Compensates for a subject that appears too bright under strong direct light
such as spotlight. It is suitable for concerts and school performances.
Use when the light is very strong such as on the beach or in the snow.
The selected function icon is displayed.
If <Auto> is selected, no icon will be displayed.
1
2
3
4
[ Note ]
✤
While the menu screen is displayed, pressing the [Record / Stop] button will move to Movie
Record mode.
4444
Page 45

Movie Mode : Setting the Recording Options
Sepia
Recording...
12:00AM 2006/01/01
S
F
STBY
00:00:00/00:40:05
Movie
Move Exit
MENU
Select
OK
Effect
AE
Art
Off
Mosaic
Sepia
Recording...
12:00AM 2006/01/01
S
F
STBY
00:00:00/00:40:05
Movie
Move ExitSelect
Effect
Art
Off
Mosaic
Movie
Move Exit
MENU
Select
OK
Effect
Mirror
Negrtive
B&W
AE
Recording...
12:00AM 2006/01/01
SS
SFSF
Sepia
Recording...
12:00AM 2006/01/01
S
F
STBY
00:00:00/00:40:05
720i
STBY
00:00:00/00:40:05
Movie
Move ExitSelect
Effect
Art
Off
Mosaic
FF
Movie
Move ExitSelect
Effect
Mirror
Mirror
Negrtive
B&W
Sepia
Recording...
12:00AM 2006/01/01
SS
720i
FF
STBY
00:00:00/00:40:05
Setting the Effect
You can apply various digital effects to your recording.
1. Press the [POWER] button to turn on the Sports Camcorder.
◆
The Movie Record screen appears.
2. Press the [MENU] button.
Move the [Joystick] left / right to select <Effect>.
3. Move the [Joystick] up / down to select an option, and then press the
[Joystick(OK)].
Off
Art
Mosaic
Sepia
Negative
Mirror
B&W
Cancels the <Effect>.
Adds artistic effects to your movie file.
A mosaic overlay appears on your movie file.
The image is displayed in sepia colour similar to that of an old photograph.
Reverses the colours, creating the look of a negative.
This mode cuts the image in half using a Mirror effect.
Changes the images into Black and White.
4. Press the [MENU] button to exit the menu.
◆
The selected effect and icon are displayed.
◆
[ Note ]
✤
While the menu screen is displayed, pressing the [Record / Stop] button will move to Movie
Record mode.
If <Off> is selected, no icon will be displayed.
ENGLISH
1
2
3
4
4545
Page 46

ENGLISH
Sepia
Recording...
12:00AM 2006/01/01
S
F
STBY
00:00:00/00:40:05
Movie
Move Exit
MENU
Select
OK
EIS
Off
On
TV
PC
Sepia
Recording...
12:00AM 2006/01/01
S
F
STBY
00:00:00/00:40:05
Movie
Move ExitSelect
EIS
Off
On
Movie
Move Exit
MENU
Select
OK
EIS
Off
On
TV
PC
SFSF
Sepia
Recording...
12:00AM 2006/01/01
S
F
STBY
00:00:00/00:40:05
Sepia
Recording...
12:00AM 2006/01/01
SS
720i
STBY
00:00:00/00:40:05
Movie
Move ExitSelect
EIS
Off
On
FF
Movie
Move ExitSelect
EIS
Off
On
Sepia
Recording...
12:00AM 2006/01/01
SS
720i
FF
STBY
00:00:00/00:40:05
Movie Mode : Setting the Recording Options
Setting the EIS (Electronic Image Stabilizer)
The Electrical Image Stabilizer is a function that compensates for hand shake and other
movements while recording.
EIS provides a more stable image when:
◆
Recording while zooming
◆
Recording small objects
◆
Recording while walking or moving
◆
Recording through the window of a moving vehicle
1. Press the [POWER] button to turn on the Sports Camcorder.
◆
The Movie Record screen appears.
2. Press the [MENU] button.
Move the [Joystick] left / right to select <EIS>.
3. Move the [Joystick] up / down to select an option, and then press the
[Joystick(OK)].
◆
◆
4. Press the [MENU] button to exit the menu.
◆
◆
[ Note ]
✤
While the menu screen is displayed, pressing the [Record / Stop] button will move to Movie
Record mode.
4646
<On>: Enables EIS function.
<Off>: Disables EIS function.
If you select <On>, the EIS icon ( ) is displayed.
If you select <Off>, no icon is displayed.
1
2
3
4
Page 47

Movie Mode : Setting the Recording Options
Sepia
Recording...
12:00AM 2006/01/01
SS
720i
FF
STBY
00:00:00/00:40:05
Sepia
Recording...
12:00AM 2006/01/01
S
F
STBY
00:00:00/00:40:05
Movie
Move Exit
MENU
Select
OK
Focus
MF
AF
TV
PC
Sepia
Recording...
12:00AM 2006/01/01
S
F
STBY
00:00:00/00:40:05
Movie
Move ExitSelect
Focus
MF
AF
Movie
Move Exit
MENU
Select
OK
Focus
MF
AF
TV
PC
Sepia
Recording...
12:00AM 2006/01/01
S
F
STBY
00:00:00/00:40:05
Movie
Move ExitSelect
Focus
MF
AF
Sepia
Recording...
12:00AM 2006/01/01
SS
720i
FF
STBY
00:00:00/00:40:05
Movie
Move ExitSelect
Focus
MF
AF
Setting the Focus
You can set the focus depending on the subject or environment. In most situations,
it is best to use the AF(Auto Focus).
1. Press the [POWER] button to turn on the Sports Camcorder.
◆
The Movie Record screen appears.
2. Press the [MENU] button.
Move the [Joystick] left / right to select <Focus>.
3. Move the [Joystick] up / down to select an option, and then press the
[Joystick(OK)].
◆
◆
4. Press the [MENU] button to exit the menu.
◆
◆
Manual Focus <MF>
Adjust the focus by moving the [Joystick] up/down to zoom in or out manually.
◆ When a picture contains objects that are both close and far away from the Sports
◆ When a person is enveloped in fog or surrounded by snow.
<AF>: Set the focus automatically.
<MF>: Set the focus manually.
The selected function icon is displayed.
If you select <AF>, no icon is displayed.
Camcorder.
ENGLISH
1
2
3
4
[ Notes ]
✤
The focus is set to <AF> automatically when the Sports Camcorder is turned off.
✤
While the menu screen is displayed, pressing the [Record / Stop] button will move to Movie
Record mode.
4747
Page 48

ENGLISH
Sepia
Recording...
12:00AM 2006/01/01
S
F
STBY
00:00:00/00:40:05
Movie
Move Exit
MENU
Select
OK
BLC
Off
On
TV
PC
Sepia
Recording...
12:00AM 2006/01/01
S
F
STBY
00:00:00/00:40:05
Movie
Move ExitSelect
BLC
Off
On
Movie
Move Exit
MENU
Select
OK
BLC
Off
On
TV
PC
Sepia
Recording...
12:00AM 2006/01/01
S
F
STBY
00:00:00/00:40:05
Movie
Move ExitSelect
BLC
Off
On
Sepia
Recording...
12:00AM 2006/01/01
SS
720i
FF
STBY
00:00:00/00:40:05
Movie
Move ExitSelect
BLC
Off
On
Sepia
Recording...
12:00AM 2006/01/01
SS
720i
FF
STBY
00:00:00/00:40:05
Movie Mode : Setting the Recording Options
Setting the BLC (Backlight Compensation)
The Backlight Compensation function helps to make the subject brighter when the subject is
in front of a window or the subject is too dark to distinguish. You can use this function when
using the Sports Camcorder in bright or snowy backgrounds.
1. Press the [POWER] button to turn on the Sports Camcorder.
◆
4848
The Movie Record screen appears.
2. Press the [MENU] button.
Move the [Joystick] left / right to select <BLC>.
3. Move the [Joystick] up / down to select an option, and then press the
[Joystick(OK)].
◆
<On>: Set the BLC function.
◆
<Off>: Cancel the BLC function.
4. Press the [MENU] button to exit the menu.
◆
The selected function ( ) icon is displayed.
◆
If you select <Off>, no icon is displayed.
[ Notes ]
✤
The BLC is set to <Off> when the Sports Camcorder is turned off.
✤
While the menu screen is displayed, pressing the [Record / Stop] button will move to Movie
Record mode.
1
2
3
4
Page 49

Movie Mode : Setting the Recording Options
Sepia
Recording...
12:00AM 2006/01/01
S
F
STBY
00:00:00/00:40:05
Movie
Move Exit
MENU
Select
OK
Digital Zoom
Off
On
TV
PC
Sepia
Recording...
12:00AM 2006/01/01
S
F
STBY
00:00:00/00:40:05
Movie
Move ExitSelect
Digital Zoom
Off
On
Movie
Move Exit
MENU
Select
OK
Digital Zoom
Off
On
TV
PC
Sepia
Recording...
12:00AM 2006/01/01
S
F
STBY
00:00:00/00:40:05
Movie
Move ExitSelect
Digital Zoom
Off
On
Sepia
Recording...Recording...
12:00AM 2006/01/01
SS
720i
FF
STBY
00:00:00/00:40:05
Movie
Move ExitSelect
Digital Zoom
Off
On
W
T
1X
10X
Sepia
Recording...
12:00AM 2006/01/01
SS
720i
FF
STBY
00:00:00/00:40:05
Setting the Digital Zoom
Zooming more than 10x is achieved digitally, up to 100X when combined with optical zoom.
The Digital Zoom processes data to enlarge the centre portion of the image to fill the frame.
It may produce a less detailed and slightly grainy picture.
1. Press the [POWER] button to turn on the Sports Camcorder.
◆
The Movie Record screen appears.
2. Press the [MENU] button.
Move the [Joystick] left / right to select <Digital Zoom>.
3. Move the [Joystick] up / down to select an option, and then press the
[Joystick(OK)].
◆
<On>: Enables digital zoom. Attempts to zoom in more than 10x will automatically
apply digital zooming. (up to 100x)
◆
<Off>: Disables digital zoom. Only optical zoom 10x will be supported for zooming
4. Press the [MENU] button to exit the menu.
◆
When using the digital zoom switch, a digital zoom indicator appears on the screen.
[ Note ]
✤
While the menu screen is displayed, pressing the [Record / Stop] button will move to
Movie Record mode.
ENGLISH
1
2
3
4
4949
Page 50

ENGLISH
Sepia
Recording...
12:00AM 2006/01/01
S
F
STBY
00:00:00/00:40:05
Movie
Move Exit
MENU
Select
OK
Record ModeRecord Mode
PC
TV
TV
PC
Sepia
Recording...
12:00AM 2006/01/01
S
F
STBY
00:00:00/00:40:05
Movie
Move ExitSelect
Record Mode
PC
TV
Movie
Move Exit
MENU
Select
OK
Record ModeRecord Mode
PC
TV
TV
PC
Sepia
Recording...
12:00AM 2006/01/01
S
F
STBY
00:00:00/00:40:05
Sepia
Recording...
12:00AM 2006/01/01
SS
720p
FF
STBY
00:00:00/00:40:05
Movie
Move ExitSelect
Record Mode
PC
TV
Movie
Move ExitSelect
Record Mode
PC
TV
Sepia
Recording...
12:00AM 2006/01/01
SS
720i
FF
STBY
00:00:00/00:40:05
Movie Mode : Setting the Recording Options
Setting the Record Mode
You can set the proper record mode before starting movie file recording.
1. Press the [POWER] button to turn on the Sports Camcorder.
◆
The Movie Record screen appears.
2. Press the [MENU] button.
Move the [Joystick] left / right to select <Record Mode>.
3. Move the [Joystick] up / down to select an option, and then press the
[Joystick(OK)].
◆
◆
◆
4. Press the [MENU] button to exit the menu.
◆
◆
[ Notes ]
✤
If <TV> is selected as the Record Mode, the size is set to 720i only.
✤
If <PC> is selected as the Record Mode, the size is set to 720p or 352p.
✤
When the size is set to 352(352X288), <PC> is automatically selected for movie files
recording.
✤
While the menu screen is displayed, pressing the [Record / Stop] button will move to
Movie Record mode.
5050
<TV>: The system generates clear images when played back on TV.
<PC>: The system generates clear images when played back on PC.
We recommend copying the file onto a PC or connecting the Sports Camcorder to a
TV for a better playback picture.
If you select <TV>, <i> is displayed with size icon.
If you select <PC>, <p> is displayed with size icon.
1
2
3
4
Page 51

Movie Mode : Setting the Recording Options
Sepia
Recording...
12:00AM 2006/01/01
SS
720i
FF
STBY
00:00:00/00:40:05
Movie
Move Exit
MENU
Select
OK
Line In/Out
In
Out
Sepia
Recording...
12:00AM 2006/01/01
S
F
STBY
00:00:00/00:40:05
TV
PC
AE
Movie
Move ExitSelect
Line In/Out
In
Out
Movie
Move Exit
MENU
Select
OK
In
Out
Sepia
Recording...
12:00AM 2006/01/01
S
F
STBY
00:00:00/00:40:05
Line In/Out
TV
PC
AE
Setting the Line In/Out
You can record or play back the contents of the Sports Camcorder onto an external device
and vice versa. ➥pages 127~129
ENGLISH
1. Press the [POWER] button to turn on the Sports Camcorder.
◆
The Movie Record screen appears.
2. Press the [MENU] button.
Move the [Joystick] left / right to select <Line In/Out>.
3. Move the [Joystick] up / down to select an option, and then press the
[Joystick(OK)].
◆
<In>: Select this when recording the contents of an external device into the Sports
◆
4. Press the [MENU] button to exit the menu.
◆
[ Note ]
✤
While the menu screen is displayed, pressing the [Record / Stop] button will move to
Movie Record mode.
Camcorder.
<Out>: Select this when recording or playing back the contents of the Sports
Camcorder onto an external device.
The Sports Camcorder is set to the selected setting.
1
2
3
5151
Page 52

ENGLISH
Move Play
100-0001
OK
?
ERROR
Move Play
100-0001
Move SelectSelect
100-0003
OK
?
ERROR
Cancel
OK
Multi Select
All
00:00:00/00:10:40
720X576
100-0001
Move Select
OK
Cancel
OK
00:00:00/00:10:40
Movie Mode : Setting the Viewing Options
Deleting Movie Files
You can delete saved movie files.
1. Press the [POWER] button to turn on the Sports Camcorder.
◆
The Movie Record screen appears.
2. Press the [PLAY] button or [Joystick(OK)].
◆
Switches to Movie Play mode.
◆
Move to the desired movie file, using the [Joystick].
2
[PLAY]
button
[Joystick(OK)]
Deleting a Movie File in Full Screen-View
3. Press the [DELETE] button on the LCD monitor.
4. Select an option by moving the [Joystick] up / down and then press the
[Joystick(OK)].
◆
<OK>: Deletes the selected movie file.
◆
<Cancel>: Cancels the deletion.
Deleting Movie Files in Multi-View
3. Move the [W/T] switch to W (WIDE).
◆
The screen switches to multi-view.
4. Press the [DELETE] button on the LCD monitor.
5. Select an option by moving the [Joystick] up / down and then press the
[Joystick(OK)].
◆
<OK>: Deletes the selected movie file using the [Joystick(OK)].
◆
5252
<Multi Select>: Multiple movie files can be selected using the [Joystick(OK)].
< ✔ > indicator appears on the selected files.
Press the [PLAY] button to delete.
◆
<All>: All movie files will be deleted.
◆
<Cancel>: Cancels the deletion.
[ Notes ]
✤
Locked files will not be deleted.
✤
While the menu screen is displayed, pressing the [Record / Stop] button will move to Movie
Record mode.
3
3
4
Page 53

Movie Mode : Setting the Viewing Options
720X576
00:00:00/00:10:40
100-0001
Movie
Move Exit
MENU
Select
OK
Play Mode
Play All
Play One
Repeat OneRepeat One
1
1
ALL
720X576
00:00:00/00:10:40
100-0001
Movie
Move ExitSelect
Play Mode
Play All
Play One
Repeat One
1
Movie
Move Exit
MENU
Select
OK
Play ModePlay Mode
Play All
Play One
Repeat One
1
1
ALL
720X576
00:00:00/00:10:40
100-0001
720X576
00:00:00/00:10:40
100-0001
720X576
00:00:10/00:10:30
100-0001
Movie
Move ExitSelect
Play Mode
Play All
Play One
Repeat One
1
Movie
Move ExitSelect
Play Mode
Play All
Play One
Repeat One
1
Setting the Play Mode
You can play all files continuously or play the selected file only. You can also set the repeat option for all files.
2
1. Press the [POWER] button to turn on the Sports Camcorder.
◆
The Movie Record screen appears.
2. Press the [PLAY] button or [Joystick(OK)].
◆
Switches to Movie Play mode.
ENGLISH
3. Press the [MENU] button.
Move the [Joystick] left / right to select <Play Mode>.
4. Move the [Joystick] up / down to select an option, and then press the
[Joystick(OK)].
◆
◆
◆
◆
5. Press the [MENU] button to exit the menu.
Press the [PLAY] button.
◆ The selected option will be applied.
[ Note ]
✤
While the menu screen is displayed, pressing the [Record / Stop] button will move to Movie
Record mode.
<Play One>: The selected movie file will be played.
<Play All>: Plays back from the selected file to the last file.
<Repeat One>: The selected movie file will be played repeatedly.
<Repeat All>: All movie files will be played repeatedly.
3
4
5
5353
Page 54

ENGLISH
Movie
Move Exit
MENU
Select
OK
Lock
Lock
720X576
00:00:00/00:10:40
100-0001
Movie
Move ExitSelect
Lock
Lock
Movie Mode : Setting the Viewing Options
Locking Movie Files
You can lock saved important movie files from accidental deletion. Locked files will not be
deleted unless you release the lock or format the memory.
1. Press the [POWER] button to turn on the Sports Camcorder.
◆
The Movie Record screen appears.
2. Press the [PLAY] button or [Joystick(OK)].
◆
Switches to Movie Play mode.
◆
Move to the desired movie file, using the [Joystick].
Locking a Movie File in Full Screen-View
3. Press the [MENU] button.
Move the [Joystick] left / right to select <Lock>.
4. Press the [Joystick(OK)] to lock.
◆
The selected movie file is locked.
Locking Movie Files in Multi-View
3. Move the [W/T] switch to W (WIDE).
◆
The screen switches to multi-view.
4. Press the [MENU] button.
Move the [Joystick] left / right to select <Lock>.
5. Move the [Joystick] up / down to select an option, and then press the
[Joystick(OK)].
◆
<Lock>: Locks the selected movie file using the [Joystick(OK)].
◆
<Multi Select>: Multiple movie files can be selected using the [Joystick(OK)].
<
> indicator appears on the selected files.
5454
Press the [PLAY] button to lock.
◆
<Lock All>: All movie files are locked.
◆
<Unlock All>: Unlocks all movie files.
[ Notes ]
✤
The <
✤
While the menu screen is displayed, pressing the [Record / Stop] button will move to Movie
> icon is displayed on the locked file.
Record mode.
3
4
3
4
Page 55

Movie Mode : Setting the Viewing Options
Movie
Move Exit
MENU
Select
OK
Copy To
OK
Movie
Move ExitSelect
Copy To
OK
Movie
Move Exit
MENU
Select
OK
Copy To
OK
Copying file(s)...Copying file(s)...
SMOV0005.AVISMOV0005.AVI
Press OK to cancel.Press OK to cancel.
Cancel
Copying Movie Files
You can copy saved files from the internal memory to a memory card and vice versa.
1. Insert a memory card in the memory card slot on Sports Camcorder.
2. Press the [POWER] button to turn on the Sports Camcorder.
◆
The Movie Record screen appears.
3. Press the [PLAY] button or [Joystick(OK)].
◆
Switches to Movie Play mode.
◆
Move to the desired movie file, using the [Joystick].
Copying a Movie File in Full Screen-View
4. Press the [MENU] button.
Move the [Joystick] left / right to select <Copy To>.
5. Press the [Joystick(OK)] to copy.
◆
Copies the selected movie file.
Copying Movie Files in Multi-View
4. Move the [W/T] switch to W (WIDE).
◆
The screen switches to multi-view.
5. Press the [MENU] button.
Move the [Joystick] left / right to select <Copy To>.
6. Move the [Joystick] up / down to select an option, and then press the
[Joystick(OK)].
◆
<OK>: Copies the selected movie file.
◆
<Multi Select>: Multiple movie files can be selected using the [Joystick(OK)].
< ✔ > indicator appears on the selected files.
Press the [PLAY] button to copy.
◆ <All>: All movie files will be copied.
[ Notes ]
✤
The Sports Camcorder copies from the currently-used memory to another. If the internal memory
was used, it copies to a memory card.
✤
If the memory card is not inserted, you cannot perform the <Copy To> function.
✤
While the menu screen is displayed, pressing the [Record / Stop] button will move to Movie Record mode.
ENGLISH
4
5
4
5
5555
Page 56

Photo
ENGLISH
How to set to
How to set to
Photo mode
Photo mode
1. Press the [POWER] button to
turn on the Sports Camcorder.
MENU
Power
button
MODE
HOLD
DC IN
2. Set the Photo mode by
pressing the [MODE] button.
5656
2
2
Photo Mode
Capturing ........................................................................................57
Capturing Images .....................................................................57
Zooming In and Out ..................................................................58
Viewing ............................................................................................59
Viewing Photo Files on the LCD monitor .................................59
Viewing Multiple Photo Files ....................................................60
Setting the Capturing Options .....................................................61
Setting the White Balance ........................................................61
Setting the Program AE (Programmed Auto Exposure) ..........62
Setting the Effect ......................................................................63
Setting the Flash .......................................................................64
Setting the Continuous Shot ....................................................65
Setting the EIS (Electronic Image Stabilizer) ...........................66
Setting the Focus ......................................................................67
Setting the BLC (Backlight Compensation) .............................68
Setting the Digital Zoom ...........................................................69
Setting the Viewing Options .........................................................70
Deleting Photo Files .................................................................70
Setting the Slide show ..............................................................71
Setting the DPOF (Digital Print Order Format) Function .........72
Locking Photo Files ..................................................................73
Copying Photo Files .................................................................74
◆ Save important data / recordings separately on other media, to
avoid accidental loss due to a system failure or other reasons.
Page 57

Photo Mode : Capturing
SS
Capturing...
Sepia12:00AM 2006/01/01
SSSS
Sepia12:00AM 2006/01/01
Capturing...
SSSS
Capturing...
Sepia12:00AM 2006/01/01
MENU
MODE
HOLD
Capturing Images
You can take a photo image as well as record movie files.
1. Press the [POWER] button to turn on the Sports Camcorder.
◆
The Movie Record screen appears.
ENGLISH
1
POWER
button
2. Set the Photo mode by pressing the [MODE] button.
◆
The Photo Capture screen appears.
3. Press the [Record / Stop] button to take a photo image.
4. After capturing, press the [POWER] button to turn off the Sports Camcorder
to prevent battery power consumption.
[ Notes ]
✤
If the battery is low, the flash will not operate automatically.
✤
In order to take pictures on the memory card, insert a memory card and then set the storage
type to <External>. ➥page 97
2
3
5757
Page 58

ENGLISH
100
SepiaSepia12:00AM 2006/01/01
SS
W
T
1X
10X
100
Sepia12:00AM 2006/01/01
S
W
T
1X
10X
Sepia12:00AM 2006/01/01
SS
W
T
1X
10X
SS
100
Sepia12:00AM 2006/01/01
S
W
T
1X
10X
Sepia12:00AM 2006/01/01
S
W
T
1X
10X
SepiaSepia12:00AM 2006/01/01
W
T
1X
10X
Photo Mode : Capturing
Zooming In and Out
Zooming lets you change the size of the subject captured in a scene.
You can take advantage of the 10x optical electro motion zoom lens.
1. Press the [POWER] button to turn on the Sports Camcorder.
◆
The Movie Record screen appears.
2. Set the Photo mode by pressing the [MODE] button.
[ Notes ]
✤ Frequent use of zooming may result in higher battery power consumption.
✤ You can take advantage of 10x digital zoom as well as 10x optical zoom for a
✤ Optical zoom preserves the image quality.
5858
◆
The Photo Capture screen appears.
Slide the [W/T] switch up to zoom out.
●
The subject’s size is reduced, and you can take a picture
as if you were far away from the subject.
●
On the zoom indicator in the LCD screen, the arrow
moves to W.
●
The smallest rate of zoom out is the default rate
total of 100x zoom.
(original resolution of the subject).
Slide the [W/T] switch down to zoom in.
●
The subject is larger, and you can take a picture as if
you were close to the subject.
●
On the zoom indicator the arrow moves to T.
●
The largest optical zoom ratio is 10x, which is the
biggest among the basic zoom.
Zoom Out
Zoom In
Page 59

Photo Mode : Viewing
100
Capturing...Capturing...
Sepia12:00AM 2006/01/01
SS
100
Sepia
12:00AM 2006/01/01
01
Capturing...
Sepia12:00AM 2006/01/01
S
100-0001100-0001
100
Sepia
12:00AM 2006/01/01
01
Sepia
12:00AM 2006/01/01
01
Capturing...
Sepia12:00AM 2006/01/01
S
100-0001
100-0002100-0002
MENU
MODE
HOLD
Viewing Photo Files on the LCD monitor
It is handy and practical to view photos using the LCD monitor in locations such as in a car,
indoors, or outdoors.
1
ENGLISH
1. Press the [POWER] button to turn on the Sports Camcorder.
◆
The Movie Record screen appears.
2. Set the Photo mode by pressing the [MODE] button.
◆
The Photo Capture screen appears.
3. Press the [PLAY] button or [Joystick(OK)].
◆
Switches to Photo View mode.
4. Move the [Joystick] left / right to find the photo you want to view.
◆
[ Notes ]
✤ If there is no file stored to view, the message <No Files...> appears.
✤ Moving the [Joystick] right at the last photo will move to the first photo.
✤ Moving the [Joystick] left at the first photo will move to the last photo.
✤ Moving the [Joystick] left / right for more than 1 second will start fast search.
✤ While the menu screen is displayed, pressing the [Record / Stop] button will move to Photo
Capture mode.
Each movement of the joystick goes to the previous / next photo.
Power
button
2
3
4
5959
Page 60

ENGLISH
100
SS
Capturing...
Sepia12:00AM 2006/01/01
100
720X480720X480
S
12:00AM 2006/01/01
01
Sepia
100-0001
Capturing...
Sepia12:00AM 2006/01/01
100
720X480
S
12:00AM 2006/01/01
01
Sepia
01
Move View
100-0001
OK
100-0001
Capturing...
Sepia12:00AM 2006/01/01
Photo Mode : Viewing
Viewing Multiple Photo Files
Using the [W/T] switch in Photo View mode, you can display multiple images on one LCD screen.
1. Press the [POWER] button to turn on the Sports Camcorder.
◆
The Movie Record screen appears.
2. Set the Photo mode by pressing the [MODE] button.
◆
The Photo Capture screen appears.
2
3
3. Press the [PLAY] button or [Joystick(OK)] and slide the [W/T] switch to
W(WIDE).
◆
The Multi-view screen appears.
4. Move the [Joystick] to the left/ right/ up/ down to find the photo file you want
to view.
5. Press [PLAY] button or [Joystick(OK)] to view the photo file you want.
◆
[ Notes ]
✤
If there is no file stored to view, the message <No Files...> appears.
✤
Display time may vary depending on the picture size.
✤
The image edited or turned in Image Viewer programme on your PC may not be displayed.
6060
The full screen is displayed.
4
Page 61

Photo Mode : Setting the Capturing Options
Setting the White Balance
The White Balance allows calibration of the picture for accurate colour display in different lighting
conditions. We recommended setting the white balance prior to any photo capturing.
1. Press the [POWER] button to turn on the Sports Camcorder.
◆
The Movie Record screen appears.
2. Set the Photo mode by pressing the [MODE] button.
◆
The Photo Capture screen appears.
3. Press the [MENU] button.
Move the [Joystick] left / right to select <White Balance>.
4. Move the [Joystick] up / down to select an option, and then press the
[Joystick(OK)].
◆
To set Custom, frame your Sports Camcorder on a white area (such as a wall), filling the
LCD monitor with white colour. Press the [Joystick(OK)] to set.
Auto
Daylight
Fluorescent
Tungsten
Custom
Automatically sets according to the shooting environment.
Adjusts the colour according to daylight/indoor, outdoor light.
Suitable for a fluorescent light environment.
Suitable for an incandescent light environment.
Adjusts the white balance based on the shooting environment.
5. Press the [MENU] button to exit the menu.
◆
The selected function icon is displayed.
◆
If <Auto> is selected, no icon will be displayed.
[ Notes ]
✤
When taking pictures outdoors, <Auto> setting will allow you to obtain the best results.
✤
As the lighting condition changes, set the appropriate white balance before taking a picture.
✤
The subject used for <Custom> should be white colour. If not, the colour balance will not be
natural.
✤
While the menu screen is displayed, pressing the [Record / Stop] button will move to Photo
Capture mode.
2
3
4
5
ENGLISH
6161
Page 62

ENGLISH
100
SSSS
Capturing...
Sepia12:00AM 2006/01/01
100
SS
Capturing...
Sepia12:00AM 2006/01/01
Photo
Move Exit
MENU
Select
OK
Program AE
Spotlight
Sports
Auto
100
SS
Capturing...
Sepia12:00AM 2006/01/01
Photo
Move ExitSelect
Program AE
Spotlight
Sports
Auto
Photo
Move Exit
MENU
Select
OK
Program AE
Spotlight
Auto
Sports
100
100
SS
SSSS
Capturing...
Sepia12:00AM 2006/01/01
Photo
Move ExitSelect
Program AE
Spotlight
Sports
Auto
Capturing...
Sepia12:00AM 2006/01/01
Photo
Move ExitSelect
Program AE
Spotlight
Auto
Sports
Photo Mode : Setting the Capturing Options
Setting the Program AE (Programmed Auto Exposure)
Program AE modes are preset automatic exposure modes based upon an internal computer
programme. Program AE allows you to adjust the aperture setting to suit different conditions.
1. Press the [POWER] button to turn on the Sports Camcorder.
2. Set the Photo mode by pressing the [MODE] button.
3. Press the [MENU] button.
4. Move the [Joystick] up / down to select an option, and then press the
5. Press the [MENU] button to exit the menu.
[ Note ]
✤
6262
◆
The Movie Record screen appears.
◆
The Photo Capture screen appears.
Move the [Joystick] left / right to select <Program AE>.
[Joystick(OK)].
Auto
Sports
Spotlight
Sand/Snow
◆
The selected function icon is displayed.
◆
If you select <Auto>, no icon is displayed.
While the menu screen is displayed, pressing the [Record / Stop] button will move to Photo
Capture mode.
Auto balances between the subject and background to get the best result.
The shutter speed automatically varies from 1/50 to 1/250 per second depending
on the scene.
For recording fast-moving people or objects. It is suitable for sports events
and recording outside in the car.
Compensates for a subject that appears too bright under strong direct light
such as spotlight. It is suitable for concerts and school performances.
Use when the light is very strong such as on the beach or in the snow.
2
3
4
5
Page 63

Photo Mode : Setting the Capturing Options
100
SS
Capturing...
Sepia12:00AM 2006/01/01
Photo
Move Exit
MENU
Select
OK
Mosaic
Art
Off
Effect
100
SS
Capturing...
Sepia12:00AM 2006/01/01
Photo
Move ExitSelect
Mosaic
Art
Off
Photo
Move Exit
MENU
Select
OK
Sepia
Negative
Mirror
Effect
Effect
100
SSSS
Capturing...
Sepia12:00AM 2006/01/01
100
SS
Capturing...
Sepia12:00AM 2006/01/01
Photo
Move ExitSelect
Mosaic
Art
Off
Photo
Move ExitSelect
Sepia
Negative
Mirror
Effect
Effect
Mirror
Setting the Effect
You can apply various effects to your photos.
1. Press the [POWER] button to turn on the Sports Camcorder.
2. Set the Photo mode by pressing the [MODE] button.
◆
The Movie Record screen appears.
◆
The Photo Capture screen appears.
ENGLISH
2
Off
Art
Mosaic
Sepia
Negative
Mirror
B&W
Cancels the <Effect>.
Adds artistic effects to your photo file.
A mosaic overlay appears on your photo file.
The picture is displayed in sepia colour similar to that of an old photograph.
Reverses the colours, creating the look of a negative.
This mode cuts the picture in half using a mirror effect.
Changes the images into Black and White.
3. Press the [MENU] button.
Move the [Joystick] left / right to select <Effect>.
4. Move the [Joystick] up / down to select an option, and then press the
[Joystick(OK)].
5. Press the [MENU] button to exit the menu.
◆ The selected effect and icon are displayed.
◆ If you select <Off>, no icon is displayed.
[ Note ]
✤
While the menu screen is displayed, pressing the [Record / Stop] button will move to Photo
Capture mode.
3
4
5
6363
Page 64

ENGLISH
100
SS
Capturing...
Sepia12:00AM 2006/01/01
Photo
Move Exit
MENU
Select
OK
Flash
Off
On
Auto
100
SS
Capturing...
Sepia12:00AM 2006/01/01
Photo
Move Exit
MENU
Select
OK
Flash
Off
Photo
Move ExitSelect
Flash
Off
On
Auto
On
Auto
100
SSSS
100
SS
Capturing...
Sepia12:00AM 2006/01/01
Capturing...
Sepia12:00AM 2006/01/01
Photo
Move ExitSelect
Flash
Off
Photo
Move ExitSelect
Flash
Off
On
Auto
On
Auto
100
SSSS
Capturing...
Sepia12:00AM 2006/01/01
Photo Mode : Setting the Capturing Options
Setting the Flash
Flash is very useful not only for brighter subjects at night, but also in daytime when there is not
enough lighting on the subject, such as in a shadow, indoors, and in backlight situations.
1. Press the [POWER] button to turn on the Sports Camcorder.
◆
The Movie Record screen appears.
2
2. Set the Photo mode by pressing the [MODE] button.
◆
3. Press the [MENU] button.
Move the [Joystick] left / right to select <Flash>.
4. Move the [Joystick] up / down to select an option, and then press the
[Joystick(OK)].
5. Press the [MENU] button to exit the menu.
◆
The Photo Capture screen appears.
On Flash will go on.
Auto Flash will be set automatically according to lighting conditions.
Off Flash will not come on. Select this option when you cannot use the flash in
locations such as a museum.
The selected function icon is displayed.
[ Notes ]
✤
If the battery is low, the flash will not operate automatically.
✤
✤
6464
Flash is not as effective as a normal strobe light.
While the menu screen is displayed, pressing the [Record / Stop] button will move to Photo
Capture mode.
3
4
5
Page 65

Photo Mode : Setting the Capturing Options
100
SS
Capturing...
Sepia12:00AM 2006/01/01
Photo
Move Exit
MENU
Select
OK
3 shots
Off
Continuous Shot
100
SS
Capturing...
Sepia12:00AM 2006/01/01
Photo
Move Exit
MENU
Select
OK
Continuous Shot
Off
3 shots
Photo
Move ExitSelect
3 shots
Off
Continuous Shot
SSSS
100
100
SS
Capturing...
Sepia12:00AM 2006/01/01
Capturing...
Sepia12:00AM 2006/01/01
Photo
Move ExitSelect
Continuous Shot
Off
3 shots
Photo
Move ExitSelect
3 shots
Off
Continuous Shot
100
SSSS
Capturing...
Sepia12:00AM 2006/01/01
Setting the Continuous Shot
You can take a series of pictures continuously with just one press of the shutter.
1. Press the [POWER] button to turn on the Sports Camcorder.
2. Set the Photo mode by pressing the [MODE] button.
◆
The Movie Record screen appears.
◆
The Photo Capture screen appears.
ENGLISH
2
3
3. Press the [MENU] button.
Move the [Joystick] left / right to select <Continuous Shot>.
4. Move the [Joystick] up / down to select an option, and then press the
[Joystick(OK)].
◆ <Off>: Disables Continuous Shot and takes one photo at a time.
◆ <3 shots>: Enables Continuous Shot and takes 3 photos in a row.
5. Press the [MENU] button to exit the menu.
◆
◆
[ Notes ]
✤
When you set <Continuous Shot>, you cannot use the flash.
✤
While the menu screen is displayed, pressing the [Record / Stop] button will move to Photo
Capture mode.
The selected function icon is displayed.
If <Off> is selected, no icon will be displayed.
4
5
6565
Page 66

ENGLISH
100
SS
Capturing...
Sepia12:00AM 2006/01/01
Photo
Move Exit
MENU
Select
OK
EIS
Off
On
100
SS
Capturing...
Sepia12:00AM 2006/01/01
Photo
Move Exit
MENU
Select
OK
EIS
Off
On
Photo
Move ExitSelect
EIS
Off
On
SSSS
100
100
SS
Capturing...
Sepia12:00AM 2006/01/01
Capturing...
Sepia12:00AM 2006/01/01
Photo
Move ExitSelect
EIS
Off
On
Photo
Move ExitSelect
EIS
Off
On
100
SSSS
Capturing...
Sepia12:00AM 2006/01/01
Photo Mode : Setting the Capturing Options
Setting the EIS (Electronic Image Stabilizer)
The Electronic Image Stabilizer is a function that compensates for hand shake and other
movements while taking pictures.
EIS provides more stable photo when:
◆ Photo capturing while zooming
◆ Capturing small objects
◆ Capturing while walking or moving
◆ Capturing through the window of a moving vehicle
2
1. Press the [POWER] button to turn on the Sports Camcorder.
◆
2. Set the Photo mode by pressing the [MODE] button.
◆
The Movie Record screen appears.
The Photo Capture screen appears.
3. Press the [MENU] button.
Move the [Joystick] left / right to select <EIS>.
4. Move the [Joystick] up / down to select an option, and then press the
[Joystick(OK)].
◆ <On>: Enables EIS function.
◆ <Off>: Disables EIS function.
5. Press the [MENU] button to exit the menu.
◆
◆
[ Note ]
✤
While the menu screen is displayed, pressing the [Record / Stop] button will move to Photo
Capture mode.
6666
If you select <On>, the EIS icon ( ) is displayed.
If you select <Off>, no icon is displayed.
3
4
5
Page 67

Photo Mode : Setting the Capturing Options
SS
100
Capturing...
Sepia12:00AM 2006/01/01
Photo
Move Exit
MENU
Select
OK
Focus
MF
AF
SS
100
Capturing...
Sepia12:00AM 2006/01/01
Photo
Move ExitSelect
Focus
MF
AF
Photo
Move Exit
MENU
Select
OK
Focus
MF
AF
100
SSSS
SS
100
Capturing...
Sepia12:00AM 2006/01/01
Capturing...
Sepia12:00AM 2006/01/01
Photo
Move ExitSelect
Focus
MF
AF
Photo
Move ExitSelect
Focus
MF
AF
SSSS
100
Capturing...
Sepia12:00AM 2006/01/01
Setting the Focus
Select an appropriate focus method for the best results.
1. Press the [POWER] button to turn on the Sports Camcorder.
2. Set the Photo mode by pressing the [MODE] button.
3. Press the [MENU] button.
4. Move the [Joystick] up / down to select an option, and then press the
5. Press the [MENU] button to exit the menu.
Manual Focus <MF>
Adjust the focus by moving [Joystick] up/down to zoom in or out
manually.
[ Note ]
✤
◆
The Movie Record screen appears.
◆
The Photo Capture screen appears.
Move the [Joystick] left / right to select <Focus>.
[Joystick(OK)].
◆
<AF>: Set the focus automatically.
◆
<MF>: Set the focus manually.
◆
If you select the <MF>, the icon ( ) is displayed.
◆
If you select the <AF>, no icon is displayed.
◆
◆ When a person is enveloped in fog or surrounded by snow
While the menu screen is displayed, pressing the [Record / Stop] button will move to Photo
Capture mode.
When a picture has subjects close or distant to the Sports Camcorder
ENGLISH
2
3
4
5
6767
Page 68

ENGLISH
SS
100
Capturing...
Sepia12:00AM 2006/01/01
Photo
Move Exit
MENU
Select
OK
BLC
Off
On
SS
100
Capturing...
Sepia12:00AM 2006/01/01
Photo
Move Exit
MENU
Select
OK
BLC
Off
On
Photo
Move ExitSelect
BLC
Off
On
100
SSSS
SS
100
Capturing...
Sepia12:00AM 2006/01/01
Capturing...
Sepia12:00AM 2006/01/01
Photo
Move ExitSelect
BLC
Off
On
Photo
Move ExitSelect
BLC
Off
On
SSSS
100
Capturing...
Sepia12:00AM 2006/01/01
Photo Mode : Setting the Capturing Options
Setting the BLC (Backlight Compensation)
The Backlight Compensation function helps to make the subject brighter when the subject is
in front of a window or the subject is too dark to distinguish. You can use this function when
using the Sports Camcorder in the bright backgrounds including snow scenes.
1. Press the [POWER] button to turn on the Sports Camcorder.
◆
The Movie Record screen appears.
2
2. Set the Photo mode by pressing the [MODE] button.
◆
3. Press the [MENU] button.
Move the [Joystick] left /right to select <BLC>.
The Photo Capture screen appears.
4. Move the [Joystick] up / down to select an option, and then press the
[Joystick(OK)].
◆
◆
5. Press the [MENU] button to exit the menu.
◆
◆
[ Notes ]
✤
The BLC is set to <Off> when the Sports Camcorder is turned off.
✤
While the menu screen is displayed, pressing the [Record / Stop] button will move to Photo
Capture mode.
6868
<On>: Set the BLC function.
<Off>: Cancel the BLC function.
The selected function icon ( ) is displayed.
If you select <Off>, no icon is displayed.
3
4
5
Page 69

Photo Mode : Setting the Capturing Options
SSSS
100
Capturing...
Sepia12:00AM 2006/01/01
SS
100
Capturing...
Sepia12:00AM 2006/01/01
Photo
Move Exit
MENU
Select
OK
Digital Zoom
Off
On
SS
100
Capturing...
Sepia12:00AM 2006/01/01
Photo
Move ExitSelect
Digital Zoom
Off
On
Photo
Move Exit
MENU
Select
OK
Digital Zoom
Off
On
Sepia
W
T
1X
10X
SS
100
Capturing...
Sepia12:00AM 2006/01/01
Photo
Move ExitSelect
Digital Zoom
Off
On
Photo
Move ExitSelect
Digital Zoom
Off
On
Setting the Digital Zoom
As well as the 10x optical zoom, this Sports Camcorder supports 10x digital zoom which
produces a total of 100x zoom. Exceeding the optical zoom limit will automatically engage the
digital zoom when available. Digital zoom may produce a grainy picture.
1. Press the [POWER] button to turn on the Sports Camcorder.
◆
The Movie Record screen appears.
ENGLISH
2
2. Set the Photo mode by pressing the [MODE] button.
◆
3. Press the [MENU] button.
Move the [Joystick] left /right to select <Digital Zoom>.
The Photo Capture screen appears.
4. Move the [Joystick] up / down to select an option, and then press the
[Joystick(OK)].
◆
◆
<On>: Enables digital zoom. Attempts to zoom in more than 10x will automatically apply
digital zooming.(up to 100x)
<Off>: Disables digital zoom. Only optical zoom 10x will be supported for zooming
5. Press the [MENU] button to exit the menu.
◆
When using the digital zoom switch, a digital zoom indicator appears on the screen.
[ Note ]
✤
While the menu screen is displayed, pressing the [Record / Stop] button will move to Photo
Capture mode.
3
4
5
6969
Page 70

ENGLISH
MoveMove ViewView
100-0001100-0001
OK
Move View
100-0001
Move
Select
OK
100-0001
Cancel
OK
Multi Select
Sepia
12:00AM 2006/01/01
01
100-0001
Move Select
OK
Cancel
OK
Photo Mode : Setting the Viewing Options
Deleting Photo Files
You can delete saved photo files.
1. Press the [POWER] button to turn on the Sports Camcorder.
◆
The Movie Record screen appears.
2. Set the Photo mode by pressing the [MODE] button.
◆
The Photo Capture screen appears.
3. Press the [PLAY] button or [Joystick(OK)].
◆
Switches to Photo View mode.
◆
Move to the desired photo file, using the [Joystick].
Deleting a Photo File in Full Screen-View
4. Press the [DELETE] button on the LCD monitor.
5. Select an option by moving the [Joystick] up / down and then press the
[Joystick(OK)].
◆
<OK>: Deletes the selected photo file using the [Joystick(OK)].
◆
<Cancel>: Cancels the deletion.
6. Press the [MENU] button to exit the menu.
Deleting Photo Files in Multi-View
4. Slide the [W/T] switch to W (WIDE).
◆
The screen switches to multi-view.
5. Press the [DELETE] button on the LCD monitor.
6. Select an option by moving the [Joystick] up / down and then press the
[Joystick(OK)].
◆
7070
<OK>: Deletes the selected photo file.
◆
<Multi Select>: Multiple photo files can be selected using the [Joystick(OK)].
< ✔ > indicator appears on the selected files. Press the [PLAY] button to delete.
◆
<All>: All photo files will be deleted.
◆
<Cancel>: Cancels the deletion.
[ Notes ]
✤
Locked files will not be deleted.
✤
While the menu screen is displayed, pressing the [Record / Stop] button will move to Photo
Capture mode.
3
[PLAY]
button
[Joystick(OK)]
4
4
5
Page 71

Photo Mode : Setting the Viewing Options
01
100-0001
Repeat
Sta
Move
Exit
MENU
Select
OK
Photo
100-0001
01
100-0001
Exit
MENU
Select
OK
Start
Repeat
01
100-0001
SepiaSepia
0101
StopStop
OK
0101
100-0001100-0001
Setting the Slide show
You can set a slide show, and also set the interval and repetition options for the slide show.
1. Press the [POWER] button to turn on the Sports Camcorder.
◆ The Movie Record screen appears.
2. Set the Photo mode by pressing the [MODE] button.
◆
The Photo Capture screen appears.
3. Press the [PLAY] button or [Joystick(OK)].
◆
Switches to Photo View mode.
◆
Move to the desired photo file, using the [Joystick].
4. Press the [MENU] button.
Move the [Joystick] left / right to select <Slide>.
5. Select <Interval (sec.)> by moving the [Joystick] up / down and then press the
[Joystick(OK)].
6. Set the interval by moving the [Joystick] up / down and then press the
[Joystick(OK)].
◆
Interval range: 1 ~ 10 seconds.
7. Select <Repeat> by moving the [Joystick] up / down and then press the
[Joystick(OK)].
8. Set the repeat option by moving the [Joystick] up / down and then press the
[Joystick(OK)].
◆
<Off>: Sets not to repeat the slide show.
◆
<On>: Sets to repeat the slide show.
9. Select <Start> by moving the [Joystick] up / down and then press the
[Joystick(OK)].
◆
Slide show starts. To stop the slide show, press the [Joystick(OK)].
[ Notes ]
✤
The interval between photos may vary depending on the size of the photo.
✤
Slide show starts from the current photo displayed.
✤
Slide show cannot start from a damaged photo file. Damaged photos will be skipped during the
slide show.
✤
While the menu screen is displayed, pressing the [Record / Stop] button will move to Photo Capture mode.
ENGLISH
3
5
7
9
7171
Page 72

ENGLISH
Sepia
01
100-0001
Sepia
100-0001
1
Photo
Move ExitSelect
DPOF
Off
1
100-0001
Copies
Sepia
01
100-0001
Photo
Move Exit
MENU
Select
OK
DPOF
Off
1
100-0001
Copies
01
100-0001
Move
Exit
MENU
Select
OK
01
100-0001
MoveMove ViewView
OK
100-0001
1
Photo Mode : Setting the Viewing Options
Setting the DPOF (Digital Print Order Format) Function
You can automatically print a photo file recorded with a printer that supports DPOF.
Setting the DPOF is only available when using a memory card.
1. Insert the memory card into the memory card slot on the Sports Camcorder.
2. Press the [POWER] button to turn on the Sports Camcorder.
◆ The Movie Record screen appears.
3. Set the Photo mode by pressing the [MODE] button.
◆ The Photo Capture screen appears.
4. Press the [PLAY] button or [Joystick(OK)].
◆ Switches to Photo View mode.
◆ Move to the desired photo file, using the [Joystick].
Setting the DPOF in Full Screen-View
5. Press the [MENU] button.
Move the [Joystick] left / right to select <DPOF>.
6. Select an option by moving the [Joystick] up / down and then press the [Joystick(OK)].
◆ <Copies>: Move the [Joystick] up / down to select the number of copies you want to print
and press the [Joystick(OK)]. (copy range: 0 ~ 30)
◆ <Off>: Cancels DPOF setting.
7. Press the [MENU] button to exit the menu.
Setting the DPOF in Multi-View
5. Slide the [W/T] switch to W (WIDE).
◆ The screen switches to multi-view.
6. Press the [MENU] button.
Move the [Joystick] left / right to select <DPOF>.
7. Select an option by moving the [Joystick] up / down and then press the [Joystick(OK)].
◆ <Copies>: Move the [Joystick] up / down to select the number of copies you want to print and press
◆ <Set All>: All photo files will be marked with DPOF settings.
◆ <Reset All>: All photo files will be resetted.
8. Press the [MENU] button to exit the menu.
[ Notes ]
> icon is displayed on the photos with DPOF setup.
✤ <
✤ Refer to page 130 for further details about printing DPOF files.
✤ While the menu screen is displayed, pressing the [Record / Stop] button will move to Photo Capture mode.
7272
the [Joystick(OK)]. (copy range: 0 ~ 30)
6
7
7
8
Page 73

Photo Mode : Setting the Viewing Options
xit
S
OK
P
1
MoveMove ViewView
OK
Photo
Move Exit
MENU
Select
OK
Lock
100-0001
Lock
Sepia
01
100-0001
1
Sepia
100-0001
Photo
Move ExitSelect
Lock
100-0001
Lock
Sepia
01
100-0001
Locking Photo Files
You can lock important saved photo files from accidental erasure. Locked files will not be deleted
unless you release the lock or format the memory.
1. Press the [POWER] button to turn on the Sports Camcorder.
◆
The Movie Record screen appears.
2. Set the Photo mode by pressing the [MODE] button.
◆
The Photo Capture screen appears.
3. Press the [PLAY] button or [Joystick(OK)].
◆
Switches to Photo View mode.
◆
Move to the desired photo file, using the [Joystick].
Locking a Photo File in Full Screen-View
4. Press the [MENU] button.
Move the [Joystick] left / right to select <Lock>.
5. Press the [Joystick(OK)].
◆
Locks the selected photo file.
◆
Press the [MENU] button once again to set unlock.
Locking Photo Files in Multi-View
4. Slide the [W/T] switch to W (WIDE).
◆
The screen switches to multi-view.
5. Press the [MENU] button.
Move the [Joystick] left / right to select <Lock>.
6. Select an option by moving the [Joystick] up / down and then press the
[Joystick (OK)].
◆
<Lock>: Locks the selected photo file using the [Joystick(OK)].
◆
<Multi Select>:
< > indicator appears on the selected files. Press the [PLAY] button to lock.
◆
<Lock All>: All photo files are locked.
◆
<Unlock All>: Unlocking all photo files.
[ Notes ]
✤
The < > icon is displayed on the locked file.
✤
While the menu screen is displayed, pressing the [Record / Stop] button will move to Photo
Capture mode.
Multiple photo files can be selected using the [Joystick(OK)].
ENGLISH
4
5
5
6
7373
Page 74

ENGLISH
Sepia
01
100-0001
Sepia
01
100-0001
Photo
Move Exit
MENU
Select
OK
Copy To
100-0001
OK
01
100-0001
Exit
MENU
Select
OK
OK
01
100-0001
MoveMove ExitExit
MENU
SelectSelect
OK
DPOFDPOF
100-0001
OKOK
Copying file(s)...Copying file(s)...
DCAM0001.JPGDCAM0001.JPG
Press OK to cancel.Press OK to cancel.
Cancel
Photo Mode : Setting the Viewing Options
Copying Photo Files
You can copy saved files from the internal memory to a memory card and vice versa.
1. Insert the memory card into the memory card slot on the Sports Camcorder.
2. Press the [POWER] button to turn on the Sports Camcorder.
◆
The Movie Record screen appears.
3. Set the Photo mode by pressing the [MODE] button.
◆
The Photo Capture screen appears.
4. Press the [PLAY] button or [Joystick(OK)].
◆
Switches to Photo View mode.
◆
Move to the desired photo file, using the [Joystick].
Copying a Photo File in Full Screen-View
5. Press the [MENU] button.
Move the [Joystick] left / right to select <Copy To>.
6. Press the [Joystick(OK)].
◆
Copies the selected photo file.
Copying Photo Files in Multi-View
5. Slide the [W/T] switch to W (WIDE).
◆
The screen switches to multi-view.
6. Press the [MENU] button.
Move the [Joystick] left / right to select <Copy To>.
7. Select an option by moving the [Joystick] up / down and then press the
[Joystick (OK)].
◆
<OK>: Copies the selected photo file.
◆
<Multi Select>: Multiple photo files can be selected using the [Joystick(OK)].
< ✔ > indicator appears on the selected files. Press the [PLAY] button to copy.
◆
<All>: All photo files will be copied.
[ Notes ]
✤ The Sports Camcorder copies from the currently-used memory to another. If the internal
memory was used, it copies to a memory card.
✤ If the memory card is not inserted, you cannot perform the <Copy To> function.
✤ While the menu screen is displayed, pressing the [Record / Stop] button will move to Photo
Capture mode.
7474
4
5
5
7
Page 75

MP3
ENGLISH
How to set to
How to set to
MP3 mode
MP3 mode
1. Press the [POWER] button to
turn on the Sports Camcorder.
MENU
Power
button
MODE
HOLD
DC IN
2. Set the MP3 mode by pressing
the [MODE] button.
3
3
MP3 Mode
Storing MP3 Files in the Sports Camcorder...............................76
Copying MP3 Files to the Sports Camcorder ..........................76
Playing.............................................................................................77
Playing MP3 Files .....................................................................77
Setting the MP3 Play Options ......................................................78
Deleting MP3 Files ...................................................................78
Setting the Repeat Play............................................................79
Setting the Equalizer ................................................................80
Locking MP3 Files ....................................................................81
Copying MP3 Files ...................................................................82
◆ Save important data / recordings separately on other media, to
avoid accidental loss due to a system failure or other reasons.
7575
Page 76

ENGLISH
MP3 Mode : Storing MP3 Files in the Sports Camcorder
Copying MP3 Files to the Sports Camcorder
You can copy MP3 files from a PC to the Sports Camcorder while connected to the
PC with a USB cable.
Before your start!
◆ You can copy the MP3 files when <USB Mode> sets to <Mass Storage>
➥page 98
1. Press the [POWER] button to turn on the Sports Camcorder.
◆
The Movie Record screen appears.
2. Connect the Sports Camcorder to the PC using the USB cable provided.
◆
A - Connect the USB cable to the Sports Camcorder.
◆
B - Connect the other end of the USB cable to the PC.
3. Double-click the new removable drive to open.
4. Select the MUSIC folder and double-click to enter.
5. Drag and drop the MP3 file from your PC into the MUSIC folder.
◆
The maximum music memory capacity is 2000 MP3 files.
Disconnecting USB Connection
After completing the data transfer, you must disconnect the cable in the following way.
1. Select the removable disk icon and click the right mouse button to select ‘Safely
Remove Hardware’.
2. Select ‘Stop’ and disconnect the USB cable when the pop-up screen disappears.
[ Warning ]
✤
Copying and redistributing of MP3 files may violate the copyright law.
✤
You cannot create a new folder on your Sports Camcorder.
[ Notes ]
✤
You can copy a folder on your Sports Camcorder.
✤
To see MP3 file capacity with regards to the Sports Camcorder's memory capacity.
➥page 32.
✤
It is recommended to use an AC Power Adapter during the file transfer to avoid
unintended power outage due to low battery power.
7676
B
A
USB
MMC/SD
Page 77

MP3 Mode : Playing
Move Play
Life is cool.mp3
Everytime.mp3
Toxic.mp3
Don't push me.mp3
Love you.mp3
SearchSearch
1/61/6
PausePause
OK
ListList
Life is cool.mp3Life is cool.mp3
Sweetbox Sweetbox
00:01:07/00:03:27
Stereo
44.1KHz
192Kbps
MoveMove PlayPlay
OK
Life is cool.mp3Life is cool.mp3
Everytime.mp3Everytime.mp3
Toxic.mp3Toxic.mp3
Don't push me.mp3Don't push me.mp3
Love you.mp3Love you.mp3
Playing MP3 Files
You can play back stored MP3 files.
1. Press the [POWER] button to turn on the Sports Camcorder.
◆ The Movie Record screen appears.
2. Set the MP3 mode by pressing the [MODE] button.
◆ The MP3 playlist appears.
◆ If there is no MP3 file stored, the message <No Files...> appears.
3. Select an MP3 file to play by moving the [Joystick] up / down, and then press the
[Joystick(OK)].
4. The selected MP3 file is played back.
◆ Each time you press the [PLAY] button or [Joystick(OK)], play or pause is selected repeatedly.
◆ To adjust volume, move [Joystick] up / down.
Volume indicator appears and disappears after few seconds.
Using the Joystick (left/right)
Move the [Joystick] left
◆ Within 2 seconds after starting playback - Previous file plays.
◆ In Pause/Stop mode - Previous file appears.
◆ 2 seconds after starting playback - Current file starts again.
Move the [Joystick] right
◆ During playback - The next file plays.
◆ In Pause/Stop mode - The next file appears.
◆ During playback, press and hold [Joystick(OK)] left / right to forward or reverse search the
currently playing MP3 file.
Setting to Hold - [MP3/ External Camera Module HOLD] switch
If you slide the [MP3/ External Camera Module HOLD] switch down, all buttons except the Power button and Volume control are locked.
The [MP3/ External Camera Module HOLD] switch operates only in the MP3 mode or when connecting External Camera Module.
[ Notes ]
✤
The MP3 file with tag information will display the artist name. MP3 files with no tag information will leave the item blank.
✤
If a broken file name is displayed, try renaming it on a PC.
✤
When the language set is not the same as the MP3 file Tag information language, the Artist information may not display correctly.
✤
✤
✤
✤
✤
✤
✤
✤
When the earphones, Audio/Video cable or External Camera Module cable is connected to the Sports Camcorder, the built-in speaker will turn
off automatically.
The Sports Camcorder only supports MP3 file format.
Damaged or non-standard MP3 files may not display properly or fail to play back.
Playback will fail to start if the first file is damaged.
The title may not be displayed if the language is not supported or in Chinese.
MP3 files with VBR setting will appear as VBR on the LCD monitor and its play time and recording time may differ from the displayed diagram.
If a title of a track is too long, it may appear cropped on the LCD monitor.
Supported bitrates for MP3 files is 8Kbps~320Kbps and VBR.
3
4
ENGLISH
7777
Page 78

ENGLISH
Search
1/61/6
PauseOKList
Life is cool.mp3Life is cool.mp3
Sweetbox Sweetbox
00:00:00/00:03:27
Stereo
44.1KHz
192Kbps
1/6
Life is cool.mp3
Sweetbox
Play
OK
Move
Select
OK
Cancel
Move
Play
OK
Life is cool.mp3Life is cool.mp3
Everytime.mp3Everytime.mp3
Toxic.mp3Toxic.mp3
Don't push me.mp3Don't push me.mp3
Love you.mp3Love you.mp3
1/6
Life is cool.mp3
Sweetbox
Life is cool.mp3
Everytime.mp3
Toxic.mp3
Don't push me.mp3
Love you.mp3
1/6
Life is cool.mp3
Sweetbox
Select
OK
MP3 Mode : Setting the MP3 Play Options
Deleting MP3 Files
You can delete a selected MP3 file or group of MP3 files.
1. Press the [POWER] button to turn on the Sports Camcorder.
◆
The Movie Record screen appears.
2. Set the MP3 mode by pressing the [MODE] button.
◆
The MP3 playlist appears.
◆
Move to the desired MP3 file, using the [Joystick].
Deleting MP3 Files in MP3 playlist
3. Press the [DELETE] button on the LCD monitor in pause mode. Select an
option by moving the [Joystick] up / down and then press the [Joystick(OK)].
◆
<OK>: Deletes the selected MP3 file.
◆
<Multi Select>: Multiple MP3 files can be selected using the [Joystick(OK)].
< ✔ > indicator appears on the selected files. Press the [PLAY] button.
◆
<All>: All MP3 files will be deleted.
◆
<Cancel>: Cancels the deletion.
2
3
3
Deleting an MP3 File in Full screen
3. Press the [PLAY] button or [Joystick(OK)].
◆
The selected MP3 file is played.
4. Press the [DELETE] button on the LCD monitor in pause mode. Select an
option by moving the [Joystick] up / down and then press the [Joystick(OK)].
◆
7878
<OK>: Deletes the selected MP3 file.
◆
<Cancel>: Cancels the deletion.
[ Notes ]
✤
Locked files will not be deleted.
✤
You cannot access the menu during playback.
4
Page 79

MP3 Mode : Setting the MP3 Play Options
Life is cool.mp3
Everytime.mp3
Toxic.mp3
Don't push me.mp3
Love you.mp3
Move Play
Life is cool.mp3
Everytime.mp3
Toxic.mp3
Don't push me.mp3
Love you.mp3
Life is cool.mp3
Everytime.mp3
Toxic.mp3
Don't push me.mp3
3
on't push me.mp
Love you.mp3
MP3MP3
MoveMove ExitExit
MENU
SelectSelect
OK
RepeatRepeat
Repeat OneRepeat One
Repeat FolderRepeat Folder
OffOff
1
Move Play
Life is cool.mp3
Everytime.mp3
Toxic.mp3
Don't push me.mp3
Love you.mp3
Life is cool.mp3
Everytime.mp3
Toxic.mp3
Don't push me.mp3
Love you.mp3
MP3
Move ExitSelect
Repeat
Repeat One
Repeat Folder
Off
1
Life is cool.mp3
Everytime.mp3
Toxic.mp3
Don't push me.mp3
3
push me.mp
Love you.mp3
MP3MP3
MoveMove ExitExit
MENU
SelectSelect
OK
RepeatRepeat
Repeat FolderRepeat Folder
OffOff
Repeat OneRepeat One
1
Move Play
Life is cool.mp3
Everytime.mp3
Toxic.mp3
Don't push me.mp3
Love you.mp3
MoveMove PlayPlay
OK
Life is cool.mp3Life is cool.mp3
Everytime.mp3Everytime.mp3
Toxic.mp3Toxic.mp3
Don't push me.mp3Don't push me.mp3
Love you.mp3Love you.mp3
MP3
Move ExitSelect
Repeat
Repeat One
Repeat Folder
Off
1
MP3
Move ExitSelect
Repeat
Repeat Folder
Off
Repeat One
1
1
MoveMove PlayPlay
OK
Life is cool.mp3Life is cool.mp3
Everytime.mp3Everytime.mp3
Toxic.mp3Toxic.mp3
Don't push me.mp3Don't push me.mp3
Love you.mp3Love you.mp3
Setting the Repeat Play
You can repeat a selected MP3 file or group of MP3 files, or play the MP3 files at random.
1. Press the [POWER] button to turn on the Sports Camcorder.
◆
The Movie Record screen appears.
2. Set the MP3 mode by pressing the [MODE] button.
◆
The MP3 playlist appears.
3. Press the [MENU] button in pause mode.
Move the [Joystick] left / right to select <Repeat>.
4. Select an option by moving the [Joystick] up / down and then press the
[Joystick (OK)].
◆
<Off>: No repeat, plays each title once in the order from the selected MP3 file.
◆
<Repeat One>: One selected MP3 file will play repeatedly.
◆
<Repeat Folder>: All files in the folder will play repeatedly.
◆
<Repeat All>: All MP3 files will play through in order and start again from the beginning.
◆
<Shuffle Folder>: All files in the folder will play at random.
◆
<Shuffle All>: All MP3 files will play in random order once.
5. Press the [MENU] button to exit the menu.
◆
Move the MP3 file of the desired folder using the [Joystick].
◆
When the MP3 file plays back, the selected option will be applied.
◆
The selected function icon is displayed.
◆
If you select <Off>, no icon is displayed.
[ Notes ]
✤
When the earphones, Audio/Video cable or External Camera Module cable is connected to
the Sports Camcorder, the built-in speaker will not operate.
✤
You cannot access the menu during playback.
ENGLISH
3
4
5
7979
Page 80

ENGLISH
Life is cool.mp3
Everytime.mp3
Toxic.mp3
Don't push me.mp3
Love you.mp3
MP3
Move
Exit
MENU
OK
Life is cool.mp3
Everytime.mp3
Toxic.mp3
Don't push me.mp3
Love you.mp3
MP3
Move
Exit
MENU
Select
OK
Life is cool.mp3
Everytime.mp3
Toxic.mp3
Don't push me.mp3
Love you.mp3
SearchSearch PausePause
OK
ListList
Life is cool.mp3Life is cool.mp3
Sweetbox Sweetbox
00:01:07/00:03:27
Stereo
44.1KHz
192Kbps
POPPOPPOP
1/6
Move
Play
OK
Life is cool.mp3Life is cool.mp3
Everytime.mp3Everytime.mp3
Toxic.mp3Toxic.mp3
Don't push me.mp3Don't push me.mp3
Love you.mp3Love you.mp3
MP3 Mode : Setting the MP3 Play Options
Setting the Equalizer
You can choose an Equalizer mode for different types of music.
1. Press the [POWER] button to turn on the Sports Camcorder.
◆
The Movie Record screen appears.
2. Set the MP3 mode by pressing the [MODE] button.
◆
The MP3 playlist appears.
3. Press the [MENU] button in pause mode.
Move the [Joystick] left / right to select <Equalizer>.
4. Select an option by moving the [Joystick] up / down and then press the
[Joystick (OK)].
◆
<Off> / <Pop> / <Classic> / <Jazz>
5. Press the [MENU] button to exit the menu.
◆
The selected option is applied.
◆ If you select <Off>, no icon is displayed.
2
3
4
5
[ Note ]
✤
You cannot access the menu during playback.
8080
Page 81

MP3 Mode : Setting the MP3 Play Options
SearchSearch
1/61/6
PausePause
OK
ListList
Life is cool.mp3Life is cool.mp3
Sweetbox Sweetbox
00:00:00/00:03:27
Stereo
44.1KHz
192Kbps
00:00:00/00:03:27
Stereo
44.1KHz
192Kbps
00:00:00/00:03:27
Stereo
44.1KHz
192Kbps
MP3MP3
MoveMove ExitExit
MENU
SelectSelect
OK
LockLock
LockLock
1/61/6
Search
1/6
PauseList
Life is cool.mp3
Sweetbox
MoveMove PlayPlay
OK
Life is cool.mp3Life is cool.mp3
Everytime.mp3Everytime.mp3
Toxic.mp3Toxic.mp3
Don't push me.mp3Don't push me.mp3
Love you.mp3Love you.mp3
Search
1/6
PauseList
Life is cool.mp3
Sweetbox
Move Play
Life is cool.mp3
Everytime.mp3
Toxic.mp3
Don't push me.mp3
Love you.mp3
Life is cool.mp3
Everytime.mp3
Toxic.mp3
Don't push me.mp3
Love you.mp3
Life is cool.mp3
Everytime.mp3
Toxic.mp3
Don't push me.mp3
3
push me.mp
Love you.mp3
MP3MP3
MoveMove ExitExit
MENU
SelectSelect
OK
LockLock
Multi SelectMulti Select
Lock AllLock All
LockLock
MP3
Move ExitSelect
Lock
Lock
1/6
Search
1/6
PauseList
Life is cool.mp3
Sweetbox
Locking MP3 Files
You can lock saved important MP3 files from accidental deletion. Locked files will not be deleted
unless you release the lock or format the memory.
1. Press the [POWER] button to turn on the Sports Camcorder.
◆
The Movie Record screen appears.
2. Set the MP3 mode by pressing the [MODE] button.
◆
The MP3 playlist appears.
◆
Move to the desired MP3 file, using the [Joystick].
Locking MP3 Files in MP3 playlist
3. Press the [MENU] button in pause mode.
Move the [Joystick] left / right to select <Lock>.
4. Select an option by moving the [Joystick] up / down and then press the
[Joystick (OK)].
◆
<Lock>: The selected MP3 file is locked.
◆
<Multi Select>: Multiple MP3 files can be selected using the [Joystick(OK)].
<
◆
◆
Locking an MP3 File in Full screen
3. Press the [PLAY]button or [Joystick(OK)]
◆
4. Press the [MENU] button in pause mode.
Move the [Joystick] left / right to select <Lock>.
5. Press the [Joystick(OK)].
◆
[ Notes ]
✤
The <
✤
You cannot access the menu during playback.
> indicator appears on the selected files. Press the [PLAY] button.
<Lock All>: All MP3 files are locked.
<Unlock All>: Unlocking all MP3 files.
The selected MP3 file is played.
The selected MP3 file is locked.
> icon is displayed on the locked file.
ENGLISH
2
3
3
4
8181
Page 82

ENGLISH
Life is cool.mp3
Sweetbox
Life is cool.mp3
Sweetbox
00:00:00/00:03:27
Stereo
44.1KHz
192Kbps
Life is cool.mp3
Sweetbox
00:00:00/00:03:27
Stereo
44.1KHz
192Kbps
Life is cool.mp3Life is cool.mp3
MP3MP3
MoveMove ExitExit
MENU
SelectSelect
OK
Copy ToCopy To
OKOK
1/61/6
Search
1/6
PauseList
Life is cool.mp3
Sweetbox
Life is cool.mp3
DPOFDPOF
OKOK
Copying file(s)...Copying file(s)...
Life is cool.mp3Life is cool.mp3
Press OK to cancel.Press OK to cancel.
Cancel
1/61/6
MP3
MP3MP3
Move ExitSelect
MoveMove ExitExit
MENU
SelectSelect
OK
Copy To
OK
1/6
Search
1/6
PauseList
Life is cool.mp3
Sweetbox
MoveMove PlayPlay
OK
Life is cool.mp3Life is cool.mp3
Everytime.mp3Everytime.mp3
Toxic.mp3Toxic.mp3
Don't push me.mp3Don't push me.mp3
Love you.mp3Love you.mp3
Search
1/6
PauseList
Life is cool.mp3
Sweetbox
Life is cool.mp3
Life is cool.mp3
Everytime.mp3
Toxic.mp3
Don't push me.mp3
Love you.mp3
Life is cool.mp3
Everytime.mp3
Toxic.mp3
Don't push me.mp3
3
push me.mp
Love you.mp3
Move Play
Life is cool.mp3
Everytime.mp3
Toxic.mp3
Don't push me.mp3
Love you.mp3
MP3MP3
MoveMove ExitExit
MENU
SelectSelect
OK
Copy ToCopy To
Multi SelectMulti Select
AllAll
OKOK
MP3
Move ExitSelect
Copy To
OK
1/6
Search
1/6
PauseList
MP3 Mode : Setting the MP3 Play Options
Copying MP3 Files
You can copy saved files from the internal memory to the memory card and vice versa.
1. Insert the memory card into the memory card slot on the Sports Camcorder.
2. Press the [POWER] button to turn on the Sports Camcorder.
◆
The Movie Record screen appears.
3. Set the MP3 mode by pressing the [MODE] button.
◆
The MP3 playlist appears.
◆
Move to the desired MP3 file, using the [Joystick].
3
Copying MP3 Files in MP3 playlist
4. Press the [MENU] button in pause mode.
Move the [Joystick] left / right to select <Copy To>.
5. Select an option by moving the [Joystick] up / down and then press the
[Joystick (OK)].
◆
<OK>: Copies the selected MP3 file.
◆
<Multi Select>: Multiple MP3 files can be selected using the [Joystick(OK)].
< ✔ > indicator appears on the selected files. Press the [PLAY] button.
◆
Copying an MP3 File in Full screen
4. Press the [PLAY]button or [Joystick(OK)]
◆
5. Press the [MENU] button in pause mode.
Move the [Joystick] left / right to select <Copy To>.
6. Press the [Joystick (OK)].
◆ Copies
[ Notes ]
✤
The Sports Camcorder copies from the currently-used memory to another. If the internal
memory is being used, it copies to a memory card.
✤
If the memory card is not inserted, you cannot perform the <Copy To> function.
✤
You cannot access the menu during playback.
8282
<All>: All MP3 files will be copied.
The selected MP3 file is played.
the selected MP3 file.
4
5
6
Page 83

Voice Recorder
ENGLISH
How to set to
How to set to
Voice Recorder
Voice Recorder
mode
mode
1. Press the [POWER] button to
turn on the Sports Camcorder.
MENU
Power
button
MODE
HOLD
DC IN
2. Set the Voice Recorder mode by
pressing the [MODE] button.
4
4
Voice Recorder Mode
Recording .......................................................................................84
Recording Voice Files ..............................................................84
Playing.............................................................................................85
Playing Voice Files ...................................................................85
Setting the Voice Play Options ....................................................86
Deleting Voice Files ..................................................................86
Setting the Play Mode ..............................................................87
Locking Voice Files...................................................................88
Copying Voice Files ..................................................................89
◆ Save important data / recordings separately on other media, to
avoid accidental loss due to a system failure or other reasons.
8383
Page 84

ENGLISH
2006/01/01 12:00:00 AM
SWAV0001.WAV
00:00:12/34:59:48
Stereo
8.0KHz
64Kbps
SWAV0001.WAV
00:00:00/35:00:00
2006/01/01 12:00:00 AM
SWAV0001.WAV
00:00:12/34:59:48
SWAV0002.WAV
00:00:12/34:59:48
Stereo
8.0KHz
64Kbps
SWAV0001.WAV
00:00:00/35:00:00
SWAV0001.WAV
00:00:00/35:00:00
Stereo
8.0KHz
64Kbps
Voice Recorder Mode : Recording
Recording Voice Files
The built-in microphone allows users to record voices without any additional devices.
1. Press the [POWER] button to turn on the Sports Camcorder.
◆
The Movie Record screen appears.
2. Set the Voice Recorder mode by pressing the [MODE] button.
◆
The Voice Record screen appears.
3. Press the [Record / Stop] button to start recording.
◆
< > icon appears on the screen and starts recording.
4. To stop recording, press the [Record / Stop] button again.
2
3
4
[ Notes ]
✤
Recorded voice files are saved in a list automatically.
✤
During voice recording or in the Voice Record mode, the menu is not accessed.
8484
Page 85

Voice Recorder Mode : Playing
SWAV0004.WAV
00:00:00/30:20:00
Move Play
3/3
OK
2006/01/01 12:00:00 AM2006/01/01 12:00:00 AM
2006/01/01 12:36:25 AM2006/01/01 12:36:25 AM
2006/01/01 01:00:02 AM2006/01/01 01:00:02 AM
1
SWAV0004.WAV
00:00:00/30:20:00
Move Play
3/3
2006/01/01 12:00:00 AM
2006/01/01 12:36:25 AM
2006/01/01 01:00:02 AM
Move Play
2/3
OK
2006/01/01 12:00:00 AM2006/01/01 12:00:00 AM
2006/01/01 12:36:25 AM2006/01/01 12:36:25 AM
2006/01/01 01:00:02 AM2006/01/01 01:00:02 AM
1
1
SWAV0004.WAV
00:00:00/30:20:00
Move Play
3/3
2006/01/01 12:00:00 AM
2006/01/01 12:36:25 AM
2006/01/01 01:00:02 AM
Move Play
2/3
2006/01/01 12:00:00 AM
2006/01/01 12:36:25 AM
2006/01/01 01:00:02 AM
2006/01/01 12:36:25 AM
SWAV0002.WAV
00:00:12/00:02:15
Stereo
8.0KHz
64Kbps
2/3
Search Pause
OK
List
1
SWAV0004.WAVSWAV0004.WAV
00:00:00/30:20:00
Stereo
8.0KHz
64Kbps
Playing Voice Files
You can play back recorded voice files using the built-in speaker or the earphones.
1. Press the [POWER] button to turn on the Sports Camcorder.
◆
The Movie Record screen appears.
2. Set the Voice Recorder mode by pressing the [MODE] button.
◆
The Voice Record screen appears.
3. Press the [PLAY] button or [Joystick(OK)].
◆
The Voice Playlist screen appears.
4. Select a voice file to play by moving the [Joystick] up/down, and then press
the [Joystick(OK)].
5. The selected voice file is played back.
◆
To pause playback, press the [Joystick(OK)].
◆
To search backward / forward, move the [Joystick] left / right.
6. To adjust the volume, move the [Joystick] up / down.
◆
Volume indicator appears and disappears after a few seconds.
[ Notes ]
✤ When you record the voice file after you set date&time, the date&time displayed on the LCD
monitor indicates the date & time you started to record.
✤
When the earphones, Audio/Video cable or External Camera Module cable is connected to
the Sports Camcorder, the built-in speaker will not operate.
✤
You cannot access the menu during voice playback.
✤
While the menu screen is displayed, pressing the [Record / Stop] button will move to Voice
Record mode.
ENGLISH
2
3
4
6
8585
Page 86

ENGLISH
SWAV0004.WAVSWAV0004.WAV
00:00:00/30:20:0000:00:00/30:20:00
Stereo
8.0KHz
64Kbps
SWAV0004.WAV
00:00:00/30:20:00
Move
Play
3/33/3
OK
2006/01/01 12:00:00 AM2006/01/01 12:00:00 AM
2006/01/01 12:36:25 AM2006/01/01 12:36:25 AM
2006/01/01 01:00:02 AM2006/01/01 01:00:02 AM
1
SWAV0004.WAV
00:00:00/30:20:00
3/3
2006/01/01 12:00:00 AM
2006/01/01 12:36:25 AM
2006/01/01 01:00:02 AM
2006/01/01 12:00:00 AM
Move
Select
OK
Cancel
1/3
Voice Recorder Mode : Setting the Voice Play Options
Deleting Voice Files
You can delete a selected voice file or group of voice files.
1. Press the [POWER] button to turn on the Sports Camcorder.
◆
The Movie Record screen appears.
2. Set the Voice Recorder mode by pressing the [MODE] button.
◆
The Voice Record screen appears.
3. Press the [PLAY] button or [Joystick(OK)]
◆
The Voice Playlist screen appears.
◆
Move to the desired voice file, using the [Joystick].
4. Press the [DELETE] button on the LCD monitor in pause mode. Select an
option by moving the [Joystick] up / down and then press the [Joystick(OK)].
◆
<OK>: Deletes the selected voice file.
◆
<Multi Select>: Multiple voice files can be selected using the [Joystick(OK)].
< ✔ > indicator appears on the selected files. Press the [PLAY] button.
◆
<All>: All voice files will be deleted.
◆
<Cancel>: Cancels the deletion.
2
3
4
[ Notes ]
✤
Locked files will not be deleted.
8686
✤
You cannot access the menu during voice playback.
✤
While the menu screen is displayed, pressing the [Record / Stop] button will move to Voice
Record mode.
Page 87

Voice Recorder Mode : Setting the Voice Play Options
Move
Exit
MENU
Select
OK
1/3
Repeat One
1/3
2006/01/01 12:00:00 AM
2006/01/01 12:36:25 AM
2006/01/01 01:00:02 AM
1/3
2006/01/01 12:00:00 AM
2006/01/01 12:36:25 AM
2006/01/01 01:00:02 AM
MoveMove PlayPlay
1/3
OK
2006/01/01 12:00:00 AM2006/01/01 12:00:00 AM
2006/01/01 12:36:25 AM2006/01/01 12:36:25 AM
2006/01/01 01:00:02 AM2006/01/01 01:00:02 AM
Voice Recorder
Exit
MENU
OK
Play All
1/3
1/3
2006/01/01 12:00:00 AM
2006/01/01 12:36:25 AM
2006/01/01 01:00:02 AM
Move
Play
1/31/3
OK
2006/01/01 12:00:00 AM2006/01/01 12:00:00 AM
2006/01/01 12:36:25 AM2006/01/01 12:36:25 AM
2006/01/01 01:00:02 AM2006/01/01 01:00:02 AM
1
Setting the Play Mode
You can play all files continuously or play the selected file only. You can also set the repeat option.
1. Press the [POWER] button to turn on the Sports Camcorder.
◆
The Movie Record screen appears.
2. Set the Voice Recorder mode by pressing the [MODE] button.
◆
The Voice Record screen appears.
3
ENGLISH
3. Press the [PLAY] button or [Joystick(OK)]
◆
Switches to the Voice Playlist screen.
◆
Move to the desired voice file, using the [Joystick].
4. Press the [MENU] button.
Move the [Joystick] left / right to select <Play Mode>.
5. Move the [Joystick] up / down to select an option, and then press the
[Joystick(OK)].
◆
<Play One>: The selected voice file will be played.
◆
<Play All>: Plays back from the selected file to the last file.
◆
<Repeat One>: The selected voice file will be played repeatedly.
◆
<Repeat All>: All voice files will be played repeatedly.
6. Press the [MENU] button to exit the menu.
◆
When you play back, the selected option will be applied.
◆ The selected function icon is displayed.
[ Notes ]
✤
You cannot access the menu during voice playback.
✤
While the menu screen is displayed, pressing the [Record / Stop] button will move to Voice
Record mode.
4
5
6
8787
Page 88

ENGLISH
2006/01/01 12:00:00 AM
2006/01/01 12:36:25 AM
2006/01/01 01:00:02 AM
2006/01/01 12:00:00 AM
2006/01/01 12:36:25 AM
2 A
2006/01/01 01:00:0
Move Exit
MENU
Select
OK
Lock
Multi Select
Lock All
Lock
1/3
Voice Recorder
Move Play
1/3
2006/01/01 12:00:00 AM
2006/01/01 12:36:25 AM
2006/01/01 01:00:02 AM
2006/01/01 01:00:02 AM
2 A
2006/01/01 01:00:0
Move ExitSelect
Lock
Multi Select
Lock All
Lock
1/3
Voice Recorder
Move ExitExit
MENU
Select
OK
Lock
Lock All
Lock
1/3
Voice Recorder
Multi Select
Move Play
1/3
2006/01/01 12:00:00 AM
2006/01/01 12:36:25 AM
2006/01/01 01:00:02 AM
Move ExitSelect
Lock
Multi Select
Lock All
Lock
1/3
Voice Recorder
Move ExitSelect
Lock
Lock All
Lock
1/3
Voice Recorder
Multi Select
Move Play
1/3
2006/01/01 12:00:00 AM
2006/01/01 12:36:25 AM
2006/01/01 01:00:02 AM
Move Play
1/3
OK
2006/01/01 12:00:00 AM
2006/01/01 12:36:25 AM
2006/01/01 01:00:02 AM
1
Move Play
1/3
OK
2006/01/01 12:00:00 AM
2006/01/01 12:36:25 AM
2006/01/01 01:00:02 AM
1
Voice Recorder Mode : Setting the Voice Play Options
Locking Voice Files
You can lock saved important voice files from accidental erasure. Locked files will not be deleted
unless you release the lock or format the memory.
1. Press the [POWER] button to turn on the Sports Camcorder.
◆
8888
The Movie Record screen appears.
2. Set the Voice Recorder mode by pressing the [MODE] button.
◆
The Voice Record screen appears.
3. Press the [PLAY] button or [Joystick(OK)]
◆
Switches to the Voice Playlist screen.
◆
Move to the desired voice file, using the [Joystick].
4. Press the [MENU] button.
Move the [Joystick] left / right to select <Lock>.
5. Move the [Joystick] up / down to select an option, and then press the
[Joystick(OK)].
◆
<Lock>: The selected voice file is locked.
◆
<Multi Select>: Multiple voice files can be selected using the [Joystick(OK)].
<
◆
◆
[ Notes ]
✤
The <
✤
You cannot access the menu during voice playback.
✤
While the menu screen is displayed, pressing the [Record / Stop] button will move to Voice
Record mode.
> indicator appears on the selected files. Press [PLAY] button.
<Lock All>: All voice files are locked.
<Unlock All>: Unlocks all voice files.
> icon is displayed on the locked file.
3
4
5
Page 89

Voice Recorder Mode : Setting the Voice Play Options
Move
Exit
MENU
Select
OK
1/3
Voice Recorder
1/3
2006/01/01 12:00:00 AM
2006/01/01 12:36:25 AM
2006/01/01 01:00:02 AM
Multi Select
Move
Play
1/31/3
OK
2006/01/01 12:00:00 AM2006/01/01 12:00:00 AM
2006/01/01 12:36:25 AM2006/01/01 12:36:25 AM
2006/01/01 01:00:02 AM2006/01/01 01:00:02 AM
1
DPOFDPOF
Copying file(s)...Copying file(s)...
SWAVE0001.WAVSWAVE0001.WAV
Press OK to cancel.Press OK to cancel.
Cancel
1/3
MoveMove ExitExit
MENU
SelectSelect
OK
Voice Recorder
1/3
2006/01/01 12:00:00 AM
2006/01/01 12:36:25 AM
2006/01/01 01:00:02 AM
Move
Exit
MENU
Select
OK
1/3
1/3
2006/01/01 12:00:00 AM
2006/01/01 12:36:25 AM
2006/01/01 01:00:02 AM
Copying Voice Files
You can copy saved files from the internal memory to a memory card and vice-versa.
1. Insert the memory card into the memory card slot on the Sports Camcorder.
2. Press the [POWER] button to turn on the Sports Camcorder.
◆
The Movie Record screen appears.
3. Set the Voice Recorder mode by pressing the [MODE] button.
◆
The Voice Record screen appears.
4. Press the [PLAY] button or [Joystick(OK)].
◆
Switches to the Voice Playlist screen.
◆
Move to the desired voice file, using the [Joystick].
5. Press the [MENU] button in pause mode.
Move the [Joystick] left / right to select <Copy To>.
6. Select an option by moving the [Joystick] up / down and then press the
[Joystick(OK)].
◆
<OK>: Copies the selected voice file.
◆
<Multi Select>: Multiple voice files can be selected using the [Joystick(OK)].
< ✔ > indicator appears on the selected files. Press the [PLAY] button.
◆
<All>: All voice files will be copied.
ENGLISH
4
5
6
[ Notes ]
✤
The Sports Camcorder copies from the currently-used memory to another. If the internal
memory was used, it copies to a memory card.
✤
If a memory card is not inserted, you cannot perform the <Copy To> function.
✤
You cannot access the menu during voice playback.
✤
While the menu screen is displayed, pressing the [Record / Stop] button will move to Voice
Record mode.
8989
Page 90

File Browser
ENGLISHENGLISH
How to set to
How to set to
File Browser mode
File Browser mode
1. Press the [POWER] button to
turn on the Sports Camcorder.
MENU
Power
button
MODE
HOLD
DC IN
2. Set the File Browser mode by
pressing the [MODE] button.
5
5
Using File Browser
Viewing Files or Folders ...............................................................91
Deleting Files or Folders ...............................................................92
Locking Files ..................................................................................93
Copying Files or Folders ..............................................................94
Viewing File Information ...............................................................95
◆ Save important data / recordings separately on other media, to
avoid accidental loss due to a system failure or other reasons.
9090
Page 91

Using File Browser
/DCIM
100SSDVC
Move Play
1/5
Move Play
OK
DCIM
MISC
MUSIC
VIDEO
VOICE
Move Play
1/5
OK
/DCIM
100SSDVC
/DCIM/100SSDVC
DCAM0002.JPG
DCAM0003.JPG
DCAM0004.JPG
DCAM0001.JPG
Move Play
1/5
1/4
Move Play
Move Play
OK
100-0001
/DCIM
100SSDVC
/DCIM/100SSDVC
DCAM0002.JPG
DCAM0003.JPG
DCAM0004.JPG
DCAM0001.JPG
720X480
12:00AM 2006/01/01
01
Sepia
Move Play
1/5
1/4
Move Play
Move Play
Viewing Files or Folders
You can play back the stored file(AVI, JPEG, MP3, WAV) in your Sports Camcorder.
1. Press the [POWER] button to turn on the Sports Camcorder.
2. Set the File Browser mode by pressing the [MODE] button.
3. Select the desired folder or file by moving the [Joystick] up/down and then
4. The selected file will be played back.
[ Notes ]
✤
✤
◆
The Movie Record screen appears.
◆
The File Browser screen appears.
press the [Joystick(OK)].
◆
Perform these steps repeatedly until the file you want to view appears.
If you slide the [W/T] switch to W(WIDE) in play mode, return to the file list screen.
If you move the [Joystick] left, the previous folder screen appears.
ENGLISH
2
3
4
9191
Page 92

ENGLISH
DCIM
MISC
MUSIC
VIDEO
VOICE
1/5
DCIM
1/5
Select
DCIMDCIM
MISCMISC
MUSICMUSIC
VIDEOVIDEO
VOICEVOICE
Move
1/51/5
Play
OK
DCIM
MISC
MUSIC
VIDEO
VOICE
1/5
DCIM
1/5
Move
Select
OK
DCIM
MISC
MUSIC
VIDEO
VOICE
MoveMove PlayPlay
OK
MISCMISC
MUSICMUSIC
VIDEOVIDEO
VOICEVOICE
1/5
1/41/4
MoveMove
OK
PlayPlay
Using File Browser
Deleting Files or Folders
You can delete the file(AVI, JPEG, MP3, WAV) or folders you recorded.
1. Press the [POWER] button to turn on the Sports Camcorder.
2. Set the File Browser mode by pressing the [MODE] button.
3. Select the desired file or folder by using the [Joystick].
4. Press the [DELETE] button on the LCD monitor. Select an option by moving
◆
The Movie Record screen appears.
◆
The File Browser screen appears.
◆
Move the [Joystick] up/down and press the [Joystick(OK)] repeatedly until the file or folder
you want appears.
the [Joystick] up / down and then press the [Joystick(OK)].
◆
<OK>: The selected file or folder are deleted.
◆
<Multi Select>: Multiple files or folders will be selected using the [Joystick(OK)].
< ✔ > indicator appears on the selected files or folders. Press the [PLAY] button.
◆
<All>: All files or folders will be deleted.
◆
<Cancel>: Cancels deleting files or folders.
2
4
[ Notes ]
✤ If you slide the [W/T] switch to W(WIDE) in play mode, it returns to the previous screen.
✤ Locked files will not be deleted.
✤ The folder with a locked file will not be deleted. Only unlocked files will be deleted.
✤ If you move the [Joystick] left, the previous folder screen appears.
9292
Page 93

Using File Browser
DCIMDCIM
MISCMISC
MUSICMUSIC
VIDEOVIDEO
VOICEVOICE
1/51/5
MoveMove PlayPlay
OK
/DCIM/100SSDVC/DCIM/100SSDVC
DCAM0002.JPGDCAM0002.JPG
DCAM0003.JPGDCAM0003.JPG
DCAM0004.JPGDCAM0004.JPG
DCAM0001.JPGDCAM0001.JPG
DCIM
MISC
MUSIC
VIDEO
VOICE
1/5
1/41/4
Move Play
MoveMove PlayPlay
OK
/DCIM/100SSDVC
DCAM0002.JPG
DCAM0003.JPG
DCAM0001.JPG
DCAM0001.JPG
/DCIM/100SSDVC
DCAM0002.JPG
DCAM0003.JPG
DCAM0004.JPG
DCAM0001.JPG
DCIM
MISC
MUSIC
VIDEO
VOICE
1/5
1/4
Move Play
Move Play
/DCIM/100SSDVC
DCAM0002.JP
DCAM0003.JPG
G
DCAM0001.JPG
DCAM0001.JPG
MoveMove ExitExit
MENU
SelectSelect
OK
File BrowserFile Browser
1/41/4
LockLock
Multi SelectMulti Select
Lock AllLock All
LockLock
/DCIM/100SSDVC/DCIM/100SSDVC
DCAM0002.JPGDCAM0002.JPG
DCAM0003.JPGDCAM0003.JPG
DCAM0004.JPGDCAM0004.JPG
DCAM0001.JPGDCAM0001.JPG
/DCIM/100SSDVC
DCAM0002.JPG
DCAM0003.JPG
DCAM0004.JPG
DCAM0001.JPG
DCIM
MISC
MUSIC
VIDEO
VOICE
1/5
1/4
1/41/4
Move Play
Move Play
MoveMove PlayPlay
OK
Move ExitSelect
File Browser
1/4
Lock
Multi Select
Lock All
Lock
Locking Files
1
You can lock the important files so they can not be deleted.
1. Press the [POWER] button to turn on the Sports Camcorder.
◆
The Movie Record screen appears.
2. Set the File Browser mode by pressing the [MODE] button.
3. Select the desired file or folder by using the [Joystick].
4. Press the [MENU] button.
Move the [Joystick] left / right to select <Lock>.
5. Move the [Joystick] up / down to select an option, and then press the
[ Notes ]
✤
✤
✤
✤
◆
The File Browser screen appears.
◆
Move the [Joystick] up / down and press the [Joystick(OK)] repeatedly until the file you
want appears.
[Joystick(OK)].
◆
<Lock>: The selected file is locked.
◆
<Multi Select>: Multiple files can be selected using the [Joystick(OK)].
< > indicator appears on the selected files. Press the [PLAY] button.
◆
<Lock All>: All files are locked.
◆
<Unlock All>: Unlocking all files.
You can’t lock folders.
The <
If you slide the [W/T] switch to W(WIDE) in play mode, return to the file list screen.
> icon is displayed when the file is locked.
If you move the [Joystick] left, the previous folder screen appears.
ENGLISH
2
3
4
5
9393
Page 94

ENGLISH
DCIMDCIM
MISCMISC
MUSICMUSIC
VIDEOVIDEO
VOICEVOICE
1/51/5
MoveMove
PlayPlay
OK
MoveMove PlayPlay
OK
/DCIM/100SSDVC/DCIM/100SSDVC
DCAM0002.JPGDCAM0002.JPG
DCAM0003.JPGDCAM0003.JPG
DCAM0004.JPGDCAM0004.JPG
DCAM0001.JPGDCAM0001.JPG
DCIM
MISC
MUSIC
VIDEO
VOICE
1/5
1/41/4
Move
Play
MoveMove
PlayPlay
OK
/DCIM/100SSDVC
DCAM0002.JPG
DCAM0003.JPG
DCAM0001.JPG
DCAM0001.JPG
Move Play
/DCIM/100SSDVC
DCAM0002.JPG
DCAM0003.JPG
DCAM0004.JPG
DCAM0001.JPG
DCIM
MISC
MUSIC
VIDEO
VOICE
1/5
1/4
Move
Play
Move
Play
/DCIM/100SSDVC
DCAM0001.JPG
ExitExit
MENU
MoveMove SelectSelect
OK
File BrowserFile Browser
1/41/4
Copy ToCopy To
Multi SelectMulti Select
AllAll
OKOK
Move Play
/DCIM/100SSDVC
DCAM0002.JPG
DCAM0003.JPG
DCAM0004.JPG
DCAM0001.JPG
DCIM
MISC
MUSIC
VIDEO
VOICE
DPOFDPOF
OKOK
Copying file(s)...Copying file(s)...
DCAM0001.JPGDCAM0001.JPG
Press OK to cancel.Press OK to cancel.
Cancel
MoveMove ExitExit
MENU
SelectSelect
OK
File BrowserFile Browser
1/5
1/4
Move
Play
Move
Play
ExitMove Select
File Browser
1/4
Copy To
Multi Select
All
OK
Using File Browser
Copying Files or Folders
1
You can copy the file or folder to the internal or external memory.
1. Insert the memory card into the memory card slot on the Sports Camcorder.
2. Press the [POWER] button to turn on the Sports Camcorder.
◆
The Movie Record screen appears.
3. Set the File Browser mode by pressing the [MODE] button.
◆
9494
The File Browser screen appears.
4. Select the desired file or folder by using the [Joystick].
◆
Move the [Joystick] up / down and press the [Joystick(OK)] repeatedly until the file or
folder you want appears.
5. Press the [MENU] button.
Move the [Joystick] left / right to select <Copy To>.
6. Move the [Joystick] up / down to select an option, and then press the
[Joystick(OK)].
◆
<OK>: Copies the selected file or folder.
◆
<Multi Select>: Multiple files or folders can be selected using the [Joystick(OK)].
< ✔ > indicator appears on the selected files or folders.
Press the [PLAY] button.
◆
<All>: All files or folders will be copied.
[ Notes ]
✤
The Sports Camcorder copies from the currently-used memory to another. If the internal
memory was used, it copies to a memory card.
✤
If a memory card is not inserted, you cannot perform the <Copy To> function.
✤
If you slide the [W/T] switch to W(WIDE) in play mode, the Sports Camcorder returns to the
file list screen.
✤
If you move the [Joystick] left, the previous folder screen appears.
3
4
5
6
Page 95

Using File Browser
MoveMove PlayPlay
OK
DCIMDCIM
MISCMISC
MUSICMUSIC
VIDEOVIDEO
VOICEVOICE
1/51/5
MoveMove
PlayPlay
OK
MoveMove PlayPlay
OK
/DCIM/100SSDVC/DCIM/100SSDVC
DCAM0002.JPGDCAM0002.JPG
DCAM0003.JPGDCAM0003.JPG
DCAM0004.JPGDCAM0004.JPG
DCAM0001.JPGDCAM0001.JPG
Move Play
DCIM
MISC
MUSIC
VIDEO
VOICE
1/5
1/41/4
Move
Play
MoveMove
PlayPlay
OK
/DCIM/100SSDVC
DCAM0002.JPG
DCAM0003.JPG
DCAM0004.JPG
DCAM0001.JPG
Move Play
/DCIM/100SSDVC
DCAM0002.JPG
DCAM0003.JPG
DCAM0004.JPG
DCAM0001.JPG
Move Play
DCIM
MISC
MUSIC
VIDEO
VOICE
1/5
1/4
Move
Play
Move
Play
/DCIM/100SSDVC
DCAM0001.JPG
MoveMove ExitExit
MENU
SelectSelect
OK
File Info.File Info.
File BrowserFile Browser
OKOK
1/131/13
Move Play
/DCIM/100SSDVC
DCAM0002.JPG
DCAM0003.JPG
DCAM0004.JPG
DCAM0001.JPG
Move Play
DCIM
MISC
MUSIC
VIDEO
VOICE
MoveMove ExitExit
MENU
SelectSelect
OK
File Info.File Info.
File BrowserFile Browser
OKOK
Close : OK
DCAM0001.JPGDCAM0001.JPG
Size 92805 bytesSize 92805 bytes
Date 2006/01/01Date 2006/01/01
12:00:00 AM 12:00:00 AM
Locked NoLocked No
1/5
1/41/4
1/4
Move
Play
Move
Play
Move ExitSelect
File Info.
File Browser
OK
1/13
Viewing File Information
1
You can see the file name, format, size and date.
1. Press the [POWER] button to turn on the Sports Camcorder.
◆
The Movie Record screen appears.
2. Set the File Browser mode by pressing the [MODE] button.
◆
The File Browser screen appears.
3. Select the desired file list by using the [Joystick].
Move the [Joystick] up / down to want to view file information.
4. Press the [MENU] button.
Move the [Joystick] left / right to select <File Info.>.
5. Press the [Joystick(OK)] to view the file information.
6. Press the [Joystick(OK)] to finish viewing file information.
[ Notes ]
✤
✤
◆
Move the [Joystick] up / down and press the [Joystick(OK)] repeatedly until the file list you
want appears.
◆
The screen with file name, size, date, locked state appears.
You cannot view folder information. You can only view file information.
If you move the [Joystick] left, the previous folder screen appears.
ENGLISH
2
3
4
5
9595
Page 96

System Settings
ENGLISH
Setting the Sports
How to set to
How to set to
System Settings
System Settings
mode
mode
1. Press the [POWER] button to
turn on the Sports Camcorder.
MENU
Power
button
MODE
HOLD
DC IN
2. Set the System Settings mode by
pressing the [MODE] button.
6
6
Camcorder
Setting Memory ..............................................................................97
Selecting the Storage Type ......................................................97
Setting USB Mode ..........................................................................98
Setting USB Mode ....................................................................98
Setting Memory ..............................................................................99
Setting the File No. Function ....................................................99
Formatting the Memory ..........................................................100
Viewing Memory Space..........................................................101
Adjusting the LCD monitor .........................................................102
Adjusting the LCD Brightness ................................................102
Adjusting the LCD Colour .......................................................103
Adjusting Date/Time ....................................................................104
Setting Date&Time .................................................................104
Setting Date Format ...............................................................105
Setting Time Format ...............................................................106
Setting Date/Time Display ......................................................107
Setting the System Settings .......................................................108
Setting the Beep Sound .........................................................108
Setting Start-up Mode ............................................................109
Resetting the Sports Camcorder ............................................110
Selecting Language ................................................................111
Setting the Auto Shut off ........................................................112
Setting the Demonstration Function .......................................113
Viewing Version Information...................................................114
Using USB Mode ..........................................................................115
Transferring files to a computer .............................................115
Printing with PictBridge ..........................................................116
Using the PC Cam Function ..................................................117
9696
◆ Save important data / recordings separately on other media, to
avoid accidental loss due to a system failure or other reasons.
Page 97

Setting the Sports Camcorder : Setting Memory
System Settings
Move Select
Storage Type
External
Internal
System SettingsSystem Settings
Move Select
OK
TYPE
Storage TypeStorage Type
Internal
External
Ver.
System Settings
Move Select
Storage Type
External
Internal
System Settings
Move Select
Storage Type
Internal
External
Sepia
Recording...
12:00AM 2006/01/0112:00AM 2006/01/01
SS
720i
FF
STBY
00:00:00/00:40:05
System SettingsSystem Settings
Move Select
OK
Storage TypeStorage Type
External
Internal
TYPE
Ver.
Selecting the Storage Type
You can set the storage to the internal memory or memory card (not supplied).
1. Press the [POWER] button to turn on the Sports Camcorder.
◆
The Movie Record screen appears.
2. Set the System Settings mode by pressing the [MODE] button.
◆
The System Settings screen appears.
3. Move the [Joystick] left / right to select <Storage Type>.
4. Move the [Joystick] up / down to select an option, and then press the
[Joystick(OK)].
◆
<Internal>: Movie, photo, music and voice files are stored in the internal memory.
◆
<External>: Movie, photo, music and voice files are stored in the external memory
(SD/MMC).
5. After you finish setting, move to the desired mode by pressing the [MODE]
button.
[ Notes ]
✤
If you insert a memory card when the Sports Camcorder is on, the “pop-up message” will
prompt you automatically to select the storage type .
✤
If there is no memory card inserted, only the <Internal> option will be available.
✤
System requires a small portion of memory space, actual storage capacity may differ from
the printed memory capacity.
✤
The maximum recording time and image capacity is subject to change depending on the
media used. ➥pages 31, 32
ENGLISH
3
4
5
9797
Page 98

ENGLISH
System Settings
Move Select
OK
USB Mode
PictBridge
PC-Cam
Mass Storage
TYPE
System Settings
Move Select
USB Mode
PictBridge
PC-Cam
Mass Storage
System Settings
Move Select
OK
USB Mode
Mass Storage
PictBridge
PC-Cam
TYPE
Setting the Sports Camcorder : Setting USB Mode
Setting USB Mode
Before connecting your Sports Camcorder to a computer or a printer via USB, please set the
proper USB mode.
1. Press the [POWER] button to turn on the Sports Camcorder.
◆
The Movie Record screen appears.
2. Set the System Settings mode by pressing the [MODE] button.
◆
The System Settings screen appears.
3. Move the [Joystick] left / right to select <USB Mode>.
4. Move the [Joystick] up / down to select an option, and then press the
[Joystick(OK)].
9898
Mass Storage
PictBridge
PC-Cam
Transferring files from the Sports Camcorder to your computer
➥page 115
By connecting the Sports Camcorder to printers with PictBridge
support (sold separately), you can send images from the internal
memory or external memory (SD/MMC) directly to the printer
with a few simple operations. ➥page 116
You can use the Sports Camcorder as a PC camera for video chatting,
video conference and other PC camera applications. ➥page 117
3
4
Page 99

Setting the Sports Camcorder : Setting Memory
System Settings
Move Select
OK
File No.
Reset
Series
RGB
System Settings
Move Select
File No.
Series
Reset
System Settings
Move Select
OK
File No.
Series
RGB
Reset
Setting the File No. Function
You can set the file numbers so that they reset each time the memory card is formatted, or so
that they count up continuously.
1. Press the [POWER] button to turn on the Sports Camcorder.
◆
The Movie Record screen appears.
2. Set the System Settings mode by pressing the [MODE] button.
◆
The System Settings screen appears.
3. Move the [Joystick] left / right to select <File No.>.
4. Move the [Joystick] up / down to select an option, and then press the
[Joystick(OK)].
◆
<Series>: Numbering is continuous between the memory cards, so that the first file
number assigned on a new memory card is 1 more than the last file number assigned on
the previous memory card.
◆
<Reset>: When the storage memory is formatted, the file number goes back to its default
value (100-0001).
ENGLISH
3
4
5. After you finish, move to the desired mode by pressing the [MODE] button.
[ Note ]
✤
When you set <File No.> to <Series>, each file is assigned with a different number so as to
avoid duplicating file names. It is convenient when you want to manage your files on a PC.
9999
Page 100

ENGLISH
System Settings
Move Select
Format
External
Internal
System Settings
Move Select
OK
Format
Internal
RGB
External
System Settings
Move Select
Format
External
Internal
System Settings
Move Select
Format
Internal
External
System Settings
Move Select
OK
Format
Internal
RGB
External
Are you sure you want to
format the external memory,
all files will be erased?
Cancel
OK
System Settings
Move Select
Format
External
Internal
System Settings
Move Select
Format
Internal
External
System Settings
Move Select
Format
Internal
External
Are you sure you want to
format the external memory,
all files will be erased?
System Settings
Move Select
OK
Format
Internal
RGB
External
Formatting
external memory...
System Settings
Move Select
OK
Format
External
Internal
RGB
Setting the Sports Camcorder : Setting Memory
Formatting the Memory
You can format the internal memory or the memory card to erase all files.
1. Press the [POWER] button to turn on the Sports Camcorder.
◆
The Movie Record screen appears.
2. Set the System Settings mode by pressing the [MODE] button.
◆
The System Settings screen appears.
3. Move the [Joystick] left / right to select <Format>.
4. Move the [Joystick] up / down to select an option, and then press the
[Joystick(OK)].
◆
<Internal>: Format the internal memory.
◆
<External>: Format the external memory.
When the [Joystick(OK)] is pressed, the pop-up message appears.
100100
Select <OK> or <Cancel> by moving the [Joystick] up / down and then press the
[Joystick(OK)].
5. After you finish setting, move to the desired mode by pressing the [MODE]
button.
[ Warning ]
✤
Previous information can not be restored after formatting.
[ Notes ]
✤
There is no guarantee on the operation of a memory card which has not been formatted
on the Sports Camcorder. Make sure to format the memory card on the Sports Camcorder
before using.
✤
If the memory card is not inserted, <External> option is not displayed.
3
4
 Loading...