

Page 1
ENGLISH
ESPAÑOL
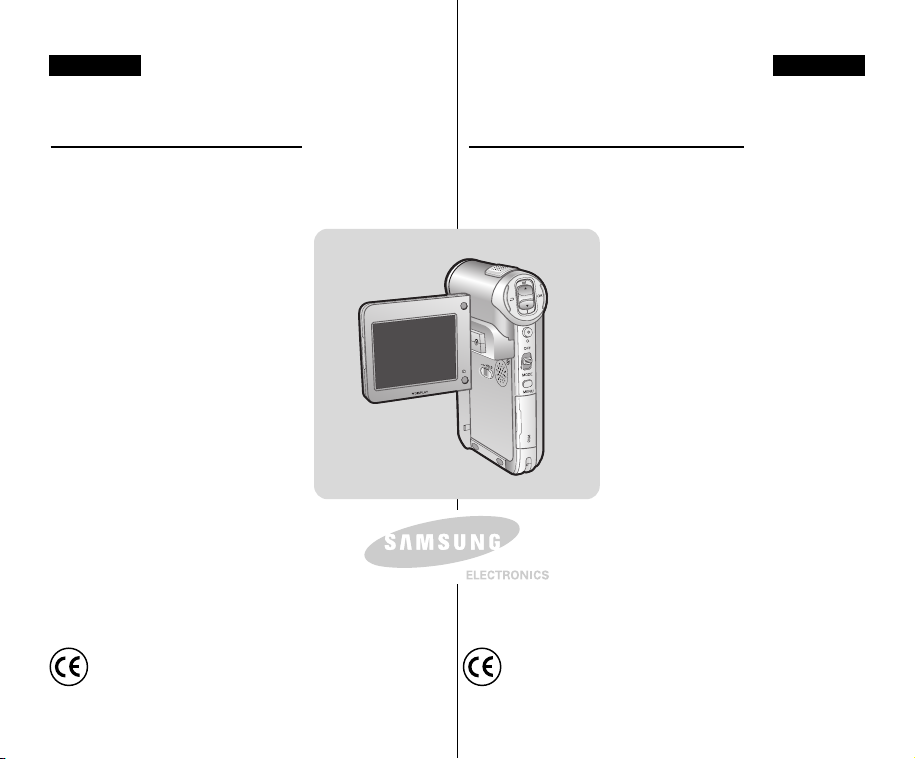
Digital Camcorder
VP-X105(L)/X110(L)
AF Auto Focus
CCD Charge Coupled Device
LCD Liquid Crystal Display
Owner’s Instruction Book
Before operating the unit, please read this
Instruction Book thoroughly, and retain it for future
reference.
This product meets the intent of
Directive 89/ 336 CEE, 73/ 23 CEE, 93/ 68 CEE.
Videocámara digital
VP-X105(L)/X110(L)
AF Enfoque automático
CCD Dispositivo acoplado por
carga
LCD Pantalla de cristal líquido
Manual de instrucciones
Antes de utilizar la cámara lea detenidamente
este manual de instrucciones y consérvelo para
consultas posteriores.
Este producto cumple con las normas
CEE 89/336, CEE 73/23 y CEE93/68.
AD68-00876J
Page 2

ENGLISH
Contents Índice
ESPAÑOL
Notices and Safety Precautions ........................... 8
Precautions on the CAM Care ......................................................................8
Notes Regarding COPYRIGHT......................................................................9
Notes Regarding Moisture Condensation...................................................9
Notes Regarding the CAM.............................................................................9
Notes Regarding the Battery Pack.............................................................10
Notes Regarding a Trademark....................................................................10
Notes Regarding the Lens...........................................................................11
Notes Regarding the LCD Display..............................................................11
Precautions Regarding Service..................................................................11
Precautions Regarding Replacement Parts..............................................11
Getting to Know Your CAM .............................. 12
Features .........................................................................................................12
Accessories Supplied with the CAM .........................................................13
Name of Each Part .............................................14
Rear & Left View ...........................................................................................14
Right & Bottom View....................................................................................15
External Camera Module View (VP-X105L/X110L only)..........................16
LCD Display...................................................................................................17
OSD(On Screen Display in Video Record Mode/ Video Play Mode).....17
OSD(On Screen Display in Photo Capture Mode/ Photo View Mode) ..18
OSD(On Screen Display in MP3 Play Mode/ Voice Record/
Play Mode)................................................................................................19
How to Use the Battery Pack .............................20
Battery Pack Installation / Ejection............................................................20
Maintain the Battery Pack ...........................................................................21
Charging the Battery Pack ..........................................................................24
22
Avisos y precauciones de seguridad ...................... 8
Precauciones sobre el cuidado de la VIDEOCÁMARA.............................8
Notas referentes a los DERECHOS DE REPRODUCCIÓN .......................9
Notas referentes a la condensación de humedad.....................................9
Notas referentes a la VIDEOCÁMARA.........................................................9
Notas referentes a la batería ......................................................................10
Notas referentes a la marca comercial......................................................10
Notas referentes al objetivo ........................................................................11
Notas referentes a la pantalla LCD ...........................................................11
Precauciones referentes al servicio...........................................................11
Precauciones referentes a las piezas de repuesto..................................11
Introducción a la VIDEOCÁMARA .......................12
Características ..............................................................................................12
Accesorios incluidos con la VIDEOCÁMARA ..........................................13
Nombre de los componentes ................................ 14
Vistas posterior y lateral izquierda ............................................................14
Vistas lateral derecha e inferior..................................................................15
Vista del módulo externo de cámara (Sólo VP-X105L/X110L) .............16
Pantalla LCD .................................................................................................17
OSD (Presentación en pantalla en la modalidad Video Record
<Grabar vídeo> / Video Play <Reproducir vídeo>) ...............................17
OSD (Presentación en pantalla en la modalidad Photo Capture
<Capturar vídeo> / Photo View <Ver foto>) ...........................................18
OSD (Presentación en pantalla en la modalidad MP3 Play
<Reproducir MP3> / Voice Record/Play <Grabar vídeo/Reproducir>) 19
Uso de la batería ..................................................... 20
Instalación y extracción de la batería .......................................................20
Mantenimiento de la batería........................................................................21
Carga de la batería .......................................................................................24
Page 3

ENGLISH
Contents Índice
ESPAÑOL
Getting Started ................................................. 25
The Colour of the LED .................................................................................25
Using Hardware Reset Function ................................................................25
Before You Start Operating the CAM.........................................................26
Using the Function Button..........................................................................27
Using the Display Button ............................................................................28
Adjusting the LCD Monitor..........................................................................29
Structure of the Folders and Files .............................................................30
Recording Time and Capacity ...................................................................31
Selecting the Memory Type.........................................................................33
Using the Memory Stick (Optional Accessory)........................................34
Mode and Menu Selection...........................................................................35
Video Mode ...................................................... 36
Recording ......................................................................................................37
Recording .................................................................................................37
Zooming In and Out .................................................................................38
Setting the Video In..................................................................................39
Playing............................................................................................................40
Playing on the LCD Monitor.....................................................................40
Selecting File Options..................................................................................42
Deleting Video files...................................................................................42
Locking Video files ...................................................................................43
Copying Video files...................................................................................44
Setting the PB Option...............................................................................45
Setting Various Functions...........................................................................46
Setting the Video file Size........................................................................46
Setting the Video file Quality....................................................................47
Setting the Focus .....................................................................................48
Setting the EIS (Electronic Image Stabilizer) ..........................................49
Setting the White Balance........................................................................50
Setting the Program AE (Programmed Auto Exposure) .........................51
Introducción ..................................................... 25
Color del indicador LED ..............................................................................25
Uso de la función de reinicio de hardware...............................................25
Antes de empezar a utilizar la VIDEOCÁMARA .......................................26
Utilización del botón de funciones ............................................................27
Utilización del botón Display ......................................................................28
Ajuste de la pantalla LCD ...........................................................................29
Estructura de carpetas y archivos ............................................................30
Tiempo y capacidad de grabación ............................................................31
Selección del tipo de memoria...................................................................33
Utilización del Memory Stick (Accesorios opcionales)...........................34
Selección de modalidad y menú................................................................35
Modalidad Video .............................................. 36
Grabación ......................................................................................................37
Grabación .................................................................................................37
Acercamiento y alejamiento de las imágenes ........................................38
Ajuste de Video In <Entrada de vídeo> ..................................................39
Reproducción ...............................................................................................40
Reproducción en la pantalla LCD............................................................40
Selección de opciones de archivo.............................................................42
Eliminación de archivos de vídeo ...........................................................42
Bloqueo de archivos de vídeo ................................................................43
Copia de archivos de vídeo ....................................................................44
Ajuste de la opción PB.............................................................................45
Ajustes de diversas funciones ...................................................................46
Ajuste del tamaño del archivo de vídeo ..................................................46
Ajuste de la calidad del archivo de vídeo................................................47
Ajuste del enfoque....................................................................................48
Ajuste de EIS (Estabilizador electrónico de la imagen)..........................49
Ajuste del balance de blanco...................................................................50
Ajuste del Programa AE (Exposición automática programada).............51
33
Page 4

ENGLISH
Contents Índice
Setting the BLC (Backlight Compensation).............................................52
Setting the Effect ......................................................................................53
Setting the Digital Zoom...........................................................................54
Photo Mode ....................................................... 55
Capturing .......................................................................................................56
Capturing Images.....................................................................................56
Zooming In and Out .................................................................................57
Viewing...........................................................................................................58
Viewing Photo files on the LCD Monitor..................................................58
Selecting File Options..................................................................................59
Deleting Photo files ..................................................................................59
Locking Photo files ...................................................................................60
Setting DPOF(Digital Print Order Format) Function ...............................61
Copying Photo files ..................................................................................62
Setting Various Functions...........................................................................63
Setting the Photo file Size........................................................................63
Setting the Light........................................................................................64
Setting the Focus .....................................................................................65
Setting the EIS (Electronic Image Stabilizer) ..........................................66
Setting the White Balance........................................................................67
Setting the Program AE (Programmed Auto Exposure) .........................68
Setting the BLC (Backlight Compensation).............................................69
MP3/Voice Recorder Mode/Using File Browser
Storing Music in the CAM ...........................................................................72
Copying Music files to the CAM ..............................................................72
Playing............................................................................................................73
Playing Music files....................................................................................73
Selecting Play Options ................................................................................74
Setting Repeat Play .................................................................................74
Selecting File Options..................................................................................75
Deleting Music files ..................................................................................75
44
.....71
Modalidad Foto ................................................. 55
Captura...........................................................................................................56
Visualización .................................................................................................58
Selección de opciones de archivo.............................................................59
Ajustes de diversas funciones ...................................................................63
MP3/Modalidad de grabador de voz/
Utilización del explorador de archivos...............71
Almacenamiento de música en la VIDEOCÁMARA.................................72
Reproducción ...............................................................................................73
Selección de opciones de reproducción ..................................................74
Selección de opciones de archivo.............................................................75
ESPAÑOL
Ajuste de BLC (Compensación de luz de fondo)....................................52
Ajuste del efecto.......................................................................................53
Ajuste del zoom digital .............................................................................54
Captura de imágenes...............................................................................56
Acercamiento y alejamiento de las imágenes ........................................57
Visualización de archivos de fotos en la pantalla LCD...........................58
Eliminación de archivos de fotos.............................................................59
Bloqueo de archivos de fotos ..................................................................60
Ajuste de la función DPOF (Formato de orden de impresión digital) ....61
Copia de archivos de fotos ......................................................................62
Ajuste del tamaño del archivo de foto.....................................................63
Ajuste de luz.............................................................................................64
Ajuste del enfoque....................................................................................65
Ajuste de EIS (Estabilizador electrónico de la imagen)..........................66
Ajuste del balance de blanco...................................................................67
Ajuste del Programa AE (Exposición automática programada).............68
Ajuste de BLC (Compensación de luz de fondo)....................................69
Copia de archivos de música en la VIDEOCÁMARA.............................72
Reproducción de archivos de música .....................................................73
Ajuste de Repeat Play <Repetir reproducción>......................................74
Eliminación de archivos de música .........................................................75
Page 5

ENGLISH
Contents Índice
Locking Music files ...................................................................................76
Copying Music files ..................................................................................77
Voice Recorder Mode ....................................... 78
Recording ......................................................................................................78
Recording Voice.......................................................................................78
Playing............................................................................................................79
Playing Voice files ....................................................................................79
Selecting File Options..................................................................................80
Deleting Voice files...................................................................................80
Locking Voice files....................................................................................81
Copying Voice files...................................................................................82
Using File Browser ............................................ 83
Deleting Files or Folders .............................................................................83
Locking Files.................................................................................................84
Copying Files or Folders.............................................................................85
Viewing File Information..............................................................................86
Setting the CAM ................................................ 87
Adjusting the LCD Monitor..........................................................................88
Adjusting the LCD Brightness..................................................................88
Adjusting the LCD Colour ........................................................................89
Adjusting Date/Time.....................................................................................90
Setting Time..............................................................................................90
Setting Date..............................................................................................91
Setting Date Format.................................................................................92
Setting Time Format.................................................................................93
Setting the System .......................................................................................94
Setting the Auto Shut off..........................................................................94
Setting the Demo Function ......................................................................95
Setting Start-up Mode ..............................................................................96
Bloqueo de archivos de música...............................................................76
Copia de archivos de música ..................................................................77
Modalidad Grabador de voz ............................. 78
Grabación ......................................................................................................78
Grabación de voz .....................................................................................78
Reproducción................................................................................................79
Reproducción de archivos de voz ...........................................................79
Selección de opciones de archivo.............................................................80
Eliminación de archivos de voz ...............................................................80
Bloqueo de archivos de voz.....................................................................81
Copia de archivos de voz ........................................................................82
Utilización del explorador de archivos ............. 83
Eliminación de archivos o carpetas ..........................................................83
Bloqueo de archivos ....................................................................................84
Copia de archivos o carpetas.....................................................................85
Visualización de la información del archivo.............................................86
Ajuste de la VIDEOCÁMARA ............................ 87
Ajuste de la pantalla LCD............................................................................88
Ajuste del brillo de la LCD .......................................................................88
Ajuste del color de la pantalla LCD .........................................................89
Ajuste de fecha y hora.................................................................................90
Ajuste de la hora ......................................................................................90
Ajuste de la fecha.....................................................................................91
Ajuste del formato de fecha.....................................................................92
Ajuste del formato de hora.......................................................................93
Ajuste del sistema........................................................................................94
Ajuste de apagado automático................................................................94
Ajuste de la función Demo.......................................................................95
Ajuste de la modalidad de inicio..............................................................96
ESPAÑOL
55
Page 6

ENGLISH
Contents Índice
Setting the File No. Function ...................................................................97
Setting the Beep Sound...........................................................................98
Viewing Version Information ...................................................................99
Setting Memory...........................................................................................100
Selecting the Storage Type....................................................................100
Formatting the Memory..........................................................................101
Viewing Memory Space .........................................................................102
Using USB Mode.........................................................................................103
Storing Files to the External Memory....................................................103
USB Speed depending on the System .................................................104
System Environment..............................................................................104
Using PC Cam .......................................................................................105
Connecting the CAM to a Printer...........................................................106
Using the External Camera Module (VP-X105L/X110L only).. 107
Connecting the External Camera Module...............................................108
Connecting the External Camera Module to CAM ...............................108
Recording Video Using the External Camera Module..........................108
Wearing the External Camera Module.....................................................109
Connecting the extension cable while the set is in the
Carrying Case.........................................................................................109
Mounting the External Camera Module on Rubber Mount...................109
Using the Short and Long Mount Bands ...............................................110
Miscellaneous Information .................................. 111
Connecting the CAM with other Devices ................................................112
Connecting the CAM to TV ...................................................................112
Connecting the CAM to VCR.................................................................113
Copying Video files to a VCR Tape .......................................................114
Recording unscramble contents from other digital devices..................115
Connecting the CAM to a PC using the USB cable..............................116
Ajuste de la función File No.....................................................................97
Ajuste del sonido del pitido ......................................................................98
Visualización de la información de versión .............................................99
Ajuste de la memoria .................................................................................100
Selección del tipo de almacenamiento..................................................100
Formato de la memoria..........................................................................101
Visualización de espacio en memoria...................................................102
Utilización de la modalidad USB..............................................................103
Almacenamiento de archivos en la memoria externa ..........................103
Velocidad de USB según el sistema.....................................................104
Entorno del sistema ...............................................................................104
Utilización de PC Cam...........................................................................105
Conexión de la VIDEOCÁMARA a una impresora...............................106
Utilización del módulo externo de cámara (Sólo VP-X105L/X110L) ..107
Conexión del módulo externo de cámara ..............................................108
Conexión del módulo externo de cámara a la CAM.............................108
Grabación utilizando el módulo externo de cámara .............................108
Instalación del módulo externo de cámara ...........................................109
Conexión del cable alargador con el equipo en la funda de
transporte................................................................................................109
Montaje del módulo externo de cámara en el soporte de goma .........109
Utilización de las bandas corta y larga de soporte ..............................110
Información diversa ............................................. 111
Conexión de la VIDEOCÁMARA con otros dispositivos ......................112
Conexión de la VIDEOCÁMARA a un TV.............................................112
Conexión de la VIDEOCÁMARA a un aparato de vídeo .....................113
Copia de archivos de vídeo en una cinta de vídeo...............................114
Grabación de contenido sin descodificar desde otros dispositivos......115
Conexión de la VIDEOCÁMARA a un PC utilizando el cable USB.....116
ESPAÑOL
66
Page 7
ENGLISH
Contents Índice
Installing Programmes...............................................................................117
Installing Image Mixer ............................................................................117
Installing for using PC-Cam ...................................................................119
Installing Windows98SE Driver(For Windows98SE only) ....................120
Printing Photos...........................................................................................122
Printing with PictBridge Function...........................................................122
Printing Photos with DPOF Files ...........................................................123
Maintenance .................................................... 124
Cleaning and Maintaining the CAM .........................................................124
After using the CAM...............................................................................124
Cleaning the Body .................................................................................125
Using the Built-in Rechargeable Battery ...............................................125
Regarding the Battery ............................................................................126
Using the CAM Abroad..........................................................................127
Troubleshooting ............................................... 128
Self Diagnosis Display...............................................................................128
Using the Menu ............................................... 130
Specifications .................................................. 132
Index ............................................................... 134
Instalación de programas..........................................................................117
Instalación de Image Mixer ....................................................................117
Instalación para utilizar PC-Cam ...........................................................119
Instalación del controlador de Windows98SE
(sólo para Windows98SE). ....................................................................120
Impresión de fotos .....................................................................................122
Impresión con la función PictBridge......................................................122
Impresión de fotos con los archivos DPOF ..........................................123
Mantenimiento .................................................124
Limpieza y mantenimiento de la VIDEOCÁMARA .................................124
Después de utilizar la VIDEOCÁMARA................................................124
Limpieza de la carcasa ..........................................................................125
Utilización de la batería recargable incorporada...................................125
Información sobre la batería..................................................................126
Utilización de la VIDEOCÁMARA en el extranjero...............................127
Solución de problemas .....................................128
Pantalla de autodiagnósticos ...................................................................128
Uso de menús ...................................................130
Especificaciones técnicas ..................................132
Índice alfabético ...............................................134
ESPAÑOL
77
Page 8

ENGLISH
ESPAÑOL
Notices and Safety Precautions Avisos y precauciones de seguridad
Precautions on the CAM Care
✤ Please note the following precautions for use:
✤ Please keep this device in a safe place. The device contains a
lens that can be damaged by shock.
Keep away from the reach of the children.
Do not place your device in a wet place.
Moisture and water may cause the device to malfunction.
To avoid electric shock, do not touch your device or power
cable with wet hands.
Do not use the flash close to another’s eyes.
The flash emits a strong light that may cause damage similar to
direct sunlight on one’s eyesight.
Particular care should be observed if photographing infants,
when the flash should be no less than 3 feet from your subject.
If the device is not working properly, please consult your
nearest dealer or authorized Samsung service facility.
Disassembling the device yourself may cause irrecoverable
damage which will be difficult to repair.
Clean the device with a dry, soft cloth.
Use a soft cloth moistened with a mild detergent solution for
removing stains.
Do not use any type of solvent, especially benzene, as they
may seriously damage the finish.
Keep your device away from rain and saltwater.
After using, clean the device. Saltwater may cause the parts to
corrode.
88
Precauciones sobre el cuidado de la VIDEOCÁMARA
✤ Tenga en cuenta las siguientes precauciones de uso:
✤ Mantenga este dispositivo en un lugar seguro.El dispositivo
contiene una lente que puede dañarse al recibir golpes.
Manténgalo fuera del alcance de los niños.
No coloque el dispositivo en lugares con humedad.
La humedad y el agua pueden provocar una avería en el
dispositivo.
Para evitar descarga eléctrica, no toque el dispositivo ni el
cable de alimentación con las manos mojadas.
No utilice el Flash cerca de los ojos. El Flash emite una
potente luz que puede provocar daños semejantes a la
emisión de luz solar directa sobre los ojos. Especial cuidado
debe prestarse al fotografiar a los niños cuando el flash se
encuentre a una distancia menor de un metro del sujeto.
Si el dispositivo no está funcionando correctamente, póngase
en contacto con el distribuidor más cercano o con el servicio
técnico autorizado de Samsung. El desmontaje del dispositivo
puede provocar daños irreparables que pueden resultar
difíciles de reparar.
Limpie el dispositivo con un paño seco y suave. Utilice un
paño suave humedecido con una solución de detergente
suave para eliminar manchas. No utilice ningún tipo de
disolvente, especialmente benceno, ya que podría dañar
seriamente el acabado.
Mantenga el dispositivo alejado de la lluvia y el agua marina.
Después de utilizarlo, límpielo. El agua marina puede
provocar la corrosión de los componentes.
Page 9

ENGLISH
ESPAÑOL
Notices and Safety Precautions Avisos y precauciones de seguridad
Notes Regarding COPYRIGHT
✤ Television programmes, movie video tapes, DVD titles, films and
other programme materials may be copyrighted. Unauthorized
recording of copyrighted materials may infringe on the rights of the
Copyright owners and is contrary to copyright laws.
✤ All the trade names and registered trademarks mentioned in this
manual or other documentation provided with your
Samsung product are trademarks or registered trademarks of their
respective holders.
Notas referentes a los DERECHOS DE REPRODUCCIÓN
✤ Es probable que los programas de televisión, las cintas de vídeo de
películas, los DVD, las películas y otros materiales audiovisuales
tengan registrados sus derechos de reproducción. La grabación no
autorizada de material con derechos de propiedad intelectual
puede infringir los derechos de los propietarios con Copyright y es
contraria a las leyes de propiedad intelectual.
✤ Todos los nombres de marcas y marcas comerciales registradas
mencionados en este manual o el resto de documentación
facilitada con el producto Samsung son marcas comerciales o
marcas registradas de sus respectivos propietarios.
Notes Regarding Moisture Condensation Notas referentes a la condensación de humedad
1. A sudden rise in atmospheric temperature may cause
condensation to form inside the CAM.
For Example:
✤ Entering or leaving a heated place on a cold day might cause
condensation inside the product.
✤ To prevent condensation, place the product in a carrying case or a
plastic bag before exposing it to a sudden change of temperature.
1. Una subida repentina de la temperatura puede producir
condensación en el interior de la VIDEOCÁMARA.
Por ejemplo:
✤ Entrar o salir de un lugar caluroso en días de frío podría causar
condensación dentro del aparato.
✤ Para evitar condensación, coloque el aparato en su funda de
transporte o en una bolsa de plástico antes de exponerlo a un
cambio repentino de temperatura.
Notes Regarding the CAM Notas referentes a la VIDEOCÁMARA
1. Do not leave the CAM exposed to high temperature (above
60°C or 140°F).
For example, in a parked closed car in summer or exposed to
direct sunlight.
2. Do not let the CAM get wet.
Keep the CAM away from rain, salt water, or any other form of
moisture.
The CAM will be damaged if immersed in water or subjected to
high levels of moisture.
1. No deje la VIDEOCÁMARA expuesta a temperaturas altas
(más de 60°C o 140°F).
Por ejemplo, en un coche aparcado cerrado en verano o expuesta
directamente a la luz del sol.
2. No permita que la VIDEOCÁMARA se moje.
Mantenga la VIDEOCÁMARA alejada de la lluvia, del agua de
mar o de cualquier otro tipo de humedad.
La VIDEOCÁMARA se dañará si se sumerge en agua o se expone
a altos niveles de humedad.
99
Page 10

ENGLISH
ESPAÑOL
Notices and Safety Precautions Avisos y precauciones de seguridad
Notes Regarding the Battery Pack Notas referentes a la batería
✤ It is recommended to use original battery pack that is available at
SAMSUNG service centre.
✤ Make sure the battery pack is fully charged before starting to record.
✤ To preserve battery power, keep the CAM turned off when you are
not operating it.
✤ If your device is left in STBY mode without being operated for
more than 5 minutes, it will automatically turn itself off to protect
against unnecessary battery discharge.
✤ Make sure that the battery pack is attached firmly in place.
✤ The new battery pack provided with the product is not charged.
Before using the battery pack, you need to fully charge it.
✤ Do not drop the battery pack.
Dropping the battery pack may damage it.
✤ Fully discharging a Lithium Polymer battery damages the internal
cells.
The battery pack may be prone to leakage when fully discharged.
✤ To avoid damage to the battery pack, make sure to remove the
battery when no charge remains.
✤ Clean the terminal to remove foreign substance before inserting
the battery pack.
✳ When the battery reaches the end of its life, please contact your
local dealer.
Batteries must be disposed of as chemical waste.
✳ Be careful not to drop the battery pack when you release it from
the CAM.
Note Regarding a Trademark Notas referentes a la marca comercial
✤ The logos regarding DivX, DivX Licensed are the trademark of
DivX, Network, Inc and can be used after contracting license.
1010
✤ Se recomienda utilizar la batería original que está disponible en el
centro de servicio técnico de SAMSUNG.
✤ Asegúrese de que la batería esté completamente cargada antes de
empezar a grabar.
✤ Para ahorrar energía de la batería mantenga la VIDEOCÁMARA
apagada cuando no la esté usando.
✤ Si el dispositivo se deja en modalidad STBY sin que funcione
durante más de 5 minutos, se apagará automáticamente para evitar
una descarga innecesaria de la batería.
✤ Asegúrese de que la batería esté colocada correctamente en su sitio.
✤ La nueva batería que se suministra con el producto no está cargada.
Antes de utilizar la batería es necesario cargarla por completo.
✤ No deje caer la batería. Si se llegara a caer podría estropearse.
✤ Descargar completamente la batería de polímero de litio daña las
células internas. La batería puede ser más propensa a fugas
cuando se deja totalmente descargada.
✤ Para evitar daños en la batería, asegúrese de quitar la batería
cuando no le quede ninguna carga.
✤ Limpie el terminal para eliminar sustancias extrañas antes de
insertar la batería.
✳ Cuando se termine la vida útil de la batería, póngase en contacto
con su proveedor habitual. Debe deshacerse de las baterías del
mismo modo que hace con los residuos químicos.
✳ Tenga cuidado de no dejar caer la batería al separarla de la
VIDEOCÁMARA.
✤ Los logotipos referentes a DivX, DivX Licensed son la marca
comercial de DivX, Network, Inc y se puede utilizar mediante
contratación de licencia.
Page 11

ENGLISH
ESPAÑOL
Notices and Safety Precautions Avisos y precauciones de seguridad
Note Regarding the Lens Notas referentes al objetivo
✤ Do not film with the camera lens pointing directly at the sun.
Direct sunlight can damage the CCD (Charge Coupled Device, the
imaging sensor).
Notes Regarding the LCD Display Notas referentes a la pantalla LCD
1. The LCD monitor has been manufactured using the high precision
technology. However, there may be tiny dots (red, blue or green in
colour) that appear on the LCD monitor. These dots are normal and do
not affect the recorded picture in any way.
2. When you use the LCD monitor under direct sunlight or outdoors, may
be difficult to see the picture clearly.
3. Direct sunlight can damage the LCD monitor.
Precautions Regarding Service Precauciones referentes al servicio
✤ Do not attempt to service the CAM yourself.
✤ Opening or removing covers may expose you to dangerous voltage or
other hazards.
✤ Refer all servicing to qualified service personnel.
Precautions Regarding Replacement Parts Precauciones referentes a las piezas de repuesto
✤ When replacement parts are required, be sure the service technician
has used replacement parts specified by the manufacturer and having
the same characteristics as the original part.
✤ Unauthorized substitutions may result in fire, electric shock or other
hazards.
Correct Disposal of This Product
(Waste Electrical & Electronic Equipment)
(Applicable in the European Union and other European countries
with separate collection systems)
This marking shown on the product or its literature, indicates that it should
not be disposed with other household wastes at the end of its working life.
To prevent possible harm to the environment or human health from
uncontrolled waste disposal, please separate this from other types of
wastes and recycle it responsibly to promote the sustainable reuse of
material resources. Household users should contact either the retailer
where they purchased this product, or their local government office, for
details of where and how they can take this item for environmentally safe
recycling. Business users should contact their supplier and check the terms and
conditions of the purchase contract.
This product should not be mixed with other commercial wastes for disposal.
✤ No grabe con el objetivo de la cámara dirigido directamente hacia el
sol. La acción de la luz directa del sol podría estropear el CCD (el
dispositivo acoplado por carga, el sensor de imágenes).
1. Para la fabricación del monitor LCD se ha empleado tecnología de alta
precisión. Sin embargo, pueden aparecer en ella puntitos rojos, azules
o verdes. Esta situación es normal y no afecta en modo alguno a la
grabación.
2. Si se emplea el monitor LCD bajo la acción directa del sol o en
exteriores, es probable que resulte difícil ver la imagen con claridad.
3. La acción directa del sol puede estropear la pantalla LCD.
✤ No intente reparar la VIDEOCÁMARA por sí mismo.
✤ La apertura o retirada de cubiertas puede exponerle a serios voltajes u
otros peligros.
✤ Confíe las reparaciones a personal técnico cualificado.
✤ Cuando se necesiten piezas de repuesto, asegúrese de que el técnico
utiliza piezas especificadas por el fabricante o que tengan las mismas
características que la pieza original.
✤ Los repuestos no autorizados pueden producir incendios, descargas
eléctricas u otros peligros.
Eliminación correcta de este producto
(material eléctrico y electrónico de descarte)
(Aplicable en la Unión Europea y en países europeos con
sistenmas de recogida selectiva de residuos)
La presencia de esta marca en el producto o en el material informativo
que lo acompaña, indica que al finalizar su vida útil no deberá eliminarse
junto con otros residuos domésticos. Para evitar los posibles daños al
medio ambiente o a la salud humana que representa la eliminación
incontrolada de residuos, separe este producto de otros tipos de residuos
y recíclelo correctamente para promover la reutilización sostenible de
recursos materiales. Los usuarios particulares pueden contactar con el
establecimiento donde adquirieron el producto, o con las autoridades
locales pertinentes, para informarse sobre cómo y dónde pueden llevarlo
Los usuarios comerciales pueden contactar con su proveedor y consultar las condiciones
del contrato de compra. Este producto no debe eliminarse mezclado con otros residuos
comerciales.
para que sea sometido a un reciclaje ecológico y seguro.
1111
Page 12

ENGLISH
ESPAÑOL
Getting to Know Your CAM Introducción a la VIDEOCÁMARA
Features
•
Integrated Digital CAM/DSC operation
An integrated digital imaging device that easily converts between a Digital
CAM and a Digital Still Camera with comfortable and easy recording.
•
High Resolution Image Quality (Digital Still Camera)
Employing 800K CCD Pixel, a maximum resolution of 800x600 is available.
•
100x Digital Zoom
Allows the user to magnify an image up to 100x its original size.
•
Colourful TFT LCD
A high-resolution(210K) colourful TFT LCD gives you clean, sharp images as
well as the ability to review your recorded files immediately.
•
Electronic Image Stabilizer (EIS)
With the CAM, you can reduce unstable images by avoiding natural shaking
movements.
•
Various Digital Effects
The DSE (Digital Special Effects) allows you to give the film a special look by
adding various special effects.
• USB Interface for Data Transfer
You can transfer still images and video files or any other files to a PC using
the USB interface.
•
PC Cam for multi-entertaining
You can use this the CAM as a PC camera for video chatting, video
conference and other PC camera applications.
•
Voice Record / Playback with vast memory
You can record voice and store it in the internal memory, Memory Stick and
Memory Stick Pro(Option) and play back the recorded voice.
•
Plus Advantage, MP3
With the CAM, you can play back the MP3 file stored in the internal memory,
Memory Stick and Memory Stick Pro(Option).
Enjoy your favourite songs with the MP3 files with the CAM.
•
A Sports CAM equipped with External Camera Module
(VP-X105L/X110L only)
Equipped with External Camera Module, enjoying sports activity can be
directly recorded when connected to the main Miniket unit.
•
Weatherproof (External Camera Module only) (VP-X105L/X110L only)
The External Camera Module is weatherproof according to IP42 standard.
IP-Protection Level
4- The External Camera is protected against contact from solid objects over
1mm in diameter.
2- The External Camera is protected against water sprayed from a vertical
position above the centre of camera top (Power LED facing up) at 15
degree angles.
1212
Características
•
Funcionamiento de la VIDEOCÁMARA/DSC digital integrada
Dispositivo de imagen digital integrada que convierte fácilmente una
VIDEOCÁMARA digital en una cámara fotográfica digital con una grabación
cómoda y sencilla.
•
Calidad de imagen de alta resolución (Cámara fotográfica digital)
Con el CCD Pixel de 800 K, puede obtener una resolución máxima de 800x600.
•
Zoom digital 100x
Permite al usuario ampliar la imagen hasta 100 veces su tamaño original.
•
LCD TFT en color
El sistema de color de alta resolución TFT de la pantalla LCD (210 K)
proporciona imágenes claras y nítidas a la vez que permite ver los archivos
grabados inmediatamente.
•
Estabilizador electrónico de la imagen (EIS)
Con la VIDEOCÁMARA, puede reducir las imágenes inestables evitando
movimientos temblorosos naturales.
•
Efectos digitales diversos
Gracias al sistema DSE (efectos especiales digitales) se puede dar a la
grabación un aire especial al permitir añadir diversos efectos especiales.
•
Interfaz USB para transferencia de datos
Puede transferir imágenes fijas y archivo de vídeo o cualquier otro tipo de
archivo a un PC utilizando la interfaz USB.
•
PC Cam para multientretenimiento
Puede utilizar esta VIDEOCÁMARA como una cámara de PC para chat con
vídeo, videoconferencia y otras aplicaciones de cámara en PC.
•
Grabación de voz / reproducción con una amplia memoria
Puede grabar voz y almacenarla en la memoria interna, en el Memory Stick y
en el Memory Stick Pro (opcional) y reproducir la voz grabada.
•
Más ventajas, MP3
Con la VIDEOCÁMARA, puede reproducir el archivo MP3 almacenado en la
memoria interna, en el Memory Stick y en el Memory Stick Pro (Opcional).
Disfrute de sus canciones favoritas en formato MP3 con la VIDEOCÁMARA.
•
CAM deportiva equipada con módulo externo de cámara
(Sólo VP-X105L/X110L)
Equipada con un módulo externo de cámara, es posible grabar directamente la
práctica de actividades deportivas al conectarse a la unidad Miniket principal.
•
Impermeable (sólo módulo externo de cámara) (Sólo VP-X105L/X110L)
El módulo externo de cámara es impermeable y está en conformidad con el
estándar IP42.
Nivel de protección IP
4- La cámara externa está protegida frente a contacto de objetos sólidos de
más de 1 mm de diámetro.
2- La cámara externa está protegida frente a agua pulverizada desde una
posición vertical por encima del centro de la parte superior de la cámara
(LED de encendido hacia arriba)) con un ángulo de 15 grados.
Page 13
ENGLISH
ESPAÑOL
Getting to Know Your CAM Introducción a la VIDEOCÁMARA
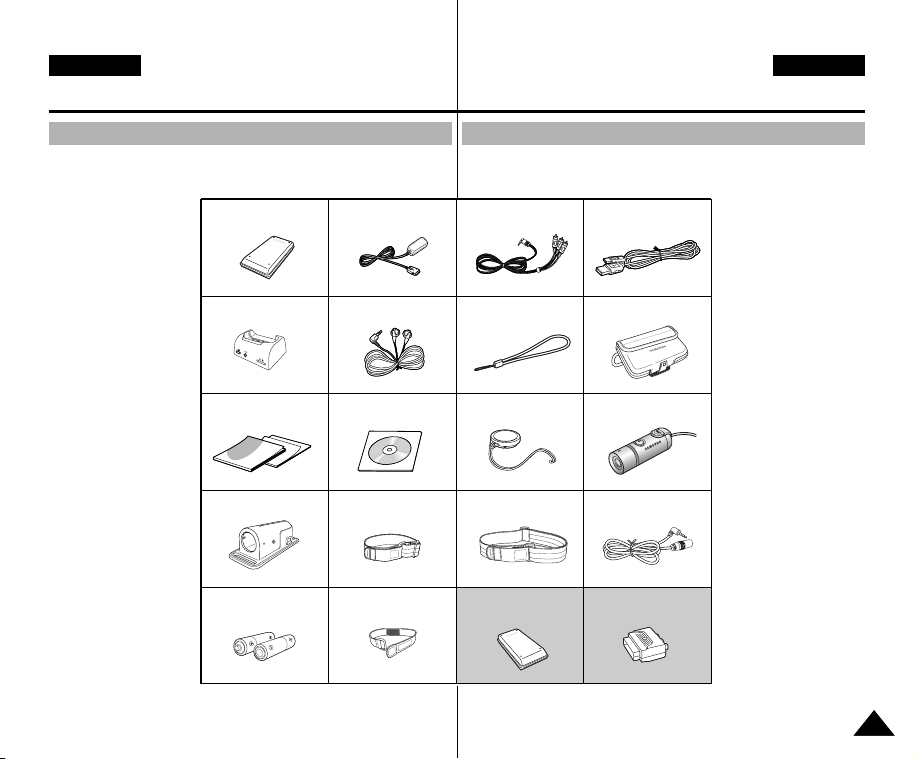
Accessories Supplied with the CAM Accesorios incluidos con la VIDEOCÁMARA
✤ Make sure that the following basic accessories are supplied with your
CAM.
1. Lithium Polymer
Battery pack
2. AC Power Adapter
1
.
Lithium Polymer Battery
pack
2
. AC Power Adapter
3. Audio/Video Cable
4. USB Cable
5. Cradle
6. Earphones
7. Hand Strap
5
. Cradle
6
.
Earphones
8. Carrying Case
9. Instruction Book/
Quick Guide
10. Software CD
11. Lens Cover
12. External Camera
Module
(VP-X105L/X110L only)
13. Rubber Mount
(VP-X105L/X110L only)
14. Short Mount Band
(VP-X105L/X110L only)
15. Long Mount Band
(VP-X105L/X110L only)
16. Extension Cable
(VP-X105L/X110L only)
17. Alkaline Batteries
(AAA x 2)
(VP-X105L/X110L only)
18. Velcro Strap
(VP-X105L/X110L only)
19. Extended life Battery
Pack (Option)
9
.
Instruction Book/Quick Guide
13
. Rubber Mount
17
. Alkaline Batteries
(AAA x 2)
10
. Software CD
14
. Short Mount Band
Velcro Strap
20. Scart Adapter (Option)
✤ Asegúrese de que los siguientes accesorios básicos le hayan sido
entregados junto con la VIDEOCÁMARA.
1.
3
. Audio/Video Cable
4
. USB Cable
Batería de polímero de litio
2. Adaptador de CA
3. Cable de vídeo/audio
4. Cable USB
5. Soporte
6. Auriculares
7
. Hand Strap
8
. Carrying Case
7. Empuñadura
8. Funda de transporte
9. Manual de
instrucciones/Manual de
referencia rápida
10. CD de software
11
. Lens Cover
12
. External Camera Module
11. Tapa del objetivo
12. Módulo externo de
cámara
(Sólo VP-X105L/X110L)
13. Montaje de goma
(Sólo VP-X105L/X110L)
15
. Long Mount Band
16
. Extension Cable
14. Banda corta de montaje
(Sólo VP-X105L/X110L)
15. Banda larga de montaje
(Sólo VP-X105L/X110L)
16. Cable alargador
(Sólo VP-X105L/X110L)
19. Extended life Battery Pack
(Option)
20. Scart Adapter (Option)18.
17. Pilas alcalinas (AAA x 2)
(Sólo VP-X105L/X110L)
18. Correa de Velcro
(Sólo VP-X105L/X110L)
19. Batería de mayor
duración (opcional)
20. Adaptador SCART
(opcional)
1313
Page 14
ENGLISH
Name of Each Part Nombre de los componentes
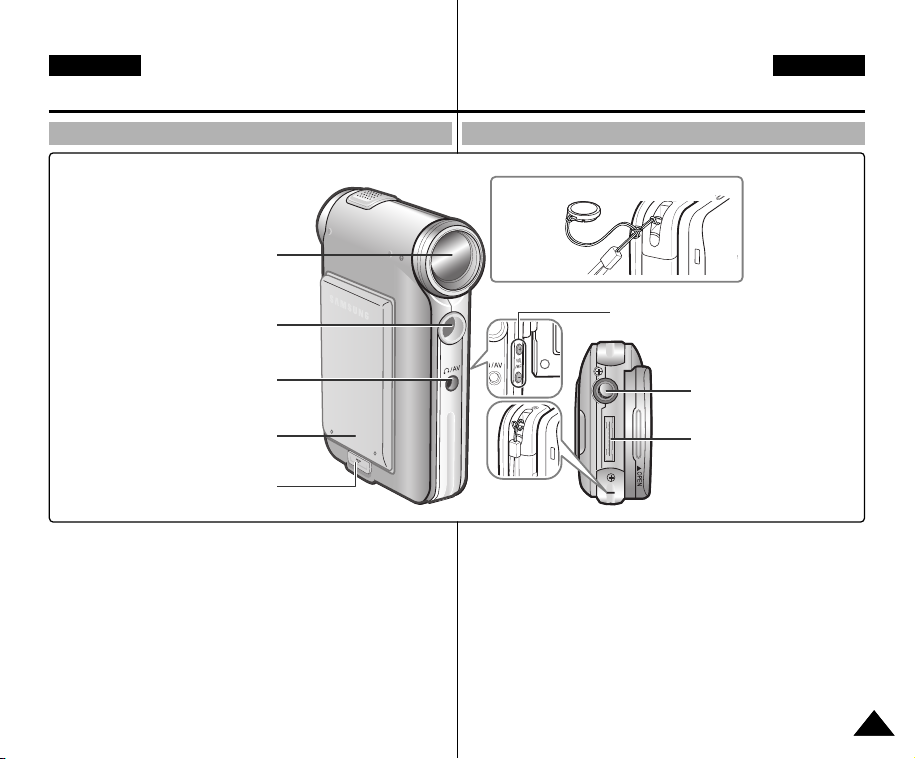
Rear & Left View Vistas posterior y lateral izquierda
7. Back( ) / Left / Multi-Play Mode button
1. Built-in MIC
1. Built-in MIC
2. LCD Monitor
2. LCD Monitor
4. LCD(DISPLAY) button
3. DISPLAY button
5. MP3 LOCK switch
4. MP3/*External Camera Hold switch
6. Built-in Speaker
5. Built-in Speaker
6. Back/Multi-Play Mode button
8. switch (Zoom out (W) / Rewind ( ) switch)
7. [▲ ] switch (Zoom out/ RPS switch)
9. OK button(Play, Pause)
8. OK button (Play/Pause)
9. [▼ ] switch (Zoom in/ FPS switch)
11. Record/Stop button
10. Record/Stop button
12. Power / Charging indicator
11. Record/Power / Charging indicator
13. OFF switch / Mode Selector
12. Power switch / Mode Selector
14. Menu button
13. Menu button
15. Memory Stick Slot
14. Memory Stick Slot
ESPAÑOL
1. Built-in MIC
2. LCD Monitor
3. DISPLAY button
4. MP3/*External Camera Hold
switch
5. Built-in Speaker
6. Back/ Multi-Play Mode
button
7. [▲ ]switch (Zoom out /RPS
switch)
8. OK button (Play/ Pause)
1414
9. [▼ ]switch (Zoom in / FPS
switch)
10. Record/ Stop button
11. Record/Power/ Charging
indicator
12. Power switch/ Mode
Selector
13. Menu button
14. Memory Stick Slot
*:VP-X105L/X110L only
1. Micrófono incorporado
2. Monitor LCD
3. Botón DISPLAY
4. Interruptor Hold de
*cámara externa/MP3
5. Altavoz incorporado
6. Botón Atrás/Modalidad
Multi-Play
7. Interruptor [▲ ] (Alejar
zoom/Interruptor RPS)
8. Botón OK
(Reproducir, Pausa)
9. Interruptor [▼ ] (Acercar
zoom/Interruptor RPS)
10. Botón Grabar/Detener
11. Indicador de grabación/
encendido/carga
12. Interruptor de encendido/
Selector de modalidad
13. Botón Menu
14. Ranura de Memory Stick
*:Sólo VP-X105L/X110L
Page 15
ENGLISH
Name of Each Part Nombre de los componentes
Right & Bottom View Vistas lateral derecha e inferior
Hanging Lens Cover on the CAM
1. Lens
ESPAÑOL
3. Earphones and
AV Input/Output Jack
4. Battery insertion part
5. Battery eject button
1. Lens
2. Light
3. Earphones and AV
Input/Output Jack
4. Battery insertion part
5. Battery eject button
2. Light
6. Volume + , - / MF button
7. Tripod Receptacle
8. Cradle Receptacle
9. Strap Hook
6. Volume +, - / MF button
9. Strap Hook
1. Objetivo
2. Luz
3. Clavija de auriculares y
salida de AV
4. Pieza de inserción de la
batería
5. Botón de expulsión de la
batería
7. Tripod Receptacle
8. Cradle Receptacle
6. Volumen +, - / Botón MF
7. Orificio para el trípode
8. Receptáculo del soporte
9. Enganche de la correa
1515
Page 16

ENGLISH
Name of Each Part Nombre de los componentes
ESPAÑOL
External Camera Module View (VP-X105L/X110L only)
1. Power button
2. Power LED
7. BATT.OPEN Switch
3. Lens
4. MIC
5. Tripod Receptacle
6. Battery Cover
1. Power button
2. Power LED
3. Lens
4. MIC
5. Tripod Receptacle
6. Battery Cover
7. BATT.OPEN Switch
8. Record Start/Stop button
9. Record LED Lamp
10. Clip
11. AV Jack
Vista del módulo externo de cámara (Sólo VP-X105L/X110L)
8. Record Start/Stop button
10. Clip
9. Record LED Lamp
11. AV Jack
1. Botón de encendido
2. LED de encendido
3. Objetivo
4. Micrófono
5. Orificio para el trípode
6. Tapa de las pilas
7. Interruptor de apertura de
batería
8. Botón Iniciar/
Parar grabación
9. Lámpara LED de grabación
10. Clip
11. Conector de AV
1616
Page 17

ENGLISH
Video Record
BLC
00:16 / 24:32
SF / 720
STBY
Sepia
Name of Each Part: LCD Display
ESPAÑOL
Nombre de los componentes: Pantalla LCD
OSD (On Screen Display in Video Record Mode/
Video Play Mode)
Video Record Mode
1. Mode indicator
2. EIS indicator
3. Program AE indicator
4. White Balance indicator
5. BLC indicator
6. Focus indicator
7. Counter (Elapsed time /Remaining time)
8. Record/Standby indicator
9. Record/Standby text
10. Effect indicator
11. Zoom in/ Zoom out indicator
12. Battery life indicator
13. Memory type indicator
14. Image quality / size indicator
15. Warning and note indicator
Video Play Mode
1. Mode indicator
2. Current display indicator
3. Lock indicator
4. Battery life indicator
5. Memory type indicator
6. Image counter(Current image )
Video Play Mode
7. Warning and note indicator
8. Counter (Elapsed time /Recorded time)
9. Operation indicator (Play / Pause / RPS/ FPS)
10. Volume indicator
Note
✤ Functions will be retained when the CAM is
turned off.
Video Record Mode
1
2
3
4
5
6
789
Video Play Mode
1
Video Play 100-0056
2
Video Play Mode
Video Play 100-0056
7
00:16 / 10:50
89
OSD (Presentación en pantalla en modalidad Video
Record <Grabar vídeo> / Video Play <Reproducir vídeo>)
Modalidad Video Record <Grabar vídeo>
131415
56
1. Indicador de modalidad
2. Indicador de EIS
12
3. Indicador de Program AE
4. Indicador de White Balance
5. Indicador de BLC
6. Indicador de enfoque
11
7. Contador (Tiempo transcurrido/Tiempo restante)
8. Indicador de grabación / espera
9. Texto de grabación / espera
10. Indicador de efecto
11. Indicador de acercamiento / alejamiento de zoom
10
12. Indicador de duración de la batería
13. Indicador de tipo de memoria
14. Indicador de calidad / tamaño de imagen
15. Indicador de advertencia y nota
4
Modalidad Video Play <Reproducir vídeo>
3
1. Indicador de modalidad
2. Indicador de visualización actual
3. Indicador de bloqueo
4. Indicador de duración de la batería
5. Indicador de tipo de memoria
6. Contador de imágenes (imagen actual)
Modalidad Video Play <Reproducir vídeo>
7. Indicador de advertencia y nota
8. Contador (Tiempo transcurrido/Tiempo grabado)
9. Indicador de operación (Reproducir/Pausa/RPS/
FPS)
10. Indicador de volumen
10
Nota
✤ Las funciones se conservarán cuando la CAM se
apague.
1717
Page 18

ENGLISH
Name of Each Part: LCD Display
ESPAÑOL
Nombre de los componentes: Pantalla LCD
OSD (On Screen Display in Photo Capture Mode/
Photo View Mode)
Photo Capture Mode
1. Mode indicator
2. EIS indicator
3. Program AE indicator
4. White balance indicator
5. BLC indicator
6. Focus indicator
7. Zoom in/out indicator
8. Battery life indicator
9. Memory type indicator
10. Image size indicator
11. Warning and note indicator
12. Light indicator
Photo View Mode
1. Mode indicator
2. Current display indicator
3. Number of print
Photo View Mode
4. Printer indicator
5. Lock indicator
6. Image counter (Current image)
Note
✤ Functions will be retained when the CAM is
turned off.
1818
1
2
3
4
5
6
1
2
OSD (Presentación en pantalla en modalidad Photo
Capture <Capturar vídeo> / Photo View <Ver foto>)
Photo Capture Mode
Photo Capture
BLC
Photo View Mode
Photo View Mode
Photo View 100-0025
2 Copies
800
6
4
9101112
Sepia
Modalidad Photo Capture <Capturar foto>
1. Indicador de modalidad
2. Indicador de EIS
8
3. Indicador de Program AE
4. Indicador de White Balance
5. Indicador de BLC
7
6. Indicador de enfoque
7. Indicador de acercamiento / alejamiento de
zoom
8. Indicador de duración de la batería
9. Indicador de tipo de memoria
10. Indicador de tamaño de imagen
11. Indicador de advertencia y nota
12. Indicador de luz
3
Modalidad Photo View <Ver foto>
1. Indicador de modalidad
2. Indicador de visualización actual
3. Número de impresión
Modalidad Photo View <Ver foto>
4. Indicador de impresión
5. Indicador de bloqueo
6. Contador de imágenes (imagen actual)
Nota
✤ Las funciones se conservarán cuando la
CAM se apague.
5
Page 19
ENGLISH
Name of Each Part: LCD Display
ESPAÑOL
Nombre de los componentes: Pantalla LCD
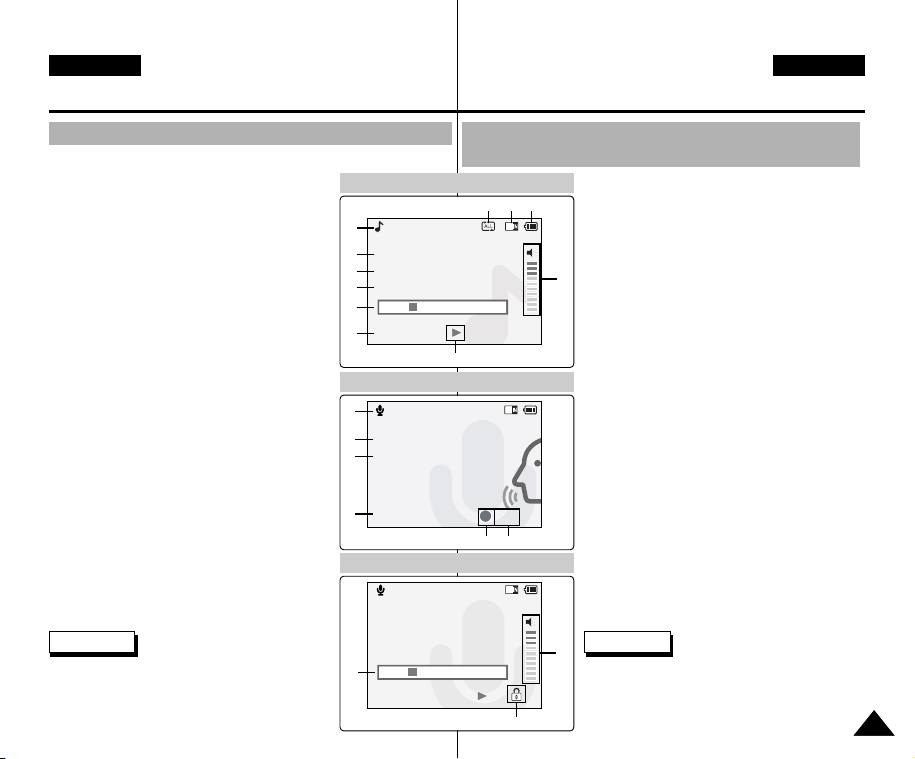
OSD (On Screen Display in MP3 Play Mode/ Voice Record/ Play Mode)
MP3 Play Mode
1. Mode indicator
2. File number/ File name/ File format
3. File size
4. Sampling Rate/Bit Rate
5. Progress Bar
6. Elapsed time/Full time
7. Operation indicator
8. Volume indicator
9. Battery life indicator
10. Memory type indicator
11. Repeat all/one indicator
Voice Record Mode
1. Mode indicator
2. File number/ Date and Time
3. Sampling Rate/Bit Rate
4. Elapsed time/Full time
5. Operation indicator
6. Record/ Standby text
Voice Play Mode
7. Progress Bar
8. Lock indicator
9. Volume indicator
Note
✤ Functions will be retained when the CAM is
turned off.
MP3 Play Mode
MP3 Play
1
2. I believe I can fly.mp3
2
3.6 Mbytes
3
4
Stereo 44.1KHz 128Kbps
5
00:34 / 03:46
6
Voice Record Mode
Voice Record
1
2
2 2005/01/01 12:51:04 AM
Stereo 8KHz 128Kbps
3
4
00:00:12 / 00:05:12
Voice Play Mode
Voice Play
2 2005/01/01 12:51:04 AM
5.0Mbytes
Stereo 8KHz 128Kbps
7
00:00:12 / 00:05:12
OSD (Presentación en pantalla en modalidad MP3 Play <Reproducir
MP3> / Voice Record/Play <Grabar vídeo/Reproducir>)
Modalidad MP3 Play <Reproducir MP3>
1011 9
7
REC
56
8
1. Indicador de modalidad
2. Número de archivo / Nombre de archivo /
Formato de archivo
3. Tamaño de archivo
4. Velocidad de muestreo / Velocidad de bits
8
5. Barra de progreso
6. Tiempo transcurrido / Tiempo total
7. Indicador de operación
8. Indicador de volumen
9. Indicador de duración de la batería
10. Indicador de tipo de memoria
11. Indicador de repetir todo / uno
Modalidad Voice Recorder <Grabador de voz>
1. Indicador de modalidad
2. Número de archivo / Fecha y hora
3. Velocidad de muestreo / Velocidad de bits
4. Tiempo transcurrido / Tiempo total
5. Indicador de operación
6. Texto de grabación / espera
Modalidad Voice Play <Reproducir voz>
7. Barra de progreso
8. Indicador de bloqueo
9. Indicador de volumen
Nota
9
✤ Las funciones se conservarán cuando la
CAM se apague.
1919
Page 20
ENGLISH
How to Use the Battery Pack Uso de la batería
ESPAÑOL
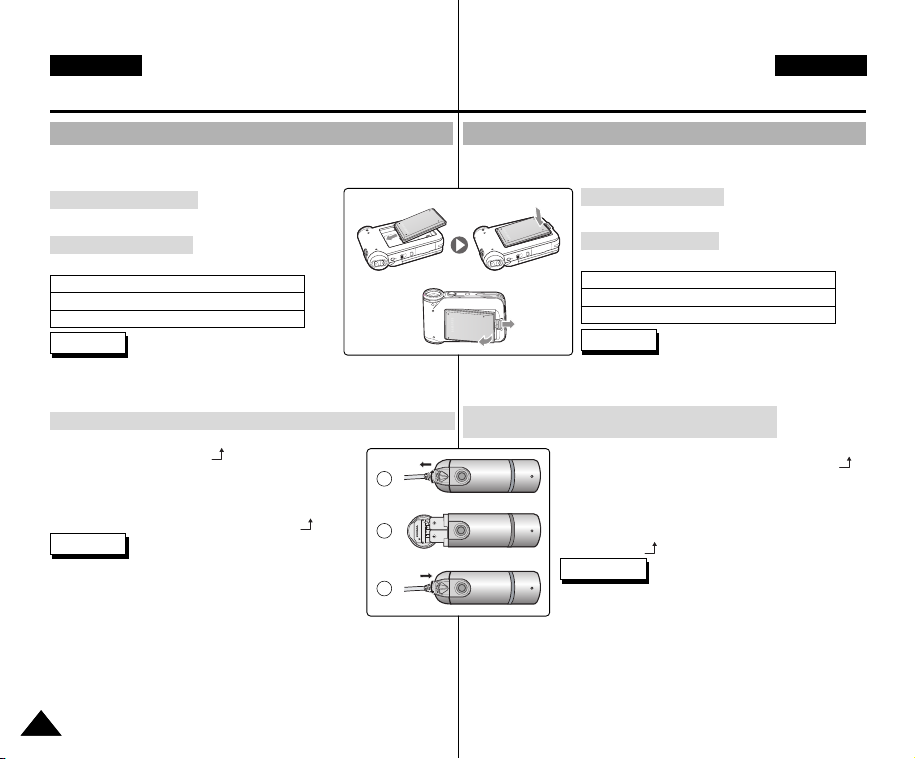
Battery (Pack) Installation / Ejection
It is recommended you purchase one or more additional battery packs to allow
continuous use of your CAM.
To insert the battery pack
Move the battery pack into the groove until it clicks.
To eject the battery pack
Pull the [Battery Eject] button to eject the battery pack.
Battery
SB-P90A (900mAh)
SB-P180A (1800mAh) (option)
Notes
✤ Clean the terminals to remove foreign substances before inserting the battery
pack.
✤ If the CAM will not be in use for a while, remove the battery pack from the CAM.
To insert the batteries for External Camera Module (VP-X105L/X110L only)
1. Open the battery compartment door after setting the door
open switch to <BATT.OPEN >.
2. Install two AAA size batteries. Make sure to match the “+”
and “
-
” ends of the batteries with the diagram inside the
compartment.
Close the battery compartment door, and then set the door
3.
open switch to the opposite side of <BATT.OPEN >.
Notes
✤ Properly dispose of the expired batteries.
Contact your local government or community disposal
service for disposal practices in your area.
Keep them away from small children.
✤ Do not mix old and new batteries. When replacing the
batteries, replace them both.
✤ If the External Camera Module will not be in use for a while, remove the
batteries.
✤ Do not insert a foreign material or electric conducting material in the battery
compartment. It can cause device failure.
✤ Do not open the battery cover with an excessive force.
The connected cable may become disconnected.
2020
<Insert>
<Eject>
1
2
3
Instalación y extracción de la batería
Se recomienda adquirir una o más baterías para poder utilizar la VIDEOCÁMARA
de forma continua.
Para introducir la batería
Deslice la batería en la ranura hasta que emita un chasquido.
Para expulsar la batería
Tire del botón [Battery Eject] para expulsar la batería.
SB-P180A (1800mAh) (opcional)
Notas
✤ Limpie los terminales para eliminar sustancias extrañas antes de insertar la
batería.
✤ Si no va a utilizar la CAM durante un tiempo, retire la batería de la CAM.
Para insertar las pilas para el módulo externo de cámara
(Sólo VP-X105L/X110L)
✤ No mezcle pilas nuevas con viejas. Al sustituir las pilas, cambie las dos.
✤ Si no va a utilizar el módulo externo de cámara durante un tiempo, retire las pilas.
✤ No inserte materiales extraños ni conductores eléctricos en el compartimento
de las pilas. Puede causar fallos en el dispositivo.
✤ No abra la tapa de las baterías con excesiva fuerza.
El cable conectado puede desconectarse.
1. Abra la puerta del compartimento de la batería tras colocar
el interruptor de apertura de puerta en <BATT.OPEN >.
2. Instale dos pilas de tamaño AAA. Asegúrese de
respetar los extremos "+" y "
diagrama del interior del compartimento.
Cierre la puerta del compartimento de la batería y coloque el
3.
interruptor de apertura de puerta en el lado opuesto de
<BATT.OPEN >.
Notas
✤ Deshágase correctamente de las pilas agotadas. Póngase
en contacto con las autoridades competentes o con el
servicio de desechos comunitarios de su área.
Manténgalas fuera del alcance de los niños.
Batería
SB-P90A (900mAh)
-
" de las pilas indicados en el
Page 21

ENGLISH
How to Use the Battery Pack Uso de la batería
Maintain the Battery Pack Mantenimiento de la batería
✤ The battery pack should be recharged in an environment of
between 32°F(0°C) and 104°F(40°C).
✤ The battery pack should never be charged in a room temperature
that is below 32°F(0°C).
✤ The life and capacity of the battery pack will be reduced if it is used
in temperatures below 32°F(0°C) or left in temperatures
above 104°F(40°C) for a long period.
✤ Do not put the battery pack near any heat sources (fire or flames,
for example).
✤ Do not disassemble, process, press or heat the Battery Pack.
✤ Do not allow the + and -terminals of the battery pack to be short-
circuited. It may cause leakage, heat generation,
induce fire and overheating.
✤ It is recommended to use original battery pack that is available at
SAMSUNG service centre.
✤ La batería debe recargarse a una temperatura ambiente de entre
0°C (32°F) y 40°C (104°F).
✤ La batería nunca debe cargarse cuando la temperatura ambiente
esté por debajo de 0° C (32° F).
✤ La vida útil y la capacidad de la batería se verán reducidas si se
utiliza en ambientes con temperaturas inferiores a 0°C (32°F) o si
se deja durante largos periodos expuesta a temperaturas
superiores a los 40°C (104°F).
✤ No ponga la batería cerca de una fuente de calor (fuego o llamas,
por ejemplo).
✤ No desmonte la batería ni la someta a manipulaciones, a
presiones ni al calor.
✤ No permita que se produzca un cortocircuito entre los polos + y –
de la batería. Podrían producirse pérdidas o recalentamiento, lo
cual podría ocasionar un incendio.
✤ Se recomienda utilizar la batería original que está disponible en el
centro de servicio técnico de SAMSUNG.
ESPAÑOL
2121
Page 22

ENGLISH
How to Use the Battery Pack Uso de la batería
ESPAÑOL
Continuous recording time based on battery type
If you close the LCD screen, it switches off automatically.
The continuous recording times given in the table below are
approximations.
Actual recording time depends on usage.
Battery
Time
SB-P90A (900mAh)
SB-P180A (1800mAh)
(option)
Notes
✤ Prepare an extra battery if you use the CAM outdoors.
✤ Contact the Samsung service centre to purchase new battery pack.
✤ If you zoom in or out, the recording time becomes shorter.
✤ ‘Continuous Recording Time’ indicates the time that you neither
use zooming function nor play video files and record the video file
continuously when the EIS( ) function is off.
Warning
✤ When you eject the battery pack from the CAM, hold the battery
pack to prevent it dropping to the floor.
Continuous Recording Time
LCD ON Backlight OFF
Approx. 60 min.
Approx. 120 min.
Approx. 80 min.
Approx. 160 min.
Tiempo de grabación continua basándose en el tipo de batería
Si cierra la pantalla LCD, se apaga automáticamente.
Los tiempos de grabación continuada que se facilitan en la tabla
siguiente son aproximados.
El tiempo real de grabación depende del uso de la videocámara.
Batería
SB-P180A (1800mAh)
✤ Prepare una batería adicional si utiliza la VIDEOCÁMARA en el
✤ Póngase en contacto con el centro de servicio técnico de
✤ Al acercar y alejar el zoom, se acorta el tiempo de grabación.
✤ Continuous Recording Time <Tiempo de grabación continua>
Advertencia
✤ Cuando expulse la batería de la VIDEOCÁMARA, sujétela para
Tiempo
SB-P90A (900mAh)
(opcional)
Notas
exterior.
Samsung para comprar una nueva batería.
indica el tiempo que no utiliza la función del zoom, ni reproduce
archivos de vídeo ni graba un archivo de vídeo de forma continua
cuando la función EIS ( ) está desactivada.
evitar que se caiga al suelo.
Tiempo de grabación continuada
LCD ENCENDIDA LCD APAGADA
Aprox. 60 min.
Aprox. 120 min.
Aprox. 80 min.
Aprox. 160 min.
2222
Page 23

ENGLISH
Video Play 100-0056
00:16 / 00:32
How to Use the Battery Pack Uso de la batería
ESPAÑOL
Battery Level Display
The Battery Level Display shows the amount of battery power
remaining in the Battery Pack.
Battery Level Indicator State
Fully charged
40~60% used
60~80% used
80~95% used
Exhausted(flickers)
The device will soon turn off.
Change the Battery Pack as
soon as possible.
The device will be forced to turn
(flickers)
off after 5 seconds.
Tips for Battery Identification
A charge mark is provided on the battery pack to
help you remember whether it has been charged
or not. If the battery has been fully charged, the
charge indicator is green.
If you are charging the battery, the colour of the
charge indicator is orange. The charge indicator
flickers if the battery is abnormal.
Charging time based on battery type
Capacity
SB-P90A (900mAh)
SB-P180A (1800mAh)
(option)
Power On
Approx. 6 hr. 30 min
Approx. 13 hr.
Approx. 1 hr. 40 min
Approx. 3 hr. 20 min
Message
“Battery Low”
Power Off
Indicador de carga de la batería
El indicador de la carga de la batería muestra la cantidad de energía
restante.
-
-
-
-
-
Indicador de nivel
de la batería
enseguida. Cambie la batería a la
El dispositivo se apagará de forma
forzada transcurridos 5 segundos.
Estado
Completamente cargada
40~60% utilizada
60~80% usada
80~95% usada
Agotada (parpadea)
El dispositivo se apagará
máxima brevedad posible.
(parpadea)
Consejos para la identificación de la batería
La batería dispone de una marca que permite
saber si ha sido o no cargada. Si la batería está
completamente cargada, el indicador de carga
aparece de color verde. Si está cargando la
batería, el indicador de carga aparece de color
naranja. El indicador de carga parpadea si la
batería muestra alguna anormalidad.
Tiempo de carga dependiendo del tipo de batería
Capacidad
SB-P90A (900mAh)
SB-P180A (1800mAh)
(opcional)
Encendida
Aprox. 6 h. 30 min.
Aprox. 13 h.
Aprox. 1 h. 40 min.
Aprox. 3 h. 20 min.
Mensaje
-
-
-
-
-
"Battery Low"
<Batería
baja>
Encendida
2323
Page 24
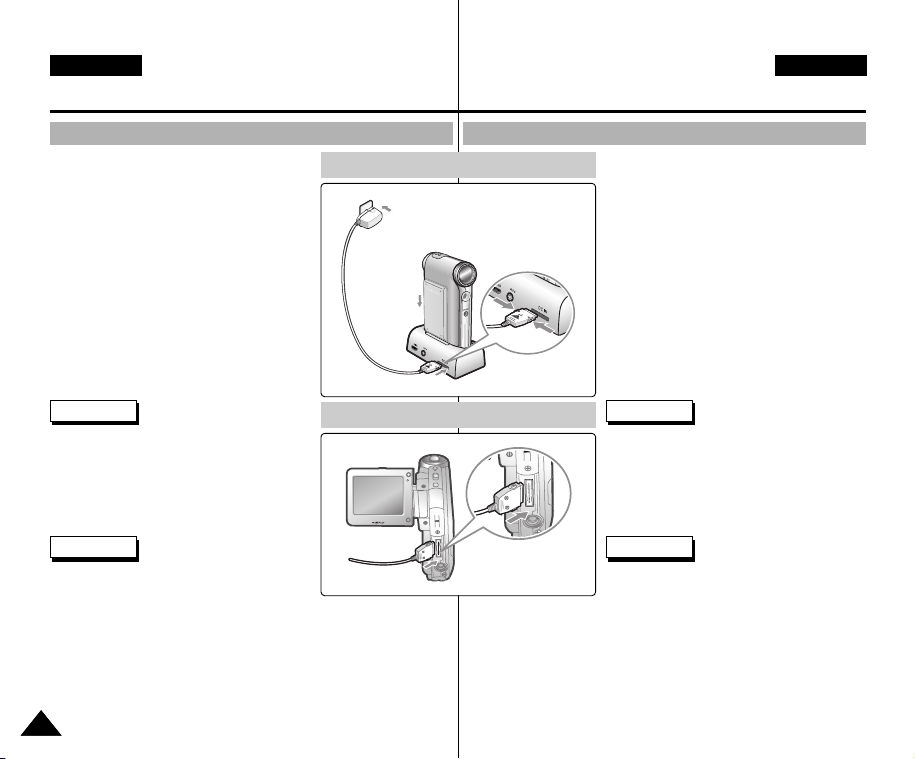
ENGLISH
How to Use the Battery Pack Uso de la batería
ESPAÑOL
Charging the Battery Pack
1. Move [Mode Selector] up to turn the
CAM off.
2. Attach the Battery Pack to the CAM.
3. Fix the CAM into the cradle.
4. Connect the DC cable to the DC in jack
on the cradle.
◆ You can detach the AC adapter by
pressing the buttons on the sides of the
adapter cable plug while pulling it out.
5. Insert the AC power adapter into the
outlet.
Note
✤ You can charge the battery pack when you
use the CAM.
Connect the AC power adapter with the
CAM directly.
Warning
✤ It is recommended you fully charge the
battery pack before use.
✤ You should only charge the battery in an
environment between 0°C and 40°C.
Carga de la batería
Charging through the cradle
Charging directly to the CAM
1. Mueva el [Selector de modalidad] hacia
arriba para apagar la VIDEOCÁMARA.
2. Conecte la batería a la VIDEOCÁMARA.
3. Coloque la VIDEOCÁMARA en el
soporte.
4. Conecte el cable de CC a la toma de
CC del soporte.
◆ Puede desconectar el adaptador de
CA pulsando los botones situados en
los laterales del enchufe del cable del
adaptador mientras tira hacia fuera.
5. Inserte el adaptador de CA en la toma
de la pared.
Nota
✤ Puede cargar la batería mientras utiliza la
VIDEOCÁMARA.
Conecte el adaptador de CA directamente
en la VIDEOCÁMARA.
Advertencia
✤ Se recomienda cargar totalmente la
batería antes de utilizarla.
✤ Debe cargar la batería únicamente en un
ambiente entre 0°C y 40°C.
2424
Page 25

ENGLISH
Getting Started Introducción
ESPAÑOL
The Colour of the LED
The colour of the LED varies depending on the state of power or
charging.
When the AC Adapter is plugged in
LED Colour
Red
Green
Orange
Green
Orange Blink
Power
Voice / Video Record
On
Off
Off
-
Charging state
-
-
Charging
Fully charged
Error
When the AC Adapter is unplugged
LED Colour
Green
Red
Power
On
Voice / Video Record
Charging state
-
-
Using Hardware Reset Function
1. Remove the battery pack and the AC adapter.
2. Turn the LCD monitor at an angle of 270°.
3. Press the [Display] button.
Note
✤ If you reset the CAM, all functions you set are
initialized.
Color del indicador LED
El color del indicador LED varía dependiendo del estado de
alimentación o de carga.
Cuando el adaptador de CA está enchufado
Color de LED
Rojo
Verde
Naranja
Verde
Naranja intermitente
Alimentación
Grabación de voz/vídeo
Encendido
Apagado
Apagado
-
Estado de carga
-
-
Cargando
Completamente cargada
Error
Cuando el adaptador de CA está desenchufado
Color de LED
Verde
Rojo
Alimentación
Encendido
Grabación de voz / vídeo
Estado de carga
-
-
Uso de la función de reinicio de hardware
1. Retire la batería y el adaptador de CA.
2. Gire la pantalla LCD hasta un ángulo de 270°.
3. Pulse el botón [Display].
Nota
✤ Si reinicia la VIDEOCÁMARA, se inicializan
todas las funciones ajustadas.
2525
Page 26
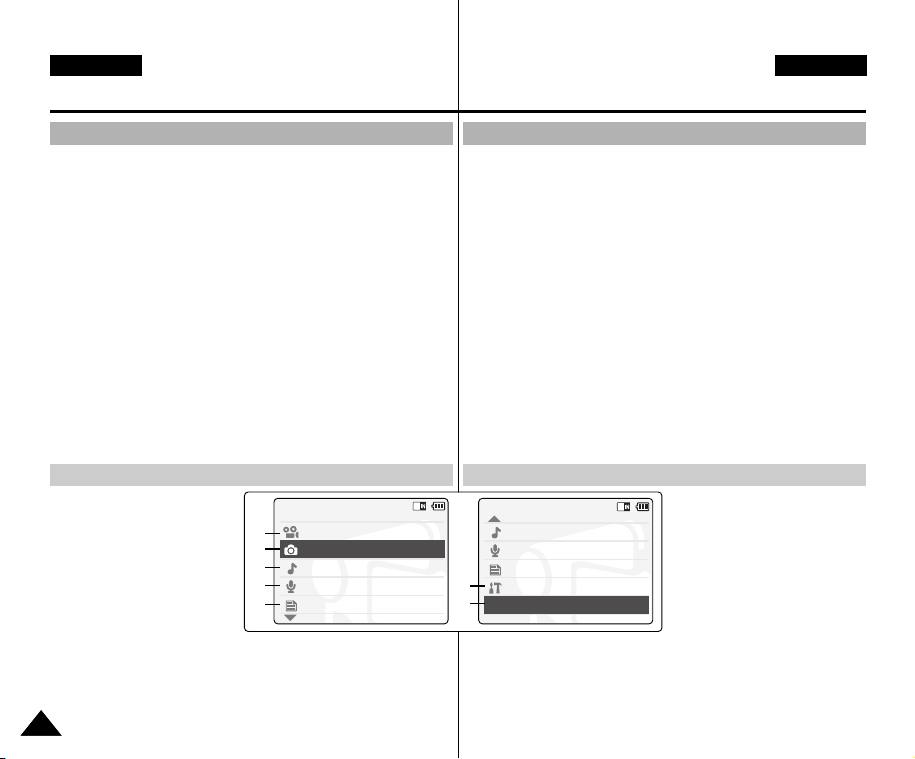
ENGLISH
Mode Selection
MP3
Voice Recorder
File Browser
Video
Photo
Mode Selection
MP3
Voice Recorder
File Browser
System Settings
Back
Getting Started Introducción
ESPAÑOL
Before You Start Operating the CAM
Before using the CAM, refer to this page for easy operation.
The Memory Stick is an optional accessory and not included.
1. Install the battery pack and insert the Memory Stick into the
Memory Stick slot. (Refer to page 34)
2. Charge the battery pack by fixing the CAM into the cradle and
connecting the power cable to the cradle. (Refer to page 24)
3. Move [Mode Selector ] down to turn on the CAM and move it
down again.
◆ You can select Video mode or Previous mode as the start-up
mode in System Settings. (Refer to page 96)
4. Move the [▲ /▼ ] switch to select the desired mode and press
the [OK] button.
5. Press the [OK ] button to take pictures, record, hear music or
record voice.
Press the [Menu] button to view the menu.
6. When you finished, move [Mode Selector] up to turn the CAM
off.
For example:If you want to select Photo Mode
1. Video: You can record and
play video files.
2. Photo: You can take and view
photo files.
3. MP3: You can download and
hear the music.
4. Voice Recorder: You can
record and hear the voice.
5. File Browser: You can delete,
lock, copy the file and view the file information.
6. System Settings: You can set the LCD monitor brightness/colour,
date/time, system and memory.
7. Back: The screen moves to previous menu in the selected mode.
2626
1
2
3
4
5
Antes de empezar a utilizar la VIDEOCÁMARA
Antes de utilizar la VIDEOCÁMARA, consulte esta página para facilitar su
funcionamiento. El Memory Stick es un accesorio adicional y no se incluye.
1. Instale la batería e introduzca el Memory Stick en la ranura del
Memory Stick. (Consulte la página 34.)
2. Cargue la batería fijando la VIDEOCÁMARA en el soporte y
conectando el cable de alimentación en el soporte.
(Consulte la página 24.)
3. Baje el [Selector de modalidad] para encender la
VIDEOCÁMARA y bájelo de nuevo.
◆ Puede seleccionar la modalidad Video <Vídeo> o la modalidad
anterior como la modalidad de inicio en System Settings
<Config. del sistema>. (Consulte la página 96).
4. Mueva el interruptor [▲ /▼ ] hasta seleccionar la modalidad
que desea y pulse el botón [OK].
5. Pulse el botón [OK] para tomar imágenes, grabar, escuchar
música o grabar voz. Pulse el botón [Menu] para ver el menú.
6. Al terminar, mueva el [Selector de modalidad] hacia arriba para
apagar la CAM.
Por ejemplo: Para seleccionar la modalidad Photo <Foto>
1. Video <Vídeo>: puede grabar
y reproducir archivos de vídeo.
2. Photo <Foto>: puede tomar
fotos y ver archivos de fotos.
3. MP3: puede descargar y
6
7
5. File Browser <Explorador de archivos>: puede borrar, bloquear,
copiar el archivo y ver la información del mismo.
6. System Setting <Config. del sistema>: puede definir el brillo y color
de la pantalla LCD, la fecha y hora, el sistema y la memoria.
7. Back <Volver>: la pantalla regresa al menú anterior en la modalidad
seleccionada.
escuchar música.
4. Voice Recorder <Grabador de
voz>: puede grabar y
escuchar la voz.
Page 27

ENGLISH
Getting Started Introducción
ESPAÑOL
Using the Function Button
The Function button is used to make a selection, move the cursor, select
the functions and exit from the menu.
The Use of Various Function button
Recording /
Button
Picture taking
Zoom out (▲)
Zoom in (▼)
Multi-Play
screen
Change from
Record/Capture
to Play/View
Notes
✤ If there is no file when you press the [OK] button in
Video Record/Photo Capture, no change occurs.
✤ Refer to page 41 for further details about the
function button.
The Use of [Back] and [Menu] button
Button
(Press for about
2 seconds)
Playing/
Viewing
RPS ( )
FPS ( )
Multi-Play
screen
Play/Pause
Video Record/Photo Capture
Move to Video Play/
Photo View
Move to <Settings>
Selecting
Select up
Select down
Return to
previous menu
Confirm
selecting
Return to
previous
menu
Select
down
Select
menu
Video Play/Photo View
Move to Video Record/
Photo Capture
Move to <File Options>
Utilización del botón de funciones
El botón de funciones se utiliza para realizar una selección, mover el
cursor, seleccionar las funciones y salir del menú.
Diversos usos del botón de funciones
Select up
Select
menu
Botón
Recording/
Picture taking
Alejar zoom (▲)
Acercar zoom (▼)
Pantalla
Multi-Play
Cambiar de Record
<Grabar>/Capture
<Capturar> a Play
<Reproducir>/
View <Ver>
Notas
✤ Si no hay ningún archivo al pulsar el botón [OK] en
Video Record <Grabar vídeo> / Photo Capture
✤ Consulte la página 41 para obtener información adicional sobre el
botón de funciones
<Capturar foto>, no se produce ningún cambio.
Uso del botón [Back] y [Menu]
Botón
(Pulsar durante
unos 2 segundos)
Video Record<Grabar vídeo>/
Photo Capture<Capturar foto>
Cambiar a Video Play
<Reproducir video> /
Photo View <Ver foto>
Cambiar a Settings <Ajustes>
Reproducción
/ Visualización
RPS ( )
FPS ( )
Pantalla
Multi-Play
Reproducir /
Pausa
Video Play<Reproducir
vídeo>/Photo View<Ver foto>
Cambiar a Video Record
<Grabar vídeo> / Photo
Capture <Capturar foto>
Cambiar a File Options
<Opciones de archivo>
Selección
Seleccionar
arriba
Seleccionar
abajo
Volver a
menú anterior
Confirmar
selección
2727
Page 28
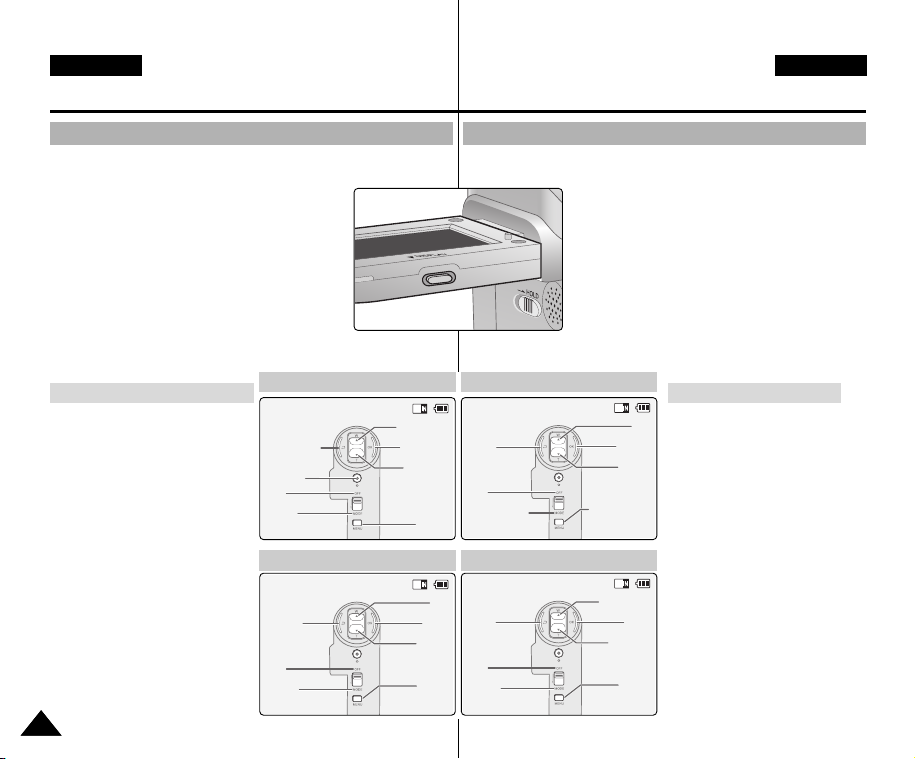
ENGLISH
Back
Up
Select
Down
Open/Close
Menu
Off
Close Mode
Selection
Select Mode
Back
Prev./Rew
Play
Next/FF
Menu
Off
Mode
Selection
Play Help
Play Mode
Zoom Out
Play Last
Zoom In
Menu
Record
Off
Record/Capture Help
Mode
Selection
Cancel
Up
Next
Down
Menu
Off
Mode
Selection
Time/Date Dialog Help
Getting Started Introducción
ESPAÑOL
Using the Display Button
You can use various functions by pressing the [Display] button.
1. Open the LCD monitor.
2. Move [Mode Selector] down to turn on the
CAM.
◆ The video screen appears.
◆ You can select Video mode or Previous mode
as the start-up mode in System Settings.
(Refer to page 96)
3. Press the [Display ] button.
If you press the [Display] button
✤ Once: The display indicators
turn off.
✤ Twice: The back light turns off.
✤ 3 times: It returns to the initial
screen.
✤ Hold down the button for 2
seconds: The [Help ] screen
according to each mode
appears.
2828
Record/Capture Help
Time/Date Dialog Help Play Help
Utilización del botón Display
Puede utilizar diversas funciones pulsando el botón [Display].
1. Abra la pantalla LCD.
2. Mueva el [Selector de modalidad] hacia
abajo para encender la VIDEOCÁMARA.
◆ Aparece la pantalla de vídeo.
◆ Puede seleccionar la modalidad Video
<Vídeo> o la modalidad anterior como la
modalidad de inicio en System Settings
<Config. del sistema>.
(Consulte la página 96).
3. Pulse el botón [Display].
Select Mode Help
Si pulsa el botón [Display].
✤ Una vez: se apagan los
indicadores de pantalla.
✤ Dos veces: se apaga la luz de
fondo.
✤ 3 veces: vuelve a la pantalla
inicial.
✤ Mantenga pulsado el botón
durante 2 segundos: Aparece
la pantalla de ayuda de la
modalidad correspondiente.
Page 29
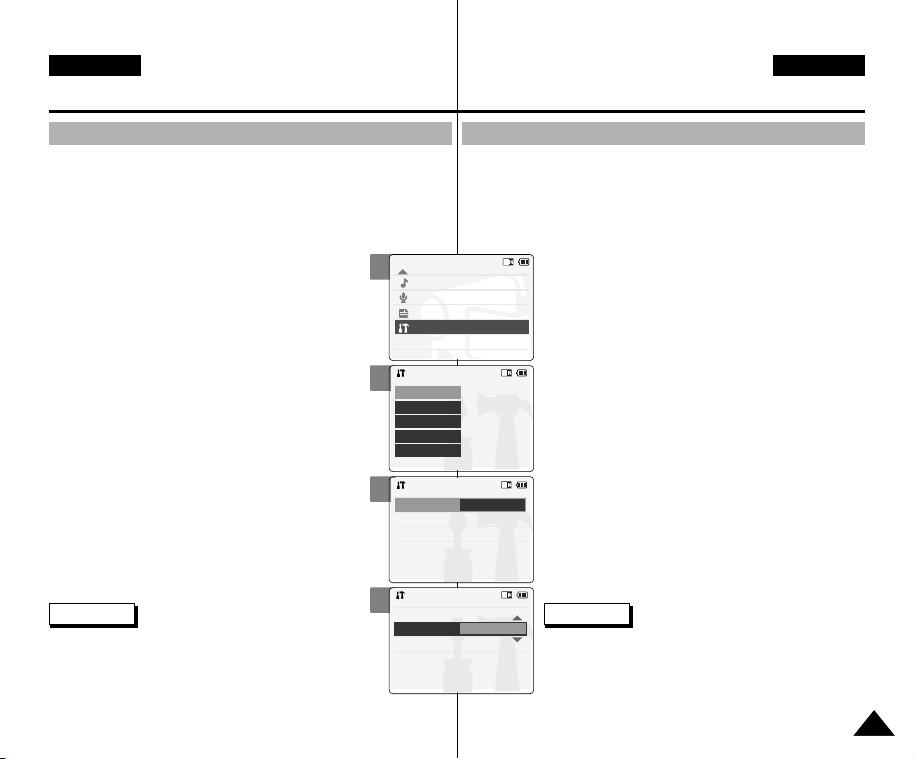
ENGLISH
Mode Selection
MP3
Voice Recorder
File Browser
System Settings
Back
System Settings
Date / Time
System
Display
Memory
Back
Settings: Display
Back
LCD Colour
50%
LCD Brightness
20%
Settings: Display
Back
LCD Brightness
20 %
LCD Colour
60 %
Getting Started Introducción
Adjusting the LCD Monitor Ajuste de la pantalla LCD
Your the CAM is equipped with a colour Liquid Crystal Display monitor,
which enables you to view directly what you are recording or playing
back. Depending on the conditions under which you are using the
CAM (indoors or outdoors for example), you can adjust the LCD
Brightness or Colour.
Esta VIDEOCÁMARA dispone de una pantalla de cristal líquido
(LCD) en color que permite ver lo que se está grabando o reproducir
imágenes grabadas directamente.
Según las condiciones de grabación (por ejemplo exteriores o
interiores), es posible ajustar el brillo y el color de la pantalla LCD.
ESPAÑOL
1. Move [Mode Selector ] down to turn on the
CAM and move it down again.
◆ The Mode Selection screen appears.
2. Move the [ ▲ /▼ ] switch to select System
Settings and press the [ OK ] button.
3. Move the [ ▲ /▼ ] switch to select <Display>
and press the [OK] button.
4. Move the [ ▲ /▼ ] switch to select <LCD
Brightness> or <LCD Colour > and press the
[OK] button.
5. Move the [ ▲ /▼ ] switch to select desired
brightness or colour and press the [OK] button.
◆ Refer to pages 88~89 for details.
Notes
✤ If you select [Back] in the menu, the previous
menu appears.
✤ If it is too bright, adjust the LCD Brightness.
2
1. Baje el [Selector de modalidad] para encender
la VIDEOCÁMARA y bájelo de nuevo.
◆ Aparece la pantalla Mode Selection <Selección
de modalidad>.
2. Mueva el interruptor [▲ /▼ ] hasta seleccionar
3
System Settings <Config. del sistema> y pulse
el botón [OK].
3. Mueva el interruptor [▲ /▼ ] hasta seleccionar
Display <Pantalla> y pulse el botón [OK].
4. Mueva el interruptor [▲ /▼ ] hasta seleccionar
4
LCD Brightness <Brillo de LCD> y pulse el
botón [OK].
5. Mueva el interruptor [▲ /▼ ] hasta seleccionar
el brillo que desea y pulse el botón [OK].
◆ Consulte la páginas 88 y 89 para obtener más
detalles.
5
Notas
✤ Si selecciona Back <Volver> en el menú, aparece
el menú anterior.
✤ Si tiene demasiado brillo, ajuste el brillo de la
pantalla LCD.
2929
Page 30
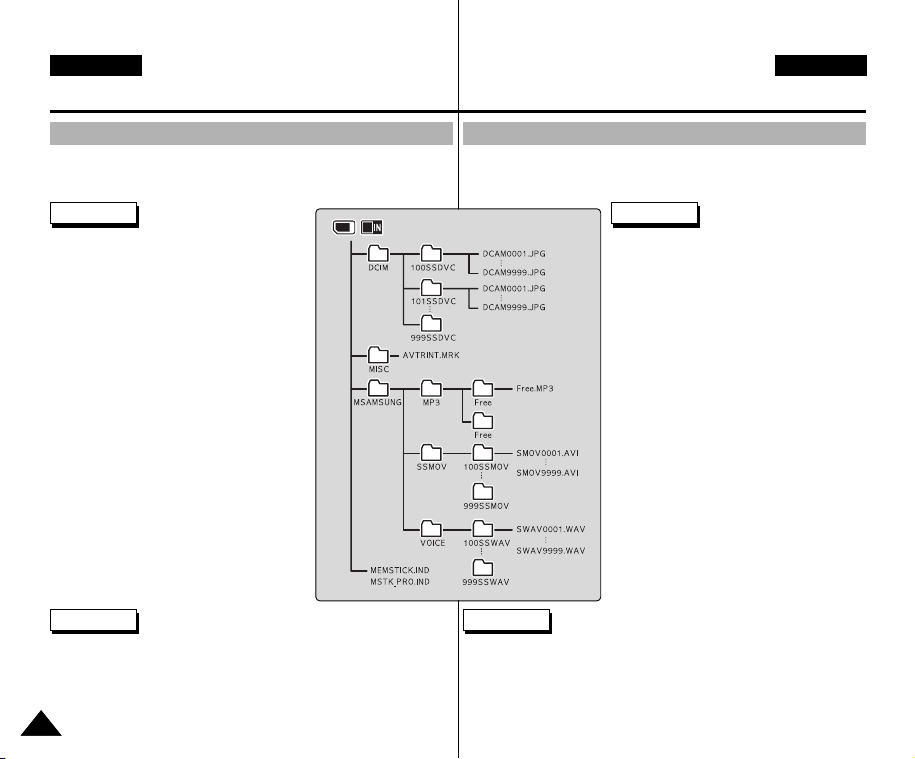
ENGLISH
Getting Started Introducción
ESPAÑOL
Structure of the Folders and Files
The video files and photo files are stored in internal memory, Memory
Stick or Memory Stick Pro as below.
Notes
✤ Refer to page 34 for details about Memory
Stick.
✤ You can store general data in files and
folders of the CAM.
✤ The number of the file is up to 9,999 and
folder is up to 999.
✤ DCAM✽✽✽✽.JPG: Photo file
SMOV✽✽✽✽.AVI: Video file
SWAV✽✽✽✽.WAV: Voice file
✽✽✽✽✽✽✽✽.MP3: MP3 file
✤ MISC: DPOF files are stored.
✤ Do not change the file or folder name
except 'Free'.
✤ You can freely change the file or folder
name of 'Free'.
✤ Video files that you have not made with
the CAM may not be able to be played.
Warning
✤ Do not turn the power off while recording, playing, erasing
file or formatting the Memory Stick.
✤ Please turn the power off before you insert or eject the
Memory Stick to avoid losing data.
✤ Save important files separately.
3030
Estructura de carpetas y archivos
Los archivos de vídeo y de fotos se almacenan en la memoria interna,
en el Memory Stick o en el Memory Stick Pro como se muestra a
continuación.
Notas
✤ Consulte la página 34 para obtener
información sobre el Memory Stick.
✤ Puede almacenar datos generales en
archivos y en las carpetas de la
VIDEOCÁMARA.
✤ La numeración de archivos llega a 9.999
y de carpeta a 999.
✤ DCAM✽✽✽✽.JPG: archivo de foto
SMOV✽✽✽✽.AVI: archivo de vídeo
SWAV✽✽✽✽.WAV: archivo de voz
✽✽✽✽✽✽✽✽.MP3: archivo de MP3
✤ MISC: se almacenan los archivos DPOF.
✤ No cambie el nombre de archivo o de
carpeta excepto donde aparezca ‘Libre’.
✤ Puede cambiar libremente el nombre de
archivo o de carpeta donde aparezca
‘Libre’.
✤ Es posible que no pueda reproducir los
archivos de vídeo que no haya captado
con la VIDEOCÁMARA.
Advertencia
✤ No apague la videocámara mientras esté grabando, reproduciendo,
borrando archivos o dando formato al Memory Stick.
✤ Apague la videocámara antes de introducir o de extraer el Memory
Stick para evitar pérdida de datos.
✤ Guarde los archivos importantes aparte.
Page 31

ENGLISH
Getting Started Introducción
ESPAÑOL
Recording Time and Capacity
Video Record Time
Media
Internal
Memory
Memory
Stick
Memory
Stick Pro
Capacity
512MB
(VP-X105(L))
(VP-X110(L))
32MB
64MB
128MB
256MB
512MB
Super Fine Fine Normal
352
720
approx.
approx.
21min.
approx.
44min.
X
X
X
approx.
10min.
approx.
20min.
approx.
42min.
10min.
approx.
22min.
X
X
X
approx.
5min.
approx.
10min.
approx.
21min.
1GB
1GB
352
approx.
32min.
approx.
66min.
approx.
2min.
approx.
4min.
approx.
8min.
approx.
15min.
approx.
31min.
approx.
63min.
720
approx.
16min.
approx.
33min.
X
X
X
approx.
7min.
approx.
15min.
approx.
31min.
352
approx.
65min.
approx.
132mi.
approx.
4min.
approx.
8min.
approx.
16min.
approx.
30min.
approx.
62min.
approx.
126min.
Tiempo y capacidad de grabación
Tiempo de grabación de vídeo
Soportes
720
approx.
32min.
66min.
2min.
4min.
8min.
15min.
31min.
63min.
Memoria
Memory
Memory
Stick Pro
approx.
approx.
approx.
approx.
approx.
approx.
approx.
Warning
✤ The compressibility is changed automatically depending on the
recorded images and the maximum recording time and capacity can be
✤ El índice de compresión cambia automáticamente dependiendo de las
changed in ‘Video Record’.
✤ You may be not able to record or play normal video files if you use the
Memory Stick over 1GB capacity.
✤ You can record video files with size of 720/Normal, 352/Normal and
352/Fine in the Memory Stick but the quality is not guaranteed.
✤ If you record video files with the quality of Normal(352/720) in the internal
memory, Memory Stick or Memory Stick Pro, the recording time becomes
✤ Es posible que no pueda grabar o reproducir archivos de vídeo normales
✤ Puede grabar archivos de vídeo con un tamaño de 720/Normal, 352/Normal
✤ Si graba archivos de vídeo con la calidad Normal (352/720) en la
longer but the video may have lower quality than other quality level.
✤ The recording time and capacity may vary by generating the bad sector
when you record video files in the Memory Stick and Memory Stick Pro.
✤ El tiempo y la capacidad de grabación pueden variar generando un
interna
Stick
Capacidad
512MB
(VP-X105(L))
1GB
(VP-X110(L))
32MB
64MB
128MB
256MB
512MB
1GB
Super Fine
<Superfino>
352
Aprox.
Aprox.
21 min.
10 min.
Aprox.
Aprox.
44min.
22min.
X
X
X
Aprox.
Aprox.
10min.
5min.
Aprox.
Aprox.
20min.
10min.
Aprox.
Aprox.
42min.
21min.
720
X
X
X
<Fino>
352
Aprox.
32 min.
Aprox.
66min.
Aprox.
2min.
Aprox.
4min.
Aprox.
8min.
Aprox.
15min.
Aprox.
31min.
Aprox.
63min.
Fine
720
Aprox.
16 min
Aprox.
33min.
X
X
X
Aprox.
7min.
Aprox.
15min.
Aprox.
31min.
Normal
352
Aprox.
65min.
Aprox.
132mi.
Aprox.
4min.
Aprox.
8min.
Aprox.
16min.
Aprox.
30min.
Aprox.
62min.
Aprox.
126min.
720
Aprox.
32min.
Aprox.
66min.
Aprox.
2min.
Aprox.
4min.
Aprox.
8min.
Aprox.
15min.
Aprox.
31min.
Aprox.
63 min.
Advertencia
imágenes grabadas, y el tiempo y la capacidad de grabación máximos
pueden cambiarse en Video Record <Grabar vídeo>.
si utiliza el Memory Stick por encima de una capacidad de 1 GB.
y 352/Fino en el Memory Stick pero no se garantiza su calidad.
memoria interna, en el Memory Stick o en el Memory Stick Pro, el
tiempo de grabación se prolonga pero es posible que el vídeo tenga
una calidad inferior a otro nivel de calidad.
sector defectuoso al grabar archivos de vídeo en el Memory Stick y en
el Memory Stick Pro.
3131
Page 32

ENGLISH
Getting Started Introducción
Number of Photo Capture
Media
Internal
Memory
Memory Stick
Memory Stick
Pro
Capacity
512MB
1GB
32MB
64MB
128MB
256MB
512MB
1GB
approx. 5019
approx. 9803
approx. 313
approx. 627
approx. 1254
approx. 2509
approx. 5019
approx. 9803
800✕600
Quality
640✕480
approx. 8258
approx. 16129
approx. 516
approx. 1032
approx. 2064
approx. 4129
approx. 8258
approx. 16129
Voice Record Time
Media
Internal
Memory
Memory Stick
Memory Stick
Pro
Notes
✤ The recording time and capacity is an approximation.
✤ You can format the Memory Stick on the CAM. (Refer to page 101)
✤ Do not format the Memory Stick or Memory Stick Pro on the PC.
✤ The recording time and the number of images shown are maximum
figures based on using one function. In actual use, using more than
one function will reduce the capacity of each.
✤ If you set the light, you can take fewer photos than mentioned number
of image.
✤ If you format the Memory Stick or Memory Stick Pro, use the Memory
Stick Formatter in the supplied software CD.
3232
Capacity
512MB
1GB
32MB
64MB
128MB
256MB
512MB
1GB
Time
approx. 8hr.
approx. 18hr.
approx. 33min.
approx. 1hr.
approx. 2hr.
approx. 4hr.
approx. 8hr.
approx. 17hr.
Número de captura de foto
Soportes
Memoria
interna
Memory Stick
Memory Stick
Pro
Tiempo de grabación de voz
Soportes
Memoria
interna
Memory Stick
Memory Stick
Pro
Notas
✤ El tiempo y capacidad de grabación es una aproximación.
✤ Puede dar formato al Memory Stick en la VIDEOCÁMARA.
(Consulte la página 101).
✤ No dé formato al Memory Stick ni al Memory Stick Pro en el PC.
✤ El tiempo de grabación y el número de imágenes que se muestra son
las cifras más altas basándose en el uso de una función.
En uso real, el uso de más de una función reducirá la capacidad.
✤ Si fija la luz, puede hacer menos fotos que el mencionado en el
número de imágenes.
✤ Si da formato al Memory Stick o al Memory Stick Pro, utilice el Memory
Stick Formatter que se suministra en el CD del software.
Capacidad
512MB
1GB
32MB
64MB
128MB
256MB
512MB
1GB
Capacidad
512MB
1GB
32MB
64MB
128MB
256MB
512MB
1GB
800✕600
Aprox. 5019
Aprox. 9803
Aprox. 313
Aprox. 627
Aprox. 1254
Aprox. 2509
Aprox. 5019
Aprox. 9803
Tiempo
Aprox. 8 h.
Aprox. 18 h.
Aprox. 33 min.
Aprox. 1 h.
Aprox. 2 h.
Aprox. 4 h.
Aprox. 8 h.
Aprox. 17 h.
ESPAÑOL
Calidad
6405✕80
Aprox. 8258
Aprox. 16129
Aprox. 516
Aprox. 1032
Aprox. 2064
Aprox. 4129
Aprox. 8258
Aprox. 16129
Page 33

ENGLISH
Mode Selection
MP3
Voice Recorder
File Browser
System Settings
Back
System Settings
Date / Time
System
Display
Memory
Back
Memory Space
Back
Format
Internal
357MB/493MB
Settings: Memory
Storage Type Internal
Back
Format
Internal
Settings: Memory
Storage Type External
Memory Space
357MB/493MB
Getting Started Introducción
Selecting the Memory Type Selección del tipo de memoria
You can select the memory type - internal memory
or external memory(Memory Stick, Memory Stick Pro).
3
The Memory Stick is an optional accessory.
The video file and the photo files are stored in
internal memory by default.
Puede seleccionar el tipo de memoria: memoria
interna o memoria externa (Memory Stick, Memory
Stick Pro).
El Memory Stick es un accesorio adicional.
Los archivos de vídeo y de fotos se guardan por
defecto en la memoria interna.
ESPAÑOL
1. Insert the Memory Stick. (Refer to page 34)
2. Move [Mode Selector] down to turn on the
CAM and move it down again.
◆ The Mode Selection screen appears.
3. Move the [ ▲ /▼ ] switch to select System
Settings and press the [ OK ] button.
4. Move the [ ▲ /▼ ] switch to select <Memory>
and press the [OK] button.
5. Move the [ ▲ /▼ ] switch to select <Storage
Type> and press the [ OK ] button.
6. Move the [ ▲ /▼ ] switch to select desired
type and press the [OK] button.
◆ You can select external or internal memory.
Note
✤ If you insert the Memory Stick or Memory Stick
Pro, the memory type selection screen appears
automatically.
4
1. Introduzca el Memory Stick
(Consulte la página 34).
2. Baje el [Selector de modalidad] para encender
la VIDEOCÁMARA y bájelo de nuevo.
◆ Aparece la pantalla Mode Selection
<Selección de modalidad>.
3. Mueva el interruptor [▲ /▼ ] hasta seleccionar
System Settings <Config. del sistema> y
5
pulse el botón [OK].
4. Mueva el interruptor [▲ /▼ ] hasta seleccionar
Memory <Memoria> y pulse el botón [OK].
5. Mueva el interruptor [▲ /▼ ] hasta seleccionar
Storage Type <Tipo de almac.> y pulse el
botón [OK].
6. Mueva el interruptor [▲ /▼ ] hasta seleccionar
6
el tipo que desea y pulse el botón [OK].
◆ Puede seleccionar la memoria interna o la
externa.
Nota
✤ Si introduce el Memory Stick o el Memory Stick
Pro, aparece automáticamente la pantalla de
selección del tipo de memoria.
3333
Page 34

ENGLISH
BLC
Video Record
00:16 / 24:32
SF / 720
OK
Cancel
External memory inserted.
Do you want to change
memory to external?
HOLD
HOLD
Getting Started Introducción
ESPAÑOL
Using the Memory Stick (Optional Accessory)
Inserting a Memory Stick
1. Open the LCD monitor.
2. Open the Memory Stick slot lid.
3. Insert the Memory Stick into the slot until it
softly clicks.
4. Close the slot lid.
This screen will appear if the Memory
Caution:
Stick is inserted with the power on.
◆ If you select <OK>, the memory type
changes to ‘External’ and if you select <Cancel>, files are
stored in internal memory.
◆ If you insert a locked Memory Stick, the [ ] icon is
displayed next to the memory type indicator.
Ejecting a Memory Stick
1. Open the LCD monitor.
2. Open the Memory Stick slot lid.
3. Slightly push the Memory Stick inwards to pop it out.
4. Pull the Memory Stick out of the slot and close the lid.
Notes
✤ Do not apply excessive force when you insert / eject the Memory
Stick.
✤ Do not turn the power off while recording, playing, erasing files or
formatting the Memory Stick.
✤ Please turn the power off before you insert or eject the Memory
Stick to avoid losing data.
✤ Do not place the Memory Stick near a strong electro-magnetic
device.
✤ Do not allow metal substances to come in contact with the terminals
on the Memory Stick.
✤ Do not bend the Memory Stick.
✤ After pulling the card out from the CAM, keep the Memory Sticks in
a soft case to prevent static shock.
✤ The data stored on the card may be changed or lost as a result of misuse, static
electricity, electric noise or repair. Save important files separately.
✤ Samsung is not responsible for data loss due to misuse.
3434
✤ Memory Stick and are trademarks of Sony
Corporation.
✤ All other product names mentioned herein may be the trademarks
or registered trademarks of their respective companies. “TM” will
not be mentioned in every instance in this manual.
The Memory Stick View
Utilización del Memory Stick (Accesorios opcionales)
Inserción de un Memory Stick.
1. Abra la pantalla LCD.
2. Abra la tapa de la ranura del Memory Stick.
3. Inserte el Memory Stick en la ranura hasta que
emita un chasquido suave.
4. Cierre la tapa de la ranura.
Precaución:
◆ Si selecciona <OK>, el tipo de memoria cambia a
◆ Si inserta el Memory Stick bloqueado, aparece el icono [ ] al
lado del indicador del tipo de memoria.
Extracción del Memory Stick
1. Abra la pantalla LCD.
2. Abra la tapa de la ranura del Memory Stick.
3. Presione ligeramente el Memory Stick hacia dentro para que salte.
4. Saque el Memory Stick de la ranura y cierre la tapa.
Terminals
Write-
protect
Switch
✤ Los datos almacenados en la tarjeta de memoria se pueden estropear o perder a
causa de un uso incorrecto, de la electricidad estática o del ruido eléctrico.
Guarde los archivos importantes aparte.
✤ Samsung no se hace responsable de los datos perdidos a causa del uso incorrecto.
Notas
✤ No apliqué excesiva fuerza al insertar o expulsar el Memory Stick.
✤ No apague la VIDEOCÁMARA mientras esté grabando,
reproduciendo, borrando archivos o dando formato al Memory Stick.
✤ Apague la VIDEOCÁMARA antes de introducir o extraer el Memory
Stick para evitar pérdida de datos.
✤ No coloque el Memory Stick cerca de un dispositivo electro-
magnético potente.
✤ Impida que los terminales del Memory Stick entren en contacto con
objetos metálicos.
✤ No doble el Memory Stick.
✤ Después de sacar la tarjeta de la VIDEOCÁMARA, guárdela en una
funda blanda para evitar descargas eléctricas.
✤ Memory Stick y son marcas registradas de Sony
Corporation.
✤ Todos los demás productos mencionados son marcas
comerciales o marcas registradas de sus respectivas empresas.
TM no se mencionará en todos los casos en este manual.
esta pantalla aparecerá si el Memory Stick
se inserta con la CAM encendida.
External <Externa> y si selecciona Cancel
<Cancelar>, los archivos se almacenan de forma
continua en la memoria interna.
Page 35

ENGLISH
Getting Started Introducción
Mode and Menu Selection Selección de modalidad y menú
You can select the mode and menu as follows.
There are 2 ways of selecting menu.
Select the way you prefer.
Puede seleccionar la modalidad y el menú de la siguiente forma.
Existen 2 formas de seleccionar el menú.
Seleccione la forma que prefiere.
ESPAÑOL
Mode Selection
1. Move the [Mode Selector] down to turn on the CAM and move
it down again.
2. Move the [ ▲ /▼ ] switch to select a desired mode and press
the [OK] button.
Menu Selection
1. Press the [Menu] button after selecting the desired mode.
2. Move the [ ▲ /▼ ] switch to select a desired menu and press
the [OK] button.
Selección de modalidad
1. Baje el [Selector de modalidad] para encender la CAM y bájelo
2. Mueva el interruptor [ ▲ /▼ ] hasta seleccionar la modalidad
Selección de menú
1. Pulse el botón [Menu] tras seleccionar la modalidad deseada.
2. Mueva el interruptor [ ▲ /▼ ] hasta seleccionar el menú que
SPECIAL OPERATION
1. Press the [Menu ] button for 2 seconds.
◆ The menu screen of the selected
mode appears.
Note
✤ User's manual only describes the first way of performing an
operation. There may be other and more convenient ways for you
to use the CAM.
✤ El Manual del usuario sólo describe el primer método para realizar
de nuevo.
que desea y pulse el botón [OK].
desea y pulse el botón [OK].
OPERACIÓN EsPECIAL
1. Pulse el botón [Menu] durante 2 segundos.
◆ Aparece la pantalla del menú de la
modalidad seleccionada.
Nota
la operación. Es posible que existan otros medios más prácticos
de utilizar la VIDEOCÁMARA.
3535
Page 36

ENGLISH
ESPAÑOL
Video Mode
Recording ............................................................................... 37
Recording ............................................................................ 37
Zooming In and Out ............................................................ 38
Setting the Video In............................................................. 39
Playing..................................................................................... 40
Playing on the LCD Monitor................................................ 40
Selecting File Options........................................................... 42
Deleting Video files.............................................................. 42
Locking Video files............................................................... 43
Copying Video files.............................................................. 44
Setting the PB Option.......................................................... 45
Setting Various Functions.................................................... 46
Setting the Video file Size ................................................... 46
Setting the Video file Quality............................................... 47
Setting the Focus ................................................................ 48
Setting the EIS (Electronic Image Stabilizer)...................... 49
Setting the White Balance................................................... 50
Setting the Program AE (Programmed Auto Exposure)..... 51
Setting the BLC (Backlight Compensation) ........................ 52
Setting the Effect ................................................................. 53
Setting the Digital Zoom...................................................... 54
Note
✤ You can set the time and date in System Settings.
Refer to pages 90~91.
3636
1
1
1
1
Grabación ............................................................................... 37
Reproducción ........................................................................ 40
Selección de opciones de archivo ...................................... 42
Ajustes de diversas funciones............................................. 46
Nota
✤ Puede fijar la hora y fecha en System Settings
<Config. del sistema>. Consulte las páginas 90 y 91.
Modalidad Vídeo
Grabación ............................................................................ 37
Acercamiento y alejamiento de las imágenes.................... 38
Ajuste de Video In <Entrada de vídeo>.............................. 39
Reproducción en la pantalla LCD....................................... 40
Eliminación de archivos de vídeo ...................................... 42
Bloqueo de archivos de vídeo............................................. 43
Copia de archivos de vídeo ............................................... 44
Ajuste de la opción PB........................................................ 45
Ajuste del tamaño del archivo de vídeo.............................. 46
Ajuste de la calidad del archivo de vídeo........................... 47
Ajuste del enfoque............................................................... 48
Ajuste de EIS (Estabilizador electrónico de la imagen) ..... 49
Ajuste del balance de blanco.............................................. 50
Ajuste del Programa AE
(Exposición automática programada) ................................. 51
Ajuste de BLC (Compensación de luz de fondo) ............... 52
Ajuste del efecto.................................................................. 53
Ajuste del zoom digital ........................................................ 54
Page 37

ENGLISH
BLC
Video Record
00:00 / 10:57 STBY
SF / 720
BLC
Video Record
SF / 720
00:16 / 10:50 REC
BLC
Video Record
00:16 / 10:41
SF / 720
STBY
Video Record
STBY
Video Mode : Recording Modalidad Vídeo: Grabación
Recording Grabación
You can record moving person and objects and store it in memory.
Refer to the page 108 for recording video using the External Camera
Module. (VP-X105L/X110L only)
1. Move [Mode Selector] down to turn on the
CAM.
1
◆ The Video Record screen appears.
◆ You can select Video mode or Previous
mode as the start-up mode in System
Settings. (Refer to page 96)
2. Press [Record/Stop] button to start
recording.
◆ [ ● REC] indicator displays on LCD.
2
◆ The elapsed time is displayed and it starts
recording.
3. Press the [Record/Stop] button again to stop
recording.
◆ It stops recording and the CAM is ready again.
4. Move [Mode Selector] up to turn off the CAM.
3
Notes
✤ If you press the [Record] button and press it in
1 second, new video file is not made.
✤ If the Auto Shut Off is set, the CAM turns off
automatically after 5 minutes.
✤ Detach the Battery Pack when you finish
recording to prevent unnecessary battery power
consumption.
✤ You can check the recording time.
Elapsed time Remaining time
Puede grabar personas y objetos en movimiento y guardarlos en
memoria. Consulte la página 108 para grabación de vídeo utilizando el
módulo externo de cámara. (Sólo VP-X105L/X110L)
1. Mueva el [Selector de modalidad] hacia abajo
para encender la VIDEOCÁMARA.
◆ Aparece la pantalla Video Record <Grabar
vídeo>.
◆ Puede seleccionar la modalidad Video
<Vídeo> o la modalidad anterior como la
modalidad de inicio en System Settings
<Config. del sistema>. (Consulte la página 96).
2. Pulse el botón [Record/Stop] para comenzar
la grabación.
◆ Aparece el indicador [ ● REC] en la pantalla
LCD.
◆ Aparece el tiempo transcurrido y se inicia la
grabación.
3. Pulse el botón [Record/Stop] de nuevo para
detener la grabación.
◆ Detiene la grabación y la VIDEOCÁMARA
está preparada de nuevo.
4. Mueva el [Selector de modalidad] hacia
arriba para apagar la VIDEOCÁMARA.
Notas
✤ Si pulsa el botón [Record] y lo mantiene pulsado
durante 1 segundo, no se crea un archivo de
vídeo nuevo.
✤ Si se define Auto Shut Off <Apagado
automático>, la VIDEOCÁMARA se apaga
automáticamente después de 5 minutos.
00:00 / 10:57
✤ Suelte la batería al terminar de grabar para
evitar un consumo innecesario de la batería.
✤ Es posible comprobar el tiempo de grabación
ESPAÑOL
3737
Page 38

ENGLISH
BLC
Video Record
SF / 720
00:16 / 10:50 REC
BLC
Video Record
SF / 720
00:16 / 10:50 REC
BLC
Video Record
SF / 720
00:16 / 10:50 REC
Video Mode : Recording Modalidad de vídeo: Grabación
ESPAÑOL
Zooming In and Out
Zooming technique lets you change the size of the subject captured in
a scene.
1. Move [Mode Selector] down to turn on the CAM.
◆ You can select Video mode or Previous mode as the start-up
mode in System Settings. (Refer to page 96)
2. Press the [Record/Stop] button to start recording.
Zoom Out
Move the [ ▲ /▼ ] switch
up to zoom out.
• The subject appears
farther away when you
zoom out.
Move the [ ▲ /▼ ] switch
down to zoom in.
• The subject appears
closer when you zoom
in.
3838
Notes
Zoom In
✤ Frequent use of zooming may result in higher battery
power consumption.
✤ Refer to page 54 about Digital Zoom.
Acercamiento y alejamiento de las imágenes
El uso de la técnica del zoom permite modificar el tamaño del
encuadre de las escenas.
1. Mueva el [Selector de modalidad] hacia abajo para encender
la VIDEOCÁMARA.
◆ Puede seleccionar la modalidad Video <Vídeo> o la modalidad
anterior como la modalidad de inicio en System Settings
<Config. del sistema>. (Consulte la página 96).
2. Pulse el botón [Record/Stop] para
comenzar la grabación.
Mueva el interruptor
[ ▲ /▼ ] hacia arriba para
alejar el zoom.
• El objeto se aleja al
alejar el zoom.
Mueva el interruptor
[ ▲ /▼ ] hacia abajo para
acercar el zoom.
• El objeto aparece más
cerca cuando se aplica
el zoom.
Notas
✤ El uso frecuente del zoom puede producir
un consumo más alto de la batería.
✤ Consulte la página 54 sobre zoom digital.
Page 39

ENGLISH
Video Record
00:16 / 10:41
SF / 720
STBY
Play
Record
Video In
Settings
Back
Video Record
00:16 / 10:41
SF / 720
STBY
Play
Record
Video In
Settings
Back
External Camera
Normal
Choose the type of
line-in source.
External
00:16 / 10:41
SF / 704
STBY
Video Mode : Recording Modalidad de vídeo: Grabación
ESPAÑOL
Setting the Video In
Video In function works only in Video mode.
Video In setting enables you to record signal from external sources or
*External Camera Module and display it on LCD monitor.
Also, you can direct your video or image to external devices to record
or play back.
1. Move [Mode Selector] down to turn on the
CAM.
◆ The Video Record screen appears.
2. Press the [Menu ] button and move the
[ ▲ /▼ ] switch.
Press the [OK] button after selecting
<Video In>.
3. “Choose the type of line-in source” message
appears.
Move the [ ▲ /▼ ] switch to select <External
Camera> when using the *external camera or
<Normal> when using just the camcorder,
then press the [OK] button.
If *<External Camera> is selected, “External”
appears on the screen.
If <Normal> is selected, “Normal” appears on the
screen.
*:VP-X105L/X110L only
Note
✤ When the External Camera Module is connected, [Record/Stop]
button of the main set does not operate. (VP-X105L/X110L only)
2
3
3
Ajuste de Video In <Entrada de vídeo>
La función Video In <Entrada de vídeo> sólo funciona en la modalidad
Vídeo. El ajuste Video In <Entrada de vídeo> permite grabar una señal
desde fuentes externas o desde un módulo *externo de cámara y lo
muestra en el monitor LCD.
Asimismo, puede dirigir su vídeo o la imagen a dispositivos externos
para grabarlos o reproducirlos.
1. Mueva el [Selector de modalidad] hacia abajo
para encender la CAM.
◆ Aparece la pantalla Video Record <Grabar
vídeo>.
2. Pulse el botón [Menu] y mueva el interruptor
[ ▲ /▼ ].
Pulse el botón [OK] tras seleccionar Video In
<Entrada de vídeo>.
3. Aparece el mensaje "Choose the type of linein source" <Elija el tipo de fuente de entrada
de línea>.
Mueva el interruptor [ ▲ /▼ ] para seleccionar
External Camera <Cámara externa> al utilizar
la *cámara externa o Normal <Normal> al
utilizar sólo la videocámara y pulse el botón
[OK].
Si se selecciona *External Camera <Cámara
externa>, aparece "External" <Externa> en la
pantalla.
Si se selecciona Normal <Normal>, aparece
"Normal" <Normal> en la pantalla.
*:Sólo VP-X105L/X110L
Nota
✤ Cuando esté conectado el módulo externo de cámara, el botón
[Record/Stop] del equipo principal no está operativo.
(Sólo VP-X105L/X110L)
3939
Page 40

ENGLISH
BLC
Video Record
00:16 / 10:41
SF / 720
STBY
Video Record
00:16 / 10:41
SF / 720
STBY
Play
Record
Video In
Settings
Back
Video Play 100-0056
00:01 / 00:16
Video Play 100-0056
ESPAÑOL
Video Mode : Playing Modalidad de vídeo: Reproducción
Playing on the LCD Monitor
It is handy and practical to view video files using the LCD monitor
almost anywhere such as in a car, indoors or outdoors.
1. Move [Mode Selector] down to turn on the
CAM.
◆ The Video Record screen appears.
◆ You can select Video mode or Previous
mode as the start-up mode in System
Settings. (Refer to page 96)
2. Press the [Menu ] button and move the
[ ▲ /▼ ] switch.
Press the [OK] button after selecting < Play >.
3. Move the [ ▲ /▼ ] switch to find the video file
you want to play.
◆ Each time you move the [ ▲ /▼ ] switch,
the frame moves horizontally.
◆ Each time you press the [+]/ [ - ] button,
a page(6 frame) moves.
4. Press [OK ] button to play the video file you
want.
◆ Each time you press the [OK] button, play or
pause is selected repeatedly.
5. Press the [OK] button again to pause.
4040
Reproducción en la pantalla LCD
Resulta útil y práctico ver archivos de vídeo utilizando el monitor LCD
casi en cualquier sitio, como en un coche, en interiores o en exteriores.
1
2
3
4
1. Mueva el [Selector de modalidad] hacia abajo
para encender la VIDEOCÁMARA.
◆ Aparece la pantalla Video Record <Grabar
vídeo>.
◆ Puede seleccionar la modalidad Video
<Vídeo> o la modalidad anterior como la
modalidad de inicio en System Settings
<Config. del sistema>. (Consulte la página 96).
2. Pulse el botón [Menu] y mueva el interruptor
[ ▲ /▼ ]. Pulse el botón [OK] tras seleccionar
Play <Reproducir>.
3. Mueva el interruptor [▲ / ▼ ] hasta encontrar el
archivo de vídeo que desea reproducir
◆ Cada vez que mueva el interruptor [▲ / ▼ ], se
desplaza horizontalmente un fotograma.
◆ Cada vez que pulse el botón [+]/[ - ], aparece
una nueva página (6 fotogramas).
4. Pulse el botón [OK] para reproducir el archivo
de vídeo que desea.
◆
Cada vez que pulse el botón [OK], se reproduce
o se hace una pausa de forma repetida.
5. Pulse el botón [OK] de nuevo tras hacer una
pausa.
Page 41

ENGLISH
00:01 / 00:16
Video Play 100-0056
00:01 / 00:16
Video Play 100-0056
ESPAÑOL
Video Mode : Playing Modalidad de vídeo: Reproducción
The button and switch you use when playing the video file
[OK] Button: Play or pause the video file
[▲ ] Switch: In Video Play mode: Press it to move to previous file.
[▼ ] Switch: In Video Play mode: Press it to move to next file.
Adjusting the Sound
1. Press the [OK ] button to play the video file.
2. Press the [+] button to increase the volume.
3. Press the [-] button to decrease the volume.
✤ You can adjust the volume up to 10 steps.
✤ You can also play the video file on a TV screen by connecting the
✤ It is necessary to install Image Mixer for playback video files
Press and hold it to use RPS function.
(RPS rate: 2x➝4x➝8x➝16x➝32x➝64x➝128x)
Press and hold it to use FPS function.
(FPS rate: 2x➝4x➝8x➝16x➝32x➝64x➝128x)
In Video Play mode: Press and hold it to play slowly
when paused.
Press it to move to the next frame when paused.
1
◆ Each time you press the [+] button, the volume
bar increases and the sound level will get louder.
◆ The volume bar disappears after 1~2 seconds.
◆ Each time you press the [-] button, the volume
bar decreases and the sound level will get
quieter.
◆ The volume bar disappears after 1~2 seconds.
Notes
CAM to a TV. (Refer to page 112)
recorded on the CAM on your PC.
2
Botón e interruptor utilizados al reproducir archivos de vídeo
Botón [OK]: Play or pause the video file
Interruptor [▲ ] : En modalidad Video Record <Grabar vídeo>: se
Interruptor [▼ ] : En modalidad Video Record <Grabar vídeo>: Se
✤ Puede ajustar el volumen hasta en 10 pasos.
✤ También puede reproducir el archivo de vídeo en una pantalla de TV
conectando la VIDEOCÁMARA a un TV. (Consulte la página 112).
✤ Es necesario instalar Image Mixer para que la CAM reproduzca los
archivos de vídeo grabados en el PC.
pulsa para ir al archivo anterior. Se mantiene
pulsado para utilizar la función RPS. (Velocidad
RPS: 2x➝4x➝8x➝16x➝32x➝64x➝128x)
pulsa para ir al archivo siguiente. Se mantiene
pulsado para utilizar la función FPS. (Velocidad
de FPS: 2x➝4x➝8x➝16x➝32x➝64x➝128x)
En modalidad Video Play <Reproducir vídeo>:
Manténgalo pulsado para reproducir lentamente
después de hacer una pausa.
Se pulsa para ir al fotograma siguiente después
de pulsar el botón de pausa.
Ajuste del sonido
1. Pulse el botón [OK] para reproducir el archivo
de vídeo.
2. Pulse el botón [+] para subir el volumen.
◆ Cada vez que se pulsa el botón [+], la barra
de volumen sube junto con el nivel del sonido.
◆ La barra de volumen desaparece después de
1 ó 2 segundos.
3. Pulse el botón [-] para bajar el volumen.
◆ Cada vez que se pulsa el botón [+], la barra
de volumen baja junto con el nivel del sonido.
◆ La barra de volumen desaparece después de
1 ó 2 segundos.
Notas
4141
Page 42

ENGLISH
Video Record
00:00 / 10:57
SF / 720
STBY
Video In
Record
Settings
Back
Play
Settings
Back
01 03
Video In
File Options
Record
Back
Play
File Options
Back
Video Play 100-0056
01 03
Lock
Copy To
Delete
Back
Video Play 100-0056
PB Option
01 03
Lock
Copy To ext.
Delete
Back
Video Play 100-0056
Selected
All
Cancel
Choose the file(s)
to delete
Video Mode : Selecting File Options
Modalidad de vídeo:
Selección de opciones de archivo
Deleting Video files Eliminación de archivos de vídeo
You can delete video files in <File Options>.
1. Move [Mode Selector] down to turn on the
CAM.
◆ The Video Record screen appears.
◆ You can select Video mode or Previous
mode as the start-up mode in System
Settings. (Refer to page 96)
2. Press the [Menu] button and move the
[ ▲ /▼ ] switch.
Press the [OK] button after selecting [Play].
3. Move the [ ▲ /▼ ] switch to select the video
file you want to delete.
4. Press the [Menu ] button to select <File
Options> and press the [OK ] button.
◆ You can select <File Options> only in Video
Play mode.
5. Move the [ ▲ /▼ ] switch to select <Delete >
and press the [OK] button.
6. Move the [ ▲ /▼ ] switch to select the
followings. Press the [OK] button.
◆ Selected: The selected video file is deleted.
◆ All: All video files are deleted.
◆ Cancel: Cancel deleting video files.
4242
Note
✤ Press and hold the [Menu] button in Video Play
mode, you can move to <File Options> directly.
2
4
5
6
Los archivos de vídeo se pueden borrar en File Options <Opciones de
archivo>.
1. Mueva el [Selector de modalidad] hacia abajo
para encender la VIDEOCÁMARA.
◆ Aparece la pantalla Video Record <Grabar
vídeo>.
◆ Puede seleccionar la modalidad Video <Vídeo>
o la modalidad anterior como la modalidad de
inicio en System Settings <Config. del
sistema>. (Consulte la página 96).
2. Pulse el botón [Menu] y mueva el interruptor
[▲ / ▼ ]. Pulse el botón [OK] tras seleccionar
Play <Reproducir>.
3. Mueva el interruptor [▲ /▼ ] hasta seleccionar el
archivo de foto que desea borrar.
4. Pulse el botón [Menu] hasta seleccionar File
Options <Opciones de archivo> y pulse el
botón [OK].
◆ Puede seleccionar File Options <Opciones de
archivo> sólo en Video Play <Reproducir vídeo>.
5. Mueva el interruptor [▲ /▼ ] hasta seleccionar
Delete <Borrar> y pulse el botón [OK].
6. Mueva el interruptor [▲ /▼ ] para seleccionar
los siguientes. Pulse el botón [OK].
◆ Selected <Seleccionado>: Se borra el
archivo de vídeo seleccionado.
◆ All <Todo>: Se borran todos los archivos de
vídeo.
◆ Cancel <Cancelar>: Cancela la supresión de
archivos de vídeo.
Nota
✤ Mantenga pulsado el botón [Menu] en la modalidad
Video Play <Reproducir vídeo>, así podrá ir
directamente a File Options <Opciones de archivo>.
ESPAÑOL
Page 43

ENGLISH
Video Record
00:00 / 10:57
SF / 720
STBY
Video In
Record
Settings
Back
Play
Settings
Back
01 03
Video In
File Options
Record
Back
Play
File Options
Back
Video Play 100-0056
01 03
Lock
Copy To
Delete
PB Option
Back
Video Play 100-0056
01 03
Lock
Copy To ext.
Delete
DPOF
Back
Selected
All
Cancel
Choose the file(s) you would
to lock.
Video Play 100-0056
Video Mode : Selecting File Options
Modalidad de vídeo:
Selección de opciones de archivo
Locking Video files Bloqueo de archivos de vídeo
You can lock the important video file to prevent accidental deletion.
1. Move [Mode Selector ] down to turn on the CAM.
◆ The Video Record screen appears.
◆ You can select Video mode or Previous mode
as the start-up mode in System Settings.
(Refer to page 96)
2. Press the [ Menu ] button and move the [ ▲ /▼ ]
switch.
Press the [OK] button after selecting <Play>.
3. Move the [ ▲/ ▼ ] switch to select the video file
you want to lock.
4. Press the [Menu] button to select <File Options>
and press the [OK] button.
◆ You can select <File Options> only in Video
Play mode.
5. Move the [ ▲/ ▼ ] switch to select <Lock> and
press the [OK] button.
6. Move the [ ▲/ ▼ ] switch to select the followings
and press the [OK] button.
◆ Selected: The selected video file is locked.
◆ All: All video files are locked.
◆ Cancel: Cancel locking video files.
Notes
✤ Press and hold the [Menu] button in Video Play
mode, you can move to <File Options> directly.
✤ The < > icon is displayed on the locked file.
2
4
5
6
Es posible bloquear archivos de vídeo importantes para evitar el borrado
accidental.
1. Mueva el [Selector de modalidad] hacia abajo
para encender la VIDEOCÁMARA.
◆ Aparece la pantalla Video Record <Grabar vídeo>.
◆ Puede seleccionar la modalidad Video <Vídeo>
2. Pulse el botón [Menu] y mueva el interruptor
[▲ / ▼ ]. Pulse el botón [OK] tras seleccionar
Play <Reproducir>.
3. Mueva el interruptor [▲ /▼ ] hasta seleccionar el
archivo de vídeo que desea bloquear.
4. Pulse el botón [Menu] hasta seleccionar File
Options <Opciones de archivo> y pulse el botón
[OK].
◆ Puede seleccionar File Options <Opciones de
5. Mueva el interruptor [▲ /▼ ] hasta seleccionar
Lock <Bloquear> y pulse el botón [OK].
6. Mueva el interruptor [▲ /▼ ] para seleccionar los
siguientes y pulse el botón [OK].
◆ Selected <Seleccionado>: Se bloquea el
◆ All <Todo>: Se bloquean todos los archivos de
◆ Cancel <Cancelar>: Cancela el bloqueo de
✤ Mantenga pulsado el botón [Menu] en la modalidad
Video Play <Reproducir vídeo>, así podrá ir
directamente a File Options <Opciones de archivo>.
✤ Aparece el icono < > sobre el archivo bloqueado.
ESPAÑOL
o la modalidad anterior como la modalidad de
inicio en System Settings <Config. del sistema>.
(Consulte la página 96).
archivo> sólo en Video Play <Reproducir vídeo>.
archivo de vídeo seleccionado.
vídeo.
archivos de vídeo.
Notas
4343
Page 44

ENGLISH
Video Record
00:00 / 10:57
SF / 720
STBY
Video In
Record
Settings
Back
Play
Settings
Back
01 03
Video In
File Options
Record
Back
Play
File Options
Back
Video Play 100-0056
01 03
Lock
Copy To
Delete
PB Option
Back
Video Play 100-0056
Video Play 100-0056
Selected
All
Cancel
Choose the file(s) to copy
to memory stick?
Video Mode : Selecting File Options
Modo Vídeo:
Selección de opciones de archivo
Copying Video files Copia de archivos de vídeo
You can copy the video file to the internal or external memory.
1. Move [Mode Selector] down to turn on the
CAM.
◆ The Video Record screen appears.
◆ You can select Video mode or Previous
mode as the start-up mode in System
Settings. (Refer to page 96)
2. Press the [Menu] button and move the
[ ▲ /▼ ] switch.
Press the [OK] button after selecting <Play>.
3. Move the [ ▲ /▼ ] switch to select the video
file you want to copy.
4. Press the [Menu] button to select <File
Options> and press the [OK] button.
◆ You can select <File Options> only in Video
Play mode.
5. Move the [ ▲ /▼ ] switch to select <Copy To>
and press the [OK] button.
◆ If you selected video ‘External’ as the Storage
type, the file is copied to ‘internal’ and vice versa.
6. Move the [ ▲ /▼ ] switch to select the
followings and press the [OK] button.
◆ Selected: Copy the selected video file.
◆ All: Copy all video files.
◆ Cancel: Cancel copying video files.
4444
Note
✤ Press and hold the [Menu] button in Video Play
mode, you can move to <File Options> directly.
2
4
5
6
El archivo de vídeo puede copiarse en la memoria interna o externa
1. Mueva el [Selector de modalidad] hacia abajo
2. Pulse el botón [Menu] y mueva el interruptor
3. Mueva el interruptor [▲ /▼ ] hasta seleccionar
4. Pulse el botón [Menu] hasta seleccionar File
5. Mueva el interruptor [▲ /▼ ] hasta seleccionar
6. Mueva el interruptor [▲ /▼ ] para seleccionar
✤ Mantenga pulsado el botón [Menu] en la modalidad
ESPAÑOL
para encender la VIDEOCÁMARA.
◆ Aparece la pantalla Video Record <Grabar
vídeo>.
◆ Puede seleccionar la modalidad Video <Vídeo>
o la modalidad anterior como la modalidad de
inicio en System Settings <Config. del
sistema>. (Consulte la página 96).
[▲ / ▼ ]. Pulse el botón [OK] tras seleccionar
Play <Reproducir>.
el archivo de vídeo que desea copiar.
Options <Opciones de archivo> y pulse el
botón [OK].
◆ Puede seleccionar File Options <Opciones de
archivo> sólo en Video Play <Reproducir vídeo>.
Copy To <Copiar en> y pulse el botón [OK].
◆ Si ha seleccionado el tipo de almacenamiento
External <Externo> de vídeo, el archivo se
copia en Internal <Interno> y viceversa.
los siguientes y pulse el botón [OK].
◆ Selected <Seleccionado>: Se copia el
archivo de vídeo seleccionado.
◆ All <Todo>: Copia todos los archivos de vídeo.
◆ Cancel <Cancelar>: Cancela la copia de
archivos de vídeo.
Nota
Video Play <Reproducir vídeo>, así podrá ir
directamente a File Options <Opciones de archivo>.
Page 45

ENGLISH
Video Record
00:00 / 10:57
SF / 720
STBY
Video In
Record
Settings
Back
Play
Settings
Back
01 03
Video In
File Options
Record
Back
Play
File Options
Back
Video Play 100-0056
01 03
Lock
Copy To
Delete
PB Option
Back
Video Play 100-0056
Video Play 100-0056
Selected
All
Cancel
Would you like to play
only selected file or
all files?
Video Mode : Selecting File Options
Modalidad de vídeo:
Selección de opciones de archivo
Setting the PB Option Ajuste de la opción PB
You can play all files continuously or play only selected file.
1. Move [Mode Selector] down to turn on the
CAM.
◆ The Video Record screen appears.
◆ You can select Video mode or Previous
mode as the start-up mode in System
Settings. (Refer to page 96)
2. Press the [Menu] button and move the
[ ▲ /▼ ] switch.
Press the [OK] button after selecting <Play>.
3. Move the [ ▲ /▼ ] switch to select the video
file you want to set the function.
4. Press the [Menu] button to select <File Options>
and press the [OK] button.
◆ You can select <File Options> only in Video
Play mode.
5. Move the [▲ / ▼ ] switch to select <PB Option>
and press the [OK] button.
6. Move the [▲ / ▼ ] switch to select the
following and press the [OK] button.
◆ Selected: Play the selected video file.
◆ All: Play all video files.
◆ Cancel: Cancel setting PB Option.
Note
✤ Press and hold the [Menu] button in Video Play
mode, you can move to <File Options> directly.
2
4
5
6
Puede reproducir de forma continua todos los archivos o reproducir
únicamente el archivo seleccionado.
ESPAÑOL
1. Mueva el [Selector de modalidad] hacia abajo
para encender la VIDEOCÁMARA.
◆ Aparece la pantalla Video Record <Grabar
vídeo>.
◆ Puede seleccionar la modalidad Video <Vídeo>
o la modalidad anterior como la modalidad de
inicio en System Settings <Config. del
sistema>. (Consulte la página 96).
2. Pulse el botón [Menu] y mueva el interruptor
[▲ / ▼ ]. Pulse el botón [OK] tras seleccionar
Play <Reproducir>.
3. Mueva el interruptor [▲ / ▼ ] hasta seleccionar
el archivo de vídeo para el que desea definir la
función.
4. Pulse el botón [Menu] hasta seleccionar File
Options <Opciones de archivo> y pulse el
botón [OK].
◆ Puede seleccionar File Options <Opciones de
archivo> sólo en Video Play <Reproducir vídeo>.
5. Pulse el interruptor [▲ /▼ ] hasta seleccionar
PB Option <Opción PB> y pulse el botón [OK].
6. Mueva el interruptor [▲ / ▼ ] para seleccionar
los siguientes y pulse el botón [OK].
◆ Selected <Seleccionado>: Reproduce el
archivo de vídeo seleccionado.
◆ All <Todo>: Reproduce todos los archivos de
vídeo.
◆ Cancel <Cancelar>: Cancela el ajuste PB
Option <Opción PB>.
Nota
✤ Mantenga pulsado el botón [Menu] en la
modalidad Video Play <Reproducir vídeo>, así
podrá ir directamente a File Options <Opciones
de archivo>.
4545
Page 46

ENGLISH
Video Record
SF / 720
00:00 / 10:57
STBY
Video In
Record
Settings
Back
Play
Settings
Back
White Balance
Auto
EIS
On
Focus
AF
Quality
Super Fine
White Balance
Auto
Video Settings
EIS
On
Focus
AF
Quality
Super Fine
Size 720
White Balance
Auto
EIS
On
Focus
AF
Quality
Super Fine
White Balance
Auto
Video Settings
EIS
On
Focus
AF
Quality
Super Fine
Size 352
Video Record
00:00 / 21:54
SF / 352
STBY
Video Mode : Setting Various Functions
Modalidad de vídeo:
Ajustes de diversas funciones
Setting the Video file Size Ajuste del tamaño del archivo de vídeo
You can set the file size for video files. The number of stored files
varies depending on the Memory Stick capacity and video file size.
1. Move [Mode Selector] down to turn on the
CAM.
◆ The Video Record screen appears.
◆ You can select Video mode or Previous
mode as the start-up mode in System
Settings. (Refer to page 96)
2. Press the [Menu] button and move the
[ ▲ /▼ ] switch.
Press the [OK] button after selecting
<Settings>.
3. Move the [ ▲ /▼ ] switch to select <Size> and
press the [OK] button.
◆ 720: Select 720 pixel.
◆ 352: Select 352 pixel.
4. Move the [ ▲ /▼ ] switch to select the video
file size and press the [OK] button.
5. Press the [Menu] button to finish setting.
◆ The icon of selected function is displayed.
Notes
4646
✤ If you select <Back> in the menu, the previous
menu appears.
✤ Press and hold the [Menu] button in Video Record
mode, you can move to <Settings> directly.
2
3
4
5
Puede fijar el tamaño de los archivos de vídeo. El número de archivos
almacenados varía dependiendo de la capacidad del Memory Stick
y el tamaño del archivo de vídeo.
1. Mueva el [Selector de modalidad] hacia abajo
para encender la VIDEOCÁMARA.
◆ Aparece la pantalla Video Record <Grabar
vídeo>.
◆ Puede seleccionar la modalidad Video
<Vídeo> o la modalidad anterior como la
modalidad de inicio en System Settings
<Config. del sistema>. (Consulte la página 96).
2. Pulse el botón [Menu] y mueva el interruptor
[▲ / ▼ ]. Pulse el botón [OK] tras seleccionar
Settings <Ajustes>.
3. Mueva el interruptor [▲ /▼ ] hasta seleccionar
Size <Tamaño> y pulse el botón [OK].
◆ 720: Selecciona 720 píxeles.
◆ 352: Selecciona 352 píxeles.
4. Mueva el interruptor [▲ /▼ ] hasta seleccionar
el tamaño de archivo de vídeo y pulse el
botón [OK].
5. Pulse el botón [Menu] para finalizar el ajuste.
◆ Aparece el icono de la función seleccionada.
Notas
✤ Si selecciona Back <Volver> en el menú, aparece
el menú anterior.
✤ Mantenga pulsado el botón [Menu] en la
modalidad Video Record <Grabar vídeo>,
así podrá ir directamente a Settings <Ajustes>.
ESPAÑOL
Page 47

ENGLISH
Video Record
SF / 720
00:00 / 10:57
STBY
Video In
Record
Settings
Back
Play
Settings
Back
White Balance
Auto
Size 720
EIS
On
Focus
AF
White Balance
Auto
Video Settings
Size 720
EIS
On
Focus
AF
Quality
Super Fine
White Balance
Auto
Size 720
EIS
On
Focus
AF
White Balance
Auto
Video Settings
Size 720
EIS
On
Focus
AF
Quality
Fine
Video Record
00:00 / 16:25
F / 720
STBY
Video Mode : Setting Various Functions
Modalidad de vídeo:
Ajustes de diversas funciones
Setting the Video file Quality Ajuste de la calidad del archivo de vídeo
You can set the quality for video files. The number of stored files
varies depending on the Memory Stick capacity and video file quality.
1. Move [Mode Selector] down to turn on the
CAM.
◆ The Video Record screen appears.
◆ You can select Video mode or Previous
mode as the start-up mode in System
Settings. (Refer to page 96)
2. Press the [Menu] button and move the
[ ▲ /▼ ] switch.
Press the [OK] button after selecting <Settings>.
3. Move the [ ▲ /▼ ] switch to select <Quality>
and press the [OK] button.
◆ SF(Super Fine): Select highest quality.
◆ F(Fine): Select high quality.
◆ N(Normal): Select normal quality.
4. Move the [ ▲ /▼ ] switch to select the video
file quality and press the [OK] button.
5. Press the [Menu] button to finish setting.
◆ The icon of selected function is displayed.
Notes
✤ If you select <Back> in the menu, the previous
menu appears.
✤ If you use the Memory Stick, you can select the
size and quality of 720/Normal, 352/Fine and
352/Normal only.
✤ Press and hold the [Menu] button in Video Record
mode, you can move to <Settings> directly.
2
3
4
5
Es posible definir la calidad de los archivos de vídeo. El número de
archivos almacenados varía dependiendo de la capacidad del Memory
Stick y la calidad del archivo de vídeo.
1. Mueva el [Selector de modalidad] hacia abajo
para encender la VIDEOCÁMARA.
◆ Aparece la pantalla Video Record <Grabar
vídeo>.
◆ Puede seleccionar la modalidad Video
<Vídeo> o la modalidad anterior como la
modalidad de inicio en System Settings
<Config. del sistema>. (Consulte la página 96).
2. Pulse el botón [Menu] y mueva el interruptor
[▲ / ▼ ]. Pulse el botón [OK] tras seleccionar
Settings <Ajustes>.
3. Mueva el interruptor [▲ / ▼ ] hasta seleccionar
Quality <Calidad> y pulse el botón [OK].
◆ SF(Superfino): Selecciona la calidad más alta.
◆ F(Fino): Selecciona una calidad alta.
◆ N(Normal): Selecciona una calidad normal.
4. Mueva el interruptor [▲ / ▼ ] hasta seleccionar
la calidad de archivo de vídeo y pulse el
botón [OK].
5. Pulse el botón [Menu] para finalizar el ajuste.
◆ Aparece el icono de la función seleccionada.
Notas
✤ Si selecciona Back <Volver> en el menú, aparece
el menú anterior.
✤ Si utiliza el Memory Stick, puede seleccionar
únicamente el tamaño y la calidad 720/Normal,
352/Fine <Fino> y 352/Normal.
✤ Mantenga pulsado el botón [Menu] en la
modalidad Video Record <Grabar vídeo>,
así podrá ir directamente a Settings <Ajustes>.
ESPAÑOL
4747
Page 48

ENGLISH
Video Record
SF / 720
00:00 / 10:57
STBY
Video In
Record
Settings
Back
Play
Settings
Back
White Balance
Auto
Quality
Super Fine
Size 720
On
EIS
White Balance
Auto
Video Settings
Quality
Super Fine
Size 720
On
Focus
AF
EIS
White Balance
Auto
Quality
Super Fine
Size 720
EIS
On
White Balance
Auto
Video Settings
Quality
Super Fine
Size 720
EIS
On
Focus
MF
BLC
Video Record
00:00 / 10:57
SF / 720
STBY
Video Mode : Setting Various Functions
Modalidad de vídeo:
Ajustes de diversas funciones
Setting the Focus Ajuste del enfoque
You can set the focus depending on the subject or the environment.
In most situations, you can record best using AF(Auto Focus).
1. Move [Mode Selector ] down to turn on the CAM.
◆ The Video Record screen appears.
◆ You can select Video mode or Previous mode
as the start-up mode in System Settings.
(Refer to page 96)
2. Press the [Menu] button and move the [ ▲/ ▼]
switch.
Press the [OK] button after selecting <Settings>.
3. Move the [ ▲/ ▼ ] switch to select <Focus> and
press the [OK] button.
◆ AF: Set the focus automatically. When the CAM
turns on, AF is selected in default.
◆ MF( ): Set the focus manually.
4. Move the [ ▲/ ▼ ] switch to select desired setting
and press the [OK] button.
5. Press the [Menu] button to finish setting.
◆ The icon of selected function is displayed.
◆ If you select the AF, any icon is not displayed.
Manual Focus
Adjust the focus using [ + ] / [ - ] button to zoom in
or out manually.
◆ When a picture contains objects that are both
close and far away from the CAM.
◆ When a person is enveloped in fog or
surrounded by snow.
Notes
4848
✤ If you select <Back> in the menu, the previous
menu appears.
✤ Press and hold the [Menu] button in Video Record mode,
you can move to <Settings> directly.
2
3
4
5
Puede definir el enfoque dependiendo del objeto o del entorno. En la mayoría
de las situaciones, el mejor método para grabar es AF (Enfoque automático).
ESPAÑOL
1. Mueva el [Selector de modalidad] hacia abajo
para encender la VIDEOCÁMARA.
◆ Aparece la pantalla Video Record <Grabar vídeo>.
◆ Puede seleccionar la modalidad Video <Vídeo>
o la modalidad anterior como la modalidad de
inicio en System Settings <Config. del sistema>.
(Consulte la página 96).
2. Pulse el botón [Menu] y mueva el interruptor
[▲ / ▼ ]. Pulse el botón [OK] tras seleccionar
Settings <Ajustes>.
3. Mueva el interruptor [▲ /▼ ] hasta seleccionar
Focus <Enfoque> y pulse el botón [OK].
◆ AF: Enfoca automáticamente. Cuando se
enciende la VIDEOCÁMARA, AF se
selecciona por defecto.
◆ MF( ): Fija el enfoque manual.
4. Mueva el interruptor [▲ /▼ ] hasta seleccionar el
ajuste que desea y pulse el botón [OK].
5. Pulse el botón [Menu] para finalizar el ajuste.
◆ Aparece el icono de la función seleccionada.
◆ Si selecciona AF, no aparece ningún icono.
Enfoque manual
Enfoque utilizando el botón [+] / [ - ] para acercar o
alejar el zoom manualmente.
◆ Cuando una imagen contenga objetos que estén
cerca y lejos de la VIDEOCÁMARA.
◆ Cuando haya una persona entre la niebla o
rodeada de nieve.
Notas
✤ Si selecciona Back <Volver> en el menú, aparece el
menú anterior.
✤ Mantenga pulsado el botón [Menu] en la modalidad
Video Record <Grabar vídeo>, así podrá ir
directamente a Settings <Ajustes>.
Page 49

ENGLISH
White Balance
Auto
Focus
AF
Quality
Super Fine
Size 720
White Balance
Auto
Focus
AF
Video Settings
Quality
Super Fine
Size 720
EIS
On
White Balance
Auto
Focus
AF
Quality
Super Fine
Size 720
White Balance
Auto
Focus
AF
Video Settings
Quality
Super Fine
Size 720
EIS
Off
Video Record
00:00 / 10:57
SF / 720
STBY
Video Record
SF / 720
00:00 / 10:57
STBY
Video In
Record
Settings
Back
Play
Settings
Back
Video Mode : Setting Various Functions
Modalidad de vídeo:
Ajustes de diversas funciones
ESPAÑOL
Setting the EIS (Electronic Image Stabilizer)
The Electrical Image Stabilizer is a function that compensates for hand
shake and other movements while recording.
EIS provides more stable video when:
◆ Recording with zooming
◆ Recording small objects
◆ Recording while walking or moving
◆ Recording through the window in the vehicle
1. Move [Mode Selector] down to turn on the
CAM.
◆ The Video Record screen appears.
◆ You can select Video mode or Previous
mode as the start-up mode in System
Settings. (Refer to page 96)
2. Press the [Menu] button and move the
[ ▲ /▼ ] switch.
Press the [OK] button after selecting
<Settings>.
3. Move the [ ▲ /▼ ] switch to select <EIS> and
press the [OK] button.
◆ On( ): Set the EIS function.
◆ Off: Cancel the EIS function.
4. Move the [ ▲ /▼ ] switch to select desired
setting and press the [OK] button.
5. Press the [Menu] button to finish setting.
◆ The icon of selected function is displayed.
Notes
✤ If you select <Back> in the menu, the previous
menu appears.
✤ Press and hold the [Menu] button in Video Record
mode, you can move to <Settings> directly.
2
3
4
5
Ajuste de EIS (Estabilizador electrónico de la imagen)
El estabilizador electrónico de la imagen es una función que compensa
los temblores de la mano y otros movimientos mientras se graba.
EIS proporciona vídeo más estable:
◆ Al grabar con zoom;
◆ Al grabar objetos pequeños;
◆ Al grabar mientras se camina o se está en
movimiento;
◆ Al grabar por la ventana de un coche.
1. Mueva el [Selector de modalidad] hacia abajo
para encender la VIDEOCÁMARA.
◆ Aparece la pantalla Video Record <Grabar
vídeo>.
◆ Puede seleccionar la modalidad Video
<Vídeo> o la modalidad anterior como la
modalidad de inicio en System Settings
<Config. del sistema>. (Consulte la página 96).
2. Pulse el botón [Menu] y mueva el interruptor
[▲ / ▼ ]. Pulse el botón [OK] tras seleccionar
Settings <Ajustes>.
3. Mueva el interruptor [▲ / ▼ ] hasta seleccionar
EIS y pulse el botón [OK].
◆ On <Act.> ( ): Ajusta la función EIS.
◆ Off <Des.>: Cancela la función EIS.
4. Mueva el interruptor [▲ / ▼ ] hasta seleccionar
el ajuste que desea y pulse el botón [OK].
5. Pulse el botón [Menu] para finalizar el ajuste.
◆ Aparece el icono de la función seleccionada.
Notas
✤ Si selecciona Back <Volver> en el menú, aparece
el menú anterior.
✤ Mantenga pulsado el botón [Menu] en la
modalidad Video Record <Grabar vídeo>,
así podrá ir directamente a Settings <Ajustes>.
4949
Page 50

ENGLISH
Digital Zoom
Off
BLC
Off
Effect
Off
Program AE
Auto
Digital Zoom
Off
BLC
Off
Video Settings
Effect
Off
Program AE
Auto
White Balance Auto
Digital Zoom
Off
BLC
Off
Effect
Off
Program AE
Auto
Digital Zoom
Off
BLC
Off
Video Settings
Effect
Off
Program AE
Auto
White Balance Outdoor
BLC
Video Record
00:00 / 10:57
SF / 720
STBY
Video Record
SF / 720
00:00 / 10:57
STBY
Video In
Record
Settings
Back
Play
Settings
Back
Video Mode : Setting Various Functions
Modalidad de vídeo:
Ajustes de diversas funciones
Setting the White Balance Ajuste del balance de blanco
The White Balance may vary depending on the lighting conditions.
The White Balance is used to preserve natural colours under different
lighting conditions.
1. Move [Mode Selector] down to turn on the CAM.
◆ The Video Record screen appears.
◆ You can select Video mode or Previous mode as
the start-up mode in System Settings.
(Refer to page 96)
2. Press the [Menu] button and move the [ ▲/ ▼]
switch.
Press the [OK] button after selecting <Settings>.
3. Move the [ ▲/ ▼ ] switch to select <White Balance>
and press the [OK] button.
◆ Auto: Adjust the colour depending on the condition
automatically.
◆ Hold( ): Record with first selected colour
without adjusting colour.
◆ Outdoor( ): Record with the balanced light.
(Natural light)
◆ Indoor( ): Record with the balanced light.
(Glow lamp or light in the studio)
4. Move the [ ▲/ ▼ ] switch to select desired setting
and press the [OK] button.
5. Press the [Menu] button to finish setting.
◆ The icon of selected function is displayed.
◆ If you select <Auto>, any icon is not displayed.
Notes
✤ If you select <Back> in the menu, the previous menu
5050
appears.
✤ Turn the Digital Zoom off for more accurate White
Balance setting.
✤ Press and hold the [Menu] button in Video Record
mode, you can move to <Settings> directly.
2
3
4
5
El balance de blanco puede variar dependiendo de las condiciones de luz.
White Balance <Balance de blanco> se utiliza para conservar los colores
naturales bajo diferentes condiciones de luz.
1. Mueva el [Selector de modalidad] hacia abajo
2. Pulse el botón [Menu] y mueva el interruptor
3. Mueva el interruptor [▲ /▼ ] hasta seleccionar
4. Mueva el interruptor [▲ /▼ ] hasta seleccionar el
5. Pulse el botón [Menu] para finalizar el ajuste.
✤ Si selecciona Back <Volver> en el menú, aparece el
✤ Apague el Zoom digital para un ajuste de Balance de
✤ Mantenga pulsado el botón [Menu] en la modalidad
ESPAÑOL
para encender la VIDEOCÁMARA.
◆ Aparece la pantalla Video Record <Grabar vídeo>.
◆ Puede seleccionar la modalidad Video <Vídeo>
o la modalidad anterior como la modalidad de
inicio en System Settings <Config. del sistema>.
(Consulte la página 96).
[▲ / ▼ ]. Pulse el botón [OK] tras seleccionar
Settings <Ajustes>.
White Balance <Balance de blanco> y pulse el
botón [OK].
◆ Auto: Ajusta el color automáticamente
dependiendo de las condiciones
◆ Hold( ): Graba con el primer color
seleccionado sin ajustar el color.
◆ Outdoor( ): Graba con el balance de luz.
(Luz natural)
◆ Indoor( ): Graba con el balance de luz.
(Lámpara brillante o luz en el estudio)
ajuste que desea y pulse el botón [OK].
◆ Aparece el icono de la función seleccionada.
◆ Si selecciona Auto <Autom.>, no aparece ningún
icono.
Notas
menú anterior.
blanco más preciso.
Video Record <Grabar vídeo>, así podrá ir
directamente a Settings <Ajustes>.
Page 51

ENGLISH
White Balance Auto
Digital Zoom
Off
BLC
Off
Effect
Off
White Balance Auto
Digital Zoom
Off
BLC
Off
Video SettingsVideo Settings
Effect
Off
Program AE
Auto
White BalanceWhite Balance Auto
Digital Zoom
Off
BLC
Off
Effect
Off
White Balance Auto
Digital Zoom
Off
BLC
Off
Video Settings
Effect
Off
Program AE
Sports
BLC
Video Record
00:00 / 10:57
SF / 720
STBY
Video Record
SF / 720
00:00 / 10:57
STBY
Video In
Record
Settings
Back
Play
Settings
Back
Video Mode : Setting Various Functions
Modalidad de vídeo:
Ajustes de diversas funciones
ESPAÑOL
Setting the Program AE (Programmed Auto Exposure)
It allows you to adjust the aperture setting to suit different conditions.
1. Move [Mode Selector ] down to turn on the CAM.
◆ The Video Record screen appears.
◆ You can select Video mode or Previous mode
as the start-up mode in System Settings.
(Refer to page 96)
2. Press the [Menu] button and move the [ ▲/ ▼]
switch.
Press the [OK] button after selecting <Settings>.
3. Move the [ ▲/ ▼ ] switch to select <Program AE>
and press the [OK] button.
◆ Auto: Auto balance between the subject and
background to get the best result. The shutter
speed automatically varies from 1/60 to 1/250
per second depending on the scene.
◆ Sport s ( ): For recording fast-moving people
or objects. It is suitable for sports events,
recording outside in the car.
◆ Spotlight ( ): Compensates for a subject
that appears too bright under strong direct light
such as spotlight. It is suitable for concert and
school performance.
◆ Sand / Snow ( ): Use when the light is very
strong such as on the beach or in the snow.
◆ HS Shutter ( ): Allows fast-moving images
to be captured one frame at a time.
4. Move the [ ▲/ ▼ ] switch to select desired setting
and press the [OK] button.
5. Press the [Menu] button to finish setting.
◆ The icon of selected function is displayed.
◆ If you select <Auto>, any icon is not displayed.
Notes
✤ If you select <Back> in the menu, the previous
menu appears.
✤ Press and hold the [Menu] button in Video Record
mode, you can move to <Settings> directly.
Ajuste del Programa AE (Exposición automática programada)
Permite ajustar la apertura para adaptarla a diferentes condiciones.
2
3
4
5
✤ Mantenga pulsado el botón [Menu] en la modalidad Video Record
<Grabar vídeo>, así podrá ir directamente a Settings <Ajustes>.
1. Mueva el [Selector de modalidad] hacia abajo
para encender la VIDEOCÁMARA.
◆ Aparece la pantalla Video Record <Grabar vídeo>.
◆ Puede seleccionar la modalidad Video <Vídeo> o
la modalidad anterior como la modalidad de
inicio en System Settings <Config. del sistema>.
(Consulte la página 96).
2. Pulse el botón [Menu] y mueva el interruptor
[▲ / ▼ ]. Pulse el botón [OK] tras seleccionar
Settings <Ajustes>.
3. Mueva el interruptor [▲ /▼ ] hasta seleccionar
Program AE <Programa AE> y pulse el botón [OK].
◆ Auto: Balance automático entre el sujeto y el
fondo para obtener el mejor resultado. La
velocidad del obturador se ajusta automáticamente
entre 1/60 y 1/250 por segundo, según la escena
que se esté grabando.
◆ Sport s( ): Para grabación rápida con
movimiento de gente u objetos. Es ideal para
acontecimientos deportivos, grabaciones de
exterior en coche.
◆ Spotlight( ): Compensa un objeto que
aparece demasiado brillante bajo la luz directa
como un foco. Es ideal para conciertos y
actuaciones escolares.
◆ Sand / Snow( ): Se utiliza cuando la luz es
muy fuerte, como en la playa o en la nieve.
◆ HS Shutter( ): Permite capturar imágenes en
rápido movimiento por fotogramas.
4. Mueva el interruptor [▲ /▼ ] hasta seleccionar el
ajuste que desea y pulse el botón [OK].
5. Pulse el botón [Menu] para finalizar el ajuste.
◆ Aparece el icono de la función seleccionada.
◆ Si selecciona Auto <Autom.>, no aparece ningún
icono.
Notas
✤ Si selecciona Back <Volver> en el menú, aparece el
menú anterior.
5151
Page 52

ENGLISH
White Balance Auto
Program AE
Auto
Digital Zoom
Off
Effect
Off
White Balance Auto
Program AE
Auto
Digital Zoom
Off
BLC
Off
Video SettingsVideo Settings
Effect
Off
Video Settings
Effect
White Balance Auto
Program AE
Auto
Off
Digital Zoom
Off
Effect
White Balance Auto
Program AE
Auto
Off
Digital Zoom
Off
BLC
On
Video SettingsVideo Settings
Video Record
00:00 / 10:57
SF / 720
BLC
STBY
Video Record
SF / 720
00:00 / 10:57
STBY
Video In
Record
Settings
Back
Play
Settings
Back
Video Mode : Setting Various Functions
Modalidad de vídeo:
Ajustes de diversas funciones
Setting the BLC (Backlight Compensation) Ajuste de BLC (Compensación de luz de fondo)
The Backlight Compensation function helps to make the subject
brighter when the subject is in front of a window or the subject is too
dark to distinguish. You can use this function when
using your the CAM in the bright background and
2
snowy background.
1. Move [Mode Selector] down to turn on the
CAM.
◆ The Video Record screen appears.
◆ You can select Video mode or Previous
mode as the start-up mode in System
3
Settings. (Refer to page 96)
2. Press the [Menu] button and move the
[ ▲ /▼ ] switch.
Press the [OK] button after selecting
<Settings>.
3. Move the [ ▲ /▼ ] switch to select <BLC> and
press the [OK] button.
4
◆ On( ): Set the BLC function.
◆ Off: Cancel the BLC function.
4. Move the [ ▲ /▼ ] switch to select desired
setting and press the [OK] button.
5. Press the [Menu] button to finish setting.
◆ < > is displayed.
Notes
✤ If you select <Back> in the menu, the previous
menu appears.
✤ Press and hold the [Menu] button in Video Record
mode, you can move to <Settings> directly.
5252
5
La función de compensación de luz de fondo ayuda a que el objeto sea
más brillante cuando se encuentra delante de una ventana o es muy
difícil de distinguir por ser demasiado oscuro. Puede
utilizar esta función al utilizar su VIDEOCÁMARA en
un ambiente brillante y un entorno nevado.
1. Mueva el [Selector de modalidad] hacia abajo
para encender la VIDEOCÁMARA.
◆ Aparece la pantalla Video Record <Grabar
vídeo>.
◆ Puede seleccionar la modalidad Video
<Vídeo> o la modalidad anterior como la
modalidad de inicio en System Settings
<Config. del sistema>. (Consulte la página 96).
2. Pulse el botón [Menu] y mueva el interruptor
[▲ / ▼ ]. Pulse el botón [OK] tras seleccionar
Settings <Ajustes>.
3. Mueva el interruptor [▲ /▼ ] hasta seleccionar
BLC y pulse el botón [OK].
◆ On <Act.> ( ): Fija la función BLC.
◆ Off <Des.>: Cancela la función BLC.
4. Mueva el interruptor [▲ /▼ ] hasta seleccionar
el ajuste que desea y pulse el botón [OK].
5. Pulse el botón [Menu] para finalizar el ajuste.
◆ Aparece < >
Notas
✤ Si selecciona Back <Volver> en el menú, aparece
el menú anterior.
✤ Mantenga pulsado el botón [Menu] en la
modalidad Video Record <Grabar vídeo>,
así podrá ir directamente a Settings <Ajustes>.
ESPAÑOL
Page 53

ENGLISH
White Balance Auto
Program AE
Auto
Digital Zoom
Off
BLC
Off
White Balance Auto
Program AE
Auto
Digital Zoom
Off
BLC
Off
Video SettingsVideo Settings
Effect
Off
White Balance Auto
Program AE
Auto
Digital Zoom
Off
BLC
Off
White Balance Auto
Program AE
Auto
Digital Zoom
Off
BLC
Off
Video SettingsVideo Settings
Effect
Mirror
Video Settings
BLC
Video Record
00:00 / 10:57
SF / 720
Mirror
STBY
Video Record
SF / 720
00:00 / 10:57
STBY
Video In
Record
Settings
Back
Play
Settings
Back
Video Mode : Setting Various Functions
Modalidad de vídeo:
Ajustes de diversas funciones
Setting the Effect Ajuste del efecto
You can create professional looking effect on your video file.
1. Move [Mode Selector ] down to turn on the CAM.
◆ The Video Record screen appears.
◆ You can select Video mode or Previous mode
as the start-up mode in System Settings.
(Refer to page 96)
2. Press the [Menu] button and move the [ ▲/ ▼]
switch.
Press the [OK] button after selecting <Settings>.
3. Move the [ ▲/ ▼ ] switch to select <Effect> and
press the [OK] button.
◆ Off: Cancel the <Effect>.
◆ Art: Artistic effects on your video file.
◆ Mosaic: A mosaic overlay appears on your
video file.
◆ Sepia: The picture is displayed in sepia colour
similar to that of an old photograph.
◆ Negative: Reverses the colours, creating the
look of a negative.
◆ Mirror : This mode cuts the picture in half using
a Mirror effect.
◆ B&W: Changes the images into Black and White.
◆ Emboss: Embossing effects on your video file.
4. Move the [ ▲/ ▼ ] switch to select desired setting
and press the [OK] button.
5. Press the [Menu] button to finish setting.
◆ The letters of selected function is displayed.
Notes
✤ If you select <Back> in the menu, the previous
menu appears.
✤ Press and hold the [Menu] button in Video Record mode,
you can move to <Settings> directly.
2
3
4
5
Es posible crear un efecto de aspecto profesional en su archivo de vídeo.
ESPAÑOL
1. Mueva el [Selector de modalidad] hacia abajo
para encender la VIDEOCÁMARA.
◆ Aparece la pantalla Video Record <Grabar vídeo>.
◆ Puede seleccionar la modalidad Video <Vídeo>
o la modalidad anterior como la modalidad de
inicio en System Settings <Config. del sistema>.
(Consulte la página 96).
2. Pulse el botón [Menu] y mueva el interruptor
[▲ / ▼ ]. Pulse el botón [OK] tras seleccionar
Settings <Ajustes>.
3. Mueva el interruptor [▲ /▼ ] hasta seleccionar
Effect <Efecto> y pulse el botón [OK].
◆ Off: Cancela el efecto.
◆ Art: Efectos artísticos en el archivo de vídeo.
◆ Mosaic: En el vídeo aparece una presentación
en mosaico.
◆ Sepia: La imagen aparece en color sepia similar
a una fotografía antigua.
◆ Negative: Invierte los colores, creando el
aspecto en negativo.
◆ Mirror : Esta modalidad divide la imagen en dos,
empleando un efecto de espejo.
◆ B&W: Cambia la imagen a blanco y negro
◆ Emboss: Efectos de relieve en el archivo de
vídeo.
4. Mueva el interruptor [▲ /▼ ] hasta seleccionar el
ajuste que desea y pulse el botón [OK].
5. Pulse el botón [Menu] para finalizar el ajuste.
◆ Aparecen las letras de la función seleccionada.
Notas
✤ Si selecciona Back <Volver> en el menú, aparece el
menú anterior
✤ Mantenga pulsado el botón [Menu] en la modalidad
Video Record <Grabar vídeo>, así podrá ir
directamente a Settings <Ajustes>.
5353
Page 54

ENGLISH
Effect
White Balance Auto
Program AE
Auto
Off
BLC
Off
Effect
White Balance Auto
Program AE
Auto
Off
Digital Zoom
Off
BLC
Off
Video SettingsVideo Settings
Effect
White Balance Auto
Program AE
Auto
Off
BLC
Off
Effect
White Balance Auto
Program AE
Auto
Off
Digital Zoom
On
BLC
Off
Video SettingsVideo Settings
Video Record
00:00 / 10:57
SF / 720
STBY
Video Record
SF / 720
00:00 / 10:57
STBY
Video In
Record
Settings
Back
Play
Settings
Back
Video Mode : Setting Various Functions
Modalidad de vídeo:
Ajustes de diversas funciones
Setting the Digital Zoom Ajuste del zoom digital
Zooming more than 10x is achieved digitally, up to
100X when combined with optical zoom.
The Digital Zoom processes data to enlarge the
centre portion of the image to fill the frame may
produce a less detailed and slightly grainy picture.
1. Move [Mode Selector] down to turn on the
CAM.
◆ The Video Record screen appears.
◆ You can select Video mode or Previous
mode as the start-up mode in System
Settings. (Refer to page 96)
2. Press the [Menu] button and move the
[ ▲ /▼ ] switch. Press the [OK] button after
selecting <Settings>.
3. Move the [ ▲ /▼ ] switch to select <Digital
Zoom> and press the [OK] button.
◆ On: Set the Digital Zoom. (X100)
◆ Off: Cancel the Digital Zoom.
4. Move the [ ▲ /▼ ] switch to select desired
setting and press the [OK] button.
5. Press the [Menu] button to finish setting.
◆ 4 zoom indicators increase after setting the
Digital Zoom.
Notes
✤ If you select <Back> in the menu, the previous
5454
menu appears.
✤ Press and hold the [Menu] button in Video Record
mode, you can move to <Settings> directly.
2
3
4
5
✤ Mantenga pulsado el botón [Menu] en la modalidad Video Record
<Grabar vídeo>, así podrá ir directamente a Settings <Ajustes>.
ESPAÑOL
Un zoom por encima de 10x se obtiene digitalmente
hasta 100x cuando se combina con el zoom óptico.
El zoom digital procesa datos para ampliar la parte
central de la imagen para llenar el fotograma; puede
producir una imagen ligeramente granulosa menos
detallada.
1. Mueva el [Selector de modalidad] hacia abajo
para encender la VIDEOCÁMARA.
◆ Aparece la pantalla Video Record <Grabar
vídeo>.
◆ Puede seleccionar la modalidad Video
<Vídeo> o la modalidad anterior como la
modalidad de inicio en System Settings
<Config. del sistema>. (Consulte la página 96).
2. Pulse el botón [Menu] y mueva el interruptor
[ ▲ /▼ ]. Pulse el botón [OK] tras seleccionar
Settings <Ajustes>.
3. Mueva el interruptor [▲ /▼ ] hasta seleccionar
Digital Zoom <Zoom digital> y pulse el botón
[OK].
◆ On: Fija el zoom digital (X100)
◆ Off: Cancela el zoom digital
4. Mueva el interruptor [▲ /▼ ] hasta seleccionar
el ajuste que desea y pulse el botón [OK].
5. Pulse el botón [Menu] para finalizar el ajuste.
◆ 4 indicadores de zoom aumentan tras definir
el zoom digital.
Notas
✤ Si selecciona Back <Volver> en el menú, aparece
el menú anterior.
Page 55

ENGLISH
ESPAÑOL
2
2
Photo Mode
Capturing ................................................................................ 56
Capturing Images ................................................................ 56
Zooming In and Out ............................................................ 57
Viewing.................................................................................... 58
Viewing Photo files on the LCD Monitor............................. 58
Selecting File Options........................................................... 59
Deleting Photo files ............................................................. 59
Locking Photo files .............................................................. 60
Setting DPOF Function ....................................................... 61
Copying Photo files ............................................................. 62
Setting Various Functions.................................................... 63
Setting the Photo file Size................................................... 63
Setting the Light................................................................... 64
Setting the Focus ................................................................ 65
Setting the EIS (Electronic Image Stabilizer)...................... 66
Setting the White Balance................................................... 67
Setting the Program AE (Programmed Auto Exposure)..... 68
Setting the BLC (Backlight Compensation) ........................ 69
2
2
Captura.................................................................................... 56
Visualización .......................................................................... 58
Selección de opciones de archivo ...................................... 59
Ajustes de diversas funciones............................................. 63
Modalidad de foto
Captura de imágenes.......................................................... 56
Acercamiento y alejamiento de las imágenes.................... 57
Visualización de archivos de fotos en la pantalla LCD ...... 58
Eliminación de archivos de fotos ........................................ 59
Bloqueo de archivos de fotos.............................................. 60
Ajuste de la función DPOF.................................................. 61
Copia de archivos de fotos ................................................. 62
Ajuste del tamaño del archivo de foto ................................ 63
Ajuste de luz ........................................................................ 64
Ajuste del enfoque............................................................... 65
Ajuste de EIS (Estabilizador electrónico de la imagen) ..... 66
Ajuste del balance de blanco.............................................. 67
Ajuste del Programa AE
(Exposición automática programada) ................................. 68
Ajuste de BLC (Compensación de luz de fondo) ............... 69
5555
Page 56

ENGLISH
Mode Selection
MP3
Voice Recorder
File Browser
Video
Photo
Capturing...
800
Photo Capture
Photo Mode : Capturing Modalidad de foto: Captura
Capturing Images Captura de imágenes
You can take photo as well as record video files.
Puede hacer fotos y grabar archivos de vídeo.
ESPAÑOL
1. Move [Mode Selector] down to turn on the
CAM and move it down again.
◆ The Mode Selection screen appears.
2. Move the [ ▲ /▼ ] switch to select Photo
mode and press the [OK] button.
◆ The CAM is ready for taking pictures.
◆ [ ] indicator is displayed on LCD.
3. Press [Record /Stop] button to take pictures.
Note
✤ If the battery is low and the battery charge icon
blinks, the light will not operate and light icon is
set to off state.
5656
2
1. Baje el [Selector de modalidad] para
encender la VIDEOCÁMARA y bájelo de
nuevo.
◆ Aparece la pantalla Mode Selection
<Selección de modalidad>.
2. Mueva el interruptor [▲ /▼ ] hasta
seleccionar la modalidad Photo <Foto> y
pulse el botón [OK].
◆ La VIDEOCÁMARA está lista para tomar
imágenes.
◆ Aparece el indicador [ ] en la pantalla
LCD.
3. Pulse el botón [Record/Stop] para tomar
imágenes.
Nota
✤ Si la batería está baja y el icono aparece de forma intermitente, la
luz no funciona y el icono de luz aparece con el estado de
apagado.
Page 57

ENGLISH
BLC
800
Photo Capture
800
Photo Capture
800
Photo Capture
ESPAÑOL
Photo Mode : Capturing Modalidad de foto: Captura
Zooming In and Out Acercamiento y alejamiento de las imágenes
Zooming technique lets you change the size of the subject captured in
a scene.
El uso de la técnica del zoom permite modificar el tamaño del
encuadre de las escenas.
1. Move [Mode Selector] down to turn on the CAM and move it
down again.
◆ The Mode Selection screen appears.
2. Move the [ ▲ /▼ ] switch to select Photo mode and press the
[OK] button.
◆ To take pictures, press the [Record/Stop] button again.
Zoom Out
Move the [ ▲ /▼ ] switch
up to zoom out.
• The subject appears
farther away when you
zoom out.
Move the [ ▲ /▼ ] switch
down to zoom in.
• The subject appears
closer when you zoom in.
Note
✤ Frequent use of zooming may result in
higher battery power consumption.
Zoom In
1. Baje el [Selector de modalidad] para encender la
VIDEOCÁMARA y bájelo de nuevo.
◆ Aparece la pantalla Mode Selection <Selección de modalidad>.
2. Mueva el interruptor [▲ /▼ ] hasta seleccionar la modalidad
Photo <Foto> y pulse el botón [OK].
◆ Para tomar imagines, pulse el botón [Record/Stop].
Mueva el interruptor
[ ▲ /▼ ] hacia arriba para
alejar el zoom.
• El objeto se aleja al
alejar el zoom.
Mueva el interruptor
[ ▲ /▼ ] hacia abajo para
acercar el zoom.
• El objeto aparece más
cerca cuando se aplica el
zoom.
Nota
✤ El uso frecuente del zoom puede producir
un consumo más alto de la batería.
5757
Page 58

ENGLISH
Mode Selection
MP3
Voice Recorder
File Browser
Video
Photo
Capturing...
800
Photo Capture
View
Capture
Settings
Back
Photo View 100-0022
Capturing...
Photo View 100-0022
ESPAÑOL
Photo Mode : Viewing Modalidad de foto: Visualización
Viewing Photo files on the LCD Monitor
It is handy and practical to view pictures using the LCD monitor almost
anywhere such as in a car, indoors or outdoors.
1. Move [Mode Selector] down to turn on the
CAM and move it down again.
◆ The Mode Selection screen appears.
2. Move the [ ▲ /▼ ] switch to select Photo mode
and press the [OK] button.
◆ The Photo Capture screen appears.
3. Press the [Menu] button and move the
[ ▲ /▼ ] switch.
Press the [OK] button after selecting <View>.
4. Move the [ ▲ /▼ ] switch to find the photo you
want to view.
◆ Each time you move the [ ▲ /▼ ] switch, the
frame moves horizontally.
◆ Each time you press the [+]/[ -] button,
another page of 6 frames is displayed.
5. Press [OK] button to view the photo you want.
◆ The full screen is displayed.
Note
5858
✤ Display time may vary depending on the picture
size.
2
3
4
5
Visualización de archivos de fotos en la pantalla LCD
Resulta útil y práctico ver imágenes utilizando la pantalla LCD casi en
cualquier sitio, como en un coche, en interiores o en exteriores.
1. Baje el [Selector de modalidad] para encender
la VIDEOCÁMARA y bájelo de nuevo.
◆ Aparece la pantalla Mode Selection
<Selección de modalidad>.
2. Mueva el interruptor [▲ /▼ ] hasta
seleccionar la modalidad Photo y pulse el
botón [OK].
◆ Aparece la pantalla Photo Capture <Capturar
foto>.
3. Pulse el botón [Menu] y mueva el interruptor
[▲ / ▼ ]. Pulse el botón [OK] tras seleccionar
View <Ver>.
4. Mueva el interruptor [▲ /▼ ] hasta encontrar
la foto que desea ver.
◆ Cada vez que mueva el interruptor [▲ / ▼ ],
se desplaza horizontalmente un fotograma.
◆ Cada vez que pulse el botón [+]/[ - ], aparece
una nueva página (6 fotogramas).
5. Pulse el botón [OK] para ver la foto que
desea.
◆ Aparece la pantalla completa.
Nota
✤ El tiempo de visualización puede variar
dependiendo del tamaño de la imagen.
Page 59

ENGLISH
800
Photo Capture
View
Capture
Settings
Back
01 03
Photo View 100-0022
View
File Options
Capture
Back
01 03
Photo View 100-0022
Lock
Copy To
Delete
DPOF
Back
Photo View 100-0022
01 03
Lock
Copy To ext.
Delete
DPOF
Back
Selected
All
Cancel
Choose the file(s)
to delete
Photo Mode : Selecting File Options
Modalidad de foto:
Selección de opciones de archivo
Deleting Photo files Eliminación de archivos de fotos
You can delete photo files in <File Options>.
1. Move [Mode Selector] down to turn on the
CAM and move it down again.
◆ The Mode Selection screen appears.
2. Move the [ ▲ /▼ ] switch to select Photo
mode and press the [OK] button.
◆ The Photo Capture screen appears.
3. Press the [Menu] button and move the
[ ▲ /▼ ] switch.
Press the [OK] button after selecting <View>.
4. Move the [ ▲ /▼ ] switch to select the photo
file you want to delete.
5. Press the [Menu] button to select <File
Options> and press the [OK] button.
◆ You can select <File Options> only in Photo
View mode.
6. Move the [ ▲ /▼ ] switch to select <Delete>
and press the [OK] button.
7. Move the [ ▲ /▼ ] switch to select the
followings and press the [OK] button.
◆ Selected: The selected photo file is deleted.
◆ All: All photo files are deleted.
◆ Cancel: Cancel deleting photo files.
Note
✤ Press and hold the [Menu] button in Photo View
mode, you can move to <File Options> directly.
3
5
6
7
Los archivos de foto se pueden borrar en File Options <Opciones de
archivo>.
1. Baje el [Selector de modalidad] para encender
la VIDEOCÁMARA y bájelo de nuevo.
◆ Aparece la pantalla Mode Selection
2. Mueva el interruptor [▲ / ▼ ] hasta seleccionar
la modalidad Photo y pulse el botón [OK].
◆ Aparece la pantalla Photo Capture <Capturar
3. Pulse el botón [Menu] y mueva el interruptor
[▲ / ▼ ]. Pulse el botón [OK] tras seleccionar
View <Ver>.
4. Mueva el interruptor [▲ / ▼ ] hasta seleccionar
el archivo de foto que desea borrar.
5. Pulse el botón [Menu] hasta seleccionar File
Options <Opciones de archivo> y pulse el
botón [OK].
◆ Puede seleccionar File Options <Opciones de
6. Mueva el interruptor [▲ / ▼ ] hasta seleccionar
Delete <Borrar> y pulse el botón [OK].
7. Mueva el interruptor [▲ / ▼ ] para seleccionar
los siguientes y pulse el botón [OK].
◆ Selected <Seleccionado>: Se borra el
◆ All <Todo>: Se borran todos los archivos de
◆ Cancel <Cancelar>: Cancela la supresión de
Nota
✤ Mantenga pulsado el botón [Menu] en la modalidad
Photo View <Ver foto>, así podrá ir directamente a
File Options <Opciones de archivo>.
ESPAÑOL
<Selección de modalidad>.
foto>.
archivo> sólo en la modalidad Photo Video
<Vídeo fotográfico>.
archivo de foto seleccionado.
fotos.
archivos de fotos.
5959
Page 60

ENGLISH
800
Photo Capture
View
Capture
Settings
Back
01 03
Photo View 100-0022
View
File Options
Capture
Back
01 03
Photo View 100-0022
Lock
Copy To
Delete
DPOF
Back
Photo View 100-0022
01 03
Lock
Copy To ext.
Delete
DPOF
Back
Selected
All
Cancel
Choose the file(s) you would
to lock.
Photo Mode : Selecting File Options
Modalidad de foto:
Selección de opciones de archivo
Locking Photo files Bloqueo de archivos de fotos
You can lock the important photo file not to be deleted.
1. Move [Mode Selector] down to turn on the
CAM and move it down again.
◆ The Mode Selection screen appears.
2. Move the [ ▲ /▼ ] switch to select Photo mode
and press the [OK] button.
◆ The Photo Capture screen appears.
3. Press the [Menu] button and move the [ ▲ /▼ ]
switch.
Press the [OK] button after selecting <View>.
4. Move the [ ▲ /▼ ] switch to select the photo file
you want to lock.
5. Press the [Menu] button to select <File
Options> and press the [OK] button.
◆ You can select <File Options> only in Photo
View mode.
6. Move the [ ▲ /▼ ] switch to select <Lock> and
press the [OK] button.
7. Move the [ ▲ /▼ ] switch to select the
followings and press the [OK] button.
◆ Selected: The selected photo file is locked.
◆ All: All photo files are locked.
◆ Cancel: Cancel locking photo files.
6060
Notes
✤ Press and hold the [Menu] button in Photo View
mode, you can move to <File Options> directly.
✤ The < > icon is displayed on the locked file.
3
5
6
7
Puede bloquear archivos de fotos importantes para evitar que se borren.
1. Baje el [Selector de modalidad] para encender
2. Mueva el interruptor [▲ /▼ ] hasta seleccionar
3. Pulse el botón [Menu] y mueva el interruptor
4. Mueva el interruptor [▲ /▼ ] hasta seleccionar
5. Pulse el botón [Menu] hasta seleccionar File
6. Mueva el interruptor [▲ /▼ ] hasta seleccionar
7. Mueva el interruptor [▲ /▼ ] para seleccionar
✤ Mantenga pulsado el botón [Menu] en la modalidad
✤ Aparece el icono < > sobre el archivo bloqueado.
ESPAÑOL
la VIDEOCÁMARA y bájelo de nuevo.
◆ Aparece la pantalla Mode Selection
<Selección de modalidad>.
la modalidad Photo y pulse el botón [OK].
◆ Aparece la pantalla Photo Capture <Capturar
foto>.
[▲ / ▼ ]. Pulse el botón [OK] tras seleccionar
View <Ver>.
el archivo de foto que desea bloquear.
Options <Opciones de archivo> y pulse el
botón [OK].
◆ Puede seleccionar File Options <Opciones de
archivo> sólo en la modalidad Photo Video
<Vídeo fotográfico>.
Lock <Bloquear> y pulse el botón [OK].
los siguientes y pulse el botón [OK].
◆ Selected <Seleccionado>: Se bloquea el
archivo de foto seleccionado.
◆ All <Todo>: Se bloquean todos los archivos
de fotos.
◆ Cancel <Cancelar>: Cancela el bloqueo de
archivos de foto.
Notas
Photo View <Ver foto>, así podrá ir directamente a
File Options <Opciones de archivo>.
Page 61

ENGLISH
800
Photo Capture
View
Capture
Settings
Back
01 03
Photo View 100-0022
View
File Options
Capture
Back
01 03
Photo View 100-0022
Lock
Copy To
Delete
DPOF
Back
Photo View 100-0022
01 03
Lock
Copy To ext.
Delete
DPOF
Back
copies for DPOF print
Press OK to set.
Press to cancel.
2
Photo Mode : Selecting File Options
Modalidad de foto:
ESPAÑOL
Selección de opciones de archivo
Setting DPOF (Digital Print Order Format) Function
1. Move [Mode Selector] down to turn on the
CAM and move it down again.
◆ The Mode Selection screen appears.
2. Move the [ ▲ /▼ ] switch to select Photo mode
and press the [OK] button.
◆ The Photo Capture screen appears.
3. Press the [Menu] button and move the
[ ▲ /▼ ] switch.
Press the [OK] button after selecting <View>.
4. Move the [ ▲ /▼ ] switch to select the photo
file you want to print.
5. Press the [Menu] button to select <File
Options> and press the [OK] button.
6. Move the [ ▲ /▼ ] switch to select <DPOF>
and press the [OK] button.
◆ You can select <DPOF> only when you’ve
selected storage type ‘External’.
Refer to page 33.
7. Move the [ ▲ /▼ ] switch to select copies you
want to print and press the [OK] button to set.
Notes
✤ Press and hold the [Menu] button in Photo View
mode, you can move to <File Options> directly.
✤ Refer to page 123 for further details about
printing DPOF files.
✤ You can set copies for DPOF print up to 30.
Ajuste de la función DPOF (Formato de orden de impresión digital)
3
5
6
7
1. Baje el [Selector de modalidad] para encender
la VIDEOCÁMARA y bájelo de nuevo.
◆ Aparece la pantalla Mode Selection <Selección
de modalidad>.
2. Mueva el interruptor [▲ /▼ ] hasta seleccionar
la modalidad Photo y pulse el botón [OK].
◆ Aparece la pantalla Photo Capture <Capturar
foto>.
3. Pulse el botón [Menu] y mueva el interruptor
[▲ / ▼ ]. Pulse el botón [OK] tras seleccionar
View <Ver>.
4. Mueva el interruptor [▲ /▼ ] hasta seleccionar
el archivo de foto que desea imprimir.
5. Pulse el botón [Menu] hasta seleccionar File
Options <Opciones de archivo> y pulse el
botón [OK].
6. Mueva el interruptor [▲ /▼ ] hasta seleccionar
DPOF y pulse el botón [OK].
◆ Puede seleccionar <DPOF> sólo cuando haya
seleccionado el tipo de almacenamiento
External <Externo>.Consulte la página 33.
7. Deslice el interruptor [▲ /▼ ] para seleccionar
el número de copias que desea imprimir y
pulse el botón [OK] para fijarlo.
Notas
✤ Mantenga pulsado el botón [Menu] en la modalidad
Photo View <Ver foto>, así podrá ir directamente a
File Options <Opciones de archivo>.
✤ Consulte la página 123 para obtener información
adicional sobre la impresión de archivos DPOF.
✤ Puede definir las copias de la impresión DPOF
hasta en 30.
6161
Page 62

ENGLISH
800
Photo Capture
View
Capture
Settings
Back
01 03
Photo View 100-0022
View
File Options
Capture
Back
01 03
Photo View 100-0022
Lock
Copy To
Delete
DPOF
Back
Photo View 100-0022
01 03
Lock
Copy To ext.
Delete
DPOF
Back
Selected
All
Cancel
Choose the file(s) to copy
to memory stick?
Photo Mode : Selecting File Options
Modalidad de foto:
Selección de opciones de archivo
Copying Photo files Copia de archivos de fotos
You can copy photo files to the internal or external memory.
1. Move [Mode Selector] down to turn on the
CAM and move it down again.
◆ The Mode Selection screen appears.
2. Move the [ ▲ /▼ ] switch to select Photo mode
and press the [OK] button.
◆ The Photo Capture screen appears.
3. Press the [Menu] button and move the
[ ▲ /▼ ] switch.
Press the [OK] button after selecting <View>.
4. Move the [ ▲ /▼ ] switch to select the photo
file you want to copy.
5. Press the [Menu] button to select <File
Options> and press the [OK] button.
◆ You can select <File Options> only in <Photo
View mode>.
6. Move the [ ▲ /▼ ] switch to select <Copy To>
and press the [OK] button.
◆ If you selected the Storage type ‘External’,
the file is copied to ‘Internal’ and vice versa.
7. Move the [ ▲ /▼ ] switch to select the
followings and press the [OK] button.
◆ Selected: Copy the selected photo file.
◆ All: Copy all photo files.
◆ Cancel: Cancel copying photo files.
6262
Note
✤ Press and hold the [Menu] button in Photo View
mode, you can move to <File Options> directly.
3
5
6
7
Puede copiar archivos de fotos en la memoria interna o externa.
ESPAÑOL
1. Baje el [Selector de modalidad] para encender
la VIDEOCÁMARA y bájelo de nuevo.
◆ Aparece la pantalla Mode Selection <Selección
de modalidad>.
2. Mueva el interruptor [▲ /▼ ] hasta seleccionar
la modalidad Photo y pulse el botón [OK].
◆ Aparece la pantalla Photo Capture <Capturar
foto>.
3. Pulse el botón [Menu] y mueva el interruptor
[▲ / ▼ ]. Pulse el botón [OK] tras seleccionar
View <Ver>.
4. Mueva el interruptor [▲ /▼ ] hasta seleccionar
el archivo de foto que desea copiar.
5. Pulse el botón [Menu] hasta seleccionar File
Options <Opciones de archivo> y pulse el
botón [OK].
◆ Puede seleccionar File Options <Opciones de
archivo> sólo en View <Ver>.
6. Mueva el interruptor [▲ /▼ ] hasta seleccionar
Copy To <Copiar en> y pulse el botón [OK].
◆ Si ha seleccionado el tipo de almacenamiento
External (Externo), el archivo se copia en
Internal (Interno) y viceversa.
7. Mueva el interruptor [▲ /▼ ] para seleccionar
los siguientes y pulse el botón [OK].
◆ Selected <Seleccionado>: Se copia el
archivo de foto seleccionado.
◆ All <Todo>: Copia todos los archivos de
fotos.
◆ Cancel <Cancelar>: Cancela la copia de
archivos de fotos.
Nota
✤ Mantenga pulsado el botón [Menu] en la modalidad
Photo View <Ver foto>, así podrá ir directamente a
File Options <Opciones de archivo>.
Page 63

ENGLISH
800
Photo Capture
View
Capture
Settings
Back
EIS
Light
Auto
On
White Balance
Auto
Focus
AF
Photo SettingsPhoto Settings
EIS
Light
Auto
On
White Balance
Auto
Focus
AF
Size
EIS
Light
Auto
On
White Balance
Auto
Focus
AF
Photo SettingsPhoto Settings
EIS
Light
Auto
On
White Balance
Auto
Focus
AF
Size
640
Photo Capture
Photo Mode: Setting Various Functions
Modalidad de foto:
Ajustes de diversas funciones
Setting the Photo file Size Ajuste del tamaño del archivo de foto
You can set the photo files size. The number of stored
files varies depending on the Memory Stick capacity,
photo files size.
1. Move [Mode Selector] down to turn on the
CAM and move it down again.
◆ The Mode Selection screen appears.
2. Move the [ ▲ /▼ ] switch to select Photo mode
and press the [OK] button.
◆ The Photo Capture screen appears.
3. Press the [Menu] button and move the
[ ▲ /▼ ] switch. Press the [OK] button after
selecting <Settings>.
4. Move the [ ▲ /▼ ] switch to select <Size> and
press the [OK] button.
◆ You can select 800x600 or 640x480 size.
5. Move the [ ▲ /▼ ] switch to select the desired
setting and press the [OK] button.
6. Press the [Menu] button to finish setting.
Notes
✤ If you select <Back> in the menu, the previous
menu appears.
✤ Press and hold the [Menu] button in Photo Capture
mode, you can move to <Settings> directly.
3
4
5
6
Puede definir el tamaño de los archivos de fotos.
El número de archivos almacenados varía
dependiendo de la capacidad del Memory Stick y el
tamaño de los archivos de fotos
1. Baje el [Selector de modalidad] para encender
la VIDEOCÁMARA y bájelo de nuevo.
◆ Aparece la pantalla Mode Selection
<Selección de modalidad>.
2. Mueva el interruptor [▲ /▼ ] hasta seleccionar
la modalidad Photo y pulse el botón [OK].
◆ Aparece la pantalla Photo Capture <Capturar
foto>.
3. Pulse el botón [Menu] y mueva el interruptor
[▲ / ▼ ]. Pulse el botón [OK] tras seleccionar
Settings <Ajustes>.
4. Mueva el interruptor [▲ /▼ ] hasta seleccionar
Size <Tamaño> y pulse el botón [OK].
◆ Puede seleccionar el tamaño 800x600 ó
640x480.
5. Mueva el interruptor [▲ /▼ ] hasta seleccionar
el ajuste que desea y pulse el botón [OK].
6. Pulse el botón [Menu] para finalizar el ajuste.
Notas
✤ Si selecciona Back <Volver> en el menú, aparece
el menú anterior.
✤ Mantenga pulsado el botón [Menu] en la
modalidad Photo Capture <Capturar foto>,
así podrá ir directamente a Settings <Ajustes>.
ESPAÑOL
6363
Page 64

ENGLISH
800
Photo Capture
View
Capture
Settings
Back
Capturing...
BLC
800
Photo Capture
Photo Mode: Setting Various Functions
Setting the Light Ajuste de luz
The Light only works in Photo Mode and allows the user to take
photographs in dark places such as during the night, shaded or dark
areas and indoors.
1. Move [Mode Selector] down to turn on the
CAM and move it down again.
◆ The Mode Selection screen appears.
2. Move the [ ▲ /▼ ] switch to select Photo mode
and press the [OK] button.
◆ The Photo Capture screen appears.
3. Press the [Menu] button and move the
[ ▲ /▼ ] switch.
Press the [OK] button after selecting <Settings>.
4. Move the [ ▲ /▼ ] switch to select <Light> and
press the [OK] button.
5. Move the [ ▲ /▼ ] switch to select the desired
setting and press the [OK] button.
◆ Auto: Set the light automatically.
◆ On( ): Turn on the light.
◆ Off( ): Turn off the light.
6. Press the [Menu] button to finish setting.
◆ The icon of selected function is displayed.
Notes
✤ If you select <Back> in the menu, the previous
menu appears.
✤ Press and hold the [Menu] button in Photo Capture
mode, you can move to <Settings> directly.
6464
✤ If the battery is low and the battery charge icon
blinks, the light will not operate and light icon is set
to off state.
3
4
5
6
Modalidad de foto:
ESPAÑOL
Ajustes de diversas funciones
La luz sólo funciona en la modalidad Photo <Foto> y permite a los
usuarios hacer fotos en lugares oscuros, por la noche, en áreas
oscuras o con sombra y en interiores.
1. Baje el [Selector de modalidad] para encender
la VIDEOCÁMARA y bájelo de nuevo.
◆ Aparece la pantalla Mode Selection
<Selección de modalidad>.
2. Mueva el interruptor [▲ /▼ ] hasta seleccionar
la modalidad Photo y pulse el botón [OK].
◆ Aparece la pantalla Photo Capture <Capturar
foto>.
3. Pulse el botón [Menu] y mueva el interruptor
[▲ / ▼ ]. Pulse el botón [OK] tras seleccionar
Settings <Ajustes>.
4. Mueva el interruptor [▲ /▼ ] hasta seleccionar
Light <Luz> y pulse el botón [OK].
5. Mueva el interruptor [▲ /▼ ] hasta seleccionar
el ajuste que desea y pulse el botón [OK].
◆ Auto <Autom.>: Fija la luz automáticamente.
◆ On <Act.> ( ): Enciende la luz.
◆ Off <Des.> ( ): Apaga la luz.
6. Pulse el botón [Menu] para finalizar el ajuste.
◆ Aparece el icono de la función seleccionada.
Notas
✤ Si selecciona Back <Volver> en el menú, aparece
el menú anterior.
✤ Mantenga pulsado el botón [Menu] en la
modalidad Photo Capture <Capturar foto>,
así podrá ir directamente a Settings <Ajustes>.
✤ Si la batería está baja y el icono aparece de
forma intermitente, la luz no funciona y el icono
de luz aparece con el estado de apagado.
Page 65

ENGLISH
800
Photo Capture
View
Capture
Settings
Back
Light
Capturing...
BLC
800
Photo Capture
Photo Mode: Setting Various Functions
Modalidad de foto:
Ajustes de diversas funciones
Setting the Focus Ajuste del enfoque
You can set the focus depending on the subject or the environment.
In most situations, you can record the best photo using AF(Auto Focus).
1. Move [Mode Selector ] down to turn on the CAM
and move it down again.
◆ The Mode Selection screen appears.
2. Move the [ ▲/ ▼ ] switch to select Photo mode
and press the [OK] button.
◆ The Photo Capture screen appears.
3. Press the [Menu] button and move the [ ▲/ ▼]
switch. Press the [OK] button after selecting
<Settings>.
4. Move the [ ▲/ ▼ ] switch to select <Focus> and
press the [OK] button.
◆ AF: Set the focus automatically. When the CAM
turns on, AF is selected in default.
◆ MF( ): Set the focus manually.
5. Move the [ ▲/ ▼ ] switch to select the desired
setting and press the [OK] button.
6. Press the [Menu] button to finish setting.
◆ The icon of selected function is displayed.
◆ If you select the AF, no icon is displayed.
Manual Focus
Adjust the focus using [ + ]/ [ -] button to zoom in or
out manually.
◆ When a picture has subjects close and distant
to the CAM
◆ When a person is enveloped in fog or
surrounded by snow
Notes
✤ If you select <Back> in the menu, the previous
menu appears.
✤ Press and hold the [Menu] button in Photo Capture
mode, you can move to <Settings> directly.
3
4
5
6
Puede definir el enfoque dependiendo del objeto o del entorno.
En la mayoría de las situaciones, la mejor forma de hacer fotos es con AF
(Enfoque automático).
ESPAÑOL
1. Baje el [Selector de modalidad] para encender la
VIDEOCÁMARA y bájelo de nuevo.
◆ Aparece la pantalla Mode Selection <Selección
de modalidad>.
2. Mueva el interruptor [▲ /▼ ] hasta seleccionar la
modalidad Photo y pulse el botón [OK].
◆ Aparece la pantalla Photo Capture <Capturar foto>.
3. Pulse el botón [Menu] y mueva el interruptor
[▲ / ▼ ]. Pulse el botón [OK] tras seleccionar
Settings <Ajustes>.
4. Mueva el interruptor [▲ /▼ ] hasta seleccionar
Focus <Enfoque> y pulse el botón [OK].
◆ AF: Enfoca automáticamente. Cuando se
enciende la VIDEOCÁMARA, AF se selecciona
por defecto.
◆ MF( ): Fija el enfoque manual.
5. Mueva el interruptor [▲ /▼ ] hasta seleccionar el
ajuste que desea y pulse el botón [OK].
6. Pulse el botón [Menu] para finalizar el ajuste.
◆ Aparece el icono de la función seleccionada.
◆ Si selecciona AF, no aparece ningún icono.
Enfoque manual
Enfoque utilizando el botón [+] / [ - ] para acercar o
alejar el zoom manualmente.
◆ Cuando una imagen tenga objetos cerca y lejos
de la VIDEOCÁMARA
◆ Cuando haya una persona entre la niebla o
rodeada de nieve.
Notas
✤ Si selecciona Back <Volver> en el menú, aparece el
menú anterior.
✤ Mantenga pulsado el botón [Menu] en la modalidad
Photo Capture <Capturar foto>, así podrá ir
directamente a Settings <Ajustes>.
6565
Page 66

ENGLISH
800
Photo Capture
View
Capture
Settings
Back
Size 800 x 600
White Balance
Auto
Focus
AF
Light
Auto
Photo SettingsPhoto Settings
Size 800 x 600
White Balance
Auto
Focus
AF
Light
Auto
EIS
On
Size
White Balance
Auto
Focus
AF
Light
Auto
800 x 600
Photo SettingsPhoto Settings
Size
White Balance
Auto
Focus
AF
Light
Auto
800 x 600
EIS
Off
800
Photo Capture
Photo Mode: Setting Various Functions
Modalidad de foto:
Ajustes de diversas funciones
ESPAÑOL
Setting the EIS (Electronic Image Stabilizer)
The Electrical Image Stabilizer is a function that
compensates for hand shake and other movements
while taking pictures.
Refer to page 49 for further details.
1. Move [Mode Selector] down to turn on the
CAM and move it down again.
◆ The Mode Selection screen appears.
2. Move the [ ▲ /▼ ] switch to select Photo mode
and press the [OK] button.
◆ The Photo Capture screen appears.
3. Press the [Menu] button and move the [ ▲ /▼ ]
switch. Press the [OK] button after selecting
<Settings>.
4. Move the [ ▲ /▼ ] switch to select <EIS> and
press the [OK] button.
◆ On( ): Set the EIS function.
◆ Off: Cancel the EIS function.
5. Move the [ ▲ /▼ ] switch to select the desired
setting and press the [OK] button.
6. Press the [Menu] button to finish setting.
◆ The icon of selected function is displayed.
Notes
6666
✤ If you select <Back> in the menu, the previous
menu appears.
✤ Press and hold the [Menu] button in Photo Capture
mode, you can move to <Settings> directly.
Ajuste de EIS (Estabilizador electrónico de la imagen)
3
4
5
6
El estabilizador electrónico de la imagen es una
función que compensa los temblores de la mano y
otros movimientos mientras toma imágenes.
Consulte la página 49 para obtener más detalles.
1. Baje el [Selector de modalidad] para encender
la VIDEOCÁMARA y bájelo de nuevo.
◆ Aparece la pantalla Mode Selection
<Selección de modalidad>.
2. Mueva el interruptor [▲ /▼ ] hasta seleccionar
la modalidad Photo y pulse el botón [OK].
◆ Aparece la pantalla Photo Capture <Capturar
foto>.
3. Pulse el botón [Menu] y mueva el interruptor
[▲ / ▼ ]. Pulse el botón [OK] tras seleccionar
Settings <Ajustes>.
4. Mueva el interruptor [▲ /▼ ] hasta seleccionar
EIS y pulse el botón [OK].
◆ On <Act.> ( ): Ajusta la función EIS.
◆ Off <Des.>: Cancela la función EIS.
5. Mueva el interruptor [▲ /▼ ] hasta seleccionar
el ajuste que desea y pulse el botón [OK].
6. Pulse el botón [Menu] para finalizar el ajuste.
◆ Aparece el icono de la función seleccionada.
Notas
✤ Si selecciona Back <Volver> en el menú, aparece
el menú anterior.
✤ Mantenga pulsado el botón [Menu] en la
modalidad Photo Capture <Capturar foto>,
así podrá ir directamente a Settings <Ajustes>.
Page 67

ENGLISH
800
Photo Capture
View
Capture
Settings
Back
Focus
EIS
Size
Light
Auto
800 x 600
AF
On
Photo SettingsPhoto Settings
Focus
EIS
Size
Light
Auto
800 x 600
AF
On
White Balance
Auto
Focus
EIS
Size
Light
Auto
800 x 600
AF
On
Photo SettingsPhoto Settings
Focus
EIS
Size
Light
Auto
800 x 600
AF
On
White Balance
Hold
Capturing...
BLC
800
Photo Capture
Photo Mode: Setting Various Functions
Modalidad de foto:
Ajustes de diversas funciones
Setting the White Balance Ajuste del balance de blanco
The White Balance may vary depending on the lighting conditions.
The White Balance is used to preserve natural colours under different
lighting conditions.
1. Move [Mode Selector ] down to turn on the CAM
and move it down again.
◆ The Mode Selection screen appears.
2. Move the [ ▲/ ▼ ] switch to select Photo mode and
press the [OK] button.
◆ The Photo Capture screen appears.
3. Press the [Menu] button and move the [ ▲/ ▼]
switch. Press the [OK] button after selecting
<Settings>.
4. Move the [ ▲/ ▼ ] switch to select <White
Balance> and press the [OK] button.
◆ Auto: Adjust the colour depending on the
condition automatically.
◆ Hold( ): Record with first selected colour
without adjusting colour.
◆ Outdoor( ): Record with the balanced light.
(Natural light)
◆ Indoor( ): Record with the balanced light.
(Glow lamp, light in the studio or video light)
5. Move the [ ▲/ ▼ ] switch to select the desired
setting and press the [OK] button.
6. Press the [Menu] button to finish setting.
◆ The icon of selected function is displayed.
◆ If you select <Auto>, no icon is displayed.
Notes
✤ If you select <Back> in the menu, the previous
menu appears.
✤ Press and hold the [Menu] button in Photo Capture
mode, you can move to <Settings> directly.
3
4
5
6
El balance de blanco puede variar dependiendo de las condiciones de luz.
White Balance <Balance de blanco> se utiliza para conservar los colores
naturales bajo diferentes condiciones de luz.
1. Baje el [Selector de modalidad] para encender la
2. Mueva el interruptor [▲ /▼ ] hasta seleccionar la
3. Pulse el botón [Menu] y mueva el interruptor
4. Mueva el interruptor [▲ /▼ ] hasta seleccionar
5. Mueva el interruptor [▲ /▼ ] hasta seleccionar el
6. Pulse el botón [Menu] para finalizar el ajuste.
✤ Si selecciona Back <Volver> en el menú, aparece el
✤ Mantenga pulsado el botón [Menu] en la modalidad
ESPAÑOL
VIDEOCÁMARA y bájelo de nuevo.
◆ Aparece la pantalla Mode Selection <Selección
de modalidad>.
modalidad Photo y pulse el botón [OK].
◆ Aparece la pantalla Photo Capture <Capturar
foto>.
[▲ / ▼ ]. Pulse el botón [OK] tras seleccionar
Settings <Ajustes>.
White Balance <Balance de blanco> y pulse el
botón [OK].
◆ Auto <Autom.>: Ajusta el color automáticamente
dependiendo de las condiciones.
◆ Hola <Mantener> ( ): Graba con el primer
color seleccionado sin ajustar el color.
◆ Outdoor <Exterior> ( ): Graba con el
balance de luz. (Luz natural)
◆ Indoor <Interior> ( ): Graba con el balance
de luz. (Lámpara brillante, luz de estudio o luz
de vídeo)
ajuste que desea y pulse el botón [OK].
◆ Aparece el icono de la función seleccionada.
◆ Si selecciona Auto <Autom.>, no aparece ningún
icono.
Notas
menú anterior.
Photo Capture <Capturar foto>, así podrá ir
directamente a Settings <Ajustes>.
6767
Page 68

ENGLISH
800
Photo Capture
View
Capture
Settings
Back
EIS
White Balance
Light Auto
Focus
AF
On
Auto
Photo SettingsPhoto Settings
EIS
White Balance
Light Auto
Focus
AF
On
Auto
Program AE
Auto
EIS
White Balance
Light Auto
Focus
AF
On
Auto
Photo SettingsPhoto Settings
EIS
White Balance
Light Auto
Focus
AF
On
Auto
Program AE
Sand/Snow
Capturing...
BLC
800
Photo Capture
Photo Mode: Setting Various Functions
Modalidad de foto:
Ajustes de diversas funciones
ESPAÑOL
Setting the Program AE (Programmed Auto Exposure)
It allows you to adjust the aperture setting to suit different conditions.
1. Move [Mode Selector ] down to turn on the CAM
and move it down again.
◆ The Mode Selection screen appears.
2. Move the [ ▲/ ▼ ] switch to select Photo mode
and press the [OK] button.
◆ The Photo Capture screen appears.
3. Press the [Menu] button and move the [ ▲/ ▼]
switch. Press the [OK] button after selecting
<Settings>.
4. Move the [ ▲/ ▼ ] switch to select <Program AE>
and press the [OK] button.
◆ Auto:Auto balance between the subject and
background to get the best result. The shutter
speed automatically varies from 1/60 to 1/250
per second depending on the scene.
◆ Sport s( ): For fast-moving people or objects.
It is suitable for sports events or when you are
outside in the car.
◆ Spotlight( ): Compensates for a subject that
appears too bright under strong direct light such
as spotlight. It is suitable for concert and school
performance.
◆ Sand / Snow( ): Use when the light is very
strong such as on the beach or in the snow.
◆ HS Shutter( ): Allows fast-moving images to
be captured one frame at a time.
5. Move the [ ▲/ ▼ ] switch to select the desired
setting and press the [OK] button.
6. Press the [Menu] button to finish setting.
◆ The icon of selected function is displayed.
◆ If you select <Auto>, any icon is not displayed.
6868
Notes
✤ If you select <Back> in the menu, the previous
menu appears.
✤ Press and hold the [Menu] button in Photo Capture
mode, you can move to <Settings> directly.
Ajuste del Programa AE (Exposición automática programada)
Permite ajustar la apertura para adaptarla a diferentes condiciones.
3
4
5
6
✤ Mantenga pulsado el botón [Menu] en la modalidad Photo Capture
<Capturar foto>, así podrá ir directamente a Settings <Ajustes>.
1. Baje el [Selector de modalidad] para encender la
VIDEOCÁMARA y bájelo de nuevo.
◆ Aparece la pantalla Mode Selection <Selección
de modalidad>.
2. Mueva el interruptor [▲ /▼ ] hasta seleccionar la
modalidad Photo y pulse el botón [OK].
◆ Aparece la pantalla Photo Capture <Capturar foto>.
3. Pulse el botón [Menu] y mueva el interruptor
[▲ / ▼ ]. Pulse el botón [OK] tras seleccionar
Settings <Ajustes>.
4. Mueva el interruptor [▲ /▼ ] hasta seleccionar
Program AE <Programa AE> y pulse el botón [OK].
◆ Auto: Balance automático entre el sujeto y el
fondo para obtener el mejor resultado.
La velocidad del obturador se ajusta
automáticamente entre 1/60 y 1/250 por segundo,
según la escena que se esté grabando.
◆ Sports( ): Para movimiento de gente u
objetos. es ideal para acontecimientos deportivos
o en exteriores en coche.
◆ Spotlight( ): Compensa un objeto que
aparece demasiado brillante bajo la luz directa,
como un foco. Es ideal para conciertos y
actuaciones escolares.
◆ Sand/Snow( ): Se utiliza cuando la luz es
muy fuerte, como en la playa o en la nieve.
◆ HS Shutter( ): Permite capturar imágenes en
rápido movimiento por fotogramas.
5. Mueva el interruptor [▲ /▼ ] hasta seleccionar el
ajuste que desea y pulse el botón [OK].
6. Pulse el botón [Menu] para finalizar el ajuste.
◆ Aparece el icono de la función seleccionada.
◆ Si selecciona Auto <Autom.>, no aparece ningún
icono.
Notas
✤ Si selecciona Back <Volver> en el menú, aparece el
menú anterior.
Page 69

ENGLISH
800
Photo Capture
View
Capture
Settings
Back
White Balance
Program AE
Focus AF
EIS
On
Auto
Auto
Photo SettingsPhoto Settings
White Balance
Program AE
BLC
Focus AF
EIS
On
Auto
Auto
Off
White Balance
Program AE
Focus AF
EIS
On
Auto
Auto
Photo SettingsPhoto Settings
White Balance
Program AE
BLC
Focus AF
EIS
On
Auto
Auto
On
Capturing...
800
Photo Capture
BLC
Photo Mode: Setting Various Functions
Modalidad de foto:
Ajustes de diversas funciones
Setting the BLC (Backlight Compensation) Ajuste de BLC (Compensación de luz de fondo)
The Backlight Compensation function helps to make
the subject brighter when the subject is in front of a
window or the subject is too dark to distinguish. You
can use this function when using the CAM in the
bright backgrounds including snow scenes.
1. Move [Mode Selector] down to turn on the
CAM and move it down again.
◆ The Mode Selection screen appears.
2. Move the [ ▲ /▼ ] switch to select Photo mode
and press the [OK] button.
◆ The Photo Capture screen appears.
3. Press the [Menu] button and move the
[ ▲ /▼ ] switch.
Press the [OK] button after selecting
<Settings>.
4. Move the [ ▲ /▼ ] switch to select <BLC> and
press the [OK] button.
◆ On( ): Set the BLC function.
◆ Off: Cancel the BLC function.
5. Move the [ ▲ /▼ ] switch to select the desired
setting and press the [OK] button.
6. Press the [Menu] button to finish setting.
◆ < > is displayed.
Notes
✤ If you select <Back> in the menu, the previous
menu appears.
✤ Press and hold the [Menu] button in Photo Capture
mode, you can move to <Settings> directly.
3
4
5
6
La función de compensación de luz de fondo ayuda
a que el objeto sea más brillante cuando se
encuentra delante de una ventana o es muy difícil de
distinguir por ser demasiado oscuro. Puede utilizar
esta función al utilizar su VIDEOCÁMARA en un
ambiente brillante incluidas escenas nevadas.
1. Baje el [Selector de modalidad] para encender
la VIDEOCÁMARA y bájelo de nuevo.
◆ Aparece la pantalla Mode Selection
<Selección de modalidad>.
2. Mueva el interruptor [▲ /▼ ] hasta seleccionar
la modalidad Photo y pulse el botón [OK].
◆ Aparece la pantalla Photo Capture <Capturar
foto>.
3. Pulse el botón [Menu] y mueva el interruptor
[▲ / ▼ ]. Pulse el botón [OK] tras seleccionar
Settings <Ajustes>.
4. Mueva el interruptor [▲ /▼ ] hasta seleccionar
BLC y pulse el botón [OK].
◆ On <Act.> ( ): Fija la función BLC.
◆ Off <Des.>: Cancela la función BLC.
5. Mueva el interruptor [▲ /▼ ] hasta seleccionar
el ajuste que desea y pulse el botón [OK].
6. Pulse el botón [Menu] para finalizar el ajuste.
◆ Aparece < >
Notas
✤ Si selecciona Back <Volver> en el menú, aparece
el menú anterior.
✤ Mantenga pulsado el botón [Menu] en la
modalidad Photo Capture <Capturar foto>,
así podrá ir directamente a Settings <Ajustes>.
ESPAÑOL
6969
Page 70

ENGLISH
MEMO
ESPAÑOL
NOTAS
7070
Page 71

ENGLISH
ESPAÑOL
MP3 / Voice Recorder Mode/
3
3
Using File Browser
MP3 Mode
Storing Music in the CAM..................................................... 72
Copying Music files to the CAM.......................................... 72
Playing..................................................................................... 73
Playing Music files............................................................... 73
Selecting Play Options.......................................................... 74
Setting Repeat Play............................................................. 74
Selecting File Options........................................................... 75
Deleting Music files.............................................................. 75
Locking Music files .............................................................. 76
Copying Music files ............................................................. 77
Voice Recorder Mode
Recording ............................................................................... 78
Recording Voice .................................................................. 78
Playing..................................................................................... 79
Playing Voice files................................................................ 79
Selecting File Options........................................................... 80
Deleting Voice files.............................................................. 80
Locking Voice files............................................................... 81
Copying Voice files.............................................................. 82
Using File Browser
Deleting Files or Folders ..................................................... 83
Locking Files........................................................................ 84
Copying Files or Folders ..................................................... 85
Viewing File Information...................................................... 86
MP3/Modalidad de grabador de voz/
3
3
Modalidad MP3
Almacenamiento de música en la VIDEOCÁMARA........... 72
Reproducción ........................................................................ 73
Selección de opciones de reproducción............................ 74
Selección de opciones de archivo ...................................... 75
Modalidad de grabador de voz
Grabación ............................................................................... 78
Reproducción......................................................................... 79
Selección de opciones de archivo ...................................... 80
Utilización del explorador de archivos
Utilización del explorador de archivos
Copia de archivos de música en la VIDEOCÁMARA ........ 72
Reproducción de archivos de música................................. 73
Ajuste de Repeat Play <Repetir reproducción> ................. 74
Eliminación de archivos de música..................................... 75
Bloqueo de archivos de música.......................................... 76
Copia de archivos de música.............................................. 77
Grabación de voz ................................................................ 78
Reproducción de archivos de voz....................................... 79
Eliminación de archivos de voz........................................... 80
Bloqueo de archivos de voz................................................ 81
Copia de archivos de voz.................................................... 82
Eliminación de archivos o carpetas .................................... 83
Bloqueo de archivos............................................................ 84
Copia de archivos o carpetas ............................................. 85
Visualización de la información del archivo........................ 86
7171
Page 72

ENGLISH
MP3 Mode : Storing Music in the CAM
Modalidad MP3: Almacenamiento
ESPAÑOL
de música en la VIDEOCÁMARA
Copying Music files to the CAM
You can transfer music files from your PC to the internal memory,
Memory Stick or Memory Stick Pro. For copying music files, the CAM
must be connected to your PC with the USB cable. You don’t have to
connect the CAM to your PC when you transfer music files to the
Memory Stick directly.
1. Connect the CAM to a PC with the USB
cable. (Refer to page 103)
◆ Your computer recognizes this device
and the symbol for removable drive will
appear in ‘My Computer’.
2. Double-click the new removable drive to
open.
3. Select the MP3 folder and double-click to
enter.
4. Copy the MP3 file you want from PC to the CAM.
◆ Refer to the folder structure on page 30 for copying
MP3 files.
Disconnecting USB Connection
After completing the data transfer, you must disconnect the cable in
the following way.
1. Select the removable disk icon and click the right mouse button to
select ‘Safely Remove Hardware’.
2. Select ‘Stop’ and disconnect the USB cable when the pop-up
screen disappears.
Notes
✤ The way of transferring, playing with the Memory Stick is same as
that of internal memory.
✤ Refer to page 120 for installing USB Driver for Windows98SE.
7272
Copia de archivos de música en la VIDEOCÁMARA
Puede transferir archivos de música desde el PC a la memoria interna,
Memory Stick o Memory Stick Pro. Para copiar archivos de música, la
VIDEOCÁMARA debe estar conectada al PC con el cable USB. No
tiene que conectar la VIDEOCÁMARA al PC al transferir archivos de
música directamente al Memory Stick.
1. Conecte la VIDEOCÁMARA a un PC
utilizando el cable USB.
(Consulte la página 103)
◆ El PC reconoce este dispositivo y en
"Mi PC" aparece el símbolo de unidad
extraíble.
2. Haga doble clic en la nueva unidad
extraíble para abrirla.
3. Seleccione la carpeta MP3 y haga doble clic en ella para entrar.
4. Copie el archivo MP3 que desea desde el PC a la
VIDEOCÁMARA.
◆ Consulte la estructura de carpetas de la página 30 para copiar
los archivos MP3.
Desconexión de la conexión USB
Tras completar la transferencia de datos, debe desconectar el cable de
la forma siguiente:
1. Seleccione el icono del disco extraíble y haga clic en el botón
derecho del ratón para seleccionar Quitar hardware con seguridad.
2. Seleccione Detener y desconecte el cable USB cuando
desaparezca la pantalla emergente.
Notas
✤ La forma de transferir, reproducir con el Memory Stick es igual que
con la memoria interna.
✤ Consulte la página 120 para instalar el controlador USB para
Windows98SE.
Page 73

ENGLISH
Mode Selection
Voice Recorder
File Browser
Video
Photo
MP3
3 black or white.mp3
5 What a wonderful world.mp3
MP3 Play
4 Let it be.mp3
1 hey jude.mp3
2 I believe I can fly.mp3
MP3 Play
2. I believe I can fly.mp3
4.4 Kbytes
Stereo 44.1KHz 128Kbps
03:19 / 04:32
MP3 Mode : Playing Modalidad MP3: Reproducción
Playing Music files Reproducción de archivos de música
You can hear the music copied from your PC directly or with the Memory
Stick.
1. Connect the earphones to the CAM.
◆ You can also hear the music from the Built-in
speaker without the earphones.
2. Move [Mode Selector ] down to turn on the CAM
and move it down again.
◆ The Mode Selection screen appears.
3. Move the [ ▲/ ▼ ] switch to select MP3 mode and
press the [OK] button.
4. Move the [ ▲/ ▼ ] switch to find the music you
want to hear and press the [OK] button.
◆ The selected music is played.
5. Press the [OK] button again to stop hearing music.
◆ Each time you press the [OK] button, play or
pause is selected repeatedly.
3
4
The use of [ ▲ / ▼] switch
✤ Press the [ ▲ ] switch
First 2 seconds after start playing - the previous file
appears.
2 seconds after start playing - the first scene of the
file appears.
✤ Press the [ ▼ ] switch
The next file appears.
5
Notes
✤ ‘----’ is displayed depending on the title of MP3 file.
✤ If you slide the MP3/*External Camera Hold switch to on, all buttons
except the Power switch and volume +/- button are locked.
The MP3/*External Camera Hold switch operates only in the
MP3/*External Camera mode.
✤ In MP3 playback mode, a file name may not be displayed correctly or
an MP3 file may not playback. In this case, rename the file name using
English alphabets only.
*:VP-X105L/X110L only
Puede escuchar música copiada desde el PC directamente o con el Memory Stick.
1. Conecte los auriculares a la VIDEOCÁMARA.
◆ Puede escuchar música desde el altavoz
incorporado sin los auriculares.
2. Baje el [Selector de modalidad] para encender la
VIDEOCÁMARA y bájelo de nuevo.
◆ Aparece la pantalla Mode Selection <Selección
de modalidad>.
3. Mueva el interruptor [▲ /▼ ] hasta seleccionar la
modalidad MP3 y pulse el botón [OK].
4. Mueva el interruptor [▲ / ▼] hasta encontrar la
música que desea escuchar y pulse el botón [OK].
◆ Se reproduce la música seleccionada.
5. Pulse de nuevo el botón [OK] para dejar de
escuchar música.
◆ Cada vez que pulse el botón [OK], se reproduce
o se hace una pausa de forma repetida.
Uso del interruptor [ ▲ /▼ ]
✤ Pulse el interruptor [ ▲ ]
En primer lugar durante 2 segundos tras iniciar la
reproducción: aparece el archivo anterior.
2 segundos tras iniciar la reproducción: aparece la
primera escena del archivo.
✤ Pulse el interruptor [ ▼ ]
Aparece el archivo siguiente.
Notas
✤ Aparece ‘----’ dependiendo del título del archivo MP3.
✤ Si desliza el interruptor Hold de *cámara externa / MP3, se bloquean
todos los botones excepto el interruptor Power y el botón de volumen +/-.
El interruptor Hold de *cámara externa / MP3 sólo está operativo en la
modalidad de *cámara externa / MP3.
✤ En la modalidad de reproducción de MP3, un nombre de archivo no
puede verse correctamente o no puede reproducirse un archivo MP3.
En este caso, cambie el nombre al archivo sin utilizar acentos ni
caracteres especiales.
*:Sólo VP-X105L/X110L
ESPAÑOL
7373
Page 74

ENGLISH
3 black or white.mp3
5 What a wonderful world.mp3
MP3 Play
4 Let it be.mp3
1 hey jude.mp3
2 I believe I can fly.mp3
2 I belive i can fly.mp3
3 black or white.mp3
1 hey jude.mp3
5 What a wonderful world.mp3
MP3 Play
4 Let it be.mp3
File Options
Back
Play Options
MP3 Play
Back
Repeat
All
MP3 Play
Back
Repeat
One
ENGLISH
MP3 Mode : Selecting Play Options
Modalidad MP3:
Selección de opciones de reproducción
Setting Repeat Play Ajuste de Repeat Play <Repetir reproducción>
You can play the only one or all music repeatedly.
1. Connect the earphones to the CAM.
◆ You can also hear the music from the Built-in
speaker without the earphones.
2. Move [Mode Selector] down to turn on the
CAM and move it down again.
◆ The Mode Selection screen appears.
3. Move the [ ▲ /▼ ] switch to select MP3 mode
and press the [OK] button.
◆ Press the [Menu] button when the music list
appears.
4. Move the [ ▲ / ▼ ] switch to select <Play
Options> and press the [OK] button.
5. Move the [ ▲ /▼ ] switch to select <Repeat>
and press the [OK] button.
◆ All: All files are repeated.
◆ Off: Cancel the Repeat Play function.
◆ One: One file is repeated.
6. Move the [ ▲ /▼ ] switch to select desired
setting and press the [OK] button.
7. Press the [Menu] button to finish setting.
Note
✤ If you select <Back> in the menu, the previous
menu appears.
7474
3
4
5
6
Puede reproducir una solamente o toda la música de forma repetida.
1. Conecte los auriculares a la VIDEOCÁMARA.
◆ Puede escuchar música desde el altavoz
incorporado sin los auriculares.
2. Baje el [Selector de modalidad] para encender
la VIDEOCÁMARA y bájelo de nuevo.
◆ Aparece la pantalla Mode Selection
<Selección de modalidad>.
3. Mueva el interruptor [▲ /▼ ] hasta seleccionar
la modalidad MP3 y pulse el botón [OK].
◆ Pulse el botón [Menu] cuando aparezca la
lista de música.
4. Mueva el interruptor [▲ /▼ ] hasta seleccionar
Play Options <Opciones de reproducción> y
pulse el botón [OK].
5. Mueva el interruptor [▲ /▼ ] hasta seleccionar
Repeat <Repetir> y pulse el botón [OK].
◆ All <Todo>: Se repiten todos los archivos.
◆ Off <Des.>: Cancela la función de repetir
reproducción.
◆ One <Uno>: Se repite un archivo.
6. Mueva el interruptor [▲ /▼ ] hasta seleccionar
el ajuste que desea y pulse el botón [OK].
7. Pulse el botón [Menu] para finalizar el ajuste.
Nota
✤ Si selecciona Back <Volver> en el menú, aparece
el menú anterior.
ESPAÑOL
Page 75

ENGLISH
3 black or white.mp3
5 What a wonderful world.mp3
MP3 Play
4 Let it be.mp3
1 hey jude.mp3
2 I believe I can fly.mp3
2 I belive i can fly.mp3
3 black or white.mp3
1 hey jude.mp3
5 What a wonderful world.mp3
MP3 Play
4 Let it be.mp3
File Options
Back
Play Options
Lock
Copy To
Delete
Back
2 I belive i can fly.mp3
3 black or white.mp3
1 hey jude.mp3
5 What a wonderful world.mp3
MP3 Play
4 Let it be.mp3
Lock
Copy To
Delete
Back
MP3 Play
2. I belive i can fly.mp3
5.6 Mbytes
Stereo 44.1KHz 128Kbps
03:19 / 04:32
Selected
All
Cancel
Choose the file(s)
to delete
MP3 Mode : Selecting File Options
Modalidad MP3:
Selección de opciones de archivo
Deleting Music files Eliminación de archivos de música
You can delete the music file you want.
Puede borrar el archivo de música que desee.
ESPAÑOL
1. Move [Mode Selector] down to turn on the
CAM and move it down again.
◆ The Mode Selection screen appears.
2. Move the [ ▲ / ▼ ] switch to select MP3 mode
and press the [OK] button.
◆ Press the [Menu] button when the music list
appears.
3. Move the [ ▲ / ▼ ] switch to select <File
Options> and press the [OK] button.
4. Move the [ ▲ /▼ ] switch to select <Delete>
and press the [OK] button.
5. Move the [ ▲ /▼ ] switch to select the
followings and press the [OK] button.
◆ Selected: The selected music file is deleted.
◆ All: All music files are deleted.
◆ Cancel: Cancel deleting music files.
Note
✤ If you select <Back> in the menu, the previous
menu appears.
2
1. Baje el [Selector de modalidad] para encender
la VIDEOCÁMARA y bájelo de nuevo.
◆ Aparece la pantalla Mode Selection
<Selección de modalidad>.
2. Mueva el interruptor [▲ / ▼ ] hasta seleccionar
la modalidad MP3 y pulse el botón [OK].
◆ Pulse el botón [Menu] cuando aparezca la
3
lista de música.
3. Mueva el interruptor [▲ / ▼ ] hasta seleccionar
File Options <Opciones de archivo> y pulse el
botón [OK].
4. Mueva el interruptor [▲ / ▼ ] hasta seleccionar
Delete <Borrar> y pulse el botón [OK].
5. Mueva el interruptor [▲ / ▼ ] para seleccionar
los siguientes y pulse el botón [OK].
4
◆ Selected <Seleccionado>:Se borra el
archivo de música seleccionado.
◆ All <Todo>: Se borran todos los archivos de
música.
◆ Cancel <Cancelar>: Cancela la supresión de
archivos de música.
5
Nota
✤ Si selecciona Back <Volver> en el menú, aparece
el menú anterior.
7575
Page 76

ENGLISH
3 black or white.mp3
5 What a wonderful world.mp3
MP3 Play
4 Let it be.mp3
1 hey jude.mp3
2 I believe I can fly.mp3
2 I belive i can fly.mp3
3 black or white.mp3
1 hey jude.mp3
5 What a wonderful world.mp3
MP3 Play
4 Let it be.mp3
File Options
Back
Play Options
Lock
Copy To
Delete
Back
2 I belive i can fly.mp3
3 black or white.mp3
1 hey jude.mp3
5 What a wonderful world.mp3
MP3 Play
4 Let it be.mp3
Lock
Copy To
Delete
Back
MP3 Play
2. I belive i can fly.mp3
5.6 Mbytes
Stereo 44.1KHz 128Kbps
03:19 / 04:32
Selected
All
Cancel
Choose the file(s) you would
to lock.
ENGLISH
MP3 Mode : Selecting File Options
Modalidad MP3:
Selección de opciones de archivo
Locking Music files Bloqueo de archivos de música
You can lock the important music file not to be deleted.
1. Move [Mode Selector] down to turn on the
CAM and move it down again.
◆ The Mode Selection screen appears.
2. Move the [ ▲ / ▼ ] switch to select MP3 mode
and press the [OK] button.
◆ Press the [Menu] button when the music list
appears.
3. Move the [ ▲ / ▼ ] switch to select <File Options>
and press the [OK] button.
4. Move the [ ▲ /▼ ] switch to select <Lock> and
press the [OK] button.
5. Move the [ ▲ /▼ ] switch to select the
followings and press the [OK] button.
◆ Selected: The selected music file is locked.
◆ All: All music files are locked.
◆ Cancel: Cancel locking music files.
Notes
✤ If you select <Back> in the menu, the previous
menu appears.
✤ The < > icon is displayed on the locked file.
7676
2
3
4
5
Puede bloquear archivos de música importantes para evitar que se
borren.
1. Baje el [Selector de modalidad] para encender
la VIDEOCÁMARA y bájelo de nuevo.
◆ Aparece la pantalla Mode Selection
2. Mueva el interruptor [▲ /▼ ] hasta seleccionar
la modalidad MP3 y pulse el botón [OK].
◆ Pulse el botón [Menu] cuando aparezca la
3. Mueva el interruptor [▲ /▼ ] hasta seleccionar
File Options <Opciones de archivo> y pulse el
botón [OK].
4. Mueva el interruptor [▲ /▼ ] hasta seleccionar
Lock <Bloquear> y pulse el botón [OK].
5. Mueva el interruptor [▲ /▼ ] para seleccionar
los siguientes y pulse el botón [OK].
◆ Selected <Seleccionado>: Se bloquea el
◆ All <Todo>: Se bloquean todos los archivos
◆ Cancel <Cancelar>: Cancela el bloqueo de
Notas
✤ Si selecciona Back <Volver> en el menú, aparece
el menú anterior
✤ Aparece el icono < > sobre el archivo
bloqueado.
ESPAÑOL
<Selección de modalidad>.
lista de música.
archivo de música seleccionado.
de música.
archivos de música.
Page 77

ENGLISH
3 black or white.mp3
5 What a wonderful world.mp3
MP3 Play
4 Let it be.mp3
1 hey jude.mp3
2 I believe I can fly.mp3
2 I belive i can fly.mp3
3 black or white.mp3
1 hey jude.mp3
5 What a wonderful world.mp3
MP3 Play
4 Let it be.mp3
File Options
Back
Play Options
Lock
Copy To
Delete
Back
2 I belive i can fly.mp3
3 black or white.mp3
1 hey jude.mp3
5 What a wonderful world.mp3
MP3 Play
4 Let it be.mp3
Lock
Copy To
Delete
Back
MP3 Play
2. I belive i can fly.mp3
5.6 Mbytes
Stereo 44.1KHz 128Kbps
03:19 / 04:32
Selected
All
Cancel
Choose the file(s) to copy
to memory stick?
MP3 Mode : Selecting File Options
Modalidad MP3:
Selección de opciones de archivo
Copying Music files Copia de archivos de música
You can copy the music file to the internal or external memory.
1. Move [Mode Selector] down to turn on the
CAM and move it down again.
◆ The Mode Selection screen appears.
2. Move the [ ▲ / ▼ ] switch to select MP3 mode
and press the [OK] button.
◆ Press the [Menu] button when the music list
appears.
3. Move the [ ▲ / ▼ ] switch to select <File
Options> and press the [OK] button.
4. Move the [ ▲ /▼ ] switch to select <Copy To>
and press the [OK] button.
◆ If you selected the Storage type ‘External’,
the file is copied to ‘Internal’ and vice versa.
5. Move the [ ▲ /▼ ] switch to select the
followings and press the [OK] button.
◆ Selected: Copy the selected music file.
◆ All: Copy all music files.
◆ Cancel: Cancel copying music files.
Note
✤ If you set the Hold function with the
MP3/*External Camera Hold switch, you can’t
delete, lock or copy music files. You can only
use Power switch and volume [+]/[-] buttons.
*:VP-X105L/X110L only
2
3
4
5
El archivo de música puede copiarse en la memoria interna o externa.
1. Baje el [Selector de modalidad] para encender
2. Mueva el interruptor [▲ / ▼ ] hasta seleccionar
3. Mueva el interruptor [▲ / ▼ ] hasta seleccionar
4. Mueva el interruptor [▲ / ▼ ] hasta seleccionar
5. Mueva el interruptor [▲ / ▼ ] para seleccionar
✤ Si fija la función Hold con el interruptor Hold de
*:Sólo VP-X105L/X110L
ESPAÑOL
la VIDEOCÁMARA y bájelo de nuevo.
◆ Aparece la pantalla Mode Selection
<Selección de modalidad>.
la modalidad MP3 y pulse el botón [OK].
◆ Pulse el botón [Menu] cuando aparezca la
lista de música.
File Options <Opciones de archivo> y pulse el
botón [OK].
Copy To <Copiar en> y pulse el botón [OK].
◆ Si ha seleccionado el tipo de almacenamiento
External <Externo>, el archivo se copia en
Internal <Interno> y viceversa.
los siguientes y pulse el botón [OK].
◆ Selected <Seleccionado>: Se copia el
archivo de música seleccionado.
◆
All <Todo>: Copia todos los archivos de música.
◆ Cancel <Cancelar>: Cancela la copia de
archivos de música.
Nota
*cámara externa / MP3, no puede borrar,
bloquear ni copiar archivos de música. Sólo
puede utilizar el interruptor Power y los botones
de volumen [+]/[ - ].
7777
Page 78

ENGLISH
Mode Selection
File Browser
Video
Photo
MP3
Voice Recorder
Voice Record
9 2005/01/01 12:18:12 AM
Stereo 8KHz 128Kbps
00:00:16 / 00:24:32
REC
Voice Record
10
Stereo 8KHz 128Kbps
STBY
00:00:16 / 00:24:32
Voice Recorder Mode : Recording
Modalidad de grabador de voz Grabación
Recording Voice Grabación de voz
You can record voice using the built-in microphone in the CAM.
Puede grabar voz utilizando el micrófono incorporado en la
VIDEOCÁMARA.
ESPAÑOL
1. Move [Mode Selector] down to turn on the
CAM and move it down again.
◆ The Mode Selection screen appears.
2. Move the [ ▲ /▼ ] switch to select Vo ice
Recorder mode and press the [OK] button.
3. Press the [Record/Stop] button to record
voice.
◆ The elapsed time and <● REC> is
displayed. It starts recording.
4. Press the [Record/Stop] button to stop
recording voice.
◆ < ■ STBY > is displayed and it stops
recording.
7878
2
1. Baje el [Selector de modalidad] para encender
la VIDEOCÁMARA y bájelo de nuevo.
◆ Aparece la pantalla Mode Selection
<Selección de modalidad>.
2. Mueva el interruptor [▲ /▼ ] hasta seleccionar
la modalidad Voice Recorder <Grabador de
3
voz> y pulse el botón [OK].
3. Pulse el botón [Record/Stop] para grabar voz.
◆ Aparece el tiempo transcurrido y <● REC>.
Se inicia la grabación.
4. Pulse el botón [Record/Stop] para detener la
4
grabación de voz.
◆ Aparece < ■ STBY > y se detiene la
grabación.
Page 79

ENGLISH
Voice Record
10
Stereo 8KHz 128Kbps
STBY
00:00:16 / 00:24:32
Voice Record
Stereo 8KHz 128Kbps
Play
Record
Back
STBY
00:00:16 / 00:24:32
1 2005/01/01 12:22:00 AM
2 2005/01/02 01:23:00 AM
3 2005/01/03 05:39:00 AM
4 2005/01/07 07:13:00 AM
5 2005/01/07 11:54:00 AM
Voice Play
Voice Play
2 2005/01/01 01:23 AM
5.0 Mbytes
Stereo 8KHz 128Kbps
00:00:12 / 00:05:12
Voice Recorder Mode : Playing
Modalidad de grabador de voz
Reproducción
Playing Voice files Reproducción de archivos de voz
You can hear the voice file connecting earphones.
1. Move [Mode Selector] down to turn on the
CAM and move it down again.
◆ The Mode Selection screen appears.
2. Move the [ ▲ /▼ ] switch to select Voice Recorder
mode and press the [OK] button.
3. Press the [Menu] button when the Voice Record
screen appears.
4. Move the [ ▲ /▼ ] switch to select <Play> and
press the [OK] button.
5. Move the [ ▲ /▼ ] switch to select the file you
want to play.
6. Press the [OK] button to play the recorded
voice.
◆ Press the [OK] button to pause playing.
The button and switch you use when playing
the recording
Play/Pause [ ] button : Play or pause the voice file
Rewind [ ] switch: Rewind the voice file backward
(Press and hold over 2 seconds during playback.)/
Move to previous file
Fast Forward [ ] switch: Wind the voice file forward
(Press and hold over 2 seconds during playback.)/
Move to next file
Note
✤ Press the [Back] button while recording standby
status to view the file list.
2
4
5
6
Puede escuchar el archivo de voz conectando los auriculares.
1. Baje el [Selector de modalidad] para encender
la VIDEOCÁMARA y bájelo de nuevo.
◆ Aparece la pantalla Mode Selection
<Selección de modalidad>.
2. Mueva el interruptor [▲ / ▼ ] hasta seleccionar
la modalidad Voice Recorder <Grabador de
voz> y pulse el botón [OK].
3. Pulse el botón [Menu] cuando aparezca la
pantalla Voice Record <Grabar voz>.
4. Mueva el interruptor [▲ / ▼ ] hasta seleccionar
Play <Reproducir> y pulse el botón [OK].
5. Mueva el interruptor [▲ / ▼ ] hasta seleccionar
el archivo que desea reproducir.
6. Pulse el botón [OK] para reproducir el archivo
grabado.
◆ Pulse el botón [OK] tras interrumpir la
grabación.
Botón e interruptor utilizados al reproducir la
grabación
Botón Reproducir/Pausa [ ] : Reproduce o
interrumpe el archivo de voz. Interruptor Rebobinar
[ ] : Rebobina el archivo de voz (Mantenga
pulsado más de 2 segundos durante la
reproducción.) / va al archivo Anterior terruptor de
avance rápido [ ] : Pasa el archivo de voz
(Mantenga pulsado más de 2 segundos durante la
reproducción.) / va al archivo siguiente
Nota
✤ Pulse el botón [Back] mientras se encuentra en el
estado de espera de grabación para ver la lista
de archivos.
ESPAÑOL
7979
Page 80

ENGLISH
Voice Record
Stereo 8KHz 128Kbps
Play
Record
Back
STBY
00:00:16 / 00:24:32
1 01/01/2005 12:22:00 AM
2 01/01/2005 01:23:00 AM
3 01/02/2005 05:39:00 AM
4 2005/01/07 07:13:00 AM
5 2005/01/07 11:54:00 AM
Voice Play
Play
File Options
Record
Back
1 01/01/2005 12:22:00 AM
2 01/01/2005 01:23:00 AM
3 01/02/2005 05:39:00 AM
4 2005/01/07 07:13:00 AM
5 2005/01/07 11:54:00 AM
Voice Play
Lock
Copy To
Delete
Back
1 04/07/04 12:22 pm
2 04/07/05 1:23 am
3 04/07/05 5:39 pm
4 04/07/09 7:3 am
5 04/07/12 11:54 pm
Voice Play
Play
File Option
Record
Back
Selected
All
Cancel
Choose the file(s)
to delete
Voice Recorder Mode: Selecting File Options
Modalidad de grabador de voz:
Selección de opciones de archivo
Deleting Voice files Eliminación de archivos de voz
You can delete voice files you want.
1. Move [Mode Selector] down to turn on the
CAM and move it down again.
◆ The Mode Selection screen appears.
2. Move the [ ▲ /▼ ] switch to select Voice
Recorder mode and press the [OK] button.
3. Press the [Menu] button when the Voice
Record Screen appears.
4. Move the [ ▲ /▼ ] switch to select <Play> and
press the [OK] button.
5. Move the [ ▲ /▼ ] switch to select the voice
file you want to delete.
6. Press the [Menu] button to select <File
Options> and press the [OK] button.
◆ You can select <File Options> only in Voice
Play mode.
7. Move the [ ▲ /▼ ] switch to select <Delete>
and press the [OK] button.
8. Move the [ ▲ /▼ ] switch to select the
followings and press the [OK] button.
◆ Selected: The selected voice file is deleted.
◆ All: All voice files are deleted.
◆ Cancel: Cancel deleting voice files.
Note
✤ If you select <Back> in the menu, the previous
menu appears.
8080
4
6
7
8
Puede eliminar los archivos de voz que desee.
1. Baje el [Selector de modalidad] para encender
la VIDEOCÁMARA y bájelo de nuevo.
◆ Aparece la pantalla Mode Selection
2. Mueva el interruptor [▲ /▼ ] hasta seleccionar
la modalidad Voice Recorder <Grabador de
voz> y pulse el botón [OK].
3. Pulse el botón [Menu] cuando aparezca la
pantalla Voice Record <Grabar voz>.
4. Mueva el interruptor [▲ / ▼ ] hasta seleccionar
Play <Reproducir> y pulse el botón [OK].
5. Deslice el interruptor [▲ /▼ ] hasta seleccionar
el archivo de voz que desea borrar.
6. Pulse el botón [Menu] hasta seleccionar File
Options <Opciones de archivo> y pulse el
botón [OK].
◆ Puede seleccionar File Options <Opciones de
7. Mueva el interruptor [▲ /▼ ] hasta seleccionar
Delete <Borrar> y pulse el botón [OK].
8. Mueva el interruptor [▲ /▼ ] para seleccionar
los siguientes y pulse el botón [OK].
◆ Selected <Seleccionado>: Se borra el
◆ All <Todo>:Se borran todos los archivos de
◆ Cancel <Cancelar>: Cancela la supresión de
Nota
✤ Si selecciona Back <Volver> en el menú, aparece
el menú anterior.
ESPAÑOL
<Selección de modalidad>.
archivo> sólo en Voice Play <Reproducir voz>.
archivo de foto seleccionado.
fotos.
archivos de voz.
Page 81

ENGLISH
Voice Record
Stereo 8KHz 128Kbps
Play
Record
Back
STBY
00:00:16 / 00:24:32
1 01/01/2005 12:22:00 AM
2 01/01/2005 01:23:00 AM
3 01/02/2005 05:39:00 AM
4 2005/01/07 07:13:00 AM
5 2005/01/07 11:54:00 AM
Voice Play
Play
File Options
Record
Back
1 01/01/2005 12:22:00 AM
2 01/01/2005 01:23:00 AM
3 01/02/2005 05:39:00 AM
4 2005/01/07 07:13:00 AM
5 2005/01/07 11:54:00 AM
Voice Play
Lock
Copy To
Delete
Back
1 04/07/04 12:22 pm
2 04/07/05 1:23 am
3 04/07/05 5:39 pm
4 04/07/09 7:3 am
5 04/07/12 11:54 pm
Voice Play
Play
File Option
Record
Back
Selected
All
Cancel
Choose the file(s) you would
to lock.
Voice Recorder Mode: Selecting File Options
Modalidad de grabador de voz:
Selección de opciones de archivo
Locking Voice files Bloqueo de archivos de voz
You can lock the important voice file not to be deleted.
1. Move [Mode Selector] down to turn on the
CAM and move it down again.
◆ The Mode Selection screen appears.
2. Move the [ ▲ /▼ ] switch to select Voic e
Recorder mode and press the [OK] button.
3. Press the [Menu] button when the Voice
Record screen appears.
4. Move the [ ▲ /▼ ] switch to select <Play> and
press the [OK] button.
5. Move the [ ▲ /▼ ] switch to select the voice
file you want to lock.
6. Press the [Menu] button to select <File
Options> and press the [OK] button.
◆ You can select <File Options> only in Voice
Play mode.
7. Move the [ ▲ /▼ ] switch to select <Lock> and
press the [OK] button.
8. Move the [ ▲ /▼ ] switch to select the
followings and press the [OK] button.
◆ Selected: The selected voice file is locked.
◆ All: All voice files are locked.
◆ Cancel: Cancel locking voice files.
Notes
✤ If you select <Back> in the menu, the previous
menu appears.
✤ The < > icon is displayed on the locked file.
4
6
7
8
Puede bloquear archivos de voz importantes para evitar que se borren.
1. Baje el [Selector de modalidad] para encender
2. Mueva el interruptor [▲ / ▼ ] hasta seleccionar
3. Pulse el botón [Menu] cuando aparezca la
4. Mueva el interruptor [▲ / ▼ ] hasta seleccionar
5. Deslice el interruptor [▲ /▼ ] hasta seleccionar
6. Pulse el botón [Menu] hasta seleccionar File
7. Mueva el interruptor [▲ / ▼ ] hasta seleccionar
8. Mueva el interruptor [▲ / ▼ ] para seleccionar
✤ Si selecciona Back <Volver> en el menú, aparece
✤ Aparece el icono < > sobre el archivo
ESPAÑOL
la VIDEOCÁMARA y bájelo de nuevo.
◆ Aparece la pantalla Mode Selection
<Selección de modalidad>.
la modalidad Voice Recorder <Grabador de
voz> y pulse el botón [OK].
pantalla Voice Record <Grabar voz>.
Play <Reproducir> y pulse el botón [OK].
el archivo de voz que desea borrar.
Options <Opciones de archivo> y pulse el
botón [OK].
◆ Puede seleccionar File Options <Opciones de
archivo> sólo en Voice Play <Reproducir voz>.
Lock <Bloquear> y pulse el botón [OK].
los siguientes y pulse el botón [OK].
◆ Selected <Seleccionado>: Se bloquea el
archivo de voz seleccionado.
◆ All <Todo>: Se bloquean todos los archivos
de voz.
◆ Cancel <Cancelar>: Cancela el bloqueo de
archivos de voz.
Notas
el menú anterior.
bloqueado.
8181
Page 82

ENGLISH
Voice Record
Stereo 8KHz 128Kbps
Play
Record
Back
STBY
00:00:16 / 00:24:32
1 01/01/2005 12:22:00 AM
2 01/01/2005 01:23:00 AM
3 01/02/2005 05:39:00 AM
4 2005/01/07 07:13:00 AM
5 2005/01/07 11:54:00 AM
Voice Play
Play
File Options
Record
Back
1 01/01/2005 12:22:00 AM
2 01/01/2005 01:23:00 AM
3 01/02/2005 05:39:00 AM
4 2005/01/07 07:13:00 AM
5 2005/01/07 11:54:00 AM
Voice Play
Lock
Copy To
Delete
Back
1 04/07/04 12:22 pm
2 04/07/05 1:23 am
3 04/07/05 5:39 pm
4 04/07/09 7:3 am
5 04/07/12 11:54 pm
Voice Play
Lock
Copy To
Delete
Back
Selected
All
Cancel
Choose the file(s) to copy
to memory stick?
Voice Recorder Mode: Selecting File Options
Modalidad de grabador de voz:
Selección de opciones de archivo
Copying Voice files Copia de archivos de voz
You can copy the voice file to the internal or external memory.
1. Move [Mode Selector] down to turn on the
CAM and move it down again.
◆ The Mode Selection screen appears.
2. Move the [ ▲ /▼ ] switch to select Voice
Recorder mode and press the [OK] button.
3. Press the [Menu] button when the Voice
Record screen appears.
4. Move the [ ▲ /▼ ] switch to select <Play> and
press the [OK] button.
5. Move the [ ▲ /▼ ] switch to select the voice
file you want to copy.
6. Press the [Menu] button to select <File
Options> and press the [OK] button.
◆ You can select <File Options> only in Voice
Play mode.
7. Move the [ ▲ /▼ ] switch to select <Copy To>
and press the [OK] button.
◆ If you selected the Storage type ‘External’,
the file is copied to ‘Internal’ and vice versa.
8. Move the [ ▲ /▼ ] switch to select the
followings and press the [OK] button.
◆ Selected: Copy the selected voice file.
◆ All: Copy all voice files.
◆ Cancel: Cancel copying voice files.
Note
✤ If you select <Back> in the menu, the previous
menu appears.
8282
4
6
7
8
El archivo de voz puede copiarse en la memoria interna o externa.
ESPAÑOL
1. Baje el [Selector de modalidad] para encender
la VIDEOCÁMARA y bájelo de nuevo.
◆ Aparece la pantalla Mode Selection
<Selección de modalidad>.
2. Mueva el interruptor [▲ /▼ ] hasta seleccionar
la modalidad Voice Recorder <Grabador de
voz> y pulse el botón [OK].
3. Pulse el botón [Menu] cuando aparezca la
pantalla Voice Record <Grabar voz>.
4. Mueva el interruptor [▲ /▼ ] hasta seleccionar
Play <Reproducir> y pulse el botón [OK].
5. Deslice el interruptor [▲ /▼ ] hasta seleccionar
el archivo de voz que desea borrar.
6. Pulse el botón [Menu] hasta seleccionar File
Options <Opciones de archivo> y pulse el
botón [OK].
◆ Puede seleccionar File Options <Opciones de
archivo> sólo en Voice Play <Reproducir voz>.
7. Mueva el interruptor [▲ /▼ ] hasta seleccionar
Copy To <Copiar en> y pulse el botón [OK].
◆ Si ha seleccionado el tipo de almacenamiento
External <Externo>, el archivo se copia en
Internal <Interno> y viceversa.
8. Mueva el interruptor [▲ /▼ ] para seleccionar
los siguientes y pulse el botón [OK].
◆ Selected <Seleccionado>: Se copia el
archivo de voz seleccionado.
◆ All <Todo>: Copia todos los archivos de voz.
◆ Cancel <Cancelar>: Cancela la copia de
archivos de voz.
Nota
✤ Si selecciona Back <Volver> en el menú, aparece
el menú anterior.
Page 83

ENGLISH
Mode Selection
Video
Photo
MP3
Voice Recorder
File Browser
/
DCIM
MSAMSUNG
MISC
/ . . . / 100SSWAV
SWAV0004.WAV
Up One Level
SWAV0001.WAV
SWAV0002.WAV
SWAV0003.WAV
Lock
Copy To
Delete
File Info
Back
/ . . . / 100SSWAV
SWAV0004.WAV
Up One Level
SWAV0001.WAV
SWAV0002.WAV
SWAV0003.WAV
Lock
Copy To
Delete
File Info
Back
Choose the file(s)
to delete
Selected
All
Cancel
Using File Browser Utilización del explorador de archivos
Deleting Files or Folders Eliminación de archivos o carpetas
You can delete the file(AVI, MP3, JPEG, WAV) or folders you recorded.
1. Move the [Mode Selector] down to turn on
the CAM and move it down again.
◆ The Mode Selection screen appears.
2. Move the [ ▲ /▼ ] switch to select File Browser
and press the [OK] button.
3. Move the [ ▲ /▼ ] switch to select the folder
to find the file you want to delete.
Press the [OK] button.
◆ Press the [Menu] button if you want to delete
the selected folder.
◆ Perform these steps repeatedly until the file
you want to delete appears.
4. Press the [Menu] button.
Move the [ ▲ / ▼ ] switch to select <Delete>
and press the [OK] button.
5. Move the [ ▲ /▼ ] button to select the setting
you want.
Press the [OK] button.
◆ Selected: The selected file is deleted.
◆ All: All files are deleted.
◆ Cancel: Cancel deleting files.
Note
✤ If you select <Back> in the menu, the previous
menu appears.
2
3
4
5
Puede borrar el archivo (AVI, MP3, JPEG, WAV) o las carpetas
grabadas.
1. Baje el [Selector de modalidad] para encender
la VIDEOCÁMARA y bájelo de nuevo.
◆ Aparece la pantalla Mode Selection
<Selección de modalidad>.
2. Mueva el interruptor [▲ / ▼ ] hasta seleccionar
File Browser <Explorador de archivos> y
pulse el botón [OK].
3. Mueva el interruptor [▲ / ▼ ] hasta seleccionar
la carpeta para localizar el archivo que desea
borrar. Pulse el botón [OK].
◆ Pulse el botón [Menu] para borrar la carpeta
seleccionada.
◆ Realice estos pasos de forma repetida hasta
que aparezca el archivo que desea borrar.
4. Pulse el botón [Menu].
Mueva el interruptor [▲ / ▼ ] hasta seleccionar
Delete <Borrar> y pulse el botón [OK].
5. Mueva el botón [▲ /▼ ] hasta seleccionar el
ajuste que desea. Pulse el botón [OK].
◆ Selected <Seleccionado>: Se borra el
archivo seleccionado.
◆ All <Todo>: Se borran todos los archivos.
◆ Cancel <Cancelar>: Cancela la supresión de
archivos.
Nota
✤ Si selecciona Back <Volver> en el menú, aparece
el menú anterior.
ESPAÑOL
8383
Page 84

ENGLISH
Mode Selection
Video
Photo
MP3
Voice Recorder
File Browser
/
DCIM
MSAMSUNG
MISC
/ . . . / 100SSWAV
SWAV0004.WAV
Up One Level
SWAV0001.WAV
SWAV0002.WAV
SWAV0003.WAV
Lock
Copy To
Delete
File Info
Back
/ . . . / 100SSWAV
SWAV0004.WAV
Up One Level
SWAV0001.WAV
SWAV0002.WAV
SWAV0003.WAV
Lock
Copy To
Delete
File Info
Back
Selected
All
Cancel
Choose the file(s) you would
to lock.
ESPAÑOL
Using File Browser Utilización del explorador de archivos
Locking Files Bloqueo de archivos
You can lock the important files not to be deleted.
Puede bloquear archivos de música importantes para no borrarlos.
1. Move the [Mode Selector] down to turn on
the CAM and move it down again.
◆ The Mode Selection screen appears.
2. Move the [ ▲ /▼ ] switch to select File Browser
and press the [OK] button.
3. Move the [ ▲ /▼ ] switch to select the file you
want to lock.
Press the [OK] button.
◆ Perform these steps repeatedly until the file
you want to lock appears.
4. Press the [Menu] button.
Move the [ ▲ / ▼ ] switch to select <Lock> and
press the [OK] button.
5. Move the [ ▲ /▼ ] button to select the followings.
Press the [OK] button.
◆ Selected: The selected file is locked.
◆ All: All files are locked.
◆ Cancel: Cancel locking files.
Notes
✤ If you select <Back> in the menu, the previous
menu appears.
✤ You can’t lock folders.
✤ The < > icon is displayed on the locked file.
8484
2
1. Baje el [Selector de modalidad] para encender
la VIDEOCÁMARA y bájelo de nuevo.
◆ Aparece la pantalla Mode Selection
<Selección de modalidad>.
2. Mueva el interruptor [▲ /▼ ] hasta seleccionar
File Browser <Explorador de archivos> y
pulse el botón [OK].
3. Mueva el interruptor [▲ /▼ ] hasta seleccionar
3
el archivo que desea bloquear.
Pulse el botón [OK].
◆ Realice estos pasos de forma repetida hasta
que aparezca el archivo que desea bloquear.
4. Pulse el botón [Menu].
Mueva el interruptor [▲ / ▼ ] hasta seleccionar
Lock <Bloquear> y pulse el botón [OK].
4
5. Mueva el botón [▲ /▼ ] para seleccionar los
siguientes. Pulse el botón [OK].
◆ Selected <Seleccionado>: Se bloquea el
archivo seleccionado.
◆ All <Todo>: Se bloquean todos los archivos.
◆ Cancel <Cancelar>: Cancela el bloqueo de
archivos.
5
Notas
✤ Si selecciona Back <Volver> en el menú, aparece
el menú anterior.
✤ No puede bloquear carpetas.
✤ Aparece el icono < > sobre el archivo
bloqueado.
Page 85

ENGLISH
Mode Selection
Video
Photo
MP3
Voice Recorder
File Browser
/
DCIM
MSAMSUNG
MISC
/ . . . / 100SSWAV
SWAV0004.WAV
Up One Level
SWAV0001.WAV
SWAV0002.WAV
SWAV0003.WAV
Lock
Copy To
Delete
File Info
Back
/ . . . / 100SSWAV
SWAV0004.WAV
Up One Level
SWAV0001.WAV
SWAV0002.WAV
SWAV0003.WAV
Lock
Copy To
Delete
File Info
Back
All
Cancel
Selected
Choose the file(s) to copy
to memory stick?
Using File Browser Utilización del explorador de archivos
Copying Files or Folders Copia de archivos o carpetas
You can copy the file or folder to the internal or external memory.
1. Move the [Mode Selector] down to turn on
the CAM and move it down again.
◆ The Mode Selection screen appears.
2. Move the [ ▲ /▼ ] switch to select File Browser
and press the [OK] button.
3. Move the [ ▲ /▼ ] switch to select the folder
to find the file you want to copy.
Press the [OK] button.
◆ Press the [Menu] button if you want to copy
the selected folder.
◆ Perform these steps repeatedly until the file
you want to copy appears.
4. Press the [Menu] button.
Move the [ ▲ / ▼ ] switch to select <Copy To>
and press the [OK] button.
◆ If you selected the Storage type ‘External’,
the file is copied to ‘Internal’.
5. Move the [ ▲ /▼ ] button to select the
followings. Press the [OK] button.
◆ Selected: Copy the selected file.
◆ All: Copy all files.
◆ Cancel: Cancel copying files.
Note
✤ If you select <Back> in the menu, the previous
menu appears.
2
3
4
5
El archivo o la carpeta pueden copiarse en la memoria interna o externa.
1. Baje el [Selector de modalidad] para encender
la VIDEOCÁMARA y bájelo de nuevo.
◆ Aparece la pantalla Mode Selection
<Selección de modalidad>.
2. Mueva el interruptor [▲ / ▼ ] hasta seleccionar
File Browser <Explorador de archivos> y
pulse el botón [OK].
3. Mueva el interruptor [▲ / ▼ ] hasta seleccionar
la carpeta para localizar el archivo que desea
copiar. Pulse el botón [OK].
◆ Pulse el botón [Menu] para copiar la carpeta
seleccionada.
◆ Realice estos pasos de forma repetida hasta
que aparezca el archivo que desea copiar.
4. Pulse el botón [Menu].
Mueva el interruptor [▲ / ▼ ] hasta seleccionar
Copy To <Copiar en> y pulse el botón [OK].
◆ Si ha seleccionado el tipo de almacenamiento
External <Externo>, el archivo se copia en
Internal <Interno>.
5. Mueva el botón [▲ /▼ ] para seleccionar los
siguientes. Pulse el botón [OK].
◆ Selected <Seleccionado>: Se copia el
archivo seleccionado.
◆ All <Todo>: Copia todos los archivos.
◆ Cancel <Cancelar>: Cancela la copia de
archivos.
Nota
✤ Si selecciona Back <Volver> en el menú, aparece
el menú anterior.
ESPAÑOL
8585
Page 86

ENGLISH
Mode Selection
Video
Photo
MP3
Voice Recorder
File Browser
/
DCIM
MSAMSUNG
MISC
/ . . . / 100SSWAV
SWAV0004.WAV
Up One Level
SWAV0001.WAV
SWAV0002.WAV
SWAV0003.WAV
Lock
Copy To
Delete
File Info
Back
/ . . . / 100SSWAV
SWAV0004.WAV
Up One Level
SWAV0001.WAV
SWAV0002.WAV
SWAV0003.WAV
Lock
Copy To
Delete
File Info
Back
Close
SWAV0001.WAV
Size 6482524 bytes
Date 2005/01/01
08:30:00 PM
Locked No
Using File Browser Utilización del explorador de archivos
Viewing File Information Visualización de la información del archivo
You can see the file name, format, size and date.
1. Move the [Mode Selector] down to turn on
the CAM and move it down again.
◆ The Mode Selection screen appears.
2. Move the [ ▲ /▼ ] switch to select File Browser
and press the [OK] button.
3. Move the [ ▲ /▼ ] switch to select the file you
want to see its file information.
Press the [OK] button.
◆ Perform these steps repeatedly until the file
you want to see its file information appears.
4. Press the [Menu] button.
Move the [ ▲ / ▼ ] switch to select <File Info>
and press the [OK] button.
◆ The screen with file name, format, size and
date appears.
5. Press the [OK] button to finish viewing file
information.
◆ If you select <Close> in the screen, the
screen disappears.
8686
2
3
4
5
Puede ver el nombre de archivo, formato, tamaño y fecha.
1. Baje el [Selector de modalidad] para encender
la VIDEOCÁMARA y bájelo de nuevo.
◆ Aparece la pantalla Mode Selection
<Selección de modalidad>.
2. Mueva el interruptor [▲ /▼ ] hasta seleccionar
File Browser <Explorador de archivos> y
pulse el botón [OK].
3. Mueva el interruptor [▲ /▼ ] hasta seleccionar
el archivo sobre el que desea ver su
información. Pulse el botón [OK].
◆ Realice estos pasos de forma repetida hasta
que aparezca el archivo que desea ver.
4. Pulse el botón [Menu].
Mueva el interruptor [▲ / ▼ ] hasta seleccionar
File Info <Inf. archivo> y pulse el botón [OK].
◆ Aparece la pantalla con el nombre de archivo,
el formato, el archivo y la fecha.
5. Pulse el botón [OK] para finalizar la
visualización de la información del archivo.
◆ Si selecciona Close <Cerrar> en la pantalla,
ésta desaparece.
ESPAÑOL
Page 87

ENGLISH
ESPAÑOL
Ajuste de la
4
4
Setting the CAM
Adjusting the LCD Monitor................................................... 88
Adjusting the LCD Brightness ............................................. 88
Adjusting the LCD Colour.................................................... 89
Adjusting Date/Time .............................................................. 90
Setting Time......................................................................... 90
Setting Date......................................................................... 91
Setting Date Format ............................................................ 92
Setting Time Format............................................................ 93
Setting the System ................................................................ 94
Setting the Auto Shut off ..................................................... 94
Setting the Demo Function.................................................. 95
Setting Start-up Mode ......................................................... 96
Setting the File No. Function............................................... 97
Setting the Beep Sound ...................................................... 98
Viewing Version Information................................................ 99
Setting Memory.................................................................... 100
Selecting the Storage Type............................................... 100
Formatting the Memory ..................................................... 101
Viewing Memory Space .................................................... 102
Using USB Mode.................................................................. 103
Storing Files to the External Memory ............................... 103
USB Speed depending on the System.............................. 104
System Environment ......................................................... 104
Using PC Cam................................................................... 105
Connecting the CAM to a Printer...................................... 106
4
4
Ajuste de la pantalla LCD ..................................................... 88
Ajuste de fecha y hora .......................................................... 90
Ajuste del sistema ................................................................. 94
Ajuste de la memoria .......................................................... 100
Utilización de la modalidad USB ....................................... 103
VIDEOCÁMARA
Ajuste del brillo de la LCD................................................... 88
Ajuste del color de la pantalla LCD .................................... 89
Ajuste de la hora ................................................................. 90
Ajuste de la fecha................................................................ 91
Ajuste del formato de fecha ................................................ 92
Ajuste del formato de hora.................................................. 93
Ajuste de apagado automático ........................................... 94
Ajuste de la función Demo .................................................. 95
Ajuste de la modalidad de inicio ......................................... 96
Ajuste de la función File No. ............................................... 97
Ajuste del sonido del pitido ................................................. 98
Visualización de la información de versión......................... 99
Selección del tipo de almacenamiento ............................. 100
Formato de la memoria..................................................... 101
Visualización de espacio en memoria .............................. 102
Almacenamiento de archivos en la memoria externa ...... 103
Velocidad de USB según el sistema................................. 104
Entorno del sistema........................................................... 104
Utilización de PC Cam ...................................................... 105
Conexión de la VIDEOCÁMARA a una impresora........... 106
8787
Page 88

ENGLISH
Mode Selection
MP3
Voice Recorder
File Browser
System Settings
Back
System Settings
Date/Time
System
Display
Memory
Back
Settings: Display
Back
LCD Colour
50 %
LCD Brightness
20 %
Settings: Display
Back
LCD Colour
50 %
LCD Brightness
30 %
Setting the CAM: Adjusting the LCD Monitor
Ajuste de la VIDEOCÁMARA:
Ajuste de la pantalla LCD
Adjusting the LCD Brightness Ajuste del brillo de la LCD
You can adjust the brightness of the LCD monitor to compensate for
ambient lighting conditions.
1. Move [Mode Selector] down to turn on the
CAM and move it down again.
◆ The Mode Selection screen appears.
2. Move the [ ▲ /▼ ] switch to select System
Settings and press the [OK] button.
3. Move the [ ▲ /▼ ] switch to select <Display>
and press the [OK] button.
4. Move the [ ▲ /▼ ] switch to select <LCD
Brightness> and press the [OK] button.
◆ You can adjust the LCD Brightness from
0% to 100%.
5. Move the [ ▲ /▼ ] switch to select the
brightness you want.
6. Press the [Back] button to finish setting.
Notes
✤ If you select <Back> in the menu, the previous
menu appears.
✤ A brighter LCD Monitor setting consumes more
8888
battery power.
2
3
4
5
Puede ajustar el brillo de la pantalla LCD para compensar las
condiciones de luz ambientales.
ESPAÑOL
1. Baje el [Selector de modalidad] para encender
la VIDEOCÁMARA y bájelo de nuevo.
◆ Aparece la pantalla Mode Selection
<Selección de modalidad>.
2. Mueva el interruptor [▲ / ▼ ] hasta
seleccionar System Settings <Config. del
sistema> y pulse el botón [OK].
3. Mueva el interruptor [▲ /▼ ] hasta
seleccionar Display <Pantalla> y pulse el
botón [OK].
4. Mueva el interruptor [▲ /▼ ] hasta
seleccionar LCD Bright <Brillo de LCD> y
pulse el botón [OK].
◆ Puede ajustar el brillo de la pantalla LCD de
0% a 100%.
5. Mueva el interruptor [▲ /▼ ] hasta
seleccionar el brillo que desea.
6. Pulse el botón [Back] para finalizar el ajuste.
Notas
✤ Si selecciona Back <Volver> en el menú,
aparece el menú anterior.
✤ Un ajuste de monitor LCD más brillante
consume más energía de la batería.
Page 89

ENGLISH
Mode Selection
MP3
Voice Recorder
File Browser
System Settings
Back
System Settings
Date/Time
System
Display
Memory
Back
Settings: Display
Back
LCD Brightness
20 %
LCD Colour
50 %
Settings: Display
Back
LCD Brightness
20 %
LCD Colour
60 %
Setting the CAM: Adjusting the LCD Monitor
Ajuste de la VIDEOCÁMARA:
Ajuste de la pantalla LCD
Adjusting the LCD Colour Ajuste del color de la pantalla LCD
You can adjust the colour of the LCD monitor depending on the
situation.
1. Move [Mode Selector] down to turn on the
2
CAM and move it down again.
◆ The Mode Selection screen appears.
2. Move the [ ▲ /▼ ] switch to select System
Settings and press the [OK] button.
3. Move the [ ▲ /▼ ] switch to select <Display>
3
and press the [OK] button.
4. Move the [ ▲ /▼ ] switch to select <LCD
Colour> and press the [OK] button.
◆ You can adjust the LCD Colour from 0% to
100%.
5. Move the [ ▲ /▼ ] switch to select the colour
4
you want.
Puede ajustar el color de la pantalla LCD dependiendo de la situación.
1. Baje el [Selector de modalidad] para encender
la VIDEOCÁMARA y bájelo de nuevo.
◆ Aparece la pantalla Mode Selection
<Selección de modalidad>.
2. Mueva el interruptor [▲ / ▼ ] hasta seleccionar
System Settings <Config. del sistema> y
pulse el botón [OK].
3. Mueva el interruptor [▲ / ▼ ] hasta seleccionar
Display <Pantalla> y pulse el botón [OK].
4. Mueva el interruptor [▲ / ▼ ] hasta seleccionar
LCD Colour <Color de LCD> y pulse el botón
[OK].
◆ Puede ajustar el color de la pantalla LCD de
0% a 100%.
ESPAÑOL
6. Press the [Back] button to finish setting.
Note
✤ If you select <Back> in the menu, the previous
menu appears.
5. Mueva el interruptor [▲ / ▼ ] hasta seleccionar
el color que desea.
5
6. Pulse el botón [Back] para finalizar el ajuste.
Nota
✤ Si selecciona Back <Volver> en el menú, aparece
el menú anterior.
8989
Page 90

ENGLISH
Mode Selection
MP3
Voice Recorder
File Browser
System Settings
Back
System Settings
Date/Time
System
Display
Memory
Back
Settings: Date/Time
Time Format
Back
Date Format
YY/MM/DD
12 Hour
2005/01/01
06:39 PM
Set Date
Set Time
Settings: Date/Time
Back
Date Format
DD/MM/YY
24 Hour
Set Date
Set Time
Time Format
Press Up/Down to change and
OK to confirm selection
06 : 39 PM
Setting the CAM: Adjusting Date/Time
Ajuste de la VIDEOCÁMARA:
Ajuste de fecha y hora
Setting Time Ajuste de la hora
The built-in clock creates the time stamp.
You can adjust the time you use.
1. Move [Mode Selector] down to turn on the
CAM and move it down again.
◆ The Mode Selection screen appears.
2. Move the [ ▲ /▼ ] switch to select System
Settings and press the [OK] button.
3. Move the [ ▲ /▼ ] switch to select
<Date/Time> and press the [OK] button.
4. Move the [ ▲ /▼ ] switch to select <Set Time>
and press the [OK] button.
5. Move the [ ▲ /▼ ] switch to set time and
press the [OK] button.
◆ Move the [ ▲ /▼ ] switch to change the
setting and press the [OK] button to confirm
selection and move to the next setting.
6. Press the [Back] button to finish setting.
Note
✤ If you select <Back> in the menu, the previous
9090
menu appears.
2
3
4
5
El reloj incorporado crea la marca de la hora.
Puede ajustar la hora que utilice.
ESPAÑOL
1. Baje el [Selector de modalidad] para encender
la VIDEOCÁMARA y bájelo de nuevo.
◆ Aparece la pantalla Mode Selection
<Selección de modalidad>.
2. Mueva el interruptor [▲ / ▼ ] hasta
seleccionar System Settings <Config. del
sistema> y pulse el botón [OK].
3. Mueva el interruptor [▲ /▼ ] hasta
seleccionar Date/Time <Fecha y hora> y
pulse el botón [OK].
4. Mueva el interruptor [▲ /▼ ] hasta
seleccionar Set Time <Fijar fecha> y pulse el
botón [OK].
5. Mueva el interruptor [▲ /▼ ] hasta fijar la
fecha y pulse el botón [OK].
◆ Mueva el interruptor [▲ / ▼ ] para cambiar el
ajuste y pulse el botón [OK] para confirmar la
selección y pasar al ajuste siguiente..
6. Pulse el botón [Back] para finalizar el ajuste.
Nota
✤ Si selecciona Back <Volver> en el menú,
aparece el menú anterior.
Page 91

ENGLISH
Mode Selection
MP3
Voice Recorder
File Browser
System Settings
Back
System Settings
Date/Time
System
Display
Memory
Back
Settings: Date/Time
Time Format
Back
Date Format
YY/MM/DD
12 Hour
Set Date
Set Time
2005/01/01
06:39 PM
Settings: Date/Time
Back
Date Format
DD/MM/YY
24 Hour
Set Date
Set Time
Time Format
Press Up/Down to change and
OK to confirm selection
01 //012005
Setting the CAM: Adjusting Date/Time
Ajuste de la VIDEOCÁMARA:
Ajuste de fecha y hora
Setting Date Ajuste de la fecha
The built-in calendar creates the date stamp.
You can adjust the date you use.
1. Move [Mode Selector] down to turn on the
CAM and move it down again.
◆ The Mode Selection screen appears.
2. Move the [ ▲ /▼ ] switch to select System
Settings and press the [OK] button.
3. Move the [ ▲ /▼ ] switch to select
<Date/Time> and press the [OK] button.
4. Move the [ ▲ /▼ ] switch to select <Set Date>
and press the [OK] button.
2
3
El calendario incorporado crea la marca de la hora.
Puede ajustar la fecha que utilice.
1. Baje el [Selector de modalidad] para encender
2. Mueva el interruptor [▲ / ▼ ] hasta seleccionar
3. Mueva el interruptor [▲ / ▼ ] hasta seleccionar
ESPAÑOL
la VIDEOCÁMARA y bájelo de nuevo.
◆ Aparece la pantalla Mode Selection
<Selección de modalidad>.
System Settings <Config. del sistema> y
pulse el botón [OK].
Date/Time <Fecha y hora> y pulse el botón
[OK].
5. Move the [ ▲ /▼ ] switch to set date and
press the [OK] button.
◆ Move the [ ▲ /▼ ] switch to change the
setting and press the [OK] button to confirm
selection and move to the next setting.
6. Press the [Back] button to finish setting.
Note
✤ If you select <Back> in the menu, the previous
menu appears.
4. Mueva el interruptor [▲ / ▼ ] hasta seleccionar
4
Set Time <Fijar hora> y pulse el botón [OK].
5. Mueva el interruptor [▲ / ▼ ] hasta fijar la hora
y pulse el botón [OK].
◆ Mueva el interruptor [▲ / ▼ ] para cambiar el
ajuste y pulse el botón [OK] para confirmar la
selección y pasar al ajuste siguiente.
5
6. Pulse el botón [Back] para finalizar el ajuste.
Nota
✤ Si selecciona Back <Volver> en el menú, aparece
el menú anterior.
9191
Page 92

ENGLISH
Mode Selection
MP3
Voice Recorder
File Browser
System Settings
Back
System Settings
Date/Time
System
Display
Memory
Back
Settings: Date/Time
Time Format
Back
Date Format
YY/MM/DD
12 Hour
Set Date
Set Time
2005/01/01
06:39 PM
Settings: Date/Time
Time Format
Back
Date Format
DD/MM/YY
12 Hour
Set Date
Set Time
2005/01/01
06:39 PM
Setting the CAM: Adjusting Date/Time
Ajuste de la VIDEOCÁMARA:
Ajuste de fecha y hora
Setting Date Format Ajuste del formato de fecha
You can select the date format to display.
1. Move [Mode Selector] down to turn on the
CAM and move it down again.
◆ The Mode Selection screen appears.
2. Move the [ ▲ /▼ ] switch to select System
Settings and press the [OK] button.
3. Move the [ ▲ /▼ ] switch to select
<Date/Time> and press the [OK] button.
4. Move the [ ▲ /▼ ] switch to select <Date
Format> and press the [OK] button.
5. Move the [ ▲ /▼ ] switch to select the desired
format and press the [OK] button.
◆ YY/MM/DD: The date is displayed in order as
Year/Month/Date.
◆ DD/MM/YY: The date is displayed in order as
Date/Month/Year.
◆ MM/DD/YY: The date is displayed in order as
Month/Date/Year.
6. Press the [Back] button to finish setting.
Note
✤ If you select <Back> in the menu, the previous
menu appears.
9292
2
3
4
5
Puede seleccionar el formato de fecha que va a aparecer.
ESPAÑOL
1. Baje el [Selector de modalidad] para encender
la VIDEOCÁMARA y bájelo de nuevo.
◆ Aparece la pantalla Mode Selection
<Selección de modalidad>.
2. Mueva el interruptor [▲ / ▼ ] hasta seleccionar
System Settings <Config. del sistema> y
pulse el botón [OK].
3. Mueva el interruptor [▲ / ▼ ] hasta seleccionar
Date/Time <Fecha y hora> y pulse el botón
[OK].
4. Mueva el interruptor [▲ / ▼ ] hasta seleccionar
Date Format <Formato de fecha> y pulse el
botón [OK].
5. Mueva el interruptor [▲ /▼ ] hasta seleccionar
el formato que desea y pulse el botón [OK].
◆ YY/MM/DD <AA/MM/DD>: La fecha aparece
en el orden Año/Mes/Día.
◆ DD/MM/YY <DD/MM/AA>: La fecha aparece
en el orden Día/Mes/Año.
◆ MM/DD/YY <MM/DD/AA>: La fecha aparece
en el orden Mes/Día/Año.
6. Pulse el botón [Back] para finalizar el ajuste.
Nota
✤ Si selecciona Back <Volver> en el menú, aparece
el menú anterior.
Page 93

ENGLISH
Mode Selection
MP3
Voice Recorder
File Browser
System Settings
Back
System Settings
Date/Time
System
Display
Memory
Back
Settings: Date/Time
Back
Date Format
DD/MM/YY
12 Hour
Set Date
Set Time
Time Format
2005/01/01
06:39 PM
Settings: Date/Time
Back
Date Format
DD/MM/YY
24 Hour
Set Date
Set Time
Time Format
2005/01/01
06:39 PM
Setting the CAM: Adjusting Date/Time
Ajuste de la VIDEOCÁMARA :
Ajuste de fecha y hora
Setting Time Format Ajuste del formato de hora
You can select the time format to display.
1. Move [Mode Selector] down to turn on the
CAM and move it down again.
◆ The Mode Selection screen appears.
2. Move the [ ▲ /▼ ] switch to select System
Settings and press the [OK] button.
3. Move the [ ▲ /▼ ] switch to select
<Date/Time> and press the [OK] button.
4. Move the [ ▲ /▼ ] switch to select <Time
Format> and press the [OK] button.
5. Move the [ ▲ /▼ ] switch to select the desired
format and press the [OK] button.
◆ 12 Hour: The time is displayed as the unit of
12 hours.
◆ 24 Hour: The time is displayed as the unit of
24 hours.
6. Press the [Back] button to finish setting.
2
3
4
5
Puede seleccionar el formato de hora que va a aparecer.
1. Baje el [Selector de modalidad] para encender
la VIDEOCÁMARA y bájelo de nuevo.
◆ Aparece la pantalla Mode Selection
<Selección de modalidad>.
2. Mueva el interruptor [▲ / ▼ ] hasta seleccionar
System Settings <Config. del sistema> y
pulse el botón [OK].
3. Mueva el interruptor [▲ / ▼ ] hasta seleccionar
Date/Time <Fecha y hora> y pulse el botón
[OK].
4. Mueva el interruptor [▲ / ▼ ] hasta seleccionar
Time Format <Formato de hora> y pulse el
botón [OK].
5. Mueva el interruptor [▲ / ▼ ] hasta seleccionar
el formato que desea y pulse el botón [OK].
◆ 12 Hour <12 horas>: La hora aparece como
la unidad de 12 horas.
◆ 24 Hour <24 horas>: La hora aparece como
la unidad de 24 horas.
6. Pulse el botón [Back] para finalizar el ajuste.
ESPAÑOL
Note
✤ If you select <Back> in the menu, the previous
menu appears.
Nota
✤ Si selecciona Back <Volver> en el menú, aparece
el menú anterior.
9393
Page 94

ENGLISH
Mode Selection
MP3
Voice Recorder
File Browser
System Settings
Back
System Settings
Date/Time
System
Display
Memory
Back
Settings: System
Beep Sound
File No.
Reset
Off
5 Minutes
Video Mode
On
Demo
Auto Shut off
Start-up
Settings: System
Beep Sound
Start-up
Video Mode
Off
Off
Reset
On
Demo
Auto Shut off
File No.
Setting the CAM: Setting the System
Ajuste de la VIDEOCÁMARA:
Ajuste del sistema
Setting the Auto Shut off Ajuste de apagado automático
To save energy or battery, you can set the Auto Shut off function.
1. Move [Mode Selector] down to turn on the
CAM and move it down again.
◆ The Mode Selection screen appears.
2. Move the [ ▲ /▼ ] switch to select System
Settings and press the [OK] button.
3. Move the [ ▲ /▼ ] switch to select <System>
and press the [OK] button.
4. Move the [ ▲ /▼ ] switch to select <Auto Shut
off> and press the [OK] button.
5. Move the [ ▲ /▼ ] switch to select the desired
setting and press the [OK] button.
◆ Off: Cancel the Auto Shut off function.
◆ 5 Minutes: the CAM turns off after 5 minutes.
6. Press the [Back] button to finish setting.
Notes
✤ If the CAM turns off after 5 minutes, you can use
the CAM again after turning it on.
✤ If you select <Back> in the menu, the previous
menu appears.
✤ The <Auto Shut off> function cannot be operated
if you connect the power adapter to the CAM.
It can be only operated when you insert battery
pack into the CAM.
9494
2
3
4
5
Para ahorrar energía o batería, puede definir la función Auto Shut off
<Apagado automático>.
1. Baje el [Selector de modalidad] para encender
2. Mueva el interruptor [▲ / ▼ ] hasta
3. Mueva el interruptor [▲ /▼ ] hasta seleccionar
4. Mueva el interruptor [▲ / ▼ ] hasta
5. Mueva el interruptor [▲ / ▼ ] hasta seleccionar
6. Pulse el botón [Back] para finalizar el ajuste.
✤ Si la VIDEOCÁMARA se apaga tras 5 minutos,
✤ Si selecciona Back <Volver> en el menú,
✤ La función Auto Shut off <Apagado automático>
ESPAÑOL
la VIDEOCÁMARA y bájelo de nuevo.
◆ Aparece la pantalla Mode Selection
<Selección de modalidad>.
seleccionar System Settings <Config. del
sistema> y pulse el botón [OK].
System <Sistema> y pulse el botón [OK].
seleccionar Auto Shut off <Apagado
automático> y pulse el botón [OK].
el ajuste que desea y pulse el botón [OK].
◆ Off <Des.>: Cancela la función de apagado
automático.
◆ 5 Minutes <5 minutos>: La VIDEOCÁMARA
se apaga tras 5 minutos.
Notas
puede utilizar de nuevo la VIDEOCÁMARA tras
encenderla.
aparece el menú anterior.
no está operativa si conecta el adaptador de
alimentación a la VIDEOCÁMARA. Sólo se puede
accionar cuando inserte la batería en la
VIDEOCÁMARA.
Page 95

ENGLISH
Mode Selection
MP3
Voice Recorder
File Browser
System Settings
Back
System Settings
Date/Time
System
Display
Memory
Back
Settings: System
Beep Sound
Start-up
Video Mode
Off
5 Minutes
Reset
On
Demo
Auto Shut off
File No.
Settings: System
Beep Sound
Start-up
Video Mode
5 Minutes
5 Minutes
Reset
On
Demo
Auto Shut off
File No.
Setting the CAM: Setting the System
Ajuste de la VIDEOCÁMARA:
Ajuste del sistema
Setting the Demo Function Ajuste de la función Demo
Demo function will allow you to view all the functions that the CAM
supports. Demo will run for up to 5 minutes.
1. Move [Mode Selector] down to turn on the
CAM and move it down again.
◆ The Mode Selection screen appears.
2. Move the [ ▲ /▼ ] switch to select System
Settings and press the [OK] button.
3. Move the [ ▲ /▼ ] switch to select <System>
and press the [OK] button.
4. Move the [ ▲ /▼ ] switch to select <Demo>
and press the [OK] button.
5. Move the [ ▲ /▼ ] switch to select the desired
setting and press the [OK] button.
◆ Off: Cancel the Demo function.
◆ 5 Minutes: Start the Demo function in 5 minutes.
◆ Play Now: Start the Demo function now.
6. Press the [Back] button to finish setting.
Notes
✤ If you select <Back> in the menu, the previous
menu appears.
✤ If you set the Demo function, it operates only in
Video Record mode.
2
3
4
5
La función Demo permite ver todas las funciones que admite la
VIDEOCÁMARA. Demo puede durar hasta 5 minutos.
ESPAÑOL
1. Baje el [Selector de modalidad] para encender
la VIDEOCÁMARA y bájelo de nuevo.
◆ Aparece la pantalla Mode Selection
<Selección de modalidad>.
2. Mueva el interruptor [▲ / ▼ ] hasta seleccionar
System Settings <Config. del sistema> y
pulse el botón [OK].
3. Mueva el interruptor [▲ / ▼ ] hasta seleccionar
System <Sistema> y pulse el botón [OK].
4. Mueva el interruptor [▲ / ▼ ] hasta seleccionar
Demo <Demostración> y pulse el botón [OK].
5. Mueva el interruptor [▲ / ▼ ] hasta seleccionar
el ajuste que desea y pulse el botón [OK].
◆ Off <Des.>: Cancela la función Demo.
◆ 5 Minutes <5 minutos>: Inicia la función
Demo en 5 minutos.
◆ Play Now <Reproducir ahora>: Inicia ahora
la función Demo.
6. Pulse el botón [Back] para finalizar el ajuste.
Notas
✤ Si selecciona Back <Volver> en el menú, aparece
el menú anterior.
✤ Si define la función Demo, sólo está operativa en
Video Record <Grabar vídeo>.
9595
Page 96

ENGLISH
Mode Selection
MP3
Voice Recorder
File Browser
System Settings
Back
System Settings
Date/Time
System
Display
Memory
Back
Settings: System
Beep Sound
File No.
Reset
Off
5 Minutes
Video Mode
On
Demo
Auto Shut off
Start-up
Settings: System
Beep Sound
Off
5 Minutes
Previous Mode
On
Demo
Reset
File No.
Auto Shut off
Start-up
Setting the CAM: Setting the System
Ajuste de la VIDEOCÁMARA:
Ajuste del sistema
Setting Start-up Mode Ajuste de la modalidad de inicio
You can select the starting mode displayed when you turn the CAM on.
1. Move [Mode Selector] down to turn on the
CAM and move it down again.
2
◆ The Mode Selection screen appears.
2. Move the [ ▲ /▼ ] switch to select System
Settings and press the [OK] button.
3. Move the [ ▲ /▼ ] switch to select <System>
and press the [OK] button.
3
4. Move the [ ▲ /▼ ] switch to select <Start-up>
and press the [OK] button.
5. Move the [ ▲ /▼ ] switch to select the desired
setting and press the [OK] button.
◆ Video Mode: The CAM starts up in the Video
4
Mode.
◆ Previous Mode: The CAM starts up in the
mode you used last.
6. Press the [Back] button to finish setting.
5
Note
✤ If you select <Back> in the menu, the previous
9696
menu appears.
Puede seleccionar la modalidad de inicio por defecto al encender la
VIDEOCÁMARA.
1. Baje el [Selector de modalidad] para encender
la VIDEOCÁMARA y bájelo de nuevo.
◆ Aparece la pantalla Mode Selection
2. Mueva el interruptor [▲ / ▼ ] hasta seleccionar
System Settings <Config. del sistema> y
pulse el botón [OK].
3. Mueva el interruptor [▲ / ▼ ] hasta seleccionar
System <Sistema> y pulse el botón [OK].
4. Mueva el interruptor [▲ / ▼ ] hasta seleccionar
Start-up <Inicio> y pulse el botón [OK].
5. Mueva el interruptor [▲ / ▼ ] hasta seleccionar
el ajuste que desea y pulse el botón [OK].
◆ Video Mode <Modalidad de vídeo>: La
◆ Previous Mode <Modo anterior>: La
6. Pulse el botón [Back] para finalizar el ajuste.
Nota
✤ Si selecciona Back <Volver> en el menú, aparece
el menú anterior.
ESPAÑOL
<Selección de modalidad>.
VIDEOCÁMARA se inicia en la modalidad de
vídeo.
VIDEOCÁMARA se inicia en la última
modalidad utilizada.
Page 97

ENGLISH
Mode Selection
MP3
Voice Recorder
File Browser
System Settings
Back
System Settings
Date/Time
System
Display
Memory
Back
Settings: System
Beep Sound
File No.
Reset
Off
5 Minutes
Video Mode
On
Demo
Auto Shut off
Start-up
Settings: System
File No.
Series
Beep Sound
Off
5 Minutes
Video Mode
On
Demo
Auto Shut off
Start-up
Setting the CAM: Setting the System
Ajuste de la VIDEOCÁMARA:
Ajuste del sistema
Setting the File No. Function Ajuste de la función File No.
You can set the file numbers so that they reset each
time Memory stick is formatted, or so that they count
up continuously.
1. Move [Mode Selector] down to turn on the
CAM and move it down again.
◆ The Mode Selection screen appears.
2. Move the [ ▲ /▼ ] switch to select System
Settings and press the [OK] button.
3. Move the [ ▲ /▼ ] switch to select <System>
and press the [OK] button.
4. Move the [ ▲ /▼ ] switch to select <File No.>
and press the [OK] button.
5. Move the [ ▲ /▼ ] switch to select the desired
setting and press the [OK] button.
◆ Series: Numbering is continuous between
the Memory Sticks, so that the first file
number assigned on a new Memory Stick is
1 more than the last file number assigned
on the previous Memory Stick.
◆ Reset: When the Memory Stick is formatted,
the file number resets to its default value.
(100-0001)
6. Press the [Back] button to finish setting.
Notes
✤ If you select <Back> in the menu, the previous
menu appears.
✤ When you set file number to ‘Series’, each file is
assigned a different number avoiding duplication
of numbers. It is convenient when you want to
manage your files on a PC.
2
3
4
5
Puede definir los números de archivos de forma que
se reinicien cada vez que se dé formato al Memory
Stick o que se enumeren de forma continua.
1. Baje el [Selector de modalidad] para encender
2. Mueva el interruptor [▲ /▼ ] hasta seleccionar
3. Mueva el interruptor [▲ /▼ ] hasta seleccionar
4. Mueva el interruptor [▲ /▼ ] hasta seleccionar
5. Mueva el interruptor [▲ /▼ ] hasta seleccionar
6. Pulse el botón [Back] para finalizar el ajuste.
✤ Si selecciona Back <Volver> en el menú, aparece
✤ Cuando se define el número de archivo en Series
ESPAÑOL
la VIDEOCÁMARA y bájelo de nuevo.
◆ Aparece la pantalla Mode Selection
<Selección de modalidad>.
System Settings <Config. del sistema> y
pulse el botón [OK].
System <Sistema> y pulse el botón [OK].
File No. <Nº archivo > y pulse el botón [OK].
el ajuste que desea y pulse el botón [OK].
◆ Series <Serie>: La numeración es continua
entre los Memory Stick, de forma que el
primer número de archivo asignado en un
nuevo Memory Stick sea 1 más que el último
número de archivo asignado en el Memory
Stick anterior.
◆ Reset <Reiniciar>: Ando se dé formato al
Memory Stick, se reinicia el número de
archivo en su valor por defecto.(100-0001)
Notas
el menú anterior.
<Serie>, a cada archivo se le asigna un número
diferente evitando la duplicación de números.
Es conveniente cuando se desea administrar los
archivos en un PC.
9797
Page 98

ENGLISH
Mode Selection
MP3
Voice Recorder
File Browser
System Settings
Back
System Settings
Date/Time
System
Display
Memory
Back
Settings: System
Beep Sound
Off
5 Minutes
Reset
On
Demo
Auto Shut off
File No.
Video Mode
Start-up
Settings: System
Beep Sound
Off
5 Minutes
Reset
Off
Demo
Auto Shut off
File No.
Video Mode
Start-up
Setting the CAM: Setting the System
Ajuste de la VIDEOCÁMARA:
Ajuste del sistema
Setting the Beep Sound Ajuste del sonido del pitido
You can set the beep sound on/off. When on, a beep will sound every
time a button is pressed.
1. Move [Mode Selector] down to turn on the
2
CAM and move it down again.
◆ The Mode Selection screen appears.
2. Move the [ ▲ /▼ ] switch to select System
Settings and press the [OK] button.
3. Move the [ ▲ /▼ ] switch to select <System>
3
and press the [OK] button.
4. Move the [ ▲ /▼ ] switch to select <Beep
Sound> and press the [OK] button.
5. Move the [ ▲ /▼ ] switch to select the desired
sound and press the [OK] button.
◆ On: Turn the effect sound on.
4
◆ Off: Turn the effect sound off.
6. Press the [Back] button to finish setting.
Puede activar o desactivar el sonido del pitito. Cuando está activado,
sonará un pitido siempre que se pulse un botón.
1. Baje el [Selector de modalidad] para encender
la VIDEOCÁMARA y bájelo de nuevo.
◆ Aparece la pantalla Mode Selection
<Selección de modalidad>.
2. Mueva el interruptor [▲ / ▼ ] hasta seleccionar
System Settings <Config. del sistema> y
pulse el botón [OK].
3. Mueva el interruptor [▲ /▼ ] hasta seleccionar
System <Sistema> y pulse el botón [OK].
4. Mueva el interruptor [▲ /▼ ] hasta seleccionar
Beep Sound <Sonido de pitido> y pulse el
botón [OK].
5. Mueva el interruptor [▲ /▼ ] hasta seleccionar
el sonido que desea y pulse el botón [OK].
◆ On <Act.>: Activa el efecto de sonido.
◆ Off <Des.>: Desactiva el efecto de sonido.
6. Pulse el botón [Back] para finalizar el ajuste.
ESPAÑOL
Notes
✤ If you select <Back> in the menu, the previous
menu appears.
✤ When the earphones or Audio/Video cable is
connected to the CAM, the beep sound function
does not operate.
9898
5
Notas
✤ Si selecciona Back <Volver> en el menú, aparece
el menú anterior.
✤ Cuando se conectan los auriculares o el cable de
audio/vídeo a la VIDEOCÁMARA, la función de
sonido de pitido no está operativa.
Page 99

ENGLISH
Mode Selection
MP3
Voice Recorder
File Browser
System Settings
Back
System Settings
Date/Time
System
Display
Memory
Back
Settings: System
Version Info
File No.
Reset
Start-up
Video Mode
Off
On
Demo
Beep Sound
Settings: System
Version Info
Start-up
Previous Mode
English
Off
High
Language
Demo
Sys. Sound
Close
Samsung Elec. Co. LTD
Miniket DSP 0.01X
Mar 04 2005 22:09:25
Micom 0.02X
Mar 07 2005 01:09:26
Setting the CAM: Setting the System
Ajuste de la VIDEOCÁMARA:
Ajuste del sistema
Viewing Version Information Visualización de la información de versión
You can see the information of the version.
Puede ver la información de la versión.
ESPAÑOL
1. Move [Mode Selector] down to turn on the
CAM and move it down again.
◆ The Mode Selection screen appears.
2. Move the [ ▲ /▼ ] switch to select System
Settings and press the [OK] button.
3. Move the [ ▲ /▼ ] switch to select <System>
and press the [OK] button.
4. Move the [ ▲ /▼ ] switch to select <Version
Info> and press the [OK] button.
◆ The version of the CAM is displayed.
5. Press the [OK] button to finish viewing
version information.
Note
✤ If you select <Back> in the menu, the previous
menu appears.
2
1. Baje el [Selector de modalidad] para
encender la VIDEOCÁMARA y bájelo de
nuevo.
◆ Aparece la pantalla Mode Selection
<Selección de modalidad>.
2. Mueva el interruptor [▲ / ▼ ] hasta
3
seleccionar System Settings <Config. del
sistema> y pulse el botón [OK].
3. Mueva el interruptor [▲ / ▼ ] hasta
seleccionar System <Sistema> y pulse el
botón [OK].
4. Mueva el interruptor [▲ / ▼ ] hasta
4
seleccionar Version Info <Inf. versión> y
pulse el botón [OK].
◆ Aparece la versión de la VIDEOCÁMARA.
5. Pulse el botón [OK] para finalizar la
visualización de la información de la versión.
Nota
✤ Si selecciona Back <Volver> en el menú,
aparece el menú anterior.
9999
Page 100

ENGLISH
Mode Selection
MP3
Voice Recorder
File Browser
System Settings
Back
System Settings
Date/Time
System
Display
Memory
Back
Settings: Memory
Memory Space
Back
Internal
357MB/493MB
Internal
Format
Storage Type
Settings: Memory
Back
Internal
External
Format
Storage Type
Memory Space 357MB/493MB
Setting the CAM: Setting Memory
Ajuste de la VIDEOCÁMARA:
Ajuste de la memoria
Selecting the Storage Type Selección del tipo de almacenamiento
Select the storage type(internal or Memory Stick, Memory Stick Pro)
before recording or taking pictures.
1. Move [Mode Selector] down to turn on the
2
CAM and move it down again.
◆ The Mode Selection screen appears.
2. Move the [ ▲ /▼ ] switch to select System
Settings and press the [OK] button.
3. Move the [ ▲ /▼ ] switch to select <Memory>
and press the [OK] button.
◆ If you didn’t insert Memory Stick, you cannot
3
select ‘External’.
4. Move the [ ▲ /▼ ] switch to select <Storage
Type> and press the [OK] button.
5. Move the [ ▲ /▼ ] switch to select the desired
setting and press the [OK] button.
◆ Internal: The video, photo, mp3 file or voice
◆ External: The video, photo, mp3 file or voice
file is stored in internal memory.
4
file is stored in external memory
(Memory stick or Memory stick pro).
Notes
✤ If you select <Back> in the menu, the previous
menu appears.
5
✤ ‘Internal’ is selected by default.
✤ If you insert the Memory Stick or Memory Stick Pro
when the CAM on, the pop-up screen about the
memory type selection appears automatically.
100
100
Seleccione el tipo de almacenamiento (Internal <Interno> o Memory
Stick, Memory Stick Pro) antes de grabar o tomar imágenes.
1. Baje el [Selector de modalidad] para encender
la VIDEOCÁMARA y bájelo de nuevo.
◆ Aparece la pantalla Mode Selection
<Selección de modalidad>.
2. Mueva el interruptor [▲ / ▼ ] hasta seleccionar
System Settings <Config. del sistema> y
pulse el botón [OK].
3. Mueva el interruptor [▲ /▼ ] hasta seleccionar
Memory <Memoria> y pulse el botón [OK].
◆ Si no ha introducido el Memory Stick, no
puede seleccionar External <Externa>.
4. Mueva el interruptor [▲ /▼ ] hasta seleccionar
Storage Type <Tipo de almac.> y pulse el
botón [OK].
5. Mueva el interruptor [▲ /▼ ] hasta seleccionar
el ajuste que desea y pulse el botón [OK].
◆ Internal <Interna>: El archivo de vídeo, foto,
mp3 o voz se almacena en la memoria
interna.
◆ External <Externa>: El archivo de vídeo,
foto, mp3 o voz se almacena en la memoria
externa (Memory stick o Memory stick pro).
Notas
✤ Si selecciona Back <Volver> en el menú, aparece
el menú anterior.
✤ La memoria interna se selecciona por defecto.
✤ Si introduce el Memory Stick o el Memory Stick
Pro con la CAM encendida, aparece
automáticamente la pantalla de selección del tipo
de memoria.
ESPAÑOL
 Loading...