


This manual is provided for information purposes only. All information included herein is subject to change without notice. Samsung
Electronics is not responsible for any changes, direct or indirect, arising from or related to use of this manual.
© 2005 Samsung Electronics
Co., Ltd
. All rights reserved.
• ML-3560, ML-3561N, ML-3561ND, ML-3562W, and Samsung logo are trademarks of Samsung Electronics Co., Ltd.
• Centronics is a trademark of Centronics Data Computer Corporation.
• IBM and IBM PC are trademarks of International Business Machines Corporation.
• PCL and PCL 6 are trademarks of Hewlett-Packard company.
• Microsoft, Windows, Windows 9x, Windows Me, Windows 2000, Windows NT 4.0, and Windows XP are registered trademarks of Microsoft
Corporation.
• PostScript 3 is a trademark of Adobe System, Inc.
• UFST® and MicroType™ are registered trademarks of Agfa division of Bayer Corp.
• TrueType, LaserWriter, and Macintosh are trademarks of Apple Computer, Inc.
• All other brand or product names are trademarks of their respective companies or organizations.

1. Introduction
Special Features .................................................................................................................... 1.1
Printer Features ............................................................................................................... 1.2
Printer Components ................................................................................................................ 1.3
Front View ....................................................................................................................... 1.3
Rear View ........................................................................................................................ 1.3
2. Setting Up Your Printer
Unpacking ............................................................................................................................. 2.1
Selecting a Location .......................................................................................................... 2.2
Installing the Toner Cartridge .................................................................................................. 2.2
Loading Paper ....................................................................................................................... 2.4
Changing the Size of the Paper in the Paper Tray .................................................................. 2.5
Connecting a Printer Cable ...................................................................................................... 2.6
For Local Printing .............................................................................................................. 2.6
For Network Printing ......................................................................................................... 2.6
Turning the Printer On ............................................................................................................ 2.7
Printing a Demo Page ............................................................................................................. 2.7
Changing the Display Language ............................................................................................... 2.8
Using the Toner Save Mode ..................................................................................................... 2.8
Using the Control Panel Button ........................................................................................... 2.8
Using the Control Panel Menu ............................................................................................. 2.8
From the Software Application ............................................................................................ 2.8
Installing Printer Software ....................................................................................................... 2.8
3. Using the Control Panel
Understanding the Control Panel .............................................................................................. 3.1
Display ............................................................................................................................ 3.1
Buttons ........................................................................................................................... 3.2
Using Control Panel Menus ...................................................................................................... 3.3
Accessing Control Panel Menus ........................................................................................... 3.3
Overview of Control Panel Menus ........................................................................................ 3.3
Information Menu ............................................................................................................. 3.4
Paper Menu ..................................................................................................................... 3.4
Layout Menu .................................................................................................................... 3.5
Graphics Menu ................................................................................................................. 3.6
Printer Menu .................................................................................................................... 3.7
Setup Menu ..................................................................................................................... 3.7
PCL Menu ........................................................................................................................ 3.8
PostScript Menu ............................................................................................................... 3.9
EPSON/IBM Menu ............................................................................................................. 3.9
Network Menu .................................................................................................................. 3.9
4. Using Print Materials
Choosing Paper and Other Materials ......................................................................................... 4.1
Sizes and Capacities ......................................................................................................... 4.1
Guidelines for Paper and Special Materials ........................................................................... 4.1
Loading Paper ....................................................................................................................... 4.2
Using the Standard Tray or the Optional Tray ....................................................................... 4.2
Using the Multi-purpose Tray ............................................................................................. 4.2
Using the Manual Feed Mode .............................................................................................. 4.4
Selecting an Output Location ................................................................................................... 4.5
Printing to the Top Output Tray (Face down) ........................................................................ 4.5
Printing to the Rear Output Tray (Face up) ........................................................................... 4.5
Printing on Special Print Materials ............................................................................................. 4.6
Printing on Envelopes ........................................................................................................ 4.6
Printing on Labels ............................................................................................................. 4.7
Printing on Transparencies ................................................................................................. 4.8
Printing on Preprinted Paper ............................................................................................... 4.8
Printing on Card Stock or Custom-sized Materials .................................................................. 4.9
ii

5. Basic Printing
Printing a Document ............................................................................................................... 5.1
Canceling a Print Job .............................................................................................................. 5.1
6. Maintaining Your Printer
Printing Information Pages ...................................................................................................... 6.1
Printing a Configuration Page ............................................................................................. 6.1
Printing Event Log Page ..................................................................................................... 6.1
Printing Usage Page .......................................................................................................... 6.1
Maintaining the Toner Cartridge ............................................................................................... 6.2
Checking the Toner Remains .............................................................................................. 6.2
Redistributing Toner .......................................................................................................... 6.2
Replacing the Toner Cartridge ............................................................................................ 6.3
Replacing Transfer Roller ........................................................................................................ 6.5
Replacing Pickup Roller ........................................................................................................... 6.6
Replacing Pickup Pad .............................................................................................................. 6.7
Replacing Fuser Roller ............................................................................................................ 6.8
Cleaning the Printer ................................................................................................................ 6.9
Cleaning the Outside of the Printer ...................................................................................... 6.9
Cleaning the Inside of the Printer ........................................................................................ 6.9
Consumables and Replacement Parts ...................................................................................... 6.10
7. Solving Problems
Troubleshooting Checklist ........................................................................................................ 7.1
Solving General Printing Problems ............................................................................................ 7.2
Clearing Paper Jams ............................................................................................................... 7.4
In the Paper Feed Area ...................................................................................................... 7.4
Around the Toner Cartridge ................................................................................................ 7.6
In the Paper Exit Area ....................................................................................................... 7.7
In the Duplex Area ........................................................................................................... 7.7
Tips for Avoiding Paper Jams .............................................................................................. 7.8
Solving Print Quality Problems ................................................................................................. 7.8
Understanding Display Messages ............................................................................................ 7.10
Common Windows Problems .................................................................................................. 7.12
Common Macintosh Problems ................................................................................................ 7.12
Common PS Problems ........................................................................................................... 7.13
Common Linux Problems ....................................................................................................... 7.13
8. Using Your Printer on a Network
About Sharing the Printer on a Network .................................................................................... 8.1
Setting Up a Network-Connected Printer ................................................................................... 8.1
Configuring Network Parameters on the Control Panel ........................................................... 8.1
9. Installing Printer Options
Precautions When Installing Printer Options ............................................................................... 9.1
Installing Memory DIMM ......................................................................................................... 9.1
Removing the Memory DIMM .............................................................................................. 9.3
Installing a Network Card or Serial Interface Card ...................................................................... 9.3
Using the Hard Disk ................................................................................................................ 9.5
Installing the Hard Disk ..................................................................................................... 9.5
Printing with the Optional Hard Disk .................................................................................... 9.6
Installing an Optional Paper Tray .............................................................................................. 9.8
Installing a Duplex Unit ........................................................................................................... 9.9
Printing on Both Sides of Paper ........................................................................................ 9.10
iii

10. Specifications
Printer Specifications ............................................................................................................ 10.1
Paper Specifications ............................................................................................................. 10.2
Overview ....................................................................................................................... 10.2
Supported Sizes of Paper ................................................................................................. 10.2
Guidelines for Using Paper ............................................................................................... 10.3
Paper Specifications ........................................................................................................ 10.4
Paper Output Capacity .................................................................................................... 10.4
Printer and Paper Storage Environment ............................................................................. 10.4
Envelopes ...................................................................................................................... 10.4
Labels ........................................................................................................................... 10.5
Transparencies ............................................................................................................... 10.5
iv
Environmental and Safety
O
NE
Consideration
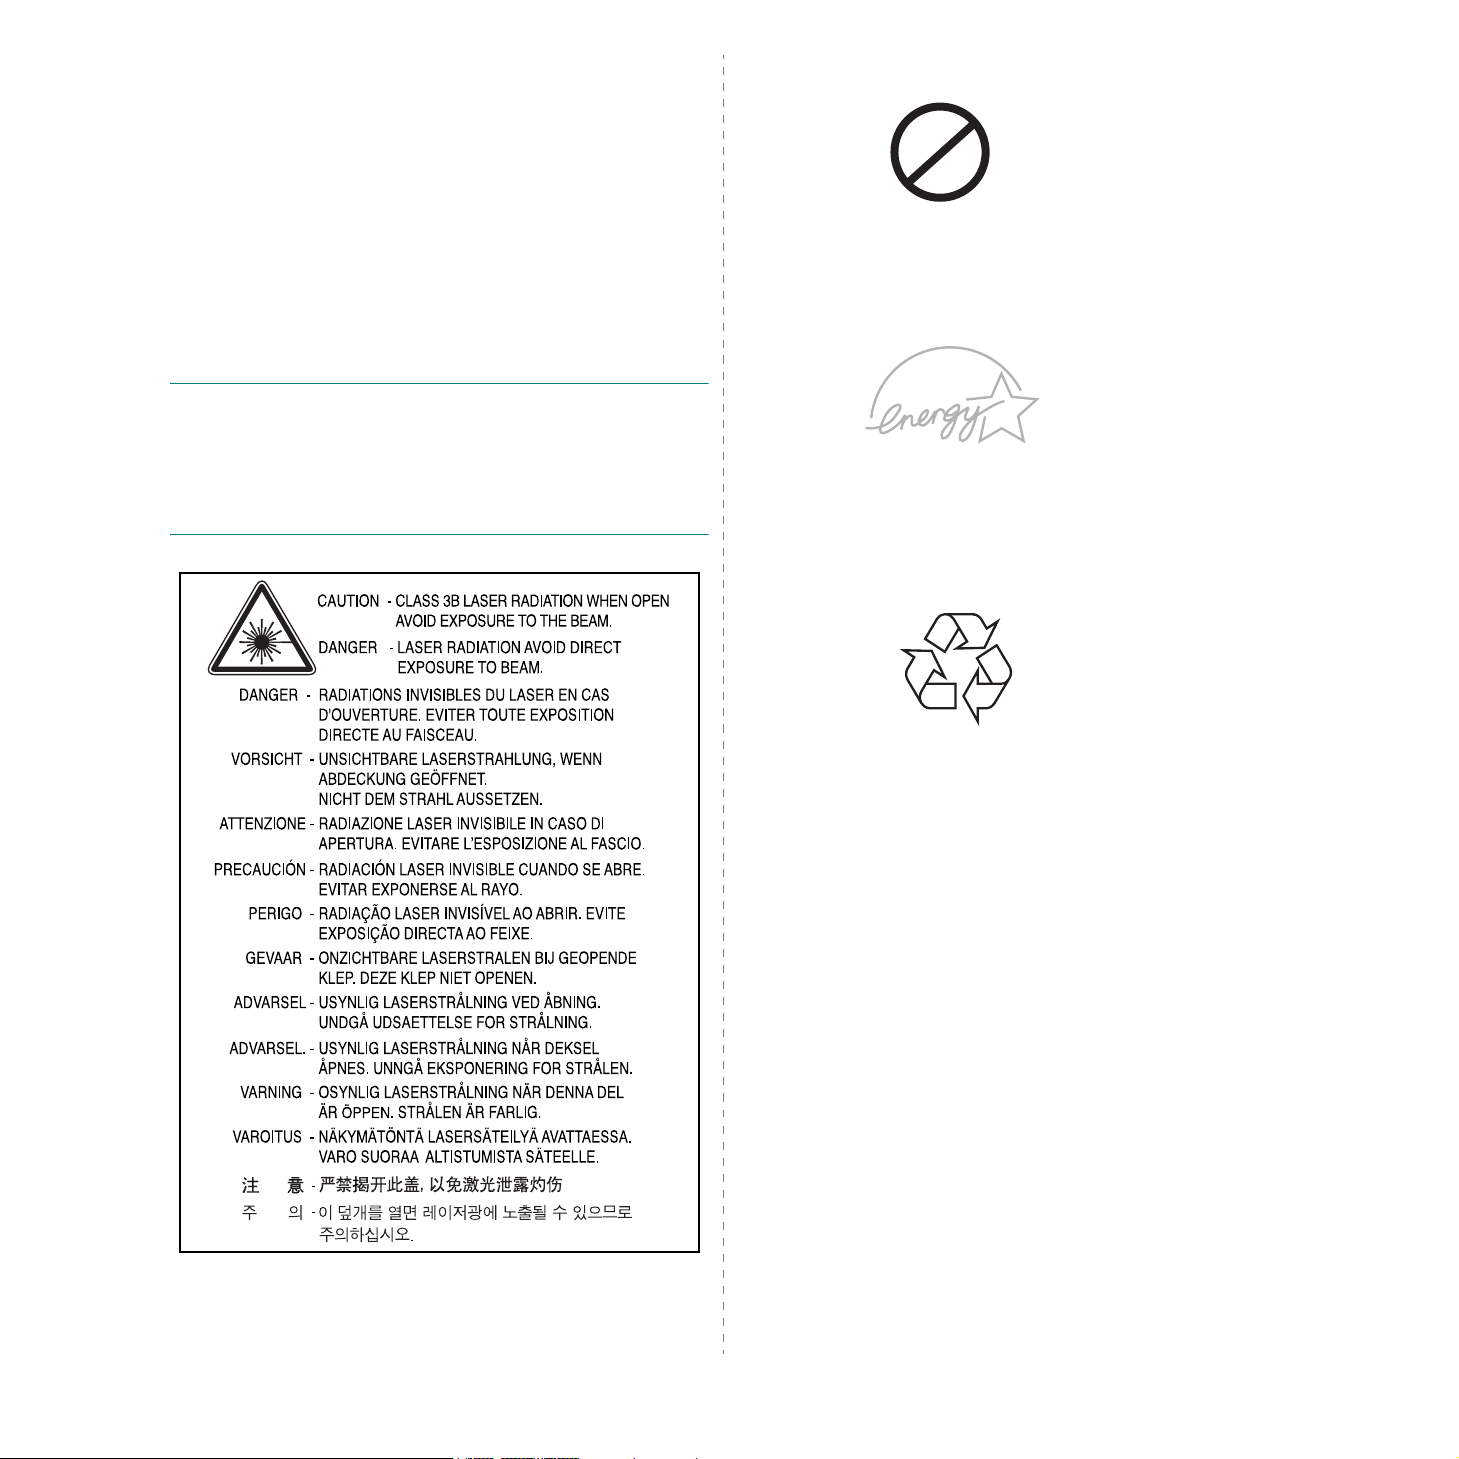
Laser Safety Statement
The printer is certified in the U.S. to conform to the
requirements of DHHS 21 CFR, chapter 1 Subchapter J for Class
I(1) laser products, and elsewhere, is certified as a Class I laser
product conforming to the requirements of IEC 825.
Class I laser products are not considered to be hazardous. The
laser system and printer are designed so there is never any
human access to laser radiation above a Class I level during
normal operation, user maintenance, or prescribed service
condition.
W
ARNING
Never operate or service the printer with the protective cover
removed from Laser/Scanner assembly. The reflected beam,
although invisible, can damage your eyes.
When using this product, these basic safety precautions should
always be followed to reduce risk of fire, electric shock, and
injury to persons:
Ozone Safety
ZO
Power Saver
Recycling
During normal operation, this machine
produces ozone. The ozone produced
does not present a hazard to the
operator. However, it is advisable that
the machine be operated in a well
ventilated area.
If you need additional information about
ozone, please contact your nearest
Samsung dealer.
This printer contains advanced energy
conservation technology that reduces
power consumption when it is not in
active use.
When the printer does not receive data
for an extended period of time, power
consumption is automatically lowered.
The energy star emblem does not
represent EPA endorsement of any
product or service.
Please recycle or dispose of the
packaging material for this product in
an environmentally responsible
manner.
Radio Frequency Emissions
FCC regulations
This device has been tested and found to comply with the limits
for a Class B digital device, pursuant to Part 15 of the FCC rules.
These limits are designed to provide reasonable protection
against harmful interference in a residential installation. This
equipment generates, uses and can radiate radio frequency
energy and, if not installed and used in accordance with the
instructions, may cause harmful interference to radio
communications. However, there is no guarantee that
interference will not occur in a particular installation. If this
equipment does cause harmful interference to radio or
television reception, which can be determined by turning the
equipment off and on, the user is encouraged to try to correct
the interference by one or more of the following measures:
Reposition the receiving antenna.
Increase the separation between the equipment and receiver.
Connect the equipment into an outlet on a circuit different from
that to which the receiver is connected.
Consult the dealer or an experienced radio/TV technician for
help.
v
C
AUTION
by the manufacturer responsible for compliance could void the
user’s authority to operate the equipment.
: Changes or modifications not expressly approved
Canadian Radio Interference Regulations
This digital apparatus does not exceed the Class B limits for
radio noise emissions from digital apparatus as set out in the
interference-causing equipment standard entitled “Digital
Apparatus”, ICES-003 of the Industry and Science Canada.
Cet appareil numérique respecte les limites de bruits
radioélectriques applicables aux appareils numériques de
Classe B prescrites dans la norme sur le matériel brouilleur:
“Appareils Numériques”, ICES-003 édictée par l’Industrie et
Sciences Canada.
United States of America
Federal Communications Commission (FCC)
Intentional emitter per FCC Part 15
Low power, Radio LAN type devices (radio frequency (RF)
wireless communication devices), operating in the 2.4 GHz
Band, may be present (embedded) in your printer system. This
section is only applicable if these devices are present. Refer to
the system label to verify the presence of wireless devices.
Wireless devices that may be in your system are only qualified
for use in the United States of America if an FCC ID number is
on the system label.
The FCC has set a general guideline of 20 cm (8 inches)
separation between the device and the body, for use of a
wireless device near the body (this does not include
extremities). This device should be used more than 20 cm (8
inches) from the body when wireless devices are on. The power
output of the wireless device (or devices), which may be
embedded in your printer, is well below the RF exposure limits
as set by the FCC.
This transmitter must not be collocated or operation in
conjunction with any other antenna or transmitter.
Operation of this device is subject to the following two
conditions:(1) This device may not cause harmful interference,
and(2) this device must accept any interference received,
including interference that may cause undesired operation of
the device.
Wireless devices are not user serviceable. Do not
modify them in any way. Modification to a
wireless device will void the authorization to use
it. Contact manufacturer for service.
FCC Statement for Wireless LAN use:
“While installing and operating this transmitter
and antenna combination the radio frequency
exposure limit of 1mW/cm2 may be exceeded at
distances close to the antenna installed.
Therefore, the user must maintain a minimum
distance of 20cm from the antenna at all times.
This device can not be colocated with another
transmitter and transmitting antenna.”
Declaration of Conformity (European
Countries)
Approvals and Certifications
The CE marking applied to this product
symbolises Samsung Electronics Co., Ltd.
Declaration of Conformity with the
following applicable 93/68/EEC Directives
of the European Union as of the dates
indicated:
January 1, 1995: Council Directive 73/23/EEC Approximation of
the laws of the member states related to low voltage
equipment.
January 1, 1996: Council Directive 89/336/EEC (92/31/EEC),
approximation of the laws of the Member States related to
electromagnetic compatibility.
March 9, 1999: Council Directive 1999/5/EC on radio
equipment and telecommunications terminal equipment and
the mutual recognition of their conformity.
A full declaration, defining the relevant Directives and
referenced standards can be obtained from your Samsung
Electronics Co., Ltd. representative.
EC Certification
Certification to 1999/5/EC Radio Equipment &
Telecommunications Terminal Equipment Directive
(FAX)
This Samsung product has been self-certified by Samsung for
pan-European single terminal connection to the analogue public
switched telephone network (PSTN) in accordance with
Directive 1999/5/EC. The product has been designed to work
with the national PSTNs and compatible PBXs of the European
countries:
In the event of problems, you should contact the Euro QA Lab
of Samsung Electronics Co., Ltd. in the first instance.
The product has been tested against TBR21 and/or TBR 38. To
assist in the use and application of terminal equipment which
complies with this standard, the European Telecommunication
Standards Institute (ETSI) has issued an advisory document
(EG 201 121) which contains notes and additional requirements
to ensure network compatibility of TBR21 terminals. The
product has been designed against, and is fully compliant with,
all of the relevant advisory notes contained in this document.
vi
European Radio Approval Information
(for products fitted with EU-approved radio
devices)
This Product is a printer; low power, Radio LAN type devices
(radio frequency (RF) wireless communication devices),
operating in the 2.4 GHz band, may be present (embedded) in
your printer system which is intended for home or office use.
This section is only applicable if these devices are present.
Refer to the system label to verify the presence of wireless
devices.
Wireless devices that may be in your system are only qualified
for use in the European Union or associated areas if a CE mark
with a Notified Body Registration Number and the Alert
Symbol is on the system label.
The power output of the wireless device or devices that may be
embedded in you printer is well below the RF exposure limits as
set by the European Commission through the R&TTE directive.
European States qualified under wireless
approvals:
EU
Austria, Belgium, Denmark, Finland, France
(with frequency restrictions), Germany,
Greece, Ireland, Italy, Luxembourg, The
Netherlands, Portugal, Spain, Sweden and
the United
Accept EU
Iceland, Liec h t e n s t ein, Norway and Switzerla n d
The power output of the wireless device or devices that may be
embedded in your printer is well below the RF exposure limits
as known at this time. Because the wireless devices (which may
be embedded into your printer) emit less energy than is allowed
in radio frequency safety standards and recommendations,
manufacturer believes these devices are safe for use.
Regardless of the power levels, care should be taken to
minimize human contact during normal operation.
As a general guideline, a separation of 20 cm (8 inches)
between the wireless device and the body, for use of a wireless
device near the body (this does not include extremities) is
typica l. Thi s device sh ould be use d mor e than 20 cm (8 inches)
from the body when wireless devices are on and transmitting.
This transmitter must not be collocated or operation in
conjunction with any other antenna or transmitter.
Some circumstances require restrictions on wireless devices.
Examples of common restrictions are listed below:
Radio frequency wireless communication can
interfere with equipment on commercial aircraft.
Current aviation regulations require wireless
devices to be turned off while traveling in an
airplane. 802.11B (also known as wireless
Ethernet) and Bluetooth communication devices
are examples of devices that provide wireless
communication.
European States with restrictions on use:
EU
to 2446.5-2483.5 MHz for devices above
10 mW transmitting power such as wireless
Accept EU
In France, the frequency range is restricted
No limitations at this time.
Regulatory Compliance Statements
Wireless Guidance
Low power, Radio LAN type devices (radio frequency (RF)
wireless communication devices), operating in the 2.4 GHz
Band, may be present (embedded) in your printer system. The
following section is a general overview of considerations while
operating a wireless device.
Additional limitations, cautions, and concerns for specific
countries are listed in the specific country sections (or country
group sections). The wireless devices in your system are only
qualified for use in the countries identified by the Radio
Approval Marks on the system rating label. If the country you
will be using the wireless device in, is not listed, please contact
your local Radio Approval agency for requirements. Wireless
devices are closely regulated and use may not be allowed.
In environments where the risk of interference to
other devices or services is harmful or perceived
as harmful, the option to use a wireless device
may be restricted or eliminated. Airports,
Hospitals, and Oxygen or flammable gas laden
atmospheres are limited examples where use of
wireless devices may be restricted or eliminated.
When in environments where you are uncertain
of the sanction to use wireless devices, ask the
applicable authority for authorization prior to use
or turning on the wireless device.
Every country has different restrictions on the
use of wireless devices. Since your system is
equipped with a wireless device, when traveling
between countries with your system, check with
the local Radio Approval authorities prior to any
move or trip for any restrictions on the use of a
wireless device in the destination country.
If your system came equipped with an internal
embedded wireless device, do not operate the
wireless device unless all covers and shields are
in place and the system is fully assembled.
vii
Wireless devices are not user serviceable. Do not
modify them in any way. Modification to a
wireless device will void the authorization to use
it. Please contact manufacturer for service.
Only use drivers approved for the country in
which the device will be used. See the
manufacturer System Restoration Kit, or contact
manufacturer Technical Support for additional
information.
Temporary
viii

WARNING
• Do not disassemble the printer. Doing so may give you an
electric shock.
• If you continuously print many pages, the surface of the
output tray may become hot. Be careful not to touch the
surface, especially for children.
ix

1 Introduction
Special Features
Congratulations on the purchase of your printer!
This chapter includes:
• Special Features
• Printer Components
Your new printer is equipped with several special features that
improve the print quality. You can:
Print with excellent quality and high speed
• You can print up to
details, see the
• Your printer prints A4-sized paper at
sized paper at
1200 x 1200 dpi
Software User’s Guide
35 ppm
.
effective output.
.
33 ppm
and letter-
For
Handle paper flexibly
•The
Multi-purpose Tray
labels, transparencies, custom-sized materials,
postcards, and heavy paper.
supports up to 100 sheets of plain paper.
•
Standard 500-sheet input tray
500-sheet input tray
of paper.
• Two output tray; select either
down)
convenient access.
•
Straight-through paper path
Multi-purpose Tray to the rear output tray.
or
the rear output tray (face-up)
supports letterheads, envelopes,
The
Multi-purpose Tray
(Tray1) and
(Tray2) supports all standard sizes
the top output (face-
capability from the
optional
for the most
also
Create professional documents
•Print
9
8
•Print
Watermarks
a watermark, such as the word “Confidential.” For details,
see the
document to create a book. Once printed, all you have to do
is fold and staple the pages. For details, see the
User’s Guide
Software User’s Guide
Booklets
. You can customize your documents with
.
. This feature enables you to easily print a
Software
.
1.1
Introduction
•Print
Posters
document can be magnified and printed across several
sheets of paper and taped together to form a poster. For
details, see the
. The text and pictures of each page of your
Software User’s Guide
.

Save time and money
• This printer allows you to use the
save toner. For details, s
• You can print on both sides of the paper to save paper
(
double-sided printing
unit.
For details, see
• You can print multiple pages on a single sheet of paper to
save paper (
User’s Guide
• You can use preprinted forms and letterhead. For details, see
the
Software User’s Guide
• This printer automatically
substantially reducing power consumption when not
printing.
• This printer meets
efficiency.
N-Up printing
.
ee
page 2.8.
) if you install an optional duplex
page 9.9.
).
.
conserves electricity
Energy Star
Toner Save
For details, see the
guidelines for energy
mode to
Software
by
Expand the printer capacity
• This printer has 32 MB of memory which can be expanded
to
288 MB
• An optional Serial interface card allows you to use the
serial connection.
•A
Network interface
add an optional network interface card to the ML-3560.
The ML-3561N, ML-3561ND and ML-3562W come with a built-
in network interface, 10/100 Base TX. The ML-3562W also
has a wireless network interface.
You can also use an optional wireless network interface in
both the ML-3560, ML-3561N and ML-3561ND.
• Your printer comes with a built-in
Emulation
. For details, see page 9.1.
enables network printing. You can
PostScript 3
* (PS) DIMM which enables PS printing.
* PostScript 3 Emulation
•© Copyright 1995-2003, Zoran
Corporation. All rights reserved. Zoran,
the Zoran logo, IPS/PS3 and OneImage
are trademarks of zoran Corporation.
* 136 PS3 fonts
• Contains UFST and MicroType from Agfa Monotype
Corporation.
Use the optional hard disk
If you install an optional hard disk, you can use it in various
ways with your printer.
• The hard disk allows the data from your computer to be
sent to the print queue of the printer hard disk. This
decreases the workload of the computer.
• You can use various print features, such as storing a job
in the hard disk and printing jobs anytime you want.
• You can print or delete the stored files in the hard disk.
• You can manage the print jobs in the print queue of the
printer hard disk.
For details, see page 9.5.
Print in various environments
• You can print in
.
2003
• Your printer is compatible with
• Your printer comes with both the
interfaces.
• You can also use a
ML-3561ND and ML-3562W come with a built-in network
interface, 10/100 Base TX. The ML-3562W also has a
wireless network interface.
However, you need to install the optional network interface
card to the ML-3560. You can also install the optional wireless
network interface in both the ML-3560, ML-3561N and ML3561ND.
Windows 95/98/Me/NT 4.0/2000/XP/
Linux
and
Macintosh
Parallel
network interface
and
. The ML-3561N,
Printer Features
The table below lists a general overview of features supported
by your printer.
(S: Standard, O: Option)
Features
IEEE 1284 S S S S
USB 2.0 S S S S
Network
Interface
ML-3560 ML-3561N ML-3561ND ML-3562W
OS S S
USB
.
1.2
Introduction
Wireless LAN O O O S
PostScript
Emulation
Serial Interface O O O O
Hard Disk O O O O
Duplex Unit O O S O
Optional Paper
Tray
SS S S
OO O O
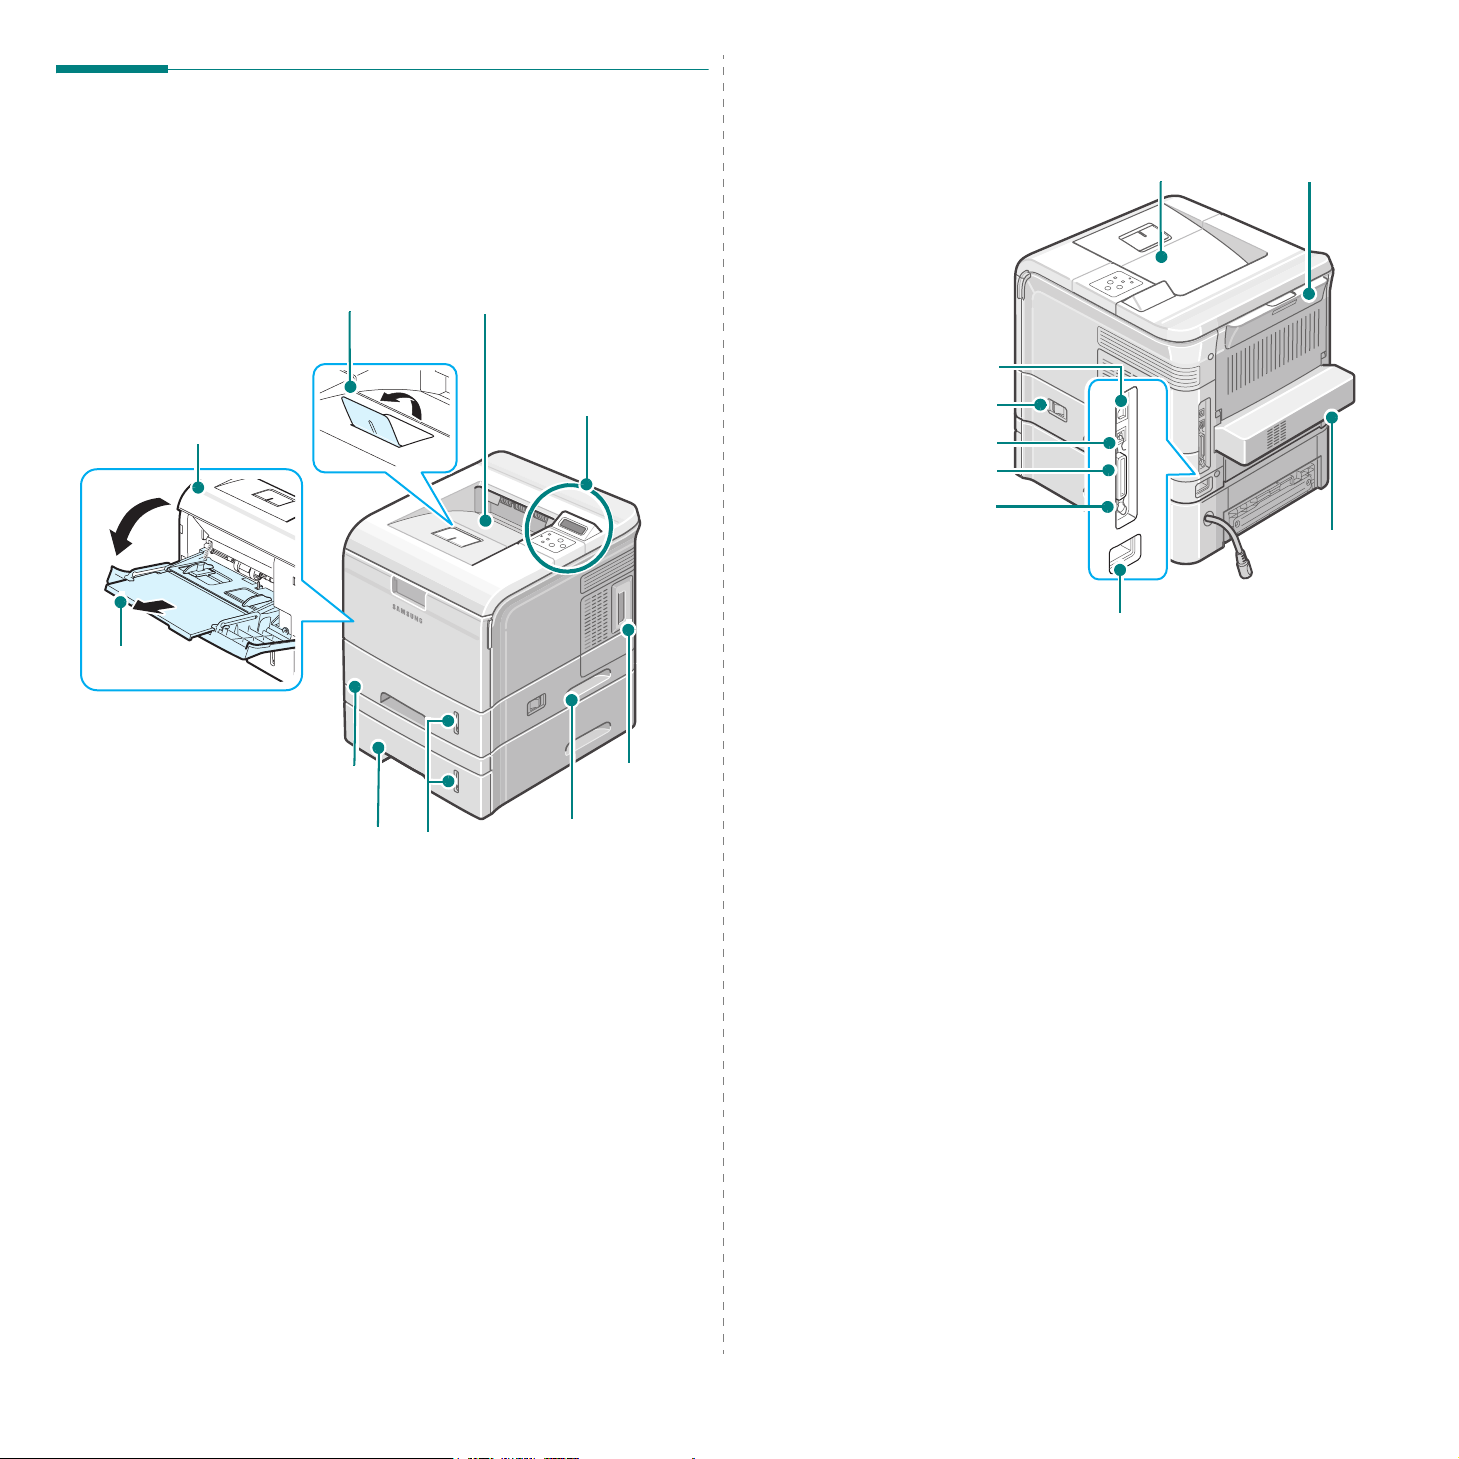
Printer Components
Rear View
Front View
Top Cover
(Open to access the
toner cartridge.)
Multi-purpose Tray
Output Support
Top Output Tray
(Face down)
Control Panel
(See page 3.1.)
Network Port
(ML-3560: Option
ML-3561N, ML-3561ND and
ML-3562W: Standard)
Power Switch
USB Port
Parallel Port
Optional Tray2
Cable Connector
Output Tray
(Face down)
Power
Receptacle
Rear Output Tray
(Face up)
Optional
Duplex Unit
(ML-3561ND:
Standard
ML-3560, ML3561N and ML3562W: Option)
Standard Tray
(500-sheet paper feeder)
Optional Tray
(500-sheet paper feeder)
(Tray1)
(Tray2)
Control Board
Cover
Paper Level
Indicator
* The figure above shows an ML-3561N.
Handle
(Open to install
optional printer
accessories.)
* The figure above shows an ML-3561N.
1.3
Introduction

2 Setting Up Your Printer
This chapter provides step by step information on setting up
your printer.
This chapter includes:
•Unpacking
• Installing the Toner Cartridge
•Loading Paper
• Connecting a Printer Cable
• Turning the Printer On
• Printing a Demo Page
• Changing the Display Language
• Using the Toner Save Mode
• Installing Printer Software
Unpacking
1
Remove the printer and all accessories from the packing
carton. Make sure that the printer has been packed with
the following items:
CD-ROM
*
Network CD-ROM
**
Network Quick
Guide**
Power Cord
* The CD-ROM contains the printer driver, the User’s Guide,
and the Adobe Acrobat Reader programme.
**The Network CD-ROM and Network Quick Guide are only for
ML-3561N, ML-3561ND and ML-3562W.
***The appearance of the power cord may differ depending on
your country’s specifications.
N
OTES
• If any items are missing or damaged, notify your dealer
immediately.
•
Components may differ from one country to another.
C
AUTION
cartridge and the tray. Use safe lifting and handling
techniques. If you need to move the printer, it should be
moved by two people. Use the lifting handles as shown in the
diagram (see page 1.3). Back injury could result if a single
person attempts to lift the printer.
2
Carefully remove all of the packing tape from the printer.
***
:
: The printer weights 17kg including the toner
Setup Guide
2.1
Setting Up Your Printer
3
Pull the paper tray out of the printer and remove the
packing tape and the packing material inside of the tray.
Selecting a Location
Select a level, stable place with adequate space for air
circulation. Allow extra space for opening covers and trays.
The area should be well-ventilated and away from direct
sunlight or sources of heat, cold, and humidity. Do not set the
printer close to the edge of your desk or table.
Clearance Space
Front
: 482.6 mm
(enough space so that
trays can be opened
or removed)
Back
: 320 mm
(enough space to
allow opening of the
rear output tray)
Right
: 100 mm
(enough space for
ventilation)
Left
: 100 mm
(enough space for
ventilation)
100mm
(3.9in)
320mm(12.6in)
100mm
(3.9in)
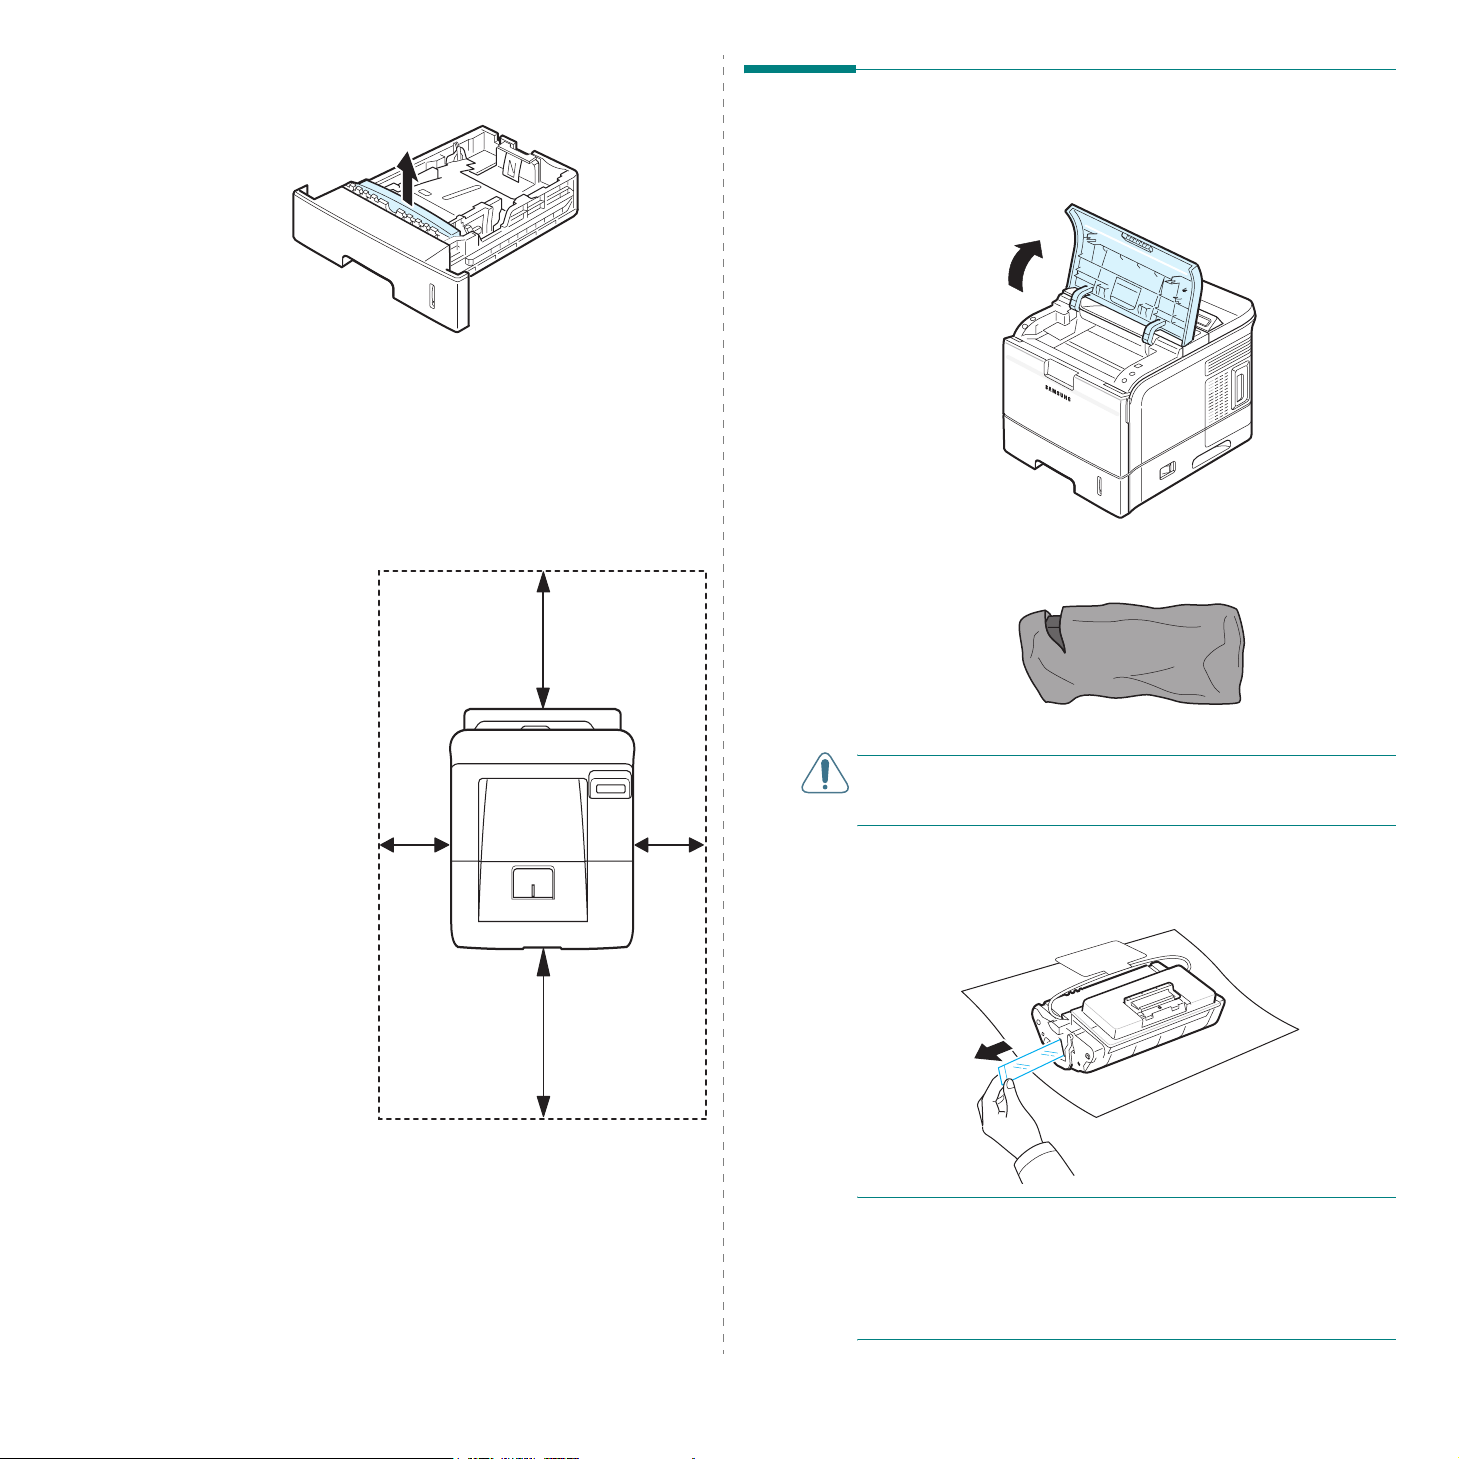
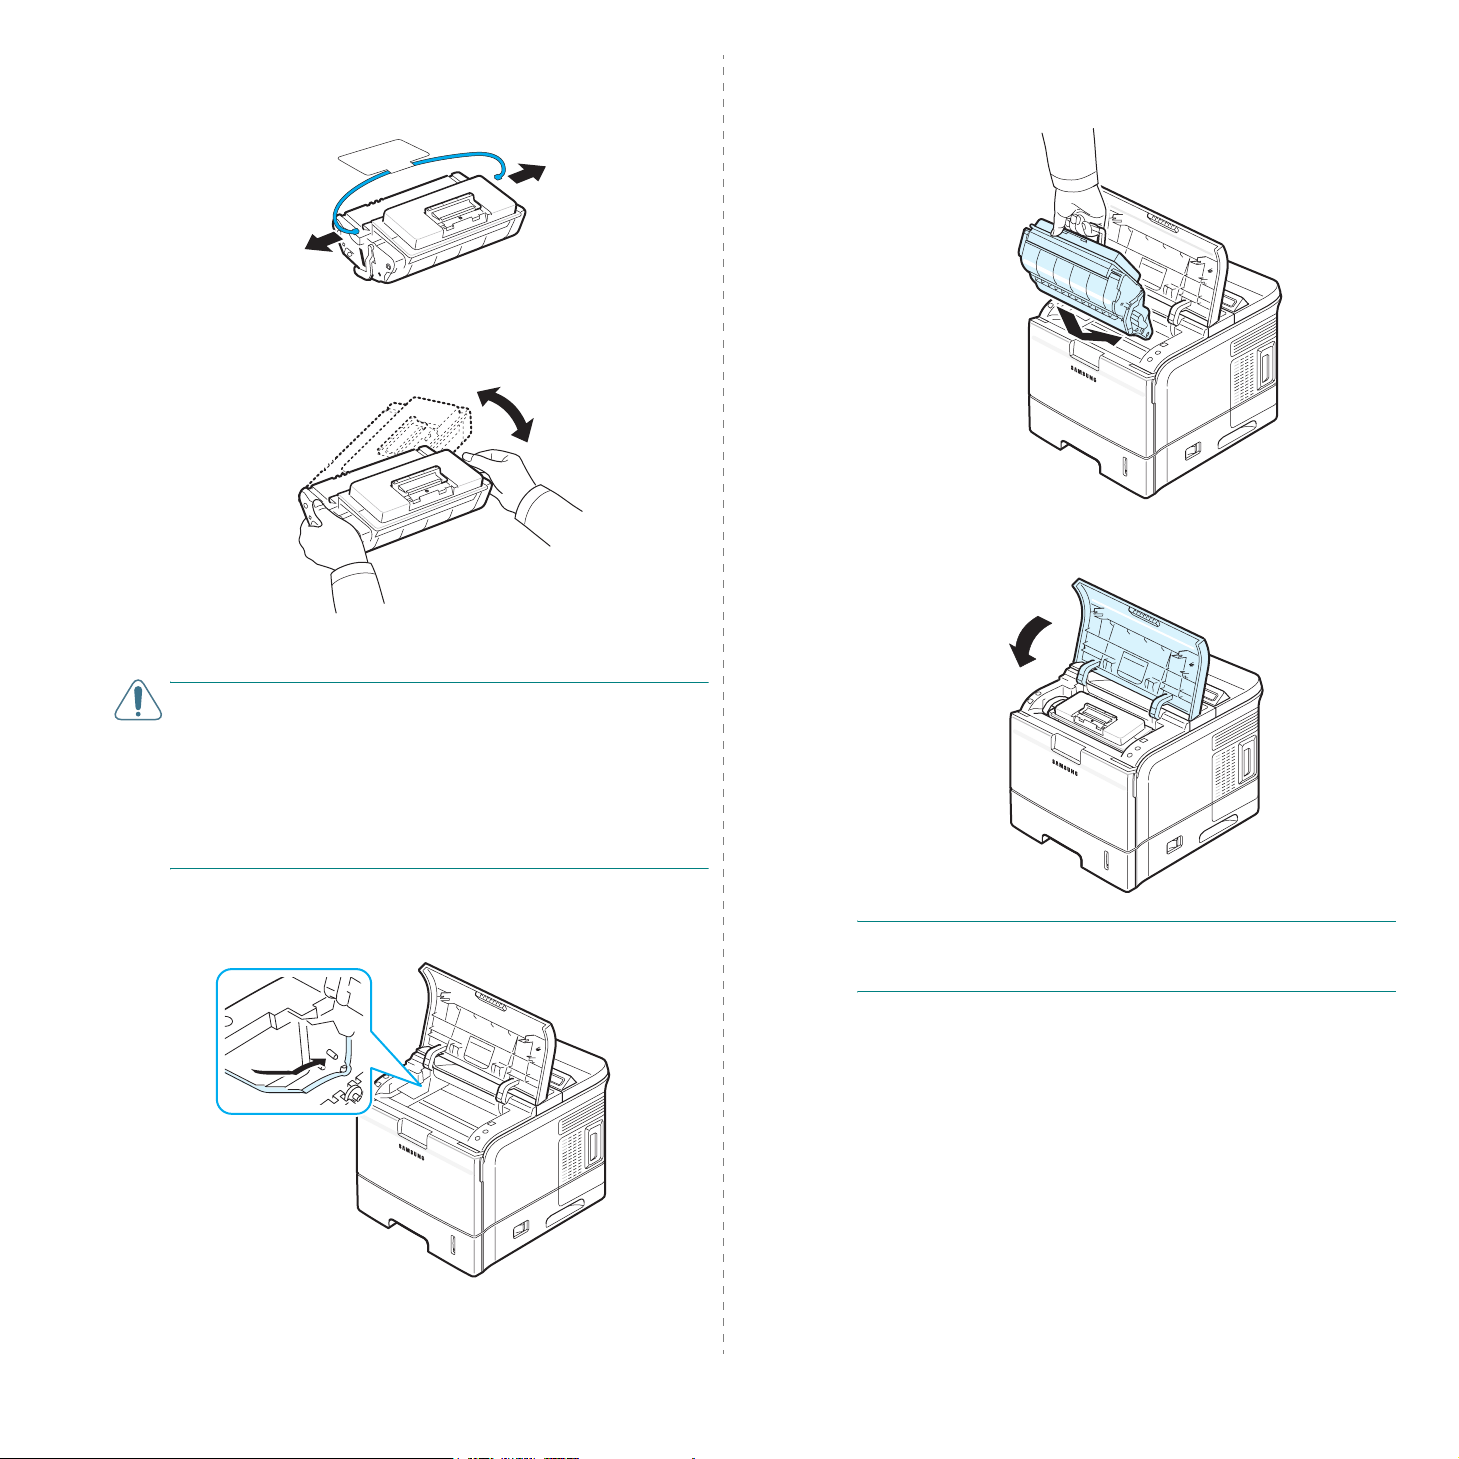
Installing the Toner Cartridge
1
Open the top cover. Pull up on the handle to open the
cover.
2
Remove the starter toner cartridge from its bag.
C
AUTION
scissors, to open the toner cartridge package. They might
scratch the drum of the cartridge.
3
: Do not use sharp objects, such as a knife or
Locate the sealing tape at the end of the toner cartridge.
Carefully pull the tape completely out of the cartridge and
discard it.
482.6mm(19in)
2.2
Setting Up Your Printer
N
OTES
:
• The sealing tape should be longer than 600 mm when
correctly removed.
• Holding the toner cartridge, pull the sealing tape straight to
remove it from the cartridge. Be careful not to cut the tape.
If this happens, you cannot use the toner cartridge.
4
Hold the toner cartridge and lift up the handle part of the
toner cartridge. There is a flexible plastic holder. Remove
the holder out of the toner cartridge.
5
Gently shake the cartridge from side to side to distribute
the toner evenly inside the cartridge.
Thoroughly shaking the cartridge will assure maximum
copies per cartridge.
7
Grasp the handle and insert the cartridge in the printer
until it snaps into place.
8
Close the top cover. Make sure that the cover is securely
closed.
C
AUTIONS
• If toner gets on your clothing, wipe it off with a dry cloth and
wash clothing in cold water. Hot water sets toner into fabric.
• Do not touch the green surface, the OPC drum, on the front
of the toner cartridge with your hands or any other material.
• To prevent damage, do not expose the toner cartridge to
light for more than a few minutes. Cover it with a piece of
paper to protect it, if necessary.
6
Locate the cartridge slots inside the printer, one on each
side.
:
N
OTE
: When printing text at 5% coverage, you can expect a
toner cartridge life of approximately 12,000 pages (6,000
pages for the toner cartridge that is shipped with the printer).
2.3
Setting Up Your Printer
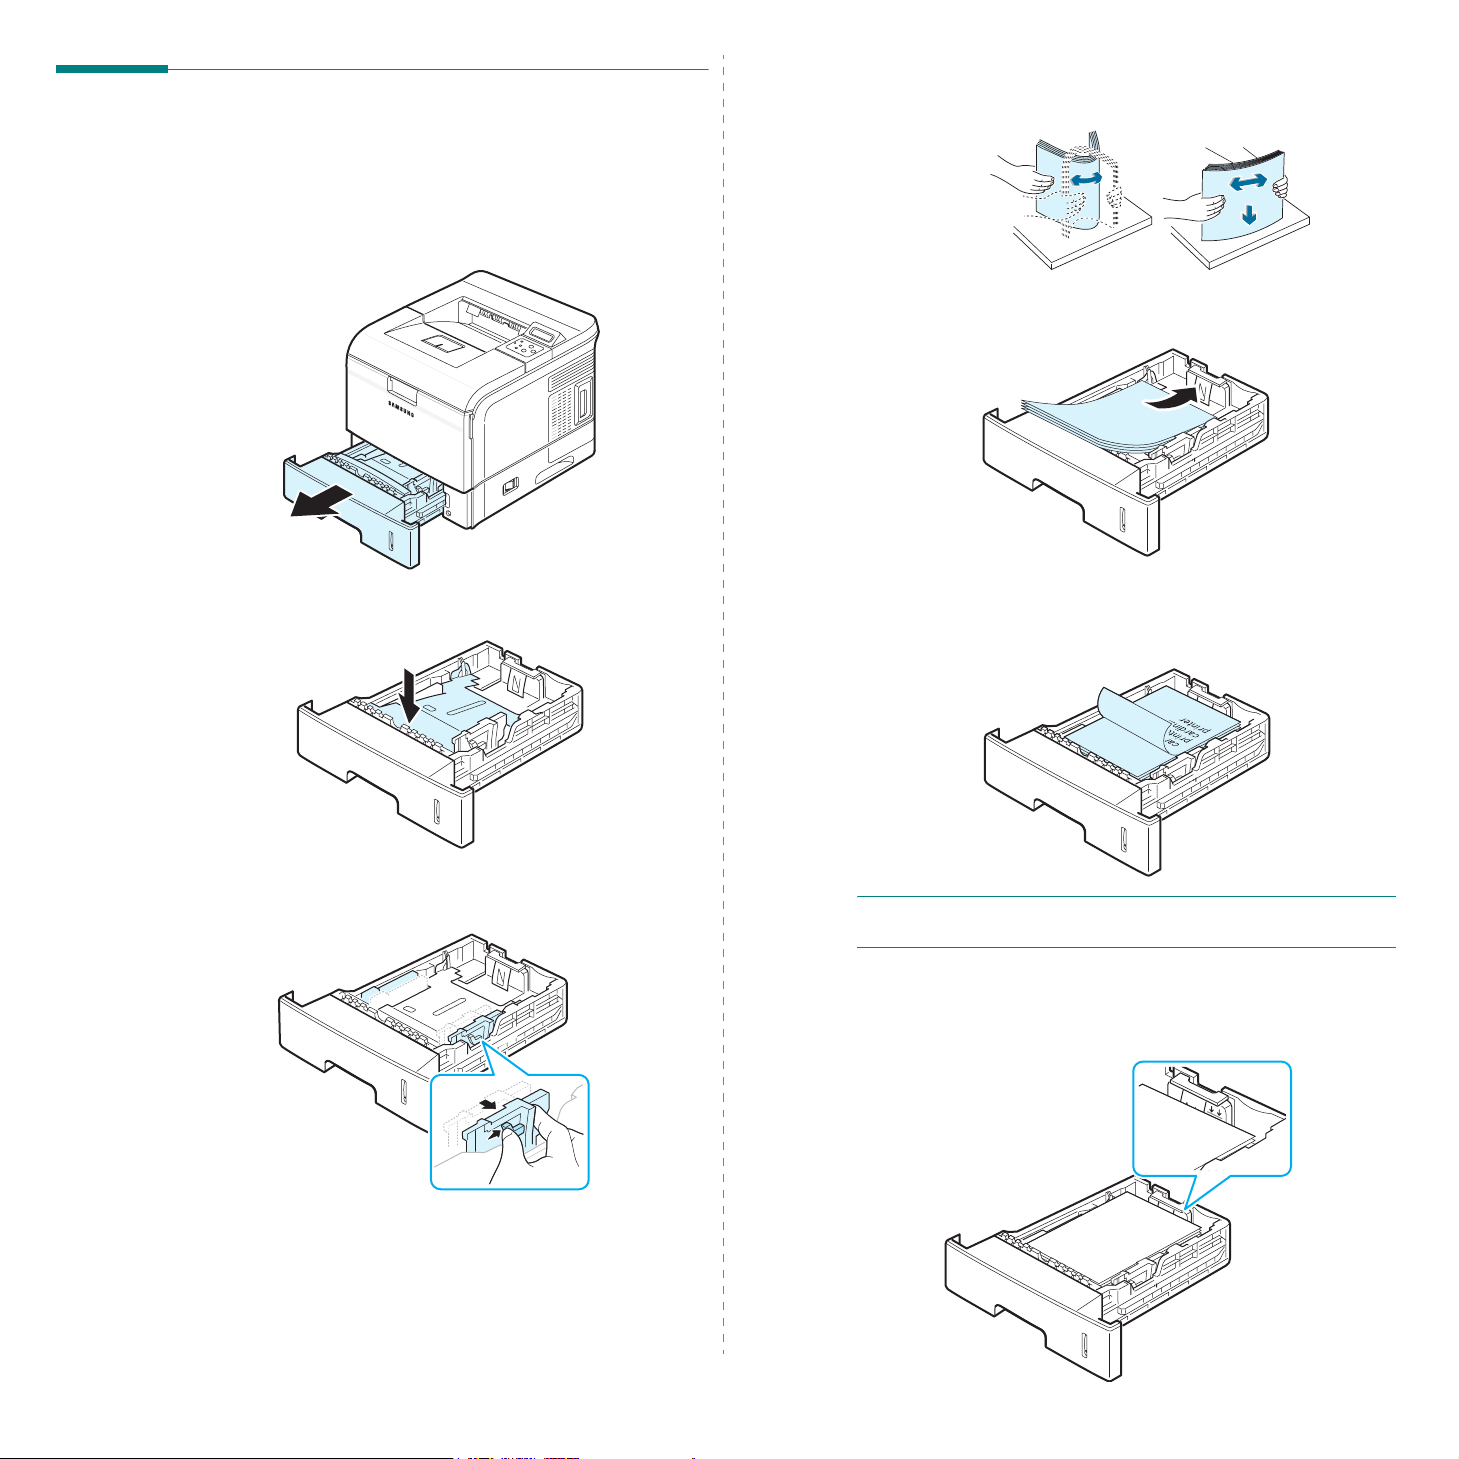
Loading Paper
The paper tray can hold a maximum of 500 sheets of 20lb plain
paper.
To load a stack of A4 or Letter-sized paper:
1
Pull open the paper tray and remove it from the printer.
2
Pull down the metal plate until it locks into position.
4
Fan the edges of the paper stack to separate the pages.
Then tap the stack on a flat surface to even it up.
5
Insert the paper stack into the paper tray
side down
You can load previously printed paper. The printed side
should be facing up with an uncurled edge at the top side.
If you experience problems with paper feed, turn the
paper around.
.
with the print
3
Squeeze the paper width guide and slide it to the desired
paper size marked at the bottom of the tray.
2.4
Setting Up Your Printer
N
OTE
: If you want load a different sized paper, you need to
adjust the paper guides. For details, see page 2.5.
6
Make sure not to overfill the tray and that all four corners
are flat in the tray and under the paper length guide
bracket, as shown below. Overfilling the tray may cause a
paper jam.

7
Insert and slide the paper tray back into the printer.
Changing the Size of the Paper in the Paper Tray
The tray is preset to Letter or A4 size, depending on your
country. To change the size, you need to adjust the paper
guides.
1
Push the back plate of the tray outwards completely so
that it can extend the length of the tray.
3
Squeeze the paper width guide and slide it to the desired
paper size marked at the bottom of the tray.
N
OTES
:
• Do not push the paper width guide far enough to cause the
material to warp.
• If you do not adjust the paper width guide, it may cause
paper jams.
2
Squeeze the paper length guide and slide it to the correct
position for the paper size you are loading, which is
marked at the bottom of the tray.
4
Load paper with the print side down. For details, see from
step 5 on page 2.4.
2.5
Setting Up Your Printer
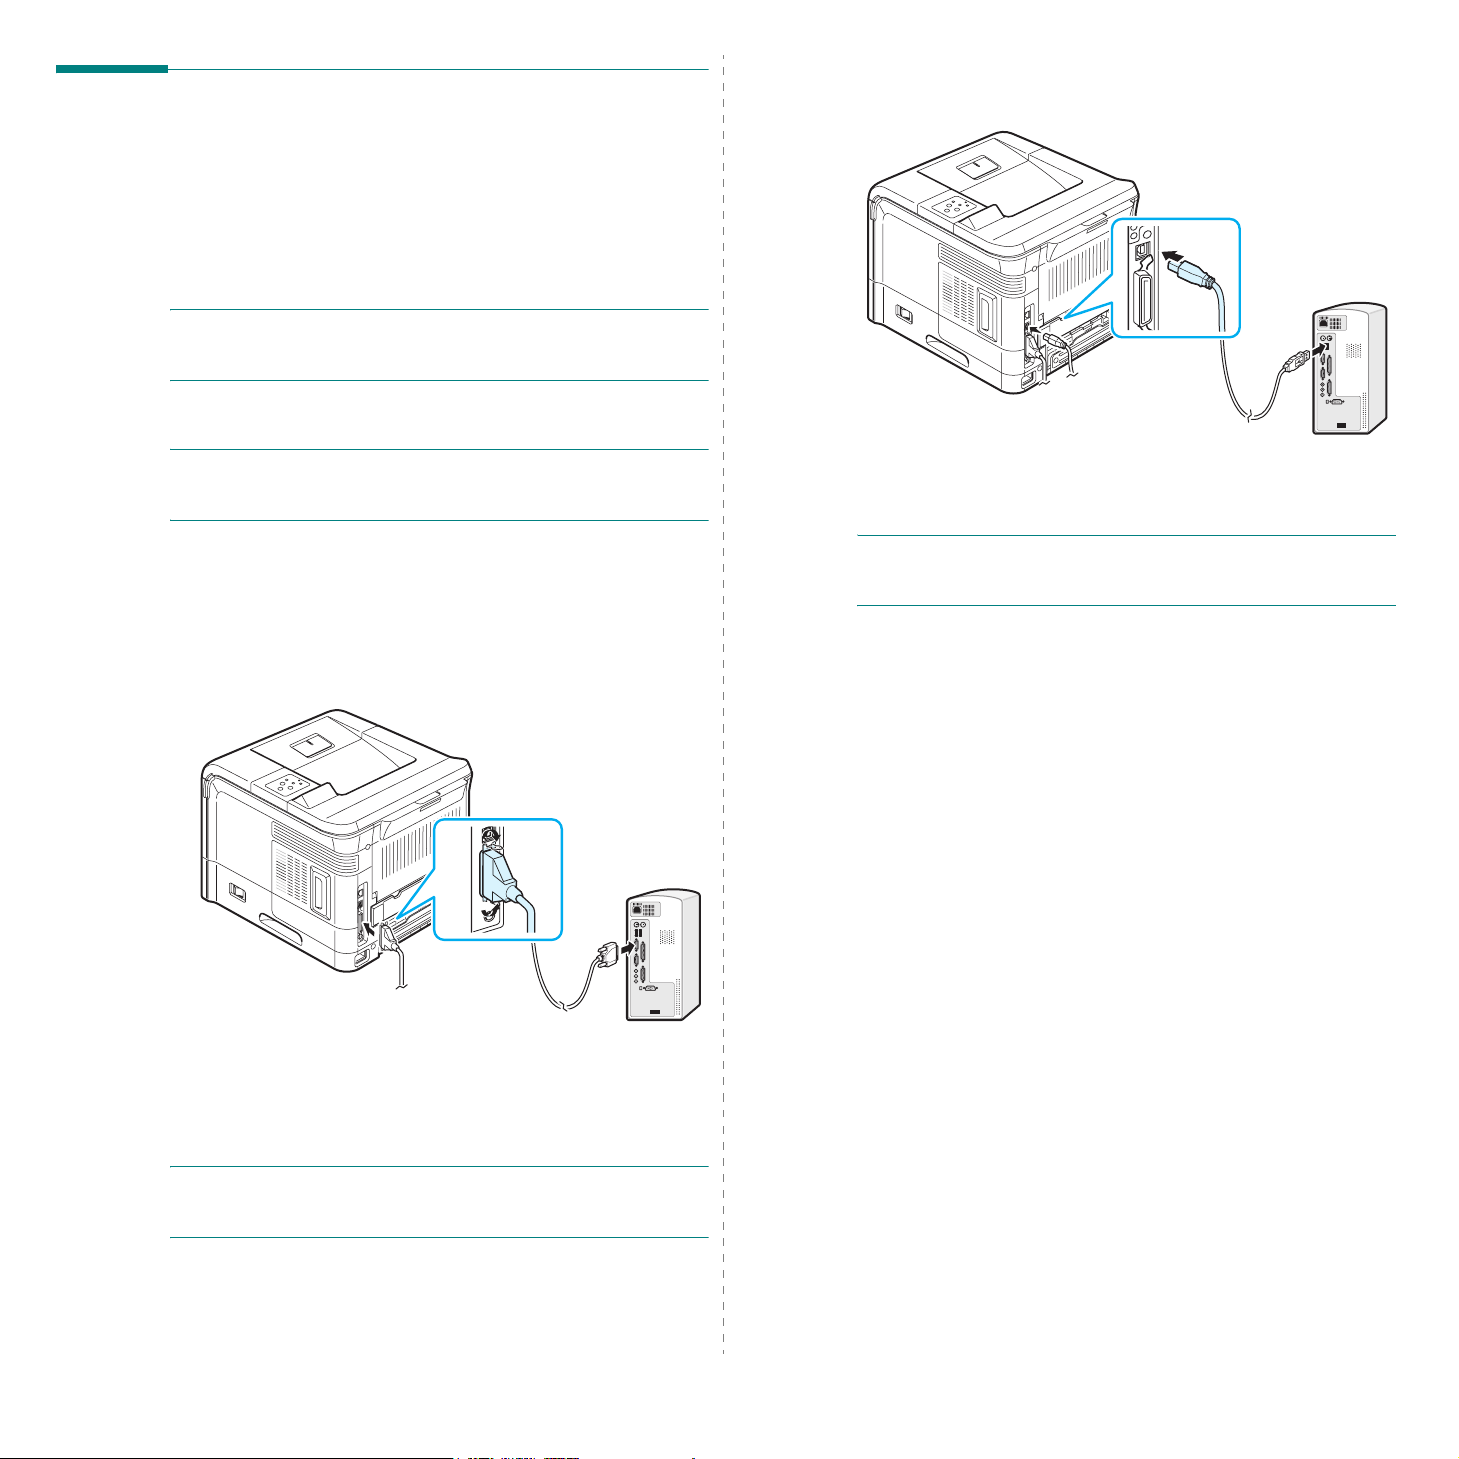
Connecting a Printer Cable
For Local Printing
To print from your computer in a local environment, you need
to connect your printer to the computer with either a parallel
interface cable or a Universal Serial Bus (USB) cable.
If you are a Macintosh user, you can use only the USB cable.
N
OTE
: You only need to connect one of the cables mentioned
above. Do not use the parallel cable and USB cables at the
same time.
Using a Parallel Cable
N
OTE
: Connecting the printer to the parallel port of the
computer requires a certified parallel cable. You will need to
buy a IEEE1284 compliant cable that is 3 m or less in length.
1
Make sure that both the printer and the computer are
turned off.
2
Connect a parallel printer cable into the parallel connector
on the back of the printer.
Push the metal clips down to fit inside the notches on the
cable plug.
3
Connect the other end of the cable to the parallel interface
port on your computer, and tighten the screws.
See your computer’s User’s Guide, if you need help.
2
Connect a USB printer cable into the USB connector on the
back of the printer.
3
Connect the other end of the cable to the USB port on your
computer.
See your computer’s User’s Guide, if you need help.
N
OTE
: To print using the USB interface, you must be running
Windows 98/Me/2000/XP/2003 or Macintosh with the
and G3 processor or OS 10.2.x later
.
OS 9.x
For Network Printing
You can attach your printers to a network using an Ethernet
cable (UTP cable with RJ.45 connector).
The ML-3561N, ML-3561ND and ML-3562W come with a builtin network interface card. The ML-3562W also has a network
antenna which allows you to use wireless LAN interface.
If you are a ML-3560 user, you need to install an optional
network interface card.
If you want to use the printer in both wired and wireless
network environments, you need to install an optional wired
and wireless network card to the ML-3560. For the ML-3561N,
ML-3561ND you can replace the network interface card to one
supporting the wired and wireless LAN interface.
For details about installing the network interface card, see
page 9.3.
Using a USB Cable
N
OTE
: Connecting the printer to the USB port of the computer
requires a certified USB cable. You will need to buy a USB 2.0
compliant cable that is within 3 m in length.
1
Make sure that both the printer and the computer are
turned off.
Setting Up Your Printer
2.6
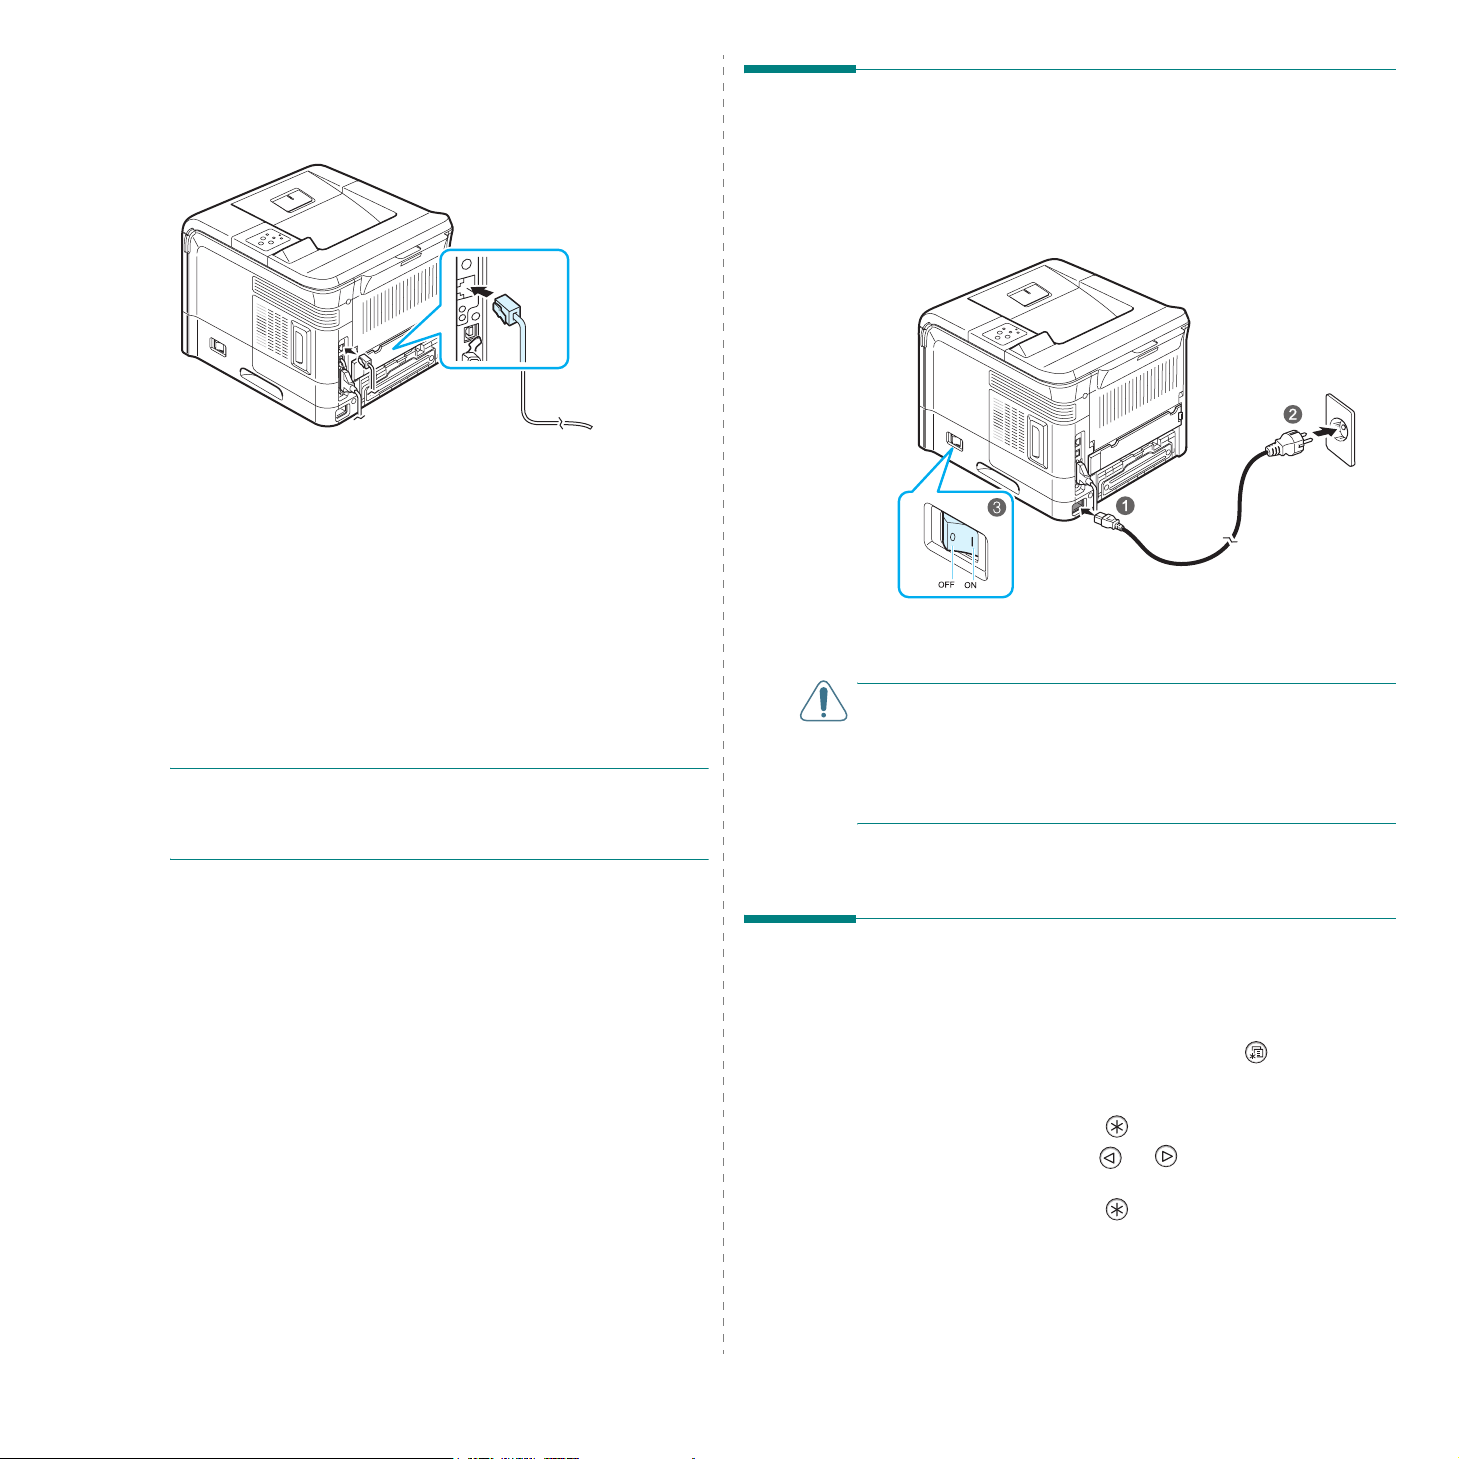
Using an Ethernet Cable
1
Connect one end of the Ethernet cable into the Ethernet
network port on the printer.
To the network LAN
connection
2
Connect the other end of the cable into a network LAN
connection.
See your computer’s User’s Guide, if you need help.
Using a Network Antenna
If you install a wired and wireless network card, you can use
your printer in a wireless environment by using a network
antenna.
For the ML-3560, ML-3561N, ML-3561ND you need to install an
optional wired and wireless network card. For details about
installing the wired and wireless network card, see page 9.3.
N
OTE
: After connecting the printer, you need to configure the
network parameters on the control panel. See page 8.1. You
can use the software supplied with the card. Refer to the
software User’s Guide.
Turning the Printer On
1
Connect one end of the supplied power cord into the power
receptacle on the back of the printer.
2
Connect the other end into a properly grounded AC outlet
and turn on the printer using the power switch.
To view your display text in another language, see
page 2.8.
C
AUTIONS
• The fuser area inside the rear output tray of your printer
becomes very hot when in use. Take care not to burn your
fingers when you access this area.
• Do not disassemble the printer with power on. If you do, you
may receive an electric shock.
:
2.7
Setting Up Your Printer
Printing a Demo Page
Print a demo page to make sure that the printer is operating
correctly.
1
In ready mode, press the
control panel. You can see “Information” on the bottom
line of the display.
2
Press the
3
Press the scroll button ( or ) until you see “Demo
Page” on the bottom line.
4
Press the
A demo page prints out.
Enter
button ( ) to access the menu.
Enter
button ( ).
Menu
button ( ) on the

Changing the Display Language
To change the language that is displayed on the control panel,
follow these steps:
1
In ready mode, press the
control panel until you see “Setup” on the bottom line of
the display.
2
Press the
3
Press the scroll button ( or ) until you see “LCD
Language” on the bottom line.
4
Press the
5
Press the scroll button ( or ) to display the language
you want to use.
6
Press the
7
Press the
ready mode.
Enter
button ( ) to access the menu.
Enter
button ( ) to confirm the menu item.
Enter
button ( ) to save the selection.
On Line/Continue
Menu
button ( ) on the
button ( ) to return to
Using the Toner Save Mode
The Toner Save mode allows the printer to use less toner on
each page. Activating this mode extends the life of your toner
cartridge and reduces your cost per page beyond what one
would experience in the normal mode, but it reduces print
quality. This setting is not available with the 1200 dpi setting.
There are three ways to enable the Toner Save mode:
Using the Control Panel Button
Press the
printer must be in ready mode; the
( ) is on in green and “Ready” is shown on the display.
•If the
enabled and the printer uses less toner to print a page.
•If the
disabled and the printer prints in normal mode.
Toner Save
Toner Save
Toner Save
button ( ) on the control panel. The
On Line/Continue
button backlight is on, the mode is
button backlight is off, the mode is
button
From the Software Application
You can set the Toner Save mode from the printer properties
window on your printer driver. For details, see the
User’s Guide
.
Software
Installing Printer Software
You must install software using the supplied CDROM after you have set up your printer and
connected it to your computer. For details, see the
Software User’s Guide
The CD-ROM provides you with the following software:
If you are printing from Windows
You can install the following printer software using the CDROM.
•
PCL printer driver
full advantage of your printer’s features. See the
Software User’s Guide for details about installing the
Samsung PCL printer driver.
•
PostScript Printer Description (PPD) file
to allow installation of the PostScript driver.
To install the PostScript driver, you need to select
and put a check mark on the PostScript driver when you
install the software. For details, see the
Guide
.
•
SmartPanel
Software User’s Guide
SmartPanel program.
. Appears when printing errors occur. See the
If you are printing in Linux
You can print from a Linux-based computer with your printer.
Go to the
installing the Linux driver and printing from a Linux
environment.
Software User’s Guide
If you are printing from a Macintosh
.
for Windows. Use this driver to take
for Windows
Custom
Software User’s
for details about installing the
for information about
Using the Control Panel Menu
You can set the
the Toner Save mode on or off.
For further details about using the control panel menu, see
page 3.3.
Toner Save
item in the
Graphics
menu to turn
Setting Up Your Printer
2.8
You can print from a Macintosh with your printer. Go to the
Software User’s Guide
print software and printing from a Macintosh.
for information about installing the
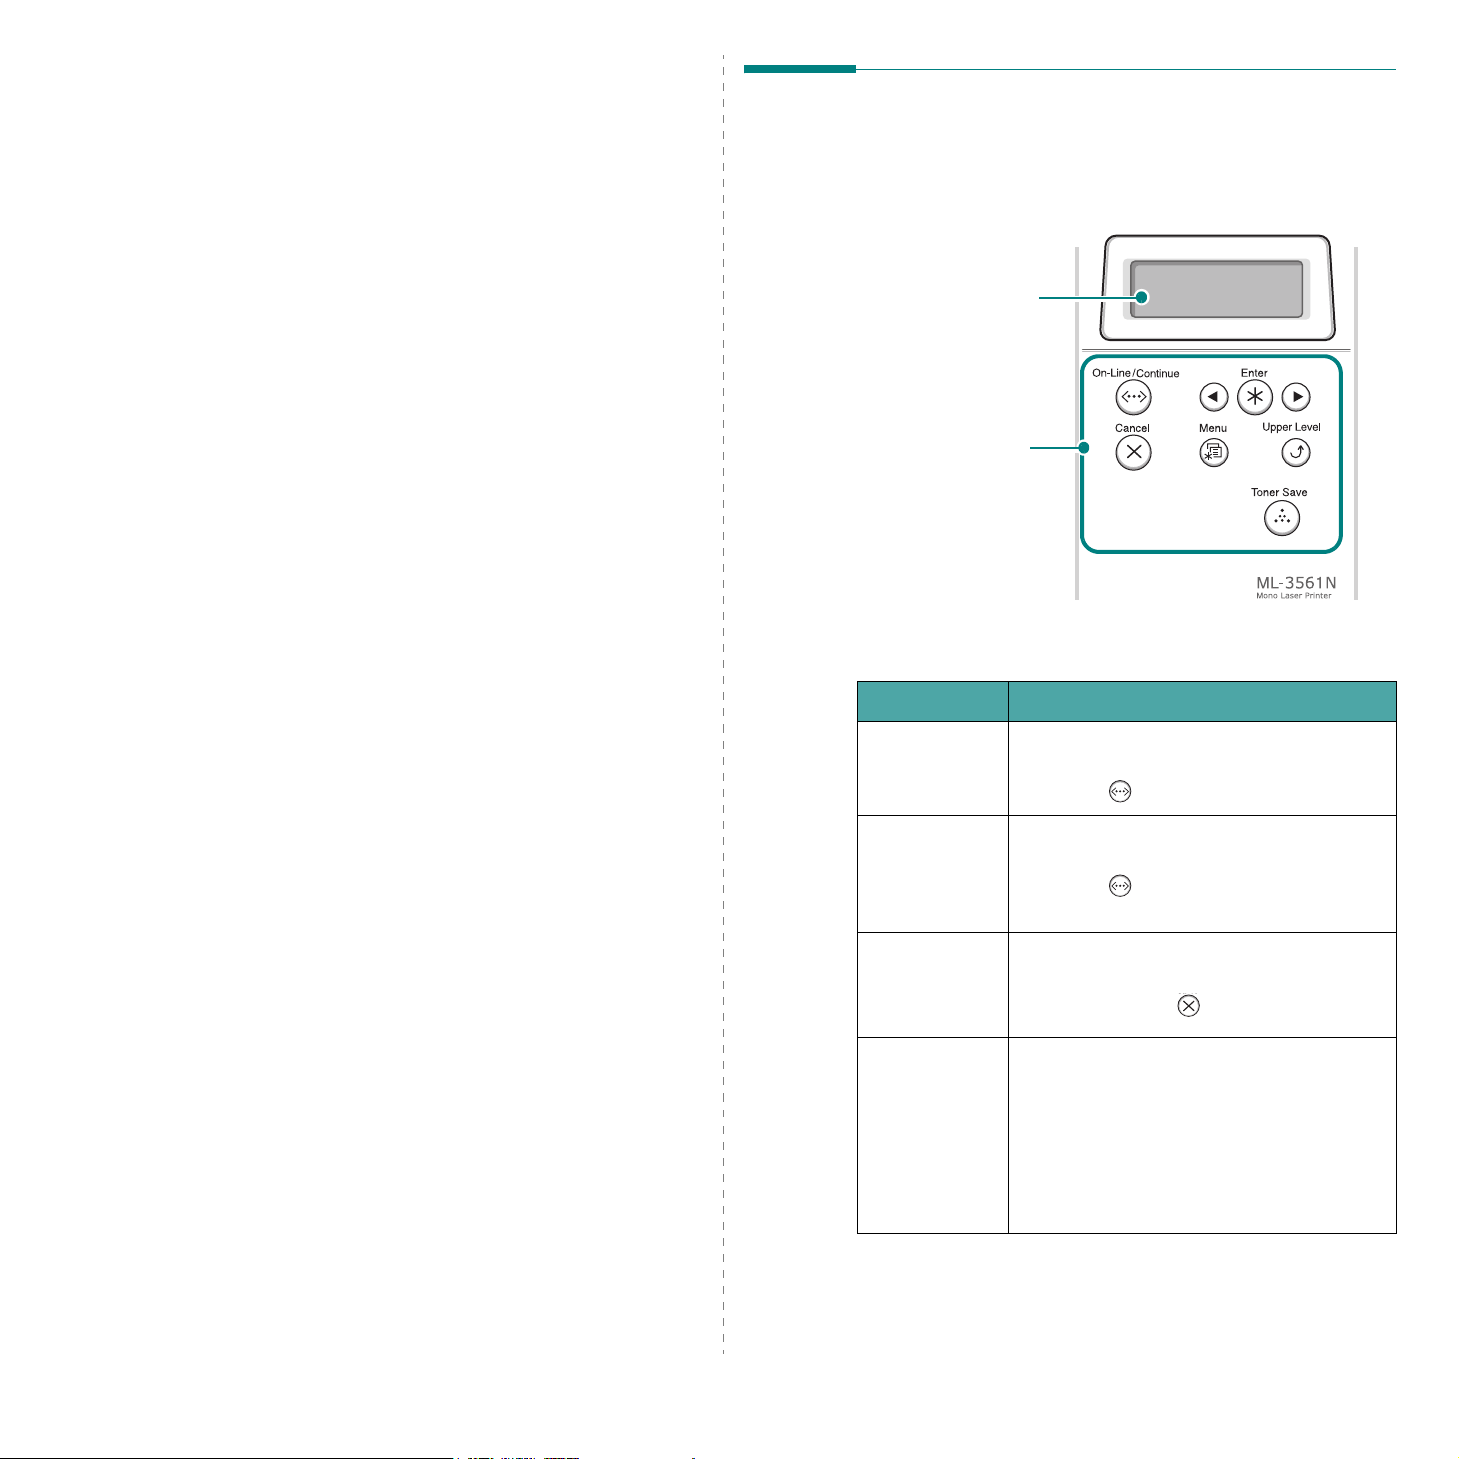
3 Using the Control Panel
Understanding the Control
This chapter describes how to use the printer’s control panel.
This chapter includes:
• Understanding the Control Panel
• Using Control Panel Menus
Panel
The control panel on the top right side of your printer has the
display and the eight buttons.
Display
printer status and job
in progress.
Display
: displays the
Buttons
Message Description
• The printer is on-line and ready to print.
Ready
Offline
Printing XXX
* xxx is the
current
emulation.
Sleeping...
See “Understanding Display Messages” on page 7.10 for a
complete listing of all printer messages.
• If you press the
button ( )
• The printer is off-line and cannot print.
• If you press the
button ( )
line.
• The printer is printing.
• If you want to stop printing, press the
Cancel button ( )
• The printer is in the Power Save mode,
consuming less power. When a print job is
received from the computer, or if any
button is pressed, the printer switches to
on-line.
• To deactivate the Power Save mode or
change the power-saving time, see
page 3.7.
On Line/Continue
, the printer goes to off-line.
On Line/Continue
, the printer switches to on-
.
3.1
Using the Control Panel

Buttons
Button Description
Button Description
• Press to switch between on-line and off-line.
• In menu mode, press to return to ready mode.
You can check the printer status according to the
button backlight.
The printer is on-line and
On
Green
Blinking
On Line/
Continue
On
can receive data from the
computer.
• When the backlight
slowly blinks, the printer
is receiving data from the
computer.
• When the backlight fast
blinks, the printer is
receiving and printing
data.
If you want to pause
printing, switch the printer
to off-line.
The printer has stopped
printing due to a major
error. Check the display
message. See page 7.10
for details on the meaning
of the error message.
Scroll
buttons
Cancel
Upper
Level
Ton e r
Save
In menu mode, press to scroll through sub menu
items or setting options. Pressing
the next option and pressing
the previous option.
• Press to cancel the current print job.
• In menu mode, press to return to ready mode.
In menu mode, press to go back to the upper
menu level.
Press to enable or disable the Toner Save mode.
• If the button backlight is on, the mode is
enabled and the printer uses less toner to print a
document.
• If the button backlight is off, the mode is
disabled and the printer will print in the normal
quality.
For more information on the Toner Save mode, see
page 2.8.
moves you to
sends you back to
Menu
Enter
Orange
Blinking
• The printer is off-line and cannot
print.
Off
• Press to enter menu mode.
• In menu mode, press to scroll through the
menus.
In menu mode, press to select the displayed sub
menu item or to confirm the changed setting. You
can see the selected value marked with *.
• The printer is in the Power Save
mode. When data is received, it
switches to on-line automatically.
A minor error occurs and
the printer is waiting an
error to be cleared. Check
the display message. When
the problem is cleared, the
printer resumes printing. If
you want to ignore this
warning, press this button.
3.2
Using the Control Panel
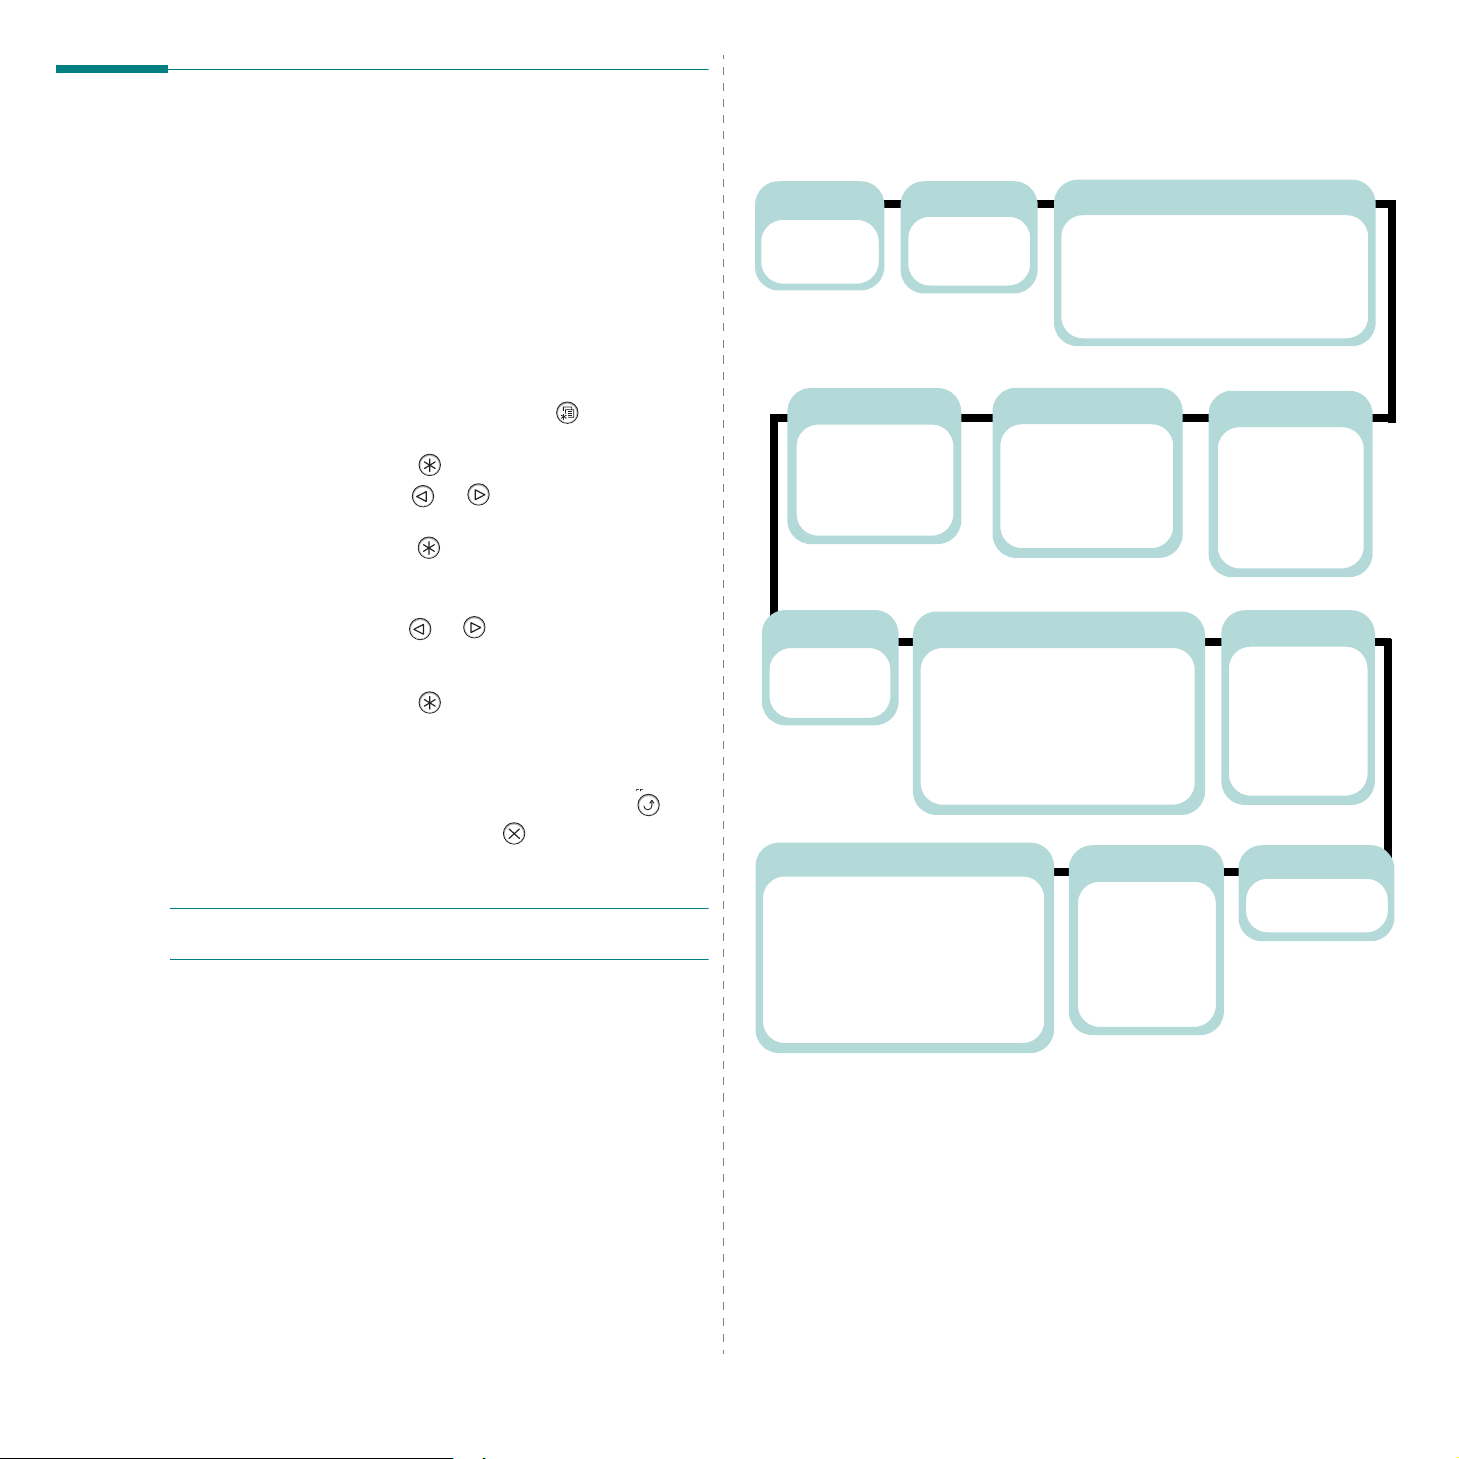
Using Control Panel Menus
A number of menus are available to make it easy for you to
change printer settings. The diagram on next column shows the
menus and all of the menu items available in each menu. The
items in each menu and the values you can select are described
in more detail in the tables beginning on page 3.4.
Accessing Control Panel Menus
You can control your printer from the printer’s control panel.
You can also set the control panel menus while the printer is in
use.
1
In ready mode, press the
the menu you want on the bottom line of the display.
2
Press the
3
Press the scroll button ( or ) until the desired menu
Enter
button ( ) to access the menu.
item displays on the bottom line.
4
Press the
5
If the selected menu item has sub menus, repeat steps 3
Enter
button ( ) to confirm the selected item.
and 4.
6
Press the scroll button ( or ) until the desired setting
option displays on the bottom line, or enter the required
value.
7
Press the
Enter
button ( ) to save your input or
selection.
*
An asterisk (
) appears next to the selection on the
display, indicating that it is now the default.
8
To exit the menu, press the
repeatedly, or the
Cancel
After 60 seconds of inactivity (no key being pressed), the
printer automatically returns to ready mode.
N
OTE
: Print settings made from the printer driver on a
connected computer override the settings on the control panel.
Menu
button ( ) until you see
Upper Level
button ( )
button ( ).
Overview of Control Panel Menus
The control panel menus are used to configure the printer. The
control panel provides access to the following menus:
Active Job *
(See page 9.6.)
User Name
Job Name
Graphics
(See page 3.6.)
Resolution
Image Enhance
Tone r S a v e
Density
Printer
(See page 3.7.)
Default Set
Current Job
Network******
(See page 3.9.)
Config Network
Config TCP
IP Get Method
IP Address
Subnet Mask
Gateway
Config 802.11b
Stored Job **
(See page 9.6.)
User Name
Job Name
Setup
(See page 3.7.)
Date & Time***
Fixed Overlay***
Sel. 1st. Form***
Sel. 2nd. Form***
LCD Language
Emulation
Power Save
AppleTalk
Netware
Config Netware
IPX Frame Type
Reset Network
Default Set
Print Net CFG
Information
(See page 3.4.)
Configuration
Menu Map
Demo Page
Stored Job List***
Event Log***
Layout
(See page 3.5.)
Orientation
Duplex****
Duplex Margin****
Simplex Margin
Copies
Auto Continue
Jam Recovery
Altitude Adj.
Auto CR
Job Time Out
RS-232C*****
Maintenance
EPSON/IBM/IBM
(See page 3.9.)
Font
Auto Wrap
Character Set
Character Tab..
LPI
Pitch
Usage Page***
Completed Job***
PS3 Font List
PCL Font List
EPSON Fonts
IBM Fonts
Paper
(See page 3.4.)
Tray Source
Media Size
Custom Width
Custom Height
Media Type
Tray Chaining
PCL
(See page 3.8.)
Typeface
Symbol
Lines
Pitch
Point Size
Courier
PostScript
(See page 3.9.)
Print PS Error
*:Available when your printer is printing a file from an optional hard disk.
**: Available when there is a file stored in an optional hard disk.
***: Available when your printer has an optional hard disk.
****: Available when an optional duplex unit is installed in your printer.
*****: Available when an optional serial interface card is installed in your printer.
******: Available when a network card is installed in your printer. (ML-3561N, ML-3561ND or ML-3562W, or
ML-3560 with an optional network card)
3.3
Using the Control Panel
Information Menu
This menu contains printer information pages that give details
about the printer and its configuration.
Item Explanation
Paper Menu
Use this menu to define all settings relating to print material
input and output, as well as the specific print material you are
using with your printer.
(*: the default setting)
Configuration
Menu Map
Demo Page
Stored Job List
Event Log
Usage Page
Completed Job
PS3 Font List
PCL Font List
EPSON Fonts
IBM Fonts
The configuration page shows the printer’s
current configuration. See page 6.1.
The menu map shows the layout and
current settings of the control panel menu
items.
The demo page allows you to check if your
printer properly performs printing.
The list shows the file list stored in the
optional hard disk.
The Event Log page lists the errors
occurring when you are using the printer.
See page 6.1.
The Usage Page contains the total number
of pages printed by person or group. This
page can be used for cost accounting. See
page 6.1.
The Completed Job page shows the list of
completed print jobs. The list contains up
to 50 files from the latest print jobs.
The font sample list shows all of the fonts
currently available in the selected
language.
Item Explanation
Values: Auto Select*, Tray1, MP Tray,
Tray2 , M a nua l Tr a y
Using this item, you can set the tray you will
use.
Tray So u rce
Media Size
• If you select
automatically determine the source.
• Select
Multi-purpose Tray. If you select
Tray
, you need to press the
Continue
page.
Tray2
•The
optional Tray2 is installed.
Values: Letter, Legal, A4, Executive, JIS B5,
ISO B5, N o. 1 0 E n v., Monar c h E n v., DL Env.,
C5 Env., C6 Env., US Folio, A5, A6, Custom ,
Oficio
* Letter for USA, A4 for Europe and Asia
Select the paper size currently loaded in the
tray.
Values: A4:210 mm/ Letter:215 mm
* Letter for USA, A4 for Europe and Asia
Auto Select
MP Tray
or
button each time you print a
item is available only when the
, the printer can
Manual Tray
On Line/
to use the
Manual
3.4
Using the Control Panel
Custom Width
Custom
Height
Select the paper size currently loaded in the
tray. This menu is shown when
value is set up by
Custom Width
•
76 to 216 mm.
Values: A4:297 mm/ Letter:279 mm
* Letter for USA, A4 for Europe and Asia
Select the paper size currently loaded in the
tray. This menu is shown when
value is set up by
Custom Height
•
from 127 to 356 mm.
Custom Size
: Set the custom width from
Custom Size
: Set the custom height
Media Size
.
Media Size
.
Item Explanation
Values: Off*, Plain Paper, Thick, Thin, Bond,
Color Paper, Card Stock, Labels,
Transparency, Envelope, Preprinted
Layout Menu
Use the
(*: the default setting)
Layout
menu to define all settings relating to output.
Item Explanation
Media Type
Tray Chaining
The Media Type setting lets you specify the type
of print material you are using to get the best
result.
Plain Paper
•
Thick
•
•
Thin
: Select for thin paper
•
Bond
Color Paper
•
•
Card Stock
•
Labels
Transparency
•
•
Envelope
•
Preprinted
: Select for plain paper.
: Select for thick paper
: Select for thick paper.
: Select for colored paper.
: Select for card stocks.
: Select for labels.
: Select for transparencies.
: Select for envelops.
: Preprinted is for paper with
something else printed on it, such as
letterhead.
Values: Off, On*
When you select any other value except
from
Select
Tray Source
and the selected
Auto
tray is empty, the printer automatically prints
from other trays.
Off
If this menu item is set to
On Line/Continue
button backlight blinks in
, the
orange and the printer doesn’t work until you
insert paper into the specified tray.
Orientation
Duplex
Values: Portrait*, Landscape
Choose the default orientation of print image
on the page.
Portrait
Values: Off*, Long Edge, Short Edge
Landscape
To print on both sides of paper, choose the
binding edge as follows.
•
Long Edge
: Flip on long edge. Prints
pages to read like a book.
Short Edge
•
: Flip on short edge. Prints
pages to read by flipping over like a note
pad.
2
25
Long Edge in the
Portrait orientation
3
3
5
Long Edge in the
Landscape orientation
3.5
Using the Control Panel
2
3
2
3
5
Short Edge in the
Portrait orientation
Off
Select
N
OTE
to print on one side of paper.
: This menu item is available only
Short Edge in the
Landscape orientation
5
when you install an optional duplex unit.

Item Explanation
Values: Top/Left:5.0* , Short/Long: 0*
Graphics Menu
Use the
of the printed characters and images.
(*: the default setting)
Graphics
menu to change settings affecting the quality
Duplex Margin
Simplex
Margin
In this menu, you can set the margin of print
materials for double-sided printing. You can
increase or decrease the value in 0.1 mm
increments.
Top Margin
•
to 9.9 mm.
•
Left Margin
to 9.9 mm.
Short Binding
•
the rear side for short binding, from 0.0 to
22 mm.
Long Binding
•
rear side for long binding, from 0.0 to 22
mm.
N
OTE
:
when you install an optional
Values: 0.0*
Set the margin of print materials for onesided printing. You can increase or decrease
the value in 0.1 mm increments.
Top Margin
•
to 250 mm.
Left Margin
•
to 164 mm.
: Set the top margin, from 0.0
: Set the left margin, from 0.0
: Set the bottom margin of
: Set the right margin of the
This menu item is available only
duplex unit
: Set the top margin, from 0.0
: Set the left margin, from 0.0
.
Item Explanation
Values: 300dpi-Draft, 600dpi-Normal*,
1200dpi-Best
Specify the number of dots printed per inch
(dpi). The higher the setting, the sharper the
clarity of printed characters and graphics.
300dpi-Draft
document.
600dpi-Normal
output.
1200dpi-Best
contains bitmapped images, such as
scanned photos or some business graphics,
that will benefit from enhanced line
screening.
Values: Normal, Image Enhance, Text
Enhance*
Normal
Image Enhance
images, like scanned pictures.
Text Enhance
simple figures.
: Doesn’t enhance the quality.
for the highest quality
: Enhances bitmap
: Enhances letters and
Resolution
Image
Enhance
• Select
• If your print jobs are mostly text, select
• Select
This item enhances the print quality.
•
•
•
to print a draft
when your job
Copies
Values: 1* ~ 999
Set the default number of copies by selecting
any number from 1 to 999.
Using the Control Panel
3.6
Ton e r S a ve
Density
Values: Off*, On
To get the most from your toner supply, set
Off
this menu to
print quality may be reduced.
Values: Light, Medium*, Dark
You can lighten or darken the print on the
page by changing the toner density setting.
Medium
The
best result. Use the
setting to save toner.
. If you set this menu to On,
setting usually produces the
Light
toner density
 Loading...