


GT-I5800
quick start guide
For more information, refer to the user manual at www.samsungmobile.com.

Using this guide
Thank you for purchasing this Samsung mobile phone. This device will provide you with high quality mobile communication and entertainment based on Samsung’s exceptional technology and high standards.
This guide has been specially designed to guide you through the basics of your device, such as assembling and getting started with the device.
•Please read this guide carefully before using your device to ensure safe and correct use.
•The descriptions in this guide are based on the default settings of your device.
•Please keep this guide for future reference.
You can get more detailed descriptions and instructions for using the device's features from the PDF format user manual. Visit the Samsung website (www.samsungmobile. com) to view your device's user manual.
Instructional icons
Before you start, familiarise yourself with the icons you will see in this guide:
Warning—situations that could cause injury to yourself or others
Caution—situations that could cause damage to your device or other equipment
Note—notes, usage tips, or additional information
2 Using this guide

►Refer to—pages with related information; for example: ►p.12 (represents“see page 12”)
→Followed by—the order of options or menus you must select to perform a step; for example: In Idle mode, open the application list and select Messaging → New message (represents Messaging, followed by New message)
[ |
] Square brackets—phone keys; for example: |
|
[ ] (represents the Power key) |
Copyright information
Rights to all technologies and products that comprise this device are the property of their respective owners:
•This product has an Android platform based on Linux, which can be expanded by a variety of JavaScript-based software.
•Google™, Android Market™, Google Talk™, Google Mail™, Google Maps™, and YouTube™ are trademarks of Google, Inc.
•Bluetooth® is a registered trademark of the Bluetooth SIG, Inc. worldwide.
•Java™ is a trademark of Sun Microsystems, Inc.
•Windows Media Player® is a registered trademark of Microsoft Corporation.
Using this guide 3

•

 is a trademark of SRS Labs, Inc. WOW HD technologies is incorporated under licence from SRS Labs, Inc.
•Wi-Fi®, the Wi-Fi CERTIFIED logo, and the Wi-Fi logo are registered trademarks of the Wi-Fi Alliance.
•DivX® is a registered trademark of DivX, Inc., and is used under licence. Pat. 7,295,673
ABOUT DIVX VIDEO
DivX® is a digital video format created by DivX, Inc. This is an official DivX Certified device that plays DivX video. Visit www.divx.com for more information and software tools to convert your files into DivX video.
ABOUT DIVX VIDEO-ON-DEMAND
This DivX Certified® device must be registered in order to play DivX Video-on-Demand (VOD) content. To generate the registration code, locate the DivX VOD section in the device setup menu. Go to http://vod.divx. com with this code to complete the registration process and learn more about DivX VOD.
DivX Certified to play DivX® video up to 320x240.
4 Using this guide

Contents |
|
Assembling .............................................. |
7 |
Unpack ................................................................... |
7 |
Install the SIM or USIM card and battery ....... |
7 |
Charge the battery .............................................. |
9 |
Insert a memory card (optional) .................... |
11 |
Attach a hand strap (optional) ....................... |
13 |
Getting started ..................................... |
14 |
Turn your device on and off ............................ |
14 |
Get to know your device .................................. |
14 |
Use the touch screen ........................................ |
17 |
Lock or unlock the touch screen and keys .. |
18 |
Get to know the idle screen ............................ |
19 |
Access applications ........................................... |
21 |
Customise your device ..................................... |
22 |
Enter text ............................................................. |
25 |
Calling ..................................................... |
28 |
Creating and finding contacts ........... |
29 |
Messaging .............................................. |
30 |
Capturing photos and videos ............ |
33 |
Contents 5

Viewing photos and videos ................ |
36 |
Listening to music ................................ |
36 |
Connecting to the internet ................. |
40 |
Download applications from Android |
|
Market .................................................... |
41 |
Download files from the web ............. |
42 |
Connecting to a PC ............................... |
43 |
Using Bluetooth .................................... |
46 |
Using Wi-Fi ............................................. |
47 |
Safety and usage information ........... |
49 |
6 Contents

Assembling
Unpack
Check your product box for the following items:
•Mobile device
•Battery
•Travel adapter (charger)
•Quick start guide
Use only Samsung-approved software. Pirated or illegal software may cause damage or malfunctions that are not covered by your manufacturer's warranty.
•The items supplied with your device may vary depending on the software and accessories available in your region or offered by your service provider.
•You can obtain additional accessories from your local Samsung dealer.
•The supplied accessories perform best for your device.
Install the SIM or USIM card and battery
When you subscribe to a cellular service, you will receive a Subscriber Identity Module (SIM) card, with subscription details, such as your personal identification number (PIN) and optional services. To use UMTS or HSDPA services, you can purchase a Universal Subscriber Identity Module (USIM) card.
Assembling 7

To install the SIM or USIM card and battery, |
3 Insert the SIM or USIM card. |
||
1 |
If the device is on, press and hold [ ] and select Power |
|
|
|
off to turn it off. |
|
|
2 Remove the back cover. |
|
|
|
|
|
• |
Place the SIM or USIM card into the device with |
|
|
• |
the gold-coloured contacts facing up. |
|
|
If you do not insert a SIM or USIM card, you can |
|
|
|
|
only use your device’s non-network services and |
|
Be careful not to damage your fingernails when you |
• |
some menus. |
|
Do not insert a memory card into the SIM card |
||
|
remove the back cover. |
||
|
|
slot. |
|
|
|
|
|
8 Assembling
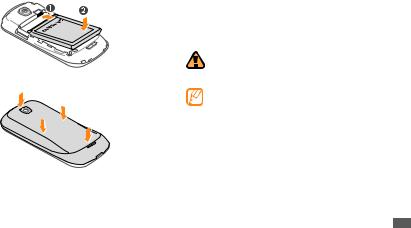
4
5
Insert the battery.
Replace the back cover.
Charge the battery
Before using the device for the first time, you must charge the battery.
You can charge the device with the provided travel adapter or by connecting the device to a PC with a PC data cable.
Use only Samsung-approved chargers and cables. Unauthorised chargers or cables can cause batteries to explode or damage your device.
When your battery is low, the device will emit a warning tone and display a low battery message. The battery icon  will also be empty and turn red. If the battery level becomes too low, the device will automatically power off. Recharge your battery to continue using your device.
Assembling 9
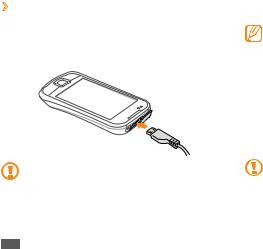
››Charge with the travel adapter
1 |
Open the cover to the multifunction jack on the top of |
2 |
the device. |
Plug the small end of the travel adapter into the |
|
|
multifunction jack. |
Improperly connecting the travel adapter can cause serious damage to the device. Any damage caused by misuse is not covered by the warranty.
3 |
Plug the large end of the travel adapter into a power |
|
outlet. |
•You can use the device while it is charging, but it may take longer to fully charge the battery.
•While charging, the device may heat up. This is normal and should not affect your device’s lifespan or performance.
•If your device is not charging properly, bring your device and the charger to a Samsung Service Centre.
4 When the battery is fully charged, unplug the travel adapter from the device and then from the power outlet.
Do not remove the battery before removing the travel adapter. Doing this may cause damage to the device.
10 Assembling
››Charge with the PC data cable
Before charging, ensure that your PC is turned on.
1 |
Open the cover to the multifunction jack on the top of |
2 |
the device. |
Plug one end (micro USB) of the PC data cable into the |
|
3 |
multifunction jack. |
Plug the other end of the PC data cable into a USB port |
|
|
on a PC. |
|
Depending on the type of PC data cable you are |
|
using, it may take some time before charging |
|
begins. |
4 |
When the battery is fully charged (the battery icon is |
|
no longer moving), unplug the PC data cable from the |
device and then from the PC.
Insert a memory card (optional)
To store additional multimedia files, you must insert a memory card. Your device accepts microSD™ or
microSDHC™ memory cards with maximum capacities of 32 GB (depending on memory card manufacturer and type).
Samsung uses approved industry standards for memory cards, but some brands may not be fully compatible with your device. Using an incompatible memory card may damage your device or the memory card and can corrupt data stored on the card.
•Your device supports only the FAT file structure for memory cards. If you insert a card formatted with a different file structure, your device will ask you to reformat the memory card.
•Frequent writing and erasing of data will shorten the life span of memory cards.
•When you insert a memory card in your device, the file directory of the memory card will appear in the /sdcard folder.
Assembling 11

1
2
Remove the back cover.
Insert a memory card with the gold-coloured contacts facing up.
››Remove the memory card
Before removing a memory card, first unmount it for safe removal.
3 |
Push the memory card in the memory card slot until it |
4 |
locks in place. |
Replace the back cover. |
1
2
3
4
5
6
In Idle mode, select Applications → Settings → SD card and phone storage → Unmount SD card.
Remove the back cover.
Push the memory card gently until it disengages from the device.
Pull the memory card out of the memory card slot. Remove the memory card.
Replace the back cover.
Do not remove a memory card while the device is transferring or accessing information, as this could result in loss of data or damage to the memory card or device.
12 Assembling
››Format the memory card
Formatting your memory card on a PC may cause incompatibilities with your device. Format the memory card only on the device.
In Idle mode, select Applications → Settings → SD card and phone storage → Unmount SD card → Format SD card → Format SD card.
Before formatting the memory card, remember to make backup copies of all important data stored on your device. The manufacturer’s warranty does not cover loss of data resulting user actions.
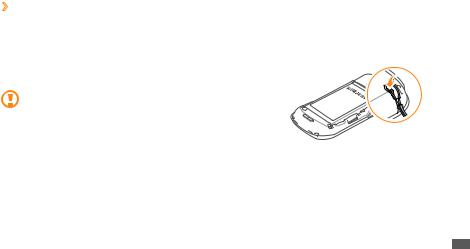
Attach a hand strap (optional)
1 |
Remove the back cover. |
2 |
Slide a hand strap through the slot and hook it over |
|
the small projection. |
3 Replace the back cover.
Assembling 13
Getting started
Turn your device on and off
To turn on your device, press and hold [ ]. Your device will automatically connect to the cellular network.
If you turn on your device for the first time, tap the Android image on the screen and follow the on-screen instructions to set up your device for its first use.
To turn off your device, press and hold [ ] and the select
Power off.
•Follow all posted warnings and directions from official personnel when in areas where the use of wireless devices is restricted, such as aeroplanes and hospitals.
•To use your device's non-network services only,
switch to Flight mode. Press and hold [ ] and select Flight mode.
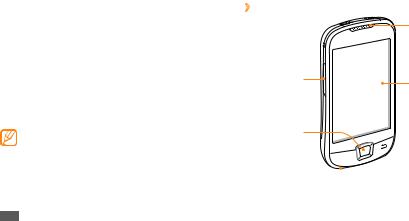
Get to know your device
››Device layout
Earpiece
Proximity sensor 

Volume key |
Touch screen |
|
Home key
 Back key
Menu key 

Mouthpiece
14 Getting started
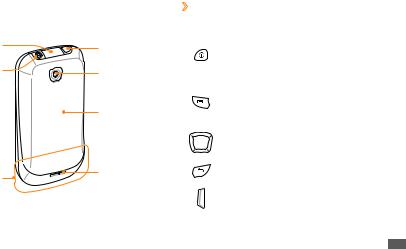
Multifunction jack |
Power key |
|
|
Headset jack |
Camera lens |
|
|
|
Back cover |
Internal antenna |
Speaker |
|
››Keys
Key |
Function |
|
|
Turn on the device (press and |
|
Power |
hold); Access the quick menus |
|
(press and hold); Lock the touch |
||
|
||
|
screen. |
|
|
Open a list of options available |
|
Menu |
on the current screen; Open the |
|
Google Search bar (press and |
||
|
||
|
hold). |
|
|
Return to the idle screen; Open |
|
Home |
the list of recent applications |
|
|
(press and hold). |
|
Back |
Return to the previous screen. |
|
|
|
|
Volume |
Adjust the device’s volume. |
|
|
|
Getting started 15
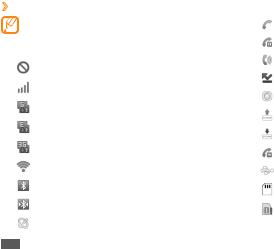
››Indicator icons |
|
|
||||
Icon |
Definition |
|||||
|
Icons shown on the display may vary depending on |
|
Voice call in progress |
|||
|
your region or service provider. |
|
||||
|
|
|
||||
|
|
Call on hold |
||||
|
|
|
|
|
|
|
Icon |
|
Definition |
|
|
||
|
|
|
|
|||
|
Speakerphone activated |
|||||
|
|
No signal |
|
|
|
|
|
|
|
|
|||
|
|
Missed call |
||||
|
|
|
|
|
|
|
|
|
Signal strength |
|
|||
|
|
|
|
|||
|
|
Synchronised with the web |
||||
|
|
|
|
|
|
|
|
|
GPRS network connected |
|
|||
|
|
|
|
|||
|
|
Uploading data |
||||
|
|
|
|
|
|
|
|
|
EDGE network connected |
|
|||
|
|
|
|
|||
|
|
Downloading data |
||||
|
|
|
|
|
|
|
|
|
UMTS network connected |
|
|||
|
|
|
|
|||
|
|
Call diverting activated |
||||
|
|
|
|
|
|
|
|
|
Wi-Fi activated |
|
|
||
|
|
Connected to PC |
||||
|
|
|
|
|
|
|
|
|
|
|
|
|
|
|
|
Bluetooth activated |
|
Memory card inserted |
||
|
|
|
|
|
|
|
|
|
Bluetooth headset connected |
|
|
||
|
|
No SIM or USIM card |
||||
|
|
|
|
|
|
|
|
|
GPS activated |
|
|
||
|
|
|
||||
|
|
|
|
|
|
|
16 Getting started

Icon |
Definition |
|
New text or multimedia message |
|
|
|
New email message |
|
|
|
New voice mail message |
|
|
|
Alarm activated |
|
|
|
Event notification |
|
|
|
Roaming (outside of normal service area) |
|
|
|
Silent mode activated |
|
|
|
Flight mode activated |
|
|
|
Vibration activated |
|
|
|
Music playback in progress |
|
|
|
FM radio turned on in the background |
|
|
|
Error occurred or caution required |
|
|
Icon Definition
Battery power level
10:00 AM Current time
Use the touch screen
Your device’s touch screen lets you easily select items or perform functions. Learn basic actions to use the touch screen.
•To avoid scratching the touch screen, do not use sharp tools.
•Do not allow the touch screen to come into contact with other electrical devices. Electrostatic discharges can cause the touch screen to malfunction.
•Do not allow the touch screen to come into contact with water. The touch screen may malfunction in humid conditions or when exposed to water.
Getting started 17

•For optimal use of the touch screen, remove the screen protection film before using your device.
•Your touch screen has a layer that detects small electrical charges emitted by the human body. For best performance, tap the touch screen with your fingertip. The touch screen will not react to touches of sharp tools, such as a stylus or pen.
Control your touch screen with the following actions:
•Tap: Tap once with your finger to select or launch a menu, option, or application.
•Tap and hold: Tap an item and hold it for more than 2 seconds to open a pop-up option list.
•Scroll: Tap and drag your finger up, down, left, or right to move to items on lists.
•Drag and drop: Tap and hold your finger on an item, and then drag your finger to move the item.
•Double-tap: Tap twice quickly with your finger to zoom in or out while viewing photos or web pages.
•Your device turns off the touch screen when you do not use the device for a specified period. To turn on the screen, press any key.
•You can also adjust the backlight time. In Idle mode, open the application list and select
Settings → Sound and display → Screen timeout.
Lock or unlock the touch screen and keys
You can lock the touch screen and keys to prevent any unwanted device operations.
To lock, press [ ]. To unlock, turn on the screen by pressing any key, and then flick the grey window with your finger.
18 Getting started
 Loading...