

SAITEK PRO FLIGHT INSTRUMENT PANEL
Congratulations on buying the Saitek Pro Flight Instrument Panel. The Instrument
Panel interacts in real time with Microsoft Flight Simulator X to display a choice of
cockpit screens, improving control and making your flying experiences more realistic.
Installing the Instrument Panel
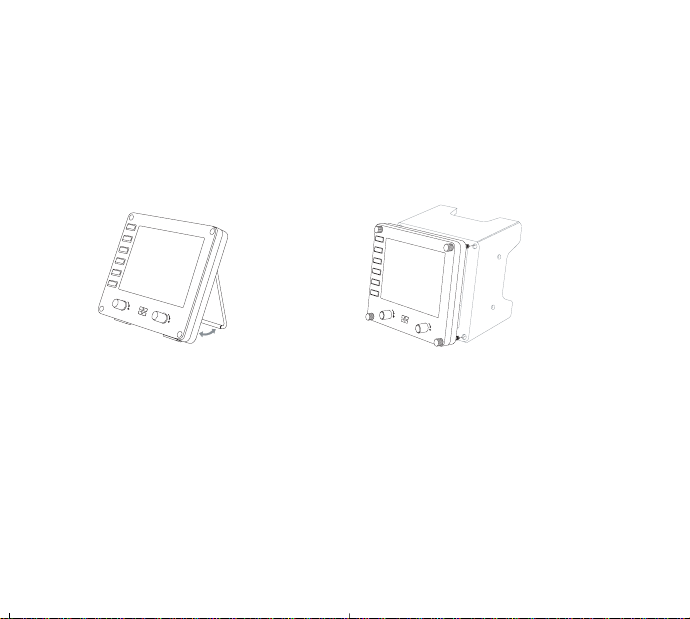
To use the Instrument Panel as a standalone device, simply extend the support stand
at the back of unit as shown.
You can also fix the panel to the supplied mounting bracket. Insert the screws
through the holes at the corners of the panel into the bracket behind and tighten. If
you already own a Saitek Pro Flight Yoke System, you can mount the panel and
bracket on top of the yoke unit using the screws provided.
Installation for users of Windows® XP, XP64 and Vista
Important: Do not connect the Flight Instrument Panel’s USB cable to your PC
before installing the driver software.
1. With your computer switched on, close down any programs that are currently
running and insert the Installation CD into your CD or DVD drive.
2. If the CD does not run automatically, select Start from the Windows® Taskbar,
1
Saitek
Saitek

stage 1 of the installation process above. For Vista users, a screen will appear
saying “WIndows needs to install driver software for your unknown device”. Select
“Ask me again later” and go to stage 1 of the installation process.
Note 2: If you have lost or damaged your CD, you can use Windows Update to
restore or load software drivers.
Note 3: If you install a Saitek X52 Pro after having installed the Flight Instrument
Panel, the Instrument Panel’s Direct Output file will be overwritten. If this happens,
please reinstall the Instrument Panel software.
Troubleshooting
How to assign Flight Simulator X instrument displays to the Pro Flight
Instrument Panel
Once you have installed the Instrument Panel software and plugged the panel’s USB
cable into one or your PC’s free USB ports (or Saitek Pro flight yoke USB hub), the
screen will show a default scrolling display of Saitek Pro Flight products.
The Instrument Panel buttons and screen are now automatically configured to
interact with FS X software. When you open Microsoft FSX you will be asked “Do
you trust this driver from Saitek?” Click “Yes”. You will then be asked “Do you always
want to load this plugin when launching Flight Sim X?” Again, click “Yes”. The
Instrument Panel screen display will switch to show the aircraft Altimeter instrument.
If your FS X software does not recognise the Instrument Panel, unplug the USB
cable and plug it back in.
If FS X appears not to load, this is because it is waiting for a prompt. To view the
prompt window, select it either by pressing Alt + tab or by clicking on the prompt on
the Windows task bar. The prompt reads “Microsoft Flight Simulator security warning
: will happen once after install”. Click Run and when asked “would you like to
designate this module?”, click yes and FS X will continue to load.
then Run and type D:\Setup.exe and click OK - where D:\ is letter of your disc
drive. For Vista users, if you receive the “User Account Control” prompt, click
continue.
3. For XP users, when the Set-up wizard screen appears, click “Next” to continue.
For Vista users, when prompted “Would you like to install this device software?”
click “Install”. After reading the Disclaimer, select the “I accept the terms of the
Disclaimer” option and click “Next” to continue.
4. The following screen will say “Driver set-up is installing Direct Output”.
5. Once the driver installation has finished, click “Finish” to exit the installation
process.
6. Plug in your Flight Instrument Panel.
7. For XP users, the New Hardware Wizard will appear asking “Can Windows
connect to Windows Update to search for software?”. Select “Not at this time” and
click “Next”. For Vista users, the installation will now be completed automatically.
8. At the next screen, XP users should choose the recommended option “Install
software automatically”. Click “Next” and then “Finish” to complete the installation.
9. If prompted, restart your PC.
Note 1: If you plug in your Flight Instrument Panel before installing the drivers, for
XP users, the Found New Hardware Wizard will appear. Click “Cancel” and go to
3
2
Screen displays
Altimeter
Airspeed
Attitude Compass Turn and Slip
Vertical Speed

Definitions
Server = The PC that will be running FSX and the
main Flight controllers attached.
Client = The PC that will be linked to the Server via
the LAN. The instrument panels will be connected to
this PC to alleviate the processing stress of having
multiple screens connected to one PC.
On the Server PC
1. Ensure FSX and the FIP drivers are installed and running.
2. Original retail DVD1: FSX Deluxe edition; Navigate to the SDK folder and run
Setup.exe.
3. Show hidden files.
In Windows Explorer (if running Vista press Alt key) navigate to Tools > Folder
Options. Select View tab. In Advance Settings > Hidden Files and Folders section,
Select Show Hidden Files and Folders.
4. Locate SimConnect.xml
On Vista: C:\Users\username\AppData\Roaming\Microsoft\FSX\
On XP: C:\Documents and Settings\Application Data\Microsoft\FSX\
Add section within the section <SimBase.Document...>
<SimConnect.Comm>
<Disabled>False</Disabled>
<Protocol>IPv4</Protocol>
<Scope>global</Scope>
The Pro Flight Instrument Panel will not register automatically if you have installed
the Pro Flight Instrument Panel before installing FS X. To register the Pro Flight
Instrument Panel with FS X, click on the “Launch the Flightsim X plugin manually”
icon to re-run the program.
You can select one of the above six screens to be displayed on the Flight Instrument
Panel. Press the cursor up or down buttons at the bottom centre of the panel to scroll
through the screen displays.
Additional buttons
The six buttons on the left of the Instrument Panel open additional cockpit screens or
displays when flying in FSX. Each button is labelled with the corresponding display to
the right of it. The Map, Main Panel, Radios and GPS buttons will open those
screens or cockpit panels when flying most aircraft. The panel 4 and 5 buttons will
open different screens or panels depending on the aircraft being flown. Press the
button once to open the panel or screen and again to close it (except map where you
must click on OK or press return to close the map screen).
Note: Pressing any of the six buttons when FSX is not loaded will switch the
panel display off and on.
You can connect multiple Instrument Panels to your PC to show different cockpit
displays simultaneously. Each panel uses system resources - see Advanced options
below to connect multiple panels with maximum system performance.
Advanced options
If you have more than one PC connected to a LAN you can connect multiple
instrument panels to a secondary PC which will display flight information from
Microsoft FSX running on your primary PC. This can be useful to free up system
resources for FSX.
5
4
LAN
Server Client

Address=SERVER_MACHINE_IP_ADDRESS
Port=SERVER_MACHINE_PORT_NUMBER
MaxReceiveSize=4096
DisableNagle=0
Note: Fill in the Server machine IP address and the port number selected from
Step 4.
• To start the instrument panel, start FSX on the server. You may need to allow FSX
to act as a server in the Firewall settings. If you have trouble connecting to this
machine, temporarily disable the Firewall to see if a connection can be made.
• On the client PC, start SaiFlightSimX.exe
Locate at: C:\Program Files\Saitek\DirectOutput\
Note: If nothing appears to happen, open Task Manager and check that
SaiFlightSimX.exe is in the list of running Processes. If SimConnect cannot find or
connect to the Server PC, SaiFlightSimX.exe will only run very briefly and will not
display any gauges. If this is the case try disabling the Firewall.
Tip: If the client machine fails to connect, please check the Advanced Network
Settings. Navigate Control Panel > Network Connections > Local Area Connection.
Select Properties. Highlight Internet Protocol (TCP/IP) and Select Properties. Select
Advanced. Select WINS tab. Select Enable NetBIOS over TCP/IP. Select OK or
Close and all opened windows.
Please see www.fsdeveloper.com navigate to wiki > simconnect >
remote_connection for further details.
For more information on configuring the Flight Instrument Panel, plus a range of
Frequently Asked Questions, please visit www.saitek.com.
<Address>SERVER_MACHINE_IP_ADDRESS</Address>
<MaxClients>64</MaxClients>
<Port>SERVER_MACHINE_PORT_NUMBER</Port>
<MaxRecvSize>4096</MaxRecvSize>
<DisableNagle>False</DisableNagle>
</SimConnect.Comm>
Note: Find and insert the server machine IP address into the field above from
Control Panel > Network Connections > Local Area Connection. Select Support tab.
Note: Select a port number greater than 1024 (Not 8080). We recommend using
2001.
Note: You will need to make a note of the Server machine IP address and the port
number when setting up the client machine.
On the Client PC
5. Ensure that the Flight Instrument Panel drivers are installed and working correctly.
6. Download and install Microsoft Visual C++ 2005 Redistributable Package (x86).
NOT the SP1 variant!
7. Copy SimConnect.msi from server machine and install. On server machine,
default location: C:\Program Files\Microsoft Games\Microsoft Flight Simulator X
SDK\SDK\Core Utilities Kit\SimConnect\SDK\lib\
8. Create file in My Documents, a text document, rename to SimConnect.cfg
This contains:
[SimConnect]
Protocol=IPv4
7
6

acts of God, or any use violative of instructions furnished by Saitek plc.
5. Obligations of Saitek shall be limited to repair or replacement with the same or
similar unit, at our option. To obtain repairs under this warranty, present the
product and proof of purchase (eg, bill or invoice) to the authorized Saitek
Technical Support Center (listed on the separate sheet packaged with this
product) transportation charges prepaid. Any requirements that conflict with any
state or Federal laws, rules and/or obligations shall not be enforceable in that
particular territory and Saitek will adhere to those laws, rules, and/or obligations.
6. When returning the product for repair, please pack it very carefully, preferably
using the original packaging materials. Please also include an explanatory note.
IMPORTANT: To save yourself unnecessary cost and inconvenience, please
check carefully that you have read and followed the instructions in this manual.
This warranty is in Lieu of all other expressed warranties, obligations or liabilities.
ANY IMPLIED WARRANTIES, OBLIGATIONS, OR LIABILITIES, INCLUDING
BUT NOT LIMITED TO THE IMPLIED WARRANTIES OF MERCHANTABILITY
AND FITNESS FOR APARTICULAR PURPOSE, SHALL BE LIMITED IN
DURATION TO THE DURATION OF THIS WRITTEN LIMITED WARRANTY.
Some states do not allow limitations on how long an implied warranty lasts, so the
above limitations may not apply to you. IN NO EVENT SHALL WE BE LIABLE
FOR ANY SPECIAL OR CONSEQUENTIAL DAMAGES FOR BREACH OF THIS
OR ANY OTHER WARRANTY, EXPRESS OR IMPLIED, WHATSOEVER Some
states do not allow the exclusion or limitation of special, incidental or
consequential damages, so the above limitation may not apply to you. This
warranty gives you specific legal rights, and you may also have other rights which
vary from state to state.
Technical Support
Nearly all the products that are returned to us as faulty are not faulty at all - they
have just not been installed properly.
If you experience any difficulty with this product, please first visit our website
www.saitek.com. The technical support area will provide you with all the information
you need to get the most out of your product and should solve any problems you
might have.
If you do not have access to the internet, or if the website cannot answer your
question, please contact your local Saitek Technical Support Team. We aim to offer
quick, comprehensive and thorough technical support to all our users so, before you
call, please make sure you have all the relevant information at hand.
To find your local Saitek Technical Support Center, please see the separate Technical
Support Center sheet that came packaged with this product.
Conditions of Warranty
1. Warranty period is 2 years from date of purchase with proof of purchase
submitted.
2. Operating instructions must be followed.
3. Specifically excludes any damages associated with leakage of batteries.
Note: Batteries can leak when left unused in a product for a period of time, so it is
advisable to inspect batteries regularly.
4. Product must not have been damaged as a result of defacement, misuse, abuse,
neglect, accident, destruction or alteration of the serial number, improper electrical
voltages or currents, repair, alteration or maintenance by any person or party
other than our own service facility or an authorized service center, use or
installation of non-Saitek replacement parts in the product or the modification of
this product in any way, or the incorporation of this product into any other
products, or damage to the product caused by accident, fire, floods, lightning, or
9
8

- Connect the equipment into an outlet on a circuit different from that to which the
receiver is connected;
- Consult the dealer or an experienced radio/TV technician for help.
Saitek Industries, 2295 Jefferson Street, Torrance, CA 90501, USA
Canada ICES-003
Operation is subject to the following two conditions:
1. This device may not cause interference, and;
2. This device must accept any interference, including interference that may cause
undesired operation of the device.
This Class B digital apparatus complies with Canadian ICES-003.
Cet appareil numérique de la classe B est conforme à la norme NMB-003 du
Canada.
This symbol on the product or in the instructions means that your
electrical and electronic equipment should be disposed at the end
of its life separately from your household waste. There are separate
collection systems for recycling in the EU.
For more information, please contact the local authority or your retailer where
you purchased the product.
FCC Compliance and Advisory Statement
Warning: Changes or modifications to this unit not expressly approved by the party
responsible for compliance could void the user's authority to operate the equipment.
This device complies with Part 15 of the FCC Rules. Operation is subject to the
following two conditions:
1. This device may not cause harmful interference, and;
2. This device must accept any interference received, including interference that
may cause undesired operation.
NOTE: This equipment has been tested and found to comply with the limits for a
Class B digital device, pursuant to Part 15 of the FCC Rules. These limits are
designed to provide reasonable protection against harmful interference in a
residential installation. This equipment generates, uses and can radiate radio
frequency energy and, if not installed and used in accordance with the instructions,
may cause harmful interference to radio communications. However, there is no
guarantee that interference will not occur in a particular installation. If this equipment
does cause harmful interference to radio or television reception, which can be
determined by turning the equipment off and on, the user is encouraged to try to
correct the interference by one or more of the following measures:
- Reorient or relocate the receiving antenna;
- Increase the separation between the equipment and receiver;
11
10

1. Schließen Sie bei eingeschaltetem Computer alle laufenden Programme und
legen Sie die Installations-CD in das CD-ROM-Laufwerk ein.
2. Falls die CD nicht automatisch startet, wählen Sie zunächst auf der Windows®
Taskleiste Start und danach Ausführen aus, geben Sie D:\Setup.exe ein und
klicken Sie auf OK. D:\ ist die Bezeichnung für Ihr CD-ROM-Laufwerk. Wenn Sie
Vista benutzen und zur "Benutzerkonten-Steuerung" gelangen, klicken Sie auf
"Continue" (Fortfahren).
3. Für XP-Benutzer: Wenn der Installationsassistent erscheint, klicken Sie auf "Next"
(Weiter), um fortzufahren. Für Vista Benutzer: Wenn die Aufforderung "Would you
like to install this device software?" (Wollen Sie diese Treibersoftware
installieren?) erscheint, klicken Sie auf "Installieren". Nachdem Sie den
Haftungsausschluss gelesen haben, wählen Sie die Option "I accept the terms of
the Disclaimer" (Ich akzeptiere die Bedingungen des Haftungsausschlusses) aus
und klicken Sie auf Next (Weiter), um fortzufahren.
4. Auf der folgenden Ansicht erscheint "Driver set-up ist installing Direct Output"
(Treibersetup installiert Direct Output)
5. Sobald die Treiberinstallation abgeschlossen ist, klicken Sie "Finish" (Beenden),
um den Installationsvorgang zu beenden.
6. Schließen Sie Ihr Flight Instrument Panel an.
7. Für XP-Benutzer: Der Neue Hardware-Assistent erscheint mit der Frage "Can
Windows connect to Windows Update to search for software?" (Darf Windows
eine Verbindung zu Windows Update zur Softwaresuche herstellen?). Wählen Sie
"Not at this time" (Jetzt nicht) und klicken Sie auf "Next" (Weiter). Für VistaBenutzer: Die Installation wird nun automatisch fertiggestellt.
SAITEK PRO FLIGHT INSTRUMENT PANEL
Wir beglückwünschen Sie zum Kauf des Saitek Pro Flight Instrument Panel. Das
Instrument Panel interagiert in Echtzeit mit Microsoft Flight Simulator X und zeigt
dabei eine Auswahl von Cockpitansichten. Somit bietet es bessere Kontrolle und ein
noch realistischeres Flugerlebnis.
Installation des Instrument Panel
Um das Instrument Panel als alleinstehendes Gerät zu verwenden, ziehen Sie
einfach den Ständer auf der Geräterückseite entsprechend der Abbildung aus.
Sie können das Panel auch auf der mitgelieferten Konsole befestigen. Stecken Sie
die Schrauben durch die Öffnungen an den Ecken des Panel und in die Halterung
dahinter. Ziehen Sie die Schrauben fest. Falls Sie bereits ein Saitek Pro Flight YokeSystem besitzen, können Sie das Panel und die Konsole auch mithilfe der
mitgelieferten Schrauben oben auf dem Yoke-System befestigen.
Software-Installation für Benutzer von Windows® XP, XP64 und Vista
Wichtig: Schließen Sie das USB-Kabel des Flight Instrument Panel nicht an den PC
an, bevor Sie die Treibersoftware installiert haben.
13
12
Saitek
Saitek

konfiguriert, mit der FS X Software zu interagieren. Beim Öffnen von Microsoft FSX
erscheint die Frage "Do you trust this driver from Saitek?" (Ist dieser Treiber von
Saitek vertrauenswürdig?). Klicken Sie auf "Yes" (Ja). Danach erfolgt die Frage "Do
you always want to load this plugin when launching Flight Sim X?" (Wollen Sie
immer dieses Plugin beim Start von Flight Sim X laden?). Klicken Sie erneut auf
"Yes" (Ja). Die Anzeige des Instrument Panel zeigt nun den Höhenmesser des
Flugzeugs. Falls Ihre FS X Software Ihr Instrument Panel nicht erkennt, hängen Sie
das USB-Kabel ab und schließen Sie es erneut an.
Sollte FS X nicht laden, liegt das daran, dass die Software auf eine Eingabe wartet.
Wählen Sie das Eingabe-Fenster aus, indem Sie entweder Alt + Tab drücken oder
die Eingabeaufforderung auf der Windows-Taskleiste anklicken. Die
Eingabeaufforderung lautet: "Microsoft Flight Simulator security warning : will happen
once after install" (Microsoft Flight Simulator Sicherheitshinweis: Erfolgt einmal nach
der Installation). Klicken Sie auf Ausführen. Wenn die Frage "Would you like to
designate this module?" (Wollen Sie dieses Modul zuweisen?) erscheint, klicken Sie
auf Yes (Ja), und der Ladevorgang von FS X wird fortgesetzt.
Das Pro Flight Instrument Panel wird nicht automatisch registriert, wenn Sie das Pro
Flight Instrument Panel vor der Installation von FS X installiert haben. Um das Pro
8. Auf der nächsten Ansicht sollten XP-Benutzer die empfohlene Option "Software
automatisch installieren" wählen. Klicken Sie auf "Next" (Weiter) und danach auf
"Finish" (Beenden), um die Installation fertig zu stellen.
9. Falls Sie dazu aufgefordert werden, starten Sie Ihren PC neu.
Hinweis 1: Für XP-Benutzer: Wenn Sie Ihr Flight Instrument Panel vor der
Installation der Treiber anschließen, erscheint der Neue Hardware-Assistent. Klicken
Sie "Cancel" (Abbrechen) und gehen Sie zu Schritt 1 des Installationsvorgangs oben.
Für Vista-Benutzer: Eine Ansicht erscheint mit "Windows needs to install driver
software for your unknown device" (Windows muss Treibersoftware für Ihr
unbekanntes Gerät installieren). Wählen Sie "Ask me again later" (Später erneut
fragen) und gehen Sie zu Schritt 1 des Installationsvorgangs.
Hinweis 2: Wenn Sie Ihre CD verloren oder beschädigt haben, können Sie Windows
Update verwenden, um Softwaretreiber wiederherzustellen oder zu laden.
Hinweis 3: Wenn Sie einen Saitek X52 Pro nach der Installation des Flight
Instrument Panel installieren, wird die Direct Output-Datei des Instrument Panel
überschrieben. In diesem Fall installieren Sie die Software des Instrument Panel neu.
Fehlerbehebung
Zuweisung von Instrument Panel Bedienelementen an Flight Simulator X
Funktionen
Nachdem Sie die Instrument Panel Software installiert und das USB-Kabel des
Instrument Panel an einen freien USB-Port Ihres PC (oder Saitek Pro Flight Yoke
USB-Hub) angeschlossen haben, erscheint eine Scrolling-Anzeige mit Saitek Pro
Flight Produkten.
Die Tasten und die Anzeige des Instrument Panel sind nun automatisch dafür
15
14
Instrument Panel Bedienelementen
Altimeter
Airspeed
Attitude Compass Turn and Slip
Vertical Speed

Instrument Panels an einen zweiten PC anschließen,
der dann Fluginformationen aus Microsoft FSX auf
Ihrem ersten PC anzeigt. Dadurch können Sie
Systemressourcen für FSX freisetzen.
Definitionen
Server = Der PC, auf dem FSX läuft und an den die
Haupt-Flightcontroller angeschlossen sind.
Client-PC = Der PC, der mit dem Server über das
LAN verbunden wird. Die Instrument Panels werden an diesen PC angeschlossen,
um den Rechenaufwand zu reduzieren, der durch mehrere an den PC
angeschlossene Bildschirme entsteht.
Auf dem Server-PC
1. Stellen Sie sicher, dass FSX und die FIP-Treiber installiert sind und laufen.
2. Original-DVD1: FSX Deluxe Ausgabe; Gehen Sie zum SDK-Ordner und starten
Sie Setup.exe.
3. Versteckte Dateien anzeigen.
In Windows Explorer (bei Vista drücken Sie die Alt-Taste) gehen Sie auf
Werkzeuge -> Ordneroptionen. Wählen Sie die Leiste Ansicht. In Erweiterte
Einstellungen -> Abschnitt Versteckte Dateien und Ordner wählen Sie Versteckte
Dateien und Ordner anzeigen.
4. Suchen Sie SimConnect.xml
In Vista: C:\Users (Benutzer)\Benutzerdaten\AppData\Roaming\Microsoft\FSX\
In XP: C:\Dokumente und Einstellungen\Anwendungsdaten\Microsoft\FSX\
Abschnitt in diesem Abschnitt hinzufügen <SimBase.Document...>
Flight Instrument Panel bei FS X zu registrieren, klicken Sie auf das Symbol "
Launch the Flightsim X plugin manually" (Flightsim X Plugin manuell starten), um das
Programm erneut auszuführen.
Sie können eine der sechs Ansichten oben zur Darstellung auf dem Flight Instrument
Panel auswählen. Wählen Sie durch Drücken der Cursortasten unten in der Mitte des
Geräts eine Ansicht aus.
Zusätzliche Tasten
Die sechs Tasten links auf dem Instrument Panel öffnen zusätzliche CockpitEinstellungen oder Ansichten in FSX. Jede Taste ist entsprechend der jeweiligen
Ansicht rechts davon gekennzeichnet. Die Tasten Map (Karte), Main Panel
(Hauptschalttafel), Radios (Funk) und GPS öffnen diese Ansichten oder
Cockpitkonsolen beim Fliegen mit den meisten Flugzeugen. Die Tasten Panel 4 und
5 öffnen verschiedene Ansichten oder Steuertafeln, je nach dem geflogenen
Flugzeug. Drücken Sie die Taste einmal, um die Konsole oder Ansicht zu öffnen, und
erneut, um sie zu schließen (mit der Ausnahme von Map (Karte), wo Sie auf OK
klicken oder die Eingabetaste drücken müssen, um die Kartenansicht zu schließen).
Hinweis: Wenn FSX nicht läuft und eine der sechs Tasten gedrückt wird, schaltet die
Anzeige des Panels aus oder ein.
Sie können mehrere Instrument Panels an Ihren PC anschließen, um verschiedene
Cockpitanzeigen gleichzeitig anzuzeigen. Jedes Panel benötigt Systemressourcen sehen Sie in Erweiterte Optionen unten nach, um mehrere Panels mit maximaler
Systemleistung zu verwenden.
Erweiterte Optionen
Wenn Sie mehr als einen PC an ein LAN angeschlossen haben, können Sie mehrere
17
16
LAN
Server Client

befindet sich die Datei in der Grundeinstellung auf: C:\Program Files\Microsoft
Games\Microsoft Flight Simulator X SDK\SDK\Core Utilities
Kit\SimConnect\SDK\lib\
8. Erstellen Sie eine Datei in Meine Dokumente als Textdokument und benennen Sie
sie auf SimConnect.cfg um.
Sie beinhaltet:
[SimConnect]
Protocol=IPv4
Address=SERVER_MACHINE_IP_ADDRESS
Port=SERVER_MACHINE_PORT_NUMBER
MaxReceiveSize=4096
DisableNagle=0
Hinweis: Tragen Sie die Server IP-Adresse und Portnummer ein, die Sie in Schritt 4
ausgewählt haben.
• Zum Starten des Instrument Panel starten Sie FSX auf dem Server. Unter
Umständen müssen Sie FSX Server-Rechte in Ihren Firewall-Einstellungen
genehmigen. Wenn Sie Probleme mit der Verbindung zu diesem Rechner haben,
deaktivieren Sie die Firewall kurzfristig, um festzustellen, ob eine Verbindung
hergestellt werden kann.
• Starten Sie SaiFlightSimX.exe auf dem Client-PC.
Zu finden unter: C:\Programme\Saitek\DirectOutput\
Hinweis: Wenn nichts passiert, öffnen Sie den Task-Manager und überprüfen Sie, ob
sich SaiFlightsimX.exe in der Aufstellung der laufenden Prozesse befindet. Wenn
<SimConnect.Comm>
<Disabled>False</Disabled>
<Protocol>IPv4</Protocol>
<Scope>global</Scope>
<Address>SERVER_MACHINE_IP_ADDRESS</Address>
<MaxClients>64</MaxClients>
<Port>SERVER_MACHINE_PORT_NUMBER</Port>
<MaxRecvSize>4096</MaxRecvSize>
<DisableNagle>False</DisableNagle>
</SimConnect.Comm>
Hinweis: Suchen und fügen Sie die Server IP-Adresse in das Feld oben aus
Systemsteuerung->Netzwerkverbindungen->Local Area Connection (örtliche
Verbindung) ein.
Hinweis: Geben Sie eine Portnummer größer als 1024 (nicht 8080) ein. Wir
empfehlen 2001.
Hinweis: Sie sollten sich die Server IP-Adresse und Portnummer bei der
Konfiguration des Client-PC merken.
Auf dem Client-PC
5. Stellen Sie sicher, dass die Flight Instrument Panel-Treiber installiert sind und
korrekt funktionieren.
6. Laden Sie Microsoft Visual C++ 2005 Redistributable Package (x86) herunter und
installieren es. NICHT die SP1-Version!
7. Kopieren Sie SimConnect.msi vom Server und installieren es. Auf dem Server
19
18
 Loading...