

Page 1
User manual
FACSIMILE
SAGEM PHONEFAX
320 / 325
This product is not designed for making emergency telephone calls when the power
fails. Alternative arrangements should be made for access to emergency service.
Page 2
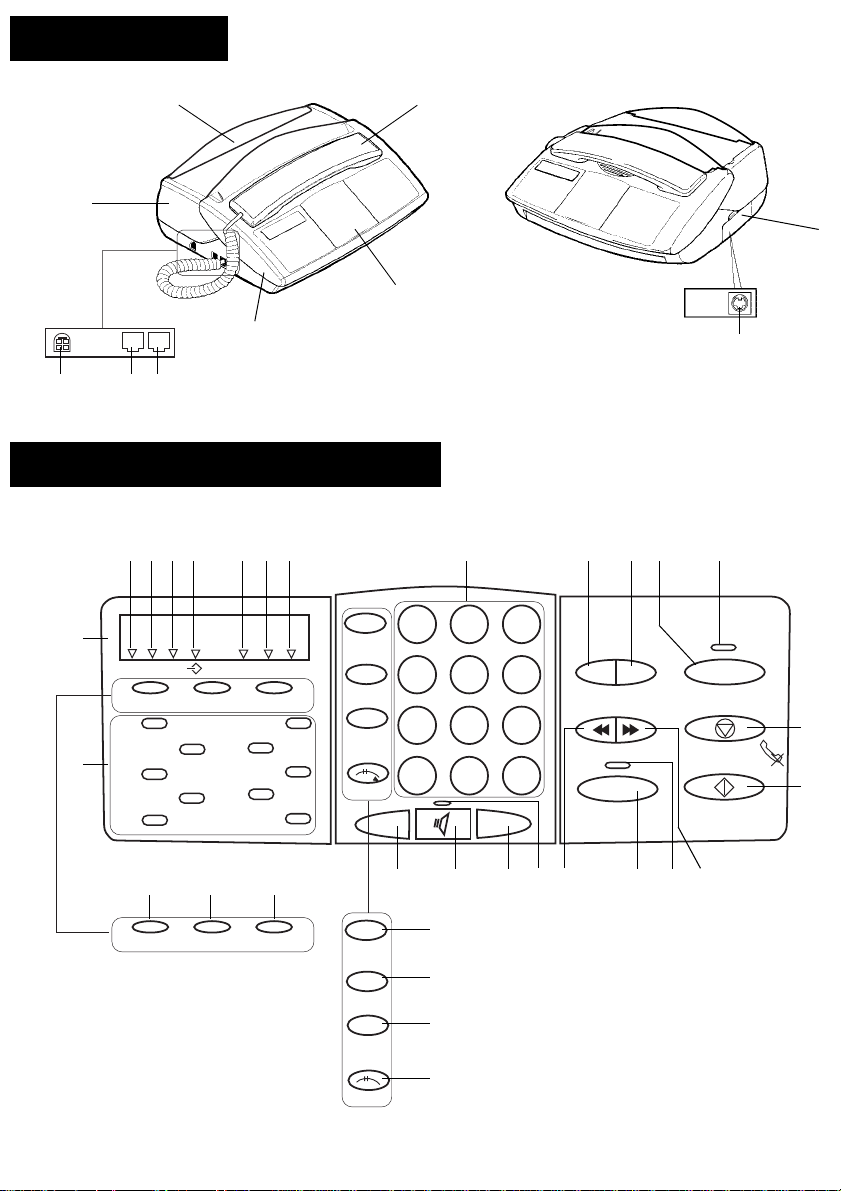
GENERAL VIEW
1
10
5
6
789
320 / 325 MODEL CONTROL PANEL
13 14 15 16 17 18
11
Fine Photo Tel. Fax TAD
<
1 abc
41
def 2
3 ghi
jkl 4
5 mno
<
FunctionMode Auto Answ.
>
pqr 6
7 stu
vw 8
9 xyz
+ - 0
123
Redial
45
Recall
7
Speed
Dial
Hold
*
-
C
2
3
4
2221201912
23
8
0
6
Erase- OGM
9
#
+
Play
Fax
24
Stop
25
Start
<
FunctionMode Auto Answ.
383940
<
>
Redial
Recall
Speed
Dial
Hold
34
35
36
37
27 26282930313233
Page 3
NOTE
This manual covers the following models:
- 320 : internal telephone answering device model.
- 325 : internal telephone answering device model, delivered with a cordless telephone.
1 Fax access panel.
2 Handset.
3 Cordless telephone socket ac cess flap.
4 Cordless telephone socket.
5 Console.
6 Front cover.
7 Telephone handset socke t.
8 Telephone line sock et.
9 Mains socket.
10 Rear cover.
11 LCD display panel (cha ra cters and icons).
12 Fine icon: FINE resolution mode (high quality).
13 Photo icon: PHOTO resolution mode
(photographs).
14 Error icon: appears in the event of an incident
(e.g. open cover).
15 On-line icon: on during tra nsmission; flashes
while connec ti ng.
16 Tel icon: on when the telephone is in use; flashes
when ring is off.
17 Fax icon: on when receiving a document; flashes
when the fax’s memory is full.
18 TAD icon: on when internal telephone answering
device (TAD) is operating; flashes when there are
no messages or when the TAD is full.
19 Dial keypad.
20 Erase key: to erase messages on the TAD.
21 OGM key: to listen to or record messages on the
TAD.
22 Fax key: to print out faxes stored in mem ory.
23 Fax indicator: presence of fax messages stored in
memory, but not printed out.
24 (Stop) key: to stop the current
operation or as a mute for the telepho ne.
25 (Start) key: to send a fax or activate
photocopying.
26 key: used to fast forward through TAD
message playback.
27 Play indicator: there are messages on the TAD.
28 Play key: to play back messages on the TAD.
29 key: used to skip ba ck t hrough TAD
message play back.
30 Loudspeaker indicator: hands-free telephony or
speaker mode.
31 key: loudspeaker volum e up.
+
32 (Loudspeaker) key: hands-fr ee
telephony or speaker mod e.
33 key: loudspeaker volum e down.
34 Redial key: to automatically call the last numbers
dialled.
35 Recall key: to insert a pause in the number being
dialled or as a “F LA SH” key (PABX).
36 Speed Dial key: to call or store an abbreviated
number in the unit’s memory.
37 Hold key: to transfe r a telephone call to
another handset on the same l ine.
38 Auto answ. key: to select the answer
39 Function key: to access the unit’s various
40 Mode key: to select the scan resolution, to
41 Direct dial / alphanumeric keypa d.
<
mode, to access t he next option of the men u
displayed, or to shift the cursor right.
<
functions and as a confirmation key.
<
access the previous option of the menu displayed
or to shift the cursor left.
Page 4

TABLE OF CONTENTS
CHAPTER 1: INSTALLATION.................................................................................................1
1. Unpacking the unit......................... .................. ................................... .........................1
2. Output paper ................................................................................................................1
3. connections ...............................................................................................................1
4. Use..................................................................................................................................2
CHAPTER 2: TELEPHONE FUNCTIONS..............................................................................5
1. Directory ................. ................................... ................................... ...............................5
2. Loudspeaker key ................................................... ................................... ...................6
3. Other functions.............................................................................................................6
CHAPTER 3: FACSIMILE.........................................................................................................7
1. Inserting a document .................. .................................... ................................... ..........7
2. Transmitting documents..............................................................................................7
3. Receiving faxes .............................................................................................................9
4. Making a telephone call during a fax transmission................................................10
5. Queue function ....................... ................. ................................... ................................10
6. Fax-back and polling..................................................................................................11
CHAPTER 4: TELEPHONE ANSWERING DEVICE..........................................................12
1. Activating / de-activating the TAD...........................................................................12
2. Announcements ..........................................................................................................12
3. Messages OGM ...........................................................................................................13
4. Call screening .............................................................................................................13
5. Recording a memo....................... .................................... ................................... ........14
6. Remote retrieval......................................................................................................... 14
7. Privileged access.........................................................................................................15
CHAPTER 5: RECEIVE MODES ...........................................................................................16
1. Telephone mode..........................................................................................................16
2. Fax/phone mode .......................... .................................... ................................... ........16
3. TAD mode
(*)........................................................................................................................................... 16
CHAPTER 6: OTHERS FUNCTIONS....................................................................................17
1. Photocopying ..............................................................................................................17
2. Printing out.......................... ................. ................................... ...................................17
3. Remote operation from another handset on the same line .....................................18
4. Audible alarm............................................. ................................................................18
5. Ink gauge......................................... ................................... .................................... .....18
6. Operation in conjunction with a cordless telephone...............................................18
7. Distinctive ringing (for Australia only).................................................................... 19
8. Using a portable phone (depending on model)..................... ...................................19
Page 5

CHAPTER 7: APPENDICES....................................................................................................20
1. Consumables replacement.........................................................................................20
2. Settings ........................................................................................................................22
3. Transmission report codes .................. .................. ................................... .................22
4. Troubleshooting................... ................................... ................................... .................23
5. Notice for connection to the telecommunication system.........................................24
This equipment ha s been approved in accorda nce with Council Decisio n 98/482/EC for pan-Eur opean single
terminal connecti on to the public switched tele phone network (PSTN).
In the event of problem s, yo u sh ould contact your equipm ent supplier.
Page 6

NOTE POUR
L’IMPRIMEUR :
VO IR BAT
Page 7

Page 8
CHAPTER 1: INSTALLATION
1. UNPACKING THE UNIT
Check the presen ce of the following items :
Machine
Mains supply unit
Telephone handset
2. OUTPUT PAPER
You may use any stand ard plain p aper ( A4 format photo copying p aper, approx. 80 g/ m2). However, for
!
optimal print quality results, we suggest you use the type of paper recommended by the manufacturer.
Introduce the paper one sheet by one sheet.
Telephone cable
Paper
User manual
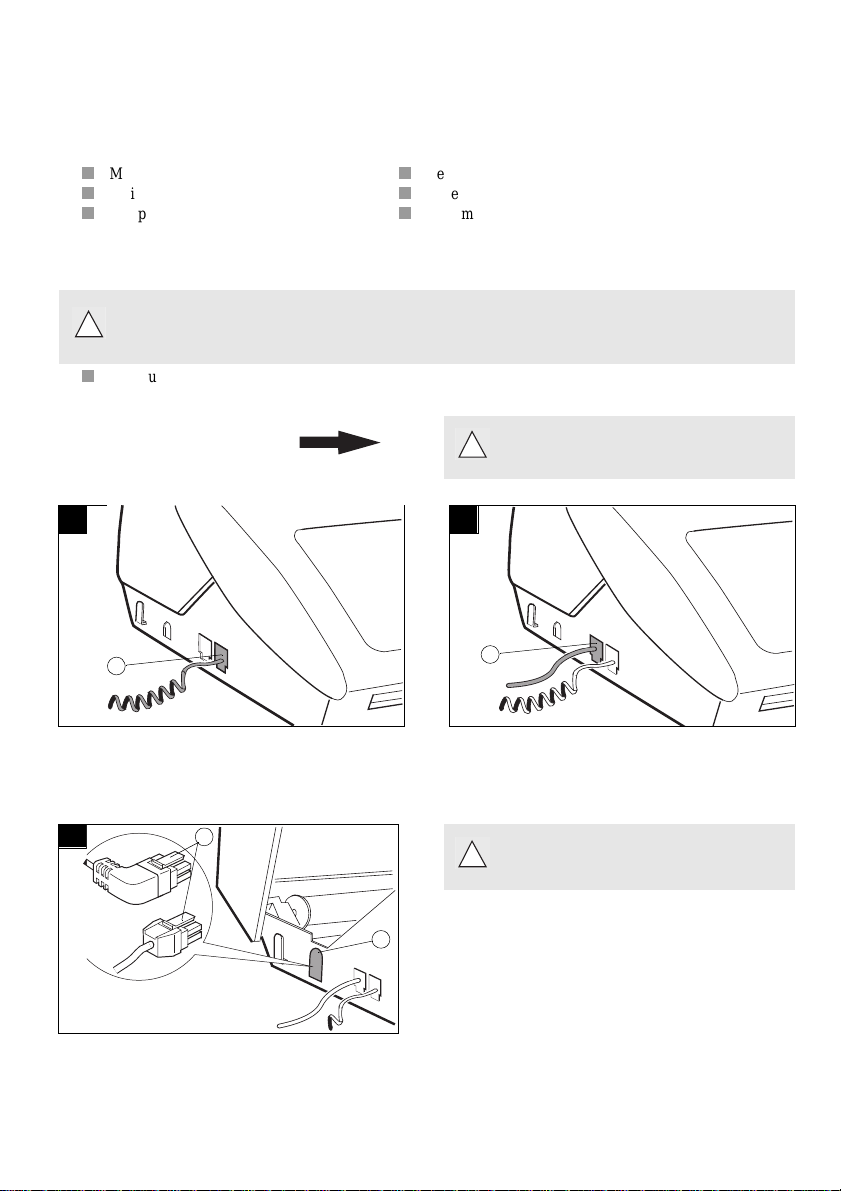
3. CONNECTIONS
1 2
1
Connect the telephone handset cord to t he appropriate
connector (1) on the m ain unit.
3
or
3
4
Refer to the safety warni ngs at the begin-
!
ning of this use r manual.
2
Connect the plug of the telephone cable into the
appropriate connec tor (2) on the main unit, an d con-
nect the other end to your wall telephone sock et
Check if the wal l so cket to w hich you ’ll con-
!
nect your machine complies with directives
on the label under the ma ins supply unit.
Connect the plug of the mains supp ly unit into connec tor (4) on the main uni t. Ensure the strip (3) i s facing
upwards.
Connect the ma ins cab le plug of the ma ins sup pl y u nit
to the wall socket.
.
1
Page 9
4. USE
<
When the unit is powered up for the first time, you will be prompted to set the date and time. Having entered the
date and time, you may use all your unit’ s basi c functions. You may program your "first setups" before sending
a fax.
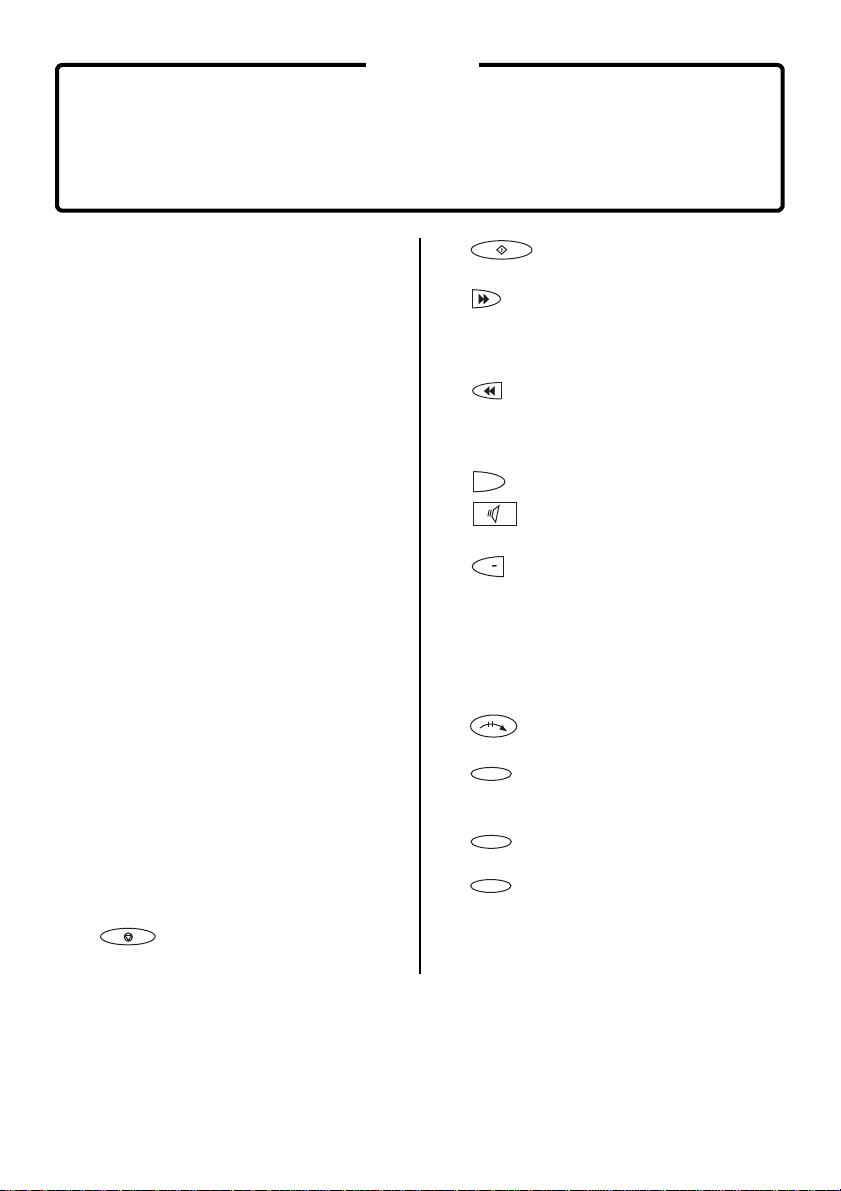
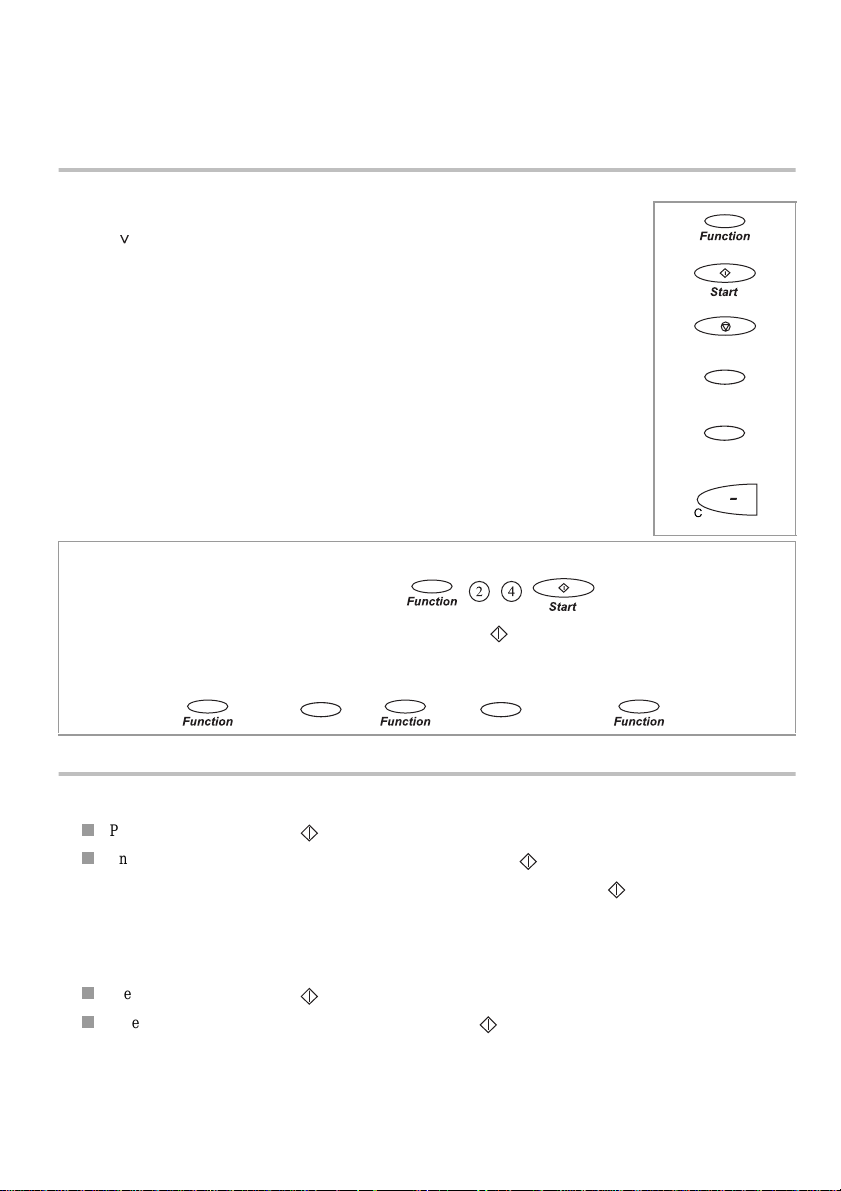
FUNCTIONS ACCESS
The following key s are used to program your unit:
- FUNCTION
key
ou
- START key:
enables you to enter FUNCTION mode or to confirm an entry
or option.
used to confirm an entry or op ti on
.
<
- STOP key: enables you to exit the FUNCTION mode. Any changes which
- > key:
- < key:
- C key: enables you to exit a func tion or go back up one level in the
There are 2 ways to access functions:
• by invoking the ap propriate function directly, e.g.:
(print out the listing of functio n codes press FUNCTION, 5, 1, )
• by scrolling through the unit’s menus using the V, > and <.. keys, e.g.:
were not confirmed will be di scarded.
enables you to move t o the next option or to shift the cursor
right in an input field.
enables you to return to the previous option or to shift the
cursor left in an input field.
menu structure.
<
<
<
<
(3 times)
FIRST SETUPS
ENTERING OR CHANGING THE DATE AND TIME
Press FUNCTION, 2, 1 and .
Enter the date and time using the numerical keypad, then press to confirm.
For example, to enter 7 May 1999, 9:15, enter 0 7 0 5 9 9 0 9 1 5 then press .
Stop
<
<
<
STORING YOUR CSID
This is the numbe r of the telephone li ne to which your unit i s connected. This nu mber will be pri nted on the
header of the faxes you send.
Press FUNCTION, 2, 2 and
Enter your CSID using the numerical keypad, then press to confirm .
Notes: to erase the last character entered, pres s the < key.
You can insert spaces to make the number more legible, using the > key.
T o insert a “+” sign, press the “*” key.
2
Page 10

ENTERING YOUR NAME
This name will be printed on the header of the faxes you send.
You can enter an y le tter in the alphab et using the alphanumeric keys “abc”, etc.
Press several times on th e appropriate alphan umeric key to obta in the letter you requ ire (e.g. for the def key,
pressing the key repeatedly will scro ll through characte rs D, E, F, 2, D, E, etc.). As soon as the appropriate
character is displayed, you may proceed to select the next character by pressing another alphanumeric key or by
pressing >.
Press FUNCTION, 2, 3 and .
Enter your name using the alphanumeric keys, then press t o confirm.
Notes: to erase the last character entered, pres s the < key .
Y ou can insert spaces by pressing the > key.
To insert a “+” or “-“ sign, press the “0” key.
TYPE OF NETWORK
Customise your unit to t he particular type of netwo rk it is li nked up to
- If you are linked directly to the public network (e.g. in a private home), you need not make any modifications
since the unit is set to “public network” by default on leaving the factory.
- If you are not link ed up to the public ne twork (e.g. i n a large c ompany), you should set the unit t o “private
network”.
Proceed as follows:
Press FUNCTION, 2, 4 and .
Scroll through the options by pressing the > key, then press to confirm.
PULSE / TONE DIALLING
Your unit has been factory-programmed to opera te on digital exchange s that support tone dialling.
If you are unable to connect and m ake a call, this may be be cause you are connected to an exch ange that on ly
supports pulse dialling.
Press FUNCTION, 2, 5 and .
The current dialling mode is displayed: TONE or P UL S E
Press the > key to select the other mode , then press to conf irm.
SETTING THE NUMBER OF RINGS BEFORE AUTOMATIC ANSWER
Press FUNCTION, 2, 6 and .
Enter the new num ber of rings required , then press to confirm.
SELECTING THE RINGING TONE
Press FUNCTION, 2, 7 and . You will hear the current ringing tone. Use the > key to select another tone.
To set the volume of th e ri nging tone, press the + and - keys (4 possible levels).
When you have set the appropriate ringing tone and volume, then press to confirm.
Note: select WITHOUT RING to eliminate the ringing tone outright; the TEL icon will flash instead.
REMOTE INQUIRY CODE
This function allows you to defin e the code necessary for locally or remotel y accessing the vocal messages
recorded or the faxes received by your machine and stored in memory.
To enter an inquiry code , pre ss keys FUNCTION, 2, 8 and .
Enter your code, then press to confirm.
3
Page 11

PREFIX
If your unit is conn ected t o a private auto matic bra nch exc hange (PAB X), you ar e advise d to reco rd the pre fix
number (generally 0) into your unit.
Press the FUNCTION, 8, 4 and .
Select the WITH opt ion using the > or < keys and press the key to validate.
Enter the number used b y you r PABX to acc ess the t elephon e net work (for insta nce 0) followed by a / and
press the key.
Enter if necessary th e phone number length from which the prefix m ust be automatic ally added (in most
cases the value is 10).
Press the key to validate.
Note: Check that the telephone numbers in the directory are not programmed with the prefix.
4
Page 12

CHAPTER 2: TE LEPHONE FUNCTIONS
(*)
1. DIRECTORY
STORING A TELEPHONE NUMBER IN THE DIRECTORY
You may store up to 50 numbe rs (either phone or fax) which can then be speed diall ed simply by enteri ng their
2-digit reference cod e (00 to 49).
Press FUNCTION, then SPEED DIAL
Enter the 2-digit number of the desired memory location, then press to confirm.
Enter your contact’s name or a handle using the alphanumeric keypad. To enter “LONDON” for instance,
perform the followin g sequence:
jkl 4
3 times L3 times
>
2 times N1 time D3 times
O
Press to confirm your entry.
Now enter your contact’s number using the keypad, and press to confirm.
Note: if you want to insert a dia lling pa use (e.g. to exit a private corpo rate PABX), press the RECALL key on
the alphanumeric keypad.
A “/”character will be inserted in the number displayed.
def 2
mnomno mno
>
O
mno
2 times
N
MODIFYING/DELETING A STORED NUMBER
To modify or delete an entry in your directory, follow the same procedure as for entering a new entry:
Press FUNCTION, then SPEED DIAL.
Enter the 2-digit number of the desired memory location, then press to confirm.
Erase your contact’s name using the < key.
Press to confirm.
Erase your contact’s number using the < key.
Press to confirm.
CALLING A NUMBER STORED IN THE DIRECTORY
There are several wa ys to c al l a number stored in the directory:
Press SPEED DIAL, SPEED DIAL , 2, 0 (to call the num ber stored in memory lo cation 20) and lift the
handset to speak.
or
Press one of the one-touch dialling keys numbered 1 to 0. (The 0 key corresponds to SPEED DIAL 00, the
1 key to SPEED DIAL 01… the 9 key to SPEED DIAL 09) and lift the handset to spe ak.
or
Press SPEED DIAL, SPEED DIAL then > or < in order to scroll through the numbers in numerical order;
lift your handset when the nu m ber you wish to dial is displaye d on sc reen.
or
Press SPEED DIAL and then > o r < to scroll through th e contacts in alphabetical order and lift you r
handset when the name of t he contact you wish to call is displa yed on screen.
(*)
Your unit’s telephony function is only operative when it is powered up.
5
Page 13

2. LOUDSPEAKER KEY
CALLING WITHOUT LIFTING THE RECEIVER
Dial your contact’s number and press the key,
or
Press the key and dial your contact’s number (you may use one of the ten one-touch dialling keys).
When the perso n at the other end of the line answers the phone , p ic k up the receiver.
SPEAKERPHONE MODE
Press the key (the indicator comes on).
Press the + and - keys (locate d on either side of the key) as required in order to set the sound level.
Note: To de-activate speakerphone mode, press the key again (the indicator will go off).
3. OTHER FUNCTIONS
LAST NUMBER REDIAL
Press REDIAL, then < or > to access the last ten numbers dialled.
When the number re qu ired is displa yed on screen:
• pick up the handset
or
• press the key, and the unit w i ll dial the number aut o m atically
or
• press to send by facsimile the page located inside the document loader.
MUTE
During a telephone conversation, if you want the person at the other end of the li ne not to hear you:
Press the key.
Press the key again to resume the conversation.
CALLING DURATION
A counter showing the duration of the current call com es on ten seconds after the last digi t has been dialled.
TRANSFERRING CALLS TO ANOTHER HANDSET ON THE SAME LINE
This function is useful whe n you want to continue a conversation from anot her telephone terminal connected to
the same line.
Notify the person at the othe r end of the line.
Press the key.
Hang up (instead of dropping the line, your unit will stay on the line).
Lift the receiv er on the other termina l a nd continue your conversa tion.
Note: pressing will have no effect unless you hang up within 4 seconds.
You then have around 25 se conds to lift the receiver located in the ot her room.
6
Page 14

CHAPTER 3: FACSIMILE
DO NOT INSERT IN THE UNIT DOCUMENTS WITH:
• paper clips, staples, or other si milar objects,
• pins or glued-on inserts,
• sellotape,
• liquid correction fluid,
•wet ink.
Do not insert documents that are glued together.
USE DOCUMENTS OF THE FOLLOWING SPEC IFICATIONS ONLY:
• A4 format (21 x 29.7 cm),
• average thickness (such as photocopying paper),
• non-transparent,
• non-torn, crumpled or curled.
1. INSERTING A DOCUMENT
1 2
The printer loa der (1) and documen t loader (2) can
take only one sheet at a time.
1
2
Insert the document printed face down in the
document loader (one page at a time).
The unit displays: DOCUMENT READY
2. TRANSMITTING DOCUMENTS
SETTING THE RESOLUTION OR SCAN MODE
Press the MODE key to toggle the resolution setting:
- Use normal mode for good quality documents which do not include minute detailing.
- Use fine mode (the FINE icon come s on) fo r documents which include small charac t ers or drawings.
- Use photographic mode (the PHOTO icon comes on) for documents which inclu de phot ogra phs.
IMMEDIATE TRANSMISSION
The document is saved before transmitting.
Insert the first page of th e doc ument in the documen t loader
Dial the called party's fax nu mber
Note: use the < key to delete the last character while dial li ng a number.
Press ; your unit will store the first page in memory.
7
Page 15

When the first page has bee n memorised the unit displays INSERT DOCUMENT, togeth er with audible
bleeps
You have several seconds to insert the next page of the document to be sent
The unit assumes there ar e no further pages to be saved:
• If you insert no further sheets during the bleeps
• If you press the key during the blee ps
The unit will then s ta r t d ocument transmi s s ion to the called party
TRANSMISSION WITH CALL MONITORING
Insert the first page of th e doc ument into the document feeder.
Press the key; you will then hear the dial tone.
Dial your contact’s number (you will hear the unit go through the motions).
Press as soon as you hear the fax tone fro m the rem ot e t erm inal.
Note: if the recipient lift s the receiver, tell them that you are trying to send a fax. H e will activate their fax and
put the recei ver down.
You have several seconds to insert the next page after the first page has bee n sent.
SCHEDULED TRANSMISSION
The schedule d transmission fac il it y enables you to spec ify the time when you wa nt the unit to send out a f ax.
Insert the document (one sheet by one sheet).
Press FUNCTION, 3, 1 and .
Enter your contact’s fax number.
Press FUNCTION.
Enter the time when the fax is to be sen t, e. g. 20:30.
You have two possibilities:
• press to send the document,
or
• scroll down the menu by pressing FUNCTION: enter the number of pages to be transmitted and press .
The pending docume nt is signalled by a flashing di spla y.
Note: to cancel a scheduled transmission or to send the docu ment right away, refer to the para "QUEUE
FUNCTION".
BROADCASTING
You may send a docume nt to multiple adressees. This op tion is available for both imm ediate and scheduled
transmission.
Insert the document (one sheet by one sheet).
Press FUNCTION, 3, 1 and .
Enter the recipient ’s num ber (either in full or using its speed dialling code if in the dire ctory).
Go on to the next recipient (CALLED PARTY2) by pressing >.
Enter the secon d recipient’s numb er.
Repeat the procedure until you have entered your last recipient (maximum = 6).
You have two possibilities:
• send the document by pressing ,
or
• access the next option by pressing FUNCTION: enter the number of pages to be transmitted and press
.
Note: use the < key to amend a recipient number, or return to a previous recipient num ber, if any.
8
Page 16

SENDING TO A RECIPIENT IN THE DIRECTORY
3 ghi
Insert the document (page by page) to be sent, and, for example:
Press SPEED DIAL, SPEED DIAL, 2, 0 and to call the recipient whose number i s stored under
memory location 20.
or
Press a one-touch dialling key (e.g. to call the recipie nt whose number is stored in mem ory
location 03).
or
Press SPEED DIAL, SPEED DIAL and use the < and > keys to scroll through the numbers stored i n
numerical order. When the desired recipient’s number is displayed on the unit, press .
or
Press SPEED DIAL again and use the < and > keys to scroll thr ough the numbers store d in alphabetical
order. When the desired recipient’s numb er i s displ ay ed on the unit, press .
TRANSMISSION REPORTS
CHOICE OF THE TRANSMISSION REPORT TYPE
Press FUNCTION, 3, 4 and .
Press > to choose another option:
WITHOUT: The documents you send will not generate a report.
WITH: A transmission report is printed upon proper comp letion or failure of the tran sm ission.
IF ERROR: A transm issi on report is printed out only upon fa il ure of the transmission.
Press to confirm your choice.
PRINTING OUT THE PREVIOUS TRANSMISSION REPORT
Insert a page inside the doc ument loader.
Press FUNCTION, 5, 5 and .
3. RECEIVING FAXES
The unit stores incoming faxes in its inbound memory.
PRESENCE OF FAXES IN MEMORY
The FAX indicator shows the presence of faxes in memory:
- when it is off, there are no faxe s in m em ory,
- when it is flashing, one or mor e fa xes are stored in memory.
PRINTING OUT RECEIVED FAXES
Install paper inside the document lo ader (one page by one page).
Press the FAX button to print the faxes.
The machine emit s a bee p a s king you to insert another pa ge into the printer loa der as appropriate.
INBOUND MEMORY FULL
When there are too many faxes in memory, the unit can no longer record any additional faxes. The FAX icon will
flash, and the unit will display t he following message: “MEMORY FULL”.
Print out the faxes stored in mem o ry to free some sp ac e.
9
Page 17

4. MAKING A TELEPHONE CALL DURING A FAX
TRANSMISSION
You may, should you so desire , i nterrupt a fax transmission to speak to the person at the other end of the line.
TO CALL THE PERSON ON THE OTHER END OF THE LINE
During document transmission, press the key, and your unit’s display will alternate between
TRANSMISSION or RECEPTION and PHONE.
As soon as the cu rrent page has gone through, your party’s han dset will ring to signal that you want to speak to
them. If they acknowledg e your request, your ha ndset will ring in tu rn; all you need to do now i s pick up the
receiver.
TO ACCEPT AN INCOMING CALL
Should your party wish to inte rrupt the fax transmission to spe ak to you over the line.
Your telephone will ring: pic k up t he rec ei ve r to spe ak .
5. QUEUE FUNCTION
This function enables you to manage pending operations (scheduled transmission, deposi t, polling).
IMMEDIATE EXECUTION OF A PENDING OPERATION
To immediately execute a pending operation:
Press FUNCTION, 6, 1 and .
Position yourself on th e re qui site pending operation using the > key.
Press to confirm.
MODIFYING AN OPERATION
To modify an pending opera ti on :
Press FUNCTION, 6, 2 and .
Position yourself on th e de sired pending operatio n using the > key.
Press to confirm.
Change the recipie nt ’ s num be r or the scheduled transmission time.
Press to confirm.
DELETING PENDING OPERATIONS
To delete a pending ope r at ion, proceed as follows:
Press FUNCTION, 6, 3 and .
You can scroll thr ough all currently pend ing operations by pressi ng the > key or entering the number of the
selected operation.
The different typ es of pe nding operations are :
- TX: Send.
- DOC: Deposit.
- POL: Polling.
Press to select the operation t o be deleted.
Press to confirm de letion.
10
Page 18

PRINTING OUT A PENDING DOCUMENT
In order to check the con te nts of a pending document, you can print it out:
Insert one sheet of paper in the printer loader.
Press FUNCTION, 6, 4 and .
Press the > key to scroll through the list of pe nding documents.
Press to print out the displayed document.
PRINTING OUT THE LIST OF PENDING OPERATIONS
This report lists the characteristics of each pending operation.
Press FUNCTION, 6, 5 and .
6. FAX-BACK AND POLLING
POLLING
To poll a document from a remote fax terminal:
Press FUNCTION, 3, 2 and .
Enter the fax number of t he rem ote te rmin al from whic h you wa nt to poll the do cume nt (you may u se the
directory).
For immediate polling , press .
or
If you want specify a scheduled polling time:
- press FUNCTION,
- enter the polling time,
- press to confirm. The scr een displays the time when the po lling operation is to be carr ied.
DEPOSITING A FAX-BACK DOCUMENT
To set up a documen t in your un it for poll ing by another f ax mach ine (the transmissi on of the do cum ent being
initiated remotely by the recipient),
Check that your unit is in au tomatic receive mode (the FAX ico n should be switched on).
Insert a document in to t he document feeder (one page by one page).
Press FUNCTION, 3, 3 and .
The unit then prompts you to ch oose between SINGLE POLLING and MULTI POLLING.
Note: if you selected multi polling, the docume nt will not be dele ted au to matic ally. It is up to th e u ser to erase
it manually by pressing FUNCTION, 6, 3.
11
Page 19

CHAPTER 4: TELEPHONE ANSWERING DEVICE
1. ACTIVATING / DE-ACTIVATING THE TAD
ACTIVATING THE TAD
The TAD icon must be on:
Press AUTO. ANSWER to put the TAD icon on.
Press to confirm.
DE-ACTIVATING THE TAD
The TAD icon must be off:
Press AUTO. ANSWER to put the TAD icon off.
Press to confirm.
SELECTING THE TAD MODE
The unit’s built-in TAD has two operating mod es:
Answer-record: callers can leave a message after listening to the welcome message (the unit is set by default to
answer-record, with a pre-recorded message).
Answer only: callers can li sten to you r annou ncement b ut canno t leave a v oice me ssage. T o change the TAD
mode, proceed as follows :
SELECTING THE ANSWER-RECORD MODE
Press FUNCTION, 4, 4 and .
Select OGM using the > key.
Press to confirm.
SELECTING THE ANSWER-ONLY MODE
Press FUNCTION, 4, 4 and .
Select SIMPLE OGM using the > key.
Press to confirm.
2. ANNOUNCEMENTS
ANSWER-RECORD ANNOUNCEMENT
You may record tw o diff erent anno unc ement s: one fo r t he an swer -recor d fu ncti on an d o ne for th e an sw er-onl y
function.
ANSWER-RECORD ANNOUNCEMENT RECORDING
Press FUNCTION, 4, 1 and , select OGM using the > key then press to confirm.
Lift the receiver to st art recording your an nouncement.
Hang up to end the recording.
ANSWER-RECORD ANNOUNCEMENT LISTENING
Press FUNCTION, 4, 2 and , select OGM then press .
ANSWER-ONLY ANNOUNCEMENT
ANSWER-ONLY ANNOUNCEMENT RECORDING
Press FUNCTION, 4, 1 and , select SIMPLE OGM using the > key and press to confirm.
Lift the receiver to st art recording your an nouncement.
12
Hang up to end the recording.
Page 20

ANSWER-ONLY ANNOUNCEMENT LISTENING
Press FUNCTION, 4, 2 and , select SIMPLE OGM then press .
Note: to listen to the announcement of the currentl y s elected TAD mode, you can als o press the OGM key.
To erase the announcement of the currently selected TAD mode, press ERASE then OGM.
3. MESSAGES OGM
PRESENCE OF MESSAGES
The status of the PLAY indicator tells you of the presence of messa ge s :
- "PLAY" indicator off: no messages.
- "PLAY" indicator flashing: at least one message not listened to.
- "PLAY" indicator lit: presence of messages. All the messages have been listened to.
Note: the number of messages is indicated on the screen.
LISTENING TO MESSAGES
Press the PLAY key.
The unit will display, while each message plays, its sequential number and the date and time when it was
received.
During message playback:
- Press the to go on to the next message,
- Press the to return to the beginni ng of t he current message.
- Press the twice to go back to the previous message.
- Press the PLAY key to pause playback; press PLAY again to resume playback
- Press the ERAS E key to erase the message being li s te n ed to,
- Press the + and - to increase or dec re ase the vo l um e during playback.
ERASING MESSAGES
ERASING ALL MESSAGES
After playback, press ERASE then PL A Y .
ERASING A MESSAGE
During playback, press ERASE. The system skips to the next message, if any.
4. CALL SCREENING
The call screening facility enables you to listen to a voice message while it is being recorde d:
- you may answer the call by picking up th e re ceiver,
- you may set the loudspeaker volume using the + and - keys .
To select call screening:
Press FUNCTION, 4, 5 and .
Select the desired mode (WITH or WITHOUT call screening).
Press to confirm.
13
Page 21

5. RECORDING A MEMO
A memo is a message you record locally on your TAD. It may be for relatives or colleagues. It may even be used
as a reminder.
Press FUNCTION followed by PLAY.
Pick up the rece iver and start speaking.
Hang up to stop recording the memo.
6. REMOTE RETRIEVAL
In order to retriev e messages on your TAD re motely, you must set up a four digit PIN cod e other than 0000
(refer to the para Remote inquiry code of the chapter INSTALL A TION).
To retrieve messages on your TAD remotely:
Dial your terminal’s number from a remote location.
Press the * key when you hear the recorded announce m ent , the n enter your 4-digit PIN code.
The unit automatically plays back all your voice messages.
You may pause playback by pressin g 5, and resume by pressing 5 again.
The keys of the telepho ne you a re using t o retri eve you r messag es remo tely provi de the same functi onali ty
as those on your base unit.
Y ou can only retrieve your messages remotely from a touch tone telephone.
!
You can carry out the following operations over a
remote telephone:
Whilst listening:
• pause or resume message listening by pressing ,
• go on to next message, by pressing ,
• start listening to message again, by pressing ,
• go back to previous message, by pressing twice.
After listening:
• delete received messages, by pressing and ,
• reco rd you r announcement, by pressing and
and stop the recording of your announcement, by
pressing any key,
• listen to your announcement, by pressing ,
• switch on your answering machine, by pressing ,
• switch off your answering machine, by pressing ,
• resume message listening, by pressing .
(See the detachable guid e at the end of thi s user’ s guide)
14
Page 22

7. PRIVILEGED ACCESS
PRIVILEGED ACCESS CALLS
If you do not want to be disturbed by anyone except privileged access callers (with a special access code), set the
unit to TAD re ceive mode and inp ut a privileged access code:
Press FUNCTION, 4, 6 and .
Input an access code other than 0000 and press to confirm.
Note: you must activate the privileged acc ess facility using FUNCTION 47 (setting: WITH).
INCOMING CALLS
To call you, your privilege d c al lers (knowing your privileged access code) will proceed as follows:
Dial your number.
Wait for your terminal to answer the call.
Press the * key, then enter the 4-digit privileged access code.
Notes: if you do not answer the call, the calle r wil l be prompt e d to l eave a message on your TAD.
The "remote message retrieval" and "privileged access" codes must be different. To de-activate the
privileged access facility, simply set the code to 0000.
15
Page 23

CHAPTER 5: RECEIVE MODES
Press AUTO ANSWER once or several times to select the requisite Receive mode and press to confirm.
1. TELEPHONE MODE
The TEL icon is on; the FAX and TAD icons are off .
Your terminal will beha ve like a telephone. Set the unit to this mode if you receive only the occasional fax.
Upon receivin g an incom ing call , the unit w ill ring, but will not answer the call autom ati cally
the receiver to answer the call:
- if the incoming cal l i s a vo i ce call, simply conv ers e with the caller;
- if the incoming call is a fax, you can press and hang up; the unit will automatically switch to fax receive
mode.
(*) If you do not pick up the r eceiver af ter 9 r ings, the unit dive rts the ca ll automatically to the TAD and plays the recorded announce ment; this
function enables you to remotely activate your TAD (switch to TAD mode) if you are away from the unit (see the section entitled Remote
Retrieval in the TELEPHONE ANSWERING DEVICE chapter).
2. FAX/PHONE MODE
The TEL and FAX icons are on; the TAD icon is off.
The unit w il l switch in coming c alls automat icall. Select to this mode if you expect substantial fax traffic and
do not wish to be inconvenie nce d by incoming faxes.
Upon receiving an incoming call, the unit answers the call silently
caller (e.g. “one moment, please”) prompting the call er to wait, then:
- if the call is a fax, the unit switches to fax receive mode;
- if the call is a voice call, t he un it wil l ri ng intermittently (warning ri ng) for 30 seconds to notify you
caller will hear an intermittent ring at the other en d of the line. If you fail to pick up, your c al le r is then given
the opportunity t o le ave you a voice message.
(*)
, plays a pre-recorded announcement to the
(*)
; you must lift
(**)
. The
(*) The unit will not play the ringing tone generated by the telephone network. However, if there are any other extensions on
the line, these will ring as normal.
(**) If there are any other extensions on the line, these will not ring.
3. TAD MODE
The TEL, FAX and TAD icons are all on.
Your unit will behave like a telephone and TAD attached to a fax machine. Yo u should set this mo de when you
have to leave your uni t una t te nded or if you are determined not to miss any calls, be they voic e or fax.
Upon receiving an in co ming call , th e u nit will answe r the ca ll a fter a few ri ngs, a nd pla y your TA D’s re corde d
announcemen t.
- if the call is a fax, your unit will switch to fax receive mode;
- if the call is a voice call, your caller can leave you a message.
(*) We recommend using this mode when several handsets are connected to the same line (the unit rings at the same time as
the other handsets).
(*)
16
Page 24

CHAPTER 6: OTHERS FUNCTIONS
1. PHOTOCOPYING
Your unit can be used for phot ocopying:
1 2
Insert the document to be photocopied in the
document loader as for a transm ission.
Press . Th e unit records your doc ument in its
memory. When recording has finished the unit
gives two beeps and OUT OF PAPER appears on
screen.
2. PRINTING OUT
Insert a sheet of paper in the print loader. The unit
will automatically print your document.
The photocopy is printed in "fine" mode (or an
"photo" mode if this mode ha s bee n selected).
FUNCTION GUIDE
This guide lists the functions supported by your unit, together with their nume rical access codes.
Insert paper into the feeder and press FUNCTION, 5, 1 and .
LOGS
You can print out a log showing details of the last 30 faxe s se nt and received.
Press FUNCTION, 5, 2 and .
DIRECTORY
Press FUNCTION, 5, 3 and .
SETTINGS
The list of settings reflects the unit’s operating mode at any point in time.
Press FUNCTION, 5, 4 and .
17
Page 25

3. REMOTE OPERATION FROM ANOTHER HANDSET ON THE
SAME LINE
Several functions can be remote-controlled from another touch-tone handset on the same line.
REMOTE STOP INSTRUCTION
If you lift the r eceiver to answer an incom ing call from another p hone terminal and you r terminal has also
answered the call (and is transmitting audible ‘wait’ beeps, a recorded announcement or welcome message), you
can neutralise your terminal by dialling on your telephone’s keypad.
REMOTE FAX RECEIVE INSTRUCTION
If you have lifted the receiver to answer an incoming call from another phone terminal, you can remotely instruct
your termina l to switch into fax receive m ode and pick up an incomi ng fax by dialling on your
telephone’s keypad.
4. AUDIBLE ALARM
The unit can sound an alarm at a pre-set time. You may use this facility as an alarm clock, a reminder, or not to
forget a meeting. To activate the alarm:
Press FUNCTION, 8, 1 and .
You can toggle the mode (ON/OFF) by using the > key.
Confirm by pressing the key.
If you selected ON you may now set the ti me .
Enter the time when the alarm is to be ac tivated and press to confirm.
The unit will display an hourglass symbol to the right of the time display in dic ating that the alarm has been
set.
Note: the hourglass will not be displayed if some fax messages hav e no t be en pri nted.
To stop the alarm ringing , pr ess the key. If you do not interrupt it, the ala rm w il l stop aft er 30 seconds,
and will de-activate automati cally.
5. INK GAUGE
The ink gauge ena bles the unit to display th e pe rcentage of remaini ng ink ribbon:
Press FUNCTION, 5, 6 and .
6. OPERATION IN CONJUNCTION WITH A CORDLESS
TELEPHONE
The unit can be used in conjunction with one or more cordless telephones.
To do so, you must use the cor dle ss te lephone kit provided with you r uni t, or available from your deal er.
The cordless telephone kit contains a user guide. For more details, refer to this guide.
Your unit will provid e yo u with access to the following functions:
REGISTERING A CORDLESS TELEPHONE INTO THE UNIT
Press FUNCTION, 8, 8 and .
Press OK, then 6 on the cordl es s te lephone.
18
Page 26

DE-REGISTERING A CORDLESS TELEPHONE HANDSET FROM THE UNIT
Press FUN CTION, 8, 9 and . T he unit will displ ay the reference s (1 digit) of all registered co rdless
handsets.
Input the reference of the cordless handset to be de-registered and press . Your unit will give out a series
of audible beeps.
SETTING A 4-DIGIT ACCESS CODE
Press FUNCTION, 8, 7 and ; you can then enter a 4-digit access code (see the section entitled
Customised procedure in the Matching t he Mobile w ith a Ba se chapter o f the cordle ss telephone use r’s
guide).
7. DISTINCTIVE RINGING (FOR AUSTRALIA ONLY)
If you subscribe to a distinctive ringing service from your telephone company, you will need to DUAL R ING
(FUNCTION 85) to turn on the Distinctive Ringing function. Whe n this is done, your fax machine will signal
voice calls by the nor mal ringi ng p attern, and fax tranm issio ns by a sp ecia l rin ging p atte rn. In th e ca se of a fax
tranmission, your fax machine will automatically answer the call after 2 rings and receive the fax.
Important: the Distinctive Ringing fun ct ion can only be used i f you subscribe to a distinctive rin ging service
from your telephone comp any. Do not set DUAL RING to WITH if you are on a normal line, as
the fax machine will not operate proper ly.
8. USING A PORTABLE PHONE (DEPENDING ON MODEL)
You can connect a portable phone (GSM) to your ma chine. This will allow you to send or receive faxes
through your portable phone.
To do so you have to purchase the Fax-Porta ble pho ne connec tion kit fr om your loc al retailer. The mobi le
kit includes an operating inst ruc ti ons handbook. Please refer to the handbook for further informa ti on.
19
Page 27

CHAPTER 7: APPENDICES
1. CONSUMABLES REPLACEMENT
The consumables, ink ribbon and ribbon gauge card are already installed in the machine. You may need to change
these consumables whe n they become worn. To do so, refe r to the instructions in the following paragraphs.
INK RIBBON
The ink ribbon enab l es th e unit to print on normal pape r.
Only use an ink ribbo n that matches the man ufacturer’s specifications. Th e use of other types of i nk
ribbons could result in damage to the main unit and invalidate the warranty. Documents printed by your
!
unit may be rea d from the u sed porti on of t he in k ribbon . If the se docum ent s are confi dent ial, you m ay
want to remove the ink ribbon wheneve r you leave the unit.
1 2
1
1
Open the front cover: let it swivel round to you until it
remains open.
3
2
20
Open the back cover: unlock the latches (1) before
swiveling the cover round to the back.
Remove the worn gauge from its housing.
Position the ink ribbon over its housing under the r ear
cover.
Insert the ink ribbon into its housing without removing
the adhesive strip (2):
• position t he right end of the m ain roller onto the
retractable axe.
• position the le ft end of the main roller ont o the left
axe.
Page 28

4 5
2
5
6
3
4
Pull of the adhesive strip (2) from the ink ribbon. Insert the smal l roller in its housing: che ck that the
gear axe (3) is correctly positioned in its housing (4),
and that the other a xe (5) is also corr ectly positio ned
(6) in its housing.
INK RIBBON GAUGE
The gauge enables screen display, after printo ut, of remaining ink ribbon.
6 7
Remove the gauge hou si ng flap (7):
• slip the flap bac k w a rd, then
• lift the front part of the flap to remove it from the
main unit.
Remove the worn gauge from its housing
8 9
7
8
9
Remove the (pre-cut) gauge (9) from the ribbon gauge
card (8).
7
1
9
10
11
1
11
Insert the gauge (9) into the slit (10) of the gauge
housing, ensuring that the chip faces you and the
bevelled corner is positioned top right. Replace the
flap (7).
If the gauge is not installed or not properly installed, the unit displa ys:
!
Close the rear cover: press down simultaneously on
both sides of the cover (11) unt il the two latches (1)
click into place .
MISSING GAUGE
21
Page 29

2. SETTINGS
To view the unit’s settings, press FUNCTION, 9 and .
The user can scroll throu gh t h e se tt ings by using the > and < navigation keys.
IMP LIST: List of settings printing.
TX HEADER: Transmit your name, fax number, the date and time to the recipi ent; the data will be
TX LOCK UP: Set a ceiling transmission speed for faxes se nt t o sel ec ted num bers in the directory
ANTI ECHO: This setting blocks the satellit e ech o i n the e ve nt of qu alit y p roblem s with lo ng-dist an ce
RX HEADER: Print out the name a nd fax numb er of the send er as wel l as the cu rrent date an d time on
RX LOCK UP: Maximum receive speed fo r incoming faxes.
REDUCE MODE: Condensed printing mode (incomi ng faxes, local photocopies) : au tom atic or manual.
REDUCE RATE: This parameter sets the condensed printi ng ra tio (in automatic co nde nsed mode).
NB OF PAGES: This parameter shows the number of pages printed out (incoming faxes and local copies)
PAUSE LENGTH: D uration of the line break indu ced by the “Pause” signal em itted by t he R key: long or
displayed in the header of the faxes they receive.
faxing.
the headers of incoming faxes.
since the unit was plugged i n.
short.
3. TRANSMISSION REPORT CODES
The log (send/rec eive) and t he transmi ssion repo rt detail t he outcom e of eac h transmissi on. In the e vent of an
incident, they will use one of the following codes:
Code 01 - No answer
Try again later.
Code 03 - STOP
Call interrupted by us er pressing STOP.
Code 04 - Invalid speed dial number
Check number.
Code 05 - Document feeder problem during the call
Paper jam or document feeder malfunction.
Code 07 - Bad line or remote terminal malfunction
Try again.
Code 08 - The document sent may not have been received in full
Send again and check with recipient.
Code 0A - Polling operation failed
No fax-back docume nt on remote terminal.
Code 0B - There is a difference between the number of pages logged for sending and the number of pages
actually sent out
Check the number of pag es.
Code 13 - Memory full
Fax could not be receiv ed.
22
Page 30

4. TROUBLESHOOTING
OUT OF PAPER
PRINTER COVER
PAPER JAM
OVERHEATING
GAUGE EMPTY
MISSING GAUGE
CHANGE RIBBON
PROBLEM SOLUTION
• Blank unit display. • Check that the power cord and the power adapter cord are properly
• The unit does not an swer incoming
calls after several rings.
• Blank photocopies
• The telephone excha nge does not recognise the number dialled.
• The terminal does not ring. • The TEL icon is flashing: re-activate the ringing tone (see the sec-
• The telephone does not work. • The mains may be down .
• One or more vertical black lines on
documents copied loca lly or sent.
• The unit displays the following messages:
.
connected.
• The FAX icon may be off: check the receive mode (Manual/automatic).
• Check the number of rings.
• Configure the unit for “private network” (see th e sections headed
Setting the number of rings before automatic answer and Type
of network in the INSTALLATION chapter).
• The document was p ositione d faci ng the wrong wa y rou nd in the
feeder.
• Check that the tel ephone cord is properly plu gged in.
• Configure your unit for pulse dialling (see the section headed Pul-
se/tone dialling in the INSTALLATION chapter).
tion headed Selecti n g the ringing tone in the INSTALLATION
.
chapter)
• Check that the tel ephone line cord is properly connected.
• Open the cover and cle an the sc anning su b-assem bly locat ed opposite the white roller usin g a soft but not fluffy cloth dipped in
surgical spirit. After cleaning, close the front cover and make a local copy to check tha t the black lines have disappeared.
• Insert more paper in the paper feeder.
• Close the rear cover.
• Open the rear cover to access the paper circuit. Check that the rear
cover is properly secure d after closing it.
• The last documents printed out are blackened; the printer’s temperature is too high. Wait a few minutes for it to cool down.
• You may have forgotten to replace the gauge smartcard when you
put in the ink ribbon.
• Open the gauge housing flap and check t hat the gauge smart card
is inserted and correctly positioned.
• No ink ribbon left: insta ll a new ribbon and gauge.
23
Page 31

PROBLEM SOLUTION
REMOVE DOCUMENT
MEMORY FULL
• Open the front cover and check the document circuit.
• Print out faxes received and/or listen to the voice messages on the
TAD.
• Other • Disconnec t you r unit from the mains and re connect it.
If the problem per sists, contact our main tenance depar tment.
5. NOTICE FOR CONNECTION TO THE TELECOMMUNICATION
SYSTEM
1. BABT Certificate Number/Approval Number for the
SAGEM PHONEFAX 320 N° 609099
SAGEM PHONEFAX 325 N° 609605
Approved for con nection to teleco mmunication s ystem specif ied in the instru ctions for use subjec t to the
conditions set out in them.
2. This apparatus has been approved for the use of the following facilities:
Facsimile
Simple telephone
Terminal and subsriber identifier
Transmission status report (send report only)
Manual mode ( RX and TX)
Auto-Answering
Auto calling
Delayed transmissio n- Time recorder and logs
Automatic redial (5 times, 5 minutes intervals)
Fax switch
Polling RX (To poll a document from on a distant fa x)
Polling TX (prepare a document to be poll)
Automatic document feeder
Halftone 16 shades of grey
Modem Fax up to 14400 bps
Facsimile transmission and reception
Call progressing mode
Full Numeric Handsfree
Answering Recording De vice
Fax Answering Device
Any other usage will inva lida te the a pprova l o f the a ppara tus if as a resu lt, it t hen c eases t o co nform to the
standards against which approval was granted .
3. T he conne ction to the tele comm unica tion system must be unp lugge d before the earth is di sconnect ed. The
connection to the telecommunication system must be hardwired.
4. This apparatus may be used on the telecommunica ti on e mploying loop disconne ct or MF dia lling.
5. T his ap pa ratus i s suit ab le for c onnec tion to d irect ex chan ge l ines on th e PSTN di rect ly or via a comp at ible
PABX (selection done by parameter setting).
24
Page 32

6. Ringing delay: the maximum number of ring before autom a tic answering is 5.
7. Ringer Equivalent Number (R EN) = 1
The REN is a custumer guide indicating appoximately the maximum number of items of apparatus that
should be connected simult aneously to the line.
The sum of the REN’s of the in di vidual items should be not exceed 4. The REN va lue of a BT telephone is
assumed to be 1 unless otherwise marked.
8. Th e voltage drop introd uced by the appar atus betwe en the PSTN and t he associa ted tele phone is 2. 0 Volts
dc therefore no a dditional serie s equipment ma y be connected. The introducti on of this voltage drop may
occasionally cause difficulties in making calls from the associated te lephone or problems in telephone
conversation being experienced by both part ies to the call.
While operation may be possible initia lly, change to or mo dernization of the network taking plac e in the
normal course of events may result in the apparatus being connected to be compatible. failure of the
apparatus to wok under these ci rcumstances may not be responsib il it y of t he ne t w ork operator.
In the unlikely e vent of suc h problem s occurin g, the use r should con tact the sup plier or m aintainer of the
apparatus.
Difficulty may be experienced when making calls from other apparatus. such di ffi culties may include:
- Difficulties in making call
- Problems in telepho ne conversation being expe rie n c ed by both parties to the call.
Note : The definition of RBS (Relev ant branch system) for PST N lines is given in BS6789 se ction 6.1
(1986) clause 2.4.
9. Naive caller
"Callers ar e accustomed to being an s w er ed normally within 10s and that the majority abandon calls that are
not answeed with i n 45s".
It is "normal" to set the num ber of rings beetween 1 to 5 rings before the answering mac hine responds.
The machine is already preset for a plug and play mode.
"If the intention is to delay answer so that normal voice callers would abandon the call before the non-voice
TE answered, then the delay sho uld at least 45 s".
It is helpful to include the statement of the answering telephone number with the exchange name or
international cod e and that th e announc ement must be sut able for the purpose f or which it is intented . The
announcemen t s hould also start wit h in 3s of answering.
Paytone may be received after answering calls from some types of payphones and may persist forr up to 13 s
and the answering ann ouncement should be co nstructed so as to ensure tha t an answering announ cement
containing the identity of the called line and, where appropriate, the invitation to record, will be heard by the
callers after payt one has ceased.
IMPORTANT ! Compatible switchboards
Your terminal is ap proved only for use with the compatible switchboard incl uding those which do not
provide secondary proceed indication. If you would like a list suitable switchboards, contact BT on 0800 800
152.
25
Page 33

If you do have a com patible swit chboard it cannot be guaran teed th at the ap paratus wi ll operat e correct ly
under all possible conditions of connection. If you have any difficulties, contact BT on 0800 800 152.
Calling the Emergency services
This equipment is n ot designed for making emergency te lephone call (999) when the power
!
fails. Alternative arrangements should be made for access to emergency services.
10. SAFETY WARNING
Interconnection circuits should be such that the equipment contibues to comply with the requirements of 4.2
of EN 41003 for T NV circui ts and 2. 3 of EN 60 950 for SELV ci rcuits, after m aking c onnecti ons be tween
circuits.
Interconnection directly, or by way of the other apparatus, of ports m arked "SAFETY WARNING". SEE
INSTRUCTION FOR USE, with ports marked or not so marked may produce hazardous conditions on the
network. Advice should be obtained from a compet ent engineer befor e s uch a connection is m ade.
To prevent fire or shock haza rd, do not exposethis product t o rai n or any type of moisture
!
How to connect the mains lead to a plug
Your apparatus comes complete with fitted plug. If however, it becomes necessary to fit an alternative main
plug, the following instructions must be adhered t o.
For apparatus connecte d by mains plug, the wal l socket must be inst alled near the appa ratus and must be
easely accessible.
Note : The wire s in the mais lead are colored in accorrdance with the fo ll owing code:
Green-and-yellow: earth connected
Blue: Neutral
Brown: Live
26
Read the instruc tion carefully before connecting the mains lead to a plug. If in doubt , consult a
qualified ele ct r ic ian.
As the colours of the wires in the mains le ad of the appara t u s may not correspond with th e coloured
markings identifying t he termi nals in your plug, proceed as follo ws:
- the wire which is coloured blue must be connected to the terminal which is marked with the letter
N or coloured black,
- the wire which is coloured brown must be connected to the terminal which is marked with the letter
L or coloured red,
- the wire which is coloure d gre en an d yello w must be conne cted t o the termi nal whic h is m arked
with the letter C or coloured green.
Page 34

DETACHABLE GUIDE
Guide to remote
operation of your unit’s
built-in TAD
Your TAD security code: *
• Go on to next message, by pressing .
• Start listening to message again, by pressing .
• Go bac k to previous message , by pressing
twice.
• Delete received messages, by pressing and
.
• Recor d your annou ncemen t, by pr essing and
and stop the recording of your announcement,
by pressing any key.
• Listen to your announcement, by pressing .
• Switch on your answering machine, by pressing
.
• Switch off your answering machine, by pressing
.
• Resume message listening, by pressing .
27
Page 35

LIASSE 23227796-2
28
Page 36

CONSUMABLES
INK RIBBONS
The TTR 815 ink r ibbon used in your fax machine pr ovides over 230 pa ges (*) without user intervention,
whatever the cont ents of the document s pr in t ed.
Use the followin g references to order new ribbons:
TTR 815 INK RIBBON, ref: 233279 83-7
PAPER
Print quality wil l va ry ac cording to the kind of paper use d.
For best results, use SAGEM’s "Séri e 300" pa pe r, avail ab le in reams of 500 sheets.
SAGEM "Série 300" paper, ref: 23273604-9
INK RIBBON + PAPER PACKAGE
To simplify your consuma bles requirements, a package comp rising a TTR 815 ink ribbon and 250 sheets of
SAGEM "Série 300" paper is available under the foll owing reference:
TTR package, ref: 23295329-4
* PLEASE NOTE: the free sample ink ribbon provided with your unit will allow you to print about 50 pages.
LU 23227794-1 IND A
*23227785-5*
DATA SUBJECT TO CHANGE WITHOUT NOTICE
6, avenue d'Iéna - 75783 PARIS CEDEX 16 - FRANCE
SPEC. DEPT 23310833-5
http://www.sagem.com
 Loading...