

Page 1

Owner’s manual
Bedienungsanleitung
RSP-985
Surround Sound Processor
Surround-Sound-Prozessor
Page 2

RSP-985
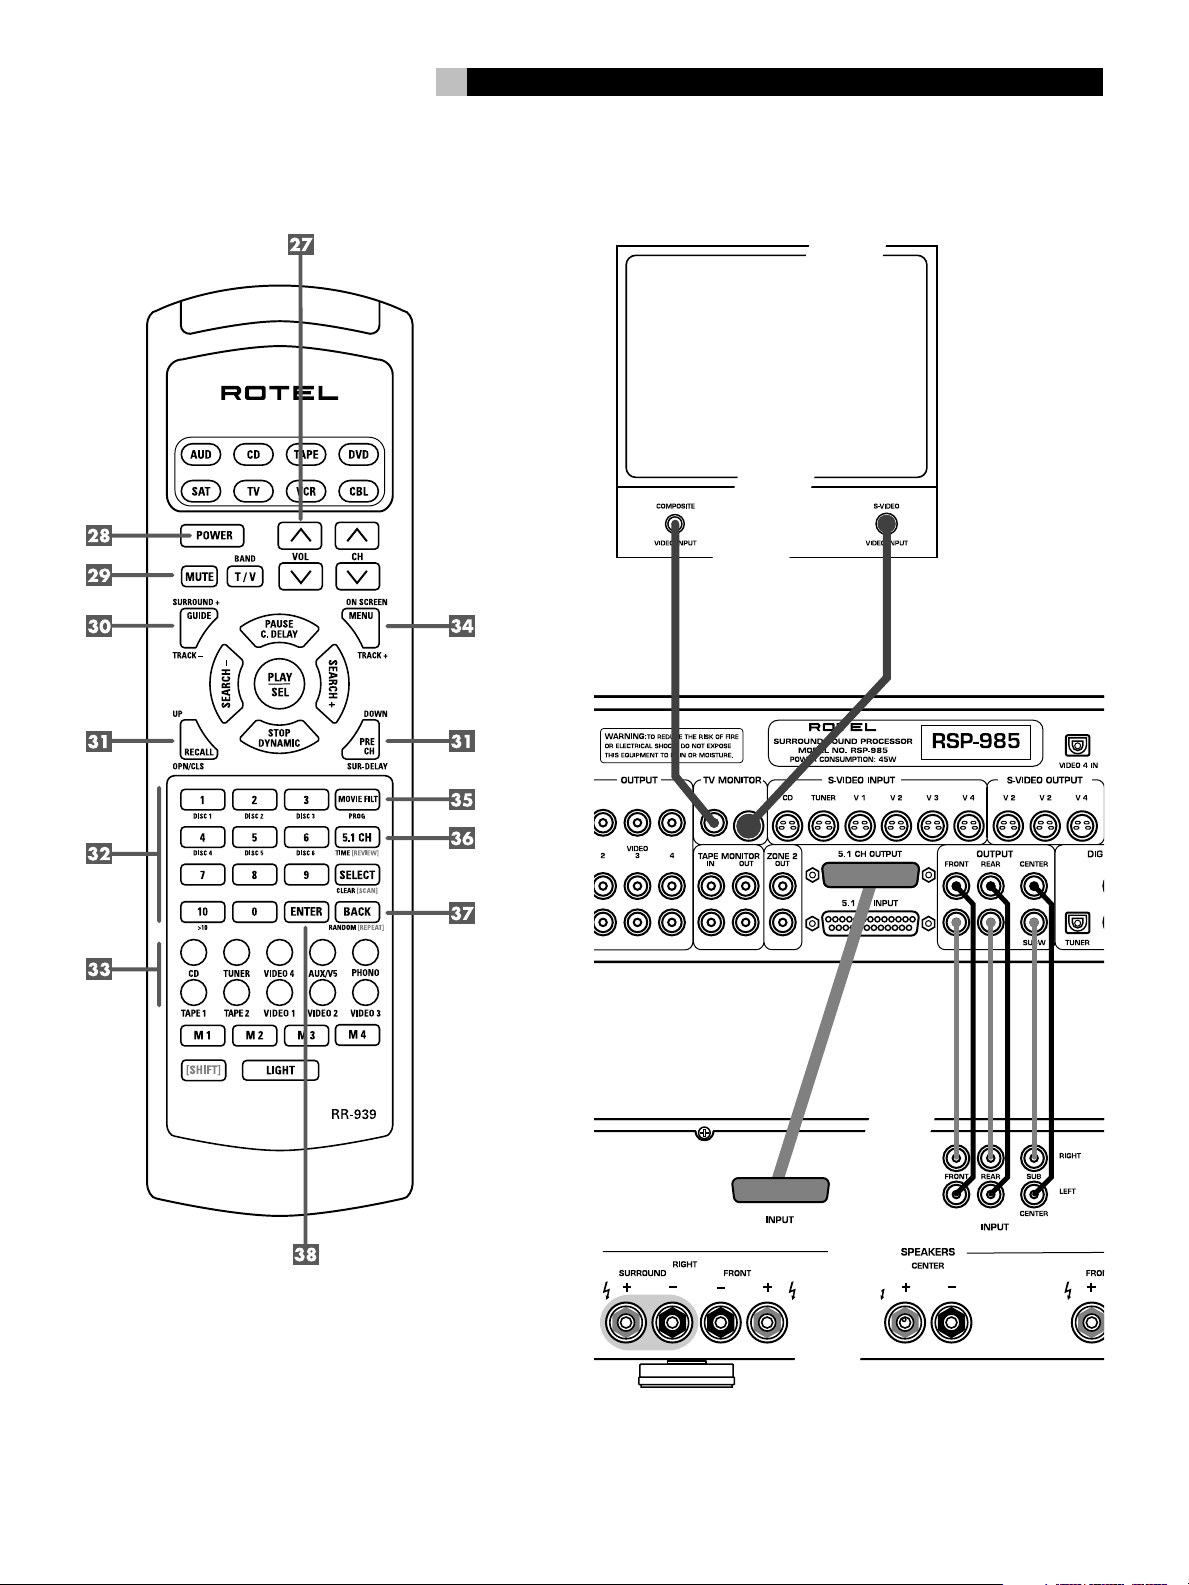
1: Controls and Connections
Bedienelemente und Anschlüsse
2
English
2: DB25 pin assignments
Pinbelegung der DB25-Anschlüsse
1 left front +
2 center +
3 right front +
4 subwoofer +
5 left surround +
6 right surround +
14 left front GND
15 center GND
16 right surround GND
17 subwoofer GND
18 left surround GND
19 right surround GND
1 Signal Front links
2 Signal Center
3 Signal Front rechts
4 Signal Subwoofer
5 Signal Surround links
6 Signal Surround rechts
14 GND Front links
15 GND Center
16 GND Front rechts
17 GND Subwoofer
18 GND Surround links
19 GND Surround rechts
Page 3
3
3: Remote control
Fernbedienung
4: Output connections
Ausgangsanschlüsse
Page 4

RSP-985
5: RCA Source Connections
Anschließen der Quellen über die Cinch-Eingänge
4
CD / DVD • DVD-PLAYER/CD-PLAYER
TUNER
TUNER
VCR • VIDEORECORDER
TAPE DECK • CASSETTENRECORDER
VCR
ROTEL RSP-985
ROTEL RSP-985
TAPE DECK
Page 5

6: S-Video Source Connections
S-Video-Anschlußmöglichkeiten
5
CD / DVD • DVD-PLAYER/CD-PLAYER
TUNER
VCR • VIDEORECORDER
ROTEL RSP-985
TAPE DECK • CASSETTENRECORDER
Page 6

RSP-985
7: Zone 2 Connections
Anschlußdiagramm für den Zone 2-Betrieb
6
CD / DVD • DVD-PLAYER/CD-PLAYER
TUNER
ZONE 2 AMPLIFIER • VERSTÄRKER FÜR ZONE 2
ROTEL RSP-985
ZONE 2 LOUDSPEAKERS • LAUTSPRECHER FÜR ZONE 2
INFRAROTEMPFÄNGER FÜR ZONE 2
ZONE 2 IR REPEATER
Page 7
8: On-Screen Menus
On-Screen-Menüsystem
7
Page 8

RSP-985
8
English 9
Deutsch 24
English
WARNING: There are no user serviceable parts inside.
Refer all servicing to qualified service personnel.
WARNING: To reduce the risk of fire or electric shock,
do not expose the unit to moisture or water. Do not
allow foreign objects to get into the enclosure. If the
unit is exposed to moisture, or a foreign object gets
into the enclosure, immediately disconnect the power
cord from the wall. Take the unit to a qualified service
person for inspection and necessary repairs.
Read all the instructions before connecting or operating the component. Keep this manual so you can refer to these safety instructions.
Heed all warnings and safety information in these instructions
and on the product itself. Follow all operating instructions.
Clean the enclosure only with a dry cloth or a vacuum cleaner.
You must allow 10 cm or 4 inches of unobstructed clearance around
the unit. Do not place the unit on a bed, sofa, rug, or similar surface
that could block the ventilation openings. If the unit is placed in
a bookcase or cabinet, there must be ventilation of the cabinet
to allow proper cooling.
Keep the component away from radiators, heat registers, stoves,
or any other appliance that produces heat.
The unit must be connected to a power supply only of the type
and voltage specified on the rear panel of the unit. (USA: 115 V/
60Hz, EC: 230V/50Hz)
Connect the component to the power outlet only with the supplied power supply cable or an exact equivalent. Do not modify
the supplied cable in any way. Do not attempt to defeat grounding and/or polarization provisions. The cable should be connected
to a 2-pin polarized wall outlet, matching the wide blade of the
plug to the wide slot of the receptacle. Do not use extension cords.
Do not route the power cord where it will be crushed, pinched,
bent at severe angles, exposed to heat, or damaged in any way.
Pay particular attention to the power cord at the plug and where
it exits the back of the unit.
The power cord should be unplugged from the wall outlet if the
unit is to be left unused for a long period of time.
Immediately stop using the component and have it inspected and/
or serviced by a qualified service agency if:
• The power supply cord or plug has been damaged.
• Objects have fallen or liquid has been spilled into the unit.
• The unit has been exposed to rain.
• The unit shows signs of improper operation
• The unit has been dropped or damaged in any way
Deutsch
Bitte lesen Sie sich die Bedienungsanleitung vor Gebrauch
des Gerätes genau durch. Sie enthält wichtige
Sicherheitsvorschriften, die unbedingt zu beachten sind!
Bewahren Sie die Bedienungsanleitung so auf, daß sie
jederzeit zugänglich ist.
Außer den in der Bedienungsanleitung beschriebenen
Handgriffen sollten vom Bediener keine Arbeiten am
Gerät vorgenommen werden. Das Gerät ist ausschließlich
von einem qualifizierten Fachmann zu öffnen und zu
reparieren.
Dieses Gerät darf nur in trockenen Räumen betrieben
werden. Um die Gefahr von Feuer oder eines elektrischen
Schlags auszuschließen, dürfen keine Flüssigkeiten oder
Fremdkörper in das Gerät gelangen. Sollte dieser Fall
trotzdem einmal eintreten, trennen Sie das Gerät sofort
vom Netz ab. Lassen Sie es von einem Fachmann prüfen
und die notwendigen Reparaturarbeiten durchführen.
Befolgen Sie alle Warn- und Sicherheitshinweise in der
Bedienungsanleitung und auf dem Gerät.
Dieses Gerät sollte, wie andere Elektrogeräte auch, nicht
unbeaufsichtigt betrieben werden.
Ist das Gerät z.B. während des Transports über längere Zeit Kälte
ausgesetzt worden, so warten Sie mit der Inbetriebnahme, bis es
sich auf Raumtemperatur erwärmt hat und das Kondenswasser
verdunstet ist.
Bitte stellen Sie sicher, daß um das Gerät ein Freiraum von
10 cm gewährleistet ist, so daß die Luft ungehindert zirkulieren
kann. Stellen Sie das Gerät weder auf ein Bett, Sofa, Teppich oder
ähnliche Oberflächen, um die Ventilationsöffnungen nicht zu
verdecken. Das Gerät sollte nur dann in einem Regal oder in einem
Schrank untergebracht werden, wenn eine ausreichende
Luftzirkulation gewährleistet ist.
Stellen Sie das Gerät nicht in die Nähe von Wärmequellen
(Heizkörper, Wärmespeicher, Öfen oder sonstige wärmeerzeugende
Geräte).
Bevor Sie das Gerät in Betrieb nehmen, prüfen Sie, ob die
Betriebsspannung mit der örtlichen Netzspannung übereinstimmt.
Die Betriebsspannung ist an der Rückseite des Gerätes angegeben.
(USA: 115 V/60Hz, EC: 230V/50Hz)
Schließen Sie das Gerät nur mit dem dazugehörigen zweipoligen
Netzkabel an die Wandsteckdose an. Modifizieren Sie das Netzkabel
auf keinen Fall. Versuchen Sie nicht, die Erdungs- und/oder
Polarisationsvorschriften zu umgehen. Das Netzkabel sollte an
eine zweipolige Wandsteckdose angeschlossen werden. Verwenden
Sie keine Verlängerungskabel.
Netzkabel sind so zu verlegen, daß sie nicht beschädigt werden
können (z.B. durch Trittbelastung, Möbelstücke oder Erwärmung).
Besondere Vorsicht ist dabei an den Steckern, Verteilern und den
Anschlußstellen des Gerätes geboten.
Sollten Sie das Gerät für eine längere Zeit nicht in Betrieb nehmen,
ziehen Sie den Netzstecker aus der Steckdose.
Schalten Sie das Gerät sofort aus und ziehen Sie geschultes
Fachpersonal zu Rate, wenn:
• das Netzkabel oder der Stecker beschädigt sind,
• Gegenstände bzw. Flüssigkeit in das Gerät gelangt sind,
• das Gerät Regen ausgesetzt war,
• das Gerät nicht ordnungsgemäß funktioniert bzw. eine
deutliche Leistungsminderung aufweist,
• das Gerät hingefallen ist bzw. beschädigt wurde.
Ziehen Sie den Netzstecker aus der Steckdose, bevor Sie mit der
Reinigung des Gerätes beginnen. Reinigen Sie die Oberflächen
des Gerätes nur mit einem weichen, trockenen Tuch. Verwenden
Sie keine scharfen Reinigungs- oder Lösungsmittel. Vor der erneuten
Inbetriebnahme des Gerätes ist sicherzustellen, daß an den
Anschlußstellen keine Kurzschlüsse bestehen und alle Anschlüsse
ordnungsgemäß sind.
Stellen Sie das Gerät waagerecht auf eine feste, ebene Unterlage.
Es sollte weder auf beweglichen Unterlagen noch Wagen oder
fahrbaren Untergestellen transportiert werden.
Page 9

9
Contents
(numbers in gray boxes correspond to bullet numbers on illustration at the front of this manual)
1: Controls and Connections 2
2: DB25 pin assignments 2
3: Remote control 3
4: Output connections 3
5: RCA Source Connections 4
6: S-Video Source Connections 5
7: Zone 2 Connections 6
8: On-Screen MenusOn-Screen-Menüsystem 7
About Rotel .........................................10
Getting Started ....................................10
RSP-985 Key Features 10
About the THX Ultra™ System 10
Unpacking the RSP-985 10
Placement 10
Front Panel Controls .............................10
Standby LED 11
Standby Switch 11
Remote Sensor 11
Master Volume Control 11
Tone Controls 11
Listening Input Source Buttons 11
5.1 Channel Input 11
Tape Monitor 11
Recording Input Source Buttons 11
Surround Sound Mode LEDs 12
RR-939 Remote Control .......................13
Programming the RR-939 13
Power Button 13
Volume Buttons 13
Mute Button (remote only) 13
Input Select Buttons 13
5.1 CH Button 13
Surround + Button 13
Movie Filter/THX (remote only) 13
Numeric Buttons (remote only) 13
On-Screen Button (remote only) 13
DOWN/UP Buttons (remote only) 13
ENTER Button (remote only) 14
Back Button (remote only) 14
Rear Panel Input Connections ................14
RCA Audio and Video Inputs 14
S-Video Source Inputs 14
Digital Audio Inputs 14
5.1 Channel Audio Input 15
RCA Tape Monitor Inputs 15
External In Jack 15
Rear Panel Output Connections .............15
RCA Audio and Video Outputs 15
S-Video Outputs 15
Main Processor RCA Audio Outputs 15
Main Processor 25-pin Audio Outputs 16
TV/Monitor Video Outputs 16
Tape Monitor Audio Outputs 16
Rear Panel AC Power Connections.........16
AC power 16
AC Convenience Outlets 16
Zone 2 Connection and Operation..........16
Zone 2 Power On/Off Operation 17
Zone 2 Audio Outputs 17
Remote External Sensor/Repeater Jacks 17
On-Screen Display and
System Configuration ...........................17
Navigation Buttons 17
Start-up Screen 18
System Status Screen 18
Main Menu Screen 18
Dolby Digital Setup Menu 19
Input Setup Menu 19
System Setup Menu 20
Speaker Setup Menu 20
Delay Setup Menu 22
Balance Setup Menu 22
Subwoofer Setup Menu 23
Factory Default Menu 23
Specifications .......................................23
Audio 23
Video 23
General 23
Mode Button 12
Page 10

RSP-985 Surround Sound Processor
10
About Rotel
A family whose passionate interest in music
led them to manufacture high fidelity components of uncompromising quality founded Rotel
over 30 years ago. Through the years that passion has remained undiminished and the family
goal of providing exceptional value for audiophiles and music lovers regardless of their budget, is shared by all Rotel employees.
The engineers work as a close team, listening to, and fine tuning each new product until
it reaches their exacting musical standards.
They are free to choose components from
around the world in order to make that product the best they can. You are likely to find capacitors from the United Kingdom and Germany, semi conductors from Japan or the United
States, while toroidal power transformers are
manufactured in Rotel’s own factory.
Rotel’s reputation for excellence has been
earned through hundreds of good reviews and
awards from the most respected reviewers in
the industry, who listen to music every day.
Their comments keep the company true to its
goal – the pursuit of equipment that is musical, reliable and affordable.
All of us at Rotel, thank you for buying this
product and hope it will bring you many hours
of enjoyment.
Getting Started
Thank you for purchasing the Rotel RSP-985
Surround Sound Processor. The RSP-985 is a
full-featured audio/video control center designed to handle both analog and digital source
components. Its surround sound processing
includes Dolby
®
and THX® as well as synthesized surround
DTS
modes for music from both analog and digital inputs. System control flexibility includes
inputs for six audio/video components plus
a recording function that allows independent
recording of any analog input signal. Zone
2 capability allows the use of the RSP-985 in
a main listening room plus a remote location.
The RSP-985 is a natural extension of Rotel’s
passion for high performance, providing accurate reproduction of both movie soundtracks
and demanding musical selections.
To get the most from your RSP-985, we suggest you read this manual and keep it as a
reference to answer any future questions.
®
Pro Logic®, Dolby Digital®,
RSP-985 Key Features
•
Rotel’s Balanced Design Concept combines
advanced circuit board layout, comprehensive parts evaluation, and extensive listening
tests for superior sound and long term reliability.
•
Dolby® Pro Logic®, Dolby Digital®, and DTS
surround processing with DSP music modes.
•
THX® Ultra™ surround processing.
•
5.1 channel input for outboard surround
processing such as MPEG
digital standard.
•
User friendly ON-SCREEN MENU System.
•
Comprehensive rear panel input and output connections for audio and video sources
(RCA, S-Video, digital).
•
Comprehensive input switching with separate input selection for listening (analog &
digital) and recording (analog).
•
“Zone 2” output with independent input
selection and level adjustments for multizone custom installations.
•
Universal remote control to operate the
RSP-985 and up to seven other components.
®
or any future
About the THX Ultra™ System
THX is an exclusive set of standards and technologies established by the world-renowned
film production company, Lucasfilms Ltd. THX
grew from George Lucas’ personal desire to
make your experience of the film soundtrack,
in both movie theaters and in your home theater, as faithful as possible to what the director intended.
Movie sound tracks are mixed in special movie
theaters called dubbing stages and are designed to be played back in movie theaters
with similar equipment and conditions. The
soundtrack created for movie theaters is then
transferred directly onto Laserdisc, VHS tape,
DVD, etc., and is not changed for playback
in a small home theater environment. THX
engineers developed patented technologies
to accurately translate the sound from the movie
theater environment into the home, correcting
the tonal and spatial errors that occur.
Before any home theater component can be
THX Ultra certified, it must incorporate the THX
technologies and also pass a rigorous series
of quality and performance tests. Only then
can a product feature the THX Ultra logo, which
is your guarantee that the Home Theater products you purchase will give you superb performance for many years to come.
Unpacking the RSP-985
Remove the unit carefully from its packing. Look
for the handheld remote control and other
®
accessories. Save the packing and box as it
will protect the RSP-985 if you move or need
to return it to us for maintenance.
Placement
Place the RSP-985 on a solid, dry, level surface away from direct sunlight, excessive heat,
high humidity, or strong vibrations.
Make sure the RSP-985 is close to the other
components in your audio/video system and,
if possible, place it on its own shelf. This will
make initial cable routing, hookup, and any
subsequent system changes easier. It also
minimizes potential interference or heat buildup
from other components.
The RSP-985 can generate heat during normal operation. Do not block ventilation openings. Allow a minimum of 10 cm (4 inches)
of unobstructed open space around the unit.
If installed in a cabinet, make sure that there
is adequate ventilation.
Make sure there is enough room behind the
RSP-985 for easy hookup. Remember, you are
connecting many other components to this unit
and you’ll probably need more space than you
think.
Don’t stack other objects (components or other
items) on top of the RSP-966. Don’t let water
fall into the RSP-966 as this could damage
delicate circuitry.
Front Panel Controls
Although we have designed the RSP-985 to
be as simple to use as possible, it is still a
complex piece of equipment. For that reason,
we suggest you look over the RSP-985’s front
and rear panels before you start connecting
other components to it. The following brief
explanations provide an overview of the unit’s
connections, features, and controls, with number references corresponding to the illustrations at the front of this manual.
Page 11

11
English
Most functions are duplicated on the front panel
and on the handheld remote control, a few
only on one or the other. These duplications
are noted below. In addition, when two reference numbers appear, one refers to the location of the button on the front panel, the other
to the location of the button on the handheld
remote control.
Standby LED
Some of the RSP-985’s circuitry (microprocessor,
infrared sensor, etc.) remains powered at all
times, while the rest of the circuitry is turned
on or off by the user. The STANDBY LED lights
whenever the RSP-985 is plugged into a live
AC outlet but does not necessarily mean that
the RSP-985 is totally active. If other front panel
LEDs are lit, then the RSP-985 is fully functional.
NOTE
: During system setup, it is possible to
select an alternative FULLY-ON power-up
mode in which the unit is fully activated whenever it is connected to a live AC outlet.
Standby Switch
Similar to a power switch in function, this button
switches the RSP-985 from standby mode to
fully active mode. If only the STANDBY LED is
lit, push the front panel (or handheld remote
POWER button) to fully activate the RSP-985.
Other front panel LEDs light up and a welcome
screen will appear on your TV set. Push the
STANDBY switch again to deactivate the
RSP-985. You'll see that only the STANDBY LED
remains lit.
NOTE
: The STANDBY switch also controls the
rear panel AC power outlets. When the
RSP-985 is in
STANDBY
mode, the AC outlets are off. When the RSP-985 is functional,
the AC outlets are live.
The operation of the STANDBY switch is somewhat more elaborate when using the RSP-985’s
ZONE 2 capability. For a detailed explanation, see the ZONE 2 Connections and Operations section of this manual.
Remote Sensor
This sensor receives infrared signals from the
handheld remote control. Make sure you do
not accidentally block this sensor with cables
or accessories.
Master Volume Control
Turn this control clockwise to raise and counterclockwise to lower the volume to all six main
output channels simultaneously.
MASTER VOLUME buttons are also available
on the RSP-985's handheld remote control.
NOTE
: The MASTER VOLUME control is me-
chanically connected to an internal servomotor and responds to commands from the
handheld remote. It will rotate in the appropriate direction automatically when adjusting
the volume from the remote control.
Use the position of the LED indicator on the
knob’s outer edge to determine relative volume settings. When the volume control LED
blinks, you’ve engaged MUTE from the remote
controller.
Tone Controls
BASS and TREBLE controls increase and decrease the audio signal’s low and high frequency content. Rotate each one clockwise
to increase output in the respective frequency
range and counterclockwise to reduce it. The
center detent removes each control from the
audio path for maximum signal integrity. The
ON-SCREEN DISPLAY will show tone control
settings as you adjust them.
NOTE
: The BASS and TREBLE controls are by-
passed in THX mode and will have no effect,
regardless of the setting indicated by the ONSCREEN DISPLAY.
Listening Input Source Buttons
Six front panel pushbuttons select an audio/
video input source such as a CD player, VCR,
Laser Disc Player, etc. Push any of these buttons (or the duplicates on the handheld remote)
to select the desired source. You will hear this
source and, if you have selected a video source,
see its picture on your TV. An LED indicator
on each pushbutton lights to confirm your selection. In addition, the ON-SCREEN DISPLAY
confirms your selection.
NOTE
: The source inputs can accommodate
either analog signals or digital signals. This
selection is made from the ON-SCREEN
MENU system during initial setup of the system.
5.1 Channel Input
This button overrides all other audio inputs and
directly connects an external adaptor to the
RSP-985’s MASTER VOLUME control and audio
outputs. Press this button to listen to the audio
input from a 5.1 channel decoder. An LED
above the button will light to indicate your
selection. All of the RSP-985’s circuitry is bypassed, except the MASTER VOLUME control.
The 5.1 CHANNEL button is duplicated on
the handheld remote control.
NOTE
: The 5.1 Channel Input is an audio-only
signal. The video signal from the selected
source remains active. The 5.1 Channel input signal is not available for recording or
for Zone 2.
Tape Monitor
This switch overrides the normal Listening
Source Selectors to listen to whatever source
component is connected to the Tape Monitor
Input jacks. A confirming LED will light whenever the Tape Monitor switch is depressed.
Recording Input Source Buttons
The RSP-985 allows you to listen to and/or
watch one source while simultaneously recording from a second source. For example, you
could listen to a CD while recording from a
DVD player to a VCR. The row of RECORDING front panel buttons allows you to select
the analog input from any source for recording. Its signal is routed to the rear panel VIDEO
2, 3, and 4 outputs and has no effect on the
source selected for listening. LEDs immediately
above each pushbutton light to confirm your
selection.
The handheld remote does not have RECORDING buttons. However, a recording selection
can be made from the remote using the ONSCREEN MENU system.
NOTE
: The RECORD inputs accept only ana-
log signals. Thus, if you are using a digital
connection from a CD player or DVD for listening, you should also connect an analog
signal for recording. See the section on Rear
Panel Input Connections.
Page 12

RSP-985 Surround Sound Processor
12
Surround Sound Mode LEDs
The RSP-985 provides numerous surround
sound modes to accommodate different types
of audio and video source material as described below. These LEDs indicate which
surround sound mode you’ve selected. Here
is a brief description of the various surround
sound modes.
2 CH STEREO provides conventional 2speaker stereo with no surround sound or other
processing. The front left and right speakers
are on. The center and surround speakers are
off.
MONO combines all channels from the source
input into a single signal. The signal is sent to
the center channel speaker. If there is no center channel speaker in your system, the signal is sent equally to the front left and right
speakers. All other speakers (except the
subwoofer) are off. This setting might be suitable for some TV watching, for example if you
have the news report on in the background
and do not want the volume levels or effects
of the full surround system.
MUSIC 1, MUSIC 2, MUSIC 3, and
MUSIC 4 simulate different acoustic environ-
ments and are primarily used to recreate ambience when listening to music sources. MUSIC 1 (“Hall”) produces the long, bright echo
of a large auditorium, suitable for live recordings. MUSIC 2 (“Club”) provides the short, dark
echo of a crowded club, suitable for pop and
rock. MUSIC 3 (“Natural”) provides minimal
ambience suitable for a wide range of music
including jazz, acoustic, and surround encoded
music. MUSIC 4 (“Party”) sends the full stereo signal with no surround processing to front
and rear speakers for maximum output. Experiment to determine which mode best
matches your chosen source. All speakers are
on in all MUSIC modes.
NOTE
: A single LED is used to indicate both
the MUSIC 1 and 2 modes while a second
LED indicates both MUSIC 3 and 4.
NOTE
: The subwoofer is normally not active in
MUSIC modes, if LARGE front speakers are
selected (although, this setting can be overridden to make the subwoofer active during
system configuration).
DOLBY PRO LOGIC® provides proper play-
back decoding and processing for any Dolby
Surround encoded analog audio source,
whether it be a music CD, videotape, videodisc, conventional stereo TV broadcast, or satellite broadcast. Dolby Pro Logic processing
and playback through a properly calibrated
system will preserve the directionality, ambiance, and spatial effects intended by the
source’s producers.
®
Dolby Digital
provides proper playback
decoding processing for any discrete Dolby
Digital encoded digital audio source such as
an AC-3 Laser Disc or DVD disc. Dolby Digital provides up to 5 channels of discrete surround information plus subwoofer.
®
provides proper playback decoding
DTS
processing for any discrete Digital Theater
Systems (DTS) encoded digital audio source
such as a Laser Disc or DVD disc. Like Dolby
Digital, DTS is a proprietary digital system
providing up to 5 channels of discrete surround
information plus subwoofer.
®
Ultra™ is a set of patented technolo-
THX
gies developed by THX engineers to accurately
translate the sound from the movie theater environment into the home, correcting tonal and
spatial errors. When the THX indicator is lit,
the following THX technologies are automatically added after the Dolby Pro Logic, Dolby
Digital, or DTS decoder.
• Re-Equalization™: The tonal balance
of a film soundtrack will be excessively bright
and harsh when played back in the home
because it was originally designed to be
played in large movie theaters using very
different equipment. Re-Equalization restores
the correct tonal balance for movie
soundtracks in the smaller home environment.
• Timbre Matching™: The human ear
changes our perception of sound depending
on the direction from which the sound is
coming. In a movie theater, there is an array
of surround speakers so that the surround
information is all around you. In a home
theater, you only use two speakers located
to the side of your head. The Timbre Matching filters the information going to the surround speakers so that they more closely
match the tonal characteristics of the sound
coming from the front speakers. This ensures seamless panning between the front
and surround speakers.
• Adaptive Decorrelation™: In a movie
theater, a large number of surround speakers help create an enveloping surround
sound experience. In a home theater, there
are only two surround speakers which can
reduce spatiousness and envelopment. Surround sound can also collapse into the
closest speaker as you move away from
the middle seating position. Adaptive
Decorrelation slightly changes one surround
channel’s time and phase relationship with
respect to the other surround channel. This
expands the listening position and creates
the same spacious surround experience as
in a movie theater.
By pressing the MOVIE FILTER button on the
remote control, you activate the THX technologies described above. Movies that have been
encoded in Dolby Digital, DTS, Dolby Pro Logic,
Stereo, and Mono can all benefit from activating these THX features. THX should only be
activated for movies that were mixed for playback in large movie theaters. It need not be
activated for music, made for TV movies, sports,
talk shows or other programs mixed for small
rooms.
NOTE
: All of the surround modes described
above are selected with the MODE button
(described below) except Dolby Digital , DTS,
and THX. Dolby Digital and DTS are automatically activated when special digital codes
in the source material are detected. THX is
added to any of the other cinema surround
modes using the MOVIE FILTER button on the
remote control or during initial system setup
from the ON-SCREEN MENUS.
Mode Button
The MODE button selects one of the surround
modes described above. To make a selection,
press the MODE button (or the SURROUND
+ button on the remote). The LED above the
button will light. Each time you press the button while the LED is lit, the surround mode will
cycle to the next available setting as indicated
by the SURROUND MODE LEDs. In addition,
the surround mode setting may be changed
using the ON-SCREEN MENU system.
No selection is required when playing Dolby
Digital or DTS source material. These settings
are automatically engaged. THX can be added
to any of the cinema surround modes by pressing the MOVIE FILTER button on the remote
control.
Page 13

13
English
NOTE
: A default MODE selection can be memo-
rized for each input so that whenever you
select that input source, the desired mode is
automatically engaged. The default setting is
made from the ON-SCREEN MENU system
during setup of the system described at the
end of this manual.
RR-939 Remote Control
The RSP-985 includes a handheld remote
control that does far more than operate the
RSP-985. The RR-939 is a full-function universal remote control that can operate up to 8
additional audio/video components.
A separate manual, included with the remote,
gives detailed information on programming
and using the RR-939 to replace all of the remote
controls in your system. This section is intended
to provide only that information which pertains
to the use of the RR-939 to operate the RSP-985.
NOTE
: Many functions duplicate the RSP-985
front panel controls and are listed here only
for your reference. Please refer to the previous Front Panel Controls section of this manual
if you need additional information.
Programming the RR-939
The RR-939 is preprogrammed from the factory to operate the RSP-985. Should the AUDIO command set on your RR-939 not operate the RSP-985, it’s possible that the programming has been inadvertently changed.
gram the remote to operate the RSP-985 (AUDIO Button / 3-digit code 002):
1. Press the AUDIO button at the top of the
remote while simultaneously pressing the
MUTE button and hold both for at least one
second. The AUDIO button will light in red
for 20 seconds, indicating that you have
entered the program mode. The next step
must be done within this 20 second period,
or the RR-939 will revert to its standard
operating mode.
2. Use the NUMERIC buttons to enter the 3-
digit code (002) for the RSP-985 – press
0, then 0, then 2. The AUDIO button will
flash each time you enter a digit.
3. Store the code number by pressing the cor-
responding AUDIO button again. The button
will blink twice to confirm the storage of
the code in memory.
To pro-
To operate the RSP-985, make sure that the
AUDIO mode is active by pressing it before
you start. If it is active, pressing command keys
on the RR-939 will cause the AUDIO button
to flash red. Once the AUDIO mode is active,
it will stay active unless you press one of the
other DEVICE buttons to control a different
component.
Power Button
Duplicates the function of the STANDBY switch
on the front panel. Press to activate the RSP-985.
Press again to deactivate.
Volume Buttons
A pair of buttons which duplicate the function
of the front panel volume control. Press VOLUME UP to increase the volume and press
VOLUME DOWN to decrease the volume.
These buttons are also used to change the
current settings for a menu choice in the ONSCREEN MENU system.
Mute Button (remote only)
Push this button once to interrupt all AUDIO
PREOUT (RCA and DB25) signals – in other
words, to turn the sound off. To provide visual
indication that the sound is muted, the front
panel volume control LED will blink and a MUTE
indication will appear in the On Screen Display. Press the MUTE button again to restore
previous volume levels.
Input Select Buttons
Two rows of buttons which duplicate the function
of the six LISTENING INPUT SOURCE buttons
on the RSP-985 front panel. Select any input
source by pressing the appropriate button.
NOTE
: The TAPE 1 button on the RR-939 dupli-
cates the front panel TAPE MONITOR button.
The AUX/V5, PHONO, and TAPE2 buttons
are not used in the operation of the RSP-985.
5.1 CH Button
Duplicates the 5.1 CH button on the front panel.
Selects the 5.1 Channel input, overriding any
other source selection.
Surround + Button
Duplicates the function of the MODE button
on the front panel. Steps sequentially through
various surround sound operating modes: 2
CH STEREO, MONO, MUSIC 1, MUSIC 2,
MUSIC 3, MUSIC 4, and DOLBY PRO LOGIC.
Dolby Digital and DTS are automatically selected when playing appropriately encoded
source material.
Your current selection will be indicated by front
panel LEDs and by the ON-SCREEN MENU
System as you step through the available options.
Movie Filter/THX (remote only)
This button activates THX technologies for movie
playback. See the prior description of THX for
more details.
RE-EQ ON: Re-EQ is one of the THX technologies and can be individually selected. This
setting activates Re-EQ without the other THX
features.
THX ON: Adds all of the THX features to the
cinema modes.
THX OFF: No THX processing.
NOTE
: These settings can also be made dur-
ing initial system setup from the ON-SCREEN
MENUS and memorized so that they are automatically activated for each source input.
Numeric Buttons (remote only)
Ten numeric buttons, labeled 1 through 10.
Used with the RSP-985 only in entering the
3-digit address code (002) during initial setup.
ON-SCREEN Button (remote only)
Push this button to turn on the ON-SCREEN
MENU System and its initial SYSTEM STATUS
menu. If the ON-SCREEN DISPLAY is already
visible, push this button to cancel the Display.
DOWN/UP Buttons (remote only)
These two buttons (also labelled RECALL and
PRE CH) are used to move up and down in
the lists that appear on the ON-SCREEN MENU
system.
Page 14

RSP-985 Surround Sound Processor
14
ENTER Button (remote only)
This button is used to activate a choice on the
ON-SCREEN MENU system. For example, you
might select an option to take you to another
menu using the DOWN/UP buttons and then
press ENTER to execute the command. See
below for more information on these menus.
Back Button (remote only)
The BACK button is used to cancel a selection on an ON-SCREEN MENU and return to
the previous menu.
Rear Panel Input Connections
This section of the manual provides information on the audio and video signal input connections on the rear panel of the RSP-985.
NOTE
: DO NOT plug any system component
into an AC source until system hookup is complete and you are confident that all component-to-component connections have been
properly made.
All video cables should have a 75 ohm
impedance rating. Although conventional
audio interconnects will pass a video signal,
their construction and limited bandwidth impose a performance penalty because, in part,
they do not adhere to the 75 ohm standard.
The S/PDIF digital audio interface standard
specifies a 75 ohm transmission line and all
good digital cables adhere to this requirement.
Because the video and S/PDIF standards are
so close, you can use a video cable for digital audio data transmission. We strongly advise that you NOT substitute a conventional
analog audio interconnect cable for either
digital or video.
RCA Audio and Video Inputs
Six sets of RCA inputs (CD, TUNER, VIDEO
1, VIDEO 2, VIDEO 3, and VIDEO 4) accept
line level audio and composite video signals
from source components. All six sets of inputs
accept left and right channel audio plus a video
signal.
All RCA-type connections on the
RSP-985 follow these standard color
codes:
Left channel audio: RCA jack with white inset
Right channel audio: RCA jack with red inset
Composite video: RCA jack with yellow inset
Connect the OUTPUTS of your source components to the appropriate INPUTS on the
RSP-985. For example, if your system includes
a CD player, connect its left and right channel analog outputs to the RSP-985’s CD inputs.
To hookup a video source, connect its analog audio outputs to one pair of the RSP-985’s
VIDEO audio inputs and its video composite
RCA output to the corresponding composite
RCA video input.
S-Video Source Inputs
See Figure 6
These mini-DIN inputs allow the RSP-985 to
receive S-Video signals from appropriatelyequipped source components as an alternative to the standard RCA video inputs described
above.
If you opt for S-Video connections, remember
that long S-Video cable runs can cause significant signal degradation. In some difficult
system configurations, composite connections
may actually be preferable. In all cases, keep
your cables as short as possible to insure the
best performance.
NOTE
: You may not get the best signal from a
Laser Disc player by using the S-Video output. Because the format is older, LD players
add a circuit to separate the luminance (black
and white) from the chrominance (color) information that make up the complete video
signal. This extra circuitry may actually degrade the apparent resolution of an LD
player’s S-Video output. Experiment to determine which output provides a sharper picture in your system.
S-Video hookup is straightforward. Simply
connect the S-Video output of each video source
component to the appropriate S-Video input
on the back panel of the RSP-985 in place of
the RCA composite video connections. Remember that you will still need to use the RCA-type
connections for the audio signals from each
source component.
When connecting video source components,
make sure that all audio and video signals from
one component connect to the same set of inputs on the RSP-985. For example, if you connect your VCR to the VIDEO 2 inputs, make
sure that both the audio and video signals
are connected to the VIDEO 2 inputs.
Digital Audio Inputs
The RSP-985 features a complete decoding
and D/A conversion capability which accepts
digital input signals from source components.
These include digital signals from CD players
(44.1kHz sampling rate), satellite TV tuners
(32kHz sampling rate), and 5.1 channel Dolby
Digital and DTS signals from DVD and Laser
Disc players (32kHz to 48kHz sampling rate).
The digital circuitry senses the incoming signal type and adjusts to it automatically.
To take full advantage of various digital sources,
the RSP-985 accepts digital signals from source
components in two different formats. The digital
inputs are as follows:
OPTICAL: Allows connection of a standard
optical digital output from a digital TV tuner,
DVD player, or other source component. Requires an optical digital cable. Optical digital inputs are available on the back panel for
the TUNER input and the VIDEO 4 input.
COAXIAL: Standard digital connectors for
use with the digital output of any component.
Coax digital connectors are available for the
CD, VIDEO 1, VIDEO 2, and VIDEO 3 inputs.
NOTE
: To connect a Laser Disc player’s AC-3
RF output connection, you must use an external RF demodulator to convert the RF-modulated AC-3 signal to a conventional digital
signal which is then connected to the
RSP-985’s coax digital input.
To use the digital inputs, connect the appropriate cable from the digital output of your
source component to the corresponding digital input on the RSP-985.
It is necessary to configure each source to use
the desired input (digital or analog). This configuration is done using the ON-SCREEN
MENU system and is memorized so that simply selecting a SOURCE INPUT button activates
the appropriate audio input.
Page 15

15
English
NOTE
: The RSP-985 is a digital component.
Incoming analog signals are converted to the
digital domain for processing. To avoid a D/
A conversion at the source component and
subsequent A/D conversion at the RSP-985
input stage, it is best to use digital signal connections whenever possible. However, you
should still hook up analog audio signal connections from each source because only analog inputs are available at the tape monitor
outputs, for recording and for use in Zone 2.
5.1 Channel Audio Input
This 25-pin input connects six discrete channels of analog information from an outboard
processor.
Many external adaptors provide a choice of
RCA or DB25 outputs. We suggest that you
use a DB25-to-DB25 cable to reduce the number of cables and to insure proper channelto-channel continuity. If your external adaptor does not have a DB25 output, you will need
to purchase a multi-RCA to DB25 adaptor cable
from your authorized Rotel dealer. Be sure to
observe proper channel continuity.
NOTE
: The 5.1 Channel Input is an audio-only
signal. The video signal from the selected
source remains active. The 5.1 Channel input signal is not available for recording or
for Zone 2.
RCA Tape Monitor Inputs
A pair of standard RCA inputs accept the left
and right analog audio signals from a cassette
deck or other audio tape recorder. These inputs are activated when the front panel TAPE
MONITOR button is pressed.
External In Jack
This 3.5 mm jack accepts a remote infrared
sensor which duplicates the function of the front
panel IR sensor in installations where the front
panel sensor could be blocked by a cabinet.
See your authorized Rotel dealer for a selection of remote sensors that will work with your
RSP-985.
Rear Panel Output Connections
This section of the manual provides complete
information on all of the audio and video signal output connections on the rear panel of
the RSP-985. For convenience, each topic
begins with an overview of the particular
connection, followed by detailed hookup instructions.
RCA Audio and Video Outputs
See Figure 5
These three sets of RCA outputs (VIDEO 2,
VIDEO 3, and VIDEO 4) include left and right
channel audio plus composite video outputs
from the RSP-985 to appropriate components
(VCR, etc.) for recording or further processing. Standard color coding applies.
Connect the RSP-985's VIDEO 2 left and right
audio outputs to the audio inputs of the first
source component. Then, connect the VIDEO
2 composite video output to the video input
of the same source component. Repeat these
steps for VIDEO 3 and VIDEO 4 connections.
To avoid mistakes, make sure that you:
• Connect the source component’s outputs
to the appropriate RSP-985 inputs
• Connect the appropriate RSP-985 outputs
to the source component inputs.
• Make sure that whatever video component
is connected to the VIDEO 2 inputs is the
same component connected to the VIDEO
2 outputs, etc.
NOTE
: The signal available at these outputs is
determined by the RECORDING input selection buttons and is not necessarily the same
source as that selected by the LISTENING
input selection buttons.
NOTE
: A source’s signal cannot be sent back
to itself. For example, if you select VIDEO 2
with the RECORDING select buttons, the outputs for VIDEO 2 will be muted and you can
only record from the VIDEO 3 or VIDEO 4
outputs.
NOTE
: Only analog input signals are routed
to the VIDEO OUT jacks. If you are using a
digital input, you should also connect the
analog output of the source component for
recording.
S-Video Outputs
See Figure 6
Mini-DIN outputs give you the option of using
S-Video outputs instead of the RCA composite video connections described above.
NOTE
: Composite video signals cannot be con-
verted to S-Video signals. There will be no
signal available at the S-Video outputs unless
S-Video connections have also been used at
the inputs.
If you have opted for S-Video connections rather
than composite RCA video connections, connect the S-Video outputs for VIDEO 2 to the
S-Video input on your first source component.
Remember that you are merely substituting an
S-Video connection for the standard RCA-style
composite video connection. Your audio connections will still use the RCA outputs described
above. Also remember to observe the same
component-to-component continuity between
audio and video signals described above.
Repeat the same process using VIDEO 3 and
VIDEO 4 if you have additional video source
components.
Main Processor RCA Audio Outputs
See Figure 4
The RSP-985 sends six channels of audio to
the power amplifiers. These outputs (6 individual RCA-style jacks) direct the RSP-985’s
main output to power amplifiers for speakers
in the primary listening/viewing area. These
six outputs (Left Front, Center Front, Right Front,
Left Surround, Right Surround, and Subwoofer)
connect the RSP-985's main audio output to
a multichannel power amplifier or multiple
power amplifiers for the primary listening area.
Standard color coding applies with black insets to distinguish Center Channel and
Subwoofer outputs from Left (white) and Right
(red) Front and Rear outputs. To hook up the
RCA main audio outputs, connect a standard
audio cable from each output to the input of
the amplifier channel that will power the corresponding speaker. In a full home theater
system, you will need to make six different
connections corresponding to the six speakers (Left Front, Center Front, Right Front, Left
Surround, Right Surround, and Subwoofer).
Page 16

RSP-985 Surround Sound Processor
16
It is important to make sure that you have the
correct output connected to the proper amplifier
channel. Take your time and you will have no
trouble getting it right.
Main Processor 25-pin Audio Outputs
See Figure 4
As an alternative to the RCA outputs , the
RSP-985 also provides DB25 multi-pin output
connector which carries all output channels
in a single cable. The DB25 output connector provides exactly the same signal as the RCA
outputs, but is more convenient for use with
Rotel, or other, multichannel amplifiers equipped
with a matching DB25 input. Choose whichever is most convenient for your system hookup.
To use the DB25 output connections, simply
connect a female-to-male DB25 audio cable
from the output of the RSP-985 to the matching input on the multichannel power amplifier.
TV/Monitor Video Outputs
See Figure 4
The video output of the RSP-985 is sent to your
TV monitor from either an RCA-type composite video connection or an S-Video connection. Use the type of connection appropriate
for your monitor and system.
For example, if you’ve chosen to use S-Video
connections, run an S-Video cable (with miniDIN connectors) from the RSP-985’s S-Video
output to your monitor’s S-Video input.
If you have chosen a composite interface,
connect the RSP-985’s RCA output jack to the
matching RCA input on your television monitor.
NOTE
: The RSP-985 cannot convert compos-
ite RCA video signals from source components
to an S-Video signal to send to the TV monitor. Unless all of your video sources have SVideo connections, you may decide to use
RCA composite signals for ALL video connections. Alternatively, if your TV monitor has two
selectable inputs, you could connect the RCA
output of the RSP-985 to one input and the SVideo output to the other. This would require
switching between the two inputs on the TV
monitor in order to watch an RCA composite
or an S-Video components. This is the only
way to have a “mixed” system with some
RCA composite and some S-Video sources.
Tape Monitor Audio Outputs
See Figure 5
A pair of RCA-type audio outputs send a signal to an audio recording device (cassette deck,
DAT, or Mini-Disc recorder, etc.). The analog
signal from any of your source components
will be routed to these outputs for recording,
depending on the selection made with the LISTENING input buttons.
Connect audio cables from the RSP-985’s TAPE
MONITOR OUT jacks to your recorder’s analog
inputs.
NOTE
: Only analog input signals are routed
to the TAPE MONITOR OUT jacks. If you are
using a digital input, you should also connect the analog output of the source component for recording.
Rear Panel AC Power Connections
AC power
Your RSP-985 is configured at the factory for
the proper AC line voltage in the country where
you purchased it (115 volts/60Hz AC in the
USA and 230 volts/50Hz AC in Europe). The
AC line configuration is noted on the back of
your unit.
Plug the supplied power cable into the AC
receptacle on the back of the unit. Then, plug
into an appropriate AC outlet.
AC Convenience Outlets
Two outlets let you plug AC cords from source
components into the back of the RSP-985 so
that they will be turned on and off automatically. The outlets are powered whenever the
RSP-985 is fully active. It is off when the RSP-985
is in STANDBY mode.
NOTE
: We DO NOT RECOMMEND using this
outlet for a power amplifier. Do not exceed
the maximum 500 watt capability of these
switched outlets.
Zone 2 Connection and Operation
The RSP-985 provides a second zone capability for a separate amplifier and pair of
speakers in a remote location in your house.
From the remote zone, you can select a source
component (even if different from the source
playing in the main listening room), adjust the
volume level in the remote zone, and (depending on the remote control you are using) operate the source components.
To take advantage of the Zone 2 capability,
you will need additional components: a pair
of speakers installed in the remote zone and
a power amplifier to drive them.
Although Zone 2 can be controlled from the
RSP-985’s ON-SCREEN MENU system, operation from the second zone requires the installation of an infrared repeater system such as
a Xantech, Niles, etc. This repeater system
relays infrared remote control commands from
a handheld remote to the REMOTE EXTENSION IN repeater input on the back of the
RSP-985. Ask your authorized Rotel dealer for
additional information on repeater systems and
their installation.
Several points to keep in mind about the Zone
2 function:
•
An infrared repeater system (Xantech, Niles,
et al) should be used for Zone 2 control
via the 3.5 mm REMOTE EXTENSION IN
jack on the back panel
•
Zone 2 is immediately active when the
RSP-985 is turned on, either at a zero vol-
ume level or at the last previous volume
depending on the “Zone 2 Auto-Mute”
setting chosen from the ON-SCREEN MENU
system during initial system setup. By default, Auto-Mute is engaged, meaning that
every time you turn the unit off, the volume
in the remote zone is muted and must be
manually raised the next time Zone 2 is
used. If Auto-Mute is not engaged, the
remote zone will begin playing at the previous volume the next time the RSP-985 is
activated.
Page 17

17
English
• The RR-939 remote control supplied with
the RSP-985 will operate Zone 2 if used
in conjunction with a repeater system from
the remote zone. It can also be programmed
to operate Rotel source components via the
RSP-985's REMOTE EXTENSION OUT jack.
•
All source components connected to the
RSP-985's analog audio inputs (except the
TAPE MONITOR and 5.1 CHANNEL input) are available at the line level output
for Zone 2. The ZONE 2 outputs are independent of the main outputs. You can
select a different source or adjust Zone 2
volume without effecting the MAIN outputs
in any way.
•
Avoid sending the same infrared command
to the RSP-985 front panel sensor and the
Zone 2 repeater at the same time. This
means that Zone 2 must be in a different
room from the RSP-985.
Zone 2 Power On/Off Operation
With the factory default settings, the RSP-985
provides totally independent power on/power
off operation for both zones. Pressing the
STANDBY button on the front panel or from
the remote in the main room activates or deactivates the RSP-985 in the main room only
and has no effect on Zone 2. Conversely, using
the remote control from Zone 2 activates or
deactivates Zone 2 only and has no effect on
the main listening room. In other words, Zone
2 can be turned on without turning on the main
room and vice versa. Each room can only be
turned on or off from that room.
NOTE
: In this default mode, you cannot deac-
tivate the entire system from the front panel
of the RSP-985. To turn off ZONE 2, you would
have to go to ZONE 2 and use the remote
control STANDBY button to deactivate ZONE
2 from that location. You can change this
default operation by selecting the AUTOMUTE NO selection at the SYSTEM SETUP
MENU. When AUTO MUTE is disabled, the
entire system (both zones) is activated or deactivated when the front panel STANDBY
button is pressed. See the section on the SYSTEM SETUP MENU for details of changing
this setting, either on a permanent basis or
as a temporary measure to allow you to deactivate ZONE 2 from the front panel.
Zone 2 Audio Outputs
See Figure 7
These variable line-level RCA-type audio outputs send the Zone 2 audio signal to a stereo
power amplifier driving a pair of speakers in
the remote zone.
Although you have the option of using an integrated amplifier or a receiver to power the
remote speakers, we strongly suggest using
a fixed-gain power amplifier. This simplifies
system installation and operation. Your authorized Rotel dealer may make another recommendation based on specific system requirements.
If you are configuring your system for Zone 2
operation, connect the left and right Zone 2
outputs on the RSP-985 to the left and right
channels of the amplifier powering the remote
speakers, using conventional RCA audio
cables.
Remote External Sensor/ Repeater Jacks
See Figure 7
These 3.5 mm mini-jacks allow your RSP-985
to send/receive command codes from industry-standard infrared transmitters and receivers via hard-wired connections. They are used
in configuring your RSP-985 with the proper
IR connections for Zone 2 operation.
These 3.5 mm mini-jack connections provide
easy incorporation of third party infrared transmitters and repeaters (Xantech, etc.) for total
control of custom installed and multi-zone
systems.
The REMOTE EXTENSION IN jack accepts
signals from infrared repeaters located in a
remote area of your home. This receptacle is
required for connecting a remote sensor/transmitter to enable operation of the RSP-985’s
ZONE 2 functions.
The REMOTE EXTENSION OUT jack sends
signals from the REMOTE EXTENSION IN jack
to a remote infrared repeater or to Rotel CD
players, cassette decks, or tuners with a compatible rear panel remote connector.
The EXTERNAL IN JACK located above these
two jacks is for use with an external IR sensor
duplicating the front panel IR sensor and should
not be used for ZONE 2 IR connections.
NOTE
: ZONE 2 and its IR repeater should be
in a different area from the main room. The
RSP-985 should not be within range of Zone
2’s remote control to prevent IR commands
intended to control Zone 2 from inadvertently
controlling the main room operations.
On-Screen Display and System Configuration
The RSP-985 features two on-screen systems
to help operate the system. The first is a simple
ONE-LINE DISPLAY that appears at the bottom of the TV screen whenever primary settings (Volume, Input, etc.) are changed. ONELINE DISPLAY can be turned off during the
configuration of the system if you prefer.
A more comprehensive ON-SCREEN MENU
system is available at any time by pressing
the ON-SCREEN button on the remote control. This system includes intuitive menus that
guide you through the setup and operation
of virtually every function and setting of your
RSP-985 using the buttons on the remote control.
Navigation Buttons
Page 18

RSP-985 Surround Sound Processor
18
The following buttons are used to navigate the
ON-SCREEN MENU system:
ON-SCREEN/MENU Button:
play the main SYSTEM STATUS screen. All other
menus are reached from this menu. If a menu
is already visible, push this button to cancel
the display.
DOWN/UP Buttons:
down in the lists that appear on the ONSCREEN MENU system.
VOLUME DOWN/UP Buttons:
change the current settings for a selected menu
choice in the ON-SCREEN MENU system.
ENTER Button:
on the ON-SCREEN MENU system, generally
to move to the next menu or confirm a choice.
BACK Button:
to cancel a selection on an ON-SCREEN MENU
and return to the previous menu.
NOTE
: There is no need to memorize these
To move up and
To execute a command
The BACK button is used
To dis-
To
buttons. A help system at the bottom of each
ON-SCREEN MENU reminds you which buttons to press.
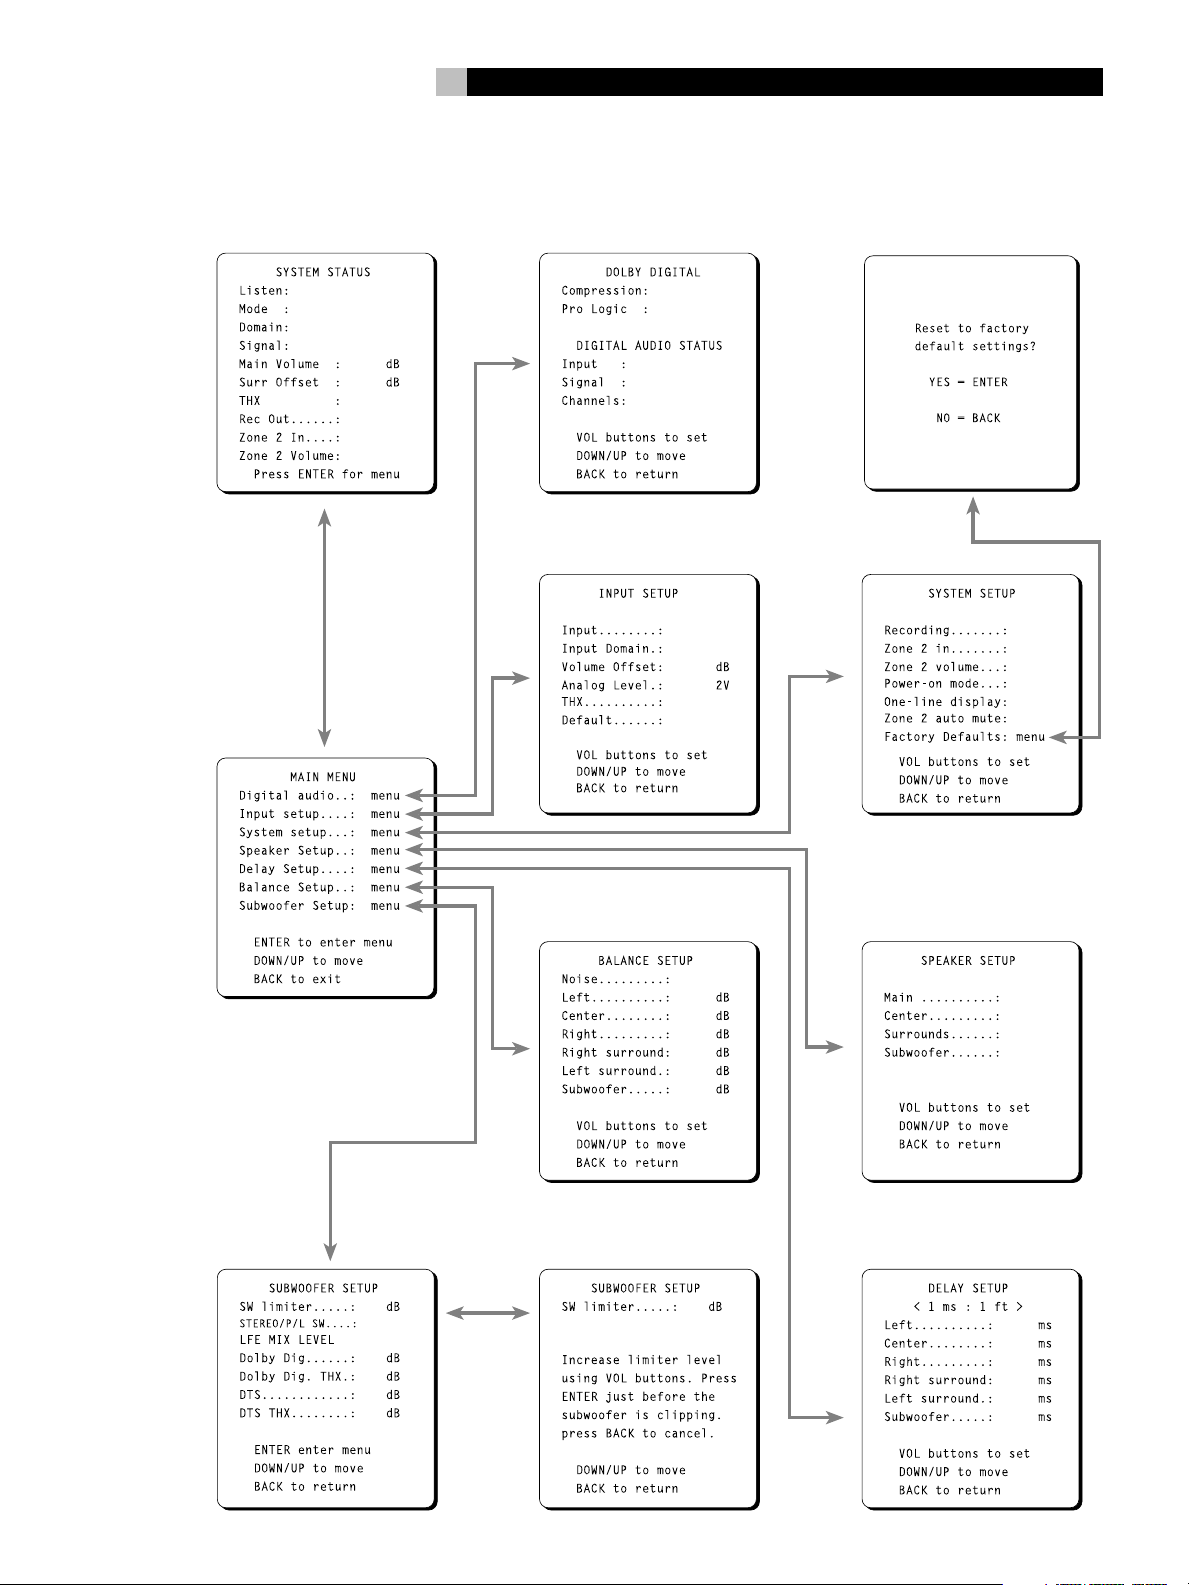
Figure 8 at the front of this manual shows the
menus that constitute the ON-SCREEN MENU
system and how to reach them. Most of the
menus are used to configure the system and
will not typically be used during normal operation. Details of each menu follow:
Start-up Screen
The RSP-985’s ON-SCREEN MENU system
automatically appears on your TV monitor
whenever you take the RSP-985 out of
STANDBY mode. The first screen you’ll see is
the START-UP screen.
System Status Screen
The SYSTEM STATUS screen provides the status all of the important settings of the RSP-985
and a starting point for reaching all other
screens and menus. This screen is available
at any time by pressing the ON-SCREEN button
on the remote control. The screen displays the
following status information:
LISTEN: the current source selected
MODE: the current surround mode
DOMAIN: whether a DIGITAL or ANALOG
signal is active for the listening source
SIGNAL: type of digital signal available at
the selected input, for example: DOLBY DIGITAL, DIGITAL AUDIO, DTS, NO SIGNAL, or
ANALOG
MAIN VOLUME: the output volume setting
SURR OFFSET: a temporary increase or de-
crease in the surround speaker volume for more
or less emphasis on surround effects. The setting is made with the SEARCH +/– buttons on
the RR-939 remote and reverts to the calibrated
settings when the surround mode is changed
or the unit is powered off.
THX: current status of the additional cinema
circuitry – THX ON, THX OFF, or RE-EQ ON.
REC OUT: which source is selected for the
recording outputs
ZONE 2 IN: which source is selected for Zone
2
ZONE 2 VOLUME: the volume setting for
Zone 2
The SYSTEM STATUS screen simply provides
information. None of the settings can be adjusted from this screen. To make changes to
the settings, go to the MAIN MENU by pressing the ENTER button on the remote control,
as indicated at the bottom of the SYSTEM
STATUS screen.
Main Menu Screen
The MAIN MENU screen is the entry point for
all of the RSP-985’s settings and setup menus
where system configuration settings can be
made. These are typically accessed only during initial system configuration and are not used
in day-to-day operation:
DIGITAL AUDIO MENU: Reach this menu
by moving the highlight to this line and pressing the ENTER button. This takes you to a menu
for setting up digital sources.
INPUT SETUP: Reach this menu by moving
the highlight to this line and pressing the ENTER
button. This will take you to a menu for configuring each input including selection of digital
or analog connections, type of digital connection, input levels, etc.
SYSTEM SETUP: Reach this menu by moving the highlight to this line and pressing the
ENTER button. This takes you to a menu for
basic system settings, Zone 2 settings, etc.
SPEAKER SETUP: Reach this menu by moving
the highlight to this line and pressing the ENTER
button. This will take you to a menu for configuring the number and type of speakers in
the system.
DELAY SETUP: Reach this menu by moving
the highlight to this line and pressing the ENTER
button. This takes you to a menu for configuring delay times to each speaker in surround
modes.
BALANCE SETUP: Reach this menu by
moving the highlight to this line and pressing
the ENTER button. This will take you to a menu
for configuring the relative volume levels of
each speaker .
SUBWOOFER SETUP: Reach this menu by
moving the highlight to this line and pressing
the ENTER button. This takes you to a menu
for configuring your subwoofer for various surround modes.
Page 19

19
English
Dolby Digital Setup Menu
This menu, which is reached from the MAIN
MENU, provides status information and setup
options for digital inputs.
The first two lines of the screen allow you to
set system-wide configuration options for Dolby
processing:
COMPRESSION: Today’s digital sources are
capable of extremely high dynamic range (the
difference between the softest and loudest
sounds). In some cases, the available dynamic
range may tax the amplifiers or speakers. In
other cases, it may be desirable to compress
the dynamic range when listening at low volume levels. This configuration option allows
you to select three different levels of dynamic
range: OFF (no compression), MODERATE,
or LATE NIGHT (maximum compression). The
factory default is OFF (no compression). If loud
passages are causing distortion or audible
stress to the system, try a setting with more
compression.
PRO LOGIC: This setting determines how the
RSP-985 processes 2-channel Dolby Digital or
DTS source material. Processing of discrete
multi-channel surround material is automatic.
But, some source material, such as a CD played
on a Dolby Digital DVD or an older movie
soundtrack, might have either a 2-channel
stereo signal or a matrix encoded two-channel Pro Logic signal. In some cases, the RSP-985
can detect an encoded ID tag which tells it
how to process a 2-channel signal. In other
cases, it cannot.
The options for processing 2-channel signals
from a Dolby Digital or DTS source are as
follows.
Auto/On: Turns on Dolby Pro Logic decod-
ing for all signals unless the RSP-985 is able
to sense a control code identifying the 2-channel
material as conventional stereo, in which case
Pro Logic is turned off automatically. This is
the default setting, suitable for most applications.
Auto/Off: Turns off Dolby Pro Logic decoding
and plays 2-channel stereo, unless a Pro Logic
signal is specifically identified, in which case
Pro Logic will be activated.
On: Turns on Dolby Pro Logic decoding for
all 2-channel signals, disabling the automatic
sensing.
Off: Turns off Dolby Pro Logic decoding for
all 2-channel signals, disabling the automatic
sensing. Plays conventional 2-channel stereo.
NOTE
: The above settings only effect 2-chan-
nel signals from a Dolby Digital or DTS source.
Discrete digital surround signals (e.g. 5.1
channel signals) will play correctly regardless of the setting.
The three lines in the DIGITAL AUDIO STATUS
portion of the menu screen provide information about the current status of Dolby Digital
inputs:
INPUT: Shows the name of the input source.
SIGNAL: Shows the format of the current
source, i.e. DOLBY DIGITAL, DTS, etc.
CHANNELS: Dolby Digital and DTS signals
can contain up to six discrete channels of information – left, center, right, left rear, right
rear, and a subwoofer or low frequency effects channel. This status line indicates how
many channels are active in the current source
material.
Input Setup Menu
The RSP-985 accepts both analog and digital signals. The INPUT SETUP menu allows you
to configure each input:
INPUT: Select the input you wish to setup by
highlighting this line and stepping through the
available choices with the VOLUME DOWN/
UP buttons. You will need to configure each
input, repeating the following configuration
sequence several times, each time selecting
a different input.
INPUT DOMAIN: Select ANALOG or DIGITAL or AUTO depending on the type of signal connection you have made by stepping
through the available choices with the VOLUME DOWN/UP buttons. Using a DIGITAL
signal, if available, avoids a D/A conversion
in the source component and A/D conversion
in the RSP-985. Note that even when using a
digital input, you still should make analog connections from the source. These will be used
for recording, regardless of the setting on this
menu. Selecting AUTO for the input will check
for the presence of a DIGITAL signal and automatically revert to an ANALOG input if no
DIGITAL signal is present.
VOLUME OFFSET: This menu item adjusts
the volume of each source component so that
the volume level remains relatively constant
when switching between sources and so that
the signal does not overload the RSP-985. Typically, you determine which source has the lowest level and then match the others to that one.
Adjust the level using the VOLUME DOWN/
UP buttons. Note that you are matching the
perceived level you hear from that source, not
the dB readout that appears on-screen.
NOTE
: It is essential not to set the source input
levels so high that the signal overloads the
RSP-985’s input circuitry. Adjust to match the
quietest source, not the loudest.
Page 20

RSP-985 Surround Sound Processor
20
ANALOG LEVEL: The maximum input level
for analog sources is 2V RMS. It is possible
that a source with a very high output level,
such as some CD players, may overdrive the
input. This will be indicated with the word CLIP
appearing on the screen. Should this occur,
change the ANALOG LEVEL menu setting for
that source to 4V which will reduce its input
level by 6dB.
THX: This setting determines which additional
surround circuitry should be activated for the
current input. Choices are THX ON, RE-EQ
(activated Re-EQ only), and THX OFF.
DEFAULT: This setting specifies the default surround mode for each input. Choices are 2 CH
STEREO, MONO, MUSIC 1-4, and PROLOGIC. DOLBY DIGITAL are DTS are automatically selected when an appropriate signal is
present.
Once you have completed the settings for all
of your input sources, return to the MAIN MENU
by pressing the BACK button.
System Setup Menu
This menu, which is reached from the MAIN
MENU, provides access to a wide range of
system-wide configuration options.
RECORDING: Select a source for the VIDEO
2, 3, and 4 record outputs by moving the highlight to this line and then stepping through the
six available input choices using the VOLUME
DOWN/UP buttons.
ZONE 2 IN: Select a source for Zone 2 by
moving the highlight to this line and then stepping through the six available input choices
using the VOLUME DOWN/UP buttons.
ZONE 2 VOLUME: Set the volume level for
Zone 2 by moving the highlight to this line and
then adjust the volume up or down using the
VOLUME DOWN/UP buttons.
POWER-ON MODE: This setting determines
how the RSP-985 powers up when connected
to an AC outlet. In the default STANDBY mode,
the unit goes into a standby status when AC
is applied and must be fully activated from the
front-panel or remote control. In the DIRECT
mode, the unit is fully active whenever it is connected to AC. This may be desirable in installations where the RSP-985 is plugged into a
switched outlet.
ONE-LINE DISPLAY: This option determines
whether a one-line information display appears
on the TV screen for 5 seconds every time an
RSP-985 setting is changed. Some users prefer to turn it off so that it never appears. Change
the setting by highlighting this menu line and
using the VOLUME DOWN/UP buttons to
change from ON to OFF or vice versa.
ZONE 2 AUTO-MUTE: Determines whether
Zone 2 is automatically muted when the
RSP-985 is activated. If auto-mute is YES, the
volume of Zone 2 will be muted when the system
is turned on. If auto-mute is NO, the volume
in Zone 2 will return to its last previous setting when the system is turned on.
FACTORY DEFAULTS: Highlight this option
and press the ENTER button on the remote
control to go to the FACTORY DEFAULT menu
which allows you to return ALL system settings
to the factory default settings.
Press the BACK button to return to the MAIN
menu.
Speaker Setup Menu
This menu, which is reached from the MAIN
menu, allows you to configure the RSP-985
to make optimum use of the capabilities of the
speakers in your system. Using these settings,
the RSP-985 adjusts its crossovers and digital
processing to direct signals to the appropriate speakers.
Home theater speaker systems vary considerably in their size and performance, particularly in their bass output. For this reason, today’s
surround sound processors feature elaborate
logic which can send bass information from
movie soundtracks to the speaker(s) best able
to handle it – subwoofers and/or LARGE speakers. For optimum performance, it is necessary
to tell the RSP-985 the number and type of
speakers in your system.
The following configuration instructions refer
to LARGE and SMALL speakers. The size refers more to the bass performance of the
speaker than its physical size. A full-range
speaker that has extended bass response is
considered LARGE. A compact minispeaker
with limited bass response or power handling
is considered SMALL.
While understanding the terms LARGE and
SMALL is useful, it is probably more important
to understand what these different speaker types
system
mean in terms of
help determine how you should configure your
system. As a general rule, the system
will redirect bass information away
from SMALL speakers and send it to
the LARGE speakers and/or the
SUBWOOFER in your system.
Things become a little more complex in systems with a subwoofer. For example, the
system will generally not redirect bass
information away from a LARGE
speaker to the subwoofer. Thus, the de-
cision you often need to make when faced with
a choice of LARGE or SMALL is whether you
performance. This will
Page 21

21
English
want the particular speaker to play the deep
bass or whether you would prefer that the deep
bass be sent to the subwoofer. If you have
invested in a subwoofer for your system, you
might decide to send all of the bass to it, regardless of how capable the other speakers
in the system may be. In this case, you would
tell the RSP-985 that all of your speakers are
SMALL, without regard to how big they may
actually be.
An alternative configuration for setting up front
SMALL speakers with a subwoofer would be
to follow the speaker manufacturer’s instructions, wiring the SMALL speakers to the
subwoofer’s crossover and then connecting the
subwoofer directly to the front speaker connection terminals. In this arrangement, the
speakers would be classified as LARGE and
the subwoofer setting would be OFF for all
surround modes. No information will be lost
during playback because the system knows
to redirect the bass information to the front
LARGE speakers. This configuration may be
optimal for many users as it can improve the
way the bass integrates into the listening room
and ensure correct satellite speaker operation
by using the speaker manufacturer’s own crossovers.
To configure your system, highlight each of the
following menu lines and use the VOLUME
DOWN/UP buttons to make the setting that
best matches your speakers.
MAIN (Small/Large): This menu setting tells
the RSP-985 what kind of main front left and
right speakers you are using. Use the LARGE
setting if your main left and right speakers are
full range designs with good bass response
capability. If you are using satellite mini-speakers
or if you have THX certified front speakers,
choose the SMALL setting to redirect LFE bass
frequencies to the subwoofer. Highlight this
menu line and use the VOLUME DOWN/UP
buttons to make the appropriate setting. If you
have THX certified front speakers, choose the
SMALL setting.
CENTER (small/large/none): Surround
sound derives much of its spatial accuracy from
a center channel speaker located very close
to a TV. This center channel speaker anchors
dialog information to your screen for greater
coherence between the apparent point of origin
for picture and sound.
• Use the LARGE position if your
system’s center channel speaker is
capable of full-range, extended
bass response. In this position, bass fre-
quencies are handled by the center channel speaker itself.
• Use the SMALL position if your center channel speaker has more limited low frequency capability or if
you have a THX certified center
channel speaker. Low frequencies be-
low 80 Hz are redirected to the front left
and front right speakers (or to a subwoofer)
so they will not overload the center channel speaker. When no subwoofer is used,
all bass frequencies below 80 Hz are sent
to the front left and right speakers. When
a subwoofer is used, bass below 80 Hz
is automatically sent to the subwoofer.
• Select the NONE setting if your system does not have a center channel speaker. The RSP-985 turns the center
channel output off and divides the center
channel signal equally between left and
right front speakers.
SURROUNDS (small/large/none): Surround speaker performance varies widely from
system to system. It is important to tell the
RSP-985 what type of surround speakers you
have in your system.
• If your rear surround speakers are
capable of sustained low frequency
output below 80 Hz, select the
LARGE setting. This ensures that your rear
speakers receive a full bandwidth signal
whenever available from the RSP-985.
• If your rear speakers have limited
bass capability or if you have THX
certified surround speakers, use the
SMALL setting. This limits the RSP-985’s
low frequency output so that the speaker
is not overdriven. The result will be cleaner
reproduction of ambience and effects information. In the SMALL position, the bass
information originally intended for particular
speakers is sent to the Subwoofer or LARGE
speakers instead. Fundamental tones are
not lost but simply redirected to the speakers
best able to handle them.
• If your system has no rear surround
speakers, select the NONE setting.
Surround information is sent to the front
speakers and, in certain cases, the
subwoofer.
SUBWOOFER (On/Off): Use the ON setting if your system has a subwoofer. This activates the built-in electronic crossover to route
low frequencies (called “redirected bass”) from
any SMALL speakers to the subwoofer, which
is best capable of reproducing these low frequency signals. If your system does not
have a subwoofer, put this switch in
the OFF position. This sends the redirected
bass signals plus the LFE channel (Low Frequency Extension, the .1 channel) to LARGE
speakers in the system.
NOTE
: In STEREO, DOLBY PRO LOGIC, and
DSP MUSIC modes, bass is directed to the
front speakers and NOT to the subwoofer
when LARGE is selected. For subwoofer output in these modes with LARGE front speakers, override the bass management system
with a setting in the SUBWOOFER SETUP
menu.
Once you have completed the settings for all
of your speakers, return to the MAIN menu
by pressing the BACK button.
Page 22

RSP-985 Surround Sound Processor
22
Delay Setup Menu
This menu, which is reached from the MAIN
menu, allows you to set the delay time for each
individual speaker. This is an important feature as it enables the sound from each speaker
to arrive at the listening position at the same
time, even when they are not all placed at equal
distances from the listener. This preserves accurate sound imaging even with irregular
speaker placements.
As a rule of thumb, increase the relative delay to speakers located closer to the seating
area and decrease the relative delay to speakers located farther from the seating area. Start
by measuring the distance from your seating
position to each speaker. The speaker farthest
away should receive no additional delay. Each
of the other speakers will receive one millisecond of delay for each foot (30 cm) closer to
you than the farthest speaker. For example,
if the left front speaker is farthest away at 13
feet and the left rear speaker is 7 feet away,
you should add 6 milliseconds of delay to the
left rear speaker. Continue setting delays for
each speaker until you have compensated for
each speaker that is closer to you than the
farthest speaker.
Once you have completed the delay settings
for all of your speakers, return to the MAIN
menu by pressing the BACK button.
Balance Setup Menu
This menu, also reached from the MAIN screen,
adjusts the relative volume level of all six speakers. Just as you set the delays in the previous
step to ensure that the sound from all of the
speakers arrives at the same time, you also
need to ensure that the volume of the sound
from all speakers is the same.
To calibrate levels, turn on the built-in noise
generator by highlighting the NOISE line of
the BALANCE SETUP menu and use the VOL
DOWN/UP buttons to choose the AUTO position. You will hear noise coming from the first
speaker. After three seconds with no adjustment , the test signal will automatically shift
to the next speaker, continuing through all of
the speakers in sequence.
While seated in the normal listening location,
listen to hear if one speaker is significantly
louder or quieter than the others. It is best to
identify a speaker that is in the middle range
(neither the loudest nor the quietest) to use as
a reference.
Leaving the volume level of the reference
speaker unchanged, cycle through the other
speakers, this time adjusting each of their
volume levels up or down to match the reference speaker, using the VOLUME DOWN/
UP buttons to change the volume of the highlighted speaker while the test noise is coming
from it. Alternatively, you can switch to the
MANUAL noise setting which will send the noise
signal to the speaker you highlight on the menu.
Continue through all of the speakers until they
produce the same output level. It may be necessary to cycle through the speakers, adjusting volumes several times to get the desired
result.
It is also possible to adjust the balance with an
external signal, such as a test signal disc. In
this case, turn the noise setting to OFF and
proceed directly to volume settings of individual
speakers.
NOTE
: This calibration will be more accurate
using a sound pressure level (SPL) meter to
measure the output of each speaker. SPL
meters are available from electronics stores,
or your authorized Rotel dealer may loan you
one. Set the meter to its SLOW response with
C-weighting and hold it away from your body.
Adjust each speaker so that the meter provides the same reading for each of the speakers in your system. Use the MANUAL noise
setting. For the most accurate calibration of
a surround system, an SPL meter must be used
and all speakers must be calibrated to produce a 75 dB reading at the listening position.
Once you have completed the balance settings
for all of your speakers, return to the MAIN
menu by pressing the BACK button.
Page 23

23
English
Subwoofer Setup Menu
This menu, also reached from the MAIN screen,
allows you to optimize the RSP-985 for your
particular subwoofer. The settings in this menu
may be considered to be “advanced” and need
not be adjusted unless specifically desired.
SW LIMITER: The wide dynamic range and
impressive bass effects of today’s source
material can overload a subwoofer. This setting allows you to limit the level of the signal
sent to the subwoofer. Go to the limiter menu
by highlighting the SW LIMITER line and pressing ENTER. An instruction menu appears and
a low frequency noise signal is sent to the
subwoofer (or LARGE speakers if no subwoofer
is present). Adjust the noise level with the VOL
buttons until you just begin to hear distortion
from the speakers. Press the ENTER button to
set the limiter at this level. Press BACK to return.
STEREO/P/L SW: This setting allows you to
override the standard bass management in
STEREO, PRO LOGIC, and DSP MUSIC modes
when LARGE front speakers are selected. Select
YES to have a subwoofer active with LARGE
front speakers in these modes. Select NO if
you don’t have a subwoofer. Select NORMAL
for the standard automatic bass management
in all modes.
LFE MIX LEVEL: This setting determines the
relative signal level of the LFE (Low Frequency
Extension) channel (the .1 channel) relative to
the five full-range channels. It is factory set according to the standards of Dolby Labs, DTS
Technology, and THX Lucasfilm. The adjustment
may be varied for each surround mode according to personal taste, if desired.
The LFE content of DTS encoded movies is mixed
differently than DTS encoded music. For DTS
movies, the LFE MIX LEVEL should be set to
10dB for correct THX playback. For DTS music,
the level should be set to 0db. THX should not
be activated for music playback. For Dolby
Digital movies, the LFE MIX LEVEL should be
set to 10db for proper playback in DOLBY
DIGITAL and THX modes.
Once you have completed the subwoofer
settings for all of your speakers, return to the
MAIN menu by pressing the BACK button.
Factory Default Menu
The final menu that can be reached from the
SYSTEM SETUP screen is the FACTORY DEFAULT menu, which resets all system configuration settings to the factory supplied settings.
NOTE
: Resetting to factory default settings will
erase all stored settings including delay settings, speaker settings, balance settings, input settings and more. You will lose ALL system
configuration settings. Be certain that you wish
to do so before resetting the factory defaults.
To reset the factory defaults, press the ENTER
button. This will take you to a confirmation
screen where you will have a chance to confirm your decision by pressing ENTER a second time.
To return to the SYSTEM SETUP screen without resetting the factory defaults, press the BACK
button.
Specifications
Audio
Total Harmonic Distortion (10 Hz - 70 kHz):
<0.03%
Intermodulation Distortion (60 Hz: 7 kHz):
<0.03%
Frequency Response (line level):
20 Hz - 20 kHz, ± 1 dB
Signal to Noise Ratio (IHF “A” weighted):
100 dB (Stereo)
90 dB (Dolby Digital, dts)
Gain/Input Impedance:
Analog Gain:10dB/47 kohms
Digital: 0.5V/-20dBf
Tone Controls (Bass/Treble):
±6 dB at 50 Hz/15 kHz
Video
Frequency Response:
3 Hz-10 MHz, ± 3 dB
Signal to Noise Ratio:
45 dB
Input Impedance:
75 ohms
Output Impedance:
75 ohms
Output Level:
1 volt
General
Power Consumption:
46 watts
Power Requirements (AC):
115 volts, 60Hz (USA)
230 volts, 50Hz (EC)
Weight:
7.0 Kg/15.4 lb.
Dimensions (W x H x D):
440 x 121 x 329 mm
17
3/8" x 47/8" x 13"
All specifications are accurate at the time of printing.
Rotel reserves the right to make improvements without notice.
Rotel and the Rotel HiFi logo are registered trademarks of
The Rotel Co, Ltd., Tokyo, Japan.
DTS is a registered trademark of Digital Theater Systems.
Manufactured under license from Dolby Laboratories
Licensing Corporation. “Dolby”, “Pro Logic”, and the doubleD symbol are trademarks of Dolby Laboratories Licensing
Corporation. Confidential unpublished works © 1992 –
1997 Dolby Laboratories, Inc. All rights reserved.
THX Ultra™ and the THX Ultra logo are registered trademarks of Lucasfilms, Ltd.
Page 24

RSP-985 Surround-Sound-Prozessor
24
Inhaltsverzeichnis
(die grau unterlegten Zahlen beziehen sich auf die Abbildungen)
1: Bedienelemente und Anschlüsse 2
2: Pinbelegung der DB25-Anschlüsse 2
3: Fernbedienung 3
4: Ausgangsanschlüsse 3
5: Anschließen der Quellen
über die Cinch-Eingänge 4
6: S-Video-Anschlußmöglichkeiten 5
7: Anschlußdiagramm für den Zone 2-Betrieb 6
8: On-Screen-Menüsystem 7
Die Firma Rotel ....................................25
Zu dieser Anleitung ..............................25
THX Ultra™ 25
Auspacken des Gerätes 25
Einige Vorsichtsmaßnahmen 25
Aufstellung des Gerätes 25
Bedienelemente an der Gerätefront .......26
Standby-LED 26
Standby-Taste 26
Fernbedienungssensor 26
Lautstärkeregler (MASTER VOLUME) 26
Klangregler 26
Tasten zur Eingangswahl (LISTENING) 26
5.1 CH-Taste 26
TAPE MONITOR 26
Tasten zur Aufnahmewahl (RECORDING) 26
MODE-LEDs (Surround Sound) 27
Mode-Taste 28
Fernbedienung RR-939 .........................28
Programmieren der RR-939 28
POWER-Taste 28
VOLUME-Tasten 28
MUTE-Taste (nur auf der Fernbedienung) 28
Input Select-Tasten 28
5.1 CH-Taste 28
Taste Surround + 28
Movie Filter/THX-Taste
(nur auf der Fernbedienung) 29
ZIFFERN-Tasten
(nur auf der Fernbedienung) 29
On-Screen-Taste
(nur auf der Fernbedienung) 29
DOWN/UP-Tasten
(nur auf der Fernbedienung) 29
ENTER-Taste
(nur auf der Fernbedienung) 29
BACK-Taste
(nur auf der Fernbedienung) 29
Eingangsanschlußmöglichkeiten
an der Rückseite ..................................29
Cinch-Audio- und Videoeingänge 29
VIDEO-Eingänge 29
Digitalaudioeingänge 30
5.1 CH-Audioeingang 30
Cinch-Tape-Monitor-Eingänge 30
EXTERNAL IN-Buchse 30
Geräterückseite:
Ausgangssignalanschlüsse.....................30
Cinch-Audio- und Videoausgänge 30
S-Video-Ausgänge 31
Cinch-Audioausgänge (Hauptprozessor) 31
5.1 CH OUTPUT
(DB25-Ausgang, Hauptprozessor) 31
Geräterückseite: Netzanschlüsse ...........32
Netzeingang 32
Schaltbare Steckdosen 32
Zone 2-Betrieb.....................................32
Ein- und Ausschalten im Zone 2-Betrieb 32
Zone 2-Ausgänge 32
Remote Extension-Buchsen 33
Bildschirmanzeige
(On-Screen-Display = OSD) und
Systemkonfiguration ............................33
Diese Tasten führen Sie durch die Menüs
33
Bildschirmanzeige des Gerätetyps 33
SYSTEM STATUS-Menü 34
MAIN-Menü 34
DOLBY DIGITAL Setup-Menü 34
INPUT SETUP-Menü 35
SYSTEM SETUP-Menü 36
SPEAKER SETUP-Menü 36
DELAY SETUP-Menü 37
BALANCE SETUP-Menü 38
SUBWOOFER SETUP-Menü 38
Factory Default-Menü 39
Technische Daten ..................................39
Audio 39
Video 39
Sonstige Daten 39
TV-MONITOR-Videoausgänge 31
Tape Monitor-Audioausgänge 32
Page 25

25
Deutsch
Die Firma Rotel
Die Firma Rotel wurde vor mehr als 30 Jahren
von einer Familie gegründet, deren Interesse
an Musik so groß war, daß sie beschloß,
qualitativ hochwertigste HiFi-Produkte
herzustellen und Musikliebhabern ungeachtet
ihres Geldbeutels einen außergewöhnlichen
Wert zukommen zu lassen. Ein Ziel, das von
allen Rotel-Angestellten verfolgt wird.
Die Ingenieure arbeiten als Team eng
zusammen. Sie hören sich jedes neue Produkt
an und stimmen es klanglich ab, bis es den
gewünschten Musikstandards entspricht. Die
eingesetzten Bauteile stammen aus verschiedenen Ländern und wurden ausgewählt, um
das jeweilige Produkt zu optimieren. So finden
Sie in Rotel-Geräten Kondensatoren aus
Großbritannien und Deutschland, Halbleiter
aus Japan oder den USA und direkt bei Rotel
gefertigte Ringkerntransformatoren.
Rotels guter Ruf wird durch hunderte von
Testerfolgen von den angesehensten Testern
der Branche, die jeden Tag Musik hören,
untermauert. Die Ergebnisse beweisen, daß
das Unternehmen sein Ziel konsequent verfolgt
hat, mit Equipment hoher Musikalität und
Zuverlässigkeit bei gleichzeitig günstigen
Preisen.
Wir danken Ihnen, daß Sie sich für dieses RotelProdukt entschieden haben und wünschen
Ihnen viel Hörvergnügen.
Zu dieser Anleitung
Im RSP-985 ist Rotels Balanced-Design-Konzept
überzeugend umgesetzt worden. Sein
ausgeklügeltes Platinenlayout, die sorgfältige
Auswahl der Bauteile und ausführliche Hörtests
geben Ihnen als Käufer die Sicherheit, ein Gerät
mit einem hervorragenden Klang erworben
zu haben, das obendrein durch seine Zuverlässigkeit besticht. Er verfügt über das analoge
®
-Prologic®-Format und beherrscht
Dolby
darüber hinaus die Dolby-Digital
®
Ultra™-Surround-Verarbeitung. Ferner
THX
glänzt er mit:
• DB25-Schnittstelle für den 5.1-Eingang (für
eine externe Surround-Verarbeitung wie
®
oder andere künftige Digital-
MPEG
standardformate)
• On-Screen-Menüführung
®
-, DTS®- und
• einer Vielzahl von Ein- und
Ausgangsanschlüssen für Audio- und
Videoquellen (Cinch, S-Video, digital)
• einer Reihe von Eingangswahltasten: LISTENING (analog und digital) und RECORDING (analog)
• „ZONE 2“-Ausgangsanschluß mit separater
Eingangswahl und Pegeleinstellung in einem
zweiten Wohnbereich
• programmierbarer Fernbedienung zur
Fernsteuerung des RSP-985 und bis zu
sieben weiterer Komponenten.
THX Ultra™
Unter THX sind eine Reihe von Standards und
Technologien zu verstehen, die von der
renommierten Filmgesellschaft Lucasfilm Ltd.
entwickelt wurden. THX ist aus dem Bedürfnis
von George Lucas entstanden, den Ton eines
Films sowohl im Kino als auch in Ihrem
Wohnraum so wiederzugeben, wie ihn der
Regisseur beim Abmischen hört.
Der Original-Soundtrack für einen Film wird
in speziellen Studios abgemischt und optimal
auf die Wiedergabebedingungen in einem
Kino abgestimmt. Der so abgestimmte Ton wird
dann direkt auf Laserdisc, VHS-Band, DVD usw.
übertragen und nicht an die Wiedergabebedingungen in kleineren Heimkinoumgebungen angepaßt. Aus diesem Grund
entwickelten die THX-Ingenieure ein
patentiertes, neues Verfahren, das die richtige
Wiedergabe eines Film-Soundtracks in Ihrer
Heimkinoumgebung sicherstellt.
Bevor eine HiFi-Cinema-Komponente die THX
Ultra-Zertifizierung erhält, gilt es, die THXTechnologien in das System zu integrieren und
strenge Qualitäts- und Leistungstests zu
durchlaufen. Erst dann darf das Produkt das
THX Ultra-Logo tragen. Damit ist gewährleistet,
daß die von Ihnen erworbene HiFi-CinemaKomponente in den kommenden Jahren einen
hervorragenden HiFi-Cinema-Sound sicherstellt.
Auspacken des Gerätes
Entfernen Sie die Verpackung vorsichtig vom
RSP-985. Sie enthält neben dem Gerät die
Fernbedienung und weiteres Zubehör.
Bewahren Sie den Versandkarton und das
übrige Verpackungsmaterial des RSP-985 für
einen eventuellen späteren Einsatz auf. Der
Versand oder Transport des Gerätes in einer
anderen als der Originalverpackung kann zu
erheblichen Beschädigungen führen.
Einige Vorsichtsmaßnahmen
Lesen Sie sich die Bedienungsanleitung bitte
vor der Inbetriebnahme genau durch. Neben
grundsätzlichen Installations- und
Bedienungshinweisen (bitte beachten Sie auch
die Sicherheits- und Warnhinweise am Anfang
der Bedienungsanleitung) enthält sie allgemeine
Informationen, die Ihnen helfen werden, Ihr
System mit seiner maximalen Leistungsfähigkeit
zu betreiben. Bitte setzen Sie sich bei etwaigen
Fragen mit Ihrem autorisierten RotelFachhändler in Verbindung.
Schicken Sie die Ihrem Gerät beiliegende
Garantieanforderungskarte ausgefüllt an den
Rotel-Distributor in Ihrem Land. Bewahren Sie
bitte die Original-Kaufquittung auf. Sie belegt
am besten das Kaufdatum, das für Sie wichtig
wird, sobald Sie eine Garantieleistung in
Anspruch nehmen.
Aufstellung des Gerätes
Plazieren Sie den RSP-985 auf einer stabilen,
trockenen, ebenen Oberfläche und setzen Sie
das Gerät weder direktem Sonnenlicht,
extremer Wärme, Feuchtigkeit noch starken
Vibrationen aus.
Stellen Sie sicher, daß der RSP-985 in der Nähe
der anderen, zu Ihrem Audio-/Videosystem
gehörenden Komponenten und, wenn möglich,
in speziellem HiFi-Mobiliar untergebracht wird.
Dies vereinfacht die Kabelführung, das
Anschließen und mögliche Änderungen am
System. Auf diese Weise wird auch
Interferenzen mit anderen Komponenten und
der Wärmeübertragung durch andere
Komponenten vorgebeugt.
Der RSP-985 erwärmt sich während des
normalen Betriebes. Die entstehende Wärme
kann unter normalen Bedingungen über die
Ventilationsöffnungen abgeführt werden. Die
Ventilationsöffnungen an der Oberseite dürfen
nicht verdeckt werden. Um das Gehäuse muß
ein Freiraum von 10 cm und am Aufstellungsort
eine ausreichende Luftzirkulation gewährleistet
sein, um einer Überhitzung des SurroundProzessors vorzubeugen.
Stellen Sie sicher, daß hinter dem RSP-985
genügend Platz ist, um so das Anschließen zu
vereinfachen. Berücksichtigen Sie, daß Sie viele
Page 26

RSP-985 Surround-Sound-Prozessor
26
andere Geräte an den Surround-SoundProzessor anschließen und Sie möglicherweise
mehr Platz benötigen als erwartet.
Stellen Sie keine anderen Gegenstände (Geräte
oder sonstige Dinge) auf den RSP-985. Es darf
kein Wasser in das Gerät gelangen, da
hierdurch die empfindlichen Schaltkreise
beschädigt werden können.
Bedienelemente an der Gerätefront
Obwohl der RSP-985 ausgesprochen
bedienerfreundlich aufgebaut ist, sollten Sie
sich mit den Bedienelementen an der
Gerätefront und den Anschlüssen an der
Geräterückseite des RSP-985 vertraut machen,
bevor Sie andere Komponenten an den Surround-Sound-Prozessor anschließen. Die
folgenden Erklärungen werden Ihnen dabei
helfen, sich mit dem Gerät vertraut zu machen.
Die nebenstehenden Referenznummern
beziehen sich auf die Abbildungen am Anfang
der Bedienungsanleitung.
Standby-LED
Die STANDBY-LED leuchtet, sobald der RSP-985
an eine stromführende Steckdose angeschlossen wird. Damit ist der RSP-985 jedoch noch
nicht vollständig aktiviert. Erst wenn weitere
LEDs an der Gerätefront leuchten, ist der
RSP-985 vom Standby-Modus in den normalen
Betriebszustand geschaltet worden.
HINWEIS
: Während des Systemsetups kann der
RSP-985 im Menüpunkt „POWER-ON
MODE“ in den DIRECT-Modus gesetzt
werden. Dann schaltet der Surround-Prozessor
stets in den normalen Betriebszustand, sobald
er an eine stromführende Steckdose
angeschlossen wird.
Standby-Taste
Über diese Taste wird der RSP-985 vom
Standby-Modus in den normalen Betriebszustand geschaltet. Leuchtet an der Gerätefront
nur die STANDBY-LED, drücken Sie die
STANDBY-Taste an der Gerätefront oder die
POWER-Taste auf der Fernbedienung, so wird
der RSP-985 vollständig aktiviert. An der
Gerätefront beginnen auch andere LEDs zu
leuchten und auf dem Fernsehbildschirm
erscheint die Anzeige „ROTEL RSP-985 SUR-
ROUND SOUND PROCESSOR“. Durch
erneutes Drücken der STANDBY-Taste
deaktivieren Sie den RSP-985 wieder. Sie
sehen, daß die STANDBY-LED weiterhin
leuchtet.
HINWEIS
: Über die STANDBY-Taste werden
auch die schaltbaren Steckdosen an der
Geräterückseite ein- und ausgeschaltet.
Befindet sich der RSP-985 im STANDBYModus, sind die schaltbaren Steckdosen
abgeschaltet. Ist der RSP-985 in Betrieb, sind
auch die schaltbaren Steckdosen aktiv.
Die Besonderheiten zur Funktion der STANDBYTaste bei Nutzung der Zone 2-Funktion des
RSP-985 werden unten in den entsprechenden
Abschnitten erläutert.
Fernbedienungssensor
Über dieses Fenster werden die von der
Fernbedienung übermittelten Infrarotsignale
empfangen. Richten Sie die Fernbedienung
auf diesen Sensor, um eine korrekte
Signalübertragung zu gewährleisten. Stellen
Sie sicher, daß der Sensor nicht durch Kabel
oder sonstiges Zubehör verdeckt wird.
Lautstärkeregler (MASTER VOLUME)
Über den MASTER-VOLUME-Lautstärkeregler
werden die Lautstärkepegel aller Ausgangskanäle gleichzeitig verändert. Drehen Sie
diesen Regler nach rechts, um die Surroundlautstärke zu erhöhen. Drehen Sie den Regler
nach links, um die Lautstärke zu reduzieren.
Die Surroundlautstärke kann auch über die VOLTasten auf der Fernbedienung eingestellt
werden.
Klangregler
Mit den Baß- (BASS) und Höhenreglern (TREBLE)
werden die tiefen und hohen Frequenzen
hervorgehoben bzw. abgeschwächt. Zum
Anheben der Frequenzbereiche drehen Sie
den jeweiligen Regler im Uhrzeigersinn, zur
Abschwächung gegen den Uhrzeigersinn. In
der mittleren Position werden die Signale ohne
Beeinträchtigung der Klangqualität am
Klangregelnetzwerk vorbeigeleitet. Dabei
erfolgt weder eine Hervorhebung noch eine
Abschwächung der Frequenz. Die Veränderung
in der Einstellung der Klangregler wird auf dem
Bildschirm angezeigt.
HINWEIS
: Die Klangregler haben im THX-
Modus keine Funktion. Dies gilt unabhängig
von der Bildschirmanzeige.
Tasten zur Eingangswahl (LISTENING)
Über die sechs Tasten an der Gerätefront
können Sie eine Audio- oder VideoEingangsquelle (wie z.B. einen CD-Player, einen
Videorecorder, einen Laserdisc-Player usw.)
direkt anwählen und anhören und/oder
ansehen. Die Bildschirmanzeige gibt Auskunft
über die gewählte Quelle.
HINWEIS
: An den Quelleneingängen können
sowohl analoge als auch digitale Signale
anliegen. Bitte beachten Sie hierzu die
Hinweise im Kapitel „Bildschirmanzeige”.
5.1 CH-Taste
Diese Taste umgeht alle anderen (sowohl
digitalen als auch analogen) Eingänge und
verbindet einen externen Digital-Decoder direkt
mit dem MASTER-VOLUME-Regler und den
Ausgängen des RSP-985. Nach Drücken dieser
Taste können Sie sich das Audio-Eingangssignal
eines 5.1-Decoders anhören. Über der 5.1 CHTaste leuchtet eine LED zur Bestätigung Ihrer
Wahl. Diese Funktion können Sie auch über
die Fernbedienung steuern.
HINWEIS
: Das Eingangssignal am 5.1-Eingang
ist ein reines Audiosignal. Das Videosignal
der gewählten Quelle bleibt aktiv. Das 5.1Eingangssignal steht weder für Aufnahmen
noch für die 2-Bereichs-Funktion zur
Verfügung.
TAPE MONITOR
Mit Drücken dieser Taste umgehen Sie die
normalen Listening-Eingangswahltasten und
hören sich die Quelle an, die an die TAPE
MONITOR-Eingangsbuchsen angeschlossen
ist. Nach Drücken der TAPE-MONITOR-Taste
leuchtet die über dieser Taste liegende LED.
Tasten zur Aufnahmewahl (RECORDING)
Beim RSP-985 haben Sie die Möglichkeit, sich
eine Quelle anzuhören und/oder anzusehen,
während Sie gleichzeitig eine zweite Quelle
aufnehmen. So können Sie sich beispielsweise
eine CD anhören und gleichzeitig Aufnahmen
von einem DVD-Player auf einen Videorecorder
Page 27

27
Deutsch
überspielen. Über die mit RECORDING
gekennzeichneten Tasten an der Gerätefront
können Sie den analogen Eingang jeder
beliebigen Quelle zum Überspielen anwählen.
Die Signale werden zu den Ausgängen VIDEO
2, 3 und 4 an der Geräterückseite gesendet
und haben keinen Einfluß auf die gerade
gehörte Quelle. Direkt über den Tasten sitzende
LEDs zeigen an, welche Taste gedrückt wurde.
Auf der Fernbedienung befinden sich keine
RECORDING-Tasten. Jedoch können Sie Ihre
Wahl mit Hilfe der On-Screen-Menüführung
auch über die Fernbedienung treffen.
HINWEIS
: Für die RECORD-Funktion müssen
analoge Signale anliegen. Nutzen Sie also
eine digitale Verbindung von einem CD- oder
DVD-Player, um Musik zu hören, sollten Sie
zu Aufnahmezwecken auch ein analoges Signal anschließen. Siehe Abschnitt „Eingangsanschlußmöglichkeiten an der Rückseite“
unten.
MODE-LEDs (Surround Sound)
Der RSP-985 ermöglicht die Wiedergabe
verschiedenster Arten von Audio- und
Videoquellen (siehe unten). Dazu bietet dieser
Surround-Prozessor eine Vielzahl von SurroundSound-Modi. Die LEDs zeigen an, für welchen
Surround-Sound-Modus Sie sich entschieden
haben. Im folgenden erhalten Sie eine kurze
Beschreibung zu den einzelnen SurroundSound-Modi.
2 CH STEREO ermöglicht die herkömmliche
Stereowiedergabe mit zwei Lautsprechern ohne
Surround-Sound- oder sonstige Verarbeitung.
Die linken und rechten Frontlautsprecher
spielen. Center- und Surroundlautsprecher sind
nicht aktiv.
MONO kombiniert alle Kanäle am Quelleneingang in einem einzigen Signal. Das Signal wird zum Centerlautsprecher geleitet. Ist
in das System kein Centerlautsprecher integriert,
wird das Signal gleichmäßig zwischen den
linken und rechten Frontlautsprechern aufgeteilt.
Alle anderen Lautsprecher sind (mit Ausnahme
des Subwoofers) nicht aktiv. Diese Einstellung
kann sinnvoll sein, wenn Sie sich z.B. im
Hintergrund eine Nachrichtensendung ansehen
und nicht die Lautstärkepegel oder Effekte des
kompletten Surroundsystems hören möchten.
MUSIC 1, MUSIC 2, MUSIC 3 und MUSIC
4 simulieren verschiedene akustische
Umgebungen und werden vorwiegend dazu
verwendet, beim Anhören von Musikquellen
Umgebungseffekte zu erzeugen. MUSIC 1
(„Hall“) erzeugt ein langes, helles Echo in einem
großen Zuhörerraum und eignet sich für
Liveaufnahmen. MUSIC 2 („Club“) erzeugt ein
kurzes, dunkles Echo in einem mit Publikum
gefüllten Club und ist für Pop und Rock die
richtige Betriebsart. MUSIC 3 („Natural“) bietet
minimale Umgebungseffekte für eine große
Bandbreite von Musik einschließlich Jazz und
Surround-codierter Musik. MUSIC 4 („Party“)
sendet das komplette Stereosignal ohne
Surroundverarbeitung zu den vorderen und
hinteren Lautsprechern und sorgt für eine
maximale Ausgangsleistung. Experimentieren
Sie ein wenig. So werden Sie herausfinden,
welcher Modus am besten zu der von Ihnen
gewählten Quelle paßt. In den MUSIC-Modi
sind alle Lautsprecher aktiv.
HINWEIS
: Für die Modi MUSIC 1 und MUSIC
2 sowie für die Modi MUSIC 3 und MUSIC
4 verfügt der RSP-985 jeweils über eine LED.
HINWEIS
: Ist für die Frontlautsprecher die
Einstellung LARGE gewählt worden, ist der
Subwoofer in den MUSIC-Modi nicht aktiv
(dies kann während der Systemkonfiguration
durch eine entsprechende Einstellung im
SUBWOOFER SETUP-Menü geändert
werden).
DOLBY PROLOGIC® sorgt für eine korrekte
Decodierung und Verarbeitung von analogen
Dolby Surround-codierten Audioquellen. Dabei
spielt es keine Rolle, ob es sich um eine MusikCD, ein Videotape, eine Videodisc, eine
herkömmliche Stereo-TV-Übertragung oder eine
Satellitenübertragung handelt. Die Dolby
Prologic-Decodierung oder -Wiedergabe über
ein korrekt eingestelltes System gewährleistet
eine exakte Wiedergabe von gerichteten
Informationen und Umgebungseffekten, wie
der Regisseur sie beim Abmischen gehört hat.
®
Bei DOLBY DIGITAL
wird jede diskrete Dolby
Digital-codierte digitale Audioquelle wie z.B.
eine AC-3 Laserdisc oder DVD-Disc decodiert.
Im Dolby Digital-Format kann die diskrete
Surroundinformation von bis zu fünf Kanälen
plus Subwoofer verarbeitet werden.
®
Unter THX
Ultra™ versteht man eine Reihe
von Technologien, die von den THX-Ingenieuren
entwickelt worden sind, um den Klang im
Wohnzimmer möglichst exakt dem Sound
anzugleichen, den der Regisseur beim
Abmischen eines Films gehört hat. Dies ist nicht
einfach, da Filme in Referenz-Theatern
abgemischt werden, die in der Größe einem
durchschnittlichen Kino entsprechen. Ein so
großer Raum wird von anderen akustischen
Eigenheiten geprägt als ein Wohnzimmer.
Daher entwickelten die THX-Ingenieure eine
Reihe zusätzlicher Kunstgriffe. Leuchtet die THXAnzeige, werden die folgenden THX-Technologien
automatisch dem Dolby Prologic-, Dolby-Digital- bzw. DTS-Decoder hinzugefügt:
• Re-Equalization™ zum Herausfiltern der
hohen Frequenzen und damit der
Unterschiede, die durch die
unterschiedlichen Bedingungen in einem
Kino und zu Hause bestehen. Vielleicht
haben Sie schon einmal die Erfahrung
gemacht, daß einige Video-Soundtracks bei
der Wiedergabe über ein gutes Home-HiFiCinema-System sehr hell klingen, obwohl
der Klang im Kino gut ist. Das ist darauf
zurückzuführen, daß in Ihrem Wohnraum
andere Bedingungen herrschen als im Kino,
die vor allem im Equipment, der Akustik
und dem Tuning-Verfahren begründet sind.
Re-Equalization hilft bei der Kompensierung
dieser Probleme.
• Timbre Matching™ zur Reduzierung von
Klangunterschieden zwischen Front- und
Surround-Signalen durch Implementierung
einer Equalization-Kurve in das SurroundSignal. Aufgrund der Kontur unserer Ohren
werden die Töne, die von hinten oder oben
kommen, anders wahrgenommen als
solche, die von vorne kommen. Eine
spezielle Equalization-Kurve gleicht dieses
Phänomen aus. Durch Timbre Matching™
wird von vorne nach hinten ein
harmonisches Klangbild sichergestellt.
• Decorrelation™ verbessert die räumliche
Abbildung des Dolby-Surround-Signals aus
dem hinteren Kanal, indem die
Surroundinformationen eines DolbyPrologic-Decoders getrennt werden, um die
Teilinformationen des Signals aufeinander
abzustimmen. Hierdurch kann sich das Signal weiter ausbreiten. Der Hörbereich wird
vergrößert.
Durch Drücken der MOVIE FILTER-Taste auf der
Fernbedienung können Sie die oben
beschriebenen THX-Technologien aktivieren.
Dolby Digital-, DTS- und Dolby Prologic-codierte
Filme sowie Filme in Stereo oder Mono können
von der Aktivierung dieser THX-Features
Page 28

RSP-985 Surround-Sound-Prozessor
28
profitieren. Aktivieren Sie THX nur bei der
Wiedergabe von Filmen, die für große
Filmtheater abgemischt wurden. THX muß nicht
aktiviert werden, wenn Filmmusik, Sportsendungen, Talkshows oder sonstige Programme
wiedergegeben werden, die für kleine Räume
abgemischt worden sind.
HINWEIS
: Alle oben beschriebenen Surround-
modi werden mit Ausnahme von Dolby Digital, DTS und THX über die MODE-Taste (siehe
Beschreibung unten) ausgewählt. Dolby Digital und DTS werden automatisch aktiviert,
wenn der RSP-985 spezielle Digitalcodes im
Quellmaterial erkennt. THX wird jedem
beliebigen Cinema-Surroundmodus hinzugefügt, wenn Sie die MOVIE FILTER-Taste
auf der Fernbedienung drücken oder
während des Systemsetups eine Einstellung
im entsprechenden On-Screen-Menü vorgenommen haben.
Mode-Taste
Über die MODE-Taste können Sie einen der
oben beschriebenen Surroundmodi anwählen.
Drücken Sie die MODE-Taste (oder die Taste
SURROUND + auf der Fernbedienung). Die
LED über der Taste beginnt zu leuchten. Die
Einstellung der Surroundmodi kann auch im
ON-SCREEN-Menüsystem geändert werden.
Dolby Digital und DTS werden automatisch
aktiviert. THX kann jedem CinemaSurroundmodus hinzugefügt werden, indem
Sie die MOVIE-FILTER-Taste auf der
Fernbedienung drücken.
HINWEIS
: Für jeden Eingang kann eine Stan-
dard-MODE-Einstellung gespeichert werden.
Wenn Sie die daran angeschlossene
Eingangsquelle wählen, wird der gewünschte
Modus direkt aktiviert. Die Einstellung wird
während des Systemsetups (siehe
Erläuterungen am Ende der Bedienungsanleitung) im ON-SCREEN-Menüsystem
vorgenommen.
Fernbedienung RR-939
Dem RSP-985 liegt eine programmierbare
Fernbedienung bei, über die nicht nur der
Surround-Prozessor, sondern insgesamt bis zu
8 Audio-/Videokomponenten ferngesteuert
werden können.
Der Fernbedienung liegt eine Bedienungsanleitung bei, der Sie detaillierte Informationen
zur Programmierung und zu den
Einsatzmöglichkeiten der RR-939 entnehmen
können. Der folgende Abschnitt enthält nur
Informationen zum Betrieb der RR-939 mit dem
RSP-985.
HINWEIS
: Viele Funktionen können auch über
die Bedienelemente an der Gerätefront
aktiviert werden und sind hier nur kurz
aufgelistet. Detaillierte Informationen
entnehmen Sie bitte den entsprechenden
Abschnitten oben in dieser Bedienungsanleitung.
Programmieren der RR-939
Die dem RSP-985 beiliegende RR-939 wird
im Werk so programmiert, daß der SurroundProzessor über sie ferngesteuert werden kann.
Sollte trotz Aktivierung des AUDIO-Befehls die
Fernsteuerung des RSP-985 durch die RR-939
nicht möglich sein, können Sie die
Fernbedienung selber programmieren (AU-
DIO Code = 002). Gehen Sie dabei wie
folgt vor:
1. Drücken Sie die AUDIO-Taste im oberen
Bereich der Fernbedienung. Drücken Sie
gleichzeitig die MUTE-Taste und halten Sie
diese für mindestens eine Sekunde gedrückt.
Die AUDIO-Taste leuchtet 20 Sekunden rot
und zeigt damit an, daß Sie den
Programmiermodus aktiviert haben.
Innerhalb der nächsten 20 Sekunden muß
der nächste Schritt vollzogen werden.
Ansonsten kehrt die RR-939 in den Standard-Betriebsmodus zurück.
2. Geben Sie über die ZIFFERN-Tasten den
3-Ziffern-Code (002) für den RSP-985 ein
- drücken Sie 0, dann 0 und anschließend
2. Die AUDIO-Taste blinkt jedes Mal, wenn
Sie eine Zahl eingeben.
3. Speichern Sie die Codenummer, indem Sie
die AUDIO-Taste erneut drücken. Die Taste
blinkt zweimal, um die Speicherung des
Codes zu bestätigen.
Zur Fernsteuerung des RSP-985 mit der RR-939
müssen Sie sicherstellen, daß der AUDIOModus aktiviert ist. Dazu müssen Sie die AUDTaste auf der Fernbedienung drücken, bevor
Sie beginnen. Ist der AUDIO-Modus aktiviert,
leuchtet die AUD-Taste rot, wenn Sie die
Befehlstasten drücken. Der AUDIO-Modus
bleibt aktiv, bis Sie eine andere GERÄTE-Taste
drücken.
POWER-Taste
Sie hat dieselbe Funktion wie die STANDBYTaste an der Gerätefront. Drücken Sie die
POWER-Taste auf der Fernbedienung, um den
RSP-985 zu aktivieren. Drücken Sie die
POWER-Taste auf der Fernbedienung noch
einmal, um ihn zu deaktivieren
VOLUME-Tasten
Über dieses Tastenpaar kann, wie mit dem
Lautstärkeregler an der Gerätefront, die
Lautstärke verändert werden. Drücken Sie die
VOLUME UP-Taste, um die Lautstärke zu
erhöhen, die VOLUME DOWN-Taste, um die
Lautstärke zu reduzieren. Diese Tasten werden
im ON-SCREEN-Menüsystem zur Änderung
der Einstellung genutzt.
MUTE-Taste
(nur auf der Fernbedienung)
Mit Drücken dieser Taste schalten Sie den Ton
stumm. Die LED am Lautstärkeregler blinkt und
in der Bildschirmanzeige erscheint das Wort
MUTE. Drücken Sie erneut die MUTE-Taste, um
die vorherigen Lautstärkepegel wieder
herzustellen.
Input Select-Tasten
Die Tasten in diesen beiden Reihen haben
dieselbe Funktion wie die sechs Tasten zur
EINGANGSWAHL an der Gerätefront.
Wählen Sie die Eingangsquelle durch Drücken
der entsprechenden Taste.
HINWEIS
: Die TAPE 1-Taste auf der RR-939 hat
dieselbe Funktion wie die TAPE MONITORTaste. Die Tasten AUX/V5, PHONO und
TAPE2 werden für den Betrieb des RSP-985
nicht genutzt.
5.1 CH-Taste
Wie die 5.1 CH INPUT-Taste an der Gerätefront
umgeht diese Taste alle anderen (sowohl
digitalen als auch analogen) Eingänge und
wählt direkt den 5.1-Eingang an.
Taste Surround +
Hat dieselbe Funktion wie die MODE-Taste an
der Gerätefront. Durch Drücken dieser Taste
können Sie nacheinander die verschiedenen
Surround-Sound-Betriebsmodi aufrufen: 2 CH
STEREO, MONO, MUSIC 1, MUSIC 2, MUSIC
3, MUSIC 4 und DOLBY PROLOGIC. Dolby
Page 29

29
Deutsch
Digital und DTS werden automatisch aktiviert,
wenn entsprechend codiertes Quellmaterial
gespielt wird.
Die getroffene Wahl wird durch LEDs an der
Gerätefront angezeigt und sind im ONSCREEN-Menüsystem anwählbar, wenn Sie die
verfügbaren Optionen anwählen.
Movie Filter/THX-Taste
(nur auf der Fernbedienung)
Über diese Taste werden die THX-Technologien
bei der Filmwiedergabe aktiviert. Weitere
Details entnehmen Sie bitte den Beschreibungen
zu THX.
RE-EQ ON: Re-EQ ist eine der THXTechnologien und kann individuell angewählt
werden. Diese Einstellung aktiviert Re-EQ ohne
die anderen THX-Features.
THX ON: Fügt den Cinema-Modi alle THXFeatures hinzu.
THX OFF: Keine THX-Verarbeitung.
HINWEIS
: Diese Einstellungen können während
des Systemsetups über die On-Screen-Menüs
vorgenommen und gespeichert werden, so
daß sie für jeden Quelleneingang automatisch
aktiviert werden.
ZIFFERN-Tasten
(nur auf der Fernbedienung)
Zehn Zifferntasten von 1 bis 10. Sie werden
beim RSP-985 nur zur Eingabe des 3Zifferncodes (002) genutzt.
On-Screen-Taste
(nur auf der Fernbedienung)
Drücken Sie diese Taste, um in das ONSCREEN-Menüsystem zu schalten. Es erscheint
das SYSTEM STATUS-Menü. Ist das ONSCREEN-DISPLAY bereits sichtbar, so können
Sie es durch Drücken der On-Screen-Taste
abschalten.
UP/DOWN-Tasten
(nur auf der Fernbedienung)
Mit diesen beiden (auch mit RECALL und PRE
CH gekennzeichneten) Tasten können Sie die
verschiedenen Unterpunkte in den einzelnen
On-Screen-Menüs von oben nach unten bzw.
von unten nach oben anwählen.
ENTER-Taste
(nur auf der Fernbedienung)
Diese Taste dient dazu, eine Wahl im ONSCREEN-Menüsystem zu bestätigen. Sie
können beispielsweise ein anderes Menü
anwählen, indem Sie mit den DOWN/UPTasten im MAIN-Menü den entsprechenden
Unterpunkt anwählen. Durch Drücken der
ENTER-Taste gelangen Sie dann in die einzelnen
Menüs. Weitere Informationen zu den
einzelnen Menüs erhalten Sie hinten in dieser
Bedienungsanleitung.
BACK-Taste
(nur auf der Fernbedienung)
Die BACK-Taste wird genutzt, um ein ONSCREEN-MENÜ zu verlassen und zum
vorherigen Menü zurückzukehren.
Eingangsanschlußmöglichkeiten an der Rückseite
In diesem Abschnitt der Bedienungsanleitung
erhalten Sie Informationen zu den Audio- und
Videoeingangsanschlüssen an der Rückseite
des RSP-985.
HINWEIS
komponenten erst an das Netz an, wenn die
Geräte ordnungsgemäß miteinander
verbunden sind.
Alle Videokabel sollten eine Impedanz
von 75 Ohm aufweisen. Obwohl auch
normale Audioverbindungskabel ein
Videosignal weiterleiten, kommt es aufgrund
ihres Aufbaus und der begrenzten Bandbreite
zu Leistungsverlusten, die dem 75-Ohm-Standard nicht gerecht werden. Der S/PDIF-Digital-Audiostandard definiert die Anforderungen
an ein 75-Ohm-Übertragungskabel genau. Alle
guten Digitalkabel entsprechen diesen Standards. Da die Video- und S/PDIF-Standards
sehr ähnlich sind, können Sie Videokabel für
die digitale Audioübertragung verwenden. Wir
empfehlen Ihnen, NIEMALS ein herkömmliches
analoges Audioverbindungskabel als Digitaloder Videokabel einzusetzen.
: Schließen Sie die System-
Cinch-Audio- und Videoeingänge
Diese Cinch-Eingänge (CD, TUNER, VIDEO
1, VIDEO 2, VIDEO 3 und VIDEO 4)
akzeptieren Hochpegelaudio- und Composite-Videosignale von den Quellkomponenten
(den linken und rechten Audiokanal plus ein
Videosignal).
Alle Cinch-Anschlüsse am RSP-985 sind
folgendermaßen gekennzeichnet:
Linker Audiokanal: Cinch-Buchse, weiß
gekennzeichnet
Rechter Audiokanal: Cinch-Buchse, rot
gekennzeichnet
Composite Video: Cinch-Buchse, gelb
gekennzeichnet
Verbinden Sie die AUSGÄNGE der
anzuschließenden Quellen mit den
entsprechenden EINGÄNGEN am RSP-985.
Soll beispielsweise ein CD-Player an Ihr System angeschlossen werden, so verbinden Sie
den linken und rechten Analogausgang mit
den mit CD gekennzeichneten Eingängen am
RSP-985. Möchten Sie eine Videoquelle
anschließen, so verbinden Sie z.B. die
analogen Audioausgänge des Videorecorders
mit den mit VIDEO 1 gekennzeichneten
Audioeingängen und den Video-CompositeCinch-Ausgang mit dem mit VIDEO 1
gekennzeichneten Composite-CinchVideoeingang am RSP-985.
VIDEO-Eingänge
Siehe Abbildung 6
Über diese S-Video-Anschlüsse ist der RSP-985
in der Lage, S-Video-Signale zu empfengen.
Dazu muß die Quellkomponente mit einem SVideo-Ausgang ausgestattet sein. Diese
Eingangsanschlüsse stellen eine Alternative zu
den oben beschriebenen Standard-CinchVideoeingängen dar.
Möchten Sie die Verbindung über die S-VideoAnschlüsse herstellen, denken Sie daran, daß
lange S-Videokabel zu einer erheblichen
Verschlechterung der Signalqualität führen
können. In einigen schwierigen Systemkonfigurationen ist es empfehlenswert, sich für
die Composite-Anschlüsse zu entscheiden. Auf
jeden Fall sollten die Kabel möglichst kurz sein,
um eine bestmögliche Leistung sicherzustellen.
Page 30

RSP-985 Surround-Sound-Prozessor
30
HINWEIS
: Möglicherweise ist die Signalqualität
nicht die beste, wenn Sie einen Laser-DiscPlayer über dessen S-Video-Ausgang
anschließen. Da das Format älter ist, ist in
LD-Player ein Schaltkreis integriert, der die
Schwarzweißanteile und die Farbanteile
trennt, aus denen das komplette Videosignal
besteht. Dieser zusätzliche Schaltkreis kann
die Auflösung am S-Video-Ausgang eines
LD-Players verschlechtern. Probieren Sie
einfach aus, welcher Ausgang in Ihrem System ein schärferes Bild liefert.
Das Herstellen einer Verbindung über die SVideo-Anschlüsse ist einfach. Möchten Sie
anstelle der Cinch-Composite-Videoanschlüsse
die Verbindung über den S-Video-Anschluß
herstellen, so schließen Sie einfach den S-VideoAusgang jeder Videoquelle an den
entsprechenden S-Video-Eingang an der
Rückseite des RSP-985 an. Denken Sie daran,
daß Sie für die Audiosignale trotzdem die
Cinch-Verbindungen zu den Quellkomponenten
herstellen müssen.
Stellen Sie beim Anschließen der Videoquellen
sicher, daß alle Audio- und Videosignalanschlüsse zu einer Komponente mit gleich
gekennzeichneten Anschlüssen vorgenommen
werden. Schließen Sie Ihren Videorecorder
beispielsweise an die VIDEO 2-Eingänge an,
stellen Sie sicher, daß sowohl die Audio- als
auch die Videosignale über die VIDEO 2-
Eingänge gesendet werden.
Digitalaudioeingänge
In den RSP-985 ist eine komplette Einheit zum
Decodieren und zur D/A-Wandlung der
digitalen Eingangssignale von den
angeschlossenen Quellkomponenten integriert.
Diese kann die Digitalsignale von CD-Playern
(Abtastfrequenz 44,1 kHz), Satelliten-TV-Tunern
(Abtastfrequenz 32 kHz) sowie 5.1-KanalDolby-Digital- und DTS-Signalen von DVD- und
Laser Disc-Playern (Abtastfrequenz 32 kHz bis
48 kHz) verarbeiten. Der Digitalschaltkreis
registriert die eingehenden Signale und paßt
sie automatisch an.
Sie haben die Möglichkeit, die Digitalsignale
über zwei Digitaleingänge zum RSP-985 zu
senden:
OPTISCH: Über den optischen Eingang kann
der optische Digitalausgang eines digitalen
TV-Tuners, DVD-Players oder einer anderen
Quelle angeschlossen werden. Dazu ist ein
optisches Digitalkabel erforderlich. Optische
Digitaleingänge stehen an der Rückseite als
TUNER- und VIDEO 4-Eingang zur Verfügung.
KOAXIAL: Standard-Digitalanschlüsse zum
Anschluß an jede beliebige Komponente. An
der Rückseite stehen Koaxial-Digitaleingänge
für CD, VIDEO 1, VIDEO 2 und VIDEO 3 zur
Verfügung.
HINWEIS
: Um den AC-3-HF-Ausgangsanschluß
eines Laser-Disc-Players mit dem KoaxialDigitaleingang des RSP-985 zu verbinden,
muß ein externer HF-Demodulator da
zwischengeschaltet werden, um die HFmodulierten AC-3-Signale in ein herkömmliches Digitalsignal umzuwandeln.
Möchten Sie die Digitaleingänge nutzen,
verbinden Sie das entsprechende Kabel mit
dem Digitalausgang Ihrer Quellkomponente
und dem entsprechenden Digitaleingang des
RSP-985.
Zunächst ist der RSP-985 im On-ScreenMenüsystem so zu konfigurieren, daß Sie den
gewünschten Eingang (digital oder analog)
nutzen können. Ist die Eingangsquelle einmal
im On-Screen-Menüsystem gespeichert, so wird
durch Auswählen einer EINGANGSQUELLE
der entsprechende Audioeingang aktiviert.
HINWEIS
Komponente. Eingehende analoge Signale
werden zur Verarbeitung in ein Digitalsignal
gewandelt. Um eine D/A-Wandlung in der
Quellkomponente und die folgende A/DWandlung in der Eingangsstufe des RSP-985
zu vermeiden, sollten möglichst die
Digitalanschlüsse genutzt werden. Dennoch
sollten auch die analogen Signalanschlüsse
genutzt werden, da nur analoge Eingangssignale am Tape Monitor-Ausgang verfügbar
sind (zum Aufnehmen und für die 2. Zone).
: Der RSP-985 ist eine digitale
5.1 CH-Audioeingang
Über diesen DB25-Eingang kann ein externer
Prozessor angeschlossen werden. Dabei
werden die analogen Informationen von sechs
Kanälen über ein einziges Kabel übertragen.
Viele externe Adapter verfügen sowohl über
Cinch- als auch über DB25-Ausgänge. Wir
empfehlen Ihnen, ein DB25/DB25-Kabel zu
verwenden. Auf diese Weise reduzieren Sie
die Anzahl der Kabel und stellen automatisch
sicher, daß die Kanäle ordnungsgemäß
miteinander verbunden sind. Verfügt Ihr
externer Adapter nicht über einen DB25Ausgang, so haben Sie die Möglichkeit, ein
Multi-Cinch/DB25-Adapterkabel zu kaufen.
Lassen Sie sich diesbezüglich von Ihrem
autorisierten Rotel-Fachhändler beraten.
HINWEIS
: Beim 5.1-Eingangssignal handelt es
sich um ein reines Audiosignal. Die
Videosignale der gewählten Quelle bleiben
aktiv. Das 5.1-Eingangssignal ist für
Aufnahmezwecke und in der 2. Zone nicht
verfügbar.
Cinch-Tape-MonitorEingänge
Die beiden Standard-Cinch-Eingänge (IN)
empfangen die linken und rechten analogen
Audiosignale eines Cassettendecks oder eines
anderen Audio-Cassettenrecorders. Diese
Eingänge werden durch Drücken der TAPEMONITOR-Taste an der Gerätefront aktiviert.
EXTERNAL IN-Buchse
Diese 3,5-mm-Anschlußbuchse kann über ein
Kabel mit 3,5-mm-Klinkensteckern mit einem
Video-Link-Infrarotempfänger verbunden
werden. Dieses Feature ist sehr hilfreich, wenn
das Gerät in einen Schrank eingebaut und der
Infrarotsensor verdeckt ist. Lassen Sie sich
diesbezüglich von Ihrem autorisierten
Fachhändler beraten.
Geräterückseite: Ausgangssignalanschlüsse
Dieser Abschnitt der Bedienungsanleitung
enthält vollständige Informationen zu den
Audio- und Videosignalausgangsanschlüssen
an der Rückseite des RSP-985. Zum einfacheren
Verständnis steht unter jeder Überschrift
zunächst eine kurze Erläuterung zu der
jeweiligen Anschlußmöglichkeit und detaillierte
Informationen zum Herstellen der
Verbindungen.
Cinch-Audio- und Videoausgänge
Siehe Abbildung 5
Diese mit VIDEO 2, VIDEO 3 und VIDEO 4
gekennzeichneten Cinch-Ausgänge (linker und
rechter Audiokanal plus Composite-VideoAusgänge) des RSP-985 werden mit den
Page 31

31
Deutsch
entsprechenden Komponenten (z.B.
Videorecorder) zu Aufnahmezwecken oder
anderen Verarbeitungsverfahren verbunden.
Verbinden Sie die mit VIDEO 2
gekennzeichneten linken und rechten
Audioausgänge mit den Audioeingängen der
ersten Quellkomponente. Anschließend
verbinden Sie den VIDEO 2-CompositeVideoausgang mit dem Videoeingang
derselben Quellkomponente. Wiederholen Sie
diese Schritte für die mit VIDEO 3 und VIDEO
4 gekennzeichneten Anschlüsse.
Um Fehler zu vermeiden, sollten Sie folgendes
beachten:
Verbinden Sie die Ausgänge der
Quellkomponenten mit den entsprechenden
Eingängen am RSP-985.
Verbinden Sie die Ausgänge am RSP-985
mit den entsprechenden Eingängen der
Quellkomponenten.
Stellen Sie sicher, daß dieselbe
Videokomponente, die an die VIDEO 2Eingänge angeschlossen wird, auch an die
VIDEO 2-Ausgänge angeschlossen wird usw.
HINWEIS
: Das an diesen Ausgängen
anliegende Signal wird durch Drücken einer
der RECORDING-Eingangswahltasten
festgelegt. Dabei muß es sich nicht
notwendigerweise um dieselbe Quelle
handeln, die durch Drücken einer der LISTENING-Eingangswahltasten festgelegt wird.
HINWEIS
: Das Signal einer Quelle kann nicht
zu sich selbst zurückgesendet werden. Wenn
Sie beispielsweise mit den RECORDINGWahltasten VIDEO 2 anwählen, werden die
Ausgänge für VIDEO 2 stummgeschaltet und
es kann nur von den Ausgängen VIDEO 3
und VIDEO 4 überspielt werden.
HINWEIS
: Zu den VIDEO OUT-Buchsen werden
nur analoge Eingangssignale gesendet.
Nutzen Sie einen digitalen Eingang, sollten
Sie zu Aufnahmezwecken auch den analogen
Ausgang der Quellkomponente anschließen.
S-Video-Ausgänge
Siehe Abbildung 6
Diese Ausgangsanschlüsse können Sie anstelle
der oben beschriebenen Cinch-CompositeVideoanschlüsse benutzen.
HINWEIS
: Composite-Video-Signale können
nicht in S-Video-Signale gewandelt werden.
An den S-Video-Ausgängen stehen keine
Signale zur Verfügung, wenn diese Signale
nicht auch an den Eingängen anliegen.
Haben Sie sich für S-Video-Anschlüsse anstelle
der Composite-Video-Anschlüsse entschieden,
verbinden Sie den S-Video-Ausgang für VIDEO
2 mit dem S-Video-Eingang an Ihrer ersten
Quellkomponente.
Beachten Sie, daß Sie nur einen CompositeVideo-Anschluß durch einen S-Video-Anschluß
ersetzen. Für die Audioanschlüsse werden
weiterhin die oben beschriebenen CinchAusgänge benutzt. Stellen Sie sicher, daß
dieselbe Komponente, die an die VIDEOAnschlüsse angeschlossen wird, auch an die
Audioanschlüsse angeschlossen wird usw.
Möchten Sie weitere Videokomponenten
anschließen, so wiederholen Sie die obigen
Schritte für VIDEO 3 und VIDEO 4.
Cinch-Audioausgänge (Hauptprozessor)
Siehe Abbildung 4
Der RSP-985 sendet Audiosignale von sechs
Kanälen zu den Endstufen. Über diese
Ausgänge (6 einzelne Cinch-Buchsen) leitet der
RSP-985 die Signale über die Endstufe zu den
Lautsprechern im Hauptraum. Diese sechs
Ausgänge (Front links, Center, Front rechts, Rear
links, Rear rechts und Subwoofer) werden im
Hauptraum mit den Eingängen einer
Mehrkanal-Endstufe oder mit den Eingängen
mehrerer Endstufen verbunden.
Die Ausgänge für den Centerkanal und den
Subwoofer sind schwarz, die Front- und
Surroundlautsprecher links weiß und rechts rot
gekennzeichnet. Verbinden Sie jeden Ausgang
am RSP-985 mit jeweils einem Kabel mit dem
entsprechenden Eingang an der Endstufe. In
einem kompletten HiFi-Cinema-System sind
dazu sechs Kabel erforderlich.
Stellen Sie sicher, daß jeder Ausgang mit dem
entsprechenden Eingang an der Endstufe
verbunden wird. Nehmen Sie sich für das
Anschließen Zeit.
5.1 CH OUTPUT (DB25Ausgang, Hauptprozessor)
Siehe Abbildung 4
Neben den separaten Cinch-Ausgängen besitzt
der RSP-985 einen DB25-Anschluß, der die
Signale aller sechs Ausgangskanäle über ein
einziges Kabel überträgt. Der DB25-Ausgang
stellt genau dieselben Signale wie die separaten
Cinch-Ausgänge zur Verfügung. Er ist ein
verwechslungssicherer Anschluß und kann
daher einfach und schnell mit einem DB25Eingangsanschluß einer Mehrkanal-Endstufe
verbunden werden. Verwenden Sie dazu ein
entsprechendes DB25-Audiokabel (Buchse/
Stecker) und verbinden Sie den Ausgang am
RSP-985 mit dem entsprechenden Eingang an
der Mehrkanal-Endstufe.
TV-MONITOR-Videoausgänge
Siehe Abbildung 4
Über diese Videoausgänge kann der RSP-985
Videosignale zum angeschlossenen Fernsehgerät senden. Dazu stehen ein Cinch-Composite- und ein S-Video-Anschluß zur Verfügung.
Verbinden Sie einfach einen der TV-MONITORAusgangsanschlüsse (Composite- oder S-Video)
mit dem entsprechenden Eingang an Ihrem
Fernsehgerät.
Möchten Sie die Verbindung beispielsweise
über den S-Video-Anschluß herstellen, nehmen
Sie ein S-Video-Kabel (mit Mini-DIN-Anschluß)
und verbinden dies mit dem S-Video-Ausgang
am RSP-985 und dem S-Video-Eingang am
Fernsehgerät.
Haben Sie sich für den Composite-Ausgang
entschieden, so verbinden Sie diesen mit dem
Cinch-Eingang am Fernsehgerät.
HINWEIS
: Der RSP-985 kann die Composite-
Cinch-Videosignale der Quellkomponenten
nicht in ein S-Video-Signal wandeln, das dann
zum Fernsehgerät gesendet wird. Wenn nicht
alle Videoquellen S-Video-Anschlüsse
besitzen, können Sie für ALLE Videoanschlüsse
Cinch-Composite-Signale nutzen. Verfügt Ihr
Fernsehgerät über zwei schaltbare Eingänge,
so können Sie den Cinch-Ausgang am
RSP-985 mit dem Cinch-Eingang am
Fernsehgerät und den S-Video-Ausgang mit
dem S-Video-Eingang am Fernsehgerät
verbinden. So können Sie am Fernsehgerät
je nach Videoquelle zwischen Cinch-Composite und S-Video hin und her schalten.
Page 32

RSP-985 Surround-Sound-Prozessor
32
Tape MonitorAudioausgänge
Siehe Abbildung 5
Über diese beiden Cinch-Audioausgänge wird
ein Signal zu einem Audioaufnahmegerät
gesendet (Cassettendeck, DAT, Mini-Disc-Recorder usw.). Das analoge Signal einer
beliebigen Quelle wird, abhängig von der
gewählten LISTENING-Eingangswahltaste, zu
Aufnahmezwecken zu diesen Ausgangsanschlüssen gesendet.
Verbinden Sie über Audiokabel die TAPE
MONITOR OUT-Buchsen am RSP-985 mit den
analogen Eingängen Ihres Recorders.
HINWEIS
: Nur analoge Eingangssignale
werden zu den TAPE MONITOR OUT-Buchsen
gesendet. Nutzen Sie einen digitalen
Eingang, sollten Sie für Aufnahmen auch den
analogen Ausgang der Quellkomponente
anschließen.
Geräterückseite: Netzanschlüsse
Netzeingang
Ihr RSP-985 wird von Rotel so eingestellt, daß
er der in Ihrem Land üblichen Wechselspannung
(entweder 230 Volt Wechselspannung oder
115 Volt Wechselspannung mit einer
Netzfrequenz von 50 Hz oder 60 Hz)
entspricht. Die Einstellung ist an der
Geräterückseite angegeben.
Schließen Sie das beiliegende Netzkabel an
den Netzeingang des RSP-985 und eine
Steckdose an.
Schaltbare Steckdosen
Die schaltbaren Steckdosen an der Rückseite
des RSP-985 liefern daran angeschlossenen
Geräten Netzspannung. Ist der SurroundProzessor eingeschaltet, ist auch das Gerät
eingeschaltet. Befindet sich der RSP-985 im
Standby-Betrieb, ist das angeschlossene Gerät
abgeschaltet.
HINWEIS
: An die schaltbaren Steckdosen sollte
keine Endstufe angeschlossen werden. Die
maximale Leistung dieser Steckdosen beträgt
500 Watt.
Zone 2-Betrieb
Um die Zone 2-Funktion des RSP-985 nutzen
zu können, benötigen Sie zusätzliche Geräte:
eine Endstufe und ein Paar Lautsprecher (diese
werden im zweiten Hörraum aufgestellt).
Obwohl im On-Screen-Menüsystem
Einstellungen für den Zone 2-Betrieb
vorgenommen werden, ist für einen
ordnungsgemäßen Betrieb darüber hinaus
noch der Anschluß eines Infrarotempfängers
von Xantech, Niles usw. erforderlich. Dieses
System überträgt die Befehle einer
Infrarotfernbedienung zum REMOTE-EXTENSION IN-Eingang an der Rückseite des
RSP-985. Lassen Sie sich von Ihrem autorisierten
Fachhändler in bezug auf Empfänger und
deren Installation beraten.
Berücksichtigen Sie die folgenden Punkte
hinsichtlich der Zone 2-Funktion:
• Nutzen Sie für den Zone 2-Betrieb über
die 3,5-mm-REMOTE EXTENSION INBuchse an der Geräterückseite ein
Infrarotempfängers (Xantech, Niles usw.).
• Die Zone 2-Funktion wird mit Einschalten
des RSP-985 sofort aktiviert. Je nach der
während des Systemsetups unter „Zone 2
Auto-Mute“ gewählten Einstellung im OnScreen-Menüsystem ist entweder der Ton
stummgeschaltet oder der Lautstärekpegel
befindet sich auf dem zuletzt eingestellten
Niveau. Im Werk wird Auto-Mute aktiviert.
Damit ist der Ton im zweiten Hörraum beim
Einschalten des RSP-985 stummgeschaltet
und muß manuell bei Nutzung der Zone
2-Funktion auf den gewünschten Wert
eingestellt werden. Ist Auto-Mute nicht
aktiviert, ist nach Einschalten des RSP-985
im zweiten Raum die Lautstärke zu hören,
die zuletzt eingestellt worden war.
• Die Zone 2-Funktion kann über die dem
RSP-985 beiliegende RR-939 gesteuert
werden, wenn ein Empfänger
angeschlossen ist. Die RR-939 kann so
programmiert werden, daß RotelQuellkomponenten über die REMOTE EXTENSION OUT-Buchse betrieben werden
können.
• Alle an die analogen Audioeingänge des
RSP-985 (mit Ausnahme von TAPE MONITOR und 5.1 CH) angeschlossenen
Quellkomponenten stehen am
Hochpegelausgang für Zone 2 zur
Verfügung. Die ZONE 2-Ausgänge sind
unabhängig von den Hauptausgangsanschlüssen. Sie können eine andere Quelle
anwählen oder die Lautstärke im zweiten
Raum verändern, ohne daß dies Einfluß
auf die HAUPTAUSGANGSANSCHLÜSSE
hat.
• Vermeiden Sie es, denselben Befehl über
die Infrarotfernbedienung zum Fernbedienungssensor an der Gerätefront des
RSP-985 und gleichzeitig zum Zone 2Verstärker zu senden. Das heißt, die für den
Zone 2-Betrieb benötigten Zusatzkomponenten müssen sich in einem
anderen Raum befinden als der RSP-985.
Ein- und Ausschalten im Zone 2-Betrieb
Der RSP-985 wird im Werk so eingestellt, daß
das Ein- und Ausschalten in den beiden
Bereichen unbhängig erfolgt. Drücken Sie die
STANDBY-Taste an der Gerätefront oder im
Hauptraum die POWER-Taste auf der
Fernbedienung, so wird der RSP-985 im
Hauptraum aktiviert oder deaktiviert. Der zweite
Raum bleibt davon unbeeinflußt. Umgekehrt
bleibt der Hauptraum unberührt, wenn die
Fernbedienung im zweiten Raum genutzt wird.
HINWEIS
: Im Standardmodus können Sie nicht
das gesamte System von der Standby-Taste
an der Gerätefront aus deaktivieren. Um
ZONE 2 zu deaktivieren, müssen Sie in den
zweiten Raum gehen und ZONE 2 von hier
über die STANDBY- (bzw. POWER)-Taste
deaktivieren. Sie können die
Standardeinstellung ändern, indem Sie im
SYSTEM SETUP-Menü die Einstellung AUTOMUTE NO wählen. Wird AUTO MUTE
deaktiviert, kann das gesamte System (beide
Zonen) aktiviert oder deaktiviert werden,
wenn Sie die STANDBY-Taste an der
Gerätefront drücken. Weitere Informationen
zur Änderung dieser Einstellung entnehmen
Sie bitte dem Abschnitt SYSTEM SETUP-Menü
unten in dieser Bedienungsanleitung.
Zone 2-Ausgänge
Siehe Abbildung 7
Über diese Hochpegel-Cinch-Audioausgänge
werden die Zone 2-Audiosignale zur Endstufe
und darüber zu dem Lautsprecherpaar im
zweiten Raum gesendet.
Page 33

33
Deutsch
Sie haben zwar die Möglichkeit, einen
Vollverstärker oder einen Receiver zur Kontrolle
der Lautsprecher im zweiten Raum einzusetzen.
Wir empfehlen jedoch unbedingt den Einsatz
einer Endstufe. Dies vereinfacht die
Systeminstallation und den Betrieb. Jedoch ist
es auch möglich, daß Ihr autorisierter RotelFachhändler Ihnen bei bestimmten Systemanforderungen eine andere Empfehlung gibt.
Konfigurieren Sie Ihr System für den Zone 2Betrieb, schließen Sie die mit ZONE 2
gekennzeichneten linken und rechten
Ausgänge am RSP-985 an die linken und
rechten Kanäle des zur Kontrolle der
Lautsprecher verwendeten Verstärkers an.
Verwenden Sie dazu herkömmliche CinchAudiokabel.
Remote Extension-Buchsen
Siehe Abbildung 7
Diese 3,5-mm-Anschlußbuchsen können über
ein Kabel mit 3,5-mm-Klinkensteckern mit Standard-Infrarotsendern und -empfängern (z.B. von
Xantech) verbunden werden. Sie werden also
bei der Konfiguration des RSP-985 für den Zone
2-Betrieb genutzt.
Die REMOTE EXTENSION IN-Buchse akzeptiert
Signale, die von einem Infrarotempfänger in
einem zweiten Bereich Ihres Hauses gesendet
werden. Dadurch wird der ZONE 2-Betrieb
des RSP-985 erst möglich.
Die REMOTE EXTENSION OUT-Buchse sendet
Signale zu einem Infrarotsender oder zu RotelCD-Playern, Cassettendecks oder Tunern mit
einem entsprechenden Remote-Anschluß.
Bildschirmanzeige (OnScreen-Display = OSD)
und Systemkonfiguration
Um einen optimalen Systembetrieb zu
gewährleisten, verfügt der RSP-985 über zwei
On-Screen-Systeme. Beim ersten handelt es sich
um eine einfache Statusanzeige, die auf dem
Fernsehbildschirm erscheint, sobald
grundlegende Änderungen (z.B. in Lautstärke,
Eingang usw.) vorgenommen werden. Die
automatische Anzeige der Statusinformationen
kann während der Systemkonfiguration
abgeschaltet werden.
Eine umfangreichere On-Screen-Menüführung
wird mit Drücken der ON-SCREEN/MENUTaste auf der Fernbedienung aufgerufen. Dieses
System besteht aus einem SYSTEM STATUSMenü und einem Hauptmenü (MAIN MENU)
sowie einer Reihe von verschiedenen
Untermenüs.
Diese Tasten führen Sie durch die Menüs
DOWN/UP-Tasten
können Sie die verschiedenen Unterpunkte der
Menüliste von oben nach unten bzw. von unten
nach oben anwählen.
VOLUME DOWN/UP-Tasten
diesen Tasten können in bestimmten Menüs die
Einstellungen geändert werden.
ENTER-Taste
Sie im On-Screen-Menüsystem Befehle
ausführen. So gelangen Sie durch Drücken
dieser Taste zum nächsten Menü oder
bestätigen eine Einstellung.
BACK-Taste
genutzt, um ein On-Screen-Menü zu verlassen
und zum vorherigen Menü zurückzukehren.
HINWEIS
: Sie brauchen sich diese Tasten nicht
zu merken. Am unteren Ende jedes On-ScreenMenüs erscheint eine kurzes Hilfesystem, das
Auskunft darüber gibt, welche Taste zu
betätigen ist.
In Abbildung 8 am Anfang dieser Anleitung
finden Sie alle On-Screen-Menüs, aus denen
das On-Screen-Menüsystem besteht. Ferner
zeigt die Abbildung, wie die einzelnen Menüs
zu erreichen sind. Die meisten Menüs werden
während der Systemkonfiguration und weniger
während des normalen Betriebes genutzt. Im
folgenden erhalten Sie detaillierte Informationen
zu jedem Menü.
: Mit diesen Tasten
: Mit
: Mit dieser Taste können
: Die BACK-Taste wird
Bildschirmanzeige des Gerätetyps
Die über diesen beiden Anschlüssen liegende
EXTERNAL IN-Buchse ist für den Anschluß eines
externen Infrarotempfängers gedacht, der
dieselbe Funktion wie der Infrarotsensor an
der Gerätefront hat. Verwenden Sie diese
Buchse nicht als ZONE 2-Anschluß.
HINWEIS
: ZONE 2 und der Infrarotempfänger
sollten nicht im Hauptraum, sondern in einem
anderen Bereich genutzt werden. Der
RSP-985 sollte sich nicht in der Nähe der Zone
2-Fernbedienung befinden. Dadurch
schließen Sie aus, daß die für den zweiten
Raum bestimmten Infrarotbefehle ungewollt
die Funktionen im Hauptraum beeinflussen.
ON-SCREEN/MENU-Taste : Mit
Drücken dieser Taste wird das SYSTEM STATUS-Menü aufgerufen. Vom SYSTEM STATUSMenü gelangen Sie zu den anderen Menüs.
Wird bereits ein Menü angezeigt, drücken Sie
diese Taste, um die Anzeige abzuschalten.
Das On-Screen-Menüsystem erscheint beim
RSP-985 automatisch auf dem Fernsehbildschirm, sobald der Surround-Prozessor vom
Standby- in den normalen Betriebsmodus
geschaltet wird. Als erstes erscheint die obige
Bildschirmanzeige.
Page 34

RSP-985 Surround-Sound-Prozessor
34
SYSTEM STATUS-Menü
Über das SYSTEM STATUS-Menü erhalten Sie
Statusinformationen zu allen wichtigen
Einstellungen des RSP-985. Von diesem Menü
aus gelangen Sie zu allen anderen Bildschirmen
und Menüs. Sie rufen diesen Bildschirm mit
Drücken der ON-SCREEN-Taste auf der
Fernbedienung auf. Es erscheinen die
folgenden Statusinformationen:
LISTEN: die derzeit gewählte Quelle
MODE: der derzeit gewählte Surroundmodus
DOMAIN: ob für die LISTENING-Quelle ein
ANALOGES oder DIGITALES Signal aktiv ist
SIGNAL: Gibt Auskunft über das am
gewählten Eingang anliegende Digitalsignal,
z.B. DOLBY DIGITAL, DIGITAL AUDIO, DTS,
NO SIGNAL oder ANALOG
MAIN VOLUME: Einstellung der
Ausgangslautstärke
SURR OFFSET: eine vorübergehende
Anhebung bzw. Abschwächung in der
Lautstärke der Surroundlautsprecher für eine
stärkere Betonung oder Abschwächung der
Surroundeffekte. Die Einstellung kann mit den
SEARCH-Tasten (+/-) auf der RR-939
vorgenommen werden. Der RSP-985 kehrt
durch Änderung des Surroundmodus oder
Ausschalten des Gerätes zu den
Standardeinstellungen zurück.
THX: derzeitiger Status des zusätzlichen
Cinema-Schaltkreises – THX ON, THX OFF oder
RE-EQ ON
REC OUT: Hier stellen Sie ein, welche Quelle
für die Rec-Ausgänge gewählt wird.
ZONE 2 IN: die für Zone 2 gewählte Quelle
ZONE 2 VOLUME: die Lautstärkeeinstellung
für Zone 2
Die SYSTEM STATUS-Bildschirmanzeige stellt
nur Statusinformationen zur Verfügung. Die
Statusinformationen (außer MAIN VOL und
SURR OFFSET) können nicht über diesen
Bildschirm geändert werden. Möchten Sie
Änderungen in der Einstellung vornehmen, so
drücken Sie (wie unten am Bildschirm
angezeigt) die ENTER-Taste auf der
Fernbedienung, um in das MAIN-Menü zu
gelangen.
MAIN-Menü
Das MAIN-Menü ist der Ausgangspunkt, von
dem aus Sie alle anderen Bildschirme und
Menüs erreichen können, über die die
Einstellungen bei der Systemkonfiguration
geändert werden. Diese werden in der Regel
nur während der Systemkonfiguration
aufgerufen und weniger während des normalen
Betriebes.
DIGITAL AUDIO MENU: Wählen Sie diese
Zeile mit den DOWN/UP-Tasten an und
drücken Sie die ENTER-Taste. Auf diese Weise
kommen Sie zum DOLBY DIGITAL Setup-Menü.
INPUT SETUP: Sie kommen mit den DOWN/
UP-Tasten zu dieser Zeile. Drücken Sie die
ENTER-Taste und wählen Sie auf diese Weise
das INPUT SETUP-Menü an. In diesem Menü
können Sie jeden Eingang konfigurieren. Sie
können zwischen analogen und digitalen
Anschlüssen wählen, den Lautstärkepegel jeder
Quelle einstellen usw.
SYSTEM SETUP: Wählen Sie diese Zeile
durch Drücken der DOWN/UP-Tasten an und
drücken Sie anschließend die ENTER-Taste. Sie
gelangen damit in das SYSTEM-SETUP-Menü,
in dem Sie grundlegende Systemeinstellungen,
Einstellungen für den zweiten Bereich usw.
vornehmen können.
SPEAKER SETUP: Haben Sie diese Zeile
angewählt, gelangen Sie durch Drücken der
ENTER-Taste in das SPEAKER SETUP-Menü, in
dem Sie dem System mitteilen können, welche
Lautsprecher (Anzahl und Größe) zu Ihrem
System gehören.
DELAY SETUP: Mit Anwählen dieser Zeile
und durch Drücken der ENTER-Taste gelangen
Sie in das DELAY SETUP-Menü. In diesem Menü
können Sie dem System die Verzögerungszeiten
jedes Lautsprechers in den Surroundmodi
mitteilen.
BALANCE SETUP: Mit Anwählen dieser Zeile
und durch Drücken der ENTER-Taste gelangen
Sie in das BALANCE SETUP-Menü. In diesem
Menü können Sie dem System die relativen
Lautstärkepegel jedes Lautsprechers mitteilen.
SUBWOOFER SETUP: Mit Anwählen dieser
Zeile und durch Drücken der ENTER-Taste
gelangen Sie in das SUBWOOFER SETUPMenü. In diesem Menü können Sie dem System die dB-Werte Ihres Subwoofers in den
verschiedenen Surroundmodi mitteilen.
DOLBY DIGITAL Setup-Menü
Sie gelangen über das MAIN-Menü in dieses
Untermenü, das Statusinformationen und
Setupoptionen für die digitalen Eingänge bietet.
In den ersten beiden Zeilen haben Sie die
Möglichkeit, das System für die DolbyVerarbeitung zu konfigurieren.
COMPRESSION: Die heutigen Digitalquellen
sind in der Lage, einen extrem weiten
Dynamikbereich wiederzugeben (der
Dynamikbereich ist die Differenz zwischen dem
leisesten und dem lautesten Ton). In einigen
Fällen wird der Dynamikbereich zur
Klassifizierung von Verstärkern und/oder
Lautsprechern genutzt. In anderen Fällen ist
es vielleicht wünschenswert, den Dynamikbereich zu reduzieren, z.B. wenn man sich
Musik bei niedrigen Lautstärkepegeln anhört.
Sie können zwischen drei verschiedenen
Einstellungen des Dynamikbereichs wählen:
OFF (maximaler Dynamikbereich), MODERATE (begrenzter Dynamikbereich) und LATE
NIGHT (minimaler Dynamikbereich). Sollte es
Page 35

35
Deutsch
bei lauten Textpassagen zu einem verzerrten
Klang kommen, wählen Sie eine Einstellung
mit begrenzterem Dynamikbereich.
PROLOGIC: Diese Einstellung legt fest, wie
der RSP-985 2-Kanal-Dolby Digital- und DTSQuellmaterial verarbeitet. Diskretes MehrkanalSurroundmaterial wird automatisch verarbeitet.
Aber einige Quellen, wie z.B. eine auf einem
Dolby Digital-DVD-Player abgespielte CD oder
ein älterer Film-Soundtrack haben entweder
ein 2-Kanal-Stereosignal oder ein Matrixcodiertes 2-Kanal-Prologic-Signal. In einigen
Fällen findet der RSP-985 ein codiertes
Identifizierungskennzeichen, das ihm mitteilt,
wie das 2-Kanal-Signal zu verarbeiten ist. In
anderen Fällen gibt es kein Identifizierungskennzeichen.
Sie haben die folgenden Möglichkeiten bei
der Verarbeitung von 2-Kanal-Signalen von
einer Dolby Digital- oder DTS-Quelle:
Auto/On: Aktiviert die Dolby PrologicDecodierung für alle Signale, sofern der
RSP-985 keinen Kontrollcode erkennt, der 2Kanal-Software als herkömmliches
Stereomaterial ausweist. In diesem Fall wird
Prologic automatisch deaktiviert. Dies ist die
Standardeinstellung, die für die meisten
Anwendungsfälle genutzt werden kann.
Auto/Off: Hierbei wird die Dolby PrologicDecodierung abgeschaltet und 2-Kanal-Stereo
gespielt, sofern kein Prologic-Signal erkannt
wird. In diesem Fall wird Prologic aktiviert.
On: Bei dieser Einstellung wird die PrologicDecodierung für alle 2-Kanal-Signale
eingeschaltet und die automatische Erkennung
deaktiviert.
Off: Bei dieser Einstellung wird die PrologicDecodierung für alle 2-Kanal-Signale
ausgeschaltet und die automatische Erkennung
deaktiviert. Die Wiedergabe erfolgt in
herkömmlichem 2-Kanal-Stereo.
HINWEIS
: Die obigen Einstellmöglichkeiten
beziehen sich nur auf 2-Kanal-Signale von
einer Dolby Digital- oder DTS-Quelle. Diskrete,
digitale Surroundsignale (z.B. 5.1-Signale)
werden unabhängig von der Einstellung
korrekt wiedergegeben.
Im Menüabschnitt DIGITAL AUDIO STATUS
erhalten Sie Informationen zum derzeitigen
Status der Dolby Digital-Eingänge:
INPUT: Hier wird der Name der
Eingangsquelle angezeigt.
SIGNAL: Gibt das Format der derzeitigen
Quelle an, z.B. DOLBY DIGITAL, DTS usw.
CHANNELS: Dolby Digital- und DTS-Signale
können aus bis zu sechs diskreten Kanälen
bestehen – links, Mitte, rechts, hinten links,
hinten rechts und ein Subwoofer bzw. LFEKanal. Diese Statuszeile gibt an, wie viele
Kanäle im derzeitigen Quellmaterial aktiv sind.
INPUT SETUP-Menü
Der RSP-985 kann sowohl analoge als auch
digitale Signale verarbeiten. Im INPUT SETUPMenü wird jeder Eingang konfiguriert.
INPUT: Wählen Sie den Eingang, für den Sie
das Setup erstellen möchten. Die verfügbaren
Wahlmöglichkeiten können Sie mit den VOLUME DOWN/UP-Tasten aufrufen. Sie müssen
jeden Eingang konfigurieren und die folgende
Konfigurationsfolge mehrmals wiederholen,
indem Sie jedes Mal einen anderen Eingang
wählen.
INPUT DOMAIN: Abhängig von der Art des
Signalanschlusses, den Sie über die VOLUME
DOWN/UP-Tasten aufgerufen haben, wählen
Sie zwischen ANALOG, DIGITAL oder AUTO.
Ein DIGITALES Signal verhindert, falls verfügbar,
eine D/A-Wandlung in der Quellkomponente
und eine A/D-Wandlung im RSP-985. Beachten
Sie, daß Sie auch die analogen Verbindungen
zur Quelle herstellen sollten, wenn Sie einen
Digitaleingang nutzen. Unabhängig von der
Einstellung in diesem Menü werden die
analogen Anschlüsse für Aufnahmezwecke
genutzt. Haben Sie für den Eingang die
Einstellung AUTO gewählt, wird geprüft, ob
ein Digitalsignal anliegt. Falls nicht, wird
automatisch auf einen ANALOGEN Eingang
umgeschaltet.
VOLUME OFFSET: In diesem Menüpunkt
kann die Lautstärke jeder Quelle angepaßt
werden, so daß der Lautstärkepegel relativ
konstant bleibt, wenn zwischen den Quellen
hin und her geschaltet wird und so das Signal den RSP-985 nicht überlastet.
Normalerweise bestimmen Sie, welche Quelle
den niedrigsten Pegel besitzt und passen die
anderen anschließend daran an. Verändern
Sie den Pegel mit den VOLUME DOWN/UPTasten. Beachten Sie, daß Sie den
wahrgenommenen Pegel anpassen, den Sie
von dieser Quelle hören und nicht die dBAnzeige, die auf dem Bildschirm erscheint.
HINWEIS
: Die Eingangspegel der Quelle dürfen
nicht so hoch sein, daß das Signal den
Eingangsschaltkreis des RSP-985 überlastet.
Orientieren Sie sich bei der Einstellung an
der leisesten und nicht an der lautesten Quelle.
ANALOG LEVEL: Der maximale
Eingangspegel für analoge Quellen ist 2 V
RMS. Es ist möglich, daß eine Quelle mit einem
sehr hohen Ausgangspegel (z.B. einige CDPlayer) den Eingang überlasten. Dann erscheint
das Wort CLIP auf dem Bildschirm. Sollte dies
passieren, ändern Sie den Wert für diese Quelle
im Menüpunkt ANALOG LEVEL auf 4 V. Damit
reduzieren Sie den Eingangspegel um 6 dB.
THX: Mit dieser Einstellung legen Sie fest,
welcher zusätzliche Surround-Schaltkreis für
den derzeitigen Eingang aktiviert werden soll.
Sie haben die Wahl zwischen THX ON, REEQ (nur Re-EQ ist aktiviert) und THX OFF.
DEFAULT: Bei dieser Einstellung wird der
Standard-Surroundmodus für jeden Eingang
festgelegt. Sie haben die Wahl zwischen 2
CH STEREO, MONO, MUSIC 1 - 4 und
PROLOGIC. DOLBY DIGITAL und DTS werden
automatisch gewählt, wenn ein entsprechendes
Signal anliegt.
Haben Sie die Einstellungen für alle
Eingangsquellen vorgenommen, kehren Sie
durch Drücken der BACK-Taste zum MAINMenü zurück.
Page 36

RSP-985 Surround-Sound-Prozessor
36
SYSTEM SETUP-Menü
Sie erreichen dieses Menü über das MAINMenü. Innerhalb dieses Menüs stehen eine
Reihe von Konfigurationsoptionen zur
Verfügung.
RECORDING: Wählen Sie eine Quelle für
die Rec-Ausgänge VIDEO 2, 3 und 4, indem
Sie diese Zeile mit den DOWN/UP-Tasten
anwählen und anschließend mit den VOLUME
DOWN/UP-Tasten einen der sechs
verfügbaren Eingänge auswählen.
ZONE 2 IN: Wählen Sie eine Quelle für die
2. Zone, indem Sie diese Zeile mit den
DOWN/UP-Tasten anwählen und
anschließend mit den VOLUME DOWN/UPTasten einen der sechs verfügbaren Eingänge
auswählen.
ZONE 2 VOLUME: Hier können Sie den
Lautstärkepegel für die 2. Zone einstellen.
Wählen Sie diese Zeile dazu mit den DOWN/
UP-Tasten an. Sie können den Lautstärkepegel
nun mit den VOLUME DOWN/UP-Tasten
verändern.
POWER-ON MODE: Mit dieser Einstellung
legen Sie fest, wie der RSP-985 reagiert, wenn
er an eine stromführende Steckdose
angeschlossen wird. Im STANDBY-Modus
(Standardeinstellung ab Werk) schaltet das
Gerät in den STANDBY-Status, wenn es an eine
stromführende Steckdose angeschlossen wird.
Über die STANDBY-Taste an der Gerätefront
bzw. der Fernbedienung (mit POWER
gekennzeichnet) wird es aktiviert. Im DIRECTModus ist das Gerät eingeschaltet, sobald es
an eine stromführende Steckdose
angeschlossen wird. Diese Einstellung ist
sinnvoll, wenn der RSP-985 an die schaltbare
Steckdose einer anderen Komponente
angeschlossen wird.
ONE-LINE DISPLAY: Hier können Sie dem
System mitteilen, ob fünf Sekunden lang eine
einzeilige Anzeige auf dem Fernsehbildschirm
erscheinen soll, wenn eine Einstellung am
RSP-985 geändert wird. Wählen Sie diese Zeile
mit den DOWN/UP-Tasten an. Sie können nun
mit den VOLUME DOWN/UP-Tasten zwischen
den Einstellungen ON und OFF hin und her
schalten.
ZONE 2 AUTO MUTE: Hier wird festgelegt,
ob der 2. Bereich automatisch stummgeschaltet
wird, wenn der RSP-985 aktiviert ist. Wird die
Einstellung YES gewählt, wird die Lautstärke
im zweiten Raum bei eingeschaltetem System
automatisch stummgeschaltet. Wird die
Einstellung NO gewählt, entspricht die
Lautstärke im zweiten Raum bei eingeschaltetem
System der zuletzt eingestellten Lautstärke.
FACTORY DEFAULTS: Wählen Sie diese
Option an und drücken Sie die ENTER-Taste
auf der Fernbedienung, um in das Factory
Default-Menü zu gelangen, in dem Sie ALLE
Systemeinstellungen in die Standardeinstellungen ab Werk zurücksetzen können.
Durch Drücken der BACK-Taste kehren Sie zum
MAIN-Menü zurück.
SPEAKER SETUP-Menü
Sie erreichen dieses Menü über das MAINMenü. Sie können den RSP-985 mit diesem
Menü so konfigurieren, daß die Möglichkeiten
der zu Ihrem System gehörenden Lautsprecher
optimal genutzt werden.
Lautsprecher für HiFi-Cinema-Anwendungen
unterscheiden sich in Größe und
Leistungsfähigkeit, und zwar besonders in
puncto Baßwiedergabe, erheblich. Aus diesem
Grunde verfügen die heutigen Surround-SoundProzessoren über ausgeklügelte Schaltkreise,
über die die abgrundtiefen Frequenzen
mancher Film-Soundtracks an den/die
Lautsprecher im System weitergeben werden,
der/die diese am besten verarbeiten kann –
Subwoofer und/oder Full-Range-Lautsprecher.
Um einen optimalen Surround-Sound zu
gewährleisten, müssen Sie dem RSP-985
mitteilen, welche Lautsprecher zu Ihrem System gehören und welche Größe sie haben.
In den folgenden Hinweisen zur Systemkonfiguration wird in bezug auf die
Lautsprechergröße zwischen LARGE und
SMALL unterschieden. Die Größenangabe
bezieht sich dabei auf die Baßtauglichkeit eines
Lautsprechers und weniger auf seine
Abmessungen. Ein baßstarker Full-RangeLautsprecher wird mit LARGE gekennzeichnet.
Für kompakte Minilautsprecher mit einer
begrenzten Baßwiedergabe oder Nennbelastbarkeit wird die Einstellung SMALL gewählt.
Zunächst ist es natürlich hilfreich, den
Unterschied zwischen den Begriffen LARGE
und SMALL zu kennen. Wichtiger aber ist zu
verstehen, inwiefern der Einsatz der
unterschiedlichen Lautsprechertypen Einfluß auf
Systems
die Leistungsfähigkeit des
Wissen wird Ihnen bei der Konfiguration Ihres
Systems helfen. Allgemein gilt, daß das
System Baßinformationen nicht zu den
mit SMALL, sondern zu den mit LARGE
gekennzeichneten Lautsprechern und/
oder dem SUBWOOFER in Ihrem System leitet.
Etwas komplizierter wird es dann in Systemen
mit Subwoofer. So wird das System die
Baßinformationen nicht automatisch
von den Full-Range-Lautsprechern
(LARGE) zum Subwoofer umleiten.
Daher müssen Sie sich zunächst entscheiden,
welcher Lautsprecher des Systems die tiefen
Bässe wiedergeben soll (Full-RangeLautsprecher oder Subwoofer). Möchten Sie,
daß das System ungeachtet der Baßtauglichkeit
der anderen, zum System gehörenden
Lautsprecher alle Baßinformationen zum
Subwoofer leitet, müssen Sie die anderen
Lautsprecher beim Setup auf SMALL setzen.
Des Weiteren haben Sie die Möglichkeit, kleine
Frontlautsprecher (SMALL) an die
Frequenzweiche des Subwoofers anzuschließen und den Subwoofer dann direkt mit
den Frontlautsprecher-Schraubklemmen zu
verbinden. In diesem Fall werden die
Frontlautsprecher mit LARGE gekennzeichnet
und als Subwoofer-Einstellung für alle
Surroundmodi OFF gewählt. Bei der
Wiedergabe geht keine Information verloren,
da das System die Baßanteile zu den mit LARGE
klassifizierten Frontlautsprechern leitet. Diese
Konfiguration kann für viele Anwender optimal sein, da die Baßwiedergabe im Hörraum
hat. Dieses
Page 37

37
Deutsch
harmonischer wird. Zugleich ist ein
einwandfreier Betrieb der Satellitenlautsprecher
sichergestellt, weil die Frequenzweichen des
Lautsprecherherstellers genutzt werden.
Wählen Sie zur Konfiguration Ihres Systems
jede der folgenden Menüzeilen an, und wählen
Sie über die VOLUME DOWN/UP-Tasten die
Einstellung, die für Ihre Lautsprecher am besten
geeignet ist.
MAIN (small/large): Mit dieser
Menüeinstellung teilen Sie dem System mit,
welche Frontlautsprecher links und rechts
angeschlossen sind. Wählen Sie die Einstellung
LARGE, wenn Sie baßstarke „Full-Range“Modelle angeschlossen haben. Benutzen Sie
Minilautsprecher oder haben Sie THXzertifizierte Frontlautsprecher, verwenden Sie
die Einstellung SMALL. Wählen Sie diese Zeile
an und nutzen Sie die VOLUME DOWN/UPTasten, um die entsprechende Einstellung
durchzuführen.
CENTER (small/large/none): Ein
Centerlautsprecher wird stets nah am
Fernsehgerät positioniert. Der Mittenkanal trägt
praktisch alle Dialoge und einen Großteil der
Soundeffekte.
Wählen Sie die Einstellung LARGE,
wenn der angeschlossene Centerlautsprecher tiefbaßtauglich ist. In dieser
Position werden die tiefen Frequenzen vom
Centerlautsprecher selber übertragen.
Wählen Sie die Position SMALL, wenn
Ihr Centerlautsprecher nur begrenzte
Möglichkeiten im Tieftonbereich bietet
oder wenn Sie einen THX-zertifizierten
Centerlautsprecher haben. Tiefe
Frequenzen unter 80 Hz werden zu den linken
und rechten Frontlautsprechern (oder zu einem
Subwoofer) gesendet, damit der Centerlautsprecher nicht überlastet wird. Gehört kein
Subwoofer zu Ihrem System, werden alle tiefen
Frequenzen unter 80 Hz zu den linken und
rechten Frontlautsprechern geleitet. Ist ein
Subwoofer angeschlossen, werden tiefe
Frequenzen unter 80 Hz automatisch zum
Subwoofer geleitet.
Wählen Sie die NONE-Position, wenn
kein Centerlautsprecher an Ihr System
angeschlossen ist. Der RSP-985 schaltet
den Ausgang für den Centerkanal aus und
verteilt die Signale gleichmäßig zwischen dem
linken und dem rechten Frontlautsprecher.
SURROUND (small/large/none): Die
Leistung der Surroundlautsprecher ist von
System zu System sehr unterschiedlich. Es ist
wichtig, dem RSP-985 den
Surroundlautsprechertyp in Ihrem System
mitzuteilen.
Sind Ihre hinteren Surroundlautsprecher in der Lage, eine
Baßwiedergabe unter 80 Hz zu
gewährleisten, wählen Sie die
Einstellung LARGE. Diese Einstellung
gewährleistet, daß die hinteren
Surroundlautsprecher die volle
Signalbandbreite vom RSP-985 erhalten.
Haben die hinteren Lautsprecher eine
begrenzte Baßwiedergabe oder
wählen Sie THX-zertifizierte Surroundlautsprecher, verwenden Sie die
Einstellung SMALL. Durch diese Einstellung
wird sichergestellt, daß die Surroundlautsprecher nicht überlastet werden. Das
Ergebnis ist eine reinere Wiedergabe von
Umgebungsgeräuschen und Effekten. Bei der
Einstellung SMALL werden die Baßinformationen zum Subwoofer oder zu
Lautsprechern mit der Einstellung LARGE
gesendet. Es gehen keine Informationen
verloren, sondern werden einfach zu den
Lautsprechern geleitet, die diese Signale am
besten verarbeiten können.
Sind keine hinteren Surroundlautsprecher angeschlossen, wählen
Sie die Einstellung NONE. Die
Surroundinformationen werden dann zu den
Frontlautsprechern und in bestimmten Fällen
zum Subwoofer geleitet.
SUBWOOFER (On/Off): Verwenden Sie
die Einstellung ON, wenn Ihr System über einen
Subwoofer verfügt. Ist kein Subwoofer an Ihr
System angeschlossen, wählen Sie die
Einstellung ON. Dadurch werden die tiefen
Frequenzen aller mit SMALL klassifizierten
Lautsprecher zum Subwoofer geleitet. Ist kein
Subwoofer an Ihr System angeschlossen, wählen Sie die Einstellung
OFF. Jetzt werden die Tieftonsignale
(einschließlich LFE-Kanal = .1-Kanal) zu den
mit LARGE klassifizierten Lautsprechern im
System geleitet.
HINWEIS
: Im STEREO-Modus, im DOLBY
PROLOGIC-Modus und in den DSP-MUSICMODI werden die Baßinformationen zu den
mit LARGE klassifizierten Frontlautsprechern
und NICHT zum Subwoofer geleitet. Möchten
Sie, daß die Tieftonsignale zum Subwoofer
geleitet werden, so können Sie dies dem
RSP-985 durch eine entsprechende Einstellung
im SUBWOOFER SETUP-Menü im Menüpunkt
„STEREO/P/L SW“ mitteilen.
Haben Sie die Einstellungen für alle
Lautsprecher vorgenommen, kehren Sie durch
Drücken der BACK-Taste zum MAIN-Menü
zurück.
DELAY SETUP-Menü
Sie erreichen dieses Menü über das MAINMenü. In diesem Menü können Sie die
Verzögerungszeit für jeden einzelnen
Lautsprecher einstellen. Dadurch ist es möglich,
daß der Ton jedes Lautsprechers zeitgleich an
der Hörposition eintrifft und zwar unabhängig
davon, ob der Abstand der Lautsprecher zum
Hörer gleich ist oder nicht. Dadurch ist auch
bei unregelmäßiger Aufstellung der
Lautsprecher ein homogenes Klangbild
gewährleistet.
Generell gilt, daß Sie die relative
Verzögerungszeit bei Lautsprechern erhöhen
sollten, die näher an der Hörposition stehen.
Entsprechend sollten Sie die relative
Verzögerungszeit für Lautsprecher reduzieren,
die weiter vom Hörplatz entfernt stehen. Messen
Sie zunächst den Abstand zwischen der
Hörposition und den einzelnen Lautsprechern.
Für den am weitesten entfernten Lautsprecher
sollte keine zusätzliche Verzögerungszeit
eingestellt werden. Jeder der anderen
Lautsprecher erhält pro 30 cm, die er näher
an der Hörposition steht, eine Verzögerungszeit
von 1 Millisekunde. Ist beispielsweise der linke
Frontlautsprecher mit 3,90 m am weitesten
entfernt und befindet sich der linke
Surroundlautsprecher in einem Abstand von
Page 38

RSP-985 Surround-Sound-Prozessor
38
2,10 m zur Hörposition, so wählen Sie für den
linken Surroundlautsprecher eine
Verzögerungszeit von 6 Millisekunden. Fahren
Sie hiermit solange fort, bis Sie die
entsprechende Verzögerungszeit für alle
Lautsprecher eingestellt haben, die sich näher
an der Hörposition befinden als der am
weitesten entfernte Lautsprecher.
Haben Sie die Verzögerungszeit für alle
Lautsprecher eingestellt, kehren Sie durch
Drücken der BACK-Taste zum MAIN-Menü
zurück.
BALANCE SETUP-Menü
In diesem Menü, in das Sie ebenfalls über das
MAIN-Menü gelangen, können Sie den
relativen Lautstärkepegel aller sechs
Lautsprecher einstellen.
Zum Einpegeln aktivieren Sie den eingebauten
Testtongenerator. Dazu gehen Sie in die mit
NOISE gekennzeichnete Zeile und verwenden
die VOL DOWN/UP-Tasten, um in die AUTOPosition zu schalten. Nun kommt der Testton
aus dem ersten Lautsprecher. Wird drei
Sekunden lang keine Einstellung vorgenommen,
wird der Testton automatisch auf den nächsten
Lautsprecher geschaltet. Auf diese Weise wird
der Testton nacheinander auf alle Lautsprecher
geschaltet.
Setzen Sie sich in die normale Hörpositon und
hören Sie, ob ein Lautsprecher deutlich lauter
oder leiser klingt als die anderen Lautsprecher.
Am besten ist es, einen Lautsprecher, der weder
leiser noch lauter als die anderen Lautsprecher
klingt, als Referenzlautsprecher zu nutzen.
Lassen Sie den Lautstärkepegel des
Referenzlautsprechers unverändert und passen
Sie nacheinander die Lautstärkepegel der
anderen Lautsprecher an. Nutzen Sie die
VOLUME DOWN/UP-Tasten, um den
Lautstärkepegel des jeweils angewählten
Lautsprechers (aus dem gerade der Testton
kommt) anzupassen. Sie können unter NOISE
auch die Einstellung MANUAL wählen. Dann
wird der Testton zu dem Lautsprecher gesendet,
den Sie mit den DOWN/UP-Tasten im Menü
anwählen.
Es ist möglich, daß die Einstellung der
Lautstärkepegel mehrmals geändert werden
muß, bevor Sie das gewünschte Ergebnis
erzielen und alle Lautsprecher denselben
Lautstärkepegel erzeugen.
Die Einstellung der Lautstärkepegel kann auch
mit Hilfe eines externen Signals, wie z.B. das
von einer Testsignal-Disc, vorgenommen
werden. In diesem Fall wählen Sie unter NOISE
die Einstellung OFF.
HINWEIS
: Zum genaueren Einpegeln des Sys-
tems können Sie ein sogenanntes SPL-Meter
verwenden. Die Abkürzung SPL steht für
Sound Pressure Level. Es handelt sich dabei
also um ein Meßgerät für den Schalldruck.
SPL-Meter erhalten Sie in jedem
Elektronikfachgeschäft. Setzen Sie das
Meßgerät in die Positionen „SLOW“ und „C“.
Das SPL-Meter muß sich während des
gesamten Einpegelvorgangs am Hörplatz
befinden. Ziel ist es, daß für alle Kanäle
schließlich derselbe Wert angezeigt wird.
Wählen Sie unter NOISE die Einstellung
MANUAL. Zum genauen Einpegeln eines
Surroundsystems sollten Sie ein SPL-Meter
einsetzen und die Lautstärke so lange
verändern, bis an der Hörposition für alle
Lautsprecher ein Wert von 75 dB angezeigt
wird.
Haben Sie den Lautstärkepegel für alle
Lautsprecher eingestellt, kehren Sie durch
Drücken der BACK-Taste zum MAIN-Menü
zurück.
SUBWOOFER SETUP-Menü
Auch zu diesem Menü, das zur Optimierung
des RSP-985 für einen speziellen Subwoofer
genutzt wird, gelangen Sie über das MAINMenü. Die Einstellungen in diesem Menü sind
nur dann erforderlich, wenn sie ausdrücklich
gefordert werden.
SW Limiter: Der weite Dynamikbereich und
die beeindruckenden Baßeffekte heutiger
Quellen können zu einer Überlastung des
Subwoofers führen. Diese Einstellung ermöglicht
eine Begrenzung des zum Subwoofer
gesendeten Signalpegels. Wählen Sie die Zeile
SW Limiter an und drücken Sie die ENTERTaste. Auf dem Bildschirm erscheint eine Liste
und ein Tieftonsignal wird zum Subwoofer
gesendet (oder zu den mit LARGE
gekennzeichneten Lautsprechern, wenn kein
Subwoofer angeschlossen ist). Passen Sie den
Lautstärkepegel mit den VOL-Tasten so lange
an, bis der Ton aus den Lautsprechern verzerrt
klingt. Drücken Sie nun die ENTER-Taste, um
den SW Limiter auf diesen Lautstärkepegel
einzustellen. Kehren Sie mit der BACK-Taste
zum Menü zurück.
STEREO/P/L SW: Dieser Unterpunkt
ermöglicht es, die Standard-Baßwiedergabe
in den STEREO-, PROLOGIC- und den DSPMUSIC-MODI zu umgehen, wenn mit LARGE
klassifizierte Frontlautsprecher gewählt werden.
Wählen Sie die Einstellung YES, wenn der
Subwoofer bei mit LARGE klassifizierten
Frontlautsprechern auch in diesen Modi aktiv
sein soll. Wählen Sie die Einstellung NO, wenn
kein Subwoofer angeschlossen ist. Wählen Sie
die Einstellung NORMAL für die automatische
Standard-Baßwiedergabe in diesen Modi.
LFE MIX LEVEL: Diese Einstellung gibt den
relativen Signalpegel des .1-Kanals im Vergleich
zu den fünf „Full-Range“-Kanälen an. Die
Einstellung wird im Werk entsprechend den
Vorgaben der Dolby Labs, von DTS Technol-
Page 39

39
Deutsch
ogy und THX Lucasfilm durchgeführt. Die
Einstellung kann nach eigenem Geschmack
für jeden Surroundmodus geändert werden.
Der LFE-Inhalt DTS-codierter Filme wird anders
gemischt als der DTS-codierter Musik. Für DTScodierte Filme sollte die LFE MIX LEVELEinstellung zur Gewährleistung einer korrekten
THX-Wiedergabe auf 10 dB eingestellt werden.
Für DTS-Musik sollten 0 dB eingestellt werden.
THX sollte für die Musikwiedergabe nicht
aktiviert werden. Bei Filmen im Dolby DigitalFormat sollte die Einstellung 10 dB gewählt
werden, um eine korrekte Wiedergabe in den
DOLBY DIGITAL- und THX-Modi zu
gewährleisten.
Haben Sie die Subwoofereinstellungen
vorgenommen, kehren Sie durch Drücken der
BACK-Taste zum MAIN-Menü zurück.
Factory Default-Menü
Technische Daten
Audio
Klirrfaktor (10 - 70.000 Hz)
< 0,03 %
Intermodulationsverzerrung (60 Hz: 7 kHz)
< 0,03 %
Frequenzgang (Hochpegel)
20 - 20.000 Hz (+/- 1 dB)
Geräuschspannungsabstand (IHF A)
100 dB (Stereo)
90 dB (Dolby Digital, DTS)
Verstärkung/Eingangsimpedanz
Verstärkung (analog): 10 dB/47 kOhm
Digital: 0,5 V/- 20 dBf
Klangregelung (Bass/Treble)
+/- 6 dB bei 50 Hz/15 kHz
Video
Frequenzgang
3 Hz - 10 MHz (+/-3 dB)
Geräuschspannungsabstand
45 dB
Eingangs-/Ausgangsimpedanz
75 Ohm/75 Ohm
Ausgangsspannung
1 Volt
Das letzte Menü, das Sie vom SYSTEM SETUPMenü aus erreichen können, ist das Factory
Default-Menü. Durch Drücken der ENTER-Taste
setzen Sie die gesamten Einstellungen der
Systemkonfiguration auf die Standardeinstellungen ab Werk zurück.
HINWEIS
: Mit Drücken der ENTER-Taste werden
alle Einstellungen (im Delay Setup-Menü, im
Speaker Setup-Menü, im Balance SetupMenü, im Input Setup-Menü usw.) geändert.
Sie ändern also ALLE während der
Systemkonfiguration vorgenommenen
Einstellungen und kehren zu den
Standardeinstellungen ab Werk zurück.
Werden Sie sich diese Tatsache bewußt,
bevor Sie die ENTER-Taste drücken.
Nach dem ersten Drücken der ENTER-Taste
müssen Sie Ihre Entscheidung durch ein zweites
Drücken der ENTER-Taste bestätigen.
Sonstige Daten
Leistungsaufnahme
46 Watt
Spannungsversorgung
USA: 115 V, 60 Hz
CE: 230 V, 50 Hz
Gewicht
7,0 kg
Abmessungen (B x H x T)
440 x 121 x 329 mm
Die hierin gemachten Angaben entsprechen dem Stand bei
Drucklegung. Änderungen in Technik und Ausstattung
vorbehalten.
Rotel und das Rotel HiFi-Logo sind eingetragene
Warenzeichen von The Rotel Co, Ltd., Tokio, Japan.
DTS ist ein eingetragenes Warenzeichen von Digital Theater
Systems.
In Lizenz der Dolby Laboratories Licensing Corporation
hergestellt. „Dolby“, „Prologic“ und das Doppel-D-Symbol
sind eingetragene Warenzeichen der Dolby Laboratories
Licensing Corporation. Vertrauliche, nicht veröffentlichte
Werke © 1992 - 1997 Dolby Laboratories, Inc. Alle Rechte
vorbehalten.
THX Ultra™ und das THX Ultra-Logo sind eingetragene
Warenzeichen von Lucasfilm Ltd.
Um ohne Änderungen vorzunehmen in das
SYSTEM SETUP-Menü zurückzukehren, drücken
Sie die BACK-Taste.
Page 40

The Rotel Co. Ltd.
10-10 Shinsen-Cho
Shibuya-Ku
Tokyo 150-0045
Phone: +81 3-5458-5325
Fax: +81 3-5458-5310
North Reading, MA 01864-2699
Phone: +1 978-664-3820
Fax: +1 978-664-4109
Worthing, West Sussex BN11 2RX
Phone: +44 (0)1903 524 813
Fax: +44 (0)1903 524 831
Phone: +49 05201-87170
Fax: +49 05201-73370
Japan
Rotel of America
54 Concord Street
USA
Rotel Europe
Meadow Road
England
Rotel Deutschland
Kleine Heide 12
D-33790 Halle/Westf.
Germany
www.rotel.com
082 OM-RSP-985 ENGLISH/GERMAN 122099
 Loading...