

Page 1
RB-976
SIX CHANNEL POWER AMPLIFIER
AMPLIFICATEUR DE PUISSANCE À SIX CANAUX
SECHSKANAL-ENDSTUFE
AMPLIFICATORE DI POTENZA A SEI CANALI
ETAPA DE POTENCIA DE SEIS CANALES
SIX CHANNEL POWER AMPLIFIER RB-976
POWER
CHANNEL
BRIDGED MONO
LEVEL ADJUST
12
A34B56C
Owner’s Manual
Guide d’utilisation
Bedienungsanleitung
Manuale di Istruzioni
Manual de Instrucciones
Page 2
CAUTION
RISK OF ELECTRIC SHOCK
DO NOT OPEN
CAUTION: TO REDUCE THE RISK OF ELECTRIC SHOCK, DO
NOT REMOVE COVER. NO USER-SERVICEABLE PARTS INSIDE.
REFER SERVICING TO QUALIFIED SERVICE PERSONNEL.
APPLICABLE FOR USA, CANADA OR WHERE
APPROVED FOR THE USAGE
CAUTION: TO PREVENT ELECTRIC SHOCK, MATCH WIDE BLADE
OF PLUG TO WIDE SLOT. INSERT FULLY.
ATTENTION: POUR EVITER LES CHOCS ELECTRIQUES,
INTRODUIRE LA LAME LA PLUS LARGE DE LA FICHE
DANS LA BORNE CORRESPONDANTE DE LA PRISE ET
POUSSER JUSQU AU FOND.
WARNING:
There are no user serviceable parts inside. Refer all servicing to
qualified service personnel.
WARNING:
To reduce the risk of fire or electrical shock, do not expose the unit
to moisture or water. Do not allow foreign objects to get into the
enclosure. If the unit is exposed to moisture, or a foreign object
gets into the enclosure, immediately disconnect the power cord
from the wall. Take the unit to a qualified service person for inspection and necessary repairs.
Read all the instructions before connecting or operating the unit. Keep this
manual so you can refer to these safety instructions.
Heed all warnings and safety information in these instructions and on the
product itself. Follow all operating instructions.
Clean the unit only with a dry cloth or a vacuum cleaner.
This symbol is to alert the user to the
presence of uninsulated dangerous
voltages inside the product's enclosure
that may constitute a risk of electric shock.
This symbol is to alert the user to important
operating and maintenance (service)
instructions in this manual and literature
accompanying the product.
Keep the ventilation inlets on the unit unobstructed. For example, do not place
the unit on a bed, sofa, rug, or similar surface that could block the ventilation
slots. If the unit is placed in a bookcase or cabinet, there must be sufficient
clearance around the unit and ventilation of the cabinet to allow proper cooling.
Keep the unit away from radiators, heat registers, stoves, or any other
appliance that produces heat.
The unit must be connected to a power supply only of the type and voltage
specified on the rear panel of the unit.
Connect the unit to the power outlet only with the supplied 2-pin polarized
power supply cable or an exact equivalent. Do not modify the supplied cable in
any way. Do not attempt to defeat grounding and/or polarization provisions. The
cable should be connected to a 2-pin polarized wall outlet, matching the wide
blade of the plug to the wide slot of the receptacle. Do not use extension cords.
Do not route the power cord where it will be crushed, pinched, bent at severe
angles, exposed to heat, or damaged in any way. Pay particular attention to the
power cord at the plug and where it exits the back of the unit.
The power cord should be unplugged from the wall outlet if the unit is to be left
unused for a long period of time.
Immediately stop using the unit and have it inspected and/or serviced by a
qualified service agency if:
• The power supply cord or plug has been damaged.
• Objects have fallen, or liquid has been spilled, into the unit.
• The unit has been exposed to rain.
• The unit shows signs of improper operation
• The unit has been dropped or damaged in any way
Place the unit on a fixed, level surface strong
enough to support its weight. Do not place the
unit on a moveable cart that could tip over.
Page 3
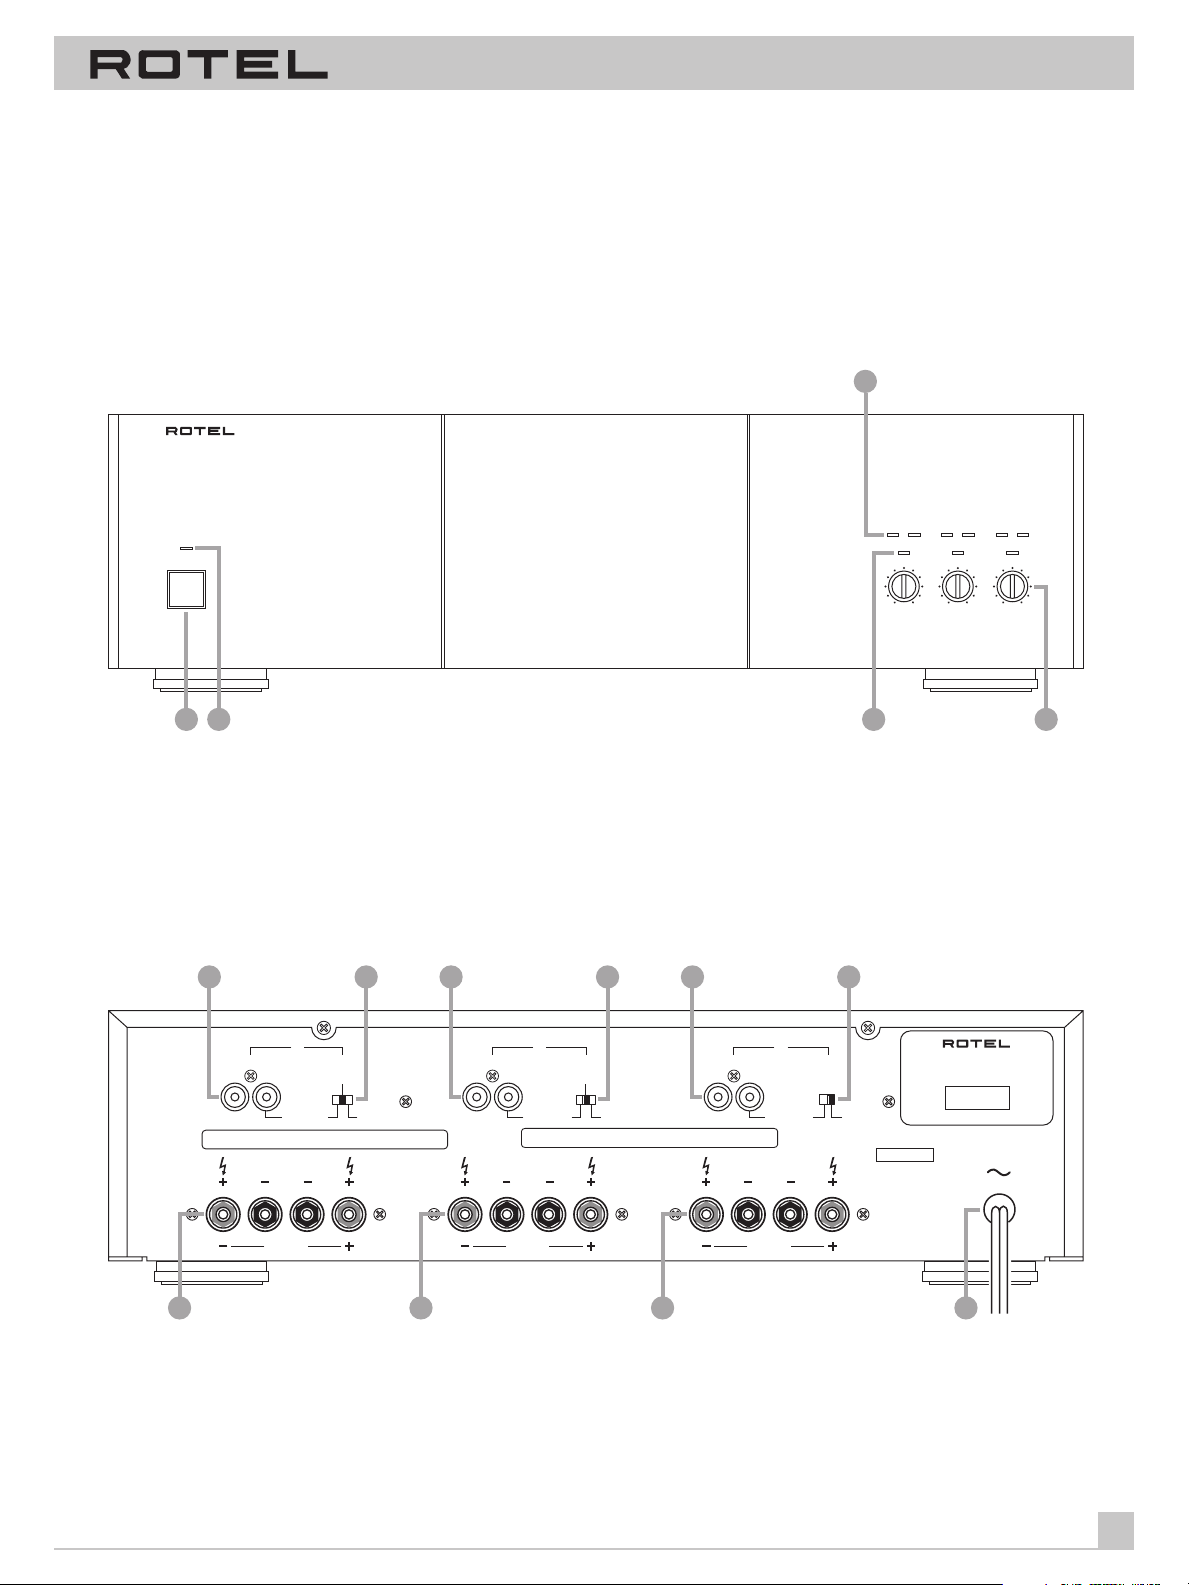
Figure 1: Controls and Connections
Commandes et Prises
Bedienelemente und Anschlüsse
Controlli e collegamenti
Controles y Conexiones
SIX CHANNEL POWER AMPLIFIER RB-976
POWER
SIX CHANNEL POWER AMPLIFIER RB-976
CHANNEL
BRIDGED MONO
LEVEL ADJUST
3
34B56
12
A
C
1 2
6 6 6
C
INPUT
LR
RIGHT
SPEAKERS
BRIDGED
BRIDGED STEREO
WARNING: TO REDUCE THE RISK OF FIRE OR ELECTRICAL SHOCK,
DO NOT EXPOSE THIS EQUIPMENT TO RAIN OR MOISTURE.
7 7 7
B
INPUT
LEFT
LINK
RIGHT
LR
SPEAKERS
BRIDGED
LINK
BRIDGED STEREO
SPEAKER IMPEDANCE
LEFT
INPUT
LR
STEREO 4 OHMS MINIMUM
BRIDGED 8 OHMS MINIMUM
SPEAKERS
RIGHT
BRIDGED
A
BRIDGED STEREO
LEFT
4
SERIAL NO.
POWER AMPLIFIER
MODEL NO. RB-976
POWER CONSUMPTION: 700W
5
8
8 8
9
Page 4
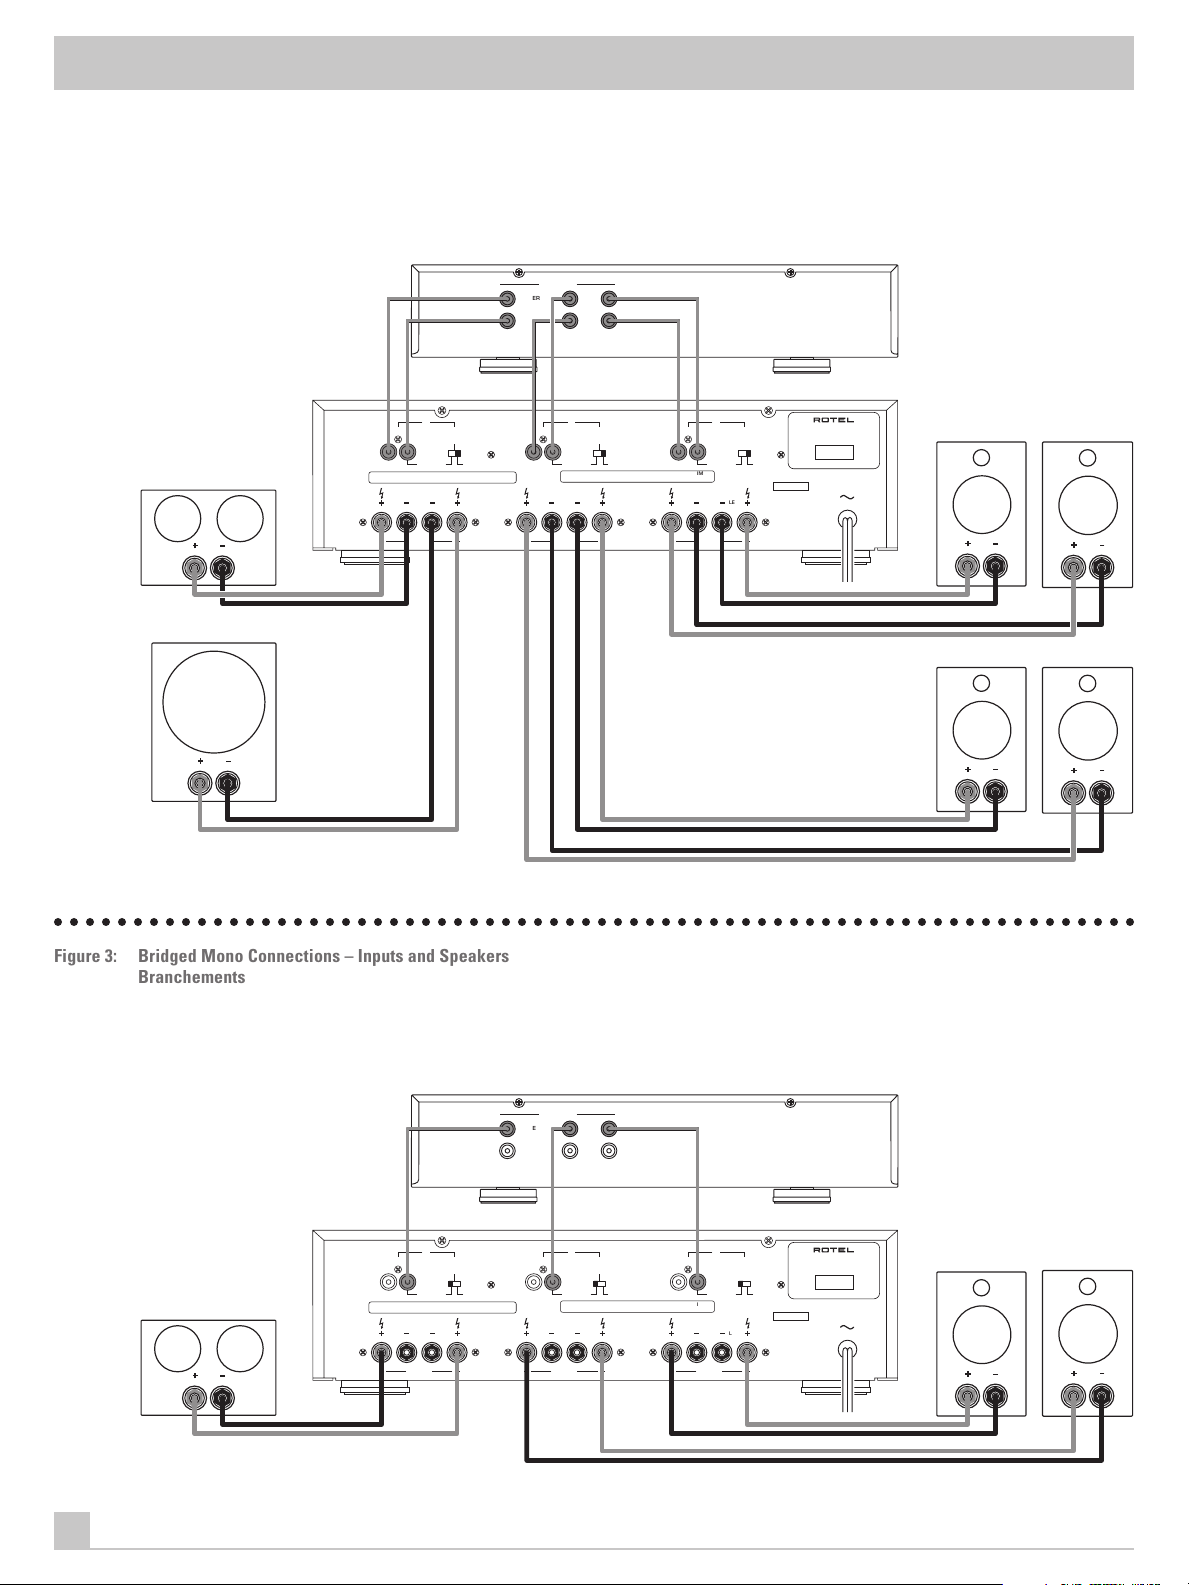
Figure 2: Normal Connections – Inputs and Speakers
Branchements normaux - Prises d’entrée et enceintes
Anschlußdiagramm bei normalem Betrieb (Eingangs- und Lautsprecheranschlüsse)
Collegamenti normali - Ingressi e diffusori
Realización de las Conexiones - Entradas y Cajas Acústicas
C
INPUT
LR
BRIDGED STEREO
WARNING:
TO REDUCE THE RISK OF FIRE OR ELECTRICAL SHOCK,
CENTER CHANNEL
DO NOT EXPOSE THIS EQUIPMENT TO RAIN OR MOISTURE.
SPEAKERS
LEFT
RIGHT
PREAMPLIFIER OR SIGNAL PROCESSOR
OUTPUTS
CENTER
SUB
REAR
RIGHT
LEFT
FRONT
ROTEL RB-976
B
INPUT
RIGHT
LR
BRIDGED STEREO
SPEAKER IMPEDANCE
SPEAKERS
LEFT
LINK
STEREO 4 OHMS MINIMUM
BRIDGED 8 OHMS MINIMUM
LINK
INPUT
RIGHT
A
LR
BRIDGED STEREO
SPEAKERS
LEFT
SERIAL NO.
POWER AMPLIFIER
MODEL NO. RB-976
POWER CONSUMPTION: 700W
LEFT FRONT RIGHT FRONT
BRIDGED
BRIDGED
BRIDGED
SUBWOOFER
LEFT REAR RIGHT REAR
○○○○○○○○○○○○○○○○○○○○○○○○○○○○○○○○○○○○○○○○○○○○○○○○○○○○○○○○○○○○○○○○○○○○
Figure 3: Bridged Mono Connections – Inputs and Speakers
Branchements en mono en mode ponté - Prises d’entrée et enceintes
Anschlußdiagramm bei Brückenschaltung (Eingangs- und Lautsprecheranschlüsse)
Collegamenti mono “a ponte” (Bridged) - Ingressi e diffusori
Conexiones para el Funcionamiento en Modo Monofónico Puenteado - Entradas y Cajas Acústicas
PREAMPLIFIER OR SIGNAL PROCESSOR
OUTPUTS
CENTER
SUB
REAR
RIGHT
LEFT
FRONT
CENTER CHANNEL
C
INPUT
LR
LINK
BRIDGED STEREO
WARNING:
TO REDUCE THE RISK OF FIRE OR ELECTRICAL SHOCK,
DO NOT EXPOSE THIS EQUIPMENT TO RAIN OR MOISTURE.
SPEAKERS
LEFT
RIGHT
BRIDGED
INPUT
RIGHT
B
LR
BRIDGED STEREO
SPEAKER IMPEDANCE
SPEAKERS
LEFT
BRIDGED
LINK
INPUT
STEREO 4 OHMS MINIMUM
BRIDGED 8 OHMS MINIMUM
RIGHT
A
LR
BRIDGED STEREO
SPEAKERS
LEFT
BRIDGED
SERIAL NO.
ROTEL RB-976
POWER AMPLIFIER
MODEL NO. RB-976
POWER CONSUMPTION: 700W
LEFT FRONT LEFT REAR
Page 5
English
○○ ○○○○○○○○○○○○○○○○○○○○○○○○○○○○○○○
Contents (circled numbers refer to illustration)
About Rotel __________________________________________ 1
Getting Started ______________________________________ 1
A Few Precautions 1
Placement 2
Protection Circuitry 2
AC Power and Control ________________________________ 2
AC Power Input
Power Switch
9
1
and Power Indicator
2
Channel and Bridged Mono Indicator Lights
Level Adjust Controls
5
Input Configuration and Connection ___________________ 3
Input Selector Switches
Input Signal Connection
7
6
Speaker Connection __________________________________ 3
Speaker Selection 3
Speaker Wire Selection 3
Polarity and Phasing 3
Stereo Speaker Connection
8
Bridged Mono Operation ______________________________ 4
Input Connection 4
Bridged Speaker Connection 4
Troubleshooting ______________________________________ 4
Front Panel Power Indicator Is Not Lit 4
Fuse Replacement 4
No Sound 4
Specifications _______________________________________ 25
3 4
2
2
2
2
3
3
3
○○ ○○○○○○○○○○○○○○○○○○○○○○○○○○○○○○○
About Rotel
A family whose passionate interest in music led them to manufacture high fidelity components of uncompromising quality founded
Rotel over 30 years ago. Through the years that passion has remained undiminished and the family goal of providing exceptional
value for audiophiles and music lovers, regardless of their budget,
is shared by all Rotel employees.
The engineers work as a close team, listening to, and fine tuning
each new product until it reaches their exacting musical standards. They are free to choose components from around the
world in order to make that product the best they can. You are
likely to find capacitors from the United Kingdom and Germany,
semi conductors from Japan or the United States, while toroidal
power transformers are manufactured in Rotel’s own factory.
Rotel’s reputation for excellence has been earned through hundreds of good reviews and awards from the most respected reviewers in the industry, who listen to music every day. Their
comments keep the company true to its goal – the pursuit of
equipment that is musical, reliable and affordable.
All of us at Rotel thank you for buying this product and hope it will
bring you many hours of enjoyment.
○○ ○○○○○○○○○○○○○○○○○○○○○○○○○○○○○○○
Getting Started
Thank you for purchasing the Rotel RB-976 Six Channel Power
Amplifier. When used in a high-quality music or home theater system, it will provide years of musical enjoyment.
The RB-976 is a high-power, six-channel power amplifier, providing the highest level of audio performance. Discrete output devices, a massive power supply, premium components, and Rotel’s
Balanced Design ensure superb sound quality. High current capability allows the RB-976 to drive the most demanding loudspeakers.
Be aware that the RB-976 is capable of high power levels, in excess of 60 watts per channel. Make sure that your speakers can
handle the power of the RB-976. If in doubt about your speakers,
ask your authorized Rotel dealer for advice.
The RB-976 is straightforward in its installation and operation. If
you have experience with other power amplifiers, you shouldn’t
find anything perplexing. Plug in the cables from your preamp into
the amplifier inputs, wire up your speakers, and enjoy.
A Few Precautions
Please read this manual carefully. In addition to basic installation
and operating instructions, it provides valuable information on
various RB-976 system configurations as well as general information that will help you get optimum performance from your system.
Please contact your authorized Rotel dealer for answers to any
questions you might have. In addition, all of us at Rotel welcome
your questions and comments.
1
Page 6
SIX CHANNEL POWER AMPLIFIER RB-976
Save the RB-976 shipping carton and all enclosed packing material for future use. Shipping or moving the RB-976 in anything
other than the original packing material may result in severe damage to your amplifier.
Fill out and send in the owner’s registration card packed with the
RB-976. Also be sure to keep the original sales receipt. It is your
best record of the date of purchase, which you will need in the
event warranty service is ever required.
Placement
Because of its high power output, the RB-976 may generate considerable heat. The heat sinks and ventilation openings in the amplifier are more than capable of dissipating this heat under normal
conditions, but don’t smother your amplifier. There must be adequate clearance around the chassis. The ventilation slots in the
top cover must be unblocked, and there must be reasonable airflow around the amplifier. Use common sense when placing the
amplifier in a cabinet or when stacking other equipment.
Likewise, remember the weight of the amplifier when you select
an installation location. Make sure that the shelf or cabinet can
support its considerable bulk. Again, use common sense.
Protection Circuitry
The RB-976 features a thermal protection circuit that protects the
amplifier against potential damage in the event of extreme or
faulty operating conditions. Unlike many designs, the RB-976’s
protection circuit is independent of the audio signal and has no
impact on sonic performance. Instead, the protection circuit
monitors the temperature of the output devices and shuts down
the amplifier if temperatures exceed safe limits.
○○ ○○○○○○○○○○○○○○○○○○○○○○○○○○○○○○○
AC Power and Controls
AC Power Input
Because of its high power rating, the RB-976 can draw considerable current. Therefore, it should be plugged directly into a 2-pin
polarized wall outlet. Do not use an extension cord. A heavy duty
multi-tap power outlet strip may be used if it (and the wall outlet)
is rated to handle the current demanded by the RB-976 and all the
other components connected to it.
Be sure the power switch on the front panel of the RB-976 is
turned off (in the out position). Then, connect the supplied power
cord to the AC power outlet.
Your RB-976 is configured at the factory for the proper AC line
voltage in the country where you purchased it (either 115 volts AC
or 230 volts AC with a line frequency of either 50 Hz or 60 Hz). The
AC line configuration is noted on a decal on the back panel.
Note: Should you move your RB-976 amplifier to another country,
it is possible to reconfigure your amplifier for use on a different
line voltage. Do not attempt to perform this conversion yourself.
Opening the enclosure of the RB-976 exposes you to dangerous
voltages. Consult a qualified service person or the Rotel factory
service department for information.
If you are going to be away from home for an extended period of
time such as a month-long vacation, it is a sensible precaution to
unplug your amplifier (as well as other audio and video components) while you are away.
9
Most likely, you will never see this protection circuitry in action.
However, should a faulty condition arise, one or more channels of
the amplifier will stop playing.
If this happens, turn the amplifier off, let it cool down for several
minutes, and attempt to identify and correct the problem that
caused the protection circuitry to engage. When you turn the amplifier back on, the protection circuit will automatically reset.
In most cases, the protection circuitry activates because of a fault
condition such as shorted speaker wires, or inadequate ventilation leading to an overheating condition. In very rare cases, highly
reactive or extremely low impedance speaker loads could cause
the protection circuit to engage.
If the protection circuitry triggers repeatedly and you are unable
to isolate and correct the faulty condition, contact your authorized
Rotel dealer for assistance in troubleshooting.
Power Switch 1 and Power Indicator
The power switch is located on the front panel of your amplifier. To
turn the amplifier on, push the switch in. The LED indicator above the
switch will light, indicating that the amplifier is turned on. To turn the
amplifier off, push the button again and return it to the out position.
2
Channel and Bridged Mono Indicator Lights 3
When a channel pair is in stereo mode the two channel indicator
lights for those channels will light. When a channel pair is in
Bridged Mono mode, the two Channel Indicator Lights are turned
off and the Bridged Mono Indicator Light for that channel pair is
turned on. Refer to the Input Configuration and Connection section
on the following page for more information.
Level Adjust Controls
The Level Adjust controls enable you to individually adjust the input sensitivity of the three channel pairs. They can be used to set
the sound output balance of the speakers in a home theater system, or control the volume level in the various rooms when the
RB-976 is used to drive the speakers in a multi-room installation.
The setting of the Input Selector Switch does not affect the operation of the Level Adjust controls.
5
4
2
Page 7
English
○○ ○○○○○○○○○○○○○○○○○○○○○○○○○○○○○○○
Input Configuration and Connection
The six chanels of the RB-976 are grouped into 3 channel pairs labeled A, B and C for easy identification and control.
Note: To prevent loud noises that neither you nor your speakers
will appreciate, make sure the amplifier is turned off when you
make any signal connections or change the setting of the Input
Selector Switches.
Input Selector Switches
When an Input Selector Switch is in the “Stereo”position the two
channels of the channel pair operate independently. When the Input Selector Switch for one or more of the channel pairs is in the
“Bridged” position the two channels are combined into one high
power (150 watt) channel. See the “Bridged Mono Operation”
section of this manual for more information.
The “Link” position of the Input Selector Switch connects the inputs of the channel pairs togther. In this configuration the inputs
connected to the A channels can also drive the B and/or C channels. This is sometimes called a “daisy chain” configuration. It is
typically used in custom installations where one set of stereo inputs is used to drive mutiple pairs of speakers, which are often located in different rooms.
7
○○ ○○○○○○○○○○○○○○○○○○○○○○○○○○○○○○○
Speaker Connection
Speaker Selection
We recommend using loudspeakers with a nominal impedance of
4 ohms or higher with the RB-976. You should exercise some caution in driving multiple pairs of speakers in parallel configuration,
because the effective impedance the amplifier sees is cut in half.
For example, when driving two pair of 8 ohm speakers, the amplifier sees a 4 ohm load. When driving multiple speakers in parallel,
it is recommended that you select speakers with a nominal impedance of 8 ohms or higher. Speaker impedance ratings are less
than precise. In practice, very few loudspeakers will present any
problems for the RB-976. See your authorized Rotel dealer if you
have any questions.
Speaker Wire Selection
Use insulated two-conductor stranded wire to connect the RB-976
to the speakers. The size and quality of the wire can have an audible effect on the performance of the system. Standard speaker
wire will work, but can result in lower output or diminished bass
response, particularly over longer distances. In general, heavier
wire will improve the sound. For best performance, you may want
to consider special high-quality speaker cables. Your authorized
Rotel dealer can help in the selection of appropriate cables for
your system.
To use the input link function move the Input Selector Switch for
the channel pair(s) you want to link to the “Link” position. Note
that the inputs of the B channels may be linked, while the C channels operate independently, or the inputs of the C channels may
be linked, while the B channels operate independently.
Note: When the input linking function is used the linked channel
pairs cannot be bridged.
Input Signal Connection
[See Figure 2 for normal wiring illustration.]
The RB-976 has conventional RCA type input connectors, the type
found on nearly all audio equipment.
Use high quality audio interconnect cables to connect the outputs
of the preamplifier or signal processor to the inputs of the RB-976.
Be sure to connect the left and right channels properly and that
you use the correct channel pair of the RB-976.
6
Polarity and Phasing
The polarity — the positive/negative orientation of the connections — for every speaker and amplifier connection must be consistent so all the speakers will be in phase. If the polarity of one
connection is mistakenly reversed, bass output will be very weak
and stereo imaging degraded. All wire is marked so you can identify the two conductors. There may be ribs or a stripe on the insulation of one conductor. The wire may have clear insulation with
different color conductors (copper and silver). There may be polarity indications printed on the insulation. Identify the positive
and negative conductors and be consistent with every speaker
and amplifier connection.
Stereo Speaker Connection
The RB-976 has six pairs of color coded binding posts on the back
panel. These connectors accept bare wire, connector lugs, or
dual banana type connectors (except in the European Community
countries where their use is not permitted).
Route the wire from the RB-976 to the speakers. Give yourself
enough slack so you can move the components enough to allow
access to the speaker connectors.
If you are using dual banana plugs, connect them to the wires and
then plug into the backs of the binding posts. The hexagonal
thumbscrews of the binding posts should be screwed in all the
way (clockwise).
8
3
Page 8
SIX CHANNEL POWER AMPLIFIER RB-976
If you are using terminal lugs, connect them to the wires. If you
are attaching bare wires directly to the binding posts, separate
the wire conductors and strip back the insulation from the end of
each conductor. Be careful not to cut into the wire strands. Unscrew (turn counterclockwise) the binding post hexagonal thumbscrews. Place the connector lug or wire around the binding post
shaft. Turn the hexagonal thumbscrews clockwise to clamp the
connector lug or wire firmly in place.
Note: Be sure there are no loose wire strands that could touch
adjacent wires or connectors.
○○ ○○○○○○○○○○○○○○○○○○○○○○○○○○○○○○○
Bridged Mono Operation
[See Figure 3 for bridged operation connection illustration.]
The channel pairs of the RB-976 can be “bridged”. In this configuration the single channel produces a massive 150 watts! This feature allows you to increase the overall power output of your
system by bridging the channel pairs of the RB-976 and adding a
second RB-976 that also has bridged channel pairs. Or one of the
RB-976 channel pairs may be bridged to drive a monophonic subwoofer. Note however that when one of the RB-976 channel pairs
is bridged the speaker connected to it must have an impedance of
8 ohms or more.
Note: Turn off all the system components before you change any
signal connections or the setting of the Input Selector Switches.
○○ ○○○○○○○○○○○○○○○○○○○○○○○○○○○○○○○
Troubleshooting
Most difficulties in audio systems are the result of incorrect connections, or improper control settings. If you encounter problems,
isolate the area of the difficulty, check the control settings, determine the cause of the fault and make the necessary changes. If
you are unable to get sound from the RB-976, refer to the suggestions for the following conditions:
Front Panel Power Indicator Is Not Lit
No main power to the RB-976. Check the front panel power
switch. Make sure that it is set to the on position. Check AC power
connections at the amplifier and the AC outlet.
Fuse Replacement
If everything checks out correctly and you still cannot get the amplifier to turn on, the internal power fuse may have blown. If you
believe this has happened, contact your authorized Rotel dealer
to get the fuse replaced.
No Sound
If the amp is getting AC power, but is producing no sound, check
the Channel and Bridged Mono indicator lights on the front panel.
Then check all input and output connections to be sure they are
correct. Finally check the connections to, and the control settings
of, the associated components.
To bridge one of the RB-976 channel pairs move the Input Selector
Switch for that channel to the “Bridged” position.
Input Connection
When using one of the RB-976 channel pairs in bridged mono
mode, connect the cable from the preamplifier or signal processor
output to the left input of the channel pair. No connection is made
to the right input.
Note: It is possible to link inputs B and/or C while A is in the
Bridged Mode. Both left and right inputs are used for A.
Bridged Speaker Connection
When using one of the RB-976 channel pairs in bridged mono
mode, the wire to the speakers is connected to the positve terminals of the left and right channels. Connect the wire that goes to
the postive terminal of the speaker to the positve terminal of the
left channel of the channel pair. Connect the wire that goes to the
negative terminal of the speaker to the positve terminal of the
right channel of the channel pair. No connections are made to the
negative terminals.
4
Page 9
Français
3
AVERTISSEMENT
Il n’y a dans cet appareil aucune pièce utilisable par l’usager. S’il
doit être réparé, le confier à un technicien qualifié.
Pour réduire le risque d’incendie ou de décharge électrique, ne pas
exposer l’appareil à l’humidité ou à l’eau. Ne pas laisser des objets
pénétrer dans le boîtier. Si l’appareil a été exposé à l’humidité ou
si un objet y a pénétré, débrancher immédiatement l’appareil et le
faire inspecter ou réparer au besoin par un technicien qualifié.
Bien lire toutes les instructions avant de brancher l’appareil ou de l’utiliser.
Garder ce guide à portée de la main afin de pouvoir consulter les consignes de
sécurité.
Bien lire tous les avertissements et les toutes les consignes de sécurité qui
sont contenus dans ce guide et sur l’appareil lui-même. Respecter toutes les
consignes d’utilisation de l’appareil.
Nettoyer le boîtier de l’appareil uniquement avec un chiffon sec ou un
aspirateur.
Ne pas obstruer les orifices de ventilation de l’appareil. On ne doit pas par
exemple le placer sur un lit, un canapé, un tapis ou sur toute autre surface qui
pourrait obstruer ses orifices de ventilation. Si on place l’appareil dans une
bibliothèque ou une armoire, il doit y avoir assez de dégagement autour de
l’appareil pour en assurer la ventilation.
Garder l’appareil loin des radiateurs, des bouches de chauffage, des poêles et
de tout autre appareil qui dégage de la chaleur.
L’appareil ne doit être branché que dans une prise de courant dont la tension
correspond à celle qui est donnée à l’arrière de l’appareil.
Brancher l’appareil dans une prise de courant en n’utilisant que le cordon
d’alimentation fourni ou un cordon équivalent. Ne jamais modifier le cordon
fourni. Ne pas tenter de rendre la mise à la terre inopérante ou de modifier la
polarisation de l’appareil. Le cordon d’alimentation devrait être branché dans
une prise murale polarisée à deux broches. La broche la plus large du cordon
devrait pénétrer dans la broche la plus large de la prise. Ne pas utiliser de cordon de prolongation.
Ne pas passer le cordon d’alimentation dans un endroit où il risque d’être
écrasé, coincé ou replié sur lui-même, exposé à la chaleur ou endommagé. On
doit porter une attention particulière à la prise aux extrémités du cordon.
L’appareil devrait être débranché si on doit s’absenter pendant une longue
période.
Cesser immédiatement d’utiliser l’appareil et le faire inspecter ou réparer par
une technicien qualifié si␣ :
• Le cordon d’alimentation ou ses prises sont endommagés.
• Des objets ou du liquide ont pénétré dans l’appareil.
• L’appareil a été exposé à la pluie.
• L’appareil semble mal fonctionner.
• L’appareil a été échappé ou endommagé.
○○ ○○○○○○○○○○○○○○○○○○○○○○○○○○○○○○○
Table des matières
(les chiffres encerclés sont des renvois aux illustrations)
Un mot sur Rotel _____________________________________ 6
Préliminaire __________________________________________ 6
Quelques précautions à prendre 6
Emplacement 6
Circuit de protection 7
Alimentation et commutateur général _________________ 7
Prise pour cordon d’alimentation
1
Commutateur général
d’alimentation
2
Témoins de canaux
en mode mono
4
et témoin
et de pontage
Commandes de réglage de niveau
9
5
Configuration et branchement des sources _____________ 8
Commutateurs de sources
Prises d’entrée
6
7
Branchement des enceintes ___________________________ 8
Choix des enceintes 8
Choix des câbles d’enceintes 8
Polarité et mise en phase 8
Branchement des enceintes en mode stéréo
Fonctionnement en mono en mode ponté ______________ 9
Prise d’entrée 9
Branchement d’une enceinte en mode ponté 9
Dépannage __________________________________________ 9
Le témoin d’alimentation sur le devant
de l’appareil ne s’allume pas 9
Remplacement du fusible 9
Absence de son 9
Fiche technique _____________________________________ 25
7
7
7
7
8
8
8
8
Placer l’appareil sur une surface plane, de niveau et suffisamment solide pour
en supporter le poids. Ne pas le placer sur un chariot mobile qui pourrait
basculer.
dépaysé. Il suffit de brancher une paire de câbles RCA de qualité
provenant du préamplificateur dans les entrées de l’amplificateur
et de raccorder les enceintes et le tour est joué.
5
Page 10

AMPLIFICATEUR DE PUISSANCE À SIX CANAUX RB-976
○○ ○○○○○○○○○○○○○○○○○○○○○○○○○○○○○○○
Un mot sur Rotel
Rotel a été fondée il y a trente ans par une famille dont la passion
pour la musique l’a amenée a fabriquer des appareils haute
fidélité de la plus haute qualité. Cette passion s’est perpétuée au
fil des années et notre objectif d’offrir aux audiophiles et aux
mélomanes des produits de qualité exceptionnelle, quel que soit
leur budget, est partagé par tous les employés de Rotel.
Notre équipe d’ingénieurs travaille en étroite collaboration afin de
faire l’écoute de chacun de nos nouveaux produits et d’en
effectuer la mise au point jusqu’à ce qu’ils répondent à des
normes rigoureuses. Nos ingénieurs ont toute la latitude voulue
pour choisir des composantes provenant de n’importe où dans le
monde afin de concevoir les meilleurs produits possibles. Vous
trouverez ainsi dans nos appareils des condensateurs provenant
du Royaume-Uni et d’Allemagne, des semi-conducteurs provenant
du Japon et des États-Unis et des transformateurs toroïdaux
fabriqués directement dans les usines de Rotel.
Rotel a acquis sa réputation d’excellence grâce aux centaines de
critiques positives et aux prix qui lui ont été décernés par les critiques les plus chevronnés de l’industrie. Ces spécialistes font de
l’écoute musicale une activité quotidienne et leurs commentaires
nous permettent de rester fidèle à notre objectif, soit de concevoir
des appareils musicaux, fiables et abordables.
Rotel vous remercie d’avoir fait l’acquisition de ce produit qui,
nous l’espérons, vous procurera beaucoup de plaisir musical.
○○ ○○○○○○○○○○○○○○○○○○○○○○○○○○○○○○○
Préliminaire
Nous vous remercions d’avoir acheté l’amplificateur de puissance
Rotel à six canaux RB-976. Incorporé dans une chaîne audio ou
une chaîne de cinéma-maison de qualité, il vous procurera
beaucoup de plaisir musical pendant de nombreuses années.
Le RB-976 est un puissant amplificateur à six canaux dont le
rendement sonore est exceptionnel. Ses sorties discrètes, son alimentation surdimensionnée, ses composantes de toute première
qualité et ses entrées balancées en font un appareil dont la
qualité sonore est de premier plan. Grâce à sa grande capacité en
courant, l’amplificateur est en mesure d’alimenter la plupart des
enceintes les plus exigeantes.
On doit être conscient que l’amplificateur RB-976 peut fournir une
puissance supérieure à 60 watts par canal et par conséquent
vérifier si les enceintes sont en mesure d’accepter cette puissance.
En cas de doute, communiquer avec un détaillant audio Rotel.
Le mode d’installation et de fonctionnement de l’amplificateur RB976 de Rotel est semblable à celui des autres amplificateurs. Si
vous êtes familier avec d’autres amplificateurs de puissance
stéréo, vous ne devriez pas être dépaysé. Il suffit de brancher des
câbles RCA de qualité dans le préamplificateur ou le processeur
et dans les prises d’entrée de l’amplificateur RB-976 et de
raccorder les enceintes et le tour est joué.
Quelques précautions à prendre
On doit lire attentivement ce manuel. En plus des instructions de
base concernant l’installation et le fonctionnement de
l’amplificateur, on y trouvera de précieux renseignements sur les
différentes configurations d’une chaîne ainsi que des
renseignements généraux qui vous aideront à optimiser le
rendement de votre chaîne. Pour de plus amples renseignements,
communiquer avec un détaillant audio Rotel autorisé. En cas de
besoin, on peut aussi communiquer directement avec Rotel. Nous
nous ferons un plaisir de répondre à vos questions et de recevoir
vos commentaires.
Conserver la boîte d’emballage d’origine de l’amplificateur ainsi
que le matériel d’emballage fourni en cas de besoin.
L’amplificateur RB-976 peut subir des dommages importants s’il
est expédié ou déplacé sans son emballage d’origine.
Remplir et retourner la carte d’enregistrement que l’on retrouve
dans la boîte de l’appareil. Conserver aussi la facture d’achat de
l’appareil. Cette pièce justificative est nécessaire si l’appareil doit
être réparé sous garantie étant donné qu’on y retrouve la date
d’achat de l’amplificateur.
Emplacement
Compte tenu de sa grande puissance, l’amplificateur RB-976 peut
dégager beaucoup de chaleur. Les dissipateurs de chaleurs et les
orifices de ventilation que l’on retrouve sur l’appareil sont en
mesure de dissiper toute la chaleur produite dans des conditions
normales d’utilisation. On doit cependant éviter de surcharger
l’appareil et prévoir suffisamment d’espace autour du boîtier. Les
orifices de ventilation prévus sur le couvercle ne doivent pas être
obstrués. On doit aussi permettre à l’air de circuler librement
autour de l’appareil. On doit faire preuve de jugement lorsqu’on
installe l’amplificateur RB-976 dans une armoire ou lorsqu’on y
empile d’autres appareils.
On doit aussi tenir compte du poids de l’amplificateur lorsqu’on
l’installe et s’assurer que l’étagère ou l’armoire sont en mesure
d’en supporter le poids. On doit encore une fois faire preuve de
jugement.
6
Page 11

Français
Circuit de protection
L’amplificateur RB-976 est doté d’un circuit de protection
thermique qui protège l’appareil contre les dommages qui
pourraient être causés par un mauvais fonctionnement ou un usage abusif. Contrairement au circuit que l’on retrouve sur
d’autres appareils, le circuit de protection de l’amplificateur RB976 est indépendant du signal audio et n’a aucune incidence sur
le rendement sonore. Le circuit de protection surveille plutôt la
température des dispositifs de sortie et coupe l’alimentation de
l’amplificateur si elle dépasse les limites sécuritaires.
Le circuit de protection de l’amplificateur RB-976 n’entrera sans
doute jamais en action. Cependant, en cas de défectuosité, un ou
plusieurs canaux de l’amplificateur cesseront de fonctionner.
Si le circuit de protection se déclenche, on doit mettre
l’amplificateur hors circuit, le laisser refroidir pendant plusieurs
minutes et tenter d’identifier et de corriger le problème qui est à
l’origine du déclenchement du circuit de protection. En remettant
l’amplificateur en circuit, le circuit de protection devrait se
rétablir.
Dans la plupart des cas, le circuit de protection se déclenchera à
la suite d’une défectuosité, notamment à la suite d’un court-circuit dans les fils d’enceintes ou d’une mauvaise ventilation
provoquant une surchauffe de l’appareil. Il peut aussi se
déclencher si l’amplificateur est utilisé avec des enceintes très
réactives ou dont l’impédance est extrêmement faible. Ces deux
cas sont toutefois très rares.
Si le circuit de protection se déclenche de façon répétée et si le
problème ne peut être identifié et corrigé, communiquer avec un
détaillant audio Rotel afin de déterminer la source du problème.
○○ ○○○○○○○○○○○○○○○○○○○○○○○○○○○○○○○
Alimentation et
commutateur général
L’amplificateur RB-976 est configuré d’usine en fonction du courant secteur du pays où il a été vendu (115 volts c.a. ou 230 volts
c.a., à une fréquence de 50 Hz ou 60 Hz). La configuration de la
tension secteur est donnée à l’arrière de l’appareil.
Remarque: si on doit utiliser l’amplificateur RB-976 dans un autre
pays, on peut le reconfigurer pour qu’il puisse accepter une tension secteur différente. On ne doit pas tenter d’effectuer cette
conversion soi-même étant donné que l’on s’expose à des tensions dangereuses en ouvrant l’appareil. Pour de plus amples
renseignements concernant la conversion de tension, consulter
un technicien qualifié ou le Service technique de Rotel.
Si l’on doit s’absenter pendant une période prolongée (pour des
vacances d’un mois par exemple), il est plus prudent de
débrancher l’amplificateur (ainsi que toutes les autres
composantes audio et vidéo) pendant son absence.
Commutateur général 1 et témoin
d’alimentation
Le commutateur d’alimentation est situé sur la façade de
l’amplificateur. Pour mettre l’appareil en circuit, enfoncer le
commutateur. Le témoin d’alimentation situé au-dessus du
commutateur devrait alors s’allumer pour indiquer que
l’amplificateur est en circuit. Pour mettre l’appareil hors circuit,
appuyer à nouveau sur le commutateur pour le ramener en retrait.
2
Témoins de canaux 3 et de pontage
en mode mono
Lorsqu’on utilise une paire de canaux en mode stéréo, les deux
témoins qui correspondent à ces canaux s’allument. Lorsqu’on
utilise une paire de canaux en mono en mode ponté, les deux
témoins s’éteignent et le témoin de fonctionnement en mono en
mode ponté qui correspond à cette paire de canaux s’allume.
Pour de plus amples renseignements à ce sujet, se reporter à la
section intitulée “ Configuration et branchement des sources “ à
la page suivante.
4
Prise pour cordon d’alimentation
Compte tenu de sa grand puissance nominale, l’amplificateur RB976 peut exiger beaucoup de courant. On doit donc le brancher
directement dans une prise murale polarisée à deux broches. Ne
pas utiliser un cordon de prolongation. On peut cependant utiliser
une lisière à prises multiples pour service intensif si sa capacité
nominale (et celle du courant secteur) répond aux exigences de
courant de l’amplificateur et des autres composantes qui y sont
raccordées.
On doit s’assurer que le commutateur d’alimentation sur le devant
de l’appareil est hors circuit (position “ out “). Brancher ensuite
le cordon d’alimentation fourni dans la prise de courant à l’arrière
de l’appareil puis dans la prise de courant secteur.
9
Commandes de réglage de niveau
Les commandes de réglage de niveau permettent de régler de
façon distincte la sensibilité d’entrée des trois paires de canaux.
On peut les utiliser pour régler l’équilibre sonore des enceintes
dans une chaîne ambiophonique ou pour contrôler le volume
sonore dans différentes pièces si on utilise l’amplificateur RB-976
pour alimenter les enceintes d’une chaîne réparties dans
plusieurs pièces. La position du commutateur de source n’a
aucun effet sur les commandes de réglage de niveau.
5
7
Page 12

AMPLIFICATEUR DE PUISSANCE À SIX CANAUX RB-976
8
○○ ○○○○○○○○○○○○○○○○○○○○○○○○○○○○○○○
Configuration et branchement
des sources
Les six canaux de l’amplificateur RB-976 sont regroupés en trois
paires de canaux identifiées A, B,et C. Ceci facilite l’identification
et l’utilisation des canaux
Remarque: Pour éviter les bruits intenses, désagréables à l’oreille
et nuisibles aux enceintes, mettre l’amplificateur hors circuit
avant d’effectuer des branchements ou de modifier la position des
commutateurs de sources.
Commutateurs de sources
Lorsqu’un commutateur de source est à la position “ Stéréo “, les
deux canaux de la paire de canaux correspondants fonctionnent
de façon indépendante. Lorsque le commutateur d’une ou de
plusieurs paires de canaux est placé à la position “ ponté “
(bridged), les deux canaux sont combinés en un seul canal haute
puissance (150 watts). Pour de plus amples renseignements, se
reporter à la section du guide intitulé “ Fonctionnement en mode
ponté “.
La position jumelage de canaux “ Link “ du commutateur de
source permet de jumeler les entrées des paires de canaux.
Grâce à cette configuration parfois désignée sous le nom de “
connexion en guirlande “, les sources raccordées aux canaux A
peuvent aussi alimenter les canaux B et C. On utilise ce genre de
connexion dans les installations personnalisées où l’on n’utilise
qu’une seule paire d’entrées stéréo pour alimenter plusieurs
paires d’enceintes souvent placées dans des pièces différentes.
Pour utiliser la fonction de jumelage d’entrée, placer le
commutateur d’entrée de la paire ou des paires de canaux que
l’on désire jumeler à la position “Link”. Veuillez prendre note que
l’on peut jumeler les entrées des canaux B tout en utilisant les
canaux B et C de façon indépendante.
Remarque: lorsqu’on utilise la fonction jumelage d’entrées, les
paires de canaux jumelés ne peuvent être utilisées en mode
ponté.
7
○○ ○○○○○○○○○○○○○○○○○○○○○○○○○○○○○○○
Branchement des enceintes
Choix des enceintes
Nous recommandons des enceintes dont l’impédance nominale
est de 4 ohms ou plus. On devrait être prudent si l’on raccorde
plusieurs paires d’enceintes en parallèle étant donné que
l’impédance se trouve réduite. Par exemple, si l’on raccorde deux
paires d’enceintes de 8 ohms, l’impédance passera à 4 ohms. Si
l’on raccorde plusieurs paires d’enceintes en parallèle, on
recommande de choisir des enceintes dont l’impédance nominale
est de 8 ohms ou plus. La valeur d’impédance d’un haut-parleur
est très imprécise. En pratique, l’amplificateur n’aura aucun mal à
alimenter la plupart des enceintes. Pour de plus amples
renseignements concernant le choix des enceintes, consulter un
détaillant audio Rotel.
Choix des câbles d’enceintes
Utiliser des câbles torsadés à deux conducteurs pour raccorder
l’amplificateur RB-976 aux enceintes. Le calibre et la qualité des
câbles peuvent avoir un effet notable sur le rendement d’une
chaîne. Un câble de haut-parleur ordinaire fera l’affaire mais risque d’atténuer le niveau de sortie ou de donner une réponse en
basses fréquences erratique, surtout si les câbles sont très longs.
En général, des câbles de calibre supérieur amélioreront le
rendement sonore. Pour obtenir de meilleurs résultats, on peut
envisager d’utiliser des câbles audio spéciaux de haute qualité.
Votre détaillant audio Rotel peut vous aider à choisir les câbles
qui conviennent à votre chaîne.
Polarité et mise en phase
Lorsqu’on raccorde les enceintes à l’amplificateur, on doit respecter la polarité (pôle positif et pôle négatif) de façon à obtenir
une bonne mise en phase des haut-parleurs. En inversant par
erreur la polarité lors du raccordement des enceintes, on risque
d’atténuer les basses fréquences et de perturber l’image
stéréophonique. Les deux fils d’un câble d’enceinte sont toujours
identifiés. Il peut s’agir de nervures sur l’isolant d’un conducteur,
d’un code-couleur sur chacun des conducteurs (cuivre et argent)
ou d’indications de polarité imprimées sur l’isolant. On doit bien
identifier les conducteurs négatif et positif et respecter la polarité
lors du raccordement des enceintes.
Prises d’entrée
[Se reporter au schéma de câblage normal de la Figure 2.]
L’amplificateur RB-976 est doté de prises classiques de type RCA
que l’on retrouve habituellement sur la plupart des appareils audio.
Choisir des câbles audio de haute qualité. Raccorder les diverses
sorties de l’amplificateur RB-976 aux entrées correspondantes du
préamplificateur ou du processeur. Vérifier bien les connexions
afin de s’assurer qu’elles sont bonnes et que l’on utilise la bonne
paire de canaux.
8
6
Branchement des enceintes en mode stéréo
L’amplificateur RB-976 est doté de six paires de bornes de
raccordement qui portent un code-couleur et qui sont situées à
l’arrière de l’appareil. Ces bornes acceptent les fils nus, les
cosses ou les fiches doubles de type banane (sauf dans les pays
qui font partie de la Communauté européenne où leur utilisation
est interdite).
Acheminer le câble d’enceinte de l’amplificateur RB-976 aux
enceintes en laissant assez de jeu pour permettre le déplacement
des composantes et l’accès aux bornes à l’arrière des enceintes.
Page 13

Français
Si on utilise des fiches doubles de type banane, les raccorder aux
fils et les brancher ensuite dans les bornes de raccordement. Les
bagues sur les bornes devraient être vissées complètement (de
gauche à droite).
Si on utilise des cosses, les raccorder aux fils. Si on raccorde des
fils nus directement aux bornes de raccordement des enceintes,
séparer les deux conducteurs de quelques pouces et enlever un
peu d’isolant à l’extrémité de chaque conducteur en prenant soin
de ne pas couper les conducteurs. Dévisser (de droite à gauche)
les bagues sur les bornes de raccordement. Placer la cosse
autour de l’arbre de la borne de raccordement ou insérer le fil
torsadé dans l’orifice de l’arbre. Visser ensuite les bagues de
gauche à droite pour fixer les cosses ou les fils nus en place.
Remarque: on doit s’assurer qu’il n’y a pas de fils lâches qui
pourraient entrer en contact avec des fils adjacents ou des
connecteurs.
○○ ○○○○○○○○○○○○○○○○○○○○○○○○○○○○○○○
Fonctionnement en mono en
mode ponté
[Se reporter au schéma de branchement en mode ponté de la Figure 3.]
Les paires de canaux de l’amplificateur RB-976 peuvent être
pontés. En mode ponté, on obtient une puissance
impressionnante de 150 watts par canal. On peut donc augmenter
la puissance globale de la chaîne en pontant les paires de canaux
de l’amplificateur RB-976 et en ajoutant un autre amplificateur
RB-976 lui aussi ponté en mono. On peut aussi ponter une parie
de canaux de l’amplificateur RB-976 pour alimenter une enceinte
de sous-graves en mode mono. On doit cependant noter que
lorsqu’on ponte une des paires de canaux de l’amplificateur RB976, l’enceinte qui y est raccordée doit avoir une impédance de 8
ohms ou plus.
Branchement d’une enceinte en mode ponté
Lorsqu’on utilise une des paires de canaux de l’amplificateur RB976 en mono en mode ponté, les fils de haut-parleurs doivent être
branchés dans les bornes positives des canaux de gauche et de
droite. Brancher le fil qui est acheminé à la borne positive de
l’enceinte à la borne positive du canal droit de la paire de canaux.
Brancher le fil qui est acheminé à la borne négative de l’enceinte
à la borne positive du canal droit de la paire de canaux. Le
bornes négatives sont libres.
○○ ○○○○○○○○○○○○○○○○○○○○○○○○○○○○○○○
Dépannage
La plupart des problèmes que l’on retrouve avec les chaînes audio
sont attribuables à de mauvais branchements ou à de mauvais
réglages. En cas de problème, en identifier l’origine, vérifier les
réglages, établir la cause du problème et effecteur les
changements nécessaires. Si on n’est pas en mesure de faire
fonctionner l’amplificateur RB-976, voici certaines suggestions :
Le témoin d’alimentation sur le devant de
l’appareil ne s’allume pas.
L’amplificateur RB-976 n’est pas alimenté en courant. Vérifier le
commutateur d’alimentation sur la façade de l’appareil et
s’assurer qu’il est bien à la position “ on “ (en circuit). Vérifier si
le câble d’alimentation est bien branché dans l’amplificateur et
dans la prise de courant secteur.
Remplacement du fusible
Si on a tout vérifié et si on ne peut toujours pas mettre
l’amplificateur en circuit, le fusible est sans doute grillé. Le cas
échéant, communiquez avec votre détaillant Rotel pour faire
remplacer le fusible.
Absence de son
Remarque: mettre toutes les composantes de la chaîne hors circuit avant de modifier les branchements ou les réglages des
commutateurs d’entrée.
Pour ponter l’une des paires de canaux de l’amplificateur RB-976,
placer le commutateur d’entrée de la paire de canaux en question
à la position “ pontage “.
Prise d’entrée
Si on utilise une des paires de canaux de l’amplificateur en mono
en mode ponté, brancher le câble provenant de la sortie du
préamplificateur ou du processeur dans l’entrée gauche de la
paire de canaux. La prise de droite ne sert pas.
Remarque: il est possible de jumeler les entrées B ou C tout en
utilisant les entrées A en mono en mode ponté. Les entrées
gauche et droite servent alors au canal A.
Si l’amplificateur est alimenté en courant et qu’il n’y a pas de son,
vérifier le témoin de canaux et de pontage en mono sur la façade
de l’appareil. S’assurer ensuite que tous les câbles d’entrée et de
sortie sont bien branchés. Vérifier toutes les connexions et les
réglages sur les composantes accessoires.
9
Page 14

SECHSKANAL-ENDSTUFE RB-976
Sicherheits- und Warnhinweise
Bitte lesen Sie sich die Bedienungsanleitung vor Gebrauch des
Gerätes genau durch. Sie enthält wichtige Sicherheitsvorschriften,
die unbedingt zu beachten sind! Bewahren Sie die Bedienungsanleitung so auf, daß sie jederzeit zugänglich ist.
Außer den in der Bedienungsanleitung beschriebenen Handgriffen
sollten vom Bediener keine Arbeiten am Gerät vorgenommen
werden. Das Gerät ist ausschließlich von einem qualifizierten
Fachmann zu öffnen und zu reparieren.
Dieses Gerät darf nur in trockenen Räumen betrieben werden. Um
die Gefahr von Feuer oder eines elektrischen Schlags
auszuschließen, dürfen keine Flüssigkeiten oder Fremdkörper in
das Gerät gelangen. Sollte dieser Fall trotzdem einmal eintreten,
trennen Sie das Gerät sofort vom Netz ab. Lassen Sie es von
einem Fachmann prüfen und die notwendigen Reparaturarbeiten
durchführen.
Befolgen Sie alle Warn- und Sicherheitshinweise in der Bedienungsanleitung
und auf dem Gerät.
Dieses Gerät sollte, wie andere Elektrogeräte auch, nicht unbeaufsichtigt
betrieben werden.
Ist das Gerät z.B. während des Transports über längere Zeit Kälte ausgesetzt
worden, so warten Sie mit der Inbetriebnahme, bis es sich auf Raumtemperatur
erwärmt hat und das Kondenswasser verdunstet ist.
Die Ventilationsöffnungen am Gerät dürfen nicht verschlossen werden. Stellen
Sie das Gerät daher weder auf ein Bett, Sofa, Teppich oder ähnliche
Oberflächen. Ferner sollte es nicht an einem Ort aufgestellt werden, an dem
keine ausreichende Luftzufuhr gegeben ist, zum Beispiel in einem engen
Regalfach oder in einem Einbauschrank.
Stellen Sie das Gerät nicht in die Nähe von Wärmequellen (Heizkörper,
Wärmespeicher, Öfen oder sonstige wärmeerzeugende Geräte).
Bevor Sie das Gerät in Betrieb nehmen, prüfen Sie, ob die Betriebsspannung
mit der örtlichen Netzspannung übereinstimmt. Die Betriebsspannung ist an
der Rückseite des Gerätes angegeben.
Schließen Sie das Gerät nur mit dem dazugehörigen zweipoligen Netzkabel an
die Wandsteckdose an. Modifizieren Sie das Netzkabel auf keinen Fall.
Versuchen Sie nicht, die Erdungs- und/oder Polarisationsvorschriften zu
umgehen. Das Netzkabel sollte an eine zweipolige Wandsteckdose
angeschlossen werden. Verwenden Sie keine Verlängerungskabel.
Netzkabel sind so zu verlegen, daß sie nicht beschädigt werden können (z.B.
durch Trittbelastung, Möbelstücke oder Erwärmung). Besondere Vorsicht ist
dabei an den Steckern, Verteilern und den Anschlußstellen des Gerätes geboten.
Sollten Sie das Gerät für eine längere Zeit nicht in Betrieb nehmen, ziehen Sie
den Netzstecker aus der Steckdose.
○○ ○○○○○○○○○○○○○○○○○○○○○○○○○○○○○○○
Inhaltsverzeichnis
(die mit einem Kreis markierten Zahlen beziehen sich auf
die Abbildungen)
Die Firma Rotel ______________________________________ 11
Zu dieser Anleitung __________________________________ 11
Einige Vorsichtsmaßnahmen 11
Aufstellung des Gerätes 11
Schutzschaltung 11
Netzspannung und Bedienung _______________________ 12
Netzanschluß
Netzschalter
Channel und Bridged Mono LEDs
Pegelregler (Level Adjust)
9
1
und Betriebsanzeige
5
2
3 4
Eingangskonfiguration und Eingangsanschlüsse _______ 12
Eingangswahlschalter
Cinch-Eingänge
7
6
Lautsprecher ________________________________________ 13
Auswahl der Lautsprecher 13
Auswahl der Lautsprecherkabel 13
Polarität und Phasenabgleich 13
Anschließen der Lautsprecher
8
Brückenschaltung ___________________________________ 14
Anschließen des Vorverstärkers
bzw. Signalprozessors 14
Anschließen der Lautsprecher
in Brückenschaltung 14
Bei Störungen _______________________________________ 14
Die Betriebsanzeige leuchtet nicht 14
Austauschen der Sicherung 14
Kein Ton 14
Technische Daten ____________________________________ 25
12
12
12
12
12
13
13
Schalten Sie das Gerät sofort aus und ziehen Sie geschultes Fachpersonal zu
Rate, wenn:
• das Netzkabel oder der Stecker beschädigt sind,
• Gegenstände bzw. Flüssigkeit in das Gerät gelangt sind,
• das Gerät Regen ausgesetzt war,
• das Gerät nicht ordnungsgemäß funktioniert bzw. eine deutliche
Listungsminderung aufweist,
• das Gerät hingefallen ist bzw. beschädigt wurde.
Ziehen Sie den Netzstecker aus der Steckdose, bevor Sie mit der Reinigung des
Gerätes beginnen. Reinigen Sie die Oberflächen des Gerätes nur mit einem
weichen, trockenen Tuch. Verwenden Sie keine scharfen Reinigungs- oder
Lösungsmittel. Vor der erneuten Inbetriebnahme des Gerätes ist
sicherzustellen, daß an den Anschlußstellen keine Kurzschlüsse bestehen und
alle Anschlüsse ordnungsgemäß sind.
Stellen Sie das Gerät waagerecht auf eine feste, ebene Unterlage. Es sollte
weder auf beweglichen Unterlagen noch Wagen oder fahrbaren Untergestellen
transportiert werden.
10
Page 15

Deutsch
○○ ○○○○○○○○○○○○○○○○○○○○○○○○○○○○○○○
Die Firma Rotel
Die Firma Rotel wurde vor mehr als 30 Jahren von einer Familie
gegründet, deren Interesse an Musik so groß war, daß sie
beschloß, qualitativ hochwertigste HiFi-Produkte herzustellen und
Musikliebhabern ungeachtet ihres Geldbeutels einen
außergewöhnlichen Wert zukommen zu lassen. Ein Ziel, das von
allen Rotel-Angestellten verfolgt wird.
Die Ingenieure arbeiten als Team eng zusammen. Sie hören sich
jedes neue Produkt an und stimmen es klanglich ab, bis es den
gewünschten Musikstandards entspricht. Die eingesetzten
Bauteile stammen aus verschiedenen Ländern und wurden
ausgewählt, um das jeweilige Produkt zu optimieren. So finden
Sie in Rotel-Geräten Kondensatoren aus Großbritannien und
Deutschland, Halbleiter aus Japan oder den USA und direkt bei
Rotel gefertigte Ringkerntransformatoren.
Rotels guter Ruf wird durch hunderte von Testerfolgen von den
angesehensten Testern der Branche, die jeden Tag Musik hören,
untermauert. Die Ergebnisse beweisen, daß das Unternehmen
sein Ziel konsequent verfolgt hat, mit Equipment hoher Musikalität
und Zuverlässigkeit bei gleichzeitig günstigen Preisen.
Wir danken Ihnen für Ihr Vertrauen in die Marke Rotel und
wünschen Ihnen viel Hörvergnügen.
○○ ○○○○○○○○○○○○○○○○○○○○○○○○○○○○○○○
Zu dieser Anleitung
Vielen Dank, daß Sie sich für die Rotel-RB-976 entschieden haben.
Diese leistungsstarke Sechskanal-Endstufe kann optimal in jedem
qualitativ hochwertigen HiFi- oder HiFi-Cinema-System eingesetzt
werden.
Einige Vorsichtsmaßnahmen
Lesen Sie sich die Bedienungsanleitung bitte vor der
Inbetriebnahme genau durch. Neben grundsätzlichen Installations- und Bedienungshinweisen (bitte beachten Sie auch die
Sicherheits- und Warnhinweise am Anfang der
Bedienungsanleitung) enthält sie allgemeine Informationen, die
Ihnen helfen werden, Ihr System mit seiner maximalen
Leistungsfähigkeit zu betreiben. Bitte setzen Sie sich bei etwaigen
Fragen mit Ihrem autorisierten Rotel-Fachhändler in Verbindung.
Bewahren Sie den Versandkarton und das übrige
Verpackungsmaterial der RB-976 für einen eventuellen späteren
Einsatz auf. Der Versand oder Transport der RB-976 in einer
anderen als der Originalverpackung kann zu erheblichen
Beschädigungen Ihrer Endstufe führen.
Schicken Sie die Ihrer Endstufe beiliegende
Garantieanforderungskarte ausgefüllt an den Rotel-Distributor in
Ihrem Land. Bewahren Sie bitte die Original-Kaufquittung auf. Sie
belegt am besten das Kaufdatum, das für Sie wichtig wird, sobald
Sie eine Garantieleistung in Anspruch nehmen.
Aufstellung des Gerätes
Aufgrund ihrer hohen Ausgangsleistung kann sich die RB-976
extrem erwärmen. Diese Wärme kann unter normalen
Bedingungen über die Kühlrippen und Ventilationsöffnungen der
Endstufe problemlos abgeführt werden. Jedoch ist das Gerät an
einem Ort aufzustellen, an dem eine ausreichende Luftzirkulation
gewährleistet ist. So dürfen die Ventilationsöffnungen an der
Oberseite nicht verdeckt werden. Beachten Sie dies beim Einbau
in einen Schrank oder beim Aufeinanderstellen mehrerer
Systemkomponenten.
Berücksichtigen Sie beim Aufbau das Gewicht der Endstufe.
Stellen Sie sicher, daß das Regal oder der Schrank auf das
vergleichsweise hohe Gewicht der RB-976 ausgelegt ist.
Die RB-976 überzeugt durch höchste Wiedergabequalität. Dafür
sorgen hochwertige Leistungstransistoren, ein großzügig
dimensioniertes Netzteil, erstklassige Bauteile und Rotels Balanced Design. Aufgrund der hohen Stromlieferfähigkeit kann die
RB-976 problemlos anspruchsvolle Lautsprecher kontrollieren.
Umgekehrt sollten Sie darauf achten, daß die RB-976 nur mit
Lautsprechern kombiniert wird, die 60 Watt/Kanal standhalten.
Sollten Sie hierzu Fragen haben, wenden Sie sich bitte an Ihren
autorisierten Rotel-Fachhändler.
Die RB-976 ist einfach zu installieren und zu bedienen. Sollten Sie
bereits Erfahrung mit der Installation anderer Endstufen haben,
dürften keinerlei Probleme auftreten. Verbinden Sie die Ausgänge
Ihres Vorverstärkers bzw. Signalprozessors mit den Eingängen
Ihrer Endstufe. Verwenden Sie dazu qualitativ hochwertige CinchKabel. Verbinden Sie anschließend die Lautsprecher mit der RB-
976.
Schutzschaltung
Die RB-976 verfügt über eine thermische Schutzschaltung.
Hierdurch wird die Endstufe vor möglichen Schäden durch extreme oder fehlerhafte Betriebsbedingungen geschützt. Im
Gegensatz zu vielen anderen Konstruktionen ist die
Schutzschaltung der RB-976 unabhängig vom Audiosignal und
beeinflußt den Klang nicht. Statt dessen überwacht sie die
Temperatur an den Leistungstransistoren und schaltet die
Endstufe ab, sobald bestimmte Temperaturgrenzen überschritten
werden.
Es ist unwahrscheinlich, daß es jemals zu einer Überlastung
kommt. Sollte dennoch eine Störung auftreten, schalten sich die
davon betroffenen Kanäle der Endstufe ab.
Schalten Sie die Endstufe aus und lassen Sie sie einige Minuten
abkühlen. Versuchen Sie, den Grund für die Störung
herauszufinden und zu beheben. Beim erneuten Einschalten der
Endstufe setzt sich die Schutzschaltung automatisch zurück.
11
Page 16

SECHSKANAL-ENDSTUFE RB-976
In vielen Fällen wird die Schutzschaltung durch eine Fehlfunktion,
wie z.B. durch kurzgeschlossene Lautsprecherkabel oder eine
unzureichende Belüftung, die schließlich zu einer Überhitzung
führt, aktiviert. In sehr seltenen Fällen können Lautsprecher mit
einer extrem niedrigen Impedanz die Schutzschaltung aktivieren.
Reagiert die Schutzschaltung immer wieder, ohne daß Sie die
Fehlfunktion lokalisieren können, setzen Sie sich mit Ihrem
autorisierten Rotel-Fachhändler in Verbindung.
○○ ○○○○○○○○○○○○○○○○○○○○○○○○○○○○○○○
Netzspannung und Bedienung
Netzanschluß
Aufgrund der hohen Aufnahmeleistung benötigt die RB-976
erhebliche Strommengen. Daher sollte sie direkt an eine
zweipolige Wandsteckdose angeschlossen werden. Verwenden
Sie kein Verlängerungskabel. Eine hochbelastbare
Mehrfachsteckdose kann eingesetzt werden, wenn sie (ebenso
wie die Wandsteckdose) ausreichende Strommengen für die RB976 sowie die anderen an sie angeschlossenen Komponenten
liefern kann.
Stellen Sie sicher, daß die RB-976 vor dem Anschließen an das
Netz abgeschaltet ist, sich der Netzschalter also in der AUS-Position befindet. Stecken Sie nun das Netzkabel in die
Wandsteckdose.
Ihre RB-976 wird von Rotel so eingestellt, daß sie der in Ihrem
Land üblichen Wechselspannung (entweder 230 Volt
Wechselspannung oder 115 Volt Wechselspannung mit einer
Netzfrequenz von 50 Hz oder 60 Hz) entspricht. Die Einstellung ist
an der Geräterückseite angegeben.
9
Channel und Bridged Mono LEDs 3
Befindet sich ein Kanalpaar im Stereomodus, leuchten die CHANNEL LEDs dieser Kanäle. Ist ein Kanalpaar „gebrückt“, leuchtet
statt der CHANNEL LEDs die entsprechende BRIDGED MONO LED.
Weitere Informationen entnehmen Sie bitte dem Abschnitt
„Eingangskonfiguration und Eingangsanschlüsse“.
Pegelregler (Level Adjust)
Über die Pegelregler können Sie die Eingangsempfindlichkeit
jedes einzelnen Kanalpaares einstellen. Diese Regler ermöglichen
es, das Lautstärkeverhältnis zwischen den Lautsprechern eines
HiFi-Cinema-Systems einzustellen. Wird die RB-976 zur Kontrolle
der Lautsprecher in einem Multi-Room-System eingesetzt, kann
über die Pegelregler der Lautstärkepegel in verschiedenen
Räumen eingestellt werden. Die Einstellung des
Eingangswahlschalters ist unabhängig von den Pegelreglern.
○○ ○○○○○○○○○○○○○○○○○○○○○○○○○○○○○○○
5
4
Eingangskonfiguration
und Eingangsanschlüsse
Die sechs Kanäle der RB-976 sind in drei Gruppen eingeteilt, die
zur Identifizierung und Kontrolle mit A, B und C gekennzeichnet
sind.
Hinweis: Beim Verkabeln und Anschließen sowie bei Änderungen
in der Einstellung des Eingangswahlschalters sollte die Endstufe
generell abgeschaltet sein.
Eingangswahlschalter
7
Hinweis: Sollten Sie mit Ihrer RB-976 in ein anderes Land
umziehen, kann die Einstellung der Endstufe geändert werden, so
daß sie mit einer anderen Netzspannung betrieben werden kann.
Versuchen Sie auf keinen Fall, diese Änderung selber
vorzunehmen. Durch Öffnen des Endstufengehäuses setzen Sie
sich gefährlichen Spannungen aus. Ziehen Sie hierzu stets
qualifiziertes Servicepersonal zu Rate.
Sind Sie für längere Zeit nicht zu Hause wie z.B. bei einer
mehrwöchigen Urlaubsreise, sollten Sie Ihre Endstufe (ebenso
wie alle anderen Audio- und Videokomponenten) während Ihrer
Abwesenheit vom Netz trennen.
Netzschalter 1 und Betriebsanzeige
Der Netzschalter ist in die Gerätefront der RB-976 integriert. Zum
Einschalten drücken Sie den Netzschalter. Die Betriebsanzeige
über dem Schalter beginnt zu leuchten und zeigt an, daß die
Endstufe eingeschaltet ist. Drücken Sie zum Ausschalten der
Endstufe erneut den Netzschalter.
12
2
Befindet sich der Eingangswahlschalter in „STEREO“-Position,
arbeiten die beiden Kanäle eines Kanalpaares unabhängig.
Befindet sich der Eingangswahlschalter für ein oder mehrere
Kanalpaare in der „BRIDGED“-Position, werden beide Kanäle zu
einem 150-Watt-Hochleistungskanal. Weitere Details können Sie
dem Abschnitt „Brückenschaltung“ dieser Bedienungsanleitung
entnehmen.
Steht der Eingangswahlschalter in „LINK“-Position, so werden die
Eingänge eines Kanalpaares miteinander verbunden. Bei dieser
Konfiguration können die mit den A-Kanälen gekoppelten
Eingangssignale auch auf Kanäle B und C übertragen werden.
Diese Konfiguration wird üblicherweise in speziellen
Anwendungsfällen eingesetzt, bei denen eine Gruppe von
Stereoeingängen zur Kontrolle mehrerer, oftmals in
verschiedenen Räumen befindlicher Lautsprecherpaare genutzt
wird.
Page 17

Deutsch
Aktivieren Sie die Link-Funktion, indem Sie den
Eingangswahlschalter des Kanalpaars/der Kanalpaare, das/die
Sie verbinden möchten, in die „LINK“-Position setzen. Sie können
die Eingänge der Kanäle B mit A verbinden und die Kanäle C
getrennt nutzen. Ebenso können die Kanäle C mit B verbunden
werden, während die Kanäle A getrennt genutzt werden.
Hinweis: Wird die Link-Funktion genutzt, so können die
miteinander verbundenen Kanalpaare nicht gebrückt werden.
Cinch-Eingänge
[siehe Anschlußdiagramm in Abb. 2]
An der Rückseite der RB-976 befinden sich unsymmetrische
Cinch-Eingänge, die nahezu an jedem Audiogerät zu finden sind.
Verwenden Sie hochwertige Verbindungskabel, um die Ausgänge
des Vorverstärkers bzw. des Signalprozessors an die Eingänge
der RB-976 anzuschließen. Verbinden Sie die linken Kanäle des
Vorverstärkers mit den linken Kanälen der Endstufe und die
rechten Kanäle des Vorverstärkers mit den rechten Kanälen der
Endstufe. Achten Sie darauf, daß Sie jeweils das richtige
Kanalpaar nutzen.
○○ ○○○○○○○○○○○○○○○○○○○○○○○○○○○○○○○
6
Lautsprecher
Polarität und Phasenabgleich
Die Polarität – die positive/negative Ausrichtung der Anschlüsse –
muß für jede Lautsprecher-/Verstärkerverbindung phasengleich
sein. Wird die Polarität einer Verbindung irrtümlicherweise
umgekehrt, führt dies zu einem unausgewogenen Klangbild mit
schwachen Bässen.
Die Kabel sind zur Identifizierung gekennzeichnet. So kann die
Isolationsschicht eines Leiters gerippt oder ein Leiter mit einem
Streifen markiert sein. Das Kabel kann verschiedenfarbige Leiter
(Kupfer und Silber) besitzen und von einer transparenten
Isolationsschicht umgeben sein. Bei anderen Kabeln wird die
Polaritätsangabe auf die Isolationsschicht gedruckt.
Unterscheiden Sie zwischen positiven und negativen Leitern und
achten Sie beim Anschluß an Lautsprecher und Verstärker auf die
gleiche Polung.
Anschließen der Lautsprecher
[siehe Anschlußdiagramm in Abb. 2]
Die RB-976 verfügt an der Rückseite über sechs Paar farbig
gekennzeichnete Anschlußklemmen. An diese Anschlußklemmen
können blanke Drähte oder Kabelschuhe angeschlossen werden.
Führen Sie das Kabel von der RB-976 zu den Lautsprechern.
Lassen Sie sich genügend Raum, damit Sie die Komponenten
bewegen können und so einen freien Zugang zu den
Lautsprechern sicherstellen.
8
Auswahl der Lautsprecher
Wir empfehlen, an die RB-976 Lautsprecher mit einer nominalen
Impedanz von mindestens 4 Ohm anzuschließen. Sie sollten beim
Betrieb mehrerer parallelgeschalteter Lautsprecherpaare einige
Vorsicht walten lassen, da sich die effektive, vom Verstärker
wahrgenommene Impedanz verringert. Beim Betrieb von zwei
Paar 8-Ohm-Lautsprechern beträgt die Last für den Verstärker 4
Ohm. Werden mehrere parallelgeschaltete Lautsprecher
angeschlossen, empfehlen wir, Lautsprecher mit einer nominalen
Impedanz von mindestens 8 Ohm einzusetzen. Die Angaben
bezüglich der Impedanz von Lautsprechern sind oft ungenau. In
der Praxis gibt es nur bei sehr wenigen Lautsprechern Probleme
beim Betrieb mit der RB-976. Wenden Sie sich bei Fragen bitte an
Ihren autorisierten Rotel-Fachhändler.
Auswahl der Lautsprecherkabel
Verbinden Sie die RB-976 und die Lautsprecher über ein isoliertes,
zweiadriges Lautsprecherkabel. Aufbau und Qualität des Kabels
können hörbare Effekte auf die Musikwiedergabe haben. Standard-„Klingeldraht“ wird funktionieren, jedoch können vor allem
bei größeren Kabellängen Leistungsverluste und eine
ungleichmäßige Wiedergabe des Frequenzspektrums das
Ergebnis sein. Allgemein gilt, daß Kabel mit größerem Querschnitt
eine verbesserte Wiedergabequalität gewährleisten. Für höchste
Wiedergabequalität sollten Sie die Benutzung von speziellen,
hochwertigen Lautsprecherkabeln erwägen. Ihr autorisierter
Rotel-Fachhändler wird Ihnen bei der Auswahl dieser
Lautsprecherkabel gerne weiterhelfen.
Bei der Verwendung von Kabelschuhen verbinden Sie diese mit
den Kabeln, stecken die Kabelschuhe hinten unter die
Anschlußklemmen und drehen die Klemmen im Uhrzeigersinn fest.
Sollten die Lautsprecherkabel direkt (ohne Kabelschuhe) an die
Lautsprecherklemmen angeschlossen werden, so entfernen Sie
an den Kabelenden ca. 15 mm der Isolation. Lösen Sie die
Polklemmen durch Drehen gegen den Uhrzeigersinn. Verdrillen
Sie die blanken Kabelenden, um ein Zerfasern zu vermeiden, und
stecken Sie das verdrillte Kabel hinter die Polklemmen.
Anschließend drehen Sie die Polklemmen im Uhrzeigersinn fest.
Hinweis: Achten Sie bitte darauf, daß die blanken Kabelenden
vollständig an den Polklemmen untergebracht sind und somit das
Berühren benachbarter Drähte oder Anschlüsse ausgeschlossen
ist.
13
Page 18

SECHSKANAL-ENDSTUFE RB-976
○○ ○○○○○○○○○○○○○○○○○○○○○○○○○○○○○○○
Brückenschaltung
[siehe Anschlußdiagramm in Abb. 3]
Die Kanalpaare der RB-976 können „gebrückt“ werden. In
Brückenschaltung liefert die RB-976 pro Kanal eine
Ausgangsleistung von beeindruckenden 150 Watt! Durch
Brückenschaltung und Anschließen einer zweiten, ebenfalls
„gebrückten“ RB-976 können Sie die Gesamtausgangsleistung
Ihres Systems steigern. Oder über ein „gebrücktes“ Kanalpaar
der RB-976 einen Subwoofer kontrollieren. Beachten Sie, daß die
Mindestimpedanz des an ein gebrücktes Kanalpaar
angeschlossenen Lautsprechers 8 Ohm beträgt.
Hinweis: Schalten Sie alle Systemkomponenten ab, bevor Sie
Änderungen an den Anschlüssen bzw. an der Einstellung der
Eingangswahlschalter vornehmen
Um ein Kanalpaar der RB-976 in Brückschaltung zu setzen, setzen
Sie den Eingangswahlschalter an der Rückseite in die Position
„BRIDGED“.
Anschließen des Vorverstärkers bzw.
Signalprozessors
Wird eines der Kanalpaare des RB-976 in Brückenschaltung
gesetzt, so verbinden Sie den linken Ausgang des Vorverstärkers
bzw. Signalprozessors mit dem linken Eingang des Kanalpaars.
Der rechte Eingang wird nicht genutzt.
○○ ○○○○○○○○○○○○○○○○○○○○○○○○○○○○○○○
Bei Störungen
Tritt eine scheinbare Fehlfunktion auf, sollten zuerst die
nachstehend aufgeführten Punkte überprüft werden. Viele
Probleme beruhen auf einfachen Bedienungsfehlern oder
fehlerhaften Anschlüssen. Läßt sich das Problem nicht beheben,
wenden Sie sich bitte an Ihren autorisierten Rotel-Fachhändler.
Die Betriebsanzeige leuchtet nicht
Die RB-976 bekommt keinen Strom. Prüfen Sie, ob der
Netzschalter an der Gerätefront gedrückt wurde. Prüfen Sie die
Netzanschlüsse an der Endstufe und der Wandsteckdose.
Austauschen der Sicherung
Sind alle Geräte korrekt angeschlossen und kann die Endstufe
trotzdem nicht angeschaltet werden, kann es sein, daß die
Sicherung im Geräteinnern durchgebrannt ist. Sind Sie der
Meinung, daß dies der Fall ist, so lassen Sie die Sicherung von
Ihrem autorisierten Rotel-Fachhändler austauschen.
Kein Ton
Bekommt die RB-976 Strom und ist trotzdem kein Ton zu hören,
prüfen Sie die CHANNEL und BIDGED MONO LEDs an der
Gerätefront. Prüfen Sie anschließend alle Ein- und
Ausgangsanschlüsse und die Einstellungen der angeschlossenen
Geräte.
Hinweis: Sie können die Eingänge B und/oder C miteinander
verbinden und A in Brückenschaltung betreiben.
Anschließen der Lautsprecher in
Brückenschaltung
In Brückenschaltung werden die negativen (–)
Lautsprecheranschlußklemmen nicht genutzt. Verbinden Sie die mit
„+“ gekennzeichneten Lautsprecheranschlußklemmen der linken
Verstärkerkanäle mit den (+)-Anschlußklemmen der Lautsprecher und
die mit „+“ gekennzeichnete Lautsprecheranschlußklemmen der
rechten Verstärkerkanäle mit den (–)-Anschlußklemmen der
Lautsprecher.
14
Page 19

Italiano
Il fulmine inserito in un triangolo vi avverte
della presenza di materiale non isolato a
"voltaggio elevato" all'interno del prodotto
che può essere abbastanza potente da
costituire pericolo di folgorazione.
Il punto esclamativo entro un triangolo
equilatero vi avverte della presenza di
istruzioni importanti per l'utilizzo e la
manutenzione nel manuale che
accompagna l'apparecchiatura.
ATTENZIONE
Non vi sono parti interne riparabili dall’utilizzatore. Per l’assistenza
fate riferimento a personale qualificato.
ATTENZIONE
Per ridurre il rischio di incendio o di folgorazione, non esporre
all’umidità o all’acqua. Evitare che oggetti estranei cadano
all’interno del cabinet. Se l’apparecchio è stato esposto all’umidità
o un oggetto estraneo è caduto all’interno del cabinet, staccare il
cordone di alimentazione dalla presa di rete. Portare l’apparecchio
ad un centro di assistenza qualificato per i necessari controlli e
riparazioni.
Leggere attentamente tutte le istruzioni prima di collegare l’apparecchio alla
rete di alimentazione. Conservate questo manuale per ogni riferimento futuro
alle istruzioni di sicurezza.
Seguire attentamente tutte le avvertenze e le operazioni per il funzionamento.
Pulire l’unità solamente con un panno asciutto o con un piccolo aspirapolvere.
Mantenete libere le prese per la ventilazione . Per esempio, l’apparecchiatura
non dovrebbe essere posta su un letto, divano, tappeto, o posti che possano
bloccare le aperture di ventilazione. Se l’apparecchio è posizionato in una
libreria o in un cabinet, fate in modo che ci sia abbastanza spazio attorno
all’unità per consentire un’adeguata ventilazione e raffreddamento.
L’unità dovrebbe essere posta lontano da fonti di calore come caloriferi,
termostati, stufe, o altri apparecchi che producano calore
L’apparecchiatura dovrebbe essere collegata solamente a una
sorgente elettrica del tipo descritto nelle istruzioni o indicato
sull’apparecchiatura.
Collegate l’unità alla presa di alimentazione solo con il cavo a due poli
polarizzato che viene fornito o con un equivalente. Non cercate di eliminare la
massa o di manomettere le polarizzazioni. Il cavo dovrebbe essere collegato ad
un’uscita a muro polarizzata a due poli collegando la lamella piatta della spina
nella fessura più ampia. Non usate prolunghe
Non far passare il cavo di alimentazione dove potrebbe essere schiacciato,
pizzicato, piegato ad angoli acuti, esposto al calore o danneggiato in alcun
modo. Fate particolare attenzione al cavo di alimentazione all’altezza della
spina e nel punto in cui esce dalla parte posteriore dell’apparecchio.
Il cordone di alimentazione dovrebbe essere scollegato quando
l’apparecchiatura è inutilizzata per un periodo piuttosto lungo.
L’apparecchiatura dovrebbe essere disattivata e data a personale qualificato
quando:
a. Il cavo di alimentazione o la spina sono stati danneggiati; o
b. Oggetti sono caduti, o del liquido è stato versato nell’apparecchio; o
c. L’apparecchiatura è stata esposta alla pioggia; o
d. L’apparecchiatura non sembra funzionare in modo normale; o
e. L’apparecchiatura è caduta, o il cabinet è rimasto danneggiato
○○ ○○○○○○○○○○○○○○○○○○○○○○○○○○○○○○○
Indice
(i numeri in grassetto fanno riferimento alle
illustrazioni)
Alcune parole sulla Rotel _____________________________ 16
Per cominciare ______________________________________ 16
Alcune precauzioni 16
Posizionamento 16
Circuito di protezione 16
Collegamento alla rete e controlli ____________________ 17
Ingresso in corrente alternata
1
Interruttore
e spia di accensione
Spie per i canali e mono “a ponte”
Controlli di regolazione del livello
9
2
3 4
5
Collegamenti e configurazione di ingresso ____________ 17
Selettore d’ ingresso
Collegamento del segnle d’ingresso
7
6
Collegamento dei diffusori ___________________________ 18
Selezione dei diffusori 18
Selezione del cavo per diffusori 18
Polarita’ e fase 18
Collegamento del diffusore stereo
8
Funzionamento mono “a ponte” _____________________ 19
Collegamento d’ingresso 19
Collegamento del diffusore “a ponte” 19
Ricerca guasti _______________________________________ 19
La spia di accensione sul pannello anteriore
non è illuminata 19
Sostituzione fusibile 19
Nessun suono 19
Caratteristiche ______________________________________ 25
17
17
17
17
17
18
18
Posizionate l’unità su una superficie piana abbastanza resistente da
sopportare il suo peso. Non posizionatela su un carrello che potrebbe
ribaltarsi.
AVVERTENZA
PER RIDURRE IL RISCHIO DI SCOSSA ELETTRICA NON
ESPONETE L’APPARECCHIO A PIOGGIA O UMIDITA’
ATTENZIONE
Avvertenza: per ridurre il rischio di scossa, non togliete il
coperchio del cabinet. Non contiene parti utili per l'utente.
Per l'assistenza fate riferimento a personale qualificato.
Rischio di scossa
elettrica, non aprire.
15
Page 20

AMPLIFICATORE DI POTENZA A SEI CANALI RB-976
○○ ○○○○○○○○○○○○○○○○○○○○○○○○○○○○○○○
Alcune parole sulla Rotel
Una famiglia, la cui passione per la musica ha spinto a realizzare
componenti hi-fi di elevata qualità, fondò la Rotel più di 30 anni fa.
Attraverso gli anni la passione è rimasta intatta e l’obbiettivo di
offrire prodotti eccezionali agli audiofili e amanti della musica ad
un costo non elevato è condiviso da tutti alla Rotel.
Gli ingegneri lavorano come una squadra affiatata, ascoltando e
mettendo a punto ogni nuovo prodotto finché non raggiunge
perfettamente i loro standard musicali. Sono liberi di scegliere i
componenti in qualsiasi parte del mondo al fine di realizzare il
prodotto nel miglior modo possibile. Così potrete trovare
condensatori provenienti dall’Inghilterra e dalla Germania,
semiconduttori dal Giappone o dagli Stati Uniti, mentre i
trasformatori toroidali sono prodotti proprio dalla Rotel.
La fama di eccellenza della Rotel è stata guadagnata grazie a
centinaia di ottime recensioni e riconoscimenti conferiti dai più
autorevoli esperti del settore, che ascoltano la musica ogni
giorno. I loro commenti confermano l’ obiettivo della società - La
ricerca di un apparecchio che sia musicale, affidabile e
conveniente.
Vi ringraziamo per aver scelto questo prodotto augurandovi molte
ore di piacevole intrattenimento musicale.
○○ ○○○○○○○○○○○○○○○○○○○○○○○○○○○○○○○
Per cominciare
Alcune precauzioni
Leggete attentamente questo manuale. Oltre alle istruzioni relative alle istruzioni di base a al funzionamento fornisce
interessanti informazioni su diverse configurazioni di sistema così
come indicazioni generali che vi aiuteranno a ottenere prestazioni
ottimali dal vostro impianto. Vi preghiamo di contattare il vostro
rivenditore autorizzato Rotel per consigli o domande. Inoltre tutti
noi alla Rotel saremo ben lieti di rispondere alle vostre domande e
commenti.
Conservate l’imballaggio dell’RB-976 e tutto il materiale di
imballaggio interno per un uso futuro. Trasportare l’RB-976 in un
imballo non originale potrebbe danneggiare il vostro
amplificatore.
Compilate e inviate la carta di registrazione allegata all’RB-976.
Assicuratevi anche di conservare la ricevuta della vendita
originale. E’ il vostro migliore documento per la data di acquisto di
cui avrete bisogno ogni volta sia necessario il servizio di
garanzia.
Posizionamento
A causa della sua alta potenza di uscita l’RB-976 può generare un
notevole calore. Le alette di raffreddamento e le aperture di
ventilazione dell’amplificatore sono perfettamente in grado di
dissipare questo calore in condizioni normali, ma non esagerate.
Deve esserci un adeguato spazio attorno allo chassis. Le fessure
di ventilazione sulla parte superiore devono essere sgombre, e ci
deve essere un ragionevole flusso di aria attorno all’amplificatore.
Usate il buon senso quando posizionate l’amplificatore in un cabinet o vi sovrapponete altri apparecchi.
Grazie per aver acquistato il finale di potenza a sei canali RB-976.
Quando utilizzato in un impianto hi-fi di alta qualità o in un sistema
home theater vi garantirà numerosi anni di intrattenimento musicale.
L’RB-976 è un finale a sei canali ad alta potenza in grado di offrire
altissme prestazioni sonore. Transistor di uscita discreti,
un’alimentazione sovra dimensionata, componenti selezionati e il
famoso concetto Rotel di Design Bilanciato assicurano una
superba qualità sonora. La capacità di erogare alta corrente
consente all’RB-976 di pilotare anche i diffusori meno efficienti.
Siate a conoscenza del fatto che l’RB-976 è in grado di erogare
alti livelli di potenza, superiori a 60 Watt per canale. Assicuratevi
che i vostri diffusori possano sopportare la potenza dell’RB-976.
Se avete dei dubbi sui vostri diffusori chiedete consiglio al vostro
rivenditore Rotel.
L’istallazione dell’RB-976 e il suo funzionamento sono facili. Se
avete già esperienza con altri finali di potenza, non dovreste
incontrare alcuna difficoltà. Collegate una coppia di cavi tra il
vostro preamplificatore e gli ingressi dell’amplificatore, collegate i
vostri diffusori e ascoltate la musica.
Allo stesso modo ricordate il peso dell’amplificatore quando
scegliete il posto dove installarlo. Assicuratevi che lo scaffale o il
cabinet possano sopportare la sua considerevole mole. Anche in
questo caso usate il buon senso.
Circuito di protezione
L’RB-976 è dotato di un circuito di protezione termico che
protegge l’amplificatore da eventuali danni derivanti da condizioni
operative estreme. A differenza di altri apparecchi, il circuito di
protezione dell’RB-976 è indipendente dal segnale audio e non ha
nessuna influenza sulle performance sonore. Invece, il circuito di
protezione controlla la temperatura dei finali e spegne
l’amplificatore se la temperatura supera i limiti di sicurezza.
Molto probabilmente, non vedrete mai questo circuito di
protezione in azione. Tuttavia se si dovessero verificare le
condizioni, uno o più canali dell’amplificatore si spegneranno.
Se questo accade, spegnete l’amplificatore, lasciatelo raffreddare
per alcuni minuti, cercate di identificare e risolvere il problema
che ha causato l’intervento del circuito. Quando accenderete
nuovamente l’amplificatore, il circuito di protezione si azzererà
automaticamente.
16
Page 21

Italiano
4
Nella maggior parte dei casi il circuito si attiva a causa di
condizioni critiche come il corto circuito dei cavi dei diffusori o
scarsa ventilazione che portano a situazioni di surriscaldamento.
In casi molto rari carichi di diffusori ad impedenza molto bassa o
molto reattivi provocano l’intervento del circuito.
Se il circuito di protezione si attiva ripetutamente e non siete in
grado di isolare e risolvere il problema, contattate il vostro
rivenditore Rotel per l’assistenza nella ricerca del guasto.
○○ ○○○○○○○○○○○○○○○○○○○○○○○○○○○○○○○
Collegamento alla rete e controlli
Ingresso in corrente alternata
A causa della sua elevata potenza l’RB-976 può erogare una
notevole corrente. Pertanto dovrebbe essere collegato
direttamente a una presa a muro polarizzata a due poli. Non usate
una prolunga. Una robusta ciabatta a prese multiple può essere
utilizzata se (insieme alla presa a muro) può pilotare la corrente
richiesta dall’RB-976 e dagli altri componenti collegati ad essa.
Assicuratevi che l’interruttore di accensione sul pannello
anteriore dell’RB-976 sia spento (in posizione esterna). Quindi
collegate il cavo di alimentazione alla presa di rete sulla parte
posteriore dell’RB-976. In seguito, collegate l’altra estremità del
cordone di alimenrazione alla presa di alimentazione.
Il vostro RB-976 è già stato predisposto in fabbrica per il voltaggio
corretto per il paese dove lo avete acquistato (115 volt o 230 volt
con una linea di frequenza di 50 Hz o 60 Hz). La configurazione di
linea di corrente alternata è indicata su un adesivo sul pannello
posteriore .
Nota: Nel caso doveste trasportare il vostro RB-976 in un altro
paese è possibile riconfigurare il voltaggio. Non cercate di
provvedere a questa conversione da soli. Aprire il cabinet dell’RB976 vi espone a voltaggi pericolosi. Consultate personale di
servizio qualificato o il centro di servizio della Rotel per
informazioni.
Se vi assentate da casa per un lungo periodo, per per un periodo
di un mese, è consigliabile staccare il vostro amplificatore dalla
rete (così come per gli altri componenti audio e video) durante la
vostra assenza.
Interruttore 1 e spia di accensione
L’interruttore di accensione è posto sul pannello anteriore del
vostro amplificatore. Per accendere l’amplificatore premete
l’interruttore. La spia LED sopra l’interruttore si illuminerà,
indicando che l’amplificatore è acceso. Per spegnere
l’amplificatore premete nuovamente il pulsante e riportatelo nella
posizione iniziale.
9
2
Spie dei canali e di funzionamento
mono “a ponte” 3
Quando una coppia di canali è in modalità stereo le spie di
accensione dei due canali per quei canali si illumineranno.
Quando una coppia di canali è in modalità “bridged mono” (mono
“a ponte”), le due spie dei canali sono spente e la spia Bridged
Mono è accesa per quella coppia di canaliw Fate riferimento alla
sezione per la Configurazione e Collegamenti sulla pagina
seguente per avere ulteriori informazioni.
Controlli di regolazione del livello
I controlli di livello vi permettono di regolare la sensibilità di
ingresso individuale delle tre coppie di canali. Possono essere
utilizzati per regolare il balance dell’uscita sonora dei diffusori di
un impianto home theater o per controllare il volume nelle varie
stanze allorché l’RB-976 venisse utilizzato per pilotare i diffusori
in un impianto multi-sala. Il settaggio dell’interruttore di selezione
di ingresso non influisce sull’operazione dei controlli di
regolazione del livello.
○○ ○○○○○○○○○○○○○○○○○○○○○○○○○○○○○○○
5
Collegamento e configurazione
di ingresso
I sei canali dell’RB-976 sono raggruppati in tre coppie di canali
con indicazione A, B e C per una facile identificazione e controllo.
Nota: Per evitare rumori troppo alti che né voi né il vostro
diffusore apprezzerebbe, assicuratevi che l’amplificatore sia
spento quando effettuate qualsiasi collegamento di segnale o
cambiate il settaggio degli interruttori di selezione dell’ingresso.
Interruttori del selettore di ingresso
Quando un interrruttore di selezione d’ingresso è in posizione
“Stereo” i due canali della coppia di canali funzionano
indipendentemente. Quando l’interruttore di selezione d’ingresso
per una o più coppie di canali è in posizione “a ponte” (Bridged) i
due canali sono combinati in un unico canale ad alta potenza
(150W). Leggete in questo manuale la sezione “Funzionamento
mono “a ponte” per maggiori informazioni.
La posizione “Link” dell’interruttore di selezione di ingresso
collega insieme gli ingressi delle coppie di canali. In questa
configurazione gli ingressi collegati ai canali A possono anche
pilotare i canali B e/o C . Talvolta questa configurazione è
chiamata “daisy chain”. E’ generalmente utilizzata in istallazioni
personalizzate dove una coppia di ingressi stereo è usata per
pilotare coppie multiple di diffusori, che sono spesso localizzati in
ambienti diversi.
7
17
Page 22

AMPLIFICATORE DI POTENZA A SEI CANALI RB-976
Per utilizzare la funzione di ingresso link spostare l’interruttore di
selezione di ingresso per la coppia(e) di canali che volete
collegare, sulla posizione “Link”. Fate attenzione che gli ingressi
dei canali B possono essere collegati , mentre i canali C
funzionano in modo indipendente o gli ingressi dei canali C
possono essere collegati, mentre i canali B funzionano in modo
indipendente .
Nota: quando è utilizzata la funzione di collegamento di ingresso
le coppie di canali collegate non possono essere messe “a
ponte”.
Collegamento del segnale di ingresso
(vedi figura 2 per l’illustrazione di cablaggio normale)
L’RB-976 è provvisto di connettori d’ingresso del tipo RCA normali,
il tipo che si trova su quasi tutti gli apparecchi audio.
Utiliaate cavi di interconnessione audio di alta qualità per
collegare le uscite del preamplificatore o il processore di segnle
agli ingressi dell’RB-976. Assicuratevi di collegare correttamente i
canali destro e sinistro e di utilizzare la coppia di canali corretta
dell’RB-976.
○○ ○○○○○○○○○○○○○○○○○○○○○○○○○○○○○○○
6
Collegamento dei diffusori
Polarita’ e fase
La polarità - l’orientamento positivo/negativo dei collegamenti per il collegamento di ogni diffusore e amplificatore deve essere
conforme affinché tutti i diffusori siano in fase. Se la polarità di un
collegamento è accidentalmente invertita, il basso sarà debole e
l’immagine stereo scadente. Tutti i cavi sono segnati affinché si
possano identificare i due conduttori. Vi possono essere
scanalature o una striscia sull’isolante di un conduttore. Il cavo
può avere un’isolante trasparente con conduttori di colori diversi
(rame e argento). Indicazioni sulla polarità possono essere
stampate sull’isolante. Identificate i conduttori positivo e negativo
e che siano corretti con i collegamenti tra l’amplificatore e i
diffusori.
Collegamento dei diffusori
L’ RB-976 ha sei coppie di connettori colorati (rosso e nero) sul
pannello posteriore. Questi connettori accettano cavi spellati,
forcelle, o doppi connettori a banana ( ad eccezione dei paesi
della Comunità Europea dove non sono consentiti)
Portare il cavo dall’RB-976 ai diffusori. Lasciatelo lento in modo da
poter muovere i componenti abbastanza da consentire l’accesso
ai connettori dei diffusori.
Se utilizzate i doppi connettori a banana, collegateli ai cavi ed
inseriteli nella parte posteriore dei connettori dell’amplificatore. I
cappellotti esagonali dei connettori dovrebbero essere avvitati in
tutti i casi (in senso orario).
8
Selezione dei diffusori
Vi raccomandiamo di utilizzare diffusori con un’impedenza minima
nominale di 4 ohm o più alta con l’RB-976. Dovreste avere molta
cautela nel pilotare coppie multiple di diffusori in parallelo, perchè
l’impedenza effettiva che l’amplificatore “vede” si dimezza. Per
esempio, quando si pilotano due coppie di diffusori da 8 ohm,
l’amplificatore “vede” un carico da 4 ohm. Quando si pilotano
diffusori multipli in parallelo vi raccomandiamo di scegliere
diffusori con un’impedenza di 8 ohm o più alta. I dati di impedenza
di un diffusore non sono molto precisi. In pratica pochissimi
diffusori presenteranno problemi per l’RB-976. Se avete alcuni
dubbi chiedete pure consiglio al vostro rivenditore Rotel.
Scelta dei cavi
Utilizzate cavi a due conduttori isolati per collegare l’RB-976 ai
diffusori. Le dimensioni e la qualità dei cavi possono avere effetti
udibili sulle performance del sistema. I cavi standard vanno bene
ma possono dare un’uscita più bassa o una risposta limitata in
gamma bassa, in particolare se sono molto lunghi. In generale
cavi ben dimensionati miglioreranno la resa sonora. Per ottenere
le migliori prestazioni, potete prendere in considerazioni cavi
speciali di alta qualità. Il vostro rivenditore Rotel vi potrà aiutare
nella scelta dei cavi adatti per il vostro impianto.
Se state utilizzando connettori a forcella, collegateli ai cavi. Se
state collegando cavi spellati direttamente ai connettori, separate
i conduttori dei cavi e strappate indietro l’isolante dall’estemità di
ogni conduttore. Fate attenzione a non tagliare l’intreccio dei fili.
Svitate (in senso antiorario) i cappellotti esagonali dei connettori.
Posizionate la forcella attorno al perno del connettore o inserite il
filo avvolto nel foro del perno. Avvitate i cappellotti esagonali in
senso orario per serrare la forcella o il filo.
Nota: Assicuratevi che non vi siano fili sparsi che potrebbero
toccare i fili o i connettori adiacenti.
18
Page 23

Italiano
○○ ○○○○○○○○○○○○○○○○○○○○○○○○○○○○○○○
Configurazione mono “a ponte”
(vedere la figura 3 per l’illustrazione del collegamento “a
ponte”)
I due canali dell’RB-976 possono essere collegati “a ponte”. In
questa configurazione il canale singolo eroga l’enorme potenza di
150 watt! Questa caratteristica vi consente di aumentare la
potenza dell’intero sistema collegando a ponte le coppie di canali
dell’RB-976 e aggiungendo un secondo RB-976 anch’esso
provvisto di una coppia di canali in configurazione “a ponte”.
Oppure una delle coppie di canali dell’RB-976 potrebbe essere
configurato “a ponte” per pilotare un subwoofer monofonico. Notate tuttavia che quando una delle coppie di canali dell’RB-976 è
configurata “a ponte” il diffusore collegato deve avere
un’impedenza pari o superiore a 8 ohm.
________________________________________________________________________________
Nota: Disattivate tutti i componenti dell’impianto prima di
cambiare qualsiasi collegamento di segnale o il settaggio degli
interruttori del Selettore di ingresso.
Per configurare a ponte una delle coppie di canali dell’ RB-976
spostate l’interruttore di selezione d’ingresso per quel canale
nella posizione “a ponte” (Bridged).
Collegamenti in ingresso
Quando utilizzate una delle coppie di canali dell’RB-976 in
configurazione mono “a ponte”, collegate il cavo proveniente
dall’uscita del preamplificatore o del processore di segnale
all’ingresso del canale sinistro. Nessun collegamento deve essere
fatto sul canale destro.
○○ ○○○○○○○○○○○○○○○○○○○○○○○○○○○○○○○
Ricerca dei guasti
Nei sistemi audio molti problemi derivano da collegamenti
sbagliati o inadeguate regolazioni dei controlli. Se vi si pone un
problema, isolate l’area critica verificate i comandi, determinate
la causa del problema e operate i necessari cambiamenti. Se non
siete in grado di far suonare l’RB-976 fate riferimento ai
suggerimenti per le condizioni che seguono:
La spia di accensione non si illumina
Non arriva corrente all’RB-976. Controllate il pulsante di
accensione sul pannello anteriore. Assicuratevi che sia in
posizione di accensione. Controllate i collegamenti alla rete
sull’amplificatore e sulla presa di alimentazione (CA)
Sostituzione del fusibile
Se avete controllato tutto correttamente e non riuscite ancora ad
accendere l’amplificatore verificate che il fusibile non sia
bruciato. Se ritenete ciò possibile contattate il vostro rivenditore
autorizzato Rotel per sapere dove portare l’amplificatore per fare
sostituire il fusibile.
Nessun Suono
Se l’amplificatore riceve l’alimentazione dalla rete ma non produce nessun suono, controllate le spie dei Canali e del Bridged
Mono (Mono “a ponte”) sul pannello frontale. Quindi controllate
che tutti i collegamenti in ingresso e uscita siano corretti. Infine
controllate i collegamenti agli altri componenti dell’ impianto e
relativo settaggio dei controlli.
Nota: E’ possibile collegare gli ingressi B e/o C mentre A è nella
modalità a ponte. Gli ingressi destro e sinistro sono entrambi
utilizzati per A.
Collegamento dei diffusori nella
configurazione “a ponte”
Quando utilizzate una delle coppie di canali dell’RB-976 in
configurazione mono “a ponte”, il cavo diretto ai diffusori è
collegato ai terminali positivi dei canali destro e sinistro. Collegate
il cavo che va al terminale positivo del diffusore al terminale
positivo del canale sinistro della coppia di canali. Collegate il cavo
che va al terminale negativo del diffusore al terminale positivo del
canale destro della coppia di canali. Nessuna connessione deve
essere effettuata ai terminali negativi.
19
Page 24

ETAPA DE POTENCIA DE SEIS CANALES RB-976
ADVERTENCIA:
No hay componentes manipulables por el usuario en el interior del aparato.
Cualquier operación de mantenimiento debe ser llevada a cabo por personal
cualificado.
ADVERTENCIA:
Para reducir el riesgo de que se produzca un incendio o una descarga
eléctrica, no exponga la RB-976 al agua o la humedad. No permita que ningún
objeto extraño penetre en el interior del aparato. Si el aparato está expuesto a
la humedad o algún objeto extraño penetra en su interior, desconecte
inmediatamente el cable de alimentación de la red eléctrica. En caso de que
fuera necesario, envíe el aparato a un especialista cualificado para su
inspección y posterior reparación.
Lea todas las instrucciones del presente manual antes de conectar o hacer
funcionar la RB-976. Conserve este manual cerca de usted para el caso de que
necesite revisar las instrucciones de seguridad que se indican a continuación.
Tenga siempre en mente las advertencias y la información relativa a seguridad
que figuran tanto en estas instrucciones como en el propio aparato. Siga al pie
de letra todas las instrucciones relacionadas con el funcionamiento del mismo.
Limpie la RB-976 únicamente con una gamuza seca o un aspirador.
Mantenga siempre despejadas las ranuras destinadas a la ventilación del
aparato. Por ejemplo, no coloque nunca la RB-976 en una cama, un sofá, una
alfombra o una superficie similar susceptible de bloquear las ranuras de
ventilación. Si la RB-976 está ubicada en la estantería de una librería o un
mueble, debe haber suficiente espacio a su alrededor y ventilación en el
mueble para permitir una refrigeración adecuada.
Mantenga a la RB-976 alejada de radiadores, estufas, cocinas o de cualquier
otra instalación que produzca calor.
La RB-976 debe ser conectada únicamente a una fuente de alimentación del
tipo y la tensión especificados en su panel posterior.
Conecte la RB-976 a una toma de corriente eléctrica únicamente a través del
cable de alimentación de dos clavijas polarizado suministrado de serie o un
equivalente exacto del mismo. No modifique de ningún modo dicho cable. No
intente desactivar los terminales destinados a la conexión a tierra o
polarización. El cable debería ser conectado a una toma de corriente eléctrica
de dos terminales que se adapten perfectamente a las clavijas del cable de
alimentación de la RB-976. No utilice ningún tipo de cable de extensión.
No coloque el cable de alimentación en lugares en que pueda ser aplastado,
pinchado, doblado en ángulos críticos, expuesto al calor o dañado de algún
modo. Preste particular atención al punto de unión entre el cable y la toma de
corriente y también a la ubicación de esta última en el panel posterior del
aparato.
El cable de alimentación debería desconectarse de la red eléctrica cuando el
aparato no vaya a ser utilizado durante un largo período de tiempo (por ejemplo
las vacaciones de verano).
○○ ○○○○○○○○○○○○○○○○○○○○○○○○○○○○○○○
Contenido
(los números encerrados en un círculo hacen
referencia a una ilustración)
Acerca de Rotel _____________________________________ 21
Para Empezar _______________________________________ 21
Algunas Precauciones 21
Colocación 21
Circuitería de Protección 22
Alimentación y Control ______________________________ 22
Entrada de Corriente Eléctrica Alterna
1
Conmutador
e Indicador Luminoso
9
2
de Puesta en Marcha 22
Indicadores Luminosos de Canal y de Activación
del Modo de Funcionamiento Monofónico
Puenteado
Controles para el Ajuste de Nivel
3 4
5
Conexiones y Configuración de Entrada _______________ 23
Conmutador de Selección de Entrada
Conexión de la Señal de Entrada
7
6
Conexión de las Cajas Acústicas ______________________ 23
Selección de las Cajas Acústicas 23
Selección del Cable de Conexión 23
Polaridad y Puesta en Fase 23
Conexión de las Cajas Acústicas en Modo
Estereofónico
8
Funcionamiento en Modo Monofónico Puenteado _____ 24
Conexiones de Entrada 24
Conexión de las Cajas Acústicas
en Modo Puenteado 24
Problemas y Posibles Soluciones
El Indicador Luminoso de Puesta en
Marcha del Panel Frontal no se Activa 24
Sustitución del Fusible 24
Ausencia de Sonido 24
Características Técnicas _____________________________ 25
22
22
22
23
23
24
Desconecte inmediatamente la RB-976 y envíela a un servicio técnico
cualificado para su inspección/reparación si:
• El cable de alimentación o alguna clavija del mismo ha sido dañado
• Han caído objetos o se ha derramado líquido en el interior del aparato.
• El aparato ha sido expuesto a la lluvia.
• El aparato muestra signos de funcionamiento inadecuado.
• El aparato ha sido golpeado o dañado de algún modo.
Coloque la RB-976 sobre una superficie fija y equilibrada que sea
suficientemente resistente para soportar su peso. No coloque la RB-976 en una
carretilla móvil de la que pudiera volcar.
20
Page 25

Español
○○ ○○○○○○○○○○○○○○○○○○○○○○○○○○○○○○○
Acerca de Rotel
Rotel fue fundada hace 30 años por una familia cuyo entusiasta
interés por la música le condujo a diseñar y construir
componentes de Alta Fidelidad sin ningún tipo de compromiso.
Esta pasión ha permanecido inalterada durante todo este tiempo,
hasta el punto de que el objetivo de los fundadores de la
compañía -proporcionar productos de la máxima calidad a
melómanos y audiófilos independientemente de cuales sean sus
posibilidades económicas- es compartido por todos sus
empleados.
Los ingenieros de Rotel trabajan como un equipo compacto,
escuchando y llevando a cabo el ajuste fino de cada nuevo
producto hasta que satisface de manera exacta los estándares de
calidad musical para los que fue diseñado. Para lograrlo,
disponen de la máxima libertad para escoger los mejores
componentes allí donde se encuentren. Le sorprenderá
agradablemente encontrar exquisitos condensadores
procedentes del Reino Unido y Alemania o semiconductores de
Japón o Estados Unidos, mientras que los transformadores
toroidales de potencia son construidos en la propia factoría de
Rotel.
Rotel se ha ganado a pulso, a través de a cientos de artículos,
bancos de pruebas y galardones firmados por los críticos
especializados más respetados del mundo, una sólida reputación
por la excelencia de sus productos. Los comentarios de estos
profesionales que escuchan música cada día hacen posible que
la compañía se reafirme en la validez de sus objetivos: la puesta a
punto de componentes y equipos musicales, fiables y asequibles.
Le agradecemos que haya adquirido este producto y esperamos
que le permita disfrutar de su música predilecta durante largos
años.
○○ ○○○○○○○○○○○○○○○○○○○○○○○○○○○○○○○
Para Empezar
Gracias por adquirir la Etapa de Potencia de Seis Canales Rotel
RB-976. Utilizada en un sistema de reproducción musical o audiovisual de alta calidad, este amplificador le permitirá disfrutar durante muchos años de sus composiciones musicales y películas
favoritas.
La RB-976 es un potente amplificador de seis canales ideal que le
permitirá alcanzar el más alto nivel posible de prestaciones en la
reproducción del sonido. Dispositivos de salida discretos, una
fuente de alimentación de grandes dimensiones, componentes
seleccionados de alta calidad y el exclusivo Concepto de Diseño
Equilibrado de Rotel garantizan una soberbia calidad sonora.
Asímismo, una elevada capacidad en corriente hace posible que
la RB-976 pueda atacar sin problemas las más exigentes cajas
acústicas.
Puede estar completamente seguro de la capacidad de la RB-976
para suministrar elevadas potencias de salida, que pueden
superar los 60 vatios por canal. Asegúrese de que sus cajas
acústicas pueden soportar la potencia de la RB-976. En caso de
que tenga alguna duda al respecto, consulte con un distribuidor
autorizado de productos Rotel para que le aconseje al respecto.
La RB-976 es un aparato que resulta muy fácil de instalar y utilizar.
Si usted ya está experimentado en el manejo de etapas de
potencia, en principio no debería encontrar nada que le resultara
especialmente complicado durante la puesta a punto inicial de la
misma. Inserte los conectores procedentes de su preamplificador
en los pertinentes terminales de entrada de la RB-976, haga lo
propio con sus cajas acústicas y disfrute con su música y sus
bandas sonoras favoritas.
Algunas Precauciones
Le rogamos que lea cuidadosamente el presente manual de
instrucciones. Además de las instrucciones básicas de
instalación y puesta a punto de la RB-976, incluye información de
gran valor sobre las diferentes configuraciones que permite el
aparato, así como información general que le ayudará a optimizar
las prestaciones de su sistema. Le rogamos asímismo que
contacte con su distribuidor autorizado de productos Rotel para
cualquier duda o consulta. No le quepa la menor duda de que
todos sus comentarios y observaciones serán bien recibidos.
Guarde el embalaje de la RB-976 y todo el material en él
contenido para un posible uso futuro del mismo. El embalaje o
transporte de la RB-976 en condiciones diferentes de las
originales puede dañar seriamente el aparato.
Rellene y envíe la tarjeta de garantía suministrada junto con la
RB-976. Asegúrese asímismo de mantener en su poder la factura
de compra puesto que es la mejor manera de que usted se
acuerde de la fecha de compra, un dato esencial en caso de que
necesitara asistencia técnica durante el período de garantía.
Colocación
Como consecuencia de su elevada potencia de salida, la RB-976
puede llegar a generar una considerable cantidad de calor. Tanto
los disipadores térmicos como las ranuras de ventilación del
aparato están perfectamente capacitados para eliminar este
calor en condiciones de funcionamiento normales. Aún así, le
rcomendamos que no fuerce el funcionamiento de su
amplificador. Debe haber un espacio libre adecuado alrededor del
chasis y las ranuras de ventilación situadas en la cubierta superior deben permanecer siempre despejadas. Asímismo, debe
procurar que haya una circulación de aire razonable alrededor
del aparato. Utilice el sentido común cuando coloque la RB-976 en
un mueble o ubique otros componentes encima suyo.
Tenga igualmente en cuenta el peso del amplificador cuando
seleccione una ubicación determinada para su instalación.
Asegúrese por tanto de que la estantería o mueble utilizado
pueda soportar el considerable volumen de la RB-976. Una vez
más, le recomendamos que utilice su sentido común.
21
Page 26

ETAPA DE POTENCIA DE SEIS CANALES RB-976
2
Circuitería de Protección
La RB-976 incorpora un circuito de protección térmica que la protege frente a cualquier daño potencial que pudiera producirse en
caso de funcionamiento en condiciones extremas o de que
hubiese fallos en la misma. Al contrario de lo que sucede en
muchos diseños de su clase, la circuitería de protección de la RB976 es completamente independiente de la señal de audio y por
tanto no tiene el más mínimo impacto en las prestaciones musicales. De este modo, el circuito de protección monitoriza la
temperatura de los dispositivos de salida y desconecta el
amplificador si la temperatura de funcionamiento excede los
límites de seguridad prefijados.
En principio, usted no debería ver nunca este circuito en acción.
Sin embargo, en el caso de que se detectara un funcionamiento
defectuoso de su RB-976, el aparato se desconectaría y el
indicador luminoso del panel frontal se activaría.
Si esto sucede, desconecte completamente el amplificador e
intente identificar y corregir el problema que ha provocado la
activación de la circuitería de protección. Cuando vuelva a poner
de nuevo en marcha el aparato, el circuito de protección se
reinicializará automáticamente y el indicador luminoso debería
desactivarse.
En la mayoría de casos, la circuitería de protección se activa
como consecuencia de una condición de funcionamiento
incorrecto, como por ejemplo la unión de los cables de conexión
(positivo con negativo) de las cajas acústicas o una ventilación
inadecuada que provoque el sobrecalentamiento del aparato. En
algunos casos muy concretos (y raros), una impedancia de las
cajas extremadamente baja o muy reactiva podría provocar la
activación de los circuitos de protección.
Si la circuitería de protección se dispara repetidamente y usted
es incapaz de aislar y corregir la causa de tal situación, contacte
con su distribuidor autorizado de productos Rotel para recibir
asistencia técnica adecuada.
○○ ○○○○○○○○○○○○○○○○○○○○○○○○○○○○○○○
Alimentación y Control
Entrada de Corriente Eléctrica
Debido a su elevada potencia de salida, la RB-976 puede drenar
una considerable cantidad de corriente. Además, debería ser
conectada directamente a una toma de corriente polarizada de 2
clavijas. No utilice ningún tipo de cable de extensión. Puede
utilizarse una base de enchufes de alta calidad si la misma (y, por
supuesto, la toma de corriente ubicada en la pared de su casa)
está preparada para manejar la corriente (lea las indicaciones
correspondientes que figuran tanto en la citada base como en la
toma de corriente) exigida por la RB-976 y el resto de
componentes conectados a la misma.
9
Asegúrese de que el conmutador de puesta en marcha situado en
el panel frontal de la RB-976 está desconectado (es decir hacia
fuera) y a continuación conecte el cable de alimentación
suministrado de serie al receptáculo correspondiente (indicado
como toma de corriente alterna).
Su RB-976 está configurada en fábrica para que trabaje con la
tensión de red correcta que corresponda al país en que ha sido
comprada (115 ó 230 voltios de corriente alterna con una
frecuencia de 50 ó 60 Hz). Dicha configuración está indicada en
un lugar visible del panel posterior del aparato.
Nota: En caso de que tuviese que desplazar su RB-976 a otro país,
es posible reconfigurarla para que pueda trabajar con tensiones de
red diferentes de la establecida en fábrica. No intente llevar a cabo
esta conversión por su cuenta. El acceso al interior de la RB-976 le
expone a tensiones peligrosas. Para cualquier información al
respecto, le rogamos que contacte con personal cualificado o
llame al departamento de asistencia técnica postventa de Rotel.
Si va a estar fuera de su casa durante un largo período de tiempo
-por ejemplo las vacaciones de verano-, le recomendamos, como
precaución básica, que desconecte su amplificador (así como el
resto de componentes de audio y vídeo de su equipo) de la red
eléctrica.
Conmutador 1 e Indicador Luminoso
de Puesta en Marcha
El conmutador de puesta en marcha está ubicado en el panel
frontal de su amplificador. Púlselo para poner en marcha la RB-
976. El indicador luminoso situado encima del mismo se activará,
indicando que el amplificador está conectado. Para desconectar
el aparato, basta con que pulse de nuevo el mencionado botón a
fin de que éste regrese a su posición inicial.
Indicadores Luminosos de Canal y
de Activación del Modo de Funcionamiento
Monofónico Puenteado 3
Cuando un par de canales funciona en modo estereofónico, los
indicadores luminosos correspondientes a ese par de canales se
activarán. Cuando los dos canales de un par se conecten en
modo Monofónico Puenteado, los indicadores luminosos
correspondientes a dichos canales se apagarán y se activará el
indicador correspondiente a la conexión Monofónica Puenteada
de dicho par. Consulte la sección de Conexiones y Configuración
de Entrada de la página siguiente para más información.
Controles para el Ajuste de Nivel
Los Controles de Ajuste de Nivel le permiten a usted regular
individualmente la sensibilidad de entrada de los tres pares de
canales disponibles. Pueden utilizarse para ajustar el balance de
las cajas acústicas de un sistema de Cine en Casa o para
controlar el nivel de volumen correspondiente a distintas
habitaciones cuando la RB-976 es utilizada para atacar las cajas
acústicas de una instalación multihabitación. La manipulación del
Conmutador de Selección de Entrada no afecta el funcionamiento
de los constroles de Ajuste de Nivel.
4
5
22
Page 27

Español
○○ ○○○○○○○○○○○○○○○○○○○○○○○○○○○○○○○
Conexiones y Configuración
de Entrada
Los seis canales de la RB-976 están agrupados en tres pares de
canales indicados con las letras A, B y C para facilitar su
identificación y control.
Nota: Para evitar la presencia de ruidos susceptibles de ser
apreciados tanto por usted como por sus cajas acústicas,
asegúrese de que el amplificador está desconectado cuando
usted esté realizando las distintas conexiones o cambie el ajuste
de los Conmutadores de Selección de Entrada.
Conmutador de Selección de Entrada
Cuando un Conmutador de Selección de Entrada está en la
posición “Stereo”, los dos canales del par correspondiente
funcionan independientemente. Cuando el Conmutador de
Selección de Entrada correspondiente a uno o más pares de
canales está en la posición “Bridged” (“Puenteado”), los dos
canales de cada par se combinan en uno solo de mayor potencia
(150 W). Diríjase a la sección “Funcionamiento en Modo
Monofónico Puenteado” de este manual para más información.
La posición “Link” (“Enlace”) de los Conmutador de Selección de
Entrada conecta entre sí las entradas de los pares de canales. En
esta configuración, las entradas conectadas a los canales A
también pueden atacar los canales B y C. A esta configuración se
la denomina en ocasiones “encadenada”. Por lo general, suele
utilizarse en las instalaciones personalizadas (“custom”) en las
que se emplean un par de entradas estereofónicas para atacar
múltiples parejas de cajas acústicas ubicadas a menudo en
distintas habitaciones.
Para utilizar la función de enlace de entrada, desplace el
Conmutador de Selección de Entrada correspondiente al(los)
par(es) de canales que desee unir hacia la posición “Link”.
Observe que las entradas de los canales B pueden ser unidas
mientras que los canales C operan independientemente, o
también que pueden unirse las entradas de los canales C
mientras que los canales B operan independientemente.
Nota: Cuando se utilice la función de enlace de entradas los
pares de canales enlazados no pueden puentearse.
Conexión de la Señal de Entrada
(Vea la Figura 2 para la realización de las conexiones pertinentes)
La RB-976 incorpora conectores de entrada RCA convencionales,
es decir idéntidos a los que pueden encontrarse en la práctica
totalidad de componentes de audio existentes en el mercado.
Utilice cables de interconexión de alta calidad para conectar las
salidas del preamplificador o procesador de señal a las entradas
de la RB-976. Asegúrese de conectar adecuadamente los canales
izquierdo y derecho y que utiliza el par de canales correcto de la
RB-976.
7
6
○○ ○○○○○○○○○○○○○○○○○○○○○○○○○○○○○○○
Conexión de las Cajas Acústicas
Selección de las Cajas Acústicas
Le recomendamos que utilice la RB-976 con cajas acústicas cuya
impedancia nominal sea igual o superior a 4 ohmios. Debería
tomar algunas precauciones a la hora de atacar varias parejas de
cajas acústicas conectadas en paralelo puesto que la impedancia
efectiva que ve el amplificador en este caso es exactamente la
mitad. Por ejemplo, cuando se atacan dos parejas de cajas
acústicas con una impedancia de 8 ohmios (cada caja), el
amplificador ve una carga de 4 ohmios. Por lo tanto, cuando
utilice varias cajas acústicas conectadas en paralelo se
recomienda que utilice diseños cuya impedancia nominal sea de 8
o más ohmios. Tenga en cuenta que la impedancia de las cajas
acústicas no tiene un comportamiento particularmente preciso
aunque, en la práctica, muy pocos modelos podrán presentar
problemas a la RB-976. Consulte con un distribuidor autorizado de
productos Rotel en caso de que tenga cualquier duda al respecto.
Selección del Cable de Conexión
de las Cajas Acústicas
Utilice un cable de dos conductores perfectamente aislado para
conectar la RB-976 a las cajas acústicas. El tamaño y la calidad
de dicho cable pueden tener un efecto audible sobre las
prestaciones de la totalidad de su equipo. Un cable de conexión
de calidad estándar funcionará pero es posible que provoque una
disminución de la potencia de salida o una atenuación de la
respuesta en graves, en particular si la longitud del mismo es
elevada. En general, un cable más pesado mejorará el sonido.
Para conseguir unas prestaciones óptimas, debería considerar la
compra de cables de alta calidad especialmente diseñados para
aplicaciones de audio. Su distribuidor autorizado de productos
Rotel puede ayudarle en la selección de los cables que vaya a
utilizar en su sistema.
Polaridad y Puesta en Fase
La polaridad, es decir la orientación positiva/negativa de las
conexiones correspondientes a cada caja acústica y a la unión
con el amplificador, debe ser coherente, de modo que todas las
cajas acústicas del sistema estén en fase. Si la polaridad de una
conexión es invertida por error, se producirá una fuerte caída de
la respuesta en graves, así como una degradación perceptible de
la imagen estereofónica global. Todos los cables están marcados
de manera que usted pueda identificar fácilmente los dos
conductores. Puede haber marcas o líneas impresas en el
revestimiento aislante de un conductor. El cable también puede
presentar un claro aislamiento al incorporar conductores de
distintos colores (cobre y plata). También puede haber
indicaciones de polaridad impresas en el revestimiento aislante.
Identifique los conductores positivos y negativos y sea coherente
con cada una de las conexiones del amplificador y las cajas
acústicas.
23
Page 28

ETAPA DE POTENCIA DE SEIS CANALES RB-976
Conexión de las Cajas Acústicas
en Modo Estereofónico
La RB-976 tiene seis pares de terminales de conexión
debidamente codificados (en color) en su panel posterior. Estos
terminales de conexión aceptan cable pelado, clavijas o incluso
conectores de tipo banana dobles (excepto en los países de la
Comunidad Europea, donde su empleo no está permitido).
Lleve el cable desde la RB-976 hasta las cajas acústicas. Procure
que el mismo posea la suficiente longitud para que pueda accederse
sin ninguna restricción a los terminales de conexión de aquéllas.
Si usted está utilizando conectores dobles de tipo banana, únalos
primero a los cables y a continuación insértelos en la zona posterior de los terminales de conexión. En cualquier caso, las tuercas
de fijación hexagonales de los terminales de conexión deberían
bloquearse girándose en sentido horario.
Si está utilizando terminales de tipo clavija, conéctelos en primer
lugar a los cables. Si está colocando directamente cable pelado a
los terminales de conexión, separe los cables correspondientes a
cada conductor y quite la parte superior del revestimiento
aislante. Asegúrese asímismo de no cortar ninguno de los
conductores propiamente dichos. Libere (girándolas en sentido
contrario de las agujas del reloj) las tuercas de fijación
hexagonales y a continuación coloque las clavijas alrededor de
los terminales de conexión o el cable pelado en el orificio transversal que hay en los mismos. Gire en sentido horario las tuercas
de fijación hexagonales para sujetar firmemente en su lugar la
clavija o el cable de conexión.
Nota: Asegúrese de que no haya restos de cable que puedan
tocar los cables o conductores adyacentes.
○○ ○○○○○○○○○○○○○○○○○○○○○○○○○○○○○○○
8
Funcionamiento en Modo
Monofónico Puenteado
(Vea la Figura 3 para la realización de las conexiones correspondientes al modo de funcionamiento monofónico puenteado)
Los tres pares de canales de la RB-976 pueden ser “puenteados”.
En esta configuración, un único canal suministra una potencia de
150 vatios continuos. Esta prestación le permite incrementar de
manera sustancial la potencia global de su equipo al utilizar la
RB-976 de que dispone con sus tres pares de canales puenteados
en mono junto con una segunda RB-976 con sus pares
estereofónicos también puenteados. También puede usar uno de
los pares estereofónicos de la RB-976 puenteado en mono para
atacar un subwoofer pasivo. En cualquier caso, tenga en cuenta
que cuando uno de los pares estereofónicos de la RB-976 esté
puenteado en mono la caja acústica que se le conecte debe tener
una impedancia igual o superior a 8 ohmios.
Nota: Es posible unir las entradas B o/y C mientras A está en
Modo Puenteado. En A se utiliza tanto la entrada izquierda como
la derecha.
Para puentear uno de los tres pares esterofónicos de la RB-976,
sitúe el Conmutador de Selección de Entrada de dicho par en la
posición “Bridged”.
Conexión de la Señal de Entrada
Cuando utilice uno de los tres pares esterofónicos de la RB-976
en el modo de funcionamiento monofónico puenteado, conecte el
cable procedente del preamplificador o procesador de señal a la
entrada izquierda correspondiente a dicho par. No hay que llevar
a cabo ninguna conexión en la entrada derecha.
Conexión de las Cajas Acústicas
en Modo Monofónico Puenteado
Cuando utilice uno de los pares estereofónicos de la RB-976 en el
modo monofónico puenteado, el cable de conexión a las cajas
acústicas deberá ser conectado a los terminales positivos de los
canales izquierdo y derecho. Conecte el cable que va al terminal
positivo de la caja acústica al terminal positivo del canal izquierdo
del par de canales de la RB-976. Conecte el cable que va al terminal negativo de la caja acústica al terminal positivo del canal
derecho del par de canales de la RB-976. No hay que realizar
ninguna conexión en los terminales negativos.
○○ ○○○○○○○○○○○○○○○○○○○○○○○○○○○○○○○
Problemas y Posibles Soluciones
La mayoría de dificultades que suelen producirse en los sistemas
de audio son el resultado de conexiones realizadas
incorrectamente o ajustes inapropiados. En caso de que se
encuentre con algún problema, aísle en primer lugar el área
afectada, compruebe los ajustes de control realizados, determine
la causa del fallo y haga los cambios necesarios. Si se ve incapaz
de hacer funcionar de nuevo a la RB-993, considere las
sugerencias que le damos para las siguientes condiciones:
El Indicador Luminoso del Panel Frontal no se activa
No entra corriente eléctrica en la RB-976. Compruebe el
conmutador de puesta en marcha del panel frontal. Asegúrese de
que está situado en la posición “on”. Compruebe las conexiones
relativas al suministro de señal eléctrica tanto del amplificador
como de su propia casa (red eléctrica).
Sustitución del Fusible
Si todo está correcto y no consigue que el amplificador se ponga
en marcha, es posible que se haya fundido el fusible interno. Si
creee que esto es lo que ha sucedido, contacte con su distribuidor
autorizado de productos Rotel para reemplazarlo por uno nuevo.
Ausencia de Sonido
Si el amplificador recibe señal eléctrica pero no produce sonido,
compruebe el estado de los indicadores luminosos Channel y
Bridged Mono de su panel frontal. Compruebe a continuación todas
las conexiones de entrada y salida para asegurarse de que son
correctas. Finalmente, compruebe las conexiones y los ajustes de
control correspondientes a los componentes asociados.
24
Page 29

RB-976
○○ ○○○○○○○○○○○○○○○○○○○○○○○○○○○○○○○
Specifications
Continuous Power Output 60 watts/ch
(20-20 kHz, < 0.03%, 8 ohms)
Bridged Mono Power Output 150 watts/ch
(20-20 kHz, < 0.1%, 8 ohms)
Total Harmonic Distortion (20Hz-20kHz, 8 ohms) < 0.03%
Intermodulation Distortion (60 Hz : 7 kHz, 4:1) < 0.03%
Frequency Response ( ±1 dB) 15Hz-100kHz
Damping Factor (20-20,000 Hz, 8 ohms) 150
Speaker Impedance (Normal mode) 4 ohms minimum
Signal to Noise Ratio (IHF A network) 116 dB
Input Impedance/Sensitivity 22 k Ohms/1.5 volt
Power Requirements 115 Volts, 60 Hz or
230 Volts, 50 Hz
Power Consumption 700 Watts
Dimensions (W x H x D) 440 x 121 x 400 mm
173/8” x 43/4” x 153/4”
Weight (net) 11.8 kg, 26 lb.
All specifications are accurate at the time of printing.
Rotel reserves the right to make improvements without notice.
○○ ○○○○○○○○○○○○○○○○○○○○○○○○○○○○○○○
○○ ○○○○○○○○○○○○○○○○○○○○○○○○○○○○○○○
Technische Daten
Dauerausgangsleistung 60 Watt pro Kanal
(20 - 20.000 Hz, < 0,03 %, 8 Ohm)
Ausgangsleistung bei Brückenschaltung 150 Watt pro Kanal
(20 – 20.000 Hz, < 0,1 %, 8 Ohm)
Gesamtklirrfaktor < 0,03 %
(20 - 20.000 Hz, 8 Ohm)
Intermodulationsverzerrung < 0,03 %
(60 Hz : 7 kHz, 4:1)
Frequenzgang (± 1 dB) 15 bis 100.000 Hz
Dämpfungsfaktor 150
(20 - 20.000 Hz, 8 Ohm)
Lautsprecherimpedanz Minimum 4 Ohm
Geräuschspannungsabstand (IHF A) 116 dB
Eingangsimpedanz/-empfindlichkeit 22 kOhm/1,5 V
Spannungsversorgung 230 Volt/50 Hz
Max. Leistungsaufnahme 700 Watt
Abmessungen (B x H x T) 440 x 121 x 400 mm
Nettogewicht 11,8 kg
Diese Bedienungsanleitung entspricht dem technischen Stand bei
Drucklegung. Änderungen in Technik und Ausstattung vorbehalten.
○○ ○○○○○○○○○○○○○○○○○○○○○○○○○○○○○○○
Fiche technique
Caratteristiche
Puissance de sortie en continu 60 watts par canal
(20 Hz à 20 kHz, < 0,03 %, 8 ohms)
Puissance en mono en mode ponté 150 watts par canal
(20 Hz à 20 kHz, < 0,1 %, 8 ohms)
Distorsion harmonique totale (20 Hz-20 kHz, 8 ohms) < 0.03 %
Distortion d’intermodulation (60 Hz : 7 kHz, 4:1) < 0.03 %
Réponse en fréquence (± 1 dB) 15 Hz à 100 kHz
Facteur d’amortissement (20-20,000 Hz, 8 ohms) 150
Impédance des enceintes (mode normal) 4 ohms minimum
Rapport signal/bruit (IHF A network) 116 dB
Impédance d’entrée/Sensibilité 22 kohms/1.5 volt
Alimentation 115 Volts, 60 Hz ou
230 Volts, 50 Hz
Consommation 700 Watts
Dimensions (L, H, P) 440 x 121 x 400 mm
17 3/8 x 4 3/4 x 15 3/4
Poids (net) 11.8 kg, 26 lb
Toutes les spécifications de cet appareil étaient exactes au moment de
l’impression de ce manuel. Rotel se réserve le droit de les modifier sans
préavis.
○○○○○○○○○○○○○○○○○○○○○○○○○○○○○○○○○○○○○○○○○○○○○○○○○○○○○○○○○○○○○○○○○○○○
Potenza di uscita continua (20-20kHz, < 0.03%, 8Ω) 60 Watt per canale
Potenza di uscita Mono “a ponte” 150 Watt per canale
(20-20kHz, < 0.03%, 8Ω)
Distorsione armonica totale (20-20kHz, 8 Ω) < 0.03%
Distorsione d’intermodulazione (60 Hz, 7kHz, 4:1) < 0.03%
Risposta in frequenza (± 1 dB) da15 a 100 Khz
Fattore di smorzamento ( 8 ohm 20 - 20kHz) 150
Impedenza altoparlanti min. 4Ω
Sensibilità d’ingresso/impedenza 22 k Ω / 1.5 volt
Rapporto S/N (IHF A network) 116 dB
Alimentazione 115 V, 60Hz oppure
230 V, 50 Hz
Assorbimento 700 W
Dimensioni (LxAxP) 440x121x400mm
Peso (netto) 11,8 Kg
Tutte le caratteristiche sono corrette al momento della stampa. Rotel si
riserva il dirito di apportare milgioramenti senza darne preavviso.
Características Técnicas
Potencia Continua de Salida 60 vatios/canal
(20-20.000 Hz, THD menor del 0’03%, 8 ohmios)
Potencia Continua de Salida
en Modo Monofónico Puenteado 150 vatios/canal
(20-20.000 Hz, THD menor del 0’1%, 8 ohmios)
Distorsión Armónica Total (20-20.000 Hz, 8 ohmios) <0’03%
Distorsión por Intermodulación (60 Hz : 7 kHz, 4:1) <0’03%
Respuesta en Frecuencia (±1 dB) 15-100.000 Hz
Factor de Amortiguamiento (20-20.000 Hz, 8 ohmios) 150
Impedancia de las Cajas Acústicas (modo Normal) mínima de 4 ohmios
Relación Señal/Ruido (norma IHF/ponderación A) 116 dB
Sensibilidad/Impedancia de Entrada 22 kohmios/1’5 V
Alimentación 115 voltios/60 Hz
230 voltios/50 Hz
Consumo 700 vatios
Dimensiones (An, Al, P) 440x121x400 mm
Peso Neto 11’8 kg
Todas estas especificaciones son las correctas en el momento de la
impresión del presente manual de instrucciones. Rotel se reserva el
derecho a realizar modificaciones en las mismas sin aviso previo.
25
Page 30

RB-976
SIX CHANNEL POWER AMPLIFIER
AMPLIFICATEUR DE PUISSANCE À SIX CANAUX
SECHSKANAL-ENDSTUFE
AMPLIFICATORE DI POTENZA A SEI CANALI
ETAPA DE POTENCIA DE SEIS CANALES
The Rotel Co. Ltd.
10-10 Shinsen-Cho
Shibuya-Ku
Tokyo 150-0045
Japan
Phone: +81-3-5458-5325
Fax: +81-3-5458-5310
082 OMRB-976 021699
Rotel of America
54 Concord Street
North Reading, MA 01864-2699
USA
Phone: +1 978-664-3820
Fax: +1 978-664-4109
Rotel Europe
Meadow Road
Worthing, West Sussex BN11 2RX
England
Phone: +44 1903-524-813
Fax: +44 1903-524-831
Rotel Deutschland
Kleine Heide 12
D-33790 Halle/Westf.
Germany
Phone: +49 5201-87170
Fax: +49 5201-73370
 Loading...