

Roland TD-3KV User Manual
201a
Before using this unit, carefully read the sections entitled: “USING THE UNIT
SAFELY” and “IMPORTANT NOTES” (p. 2; p. 3). These sections provide important
information concerning the proper operation of the unit. Additionally, in order to feel
assured that you have gained a good grasp of every feature provided by your new
unit, Owner’s manual should be read in its entirety. The manual should be saved
and kept on hand as a convenient reference.
Owner’s Manual
Thank you, and congratulations on your choice of the Roland Drum System TD-3KV.
202
Copyright © 2005 ROLAND CORPORATION
All rights reserved. No part of this publication may be reproduced in any form without the
written permission of ROLAND CORPORATION.
USING THE UNIT SAFELY
Used for instructions intended to alert
the user to the risk of death or severe
injury should the unit be used
improperly.
Used for instructions intended to alert
the user to the risk of injury or material
damage should the unit be used
improperly.
* Material damage refers to damage or
other adverse effects caused with
respect to the home and all its
furnishings, as well to domestic
animals or pets.
001
• Before using this unit, make sure to read the
instructions below, and the Owner’s Manual.
................................................................................................
002a
• Do not open or perform any internal modifications
on the unit.
................................................................................................
003
• Do not attempt to repair the unit, or replace parts
within it (except when this manual provides
specific instructions directing you to do so). Refer
all servicing to your retailer, the nearest Roland
Service Center, or an authorized Roland
distributor, as listed on the “Information” page.
................................................................................................
004
• Never use or store the unit in places that are:
• Subject to temperature extremes (e.g., direct
sunlight in an enclosed vehicle, near a heating
duct, on top of heat-generating equipment); or
are
• Damp (e.g., baths, washrooms, on wet floors); or
are
• Humid; or are
• Exposed to rain; or are
• Dusty; or are
• Subject to high levels of vibration.
................................................................................................
007
• Make sure you always have the unit placed so it is
level and sure to remain stable. Never place it on
stands that could wobble, or on inclined surfaces.
................................................................................................
011
• Do not allow any objects (e.g., flammable material,
coins, pins); or liquids of any kind (water, soft
drinks, etc.) to penetrate the unit.
The symbol alerts the user to important instructions
or warnings.The specific meaning of the symbol is
determined by the design contained within the
triangle. In the case of the symbol at left, it is used for
general cautions, warnings, or alerts to danger.
The symbol alerts the user to items that must never
be carried out (are forbidden). The specific thing that
must not be done is indicated by the design contained
within the circle. In the case of the symbol at left, it
means that the unit must never be disassembled.
The ● symbol alerts the user to things that must be
carried out. The specific thing that must be done is
indicated by the design contained within the circle. In
the case of the symbol at left, it means that the powercord plug must be unplugged from the outlet.
013
• In households with small children, an adult should
provide supervision until the child is capable of
following all the rules essential for the safe
operation of the unit.
................................................................................................
014
• Protect the unit from strong impact.
(Do not drop it!)
................................................................................................
104
• Try to prevent cords and cables from becoming
entangled. Also, all cords and cables should be
placed so they are out of the reach of children.
................................................................................................
106
• Never climb on top of, nor place heavy objects on
the unit.
................................................................................................
118a
• Should you remove nuts, washers, screws, anchor
bolts, etc., keep them in a safe place out of
children’s reach, so there is no chance of them
being swallowed accidentally.
................................................................................................
................................................................................................
2

IMPORTANT NOTES
291a
In addition to the items listed under “USING THE UNIT
SAFELY” on page 2, please read and observe the
following:
Placement
354a
• Do not expose the unit to direct sunlight, place it near
devices that radiate heat, leave it inside an enclosed
vehicle, or otherwise subject it to temperature extremes.
Excessive heat can deform or discolor the unit.
Maintenance
401a
• For everyday cleaning wipe the unit with a soft, dry cloth
or one that has been slightly dampened with water. To
remove stubborn dirt, use a cloth impregnated with a
mild, non-abrasive detergent. Afterwards, be sure to wipe
the unit thoroughly with a soft, dry cloth.
402
• Never use benzine, thinners, alcohol or solvents of any
kind, to avoid the possibility of discoloration and/or
deformation.
Additional Precautions
553
• Use a reasonable amount of care when using the unit’s
buttons, sliders, or other controls; and when using its jacks
and connectors. Rough handling can lead to malfunctions.
556
• When connecting / disconnecting all cables, grasp the
connector itself—never pull on the cable. This way you
will avoid causing shorts, or damage to the cable’s
internal elements.
558c
• Since sound vibrations can be transmitted through floors
and walls to a greater degree than expected, take care not
to allow such sound to become a nuisance to neighbors,
especially at night and when using headphones. Although
the drum pads and pedals are designed so there is a
minimal amount of extraneous sound produced when
they’re struck, rubber heads tend to produce louder
sounds compared to mesh heads. You can effectively
reduce much of the unwanted sound from the pads by
switching to mesh heads.
559a
• When you need to transport the unit, package it in the box
(including padding) that it came in, if possible. Otherwise,
you will need to use equivalent packaging materials.
562
• Use a cable from Roland to make the connection. If using
some other make of connection cable, please note the
following precautions.
• Some connection cables contain resistors. Do not use
cables that incorporate resistors for connecting to this
unit. The use of such cables can cause the sound level to
be extremely low, or impossible to hear. For information on cable specifications, contact the manufacturer of the cable.
3

USING THE UNIT SAFELY
Check the Contents of the Box
❑
TD-3 (Percussion Sound Module) x 1
❑
KD-8 (Kick Trigger Pad) x 1
❑
FD-8 (Hi-Hat Control Pedal) x 1
❑
PD-85BK (V-Pad) x 1
❑
PD-8 (Pad) x 4
❑
CY-8 (Cymbal Pad) x 2
❑
Connection Cables
❑
Tuning Key x 1
■
TD-3KV Owner’s Manual x 1
• The tuning key is included in the FD-8 package.
• The TD-3 Owner’s Manual is included in the TD-3
package.
• This package does not include a kick pedal. Use with a
commercially available kick pedal.
962a
* In the interest of product improvement, the specifications and/
or appearance of this unit are subject to change without prior
notice.
Drum Stand
Assemble the Drum Stand.
About the Stand, refer to the owner’s manual for the
stand.
4
USING THE UNIT SAFELY
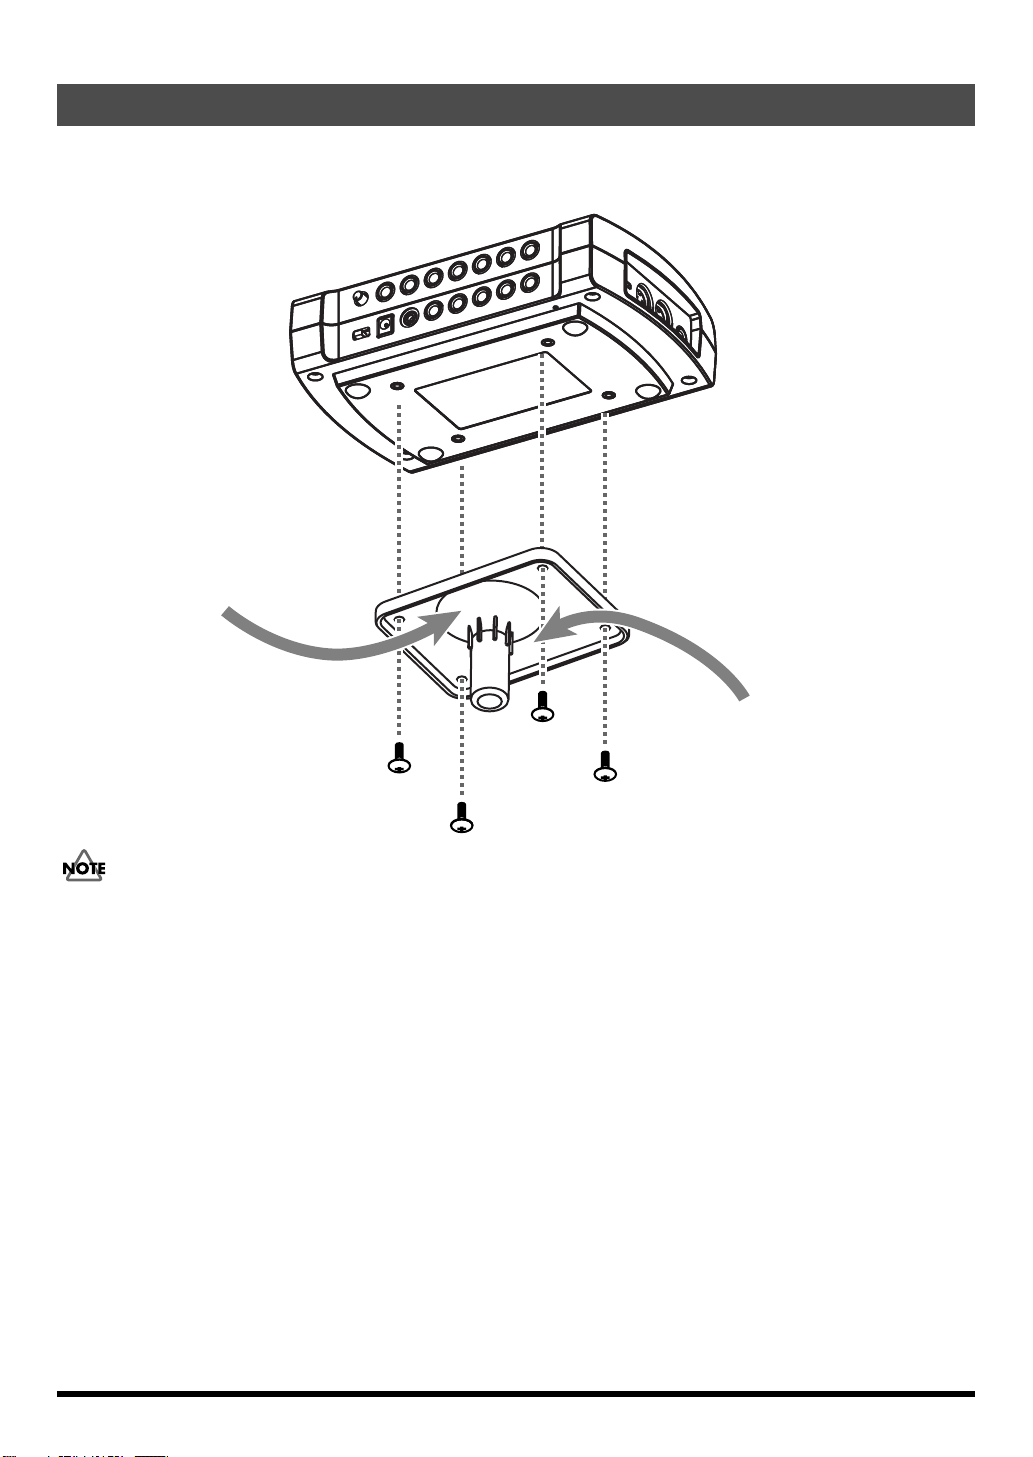
TD-3
Attach the stand holder (included with the optional drum stand) to the TD-3.
Using the screws attached to the bottom panel, attach the holder so the unit is oriented as shown in the diagram.
fig.TD-3.e
(Percussion Sound Module)
Narrow
Wide
• To attach the stand holder, remove the four 8 mm screws (M5 x 8) from the bottom of the TD-3 and use them.
Use of other screws may result in damage to the unit.
928
• When turning the unit upside-down, get a bunch of newspapers or magazines, and place them under the
four corners or at both ends to prevent damage to the buttons and controls. Also, you should try to orient the
unit so no buttons or controls get damaged.
929
• When turning the unit upside-down, handle with care to avoid dropping it, or allowing it to fall or tip over.
5
 Loading...