

Page 1

Contents
Let’s Learn About Drums . . . . . . . . . . . . . . . . . . . . . . . . . . . . . . . . . . . . . . .2
Drum Set Elements . . . . . . . . . . . . . . . . . . . . . . . . . . . . . . . . . . . . . . . . . . . .2
The Basics of Playing . . . . . . . . . . . . . . . . . . . . . . . . . . . . . . . . . . . . . . . . . .2
Assembly . . . . . . . . . . . . . . . . . . . . . . . . . . . . . . . . . . . . . . . . . . . . . . . . . . . . . . 4
Kit Assembly . . . . . . . . . . . . . . . . . . . . . . . . . . . . . . . . . . . . . . . . . . . . . . . . . .4
Connecting the Cables . . . . . . . . . . . . . . . . . . . . . . . . . . . . . . . . . . . . . . . . 7
Quick Start . . . . . . . . . . . . . . . . . . . . . . . . . . . . . . . . . . . . . . . . . . . . . . . . . . . . 8
Connecting Your Equipment . . . . . . . . . . . . . . . . . . . . . . . . . . . . . . . . . . .8
Front Panel . . . . . . . . . . . . . . . . . . . . . . . . . . . . . . . . . . . . . . . . . . . . . . . . . . . .8
Switching the Power On and O . . . . . . . . . . . . . . . . . . . . . . . . . . . . . . .8
Playing . . . . . . . . . . . . . . . . . . . . . . . . . . . . . . . . . . . . . . . . . . . . . . . . . . . . . . .9
Selecting a Drum Kit . . . . . . . . . . . . . . . . . . . . . . . . . . . . . . . . . . . . .9
Playing with the Metronome . . . . . . . . . . . . . . . . . . . . . . . . . . . .9
Practicing . . . . . . . . . . . . . . . . . . . . . . . . . . . . . . . . . . . . . . . . . . . . . . . . . . . .10
Practicing in Coach Mode . . . . . . . . . . . . . . . . . . . . . . . . . . . . . . . . . . . 10
Correctly Playing in Time with the Beat . . . . . . . . . . . . . . . . . 10
Playing Along with a Changing Rhythm . . . . . . . . . . . . . . . . 10
Playing Along with a Changing Tempo . . . . . . . . . . . . . . . . . 11
Developing Internal Timing Sense . . . . . . . . . . . . . . . . . . . . . 11
Continuing to Play at a Steady Tempo . . . . . . . . . . . . . . . . . . 11
Matching the Striking Strength of the Right and Left
Hands. . . . . . . . . . . . . . . . . . . . . . . . . . . . . . . . . . . . . . . . . . . . . . . . . 12
Practicing for a Specied Time . . . . . . . . . . . . . . . . . . . . . . . . . 12
Recording and Checking Your Own Performance . . . . . . . 12
Practicing Along with a Song . . . . . . . . . . . . . . . . . . . . . . . . . . . . . . . . 13
Selecting a Song . . . . . . . . . . . . . . . . . . . . . . . . . . . . . . . . . . . . . . 13
Playing/Stopping the Song . . . . . . . . . . . . . . . . . . . . . . . . . . . . 13
ENG
JPN
DEU
FRA
ITA
ESL
POR
NLD
* The illustration shows the TD-1KV.
Owner’s Manual
Bef ore using this unit, ca refully read the sec tions en title d “US ING THE
UNIT SAFELY” and “IMPORTANT NOTES” (Leaflet "USING THE UNIT SAFELY"
and Owner's Manual p. 16). These sections provide important information
concerning the proper operation of the unit. Additionally, in order to feel
assured that you have gained a good grasp of every feature of your new unit,
read Owner's Manual in its entirety. This manual should be saved and kept on
hand as a convenient reference.
Connecting to your Computer/iPad . . . . . . . . . . . . . . . . . . . . . . . . . . . .13
Making Detailed Settings. . . . . . . . . . . . . . . . . . . . . . . . . . . . . . . . . . . . . .14
Adjust the Pad Sensitivity . . . . . . . . . . . . . . . . . . . . . . . . . . . . . . 14
Changing the Type of Pad . . . . . . . . . . . . . . . . . . . . . . . . . . . . . 14
Changing the Time of Auto O . . . . . . . . . . . . . . . . . . . . . . . . . 14
Changing MIDI Note Number of the Pad . . . . . . . . . . . . . . . 14
Restoring the Factory Settings . . . . . . . . . . . . . . . . . . . . . . . . . . . . . . . 14
Appendix . . . . . . . . . . . . . . . . . . . . . . . . . . . . . . . . . . . . . . . . . . . . . . . . . . . . .15
Troubleshooting . . . . . . . . . . . . . . . . . . . . . . . . . . . . . . . . . . . . . . . . . . . . 15
Main Specications . . . . . . . . . . . . . . . . . . . . . . . . . . . . . . . . . . . . . . . . . . 15
USING THE UNIT SAFELY . . . . . . . . . . . . . . . . . . . . . . . . . . . . . . . . . . . . . 16
IMPORTANT NOTES . . . . . . . . . . . . . . . . . . . . . . . . . . . . . . . . . . . . . . . . . . 16
To obtain the PDF manual
Enter the following URL in your computer.
1.
http://www.roland.com/manuals/
I
2. Choose “TD-1KV” or “TD-1K” at the product name.
Copyright © 2014 ROLAND CORPORATION
All rights reserved. No part of this publication may be reproduced in any form without the written permission of ROLAND CORPORATION.
Page 2
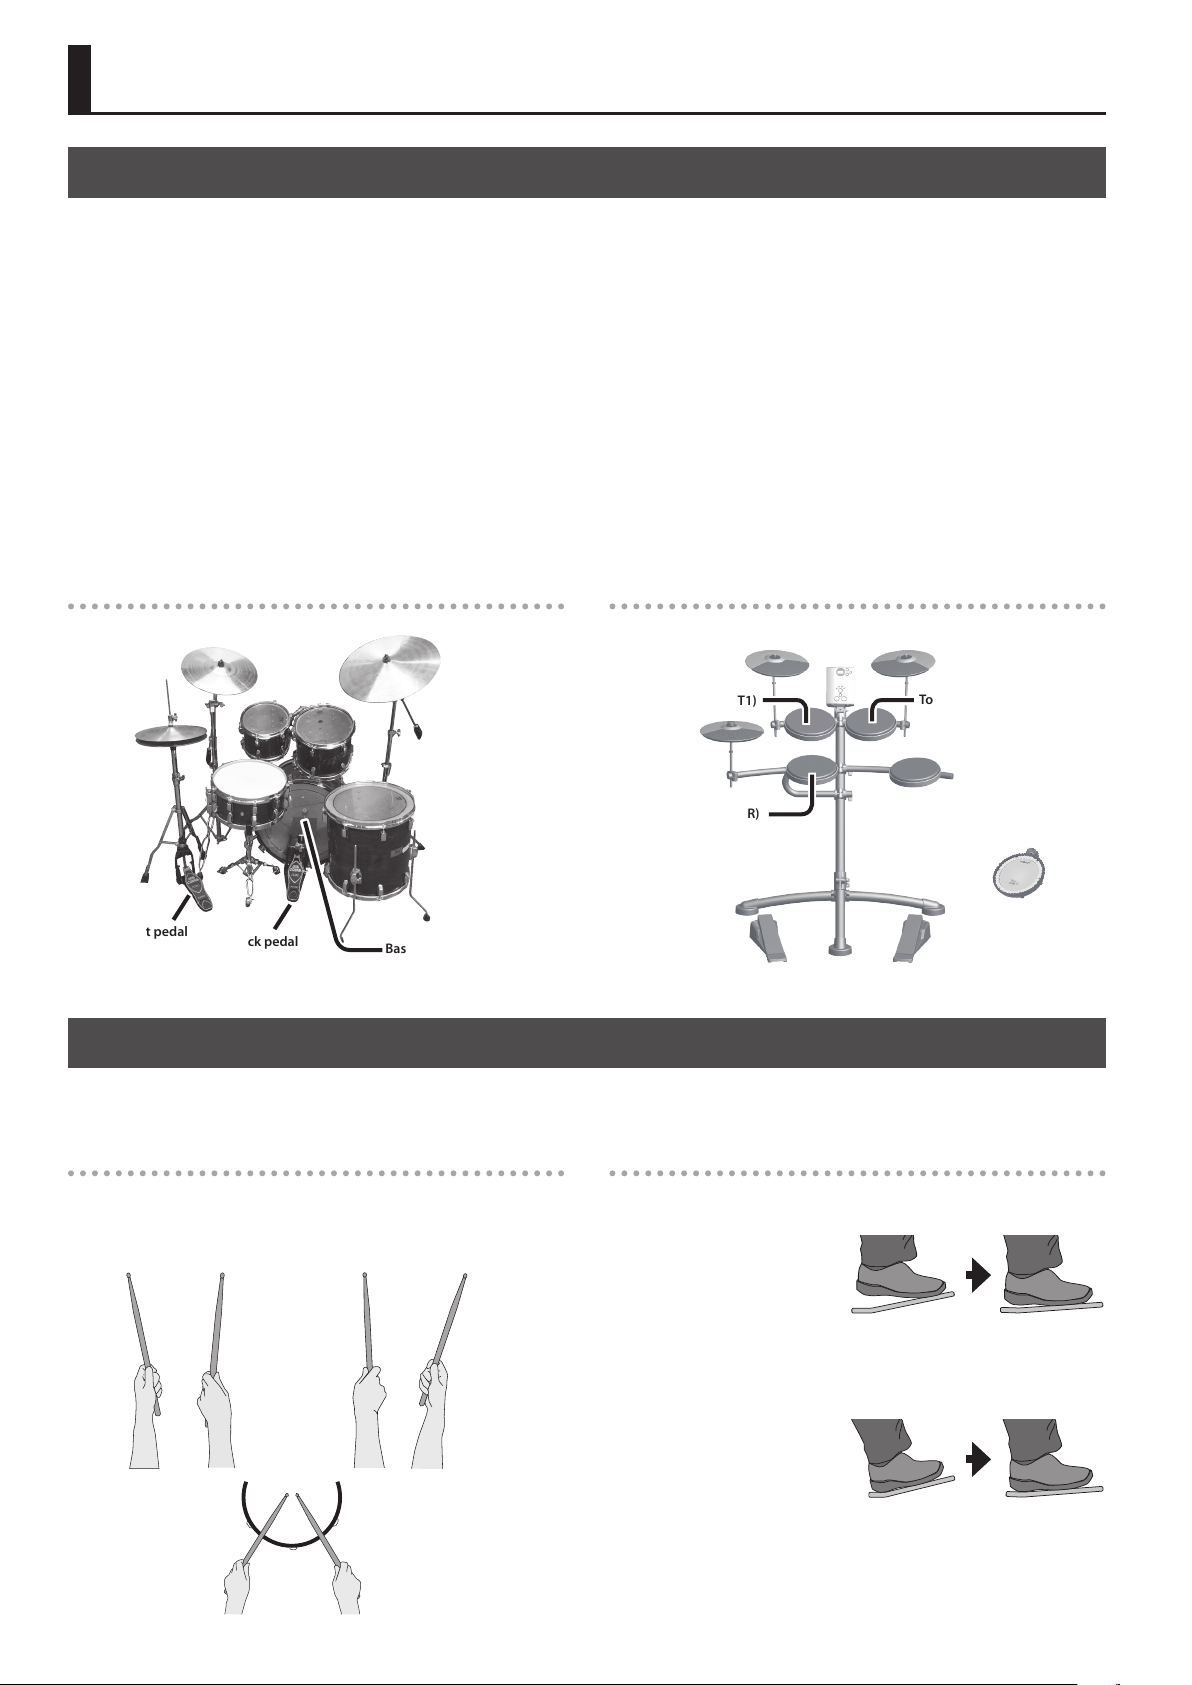
Let’s Learn About Drums
Drum Set Elements
Here are some basic terms related to drum sets.
Bass drum/Kick Pedal
Played with a kick pedal, it’s the largest drum in the kit.
Snare drum
The snare drum is the main “voice” of a drum kit.
Hi-hat/Hi-hat pedal
An acoustic hi-hat uses 2 cymbals mounted on a hi-hat stand.
Pressing the hi-hat pedal opens and closes it.
* The TD-1KV/TD-1K uses a single pad.
Acoustic drum
Crash
Tom
Hi-hat
Snare
Floor tom
Ride
Tom (Tom 1, Tom 2)
These are usually mounted above the bass drum.
Floor tom (Tom 3)
Sometimes called a bass tom, it either stands on it’s own legs or is
mounted on a stand.
Ride cymbal
Usually mounted on the right side of the kit, the ride cymbal is
principle elements in keeping time.
Crash cymbal
Smaller than the ride, the crash cymbal is mainly used for accents.
TD-1KV/TD-1K
Crash (CR1)
Tom 1 (T1)
Hi-hat (HH)
Snare (SNR)
Ride (RD)
Tom 2 (T2)
Tom 3 (T3)
* The illustration shows the
TD-1K. The TD-1KV has a
dierent snare pad.
Hi-hat pedal
Kick pedal
Bass drum
The Basics of Playing
Drums are played using both hands and both feet.
Here we’ll explain how to hold the sticks and use the pedals.
Holding the sticks
The most common way to hold the sticks is called the “matched
grip” as shown in the illustrations below.
Left hand Right hand
Hi-hat pedal (HHC) Kick pedal (KIK)
Using the kick pedal
The kick pedal can be pressed in either of two ways: “heel up” or
“heel down.”
Heel up
In this method, your heel
oats above the pedal.
With your heel o the
pedal, lower your entire foot to push down the pedal.
This method applies the full weight of your leg to the pedal, making
it easier for you to produce a stronger sounds than the heel down
method. This is often used in rock and pop.
Heel down
In this method, the entire
bottom of your foot from
heel to toe stays in contact
with the pedal. Use your ankle joint to make your toes push down
the pedal. This method allows more precise control of the volume,
and is often used in jazz and bossa nova.
2
Page 3
Let’s Learn About Drums
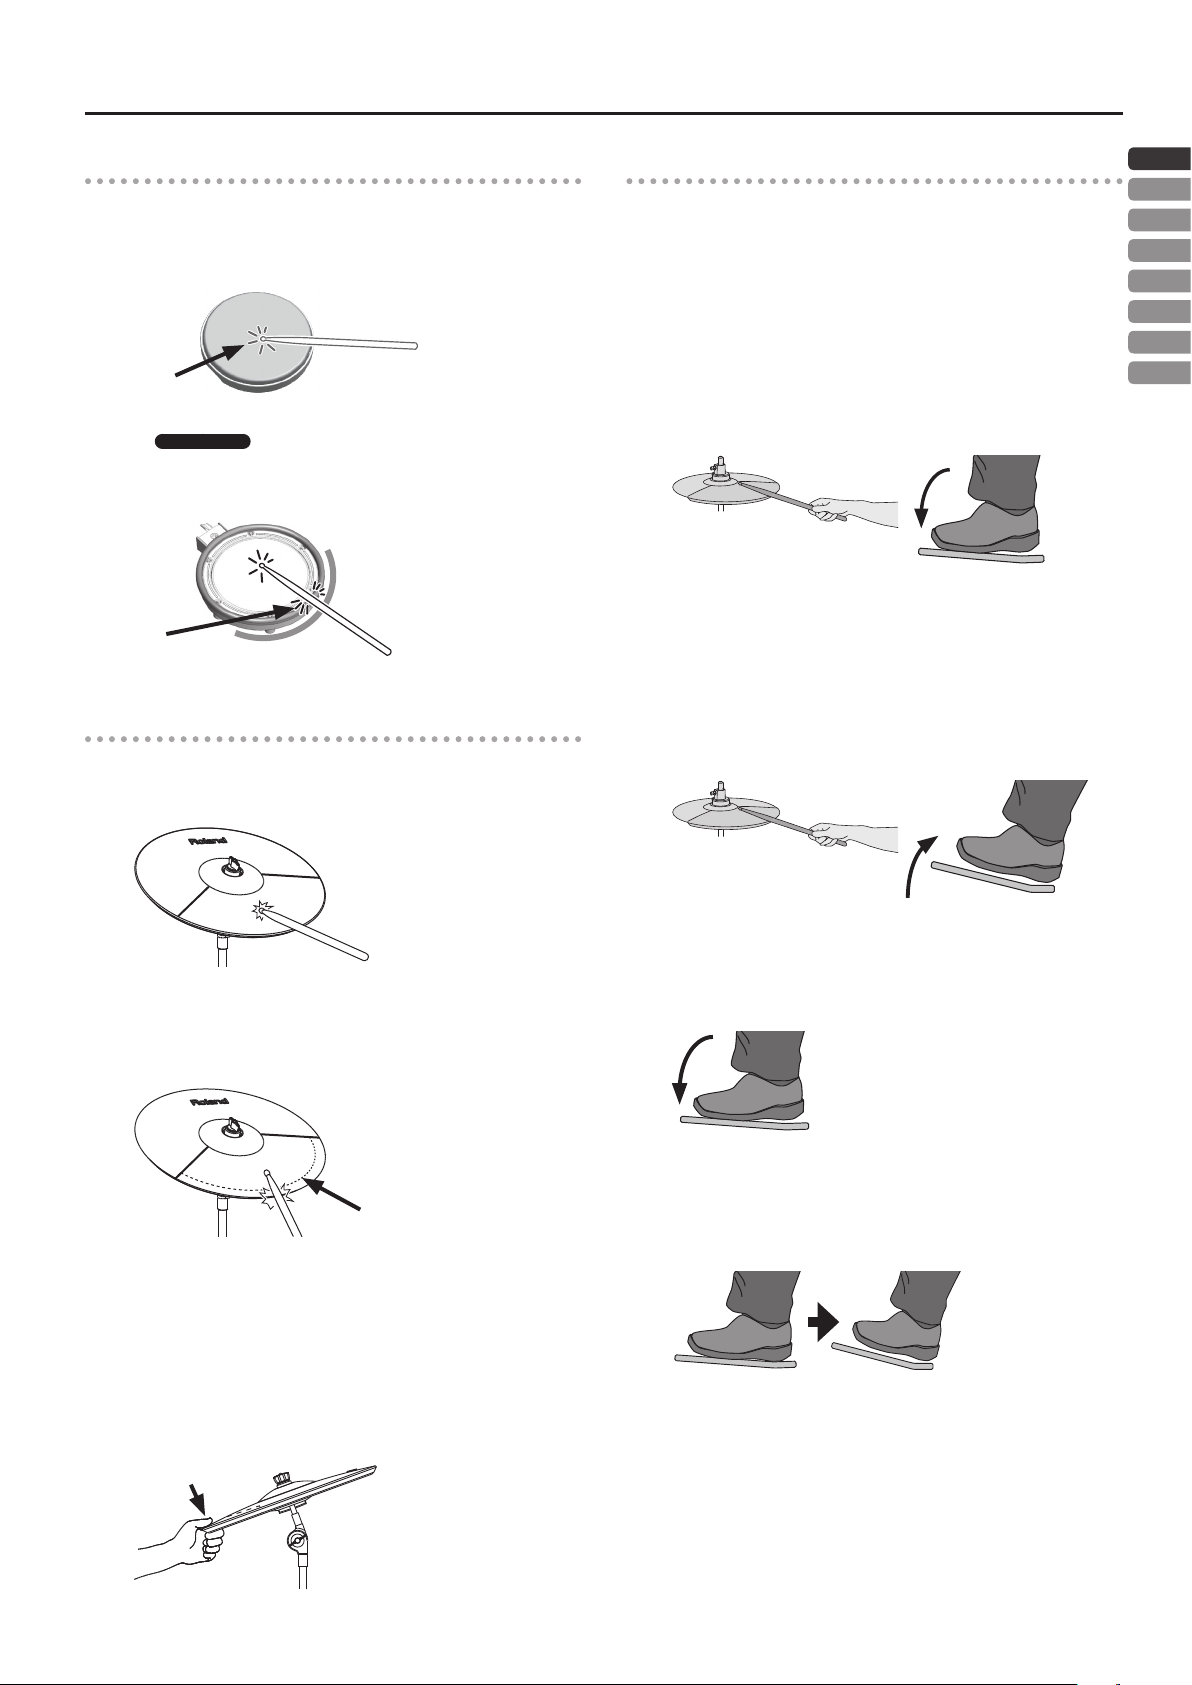
Using the snare
Head shot
Hit only the head of the pad. This is the most common method to
play the snare.
Head
Rim shot
TD-1KV only
Strike the head and the rim of the pad simultaneously.
A sound (rim sound) dierent than the head shot will be heard.
Suitable position
for rim shots
Rim
Using the cymbals
Bow shot
The most common method, playing the middle area of the cymbal.
Using the hi-hat
In an acoustic drum set, the hi-hat consists of two cymbals placed
facing each other vertically on a hi-hat stand. The two cymbals can
be closed together by pressing the pedal.
A variety of playing techniques are possible, such as playing the
cymbals with the pedal and/or playing them with sticks.
When you press the pedal, the two cymbals will come together
(closed). When you release the pedal, the two cymbals will separate
(opened).
Closed
With the hi-hat pedal pressed rmly, strike the pad with a stick. A
short “chick” sound will be heard.
Half-open
With the hi-hat pedal pressed gently, strike the pad with a stick. A
slightly longer “swish” sound will be heard.
Open
With the hi-hat pedal completely released, strike the pad with a
stick. An even longer “sound” than the half-open sound will be
heard.
ENG
JPN
DEU
FRA
ITA
ESL
POR
NLD
Edge shot
Use the shoulder of the stick to hit the edge of the cymbal pad (Hit
the edge sensor as shown in the illustration).
Edge sensor
* Bow shots and edge shots can also be played on the hi-hat.
Choking a cymbal
Choking (pinching) the cymbal’s edge with the hand immediately
after hitting the cymbal will mute or choke the sound, just like with
a real cymbal.
* The Choke function only works when you grasp in the area
(where the edge sensor is) as shown in the illustration. If you do
otherwise, it will not work.
Edge sensor
Foot closed
Just press the pedal without using a stick. This sound will be softer
and shorter than the closed sound played with a stick. Useful for
keeping time with this tight sound.
Foot splash
Press and immediately release the pedal without using a stick.
This is equivalent to momentarily clashing the two cymbals of an
acoustic hi-hat. It produces a “splash” sound that is softer than the
open strike.
3
Page 4
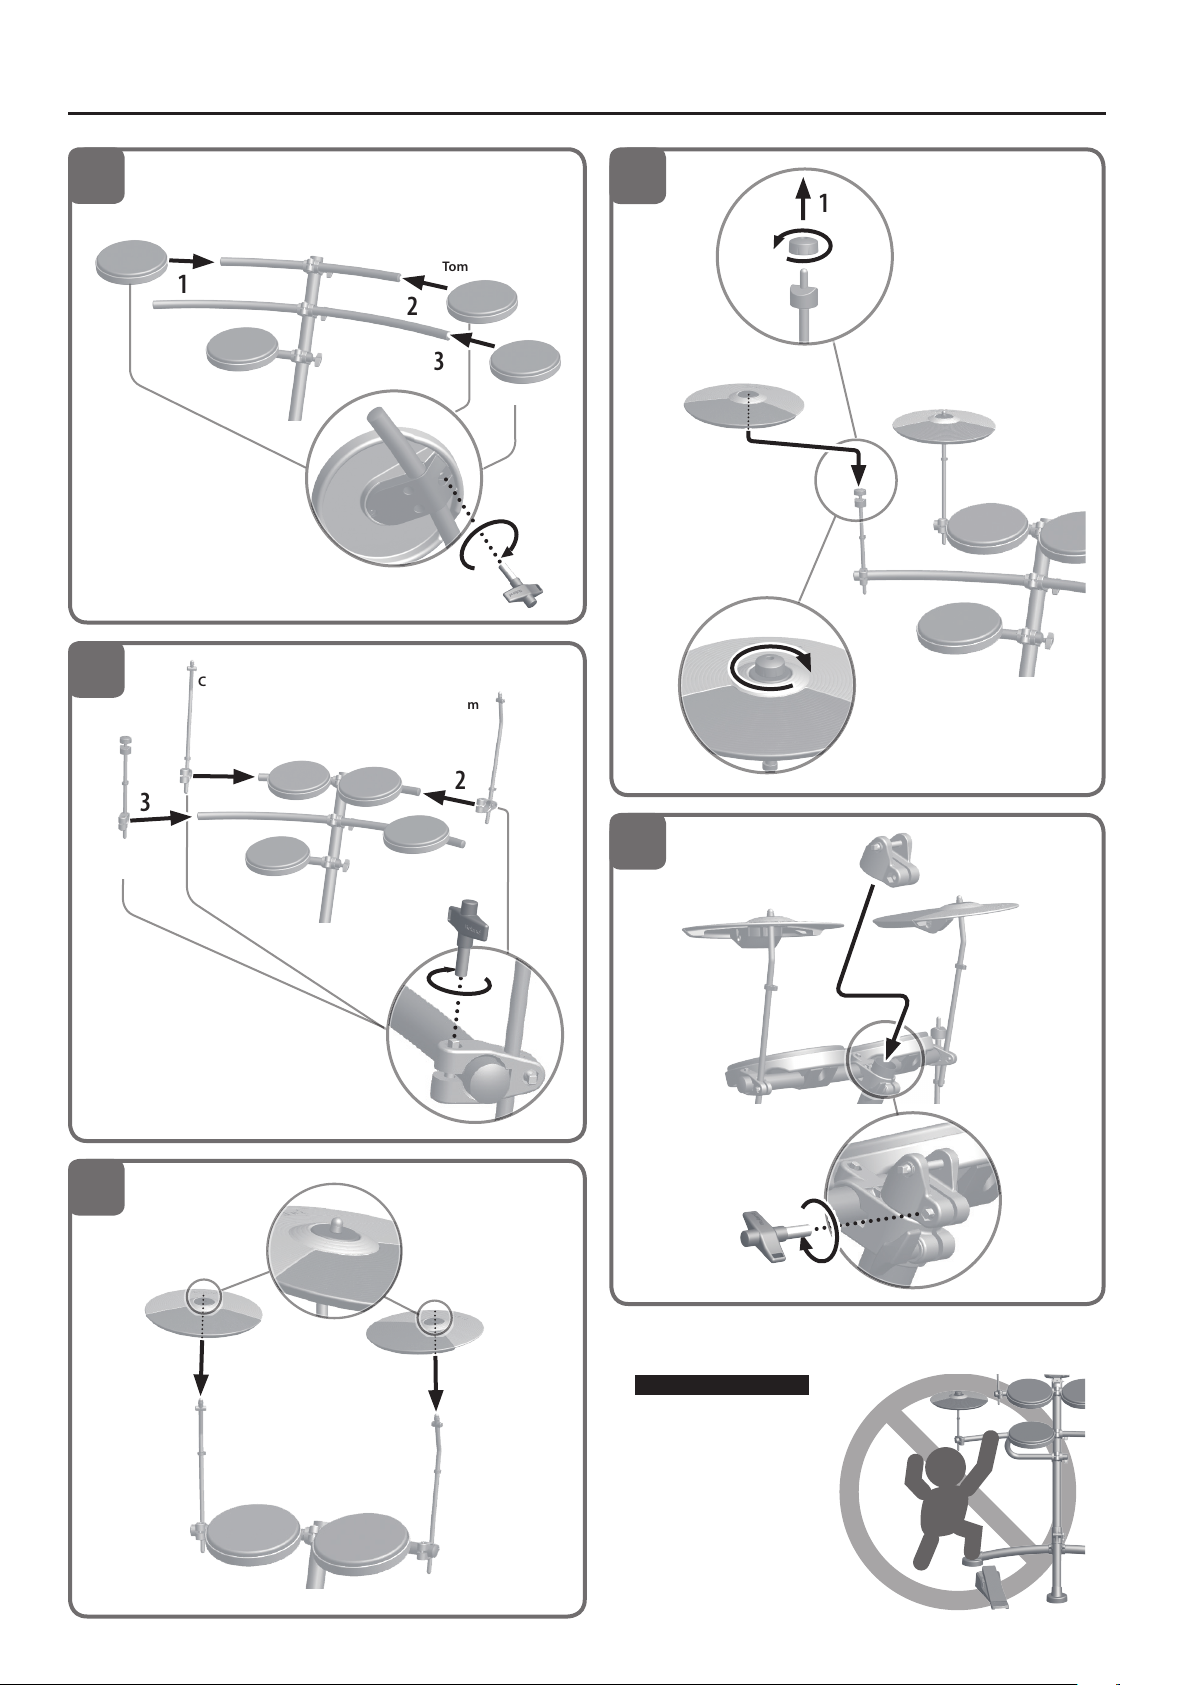
Assembly
Check the included items
Pipe A
Pipe B
Pipe C
Pipe D
Pipe E
Sound module
holder
Rubber
foot A
Kit Assembly
As soon as you open the package, check to see that all items are included.
If anything is missing, please contact your dealer.
TD-1K TD-1KV
Kick pedal
Hi-hat pedal
Hi-hat arm
Rubber foot B × 2
Snare arm Snare arm
Snare pad
Snare/Tom
pad × 4
Tom pad × 3
Cymbal pad × 3 Sound module
Cymbal
arm × 2
AC adaptor
Cable clip × 4
Drum key
Connection cable
Owner’s manual
Completed setup
Cymbal pad Sound module
Hi-hat arm
Snare pad Tom pad
Snare arm
Hi-hat pedal
Rubber foot A
Kick pedal
* The illustration shows the TD-1K.
Rubber foot B
Cymbal
arm
Pipe D
Pipe E
Pipe C
Pipe A
Pipe B
1
2
Pipe C
Pipe A
1
Pipe B
Adjust so that the pipes form a
right angle as shown.
Pipe C
Pipe B
Do not loosen this
screw.
2
2
Note
• If you set up this unit in an unstable location, it may fall over. Be
sure to set it up in a stable and level location.
• When you operate the kick pedal or hi-hat pedal, please be
careful not to get your ngers pinched between the movable
parts. In places where small children are present, make sure that
an adult provides supervision and guidance.
4
Pipe A
1
Page 5
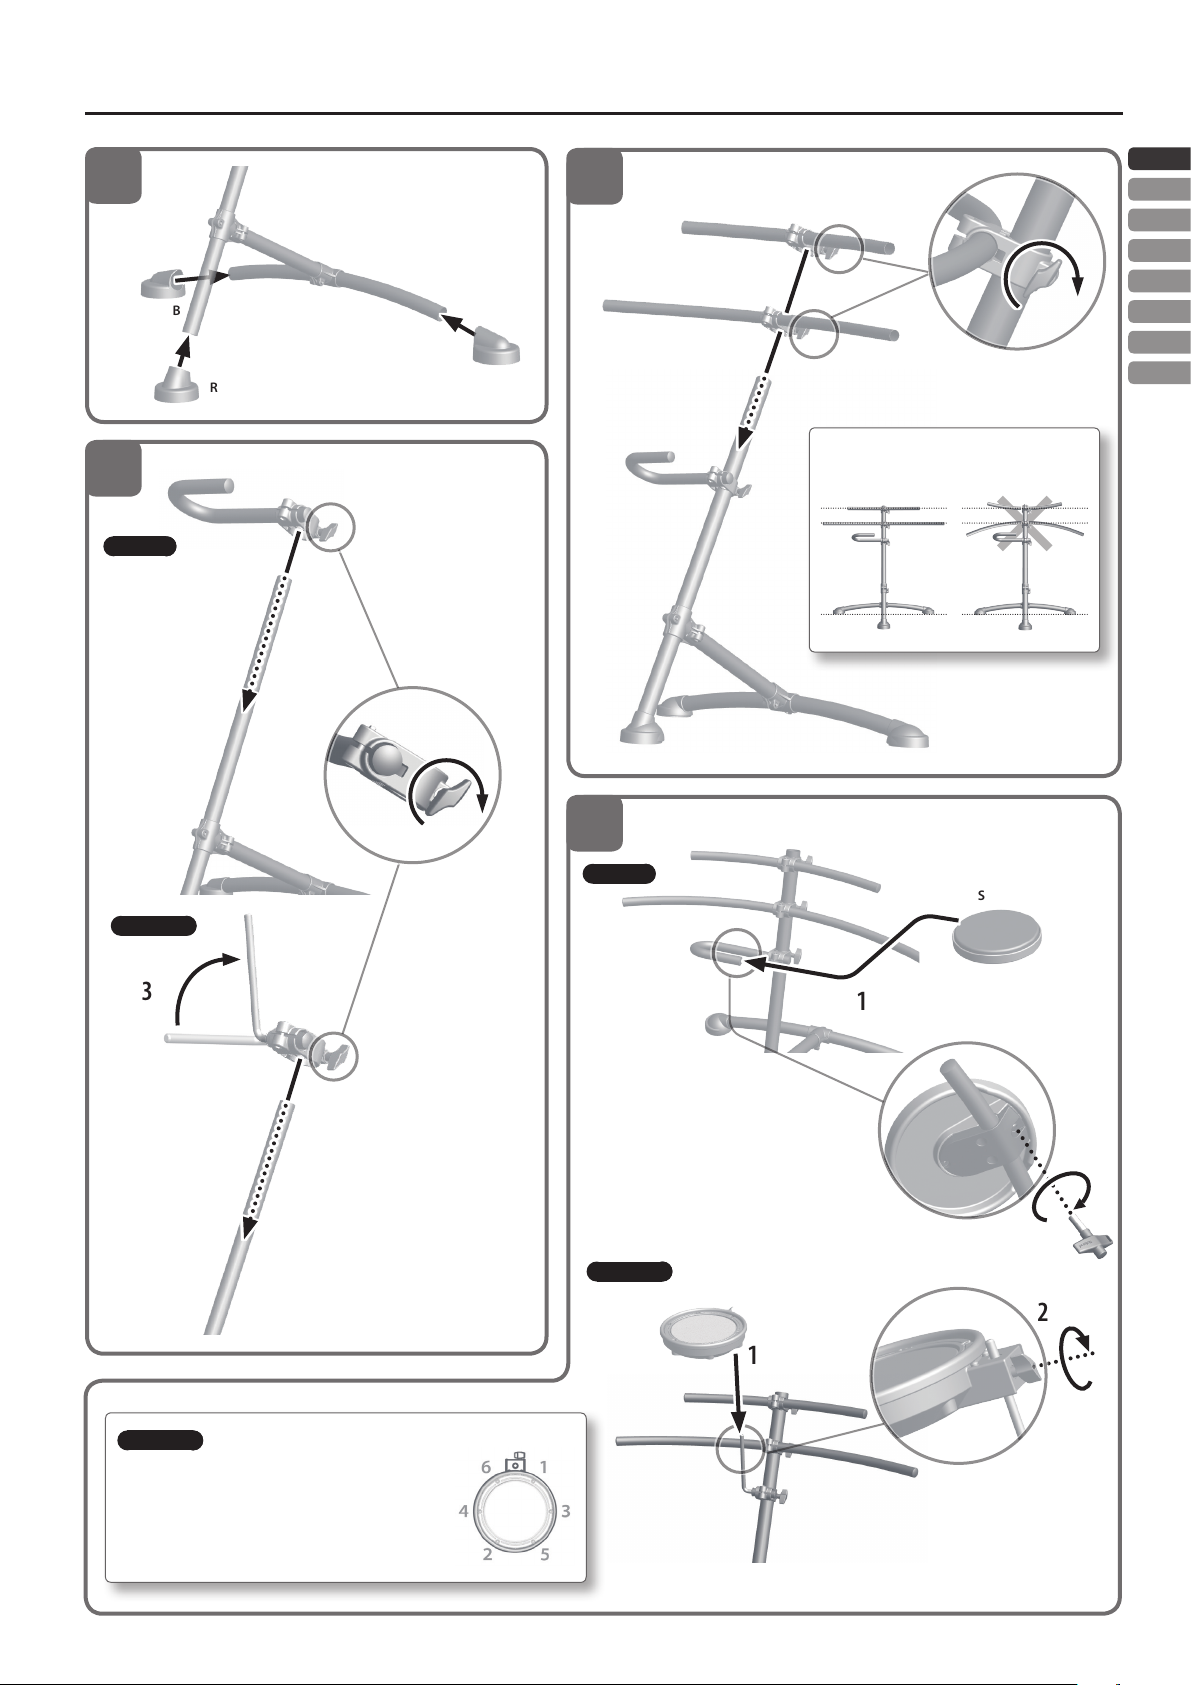
3
Rubber foot B
1
4
2
Rubber foot A
Snare arm
3
Rubber foot B
5
Pipe E
Pipe D
Assembly
ENG
JPN
DEU
2
1
Adjust pipe D and pipe E so that they
are level with the oor.
FRA
ITA
ESL
POR
NLD
TD-1K
TD-1KV
3
Snare arm
1
Pipe C
2
Pipe C
6
TD-1K
Snare pad
1
1
Pipe C
TD-1KV
Use the drum key to evenly tighten the tuning bolts a
little at a time in the order shown in the illustration.
Adjust the tension so that the pad responds to your
strikes with the appropriate feel.
Adjusting the head tension
2
Underside of the pad
TD-1KV
Snare pad
2
1
5
Page 6
Assembly
7
Tom pad
8
1
Underside of the pad
Cymbal arm
1
3
Tom pad
2
3
Cymbal arm
2
10
1
Cymbal pad
Tom pad
2
Hi-hat arm
3
Hi-hat arm
9
Cymbal pad
Cymbal arm
11
Sound module
holder
1
2
Cymbal pad
1
Cymbal arm
2
Beware of overturning
The unit may overturn if
a child pushes it or hangs
on it. Make sure that an
adult is supervising and
providing guidance.
6
Page 7

12
Pull out
Assembly
ENG
Note
1
Be careful not to
drop the sound
module.
Sound module
13
JPN
DEU
FRA
ITA
ESL
Kick pedalHi-hat pedal
POR
NLD
2
3
Connecting the Cables
Connect the cable to the sound module and each pads as shown in the illustration.
Each cable has a label indicating the pad to which it should be connected.
Backside of the
sound module
1
Connect if you use the
separately sold OP-TD1C to
add a cymbal.
If you’re not adding a
cymbal, “CR2” is not used.
RD
The label on the bottom of each pedal distinguishes
the kick pedal (KIK) from the hi-hat pedal (HHC).
Bottom of the pedal
* Before you play, verify that the bolts and knobs are not loose.
3
CR1
RD
HH
Underside of the
cymbal
CR1
OP-TD1C
SNR
T1
T2
T3
Underside of
the pad
CR2
2
T3
KIK
T2
SNR
T1
HHC
HH
5
Use the included cable
clips to secure the
cables.
4
KIK
HHC
Bottom of
the pedal
7
Page 8

Quick Start
Connecting Your Equipment
* To prevent malfunction and equipment failure, always turn down the volume, and turn o all the units before making any connections.
DC IN jack
Connect the included AC
adaptor to the DC IN jack.
Place the AC adaptor so
the side with the indicator
(see the illustration) faces
upwards and the side with
textual information faces
downwards. The indicator
will light when you plug
the AC adaptor into an AC
outlet.
Indicator
Front Panel
Display
Shows the drum kit number and
metronome tempo etc.
[Select] button, mode lamps
Each time you press the [Select] button,
you cycle through the four modes
(Drums, Tempo, Coach, Song) and the
corresponding lamp is illuminated.
Tap tempo function
By holding down the [Select] button and
repeatedly striking a pad, you can set
the tempo to the interval between your
strikes.
OUTPUT/PHONES jack
Connect your amplied speaker
or headphones to the OUTPUT/
PHONES jack.
MIX IN jack (Stereo)
Connect your portable
audio player or other
external sources to the
MIX IN jack so that you
can play along with your
favorite songs.
USB COMPUTER port
Refer to p. 13.
Sound module
[L] (power) button
Turns the power on/o.
Volume [H][I] buttons
Adjust the volume in 20 levels.
[ ] (metronome) button
Starts or stops the metronome. The light
ashes with the tempo.
[-][+] buttons
Use this button to change a value on the
display. If you hold down one button
while pressing the other, the value
increases or decreases more quickly.
Turning the Power On and O
Turning the power on
Once everything is properly connected (p. 8), be sure to follow the
procedure below to turn on their power. If you turn on equipment
in the wrong order, you risk causing malfunction or equipment
failure.
1. Minimize the volume of the connected amplied speaker.
Before turning the unit on/o, always be sure to turn the volume
down. Even with the volume turned down, you might hear some
sound when switching the unit on/o. However, this is normal and
does not indicate a malfunction.
2. Press the [L] (power) button.
The power turns on.
* This unit is equipped with a protection
circuit. A brief interval (a few seconds)
after turning the unit on is required
before it will operate normally.
8
3. Power-on the connected amplied speaker, and adjust
the volume.
4. Adjust the volume by pressing
the volume[H][I] button.
Turning the power o
1. Turn the volume down on the TD-1KV/TD-1K and any
connected equipment.
2. Power-o the connected equipment.
3. Long-press the [L] (power) button.
The power turns o.
* You must turn o the power by pressing the [L] (power) button.
Page 9

Quick Start
Playing
Playing drums is not only fun, but just about anyone can easily start
playing — they make sound when you simply hit them! Let’s start
playing drums using the wide variety of built-in sounds.
Selecting a Drum Kit
A drum kit consists of sounds assigned to each pad. In some cases,
the sound will change depending upon your playing dynamics.
1. Use the [Select] button to select Drums mode.
* When you turn on the power, Drums mode is selected.
The display shows the drum kit number.
Playing with the Metronome
Here’s how you can play the drums while listening to the
metronome. This is the best way to practice and learn to play at a
steady tempo.
1. Use the [Select] button to select Tempo mode.
The display shows the metronome tempo.
2. Press the [ ] (metronome) button.
The metronome turns on, and the button blinks in time with the
metronome tempo.
ENG
JPN
DEU
FRA
ITA
ESL
POR
NLD
2. Press the [-][+] buttons to select a drum kit.
* For a list of the drum kits, refer to the end of this manual.
3. Play the drums by striking the pad.
About Auto O function
The power to this unit will be turned o automatically after
a predetermined amount of time has passed since it was
last used for playing music, or its buttons or controls were
operated (Auto O function). If you do not want the power
to be turned o automatically, disengage the Auto O
function (p. 14).
To restore power, turn the power on again.
* Even in Drums mode, you can press the [ ] (metronome) button
to sound the metronome.
3. Press the [-][+] buttons to change the tempo.
* You can also specify the tempo with Tap tempo function (p. 8).
4. Press the [ ] (metronome) button once again to turn the
metronome o.
Changing how the metronome sounds
In Tempo mode, long-press the [ ] (metronome)
1.
button.
The metronome sounds.
2. Use the [Select] button to select the item
(parameter) that you want to change, and use the
[-][+] buttons to change its setting.
Parameter Display Explanation
Beats
Rhythm type
Volume
Sound
b 1 (1 beat)–
b g (9 beats)
r 0 (whole note)
r 4 (quarter notes)
r 8 (eighth notes)
r83 (eighth note triplets)
r16 (sixteenth notes)
L 0–L10
S 1–S 8
Sets the number of
beats
Sets the beat unit
Sets the volume
Sets the sound
3. Press the [ ] (metronome) button to complete the
settings.
9
Page 10

Practicing
Practicing in Coach Mode
The TD-1KV/TD-1K Coach mode is a unique set of exercises
specically designed to help build speed, accuracy and stamina, as
well as develop better timing skills.
Selecting a practice menu
1. Use the [Select] button to select Coach mode.
The Coach mode menu screen appears.
2. Press the [-][+] buttons to select a practice menu C-1–C10.
For details on the contents of the Coach mode menu, refer to the
next section.
Correctly Playing in Time with the Beat
<C-1> Time Check (Easy)
<C-2> Time Check (Hard)
The accuracy of your playing will be checked against the
metronome.
C-1 and C-2 dier in their diculty.
Changing the number of measures to score
You can change the number of measures after which the
Time Check result is shown. You can also make settings so
that the score result is not shown.
1. Long-press the [ ] (metronome) button.
2. Press the [-][+] buttons to change the value.
Display Explanation
OFF
4, 8, 16, 32
No scoring.
Specify the number of measures that are
scored.
The score result is shown in the display.
* A two-measure count-in is inserted when
you start.
3. Press the [ ] (metronome) button.
Playing Along with a Changing Rhythm
<C-3> Change-up
1. Press the [ ] (metronome) button to start practicing.
A two-measure count-in is inserted when you start.
2. Strike the pad in time
with the metronome.
The display will indicate
whether your pad strikes
match the beat sounded
by the metronome.
* You can use the [-][+]
buttons to adjust the
tempo even while you
practice.
Behind the beat (too slow)
On the beat (perfect timing)
Ahead of the beat (too fast)
3. Time Check automatically ends, and the results will
appear in the display.
If the scoring function is turned “OFF,” press the [ ] (metronome)
button to stop practice. Then, you return to the Coach mode menu
screen.
The rhythm type will change every two measures. Starting from half
notes, the note values will gradually become shorter, and will then
return to half notes; this change in rhythms will be repeated.
1. Press the [ ] (metronome) button to start practicing.
2. Strike the pad in time with the metronome.
The display shows the tempo while you practice.
* You can use the [-][+] buttons to adjust the tempo even while
you practice.
3. Press the [ ] (metronome) button to return to the Coach
mode menu screen.
Specifying the pattern of rhythm change
Long-press the [ ] (metronome) button.
1.
2. Press the [-][+] buttons to change the value.
Display Rhythm pattern
r-5
r-6
10
r-7
3. Press the [ ](metronome) button.
Page 11

Practicing
Playing Along with a Changing Tempo
<C-4> Auto Up/Down
The metronome increases and decreases tempo over time, to help
develop stamina and endurance. The tempo will increase in steps
for each beat until the metronome reaches the upper limit; then
the tempo will continue slowing down in steps until it reaches the
initial tempo. This cycle will repeat.
1. Press the [ ] (metronome) button to start practicing.
2. Strike the pad in time with the metronome.
While practicing, you can press the [-] button to specify the current
tempo as the upper limit; if you press the [+] button, the upper
tempo limit will return to 260.
3. Press the [ ] (metronome) button to return to the Coach
mode menu screen.
Specifying the number of beats at which the
tempo change
Long-press the [ ] (metronome) button.
1.
2. Press the [-][+] buttons to change the value.
Display Explanation
The tempo is incremented/decremented by one at
b-1
intervals of one beat.
The tempo is incremented/decremented by one at
b-2
intervals of two beats.
The tempo is incremented/decremented by one at
b-4
intervals of four beats.
3. Press the [ ] (metronome) button.
Changing the volume cycle of the metronome
Long-press the [ ] (metronome) button.
1.
2. Press the [-][+] buttons to change the value.
Display Explanation
The volume of the metronome changes at intervals of one
n-1
measure.
The volume of the metronome changes at intervals of two
n-2
measures.
The volume of the metronome changes at intervals of four
n-4
measures.
For the rst three measures, the metronome sounds at the
n31
specied volume; for the next measure, the volume is reduced.
For the rst six measures, the metronome sounds at the specied
n62
volume; for the next two measures, the volume is reduced.
3. Press the [ ] (metronome) button.
Continuing to Play at a Steady Tempo
<C-6> Tempo Check (Easy)
<C-7> Tempo Check (Hard)
This menu lets you practice playing at a steady tempo without
relying on the tempo sounded by the metronome.
C-6 and C-7 dier in their diculty.
ENG
JPN
DEU
FRA
ITA
ESL
POR
NLD
Developing Internal Timing Sense
<C-5> Quiet Count
This practice will help you develop a good sense of time/tempo.
The metronome alternates between “sounding and not sounding”
at every four measures, and the cycle will repeat.
1. Press the [ ] (metronome) button to start practicing.
2. Strike the pad in time with the metronome.
• The metronome sounds during the rst few measures.
• The metronome does not sound on subsequent measures.
Continue striking the pads during this time.
• The metronome sounds again. The “%” value indicates the
percentage by which you played at an accurate tempo.
* You can use the [-][+] buttons to adjust the tempo even while
you practice.
3. Press the [ ] (metronome) button to return to the Coach
mode menu screen.
1. Press the [ ] (metronome) button to start practicing.
2. Strike the pad in time with the
metronome.
Strike the pads at a constant tempo.
• The more your tempo becomes
accurate, the softer the
metronome volume will become.
• The metronome volume will
increase if the tempo of your pad
strikes begins to drift. The more
your tempo drifts, the louder the metronome will become.
Strike the pads with an accurate timing that matches the tempo
of the metronome.
* You can use the [-][+] buttons to adjust the tempo even while
you practice.
* If the tempo of your strikes is signicantly inaccurate, it may be
impossible to precisely determine the amount of inaccuracy.
Accurate
More inaccuracy
3. Press the [ ] (metronome) button to return to the Coach
mode menu screen.
11
Page 12

Practicing
Matching the Striking Strength of the Right and Left Hands
<C-8> Stroke Balance
This practice lets you reduce the volume discrepancy between your
right and left hands, so that the sound is more consistent.
The display shows the strength of your strikes.
1. Press the [ ] (metronome) button to start practicing.
2. Strike the pad in time with the
metronome.
The strength of your strikes on the pad is
shown in the display.
* You can use the [-][+] buttons to adjust
the tempo even while you practice.
3. Press the [ ](metronome) button
to return to the Coach mode menu
screen.
Strength of Striking
Practicing for a Specied Time
Hard
Soft
Changing the time
Long-press the [ ] (metronome) button.
1.
2. Press the [-][+] buttons to change the value.
Value: 1–99 minutes (t 1–tgg)
3. Press the [ ] (metronome) button.
Recording and Checking Your Own Performance
<C10> Recording
This function lets you easily record your own performance. This
is a very useful practice tool, recording and then checking your
drumming.
Recording
Press the [ ] (metronome) button.
1.
The metronome sounds, and the TD-1KV/TD-1K will enter
recording-standby mode.
* You can use the [-][+] buttons to adjust the tempo.
<C-g> Timer
An alert tone informs you when the specied time has elapsed. You
can use this to specify a daily time goal for practicing the basics.
The default value is three minutes.
1. Press the [ ] (metronome) button to start practicing.
The timer starts.
2. Practice as desired, in time with the metronome.
The display shows the approximate remaining time.
Remaining time: 3 minutes
Blinks while the
timer is running.
When the specied time has elapsed, the alarm sounds and the
metronome stops.
The Coach mode menu screen reappears.
* You can use the [-][+] buttons to adjust the tempo even while
you practice.
* If you want to stop the timer before the specied time has
elapsed, press the [
* The timer continues to operate even if you use the [Select]
button to select a dierent menu.
] (metronome) button once again.
2. Strike the pad to start recording.
* The metronome sounds constantly during recording.
* A signal input via the MIX IN jack won’t be recorded.
3. To stop recording, press the [ ] (metronome) button once
again.
Playback
Press the [+] button to play back the recorded data.
1.
When the performance ends, playback stops automatically.
2. To stop playback, press the [-] button.
12
Page 13

Practicing Along with a Song
The TD-1KV/TD-1K contains songs that are suitable for practicing.
Selecting a Song
1. Press the [Select] button to select Song mode.
2. Press the [-][+] buttons to select a song.
* For a list of the song, refer to the end of this manual.
Playing/Stopping the Song
1. Press the [ ] (metronome) button to play back the song.
* A one-measure count-in is inserted when you start.
* You can’t change the tempo of the song.
2. Press the [ ] (metronome) button once again, and the
song stops.
Connecting to your Computer/iPad
Silencing the metronome
You can practice along with the song without hearing the
metronome.
1. Long-press the [ ] (metronome) button.
2. Use the [-][+] buttons to make the display indicate
OFF.
* If you want to hear the metronome, make the display
indicate On.
1. Press the [ ] (metronome) button.
ENG
JPN
DEU
FRA
ITA
ESL
POR
NLD
* No data for the music that is played will be output from the USB
COMPUTER port.
Connecting to your Computer/iPad
You can connect the TD-1KV/TD-1K to your computer or iPad, and use it with an app such as V-Drums Friend Jam or V-Drums Tutor.
Connecting to your computer
* You don’t need to install a driver.
USB cable
(sold separately)
Sound module
If you want sound from a computer or iPad to play back from the V-Drums sound module, use a
commercially available audio cable to connect the audio output of the computer or iPad to the
MIX IN jack of the sound module.
Connecting to your iPad
* To make the connection, you’ll need the Apple Lightning to USB
Camera Adapter (made by Apple Corporation).
Apple Lightning to USB
Camera Adapter (sold separately)
USB cable
(sold separately)
Sound Module
What is V-Drums Friend Jam?
V-Drums Friend Jam is a drummer’s social networking tool that lets you use the V-Drums and your computer to enjoy practicing/competing with
friends around the world. Practice songs can be automatically downloaded from the Internet, and are also linked with Twitter.
Access http://vdru.ms/ and download it!
What is V-Drums Tutor?
The V-Drums Tutor (sold separately) is a drumming practice software designed to be used with Roland V-Drums, making your practice time simple,
enjoyable, challenging and eective.
13
Page 14

Making Detailed Settings
1. Press the [Select] button to select Drums mode.
2. Long-press the [ ] (metronome) button.
* The mode lamp blinks.
Adjust the Pad Sensitivity
3. Press the [Select] button to blink Drums mode lamp.
4. Play the pad or kick pedal whose sensitivity you want to
change.
5. Use the [-][+] buttons to adjust the sensitivity.
The display shows the sensitivity value. Higher sensitivity allows
the pad to produce a loud volume even when played softly. Lower
sensitivity will keep the pad producing a low volume even when
played forcefully.
6. Press the [ ](metronome) button to complete the setting.
Changing the Type of Pad
If you use a separately sold kick trigger or mesh pad, you’ll need to
change the pad type.
3. Press the [Select] button to blink Tempo mode lamp.
4. Play the pad or kick pedal.
5. Use the [-][+] buttons to change the type.
Display Type of Pad
Kick pedal
1 (TD-1KV/TD-1K default value)
2 KD-9
3 KT-10
Snare pad
S 1 (TD-1K default value)
S 2 PDX-8, PDX-6 (TD-1KV default value)
Pad Note number
T3 43
HH open (Bow) 46 *a
HH open (Edge) 26 *b
HH closed (Bow) (42) *a-4
HH closed (Edge) (22) *b-4
HH foot closed (44) *a-2
CR1 (Bow) 49
CR1 (Edge) 55
CR2 (Bow) 57
CR2 (Edge) 52
RD (Bow) 51
RD (Edge) 59
MIDI channel: 10
* The TD-1KV/TD-1K does not receive any MIDI messages.
Changing the Time of Auto O
The TD-1KV/TD-1K is set to automatically power-o when a certain
minutes have elapsed since it was last played or operated. When
you want to turn the power on, switch the power on again. You can
also make settings so that the power is not o automatically.
3. Press the [Select] button to blink Song mode lamp.
4. Use the [-][+] buttons to change the time of Auto O.
Display Explanation
OFF The power will not turn o automatically.
10
30
240
5. Press the [ ] (metronome) button to complete the setting.
The power will turn o automatically when 10 minutes have
elapsed.
The power will turn o automatically when 30 minutes have
elapsed.
The power will turn o automatically when four hours have
elapsed.
6. Press the [ ] (metronome) button to complete the setting.
Changing MIDI Note Number of the Pad
3. Press the [Select] button to blink Coach mode lamp.
4. Play the pad whose note number you want to change.
The display shows the note number.
5. Use the [-][+] buttons to change the setting.
Value: 0–127, OFF
6. Press the [ ] (metronome) button to complete the setting.
Note numbers (default)
Pad Note number
KIK 36
SNR (Head) 38
SNR (Rim) 40
T1 48
T2 45
14
Restoring the Factory Settings
The “Factory Reset” operation returns all settings stored in the
TD-1KV/TD-1K to their factory-set condition.
Note
The settings stored in the TD-1KV/TD-1K will be lost when you
execute a factory reset.
1. While pressing the [-][+] buttons, press the [L] (power)
button to turn the power on.
The display shows as follows.
2. Press the [ ] (metronome) button to execute a factory
reset.
To cancel a factory reset, press the [L] (power) button and turn the
power o.
Page 15

Appendix
Troubleshooting
Problem Items to check Action
Problems with sound
Is the TD-1KV/TD-1K correctly connected to the external devices?
Could the cable be connected to an output jack (instead of the input) of
the connected amplied speaker?
Are the cables correctly connected to the unit’s OUTPUT/PHONES jack?
Could an audio cable be broken? Try using a dierent cable.
No sound
A specic pad does not sound
No sound when you press the
kick pedal
No sound when you press the
hi-hat pedal
The sound of another pad is
also
heard when you strike
the pad.
Two or more notes are sounded
when you strike once
Sounds do not play reliably
Problems with USB
Can’t connect with a computer Is the USB cable connected correctly? Make sure that the USB cable is correctly connected.
Problems with MIDI
No sound from external MIDI
device
Check whether you hear sound through headphones.
Could you be using a connection cable that contains a resistor? Use a connection cable that does not contain a resistor.
Could the TD-1KV/TD-1K volume be lowered?
Could the volume be lowered on the device connected to the MIX IN jack?
Is the connection cable correctly connected to the TRIGGER INPUT
connector?
Are the cables correctly connected to each pad and pedal?
Could the pad’s “Sensitivity” be lowered? Adjust the pad’s “Sensitivity.”
Is the pad’s “Type” set correctly? Set the pad’s “Type.”
Is the cable labeled KIK connected to the kick pedal?
Is the cable labeled HHC connected to the hi-hat pedal?
If multiple pads are attached to the same stand, the vibration of a strike
can be transmitted to another pad, causing it to sound inadvertently.
Is the pad fastened to the stand? Fasten the pad rmly to the stand.
TD-1KV
Is the pad’s mesh head tensioned evenly?
Is the MIDI channel set correctly? Set the MIDI channel of external MIDI device to 10.
Has the note number been set properly? Check the pad’s “Note#.”
Check the connections.
If you hear sound in the headphones, there is a problem with the
connection cables or with the connected amplied speaker.
Adjust the volume to an appropriate level.Could the volume of the connected amplied speaker be lowered?
Check the connections.
Check the connections.
Reattach the pad at a dierent location.
Adjust the mesh head tension. Slightly higher tension is good for
proper triggering.
ENG
JPN
DEU
FRA
ITA
ESL
POR
NLD
Main Specications
Roland TD-1KV: Drum kit
Roland TD-1K: Drum kit
Drum Kits 15
Songs 15
Display 7 segments, 3 characters (LED)
OUTPUT/PHONES jack: Stereo miniature phone type
MIX IN jack: Stereo miniature phone type
Connectors
Interface USB MIDI (Transmitting only)
Power Supply AC adaptor
Current Draw 150 mA
Dimensions
USB COMPUTER port: USB type B
TRIGGER INPUT connector: DB-25 type
DC IN jack
800 (W) x 700 (D) x 1,150 (H) mm
31-1/2 (W) x 27-9/16 (D) x 45-5/16 (H) inches
Weight
(excluding AC adaptor)
Accessories
Options (sold separately)
*1 To upgrade TD-1K to the TD-1KV, V-Pad PDX-8 (sold separately) and Pad Mount
MDH-12 (sold separately) are needed.
TD-1KV 11.8 kg 26 lbs 1 oz
TD-1K 11.4 kg 25 lbs 3 oz
Owner’s manual, Leaet “USING THE UNIT SAFELY,”
Drum key, Cable clip, Special connection cable,
AC adaptor
Cymbal: OP-TD1C
Kick: KD-9, KT-10
Snare: PDX-8, PDX-6 *1
Personal Drum Monitor: PM-03
* In the interest of product improvement, the specications and/or
appearance of this unit are subject to change without prior notice.
15
Page 16

USING THE UNIT SAFELY
Please read this in conjunction with the leaet “USING THE UNIT SAFELY.”
WARNING
To completely turn o power to the unit, pull out the plug from the outlet
Even with the power switch turned o, this unit is not completely
separated from its main source of power. When the power needs to be
completely turned o, turn o the power switch on the unit, then pull
out the plug from the outlet. For this reason, the outlet into which you
choose to connect the power cord’s plug should be one that is within easy reach
and readily accessible.
Concerning the Auto O function
The power to this unit will be turned o automatically after a
predetermined amount of time has passed since it was last used for
playing music, or its buttons or controls were operated (Auto O
function). If you do not want the power to be turned o automatically,
disengage the Auto O function (p. 14).
Use only the supplied AC adaptor and the correct voltage
Be sure to use only the AC adaptor supplied with the unit. Also, make
sure the line voltage at the installation matches the input voltage
specied on the AC adaptor’s body. Other AC adaptors may use a
dierent polarity, or be designed for a dierent voltage, so their use
could result in damage, malfunction, or electric shock.
Use only the supplied power cord
Use only the attached power cord. Also, the supplied power cord must
not be used with any other device.
CAUTION
Take care so as not to get ngers pinched
When handling the following moving parts, take care so as not to get
ngers, etc., pinched. An adult should always be in charge of handling
these items.
• Pipes, arms, kick pedal, and hi-hat pedal (p. 4)
Keep small items out of the reach of children
To prevent accidental ingestion of the parts listed below, always keep
them out of the reach of small children.
• Removable Parts
Screws (p. 4)
Cap of the special connection cable
IMPORTANT NOTES
Placement
• Depending on the material and temperature of the surface on which you place
the unit, its rubber feet may discolor or mar the surface.
You can place a piece of felt or cloth under the rubber feet to prevent this from
happening. If you do so, please make sure that the unit will not slip or move
accidentally.
Maintenance
• For everyday cleaning wipe the unit with a soft, dry cloth or one that has
been slightly dampened with water. To remove stubborn dirt, use a cloth
impregnated with a mild, non-abrasive detergent. Afterwards, be sure to wipe
the unit thoroughly with a soft, dry cloth.
• The pedals of this drum set are made of stainless steel. Depending on the
conditions of use, the stainless steel may rust. If rusting occurs, use commercially
available metal polish to remove it.
Repairs and Data
• Before sending the unit away for repairs, be sure to make a backup of the data
stored within it; or you may prefer to write down the needed information.
Although we will do our utmost to preserve the data stored in your unit
when we carry out repairs, in some cases, such as when the memory section
is physically damaged, restoration of the stored content may be impossible.
Roland assumes no liability concerning the restoration of any stored content
that has been lost.
Additional Precautions
• Any data stored within the unit can be lost as the result of equipment failure,
incorrect operation, etc. To protect yourself against the irretrievable loss of data,
try to make a habit of creating regular backups of the data you’ve stored in the
unit.
• Roland assumes no liability concerning the restoration of any stored content
that has been lost.
• Since sound vibrations can be transmitted through oors and walls to a greater
degree than expected, take care not to allow such sound to become a nuisance
to others nearby. Although the drum pads and pedals are designed so there is
a minimal amount of extraneous sound produced when they’re struck, rubber
heads tend to produce louder sounds compared to mesh heads. You can
eectively reduce much of the unwanted sound from the pads by switching to
mesh heads.
• This instrument is designed to minimize the extraneous sounds produced when
it’s played. However, since sound vibrations can be transmitted through oors
and walls to a greater degree than expected, take care not to allow these sounds
to become a nuisance others nearby.
• When you operate the kick pedal or hi-hat pedal, please be careful not to get
your ngers pinched between the movable parts. In places where small children
are present, make sure that an adult provides supervision and guidance.
• The rubber portion of the striking surface is treated with a preservative to
maintain its performance. With the passage of time, this preservative may
appear on the surface as a white stain, or reveal how the pads were struck
during product testing. This does not aect the performance or functionality of
the product, and you may continue using it with condence.
• Continuous playing may cause dis-coloration of the pad, but this will not aect
the Pad’s function.
About copyrights and trademarks
• It is forbidden by law to make an audio recording, video recording, copy
or revision of a third party’s copyrighted work (musical work, video work,
broadcast, live performance, or other work), whether in whole or in part, and
distribute, sell, lease, perform, or broadcast it without the permission of the
copyright owner.
• Do not use this product for purposes that could infringe on a copyright held
by a third party. We assume no responsibility whatsoever with regard to any
infringements of third-party copyrights arising through your use of this product.
• The copyright of content in this product (the sound waveform data, style data,
accompaniment patterns, phrase data, audio loops and image data) is reserved
by Roland Corporation.
• Purchasers of this product are permitted to utilize said content (except
song data such as Demo Songs) for the creating, performing, recording and
distributing original musical works.
• Purchasers of this product are NOT permitted to extract said content in original
or modied form, for the purpose of distributing recorded medium of said
content or making them available on a computer network.
• Roland and V-Drums are either registered trademarks or trademarks of Roland
Corporation in the United States and/or other countries.
• Company names and product names appearing in this document are registered
trademarks or trademarks of their respective owners.
16
Page 17

Kit List
Song List
# Kit name
1 Standard
2 Rock
3 Funk
4 Jazz
5 House
6 Fiber
7 Light
8 Coated
9 Heavy
10 Acoustic
11 Drum’nBass
12 TR-808
13 Electronic
14 Reggae
15 Percussion
# Song name Tempo Recommended kit#
1 Rock 1 130 2
2 Rock 2 150 6
3 Pop 1 120 1
4 Pop 2 75 1
5 Jazz Funk 128 1, 5, 10
6 Funk 1 118 3
7 Funk 2 110 3
8 Acid Jazz 96 1, 3
9 Metal 1 150 2
10 Metal 2 135 2
11 Metal 3 126 2
12 Pop 3 90 1
13 Jazz 1 186 4
14 Jazz 2 180 4
15 Pop Ballad 84 1
 Loading...