

Page 1
Owner’s Manual
Contents
Let’s Learn About Drums . . . . . . . . . . . . . . . . . . . . . . . . 2
Drum Set Elements . . . . . . . . . . . . . . . . . . . . . . . . . . . . . . . 2
The Basics of Playing . . . . . . . . . . . . . . . . . . . . . . . . . . . . . . 3
Quick Start . . . . . . . . . . . . . . . . . . . . . . . . . . . . . . . . . . . . . 5
Panel Descriptions . . . . . . . . . . . . . . . . . . . . . . . . . . . . . . . . 5
Connect Your Equipment . . . . . . . . . . . . . . . . . . . . . . . . . . 6
Turning the Power On/O . . . . . . . . . . . . . . . . . . . . . . . . . 6
Playing . . . . . . . . . . . . . . . . . . . . . . . . . . . . . . . . . . . . . . . . . . 7
Selecting a Drum Kit . . . . . . . . . . . . . . . . . . . . . . . . . . . . 7
Playing with the Metronome . . . . . . . . . . . . . . . . . . . . . 7
Practicing in Coach Mode (COACH) . . . . . . . . . . . . . . 8
Selecting a Practice Menu . . . . . . . . . . . . . . . . . . . . . . . . . 8
Correctly Playing in Time with the Beat (TIME
CHECK) . . . . . . . . . . . . . . . . . . . . . . . . . . . . . . . . . . . . . . . . 8
Developing Internal Timing Sense (QUIET COUNT) . . 9
Playing Along with a Changing Tempo (AUTO
UP/DOWN) . . . . . . . . . . . . . . . . . . . . . . . . . . . . . . . . . . . . . 9
Playing Along with a Changing Rhythm
(CHANGE UP) . . . . . . . . . . . . . . . . . . . . . . . . . . . . . . . . . . 10
Performing Along with a Song from Your
Smartphone . . . . . . . . . . . . . . . . . . . . . . . . . . . . . . . . . . .11
Connecting via a Cable to the MIX IN Jack . . . . . . . . . 11
Connecting Wirelessly via Bluetooth . . . . . . . . . . . . .11
Adjusting the Stereo Feel of the Drum Kit
(OVERHEAD) . . . . . . . . . . . . . . . . . . . . . . . . . . . . . . . . . .15
Adjusting the Reverberation of the Drum Kit
(ROOM) . . . . . . . . . . . . . . . . . . . . . . . . . . . . . . . . . . . . . . . 15
Applying an Eect to the Drum Kit (MFX) . . . . . . . . .16
Renaming the Drum Kit (KIT NAME) . . . . . . . . . . . . . . 16
Specifying MIDI Note Numbers (MIDI NOTE) . . . . . . . 16
Copying a Drum Kit (KIT COPY) . . . . . . . . . . . . . . . . . . 17
Resetting a Drum Kit's Settings (KIT RESET) . . . . . . . .17
Using the TD-07 with a Computer or
Smartphone App
Using the TD-07 with Computer Software . . . . . . . . . 18
Using the TD-07 with a Smartphone App . . . . . . . . .18
. . . . . . . . . . . . . . . . . . . . . . . . . . . . . .18
Making Detailed Settings (SETUP) . . . . . . . . . . . . . .19
Making Pad Settings . . . . . . . . . . . . . . . . . . . . . . . . . . .19
MIDI Settings . . . . . . . . . . . . . . . . . . . . . . . . . . . . . . . . . . 24
Making System Settings . . . . . . . . . . . . . . . . . . . . . . . .24
Viewing Version Information . . . . . . . . . . . . . . . . . . . .25
Restoring the Factory Settings . . . . . . . . . . . . . . . . . .25
Troubleshooting . . . . . . . . . . . . . . . . . . . . . . . . . . . . . . . 26
USING THE UNIT SAFELY . . . . . . . . . . . . . . . . . . . . . . . 28
IMPORTANT NOTES . . . . . . . . . . . . . . . . . . . . . . . . . . . . 28
Customizing a Drum Kit (KIT EDIT) . . . . . . . . . . . . . . 12
Editing the Sound of Each Pad (INSTRUMENT) . . . . .13
Adjusting the Drum Kit’s Volume (KIT VOLUME) . . . .13
Adjusting the Attack and Release (TRANSIENT) . . . .14
Adjusting the Tonal Character of Each Pad (PAD EQ) 14
Before using this unit, carefully read “USING THE UNIT SAFELY” and “IMPORTANT NOTES” (the leaet “USING THE UNIT SAFELY” and the Owner’s
Manual (p. 28). After reading, keep the document(s) where it will be available for immediate reference.
© 2020 Roland Corporation
Main Specications . . . . . . . . . . . . . . . . . . . . . . . . . . . . 29
Page 2
Let’s Learn About Drums
Drum Set Elements
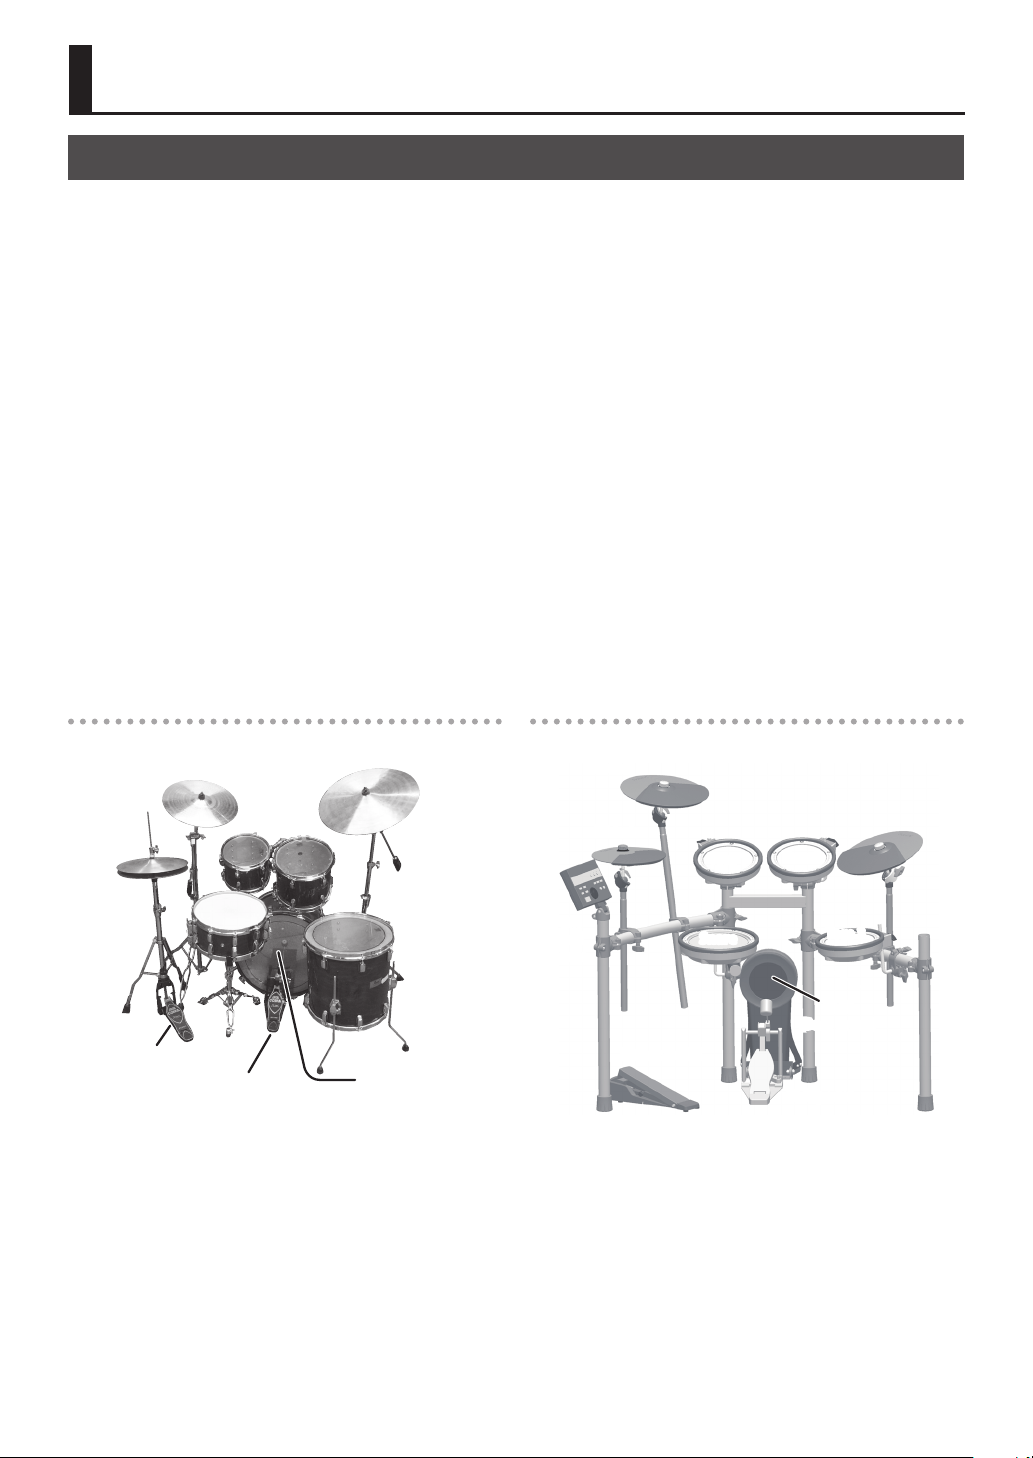
Here are some basic terms related to drum sets.
Bass drum/Kick Pedal
Played with a kick pedal, it’s the largest drum in the kit.
* Use a commercially available kick pedal.
Snare drum
The snare drum is the main “voice” of a drum kit.
Hi-hat/Hi-hat pedal
An acoustic hi-hat uses 2 cymbals mounted on a hi-hat
stand. Pressing the hi-hat pedal opens and closes it.
* TD-07KV (example) uses a single pad.
Acoustic drum
Crash
Tom
Hi-hat
Ride
Tom (Tom 1, Tom 2)
These are usually mounted above the bass drum.
Floor tom (Tom 3)
Sometimes called a bass tom, it either stands on its own legs
or is mounted on a stand.
Ride cymbal
Usually mounted on the right side of the drum kit, the ride
cymbal is principle elements in keeping time.
Crash cymbal
Smaller than the ride, the crash cymbal is mainly used for
accents.
* In the TD-07KV (example), this is the same size as the ride.
V-drums (example: TD-07KV)
Crash
Hi-hat
Tom 1
Tom 2
Ride
Hi-hat pedal
2
Snare
Kick pedal
Floor tom
Bass drum
Drum
sound
module
Hi-hat pedal
Snare
Tom 3
Kick
(Bass drum)
Kick pedal
Page 3
The Basics of Playing
Drums are played using both hands and both feet.
Here we explain how to hold the sticks, strike the drums, and use the pedal.
Let’s Learn About Drums
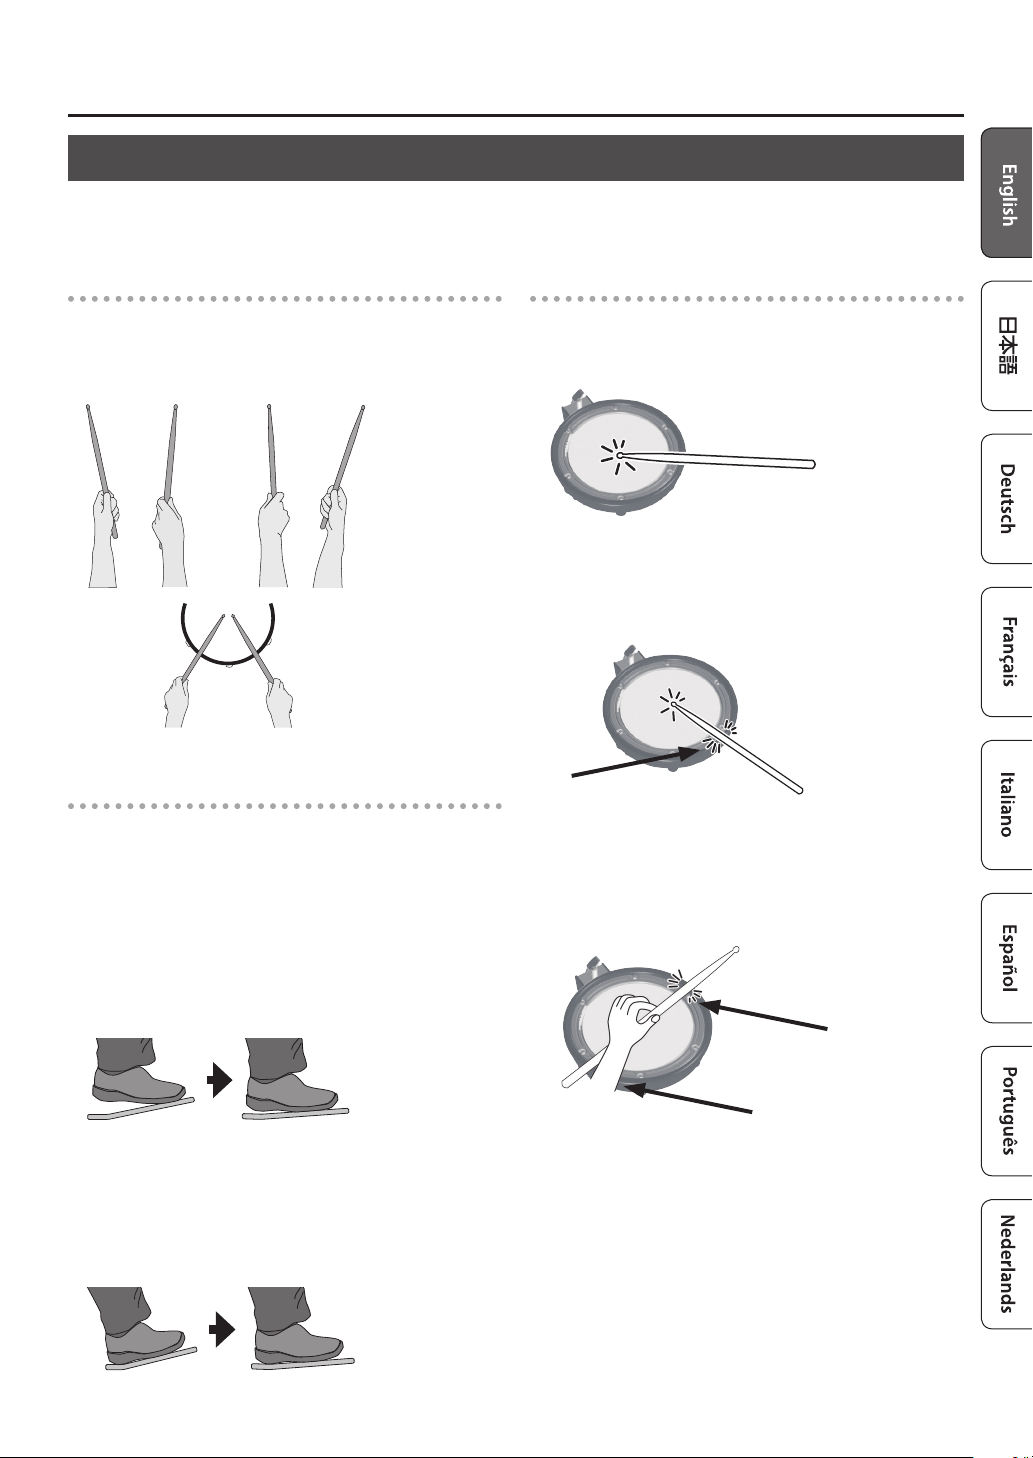
Holding the sticks
The most common way to hold the sticks is called the
“matched grip” as shown in the illustrations below.
Left hand
Right hand
Using the kick pedal
The kick pedal can be pressed in either of two ways: “heel
up” or “heel down.”
Heel up
In this method, your heel oats above the pedal. With your
heel o the pedal, lower your entire foot to push down the
pedal. This method applies the full weight of your leg to the
pedal, making it easier for you to produce a stronger sounds
than the heel down method.
This is often used in rock and pop.
Using the snare
Head shot
Hit only the head of the pad. This is the most common
method to play the snare.
Rim shot
Strike the head and the rim of the pad simultaneously.
A sound (rim sound) dierent than the head shot will be
heard.
Rim
Cross stick
Only strike the rim of the pad.
Velocity switching “snare rim” sound, played softly produces
a cross stick sound, and when played harder, produces a rim
shot sound.
Rim
Heel down
In this method, the entire bottom of your foot from heel to
toe stays in contact with the pedal. Use your ankle joint to
make your toes push down the pedal.
This method allows more precise control of the volume, and
is often used in jazz and bossa nova.
Rim
& When playing cross stick, set XStickSens (p. 19) to anything
other than “OFF.”
* To play the cross stick, be sure that you only strike the rim
of the pad. If you're resting your hand on the head, cross
stick playing technique might not be possible.
* This is eective only for a pad that is connected to the
“SN” connector of the dedicated connection cable.
* On some snare sounds, it might not be possible to play
separate sounds in this way.
3
Page 4
Let’s Learn About Drums
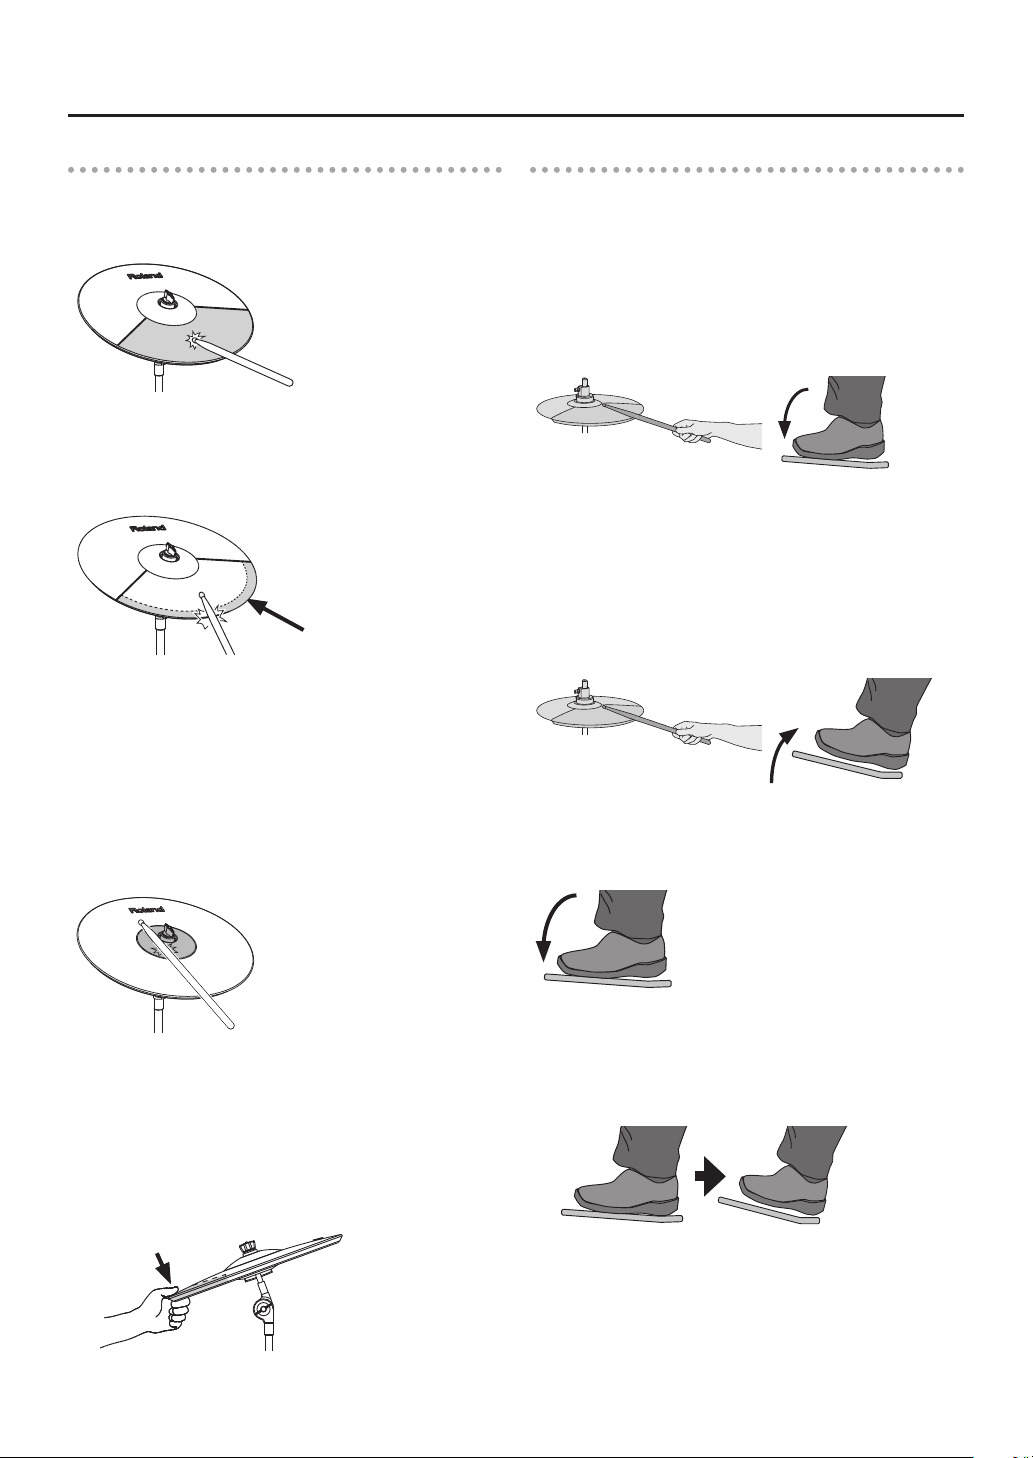
Using the cymbals
Bow shot
The most common method, playing the middle area of the
cymbal.
Edge shot
Use the shoulder of the stick to hit the edge of the
cymbal pad (Hit the edge sensor position as shown in the
illustration).
Edge sensor
* Bow shots and edge shots can also be played on the
hi-hat.
Using the hi-hat
In an acoustic drum set, the hi-hat consists of two cymbals
placed facing each other vertically on a hi-hat stand. When
you press the pedal, the two cymbals will come together
(closed). When you release the pedal, the two cymbals will
separate (opened).
Closed
With the hi-hat pedal pressed rmly, strike the pad with a
stick. A short “chick” sound will be heard.
Half-open
With the hi-hat pedal pressed gently, strike the pad with a
stick. A slightly longer “swish” sound will be heard.
Open
With the hi-hat pedal completely released, strike the pad
with a stick. An even longer “sound” than the half-open
sound will be heard.
Bell Shot (ride only)
This playing method involves striking the bell of the cymbal.
* Use a pad that supports the ride three-way trigger.
* Set the CR2Usage setting (p. 20) to “RDB.”
* Strike the bell somewhat strongly with the shoulder of the
stick.
Choking a cymbal
Choking (pinching) the cymbal’s edge with the hand
immediately after hitting the cymbal will mute or choke the
sound, just like with a real cymbal.
* The Choke function only works when you grasp in
the area (where the edge sensor is) as shown in the
illustration. If you do otherwise, it will not work.
Edge sensor
Foot closed
Just press the pedal without using a stick. This sound will be
softer and shorter than the closed sound played with a stick.
Useful for keeping time with this tight sound.
Foot splash
Press and immediately release the pedal without using a
stick. This is equivalent to momentarily clashing the two
cymbals of an acoustic hi-hat. It produces a “splash” sound
that is softer than the open strike.
4
Page 5
Quick Start
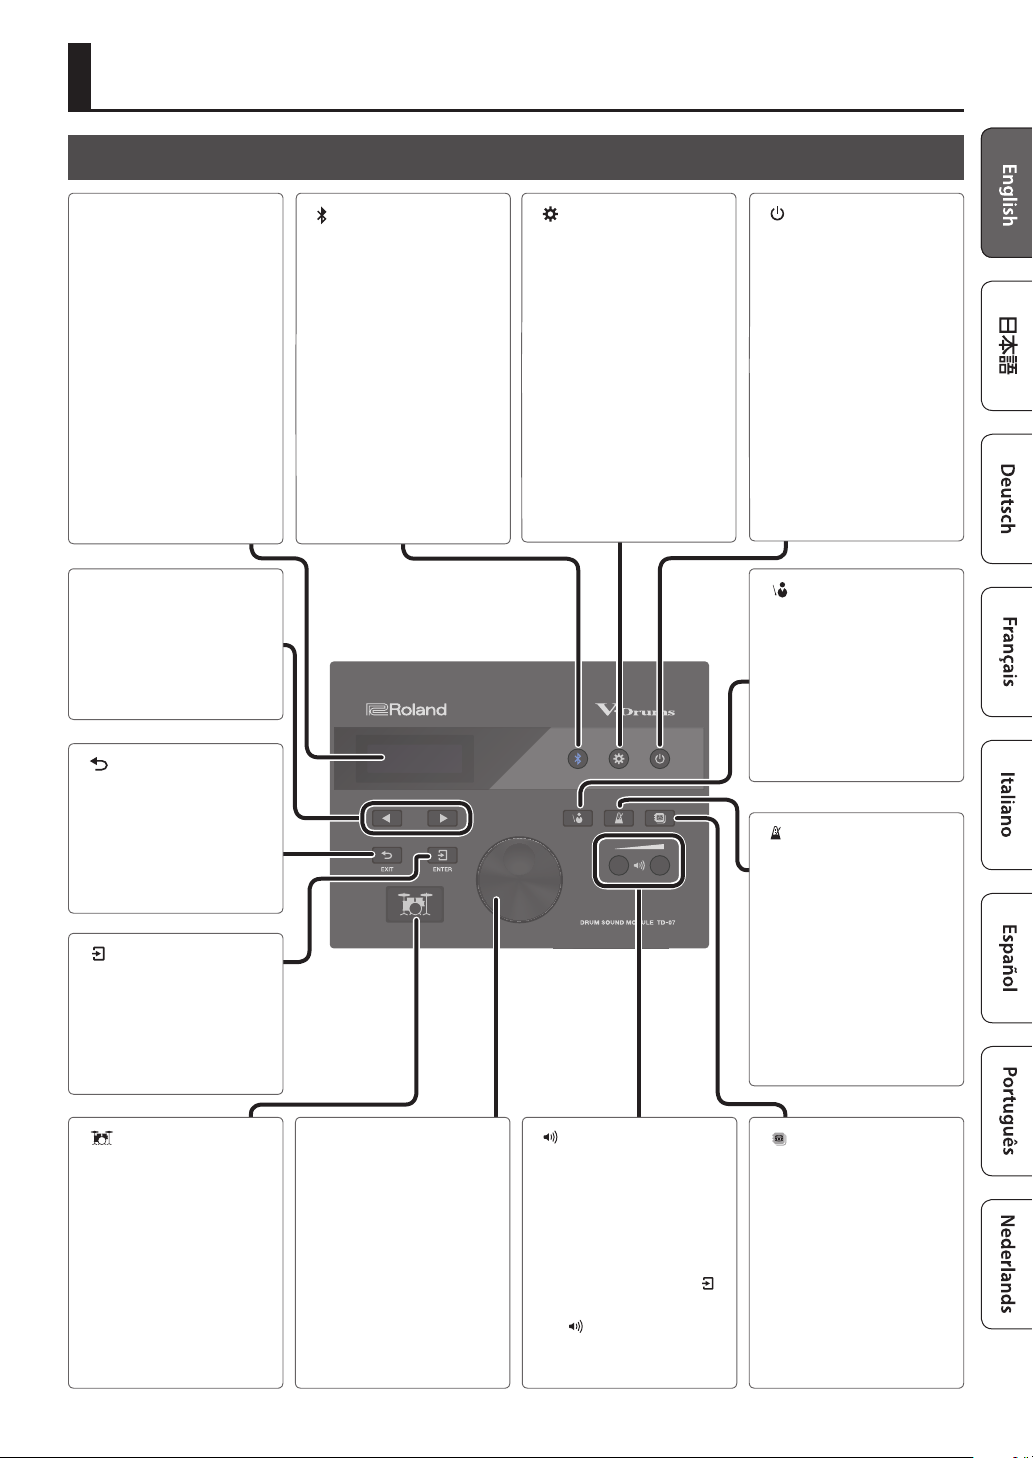
Panel Descriptions
Display
This shows various
information depending on
the operation.
A short time after you turn
on the power, the DRUM
KIT screen (basic screen)
appears.
&“Selecting a Drum Kit”
(p. 7)
[C][A] buttons
Access the previous/next
page of the screen.
[ ] (EXIT) button
Cancels an operation.
Alternatively, returns to the
previous screen.
[ ] (ENTER) button
Conrms an operation
or value. Alternatively,
proceeds to the next
screen.
[ ] (Bluetooth) button
Lets you connect wirelessly
to your smartphone or
a similar device, and
play the drums while
listening to a song from
your smartphone. You can
also use the TD-07 with a
smartphone app.
&“Performing Along
with a Song from Your
Smartphone” (p. 11)
&“Using the TD-07 with a
Computer or Smartphone
App” (p. 18)
[ ] (SETUP) button
Lets you make detailed
settings for the TD-07 such
as adjusting the pad
sensitivity and performing
a factory reset.
&“Making Detailed Settings
(SETUP)” (p. 19)
[ ] (POWER) button
Turns the power on/o.
&“Turning the Power On/
O” (p. 6)
[ ] (COACH) buttons
Lets you use the coach
menu to practice drums in
a way that’s appropriate
for your performance skill
level.
&“Practicing in Coach
Mode (COACH)” (p. 8)
[ ] (METRONOME) button
Allows you to sound the
metronome, or to make
settings for the tempo or
beat.
The button will blink in
time with the metronome.
&“Playing with the
Metronome” (p. 7)
[ ] (DRUM KIT) button
Accesses the basic screen
where you can select drum
set sounds (drum kits).
You can also press this to
return to the basic screen
from another screen.
&“Selecting a Drum Kit”
(p. 7)
Dial
In the DRUM KIT screen
(basic screen), turn the dial
to select drum set sounds
(drum kits).
This is also used to change
the value of the parameter
selected by the [C][A]
buttons.
[ ] (VOLUME) button
Adjust the volume in 30
levels.
If a smartphone or similar
device is wirelessly
connected to the TD-07,
you can hold down the [
(ENTER) button and use
the [ ] (volume) buttons
to adjust the smartphone’s
volume from the TD-07.
[ ] (KIT EDIT) button
Lets you select sounds for
the pads, and apply eects
to the selected sounds.
&“Customizing a Drum Kit
(KIT EDIT)” (p. 12)
]
5
Page 6
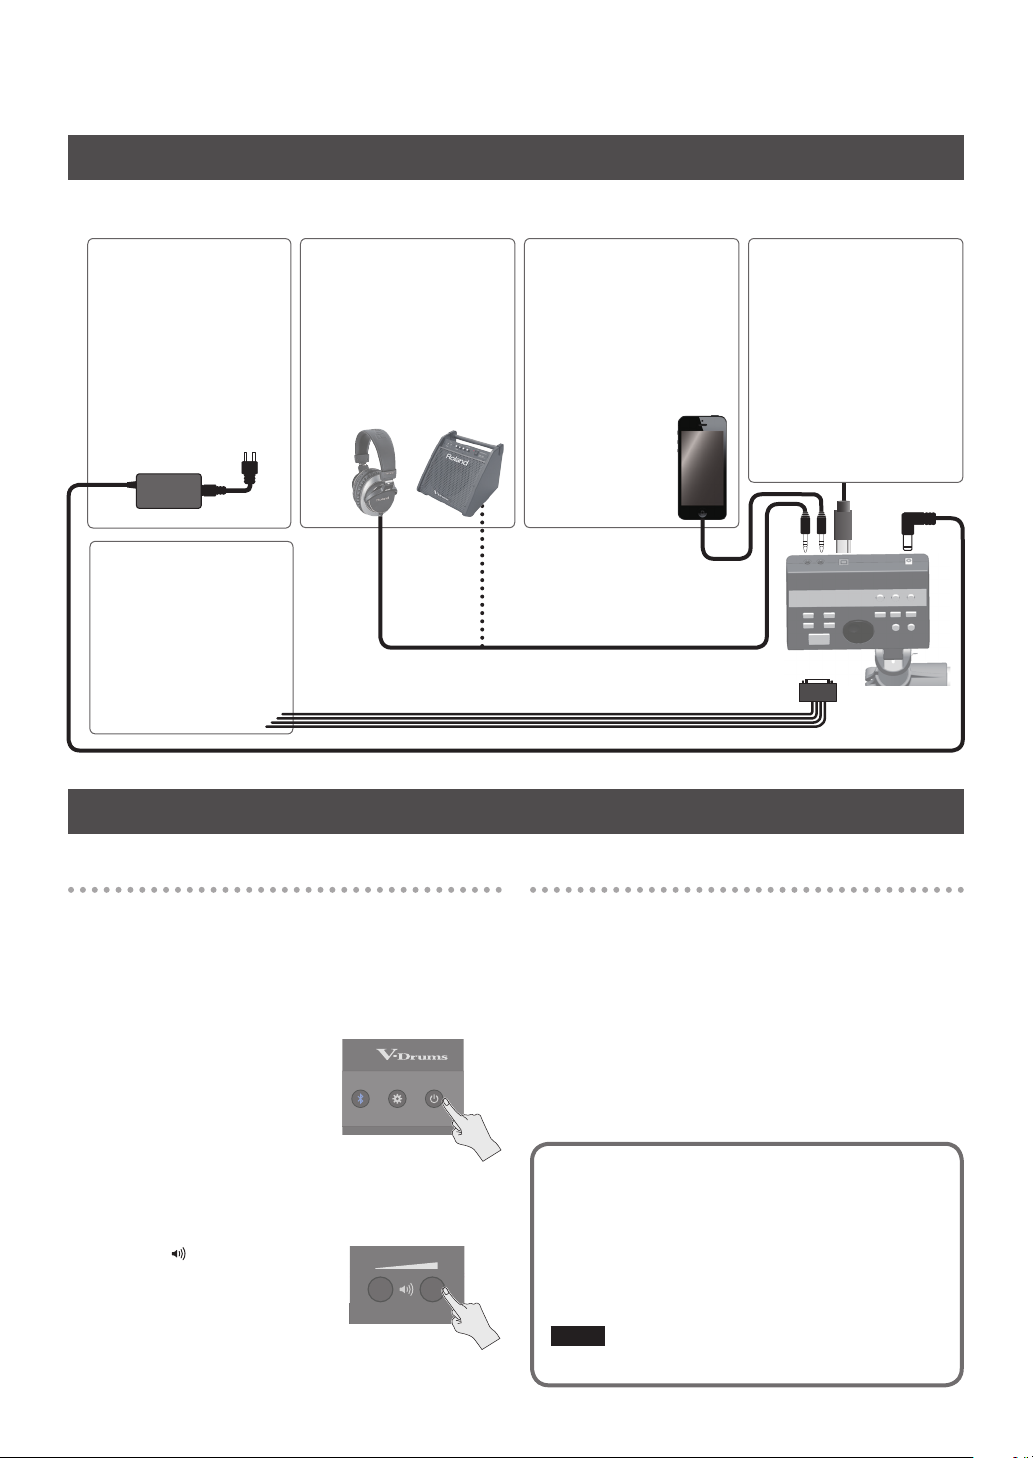
Connect Your Equipment
* To prevent malfunction and equipment failure, always turn down the volume, and turn o all the units before making any
connections.
DC IN jack
Connect the included AC
adaptor here.
TRIGGER INPUT jack
Connect the included
dedicated connection
cable to this connector,
and use it to connect the
pads and pedals.
Turning the Power On/O
OUTPUT/PHONES jack
Outputs the sound.
Connect headphones
(sold separately) or
an amplied speaker
(sold separately).
MIX IN jack (Stereo)
Connect your audio player
or smartphone here. You
can perform along with a
song on the smartphone.
&“Performing Along
with a Song from Your
Smartphone”
(p. 11)
USB COMPUTER port
If the TD-07 is connected
to your computer via a
USB cable (commercially
available), you can
transmit and receive MIDI
and audio data.
&“Using the TD-07 with a
Computer or Smartphone
App” (p. 18)
(back side)
TD-07
Turning the Power On
1. Connect headphones (sold separately) or
amplied speakers (sold separately) to the
TD-07.
* If amplied speakers are connected, minimize the volume
of the amplied speakers.
2. Press the [L] (POWER)
button.
The power turns on.
3. If amplied speakers are
connected, turn on the
power of the amplied speakers, and adjust
the volume.
4. Use the [ ] (VOLUME)
buttons to adjust the
volume.
6
Turning the Power O
1. If amplied speakers are connected to the
TD-07, minimize the volume of amplied
speakers and turn o their power.
2. Long-press the [L] (POWER) button.
The power turns o.
* You must turn o the power by pressing the [L] (POWER)
button. If you turn o the power by disconnecting the
power cord, the settings might not be saved correctly.
About Auto O function
The power to this unit will be turned o automatically
after a predetermined amount of time has passed
since it was last used for playing music, or its buttons
or controls were operated (Auto O function). If you
do not want the power to be turned o automatically,
disengage the Auto O function (p. 24).
NOTE
To restore power, turn the power on again.
Page 7

Quick Start
Playing
Playing drums is not only fun, but just about anyone can easily start playing — they make sound when you simply hit them!
Let’s start playing drums using the wide variety of built-in sounds.
Selecting a Drum Kit
A drum kit consists of sounds assigned to each pad. In some
cases, the sound will change depending upon your playing
dynamics.
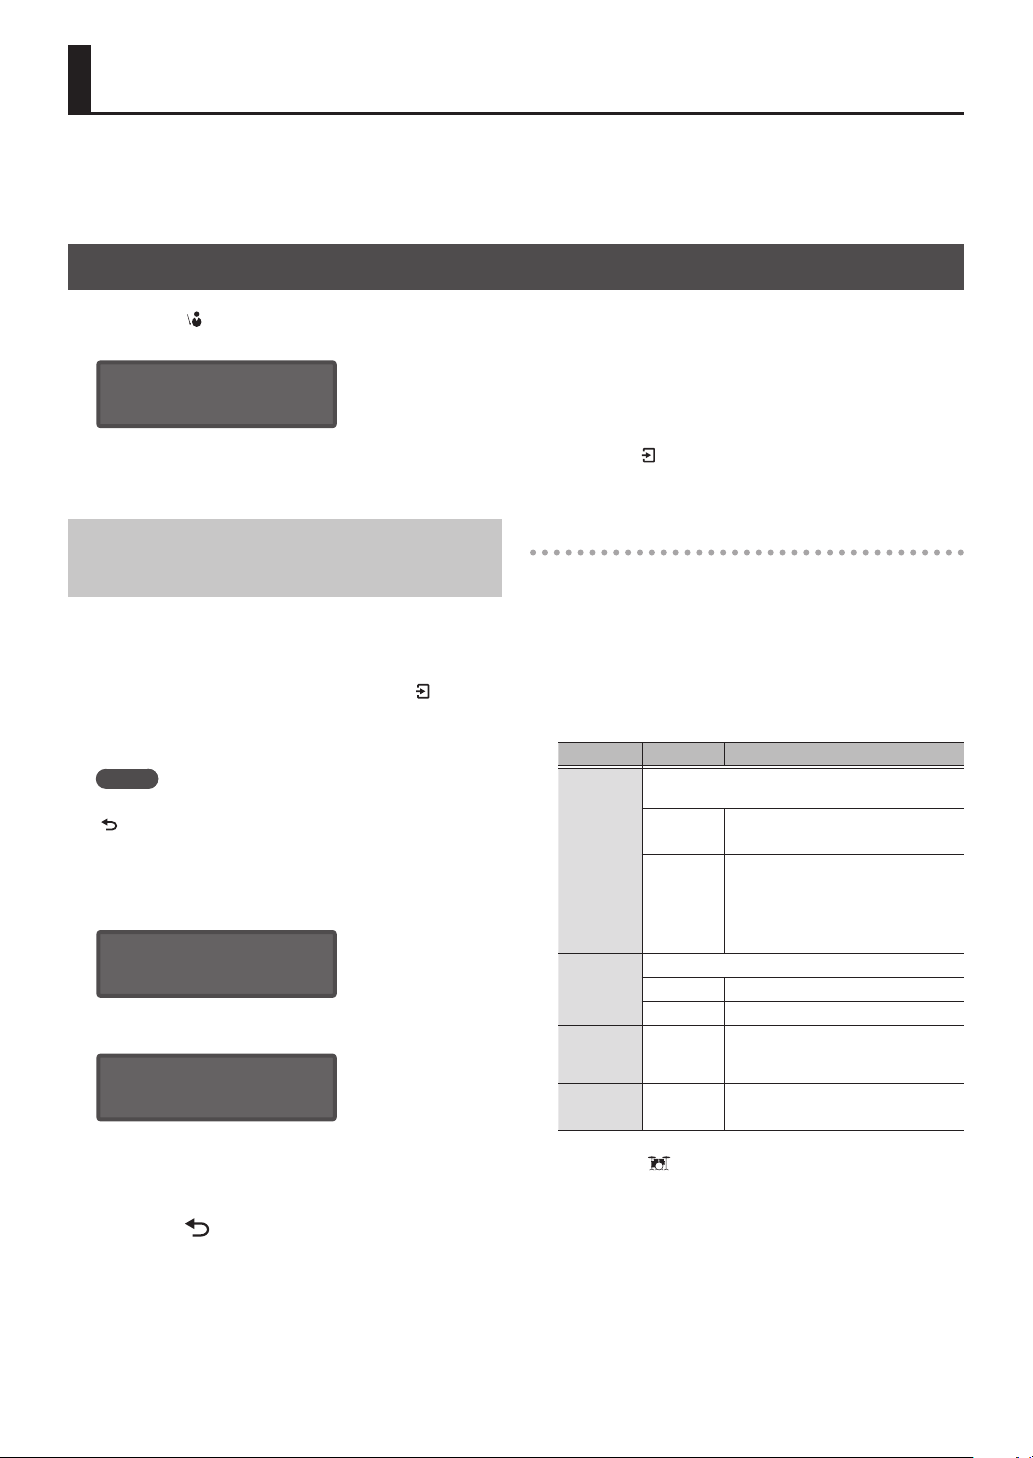
1. Press the [ ] (DRUM KIT) button.
The DRUM KIT screen appears.
DRUM KIT
01 TD-07
2. Use the dial to select a drum kit.
MEMO
For a list of all the drum kits, use the following QR code to
access the “TD-07 Data List” (PDF).
http://roland.cm/td-07_om
3. Play the drums by striking the pad.
Playing with the Metronome
Here’s how you can play the drums while listening to the
metronome.
1. Press the [ ]
(METRONOME) button.
The metronome turns on, and
the button blinks in time with
the metronome tempo.
MEMO
Alternatively, you can hold down the [
and press the [ ] (METRONOME) button to turn the
metronome on/o without switching screens.
2. Press the [ ] (METRONOME) button once again
to turn the metronome o.
Changing how the metronome sounds
1. In the metronome screen, use the [C][A]
buttons to select the item (parameter) that you
want to set.
2. Use the dial to change the value.
Parameter Value Explanation
ON/OFF ON, OFF
Tempo 20–260 (bpm) Sets the tempo.
Level -INF–+6.0dB Sets the volume.
Beat 1–9 (beat)
ˇ (half note)
¸ (quarter notes)
Rhythm
Pan L30–CTR–R30 Sets the stereo position.
Sound TYPE1–TYPE15
LED Sync ON, OFF
˙ (eighth notes)
¯ (eighth note
triplets)
˜ (sixteenth notes)
Turns the metronome on/
o.
Sets the number of beats
per measure.
Sets the interval of the
metronome.
Sets the sound of the
metronome.
Species whether the
[
blinks in time with the
metronome (ON) or does
not blink (OFF).
] (ENTER) button
] (METRONOME) button
3. Press the [ ] (DRUM KIT) button to return to
the DRUM KIT screen.
7
Page 8
Practicing in Coach Mode (COACH)
The TD-07 provides a “coach mode” that helps you to use your practice time most eectively. It contains four menus: TIME
CHECK, QUIET COUNT, AUTO UP/DOWN, and CHANGE UP. You can use these menus to improve your skills in speed control,
precision, endurance, and timing.
Selecting a Practice Menu
1. Press the [ ] (COACH) button.
The COACH screen appears.
COACH [ENTER]
TIME CHECK À
2. Use the [C][A] buttons to select the practice menu, and press [ ] (ENTER) button.
For details on the contents of the practice menu, refer to the next section.
Correctly Playing in Time with the Beat (TIME CHECK)
This lets you practice drumming in accurate time along with
the metronome.
1. In the TIME CHECK screen, press the [ ]
(ENTER) button.
A two-measure count-in is played when you start.
MEMO
If you decide to stop mid-way through practice, press the
[
] (EXIT) button.
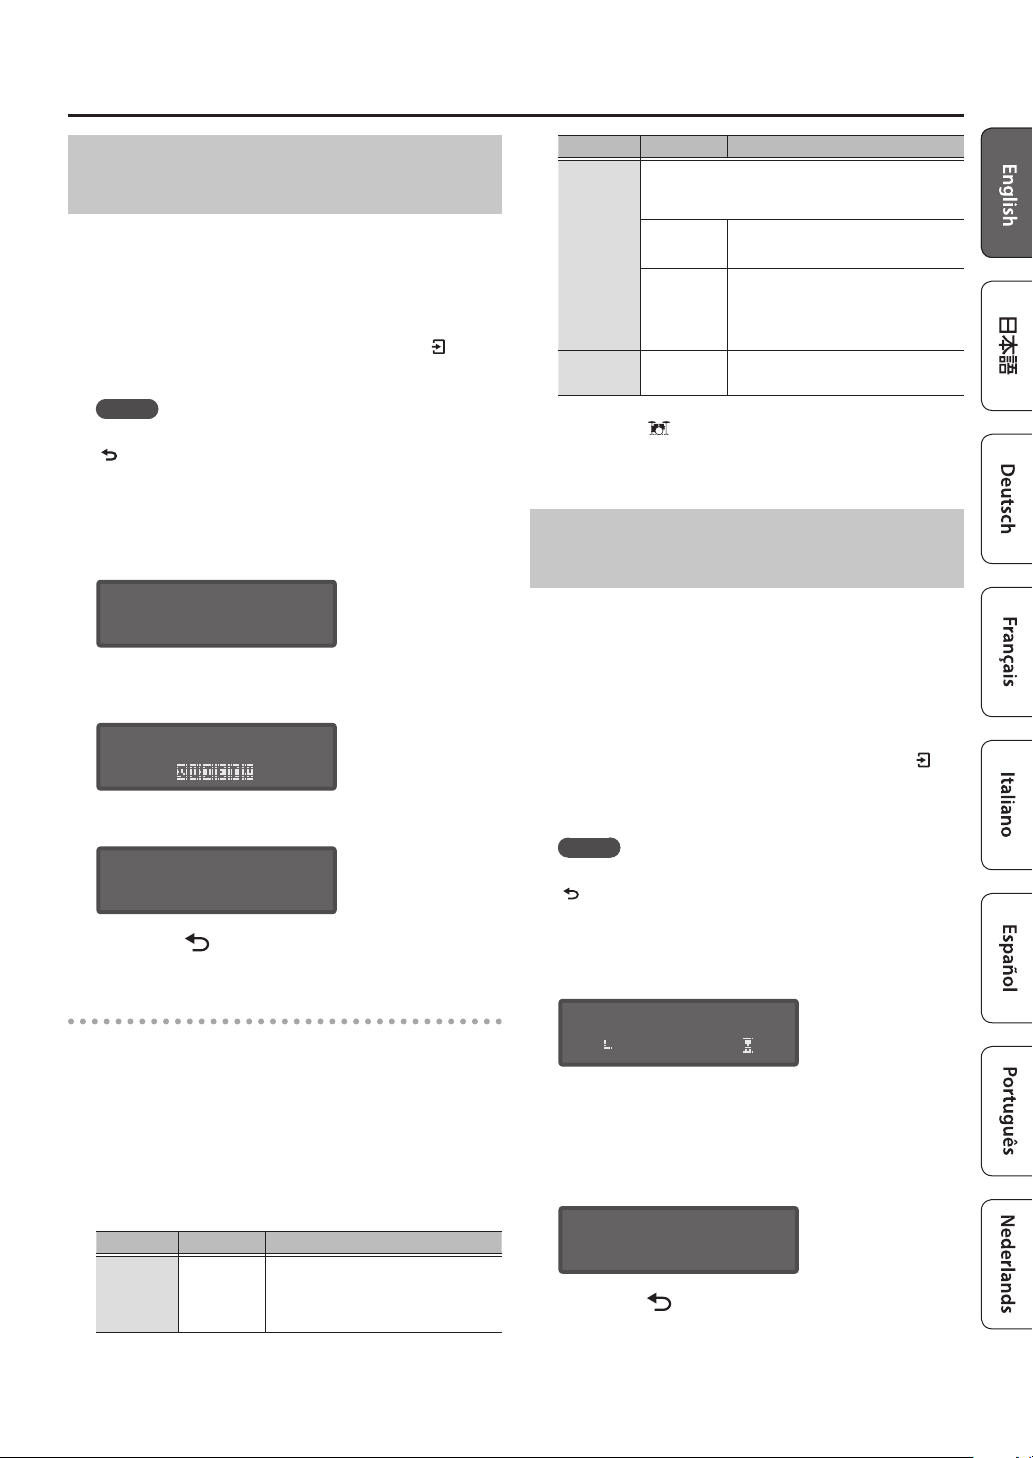
2. Strike the pad in time with the metronome.
The display will indicate whether your pad strikes match
the beat sounded by the metronome.
Ì=120 GOOD! 1-3
SNRÄ___[_Â_]___À
This ends when the specied time has elapsed, and the
strike timing is evaluated.
Finished! [EXIT]
SCORE:100
* If the tempo of your strikes is signicantly inaccurate, it
may be impossible to precisely determine the amount of
inaccuracy.
TIME CHECK settings
Lets you change the pads that are evaluated and the
number of measures that are scored.
1. In the TIME CHECK screen, use the [C][A]
buttons to select the item (parameter) that you
want to set.
2. Use the dial to change the value.
Parameter Value Explanation
Species whether the score will be shown in the
screen.
OFF
Score
4, 8, 16, 32
(measures)
Species the strictness of scoring.
Grade
PAD
Tempo
EASY Normal
HARD Timing will be checked more strictly.
KIK, SNR,
TOM, HH,
RID, CYM
20–260
(bpm)
3. Press the [ ] (DRUM KIT) button to return to
the DRUM KIT screen.
Your performance will not be scored.
Only the timing will be checked.
The score will be shown in the
screen.
You can also specify the number
of measures you’ll practice before
being scored.
Selects the pads that are used in the
evaluation.
Sets the tempo.
3. Press the [ ] (EXIT) button to nish.
8
Page 9
Practicing in Coach Mode (COACH)
Developing Internal Timing Sense (QUIET COUNT)
This practice will help you develop a good sense of time/
tempo. The metronome alternates between “sounding and
not sounding” at every specied length, and the cycle will
repeat.
1. In the QUIET COUNT screen, press the [ ]
(ENTER) button.
MEMO
If you decide to stop mid-way through practice, press the
[
] (EXIT) button.
2. Strike the pad in time with the metronome.
The metronome will sound during the rst few measures.
When you reach the last measure during which the
metronome will sound, the screen will indicate “Ready..”
Ì=120 1-3
Ready..
When the metronome stops sounding, the screen
indication will change to “QUIET!!” Continue striking the
pads during this time.
Parameter Value Explanation
Of the measures specied by “Measures,” this
setting species the length of the measures that
will be “Quiet ”
The length of the QUIET interval will
randomly change each time.
Species the length (number of
measures) of the QUIET interval.
* This setting cannot be longer
than half of the Measures value.
Sets the tempo.
Quiet
Tempo
RANDOM
1, 2, 4
20–260
(bpm)
3. Press the [ ] (DRUM KIT) button to return to
the DRUM KIT screen.
Playing Along with a Changing Tempo (AUTO UP/DOWN)
The metronome increases and decreases tempo over time,
to help develop stamina and endurance. The tempo will
increase in steps for each beat until the metronome reaches
the upper limit; then the tempo will continue slowing down
in steps until it reaches the initial tempo. This cycle will
repeat.
Ì=120 4-*
The strike timing is evaluated following the QUIET
interval.
Ì=120 1-2
SCORE:100
3. Press the [ ] (EXIT) button to nish.
QUIET COUNT settings
You can specify the number of measures in which the
metronome will sound and the number of measures in
which it will not sound.
1. In the QUIET COUNT screen, use the [C][A]
buttons to select the item (parameter) that you
want to set.
2. Use the dial to change the value.
Parameter Value Explanation
Specify the length (measures) of the
interval for which the metronome
will alternate between “Sounding”
and “Quiet.”
Measures
2, 4, 8, 16
(measures)
1. In the AUTO UP/DOWN screen, press the [ ]
(ENTER) button.
A two-measure count-in is played when you start.
MEMO
If you decide to stop mid-way through practice, press the
[
] (EXIT) button.
2. Strike the pad in time with the metronome.
The remaining time is shown in the lower right of the
screen.
Ì=121 1-4
ÃMAX260
* Auto Up/Down does not let you change the current
tempo.
* The current tempo value will be the lower tempo limit.
This ends when the specied time has elapsed, and the
strike timing is evaluated.
3
Finished! [EXIT]
SCORE:100
3. Press the [ ] (EXIT) button to nish.
9
Page 10

Practicing in Coach Mode (COACH)
AUTO UP/DOWN settings
Here you can specify the duration of your practice time, and
set the upper and lower tempo limits.
1. In the AUTO UP/DOWN screen, use the [C][A]
buttons to select the item (parameter) that you
want to set.
2. Use the dial to change the value.
Parameter Value Explanation
Species the time.
Duration
MaxTempo
Tempo
3. Press the [ ] (DRUM KIT) button to return to
the DRUM KIT screen.
1, 3, 5, 10, 15
MIN
21–260
(bpm)
20–260
(bpm)
Selects the duration (minutes)
of practice.
Species the upper tempo
limit.
* This can only be set to
a value higher than the
current tempo.
Species the lower tempo
limit.
Playing Along with a Changing Rhythm (CHANGE UP)
The rhythm type will change every two measures. Starting
from half notes, the note values will gradually become
shorter, and will then return to half notes; this change in
rhythms will be repeated.
1. In the CHANGE UP screen, press the [ ]
(ENTER) button.
A two-measure count-in is played when you start.
MEMO
If you decide to stop mid-way through practice, press the
[
] (EXIT) button.
2. Strike the pad in time with the metronome.
During practice, the screen shows the tempo and the
rhythm type. The remaining time is shown in the lower
right of the screen.
Ì=120 2-1
Ì
This ends when the specied time has elapsed, and the
strike timing is evaluated.
3
Finished! [EXIT]
SCORE:100
3. Press the [ ] (EXIT) button to nish.
CHANGE UP settings
Here’s how to specify the duration of your practice time and
the tempo.
1. In the CHANGE UP screen, use the [C][A]
buttons to select the item (parameter) that you
want to set.
2. Use the dial to change the value.
Parameter Value Explanation
Duration
Tempo 20–260 (bpm) Sets the tempo
3. Press the [ ] (DRUM KIT) button to return to
the DRUM KIT screen.
Species the time.
1, 3, 5, 10, 15 MIN
Selects the duration
(minutes) of practice.
10
Page 11

Performing Along with a Song from Your Smartphone
You can enjoy playing the drums along with songs on your smartphone or other mobile device (subsequently called
“smartphone”).
Connecting via a Cable to the MIX IN Jack
1. Connect a stereo mini-plug cable
(commercially available) from your
smartphone to the TD-07’s MIX IN jack (p. 6).
2. Play back a song on your smartphone.
3. Use your smartphone to adjust the volume of
the song.
Connecting Wirelessly via Bluetooth
In order to connect your
smartphone wirelessly to the
TD-07 via Bluetooth, you’ll
need to “pair” by registering the
TD-07 in your smartphone so that
the two devices can authenticate
with each other.
As an example, we explain how to make settings for an
iPhone.
* Once a smartphone has been paired with TD-07, there is
no need to perform pairing again. Refer to “Connecting an
already-paired smartphone” (p. 11).
Registering the smartphone (pairing)
1. Place the smartphone that you want to
connect near TD-07.
2. Press the [ ] (Bluetooth) button.
3. Use the [C][A] buttons to select “PAIRING,”
and press [ ] (ENTER) button.
The TD-07 starts pairing, and the [ ] (Bluetooth) button
blinks.
MEMO
If you decide to cancel pairing, press the [
button.
4. Turn on the Bluetooth function of your
smartphone.
Pairing
] (EXIT)
5. Tap “TD-07 AUDIO” that appears in the
smartphone’s Bluetooth “DEVICES” eld.
TD-07 and smartphone are paired. When pairing is
completed, a display like the following appears.
smartphone
TD-07
“TD-07 AUDIO” is added to the “My devices”
area, and shown as “Connected.”
The indication “A” appears in the upper right
of the screen, and the [ ] (Bluetooth) button
is lit blue.
BLUETOOTH
PAIRING[ENTER]À
6. Press the [ ] (DRUM KIT) button to return to
the DRUM KIT screen.
Playing back songs from your smartphone
NOTE
Since playback might be extremely loud, lower the volume
on your smartphone in advance.
When you play back a song on your smartphone, you hear
the sound from the headphones or amplied speakers that
are connected to the TD-07.
MEMO
Use your smartphone to adjust the volume of the song.
You can also make adjustments by holding down the TD-07’s
[
] (ENTER) button and using the [ ] (volume) buttons.
* In order to change the volume of the smartphone by
operating the TD-07, your smartphone must support the
Bluetooth AVRCP protocol.
Connecting an already-paired smartphone
1. Turn on the Bluetooth function of your
smartphone.
TD-07 and the smartphone are connected wirelessly.
* If the above step does not establish a connection, tap
“TD-07 AUDIO” that are shown in the “DEVICES” eld of the
smartphone.
MEMO
By holding down the [
the [ ] (Bluetooth) button you can turn on/o the TD-07’s
Bluetooth function.
] (ENTER) button and pressing
11
Page 12

Customizing a Drum Kit (KIT EDIT)
The TD-07 let’s you customize each pad’s sound and adjust the eects to your preferences.
* Since the TD-07 automatically saves the values that you change, there’s no need to perform a specic operation to save your
settings. Settings are also saved when you turn o the power.
Kit edit menu
Indication Explanation Page
INSTRUMENT Modies the sound of each pad.
KIT VOLUME Adjusts the volume of the drum kit.
TRANSIENT
PAD EQ
OVERHEAD
ROOM
MFX
MIDI NOTE
KIT COPY Copies the settings of a drum kit.
KIT RESET
Boosts or cuts the attack or release of
each pad’s sound.
Adjusts the tonal character of each
pad (pad equalizer).
Adjusts the sound of the overhead
mics that capture the entire drum kit.
This adjusts the sound’s spaciousness
and sense of stereo. You can specify
the amount of eect for each pad.
Simulates the reverberation and
resonance of the location in which
you’re playing the drums.
By applying the Room eect you can
give the drum sound a more natural
feel and a sense of presence. You can
specify the amount of eect for each
pad.
Lets you apply a variety of eects to
the overall drum kit. You can specify
the amount of eect for each pad.
Species the MIDI note number that
is transmitted or received when you
strike a pad.
Returns the drum kit settings to their
factory-set state.
p. 13
p. 14
p. 15
p. 16KIT NAME Edit the name of the drum kit.
p. 17
Choosing a Pad to Edit
To edit the settings for a pad, strike that pad to select
it. To select the rim of a pad, strike the rim.
MEMO
5 You can also select the pad to edit by holding
down the [
] (ENTER) button and using the [C]
[A] buttons.
5 You can also select the head or rim by holding
down the [
] (ENTER) button and pressing the [ ]
(EXIT) button.
Selecting an instrument for each strike
location
For menus in which the “H&R Link” indication is
shown, you can switch between switching sound
parameters for head and rim as a set (ON) or
individually (OFF).
Head and rim parameters are selected as a set.
Recommended parameters are selected as a set
depending on the parameter that you select.
* If the items selected as a set include identical
ON
OFF
parameters, they are automatically given the
same values.
* For some sounds, the same sound might be
selected for both head and rim.
Parameters can be selected independently for head
and rim.
12
Page 13

Customizing a Drum Kit (KIT EDIT)
Editing the Sound of Each Pad (INSTRUMENT)
Here’s how to edit each pad’s sound, and its pitch and decay.
1. Press the [ ] (KIT EDIT) button.
2. Use the [C][A] buttons to select
“INSTRUMENT,” and press [ ] (ENTER) button.
The INSTRUMENT screen appears.
INSTRUMENT SN
026 Steel S À
3. Strike the pad that you want to make settings.
4. To change a pad’s sound, turn the dial in the
INSTRUMENT screen.
MEMO
For a list of all sounds (an instrument list),
access the following QR code and view
the “TD-07 Data List” (PDF).
http://roland.cm/td-07_om
5. To edit the selected sound, use the [C][A]
buttons to select an item (parameter), and use
the dial to edit the value.
Parameter Value Explanation
Level -INF–+6.0dB
Pan L30–CTR–R30
Tuning *1 -100–+100 Tuning of the head
OFF, 1–9 (kick,
Muing *1
Head *1
Beater *1
Size *1 1.0–40.0 Cymbal diameter
Fixed *1
Pitch *1 -100–+100 Pitch of the pad sound
Decay *1 1–100
snare, tom)
OFF, 1–19
(cymbal)
CLEAR, COATED,
PINSTRIPE
FELT1, 2, WOOD,
PLSTIC1, 2
NORMAL,
FIXED1–4
Volume of the pad sound
(level)
Stereo position of the pad
sound (pan)
Muing (muting) setting
Type of head
Type of beater
Openness of the hi-hat
If something other than
“NORMAL” is selected, the
openness of the hi-hat does
not change, regardless of
how much you press the
hi-hat pedal.
Decay length of the pad
sound
Parameter Value Explanation
Selects whether the head
H&R Link ON, OFF
*1: Whether you can edit these parameters depends on
the sound that is selected. Also, these parameters do
not aect cross-stick sounds.
and rim parameters are
edited as a set (ON) or
independently (OFF).
6. Press the [ ] (DRUM KIT) button to return to
the DRUM KIT screen.
Adjusting the Drum Kit’s Volume (KIT VOLUME)
Here’s how to adjust the volume of the drum kit.
1. Press the [ ] (KIT EDIT) button.
2. Use the [C][A] buttons to select “KIT
VOLUME,” and press [ ] (ENTER) button.
The KIT VOLUME screen appears.
KIT VOLUME
Kit -3.0dBÀ
3. Use the [C][A] buttons to select an item
(parameter), and use the dial to edit the value.
Parameter Value Explanation
Kit
FootHH Volume of the pedal hi-hat sound
XStick Volume of the cross-stick sound
HH Op/Cl -5–+5
-INF–+6.0dB
4. Press the [ ] (DRUM KIT) button to return to
the DRUM KIT screen.
Drum kit volume
Balance between hi-hat open and
close volume
Higher values increase the
volume of the hi-hat when played
while open, relative to the volume
when played while closed.
Lower values decrease the
volume of the hi-hat when played
while open, relative to the volume
when played while closed.
13
Page 14

Customizing a Drum Kit (KIT EDIT)
Adjusting the Attack and Release (TRANSIENT)
Here’s how to emphasize or de-emphasize the attack or
release portion of the sound. You can adjust this individually
for each pad.
1. Press the [ ] (KIT EDIT) button.
2. Use the [C][A] buttons to select “TRANSIENT,”
and press [ ] (ENTER) button.
The TRANSIENT screen appears.
TRANSIENT SN
ON/OFF ONÀ
3. Strike the pad that you want to make settings.
4. Use the [C][A] buttons to select an item
(parameter) and use the dial to edit the value.
Parameter Value Explanation
ON/OFF ON, OFF Turns the eect on/o.
Time 1–10
Attack
Release Release adjustment
Gain -12.0–+6.0dB
H&R Link ON, OFF
-100–100
5. Press the [ ] (DRUM KIT) button to return to
the DRUM KIT screen.
Time over which the sound
rises (attack)
Attack adjustment
Volume after transient is
adjusted
Selects whether the head and
rim parameters are edited as
a set (ON) or independently
(OFF).
Adjusting the Tonal Character of Each Pad (PAD EQ)
Here’s how to adjust the tonal character of each pad (pad
equalizer).
1. Press the [ ] (KIT EDIT) button.
2. Use the [C][A] buttons to select “PAD EQ,” and
press [ ] (ENTER) button.
The PAD EQ screen appears.
PAD EQ SN
ON/OFF ONÀ
3. Strike the pad that you want to make settings.
4. Use the [C][A] buttons to select an item
(parameter) and use the dial to edit the value.
Parameter Value Explanation
ON/OFF ON, OFF Turns the eect on/o.
LoFrq 20Hz–1kHz
LoGain -15–+15dB
MidQ 0.5–8.0
MidFrq 20Hz–16kHz
MidGain -15–+15dB
HiFrq 1kHz–16kHz
HiGain -15–+15dB
H&R Link ON, OFF
Center frequency of the low
range
Amount of boost/cut for the
low range
Width of the frequency range
A higher Mid Q narrows the
aected area.
Center frequency of the mid
range
Amount of boost/cut for the
mid range
Center frequency of the high
range
Amount of boost/cut for the
high range
Selects whether the head and
rim parameters are edited as
a set (ON) or independently
(OFF).
14
5. Press the [ ] (DRUM KIT) button to return to
the DRUM KIT screen.
Page 15

Customizing a Drum Kit (KIT EDIT)
Adjusting the Stereo Feel of the Drum Kit (OVERHEAD)
Here’s how to adjust the sound of the overhead mics that
capture the entire drum kit.
This adjusts the sound’s spaciousness and sense of stereo.
You can specify the amount of eect for each pad.
1. Press the [ ] (KIT EDIT) button.
2. Use the [C][A] buttons to select “OVERHEAD,”
and press [ ] (ENTER) button.
The OVERHEAD screen appears.
OVERHEAD
ON/OFF ONÀ
3. Use the [C][A] buttons to select an item
(parameter) and use the dial to edit the value.
Parameter Value Explanation
ON/OFF ON, OFF Turns the eect on/o.
When you edit this
STD-1, STD-2,
WIDE, CLEAR,
Type
Mic TYPE1–10 Type of mic
Width 1–5 Distance between mics
Level -INF–+12.0dB Volume of overhead
Send -INF–+6.0dB
H&R Link ON, OFF
*1: Depending on the settings of each parameter, the
template name might not match the eect. Also, if
the default settings of the template do not match
the current values, an “*” is shown for the template
setting.
If you changed the template when the “*” is shown,
the values will return to the default values of the
template.
WARM, DRY,
MILD, BRIGHT,
OTHER-1–4
*1
parameter, all settings other
than the overhead Level
are changed to the optimal
values.
To quickly obtain the sound
you want, select the desired
template and then edit the
settings.
Amount of overhead applied
to each pad
Selects whether the head
and rim parameters are
edited as a set (ON) or
independently (OFF).
Adjusting the Reverberation of the Drum Kit (ROOM)
Here’s how to simulate the reverberation and resonance of
the location in which you’re playing the drums.
By applying the Room eect you can give the drum sound
a more natural feel and a sense of presence. You can specify
the amount of eect for each pad.
1. Press the [ ] (KIT EDIT) button.
2. Use the [C][A] buttons to select “ROOM,” and
press [ ] (ENTER) button.
The ROOM screen appears.
ROOM
ON/OFF ONÀ
3. Use the [C][A] buttons to select an item
(parameter) and use the dial to edit the value.
Parameter Value Explanation
ON/OFF ON, OFF Turns the eect on/o.
STUDIO1-1–4,
Type
Distance 0–6
Time -64–0
Level -INF–+6.0dB Volume of reverb
Send -INF–+6.0dB
H&R Link ON, OFF
4. Press the [ ] (DRUM KIT) button to return to
the DRUM KIT screen.
STUDIO2-1–4,
CLUB-1–4,
STAGE-1–4,
HALL-1–4
Type of room
Sense of distance for the
room’s reverberation
Reverberation time of the
room
Amount of room applied to
each pad
Selects whether the head
and rim parameters are
edited as a set (ON) or
independently (OFF).
4. Press the [ ] (DRUM KIT) button to return to
the DRUM KIT screen.
15
Page 16

Customizing a Drum Kit (KIT EDIT)
Applying an Eect to the Drum Kit (MFX)
Lets you apply a variety of eects to the overall drum kit. You
can specify the amount of eect for each pad.
1. Press the [ ] (KIT EDIT) button.
2. Use the [C][A] buttons to select “MFX,” and
press [ ] (ENTER) button.
The MFX screen appears.
MFX
ON/OFF ONÀ
3. Use the [C][A] buttons to select an item
(parameter) and use the dial to edit the value.
Parameter Value Explanation
ON/OFF ON, OFF Turns the eect on/o.
Type
Refer to “Data
MFX PRM
Level -INF–+6.0dB
Send -INF–+6.0dB
H&R Link ON, OFF
MEMO
For a list of multi-eect parameters, access the following
QR code and view the “TD-07 Data List” (PDF).
http://roland.cm/td-07_om
List” (PDF)
Type of multi-eect
Moves to a screen
where you can edit
the parameters of the
selected multi-eect.
Volume of the eect
sound
Amount of eect applied
to each pad
Selects whether the head
and rim parameters are
edited as a set (ON) or
independently (OFF).
Renaming the Drum Kit (KIT NAME)
Here’s how to rename the currently selected drum kit.
1. Press the [ ] (KIT EDIT) button.
2. Use the [C][A] buttons to select “KIT NAME,”
and press [ ] (ENTER) button.
The KIT NAME screen appears.
KIT NAME
Ä[
D-07 ]À
Controller Explanation
[C][A] buttons
Dial Change the character.
Move the cursor to the character that you
want to change.
3. Press the [ ] (DRUM KIT) button to return to
the DRUM KIT screen.
Specifying MIDI Note Numbers (MIDI NOTE)
Here’s how to specify the MIDI note number of each pad in
the currently selected drum kit.
1. Press the [ ] (KIT EDIT) button.
2. Use the [C][A] buttons to select “MIDI NOTE,”
and press [ ] (ENTER) button.
The MIDI NOTE NO. screen appears.
MIDI NOTE NO.
KICK H 36C2À
4. Press the [ ] (DRUM KIT) button to return to
the DRUM KIT screen.
16
3. Use the [C][A] buttons to select the pad that
you want to edit, and use the dial to edit the
value.
Value Explanation
0(C-)127–(G9)
OFF
MIDI note number transmitted and received
by each pad
Note messages are not transmitted or
received
4. Press the [ ] (DRUM KIT) button to return to
the DRUM KIT screen.
MEMO
If you’re playing the TD-07’s internal sound engine from
an external MIDI device, and the received note number is
assigned to more than one pad, the pad that’s shown at
the top in the MIDI NOTE NO. screen will produce sound.
Pads that do not produce sound are indicated by an “*”
symbol at the right of the note number.
Page 17

Customizing a Drum Kit (KIT EDIT)
Copying a Drum Kit (KIT COPY)
Here’s how to copy the settings of a drum kit.
NOTE
When you execute a copy operation, the contents of the
copy-destination are overwritten.
1. Press the [ ] (KIT EDIT) button.
2. Use the [C][A] buttons to select “KIT COPY,”
and press [ ] (ENTER) button.
The KIT COPY screen appears.
KIT COPY
From Kit01À
3. Use the dial to select the copy-source drum kit.
4. Press the [A] button.
KIT COPY
ÄTo Kit03À
5. Use the dial to select the copy-destination
drum kit.
6. Press the [A] button.
Resetting a Drum Kit's Settings (KIT RESET)
Here’s how to return the drum kit settings to their factoryset state.
1. Press the [ ] (KIT EDIT) button.
2. Use the [C][A] buttons to select “KIT RESET,”
and press [ ] (ENTER) button.
The KIT RESET screen appears.
KIT RESET[ENTER]
01 TD-07
3. Use the dial to select the drum kit that you
want to reset.
4. Press the [ ] (ENTER) button.
A conrmation message appears.
Sure? CANCEL/OK
[EXIT] / [ENTER]
If you decide to cancel, press the [ ] (EXIT) button.
5. Press the [ ] (ENTER) button.
The drum kit returns to the factory settings.
KIT COPY [ENTER]
ÄKit01 Ã Kit03
7. Press the [ ] (ENTER) button.
A conrmation message appears.
Sure? CANCEL/OK
[EXIT] / [ENTER]
If you decide to cancel, press the [ ] (EXIT) button.
8. Press the [ ] (ENTER) button.
The drum kit is copied.
17
Page 18

Using the TD-07 with a Computer or Smartphone App
Using the TD-07 with Computer Software
If the TD-07 is connected to your computer via a USB cable (commercially available), you can transmit and receive MIDI and
audio data.
* A USB cable is not included. Use a USB2.0 Hi-Speed cable.
In order to transmit and receive audio as USB AUDIO, you
must install the USB driver.
The USB driver is software that transfers data between the
TD-07 and the software such as DAW on your computer.
USB cable
(commercially
available)
TD-07
MEMO
For details on downloading and installing the USB driver,
refer to the Roland website.
http://www.roland.com/support/
Specifying the USB Driver
Here’s how to switch between the TD-07’s dedicated USB
driver and the driver provided by your operating system.
Reference
In “Making System Settings” (p. 24), refer to “USBDrv” and
make the appropriate settings.
Using the TD-07 with a Smartphone App
You can connect the TD-07 with an app on your smartphone that supports Bluetooth MIDI (such as GarageBand).
As an example, we explain how to make settings for an iPhone.
Registering the smartphone (pairing)
1. Place the smartphone that you want to
connect near TD-07.
2. Press the [ ] (Bluetooth) button.
3. Use the [C][A] buttons to select “BT MIDI,” and
use the dial to turn it “ON.”
BLUETOOTH
ÄBT MIDI ONÀ
MEMO
If the TD-07’s Bluetooth function is o, turn it on.
Hold down the [
(Bluetooth) button to switch the TD-07’s Bluetooth
function on/o.
] (ENTER) button and press the [ ]
NOTE
Even if the “Devices” area shows the name of the product
that you’re using (e.g., TD-07), do not tap it. If you tapped
this, temporarily cancel the device registration, and
perform the procedure again from step 1.
5. Start the app on your smartphone.
6. From your smartphone app, initiate pairing.
TD-07 and smartphone are paired. When pairing is
completed, a display like the following appears.
smartphone
TD-07
The indication “Connected” appears in the
app.
The indication “M” appears in the upper right
of the screen.
BLUETOOTH
ÄBT MIDI ONÀ
4. Turn on the Bluetooth function of your
smartphone.
18
7. Press the [ ] (DRUM KIT) button to return to
the DRUM KIT screen.
Page 19

Making Detailed Settings (SETUP)
Lets you make detailed settings for the TD-07 such as adjusting the pad sensitivity, MIDI settings, and performing a factory
reset.
Setup menu
Indication Explanation Page
PAD
MIDI Make MIDI-related settings for the TD-07.
SYSTEM Make settings for the TD-07’s power supply, volume, display, and USB COMPUTER port input/output.
VERSION Shows the TD-07’s program version.
FACTORY RESET Return the TD-07 to its factory settings.
Making Pad Settings
Here’s how to make settings to ensure that the TD-07 correctly processes the signals from the pads. Here you can adjust the
balance (sensitivity) between the force of a strike on a pad and the resulting volume.
1. Press the [ ] (SETUP) button.
2. Use the [C][A] buttons to select “PAD,” and press [ ] (ENTER) button.
The PAD screen appears.
PAD SN
Type PDX8À
Make settings to ensure that the TD-07 correctly processes the signals from the pads. Here you can adjust
the balance (sensitivity) between the force of a strike on a pad and the resulting volume.
p. 19
p. 24
p. 25
3. Strike the pad that you want to make settings.
4. Use the [C] [A] buttons to select an item (parameter) that you want to edit, and use the dial to edit
the value.
Parameter Value Explanation
Specify the pad type. You’ll need to make these settings if you expand the pads of your drum set
or if you connect pads of a dierent type.
Type
Sens 1–32
Threshold 0–31
XStickSens OFF, 1–10
Refer to “PAD Type
list” (p. 20)
* When you specify the PAD type, the parameters such as Threshold, ADVANCED (with the
exception of certain parameters such as XtlkCancel) are set to optimal values. These values are
only general guidelines; you can make ne adjustments as appropriate according to how you
attach the pad and how you use it.
Adjusts the balance (sensitivity) between pad striking strength and volume.
Increasing this value increases the sensitivity, so that even soft strikes on the pad are sounded at
high volume. Decreasing this value decreases the sensitivity, so that even strong strikes on the
pad are sounded at low volume.
Adjusts the minimum sensitivity of the pad.
This setting allows a trigger signal to be received only when the pad is above a determined force
level (velocity). This can be used to prevent a pad from sounding because of vibrations from
other pads.
While striking the pad, gradually raise the threshold value. If a soft strike on the pad fails to
produce sound, slightly lower this value. Repeat this to obtain the ideal setting.
Species the strength of the strike at which the cross-stick sound and the rim shot sound are
switched.
Increasing this value causes the cross-stick sound to be heard even for a softer rim shot.
If this is “OFF,” the rim shot sound is heard even when you play a cross-stick strike.
19
Page 20

Making Detailed Settings (SETUP)
Parameter Value Explanation
If you want to expand the drum set, use the CR2 connector of the dedicated connection cable as
CR2
CR2Usage
RDB
FootSpSens -10–+10 Adjusts the amount of how easy to make the foot splash.
VH Set –
ADVANCED
Refer to “Making
detailed settings in
ADVANCED” (p. 22)
CR2.
* For an example of expanding the drum set, refer to “Expanding your drum set” (p. 21).
If you want to expand the drum set, use the CR2 connector of the dedicated connection cable as
RIDE BELL.
* For an example of expanding the drum set, refer to “Expanding your drum set” (p. 21).
When using a VH-10 or VH-11 hi-hat, adjust the oset on the TD-07.
This is necessary in order to correctly detect open/close operations and pedal movement.
For details of the settings, refer to “Adjusting the Oset of the Hi-Hat (VH-10/VH-11)” (p. 21).
Moves to a screen where you can make more detailed adjustments for the pad.
5. Press the [ ] (DRUM KIT) button to return to the DRUM KIT screen.
PAD Type list
Used Pad Type Rim shot Bell shot
KD-A22 KDA22 – – –
KD-200 KD200 – – –
KD-140 KD140 – – –
KD-120 KD120 – – –
KD-85 KD85 – – –
KD-10 KD10 – – –
KD-9 KD9 – – –
KD-8 KD8 – – –
KD-7 KD7 – – –
KT-10 KT10 – – –
KT- 9 KT9 – – –
PDA120L PDA120L
PDA100L PDA100L
PD-128 PD128
PD-125X PD125X
PD-125 PD125
PD-108 PD108
PD-105X PD105X
PD-105 PD105
PD-85 PD85
PDX-100 PDX100
PDX-12 PDX12
PDX-8 PDX8
PDX-6 PDX6
PD-8 PD8
VH-11 VH11
VH-10 VH10
CY-16R-T CY16RT
CY-15R CY15R
(
(
(
(
(
(
(
(
(
(
(
(
(
(
(
(
( ( (
( ( (
Choke
play
– –
– –
– –
– –
– –
– –
– –
– –
– –
– –
– –
– –
– –
–
–
–
Used Pad Type Rim shot Bell shot
CY-14C-T CY14CT
CY-14C CY14C
CY-13R CY13R
CY-12C CY12C
CY-12R/C CY12R/C
CY- 8 CY8
CY- 5 CY5
BT-1
RT-30K RT30K – – –
RT-30HR RT30HR
RT-30H
RT-10K RT10K – – –
RT-10S RT10S
RT-10T RT10T – – –
*1: When using the BT-1, it is possible to further increase the
sensitivity for soft strikes, but this increases the possibility of
unwanted triggering by vibration from the surroundings.
*2: Select this if you attach an RT-30H to the snare.
*3: Select this if you attach an RT-30H to a tom.
(
(
(
BT1 – – –
BT1 SENS *1 – – –
RT30H SN *2 – – –
RT30H TM *3 – – –
(
(
( ( (
(
( ( (
(
(
(
(
Choke
play
–
–
–
–
–
– –
– –
(
(
(
(
(
20
Page 21

Adjusting the Oset of the Hi-Hat (VH-10/VH-11)
Making Detailed Settings (SETUP)Making Detailed Settings (SETUP)
1. With the hi-hat completely separated from the
motion sensor unit, power-on the TD-07.
clutch screw
Separated
motion sensor unit
2. Loosen the clutch screw and let the hi-hat rest
naturally on the motion sensor unit.
3. Press the [ ] (SETUP) button.
4. Use the [C][A] buttons to select “PAD,” and
press [ ] (ENTER) button.
5. Strike the hi-hat to select the pad.
6. Use the [C][A] buttons to select “Type,” and
use the dial to select the type of hi-hat you’re
using (VH-10 or VH-11).
PAD HH
Type VH10À
7. Use the [C][A] buttons to select “VH Set,” and
press [ ] (ENTER) button.
8. If the screen indicates
“Turn screw L,” turn the
oset adjustment screw
oset
adjustment
screw
OPEN
counter-clockwise. If
the screen indicates “Turn screw R,” turn it
clockwise.
When the value shown in the lower left of the screen is
approximately 80 and the “OK!” indication appears, the
adjustment is complete.
Adjust HH offset
<80> OK![EXIT]
9. Fasten the clutch screw so that the hi-hat
opens to the amount you prefer.
10.
Press the [ ] (DRUM KIT) button to return to
the DRUM KIT screen.
CLOSE
Expanding your drum set
Adding a crash cymbal
This is an example setup in which the TD-07KV is
supplemented by adding a separately sold cymbal (CY-8)
as "crash cymbal 2" (CR2), using a separately sold cymbal
mount (MDY-Standard).
Added CY-8
MDY-Standard
CR2 (CY-8) settings
1. Connect CR2 of the dedicated connection
cable to the CY-8 pad that you added.
2. As described in “Making Pad Settings” (p. 19),
set the CR2’s PAD Type to “CY8,” and set
CR2Usage to “CR2.”
This completes settings.
Using a CY-13R instead of the CY-8 ride cymbal
Here’s an example of replacing the ride cymbal (CY-8) with a
separately sold CY-13R.
Replaced with a CY-13R
* In this case, the CR 2 pad
cannot be connected.
RIDE (CY-13R) settings
1. To the CY-13R’s BOW/EDGE OUTPUT jack,
connect the dedicated connection cable’s “RD”
connector, and to the BELL OUTPUT connector
connect the dedicated connection cable’s
“CR2” connector.
2. As described in “Making Pad Settings” (p. 19),
set the RD’s PAD Type to “CY13R,” and set
CR2Usage to “RDB.”
This completes settings.
21
Page 22

Making Detailed Settings (SETUP)
LINEAR
EXP2EXP1
EXP2EXP1
LOG2LOG1
LOG2LOG1
SPLINE
LOUD2LOUD1
LOUD2LOUD1
Making detailed settings in ADVANCED
Parameter Value Explanation
Volume change in response to pad strike strength
Volume
LINEAR
Playing dynamics
The standard setting. This produces the most natural
correspondence between playing dynamics and
volume change.
EXP1, EXP2
Curve
RimGain 0–3.2
LOG1, LOG2
SPLINE
LOUD1, LOUD2
Volume
Volume
Volume
Volume
Adjusts the balance between the force of striking the rim or edge and the loudness of the sound.
If you increase this value, even soft strikes on the rim are sounded at high volume. If you decrease this
value, even strong strikes on the rim are sounded at low volume.
This setting species how easy it is to play a head shot or rim shot.
If the rim sound is heard when you play a head shot, increase this value. If the head sound is heard when
you play an rim shot, decrease this value.
Playing
dynamics
Playing
dynamics
Playing
dynamics
Playing
dynamics
Volume
Volume
Volume
Playing
dynamics
Playing
dynamics
Playing
dynamics
Compared to “LINEAR,” strong dynamics produce a
greater change.
Compared to “LINEAR,” a soft playing produces a
greater change.
Extreme changes are made in response to playing
dynamics.
Very little dynamic response, making it easy to
maintain strong volume levels. If you’re using a drum
trigger as an external pad, these settings will produce
reliable triggering.
H/R Adjust *1 0–80
22
MEMO
If the rim shot sound is heard when you play a head shot, or if a head shot sound is heard when
you play a rim shot, make small changes to the H/R Adjust values while you continue trying out the
results. Extreme changes to the values will cause the wrong sound to be heard when you strike the
pad, for example producing the rim shot sound when you play a head shot.
Page 23

Parameter Value Explanation
Detecting trigger signal attenuation (Retrigger Cancel)
When you strike a snare drum etc. to which a commercially available
drum trigger is attached, there might be cases in which the waveform is
misshapen, causing another trigger to unintendedly occur at point “A” in
the following illustration (retriggering).
This occurs in particular at the decaying edge of the waveform.
Retrigger Cancel detects such distortion in and prevents retriggering
from occurring.
RetrgCancel 1–16
While repeatedly striking the pad, raise the “Retrigger Cancel” value until retriggering no longer occurs.
Although setting this to a high value prevents retriggering, it then becomes easy for sounds to be
omitted when the drums played fast (roll etc.). Set this to the lowest value as possible while still
ensuring that there is no retriggering.
MEMO
You can also eliminate this problem of retriggering with the Mask Time setting. Mask Time does not
detect trigger signals if they occur within the specied amount of time after the previous trigger
signal was received. Retrigger Cancel detects the attenuation of the trigger signal level, and triggers
the sound after internally determining which trigger signals were actually generated when the head
was struck, while weeding out the other false trigger signals that need not trigger a sound.
If more than one pad (or acoustic drum to which a drum trigger is attached) is mounted on the same
stand, you can use this setting to prevent the vibrations caused by striking a pad from producing
XtlkCancel 1–80
ScanTime 0–4.0ms
MaskTime 0–64ms
unintentional triggering (crosstalk) for a dierent pad (or drum trigger). For example, if pad B
unintendedly sounds when you strike pad A, increase the XtlkCancel value of pad B until crosstalk no
longer occurs. If this value is raised excessively, the sound of pad B will tend to drop out when pad A and
pad B are struck simultaneously.
Trigger signal detection time (Scan Time)
Since the rise time of the trigger signal waveform may dier slightly
depending on the characteristics of each pad or acoustic drum trigger
(drum pickup), you may notice that identical hits (velocity) may produce
sound at dierent volumes. If this occurs, you can adjust the “Scan Time” so
that your way of playing can be detected more precisely.
While repeatedly hitting the pad at a constant force, gradually raise the
Scan Time value from 0 msec, until the resulting volume stabilizes at the loudest level. At this setting, try
both soft and loud strikes, and make sure that the volume changes appropriately.
* As the value is set higher, the time it takes for the sound to be played increases. Set this to the lowest
value as possible.
Double triggering prevention (Mask Time)
When playing a kick trigger, the beater can bounce back and hit
the head a second time immediately after the intended note—with
acoustic drums sometimes the beater stays against the head—this
causes a single hit to “double trigger” (two sounds instead of one).
The Mask Time setting helps to prevent this. Once a pad has been
hit, any additional trigger signals occurring within the specied
“Mask Time” will be ignored.
Adjust the “Mask Time” value while playing the pad. When using a kick trigger, try to let the beater
bounce back and hit the head very quickly, then raise the “Mask Time” value until there are no more
sounds made by the beater rebound.
Increasing this value makes it more likely that a note played in rapid succession will drop out. Set this to
as low a value as possible.
Making Detailed Settings (SETUP)
Time
Scan Time
Time
Mask Time
Time
Sound not produced
MEMO
If two or more sounds are being produced when you strike the head just once, then adjust Retrig
Cancel.
*1: For some PAD Type settings, this cannot be specied.
23
Page 24

Making Detailed Settings (SETUP)
MIDI Settings
Here’s how to make MIDI-related settings for the TD-07.
1. Press the [ ] (SETUP) button.
2. Use the [C][A] buttons to select “MIDI,” and
press [ ] (ENTER) button.
3. Use the [C] [A] buttons to select the item
(parameter) that you want to edit, and use the
dial to change the value.
Parameter Value Explanation
Channel 1–16Ch Transmit and receive channel.
Tx/Rx Sw OFF, ON
ProgChg Tx OFF, ON
ProgChg Rx OFF, ON
Local Ctrl OFF, ON
Choke Shot OFF, ON
Device ID 17–32
SysEx Tx OFF, ON
SysEx Rx OFF, ON
Turns the transmitting and
receiving MIDI messages on/o.
Turns program change
transmission on/o
Turns program change reception
on/o
Turns on/o the connection
between the performance data
from the pads and the TD-07’s
sound generator section
Normally you’ll leave this “ON.”
If this is “OFF,” the performance
data from the pads is not
connected to the TD-07’s sound
generator section.
Species operation when you
strike a pad while choking it.
If this is “ON,” striking a pad while
choking it causes it to be muted
immediately after sounding. If
this is “OFF,” immediate muting
does not occur even if you strike
a pad while choking it.
Device ID setting
The setting described here is
necessary only when you wish
to transmit separate data to two
or more TD-07 units at the same
time. Do not change this setting
in any other case.
Species whether changes to the
TD-07’s settings are transmitted
as system exclusive messages
(ON) or not transmitted (OFF).
Species whether system
exclusive messages are received
(ON) or not received (OFF).
Making System Settings
Here’s how to make settings for the TD-07’s power supply,
volume, display, and USB COMPUTER port input/output.
1. Press the [ ] (SETUP) button.
2. Use the [C][A] buttons to select “SYSTEM,”
and press [ ] (ENTER) button.
3. Use the [C] [A] buttons to select the item
(parameter) that you want to edit, and use the
dial to change the value.
Parameter Value Explanation
LCDContrast 1–16
USB In -36–+12dB
USB Out -24–+24dB
USBDrv
Earplugs OFF, ON
AutoO
GENERIC,
VENDOR
OFF, 10MINS,
30MINS,
4HOURS
4. Press the [ ] (DRUM KIT) button to return to
the DRUM KIT screen.
Adjusts the brightness of the
display.
Adjusts the input level of the
USB audio that is input via the
USB COMPUTER port.
Adjusts the output level of the
USB audio that is output via the
USB COMPUTER port.
Changes the USB driver mode.
Specify “GENERIC” if you want to
use the generic driver provided
by the operating system, or
“VENDOR” if you want to use
the TD-07’s dedicated driver
provided by Roland.
* If you change this setting, it
takes eect when the TD-07’s
power is turned o and on
again.
If this is “ON,” the volume of your
drum performance is decreased.
If you want to protect your
hearing from high volume, such
as when children are using the
TD-07, we recommend that you
turn this “ON.”
Turns the power o
automatically when no pad has
been struck and no operation
performed within the specied
time (10 minutes, 30 minutes, 4
hours).
If this is “OFF,” the power does
not turn o automatically.
4. Press the [ ] (DRUM KIT) button to return to
the DRUM KIT screen.
24
Page 25

Viewing Version Information
Here’s how to show the TD-07’s program version.
If a new system program is released, you can update the
TD-07. For details, refer to the following URL.
http://www.roland.com/support/
Enter the model name 0 refer to “Updater and Driver”
1. Press the [ ] (SETUP) button.
2. Use the [C][A] buttons to select “VERSION,”
and press [ ] (ENTER) button.
The TD-07’s version information is shown.
3. Press the [ ] (DRUM KIT) button to return to
the DRUM KIT screen.
Restoring the Factory Settings
The “Factory Reset” operation returns all data and settings
stored in the TD-07 to their factory-set condition.
Making Detailed Settings (SETUP)
NOTE
When you execute this operation, all data and settings in
the TD-07 will be lost.
1. Press the [ ] (SETUP) button.
2. Use the [C][A] buttons to select “FACTORY
RESET,” and press [ ] (ENTER) button.
A conrmation message appears.
Sure? CANCEL/OK
[EXIT] / [ENTER]
If you decide to cancel, press the [ ] (ENTER) button.
3. Press the [ ] (ENTER) button.
The “Factory Reset” operation will be executed.
Completed!
25
Page 26

Troubleshooting
Troubles Items to check Action Page
Troubles with sound
No sound /
Insucient volume
A specic pad does
not sound
No sound when you
press the kick pedal
No sound when you
press the hi-hat pedal
The sound of another
pad is also heard
when you strike the
pad.
Two or more notes
are sounded when
you strike once
Sounds do not play
reliably
Connect amplied speakers or headphones to the
Is the TD-07 correctly connected to the
amplied speaker or headphones?
Is the dedicated connection cable correctly
connected to the TRIGGER INPUT connector
located on the bottom of the TD-07?
Could an audio cable of headphones or
amplied speaker be broken?
If sound is not output from the amplied
speaker that’s connected, is sound output
when you connect headphones?
Could the TD-07’s volume be lowered?
Could the volume of the connected amplied
speaker be lowered?
Could the volume be lowered on the
smartphone etc. that’s connected to the MIX
IN jack or via Bluetooth?
Are the cables correctly connected to each
pad and pedal?
Could the pad sensitivity be lowered? Adjust the pad sensitivity (Sens).
If you expanded the pads or replaced a pad
with a dierent type of pad, is the pad type
specied correctly?
Is the cable labeled KIK connected to the kick
pad?
Is the cable labeled HHC connected to the
hi-hat pedal?
If multiple pads are attached to the same
stand, the vibration of a strike can be
transmitted to another pad, causing it to
sound inadvertently.
Is the pad fastened to the stand?
Is the snare and tom pad’s mesh head
tensioned evenly?
TD-07’s OUTPUT/PHONES jack.
If you’re connecting an amplied speaker, connect to
the amplied speaker’s input jack.
Check the connections.
Try using a dierent cable. –
If sound is being output, either the connection
cable of the amplied speaker is broken, or there
is a malfunction in the amplied speaker that’s
connected. Check the connected device and cable.
Adjust the volume to an appropriate level –
Connect the appropriately labeled cable to each pad.
Adjust the pad type.
Check the connections.
Note the following points, and make changes to the
attached positions.
5 Separate the pads so that they do not touch each
other.
5 Firmly tighten the pad attachment knob when
attaching it to the stand.
In some cases, sound from a monitor speaker might
cause unintended triggering.
5 Set up the pads at a distance from the speakers
5 Angle the pads, placing them where they are less
likely to be aected by the sound
5 Increase the pad’s minimum sensitivity value
(Threshold) (p. 19)
Fasten the pad rmly to the stand.
Also set the RetrigCancel parameter.
Adjust the mesh head tension. Use a drum key to
adjust the pad’s tuning bolts. Slightly higher tension
is good for proper triggering.
p. 6
–
“Setup
Guide”
–
“Setup
Guide”
p. 19
“Setup
Guide”
–
p. 23
“Setup
Guide”
26
Page 27

Troubles with USB
Troubleshooting
Is the USB cable connected correctly? Check the connections. p. 18
Can’t communicate
with a computer
Troubles with MIDI
No sound from an
external MIDI device
In order to transmit and receive audio as USB
AUDIO, the USB driver must be installed.
Are you using a cable that supports USB 2.0?
Have the settings for “Driver Mode” been
made correctly?
Is the MIDI channel set correctly?
Has the note number been set properly? Set the pad’s “MIDI NOTE NO.” p. 16
Install the USB driver on your computer. p. 18
The product cannot be used the cable that supports
USB 3.0. Use the cable that supports USB 2.0.
Choose the setting that’s appropriate for your
situation.
Set the MIDI channels of the product and external
MIDI device to the same setting.
–
p. 24
p. 24
Troubles with Bluetooth functionality
Troubles Items to check/Action Page
Turn this unit’s Bluetooth function “ON.”
] (Bluetooth)0[A] “ON/OFF”0dial (ON)
[
Bluetooth audio function:
“TD-07” is not shown
on your smartphone
Can’t connect to
Bluetooth audio
Can’t connect to
Bluetooth MIDI
A paired smartphone
does not connect
Can’t execute pairing
between a smartphone
and one of the TD-07 of
multiple units
Could this unit’s Bluetooth function be
“OFF”?
If your smartphone’s Bluetooth device list
shows “TD-07 AUDIO”
If your smartphone’s Bluetooth device list
does not show “TD-07 AUDIO”
For the Bluetooth MIDI function, you’ll execute pairing not via the Bluetooth settings of your smartphone,
but by using the settings within your Bluetooth MIDI compatible app (such as GarageBand). Even if your
smartphone’s Bluetooth device list shows “TD-07 MIDI,” do not tap it. If you tapped it by mistake, cancel
“TD-07 MIDI,” turn the Bluetooth function o and then on again, and make the connection again.
If connection occurs but is immediately broken, turning the smartphone’s Bluetooth function o and then
on again might make connection succeed.
If you are pairing with your smartphone
in a location where there are multiple TD-07
units, you can assign an ID to each unit.
When you specify a Device ID, the specied
number is added to the end of the device
name that is shown on your smartphone.
Example) “TD-07 AUDIO 1” “TD-07 MIDI 1”
etc.
When you initiate pairing ([
name “TD-07 AUDIO” appears on your smartphone.
Bluetooth MIDI function:
] (Bluetooth)0[A] “BT MIDI”0dial (ON)
[
Initiate pairing from the settings of your Bluetooth MIDI
compatible app (such as GarageBand).
In your smartphone’s settings, temporarily remove the
registration of the “TD-07 AUDIO” Bluetooth device, turn the
Bluetooth function o and then on again, and execute pairing
once again.
In your smartphone’s settings, turn the Bluetooth function o
and then on again, and then initiate pairing from the TD-07 to
pair it once again.
[
] (Bluetooth)0[A] “BT ID”0dial (1–99)0[ ] (DRUM KIT)
* If you assign a Device ID, it takes eect when the TD-07
exits from the BLUETOOTH screen.
] (ENTER) button), the device
p. 11
p. 18
–
–
–
–
27
Page 28

USING THE UNIT SAFELY
WARNING
Concerning the Auto O function
The power to this unit will be turned o automatically
after a predetermined amount of time has passed since
it was last used for playing music, or its buttons or
controls were operated (Auto O function). If you do not
want the power to be turned o automatically, disengage the Auto
O function (p. 24).
IMPORTANT NOTES
Power Supply
• Place the AC adaptor so that the side with text is downward.
Repairs and Data
• Before sending the unit away for repairs, be sure to make a
backup of the data stored within it; or you may prefer to write
down the needed information. Although we will do our utmost to
preserve the data stored in your unit when we carry out repairs,
in some cases, such as when the memory section is physically
damaged, restoration of the stored content may be impossible.
Roland assumes no liability concerning the restoration of any
stored content that has been lost.
Additional Precautions
• Any data stored within the unit can be lost as the result of
equipment failure, incorrect operation, etc. To protect yourself
against the irretrievable loss of data, try to make a habit of
creating regular backups of the data you’ve stored in the unit.
• Roland assumes no liability concerning the restoration of any
stored content that has been lost.
• Never strike or apply strong pressure to the display.
• This instrument is designed to minimize the extraneous sounds
produced when it’s played. However, since sound vibrations
can be transmitted through oors and walls to a greater degree
than expected, take care not to allow these sounds to become a
nuisance others nearby.
• When disposing of the packing carton or cushioning material in
which this unit was packed, you must observe the waste disposal
regulations that apply to your locality.
• The rubber portion of the striking surface is treated with a
preservative to maintain its performance. With the passage of
time, this preservative may appear on the surface as a white stain,
or reveal how the pads were struck during product testing. This
does not aect the performance or functionality of the product,
and you may continue using it with condence.
• Continuous playing may cause dis-coloration of the pad, but this
will not aect the pad’s function.
• Do not use connection cables that contain a built-in resistor.
WARNING
Use only the supplied AC adaptor and the correct voltage
Be sure to use only the AC adaptor supplied with the
unit. Also, make sure the line voltage at the installation
matches the input voltage specied on the AC adaptor’s
body. Other AC adaptors may use a dierent polarity, or
be designed for a dierent voltage, so their use could
result in damage, malfunction, or electric shock.
Use only the supplied power cord
Use only the attached power cord. Also, the supplied
power cord must not be used with any other device.
Caution Regarding Radio Frequency Emissions
• The following actions may subject you to penalty of law.
• Disassembling or modifying this device.
• Removing the certication label axed to the back of this
device.
• Using this device in a country other than where it was
purchased
Intellectual Property Right
• The copyright of content in this product (the sound waveform
data, style data, accompaniment patterns, phrase data, audio
loops and image data) is reserved by Roland Corporation.
• Purchasers of this product are permitted to utilize said content
(except song data such as Demo Songs) for the creating,
performing, recording and distributing original musical works.
• Purchasers of this product are NOT permitted to extract
said content in original or modied form, for the purpose of
distributing recorded medium of said content or making them
available on a computer network.
• ASIO is a trademark and software of Steinberg Media
Technologies GmbH.
• This product contains eParts integrated software platform of
eSOL Co.,Ltd. eParts is a trademark of eSOL Co., Ltd. in Japan.
• The Bluetooth
owned by Bluetooth SIG, Inc. and any use of such marks by
Roland is under license.
• This Product uses the Source Code of μT-Kernel under T-License
2.0 granted by the T-Engine Forum (www.tron.org).
• Roland and V-Drums are either registered trademarks or
trademarks of Roland Corporation in the United States and/or
other countries.
• Company names and product names appearing in this document
are registered trademarks or trademarks of their respective
owners.
word mark and logos are registered trademarks
®
28
Page 29

Main Specications
Roland TD-07: Drum Sound Module
Drum kits 50 (Preset: over 20)
Instruments 143
Pad Equalizer: each pad
Eect Types
Bluetooth
Display 16 characters x 2 lines LCD (with backlight)
Power Supply AC adaptor (DC 12 V)
Current Draw 250 mA
Dimensions
Weight
(excluding AC adaptor)
Accessories
Options
(sold separately)
Overhead Mic Simulator
Room
Multi-Eects: 1 system, 30 types
Supported standards: Bluetooth Ver 4.2
Supported prole: A2DP (Audio), GATT (MIDI over Bluetooth Low Energy)
Codec: SBC (Support to the content protection of the SCMS-T method)
185 (W) × 36 (D) × 177 (H) mm
7-5/16 (W) × 1-7/16 (D) × 7 (H) inches
407 g
15 oz
Setup Guide
Owner's Manual
Leaet "USING THE UNIT SAFELY"
AC adaptor
Additinal crash cymbal (Crash2): CY-8, MDY-Standard *1
Personal drum monitor: PM series
V-Drums accessory package: DAP-3X
V-Drums mat: TDM series
Noise eater: NE series
*1: MDY-Standard is additionally required for mounting a CY-8 on the stand.
* This document explains the specications of the product at the time that the document was issued. For the latest
information, refer to the Roland website.
29
Page 30

 Loading...