

Roland KS-G8B, KS-18Z, KS-12 User Manual
Contents
Synthesizer
Owner’s Manual
Panel Descriptions
Top Panel
Rear Panel (Connecting Your Equipment)
Installing Batteries
Overview
............................................. 4
How the JUNO-DS Is Organized
Basic Operation
Playing the JUNO-DS
Turning On/O the Power
Playing a Single Tone (Patch Mode)
Performing Multiple Sounds Together (Performance Mode)
Changing the Key Touch (KEY TOUCH)
Shifting the Key Range in Semitone Steps (Transpose)
Changing the Keyboard’s Pitch in One-Octave Steps
(Octave Shift)
Using the Control Knobs to Vary the Sound
Registering Favorite Sounds to a Button (FAVORITE)
Playing Arpeggios (ARPEGGIO)
Performing with Voice from a Mic
.................................... 2
........................................... 2
................... 3
..................................... 3
.......................... 4
....................................... 4
.................................. 5
............................... 5
........................ 5
..................... 7
......... 7
........................................ 7
................. 7
.......... 7
........................... 8
......................... 8
Importing a Sample and Playing It on the Keyboard
(SAMPLE IMPORT)
Importing Audio Files (Sample)
Recalling a Sample
Deleting Imported Samples
Editing Samples
Editing Sounds
Editing a Patch/Drum Kit
Editing a Performance
Editing the Eects
Saving Your Settings (Write)
Playing Rhythm Patterns
Selecting and Playing a Rhythm Pattern
Changing the Tempo
..................................... 9
........................... 9
.................................... 9
............................. 9
...................................... 9
........................................ 10
................................ 10
.................................. 10
..................................... 10
............................. 10
.............................. 11
.................... 11
................................... 11
..... 5
Playing Audio Files (Audio Player)
Assigning Audio Files to Pads and Playing Them
Audio Player Operations
. . . . . . . . . . . . . . . . . . . . . . . . . . . . . . . . 12
...................... 12
.............. 12
Playing/Recording Patterns (PATTERN SEQUENCER)
Playing Patterns
Basic Operations for the Pattern Sequencer
Recording Patterns
Saving a Pattern
Pattern Utility
Overall Settings for the JUNO-DS
Accessing the Menu Screens
Making System Settings (SYSTEM)
Adjusting the Display Contrast
Adjusting the Display Brightness
Enabling/Disabling the Auto-O Function
Master Tuning
Applying Reverb to the Mic Input
Assigning the Function of the Control Pedal
Assigning the Function of the Control Knobs
Convenient Functions (UTILITY)
Playing the Demo Songs
Appendix
Troubleshooting
Error Messages
USING THE UNIT SAFELY
IMPORTANT NOTES
Shortcut List
Main Specications
...................................... 13
................. 13
.................................... 13
...................................... 15
........................................ 15
...................... 16
............................. 16
. . . . . . . . . . . . . . . . . . . . . . . . 16
............................ 16
.......................... 16
................... 16
......................................... 16
.......................... 16
.................. 16
. . . . . . . . . . . . . . . . . 17
.......................... 17
................................ 18
............................................. 19
...................................... 19
....................................... 19
............................... 20
.................................... 20
.......................................... 22
.................................... 22
..... 13
Owner’s Manual
Read this rst. It explains the basic things you need to know in order to use the JUNO-DS.
PDF manual
5Parameter Guide
This explains all parameters of the JUNO-DS.
5MIDI Implementation
This is detailed information about MIDI messages.
Before using this unit, carefully read “USING THE UNIT SAFELY” and “IMPORTANT NOTES” (leaet “USING THE UNIT SAFELY” and Owner’s Manual (p. 20)). After reading, keep the document(s) including
those sections where it will be available for immediate reference.
© 2015 ROLAND CORPORATION
(this document)
(download from the Web)
(English)
(English)
To obtain the PDF manual
1.
Enter the following URL in your computer.
http://www.roland.com/manuals/
2.
Choose “JUNO-DS” as the product name.
I
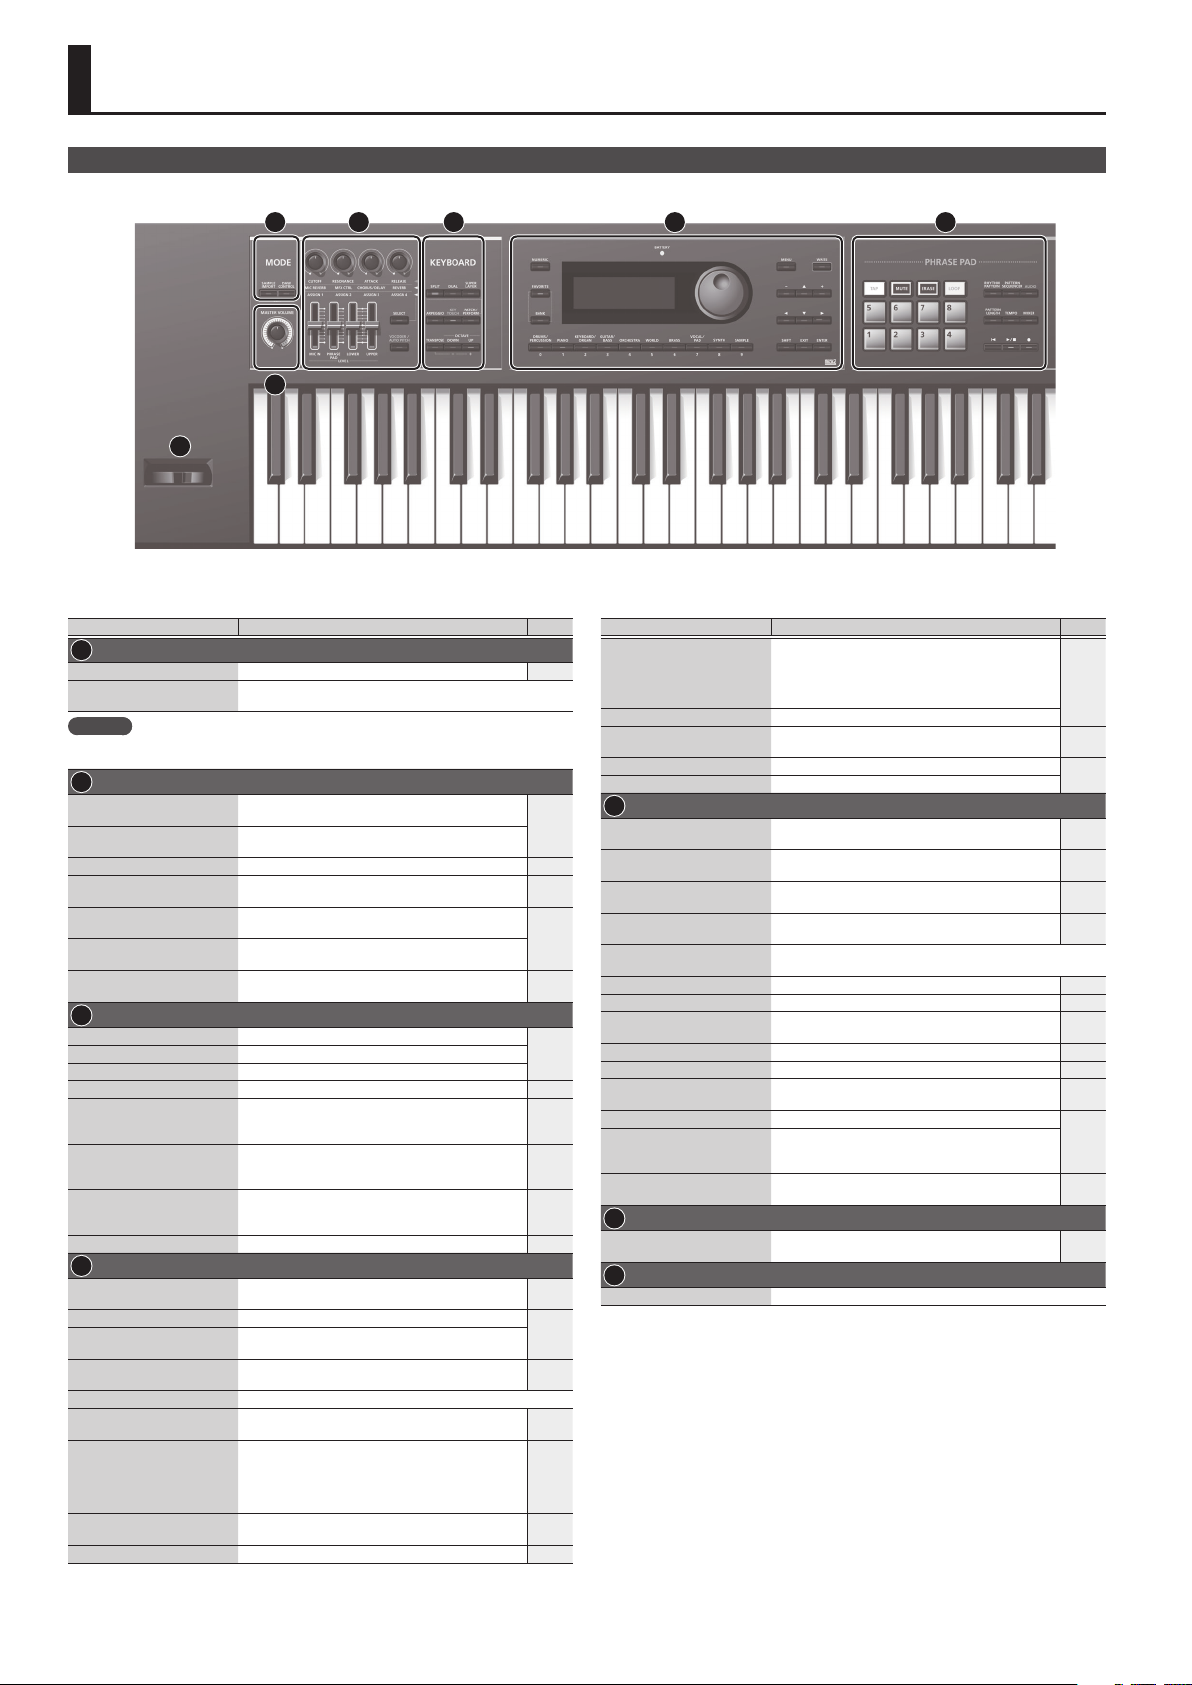
Panel Descriptions
Top Panel
1 2 3 4 5
6
7
Controller Explanation Page
MODE
1
[SAMPLE IMPORT] button Used to import an audio le (sample) into the JUNO-DS. p. 9
[DAW CONTROL] button
MEMO
You can move to the EDIT MENU screen by pressing the [SAMPLE IMPORT ] button and [DAW
CONTROL] button simultaneously.
2
Control knobs
[SELECT] button
[MIC IN] LEVEL slider Adjusts the volume of the input from MIC INPUT jack. p. 8
[PHRASE PAD] LEVEL slider
[LOWER] LEVEL slider
[UPPER] LEVEL slider
[VOCODER/AUTO PITCH]
button
KEYBOARD
3
[SPLIT] button Turns the split function on/o.
[SUPER LAYER] button Turns the super layer function on/o.
[ARPEGGIO] button Turns the arpeggiator on/o. p. 8
[KEY TOUCH] button
[PATCH/PERFORM] button
[TRANSPOSE] button
OCTAVE [DOWN] [UP] buttons Raise or lower the pitch range in steps of an octave. p. 7
4
[NUMERIC] button
[FAVORITE] button Turns the Favorite function on/o.
[BANK] button
BATTERY indicator
Display Shows various information depending on operation.
Value dial
[DRUMS/PERCUSSION]–
[SAMPLE] (Category) buttons
([0]–[9] buttons)
[MENU] button Displays a menu screen.
[WRITE] button Saves the modied settings in internal memory. p. 10
Used to control DAW software from the JUNO-DS.
For details, refer to “Parameter Guide (English)“ (PDF).
Control the parameters that you’ve selected by the
[SELECT] button.
Selects the group of parameters that is controlled by
the Control knobs.
Adjusts the volume of the rhythm pattern / audio
player.
Split: Adjusts the volume of the lower part.
Dual: Adjusts the volume of part 2.
Split: Adjusts the volume of the upper part.
Dual: Adjusts the volume of part 1.
Accesses settings for the Vocoder function and Auto
Pitch function.
Used to change the touch response of the keyboard.
Depending on the KEY TOUCH setting, the [KEY TOUCH]
button is lit or unlit.
When this button is on (lit), the JUNO-DS is in
Performance mode. When this button is o (unlit), the
JUNO-DS is in Patch mode.
Hold down this button and use the OCTAVE [DOWN]
[UP] buttons to raise or lower the pitch range in
semitone steps.
When this button is on (lit), you can use the [0]–[9]
buttons to enter numeric values.
When this button is on (lit), you can use the [0]–[9]
buttons to select Favorite banks.
The indication changes depending on the remaining
battery amount.
Changes a value. If you hold down the [SHIFT] button
and turn the dial, the value changes more greatly.
Select categories (types) of sound (such as patches
or drum kits). You can also use the value dial to select
other sounds within the same category.
* When the [NUMERIC] button is on (lit), these buttons
operate as [0]–[9] buttons to enter numeric values.
p. 7
p. 11
p. 12
p. 6
p. 8
p. 6[DUAL] button Turns the dual function on/o.
p. 7
p. 16
p. 5
p. 7
p. 4
p. 7
p. 3
p. 4
p. 5
p. 4
p. 16
Controller Explanation Page
Changes a value.
* If you press one of these buttons while holding
[–] [+] buttons
[H] [I] [K] [J] buttons Move the cursor position up/down/left/right.
[SHIFT] button
[EXIT] button Exits a screen or cancels an operation.
[ENTER] button Used to execute an operation.
PHRASE PAD
5
[TAP] button
[MUTE] button
[ERASE] button
[LOOP] button
Pads [1]–[8]
[RHYTHM PATTERN] button Press this button to use rhythm patterns. p. 11
[PATTERN SEQUENCER] button Press this button to use the pattern sequencer. p. 13
[AUDIO] button
[PATTERN LENGTH] button Changes the number of measures in the pattern. p. 14
[TEMPO] button Adjusts the tempo. p. 11
[MIXER] button
[u] button Moves to the beginning of the pattern or audio le.
[s] button
[t] button
6
[MASTER VOLUME] knob
7
Pitch bend/Modulation lever Varies the pitch or applies vibrato.
down the other, the value changes more rapidly. If
you press one of these buttons while holding down
the [SHIFT] button, the value changes more greatly.
Accesses the corresponding edit screen when pressed
together with another button.
Sets the tempo to the interval at which you press this
button during pattern playback.
When using the pattern sequencer, mutes the specied
track.
When using the pattern sequencer, erases the recorded
pattern or a portion of the pattern.
When using the pattern sequencer, turns loop playback/
recording on/o.
Play back phrases (rhythm patterns / patterns / samples) that are
assigned to the pads.
Press this button to use the “audio player” which plays
back audio les from a USB ash drive.
When using the pattern sequencer, species settings
such as level or pan for each track.
Starts/stops playback of the rhythm pattern, pattern,
or audio le that is selected for the rhythm pattern
function, the pattern sequencer, or the audio player.
When using the pattern sequencer, press this button to
record a pattern.
Adjusts the volume that is output from the OUTPUT
jacks and the PHONES jack.
p. 4
p. 4
p. 22
p. 4
p. 11
p. 13
p. 13
p. 14
p. 13
p. 12
p. 13
p. 11
p. 12
p. 13
p. 13
p. 5
2

Rear Panel (Connecting Your Equipment)
Microphone
External audio player
MIDI device
Amplied speakers
Headphones
Panel Descriptions
* To prevent malfunction and equipment failure,
always turn down the volume, and turn o all the
units before making any connections.
8 9
11 12
10
Pedal switch
Expression pedal
Jack/Controller Explanation Page
PEDAL CONTROL jack
8
PEDAL HOLD jack
9
MIDI IN, OUT connectors For connecting a MIDI device.
10
MIC [LEVEL] knob Adjusts the input level of the MIC INPUT jack.
11
MIC INPUT jack
12
EXT INPUT jack Connect your external audio player or audio device here.
13
OUTPUT R, L/MONO jacks
14
PHONES jack Connect your headphones (sold separately) to this jack.
15
USB COMPUTER port
16
USB MEMORY port
17
DC IN jack
18
[POWER] switch This turns the power on/o. p. 5
19
Ground terminal Refer to “Ground Terminal” (p. 20).
20
13 14
You can connect an expression pedal (EV-5;
sold separately) or pedal switch (DP series; sold
separately) here and use them to control various
parameters or functions.
* Use only the specied expression pedal (EV-
5; sold separately). By connecting any other
expression pedals, you risk causing malfunction
and/or damage to the unit.
You can connect a pedal switch (DP series; sold
separately) and use it as a hold pedal.
Connect your dynamic microphone here.
This is an unbalanced 1/4” phone jack.
These output the audio signal in stereo to your amp or mixer.
If you’re outputting in mono, connect only the L/MONO jack.
Use a commercially available USB 2.0 cable to connect this
unit to your computer.
You can synchronize it with a DAW on your computer via USB
MIDI, and record the sound of the JUNO-DS into your DAW
via USB audio.
Connect a USB ash drive (sold separately) here.
You can use a USB ash drive to play audio les or
to back up data.
* Use USB Flash Memory sold by Roland. We
cannot guarantee operation if other products
are used.
* Never insert or remove the USB ash drives
while this unit is turned on. Doing so may
corrupt the unit’s data or the data on the USB
ash drives.
* Carefully insert the USB ash drives all the way
in—until it is rmly in place.
Connect the included AC adaptor here.
* To prevent the inadvertent disruption of power to your
unit (should the plug be pulled out accidentally), and to
avoid applying undue stress to the jack, anchor the power
cord using the cord hook, as shown in the illustration.
15
Computer
16 17
USB ash drive
* Place the AC adaptor so the side with the indicator (see
illustration) faces upwards and the side with textual
information faces downwards. The indicator will light when
you plug the AC adaptor into an AC outlet.
p. 16
p. 8
p. 9
p. 12
p. 17
18 19
Concerning the Auto O Function
Indicator
AC adaptor
20
Power Cord
AC Outlet
The power to this unit will be turned
o automatically after a predetermined
amount of time has passed since it was last
used for playing music, or its buttons or
controls were operated (Auto O function).
If you do not want the power to be turned
o automatically, disengage the Auto O
function (p. 16).
NOTE
5Any settings that you are in the process
of editing will be lost when the power
is turned o. If you have any settings
that you want to keep, you should save
them beforehand.
5To restore power, turn the power on
again.
Installing Batteries
If eight commercially available AA nickel-metal hydride batteries are installed, you’ll
be able to play the JUNO-DS without connecting the AC adaptor.
Remove the battery compartment cover.
1.
61-key model
88-key model
* When turning the unit over, be careful so as to protect the buttons and knobs
from damage. Also, handle the unit carefully; do not drop it.
Insert the batteries into the battery compartment, taking care to observe
2.
the correct polarity.
61-key model 88-key model
Securely close the battery compartment cover.
3.
NOTE
If you handle batteries improperly, you risk explosion and uid leakage. Make
sure that you carefully observe all of the items related to batteries that are listed
in “USING THE UNIT SAFELY” and “IMPORTANT NOTES” (leaet “USING THE UNIT
SAFELY” and Owner’s manual (p. 20)).
When to replace the batteries (BATTERY indicator)
When the batteries run down, the BATTERY indicator will light or blink.
5The BATTERY indicator will light when the batteries run low.
5If you continue using the JUNO-DS, the indicator will blink; please replace the
batteries.
NOTE
5If you continue use even though the indicator is blinking, the display will
indicate “Battery Low!” and further operation will be impossible.
5The BATTERY indicator is only an approximation.
While pressing the tabs of the battery compartment cover on the bottom
panel, remove the cover.
Slide the top panel battery compartment cover, and detach the cover.
3
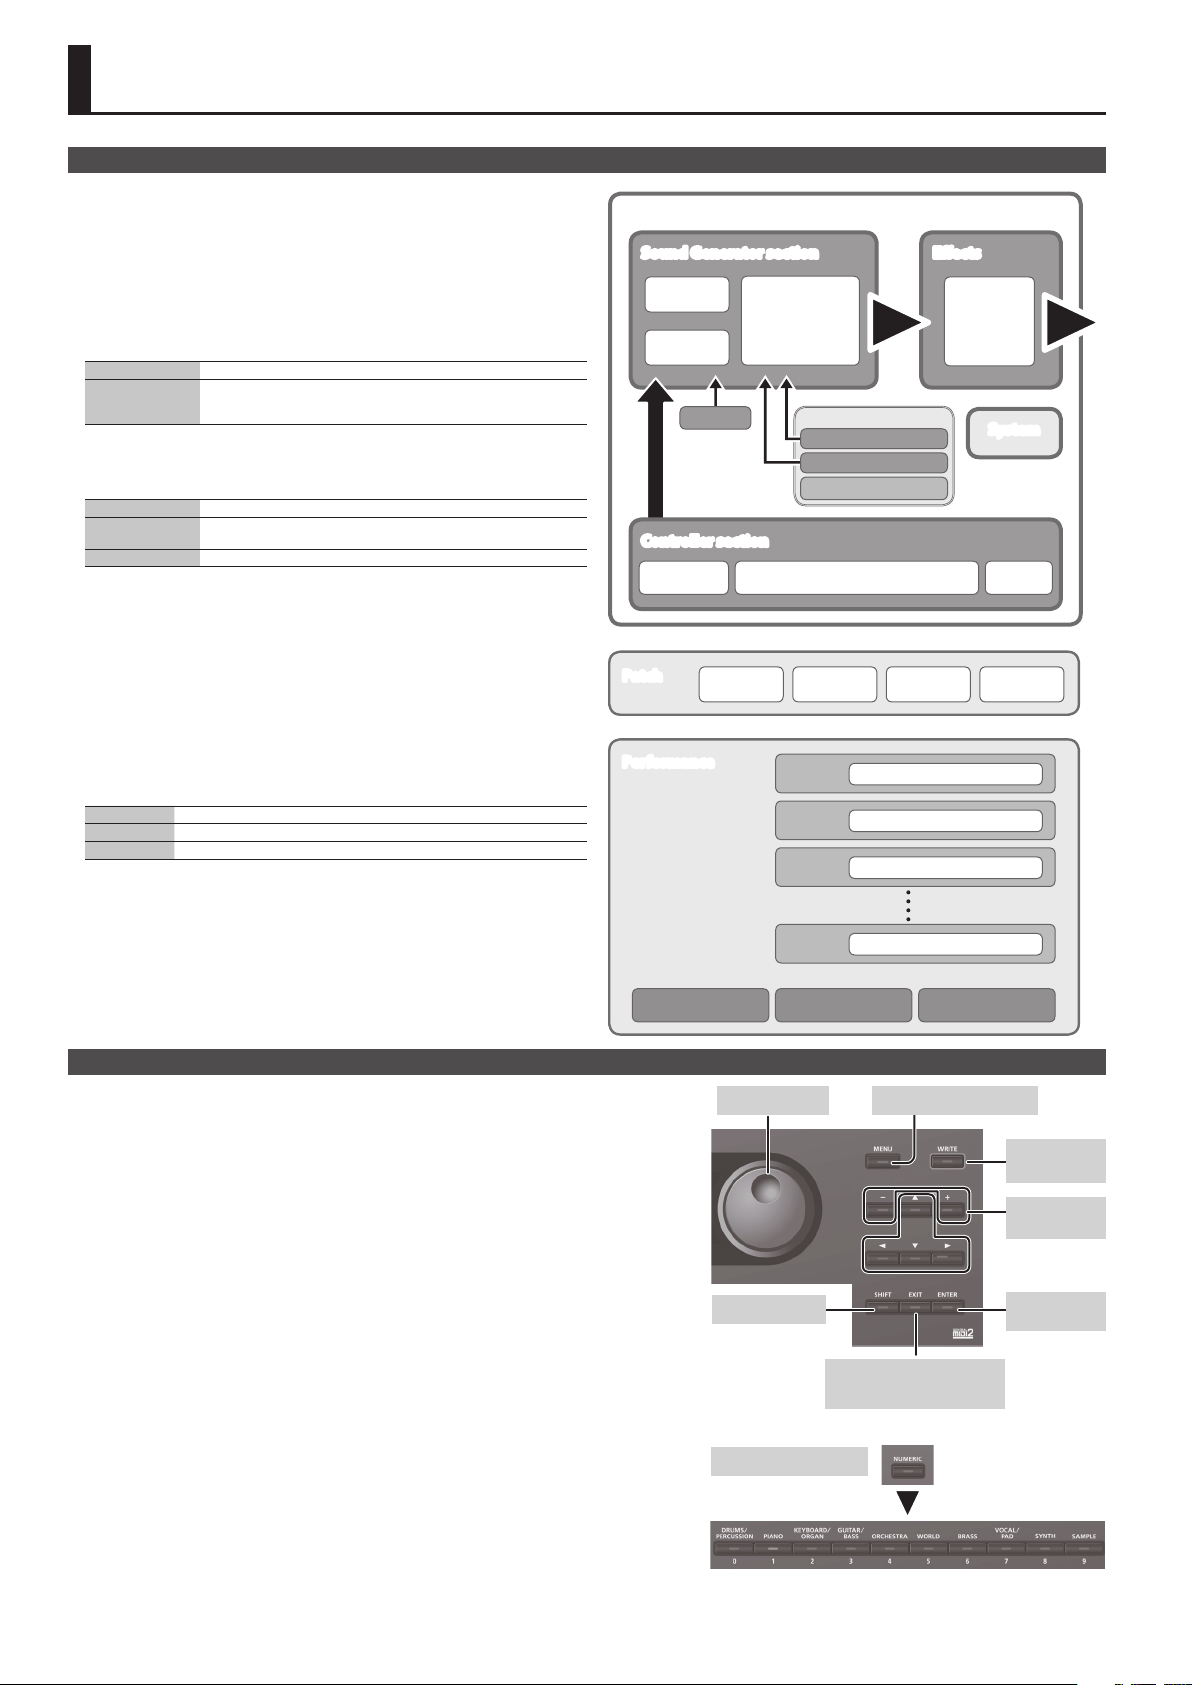
Overview
How the JUNO-DS Is Organized
Controller section
The performance information generated when you press/release a key or press a hold
pedal are transmitted to the sound generator section.
This section consists of a keyboard, pitch bend/modulation lever, the panel buttons
and knobs, and pedals connected to the rear panel.
Sound Generator section
This section receives performance information sent from the controller section, and
sounds a patch or performance accordingly.
Eects
MFX (Multi eects) Provides 80 types of eect, such as distortion and anger.
Chorus/Reverb
* MFX and chorus/reverb can have dierent settings for each patch and performance.
Phrase Pad
These play the phrases that are assigned to pads [1]–[8].
Rhythm Pattern The pads play dedicated rhythm patterns.
Pattern Sequencer
Audio Player The pads play audio les from a USB ash drive.
Patch
A patch is a sound that you can perform. Each patch consists of up to four “tones,” and
you can create a wide variety of sounds by combining tones.
Drum Kit
A drum kit is a collection of percussion instrument sounds or sound eects. Each
dierent key (note number) plays a dierent percussion instrument or sound eect.
Sample
These are sounds created by Sample Import (p. 9).
Performance
A performance lets you assign a dierent patch, drum kit, or sample to each of 16
parts, allowing you to use 16 dierent sounds simultaneously.
The following settings are also saved as performance settings.
SPLIT Use dierent sounds for the right and left hands
DUAL Layer two sounds
SUPER LAYER Layer a single sound to create a richer feeling
When you select Split or Dual, the patches of part 1 and part 2 are used.
“Patch mode” is when you select and play a single patch (or drum kit or sample).
“Performance mode” is when you select and play a performance.
When using SPLIT/DUAL/SUPER LAYER, you’ll always be in Performance mode (the
[PATCH/PERFORM] button is lit).
A chorus/reverb unit that can be used independently of the chorus/reverb
eects of the MFX unit.
Chorus can also be used as a delay.
The pads record patterns of several measures, and play them back while
you perform.
JUNO-DS
Sound Generator section
Patch
Drum Kit
Arpeggio
Controller section
Keyboard
Patch
Performance
Tone 1 Tone 2
Performance
Phrase Pad
Rhythm Pattern
Pattern Sequencer
Audio Player
Pitch Bend/Modulation lever
Part 1
(Upper)
Part 2
(Lower)
Part 3
Part 16
Eects
MFX
Chorus
Reverb
System
Tone 3 Tone 4
Patch/Drum Kit/Sample
Patch/Drum Kit/Sample
Patch/Drum Kit/Sample
Patch/Drum Kit/Sample
Pedal
Basic Operation
Move the cursor
To change a selection or parameter setting that’s shown in the screen, use the [H] [I] [K] [J] buttons to
move the cursor to the value of the parameter that you want to change.
If you hold down a cursor button, the cursor continues to move.
If you hold down the cursor button of a certain direction and then press the cursor button of the
opposite direction, the cursor moves faster.
Changing a value
To change the value that’s highlighted by the cursor, use the value dial or the [–] [+] buttons.
5If you hold down the [SHIFT] button while performing this operation, the value will change more
greatly.
5In case of [–] [+] buttons, If you hold down one button and press the other button, the value will
change faster.
Entering numeric values
When the [NUMERIC] button is on (lit), you can use the [0]–[9] buttons to enter numeric values.
Press the [0]–[9] buttons to enter a numerical value, and then press the [ENTER] button.
[ENTER] button
Use this button to conrm a value or execute an operation.
[EXIT] button
Use this button to exit a screen or to cancel an operation without executing it.
[MENU] button
From the menu you can select detailed sound settings (editing), system settings, or utility functions.
Saving your settings
When you press the [WRITE] button, the WRITE MENU screen appears, allowing you to save a patch (drum
kit) or performance.
Shortcut
By holding down the [SHIFT] button and pressing another button, you can move to the setting screen
for the button you pressed.
For details, refer to “Shortcut List” (p. 22).
4
Split Dual Super Layer
Change a value
Shortcut
Entering numeric values
Display the menu screen
5Exit a screen
5Cancel an operation
Save your
settings
Change a
value
Conrm/
execute

Playing the JUNO-DS
Turning On/O the Power
Before turning the unit on/o, always be sure to turn the volume down. Even with
the volume turned down, you might hear some sound when switching the unit on/
o. However, this is normal and does not indicate a malfunction.
Turn the power on in the following order:
1.
this unit 0 connected devices.
* This unit is equipped with a protection
circuit. A brief interval (a few seconds) after
turning the unit on is required before it will
operate normally.
A screen like the following appears.
* The explanations in this manual include illustrations that depict what should
typically be shown by the display. Note, however, that your unit may incorporate
a newer, enhanced version of the system (e.g., includes newer sounds), so
what you actually see in the display may not always match what appears in the
manual.
Turn the [MASTER VOLUME] knob to adjust the volume.
2.
Turning the Power O
Turn the power o in the following order: connected devices 0 this unit.
1.
On
O
Patches are organized into categories which are assigned to buttons.
Each category is further divided into several sub-categories.
Use the value dial to select a patch.
3.
MEMO
Patches whose category number is marked with an “S” (e.g., Pf: S01) are specially
recommended sounds.
Selecting a bank
Move the cursor to bank, and use the value dial to select a bank.
1.
Bank Explanation
DS (DS Tone)
PRST (Preset)
GM (GM2) This bank is for GM2 sounds.
EXP
USER
These are the particularly recommended patches of the JUNO-DS.
The edited result is saved in the user bank.
These patches cannot be rewritten. The edited result is saved in
the user bank.
This bank is for expansion sounds.
A wide range of tones from the Axial sound
library site can be added to this unit.
For details, refer to the Axial site.
http://axial.roland.com/
Patches, drum kits, or samples that you edit are saved in this
bank.
5User patches can be saved in numbers 501–756.
5User drum kits can be saved in numbers R501–R508.
Performing Multiple Sounds Together (Performance Mode)
Press the [PATCH/PERFORM] button to
1.
make it light.
The JUNO-DS is in Performance mode, and the
PERFORM screen appears.
Playing a Single Tone (Patch Mode)
Make sure that the [PATCH/PERFORM]
1.
button is unlit.
If the [PATCH/PERFORM] button is lit, press the
[PATCH/PERFORM] button to make it go dark.
The JUNO-DS is in Patch mode, and the PATCH
screen appears.
1
3
6
No. Explanation
1
2
3
4
5
6
Press a category button ([DRUMS/PERCUSSION]–[SAMPLE]) to select a
2.
category.
Category Explanation
DRUMS/PERCUSSION Drum kit
PIANO Piano
KEYBOARD/ORGAN Keyboard, Organ
GUITAR/BASS Guitar, Bass
ORCHESTRA Orchestral
WORLD Ethnic instruments
BRASS Brass, Woodwinds
VOCAL/PAD Vocal, Choir, Pads
SYNTH Synthesizer
SAMPLE Sample (imported audio les)
4
Eect on (lit)/o (unlit)
Tempo
Patch bank
Bank number
Sub category
Category number
11
5
8
2
7
9
10
No. Explanation
Patch name
7
Octave Shift setting
8
Patch level
9
Level meter
10
Parameters that can currently be
11
adjusted by the control knobs
Performance bank/number
Split
Super Layer
Move the cursor to bank, and use the value dial to select a bank.
2.
Bank Explanation
PRST (Preset)
USER
Move the cursor to the performance number, and use the value dial to
3.
select a performance.
These performances cannot be rewritten. The edited result is saved in the user
bank.
Performances that you edit are saved in this bank.
User performances can be saved in numbers 001–128.
Dual
16-part mode
5If you select a performance that is set to split, dual, or super layer, the
corresponding button is lit.
5Within Performance mode, the state in which neither split, dual, nor super layer
is selected is called “16-part mode”; this allows you to make more detailed
settings. For details, refer to “Parameter Guide (English)” (PDF).
When you edit the settings of a patch or performance, an “*” symbol appears
beside the name. If you want to keep the edited settings, perform the Write
operation (p. 10).
When you save the setting, the “*” disappears.
5
Playing the JUNO-DS
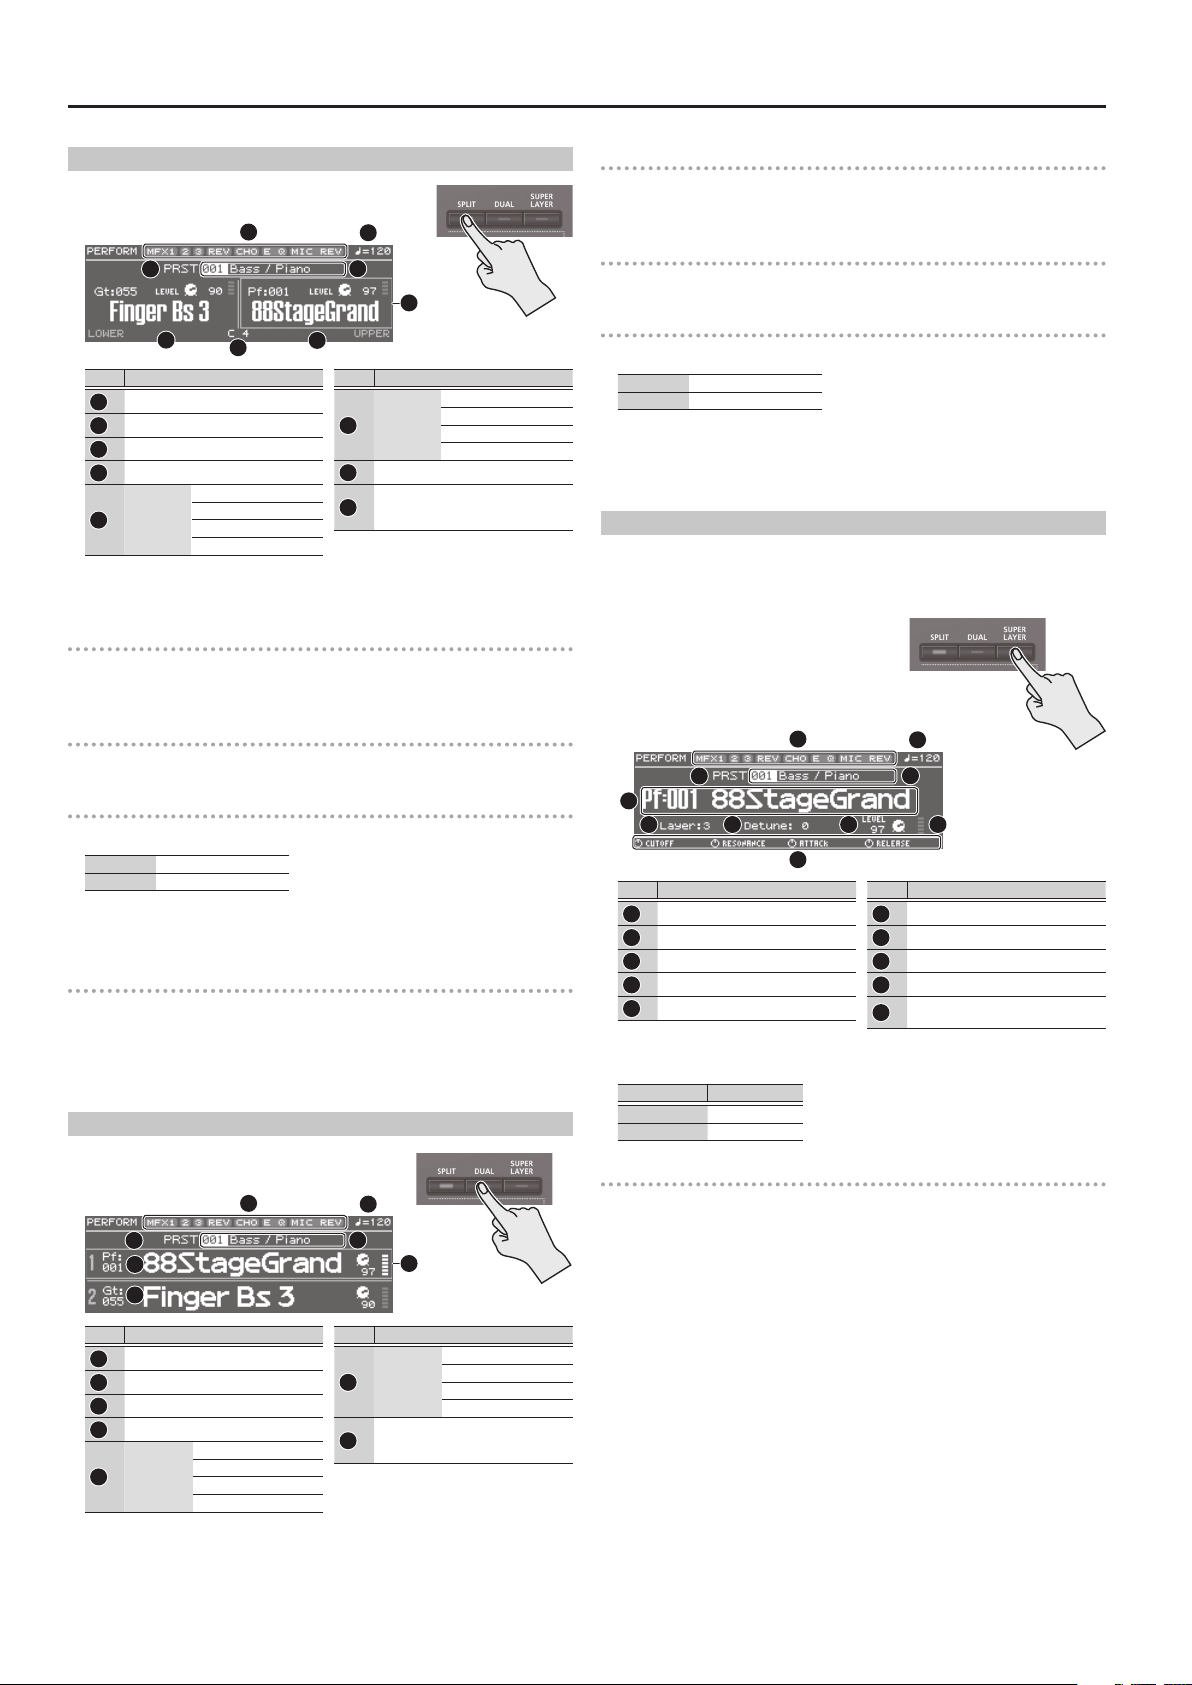
Playing Dierent Tones with Your Right and Left Hands (SPLIT)
Press the [SPLIT] button to make it light.
1.
The Split screen appears.
3
5
No. Explanation
Eect on (lit)/o (unlit)
1
Tempo
2
Performance bank
3
Performance number/name
4
Lower
5
(Part 2)
7
Category number
Patch name
Patch level
Level meter
1
2
4
6
No. Explanation
6
7
8
8
Category number
Upper
(Part 1)
Split point
*
Indicates the part whose patch will
be switched
Patch name
Patch level
Level meter
frame
Divided by the split point, the right-hand side of the keyboard plays the upper
(part 1) patch, and the left-hand side plays the lower (part 2) patch.
Adjusting the volume
You can use the [UPPER] LEVEL slider and [LOWER] LEVEL slider to adjust the upper
(part 1) and lower (part 2) volume (LEVEL). The “LEVEL” values in the screen change
accordingly.
Exchanging the upper/lower patches
Hold down the [SPLIT] button and press the [DUAL] button.
1.
Switching patches
Press pad [1] or pad [2] to select the part whose patch you want to switch.
1.
Pad [1] Upper (Part 1)
Pad [2] Lower (Part 2)
Use the value dial to switch patches.
2.
You can also select patches by pressing the [DRUMS/PERCUSSION]–[SAMPLE]
buttons.
Changing the Split point
Hold down the [SPLIT] button and press the key that you want to be the
1.
new split point.
The key you press becomes the split point.
The split point key is included in the upper region.
Playing Two Layered Sounds (DUAL)
Press the [DUAL] button to make it light.
1.
The Dual screen appears.
1
3
5
6
2
4
7
Adjusting the volume
You can use the [UPPER] LEVEL slider and [LOWER] LEVEL slider to adjust the upper
(part 1) and lower (part 2) volume (LEVEL). The “LEVEL” values in the screen change
accordingly.
Exchanging the upper/lower patches
Hold down the [SPLIT] button and press the [DUAL] button.
1.
Switching patches
Press pad [1] or pad [2] to select the part whose patch you want to switch.
1.
Pad [1] Upper (Part 1)
Pad [2] Lower (Part 2)
Use the value dial to switch patches.
2.
You can also select patches by pressing the [DRUMS/PERCUSSION]–[SAMPLE]
buttons.
Thickening a Patch (SUPER LAYER)
You can overlay a patch several times, slightly shifting the pitches of each layer. This
is called “detuning.”
Using the “Super Layer” function, you can easily set the detuning and the number
of times you overlay the patch (number of parts), to create more spacious or thicker
tones.
Select a patch.
1.
Press the [SUPER LAYER] button to make it
2.
light.
The Super Layer screen appears.
1
3
5
6
No. Explanation
Eect on (lit)/o (unlit)
1
Tempo
2
Performance bank
3
Performance number/name
4
Category number/Patch name
5
Move the cursor to “Layer” or “Detune,” and use the value dial to change the
3.
setting.
Parameter Value
Layer 2–5
Detune 0–30
7
8
10
2
4
9
No. Explanation
Layer Number of layered parts
6
Detune Amount of pitch shift
7
Part level
8
Level meter
9
Parameters that can currently be
10
adjusted by the control knobs
Adjusting the volume
You can use the [UPPER] LEVEL slider to adjust the volume (LEVEL). The “LEVEL”
values in the screen change accordingly.
No. Explanation
Eect on (lit)/o (unlit)
1
Tempo
2
Performance bank
3
Performance number/name
4
Upper
5
(Part 1)
Category number
Patch name
Patch level
Level meter
No. Explanation
Lower
6
(Part 2)
*
Indicates the part whose patch will
7
be switched
The upper (part 1) and lower (part 2) patches sound together.
6
Category number
Patch name
Patch level
Level meter
frame

Playing the JUNO-DS
Changing the Key Touch (KEY TOUCH)
Sets the keyboard’s touch.
Press the [KEY TOUCH] button.
1.
The KEY TOUCH screen appears.
Move the cursor to “Velo Curve,” and use the value dial to change the
2.
setting.
Value Explanation
LIGHT
MEDIUM This sets the keyboard to the standard touch.
HEAVY
This sets the keyboard to a light touch. You can achieve fortissimo ( ) play with
a less forceful touch than MEDIUM setting, so the keyboard feels lighter. This
setting makes it easier for children, whose hands have less strength.
This sets the keyboard to a heavy touch. You have to play the keyboard more
forcefully than MEDIUM setting in order to play fortissimo (), so the keyboard
touch feels heavier. This setting allows you to add more expression when
playing dynamically.
MEMO
You can also make more detailed adjustments to the keyboard touch, or specify
that all notes sound at a xed volume regardless of your keyboard playing
dynamics. For details, refer to system settings “KEY TOUCH” (p. 16).
Shifting the Key Range in Semitone Steps (Transpose)
Hold down the [TRANSPOSE] button,
1.
and press the OCTAVE [DOWN] or
[UP] buttons.
If a value other than “C” is set, the
[TRANSPOSE] button is lit.
To reset the value to “C,” hold down
the [TRANSPOSE] button and press
the OCTAVE [DOWN] and [UP] buttons
simultaneously.
Using the Control Knobs to Vary the Sound
You can use the Control knobs to
control the sound in real time.
You can control a total of 12
parameters, organized as three
groups each containing four
parameters.
If you select the parameters to be set
for each part, the target aected by
these modications will depend on
the current settings.
Patch mode
Control knobs will apply to each individual key. When you turn one of
Drum Kit
Performance mode
Dual, Super Layer All parts
Split, 16-part mode The currently selected part
* For some sounds, the knobs may not have an eect.
Press the [SELECT] button to select the group of parameters.
1.
Use the control knobs to control the parameters.
2.
Parameter Explanation
CUTOFF
RESONANCE
ATT ACK
RELEASE
MIC REVERB Adjusts the reverb that’s applied to the input sound from the MIC IN jack.
MFX CTRL Controls MFX.
CHORUS/DELAY Adjusts the amount of chorus or delay.
REVERB Adjusts the amount of reverb.
ASSIGN 1–4
these knobs, the currently selected key will be indicated (e.g., C4).
To change the key to which the eect is to be applied, press a key and
specify a new key name.
Adjusts the frequency (cuto frequency) at which the lter begins to be
applied.
Boosts the sound in the vicinity of the cuto frequency, adding a
distinctive character to the sound.
Adjusts the time from when you press the key until the sound reaches
the maximum level.
Adjusts the time from when you release the key until the sound is no
longer heard.
You can assign various parameters to these knobs and control them.
For details on how to change the parameters that are assigned to the
knobs, refer to “Parameter Guide (English)” (PDF).
Value -5 (G)–0 (C)–+6 (F#)
Changing the Keyboard’s Pitch in One-Octave Steps (Octave Shift)
Press the OCTAVE [DOWN] or [UP] button.
1.
If this setting is other than “0,” OCTAVE [DOWN] or
[UP] button will light.
You can reset this setting to “0” by pressing
OCTAVE [DOWN] and [UP] buttons simultaneously.
Value -3–0–+3
What’s aected by the Octave Shift setting will depend on the current mode.
Patch mode
The octave of the selected patch will change. The setting cannot be saved.
Performance mode
Dual, Super Layer The octave of all parts will change.
Split, 16-part mode
* You can save the Octave setting of each part by saving the performance.
The octave of the currently selected part will change.
You can set this independently for each part.
Registering Favorite Sounds to a Button (FAVORITE)
“Favorites” store settings for frequently used patches and performances, allowing
you to recall them by simply pressing a button.
Favorites store the number of the patch or performance.
Favorite Bank 9
Favorite Bank 0
Favorite 0–9
5Favorites 0–9 can be registered as a “favorite set”; you can register a total of ten
such sets.
5Use the [0] to [9] buttons to register tones or switch to tones.
NOTE
If you’ve changed the sound or keyboard settings (split, dual, super layer), you
must rst save the changed settings before you can register them as a favorite.
Registering a Favorite
Select a patch or performance that you want to
1.
register.
Press the [BANK] button to make it light.
2.
Press a [0]–[9] button to select the bank in which
3.
you want to register the favorite.
Hold down the [FAVORITE] button and press a
4.
[0]–[9] buttons to select the number in which the
favorite will be registered.
7
 Loading...