

Page 1

INSTALLATION AND CON
FIGURATION GUIDE
Rockwell Automation Publication HSE-IN024A-EN-E–December 2012
Supersedes Publication HSE-IN023A-EN-E–May 2012
Page 2

Contact Rockwell Automation
Customer Support Telephone — 1.440.646.3434
Online Support — http://www.rockwellautomation.com/support
Copyright Notice
Trademark Notices
Other Trademarks
© 2012 Rockwell Automation Technologies, Inc. All rights reserved. Printed in USA.
© 2010 OSIsoft, Inc. All rights reserved.
This document and any accompanying Rockwell Software products are copyrighted by Rockwell Automation
Technologies, Inc. Any reproduction and/or distribution without prior written consent from Rockwell
Automation Technologies, Inc. is strictly prohibited. Please refer to the license agreement for details.
FactoryTalk, Rockwell Automation, Rockwell Software, the Rockwell Software logo are registered trademarks
of Rockwell Automation, Inc.
The following logos and products are trademarks of Rockwell Automation, Inc.:
FactoryTalk Historian Site Edition (SE), FactoryTalk Historian Machine Edition (ME), RSView, FactoryTalk View,
RSView Studio, FactoryTalk ViewStudio, RSView Machine Edition, RSView ME Station, RSLinx Enterprise,
FactoryTalk Services Platform, FactoryTalk Live Data, and FactoryTalk VantagePoint.
The following logos and products are trademarks of OSIsoft, Inc.:
PI System, Sequencia, Sigmafine, gRecipe, sRecipe, and RLINK.
ActiveX, Microsoft, Microsoft Access, SQL Server, Visual Basic, Visual C++, Visual SourceSafe, Windows,
Windows ME, Windows NT, Windows 2000, Windows Server 2003, and Windows XP are either registered
trademarks or trademarks of Microsoft Corporation in the United States and/or other countries.
Adobe, Acrobat, and Reader are either registered trademarks or trademarks of Adobe Systems Incorporated in
the United States and/or other countries.
ControlNet is a registered trademark of ControlNet International.
DeviceNet is a trademark of the Open DeviceNet Vendor Association, Inc. (ODVA).
Ethernet is a registered trademark of Digital Equipment Corporation, Intel, and Xerox Corporation.
Restricted Rights Legend
Warranty
OLE for Process Control (OPC) is a registered trademark of the OPC Foundation.
Oracle, SQL*Net, and SQL*Plus are registered trademarks of Oracle Corporation.
All other trademarks are the property of their respective holders and are hereby acknowledged.
Use, duplication, or disclosure by the Government is subject to restrictions as set forth in subparagraph
(c)(1)(ii) of the Rights in Technical Data and Computer Software clause at DFARS 252.227-7013.
This product is warranted in accordance with the product license. The product’s performance may be affected
by system configuration, the application being performed, operator control, maintenance, and other related
factors. Rockwell Automation is not responsible for these intervening factors. The instructions in this
document do not cover all the details or variations in the equipment, procedure, or process described, nor do
they provide directions for meeting every possible contingency during installation, operation, or
maintenance.
This product’s implementation may vary among users.
This document is current as of the time of release of the product; however, the accompanying software may
have changed since the release. Rockwell Automation, Inc. reserves the right to change any information
contained in this document or the software at anytime without prior notice. It is your responsibility to obtain
the most current information available from Rockwell when installing or using this product.
Page 3

Chapter 1
Table of Contents
Overview
System Requirements
Integration with Other Rockwell Automation Products .................... 8
FactoryTalk Historian Installation Package ........................................... 9
Typical Architecture ..................................................................................... 9
User Documentation .................................................................................. 10
On the Installation DVD ..................................................................... 10
On the Local Hard Drive ..................................................................... 11
In the Start Menu ................................................................................... 11
Technical Support and Resources ........................................................... 13
Technical Support ................................................................................. 13
Knowledgebase .................................................................................. 13
Worldwide Support ......................................................................... 13
Training Programs ............................................................................ 13
TechConnect Support .................................................................... 14
Find the Version and Build Numbers ............................................... 15
View Computer Platform Information ............................................ 15
Chapter 2
FactoryTalk Historian SE Server Machine ........................................... 17
FactoryTalk Historian Live Data Interface Machine ......................... 18
FactoryTalk Historian Client Machine ................................................. 18
FactoryTalk Historian Asset Framework .............................................. 19
FactoryTalk Historian DataLink ............................................................ 20
Chapter 3
Pre-Installation Tasks
Synchronize Time Settings on FactoryTalk Historian System
Computers .................................................................................................... 23
Disable the Windows Time Zone (TZ) Environment Variable ...... 24
Learn About Installation-related Recommendations ......................... 24
Chapter 4
Installing FactoryTalk Historian
Rockwell Automation Publication HSE-IN024A-EN-E–December 2012 3
Installing Core Components .................................................................... 25
Install Microsoft SQL Server .............................................................. 25
Install FactoryTalk Services Platform ............................................... 27
Specify FactoryTalk Directory Server Location ........................ 28
Install FactoryTalk Activation Manager .......................................... 30
Page 4

Table of Contents
Install RSLinx Enterprise (Data Server) ........................................... 31
Installing FactoryTalk Historian Suites ................................................. 32
Install FactoryTalk Historian Asset Framework ............................ 33
Installation Modes for FactoryTalk Historian Asset
Framework ......................................................................................... 34
Install FactoryTalk Historian Asset Framework Server .......... 36
Install FactoryTalk Historian SE Server ........................................... 39
Install FactoryTalk Historian Live Data Interface (Optional) ... 43
Install FactoryTalk Historian Management Tools (Optional) .. 47
Install Advanced Server (Optional) ................................................... 50
Install FactoryTalk VantagePoint (Optional) ................................ 52
Install Additional Historian Components ...................................... 52
Chapter 5
Post-Installation Tasks
Configuring FactoryTalk
Historian
View the Installation Log File .................................................................. 53
Verify that Historian Services are Running .......................................... 53
Verify that the Historian Server is Updating Data for Default Tags
.......................................................................................................................... 55
Add the AF Service Computer to the AFServer Group ..................... 55
Manually Create the Asset Framework Database ................................ 56
Manually Configure the Asset Framework Service ............................. 58
Perform the MDB to AF Synchronization ........................................... 59
Verify the MDB to AF Synchronization ............................................... 59
Disable Virus Scanning .............................................................................. 60
Chapter 6
Activating the Historian Server ............................................................... 61
Securing the Historian Server ................................................................... 62
Historian Security Components and Their Privileges .................. 63
Managing Historian Security Components .................................... 67
Creating Security Mappings ................................................................ 69
Managing Security of the Historian Server Database .................... 71
Configuring Firewall for FactoryTalk Historian ................................. 73
Configuring the Historian Server ............................................................ 75
Adding the Server to the FactoryTalk Directory ........................... 75
Verifying the FactoryTalk Historian Live Data Local Interface. 77
Managing Licenses ................................................................................. 77
4 Rockwell Automation Publication HSE-IN024A-EN-E–December 2012
Page 5

Table of Contents
Types of Licenses .............................................................................. 78
How Licenses Are Distributed Between License Pools ........... 80
Assigning License Activations to the Historian Server ........... 85
Allocating Licenses to Interface Types ........................................ 86
Viewing Allocated Licenses ............................................................ 89
Configuring Points ................................................................................ 90
Adding Individual Data Points Manually................................... 90
Adding Multiple Data Points Automatically ............................. 91
Viewing Current and Archive Data................................................... 93
Viewing Current Data ..................................................................... 93
Viewing Archive Data...................................................................... 94
Archiving and Backups ......................................................................... 95
Restarting FactoryTalk Historian SE Server ................................... 96
Configuring the Data Server ..................................................................... 96
Configuring Historian Interface Connections .................................... 97
Configuring FactoryTalk Historian Live Data Interface .................. 98
Registering Live Data Interfaces ......................................................... 98
Live Data Interface Services ................................................................. 99
Enable Buffering .................................................................................. 100
Manually Enabling Excel Add-ins ........................................................ 103
Recording Messages Using FactoryTalk Diagnostics ...................... 104
Message Parameters ............................................................................ 104
Viewing Messages ................................................................................ 105
Chapter 7
Troubleshooting FactoryTalk
Historian
Rockwell Automation Publication HSE-IN024A-EN-E–December 2012 5
Using FactoryTalk Historian ME Modules with FactoryTalk
Security ....................................................................................................... 107
Verifying the Windows Administrator Privileges ............................ 108
Resolving Error and Warning Messages.............................................. 109
General .................................................................................................. 109
Error: System is a PINs Node ..................................................... 109
Error: Server Not Found .............................................................. 110
Error: Failure to Retrieve Interface Information ................... 111
No Connection to FactoryTalk Directory ................................... 111
Schema Creation ............................................................................ 112
Folders Creation ............................................................................ 113
Page 6

Table of Contents
Firewall-related Errors ....................................................................... 114
Configuring Windows Firewall with WFCU ........................ 115
Appendix A
Configuring Historian Servers in
High Availability Mode
Configuring Live Data Interface
Redundancy
FactoryTalk View SE TrendX
High Availability (HA) Architecture .................................................. 117
Working with Server Collectives .......................................................... 119
Creating Server Collectives .................................................................... 120
Verifying Communication Between Server Collective Members . 122
Verifying Replication of Configuration Changes in the Primary
Server ........................................................................................................... 124
Assigning License Activations to Server Collectives ........................ 125
Configuring Interfaces and Buffering Services for Historian Server
Collectives .................................................................................................. 128
Appendix B
Overview ..................................................................................................... 129
Appendix C
Creating Security Trusts for the FactoryTalk View TrendX Display
Object .......................................................................................................... 131
Configuring Trend Properties .............................................................. 134
Appendix D
Upgrading FactoryTalk
Historian
Upgrading FactoryTalk Historian to the Current Version ........... 137
Appendix E
Removing FactoryTalk Historian
6 Rockwell Automation Publication HSE-IN024A-EN-E–December 2012
Removing the Suite Using the Start Menu ........................................ 140
Removing the Suite Using Control Panel .......................................... 140
Removing the Suite Using the Installation DVD ............................. 141
Page 7

Chapter 1
Overview
FactoryTalk Historian Site Edition (SE) provides the capability to
collect, store, analyze, and visualize data using a powerful engine and
a set of reporting tools such as time-series trends, bar charts, pie
charts, pareto and tabular trends, and a method of generating reports
using Microsoft Excel. It also uses compressed-storage data
algorithms to contain a vast amount of data in a small format.
In the following chapters, you will find information on how to
install, secure, configure, use, and troubleshoot FactoryTalk
Historian SE:
• System Requirements (page 17)
• Pre-Installation Tasks (page 23)
• Installing FactoryTalk Historian (page 25)
• Post-Installation Tasks (page 53)
• Configuring FactoryTalk Historian (page 61)
• Troubleshooting FactoryTalk Historian (page 107)
• Appendix A: Configuring Historian Servers in High
Availability Mode (page 117)
• Appendix B: Configuring Live Data Interface Redundancy
(page 129)
• Appendix C: FactoryTalk View SE TrendX (page 131)
• Appendix D: Upgrading FactoryTalk Historian (page 137)
• Appendix E: Removing FactoryTalk Historian (page 139)
Rockwell Automation Publication HSE-IN024A-EN-E–December 2012 7
Page 8

Chapter 1 Overview
Integration with Other Rockwell Automation Products
FactoryTalk Historian SE is closely integrated with FactoryTalk
Services Platform and the following Rockwell Automation
applications:
Application Description
FactoryTalk Live Data
(FTLD)
A direct data interface to FTLD delivers native FTLD data directly to
FactoryTalk Historian SE without requiring intermediate interfaces
and standards such as OPC.
FactoryTalk Directory FactoryTalk Historian SE uses FactoryTalk Directory to look up data
points for configuring points to historize. The FactoryTalk Directory
is also used for auto-discovering controller data sources and tags in
the initial configuration process.
FactoryTalk
Activation
FactoryTalk Historian SE is activated by Rockwell Automation's
central licensing system based on the FactoryTalk Activation
Server.
FactoryTalk
Diagnostics
Because of a close integration of FactoryTalk Historian SE with
FactoryTalk Diagnostics, all system and diagnostics messages from
FactoryTalk Historian SE are centrally stored and maintained in the
FactoryTalk Diagnostics database.
FactoryTalk Audit All FactoryTalk Historian SE Server auditing messages are stored
and available in the FactoryTalk Audit database.
FactoryTalk View SE
Trending
FactoryTalk Historian
Machine Edition (ME)
FactoryTalk View Site Edition natively trends data from FactoryTalk
Historian SE.
FactoryTalk Historian ME provides a Data Transfer service to allow
its logged data to be transferred to the FactoryTalk Historian SE for
long-term storage and analysis.
FactoryTalk
VantagePoint
The data from multiple FactoryTalk Historian SE Servers and
FactoryTalk Historian ME Servers can be brought together into a
single information management and decision support system
using FactoryTalk VantagePoint.
FactoryTalk Batch The event journal data from your FactoryTalk Batch system can be
collected through the FactoryTalk Batch Interface and stored
within FactoryTalk Historian SE.
8 Rockwell Automation Publication HSE-IN024A-EN-E–December 2012
Page 9

Overview Chapter 1
FactoryTalk Historian Installation Package
Typical Architecture
The FactoryTalk Historian SE installation DVD contains the
following software products:
• FactoryTalk Services Platform (with FactoryTalk Directory)
• FactoryTalk Historian Asset Framework
• FactoryTalk Historian SE (includes FactoryTalk Historian SE
Server, FactoryTalk Historian Live Data Interface, and
FactoryTalk Activation Manager)
• FactoryTalk Historian Management Tools
• RSLinx Enterprise
• FactoryTalk Historian DataLink
The following diagram shows a typical architecture of the
FactoryTalk Historian SE environment.
Rockwell Automation Publication HSE-IN024A-EN-E–December 2012 9
Page 10

Chapter 1 Overview
User Documentation
On the Installation DVD
The user documentation on FactoryTalk Historian SE is available in
the following locations:
• The FactoryTalk Historian SE installation DVD (page 10).
• The computer on which you have installed FactoryTalk
Historian SE (page 11).
• The Help folder in the Start menu (page 11).
There are the following locations on the FactoryTalk Historian SE
installation DVD with the user documentation and
documentation-related resources:
• The Open Installation Instructions > Installation
Instructions page
On this page you will find the following resources:
• FactoryTalk Historian SE Installation Assistant
• FactoryTalk Historian SE Installation and Configuration
Guide
• Adobe Reader required to open PDF files.
• The Read Documentation > Documentation page
On this page you will find the following resources:
• FactoryTalk Historian SE Upgrade and Migration Guide
• FactoryTalk Historian SE Installation and Configuration
Guide
• FactoryTalk Historian SE Reference Guide
• FactoryTalk Historian Live Data Interface User Guide
• Introduction to Historian SE Server System Management
Guide
• FactoryTalk Historian SE Release Notes
10 Rockwell Automation Publication HSE-IN024A-EN-E–December 2012
Page 11

Overview Chapter 1
• Adobe Reader required to open the PDF files.
• A link to the Redist\Docs folder on the installation DVD
that stores all the user documentation.
• A link to the Rockwell Automation Literature Library
(http://literature.rockwellautomation.com/idc/groups/pu
blic/documents/webassets/browse_category.hcst).
• The Watch Historian How-to Videos on YouTube link on
the main page of the installation wizard.
A link to a Rockwell Automation channel at YouTube
devoted to FactoryTalk Historian
(http://www.youtube.com/playlist?list=PLB6E76CAA1F7F
F7B5&feature=plcp).
On the Local Hard Drive
In the Start Menu
To access the user documentation available on your computer, go to
the following locations:
• On a 32-bit operating system:
C:\Program Files\Common Files\Rockwell\Help.
• On a 64-bit operating system:
C:\Program Files (x86)\Common Files\Rockwell\Help.
Go to Start > All Programs > Rockwell Software > FactoryTalk
Historian SE > Help to access the following documents:
• Auditing the FactoryTalk Historian SE Server User Guide
(.pdf)
• Configuring FactoryTalk Historian SE Security User Guide
(.pdf)
• FactoryTalk Historian DataLink Online Help (.chm)
• FactoryTalk Historian SE Live Data Interface User Guide
(.pdf)
Rockwell Automation Publication HSE-IN024A-EN-E–December 2012 11
Page 12

Chapter 1 Overview
• FactoryTalk Historian SE AF 2010 R2 Installation and
Maintenance Guide (.pdf)
• FactoryTalk Historian SE Applications User Guide (.pdf)
• FactoryTalk Historian SE Buffering User Guide (.pdf)
• FactoryTalk Historian SE High Availability Administrator
Guide (.pdf)
• FactoryTalk Historian SE Interface Configuration Utility User
Guide (.pdf)
• Introduction to Historian SE Server System Management (.pdf)
• FactoryTalk Historian SE MDB to AF Transition Guide (.pdf)
• FactoryTalk Historian SE OPC DA Interface Failover Manual
(.pdf)
• FactoryTalk Historian SE OPC Interface Manual (.pdf)
• FactoryTalk Historian SE Server Reference Guide (.pdf)
• FactoryTalk Historian SE System Explorer User Guide (.pdf)
• FactoryTalk Historian SE System Management Guide (.pdf)
• FactoryTalk Historian DataLink User Guide (.pdf)
• FactoryTalk Historian SE Installation and Configuration
Guide (.pdf)
• FactoryTalk Historian SE Upgrade and Migration Guide (.pdf)
• FactoryTalk Historian SE Online Help (.chm)
• FactoryTalk Historian DataLink Release Notes (.htm)
• FactoryTalk Historian SE Release Notes (.chm)
12 Rockwell Automation Publication HSE-IN024A-EN-E–December 2012
Page 13

Overview Chapter 1
Technical Support and Resources
Technical Support
Knowledgebase
Rockwell provides dedicated technical support internationally, 24
hours a day, 7 days a week.
You can read complete information about technical support
options, and access all of the following resources at the Rockwell
Automation Support Web site
(http://www.rockwellautomation.com/support/).
Please visit Rockwell Automation Customer Support Center
(http://www.rockwellautomation.com/support/) for access to user
forums, sample code, software and firmware updates, product
manuals, and other downloads.
The Customer Support Center offers an extensive online
knowledgebase that includes frequently asked questions (FAQs) and
the latest patches. Please visit the support site
(http://www.rockwellautomation.com/resources/support.html)
and select the Knowledgebase link located under Tools &
Resources to:
• View technical and application notes.
• Obtain software patches and firmware updates.
• Subscribe to product and service e-mail notifications.
• Ask questions.
Worldwide Support
If you are not located in North America and want to contact
Rockwell Automation Support, use the Worldwide Locator
(http://www.rockwellautomation.com/locations/) for worldwide
contact information.
Training Programs
Rockwell Automation offers a wide range of training programs that
include e-learning, regularly scheduled and custom-tailored classes,
self-paced training, and certificate programs. For more information
on the trainings, visit the Rockwell Automation Training site
Rockwell Automation Publication HSE-IN024A-EN-E–December 2012 13
Page 14

Chapter 1 Overview
(http://www.rockwellautomation.com/services/training/) or call
1.440.646.3434.
If you are not located in North America and want to contact
Rockwell Automation Support, use the Worldwide Locator
(http://www.rockwellautomation.com/locations/) for worldwide
contact information.
TechConnect Support
With TechConnect Support, your site has unlimited, real-time
access to Rockwell Automation's global network of Customer
Support Centers and technical resources. TechConnect service
levels are provided at the TechConnect site
(http://www.rockwellautomation.com/services/onlinephone/techc
onnect/).
When you contact Rockwell Technical Support, please provide:
• Product name, version, and/or build numbers.
• Computer platform (CPU type, operating system, and version
number).
• Exact wording of any messages that appeared on your screen.
• The message log(s) at that time.
• Descriptions of:
• What happened and what you were doing when the
problem occurred.
• How you tried to solve the problem.
14 Rockwell Automation Publication HSE-IN024A-EN-E–December 2012
Page 15

Overview Chapter 1
Find the Version and Build Numbers
To find version and build numbers for each Historian Server
subsystem (which vary depending on installed upgrades, updates, or
patches), use either of the following methods:
To check the numbers with System Management Tools (SMT):
1. Go to Start > All Programs > Rockwell Software > FactoryTalk
Historian SE > System Management Tools. The System
Management Tools dialog box appears.
2. Under Collectives and Servers, select the name of the server
you want to check.
3. Under System Management Tools, select Operation > PI
Version.
The Version in Memory and Version on Disk columns
display information on versions of all the server subsystems.
If you do not have System Management Tools installed, open a
command prompt, change to the pi\adm directory, and type
piversion -v. To see individual version numbers for each subsystem,
change to the pi\bin directory and type the subsystem name
followed by the option -v (for example, piarchss.exe -v).
View Computer Platform Information
To view platform specifications, right-click My Computer and
select Properties. For more detailed information, choose Start >
Run, and type msinfo32.exe.
Rockwell Automation Publication HSE-IN024A-EN-E–December 2012 15
Page 16

Chapter 1 Overview
16 Rockwell Automation Publication HSE-IN024A-EN-E–December 2012
Page 17

Chapter 2
System Requirements
The hardware required with FactoryTalk Historian Site Edition
depends on the demands an application places on the system. The
greater the demand, the more powerful a system is required. In any
application, faster processors and more memory will result in better
performance. In addition, there should always be sufficient disk
space to provide virtual memory that is at least twice the size of the
physical memory.
FactoryTalk Historian SE Server Machine
Learn about the system requirements for the following components
of FactoryTalk Historian SE:
• FactoryTalk Historian SE Server Machine (page 17)
• FactoryTalk Historian Live Data Interface Machine (page 18)
• FactoryTalk Historian Client Machine (page 18)
• FactoryTalk Historian Asset Framework (page 19)
• FactoryTalk Historian DataLink (page 20)
Item Description
System requirements
• FactoryTalk Historian SE 25,000 points and below
Minimum: Intel Pentium Xeon, 3.2 GHz, 4GB RAM
• FactoryTalk Historian SE 50,000 points and below
Minimum: Intel Pentium Xeon, 3.2 GHz, 4GB RAM
• FactoryTalk Historian SE 100,000 points and below
Minimum: Intel Pentium Xeon dual processor, 3.4 GHz, 4GB
RAM
Hardware
• 100 Megabit or faster Ethernet card, network cable,
concentrator if using twisted pair wiring; TCP/IP protocol.
• SVGA TrueColor monitor with 1 MB of video RAM and
1024x768 resolution.
Rockwell Automation Publication HSE-IN024A-EN-E–December 2012 17
Page 18

Chapter 2 System Requirements
•
Item Description
Operating systems Microsoft Windows Server 2008 R2 with Service Pack 1 64-bit
FactoryTalk Historian Live Data Interface Machine
FactoryTalk Historian Client Machine
Item Description
Hardware Minimum: Intel Celeron D, 3.0Ghz, 512MB RAM
Operating systems
Microsoft Windows 7 with Service Pack 1 32-bit and 64-bit
• Microsoft Windows XP with Service Pack 3 32-bit
• Microsoft Windows Server 2003 R2 with Service Pack 2 32-bit
and 64-bit
• Microsoft Windows Server 2008 R2 with Service Pack 1 64-bit
• Microsoft Windows Server 2008 with Service Pack 2 32-bit and
64-bit
Item Description
Hardware
• 100 Megabit or faster Ethernet card, network cable;
concentrator if using twisted pair wiring; TCP/IP protocol
• SVGA TrueColor monitor with 1 MB of video RAM and
1024x768 resolution
• Minimum: Intel Pentium III, 600Mhz, 512MB RAM
• Recommended: Intel Celeron, 3GHz or higher, 1GB RAM or
more
Operating systems
• Microsoft Windows 7 with Service Pack 1 32-bit and 64-bit
• Microsoft Windows XP with Service Pack 3 32-bit
• Microsoft Windows Server 2008 R2 with Service Pack 1 64-bit
• Microsoft Windows Server 2008 with Service Pack 2 32-bit and
64-bit
Other software
• Microsoft Internet Explorer 6SP1, IE7, IE8
• Microsoft Excel 2003 or newer for FactoryTalk Historian
DataLink or FactoryTalk Historian System Management Tools
(SMT)
18 Rockwell Automation Publication HSE-IN024A-EN-E–December 2012
Page 19

System Requirements Chapter 2
FactoryTalk Historian Asset Framework
FactoryTalk Historian Asset Framework requirements
Item Description
Hardware Processor: a single quad-core processor, minimum 2.2 GHz
Operating systems
(both 32-bit and
64-bit versions, if
available)
• Microsoft Windows Server 2008 R2
• Microsoft Windows Server 2008
• Microsoft Windows Server 2003 (with Service Pack 1 or later)
• Microsoft Windows 7
• Microsoft Windows Vista
• Microsoft Windows XP with Service Pack 2 or later
Database size
Database storage is consumed depending on the type and quantity of
FactoryTalk Historian Asset Framework objects. The table below
shows approximate database sizes of some representative Asset
Framework systems.
AF Element
Count
(in MB)
Event Frames
Count
(in MB)
SQL DB
Size
(in MB)
Recommended
Memory
(in MB)
0 0 40 24
1,000 10,000 165 99
2,000 20,000 285 171
3,000 30,000 400 240
4,000 40,000 520 312
5,000 50,000 640 384
6,000 60,000 755 453
10,000 100,000 1,100 660
20,000 200,000 2,230 1,338
30,000 300,000 3,300 1,980
40,000 400,000 4,320 2,592
50,000 500,000 5,380 3,228
100,000 1,000,000 10,640 6,384
Rockwell Automation Publication HSE-IN024A-EN-E–December 2012 19
Page 20

Chapter 2 System Requirements
SQL Server requirements
Item Description
Supported SQL Server editions
Supported SQL Server versions (both
32-bit and 64-bit versions, if
available)
Required SQL Server components
Required memory
NOTE
For databases with up to 1000 elements, Asset Framework may be
installed on the FactoryTalk Historian server.
For more information on the Microsoft SQL Server system requirements,
refer to the Microsoft Development Network
(http://msdn.microsoft.com/en-us/library/ms143506(SQL.90).aspx).
• Express
• Standard
SQL Server 2008
• Database Engine
• Agent (backup and replication)
• 1GB for databases with up to 50000 elements
• 4 GB for databases with up to 200000 elements
FactoryTalk Historian DataLink
Item Description
Hardware
• Physical memory:
Min. 32 MB, recommended 128 MB
• Processor: Pentium or higher
• Disk space requirements:
Min. 120 MB for application files and registry entries as well as
space for keeping a backup copy of the pisdk.msi and
ProcessBook.msi files.
Operating systems
• Microsoft Windows Server 2008 R2
• Microsoft Windows 7
• Microsoft Windows XP with Service Pack 2 or higher
20 Rockwell Automation Publication HSE-IN024A-EN-E–December 2012
Page 21

•
•
Item Description
System Requirements Chapter 2
Other software
NOTES
• Microsoft Excel Versions:
Microsoft Excel 2010 (32-bit) *, **
Microsoft Excel 2007 *
• FactoryTalk Services Platform 2.50 (CPR 9 SR 5)
* If this is a Microsoft Office upgrade and there is a pre-existing
installation of DataLink 4.x on that machine, a removal and
reinstallation of DataLink may be necessary. Refer to the KB article
254380
(http://rockwellautomation.custhelp.com/app/answers/detail/a_id/25
4380/kw/254380) to eliminate VBA related errors that might occur
after an Excel upgrade.
** In rare instances, the PI tab does not appear on the ribbon
immediately following the installation of the Microsoft Excel add-in.
Refer to the KB article 254379
(http://rockwellautomation.custhelp.com/app/answers/detail/a_id/25
4379/kw/254379) to resolve the situation.
Rockwell Automation Publication HSE-IN024A-EN-E–December 2012 21
Page 22

Chapter 2 System Requirements
22 Rockwell Automation Publication HSE-IN024A-EN-E–December 2012
Page 23

Chapter 3
Pre-Installation Tasks
Before you install FactoryTalk Historian SE, do the following:
• Synchronize time settings on Historian system computers
(page 23).
Synchronize Time Settings on FactoryTalk Historian System Computers
• Disable the Windows time zone (page 23).
• Learn about installation-related recommendations (page 24).
For all machines that are part of the FactoryTalk Historian system,
you must ensure that the time is set correctly and synchronized with
the FactoryTalk Historian server. In addition, make sure that all
Windows machines have the proper time-zone settings and that they
are set to automatically adjust for daylight-saving changes.
The clocks of the FactoryTalk Historian server computer and client
computers should all be synchronized. This is typically done through
the domain controller. The domain controller's time is synchronized
first by an NTP source. Then, the domain controller synchronizes
all the other computers that are a part of the FactoryTalk Historian
system.
For details, search the Rockwell Automation Technical Support
(http://rockwellautomation.custhelp.com/) web site for daylight
saving time.
Rockwell Automation Publication HSE-IN024A-EN-E–December 2012 23
Page 24

Chapter 3 Pre-Installation Tasks
Disable the Windows Time Zone (TZ) Environment Variable
The Windows time zone (TZ) environment variable adversely
affects the Historian server. You must ensure that TZ is not set on
the Historian server computer.
To confirm that the TZ variable is not set on computers prior to
Windows 2008:
1. Go to Start > My Computer.
2. Right-click and select Properties.
3. In the System Properties dialog box, click the Advanced tab.
4. Click Environment Variables.
5. If the TZ variable is present, delete it.
6. If prompted, restart the computer.
To confirm that the TZ variable is not set on Windows Server
2008 and 2008 R2:
1. Go to Start > My Computer.
2. Right-click and select Properties.
3. Click Advanced system settings.
4. Click Environment Variables.
5. If the TZ variable is present, delete it.
6. If prompted, restart the computer.
Learn About
We recommend that you use the default installation options.
Installation-related
Recommendations
24 Rockwell Automation Publication HSE-IN024A-EN-E–December 2012
If you want to use the SMT software installed on a FactoryTalk
Historian SE server computer to manage a FactoryTalk Historian
Live Data Interface installed on another computer, you must log on
to both computers with the same user name. (The user must have
administrator privileges on both computers.)
Page 25

Chapter 4
Installing FactoryTalk Historian
In this chapter you will find instructions on how to install the
following:
• Core components of the product (page 25).
Installing Core Components
Install Microsoft SQL Server
• FactoryTalk Historian suites (page 32).
In this section you will find instructions on how to install the
following core components of FactoryTalk Historian SE:
• Microsoft SQL Server (page 25)
• FactoryTalk Services Platform (page 27)
• FactoryTalk Activation Manager (page 30)
• RSLinx Enterprise (Data Server) (page 31)
Microsoft SQL Server 2008 is a requirement for running
FactoryTalk Historian Asset Framework.
FactoryTalk Historian SE 3.01 supports SQL Server Express and
Standard Editions. Rockwell Automation recommends using the
SQL Server Express Edition, which is available on the FactoryTalk
Historian SE installation DVD. If you choose to use the SQL
Standard Edition (for example, from the FactoryTalk VantagePoint
installation DVD), please acquire appropriate Client Access
Licenses (CAL) and/or processor licenses from Microsoft. For more
information, refer to the Microsoft site
(http://www.microsoft.com/sqlserver/en/us/get-sql-server/how-tobuy.aspx).
Rockwell Automation Publication HSE-IN024A-EN-E–December 2012 25
Page 26

Chapter 4 Installing FactoryTalk Historian
If you already have an SQL Server, you will be able to point to it
during the installation of FactoryTalk Historian Asset Framework.
If you are going to use FactoryTalk VantagePoint as your Historian
client, you can use Microsoft SQL Server 2008 R2 that is provided
on the FactoryTalk VantagePoint installation DVD. Refer to the
following documentation before the installation of the SQL Server:
• FactoryTalk VantagePoint Getting Results Guide, section
"Installing and Configuring IIS". The guide is available on
the FactoryTalk VantagePoint installation DVD.
• Article 279061 - How to install Microsoft SQL Server 2008
R2 for use with FactoryTalk VantagePoint v3.1.5 and higher.
The article is available on the Rockwell Automation
Knowledgebase
(http://rockwellautomation.custhelp.com/).
NOTE
If you want to install the Asset Framework SQL database
only, you need to run the installation on the machine with
the Microsoft SQL Server installed.
To install Microsoft SQL Server 2008 Express:
1. Run the FactoryTalk Historian SE installation DVD.
2. On the welcome page of the installation wizard, click Install
FactoryTalk Historian SE > Install FactoryTalk Historian Asset
Framework > Install Microsoft SQL Server 2008 Express.
The installation wizard appears.
3. Follow the on-screen instructions to complete the process.
NOTE
For more information on installing Microsoft SQL Server 2008
Express, refer to the product documentation.
4. If instructed, restart the computer.
26 Rockwell Automation Publication HSE-IN024A-EN-E–December 2012
Page 27

Installing FactoryTalk Historian Chapter 4
Install FactoryTalk Services Platform
When you select this option, the following components will be
installed:
• FactoryTalk Diagnostics
• Windows Firewall Configuration Utility (WFCU)
• FactoryTalk Services Platform
FactoryTalk Services Platform is an underlying architecture and a set
of common services (such as diagnostic messages, health monitoring
services, access to real-time data, and shared plant resources such as
tags and graphic displays) that Rockwell Automation products build
upon. It is a prerequisite for all FactoryTalk-enabled software
products, such as FactoryTalk Historian SE, FactoryTalk View, and
RSLinx Enterprise.
FactoryTalk Diagnostics collects and provides access to activity,
status warnings, and error messages generated throughout a
FactoryTalk system.
For more information on FactoryTalk, refer to FactoryTalk Help.
You can access it from Start > All Programs > Rockwell Software >
FactoryTalk Tools > FactoryTalk Help after you have installed
FactoryTalk Services Platform on your machine.
NOTE
Make sure to install FactoryTalk Services Platform on all the computers,
including the computer that will serve as the FactoryTalk Directory.
To install FactoryTalk Services Platform:
1. Run the FactoryTalk Historian SE installation DVD.
2. On the welcome page of the installation wizard, click Install
FactoryTalk Historian SE > Install FactoryTalk Services
Platform > Install FactoryTalk Services Platform.
Rockwell Automation Publication HSE-IN024A-EN-E–December 2012 27
Page 28

Chapter 4 Installing FactoryTalk Historian
The system checks if you have all the required components
installed. If any components are missing, a dialog box appears
prompting you to install the missing components. Click
Install to install the components.
The installation wizard appears.
3. On the Welcome... page, click Next.
4. On the License Agreement page, read and accept the terms of
the license agreement, selecting the I accept... option.
Click Next.
5. On the Setup Type page, select Standard and click Next.
6. On the Ready to Install the Program page, click Install to
start the installation.
Specify FactoryTalk Directory Server Location
The Installing page appears with the status of the installation.
7. On the InstallShield Wizard Completed page, click Finish
to exit the wizard.
You may be prompted to restart your computer to complete
the installation. If you do not choose to restart your computer
at this time, be sure to restart it at the completion of the
required installation steps for FactoryTalk Historian SE.
This configuration points your client computer to the FactoryTalk
Directory server computer. Once your computer is connected to the
FactoryTalk Directory server, you can use the client computer to
administer the Network directory on the FactoryTalk Directory
server computer. Also, the FactoryTalk Administration Console
window on your client computer reflects the content of the
Network Directory server computer.
28 Rockwell Automation Publication HSE-IN024A-EN-E–December 2012
Page 29

Installing FactoryTalk Historian Chapter 4
To specify the FactoryTalk Directory server location:
1. Run the FactoryTalk Historian SE installation DVD.
2. On the welcome page of the installation wizard, click Install
FactoryTalk Historian SE > Install FactoryTalk Services
Platform > Specify FactoryTalk Directory Server Location.
The FactoryTalk Directory Server Location Utility dialog
box appears.
3. In the FactoryTalk Directory Server Location Utility dialog
box, identify the computer that hosts the FactoryTalk
Directory server. If it is the current computer, leave localhost in
the text box. Otherwise, do the following to point to the
proper FactoryTalk Directory computer:
1. Click the ellipsis button (
). The Login User dialog box
appears.
2. In the User name and Password text boxes, type the
credentials to the current FactoryTalk Directory machine.
The FactoryTalk Directory Server Configuration dialog
box appears.
3. Select the Remote computer option and click the ellipsis
button (
) to open the Browse for Computer dialog box.
4. Select the machine that hosts the FactoryTalk Directory
and click OK.
The name of the machine appears in the FactoryTalk
Directory Server Location Utility dialog box.
5. Click OK.
6. In the message box informing you that you will need to
restart the computer, click OK.
7. In the Log On to FactoryTalk (New Server) dialog box,
type the user name and password to the newly selected
FactoryTalk Directory machine.
Rockwell Automation Publication HSE-IN024A-EN-E–December 2012 29
Page 30

Chapter 4 Installing FactoryTalk Historian
8. Click OK. The system connects to the FactoryTalk
Directory server.
Install FactoryTalk Activation Manager
NOTE
On the computers that have FactoryTalk Services Platform
installed, you can open the Specify FactoryTalk
Directory Server Location Utility dialog box also from
Start > All Programs > Rockwell Software > FactoryTalk
Tools > Specify FactoryTalk Directory Location.
FactoryTalk Activation Manager allows you to download activation
files using an Internet connection, and transfer activation files to a
computer that does not have an Internet connection. Install this
software on the same computer as the FactoryTalk Directory server.
To install the FactoryTalk Activation Manager:
1. Run the FactoryTalk Historian SE installation DVD.
2. On the welcome page of the installation wizard, click Install
FactoryTalk Historian Site Edition > Install FactoryTalk
Services Platform > Install FactoryTalk Activation.
The FactoryTalk Activation Manager installation wizard
appears with a list of prerequisite packages.
Click Continue.
3. In the message box that appears:
• Click Yes, if you want to install the software for Rockwell
Automation USB dongles.
The drivers are used to support mobile activations which
are locked in a hardware dongle.
Follow the on-screen instruction to install the software.
• Click No, if you want to skip this step.
4. On the Welcome... page, click Next.
30 Rockwell Automation Publication HSE-IN024A-EN-E–December 2012
Page 31

Installing FactoryTalk Historian Chapter 4
5. On the License Agreement page, read and accept the terms of
the license agreement, selecting the I accept... option.
Click Next.
6. On the Ready to Install the Program page, click Install to
start the installation.
The Installing page appears with the status of the installation.
7. On the InstallShield Wizard Completed page, click Finish
to exit the wizard.
You may be prompted to restart your computer to complete
the installation. If you do not choose to restart your computer
at this time, be sure to restart it before running FactoryTalk
Activation.
Install RSLinx Enterprise (Data Server)
NOTE
For more information on FactoryTalk Activation, see "Activating
FactoryTalk Historian SE Server 61".
RSLinx Enterprise is a FactoryTalk Live Data server and a
device-based alarm and event server. RSLinx Enterprise links
Allen-Bradley networks and devices to Microsoft Windows
products such as the FactoryTalk View SE (HMI software) and the
RSLogix family of device programming software. RSLinx Enterprise
provides FactoryTalk Historian SE with the data points (tags) it
collects from Rockwell Automation controllers.
NOTE
It is recommended to install RSLinx Enterprise (Data Server) on the
same machine as FactoryTalk Historian Live Data Interface, remote
from the FactoryTalk Historian SE server.
To install RSLinx Enterprise:
1. Run the FactoryTalk Historian SE installation DVD.
2. On the welcome page of the installation wizard, click Install
FactoryTalk Historian Site Edition > Install RSLinx Enterprise.
Rockwell Automation Publication HSE-IN024A-EN-E–December 2012 31
Page 32

Chapter 4 Installing FactoryTalk Historian
The system checks if you have all the required components
installed. If any components are missing, a dialog box appears
prompting you to install the missing components. Click OK.
The installation wizard appears.
3. On the Welcome page, click Next.
4. On the License Agreement page, read and accept the terms of
the license agreement, selecting the I accept... option.
Click Next.
5. On the Setup Type page, select Standard Feature Set
Installation, and click Next.
6. On the Ready to Install the Program page, click Install to
start the installation.
Installing FactoryTalk Historian Suites
The Installing... page appears with the status of the
installation.
7. In the Windows Security dialog box, select Always trust
software from "Rockwell Automation", and click Install to
proceed with the installation of the software.
8. On the InstallShield Wizard Completed page:
• Clear the check box next to Review Release Notes, if you
do not want to have them displayed.
• Click Finish to exit the wizard.
In this section you will find instructions on how to install the
following suites of FactoryTalk Historian SE:
• FactoryTalk Historian Asset Framework (page 33)
• FactoryTalk Historian SE Server (page 39)
• (Optional) FactoryTalk Historian Live Data Interface (page
43)
Applicable only to the customers who want to install the
interface on a remote computer.
32 Rockwell Automation Publication HSE-IN024A-EN-E–December 2012
Page 33

Installing FactoryTalk Historian Chapter 4
• (Optional) FactoryTalk Historian Management Tools (page
47)
Applicable only to the customers who want to administer the
FactoryTalk Historian SE server from a remote computer.
• (Optional) Install Advanced Server (page 50)
• (Optional) Install FactoryTalk VantagePoint (page 52)
• Install Additional Historian Components (page 52)
Install FactoryTalk Historian Asset Framework
NOTE
To install FactoryTalk Historian SE, use a local Administrator
account or any other account that is a member of the Domain
Admins group. Do not use the built-in Domain Administrator
account of the domain created on Microsoft Windows Server
2008 R2.
When you select this option, the following components will be
installed:
• (Optional) Microsoft SQL Server 2008 Express
• FactoryTalk Historian Asset Framework Server
FactoryTalk Historian Asset Framework is a prerequisite for
installing FactoryTalk Historian SE. AF replaces the Historian
Module Database (MDB). Over time, Rockwell Automation will
transform MDB applications into AF applications. To provide
backward compatibility, FactoryTalk Historian SE 3.01 copies the
contents of Historian MDB over to AF, in a process called
transition. After the migration, the Historian server constantly
synchronizes the MDB content with AF, allowing you to access
MDB content from AF clients as well as MDB clients. Similarly, you
can access AF content from MDB clients, as well as AF clients. This
allows you to access your AF content with MDB-based tools, such as
ACE, or with an AF client such as FactoryTalk Historian System
Explorer.
Rockwell Automation Publication HSE-IN024A-EN-E–December 2012 33
Page 34

Chapter 4 Installing FactoryTalk Historian
AF itself requires Microsoft SQL Server. See "Install Microsoft SQL
Server (page 25)" for more information.
Installation Modes for FactoryTalk Historian Asset Framework
NOTE
Before installing FactoryTalk Historian Asset Framework, learn about
the installation options it offers. See "Installation Modes for FactoryTalk
Historian Asset Framework (page 34)" for more information.
For the best performance and improved security, Rockwell
Automation recommends that you install the SQL Server and the
Asset Framework service on different computers.
During the installation process, you can decide how the AF service
and the AF SQL database will be installed on your computer, by
choosing one of five installation modes representing the following
scenarios:
• Both the service and the database are located on the same
machine:
Installation
Description
mode
AF Application
Service and AF
The service and the database are installed on the same
machine.
SQL Database
AF Application
Service and AF
SQL Database
with
unprocessed
database scripts
The service is installed on the machine, the system is
prepared for the database installation, and the database
scripts are copied to the following location in the Program
Files directory: Rockwell Software\FactoryTalk
Historian\PIPC\AF\SQL.
You can create the database manually, using the provided
scripts. See "Manually Create the Asset Framework
Database (page 56)" for more information.
If you select this option, you need to provide in the DB
Server Name text box the name of the SQL Server machine
and (optionally) the name of the instance of the SQL Server
with which the AF service will communicate.
• The service and the database are located on different
machines:
34 Rockwell Automation Publication HSE-IN024A-EN-E–December 2012
Page 35

Installation
mode
Installing FactoryTalk Historian Chapter 4
Description
AF Application
Service
AF SQL Database
AF SQL Database
with
unprocessed
database scripts
Only the service is installed on the machine.
If you select this option, you need to provide in the DB
Server Name text box the name of the SQL Server machine
and (optionally) the name of the instance of the SQL Server
with which the AF service will communicate.
Note: This option must be executed on the machine with
the Microsoft SQL Server installed.
Only the database is installed on the machine.
If you select this option, the database scripts will be copied
to the machine and executed during the installation. This
will result in creating the PIFD Asset Framework SQL
database.
Note: This option must be executed on the machine with
the Microsoft SQL Server installed.
The system is prepared for the database installation, and
the database scripts are copied to the following location in
the Program Files directory: Rockwell
Software\FactoryTalk Historian\PIPC\AF\SQL.
You can create the database manually, using the provided
scripts. See "Manually Create the Asset Framework
Database (page 56)" for more information.
You may choose to create the AF SQL database manually using the
provided scripts, for example when the configuration of your SQL
server does not allow for the integrated Windows authentication.
During the execution of the database scripts you can provide the
user name and the password to the SQL Server.
Rockwell Automation Publication HSE-IN024A-EN-E–December 2012 35
Page 36

Chapter 4 Installing FactoryTalk Historian
If you want to install the Asset Framework SQL database only, you need
Install FactoryTalk Historian Asset Framework Server
NOTE
to run the installation on the machine with the Microsoft SQL Server
installed.
To install FactoryTalk Historian Asset Framework Server:
1. Run the FactoryTalk Historian SE installation DVD.
2. On the welcome page of the installation wizard, click Install
FactoryTalk Historian SE > Install FactoryTalk Historian Asset
Framework > Install FactoryTalk Historian AF Server.
The installation wizard appears.
If there are any software prerequisites missing from the
computer, they are listed in red at the bottom of the
installation wizard Welcome page. Click Cancel and Finish
to exit the wizard, install the prerequisites, and start the
installation wizard again.
3. On the Welcome... page, click Next.
4. On the License Agreement page, read and accept the terms of
the license agreement, selecting the I accept... option.
5. Click Next.
6. On the Review Component Installation page, review the list
of the components that are already installed and those that will
be installed during the installation process.
Click Next.
7. On the Destination Drive page, select the drive on which you
want to install the product.
If the space available on the drive is not sufficient for the
installation, a warning message will appear below the
Installation drive list. In such a case, select another drive or
increase the available space on the drive you have originally
selected. For more information on the disk space
36 Rockwell Automation Publication HSE-IN024A-EN-E–December 2012
Page 37

Installing FactoryTalk Historian Chapter 4
(1) AF Application Service and AF
(2) AF Application Service and AF
requirements, refer to the FactoryTalk Historian SE Release
Notes.
NOTE
You can choose the destination drive only if you install the
component on the selected machine for the first time. If there have
been any FactoryTalk Historian components installed on the
machine before, the Installation drive list will not be enabled.
Click Next.
8. On the AF Server Components Configuration page, choose
the Microsoft SQL Server name and the installation mode.
1. In the DB Server Name text box, type the name of a
Microsoft SQL Server or an SQL Server named instance
that will host the AF SQL database.
• To use the local default instance created by Microsoft
SQL Server Express, leave the default database name
displayed in the text box.
• To use another SQL Server database instance, type the
name of the computer on which the database is located,
followed by the name of the instance that hosts the AF
SQL database, if the instance name is different than the
default one. For example:
SQLDBSERVER\SQLDBINSTANCE.
Rockwell Automation Publication HSE-IN024A-EN-E–December 2012 37
2. From the list, select the installation mode. See "Installation
Modes for FactoryTalk Historian Asset Framework (page
34)" for more information.
Choose this mode: To:
Install both the service and the database
SQL Database
SQL Database with unprocessed
database scripts
(3) AF Application Service Install the service only.
(4) AF SQL Database Install the database only.
on the same machine.
Install the service, prepare the system
for the database installation, and copy
the database executable scripts to the
machine.
Page 38
Chapter 4 Installing FactoryTalk Historian
Choose this mode: To:
(5) AF SQL Database with
unprocessed database scripts
Prepare the system for the database
installation, and copy the database
executable scripts to the machine.
NOTE
For more information on using the database scripts to manually
create the database, see "Manually Create the Asset Framework
Database (page 56)".
9. Click Next.
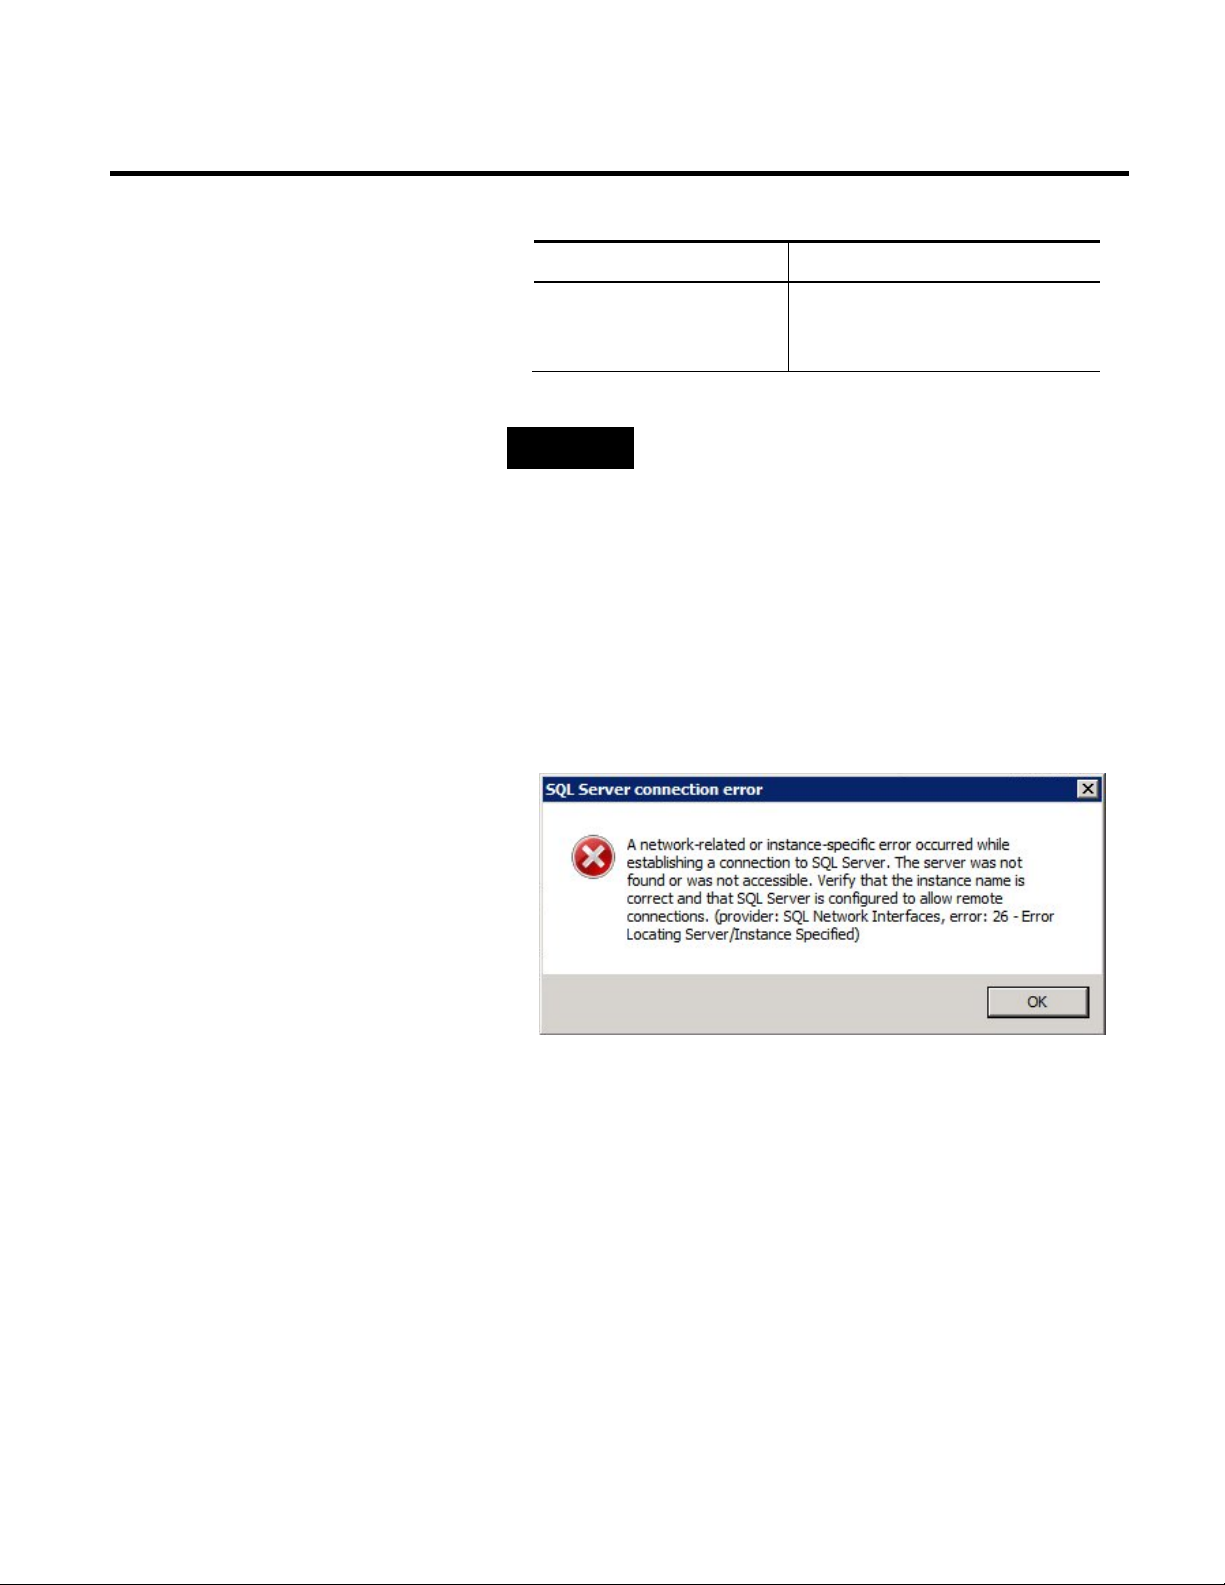
• If you have selected to install both the AF service and the
AF SQL database (installation mode 1) or the database only
(installation mode 4), the installation wizard will test the
connection with the database instance. If the connection
test fails, an error message generated by the database server
appears, for example:
Click OK to close the message. Follow the instructions
provided in the message to verify the connection and then
click Next on the wizard page to resume the installation.
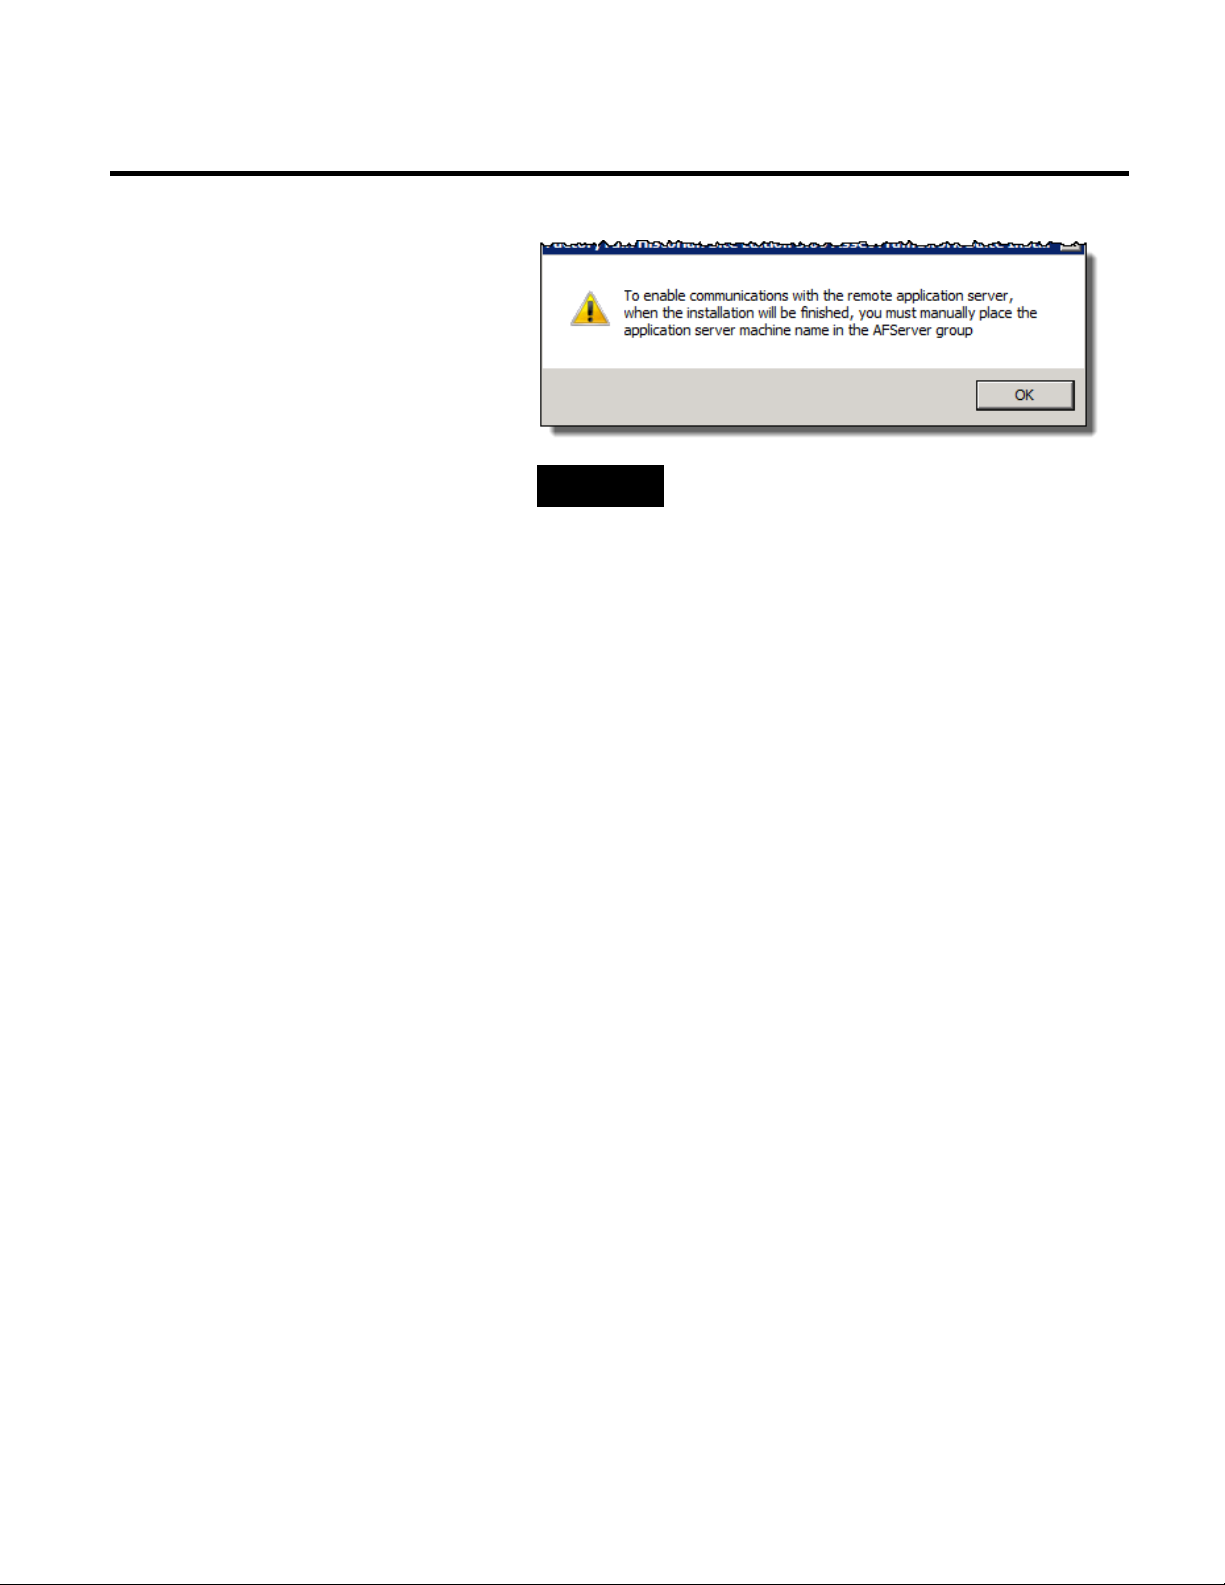
• If you have selected either to install the AF SQL database
only (installation mode 4) or the AF SQL database with the
unprocessed database scripts (installation mode 5), a
message will appear prompting you to manually add the
machine with the AF service installed to the Windows
AFServer user group, which is created during the
installation of the Asset Framework.
38 Rockwell Automation Publication HSE-IN024A-EN-E–December 2012
Page 39
Installing FactoryTalk Historian Chapter 4
Install FactoryTalk Historian SE Server
NOTE
See "Add the AF Service Computer to the AFServer Group
55" for more information.
The Installation Progress page appears. It lists the
components that are going to be installed. The status of the
installation is displayed in the Status column of the
component table.
10. Click Install to start the installation.
11. Wait until the components are installed. The installation time
will vary depending on the selected installation mode and the
computer performance. The installation status is displayed on
the progress bar below the component table.
12. On the Installation Wizard Completed page, click Show the
installation log, if you want to view the installation log after
the installation wizard closes.
13. Click Finish to exit the installation wizard.
The FactoryTalk Historian SE server is installed with the following
FactoryTalk Historian components:
• FactoryTalk Historian server
• FactoryTalk Historian Live Data Interface
• Historian Interface Configuration Utility (ICU)
• RA Components
• FactoryTalk Activation Manager
Rockwell Automation Publication HSE-IN024A-EN-E–December 2012 39
Page 40
Chapter 4 Installing FactoryTalk Historian
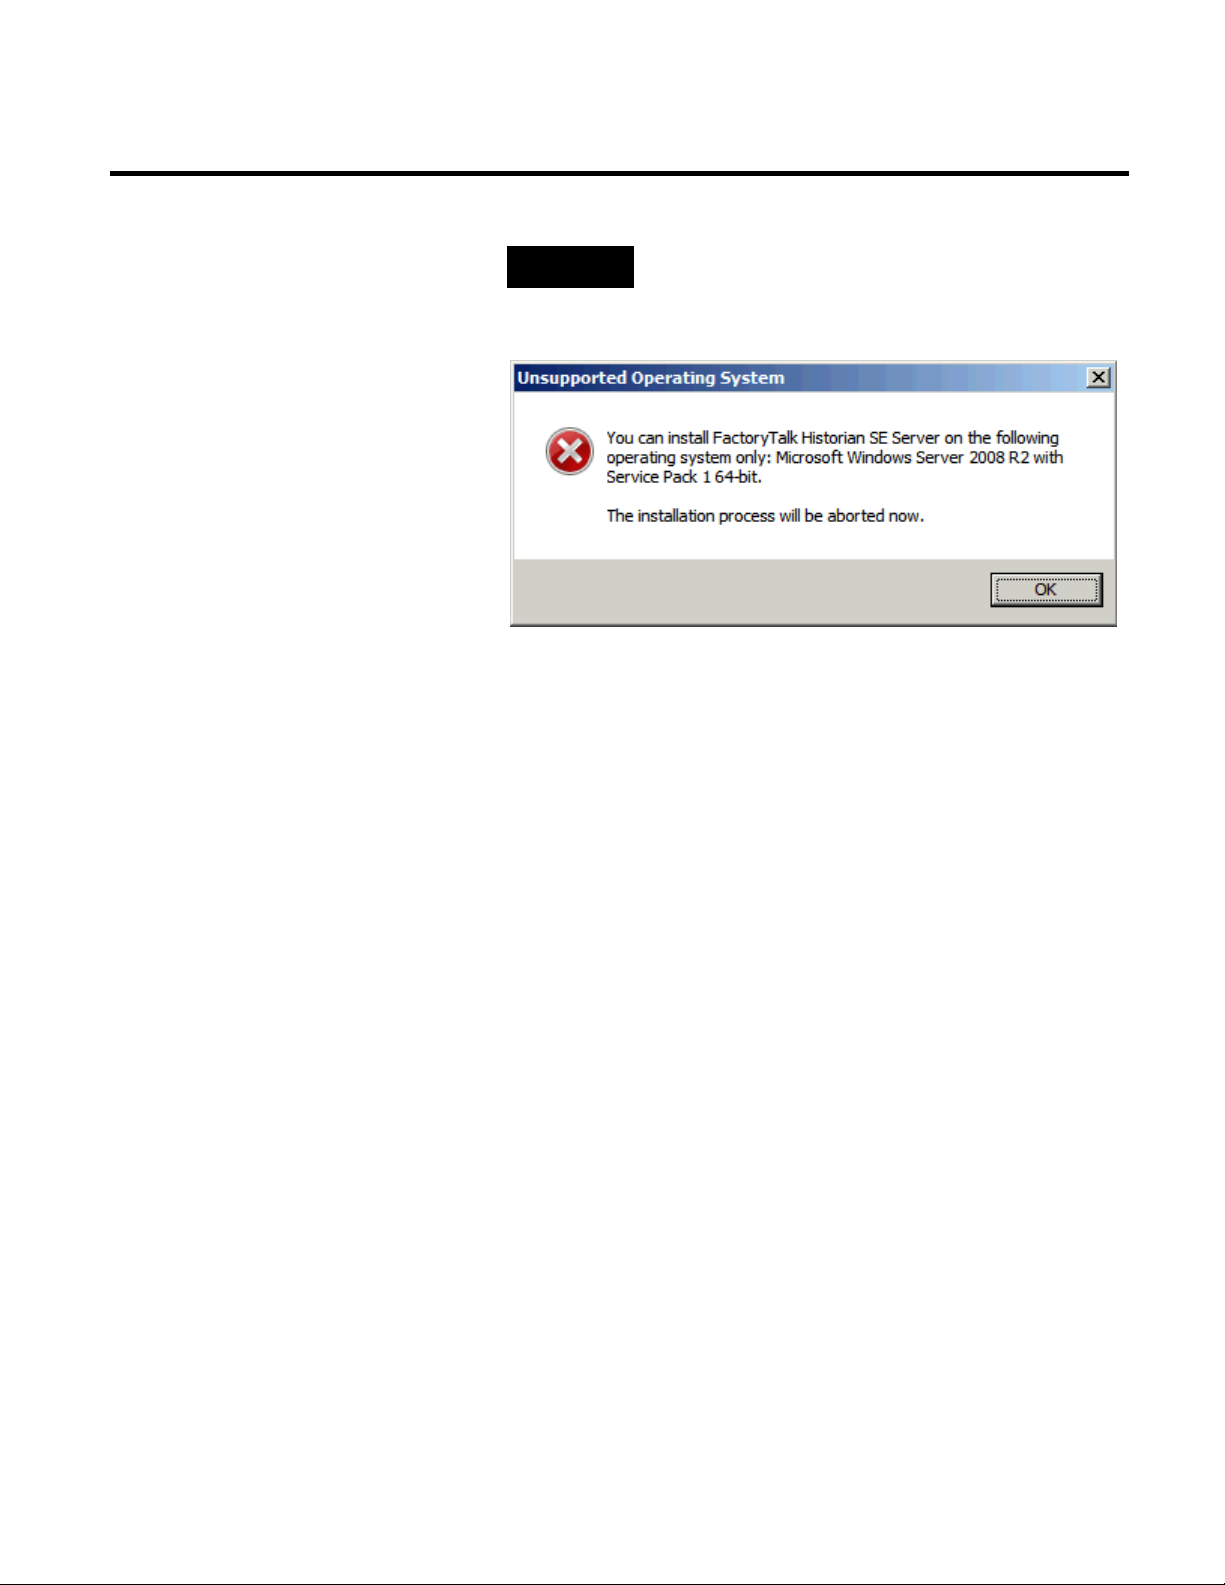
NOTE
The FactoryTalk Historian SE Server must be installed on Microsoft
Windows Server 2008 R2 with Service Pack 1 64-bit. If you try to
install it on any other operating system, the message presented
below will appear and the installation will be aborted.
To install the FactoryTalk Historian SE server:
1. Run the FactoryTalk Historian SE installation DVD.
2. On the welcome page of the installation wizard, click Install
FactoryTalk Historian SE > Install FactoryTalk Historian
Server.
The installation wizard appears.
If there are any software prerequisites missing from the
computer, they are listed in red at the bottom of the
installation wizard Welcome page. Click Cancel and Finish
to exit the wizard, install the prerequisites, and start the
installation wizard again.
3. On the Welcome... page, click Next.
4. On the License Agreement page, read and accept the terms of
the license agreement, selecting the I accept... option.
5. Click Next.
6. On the Customer Information page, type your user name,
organization, and the 10-digit product serial number, e.g.
0123456789.
40 Rockwell Automation Publication HSE-IN024A-EN-E–December 2012
Page 41

Installing FactoryTalk Historian Chapter 4
7. On the Review Component Installation page, review the list
of the components that are already installed and those that will
be installed during the installation process.
Click Next.
8. On the Destination Drive page, select the drive on which you
want to install the product.
If the space available on the drive is not sufficient for the
installation, a warning message will appear below the
Installation drive list. In such a case, select another drive or
increase the available space on the drive you have originally
selected.
NOTE
You can choose the destination drive only if you install the
component on the selected machine for the first time. If there have
been any FactoryTalk Historian components installed on the
machine before, the Installation drive list will not be enabled.
Click Next.
The Installation Progress page appears. It lists the
components that are going to be installed. The status of the
installation is displayed in the Status column of the
component table.
9. Click Install to start the installation.
10. Wait until the components are installed. The installation time
will vary depending on the number of components being
installed and the computer performance. The installation
status is displayed below the component table.
During the installation process, the Release Notes appear. Close
the dialog box to proceed with the installation.
If the FactoryTalk Activation Manager has not been installed
yet, the wizard for installing USB dongles software appears.
The FactoryTalk Activation Manager installation wizard
appears with a list of prerequisite packages.
Click Continue.
Rockwell Automation Publication HSE-IN024A-EN-E–December 2012 41
Page 42

Chapter 4 Installing FactoryTalk Historian
11. In the message box that appears:
• Click Yes, if you want to install the software for Rockwell
Automation USB dongles.
The drivers are used to support mobile activations which
are locked in a hardware dongle.
Follow the on-screen instruction to install the software.
• Click No, if you want to skip this step.
The installation wizard appears.
12. Follow the instructions displayed on the screen to complete
the installation.
13. In the FactoryTalk Directory Server Location Utility dialog
box, identify the computer that hosts the FactoryTalk
Directory server. If it is the current computer, leave localhost in
the text box. Otherwise, do the following to point to the
proper FactoryTalk Directory computer:
1. Click the ellipsis button (
). The Login User dialog box
appears.
2. In the User name and Password text boxes, type the
credentials to the current FactoryTalk Directory machine.
The FactoryTalk Directory Server Configuration dialog
box appears.
3. Select the Remote computer option and click the ellipsis
button (
) to open the Browse for Computer dialog box.
4. Select the machine that hosts the FactoryTalk Directory
and click OK.
The name of the machine appears in the FactoryTalk
Directory Server Location Utility dialog box.
5. Click OK.
6. In the message box informing you that you will need to
restart the computer, click OK.
42 Rockwell Automation Publication HSE-IN024A-EN-E–December 2012
Page 43

Installing FactoryTalk Historian Chapter 4
7. In the Log On to FactoryTalk (New Server) dialog box,
type the user name and password to the newly selected
FactoryTalk Directory machine.
8. Click OK. The system connects to the FactoryTalk
Directory server.
14. On the Installation Wizard Completed page, click Show the
installation log, if you want to view the installation log after
the installation wizard closes.
Install FactoryTalk Historian Live Data Interface (Optional)
NOTE
See "View the Installation Log File (page 53)" for more
information.
If any of the installed components requires rebooting the
computer, a relevant message will appear on the installation
wizard page, and you will be prompted to restart the machine
after the installation wizard closes.
15. Click Finish to exit the installation wizard.
16. In the message box prompting you to restart the computer,
click Yes.
The FactoryTalk Historian Live Data Interface collects data points
(tags) from the data server and passes them to the FactoryTalk
Historian SE server. Install the FactoryTalk Historian Live Data
Interface component on the same computer as the data server and
separate from the computer that has the FactoryTalk Historian SE
server installed.
After installing the interface, configure the buffering service on the
data server computer. The buffering service stores data in its
memory so that in the event the interface is not able to
communicate with the FactoryTalk Historian SE server, the data
will not be lost.
By default, the FactoryTalk Historian Live Data Interface is
installed during the installation of the FactoryTalk Historian SE
Server. Such a configuration is typically used for demonstration
Rockwell Automation Publication HSE-IN024A-EN-E–December 2012 43
Page 44

Chapter 4 Installing FactoryTalk Historian
purposes rather than real-life production environments. It is
recommended to install the FactoryTalk Historian Live Data
Interface on a different computer than the FactoryTalk Historian
server, typically on a data server computer.
NOTE
For more information on buffering, see "Enable Buffering (page 100)".
To install the FactoryTalk Historian Live Data Interface on the
data server computer:
1. Run the FactoryTalk Historian SE installation DVD.
2. On the welcome page of the installation wizard, click Install
FactoryTalk Historian SE > Install FactoryTalk Historian Live
Data Interface.
The installation wizard appears.
If there are any software prerequisites missing from the
computer, they are listed in red at the bottom of the
installation wizard Welcome page. Click Cancel and Finish
to exit the wizard, install the prerequisites, and start the
installation wizard again.
3. On the Welcome... page, click Next.
4. On the License Agreement page, read and accept the terms of
the license agreement, selecting the I accept... option.
5. Click Next.
6. On the Review Component Installation page, review the list
of the components that are already installed and those that will
be installed during the installation process.
Click Next.
7. On the Destination Drive page, select the drive on which you
want to install the product.
If the space available on the drive is not sufficient for the
installation, a warning message will appear below the
44 Rockwell Automation Publication HSE-IN024A-EN-E–December 2012
Page 45

Installing FactoryTalk Historian Chapter 4
Installation drive list. In such a case, select another drive or
increase the available space on the drive you have originally
selected.
NOTE
You can choose the destination drive only if you install the
component on the selected machine for the first time. If there have
been any FactoryTalk Historian components installed on the
machine before, the Installation drive list will not be enabled.
Click Next.
The Installation Progress page appears. It lists the
components that are going to be installed. The status of the
installation is displayed in the Status column of the
component table.
8. Click Install to start the installation.
9. Wait until the components are installed. The installation time
will vary depending on the number of components being
installed and the computer performance. The installation
status is displayed below the component table.
During the installation process, the Release Notes appear. Close
the dialog box to proceed with the installation.
If the FactoryTalk Activation Manager has not been installed
yet, the wizard for installing USB dongles software appears.
The FactoryTalk Activation Manager installation wizard
appears with a list of prerequisite packages.
Click Continue.
10. In the message box that appears:
• Click Yes, if you want to install the software for Rockwell
Automation USB dongles.
The drivers are used to support mobile activations which
are locked in a hardware dongle.
Follow the on-screen instruction to install the software.
• Click No, if you want to skip this step.
Rockwell Automation Publication HSE-IN024A-EN-E–December 2012 45
Page 46

Chapter 4 Installing FactoryTalk Historian
The installation wizard appears.
11. Follow the instructions displayed on the screen to complete
the installation.
12. In the FactoryTalk Directory Server Location Utility dialog
box, identify the computer that hosts the FactoryTalk
Directory server. If it is the current computer, leave localhost in
the text box. Otherwise, do the following to point to the
proper FactoryTalk Directory computer:
1. Click the ellipsis button (
). The Login User dialog box
appears.
2. In the User name and Password text boxes, type the
credentials to the current FactoryTalk Directory machine.
The FactoryTalk Directory Server Configuration dialog
box appears.
3. Select the Remote computer option and click the ellipsis
button (
) to open the Browse for Computer dialog box.
4. Select the machine that hosts the FactoryTalk Directory
and click OK.
The name of the machine appears in the FactoryTalk
Directory Server Location Utility dialog box.
5. Click OK.
6. In the message box informing you that you will need to
restart the computer, click OK.
7. In the Log On to FactoryTalk (New Server) dialog box,
type the user name and password to the newly selected
FactoryTalk Directory machine.
13. Click OK. The system connects to the FactoryTalk Directory
server.
14. On the Installation Wizard Completed page, click Show the
installation log (page 53), if you want to view the installation
log after the installation wizard closes.
46 Rockwell Automation Publication HSE-IN024A-EN-E–December 2012
Page 47

Installing FactoryTalk Historian Chapter 4
If any of the installed components requires rebooting the
computer, a relevant message will appear on the installation
wizard page, and you will be prompted to restart the machine
after the installation wizard closes.
15. Click Finish to exit the installation wizard.
16. If prompted, restart the computer.
Install FactoryTalk Historian Management Tools (Optional)
The FactoryTalk Historian Management Tools are installed
automatically as a part of the FactoryTalk Historian SE installation.
This option allows you to install just the Management Tools on a
non-FactoryTalk Historian Server computer, typically a FactoryTalk
View SE client computer or a remote computer, from which you can
perform administrative tasks.
The FactoryTalk Historian Management Tools are installed with
the following FactoryTalk Historian components:
• Historian Software Development Kit (PI SDK)
• Historian Interface Configuration Utility (ICU)
• FactoryTalk Historian SE RA Components
• FactoryTalk Activation Manager
• Rockwell MS Runtime Redistributables
To install the FactoryTalk Historian Management Tools:
1. Run the FactoryTalk Historian SE installation DVD.
2. On the welcome page of the installation wizard, click Install
FactoryTalk Historian SE > Install FactoryTalk Historian
Management Tools.
The installation wizard appears.
If there are any software prerequisites missing from the
computer, they are listed in red at the bottom of the
Rockwell Automation Publication HSE-IN024A-EN-E–December 2012 47
Page 48

Chapter 4 Installing FactoryTalk Historian
installation wizard Welcome page. Click Cancel and Finish
to exit the wizard, install the prerequisites, and start the
installation wizard again.
3. On the Welcome... page, click Next.
4. On the License Agreement page, read and accept the terms of
the license agreement, selecting the I accept... option.
Click Next.
5. On the Review Component Installation page, review the list
of the components that are already installed and those that will
be installed during the installation process.
Click Next.
6. On the Destination Drive page, select the drive on which you
want to install the product.
If the space available on the drive is not sufficient for the
installation, a warning message will appear below the
Installation drive list. In such a case, select another drive or
increase the available space on the drive you have originally
selected.
NOTE
You can choose the destination drive only if you install the
component on the selected machine for the first time. If there have
been any FactoryTalk Historian components installed on the
machine before, the Installation drive list will not be enabled.
Click Next.
The Installation Progress page appears. It lists the
components that are going to be installed. The status of the
installation is displayed in the Status column of the
component table.
7. Click Install to start the installation.
8. Wait until the components are installed. The installation time
will vary depending on the number of components being
installed and the computer performance. The installation
status is displayed below the component table.
48 Rockwell Automation Publication HSE-IN024A-EN-E–December 2012
Page 49

Installing FactoryTalk Historian Chapter 4
During the installation process, the Release Notes appear. Close
the dialog box to proceed with the installation.
If the FactoryTalk Activation Manager has not been installed
yet, the wizard for installing USB dongles software appears.
The FactoryTalk Activation Manager installation wizard
appears with a list of prerequisite packages.
Click Continue.
9. In the message box that appears:
• Click Yes, if you want to install the software for Rockwell
Automation USB dongles.
The drivers are used to support mobile activations which
are locked in a hardware dongle.
Follow the on-screen instruction to install the software.
• Click No, if you want to skip this step.
The installation wizard appears.
10. Follow the instructions displayed on the screen to complete
the installation.
11. In the FactoryTalk Directory Server Location Utility dialog
box, identify the computer that hosts the FactoryTalk
Directory server. If it is the current computer, leave localhost in
the text box. Otherwise, do the following to point to the
proper FactoryTalk Directory computer:
1. Click the ellipsis button (
). The Login User dialog box
appears.
2. In the User name and Password text boxes, type the
credentials to the current FactoryTalk Directory machine.
The FactoryTalk Directory Server Configuration dialog
box appears.
3. Select the Remote computer option and click the ellipsis
button (
Rockwell Automation Publication HSE-IN024A-EN-E–December 2012 49
) to open the Browse for Computer dialog box.
Page 50

Chapter 4 Installing FactoryTalk Historian
4. Select the machine that hosts the FactoryTalk Directory
and click OK.
The name of the machine appears in the FactoryTalk
Directory Server Location Utility dialog box.
5. Click OK.
6. In the message box informing you that you will need to
restart the computer, click OK.
7. In the Log On to FactoryTalk (New Server) dialog box,
type the user name and password to the newly selected
FactoryTalk Directory machine.
12. Click OK. The system connects to the FactoryTalk Directory
server.
13. On the Installation Wizard Completed page, click Show the
installation log (page 53), if you want to view the installation
log after the installation wizard closes.
Install Advanced Server (Optional)
If any of the installed components requires rebooting the
computer, a relevant message will appear on the installation
wizard page, and you will be prompted to restart the machine
after the installation wizard closes.
14. Click Finish to exit the installation wizard.
15. If prompted, restart the computer.
Advanced Server is a collection of add-on components to
FactoryTalk Historian SE Server. The Advanced Server includes:
• ACE Advanced Computation Engine for Visual Basic
calculations on Historian data
• Data Access
• JDBC Data Provider
• ODBC
• OLE DB Provider
50 Rockwell Automation Publication HSE-IN024A-EN-E–December 2012
Page 51

Installing FactoryTalk Historian Chapter 4
• OPC DA Server
• OPC HDA Server
• OPC HDA DA Server
• WebServices
• Notifications for using Microsoft Lync Unified
Communication Server
New users may activate the Advanced Server components with the
FTHSE.Advanced license activation.
For the users upgrading their license activations from FactoryTalk
Historian SE 2.2/2.1, the Advanced Server components are
activated automatically when the total license count of the FHLD
and PTY3 license activations is at least 250.
To install the Advanced Server components:
1. Open the FactoryTalk Historian SE installation DVD.
2. Go to the Redist\Advanced Server Options folder.
3. Choose the components you want to install.
4. Follow the on-screen instructions to complete the process.
To activate the Advanced Server components:
• See "Activating FactoryTalk Historian SE Server (page 61)" to
learn about the activation process.
• See "Types of Licenses (page 78)" to learn about the license
activation.
Rockwell Automation Publication HSE-IN024A-EN-E–December 2012 51
Page 52

Chapter 4 Installing FactoryTalk Historian
Install FactoryTalk VantagePoint (Optional)
Install Additional Historian Components
The data from multiple FactoryTalk Historian SE servers and
FactoryTalk Historian ME servers can be brought together into a
single information management and decision support system using
FactoryTalk VantagePoint.
For detailed instructions on installing FactoryTalk VantagePoint
and its components, refer to the FactoryTalk VantagePoint
documentation.
The FactoryTalk Historian SE DVD contains several optional
Historian components used for data management, such as
FactoryTalk Historian DataLink or PerfMon Health Monitor.
These components are located in the Redist folder on the
installation DVD.
If you choose to install these components, be sure to install them
after you install FactoryTalk Historian SE. For further information
regarding these components, refer to the FactoryTalk Historian SE
documentation, available in the Redist\Docs folder on the
FactoryTalk Historian SE installation DVD.
52 Rockwell Automation Publication HSE-IN024A-EN-E–December 2012
Page 53

Chapter 5
Post-Installation Tasks
In this chapter you will learn about the following tasks that you
should perform after installing FactoryTalk Historian SE:
• View the Historian server installation log file. (page 53)
View the Installation Log File
• Verify that Historian services are running. (page 53)
• Verify that Historian server is updating data for default tags.
(page 54)
• Add the AF Service computer to the AFServer group. (page
55)
• Manually create the Asset Framework database. (page 56)
• Manually configure the Asset Framework service. (page 58)
• Perform the MDB to AF synchronization. (page 59)
• Verify the MDB to AF synchronization. (page 59)
• Disable virus scanning. (page 60)
You can open the installation log, fth_installer.log, directly from
the installation wizard. If you want to refer to it later, open it from
the following location:
C:\Program Files\Rockwell Software\FactoryTalk
Historian\Installation Manager\<Name of the Historian
suite>\FTHInstallerLogs\<Date and Time of the Installation>.
Verify that Historian Services are Running
Use Historian Services in System Management Tools to view,
configure, start and stop Historian services for each connected
Historian server. The status of each service is updated every 30
seconds by default. You may change this refresh rate. You can also
Rockwell Automation Publication HSE-IN024A-EN-E–December 2012 53
Page 54

Chapter 5 Post-Installation Tasks
view the status, errors, and thread details for services used by the
connected Historian server, and export a list of Historian services.
To open Historian services:
1. Click Start > Program Files > Rockwell Software > FactoryTalk
Historian SE > System Management Tools. The System
Management Tools dialog box appears.
2. Under Collectives and Servers, select the server for which you
want to view the information.
3. Under System Management Tools, select Operation > PI
Services.
4. Verify that the following Historian services and default
interfaces are running:
• Archive Subsystem
• Backup Subsystem
• Base Subsystem
• License Manager
• Network Manager
• Ramp Soak Simulator (rmp_sk) Interface
• Random Simulator (random) Interface
• Snapshot Subsystem
• SQL Subsystem
• Update Manager
Depending on your license, you might see additional services.
54 Rockwell Automation Publication HSE-IN024A-EN-E–December 2012
Page 55

Post-Installation Tasks Chapter 5
Verify that the Historian Server is Updating Data for Default Tags
To verify that the Historian server is updating data for default
tags:
1. On the computer with the Historian server installed, go to
Start > All Programs > Rockwell Software > FactoryTalk
Historian SE > System Management Tools. The System
Management Tools dialog box appears.
2. Under Collectives and Servers, select the Historian server
whose data you want to view.
3. Under System Management Tools, select Data > Archive
Editor.
4. In the (Tag Not Specified) tab, click
. The Tag Search
dialog box appears.
5. In the Tag Mask text box, type cdt158, and click Search.
The cdt158 tag appears in the search results list.
6. Click OK.
The list of events of the selected tag is displayed in the tab in
the right pane of the System Management Tools dialog box.
NOTE
For more information on the Archive Editor, click .
Add the AF Service
NOTE
Computer to the AFServer
Group
Rockwell Automation Publication HSE-IN024A-EN-E–December 2012 55
This procedure applies if you have selected either of the following
installation modes of FactoryTalk Historian Asset Framework:
• AF SQL Database.
• AF SQL Database with unprocessed database scripts.
See "Installation Modes for FactoryTalk Historian Asset Framework
(page 34)" for information on the installation modes.
Page 56

Chapter 5 Post-Installation Tasks
To add the computer with the AF service installed to the
AFServer group:
1. Go to Start > All Programs > Administrative Tools > Computer
Management. The Computer Management dialog box
appears.
2. In the explorer tree, select System Tools > Local Users and
Groups > Groups.
3. In the right pane, right-click the AFServers group, and select
Add to Group.
4. In the AFServers Properties dialog box, click Add.
5. In the Select Users, Computers, Service Accounts, or
Groups dialog box, type the name of the machine with the AF
service installed in the text box, and click Check Names to
verify the name.
Manually Create the Asset Framework Database
6. Click OK to exit the dialog boxes.
NOTE
This procedure applies if you have selected either of the following
installation modes of FactoryTalk Historian Asset Framework:
• AF Application Service and AF SQL Database with unprocessed
database scripts.
• AF SQL Database with unprocessed database scripts.
See "Installation Modes for FactoryTalk Historian Asset Framework
(page 34)" for information on the installation modes.
If you have installed FactoryTalk Historian Asset Framework with
unprocessed scripts, you need to create the AF SQL database
manually using the scripts. The scripts create the AF SQL database
called PIFD and populate its tables.
NOTE
To execute the scripts, you must have sysadmin privileges on the
SQL Server instance.
56 Rockwell Automation Publication HSE-IN024A-EN-E–December 2012
Page 57

Post-Installation Tasks Chapter 5
To manually create the Asset Framework SQL PIFD database:
1. On the computer to which the unprocessed database scripts
were copied during the FactoryTalk Historian Asset
Framework installation process, open the Command Prompt
window and navigate to the following folder in the Program
Files directory: Rockwell Software\FactoryTalk
Historian\PIPC\AF\SQL.
2. Call the GO.bat file with the following parameters, depending
on the user authentication method:
• SQL Server authentication:
GO.bat SQLServer\SQLInstance PIFD SQLServerLogin
SQLServerPassword, where:
• SQLServer is the name of the SQL Server machine on
which the PIFD database will be installed.
• SQLInstance is the name of the instance of the SQL
Server. This parameter is required if the SQL Server has
been installed with an instance name.
• SQLServerLogin is the SQL Server user name.
• SQLServerPassword is the password of the SQL Server
user.
• Windows authentication:
GO.bat SQLServer\SQLInstance PIFD
3. Press Enter to start the database creation process.
The end of the process is indicated with an underscore at the
command prompt.
Once the database is created, you need to configure the Asset
Framework service to communicate with the database. See
"Manually Configure the Asset Framework Service (page 58)" for
more information.
Rockwell Automation Publication HSE-IN024A-EN-E–December 2012 57
Page 58
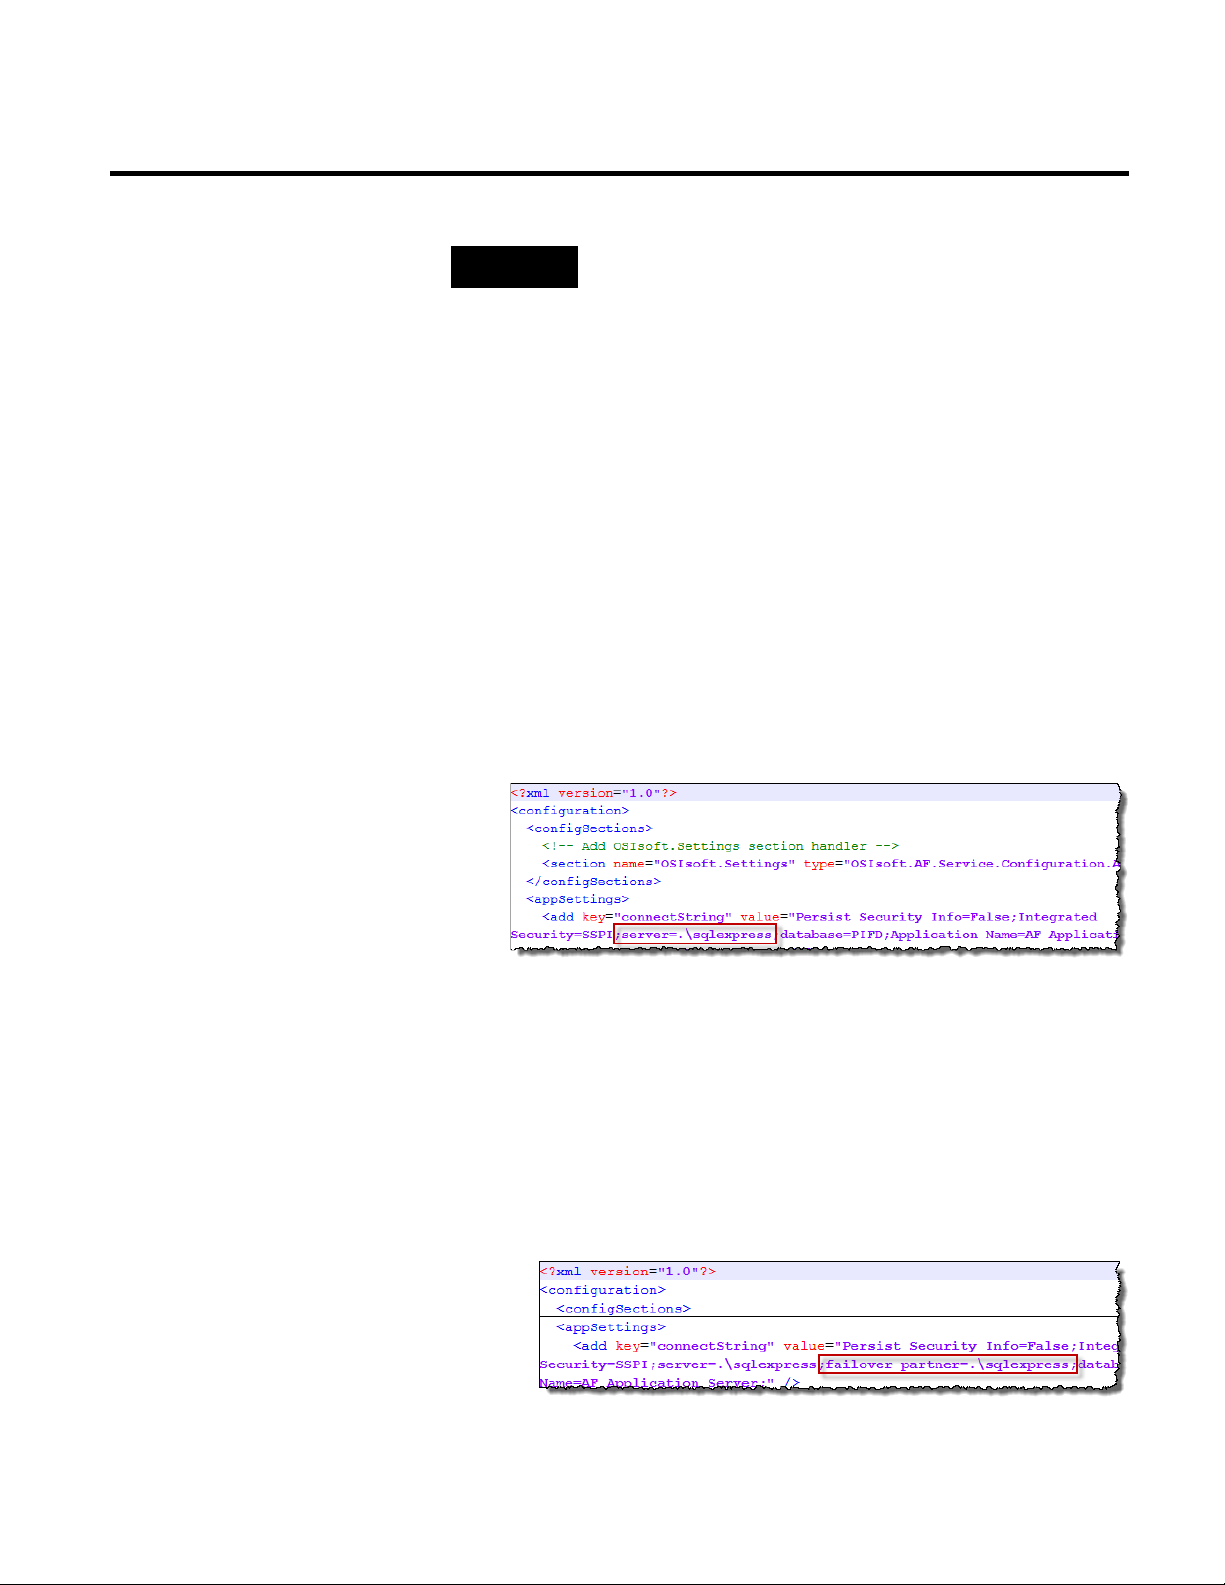
Chapter 5 Post-Installation Tasks
Manually Configure the Asset Framework Service
NOTE
Perform the steps described below on each computer with the Asset
Framework service installed.
To configure the AF service to communicate with the PIFD SQL
database:
1. In Windows Explorer, navigate to the following folder in the
Program Files directory: Rockwell Software\FactoryTalk
Historian\PIPC\AF\.
2. Open the AFService.exe.config file in a text editor.
3. Navigate to the <appSettings> section, and in the add element
with the key=connectString attribute update the values of
the server attribute:
server=SQLServer\SQLInstance
For example:
• If the SQL Server is running on a computer cluster, type the
IP address of the clustered resource as the SQLServer value.
• If the SQL Server is configured to use the SQL Server
database mirroring, add the failover partner attribute after
the server attribute with the following values:
failover partner=SQLServer\SQLInstance
For example:
58 Rockwell Automation Publication HSE-IN024A-EN-E–December 2012
Page 59
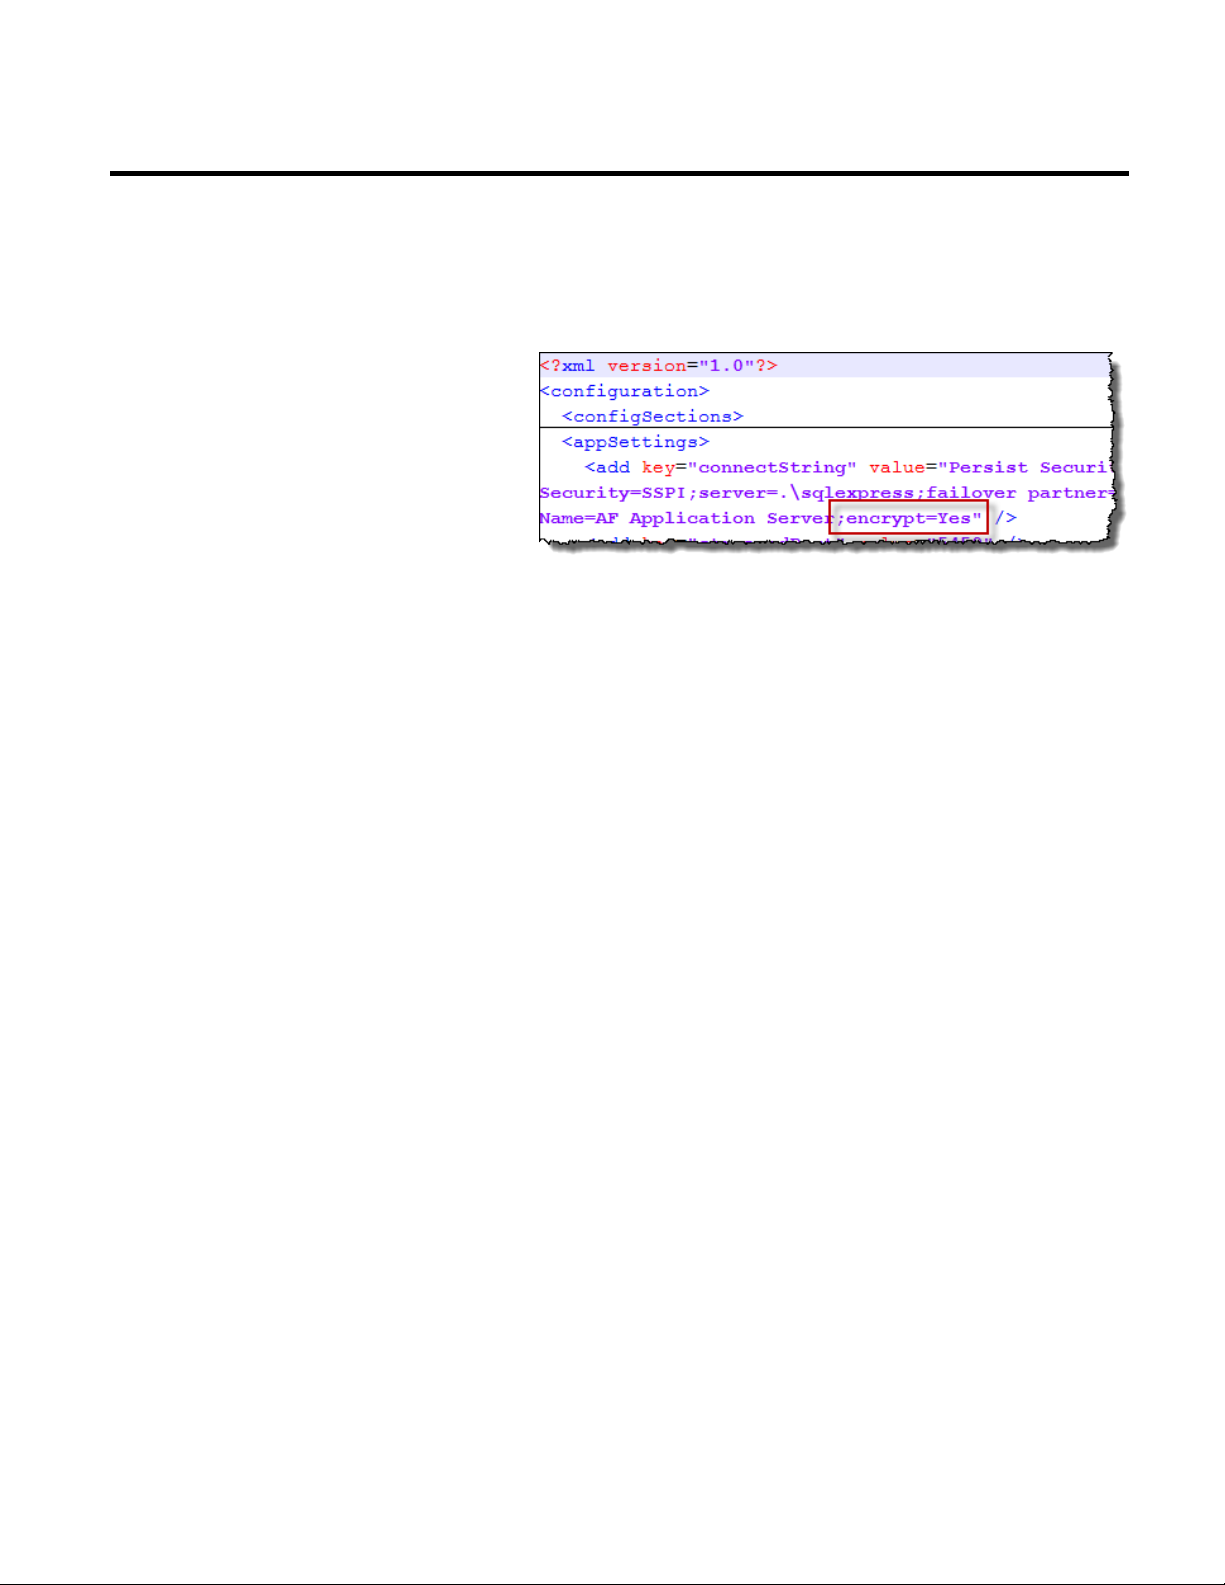
Post-Installation Tasks Chapter 5
Synchronization
• If you want to enable the encrypted communication
between the AF service and the AF SQL database, add the
encrypt=Yes attribute to the code, for example:
• If you want to configure other options, refer to the
Microsoft SQL Native Client documentation.
4. Save the file.
5. If the Asset Framework service is running, restart it for the
changes to take effect:
Perform the MDB to AF Synchronization
Verify the MDB to AF
1. Go to Start > All Programs > Administrative Tools >
Services.
2. In the Services dialog box, right-click PI AF Server 2.x and
select Restart.
Once you have the FactoryTalk Historian Asset Framework and the
FactoryTalk Historian SE Server installed, you need to set up
synchronization between the AF service and the Historian server.
This process is called the MDB to AF transition. For more
information, refer to the FT Historian SE MDB to AF Transition
Guide.
To verify the MDB to AF synchronization:
1. Click Start > All Programs > Rockwell Software > FactoryTalk
Historian SE > System Management Tools. The System
Management Tools dialog box appears.
Rockwell Automation Publication HSE-IN024A-EN-E–December 2012 59
Page 60

Chapter 5 Post-Installation Tasks
2. Under System Management Tools, select Operation > MDB
to AF Synchronization.
3. Select the Historian server for which you want to verify the
synchronization.
• If the synchronization is operating correctly, a green icon
appears next to the name of the server.
Disable Virus Scanning
• If the synchronization fails, a red icon appears. Click
in
the System Management Tools dialog box for information
on how to diagnose and solve the problem.
Rockwell Automation considers it a good practice to exclude the
following directories from anti-virus software scanning:
• On Historian server computers, exclude the Server\dat
directory and any directory where archive or event queue files
are located.
• For Interface nodes, exclude the pipc\dat and pipc\log
directories, as well as the directory where buffer queue files are
located.
By excluding these directories you avoid random signature match
incidents, potential performance impacts, and conflicts with locked
files.
NOTE
For more details, see the FT Historian SE Server Reference Guide,
available in the Redist\Docs folder on the FactoryTalk Historian SE
installation DVD and in the Common Files\Rockwell\Help folder in
your Program Files directory.
60 Rockwell Automation Publication HSE-IN024A-EN-E–December 2012
Page 61

Chapter 6
Configuring FactoryTalk Historian
In this chapter you will find the following information on
configuring FactoryTalk Historian SE and its components:
• Activating the Historian server. (page 61)
Activating the Historian Server
• Securing the Historian server. (page 62)
• Configuring Windows Firewall for FactoryTalk Historian SE.
(page 73)
• Configuring the Historian server. (page 75)
• Configuring the Data server. (page 96)
• Configuring Historian interface connections. (page 97)
• Configuring FactoryTalk Historian Live Data Interface. (page
98)
• Configuring Excel Add-ins for FactoryTalk clients. (page 103)
• Recording messages using FactoryTalk Diagnostics. (page 104)
You need to activate the FactoryTalk Historian SE server so that it
starts collecting data points (tags) from data servers.
You activate the server by obtaining license activation file(s) from
the Rockwell Automation licensing website and assigning them to
the server using the FactoryTalk Activation Manager.
To activate FactoryTalk Historian SE server:
1. Go to Start > All Programs > Rockwell Software > FactoryTalk
Activation > FactoryTalk Activation Manager. The
FactoryTalk Activation Manager dialog box appears.
Rockwell Automation Publication HSE-IN024A-EN-E–December 2012 61
Page 62

Chapter 6 Configuring FactoryTalk Historian
2. Follow the instructions displayed in the wizard to configure
your activations.
Securing the Historian Server
NOTE
Click Help for more information, or refer to the instructions from
the Activate Rockwell Software Products leaflet, available with your
FactoryTalk Historian SE installation package.
FactoryTalk Historian SE allows you to manage the Historian server
authentication through Windows and Microsoft Active Directory
(AD). This solution improves the Historian server security, reduces
your management workload, and provides users with a single sign-on
experience.
With Windows authentication for the FactoryTalk Historian SE
Server, users log on to their Windows accounts and are
automatically authenticated on the Historian server. The Historian
server comes with a set of preconfigured security components
created to reflect particular roles that may be adopted by users to
access the Historian server resources. Each user comes with
predefined trusts and is assigned to one or more groups, depending
on the scope of privileges they should have. Each group is defined
with a different scope of privileges. The users and groups are
assigned to individual database tables, creating in this way a system
of permissions for accessing the Historian server database resources.
The users are the central components that connect the Windows
authentication functionality with the Historian server security
model. They determine which Windows users are authenticated on
the Historian server and what access permissions they have there
(for example, whether the user is allowed to create a point or run a
backup).
The connection between the Windows users and/or groups and the
Historian server security users is established through mappings. If
you want to grant a Windows user or group access to a Historian
server resource (such as a point or a module), you need to create on
the Historian server mappings between the Windows users and/or
62 Rockwell Automation Publication HSE-IN024A-EN-E–December 2012
Page 63

Configuring FactoryTalk Historian Chapter 6
groups and relevant Historian server users or groups. In this way the
Window users and/or groups adopt the permissions from the
Historian users to which they are mapped. This is the safest,
quickest and most convenient way of distributing the Historian
server privileges.
You can manage the Historian server security with the System
Management Tools.
See the following sections to learn more about the Historian server
security model:
• Historian Security Components and Their Privileges (page
63)
• Managing Historian Security Components (page 67)
Historian Security Components and Their Privileges
• Creating Security Mappings (page 69)
• Managing Security of the Historian Server Database (page 71)
The following components constitute the Historian security model:
Identities Users Groups
PIEngineers FTHEngineer FTHEngineers
PIOperators FTHOperator FTHOperators
PISupervisors FTHSupervisor FTHSupervisors
PIWorld pidemo FTHAdministrators
piadmin piusers
The descriptions and privileges of the security components are
presented in the following tables:
Identities Description and privileges
PIEngineers A sample identity with engineering duties with no pre-configured
settings.
PIOperators A sample identity with operational duties with no pre-configured
settings.
Rockwell Automation Publication HSE-IN024A-EN-E–December 2012 63
Page 64

Chapter 6 Configuring FactoryTalk Historian
•
•
Identities Description and privileges
PISupervisors A sample identity with supervisory duties with no pre-configured
settings.
PIWorld An identity with preconfigured access permissions to Historian
server resources. It represents the "everyone" concept of Windows,
and specifies the rights of non-explicit users or groups.
All authenticated Historian server users are given at least PIWorld
privileges.
The PIWorld identity has write access to the following table:
• PIMSGSS
The PIWorld identity has read access to the following tables:
• PIAUDIT
• PIBatch
• PIBATCHLEGACY
• PICampaign
• PIDBSEC
• PIDS
• PIHeadingSets
• PIModules
• PIPOINT
• PIReplication
• PITransferRecords
• PIUSER
The PIWorld identity does not have access to the following tables:
• PIAFLINK
• PIARCADMIN
• PIARCDATA
• PIBACKUP
• PIMAPPING
• PITRUST
• PITuning
You can or cannot do the following with the PIWorld identity:
• You can:
Fully disable it.
• You cannot:
Delete it.
64 Rockwell Automation Publication HSE-IN024A-EN-E–December 2012
Page 65

Configuring FactoryTalk Historian Chapter 6
•
•
•
•
•
•
•
Identities Description and privileges
Use it in a mapping.
Use it in a trust.
Users Description and privileges
FTHEngineer
A preconfigured user, member of the FTHEngineers and
FTHSupervisors groups.
FTHOperator
FTHSupervisor
A preconfigured user, member of the FTHOperators group.
A preconfigured user, member of the FTHSupervisors group.
piadmin A preconfigured administrative PI User with unrestricted access to
Historian server resources.
You can or cannot do the following with the piadmin user:
• You can disable its properties:
To be used in a mapping.
To be used in a trust.
To be used for an explicit logon.
• You cannot:
Delete it.
Fully disable it.
You should:
• Map it only to a limited group of administrators.
Piadmin is a member of the FTHEngineers, FTHSupervisors, and
FTHAdministrators groups.
pidemo
A generic PI User, member of the piusers group.
Rockwell Automation Publication HSE-IN024A-EN-E–December 2012 65
Page 66

Chapter 6 Configuring FactoryTalk Historian
•
•
•
•
•
•
•
Groups Description and privileges
FTHAdministrators It represents Historian server administrators and has
read-and-write access to all Historian server resources and default
points, except the following database tables:
• PIDS
• PIHeadingSets
• PIPOINT
You can or cannot do the following with the FTHAdministrators
group:
• You can:
Map it to the AD group that represents your Historian server
system administrators.
Adjust its access permissions to meet your needs.
Fully disable it.
• You cannot:
Delete it.
FTHEngineers A preconfigured group with the following privileges:
• Create, modify, and delete point definitions.
• Read and write access to the following database tables:
PIDS
PIHeadingSets
PIPOINT
FTHOperators A preconfigured group with the following privileges:
• Read any point definition.
• Read any point’s historical data set.
FTHSupervisors A preconfigured group with the following privileges:
• Read any point definition.
• Read any point’s historical data set.
When the users belonging to the FTHSupervisors group create
points in the FactoryTalk Administration Console, they get the
following privileges to these points:
• Add new point data to any point’s historical data set.
• Add, modify, and delete point data.
66 Rockwell Automation Publication HSE-IN024A-EN-E–December 2012
Page 67

Configuring FactoryTalk Historian Chapter 6
•
•
Groups Description and privileges
piusers A generic PI Group formerly named "piuser".
This group has no preconfigured access permissions.
You can or cannot do the following with the piusers group:
• You can:
Fully disable it.
• You cannot:
Delete it.
Use the System Management Tools to manage the security
components and security of your Historian server database.
Managing Historian Security Components
NOTE
To manage security identities, users, and groups, you need
administrative rights to the Historian server.
To manage the Historian server security components:
1. Go to Start > All Programs > Rockwell Software > FactoryTalk
Historian SE > System Management Tools.
2. Under Collectives and Servers, click the check box next to
the server for which you want to view and manage the security
information.
3. Under System Management Tools, expand Security and
select Identities, Users, & Groups.
In the right pane, the PI Identities, PI Users, and PI Groups
tabs appear.
Each tab contains a set of columns with security-related
information. To modify the type of information displayed,
right-click a column name and add or remove columns from
the context menu.
Rockwell Automation Publication HSE-IN024A-EN-E–December 2012 67
Page 68
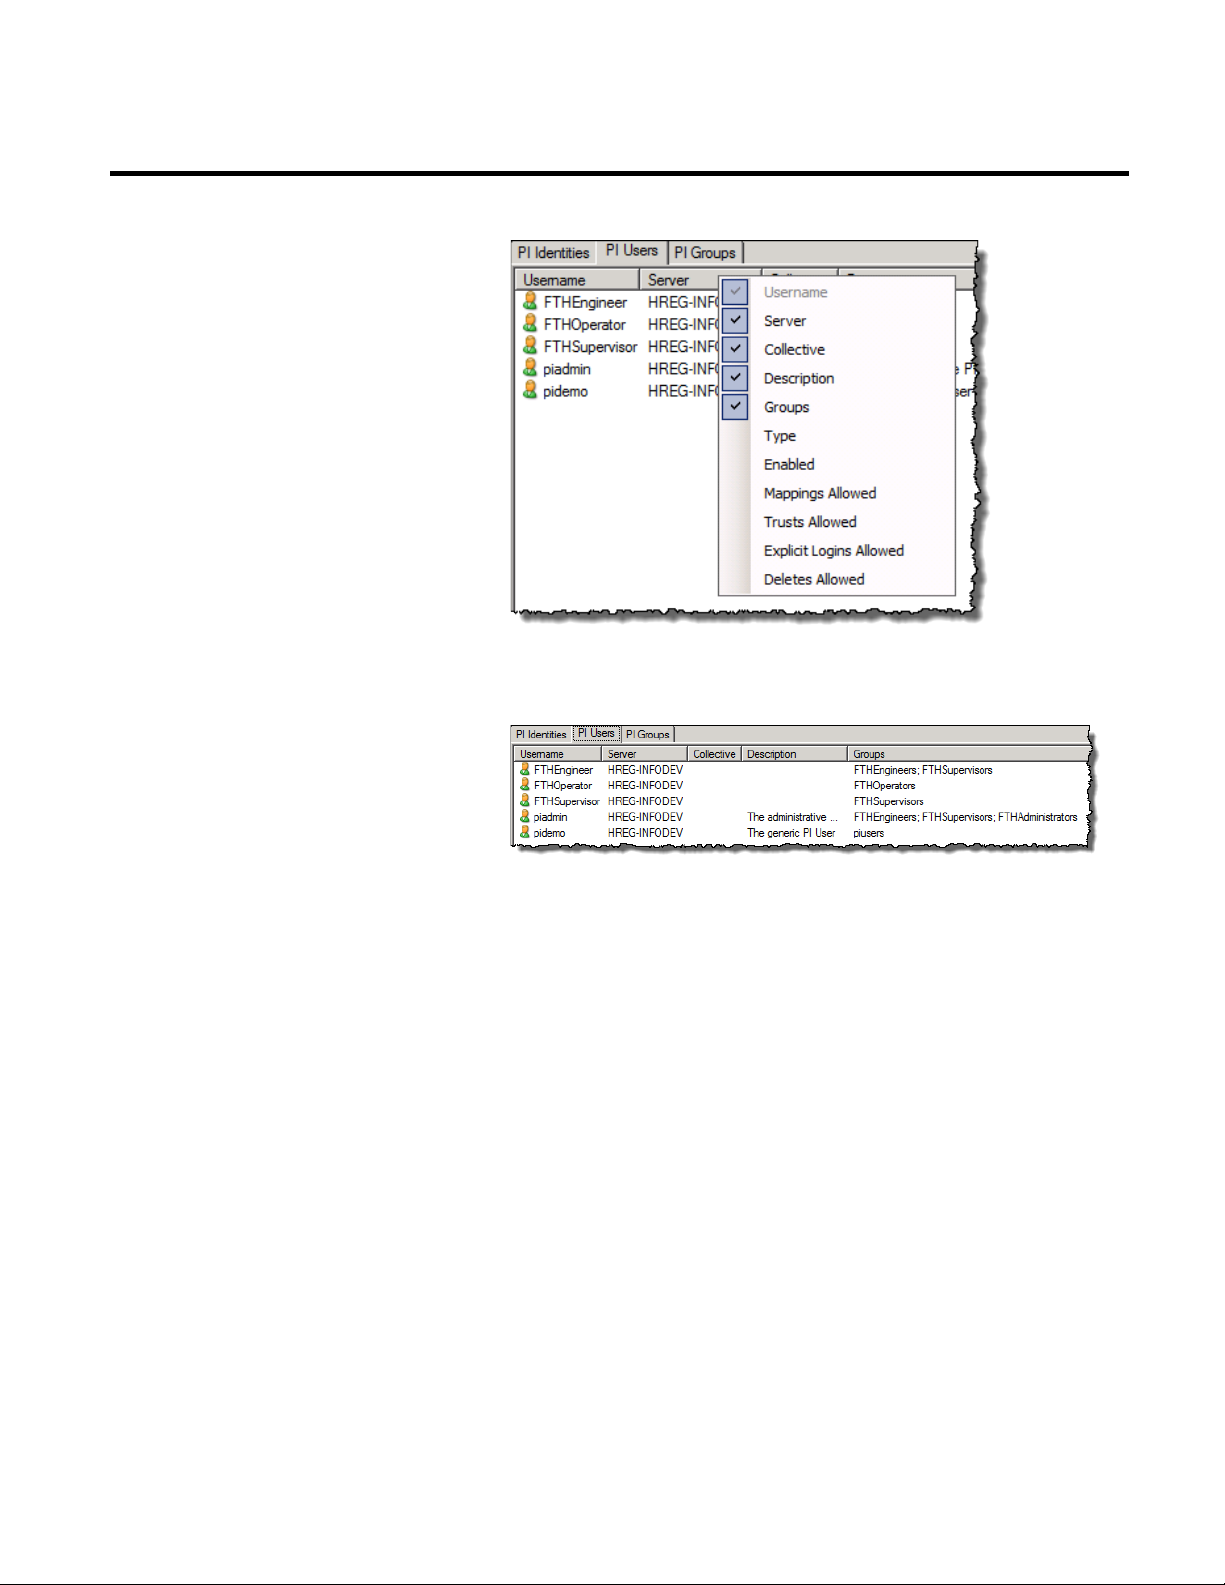
Chapter 6 Configuring FactoryTalk Historian
4. Click the tab containing the security component type you
want to view and manage.
5. In the selected tab, right-click the security component that you
want to view or modify, and select Properties. The Properties
dialog box appears.
68 Rockwell Automation Publication HSE-IN024A-EN-E–December 2012
Page 69
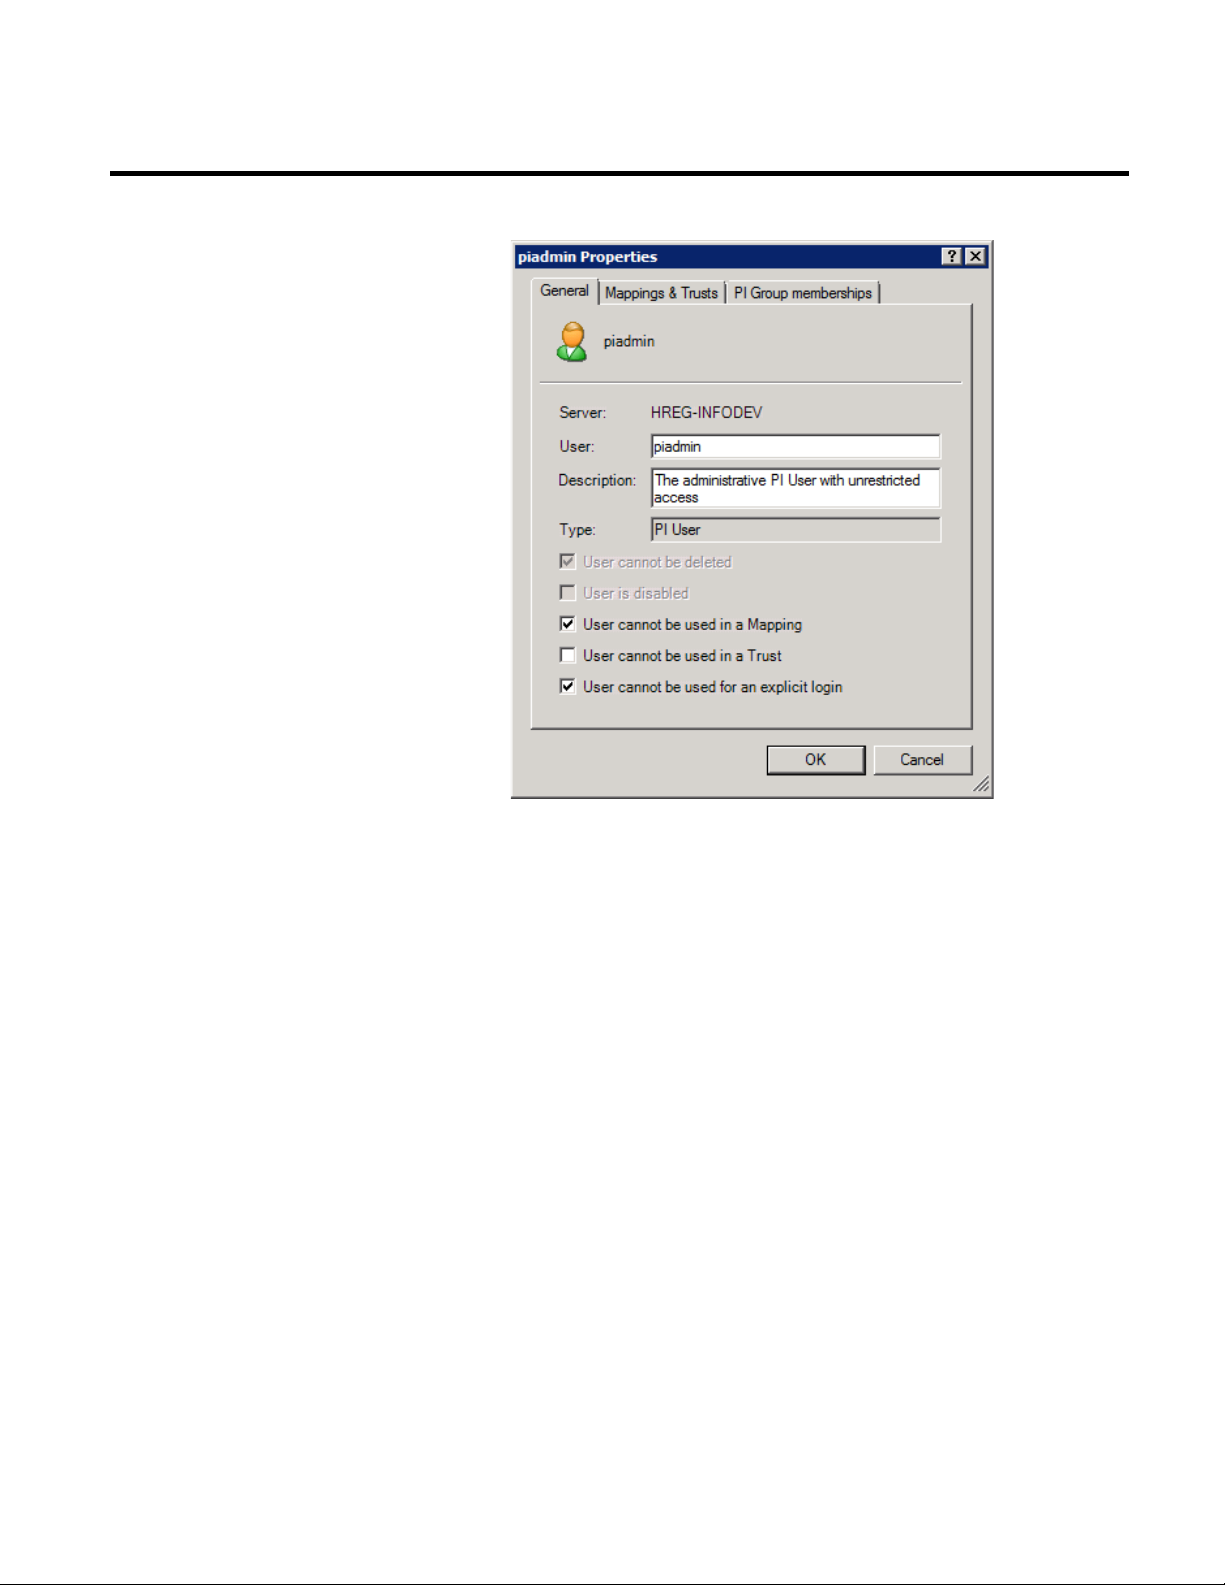
Configuring FactoryTalk Historian Chapter 6
Creating Security Mappings
The content of the dialog box differs depending on the
security component type you select.
6. View the settings of the selected security component presented
in the tabs.
You can modify the privileges of the security component to
the extent that is allowed by the component’s configuration.
See "Historian Security Components and Their Privileges
(page 63)" for more information.
7. Click OK.
To create a security mapping between a Windows user and/or
group and a Historian server user:
1. Go to Start > All Programs > Rockwell Software > FactoryTalk
Historian SE > System Management Tools. The System
Management Tools dialog box appears.
Rockwell Automation Publication HSE-IN024A-EN-E–December 2012 69
Page 70

Chapter 6 Configuring FactoryTalk Historian
2. Under Collectives and Servers, select the server for which you
want to create the mapping.
3. Under System Management Tools, select Security >
Mappings & Trusts.
4. In the Mappings tab, click
. The Add New Mapping
dialog box appears.
5. Click
next to Windows Account. The Select User,
Computer, or Group dialog box appears.
6. In the text box, type the name of the user, for which you want
to create the mapping.
7. Click Check Names to verify the user name, and click OK.
8. Click
next to PI Identity. The Select PI Identity, PI
Group, or PI User dialog box appears.
9. From the Type drop-down list, select PI Users.
10. Select the PI user, to which you want to map the selected
Windows user (e.g. piadmin), and click OK.
11. Click OK to apply the changes. The new mapping is listed in
the Mappings tab.
To check if a Windows user/group is mapped to a Historian
security user:
1. In the System Management Tools, select File >
Connections. The Connection Manager appears.
2. Select the server and view its Connected User information.
The information contains the domain name, the Windows
user/group name, and the name of the Historian security user,
to which the Windows user/group is mapped. It also lists
other Historian server security components, whose privileges
the Windows user/group shares via the Historian security
user.
70 Rockwell Automation Publication HSE-IN024A-EN-E–December 2012
Page 71

Configuring FactoryTalk Historian Chapter 6
Managing Security of the Historian Server Database
NOTE
To manage security of the Historian server database, you need
administrative rights to the Historian server.
To view and manage security privileges of the Historian server
database:
1. Go to Start > All Programs > Rockwell Software > FactoryTalk
Historian SE > System Management Tools. The System
Management Tools dialog box appears.
2. Under Collectives and Servers, select the server for which you
want to manage security.
3. Under System Management Tools, select Security >
Database Security.
In the right pane of the dialog box, a list of individual database
tables is displayed.
The Security column contains a summary of security-related
information: a list of the security components (identities,
users, and/or groups) assigned to the database table, and their
rights displayed in brackets.
Rockwell Automation Publication HSE-IN024A-EN-E–December 2012 71
Page 72
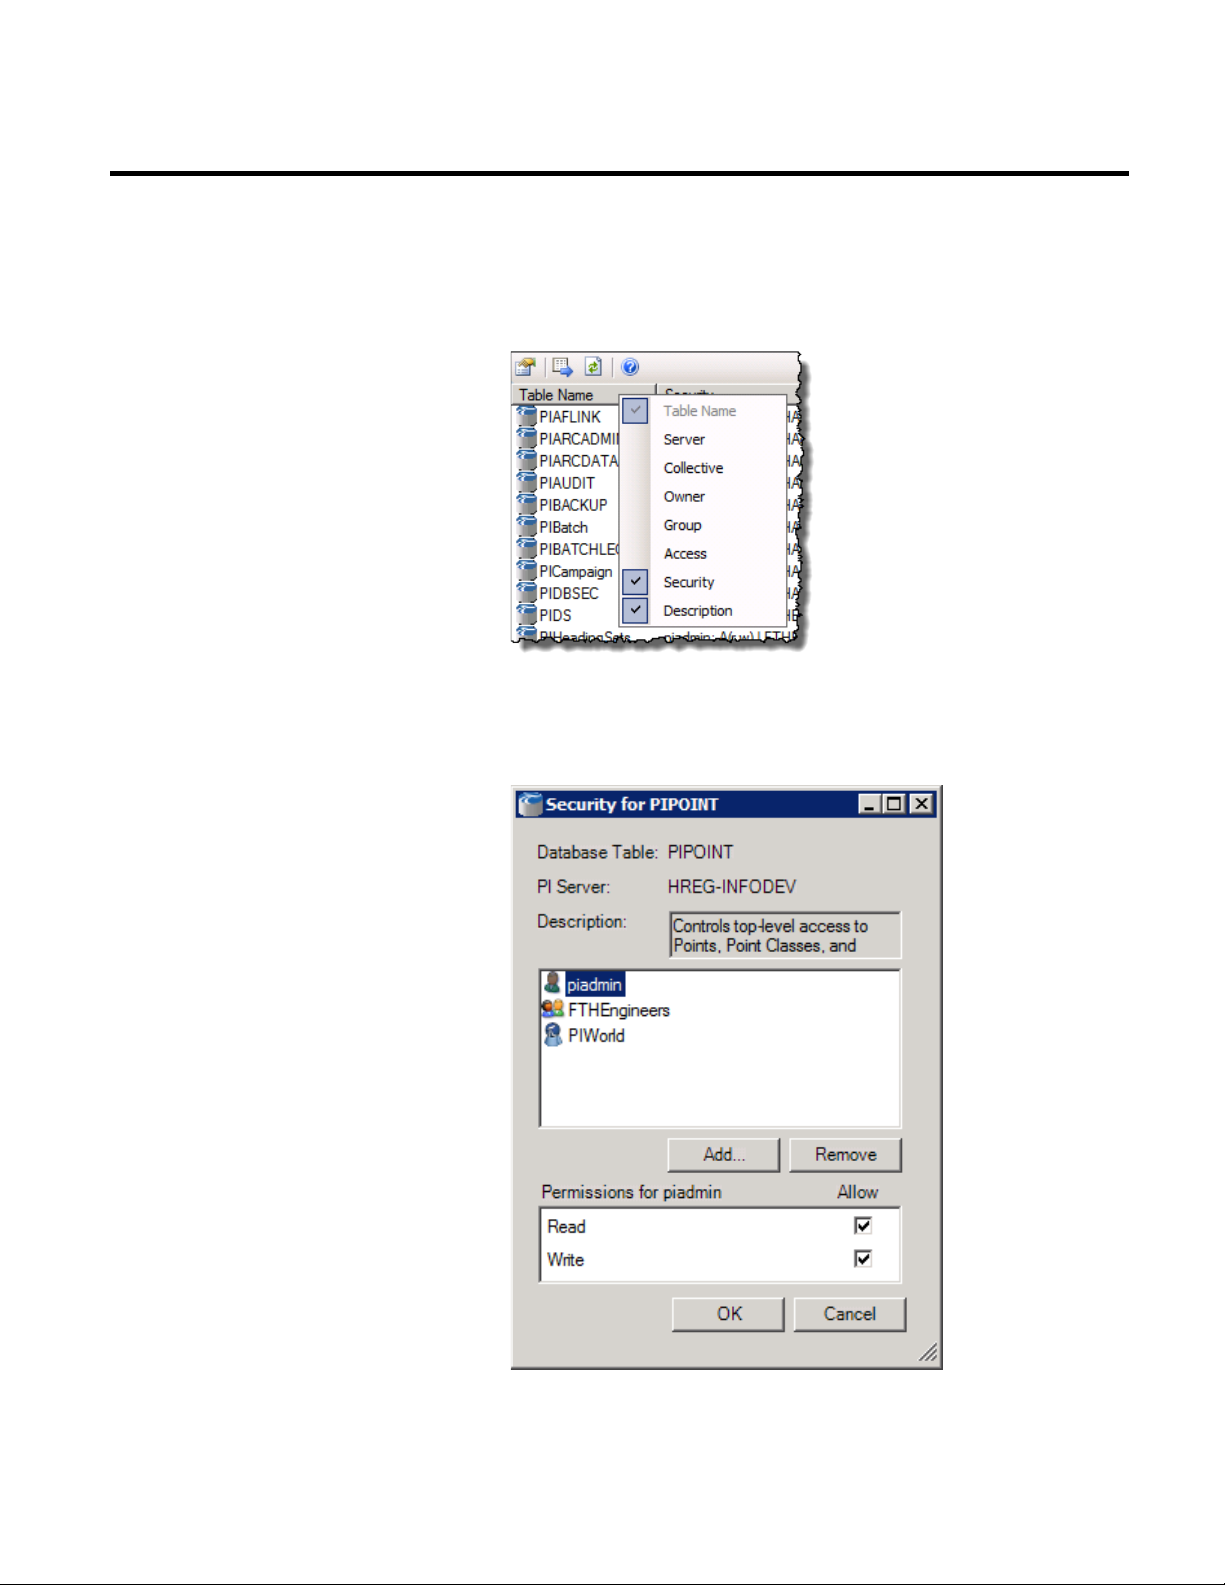
Chapter 6 Configuring FactoryTalk Historian
To modify the type of information displayed, right-click a
column name and add or remove columns from the context
menu.
4. Right-click the name of the database table for which you want
to manage the security information, and select Properties.
The Security for… dialog box appears.
72 Rockwell Automation Publication HSE-IN024A-EN-E–December 2012
Page 73

Configuring FactoryTalk Historian Chapter 6
5. Click a security component to check its privileges in the
Permissions for… list.
You can modify the privileges of the component for the
database table to the extent that is allowed by the component’s
configuration. See "Historian Security Components and Their
Privileges (page 63)" for more information.
6. Click OK.
Configuring Firewall for FactoryTalk Historian
If you use Microsoft Windows Firewall on the computers on which
you have installed FactoryTalk Historian SE, the firewall
configuration is performed automatically during the installation of
individual FactoryTalk Historian components, using the Rockwell
Firewall Configuration Utility (WFCU).
If you use another utility, you need to configure the firewall
manually following the steps presented below. Refer to the user
documentation of your firewall configuration utility for more
information.
NOTE
You need administrator privileges to perform the steps described
below.
To manually configure the firewall:
• Open TCP/IP ports in the firewall to accept incoming
connections:
See the table below to learn which ports need to be open for
individual FactoryTalk Historian suites.
For this FactoryTalk
Open these ports: Of this type:
Historian suite:
Historian to Historian
Interface
Asset Framework 5457
Rockwell Automation Publication HSE-IN024A-EN-E–December 2012 73
5450 TCP
TCP
5459
TCP
Page 74

Chapter 6 Configuring FactoryTalk Historian
For this FactoryTalk
Historian suite:
Open these ports: Of this type:
Historian Server 5450
5454
5455
5456
5458
TCP
TCP
TCP
TCP
TCP
Live Data Interface 6000 TCP
• Allow FactoryTalk Historian Live Data Interface to
communicate through the firewall:
See the table below to learn which settings you need to use
when configuring the firewall.
Item Description
The absolute path to
the Live Data
interface
The name (ID) of the
Live Data interface
Network location
types
<PIHOME_Value>Interfaces\LDInterface\FTLDInt.exe,
where <PIHOME_Value> is the path specified in the
following registry key:
Computer > HKEY_LOCAL_MACHINE > Software >
Wow6432Node > PISystem
PIUniint Interface to the PI System.
Private and public.
To check the location of the Live Data interface:
1. Open the Windows Registry Editor.
2. Go to Computer > HKEY_LOCAL_MACHINE >
Software > Wow6432Node > PISystem.
3. Double-click the PIHOME value and copy the path from
the value data text box.
The complete path to the Live Data Interface will consist of
the following parts:
• The path you get from the registry.
• \Interfaces\LDInterface\FTLDInt.exe
74 Rockwell Automation Publication HSE-IN024A-EN-E–December 2012
Page 75

Configuring FactoryTalk Historian Chapter 6
Example: If the PIHOME value points to the following
location:
C:\Program Files (x86)\Rockwell Software\FactoryTalk
Historian\PIPC\
The complete path to the Live Data interface would be:
C:\Program Files (x86)\Rockwell Software\FactoryTalk
Historian\PIPC\\Interfaces\LDInterface\FTLDInt.exe
Configuring the Historian Server
Adding the Server to the FactoryTalk Directory
NOTE
For more information on firewall configuration, refer to the
documentation of your firewall.
In the following sections you will learn how to configure and use
FactoryTalk Historian SE Server.
Once the FactoryTalk Historian SE server is installed and running,
add it to the FactoryTalk Directory.
To add the FactoryTalk Historian SE server to the FactoryTalk
Directory:
1. Go to Start > All Programs > Rockwell Software > FactoryTalk
Administration Console.
2. In the Select FactoryTalk Directory dialog box, select
Network, and click OK.
3. In the Explorer tree, expand System > Connections.
4. Right-click Historical Data and select New Historian Server
Connection.
5. In the New Historian Server Connection dialog box, select
the name of your FactoryTalk Historian SE server from the
Server or Collective name drop-down list, and click Test
Server Connection.
Rockwell Automation Publication HSE-IN024A-EN-E–December 2012 75
Page 76

Chapter 6 Configuring FactoryTalk Historian
• If the connection is successful, the Server found message
appears next to the Test Server Connection button.
• If the connection is not successful, the No server found
message appears next to the Test Server Connection
button. In such a case, check the status of your server in the
Connection Manager.
6. Click Finish. The new server connection with the default Live
Data interface instance FTLD1 appears under the Historical
Data folder.
The local interface is now configured to start collecting data points
from any data servers that are available to the FactoryTalk Historian
SE server.
For more information on the FactoryTalk Historian Live Data
Interface, see "Configuring FactoryTalk Historian Live Data
Interface (page 98)".
If you want to verify if the FTLD interface is properly configured,
see "Verifying the FactoryTalk Historian Live Data Local Interface
(page 77)".
IMPORTANT
You can use the local interface for data collection. However, we
strongly recommend that you create a remote interface on the
computer that has the data server installed. Buffering, which
ensures that the loss of data does not occur, can only be enabled on
a remote interface. To learn more about buffering, see "Enable
Buffering (page 100)".
76 Rockwell Automation Publication HSE-IN024A-EN-E–December 2012
Page 77

Verifying the FactoryTalk
Configuring FactoryTalk Historian Chapter 6
To verify that the local interface is configured:
Historian Live Data Local
Interface
1. Go to Start > All Programs > Rockwell Software > FactoryTalk
Administration Console. The FactoryTalk Administration
Console appears.
2. In the Select FactoryTalk Directory dialog box, select
Network, and click OK.
3. In the Explorer tree, expand System > Connections >
Historical Data, and the FactoryTalk Historian SE server
node.
4. Right-click FTLD1, and select Properties. The Data
Collection Interface Properties dialog box appears.
5. Go to the General tab, and verify in the Service Status section
that the Startup Type is set to Automatic.
6. To start the data collection service, click Start and wait until
the service status changes to Started. For more information,
click the help icon in the dialog box.
Managing Licenses
7. Click OK to close the dialog box.
Once you have your activations, you can assign them to your
Historian server, and allocate tag counts to selected interface types
(or point sources).
See the following topics for more information:
• Types of Licenses (page 78)
• Using the General License Pool (page 80)
• Assigning License Activations to FactoryTalk Historian SE
Server (page 85)
• Allocating Licenses to Interface Types (page 86)
• Viewing Allocated Licenses (page 88)
Rockwell Automation Publication HSE-IN024A-EN-E–December 2012 77
Page 78

Chapter 6 Configuring FactoryTalk Historian
Types of Licenses
The license activations you get for your Historian server are various
types of licenses that you can use in either of the following pools of
licenses:
• Rockwell
Groups license activations for Rockwell sources only.
• General
Groups license activations for tags from both Rockwell and
third-party devices.
You may use the following license activations with your FactoryTalk
Historian:
Type of license
Point sources Description
activation
FHSE.XXX FTLD FactoryTalk Live Data connector interfaces.
FTMS Points transferred from a FactoryTalk Historian
ME module.
FHSE.H2H FHSS FactoryTalk Server to Server interfaces.
The license sets the number of points from the
FHSS interface to unlimited.
78 Rockwell Automation Publication HSE-IN024A-EN-E–December 2012
Page 79

Configuring FactoryTalk Historian Chapter 6
•
•
•
•
•
•
•
Type of license
Point sources Description
activation
FTHSE.Advanced not applicable Activates the following Advanced Server
components for the standard FactoryTalk
Historian SE server:
• ACE Advanced Computation Engine for
Visual Basic calculations on Historian data
• Data Access
JDBC Data Provider
ODBC
OLE DB Provider
OPC DA Server
OPC HDA Server
OPC HDA DA Server
WebServices
• Notifications for using Microsoft Lync
Unified Communication Server
Note: For the users upgrading their license
activations from FactoryTalk Historian SE
2.2/2.1, the Advanced Server components are
activated automatically when the total license
count of the FHLD and PTY3 license activations is
at least 250.
FTBAInt.XXX FTBOINT
PIFTBOINT
FactoryTalk Batch Interface. The license sets the
number of points from the FTBOINT AND
PIFTBOINT interfaces to unlimited.
FHSE3ADD.XXX Third-party and
Rockwell point
sources.
See "Using the General License Pool (page 80)"
for details.
The names of the license activations have the following structure:
<Type>.<Quantity>, and contain the following information:
• <Type>
The type of the license activation.
• <Quantity>
Rockwell Automation Publication HSE-IN024A-EN-E–December 2012 79
Page 80

Chapter 6 Configuring FactoryTalk Historian
The maximum number of individual licenses that can be
allocated to an interface type (or point source). Each license
corresponds to a single point with which the server can collect
data from the interface.
For example, for the FTHSE license activation, the quantity
ranges from 250 to 100K points.
• For some types of license activations, instead of the
<Quantity> part there is a combination of digits and/or
characters that further describe the activation, e.g.
FTHSE.H2H, FTBAInt.1.
Each license activation contains a number of individual licenses. The
system distributes the licenses between the Rockwell and General
license pools, depending on the type of license activations you have.
When you allocate licenses to interface types (or point sources), you
take the licenses from either of the license pools.
How Licenses Are Distributed Between License Pools
To use the licenses:
1. Learn how FactoryTalk Historian distributes individual
licenses between the license pools. (page 80)
2. Assign the license activations to your Historian server (page
85).
3. Allocate the individual licenses to interface types (or point
sources) (page 86).
When you acquire license activations for your FactoryTalk
Historian and assign them to your Historian server, the system
automatically distributes individual licenses from the license
activations between the General and Rockwell license pools.
80 Rockwell Automation Publication HSE-IN024A-EN-E–December 2012
Page 81

Configuring FactoryTalk Historian Chapter 6
The system takes into account the following license activations to
calculate the volume of the individual license pools:
• FHSE3ADD
• FHSE
• FHLD
• PTY3
If you want to calculate how licenses from your license activations
will be distributed between the license pools, follow the steps
described below.
To calculate the distribution of licenses between the General
and Rockwell license pools:
1. Calculate the <BaseLicenseCount> value.
It is an intermediate value that will be used to calculate your
number of licenses of the General pool.
• If you use FHSE3ADD license activations, take the number
of your FHSE license activations and substitute it into the
following equation:
<BaseLicenseCount> = 20% * ∑ <FHSE licenses>
See "Distributing Licenses with FHSE3ADD Activation
(page 82)" for details.
• If you do not use FHSE3ADD license activations, take the
number of your FHSE license activations and substitute it
into the following equation:
<BaseLicenseCount> = Max (Min(1000, ∑ <FHSE
licenses>), 20% * ∑ <FHSE licenses>)
See "Distributing Licenses without FHSE3ADD Activation
(page 83)" for details.
Rockwell Automation Publication HSE-IN024A-EN-E–December 2012 81
Page 82

Chapter 6 Configuring FactoryTalk Historian
2. Calculate the number of licenses for the Rockwell license
pool.
Take the number of your FHLD licenses, FHSE licenses, and
the <BaseLicenseCount> value, and then substitute them into
the following equation:
<RockwellLicensePool> = ∑ <FHLD licenses> + ∑ <FHSE
licenses> - <BaseLicenseCount>
3. Calculate the number of licenses for the General license pool.
Take the number of your PTY3 licenses, the FHSE3ADD
licenses, and the <BaseLicenseCount> value, and then
substitute them into the following equation:
<GeneralLicensePool> = ∑ <PTY3 licenses> +
<BaseLicenseCount> + ∑ <FHSE3ADD licenses>
Distributing Licenses with FHSE3ADD Activation
In the following example we will calculate how licenses will be
distributed between the General and Rockwell license pools with
FHSE3ADD license activations.
We will use the following values:
Activation Value ∑
FHSE.2K 2000 12000
FHSE.10K 10000
FHSE3ADD.2K 0 2000
FHLD.5K 5000 5000
PTY3.500 500 500
Total
19500
To distribute licenses between the license pools:
1. Calculate the <BaseLicenseCount> value.
<BaseLicenseCount> = 20% * ∑ <FHSE licenses>
<BaseLicenseCount> = 20% * 12000
82 Rockwell Automation Publication HSE-IN024A-EN-E–December 2012
Page 83

Configuring FactoryTalk Historian Chapter 6
<BaseLicenseCount> = 2400
2. Calculate the number of licenses for the Rockwell license pool.
<RockwellLicensePool> = ∑ <FHLD licenses> + ∑ <FHSE
licenses> - <BaseLicenseCount>
<RockwellLicensePool> = 5000 + 12000 - 2400
<RockwellLicensePool> = 14600
3. Calculate the number of licenses for the General license pool.
<GeneralLicensePool> = ∑ <PTY3 licenses> +
<BaseLicenseCount> + ∑ <FHSE3ADD licenses>
<GeneralLicensePool> = 500 + 2400 + 2000
<GeneralLicensePool> = 4900
Distributing Licenses without FHSE3ADD Activation
In this example, the total of 19500 licenses has been distributed in
the following way:
Licenses and license pools Values
License total 19500
Rockwell license pool 14600
General license pool 4900
In the following example we will calculate how licenses will be
distributed between the General and Rockwell license pools without
FHSE3ADD license activations.
We will use the following values:
Activation Value ∑
FHSE.2K 2000 12000
FHSE.10K 10000
FHSE3ADD.2K 0 0
Rockwell Automation Publication HSE-IN024A-EN-E–December 2012 83
Page 84

Chapter 6 Configuring FactoryTalk Historian
Activation Value ∑
FHLD.5K 5000 5000
PTY3.500 500 500
Total
17500
To distribute licenses between the license pools:
1. Calculate the <BaseLicenseCount> value.
<BaseLicenseCount> = Max (Min(1000, ∑ <FHSE licenses>),
20% * ∑ <FHSE licenses>)
<BaseLicenseCount> = Max (Min(1000, 12000), 20% *
12000)
<BaseLicenseCount> = Max (Min(1000, 12000), 2400)
<BaseLicenseCount> = Max (1000, 2400)
<BaseLicenseCount> = 2400
2. Calculate the number of licenses for the Rockwell license pool.
<RockwellLicensePool> = ∑ <FHLD licenses> + ∑ <FHSE
licenses> - <BaseLicenseCount>
<RockwellLicensePool> = 5000 + 12000 - 2400
<RockwellLicensePool> = 14600
3. Calculate the number of licenses for the General license pool.
<GeneralLicensePool> = ∑ <PTY3 licenses> +
<BaseLicenseCount> + ∑ <FHSE3ADD licenses>
<GeneralLicensePool> = 500 + 2400 + 0
<GeneralLicensePool> = 2900
84 Rockwell Automation Publication HSE-IN024A-EN-E–December 2012
Page 85
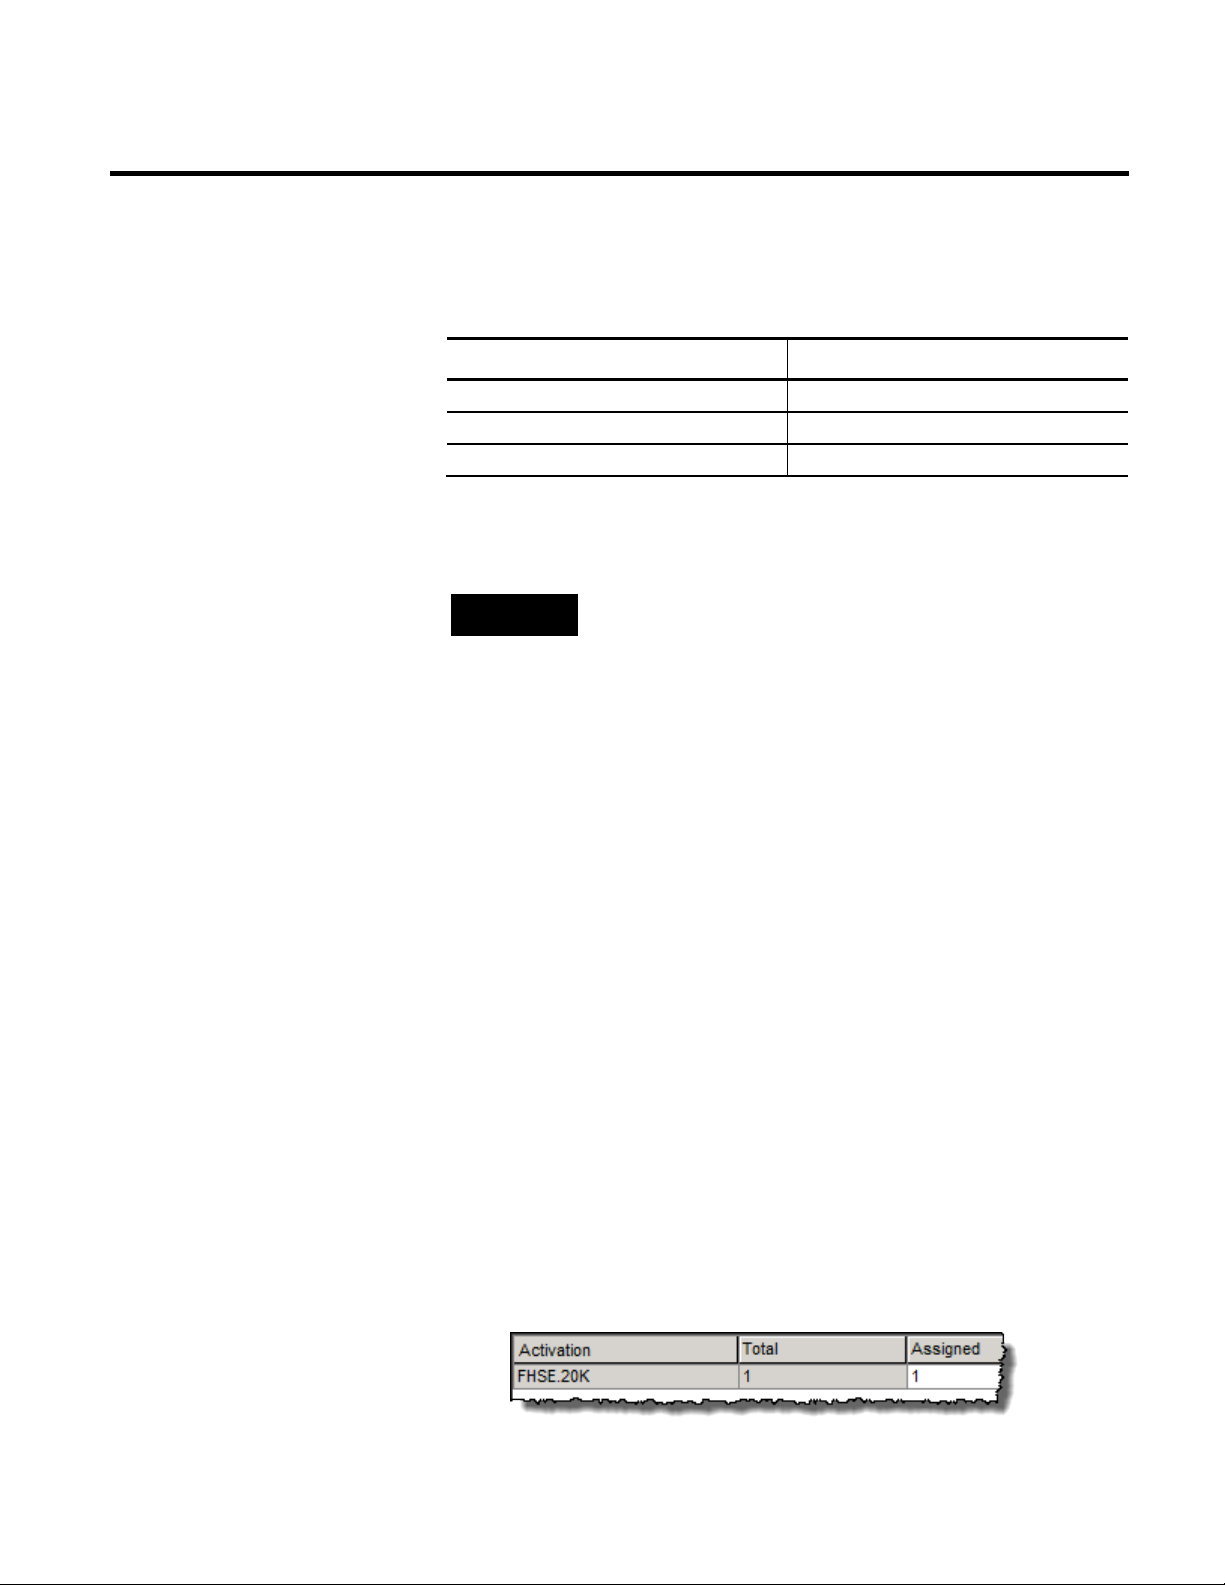
Configuring FactoryTalk Historian Chapter 6
In this example, the total of 17500 licenses has been distributed in
the following way:
Licenses and license pools Values
License total 17500
Rockwell license pool 14600
General license pool 2900
Assigning License Activations to the Historian Server
NOTE
In order to assign the activations to a FactoryTalk Historian SE server,
the server must be added to the FactoryTalk Directory. See "Adding the
Server to the FactoryTalk Directory (page 75)" for more information.
To assign the license activations to the server:
1. Go to Start > All Programs > Rockwell Software > FactoryTalk
Administration Console.
2. In the Select FactoryTalk Directory dialog box, select
Network and click OK.
3. In the Explorer tree, expand System > Connections >
Historical Data.
4. Right-click the name of the server to which you want to assign
the license activations, and click Properties.
5. In the Historian Server Connection Properties dialog box,
click the Licensing tab. The table in the tab lists the types and
number of activations available for the selected server.
6. To assign a license activation to the server, type a number in
the Assigned column for the selected license activation. The
number shows how many licenses of the selected type will be
assigned to the server.
Rockwell Automation Publication HSE-IN024A-EN-E–December 2012 85
Page 86
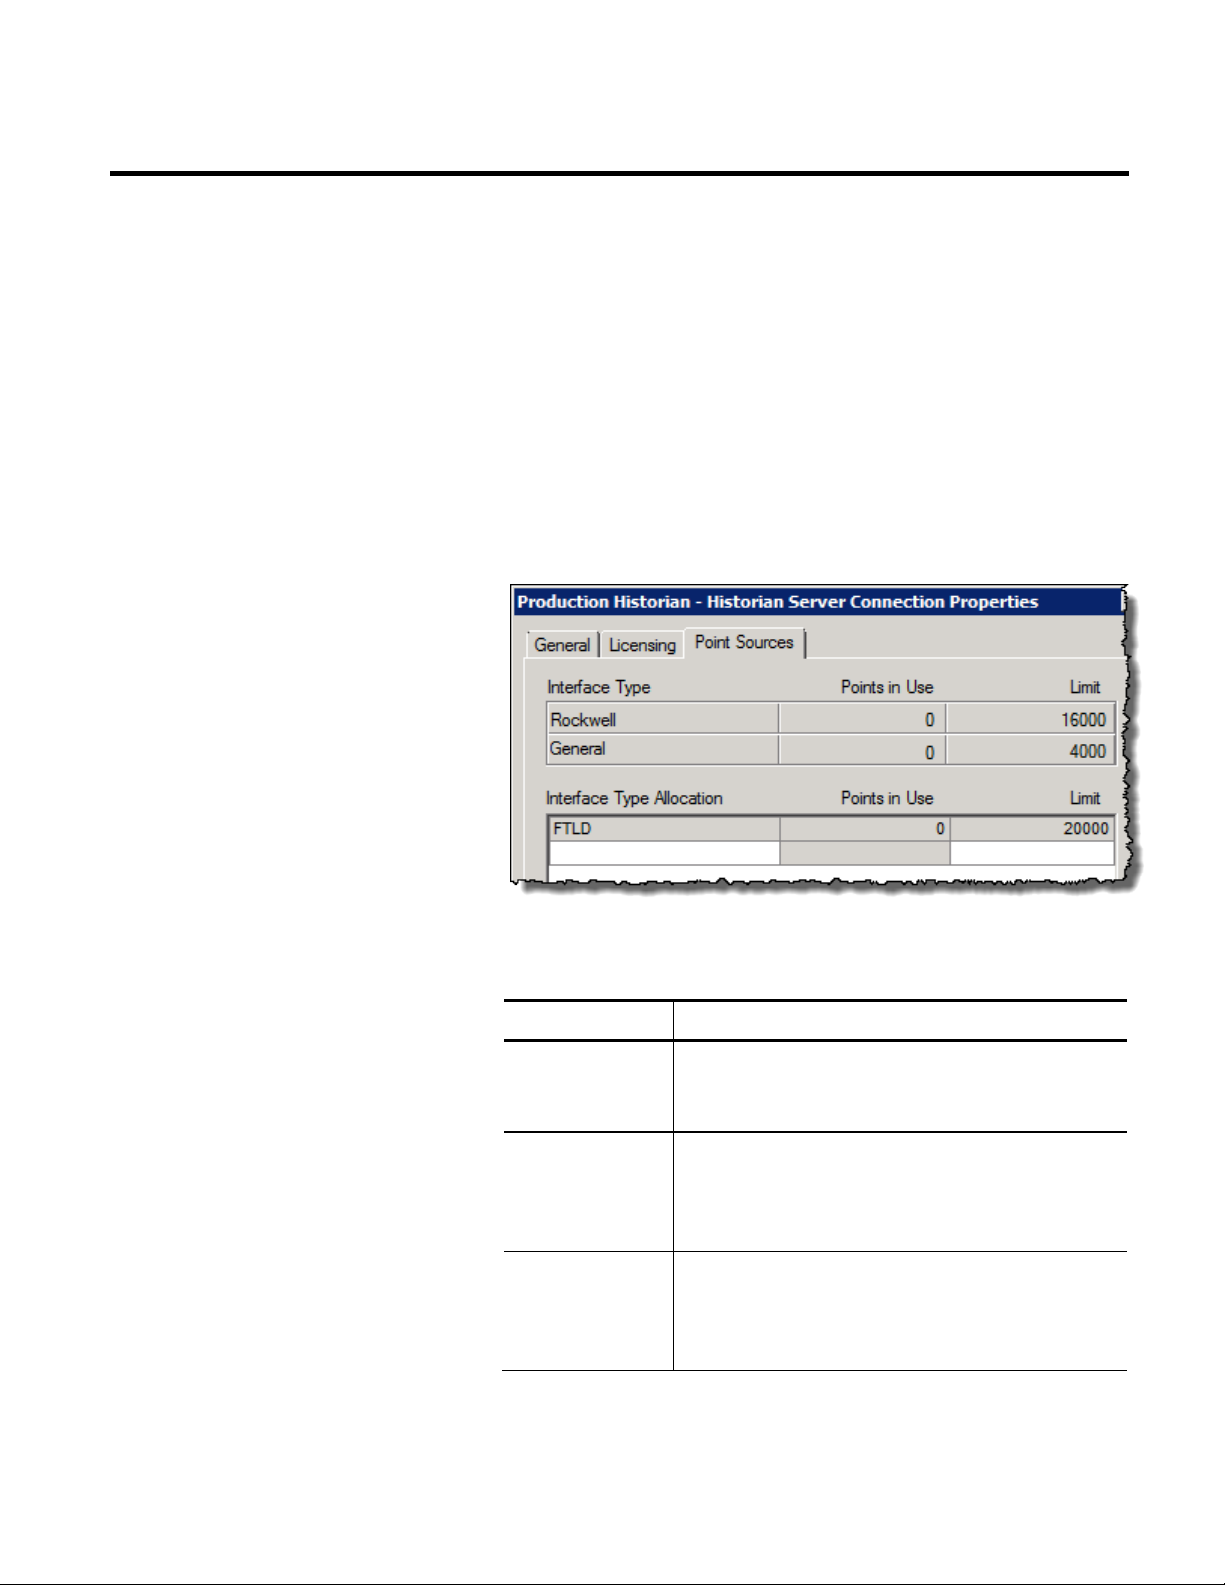
Chapter 6 Configuring FactoryTalk Historian
7. Click Apply.
Allocating Licenses to Interface Types
By allocating a license to an interface type (or point source), you
specify the maximum number of points with which the server will
collect data from a given interface type (or point source).
To allocate licenses to interface types:
1. In the Historian Server Connection Properties dialog box,
click the Point Sources tab.
The tab contains two tables that display the following
information:
Item name Description
Interface Type Pools of licenses (Rockwell and General) assigned to the
server.
This information cannot be edited.
Interface Type
Allocation
Points in Use The number of points already configured for collecting data
86 Rockwell Automation Publication HSE-IN024A-EN-E–December 2012
Abbreviated names of interface types (or point sources) to
which you can allocate licenses from the license pools.
The FTLD interface type is the default type and it cannot be
edited.
from a given interface type.
This information is updated automatically and cannot be
edited.
Page 87

Configuring FactoryTalk Historian Chapter 6
Item name Description
Limit The maximum number of licenses that is allocated to a
license pool or an interface type.
• For the license pools, the limits are collected from the
license activations. This information cannot be edited.
• For the FTLD interface type, the limit equals the total
number of unallocated licenses from both Rockwell and
General license pools. This information is updated
automatically and cannot be edited.
2. In the Interface Type Allocation column, type the
abbreviated name of the interface type (or point source) to
which you want to allocate a license limit. See Types of
Licenses (page 78) for more information on the interface
types.
3. In the Limit column, type the maximum number of licenses
for points that the server will use to collect data from the
selected interface type. The number must be a multiple of 50.
Rockwell Automation Publication HSE-IN024A-EN-E–December 2012 87
Page 88

Chapter 6 Configuring FactoryTalk Historian
If you type incorrect information in the Interface Type
Allocation or Limit columns, a relevant message will appear.
Read the message to learn about the error, for example:
NOTE
For PINotifications, you allocate the maximum number of
licenses for individual notifications instead of points. The licenses
are taken from the Rockwell pool.
4. Click Apply. The license limit of the FTLD interface type is
updated accordingly:
5. Repeat the steps for other interface types that you want to add.
6. Click OK.
7. Restart the FactoryTalk Historian SE server (page 96) for the
changes to take effect.
You can view the information on the allocated licenses in System
Management Tools (page 88).
88 Rockwell Automation Publication HSE-IN024A-EN-E–December 2012
Page 89
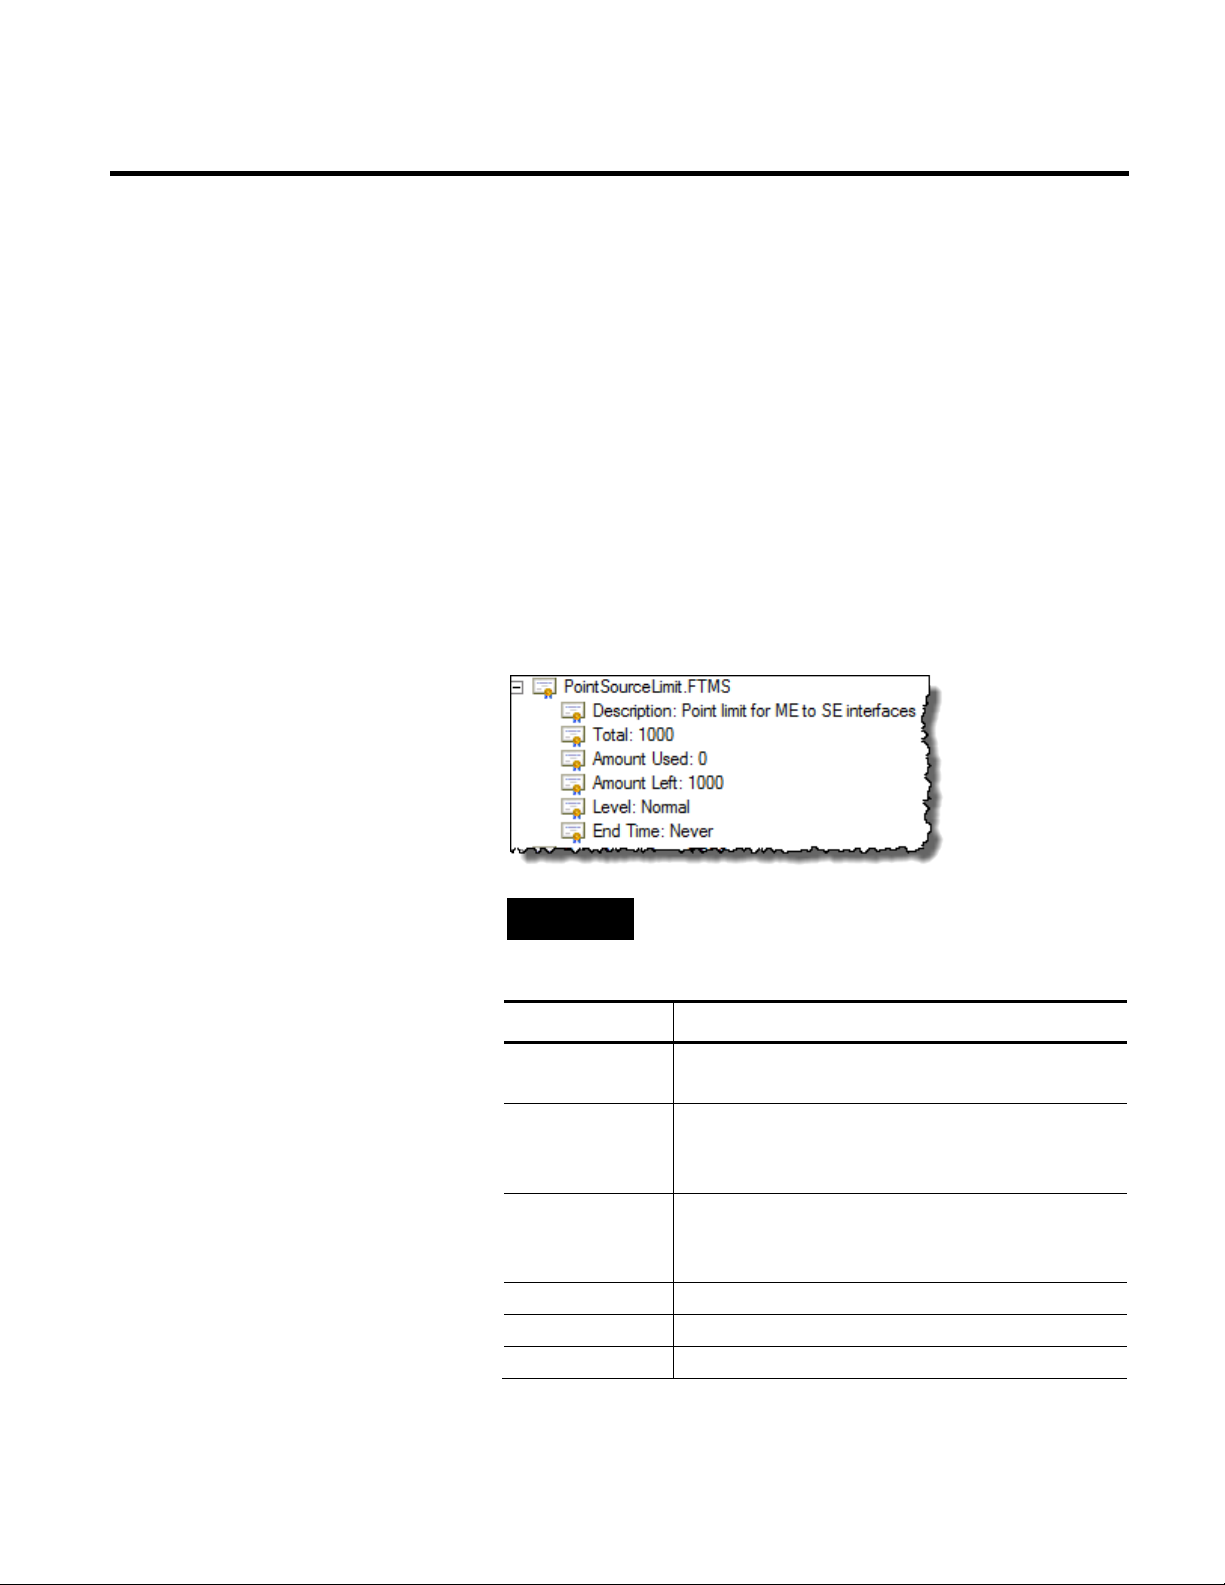
Configuring FactoryTalk Historian Chapter 6
Viewing Allocated Licenses
To view the information on the allocated licenses:
1. Go to Start > All Programs > Rockwell Software > FactoryTalk
Historian SE > System Management Tools.
2. Under Collectives and Servers, select the server for which you
want to view the license information.
3. Under System Management Tools, select Operation >
Licensing.
4. Click Resources >
PointSourcesLimit.<InterfaceTypeName>.
NOTES
<InterfaceTypeName> is the abbreviated name of the interface
type you added to the Point Sources tab when allocating points.
The node contains the following information:
Item name Description
Description The description of the license limit assigned to the interface
type (point source).
Total
Amount Used The number of points already configured for collecting data
Amount Left The number of licenses still available for the interface type.
Level The license enforcement level.
End Time The license expiration date.
Rockwell Automation Publication HSE-IN024A-EN-E–December 2012 89
The total number of licenses allocated to the interface type.
It corresponds to the Limit value in the FactoryTalk
Administration Console.
from the interface type. It corresponds to the Point in Use
value in the FactoryTalk Administration Console.
Page 90

Chapter 6 Configuring FactoryTalk Historian
Configuring Points
NOTE
The numbers provided for PINotifications in Total, Amount Used, and
Amount Left are multiplied by 7 against those set in the FactoryTalk
Administration Console. It is because each notification uses 7 points
from the Rockwell pool.
For example, if you set the limit for PINotifications to 50 in the
FactoryTalk Administration Console, the Total number of allocated
licenses in the System Management Tools will equal 350.
Use the FactoryTalk Administration Console to configure your
FactoryTalk Historian SE server to start collecting data points. You
can add data points to the server in either of the following ways:
• Adding individual data points manually (page 90).
• Adding multiple data points automatically (page 91).
Once you have added the data points to the server, you can verify if
the points are collected by the server correctly. See "Viewing Archive
Data (page 94)" for more information.
Adding Individual Data Points Manually
To add individual data points to the FactoryTalk Historian SE
server:
1. Go to Start > All Programs > Rockwell Software > FactoryTalk
Administration Console. The FactoryTalk Administration
Console dialog box appears.
2. In the Select FactoryTalk Directory dialog box, choose either
Network or Local directory that you want to use, and click
OK.
3. In the Explorer tree, right-click the application from which
you want to collect points, and select Add Individual
90 Rockwell Automation Publication HSE-IN024A-EN-E–December 2012
Page 91

Configuring FactoryTalk Historian Chapter 6
Adding Multiple Data Points
Historian Points. The Add Historian Points dialog box
appears.
4. In the Add points to server list, select the FactoryTalk
Historian SE server to which you want to add the points.
5. In the respective lists, select the data collection interface,
default scan rate, and tag attributes for new points.
6. Click Browse Tags. The Tag Browser dialog box appears.
7. In the Tag Browser dialog box, select the folder from which
you want to collect data points. The data points from the
selected folder are displayed in the right pane of the dialog box.
8. Select the data points that you want to add, and click Add
Tag(s) to List. The tags appear in the Selected tag(s) list at
the bottom of the Tag Browser dialog box.
Automatically
9. Click OK until you return to the FactoryTalk Administration
Console.
The point discovery wizard is a feature of FactoryTalk Historian SE
that guides you through the process of finding data points from
selected point sources, such as Linx Enterprise, Linx Classic, other
OPC-DA Servers (for example, kepware opc), and HMI/ Alarm
Servers (for example, FactoryTalk View).
The point discovery wizard uses discovery rules to search for
Historian points. Creating the rules is a part of the discovery
process. The data points (tags) that match the rules you create are
added to the FactoryTalk Historian SE server. The default rules are
stored in the following XML file:
C:\ProgramData\Rockwell Automation\FactoryTalk Historian\Auto
Discovery and Configuration Rules.xml
Rockwell Automation Publication HSE-IN024A-EN-E–December 2012 91
The rules that you define are saved in a user-defined XML file. The
file is stored in the same location as the file with the default set of
rules. The point discovery wizard uses the rules from both files.
Page 92

Chapter 6 Configuring FactoryTalk Historian
However, the rules defined in the user-defined XML file take
precedence over the rules defined in the default XML file.
To automatically discover Historian points with the wizard:
1. Go to Start > All Programs > Rockwell Software > FactoryTalk
Administration Console. The FactoryTalk Administration
Console appears.
2. In the Select FactoryTalk Directory dialog box, choose either
Network or Local directory that you want to use, and click
OK.
3. In the Explorer tree, right-click the application or area from
which you want to search for data points, and select Discover
Historian Points. The Discover New Historian Points
dialog box appears.
NOTE
For more information on the point discovery wizard, click the help
icon in the Discover New Historian Points dialog box.
4. In the Add points to server list, select the FactoryTalk
Historian SE server to which you want to add the points.
5. In the Using data collection interface list, select the
appropriate data collection interface.
6. In the Default scan rate list, select the time interval at which
points will be collected.
7. Under Add points from these sources, select the sources
from which you want to add the points.
8. Under Start searching from, click the tree at the starting
point for the point search. If this is a new server, the root node
in the tree is selected by default.
9. Click Edit Discovery Rules to create rules to be used during
the discovery process. The FactoryTalk Historian Discovery
Rule Editor dialog box appears.
NOTE
For more information on the Discovery Rule Editor click the help
icon in the dialog box.
92 Rockwell Automation Publication HSE-IN024A-EN-E–December 2012
Page 93

Configuring FactoryTalk Historian Chapter 6
10. Select Enable data type filter to perform the search using the
default discovery rule.
Viewing Current and Archive Data
NOTE
When you check the Enable data type filter option, the
auto-discovery mechanism will get all attributes that match the
name, UDT, and data type rule. When you leave the option cleared,
the mechanism will ignore the data type filter and only check the
name and UDT rule.
11. Click Next to begin discovering points. The Discovering
Historian Points dialog box displays the progress of point
discovery.
The discovered points are listed in the Confirm New
Historian Points dialog box.
12. Click Confirm Points to accept the search result.
13. In the New Historian Points Discovery Complete dialog
box, click Start. The FactoryTalk Historian SE server starts
collecting the discovered points.
14. Click OK.
You can view current and archive data using System Management
Tools. In this section you will learn how to:
• View current data (page 93).
• View archive data (page 94).
Viewing Current Data
To view current data being collected by the FactoryTalk
Historian SE server:
1. Go to Start > All Programs > Rockwell Software > FactoryTalk
Historian SE > System Management Tools. The System
Management Tools dialog box appears.
2. Under Collectives and Servers, select the FactoryTalk
Historian SE server whose data you want to view.
Rockwell Automation Publication HSE-IN024A-EN-E–December 2012 93
Page 94

Chapter 6 Configuring FactoryTalk Historian
3. Under System Management Tools, select Data > Current
Values.
4. From the menu bar, select Tools > Tag Search. The Tag
Search dialog box appears.
5. Use the default settings and click Search.
6. From the list of tags that appears in the search results, select
the tags you want to view, and click OK. The current values of
the tags are displayed in the right pane of the System
Management Tools dialog box.
Viewing Archive Data
If you want the server to start updating the values for the tag,
right-click it and select Start Updating Values.
To view archive data that has been collected by the FactoryTalk
Historian SE server:
1. Go to Start > All Programs > Rockwell Software > FactoryTalk
Historian SE > System Management Tools. The System
Management Tools dialog box appears.
2. Under Collectives and Servers, select the FactoryTalk
Historian SE server whose data you want to view.
3. Under System Management Tools, select Data > Archive
Editor.
4. In the (Tag Not Specified) tab, click
. The Tag Search
dialog box appears.
5. Use the default settings and click Search.
6. From the list of tags that appears in the search results, choose
one of the tags you have selected in "Adding Individual Data
Points Manually (page 90)", and click OK.
94 Rockwell Automation Publication HSE-IN024A-EN-E–December 2012
Page 95

Configuring FactoryTalk Historian Chapter 6
The list of events of the selected tag is displayed in the tab in
the right pane of the System Management Tools dialog box.
Archiving and Backups
NOTE
For more information on the Archive Editor, click .
7. Verify that the system has returned archived values, and close
the System Management Tools.
After you have installed and verified the Historian server, configure
your Historian server automatic daily backups. You must specifically
schedule a backup task on the Historian server.
Historian Archive files store the historical record of process data
maintained by the Historian server. By default, the Historian server
setup program creates three archive files. Make sure that the location
of the archive directory contains enough free space for these files.
The default archive file size of 256 MB might be too small for most
systems. Rockwell Automation recommends that you change the
default size based on the number of Historian Points, according to
the recommendations in the Introduction to Historian SE Server
System Management guide.
NOTE
The complete user documentation on FactoryTalk Historian SE is
available in the Common Files\Rockwell\Help folder in your
Program Files directory, and in the Redist\Docs folder on your
FactoryTalk Historian SE installation DVD.
The location for archives is typically on the largest drive on the
server. Rockwell Automation recommends that you change the
name of the archive directory from the default Server\dat to a more
meaningful name, such as \arc.
NOTE
Rockwell Automation Publication HSE-IN024A-EN-E–December 2012 95
Use the Windows File System Compression feature with caution; it
might slow down the access of the Historian server to archive files. The
compression can save disk space, but it requires more CPU resources.
Page 96

Chapter 6 Configuring FactoryTalk Historian
Restarting FactoryTalk Historian SE Server
NOTE
You need administrative rights to perform these steps.
To restart the server:
1. Stop the server:
1. Go to Start > All Programs > Rockwell Software >
FactoryTalk Historian SE > Stop FactoryTalk Historian SE.
The server stopping process begins. The progress is
displayed in the Command Prompt window.
2. Wait until the server is stopped and the Command Prompt
window is closed.
2. Start the server:
1. Go to Start > All Programs > Rockwell Software >
FactoryTalk Historian SE > Start FactoryTalk Historian SE.
The server starting process begins. The progress is displayed
in the Command Prompt window.
2. Wait until the server is started and the Command Prompt
window is closed.
Configuring the Data Server
Use the FactoryTalk Administration Console to configure the data
server by adding new applications, areas, data server instances, and
shortcuts to controllers.
To open FactoryTalk Administration Console:
1. Go to Start > All Programs > Rockwell Software > FactoryTalk
Administration Console. The FactoryTalk Administration
Console dialog box appears.
96 Rockwell Automation Publication HSE-IN024A-EN-E–December 2012
Page 97

Configuring FactoryTalk Historian Chapter 6
Under Explorer, the tree of the FactoryTalk Directory you
have selected using the FactoryTalk Directory Server Location
Utility (page 28) is displayed.
2. From the menu bar, select Help > Contents to open
FactoryTalk Help and learn more about configuring the data
server.
Configuring Historian Interface Connections
NOTE
Refer to the information on configuring Historian interface connections
in the Configuring FT Historian SE Security guide for details associated
with the following procedure.
To configure your Historian server to provide access for
Historian Interfaces:
1. Identify all the Historian Interfaces that need access to the
Historian server.
2. Consult the documentation for each interface and gather the
information you need to configure the trust. You need to
know the connection type. The type of connection determines
what information you can use to define the trust. You also
need to specify at least one of the following:
• The correct application name to define the trust.
• IP information for the connecting computer.
3. Decide how many trusts you will create. You can create
explicit individual trusts for each Historian interface, or you
can group them by subnet, host machine, or user name. A
group of Historian interfaces can share the same privileges.
4. For each trust, create a PI identity.
5. Give that PI identity all the access permissions required by the
trust.
6. Create a trust based on that PI identity.
Rockwell Automation Publication HSE-IN024A-EN-E–December 2012 97
Page 98

Chapter 6 Configuring FactoryTalk Historian
Configuring FactoryTalk Historian Live Data Interface
The interface collects data points (tags) from the data server and
passes them to the FactoryTalk Historian SE server. Install the
FactoryTalk Historian Live Data Interface component on the same
computer as the data server. After installing the interface, configure
the buffering service on the data server computer. The buffering
service stores data in its memory so that in the event the interface is
not able to communicate with the FactoryTalk Historian SE server,
the data will not be lost.
Registering Live Data Interfaces
When you create a Historian server connection in the FactoryTalk
Administration Console (page 75), a default Live Data Interface
instance FTLD1 is created and registered.
To register another instance of the FactoryTalk Historian Live
Data Interface:
1. On the computer with the FactoryTalk Historian SE server
installed, go to Start > All Programs > Rockwell Software >
FactoryTalk Administration Console.
2. In the Select FactoryTalk Directory dialog box, click
Network.
3. In the Explorer tree of the FactoryTalk Administration
Console dialog box, go to System > Connections >
Historical Data, right-click the FactoryTalk Historian server
connection name, and select New Data Collection Interface.
The Data Collection Interface Properties dialog box
appears.
4. In the Computer hosting the interface drop-down list, select
the name of the computer on which you have installed the data
server and the FactoryTalk Historian Live Data Interface.
5. From the Startup Type drop-down list, choose Automatic.
6. Click Apply.
98 Rockwell Automation Publication HSE-IN024A-EN-E–December 2012
Page 99

Configuring FactoryTalk Historian Chapter 6
7. Click Start to start the data collection service. Wait until the
service status changes to Started.
8. Click OK.
The new Live Data Interface instance is added to the server
connection branch.
Live Data Interface Services
For each instance of the FactoryTalk Historian Live Data Interface,
a service (FTLD) is created and started when you start the interface.
You define the service startup type (page 98) in the Data Collection
Interface Properties dialog box in the FactoryTalk Administration
Console.
To view the status of the services, open the Services dialog box
(Start > All Programs > Administrative Tools > Services).
Rockwell Automation Publication HSE-IN024A-EN-E–December 2012 99
Page 100

Chapter 6 Configuring FactoryTalk Historian
The services are removed when you delete the interface instances in
FactoryTalk Administration Console.
Enable Buffering
NOTE
If you want to take advantage of the buffering feature, Rockwell
Automation recommends that you install the FactoryTalk Historian Live
Data Interface on a remote computer, typically the computer where the
data server is installed.
The buffering subsystem stores time-series values to memory when
the remote interface computer cannot communicate with the
FactoryTalk Historian SE server.
NOTE
FactoryTalk Historian SE supports the PI Buffer Subsystem only. It does
not support the API Buffer Subsystem.
To enable buffering on the computer with the FactoryTalk
Historian Live Data Interface installed:
1. Go to Start > All Programs > Rockwell Software > FactoryTalk
Historian SE System Management Tools. The System
Management Tools dialog box appears.
2. From the menu bar, select File > Connections. The
Connection Manager dialog box appears.
3. Select the FactoryTalk Historian SE server to which you want
to connect.
If the server name is not listed, do the following:
1. From the menu bar, select Server > Add Server. The Add
Server dialog box appears.
2. In the Network Node text box, type the fully qualified
domain name (FQDN) of the server.
3. Clear the Confirm check box, and click OK. The new
server is added to the server list.
This allows a remote client connection to be established
with the FactoryTalk Historian SE server.
100 Rockwell Automation Publication HSE-IN024A-EN-E–December 2012
 Loading...