

Page 1

INTEGRATED PRODUCTION & PERFORMANCE SUITE
Asset Management
AssetCentre
INSTALLATION GUIDE
PUBLICATION FTAC-IN005A-EN-E–March 2013
Supersedes Publication FTAC-IN004B-EN-E
Page 2

Contact Rockwell
Customer Support Telephone — 1.440.646.3434
Online Support — http://www.rockwellautomation.com/support/
Copyright Notice
Trademark Notices
Other Trademarks
Warranty
© 2013 Rockwell Automation Technologies, Inc. All rights reserved. Printed in USA.
This document and any accompanying Rockwell Software products are copyrighted by Rockwell Automation
Technologies, Inc. Any reproduction and/or distribution without prior written consent from Rockwell Automation
Technologies, Inc. is strictly prohibited. Please refer to the license agreement for details.
Allen-Bradley, Arena, ControlLogix, Data Highway Plus, DH+, Data Highway II, Datapac, Emonitor, Enlab, Enlube,
Enpac, Enshare, Entek, Entrx, Enwatch, eProcedure, FactoryTalk, GuardLogix, GuardPLC, Logix5000, MicroLogix,
MobileView, MobileView Guard, MotorMonitor, PanelBuilder, PanelView, PhaseManager, PlantLink, PLC-2, PLC-3,
PLC-5, Powermonitor, ProcessLogix, Propack Data, Rockwell, Rockwell Automation, Rockwell Software,
RSAssetSecurity, RSBizWare, RSBizWare BatchCampaign, RSBizWare BatchHistorian, RSBizWare Coordinator,
RSBizWare Historian, RSBizWare MaterialTrack, RSBizWare PlantMetrics, RSBizWare Scheduler, RSBizWare
Tracker, RSEnergyMetrix, RSLinx, RSLogix, RSLoop Optimizer., RSNetWorx, RSNetWorx for ControlNet,
RSNetWorx for DeviceNet, RS PMX, RSPower, RSSql, RSTune, RSView, RSView Administration Console, SIMAN,
SLC, SoftLogix, Studio 5000, VersaView, WINtelligent, and XM are trademarks of Rockwell Automation, Inc.
Any Rockwell Automation software or hardware not mentioned here is also a trademark, registered or otherwise, of
Rockwell Automation, Inc.
ActiveX, Microsoft, Microsoft Access, SQL Server, Visual Basic, Visual C++, Visual SourceSafe, Windows, Windows
ME, Windows NT, Windows 2000, Windows Server-, Windows XP, and Vista are either registered trademarks or
trademarks of Microsoft Corporation in the United States and/or other countries.
Adobe, Acrobat, and Reader are either registered trademarks or trademarks of Adobe Systems Incorporated in the
United States and/or other countries.
ControlNet is a registered trademark of ControlNet International.
DeviceNet is a trademark of the Open DeviceNet Vendor Association, Inc. (ODVA).
Ethernet is a registered trademark of Digital Equipment Corporation, Intel, and Xerox Corporation.
OLE for Process Control (OPC) is a registered trademark of the OPC Foundation.
Oracle is a registered trademark of Oracle Corporation.
All other trademarks are the property of their respective holders and are hereby acknowledged.
This product is warranted in accordance with the product license. The product’s performance may be affected by system
configuration, the application being performed, operator control, maintenance, and other related factors. Rockwell
Automation is not responsible for these intervening factors. The instructions in this document do not cover all the
details or variations in the equipment, procedure, or process described, nor do they provide directions for mee ting ev ery
possible contingency during installation, operation, or maintenance. This product’s implementation may vary among
users.
This document is current as of the time of release of the product; however, the accompanying software may have
changed since the release. Rockwell Automation, Inc. reserves the right to change any information contained in this
document or the software at anytime without prior notice. It is your responsibility to obtain the most current information
available from Rockwell when installing or using this product.
Other Notices
Document version: 5.00 Modified: March 4, 2013 4:03 pm
THIS IS A PRODUCT OF ROCKWELL AUTOMATION AND CONTAINS HCF SDC-625 TECHNOLOGY. THE
HCF SDC-625 TECHNOLOGY IS OWNED BY HART COMMUNICATION FOUNDATION (HCF), 9390
RESEARCH BLVD., SUITE I-350 AUSTIN, TEXAS 78759, AND MAY NOT BE ADOPTED, COPIED,
REPRODUCED, MODIFIED, LICENSED, SUBLICENSED, SOLD OR RESOLD OTHER THAN UNDER
LICENSE FROM HCF.
Page 3

Contents
1 • Introduction 1
FactoryTalk Services Platform. . . . . . . . . . . . . . . . . . . . . . . . . . . . . . . . . . . . . . . . 1
About the documentation set (or, Where do I start?) . . . . . . . . . . . . . . . . . . . . . . . . . . 1
About this book . . . . . . . . . . . . . . . . . . . . . . . . . . . . . . . . . . . . . . . . . . . . . . . . . . . 2
The components of FactoryTalk AssetCentre . . . . . . . . . . . . . . . . . . . . . . . . . . . . . . . 2
System requirements. . . . . . . . . . . . . . . . . . . . . . . . . . . . . . . . . . . . . . . . . . . . . . . . . . . 4
Server computer requirements . . . . . . . . . . . . . . . . . . . . . . . . . . . . . . . . . . . . . . . . 4
Client computer requirements . . . . . . . . . . . . . . . . . . . . . . . . . . . . . . . . . . . . . . . . 5
Agent computer requirements . . . . . . . . . . . . . . . . . . . . . . . . . . . . . . . . . . . . . . . . 7
Network requirements . . . . . . . . . . . . . . . . . . . . . . . . . . . . . . . . . . . . . . . . . . . . . . 9
About the installation process. . . . . . . . . . . . . . . . . . . . . . . . . . . . . . . . . . . . . . . . . . . 10
2 • Upgrading FactoryTalk AssetCentre 11
Upgrading from any previous CPR 9-compatible version . . . . . . . . . . . . . . . . . . . . . 11
Optional software upgrades . . . . . . . . . . . . . . . . . . . . . . . . . . . . . . . . . . . . . . . . . 11
Location of setup files . . . . . . . . . . . . . . . . . . . . . . . . . . . . . . . . . . . . . . . . . . . . . 12
Upgrading from version 2.00 (CPR 7) to 5.00 (CPR 9 SR 6) . . . . . . . . . . . . . . . . . . 12
3 • Installing the FactoryTalk AssetCentre server 14
Before you begin, check and install FactoryTalk Services Platform and FactoryTalk
View patches. . . . . . . . . . . . . . . . . . . . . . . . . . . . . . . . . . . . . . . . . . . . . . . . . . . . . . 14
Using the Patch File Validator utility. . . . . . . . . . . . . . . . . . . . . . . . . . . . . . . . . . 15
Upgrading. . . . . . . . . . . . . . . . . . . . . . . . . . . . . . . . . . . . . . . . . . . . . . . . . . . . . . . . . . 16
About the installation . . . . . . . . . . . . . . . . . . . . . . . . . . . . . . . . . . . . . . . . . . . . . . . . . 16
Installing Internet Information Services . . . . . . . . . . . . . . . . . . . . . . . . . . . . . . . . . . 17
Installing IIS on Windows Server 2003 . . . . . . . . . . . . . . . . . . . . . . . . . . . . . . . . 18
Installing IIS on Windows Server 2008 or Windows Server 2008 R2. . . . . . . . . 18
Installing Microsoft SQL Server 2008 . . . . . . . . . . . . . . . . . . . . . . . . . . . . . . . . . . . . 19
Minimum Microsoft SQL Server 2008 permissions . . . . . . . . . . . . . . . . . . . . . . 22
Installing the ProCalV5 server software. . . . . . . . . . . . . . . . . . . . . . . . . . . . . . . . . . . 23
Installing the FactoryTalk AssetCentre server software . . . . . . . . . . . . . . . . . . . . . . 23
Installing FactoryTalk Services Platform . . . . . . . . . . . . . . . . . . . . . . . . . . . . . . 26
Installing FactoryTalk Activation. . . . . . . . . . . . . . . . . . . . . . . . . . . . . . . . . . . . . 27
Installing RSLinx Enterprise . . . . . . . . . . . . . . . . . . . . . . . . . . . . . . . . . . . . . . . . 29
Patch FactoryTalk Services Platform . . . . . . . . . . . . . . . . . . . . . . . . . . . . . . . . . . 29
Check and configure FactoryTalk Services Platform. . . . . . . . . . . . . . . . . . . . . . 30
i
Page 4

CONTENTS
FactoryTalk AssetCentre Common Components installer. . . . . . . . . . . . . . . . . . 31
FactoryTalk AssetCentre server installer . . . . . . . . . . . . . . . . . . . . . . . . . . . . . . . 31
FactoryTalk AssetCentre Calibration Management Server installer . . . . . . . . . . 34
FactoryTalk AssetCentre Process Device Configuration Server installer . . . . . . 35
Using the Windows Firewall Configuration Utility. . . . . . . . . . . . . . . . . . . . . . . 35
Installing the ProCalV5 server software after the FactoryTalk AssetCentre server. . 36
Running the ProCalV5 Data Source Edit Wizard . . . . . . . . . . . . . . . . . . . . . . . . 36
4 • Installing FactoryTalk AssetCentre clients 38
Where to install the FactoryTalk AssetCentre client . . . . . . . . . . . . . . . . . . . . . . . . . 38
Upgrading. . . . . . . . . . . . . . . . . . . . . . . . . . . . . . . . . . . . . . . . . . . . . . . . . . . . . . . . . . 38
Check and install FactoryTalk Services Platform patches . . . . . . . . . . . . . . . . . . . . . 39
Installing the FactoryTalk AssetCentre client software . . . . . . . . . . . . . . . . . . . . . . . 39
Installing FactoryTalk Services Platform. . . . . . . . . . . . . . . . . . . . . . . . . . . . . . . 42
FactoryTalk AssetCentre Common Components installer. . . . . . . . . . . . . . . . . . 45
FactoryTalk AssetCentre client software installer . . . . . . . . . . . . . . . . . . . . . . . . 46
FactoryTalk AssetCentre Calibration Management client software installer. . . . 47
FactoryTalk AssetCentre Process Device Configuration client software installer 47
Using the Windows Firewall Configuration Utility. . . . . . . . . . . . . . . . . . . . . . . 48
Checking to see if the client is installed correctly . . . . . . . . . . . . . . . . . . . . . . . . . . . 49
Installing the ProCalV5 client software . . . . . . . . . . . . . . . . . . . . . . . . . . . . . . . . . . . 49
Installing DTMs . . . . . . . . . . . . . . . . . . . . . . . . . . . . . . . . . . . . . . . . . . . . . . . . . . . . . 50
Installing Rockwell Automation DTMs. . . . . . . . . . . . . . . . . . . . . . . . . . . . . . . . 50
Running Process Device Configuration Field Edition . . . . . . . . . . . . . . . . . . . . . . . . 51
• • • • •
5 • Installing FactoryTalk AssetCentre agents 52
Where to install FactoryTalk AssetCentre agents . . . . . . . . . . . . . . . . . . . . . . . . . . . 52
Upgrading. . . . . . . . . . . . . . . . . . . . . . . . . . . . . . . . . . . . . . . . . . . . . . . . . . . . . . . . . . 53
Check and install FactoryTalk Services Platform patches . . . . . . . . . . . . . . . . . . . . . 53
Installing the FactoryTalk AssetCentre Disaster Recovery agent . . . . . . . . . . . . . . . 53
Installing FactoryTalk Services Platform. . . . . . . . . . . . . . . . . . . . . . . . . . . . . . . 56
FactoryTalk AssetCentre Common Components installer. . . . . . . . . . . . . . . . . . 59
FactoryTalk AssetCentre RA Disaster Recovery Agent installer . . . . . . . . . . . . 60
FactoryTalk AssetCentre Agent installer . . . . . . . . . . . . . . . . . . . . . . . . . . . . . . . 60
RSLogix 5000 Compare installer . . . . . . . . . . . . . . . . . . . . . . . . . . . . . . . . . . . . . 61
Using the Windows Firewall Configuration Utility. . . . . . . . . . . . . . . . . . . . . . . 61
Configuring for security-enabled RSLogix family software . . . . . . . . . . . . . . . . . . . 62
If operating in a Windows domain. . . . . . . . . . . . . . . . . . . . . . . . . . . . . . . . . . . . 62
If operating in a Windows workgroup . . . . . . . . . . . . . . . . . . . . . . . . . . . . . . . . . 63
Checking to see if the agent software is current. . . . . . . . . . . . . . . . . . . . . . . . . . . . . 66
ii
Page 5

CONTENTS
6 • Configuring FactoryTalk AssetCentre 67
Configuring for client access to the server. . . . . . . . . . . . . . . . . . . . . . . . . . . . . . . . . 67
Adding users to the FactoryTalk Directory . . . . . . . . . . . . . . . . . . . . . . . . . . . . . 67
Adding computers to the FactoryTalk Directory . . . . . . . . . . . . . . . . . . . . . . . . . 68
Configuring feature security for FactoryTalk AssetCentre users. . . . . . . . . . . . . . . . 69
7 • Troubleshooting FactoryTalk AssetCentre installation 73
General installation. . . . . . . . . . . . . . . . . . . . . . . . . . . . . . . . . . . . . . . . . . . . . . . . . . . 73
A red x appears next to an item to be installed. . . . . . . . . . . . . . . . . . . . . . . . . . . 73
A “Program Maintenance” window appears while installing . . . . . . . . . . . . . . . 73
Server installation. . . . . . . . . . . . . . . . . . . . . . . . . . . . . . . . . . . . . . . . . . . . . . . . . . . . 73
SQL collation error encountered during database installation . . . . . . . . . . . . . . . 73
Unable to log on to SQL Server during server installation . . . . . . . . . . . . . . . . . 74
“The application failed to initialize properly” appears during server installation 74
“FTACServiceManager has stopped working” during server installation. . . . . . 74
Client and agent installation. . . . . . . . . . . . . . . . . . . . . . . . . . . . . . . . . . . . . . . . . . . . 75
Web page for installing the FactoryTalk AssetCentre client and agent cannot be
displayed. . . . . . . . . . . . . . . . . . . . . . . . . . . . . . . . . . . . . . . . . . . . . . . . . . . . . . 75
“Error reading Primary Server Name from FactoryTalk Directory” during client
installation. . . . . . . . . . . . . . . . . . . . . . . . . . . . . . . . . . . . . . . . . . . . . . . . . . . . . 76
“Currently logged in Windows user is not part of the Administrators group” during
client and agent installation . . . . . . . . . . . . . . . . . . . . . . . . . . . . . . . . . . . . . . . 76
Starting the client . . . . . . . . . . . . . . . . . . . . . . . . . . . . . . . . . . . . . . . . . . . . . . . . . . . . 76
“Error initializing FactoryTalk AssetCentre” appears when attempting to start the
client . . . . . . . . . . . . . . . . . . . . . . . . . . . . . . . . . . . . . . . . . . . . . . . . . . . . . . . . . 76
“The client and server versions are incompatible” . . . . . . . . . . . . . . . . . . . . . . . 77
“Cannot initialize application eventing subsystem” or “No connection could be
made because the target machine actively refused it” appears when starting the
client . . . . . . . . . . . . . . . . . . . . . . . . . . . . . . . . . . . . . . . . . . . . . . . . . . . . . . . . . 77
“At least one service or driver failed during system startup. Use Event Viewer to
examine the event log for details” appears when attempting to start the client 77
“Error initializing FactoryTalk AssetCentre. Could not load file or assembly…
CalibrationPlugin.dll” appears when attempting to start the client . . . . . . . . . 78
If the FactoryTalk AssetCentre server is installed to a drive other than C: . . . . . 78
Other errors starting the client . . . . . . . . . . . . . . . . . . . . . . . . . . . . . . . . . . . . . . . 79
Starting the agent . . . . . . . . . . . . . . . . . . . . . . . . . . . . . . . . . . . . . . . . . . . . . . . . . . . . 79
Using Calibration Management . . . . . . . . . . . . . . . . . . . . . . . . . . . . . . . . . . . . . . . . . 80
“No ProCalV5 Server connection information exists on the FactoryTalk
AssetCentre server” appears when attempting to use Calibration Management
features . . . . . . . . . . . . . . . . . . . . . . . . . . . . . . . . . . . . . . . . . . . . . . . . . . . . . . . 80
• • • • •
iii
Page 6

CONTENTS
“Error executing ProCalV5 commands, check ProCalV5 installation” appears
when attempting to use Calibration Management features . . . . . . . . . . . . . . . . 80
“Error initializing FactoryTalk AssetCentre. Could not load file or assembly…
CalibrationPlugin.dll” appears when attempting to start the client . . . . . . . . . 80
Unable to run the ProCalV5 software. . . . . . . . . . . . . . . . . . . . . . . . . . . . . . . . . . 80
Unable to run the ProCalV5 Data Source Edit Wizard . . . . . . . . . . . . . . . . . . . . 81
A • Reference 82
Additional ports you may have to open . . . . . . . . . . . . . . . . . . . . . . . . . . . . . . . . . . . 82
Index 86
• • • • •
iv
Page 7

1
Introduction
FactoryTalk® AssetCentre monitors your factory automation system and provides
centralized tools to minimize downtime due to unauthorized actions or failing devices. It
does this by:
providing version control and archiving of program files and documents.
providing a disaster recovery system that verifies your devices’ program and
configuration files against protected master files, ensuring quick and accurate
recovery if a problem should occur (optional Disaster Recovery capability).
monitoring FactoryTalk-enabled software products and logging system events and
user actions (recorded in the Event log and Audit log respectively).
managing device configuration files.
managing process device calibration, including scheduling and tracking (optional
Calibration Management capability).
managing and configuring DTM devices (optional Process Device
Configuration capability).
DTM stands for “Device Type Manager.” It is a software component for devices that
contains device information and configuration parameters for that device. The device
manufacturer provides the DTM for the device. DTMs are designed according to FDT
(Field Device Tool) standards.
FactoryTalk Services Platform
FactoryTalk AssetCentre uses FactoryTalk Services Platform to provide seamless
connectivity with other FactoryTalk-enabled software. Users and computers are defined in
FactoryTalk Directory; access to actions within the FactoryTalk AssetCentre system is
controlled with FactoryTalk Security.
About the documentation set (or, Where do I start?)
The documentation set includes:
FactoryT alk AssetCentr e Installation Guide (Document ID FTAC-IN005). Use this
manual to install the FactoryTalk AssetCentre system. This manual is also available
on the FactoryTalk AssetCentre installation disc. The file name is
FTAC-InstallGuide.pdf.
1
Page 8

1 • INTRODUCTION
Online help. Use the comprehensive online help for assistance while using the
FactoryTalk AssetCentre system. For information about getting started, see the help
topic Quick Start, on the Help menu.
About this book
This book is written for FactoryTalk AssetCentre administrators and IT professionals. To
perform many of the tasks described in this book, you need to log on to the computers
onto which you are installing software as an Administrator, or log on using an account that
has administrative privileges. For those installing the FactoryTalk AssetCentre client
software on a computer using the Windows Vista operating system, you can log on as a
Windows Vista Limited User Account that has administrative privileges.
We assume you are familiar with:
Microsoft
administration tasks
Microsoft SQL Server
RSLinx™ communication software
Rockwell Software programming tools for programmable logic controllers
®
Windows® operating systems including basic Windows networking and
• • • • •
control networks such as DeviceNet and programmable logic controllers such as
®
PLC-5
processors
Please use the feedback form, which you will find packaged with your software, to report
errors and to let us know what information you would like to see added in future editions
of this manual.
The components of FactoryTalk AssetCentre
There are three primary components of a FactoryTalk AssetCentre system:
FactoryTalk AssetCentre server, which controls the rest of the system and governs
its operations. The server requires Microsoft SQL Server 2005 (SP1 or later) or SQL
Server 2008 (SP1 or later) to function. The SQL Server is typically on the same
computer as the FactoryTalk AssetCentre server. The instructions in this manual are
written for that case, although the SQL Server could be installed on a different
computer.
2
Page 9

1 • INTRODUCTION
FactoryT alk AssetCentr e clients, which permit users to configure and use the server ,
view logged events, and perform other tasks associated with the software. The client
can be installed on any computer that:
is capable of running the client software (see “Client computer requirements” on
page 5).
is connected to the FactoryTalk AssetCentre server.
FactoryT alk AssetCentre agents, which are programs that perform certain scheduled
operations, such as Disaster Recovery and searches. Agents run independently of the
server and independently from each other—users schedule operations and the agents
perform them at the scheduled time. By spreading the processing load over multiple
computers, FactoryTalk AssetCentre agents speed up operations. When a server needs
a scheduled operation to begin, it tries to locate an available computer running the
appropriate agent to perform that task. When it locates an agent to perform the task, it
assigns the task to that agent. When the agent has completed the task, the agent reports
back to the server that the task is done.
Agents can be installed on any computer that:
is capable of running the agent software (see “Agent computer requirements” on
page 7).
• • • • •
is connected to the FactoryTalk AssetCentre server.
3
Page 10

1 • INTRODUCTION
• • • • •
When the system needs to run a schedule it searches the network for an available agent to perform that
function.
System requirements
Server computer requirements
FactoryTalk AssetCentre server computers must meet the following minimum
requirements. The operating system can be in English, Portuguese, French, Spanish,
Italian, German, Japanese, Korean, or Chinese.
Some FactoryT alk AssetCentre capabilities are only supported on an English language operating
system. At this time, the Calibration Management capability requires an English language
operating system. The Process Device Configuration capability requires an English, Portuguese,
French, or Italian operating system.
4
Page 11

1 • INTRODUCTION
Hardware requirements:
Server class computer with 2.4 GHz or higher dual core processor recommended
CD-ROM or DVD drive
4 GB of RAM (or more, depending on application requirements)
3 GB of free hard disk space (or more, depending on application requirements), and an
additional 100 GB of free hard disk space for data (10 GB additional free space for
data is acceptable if SQL Server will be on a separate computer)
Graphics adapter capable of a minimum resolution of 1024 x 768 pixels
Keyboard and pointing device (mouse)
Network adapter card
Software requirements:
One of the following Windows operating systems:
Windows Server 2008 Standard 32-bit or 64-bit
Windows Server 2008 R2 64-bit
• • • • •
Windows Server 2003 32-bit (with Service Pack 2 or later)
FactoryTalk Services Platform 2.10.00 or later
FactoryTalk Activation 3.60 or later
One of the following Microsoft SQL Server editions:
Microsoft SQL Server 2005 with Service Pack 1 or later (we recommend the most
recent service pack)
Microsoft SQL Server 2008 with Service Pack 1 or later (we recommend the most
recent service pack)
Microsoft Corporation strongly recommends the use of a RAID-5 system for computers running
SQL Server 2005 or SQL Server 2008.
Client computer requirements
Computers running the FactoryTalk AssetCentre client must meet the following minimum
requirements. The operating system can be in any language.
Some FactoryT alk AssetCentre capabilities are only supported on an English language operating
system. At this time, the Calibration Management capability requires an English language
operating system.
5
Page 12

1 • INTRODUCTION
Hardware requirements:
PC with 2 GHz or higher dual core processor recommended
2 GB of RAM (or more, depending on application requirements)
3 GB of free hard disk space (or more, depending on application requirements)
Graphics adapter capable of a minimum resolution of 1024 x 768 pixels
Keyboard and pointing device (mouse)
Network adapter card
Software requirements:
One of the following Windows operating systems:
Windows 7 Professional 32-bit or 64-bit
Windows Server 2008 Standard 32-bit or 64-bit
Windows Server 2008 R2 64-bit
Windows Vista 32-bit (with Service Pack 1 or later)
• • • • •
Windows XP Professional 32-bit (with Service Pack 2 or later)
Windows Server 2003 32-bit (with Service Pack 2 or later)
Microsoft Internet Explorer Web browser, version 6.0 or higher (version 7.0
recommended for Windows Vista operating systems)
FactoryTalk Services Platform 2.10.00 or later
RSLinx Classic Lite version 2.53 or later
(optional) RSLogix 5 version 7.30 or later, RSLogix 500 version 8.10 or later,
RSLogix 5000 version 12 or later, Studio 5000™ Logix Designer application version
21 or later, or any other version released as part of CPR 9 or later
T o take advantage of auditing, the FactoryTalk AssetCentre client should be installed
on each computer running your RSLogix family software.
T o edit the file and data settings for a compare operation for PLC-5, SLC 500, or
MicroLogix processors, you must have RSLogix 5 or RSLogix 500 software installed
on the client computer.
6
Page 13

1 • INTRODUCTION
To do a Rockwell Automation Compare, you must install the appropriate
programming software on the client computer.
For this device... Install...
PLC-5 RSLogix 5
SLC 500, MicroLogix RSLogix 500
ControlLogix RSLogix 5000 Compare utility
Rockwell Automation drives DriveExecutive Lite
(optional) RSLinx Enterprise version 5.00 or later if your system includes PanelView
Plus operator interfaces
(optional) FactoryTalk View ME Transfer Utility version 7.00 or later if your system
includes PanelView Plus operator interfaces
(optional) DriveExecutive™ Lite version 5.01 or later if your system includes
Rockwell Automation drives
• • • • •
(optional) Editing software for Siemens S5 or S7 processors, including SIMATIC
Manager (Step 7), Step 5, S5 for Windows, ACCON-PG, and PG-2000
Agent computer requirements
Computers running the FactoryTalk AssetCentre agents must meet the following
minimum requirements.
Hardware requirements:
PC with 2 GHz or higher dual core processor recommended
2 GB of RAM (or more, depending on application requirements)
3 GB of free hard disk space (or more, depending on application requirements)
Graphics adapter capable of a minimum resolution of 1024 x 768 pixels
Keyboard and pointing device (mouse)
Network adapter card
7
Page 14

1 • INTRODUCTION
Software requirements:
One of the following Windows operating systems:
Windows 7 Professional 32-bit or 64-bit
Windows Server 2008 Standard 32-bit or 64-bit
Windows Server 2008 R2 64-bit
Windows Vista Business 32-bit (with Service Pack 1 or later)
Windows XP Professional 32-bit (with Service Pack 2 or later)
Windows Server 2003 32-bit (with Service Pack 2 or later)
Microsoft Internet Explorer Web browser, version 6.0 or higher (version 7.0
recommended for Windows Vista operating systems)
FactoryTalk Services Platform 2.10.00 or later
RSLinx Classic Lite version 2.53 or later
RSLinx Enterprise version 5.00 or later
RSLogix 5000 Compare utility version 3.20 or later
• • • • •
RSLogix 5 version 7.30 or later, RSLogix 500 version 8.10 or later, RSLogix 5000
version 12 or later, Logix Designer version 21 or later, or any other version released as
part of CPR 9 or later
For Disaster Recovery functions, the appropriate programming software for your
devices MUST be installed on the agent computer.
For this device… Install...
PLC-5 RSLogix 5
SLC 500, MicroLogix RSLogix 500
ControlLogix RSLogix 5000 or Logix Designer
PanelView Plus View ME Transfer Utility and RSLinx Enterprise
Rockwell Automation drives DriveExecutive Lite
FactoryTalk View ME Transfer Utility 5.00 or later if your system includes PanelView
Plus operator interfaces
DriveExecutive™ Lite version 5.01 or later if your system includes Rockwell
Automation drives
8
Page 15

1 • INTRODUCTION
(optional) SIMATIC NET if you want to connect to Siemens S7 processors via MPI
(Multi Point Interface) or PROFIBUS protocol
(optional) INAT H1 driver if you are using an H1 protocol with a Siemens S5
controller (The driver is available at
http://www.inat.de/index.php?18&backPID=18&tt_products_sof=226&L=1)
Network requirements
Your Microsoft Windows network must use the TCP/IP protocol.
If you use a firewall, you must configure the firewall to permit traffic on the following
ports:
This port: is used for:
TCP port 25 SMTP mail
TCP port 80 Standard WWW port
TCP port 135 Remote Process Calls
TCP port 139 File and printer sharing
TCP port 445 File and printer sharing
TCP port 1433 Communications to SQL Server
TCP ports 7002 - 7004 FactoryTalk AssetCentre
UDP port 137 File and printer sharing
UDP port 138 File and printer sharing
UDP port 1434 Browsing for SQL Servers
UDP port 21060 Rockwell Automation Trace Diagnostics
UDP port 21061 Rockwell Automation Trace Diagnostics
• • • • •
Some of these ports may vary on your network. Work with your network administrators to
determine the correct port numbers to open.
You may need to open ports for other Rockwell Automation products as well. See
“Additional ports you may have to open” on page 82.
9
Page 16

About the installation process
Installing FactoryTalk AssetCentre software is a multiple-part process.
1. Install the prerequisite software for the FactoryTalk AssetCentre server.
2. If you have purchased the Calibration Management capability, install the ProCalV5
server.
3. Install the FactoryTalk AssetCentre server.
4. Install FactoryTalk AssetCentre clients.
5. If you have purchased the Calibration Management capability, install the ProCalV5
clients.
6. Install FactoryTalk AssetCentre agents.
7. Configure users and security.
8. If you have purchased the Process Device Configuration capability, install DTMs.
The following chapters guide you through these tasks.
T o upgrade an RSMACC system to FactoryT alk AssetCentre, follow the instructions in Answer ID
454396 at http://rockwellautomation.custhelp.com/cgibin/rockwellautomation.cfg/php/enduser/std_adp.php?p_faqid=454396
• • • • •
1 • INTRODUCTION
10
Page 17

2
Upgrading FactoryTalk AssetCentre
If you are upgrading from a previous version of FactoryTalk AssetCentre, the steps to
follow depend on which version you are upgrading from:
T o upgrade from FactoryTalk AssetCentre versions later than 2.00 to version 5.00,
follow the instructions in “Upgrading from any previous CPR 9-compatible version”
on page 11.
T o upgrade from FactoryTalk AssetCentre version 2.00 (compatible with CPR 7) to
version 5.00 (compatible with all CPR 9 releases), follow the instructions in
“Upgrading from version 2.00 (CPR 7) to 5.00 (CPR 9 SR 6)” on page 12.
Upgrading from any previous CPR 9-compatible version
T o upgrade from CPR 9-compatible versions later than 2.00, follow the installation
instructions in Chapters 3-5.
FactoryTalk AssetCentre version 5.00 works with any previous CPR 9 version of
FactoryTalk Services Platform and other Rockwell Software products. The FactoryTalk
AssetCentre installation will not upgrade the previous versions of FactoryTalk Services
Platform and other products. If you have these versions and want to use the latest version
instead, you must upgrade them manually. See the following section for details.
Optional software upgrades
The FactoryTalk AssetCentre disc contains installations for these software products used
with FactoryTalk AssetCentre:
FactoryTalk Services Platform version 2.60
FactoryTalk View ME Transfer Utility version 7.00
RSLinx Classic version 3.60
RSLinx Enterprise version 5.60
RSLogix 5 version 8.00
RSLogix 500 version 9.00
Logix Designer application version 21.00
If you already have earlier versions of these products and want the most recent version,
you will need to install them manually according to the table in the following section. We
recommend that you do this before installing FactoryTalk AssetCentre.
11
Page 18

2 • UPGRADING FACTORYTALK ASSETCENTRE
If you do not have RSLinx Classic or RSLinx Enterprise, FactoryTalk AssetCentre will
automatically install these products. If you use FactoryTalk Services Platform
CPR 9 SR 6, then be sure to use the CPR 9 SR 6 versions of RSLinx Enterprise and
RSLinx Classic Lite.
Location of setup files
The setup files for the optional upgrades are available on the FactoryTalk AssetCentre
installation disc.
This product’s setup.exe fil e Is located in this folder
FactoryTalk Services Platform AutoPlay\Server\Packages\ClientPrep\FTAP\setup.exe
FactoryTalk View ME Transfer
Utility
RSLinx Classic Lite AutoPlay\RSLinxClassic\setup.exe
RSLinx Enterprise AutoPlay\RSLinxEnterprise\setup.exe
RSLogix 5 RSLogix 5\setup.exe
RSLogix 500 RSLogix 500\setup.exe
Studio 5000 Studio5000\RSLogix5000\setup.exe
ME Transfer Utility\METUSetup.exe
• • • • •
Upgrading from version 2.00 (CPR 7) to 5.00 (CPR 9 SR 6)
This section provides instructions for upgrading from FactoryTalk AssetCentre
version 2.00 (CPR 7) to version 5.00 CPR 9 SR 6.
FactoryTalk AssetCentre version 5.00 relies on FactoryTalk Services Platform 2.10.00 or
later. To upgrade FactoryT alk AssetCentre, you must also upgrade from FactoryTalk
Automation Platform 2.00. This is automatically taken care of in the FactoryTalk Services
Platform portion of the FactoryTalk AssetCentre installation. Other FactoryTalk-enabled
products must also be upgraded to their correspoding CPR 9 versions. A list of products
requiring an upgrade is provided during the FactoryTalk Services Platform installation.
When you upgrade a computer from FactoryTalk Automation Platform 2.00 (CPR 7) to
FactoryTalk Services Platform 2.10.00 or later , the installation process automatically
creates a backup of your existing FactoryTalk Directory configurations. If something goes
wrong during the installation, you can restore the system from this backup. Information
about the location of the backup files is provided during installation.
In addition, while the installation process updates each directory with support for new
policy settings and new features, it leaves your original directory configurations intact. It
12
Page 19

2 • UPGRADING FACTORYTALK ASSETCENTRE
does not change your existing policy or security settings. For details, see FactoryTalk
Security Help.
It is very important that FactoryTalk AssetCentre 2.00 be removed from ALL client and agent
computers BEFORE uninstalling the FactoryTalk AssetCentre 2.00 software from the server.
T o upgrade FactoryTalk AssetCentre from a CPR 7-compatible version:
1. Uninstall FactoryTalk AssetCentre from the client and agent computers using Add or
Remove Programs from the Windows Control Panel.
On this computer… Remove these components…
Clients FactoryTalk AssetCentre Client
FactoryTalk AssetCentre Common Components
Agents FactoryTalk AssetCentre Agent
FactoryTalk AssetCentre RA Disaster Recovery Agent
FactoryTalk AssetCentre Common Components
• • • • •
2. Uninstall FactoryTalk AssetCentre from the server using Add or Remove Programs
from the Windows Control Panel.
On this computer… Remove these components…
Server FactoryTalk Asse tCentre Server
FactoryTalk AssetCentre Common Components
3. Install FactoryTalk AssetCentre according to the instructions in Chapters 3 through 5.
During the FactoryTalk Services Platform portion of the installations, FactoryTalk
will be upgraded and a message will inform you of other Rockwell Software products
that rely on FactoryTalk Services Platform and need to be updated.
4. Upgrade your other FactoryTalk-enabled products according to the instructions
provided with each product.
13
Page 20

3
Installing the FactoryTalk AssetCentre server
To upgrade an RSMACC system to FactoryTalk AssetCentre, follow the instructions in
Answer ID 454396 at http://rockwellautomation.custhelp.com/cgibin/rockwellautomation.cfg/php/enduser/std_adp.php?p_faqid=454396
IMPORTANT: If you are using a firewall (such as the Windows Firewall), you must manually
permit File and Printer Sharing through your firewall. Consult the documentation for your
firewall software for instructions. You must also open Port 80 (or whatever port is used for HTTP).
Before you begin, check and install FactoryTalk Services Platform and FactoryTalk View patches
If you are installing on a computer that already has FactoryTalk Services Platform 2.10.00
or later, or FactoryTalk View 5.00 or later, you may need to manually install the patches.
You may have more recent patches than those included on the FactoryTalk AssetCentre
disc at the time of release. It is very important to check and install the patches before you
begin the FactoryTalk AssetCentre installation.
To install the patches:
If the computer already has Then install patches by following instructions in
FactoryTalk Services Platform 2.10.00 or
later
FactoryTalk View 5.00 Answer ID 47015 at
FactoryTalk View 5.10 Answer ID 66056 at
Answer ID 49190 at
http://rockwellautomation.custhelp.com/cgibin/rockwellautomation.cfg/php/enduser/std_adp.php
?p_faqid=49190
http://rockwellautomation.custhelp.com/cgibin/rockwellautomation.cfg/php/enduser/std_adp.php
?p_faqid=47015
http://rockwellautomation.custhelp.com/cgibin/rockwellautomation.cfg/php/enduser/std_adp.php
?p_faqid=66056
14
Page 21

3 • INSTALLING THE FACTORYTALK ASSETCENTRE SERVER
If the computer already has Then install patches by following instructions in
FactoryTalk View 6.00 Answer ID 74109 at
http://rockwellautomation.custhelp.com/cgibin/rockwellautomation.cfg/php/enduser/std_adp.php
?p_faqid=74109
FactoryTalk View 6.10 Answer ID 278683 at
http://rockwellautomation.custhelp.com/cgibin/rockwellautomation.cfg/php/enduser/std_adp.php
?p_faqid=278683
When applying multiple patches, you might want to use the Patch File Validator utility.
But note that at the time this document was published, the necessary FactoryTalk Services
Platform patch information was not included in the patch list file (.PFV file). You still
need to install the product patches by following instructions in the Answer IDs provided
above. For more information about the Patch File Va lidator utility, see the following
section.
• • • • •
You will need to check the patches on all FactoryTalk AssetCentre client and agent computers.
Using the Patch File Validator utility
When you need to apply multiple patch files, it can be difficult to determine exactly which
patch files have already been installed. You can use the Patch File Validator utility to
compare the files installed on a computer with a list of patch files currently available.
To check for patches using the Patch File Validator utility:
1. Go to the Rockwell Automation Knowledgebase and search for Answer ID 30393.
http://www.rockwellautomation.com/knowledgebase/
2. You can download the Patch File Validator utility as directed in Answer ID 30393 or
you can copy it from the FactoryTalk AssetCentre installation disc. The file is located
on the disc at Autoplay\Server\Packages\ClientPrep\FTAPPatches\FTSP 2.10.01
CPR9 SR1 Patch Installs date\Utils.
3. Follow the instructions in Answer ID 30393 to download the most recent patch list file
(.PFV file) and run the utility.
15
Page 22

4. The resulting report lists the Answer IDs for the patches you need. Go to those
When checking the patches on all FactoryTalk AssetCentre client and agent computers, rather
than repeating these steps on each computer, you can select Network Computer in the Patch
File Validator utility to check each of the computers in your FactoryTalk AssetCentre system.
Read the instructions in Answer ID 30393 to use this feature.
Upgrading
If you are upgrading from an earlier version of FactoryTalk AssetCentre, you may need to
manually upgrade some associated Rockwell Software products including FactoryTalk
Services Platform. See Chapter 2 “Upgrading FactoryTalk AssetCentre” beginning on
page 11 for details.
Once you have completed upgrading associated Rockwell Software products, follow the
instructions in this chapter to upgrade the FactoryTalk AssetCentre server. Instructions
particular to upgrading are provided on the screen. Components that are already installed
will be skipped.
Overview of upgrading steps:
• • • • •
3 • INSTALLING THE FACTORYTALK ASSETCENTRE SERVER
Answer IDs and follow the instructions to download and install the patches.
1. Upgrade associated Rockwell Software products. See Chapter 2 “Upgrading
FactoryTalk AssetCentre” beginning on page 11 for details.
2. If you have Calibration Management, run the ProCalV5 server installation. See
“Installing the ProCalV5 server software” on page 23.
3. Run the FactoryTalk AssetCentre server installation. See “Installing the FactoryTalk
AssetCentre server software” on page 23.
About the installation
Setting up the FactoryTalk AssetCentre server requires installing and configuring several
software packages. These are listed on the FactoryTalk AssetCentre installation menu.
The server installation step in the menu launches a series of software installations and
utilities as illustrated in the diagram below. The yellow numbers in the diagram show the
order of the steps.
16
Page 23

• • • • •
3 • INSTALLING THE FACTORYTALK ASSETCENTRE SERVER
For information on installing this software: See page:
2) Microsoft Internet Information Services (IIS), version 5.0 or
3) Microsoft SQL Server 19
4) ProCal V5 software (for the Calibration Management capability) 23
5) FactoryTalk AssetCentre server software 23
Installing Internet Information Services
Microsoft Internet Information Services (IIS) is provided with Windows Server 2003,
Windows Server 2008, and Windows Server 2008 R2. However, it is not installed by
default. You must install this software on the server before installing FactoryTalk
AssetCentre server software.
You may want to run Windows Update to make sure you have the most recent IIS patches
before proceeding.
later
17
17
Page 24

3 • INSTALLING THE FACTORYTALK ASSETCENTRE SERVER
Installing IIS on Windows Server 2003
T o install IIS on Windows Server 2003:
1. Log on to the FactoryTalk AssetCentre server computer as an administrator (or a user
with administrative privileges).
2. Click Start > Settings > Control Panel to display Windows Control Panel.
3. In Control Panel, double-click Add or Remove Programs.
4. In the Add or Remove Programs application, click Add/Remove Windows
Components. This starts the Windows Components W izard.
5. In the Windows Components Wizard, click Application Server, and then click
Details. Select the box for Internet Information Services (IIS), and then click
Details. Make sure the following boxes are selected.
Common Files
Internet Information Services Manager
SMTP Service (if you do not have another mail server that you are going to use)
World Wide Web Service
• • • • •
Click OK. (If these boxes are already selected, click Cancel. IIS is already installed.)
6. Click Next. Windows installs IIS. Windows may prompt you to insert your operating
system disc during the installation.
Optional: If you want to use a web site other than the “Default Web Site” for IIS, create that web
site now in Computer Management. Right-click My Computer, select Manage or
Administrative. Then, under Services and Applications, click Internet Information Services
(IIS) Manager. For more information, see your Windows Server documentation.
Installing IIS on Windows Server 2008 or Windows Server 2008 R2
T o install IIS on Windows Server 2008 or Windows Server 2008 R2:
1. Log on to the FactoryTalk AssetCentre server computer as an administrator or a user
with administrative privileges.
2. Click Start > Settings > Control Panel to display Windows Control Panel.
3. In Control Panel, double-click Programs and Features.
4. In the Programs and Features window, click T urn Windows features on or off.
5. In the right pane of the Server Manager window, click Add Roles to open the Add
Roles Wizard.
18
Page 25

3 • INSTALLING THE FACTORYTALK ASSETCENTRE SERVER
6. Follow the wizard until you come to the Select Server Roles screen.
7. On the Select Server Roles screen, select Web Server (IIS). If you are asked to add
features required for Web Server (IIS), click Add Required Features to continue.
8. Follow the wizard until you come to the Select Role Services screen.
9. On the Select Role Services screen, use the default settings for IIS. Make sure the
following check boxes under ManagementTools are selected:
IIS Management Console
IIS Management Scripts and Tools
Management Service
IIS 6 Management Compatibility
IIS 6 Metabase Compatibility
IIS 6 WMI Compatibility
IIS 6 Scripting Tools
IIS 6 Management Console
• • • • •
Click Next to continue the installation. (If these check boxes are already selected,
click Cancel. IIS is already installed.)
10. Click Install to continue the installation.
Optional: If you want to use a web site other than the “Default Web Site” for IIS, create that web
site now in the Server Manager. Right-click My Computer, select Manage. Then click Roles >
Web Server (IIS) > Internet Information Services (IIS) Manager. For more information, see
your Windows Server documentation.
Installing Microsoft SQL Server 2008
FactoryTalk AssetCentre uses a Microsoft SQL Server database to store project files and
user data. Y ou may install SQL Server on the FactoryTalk AssetCentre server computer or
on a separate server computer. If you already have SQL Server 2005 or SQL Server 2008
installed, you can skip these steps (however, you may need to reconfigure the SQL
Server).
If you intend to use the Calibration Management capability, a 32-bit edition of Microsoft SQL
Server is required.
19
Page 26

3 • INSTALLING THE FACTORYTALK ASSETCENTRE SERVER
If you use an existing SQL Server installation:
The SQL Server collation must be dictionary-order, case-insensitive for use with
FactoryTalk AssetCentre software. If your existing SQL Server collation is casesensitive, the FactoryTalk AssetCentre database installation will fail. Follow the
directions here if your SQL Server collation is NOT dictionary-order, caseinsensitive.
If this SQL Server has no other databases on it:
Either: Uninstall SQL Server and reinstall it using the default collation in the
setup program. (This statement applies to English language Microsoft Windows
operating systems and SQL Server software. For other languages, be sure to
select a dictionary-order, case-insensitive collation when reinstalling.)
Or: Rebuild the master database using a dictionary-order, case-insensitive
collation. Refer to the SQL Server 2008 online books for instructions.
If this SQL Server has other databases on it, then setup or use another SQL Server
that is configured with a dictionary-order, case-insensitive collation.
If you have an MSDN subscription you can find more information at
http://msdn2.microsoft.com/en-us/library/ms143508.aspx
, or search the Microsoft
MSDN site for SQL Server 2008 collation settings.
• • • • •
T o install SQL Server 2008 so it is compatible with FactoryTalk AssetCentre server:
1. Log on to the server computer as an administrator or as a user with administrative
rights.
It is possible to install SQL Server 2008 on a different computer from the one on which you
install the FactoryTalk AssetCentre server software.
2. Start the SQL Server 2008 installation from the SQL Server 2008 discs.
3. Follow the on-screen instructions for installation until you get to the Feature
Selection screen.
4. The Feature Selection screen asks which features of SQL Server 2008 you want to
install. If you like, or if your business requires you to do so, you may install the
complete SQL Server 2008 installation.
If you want to install only those features necessary to run the FactoryTalk AssetCentre
server:
20
Page 27

3 • INSTALLING THE FACTORYTALK ASSETCENTRE SERVER
a. On the Feature Selection screen, make sure the following features are selected:
Database Engine Services
SQL Server Replication
Full-Text Search
Client Tools Connectivity
Client Tools Backwards Compatibility
Management Tools - Basic
b. Click Next.
5. Follow the on-screen instructions for installation until you get to the Server
Configuration screen.
6. In the Server Configuration screen, the Services Accounts tab asks how you want to
run the services for the SQL Server. Specify the account name and password for each
SQL Server service.
You can run the SQL Server using a domain account. This can, however, complicate system
maintenance (for instance, when changing passwords). If you are not sure of the type of
account you should use for running the SQL Server, consult your network administrator.
• • • • •
7. In the Server Configuration screen, click the Collation tab and then click the
Customize button next to the Database Engine Collation area to specify the Database
Engine collation. In the Customize the SQL Server 2008 Database Engine Collation
dialog box, select SQL collation and then select the
SQL_Latin1_General_CP1_CI_AS option.
The collation settings must be case-insensitive! If the settings are case-sensitive, the
FactoryTalk AssetCentre database installation will fail.
8. In the Database Engine Configuration window, click the Account Provisioning tab and
then select Mixed Mode (SQL Server Authentication and Windows
authentication). This means that both the SQL Server and the Windows domain can
authenticate users for the SQL Server.
FactoryTalk AssetCentre uses SQL Server authentication.
21
Page 28

3 • INSTALLING THE FACTORYTALK ASSETCENTRE SERVER
When you click Mixed Mode, fields open for entering the password for the sa (SQL
Server system administrator) account password. Do not forget the password. You
will need this password when you install the FactoryTalk AssetCentre server.
Do not leave the password blank. Doing so leaves your SQL Server and your computer open
to attack.
9. Follow the on-screen instructions to complete the installation.
I
NSTALLING MICROSOFT
SQL S
ERVER
2008 S
ERVICE PACKS
After you install Microsoft SQL Server 2008, you must install SQL Server 2008 Service
Pack 1 or later. The service pack is necessary for the software to run properly and protects
your SQL Server 2008 server from certain types of attacks.
• • • • •
T o obtain the service pack, go to the Microsoft website ( www.microsoft.com)
and search
for “SQL Server 2008 Service Pack.”
Minimum Microsoft SQL Server 2008 permissions
The permissions discussed here are set automatically during the FactoryTalk AssetCentre
Database installation (which is part of the FactoryTalk AssetCentre Server installation
discussed on page 31). This information is provided for reference for the SQL
administrator.
The AssetCentreUser SQL user’s default database value can be “master” or
“AssetCentre.” By default, the database value is set to “AssetCentre.” The
AssetCentreUser SQL user needs to belong to the following AssetCentre database roles:
db_dataexecute
db_datareader
db_datawriter
public
The “db_dataexecute” database role was added to the FactoryTalk AssetCentre database
during the FactoryTalk AssetCentre server installation. It is used to group Execute
permissions of stored procedures and functions within the AssetCentre database.
All of the user stored procedures and user functions in the FactoryTalk AssetCentre
database need to have the Execute permission granted to the “db_dataexecute” database
role.
22
Page 29

3 • INSTALLING THE FACTORYTALK ASSETCENTRE SERVER
Installing the ProCalV5 server software
If you have purchased the Calibration Management capability for FactoryTalk
AssetCentre, you next install the ProCalV5 server software on the FactoryTalk
AssetCentre server computer. This step comes after you have installed IIS, the Microsoft
SQL Server software, and FactoryTalk Activation.
You can also install the ProCalV5 server software after the FactoryTalk AssetCentre server
software as described on page 36.
1. Insert the FactoryTalk AssetCentre disc into your computer.
2. The installation program should start automatically. If it does not, open the
FactoryTalk AssetCentre disc in My Computer and then run the Setup.exe program.
3. Click Install ProCalV5.
4. Click Product Documentation on the ProCalV5 install screen.
5. In the window that opens, open the Installation Guide folder.
6. Open and review the ProCalV5 Installation Guide. Use Microsoft Word to read or
print the guide. Close the window.
• • • • •
7. Click Server Setup.
8. Follow the on-screen instructions for the installation.
9. After you install the ProCalV5 server, the ProCalV5 Server Setup window opens. This
step installs the database connection for ProCalV5. Specify the SQL Server that you
set up previously, and enter the sa (SQL Server system administrator account) user
name and password.
10. Click Connect.
11. The ProCalV5 Server Setup window expands. Provide this information:
The name of the ProCalV5 SQL database (default is PROCAL55RS).
The ProCalV5 database login name (default is pcV5us01) and password.
12. Click Load Database, and continue to follow the on-screen instructions.
Installing the FactoryTalk AssetCentre server software
If you already have an earlier CPR 9 version of FactoryTalk Services Platform installed
and you wish to upgrade to the latest version, you must manually upgrade it from the
23
Page 30

3 • INSTALLING THE FACTORYTALK ASSETCENTRE SERVER
FactoryTalk AssetCentre installation disc, as described on page 11. We recommend that
you perform the upgrade before you begin installing the FactoryTalk AssetCentre server.
If you are also installing the FactoryT alk AssetCentre client or agent on the server computer, and
you want to use the CPR 9 SR 6 version of RSLinx Enterprise, you must also use the CPR 9 SR 6
version of FactoryTalk Services Platform. If this is a first-time installation and FactoryTalk
Services Platform is not already installed on the computer, the inst allation program will inst all the
CPR 9 SR 6 version of FactoryTalk Services Platform.
T o install the FactoryTalk AssetCentre server software:
1. Log on to your server computer as an administrator or as a user with administrative
privileges.
2. Insert the FactoryTalk AssetCentre installation disc into your computer.
3. The setup program should start automatically. If it does not, open the FactoryTalk
AssetCentre disc in My Computer and then run the Setup.exe program.
4. Click Install FactoryTalk AssetCentre Server.
The Install FactoryTalk AssetCentre Server window opens. The installer searches the
computer for required components and displays the results in this window. The
installer will not attempt to install components that already exist on the computer.
Components that will be installed are indicated with a computer icon and a checked
box. You cannot select or clear the check boxes in this window.
• • • • •
If you see a red “X” next to one or more components, this means that the installer cannot
determine whether the component should be installed. Contact Technical Support using the
contact information provided on the copyright page at the beginning of this guide.
5. Click Start to begin the installation process.
6. Follow the on-screen installation instructions for the components that need to be
installed. The following sections provide more information about installing these
components.
The installation of some components may require you to restart your computer. If this is the
case and the setup program has not finished installing all of the necessary components, the
setup program will restart the next time you log on to your computer.
The following components, listed on the Install FactoryTalk AssetCentre Server window,
are checked for and installed or configured during the server installation:
Windows Installer 3.1 v2. If this component is not already installed on your
computer, the setup program will install it. Follow the on-screen installation
instructions. If you are prompted to restart when the installation is complete, close
24
Page 31

3 • INSTALLING THE FACTORYTALK ASSETCENTRE SERVER
Microsoft Internet Explorer and any FactoryTalk AssetCentre installation windows
before restarting.
Microsoft .NET Framework 3.5 and 4.0. The FactoryTalk AssetCentre server
requires that Microsoft .NET Framework 3.5 and 4.0 be installed on your computer. If
this component is not already installed on your computer, the setup program will
install it.
FactoryTalk AssetCentre Upgrade Check. Checks for an existing CPR 7 version of
FactoryTalk AssetCentre. Version 5.00 works with all CPR 9 versions of FactoryTalk
Services Platform and cannot be installed with an existing CPR 7 version of
FactoryTalk AssetCentre. To upgrade, see Chapter 2 “Upgrading from version 2.00
(CPR 7) to 5.00 (CPR 9 SR 6)” beginning on page 12.
FactoryTalk Services Platform. See “Installing FactoryTalk Services Platform” on
page 26.
FactoryTalk Activation. See “Installing FactoryTalk Activation” on page 27.
RSLinx Enterprise. See “Installing RSLinx Enterprise” on page 29.
Patch FTSP. See “Patch FactoryTalk Services Platform” on page 29.
• • • • •
FactoryTalk Services Platform patches are installed depending on whether
FactoryTalk Services Platform version 2.10 is installed on the computer:
If the computer already has FactoryTalk Services Platform version. 2.10, patches
are installed during the FactoryTalk Services Platform installation (beginning on
page 26). This installs the most recent patches at the time the FactoryTalk
AssetCentre installation disc was created. More recent patches may be available.
If you have not already checked your FactoryTalk Services Platform patches, skip
the patch during the installation and see “Before you begin, check and install
FactoryTalk Services Platform and FactoryTalk View patches” on page 14 for
more information about validating and installing patches.
If the computer has an existing version of FactoryTalk Services Platform higher
than version 2.10 or does not have an existing version of FactoryTalk Services
Platform, no patches are necessary. FactoryTalk Services Platform version
CPR 9 SR 6 will be installed as part of the FactoryTalk AssetCentre installation.
Check and Configure FTSP. See “Check and configure FactoryTalk Services
Platform” on page 30.
Stop FactoryTalk AssetCentre Server. The FactoryTalk AssetCentre server service
must be stopped at this point in the installation. The installation program stops the
service.
25
Page 32

3 • INSTALLING THE FACTORYTALK ASSETCENTRE SERVER
Stop FactoryTalk AssetCentre Website. This is part of the internal working of the
program and is stopped automatically. You may see a command prompt briefly before
the website stops.
FactoryTalk AssetCentre Common Components. See “FactoryTalk AssetCentre
Common Components installer” on page 31.
FactoryTalk AssetCentre Server. See “FactoryTalk AssetCentre server installer” on
page 31.
FactoryTalk AssetCentre Calibration Management Server. See “FactoryT alk
AssetCentre Calibration Management Server installer” on page 34.
FactoryTalk AssetCentre Process Device Configuration Server. See “FactoryTalk
AssetCentre Process Device Configuration Server installer” on page 35.
Start FactoryTalk AssetCentre Website. This is part of the internal working of the
program and is started automatically. You may see a command prompt briefly before
the website starts.
Install AssetCentre Setup Programs. This occurs in step 3 on page 35.
Launch Rockwell Windows Firewall Configuration Utility. See “Using the
Windows Firewall Configuration Utility” on page 35.
• • • • •
Start FactoryTalk AssetCentre Server. The installation program starts the service.
The following sections of this chapter provide installation instructions for these
components. Each installation automatically starts after the previous one.
Installing FactoryTalk Services Platform
See “Installing the FactoryTalk AssetCentre server software” on page 23 for the steps to get to
this part of the installation.
FactoryTalk AssetCentre depends on the Rockwell Software FactoryTalk Services
Platform to function. If the platform is not installed on your computer (or if the correct
version is not installed), the setup program will install it. If you have a previous version of
the platform installed, you may need to uninstall it before continuing (the setup program
will inform you if this is the case).
By default, all members of the Administrators group on the computer on which you are installing
the FactoryTalk Services Platform are added to the Administrators group in the FactoryTalk
Directory.
1. Follow the on-screen instructions to install the platform. If FactoryTalk Services
Platform 2.10.00 or later is already installed on your computer, go to step .
26
Page 33

3 • INSTALLING THE FACTORYTALK ASSETCENTRE SERVER
2. When you are asked whether you want to install the FactoryTalk Administration
Console, be sure the check box is selected (you will need the console to help you
configure the FactoryTalk Directory). Continue to follow the on-screen instructions
If you receive an error message indicating that an attempt to configure the Windows Firewall
Configuration Utility failed, click OK and continue. The Windows Firewall will be configured
later.
3. Click Finish on the InstallShield Wizard for FactoryTalk Services Platform. If you are
prompted to restart your computer for configuration changes made to FactoryTalk
Services Platform to take effect, click No to restart later. Follow the on-screen
instructions to continue the installation.
Installing FactoryTalk Activation
See “Installing the FactoryTalk AssetCentre server software” on page 23 for the steps to get to
this part of the installation.
FactoryTalk AssetCentre uses a software activation system called FactoryTalk Activation
and is activated on two criteria: capacity (number of devices) and capability (purchased
functions). Activation is required for the FactoryTalk AssetCentre server, but not clients
or agents.
• • • • •
Capacity is the number of device assets that can be represented in your FactoryTalk
AssetCentre software.
By default (and without activation), you are permitted to add up to ten devices or
process devices in your FactoryTalk AssetCentre software. Above that, the number of
devices and process devices you are permitted depends on the quantity of capacity
activation you have purchased. Only device and process device assets count for
capacity activation. Y ou can add as many files, folders, file links, generic devices, and
generic containers as your system requires.
Capabilities are additional features you can add to enhance your FactoryTalk
AssetCentre system.
Currently, the capabilities for purchase are:
Calibration Management
Process Device Configuration
Disaster Recovery for Rockwell Devices
Disaster Recovery for ABB Robots
Disaster Recovery for Motoman Robots
27
Page 34

3 • INSTALLING THE FACTORYTALK ASSETCENTRE SERVER
Disaster Recovery for FANUC Robots
Disaster Recovery for Generic FTP Devices
Disaster Recovery for Siemens S5 Processors
Disaster Recovery for Siemens S7 Processors
Disaster Recovery for Remote Computers
All of the other features of FactoryTalk AssetCentre are available by default. Other
capabilities will be available in future releases.
FactoryTalk AssetCentre clients do not require activation. All activations for FactoryTalk
AssetCentre are locked to the FactoryTalk AssetCentre server.
FactoryTalk Activation version 3.60 or later is required. If a previous version is already
installed, the setup program will inform you to upgrade it to 3.60 or later before
continuing.
T o install FactoryTalk Activation, follow the steps below:
1. Follow the on-screen instructions.
2. If a previous version is already installed, the setup program informs you to upgrade it
to 3.60 or later. Click Yes and follow the on-screen instructions to continue.
• • • • •
3. When complete, follow the on-screen instructions to open the Manage Activations tab
of FactoryTalk Activation Manager. Once you have the Manage Activations tab open,
click Finish on the InstallShield W izard Completed dialog box. If you are prompted to
restart your computer for the configuration changes made to FactoryTalk Activation
Manager to take effect, click No to restart later.
4. In the Manage Activations tab, click Get New Activations and select the activation
method you want to use..
Do not lock activations to virtual network adapters, such as those used for virtual private
networks (VPN) or virtual machines. Instead, lock activations to the Host IDs of fixed
hardware devices, such as hardware network adapters or hard disk serial numbers.
5. Continue following the on-screen instructions to obtain your activations.
6. Click Exit on the window with the FactoryTalk Activation installation menu.
A
DDING ACTIVATIONS IN THE FUTURE
If you add activations to the FactoryTalk AssetCentre system in the future, you will have
to refresh activations.
28
Page 35

3 • INSTALLING THE FACTORYTALK ASSETCENTRE SERVER
For more detailed information about activation for FactoryTalk AssetCentre, see the
online help. For more information about FactoryTalk Activation, see the “Activate
Rockwell Software Products” insert that came with your FactoryTalk AssetCentre
software or the online help for the FactoryTalk Activation Manager.
You need an Internet connection to install activation. If you do not have an internet connection,
see the “Activate Rockwell Software Products” insert that came with your FactoryTalk
AssetCentre software.
Installing RSLinx Enterprise
See “Installing the FactoryTalk AssetCentre server software” on page 23 for the steps to get to
this part of the installation.
After FactoryTalk Activation installation is complete, the RSLinx Enterprise installation
program starts automatically.
1. Follow the on-screen instructions.
2. In the Setup Type page of the installation wizard, select Standard Feature Set
Installation and then click Next.
3. Follow the on-screen instructions to complete the installation.
• • • • •
4. On the InstallShield Wizard Completed window, click Finish.
Patch FactoryTalk Services Platform
See “Installing the FactoryTalk AssetCentre server software” on page 23 for the steps to get to
this part of the installation.
If you have FactoryTalk Services Platform and you have already checked for and installed
FactoryTalk Services Platform patches (see “Before you begin, check and install
FactoryTalk Services Platform and FactoryTalk View patches” on page 14), click Finish
and continue the installation of the other components.
If you have FactoryTalk Services Platform and you have NOT already installed patches,
follow the instructions on the FactoryTalk Services Platform Patch Installation window.
1. A command prompt window opens while each patch is being installed. When
processing in the command prompt completes, ignore the message to reboot your
computer and close the command prompt window.
2. Install the next patch, closing the command prompt window when that patch is
finished.
3. When the last patch has been installed, close the last command prompt and click
Finish on the FactoryTalk Services Platform Patch Installation window. A message
informs you that the system will restart. Click OK.
29
Page 36

3 • INSTALLING THE FACTORYTALK ASSETCENTRE SERVER
4. Once the computer has restarted, the Install FactoryTalk AssetCentre Server window
will be displayed. Click Start to proceed with the installation.
5. The FactoryTalk Services Platform Patch Installation window reappears. Click Finish.
Check and configure FactoryTalk Services Platform
See “Installing the FactoryTalk AssetCentre server software” on page 23 for the steps to get to
this part of the installation.
The setup program continues to check and configure FactoryTalk Services Platform.
Respond to the FactoryTalk Directory Server Configuration window with care. Correctly
identifying the FactoryTalk Directory is essential to a properly functioning system.
The FactoryTalk Directory Server Configuration window asks if the computer on which
you are installing the software is also the computer that will be the FactoryTalk Directory
server. If this is the case, click Continue and go on to step 7. If the FactoryTalk Directory
server is on a different computer, click Select FactoryTalk Directory Server and
continue with the instructions below.
• • • • •
1. The utility may ask you to log on to FactoryTalk. Log on with your Windows
administrator username and password. (As mentioned earlier, members of the
Windows Administrators user group were automatically added to the FactoryTalk
Directory.)
2. In the FactoryTalk Directory Server Location Utility window, note the name in the
Computer hosting directory server field. (Most likely, this field will contain
localhost, which is correct only if you are using the computer that actually is the
FactoryTalk Directory Server.) If the name in the field is not the name of your
FactoryTalk Directory Server, click the browse button next to the field.
3. In the next window, select Remote computer. T ype the name of your FactoryTalk
Directory Server in the field, or click the browse button next to the field to browse for
the server.
4. Once you have the name of the FactoryTalk Directory Server in the field, click OK,
and then click OK again.
5. If you chose a different computer to be the FactoryTalk Directory Server, you will see
a window saying that you will need to restart your computer. Click OK. The software
attempts a connection to the FactoryTalk Directory Server. You may be asked to log
on to the server. To lon on to the server, enter the username and password for a
Network Directory server administrator on the FactoryTalk Directory Server,
and then click OK.
30
Page 37

3 • INSTALLING THE FACTORYTALK ASSETCENTRE SERVER
6. Restore the Install FactoryTalk AssetCentre Server window and click Continue.
7. When you see a checklist window showing that the FactoryTalk Services Platform
components are all installed and configured, click Continue. This will proceed to the
next segment of the FactoryTalk AssetCentre server installation.
FactoryTalk AssetCentre Common Components installer
See “Installing the FactoryTalk AssetCentre server software” on page 23 for the steps to get to
this part of the installation.
T o install the common components:
1. Follow the on-screen instructions.
2. When asked to restart your computer, click Yes. You must restart the computer before
you run the FactoryTalk AssetCentre server.
3. If you see messages indicating that the firewall has blocked a program, select
Unblock on each message.
Depending on the speed of your computer, you may see the Install FactoryTalk AssetCentre
server window for a moment after you restart and log back onto your server computer. This
behavior is normal (the installation program is designed to check to see if everything is
installed correctly before proceeding).
• • • • •
A
FTER RESTARTING
The installation software will initiate several component installations again in sequence
beginning with the FactoryTalk Services Platform. You can cancel the installation for all
components that you have already installed. The list below provides a step-by-step
sequence to cancel all installs that have been completed to this point. What you see may
vary depending on your particular system.
1. Click Start on the Install FactoryTalk AssetCentre Server window.
2. Click Finish on the FactoryTalk Services Platform Patch Installation window if it
opens.
3. Depending on your FactoryTalk Directory setting, you may see the stop sign window
again about how to set the FactoryTalk Directory. See “Check and configure
FactoryTalk Services Platform” on page 30 to make the appropriate choice.
4. Click Continue on the Check FactoryTalk Services Platform Configuration window.
FactoryTalk AssetCentre server installer
See “Installing the FactoryTalk AssetCentre server software” on page 23 for the steps to get to
this part of the installation.
31
Page 38

3 • INSTALLING THE FACTORYTALK ASSETCENTRE SERVER
After the setup program checks your FactoryTalk Services Platform installation, it starts
the installation for the FactoryTalk AssetCentre server software.
If you have a firewall (such as the Windows Firewall) installed on your server computer, you may
see warnings that the Scheduler Service and trace diagnostics are being blocked. For
FactoryTalk AssetCentre to function correctly, you must unblock traffic for these services.
T o install the FactoryTalk AssetCentre server:
1. Follow the on-screen instructions.
2. If you have created another web site for IIS (see page 18), you will see a Select Web
Site dialog box. Select Default Web Site, and then click OK.
3. The Database Installer utility opens. This utility installs the FactoryT alk AssetCentre
database. Specify the location of the database server and the SQL Server administrator
username and password.
If you see an error message about invalid SQL collation, you will need to fix the SQL Server
collation before continuing with the FactoryTalk AssetCentre installation. See “SQL collation
error encountered during database installation” on page 73.
a. By default, the server location is set to (local). There are instances where this is
not the correct setting.
• • • • •
If you installed the SQL Server software here Then enter this in the Server field
In the default location (the computer running the
FactoryTalk AssetCentre server software) and
default (local) instance.
On a different computer than will run the
FactoryTalk AssetCentre server software but in
the default (local) instance.
On a named instance of SQL Server (whether or
not you installed the SQL Server on the same
computer where you are installing the
FactoryTalk AssetCentre server software).
Leave the setting as it is (local).
The name or IP address of the computer
on which you installed the SQL Server.
The name or IP address of the server
and the instance where you installed the
SQL Server. For example, if you
installed the database on a computer
called MYSERVER and named the
instance MYINST ANCE, you would
type
MYSERVER\MYINSTANCE in the
field.
b. For the user credentials, the utility is looking for the system administrator account
(sa) you created when you installed the SQL Server. Type sa in the Username
field, and the password for the sa account in the Password field. If someone else
installed SQL Server, get the correct administrator username and password.
32
Page 39

3 • INSTALLING THE FACTORYTALK ASSETCENTRE SERVER
c. Click Start.
The setup program installs the database.
4. The Database User Configuration utility opens. Create a database user for the
FactoryTalk AssetCentre software to use to access the database.
a. You can accept the information provided or enter a different username and
password, then click OK.
If you provide a username and password, provide a SQL user account, not a
Windows user account.
b. After you click OK, if the software asks if you want to create a new login for the
database, click Yes.
c. After running the Database User Configuration utility, the software may ask you to
log on to FactoryTalk. If so, log on using a FactoryTalk Administrator account.
5. The Configure Server Settings utility opens. Configure the port and e-mail settings
that specify how the FactoryTalk AssetCentre Server software communicates with
other computers.
• • • • •
This setting: Does this:
Server Location Sets the name of the FactoryTalk AssetCentre serv er computer . Ch ange
this setting only if you want to move the server to another computer.
Base IP Port Sets the Internet Protocol (IP) port that the FactoryTalk AssetCentre
Scheduler Service will use. By default, this port is 7002. The system
uses the base port, plus the next two consecutive ports. So by default
7002 to 7004 are reserved. If you specify 7000, for example, 7000
through 7002 would be reserved.
SMTP Server Specifies the SMTP (Simple Mail Transport Protocol) address of your
outgoing SMTP (e-mail) server. For example, mailrelay.myplant.com.
The domain provided here (myplant.com in the example above) is used
to form the address from which e-mail notifications from FactoryTalk
AssetCentre will be sent. The “From” e-mail address will be
FACTORYTALKASSETCENTRE_NOREPLY@yourdomain.com.
If you do not know the name of your SMTP server, consult your
network administrator.
33
Page 40

3 • INSTALLING THE FACTORYTALK ASSETCENTRE SERVER
This setting: Does this:
SMTP Server IP Port Sets the IP port used to communicate with your SMTP server. By
default, this port is 25. Some facilities use a different port. If you do not
know your SMTP port number, consult your network administrator.
If you use a port other than 25 and are using a firewall, you’ll have to
also open that port in your firewall.
6. When the settings are as desired, click OK.
7. If you see messages indicating that the firewall has blocked a program, select
Unblock on each message.
8. On the final page of the FactoryTalk AssetCentre Server InstallShield Wizard, click
Finish.
FactoryTalk AssetCentre Calibration Management Server installer
See “Installing the FactoryTalk AssetCentre server software” on page 23 for the steps to get to
this part of the installation.
• • • • •
The FactoryTalk AssetCentre Calibration Management server must be installed in the same
folder as the FactoryTalk AssetCentre server.
T o install the Calibration Management server:
1. Follow the on-screen instructions.
2. After you install the FactoryTalk AssetCentre Calibration Management server, the
ProCalV5 Connection Installer window opens. This step installs the database
connection for ProCalV5. Provide this information from the ProCalV5 server
installation:
The name of the SQL Server for the ProCalV5 database.
The ProCalV5 SQL Server login name (default is pcV5us01) and password.
The name of the ProCalV5 SQL database (default is PROCAL55RS).
If you have not installed the ProCalV5 server software, click Skip and go to step 6. You can
install the ProCalV5 software after installing the FactoryTalk AssetCentre server software,
and then create the ProCalV5 connection (as described on page 36).
3. Click OK.
4. In the Test Data Source window, click Test Data Source.
34
Page 41

3 • INSTALLING THE FACTORYTALK ASSETCENTRE SERVER
5. When the test is finished, click Done, and then click OK.
6. Click Finish.
FactoryT alk AssetCentre Process Device Configuration Server installer
See “Installing the FactoryTalk AssetCentre server software” on page 23 for the steps to get to
this part of the installation.
The FactoryT alk AssetCentre Process Device Configuration server must be installed in the same
folder as the FactoryTalk AssetCentre server.
T o install the Process Device Configuration server:
1. Follow the on-screen instructions.
2. Click Finish.
3. The Client Package Installer window opens. Click Start.
(This does not install the FactoryTalk AssetCentre client. The Client Package Installer
prepares the server computer to provide FactoryTalk AssetCentre client and agent
installation to other computers via a website rather than the installation disc.)
• • • • •
Using the Windows Firewall Configuration Utility
See “Installing the FactoryTalk AssetCentre server software” on page 23 for the steps to get to
this part of the installation.
If you have a firewall other than Windows Firewall, use the information in “Network requirements”
on page 9 and “Additional ports you may have to open” on page 82 to configure your firewall to
allow communication through the appropriate ports and with specific processes.
The Windows Firewall Configuration Utility runs whether you are using the firewall or
not.
If your Windows Firewall/Internet Connection Sharing (ICS) service is stopped or is
disabled, the FactoryTalk AssetCentre Windows Firewall Configuration window
indicates this with a red x. Click Continue. The FactoryTalk AssetCentre server
installation is complete.
If you are using a firewall other than Windows Firewall, use the information in
“Network requirements” on page 9 and “Additional ports you may have to open” on
35
Page 42

3 • INSTALLING THE FACTORYTALK ASSETCENTRE SERVER
page 82 to configure your firewall to allow communication throu gh the appropriate
ports and with specific processes.
If your Windows Firewall/Internet Connection Sharing (ICS) service is running, the
FactoryTalk AssetCentre W indows Firewall Configuration window indicates this with
a green check mark. Click Start. The Rockwell Software Windows Firewall
Configuration Utility window opens. The list of exceptions (things to allow through
the firewall) generally includes default SQL Server and e-mail ports.
If no exceptions need to be made, none are listed and the Accept button is
unavailable. In that case, click Exit to close this utility.
If exceptions are listed, click Accept. On the Confirm Windows Firewall Changes
window make the appropriate selection depending on whether your Windows
Firewall will be on or off, and then click OK.
Installing the ProCalV5 server software after the FactoryTalk AssetCentre server
If you have purchased the Calibration Management capability for FactoryTalk
AssetCentre, you would normally install the ProCalV5 server software before you install
the FactoryTalk AssetCentre server (as described on page 23). However, if you did not
install the ProCalV5 server before the FactoryTalk AssetCentre server, you can install it
now.
• • • • •
If you installed the ProCalV5 server before you installed the FactoryTalk AssetCentre server, do
not install the ProCalV5 server again.
1. Install the ProCalV5 server software as described on page 23.
2. Run the ProCalV5 Data Source Edit Wizard, described next.
Running the ProCalV5 Data Source Edit Wizard
If you installed the ProCalV5 server AFTER you installed the FactoryTalk AssetCentre
server, you must run the ProCalV5 Data Source Edit Wizard to connect the ProCalV5
server to FactoryTalk AssetCentre.
This step is not necessary if you installed the ProCalV5 server before you installed the
FactoryTalk AssetCentre server.
36
Page 43

3 • INSTALLING THE FACTORYTALK ASSETCENTRE SERVER
For this step, you need to know this information from the ProCalV5 server installation:
The name of the SQL Server for the ProCalV5 database.
The ProCalV5 SQL Server login name (default is pcV5us01) and password.
The name of the ProCalV5 SQL database.
T o connect the ProCalV5 server to FactoryTalk AssetCentre:
1. Click Start > All Programs > Rockwell Software > FactoryTalk AssetCentre
Server > ProCalV5 Data Source Configuration.
2. Follow the on-screen instructions.
• • • • •
37
Page 44

4
Installing FactoryTalk AssetCentre clients
Once you have installed your FactoryTalk AssetCentre server , you can install FactoryT alk
AssetCentre clients.
Where to install the FactoryTalk AssetCentre client
Install the client on any computer:
from which you want to access the FactoryTalk AssetCentre client software (to edit
the representation of your assets, to view logs, to create schedules, to search the logs,
and so on).
that is capable of running the client software (see “Client computer requirements” on
page 5).
that is connected to the FactoryTalk AssetCentre server.
that you want to use remotely to manage process device configurations (using the
Field Edition software in conjunction with the Process Device Configuration
capability).
from which FactoryTalk audits are desired.
The Disaster Recovery capability provides the ability to schedule a comparison between
master files and processor program and data files. To edit the file and data settings for a
compare operation for PLC-5, SLC 500, or MicroLogix processors, you must have
RSLogix 5 or RSLogix 500 software installed on the client computer.
If you have purchased the Calibration Management capability for FactoryTalk
AssetCentre, you must also install the ProCalV5 client software on the FactoryTalk
AssetCentre client computer. This step comes after you have installed the FactoryTalk
AssetCentre client software. See page 49.
Upgrading
If you are upgrading from an earlier version of FactoryTalk AssetCentre, you may need to
manually upgrade some associated Rockwell Software products including FactoryTalk
Services Platform. See Chapter 2 “Upgrading FactoryTalk AssetCentre” beginning on
page 11 for details.
Once you have completed upgrading associated Rockwell Software products, follow the
instructions in this chapter to upgrade each FactoryTalk AssetCentre client. Instructions
particular to upgrading are provided on the screen. Components that are already installed
38
Page 45

4 • INSTALLING FACTORYTALK ASSETCENTRE CLIENTS
will be skipped. (Once you start the installation, depending on how many components are
already installed, it may skip directly to step 20 on page 45.)
Check and install FactoryTalk Services Platform patches
See “Before you begin, check and install FactoryTalk Services Platform and FactoryTalk
View patches” on page 14.
Installing the FactoryTalk AssetCentre client software
The FactoryTalk AssetCentre client provides the user interface for FactoryTalk
AssetCentre. It is through the client that you perform tasks such as checking files in and
out, creating and running scheduled events, managing and configuring DTMs (if you have
the Process Device Configuration capability), and viewing logs. For more information on
what you can do with FactoryTalk AssetCentre client software, see the online help (once
the client is installed).
Install the FactoryTalk AssetCentre client software on all computers on which you want to
use FactoryTalk AssetCentre. The client is not required on the FactoryTalk AssetCentre
server computer, but you can install it on the server if desired.
• • • • •
T o install a FactoryTalk AssetCentre client:
1. Log on to the client computer as an administrator or as a user with administrative
privileges.
For example, in Windows Vista you can log on with a Limited User Account (LUA),
but before installing you will be asked to supply administrative credentials.
If your operating system is Windows Vista or later:
2.
a. Insert the FactoryTalk AssetCentre disc into your computer.
b. The installation program should start automatically. If it does not, open the
FactoryTalk AssetCentre disc in My Computer and then run the Setup.exe
program.
c. Click Install FactoryTalk AssetCentre Client.
d. Skip to step 8.
If your operating system is Windows XP or Windows Server 2003:
On the client computer, open Internet Explorer.
3. In the Address field of Internet Explorer, type the following address:
http://servername/rockwellsoftware/assetcentre
where servername is the name of your FactoryTalk AssetCentre server computer.
39
Page 46

4 • INSTALLING FACTORYTALK ASSETCENTRE CLIENTS
For example, if your FactoryTalk AssetCentre server is called MYSERVER, type:
http://MYSERVER/rockwellsoftware/assetcentre
If you are using SSL, then begin with https:// instead.
4. Press Enter.
5. Internet Explorer displays a page from the server that allows you to install the
FactoryTalk AssetCentre client software.
6. Click Install AssetCentre Client on this computer.
If Internet Explorer displays an error message that it can’t connect to the install web page, try
bypassing the proxy for local addresses. Also make sure that IIS is running on the server. For
information on running IIS see “Web page for installing the FactoryTalk AssetCentre client
and agent cannot be displayed” on page 75.
If Internet Explorer displays a warning about opening possibly unsafe content or downloading
possibly unsafe files, try adding the FactoryTalk AssetCentre Web site (URL above) to your
Trusted Sites.
See your Internet Explorer documentation for more information.
7. On the File Download - Security Warning window, click Run (or Open). Do not
attempt to save the installation file—it will not run correctly from your local
computer.
• • • • •
8. The Install FactoryTalk AssetCentre Client window opens. The installer searches the
computer for required components and displays the results in this window. The
installer will not attempt to install components that already exist on the computer.
Components that will be installed are indicated with a computer icon and a checked
box. You cannot select or clear the check boxes in this window.
If you see a red “X” next to one or more components, this means that the installer cannot
determine whether the component should be installed. Contact Technical Support using the
contact information provided on the copyright page at the beginning of this guide.
9. Click Start. Follow the on-screen instructions for the components that need to be
installed. The following sections provide more information about installing these
components.
The installation of some components may require you to restart your computer. If this is the
case and the setup program has not finished installing all of the necessary components, the
setup program will restart the next time you log on to your computer.
40
Page 47

4 • INSTALLING FACTORYTALK ASSETCENTRE CLIENTS
The following components are checked for and installed or configured during the client
installation:
Windows Installer 3.1 v2. If this component is not already installed on your
computer, the setup program will install it. Follow the on-screen installation
instructions. If you are prompted to restart when the installation is complete, close
Microsoft Internet Explorer and any FactoryTalk AssetCentre installation windows
before restarting.
Microsoft .NET Framework 3.5 and 4.0. The FactoryTalk AssetCentre client
requires that Microsoft .NET Framework versions 3.5 and 4.0 be installed on your
computer. If this component is not already installed on your computer, the setup
program will install it. Follow the installation instructions on-screen to install it.
If a message appears asking to restart the computer, select No and then click Start on
the Install FactoryTalk AssetCentre Client window.
FactoryTalk AssetCentre Upgrade Check. Checks for an existing CPR 7 version of
FactoryTalk AssetCentre. Version 5.00 works with all CPR 9 versions of FactoryTalk
Services Platform and cannot be installed with an existing CPR 7 version of
FactoryTalk AssetCentre. To upgrade, see Chapter 2 “Upgrading from version 2.00
(CPR 7) to 5.00 (CPR 9 SR 6)” beginning on page 12.
• • • • •
FactoryTalk Services Platform. See “Installing FactoryTalk Services Platform,”
next.
RSLinx Classic Lite. See step 4 on page 43.
RSLinx Enterprise. See step 11 on page 44.
Patch FTSP. FactoryTalk Services Platform patches are installed depending on
whether FactoryTalk Services Platform is installed on the computer:
If the computer already has FactoryTalk Services Platform, patches are installed
during the FactoryTalk Services Platform installation (beginning on page 42). This
installs the most recent patches at the time the FactoryTalk AssetCentre
installation disc was created. More recent patches may be available. If you have
not already checked your FactoryTalk Services Platform patches, skip the patch
during the installation and see “Before you begin, check and install FactoryTalk
Services Platform and FactoryTalk View patches” on page 14 for more
information about validating and installing patches.
If the computer does not have an existing version of FactoryTalk Services
Platform, no patches are necessary. FactoryTalk Services Platform CPR 9 SR 6
will be installed as part of the FactoryTalk AssetCentre installation.
41
Page 48

4 • INSTALLING FACTORYTALK ASSETCENTRE CLIENTS
If installing on the
server:
Skip to step 4 to
install RSLinx
Classic.
Check and Configure FTSP. This occurs during the FactoryTalk Services Platform
installation. See the substeps in step 20 on page 45.
FactoryTalk AssetCentre Common Components. See “FactoryTalk AssetCentre
Common Components installer” on page 45.
FactoryT alk AssetCentre Client host. See “FactoryTalk AssetCentre client software
installer” on page 46.
FactoryTalk AssetCentre Calibration Management Client. See “FactoryTalk
AssetCentre Calibration Management client software installer” on page 47.
FactoryTalk AssetCentre Process Device Configuration Client. See “FactoryTalk
AssetCentre Process Device Configuration client software installer” on page 47.
Launch Rockwell Windows Firewall Configuration Utility. See “Using the
Windows Firewall Configuration Utility” on page 48.
The following sections of this chapter provide installation instructions for these
components. Each installation automatically starts after the previous one.
If you are installing the client on the FactoryTalk AssetCentre server computer, the server
computer will already have Windows Installer, Microsoft .NET Framework, FactoryTalk
Services Platform, and FactoryTalk AssetCentre Common Components installed. The
installation program automatically skips the existing components. Skip those sections in
the instructions that follow.
• • • • •
Installing FactoryTalk Services Platform
See “Installing the FactoryTalk AssetCentre client software” on page39 for the steps to get to this
part of the installation.
FactoryTalk AssetCentre depends on the Rockwell Software FactoryTalk Services
Platform to function. If the platform is not installed on your computer (or if the correct
version is not installed), the setup program will install it. If you have a previous version of
the platform installed, you may need to uninstall it before continuing (the setup program
will inform you if this is the case).
By default, all members of the Administrators group on the computer on which you are installing
the FactoryTalk Services Platform are added to the Administrators group in the FactoryTalk
Directory.
1. Follow the on-screen installation instructions to install the platform. If FactoryTalk
Services Platform 2.10.00 or later is already installed on your computer, go to step 4.
42
Page 49

4 • INSTALLING FACTORYTALK ASSETCENTRE CLIENTS
2. When you are asked whether you want to install the FactoryTalk Administration
Console, be sure the check box is selected (you will need the console to help you
configure the FactoryTalk Directory). Continue to follow the on-screen instructions.
If you receive an error message indicating that an attempt to configure the Windows Firewall
Configuration Utility failed, click OK and continue. The Windows Firewall will be configured
later.
3. Click Finish on the InstallShield Wizard for the FactoryTalk Services Platform. If you
are prompted to restart your computer for configuration changes made to FactoryTalk
Services Platform to take effect, click No to restart later. Follow the on-screen
instructions to continue the installation.
If you have RSLinx Classic version 2.53 or later installed on your computer, the installation
program skips to step 11.
4. Click Required Steps on the RSLinx Classic Welcome Page.
5. Click Install RSLinx Classic on the Welcome to RSLinx Classic window. Click Run
on the Open File - Security Warning window.
RSLinx Classic allows you to connect to Rockwell Automation control hardware.
RSLinx Classic is required even if you have RSLinx Enterprise. If RSLinx Classic is
not installed on the client computer, the installation program for the FactoryTalk
AssetCentre client will install RSLinx Classic Lite. RSLinx Classic Lite does not
support connections through OPC. For more information about RSLinx Classic, see
the RSLinx Classic documentation.
• • • • •
6. Follow the on-screen instructions. In the Customer Information page of the
installation wizard, enter your user name, organization name, and any ten digit
number. Then click Next.
7. In the Standard Setup page, select the components of the software you want to install
and to change the folder where the software is installed. We advise that you install all
of the components. Change the settings on this page as desired, and then click Next.
8. Continue following the on-screen instructions to complete the installation.
If you receive a warning indicating that the software you are installing has not passed
Windows Logo testing to verify its compatibility with the Windows version, click Continue
Anyway.
9. On the InstallShield Wizard Completed window, click Finish.
10. Click Exit on the RSLinx Classic installation menu.
43
Page 50

4 • INSTALLING FACTORYTALK ASSETCENTRE CLIENTS
If installing on the
server:
Skip to step 20.
RSLinx Enterprise
has already been
installed.
Windows Vista
users:
See Answer ID 60058
in the Rockwell
Software
Knowledgebase for
important instructions
on patching
FactoryTalk Services
Platform on Windows
Vista.
If you already have RSLinx Enterprise version 5.00.00 or later installed on your computer, the
installation program skips to step 18. RSLinx Enterprise is required for your FactoryTalk
AssetCentre system to communicate with PanelView Plus operator interfaces.
11. Click Install RSLinx Enterprise on the Welcome to FactoryTalk Services window.
12. Click Install RSLinx Enterprise on the Install RSLinx Enterprise window.
13. Follow the on-screen instructions.
14. In the Setup Type page of the installation wizard, select Standard Feature Set
Installation, and then click Next.
15. Continue following the on-screen instructions to complete the installation.
16. On the InstallShield Wizard Completed window, click Finish.
17. Click Exit on the RSLinx Enterprise installation menu.
If you have FactoryTalk Services Platform and you have already checked for
18.
and installed FactoryTalk Services Platform patches
(see “Before you begin,
check and install FactoryTalk Services Platform and FactoryTalk View patches” on
page 14), click Finish and skip to step 20.
• • • • •
If you have FactoryTalk Services Platform and you have NOT already
installed patches, do so now according to the instructions on the FactoryTalk
Services Platform Patch Installation window.
a. A command prompt window opens while each patch is being installed. When
processing in the command prompt completes, ignore the message to reboot your
computer and close the command prompt window.
b. Install the next patch, closing the command prompt window when that patch is
finished.
c. When the last patch has been installed, close the last command prompt and click
Finish on the FactoryTalk Services Platform Patch Installation window. A
message informs you that the system will restart. Click OK.
d. Once the computer has restarted, the Install FactoryTalk AssetCentre Client
window will be displayed. Click Start to proceed with the installation.
19. The FactoryTalk Services Platform Patch Installation window reappears. Click Finish.
Respond to the FactoryTalk Directory Server Configuration window, explained in step 20,
with care. Correctly identifying the FactoryTalk Directory is essential to a properly functioning
system.
44
Page 51

4 • INSTALLING FACTORYTALK ASSETCENTRE CLIENTS
If installing on the
server:
Skip to the next
section. The
common
components have
already been
installed.
20. After the system checks the FactoryTalk Services Platform configuration, you will see
a window with a stop sign on it. The purpose of this window is to set the location of
the FactoryTalk Directory. If the computer on which you are installing the software is
also the computer that will be the FactoryTalk Directory server , click Continue and go
on to step 21. If the FactoryTalk Directory server is on a different computer, click
Select FactoryTalk Directory Server and continue with the instructions below.
a. The utility may ask you to log on to FactoryTalk. Log on with your W indows
administrator username and password. (As mentioned earlier, members of the
Windows Administrators user group were automatically added to the FactoryTalk
Directory.)
b. In the FactoryTalk Directory Server Location Utility window, click the browse
button next to the Computer hosting directory server field.
c. In the next window , select Remote computer. Type the name of your FactoryTalk
Directory Server in the field, or click the browse button next to the field to browse
for the server.
d. Once you have the name of the FactoryTalk Directory Server in the field, click
OK, and then click OK again.
• • • • •
e. Click OK on the message telling you to restart the computer. The software
attempts a connection to the FactoryTalk Directory Server. You may be asked to
log on to the new FactoryTalk Directory server. If you are, enter the username and
password for the Network Directory server administrator on the FactoryTalk
Directory Server (not the local FactoryTalk Network Directory), and then click
OK.
21. When you see a checklist window showing that the FactoryTalk Services Platform
components were all installed and configured, click Continue. This will proceed to
the next segment of the FactoryTalk AssetCentre client installation.
FactoryTalk AssetCentre Common Components installer
See “Installing the FactoryTalk AssetCentre client software” on page39 for the steps to get to this
part of the installation.
T o install the common components:
1. Follow the on-screen instructions.
2. When asked to restart your computer, click Yes.
3. If you see messages indicating that the firewall has blocked a program, select
Unblock on each message.
45
Page 52

4 • INSTALLING FACTORYTALK ASSETCENTRE CLIENTS
A
FTER RESTARTING
The installation software will initiate several component installations again in sequence
beginning with the FactoryTalk Services Platform. You can cancel the installation for all
components that you have already installed. The list below provides a step-by-step
sequence to cancel all installs that have been completed to this point. What you see may
vary depending on your particular system.
1. Click Start on the Install FactoryTalk AssetCentre Client window.
2. Click Finish on the FactoryTalk Services Platform Patch Installation window.
3. Depending on your FactoryTalk Directory setting, you may see the stop sign window
again about how to set the FactoryTalk Directory. See step 20 on page 45 to make the
appropriate choice.
4. Click Continue on the Check FactoryTalk Services Platform Configuration window.
FactoryTalk AssetCentre client software installer
See “Installing the FactoryTalk AssetCentre client software” on page39 for the steps to get to this
part of the installation.
• • • • •
After the setup program checks your FactoryTalk Services Platform installation, it starts
the installation for the FactoryTalk AssetCentre client software.
1. Follow the on-screen instructions to install the FactoryTalk AssetCentre client until
you get to the Custom Setup page of the installation wizard.
2. The Custome Setup page asks which features of FactoryTalk AssetCentre client you
want to install. If you have Siemens S5 or S7 processors, you may also need to install
the 3rd party editor integration features.
T o intall the 3rd party editor integration features, click the icon for the feature you
want to install and then click This feature will be installed on local hard drive. The
other icons should have a red X indicating that they will not be installed.
Currently, FactoryTalk AssetCentre supports the integration of the following editors:
Step 7 Version 5.4
Step 5 Version 7.x
S5 for Windows
ACCON-PG
46
Page 53

4 • INSTALLING FACTORYTALK ASSETCENTRE CLIENTS
PG-2000
To successfully integrate the S5 or S7 editors, you must install the editors before the
FactoryTalk Asset Centre installation. Otherwise, you may receive an information
message indicating that the required file for the installed editor could not be found and
the editor could not be integrated.
3. Follow the on-screen instructions to complete the FactoryTalk AssetCentre client
installation.
When finished, there may be a short delay before you see the FactoryTalk AssetCentre
Calibration Management client installer start.
FactoryTalk AssetCentre Calibration Management client software installer
See “Installing the FactoryTalk AssetCentre client software” on page39 for the steps to get to this
part of the installation.
The FactoryT alk AssetCentre Calibration Management client must be installed in the same folder
as the FactoryTalk AssetCentre client.
• • • • •
After the FactoryTalk AssetCentre client is installed, the FactoryTalk AssetCentre
Calibration Management client installation begins.
1. On the Install FactoryTalk AssetCentre Calibration Management Client window, click
Next.
2. Follow the on-screen instructions to install the FactoryTalk AssetCentre Calibration
Management client.
When finished, there may be a short delay before you see the FactoryTalk AssetCentre
Process Device Configuration client installer start.
FactoryTalk AssetCentre Process Device Configuration client software installer
See “Installing the FactoryTalk AssetCentre client software” on page39 for the steps to get to this
part of the installation.
The FactoryTalk AssetCentre Process Device Configuration client must be installed in the same
folder as the FactoryTalk AssetCentre client.
47
Page 54

4 • INSTALLING FACTORYTALK ASSETCENTRE CLIENTS
After the FactoryTalk AssetCentre Calibration Management client is installed, the
FactoryTalk AssetCentre Process Device Configuration client installation begins. This
installs the client component of the Process Device Configuration capabiltiy and the Field
Edition software.
1. On the Install FactoryTalk AssetCentre Process Device Configuration Client window,
click Next.
2. Follow the on-screen instructions to install the FactoryTalk AssetCentre Process
Device Configuration client.
3. If asked to restart your computer, click Yes.
A
FTER RESTARTING
The installation software will initiate several component installations again in sequence
beginning with the FactoryTalk Services Platform. You can cancel the installation for all
components that you have already installed. The list below provides a step-by-step
sequence to cancel all installs that have been completed to this point. What you see may
vary depending on your particular system.
1. Click Start on the Install FactoryTalk AssetCentre Client window.
• • • • •
2. Click Finish on the FactoryTalk Services Platform Patch Installation window if it
opens.
3. Depending on your FactoryTalk Directory setting, you may see the stop sign window
again about how to set the FactoryTalk Directory. See step 20 on page 45 to make the
appropriate choice.
4. Click Continue on the Check FactoryTalk Services Platform Configuration window.
Using the Windows Firewall Configuration Utility
See “Installing the FactoryTalk AssetCentre client software” on page39 for the steps to get to this
part of the installation.
The Windows Firewall Configuration Utility runs whether you are using the firewall or
not.
If your Windows Firewall/Internet Connection Sharing (ICS) service is stopped or is
disabled, the FactoryTalk AssetCentre Windows Firewall Configuration window will
indicate this with a red x. Click Continue. The FactoryTalk AssetCentre server
installation is complete.
If you are using a firewall other than Windows Firewall, use the information in
“Network requirements” on page 9 and “Additional ports you may have to open” on
48
Page 55

4 • INSTALLING FACTORYTALK ASSETCENTRE CLIENTS
page 82 to configure your firewall to allow communication throu gh the appropriate
ports and with specific processes.
If your Windows Firewall/Internet Connection Sharing (ICS) service is running, the
FactoryTalk AssetCentre W indows Firewall Configuration window indicates this with
a green check mark. Click Start. The Rockwell Software Windows Firewall
Configuration Utility window opens. The list of exceptions (things to allow through
the firewall) generally includes default SQL Server and e-mail ports.
If no exceptions need to be made, none will be listed and the Accept button will be
unavailable. In that case, click Exit to close this utility.
If exceptions are listed, click Accept. On the Confirm Windows Firewall Changes
window make the appropriate selection depending on whether your Windows
Firewall will be on or off, and then click OK.
Checking to see if the client is installed correctly
To check if the client is correctly installed and connected to the FactoryTalk AssetCentre
server, start the client. Click Start > All Programs > Rockwell Softwar e > FactoryTalk
AssetCentre Client > AssetCentre Client.
• • • • •
When the client runs, it checks the server for the latest version of the client software and
displays a message if the client software is not the latest version (“The client and server
versions are incompatible”). To update the client software, follow the steps in “Installing
the FactoryTalk AssetCentre client software” on page 39.
For information on getting started with the software, see the online help.
Installing the ProCalV5 client sof tware
If you have purchased the Calibration Management capability for FactoryTalk
AssetCentre, install the ProCalV5 client software on the FactoryTalk AssetCentre client
computer. This step comes after you have installed the FactoryTalk AssetCentre client
software.
To install the ProCalV5 client:
1. Log on to the client computer as an administrator or as a user with administrative
privileges.
2. Insert the FactoryTalk AssetCentre disc into your computer.
3. The installation program should start automatically. If it does not, open the
FactoryTalk AssetCentre disc in My Computer and then run the Setup.exe program.
4. Click Install ProCalV5.
49
Page 56

5. Click Product Documentation on the ProCalV5 install screen.
6. In the window that opens, open the Installation Guide folder.
7. Open and review the ProCalV5 Installation Guide. Use Microsoft Word to read the
guide. Close the window.
8. Click Client Setup.
9. Follow the on-screen instructions for the installation.
10. After you install the ProCalV5 client, the ProCalV5 Client Configuration Assistant
window opens. This assistant creates the client connection to the ProCalV5 database
server. Click Next.
11. In the Specify CFG File window, click Change.
12. Open the Client Connection File folder, select PROCAL55S.CFG, and then click
Open. Follow the on-screen instructions to continue.
Installing DTMs
Install DTMs only if you have purchased the Process Device Configuration capability for
FactoryTalk AssetCentre.
• • • • •
4 • INSTALLING FACTORYTALK ASSETCENTRE CLIENTS
DTM stands for “Device Type Manager.” It is a software component for devices that
contains device information and configuration parameters for that device. If you have
purchased the Process Device Configuration capability, install DTMs for the devices you
use on every client computer that will communicate with the device.
The device manufacturer provides the DTM for the device. Follow the manufacturer’s
instructions to install the DTM.
After you have installed DTMs on the client computers, update the DTM Catalog on
every client computer. For information about how to do this, see the FactoryTalk
AssetCentre online help.
Installing Rockwell Automation DTMs
Rockwell Automation provides some device and communications DTMs on a separate
disc from the FactoryTalk AssetCentre installation. These include communication DTMs
and device DTMs. The communication DTMs provided are for use with Rockwell
Automation connectivity products. For example, the RSLinx 1756 DTM routes
communication between a computer and the backplane of a ControlLogix 1756 chassis.
The iDTM is a generic device DTM for use with HART or FOUNDATION fieldbus
protocol devices that do not come with a DTM. The iDTM is limited in that it may not
50
Page 57

4 • INSTALLING FACTORYTALK ASSETCENTRE CLIENTS
have all the parameters and functions specific to the physical device. The iDTM is only
available to go online with the device and does not support an offline mode.
To install a Rockwell Automation DTM:
1. Insert the FactoryTalk AssetCentre Device Type Manager (DTM) Libraries disc into
the client computer.
2. The installation menu should open automatically. If it does not, open the disc in My
Computer and then run the Setup.exe program. We recommend reading the Release
Notes before continuing.
3. From the installation menu, select the protocol type for the DTM you want to install.
4. Select the appropriate library menu item for the DTM you want to install.
5. Follow the on-screen instructions to complete the installation.
6. Perform these steps on every client computer according to the following table.
Install... If...
the iDTM for HART the computer will communicate with a HART device that lacks its
own DTM
the iDTM for
FOUNDATION Fieldbus
a communications DTM the DTM network includes Rockwell Automation devices or
the computer will communicate with a FOUNDATIO N Fieldbus
device that lacks its own DTM
gateways
• • • • •
Running Process Device Configuration Field Edition
T o run Field Edition, click Start > All Programs > Rockwell Software > FactoryTalk
AssetCentre Client > PDC Field Edition.
51
Page 58

5
Installing FactoryTalk AssetCentre agents
The Search feature, as well as purchased capabilities, such as the Disaster Recovery
capability, require the use of agents to perform scheduled operations. Agents are programs
that communicate with the FactoryTalk AssetCentre server and perform scheduled tasks
on behalf of the FactoryTalk AssetCentre server. Agents allow work to be distributed and
shared among multiple computers to spread processing load and speed up operations.
When a server needs an agent to perform a task, it locates the computer running the
operation and assigns the task to that agent. The agent then reports the task’s completion
to the server.
For FactoryTalk AssetCentre version 5.00, only the Disaster Recovery capability and
Search feature use agents.
These agents can be installed on the computer running the FactoryTalk AssetCentre
server, on computers running the FactoryTalk AssetCentre client, or on any other
computer that meets the system requirements and is connected to the FactoryTalk
AssetCentre server. See “Agent computer requirements” on page 7 for agent computer
requirements.
Where to install FactoryTalk AssetCentre agents
Agents can be installed on any computer that:
is capable of running the agent software (see “Agent computer requirements” on
page 7).
is connected to the FactoryTalk AssetCentre server.
If you intend to perform a large number of Disaster Recovery operations, you can install
the Disaster Recovery agent on up to five computers on your network to help spread out
the processing load. Contact Rockwell Automation if you need to install the agent on
more than five computers.
How do you know if you need more Disaster Recovery agents? If scheduled operations
are taking longer than desired to complete, then install more Disaster Recovery agents. T o
estimate the number of necessary FactoryTalk AssetCentre agents in your system, see
Answer ID 106118 at
http://rockwellautomation.custhelp.com/cgibin/rockwellautomation.cfg/php/enduser/std_
adp.php?p_faqid=106118.
If your system uses PanelView Plus operator interfaces, you must install RSLinx
Enterprise and the FactoryTalk View ME Transfer Utility software on every agent
computer in the system. RSLinx Enterprise must be version 5.00.00 or later. FactoryTalk
52
Page 59

5 • INSTALLING FACTORYTALK ASSETCENTRE AGENTS
View ME Transfer Utility is a separate installation. The installation is included on the
FactoryTalk AssetCentre installation disc in ME Transfer Utility\METUSetup.exe.
Also, for Disaster Recovery functions, the agent computer MUST have the appropriate
RSLogix family software for your devices.
Upgrading
If you are upgrading from an earlier version of FactoryTalk AssetCentre, you may need to
manually upgrade some associated Rockwell Software products including FactoryTalk
Services Platform. See Chapter 2 “Upgrading FactoryTalk AssetCentre” beginning on
page 11 for details.
Once you have completed upgrading associated Rockwell Software products, follow the
instructions in this chapter to upgrade each FactoryTalk AssetCentre agent. Instructions
particular to upgrading are provided on the screen. Components that are already installed
will be skipped. (Once you start the installation, depending on how many components are
already installed, it may skip directly to step 20 on page 59.)
Check and install FactoryTalk Services Platform patches
• • • • •
See “Before you begin, check and install FactoryTalk Services Platform and FactoryTalk
View patches” on page 14.
Installing the FactoryTalk AssetCentre Disaster Recovery agent
You must have the appropriate RSLogix family software for your devices installed on the agent
computer to run Disaster Recovery schedules.
T o install the FactoryTalk AssetCentre Disaster Recovery agent:
1. Log on to the agent computer as an administrator or as a user with administrative
privileges.
If your operating system is Windows Vista or later:
2.
a. Insert the FactoryTalk AssetCentre disc into your computer.
b. The installation program should start automatically. If it does not, open the
FactoryTalk AssetCentre disc in My Computer and then run the Setup.exe
program.
c. Click Install FactoryTalk AssetCentre Agents.
d. Skip to step 7.
53
Page 60

5 • INSTALLING FACTORYTALK ASSETCENTRE AGENTS
If your operating system is Windows XP or Windows Server 2003:
On the agent computer, open Internet Explorer.
3. In the Address field of Internet Explorer, type the following address:
http://servername/rockwellsoftware/assetcentre
where servername is the name of your FactoryTalk AssetCentre server computer.
For example, if your FactoryTalk AssetCentre server is called MYSERVER, type:
http://MYSERVER/rockwellsoftware/assetcentre
If you are using SSL, then begin with https:// instead.
4. Press Enter.
5. Internet Explorer displays a page from the server that allows you to install the
FactoryTalk AssetCentre agent software.
Click Install AssetCentre Agents on this computer.
If Internet Explorer displays an error message that it can’t connect to the install web page, try
bypassing the proxy for local addresses. Also make sure that IIS is running on the server. For
information on running IIS see “Web page for installing the FactoryTalk AssetCentre client
and agent cannot be displayed” on page 75.
If Internet Explorer displays a warning about opening possibly unsafe content or downloading
possibly unsafe files, try adding the FactoryTalk AssetCentre Web site (URL above) to your
Trusted Sites.
See your Internet Explorer documentation for more information.
• • • • •
6. On the File Download - Security Warning window, click Run (or Open). Do not
attempt to save the installation file—it will not run correctly from your local
computer.
7. The Install FactoryTalk AssetCentre Agents window opens. The installer searches the
computer for required components and displays the results in this window. The
installer will not install components that already exist on the computer. Components
that will be installed are indicated with a computer icon and a checked box. You
cannot select or clear the checkboxes in this window.
If you see a red “X” next to one or more components, this means that the installer cannot
determine whether the component should be installed. Contact Technical Support using the
contact information provided on the copyright page at the beginning of this guide.
54
Page 61

5 • INSTALLING FACTORYTALK ASSETCENTRE AGENTS
8. Click Start. Follow the on-screen instructions for the components that need to be
installed. The following sections provide more information about installing these
components.
The installation of some components may require you to restart your computer. If this is the
case and the setup program has not finished installing all of the necessary components, the
setup program will restart the next time you log on to your computer.
The following components are checked for and installed or configured during the agent
installation:
Windows Installer 3.1 v2. If this component is not already installed on your
computer, the setup program will install it. Follow the on-screen installation
instructions. If you are prompted to restart when the installation is complete, close
Microsoft Internet Explorer and any FactoryTalk AssetCentre installation windows
before restarting.
Microsoft .NET Framework 3.5 and 4.0. The Disaster Recovery agent requires that
Microsoft .NET Framework versions 3.5 and 4.0 be installed on the agent computer. If
this component is not already installed, the setup program will install it. Follow the
installation instructions on-screen to install it.
• • • • •
FactoryTalk AssetCentre Upgrade Check. Checks for an existing CPR 7 version of
FactoryTalk AssetCentre. Version 5.00 works with all CPR 9 versions of FactoryTalk
Services Platform and cannot be installed with an existing CPR 7 version of
FactoryTalk AssetCentre. To upgrade, see Chapter 2 “Upgrading from version 2.00
(CPR 7) to 5.00 (CPR 9 SR 6)” beginning on page 12.
FactoryTalk Services Platform. See “Installing FactoryTalk Services Platform” on
page 56.
RSLinx Classic Lite. See step 4 on page 57.
RSLinx Enterprise. See step 11 on page 58.
Patch FTSP. FactoryTalk Services Platform patches are installed depending on
whether FactoryTalk Services Platform is installed on the computer:
If the computer already has FactoryTalk Services Platform, patches are installed
during the FactoryTalk Services Platform installation (beginning on page 56). This
installs the most recent patches at the time the FactoryTalk AssetCentre
installation disc was created. More recent patches may be available. If you have
not already checked your FactoryTalk Services Platform patches, skip the patch
during the installation and see “Before you begin, check and install FactoryTalk
Services Platform and FactoryTalk View patches” on page 14 for more
information about validating and installing patches.
55
Page 62

5 • INSTALLING FACTORYTALK ASSETCENTRE AGENTS
If installing on the
server:
Skip to step 4 to
install RSLinx
Classic.
If installing on a
client:
Skip to step 18 to
install patches.
If the computer does not have an existing version of FactoryTalk Services
Platform, no patches are necessary. FactoryTalk Services Platform version
CPR 9 SR 5 will be installed as part of the FactoryTalk AssetCentre installation.
Check and Configure FTSP. This occurs during the FactoryTalk Services Platform
installation. See the substeps in step 20 on page 59.
FactoryTalk AssetCentre Common Components. See “FactoryTalk AssetCentre
Common Components installer” on page 59.
FactoryTalk AssetCentre RA Disaster Recovery Agent. See “FactoryTalk
AssetCentre RA Disaster Recovery Agent installer” on page 60
FactoryTalk AssetCentre Agent Host. See “FactoryTalk AssetCentre Agent
installer” on page 60.
RSLogix 5000 Compare v3. See “RSLogix 5000 Compare installer” on page 61.
Launch Rockwell Windows Firewall Configuration Utility. See “Using the
Windows Firewall Configuration Utility” on page 61.
The following sections of this chapter provide installation instructions for these
components. Each installation automatically starts after the previous one.
• • • • •
If the computer already has the FactoryTalk AssetCentre server or client installed on it,
then the computer will already have everything installed except the FactoryTalk
AssetCentre Disaster Recovery agent, the FactoryTalk AssetCentre Agent Host, and
RSLogix 5000 Compare. The installation program automatically skips the existing
components. Skip those sections in the instructions that follow.
Installing FactoryTalk Services Platform
See “Installing the FactoryT alk AssetCentre Disaster Recovery agent” on page 53 for the steps to
get to this part of the installation.
FactoryTalk AssetCentre depends on the Rockwell Software FactoryTalk Services
Platform to function. If the platform is not installed on the agent computer (or if the
correct version is not installed), the setup program will install it. If you have a previous
version of the platform installed, you may need to uninstall it before continuing (the setup
program will inform you if this is the case).
By default, all members of the Administrators group on the computer on which you are installing
the FactoryTalk Services Platform are added to the Administrators group in the FactoryTalk
Directory.
1. Follow the on-screen installation instructions to install the platform. If FactoryTalk
Services Platform 2.10.00 or later is already installed on your computer, go to step 4.
56
Page 63

5 • INSTALLING FACTORYTALK ASSETCENTRE AGENTS
2. When you are asked whether you want to install the FactoryTalk Administration
Console, be sure the check box is selected (you will need the console to help you
configure the FactoryTalk Directory). Continue to follow the on-screen instructions.
3. Click Finish on the InstallShield Wizard for the FactoryTalk Services Platform. If you
are prompted to restart your computer for configuration changes made to FactoryTalk
Services Platform to take effect, click No to restart later. Follow the on-screen
instructions to continue the installation.
If you have RSLinx Classic version 2.53 or later installed on your computer, the installation
program skips to step 11.
4. Click Required Steps on the RSLinx Classic Welcome Page.
5. Click Install RSLinx Classic on the Welcome to RSLinx Classic window. Click Run
on the Open File - Security Warning window. You must install RSLinx Classic to
successfully complete the RA Disaster Recovery agent installation.
RSLinx Classic allows you to connect to Rockwell Automation control hardware.
RSLinx Classic is required even if you have RSLinx Enterprise. If RSLinx Classic is
not installed on the client computer, the installation program for the FactoryTalk
AssetCentre client will install RSLinx Classic Lite. RSLinx Classic Lite does not
support connections through OPC. For more information about RSLinx Classic, see
the RSLinx Classic documentation.
• • • • •
If you have RSLinx Classic (version 2.54 or later) installed on your computer, you do
not need to install this component (and the FactoryTalk AssetCentre client installation
program will not ask you to install it).
6. Follow the on-screen instructions. In the Customer Information page of the
installation wizard, enter your user name, organization name, and any ten digit
number. Then click Next.
7. The Standard Setup page allows you to select the components of the software you
want to install and to change the folder where the software is installed. W e advise that
you install all of the components. Change the settings on this page as desired, and then
click Next.
8. Continue following the on-screen instructions to complete the installation.
If you receive a warning indicating that the software you are installing has not passed
Windows Logo testing to verify its compatibility with the Windows version, click Continue
Anyway.
9. On the InstallShield Wizard Completed window, click Finish.
10. Click Exit on the RSLinx Classic installation menu.
57
Page 64

5 • INSTALLING FACTORYTALK ASSETCENTRE AGENTS
If installing on the
server:
Skip to step 20.
RSLinx Enterprise
has already been
installed.
If you already have RSLinx Enterprise version 5.00.00 or later installed on your computer, the
installation program skips to step 18. RSLinx Enterprise is required for your FactoryTalk
AssetCentre system to communicate with PanelView Plus operator interfaces.
11. Click Install RSLinx Enterprise on the Welcome to FactoryTalk Services window.
12. Click Install RSLinx Enterprise on the Install RSLinx Enterprise window.
13. Follow the on-screen instructions.
14. In the Setup Type page of the installation wizard, select Standard Feature Set
Installation, and then click Next.
15. Continue following the on-screen instructions to complete the installation.
16. On the InstallShield Wizard Completed window, click Finish.
17. Click Exit on the RSLinx Enterprise installation menu.
If you have FactoryTalk Services Platform and you have already checked for
18.
and installed FactoryTalk Services Platform patches
(see “Before you begin,
check and install FactoryTalk Services Platform and FactoryTalk View patches” on
page 14), click Finish and skip to step 20.
• • • • •
If you have FactoryTalk Services Platform and you have NOT already
installed patches, do so now according to the instructions on the FactoryTalk
Services Platform Patch Installation window.
a. A command prompt window opens while each patch is being installed. When
processing in the command prompt completes, ignore the message to reboot your
computer and close the command prompt window.
b. Install the next patch, closing the command prompt window when that patch is
finished.
c. When the last patch has been installed, close the last command prompt and click
Finish on the FactoryTalk Services Platform Patch Installation window. A
message informs you that the system will restart. Click OK.
d. Once the computer has restarted, the Install FactoryTalk AssetCentre Agent
window will be displayed. Click Start to proceed with the installation.
19. The FactoryTalk Services Platform Patch Installation window reappears. Click Finish.
Respond to the FactoryTalk Directory Server Configuration window, explained in step 20,
with care. Correctly identifying the FactoryTalk Directory is essential to a properly functioning
system.
58
Page 65

5 • INSTALLING FACTORYTALK ASSETCENTRE AGENTS
If installing on the
server or a client:
Skip to the next
section. The
common
components have
already been
installed.
20. After the system checks the FactoryTalk Services Platform configuration, you will see
a window with a stop sign on it. The purpose of this window is to set the location of
the FactoryTalk Directory. If the computer on which you are installing the software is
also the computer that will be the FactoryTalk Directory server , click Continue and go
on to step 21. If the FactoryTalk Directory server is on a different computer, click
Select FactoryTalk Directory Server and continue with the instructions below.
a. The utility may ask you to log on to FactoryTalk. Log on with your W indows
administrator username and password. (As mentioned earlier, members of the
Windows Administrators user group were automatically added to the FactoryTalk
Directory.)
b. In the FactoryTalk Directory Server Location Utility window, click the browse
button next to the Computer hosting directory server field.
c. In the next window , select Remote computer. Type the name of your FactoryTalk
Directory Server in the field, or click the browse button next to the field to browse
for the server.
d. Once you have the name of the FactoryTalk Directory Server in the field, click
OK, and then click OK again.
• • • • •
e. Click OK on the message telling you to restart the computer. The software
attempts a connection to the FactoryTalk Directory Server. You may be asked to
log on to the new FactoryTalk Directory Server . If you are, enter the username and
password for the Network Directory server administrator on the FactoryTalk
Directory Server (not the local FactoryTalk Network Directory), and then click
OK.
21. When you see a checklist window showing that the FactoryTalk Services Platform
components were all installed and configured, click Continue. This will proceed to
the next segment of the Disaster Recovery agent installation. There may be a delay
before you see the next installer start.
FactoryTalk AssetCentre Common Components installer
See “Installing the FactoryT alk AssetCentre Disaster Recovery agent” on page 53 for the steps to
get to this part of the installation.
T o install the common components:
1. Follow the on-screen instructions.
2. When asked to restart your computer, click Yes.
59
Page 66

5 • INSTALLING FACTORYTALK ASSETCENTRE AGENTS
3. If you are using Windows Firewall, you may see messages indicating that Windows
Firewall has blocked a Rockwell Automation program. Choose the option to unblock
these programs.
A
FTER RESTARTING
The installation software will initiate several component installations again in sequence
beginning with the FactoryTalk Services Platform. You can cancel the installation for all
components that you have already installed. The list below provides a step-by-step
sequence to cancel all installs that have been completed to this point. What you see may
vary depending on your particular system.
1. Click Start on the Install FactoryTalk AssetCentre Client window.
2. Click Finish on the FactoryTalk Services Platform Patch Installation window.
3. Depending on your FactoryTalk Directory setting, you may see the stop sign window
again about how to set the FactoryTalk Directory. See step 20 on page 59 to make the
appropriate choice.
4. Click Continue on the Check FactoryTalk Services Platform Configuration window.
FactoryTalk AssetCentre RA Disaster Recovery Agent installer
See “Installing the FactoryT alk AssetCentre Disaster Recovery agent” on page 53 for the steps to
get to this part of the installation.
• • • • •
The FactoryTalk AssetCentre RA Disaster Recovery Agent is the component that
performs disaster recovery operations (backup operations and backup and compare
operations).
There may be a delay before the FactoryTalk AssetCentre RA Disaster Recovery Agent
installer opens, especially if installing on the server computer and several components are
being checked for.
To install the FactoryTalk AssetCentre RA Disaster Recovery agent:
1. Follow the on-screen instructions.
FactoryTalk AssetCentre Agent installer
See “Installing the FactoryT alk AssetCentre Disaster Recovery agent” on page 53 for the steps to
get to this part of the installation.
The FactoryTalk AssetCentre Agent handles agent requests from the FactoryTalk
AssetCentre server.
60
Page 67

5 • INSTALLING FACTORYTALK ASSETCENTRE AGENTS
After the Disaster Recovery agent installation is complete, the installation for the
FactoryTalk AssetCentre Agent begins.
T o install the FactoryTalk AssetCentre agent:
1. Follow the on-screen instructions.
RSLogix 5000 Compare insta ller
See “Installing the FactoryT alk AssetCentre Disaster Recovery agent” on page 53 for the steps to
get to this part of the installation.
T o be able to perform compares between Logix Designer or RSLogix 5000 projects, the
Disaster Recovery agent uses version 3.10 or later of the RSLogix 5000 Compare utility.
T o install the RSLogix 5000 Compare utility:
1. Follow the on-screen instructions.
2. If you have RSLogix 5000 software or Logix Designer application installed on the
computer on which you are installing the FactoryTalk AssetCentre agents, you can
add a Compare option to the application Tools menu. (This requires version 13 or later
of the application.) To do this, select the Add Compare Tool to RSLogix 5000 Tools
menu check box. Click Next.
• • • • •
3. On the Select Installation Folder screen, be sure to select Everyone. This is very
important to the proper functioning of the agent.
You can also choose where the compare utility is installed. By default, the utility is
installed in the C:\Program Files\Rockwell Software\RSLogix 5000 Compare folder.
You can change this folder by typing a new path in the Folder field, or by clicking the
Browse button.
4. Click Next.
5. Continue to follow the on-screen instructions.
Using the Windows Firewall Configuration Utility
See “Installing the FactoryT alk AssetCentre Disaster Recovery agent” on page 53 for the steps to
get to this part of the installation.
The Windows Firewall Configuration Utility will run whether you are using the firewall
or not.
If your Windows Firewall/Internet Connection Sharing (ICS) service is stopped or is
disabled, the FactoryTalk AssetCentre Windows Firewall Configuration window will
61
Page 68

5 • INSTALLING FACTORYTALK ASSETCENTRE AGENTS
indicate this with a red x. Click Continue. The FactoryTalk AssetCentre agent
installation is complete.
If you are using a firewall other than Windows Firewall, use the information in
“Network requirements” on page 9 and “Additional ports you may have to open” on
page 82 to configure your firewall to allow communication throu gh the appropriate
ports and with specific processes.
If your Windows Firewall/Internet Connection Sharing (ICS) service is running, the
FactoryTalk AssetCentre Windows Firewall Configuration window will indicate this
with a green check mark. Click Start. The Rockwell Software Windows Firewall
Configuration Utility window opens. The list of exceptions (things to allow through
the firewall) generally includes default SQL Server and e-mail ports.
If no exceptions need to be made, none will be listed and the Accept button will be
unavailable. In that case, click Exit to close this utility.
If exceptions are listed, click Accept. On the Confirm Windows Firewall Changes
window make the appropriate selection depending on whether your Windows
Firewall will be on or off, and then click OK.
Configuring for security-enabled RSLogix family software
• • • • •
If FactoryTalk Security is enabled in your RSLogix family software (Logix Designer,
RSLogix 5000, RSLogix 500, or RSLogix 5), you must configure the Disaster Recovery
agent and FactoryTalk Security to grant the necessary permissions for Disaster Recovery
operations. FactoryTalk Security is always enabled in RSLogix 5000 version 20 and
Logix Designer version 21 or later.
These instructions assume that the FactoryTalk AssetCentre agent software has been
installed and that all RSLogix family software packages that will be used in the system are
also installed on each agent computer.
To configure the Disaster Recovery agent and FactoryTalk Security in a Windows
domain, follow instructions in “If operating in a Windows domain” on page 62.
To configure the Disaster Recovery agent and FactoryTalk Security in a Windows
workgroup, follow instructions in “If operating in a Windows workgroup” on page 63.
If operating in a Windows domain
1. Create a domain account for the VerificationAgent service and the FactoryTalk
AssetCentre AgentController service to run as. This is generally performed by
someone in your Information Technology department. This account must be used
exclusively for the service, not by users.
62
Page 69

5 • INSTALLING FACTORYTALK ASSETCENTRE AGENTS
2. On each agent computer:
Add the new domain account to the Administrator user group in Windows.
Configure both services to run as the new domain account created above. To do so,
open the Services utility in Microsoft Windows, find the FactoryTalk
AssetCentre AgentController service and edit its properties to log on as the
account. Find the VerificationAgent service and edit its properties to log on as the
account.
3. On any computer in the system, open the FactoryTalk Administration Console
(logging on to the Network directory using a FactoryTalk Administrator account) and
add the new domain account as a new Windows-linked user.
4. Grant this user read access to the FactoryTalk Directory. To do so, right-click the
Network node at the top of the tree, and then select Security. On the Permissions tab,
select the domain account and then expand the Common permissions group. Make
sure the Read permission is set to Allow.
5. Set permissions for your RSLogix family software packages (depending on what type
of processors you are using). Under System in the Explorer pane, right-click
Networks and Devices and select Security. On the Permissions tab, select the new
domain user. (If the user account you just created doesn’ t appear in the list of users,
add it.) Expand the permissions group for the appropriate software and set the
following permissions to Allow:
• • • • •
For RSLogix 5 grant Offline Program File Monitoring, Save, and Upload.
For RSLogix 500 grant Offline Program File Monitoring, Save, and Upload.
For RSLogix 5000 grant Project: Export, Project: Go Online, Project: Open,
Project: Save, and Project: Upload. (Use this group for Logix Designer
applications and grant the same permissions.)
6. Configure FactoryTalk Security to use single sign-on. Still in the FactoryTalk
Administration Console, navigate to System > Policies > System Policies in the
Explorer pane. Double-click Security Policy. Set the Use single sign-on policy to
Enabled.
If operating in a Windows workgroup
ON
EACH AGENT COMPUTER
Perform these steps on each agent computer in the system. These steps show you how to
create a new Windows user account and a new FactoryTalk user account for each agent
computer.
:
63
Page 70

5 • INSTALLING FACTORYTALK ASSETCENTRE AGENTS
FactoryTalk AssetCentre provides a utility to facilitate the process of creating and setting
security credentials necessary for secured RSLogix editors.
To configure the agent computer using the utility, follow instructions on page 64.
T o manually configure the agent computer, follow instructions on page 65.
To configure the agent computer using the Agent Services Logon Configuration
utility, follow the steps below:
1. Open the utility by clicking Start > All Programs > Rockwell Software >
FactoryTalk AssetCentre Agent > Agent Services Logon Configuration.
2. Use the Agent Services Logon Configuration dialog box to create and set security
credentials:
a. In the User Name field, enter a user name. The default user name is
AssetCentre_DR.
It is recommended to use the default user name. If you want to enter another name,
make sure to follow the Windows user name policies, for example:
User names must be no more than 20 characters in length.
User names cannot contain certain characters. Invalid characters include:
" / \ [ ] : ; | = , + * ? < >
• • • • •
b. In the Password field, enter a password for the user.
c. In the Confirm Passw ord field, enter the password again.
d. When complete, click OK.
The utility creates the user as a local Windows administrator account and adds it to
FactoryTalk as a Windows-linked user account. The FactoryTalk AssetCentre
AgentController service and the VerificationAgent service are logged on as the
user. The utility also configures the necessary security permissions for Logix
Designer application, RSLogix 5000, RSLogix 500, and RSLogix 5 software
packages.
e. If a message is displayed asking to restart the agent service, click Yes to restart
immediately or click No to manually restart later.
T o manually restart the service, open the Services utility in Microsoft Windows,
find the FactoryTalk AssetCentre AgentController service, right-click and
select Restart.
If a Windows user account AssetCentre_DR with administrative privileges already exists,
you will be prompted to enter the password to continue the configuration.
64
Page 71

5 • INSTALLING FACTORYTALK ASSETCENTRE AGENTS
To manually configure the agent computer, follow the steps below:
1. On the agent computer, use the Computer Management utility in Microsoft Windows
to create a Windows user account that can be used to authenticate with FactoryTalk
Security.
2. Add the new Windows user account to the local Administrators group.
3. Configure both services to run as the new Windows user account created in step 1. To
do so, open the Services utility in Microsoft Windows, find the FactoryTalk
AssetCentre AgentController service and edit its properties to log on as the account.
Find the VerificationAgent service and edit its properties to log on as the account.
4. Open the FactoryTalk Administration Console and add the new Windows user account
created above as a new Windows-linked user.
ON
ANY COMPUTER IN THE SYSTEM
:
Perform these steps on any computer connected to the FactoryTalk Network Directory.
These steps need only be performed once and will be in effect for the entire FactoryTalk
Network Directory.
1. In the FactoryTalk Administration Console, create a new user group called “Local
Agent Users.”
• • • • •
2. The users created on different agent computers in the previous section (whether using
the utiltiy or added manually) all appear in the FactoryTalk Network Directory as
individual users. Add each of these new FactoryTalk users to the Local Agent Users
group. This will facilitate making security settings because you will be able to set
them once for the whole group, rather than for each user.
3. Grant the Local Agent Users group read access to the FactoryTalk Directory. To do
so, right-click the Network node at the top of the tree, and then select Security. On
the Permissions tab, select the Local Agent Users group and then expand the
Common permissions group. Make sure the Read permission is set to Allow.
4. Set permissions for your RSLogix family software packages (depending on what type
of processors you are using). Under System in the Explorer pane, right-click
Networks and Devices and select Security. If the Local Agent Users group doesn’t
appear in the list, add it. On the Permissions tab, select the Local Agent Users group.
Expand the permissions group for the appropriate software and set the following
permissions to Allow:
For RSLogix 5 grant Offline Program File Monitoring, Save, and Upload.
For RSLogix 500 grant Offline Program File Monitoring, Save, and Upload.
65
Page 72

5 • INSTALLING FACTORYTALK ASSETCENTRE AGENTS
For RSLogix 5000 grant Project: Export, Project: Go Online, Project: Open,
Project: Save, and Project: Upload. (Use this group for Logix Designer application
and grant the same permissions.)
5. Configure FactoryTalk Security to use single sign-on. Still in the FactoryTalk
Administration Console, navigate to System > Policies > System Policies in the
Explorer pane. Double-click Security Policy. Set the Use single sign-on policy to
Enabled.
Checking to see if the agent software is current
Unlike the FactoryTalk AssetCentre client, the FactoryTalk AssetCentre agent does not
display a message if the agent does not have the latest version of the software. Instead, the
agent does not start, and logs a message in the System Event log and the AssetCentre
Event log.
To check if the FactoryTalk AssetCentre software on the agent is up to date, start a
FactoryTalk AssetCentre client. The client does not have to be on the same computer as
the agent. Click Start > All Programs > Rockwell Software > FactoryTalk
AssetCentre Client > AssetCentre Client. The number of running agent computers is
displayed in the status bar of the client. If one or more agents are not running, and the
client software has been recently updated, then the agent software may need to be updated
as well.
• • • • •
T o update the agent software, follow the steps in “Installing the FactoryTalk AssetCentre
Disaster Recovery agent” on page 53. After you start the Install FactoryTalk AssetCentre
Agent program from the FactoryTalk AssetCentre server website, the installer searches
the computer for components that need to be updated, and displays the results in this
window. Components that will be updated are indicated with a computer icon and a
checked box.
66
Page 73

6
Configuring FactoryTalk AssetCentre
Configuring for client access to the server
For clients to be able to access the FactoryTalk AssetCentre server, the FactoryT alk
Directory and FactoryTalk Security must be configured to give clients access. To
configure access, you will need to use the FactoryTalk Administration Console.
The FactoryTalk Directory uses two factors to determine who should have access to any
given function:
The user’s account, which can either be a FactoryTalk Directory account or a
Windows domain account. This identifies the user.
The computer from which the user is accessing the FactoryTalk Directory. This
allows you to limit which computers can access the directory, and also allows you to
determine whether certain functions can or cannot be performed from a given
computer. For example, you can configure the FactoryTalk Directory to give access to
a user from her or his own computer but not from another computer.
At a minimum, you must add the FactoryTalk AssetCentre users and their computers to
the FactoryTalk Directory, and you must configure access privileges for FactoryTalk
AssetCentre in the FactoryTalk Directory.
Adding users to the FactoryTalk Directory
A user must have a FactoryTalk Directory user account in order to use FactoryTalk
AssetCentre.
This section contains only basic instructions for using the FactoryTalk Directory and FactoryTalk
Security. For background information and information regarding more advanced procedures,
please see the online help for the FactoryTalk Administration Console.
By default, all members of the Administrators group on the computers on which you
installed the FactoryTalk Services Platform were added to the Administrators group in the
FactoryTalk Directory. Also, any rights that you assign to a Windows User Group are
assigned to all members of that group.
To add a user to the FactoryTalk Directory:
1. Start the FactoryTalk Administration Console (click Start > All Programs >
Rockwell Software > FactoryTalk Administration Console).
2. Log on to the Network directory using a FactoryTalk Administrator account.
67
Page 74

6 • CONFIGURING FACTORYTALK ASSETCENTRE
3. Open the Users and Groups folder.
4. Under the Users and Groups folder, right-click the Users folder, and then select New.
5. Specify whether you want to create a new User or a Windows-Linked User. User
accounts are visible only to the FactoryTalk system and their access is independent of
Windows. A Windows-linked user is validated by W indows. See the FactoryTalk help
topic “Choosing between FactoryTalk Security accounts and Windows-linked
accounts” for more information. (A FactoryTalk Security account is the same as a
User account.) To find this help topic, open the FactoryTalk Administration Console.
Select Help > Contents. On the Index tab, look up “user accounts” and double-click
choosing FactoryTalk or Windows-linked. If you may need to use FactoryTalk
AssetCentre while disconnected from the network, use FactoryTalk Security user
accounts. Windows-linked user accounts will not be able to authenticate with the
domain while disconnected.
If you choose to use Windows-linked users, consider using Windows-linked group
accounts rather than Windows-linked user accounts if possible. This simplifies the
process if you ever move your software to a different domain. You cannot move
individual Windows-linked user accounts from one domain to another. You can move
Windows-linked group accounts to a new domain, while retaining all of the security
permissions for the group. If you change the domain an individual Windows-linked
user account belongs to, you must delete the old account, create the new account, and
then recreate all of the security permissions for the new account.
• • • • •
If you have users who need similar access to features of FactoryTalk AssetCentre, consider
grouping users to make assigning security privileges easier. For example, you can group all
of your electricians into an “Electricians” group, and then provide security access for them as
a group. For information about grouping users, see the online help for the FactoryTalk
Administration Console.
6. Enter the information for the user.
Adding computers to the FactoryTalk Directory
When FactoryTalk Services Platform is installed on a computer, that computer is
automatically added to the FactoryTalk Network Directory. Because FactoryTalk Services
Platform is included in the FactoryTalk AssetCentre installation, your client computers
should already be in the FactoryTalk Network Directory.
68
Page 75

6 • CONFIGURING FACTORYTALK ASSETCENTRE
For a user to be able to use FactoryTalk AssetCentre, the user’s computer must be in the
FactoryTalk Directory. For instructions on how to add a computer, refer to the FactoryTalk
help in the FactoryTalk Administration Console.
If you have a significant number of computers for which you need to permit or restrict access,
consider grouping them to make assigning security privileges easier. For example, you can group
all of the computers used in offices away from the plant floor and restrict access to features that
should be used only from computers stationed where the user can see the automation system
directly. For information about grouping computers, see the online help for the FactoryTalk
Administration Console.
Configuring feature security for FactoryTalk AssetCentre users
By default, all users and the Administrators group in FactoryTalk Directory can perform
any task in the FactoryTalk AssetCentre software. To deny specific users the right to
perform tasks in FactoryTalk AssetCentre, you must edit the Feature Security settings in
the FactoryTalk Administration Console.
Never explicitly deny rights to the All Users or Administrators group in FactoryTalk. Rather,
set up specific user groups of your own and deny rights to those groups. Denying rights to All
Users or Administrators could lock everyone out of the system and would deny rights in all
FactoryTalk-enabled products using any FactoryTalk CPR 9 version.
• • • • •
To change which users can perform tasks in FactoryTalk AssetCentre:
1. Start the FactoryTalk Administration Console (click Start > All Programs >
Rockwell Software > FactoryTalk Administration Console).
2. Log on to the Network directory using a FactoryTalk Administrator account.
3. In the Explorer pane of the FactoryTalk Administration Console, navigate to System >
Policies > Product Policies > FactoryTalk AssetCentre.
4. Double-click Feature Security.
There is also a Server Settings object in the FactoryTalk AssetCentre folder. Do NOT
attempt to change any of the settings in this object. Doing so may render your FactoryTalk
AssetCentre system inoperative. If you need to change server settings (to use a different
mail server, for example), click Start > All Programs > Rockwell Software > FactoryTalk
AssetCentre Server > Server Settings.
69
Page 76
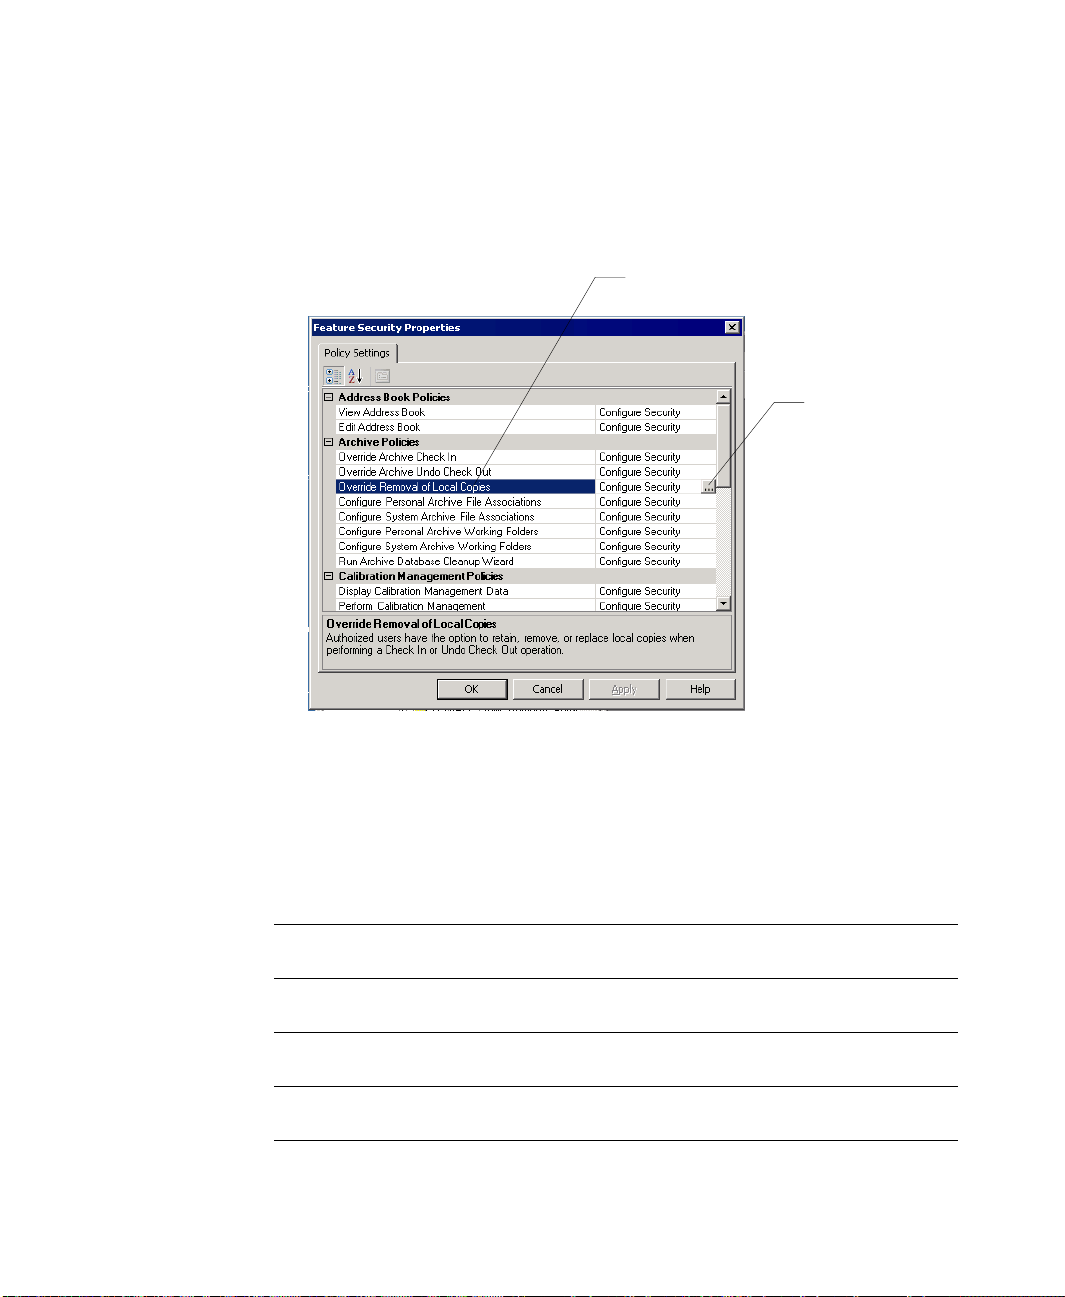
6 • CONFIGURING FACTORYTALK ASSETCENTRE
Click the policy
you want to
change …
… and then click
the browse button
for the policy.
5. In the Feature Security Properties window, click the policy you want to change, and
then click the browse button for the policy. See the table after step 8 for a description
of each policy.
• • • • •
6. In the Configure Securable Action dialog box, select the user or group for whom you
want to assign permissions. (If the user or group does not appear in the list, click Add,
click Show all, select the user or group, and then click OK.)
7. Click the appropriate box to allow or deny the user permission to the selected feature.
8. Click OK.
This Policy Setting Controls whether users can
View Address Book View the Address Book (which contains addresses for the purpose of
sending automatic e-mail notifications).
Edit Address Book Edit or add contacts and groups in the Address Book (which contains
Override Archive Check In Check in a file regardless of who checked it out or from where it was
Override Archive Undo
Check Out
addresses for the purpose of sending automatic e-mail notifications).
checked out.
Undo a check out even if a different user checked the file out.
70
Page 77

6 • CONFIGURING FACTORYTALK ASSETCENTRE
This Policy Setting Controls whether users can
Override Removal of Local
Copies
Configure Personal Archive
File Associations
Configure System Archive
File Associations
Configure Personal Archive
Working Folders
Configure System Archive
Working Folders
Run Archive Database
Cleanup Wizard
Display Calibration
Management Data
Perform Calibration
Management
Administer Calibration
Users
Switch to Design mode Enter Design mode, in which the user can edit the asset tree.
View Event Log Display the Event Log and run a search on the Event Log.
View Audit Log Display the Audit Log and run a search on the Audit Log.
View Diagnostics and
Health Log
Change Diagnostics and
Health Log Message
View Diagnostics and
Health Log Status
Choose to keep local copies of checked-in files on their computer. If
this right is allowed, the user can keep local copies. If this right is
denied, the user is not given this option.
Configure which software product launches when opening a particular
type of file. If a personal file association is set, it will take precedence
over the system file association.
Configure which software product launches when opening a particular
type of file. This setting applies unless the user has specified a personal
file association.
Set a personal working folder for checking out files. For more
information on working folders and personal working folders see the
FactoryTalk AssetCentre client online help.
Set the system working folder to which all users check out files unless
they have a personal working folder . For more in fo rmation on working
folders and system working folders see the FactoryTalk AssetCentre
client online help.
Run the wizard to delete unused versions of files.
View Calibration Management data in FactoryTalk AssetCentre.
Perform Calibration Management tasks in ProCalV5 software.
Administer users, groups, and permissions in ProCalV5 software. Note
that this policy only determines if the user is automatically added to the
Administrator group in the ProCalV5 software. Once the user is added
to ProCalV5, changing this policy for an AssetCentre user does not
change the user’s ProCalV5 security permissions.
Display the Diagnostics and Health Log and run a search on the
Diagnostics and Health Log.
Change the status of or add a comment to a Diagnostics and Health Log
record.
View the status history for a Diagnostics and Health Log record.
• • • • •
71
Page 78

6 • CONFIGURING FACTORYTALK ASSETCENTRE
This Policy Setting Controls whether users can
Run Log Database Cleanup
Wizard
Enable or Disable DTMs Enable or disable DTMs. DTMs that are disabled cannot be added to
Edit DTM Network Edit the DTM network.
Run PDC Field Edition Use the Process Device Configuration Field Edition software.
Create a new schedule Create a new schedule (backup or backup and compare).
Edit a schedule Change existing schedules.
Delete a schedule Delete schedules.
View a schedule View the Schedules tab, which displays a list of existing schedules and
Command a schedule Issue commands to a schedule, such as making the schedule active or
Create a Search Set up a ne w search to find entri es matching specified crit eria in on e of
Run the wizard to export or delete log records.
the DTM network. If they are already added to the network, they
cannot be opened or used.
their status.
running the schedule immediately.
the logs, in the Archive History, or in Archive Check Out Statu s
information.
• • • • •
For more information on these policy settings or the features to which they refer, see the
FactoryTalk AssetCentre client online help.
72
Page 79

7
Troubleshooting FactoryT alk AssetCentre installation
For issues not included here and for additional tips and design considerations, please refer
to the Rockwell Automation Knowledge Base online at
http://www.rockwellautomation.com/knowledgebase/
General installation
A red x appears next to an item to be installed
The initial window in each installation (server, client, and agent) displays a list of all
necessary components, whether they were found on the computer, and whether they will
be installed. A red x is displayed next to a component if the installer could not determine
whether the correct version already exists on that computer.
Contact Technical Support using the contact information provided on the copyright page
at the beginning of this guide.
A “Program Maintenance” window appears while installing
This indicates that the component of the software you are installing is already installed.
You do not need to install it again. If you suspect your installation is damaged, you can
choose to repair the installation.
.
Server installation
SQL collation error encountered during database installation
The SQL Server collation must be case-insensitive for use with FactoryTalk AssetCentre
software. If your SQL Server collation is case-sensitive, the FactoryTalk AssetCentre
database installation will fail. Follow the directions here if your SQL Server collation is
case-sensitive.
If this SQL Server has no other databases on it, do one of the following:
Uninstall SQL Server and reinstall it using the default collation in the setup
program.
Rebuild the master database using a case-insensitive collation. Refer to the SQL
Server online books for instructions.
73
Page 80

7 • TROUBLESHOOTING FACTORYTALK ASSETCENTRE INSTALLATION
If this SQL Server has other databases on it, then setup or use another SQL Server that
is configured with a case-insensitive collation.
You can find more information at http://msdn2.microsoft.com/en-
us/library/ms143508.aspx, or search the Microsoft MSDN site for SQL Server 2008
collation settings.
Unable to log on to SQL Server during server installation
The logon during the installation process requires the use of the SQL Server sa (system
administrator) account. If you configured your SQL Server to use mixed (both SQL
Server and Windows domain) authentication, the sa account is available. Use the
password you created for the sa account when the installation program prompts you for it.
If your SQL Server installation is not configured for mixed authentication, you will need
to change the authentication method. See the documentation for SQL Server for more
information.
If you have forgotten your sa account password, you will need to change it. See the
Microsoft SQL Server documentation for more information.
“The application failed to initialize properly” appears during server installation
This is a known issue with Symantec Endpoint Protection. When installing the
FactoryTalk AssetCentre server on a computer that has Symantec Endpoint Protection
version 11.0.5002.333, you may receive an error message indicating that the application
you are installing fails to initialize properly. To fix this issue, do one of the following:
• • • • •
Use a different Symantec Endpoint Protection version.
Disable the Symantec Application and Device Controller service by following the
steps below:
a. Click Start > All Programs > Accessories > Command Prompt.
b. At the command prompt, enter sc config sysplant start=disabled and press
ENTER.
c. Restart the computer and try to install the server again.
“FTACServiceManager has stopped working” during server installation
When you install the FactoryTalk AssetCentre server on a computer using Windows
Server 2008 or Windows Server 2008 R2, the installation may be unable to stop the
FactoryTalk AssetCentre service.
74
Page 81

7 • TROUBLESHOOTING FACTORYTALK ASSETCENTRE INSTALLATION
TO
MAKE SURE
IIS IS
RUNNING ON THE SERVER COMPUTER
a. Click Start. On the Start menu, right-click the My Computer icon, and then click
Manage. This starts the Computer Management console.
b. In the Computer Management console, open Services and Applications.
c. Click Internet Information Services. The right pane lists the Internet services
running under IIS. Open the Web Sites folder, and make sure the correct web site
for IIS is “Running.” This is generally the “Default Web Site,” however, if you
have created a different web site for IIS (see page 18) be sure to select that web site
instead. If the web site is not running, continue to step d.
d. To start the service, right-click the Default Web Sites icon, and then select Start.
T o resolve this problem, make sure IIS is correctly installed. For more information about
IIS installation, see “Installing IIS on Windows Server 2008 or Windows Server 2008 R2”
on page 18.
Client and agent installation
Web p age for installing the FactoryTalk AssetCentre client and agent cannot be displayed
Make sure the FactoryTalk AssetCentre server computer is running. In the Windows
Services utility, make sure that the FactoryTalk AssetCentre Server service is running.
Make sure you have access to your local area network.
Make sure you are installing the software as an administrator or an account with
administrative privileges.
Make sure IIS is running on the server computer. For instructions, see the gray box,
next.
Try logging on to the server computer from the client. On the client computer, click
Start, then select Run. In the Open field type two backslashes and then the server
name (for example, \\ourserver). Click OK. You will be asked to log in to the server.
• • • • •
If you are using a firewall, make sure File and Printer Sharing is permitted through the
firewall. Port 80 (or whatever port used for HTTP on the server machine) also needs to
be permitted.
75
Page 82

7 • TROUBLESHOOTING FACTORYTALK ASSETCENTRE INSTALLATION
“Error reading Primary Server Name from FactoryTalk Directory” during client installation
This error occurs when the computer on which you are installing the client is not using the
same FactoryTalk Directory as the computer running the FactoryTalk AssetCentre server,
or there was an error in the FactoryTalk Services Platform.
1. On the FactoryTalk AssetCentre server computer, set the FactoryTalk Directory
location. Click Start > All Programs > Rockwell Software > FactoryTalk Tools >
Specify FactoryTalk Directory Location.
2. Log in if prompted to do so, and then specify the location of the FactoryTalk
Directory.
3. Close any clients that are connected to the server.
4. Restart the FactoryTalk Directory Server.
“Currently logged in Windows user is not part of the Administrators group” during client and agent installation
T o resolve this problem, make sure you are installing the software as an administrator or a
user with administrative privileges.
• • • • •
Starting the client
“Error initializing FactoryTalk AssetCentre” appears when attempting to start the client
The FactoryTalk AssetCentre server may have failed (or you may have lost your network
connection to the server) or the computer on which you installed the client may not be part
of the FactoryTalk Directory.
Check the server (see “Other errors starting the client” on page 79).
Try adding the client computer to the FactoryTalk Network Directory. From another
computer that has access to the FactoryTalk Directory (the FactoryTalk AssetCentre
server, for example), use the FactoryT alk Administration Console to add the computer
to the FactoryTalk Directory. See “Adding computers to the FactoryTalk Directory”
on page 68.
See “If the FactoryTalk AssetCentre server is installed to a drive other than C:” on
page 78.
76
Page 83

7 • TROUBLESHOOTING FACTORYTALK ASSETCENTRE INSTALLATION
“The client and server versions are incompatible”
The FactoryTalk AssetCentre software installed on the server has been updated, and the
software on the client needs to be updated. See “Checking to see if the client is installed
correctly” on page 49.
“Cannot initialize application eventing subsystem” or “No connection could be made because the target machine actively refused it” appears when starting the client
If you see the error “Cannot initialize application eventing subsystem” or an error
indicating that the target machine actively refused the connection, then:
Make sure the FactoryTalk AssetCentre Server service is started on the server
computer.
Restart the client computer.
If you still see the error, stop and disable all schedules. Restart the FactoryTalk
AssetCentre server computer.
While the server is restarting other users will not be able to edit the asset tree, create or edit
schedules and searches, view information in the logs, and so on. Also, most data will not be
logged during the reboot. The exception is audit data generated by other software products
such as RSLogix software, which is cached and will appear in the audit log when the server
comes back online.
• • • • •
See “If the FactoryTalk AssetCentre server is installed to a drive other than C:” on
page 78.
“At least one service or driver failed during system startup. Use Event Viewer to examine the event log for details” appears when attempting to start the client
This message may appear when launching RSLinx Classic on a system that has both
RSLinx Classic and RSLinx Enterprise installed. The System Event log contains the
message, “The A-B Virtual Backplane service failed to start due to the following error:
The system cannot find the file specified.”
In some cases, the Virtual Backplane driver does not get installed correctly. For more
information see the Rockwell Automation Knowledgebase article 34128
(http://www.rockwellautomation.com/knowledgebase/
).
77
Page 84

7 • TROUBLESHOOTING FACTORYTALK ASSETCENTRE INSTALLATION
“Error initializing FactoryTalk AssetCentre . Could not load file or assembly… CalibrationPlugin.dll” appears when attempting to start the client
This message is displayed when you start the FactoryTalk AssetCentre client if the
FactoryTalk AssetCentre Calibration Management client was not installed in the same
directory as the FactoryTalk AssetCentre client. To fix this problem, you must uninstall
and then reinstall the FactoryTalk AssetCentre client, making sure to install the
FactoryTalk AssetCentre Calibration Management client in the same directory as the
FactoryTalk AssetCentre client.
If the FactoryTalk AssetCentre server is installed to a drive other than C:
You may encounter error messages when starting the client if the server was installed to a
drive other than C: and necessary permissions to the Users group were removed on that
drive. The FactoryTalk AssetCentre Server service will be stopped and, if you attempt to
manually start it, will fail to start.
T o rectify this problem you must set permissions for the Users group on that drive as
follows:
• • • • •
1. On the server computer in Windows Explorer or My Computer, navigate to the
Program Files folder on the drive on which the FactoryTalk AssetCentre server was
installed.
2. Right-click on the Rockwell Software folder and select Properties.
3. Select the Security tab.
4. Add the group Users (computername\Users) if it is not in the list. If it is in the list,
skip to step 5. To add the Users group:
a. Click Add.
b. Make sure the local computer name appears in the From this location field.
c. In the Enter the object names to select field, type:
Users
d. Click Check Names, then OK.
5. Select the group Users (computername\Users).
6. Set the Read & Execute, List Folder Contents, and Read permissions to Allow.
78
Page 85

7 • TROUBLESHOOTING FACTORYTALK ASSETCENTRE INSTALLATION
Other errors starting the client
If the client won’t start or you see other error messages not specifically mentioned above,
try the following:
Make sure the client computer is connected to the network and the network is
operational.
Make sure the FactoryTalk AssetCentre server computer is running.
Make sure the FactoryTalk AssetCentre Server service, IIS, and SQL Server are all
running on the server computer (and the database computer if separate). To check IIS,
see the gray box “To make sure IIS is running on the server computer” on page 75.
Make sure the correct FactoryTalk Directory is specified. On the machine running the
client, select Start > All Programs > Rockwell Software > FactoryTalk Tools >
Specify FactoryTalk Directory Location.
If you are running in an environment without a domain controller (in a workgroup),
you may need to turn off the single sign-on feature of FactoryTalk. See the
FactoryTalk help for more information.
Make sure the server location setting is correct. On the server computer, click Start >
All Programs > Rockwell Software > FactoryTalk AssetCentre Server > Server
Settings. The server location must be set in this utility, NOT in the FactoryTalk
Administration Console.
• • • • •
Make sure the SQL Connection is set properly. On the server computer, click Start >
All Programs > Rockwell Software > FactoryTalk AssetCentre Server > Data
Source Configuration.
If you are using a firewall, make sure your firewall is configured properly to permit
access to the FactoryTalk AssetCentre Server. See “Network requirements” on page 9
and “Additional ports you may have to open” on page 82.
Starting the agent
If the FactoryTalk AssetCentre software installed on the server has been updated, the
agent will not start until the software on the agent is updated. See “Checking to see if the
agent software is current” on page 66.
79
Page 86

7 • TROUBLESHOOTING FACTORYTALK ASSETCENTRE INSTALLATION
Using Calibration Management
“No ProCalV5 Server connection information exists on the FactoryTalk AssetCentre server” appears when attempting to use Calibration Management features
This error message is displayed when you attempt to use the Calibration Management
capability, but have not installed the FactoryTalk AssetCentre Calibration Management
server. See “Installing the ProCalV5 server software after the FactoryTalk AssetCentre
server” on page 36.
This error message is also displayed if you have installed the FactoryTalk AssetCentre
Calibration Management server, but have not run the ProCalV5 Data Source Edit Wizard.
See “Running the ProCalV5 Data Source Edit Wizard” on page 36.
“Error executing ProCalV5 commands, check ProCalV5 installation” appears when attemptin g to use Ca libration Management features
This error message is displayed when you attempt to use the Calibration Management
capability, but have not installed the FactoryTalk AssetCentre Calibration Management
client. See “FactoryTalk AssetCentre Calibration Management client software installer”
on page 47.
• • • • •
“Error initializing FactoryTalk AssetCentre . Could not load file or assembly… CalibrationPlugin.dll” appears when attempting to start the client
This message is displayed when you start the FactoryTalk AssetCentre client if the
FactoryTalk AssetCentre Calibration Management client was not installed in the same
directory as the FactoryTalk AssetCentre client. To fix this problem, you must uninstall
and then reinstall the FactoryTalk AssetCentre client, making sure to install the
FactoryTalk AssetCentre Calibration Management client in the same directory as the
FactoryTalk AssetCentre client. See “Installing FactoryTalk AssetCentre clients” on
page 38.
Unable to run the ProCalV5 software
You must be logged on to the client computer as an administrator or as a user with
administrative privileges to run the ProCalV5 software from within FactoryTalk
AssetCentre.
80
Page 87

7 • TROUBLESHOOTING FACTORYTALK ASSETCENTRE INSTALLATION
Unable to run the ProCalV5 Data Source Edit Wizard
If the ProCalV5 Data Source Edit Wizard displays an error when you run it (by clicking
Start > All Programs > Rockwell Software > FactoryTalk AssetCentre Server >
ProCalV5 Data Source Configuration), the cause may be that the FactoryTalk
AssetCentre Calibration Management server was not installed in the same directory as the
FactoryTalk AssetCentre server. To fix this problem, you must uninstall and then reinstall
the FactoryTalk AssetCentre server, making sure to install the FactoryTalk AssetCentre
Calibration Management server in the same directory as the FactoryTalk AssetCentre
server.
• • • • •
81
Page 88

A
Reference
Additional ports you may have to open
If you are using a firewall, you may need to open ports for other Rockwell Automation
products as well as for FactoryTalk AssetCentre. For the ports to open for FactoryTalk
AssetCentre, see “Network requirements” on page 9.
Is used with this
This port Of this type
25 TCP 1769-L35E
67-68 UDP 1734-AENT
69 UDP 5820-EI For binary download, used in conjunction
product For this purpose
RSBizWare
RSSql
RSView Messenger
1747-L55x
1756-ENBT
1756-ENET
1756-EWEB
1761-NET-ENI
1769-L35E
1785-ENET
1785-LXXE
1788-ENBT
1794-AENT
5820-EI
PowerFlex Drives
PowerMonitor 3000
PanelView
PanelView Plus
Outbound e-mail only
Client only
with BootP
82
Page 89

Is used with this
This port Of this type
80 TCP 1734-AENT
123 UDP PowerMonitor 3000 Network time protocol
135 TCP FactoryTalk DCOM endpoint mapper
135 TCP RSMACC
161 UDP 1734-AENT
300-400 UDP PowerMonitor 3000 Master / slave configuration
product For this purpose
1747-L55x
1756-ENBT
1756-ENET
1756-EWEB
1761-NET-ENI
1763-L16x
1769-L35E
1785-ENET
1785-LXXE
1788-ENBT
1794-AENT
PowerFlex Drives
PowerMonitor 3000
PanelView
PanelView Plus
RSBizWare
RSView32
RSViewSE
1747-L55x
1756-ENBT
1756-ENET
1761-NET-ENI
1769-L35E
1785-ENET
1785-LXXE
1788-ENBT
1794-AENT
5820-EI
PowerFlex Drives
PowerMonitor 3000
PanelView
PanelView Plus
• • • • •
A • REFERENCE
83
Page 90

A • REFERENCE
Is used with this
This port Of this type
400-402 TCP RSSql Transaction Manager, Compression Server,
1089 TCP / UDP Foundation Fieldbus
1090 TCP / UDP
1091 TCP / UDP
1330 TCP FactoryTalk Object RPC
1331 TCP FactoryTalk Service control
1332 TCP FactoryTalk Server health
1433 TCP RSMACC SQL Server Communication (default port)
2222 TCP 1747-L55x
2222 UDP 1734-AENT
3060 TCP FactoryTalk Directory Server file transfer
3622 TCP / UDP
4120 TCP RSBizWare Production Server
4121 TCP RSBizWare Server Manager
4122 TCP RSBizWare PlantMetrics Server
4123 TCP RSBizWare Task Manager
4124 TCP RSBizWare Scheduler Server
4125 TCP RSBizWare Scheduler CTP Server
6543 TCP FactoryTalk Alarm Server
7600 TCP FactoryTalk Event Multiplexor
product For this purpose
and Configuration Server
Uses port 2223 as the source port for TCP
1771-DMC(x)
1785-ENET
1785-LxxE
5820-EI
INTERCHANGE
PowerMonitor II
RSLinx
1756-ENBT
1769-L35E
1788-ENBT
1794-AENT
connections
I/O communications (used only by products
that support I/O over EtherNET/IP)
• • • • •
84
Page 91

Is used with this
This port Of this type
7700 TCP FactoryTalk Event Server
7710 TCP FactoryTalk Directory Server
7720 TCP RSViewSE HMI Server
7721 TCP RSViewSE Server Framework
7722 TCP RSViewSE HMI Activation
7723 TCP RSViewSE Historical Data Log Reader
8080 TCP RSBizWare Production Server, reports
8081 TCP
8083 TCP CTP Server
27000 TCP FactoryTalk License Server
44818 TCP / UDP 1734-AENT
dynamic
(102465535+)
TCP FactoryTalk DCOM dynamic ports
product For this purpose
RSBizWare
1747-L55x
1756-ENBT
1756-ENET
1756-EWEB
1761-NET-ENI
1763-L16x
1769-L35E
1785-ENET
1785-LXXE
1788-ENBT
1794-AENT
INTERCHANGE
(rsicd)
PowerFlex Drives
PowerMonitor 3000
PanelView
PanelView Plus
RSLinx
RSLinx Enterprise
Server Manager
Messaging, data transfer, upload/download,
peer messaging, and so on. TCP type is used
by RSLinx largely for browsing.
• • • • •
A • REFERENCE
If your computers are using virtual private networking (VPN) software, you may need to
work with your network administrator to permit traffic for these ports.
85
Page 92

Index
Symbols
.NET installation 25, 41, 55
A
access to features 69
activating
FactoryTalk AssetCentre
activation
adding in future
capability
capacity
28
refresh
28
27
27
Agent Services Logon Configuration utility
64
3
agents
agent does not run
Disaster Recovery, installing
installing
not starting
52
79
system requirements
updating from server
where to install
52
C
Calibration Management capability
activation
installing client
installing ProCalV5 client
installing ProCalV5 server
installing server
operating system language
ProCalV5 Connection Installer
requirements
Calibration Management client, installing
Calibration Management server, installing
23, 34, 50
capabilities
agents and
types
capacity activation
27
47
23, 34, 50
4, 5
52
27
27
28
66
5, 7
66
38, 49
53
23, 36
4, 5
23, 34, 50
clients
3
error starting
installing
running
76
39
49, 66
system requirements
updating from server
where to install
38
computers
adding to FactoryTalk Directory
Configure Server Settings utility
configuring
access to features
client computers
security
69
security and RSLogix
67
users
connecting ProCalV5 server
CPR 9 SR 6, upgrading
FactoryTalk AssetCentre agents
CPR 9 SR 6, upgrading to
FactoryTalk AssetCentre clients
FactoryTalk Services Platform
FactoryTalk View ME Transfer Utility
RSLinx Classic
11
RSLinx Enterprise
RSLogix
Studio 5000
11
11
D
Database Installer utility 32
Database User Configuration utility
Device Type Manager
installing
Disaster Recovery
47
activation
installing agent
Disaster Recovery agent
upgrading
DriveExecutive Lite
DTM
installing
50
27
53
53
1
50
5, 7
49
68
33
69
68
62
36
53
38
11
11
11
33
1
7, 8
86
Page 93

INDEX
• • • • •
DTM Catalog
updating
50
E
error messages
"At least one service or driver failed during
system startup"
77
"Cannot initialize application eventing
subsystem"
77
"Currently logged in Windows user is not
part of the Administrators group"
76
"Error executing ProCalV5 commands,
check ProCalV5 installation"
80
"Error initializing FactoryTalk AssetCentre.
Could not load file or assembly"
78,
80
"Error initializing FactoryTalk AssetCentre"
76
"Error reading Primary Server Name from
FactoryTalk Directory"
76
"No ProCalV5 Server connection
information exists on the FactoryTalk
AssetCentre server"
80
"The application failed to initialize properly"
74
"The client and server versions are
incompatible"
77
target machine actively refused the
connection
77
F
FactoryTalk Administration Console 27, 43,
57
67
using
FactoryTalk AssetCentre agents
installing
not starting
requirements
upgrading
52
79
5, 7
53
FactoryTalk AssetCentre clients
error starting
installing
requirements
running
upgrading
76
39
5, 7
49, 66
38
3
3
FactoryTalk AssetCentre server
error starting
installing
requirements
upgrading
76
14, 23
4
16
2
FactoryTalk Directory
access via
adding computers
adding users
67
68
67
FactoryTalk Security
configuring
RSLogix and
69
62
FactoryTalk Services Platform
installing on agent computers
installing on clients
installing on server
upgrading
11
42
26
56
FactoryTalk View ME Transfer Utility
installing
upgrading
feature security
Field Edition
running
File and Printer Sharing setting
52
11
69
48
51
14
firewall
configuring for
IIS and
TCP/IP ports
9, 82
14
9, 82
H
hardware requirements 4
agent computer
5, 7
clients
4
server
5, 7
I
IIS
check if running
firewall and
installing
installing
25, 41, 55
.NET
52
agents
Calibration Management client
Calibration Management server
75
14
17
47
23, 34, 50
87
Page 94

INDEX
• • • • •
DTM 50
FactoryTalk AssetCentre agents
FactoryTalk AssetCentre clients
FactoryTalk AssetCentre server
52
39
14, 23
FactoryTalk Services Platform
on agent computers
on clients
on server
17
IIS
42
26
Internet Information Services
overview
10
ProCalV5 client
ProCalV5 server
56
17
38, 49
23, 36
Process Device Configuration client
Process Device Configuration server
RSLinx Classic
RSLinx Enterprise
RSLogix 5000 Compare tool
Siemens editor integration
SQL Server 2008
SQL Server Service Pack
43, 57
44, 58
61
46
19
22
Internet Information Services
installing
17
L
Logix Designer 6, 62
N
network requirements 9
P
Patch File Validator utility
downloading
using
ports
needed for FactoryTalk AssetCentre
needed for Rockwell Automation products
82
TCP/IP
ProCalV5 client
installing
ProCalV5 Connection Installer
ProCalV5 Data Source Configuration
ProCalV5 Data Source Edit Wizard
running
15
15
9, 82
38, 49
23, 34, 50
36
48
35
9
36
unable to run 81
ProCalV5 server
connecting
installing
Process Device Configuration capability
activation
installing client
installing server
36
23, 36
1
27
48
35
Process Device Configuration client, installing
48
Process Device Configuration server, installing
35
R
RAID-5 5
RSLinx Classic
installing
upgrading
43, 57
11
RSLinx Enterprise
installing
upgrading
44, 58
11
RSLogix
agents and
security and
upgrading
where to install
53
62
11
53
RSLogix 5000 Compare tool
installing
61
running
FactoryTalk AssetCentre client
Field Edition
51
49, 66
S
security
adding users
configuring
policies
RSLogix and
2
server
installing
system requirements
Server Settings
Siemens editor integration, installing
Siemens, editors for
ACCON-PG
67
69
70
62
14, 23
4
69
46
7, 46
88
Page 95

INDEX
• • • • •
PG-2000 7, 47
S5 for Windows
SIMATIC Manager
7, 46
Step 5
7, 46
Step 7
SIMATIC NET
software requirements
agent computer
5, 7
clients
4
server
7, 46
7
9
4
5, 7
SQL Server
collation
20
installing
Service Pack
22
minimum SQL permissions
SQL Server 2008
installing
19
starting
FactoryTalk AssetCentre agent
FactoryTalk AssetCentre client
Field Edition
Studio 5000
upgrading
system requirements
agent computer
clients
server
51
6
11
4
5, 7
5, 7
4
22
79
49, 66, 76
T
TCP/IP 9
troubleshooting
73
U
updating message when starting client 49
upgrading
FactoryTalk AssetCentre server
from CPR 7 to CPR 9 SR 6
from earlier CPR 9 versions
from earlier versions
11
16
12
11
users
adding to FactoryTalk Directory
67
V
virtual private network 85
85
VPN
W
Windows Firewall
configuration
IIS and
Windows Firewall Configuration Utility
48, 61
Windows Vista
for FactoryTalk AssetCentre clients
Limited User Account
35, 48, 61
14
35,
6
2
89
 Loading...